

Page 1

User Guide
KODAK DP2900
Digital Projector
with Kodak’s Exclusive
Image Manager
Page 2

Page 3

FCC Warning
This equipment has been tested and found to comply with the limits for a Class A digital device, pursuant to part 15 of the
FCC Rules. These limits are designed to provide r easonable pr otecti on against harmfu l interfer ence when the equipment i s
operated in a commer ci al environment. This equipment generates , uses, and can radiate radio frequency energy and, if n ot
installed and used in accordance with the instruction manual, may cause harmful interference to radio communications .
Operation of this equipment in a residential area is likely to cause harmful interference in which case the user will be
required to correct the interference at his own expense.
Canada
This Class A digital apparatus c om plies with Canadian ICES-003 .
Cet appareil numérique de la classe A est c on for me à la norme NMB-003 du Canad a.
Safety Certifications
UL, CUL, TÜV, NOM
EN 55022 Warning
This is a Class A product. In a dome stic environment it may cau se radio interference, in which case the user may be
required to take adequate measures. The typical use is in a conference room, meeting room or auditorium.
Declaration of Conformity
Manufacturer: Eastman Kodak Company
Rochester, New York 14650 USA
We declare under our sole responsib i lit y that the KODAK DP2900 Digital Projector conforms to the followin g directives
and norms:
Directive 89/336/EEC, Amended by 93 /68/EEC
EMI: EN 55022 (1992) Class A
EMC: EN 50082-1 (1992)
IEC 801-2, IEC 801-3, IEC 801- 4
Directive 73/23/EEC, Amended by 93/ 68/EEC
Safety: EN 60950: 1992 + A1 + A2 + A3: 1995 +A4: 1997
May, 2000
Australian Certification C-tick mark
Page 4

Page 5

Table of Contents
Safety Instructions. . . . . . . . . . . . . . . . . . . . . . . . . . . . vii
Introduction . . . . . . . . . . . . . . . . . . . . . . . . . . . . . . . . . 11
Image Resolution . . . . . . . . . . . . . . . . . . . . . . . . . . . . . . . . . . 11
Compatibility . . . . . . . . . . . . . . . . . . . . . . . . . . . . . . . . . . . . . . 11
Unpacking the Projector . . . . . . . . . . . . . . . . . . . . . . . . . . . . . 12
Projector Features . . . . . . . . . . . . . . . . . . . . . . . . . . . . . . . . . 13
Usage Guidelines . . . . . . . . . . . . . . . . . . . . . . . . . . . . . . . . . . 13
If You Need Assistance . . . . . . . . . . . . . . . . . . . . . . . . . . . . . 14
Setting up the Projector. . . . . . . . . . . . . . . . . . . . . . . . 17
Connecting the Projector . . . . . . . . . . . . . . . . . . . . . . . . . . . . 18
Starting the Projector . . . . . . . . . . . . . . . . . . . . . . . . . . . . . . . 22
Turning Off the Projector . . . . . . . . . . . . . . . . . . . . . . . . . . . . 23
Using the Projector . . . . . . . . . . . . . . . . . . . . . . . . . . . 25
Basic Image Adjustment . . . . . . . . . . . . . . . . . . . . . . . . . . . . . 25
Adjusting the Projector . . . . . . . . . . . . . . . . . . . . . . . . . . . . . . 26
Using the Remote Control . . . . . . . . . . . . . . . . . . . . . . . . . . . 27
Using the Keypad and Remote Buttons . . . . . . . . . . . . . . . . 29
Using the On-Screen Menus . . . . . . . . . . . . . . . . . . . . . . . . . 32
Display Menu . . . . . . . . . . . . . . . . . . . . . . . . . . . . . . . . . . . . . 33
Audio Menu . . . . . . . . . . . . . . . . . . . . . . . . . . . . . . . . . . . . . . 35
Image Menu . . . . . . . . . . . . . . . . . . . . . . . . . . . . . . . . . . . . . . 35
Controls Menu . . . . . . . . . . . . . . . . . . . . . . . . . . . . . . . . . . . . 38
Language Menu . . . . . . . . . . . . . . . . . . . . . . . . . . . . . . . . . . . 40
Status Menu . . . . . . . . . . . . . . . . . . . . . . . . . . . . . . . . . . . . . . 41
Using KODAK Image Manager . . . . . . . . . . . . . . . . . . . . . . . . 43
Maintenance & Troubleshooting . . . . . . . . . . . . . . . . . 45
Cleaning the Lens . . . . . . . . . . . . . . . . . . . . . . . . . . . . . . . . . . 45
Replacing the Projection Lamp . . . . . . . . . . . . . . . . . . . . . . . . 46
Replacing the Batteries in the Remote Control . . . . . . . . . . . . 49
Using the Security Lock . . . . . . . . . . . . . . . . . . . . . . . . . . . . . 49
Troubleshooting . . . . . . . . . . . . . . . . . . . . . . . . . . . . . . . . . . . 50
v
Page 6

User Guide KODAK DP2900 Digital Projector
Appendix A . . . . . . . . . . . . . . . . . . . . . . . . . . . . . . . . . 55
Appendix B . . . . . . . . . . . . . . . . . . . . . . . . . . . . . . . . . 57
Portable and Laptop Activation Chart . . . . . . . . . . . . . . . . . . . 57
Appendix C . . . . . . . . . . . . . . . . . . . . . . . . . . . . . . . . . 67
Using Video Mirroring with a PowerBook Computer . . . . . . . . 67
Appendix D . . . . . . . . . . . . . . . . . . . . . . . . . . . . . . . . . 69
Projected Image Size . . . . . . . . . . . . . . . . . . . . . . . . . . . . . . . 69
Index . . . . . . . . . . . . . . . . . . . . . . . . . . . . . . . . . . . . . . 71
Warranty . . . . . . . . . . . . . . . . . . . . . . . . . . . . . . . . . . . 75
vi
Page 7

Please read and follow all safety instructions provided before using
your new projector. Failure to comply with safety instructions may
result in fire, electrical shock, or personal injury and may damage or
impair protection provided by equipment. Please save all safety
instructions.
Safety Definitions
• Warning: Statements identify conditions or practices that could
result in personal injury.
• Caution: Statements identify conditions or practices that could
result in damage to your equipment.
Safety Symbols
Attention: For information about usage of a feature, p lease refer to the
User’s Guide.
Warning: Hot surface. Do not touch.
An arrow pointing to the lamp door on the projector.
Safety Instructions
vii
Page 8

User Guide KODAK DP2900 Digital Projector
Safety Issues
• Warning: Don’t look directly into the lens when the lamp is turned
on.
•Warning: To replace the lamp, turn the projector off by
unplugging the power cord. To avoid burns, wait 30 minutes
before opening the lamp door. Follow all instructions provided
in this User’s Guide.
•Warning: Please use the power cord provided. Connect the
power cord to a receptacle with a protective safety (earth)
ground terminal.
• Warning: Refer all service to qualified service personnel.
Servicing your own projector will void the warranty. See the
following page for the customer service contact information.
• Caution: Don’t block ventilation openings.
• Caution: Don’t set liquids on the projector. Spilled liquids may
damage your projector.
• Caution: Don’t place the projector on a hot surface or in direct
sunlight.
• Caution: Do not drop the projector. Transport the projector in an
KODAK-approved case. For acce ssory information go to our Web
site at www.kodak.com/go/projectors.
Important Operating Considerations
Do not place the projector on a tablecloth or other soft covering that
may block the vents. In the unlikely event of the bulb rupturing,
thoroughly clean the area behi nd the proj ect or and di scard any edible
items placed in that area.
m)
6
(.
t
f
2
Do not place obje cts in
this area behind the projector
viii
Page 9

Battery Use
Read and follow a ll warnings and instructi ons supplied by the battery
manufacturer .
Keep batteries away from children.
Store batteries in their original packaging.
When inserting batteries, verify that the (+) and (-) terminals are
aligned co rrectly.
Replace all batteries of a set at the same time.
Do not mix new batteries with used ones.
Do not use batteries of different chemistries, capacities, brands or
sizes together. Leakage could result.
Do not disassemble, recharge, or short-circuit batteries.
Do not subject batteries to high temperature or fire.
Discard used batteries according to all applicable local and national
regulations.
Safety Instructions
In the unlikely event of co ntact with battery electrol yte, customers in
the U.S. can contact the Kodak Info rmation Center (KIC) at
1-800-242-2424. U.S. customers can also contact KIC for
information regarding electrolyte removal from KODAK product
components. Customers outside the U.S. can contact their local
Kodak Customer Service representative.
ix
Page 10

Page 11

The KODAK DP2900 Digital Projector is specifically designed for
the mobile presenter. It packs XGA 1024x768 graphics with
16.7 million colors into a small, 4.8 pound package. It generates
crisp, clear images using Digital Light Processing™ (DLP)
technology, and features an M1-DA connector for easy, built-in
digital/analog and USB con nec ti vity. The DP2900 i s ea sy t o connect,
easy to use, easy to transport, and easy to maintain.
Included with the DP2900 is Kodak’s exclusive Image Manager
feature. W ith thi s feature you can sel ect the ima ge display s etting bes t
suited for your specific presentation material and projection
environment.
Image Resolution
The XGA resolution of the DP2900 projected image is 1024x768.
The projector cannot compre ss screen re solutio ns above 1024x768 . If
your computer’s scr een reso lutio n is highe r th an 1024x768 , reset i t to
a lower resolution before you connect the projector.
Note: The DP2900 automatically expands 640x480 and 800x600
images to 1024x768. You can display these images at their
native resolution s by turni ng of f the Au to Resize featur e. See
“Resize” on page 36 for more information.
Introduction
Compatibility
The projector is compatible with a wide variety of computers and
video devices, including:
• IBM-compatible computers, including laptops, up to
• Apple, Macintosh, and PowerBook computers up to
• Most standard VCRs, DVD players, HDTV sources,
1024x768 resolution.
1024x768 resolution.
camcorders and laser disc players.
Note: The projector is compatible with 1080i HDTV
format.
11
Page 12
User Guide KODAK DP2900 Digital Projector
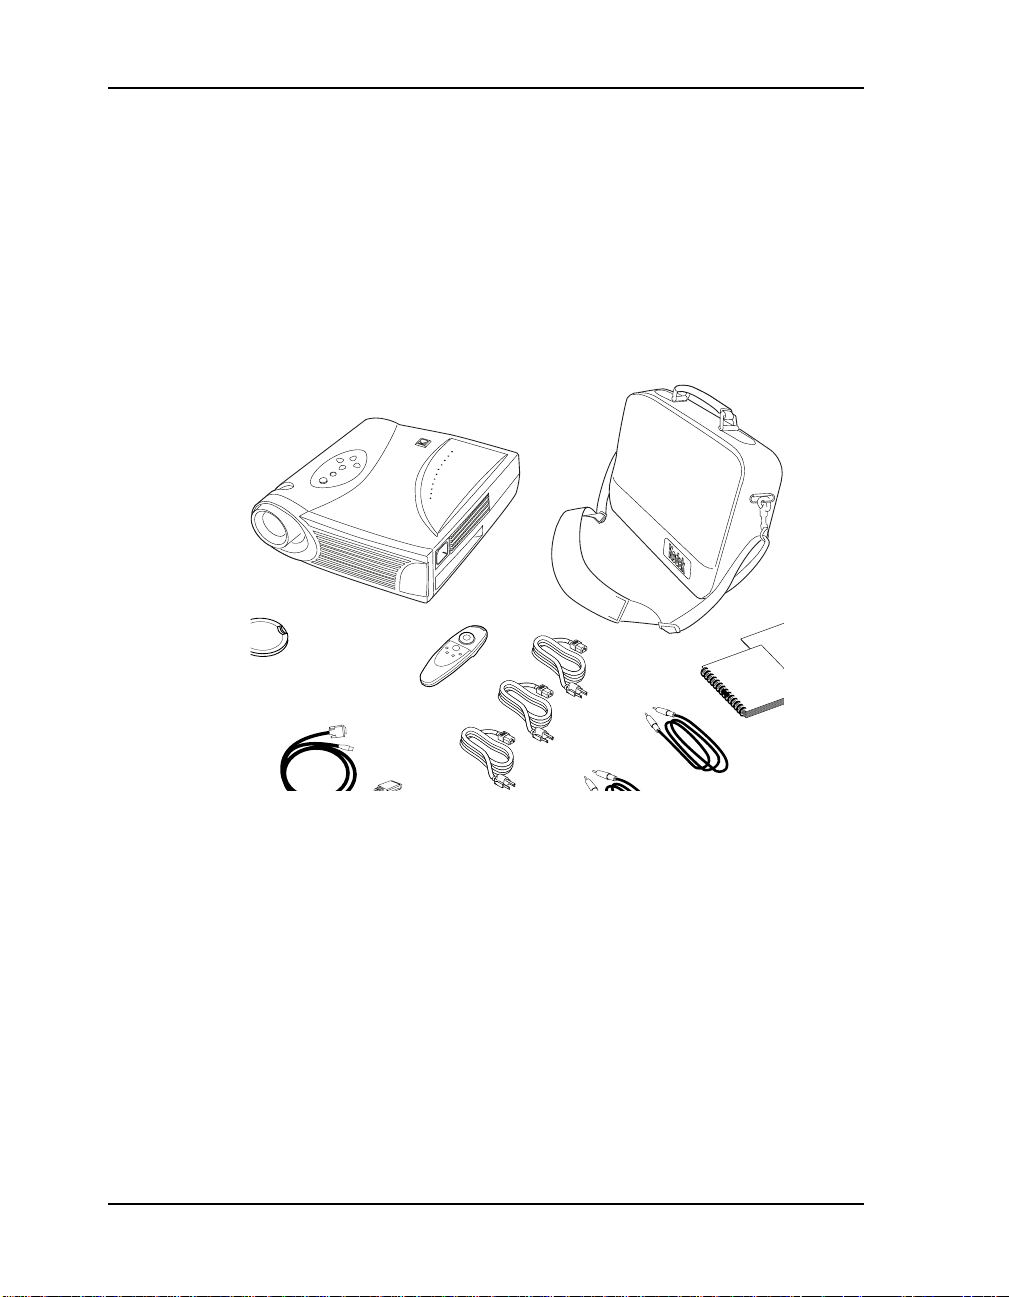
Unpacking the Projector
The projector comes wit h the items shown. Check t o make sure all are
included. Contact your de aler of KODAK pr oducts immediately if
anything is missing.
A registration card is included in the box. Register to receive product
updates, announcements, and special offers from Kodak.
The contents of your shipping box may vary depending on the
projector configuration you’ve ordered.
1
4
5
2
3
6
7
9
8
1. DP2900 projector and lens cap 6. M1-DA analog computer cable
2. Soft carry case 7. Audio cable adapter
3. User Guide, Quick Start Card
8. Audio cable
and Online User Guide CD
4. 3 Power cords 9. Composite video cable
5. Remote con trol
12
Page 13

Projector Features
keypad
zoom ring
Introduction
speaker
Security lock
focus ring
Usage Guidelines
• Do not look directly into the projection lens when the lamp is
turned on. The bright light may harm your eyes.
Do not block the grills on the projector. Restricting the air flow
•
can cause it to over heat and t urn of f. If this hap pens, you must wait
a minute before attempting to turn it back on.
Handle the projector as you would any product with glass
•
components. Be especially careful not to drop it.
Avoid leaving the projector in direct sunlight or extreme cold for
•
extended periods of time. If this happens, allow it to reach room
temperature before use.
• Transport the projector in a KODAK-approved case. For
accessories, visit our Web site at www.kodak.com/go/projecors.
connector panel
power
cord
connector
13
Page 14

User Guide KODAK DP2900 Digital Projector
If You Need Assistance
The first place to look for h elp is in “Maintenance &
Troubleshooting” on page 37. But you can also get help online, by
fax, or by phone.
Before calling you r dealer or Kodak Technical Support for assistanc e,
please have the following information available:
• the projector’s serial number (located on the bottom label)
• the resolution of your computer.
Online Services
Contact Kodak via:
World Wide Web http://www.kodak.com
America Online (keyword) KODAK
CompuServe GO KODAK
Kodak Internet List Server photo-cd@info.kodak.com; or
(click on Service and Support)
ftp.kodak.com
14
Faxed Information
Kodak offers automated support by fax:
U.S. and Canada 1-800-508-1531
Europe 44-0-131-458-6962
U.K. 44-0-131-458-6962
Page 15

Telephone Customer Support
If you have questions concerning the operation of your KODAK
projector , you can spea k directly t o a customer su pport represent ative.
Have the projector se rial number ready, and be at your computer with
your projector when you call.
In the U.S. and Canada call toll free, 1- 800- 23K- ODAK, be tween the
hours of 9:00 a.m. and 8:00 p.m. (Eastern Standard Time) Monday
through Friday.
The International Toll Line is +44 (0) 131 458 6714.
In Europe ca ll
Austria/Osterreich
Introduction
01 795 67000
Germany/Deutschland
Spain/Espana
Belgium/Belgique
Ireland/Eire
Sweden/Sverige
Denmark/Danmark
Italy/Italia
Switzerland/Schweiz/Suisse
Finland/Soumi
Netherlands/Nederland
UK (National Line)
France
Norway/Norge
069 9509 6055
91 4069130
02 713 1398
01 402 6815
08 587 70305
38 48 7088
02 696 33205
01 838 5358
0800 11 8043
020 346 9128
0870 6061031
0141 918578
23 16 2041
Int. Fax Line
+44 (0) 131 458 6962
15
Page 16

User Guide KODAK DP2900 Digital Projector
In other regions call:
Australia 613 9353-2261
Fax 613 9353-2567
Singapore/Malaysia/Indonesia/
India
65 4736 611
Fax 65 4798 397
Thailand 662 2713 040
Fax 662 6161 923
Philippines 632 8100 331 loc 223 or
416
Fax 632 8140 626
South Korea 822 7085 577
Fax 822 36721 450
HK/PRC 852 2564 9396
Fax 852 2562 4258
Taiwan 886 2-8938178
Fax 886 2-8951069
16
Page 17

Setting up the Projector
This section describes how to:
• determine where to position the projector
• connect the projector to a computer or a video source
• turn on and turn off the projector
If you are experienced in setting up presentation systems, use the
Quick Start card that came with the KODAK DP2900 Digital
Projector. Otherwise, follow the procedures described here.
Positioning the Projector
Note: If you want to project f rom behind a tran slucent screen, set up
the projector behind your screen. See “Rear Projection” on
page 38 to reverse the image.
1. Make sure your projector is on a flat surface. It must be within 10
feet (3 m) of your power sourc e and wi th in 6 f eet (1.8 m) of your
image source.
2. Position the projector the desired distance from the screen.
• The distance from the lens of the projector to the screen and
the zoom setting determine the size of the projected image.
Three projected image sizes are shown here. For more
information about image size, see “Projected Image Size” on
page 69.
1
3
.
0
f
t
.
7
.
8
3
f
.
t
2
.
f
t
.
5 ft.
12 ft.
20 ft.
3. Make sure the projector is unplugged and your computer i s turned
off.
17
Page 18

User Guide KODAK DP2900 Digital Projector
Connecting the Projector
in
in
S-video
composite
video
Audio in
,FRQVRQWKHSURMHFWRUZLOODLG\RXZKHQFRQQHFWLQJWKHSURMHFWRUWRD
FRPSXWHURUYLGHRVRXUFH
&DXWLRQ 7XUQRIIWKHFRPSXWHUPRQLWRUDQGSURMHFWRUZKHQHYHU
\RXFRQQHFWWKHFRPSRQHQWV
Connecting a Computer
The projector ships with an M1-DA analog computer cable. If your
computer has a digital output, you can order the optional M1-DA
digital computer cable. For accessory information, visit our Web site
at www.kodak.com/go/projectors.
Note: Many laptop computers do not automatically turn on their
external video port when a secondary display device such as
a projector is connected. Refer to your computer manual for
the comman d that activates the external video port.
Activation commands for some lapt op computers are list ed in
“Portable and Laptop Activation Chart” on page 57.
1. Plug the end of the M1-DA analog computer cable into
M1-DA
data interface
18
the connector on the projector.
2. Plug the end of the M1-DA analog computer cable into the
video connector on your computer.
Page 19

audio cable
Setting up the Projector
in
in
USB mouse
M1-DA analog computer cable
Note: If you are connecting an older MACINTOSH computer that
does not have a 15-pin connector, you must use the
MACINTOSH adaptor that came with the projector.
Do you want to control the computer’s mouse from the
projector’s remote or keypad?
Note: The USB mouse is supported for use with Windows 98,
Windows 2000, and Apple OS 8.5 and higher only. You do
not need to restart your computer after connecting a USB
mouse to use it (it is hot-pluggable).
1. Plug the end of the M1-DA analog computer cable into
the mouse connector on your computer.
Do you want to play your computer’s audio on the
projector?
1. Plug either end of the audio cable into the audio connector on
your computer.
2. Plug the other end of the audio cable into the connector on
the projector.
Now you’re ready to turn on t he proj ector and your c omputer. Skip to
“Starting the Projector” on page 22.
19
Page 20

User Guide KODAK DP2900 Digital Projector
Connecting a Video Source
If your video source uses a round, one-prong composite video
connector, you’ll need only the audio cable, audio adapter, and
composite video cable that shipped with the projector.
Note: HDTV sources are connected to the projector using the
M1-DA computer cable. See the previous pages for details.
If your video source uses a round, four-prong S-video connector,
you’ll need an S-video cable in addition to the audio cable and audio
adapter. The S-video cable is sold separately.
To connect to a video source:
1. Plug the composite video cable’s yellow connector into the
“video-out” connector on your video source. This connector may
be labeled “To Monitor.”
• If you’re using an S-video cable, connect it to the “S-video
out” connector on the video source.
&DXWLRQ <RXUYLGHRVRXUFHPD\DOVRKDYHD´9LGHR2XWµ
FRQQHFWRUIRUDFRD[LDOFDEOHFRQQHFWLRQ'2127XVH
WKLVWRFRQQHFWWRWKHSURMHFWRU
2. Plug the other yellow connector into the composite video
connector
• If you’re using S-video, plug the other end of the cable into
the “S-video” connector
Connecting with a composite v ideo cable:
on the projector.
on the projector.
20
audio
adapter
audio cable
composite video
cable
in
in
Page 21

Connecting with an S-video cable:
Setting up the Projector
in
in
audio
adapter
S-video
cable
audio cable
3. Plug the audio adapter’s white c onne ct or i nt o t he l ef t “audio out”
connector on your video sour ce. Pl ug the adapter’s red connect or
into the right “audio out” connector on the video source.
4. Plug the audio adapter’s whit e c onne ct or i nt o the left “audio out”
connector on your video sour ce. Pl ug the adapter’s red connect or
into the right “audio out” connector on t he video source. Plug the
audio adapter’s other end into the audio cable.
5. Plug the audio cable into the “audio in” connector on the
projector.
The projector is compatible with these major broadcast video
standards: NTSC, NTSC 4.43, PAL, PAL-M, PAL-N, PAL-60, and
SECAM. It automatically a djusts to optimize its performance for the
incoming video. The inp ut signal for SECAM v ideo is similar to other
video signals and cannot be automatically detected, therefore
SECAM must be chosen manually. See “Video Standard” on page 38
for details.
21
Page 22

User Guide KODAK DP2900 Digital Projector
Starting the Projector
We recommend using a surge protector power strip when connecting
your projector.
&DXWLRQ $OZ D\VXVHWKHSRZHUFRUGWKDWVKLSSHGZLWKWKH
SURMHFWRU
1. R emove the le ns cap.
2. Plug the power c ord int o the s ide of the proj ector, then plug it i nto
your electrical outlet.
The fans start to run, and the Lamp LED on the top of the
projector lights orange until the software has initialized. When
initialization is complet e, the Lamp LED l ights green. A green
Lamp LED indicates that you can press the
lamp on/off button
to turn the lamp on and off.
Note: The first time you c onnect your computer to the pr ojector, the
computer may display a message stating that new hardware
was found. The Add New Hardware Wizard may appear. Use
the Wizard to load the correct driver (t he com put er cons iders
the projector a Plug and Play Monitor).
3. Turn on the lamp by pressing the
lamp on/off button on the
keypad.
The startup screen appears.
4. If you connected a video source, turn it on.
The video image should display on the projection screen. If a
computer source is active, press the
keypad (page 30) or press the
source button on the
video button on the remote to
display your video image. You can select a default source to
determine which source the projector examines first during
power-up for active video; see “Default Source” on page 39.
Use the
volume buttons to adjust the volume.
22
Page 23

Setting up the Projector
5. Turn on your computer. Make sure your laptop’s external video
port is activated; see “Portable and Laptop Activation Chart” on
page 57 for details.
Note: With some computers, the order in which you power up the
equipment is very important. Most computers should be
turned on last, after al l other perip heral s have been turned on.
Refer to your computer’s documentation to determine the
correct order.
The computer image should display on the projection screen. If a
video source is a ctive, press th e
computer button on the remote to display your computer’s
the
source but ton on the keypad or
image.
If necessary, make adjustments to the image usi ng the projector’s
on-screen menus. To open the menus, press the
on the keypad or remote, then select the Display or Image
sub-menu. For more information about the menus, see page 32.
Turning Off the Projector
If you want to turn off the projector for a short period of time, press
standby butt on on the k eypad or r emote. Thi s blank s the sc reen f or
the
fifteen minutes, but keep s the proj ec tor running. (You can change the
amount of time the projector stays in standby mode; see “Standby
Time” on page 38 for details.) After 15 minutes, the lamp goes out
but the projector keeps running. To exit standby mode, press the
standby button again. (It may take several seconds for the projection
lamp to reach full power and project the image again.)
,PSRUWDQW /DPSOLIHZLOOEHH[WHQGHGLI\RXWXUQWKHODPSRIIWKHQZDLWPLQXWH
ZKLOHWKHODPSFRROVEHIRUHXQSOXJJLQJWKHSURMHFWRU7KH/DPS/('
ZLOOOLJKWJUHHQZKHQWKHODPSKDVFRROHG6HHSDJH IRUGHWDLOVRQWKH
/DPS/('
T o compl etely turn of f t he proje ctor, unplug it. If you want to turn the
lamp back on immediately, you must allow about a minute for the
lamp to cool. The lamp won’t light if it’s too hot.
menu butto n
23
Page 24

Page 25

Using the Projector
This section describes how to use and make adjustments to the
projector. It also provides a reference to the keypad and remote
buttons and the options available from the on-screen menus.
Basic Image Ad jus tm e nt
• Make sure you have turned on your equipment in the right order
(page 22).
• If the image doesn’t display completely, zoom the image (page 26),
adjust the height of the projector (page 26) or center the image by
adjusting its horizontal or vertical position (page 37). Be sure the
projector is at a 90 degree angle to the scree n.
• If the image is out of focus, rotate the focus lens (page 26).
• If the image appears to shimmer or if it has blurry vertical bars
after you have adjusted the focus, turn Auto Image (page 36) off
and then back on to reset the automatic sync and tracking. If that
doesn’t clear up the ima ge, turn Auto Image of f and adjust the sync
(page 37) and/or the tracking (page 37) manually.
• If the colors don’t look right, check the KODAK Image Manager
settings. See “Using KODAK Image Manager” on page 43.
,PSRUWDQW7KH.2'$.,PDJH0DQDJHUVHWWLQJVZRUNEHVWLI\RXVHOHFW5HVHW
IURPWKH$GMXVWWDEHDFKWLPHEHIRUHVHOHFWLQJDQ,PDJH0DQDJHU
VHWWLQJ
Or
Adjust the brightness (page 33) and the tint (page 34).
• If the computer source image is not rectangular, adjust the
keystoning (page 35).
• If the edges of the video source image appear jagged, adjust the
overscan (page 35).
25
Page 26

User Guide KODAK DP2900 Digital Projector
Adjusting the Projector
To focus the image, rotate the focus ring until the image is clear. To
zoom the image, rotate the zoom rin g. This adjusts the image size
without affecting focus.
zoom ring
focus ring
The projector is equipped with a self-locking, quick-release elevator
foot and button.
To raise the projector:
26
1. Press and hold the elevator button.
2. Raise the projector to the height you want, then release the button
to lock the elevator foot into position.
elevator foot
elevator button
(under finger)
Page 27

Using the Remote Control
,PSRUWDQW 7RFRQWUROWKHFRPSXWHU·VPRXVHIURPWKHSURMHFWRU·VUHPRWHRUNH\SDG
\RXPXVWFRQQHFWWKHPRXVHFRQQHFWRURQWKHFRPSXWHUFDEOHWRWKH
FRPSXWHU6HHSDJH IRUGHWDLOV
The projector ships with a remote control that has four function
buttons, a disk mouse and two mouse buttons—one on the top of the
remote and one on the bottom.
Point the remote control at the projection screen or at the front of the
projector. The range for optimum operation is about 25 feet. If you
point the remote at the projection screen, the distance to the screen
and back to the projector must be less than or equal to 25 feet. For
best results, point the remote directly at the projector.
disk mouse
right mouse button
Using the Projector
left mouse button
(on undersid e of remote)
Note: If the remote is inactiv e for several minutes, it “sleeps” to
conserve battery li fe . Pre ss any button except the disk mouse
to re-activate the remote.
Press anywhere on the edge of the disk mouse to move the cursor on
the screen. You can move the cursor at any angle by pressing the
corresponding edge of the disk. The mouse button on the top of the
remote simulates your computer’s right mouse button; the button on
the bottom simulates your computer’s left mouse button. See “Using
the Keypad and Remote Buttons” on page 29 for a description of the
four function buttons.
27
Page 28

User Guide KODAK DP2900 Digital Projector
If you are creating presentations in MICROSOFT POWERPOINT,
you can use the remote control mouse buttons to navigate through
your presentation while in Slide Show mode. To configure the
POWERPOINT program for this, choose Options from the Tools
menu, click the View Tab, de-select the “Popup Menu on Right
Mouse Click” option in th e Sl ide Show se ct ion , th en c li ck OK. The n,
when you’re in POWERPOINT Slide Show mode, a left click
advances to the next slide and a right click returns to the previous
slide (other POWERPOINT modes are not affected).
28
Page 29

Using the Projector
Using the Keypad and Remote Buttons
While the menus are displayed, the volume, source, and standby buttons on
the keypad act as menu n avigation button s. See “Using t he On-Scr een
Menus” on page 32 for details.
The Keypad Buttons
lamp LED
source button - toggles
back and forth
between video and
computer sources
volume decreases volume
The Remote Control Buttons
lamp on/off
menu button displays a menu of
projector options on
the screen
volume increases volume
standby - turns off the
image without turning
off the projector
standby
computer
disk mouse
simulates the right mouse button
menu
video
29
Page 30

User Guide KODAK DP2900 Digital Projector
Lamp on/off (keypad only)
Press the lamp on/off button to turn the lamp on or off. The Lamp
LED indicates the state of t he lamp. A green Lamp LED indi cates that
you can turn the lamp on , or th e lamp i s curr ently on. An or ange LED
indicates the software is initializing or the lamp is cooling. Do not
press the
lamp on/off button when the LED is orange.
Menu
Press the menu button to open the on-screen menus. Press
menu again to close the menus. When you close the menus, the
projector saves any changes you made. For more information about
the on-screen menus, see page 32.
Source (keypad only) or Computer and Video
(remote only)
When you have more than one source (computer and video)
connected to the project or, select between them by pre ssing t he
button on the keypad or the
computer or video button on the remote.
source
30
Page 31

Standby
When you press standby , the display and audio turn off and a
blank screen is displayed for 15 minutes. You can change the amount
of time the projector stays in standby mode; see “Standby Time” on
page 38 for details.
• If you press standby again within 15 minutes, the projector
returns to normal operations immediately.
• If you press standby again after 15 minute s, there is about a
60 second delay before the lamp turns back on.
• If you don’t press standby again, the lamp turns off after 15
minutes.
Volume (keypad only)
To increase the volume, press volume + . To decrease the volume,
volume - .
press
Using the Projector
Volume adjustments are saved for each source you have connected.
31
Page 32

User Guide KODAK DP2900 Digital Projector
Using the On-Screen Menus
The projector has si x drop-down me nus that all ow you to make ima ge
adjustments and change a variety of settings. Most of these
adjustments aren’t available directly from the keypad.
Note: Some menu items may be grayed out at certain times. This
indicates the item is not applicable to your setup (for example,
video standards do not apply to computer sources) or the item
is not enabled until another selection is made (for example,
Manual Tracking is not available until Auto Image is turned
off).
To open the on-screen menus, press the
menu button on t he
keypad or remote. This changes the volume, source, and standby
buttons on the keypad to menu navigation buttons. Press the
corresponding buttons to move the cursor up, down, left, or right, or
use the disk mouse on the remote. To select a menu, move the cursor
left or right to highlight the menu you want. The drop-down menu
appears.
>
>
Display Audio Image Controls Language Status
Brightness
Contrast
Tint
Color
Sharpness
Blank screen blue
Reset all
When the menu is active use these buttons
to navigate through the menus
T o cha nge a menu set ting , use the up and down navi gatio n button s on
the keypad or the dis k mouse on th e remote t o move the cu rsor up an d
down to the item you want to change (the selected item is
highlighted), then use the left and right navigation buttons to adjust a
setting.
32
Page 33

Some submenus, such as Bri ghtnes s, cons ist of a sli der ba r you us e to
increase or decrease a value; some submenus, such as Standby Time,
consist of options you scroll through to select the desired one. All
changes are saved when you close the menus.
To access another menu, use the up and down navigation buttons or
the disk mouse to move back to the top of the current menu, then use
the left and right navigation buttons to move to another menu.
Display Menu
Using the Projector
>
Display Audio Image Controls Language Status
Brightness
Contrast
Tint
Color
Sharpness
Blank screen blue
Reset all
Brightness
Adjusting the brightness changes the intensity of the image.
• Press the left navigation button to d arken the im age.
• Press the right navigation button to lighten the image.
Contrast
The contrast controls the degree of difference between the lightest
and darkest parts of the picture. Adjusting the contrast changes the
amount of black and white in the image.
• Press the left navigation button to decrease the contrast.
• Press the right navigation button to increase the contrast, making
the blacks appear blacker and the whites appear whiter.
>
33
Page 34

User Guide KODAK DP2900 Digital Projector
Tint
The tint ad justs the red-green color balance in the projected image.
Changing the Tint setting has no effect on PAL or SECAM video
sources.
• Press the left navigation button to increase the amount of green in
the image.
• Press the right navigation button to increase the amount of red in
the image.
Color
The color setting adjusts a video image from black and white to fully
saturated color.
• Press the left mouse button to decrease the amount of color in the
image.
• Press the right mouse button to increase the amount of color in the
image.
Sharpness
34
This setting adjusts the sharpness of a video image.
• Press the left mouse button to decrease the sharpness.
• Press the right mouse button to increase the sharpness.
Blank Screen
Blank Screen determines what color is displaye d when there is no
active source and when the projector is in standby. Click the left or
right navigation button to toggle between blue and black.
Reset All
Click the left or r ight navig ation butt on to rese t all t he options (except
Language, Video Standard, Rear Proje ction, and St andby Time) in all
the menus to their original settings.
Page 35

Audio Menu
Volume
Note: Changing the volume using th e menu is the s ame as changi ng
• Press the left navigation button to decrease the volume.
• Press the right navigation button to increase the volume.
Volume adjustments you make are saved for each source.
Image Menu
Using the Projector
it using the keypad.
Display Audio Image Controls Language Status
>
>
Keystone
Overscan
Auto image on
Resize on
Manual sync
Manual tracking
Horizontal position
Vertical position
Keystone (computer source only)
This option helps to keep the image square as the angle of projection
is changed. To adjust the keystone, highlight Keystone , then click the
right navigation button.
Note: Keystone correction is only available for XGA signals.
Overscan (video source only)
This option crops all the edges of the image to remove noise
generated on the edges by your source.
on
35
Page 36

User Guide KODAK DP2900 Digital Projector
Auto Image
Note: Some screen savers interfere with the operation of Auto
Image. If you’re experiencing problems, turn off your screen
saver, then turn Auto Image off and back on.
The projector automatically adjusts tracking, signal synchronization
and vertical and horizontal position for most computers (Auto Image
does not apply to video sources). If you want to adjust these features
manually, you must turn off
Image in the Image menu and clicking the left or right navigation
button to select “off”.
Resize
This option works differently for computer and video sources. For
computer sources,
up or down. It only affects computer images that are not the
projector’s native resolution. When
the best fit of the image to the computer screen. If you turn
(by highlighting it in the Image menu and clicking the left or right
navigation butto n to sel ect “ of f ”), the ima ge may be e ither cropp ed or
too small for the screen.
Resize automatically resiz es the image by scaling it
Auto Image first by highlighting Auto
Resize is on, the projector makes
Resize off
36
Note: When you connect an HDTV source, the projector
automatically displays the image in 16x9 format.
For video sources,
different re-sizing options. The default is
Resize allows you to select from among four
Standard, which resizes the
image from its original version to fit a sta ndard 4x3 aspe ct ratio
screen.
Widescreen Letterbox preserves the 16x9 aspect ratio of the
original theater version, but the image is placed in a 4x3 space, so
black bars appear at the top and bottom of the image.
Widescreen also preserves the aspect ratio of the original theater
Enhanced
version and is designed to be used with content that is Enhanced for
Widescreen TVs. This option yields more detail than Widescreen
Letterbox.
Native reduces the Standard size to match the height of
Enhanced Widescreen.
Page 37

Manual Sync (computer source only)
The projector adjusts signal synchronization automatically for most
computers. But if the projected computer image looks fuzzy or
streaked, try turning
still looks bad, try adjusting the signal synchronization manually:
1. Turn Auto Image off.
2. Highlight Manual sync, then press the left or right navigation
button repeatedly until the image is sharp and free of streaks.
Auto Image off then back on again. If the image
Manual Tracking (computer source only)
The projector adju sts tra cking automat ically to match the vide o signal
from your computer. However, if the display shows evenly spaced,
fuzzy, vertical lines or if the projected image is too wide or too
narrow for the scre en, tr y tu rni ng
the image is still bad, try adjusting the tracking manually:
1. Turn Auto Image off.
2. Highlight Manual tracking, then press the left or right navigation
button repeatedly until the fuzzy vertical bars are gone.
Auto Image off then back on ag ain. I f
Using the Projector
Horizontal position (computer source only)
Follow these steps to manually adjust the horizontal position:
1. Turn off Auto Image.
2. Highlight Horizontal position, then press the left navigation
button to move the image right or press the right navigation
button to move the image left.
Positioning adjustments are saved when you power off the projector.
Vertical position (computer source only)
Follow these steps to manually adjust the vertical position.
1. Turn off Auto Image.
2. Highlight Vertical position, then press the left navigation button
to move the image down or press the right navigation button to
move the image up.
Positioning adjustments are saved when you power off the projector.
37
Page 38

User Guide KODAK DP2900 Digital Projector
Controls Menu
Video Standard
Note: If you already know the video standard used in your
geographical area, it’s often best to manually select it.
When V i deo stand ard is set to Auto, t he proj ec tor at tempts t o pick the
video standard (NTSC, NTSC 4.43, PAL, PAL-M, PAL-N, PAL-60,
or SECAM) automatically based on the input signal it receives. (The
video standard options may vary depending on your region of the
world.) The input signal for SECAM video is similar to other video
signals and cannot be automat ically dete cted, ther efore SECAM must
be chosen man ually. If the projector is unable to detect the correct
standard, the colors might not look right or the image might appear
“torn.” If this hap pens, manually select a standard by clicking the l eft
or right navigation button and cycling through the standards.
38
Standby Time
This option lets you select how long the lamp stays on and the blank
screen is displayed when the projector ent ers standby mode be fore the
projector turns off. Select among instant, 1, 5, 10, 15 and 30 minutes
and 1 and 2 hours by clicking the left or right navigation button and
cycling through the options.
Rear Projection
When you turn Rear Projection on, the projector reverses the image so
you can project from behind a translucent screen. Highlight Rear
Page 39

Projection, then click the left or right navigation button to turn this
feature on and off.
Default Source
Default Source toggles among Computer analog, Computer digital,
and Video. This determines which source the projector checks first
for active video duri ng po wer-up. Highlight Default Sour ce and click
the left or right navigation button to toggle among the options.
Auto Source Select
This setting toggl es betwee n On and Of f. When this feature is Of f, the
projector default s to th e sourc e sele cted i n Defau lt Source . To display
another source, you must manually select one by pressing the
button on the keypad or the
When this feature is On, the projector automatically finds the active
source, checking the default source first. Highlight Auto Source
Select and click the left or right navigation button to turn this feature
on and off.
Using the Projector
source
computer or video button on the remote.
Plug and Play
This setting toggles between On and Off. When it is On, most new
computers will automatically recognize the projector, then set the
monitor resolution and refresh rate accordingly. You need to set the
Plug and Play setting to Off for the projector to display properly on
some older computers. The Plug and Play setting does not affect
video images.
If the projector’s display constantly changes between the computer
image and the mess age, “P erfec ting the i mage”, y ou may n eed to t urn
Plug and Play Off.
Display Messages
This setting toggles between On and Off. When this feature is On,
status messages such as “No signal detected” or “Standby Active”
appear in th e lower-right corner of the screen. Click the left or right
navigation button to turn this feature off and not see status messages.
39
Page 40

User Guide KODAK DP2900 Digital Projector
Display Startup Screen
This setting toggles be tween On and Of f. When this feature is On, the
startup screen appear s when the pro jector star ts up and remains until
an active source is detected. Click the left or right navigation button
to turn this featur e of f an d displ ay a pla in bla ck or blue s creen i nste ad
of the startup screen.
Language Menu
You can display the on-screen menus in English, French, German,
Spanish, Chinese or Japanese.
40
• Move the cursor to the language you want, then click the left or
right navigation button. The menus redraw immediately.
Page 41

Status Menu
This is a read -only win dow for i nformat ional pu rposes . To display the
status window, select Show status from the menu, then click the left
or right navigation button. To remove the window, click the left or
right navigation button.
Display Audio Image Controls Language Status
>
Show status
Using the Projector
Lamp hours used
Computer resolution
Horizontal refresh rate
Vertical refresh rate
Mute status
Source
Software version
Startup screen version
Boot version
Lamp hours used
Indicates how many hours the current lamp has been in use. The
counter starts at zero hours and counts each hour the lamp is in use.
Change the bulb when the brightness is no longer acceptable. See
“Replacing the Projection Lamp” on page 46 for details.
Computer resolution
Shows your computer’s resolution setting. To change this, go to your
computer’s Control Panel and adjust the resoluti on in the Displa y tab.
See your computer’s user’s guide for details.
Horizontal refresh rate
The time period that one horizontal line is displayed.
0039
1024x768
60.03 KHz
75.04 Hz
off
computer
1.0
1.0
1.0
Vertical refresh rate
The time period that one video frame is displayed.
Mute status
Indicates if the audio is muted.
41
Page 42

User Guide KODAK DP2900 Digital Projector
Source
Indicates the active source, Computer analog, Computer digital, or
Video.
Software version
Indicates the projector’s software version. This information is useful
when contacting Technical Support.
Startup screen version
Indicates the projector’s splash screen version. This information is
useful when contacting Technical Support.
Boot version
Indicates the projector’s boot software version. This information is
useful when contacting Technical Support.
42
Page 43

Using KODAK Image Manager
With one click, Kodak’s exclusive Image Manager lets you choose the best
image settings for your presentation type.
Important:The KODAK Image Manage r s et ti ngs work best if you select Reset
from the Adjust tab each time before selecting an Image Manager
setting.
Move the cursor to the option you wan t, then click the left or right navigati on
button.
Photos (PC) matches the higher contrast found on a standard PC monitor.
This feature is best for:
• images created on a PC
• images from a KODAK digital camera
• a starting point for video input.
Using the Projector
Photos (MAC) matches the lower contrast found on a standard
MACINTOSH monitor. It is generally used for images created on or for a
MACINTOSH. This setting also work s well wit h a PC if you ar e using hi gher
than normal contrast PC images.
Rich Colors results in an image with deep contrast and saturated vibrant
colors. It is generall y used under bri ght lighting condi tions. This set ting works
well to enhance colors of certain graphics and it may be useful when images
created for a MACINTOSH are displayed from a PC.
Spreadsheets results in an image with contrast between a PC and
MACINTOSH monitor. It is generally used for text-rich tab les, such as
financial dis plays. This setting factors in ambient light, subject ma tter, and
personal preferences to deliver the right balance of contrast and brightness.
Graphics delivers the high contrast needed to project graphics and text
against solid colored backgrounds.
43
Page 44

Page 45

This section describes how to:
• clean the lens
• replace the projection lamp
• replace the batteries in the remote
• use the se curity lock feature
• troubleshoot the projector
Cleaning the Lens
Follow these steps to clean the projection lens:
1. Apply a non-abrasive camera lens cleaner to a soft, dry cloth.
• Avoid using an excessive amount of cleaner.
• Abrasive cleaners, solvents or other harsh chemicals might
scratch the lens.
2. Lightly wipe the cleaning cloth over the lens in a circular motion.
3. If you don’t intend to use the projector immediately, replace the
lens cap.
Maintenance &
Troubleshooting
45
Page 46

User Guide KODAK DP2900 Digital Projector
Replacing the Projection Lamp
Warning: To avoid burns, allow the projector to cool for at least 30
minutes before you open the lamp module door. Never
extract the lamp module while the lamp is operating .
,PSRUWDQW 7KHODPSLQWKH.2'$.'3FRQWDLQVWUDFHDPRXQWVRIPHUFXU\
6RPHJRYHUQPHQWVU HTXLUHVSHFLDOGLVSRVDORIODPSVFRQWDLQLQJPHUFXU\
'LVSRVHRIODPSVLQDFFRUGDQFHZLWKWKHODZDQGDQ\DSSOLFDEOHORFDO
UHJXODWLRQV
The lamp hour counter in the Status menu counts th e number of hour s
the lamp has been in use. Replace the lamp when the brightness is no
longer acceptable. To order replacement lamp modules contact your
dealer of KODAK products or visit our Web site at www.kodak.com/
go/projectors.
Follow these steps to replace the projection lamp:
1. Turn off the projector by unplugging the power cord.
2. Wait 30 minutes to allow the projector to cool thoroughly.
3. Invert the projector on a soft flat surface, then insert a small
screwdriver or other flat object into the tab on the lamp module
.
door.
46
Page 47

Maintenance & Troubleshooting
4. Pull the lamp door up and remove it.
W arning :Be extremely careful when removing the lamp module. In
the unlikely event that the bulb ruptures, small glass
fragments may be generated. The lamp module is
designed to contain these fragments, but use caution
when removing the lamp module
&DXWLRQ 1HYHURSHUDWHWKHSURMHFWRUZLWKWKHODPSGRRURSHQRU
UHPRYHG7KLVGLVUXSWVWKHDLUIORZDQGFDXVHVWKH
SURMHFWRUWRRYHUKHDW
5. Loosen the two non-removable screws on the outside of the
module.
47
Page 48

User Guide KODAK DP2900 Digital Projector
6. Lift and grasp the pull tab and lift the module out. Dispose of the
lamp module in an environmentally proper manner.
Warning: Do not drop the l amp module or touch the gla ss bulb!
The glass may shatter and cause injury.
7. Install the new lamp module, being sure to align the connectors
properly.
8. Push the module in until it is flush with the bottom case of the
projector.
9. Tighten the screws on the outside of the module.
5HSODFHWKHODPSGRRUE\LQVHUWLQJWKHKRRNVRQWKHUHDURIWKH
ODPSGRRULQWRWKHSURMHFWRUDQGSUHVVLQJWKHODPSGRRULQWRSODFH
,IWKHODPSGRRUGRHVQRWILWSURSHUO\RUEXOJHVRXWUHPRYHWKH
GRRUDQGUHVHDWWKHODPSPRGXOH
3OXJLQWKHSRZHUFRUGWRWXUQWKHSURMHFWRUEDFNRQ
7RUHVHWWKHODPSKRXUFRXQWHULQWKH6WDWXVZLQGRZSUHVVDQGKROG
pull tab
48
volume -EXWWRQ WKHQSUHVVWKHmenuEXWWRQ ZKLOHVWLOO
WKH
KROGLQJGRZQWKH
FRXQWHUZDVUHVHWE\SUHVVLQJWKH
volume -EXWWRQ IRUVHFRQGV9HULI\WKDWWKH
menuEXWWRQ DQGYLHZLQJWKH
FRXQWHULQWKH6WDWXVZLQGRZ
Page 49

Maintenance & Troubleshooting
Replacing the Batteries in the Remote
Control
The life of the batteries depends on how often and how long you use
the remote. Symptoms of low battery charge include erratic responses
when using the remote and a reduced range of operation.
Follow these steps to replace the batteries:
1. Turn the remote face down in your hand.
2. Slide the battery cover off the end of the remote.
3. R emove the ol d batteries and dispose of them in an
environmentally proper manner.
4. Install two n ew AAA alkaline batteries. Make sure you install
each in the c orrect direction.
5. Slide the battery cover back on the remote.
Using the Security Lock
The projector has a security connector for use with a PC Guardian
Cable Lock System. (This Lock System must be purchased
separately.) Refer to the information that came with th e lock for
instructions on how to use it to secure the projector.
49
Page 50

User Guide KODAK DP2900 Digital Projector
Troubleshooting
If you don’t find the answer to your problem here, visit our Web site at
www.kodak.com/go/projectors
troubleshooting.
Sound
Problem Cause and Solution
No sound. • Adjust volume.
Poor sound quality. • Make sure you are connected to the
for the latest updates on
• Verify audio / input connections.
• Adjust audio source.
earphone jack on your laptop or line out
jack on your desktop.
• Make sure the volume setting on your
computer is halfway.
No audio-out port on the
image source.
Remote Control
Problem Cause and Solution
Projector responds poorly
or not at all to the remote
control.
You are not able to connect audio to the
projector.
• Make sure that the total distance from
the remote to the projector is no more
than 25 feet (7.6 m).
• Point the remote control at the screen or
at the front of the projector.
• Make sure nothing is blocking the
infrared sensor on the front of the
projector.
• Darken the room. The lighting might be
effecting the remote control.
• Replace t he remote contro l batteries.
50
Page 51

Maintenance & Troubleshooting
Image Quality
Problem Solution
Color or text is not projected. Adjust the brightness up or down until
the text is v isible.
Some text or fonts are not
sharp with a computer as an
image source.
For optimal results, set the computer’s
resolution to 1024 x 768. (Refer to your
computer user manual.) It may be
necessary to reduce the keystone
correction for optimum results.
Image isn't centered on the
screen.
• Be sure that the projector is at a 90°
angle to the screen.
• Use the software to reposition the
image. “Horizontal position (computer
source onl y)” on page 37 and “Vertical
position (computer source only)” on
page 37.
Image is out of focus. • Turn the projection lens to focus the
image.
• Make sure that the projection screen is
at least 3 ft (.9 m) from the projector.
• Check the projection lens to see if it
needs cleaning.
Image and menus are
reversed fro m left to right.
• If projecting from behind a screen,
make sure th at Rear Projection is
selected.
• If projecting from in front of a screen,
make sure that Front Projection is
selected.
Image appears flat with no
contrast
Image appears washed out or
dark.
Adjust the contrast. See “Contrast” on
page 33.
• Check the projection lens to see if it
needs cleaning.
• Adjust the brightnes s. See “Brightness ”
on page 33.
51
Page 52

User Guide KODAK DP2900 Digital Projector
Problem Solution
Image is "noisy" or stre aked. Try these steps in this order.
1. Deactivate the screen saver on
your computer.
2. Turn
Auto Image off and then
back on again. See “Auto
Image” on page 36.
3. Turn
Auto Image off and adjust
the synchronization and
tracking manually to find an
optimal setting. See “Manual
Sync (computer source only)”
on page 37 and “Manual
Tracking (computer source
only)” on page 37.
• Try connecting to another computer.
The problem could be with your
computer's video card.
52
Image is wider at the top or
bottom of the screen.
Image is wider at one side
than the other
Projected colors don't match
the computer or video source
colors.
This keystoning effect is caused by the
projection angle not being perpendicular
to the screen. Adjust the keystoning. See
“Keystone (computer source only)” on
page 35.
Make sure the projector is at a 90 degree
angle to the screen.
Use the KODAK Image Manager to
select a setting that is more acceptable.
Important: The KODAK Image Manager
settings work best if you select
Reset from the Adj ust Tab each
time before selecting an Image
Manager setting.
If further adjustment is needed, optimize
the brightness, tint, color and contrast
from the Image Menu.
Page 53

Lamp
Maintenance & Troubleshooting
Problem Cause and Solution
No light is coming from the
lamp.
• Make sure that the po wer cord is
properly connected to a fully functio nal
AC electric outlet. The Power light
blinks when the power is connected but
the projector is not turned on. The
Power light is a steady green when the
lamp is running.
• Make sure that the po wer cord is
properly connected to the projecto r.
• Make sure that you have removed the
lens cap on the projector len s at the front
of the projector.
• Make sure you have pressed the Power
button and the Power light is a steady
green.
• Check the projector' s l amp t o make sur e
that it is securely connected to the
projector.
• Make sure that the lamp module door is
fully closed.
• Make sure that the cable connectors do
not have any bent pins.
• Replace the lamp.
Lamp shuts off. • A minor power surge may cause the
lamp to shut off.
Unplug the projector,
wait at least a minute, then plug it back
in.
• Make sure the vents are not blocked.
• Replace the lamp module.
Lamp seems to be getting
dimmer
The lamp begins to lose brigh tne ss when
it has been in use for a long time.
Replace the lamp as described in
“Replacing the Projection Lamp” on
page 46.
53
Page 54

User Guide KODAK DP2900 Digital Projector
Image Source
Problem Cause and Solution
The S-Video image source
does not appear.
Only the start-up screen
appears and not the image
from the image source.
Some inexpensive cables are not
compatible with the projector. Be sure to
use a high quality cable.
• Verify that the cables are connected
correctly.
• Verify that the proper image source is
connected and that it is selected on the
Setup tab of the menus.
• Make sure that the im age source is
turned on.
• Turn off everything and power up again
in the proper order.
• Make sure that your laptop's external
video port is turned on. See the
computer manual for details.
• Make sure your comput er’ s v ideo bo ard
is installed and configured correctly.
• Make sure your computer has a
compatible video board. The projector
isn’t CGA, EGA or SXGA compatible.
• If you’re using Windows 98:
1.Open “My Computer” icon, the
Control Panel folder and then the
Display icon.
2.Click the Settings tab.
3.Verify that the Desktop area is set to
1024x768 or less.
54
No image is displayed • Make sure that you have removed the
lens cap.
• Make sure that the lamp is switched on.
Page 55

Specifications
The KODAK DP2900 Digital Projector must be operated and stored
within the temperature and humidity ranges specified.
Temperature
Operating 50 to 104° F (10 to 40° C)
Appendix A
Non-operating -4 to 158
° F (-20 to 70° C)
Humidity
Operating and non-oper. 5% to 95% relative humidity, non-
condensing
Dimensions
8.75 x 9.75 x 2.5 inches (22.2 x 24.8 x 6.4 cm)
Weight
4.8 lbs. (2.2 kg) unpacked
Altitude
Operating 0 to 10,000 feet (3,048 meters)
Non-operating 0 to 40,000 feet (12,192 meters)
55
Page 56

User Guide KODAK DP2900 Digital Projector
Optics
Focus Range 4.9 - 16 feet (1.5-5 m)
Lamp
Type 120-watt VHP lamp
Input Power Requirements
100-120VAC 6A;50/60Hz
200-240VAC 3A; 50Hz
Audio Input
Input Impedance 10K ohm nominal, AC coupled
Maximum Input Voltage (L
+ RIN)
IN
< 4.5 V for THD ≤
PEAK
0.3%
or RIN < 2.0 Vrms for THD ≤
L
IN
0.3%
Sensitivity 100 mV at 1 KHz for 88 dB SPL at 1
meter
Connector Type 3.5 mm (1/8 inch) stereo phone mini
56
Page 57

Appendix B
Portable and Laptop Activation Chart
Many laptop computers do not automatically turn on their external
video port when a projector is connected. Activation commands for
some laptop computers are listed in the following table. (If your
computer is not listed or the given command does not work, refer to
the computer’s documentation for the appropriate command.) On
many laptops, the activation function key is labeled with an icon, for
example or the text CRT/LCD.
Note: Usually, pressing the key commands once activates the
external video port, pressing it again activates both the
external and internal ports, and pressing it a third time
activates the internal port. Refer to your computer
documentation for details on your specific model.
Key command
Key command
to
Computer
to
de-activate
activate port
port
Acer Ctrl-Alt-Esc (for
setup)
AST* ** FN-D or Ctrl-D FN-D or C trl-D
Ctrl-FN-D Ctrl-FN-D
FN-F5 FN-F5
type from A:/IVGA/
CR T
FN-F12 FN-F12
Ctrl-Alt-Esc (for
setup)
type from A:/IVGA/
CRT
57
Page 58

User Guide KODAK DP2900 Digital Projector
Key command
Computer
Key command
to
activate port
to
de-activate
port
AMS FN-F2 FN-F2
AMT setup screen setup screen
AT& T FN-F3
FN-F6
Advanced Logic
Research
Altima Shift-Ctrl-Alt-C
Ambra** FN-F12 FN-F12
Ctrl-Alt-V Ctrl-Alt-V
setup VGA/
Conf.Simulscan
FN-F3
FN-F6
Shift-Ctrl-Alt-L
setup VGA/
Conf.Simulscan
58
FN-F5 FN-F5
F2/Choose Option/
F5
Amrel* ** setup menu setup menu
Shift-Ctrl-D Shift-Ctrl-D
Apple see Mac Portable and Mac PowerBook
Aspen automatic automatic
Award FN-F6 FN-F6
F2/Choose Option/
F5
Page 59

Appendix B
Key command
Computer
Key command
to
activate port
to
de-activate
port
BCC* automatic reboot computer
Bondwell LCD or CRT
options after bootup
Chaplet** setup screen setup screen
FN-F6 FN-F6
FN-F4 FN-F4
Chembook FN-F6 FN-F6
Commax Ctrl-Alt-#6 Ctrl-Alt-#5
Compaq* ** Ctrl-Alt-< Ctrl-Alt->
reboot for LCD or
CRT options to
appear
FN-F4 FN-F4
automatic automatic
mode/? (for setup
option)
Compuadd* ** automatic automatic
Alt-F for screen
setup option
Data General Ctrl-Alt-Command Ctrl-Alt-Command
mode/? (for setup
option)
Alt-F for screen
setup option
59
Page 60

User Guide KODAK DP2900 Digital Projector
Key command
Computer
Key command
to
activate port
to
de-activate
port
Data General
Walkabout
Datavue Ctrl-Shift-M Ctrl-Shift-M
DEC** FN-F5 FN-F5
Dell** Ctrl-Alt-< Ctrl-Alt->
2 CRT/X at DOS
prompt
FN-F4 FN-F4
Ctrl-Alt-F10 Ctrl-Alt-F10
FN-F8 (CRT/LCD) FN-F8
FN-D FN-D
reboot
60
FN-F12 FN-F12
Digital* automatic reboot
FN-F2 FN-F2
Dolch dip switch to CRT dip switch to LCD
Epson dip switch to CRT dip switch to LCD
Everex* setup screen option setup screen option
For-A Ctrl-Alt-Shift-C Ctrl-Shift-Alt-L
Fujitsu FN-F10
Page 61

Appendix B
Key command
Computer
Key command
to
activate port
to
de-activate
port
Gateway FN-F3
FN-F1/FN-F1 again
simultaneous
Grid* ** FN-F2, choose auto
or simultaneous
Ctrl-Alt-Tab Ctrl-Alt-Tab
Hitachi FN-F7 FN-F7
Honeywell FN-F10 FN-F10
Hyundai setup screen option setup screen option
IBM 970* automatic warm reboot
FN-F3
FN-F1
FN-F2
IBM
ThinkPad**
reboot, enter setup
menu
FN-F7, select
choice from setup
menu
FN-F1, select
choice
FN-F5, select
choice
PS/2 SC select choice
(CRT, LCD, etc.)
FN-F2
61
Page 62

User Guide KODAK DP2900 Digital Projector
Key command
Computer
Key command
to
activate port
to
de-activate
port
Infotel FN-F12 FN-F12
Kaypro boot up, monitor
plugged in
Kris Tech FN-F8 FN-F8
Leading Edge FN-T FN-T
Mac Portable
100
Mac PowerBook
140, 145, 150,
170
no video port: not compatible
no video port: requires a 3rd-party interface
unplug monitor
62
160, 165,
180, 520, 540,
5300
210, 230, 250,
270, 280, 2300
Magitronic FN-F4 FN-F4
Mastersport FN-F2 FN-F1
Micro Express* automatic warm reboot
Control Panel
folder, PowerBook
Display fold er;
Activate Video
Mirroring
requires Apple Docking Station or Mini
Dock
warm reboot
Page 63

Appendix B
Key command
Computer
Key command
to
activate port
to
de-activate
port
Micron FN-F2 FN-F2
Microslate* automatic warm reboot
Mitsubishi SW2 On-Off-Off-
Off
NCR setup screen option setup screen option
NEC* ** setup screen option setup screen option
CRT at the DOS
prompt
FN-F3 FN-F3
Olivetti* automatic automatic
SW2 Off-On-OnOn
LCD at the DOS
prompt
FN-O/* FN-O/*
Packard Bell* ** FN-F0 FN- F0
Ctrl-Alt-< Ctrl-Alt->
Panasonic FN-F2 FN-F2
Prostar Ctrl-Alt-S at bootup Ctrl-Alt-S at bootup
Samsung* setup screen option setup screen option
Sanyo setup screen option setup screen option
63
Page 64

User Guide KODAK DP2900 Digital Projector
Key command
Computer
Key command
to
activate port
to
de-activate
port
Sharp dip switch to CRT dip switch to LCD
Sun SPARCDataview
Tandy** Ctrl-Alt-Insert Ctrl-Alt-Insert
Tangent FN-F5 FN-F5
Texas
Instruments*
Top-Link* ** setup screen option setup screen option
Ctrl-Shift-M Ctrl-Shift-M
setup screen option setup screen option
setup screen option setup screen option
FN-F6 FN-F6
64
Toshiba* ** Ctrl-Alt-End Ctrl-Alt-Home
FN-End FN-Home
FN-F5 FN-F5
setup screen option setup screen option
Twinhead* FN-F7 FN-F7
FN-F5 FN-F5
Page 65

Appendix B
Key command
Key command
to
Computer
to
de-activate
activate port
port
Automatic Automatic
WinBook Ctrl-Alt-F10 Ctrl-Alt-F10
Wyse software driven software driven
Zenith** FN-F10 FN-F10
FN-F2 FN-F2
FN-F1 FN-F1
Zeos** Ctrl-Shift-D
FN-F1
* These manufacturers have models that automatically send video to
the external CRT port when some type of display device is attached.
Ctrl-Shift-D
FN-F1
** These manufacturers of fer mor e than one key comman d depending on
the computer model
65
Page 66

Page 67

Appendix C
Using Video Mirroring with a PowerBook
Computer
When you turn video mirroring (called SimulScan in newer
PowerBooks—see below) on, the projector displays the same
information that appears on your PowerBook’s built-in screen. When
video mirroring is off, the projector acts like a separate display.
To turn on video mirroring for the first time:
1. Open the Monitors control panel; click on Monitor 2.
2. Set the number of colors you want.
3. Open the Control Strip, then click on the monitor icon.
4. Select “Turn Video Mirroring On.”
Now you can turn video mirroring on and off from the Control Strip
without having to open the Monitors control panel again.
When using video mirroring and high color graphics such as slide
shows, the projected image occasionally might turn black and white.
If this happens, perform the following steps:
1. Turn off video mirroring.
2. Open the Monitors control panel.
3. Move the white menu bar to Monitor 2 to set the projector as the
primary monitor.
4. Restart the PowerBook.
67
Page 68

User Guide KODAK DP2900 Digital Projector
Using SimulScan
Some newer PowerBooks display images on an external monitor or
projector differently than previous ones. When using SimulScan, the
projector displays the same information that appears on your
PowerBook
To select SimulScan:
1. Open the Control Panel, then double-click Monitors and Sound.
2. In the Resolution list, choose the SimulScan mode, then click
OK.
3. If this changes your display settings, a dialog box appears. Click
OK to confirm the change.
68
Page 69

Projected Image Size
Use the graph and table s to help you determine project ed image sizes.
Note: Image sizes shown are based on a digital keystone c orr ection
of zero.
Appendix D
Image Size, Width and Height for DP2900
maximum image size
Distance to
Screen (feet)
4.9 3.2 2.6 1.9
8 5.2 4.2 3.1
12 7.8 6.3 4.7
16 10.4 8.3 6.3
20 13.0 10.4 7.8
30 19.5 15.6 11.7
Diagonal
(feet)
Width
(feet)
Height
(feet)
69
Page 70

User Guide KODAK DP2900 Digital Projector
Image Size, Width and Height for DP2900
minimum image size
Distance to
Screen (feet)
4.9 2.5 2.0 1.5
8 4.1 3.3 2.5
12 6.2 4.9 3.7
16 8.2 6.6 4.9
20 10.3 8.2 6.2
30 15.4 12.3 9.2
Diagonal
(feet)
Width
(feet)
Height
(feet)
70
Page 71

Index
A
activation commands for laptops 57
adjusting
brightness 33
color 34
contrast 33
height 26
tint 34
volume 31, 35
altitude limits 55
assistance 14
audio cable, connecting 19
Audio menu 35
Audio menu options
Volume 35
Auto Source Select 39
B
battery use ix
Blank Screen 34
brightness, adjusting 33
buttons on keypad
Lamp on/off 30
Menu 30
Source 30
Standby 31
Volume 31
C
cables
audio 19
composite video 20
M1-DA analog 12
M1-DA analog computer cable 18
S-video 20
cleaning the projection lens 45
color, adjusting 34
compatibility
IBM-compatible 11
Macintosh 11
composite video cable
connecting 20
computer cable, analog 12
computers, compatible 11
connecting
audio cable 19
IBM-compatible computer 18
power cord 22
video player 20–21
contrast, adjusting 33
Controls menu options
Auto Source Select 39
Default Source 39
Display Messages 39
Display Startup Screen 40
Plug and Play 39
Rear Projection 38
Standby Time 38
Video Standard 38
customer support numbers 15
D
Default Source 39
Display menu 33
Display menu options
Blank Screen 34
Brightness 33
Color 34
Contrast 33
Reset All 34
71
Page 72

User Guide KODAK DP2900 Digital Projector
Tint 34
Display Messages 39
Display Startup Screen 40
displaying
on-screen menus 30
startup screen 40
status messages 39
E
elevator button/foot 26
F
foot 26
fuzzy lines 37
H
HDTV 11, 20, 36
help
customer support numbers 15
fax 14
I
IBM-compatible computers
compatibility 11
connecting 18
image
adjusting 25
centering 37
focusing 26
fuzzy lines 37
quality ??–53
resolution 11
reversed 38
size 17, 69
zooming 26
Image menu 35
Image menu options
Auto Image 36
Horiz. Position 37
Keystone 35
Manual Sync 37
Manual Tracking 37
Resize 36
Vert. Position 37
K
keypad
using 29
keystone correction 35
L
lamp
replacing 46
lamp hour counter 41
Lamp on/off button 30
Language menu 40
language, selecting for menus 40
laptop activation sequence 57
laptop computers
compatibility 18
connecting IBM-compatible 18
lens
cleaning 45
M
M1-DA analog computer cable 12, 18
Macintosh computers
compatibility 11
connecting 19
Menu button 32
menus. See on-screen menus
mouse, connecting 19
72
Page 73

Index
N
NTSC video 38
O
on-screen menus
Audio menu 35
changing language of 40
changing menu functions 32
Controls menu 38
Display menu 33
displaying 32
Image menu 35
Language menu 40
Status menu 41
overscan 35
P
PAL video 34, 38
Plug and Play 39
positioning projector viii
power cord
connecting 22
power up sequence 23
PowerBook video mirroring 67
R
rear projection 38
remote control
replacing the batteries 49
using 27, 29
replacing projection lamp module 46
re-positioning image 37
resetting adjustments 34
resizing video 36
resolution 11
S
safety guidelines vii
screen
projecting behind 38
sizes 17, 69
SECAM video 34, 38
security lock 49
service numbers 15
setting up 17
SimulScan, with PowerBooks 68
Source button 30
specifications 55
Standby
button 31
Time 38
startup screen 40
Status menu 41
support numbers 15
S-video
connecting 20
T
Technical Support
information to have on hand
before you call 14
technical support 14
temperature limits 55
tint, adjusting 34
turning off the projector 23
U
USB mouse 19
V
vertical lines 37
video
mirroring 67
73
Page 74

User Guide KODAK DP2900 Digital Projector
resizing 36
standards 38
Volume buttons 31
volume, adjusting 31
W
widescreen video 36
Z
zooming the image 26
74
Page 75

Warranty
WARRANTY TIME PERIOD
Kodak warrants the KODAK DP2900 Digital Projector (excluding lamps,
from the date of purchase
two years from the date of purchase.
) to be free from malfunctions and de fe cts in both materials and workmanship for
WARRANTY REPAIR COVERAGE
This warranty wi ll b e honored within the geog raphical location th at the p roduct was purchased.
If the equipment does not function properly during the warranty period due to defects in either materials
or workmanship, Kodak will, at its option, either repair or replace the equipment without charge, subject to
the conditions and lim it at ions stated herein. Such repair will in cl ude all labor as well as any necessary
adjustments and/or replacement parts.
If replacement parts are used in making repairs, these parts may be remanufactured, or may contain
remanufactured materials. If it is necessary to replace the entire system, it may be replaced with a
remanufactured system.
Kodak will also provide telephone assistance during the warranty period.
LIMITATIONS
WARRANTY SERVICE WILL NOT BE PROVIDED WITHOUT DATED PROOF OF PURCHASE.
THIS WARRANTY BECOMES NULL AND VOID IF YOU FAIL TO PACK YOUR DIGITAL PROJECTOR
IN A MANNER CONSISTENT WITH THE ORIGINAL PRODUCT PACKAGING AND DAMAGE
OCCURS DURING PRODUCT SHIPME NT.
THIS WARRANTY DOES NOT COVER: CIRCUMSTANCES BEYOND KODAK’S CONTROL; SERVICES
OR PARTS TO CORRECT PROBLEMS RESULTING FROM THE USE OF ATTACHMENTS,
ACCESSORIES, OR ALTERATIONS NOT MARKETED BY KODAK; SERVICE REQUIRED AS THE
RESULT OF UNAUTHORIZED MODIFICATIONS OR SERVICE; MISUSE, ABUSE; FAILURE TO
FOLLOW KODAK’S OPERATING, MAINTENANCE, OR REPACKAGING INSTRUCTIONS; OR
FAILURE TO USE ITEMS SUPPLIED BY KODAK (SUCH AS ADAPTORS AND CABLES).
KODAK MAKES NO OTHER WARRANTIES, EXPRESS, IMPLIED, OR OF MERCHA NTABILITY OR
FITNESS FOR A PARTICULAR PURPOSE FOR THIS EQUIPMENT OR SOFTWARE.
REPAIR OR REPLACEMENT WITHOUT CHARGE ARE KODAK’S ONLY OBLIGATION UNDER THIS
WARRANTY. KODAK WILL NOT BE RESPONSIBLE FOR ANY SPECIAL, CONSEQUENTIAL OR
INCIDENTAL DAMAGES RESULTING FROM THE PURCHASE, USE, OR IMPROPER FUNCTIONING
OF THIS EQUIPMENT REGARDLESS OF THE CAUSE. SUCH DAMAGES FOR WHICH KODA K WIL L
NOT BE RESPONSIBLE INCLUDE, BUT ARE NOT LIMITED TO, LOSS OF REVENUE OR PROFIT,
DOWNTIME COSTS, LOSS OF USE OF THE EQUIPMENT, COST OF ANY SUBSTITUTE EQUIPMENT,
FACILITIES OR SERVICES, OR CLAIMS OF YOUR CUSTOMERS FOR SUCH DAMAGES.
Depending on your geographical location, some limitations and exclusions may not apply.
Shipment of a unit from the customer to the kodak service center will be at the customer’s expense.
This warranty is not tr an sfe rable from the original purcha se r of t he e quipment.
which have an initial 90-day warranty
75
Page 76

User Guide KODAK DP2900 Digital Projector
HOW TO OBTAIN SERVICE
Please refer to the Service and Support section of your User ’s G uide for the support hotline designated to
your location.
When returning a di g it a l p roje ctor for repair, the unit shall be pac k e d i n it s original packin g materials. A
problem report should also be encl osed with the equipment. If the ori ginal packaging has been disca rded or
is not available, packing will be at the owner’s expense.
The repaired or replaced unit will be shipped from Kodak within five business days from the date of the
digital projector r ecei p t at the serv ice center.
Unless a specific Kodak warranty is communicated to the purchaser in writing by a Kodak company, no
other warranty or li ab ility exists beyond the information contained above, even thoug h defect, damage, or
loss may be caused by neg li g e nc e or ot h e r ac t.
To obtain warranty repair service contact your local Kodak representative. For assistance, refer to the
Service and Suppo rt information in the KODAK Digital Projector User’s Guide.
76
Page 77

Page 78

Eastman Kodak Company
343 State Street
Rochester, New York 14650
Kodak is a trademark of
Eastman Kodak Company.
PN 6b5276 5/00 ©Eastman Kodak Company Printed in the U.S.A.
 Loading...