

Page 1

User’s Guide
K ODAK DP900 / DP1100 Digital Projectors
PN 009-0405-00 3/99
Page 2

Page 3

Contents
Safety Instructions . . . . . . . . . . . . . . . . . . . . . . . . . . 1
Safety Definitions . . . . . . . . . . . . . . . . . . . . . . . . . . . . . . . . .1
Safety Symbols . . . . . . . . . . . . . . . . . . . . . . . . . . . . . . . . . .1
Safety Terms: . . . . . . . . . . . . . . . . . . . . . . . . . . . . . . . . . . . .2
Unpacking the Projector. . . . . . . . . . . . . . . . . . . . . . 3
Projector Features . . . . . . . . . . . . . . . . . . . . . . . . . . 4
Front of Projector . . . . . . . . . . . . . . . . . . . . . . . . . . . . . . . . .4
Rear and Side of Projector . . . . . . . . . . . . . . . . . . . . . . . . . .4
Connector Panel . . . . . . . . . . . . . . . . . . . . . . . . . . . . . . . . .4
Connecting the Projector. . . . . . . . . . . . . . . . . . . . . 5
Connecting to a Laptop Computer . . . . . . . . . . . . . . . . . . . .6
Connecting to a Desktop Computer . . . . . . . . . . . . . . . . . . .7
Connecting to a Video Player . . . . . . . . . . . . . . . . . . . . . . . .9
Starting the Projector . . . . . . . . . . . . . . . . . . . . . . . 11
ENGLISH
Using the Remote Control . . . . . . . . . . . . . . . . . . . 14
Using the Keypad. . . . . . . . . . . . . . . . . . . . . . . . . . 15
Turning Off the Projector . . . . . . . . . . . . . . . . . . . . 17
For More Information . . . . . . . . . . . . . . . . . . . . . . . 18
3/99 i
Page 4

Page 5
User’s Guide
KODAK DP900 / DP1100 Digital Projectors
This guide contains the setup and operating procedures for your
KODAK DP900 or DP1100 Digital Projector. For more
information on how to connect, operate and maintain your
projector, refer to your
Safety Instructions
Reference Manual
.
ENGLISH
Please read and follow all safety instructions provided
using your new projector. Failure to comply with safety
instructions may result in fire, electrical shock, or pers onal i n j ury
and may damage or impair protection provided by equipment.
Please save all safety i nstructions
Safety Definitions
•
Warning:
that could r esult in perm anent personal injury.
•
Caution:
could result in damage to your equipment.
Safety Sym b ols
Attention:
refer to the
Warning:
An arrow pointing to the lamp door on the projector.
before
.
Statements identify conditions or practices
Statements identify c ondi ti ons or pr ac ti ces tha t
For information about use of a feature, please
Reference Manual
Hot surface. Do not touch.
.
3/99 1
Page 6
User’s Guide KODAK DP900 / DP1100
Safety Terms:
•
Warning:
projector is turned on.
Don’t look directly into the lens when the
•
Warning:
Don’t block ventilation openings.
•
Warning:
To replace the lamp, turn the power off
and unplug the power cord. To avoid burns, wait 30
minutes before opening the lamp door. Follow all
instructions provided in the
•
Warning:
Please use the power cord provided.
Reference Manual
Connect the power cord to a receptacle with a
protective safety (earth) ground terminal.
•
Warning:
Refer all service to qualified service personnel.
Servicing your o wn pr ojector will v oid t he warr anty. See “For
More Information” on page 18 for the customer service
contact information.
•
Caution:
Don’t set liquids on the projector. Spilled liquids
may damage your projector.
•
Caution:
Don’t place the projector on a hot surface or in
direct sunlight.
•
Caution:
Do not drop the projector. Transport the projector
in a Kodak-approved case.
.
•
Caution:
ceiling mount recommended in the
For ceiling mount installations, please use the
Reference Guide
and
follow all instructions provided with it.
•
Caution:
The projector lamp bulb is pressurized and may
rupture after more than 1,000 hours use. Always change the
bulb as soon as you notice a decrease in the brightness.
2 3/99
Page 7

Unpacking the Projector
Unpacking the Projector
The projector comes with the items s hown here. If any items are
missing, call your dealer immediately.
1
4
3
6
7
11
ENGLISH
2
5
8
9
10
Digital projector and lens cap
1.
Soft carry case
2.
Remote control
3.
Power cord
4.
DP900 / DP1100 User’s Guide
5.
Reference Manual
Online User Guide
, and
CD
,
RCA audio/video cable
6.
Cable hub connector
7.
Audio cable
8.
PS/2 mouse cable
9.
USB mouse cable
10.
MAC adapter
11.
Note: Optional accessories are not shown.
3/99 3
Page 8
User’s Guide KODAK DP900 / DP1100
Projecto r Fe atu r es
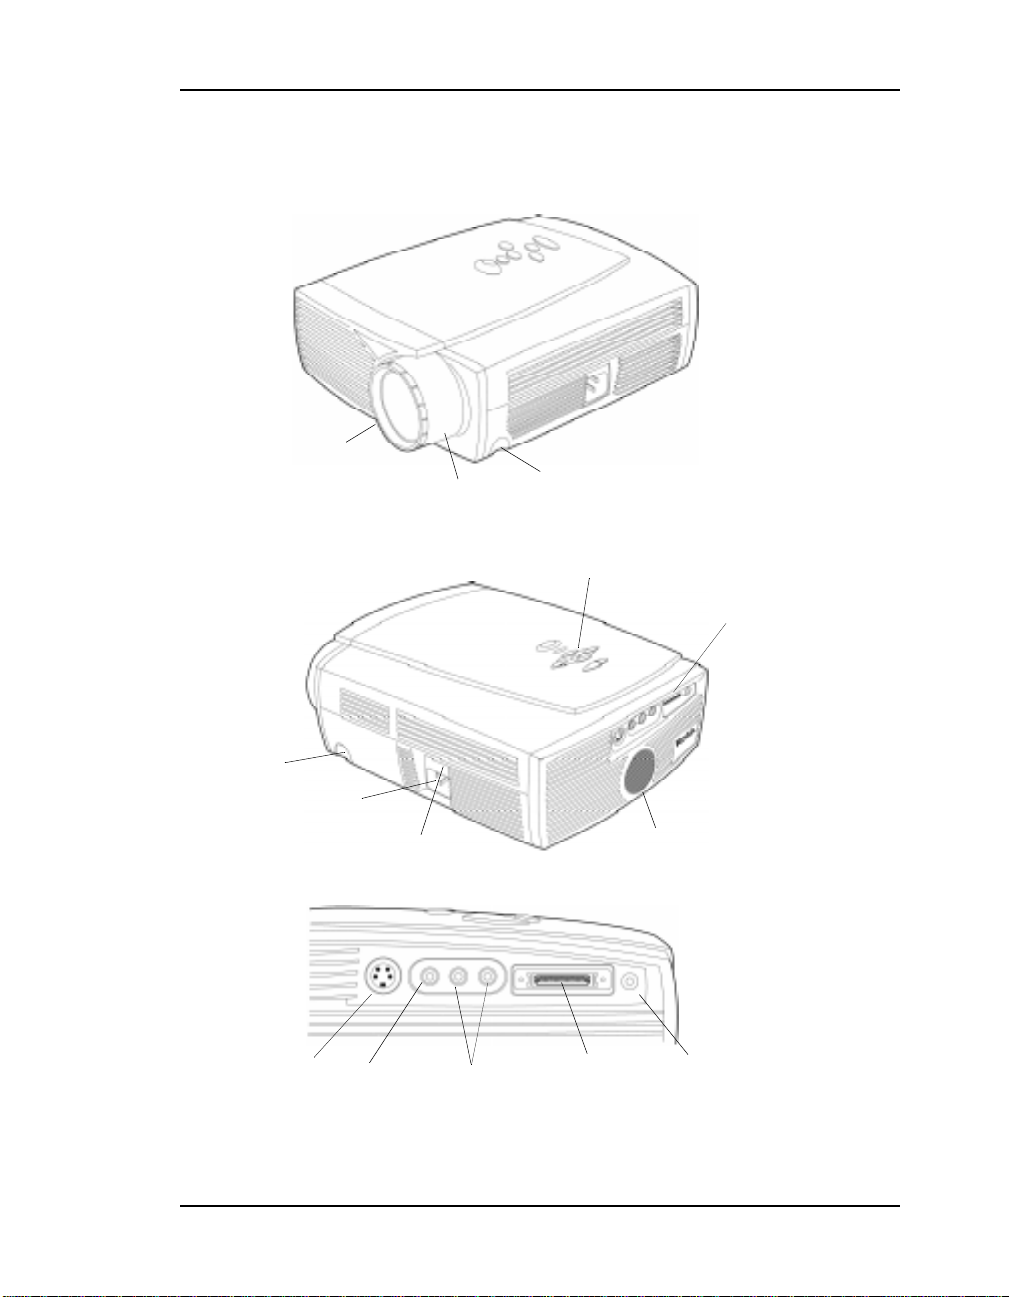
Front of Projector
focus ring
zoom ring
Rear and Side of Projector
front of projector
elevator button
power
cord
connector
power switch
Connector Panel
s-video
composite
connector
L/R audio in
(for video source)
elevator button
keypad
cable
hub connector
connector panel
speaker
computer
audio in
4 3/99
Page 9

Connecting the Projector
Connecting the Projector
You can connect your projector to a laptop computer, desktop
computer, or video player. All connections are made with the aid
of icons on the cables . The cabl es wit h their icons are sh o wn here.
Caution: Make sure your projector, computer and video
player are turned off before you connect them.
Cable hub connector
To your
projector
Audio cable
To the audio
connection on
the cable hub
ENGLISH
To your
computer
Mouse
Audio
Monitor
To the audio
connection on
your computer
PS/2 mouse cable
To the mouse
connection on the
cable hub
To the PS/2 mouse
port on your
computer
USB mouse cable
To the mouse
connection on the
cable hub
3/99 5
To the USB
port on your
computer
Page 10

User’s Guide KODAK DP900 / DP1100
Connecting to a Laptop Computer
audio cable
mouse cable
cable hub connector
1. Connect the end of the cable hub connector to the
connector on the projector’s connector panel.
2. Plug the end of the cable hub connector into the video
connector on your laptop.
3. Plug either end of the audio cable into the audio connector on
your computer; plug the other end of the audio cable into the
connector on the cable hub.
4. Plug the end of the PS/2 mouse cable into the mouse
connector on your computer; plug the end of the PS/2
mouse cable into the connector on the cable hub.
Or if you have a USB connection:
Plug the end of the USB mouse cable into t he USB
mouse connector on your computer; plug the end of the
USB mouse cable into the connector on the cable hub.
To start using your projector, go to “Starting the Projector” on
page 11.
6 3/99
Page 11

Connecting the Projector
Connecting to a Desktop Computer
audio cable
mouse cable
monitor cable
1. Connect the end of the cable hub connector to the
connector on the projector’s connector panel.
2. Locate the cable that connects your monitor to your computer
and unplug it from the computer.
hub connector
ENGLISH
3. Plug your monitor cable into the connector on the cable
hub.
4. Plug the end of the cable hub into the monitor connector
on your computer.
5. Unplug the audio cable, if present, from your computer and
plug either end of the audio cable into the audio connector on
your computer. Plug the other end of the audio cable into the
connector on the cable hub.
3/99 7
Page 12

User’s Guide KODAK DP900 / DP1100
6. Unplug the mouse cable from your computer and plug the
end of the PS/2 mouse cable into the mouse connect or on your
computer. Then plug the end of the PS/2 mouse cable int o
the connector on the cable hub.
Or if you have a USB connection:
Plug the end of the USB mouse cable into t he USB
mouse connector on your computer and plug the end of
the USB mouse cable into the connector on the cable hub.
To start using your projector, go to “Starting the Projector” on
page 11.
8 3/99
Page 13

Connecting the Projector
Connecting to a Video Player
If your video player uses a round, one-prong composite video
connector , you need onl y the A/V cable that w as shipped wit h the
projector. If your video player uses a round, four-prong S-video
connector, you need an S-video cable in addition to the
A/V cable.
Note: The S-video cable is sold separately. To order the cable,
refer to the
Connecting with an AV Cable
Reference Manual
audio/video cable
ENGLISH
.
1. Plug the A/V cable’s yellow connector into the “video-out”
port on your video player. This port may be labeled “To
Monitor.”
2. Plug the other yellow connector into the composite connector
on the back of the projector.
3. Plug the A/V cable’s white connector into the left “audio out”
port on your video player. Plug the cable’s red connector into
the right “audio out” port on the video player.
4. Plug the A/V cable’s other white and red connectors to the l eft
and right “audio in” ports on the projector.
To start using your projector, go to “Starting the Projector” on
page 11.
3/99 9
Page 14

User’s Guide KODAK DP900 / DP1100
Connecting with an S-video Cable
A/V cable
1. Connect the S-video cable to the “s-video out” connector on
the video player.
2. Plug the other end of th e cabl e int o the “s-vi deo” co nnecto r on
the projector.
S-video cable
3. Connect the white and red AV cable connectors to the video
player and to the projector.
The yellow connectors on the A/V cable are not connected to
anything when used with the S-video cable.
To start using your projector, go to “Starting the Projector” on
page 11.
10 3/99
Page 15

Starting the Projector
Starting the Projector
1. Remove the lens cap.
2. Plug the power cord into the side of the projector, then plug it
into your electrical outlet.
3. Press the “I” side of the power switch to turn on the projector.
The Kodak start-up screen appears and the power LED on top
of the projector lights up.
ENGLISH
Power switch
Power cord connection
4. Turn on your video source - a video player or a computer.
The video image appears on the projection screen.
3/99 11
Page 16

User’s Guide KODAK DP900 / DP1100
5. Position the projector and adjust the zoom setting for the
image size you want.
DP900
9.
6
2
-
.
9
1
2
-
.
6
3
.
f
8
5
.
8
1.
-
8
7
.
-
6
2.
5 ft.
1.5 m
f
t
3
.
m
12 ft.
3.7 m
2.
4
-
.
7
3.
-
0
.
9
f
t
.
m
t
.
m
20 ft.
6 m
1
2
.
4
3
.
-
8
16
-
4
f
.
t
9
7.
4
2
-
.
3
9.
-
7
3
f
3.
0
.
9
-
3
-
1.
1
DP1100
12 3/99
m
t
m
.
.
6
f
t
.
12 ft.
5 ft.
1.5 m
3.7 m
.
m
20 ft.
6 m
Page 17

Starting the Projector
6. Make basic image adjustments. (Refer to the
Manual
for advanced image adjustments.)
Reference
• Adjust the zoom ring
• Focus by rotating focus lens.
• Be sure the projec tor is at a 90-d e gre e angle t o th e scree n.
• Adjust the height of the projector. Press and hold the
elevator button. Raise the projector to the height you
want, then release the button.
elevator button
ENGLISH
3/99 13
Page 18

User’s Guide KODAK DP900 / DP1100
Using the Remote Control
Point the remote control a t the projection screen or at the front or
rear of the projector. For best results, point the remote directly at
the projector. The range for optimum operation is about
40 feet (12 m).
The remote has four function buttons, a disk mouse and two
mouse buttons, one on the top of the remote and one on the
bottom.
standby
computer
video
simulates the left mouse button
disk mouse
simulates the right mouse button
menu
14 3/99
Page 19

Using the Keypad
Using the Keypad
The keypad is lit green while the menus are displayed and is lit
orange when the projector is on. While the menus are displayed,
the volume, sour ce, and s tandb y b ut tons ac t as navigation buttons.
source button - toggles
back and forth
between video and
computer sources
volume decreases volume
ENGLISH
menu button - displays a menu of
projector options on the screen
volume increases volume
standby - turns off the image without
turning off the projector
simulates left and right mouse buttons
3/99 15
Page 20

User’s Guide KODAK DP900 / DP1100
To view the on-screen menus, press the
button on the
keypad or remote. The menu bar appears and the volume, source,
and standby b uttons b ecome nav igation b uttons. To select a menu,
use the keypad or the remote control to move the cursor left and
right to highlight the menu you want. The drop-down menu
appears.
To change a menu setting, use the up and down navigation
buttons on the keypad or the disk mouse on the remote to move
the cursor to the desired item. The selected item is highlighted.
Then use the left and right mouse buttons at the bottom of the
keypad or the mouse buttons on the remote control to adjust a
setting. Changes are saved when you close the menus.
To access another menu, use the left and right navigation buttons
on the keypad or the disk mouse on the remote control to move
left or right to another menu.
16 3/99
Page 21

Turning Off the Projector
Turning Off the Projector
To turn off the projector for a short period of time, press the
button on the ke ypad or remote contro l. This blanks the scre en for
a preset amount of ti me but keeps the projector running. Aft er th e
set amount of time elapses again, the lamp turns off. To exit
standby mode, press the button again.
To completely turn off the projector, press the “0” side of the
power switch on the side of the projector. If you want to turn the
projector back on immedi atel y, allow about a minu te for the l amp
to cool. The lamp will not light if it is too hot.
Always unplug the projector from the wall outlet before
unplugging the cord at the projector.
ENGLISH
3/99 17
Page 22

User’s Guide KODAK DP900 / DP1100
For More Information
The first place to look for hel p is in the
sure to check the guidelines in “Troubleshooting.”
Online Services
Contact Kodak via:
World Wide Web http://www.kodak.com
America Online (keyword) KODAK
CompuServe GO KODAK
Kodak Internet List Ser v e r photo-cd@info.kodak.com; or
Faxed Information
Kodak offers automated support by fax:
U.S. and Canada 1-800-295-5531
Europe 44-131-458-6962
Reference Manual
(click on Service and Support)
ftp.kodak.com
. Be
U.K. 44-0-131-458-6962
18 3/99
Page 23

For More Information
Customer Support
If you have questions concerning the operation of your KODAK
projector, you can speak directly to a customer support
representative. Have the projector serial number ready, and be at
your computer with your projector when you call.
In the U.S. and Canada call toll free, 1-888-375-6325, between
the hours of 9:00 a.m. and 8:00 p.m. (Eastern Standard Time)
Monday through Friday.
In Europe call
Austria/Osterreich 01 795 67000
Germany/Deutschland 069 9509 6055
Spain/Espana 91 4069130
Belgium/Belgique 02 713 1398
Ireland/Eire 01 402 6815
Sweden/Sverige 08 587 70305
ENGLISH
Denmark/ Danmark 38 48 7088
Italy/Italia 02 696 33205
Switzerland/Schweiz/
Suisse
Finland/Soumi 0800 11 8043
Netherlands/Nederland 020 346 9128
UK (National Line) 0870 6061031
France 0141 918578
Norway/Norge 23 16 2041
1 Int. Fax Line +44 (0) 870 6061032
3/99 19
01 838 5358
Page 24

Eastman K o da k Co mp a ny
343 State Street
Rochester, New York 14650
Kodak is a trademark of
Eastman K o da k Co mp a ny.
PN 009-0405-00 3/99 ©Eastman Kodak Company Printed in the U.S.A.
 Loading...