

Page 1
DCS 700 Series Digital Cameras
Quick Set up
for the DCS 700 Series Digital Cameras
Page 2
YOUR
YOUR
CAMERA
CAMERA
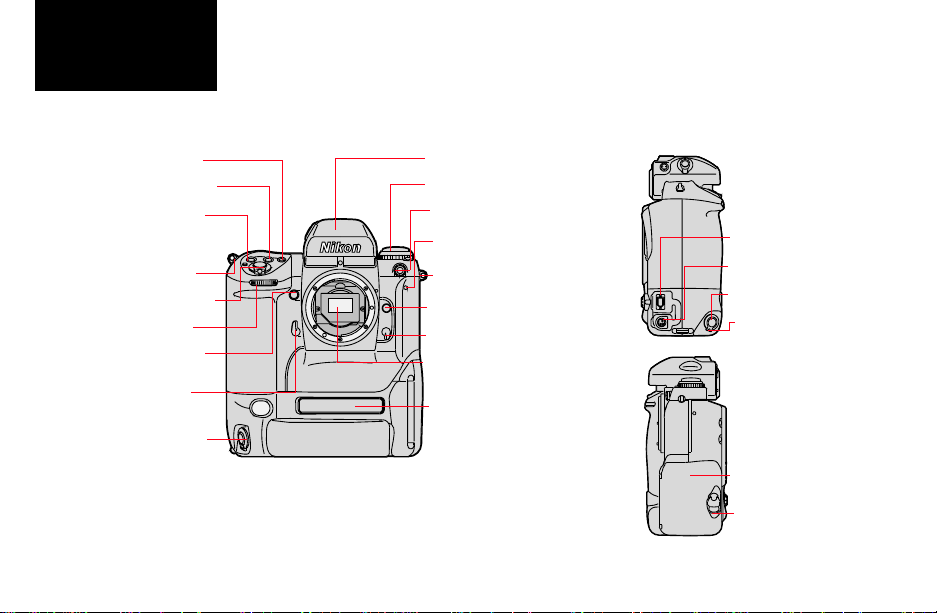
Camera Front
AF Area Mode button
Exposure Mode button
Exposure Compensat ion
button
Camera Strap eyelet
Shutter Release button
Sub-Command dial
Depth-of-field Preview
button
Mirror Lockup lever
Vertical Shutter release
Multi-meter finder
Drive mode/Self-timer
selector
Sync terminal
Self-timer LED
Camera Strap eyelet
Lens Release button
Focus Mode selector
IR filter
Product label
Camera Sides
IEEE 1394 port
IEEE 1394 port
IEEE 1394 port
AC Adapter
AC Adapter
AC Adapter
connection
connection
connection
Vertical Shutter
Vertical Shutter
Vertical Shutter
release
release
release
Vertical Shutter
Vertical Shutter
Vertical Shutter
release lock
release lock
release lock
Battery/PC Card
door
Battery/PC Card
door latch
Page 3
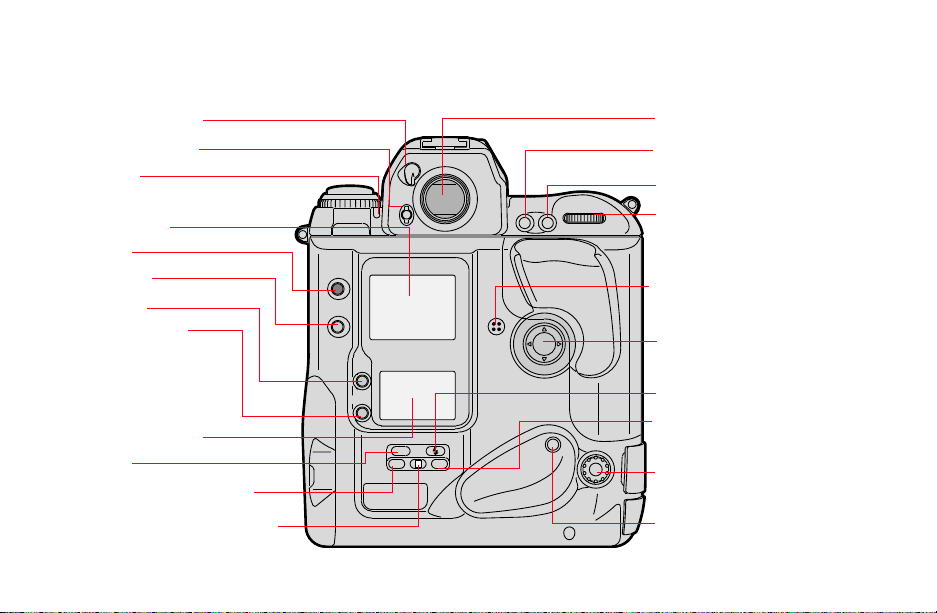
Camera Back
Eyepiece Shutter le ve r
Finder Release button
Alert LED
Image LCD
OK button
Cancel button
Menu button
Tag/Record button
Back Status LCD panel
ISO button
Auto Exposure/Flash Exposure
bracketing button
Shutter Speed/Aperture/Focus Area
Lock button
OK
CANCEL
MENU
TAG/
RECORD
Vie w finder eyepiece
Auto Exposure/Autofocus Lock
button
AF Start button
Main-Command dial
Microphone
Navigate switch
Flash Sync Mode button
Custom Setting Menu button
ISO
L CSMBKT
Remote Release Accessory port
Vertical AF Start button
Page 4
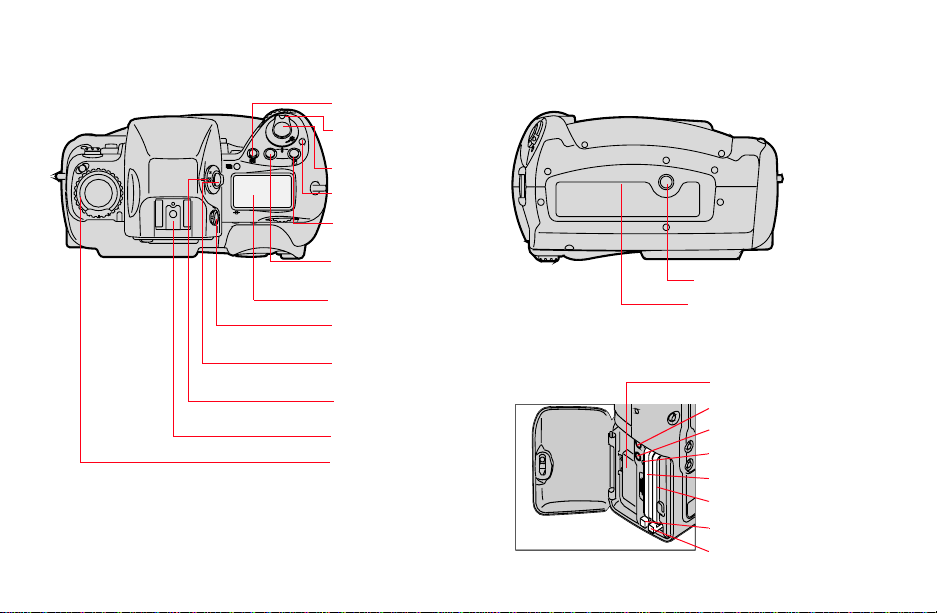
Camera Top
L
C
S
Camera Bottom
AF Area Mode button
O
F
F
MODE
Power/LCD Panel
O
N
Illumination switch
Shutter Release button
Power Switch Lock
release
Exposure
Compensation button
Exposure Mode
(MODE) button
Top Status LCD panel
Diopter Adjustment
knob
Metering System
selector lock r el ease
Metering System
selector
Accessory shoe
Drive Mode/Self
Timer sel ector
Tripod mount
Data plate label
Battery/PC Card door
SERIAL
VIDEO
Battery
Serial port
Video Out port
Card Busy LED
CARD1
CARD2
Eject button (CARD1)
Eject button (CARD2)
Page 5
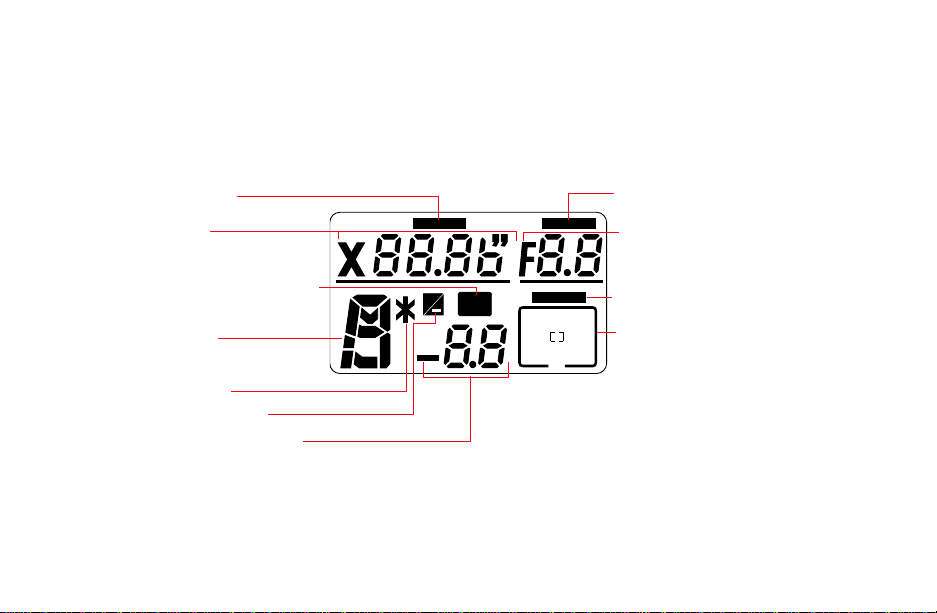
Top Status LCD Panel
Shutter speed lock
Shutter speed
Auto Exposure/Flash Exposure
bracketing
Exposure mode
Flexible program
Exposure compensation
Exposure compensation value
LOCK
+
+
BKT
LOCK
LOCK
Aperture lock
Aperture
Focus area lock
Focus area/AF area mode
Page 6
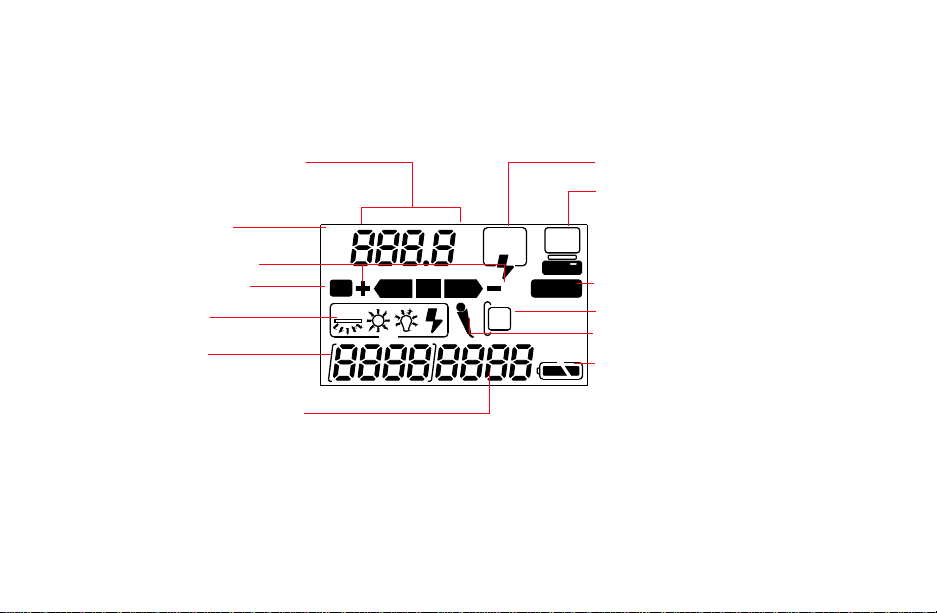
Back Status LCD Panel
ISO/Bracketing information/
Custom Setting
ISO Setting mode
Bracketing bar graphs
Auto Exposure/Flash
Exposure Bracketi ng
White Balance
Frame number
Frames remaining on PC Card
ISO
BKT
AUTO
SLOW
REAR
CUSTOM
Flash sync mode
Personal computer connection
Custom setting
Card present
Microphone
Battery level
Page 7
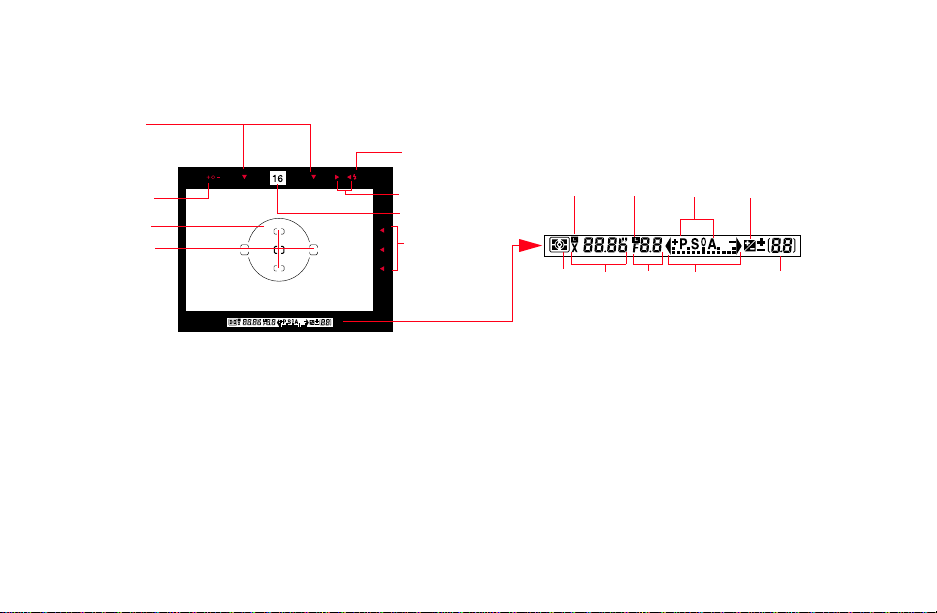
Viewfinder
1
5
2
3
4
1. Focus area indicators
2. Exposure level
3. Reference circle for Ce nte r-weig ht ed m et e ring
4. Focus brackets/Spot metering
5. Ready light
6. Focus indicators
7. Aperture direct readout
8. Focus area indicators
6
7
8
9 10 11 12
13 14 15 16 17
9. Shutter speed lock indicator
10. Aperture lock indicator
11. Exposure mode
12. Exposure compen sation
13. Metering system
14. Shutter speed
15. Aperture
16. Electronic analog exp o sure display
17. Exposure compen sation
Page 8
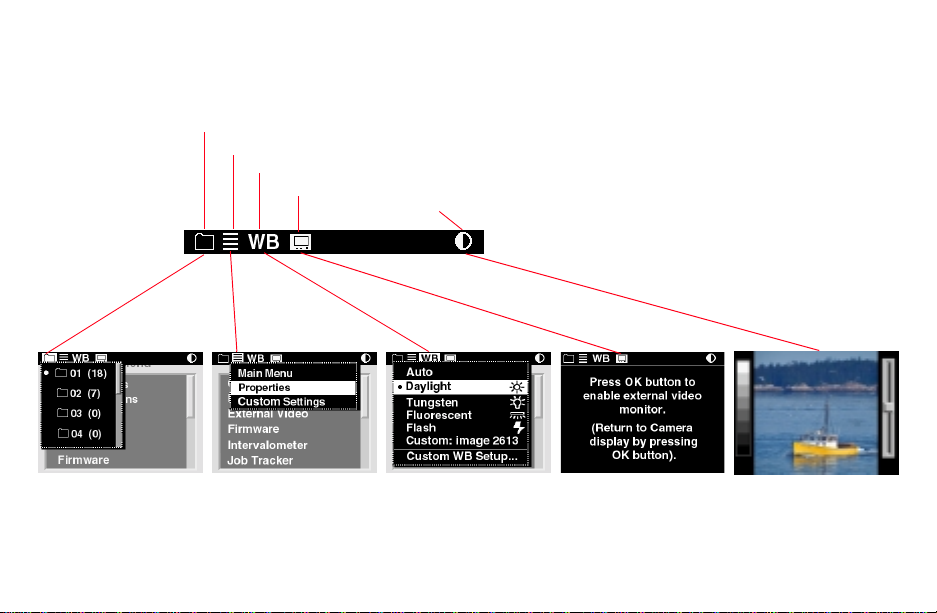
Image LCD/Menu Bar
Folder icon
Menu icon
White Balance icon
Video icon (appears if Video is enabled using Main Menu)
Contrast icon
Page 9

Turning the Image LCD On
Displaying and Navigating the Menu Bar
There are two ways to turn the Image LCD on:
✔ Press the OK button to turn the Image LCD on
in Display mode
✔ Press the Menu button to turn the Image LCD
on with the Menu bar and the last-used menu
displayed.
Turning the Image LCD Off
✔ Press the Cancel button to turn the Image LCD
off.
If you turned the LCD on using the OK button
and the LCD is not in Display mode, press the
Cancel button more than once.
If you turned the LCD on using the Menu
button, pressing the Cancel button once turns
the LCD off without returning to Display mode.
1 Turn the Image LCD on.
2 Press the Menu button to turn the Menu bar on.
3 Press the left or right side of the Four-way
switch to highlight the needed Menu bar icon.
4 Press the Cancel button or Menu button to turn
the Menu bar off.
☛ Alternatively you can press the Menu button
to turn the Image LCD on with the Menu bar
and the last-used menu displayed.
Page 10

Making a Menu Selection
1 Navigate the Menu bar until the Folder or Menu
icon is highlighted.
A dropdown menu lists the available options.
2 Press the top or bottom of the Four-way switch
to highlight an option.
3 Press the OK button to activate the option.
Page 11

Using the Image LCD and Digital Buttons
Turn the Image LCD on: Press the OK button.
Select a highlighted menu option: Press the OK button.
Enable Region of Interest box (Zoom mode): Press the OK button.
Implement a zoom (Zoom mode): Press the OK button.
Delete an image (Delete mode): Press the OK button.
Toggle the Menu bar on/off: Press the Menu button.
Turn the Image LCD off: Press the Cancel button.
Dismiss a menu without implementing change: Press the Cancel button.
Disable Region of Interest box (Zoom mode): Press the Cancel button.
Navigate through images in all Display modes except
Zoom mode when Region of Interest box is on:
Navigate the Menu bar and display menus: Press the left or right side of the Four-way switch.
Navigate a dropdown menu: Press the top or bottom of the Four-way switch.
Change to a different display mode: Press the top or bottom of the Four-way switch.
Move the Region of Interest box (Zoom mode): Press any side of the Four-way switch.
Press the left or right side of the Four-way switch.
Page 12

Charging Batteries
You will need to charge a battery before using it
for the first time, then whenever it is low.
1 Plug the cable
from the
charger’s AC
adapter into
the battery
charger jack.
2 Select the
power cord
with the universal plug that is appropriate for
your area.
3 Insert the appropriate end of the power cord
into the receptacle on the rear of the charger
AC adapter.
INITIAL
SETUP
4 Plug the power cord into a wall outlet.
5 Insert one or two batteries into the slots on the top
of the battery charger. (For one battery, you can
use either slot).
On average, the charger will completely charge a
battery in approximately one hour. If two
batteries are inserted, it will charge them
simultaneously.
6 Remove the battery or
batteries from the
charger when the
lights on the charger
turn green.
Page 13

INITIAL
SETUP
Battery, PC Card and Lens
O
F
F
O
N
MODE
L
C
S
1 Turn the camera off by pressing the
Power Switch Lock release and rotating
the Power switch counter-clockwise.
2 Lift the latch assembly on
the Battery/PC Card door
and turn it counterclockwise
to open the door.
3 Insert the battery
SERIAL
VIDEO
into the battery
slot.
Page 14

4 Insert a PC Card into either (or both)
slots.
5 Turn the latch assembly clockwise and
return it to its flat position to close the
door.
SERIAL
VIDEO
6 Position the lens in the
camera’s bay onet mount so that
the mounting indexes on the
lens and camera body are
aligned. Taking care not to
press the Lens Release button,
twist the lens counterclockwise
until it locks in place.
7 Turn the camera on by
pressing the Power Switch
Lock release and rotating the
Power switch clockwise.
O
F
F
O
N
MODE
L
C
S
Page 15

AC Adapter
1 When working in doors, yo u can
conserve your battery and
power your camera using the
AC adapter provided with your
camera.
2 Plug the AC adapter into
the round connector on the
side of the camera.
3 Select the power cord
with the universal plug
that is appropriate for
your area.
4 Plug the appropriate
end of the power cord
into the AC adapter.
5 Plug the power cord
into a wall outlet.
☛ The AC adapter will
not charge your
battery.
Page 16

Time and Date
1 Highlight the Menu icon and choose Main
Menu from the dropdown menu.
2 Choose Time/Date from the Main menu.
The Date/Time screen appears.
3 Press the left or right side of the Four-way
switch to sequence through the numeric
fields.
4 Press the top or bottom of the Four-way
switch to change the highlighted numeric
value.
5 Press the OK or Cancel button.
GENERAL
SETUP
Page 17

GENERAL
SETUP
White Balance
There are two types of white balance: preset (which provides preset settings) and custom (which is based
on a specific image). Refer to the User’s Guide for information on Custom White Balance.
1 Highlight the White Balance icon.
The White Balance screen appears. A •
symbol appears by the current setting.
ISO
BKT
AUTO
SLOW
REAR
CUSTOM
AUTO
AUTO
AUTO
Auto - Flouresc
Auto - Daylight
Auto - Tungste
Auto - Flash
Flourescent
Daylight
Tungsten
2 Highlight your choice.
The White Balance icon on the Back
Status LCD changes as shown.
Flash
Custom
Page 18

Folders
Images are stored in folders on a PC Card. You
can specify a folder to hold subsequently
captured images.
1 Highlight the Folder icon.
The Folder menu appears. It varies,
depending on whether one or two cards are
inserted.
☛ When two cards are inserted, folders on the
active card appear.
2 Select a card if two are inserted.
3 Select a folder.
Page 19

Camera Properties
You can use the Properties menu to change
the following camera settings:
1 Highlight the Menu icon and choose Main
menu from the dropdown menu.
2 Choose Properties from the Main menu.
✔ Delay before Battery Save mode
activation
✔ Delay before the Image LCD turns off
✔ View total number of camera
actuations
✔ Default folder for image capture
✔ Video format
✔ Video signal
The Properties menu appears.
3 Make your selection and change settings, as
needed.
☛ Use the same technique described for setting
the time and date to change the Battery Save
Onset and Display Off Time.
Page 20

Basic Settings
1 Set the lens to its
minimum aperture
(f/16).
2 Slide the lock lever
towards the aperture
C
S
M
4 Set the Focus Mode
selector to S for
Single Servo AF.
ring so that the white
dot on the tab aligns
with the orange dot.
O
F
F
O
3 Set the Drive mode
selector to S for
N
MODE
Single-frame
shooting.
L
C
S
5 Press and hold the AF
Area Mode button
and rotate the MainCommand dial to
select Single Area AF
mode.
CAPTURING
IMAGES
Page 21

CAPTURING
IMAGES
6 While pressing the
lock release, set the
Metering System
selector for 3D Color
Matrix Metering.
L
C
S
7 Press and hold the
O
F
F
O
N
MODE
Exposure Mode
button and rotate the
Main-Command dial
to select Programmed
Auto exposure mode.
9 Lightly press the
O
F
F
O
N
MODE
Shutter Release
button.
10 Confirm that a green
• appears inside the
viewfinder
(indicating successful
focusing), then fully
depress the Shutter
Release button to
8 Press the Navigate
capture the image.
switch to po si ti on the
focus brackets on the
main subject.
Page 22

Reviewing Images
You can review images on the active PC Card in
one of five Display modes:
✔ Single Image mode - displays 1 ima ge.
✔ Zoom mode - zooms to 1:3 or 1:1.
✔ Histogram mode - displays a histogram and
other information about the image.
✔ Multiple Image mode- displays 4 images.
✔ Delete mode - deletes 1 image a time.
There is an option in the Main menu for
deleting more than 1 image.
Selecting a Display Mode
1 Press the OK button to turn the Image LCD on
or, if a menu is displayed, press the Cancel or
Menu button to return to Display mode.
2 Press the top or bottom of the Four-way switch
to sequence through the Display modes in the
order shown below.
A pop-up appears briefly with the active mode
highlighted.
Single
Zoom
Histogram
Multiple
Delete
CAMERA
IMAGES
Page 23

CAMERA
IMAGES
Navigating Through Images
Press the left or right side of the Four-way
switch to navigate through images in the
selected folder.
☛ This works in all Display modes except
Zoom mode when the Region of Interest
box is enabled.
Enabling/Disabling the Region of Interest Box in Zoom Mode
In Zoom mode you can pan or zoom when the
Region of Interest box is enabled or navigate
to a different image when it is disabled.
Press the OK button to enable, or the Cancel
button to disable the Region of Interest box.
Selecting an Image
As you navigate through images, they are
highlighted one at a time. Release the Fourway switch when the desired image is
highlighted.
Page 24

Tagging Images or Recording Sounds
You can tag images that you do NOT want to
delete or record sounds to be associated with
an image.
Display Contrast
You can adjust the contrast on the Image LCD
(not on the actual images):
The tags remain when you open tagged
images in the DCS Host software (included)
and can be used there when selecting images.
1 Select any Image Review mode.
2 Select an image.
3 Press and release the Tag/Record button
quickly (less than one second) to tag or
un-tag an image, or press and hold the
button to activate the camera’s
microphone and record a sound.
1 Highlight the Contrast icon.
The Contrast screen appears.
2 Press the top or bottom of the Four-way
switch to move the slider bar up to lighten,
or down to darken the displayed image.
Page 25

Deleting Multiple Images
You can delete all images in a folder, all untagged images in a folder, all images on a PC Card, or all
untagged images on the card.
1 Tag any images that you DO NOT want to delete
(if you plan to use a tagged option).
2 Highlight the Menu icon and choose Main Menu
from the dropdown menu.
3 Choose Delete Images from the Main menu.
The Delete Images menu appears.
4 Select the desired option.
5 When prompted, press the OK or
Cancel button.
Page 26

EASTMAN KODAK COMPANY
Kodak Professional Division
Rochester, New York 14650
www.kodak.com/go/professional
© Eastman Kodak Company, 2001.
TM: Kodak and Kodak Professional
P/N 4E3622
 Loading...