


ILCS WinReporter Version 2.3
Instruction Manual
0900947 Rev: D (08/06) |
Page 1 of 28 |

TABLE OF CONTENTS
Getting Started ..................................................................................................... |
3 |
Setting Up The Network ....................................................................................... |
4 |
Network Diagram.................................................................................................. |
5 |
Configuration Settings .......................................................................................... |
6 |
File Commands Screen ........................................................................................ |
7 |
Location Settings .................................................................................................. |
8 |
Logging On......................................................................................................... |
10 |
Programming ...................................................................................................... |
11 |
Working With Files.............................................................................................. |
18 |
Printing Reports.................................................................................................. |
20 |
Spreadsheet Functions....................................................................................... |
22 |
Modem Setup ..................................................................................................... |
24 |
Other Features ................................................................................................... |
26 |
Warranty Information .......................................................................................... |
28 |
Knight Locations ................................................................................................. |
28 |
Page 2 of 28 |
0900947 Rev: D (08/06) |

GETTING STARTED
Thank you for your purchase of Knight Reporter software. This comprehensive and user-friendly program will make your PC a valuable tool for printing reports and programming ILCS dispensing systems. For added versatility, the software can be used on-site or off-site (via modem), and will run on either a standard desktop PC or laptop.
Before attempting to install this program, make sure there is an open USB port or serial com port on your computer to communicate with the KCI-6000 Computer Interface (or RM-6000 Reporter Module if used).
∙The PC must have a default printer driver installed to print, view, or save reports to the PC.
∙You must have at least 20 megabytes of space on your hard drive for a complete installation.
∙Reporter Software is compatible with Windows versions 98, Me, NT4, 2000, and XP.
Installing Reporter Software
(1)Turn on computer and monitor.
(2)Start Windows.
(3)Turn off all other Windows applications and network connections.
(4)Insert Reporter CD into the appropriate drive on your computer.
(5)If the installation utility does not start automatically (after a short time) click on the Windows Start button, then click on Run.
(6)In the “Open” box, type x:setup then click OK (where x represents the drive letter of your CD-ROM).
(7)As Reporter Software is installed, follow the instructions on your screen.
Uninstalling Reporter Software
There is an uninstall utility that is put onto your PC when you run Reporter software. Should it become necessary to uninstall Reporter software, the following steps will remove the program and return your PC to its original state (before Reporter was installed).
(1)Go to Windows Control Panel.
(2)Double-click on Add/Remove Programs.
(3)Select WinReporter from the list, then click the Add/Remove button.
(4)Follow the prompts on your screen to un-install Reporter Software.
0900947 Rev: D (08/06) |
Page 3 of 28 |

SETTING UP THE NETWORK
To run Reporter Software on-line with a dispenser requires the use of a KCI-6000 or RM-6000I interface module (detailed below). A USB cable is provided with the software package and should be applicable for most applications. See page 6 for details. A driver disk is also included to setup your PC for use with the USB connection on the KCI6000 module.
Note: If using the optional hardware key cable, you must connect it to a working serial com port on your computer. The program automatically detects the serial com port on your PC that the cable is connected to. If your system has difficulty locating the hardware cable, contact Knight for assistance.
Connect the PC to the KCI-6000 (or RM-6000I) using the appropriate cable. See wiring diagram to the right for details. Apply power to the KCI-6000 or RM-6000I by connecting the network cable from the dispenser network to the dispenser interface port. By default, the KCI-6000 is the selected computer interface device. If an RM-6000I is used, you must choose it as the computer interface device in the com port configuration screen (details on page 6).
Note: For RM-6000I applications (only) a 12 VDC booster transformer must be installed if the network cable length is 100 feet or greater. See wiring diagram to the right for details. The booster transformer will increase the data signal strength to assure consistent communication with the ILCS dispensing system. The booster is not required for KCI6000 applications.
KCI-6000 Computer Interface
∙By default, the KCI-6000 module is the selected computer interface device in the com port configuration.
∙The KCI-6000 allows for faster printing and data transfers.
∙The KCI-6000 does not allow storage of dispenser files.
∙The KCI-6000 allows WinReporter to communicate with any version of ILCS dispenser (backwards compatible).
∙A standard USB cable can be used to connect directly to the KCI-6000 (models built starting June, 2005).
RM-6000I Module
∙To use an RM-6000I module, you must choose it as the computer interface device in the com port configuration screen (details on page 6).
∙For remote operation offsite, it is not necessary to connect the RM-6000I Reporter Module to your PC unless files are to be downloaded to it. If remote files are to be created, or you wish to edit existing files or print saved files. It is not necessary to connect the hardware cable to your PC.
∙The RM-6000I Reporter Module is a passive interface when installed on site. There is no real need to transfer files to or from the RM module in a permanent installation such as in your customers PC.
∙For users that wish to use the RM-6000I Reporter Module to transfer files and reports from the field to an office PC for report printing and archiving, use Reporter Software to move and delete files in the RM file directory.
∙The RM-6000I can only communicate with older ILCS systems ( version 1.xx).
∙Requires the use of the hardware key cable only (cannot connect directly with a standard USB cable).
Page 4 of 28 |
0900947 Rev: D (08/06) |

Network Diagram
(not to scale)
PC
KCI-6000 or
RM-6000I
Dispenser
0900947 Rev: D (08/06) |
Page 5 of 28 |
CONFIGURATION SETTINGS
When to use this screen
This screen will pop up automatically the first time the program is run after being installed. Setting the com port configuration is required for the computer to communicate properly with the ILCS system.
NOTE: Connection through a USB port is standard. For applications that require use of a 9-pin serial cable, contact Knight for details. A proprietary cable is available for this type of computer port.
Using a USB port
The standard PC connection is for use with a USB port. There are two options for setting up your computer:
∙The latest version of the Knight KCI-6000 has USB interface capability. All you will need to do is install the drivers from the CD provided with the KCI-6000. An instruction sheet is also included with the KCI-6000 to guide you through proper setup.
∙An adapter kit (available from your PC vendor) will allow your USB port to function as a standard com port. Install the kit according to the instructions that come with it. Be sure to find out which com port number the USB port will function as, since this port number will be assigned in the configuration screen below. After you have successfully converted your USB port to a com port, you will then need to plug the hardware key cable into the USB adapter.
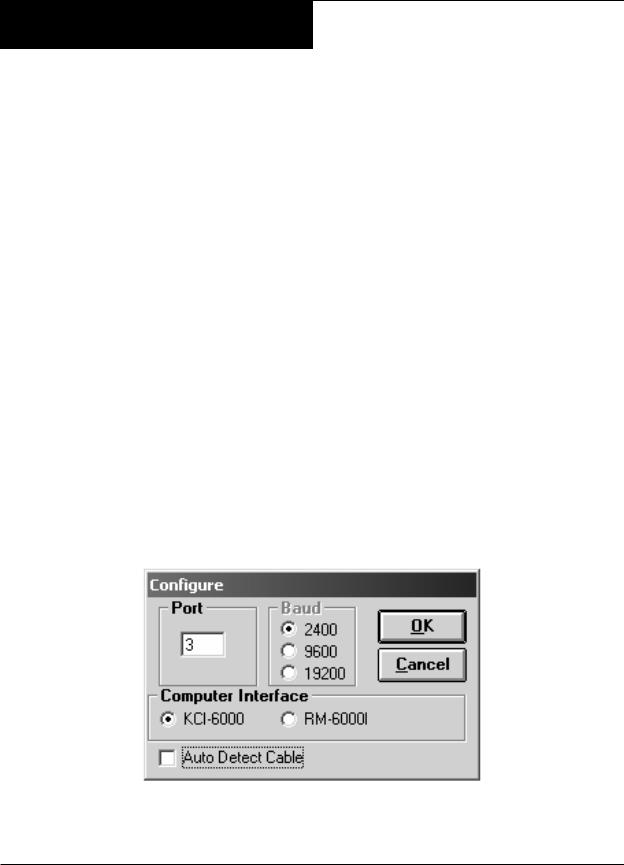
Changing the settings
(1)The setting screen will pop up automatically the first time the program is run. Otherwise, you can click Setup (from the pull-down menus at the top) then Com Port. The display below will appear.
(2)If you are using a USB Port: First de-select the Auto Detect Cable checkbox. Then enter the com port number that corresponds to the USB port’s assigned number (choosing a baud rate is not necessary).
(3)If you are using an RM-6000I: Choose RM-6000 as the Computer Interface device.
(4)When finished setting up the configuration, click the OK button.
Page 6 of 28 |
0900947 Rev: D (08/06) |

FILE COMMANDS SCREEN
The File Commands screen is where all of the programming is done. The display also shows the ID number, descriptive name, and external memory status of the ILCS system when logged on.
Location Settings Button – Takes you to the Customer Locations screen (detailed on page 8).
Logon Button – Takes you to the logon screen (detailed on page 10).
Receive Dispenser File Button – Downloads information from system you’re logged onto (detailed on page 11).
Send Dispenser File Button – Uploads the selected HEX file to system you’re logged onto (detailed on page 11).
Logoff/Reset Button – Disconnects you from the dispenser network. Also makes the RM File Directory button available if not connected to a dispenser network (when using an RM-6000I).
Reports Button – Takes you to the report screen (detailed on page 20).
New Setup Button – Used for creating a new HEX file (detailed on page 11).
Save Setup Button – Used as a “quick save” feature when working with HEX files (detailed on page 11).
RM File Directory Button – Takes you to the file directory screen for the RM-6000I module (detailed on page 19).
Convert File Button — This button will only appear if you click on a Hex file from an Edge ver 1.0 system. It is used to convert the file to the Edge ver 1.1 format. See details on page 17 for re-entering user codes.
Print Icon – Allows you to print a HEX file. Choose the file from the Setup File window, then click the icon.
Module Icon – Shows which PC interface device you are using (KCI or RM). This icon will flash green when there is communication activity taking place.
0900947 Rev: D (08/06) |
Page 7 of 28 |

LOCATION SETTINGS
The location settings contain the ID number of each ILCS system in the network (if more than one) as well as allowing you to enter descriptive names for each system. Each location setting that is created will have its own “subfolder” on the PC for storing setup and report files.
Multiple customer locations can be setup and saved. For laptop users that will run Reporter Software at various locations, saved settings can be selected from the Location Settings box when going from one account to another. Changing locations will change the number of ILCS systems listed in the Report Parameters (print functions). This is important anytime you print reports from the entire network or individually.
Creating a new location
(1)Click on Location Settings and you will see the screen to the upper right.
(2)Click New, then type the name you wish to give the account and click OK. You will then see the screen to the lower right.
(3)Type in the system ID# in the first column, then add a descriptive name for the system. Note: the default ID# for an ILCS system is 1, so this setting will typically not need to be changed.
(4)When finished entering data for all systems at the location, click Save to store the information.
Changing locations
(1)Click on Location Settings and you will see the screen to the upper right.
(2)Click on the desired choice from the Available Customer Locations, then click OK. You will then see the screen to the lower right.
(3)Click on Close if all information is correct . If you wish to modify the location setup, make any necessary changes, then click Save to store the information.
Deleting a location
(1)Click on Location Settings and you will see the screen to the upper right.
(2)Click on the desired choice from the Available Customer Locations, then click delete.
(3)The chosen customer location will be deleted.
Copying and deleting files
You can copy setup (HEX) files from one location to another using the Customer Locations display. This is a helpful feature when you have accounts with similar ILCS systems, and wish to use a particular file from one account as a “template” to quickly setup a HEX file for another. You can also delete files that are not needed to free up space on your PC.
(1)Click on Location Settings and you will see the screen to the upper right.
(2)Click on the desired choice from the Available Customer Locations and the HEX files for that account will appear in the small window on the lower left of the display.
(3)Click another choice from the Available Customer Locations and the HEX files for that account will appear in the small window on the lower right of the display.
(4)Click on the desired file, then click either Copy or Delete. If you are copying a file, notice that arrows on the copy buttons show which “direction” the file will be copied. If you wish to start over, click the Clear List button.
Page 8 of 28 |
0900947 Rev: D (08/06) |

0900947 Rev: D (08/06) |
Page 9 of 28 |
 Loading...