


DS-200D

Digi Set Series
Instruction Manual
(Multi-Language)
0900869 Rev: C (02/04) Page 1 of 52

TABLE OF CONTENTS
English
Specifications .......................................................................................................3
Installation ............................................................................................................4
Operation ..............................................................................................................6
Programming ........................................................................................................7
Titration Graph .................................................................................................... 48
Wiring Diagram ................................................................................................... 50
Espanol
Especificaciones .................................................................................................12
Instalación ..........................................................................................................13
Base de Funcionamiento .................................................................................... 15
Programación .....................................................................................................16
Gráfico de concentración .................................................................................... 48
Gráfico del cableado ...........................................................................................50
Francais
Spécificités .........................................................................................................21
Installation ..........................................................................................................22
Fonctionnement ..................................................................................................24
Programmation ...................................................................................................25
Graphique d’analyse volumétrique .....................................................................48
Diagramme du câblage ......................................................................................50
Deutsch
Spezifikationen ...................................................................................................30
Hinweise .............................................................................................................31
Funktionsweise ...................................................................................................33
Programmierung .................................................................................................34
Titration Graphik ................................................................................................. 48
Schaltschema .....................................................................................................50
Nederlands
Specificaties .......................................................................................................39
Instructies ...........................................................................................................40
Werking ..............................................................................................................42
Programmering ...................................................................................................43
Titratie grafiek ..................................................................................................... 48
Bedradings schema ............................................................................................ 50
Page 2 of 52 0900869 Rev: C (02/04)
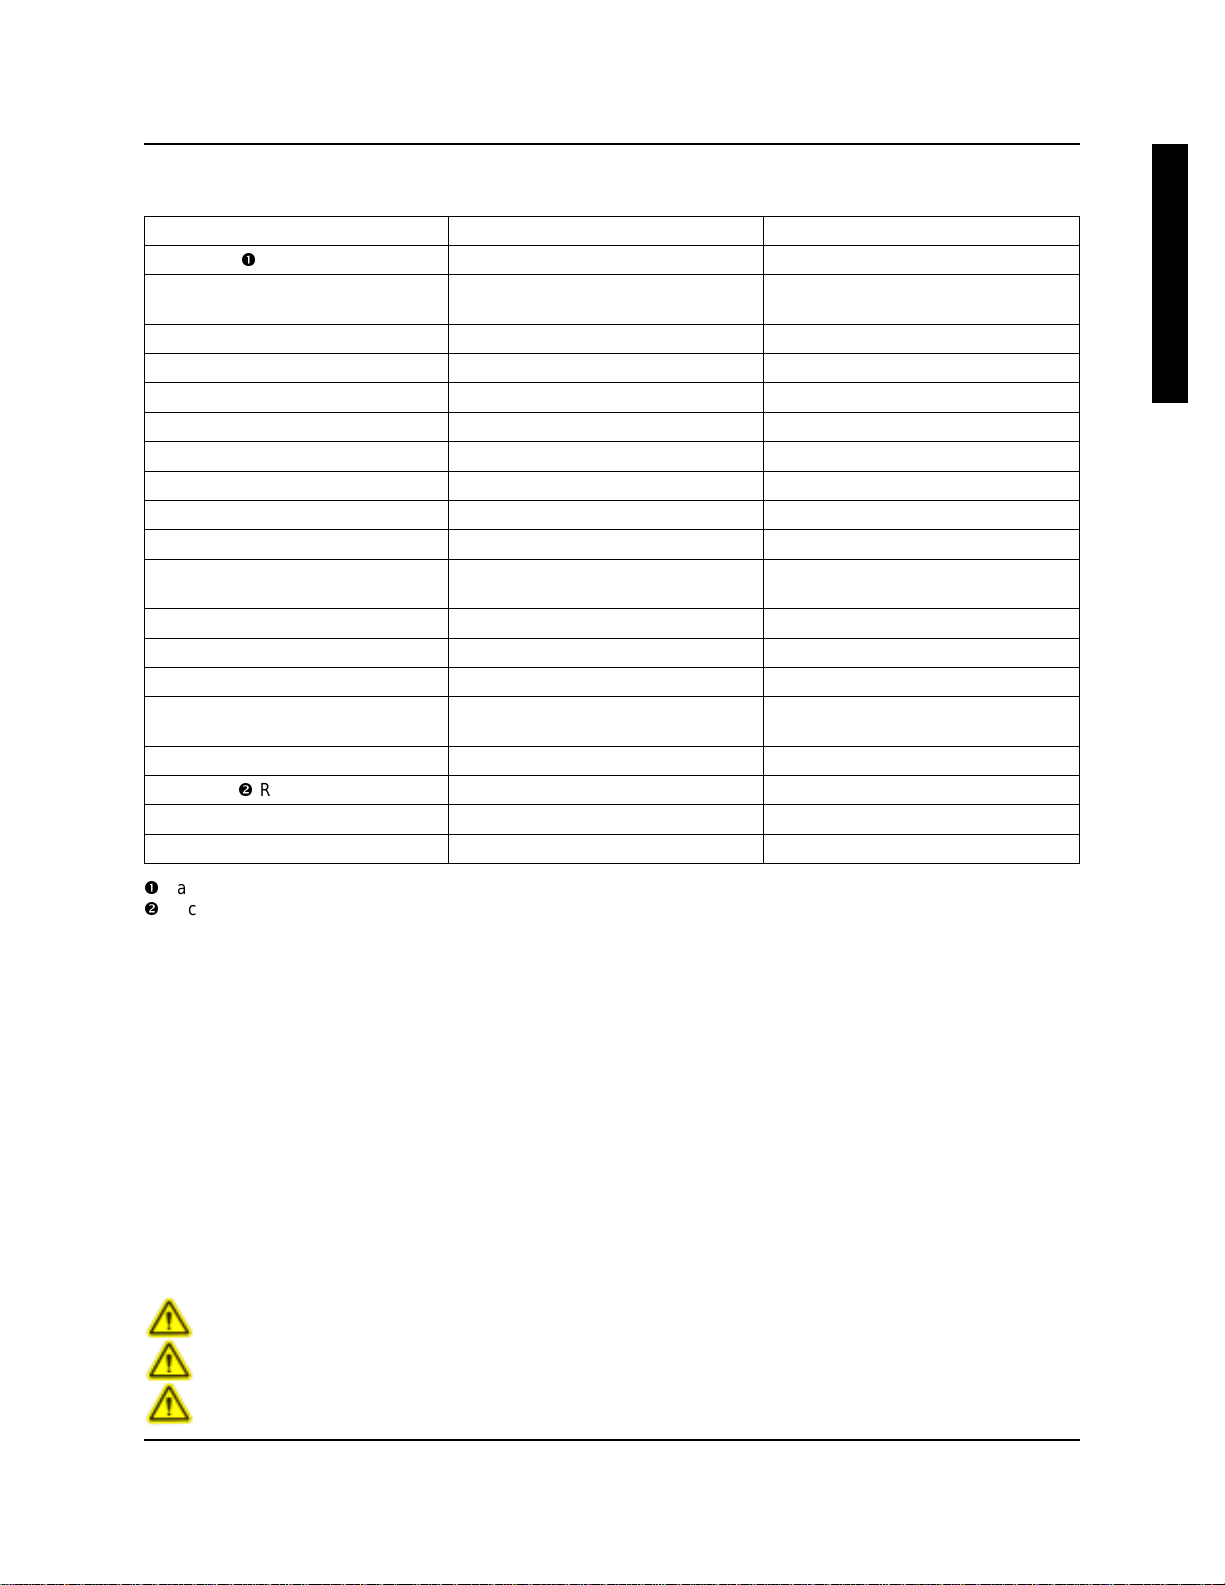
SPECIFICATIONS
Parameters Default Value Range
Pass Code 0000 0-9, A-Z
Language ——
Rinse Pump Speed 50% 0%-100% (of full speed)
Rinse Limit 60 0 – 60 sec
Rinse Delay 0 sec 0 – 60 sec
Machine Type DOOR DOOR/CONVEYOR
Rack Time 10 sec 10-255 sec
Detergent Mode Probe Probe/Probeless
Detergent Type Liquid Liquid or Dry
Detergent Speed 100% 100% (always runs at full speed)
Detergent Concentration 25%
Alarm Delay 180 sec 1-512 sec
Sani Pump Runs With Rinse Rinse/Detergent
Sani Pump Speed 50% 0%-100% (of full speed)
Initial Detergent Charge 1 sec
Detergent Recharge Time 1 sec 0-255 sec
Rack Count 0 0 – 65536
Recharge after n Racks 1 1-99
Det Feed Limit Off On/Off
English, Spanish, French, German,
0%-100% (of Knight units, 100% = 12
1-64 sec (Door Mode)
1-128 sec (Conveyor Mode)
Dutch
msiemens)
E
N
G
L
I
S
H
Pass code does not change when clearing all programmed settings
Rack count has its own menu to allow resetting back to zero
DISCLAIMER
Knight LLC does not accept responsibility for the mishandling, misuse, or non-performance of the described items
when used for purposes other than those specified in the instructions. For hazardous materials information consult
label, MSDS, or Knight LLC. Knight products are not for use in potentially explosive environments. Any use of our
equipment in such an environment is at the risk of the user, Knight does not accept any liability in such
circumstances.
WARRANTY
All Knight controls and pump systems are warranted against defects in material and workmanship for a period of
ONE year. All electronic control boards have a TWO year warranty. Warranty applies only to the replacement or
repair of such parts when returned to factory with a Knight Return Authorization (KRA) number, freight prepaid, and
found to be defective upon factory authorized inspection. Bearings and pump seals or rubber and synthetic rubber
parts such as “O” rings, diaphragms, squeeze tubing, and gaskets are considered expendable and are not covered
under warranty. Warranty does not cover liability resulting from performance of this equipment nor the labor to
replace this equipment. Product abuse or misuse voids warranty.
CAUTION: Wear protective clothing and eyewear when dispensing chemicals or other materials.
Observe safety handling instructions (MSDS) of chemical manufacturers.
CAUTION: To avoid severe or fatal shock, always disconnect main power when servicing the unit.
CAUTION: When installing any equipment, ensure that all national and local safety, electrical, and
plumbing codes are met.
0900869 Rev: C (02/04) Page 3 of 52

E
N
G
L
I
S
H
INSTALLATION — GENERAL
Check all applicable plumbing and electrical codes
before installation. This will help to ensure that the
system is installed in safe and suitable manner. A wiring
schematic of the dishwasher should be used as
reference for making electrical connections. This is
typically provided by the dishwasher manufacturer if one
cannot be located on the machine itself.
Mount the unit on a nearby wall (using suitable
hardware) or on top of the dishwasher if desired. Try to
keep the unit within three feet from the final rinse line to
avoid long tubing runs. Do not
direct path of steam. This can short circuit and
permanently damage the unit. Mounting the unit on the
side, on the back, or on the vents of the dishwasher
may cause thermal overload and damage or hinder the
performance of the unit.
Rinse & Sanitizer Plumbing
The following installation steps apply for rinse and
sanitizer pumps alike.
(1) Install the provided 1/4" tube x 1/8" NPT injection
fitting into the side or bottom of the dishwasher
rinse line between the rinse solenoid valves and the
rinse jets. If necessary, drill a 11/32" hole and tap to
1/8" NPT. Use of a saddle clamp may be desired on
copper rinse line for better support.
(2) Cut a suitable length of 1/4" OD poly tubing and
connect between the discharge (right) side of the
pump’s squeeze tube and the injection fitting.
(3) Cut a suitable length of 1/4" OD poly tubing and
connect between the suction (left) side of the
pump’s squeeze tube and the pickup tube provided.
Be sure to draw tubing through the end of the
pickup tube.
(4) Hand-tighten the compression nuts on both the
injection fitting and pickup tube. Plastic ties can be
used to cinch around the connections where the
poly tubing is inserted into the pump’s squeeze
tube.
mount the unit in the
Liquid Detergent Plumbing
(1) Install the provided bulkhead fitting through a wall
of the wash tank (above water level). If an existing
mounting hole cannot be located, use of a 7/8" hole
saw or punch may be desired.
(2) Cut a suitable length of 1/4" OD poly tubing and
connect between the discharge (right) side of the
detergent pump’s squeeze tube and the bulkhead
fitting.
(3) Cut a suitable length of 1/4" OD poly tubing and
connect between the suction (left) side of the
detergent pump’s squeeze tube and the pickup
tube provided. Be sure to draw tubing through the
end of the pickup tube.
(4) Hand-tighten the compression nuts on both the
bulkhead fitting and pickup tube. Plastic ties can be
used to cinch around the connections where the
poly tubing is inserted into the pump’s squeeze
tube.
Dry Detergent Plumbing
(1) A powder or solid type feeder (not provided) should
be used for dispensing dry detergent products.
Follow the instructions included with the detergent
feeder for installation, and recommended water
temperature/pressure.
(2) Cut a suitable length of 1/4" OD copper tubing (not
provided) and connect between the input side of the
water solenoid and the water source. Maximum
recommended water temperature is 140°F (60°C).
(3) Cut a suitable length of 1/4" OD copper tubing (not
provided) and connect between the output of water
solenoid to a powder or solid detergent feeder.
(4) Carefully tighten the compression nuts on the water
solenoid — over tightening may cause solenoid to
leak. Tighten connections to the water source and
detergent feeder as needed
Page 4 of 52 0900869 Rev: C (02/04)

INSTALLATION — ELECTRICAL
There is a convenient wiring barrier provided inside the
unit (at the upper part of the case) for quick and easy
electrical connections. Wiring diagrams are also
provided on pages 50 & 51 for additional reference.
Digi Set systems are available with either one or two
transformers. Please read the following installation
steps carefully, noting special instructions that pertain to
the number of transformers in your Digi Set.
Main Power Connection
The main power connection only applies to single
transformer systems (typical). Disregard this section for
dual transformer systems.
You will need to connect the high voltage side of the
xfmr to a 115, 208, or 230 VAC power source that is
“on” when the dishmachine is “on” (i.e. mains switch on
dishmachine). The transformer provides power to both
the detergent and rinse circuits. The Digi Set will only
operate detergent or rinse when electrically signaled.
(1) Check the voltage of the main power source and
make sure that it matches one of the three available
input voltages (115/208/230 VAC).
(2) Remove all power from the dishwasher.
(3) Connect leads from the main power source to the
appropriate terminals on the wiring barrier.
Probe Installation (if required)
(1) Install the probe in the wash tank below the water
level. It should be away from incoming water
supplies, near the recirculating pump intake, and 3
to 4 inches from corners, heating elements, or the
bottom of the tank. If an existing mounting hole
cannot be located, use of a 7/8" hole saw or punch
may be desired.
(2) For best results, use 18 AWG multi-stranded
copper wire for the probe connection. Avoid running
the wire near high voltage AC lines.
(3) Connect the two leads from the probe to the probe
terminals on the wiring barrier.
If a temperature compensating probe will be used, be
sure to connect the wires from the temperature sensing
element on the probe to the temp probe terminals on the
circuit board.
Detergent Power Signal
A detergent power signal is required to activate the
detergent probe sensing or probeless initial charge. A
detergent signal is not required when using probeless/
door mode, as the duration of the rinse signal will be
used to trigger initial charge.
(1) Check the dishwasher for a power source that is
active during the washcycle only (example: the
magnetic contactor that controls the washpump
motor) and verify voltage.
(2) Remove all power from the dishwasher.
(3) For single xfmr:
signal source to the detergent signal terminals on
the wiring barrier. The Digi Set system will accept a
detergent signal of 14 - 240 VAC.
For dual xfmr:
power source to the appropriate detergent
transformer terminals on the wiring barrier.
Detergent power must be 115, 208, or 230 VAC.
Rinse Power Signal
In addition to running the rinse pump, the rinse power
signal triggers the detergent recharge injection if
probeless mode is selected. The rinse signal will also
trigger the detergent initial charge if using probeless/
door mode.
(1) Check the dishwasher for a power source that is
(2) Remove all power from the dishwasher.
(3) For single xfmr: Connect leads from the rinse signal
active during the rinse cycle only (example: rinse
solenoid or rinse cycle light) and verify voltage.
source to the rinse signal terminals on the wiring
barrier. The Digi Set system will accept a rinse
power signal of 14 - 240 VAC.
For dual xfmr:
source to the appropriate rinse transformer
terminals on the wiring barrier. Rinse power must
be 115, 208, or 230 VAC.
Connect leads from the detergent
Connect leads from the detergent
Connect leads from the rinse power
E
N
G
L
I
S
H
0900869 Rev: C (02/04) Page 5 of 52

E
N
G
L
I
S
H
OPERATION
Detergent — Probe Mode
With the detergent signal “on”, the conductivity probe
senses detergent concentration. When concentration
drops below the setpoint, the control automatically turns
on detergent feed. As the detergent feeds, the control
senses the rate at which the detergent concentration is
approaching the setpoint. The control then begins to
pulse feeds to prevent over-use of chemical. The pulse
feed rate will depend on how fast the setpoint is being
approached.
The detergent alarm will sound if the setpoint is not
reached within the alarm delay time period. A “feed limit”
feature allows you to set the unit to automatically shut
off the detergent feed when the alarm has been
activated.
If a temperature compensating probe is used, the
control will automatically make adjustments for the
change in conductivity that is caused by temperature
variation.
Detergent — Probeless Mode
ADDITIONAL FEATURES
De-lime Mode
During normal operation, hold the SCROLL and DOWN
buttons simultaneously until “De-Lime Mode“ appears
on the display. All chemical feed of the Digi Set will be
halted while in the de-lime mode. Press the SCROLL
and DOWN buttons again, or cycle main power to the
unit, to exit the de-lime mode. Otherwise, the unit will
automatically exit de-lime mode after 10 minutes.
Low Product Alarm
Digi Set has a low product detection feature that will
activate the alarm when there is a low supply condition
with any of the products. When the alarm is activated,
the pump for that product will be shut off until the
product supply is restored. You can choose to “override” the alarm if necessary, and allow the pump to
continue, despite the low product condition.
The detergent low product alarm input is only selectable
when using probeless mode. This is because probe
mode already has a low product alarm feature. The
rinse and sanitizer alarms are available in all modes.
Controls detergent concentration without a probe, based
on timed detergent feed modes. Initial charge time feeds
detergent to bring the dishmachine to working
concentration when initially filled with water. The initial
charge can be activated by a detergent signal, or by the
rinse signal (of 30 seconds duration, or longer) when
using door mode. The initial charge counter will
increment for each activation.
Recharge time feeds detergent to maintain detergent
concentration as rinse water dilutes the dishmachine.
The recharge is triggered after a specified number of
racks passes through the machine.
Rinse Pump
The rinse pump will operate whenever the rinse signal is
energized. The rinse delay feature will postpone the
activation of the rinse pump until the delay time has
expired. The rinse limit shuts down the rinse pump after
the signal has been present for a selected time. Rinse
delay and rinse limit are functional with door machines
only.
Sanitizer Pump
A menu selection sets the sanitizer pump to operate
with detergent feed, or with rinse feed. The sanitizer
pump will run simultaneously with detergent or rinse,
whether using probe or probeless mode, rinse delay or
rinse limit.
The Digi Set circuit board has input terminals for the
connection of various types of switches that detect the
product level (I.e. vacuum switch, float switch,
conductivity sensor). When the product supply is low,
the switch opens and activates the alarm. When the
product supply is restored, the switch will make contact
and shut off the alarm.
BUTTON FUNCTIONS
• ENTER: Holding the enter button for 3 seconds
(approx.) switches between run and program modes.
Enter also advances through programming menus.
• SCROLL: The scroll button moves the position of the
cursor in menus where text or number changes are
done. The scroll button will “wrap around” at the end
of a line of characters, meaning that the cursor will
advance to the beginning of the line automatically.
The scroll button toggles between choices in menus
that have selectable settings. The scroll button also
shows the rack count and initial charge count during
normal operation.
• UP (
• DOWN (
): Increases numeric values or advances
upward through available characters. Hold the button
down to rapidly advance. The UP button also acts as
rinse prime during normal operation.
): Decreases numeric values or advances
downward through available characters. Hold the
button down to rapidly advance. The DOWN button
also acts as sanitizer prime during normal operation.
Page 6 of 52 0900869 Rev: C (02/04)
PROGRAMMING
You may find it helpful to read through the programming instructions before getting started. This will better familiarize
you with the operation of the Digi Set, and will make the actual programming go much quicker. Be aware of the
following notes.
• If you wish to return to normal operating mode at any point during programming, hold down the ENTER button for 3
seconds to exit the programming mode.
• While programming, if no buttons are pressed for approximately 2 minutes, Digi Set will automatically return to
normal operating mode.
• Programming changes can be made while Digi Set is operating — changes will take effect immediately. This allows
you to make minor adjustments “on-the-fly” and fine tune the performance of your system.
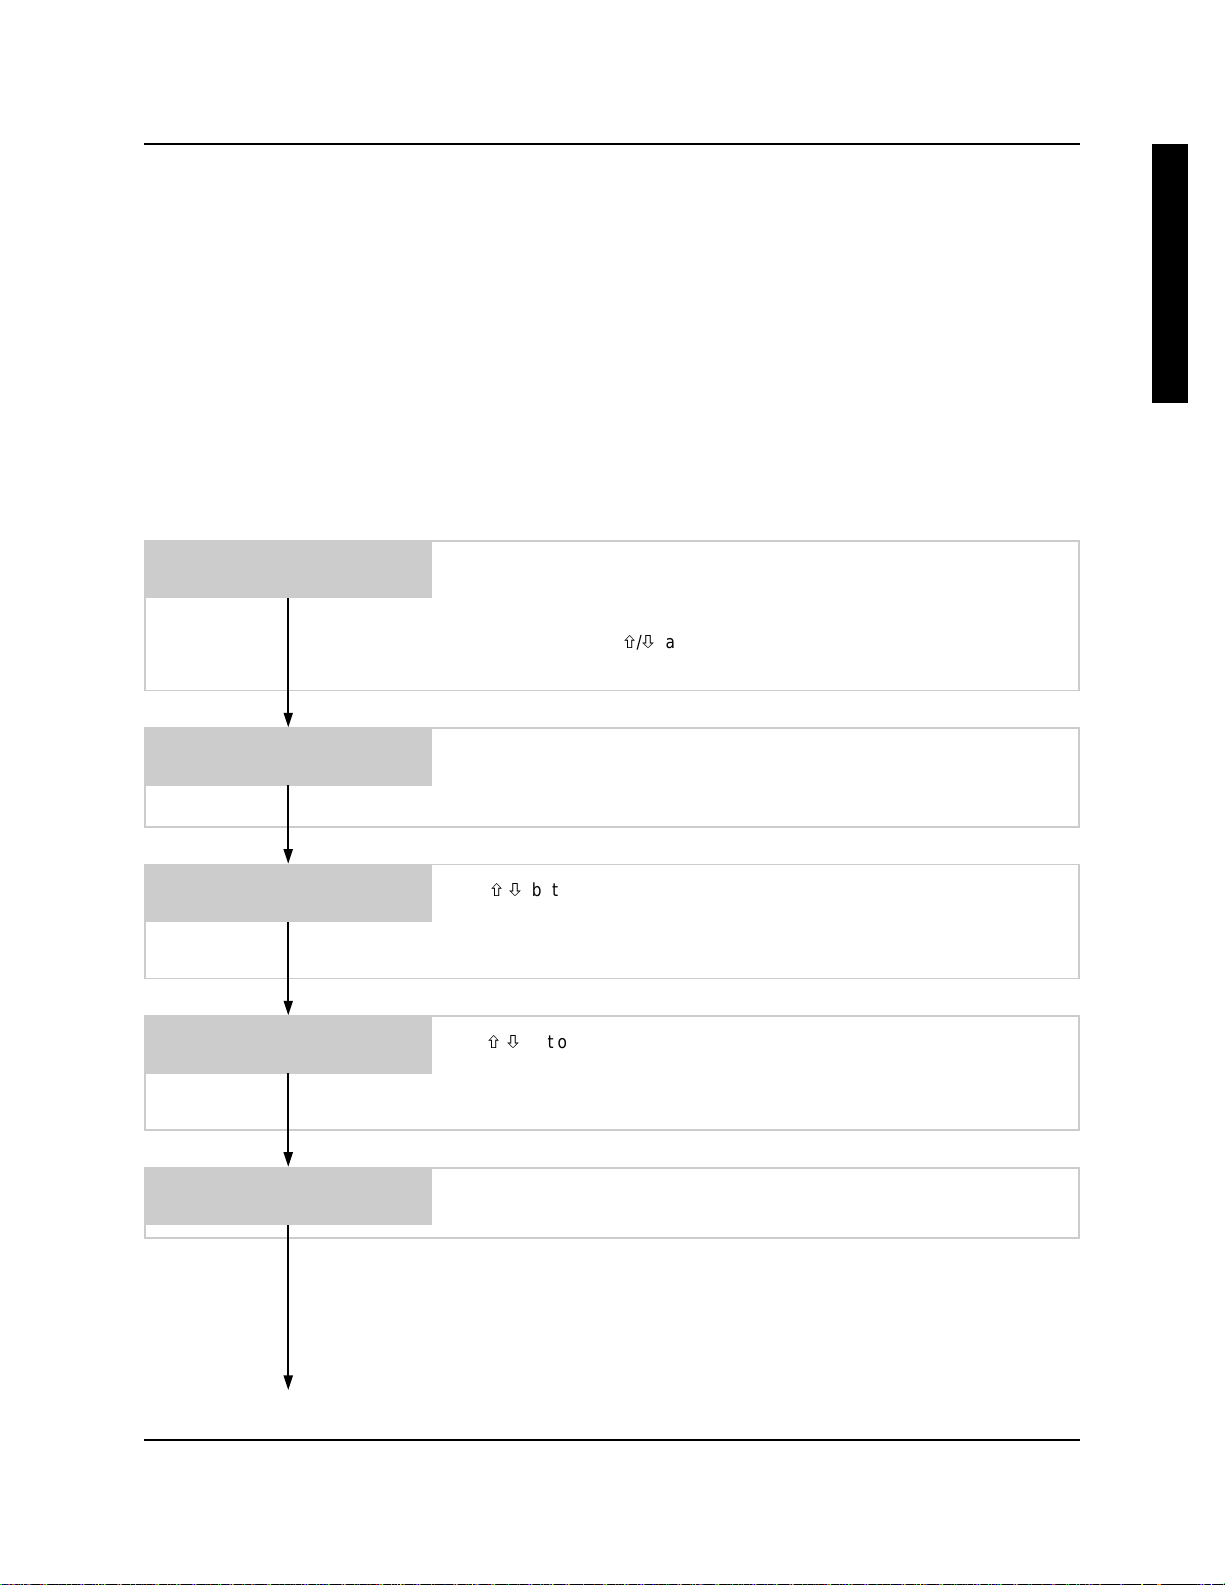
When you’re ready to get started, hold down the ENTER button for about 3 seconds to go into the programming
mode. Release the button when you see the following display...
E
N
G
L
I
S
H
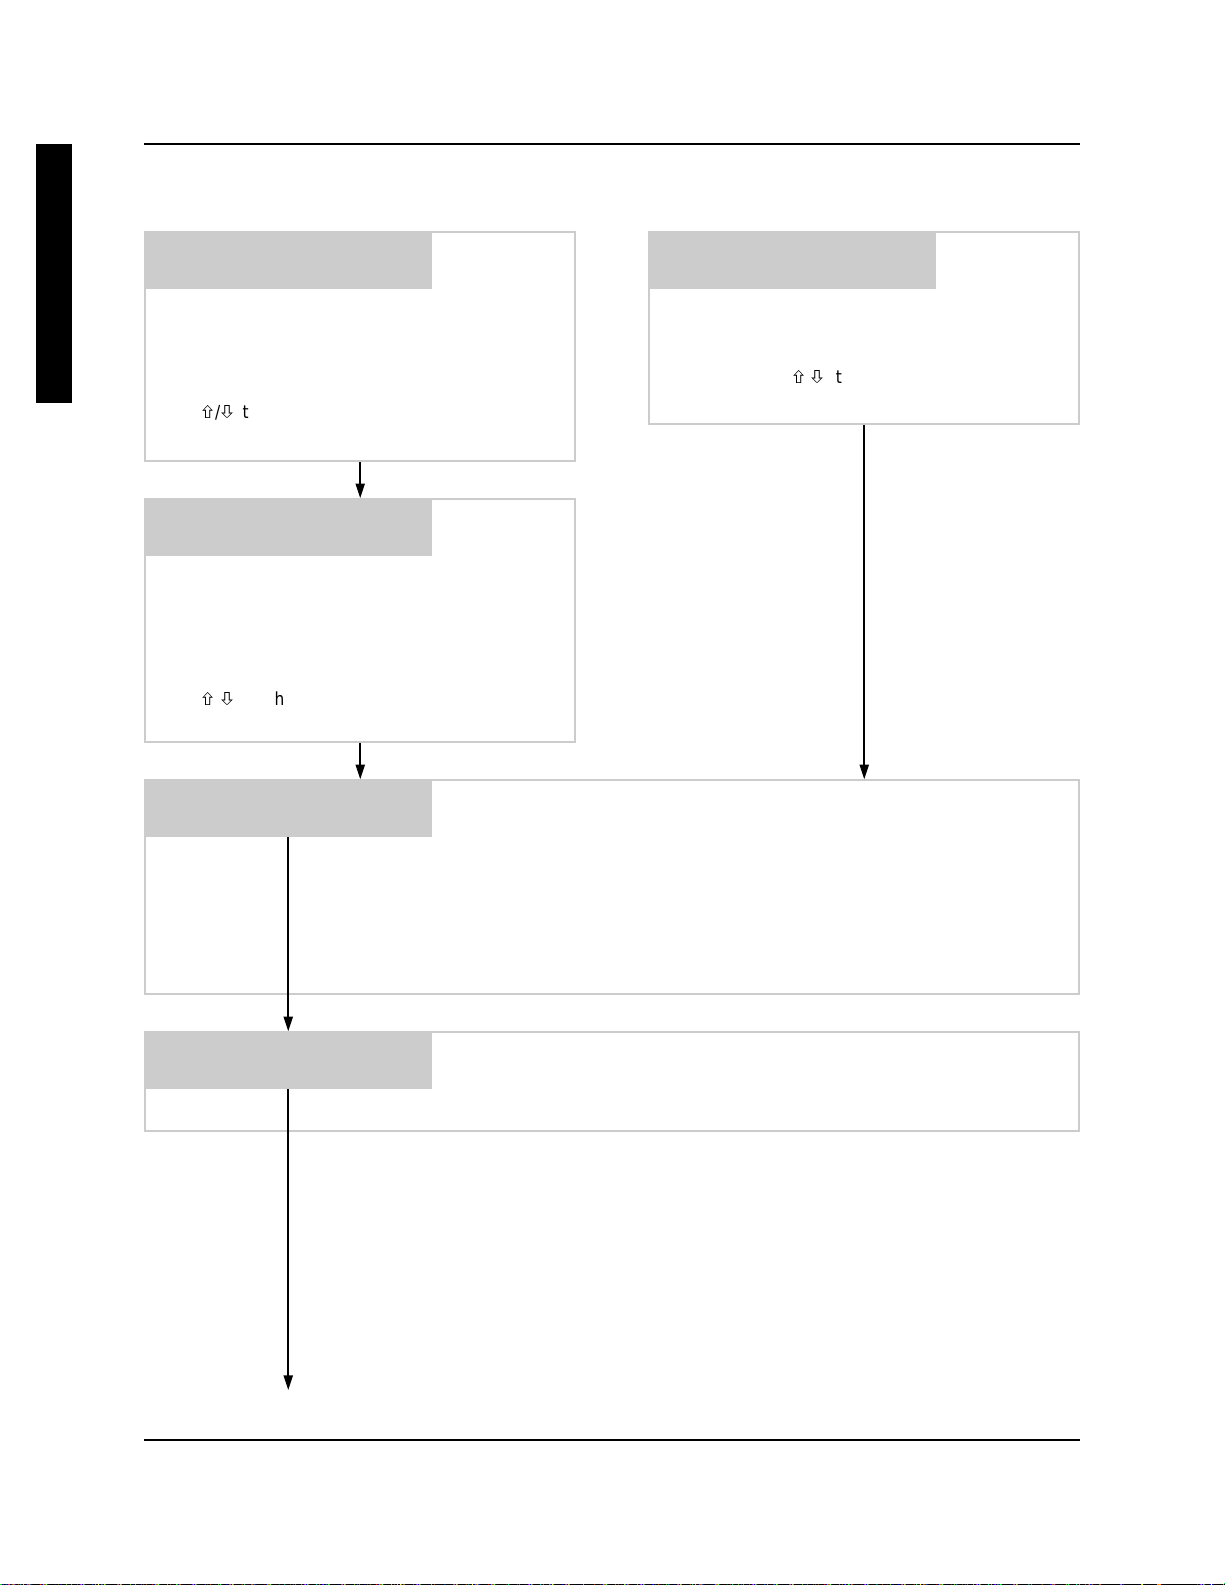
ENTER PASS CODE:
0000 PRESS ENTER
SELECT LANGUAGE:
ENGLISH
RINSE SPEED:
50%
SANITIZ SPEED:
50%
All new systems are shipped from the factory with the pass code set at 0000.
If the system is new, press ENTER to continue.
If the pass code has been changed from the default of 0000 (explained later
in this manual) use / and SCROLL to type in your code, then press
ENTER to continue.
If you wish to change the menu language, press SCROLL to advance
through the available choices until your desired language name is shown on
the display. Press ENTER to continue.
Use / buttons to change the speed of the rinse pump. The pump will
begin running when either button is pressed. When the desired setting has
been reached, press ENTER — the pump will stop running, and you will
advance to the next menu.
Use / buttons to change the speed of the sanitizer pump. The pump will
begin running when either button is pressed. When the desired setting has
been reached, press ENTER — the pump will stop running, and you will
advance to the next menu.
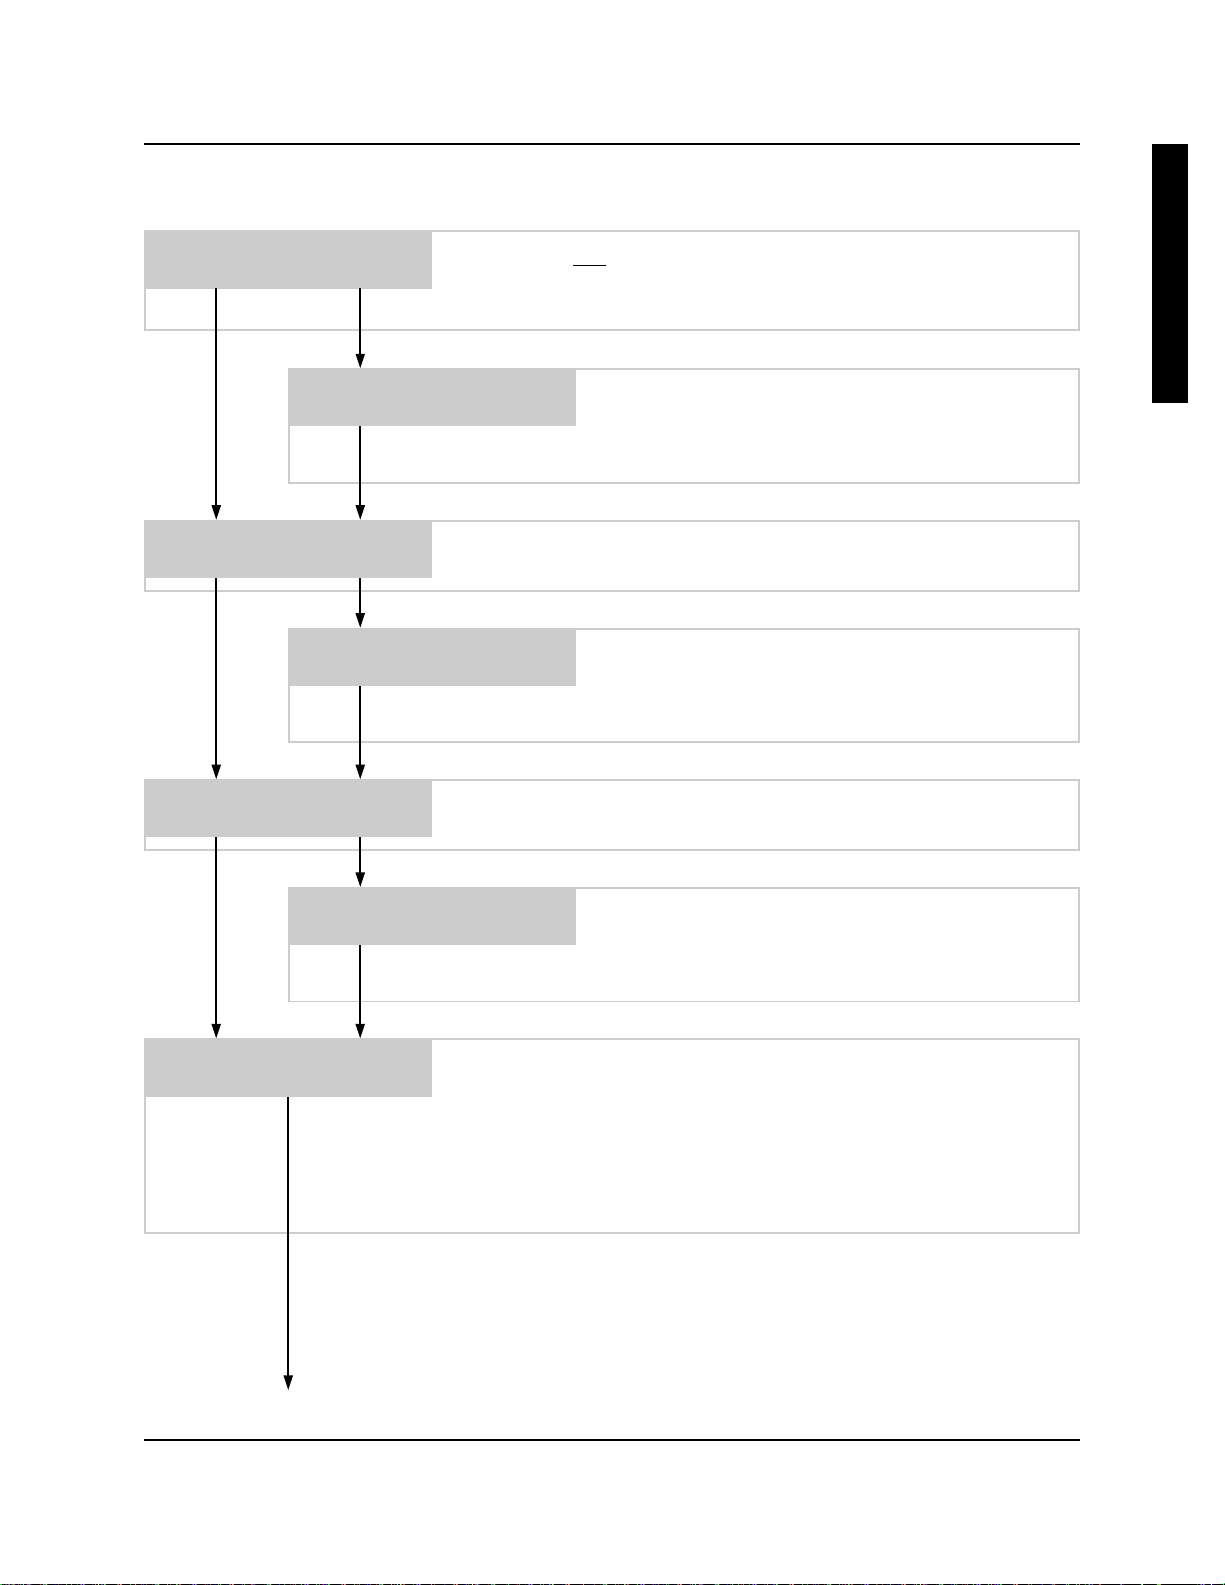
DETERGENT MODE:
PROBE_
Continue on next page
0900869 Rev: C (02/04) Page 7 of 52
Use the SCROLL button to choose probe or probeless detergent feed mode,
then press ENTER to continue.
E
N
G
L
I
S
H
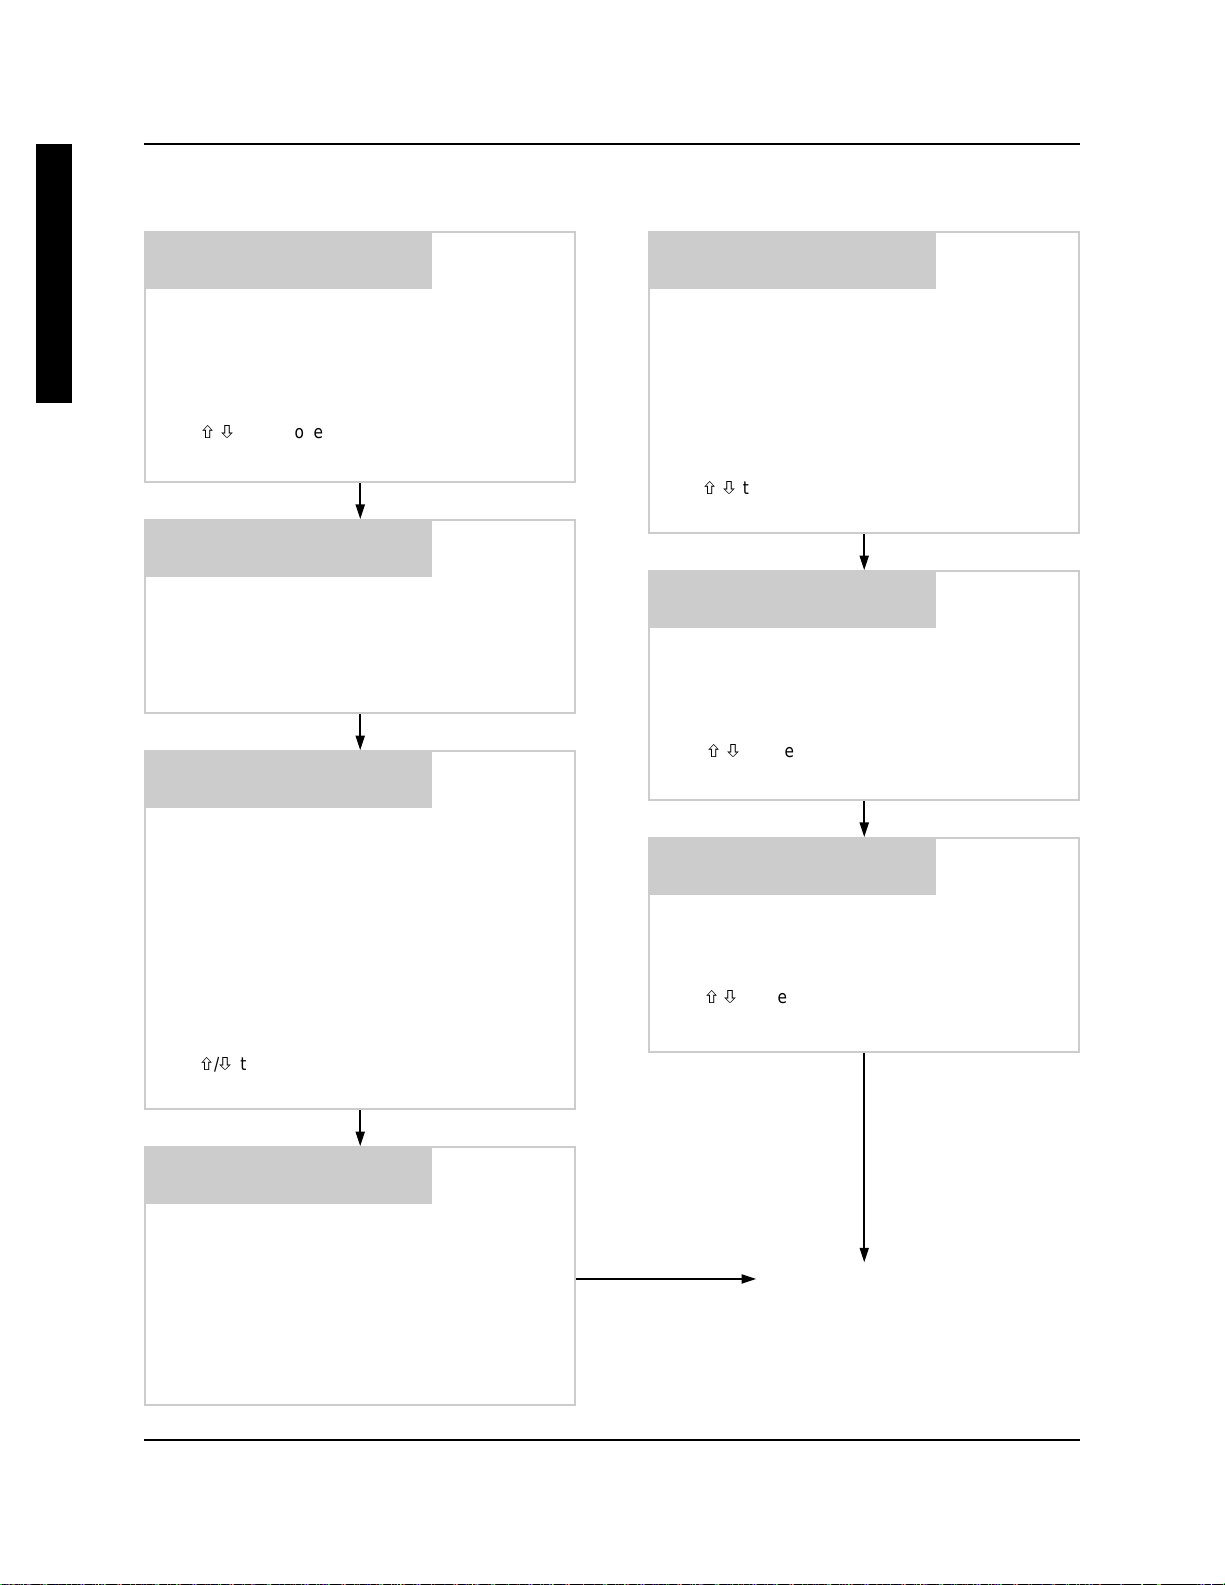
• If you chose to use PROBE mode, you will see the
following menu...
DETER CONCEN:
25 KNIGHT UNITS
Detergent concentration is set in Knight Units. A
chart is provided on page 48 to show the
relationship between Knight Units and drops of
titration. Use the chart to determine the number of
Knight Units needed for your desired titration.
• If you chose to use PROBELESS mode, you will
see the following menu...
INIT DET CHARGE:
01 SEC
The initial charge feeds detergent to achieve
working concentration when the dishmachine is
initially filled with a fresh tank of water. The
available timing range depends on whether door
or conveyor mode is selected:
Use / to choose from 0 to 100 Knight Units,
then press ENTER to continue.
DISPLAY DET CONC
ON_
This setting allows you to choose if you wish to
see the actual concentration reading on the
display during normal operation. Use SCROLL to
turn the concentration display on or off, then
press ENTER to continue.
ALARM DELAY:
180 SEC
Alarm delay is a time frame that the detergent
setpoint is expected to be reached within. If the
detergent setpoint is not achieved within the set
time, the alarm will sound intermittently until the
problem is resolved or power is cycled.
For door machines, this setting should be
calibrated to 5 – 10 seconds shorter than the
washcycle. For conveyor machines, should be
slightly longer than the time it takes for the unit to
achieve the setpoint with a fresh tank of water.
Use / to choose from 0 to 512 seconds, then
press ENTER to continue.
DOOR: 1 to 64 seconds
CONVEYOR: 1 to 128 seconds
Use / to set the initial charge time, then press
ENTER to continue.
DET RECHARG TIME
01 SEC
The recharge feeds detergent to maintain the
working concentration as rinse water dilutes the
dishmachine. The available timing range is 0 to
255 seconds.
Use / to set the recharge time, then press
ENTER to continue.
RECHARGE AFTER
01 RACKS
This setting allows you to choose how many racks
will be counted before triggering the recharge
feed. The range is 1 to 99 racks.
Use / to set recharge rack count, then press
ENTER to continue.
DETER FEED LIMIT
OFF_
Detergent feed limit works in conjunction with
alarm delay. When this feature is “on”, and the
detergent setpoint is not reached within twice the
alarm delay, the alarm will become continuous
and detergent feed will be halted until the problem
is resolved or power is cycled.
Use SCROLL to turn the feed limit on or off, then
press ENTER to continue.
Page 8 of 52 0900869 Rev: C (02/04)
Continue on next page
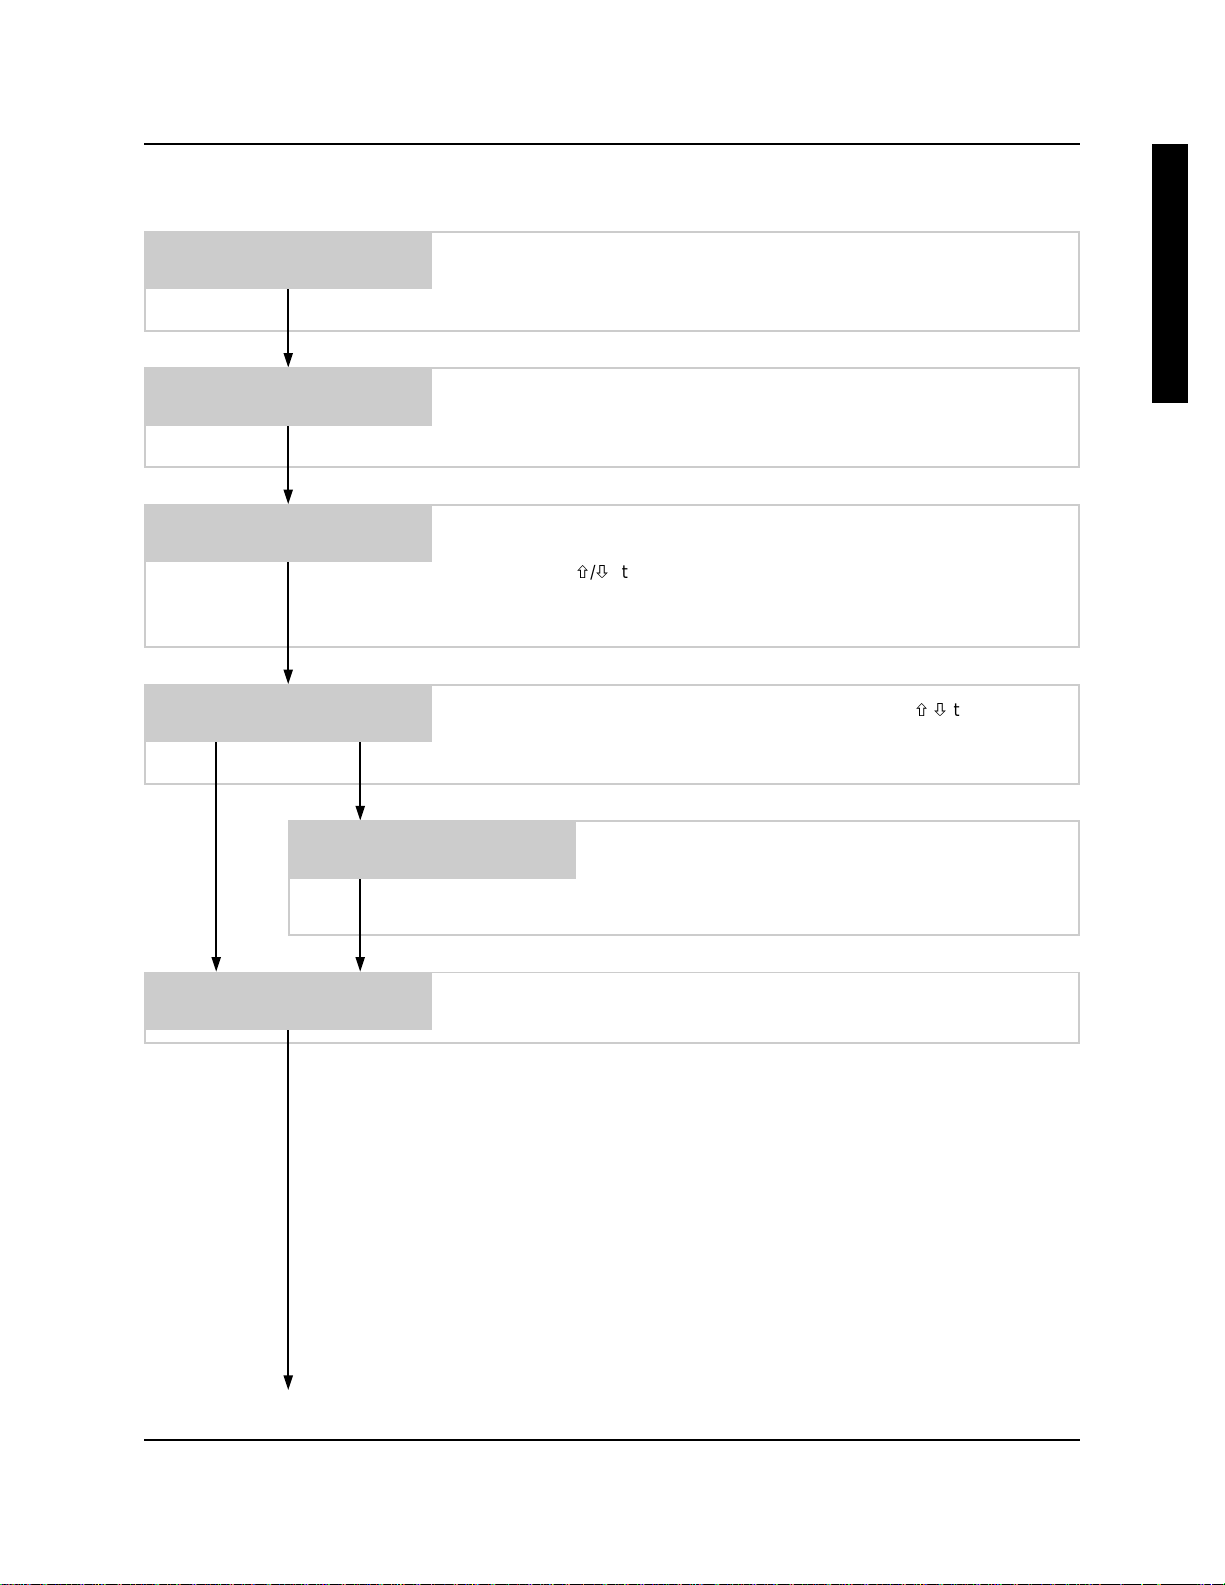
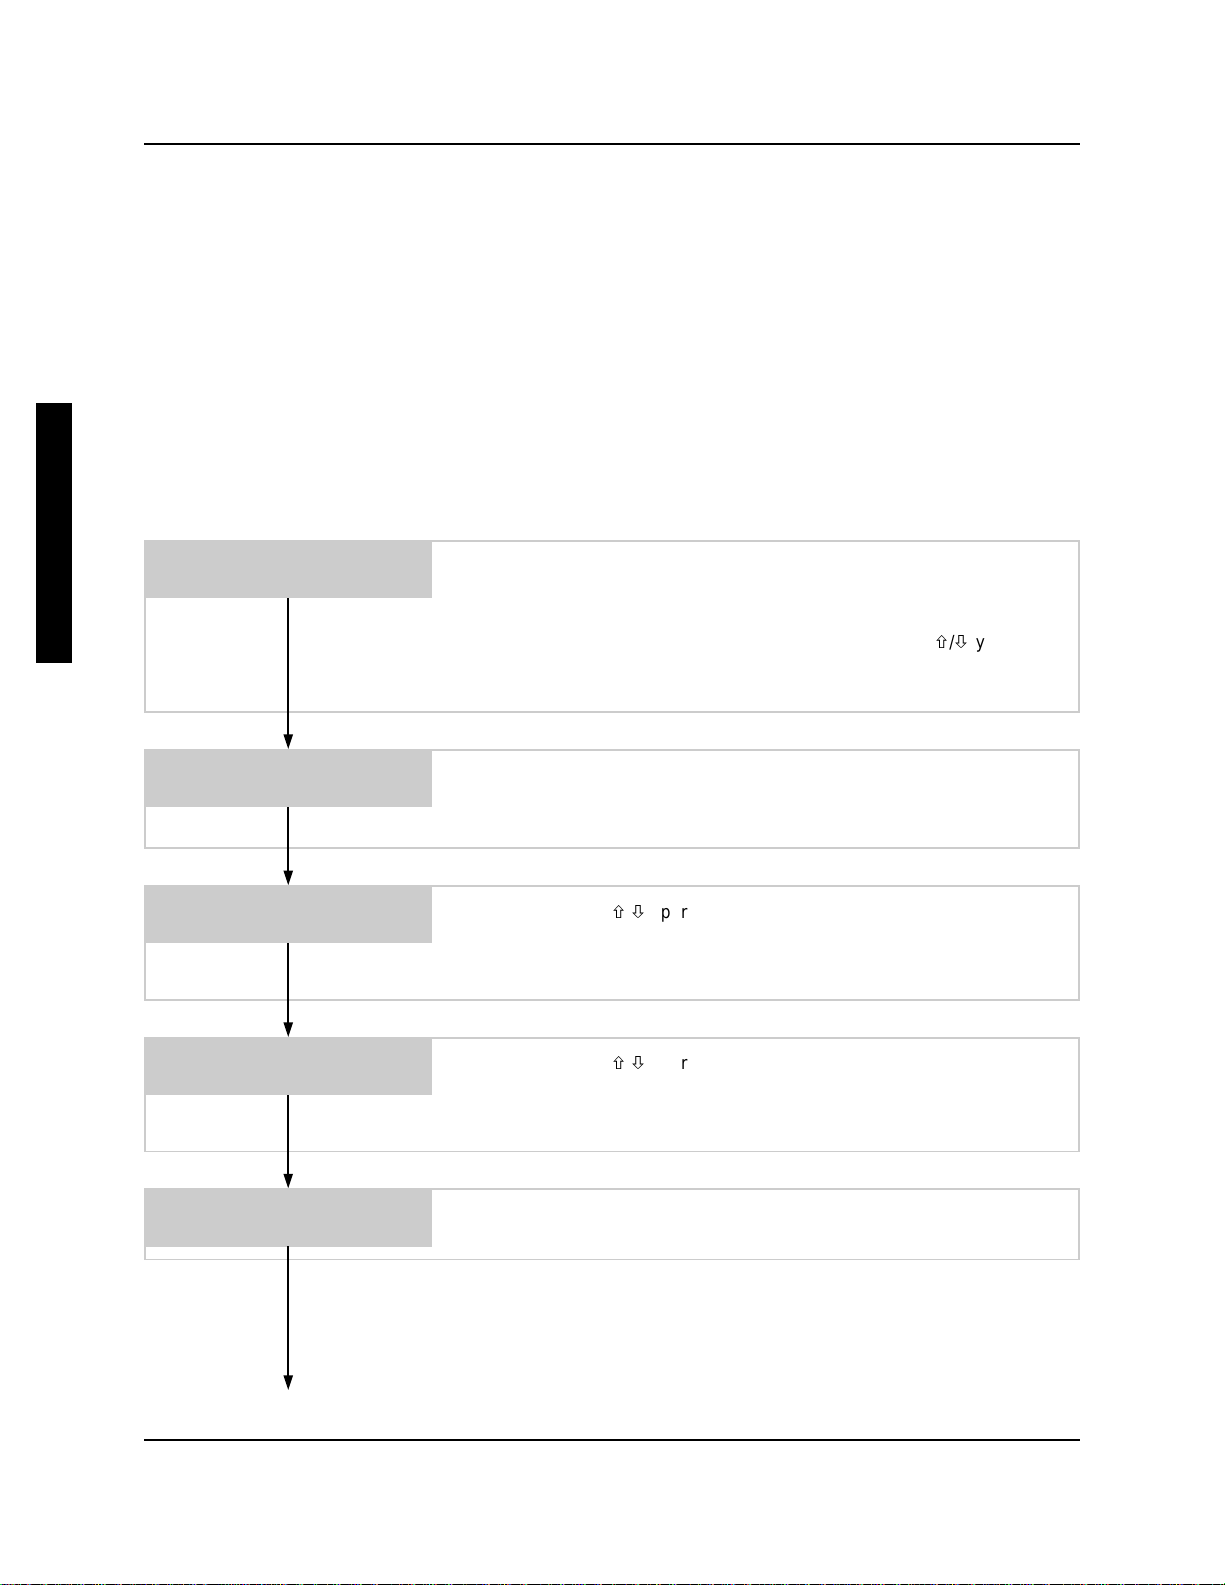
‘DOWN’ KEY TO
RESET RACK COUNT
If you wish to clear the rack counter, press the DOWN button. The display
will briefly flash to the rack counter to verify that it was set back to zero, and
will then return to the display at left. Press ENTER to continue.
E
N
G
L
I
S
H
DOWN KEY TO RES
INIT CHARGE CNT_
‘SCROLL’ TO CHAN
GE DISPLAY NAME_
CHANGE PASS CODE
0000 PRESS ENTER
ARE YOU SURE?
0000_IS NEW CODE
If you wish to clear the initial charge counter, press the DOWN button. The
display will briefly flash to the counter to verify that it was set back to zero,
and will then return to the display at left. Press ENTER to continue.
This menu item allows you to change the display name. Press the SCROLL
button once and you will see a screen with the current display name
showing. Use / to change the selected character (the one that is
underlined) and SCROLL to advance to the next character. When finished,
press ENTER to continue.
This menu item allows you to change the pass code. Use / to change the
selected character (the one that is underlined) and SCROLL to advance to
the next character. When finished, press ENTER to continue
If you changed the pass code in the previous menu, you
will be prompted to confirm your choice. If you wish to pick
a different number, press SCROLL to return to the
previous menu, otherwise press ENTER to continue.
MACHINE TYPE:
DOOR_
Continue on next page
0900869 Rev: C (02/04) Page 9 of 52
Use SCROLL to choose door or conveyor as the type of dishmachine in use,
then press ENTER to continue.
E
N
G
L
I
S
H
• If you chose DOOR as machine type, you will see
the following menu...
RINSE LIMIT:
30 SEC
This feature will stop the rinse pump after XX
seconds of continuous rinse signal, conserving
rinse agent on door-type dishmachines that fill
through the rinse valve.
Use / to choose from 0 to 60 seconds, then
press ENTER to continue.
RINSE DELAY:
00 SEC
This feature delays the operation of the rinse
pump for a selectable time once the rinse signal
is received. The delay time helps to conserve
rinse agent on door-type dishwashers (using with
conveyor machines is not typical for this feature).
Use / to choose from 0 to 60 seconds, then
press ENTER to continue.
• If you chose CONVEYOR as machine type, you will
see the following menu...
RACK TIME:
10 SEC
You will be prompted for the rack time. Use a
stop-watch (if available) to clock the time it takes
for one rack to pass through the rinse arm on the
machine. Use / to choose from 10 to 255
seconds, then press ENTER to continue.
DETERGENT TYPE:
LIQUID_
SANI RUNS WITH:
RINSE_PUMP
Use SCROLL to choose liquid or dry as the type of detergent, then press
ENTER to continue.
There is also a “SMALL TANK” setting that can be selected for special
applications to enhance dry detergent feed in probe mode (does not apply to
probeless). If SMALL TANK is selected, the detergent feed rate will be more
aggressive when the concentration reading is within 5 Knight units of the
setpoint. Additionally, the detergent alarm (delay) function will be by-passed
when the concentration reading is within 3 Knight units of the setpoint.
Use SCROLL to choose whether you wish to have the sanitizer pump run
(simultaneously) with the rinse pump, or the detergent pump, then press
ENTER to continue.
Continue on next page
Page 10 of 52 0900869 Rev: C (02/04)
DETER LOW DETECT
OFF_
This menu will only appear if you chose PROBELESS as type of detergent
feed. Use SCROLL to turn the low product detect feature on or off for
detergent, then press ENTER to continue.
E
N
G
L
I
S
H
DET LO LEV OVERD
OFF_
RINSE LOW DETECT
OFF_
RIN LO LEV OVERD
OFF_
SANIT LOW DETECT
OFF_
SAN LO LEV OVERD
OFF_
If you turned low detect “on” in the previous step, then you
will see this prompt which lets you over-ride the alarm and
allows the pump to continue. Use SCROLL to turn the
over-ride feature on or off, then press ENTER to continue
Use SCROLL to turn the low product detect feature on or off for rinse, then
press ENTER to continue.
If you turned low detect “on” in the previous step, then you
will see this prompt which lets you over-ride the alarm and
allows the pump to continue. Use SCROLL to turn the
over-ride feature on or off, then press ENTER to continue
Use SCROLL to turn the low product detect feature on or off for sanitizer,
then press ENTER to continue.
If you turned low detect “on” in the previous step, then you
will see this prompt which lets you over-ride the alarm and
allows the pump to continue. Use SCROLL to turn the
over-ride feature on or off, then press ENTER to continue
SCROLL & DOWN TO
RESET EVERYTHING
Wrap around to first menu item
0900869 Rev: C (02/04) Page 11 of 52
You will be prompted if you wish to reset the system. This function is
recommended for new installations and allows you to clear all memory and
set the unit back to default parameters.
Hold down on the SCROLL and DOWN buttons until you see the message
“RESETTING EVERYTHING“ then release both buttons. After a few
seconds, the memory will be cleared and the display will return to the display
at left. Press ENTER to continue.

E
S
P
A
N
O
L
EPECIFICACIONES
Parámetros Valor por defecto Rango
Códigos de acceso 0000 0-9, A-Z
Mensaje inicial DigiSet 2 líneas x 16 caracteres alfanuméricos
Idioma Inglés
Velocidad abrillantador 50% 0%-100% (de la velocidad max.)
Limite abrillantador 60 0-60 segundos
Retraso en abrillantador 0 seg. 0-60 seg.
Tipo de Lavavajillas PUERTA (capota) PUERTA/TUNEL
Tiempo por Bandeja 10 seg. 10-255 seg.
Modo de trabajo Sonda Sonda / Tiempo
Tipo de detergente Líquido Líquido / Sólido
Velocidad detergente 100% 100% (max. Vel. Siempre)
Concentración Detergente 25% 0%-100% (100% = 12 msiemens)
Retraso de Alarma 30 seg. 1-512 seg.
Bomba desinfección funciona con Abrillantador Abrillantador / Detergente
Velocidad desinfectante 50% 0%-100%
Tiempo carga inicial 1 seg
Tiempo de Recargo 1 seg 0-255 seg
Contaje de bandejas 0 0 – 65536
Recarga tras n bandejas 1 1-99
Limite de suministro de Detergente On On/Off
Inglés, Español, Francés, Alemán,
Holandés.
1-64 seg (Modo Puerta
1-128 seg (Modo Tunel)
El código de acceso no cambia cuando se borran todos los ajustes programados.
El contaje de bandejas tiene su propio menu que le permite resetear.
NEGACIÓN DE RESPONSIBILIDAD
Knight LLC no acepta la responsabilidad del mal manejo, abuso, o mal desempeño de los artículos descritos cuando
usados para propósitos no especificados en las instrucciones. Para la información de materiales peligrosos consulte
las etiquetas, MSDS, o llame a Knight LLC. Los productos Knight no se pueden utilizar en ambientes potencialmente
explosivos. En caso de utilizarlos en este tipo de ambiente, correría serio peligro el usuario. Knight no acepta ningún
tipo de responsabilidad en dichas
circunstancias.
GARANTIA KNIGHT
Todos los controles y sistemas de bombas Knight se garantizan contra defectos de materiales y mano de obra
durante el periodo de UN año. Todas las placas electrónicas tienen DOS años de garantía. Todas partes serán
devueltas con un número autorizado por Knight (knight Return Authorization, KRA). La garantía se aplica únicamente
al reemplazo o la reparación de dichas partes que se encuentren defectuosas. Todas partes se deben mandar con
porte pagado. Cojinetes, sellos, juntas, diafragmas, y mangueras son considerados desgastables y no están
cubiertos bajo la garantía. La garantía no cubre responsabilidad resultada por el mal manejo de este equipo ni la
mano de obra para su reemplazo. El mal manejo o abuso del equipo anula la garantía.
ATENCIÓN: es imprescindible protegerse con eficacia: utilizando gafas y vistiendose con ropa
apropiada al manipular productos químicos.
ATENCIÓN: para evitar recibir cualquier descarga eléctrica, se precisa desenchufar siempre la
alimentación principal cuando se efectúa el mantenimiento de este aparato.
CAUTION: When installing any equipment, ensure that all national and local safety, electrical, and
plumbing codes are met.
Page 12 of 52 0900869 Rev: C (02/04)

INSTALACIÓN — GENERAL
Compruebe todas las normas de seguridad, referidas a
la instalación eléctrica y de fontanería, en caso de
encontrar cualquier punto dudoso, consúltelo con el
responsable. El esquema eléctrico de la máquina nos
ayudará a realizar las conexiones eléctricas.
Normalmente el fabricante de la máquina las suministra
con cada lavavajillas.
Coloque el Digi-Set en una pared cercana o en la parte
superior del lavavajillas con los elementos incluidos con
cada unidad. Procure instalar el dosificador a no más de
1 mtr. Del conducto de abrillantado, para evitar largos
desplazamientos de producto. NO MONTE el
dosificador de manera que impida la normal circulación
de vapor de la máquina. Esto podría cortocircuitar la
unidad, dañándola gravemente. Asimismo, no instalarla
al lado de una fuente de calor, ya que el exceso de
temperatura podría reducir la vida de la unidad, así
como alterar su normal funcionamiento.
Circuito del abrillantador y del producto de
desinfección
Los pasos siguientes de la instalación se refieren a las
bombas de abrillantador y de desinfectante.
(1) Instale el inyector anti-retorno suministrada: tubo
1/4” X 1/8” en la línea de aclarado del lavavajillas
entre las electroválvulas de aclarado y los chorros
de aclarado.Si necesario, haga un agujero para la
instalación del inyector. El uso de una brida puede
ser preferible en un tubo de aclarado de cobre para
un mejor soporte.
(2) Corte una longitud adecuada de tubo 1/4” OD poly,
conéctelo entre el lado de desagüe (derecho) del
tubo de la bomba de aclarado y la unión de
inyección.
(3) Corte una longitud adecuada de tubo 1/4” OD poly
y conéctelo entre el lado de succión (izquierdo) del
tubo de la bomba de aclarado y el tubo de
aspiración suministrado. Asegúrese de insertar el
tubo en la extremidad del tubo de aspiración.
(4) Apriete con la mano las tuercas de compresión
sobre la unión de aclarado y el tubo de aspiración.
Se pueden utilizar bridas de plástico para sujetar el
tubo de conducción de producto al interior del tubo
de bombeo (negro).
Circuito de detergente líquido
(1) Instale el inyector suministrado a una de las
paredes del tanque de lavado (por encima del nivel
de agua). Si el agujero existente no se encuentra,
utilice una broca de 22,5mm para hacerlo.
(2) Corte una longitud adecuada de tubo 1/4” OD poly
y conéctelo entre el lado de expulsión (derecho) del
tubo de la bomba de detergente y el inyector de
detergente.
(3) Corte una longitud adecuada de tubo 1/4” OD poly
y conéctelo entre el lado de succión (izquierdo) del
tubo de la bomba de detergente y el tubo de
aspiración suministrado. Asegúrese de insertar el
tubo en la extremidad del tubo de aspiración.
(4) Apriete con la mano las tuercas de compresión
sobre la unión de separación y el tubo de
aspiración. Se pueden utilizar bridas de plástico
para sujetar el tubo de conducción de producto al
interior del tubo de bombeo (negro).
Circuito de detergente sólido
(1) Un alimentador de sólidos o polvos (no
suministrado) podría ser utilizado para suministrar
detergentes sólidos. Siga las instrucciones
incluidas con el alimentador de detergente para la
instalación y la temperatura/presión de agua
recomendada.
(2) Corte una longitud adecuada de tubo 1/4” OD de
cobre (no suministrado) y conéctelo entre el lado
de entrada de solenoide y la fuente de agua. La
temperatura máxima de agua recomendada es 60º.
(3) Corte una longitud adecuada de tubo 1/4” OD de
cobre (no suministrado) y conéctelo entre la salida
de solenoide al alimentador de detergente sólido o
en polvo.
(4) Apretar cuidadosamente las tuercas de compresión
del solenoide – apretar demasiado puede causar
una fuga de solenoide. Apretar las conexiones al
alimentador de fuente de agua y de detergente
como se precisa.
E
S
P
A
N
O
L
0900869 Rev: C (02/04) Page 13 of 52

INSTALACIÓN — ELÉCTRICA
E
S
P
A
N
O
L
Dentro de la unidad encontrará una regleta de
conexiones eléctricas (en la parte superior de la caja)
para faciliar las conexiones eléctricas. También se
suministra un diagrama del cableado en la página 50.
Los sistemas Digi Set están disponibles con 1 o 2
transformadores. Por favor, leer con cuidado los pasos
siguientes de la instalación, especialemente las
instrucciones a propósito del número de
transformadores de su Digi Set.
Conexión Alimentación Principal
Esta parte se refiere unicamente a los sistemas con un
solo transformador. Ignorar esta sección si se trata de
sistemas con dos transformadores.
Se tendrá que conectar el lado alta tensión del
transformador con cualquier fuente de alimentación
eléctrica VAC 115/208/230 que es “on” (activada)
cuando el lavavajillas se encuentra encendido (es decir
los principales conmutadores del lavavajillas). El
transformador suministra electricidad a los dos circuitos:
de detergente y de abrillantador. El Digi Set sólo
activará el detergente y el abrillantador cuando reciba
una señal eléctrica.
(1) Verifique el voltaje de la fuente de alimentación
principal y asegúrese que corresponde a uno de los
3 voltajes disponibles (115/208/230 VAC).
(2) Quite toda alimentación del lavavajillas.
(3) Conecte los conductores de la fuente de
alimentación principal con los cables adecuados en
el transformador.
Instalación de la sonda (Si es necesario)
(1) Instale la sonda en el tanque de lavado bajo el nivel
de agua. Tendría que estar lejos de las entradas de
agua, cerca de la entrada de la bomba de reciclaje,
y 8 a 10 cm. de las equinas, calentadores, o el
fondo del tanque). Si el agujero existente no se
encuentra en esa situación, utilice una broca de
22,5mm para hacerlo.
(2) Para mejores resultados, utilice un cable de cobre
para la conexión de la sonda. Evite poner el cable
cerca de líneas de alto voltaje AC.
(3) Conecte los conductores de los bornes de la sonda
al circuito electrónico.
Si se utiliza una sonda con termómetro, asegúrese de
conectar los hilos del termómetro a los bornes de
conexión marcados como « temp probe » en el circuito
electrónico. Esto permite compensar las variaciones de
alcalinidad producidas por los cambios de temperatura
del agua de lavado.
Señal de alimentación de detergente
Una señal de alimentación de detergente es necesaria
para activar el sondeo de detergente o la carga inicial
sin sonda. Dicha señal puede ser la alimentación
principal de la unidad, para lo que habría que cuentear
la alimentación del equipo con la entrada de señal de
detergente.
(1) Verifique el lavavajillas para una alimentación que
se active sólo durante el ciclo de lavado (ejemplo:
el contactor magnético que controla el motor de la
bomba de lavado) y verifique el voltaje.
(2) Desenchufe cualquier alimentación del lavavajillas.
(3) Para un transformador:
la alimentación de la señal de detergente hasta los
bornes de la señal de detergente en la placa
electrónica. El DigiSet acceptará una señal de 14 –
240 VAC.
Para dos transformadores:
desde la alimentación de detergente hasta los
bornes del transformador (previsto para el
detergente) en la placa electrónica. La alimentación
en detergente tiene que ser: 115, 208 ou 230 VAC.
Conecte los bornes desde
Conecte l os bornes
Señal de alimentación de abrillantador
Además de hacer funcionar la bomba de abrillantador,
la señal de alimentación de abrillantador activa también
la inyección de “recarga” de detergente si el modo sin
sonda es seleccionado. La señal de abrillantador
activará también la carga inicial de detergente si se
utiliza en modo “sin sonda”/Puerta.
(1) Verifique el lavavajillas para una alimentación que
se active sólo durante el ciclo de aclarado (ejemplo:
el indicador luminoso (LED) del solenoide de
abrillantador o de ciclo de abrillantador) y verifique
el voltaje.
(2) Desenchufe cualquier alimentación del lavavajillas.
(3) Para un transformador:
la alimentación de la señal de detergente hasta los
bornes de la señal de detergente en la placa
electrónica. El DigiSet acceptará una señal de 14 –
240 VAC.
Para dos transformadores:
desde la alimentación de detergente hasta los
bornes del transformador (previsto para el
detergente) en la placa electrónica. La alimentación
en detergente tiene que ser: 115, 208 ou 230 VAC.
Conecte los bornes desde
Conecte l os bornes
Page 14 of 52 0900869 Rev: C (02/04)

FUNCIONAMIENTO
FUNCIONES ADICIONALES
Detergente — Modo Sonda
Con la señal de detergente en « on », la sonda de
conductividad detecta la concentración de detergente.
Cuando la concentración está por debajo del nivel
normal, el control activa automáticamente el suministro
de detergente. Mientras se está suministrando el
detergente, el control determina el momento en el cual la
concentración de detergente está cerca del nivel normal.
El control calcula la velocidad de concentración y
suministra el producto por impulsos a fin de evitar
cualquier exceso. La cantidad de impulsos depende del
tiempo que necesitado para llegar al nivel normal.
La alarma de detergente sonará si el nivel normal no se
alcanza antes del tiempo de retraso de la alarma. Existe
un « limite de suministro » que le permite ajustar el
equipo para que pare automaticamente el suministro de
detergente cuando está activada la alarma.
Si se utiliza una sonda con termómetro, el control hará
automaticamente los ajustes del cambio de
conductividad causado por una variación de temperatura.
Detergente – Modo Sin Sonda
Controla la concentración de detergente sin sonda,
basado en el cálculo del tiempo de suministro del
detergente.El tiempo de carga inicial permite suministrar
el detergente para que la máquina tenga el nivel de
concentración correcto, con el llenado de agua. La carga
inicial se puede activar con la señal de detergente, con la
señal de abrillantador (30 segundos o más) o en modo
“Puerta”.
cada vez que es activada.
El tiempo de recarga permite suministrar el detergente a
fin de mantener el nivel de concentración de detergente
mientras el aclarado diluye el producto. La recarga
empieza después de que un número específico de
bandejas hayan pasado en la máquina.
La cuenta de cargas iniciales incrementará
Bomba de Abrillantador
La bomba de abrillantador funcionará cada vez que la
señal de abrillantador se activará. La opción de retraso
de abrillantador permite retrasar la activación de la
bomba de abrillantador hasta que el tiempo de retraso
haya expirado. El limite de abrillantador para la bomba
de abrillantador cuando la señal se queda activada
durante el tiempo seleccionado. El tiempo de
abrillantador y el límite de abrillantador funcionan con las
máquinas con puertas.
Bomba de desinfectante
Una selección de menú permite ajustar la bomba de
desinfectante para que funcione con el suministro de
detergente, o de abrillantador. La bomba de
desinfectante funcionará simultaneamente con el
detergente o el abrillantador, en modo sin sonda, con
sonda, retraso de abrillantador o limite de abrillantador.
Modo descalcifación
Durante el funcionamiento normal, mantener pulsadas
simultaneamente las teclas SCROLL y DOWN, hasta que el
« Modo Descalcificación » aparezca en la pantalla. Todos
los suministros de productos del Digi Set se pararán
durante el Modo Descalcificación. Pulsar las teclas
SCROLL et DOWN otra vez o la alim entación general del
ciclo del equipo para salir del modo descalcificación.
Otherwise, the unit will automatically exit de-lime mode after
10 minutes.
Alarma de nivel bajo de producto
Una de las características delDigi Set es de poder detectar
un nivel de producto bajo. La alarma se activará con
cualquier producto con un nivel demasiado bajo. Cuando la
alarma se activá, la bomba de este producto se parará
hasta que el nivel de producto haya vuelto al nivel correcto.
Se puede escoger de <ignorar > la alarma si necesario,
permitiendo así a la bomba de seguir funcionando, a pesar
del nivel bajo de producto.
La entrada de alarma de nivel de producto bajo sólo se
puede seleccionar en modo sin sonda. Eso porque este
modo ya tiene la función de alarma de nivel bajo. Las
alarmas para el abrillantador y el desinfectante son
disponibles para todos los modos.
La placa electrónica del Digi Set tiene bornes de entrada
que permiten la connexión de varios tipos de sensores que
detectan el nivel de producto (es decir: el sensor de vacio,
el sensor de flotador, el sensor de conductividad). Cuando
el suministro en producto está bajo, el sensor se abre y
activa la alarma. Cuando el suministro en producto vuelve a
su nivel normal, el sensor hará contacto de nuevo y parará
la alarma.
FUNCIONES DE LAS TECLAS
•
ENTER: Si se mantiene pulsada esta tecla durante
aproximadamente 3 segundos, Usted pasará del modo
funcionamiento al modo programa. ENTER le permite
también adelantar dentro de los menus de programación.
•
SCROLL: Esta tecla le permite desplazar el cursor dentro de
los menus cuando quiere efectuar cambios en el texto o en
las cifras. Esta tecla le permite pasar automaticamente del
final de una línea al principio de la otra. Le permite pasar de
un menú a otro, y también de visualizar el contaje de
bandejas y
• UP (): permite aumentar los valores numéricos o
desplazarse en los caracteres disponibles. Mantener la
tecla pulsada para adelantar rapidamente. Esta tecla
« UP » funciona también para cebar el abrillantador
durante el funcionamiento normal.
• DOWN (
desplazarse en los caracteres disponibles. Mantener
pulsada la tecla para adelantar rapidamente. E
caractères disponibles. Maintenez la touche enfoncée
pour avancer rapidement. Cette touche « DOWN » Esta
tecla « DOWN » funciona también para cebar el
desinfectante durante el funcionamiento normal.
las cargas iniciale s
): permite disminuir los valores numéricos o
en funcionamiento normal.
E
S
P
A
N
O
L
0900869 Rev: C (02/04) Page 15 of 52
E
S
P
A
N
O
L
PROGRAMACIÓN
Puede resultar útil leer las instrucciones de programación antes de empezar, puesto que le podrá ayudar a
familiarizarse con el funcionamiento del DigiSet, y la programación será mucho más rápida. Por favor, tome en
cuanta los puntos siguientes:
• Si quiere volver al modo de funcionamiento normal en cualquier momento durante la programación, mantenga
pulsada la tecla ENTER durante 3 segundos para salir del modo programación.
• Durante la programación, si ninguna tecla está pulsada durante aproximadamente 2 minutos, el DigiSet volverá
automáticamente al modo de funcionamiento normal.
• Es posible efectuar cambios de programación cuando el DigiSet está en funcionamiento – los cambios se
actualizarán enseguida. Esto le permite efectuar pequeños ajustes « durante el funcinamiento » y así mejorar las
prestaciones del equipo.
Cuando Usted esté listo para empezar, mantenga pulsada la tecla ENTER durante aproximadamente 3 segundos
para entrar en el modo programación, suéltela cuando vea la pantalla siguiente...
ENTRE CODACCESO:
0000 PULSE ENTRA
Todos los nuevos aparatos están enviados de fábrica con el código de
acceso: 0000. Si el sistema es nuevo, pulsar ENTER para continuar.
Si el código de acceso ha sido cambiado y no es el 0000 inscrito por defecto
(explicado más adelante en este manual), utilice las teclas / y SCROLL
para entrar su nuevo código, después pulse ENTE R para continu ar.
IDIOMA:
ESPANOL
VELO BOMB ACLAR:
50%
VELO BOMB DESINF:
50%
MODO DETERGEDE:
SONDA_
Si Usted quiere cambiar el idioma del menú, pulse SCROLL para ver las
opciones posibles hasta encontrar el idioma deseado en la pantalla. Pulse
ENTER para continuar.
Utilice las teclas / para cambiar la velocidad de la bomba de
abrillantador. La bomba empezará a funcionar cuando se pulse una tecla.
Cuando tenga el ajuste deseado, pulse ENTER. – la bomba dejará de
funcionar, y pasará al menú siguiente.
Utilice las teclas / para cambiar la velocidad de la bomba de
desinfectante. La bomba empezará a funcionar cuando se pulse una tecla.
Cuando tenga el ajuste deseado, pulse ENTER. – la bomba dejará de
funcionar, y pasará al menú siguiente.
Utilice las teclas SCROLL para elegir el modo de suministro de detergente
con o sin sonda, después pulse ENTER para continuar.
Sigue en la página siguiente
Page 16 of 52 0900869 Rev: C (02/04)
 Loading...