

Knight Equipment Expert-6000 Installation Manual
WinReporter Version 3.8
Instruction Manual
0404766 Rev: G (11/10) Page 1 of 36

TABLE OF CONTENTS
Getting Started ..................................................................................................... 3
Setting Up The Network ....................................................................................... 4
Network Diagram .................................................................................................. 5
Custom Setup ....................................................................................................... 6
Viewer Screen ...................................................................................................... 8
File Commands Screen ........................................................................................ 9
Location Settings ................................................................................................ 10
Logging On ......................................................................................................... 12
Programming (KT-I/II, CT Slave, CT-Jr) ............................................................. 13
Chem-Trak Host Programming ........................................................................... 20
Working With Files .............................................................................................. 26
Printing Reports .................................................................................................. 28
Spreadsheet Functions ....................................................................................... 30
Modem Setup ..................................................................................................... 32
System Test Functions ....................................................................................... 34
Warranty Information .......................................................................................... 36
Knight Locations ................................................................................................. 36
CAUTION: Wear protective clothing and eyewear when dispensing chemicals or
other materials. Observe safety handling instructions (MSDS) of chemical mfrs.
CAUTION: To avoid severe or fatal shock, always disconnect main power when
servicing the unit.
CAUTION: When installing any equipment, ensure that all national and local
safety, electrical, and plumbing codes are met.
Page 2 of 36 0404766 Rev: G (11/10)

GETTING STARTED
Thank you for your purchase of Knight Reporter software. This comprehensive and user-friendly program will make
your PC a valuable tool for printing, programming, and viewing the operation of Knight-Trak or Chem-Trak dispensing
system networks. For added versatility, the software can be used on-site or off-site (via modem), and will run on
either a standard desktop PC or laptop.
While using Reporter software, it is recommended to have a copy of the programming manual handy for the type of
dispenser(s) you are working with. The dispenser programming manual will have additional information about each
feature or operating parameter to better explain their functions. It will also be helpful to understand how to program
various settings at the dispenser keypad to enhance your overall knowledge of the system.
Before attempting to install this program, make sure there is an open com port on your computer to communicate with
the KCI-6000 Computer Interface or RM-6000 Reporter Module. If any other device (mouse, modem, etc.) is
assigned to your com port, Reporter cannot communicate with a dispenser network. Other system requirements are
listed below.
The PC must have a default printer driver installed to print, view, or save reports to the PC.
You must have at least 10 megabytes of space on your hard drive for a complete installation.
Reporter Software runs best with at least 64 megabytes of memory.
Reporter Software is compatible with Windows versions 98, Me, NT4, 2000, and XP.
Installing Reporter Software
(1) Turn on computer and monitor.
(2) Start Windows.
(3) Turn off all other Windows applications and network connections.
(4) Insert Reporter CD into the appropriate drive on your computer.
(5) If the installation utility does not start automatically (after a short time) click on the Windows Start button, then
click on Run.
(6) In the ―Open‖ box, type x:setup then click OK (where x represents the drive letter of your CD-ROM).
(7) As Reporter Software is installed, follow the instructions on your screen.
Uninstalling Reporter Software
There is an uninstall utility that is put onto your PC when you run Reporter software. Should it become necessary to
uninstall Reporter software, the following steps will remove the program and return your PC to its original state
(before Reporter was installed).
(1) Go to Windows Control Panel.
(2) Double-click on Add/Remove Programs.
(3) Select WinReporter from the list, then click the Add/Remove button.
(4) Follow the prompts on your screen to un-install Reporter Software.
0404766 Rev: G (11/10) Page 3 of 36
SETTING UP THE NETWORK
To run Reporter Software on-line with a dispenser requires the use of a KCI-6000 or RM-6000I interface module
(detailed below). A USB cable is provided with the software package and should be applicable for most applications.
A driver disk is also included to setup your PC for use with the USB connection on the KCI-6000 module.
Note: If using the optional hardware key cable, you must connect it to a working serial com port on your computer.
The program automatically detects the serial com port on your PC that the cable is connected to. If your system has
difficulty locating the hardware cable, contact Knight for assistance.
Connect the PC to the KCI-6000 (or RM-6000) using the appropriate cable. See wiring diagram to the right for details.
Apply power to the KCI-6000 or RM-6000 by connecting the network cable from the dispenser network to the
dispenser interface port. By default, the KCI-6000 is the selected computer interface device. If an RM-6000 is used,
you must choose it as the computer interface device in the com port configuration screen.
KCI-6000 Computer Interface
The KCI-6000 allows for faster printing and data transfers.
The KCI-6000 does not allow storage of dispenser files.
The KCI-6000 allows WinReporter to communicate with any version of dispenser (backwards compatible).
A standard USB cable can be used to connect directly to the KCI-6000 (models built starting June, 2005).
RM-6000 Module
The RM-6000 Reporter Module is a passive interface when installed on site. There is no real need to transfer files
to or from the RM module in a permanent installation such as in your customers PC.
For users that wish to use the RM-6000 Reporter Module to transfer files and reports from the field to an office PC
for report printing and archiving, use Reporter Software to move and delete files in the RM file directory.
The RM-6000 can only communicate with older Knight-Trak II dispenser (no other systems).
Requires the use of the hardware key cable only (cannot connect directly with a standard USB cable).
Notes on USB connection
PREFERRED: The latest version of the Knight KCI-6000 has USB interface capability. All you will need to do is
install the drivers from the CD provided with the KCI-6000. An instruction sheet is also included with the KCI-6000
to guide you through proper setup.
ALTERNATIVE: If necessary, older KCI modules (9-pin only) can be connected to a standard USB port. An adapter
kit (available from your PC vendor) will allow your USB port to function as a standard com port. Install the kit
according to the instructions that come with it. Be sure to find out which com port number the USB port will function
as, since this port number will be assigned in the configuration.
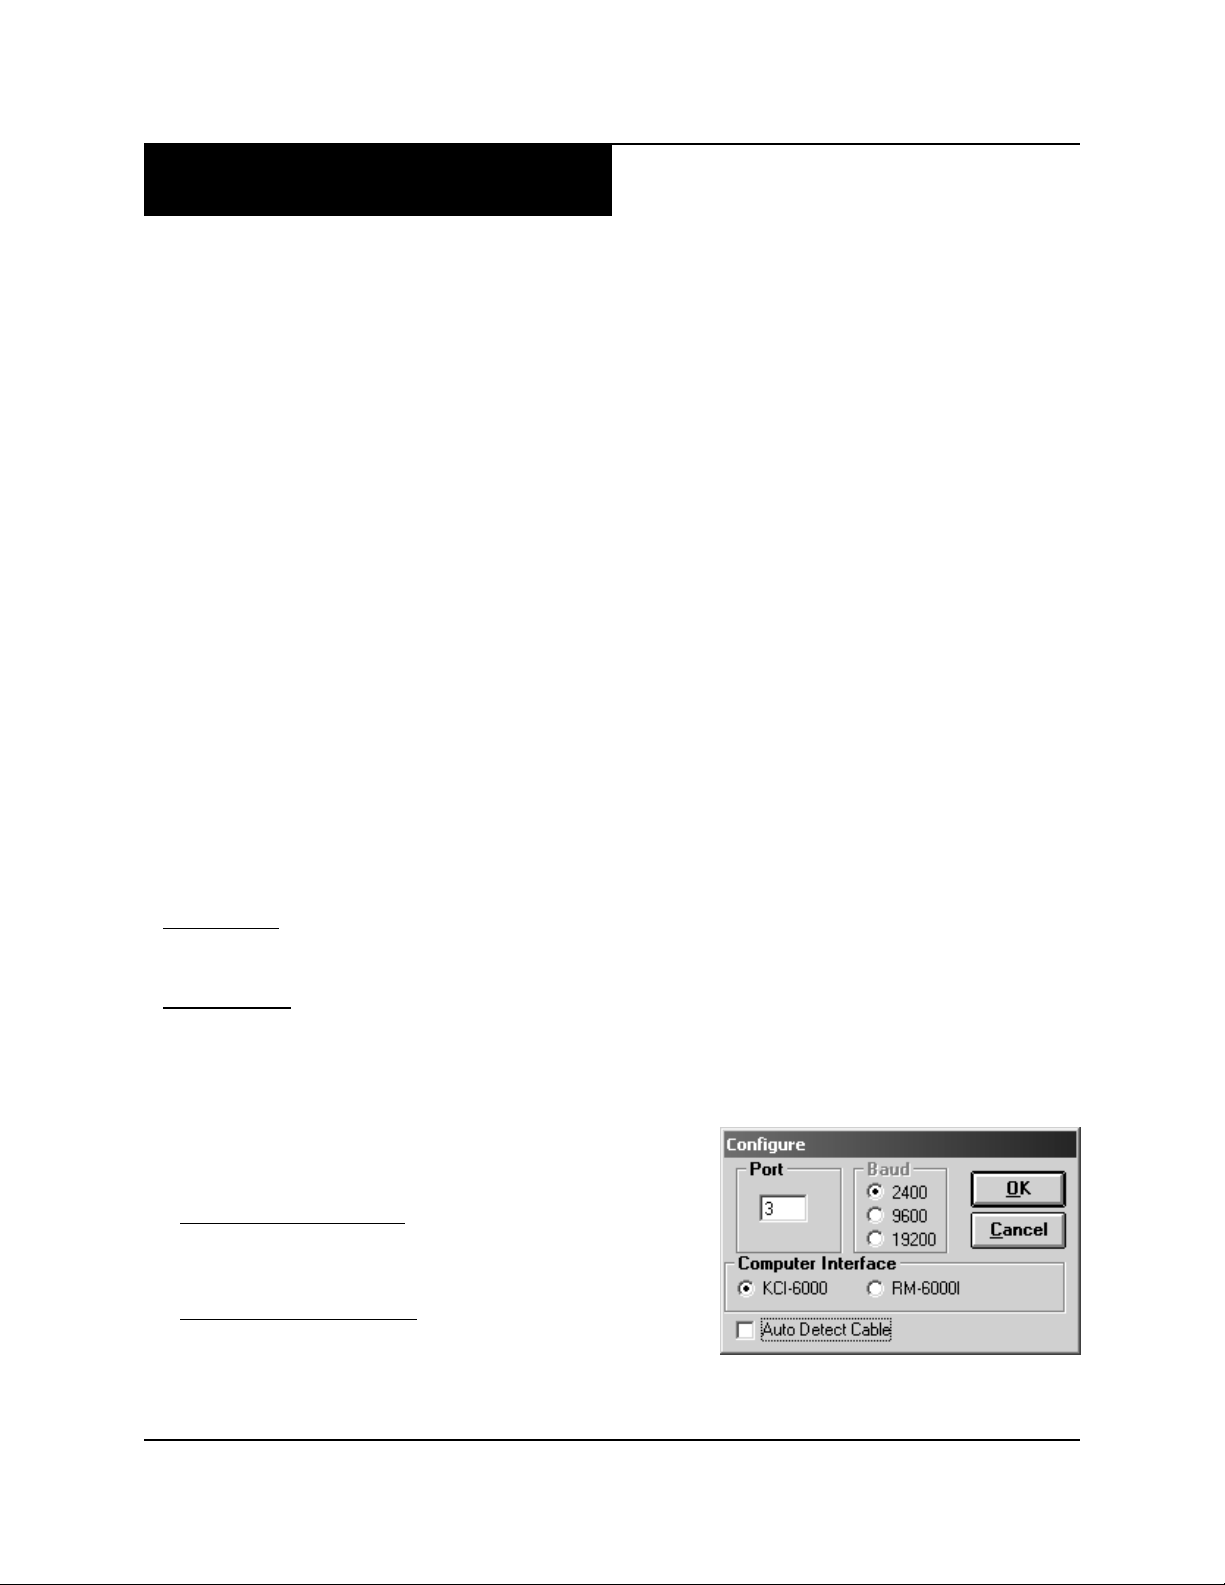
Configuration settings
(1) The setting screen to the right will pop up automatically the first
time the program is run. Otherwise, you can click Setup (from the
pull-down menus at the top) then Com Port.
(2) If you are using a USB Port: First de-select the Auto Detect Cable
checkbox. Then enter the com port number that corresponds to
the USB port’s assigned number (choosing a baud rate is not
necessary).
(3) If you are using an RM-6000: Choose RM-6000 as the Computer
Interface device.
(4) When finished setting up the configuration, click the OK button.
Page 4 of 36 0404766 Rev: G (11/10)
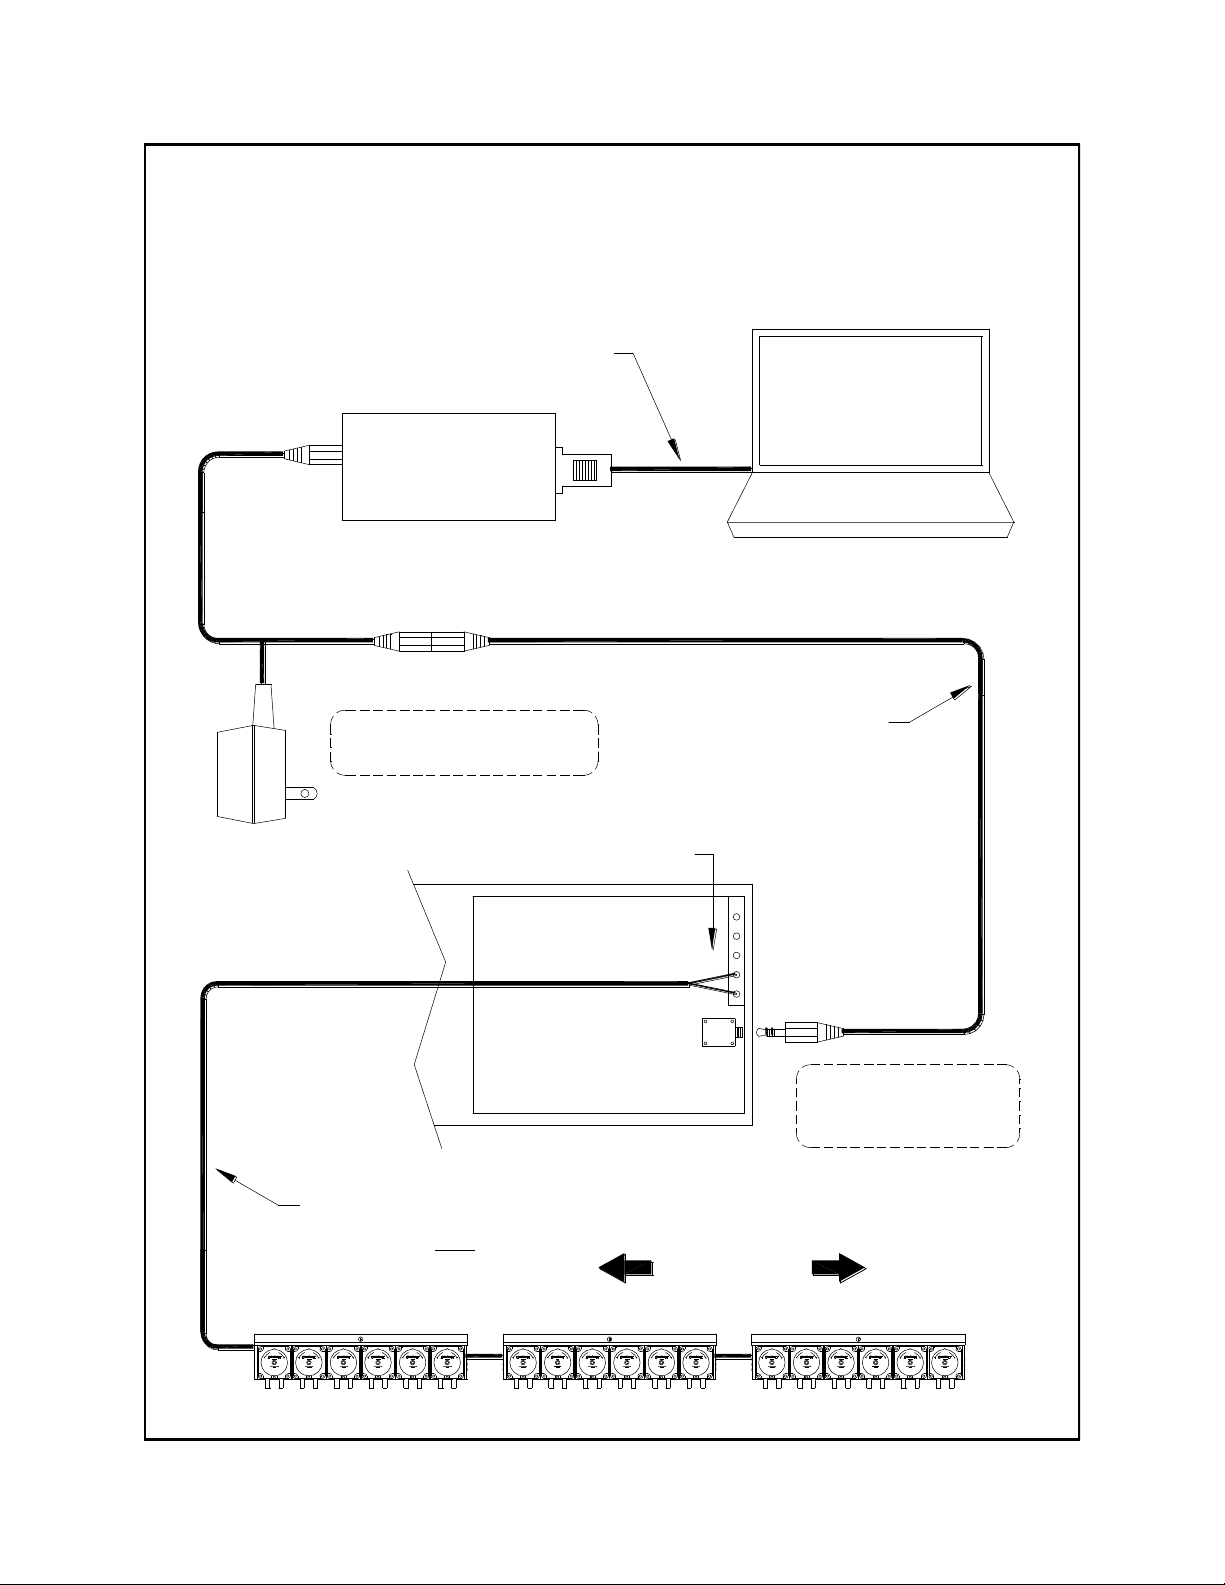
Data Flow
POB Circuit Board
Multi-Link Terminals
12 VDC
Booster
Transformer
Reporter Hardware Key Cable
Connects to PC Serial Port
USE 3 CONDUCTOR
NETWORK CABLE
KNIGHT P/N 0300058 ONLY
BLACK TERMINAL
BROWN TERMINAL
W
O
L
F
W
O
L
F
W
O
L
F
W
O
L
F
W
O
L
F
F
L
O
W
W
O
L
F
F
L
O
W
F
L
O
W
F
L
O
W
F
L
O
W
F
L
O
W
W
O
L
F
F
L
O
W
F
L
O
W
F
L
O
W
F
L
O
W
F
L
O
W
Over Multi-Link
CONNECT THE PLUG INTO
THE JACK ON THE CIRCUIT
BOARD IN ANY ONE OF THE
MULTI-LINKED DISPENSERS.
(not to scale)
KCI-6000
or
PC
WINREPORTER/101003
(X = LENGTH OF CABLE)
NETWORK CABLE
KNIGHT P/N 0300058-X
MALE
MALE
FEMALE
RM-6000
NETWORK DIAGRAM
NETWORK CABLE LENGTH.
FOR RM-6000 W/100' (OR LONGER)
BOOSTER XFMR RECOMMENDED
0404766 Rev: G (11/10) Page 5 of 36

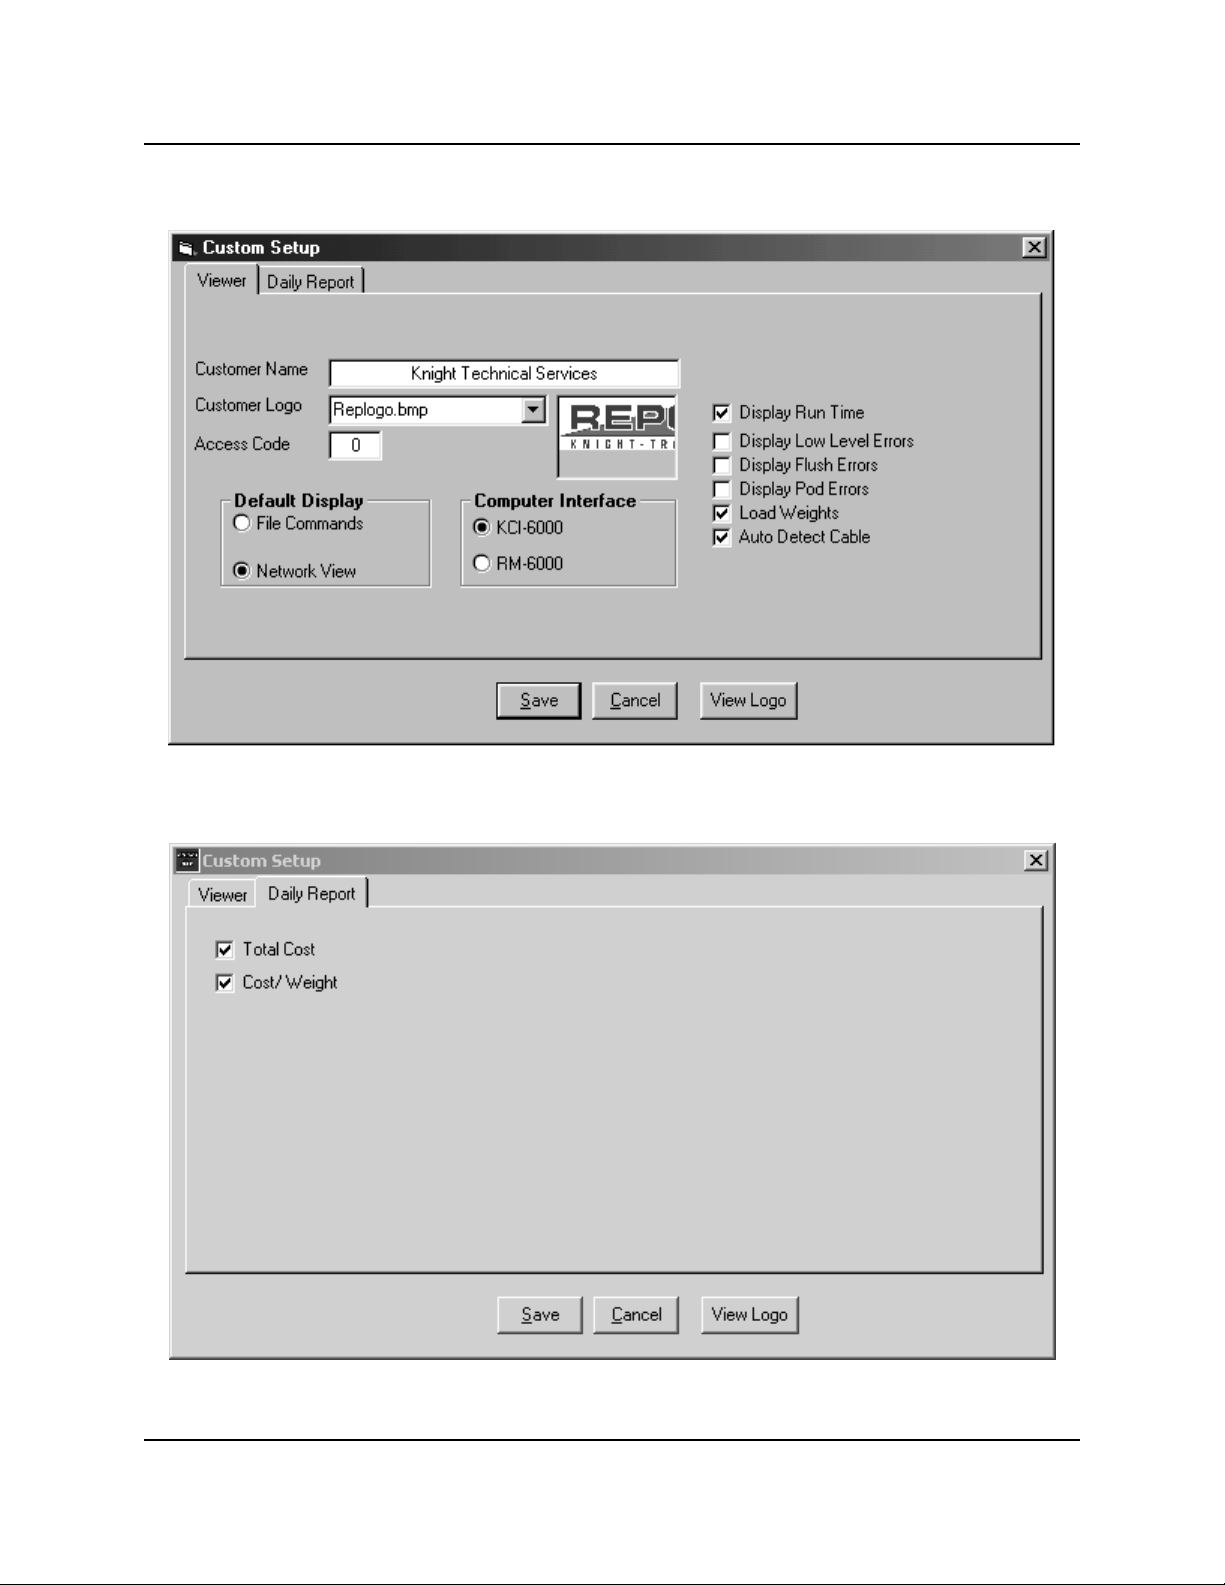
CUSTOM SETUP
The Custom Setup screens allow you to configure your PC to work properly with Reporter software. You can also
customize the Reporter Viewer screen to give a proprietary look with custom graphics and text.
(1) Go to the File Commands screen (if switching from Viewer screen — use 0 as the default access code).
(2) From the File Commands screen click Setup, then Custom. The display to right will appear.
(3) You can alternate between the custom setup displays by clicking on the Viewer or Daily Report tabs.
(4) All functions and features are explained below to help you with the setup. When finished setting up the Viewer
and Daily Report preferences, click the Save button.
Viewer
Customer Name — Enter the name of the customer or any text you would like to see displayed as the heading on
the Daily Washer Summary Report.
Customer Logo — You can replace the standard Reporter graphic image on the Viewer with any Windows bitmap
image (.BMP file format). Images must be sized to fit properly. To use a custom bitmap image, first put the file in
the Reporter ―graphics‖ directory, then use the down arrow button to select the file in the customer logo box. The
View Logo button will allow you to see the full bitmap display.
Access Code — This is the code that allows you access to the File Commands screen (from the Viewer screen).
Default Display — Choose which screen you want to appear when WinReporter is started.
Computer Interface — Choose the interface device that is connecting your PC to the dispenser network.
Display Run Time — This feature displays washer run time on the Viewer screen.
Display Low Level Errors — Check this box if you are interfacing a Knight low level alarm to detect chemical
levels. Low level conditions will then be displayed on the Viewer screen.
Display Flush Errors — Check this box if you want flush errors to display on the Viewer screen. Keep in mind, a
flush error condition should be corrected promptly to prevent products from plugging the chemical transfer line.
Display POD Errors — This feature is for custom dispensers only.
Load Weights — Check this box if you are using newer LFP (or Chem-Trak) software that permits entering
formula load weights. When this box is checked, there will no longer be a pump 10 in pump setup or formula
programming, as this is where the LFP stores the load weight information. Chem-Trak will still have 12 pumps
available, regardless of this setting.
Auto Cable Detect — This box is checked by default so that WinReporter will automatically look for the hardware
key cable that is plugged into a com port on your PC. You will need to de-select this box if using a USB port.
Daily Report
The content of the Daily Washer Summary Report can be customized to the needs and limitations of each customer
and the specific laundry machinery. Click on the Daily Report tab and you will see the display to the right.
Total Cost — If you would like your customer to view the total daily cost for each washer, select the total cost box.
De-select if this is not needed.
Cost/Weight — Check this box if you would like the daily report to display cost per weight processed. De-select
this box if cost per weight information is not desired.
Page 6 of 36 0404766 Rev: G (11/10)
0404766 Rev: G (11/10) Page 7 of 36
LOGGING ON
Logging on is typically done ―locally‖ using the on-site PC that is connected to the dispensing system, however you
can logon from a remote PC via modem. Logging on is not required when working with files, such as creating a new
HEX file, or viewing/printing report files that are saved on your PC. You must logon to do any of the following:
Creating new reports, whether directly to a printer or choosing the ―print to file‖ option.
Changing dispensing system settings on-line.
Uploading or downloading HEX file information.
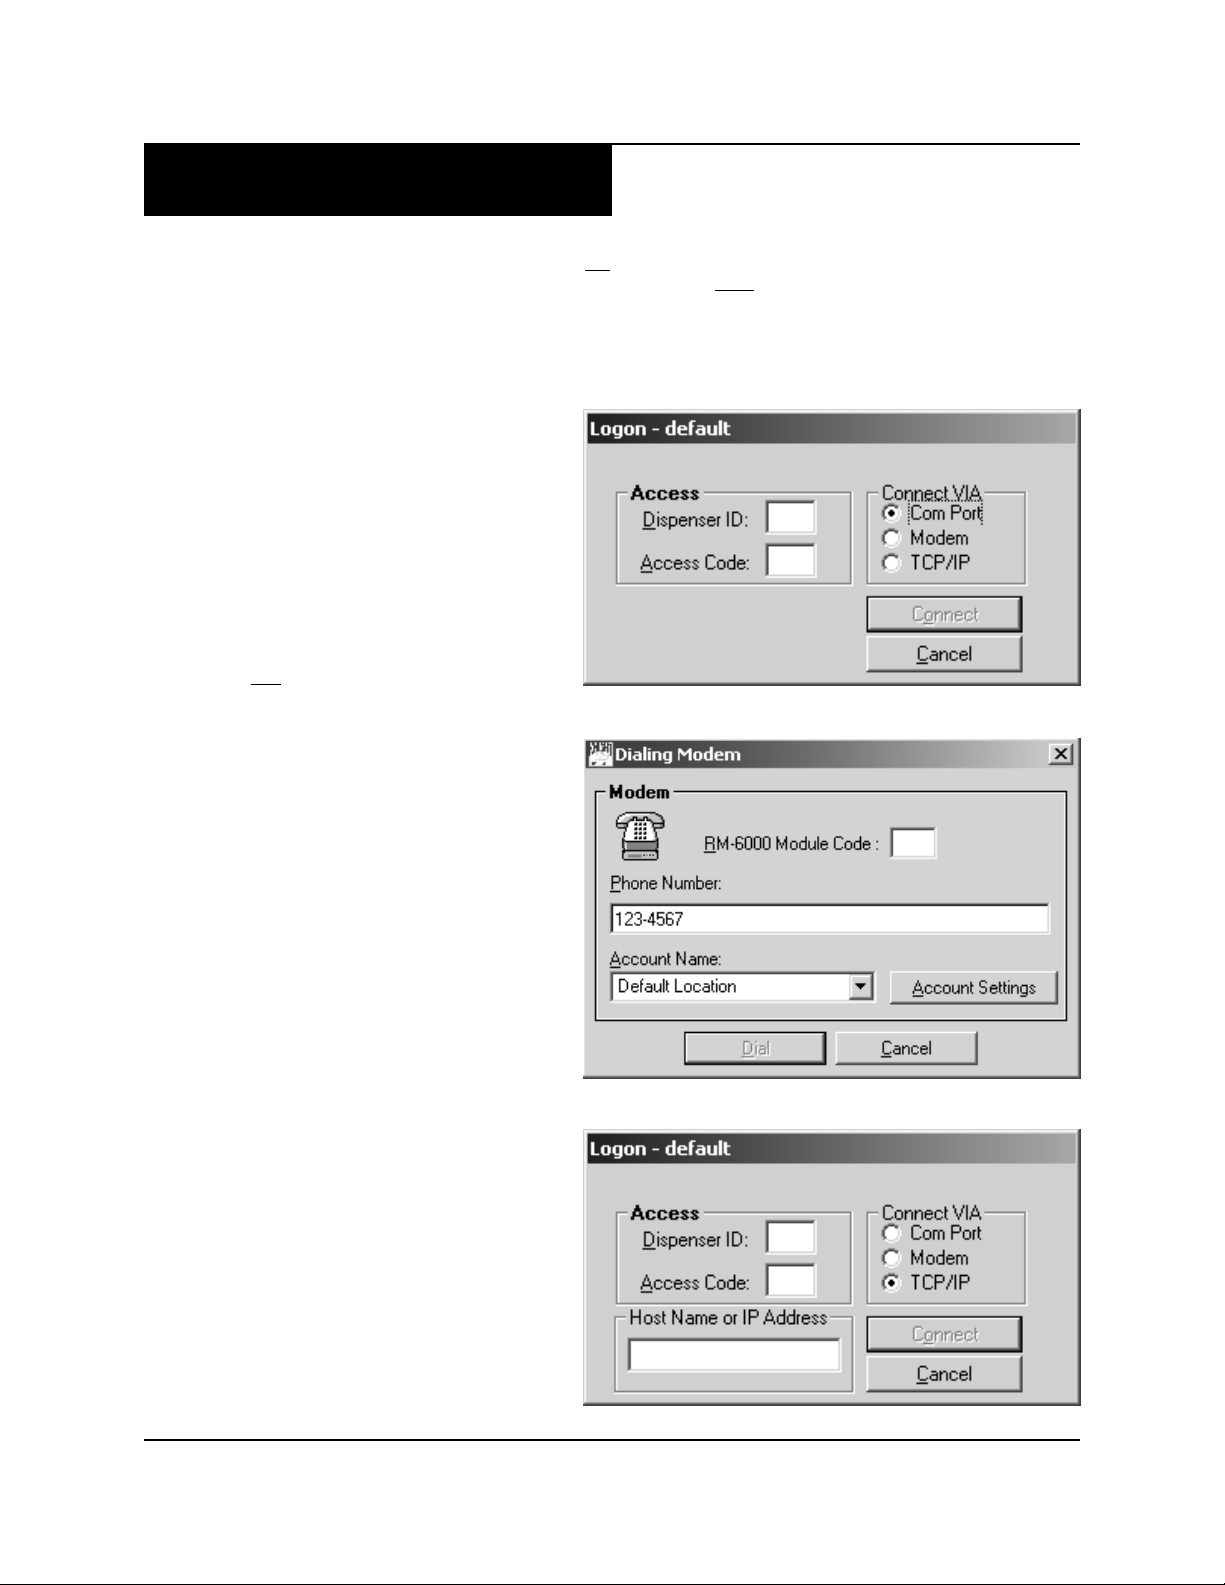
On-site (locally)
(1) Click on the Log-On button, then enter the
dispenser ID (default is ID number is 01) and
access code.
(2) Click Connect. During the log-on process, the
module icon will flash green.
From a remote PC
Before attempting to logon via modem or TCP/IP,
make sure that the on-site PC is connected to the
ILCS system and properly setup for this type of
operation (detailed on pages 32 and 33). Also check
that the Modem Interface software is running on the
on-site PC and waiting for a call.
(via modem)
(1) Click on the Log-On button, then enter the
dispenser ID and access code.
(2) Click Modem, then Connect and you will see the
screen to the right.
(3) In the RM-6000 Module Code box, enter the
access code that was setup in the modem
interface software of the on-site PC.
(4) Enter the phone number. If you have several
locations that you remotely dial into, you can
setup the phone numbers using the Account
Settings button to the right.
(5) Click Dial. During the log-on process, the
module icon will flash green.
NOTE: If you get a message telling you that the
network is busy, another user is currently logged on.
(via TCP/IP)
(1) Click on the Log-On button, then enter the
dispenser ID (default is ID number is 01) and
access code.
(2) Click TCP/IP, then enter a host name (if LAN) or
IP address (if connecting over internet).
(3) Click Connect. During the log-on process, the
module icon will flash green.
Page 8 of 36 0404766 Rev: G (11/10)

PROGRAMMING
All dispenser programming, whether on-line or off-line, is done through the File Commands screen. Programming
off-line is also known as setting up a HEX file. This feature allows you to create a dispenser setup without even
being connected to the dispenser network. For example, if you have a laptop PC, you can program HEX files in
your office, then take your PC on-site and upload the dispenser settings as part of your installation.
You must be at the File Commands screen to do any programming.
For metric file downloads, all formula volume settings must be programmed in milliliters. Reporter will not convert
liters to milliliters.
For programming a Chem-Trak host, see page 20.
Programming a dispenser on-line
(1) Logon to the dispenser.
(2) If the dispenser is already programmed and you are only making changes, you can skip this step.
If this is a new installation, or you want to completely re-program an existing dispenser, click Setup then Clear
Settings and choose all available boxes to clear the dispenser memory. Also click Setup then Set Clock, and
make any time or date adjustments as needed. Note: Be sure to clear the extended memory module (located in
the host) for Chem-Trak systems.
(3) Click on Receive Dispenser File to ―download― the setup information onto your PC. The module icon will flash
and the progress of the download will be displayed by a colored bar.
(4) When the download is complete, you can proceed with the programming menus that are detailed on the
following pages.
(5) When finished programming you will be prompted if you wish to save the information as a file when you logoff.
If you want to save the information as a HEX file, type in a file name and click Yes. This is an optional step as
all changes are updated on the dispenser in real time during programming.
Programming a dispenser off-line
(1) Click the New Setup button.
(2) When prompted, choose the type of dispenser file to create (Knight-Trak, Chem-Trak Slave, or Chem-Trak Jr).
See page 20 for programming Chem-Trak host).
(3) Proceed with the programming menus that are detailed on the following pages.
(4) When finished programming, click the Save Setup button and you can enter the name of the HEX file you wish
to create. You can also click Save Setup if you are working with an existing dispenser file.
Uploading a HEX file
(1) Logon to the dispenser.
(2) If the dispenser has already been in use, you can skip this step.
If this is a new installation, or you want to completely re-program an existing dispenser, click Setup then Clear
Settings and choose all available boxes to clear the dispenser memory. Also click Setup then Set Clock, and
make any time or date adjustments as needed. Note: Be sure to clear the extended memory module (located in
the host) for Chem-Trak systems.
(3) From the displayed list of HEX files, click the one you wish to upload, then click Send Dispenser File. You can
also ―drag-n-drop‖ the HEX file onto the pump icon. Be sure the HEX file you choose is the correct type for the
dispenser you are sending it to.
(4) The module icon will flash and the progress of the upload will be displayed by a colored bar.
0404766 Rev: G (11/10) Page 9 of 36
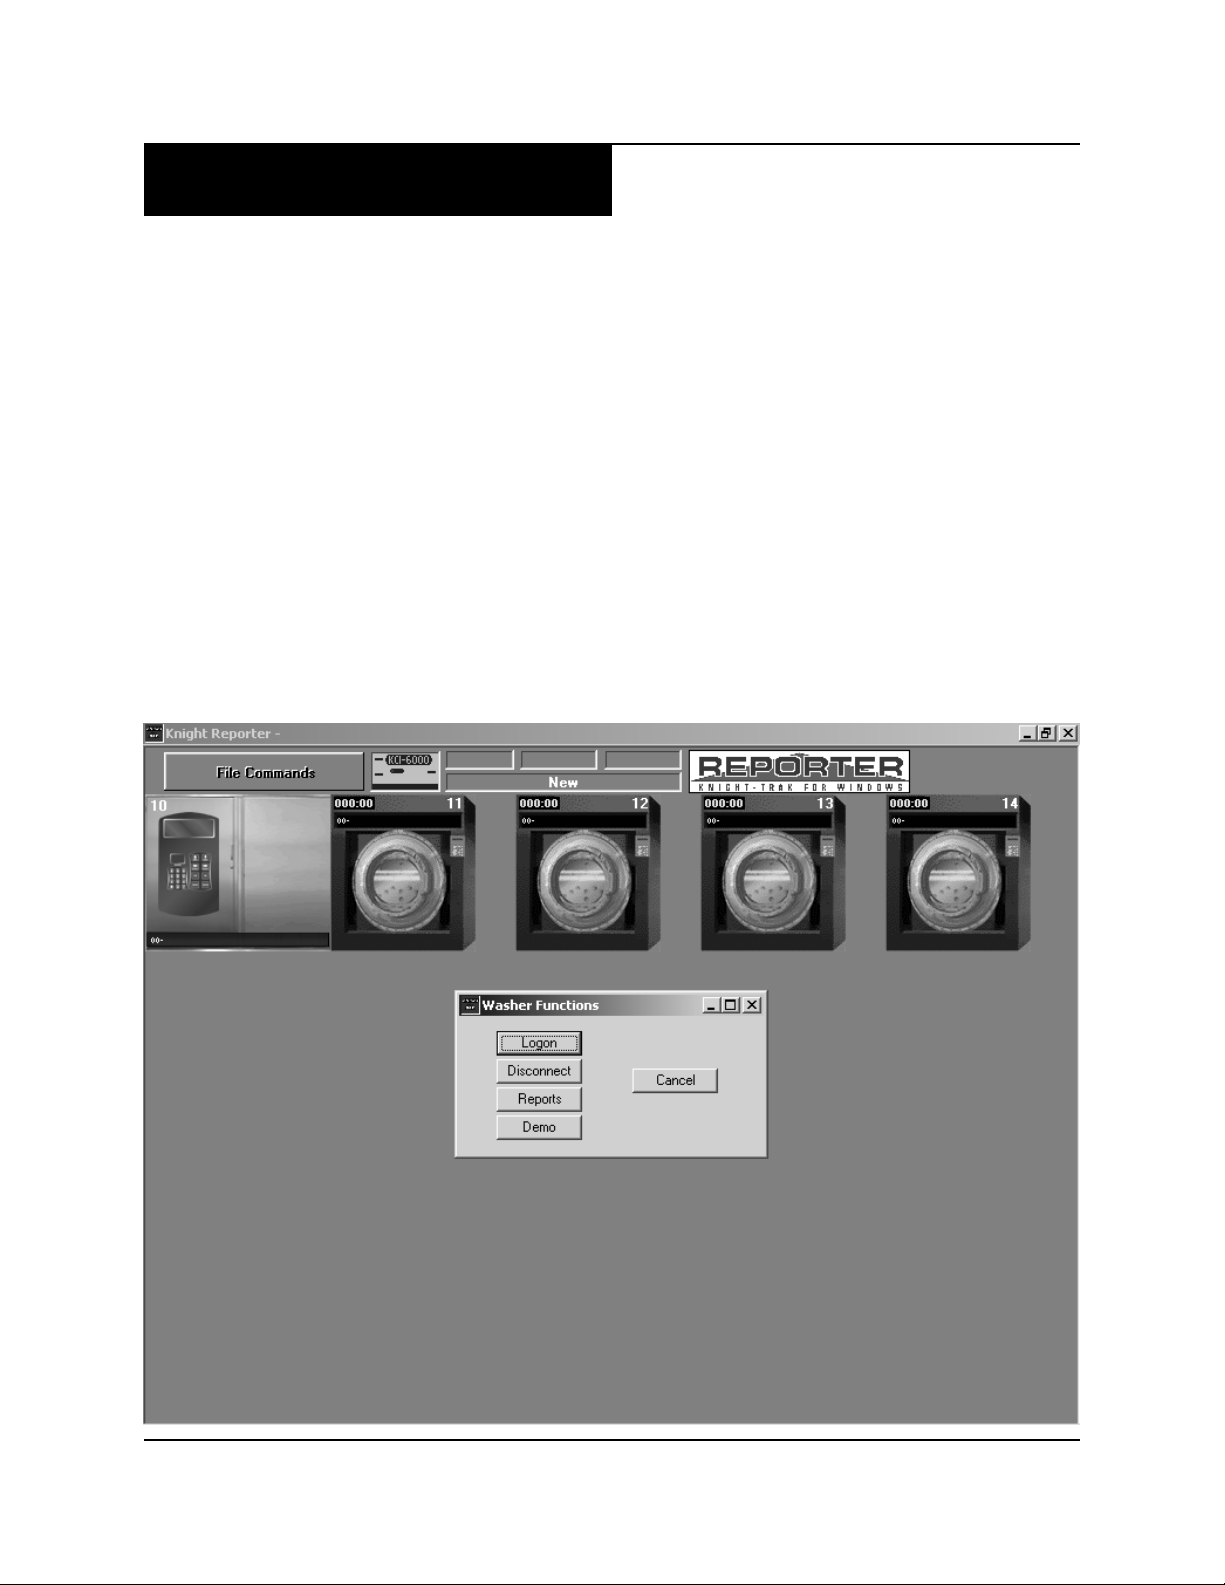
VIEWER SCREEN
This PC/Washer/Dispenser interface is designed to provide the end user and the chemical service distributor up-tothe-minute production status information. This unique graphical interface can become an important tool for any end
user concerned about the cost of labor, chemicals and utilities in the laundry. The end-user will use the Viewer for all
reporting and washer status inquiries.
The Viewer screen is the default display that appears when the program is started. However, if desired, the File
Commands screen can be selected as the default display and is explained in the Custom Setup section. To ―jump‖
from the Viewer screen to the File Commands screen, click the File Commands button in the upper left corner. When
prompted, enter the access code (by default is 0) and press ENTER.
By clicking on any one of the washers, you will see the Washer Functions display. The following buttons allow you to
choose which function to perform.
Logon – Takes you to the logon screen (detailed on page 12).
Disconnect – Used for disconnecting from a dispenser network. Also known as logging off.
Reports – Takes you to the report screen (detailed on page 28).
Demo – Runs a demo of the washer animation that is normally seen when logged on to a dispenser network
where washer activity is occurring.
Page 10 of 36 0404766 Rev: G (11/10)

FILE COMMANDS SCREEN
The File Commands screen is where all of the programming is done. Use of this screen is intended for the laundry (or
chemical) specialist, and is access code protected. End-users will typically not need to use this screen. If desired, this
screen can be chosen as the default display in the Custom Setup screen.
Location Settings – Takes you to the Customer Locations screen (detailed on page 10).
Logon – Takes you to the logon screen (detailed on page 12).
Receive Dispenser File – Downloads information from the dispenser you’re logged onto (detailed on page 13).
Send Dispenser File – Uploads the selected HEX file to the dispenser you’re logged onto (detailed on page 13).
Logoff / Reset – Disconnects you from the dispenser network. Also makes the RM File Directory button available
if not connected to a dispenser network.
Reports – Takes you to the report screen (detailed on page 28).
New Setup – Used for starting a new HEX file (detailed on page 13).
Save Setup – Used as a ―quick save‖ feature when working with HEX files (detailed on page 13).
Print Icon — Allows you to quickly print HEX files. Click on the HEX file, then click this button.
RM File Directory – Takes you to the file directory screen for the RM-6000 module (detailed on page 27).
Viewer – Takes you to back to the Viewer Screen. Also known as a ―jump‖ button.
0404766 Rev: G (11/10) Page 11 of 36
 Loading...