

Page 1
KNIGHT LLC,
English
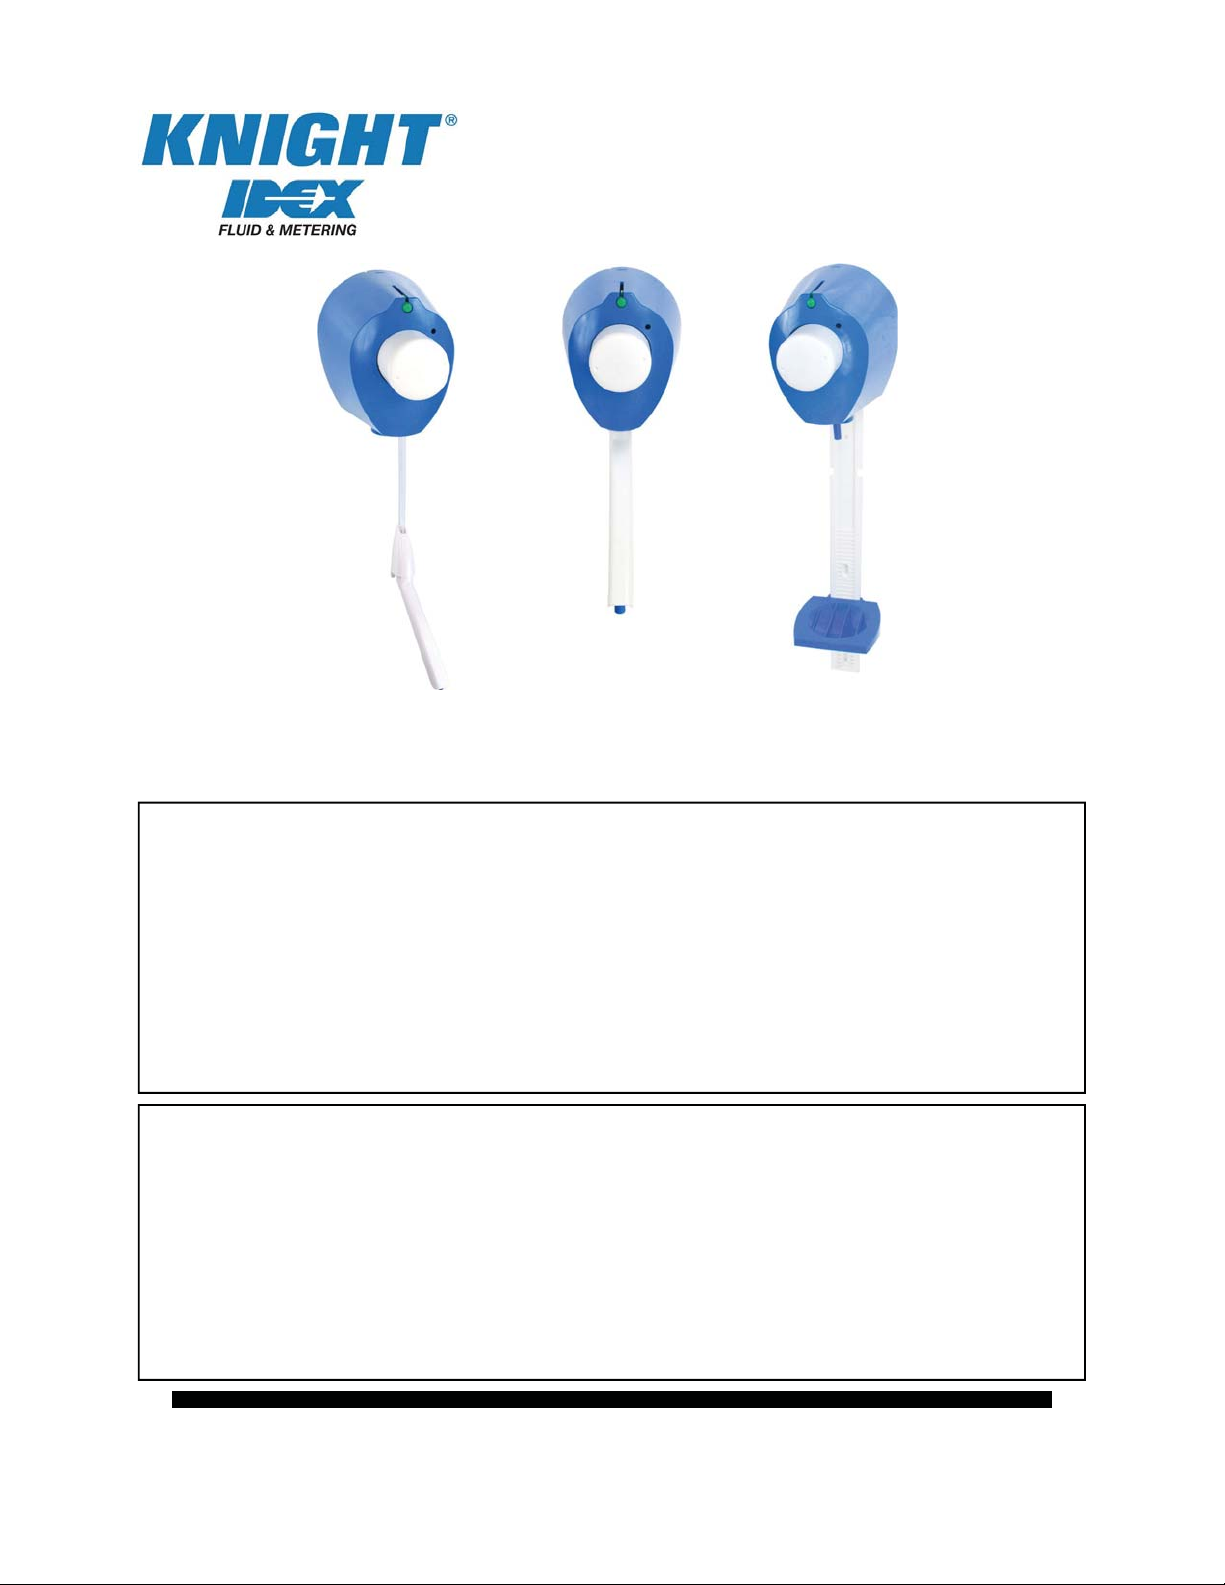
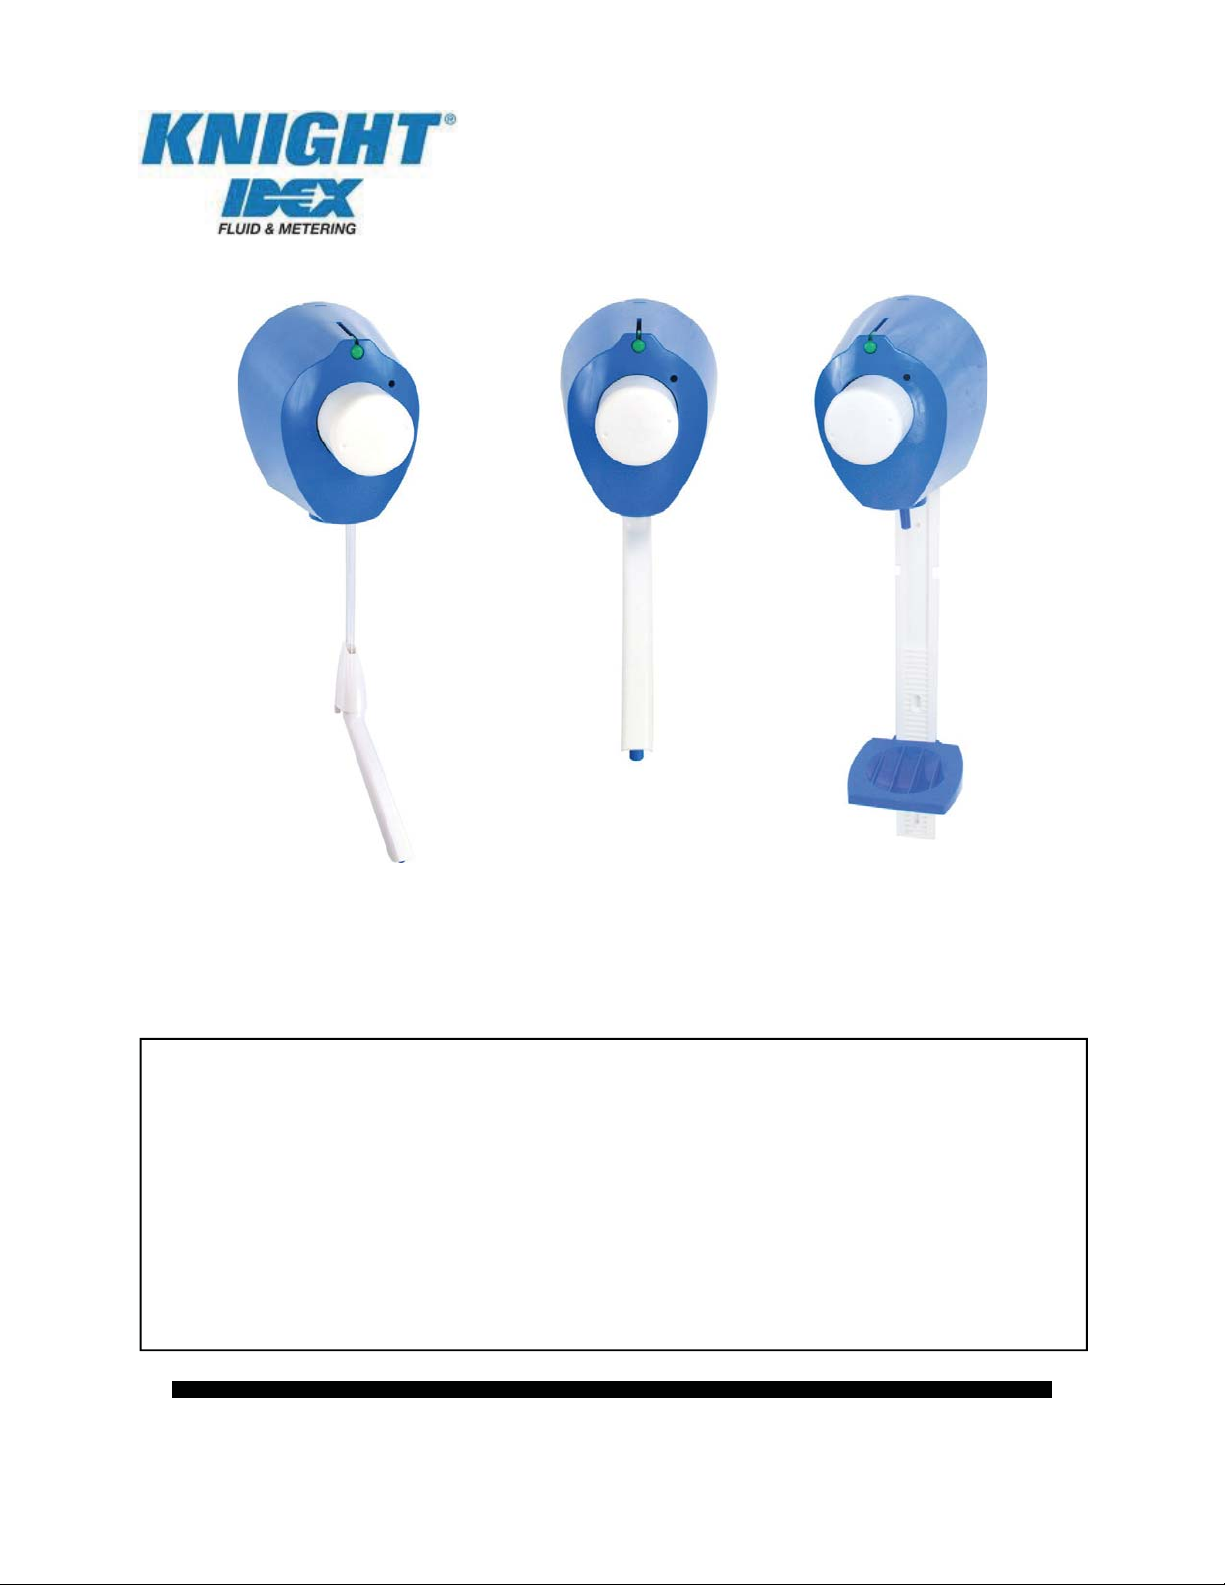
DosaMAX Jr.
Instruction Manual
DosaMAX Jr.
Bucket Fill
DosaMAX Jr.
Over the Sink
DosaMAX Jr.
Bottle Fill
SPECIFICATIONS
Bucket Fill Dimensions ……………….W 141mm x H 176mm x D 198mm (W 5.55” x H 6.93” x D 7.80”)
(without bucket fill hose)
Over the Sink Dimensions
Bottle Fill Dimensions………………….W 141mm x H 571mm x D 198mm (W 5.55” x H 22.48” x D 7.80”)
Weight……………………………………..1.2 kg. (2.65 lb.)
Outer Casing Material………………..ABS
Pump Body Material……………….…Polypropylene and PTFE
O-rings Material……………………….AFLAS®
DISCLAIMER : Knight LLC does not accept responsibility for the mishandling, misuse, or non-performance of the described items when
used for purposes other than those specified in the instructions. For hazardous materials information consult label, MSDS, or Knight LLC.
Knight products are not for use in potentially explosive environments. Any use of our equipment in such an environment is at the risk of the
user, Knight does not accept any liability in such circumstances.
WARRANTY : All Knight controls and pump systems are warranted against defects in material and workmanship for a period of ONE year.
All electronic control boards have a TWO year warranty. Warranty applies only to the replacement or repair of such parts when returned to
factory with a Knight Return Authorization (KRA) number, freight prepaid, and found to be defective upon factory authorized inspection.
Bearings and pump seals or rubber and synthetic rubber parts such as “O” rings, diaphragms, squeeze tubing, and gaskets are considered
expendable and are not covered under warranty. Warranty does not cover liability resulting from performance of this equipment nor the
labor to replace this equipment. Product abuse or misuse voids warranty.
FOOTNOTE : The information and specifications included in this publication were in effect at the time of approval for printing. Knight LLC
reserves the right, however, to discontinue or change specifications or design at any time without notice and without incurring any
obligation whatsoever.
……………W 141mm x H 308mm x D 238mm (W 5.55” x H 12.13” x D 9.37”)
Knight Headquarters
Tel: 949.595.4800
Fax: 949.595.4801
S100322 Rev: (REL) Page 1 of 16
USA Toll Free
Tel: 800.854.3764
Fax: 800.752.9518
Tel: 905.542.2333
Fax: 905.542.1536
A Unit of IDEX Corporation (www.knightequip.com)
Knight Canada
Knight Europe
Tel: 44.1323.514855
Fax: 44.1323.514828
Knight Australia
Tel: 61.02.9352.1801
Fax: 61.02.9352.1899
Knight N. Asia
Tel: 82.2.3481.6683
Fax: 82.2.3482.5742
Knight S. Asia
Tel: 65.6763.6633
Fax: 65.6489.6723
Page 2
PACKAGE CHECKLIST
DosaMAX Jr. Over the Sink
DosaMAX Jr. base unit
Dispenser arm (1)
Inlet tube with foot valve (1)
Mounting Screws (3)
Wall Anchor (3)
Hex Wrench (1)
Manual (1)
Spring (1)
DosaMAX Jr. Bucket Fill
DosaMAX Jr. base unit
Dispenser arm (1)
Bucket arm base (1)
Inlet tube with foot valve (1)
Check valve (1)
Nozzle (1)
Mounting Screws (6)
Wall Anchor (6)
Hex Wrench (1)
Outlet tube (1)
Manual (1)
Spring (1)
DosaMAX Jr. Bottle Fill
DosaMAX Jr. base unit
Bottle fill tray
Bottle fill bracket
Inlet tube with foot valve (1)
Mounting Screws (6)
Wall Anchor (6)
Hex Wrench (1)
Manual (1)
Spring (1)
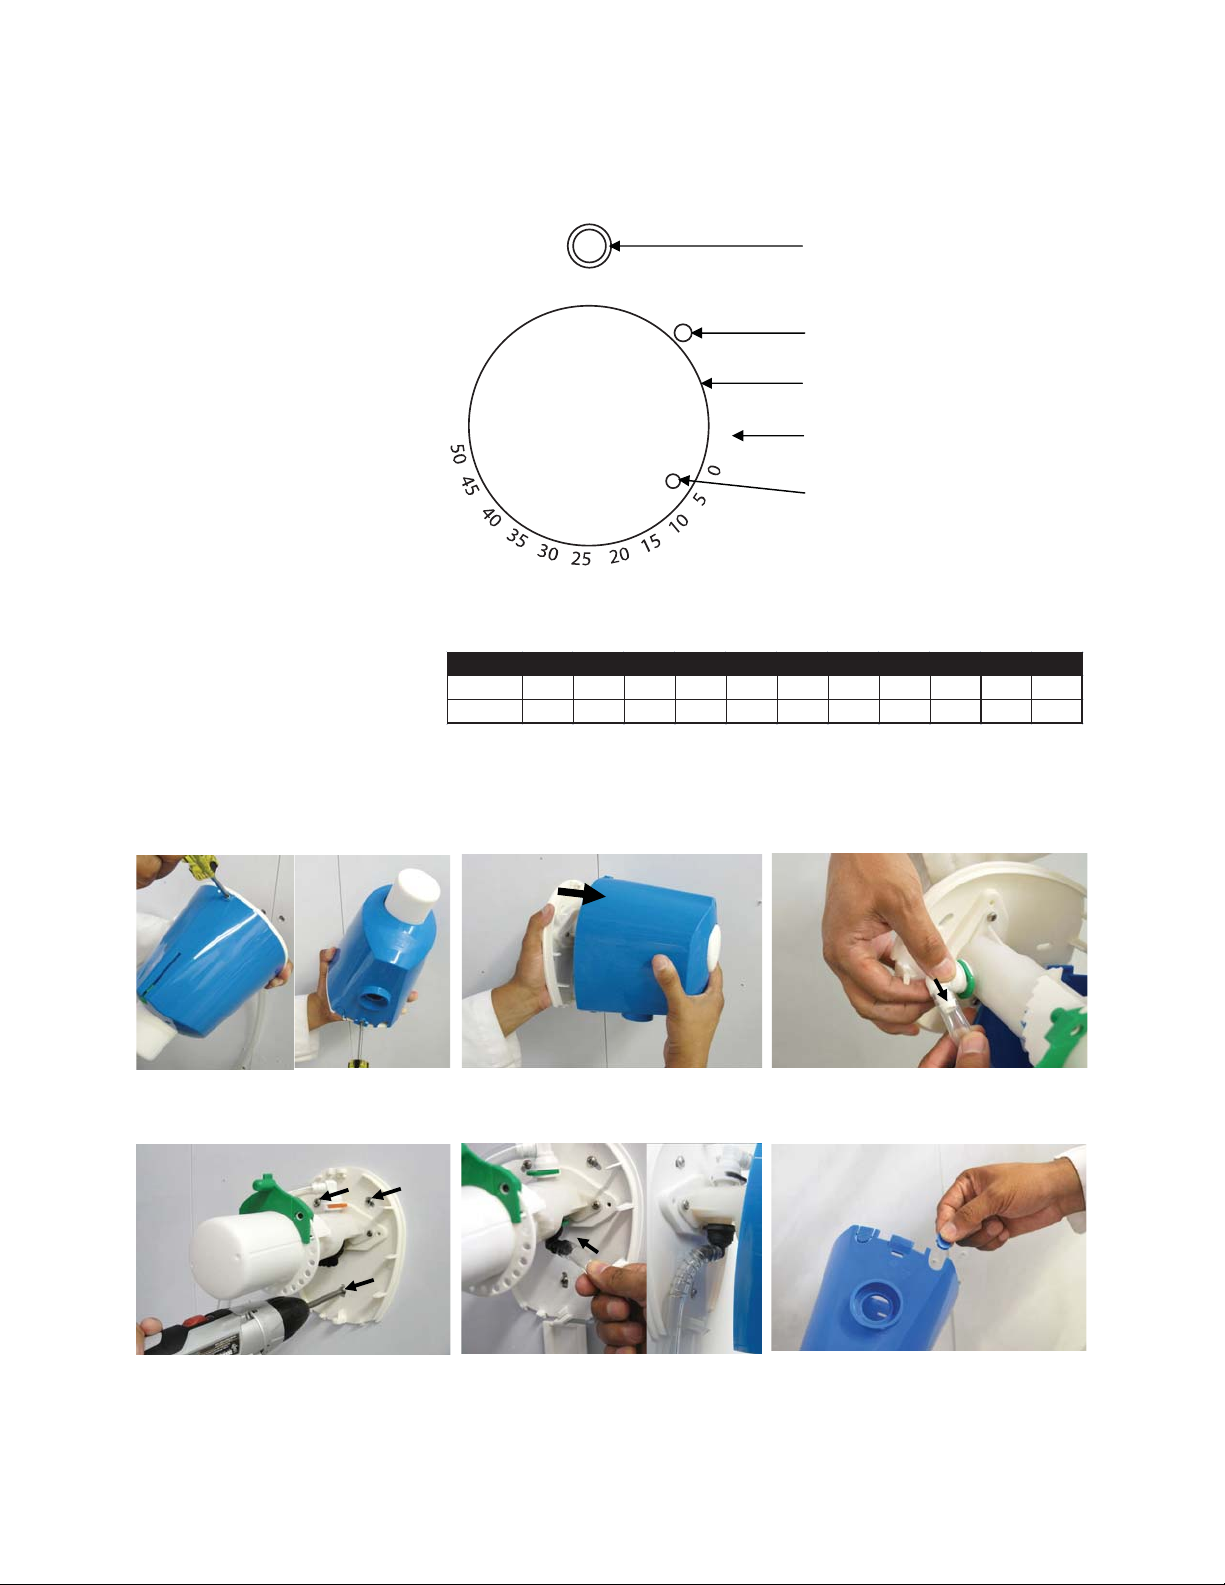
DOSAMAX PUSH DIAL DIAGRAM
Dosing ready indicator
Dial lock hole
DosaMAX Jr. push dial
ml
Milliliter settings
Setting indicator
DOSAGE CHART
Numb er 0 5 10 15 20 25 30 35 40 45 50
milliliter 0 5 10 15 20 25 30 35 40 45 50
ounces 0 0.18 0.35 0. 53 0.7 0.88 1. 06 1.23 1.41 1.58 1.76
CABINET MOUNTING
1.) Unscrew the screw on top and
bottom of the DosaMAX Jr. to
remove cover
4.)
Mark, drill, and screw in at the
three hole locations
2.) Separate cover from the back
plate
Suction Port
5.) Connect the chemical suction
tube with spring to suction port.
3.) For bottle versions only: discharge
tube will need to be disconnected to
remove cover
6.) Decide if chemical suction tube
is to run up left or right side of
cover and snap off tab.
Page 2 of 16 S100322 Rev: (REL)
Page 3
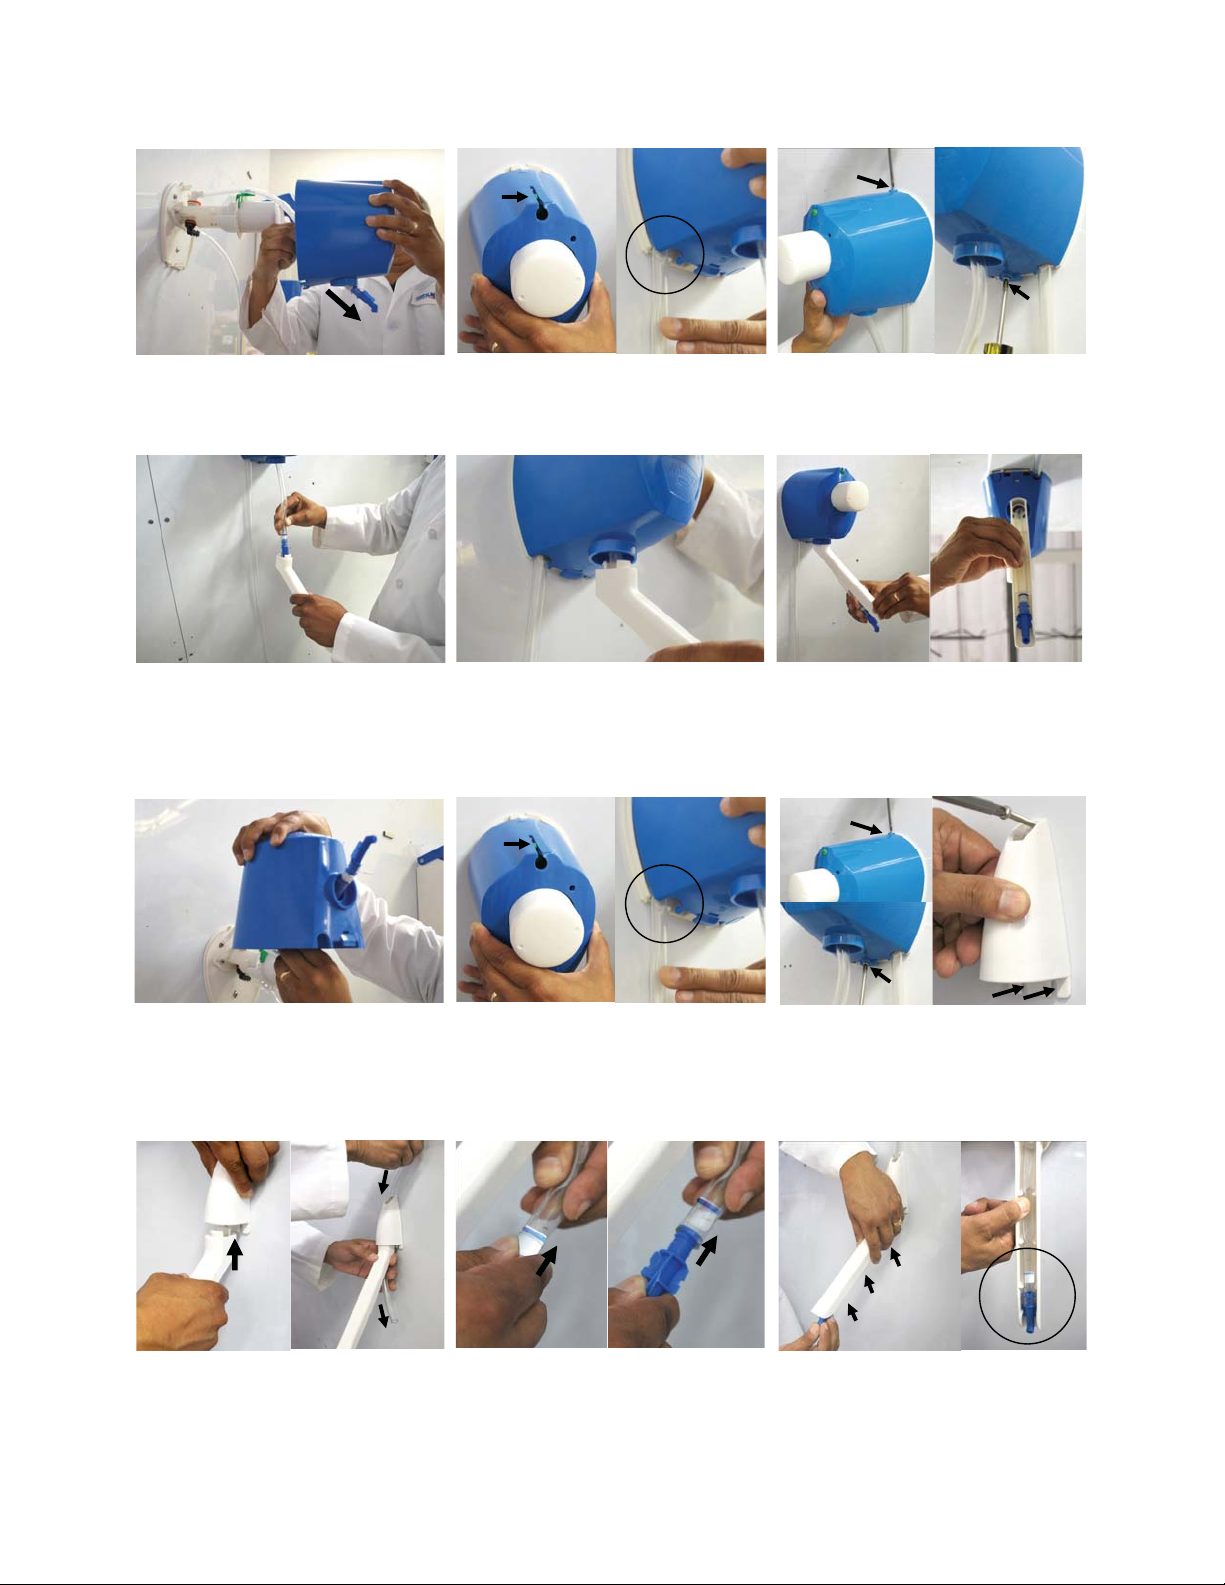
INSTALLATION : DOSAMAX OVER THE SINK
1.) Slide discharge tube through
cover
2.) Align cover, making sure the
green ready indicator is aligned
with opening and chemical suction
tube is aligned with tab opening.
4.) Slide discharge tubing through
hole on dispenser arm
5.) Snap dispenser arm onto
DosaMAX Jr. base
INSTALLATION : DOSAMAX BUCKET FILL
3.) Screw at the bottom and top of
cover to reattach cover.
6.) Snap nozzle and tubing onto
underside of dispenser arm
1.) Run discharge tube through base
and dispenser arm.
4.) Snap dispenser arm onto
bucket arm base.
tube through base and dispenser
Cut discharge tube to appro-
arm.
Run discharge
2.) Align cover, making sure the
green ready indicator is aligned
with opening and chemical suction
tube is aligned with tab opening.
5.) Insert check valve into
discharge tube with blue O-ring
side going in first. Then insert
nozzle into discharge tube.
3.) Screw at the bottom and top of
cover to reattach cover. Place
bucket arm base in place, and
screw in three screws in shown areas
to mount bucket arm base to wall.
6.) Snap nozzle and tubing onto
underside of dispenser arm
priate length.
S100322 Rev: (REL) Page 3 of 16
Page 4
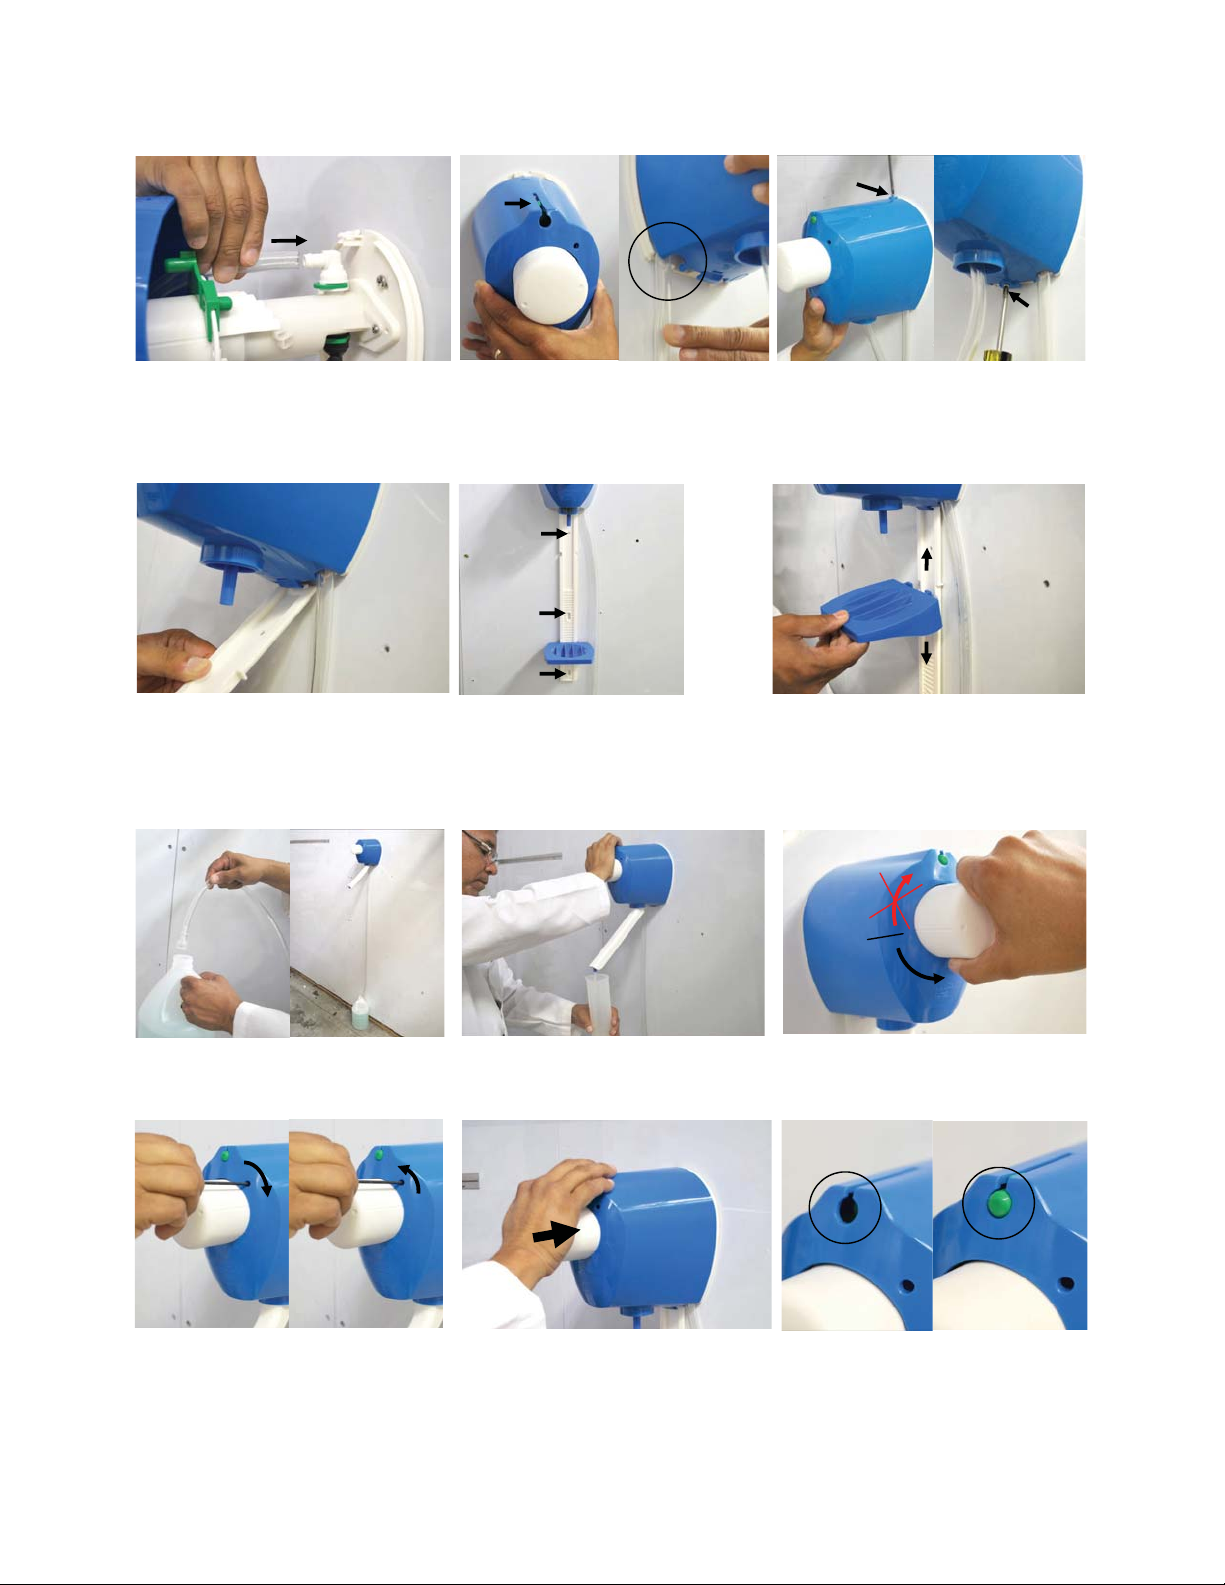
INSTALLATION : DOSAMAX BOTTLE FILL
1.) Reconnect discharge tube to
discharge port
4.) Place and hang bottle fill
bracket underneath spout
2.) Align cover, making sure the
green ready indicator is aligned
with opening and chemical suction
tube is aligned with tab opening.
5.) Drill and screw three screws in
shown areas to hang the bracket
INSTALLATION AND OPERATION
3.) Screw at the bottom and top of
cover to reattach cover.
6.) Adjust bottle fill tray to
preferred height
50 ml
1.) Insert pick-up tubing into
chemical container. 1.2 meter (47”)
suction tube supplied
4.) Use supplied hex wrench and
turn clockwise in hole to lock-in
dosing amount. If you need to
change dosing amount, use Allen
wrench and turn counter clockwise
in hole to unlock dial
Page 4 of 16 S100322 Rev: (REL)
2.) Turn dial to 50 ml position and
push dial. Repeat pushing action
until DosaMAX Jr. is primed.
5.) Fully push dial in to dose set
dosing amount
3.) Turn dial to your preferred
dosing amount. (Warning: Do not
turn over 50 ml)
6.) Dial should not be pushed
again until green indicator is fully
present
Page 5
KNIGHT LLC,
Deutsch
DosaMAX Jr.
Installationsanleitung
DosaMAX Jr.
Eimerbefüllung
SPEZIFIKATIONEN
Eimerbefüllung Gehäuseabmessungen .......................... B 141mm x H 176mm x T 198 mm
(ohne Dosierschlauch)
Waschbeckenbefüllung Gehäuseabmessungen
Flaschenbefüllung Gehäuseabmessungen ..............................
Gewicht ............................................................................ 1,2 kg
Material Gehäuse ............................................................ ABS
Material Pumpenkörper ................................................... Polypropylen und PTFE
Material O-Ringe ............................................................. AFLAS®
Knight Headquarters
Tel: 949.595.4800
Fax: 949.595.4801
USA Toll Free
Tel: 800.854.3764
Fax: 800.752.9518
A Unit of IDEX Corporation (www.knightequip.com)
Knight Canada
Tel: 905.542.2333
Fax: 905.542.1536
DosaMAX Jr.
Waschbeckenbefüllung
.............. B 141mm x H 308 mm x T 238 mm
B 141 mm x H 571 mm x T 198 mm
Knight Europe
Tel: 44.1323.514855
Fax: 44.1323.514828
Knight Australia
Tel: 61.02.9352.1801
Fax: 61.02.9352.1899
DosaMAX Jr.
Flaschenbefüllung
Knight N. Asia
Tel: 82.2.3481.6683
Fax: 82.2.3482.5742
Knight S. Asia
Tel: 65.6763.6633
Fax: 65.6489.6723
S100322 Rev: (REL) Page 5 of 16
Page 6

CHECKLISTE
DosaMAX Jr. Beckenbefüllung
DosaMAX Grundgerät
Dosierarm (1)
Ansaugschlauch m. Fussventil (1)
Befestigungsschrauben (3)
Dübel (3)
Inbusschlüssel (1)
Bedienungsanleitung (1)
Feder (1)
DosaMAX Jr. Eimerbefüllung
DosaMAX Grundgerät
Dosierarm (1)
Dosierarmhalter (1)
Ansaugschlauch m. Fussventil (1)
Rückschlagventil (1)
Düse (1)
Befestigungsschrauben (6)
Dübel (6)
Inbusschlüssel (1)
Dosierschlauch (1)
Bedienungsanleitung (1)
Feder (1)
DosaMAX Jr. Flaschenbefüllung
DosaMAX Grundgerät
Flaschenablage (1)
Flaschenablagehalter (1)
Ansaugschlauch m. Fussventil (1)
Befestigungsschrauben (6)
Dübel (6)
Inbusschlüssel (1)
Bedienungsanleitung (1)
Feder (1)
DOSAMAX BEDIENELEMENTE
Dosierbereitschaftsanzeige
Dosiermengenverriegelung
DosaMAX Druckknopf
ml
Dosierskala
Dosiermengenanzeige
DOSIERTABELLE
Skala 0 5 10 15 20 25 30 35 40 45 50
Milliliter 0 5 10 15 20 25 30 35 40 45 50
INSTALLATION GEHÄUSE
1.) Lösen Sie die Schrauben am
DosaMax Jr. Gehäuse.
4.)
Markieren und bohren Sie drei
Löcher. Montieren Sie die Grundplatte
mit drei Schrauben.
2.) Lösen Sie die Abdeckung von
der Grundplatte.
Suction Port
5.) Verbinden Sie den Ansaugschlauch mit der Feder am
Ansauganschluss.
3.) Nur für Flaschenbefüllung:
entfernen Sie den Dosierschlauch, um
die Abdeckung zu lösen.
6.) Wählen Sie, ob der Ansaugschlauch rechts oder links am
Gehäuse verlaufen soll.
Page 6 of 16 S100322 Rev: (REL)
Page 7

INSTALLATION : DOSAMAX JR. BEECKENBEFÜÜLUNG
1.) Führen Sie den Förderschlauch
durch die entsprechende Öffnung
am Gehäuse.
4.) Führen Sie den Dosierschlauch
durch das Loch am Dosierarm.
2.) Richten Sie das Gehäuse so aus,
dass die Bereitschaftsanzeige und der
Ansaugschlauch in die entsprechenden
Aussparungen passen.
Rasten Sie den Dosierarm in die
5.)
Halterung an der Unterseite des Gehäuses ein.
INSTALLATION : DOSAMAX JR. EIMERBEFÜLLUNG
3.) Befestigen Sie das Gehäuse
mit den zwei Schrauben wieder an
der Grundplatte.
6.) Rasten Sie Düse und Schlauch
in die Führungsschiene an der
Unterseite des Dosierarms ein.
1.) Führen Sie den Förderschlauch
durch die entsprechenden
Öffnungen an Gehäuse und
Dosierarm.
4.)
Rasten Sie den Dosierarm in die
Halterung ein. Führen Sie den
Dosierschlauch durch Halterung und
Dosierarm. Schneiden Sie den
Schlauch zur gewünschten Länge zu.
S100322 Rev: (REL) Page 7 of 16
2.) Richten Sie das Gehäuse so aus,
dass die Bereitschaftsanzeige und der
Ansaugschlauch in die entsprechenden
Aussparungen passen.
5.) Setzen Sie das Rückschlagventil, mit dem blauen O-Ring
zuerst, in den Dosierschlauch
ein.Setzen Sie anschließend die
Düse in den Dosierschlauch ein.
3.) Befestigen Sie das Gehäuse
mit den zwei Schrauben wieder an
der Grundplatte.
gezeigt den Dosierarmhalter mit drei
Schrauben.
Befestigen Sie wie
6.) Rasten Sie Düse und Schlauch
in die Führungsschiene an der
Unterseite des Dosierarms ein.
Page 8

INSTALLATION : DOSAMAX JR. FLASCHENBEFÜLLUNG
1.) Verbinden Sie den Ansaugschlauch mit dem Ansaug-
anschluss.
4.) Hängen Sie den Ablagehalter
unterhalb des Auslaufs in die dafür
vorgesehene Halterung ein.
2.) Richten Sie das Gehäuse so aus,
dass die Bereitschaftsanzeige und der
Ansaugschlauch in die entsprechenden
Aussparungen passen.
5.) Befestigen Sie den Halter mit
drei Schrauben an den dafür vorgesehenen Aussparungen.
INBETRIEBNAHME UND BEDIENUNG
3.) Befestigen Sie das Gehäuse
mit den zwei Schrauben wieder an
der Grundplatte.
6.) Justieren Sie die Flaschenablage in der gewünschten Höhe.
50 ml
1.) Führen Sie den Ansaugschlauch in das
Chemikaliengebinde. 1,2 m Schlauch sind im
Lieferumfang enthalten.
4.) Führen Sie den Inbusschlüssel in die
entsprechende Öffnung und drehen Sie
im Uhrzeigersinn, um die die Einstellung
zu fixieren. Soll die Dosiereinstellung
geändert werden, die Fixierung mit dem
Inbusschlüssel durch Drehung gegen den
Uhrzeigersinn lösen.
Page 8 of 16 S100322 Rev: (REL)
2.)
Drehen Sie den Knopf in die 50 mLPosition und drücken Sie so oft, bis die
Leitung vollständig mit Produkt gefüllt ist.
5.) Drücken Sie den Knopf einmal
voll durch, um das gewünschte
Produktvolumen zu dosieren.
3.)
Drehen Sie den Knopf in die gewünschte Dosiereinstellung. (Warnung: Dre-
hen Sie nicht über die 50 mL-Position!)
Der Knopf sollte nicht wieder
6.)
gedrückt werden, bis die grüne Dosierbereitschaftsanzeige voll sichtbar ist.
Page 9

KNIGHT LLC,
Español
DosaMAX Jr.
Manual de Instrucción
DosaMAX Jr.
Para cubetas
SPECIFICATIONS
Dimensiones para llenar cubetas….….W 141mm x H 176mm x D 198mm (W 5.55” x H 6.93” x D 7.80”)
(sin manguera de descarga)
Dimensiones para tarja….
Dimensiones para llanar botellas..….W 141mm x H 571mm x D 198mm (W 5.55” x H 22.48” x D 7.80”)
Peso ..……………………………………..1.2 kg. (2.65 lb.)
Material de cubierta...………………..ABS
Material cuerpo de bomba...……..…Polypropylene and PTFE
Material de O-rings ………………….AFLAS®
Knight Headquarters
Tel: 949.595.4800
Fax: 949.595.4801
USA Toll Free
Tel: 800.854.3764
Fax: 800.752.9518
DosaMAX Jr.
Sobre la tarja
DosaMAX Jr.
Lenar botellas
……………W 141mm x H 308mm x D 238mm (W 5.55” x H 12.13” x D 9.37”)
A Unit of IDEX Corporation (www.knightequip.com)
Knight Canada
Tel: 905.542.2333
Fax: 905.542.1536
Knight Europe
Tel: 44.1323.514855
Fax: 44.1323.514828
Knight Australia
Tel: 61.02.9352.1801
Fax: 61.02.9352.1899
Knight N. Asia
Tel: 82.2.3481.6683
Fax: 82.2.3482.5742
Knight S. Asia
Tel: 65.6763.6633
Fax: 65.6489.6723
S100322 Rev: (REL) Page 9 of 16
Page 10

LISTA DE VERIFICACION
DosaMAX Jr. para tarja
Unidad Base DosaMAX Jr.
Brazo de Descarga (1)
Tubo de entrada con Válvula Check (1)
Tornillos para montaje (3)
Anclaje de pared (3)
Llave Hex (1)
Manual (1)
Resorte (1)
DosaMAX Jr. para cubeta
Unidad Base DosaMAX Jr.
Brazo de Descarga (1)
Base para brazo de descarga (1)
Manguera de entrada con Válvula (1)
Válvula Check (1)
Boquilla ( (1)
Tornillos para montaje (6)
Anclaje de pared (6)
Llave Hex (1)
Tubo de salida (1)
Manual (1)
Resorte (1)
DosaMAX Jr. para botella
Unidad base DosaMAX Jr.
Bandeja para botella
Abrazadera para botella
Manguera de entrada con Válvula (1)
Tornillos para montaje (6)
Anclaje de pared (6)
Hex Wrench (1)
Manual (1)
Resorte (1)
DIAGRAMA PARA SELECTOR DOSAMAX
Indicador listo para oprimir
Entrada para cerrar con llave
Dial para oprimir DosaMAX Jr.
ml
Indicador en mililitros
Indicador de selección
GRAFICO DE DOSIFICACION
Número 0 5 10 15 20 25 30 35 40 45 50
ml 0 5 10 15 20 25 30 35 40 45 50
onzas 00.180.350.53 0.70.881.061.231.411.581.76
MONTAR GABINETE
1.) Desatornillar el tornillo en la
parte superior e inferior del
DosaMAX Jr. para remover la tapa
4.) Atornillar tres tornillos donde
esta indicado en la base
2.) Separar la tapa de la base
Puerto de succión
5.) Conectar manguera de succión
con resorte al Puerto de entrada.
3.) Para versiones de botella: el
tubo de descarga se debe desconectar
para remover la tapa
6.) Decida a que lado entrara la
manguera de succión, derecha o
izquierda de la tapa.
Page 10 of 16 S100322 Rev: (REL)
Page 11

INSTALACION : DOSAMAX JR SOBRE TARJA
1.) Recorrer la manguera de descarga por la tapa como indicado
2.) Instale la tapa asegurando que
el indicador verde se alinee con la
apertura en la tapa.
4.) Recorrer la manguera con boquilla por el agujero del brazo de
5.) Ingresar el brazo a la base del
DosaMAX Jr.
descarga
INSTALACION : DOSAMAX JR PARA CUBETAS
3.) Atornillar la tapa en la parte
superior e inferior de la tapa.
6.) Ingresar la boquilla con
manguera en la parte de abajo del
brazo.
1.) Recorra la manguera de
descarga con boquilla por la parte
de abajo de la tapa
4.)
Ingresar el brazo de descarga a
la base.
pasar la manguera de
descarga por la base y brazo de
descarga
descarga a la medida adecuada
. Cortar la manguera de
.
S100322 Rev: (REL) Page 11 of 16
2.) Instale la tapa asegurando que
el indicador verde se alinee con la
apertura en la tapa y la manguera
de succión este alineada con la
parte de debajo de la tapa.
5.) Poner la válvula check en la
manguera de descarga con el tubito con el “O” ring azul primero. Insertar la boquilla en la manguera
de descarga.
3.) Atornillar la tapa en la parte
superior e inferior de la tapa.
Atornillar tres tornillos como indicado para montar la base del brazo
de descarga.
6.) Ingresar la manguera con
boquilla en el brazo de descarga
Page 12

INSTALACION : DOSAMAX JR PARA BOTELLA
1.) Reconectar la manguera de
descarga al Puerto de descarga.
4.) Poner la abrazadera de la botella en la parte de abajo.
INSTALACION Y OPERACION
2.) Instale la tapa asegurando que
el indicador verde se alinee con la
apertura en la tapa.
5.) Atornillar tres tornillos en la
abrazadera en la parte indicada
3.) Atornillar la tapa en la parte
superior e inferior de la tapa.
6.) Ajustar la bandeja de la botella
a la altura adecuada
50 ml
1.) Insertar manguera de succión
en el contenedor. Poner 1.2 metros
(47”) de manguera de succión.
4.) Use la llave Hex incluida y girar
a la derecha para fijar la dosificación seleccionada. Si requieren
cambiar la dosis den vuelta a la
2.) Seleccionar la posición de 50 ml y
oprimir el dial. Oprimir el dial hasta que se
llene la manguera del DosaMAX Jr.
5.) Oprimir completamente el dial
para dosificar la cantidad seleccionada
3.) Dar vuelta al dial hasta seleccionar la dosificación adecuada.
(Aviso: No pase de 50 ml)
6.) No oprimir el dial hasta que
el indicador verde este
completamente visible.
llave HEX hacia l izquierda para
poder hacer el cambio.
Page 12 of 16 S100322 Rev: (REL)
Page 13

KNIGHT LLC,
Français
DosaMAX Jr.
Manuel d’instructions
Remplisseur de seau
SPÉCIFICATIONS
Dimensions du replisseur de seau...….L 141mm x H 176mm x P 198mm (L 5.55” x H 6.93” x P 7.80”)
(sans tuyau de remplissage)
Dimensions au-dessus évier…………L 141mm x H 308mm x P 238mm (L 5.55” x H 12.13” x P 9.37”)
Dimensions du remplisseur de.………..L 141mm x H 571mm x P 198mm (L 5.55” x H 22.48” x P 7.80”)
bouteille
Poids..……………………………………..1.2 kg. (2.65 livres)
Matériau de couverture externe...…..ABS
Matériaux du corps de pompe...….…Polypropylène et PTFE
Matériau des o-rings...……………….AFLAS®
Knight Headquarters
Tel: 949.595.4800
Fax: 949.595.4801
DosaMAX Jr.
USA Toll Free
Tel: 800.854.3764
Fax: 800.752.9518
A Unit of IDEX Corporation (www.knightequip.com)
Knight Canada
Tel: 905.542.2333
Fax: 905.542.1536
DosaMAX Jr.
Au-dessus évier
Knight Europe
Tel: 44.1323.514855
Fax: 44.1323.514828
Tel: 61.02.9352.1801
Fax: 61.02.9352.1899
Knight Australia
DosaMAX Jr.
Remplisseur de bouteille
Knight N. Asia
Tel: 82.2.3481.6683
Fax: 82.2.3482.5742
Knight S. Asia
Tel: 65.6763.6633
Fax: 65.6489.6723
S100322 Rev: (REL) Page 13 of 16
Page 14

LISTE DE CONTRÔLE
DosaMAX Jr. au-dessus évier
DosaMAX Jr. unité de base
Bras distributeur (1)
Tube d’entré avec soupape (1)
Vis à montage (3)
Attache pour mur (3)
Clef hexagonale (1)
Manuel (1)
Ressort (1)
DosaMAX Jr. remplis seau
DosaMAX Jr. unité de base
Bras distributeur (1)
Fond de bras de seau (1)
Tube d’entré avec soupape (1)
Soupape de retenu (1)
Buse (1)
Vis à montage (6)
Attache pour mur (6)
Clef hexagonale (1)
Tube de sortie (1)
Manuel (1)
Ressort (1)
DosaMAX Jr. remplis bouteille
DosaMAX Jr. unité de base
Plateau remplis bouteille
Support remplis bouteille
Tube d’entré avec soupape (1)
Vis à montage (6)
Attache pour mur (6)
Clef hexagonale (1)
Manuel (1)
Ressort (1)
DOSAMAX JR. DIAGRAMME D’APPUI CADRAN
Indicateur dose prête
Trou serrage de cadran
DosaMAX Jr. appui cadran
ml
Réglages millitres
Indicateur de réglage
TABLEAU DE DOSE
Nombre 0 5 10 15 20 25 30 35 40 45 50
millilitres 0 5 10 15 20 25 30 35 40 45 50
onces 0 0.18 0.35 0. 53 0.7 0.88 1.06 1.23 1. 41 1.58 1. 76
MONTAGE
1.) Dévisser la vis sur le haut et le bas
du DosaMAX Jr. pour enlever le
couvercle.
4.) Marquer les trois endroits des
trous de forage et viser en place.
2.) Séparer le couvercle de la
plaque.
Port de succion
5.) Connecter le tube d'aspiration
chimique avec ressort à port de
succion.
3.) Pour les versions de bouteille seulement: tube à décharge devrait être
déconnecté pour enlever le couvercle.
6.) Décider si le tube d'aspiration
chimique est à exécuter à la gauche ou à la
droite du couvercle et casser net l'onglet.
Page 14 of 16 S100322 Rev: (REL)
Page 15

INSTALLATION : DOSAMAX JR. AU-DESSUS EVIER
1.) Glisser le tube à décharge à travers
le couvercle.
4.) Glisser le tube de décharge par le
trou sur le bras de distributeur.
2.) Aligner le couvercle, s'assurer que
l'indicateur dose prête vert est aligné avec
l’ouverture et que le tube d'aspiration chimique
est alignée avec l'ouverture de l'onglet.
.
5.) Emboîter avec un coup sec la
base du DosaMAX Jr.
INSTALLATION : DOSAMAX JR. REMPLISSEUR DE SEAU
3.) Viser au bas et au haut du
couvercle pour rattacher le couvercle.
6.) Emboîter avec un coup sec la
buse et le tuyau au dessous du
bras du distributeur.
1.) Passer le tube à décharge à travers
la base et le bras de distribution.
.
2.) Aligner le couvercle, s'assurer que
l'indicateur dose prête vert est aligné
avec l’ouverture et que le tube
d'aspiration chimique est alignée avec
l'ouverture de l'onglet.
3.) Viser au bas et au haut du couvercle pour rattacher le couvercle. Placer
le fond de bras de seau en place et
viser les trois vis de fixation dans les
zones indiquées pour monter le fond de
bras de seau au mur.
4.) Emboîter avec un coup sec le bras
distributeur sur le fond de bras de
seau. Exécuter le tube à décharge à
travers la base et le bras distributeur.
Couper le tube à décharge à la longueur
appropriée.
S100322 Rev: (REL) Page 15 of 16
5.) Avec le côté bleu du o-ring en
premier, insérer le soupape de retenu
dans le tube à décharge. Ensuite insérer
la buse dans le tube à décharge.
6.) Emboîter avec un coup sec la buse
et le tube au-dessous du bras de distributeur.
Page 16

INSTALLATION : DOSAMAX JR. REMPLISSEUR DE BOUTEILLE
1.) Rebrancher le tube à décharge au
port de décharge
4.) Placer et accrocher le support
remplis bouteille sous le bec
verseur.
2.) Aligner le couvercle, s'assurer que
l'indicateur dose prête vert est aligné avec
l’ouverture et que le tube d'aspiration chimique est alignée avec l'ouverture de l'onglet.
.
5.) Percer les trous et viser les
trois vises aux endroits indiquées
pour accrocher le support.
INSTALLATION ET FONCTIONNEMENT
3.) Viser au bas et au haut du
couvercle pour rattacher le couvercle.
6.) Ajuster le plateau remplis bouteille
à la hauteur préférée.
50 ml
1.) Insérer le tube d’aspiration dans
le recipient chimique. Un tube d’aspiration de 1.2 metre (47”) est fournis.
4.) Utiliser la clef hexagonale fournie et
tourner dans le sens des aiguilles d’une
montre dans le trou afin de bloquer les proportions préférées. Pour modifier les proportions, utiliser la clef hexagonal et tourner dans
le sens inverse des aiguilles d’une montre
dans le trou pour déverrouiller le cadran.
Page 16 of 16 S100322 Rev: (REL)
2.) Tourner le cadran à 50 ml et appuyer
sur l’appui cadran. Continuer d’appuyer
jusqu'à ce que le DosaMAX Jr. est amorcer.
5.) Pousser entièrement l’appui
cadran dans la proportion préférée
afin de fixer ce montant.
3.) Tourner l’indicateur aux
proportions préférées. (Avis: Ne
dépasser pas 50ml)
6.) Le cadran ne doit pas être
poussée à nouveau jusqu’à ce que
l’indicateur vert est pleinement visible.
 Loading...