

Knight Equipment CT 550 Installation Manual
Control Guard FCS
Instruction Manual
0900596 Rev: A (10/07) Page 1 of 20

TABLE OF CONTENTS
Specifications ....................................................................................................... 3
Pre-Installation...................................................................................................... 4
Installation ............................................................................................................ 4
Operation.............................................................................................................. 6
Programming ........................................................................................................ 7
Titration Graph.................................................................................................... 11
System Wiring Diagram ...................................................................................... 12
Replacement Parts ............................................................................................. 13
Optional KTM-550/600 ....................................................................................... 14
Optional CT-550/600 .......................................................................................... 16
Optional MT-300/400.......................................................................................... 18
Warranty Information .......................................................................................... 20
Knight Locations ................................................................................................. 20
CAUTION: Wear protective clothing and eyewear when dispensing chemicals or
other materials. Observe safety handling instructions (MSDS) of chemical mfrs.
CAUTION: To avoid severe or fatal shock, always disconnect main power when
servicing the unit.
CAUTION: When installing any equipment, ensure that all national and local
safety, electrical, and plumbing codes are met.
Page 2 of 20 0900596 Rev: A (10/07)

SPECIFICATIONS
Pumps Wet End Mat’l Flow Rate Voltage PSI Rating Suction Lift
KP-5200 EPDM 16 oz/min 24 VDC 30 max 10 ft max
KP-8100 EPDM 34 oz/min 24 VDC 30 max 10 ft max
Clean Guard 1.5 EPDM or Viton 1.5 GPM 115 or 230 VAC 70 max 10 ft max
Clean Guard 3.2 EPDM or Viton 3.2 GPM 115 or 230 VAC 70 max 10 ft max
Probes Material Probe Max Temp Control Range Cable Length Mounting
Conductive Polypropylene 180º F max 80 ms (max) Order separately 7/8” hole
Inductive Polypropylene 180º F max 80 ms (max) 25 ft 7/8” hole
Case Material Gasket IP Rating NEMA Class Dimensions
ABS or PC EPDM IP-65 1, 4, 4X, 12, 13
•
Pollution Degree II
•
Installation category I
•
Altitude 2000m
•
Humidity 5 to 95%
•
Electrical supply 115/230VAC, 50/60Hz, 2A
W 13.25” x H 10.5”
x D 7.5”
•
For Indoor Use Only
•
Temperature 5°C to 40°C
•
Mains supply voltage fluctuations are not to exceed 10% of the nominal supply voltage
•
The unit shall not be positioned so that it is difficult to operate the power disconnecting means
•
Protection is impaired if the product is used in a manner not specified by the manufacturer
•
Replacement Fuse for 115V model: 2Amp, 250V, 6.3x32mm, Fast-Acting
•
Replacement Fuse for 230V model: 2Amp, 250V, 5x20mm, Fast-Acting
SAFETY SYMBOL EXPLANATIONS
Listed below are explanations of the safety symbols that appear either on the unit, in the instruction manual, or both.
Please familiarize yourself with the meaning of each symbol.
GENERAL CAUTION: This symbol indicates a general safety caution.
SHOCK HAZARD: This symbol indicates that hazardous voltages are inside the
enclosure.
READ MANUAL: This symbol indicates to read the manual for important
instructions and procedures related to safety.
0900596 Rev: A (10/07) Page 3 of 20

PRE-INSTALLATION
(1) Check all applicable plumbing and electrical codes before installation. This will help to ensure that the system is
installed in safe and suitable manner.
(2) Get a wiring schematic of the washmachine (provided by the machine mfr or may be on the machine itself).
(3) Check to make sure that all functions of the washer are operating properly. Including; timer, water solenoids,
water level switch, pump motor, and drain valve.
(4) Check the proposed location for a 115, or 230 VAC power source (based on the model you will be using).
(5) Check voltage of all washer chemical signals that will be used. Measure voltage between chemical signal and
signal common with a voltmeter. Do not
(6) Check mounting location for chemical injection anti-siphon valves. Verify port size with fittings you have for
installation.
Before beginning the installation, make sure you have the following tools and materials ready...
•
Flat and Phillips screwdrivers.
•
Drill and drill bits.
•
Suitable wire for main power and signals (check local
codes).
•
Wire cutters, wire strippers, and pliers.
•
Wire terminal connectors and a crimping tool.
check signal voltage between supply signal and case (earth) ground.
•
Voltmeter (or multi-meter).
•
Dry wall inserts and mounting screws.
•
Electrical tape and wire nuts.
•
Chemical test kit.
•
Injection check valves.
•
Braided vinyl hose for 3/8” ID.
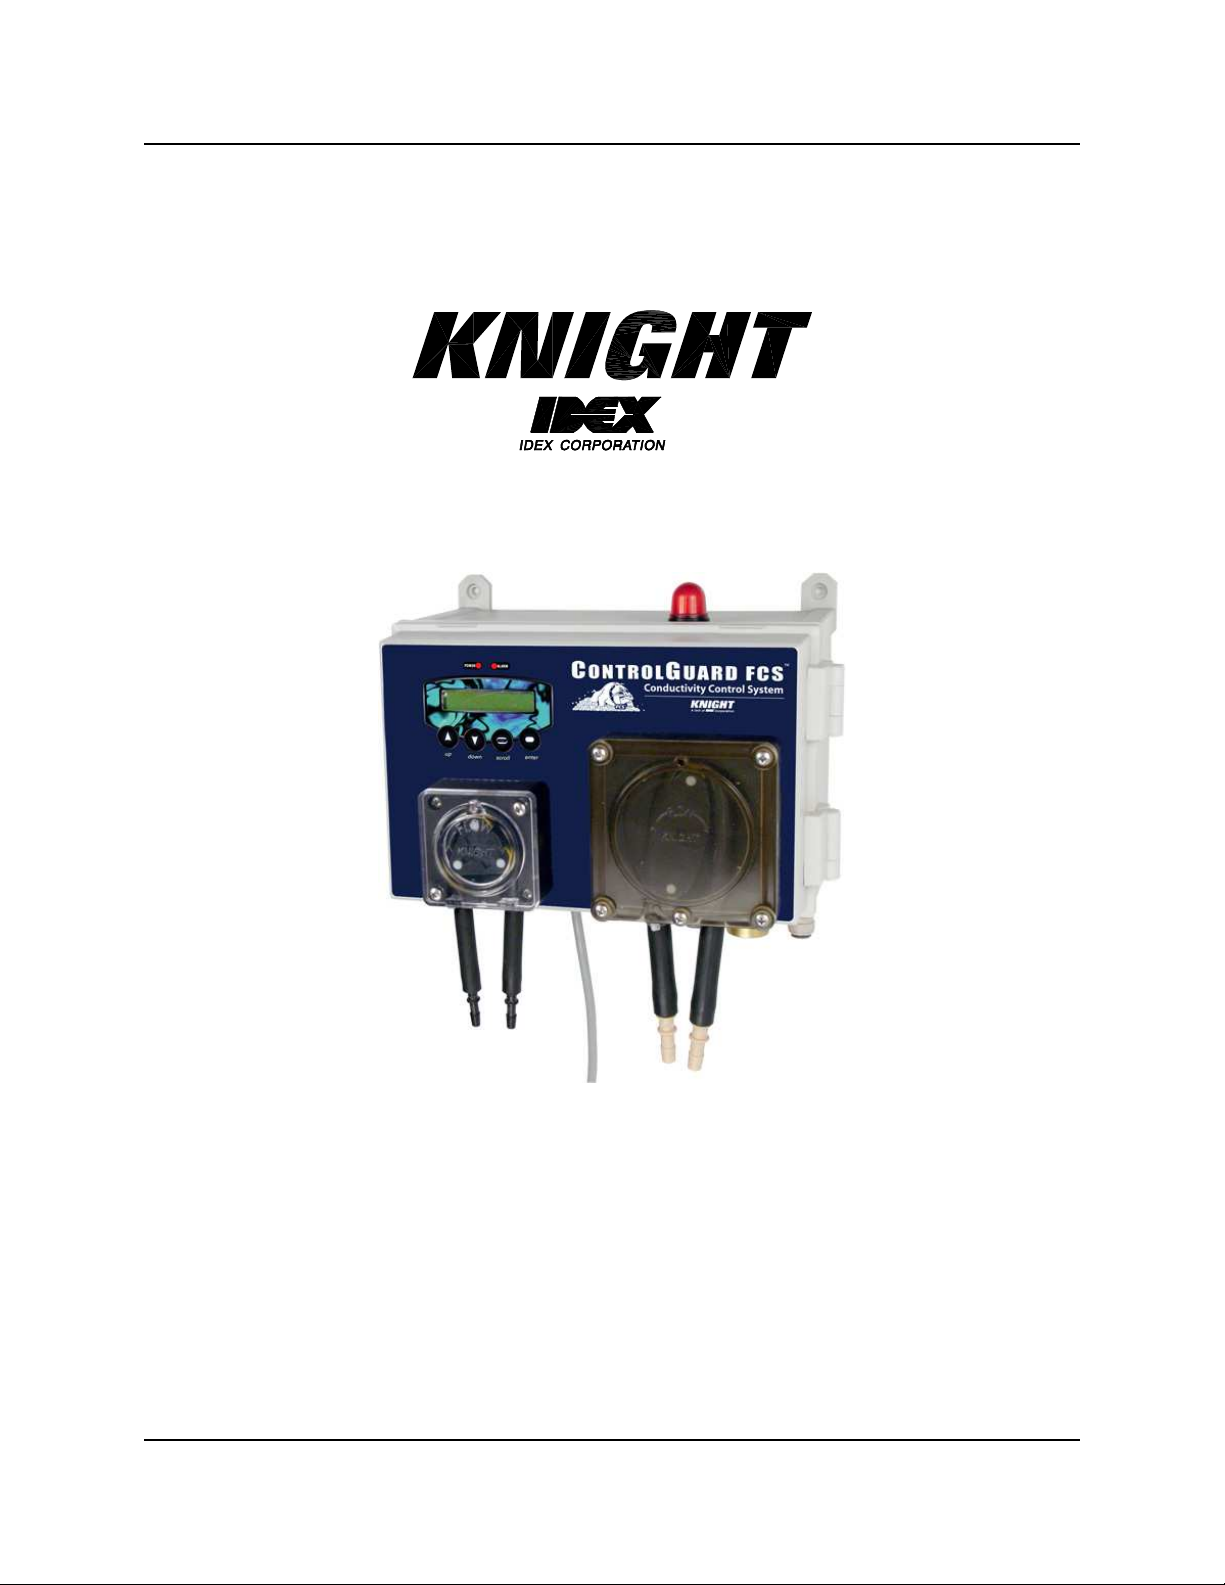
INSTALLATION
Mounting
Mounting feet and screws are provided with the unit. Attach the mounting feet to the back of the unit by putting the
screws into the brass inserts in the upper corners. Hang the unit on a wall in a suitable location that is close to the
chemical containers and also the chemical injection point(s). Mounting height should be no more than 10’ vertically
above the chemical containers.
Main Power
Connect leads to a 115, or 230 VAC power source (based on the model you have) that is “on” when the machine is
“on.” This will provide power for all pumps, however the system will only pump chemical when electrically signaled.
Whenever possible, use the machine’s ON/OFF switch as the main power source. Avoid using the machine’s pump
motor as main power. Check the voltage select switch on the circuit board to ensure its set for the correct main power
voltage. Important: If EDP pumps will be used, they must match the main power voltage.
Pump 1 Signal
A trigger signal is required to activate the probe sensing operation, or to trigger the repeat cycle mode initial charge.
For Probe mode, check the washer for a power source that is active during the wash cycle only, for example, the
magnetic contactor that controls the wash pump motor. You can also jumper main power to the signal input when a
constant power up condition is applicable. Connect leads to the pump 1 signal source. Signal voltage range is 14 240 VAC. For repeat cycle mode initial charge, check for a signal that will activate only when the machine is filled with
a fresh tank of water.
Pump 2 Signal
In addition to running pump 2, the pump 2 signal triggers the recharge injection if repeat cycle mode is selected. For
probe mode, check the washer for a signal source that is active when you want the pump to run. For repeat cycle
mode, check the washer for a signal source that will be used to trigger the recharge injection. Connect leads to the
pump 2 signal source. Signal voltage range is 14 - 240 VAC.
Page 4 of 20 0900596 Rev: A (10/07)

Conductive Probe Installation (optional)
(1) Install the probe in the wash tank below the water level. It should be away from incoming water supplies, near
the recirculating pump intake, and 3 to 4 inches from corners, heating elements, or the bottom of the tank. If an
existing mounting hole cannot be located, cut or punch a 7/8" hole.
(2) Use 18 AWG multi-stranded copper wire for the probe connection. Avoid running the wire near high voltage AC
lines. Do not route probe wires through the same conduit as power and signals.
(3) Connect leads to the probe. Ring-type terminals are recommended (be sure to connect them to the probe
terminals with “backing” nuts to prevent the probe tips from being pulled out of the probe). The ring terminals
should be secured between
the inner (backing) nuts and outer nuts.
Inductive Probe Installation (optional)
(1) The probe should be mounted in the washer tank with the hole oriented vertically. Start by feeding the wire end
through the mounting hole from the inside of the tank. One rubber washer should already be mounted on the
threaded mounting stud.
(2) After the plastic probe body has been firmly secured to the mounting hole with a rubber washer on each side of
the tank, feed the wire lead through a strain relief on the bottom of the Control Guard unit.
(3) With the wire lead routed through the strain relief, attach the four wires to the circuit board per the wiring
diagram. The wire colors must match the colors shown on the terminal strip.
Peristaltic Pump Connections
(1) Cut a suitable length of braided tubing and connect between the discharge (right) side of the pump’s squeeze
tube and the injection point. Use barb fittings (supplied) and hose clamps to secure safely.
(2) Cut a suitable length of braided tubing and connect between the suction (left) side of the pump’s squeeze tube
and the chemical pickup tube. Use of barb fittings and hose clamps is recommended.
(3) Insert pickup tube into chemical container.
Air Pump Installation (optional)
(1) Attach air input fitting to the air inlet port on the pump.
(2) Attach inlet and outlet barb fittings.
(3) Mount the pump as close as possible to the chemical supply and no more than 6 ft above chemical containers.
(4) Connect pickup line to input side of pump.
(5) Connect discharge line between output side of pump and point of injection.
(6) Cut 3/8” poly tubing to length needed and connect between air input fitting on pump and the outlet fitting on the
air solenoid at the control box.
(7) Cut 3/8” poly tubing to length needed and connect between the inlet fitting on the air solenoid at the control box
and the available air supply. Be sure to use a clean, dry, source of compressed air for optimal performance.
(8) Insert pickup line into chemical container.
EDP Pump Installation (optional)
(1) Mount the pumps as close as possible to the chemical supply and no more than 10 ft above chemical containers.
(2) Install braided tubing between the discharge (right) tube side of the pump and the injection point. Use stainless
steel hose clamps and barb fittings to secure braided tubing to pump.
(3) Install braided tubing between the suction (left) tube side and the barb fitting on the PVC pickup tube. Use
stainless steel hose clamps and barb fittings to secure braided tubing to squeeze tube.
(4) Insert pickup line into appropriate chemical container.
(5) Connect each pump to corresponding terminals on the circuit board (see wiring diagram).
0900596 Rev: A (10/07) Page 5 of 20

OPERATION
Probe Mode
When the pump 1 signal is “on”, the probe senses chemical concentration. When concentration drops below the
setpoint, the control automatically turns on chemical feed. As the chemical feeds, the control senses the rate at which
the concentration is approaching the setpoint. The control then begins to pulse feed (intermittent on/off) to prevent
over-use of chemical. The pulse feed rate will depend on how fast the setpoint is being approached.
The low product alarm will sound if the setpoint is not reached within the alarm delay time period. The alarm can be
temporarily muted if desired (see button functions). A “feed limit” feature allows you to set the unit to automatically
shut off the chemical feed when the alarm has been activated.
Repeat Cycle Mode
This type of operation controls chemical concentration without a probe, based on timed feed modes. The initial
charge feeds chemical to bring the machine to working concentration when initially filled with fresh water. The initial
charge feed is activated by a trigger signal, which also increments the initial charge counter for each activation.
Recharge time feeds chemical to maintain concentration strength as fresh water dilutes the machine. The recharge is
triggered after a specified number of washes.
BUTTON FUNCTIONS
•
ENTER: Holding the enter button for 3 seconds (approx.) switches between run and program modes. Enter also
advances through programming menus.
•
SCROLL: The scroll button moves the position of the cursor in menus where text or number changes are done.
The scroll button will “wrap around” at the end of a line of characters, meaning that the cursor will advance to the
beginning of the line automatically. The scroll button toggles between choices in menus that have selectable
settings. The scroll button also shows the wash count and initial charge count during normal operation.
•
UP (): Increases numeric values or advances upward through available characters. Hold the button down to
rapidly advance. The UP button also acts as pump 2 prime during normal operation.
•
DOWN (): Decreases numeric values or advances downward through available characters. Hold the button down
to rapidly advance. The DOWN button also acts as satellite pump 1 prime during normal operation.
Alarm Mute
During operation, the low chemical alarm (probe mode) can be silenced by pressing the SCROLL and UP buttons
simultaneously for 1 full second. The display will show “Alarm Muted” and the audio alarm will turn off for 5 minutes.
OPERATING PARAMETERS
Pass Code 0000 0 – 9, A – Z
Language English English, Spanish, French, German, Dutch, Italian
Pump 2 Speed 50% 0%-100% (of full speed)
Wash Time 10 sec 10 – 255 sec
Chemical Mode Probe Probe/Repeat Cycle
Chemical Type Liquid Liquid / Dry / Small Tank
Chemical Concentration
Alarm Delay 180 sec 1 – 512 sec
Initial Charge 1 sec 1 — 128 sec
Recharge Time 1 sec 0 – 255 sec
Wash Count 0 0 – 65536
Repeat Cycle Interval 10 10 — 255 Washes
Feed Limit On On/Off
Detergent Run Time 0 9999 Minutes
Parameter Default Value Range
25 Knight Units
0 %
0 mS
0 — 999 Knight units
0 — 99.99 %
0 — 80 Millisiemens
Page 6 of 20 0900596 Rev: A (10/07)
 Loading...