

Knight Equipment 3 GPM Installation Manual
INSTRUCTION MANUAL
INTRODUCTION
Foam cleaning is recognized as an effective method for removing oil and heavy soils from all types of surfaces. It is
used for cleaning throughout the food processing, dairy, transportation, industrial and agricultural industry. Due to it’s
characteristics, cleaning with foam is safe and cost effective. Foam can adhere to irregular surfaces and provide
better coverage than liquid cleaning chemicals. Foam stays in place longer to actively lift dirt and oil from surfaces
until it is rinsed off.
Knight’s Foam Guard system dispenses a rich lather of foam up to 65 GPM with a distance of up to 35 feet. With a
built-in 3 GPM (11 ltr/min) or 4 GPM (15 ltr/min) air operated pump, you’ll get consistent foaming quality for clean
results. Simply turn a knob and you can adjust the dryness or wetness of the foam for different cleaning applications.
APPLICATIONS
Food Processing Plants:
Transportation:
Industrial:
Agricultural:
SPECIFICATIONS
Trucking, Aviation, Transit, Automotive, Military, Ships, Construction Equipment.
General Cleaning, Machinery Degreasing, Paint Manufacturers, Paper Mills.
Dairy, Poultry, Farm Equipment, Hog.
Process Food, Beverage, Dairy, Baking, Poultry, Smoke Houses, Seafood.
3 GPM Models 4 GPM Model
Foam Output 50 gal/min (190 ltr/min) 65 gal/min (246 ltr/min)
Foaming Distance 30 feet (9 meters) 35 feet (10 meters)
Chemical Compatibility Santoprene: acids, alkalines, s oaps ,
Air Operated Pump Materials Polypropylene Body w/ Santoprene
Air Consumption 60-80 psi, 5-10 scfm 60-80 psi, 5-10 scfm
Hose Wall-mount: 50 feet (15 meters) reinforced hose, 3/4” ID with wand
alcohols, ketones.
Seals and Diaphragm
Portable: 30 feet (9 meters) reinforced hose, 3/4” ID with wand
PTFE: All acids, corrosives, and
petroleum products.
Polypropylene Body w/ PTFE Seals
and Diaphragm
REQUIREMENTS
• Minimum 60 PSI clean, dry air at 5 – 10 CFM during operation of the foamer.
• Chemical requirement: Most foam cleaning dilution rates operate at 3 to 5 oz/gal (24 to 39 ml/ltr) — consult your
chemical supplier for the proper foaming product and mixing ratio to use.
CAUTION: Wear protective clothing and
eyewear when dispensing chemicals or
other materials. Observe safety handling
instructions (MSDS) of chemical mfrs.
CAUTION: When installing any equipment,
ensure that all national and local safety,
electrical, and plumbing codes are met.
0901158 Rev: B (05/07) Page 1 of 8
SAFETY PRECAUTIONS
• Before pump operation, inspect all gasketed fasteners
for looseness caused by gasket creep. Re-torque all
loose fasteners to recommended specs (shown to right)
to prevent leakage. Failure of the sealing components
creates the possibility of jetting or forceful discharge of
pumped material at a potentially harmful velocity.
4X 25 in-lbs
24X 30 in-lbs
• Read and understand the MSDS sheets for the cleaning
chemicals that will be used — consult your chemical
supplier if you have any questions.
• Always wear safety goggles and protective gloves while
operating the foam unit.
• Avoid contact of cleaning agents with skin and eyes. If
contact occurs, rinse affected area with water for 15
minutes, and seek medical attention, if needed.
• Never point the Discharge Foam Wand at anyone.
• Be sure to flush unit with fresh water when switching
from alkaline to acid, or acid to alkaline product.
• Never leave unit unattended while discharge hose is
under pressure.
• Never foam directly into an uncovered electrical outlet or
electrical panel.
• Stand far enough away from surface being foamed to
prevent foam from splashing on you.
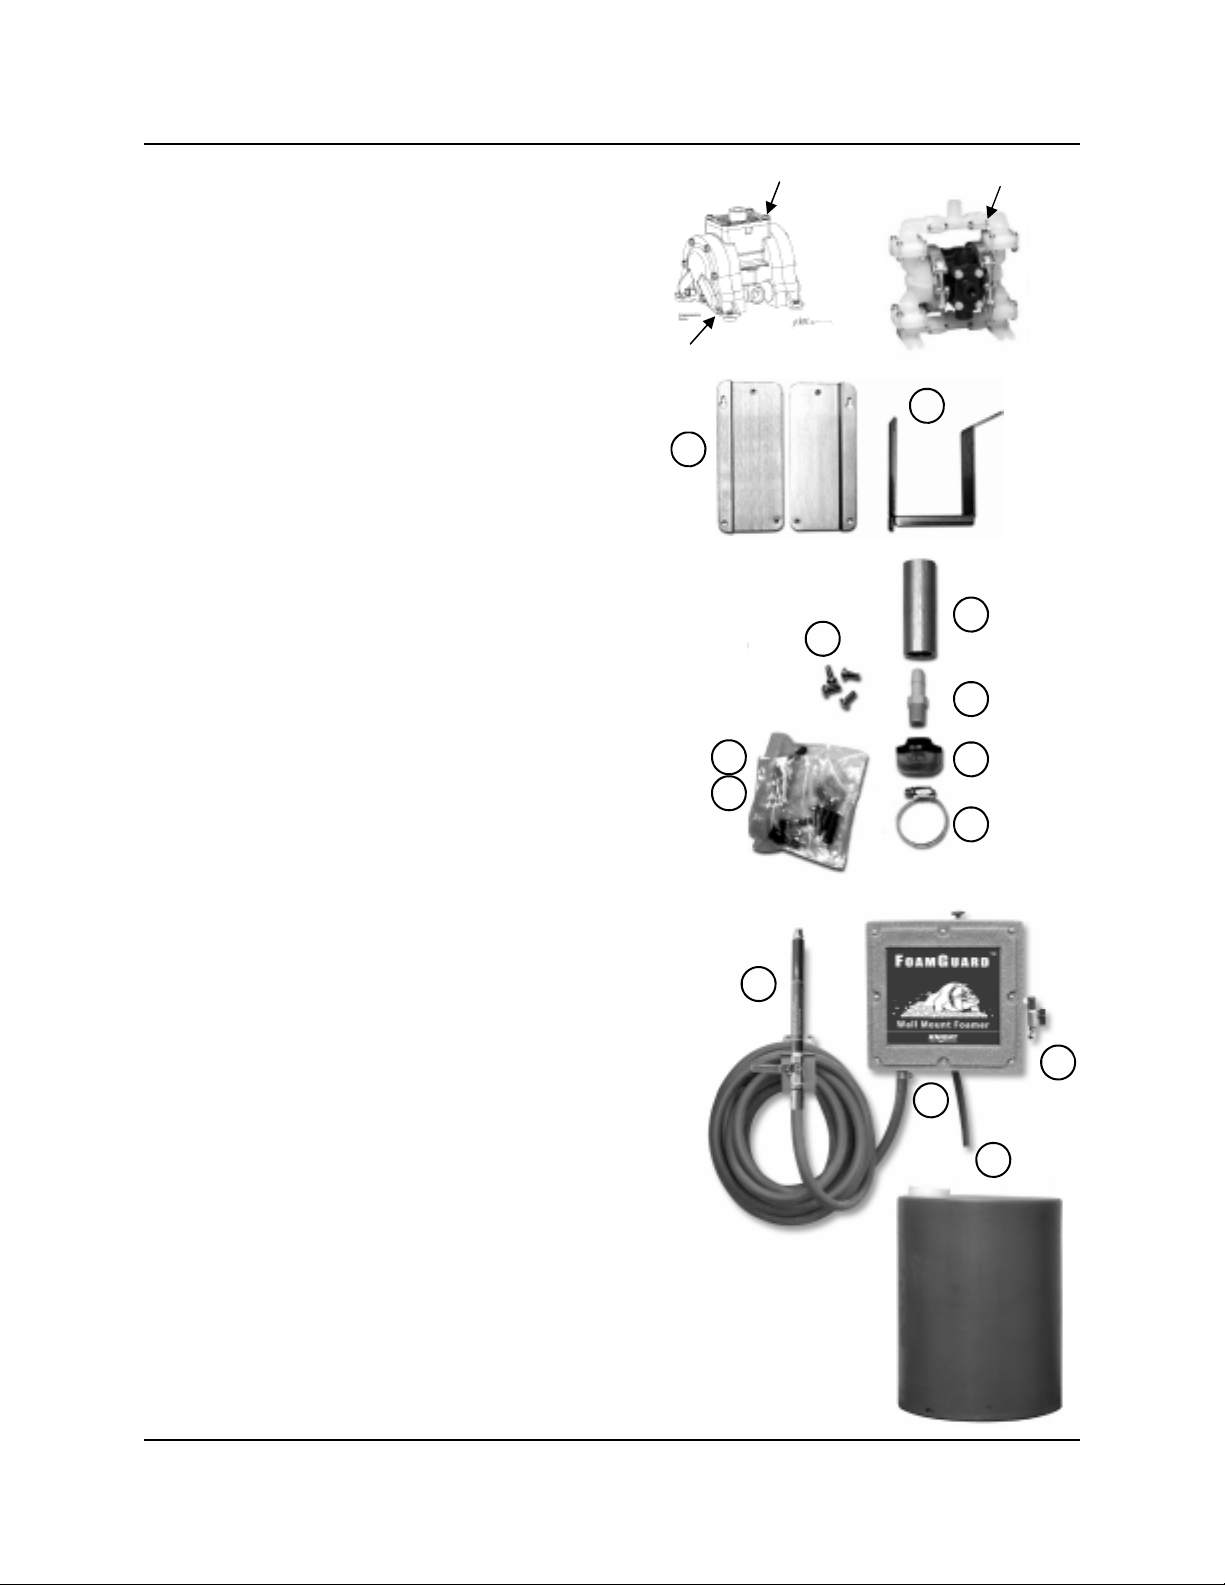
INSTALLATION
To avoid potential problems, read all instructions before
installing the system. Carefully remove all contents from
the shipping carton to make sure all parts are included.
16X 40in-lbs
2
2
3
3
6a
2
6b
6c
5
NOTE: The following installation steps apply to wall-mount
versions only. Mobile versions are built complete (no
installation necessary) and only require air connection at
the time of use.
(1) Select the desired location to mount the control box
— not more than 6 ft (2 meters) from the floor.
(2) Mount the Control Box using the hardware provided.
(3) Mount the Hose Bracket in a convenient location
using the remaining hardware.
(4) Attach the Wand to the Discharge Hose.
(5) Attach the Discharge Hose to the Hose Barb and
secure with the Hose Clamp provided.
(6) Route the pickup tube through the small hole in the
top of the container — then slide the tube weight [a]
over the tube, thread the barb [b] into the strainer [c]
and insert the barb into the tube.
(7) Connect a clean, dry, air supply to the 1/4” FNPT
fitting on the right side of the unit.
Page 2 of 8 0901158 Rev: B (05/07)
4
7
5
6
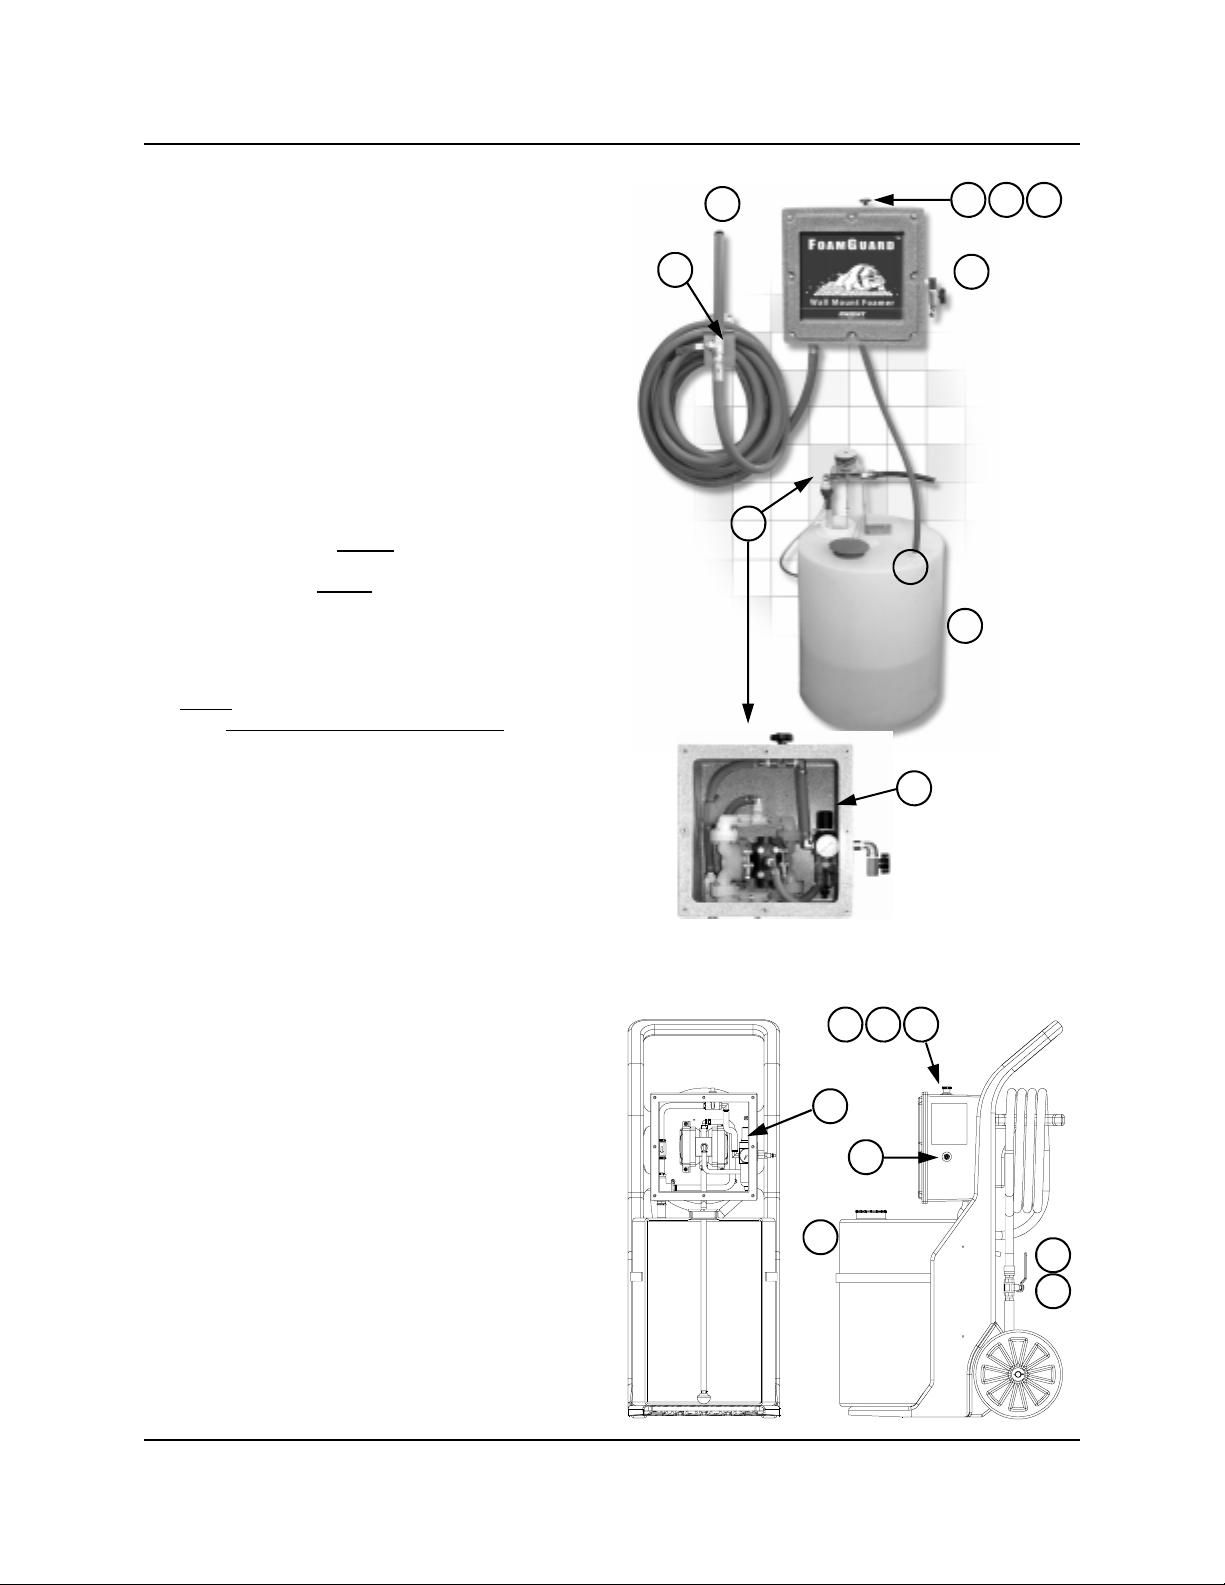
OPERATION
(1) This step is for wall-mount version only: Position the
container so that the strainer on the pickup tube can
reach the bottom of the container.
[a] The optional Aquaminder automatic level control
proportioning system (shown as an example) can be
used to maintain water/chemical solution. See
Aquaminder manual for installation and operation.
(2) Fill the container with a combination of water and
foaming chemical — consult your chemical supplier
for proper dilutions.
(3) Close Wet Foam/Dry Foam Valve completely — turn
clockwise until it stops.
4a
Wall-Mount Version
5
3 7 8
4b
(4) [a] All versions: Make sure the ball valve on the
discharge hose is closed
[b] Wall-mount: slowly
[c] Mobile: Connect a clean, dry, air supply to the
quick connect fitting on the right side of unit.
Note: Unit will operate when air supply is on.
(5) Slowly
(6) Adjust air pressure regulator to achieve desired pump
(7) Open Wet Foam/Dry Foam Valve in the counter-
(8) Continue to open the Wet Foam-Dry Foam Valve in ¼
open the ball valve on the discharge hose
while holding foam wand away from you.
ball valve will turn pump off.
flow rate (between 45—60 PSI for optimum results).
clockwise direction four complete turns.
turn increments, allowing a few seconds between
adjustments, until the proper consistency (dryness) of
foam is achieved.
!
open the air inlet valve.
Closing t he
AFTER-USE
(9) Fill the container with fresh water and rinse
thoroughly. With discharge valve “open”, allow pump
to run until all chemical has been pumped through
discharge hose, and air has been purged.
(10) Close the Air Inlet Valve and relieve all remaining
pressure on the unit by opening the valve on the
discharge hose and leave in the “open” position.
1a
2
1
6
Mobile Version
3 7 8
6
4c
MAINTENANCE
• Periodically drain the bowl on the air regulator/filter by
pushing up the barbed stem on the bottom of the bowl
till the water runs out.
• The bowl can be removed (by turning counter-
clockwise) to clean the filter element.
• Periodically check pickup tube foot strainer for blockage.
Remove foot strainer and flush to clean.
0901158 Rev: B (05/07) Page 3 of 8
2
4a
5
 Loading...