

KitchenAid KSB13**, KSB1332BM, 7KSB13** Owners Manual
Stand Blender KSB13** 7KSB13**
PARTS AND FEATURES
PARTS AND ACCESSORIES
A |
|
F |
|
|
|
|
B |
G |
|
|
|
|
|
K |
|
|
N |
C |
|
H |
|
|
 P
P
 L
L
|
|
J |
|
|
|
D |
|
M |
R |
|
|
|
||
|
E |
|
|
|
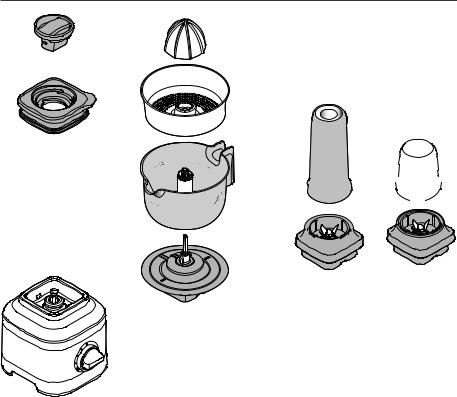
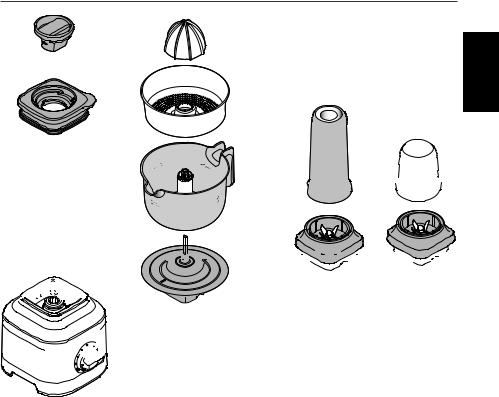
A. |
Lid Center Cap |
J. |
Gear Assembly* |
|
B. |
Lid with Vent Well |
K. |
Personal Jar** (16 oz / 500 ml capacity) |
|
C. |
Jar (48 oz / 1.4 L capacity) |
L. |
Blade Assembly of Personal Jar** |
|
|
Glass Jar**** (48 oz / 1.4 L capacity) |
M. Personal Jar Easy-Drink Lid** |
|
|
D. |
Base |
|
||
N. |
Small Batch Jar*** |
|
||
E. |
|
|
||
Control Dial |
|
(6 oz / 200 ml capacity) |
|
|
F. |
Reamer* |
P. |
Blade Assembly of Small Batch Jar*** |
|
G. |
Pulp Strainer/Basket* |
R. |
Small Batch Jar Lid*** |
|
H.Juice Container* (32 oz / 1 L capacity)
*Accessories only included with Citrus Press model.
**Accessories only included with Personal Jar model.
***Accessories only included with Small Batch Jar model.
****Accessories only included with Blender with Glass Container model.
2 | PARTS AND FEATURES

BLENDER SAFETY |
| <![if ! IE]> <![endif]>ENGLISH |
IMPORTANT SAFEGUARDS
When using electrical appliances, basic safety precautions should always be followed, including the following:
1.Read all instructions.
2.To protect against risk of electrical shock do not put stand blender base in water or other liquid.
3.This appliance is not intended for use by persons (including children) with reduced physical, sensory, or mental capabilities, or lack of experience and knowledge, unless they are closely supervised and instructed concerning use of the appliance by a person responsible for their safety. Close supervision is necessary when any appliance is used by or near children. Children should be supervised to ensure that they do not play with the appliance.
4.Turn the appliance OFF, then unplug from the outlet when not in use, before assembling or disassembling parts and before cleaning. To unplug, grasp the plug and pull from the outlet. Never pull from the power cord.
5.Avoid contacting moving parts.
6.Do not operate any appliance with a damaged cord or plug or after the appliance malfunctions, or is dropped or damaged in any manner. Contact the manufacturer at their customer service telephone number for information on examination, repair or adjustment.
7.Do not use outdoors.
8.Do not let cord hang over edge of table or counter.
9.Keep hands and utensils out of container while blending to reduce the risk of severe injury to persons or damage to the blender. A scraper may be used but must be used only when the blender is not running.
10.Blades are sharp. Handle carefully.
11.Always operate blender with cover in place.
BLENDER SAFETY | 3

BLENDER SAFETY
12.When blending hot liquids or ingredients, Lid Center Cap shall remain in place over the lid opening. Always start on lowest speed and slowly ramp to desired speed when blending hot liquids or ingredients.
13.Do not blend hot liquids and ingredients in the Personal Jar or Small Batch Jar.
14.To reduce the risk of injury, never place cutter-assembly blades on base without Personal Jar or Small Batch Jar properly attached.
15.The use of attachments, including canning jars, not recommended or sold by the manufacturer may cause a risk of injury to persons.
SAVE THESE INSTRUCTIONS
This product is designed for household use only.
ELECTRICAL REQUIREMENTS
Voltage: 120 VAC
Frequency: 60 Hz
NOTE: This Blender is equipped with a polarized plug (one blade is wider than the other). To reduce the risk of electrical shock, this plug will fit in a polarized outlet only one way.
If the plug does not fit fully in the outlet, reverse the plug. If it still does not fit, contact a qualified electrician. Do not modify the plug in any way.
GETTING STARTED
BLENDER FUNCTION GUIDE
The Blender features 3 speeds and Ice Crush/Pulse function, allowing you to customize your blend.
Recipes can differ significantly and might work best on speed that are not obvious. We encourage you to find the best speed match for your favorite recipes.
Accessories |
Size |
Speed |
Suggested items to blend |
|
|
|
|
|
|
Blender Jar |
48 oz |
Speed 1, 2, 3, and |
Smoothies, Icy drinks, Shakes / Malts, |
|
(1.4 L) |
Pulse/Ice crush |
Dips, Spreads and more. |
||
|
||||
|
|
|
|
|
Personal Jar |
16 oz |
Speed 1, 2, 3, and |
Individual Smoothie, Icy drinks, |
|
(500 ml) |
Pulse/Ice crush |
Shakes / Malts and lower volume recipes. |
||
|
||||
|
|
|
|
|
Small Batch |
6 oz |
Speed 1, 2, 3, and |
Small volume recipes - Purees, Sauces, |
|
Baby food, Dressings, Marinades, Pesto |
||||
Jar |
(200 ml) |
Pulse/Ice crush |
||
and more. |
||||
|
|
|
||
|
|
|
|
|
Citrus Press |
32 oz |
Speed 1 |
Citrus juice, Grapefruit juice and more. |
|
(1 L) |
||||
|
|
|
||
|
|
|
|
4 | GETTING STARTED
PREPARING AND USING THE BLENDER
PREPARING THE BLENDER FOR USE
Before using your Blender for the first time, wipe clean Blender base with a warm damp cloth. Dry with a soft cloth. Wash Blender Jar, Lid, and Lid Center Cap in warm, sudsy water (see “Care and Cleaning” section). Rinse parts and wipe dry. Be sure the countertop beneath the Blender and surrounding areas are dry and clean.
IMPORTANT: When moving your Blender, always support/lift from the Blender base. The Base will become disengaged from Jar if carried by Blender Jar or Blender Jar handle only.
USING THE BLENDER
<![endif]>ENGLISH
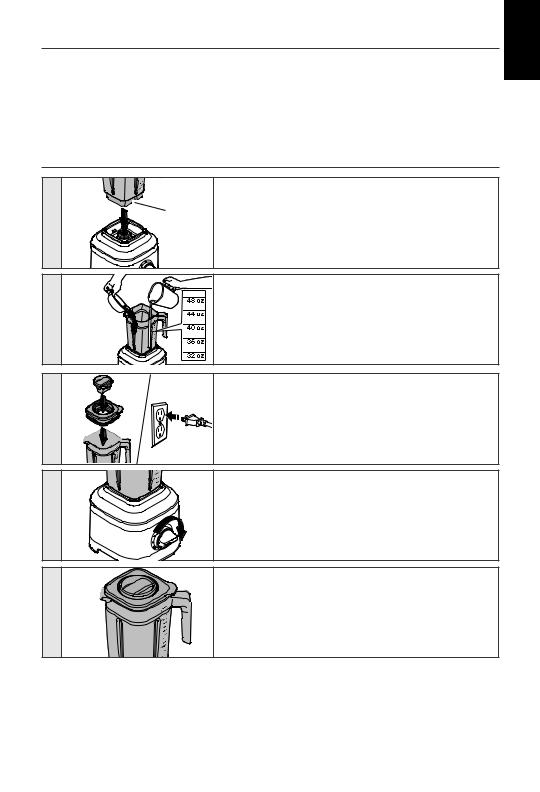
1
2
3
4
5
Slot |
Place the Blender Jar by using provided slot, so that |
|
the handle of the Jar will be towards the Control Dial. |
|
Make sure that it is fully seated in the Base. |
Place the ingredients into jar. Add liquids first, then soft foods, then leafy greens, and ice or frozen items last.
NOTE: Do not fill Blender Jar past the top-most measurement mark.
Firmly, secure Lid and Lid Center Cap in the Jar.
Before operating the Blender, make sure the Jar is properly positioned on the Blender base.
Then, plug the Blender into a grounded outlet.
Turn the Control Dial from (O) to desired speed for continuous operation. You may change desired speed by turning the Control Dial at any time.
See the “Blender Function Guide” for more information.
If blending hot liquids or ingredients, only use the full size blender jar (48 oz / 1.4 L). Place the Lid securely on the jar and the Center Cap locked in place.
It is recommended to operate only on speed (1) while blending hot liquid or food.
PREPARING AND USING THE BLENDER | 5
PREPARING AND USING THE BLENDER
6 |
When finished, turn the Blender off by returning Control Dial to (O).
Unplug the Blender before removing the Blender Jar.
IMPORTANT: Allow the Blender to fully stop before removing the Lid, Blender Jar, or pouring out your blended ingredients.
USING PULSE MODE/ICE CRUSH MODE
Your Blender offers a Pulse/Ice Crush function with a soft start to avoid ingredient splatter. When turning the Control Dial to the Pulse/Ice Crush ( P  ) function, the Blender will operate at optimal speed to crush ice. This function will continue
 until you release the Control Dial, returning to (O).
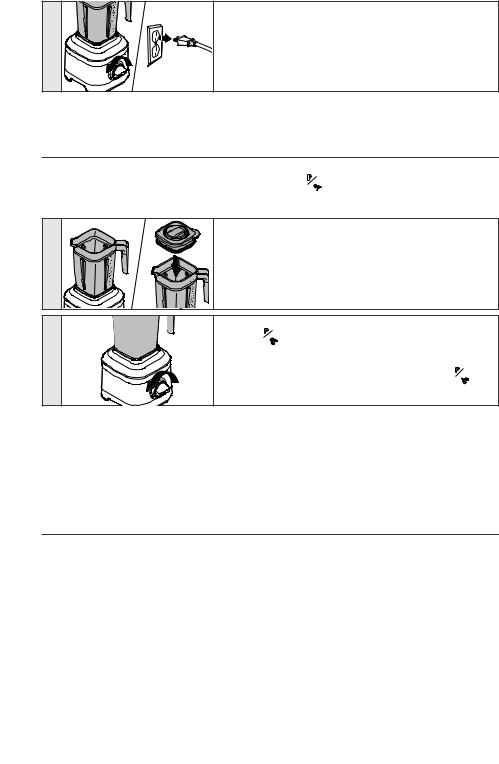
1
2
Place ingredients or Ice cubes into the Blender Jar. Firmly secure Lid with Lid Center Cap on Blender Jar.
Turn and hold the Control Dial from (O) to Pulse/Ice Crush ( P  ) function. The Blender will run at optimal ice crush speed. When finished, release the Control Dial to stop the Blender.
You may hold Control Dial on Pulse/Ice Crush ( P  ) function as per desired interval of time. See “Blender Function Guide” for more information.
TIP: Use half of standard ice cube tray or 7-8 standard ice cubes at a time for blending. The Ice Crush feature has been optimized to crush and chop ice without adding any liquid ingredients.
PREPARING AND USING THE PERSONAL JAR
PREPARING THE PERSONAL JAR FOR USE
The Personal Jar is the perfect size and handy to carry with you on the go.
Before using your Personal Jar for the first time, wash Jar, Lids, and Blade Assembly in warm, sudsy water (see “Care and Cleaning” section). Rinse parts and wipe dry. Be sure the countertop beneath the Blender and surrounding areas are dry and clean.
IMPORTANT: Do not blend hot liquids and ingredients in the Personal Jar.
6 | PREPARING AND USING THE PERSONAL JAR
PREPARING AND USING THE PERSONAL JAR
USING THE PERSONAL JAR
|
Place the ingredients into Jar. Add ice or frozen items, |
|
1 |
then leafy green, then soft foods and liquids last. |
|
NOTE: Do not fill the Personal Jar past the MAX. |
||
|
||
|
line (16 oz / 500 ml). |
<![endif]>ENGLISH
|
Secure the Blade Assembly on Personal Jar and rotate |
|
2 |
it clockwise until it is tight. |
|
Place it on the Blender base, making sure that it is fully |
||
|
||
|
seated in the Base. |
|
Turn the Control Dial from (O) to desired speed for |
3 |
continuous operation. You may change desired speed |
by turning the Control Dial at any time. |
|
|
See “Blender Function Guide” for more information. |
|
When finished, turn the Blender off by returning |
|
Control Dial to (O). |
4 |
Unplug Blender from electrical outlet. |
|
NOTE: Always hold and raise the Personal Jar with
Blade Assembly from the Blender base.
PREPARING AND USING THE SMALL BATCH JAR
PREPARING THE SMALL BATCH JAR FOR USE
The Small Batch Jar is perfect for smaller recipes like sauces, dressings, marinades and more.
Before using your Small Batch Jar for the first time, wash Bowl, Lid, and Blade Assembly in warm, sudsy water (see “Care and Cleaning” section). Rinse parts and wipe dry. Be sure the countertop beneath the Blender and surrounding areas are dry and clean.
IMPORTANT: Do not blend hot liquids and ingredients in the Small Batch Jar.
USING THE SMALL BATCH JAR
1 |
Place the ingredients into the Small Batch Jar. |
NOTE: Do not fill Small Batch Jar past MAX. line |
|
|
(6 oz / 200 ml). |
PREPARING AND USING THE SMALL BATCH JAR | 7
PREPARING AND USING THE SMALL BATCH JAR
2
3
4
Secure the Blade Assembly on Small Batch Jar and rotate it clockwise until it is tight.
Place it on the Blender base, making sure that it is fully seated in the Base.
Turn the Control Dial from (O) to desired speed for continuous operation. You may change desired speed by turning the Control Dial at any time. See the “Blender Function Guide” for more information.
When finished, turn the Blender off by returning Control Dial to (O).
Unplug Blender from electrical outlet.
NOTE: Always hold and raise the Small Batch Jar with Blade Assembly from the Blender base.
PREPARING AND USING THE CITRUS PRESS
PREPARING THE CITRUS PRESS FOR USE
Before using your Citrus Press for the first time, wash Reamer, Pulp Basket and Juice Container in warm, sudsy water. Rinse parts and wipe dry. Wipe clean the Gear Assembly with a warm, damp cloth and dry with a soft cloth (see “Care and Cleaning” section).
Be sure the countertop beneath the Blender and surrounding areas are dry and clean.
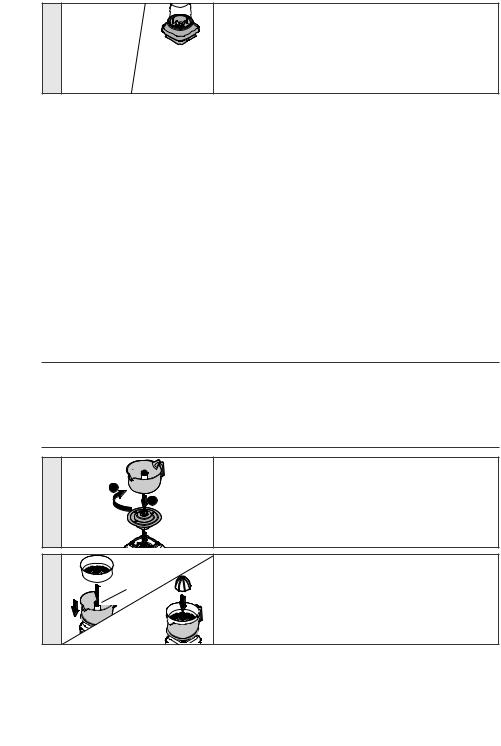
USING THE CITRUS PRESS
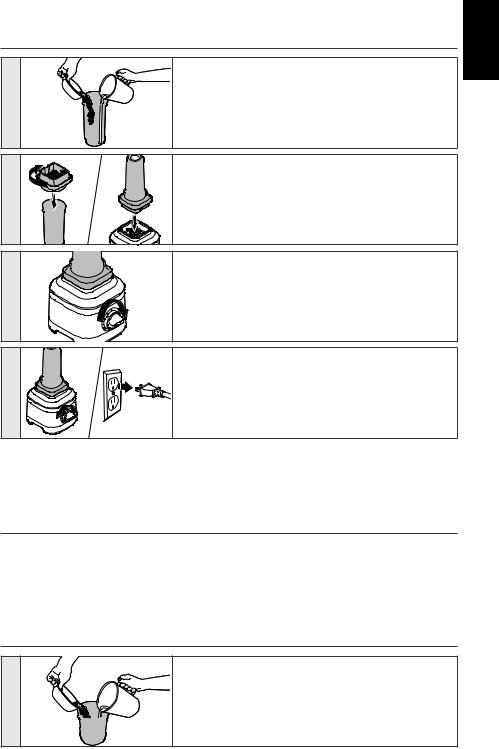
1
2
2 |
|
Place the Gear Assembly on the Blender base, making |
|
sure that it is fully seated in the Base. |
|
|
1 |
|
|
Place the Juice Container on the Gear Assembly and |
|
|
|
|
|
|
twist clockwise to lock in place. |
Drive
Shaft
Place the Pulp Basket and then the Reamer into the
Juice Container. Align them with the Drive Shaft.
8 | PREPARING AND USING THE CITRUS PRESS
PREPARING AND USING THE CITRUS PRESS
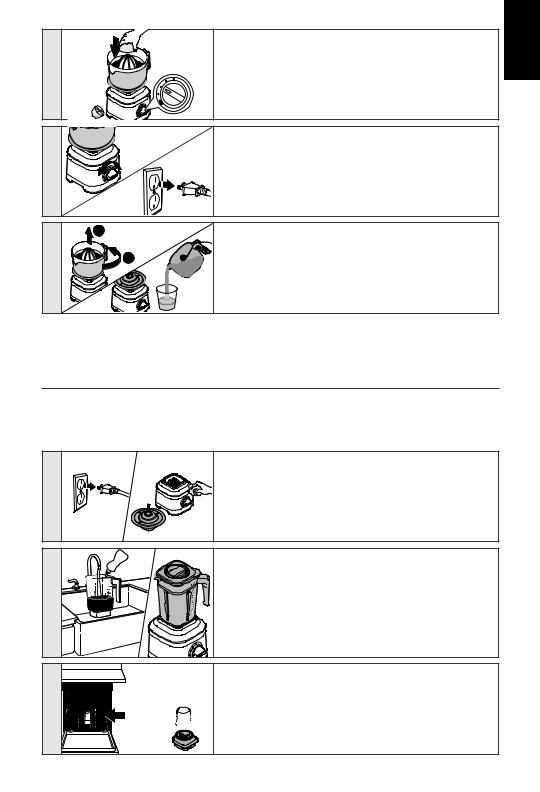
3 |
Turn the Control Dial from (O) to speed (1). |
|
Hold down the halved citrus fruit on the Reamer. |
||
|
<![endif]>ENGLISH
4 |
When finished juicing, turn the Blender off by returning Control Dial to (O).
Unplug the Blender.
|
2 |
|
5 |
1 |
Twist the Juice Container counterclockwise and lift it |
|
by using handle. |
|
|
|
Pour and enjoy! |
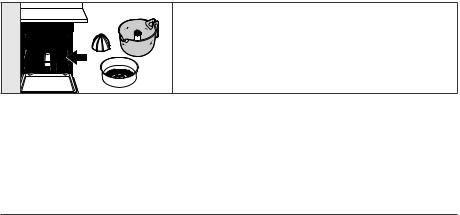
CARE AND CLEANING
CLEANING THE BLENDER AND ACCESSORIES
Clean the Blender and accessories thoroughly after every use.
NOTE: To avoid damaging the Blender, do not immerse the Blender base or cord in water. To avoid scratching the Blender, do not use abrasive cleansers or scouring pads.
|
To clean the Blender base and cord: Unplug the |
|
Blender before cleaning. Wipe clean the base and |
1 |
the cord with a warm, damp cloth and dry with a soft |
cloth. |
|
|
Wipe clean the Citrus Press Gear Assembly with a |
|
warm, damp cloth and dry with a soft cloth. |
2 |
Remove any remaining contents from the Jar.
Fill half of the Jar with warm water, and add 1 or 2 drops of dish-washing liquid.
Place the Blender Jar on the base. Make sure the Blender Jar is fully seated in the base. Secure the Lid on the Jar, turn the Control Dial to speed (3), and run the Blender for 15-20 seconds. Remove the Blender Jar, empty contents and rinse with warm water.
|
The Personal Jar, Small Batch Jar, Lids, Blade |
3 |
Assembly, and Lid Center Cap can be cleaned in the |
top rack of a dishwasher. |
|
|
The Blender Jar can be cleaned in the bottom rack of |
|
a dishwasher. |
|
CARE AND CLEANING | 9 |
CARE AND CLEANING
4 |
The Reamer, Juice Container and Pulp Basket can be cleaned in the bottom rack of a dishwasher.
FOR DETAILED INFORMATION ON CLEANING THE BLENDER
Visit www.kitchenaid.com/quickstart for additional instructions with videos, inspiring recipes, and tips on how to clean your Blender.
TROUBLESHOOTING
IF YOUR BLENDER MALFUNCTIONS OR FAILS TO OPERATE
•Is the Blender plugged into a grounded electrical outlet?
Plug the Blender into a grounded electrical outlet.
•Is the fuse in the circuit to the Blender in working order?
If you have a circuit breaker box, make sure the circuit is closed. Try unplugging the Blender, then plug it back into a grounded electrical outlet.
•If Blender stops while blending:
The Blender becomes overloaded or jammed when blending heavy ingredients. It will automatically shut off to prevent damage to the motor. Unplug the power cord. Remove the Blender Jar from the base and use a spatula to rearrange ingredients in the Blender Jar.
If it’s overloaded, divide contents into smaller batches. For certain recipes, adding liquid to the Blender Jar may also reduce the load on the Blender.
•If the ingredients of a recipe aren’t blending:
There may be times when an air pocket is created around the blade, causing the ingredients to miss the blending blade. Unplug the power cord. Remove the Blender Jar from the base, and use a spatula to rearrange ingredients in the Blender Jar.
•If Blender stops while blending with Personal Jar or Small Batch Jar:
If Blender stops, unplug the power cord. Remove the Personal Jar or Small Batch Jar from the base, and shake it a little bit. Place it back on the base, and then turn the Blender back on to continue regular use.
•If the problem cannot be corrected:
See the “KitchenAid® Warranty and Service” sections. Contact an authorized service center for assistance.
Do not return the Blender to the retailer – retailers do not provide service.
10 | TROUBLESHOOTING
WARRANTY AND SERVICE
KITCHENAID® BLENDER WARRANTY FOR THE 50 UNITED STATES, THE DISTRICT OF COLUMBIA, PUERTO RICO, AND CANADA
This warranty extends to the purchaser and any succeeding owner for Blenders operated in the 50 United States, the District of Columbia, Puerto Rico, and Canada.
Length of Warranty: One Year Full Warranty from date of purchase.
KitchenAid Will Pay Hassle-Free Replacement of your Blender. See the next page for Your Choice of: for details on how to arrange for service, or call the Customer
eXperience Center toll-free at 1-800-541-6390. OR
The replacement parts and repair labor costs to correct defects
in materials and workmanship. Service must be provided by an Authorized KitchenAid Service Facility.
<![endif]>ENGLISH
KitchenAid Will |
A. Repairs when your Blender is used in other than normal single |
Not Pay for: |
family home use. |
|
B. Damage resulting from accident, alteration, misuse or abuse. |
|
C. Any shipping or handling costs to deliver your |
|
Blender to an Authorized Service Facility. |
|
D. Replacement parts or repair labor costs for Blender attachments |
|
operated outside the 50 United States, District of Columbia, |
|
Puerto Rico, and Canada. |
DISCLAIMER OF IMPLIED WARRANTIES; LIMITATION OF REMEDIES
IMPLIED WARRANTIES, INCLUDING TO THE EXTENT APPLICABLE WARRANTIES OF MERCHANTABILITY OR FITNESS FOR A PARTICULAR PURPOSE, ARE EXCLUDED TO THE EXTENT LEGALLY PERMISSIBLE. ANY IMPLIED WARRANTIES THAT MAY BE IMPOSED BY LAW ARE LIMITED TO ONE YEAR, OR THE SHORTEST PERIOD ALLOWED BY LAW. SOME STATES AND PROVINCES DO NOT ALLOW LIMITATIONS OR EXCLUSIONS ON
HOW LONG AN IMPLIED WARRANTY OF MERCHANTABILITY OR FITNESS LASTS, SO THE ABOVE LIMITATIONS OR EXCLUSIONS MAY NOT APPLY TO YOU.
IF THIS PRODUCT FAILS TO WORK AS WARRANTED, CUSTOMER’S SOLE AND EXCLUSIVE REMEDY SHALL BE REPAIR OR REPLACEMENT ACCORDING TO THE TERMS OF THIS LIMITED WARRANTY. KITCHENAID AND KITCHENAID CANADA DO NOT ASSUME ANY RESPONSIBILITY FOR INCIDENTAL OR CONSEQUENTIAL DAMAGES. This warranty gives you specific legal rights and you may also have other rights which vary from state to state or province to province.
WARRANTY AND SERVICE | 11

WARRANTY AND SERVICE
HASSLE-FREE REPLACEMENT WARRANTY—50 UNITED STATES, DISTRICT OF COLUMBIA, AND PUERTO RICO
We’re so confident the quality of our products meets the exacting standards of KitchenAid that, if your Blender should fail within the first year of ownership, KitchenAid will arrange to deliver an identical or comparable replacement to your door free of charge
and arrange to have your original Blender returned to us. Your replacement unit will also be covered by our one year limited warranty.
If your Blender should fail within the first year of ownership, simply call our toll-free
Customer eXperience Center at 1-800-541-6390 Monday through Friday. Please have your original sales receipt available when you call. Proof of purchase will be required to initiate the claim. Give the consultant your complete shipping address (no P.O. Box numbers, please).
When you receive your replacement Blender, use the carton, packing materials, and prepaid shipping label to pack up your original Blender and send it back to KitchenAid.
HASSLE-FREE REPLACEMENT WARRANTY—CANADA
We’re so confident the quality of our products meets the exacting standards of the KitchenAid brand that, if your Blender should fail within the first year of ownership, we will replace your Blender with an identical or comparable replacement. Your replacement unit will also be covered by our one year limited warranty.
If your Blender should fail within the first year of ownership, simply call our toll-free
Customer eXperience Center at 1-800-807-6777 Monday through Friday. Please have your original sales receipt available when you call. Proof of purchase will be required to initiate the claim. Give the consultant your complete shipping address.
When you receive your replacement Blender, use the carton, packing materials, and prepaid shipping label to pack up your original Blender and send it back to KitchenAid.
ARRANGING FOR SERVICE AFTER THE WARRANTY EXPIRES, OR ORDERING ACCESSORIES AND REPLACEMENT PARTS
In the United States and Puerto Rico:
For service information, or to order accessories or replacement parts, call toll-free at 1-800-541-6390 or write to:
Customer eXperience Center,
KitchenAid Small Appliances,
P.O. Box 218, St. Joseph, MI 49085-0218
Outside the United States and Puerto Rico:
Consult your local KitchenAid dealer or the store where you purchased the Blender for information on how to obtain service.
For service information in Canada:
Call toll-free 1-800-807-6777.
For service information in Mexico: Call toll-free 01-800-0022-767.
®/™ ©2019 All rights reserved. KITCHENAID and the design of the stand mixer are trademarks in the U.S. and elsewhere. Used under license in Canada.
12 | WARRANTY AND SERVICE
PIÈCES ET CARACTÉRISTIQUES
PIÈCES ET ACCESSOIRES
A |
|
|
|
|
F |
|
B |
G |
|
|
|
|
|
K |
|
|
N |
C |
|
H |
|
|
P
 L
L


 J
J 


 D
D  M
M  R
R


 E
E
<![endif]>FRANÇAIS
A.Bouchon central du couvercle
B.Couvercle avec évent
C.Pot (capacité de 48 oz / 1,4 L) Pot en verre****
(capacité de 48 oz / 1,4 L)
D.Socle
E.Bouton de commande
F.Presse-agrumes*
G.Tamis à pulpe/panier*
H.Récipient à jus* (capacité de 32 oz / 1 L)
J.Entraînement*
K.Pot à portion individuelle** (capacité de 16 oz / 500 ml)
L.Lame pour pot à portion individuelle**
M.Couvercle Easy-Drink pour pot à portion individuelle**
N.Pot à petite portion***
(capacité de 6 oz / 200 ml)
P.Lame pour pot à petite portion***
R.Couvercle de pot à petite portion***
*Accessoires inclus dans le modèle avec presse-agrumes seulement.
**Accessoires inclus dans le modèle avec pot à portion individuelle seulement.
***Accessoires inclus dans le modèle avec pot à petite portion seulement.
****Accessoires inclus dans le modèle de mélangeur avec contenant en verre seulement.
PIÈCES ET CARACTÉRISTIQUES | 13

SÉCURITÉ DU MÉLANGEUR |
CONSIGNES DE SÉCURITÉ
IMPORTANTES
Lors de l’utilisation d’appareils électriques, il faut toujours observer certaines précautions élémentaires de sécurité, y compris les suivantes :
1.Lire toutes les instructions.
2.Pour éviter tout risque de décharge électrique, ne pas immerger le socle du mélangeur sur socle dans de l’eau ou tout autre liquide.
3.Cet appareil ne convient pas à une utilisation par des personnes (y compris des enfants) à capacités physiques, sensorielles ou mentales réduites, ou possédant un manque d’expérience et de connaissances, à moins qu’elles ne soient placées sous supervision ou qu’elles aient reçu des instructions concernant l’utilisation de l’appareil par une personne responsable de leur sécurité. Une surveillance attentive s’impose lorsqu’un appareil ménager est utilisé par ou à proximité d’enfants. Les enfants doivent être surveillés afin de s’assurer qu’ils ne jouent pas avec l’appareil.
4.S’assurer que l’appareil est éteint et débranché de la prise murale lorsqu’il n’est pas utilisé, avant d’y ajouter des pièces ou d’en enlever et avant de la nettoyer. Pour débrancher, saisir la fiche et la retirer de la prise. Ne pas tirer sur le cordon d’alimentation.
5.Éviter tout contact avec les pièces mobiles.
6.Ne pas faire fonctionner un appareil si la prise ou le cordon est endommagé, si l’appareil ne fonctionne pas correctement, s’il tombe ou s’il est endommagé d’une quelconque façon. Communiquer par téléphone avec le service à la clientèle du fabricant pour obtenir des renseignements sur la vérification,
la réparation et le réglage de l’appareil.
7.Ne pas utiliser à l’extérieur.
8.Ne pas laisser le cordon pendre par dessus le bord d’une table ou d’un plan de travail.
14 | SÉCURITÉ DU MÉLANGEUR
 Loading...