

KitchenAid 5KSMC895, KEF97A Instructions Manual
5KSMC895
KEF97A
Instructions
Instruções

COMMERCIAL STAND MIXER INSTRUCTIONS
TABLE OF CONTENTS
STAND MIXER SAFETY
Important safeguards .......................................................................................... 3
Electrical requirements ...................................................................................... 4
PARTS AND FEATURES ........................................................................................ 5
SETTING UP YOUR STAND MIXER
Assembling your Stand Mixer ............................................................................. 6
Adjusting your beater to bowl clearance ............................................................ 8
USING YOUR STAND MIXER
Using your KitchenAid accessories ..................................................................... 8
Speed control guide - 10 speed Stand Mixers .................................................... 9
TIPS FOR GREAT RESULTS
Planetary mixing action ..................................................................................... 10
Mixing time... .................................................................................................... 10
Mixer use .......................................................................................................... 10
Mixing tips ........................................................................................................ 10
CARE AND CLEANING ....................................................................................... 11
TROUBLESHOOTING ......................................................................................... 11
2
STAND MIXER SAFETY
IMPORTANT SAFEGUARDS
When using electrical appliances, basic safety precautions
should always be followed, including the following:
1. Read all instructions. Misuse of appliance may result
in personal injury.
2. To protect against risk of electrical shock, do not put
Stand Mixer in water or other liquid.
3. This appliance can be used by children aged from 8 years
and above and persons with reduced physical, sensory
or mental capabilities or lack of experience and knowledge
if they have been given supervision or instruction
concerning use of the appliance in a safe way and
understand hazards involved. Children shall not play with
the appliance. Cleaning and user maintenance shall not be
made by children
without supervision.
4. Unplug Stand Mixer from outlet when not in use, before
putting on or taking off parts, and before cleaning.
5. Avoid contact with moving parts. Keep hands, hair, clothing,
as well as spatulas and other utensils away from beater
during operation to reduce the risk of injury to persons and/
or damage to the Stand Mixer.
6. Do not operate Stand Mixer with a damaged cord or plug
or after the Stand Mixer malfunctions, or is dropped or
damaged in any manner. Return appliance to the nearest
Authorized Service Center for examination, repair or
electrical or mechanical adjustment.
English
3

STAND MIXER SAFETY
7. The use of attachments not recommended or sold by
KitchenAid may cause re, electrical shock, or injury.
8. Do not use the Stand Mixer outdoors.
9. Do not let cord hang over edge of table or counter.
10. Remove at beater, wire whip, or dough hook from
Stand Mixer before washing.
SAVE THESE INSTRUCTIONS
THIS PRODUCT IS DESIGNED FOR COMMERCIAL USE
Electrical requirements
Volts: 220-240 A.C.
Hertz: 50-60 Hz
Power: 325 W
Recommended operating time:
1-30 minutes with a duty cycle of 10-min.
ON/ 15 min. OFF.
Do not use an extension cord. If the power
supply cord is too short, have a qualied
electrician or serviceman install an outlet
near the appliance.
The wattage rating is determined by using
the attachment that draws the greatest load
(power). Other recommended attachments
may draw signicantly less power.
This product is supplied with a Y type power
cord. If the power cord is damaged, it must
be replaced by the manufacturer or a service
agent in order to avoid a hazard.
The acoustic pressure level measured in conformity with the prEN 454-test code
is less than 70 dBA.
A * in the model number indicates additional characters that designate machine color
and engineering digits for the actual model (eg. 5KSMC895*).
4
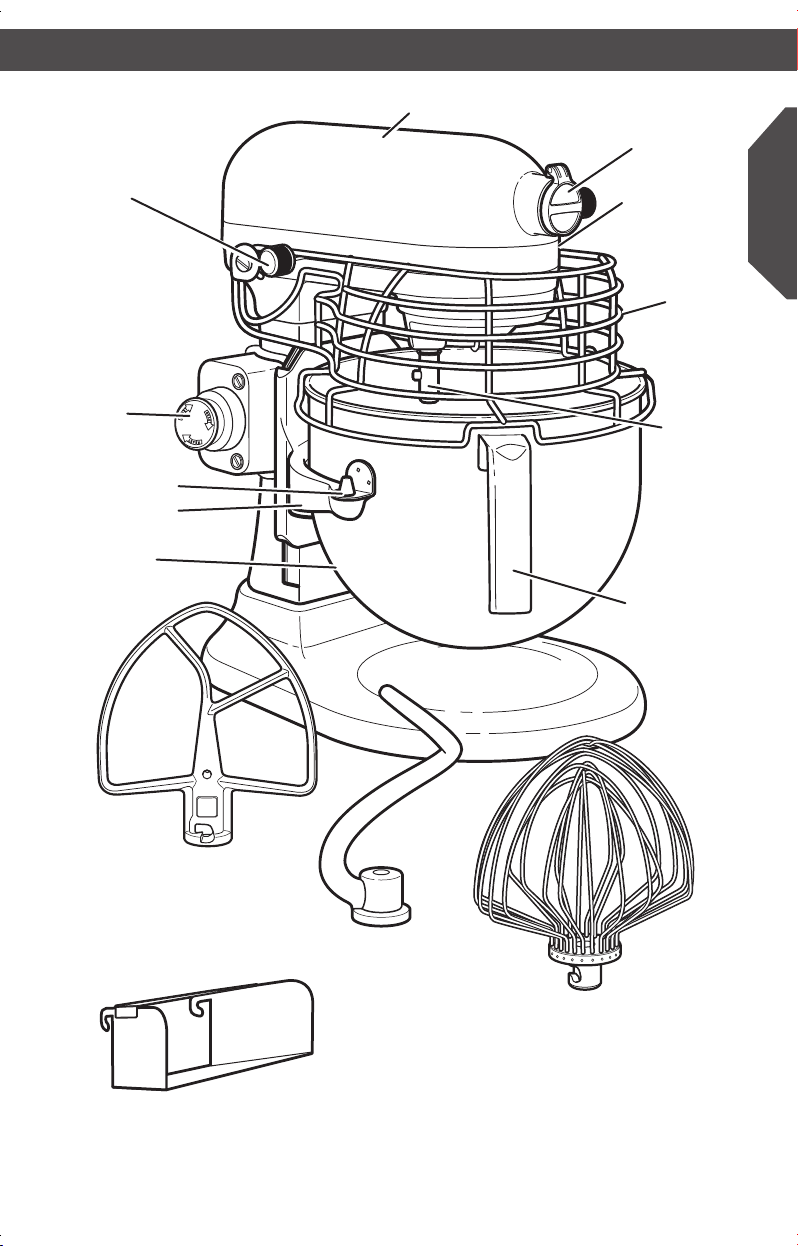
Speed control
lever
Stop
switch
Locating pins
Bowl support
7.6 L (8 qt.)
Stainless
steel bowl
Motor head
Attachment
hub
Bowl lift lever
(not shown)
Guard
Beater
shaft
Bowl handle
English
Stainless steel
at beater
Removable
pouring chute
Stainless steel
spiral dough hook
11-wire Stainless steel
elliptical whip
5
SETTING UP YOUR STAND MIXER SETTING UP YOUR STAND MIXER
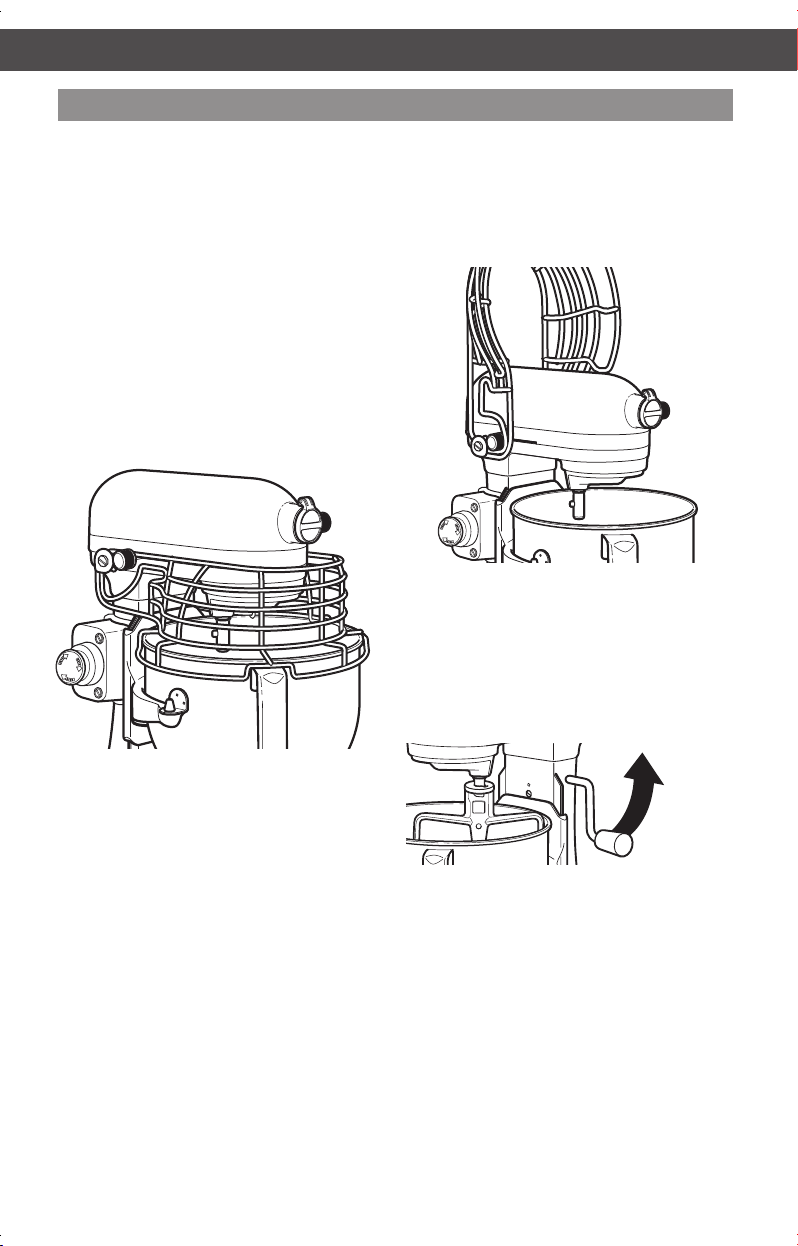
Assembling your Stand Mixer
To attach bowl
1. Turn speed control lever to “0” (OFF).
2. Unplug Stand Mixer or disconnect power.
3. Raise guard.
4. Place bowl lift lever in down position.
5. Fit bowl supports over locating pins.
6. Press down on back of bowl until
bowl pin snaps into spring latch.
NOTE: If bowl is not securely snapped into
place, the bowl will be unstable and wobble
during use.
To remove bowl
1. Turn speed control lever to “0” (OFF).
2. Unplug Stand Mixer or disconnect power.
3. Raise guard.
4. Place bowl lift lever in down position.
5. Remove at beater, wire whip, or
dough hook.
6. Grasp bowl handle and lift straight up
and off locating pins.
To raise bowl
7. Lower guard.
8. Raise bowl before mixing.
6
1. Rotate lever counterclockwise
to straight-up position.
2. Bowl must always be in raised, locked
position when mixing.

INSTALLATION: The Stand Mixer shall be installed on a level and stable surface such
as a countertop or work table.
To lower bowl
1. Rotate lever back and down.
To attach at beater, wire whip,
or dough hook
1. Turn speed control lever to “0” (OFF).
2. Unplug Stand Mixer or disconnect power.
3. Raise guard.
4. Slip at beater
on beater shaft
and press upward
as far as possible.
5. Turn beater to right, hooking beater
over the pin on shaft.
To remove at beater, wire whip,
or dough hook
1. Turn speed control lever to “0” (OFF).
2. Unplug Stand Mixer or disconnect
power.
3. Raise guard.
4. Press beater upward as far as possible
and turn left.
5. Pull beater from beater shaft.
Speed control lever
Removable pouring chute
The removable pouring chute is easily
attached to the front of the guard as shown
in the illustration above. It provides a
convenient way to add ingredients to the
Stand Mixer bowl.
Auto-reset motor protection
If the Stand Mixer stops due to overload,
slide the speed control lever to “0” (OFF)
and unplug the Stand Mixer. After a few
minutes, the Stand Mixer will automatically
reset. Plug the Stand Mixer back in and slide
the speed control lever to the desired speed
and continue mixing. If the Stand Mixer
does not restart, unplug the Stand Mixer
for a longer period of time to allow it to
cool, then plug back in and restart the Stand
Mixer. If the Stand Mixer does not restart,
see “Troubleshooting”.
Stop Switch
The Soft Start feature minimizes splash-out
by starting the Stand Mixer slowly before
increasing to the selected speed. To further
reduce the potential for splash-out, always
begin mixing using Speed 1, then gradually
move to higher speeds as needed. See
If you need to stop the Stand Mixer
immediately during use, press the Stop
switch. To resume operation, reset the
speed control lever to “0” (OFF), and pull
out the stop switch. Then, your Stand Mixer
is ready to be used normally again.
“Speed control guide”.
English
7

Adjusting your beater to bowl clearance
Your Stand Mixer is adjusted at the factory so the at beater just clears the bottom of the
bowl. If, for any reason, the at beater hits the bottom of the bowl or is too far away from
the bowl, you can correct the clearance easily.
1. Turn speed control to “0” (OFF).
2. Unplug Stand Mixer or disconnect
power.
3. Raise guard.
4. Lower the bowl to the down position.
5. Turn beater height adjustment screw
slightly counter clockwise (left) to raise
the at beater or clockwise (right) to
lower the at beater.
6. Make adjustment with at beater, so
it just clears surface of the bowl. If you
over adjust the screw, the bowl lift
lever may not lock into place.
NOTE: When properly adjusted, the at beater will not strike on the bottom or side of the
bowl. If the at beater or the wire whip is so close that it strikes the bottom of the bowl,
coating may wear off the at beater (for coated beaters) or wires on the wire whip may
wear. Scraping the sides of the bowl may be necessary under certain conditions regardless
of beater adjustment. The Stand Mixer must be stopped to scrape bowl or damage to the
Stand Mixer may occur.
USING YOUR STAND MIXER
Using your KitchenAid accessories
Flat Beater for normal to heavy mixtures
(Recommended operating time is 1-10 minutes, depending upon recipe):
cakes biscuits
creamed frostings quick breads
candies meat loaf
cookies mashed potatoes
pie pastry
Wire Whip for mixtures that need air incorporated
(Recommended operating time is 1-30 minutes, depending upon recipe):
eggs sponge cakes
egg whites angel food cakes
heavy cream mayonnaise
boiled frostings some candies
Dough Hook for mixing and kneading yeast doughs
(Recommended operating time is 1-10 minutes, depending upon recipe):
breads coffee cakes
rolls buns
8
 Loading...