

Page 1
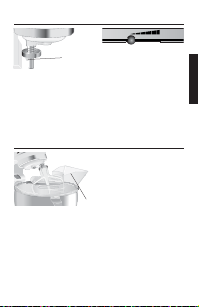
STAND MIXER USE AND CARE GUIDE
GUIDE TO EXPERT RESULTS
台式搅拌机使用和保养指南
专业效果指南
s
t
r
a
p
g
n
i
v
o
m
e
r
f
o
g
n
i
t
r
e
s
n
i
e
r
o
f
e
b
g
u
l
p
n
0
U
:
N
1
O
I
T
U
A
8
C
6
4
2
1
O
A
S
d
U
i
n
A
a
n
g
i
e
h
c
i
h
c
M
t
i
,
h
K
p
e
s
o
J
.
t
S
®
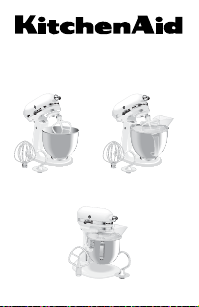
Model 5K45SSC
型号 5K45SSC
Model 5KSM150PSC
型号 5KSM150PSC
K
i
t
c
h
e
n
S
A
t
.
J
i
o
d
s
e
p
h
,
M
i
c
h
i
g
a
n
,
U
S
A
0
1
2
4
6
8
1
0
H
e
a
v
y
D
u
t
y
Model 5K5SSC
型号 5K5SSC
Page 2

Table of Contents
Stand Mixer Safety ..........................................................................................................4
Important Safeguards .....................................................................................................4
Electrical Requirements ...................................................................................................5
5K45SS Tilt-Head Stand Mixer Features ...........................................................................6
5KSM150PS Tilt-Head Stand Mixer Features ....................................................................7
Assembling Your Tilt-Head Stand Mixer ...........................................................................8
English
5K5SS Bowl-Lift Stand Mixer Features .............................................................................9
Assembling Your Bowl-Lift Stand Mixer .........................................................................10
Assembling Your Pouring Shield ....................................................................................11
®
Using Your KitchenAid
Flat Beater, Wire Whip and Dough Hook .................................12
Beater to Bowl Clearance ..............................................................................................12
Care and Cleaning ........................................................................................................13
Planetary Mixing Action ................................................................................................13
Stand Mixer Use ...........................................................................................................13
Speed Control Guide - 10 Speed Mixers ........................................................................14
Mixing Tips ...................................................................................................................15
Mixing and Kneading Yeast Dough ...............................................................................16
Egg Whites ...................................................................................................................17
Whipped Cream............................................................................................................17
Accessories - General Instructions .................................................................................18
When You Need Service ................................................................................................19
®
KitchenAid
Household Stand Mixer Warranty...............................................................20
Service Centers ..............................................................................................................20
2
Page 3

台式搅拌机安全注意事项 .......................................................................................................21
重要安全措施 ...........................................................................................................................21
电压要求 ...................................................................................................................................22
5K45SS 倾斜头台式搅拌机的结构 ..........................................................................................23
5KSM150PS 倾斜头台式搅拌机的结构 ...................................................................................24
组装倾斜头台式搅拌机 ...........................................................................................................25
5K5SS 升降式台式搅拌机的结构 ............................................................................................26
组装升降式台式搅拌机 ...........................................................................................................27
组装导流罩 ...............................................................................................................................28
使用 KitchenAid® 平搅器、打蛋器和面团钩 ..........................................................................29
搅拌器与桶的间距 ...................................................................................................................29
保养和清洁 ...............................................................................................................................30
行星式搅拌动作 .......................................................................................................................30
台式搅拌机的用法 ...................................................................................................................30
速度控制指南 - 10 速搅拌机 ..................................................................................................31
搅拌提示 ...................................................................................................................................32
搅拌和揉搓发酵面团 ...............................................................................................................33
蛋白 ...........................................................................................................................................34
发泡鲜奶油 ...............................................................................................................................34
附件 - 一般说明 .......................................................................................................................35
当您需要服务时 .......................................................................................................................36
KitchenAid® 家用台式搅拌机保修证 ......................................................................................37
服务中心 ...................................................................................................................................37
目录
33
Chinese/中文
Page 4
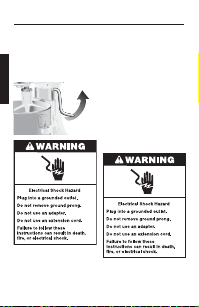
Stand Mixer Safety
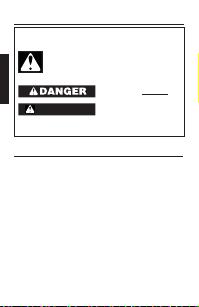
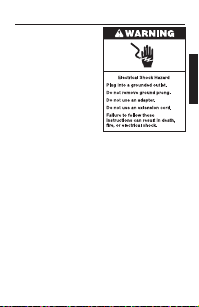
WARNING
Your safety and the safety of others are very important.
We have provided many important safety messages in this manual and on your
appliance. Always read and obey all safety messages.
This is the safety alert symbol.
This symbol alerts you to potential hazards that can kill or hurt you
and others.
English
All safety messages will follow the safety alert symbol and either
the word “DANGER” or “WARNING.” These words mean:
You can be killed or seriously
injured if you don’t immediately
follow instructions.
You can be killed or seriously injured
All safety messages will tell you what the potential hazard is, tell you how to
reduce the chance of injury, and tell you what can happen if the instructions are
not followed.
When using electrical appliances, basic
safety precautions should always be
followed including the following:
1. Read all instructions.
2. To protect against risk of electrical
shock, do not put Stand Mixer in
water or other liquid.
3. The appliance is not intended for use
by young children or infirm persons
without supervision.
4. Unplug Stand Mixer from outlet when
not in use, before putting on or
taking off parts and before cleaning.
5. Avoid contacting moving parts.
Keep hands, hair, clothing, as well
as spatulas and other utensils away
from beater during operation to
reduce the risk of injury to persons
and/or damage to the Stand Mixer.
if you don’t follow instructions.
IMPORTANT SAFEGUARDS
6. Do not operate Stand Mixer with
a damaged cord or plug or after
the Stand Mixer malfunctions, or
is dropped or damaged in any
manner. Return appliance to the
nearest Authorized Service Center
for examination, repair or electrical or
mechanical adjustment.
7. The use of accessories not
recommended or sold by KitchenAid
may cause fire, electrical shock or injury.
8. Do not use the Stand Mixer outdoors.
9. Do not let the cord hang over edge
of table or counter.
10. Remove flat beater, wire whip or dough
hook from Stand Mixer before washing.
11. This product is designed for
household use only.
SAVE THESE INSTRUCTIONS
4
Page 5
Electrical Requirements
Your Stand Mixer operates on a regular
220-240 volt A.C., 50/60 hertz house
current. The wattage rating for your
Stand Mixer is printed on the trim band.
This wattage is determined by using the
accessories which draws the greatest
power. Other recommended accessories
may draw significantly less power.
Do not use an extension cord. If the
power supply cord is too short, have a
qualified electrician or serviceman install
an outlet near the appliance.
English
5
Page 6
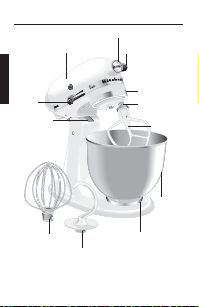
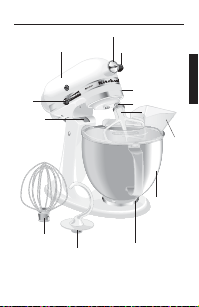
5K45SS Tilt-Head Stand Mixer Features
Motor Head
Accessory Hub
English
s
t
r
a
p
g
n
i
v
o
m
e
r
f
o
g
n
i
t
r
e
s
n
i
e
r
o
f
e
b
g
u
l
p
n
0
U
:
N
1
O
I
T
U
A
8
C
6
4
2
Speed
1
O
A
S
d
U
n
a
Control
g
i
h
c
i
chenAi
M
,
h
Kit
p
e
s
o
J
.
t
S
Lever
Beater Height
Adjustment
Screw
Wire Whip
Dough Hook
6
Accessory Knob
Motor Head
Locking Lever
(not shown)
Beater Shaft
Bowl Clamping Plate
Flat Beater
4.25 liter
(4.5 qt.)
Stainless
Steel
Bowl
Page 7
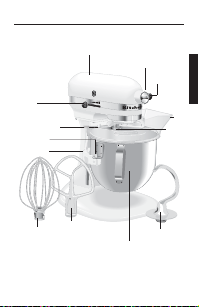
5KSM150PS Tilt-Head Stand Mixer Features
Motor Head
Accessory Hub
Accessory Knob
Speed
Control
Lever
Beater Height
Adjustment
Screw
Wire Whip
Dough Hook
7
Motor Head
Locking Lever
(not shown)
Beater Shaft
Bowl Clamping Plate
Flat Beater
4.8 liter
(5 qt.)
Stainless
Steel Bowl
Pouring
Shield
English
Page 8
Assembling Your Tilt-Head Stand Mixer
English
To Attach Bowl
1. Turn speed control to “O”.
2. Unplug Stand Mixer or disconnect
power.
3. Hold the locking lever in the UNLOCK
position and tilt motor head back.
4. Place bowl on bowl clamping plate.
5. Turn bowl gently in clockwise
direction.
To Remove Bowl
1. Turn speed control to “O”.
2. Unplug Stand Mixer or
disconnect power.
3. Hold the locking lever in the UNLOCK
position and tilt motor head back.
4. Turn bowl counterclockwise.
To Attach Flat Beater,
Wire Whip, or Dough Hook
1. Turn speed control to “O”.
2. Unplug Stand Mixer or disconnect
power.
3. Hold the locking lever in the UNLOCK
position and raise motor head.
4. Slip beater onto beater shaft and press
upward as far as possible.
5. Turn beater to right, hooking beater
over pin on shaft.
To Remove Flat Beater,
Wire Whip, or Dough Hook
1. Turn speed control to “O”.
2. Unplug Stand Mixer or disconnect
3. Hold the locking lever in the UNLOCK
4. Press beater upward as far as possible
5. Pull beater from beater shaft.
To Lock Motor Head
1. Make sure motor head is completely
2. Place locking lever in LOCK position.
3. Before mixing, test lock by attempting
To Unlock Motor Head
1. Place lever in UNLOCK position.
NOTE: Motor head should always be
kept in LOCK position when using the
Pin
Stand Mixer.
To Operate Speed Control
Plug Stand Mixer in proper electrical
outlet. Speed control lever should always
be set on lowest speed for starting, then
gradually moved to desired higher speed
to avoid splashing ingredients out of bowl.
See page 14 for Speed Control Guide.
8
power.
position and raise motor head.
and turn left.
down.
to raise head.
21
4
6
8
O
10
Page 9
5K5SS Bowl-Lift Stand Mixer Features
Motor Head
Accessory Hub
Speed Control
K
i
t
c
h
e
n
S
A
t
.
J
i
o
d
s
e
p
h
,
M
i
c
h
i
g
a
n
,
U
S
A
0
1
2
Flat Beater
4
6
8
1
0
9
H
e
a
v
y
D
u
t
y
4.8 liter (5 qt.)
Stainless Steel Bowl
Knob
Spring Latch, Bowl
Pin and Bowl Height
Adjustment Screw
(not shown)
Locating Pins
Bowl Support
Wire Whip
Accessory
Knob
Dough Hook
Bowl Lift
Handle
(not shown)
Beater
Shaft
Pouring
Shield
English
Page 10
Assembling Your Bowl-Lift Mixer
To Attach Bowl
1. Turn speed control to “O”.
2. Unplug Stand Mixer or disconnect
power.
3. Place bowl-lift handle in down
position.
4. Fit bowl supports over locating pins.
5. Press down on back of bowl until
English
bowl pin snaps into spring latch.
6. Raise bowl before mixing.
7. Plug into proper electrical outlet.
To Raise Bowl
1. Rotate handle to straight-up position.
2. Bowl must always be in raised, locked
position when mixing.
To Lower Bowl
1. Rotate handle back and down.
To Remove Bowl
1. Turn speed control to “O”.
2. Unplug Stand Mixer or disconnect
power.
3. Place bowl-lift handle in down
position.
4. Remove flat beater, wire whip, or
dough hook.
5. Grasp bowl handle and lift straight up
and off locating pins.
To Attach Flat Beater,
Wire Whip, or Dough Hook
1. Turn speed control to “O”.
2. Unplug Stand Mixer or disconnect
power.
Raise
3. Lower bowl by rotating bowl-lift
handle downward.
4. Slip flat beater on beater shaft.
5. Turn beater to left, hooking beater
over the pin on shaft.
6. Plug into proper electrical outlet.
10
Page 11
Assembling Your Bowl-Lift Mixer
Pin
To Remove Flat Beater,
Wire Whip, or Dough Hook
1. Turn speed control to “O”.
2. Unplug Stand Mixer or disconnect
power.
3. Lower bowl by rotating bowl-lift
handle downward.
4. Press beater upward and turn right.
5. Pull beater from beater shaft.
Assembling Your Pouring Shield*
Pouring Chute
To Attach Pouring Shield
1. Turn speed control to “O”.
2. Unplug Stand Mixer or disconnect power.
3. Attach flat beater, dough hook, or wire
whip and bowl (see page 8 for
tilt-head models, see page 10 for
bowl-lift models).
4. From the front of the Stand Mixer, slide
the pouring shield over the bowl until the
shield is centered. The bottom rim of the
shield should fit within the bowl.
11
10
21
4
6
8
O
Stand Mixer Speed Control
To reduce the potential for splash-out,
always begin mixing using Speed 1 (STIR
speed), then gradually move to higher
speeds as needed. See page 14 for “Speed
Control Guide.”
Auto-Reset Motor Protection
If the Stand Mixer stops due to overload,
slide the speed control lever to “O”.
After a few minutes, the Stand Mixer will
automatically reset. Slide the speed control
lever to the desired speed and continue
mixing.
If the unit does not restart, see “When
You Need Service” on page 19.
To Remove Pouring Shield
1. Turn speed control to “O”.
2. Unplug Stand Mixer or disconnect power.
3. Lift the front of the pour shield clear of
the bowl rim and pull forward.
4. Remove accessory and bowl.
To Use Pouring Shield
1. For best results, rotate the shield so the
motor head covers the “u” shaped gap
in the shield. The pouring chute will be
just to the right of the accessory hub
as you face the Stand Mixer.
2. Pour the ingredients into the bowl
through the pouring chute.
* If Pouring Shield is included.
English
Page 12
Using Your KitchenAid® Flat Beater,
Wire Whip and Dough Hook
Flat Beater for normal to heavy mixtures:
cakes biscuits creamed frostings
quick breads candies meat loaf
cookies mashed potatoes pie pastry
Wire Whip for mixtures that need air incorporated:
English
eggs sponge cakes egg whites
angel food cakes heavy cream mayonnaise
boiled frostings some candies
Dough Hook for mixing and kneading yeast doughs:
breads coffee cakes rolls
buns pizza dough
Beater to Bowl Clearance
Your Stand Mixer is adjusted at the factory so the flat beater just clears the bottom of
the bowl. If, for any reason, the flat beater hits the bottom of the bowl or is too far
away from the bowl, you can correct clearance easily.
Tilt Head Stand Mixers:
1. Turn speed control to “O”.
2. Unplug Stand Mixer.
3. Lift motor head.
4. Turn screw (A) SLIGHTLY counter
clockwise (left) to raise flat beater or
clockwise (right) to lower flat beater.
5. Make adjustment with flat beater, so it
just clears surface of bowl. If you over
adjust the screw, the bowl lock lever
may not lock into place.
NOTE: When properly adjusted, the flat
beater will not strike on the bottom or
side of the bowl. If the flat beater or the
wire whip is so close that it strikes the
bottom of the bowl, coating may wear off
the beater or wires on whip may wear.
Bowl-Lift Stand Mixers:
1. Turn speed control to “O”.
2. Unplug Stand Mixer.
3. Place bowl-lift handle in down
position.
4. Attach flat beater.
5. Turn screw (B) SLIGHTLY counter
clockwise (left) to raise flat beater or
clockwise (right) to lower flat beater.
6. Place bowl-lift handle in up position to
check clearance.
7. Repeat steps 5 and 6 if necessary.
NOTE: When properly adjusted, the flat
beater will not strike on the bottom or
side of the bowl. If the flat beater or the
wire whip is so close that it strikes the
bottom of the bowl, coating may wear off
the beater or wires on whip may wear.
A
12
B
Page 13

Care and Cleaning
Bowl, coated flat beater and coated
dough hook may be washed in an
automatic dishwasher. Or, clean them
thoroughly in hot sudsy water and rinse
completely before drying. Do not store
beaters on shaft.
NOTE: The wire whip is NOT
dishwasher-safe!
Planetary Mixing Action
During operation, the
flat beater moves
around the stationary
bowl, at the same
time turning in the
opposite direction on
its own axis. The diagram
shows the complete
Stand Mixer Use
NOTE: Do not scrape bowl while Stand
Mixer is operating.
NOTE: Always be sure to unplug Stand
Mixer before cleaning. Wipe Stand Mixer
with a soft, damp cloth. Do not use
household/commercial cleaners. Do not
immerse in water. Wipe off beater shaft
frequently, removing any residue that may
accumulate.
coverage of the bowl made by the path
of the beater. Your KitchenAid
Mixer will mix faster and more thoroughly
than most other electric mixers. Therefore,
the mixing time in most recipes must be
adjusted to avoid overbeating.
The bowl and beater are designed to
provide thorough mixing without frequent
scraping. Scraping the bowl once or twice
during mixing is usually sufficient. Turn
unit off before scraping.
The Stand Mixer may warm up during use.
Under heavy loads with extended mixing
time, you may not be able to comfortably
touch the top of the unit. This is normal.
13
English
®
Stand
Page 14

Speed Control Guide – 10 Speed Mixers
Number Speed Description
1 STIR For slow stirring, combining, mashing or
2 SLOW MIXING For slow mixing, mashing or faster
English
4 MIXING, For mixing semi-heavy batters, such as cookies.
BEATING Use to combine sugar and shortening and
6 BEATING, For medium fast beating (creaming) or whipping.
CREAMING Use to finish mixing cake, doughnut, and other
8 FAST BEATING, For whipping cream, egg whites or
WHIPPING boiled frostings.
10 FAST WHIPPING For whipping small amounts of cream, egg
NOTE: Will not maintain fast speeds under
NOTE: Do not exceed Speed 2 when preparing yeast doughs as this may cause damage
to the Stand Mixer.
starting all mixing procedures. Use to
add flour and dry ingredients to batter, and
add liquids to dry ingredients. Do not use STIR
Speed to mix or knead yeast doughs.
stirring. Use to mix and knead yeast doughs,
heavy batters and candies, start mashing
potatoes or other vegetables, cut shortening
into flour, mix thin or splashy batters. Use with
Can Opener accessory.
to add sugar to egg whites for meringues.
Medium speed for cake mixes. Use with: Food
Grinder, Rotor Slicer/Shredder, Pasta Roller, and
Fruit/Vegetable Strainer.
batters. High speed for cake mixes. Use with
Citrus Juicer accessory.
whites or for final whipping of mashed
potatoes. Use with Pasta Maker and Grain Mill
accessory.
heavy loads, such as when using Pasta Maker
or Grain Mill accessory.
14
Page 15

To help determine a mixing procedure,
1
⁄3 dry ingredients
1
⁄2 liquid ingredients
1
⁄3 dry ingredients
1
⁄2 liquid ingredients
1
⁄3 dry ingredients
Always add ingredients as close to
Mixing Tips
Converting Your Recipe
for the Stand Mixer
The mixing instructions found in this
book can be used to convert your favorite
recipes for use with your KitchenAid
Stand Mixer.
your own observations and experience will
be needed. Watch the batter or dough
and mix only until it has the desired
appearance described in your recipe
such as “smooth and creamy.” Use the
“Speed Control Guide,” page 14, to help
determine proper mixing speeds.
Adding Ingredients
The standard procedure to follow when
mixing most batters, especially cake and
cookie batters, is to add:
Use Speed 1 until ingredients have been
blended. Then gradually increase to
desired speed.
side of bowl as possible, not directly into
moving beater. The Pouring Shield can be
used to simplify adding ingredients.
NOTE: If ingredients in very bottom of
bowl are not thoroughly mixed, the beater
is not far enough into the bowl. See
“Beater to Bowl Clearance,” page 12.
Cake Mixes
When preparing packaged cake mixes, use
Speed 4 for medium speed and Speed 6
for high speed. For best results, mix for
®
the time stated on the package directions.
Adding Nuts, Raisins, or
Candied Fruits
Solid materials should be folded in the
last few seconds of mixing on Speed 1.
The batter should be thick enough to
prevent the fruit or nuts from sinking to
the bottom of the pan during baking.
Sticky fruits should be dusted with flour
for better distribution in the batter.
Liquid Mixtures
Mixtures containing large amounts of
liquid ingredients should be mixed at
lower speeds to avoid splashing. Increase
speed only after mixture has thickened.
Kneading Yeast Doughs
ALWAYS use the dough hook to mix and
knead yeast doughs. Use Speed 2 to mix
or knead yeast doughs. Use of any other
speed creates high potential for unit failure.
When making dough with a 4.25 liter
(4.5 qt.) tilt-head Stand Mixer, NEVER use
recipes calling for more than 0.87 kg
(7 cups) all-purpose flour or 0.81 kg
(6 cups) whole wheat flour.
When making dough with a 4.8 liter
(5 qt.) tilt-head Stand Mixer, NEVER use
recipes calling for more than 1.00 kg
(8 cups) all-purpose flour or 0.81 kg
(6 cups) whole wheat flour.
15
English
Page 16

Mixing and Kneading Yeast Dough
“Rapid Mix” describes a bread baking
method that calls for dry yeast to be
mixed with other dry ingredients before
liquid is added. In contrast, the traditional
method is to dissolve yeast in warm water.
1. Place all dry ingredients including yeast
into bowl, except last 125 to 250 g
(1 to 2 cups) flour.
English
2. Bowl-lift Stand Mixers: Attach
bowl and dough hook. Raise Stand
Mixer bowl.
Tilt-Head Stand Mixers: Attach
bowl and dough hook. Lock Stand
Mixer head.
3. Turn to Speed 2 and mix about
15 seconds, or until ingredients
are combined.
4. Continuing on Speed 2, gradually add
liquid ingredients to flour mixture and
mix 1 to 2 minutes longer.
NOTE: If liquid ingredients are added
too quickly, they will form a pool around
the dough hook and slow down mixing
process.
5. Continuing on Speed 2, gently add
1
remaining flour, 60 g (
⁄2 cup) at a time,
as needed. Mix until dough starts to
clean sides of bowl, about 2 minutes.
6. When dough clings to hook, knead on
Speed 2 for 2 minutes, or until dough
is smooth and elastic.
NOTE: Dust flour on the inside of bowl
and dough hook to prevent dough
from sticking.
7. Bowl-Lift Stand Mixers: Lower bowl
on Stand Mixer and remove dough
from the bowl and dough hook.
Tilt-Head Stand Mixers: Unlock and
tilt back Stand Mixer head and remove
dough from the bowl and
dough hook.
8. Follow directions in recipe for rising,
shaping, and baking.
When using the traditional method to
prepare a favorite recipe, dissolve yeast
in warm water in warmed bowl. Add
remaining liquids and dry ingredients,
except last 125 to 250 g (1 to 2 cups)
flour. Turn to Speed 2 and mix about
1 minute, or until ingredients are
thoroughly mixed. Proceed with Steps 4
through 6.
Both methods work equally well for
bread preparation. However, the “Rapid
Mix” method may be a bit faster and
easier for new bread bakers. It is slightly
more temperature tolerant because the
yeast is mixed with dry ingredients rather
than with warm liquid.
16
Page 17

Place room temperature egg whites in
clean, dry bowl. Attach bowl and wire
whip. To avoid splashing, gradually turn
to designated speed and whip to desired
stage. See chart below.
AMOUNT SPEED
1 egg white .............GRADUALLY to 10
2-4 egg whites .............GRADUALLY to 8
6 or more
egg whites ............. GRADUALLY to 8
Whipping Stages
With your KitchenAid
whites whip quickly. So, watch carefully
to avoid overwhipping. This list tells you
what to expect.
Frothy
Large, uneven air bubbles.
Pour cold whipping cream into chilled bowl.
Attach bowl and wire whip. To avoid
splashing, gradually turn to designated
speed and whip to desired stage. See
chart below.
AMOUNT SPEED
59 ml (
118 ml (
236 ml (1 cup)...............GRADUALLY to 8
472 ml (1 pint ) .............GRADUALLY to 8
Whipping Stages
Watch cream closely during whipping.
Because your KitchenAid
whips so quickly, there are just a few
seconds between whipping stages. Look
for these characteristics:
Egg Whites
®
Stand Mixer, egg
Whipped Cream
1
⁄4 cup) ..............GRADUALLY to 10
1
⁄2 cup) ............GRADUALLY to 10
®
Stand Mixer
Begins to Hold Shape
Air bubbles are fine and compact; product
is white.
Soft Peak
Tips of peaks fall over when wire whip is
removed.
Almost Stiff
Sharp peaks form when wire whip is
removed, but whites are actually soft.
Stiff but not Dry
Sharp, stiff peaks form when wire whip is
removed. Whites are uniform in color and
glisten.
Stiff and Dry
Sharp, stiff peaks form when wire whip is
removed. Whites are speckled and dull in
appearance.
Begins to Thicken
Cream is thick and custard-like.
Holds its Shape
Cream forms soft peaks when wire whip
is removed. Can be folded into other
ingredients when making desserts and
sauces.
Stiff
Cream stands in stiff, sharp peaks when
wire whip is removed. Use for topping
on cakes or desserts, or filling for cream
puffs.
17
English
Page 18

General Information
KitchenAid
and hub socket are of a square design, to eliminate any possibility of slipping during
the transmission of power to the accessory. The hub and shaft housing are tapered to
assure a snug fit, even after prolonged use and wear. KitchenAid
extra power unit to operate them; the power unit is built-in.
English
To Attach
1. Turn speed control to “O”.
2. Unplug Stand Mixer or disconnect
3. Loosen accessory knob by turning it
4. Insert accessory shaft housing into
5. Tighten accessory knob by turning
Accessories
®
Accessories are designed to assure long life. The accessory power shaft
Accessory
Accessory
Hub Socket
‡ Not part of
Stand Mixer.
Knob
Notch
Accessory Shaft
Housing
General Instructions
power.
counterclockwise. Remove accessory
hub cover.
accessory hub, making certain that
accessory power shaft fits into square
accessory hub socket. It may be
necessary to rotate accessory back and
forth. When accessory is in proper
position, the pin on the accessory will
fit into the notch on the hub rim.
clockwise until accessory is completely
secured to Stand Mixer.
6. Plug into proper electrical outlet.
18
®
Accessories require no
Accessory
Power Shaft‡
Pin
Accessory
Housing
Page 19

General Instructions
To Remove
1. Turn speed control to “O”.
2. Unplug Stand Mixer or
disconnect power.
When You Need Service
Please read the following before
calling your service center.
1. The Stand Mixer may warm up during
use. Under heavy loads with extended
mixing time periods, you may not be
able to comfortably touch the top of
the unit. This is normal.
2. The Stand Mixer may emit a pungent
odor, especially when new. This is
common with electric motors.
3. If the flat beater hits the bowl, stop
the Stand Mixer. See “Beater to Bowl
Clearance,” page 12.
3. Loosen accessory knob by turning it
counterclockwise. Rotate accessory
slightly back and forth while
pulling out.
4. Replace accessory hub cover. Tighten
accessory knob by turning it clockwise.
If your Stand Mixer should malfunction
or fail to operate, please check the
following:
- Is the Stand Mixer plugged in?
- Is the fuse in the circuit to the Stand
Mixer in working order? If you have a
circuit breaker box, be sure the circuit is
closed.
- Turn the Stand Mixer off for 10-15
seconds, then turn it back on. If the
Stand Mixer still does not start, allow it
to cool for 30 minutes before turning it
back on.
- If the problem is not due to one of the
above items, see “Service Centers.”
19
English
Page 20

®
KitchenAid
Household
Stand Mixer Warranty
Length of
KitchenAid
Will Pay For:
Replacement parts and
repair labor costs to
correct defects in materials
or workmanship. Service
must be provided by an
Authorized KitchenAid
Service Center.
In USA:
Customer Satisfaction Center
KitchenAid Portable Appliances
P.O. Box 218
Saint Joseph MI 49085
USA
Tollfree number (in U.S.A. only):
1-800-541-6390
www.KitchenAid.com
20
KitchenAid
Will Not Pay For:
A. Repairs when Stand
Mixer is used for
operations other than
normal household food
preparation.
B. Damage resulting from
accident, alterations,
misuse, abuse, or
installation/ operation
not in accordance with
local electrical codes.
Warranty:
China:
One Year Full Warranty
from date of purchase.
English
KITCHENAID DOES NOT ASSUME ANY RESPONSIBILITY FOR
INDIRECT DAMAGES.
Service Centers
All service should be handled locally by an Authorized KitchenAid Service Center. Contact
the dealer from whom the unit was purchased to obtain the name of the nearest
Authorized KitchenAid Service Center.
In China:
Greenfield Worldtrade
801 New Commerce Centre
19 On Sum Street
Shatin, N.T., Hong Kong
Tel.: +852/2321-1217
Fax.: +852/2321-8867
www.greenfieldworld.com
Page 21

台式搅拌机安全注意事项
您和他人的安全都非常重要
本手册和设备上提供很多重要的安全信息。请务必阅读并遵守所有安全信息。
这是安全警告符号。
该符号警告您,存在可导致您和他人死亡或受伤的潜在危险。
所有安全信息之前都有安全警告符号和“危险”或“警告”字样。
这些文字的含义为:
所有安全信息都会告诉您存在什么样的潜在危险,如何减少受伤风险,如果不遵
守说明会发生什么情况。
使用电器时,您应遵守基本安全预防措
施,包括:
1. 阅读所有说明。
2. 为了防止电击,不要将台式搅拌机放
在水中或其他液体中。
3. 如果无人监督,禁止小孩或体弱者使
用本电器。
4. 如果不再使用,请先从插座中拔出台
式搅拌机的插头,然后再装、卸部件
或进行清洁。
5. 避免接触运动部件。在操作期间,让
手、头发、衣服、刮铲及其他器皿远
离搅拌器,以降低人员受伤和/或台
式搅拌机受损的风险。
如果不严格遵守说明,您会受重伤或死
亡。
如果不遵守说明,您会受重伤或死亡。
重要安全措施
6. 如果台式搅拌机电源线或插头损坏,
7. 如果使用并非 KitchenAid 推荐或出售
8. 请勿在室外使用台式搅拌机。
9. 请勿将电源线挂在桌子或操作台的边
10. 清洗前,请从台式搅拌机上卸下平搅
11. 该产品仅适合家庭使用。
保存这些说明
2121
。
或搅拌机出现故障,或搅拌机被摔落
或以其他方式被损坏,请勿使用搅拌
机。将电器拿到最近的授权服务中
心,进行检查、修理或电气/机械调
整。
的附件,可能会导致火灾、电击或受
伤。
缘。
器、打蛋器和面团钩。
Chinese/中文
Page 22

本台式搅拌机使用常见的 220-240 伏、
50/60 赫兹的住宅交流电源。本台式搅拌
机的额定瓦数印在调节带上。此瓦数是使
用最耗电的附件时的功率。其他推荐附件
的能耗可能小得多。
请勿使用延长电线。如果电源线过短,请
让合格的电工或维修员在电器附近安装一
个插座。
Chinese/中文
电压要求
2222
Page 23

5K45SS 倾斜头台式搅拌机的结构
电动头
s
t
r
a
p
g
n
i
v
o
m
e
r
f
o
g
n
i
t
r
e
s
n
i
e
r
o
f
e
b
g
u
l
p
n
0
U
:
N
1
O
I
T
U
A
8
C
6
4
2
1
O
A
S
d
U
n
a
g
i
h
速度控
c
i
chenAi
M
,
h
Kit
p
e
s
o
J
.
t
S
制杆
搅拌器高度调
整螺钉
打蛋器
面团钩
2323
附件套筒
附件旋钮
电动头锁定杆
(未显示)
搅拌轴
桶夹板
平搅器
4.25 升
(4.5 夸脱)
不锈钢桶
Chinese/中文
Page 24

5KSM150PS 倾斜头台式搅拌机的结构
电动头
速度控
制杆
Chinese/中文
搅拌器高度
调整螺钉
打蛋器
面团钩
附件套筒
附件旋钮
电动头锁定杆
(未显示)
搅拌轴
平搅器
导流罩
4.8 升
(5 夸脱)
不锈钢桶
桶夹板
2424
Page 25

组装倾斜头台式搅拌机
安装桶
1. 将速度控制器旋转到 “O”。
2. 拔出台式搅拌机的插头,或断开电源。
3. 让锁定杆保持在 UNLOCK(解锁)位
置,然后让电动头后倾。
4. 将桶放在桶夹板上。
5. 以顺时针方向轻轻旋转桶。
拆卸桶
1. 将速度控制器旋转到 “O”。
2. 拔出台式搅拌机的插头,或断开电源。
3. 让锁定杆保持在 UNLOCK(解锁)位
置,然后让电动头后倾。
4. 逆时针旋转桶。
安装平搅器、打蛋器或面团钩
1. 将速度控制器旋转到 “O”。
2. 拔出台式搅拌机的插头,或断开电源。
3. 让锁定杆保持在 UNLOCK(解锁)位
置,然后抬起电动头。
4. 将搅拌器滑到搅拌轴上,然后向上压至
最大限度。
5. 向右旋转搅拌器,将搅拌器挂到轴的销
钉上。
拆卸平搅器、打蛋器或面团钩
1. 将速度控制器旋转到 “O”。
2. 拔出台式搅拌机的插头,或断开电源。
3. 让锁定杆保持在 UNLOCK(解锁)位
置,然后抬起电动头。
4. 将搅拌器向上压至最大限度,然后向
左旋转。
5. 从搅拌轴上拿下搅拌器。
锁定电动头
1. 确保电动头已完全静止。
2. 将锁定杆置于 LOCK(锁定)位置。
3. 搅拌前,尝试抬起电动头以测试锁定
状况。
解锁电动头
1. 将锁定杆置于 UNLOCK(解锁)位
销钉
置。
注意:使用台式搅拌机时,应始终将电
动头置于 LOCK(锁定)位置
O
操作速度控制器
将台式搅拌机插入适当的电源插座。无
论何时,开始时应将速度控制杆置于最
小速度处,然后逐渐移动到所需较大速
度,以免将配料溅出桶外。请参阅第 31
页的“速度控制指南”。
2525
Chinese/中文
10
21
4
6
8
Page 26

5K5SS 升降式台式搅拌机的结构
速度控制旋钮
Chinese/中文
弹簧锁、桶销钉、桶高
度调整螺钉(未显示)
定位销
桶支架
打蛋器
电动头
附件套筒
附件旋钮
H
e
a
v
y
D
u
t
y
4.8 升(5 夸脱)
不锈钢桶
面团钩
桶升降柄
(未显示)
搅拌 轴
导流罩
K
i
t
c
h
e
n
S
A
t
.
J
i
o
d
s
e
p
h
,
M
i
c
h
i
g
a
n
,
U
S
A
0
1
2
4
6
8
1
0
平搅器
2626
Page 27

组装升降式搅拌机
安装桶
1. 将速度控制器旋转到 “O”。
2. 拔出台式搅拌机的插头,或断开电
源。
3. 将桶升降柄置于低位。
4. 将桶支架放到定位销上。
5. 向下按桶背面,直到桶销钉卡入弹簧锁
为止。
6. 在搅拌前将桶向上抬一下。
上抬
7. 将搅拌机插入适当的电源插座。
上抬桶
1. 将手柄旋转到直立位置。
2. 搅拌时,桶必须始终处于抬起的锁定
位置。
降低桶
1. 向后、向下旋转手柄。
拆卸桶
1. 将速度控制器旋转到 “O”。
2. 拔出台式搅拌机的插头,或断开电
源。
3. 将桶升降柄置于低位。
4. 卸下平搅器、打蛋器或面团钩。
5. 抓住桶柄,直接向上抬,使其脱离定
位销。
安装平搅器、打蛋器或面团钩
1. 将速度控制器旋转到 “O”。
2. 拔出台式搅拌机的插头,或断开电
源。
3. 向下旋转桶升降柄,降低桶。
4. 将平搅器滑到搅拌轴上。
5. 向左旋转搅拌器,将搅拌器挂在轴的
销钉上。
6. 将搅拌机插入适当的电源插座。
2727
Chinese/中文
Page 28

拆卸平搅器、打蛋器或面团钩
1. 将速度控制器旋转到“O”。
2. 拔出台式搅拌机的插头,或断开电源。
3. 向下旋转桶升降柄,降低桶。
4. 向上压搅拌器,然后向右旋转。
5. 从搅拌轴上拿下搅拌器。
Chinese/中文
安装导流罩
1. 将速度控制器旋转到“O”。
2. 拔出台式搅拌机的插头,或断开电源。
3. 安装平搅器、面团钩或打蛋器和桶(若
是倾斜头型号,请参阅第 25 页;若是
升降式型号,请参阅第 27 页)。
4. 从台式搅拌机前部,在桶上方滑动导流
罩,直到导流罩居中为止。导流罩的底
边应当能装入桶中。
拆卸导流罩
1. 将速度控制器旋转到“O”。
2. 拔出台式搅拌机的插头,或断开电源。
3. 抬起导流罩前部,让它脱离桶边缘,然
后向前拉。
4. 拆卸附件和桶。
组装升降式搅拌机
台式搅拌机速度控制
为了降低配料溅出桶外的可能性,开始搅
销钉
拌时应始终使用 1 档速度,即
STIR(搅动)速度,然后逐渐移动到所需
的更高速度。请参阅第 31 页的“速度控
制指南”。
自动重置电机保护
如果台式搅拌机因为过载而停止,请将速
度控制杆滑到“O”。几分钟后,台式搅
拌机将自动重置。将速度控制杆滑到所需
速度,继续搅拌。
如果设备没有重启,请参阅第 36 页
的“当您需要服务时”。
组装导流罩*
使用导流罩
1. 为了获得最佳结果,请旋转导流罩,让
2. 通过导流槽,将配料倒入桶中
导流槽
2828
10
21
4
6
8
O
电动头盖住导流罩上的“u”形缺口。
当您面向台式搅拌机时,导流槽恰好位
于附件套筒右方。
* 如果包括导流罩。
Page 29

使用 KitchenAid® 平搅器、打蛋器和面团钩
对于普通的稠混合物,使用平搅器:
蛋糕 饼干 奶油糖霜
速制面饼 糖果 肉糕
曲奇 土豆泥 馅饼皮
当混合物需要混合空气时,使用打蛋器:
鸡蛋 松糕 蛋白
白蛋糕 高脂厚奶油 蛋黄酱
熟炼糖霜 某些糖果
若是搅拌和揉搓发酵面团,使用面团钩:
面包 早餐点心 面包卷
小圆面包 比萨饼面团
搅拌器与桶的间距
本台式搅拌机出厂时已调好,平搅器恰好不会接触桶底。如果由于某种原因,平搅器
接触了桶底或离桶过远,您可以轻松校正间距。
倾斜头台式搅拌机:
1. 将速度控制器旋转到“O”。
2. 拔出台式搅拌机的插头。
3. 抬起电动头。
4. 沿逆时针方向(左)略微旋转螺钉
(A),以升高平搅器;或沿顺时针方
向(右)略微旋转螺钉 (A),以降低平
搅器。
5. 调整平搅器,使其刚好离开桶表面。
如果螺钉过调,桶锁定杆可能无法锁
到位。
注意:如果调整恰当,平搅器不会碰到桶
底或桶壁。如果平搅器或打蛋器过于接近
桶,当它碰到桶底时,会磨掉/损平搅器
上的涂层或打蛋器上的金属丝。
升降式台式搅拌机:
1. 将速度控制器旋转到“O”。
2. 拔出台式搅拌机的插头。
3. 将桶升降柄置于低位。
4. 装上平搅器。
5. 沿逆时针方向(左)略微旋转螺钉
(B),以升高平搅器;或沿顺时针方向
(右)略微旋转螺钉 (B),以降低平搅
器。
6. 将桶升降柄置于高位,查看间距。
7. 必要时重复步骤 5 和 6。
注意:如果调整恰当,平搅器不会碰到桶
底或桶壁。如果平搅器或打蛋器过于接近
桶,当它碰到桶底时,会磨掉/损平搅器
上的涂层或打蛋器上的金属丝。
A
2929
B
Chinese/中文
Page 30

可以使用自动洗碗机清洗桶、带涂层的平
搅器和带涂层的面团钩。也可以用起泡沫
的热水彻底清洁它们,然后用水彻底冲
洗,之后干燥。不用时请勿将平搅器留在
轴上。
注意:不能用洗碗机洗打蛋器
不安全!
搅拌机工作时,平搅器
不仅绕着固定的桶运
动,而且绕着自己的轴
反向旋转。该图为搅拌
Chinese/中文
器在桶中运动时形成的
完整覆盖轨迹。与多数
其他电动搅拌机相比,
®
KitchenAid
台式搅拌
注意:在台式搅拌机工作期间,请勿刮
擦桶。
保养和清洁
注意:始终记得先拔出台式搅拌机的插
头,然后再清洁。用柔软的湿布擦拭台式
搅拌机。请勿使用家用/工业清洁剂。请
勿浸入水中。经常擦拭搅拌轴,去掉上面
积聚的所有残渣。
行星式搅拌动作
机速度更快、搅拌更彻底。因此,对于多
数食谱而言,必须适当调整搅拌时间,以
免搅拌过多。
台式搅拌机的用法
桶和搅拌器设计独特,无需经常刮擦即可
实现彻底搅拌。一般情况下,搅拌期间将
桶刮擦一两次就足够了。先关掉搅拌机,
然后再刮擦。
台式搅拌机在使用过程中可能会发热。如
果负荷大,需要延长搅拌时间,搅拌机顶
部可能会发烫。这是正常现象。
3030
Page 31

速度控制指南 - 10 速搅拌机
编号 速度 说明
1 搅动(STIR) 适合于缓慢的搅动、混合、捣碎操作,或作
2 缓慢搅拌 适合于缓慢的搅拌、捣碎或较快的搅动操
4 搅拌、打浆 用于搅拌中等稠度的糊浆,如曲奇的糊。用于
6 打浆、乳析 适合于中速打浆(乳析)或打发。作为蛋糕、
8 快速打浆、打发 适合于发泡鲜奶油、蛋白或熟炼糖霜。
10 快速打发 适合于打发少量奶油、蛋白,或作为土豆泥
注意:负荷大时不能维持快速状态,如使用制
注意:准备发酵面团时请勿超过 2 档速度,否则会导致台式搅拌机损坏。
为所有搅拌过程的第一步。用于向糊浆中添
加面粉和干配料,以及向干配料中添加液
体。请勿使用 STIR(搅动)速度搅拌或揉搓
发酵面团。
作。用于搅拌和揉搓发酵面团、粘稠的糊浆
和糖果,启动土豆或其他蔬菜的捣碎过程,
将起酥油切到面粉中,搅拌稀薄或易溅的糊
浆。配合开罐器附件使用。
混合糖与起酥油,以及在蛋白中加糖(用于制
作蛋白酥皮)。对蛋糕粉而言是中速。配合以
下工具使用:食品研磨机、旋转切片机/切丝
机、压面辊和水果/蔬菜滤网。
甜甜圈和其他糊浆的搅拌操作的最后一步。对
蛋糕粉而言是高速。配合柑橘榨汁机附件使
用。
打发操作的最后一步。配合制浆机和谷物磨
粉机附件使用。
浆机和谷物磨粉机附件时。
3131
Chinese/中文
Page 32

适当改变食谱,以适合本台式搅拌机
可以根据本书中的搅拌说明改变您喜爱
KitchenAid®
机。
您需要利用自己的观察和经验,来确定
搅拌过程。观察糊浆或面团,只要它具
有食谱中描述的外观(例如“光滑的像
奶一样”),就停止搅拌。利用第 31 页
的“速度控制指南”,确定适当的搅拌
速度。
添加配料
依照标准操作过程,在搅拌多数糊浆(尤
其是蛋糕和曲奇糊)时,需要添加:
Chinese/中文
1
⁄3 干配料
1
⁄2 液体配料
1
⁄3 干配料
1
⁄2 液体配料
1
⁄3 干配料
使用 1 档速度,直到各种配料混匀。然后
逐渐提高到所需速度。
任何时候都应尽量贴近桶壁添加配料,不
要直接将配料倒在转动的搅拌器上。可
以使用导流罩简化添加配料的工作。
注意:如果桶最底部的配料搅拌不充分,
则表明搅拌器在桶中伸得不够深。请参阅
第 29 页的“搅拌器与桶的间距”。
搅拌提示
蛋糕粉
用带包装的蛋糕粉准备面糊时,中速使用
4 档速度,高速使用 6 档速度。为了获得
最佳效果,请按包装说明上注明的时间进
行搅拌。
添加坚果、葡萄干或蜜饯水果
应当在搅拌过程的最后几秒钟,以 1 档速
度混入固体原料。糊浆应当足够稠,以免
在烘焙过程中水果或坚果沉到平底锅的底
部。粘湿的水果应当扑上面粉,以便更均
匀地分布在糊浆中。
稀薄混合物
包含大量液体的混合物应当以较低的速度
搅拌,以免泼溅。只有在混合物变稠后再
提速。
揉搓发酵面团
搅拌和揉搓发酵面团时,请始终使用面团
钩。使用 2 档速度搅拌或揉搓发酵面团。
如果使用其他速度,很可能会导致搅拌机
故障。
如果是用 4.25 升(4.5 夸脱)倾斜头台
式搅拌机制作面团,切勿使用需要超过
0.87 公斤(7 杯)中筋面粉或 0.81 公斤
(6 杯)全麦面粉的食谱。
如果是用 4.8 升(5 夸脱)倾斜头台式搅
拌机制作面团,切勿使用需要超过 1.00
公斤(8 杯)中筋面粉或 0.81 kg(6
杯)全麦面粉的食谱。
3232
Page 33

搅拌和揉搓发酵面团
“快速搅拌”描述的是面包焙烤方法,该
方法要求先将干酵母与其他干配料混合,
然后再加液体。传统方法与之相反,要求
用温水溶解酵母。
1. 将包括酵母在内的所有干配料放入桶
中,留出 125 到250 克(1 到 2 杯)
面粉。
2. 升降式台式搅拌机:安装桶和面团钩。
抬起台式搅拌机的桶。
倾斜头台式搅拌机:安装桶和面团钩。
锁定台式搅拌机的头。
3. 调到 2 档速度,搅拌约 15 秒,或直到
各种配料混匀为止。
4. 继续使用 2档速度,在面粉混合物中逐
渐添加液体配料,再搅拌1 到 2 分钟。
注意:如果液体配料添加速度过快,
它们会在面团钩周围形成水坑,进而
降低搅拌速度。
5. 继续使用 2 档速度,根据需要逐渐加入
剩余面粉,一次添加 60 克(
继续搅拌,直到面团开始清理桶壁为
止,大约需要 2 分钟。
1
⁄2 杯)。
6. 如果面团粘在钩上,请用 2 档速度揉
搓 2 分钟,或直到面团变得光滑而有弹
性为止。
注意:在桶内壁和面团钩上撒些面粉,以
免粘着面团。
7. 升降式台式搅拌机:在台式搅拌机上降
低桶,从桶和面团钩上取出面团。
倾斜头台式搅拌机:解锁并向后倾斜台
式搅拌机的头,然后从桶和面团钩上取
出面团。
8. 按照食谱中的说明执行发酵、成形和
焙烤。
如果使用传统方法准备您喜爱的食品,请
在预热过的桶中,用温水溶解酵母。添加
剩余液体和干配料,留出 125 到 250 克
(1 到 2 杯)面粉。调到 2 档速度,搅拌
约 1 分钟,或直到各种配料充分混合为
止。继续第 4 到 6 步。
用这两种方法的任意一种准备面包,都能
获得良好效果。但是,对于烘烤面包的新
手而言,“快速搅拌”法可能略微简便、
快捷些。它对温度的要求略微宽松,因为
酵母是与干物料而不是温水混合。
3333
Chinese/中文
Page 34

将室温蛋白放入干燥、干净的桶中。安装
桶和打蛋器。为了避免泼溅,请逐步调到
指定速度,逐渐打发到所需阶段。请参阅
下表。
数量 速度
1 个蛋白...............................逐渐调到 10
2-4 个蛋白 ............................逐渐调到 8
6 个或更多蛋白......................逐渐调到 8
打发阶段
®
KitchenAid
台式搅拌机可以迅速打发蛋
白。请仔细观察,以免打发过多。该列表
介绍了预期结果。
起泡
存在不均匀的大气泡。
Chinese/中文
开始成形
气泡小且紧密;搅拌物呈白色。
将冷的鲜奶油倒入冷却的桶中。安装桶和
打蛋器。为了避免泼溅,请逐步调到指定
速度,逐渐打发到所需阶段。请参阅下
表。
数量 速度
1
59 毫升(
⁄4 杯 ) ............... 逐渐调到 10
1
118 毫升(
⁄2 杯) .............. 逐渐调到 10
236 毫升(1 杯) ................. 逐渐调到 8
472 毫升(1 品脱) ............. 逐渐调到 8
打发阶段
打发期间密切观察奶油的状态。因为
®
KitchenAid
台式搅拌机打发速度很快,
不同打发阶段之间仅隔几秒钟。请注意如
下特征:
蛋白
湿性发泡
拿走打蛋器后,泡顶开始塌陷。
几近凝结
拿走打蛋器后,呈现明显的泡泡,但是蛋
白实际上还是软的。
凝结但不干燥
拿走打蛋器后,呈现明显的干性发泡。蛋
白颜色均匀、有光泽。
凝结且干燥
拿走打蛋器后,呈现明显的干性发泡。蛋
白表面有斑点、无光泽
发泡鲜奶油
开始变稠
奶油变得像奶油冻一样稠
保持形状
拿走打蛋器后,奶油呈现湿性发泡。如果
是制作甜点和调味汁,此时可混入其他
配料。
凝结
拿走打蛋器后,奶油中呈现明显的干性发
泡。用作蛋糕或甜点的浇头,或奶油泡芙
的馅。
3434
Page 35

一般信息
KitchenAid
计,目的是消除向附件传送动力的过程中的任何滑脱可能性。套筒和轴套采用渐缩设
计,目的是确保滑配合,即使在长时间使用和磨损后也能确保滑配合。
KitchenAid
安装
1. 将速度控制器旋转到“O”。
2. 拔出台式搅拌机的插头,或断开电源。
3. 逆时针旋转附件旋钮,将其松开。卸下
附件套筒盖。
4. 将附件轴套插入附件套筒,确保附件动
力轴在方形附件套筒槽口内配合到位。
可能需要前后旋转附件。当附件处于正
确位置时,其上的销钉恰好能卡到套筒
边缘的凹槽中。
5. 顺时针旋转附件旋钮,直到将它牢牢固
定到台式搅拌机上为止。
附件
®
附件的设计可确保较长的使用寿命。附件动力轴和套筒槽口采用正方形设
®
附件无需额外电源即可运行;电源是内置的。
附件套筒槽口
附件旋钮
附件罩
凹槽
销钉
附件轴套
一般说明
6. 将搅拌机插入适当的电源插座。
3535
Chinese/中文
Page 36

拆卸
1. 将速度控制器旋转到“O”。
2. 拔出台式搅拌机的插头,或断开电
源。
3. 逆时针旋转辅助装置旋钮,将其松
开。前后轻轻旋转附件,同时将其向
外拉。
4. 放回附件套筒盖。顺时针旋转附件旋
钮,将其拧紧。
Chinese/中文
请在致电服务中心前阅读以下内容。
1. 台式搅拌机在使用过程中可能会发热。
如果负荷大,需要延长搅拌时间,搅拌
机顶部可能会发烫。这是正常现象。
2. 台式搅拌机可能会发出刺鼻气味,新
机器尤其明显。对电机而言,这是常见
现象。
3. 如果平搅器碰撞桶壁,请停止台式搅拌
机。请参阅第 29 页的“搅拌器
与桶的间距”。
一般说明
当您需要服务时
如果台式搅拌机有故障或不能运转,请检
查以下事项:
- 是否已插上台式搅拌机的插头?
- 台式搅拌机所连接电路中的保险丝是否
正常?如果有断路开关盒,请确保电路
是闭合的。
- 将台式搅拌机关闭 10-15 秒,然后重新
打开。如果台式搅拌机仍不能启动,让
它冷却30 分钟,然后再重新打开。
- 如果不是以上问题,请参阅“服务中
心”。
3636
Page 37

®
KitchenAid
保修时间:
中国:
自购买之日起一年内整机
保修。
不对间接损害承担任何责任。
应由当地授权 KitchenAid 服务中心提供所有服务。联系向您出售搅拌机的经销商,以获
取距离您最近的授权 KitchenAid 服务中心的名称。
在亚州:
Greenfield World Trade
香港沙田小沥源,
安心街19号
汇贸中心801室
电话: +852 2321 1217
传真: +852 2321 8867
www.greenfieldworld.com
家用台式搅拌机保修证
KitchenAid
承担以下费用:
用于校正材料或工艺缺
陷的替换部件和修理人
工费。服务必须由授权
KitchenAid 服务中心提
供。
服务中心
在美国:
Customer Satisfaction Center
KitchenAid Portable Appliances
P.O. Box 218
Saint Joseph MI 49085
USA
免费电话号码(仅限美国境内):
1-800-541-6390
www.KitchenAid.com
3737
KitchenAid
不承担以下费用:
A. 由于将台式搅拌机用于
普通家庭食品准备以外
的用途而导致的修理。
B. 由于意外事件、改
造、误用、滥用台式
搅拌机,或未按照当
地电气规范安装/使用
台式搅拌机,而导致
台式搅拌机受损。
Chinese/中文
Page 38

® Registered Trademark of KitchenAid, U.S.A.
™Trademark of KitchenAid, U.S.A.
The shape of the Stand Mixer is a trademark of KitchenAid, U.S.A.
© 2008. All rights reserved.
Specifications subject to change without notice.
® KitchenAid 在美国的注册商标。
™ KitchenAid 在美国的商标。
台式搅拌机造型是 KitchenAid 在美国的商标。
© 2008 保留所有权利。
规格可能有变动,恕不另行通知。
W10190231A 6309AdZw608
 Loading...