

Page 1

HYUNDAI
KIA Navigation System
QUICK REFERENCE GUIDE
Page 2

LOOKING FOR MORE INFORMATION?
This Quick Reference Guide does not replace your System
Owner's Manual.
If you require additional information or are unsure of a
specific issue, refer to the System Owner's Manual for
additional information.
iPod®
is a registered trademark of Apple Inc.
The Bluetooth® word mark and logos are registered
trademarks owned by Bluetooth SIG, Inc. and any use of
such marks by Kia is under license. A Bluetooth® enabled
cell phone is required to use Bluetooth® wireless
technology.
Copyright(c) 2009 by NAVTEQ. All Map Database cannot be copied without
permission. This is protected by U.S. copyright laws. All rights not expressly
granted are reserved. You may not otherwise reproduce, modify, and
distribute the content without M&Soft, Inc's prior written consent.
Page 3

TABLE OF CONTENTS
Controls and functions ………………………………………………2
Control panel ……………………………………………………2
Controls and functions ………………………………………………4
Steering wheel remote controller ………………………………4
Audio sound setting …………………………………………………6
Display setting ………………………………………………………7
Operating the FM/AM radio …………………………………………8
Operating the SIRIUS radio ……………………………………… 10
Operating the CD ………………………………………………… 14
Operating the MP3, USB Music …………………………………… 16
USB Image ………………………………………………………… 19
Operating the iPod ……………………………………………… 21
Map functions ……………………………………………………… 24
Setting a destination ……………………………………………… 26
Searching an address ………………………………………… 27
Searching an intersection …………………………………… 28
Searching from addressbook ………………………………… 30
Searching a previous destination …………………………… 30
Searching a POI………………………………………………… 30
Searching for emergency facilities …………………………… 31
Operating after setting a destination …………………………… 32
Editing route ……………………………………………………… 33
Setup and Information …………………………………………… 34
Operating voice command ……………………………………… 35
EXAMPLE 1 …………………………………………………… 36
EXAMPLE 2 …………………………………………………… 36
Command list of Help ………………………………………… 37
Command list of audio system ……………………………… 38
Command list of navigation system ………………………… 42
Command list of Phone ……………………………………… 43
Converting Bluetooth® Handsfree mode ………………………… 46
Pairing and connecting a Bluetooth® phone …………………… 47
Making a call ……………………………………………………… 50
Operating menus during a call …………………………………… 52
Phone Music ……………………………………………………… 54
Page 4
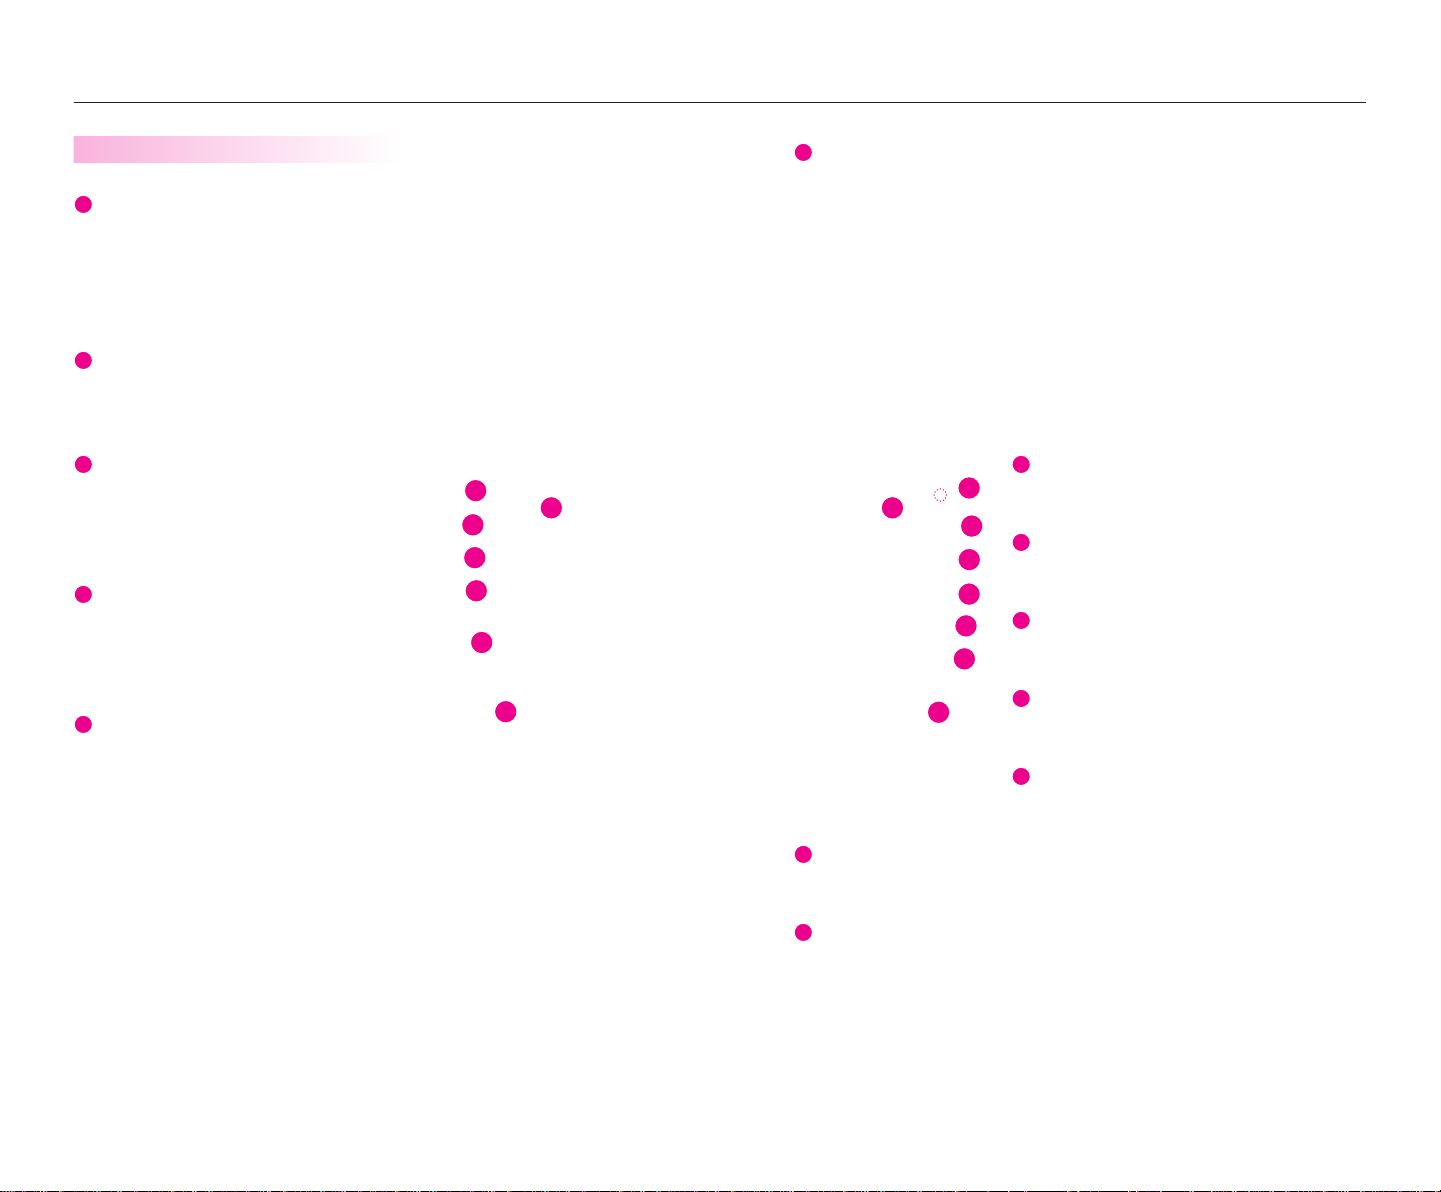
Controls and functions
6
7
8
9
10
11
12
13
1
2
3
4
5
Control panel
Power / Volume control
●
Push knob (over 0.8 second) : Turns the power off.
●
Push knob (under 0.8 second) : Each time the knob is pressed, the Audio is
turned on and off.
●
Turn knob : The range of volume adjustment is between 0 ~ 35.
FM/AM
Each press will change the bands in the
→
→
following order: FM1
SAT
Each press will change the bands in the
following order:
→
SIRIUS1
Each press will change the bands in the following
order: DISC(CD, MP3)
(Phone Music) → DISC(CD, MP3)
●
•
•
•
•
•
●
•
•
•
•
•
2 3
MEDIA
SEEK/TRACK Up/Down
SHORT KEY(less than 0.8 second)
FM/AM Mode : Automatically searches for the
previous or next broadcast frequency and starts playing.
SAT Mode : Receives the previous or next channel.
CD Mode : Plays the previous or next track.
MP3, USB Mode : Plays the previous or next file.
iPod Mode : Plays the previous or next song.
LONG KEY(over 0.8 second)
FM/AM Mode : Quickly moves through the frequencies while the button is
pressed. Once released, automatically searches for broadcasts which can be
received.
SAT Mode : Quickly moves to the previous or next channel.
CD Mode : REW/FF the current playing track.
MP3, USB Mode : REW/FF the current playing file.
iPod Mode : REW/FF the current playing song.
SIRIUS2
→
SIRIUS3
→
FM2
AM → FM1
→
SIRIUS1
(USB or iPod) → (AUX)
→
15
12 13
2
3
4
5
1
TUNE
●
FM/AM Mode : Turn the knob to search for the desired frequency. Press the knob
to receive the selected frequency.
●
SAT Mode : Turn the knob to search for the desired channel. Press the knob to
receive the selected channel.
●
CD Mode : Turn the knob to search for the desired track. Press the knob to play
the selected track.
●
MP3, USB Mode : Turn the knob to search for the desired file. Press the knob to
play the selected file.
●
iPod Mode : Turn the knob to search for the desired song. Press the knob to play
the selected song.
MAP VOICE
14
Displays the map screen for the current position.
7
8
DEST
Displays the Destination menu screen.
9
10
11
6
Displays the Bluetooth® handsfree screen.
DISC Eject
Eject the inserted disc.
CLOCK
●
Short Key (under 0.8 second)
•
When the screen is turned on : displays the current time in the center of the
screen.
•
When the screen is turned off : turns the full clock screen on and off.
●
Long Key (over 0.8 second)
•
Displays the clock setting screen.
ROUTE
Displays the Route menu screen.
SETUP
Displays the Setup menu screen.
PHONE
Page 5
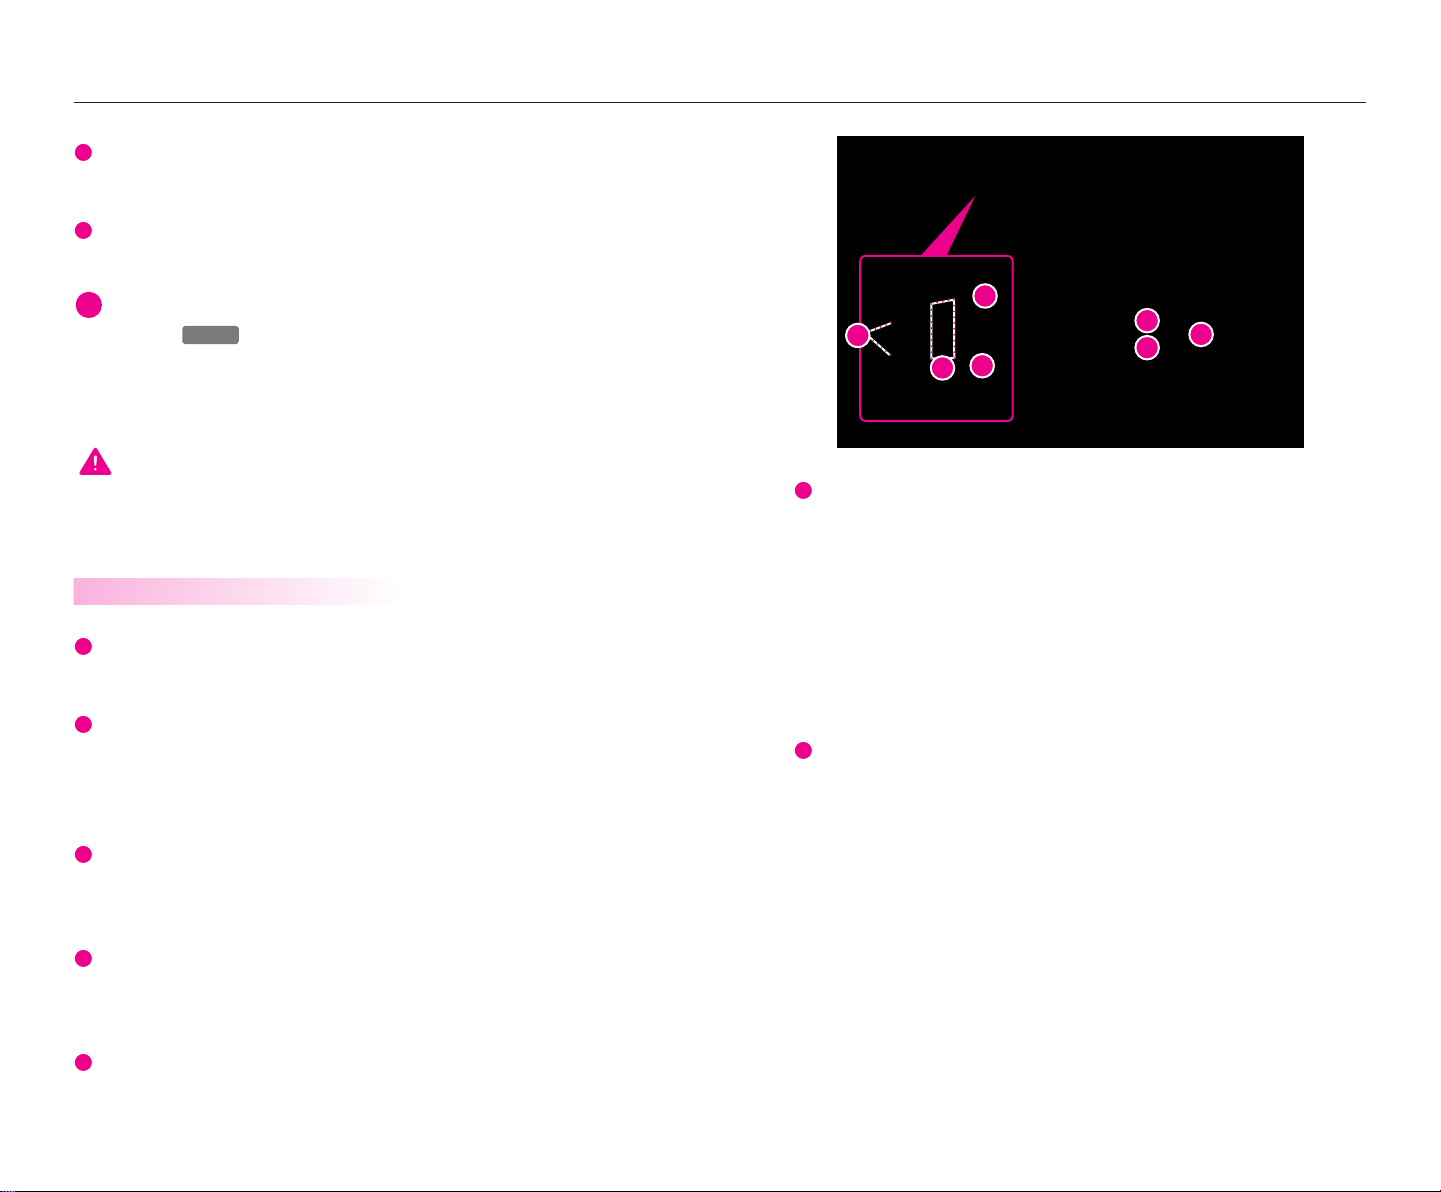
Controls and functions
14
15
i
POWER
6
7
1
2
3
4
5
RESET
Resets the system - if software locks-up.
DISC insert indicator LED
Displays that a DISC has been inserted.
INFORMATION
If pressing the
down, carefully use a straightened paper clip at the access hole shown next to the
right DISC indicator LED to reset the software. The system power will shut-off and
restart.
knob for over 0.8 second and the system does not shut
3
1
5
7
4
2
6
WARNING
Always give your full attention to driving. Avoid operating your system in such a
way that you can be distracted driving vehicle operation.
Steering wheel remote controller
Volume Up/Down
Increases or decreases the speaker volume within a range between 0 ~ 35.
MUTE
Turns the sound on and off. When the MUTE is turned on, the MUTE icon will
become displayed. When in the Navigation screen, the MUTE icon at the top of the
screen will disappear after 3seconds.
CALL
Press this key to receive an incoming call. If pressed while in AUDIO/Navigation
mode, the Bluetooth
END
Press this key to reject an incoming call.
If presse while ona call, then the call will be ended.
Voice Recognition
Starts Voice Recognition.
4 5
®
handsfree screen will be displayed.
Mode
Each time the Mode button is pressed, the mode will converted in the following
order: FM1
iPod)
If a not supported DISC has been inserted or if the corresponding unit has not
been connected, the mode will not be recognized and automatically switch to the
next mode.
●
Press this button for over 0.8 second to turn the Audio ON and OFF.
●
Press this button when the Power is turned off to turn the power on.
Seek Up/ Down
●
SHORT KEY(less than 0.8 second)
•
FM/AM : Receives the previous or next preset frequency.
•
SIRIUS Mode : Receives the previous or next preset channel.
•
CD Mode : Plays the previous or next track.
•
MP3, USB Mode : Plays the previous or next file.
•
iPod Mode : Plays the previous or next song.
●
LONG KEY(Over 0.8 second)
•
FM/AM Mode : Quickly moves through the frequencies while the button is
pressed. Once released, it automatically searches for broadcasts which can be
received.
•
SIRIUS Mode : Quickly moves to the previous or next channel.
•
CD Mode : REW/FF the current playing track.
•
MP3, USB Mode : REW/FF the current playing file.
•
iPod Mode : REW/FF the current playing song.
→
FM2 → AM → SIRIUS1 → SIRIUS2 → SIRIUS3 → (DISC) → (USB or
→
(AUX) → (Phone Music) → FM1.
Page 6
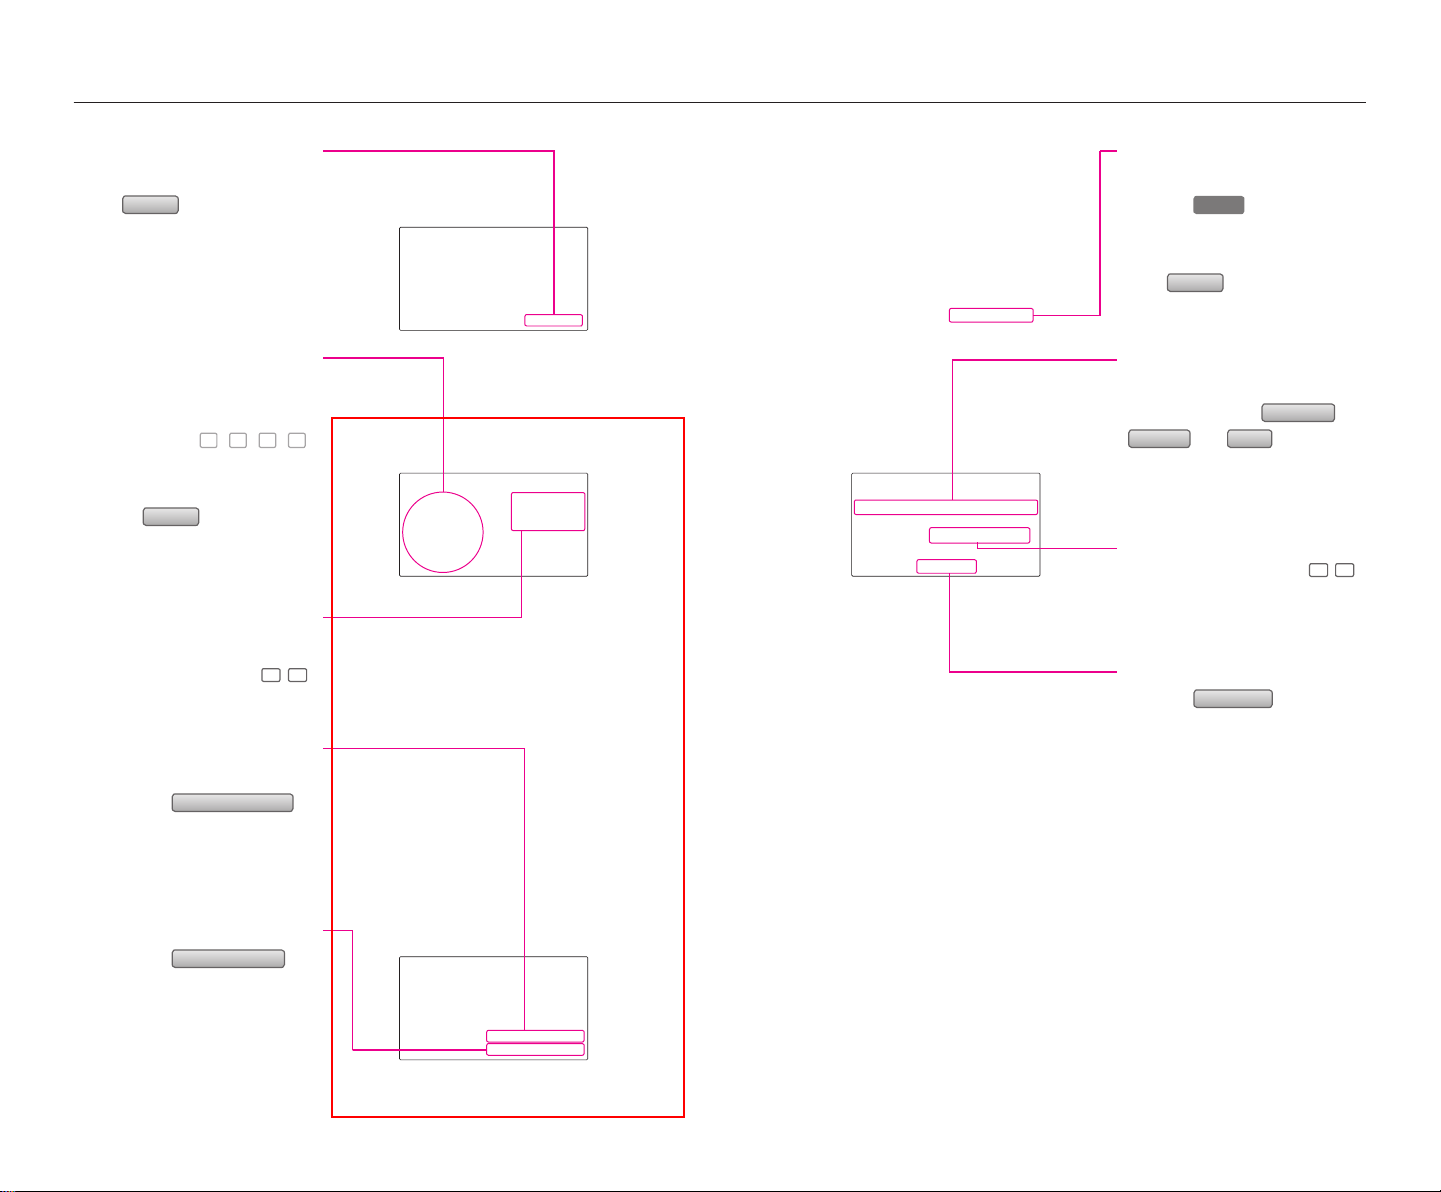
Display settingAudio sound setting
Sound
Auto volume control
SETUP
Displays the Audio sound
setup screen
Pr ess
main screen of each Audio mode
(FM/AM, SIRIUS, CD, MP3, USB,
iPod and AUX) to dis play the
Audio sound setup screen.
butto n on th e ,
FAD/BAL
The position of the sound can be
adjusted by using the up-down
and left-right
buttons on the lef t side of the
screen.
Press the
tion the sound in the center of the
vehicle.
( , , , )
Default
button to posi-
BASS/MID/TREB
The BASS/MID/TREB can be adjus-
ted by using the left/right (
buttons of each control.
, )
Displays the Display setup
screen
Press the
control panel to display the Setup
menu screen.
Display
Press
the Display Setup screen.
button on the
button to display
Display mode
Press the button for the desired
Night
Automatic
modes.
,
display mode from
Daylight
The current selected mode is
highlighted.
, and
Brightness
Use the left/right buttons
for each control to make
adjustments.
( , )
Display OFF
Press the
Display off
button.
Auto volume control ON/
OFF
Each time the
button is pressed, the Auto
volume control function is turned
on and off.
Touch screen beep ON/OFF
Each time the
button is pressed, the beeping
sound that follows each press on
the screen will turn on and off.
6 7
Touch screen beep
Display ON
Press anywhere on the black
screen.
The screen will be displayed prior
to display setting.
Page 7
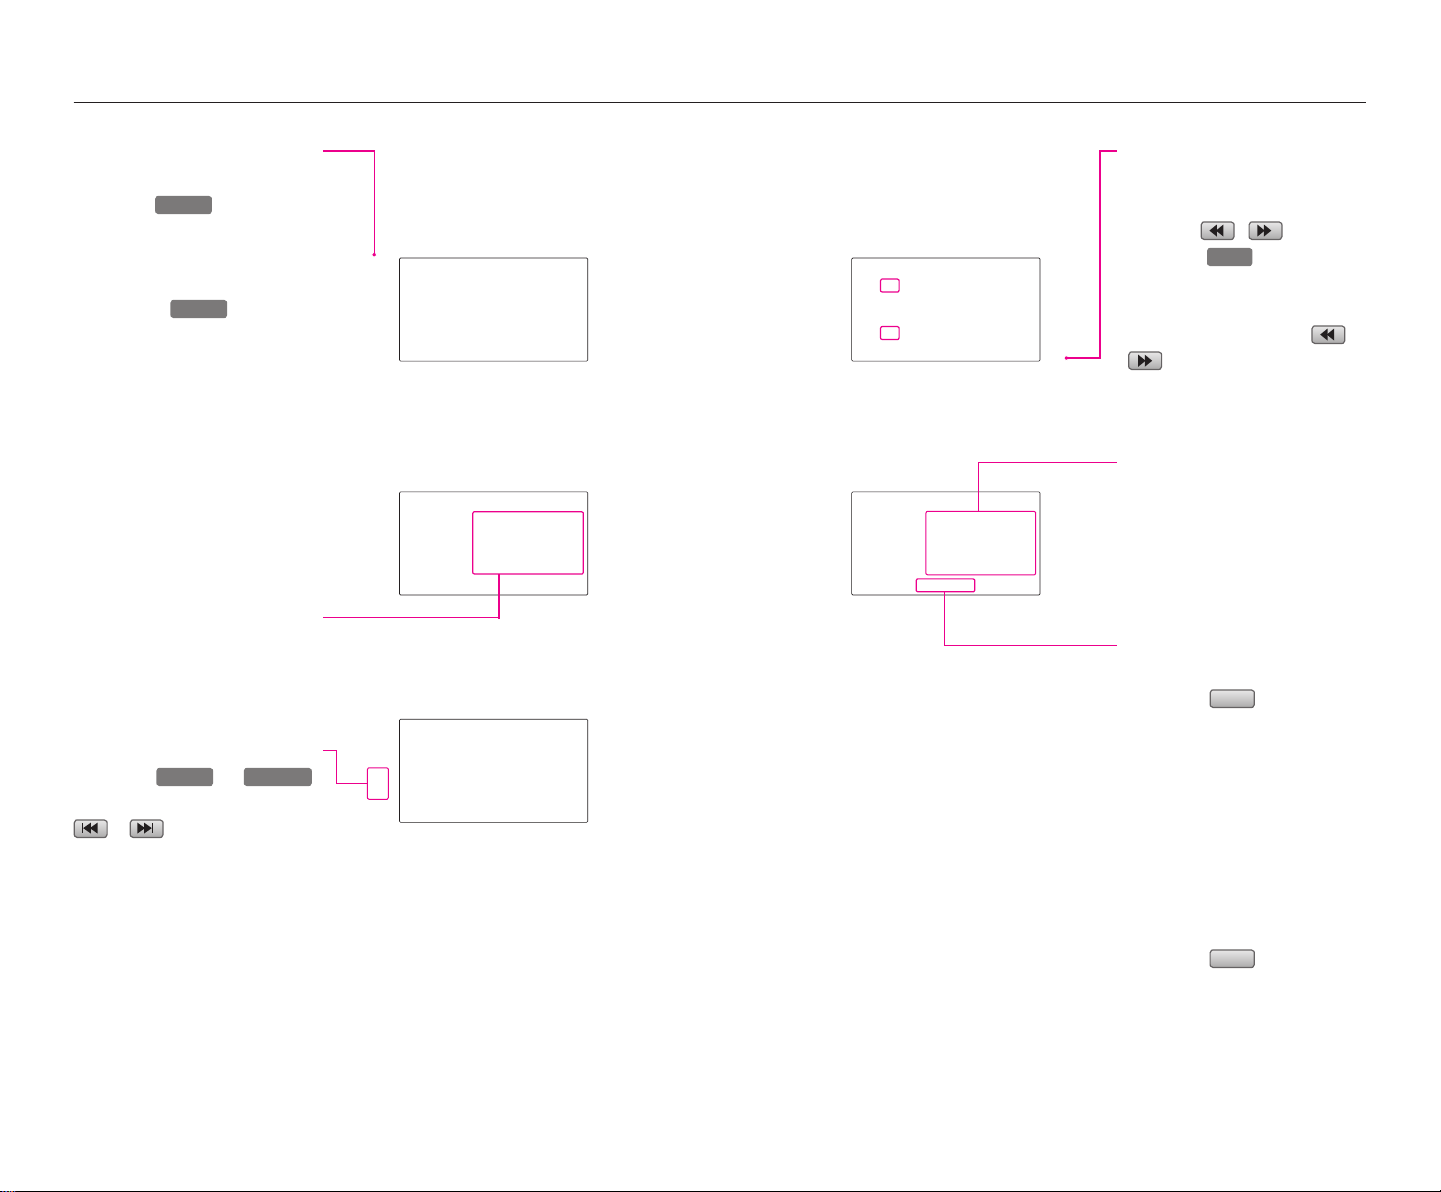
Operating the FM/AM radio
FM/AM
FM/AM
SEEK
∧
TRACK
∨
Listening to the FM/AM
radio
1. Press the
control panel. The FM/AM radio
band of the most recent station
selected will be displayed.
2. P ress the
change the desired radio band.
Ea ch pre ss wi ll chan ge the
bands in the following order:
→
FM1
FM2 → AM → FM1
3. S elect the desired broadcast
frequency.
button on the
but ton to
Selecting FM/AM broadcast
frequency
Selecting a frequency
through presets
Pre ss the preset butto n of the
desired broadcast frequency.
Selecting a Broadcast frequency through SEEK
Pr ess the
button on the control panel or the
or button on FM1, FM2,
and AM mode screen s for less
than 0.8 second. Once the SEEK
function is operating (SEEK indica-
tor blinking), the next or previous
broadcast frequency with superior
reception will be searched auto-
matically.
or
Selecting a broadcast frequency through manual
search
Press the
tu r n the
control panel in clockwise or coun-
ter-clockwise direction. Each click
on the tune knob or the
butt o n wi ll increa se or
decrease the frequency by 1 step
(FM: 0.2 MHz, AM: 10 kHz).
,
TUNE
kno b on t he
buttons or
or
Storing FM/AM preset
1. Select the desired frequency.
2. Press the preset button for over
0.8 second. The frequency will
become stored along with a
beep sound.
Scanning FM/AM broadcast
frequency
1. Press the
●
SCAN (less than 0.8 second) :
Scans all frequencies and plays
only frequencies with superior
reception for 5 seconds each.
●
PRESET SCAN (over 0.8 second):
Scans the 6 frequencies stored
as prese t frequenc ies in the
cu rren t band fo r 5 sec onds
each.
2. Press the
continue listening to a frequen-
cy. The scan will be terminated
and the current frequency will
continue to be played.
Scan
button.
Scan
button again to
8 9
Page 8
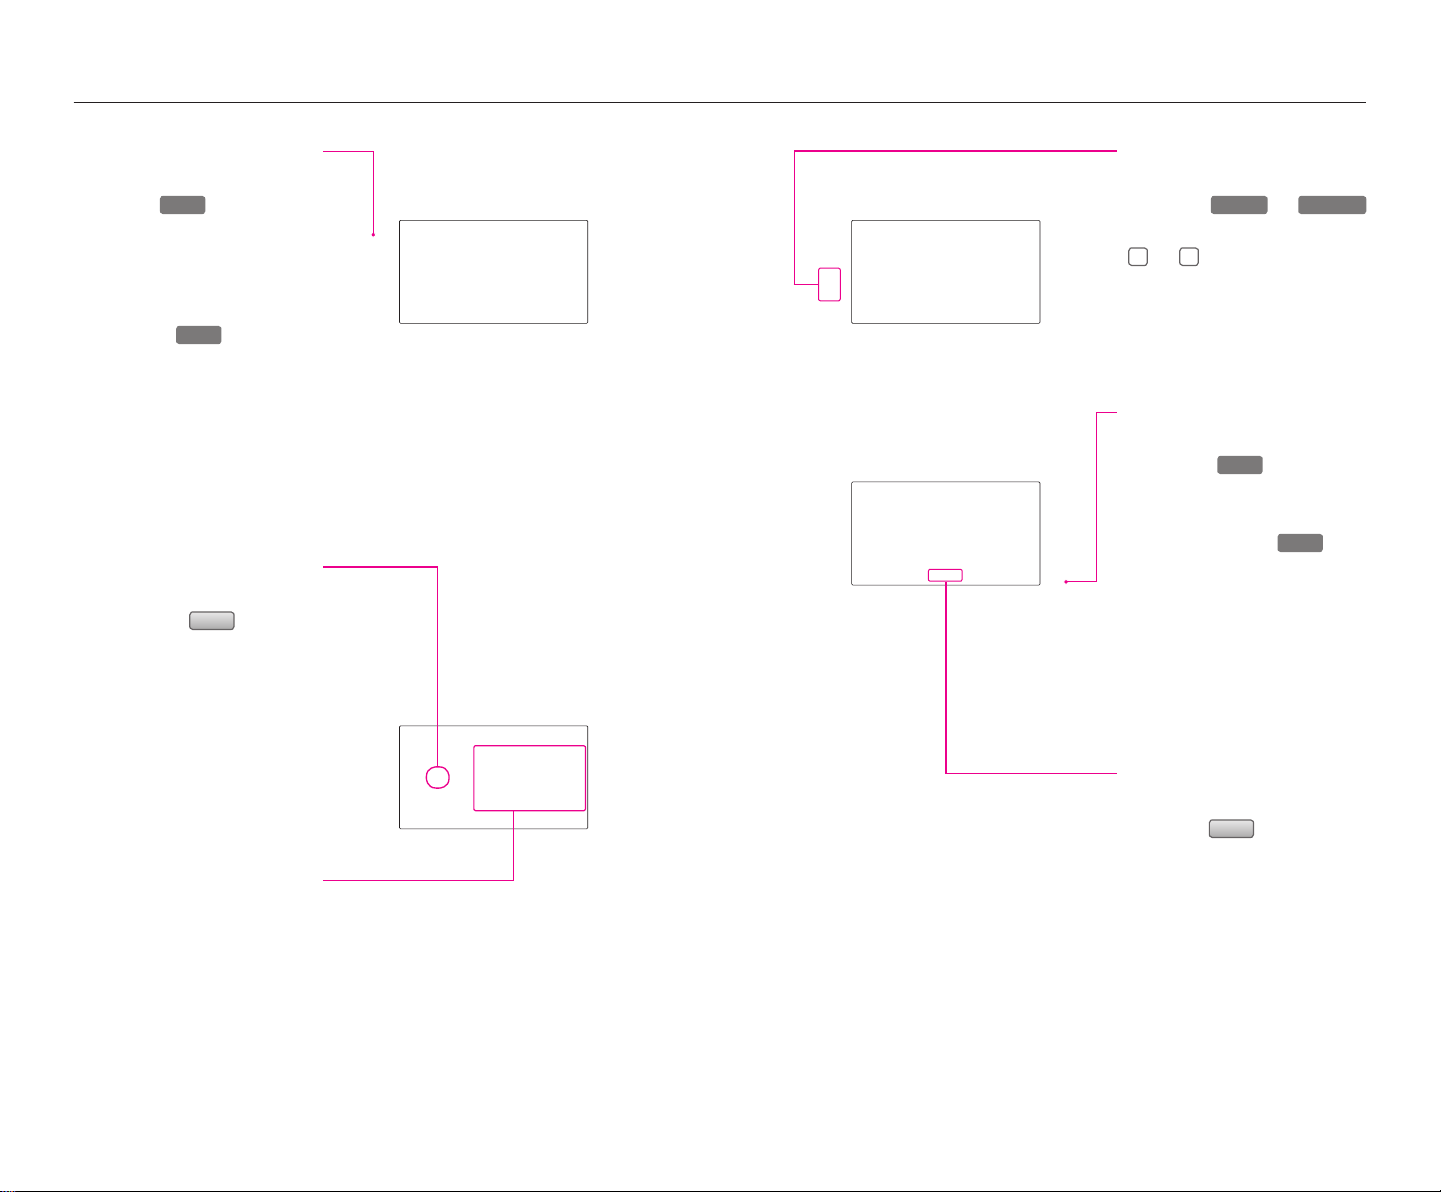
Operating the SIRIUS radio
SEEK
∧
TRACK
∨
Listening to the SIRIUS
radio
1. Press the
control panel. The SIRIUS radio
band screen of the most recent
station selected will be displa-
yed.
2. P re ss th e
change the desired radio band.
Ea ch pre ss wi ll chan ge the
bands in the following order:
SIRIUS1 → SIRIUS2 → SIRIUS3
→
SIRIUS1
3. S elect the desired broadcast
channel.
SAT
button on the
SAT
bu tt on to
Switching the SIRIUS modes
(channel/category)
Each time the
pres sed, the mode will switch
between channel mode and cate-
gory mode.
Category mode will begin opera-
ti ng when the orang e li ght is
turned ON.
CAT
button is
Selecting SIRIUS broadcast
channel
Selecting a channel through
presets
Pre ss the preset butto n of the
desired channel.
Selecting with Channel Up/
Down
Pr ess the
button on the control panel or the
or bu tton on SI RIUS 1 ,
SIRIUS2, and SIRIUS3 mode screens
for less than 0.8 second. The pre-
vious or next channel will be selec-
ted.
or
Selecting a channel through
manual search
1. Turn the
control panel in clockwise or
countercloc kwis e dire ction.
Each click on the
will display the channel infor-
mation of the previous or next
channel. The current playing
channel will continue to play.
2. Press the knob at the desired
channel. The selected channel
will begin playing.
TUNE
knob on the
TUNE
knob
Selecting channel through
channel/category list
1. Press the
●
If in channel mode, the Channel
list screen will be displayed.
●
I f i n c at eg or y m o de , t he
Category list screen will be dis-
played. Select the desired cate-
gory button to display th e
channel li st scree n fo r the
corresponding category.
List
button.
10 11
Page 9
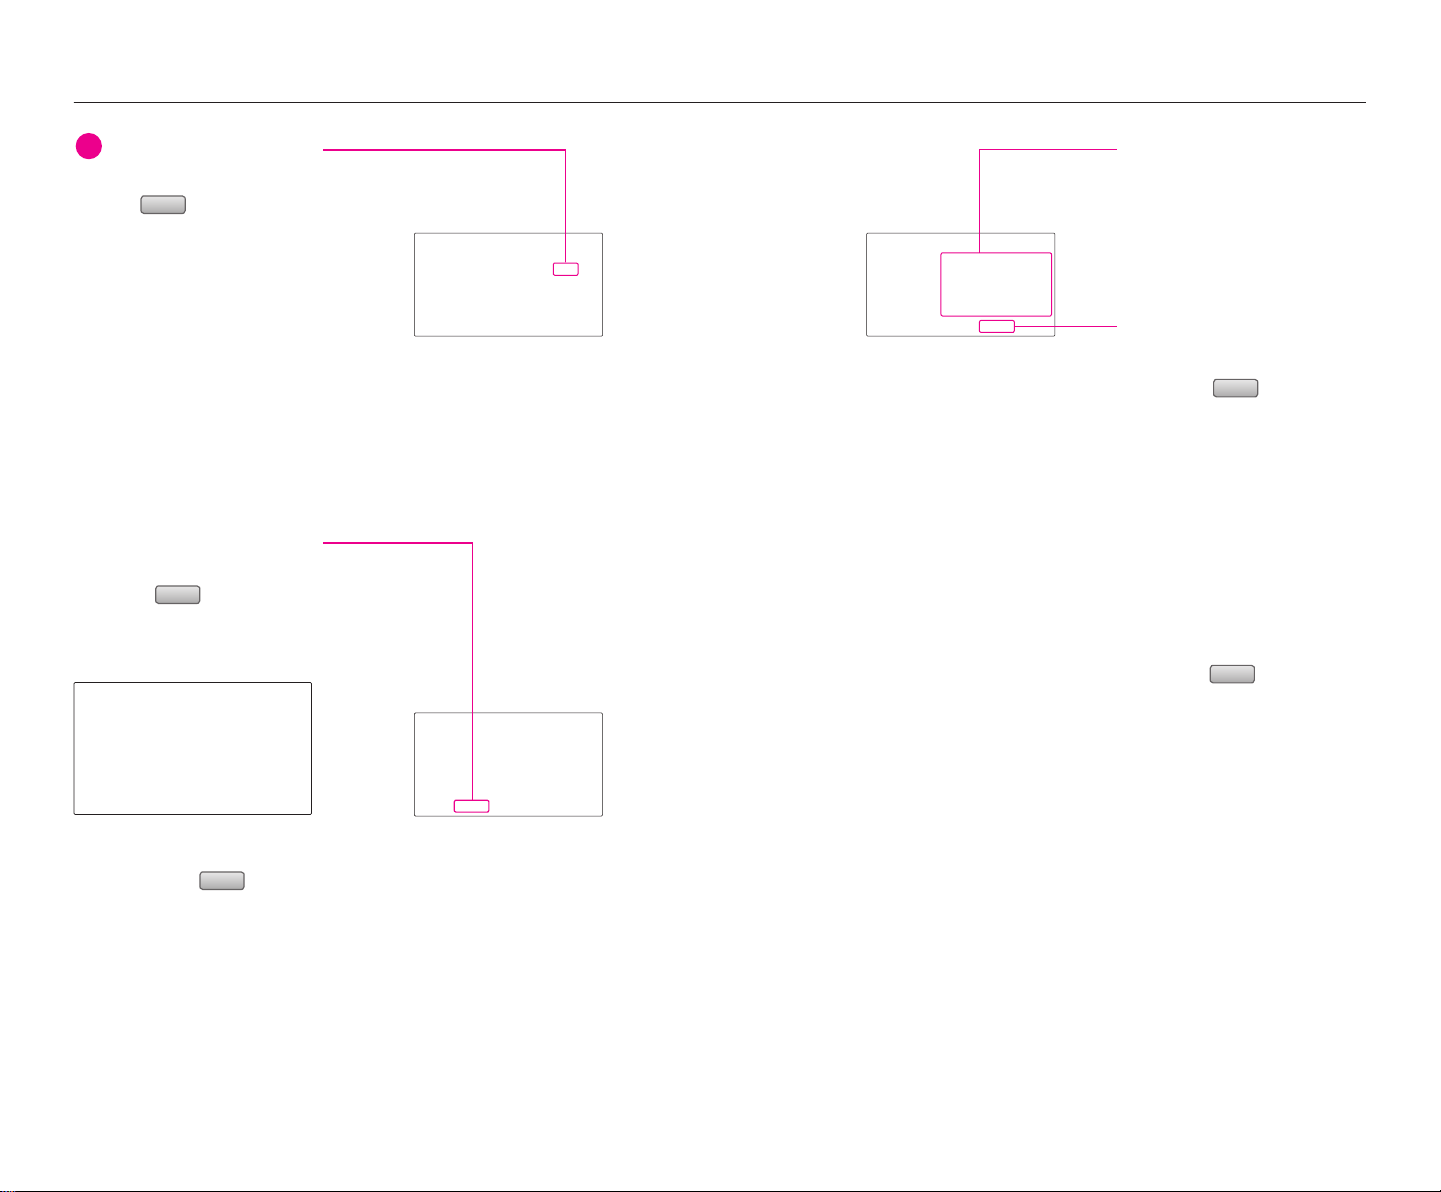
Operating the SIRIUS radio
i
Search
INFORMATION
●
Within the Channel List screen,
Skip
if the
each channel name is pressed,
the selected channel will be
excluded from SCAN operation.
●
Channel 0 is the radio ID and
contains information required
for SIRIUS activation.
2. S elect the de sire d channe l
button. The previous screen will
be restored and the selected
channel will begin playing.
button next to
Selecting channel by directly
inputting the channel number
1. Press the
The Channel search screen will
be displayed.
button.
Storing SIRIUS presets
1. Select the desired channel.
2. Press the preset button for over
0.8 second. The frequency will
be s a v e d al ong wi th be ep
sound.
Scanning SIRIUS broadcast
channel
1. Press the
●
SCAN (under 0.8 second):
Scans all channels for 5 seconds
each if in channel mode. If in
category mode, scans all chan-
nels within the current category
for 5 seconds each.
●
PRESET SCAN (over 0.8 second):
Scans the 6 pres et channels
within the current band for 5
seconds each.
2. Press the
continue playing the channel.
The scan selection will be termi-
nated and the current channel
will continue to play.
Scan
button.
Scan
button again to
2. Input desired channel number,
and press the
The previous screen will be res-
tored and the selected channel
will begin playing.
12 13
Done
button.
Page 10
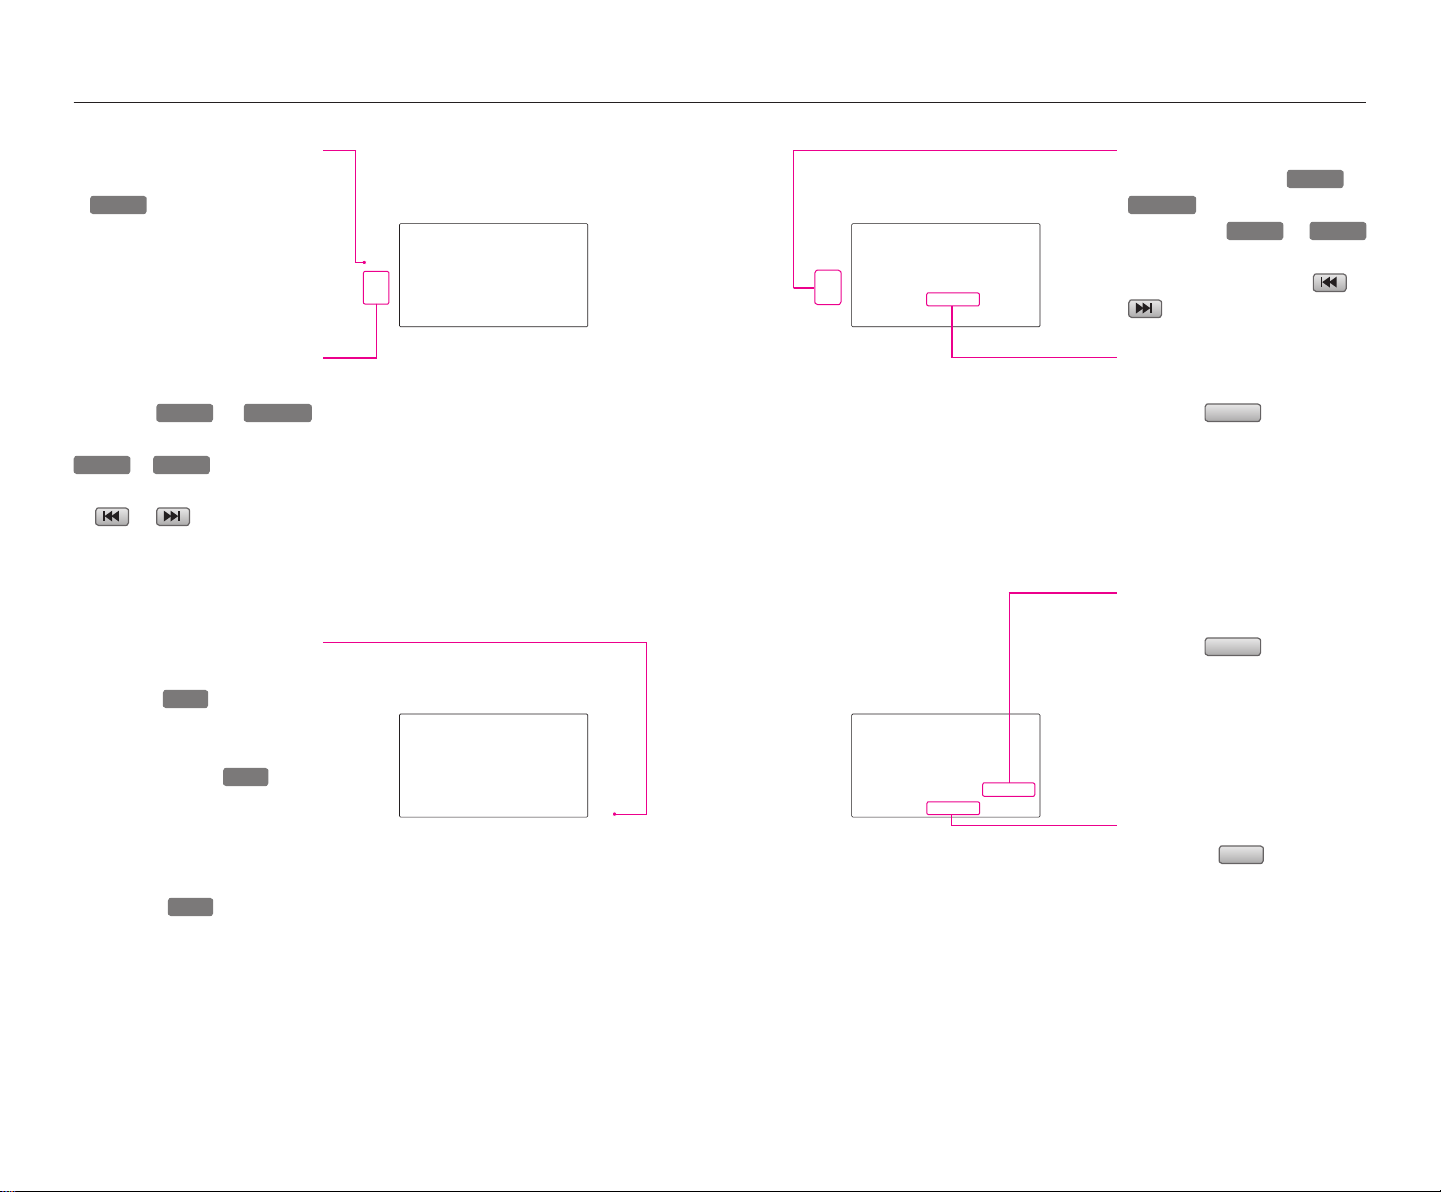
Operating the CD
SEEK
∧
TRACK
∨
SEEK
∧
SEEK
∨
Random
SEEK
∧
TRACK
∨
SEEK
∧
SEEK
∨
Listening to CD music
1. I ns er t th e CD or press t h e
MEDIA
button on the Control
panel if the CD is already inser-
ted.
2. Select the desired track.
REW/FF CD track
Press and hold the
button on the control
panel or the
butto n on the steeri ng whe el
remote controller or the
button for over 0.8 second.
or
or
or
Selecting the CD track
Selecting through Track Up
/ Down
Pr ess the
button on the control panel or the
or
steering wheel remote controller
or
or
screen for less than 0.8 second.
The next or previous track will
begin playing.
or
button on the
buttons on the
Setting Random function
for CD music
Press the
press will change the function in
the following order: RANDOM
RANDOM OFF
RANDOM : plays all tracks in the
*
disc in random order.
button. Each
→
RANDOM
→
Setting Repeat function for
CD music
Selecting track through
search
1. Turn the
control panel in clockwise or
counter-clockwise direction.
Each click on the
will display the information of
the next or previous track. The
current playing track will conti-
nue to play.
2. Press the
de sired track . T he searched
track will begin playing.
14 15
TUNE
knob on the
TUNE
knob at the
TUNE
knob
Press the
press will change the function in
the follow i n g order : REP E AT
→
REPEAT OFF → REPEAT
R EPEAT: re pea ts th e curr ent
*
playing track.
Scanning CD track
1. Press the
press will change the function
in the following order: SCAN
SCAN OFF
SCAN: Scans all tracks in the disc
*
for 9 seconds each.
2. Press the button again to conti-
nue listening to the track. The
scan selection will be termina-
ted and the current track will
continue to play.
Repeat
Scan
→
SCAN.
button. Each
button. Each
→
Page 11
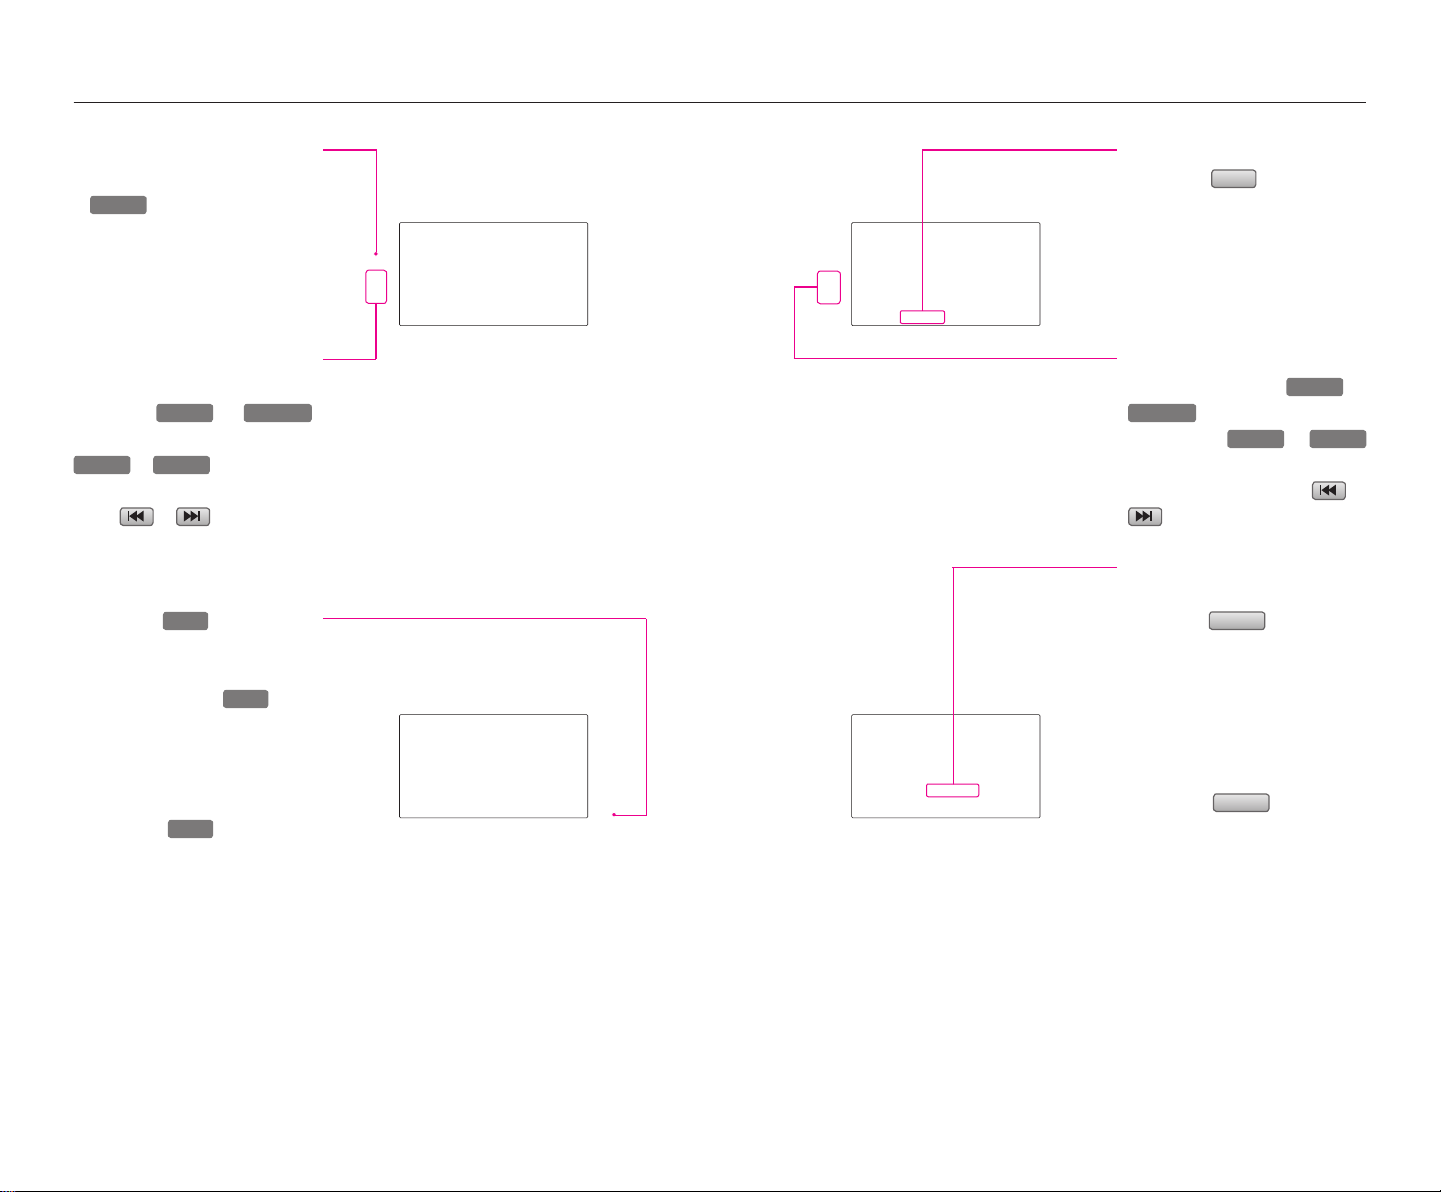
Operating the MP3, USB Music
SEEK
∧
TRACK
∨
SEEK
∧
SEEK
∨
Random
Random
MEDIA
SEEK
∧
TRACK
∨
SEEK
∧
SEEK
∨
Listening to MP3 music
1. Insert the MP3 disc or press the
button on the control
panel if the MP3 disc is already
inserted.
2. Select the desired file.
Selecting an MP3 file
Selecting through File Up /
Down
Pr ess the
button on the control panel or the
or
steering wheel remote controller
or the
screen for less than 0.8 second.
or
button on the
or button on the
Selecting through search
1. Turn the
control panel in clockwise or
counter-clockwise direction.
Each click on the
will display the information of
the next or previous file. The
current playing file will conti-
nue to play.
2. Press the
desired file. The searched file
will begin playing.
TUNE
knob on the
TUNE
knob at the
TUNE
knob
Selecting through MP3 List
1. Press the
list of the folder for the current
playing file will be displayed.
2. P ress th e de sired men u to
return to the main screen and
play the selected file.
List
button. The file
REW/FF MP3 file
Press and hold the
button on the control
panel or the
butto n on the steeri ng whe el
remote controller or the
button for over 0.8 second.
or
or
or
Setting Random function
for MP3 file
1. Press the
RANDOM (less than 0.8 second):
*
Play s all files in th e di sc in
random order.
F OLDER RA N D O M (o ver 0.8
*
second): Plays the files in the
current folder in random order.
2. Press the
to con tin ue listening to the
current file. The random selec-
tion will be terminated and the
current file will continue to play.
button.
button again
16 17
Page 12
USB ImageOperating the MP3, USB Music
MEDIA
i
Setting Repeat function for
MP3 file
1. Press the
REPEAT (less than 0.8 second):
*
Repeats the current playing file
F OL DE R R EP EAT (o ve r 0 .8
*
second): Repeats the files in the
current folder.
2. Press the
to stop repeating the current
file. The repeat selection will be
terminated and the current file
will continue to play once until
the next file starts to play.
Repeat
Repeat
button.
button again
Scanning MP3 file
1. Press the
SCAN (less tha n 0 .8 second):
*
Scans all files in the disc and
plays for 10 seconds each.
FOLDER SCAN (over 0.8 second):
*
Sc ans all files in th e cu rrent
folder for 10 seconds each.
2. Press the
to continue listening to the file.
The scan selection will be termi-
nated and the current file will
continue to play.
Scan
button.
Scan
button again
INFORMATION
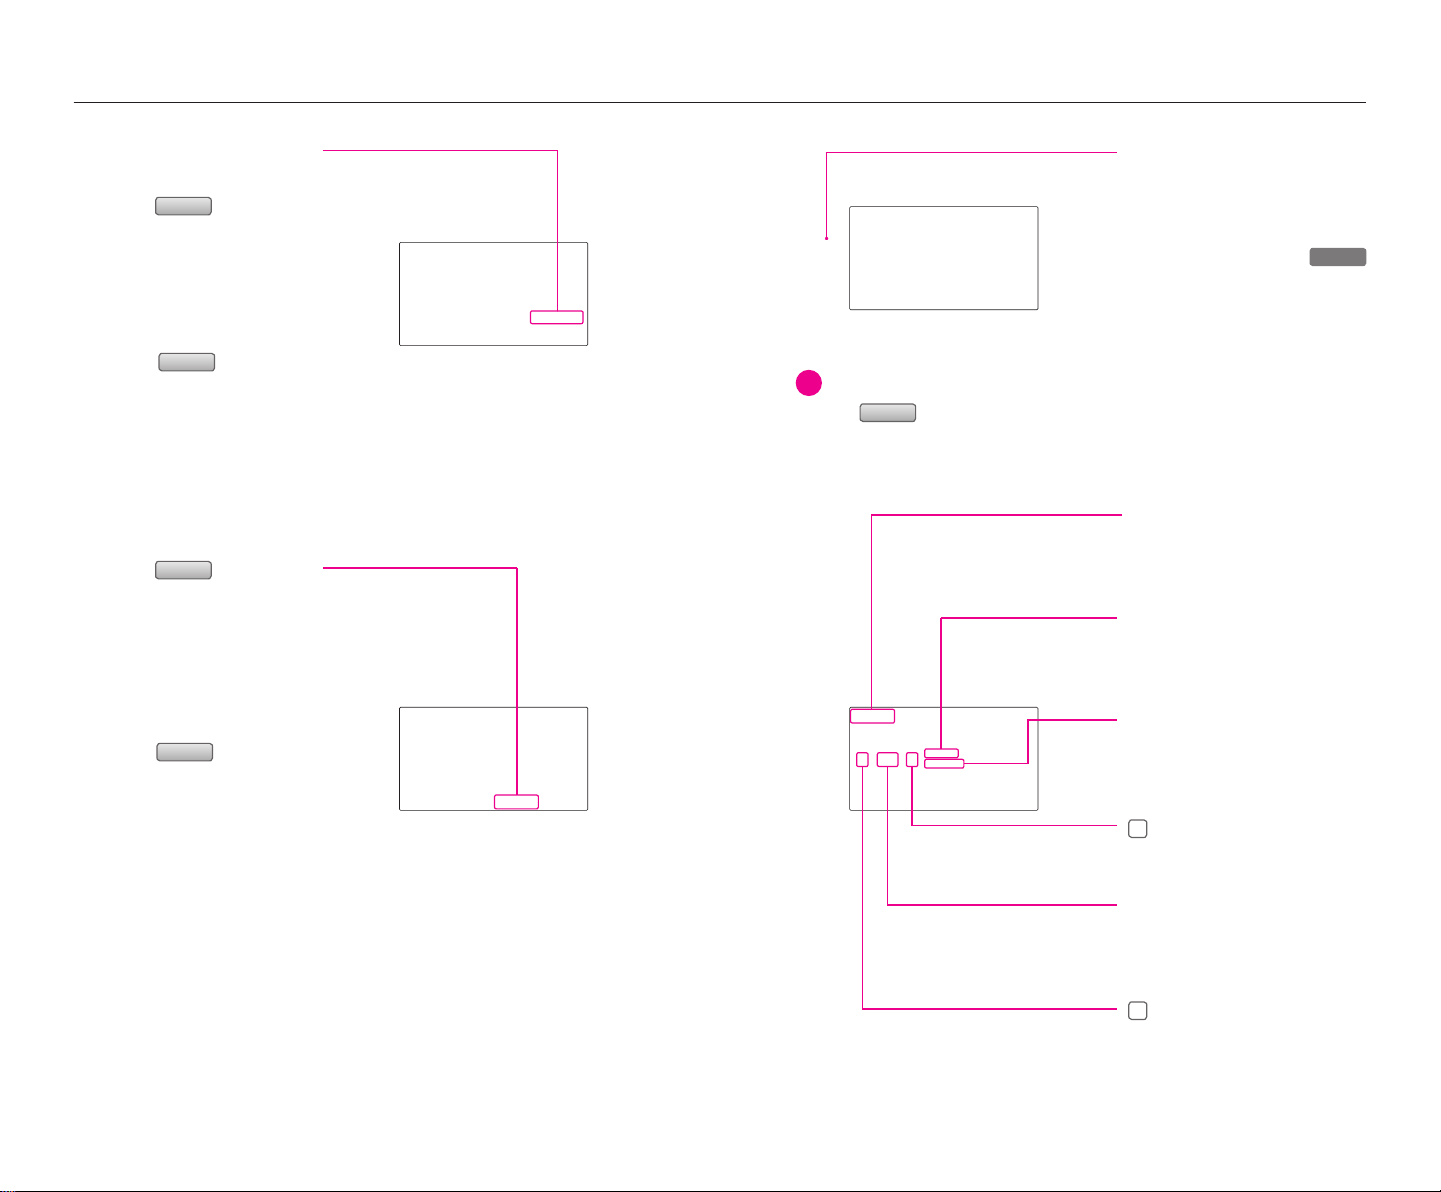
Press the
left side to enter either mode. (Supported
only when compatible files exist within the
USB)
MUSIC
button on the bottom
Starting USB IMAGE Mode
1. The USB mode will automatica-
lly start when the USB is inser-
ted. When in a different mode,
repeatedly press the
key to convert to USB mode.
(Each press will change in order
→
of AUX
2. The image will be displayed on
the screen.
DISC → USB)
Mode display
Display that the current mode is
<USB Image> mode.
Folder name
Displays the name of the folder
where photo files are located.
File name
Di spla ys the file na me of the
current photo.
button
Displays the next photo.
Slide Show View
Displays photos in intervals of 5,
10, and 20 seconds.
button
Displays the previous photo.
18 19
Page 13
Operating the iPodUSB Image
MEDIA
SEEK
∧
TRACK
∨
SEEK
∧
SEEK
∨
i
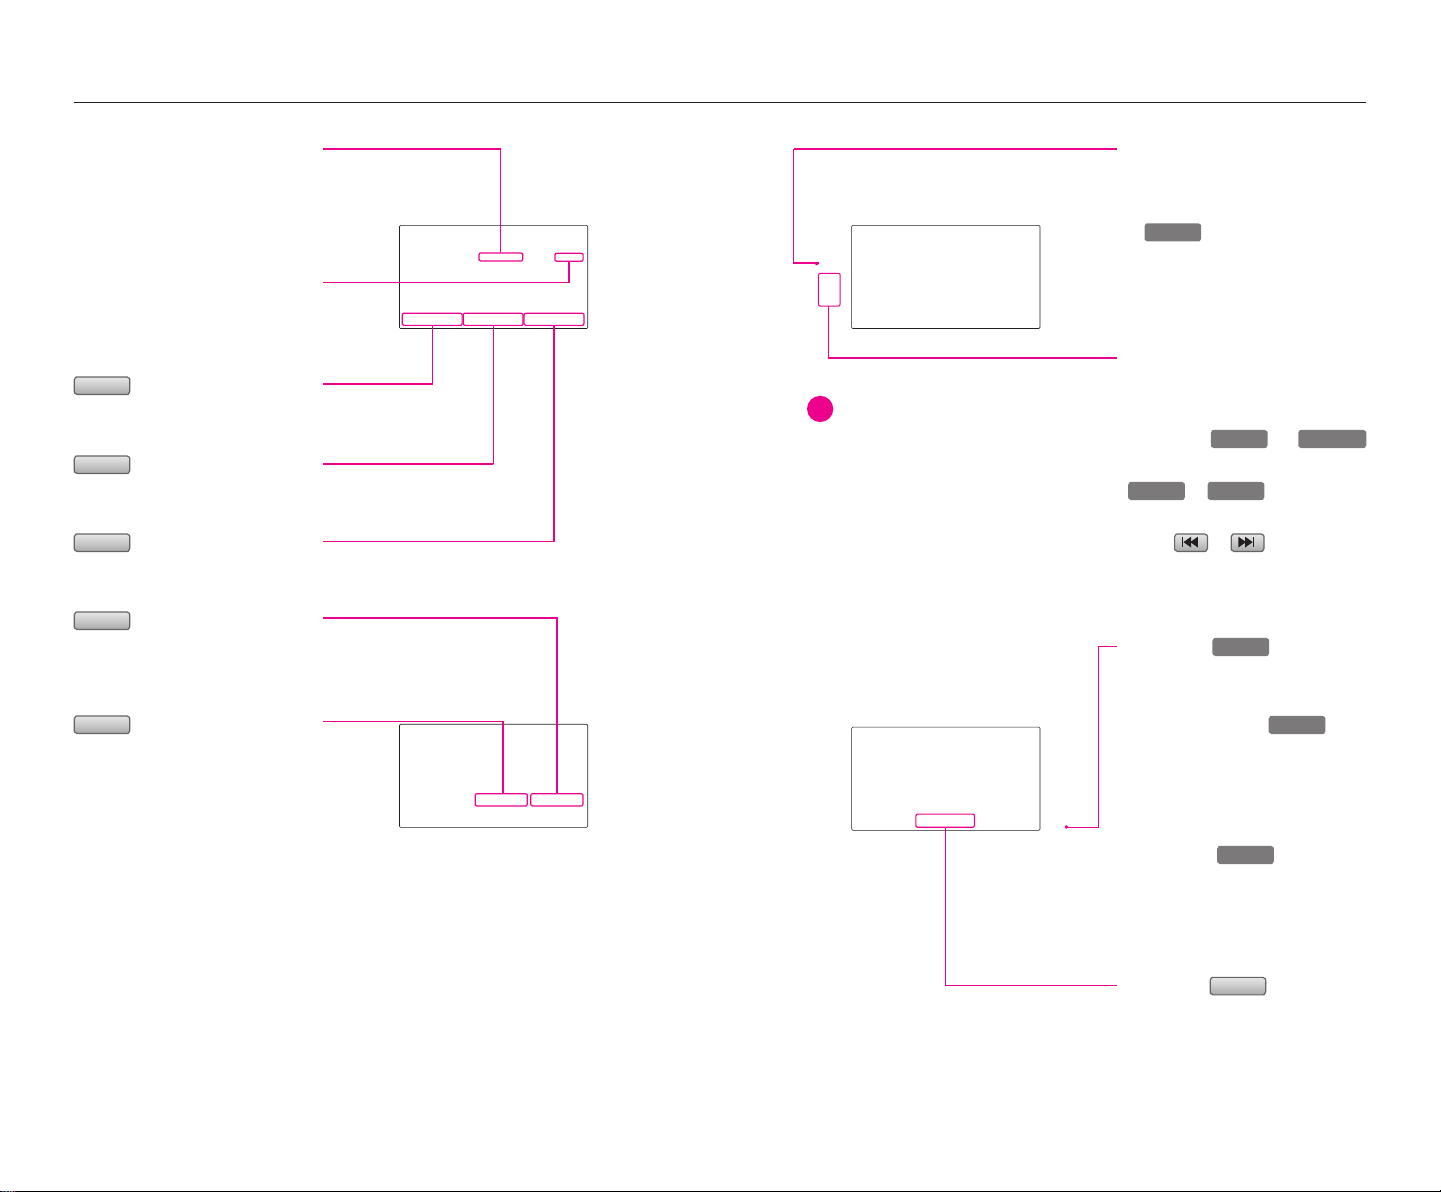
File index
displays the number of Image files
within the USB (current file / all
files)
Slide Show Interval
displays intervals of 5, 10, and 20
seconds.
MUSIC
button
converts to <USB Music> mode.
List
button
displays the <Image List> screen.
Hide
button
hides the button display image.
Timer
button
al lows ch anges to slide show
interval.
Save
button
upon turning off power, saves the
current image as the frame screen
image.
INFORMATION
The Kia iPod Power Cable is needed in
order to operate iPod with the audio
buttons on the audio system. The USB
cable provided by Apple may cause mal-
function and should not be used for Kia
vehicles.
The Kia iPod Power Cable maybe purcha-
sed through your Kia Dealership.
Listening to music from
iPod
1. Connect the iPod or press the
button on the Control
panel if the iPod is already con-
nected.
2. Select the desired song.
Selecting music from iPod
Selecting song through Up /
Down
Pr ess the
button on the control panel or the
or
steering wheel remote controller
or the
screen for less than 0.8 second.
or
button on the
or button on the
Selecting song through search
1. Turn the
control panel in clockwise or
counter-clockwise direction.
Each click on the
will display the information of
the next or previous song. The
current playing song will conti-
nue to play.
2. Press the
de sired song. The searched
song will begin playing.
TUNE
TUNE
knob on the
TUNE
knob
knob at the
Selecting song through Menu
1. Press the
The iPod menu screen will be
displayed.
Menu
iPod® is registered trademark of Apple Inc.
20 21
button.
Page 14
Operating the iPod
SEEK
∧
TRACK
∨
SEEK
∧
SEEK
∨
Random
Random
Repeat
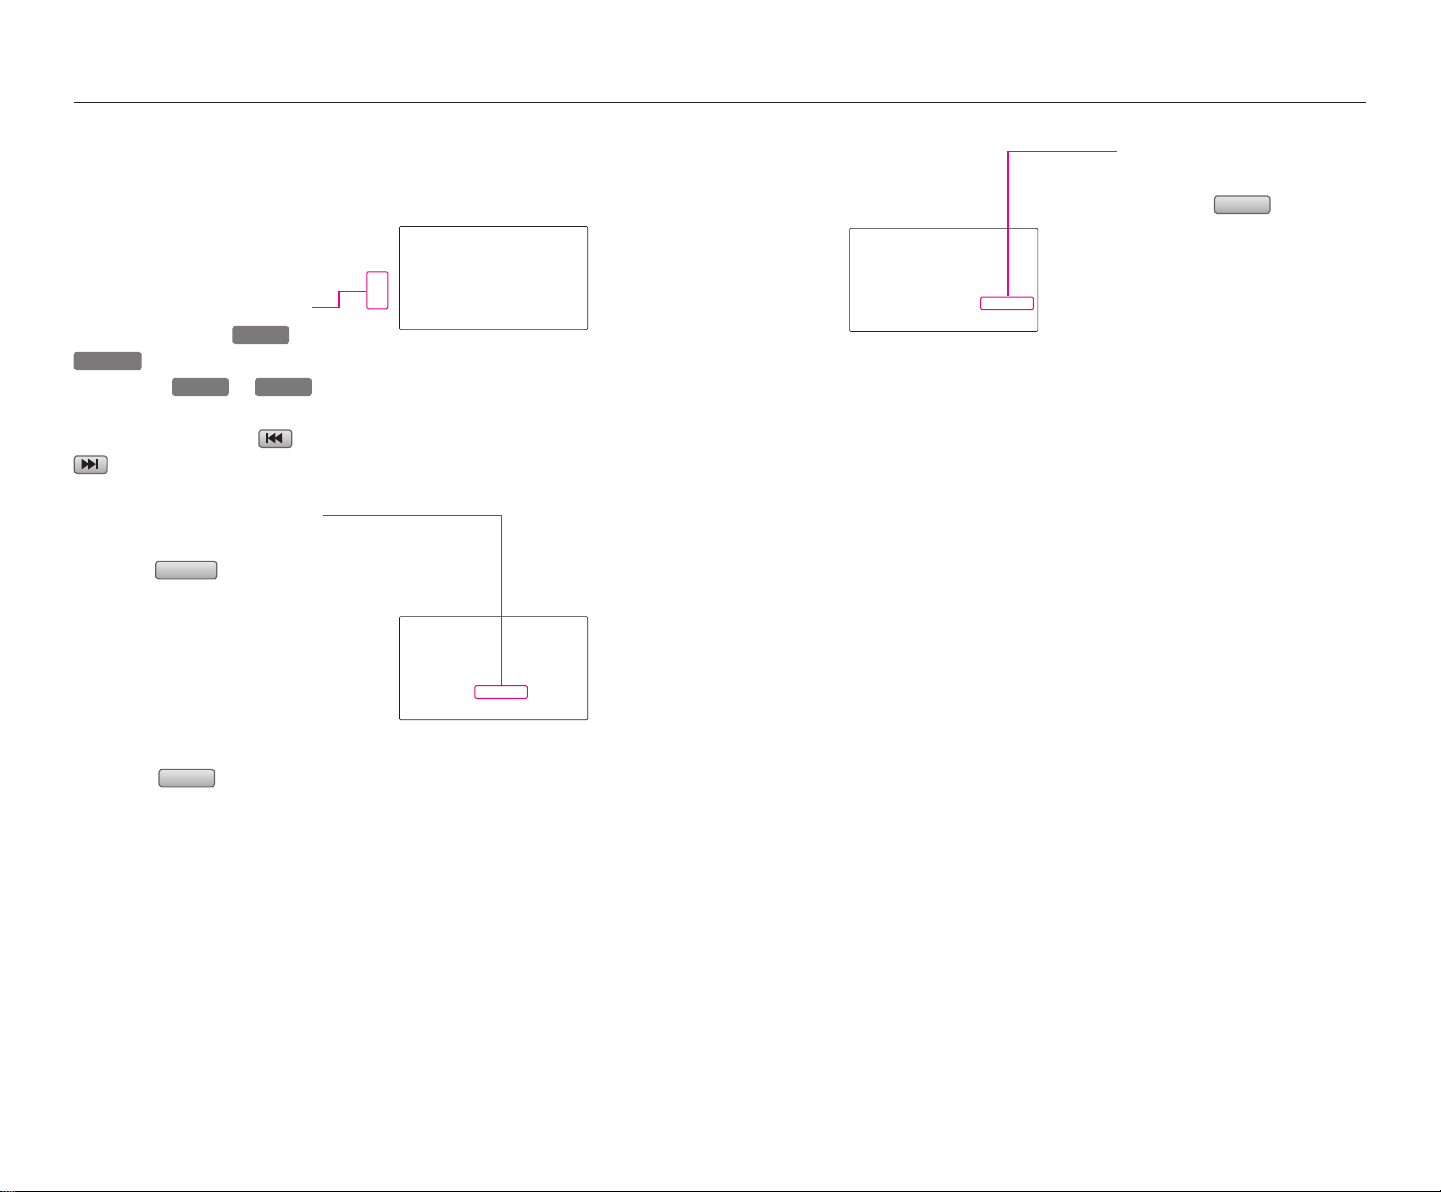
2. Press the button for the desired
search method.
3. Press the desired song button
to return to the main screen
and play the selected song.
REW/FF iPod music
Press and hold the
button on the control
panel or the
butto n on the steeri ng whe el
remote controller or the or
button for over 0.8 second.
or
or
Setting Random function
for iPod music
1. Press the
RANDOM (less than 0.8 second):
*
Pl ays all fi les in the cu r rent
playing list in random order.
ALB UM RAN DO M (ov e r 0. 8
*
second): Plays the songs in the
current playing list randomly in
album units.
2. Press the
to con tin ue listening to the
current song. The random selec-
tion will be terminated and the
current song will continue to
play.
button.
button again
Setting Repeat function for
iPod music
1. Press the
press will change the function
in the following order: REPEAT
→
REPEAT OFF → REPEAT
REPEAT : Repeats the current
*
playing song.
button. Each
22 23
Page 15
Map functions
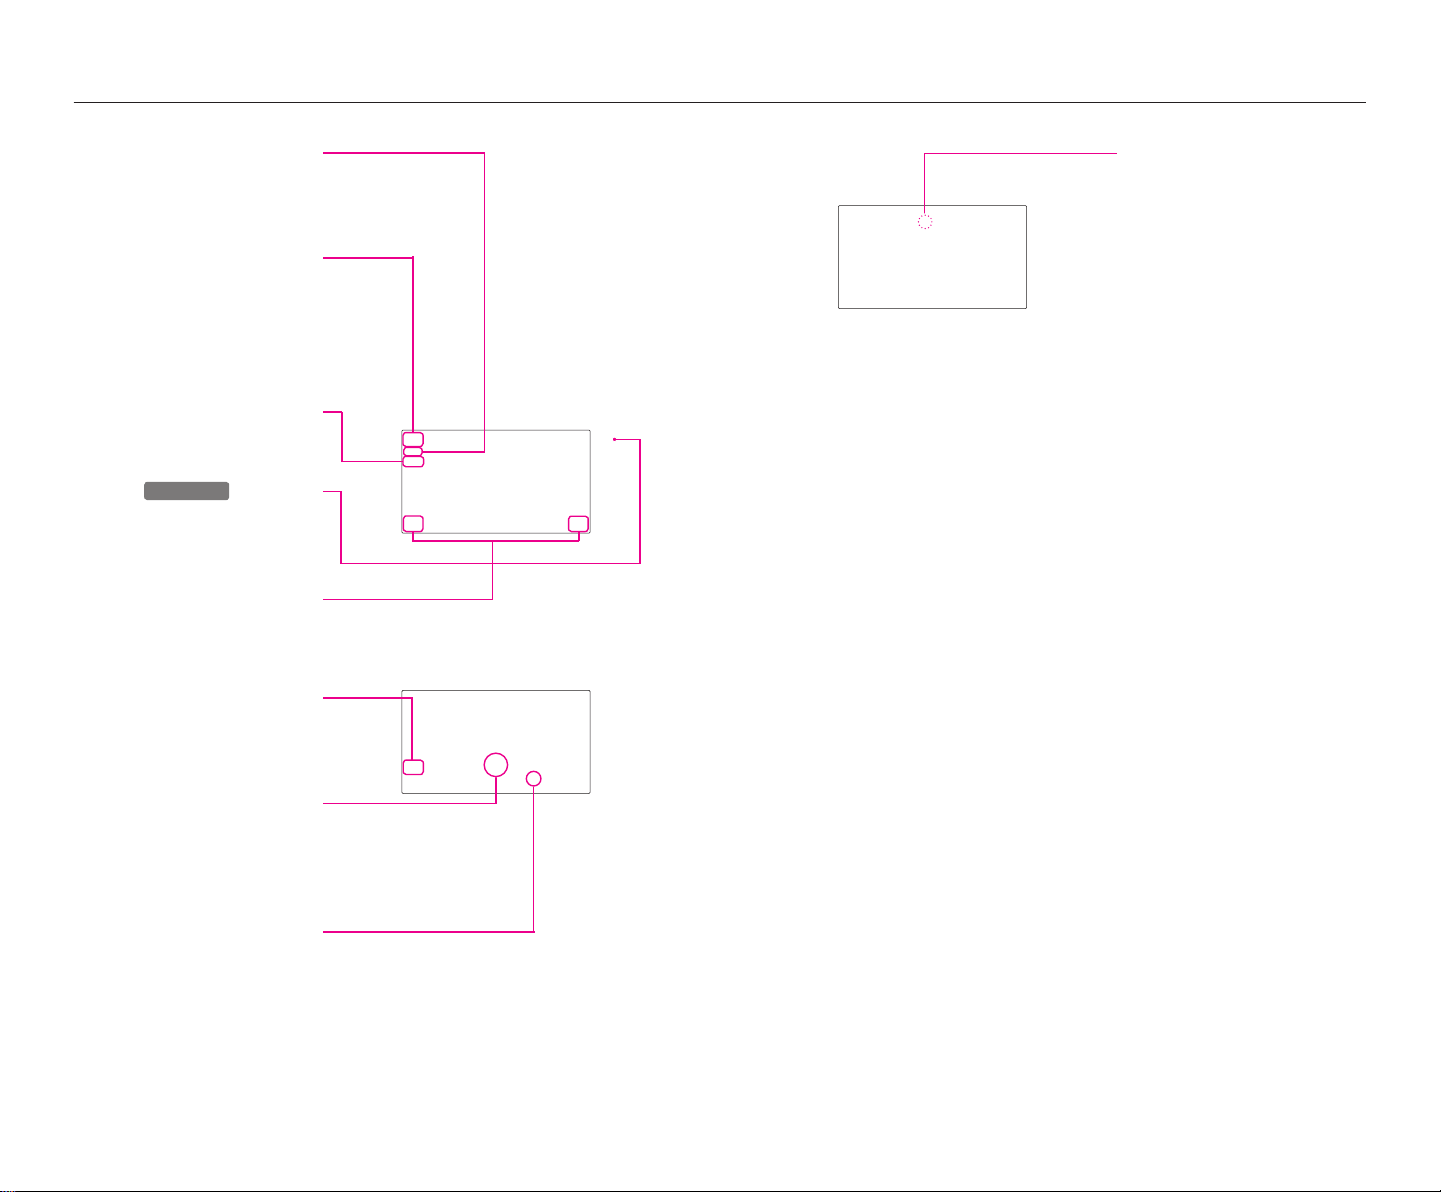
GPS signal state indicator
Displays the state of GPS signal
reception.
North Up / Heading Up
switch
Displays the current map mode.
The ma p mo de can be switc hed
between North Up and Heading Up.
Map scale level indicator
Displays the current map scale.
Press the
control pa n e l to di splay th e
current map position.
MAP VOICE
key on the
Map scale
Increases or decreases the map
scale.
POI (Point of Interest)
Displays or hides the POI icon on
the map.
Landmark Icons
Landmark icons are displayed on
the map when the map scale level
is set to under 30 0 ft(10 0 m -
dependent on map data).
Current vehicle position
icon
Displays the current position of
the vehicle.
POI icons
POI icons are displayed on the
map when the map scale level is
set to under 0.5 mi (800m).
24 25
Page 16
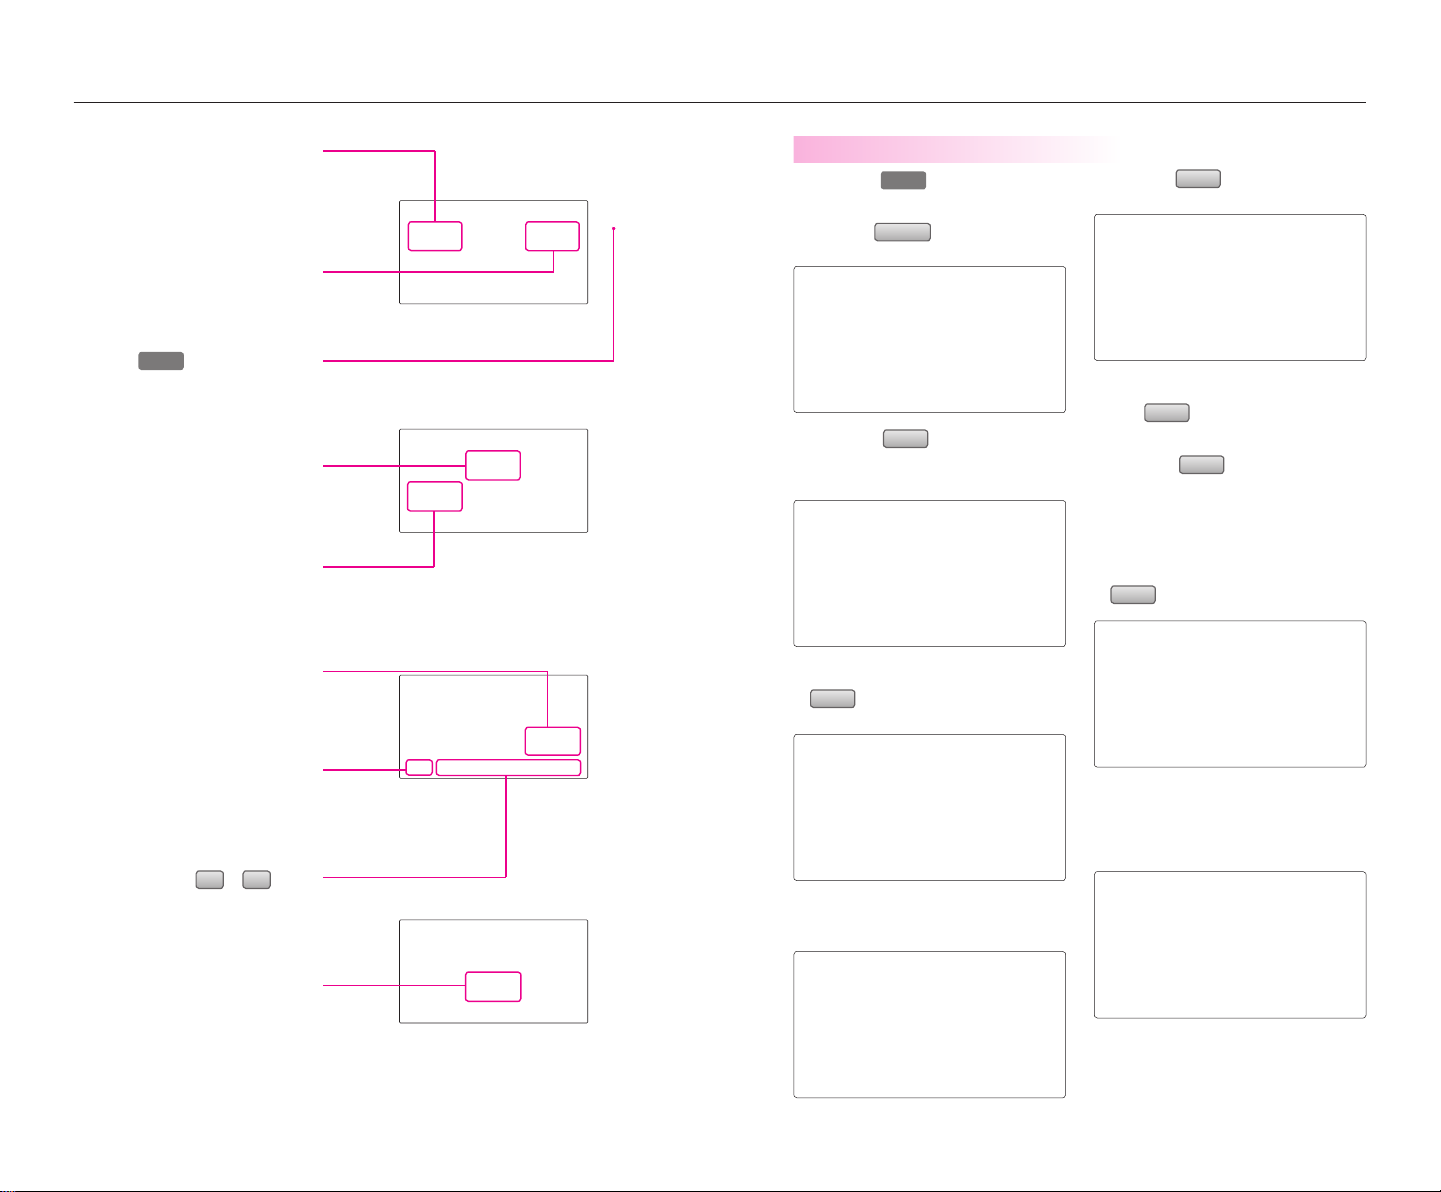
Setting a destination
Address
State
Street
Address
Set s the de sti nat ion throug h
address search.
Intersection
Sets the destination through inter-
section search.
Press the
panel to display the destination
menu screen.
Previous Dest
Sets the destination through the
previous destination list.
POI Search
Sets the destination through POI
Category search.
DEST
key on the control
Emergency
Set s the de sti nat ion throug h
emergency facilities search.
Searching an address
1. Press the
panel.
2. Press the
3. Press the
the state.
4. Input the State name and press the
List
button.
key on the control
DEST
button.
button to change
6. Press the
7. Input the House number and Press
Done
the
If the House number is not known,
press the
the range of house numbers will be
displayed during the last step.
8. Input the Street name and press the
List
button.
button.
button to complete.
Skip
button. In this case,
HOME
Sets the stored HOME as the desti-
nation.
9. If the desired street from the list is
selected, the corresponding position
will be displayed on the map.
Favorite place 1 ~ 5
Sets the destination with one of
the stored favorite places.
5. Select the desired state from the list
to change the state.
Address Book
Set s the de sti nat ion throug h
address book search.
26 27
Page 17

Setting a destination
i
State
INFORMATION
If more than 30 cities exist with the
selected street, then the city input
screen will be displayed. If less than 30
cities exist, then the city sel ect ion
screen will be displayed.
10. Input the city name and Press the
List
button to complete. If the
number of matches with the input
is less than 4 results, then the list
screen will be displayed automati-
cally.
house numbers ranges exist. Select
the desired House number range.
13. This screen will be displayed if the
House number had not been input-
ted during step 6. and only one
house numbers range exists.
Input the House number and Press
Done
the
button to complete.
The corresponding position will be
displayed on the map.
Searching an intersection
1. Press the
panel.
2. Press the
DEST
key on the control
Intersection
button.
4. Input the state name and press the
List
button.
5. Select the desired state from the list
to change the state.
8. Select the desired 1st street from the
list.
9. Input the name of the 2nd street and
press the
List
button.
6. Press the
Street
button.
10. Select the desired 2nd street menu
from the list. The corresponding posi-
11. Select the desired city from the list.
3. Press the
button to change
tion will be displayed on the map.
the state.
7. Input the name of the 1st street and
press the
12. This screen will be displayed if the
House number had not been input-
ted during step 6. and more than 2
List
button.
11. If the selected 2nd street is within
more than 2 cities, then the city list
screen will be displayed.
28 29
Page 18

Setting a destination
Previous Dest
POI Search
List
Searching a previous destination
Searching for emergency facilities
12. Select the desired city menu from
the list. The corresponding position
will be displayed on the map.
Searching from addressbook
1. Press the
panel.
2. Press the
3. S elect the desi red address book
(user) menu.
DEST
key on the control
Address book
button.
Searching a POI
1. Press the
panel.
2. Press the
DEST
key on the control
button.
6. Press the
7. Press the
Category
button.
Near current position
buton
to search for facilities nearby the
current position.
10. Select the desired menu button.
The corresponding position will be
displayed on the map.
1. Press the
key on the control
DEST
panel.
2. Press the
Emergency
button.
3. Press the
State
button.
3. Select the desired facility category.
4. S elect the desired address name
from the list. The correspond ing
position will be displayed on the
map.
4. Input the state name and press the
button.
8. Pre ss the desired main category
menu.
4. Select the desired facility menu. The
1. Press the
panel.
2. Press the
3. Select the desired previous destina-
tion. The corresponding position will
be displayed on the map.
DEST
key on the control
button.
corresponding position will be dis-
played on the map.
9. P res s the de sire d sub cate gory
menu.
5. Select the desired state from the list
to change the state.
30 31
Page 19
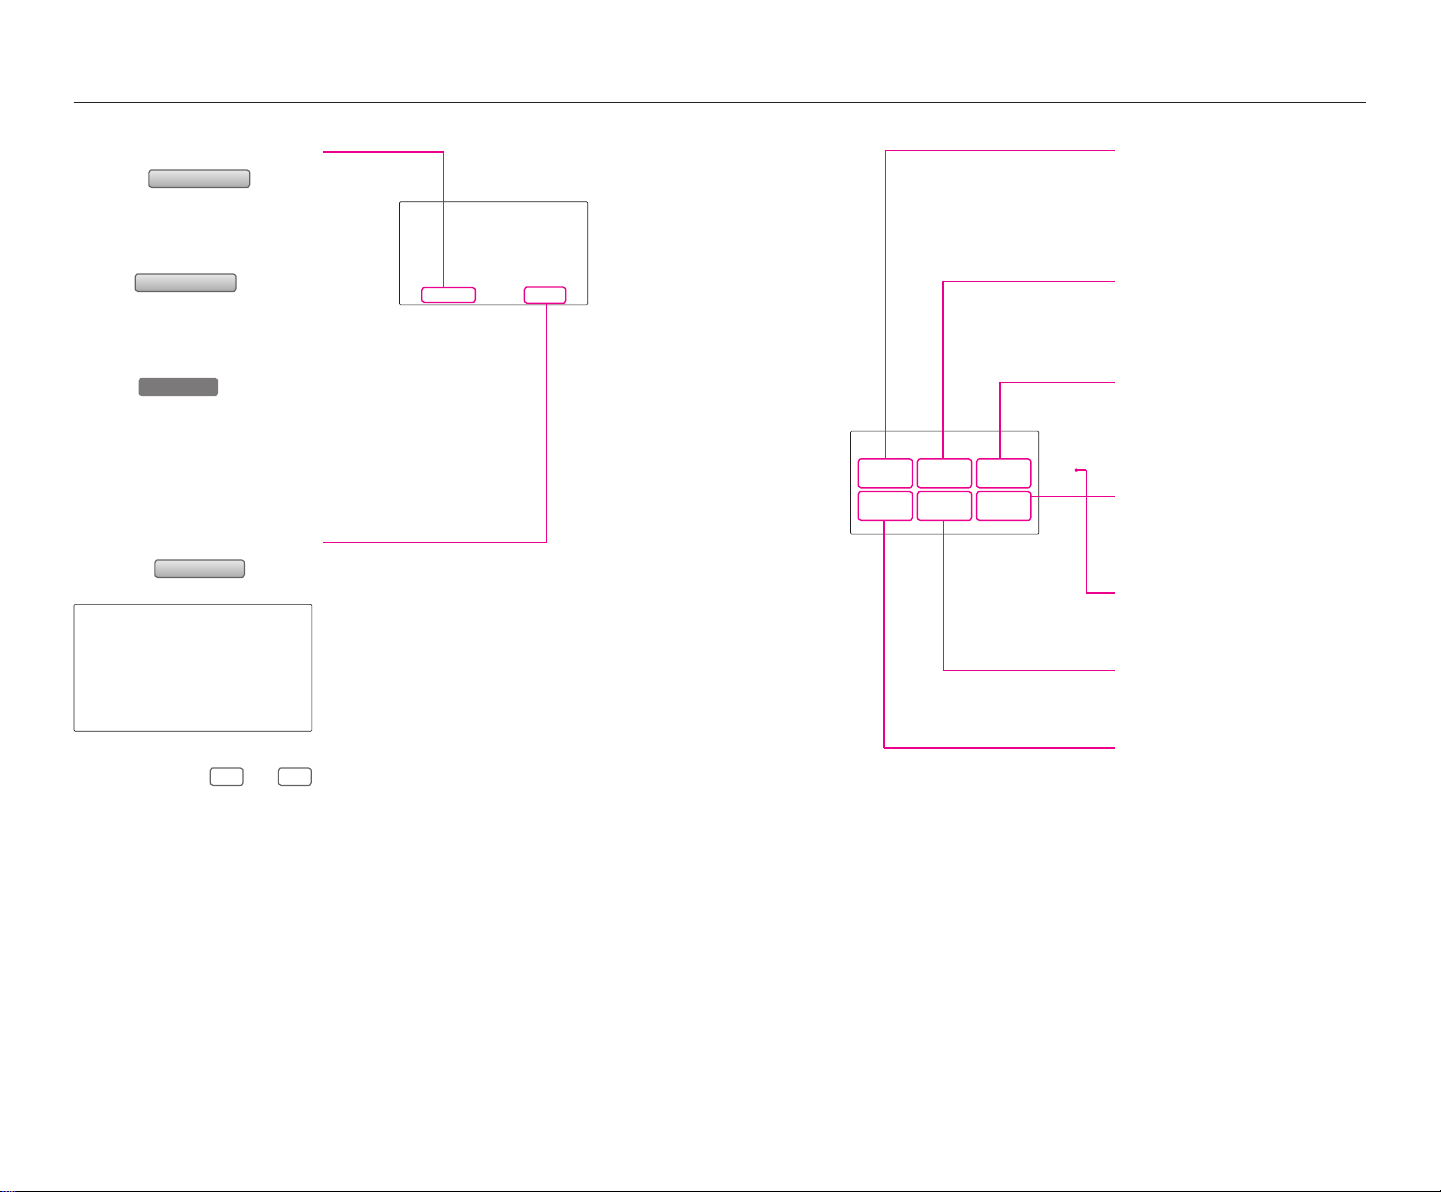
Editing routeOperating after setting a destination
Starting Route Guidance
Press the
Route Guidance will start.
Start Guidance
button.
Route simulation
●
●
Start Guidance
If the
pressed and held for over 0.8
second, then route simulation
will start.
MAP VOICE
If th e
control panel is pressed during
route simulation, then the route
simulation will be terminated.
button is
key on the
Selecting Alternative Route
1. Press the
Alternative Route
button.
Cancel Route
Deletes the destination, waypo-
ints and terminates the current
route guidance.
Route Overview
Di spla ys the whole rou te and
detailed route information.
Route Option
The route calculation method can
be changed.
Avoid Streets
Searches routes which avoids the
selected streets.
Displays the Route menu
screen
Detour
Searches detour routes.
2. Other routes can be selected by
pr es si ng t he or
buttons.
32 33
Edit Waypoint
Waypoints can be added/deleted
and the order can be changed.
Page 20
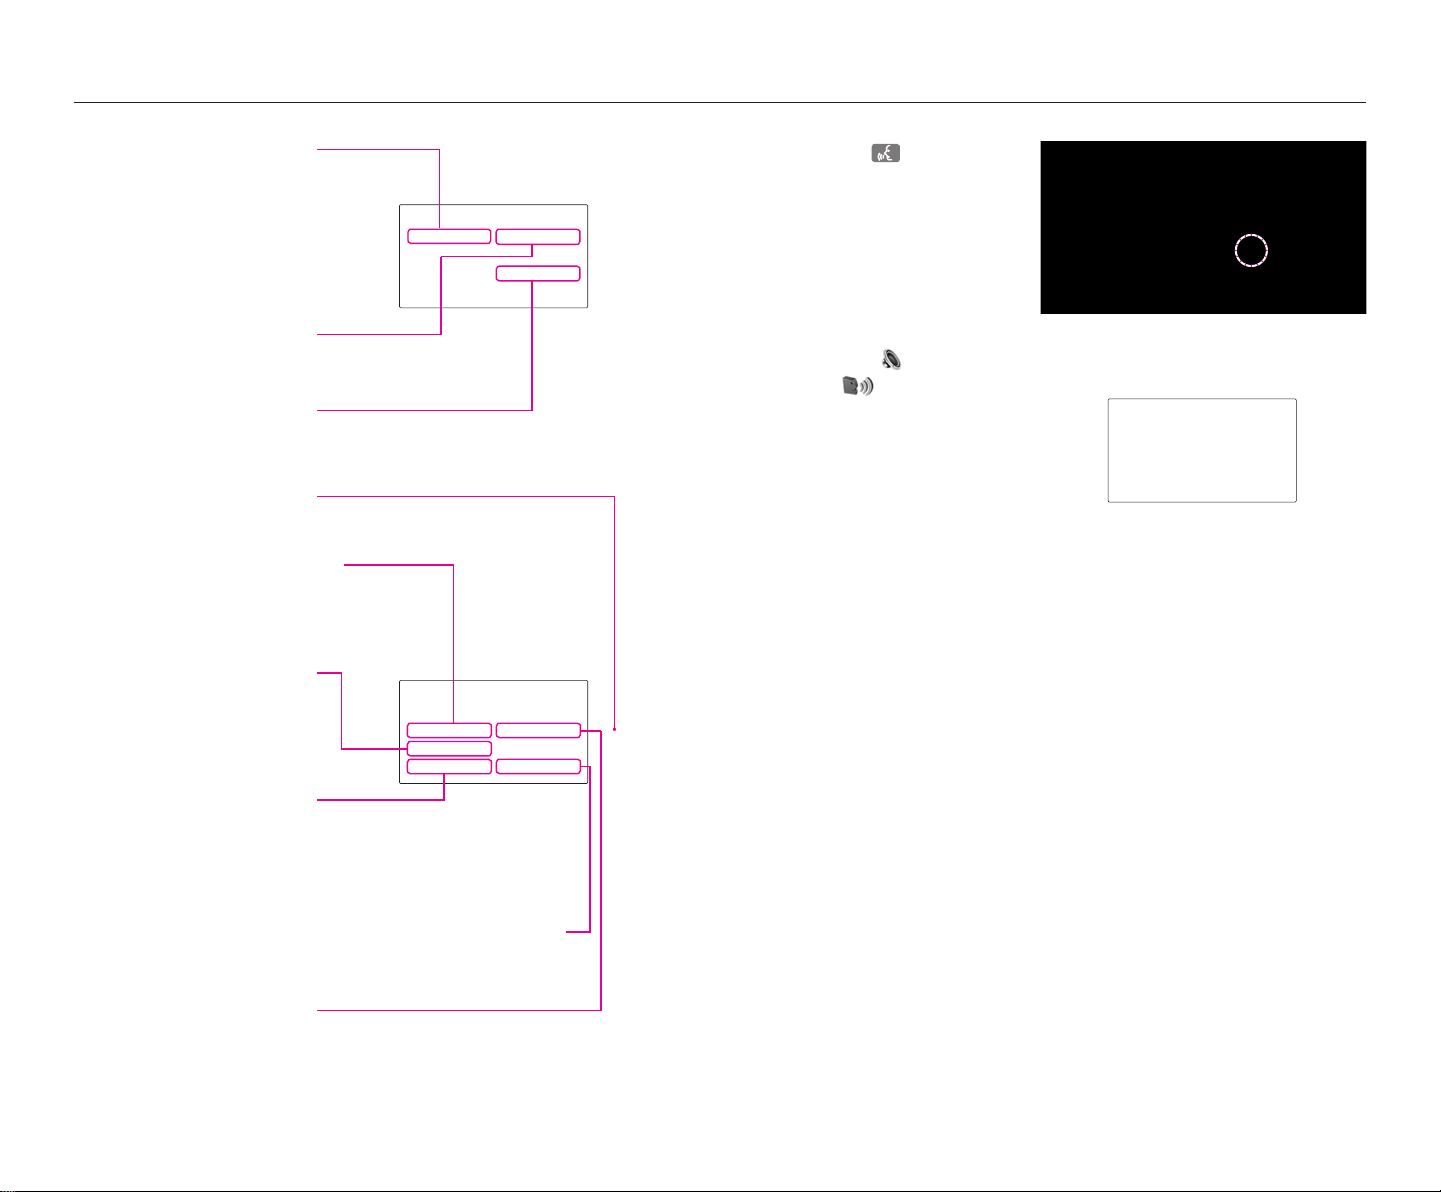
Operating voice commandSetup and Information
Main
Changes to the input keyboard
type, voice command feedback
ON/OFF settings and system ini-
tialization can be made.
Voice Setup
Adjusts the Navigation guidance
volume.
Help
The help contents can be viewed.
Display the Setup menu
screen
Navigation
Navigation related settings can be
set.
My Places
The Address book, Home address,
Favorite places, Previous destination
can be edited.
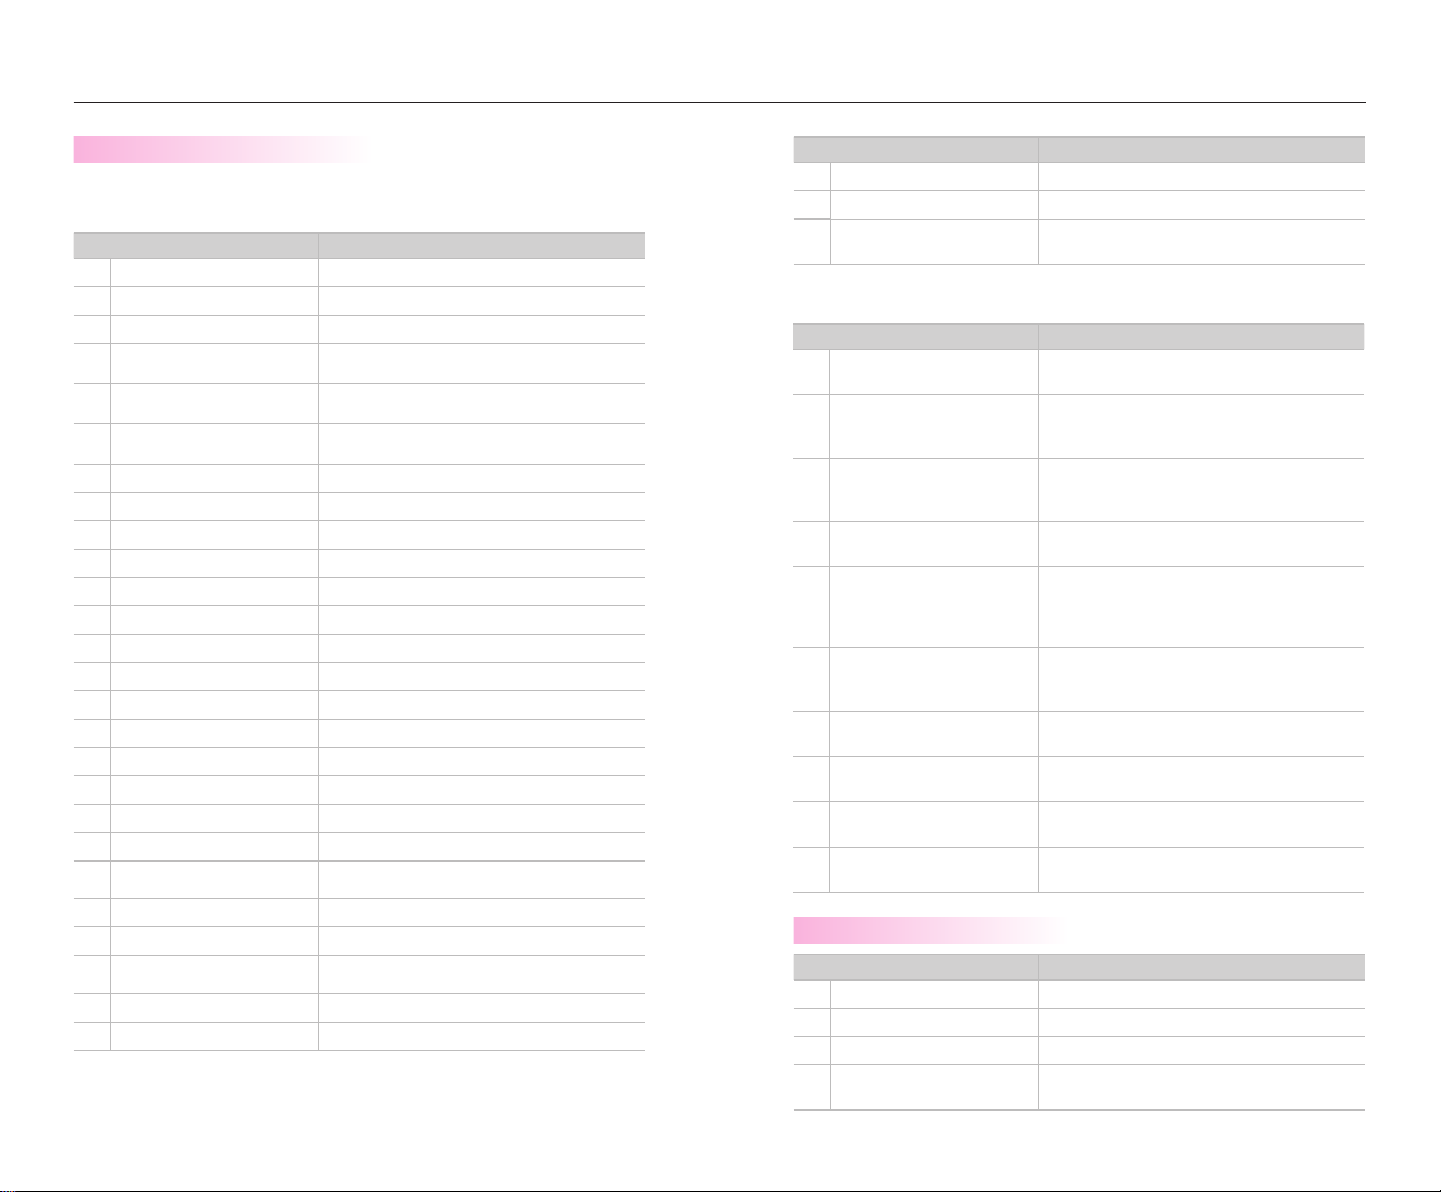
1. Press the button on the stee-
ring wheel remote controller. A
voice command window will be
displayed on the bottom side of
th e s cr ee n f ol lo we d b y a
"Command please" system voice
comment.
2. Once the icon changes into
the icon on the pop- up
screen with a beep sound, say
the desired voice command.
If the exact command is not
k n o wn , u s e t h e " H el p "
command to view the com-
mands list in detail.
Traffic Setup
Sets whether to display traffic infor-
mation on map, whether to provide
upcoming traffic information voice
guidance, and whether to display
the detour route popup showing
upcoming traffic information.
Display button
Adjusts the display setting
Clock Setup
Display the clock setting screen.
34 35
Page 21

EXAMPLE 1 :
Listening to the FM2 PRESET 1
1. Press the button on the steering
wheel remote controller.
2. Once the icon changes into the
icon on the pop•up screen with
a beep sound, say "FM2 preset 1".
EXAMPLE 2 :
4. Say the state name.
Operating voice commandOperating voice command
8. Say "Start guidance" if guidance to
the selected position is desired, or
say "Show map" to verify the loca-
tion of the selected position on the
map.
Searching a destination by
address
1. Press the button on the steering
wheel remote controller.
2. Once the icon changes into the
icon on the pop•up screen with
a beep sound, say "Find address".
3. Say "Change state" to change the
state.
5. Say the city name.
6. Say the street name.
7. Say the House number.
The range which can be inputted
will be displayed.
Command list of Help
Command Operation
Help Displays the main Help screen.
Destination Help Displays the Destination related command list.
Map Help Displays the Map related command list.
Radio Help
SIRIUS Help Displays the SIRIUS radio related command list.
Disc Help
iPod Help Displays the iPod related command list.
Phone Help
USB Help Displays the USB related command list.
Voice setup Help
Displays the FM/AM radio related command
list.
Displays the DISC mode related command list
for the disc inserted in the CDP.
Displays the Phone Help screen.
Di sp lay s th e Vo ice prom pt se tting s an d
speaker•adaptive commands on the screen.
36 37
Page 22

Operating voice command
Command list of audio system
Commands with will be accessed in the selecting mode.
FM/AM Radio
Command Operation
Radio
(Radio) AM
(Radio) FM
FM <1 or 2>
AM frequency <530 to 1710>
(ex. AM frequency 1310)
FM frequency <87.5 to 107.9>
(ex. FM frequency 99.1)
AM Preset <1 to 6> Plays the desired AM band preset frequency.
FM <1 or 2> Preset <1 to 6>
Preset <1 to 6>
Seek Up
Seek Down
Preset Up
Preset Down
Scan Scans all frequencies within the current band.
Preset Scan
Plays the most recent frequency for the most
recently operated Band.
Pl ays t he most re ce nt frequ en cy for t he
corresponding Band.
Pl ays t he most re ce nt frequ en cy for t he
corre sponding Band. In the case of FM, the
most recent frequency within the most recently
played FM1 or FM2 band is played.
Pl ays t he most re ce nt frequ en cy for t he
corresponding Band.
Plays the desired AM band frequency.
Plays the desired FM band frequency.
Plays the desired preset frequency of FM1 or
FM2 band.
Plays the des ired pre set freq uency for the
current Band.
Searches and plays the next frequency of the
current band.
Searches and plays the previous frequency of
the current band.
Plays the next preset frequency of the current
band.
Plays the previo us pres et freq uenc y of the
current.
Scans the 6 preset frequencies of the current
band.
SIRIUS Radio
Command Operation
SIRIUS
SIRIUS <1 or 2 or 3>
SIRIUS Channel <0 to 255> Plays the desired SIRIUS band channel.
SIRIUS <1 or 2 or 3>
Preset <1 to 6>
Channel < 0 to 255 > Plays the desired channel of the current band.
Preset <1 to 6>
Channel Up Plays the next channel of the current band.
Channel Down Plays the previous channel of the current band.
Preset Up
Preset Down
Scan Scans all channels within the current band.
Preset Scan
Plays the last channel within the last band from
SIRIUS1, SIRIUS2, and SIRIUS3.
Pl ay s t h e m os t r ec en t c h an ne l f or th e
corresponding Band.
Plays the desired preset channel for SIRIUS1 or
SIRIUS2 or SIRIUS3 band.
Plays the desired preset channel of the current
band.
Plays the next preset channel of the current band.
Plays the previous preset channel of the current
band.
Scans all preset channels within the current band.
CD
Command Operation
DISC Plays the DISC already inserted in the CD Player.
CD
CD track <1 to 665>
Track <1 to 665> Plays the desired track.
Next track Plays the next track.
Previous track Plays the previous track.
Scan Scans all tracks on the CD DISC.
Repeat track Repeats the current playing track.
Random Plays the tracks of the CD DISC in random order.
Normal play
Pause Pauses the CD.
Play
If the DISC inserted in the CD Player is either a CD
or MP3 DISC, then the CD or MP3 will be played.
If the DISC inserted in the CD Player is a CD, then
CD Mode will start and plays the desired track.
Turns off the Scan, Repeat, and Random functions.
This command will only be enabled when the CD
is paused.
38 39
Page 23

Operating voice command
MP3
Command Operation
DISC Plays the DISC already inserted into the CD Player.
CD
MP3
Next file Plays the next file.
Previous file Plays the previous file.
Next folder Plays the first file in the next folder.
Previous folder Plays the first file in the previous folder.
Scan Scans all files within the MP3 DISC.
Folder Scan
Repeat File Repeats the current playing file.
Repeat Folder
Random
Random Folder
Normal play
Pause Pauses the MP3 file.
Play
If the DISC inserted in the CD Player is either a CD
or MP3 DISC, then the CD or MP3 will be played.
If the DISC inserted in the CD Player is an MP3
DISC, then the MP3 will be played.
Plays all songs in the folder in which the current
playing file is located for 10 seconds each.
Repeats all tracks within the current playing folder.
Plays all files with in the MP3 DISC in random
order.
Plays all files within the current playing folder in
random order.
Turns off the Scan, Repeat, and Random functions.
This command will only be enabled when the
MP3 file is paused.
USB MP3
Command Operation
USB
Next file Plays the next file.
Previous file Plays the previous file.
Next folder Plays the first chapter of the next folder.
Previous folder Plays the first chapter of the previous folder.
Scan Scans all files within the USB.
Folder Scan
Repeat File Repeats the current playing file.
Repeat Folder
Random
Random Folder
If the USB has been connected to the device, plays
the MP3 files within the USB.
Plays all songs in the folder in which the current
playing file is located for 10 seconds each.
Repeats all songs within the current playing folder.
Plays all files within the USB in random order.
Plays all files within the current playing folder in
random order.
USB MP3
Command Operation
Normal play
Pause Pauses the USB.
Play
Turns off the Scan, Repeat, and Random functions.
The command will only be enabled when the USB
is paused.
USB Image
Command Operation
USB
Next file Plays the nest Image.
Previous File Plays the previous Image.
Next folder Plays the first chapter of the next folder.
Previous folder Plays the first chapter of the previous folder.
If the USB has been connected to the device, plays
the MP3 files within the USB.
iPod
Command Operation
iPod
Next song Plays the next song.
Previous song Plays the previous song.
Repeat song Repeats the current playing song.
Random Plays all songs within the iPod in random order.
Random Album
Normal play Turns off the Repeat and Random functions.
Pause Pauses the iPod.
Play
Plays the songs within the iPod if the iPod has
been connected to the device.
Plays all songs within the current playing album in
random order.
This command will only be enabled when the iPod
is paused.
Other
Command Operation
Line in Plays the unit connected with the AUX terminal.
Audio on Turns on the Audio.
Audio off Turns off the Audio.
40 41
Page 24
Operating voice command
Command list of navigation system
Map
Command Operation
Map Current location Displays the current position of the vehicle.
Zoom In Decreases the map zoom by one level.
Zoom Out Increases the map zoom by one level.
Zoom minimum
Zoom maximum
Zoom level <1 to 14>
Zoom <scale factor> Displays the map in the corresponding zoom.
150 feet / 50 meters
300 feet /100 meters
700 feet / 200 meters
0.25 miles / 400 meters
0.5 miles / 800 meters
1 mile / 1.6 kilometers
2 miles / 3.2 kilometers
4 miles / 6.4 kilometers
8 miles / 12 kilometers
16 miles / 25 kilometers
32 miles / 50 kilometers
64 miles / 100 kilometers
130 miles / 200 kilometers
250 miles / 400 kilometers
Zoom 0.25 miles, zoom 400 meters)
North up Displays the map in North Up mode.
Heading up
Sh ow <PO I na me> (ex . Sh ow
ATM)
Hide <POI name> (ex. Hide ATM)
Hide all Hides all POI categories.
Displays the map screen in the maximum zoom
level.
Displays the map screen in the minimum zoom
level.
Displays the map in the zoom level selected
from the 14 levels.
(ex.
Displays the map in Heading Up mode.
Displays the selected POI categories.
Hides the selected POI categories.
Command Operation
Daylight mode Converts the map display into daylight mode.
Night mode Converts the map display into night mode.
Auto mode
Converts the map display is between daylight/
night modes automatically.
Destination
Command Operation
Find address
Find nearest POI
Find nearest <POI name>
Destination POI by phone number
Find Emergency <Category>
Destination by address book
Previous destination
Previous start point
Go home
De st ina tion by m emory poi nt
<1 to 5>
Sets the destination through address search for
route guidance.
Set s a PO I near t he cu rre nt positi on as the
de stin ati on fo r rou te gu ida nce thro ugh PO I
category search.
Sets a PO I n ear th e c urren t p ositi on as the
destination by directly inputting the POI name
for route guidance.
Sets the destinat ion by searchi ng the phon e
number of the facility.
Searches for an emergency facility which is nearby
the current position and sets it as the destination
for route guidance. Emergency facilities are police
stations, hospitals, and dealerships.
Sets one of the lis t of previou sly registered
addresses in the address book for the user as the
destination.
Sets one of the previous dest inat ion as the
current destination.
Sets the previou s sta rt point as the current
destination.
Sets the previous registered home address as
the destination for route guidance.
Sets a previous registered memory point as the
destination for route guidance.
Command list of Phone
Command Operation
Call name Makes the call to the name.
Dial Number
Redial The recently called number is redialed.
Recent Call
Makes the call to the number.
The user can selest a number from the outgoing,
incoming, and missed calls.
42 43
Page 25

Operating voice command
POI Category listRoute
Command Operation
Cancel route
Repeat voice guidance Repeats the route guidance.
Detour <1 or 2 or 5 or 10> miles
Detour <1 or 2 or 5 or 10> kilometers
Replan recommended route
Replan shortest route Recalculates the route with the shortest route.
Distance to destination
Time to destination
View route
Start guidance
D el et es the de si gn at ed de st in at io n an d
terminates the route guidance.
Searches detour routes within a <1
radius.
Search es deto ur rout es with in a < 1
kilometer radius.
Recalculates the route with the recommended
route.
Reports the remaining distance until destination
by voice.
Reports the remaining time until destination by
voice.
If the destination has bee n set, displays the
whole route screen until the destination.
Sets the scroll mark displayed on the map as the
destination and starts route guidance.
Other
Command Operation
Voice guidance on Turns the Voice Guidance On.
Voice guidance off Turns the Voice Guidance Off.
Voice guidance louder
Voice guidance softer Decrease the Voice Guidance volume by 1 level.
Store marked location to <text
(ex. Store marked location to
tag>
user 1)
Increases the Voice Guidance volume by 1 level.
Registers the selected location into the selected
Address book.
|2|5|
10> mile
|2|5|
10>
All restaurants
Fast Food restaurant
American restaurant
French restaurant
Italian restaurant
Continental restaurant
Mexican restaurant
Japanese restaurant
Chinese restaurant
Korean restaurant
Vegetarian Food restaurant
Seafood restaurant
Latin American restaurant
Asian restaurant
African restaurant
Coffee Shop
Other restaurants
All automotive
Gas Station
Parking
Auto service
Road Assistance
Hyundai Dealership
Automobile Dealership
Auto Parts
Rest Area
Car Wash
Motorcycle Dealership
All Travel
Airport
Hotel
Tourist Information
Travel Agent
Tourist Attraction
City Cnter
Rental Car Agency
Campground
Ferry Terminal
Bus Station
Local Transit
Train Station
All Shopping
Department Store
Convenience Store
Shopping Center
Music Store
Grocery Store
Bookstore
Electronics Store
Hardware Store
Gifts shop
Sporting Goods store
Home Specialty Store
Clothing shop
Shoe Store
Pharmacy
All Recreation
Amusement Park
Museum
Cinema
Sports Activities
Sports Complex
Golf Course
Winery
Video & Game Rental
Ski Resort
Recreation Area
Other Recreation
All Financial Service
Bank
ATM
Check Cashing Service
Money Transfer
Business Facility
All Community
Police Station
Post Office
Library
Court House
Fire Department
Convention Center
City Hall
Civic Center
School
Government Offices
Waste & Sanitary
Utilities
All Services
Hospital
Dentist
Photography
Tax Service
Medical Service
Attorney
Funeral Director
Hair & Beauty
Cleaning & Laundry
Social Service
Physician
Communication services
Tailor & Alteration
Mover services
44 45
Page 26
Pairing and connecting a Bluetooth® phoneConverting Bluetooth® Handsfree mode
i
i
PHONE
MAP VOICE
i
Converting from Audio/
Navigation mode to
Bluetooth® Handsfree mode
1. While in Audio mode or Navigation
mode, press the
key on the steering wheel.
2. T h e s y s t e m w i ll c ha n g e t o
Bluetooth® Handsfree mode and
display the PHONE screen.
key or the
Converting from Bluetooth®
Handsfree mode to Audio/
Navigation mode
1. While in Bluetooth® Han dsfree
mode, press an Audio/Navigation
mode key, such as
key.
2. The corresponding mode will be dis-
played.
FM/AM
key or
INFORMATION
Most of the functions of the Audio or
SETUP modes are not supported while
on a Bluetooth® Handsfree call. The call
volume and Navigation (MAP VOICE,
DEST, ROUTE) screens can be operated.
Pairing a mobile phone
1. P res s the
PHONE screen.
2. P res s the
Settings screen.
3. The list of currently paired phones
will be displayed. Press the
button to pair a new mobile phone.
Settings
button on the
Pairings
button on the
Add to
there are already five mobile phones
paired, you must first delete one of the
previously paired phones.
4. From the Bl ueto oth® device list
within the mobile phone, add the
car handsfree. The default name of
the car system is SPORTAGE. For
more information on registering
Bluetooth
phone, please refer to the mobile
phone user's manual.
®
devices from the mobile
INFORMATION
While conducting a Bluetooth® device
search from the mobile phone, opera-
ting to another screen will prevent the
car handsfree from being found in the
mobile phone. Always conduct sear-
ches for Bluetooth® devices with the
Search Bluetooth® device screen dis-
played.
3. The following screen will become
displayed if no mobile phone has
been connected.
46 47
INFORMATION
For safety reasons, pairing a Bluetooth®
phone is not possible when the vehicle
is in motion. Park the vehicle in a safe
location to pair a new phone. It is pos-
sible to pair up to five mobile phones.
In order to pair a new phone when
5. When pairing the car handsfree from
the mobile phone, a passkey input
window will become displayed on
the mobile phone screen. Input the
passkey set within the car system
in to t he m ob il e p ho ne in p ut
window.
Page 27

Pairing and connecting a Bluetooth® phone
i
Connections
Connect
i
(The factory state passkey is 0000.)
As shown in the figure, once the
pa sske y become s succes sfu llyi-
nputted, the Bluetooth® connection
between the car system and mobile
phone will start.
6. Once Bluetooth® connection is suc-
cessful, the name of the connected
mobile phone will become displayed
o n t h e P H O N E s c re e n a n d
Bluetooth® handsfree functions will
operate.
Connecting a mobile phone
1. Press the
PHONE screen.
2. Press the
Settings screen.
3. The list of currently paired phones
will be displayed. Select the phone
you wish to connect from the list and
press the
Settings
button on the
button.
button on the
INFORMATION
Some functions may not be supported
due to limited Bluetooth® compatibility
between the car system and mobile
phone.
48 49
INFORMATION
When there are no paired phones, pair
the mobile phone through [Settings >
Pairings > Add to].
4. The Bluetooth® connection between
the car system and mobile phone
will start.
5. Once Bluetooth® connection is suc-
cessful, the name of the connected
mobile phone will become displayed
on the PHONE screen and Bluetooth®
handsfree functions will operate.
6. I f t he connection between th e
mobile phone and Bluetooth® fails,
the following pop-up will be displa-
yed. If problems occur while connec-
ting Blu e tooth®, ch eck for th e
following conditions.
●
Is the mobil e phone you wish to
connect is in the vicinity of the car
system.
●
Is the power of the mobile phone
Bluetooth® has been turned on.
Page 28

Making a call
i
SEND
SEND
SEND
Making a call from Call history
SEND
i
END
i
SEND
Making a call by dialing a
phone number
1. Use the number pad on the right
side of the PHONE screen to input
the number you wish to call.
2. Press the
key on the steering wheel to make
the call.
button or the
INFORMATION
To modify, press the
delete the inputted number one digit
at a time.
Press the
on the steering wheel to cancel the
call.
button or the
Del
button to
key
Making a call from the Phone
book
1. Press the
PHONE screen.
2. The phone book list will be displa-
yed.
Contacts
button on the
INFORMATION
Upon connecting a mobile phone, the
phone book lists saved in the mobile
phone will automatically be down-
loaded. The phone book download
funct ion may not be sup por ted in
some mobile phones.
3. Select the number you wish to call
from the phone book list and press
the
button.
4. The call will be made to the selected
number.
INFORMATION
When there are more than 2 numbers
saved in one phone number list, if the
list is repeatedly selected, the registe-
red phone numbers will be displayed
sequ entially on the lis t. Select the
phone number you wish to connect by
repe ate d ly se le ct in g th e phon e
number li st an d pr ess th e
button to make the call to the selected
number.
1. P res s th e
PHONE screen or press the key
on the steering wheel.
bu tton on the
3. The call will be made to the selected
number.
2. The call history list will be displayed.
Select the number you wish to call
from the call histor y list and press
the
50 51
button.
Page 29
Operating menus during a call
END
Private
i
Use handsfree
Accept
Switch
Switching call to the mobile
phone
1. If you wish to switch the call to the
mobile phone while talking on the
ca r ha ndsfre e, press the
button or press and hold (over 0.8
second) the
key on the steering
wheel.
2. As shown, the call will be switched to
the mobile phone.
INFORMATION
If you wish to switch the call to the car
handsfree while talking on the mobile
phone, press the
or press and hold (over 0.8 second) the
key on the steering wheel. The
call will be switched to the car hands-
free.
button
Activating Call waiting
1. If another person calls while already
on a call, the following screen will be
displayed.
2. Press the
key on the steering wheel to receive
the incoming call by switching to the
new caller.
3. To switch again to the other caller,
press the
key on the steering wheel. The other
call will be received and the previous
call will switch back to call waiting.
button or the
Accept
button or the
Ending a call
1. To end a call, press the
or th e ke y on th e st ee ri ng
wheel.
2. The call will be ended.
CAUTION!
button
Mobile Phone Compatibility
Depending on the manufacturer,
product and product specification,
some mobile phones functions may
no t be sup p or te d or may no t
operate to specification. Carefully
read the cautions listed below.
●
The occurrence of problems upon
using mo bile ph ones ma y be
caused by the mobile phone and
not by the AUDIO/Navigation unit.
●
Even mobi le phones which suppor
t Bluetoo th
®
function may not
op era te proper ly if the mobi le
phone connection hasbeen locked.
Release the connection lock and try
connecting the mobile phone with
the system again.
●
The Mobile phone battery icon and
signal strength icon may not be
properly displayed depending on
the type of mobile phone.
●
Ca ll wa iting is su pporte d onl y
when connected mobile phones
suppor t this featu re. The ca ll
waiting pop•up may not be displa-
yed in some mobile phones.
●
Audio streaming mode will operate
only when a Bluetooth
®
phone has
been connected. Connec t ing or di
sconnec t ing a Bluetooth
®
phone
while audio streaming is operating
will stop music play.
●
The audio streaming function may
not be supported in some mobile
phones.
●
The phonebook may take a prolon-
ged period of time to download or
may not operate in some mobile
phones. The quality of Bluetooth
handsfree calls may differ depen-
ding on the mobile phone.
®
52 53
Page 30
MEMOPhone Music
MEDIA
MODE
i
MEDIA
MODE
Disable streaming audio
i
SEEK
∧
TRACK
∨
i
Starting Phone music
1. Repeatedly press the
the front panel or the
on th e steering wh eel to enter
Phone music mode.
key on
key
INFORMATION
Each press of the
front panel will change the function in
the order of DISC
→
AUX
Phone Music → DISC .
Each press of the
steering wheel will change the audio
mode in the order of FM1
→
AM
SIRIUS1 → SIRIUS2 → SIRIUS3 →
→
DISC
USB or iPod → AUX → Phone
→
Music
FM1.
It is not possible to enter Phone music
mode if the mobile phone is not connec-
ted or if the audio streaming setting
within Bluetooth
has been set to
®
key on the
→
USB or iPod →
key on the
→
FM2 →
handsfree settings
.
INFORMATION
While music saved in the mobile phone
will automatically begin playing after
converting to the Phone music screen,
this music player function may not be
supported in some mobile phones. If
music does not begin playing even
after converting to the Phone music
screen, try starting the music directly
from the mobile phone.
Selecting Phone music files
1. Press the , buttons on the
Phone music screen or the
keys on the system. The
previous or next song will be played
each ti me the button or key is
pressed.
INFORMATION
The file selection function may not be
supported in some mobile phones.
,
2. The Phone music screen is displayed.
54 55
Page 31

 Loading...