

Kia K900 2016 Owner's Manual

GETTING TO KNOW YOUR K900
65mph
CRUISE
Congratulations on Your New Kia Purchase!
Your new Kia vehicle has been designed, engineered and manufactured to provide you with years of comfortable
and dependable driving. Kia is committed to quality, innovation, safety and — above all — your satisfaction.
Using This Guide
The information contained in this guide is a brief overview that will help you become familiar with the operation
and features of your new Kia vehicle. The flipbook format facilitates information access, while the detailed
illustrations ensure the instructions are easy to follow.
This Features & Functions Guide and the specific operational and safety information it provides are not a
substitute for your Owner’s Manual. In the interest of your safety and that of your family, and to help you avoid
risks that may result in death or serious injury, Kia reminds you to carefully read your Owner’s Manual in order
to fully familiarize yourself with the important information it contains.
While the information contained in this guide is accurate at the time of printing, Kia may change vehicle
specifications without notice in advance of or after the fact, and assumes no liability in connection with
such changes.
Driving while distracted can result in a loss of vehicle control that may lead to an accident, severe personal injury and death. The driver’s primary
responsibility is in the safe and legal operation of a vehicle, and use of any handheld devices, other equipment or vehicle systems which take the
driver’s eyes, attention and focus away from the safe operation of a vehicle or that are not permissible by law should never be used during operation
of the vehicle.
www.kia.com
Consumer Affairs - Roadside Assistance: 1-855-4KIAV IP (855-4 54-28 47) or 1-80 0-333-4KIA (8 00-3 33-4542)
See Back Cover for Vehicle Maintenance Schedule.
Always check the Owner’s Manual for complete operating information and safety warnings.

TABLE OF CONTENTS
Essential Features
Aux/USB/iPod® Port & Power Outlets ..................... 25
Advanced Smart Cruise Control (A SCC)* ...................18
Automatic Transmission (Shift by Wire) and Sport Mode ........ 28
UVO Luxury Services with Premium N avigation System ........24
®
Bluetooth
Wireless Technology ......................... 20
Climate Control ...................................... 26
Driver Information System (DIS) Controls .................. 22
Power Front Seat Headrest Adjustment * ................... 35
Head-Up Display (HUD)* ............................... 07
Smart Trunk ......................................... 38
Rear Passenger’s Control System ........................ 37
Surround View Monitoring (SVM) System* ...................31
Steering Wheel Adjustment ..............................15
Smart Key .......................................... 40
Tire Pressure Monitoring System (TPMS) .................. 05
Windshield Wipers and Washers ..........................17
Videos & QR Codes ..........................02
Instrument Cluster ....................... 03-06
Instrument Cluster Overview / Indicators & Warning Lights ... 03
Active ECO System ............................... 04
Fuel Economy .................................. 04
Tire Pressure Monitoring System (TPMS) ............... 05
LCD Instrument Cluster Modes ....................... 06
Trip Computer / Tripmeter .......................... 06
Driver’s Panel ........................... 07-1 4
Head-Up Display (HUD)* ........................... 07
Instrument Panel Dimmer .......................... 08
Electronic Stability Control (ESC) / Traction Control System (TC S) .. 08
Hill-Start Assist Control (HAC) ....................... 08
Blind Spot Detection (BSD) System* ................... 09
Lane Departure Warning System (LDWS)* ............... 10
Fuel Door Release Button .......................... 10
Power Trunk Main C ontrol Lever ..................... 10
Reverse Parking Aid Function ....................... 11
Parking Assist System ............................. 12
Parking Guide System (PG S) / Rear-Camera Display* ....... 12
Power Windows, Window Lock & Central Door Lock ........ 13
Power Folding Outside Mirrors ....................... 13
Heated Outside Mirrors ............................ 13
Auto Door Lock /Unlock ............................ 13
Engine St art /Stop Button .......................... 14
Steering Wheel Controls .................. 15 -21
Power Tilt/Telescoping Steering Wheel ................. 15
Heated Steering Wheel* ........................... 15
Headlight s & High Beams .......................... 16
Turn Signals & Fog Lights .......................... 16
Windshield Wipers & Washers ....................... 17
LCD Controls and M odes ........................... 17
Advanced Smart Cruise Control (A SCC)* ................ 18
Audio Controls .................................. 19
®
Bluetooth
Wireless Technology ...................... 20
Center Panel ............................ 22-33
Driver Information System ( DIS) C ontrols ................ 22
UVO Luxury Services with Premium N avigation ............ 24
Clock ........................................ 25
Aux/USB/iPod
®
Port & Power Outlets .................. 25
Center Panel (Continued) ................. 22-33
Automatic Climate Control S ystem .................... 26
Automatic Transmission (Shift by Wire) and Sport Mode ..... 28
Electric Parking Brake (EPB) ........................ 29
Auto Hold ..................................... 29
Drive Mode Integrated Control System ................. 30
Surround View Monitoring (SVM) System* .............. 31
Front Blind Spot Monitoring System* ................... 32
Power Rear Curtain .............................. 33
Seating ................................. 34-37
Seat Warmers / Ventilated Seats ..................... 34
Power Adjustable Driver’s Seat ...................... 35
Power Front Seat Headrest Adjustment * ................ 35
Driver Position Memory System ...................... 36
Power Reclining Rear Seats* ........................ 36
Rear Pas senger’s Control System ..................... 37
Other Key Features ...................... 3 8- 47
Smart Power Trunk ............................... 38
Smart Key ..................................... 40
Map/Room Lamps ............................... 42
Panoramic Sunroof Operation ....................... 43
Auto-Dimming Rear view Mirror with HomeLink
®
.......... 44
Sunvisor ...................................... 46
Hood Release Lever and Latch ....................... 46
Fuel Cap/Malfunction Indicator (Check Engine Light) ....... 47
Child Safety Locks ............................... 47
Safety Features ......................... 48-49
Seat Belts ..................................... 48
Pre-Safe Seat Belt (PSB)*........................... 48
Occupant Detection System (ODS) /
Passenger Airbag Off Indicator ....................... 49
Normal Maintenance Schedule ................ 5 0
Legal Disclai me rs (See Inside Back Cover)
Driving while distra cted can result in a los s of vehicle control th at may
lead to an accid ent, severe personal i njury and death. The d river’s primary
responsibil ity is in the safe and le gal operation of a veh icle, and use of any
handheld devic es, other equip ment or vehicle system s which take the driver’s
eyes, attention a nd focus away from the safe operation of a vehicle o r that are
not permissibl e by law should never be u sed during operatio n of the vehicle.
*IF EQ UIPPED ALWAYS C HECK THE OW NER’S MAN UAL FOR COM PLETE OP ERATING I NFORMAT ION AND SAF ETY WAR NINGS.
1

VIDEOS & QR CODES
QR Codes
Kia provides a number of video resources at your disposal
to assist you with becoming familiar with the features and
functions found in your Kia vehicle. You can access these
resources by snapping the QR Codes with your smartphone/
tablet (mobile devices) or by visiting the following website:
www.KuTechVideos.com/kh13/2016. Continue reading
for a more in-depth look at QR Codes and for instructions on
how to use them.
What are QR Codes?
A QR Code is a square, 2-dimensional Bar Code that can
be read by mobile devices loaded with an appropriate Bar
Code or QR Code Reader app. The app reads the Bar Code
image and then launches/uploads the specific information
the code contains, such as URLs, text, photos, videos and
so much more.
How to Use QR Codes
If you have a mobile device with a QR Code Reader App, you
can snap the code with your phone and you’ll be provided a
video with additional information pertaining to the topic. For
example, in the Kia One-Click Fuel Cap section, if you would
like additional information, just snap the code with your mobile
device to view the selected Kia Features & Functions Video.
How to snap a QR Code
1. With your mobile device, download a QR Code Reader
App. With many devices, you can do this through an App
Store or Marketplace
2. Open the QR Code Reader App on your mobile device
3. The app will utilize your device’s camera. Center the code
in the camera viewing area:
§ With some apps, as soon as the app recognizes the
code, it will launch the corresponding video
§ With other apps, you will have to snap or “take a
picture” of the code. The app will then launch the
corresponding video
§ For operation specifics, refer to the instructions that
come with the QR Code Reader app
ONE-CLICK FUEL
CAP VIDEO
To view a video on your
mobile device, snap
this QR Code or visit
the listed website.
www.KuTechVideos.com/kh13/2016
Quick Tips
1. If you’re having trouble scanning codes, check
the following:
- The code should be centered and focused in
your mobile device’s camera screen
- Consider moving your device closer to or
farther away from the code
- The code should be well lit, without
significant shadow
- Avoid scanning from a significant angle
- Confirm that the device’s app supports 2D QR
Code scanning
- Tr y another QR Code Reader app; not all apps
are created equal
2. After scanning, you may experience a “connecting”
message appears and then nothing happens or
there’s a “connection error” message. These
messages typically indicate that your device is
having trouble connecting to the Internet.
REMINDER: When accessing videos on your mobile
device, standard cellular data rates may ap ply.
2
*IF EQUIPPED
INSTRUMENT CLUSTER
B B
A
F
D
(Ty pe B Instrument Cluster)
C
G
H
E
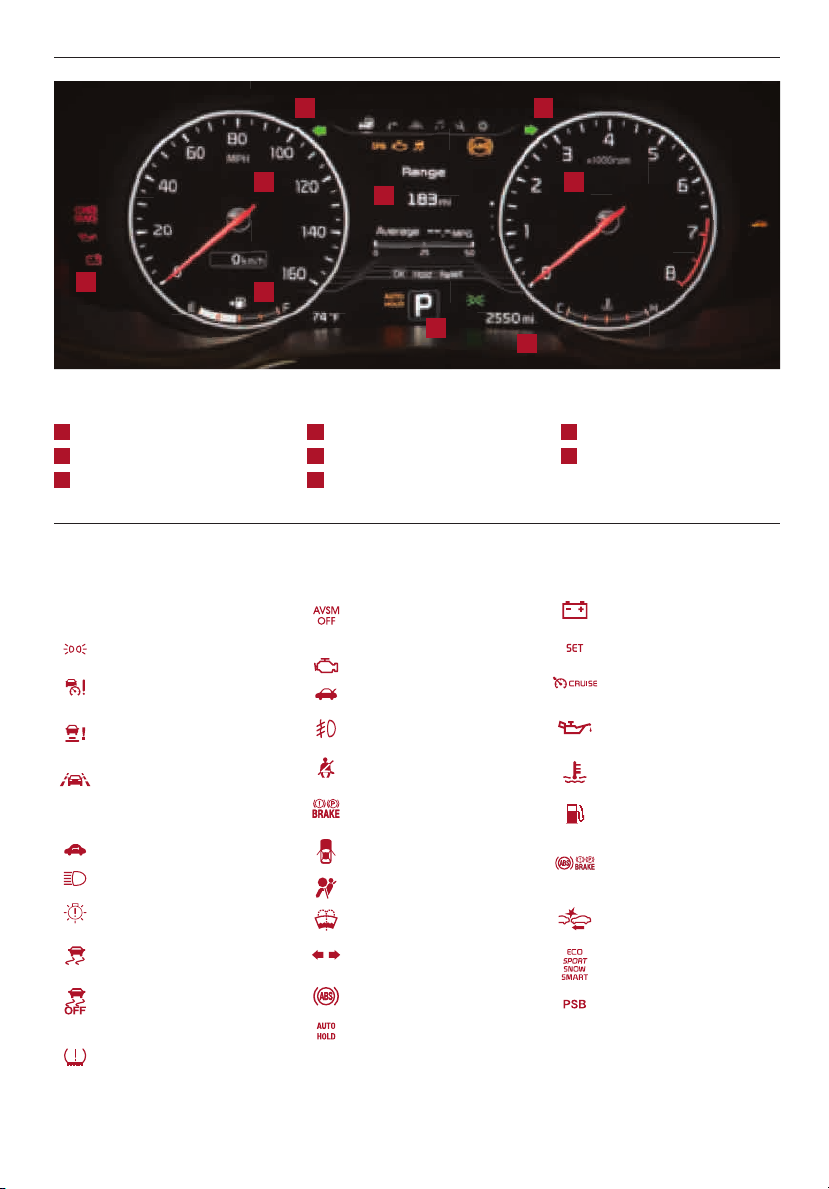
Instrument Cluster Overview
A
Tachometer
B
Tur n Signal Indicators
C
Speedometer
D
Indicator & Warning Lights
E
Gear Shift Position Indicator
F
Odometer
G
H
Indicators & Warning Lights
Adaptive Front Lighting
AFLS
System Warning Light
Light ON Indicator
Advanced Smart Cruise
Control Warning Indicator*
Advanced Smart Cruise
Control Radar Warning Light*
Lane Departure Warning
System (LDWS) Indicator*
Electric Parking Brake
EPB
Immobilizer Indicator
High Beam Indicator
LED Headlamp Warning Light*
Electronic Stability Control
(ESC) Warning Indicator
Electronic Stability Control
(ESC) OFF Indicator
Low Tire Pressure Light / Tire
Pressure Monitoring System
(TPMS) Malfunction Indicator
For more information on the function of all indicator and warning lights, please refer to the Owner’s Manual.
Advanced Vehicle Safety
Management (AVSM) OFF
Indicator Light*
Malfunction Indicator
Trunk Open Warning Light
Front Fog Light Indicator
Seat Belt Warning Light
Parking Brake & Brake Fluid
Warning Light
Door Ajar Warning Light
Airbag Warning Light
Low Windshield Washer Fluid
Tur n Signal Indicators
Anti-Lock Braking System
(ABS) Warning Light
Auto Hold Indicator
REMINDER: Your vehicle’s instrument cluster & indicator light locations may
differ from those in the images. See your Owner’s Manual for more details.
Trip Computer
Fuel Gauge
Charging System Warning
Light
Cruise SET Indicator
Cruise Indicator
Engine Oil Pressure Warning
Light
Engine Coolant Temp er atu re
Warning Light
Low Fuel Level Warning Light
Electronic Brake Force
Distribution (EBD)
System Warning Light
Autonomous Emergency
Braking (AEB) Warning Light*
ECO/SPORT/SNOW/SMART
Mode Indicator
PSB Pre-Safe Seat Belt
Warning Light*
*IF EQUIPPED ALWAY S CHECK THE OWNER’S MANUAL FOR COMPLETE OPERATING INFORMATION AND SAFETY WARNINGS.
3
INSTRUMENT CLUSTER
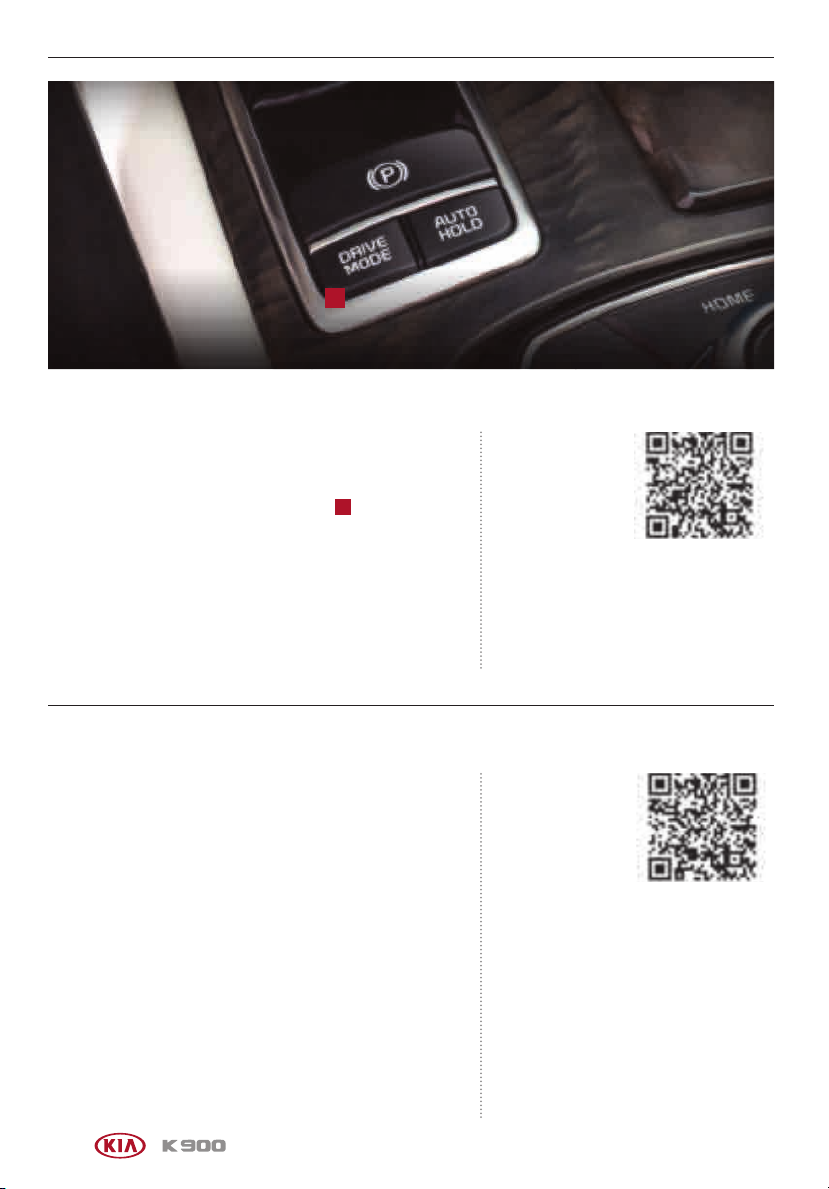
A
(Button located on center panel below the gear shift)
Active ECO System
When activated, the Active ECO system optimizes drivetrain
operations such as engine power and transmission to help
improve fuel economy.
To turn ON, press the DRIVE MODE button
the modes then select ECO.
A green ECO indicator will illuminate on the instrument cluster
(indicating that you are getting optimal fuel economy).
A
, scroll through
ECO MODE VIDEO
To view a video on
your mobile device,
snap this QR Code or
visit the listed website.
Refer to page 2 for
more information.
www.KuTechVideos.com/kh13/2016
REMINDER: When the Active ECO system is turned ON and ignition is cycled,
the system remains ON.
Fuel Economy
Several factors contribute to your vehicle’s fuel economy,
including maintenance of your vehicle, driving style,
environmental conditions, vehicle weight and vehicle
aerodynamics. Below are tips on how to help improve
fuel economy:
§ Keep your vehicle in good condition with regular maintenance
§ Don’t let the engine idle longer than necessary
§ Drive at a moderate speed, accelerating smoothly
§ Keep tires inflated to the recommended pressure
§ Travel lightly, without carrying unnecessary weight in
your vehicle
§ Avoid placing large or heavy items on roof racks
§ Avoid hilly, winding or poorly maintained roads
4
FUEL ECONOMY
VIDEO
To view a video on
your mobile device,
snap this QR Code or
visit the listed website.
Refer to page 2 for
more information.
REMINDER: Driving range varies depending on a
vehicle’s fuel tank size, e.g., 12-gal. vs. 24-gal.. Even
though two vehicles’ MPG may be the same, the
vehicle with the larger tank will have greater range.
www.KuTechVideos.com/kh13/2016
*IF EQUIPPED
INSTRUMENT CLUSTER
A
(Ty pe B Instrument Cluster)
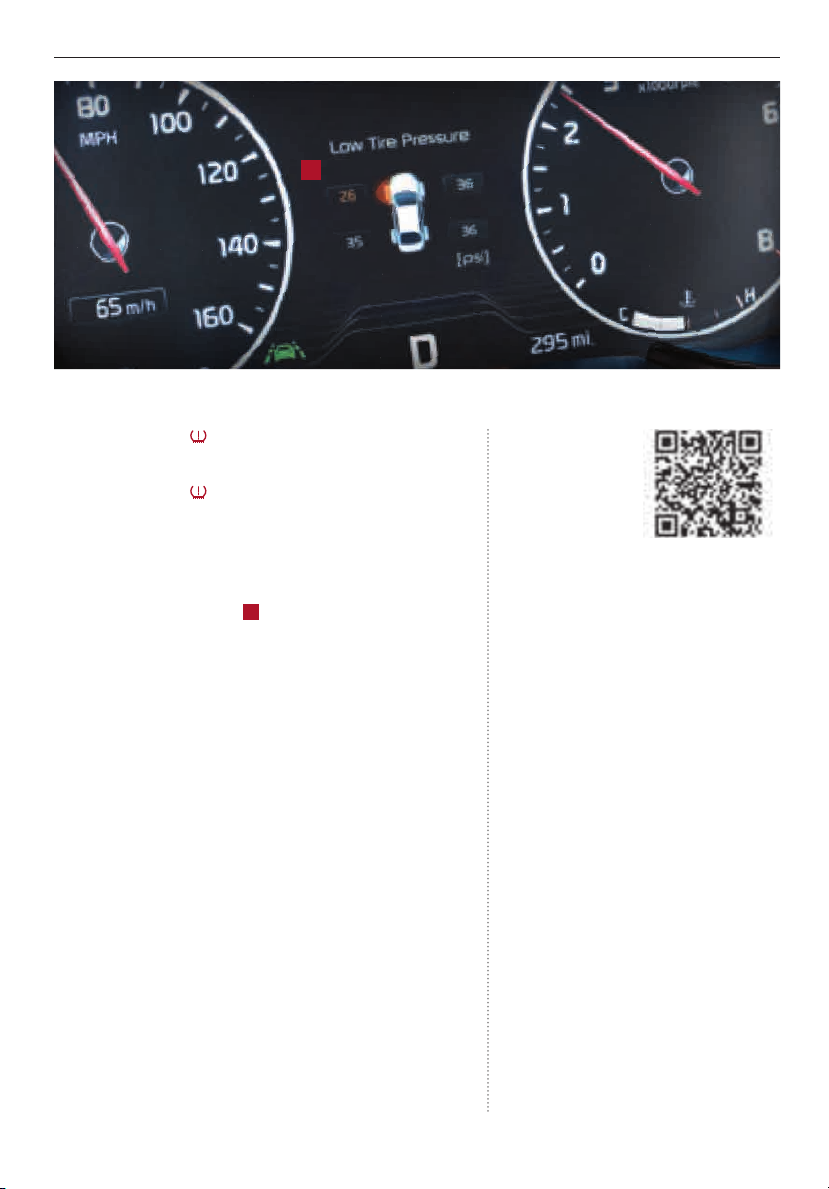
Tire Pressure Monitoring System (TPMS)
The TPMS indicator functions as both Low Tire Pressure
Light and TPMS Malfunction Indicator.
The TPMS indicator
is significantly underinflated, the vehicle has a spare tire
installed without TPMS or the outside temperature becomes
significantly colder.
The LCD screen in the instrument cluster will display the
Low Tire Pressure indicator
underinflated.
§ Inflate tire(s) to specifications using an accurate digital
tire pressure gauge. See front driver’s door jamb for
PSI specification
§ When there is a problem with the TPMS, the TPMS
Malfunction Indicator will blink for approximately one
minute then illuminate. See dealer for service
will illuminate if one or more tires
A
showing which tire(s) are
TPMS VIDEO
To view a video on your
mobile device, snap
this QR Code or visit the
listed website. Refer
to page 2 for more
information.
Quick Tips
- Even with TPMS, tire pressure should be checked
manually at least once a month. Only adjust tire
pressure on “cold tires”
- For proper maintenance, safety and optimal fuel
economy, maintain recommended tire inflation
pressure and stay within the load limits and
weight distribution recommended for your vehicle
- In winter or cold weather, the TPMS light may
illuminate if the tire pressure was adjusted to
the recommended tire inflation pressure during
warm weather
www.KuTechVideos.com/kh13/2016
REMINDER: Consult your dealer for service if
Low Tire Pressure Light remains illuminated after
inflating your tire(s).
*IF EQUIPPED ALWAY S CHECK THE OWNER’S MANUAL FOR COMPLETE OPERATING INFORMATION AND SAFETY WARNINGS.
5
INSTRUMENT CLUSTER
(Ty pe B Instrument Cluster)
B
A
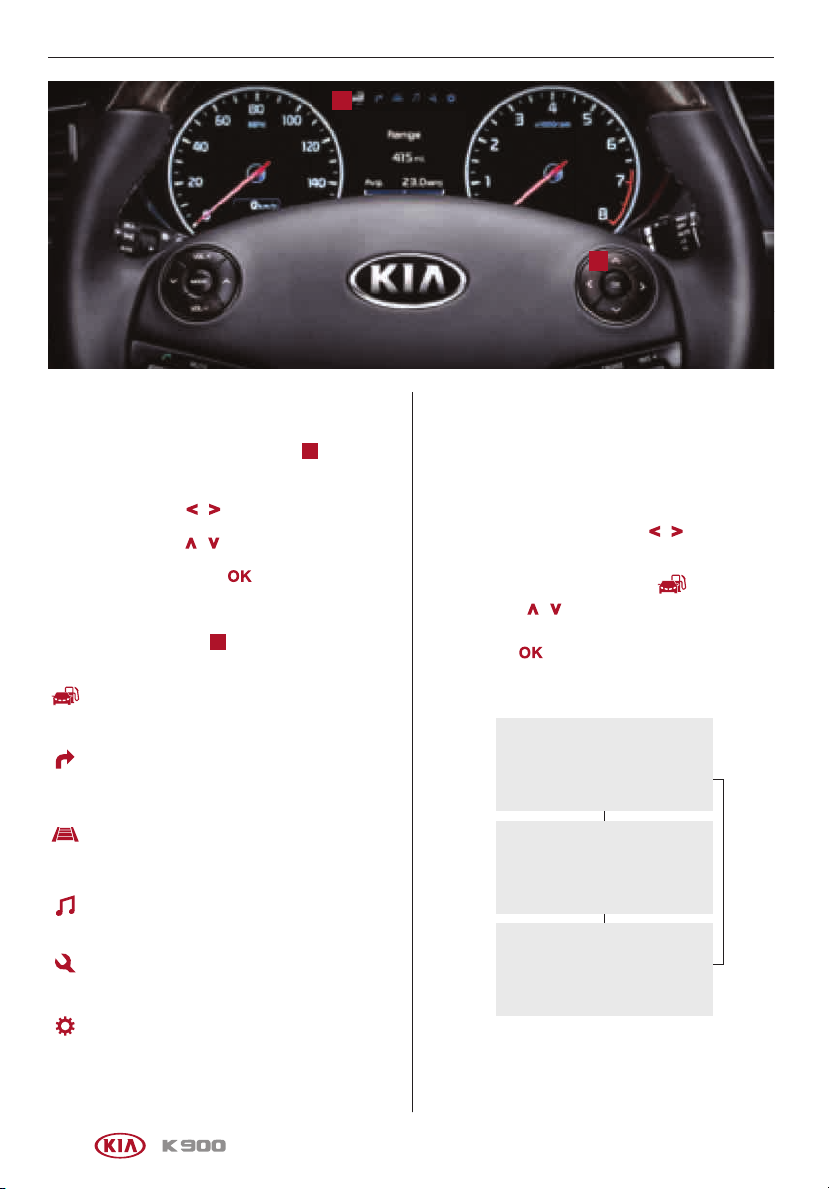
LCD Instrument Cluster Modes
The LCD Instrument Cluster modes can be
changed by using the control buttons
right side of the steering wheel.
Press Mode buttons
Press Move buttons
/ to change LCD mode.
/ to select item.
Press Select/Reset button
set/reset the item.
LCD Screen Modes B :
Trip Computer Mode: Displays driving
information for tripmeter, fuel economy, etc.
Tur n By Turn (TBT) Mode*: Displays the
state of the navigation system
Advanced Smart Cruise Control (ASCC) /
Lane Departure Warning System (LDWS)
Mode*: Displays the state of ASCC
and LDWS
A/V Mode: Displays the state of the
A/V System
Information Mode: Provides service
intervals and pressure status of each tire
User Settings Mode: Change settings of the
doors, lamps and other features
A
on the
in center to
Trip Computer / Tripmeter
The Trip Computer is a driver information system
that displays information related to driving when the
ENGINE START/STOP button is in the ON position.
To cycle through the LCD Instrument Cluster
modes, press the Mode buttons
side of the steering wheel.
When in the Trip Computer mode
Move buttons
/ to cycle through the screens.
When displaying TRIP A or TRIP B screens, press
and hold the
button to reset the Tripmeter
to zero.
FUEL ECONOMY
• RANGE
• Average MPG
• Instant MPG
TRIP A
• Tripmeter A
• Average MPH
• Elapsed Time (E/T)
TRIP B
• Tripmeter B
• Average MPH
• Elapsed Time (E/T)
REMINDERS:
- Appearance of Tripmeter display may differ as equipped
- All stored driving information (except Odometer and Range) is
reset if the battery is disconnected
/ on the right
, press the
6
*IF EQUIPPED
INSTRUMENT CLUSTER
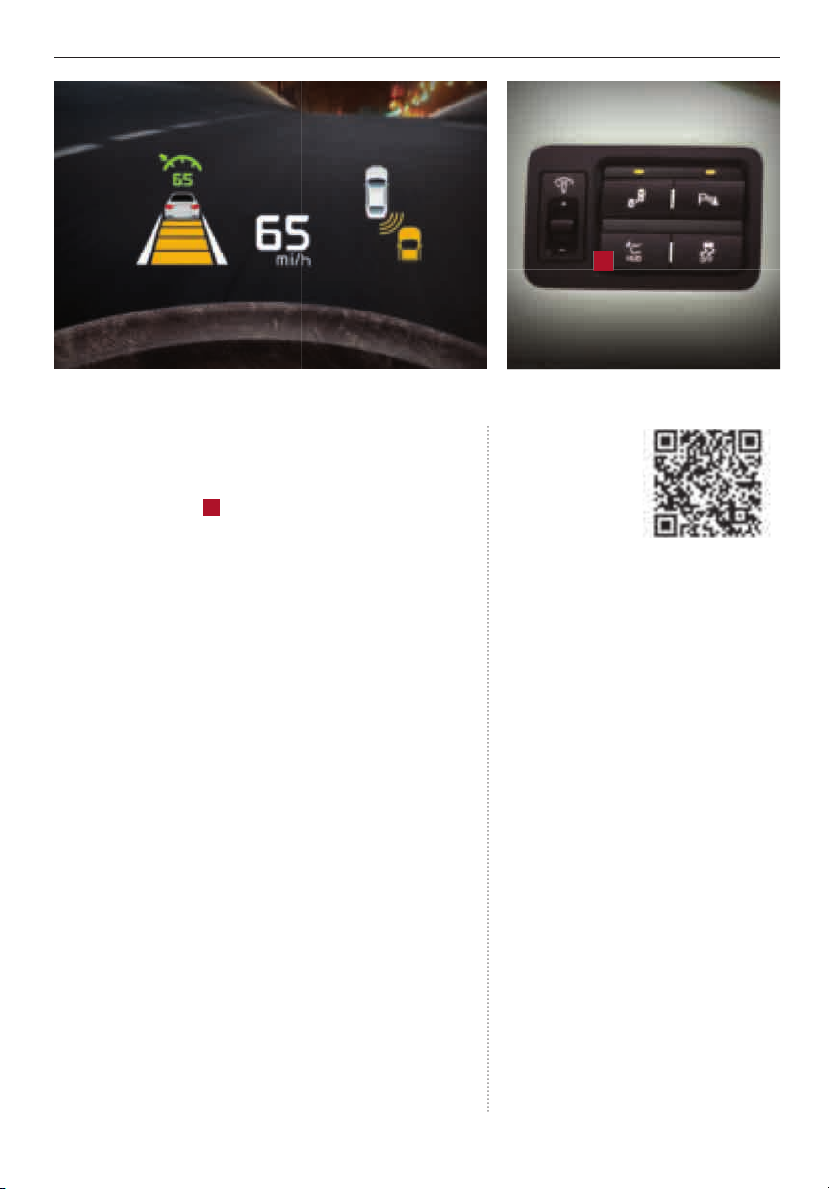
Head-Up Display (HUD)*
The Head-Up Display (HUD) is a transparent display that
projects a snippet of information from the instrument cluster
and navigation system onto the windshield glass.
Press the HUD button
The HUD displays:
§ Turn By Turn (TBT)
navigation information
§ Road signs
§ Speedometer
§ Cruise setting speed
§ Advanced Smart
Cruise Control (ASCC)
Head-Up Display (HUD) User Settings
Drivers can adjust the HUD settings from the LCD Instrument
Cluster modes in User Settings. HUD settings include:
§ Display Height: Adjust the height of the HUD image on the
windshield glass
§Rotation: Adjust the degree of HUD rotation
§Brightness: Adjust the intensity of the HUD brightness
§Contents Select: Activate or deactivate HUD content
(TBT**, ASCC, LDWS, BSD)
§Speedometer Size: Choose the size of the HUD
speedometer (Small, Medium, Large)
§Speedometer Color: Choose the color of the HUD
speedometer (White, Amber, Green)
A
to turn the display ON/OFF.
information*
§ Lane Departure Warning
System (LDWS) information*
§ Blind Spot Detection
(BSD) system information*
§ Warning lights (low fuel)
A
(Buttons located on dri ver’s panel,
left of the steering wheel)
HEAD-UP DISPLAY
(HUD) VIDEO
To view a video on
your mobile device,
snap this QR Code or
visit the listed website.
Refer to page 2 for
more information.
REMINDERS:
- The HUD image on the windshield glass
may not be visible when:
- The driver has poor sitting posture
- The driver is wearing polarized sunglasses
- There is an object covering the HUD
- Driving on a wet road
- Excessive lighting inside or outside the vehicle
- Modifications made to the windshield, such
as tinting or other aftermarket treatments,
could affect the HU D. When replacing the front
windshield glass of vehicles equipped with the
HUD, owners must replace it with windshield
glass designed for HUD operation. Otherwise,
duplicated images may be displayed on the
windshield glass.
**If Turn By Tur n (TBT) navigation information is
selected as HUD content, TBT information will not
be displayed on the LCD.
www.KuTechVideos.com/kh13/2016
*IF EQUIPPED ALWAY S CHECK THE OWNER’S MANUAL FOR COMPLETE OPERATING INFORMATION AND SAFETY WARNINGS.
7
DRIVER’S PAN EL
A
B
(Buttons located on dri ver’s panel, lef t of the steering wheel)
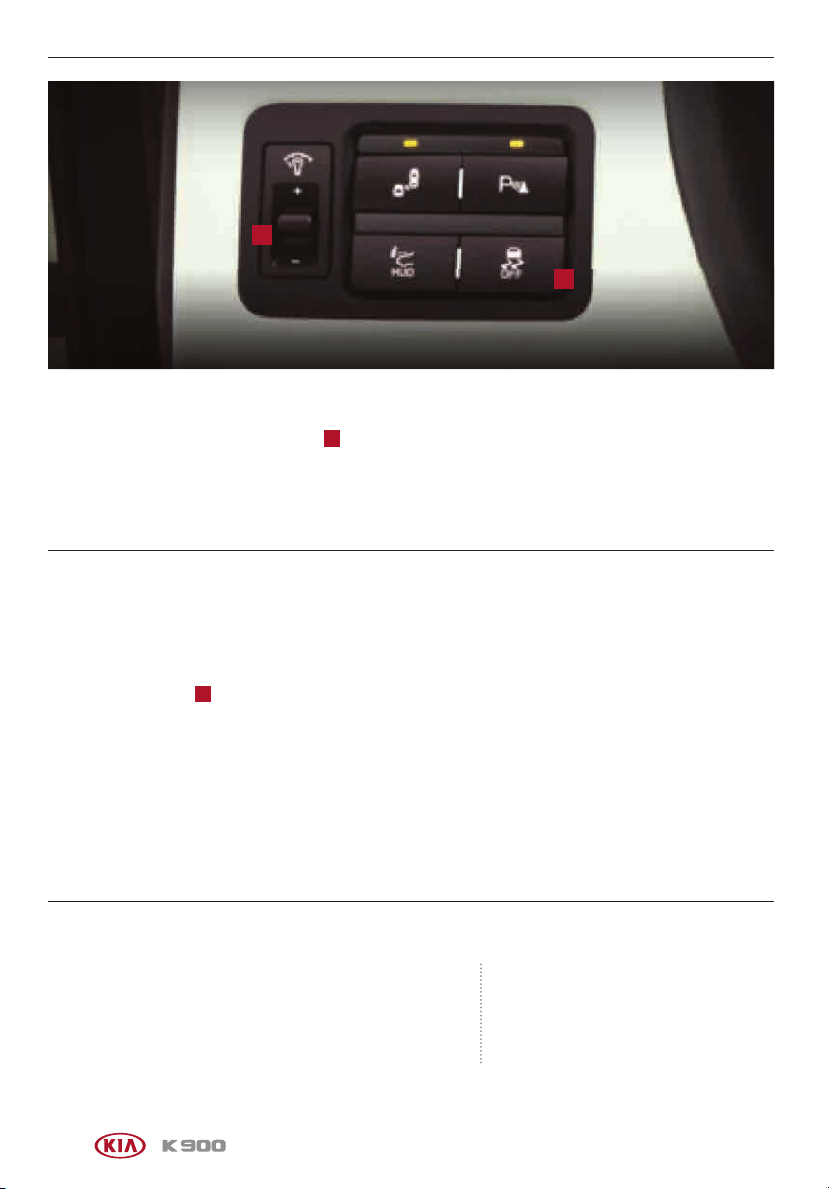
Instrument Panel Dimmer
With parking lights/headlights ON, press A (+) or (-) to adjust the brightness of the instrument
panel illumination.
REMINDER: The Instrument Panel Dimmer does not adjust brightness on the navigation system screen.
Use navigation setup to adjust brightness on the navigation system.
Electronic Stability Control (ESC) / Traction Control System (TCS)
Electronic Stability Control (ESC) is designed to help stabilize the vehicle during cornering maneuvers.
Tra cti on Control System (TCS) helps improve traction while accelerating on slippery surfaces. It is a good
idea to keep both ESC and TCS turned on for daily driving whenever possible.
Press the ESC button
To turn Electronic Stability Control and Trac tion Control System OFF, press and hold the ESC button for more
than 3 seconds. Press again to turn ON.
B
to turn Electronic Stability Control and Tract ion Control System OFF/ON.
REMINDERS:
- ESC is active by default at vehicle start-up. When ignition is cycled, ESC will turn ON again
- The ESC indicator light in the instrument cluster will be lit momentarily whenever ESC is active
For more information on Electronic Stability Control (ESC) and its specific features and operations, please refer to your Owner’s Manual.
Hill-start Assist Control (HAC)
Hill-start Assist Control (HAC) helps prevent the vehicle from
rolling backwards when accelerating from a stop while on a
steep incline.
HAC automatically activates whether ESC is OFF or ON but
does NOT activate when ESC has malfunctioned.
REMINDER: HAC does not operate when the gear shift is in P (Park) or N (Neutral) position.
Quick Tip
When HAC is active (e.g., during initial acceleration
from a stop on an incline), you may notice that the
brakes will momentarily remain engaged after you
depress the accelerator.
8
*IF EQUIPPED
DRIVER’S PAN EL
A
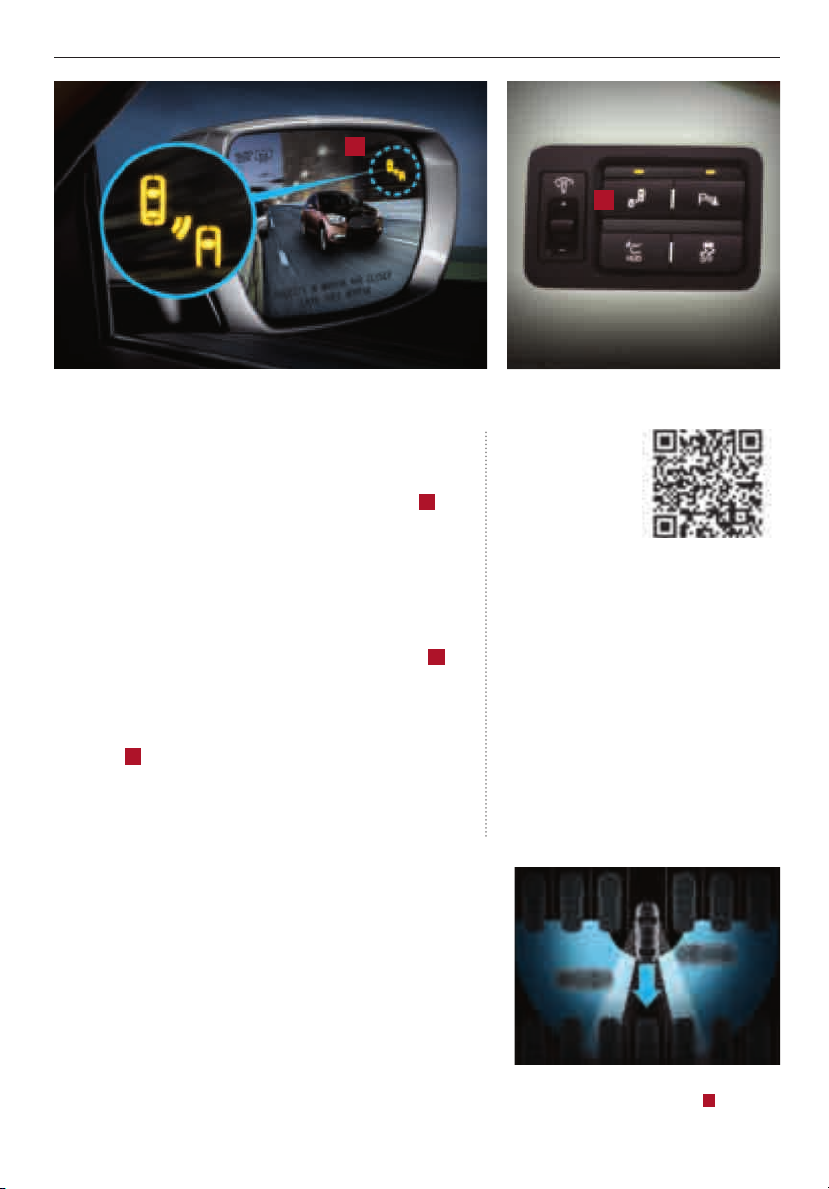
Blind Spot Detection (BSD) System*
The Blind Spot Detection (BSD) system uses radar sensors to
monitor surrounding areas and help alert the driver to nearby
vehicles before changing lanes. With the ENGINE STAR T/
STOP button in the ON position, press the BSD button
turn the system ON. The button light will illuminate.
The system will activate when the vehicle is traveling more
than 20 mph and will alert the driver if another vehicle is
detected by the radar sensor.
1st-stage alert: When another vehicle is detected within the
BSD system boundary, a yellow indicator will illuminate
the outside rearview mirrors.
2nd-stage alert: When 1st stage alert is on and the
driver activates a turn signal, a flashing red indicator will
illuminate
A
on the outside rearview mirrors and the
system will sound an alert.
B
to
A
on
B
(Buttons located on dri ver’s panel,
left of the steering wheel)
BLIND SPOT
DETECTION SYSTEM
VIDEO
To view a video on
your mobile device,
snap this QR Code or
visit the listed website.
Refer to page 2 for
more information.
REMINDERS:
- The BSD system will not issue a warning if the vehicle
speed is 6 mph or more above the surrounding vehicles
- When the BSD is ON and the ignition is cycled, the BSD
system returns to ON
Quick Tip
The BSD system will activate when:
1. The system is turned on
2. Vehicle speed is above approximately 20 mph
3. Other vehicles are detected on the rear sides of
the vehicle
www.KuTechVideos.com/kh13/2016
Rear Cross Tr a f fi c Alert ( RCTA)
If the Rear Cross Traffic Alert (RCTA) system sensors detect
vehicles approaching from the left or right side, the system
will sound an audible alert, the warning indicators on the
outside rearview mirror will illuminate and a message will
appear on the LCD screen, under these conditions:
§ When the vehicle is in Reverse
§ When the vehicle moves backwards from a parked position
§ When the vehicle is moving less than 6 mph
REMINDER: The RCTA feature can be turned
OFF/ON by pressing the BSD button B.
*IF EQUIPPED ALWAY S CHECK THE OWNER’S MANUAL FOR COMPLETE OPERATING INFORMATION AND SAFETY WARNINGS.
9
DRIVER’S PAN EL
A
(Button located on left side of the steering wheel)
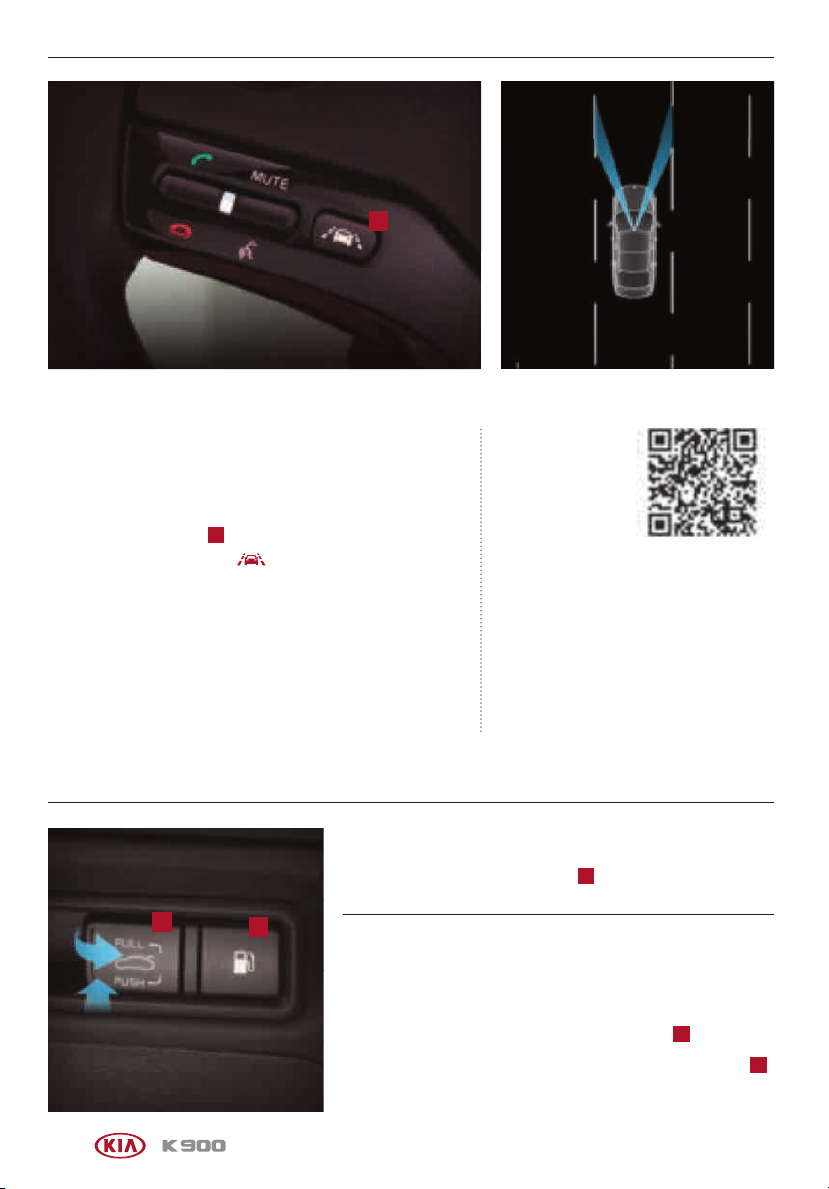
Lane Departure Warning System (LDWS)*
The Lane Departure Warning System (LDWS) monitors the
vehicle’s position on the road and issues a warning if the
vehicle is drifting out of the intended lane.
With the ENGINE START/STOP button in the ON position,
press the LDWS button
instrument cluster indicator
If the LDWS detects that you are driving outside of your lane,
the system may issue a warning on the LCD screen and an
alert may sound, under these conditions:
§ The vehicle speed exceeds approximately 43 mph
§ The LDWS system recognizes the lane the vehicle is
traveling in
A
to turn the system ON. The
will illuminate green.
LANE DEPARTURE
WARNING SYSTEM
VIDEO
To view a video on
your mobile device,
snap this QR Code or
visit the listed website.
Refer to page 2 for
more information.
REMINDERS:
- The LDWS will not issue a warning if the turn
signal is activated
- When the ignition is cycled, LDWS will return to
ON when button is pressed
www.KuTechVideos.com/kh13/2016
The Lane Departure Warning System (LDWS) is not a substitute for safe and proper driving. Always drive safely and use caution. LDWS
may not always alert the driver if the vehicle is driven outside of its lane. Refer to the Owner’s Manual for more information.
Fuel Door Release Button
Press the Fuel Door Release button B to open the fuel door.
C
B
Power Trun k Main Control Lever
The Power Trunk Main Control lever is located to the left of the
steering wheel, below the main button panel.
C
.
*IF EQUIPPED
(Buttons located under dri ver’s
panel, left of the steering wheel)
10
To open, pull the Power Trunk Main Control lever
To close, press and hold the Power Tr unk Main Control lever
For more on how to operate the Power Tru nk, see the Power Tru nk Operation section,
or refer to the Owner's Manual.
C
.
DRIVER’S PAN EL
A
(Button located on door panel)
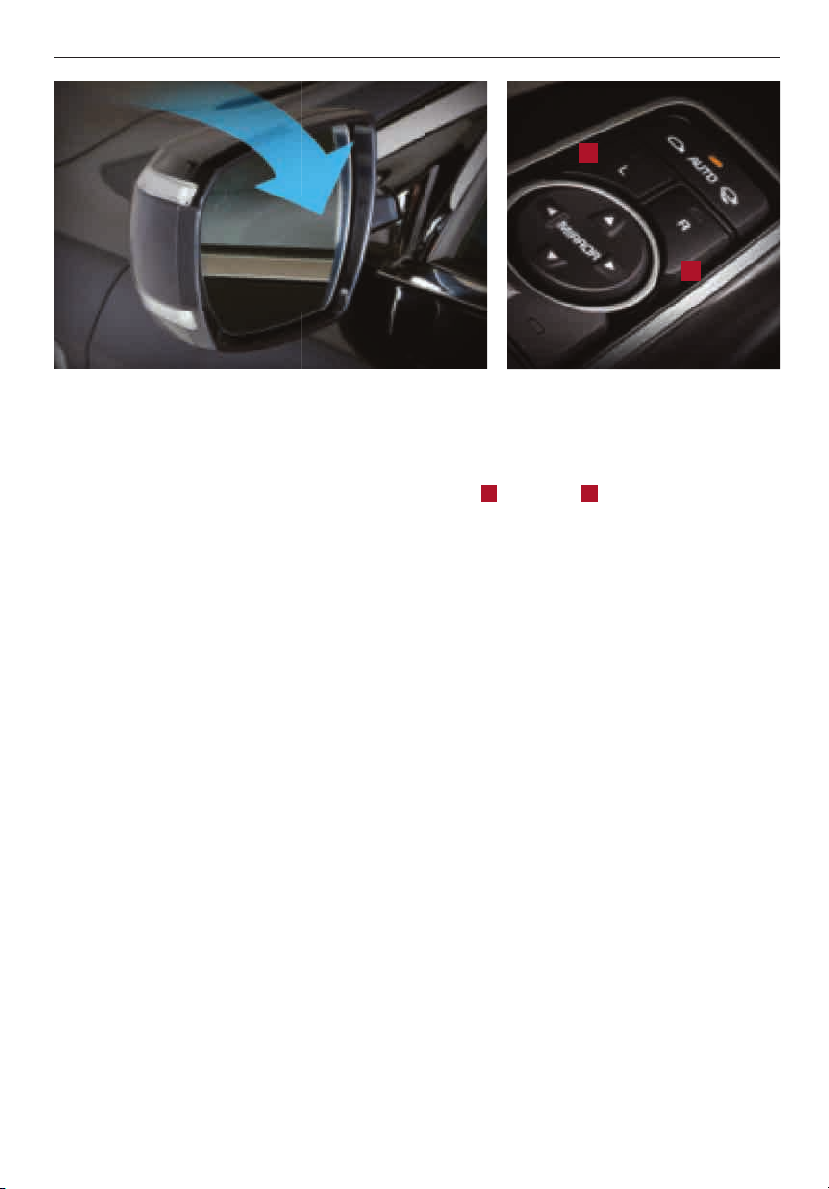
Reverse Parking Aid Function
When the gear shift lever is moved into R (Reverse) and the vehicle is moving backwards, the
outside rearview mirrors will rotate downward to aid in reverse parking.
To turn the Reverse Parking Aid Function ON, press the L (Left)
rearview mirror button (LED lit).
To turn OF F, press but ton(s) again.
The outside rearview mirrors will automatically return to their original positions when:
§ The ENGINE START/STOP button is in the OFF position
§ The gear shift lever is moved out of R (Reverse)
§ The outside rearview mirror switch is in the middle position
A
or R (Right) B outside
B
REMINDER: When the buttons are not pressed, the Reverse Parking Aid Function will not operate and the outside
rearview mirror s will not rotate downward.
*IF EQUIPPED ALWAY S CHECK THE OWNER’S MANUAL FOR COMPLETE OPERATING INFORMATION AND SAFETY WARNINGS.
11
DRIVER’S PAN EL
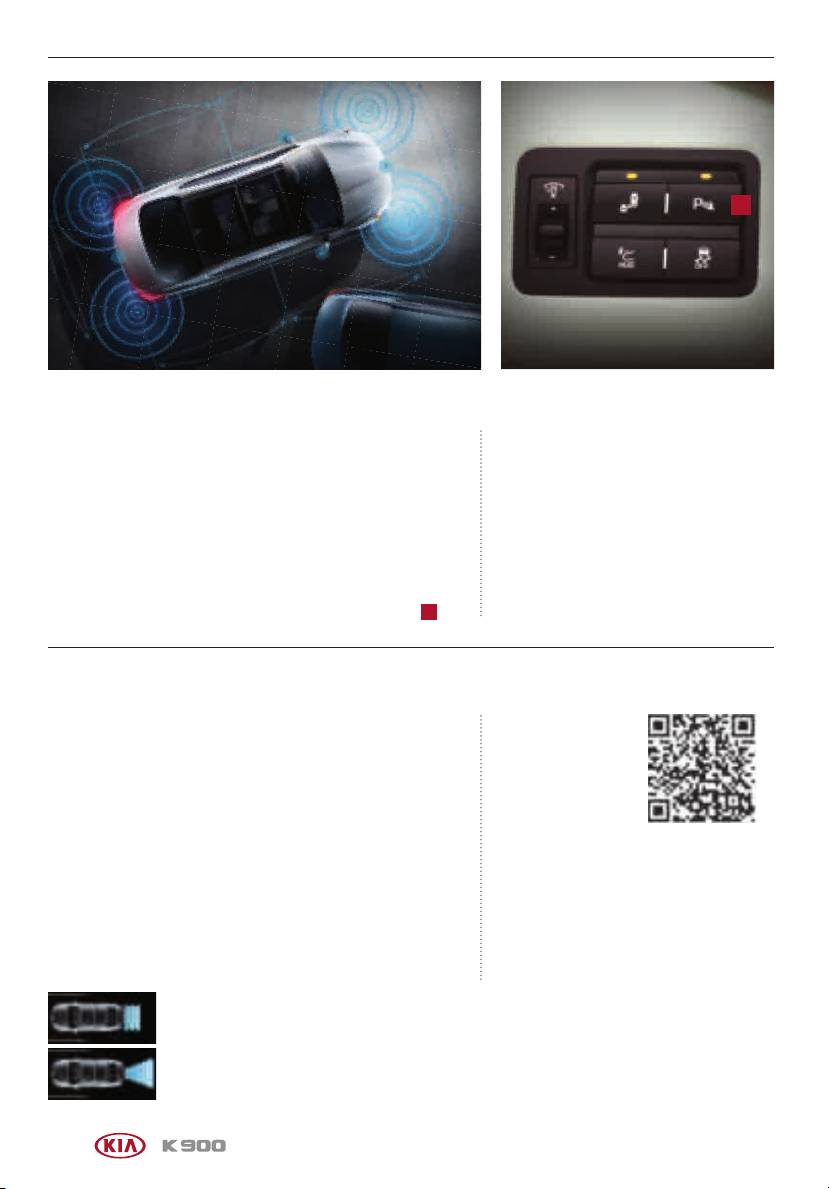
Parking Assist System
The Parking Assist System is a supplemental system that
assists the driver by chiming if an object is detected within the
sensing areas in the front or rear of the vehicle when parking or
backing up.
When the ENGINE START/STOP button is ON and the shift
lever is in R (Reverse), the system is activated and the
Parking Assist button indicator is illuminated.
To turn off the Parking Assist System, press the button
A
.
A
(Buttons located on dri ver’s panel,
left of the steering wheel)
REMINDERS:
- If the vehicle is moving at speeds over 6 mph, the
system may not activate
- When more than two objects are sensed at the
same time, the closest one will be recognized first
- The Parking Assist System is not a substitute for
proper and safe backing-up procedures. Always
drive safely and use caution when backing up.
The Parking Assist System may not detect every
object behind the vehicle
Parking Guide System (PGS) / Rear-Camera Display*
When parking (parallel parking or backing into or out of a
parking spot) the Parking Guide System (PGS)* displays the
vehicle’s projected trajectory on the navigation monitor. The
system also plays a series of audible tones as the vehicle
approaches an object, making parking ea sier.
The PGS will activate when the back-up light is ON with the
ENGINE START/STOP button ON and the shift lever in the
R (Reverse) position.
The rear-view angle of the camera can be changed by pressing
the following buttons on the navigation display:
§ Press TOP VIEW button to adjust the rear-view angle, as if looking down from above
§ Press the NORMAL VIEW button to adjust the rear-view angle, as a normal rear view perspective
PARK ING GUIDE
SYSTEM (PGS) VIDEO
To view a video on
your mobile device,
snap this QR Code or
visit the listed website.
Refer to page 2 for
more information.
REMINDERS:
- The system does NOT automatically park the vehicle
- This is a supplementary system. It is the
responsibility of the driver to always check the
area around the vehicle when parking the vehicle
12
www.KuTechVideos.com/kh13/2016
*IF EQUIPPED
DRIVER’S PAN EL
E
A
B C
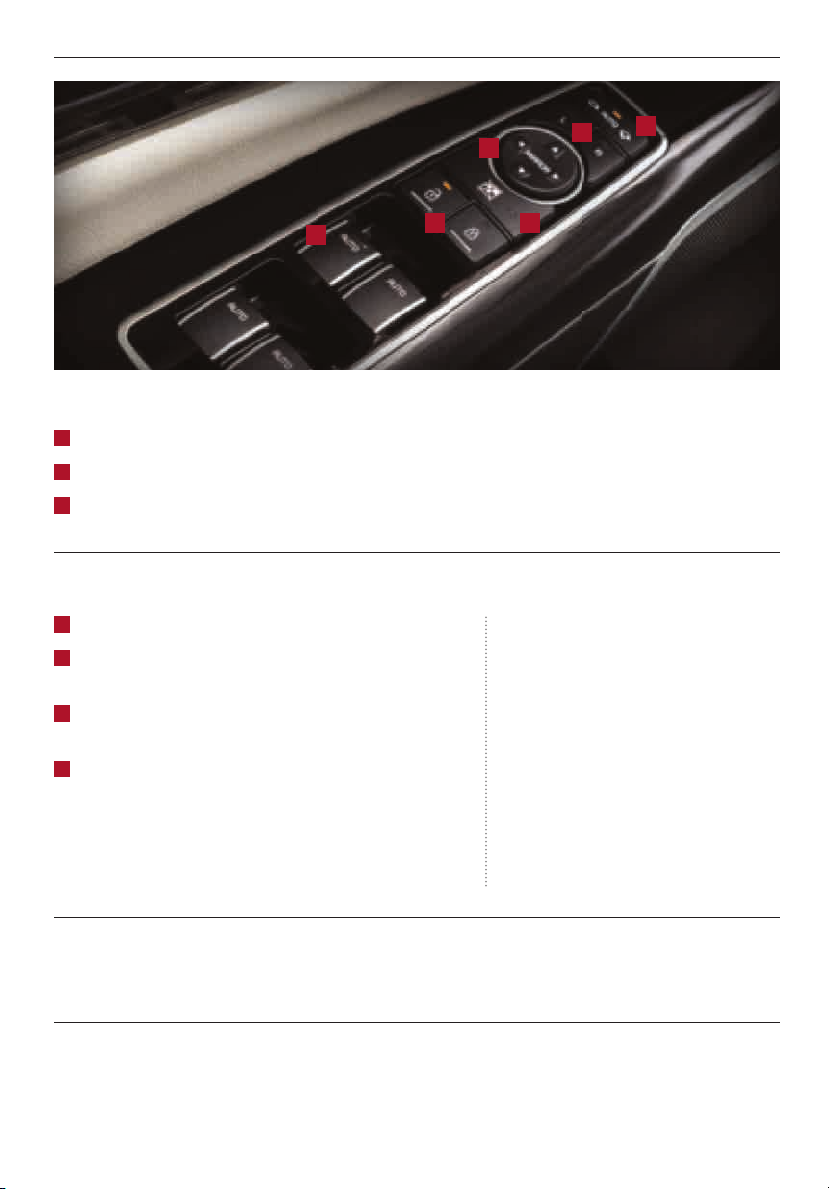
Power Windows, Window Lock & Central Door Lock
A
Pull/Press to operate driver’s window auto up/down
B
Press to unlock/lock all doors
C
Press to disable all passenger windows
Power Folding Outside Mirrors
D
Press the L or R buttons to select the mirror to adjust
E
Press button arrows left/right or up/down to adjust
mirror position
F
Toggle button left/right to unfold/fold the outside
rearview mirrors
F
Toggle button to center to automatically fold/unfold
mirrors when:
§ Smart Key lock/unlock buttons are pressed
§ Outside door handle button is pressed
§ Driver approaches the vehicle with the Smart Key
Quick Tip
The mirrors will automatically unfold when the
Smart Key* is within close proximity to the vehicle.
REMINDERS:
- To automatically fold mirrors when exiting
- To lock the mirror position, toggle button to the
D
vehicle, press the LOCK button twice on the
Smart Key
neutral (center) position
F
Heated Outside Mirrors
Mirror heaters will operate when the rear defroster is activated.
Auto Door Lock/Unlock
Auto Door Lock/Unlock will engage when gear shift is moved in to or out of the P (Park)
position. Refer to the User Settings on how to turn Auto Door Lock/Unlock ON/OFF.
*IF EQUIPPED ALWAY S CHECK THE OWNER’S MANUAL FOR COMPLETE OPERATING INFORMATION AND SAFETY WARNINGS.
13
DRIVER’S PAN EL
B
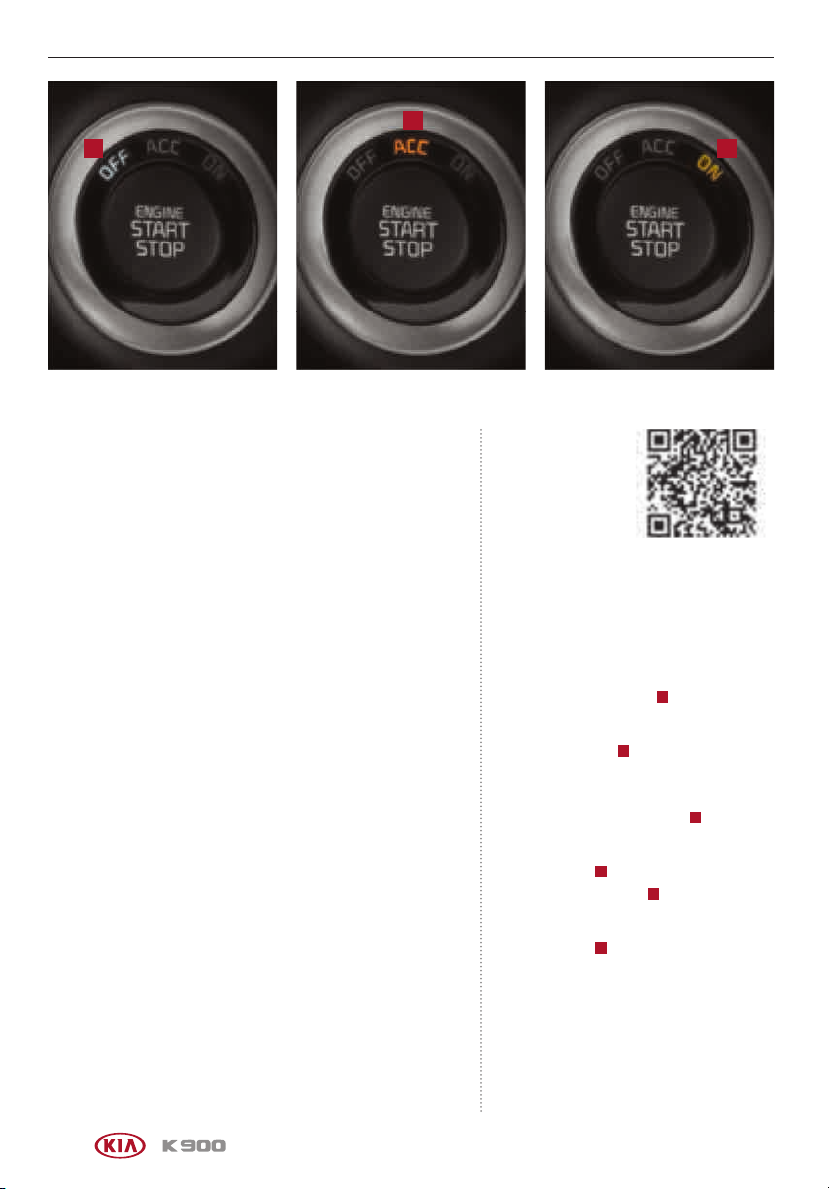
Engine Start/Stop Button
To start the engine:
1. Depress the brake pedal
2. Press the ENGINE START/STOP button while gear shift is
in P (Park)
To turn the engine OF F, press the ENGINE START/STOP
button while the gear shift is in P (Park).
To use the ENGINE START/STOP button, you must have the
Smart Key on your person or inside the vehicle.
REMINDERS:
- If Smart Key fob battery is dead, you can still start the engine by pressing
the ENGINE START/STOP button with the Lock-button end of the Smart
Key. The Smart Key must contact the ENGINE START/STOP button directly,
at a right angle
- In an emergency situation while the vehicle is in motion, you are able to turn
the engine off and to the ACC position by pressing the ENGINE STA RT/ STOP
button for more than 2 seconds or 3 times successively within 3 seconds
CA
ENGINE STAR T/STOP
BUTTON AND
SMART KEY VIDEO
To view a video on
your mobile device,
snap this QR Code or
visit the listed website.
Refer to page 2 for
more information.
Quick Tips
To use electrical accessories:
ACC position
- When in the OFF position A and without
depressing the brake pedal, press the ENGINE
START/STOP button once. The ACC indicator will
illuminate (amber) B.
To check warning lights:
ON position
- When already in the ACC position
depressing the brake pedal, press the ENGINE
START/STOP button again. The ON indicator will
illuminate (red)
- When in the OFF position
depressing the brake pedal, press the ENGINE
START/STOP button twice. The ON indicator will
illuminate (red)
Keeping the vehicle in ACC or ON position too long
can discharge the vehicle’s battery.
www.KuTechVideos.com/kh13/2016
C
.
A
and without
C
.
B
and without
14
*IF EQUIPPED
STEERING WHEEL CONTROLS
(Switch located on left side of steering wheel)
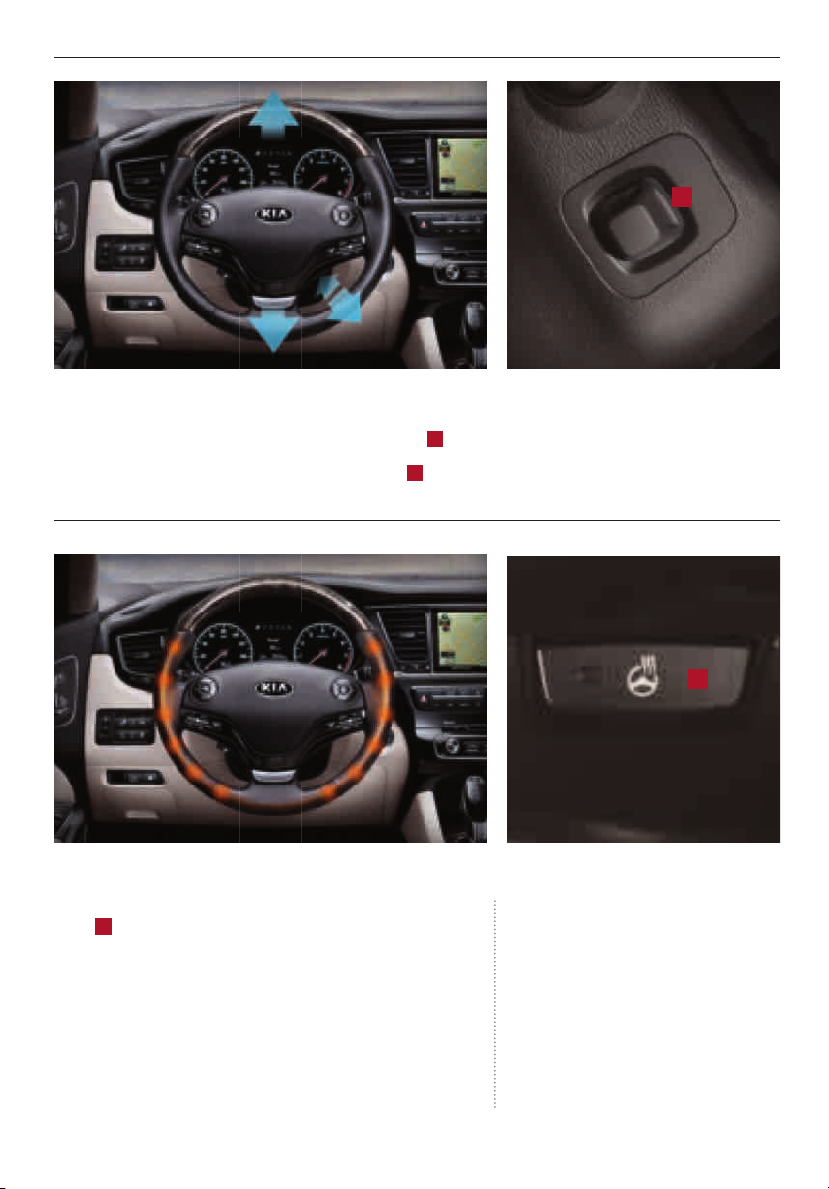
Power Tilt/Telescoping Steering Wheel
To adjust the steering wheel distance, move the switch A forward or backward.
To adjust the steering wheel angle, move the switch
A
up or down.
A
Heated Steering Wheel*
While the ENGINE START/STOP button is in the ON position,
B
press
to turn steering wheel heater ON. The button
indicator will illuminate.
The steering wheel heater will turn off automatically in 30
minutes, or when button is pressed again to deactivate.
B
(Button located on left side of steering wheel)
Quick Tips
- If ignition is turned OFF then ON again within 30
minutes of the steering wheel heater being turned
ON, the system will remain in the ON position
- System does NOT turn off when ignition is
cycled. To turn system off, press the heated
steering wheel button
*IF EQUIPPED ALWAY S CHECK THE OWNER’S MANUAL FOR COMPLETE OPERATING INFORMATION AND SAFETY WARNINGS.
15
STEERING WHEEL CONTROLS
A
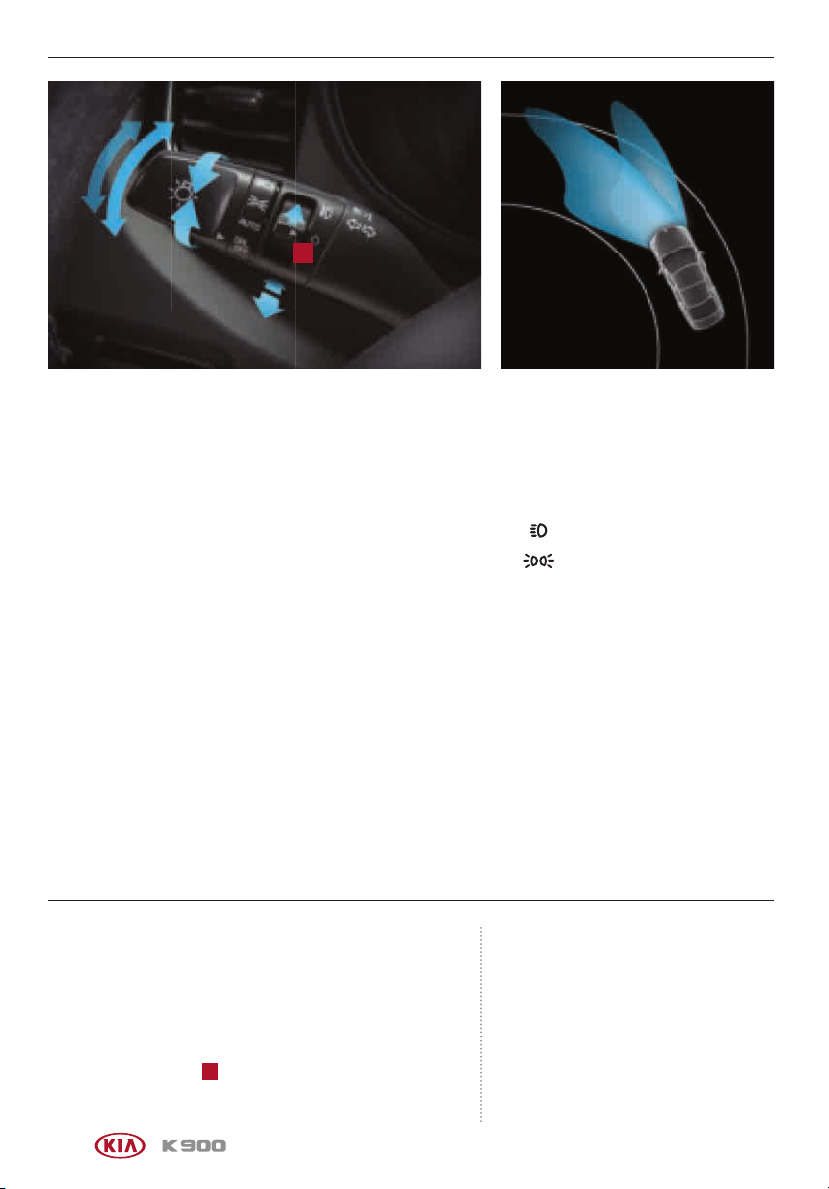
Headlights & High Beams
AUTO Light* – When the light switch is in the AUTO
Light position, the tail lights and headlights will turn
ON/OFF automatically depending on the amount of light
outside the vehicle.
AFLS (Adaptive Front Lighting System) – AFLS helps improve
visibility during nighttime driving by aiming the low-beam
headlights in the direction the vehicle is moving. AFLS controls
the aiming direction based on steering angle and speed.
When the light switch is in the AUTO light position, AFLS
will activate.
REMINDER: When the AFLS indicator illuminates on the instrument cluster, the
AFLS is not working properly. See authorized Kia dealer for service.
Daytime Running Lights (DRL) – DRL makes it easier for
others to see the front of your vehicle during the day. The lights
will be on automatically unless one of the following occurs:
§ Headlights are on
§ Parking brake is applied
§ Fog lights are on
§ Switch is in the DRL
OFF position
§ Engine is turned off
Headlight / High Beam Lever Operation
§ Rotate lever switch to change the
headlight function:
Headlight position
Parking light position
Auto Light* / AFLS position
AUTO*
DRL/OF F
OFF or DRL OFF position
§ Press lever away from you to turn
high beam headlights ON
§ Pull lever to flash headlights/
high beams
Turn Signals & Fog Lights
To operate:
§ Move lever up/down for right/left turn signal
§ Slightly move lever up/down to activate one-touch lane
change signal
§ Press toggle switch
A
up to turn fog lights ON/OFF
16
REMINDERS:
- Headlights must be ON for fog light operation
- One-touch lane change signal is activated by
moving the turn signal lever slightly for less than 1
second and then releasing. The lane change signal
will blink 3 times
- To change how many times the lane change signal
blinks (3/5/7), go to User Settings in the LCD
instrument cluster modes
For more information on the User Settings Mode,
please refer to your Owner’s Manual.
*IF EQUIPPED
STEERING WHEEL CONTROLS
A
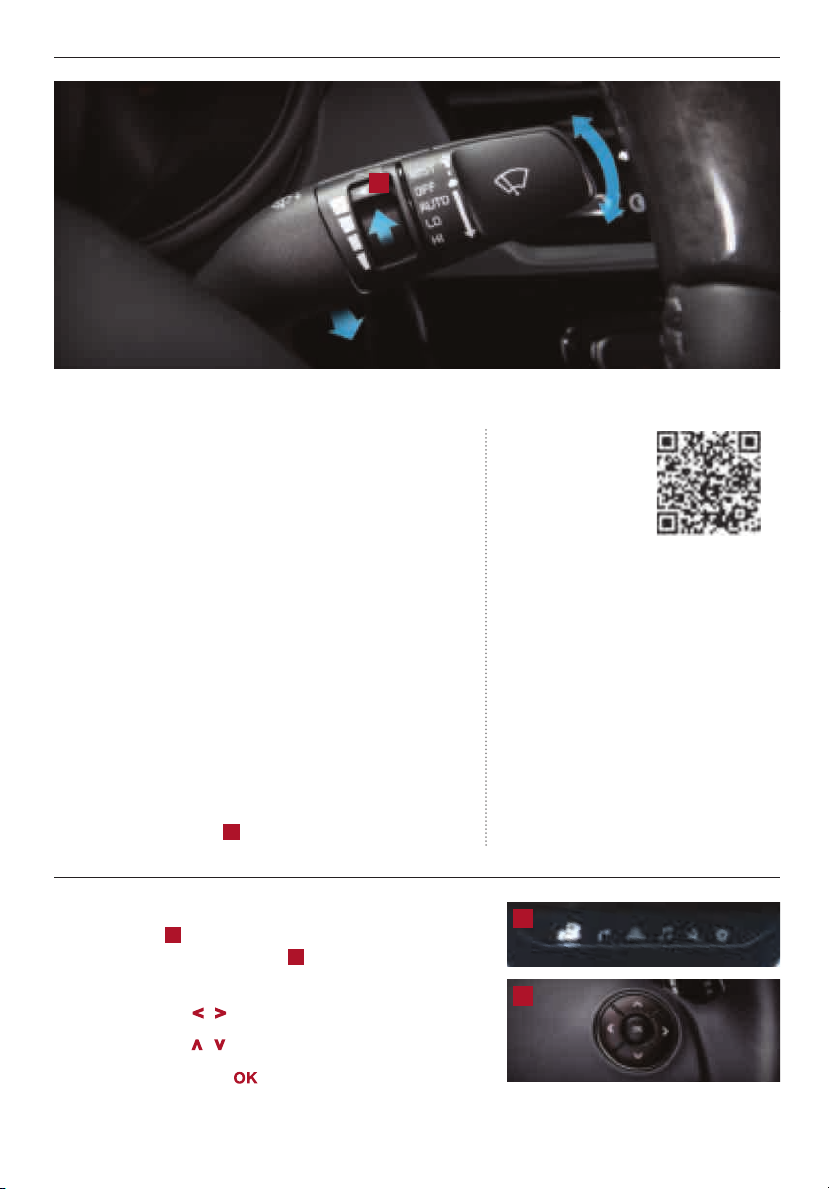
Windshield Wipers & Washers
To operate:
§ Move lever up/down to change wiper modes
MI ST: Single wipe
OFF: Wiper off
AUTO: Auto Rain Sensing
§ Pull to spray and wipe
Auto Rain Sensing
The rain sensor located on the upper end of the windshield
glass senses the amount of rainfall and controls the wiping
cycle for the proper interval. The more it rains, the faster the
wiper operates. When the rain stops, the wiper stops.
To turn ON the auto rain-sensing wipers, move lever up/down
to AUTO.
To adjust the auto rain-sensing wiper speed setting, move
the speed control switch
A
up/down.
LO: Slow wipe
HI: Fast wipe
AUTO RAIN-SENSING
WINDSHIELD WIPERS
VIDEO
To view a video on your
mobile device, snap this
QR Code or visit the listed
website. Refer to page 2
for more information.
Quick Tips
- When the ENGINE START/STOP button is in the
ON position and the wiper switch is in AUTO
mode, the wiper will automatically operate once
to perform a self-check of the system
- Set the wiper to the OFF position when the wiper
is not in use
- If going through a car wash, remind the
attendant to keep the vehicle in Neutral (N)
and keep the engine running. Also, disable the
Power Trunk lid control using the button inside
the glove compartment, turn off the auto rainsensing wipers and fold in the mirrors
www.KuTechVideos.com/kh13/2016
LCD Controls and Modes
The LCD modes B on the instrument cluster can be
changed using the control buttons
the steering wheel.
Press Mode buttons
Press Move buttons
/ to change LCD mode.
/ to select item.
Press Select/Reset button
For more detailed information, see the LCD Instrument Cluster Modes section on page 6.
C
on the right side of
in center to set/reset the item.
B
C
*IF EQUIPPED ALWAY S CHECK THE OWNER’S MANUAL FOR COMPLETE OPERATING INFORMATION AND SAFETY WARNINGS.
17
 Loading...