

Page 1

KDC-BT48DAB
CD-RECEIVER
INSTRUCTION MANUAL
AMPLI-TUNER LECTEUR DE CD
MODE D’EMPLOI
CD-RECEIVER
BEDIENUNGSANLEITUNG
CD RECEIVER
GEBRUIKSAANWIJZING
SINTOLETTORE STEREO COMPACT DISC
ISTRUZIONI PER L’USO
REPRODUCTOR DE DISCOS COMPACTOS RECEPTOR DE FM/AM
MANUAL DE INSTRUCCIONES
GET0975-001A (EW/E0)© 2013 JVC KENWOOD Corporation
Page 2

Information on Disposal of Old Electrical and Electronic Equipment and Batteries
(applicable for EU countries that have adopted separate waste collection systems)
Products and batteries with the symbol (crossed-out wheeled bin) cannot be disposed as
household waste.
Old electrical and electronic equipment and batteries should be recycled at a facility capable of
handling these items and their waste byproducts.
Contact your local authority for details in locating a recycle facility nearest to you. Proper
recycling and waste disposal will help conserve resources whilst preventing detrimental effects
on our health and the environment.
Notice: The sign “Pb” below the symbol for batteries indicates that this battery contains lead.
Information sur l’élimination des anciens équipements électriques et électroniques
et piles électriques (applicable dans les pays de l’Union Européenne qui ont adopté
des systèmes de collecte sélective)
Les produits et piles électriques sur lesquels le pictogramme (poubelle barrée) est apposé ne
peuvent pas être éliminés comme ordures ménagères.
Les anciens équipements électriques et électroniques et piles électriques doivent être recyclés
sur des sites capables de traiter ces produits et leurs déchets.
Contactez vos autorités locales pour connaître le site de recyclage le plus proche. Un recyclage
adapté et l’élimination des déchets aideront à conserver les ressources et à nous préserver des
leurs effets nocifs sur notre santé et sur l’environnement.
Remarque: Le symbole “Pb“ ci-dessous sur des piles électrique indique que cette pile contient
du plomb.
Entsorgung von gebrauchten elektrischen und elektronischen Geräten und Batterien
(anzuwenden in den Ländern der Europäischen Union und anderen europäischen
Ländern mit einem separaten Sammelsystem für solche Geräte)
Das Symbol (durchgestrichene Mülltonne) auf dem Produkt oder seiner Verpackung weist darauf
hin, dass dieses Produkt nicht als normaler Haushaltsabfall behandelt werden darf, sondern an
einer Annahmestelle für das Recycling von elektrischen und elektronischen Geräten und batterien
abgegeben werden muss.
Durch Ihren Beitrag zur korrekten Entsorgung dieses Produktes schützen Sie die Umwelt und
die Gesundheit Ihrer Mitmenschen.
Unsachgemässe oder falsche Entsorgung gefährden Umwelt und Gesundheit. Weitere
Informationen über das Recycling dieses Produktes erhalten Sie von Ihrer Gemeinde oder den
kommunalen Entsorgungsbetrieben.
Achtung: Das Zeichen „Pb“ unter dem Symbol fur Batterien zeigt an, dass diese Batterie Blei
enthalt.
Informatie over het weggooien van elektrische en elektronische apparatuur en
batterijen (particulieren)
Dit symbool geeft aan dat gebruikte elektrische, elektronische producten en batterijen niet bij
het normale huishoudelijke afval mogen.
Lever deze producten in bij de aangewezen inzamelingspunten, waar ze gratis worden
geaccepteerd en op de juiste manier worden verwerkt, teruggewonnen en hergebruikt.
Voor inleveradressen zie www.nvmp.nl, www.ictmilieu.nl, www.stibat.nl. Wanneer u dit
product op de juiste manier als afval inlevert, spaart u waardevolle hulpbronnen en voorkomt
u potentiële negatieve gevolgen voor de volksgezondheid en het milieu, die anders kunnen
ontstaan door een onjuiste verwerking van afval.
Opgelet: Het teken “Pb” onder het teken van de batterijen geeft aan dat deze batterij lood
bevat.
i
Page 3

Informazioni sullo smaltimento delle vecchie apparecchiature elettriche ed
elettroniche e delle batterie (valide per i Paesi Europei che hanno adottato sistemi di
raccolta differenziata)
I prodotti e le batterie recanti il simbolo di un cassonetto della spazzatura su ruote barrato non
possono essere smaltiti insieme ai normali rifiuti di casa.
I vecchi prodotti elettrici ed elettronici e le batterie devono essere riciclati presso un'apposita
struttura in grado di trattare questi prodotti e di smaltirne i loro componenti.
Per conoscere dove e come recapitare tali prodotti nel luogo a voi più vicino, contattare
l'apposito ufficio comunale. Un appropriato riciclo e smaltimento aiuta a conservare la natura e
a prevenire effetti nocivi alla salute e all'ambiente.
Nota: Il simbolo “Pb” sotto al simbolo delle batterie indica che questa batteria contiene
piombo.
Información acerca de la eliminación de equipos eléctricos, electrónicos y baterías al
final de la vida útil (aplicable a los países de la Unión Europea que hayan adoptado
sistemas independientes de recogida de residuos)
Los productos y las baterías con el símbolo de un contenedor con ruedas tachado no podrán ser
desechados como residuos domésticos.
Los equipos eléctricos, electrónicos y baterías al final de la vida útil, deberán ser reciclados en
instalaciones que puedan dar el tratamiento adecuado a estos productos y a sus subproductos
residuales correspondientes.
Póngase en contacto con su administración local para obtener información sobre el punto de
recogida más cercano. Un tratamiento correcto del reciclaje y la eliminación de residuos ayuda
a conservar los recursos y evita al mismo tiempo efectos perjudiciales en la salud y el medio
ambiente.
Nota: El símbolo “Pb” debajo del (contenedor con ruedas tachado) en baterías indica que
dicha batería contiene plomo.
For Israel
For Turkey
Bu ürün 28300 sayılı Resmi Gazete’de yayımlanan Atik Elektrikli ve Elektronik Eşyalarin
Kontrolü Yönetmeliğe uygun olarak üretilmiştir.
Eski Elektrik ve Elektronik Ekipmanların İmha Edilmesi Hakkında Bilgi (ayrı atık
toplama sistemlerini kullanan ülkeleri için uygulanabilir)
Sembollü (üzerinde çarpı işareti olan çöp kutusu) ürünler ev atıkları olarak
atılamaz.
Eski elektrik ve elektronik ekipmanlar, bu ürünleri ve ürün atıklarını geri
dönüştürebilecek bir tesiste değerlendirilmelidir. Yaşadığınız bölgeye
en yakın geri dönüşüm tesisinin yerini öğrenmek için yerel makamlara
müracaat edin. Uygun geri dönüşüm ve atık imha yöntemi sağlığımız ve
çevremiz üzerindeki zararlı etkileri önlerken kaynakların korunmasına da
yardımcı olacaktır.
ii
Page 4
The marking of products using lasers
The label is attached to the chassis/case and says that the component uses
laser beams that have been classified as Class1. It means that the unit
is utilizing laser beams that are of a weaker class. There is no danger of
hazardous radiation outside the unit.
Marquage des produits utilisant un laser
L’étiquette est attachée au châssis/boîtier de l’appareil et indique que
l’appareil utilise des rayons laser de classe 1. Cela signifie que l’appareil
utilise des rayons laser d’une classe faible. Il n’y a pas de danger de radiation
accidentelle hors de l’appareil.
Kennzeichnung von Geräten mit Laser-Abtastern
Das Etikett ist am Chassis/Gehäuse angebracht und besagt, dass sich die
Komponente Laserstrahlen bedient, die als Laserstrahlen der Klasse 1
klassifiziert wurden. Dies weist darauf hin, dass sich das Gerät Laserstrahlen
bedient, die einer schwächeren Klasse angehören. Das bedeutet, dass durch
den sehr schwachen Laserstrahl keine Gefahr durch gefährliche Strahlungen
außerhalb des Geräts besteht.
Markering op produkten die laserstralen gebruiken
Dit label is aangebracht op de behuizing/houder en toont dat de component
een laserstraal gebruikt die als Klasse 1 is geclassificeerd. Dit betekent dat de
laserstraal relatief zwak is en er geen gevaar van straling buiten het toestel is.
Etichetta per i prodotti che impiegano raggi laser
L’etichetta si trova sul rivestimento o sulla scatola e serve ad avvertire che il
componente impiega raggi laser che sono stati classificati come classe 1. Ciò
significa che l’apparecchio utilizza raggi laser di una classe inferiore. Non c’è
alcun pericolo di radiazioni pericolose all’esterno dell’apparecchio.
La marca para los productos que utilizan láser
Esta etiqueta está colocada en el chasis e indica que el componente funciona
con rayos láser de clase1. Esto significa que el aparato utiliza rayos láser
considerados como de clase débil. No existe el peligro de que este aparato
emita al exterior una radiación peligrosa.
iii
Declaration of Conformity with regard to the R&TTE
Directive 1999/5/EC
Declaration of Conformity with regard to the EMC
Directive 2004/108/EC
Declaration of Conformity with regard to the RoHS
Directive 2011/65/EU
Manufacturer:
JVC KENWOOD Corporation
3-12, Moriya-cho, Kanagawa-ku, Yokohama-shi, Kanagawa,
221-0022, Japan
EU Representative:
JVCKENWOOD NEDERLAND B.V.
Amsterdamseweg 37, 1422 AC UITHOORN, The Netherlands
Déclaration de conformité vis à vis de la Directive
1999/5/CE de R&TTE
Déclaration de conformité se rapportant à la directive
EMC 2004/108/EC
Déclaration de conformité se rapportant à la directive
RoHS 2011/65/EU
Fabricant:
JVC KENWOOD Corporation
3-12, Moriya-cho, Kanagawa-ku, Yokohama-shi, Kanagawa,
221-0022, Japan
Représentants dans l’UE:
JVCKENWOOD NEDERLAND B.V.
Amsterdamseweg 37, 1422 AC UITHOORN, The Netherlands
Konformitätserklärung in Bezug auf die R&TTE-Vorschrift
1999/5/EC
Konformitätserklärung in Bezug auf die EMC-Vorschrift
2004/108/EC
Konformitätserklärung in Bezug auf die RoHS-Vorschrift
2011/65/EU
Hersteller:
JVC KENWOOD Corporation
3-12, Moriya-cho, Kanagawa-ku, Yokohama-shi, Kanagawa,
221-0022, Japan
EU-Vertreter:
Kenwood Electronics Europe BV
Amsterdamseweg 37, 1422 AC UITHOORN, Niederlande
Conformiteitsverklaring met betrekking tot de R&TTErichtlijn van de Europese Unie (1999/5/EC)
Conformiteitsverklaring met betrekking tot de EMC-richtlijn
van de Europese Unie (2004/108/EC)
Conformiteitsverklaring met betrekking tot de RoHS richtlijn
van de Europese Unie (2011/65/EU)
Fabrikant:
JVC KENWOOD Corporation
3-12, Moriya-cho, Kanagawa-ku, Yokohama-shi, Kanagawa,
221-0022, Japan
EU-vertegenwoordiger:
JVCKENWOOD NEDERLAND B.V.
Amsterdamseweg 37, 1422 AC UITHOORN, Nederland
Dichiarazione di conformità alla Direttiva R & TTE
1999/5/CE
Dichiarazione di conformità relativa alla direttiva EMC
2004/108/CE
Dichiarazione di conformità relativa alla direttiva RoHS
2011/65/EU
Produttore:
JVC KENWOOD Corporation
3-12, Moriya-cho, Kanagawa-ku, Yokohama-shi, Kanagawa,
221-0022, Japan
Rappresentante UE:
JVCKENWOOD NEDERLAND B.V.
Amsterdamseweg 37, 1422 AC UITHOORN, The Netherlands
Declaración de conformidad con respecto a la Directiva
R&TTE 1999/5/CE
Declaración de conformidad con respecto a la Directiva
EMC 2004/108/CE
Declaración de conformidad con respecto a la Directiva
RoHS 2011/65/EU
Fabricante:
JVC KENWOOD Corporation
3-12, Moriya-cho, Kanagawa-ku, Yokohama-shi, Kanagawa,
221-0022, Japan
Representante en la UE:
JVCKENWOOD NEDERLAND B.V.
Amsterdamseweg 37, 1422 AC UITHOORN, Países Bajos
Page 5

English
Hereby, JVC KENWOOD declares that this unit
KDC-BT48DAB is in compliance with the essential
requirements and other relevant provisions of
Directive 1999/5/EC.
Français
Par la présente JVC KENWOOD déclare que l’appareil
KDC-BT48DAB est conforme aux exigences
essentielles et aux autres dispositions pertinentes
de la directive 1999/5/CE.
Par la présente, JVC KENWOOD déclare que
ce KDC-BT48DAB est conforme aux exigences
essentielles et aux autres dispositions de la directive
1999/5/CE qui lui sont applicables.
Deutsch
Hiermit erklärt JVC KENWOOD, dass sich dieser
KDC-BT48DAB in Übereinstimmung mit den
grundlegenden Anforderungen und den anderen
relevanten Vorschriften der Richtlinie 1999/5/EG
befindet. (BMWi)
Hiermit erklärt JVC KENWOOD die Übereinstimmung
des Gerätes KDC-BT48DAB mit den grundlegenden
Anforderungen und den anderen relevanten
Festlegungen der Richitlinie 1999/5/EG. (Wien)
Nederlands
Hierbij verklaart JVC KENWOOD dat het toestel
KDC-BT48DAB in overeenstemming is met de
essentiële eisen en de andere relevante bepalingen
van richtlijn 1999/5/EG.
Bij deze verklaat JVC KENWOOD dat deze
KDC-BT48DAB voldoet aan de essentiële eisen en
aan de overige relevante bepalingen van Richtlijn
1999/5/EC.
Italiano
Con la presente JVC KENWOOD dichiara che questo
KDC-BT48DAB è conforme ai requisiti essenziali
ed alle altre disposizioni pertinenti stabilite dalla
direttiva 1999/5/CE.
Español
Por medio de la presente JVC KENWOOD declara
que el KDC-BT48DAB cumple con los requisitos
esenciales y cualesquiera otras disposiciones
aplicables o exigibles de la Directiva 1999/5/CE.
Português
JVC KENWOOD declara que este KDC-BT48DAB está
conforme com os requisitos essenciais e outras
disposições da Directiva 1999/5/CE.
Polska
JVC KENWOOD niniejszym oświadcza, że
KDC-BT48DAB spełnia zasadnicze wymogi oraz inne
istotne postanowienia dyrektywy 1999/5/EC.
Český
JVC KENWOOD tímto prohlašuje, že tento
KDC-BT48DAB je ve shode se základními požadavky
a dalšími príslušnými ustanoveními smernice
1999/5/ES.
Magyar
Alulírott, JVC KENWOOD, kijelenti, hogy a jelen
KDC-BT48DAB megfelel az 1999/5/EC irányelvben
meghatározott alapvető követelményeknek és
egyéb vonatkozó előírásoknak.
Svenska
Härmed intygar JVC KENWOOD att denna
KDC-BT48DAB stär l överensstämelse med de
väsentliga egenskapskrav och övriga relevanta
bestämmelser som framgår av direktiv 1999/5/EG.
Suomi
JVC KENWOOD vakuuttaa täten että KDC-BT48DAB
tyyppinen laite on direktiivin 1999/5/EY oleellisten
vaatimusten ja sitä koskevien direktiivin muiden
ehtojen mukainen.
Slovensko
S tem JVC KENWOOD izjavlja, da je ta KDC-BT48DAB
v skladu z osnovnimi zahtevami in ostalimi
ustreznimi predpisi Direktive 1999/5/EC.
Slovensky
Spoločnosť JVC KENWOOD týmto vyhlasuje, že
KDC-BT48DAB spĺňa zákldné požiadavky a ďalšie
prislušné ustanovenia Direktĺvy 1999/5/EC.
Dansk
Undertegnede JVC KENWOOD erklærer harved,
at følgende udstyr KDC-BT48DAB overholder de
væsentlige krav og øvrige relevante krav i direktiv
1999/5/EF.
Ελληνικά
ΜΕ ΤΗΝ ΠΑΡΟΥΣΑ JVC KENWOOD ΔΗΛΩΝΕΙ ΟΤΙ
KDC-BT48DAB ΣΥΜΜΟΡΦΩΝΕΤΑΙ ΠΡΟΣ ΤΙΣ
ΟΥΣΙΩΔΕΙΣ ΑΠΑΙΤΗΣΕΙΣ ΚΑΙ ΤΙΣ ΛΟΙΠΕΣ ΣΧΕΤΙΚΕΣ
ΔΙΑΤΑΞΕΙΣ ΤΗΣ ΟΔΗΓΙΑΣ 1999/5/EK.
Eesti
Sellega kinnitab JVC KENWOOD, et see
KDC-BT48DAB vastab direktiivi 1999/5/EC
põhilistele nõudmistele ja muudele asjakohastele
määrustele.
Latviešu
Ar šo, JVC KENWOOD, apstiprina, ka KDC-BT48DAB
atbilst Direktīvas 1999/5/EK galvenajām prasībām
un citiem tās nosacījumiem.
Lietuviškai
Šiuo, JVC KENWOOD, pareiškia, kad šis
KDC-BT48DAB atitinka pagrindinius Direktyvos
1999/5/EB reikalavimus ir kitas svarbias nuostatas.
Malti
Hawnhekk, JVC KENWOOD, jiddikjara li dan
KDC-BT48DAB jikkonforma mal-ħtiġijiet essenzjali
u ma provvedimenti oħrajn relevanti li hemm
fid-Dirrettiva 1999/5/EC.
Українська
Компанія JVC KENWOOD заявляє, що цей виріб
KDC-BT48DAB відповідає ключовим вимогам
та іншим пов’язаним положенням Директиви
1999/5/EC.
Turkish
Bu vesileyle JVC KENWOOD, KDC-BT48DAB
ünitesinin, 1999/5/EC Direktifinin başlıca
gereksinimleri ve diğer ilgili hükümleri ile uyumlu
olduğunu beyan eder.
iv
Page 6

CONTENTS BEFORE USE
BEFORE USE 2
BASICS 3
GETTING STARTED 4
DIGITAL RADIO (DAB) 5
ANALOG RADIO 7
CD / USB / iPod 9
AUX 11
TM
RADIO 11
Aha
BLUETOOTH® 12
AUDIO SETTINGS 17
DISPLAY SETTINGS 18
MORE INFORMATION 18
TROUBLESHOOTING 19
SPECIFICATIONS 21
INSTALLATION /
CONNECTION 23
How to read this manual
• Operations are explained mainly
using buttons on the faceplate.
•
[XX]
indicates the selected items.
•
( XX)
indicates references are
available on the stated page.
Warning
Do not operate any function that takes your attention away from safe driving.
Caution
Volume setting:
• Adjust the volume so that you can hear sounds outside the car to prevent accidents.
• Lower the volume before playing digital sources to avoid damaging the speakers by the sudden increase of
the output level.
General:
• Avoid using the USB device or iPod/iPhone if it might hinder safe driving.
• Make sure all important data has been backed up. We shall bear no responsibility for any loss of recorded
data.
• Never put or leave any metallic objects (such as coins or metal tools) inside the unit, to prevent a short
circuit.
• If a disc error occurs due to condensation on the laser lens, eject the disc and wait for the moisture to
evaporate.
Remote control (RC-406):
• Do not leave the remote control in hot places such as on the dashboard.
• The Lithium battery is in danger of explosion if replaced incorrectly. Replace it only with the same or
equivalent type.
• The battery pack or batteries shall not be exposed to excessive heat such as sunshine, fire or the like.
• Keep the battery out of reach of children and in its original packaging when not in used. Dispose of used
batteries promptly. If swallowed, contact a physician immediately.
Maintenance
Cleaning the unit: Wipe off dirt on the faceplate with a dry silicone or soft cloth.
Cleaning the connector: Detach the faceplate and clean the connector
gently with a cotton swab, being careful not to damage the connector.
Handling discs:
• Do not touch the recording surface of the disc.
• Do not stick tape etc. on the disc, or use a disc with tape stuck on it.
• Do not use any accessories for the disc.
• Clean from the center of the disc and move outward.
• Clean the disc with a dry silicone or soft cloth. Do not use any solvents.
• When removing discs from this unit, pull them out horizontally.
• Remove burrs from the center hole and disc edge before inserting a disc.
Connector (on the reverse
side of the faceplate)
2
Page 7
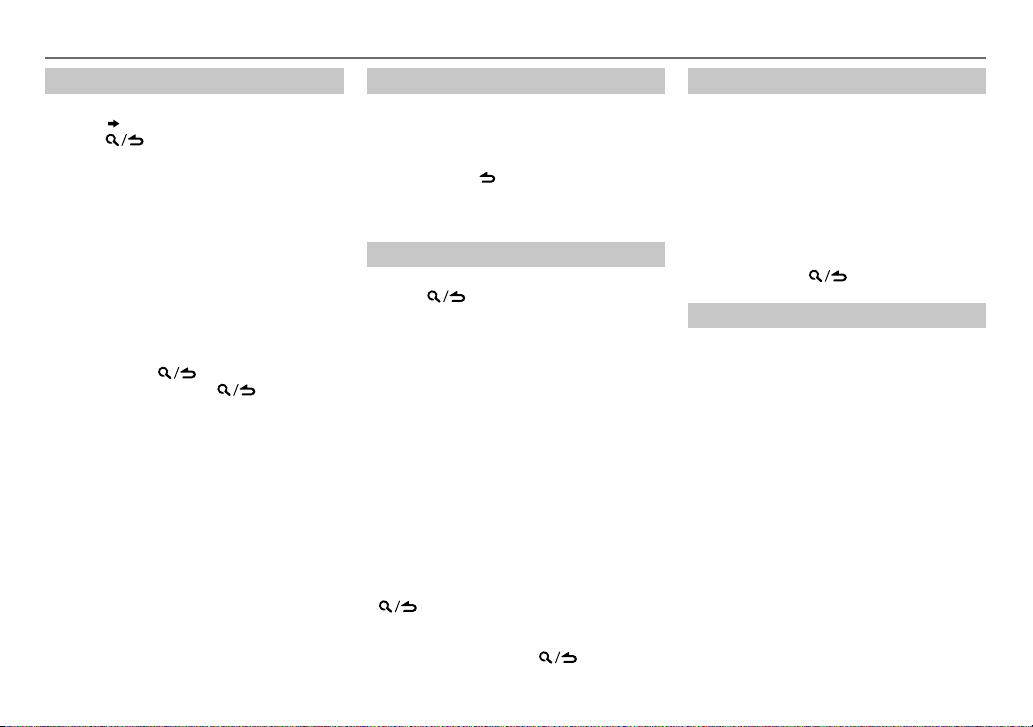
BASICS
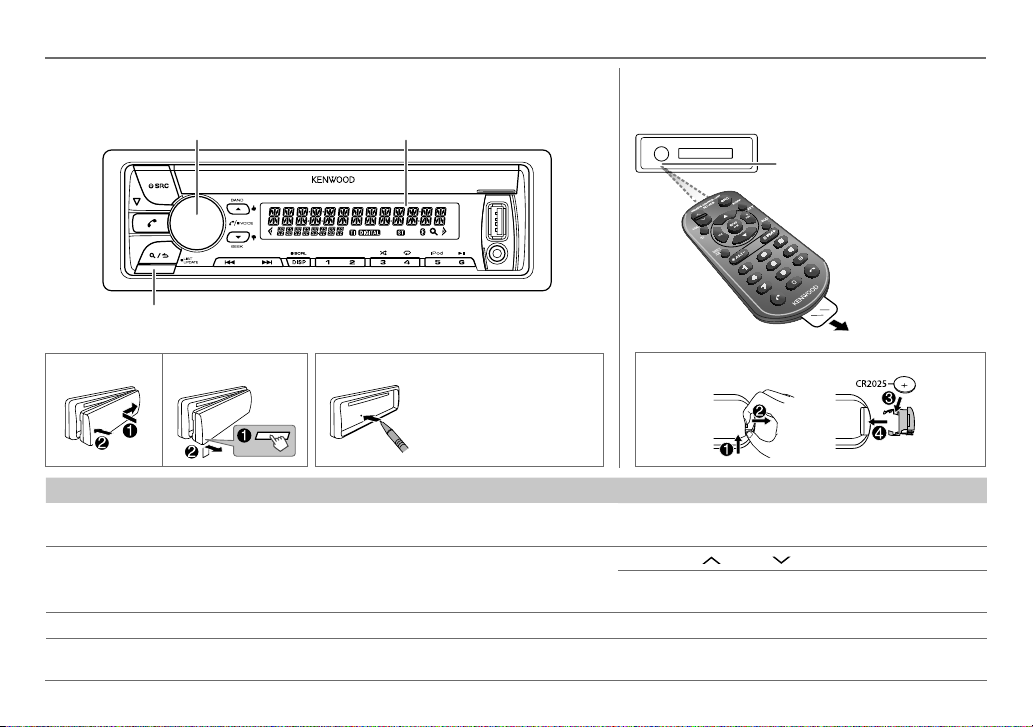
Faceplate
Detach button
Volume knob
(turn/press)
Remote control (RC-406) (not supplied)
(However, this unit can be remotely controlled with an
optionally purchased remote control.)
Display window
Remote sensor (Do not expose
to bright sunlight.)
Pull out the
insulation sheet
when using for the
first time.
How to resetAttach Detach
Your preset
adjustments will also
be erased.
How to replace the battery
To Do this (on the faceplate) Do this (on the remote control)
Turn on the power
Adjust the volume Turn the volume knob. Press VOL
Select a source
Change the display
information
Press B SRC.
• Press and hold to turn off the power.
Press B SRC repeatedly.
Press DISPSCRL repeatedly.
• Press and hold to scroll the current display information.
Press and hold SRC to turn off the power.
( Pressing SRC does not turn on the power. )
or VOL .
Press ATT during playback to attenuate the sound.
• Press again to cancel.
Press SRC repeatedly.
( not available )
ENGLISH |
3
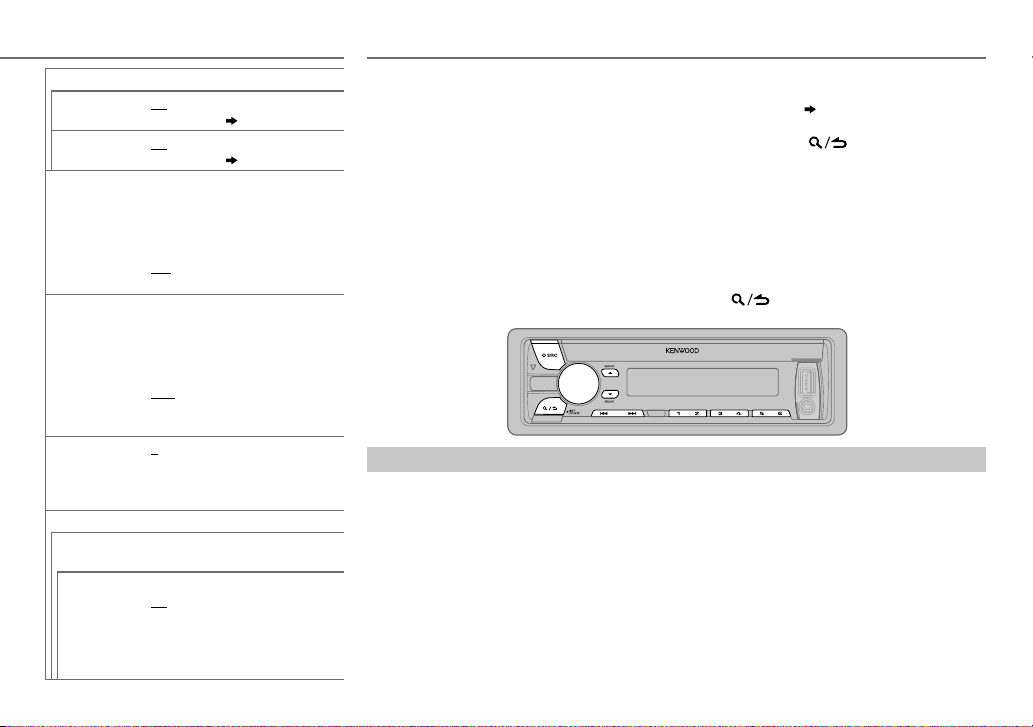
Page 8

GETTING STARTED
1
Cancel the demonstration
When you turn on the power (or after you reset the unit), the display
shows: “SELLANGUAGE”
1 Turn the volume knob to select
press the knob.
[ENG]
is selected for the initial setup.
Then, the display shows: “CANCELDEMO” “PRESS”
“VOLUMEKNOB”
2 Press the volume knob.
[YES]
is selected for the initial setup.
3 Press the volume knob again.
“DEMOOFF” appears.
2
Set the clock
Press the volume knob to enter
1
2 Turn the volume knob to select
3 Turn the volume knob to select
4 Turn the volume knob to make the settings, then press the knob.
Day Hour Minute
5 Turn the volume knob to select
6 Turn the volume knob to select
7 Press and hold to exit.
To return to the previous setting item or hierarchy, press .
“PRESS” “VOLUMEKNOB”
[ENG]
(English) or
[FUNCTION]
[CLOCK]
[CLOCK ADJUST]
[CLOCK FORMAT]
[12H]
.
, then press the knob.
, then press the knob.
, then press the knob.
or
[24H]
, then press the knob.
[RUS] (Russian)
, then
3
Set the initial settings
Press B SRC to enter STANDBY.
1
2 Press the volume knob to enter
[FUNCTION]
.
3 Turn the volume knob to make a selection (see the following table),
then press the knob.
4 Press and hold to exit.
To return to the previous setting item or hierarchy, press .
Default:
AUDIO CONTROL
SP SELECT
DISPLAY
EASY MENU
TUNER SETTING
DAB L-BAND
DAB ANT
POWER
PRESET TYPE
SYSTEM
KEY BEEP
OFF/ 5/4/ 6 × 9/6/ OEM
or 4inches, 6×9inches or 6inches) or OEM speakers for optimum
performance.
ON
:Both display and button illumination change to white color when
entering
[FUNCTION]
as
[COLOR SELECT]
ON
:Receives L-BAND ensemble during digital audio reception.;
OFF
:Cancels.
ON:Supplies power to the DAB antenna. Selects when using the supplied
antenna.;
OFF
antenna without booster.
NORMAL
: Memorizes one station for each preset button in each band
(FM1/ FM2/ FM3/ MW/ LW/ DB1/ DB2/ DB3). ;
for each preset button, regardless of the selected band.
ON
:Activates the keypress tone.;
: Selects according to the speaker size (5inches
.;
OFF
:Both display and button illumination remain
color.
( 18)
:Does not supply power. Selects when using passive
( 25)
MIX
: Memorizes one station
OFF
:Deactivates.
XX
4
Page 9
GETTING STARTED
SOURCE SELECT
ON
AHA SRC
BUILT-IN AUX
RUSSIAN SET
P-OFF WAIT
CD READ 1
F/W UPDATE
UPDATE SYSTEM / UPDATE BT/ UPDATE DAB1/
UPDATE DAB2
F/W UP xx.xx/
F/W UP xx.x.x/
F/W UP Vxxx
:Enables AHA in source selection.;
OFF
:Disables.
( 11)
ON
:Enables AUX in source selection.;
OFF
:Disables.
( 11)
Selects the display language
for
[FUNCTION]
information (folder name, file name,
song title, artist name, album name) if
applicable.
OFF
BКЛ
Applicable only when the
demonstration mode is turned off.
Sets the duration when the unit will
automatically turns off (while in
standby mode) to save the battery.
20M
60M
WAIT TIME – – –
:Automatically distinguishes between
audio file disc and music CD.;
to play as an music CD. No sound can be
heard if an audio file disc is played.
YES
NO
:Cancels (upgrading is not
activated).
For details on how to update the
firmware, see:
www.kenwood.com/cs/ce/
menu and Tag
:Display language is English.;
:Display language is Russian.
: 20minutes;
: 60minutes;
:Starts upgrading the firmware.;
40M
:Cancels
: 40minutes;
2
: Forces
DIGITAL RADIO (DAB)
About DAB (Digital Audio Broadcasting)
DAB is one of the digital radio broadcasting
systems available today. It can deliver
digital quality sound without any annoying
interference or signal distortion. Furthermore, it
can carry text, pictures and data.
In contrast to FM broadcast, where each
program is transmitted on its own frequency,
DAB combines several programs (called
“services”) to form one “ensemble.”
The “primary component” (main radio station)
is sometimes accompanied by a “secondary
component” which can contain extra programs
or other information.
Start listening
Press B SRC to select DAB.
1
2 Press J BAND repeatedly (or press #FM+ on RC-406) to select DB1/ DB2/ DB3.
3 Press and hold S / T (or press and hold S / T(+) on RC-406) to search for an
ensemble.
4 Press S / T (or press S / T(+) on RC-406) to select an ensemble, service or
component to listen.
• To change the tuning method for S / T: Press K SEEK repeatedly.
AUTO1: Press S / T: Select an ensemble, service or component.
Press and hold S / T: Automatically search for an ensemble.
AUTO2: Press S / T: Search for a preset service.
MANUAL: Press S / T: Select an ensemble, service or component.
Press and hold S / T: Manually search for an ensemble.
Preparation:
1 Connect a DAB antenna to the DAB
antenna jack.
( 25)
2 Press B SRC to select DAB.
3 Press and hold to start the Service
List update.
“LIST UPDATE” appears and update
starts. “UPDATED” appears when update
completes.
Updates take up to 3 minutes. No
interruption (such as traffic information) is
possible during updates.
• To cancel the Service List update: Press and
hold
again.
ENGLISH |
5
Page 10
DIGITAL RADIO (DAB)
• To store a service: Press and hold one of the number buttons
(1to6).
• To select a stored service: Press one of the number buttons
(1to6) (or press one of the number buttons (1to6) on RC-406).
Select a service
Press to enter Service Search mode.
1
2 Turn the volume knob or press J / K to select a service, then
press the knob.
(or using RC-406)
Press J / K to search for a service.
To cancel the Service Search mode, press
Select a service by name
Press to enter Service Search mode.
1
2 Turn the volume knob quickly to enter Alphabet Search
mode.
3 Turn the volume knob or press S / T to select the
character to be searched for.
Press J / K to go to the previous/next page.
4 Press the volume knob to start searching.
5 Turn the volume knob to select a service, then press the knob.
To cancel the Alphabet Search mode, press .
.
Replay
Press and hold K SEEK (or press K on RC-406).
“REPLAY MODE” appears and replay starts from the live position. You can replay
a certain length of time of the current service (depending on the audio bit rate).
During Replay...
• To pause or resume playback, press 6 IW (or press ENT IW on RC-406).
• To skip the current song backward/forward, press S / T (or press
S / T(+) on RC-406).
• To rewind/fast-forward, press and hold S / T (or press and hold
S / T(+) on RC-406).
• To exit from Replay and go to live, press and hold K SEEK (or press and hold
K on RC-406).
Other settings
Press the volume knob to enter
1
[FUNCTION]
.
2 Turn the volume knob to make a selection (see the following table), then
press the knob.
3 Press and hold to exit.
To return to the previous setting item or hierarchy, press .
Default:
XX
TUNER SETTING
ON
AF SET
TI ON
PTY SEARCH
:
While listening to DAB...
Automatically switch to FM broadcasting the same program if the DAB signal becomes
weak. It will switch back to DAB sound when the signal becomes strong again.
While listening to FM...
Automatically switch to DAB source broadcasting the same program (if available).;
OFF
:Cancels.
:Allows the unit to temporarily switch to Traffic Information.;
Press the volume knob to enter PTY language selection. Turn the volume knob to
select the PTY language (
Selects the available Program Type
ENGLISH/ FRENCH/ GERMAN
( 7)
, then, press
OFF
:Cancels.
), then press the knob.
S / T
to start.
6
Page 11

ANALOG RADIODIGITAL RADIO (DAB)
ASW SELECT TRAVEL, WARNINGS, NEWS, WEATHER, EVENT, SPECIAL, RAD INFO, SPORTS,
LIST UPDATE AUTO
PTY WATCH
CLOCK
TIME SYNC
• Available Program Type:
SPEECH: NEWS, AFFAIRS, INFO
SCIENCE, VARIED, WEATHER, FINANCE, CHILDREN, SOCIAL, RELIGION, PHONE IN, TRAVEL
LEISURE, DOCUMENT
MUSIC: POP M
OTHER M
The unit will search for the Program Type categorized under
if selected.
• If the volume is adjusted during reception of traffic information,
announcement or alarm, the adjusted volume is memorized automatically.
It will be applied the next time traffic information, announcement or alarm
function is turned on.
FINANCE:
Turn the volume knob to make a selection, then press the knob.
“
” appears in front of the activated announcement type.
*
Automatically switch from any source to Digital radio ensembles broadcasting an
activated announcement type.
•
Multiple announcement can be activated simultaneously.
•
To deactivate, press the volume knob again (“*” goes off).
:Automatically update the DAB Service List when the power is turned on.;
MANUAL
:Updates the DAB Service List by pressing and holding .
Automatically switch from any source to Digital Radio ensembles broadcasting a
selected type of program.
NEWS, AFFAIRS, INFO, SPORT, EDUCATE, DRAMA, CULTURE, SCIENCE,
VARIED, POP M
CLASSICS, OTHER M
RELIGION, PHONE IN, TRAVEL, LEISURE, JAZZ, COUNTRY, NATION M
OLDIES, FOLK M
OFF
ON
:Synchronizes the unit’s time to the Digital Radio signal station time.;
OFF
:Cancels.
(music),
(music),
JAZZ, COUNTRY, NATION M
:Cancels.
ROCK M
(music)
, ROCK M
(music)
, WEATHER, FINANCE, CHILDREN, SOCIAL,
(music)
, DOCUMENT
(information),
(music),
EASY M
(music)
, EASY M
(music)
SPORT, EDUCATE, DRAMA, CULTURE
(music),
(music),
LIGHT M
OLDIES, FOLK M
, LIGHT M
(music),
(music)
[SPEECH]
CLASSICS
or
(music)
(music)
,
[MUSIC]
Search for a station
Press B SRC to select TUNER.
1
2 Press JBAND repeatedly (or press
to select FM1/ FM2/ FM3/ MW (or LW).
3 Press S / T (or press S / T(+) on RC-406) to search
,
,
,
for a station.
• To change the searching method for S / T: Press KSEEK
,
repeatedly.
AUTO1: Automatically search for a station.
AUTO2: Search for a preset station.
MANUAL: Manually search for a station.
• To store a station: Press and hold one of the number buttons
(1to6).
• To select a stored station: Press one of the number buttons
(1to6) (or press one of the number buttons (1to6) on RC-406).
Direct Access Tuning (using RC-406)
Press DIRECT to enter Direct Access Tuning.
1
2 Press the number buttons to enter a frequency.
3 Press ENTIW to search for a station.
• To cancel, press or DIRECT.
• If no operation is done for 10seconds after step
Tuning is automatically canceled.
AM–/#FM+ on RC-406)
*
2, Direct Access
ENGLISH |
7
Page 12

ANALOG RADIO
Other settings
Press the volume knob to enter
1
2 Turn the volume knob to make a selection (see the following table),
then press the knob.
3 Press and hold to exit.
To return to the previous setting item or hierarchy, press .
TUNER SETTING
LOCAL SEEK
AUTO MEMORY YES
MONO SET
NEWS SET ON
REGIONAL ON
AF SET ON
TI
*
PTY SEARCH
ON
: Searches only FM stations with good reception. ;
:Automatically starts memorizing 6 stations with good
reception.;
NO
[PRESETTYPE]
ON
:Improves the FM reception, but the stereo effect may be lost.;
OFF
:Cancels.
: The unit will temporarily switch to News Programme if available. ;
OFF
: Cancels.
: Switches to another station only in the specific region using the “AF”
control.;
OFF
: Automatically searches for another station broadcasting the same
program in the same Radio Data System network with better reception
when the current reception is poor.;
ON
:Allows the unit to temporarily switch to Traffic Information.;
OFF
:Cancels.
Press the volume knob to enter PTY language selection. Turn the volume
knob to select the PTY language (
press the knob.
Selects the available Program Type (see the following), then, press
S / T
to start.
[FUNCTION]
:Cancels. (Selectable only if
.) (
4)
:Cancels.
ENGLISH/ FRENCH/ GERMAN
OFF
.
: Cancels.
[NORMAL]
Default:
OFF
: Cancels.
is selected for
), then
•
[LOCAL SEEK]/ [MONO SET]/ [NEWS SET]/ [REGIONAL]/ [AF SET]/ [PTY SEARCH]
selectable only when the band is FM1/ FM2/ FM3.
• Available Program Type:
SPEECH
: NEWS
, AFFAIRS
SCIENCE
IN
, TRAVEL
MUSIC: POP M (music), ROCK M (music), EASY M (music), LIGHT M (music),
XX
CLASSICS
FOLK M (music)
The unit will search for the Program Type categorized under
[MUSIC]
if selected.
• If the volume is adjusted during reception of traffic information, alarm
or news bulletin, the adjusted volume is memorized automatically. It
will be applied the next time traffic information, alarm or news bulletin
function is turned on.
*
[TI]
in MW/LW band is for enabling traffic interruption to DAB source
only.
, INFO (information), SPORT
, VARIED
, WEATHER
, LEISURE
, OTHER M (music), JAZZ
, FINANCE
, DOCUMENT
, EDUCATE
, CHILDREN
, SOCIAL
, COUNTRY
, NATION M (music), OLDIES
, DRAMA
, RELIGION
, CULTURE
, PHONE
[SPEECH]
is
,
,
or
8
Page 13
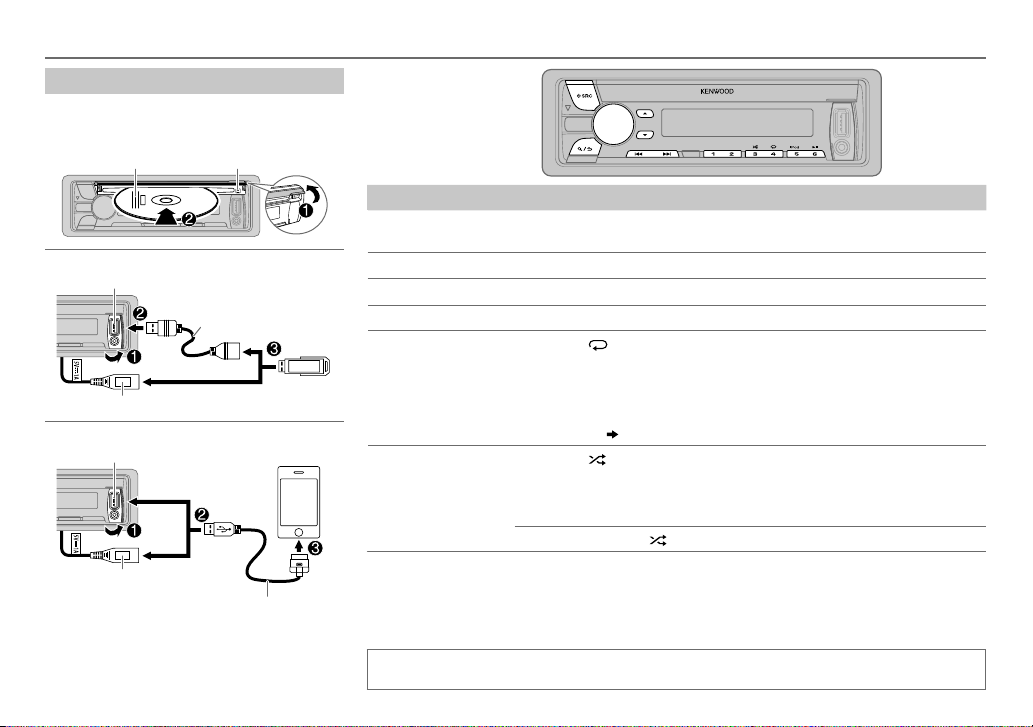
CD / USB / iPod
Start playback
The source changes automatically and playback
starts.
CD
Label side
USB
USB input terminal
USB cable from the rear of the unit
iPod/iPhone
USB input terminal
USB cable from the rear of the unit
Press 5 iPod to select the control mode while
in iPod source.
MODE ON:
From the iPod
MODE OFF:
From the unit.
M
Eject disc
CA-U1EX (max.: 500mA)
(optional accessory)
and/ or
and/ or
KCA-iP102 (optional accessory) or
accessory cable of the iPod/iPhone
2
*
.
*
To Do this
Pause or resume
Press 6 IW (or press ENT IW on RC-406).
playback
Select a track/file
Select a folder
Reverse/Fast-forward
4
Repeat play
*
Press S / T (or press S / T(+) on RC-406).
3
*
Press J / K (or press
AM– / #FM+ on RC-406).
*
Press and hold S / T (or press and hold S / T(+) on RC-406).
Press 4 repeatedly.
• Audio CD: TRACKREPEAT, REPEATOFF
• MP3/WMA/AAC/WAV file or iPod: FILEREPEAT, FOLDERREPEAT,
REPEATOFF
• KENWOOD Music Editor Light (KME Light)/ KENWOOD Music Control
Random play
(KMC) file
4
*
Press 3 repeatedly.
( 18)
: FILEREPEAT, REPEATOFF
• Audio CD: DISCRANDOM, RANDOMOFF
• MP3/WMA/AAC/WAV file or iPod or KME Light/ KMC file:
FOLDERRANDOM, RANDOMOFF
5
Press and hold 3 to select “ALLRANDOM”.
1
*
Do not leave the cable inside the car when not using.
2
*
You can still play/pause, file skip, fast-forward or reverse files from the unit.
3
*
Only for MP3/WMA/AAC/WAV files. This does not work for iPod.
4
*
1
For iPod: Applicable only when
5
*
For CD: Only for MP3/WMA/AAC files.
[MODE OFF]
is selected.
*
If you connect the iPod/iPhone to the USB input terminal of the unit (while listening to TuneIn
Radio, TuneIn Radio Pro or Aupeo), the unit will output the sound from these apps.
ENGLISH |
9
Page 14
CD / USB / iPod
Select a track/file from a list
For iPod: Applicable only when
selected.
( 9)
[MODE OFF]
is
1 Press .
2 Turn the volume knob to make a selection,
then press the knob.
• MP3/WMA/AAC/WAV file: Select the
desired folder, then a file.
• iPod or KME Light/ KMC file: Select the
desired file from the list (PLAYLISTS,
ARTISTS, ALBUMS, SONGS, PODCASTS*,
GENRES, COMPOSERS*).
*
Only for iPod.
• To return to the root folder (or first file), press
number button 5 iPod.
• To return to the previous setting item or
hierarchy, press
• To cancel, press and hold
If you have many files....
You can search through them quickly (on step 2
above) at a preset skip search ratio by pressing
S / T.
• See also “Set the skip search ratio.”
• Pressing and holding S / T skip songs at
the maximum ratio (10
setting made.
• For USB: Only for files registered in the
database created with KME Light/ KMC.
• Not applicable for audio CD.
.
.
%
) regardless of the
10
Direct Music Search (using RC-406)
Press DIRECT.
1
2 Press the number buttons to enter a track/
file number.
3 Press ENT IW to search for music.
• To cancel, press .
• Not available if Random Play is selected.
• Not applicable for iPod, KME Light/ KMC file.
Select a song by name
While listening to iPod...
1 Press .
2 Turn the volume knob to select a category,
then press the knob.
3 Turn the volume knob quickly to enter
character search.
4 Turn the volume knob to select the
character to be searched for.
5 Press S / T to move to the entry
position.
You can enter up to 3characters.
6 Press the volume knob to start searching.
7 Turn the volume knob to make a selection,
then press the knob.
Repeat step
selected.
• To search for a character other than A to Z
and 0 to 9, enter only “
• To return to the previous hierarchy, press
• To return to the top menu, press number
button 5 iPod.
• To cancel, press and hold
7 until the desired item is
.
”.
*
.
Set the skip search ratio
While listening to iPod or KME Light/ KMC file...
1 Press the volume knob to enter
2 Turn the volume knob to select
press the knob.
[FUNCTION]
[USB]
, then
.
3 Turn the volume knob to select
[SKIP SEARCH]
, then press the knob.
4 Turn the volume knob to make a selection,
then press the knob.
0.5%
(default)/ 1%/ 5%/
ratio over the total files.
10%
: Skip search
5 Press and hold to exit.
Change the USB drive
When a smartphone (Mass Storage Class) is
connected to the USB input terminal, you can
select its internal memory or external memory
(such as an SD card) to playback the stored songs.
You can also select the desired drive to playback
when a multiple drives device is connected.
Press 5 iPod repeatedly to select the desired
drive.
(or)
1 Press the volume knob to enter
2 Turn the volume knob to select
press the knob.
[FUNCTION]
[USB]
, then
.
3 Turn the volume knob to select
[MUSIC DRIVE]
, then press the knob.
4 Press the volume knob to select
[DRIVE CHANGE]
The next drive is selected automatically.
Repeat steps 1 to
drives.
Selectable items:
.
4 to select the following
[DRIVE1]
to
[DRIVE5]
Page 15

AUX AhaTM RADIO
Preparation:
Select
[ON]
for
[BUILT-IN AUX]. ( 5)
Start listening
Connect a portable audio player
1
(commercially available).
Auxiliary input jack
3.5mm stereo mini plug with “L”
shaped connector (commercially
Portable audio
player
available)
2 Press B SRC to select AUX.
3 Turn on the portable audio player and
start playback.
Set the AUX name
While listening to a portable audio player
connected to the unit...
1 Press the volume knob to enter
[FUNCTION]
2 Turn the volume knob to select
.
[SYSTEM]
then press the knob.
3 Turn the volume knob to select
[AUX NAME SET]
, then press the knob.
4 Turn the volume knob to make a
selection, then press the knob.
AUX
(default)/
DVD/ PORTABLE/ GAME/ VIDEO
TV
5 Press and hold to exit.
Preparation:
Install the latest version of Aha
application onto your device (iPhone/
iPod touch), then create an account and
log in to Aha
• Select
[ON]
TM
.
for
[AHA SRC]. ( 5)
Start listening
Open the AhaTM application on your
1
device.
2 Connect your device to the USB
input terminal.
USB input terminal
and/ or
USB cable from the rear of the unit
KCA-iP102 (optional accessory) or
accessory cable of the iPod/iPhone
The source changes to AHA FRONT/
AHA REAR and broadcast starts.
,
* Do not leave the cable inside the car
when not using.
/
TM
To Do this
Pause or resume
playback
Select a content
Press 6 IW (or press
ENT IW on RC-406).
Press S / T (or press
S / T(+) on RC-406).
Forward 30seconds
of a content
Backward 15seconds
of a content
“Likes” current
content
“Dislikes” current
content
1
*
Applicable to audiobook and podcast only.
2
*
Not applicable to audiobook and Location Based
*
*
2
*
2
*
Press and hold T.
1
Press and hold S.
1
Press J .
• To unvote, press J
Press K .
• To unvote, press K
again.
again.
Stations (LBS).
Search for a station
Press .
1
2 Turn the volume knob to select a station, then
*
press the knob.
3 Turn the volume knob to the desired content,
then press the knob.
(or using RC-406)
Press J / K to search for a station.
To cancel, press and hold .
You can make a call when your device is connected to
the unit via Bluetooth connection
( 12)
...
• To call a number in the content*: Press 1, then press
the volume knob to call.
• To end or disconnect a call: Press
.
* The availability is depending on the selected station.
ENGLISH |
11
Page 16
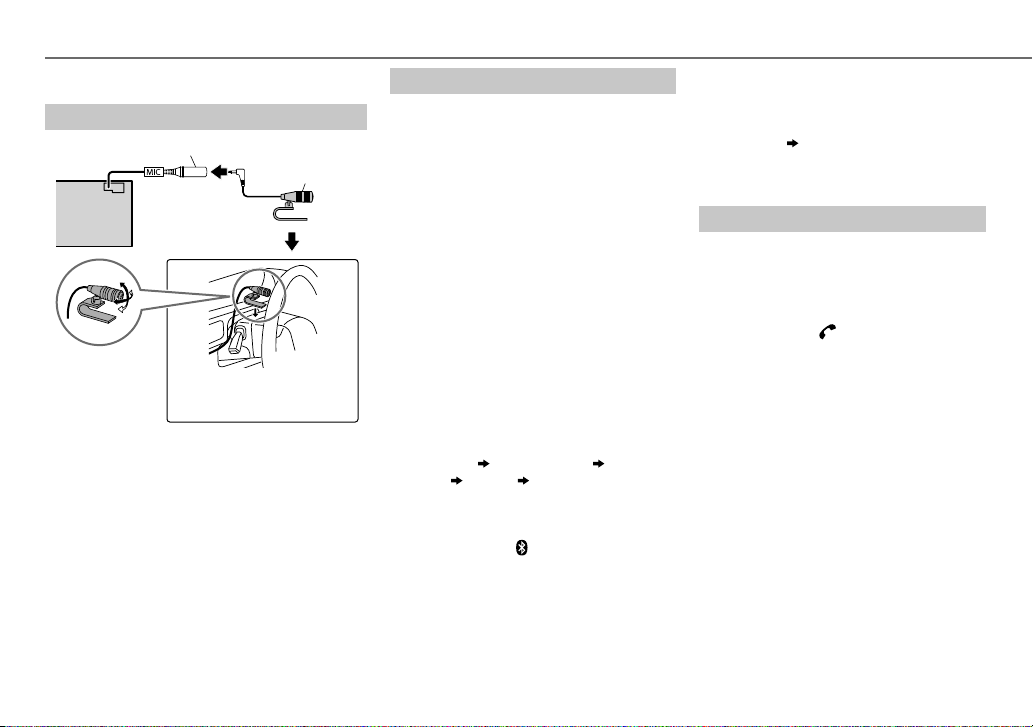
BLUETOOTH®
You can operate Bluetooth devices using this unit.
Connect the microphone
MIC (Microphone input terminal)
Microphone (supplied)
Rear panel
Adjust the microphone
angle
If you turn off the unit or detach the control panel
during a phone call conversation, the Bluetooth
connection is disconnected. Continue the
conversation using your mobile phone.
Supported Bluetooth profiles
– Hands-Free Profile (HFP)
– Serial Port Profile (SPP)
– Phonebook Access Profile (PBAP)
– Object Push Profile (OPP)
– Advanced Audio Distribution Profile (A2DP)
– Audio/Video Remote Control Profile (AVRCP)
Secure using cord clamps (not
supplied) if necessary.
Pair a Bluetooth device
When connecting a Bluetooth device to
the unit for the first time, perform pairing
between the unit and the device. Once the
pairing is completed, the Bluetooth device
will remain registered in the unit even if you
reset the unit.
• Up to five devices can be registered (paired)
in total.
• A maximum of two Bluetooth phones
and one Bluetooth audio device can be
connected at any time.
• This unit supports Secure Simple Pairing
(SSP).
• Some Bluetooth devices may not
automatically connect to the unit after
pairing. Connect the device to the unit
manually. Refer to the instruction manual of
the Bluetooth device for more information.
1 Press B SRC to turn on the unit.
2 Search and select this unit model name
(KDC-BT4*DAB) on the Bluetooth device.
“PAIRING”
name
scrolls on the display.
“PASS XXXXXX” Device
“PRESS” “VOLUME KNOB”
3 Press the volume knob to start pairing.
“PAIRING OK” appears when pairing is
completed and “
Bluetooth connection is established.
• For some Bluetooth devices, you may need
to enter the Personal Identification Number
(PIN) code immediately after searching.
” will light up when the
• Pairing request (via Bluetooth) is
automatically activated if an iPhone/iPod
touch is connected through the USB input
terminal. (Applicable only if
set to
[ON]
.)
Press the volume knob to pair once you
have confirm the device name.
( 16)
[AUTO PAIRING]
Bluetooth test mode
You can check the connectivity of the
supported profile between the Bluetooth
device and the unit.
• Make sure there is no Bluetooth device
connected.
1 Press and hold .
“PLEASE PAIR YOUR PHONE” appears.
2 Search and select this unit model name
(KDC-BT4*DAB) on the Bluetooth device.
3 Operate the Bluetooth device to confirm
pairing.
“TESTING” flashes on the display.
The connectivity result (OK or NG) appears
after the test.
PAIRING: Pairing status
HF CNT: Hands-Free Profile (HFP)
AUD CNT: Advanced Audio Distribution
PB DL: Phonebook Access profile (PBAP)
• To cancel check mode, press and hold
compatibility
Profile (A2DP) compatibility
compatibility
B SRC to turn off the unit.
is
12
Page 17
Bluetooth mobile phone
To Do this
Receive a call
Reject an incoming
call
End a call
Switch between
hands-free and
private talk modes
Adjust the phone
volume
Switch between two
connected phones
Press or the volume knob or one of
the number buttons (1 to 6) (or press
on RC-406).
• All the buttons and display
illumination flash when there is an
incoming call.
During a call, the buttons and display
illuminate according to the settings
made for
• When
selected time, the unit answers
incoming call automatically.
Press B SRC (or press on RC-406).
Press or B SRC (or press on
RC-406).
Press 6IW during a call.
• Operations may vary according to the
connected Bluetooth device.
Turn the volume knob during a call.
Phone volume:
• This adjustment will not affect the
volume of the other sources.
Press repeatedly.
• Not applicable during a call.
[DISPLAY]. (18)
[AUTO ANSWER]
[00]
is set to the
to
[35]
(Default:
(14)
Improve the sound quality during a call
While talking on the phone...
1 Press the volume knob to enter
[FUNCTION]
.
2 Turn the volume knob to make a selection (see the following table), then
press the knob.
3 Press and hold to exit.
To return to the previous setting item or hierarchy, press .
MIC GAIN –20
NR LEVEL –5
ECHO CANCEL 1
—+8(0):The sensitivity of the microphone increases as the number
increased.
—
–20(–10
heard during a phone conversation.
—10(4):Adjust the echo cancellation delay time until the least echo is being
heard during a phone conversation.
):Adjust the noise reduction level until the least noise is being
Text message notification
When the phone receives a text message, the unit rings and “SMS RECEIVED”
appears.
• You cannot read, edit, or send a message through the unit.
• To clear the message, press any button.
[15]
Use Voice Recognition
)
Press and hold .
1
The connected phone (which has been paired the earliest) is activated.
However, if priority device is connected, pressing and holding
priority device.
( 15, DVC PRIORITY)
2 Speak the name of the contact you want to call or the voice command to
control the phone functions.
• Supported Voice Recognition features vary for each phone. Refer to the
instruction manual of the connected phone for details.
• This unit also supports the intelligent personal assistant function of iPhone.
BLUETOOTH®
Default:
activate the
XX
ENGLISH |
13
Page 18

BLUETOOTH®
Bluetooth mode operations
Press to enter Bluetooth mode.
1
2 Turn the volume knob to make a selection (see the following table),
then press the knob.
3 Press and hold to exit.
To return to the previous setting item or hierarchy, press .
1
CALL
HISTORY
PHONE
BOOK
NUMBER
DIAL
Press the volume knob to select a name or a phone number.
• “INCOMING”, “OUTGOING”, or “MISSED” is shown on the lower part of the
display to indicate the previous call status.
• Press
DISP SCRL
• “NO DATA” appears if there is no recorded call history.
2
Press the volume knob to call.
1
Turn the volume knob to select a name, then press the knob.
2
Turn the volume knob to select a phone number, then press the knob to
call.
• If the phone supports PBAP, the phonebook of the connected phone is
automatically transferred to the unit when pairing. If the phone does not
support PBAP, “TRANSFER PB” appears. Transfer the phonebook manually.
(16, TRANSFER PB)
• Contacts are categorized as: HOME, OFFICE, MOBILE, OTHER, GENERAL
• This unit can display only non-accent letters. (Accent letters such as “Ú” is
showns as “U”.)
• If the phonebook contains many contacts,
1
Turn the volume knob to select a number (0 to 9) or character ( , #, +).
2
Press
S / T
Repeat steps
3
Press the volume knob to call.
(or using RC-406)
1
Press the number buttons (0 to 9) to enter the phone number.
2
Press to call.
to change the display category (NUMBER or NAME).
(Select a contact by name).
to move the entry position.
1
and 2 until you finish entering the phone number.
VOICE
BATT* LOW
SIGNAL* NO SIGNAL/ LOW/ MID/ MAX
SETTINGS
AUTO ANSWER
RING MODE SYSTEM:
SMS NOTIFY* ON:
* Functionality depends on the type of the phone used.
Speak the name of the contact you want to call or use the voice command
to control the phone functions.
/
MID/ FULL
:Shows the strength of the battery.
received signal.
1 —30
:The unit answer incoming call automatically in the selected
time.;
OFF
:Cancels.
The unit rings to notify you when a call/text message comes in.
(Default ring tone is different according to the paired device.)
•
CALL:
Selects your preferred ring tone (
calls.
•
MESSAGE:
Selects your preferred ring tone (
incoming text messages.
PHONE:
The unit uses the connected phones’ ring tone to notify you
when a call/text message comes in. (The connected phone will ring if it
does not support this feature.)
The unit rings and “SMS RECEIVED” appears to notify you of an
incoming text message.;
(
13, Use Voice Recognition)
:Shows the strength of the current
TONE 1 — 5
OFF
:Cancels.
) for incoming
TONE 1 — 5
Default:
) for
XX
Select a contact by name
• You can search through the contacts quickly according to the first letter
(A to Z), number (0 to 9), or symbol.
• The second alphabet of the contact will be searched if the first alphabet
does not exist.
1 Press to enter Bluetooth mode.
2 Turn the volume knob to select
[PHONE BOOK]
, then press the knob.
14
Page 19
3 Turn the volume knob quickly to enter alphabet search mode.
The first menu (ABCDEFGHIJK) appears. To go to the other menu
(LMNOPQRSTUV or WXYZ1
), press J / K.
4 Turn the volume knob or press S / T to select the desired first
letter, then press the knob.
• To search with numbers, select “1”.
• To search with symbols, select “ ”.
5 Turn the volume knob to select a name, then press the knob.
6 Turn the volume knob to select a phone number, then press the
knob to call.
To return to the previous hierarchy, press
.
Store a contact in memory
You can store up to 6 contacts.
1 Press to enter Bluetooth mode.
2 Turn the volume knob to select
[NUMBER DIAL]
, then press the knob.
[CALL HISTORY], [PHONE BOOK]
, or
3 Turn the volume knob to select a contact or enter a phone number.
If a contact is selected, press the volume knob to show the phone
number.
4 Press and hold one of the number buttons (1 to 6).
“STORED” appears when the contact is stored.
To erase a contact from the preset memory, select
step
2
and store a blank number.
[NUMBER DIAL]
in
Make a call from memory
Press to enter Bluetooth mode.
1
2 Press one of the number buttons (1 to 6).
3 Press the volume knob to call.
“NO MEMORY” appears if there is no contacts stored.
BLUETOOTH®
Delete a contact
Not applicable for mobile phone that supports PBAP.
1 Press to enter Bluetooth mode.
2 Turn the volume knob to select
press the knob.
3 Turn the volume knob to select a contact.
If a contact is selected, press the volume knob to show the phone
number.
4 Press and hold the volume knob to enter delete mode.
5 Turn the volume knob to select
press the knob.
DELETE ONE
DELETE ALL
step 2 is deleted.
: Selected name or phone number in step 3 is deleted.
: All names or phone numbers from the selected menu in
6 Turn the volume knob to select
Bluetooth mode settings
Press the volume knob to enter
1
2 Turn the volume knob to select
3 Turn the volume knob to make a selection (see the following table),
then press the knob.
4 Press and hold to exit.
To return to the previous setting item or hierarchy, press .
PHONE SELECT
AUDIO SELECT
DEVICE DELETE
DVC PRIORITY
Selects the phone or audio device to connect or disconnect.
“ ”
appears in front of the device name.
1
Turn the volume knob to select a device to delete, then press the
knob.
2
Turn the volume knob to select
Selects a device to be connected as priority device.
“ ”
appears in front of the device name set as priority.
[CALL HISTORY]
[DELETE ONE]
[YES]
or
[NO]
[FUNCTION]
[BT MODE]
.
, then press the knob.
[YES]
or
[PHONE BOOK]
or
[DELETE ALL]
, then press the knob.
or
[NO]
, then press the knob.
, then
, then
Default:
XX
ENGLISH |
15
Page 20
BLUETOOTH®
TRANSFER PB
PIN CODE EDIT
(0000)
RECONNECT ON
AUTO PAIRING ON
BT HF/AUDIO FRONT
INITIALIZE YES
“DL PB ” appears and transfer the
*
phonebook of the connected phone to
this unit manually.
* Selectable only when the connected
Changes the PIN code (up to 6 digits).
1
Turn the volume knob to select a
2
Press
Repeat steps
3
Press the volume knob to confirm.
when the Bluetooth device is within
range.;
supported Bluetooth device (iPhone/
iPod touch) when it is connected
through USB input terminal.Depending
on the iOS version of the connected
iPhone/iPod touch, this function may
not work. ;
and right speakers.;
from all the speakers.
(including stored pairing, phonebook,
and etc.).;
phone supports OPP.
number.
S / T
position.
entering the PIN code.
:The unit automatically reconnect
OFF
:The unit automatically pair
:Ouputs audio from the front left
:Initializes all the Bluetooth settings
to move the entry
1
and 2 until you finish
:Cancels.
OFF
:Cancels.
ALL
NO
:Cancels.
:Outputs audio
Internet radio via Bluetooth
Listen to AhaTM Radio
Preparation:
Select
[ON]
for
[AHA SRC]. ( 5)
You can listen to AhaTM Radio on your smart
phone (Android OS) through Bluetooth on
this unit.
1 Open the Aha
smart phone.
TM
application on your
2 Connect your smart phone via
Bluetooth connection.
( 12)
3 Press B SRC to select AHA.
The source switches and broadcast
starts automatically.
• You can operate Aha
way as Aha
• To call a number in the content*: Press 1,
then press the volume knob to call.
• To end or disconnect a call: Press
* The availability is depending on the
selected station.
TM
TM
Radio for iPod/iPhone.
Radio in the same
( 11)
.
Bluetooth audio player
Operations and display indications may differ
according to their availability on the connected
device.
To Do this
Playback
1 Press B SRC (or press SRC on
RC-406) to select BTAUDIO.
2 Operate the Bluetooth audio
player to start playback.
Pause or
resume
playback
Select group
or folder
Reverse/
forward skip
Reverse/fastforward
Repeat play
Random
play
Press 6IW (or press ENTIW
on RC-406).
Press J / K (or press
#FM+ on RC-406).
AM–/
*
Press S / T (or press
S / T (+) on RC-406).
Press and hold S / T (or
press and hold S / T (+) on
RC-406).
Press 4 repeatedly to make a
selection.
ALLREPEAT, FILEREPEAT,
REPEATOFF
Press 3 repeatedly to make a
selection.
FOLDERRANDOM, RANDOMOFF
Press and hold 3 to select
“ALLRANDOM.”
16
Page 21
AUDIO SETTINGS
While listening to any source...
1 Press the volume knob to enter
2 Turn the volume knob to select
knob.
3 Turn the volume knob to make a selection (see the following table),
then press the knob.
Repeat step
3 until the desired item is selected or activated.
4 Press and hold to exit.
(or using RC-406)
1 Press AUD to enter
[AUDIO CONTROL]
2 Press J / K to make a selection, then press ENT IW.
To return to the previous setting item or hierarchy, press
SUB-W LEVEL –15 to +15 (0)
BAND1 LEVEL –8 to +8 (+5):
BAND2 LEVEL –8 to +8 (+5):
BAND3 LEVEL
BAND4 LEVEL
BAND5 LEVEL
PRESET EQ
BASS BOOST
–8 to +8 (+4):
–8 to +8 (+5):
–8 to +8 (+1):
DRIVE EQ/ TOP40/ POWERFUL/ ROCK/ POPS/ EASY/ JAZZ/ NATURAL
USER
:Selects a preset equalizer suitable to the music genre. (Select
to use the customized
[DRIVE EQ]
is a preset equalizer that reduces noise from the road.
LEVEL1/ LEVEL2/ LEVEL3
OFF
: Cancels.
[FUNCTION]
[AUDIO CONTROL]
Adjusts the subwoofer output level.
Adjusts the level to memorize for each source. (Before
making an adjustment, select the source you want to
adjust.)
BAND1
: Selects your preferred bass boost level. ;
to
.
BAND5
.
, then press the
.
Default:
settings.)
/
[USER]
LOUDNESS LEVEL1/ LEVEL2
SUBWOOFERSET ON
LPFSUBWOOFER THROUGH
SUB-WPHASE REVERSE
HPF THROUGH
XX
FADER R15
BALANCE L15
VOLUMEOFFSET
(Default:0)
SOUNDRECNSTR
(Sound
reconstruction)
[SUB-W LEVEL]/ [LPF SUBWOOFER]/ [SUB-W PHASE]
[SUBWOOFER SET]
to produce a well-balanced sound at a low volume level.;
:Turns on the subwoofer output.;
:All signals are sent to the subwoofer.;
160HZ
:Audio signals with frequencies lower than 85Hz/ 120Hz/
160Hz are sent to the subwoofer.
(180°)/
output to be in line with the speaker output for optimum performance.
(Selectable only if a setting other than
[LPF SUBWOOFER]
:All signals are sent to the speakers.;
150HZ
:Audio signals with frequencies higher than 100Hz/ 120Hz/
150Hz are sent to the speakers.
to
F15 (0
):Adjusts the rear and front speaker output balance.
to
R15 (0
):Adjusts the left and right speaker output balance.
–8
to +8(for AUX) ; –8 to 0(for other sources):Presets the volume
adjustment level of each source. (Before adjustment, select the source
you want to adjust.)
ON
:Creates realistic sound by compensating the high-frequency
components and restoring the rise-time of the waveform that are lost in
audio data compression.;
is set to
[ON]
.
:Selects your preferred low and high frequencies boost
OFF
:Cancels.
NORMAL
(0°):Selects the phase of the subwoofer
.)
OFF
[THROUGH]
:Cancels.
is selectable only if
OFF
85HZ/ 120HZ
is selected for
100HZ/ 120HZ
:Cancels.
/
/
ENGLISH |
17
Page 22

DISPLAY SETTINGS
1 Press the volume knob to enter
2 Turn the volume knob to select
3 Turn the volume knob to make a selection (see the following table),
then press the knob.
Repeat step
3 until the desired item is selected or activated.
4 Press and hold to exit.
To return to the previous setting item or hierarchy, press .
COLOR SELECT VARIABLE SCAN/ COLOR 01
DIMMER ON:
BRIGHTNESS 0
TEXT SCROLL AUTO/ ONCE:
key and display illumination color.
You can create your own color (when
[USER]
is selected). The color you have created can be selected when you
select
[USER]
1
2
3
to the
illumination.
automatically, or scroll only once.
.
Press and hold the volume knob to enter the detailed color adjustment.
Press
S / T
Turn the volume knob to adjust the level (0 — 9), then press the
knob.
Dims the display and button illumination. ;
[BRIGHTNESS]
— 31: Selects your preferred brightness level for display and button
[FUNCTION]
[DISPLAY]
to select the color (R/ G/ B) to adjust.
settings.
Selects whether to scroll the display information
.
, then press the knob.
—
COLOR 24/ USER
[COLOR 01]
; OFF:
Cancels.
: Selects your preferred
—
[COLOR 24]
OFF:
Illuminates according
Default:
or
MORE INFORMATION
General
• This unit can only play the following CDs:
• Detailed information and notes about the playable audio files are stated in an online manual
on the following web site: www.kenwood.com/cs/ce/audiofile/
Playable files
XX
• Playable audio file: MP3 (.mp3), WMA (.wma), AAC(.m4a)
• Playable disc media: CD-R/CD-RW/CD-ROM
• Playable disc file format: ISO 9660 Level 1/2, Joliet, Long file name.
• Playable USB device file system: FAT12, FAT16, FAT32
Even when audio files comply with the standards listed above, playback may be impossible
depending on the types or conditions of media or device.
Unplayable discs
• Discs that are not round.
• Discs with coloring on the recording surface or discs that are dirty.
• Recordable/ReWritable discs that have not been finalized.
• 8cm CD. Attempting to insert using an adapter may cause malfunction.
About USB devices
• This unit can play MP3/WMA/AAC/WAV files stored on a USB mass storage class device.
• You cannot connect a USB device via a USB hub.
• Connecting a cable whose total length is longer than 5m may result in abnormal playback.
• This unit cannot recognize a USB device whose rating is other than 5V and exceeds 1A.
About KENWOOD Music Editor Light and KENWOOD Music
Control
• This unit supports the PC application KENWOOD Music Editor Light and Android™ application
KENWOOD Music Control.
• When you play audio files with song data added using the KENWOOD Music Editor Light or
KENWOOD Music Control, you can search for audio files by Genres, Artists, Albums, Playlists,
and Songs.
• KENWOOD Music Editor Light and KENWOOD Music Control are available on the following
web site: www.kenwood.com/cs/ce/
18
Page 23

MORE INFORMATION TROUBLESHOOTING
About iPod/iPhone
Made for
- iPod touch (1st, 2nd, 3rd, 4th, and 5th generation)
- iPod classic
- iPod nano (3rd, 4th, 5th, 6th, and 7th generation)
- iPhone, iPhone 3G, 3GS, 4, 4S, 5, 5s, 5c
• For the latest compatible list and software versions of
iPhone/iPod, see: www.kenwood.com/cs/ce/ipod
• You cannot operate iPod if “KENWOOD” or “
on iPod.
About AhaTM Radio
• AhaTM is a third-party service, therefore the specifications
are subject to change without prior notice. Accordingly,
compatibility may be impaired or some or all of the services
may become unavailable.
TM
• Some Aha
functionality cannot be operated from this
unit.
About Bluetooth
• Depending on the Bluetooth version of the device, some
Bluetooth devices may not be able to connect to this unit.
• This unit may not work with some Bluetooth devices.
• Signal conditions vary, depending on the surroundings.
• For more information about Bluetooth, visit the following
website: www.kenwood.com/cs/ce/
” is displayed
Symptom Remedy
Sound cannot be heard. • Adjust the volume to the optimum level.
“PROTECT” appears and no operations
can be done.
• Sound cannot be heard.
• The unit does not turn on.
• Information shown on the display is
incorrect.
The unit does not work at all. Reset the unit.
DAB reception is poor. Make sure
“DAB ANT ERR” appears. Check the DAB antenna. If a passive antenna (without a booster) is used, set
• Radio reception is poor.
• Static noise while listening to the radio.
“NA FILE” appears. Make sure the disc contains supported audio files.
“NO DISC” appears. Insert a playable disc into the loading slot.
“TOC ERROR” appears. Make sure the disc is clean and inserted properly.
“PLEASE EJECT” appears. Reset the unit. If this does not solve the problem, consult your nearest service
Disc cannot be ejected.
“READ ERROR” appears. Copy the files and folders onto the USB device again. If this does not solve the
“NO DEVICE” appears. Connect a USB device, and change the source to USB again.
“COPY PRO” appears. A copy-protected file is played.
• Check the cords and connections.
Check to be sure the terminals of the speaker wires are insulated properly, then
reset the unit. If this does not solve the problem, consult your nearest service
center.
Clean the connectors.
[DAB ANT POWER]
• Connect the antenna firmly.
• Pull the antenna out all the way.
center.
Press and hold
is ejected. If this does not solve the problem, reset the unit.
problem, reset the USB device or use another USB device.
( 2)
( 3)
[ON]
is selected for
M
[DAB ANT POWER]. ( 4)
to
[OFF]. ( 4)
( 18)
to forcibly eject the disc. Be careful not to drop the disc when it
( 3)
ENGLISH |
19
Page 24
TROUBLESHOOTING
Symptom Remedy
“NA DEVICE” appears. Connect a supported USB device, and check the connections.
“NO MUSIC” appears. Connect a USB device that contains playable audio files.
“iPod ERROR” appears. • Reconnect the iPod.
Noise is generated. Skip to another track or change the disc.
Tracks do not play back as
you intended them to play.
“READING” keeps flashing. Do not use too many hierarchical levels or folders.
Elapsed playing time is not
correct.
Correct characters are not
displayed (e.g. album name).
“ACTN DISABLE” An unavailable operation has been performed.
“AHA APP UPDATE
REQUIRED”
“AHA UNAVAILABLE” Your device cannot be connected to Aha Radio server.
“CHECK APP” There is no response from Aha server.
“CHECK DEVICE” Check the Aha application on your device.
Radio
TM
“CONNECT PHONE” Connect your device to the unit.
Aha
“LOGIN FAILED” Logging into Aha has failed.
“NETWORK
UNAVAILABLE”
“POOR GPS” The GPS reception condition of your smartphone is poor.
“NO SKIPS” Skips is not allowed.
• Reset the iPod.
Playback order is determined when files are recorded.
This is caused by how the tracks are recorded.
This unit can only display uppercase letters, numbers, and a
limited number of symbols. Uppercase Cyrillic letters can also
be displayed if
Make sure you have installed the latest version of the Aha
application for KENWOOD application on your device.
The network has been disconnected.
[RUSSIAN SET]
is set to
[BКЛ]. ( 5)
Symptom Remedy
No Bluetooth device is
detected.
Pairing cannot be
made.
“DEVICE FULL” appears. The number of registered devices has reached its limit.
Echo or noise occurs. • Adjust the microphone unit’s position.
Phone sound quality
is poor.
Bluetooth®
TM
• Voice calling method
is not successful.
• “N/A VOICE TAG”
appears.
“NOT SUPPORT”
appears.
• “NO ENTRY” appears.
• “NO PAIR” appears.
“ERROR” appears. Try the operation again. If “ERROR” appears again, check if
“NO INFO” appears. Bluetooth device cannot get the contact information.
• Search from the Bluetooth device again.
• Reset the unit.
• Make sure you have entered the same PIN code to both the
unit and Bluetooth device.
• Delete pairing information from both the unit and the
Bluetooth device, then perform pairing again.
Retry after deleting an unnecessary device.
DEVICE DELETE)
• Check the
• Reduce the distance between the unit and the Bluetooth
device.
• Move the car to a place where you can get a better signal
reception.
• Use voice calling method in a more quiet environment.
• Reduce the distance from the microphone when you speak
the name.
• Make sure the same voice as the registered voice tag is
used.
The connected phone does not support Voice Recognition
feature.
There is no registered device connected/found via
Bluetooth.
the device supports the function you have tried.
( 3)
[ECHO CANCEL]
setting.
( 12)
( 15,
( 12)
( 13)
20
Page 25
TROUBLESHOOTING
SPECIFICATIONS
Symptom Remedy
Sound is being
interrupted or skipped
during playback of a
Bluetooth audio player.
The connected
Bluetooth audio player
Bluetooth®
cannot be controlled.
• “HF ERROR XX”
appears.
• “BT ERROR” appears.
• Reduce the distance between the unit and the Bluetooth
audio player.
• Turn off, then turn on the unit and try to connect again.
• Other Bluetooth devices might be trying to connect to
the unit.
• Check whether the connected Bluetooth audio player
supports Audio/Video Remote Control Profile (AVRCP).
(Refer to the instructions of your audio player.)
• Disconnect and connect the Bluetooth player again.
Reset the unit and try the operation again. If this does
not solve the problem, consult your nearest service
center.
DAB Frequency Range L Band 1452.960MHz — 1490.624MHz
Band III 174.928MHz — 239.200MHz
Sensitivity –100dBm
Signal-to-Noise Ratio 80dB
Antenna Connector Type SMB
Digital radio
Antenna Output Voltage 14.4V (11V – 16V)
Antenna Maximum Current < 100 mA
FM Frequency Range 87.5MHz — 108.0MHz (50kHz space)
Usable Sensitivity
(S/N=26dB)
Quieting Sensitivity
(DINS/N=46dB)
Frequency Response (±3dB) 30Hz — 15kHz
Signal-to-Noise Ratio
(MONO)
Stereo Separation (1kHz) 45dB
Analog radio
MW Frequency Range 531kHz — 1611kHz (9kHz space)
Usable Sensitivity
(S/N=20dB)
LW Frequency Range 153kHz — 279kHz (9kHz space)
Usable Sensitivity
(S/N=20dB)
9.3dBf (1μV/75Ω)
10.2dBf (1.13μV/75Ω)
75dB
28dBμV (25μV)
33dBμV (45μV)
ENGLISH |
21
Page 26
SPECIFICATIONS
Laser Diode GaAIAs
Digital Filter (D/A) 8 times over sampling
Spindle Speed 500rpm — 200rpm (CLV)
Wow & Flutter Below measurable limit
Frequency Response (±1dB) 20Hz — 20kHz
Total Harmonic Distortion (1kHz) 0.01%
Signal-to-Noise Ratio (1kHz) 105dB
CD player
Dynamic Range 90dB
Channel Separation 85dB
MP3 Decode Compliant with MPEG-1/2 Audio Layer-3
WMA Decode Compliant with Windows Media Audio
AAC Decode AAC-LC “.m4a” files
USB Standard USB1.1, USB2.0 (Full speed)
File System FAT12/16/32
Maximum Supply Current DC5V
MP3 Decode Compliant with MPEG-1/2 Audio Layer-3
USB
WMA Decode Compliant with Windows Media Audio
AAC Decode AAC-LC “.m4a” files
WAV Decode Linear-PCM
Version Bluetooth Ver.2.1+EDR Certified
Frequency Range 2.402GHz — 2.480GHz
Output Power +4dBm (MAX), 0dBm (AVE) Power Class 2
Bluetooth
Maximum Communication Range Line of sight approx. 10m
1A
22
Profile HFP (Hands-Free Profile)
Bluetooth
Maximum Output Power 50W×4
Output Power 30W×4 (PWR DIN45324, +B = 14.4V)
Speaker Impedance 4Ω—8Ω
Tone Action Band1 100Hz±8dB
Audio
Preout Level/Load (CD) 4000mV/10kΩ
Preout Impedance ≤600Ω
Frequency Response (±3dB) 20Hz—20kHz
Input Maximum Voltage 1000mV
Auxiliary
Input Impedance 30kΩ
Operating Voltage 14.4V (10.5V—16V allowable)
Maximum Current Consumption 10A
Operational Temperature Range 0°C—+40°C
General
Installation Size (W×H×D) 182mm×53mm×159mm
Weight 1.4kg
Subject to change without notice.
SPP (Serial Port Profile)
PBAP (Phonebook Access Profile)
OPP (Object Push Profile)
A2DP (Advanced Audio Distribution Profile)
AVRCP (Audio/Video Remote Control Profile)
Band2 250Hz±8dB
Band3 630Hz±8dB
Band4 2.5kHz±8dB
Band5 6.3kHz±8dB
Page 27
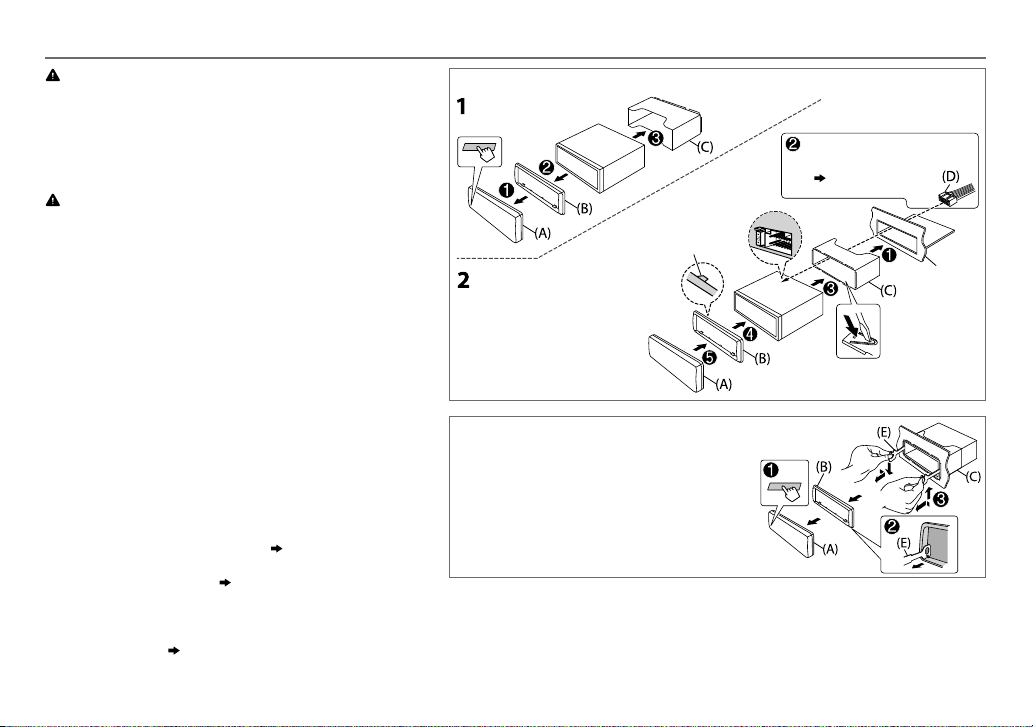
INSTALLATION / CONNECTION
Warning
• The unit can only be used with a 12V DC power supply, negative ground.
• Disconnect the battery’s negative terminal before wiring and mounting.
• Do not connect Battery wire (yellow) and Ignition wire (red) to the car
chassis or Ground wire (black) to prevent a short circuit.
• Insulate unconnected wires with vinyl tape to prevent a short circuit.
• Be sure to ground this unit to the car’s chassis again after installation.
Caution
• For safety’s sake, leave wiring and mounting to professionals. Consult the
car audio dealer.
• Install this unit in the console of your vehicle. Do not touch the metal parts
of this unit during and shortly after use of the unit. Metal parts such as the
heat sink and enclosure become hot.
• Do not connect the
(black), or connect them in parallel.
•
Mount the unit at an angle of less than 30º.
• If your vehicle wiring harness does not have the ignition terminal, connect
Ignition wire (red) to the terminal on the vehicle’s fuse box which provides
12VDC power supply and is turned on and off by the ignition key.
• After the unit is installed, check whether the brake lamps, blinkers, wipers,
etc. on the car are working properly.
• If the fuse blows, first make sure the wires are not touching car’s chassis,
then replace the old fuse with one that has the same rating.
Basic procedure
1
Remove the key from the ignition switch, then
disconnect the [ terminal of the car battery.
2 Install the DAB antenna.
See Installing the DAB antenna.
3 Connect the wires properly.
See Wiring connection.
4 Install the unit to your car.
See Installing the unit (in-dash mounting).
5 Connect the [ terminal of the car battery.
6 Reset the unit.
[
wires of speakers to the car chassis or Ground wire
(25)
( 24)
( 3)
Installing the unit (in-dash mounting)
Hook on the top side
Orientate the trim plate as
illustrated before fitting.
How to remove the unit
1
Detach the faceplate.
2 Fit the catch pin on the extraction keys
into the holes on both sides of the trim
plate, then pull it out.
3 Insert the extraction keys deeply into the
slots on each side, then follow the arrows
as shown on the right.
Do the required wiring.
( 24)
Dashboard of
your car
Bend the appropriate tabs to hold the
mounting sleeve firmly in place.
ENGLISH |
23
Page 28
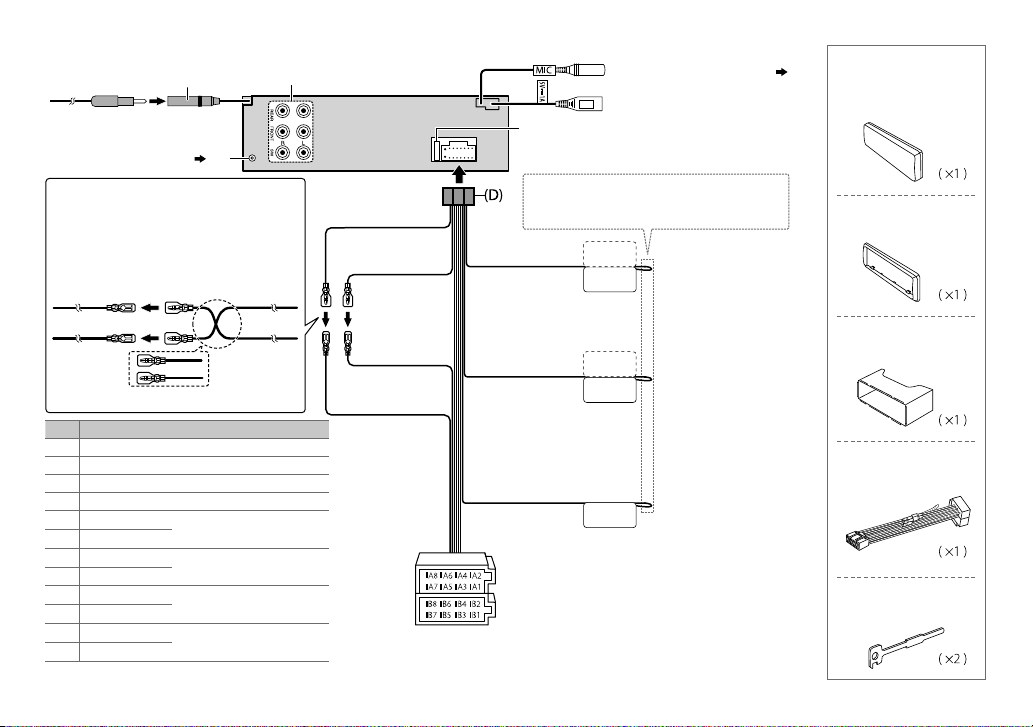
Wiring connection
Antenna terminal
DAB antenna jack
(25)
Rear/subwoofer output
Fuse (10A)
MIC (Microphone input terminal)
USB cable
( 12)
Part list for
installation
(A)
Faceplate
Connecting the ISO connectors on some VW/
Audi or Opel (Vauxhall) automobiles
You may need to modify the wiring of the
supplied wiring harness as illustrated below.
Ignition wire
A7 (Red)
Vehicle
A4 (Yellow)
(Red)
Unit
Battery wire
(Yellow)
Default wiring
Pin
Color and function
A4 Yellow : Battery
A5 Blue/White : Power control
A7 Red : Ignition (ACC)
A8 Black : Earth (ground) connection
B1
Purple
B2
B3
B4
B5
B6
B7
B8
]
Purple/black
Gray
]
Gray/black
White
]
White/black
]
Green
Green/black
: Rear speaker (right)
[
: Front speaker (right)
[
: Front speaker (left)
[
: Rear speaker (left)
[
24
Yellow (Battery wire)
Red (Ignition wire)
Red (A7)
Yellow (A4)
ISO connectors
If no connections are made, do not let the wire
Light blue/yellow
(Steering remote
control wire)
Blue/White
(Power control wire/
Antenna control wire)
Brown
(Mute control wire)
come out from the tab.
STEERING WHEEL
REMOTE INPUT
REMOTE CONT
ANT . CONT
P. CONT
To the steering wheel remote
control adapter
To the power control terminal
when using the optional power
amplifier, or to the antenna
control terminal in the vehicle.
To connect the Kenwood
MUTE
navigation system, consult your
navigation manual.
(B)
Trim plate
(C)
Mounting sleeve
(D)
Wiring harness
(E)
Extraction key
Page 29
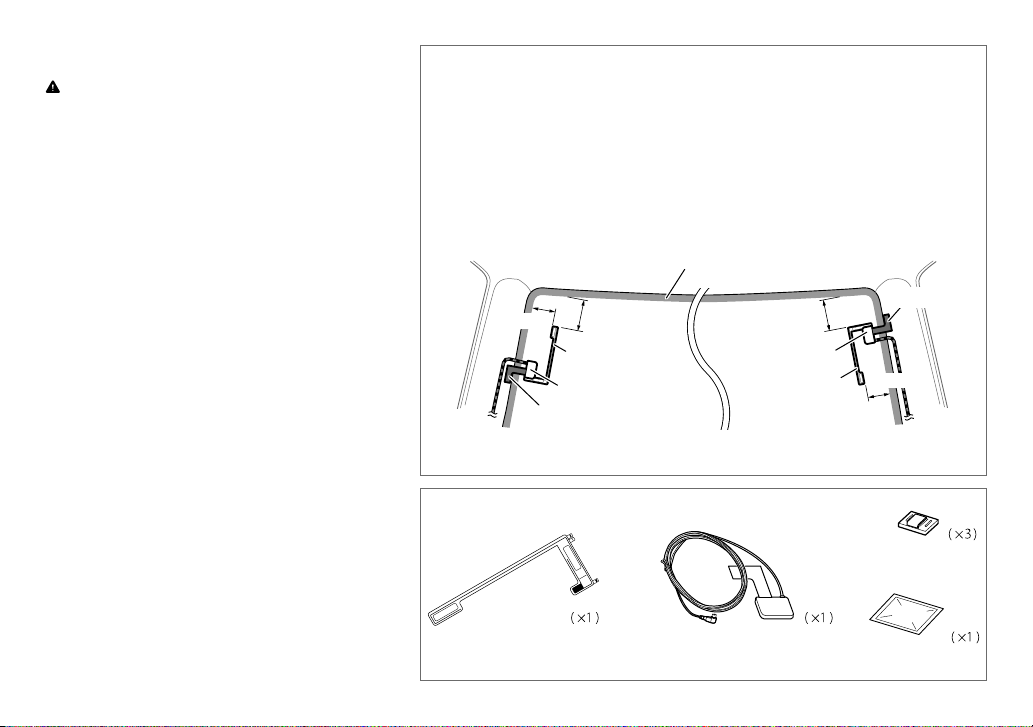
Installing the DAB antenna
Caution
• The film antenna
(F)
is exclusively for use inside the vehicle.
• Do not install at the following locations:
– where it may block the driver’s view.
– where it may obstruct the operation of safety devices such as air
bags.
– on movable glass surfaces such as the rear hatch.
– at side of vehicle (e.g. door, front quarter window).
– on rear window.
• Signal strength will weaken when installed at the following locations:
– on IR reflecting glass or locations covered with mirror type glass
film.
– where it overlaps with genuine radio antenna (pattern).
– where it overlaps with window heating wires.
– on glass that blocks radio signals (e.g. IR reflecting glass, thermal
insulation glass).
• Poor reception may occur:
– due to noise when windscreen wiper, air conditioner, or motor is
turned on.
– depending on the direction of the broadcast station with respect to
the vehicle (antenna).
• Thoroughly wipe oil and dirt from the pasting surface with the
supplied cleaner
• Do not bend or damage the film antenna
(I)
.
(F)
.
• It may not be possible to install on certain vehicles.
• Check the cable routing of the film antenna
(G)
before pasting.
• Do not apply any glass cleaner after pasting the film antenna
(F)
and amplifier unit
(F)
Determine the antenna installation position
• The direction of the film antenna
(F)
changes depending on whether the film antenna
(F)
is installed on the
right side or left side.
• Be sure to check the installation location of film antenna
(F)
before installing. Film antenna cannot be
re-pasted.
• Separate from other antennas by at least 100mm.
• Do not paste the amplifier unit
(G)
on the ceramic line (black part) around the front glass. Because there is not
enough adhesion.
o Installing the antenna on the left side o Installing the antenna on the right side
Ceramic line (black part)
Earth sheet*
70 mm
150 mm 150 mm
(F)
(G)
(G)
(F)
70 mm
Earth sheet*
* Paste the earth sheet of the amplifier unit
(G)
on the metal part of the front pillar.
Part list for installation
.
(H)
Cable clamper
(F)
Film antenna
(G)
Amplifier unit
(cable with booster, 3.5m)
(I)
Cleaner
25
Page 30
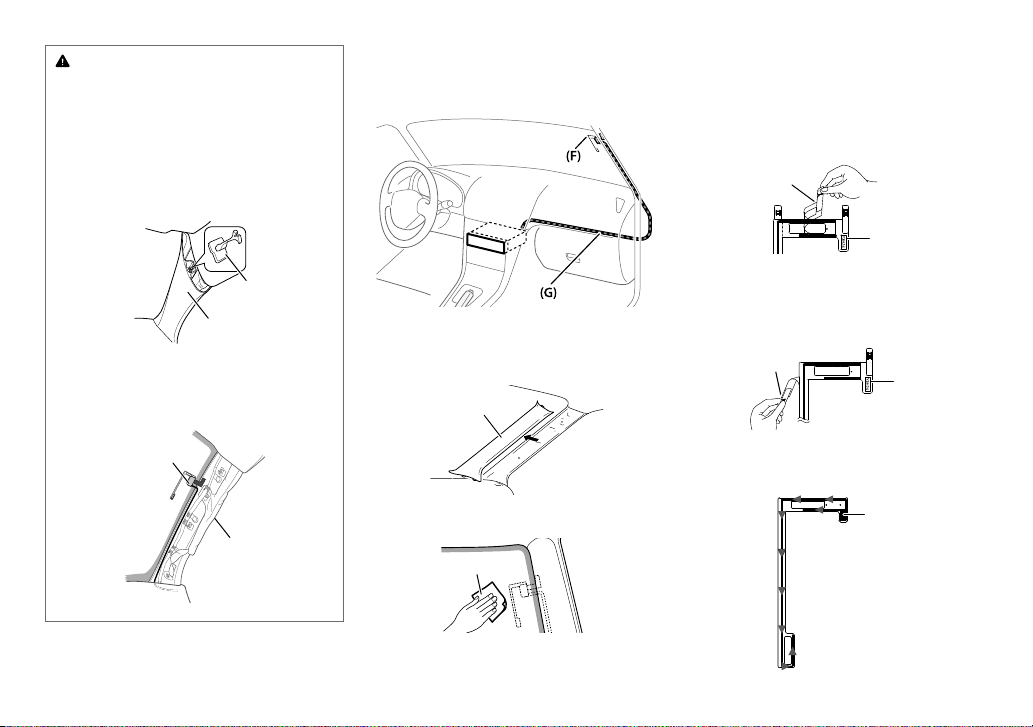
Caution
When installing the antenna cable inside
the front pillar with the air bag installed
• The front pillar cover is secured with a special clip
which may need to be replaced when it is removed.
Contact your vehicle dealer for details on removing
the front pillar cover and availability of replacement
parts.
Installation overview
The antenna should be installed on the passenger side for
safety.
– Wait until the glass surface is completely
dry before proceeding.
– Warm the surface of the windscreen with
defroster if it is cold (during winter).
3 Remove the separator (tag I) of film
antenna (F) horizontally and paste the
antenna on the windscreen.
Separator (tag I)
Front pillar
• Install the amplifier unit
it does not obstruct the operation of the air bag.
(G)
above the air bag so that
(G)
Air bag
26
Clip
Antenna installation
1
Remove the front pillar cover of your car.
Front pillar
2 Clean the windscreen with the supplied
cleaner (I).
(I)
Do not touch the pasting surface (adhesive
side) of the film antenna (F).
(F)
4 Remove the separator (tag II) of film
antenna (F) vertically and paste the
antenna on the windscreen.
Separator (tag II)
(F)
5 Rub the film antenna gently onto the
windscreen in the direction of the arrow
shown to allow it to stick firmly.
(F)
Page 31

6 Remove the application film (tag III).
(F)
Do not touch the lead terminal of film antenna (F).
Application film (tag III)
7 Set the postion of the protrusion of the amplifier unit (G) with the
K on the film antenna (F) and paste.
Do not touch the lead terminal or the pasting surface (adhesive side)
of the amplifier unit (G).
• When installing the antenna on the right side
Set the position of the protrusion with K mark
Earth sheet
(F)
(G)
Lead contact of the amplifier unit
(metal part)
Lead terminal of the film antenna
(F)
• When installing the antenna on the left side
(G)
(F)
Earth sheet
Set the position of the protrusion with J mark
8 Remove the film covering the earth sheet and paste the earth sheet
on the metal part of the vehicle.
Provide sufficient leeway for the earth sheet so that it does not
interfere with the interior parts (front pillar cover). Also take care that
the interior parts do not interfere with the amplifier unit (G).
Windscreen
Earth sheet
(G)
Front pillar cover
9 Wire the antenna cables.
Use cable clamper (H) to secure the antenna to the pillar at several
positions.
10 Attach the front pillar cover back to its original position.
Be sure not to damage the earth sheet and amplifier unit (G) when
covering.
11 Connect the amplifier unit (G) to the DAB input terminal on the rear
of the unit.
12 Set
[DAB ANT POWER]
to
[ON]. ( 5)
27
Page 32

TABLE DES MATIERES
AVANT L’UTILISATION
AVANT L’UTILISATION 2
FONCTIONNEMENT DE BASE 3
PRISE EN MAIN 4
RADIO NUMÉRIQUE (DAB) 5
RADIO ANALOGIQUE 7
CD / USB / iPod 9
AUX 11
TM
RADIO 11
Aha
BLUETOOTH® 12
RÉGLAGES AUDIO 17
RÉGLAGES D’AFFICHAGE 18
PLUS D’INFORMATIONS 18
GUIDE DE DÉPANNAGE 19
SPÉCIFICATIONS 21
INSTALLATION /
RACCORDEMENT 23
Comment lire ce manuel
• Les opérations sont expliquées
principalement en utilisant les touches
de la façade.
•
[XX]
indique les éléments choisis.
•
( XX)
indique que des références
sont disponibles aux page citées.
Avertissement
N’utilisez aucune fonction qui risque de vous distraire de la conduite sure de votre véhicule.
Précautions
Réglage du volume:
• Ajustez le volume de façon à pouvoir entendre les sons extérieurs à la voiture afin d’éviter tout risque d’accident.
• Réduisez le volume avant de reproduire des sources numériques afin d’éviter d’endommager les enceintes par la
soudaine augmentation du niveau de sortie.
Généralités:
• Évitez d’utiliser un périphérique USB ou un iPod/iPhone s’il peut gêner la conduite en toute sécurité.
• Assurez-vous que toutes les données importantes ont été sauvegardées. Nous ne pouvons pas être tenu responsable
pour toute perte des données enregistrées.
• Veuillez faire en sorte de ne jamais mettre ou laisser d’objets métalliques (tels que des pièces ou des outils) dans
l’appareil, afin d’éviter tout risque de court-circuit.
• Si une erreur de disque se produit à cause de la condensation sur l’objectif laser, éjectez le disque et attendez que
l’humidité s’évapore.
Télécommande (RC-406):
• Ne laissez pas la télécommande dans des endroits exposés à la chaleur, comme sur le tableau de bord par exemple.
• La pile au lithium risque d’exploser si elle est remplacée incorrectement. Ne la remplacez uniquement qu’avec le même
type de pile ou son équivalent.
• Le boîtier de la pile ou les piles ne doivent pas être exposés à des chaleurs excessives telles que les rayons du soleil, du
feu, etc.
• Gardez la pile hors de la portée des enfants et dans son emballage d’origine quand elle n’est pas utilisée. Débarrassezvous des piles usagées rapidement. En cas d’ingestion, contactez un médecin immédiatement.
Entretien
Nettoyage de l’appareil:
Nettoyage du connecteur:
l’aide d’un coton tige en faisant attention de ne pas endommager le connecteur.
Manipulation des disques:
• Ne pas toucher la surface d’enregistrement du disque.
• Ne pas coller de ruban adhésif, etc. sur les disques et ne pas utiliser de disque
avec du ruban adhésif collé dessus.
• N’utilisez aucun accessoire pour le disque.
• Nettoyer le disque en partant du centre vers l’extérieur.
• Nettoyez le disque avec un chiffon sec au silicone ou un chiffon doux. N’utilisez aucun solvant.
• Pour retirer les disques de cet appareil, tirez-les horizontalement.
• Retirez les ébarbures du bord du trou central du disque avant d’insérer un disque.
Essuyez la saleté de la façade avec un chiffon sec au silicone ou un chiffon doux.
Détachez la façade et nettoyez le connecteur à
Connecteur (sur la face arrière
de la façade)
2
Page 33

FONCTIONNEMENT DE BASE
Façade
Bouton de volume
(tournez/appuyez)
Touche de détachement
Fenêtre d’affichage
Télécommande (RC-406) (non fournie)
(Cependant, cet appareil peut être commandé à distance avec
une télécommande vendue séparément.)
Capteur de télécommande (NE
l’exposez PAS à la lumière directe
du soleil.)
Retirez la feuille
d’isolant lors de la
première utilisation.
Comment réinitialiserAttachez Détachez
Vos ajustements
préréglés sont aussi
effacés.
Comment remplacer la pile
Pour Faire (sur la façade) Faire (sur la télécommande)
Mettez l’appareil sous tension
Ajustez le volume Tournez le bouton de volume.
Sélectionner la source
Changez l’information sur
l’affichage
Appuyez sur
• Maintenez la touche enfoncée pour mettre l’appareil hors
Appuyez répétitivement sur
Appuyez répétitivement sur
• Maintenez la touche enfoncée pour faire défiler les
B SRC
.
tension.
B SRC
DISPSCRL
informations actuelles de l’affichage.
.
.
Maintenez
( Appuyer sur
Appuyez sur
Appuyez sur
• Appuyez une nouvelle fois pour annuler.
Appuyez répétitivement sur
( non disponible )
SRC
enfoncée pour mettre l’appareil hors tension.
SRC
ne met pas l’appareil hors tension. )
VOL
ou
VOL
.
ATT
pendant la lecture pour atténuer le son.
SRC
.
FRANÇAIS |
3
Page 34

PRISE EN MAIN
1
Annulez la démonstration
Quand vous mettez l’appareil sous tension (ou après une réinitialisation de l’appareil),
l’affichage apparaît: “SELLANGUAGE”
1 Tournez le bouton de volume pour sélectionner
[RUS] (russe)
[ENG]
Puis, l’affichage montre: “CANCELDEMO” “PRESS” “VOLUMEKNOB”
, puis appuyez sur le bouton.
est choisi pour le réglage initial.
2 Appuyez sur le bouton de volume.
[YES]
est choisi pour le réglage initial.
3 Appuyez de nouveau sur le bouton de volume.
“DEMOOFF” apparaît.
2
Réglez l’horloge
Appuyez sur le bouton de volume pour entrer
1
2 Tournez le bouton de volume pour choisir
bouton.
3 Tournez le bouton de volume pour choisir
le bouton.
4 Tournez le bouton de volume pour faire les réglages, puis appuyez sur le
bouton.
Jour Heure Minute
5 Tournez le bouton de volume pour choisir
sur le bouton.
6 Tournez le bouton de volume pour choisir
le bouton.
7 Maintenez enfoncée pour quitter.
Pour retourner à l’option de réglage ou à la hierarchie précédente, appuyez sur .
4
“PRESS” “VOLUMEKNOB”
[ENG]
(anglais) ou
[FUNCTION]
[CLOCK]
, puis appuyez sur le
[CLOCK ADJUST]
[CLOCK FORMAT]
[12H]
ou
[24H]
.
, puis appuyez sur
, puis appuyez
, puis appuyez sur
3
Faites les réglages initiaux
Appuyez sur B SRC pour entrer en veille STANDBY.
1
2 Appuyez sur le bouton de volume pour entrer
[FUNCTION]
.
3 Tournez le bouton de volume pour réaliser une sélection
(voir le tableau suivant), puis appuyez sur le bouton.
4 Maintenez enfoncée pour quitter.
Pour retourner à l’option de réglage ou à la hierarchie précédente, appuyez
sur
.
Défaut:
XX
AUDIO CONTROL
SP SELECT
DISPLAY
EASY MENU
TUNER SETTING
DAB L-BAND
DAB ANT
POWER
PRESET TYPE
SYSTEM
KEY BEEP
OFF/ 5/4/ 6 × 9/6/ OEM
des enceintes (5 pouces ou 4 pouces, 6×9 pouces ou 6 pouces) ou des
enceintes OEM pour obtenir une performance optimale.
ON
:L’éclairage de l’affichage et des touches change sur blanc quand vous
entrez dans
[FUNCTION]
reste sur la couleur du réglage
ON
:Reçoit un ensemble L-BAND pendant la réception audio numérique.;
OFF
:Annulation.
ON:Fournit une alimentation à l’antenne DAB. Lors de l’utilisation de
l’antenne fournie.;
d’une antenne passive avec un amplificateur.
NORMAL
: Mémorise une station pour chaque touche de préréglage dans
chaque bande (FM1/ FM2/ FM3/ MW/ LW/ DB1/ DB2/ DB3). ;
MIX
: Mémorise une station pour chaque touche de préréglage quelle que
soit la bande choisie.
ON
:Met en service la tonalité des touches.;
fonction.
: La sélection est faite en fonction de la taille
.;
OFF
:L’éclairage de l’affichage et des touches
[COLOR SELECT]. ( 18)
OFF
:Ne fournit pas d’alimentation. Lors de l’utilisation
( 25)
OFF
:Met hors service la
Page 35

PRISE EN MAIN
SOURCE SELECT
ON
AHA SRC
BUILT-IN AUX
RUSSIAN SET
P-OFF WAIT
CD READ 1
F/W UPDATE
UPDATE SYSTEM / UPDATE BT/ UPDATE DAB1/
UPDATE DAB2
F/W UP xx.xx/
F/W UP xx.x.x/
F/W UP Vxxx
:Met en service AHA dans la sélection de
la source. ;
OFF
:Hors service.
ON
:Met en service AUX dans la sélection de
la source. ;
OFF
:Hors service.
Sélectionnez la langue d’affichage pour le
menu
[FUNCTION]
des balises (nom de dossier, nom de fichier,
titre du morceau, nom de l’artiste, nom de
l’album) si applicable.
OFF
:La langue d’affichage est l’anglais.;
BКЛ
:La langue d’affichage est le russe.
Applicable uniquement quand le mode de
démonstration est hors service.
Règle la durée avant que l’appareil se mette
automatiquement hors service (pendant le
mode d’attente) pour économiser la batterie.
20M
: 20 minutes ;
60M
: 60 minutes ;
WAIT TIME – – –
:Distingue automatiquement les disques
de fichiers audio et les CD de musique.;
2
: Reproduit de force le disque comme un CD
de musique. Aucun son n’est entendu si un
disque de fichiers audio est reproduit.
YES
:Démarrer la mise à niveau du
micrologiciel.;
niveau n’est pas activée).
Pour en savoir plus sur la mise à niveau du
micrologiciel, référez-vous à:
www.kenwood.com/cs/ce/
et les informations
40M
:Annulation
NO
:Annulation (la mise à
( 11)
( 11)
: 40 minutes ;
RADIO NUMÉRIQUE (DAB)
À propos du DAB (Digital Audio
Broadcasting)
DAB est l’un des systèmes de radio numérique
disponibles aujourd’hui. Il peut offrir un son de qualité
numérique sans toutes les interférences gênantes ni
les distorsions des signaux. De plus, il peut transporter
des textes, des images et des données.
Contrairement aux émissions FM, où chaque
programme est émis sur sa propre fréquence, les
émissions DAB combinent plusieurs programmes
(appelés “services”) pour former un “ensemble”.
La “composante primaire” (station radio principale)
est parfois accompagnée d’une “composante
secondaire” qui peut contenir des programmes
supplémentaires ou d’autres informations.
Démarrez l’écoute
Appuyez sur B SRC pour choisir DAB.
1
2 Appuyez répétitivement sur J BAND (ou appuyez sur #FM+ sur la RC-406) pour
sélectionner DB1/ DB2/ DB3.
3 Maintenez pressée S / T (ou maintenez pressée S / T(+) sur la RC-406) pour
rechercher un ensemble.
4 Appuyez sur S / T (ou appuyez sur S / T(+) sur la RC-406) pour choisir un
ensemble, un service ou un composant à écouter.
•
Pour changer la méthode de syntonisation pour S / T:
AUTO1:
AUTO2:
MANUAL:
Appuyez sur
Appuyez sur
Appuyez sur
Maintenez enfoncée
Maintenez enfoncée
S / T:
S / T:
S / T:
S / T:
S / T:
Choisissez un ensemble, un service ou un composant.
Recherche automatique d’un ensemble.
Recherche d’un service préréglé.
Choisissez un ensemble, un service ou un composant.
Recherche manuelle d’un ensemble.
Préparation:
1 Connectez une antenne DAB à la prise
d’antenne DAB.
( 25)
2 Appuyez sur B SRC pour choisir DAB.
3 Maintenez enfoncée pour démarrer
la mise à jour de la Liste des services.
“LIST UPDATE” apparaît et la mise à jour démarre.
“UPDATED” apparaît quand la mise à jour est
terminée.
La mise à jour prend un maximum de 3 minutes.
Aucune interruption (telle que des informations
routières) n’est possible pendant la mise à jour.
•
Pour annuler la mise à jour de la Liste des
service:
Maintenez de nouveau enfoncée .
Appuyez répétitivement sur
K SEEK
FRANÇAIS |
.
5
Page 36

RADIO NUMÉRIQUE (DAB)
•
Pour mémoriser un service:
touches numériques (
•
Pour choisir un service mémorisé:
touches numériques (
numériques (
1
à 6) sur la RC-406).
Choisissez un service
Appuyez sur pour entrer en mode de recherche
1
de service.
2 Tournez le bouton de volume ou appuyez sur J / K
pour choisir un service, puis appuyez sur le bouton.
(ou utilisation de la RC-406)
Appuyez sur J / K pour recherche un service.
Pour annuler le mode de recherche de service, appuyez sur .
Sélectionnez un service par son nom
Appuyez sur pour entrer en mode de recherche
1
de service.
2 Tournez le bouton de volume rapidement pour entrer
en mode de recherche alphabétique.
3 Tournez le bouton du volume ou appuyez sur
S / T pour choisir le caractère à rechercher.
Appuyez sur
J / K
4 Appuyez sur le bouton de volume pour démarrer la
recherche.
5 Tournez le bouton de volume pour choisir un service,
puis appuyez sur le bouton.
Pour annuler le mode de recherche alphabétique, appuyez sur
.
Maintenez pressée une des
1
à 6).
1
à 6) (ou appuyez sur une des touches
pour aller à la page précédente/suivante.
Appuyez sur une des
Relecture
Maintenez pressée K SEEK (ou appuyez sur K sur la RC-406).
“REPLAY MODE” apparaît et la relecture démarre à partir de la position de direct. Vous pouvez
relire une certaine durée du service actuel (en fonction du débit binaire audio).
Pendant la relecture...
• Pour faire une pause ou reprendre la lecture, appuyez sur
la RC
-
406).
• Pour sauter le morceau actuel vers l’arrière/vers l’avant, appuyez sur
sur
S / T(+)
• Pour un retour/avance rapide, maintenez pressée
S / T(+)
• Pour quitter la relecture et retourner au direct, maintenez pressée
pressée
sur la RC-406).
K
sur la RC-406).
sur la RC-406).
6 IW
S / T
(ou appuyez sur
S / T
(ou maintenez pressée
K SEEK
ENT IW
(ou appuyez
(ou maintenez
sur
Autres paramètres
Appuyez sur le bouton de volume pour entrer
1
[FUNCTION]
.
2 Tournez le bouton de volume pour réaliser une sélection (voir le tableau
suivant), puis appuyez sur le bouton.
3 Maintenez enfoncée pour quitter.
Pour retourner à l’option de réglage ou à la hierarchie précédente, appuyez sur .
Défaut:
XX
TUNER SETTING
ON
AF SET
TI ON
PTY SEARCH
:
Lors de l’écoute de la bande DAB...
Commute automatiquement sur la station FM diffusant le même programme si le signal DAB devient
faible. Il retourne sur le son DAB quand le signal devient de nouveau fort.
Lors de l’écoute de la bande FM...
Commute automatiquement sur la source DAB diffusant le même programme (si disponible).;
OFF
:Annulation.
:Permet à l’appareil de commuter temporairement sur les informations routières.;
Appuyez sur le bouton de volume pour entrer en mode de sélection de la langue PTY. Tournez le bouton
de volume pour choisir la langue PTY (
Sélectionne le type de programme disponible
ENGLISH/ FRENCH/ GERMAN
( 7)
, puis appuyez sur S / T pour démarrer.
), puis appuyez sur le bouton.
OFF
:Annulation.
6
Page 37

RADIO ANALOGIQUERADIO NUMÉRIQUE (DAB)
ASW SELECT TRAVEL, WARNINGS, NEWS, WEATHER, EVENT, SPECIAL, RAD INFO,
LIST UPDATE AUTO
PTY WATCH
SPORTS, FINANCE:
sur le bouton.
“
” apparaît devant le type d’annonce activé.
*
Commute automatiquement, à partir de n’importe quelle source, sur des ensembles de radio
numérique diffusant un type d’annonce activé.
• Plusieurs annonces peuvent être activées simultanément.
• Pour les désactiver, appuyez de nouveau sur le bouton de volume (“
:Met à jour automatiquement la liste des services DAB quand l’appareil est mis
sous tension.;
.
Commute automatiquement, à partir de n’importe quelle source, sur des ensembles de radio
numérique diffusant un type de programme sélectionné.
NEWS, AFFAIRS, INFO, SPORT, EDUCATE, DRAMA, CULTURE, SCIENCE,
VARIED, POP M
(musique)
SOCIAL, RELIGION, PHONE IN, TRAVEL, LEISURE, JAZZ, COUNTRY, NATION M
(musique)
OFF
:Annulation.
Tournez le bouton de volume pour faire une sélection, puis appuyez
MANUAL
:Maintenez enfoncée DAB pour mettre à jour la liste des services
(musique)
, ROCK M
(musique)
, CLASSICS, OTHER M
, OLDIES, FOLK M
(musique)
(musique)
, EASY M
, WEATHER, FINANCE, CHILDREN,
, DOCUMENT
(musique)
” s’éteint).
*
, LIGHT M
CLOCK
ON
TIME SYNC
• Type de programme disponible:
SPEECH: NEWS, AFFAIRS, INFO
VARIED, WEATHER, FINANCE, CHILDREN, SOCIAL, RELIGION, PHONE IN, TRAVEL, LEISURE
:Synchronise l’heure de l’appareil avec l’heure du signal de la radio numérique.;
OFF
:Annulation.
(information),
SPORT, EDUCATE, DRAMA, CULTURE, SCIENCE
,
,
DOCUMENT
MUSIC: POP M
CLASSICS, OTHER M
(musique)
L’appareil recherche le type de programme catégorisé dans
été choisi.
• Si le volume est ajusté pendant la réception des informations routières, des annonces
ou des alarmes, le volume ajusté est automatiquement mémorisé. Il sera appliqué la
prochaine fois que la fonction d’informations routières, d’annonce ou d’alarme sera
activée.
(musique),
(musique),
ROCK M
(musique),
JAZZ, COUNTRY, NATION M
EASY M
(musique),
(musique),
[SPEECH]
LIGHT M
OLDIES, FOLK M
ou
(musique),
[MUSIC]
s’il a
Recherchez une station
Appuyez sur B SRC pour choisir TUNER.
1
2 Appuyez répétitivement sur JBAND (ou appuyez sur
AM–/#FM+ sur la RC-406) pour sélectionner FM1/ FM2/
*
FM3/ MW (ou LW).
3 Appuyez sur S / T (ou appuyez sur S / T(+) sur la
RC-406) pour rechercher une station.
•
Pour changer la méthode de recherche pour S / T:
répétitivement sur
AUTO1:
AUTO2:
MANUAL:
•
Pour mémoriser une station:
numériques (
•
Pour choisir une station mémorisée:
numériques (
sur la RC-406).
KSEEK
Recherche automatiquement une station.
Recherche d’une station préréglée.
Recherche manuellement une station.
1
à 6).
1
à 6) (ou appuyez sur une des touches numériques (1 à 6)
.
Maintenez pressée une des touches
Appuyez sur une des touches
Appuyez
Syntonisation à accès direct (en utilisant la RC-406)
Appuyez sur DIRECT pour entrer en mode de Syntonisation
1
à accès direct.
2 A l’aide des touches numériques, entrez une fréquence.
3 Appuyez sur ENTIW pour recherche une station.
• Pour annuler, appuyez sur ou
• Si aucune opération n’est effectuée pendant 10 secondes après l’étape
la syntonisation à accès direct est annulée automatiquement.
DIRECT
.
2
,
FRANÇAIS |
7
Page 38

RADIO ANALOGIQUE
Autres paramètres
Appuyez sur le bouton de volume pour entrer
1
2 Tournez le bouton de volume pour réaliser une sélection (voir le
tableau suivant), puis appuyez sur le bouton.
3 Maintenez enfoncée pour quitter.
Pour retourner à l’option de réglage ou à la hierarchie précédente, appuyez sur
.
TUNER SETTING
LOCAL SEEK
AUTO MEMORY YES
MONO SET
NEWS SET ON
REGIONAL ON
AF SET ON
TI
*
PTY SEARCH
ON
: Recherche uniquement les stations FM avec une bonne réception. ;
OFF
: Annulation.
:Mémorise automatiquement 6 stations dont la réception est bonne.;
NO
:Annulation. (Peut être sélectionné uniquement si
pour
[PRESETTYPE]
ON
:Améliore la réception FM mais l’effet stéréo peut être perdu.;
OFF
:Annulation.
: L’appareil commute temporairement sur le programme d’information s’il est
disponible. ;
: Commute sur une autre station uniquement dans la région spécifiée, à l’aide
de la commande “AF”.;
: Recherche automatiquement une autre station diffusant le même programme
dans le même réseau Radio Data System mais qui possède une meilleure réception
quand la réception actuelle est mauvaise.;
ON
:Permet à l’appareil de commuter temporairement sur les informations
routières.;
Appuyez sur le bouton de volume pour entrer en mode de sélection de la langue
PTY. Tournez le bouton de volume pour choisir la langue PTY (
FRENCH/ GERMAN
Sélectionne le type de programme disponible (voir ci-après), puis appuyez sur
S / T pour démarrer.
.) (
OFF
: Annulation.
OFF
OFF
:Annulation.
), puis appuyez sur le bouton.
4)
:Annulation.
OFF
[FUNCTION]
[NORMAL]
: Annulation.
.
ENGLISH
Défaut:
est sélectionné
/
•
[LOCAL SEEK]/ [MONO SET]/ [NEWS SET]/ [REGIONAL]/ [AF SET]/ [PTY SEARCH]
être choisi uniquement quand la bande est FM1/ FM2/ FM3.
• Type de programme disponible:
SPEECH
:
NEWS
,
AFFAIRS
,
INFO
,
LEISURE
CLASSICS
OLDIES
(information),
,
WEATHER
,
DOCUMENT
ROCK M
,
OTHER M
,
FOLK M
SCIENCE
,
VARIED
IN
,
MUSIC: POP M
XX
L’appareil recherche le type de programme catégorisé dans
s’il a été choisi.
• Si le volume est ajusté pendant la réception des informations routières,
d’alarmes ou de bulletins d’information, le volume ajusté est automatiquement
mémorisé. Il sera appliqué la prochaine fois que la fonction d’informations
routières, d’alarme ou de bulletin d’information sera activée.
*
[TI]
pour la source DAB uniquement.
TRAVEL
(musique),
(musique),
(musique),
pour la bande PO/GO permet l’interruption en cas d’information routière
,
FINANCE
(musique),
(musique),
(musique)
SPORT
,
CHILDREN
EASY M
,
EDUCATE
(musique),
JAZZ
,
SOCIAL
,
COUNTRY
,
DRAMA
,
RELIGION
[SPEECH]
,
CULTURE
LIGHT M
,
NATION M
ou
peut
,
PHONE
[MUSIC]
,
8
Page 39

CD / USB / iPod
Démarrez la lecture
La source change automatiquement et le lecture
démarre.
CD
Face portant l’étiquette M Éjectiez le disque
USB
Prise d’entrée USB
CA-U1EX (max.: 500mA)
(accessoire en option)
et/ ou
Câble USB à partir de l’arrière de l’appareil
iPod/iPhone
Prise d’entrée USB
et/ ou
Câble USB à partir de l’arrière de l’appareil
KCA-iP102 (en option) ou accessoire câble
Appuyez sur 5 iPod pour sélectionner le mode
de commande pendant que la source est iPod.
MODE ON:
À de iPod
MODE OFF:
du iPod/iPhone
2
*
À partir de l’appareil.
.
1
*
Pour Faire
Mettez en pause ou
reprenez la lecture
Sélectionnez un une
plage ou un fichier
Sélectionnez un
3
*
dossier
Recherche rapide vers
l’arrière/vers l’avant
Répéter la lecture
Lecture aléatoire
1
*
Ne laissez pas le câble à l’intérieur de la voiture quand il n’est pas utilisé.
2
*
Vous pouvez toujours faire une lecture/pause, sauter des fichiers, et faire une recherche rapide de fichiers
vers l’arrière/vers l’avant à partir de l’appareil.
3
*
Uniquement pour les fichiers MP3/WMA/AAC/WAV. Cela ne fonctionne pas pour l’iPod.
4
*
Pour iPod:
5
*
Pour CD:
Si vous connectez l’iPod/iPhone à la prise d’entrée USB de l’appareil (tout en écoutant TuneIn Radio, TuneIn
Radio Pro ou Aupeo), l’appareil sort le son de ces applications.
Fonctionne uniquement quand
Uniquement pour les fichiers MP3/WMA/AAC.
Appuyez sur 6 IW (ou appuyez sur ENT IW sur la RC-406).
Appuyez sur S / T (ou appuyez sur S / T(+) sur la RC-406).
Appuyez sur J / K (ou appuyez sur
AM– / #FM+ sur la RC-406).
*
Maintenez pressée S / T (ou maintenez pressée S / T(+) sur
la RC-406).
4
*
Appuyez répétitivement sur 4 .
• CD Audio: TRACKREPEAT, REPEATOFF
• Fichier MP3/WMA/AAC/WAV ou iPod: FILEREPEAT, FOLDERREPEAT, REPEATOFF
• Fichier KENWOOD Music Editor Light (KME Light)/ KENWOOD Music Control
(KMC)
( 18)
4
*
Appuyez répétitivement sur 3 .
• CD Audio: DISCRANDOM, RANDOMOFF
• Fichier MP3/WMA/AAC/WAV ou iPod ou fichier KME Light/ KMC:
FOLDERRANDOM, RANDOMOFF
: FILEREPEAT, REPEATOFF
Maintenez enfoncée 3 pour sélectionner “ALLRANDOM”.
[MODE OFF]
est sélectionné.
5
*
FRANÇAIS |
9
Page 40

CD / USB / iPod
Sélectionnez une plage/fichier à
partir d’une liste
Pour iPod:
[MODE OFF]
Fonctionne uniquement quand
est sélectionné.
( 9)
1 Appuyez sur .
2 Tournez le bouton de volume pour
faire une sélection, puis appuyez sur le
bouton.
• Fichier MP3/WMA/AAC/WAV: Sélectionnez
le dossier souhaité, puis un fichier.
• iPod ou fichier KME Light/ KMC:
Sélectionnez le fichier souhaité à partir de la
liste (PLAYLISTS, ARTISTS, ALBUMS, SONGS,
*
PODCASTS
*
Uniquement pour iPod.
• Pour retourner au dossier racine (ou au premier
fichier), appuyez sur la touche numérique
5 iPod
• Pour retourner à l’option de réglage ou à la
hierarchie précédente, appuyez sur
• Pour annuler, maintenez enfoncée
S’il y a beaucoup de fichiers....
Vous pouvez faire une recherche rapide parmi
les fichiers (à l’étape
sauts d’une ampleur prédéfinie en appuyant sur
S / T
• Reportez-vous aussi à “Réglez l’ampleur des
sauts pour la recherche”.
• Maintenez enfoncée
morceaux avec l’ampleur maximum (10
que soit le réglage réalisé.
•
Pour USB:
enregistrés dans la base de données crée avec
KME Light/ KMC.
• Ne peut pas être utilisé pour les CD audio.
, GENRES, COMPOSERS*).
.
2
ci-dessus) en faisant des
.
S / T
pour sauter les
Uniquement pour les fichiers
%
.
.
) quel
10
Recherche directe de morceau (en utilisant
la RC-406)
1
Appuyez sur DIRECT.
2 A l’aide des touches numériques, entrez le
numéro de plage/fichier.
3 Appuyez sur ENT IW pour rechercher un
morceau.
• Pour annuler, appuyez sur .
• Non disponible si la lecture aléatoire est sélectionné.
• Ne peut pas être utilisé pour iPod, fichier KME Light/
KMC.
Sélectionnez un morceau par son nom
Lors de l’écoute d’un iPod...
1 Appuyez sur .
2 Tournez le bouton de volume pour choisir
une catégorie, puis appuyez sur le bouton.
3 Tournez le bouton de volume rapidement
pour entrer en recherche de caractères.
4 Tournez le bouton du volume pour choisir le
caractère à rechercher.
5 Appuyez sur S / T pour déplacer la
position d’entrée.
Vous pouvez entrer un maximum de trois caractères.
6 Appuyez sur le bouton de volume pour
démarrer la recherche.
7 Tournez le bouton de volume pour faire une
sélection, puis appuyez sur le bouton.
Répétez l’étape 7 jusqu’à ce que l’élément souhaité
soit sélectionné.
• Pour rechercher un autre caractère qu’une lettre de
A à Z et un chiffre de 0 à 9, entrez seulement “
• Pour revenir à la hiérarchie précédente, appuyez sur
.
• Pour revenir au menu principal, appuyez sur la touche
numérique
• Pour annuler, maintenez enfoncée
5 iPod
.
”.
*
.
Réglez l’ampleur des sauts pour la
recherche
Lors de l’écoute d’un iPod ou d’un fichier KME Light/ KMC...
1 Appuyez sur le bouton de volume pour
[FUNCTION]
entrer
2 Tournez le bouton de volume pour choisir
[USB]
, puis appuyez sur le bouton.
.
3 Tournez le bouton de volume pour choisir
[SKIP SEARCH]
, puis appuyez sur le bouton.
4 Tournez le bouton de volume pour faire
une sélection, puis appuyez sur le bouton.
0.5%
(défaut)/ 1%/ 5%/
pour la recherche sur l’ensemble des fichiers.
10%
: Ampleur du saut
5 Maintenez enfoncée pour quitter.
Changez le lecteur USB
Quand un smartphone (périphérique à mémoire de
grande capacité) est connecté à la prise d’entrée USB,
vous pouvez sélectionnez sa mémoire interne ou sa
mémoire externe (une carte SD par exemple) pour
lire les morceaux mémorisés.
Vous pouvez aussi choisir le lecteur que vous
souhaitez quand plusieurs lecteurs sont connectés.
Appuyez répétitivement sur la touche numérique
5 iPod
pour choisir le lecteur souhaité.
(ou)
1 Appuyez sur le bouton de volume pour
[FUNCTION]
entrer
2 Tournez le bouton de volume pour choisir
[USB]
, puis appuyez sur le bouton.
.
3 Tournez le bouton de volume pour choisir
[MUSIC DRIVE]
4 Appuyez sur le bouton de volume pour
sélectionner
Le lecteur suivant est sélectionné automatiquement.
, puis appuyez sur le bouton.
[DRIVE CHANGE]
.
Répétez les étapes 1 à 4 pour choisir les lecteurs suivants.
Options sélectionnables:
[DRIVE1]
à
[DRIVE5]
Page 41

AUX AhaTM RADIO
Préparation:
Sélectionnez
[ON]
pour
[BUILT-IN AUX]. ( 5)
Démarrez l’écoute
Connectez un lecteur audio portable (en
1
vente dans le commerce).
Prise d’entrée auxiliaire
Mini fiche stéréo de 3,5 mm avec
connecteur en forme de “L” (en vente
dans le commerce)
Lecteur audio
portable
2 Appuyez sur B SRC pour choisir AUX.
3 Mettez sous tension le lecteur audio
portable et démarrez la lecture.
Réglez le nom pour AUX
Lors de l’écoute d’un lecteur audio portable
connecté à l’appareil...
1 Appuyez sur le bouton de volume pour
entrer
[FUNCTION]
.
2 Tournez le bouton de volume pour
choisir
[SYSTEM]
, puis appuyez sur le
bouton.
3 Tournez le bouton de volume pour
choisir
[AUX NAME SET]
, puis appuyez sur
le bouton.
4 Tournez le bouton de volume pour
faire une sélection, puis appuyez sur le
bouton.
AUX
(défaut)/
DVD/ PORTABLE/ GAME/ VIDEO/ TV
5 Maintenez enfoncée pour quitter.
Préparation:
Installez la dernière version de l’application
TM
Aha
sur votre appareil (iPhone/ iPod touch),
puis créez un compte et connectez-vous sur
TM
Aha
.
• Sélectionnez
[ON]
pour
Démarrez l’écoute
Ouvre l’application AhaTM sur votre
1
appareil.
2 Connectez votre appareil à la prise
d’entrée USB.
Prise d’entrée USB
et/ ou
Câble USB à partir de l’arrière de
l’appareil
La source change sur AHA FRONT/
AHAREAR et la diffusion démarre.
* Ne laissez pas le câble à l’intérieur de la
voiture quand il n’est pas utilisé.
KCA-iP102 (en option) ou accessoire
câble du iPod/iPhone
[AHA SRC]. ( 5)
*
Pour Faire
Mettez en pause ou
reprenez la lecture
Sélectionner un contenu
Appuyez sur
sur
ENT IW
6 IW
(ou appuyez
sur la RC-406).
Appuyez sur S / T (ou
appuyez sur S / T(+)
sur la RC-406).
Avancer de 30 secondes
un contenu
Avancer de 15 secondes
un contenu
“Aimer” le contenu
actuel
“Ne pas aimer” le
contenu actuel
1
*
Applicable uniquement aux livres audio et aux podcast.
2
*
Non applicable aux livres audio et aux stations
1
*
1
*
2
*
géodépendantes (LBS).
Maintenez enfoncée T.
Maintenez enfoncée S.
Appuyez sur J .
• Pour annuler le vote, appuyez à
nouveau sur
Appuyez sur K .
2
*
• Pour annuler le vote, appuyez à
nouveau sur
J
.
K
.
Recherchez une station
1
Appuyez sur .
2 Tournez le bouton de volume pour choisir une
station, puis appuyez sur le bouton.
3 Tournez le bouton de volume sur le contenu
souhaité, puis appuyez sur le bouton.
(ou utilisation de la RC-406)
Appuyez sur J / K pour recherche une station.
Pour annuler, maintenez enfoncée .
Vous pouvez passer un appel quand votre périphérique est
connecté à l'appareil via la connexion Bluetooth
•
Pour appeler un numéro du contenu*:
puis appuyez sur le bouton de volume pour appeler.
•
Pour terminer ou déconnecter un appel:
* La disponibilité dépend de la station sélectionnée.
( 12)
...
Appuyez sur 1
Appuyez sur .
FRANÇAIS |
11
Page 42

BLUETOOTH®
Vous pouvez commander les périphériques Bluetooth en
utilisant cet appareil.
Connectez le microphone
MIC (prise d’entrée microphone)
Microphone (fourni)
Panneau arrière
Ajustez l’angle du
microphone
Si vous mettez hors tension l’appareil ou si vous
détachez le panneau de commande pendant un appel,
la connexion Bluetooth est déconnectée. Continuez la
conversation en utilisant votre téléphone portable.
Profiles Bluetooth pris en charge
– Hands-Free Profile — Profile mains libres (HFP)
– Serial Port Profile — Profile de port série (SPP)
– Phonebook Access Profile — Profile d’accès au
répertoire d’adresses (PBAP)
– Object Push Profile — Profile de poussée d’objet (OPP)
– Advanced Audio Distribution Profile — Profile de
distribution audio avancé (A2DP)
– Audio/Video Remote Control Profile — Profile de
télécommande audio/vidéo (AVRCP)
12
Fixez si nécessaire en utilisant des
serre-câbles (non fourni).
Pairage d’un périphérique Bluetooth
Lors de la connexion d’un périphérique Bluetooth
à l’appareil pour la première fois, faites les pairage
entre l’appareil et le périphérique. Une fois que le
pairage est termine, le périphérique Bluetooth reste
enregistré sur l’appareil même si vous réinitialisez
l’appareil.
• Un maximum de cinq appareils peuvent être
enregistrés (appariés) en tout.
• Un maximum de deux téléphones Bluetooth et
un périphérique audio Bluetooth peuvent être
connecté en même temps.
• Cet appareil prend en charge le Pairage simple
sécurisé (SSP).
• Certains périphériques Bluetooth peuvent ne
pas se connecter automatiquement au système
après le pairage. Connectez le périphérique à
l’appareil manuellement. Référez-vous au manuel
d’instructions de votre périphérique Bluetooth
pour en savoir plus.
1 Appuyez sur B SRC pour mettre
l’appareil sous tension.
2 Recherchez et sélectionnez le nom
de ce modèle (KDC-BT4*DAB) sur le
périphérique Bluetooth.
“PAIRING” “PASS XXXXXX” Nom du
périphérique
défile sur l’affichage.
“PRESS” “VOLUME KNOB”
3 Appuyez sur le bouton de volume pour
démarrer le pairage.
“PAIRING OK” apparaît quand le pairage est
terminé et “
Bluetooth est établie.
• Pour certains périphériques Bluetooth, il se
peut que vous ayez besoin d’entrer le code
PIN (numéro d’identification personnel)
immédiatement après la recherche.
” s’allume quand la connexion
• La demande de pairage (via Bluetooth) est activée
automatiquement si un iPhone/iPod touch est
connecté par la prise d’entrée USB. (Applicable
uniquement si
( 16)
Appuyez sur le bouton de volume pour faire le
pairage une fois que vous avez validé le nom de
périphérique.
[AUTO PAIRING]
est réglé sur
[ON]
.)
Mode de vérification Bluetooth
Vous pouvez vérifier la connectivité du profile
pris en charge entre le périphérique Bluetooth et
l’appareil.
• Assurez-vous que le périphérique Bluetooth est
connecté.
1 Maintenez enfoncée .
“PLEASE PAIR YOUR PHONE” apparaît.
2 Recherchez et sélectionnez le nom
de ce modèle (KDC-BT4*DAB) sur le
périphérique Bluetooth.
3 Utilisez le périphérique Bluetooth pour
valider le pairage.
“TESTING” clignote sur l’affichage.
Le résultat de la connectivité (OK ou NG) apparaît
après la vérification.
PAIRING : État du pairage
HF CNT: Compatibilité avec le Profile mains
AUD CNT: Compatibilité avec le Profile de
PB DL: Compatibilité avec le Profile d’accès au
• Pour annuler le mode de vérification, maintenez
libres (HFP)
distribution audio avancé (A2DP)
répertoire d’adresses (PBAP)
enfoncée
B SRC
tension.
pour mettre l’appareil hors
Page 43

Téléphone portable Bluetooth
Pour Faire
Réception d’un appel
Appuyez sur , sur le bouton de
volume ou sur l’une des touches
numériques (1 à 6) (ou appuyez sur
sur la RC-406).
• Toutes les touches et les éclairages de
l’affichage clignotent quand il y a un appel
entrant.
Pendant un appel, les touches et les
affichages s’allument en fonction du
réglage réalisé pour
• Quand
l’heure choisie, l’appareil répond
automatiquement aux appels entrants.
(14)
Refus d’un appel
entrant
Fin d’un appel
Appuyez sur B SRC (ou appuyez sur
sur la RC-406).
Appuyez sur ou B SRC (ou appuyez
sur
Commute entre le
mode mains libres et le
mode de conversation
privée.
Ajustez le volume du
téléphone
Commutez entre deux
téléphones connectés
Appuyez sur 6IW pendant un appel.
• Les opérations peuvent différer en fonction
du périphérique Bluetooth connecté.
Tournez le bouton de volume pendant
un appel.
Volume du téléphone:
(Défaut:
• Cet ajustement n’affecte pas le volume des
autres sources.
Appuyez répétitivement sur .
• Ne fonctionne pas pendant un appel.
[AUTO ANSWER]
sur la RC-406).
[15]
)
[DISPLAY]. (18)
est réglé sur
[00]
à
[35]
BLUETOOTH®
Pour améliorer la qualité du son pendant un appel
Quand vous parlez au téléphone...
1 Appuyez sur le bouton de volume pour entrer
2 Tournez le bouton de volume pour réaliser une sélection (voir le tableau
suivant), puis appuyez sur le bouton.
3 Maintenez enfoncée pour quitter.
Pour retourner à l’option de réglage ou à la hierarchie précédente, appuyez sur .
MIC GAIN –20
NR LEVEL –5
ECHO CANCEL
—+8(0):La sensibilité du microphone augmente quand le numéro augmente.
—
–20(–10
soit entendu pendant une conversation téléphonique.
1
—10(4):Ajustez le temps de retard d’annulation de l’écho jusqu’à ce que le dernier écho
est entendu pendant une conversation téléphonique.
):Ajustez le niveau de réduction de bruit jusqu’à ce qu’un minimum de bruit
Notification de message texte
Quand le téléphone reçoit un message texte, l’appareil sonne et “SMS RECEIVED” apparaît.
• Vous ne pouvez pas lire, modifier ou envoyer un message via cet appareil.
• Pour annuler le message, appuyez sur n’importe quelle touche.
Utilisation de la reconnaissance vocale
Maintenez enfoncée .
1
Le téléphone connecté (qui a été apparié le plus tôt) est activé. Cependant, si un
périphérique prioritaire est connecté, maintenir enfoncée
prioritaire.
( 15, DVC PRIORITY)
2 Dites le nom du contact que vous souhaitez appeler ou la commande
vocale pour commander les fonctions du téléphone.
• Les fonctions de reconnaissance vocale prises en charge varient pour chaque téléphone.
Référez-vous au mode d’emploi du téléphone connecté pour les détails.
• L’appareil prend aussi en charge la fonction d’assistant personnel intelligent de l’iPhone.
[FUNCTION]
.
active le périphérique
Défaut:
XX
FRANÇAIS |
13
Page 44

BLUETOOTH®
Fonctionnement du mode Bluetooth
Appuyez sur pour entrer en mode Bluetooth.
1
2 Tournez le bouton de volume pour réaliser une sélection (voir le
tableau suivant), puis appuyez sur le bouton.
3 Maintenez enfoncée pour quitter.
Pour retourner à l’option de réglage ou à la hierarchie précédente, appuyez sur
.
CALL
HISTORY
1 Appuyez sur le bouton de volume pour sélectionner un nom ou un numéro de
téléphone.
• “INCOMING”, “OUTGOING” ou “MISSED” apparaît sur la partie inférieure de
l’affichage pour indiquer l’état de l’appel précédent.
• Appuyez sur
• “NO DATA” apparaît s’il n’y a pas d’historique d’appels enregistré.
DISP SCRL pour changer la catégorie de l’affichage (NUMBER
ou NAME).
2 Appuyez sur le bouton de volume pour appeler.
PHONE
BOOK
NUMBER
DIAL
1 Tournez le bouton de volume pour choisir un nom, puis appuyez sur le bouton.
2 Tournez le bouton de volume pour choisir un numéro de téléphone, puis appuyez sur
le bouton pour appeler.
• Si le téléphone prend en charge PBAP, le répertoire d’adresse du téléphone connecté
est transféré automatiquement sur l’appareil lors du pairage. Si le téléphone ne prend
pas en charge PBAP, “TRANSFER PB” apparaît. Transférez le répertoire téléphonique
manuellement.
• Les contacts sont catégorisés de la façon suivante: HOME, OFFICE, MOBILE, OTHER,
GENERAL
• Cet appareil peut uniquement afficher les lettres non accentuées. (Les lettres
accentuées telles que “Ú” sont affichées comme “U”.)
• Si le répertoire téléphonique contient beaucoup de contacts
contact par son nom).
1 Tournez le bouton de volume pour sélectionner un numéro (0 à 9) ou un caractère
(
2 Appuyez sur S / T pour déplacer la position d’entrée.
Répétez les étapes
téléphone.
(16, TRANSFER PB)
( Sélectionnez un
, #, +).
1 et 2 jusqu’à ce que vous terminiez d’entrer le numéro de
3 Appuyez sur le bouton de volume pour appeler.
(ou utilisation de la RC-406)
1 Appuyez sur les touches numérique (0 à 9) pour entrer le numéro de téléphone.
2 Appuyez sur pour appeler.
14
VOICE
Dites le nom du contact que vous souhaitez appeler ou utilisez la commande
vocale pour commander les fonctions du téléphone.
(
13, Utilisation de
la reconnaissance vocale)
BATT* LOW
SIGNAL* NO SIGNAL/ LOW/ MID/ MAX
SETTINGS
Défaut:
AUTO ANSWER
RING MODE SYSTEM:
SMS NOTIFY* ON:
* Les fonctionnalités dépendent du type de téléphone utilisé.
/
MID/ FULL
:Affiche la puissance de la batterie.
reçu.
1 —30
:L’appareil répond automatiquement aux appels entrant après le temps
sélectionné.;
OFF
:Annulation.
L’appareil sonne pour vous avertir de l’arrivée d’un appel/message
texte.
(La tonalité de sonnerie par défaut est différente en fonction du périphérique
apparié.)
•
CALL:
Choisissez votre tonalité de sonnerie préférée (
appels entrants.
•
MESSAGE:
Choisissez votre tonalité de sonnerie préférée (
pour les messages texte.
PHONE:
L’appareil utilise la tonalité de sonnerie du téléphone connecté pour
vous avertir de l’arrivé d’un appel/message texte. (Le téléphone connecté sonne
s’il ne prend pas en charge cette fonction.)
L’appareil sonne et “SMS RECEIVED” apparaît pour vous notifier de l’arrivée
d’un message texte.;
:Montre la puissance du signal actuellement
OFF
:Annulation.
TONE 1 — 5
TONE 1 — 5
) pour les
XX
)
Sélectionnez un contact par son nom
• Vous pouvez rechercher un contact rapidement à l’aide de la première lettre
(A à Z), nombre (0 à 9) ou symbole.
• La deuxième lettre du contact est recherchée si la première lettre n’existe pas.
1 Appuyez sur pour entrer en mode Bluetooth.
2 Tournez le bouton de volume pour choisir
[PHONE BOOK]
, puis
appuyez sur le bouton.
Page 45

3 Tournez le bouton de volume rapidement pour entrer en
mode de recherche alphabétique.
Le premier menu (ABCDEFGHIJK) apparaît. Pour passer sur les autres
menus (LMNOPQRSTUV ou WXYZ1
), appuyez sur
J / K
.
4 Tournez le bouton de volume ou appuyez sur S / T
pour choisir la première lettre, puis appuyez sur le
bouton.
• Pour faire une recherche avec les numéros, choisissez “1”.
• Pour faire une recherche avec les symboles, choisissez “ ”.
5 Tournez le bouton de volume pour choisir un nom, puis
appuyez sur le bouton.
6 Tournez le bouton de volume pour choisir un numéro de
téléphone, puis appuyez sur le bouton pour appeler.
Pour revenir à la hiérarchie précédente, appuyez sur .
Stockage d’un contact en mémoire
Vous pouvez mémoriser un maximum de 6 contacts.
1 Appuyez sur pour entrer en mode Bluetooth.
2 Tournez le bouton de volume pour choisir
[PHONE BOOK]
ou
[NUMBER DIAL]
, puis appuyez sur le bouton.
[CALL HISTORY]
,
3 Tournez le bouton de volume pour sélectionner un
contact ou entrez un numéro de téléphone.
Si un contact est sélectionné, appuyez sur le bouton de volume
pour afficher le numéro de téléphone.
4 Maintenez pressée une des touches numériques (1 à 6).
“STORED” apparaît quand les contacts sont mémorisés.
Pour supprimer un contact de la mémoire préréglée, choisissez
[NUMBER DIAL]
à l’étape 2 et mémorisé un numéro vide.
Pour passer un appel à partir de la mémoire
Appuyez sur pour entrer en mode Bluetooth.
1
2 Appuyez sur l’une des touches numériques (1 à 6).
3 Appuyez sur le bouton de volume pour appeler.
“NO MEMORY” apparaît s’il n’y a pas de contact mémorisé.
BLUETOOTH®
Suppression d’un contact
Ne fonctionne pas pour les téléphone portable qui prennent en charge PBAP.
1 Appuyez sur pour entrer en mode Bluetooth.
2 Tournez le bouton de volume pour choisir
appuyez sur le bouton.
3 Tournez le bouton de volume pour sélectionner un contact.
Si un contact est sélectionné, appuyez sur le bouton de volume pour afficher le numéro
de téléphone.
4 Maintenez enfoncé le bouton de volume pour entrer en mode de
suppression.
5 Tournez le bouton de volume pour choisir
appuyez sur le bouton.
DELETE ONE
DELETE ALL
supprimés.
: Le nom ou le numéro de téléphone choisi à l’étape 3 est supprimé.
: Tous les noms ou numéros de téléphone du menu choisi à l’étape 2 sont
6 Tournez le bouton de volume pour choisir
bouton.
Réglages du mode Bluetooth
Appuyez sur le bouton de volume pour entrer
1
2 Tournez le bouton de volume pour choisir
bouton.
3 Tournez le bouton de volume pour réaliser une sélection (voir le tableau
suivant), puis appuyez sur le bouton.
4 Maintenez enfoncée pour quitter.
Pour retourner à l’option de réglage ou à la hierarchie précédente, appuyez sur .
PHONE SELECT
AUDIO SELECT
DEVICE DELETE
DVC PRIORITY
Permet de sélectionner le téléphone ou le périphérique audio à connecter ou déconnecter.
“
” apparaît devant le nom de l’appareil.
1 Tournez le bouton de volume pour choisir le périphérique à supprimer, puis appuyez sur le
bouton.
2 Tournez le bouton de volume pour choisir
Sélectionne un appareil à connecter comme appareil prioritaire.
“
” apparaît devant le nom de l’appareil réglé comme propriétaire.
[CALL HISTORY]
[DELETE ONE]
[YES]
ou
[NO]
[FUNCTION]
[BT MODE]
, puis appuyez sur le
[YES]
ou
[NO]
ou
[PHONE BOOK]
ou
[DELETE ALL]
, puis appuyez sur le
.
, puis appuyez sur le bouton.
, puis
Défaut:
FRANÇAIS |
, puis
XX
15
Page 46

BLUETOOTH®
TRANSFER PB
PIN CODE EDIT
(0000)
RECONNECT ON
AUTO PAIRING ON
BT HF/AUDIO FRONT
INITIALIZE YES
“DL PB ” apparaît et transférez
*
manuellement le répertoire d’adresse du
téléphone connecté sur cet appareil.
* Peut être sélectionné uniquement quand
Change le code PIN (6 chiffres maximum).
1 Tournez le bouton de volume pour
2 Appuyez sur S / T pour déplacer
Répétez les étapes
3 Appuyez sur le bouton de volume pour
automatiquement quand le périphérique
Bluetooth est dans la plage.;
OFF
le périphérique Bluetooth pris en charge
(iPhone/iPod touch) quand il est connecté
par la prise d’entrée USB. En fonction de
la version de l’iOS de l’iPhone/iPod touch
connecté, il se peut que cette fonction ne
puisse pas être utilisée. ;
gauche et droite.;
les enceintes.
compris le pairage mémorisé, le répertoire
téléphonique, etc.).;
le téléphone connecté prend en charge
OPP.
sélectionner un numéro.
la position d’entrée.
le code PIN soit entré complètement.
valider.
:L’appareil se reconnecte
:Annulation.
:L’appareil apparie automatiquement
:Sort le son des enceintes avant
: Initialise tous les réglages Bluetooth (y
1 et 2 jusqu’à ce que
OFF
:Annulation.
ALL
:Sort le son de toutes
NO
:Annulation.
Internet radio via Bluetooth
Écoute de la AhaTM Radio
Préparation:
Sélectionnez
Vous pouvez écouter la AhaTM Radio sur votre
smartphone (Android OS) via le Bluetooth de
cet appareil.
1 Ouvrez l’application Aha
[ON]
pour
[AHA SRC]. ( 5)
TM
sur
votre smart phone.
2 Connectez votre smartphone via la
connexion Bluetooth.
( 12)
3 Appuyez sur B SRC pour choisir
AHA.
La source est sélectionnée
automatiquement et le lecture démarre.
• Vous pouvez commander la Aha
de la même façon que la Aha
iPod/iPhone.
•
Pour appeler un numéro du
contenu*:
sur le bouton de volume pour appeler.
•
Pour terminer ou déconnecter un
appel:
* La disponibilité dépend de la station
sélectionnée.
( 11)
Appuyez sur 1 puis appuyez
Appuyez sur .
TM
Radio
TM
Radio pour
Lecteur audio Bluetooth
Les opérations et les indications de l’affichage peuvent
différer en fonction de leur disponibilité sur le périphérique
connecté.
Pour Faire
Lecture
1 Appuyez sur B SRC (ou appuyez
sur SRC sur la RC-406) pour
sélectionner BTAUDIO.
2 Commandez le lecture audio
Bluetooth pour démarrer la lecture.
Mettez en
pause ou
reprenez la
lecture
Choisissez un
groupe ou un
dossier
Saut vers
l’arrière/saut
vers l’avant
Recherche
rapide vers
l’arrière/vers
l’avant
Lecture
répétée
Lecture
aléatoire
Appuyez sur 6IW (ou appuyez sur
ENTIW sur la RC-406).
Appuyez sur J / K (ou appuyez sur
AM–/ #FM+ sur la RC-406).
*
Appuyez sur S / T (ou appuyez
sur S / T (+) sur la RC-406).
Maintenez pressée S / T (ou
maintenez pressée S / T (+) sur
la RC-406).
Appuyez répétitivement sur la
touche 4
ALLREPEAT, FILEREPEAT, REPEATOFF
pour faire un choix.
Appuyez répétitivement sur la
touche 3
FOLDERRANDOM, RANDOMOFF
Maintenez enfoncée 3 pour
pour faire un choix.
sélectionner “ALL RANDOM”.
16
Page 47

RÉGLAGES AUDIO
Pendant l’écoute de n’importe quelle source...
1 Appuyez sur le bouton de volume pour entrer
2 Tournez le bouton de volume pour choisir
appuyez sur le bouton.
3 Tournez le bouton de volume pour réaliser une sélection (voir le
tableau suivant), puis appuyez sur le bouton.
Répétez l’étape 3 jusqu’à ce que l’élément souhaité soit sélectionné ou activé.
4 Maintenez enfoncée pour quitter.
(ou utilisation de la RC-406)
1 Appuyez sur AUD pour entrer en veille
2 Appuyez sur J / K pour faire un choix, puis puis appuyez sur
ENT IW.
Pour retourner à l’option de réglage ou à la hierarchie précédente, appuyez sur
.
SUB-W LEVEL –15 à +15 (0)
Ajuste le niveau de sortie du caisson de grave.
BAND1 LEVEL –8 à +8 (+5):
BAND2 LEVEL –8 à +8 (+5):
BAND3 LEVEL
BAND4 LEVEL
BAND5 LEVEL
PRESET EQ
BASS BOOST
–8 à +8 (+4):
–8 à +8 (+5):
–8 à +8 (+1):
DRIVE EQ/ TOP40/ POWERFUL/ ROCK/ POPS/ EASY/ JAZZ/ NATURAL
USER
:Sélectionne un égaliseur préréglé adapté à votre genre de musique.
(Sélectionnez
[DRIVE EQ]
LEVEL1/ LEVEL2/ LEVEL3
graves.
;
OFF
Réglez le niveau à mémoriser pour chaque source. (Avant de
réaliser un ajustement, choisissez la source que vous souhaitez
ajuster.)
[USER]
pour utiliser les réglages personnalisés
est un égaliseur préréglé qui réduit le bruit de la route.
: Annulation.
: Choisit votre niveau préféré d’accentuation des
[FUNCTION]
[AUDIO CONTROL]
[AUDIO CONTROL]
.
BAND1
.
, puis
à
Défaut:
BAND5
XX
/
.)
LOUDNESS LEVEL1/ LEVEL2
SUBWOOFERSET ON
LPFSUBWOOFER THROUGH
SUB-WPHASE REVERSE
HPF THROUGH
FADER R15
BALANCE L15
VOLUMEOFFSET
(Défaut:0)
SOUNDRECNSTR
(Reconstruction
sonore)
et hautes fréquences pour produire un son plus équilibré aux faibles niveaux de
volume.;
:Met en service la sortie du caisson de grave.;
120HZ/ 160HZ
120 Hz/ 160 Hz sont envoyés sur le caisson de grave.
caisson de grave à synchroniser avec la sortie des enceintes afin d’obtenir des
performances optimales. (Peut être uniquement sélectionné si un réglage autre
que
[THROUGH]
150HZ
150 Hz sont envoyés aux enceintes.
à
à
–8
à +8(pour AUX) ; –8 à 0 (pour les autres sources): Prérègle le niveau de
réglage du volume pour chaque source. (Avant un ajustement, sélectionnez la
source que vous souhaitez ajuster.)
ON
:Crée un son réaliste en compensant les composants haute fréquence et
en rétablissant le temps de montée de la forme d’onde qui est perdu lors de la
compression des données audio.;
:Sélectionner votre accentuations préférée pour les basses
OFF
:Annulation.
:Tous les signaux sont envoyés au caisson de grave.;
:Les signaux audio avec des fréquences inférieures à 85 Hz/
(180°)/
NORMAL
(0°):Sélectionne la phase de la sortie du
est choisi pour
:Tous les signaux sont envoyés aux enceintes. ;
:Les signaux audio avec des fréquences supérieures à 100 Hz/ 120 Hz/
F15 (0
):Règle la balance de sortie des enceintes arrière et avant.
R15 (0
):Règle la balance de sortie des enceintes gauche et droite.
[SUB-W LEVEL]/ [LPF SUBWOOFER]/ [SUB-W PHASE]
uniquement si
[SUBWOOFER SET]
est réglé sur
OFF
:Annulation.
[LPF SUBWOOFER]
OFF
: Annulation.
peut être sélectionné
[ON]
.
85HZ
.)
100HZ/ 120HZ
/
/
FRANÇAIS |
17
Page 48

RÉGLAGES D’AFFICHAGE
1 Appuyez sur le bouton de volume pour entrer
2 Tournez le bouton de volume pour choisir
sur le bouton.
3 Tournez le bouton de volume pour réaliser une sélection (voir le
tableau suivant), puis appuyez sur le bouton.
Répétez l’étape 3 jusqu’à ce que l’élément souhaité soit sélectionné ou activé.
4 Maintenez enfoncée pour quitter.
Pour retourner à l’option de réglage ou à la hierarchie précédente, appuyez sur
.
COLOR SELECT VARIABLE SCAN/ COLOR 01
de touches et d’éclairage préférée.
Vous pouvez créer votre propre couleur (quand
ou
[USER]
est sélectionné). La couleur que vous avez créée peut être sélectionnée
avec
[USER]
.
1 Maintenez pressé le bouton de volume pour entrer en mode d’ajustement
détaillé des couleurs.
—
COLOR 24/ USER
2 Appuyez sur S / T pour sélectionner la couleur (
3 Tournez le bouton de volume pour ajuster le niveau (
le bouton.
DIMMER ON:
BRIGHTNESS 0
TEXT SCROLL AUTO/ ONCE:
Assombrit l’éclairage de l’affichage de des touches. ;
fonction des réglages
— 31: Sélectionne votre niveau de luminosité préféré pour l’éclairage de
l’affichage et des touches.
l’affichage, ou de la faire défiler une seule fois.
[BRIGHTNESS]
Sélectionne de faire défiler automatiquement l’information sur
.
[FUNCTION]
[DISPLAY]
, puis appuyez
: Sélectionne votre couleur
[COLOR 01]
0 — 9
OFF:
; OFF:
Annulation.
.
Défaut:
—
[COLOR 24]
R/ G/ B
) à ajuster.
), puis appuyez sur
Éclairage en
XX
PLUS D’INFORMATIONS
Généralités
• Cet appareil ne peut lire que les CD suivants:
• Des informations détaillées et des remarques à propos des fichiers audio pouvant être lus se trouvent
dans le manuel en ligne disponible sur le site suivant: www.kenwood.com/cs/ce/audiofile/
Fichiers pouvant être lus
• Fichier audio reproductible: MP3(.mp3), WMA(.wma), AAC (.m4a)
• Supports de disque compatibles: CD-R/CD-RW/CD-ROM
• Formats de fichiers de disques compatibles: ISO 9660 Niveau 1/2, Joliet, Nom de fichier étendu.
• Systèmes de fichier de périphérique USB compatibles: FAT12, FAT16, FAT32
Même quand les fichiers audio sont conformes aux normes établies ci-dessus, il est possible que la lecture
ne soit pas possible suivant le type ou les conditions du support ou périphérique.
Disques ne pouvant pas être lus
• Disques qui ne sont pas ronds.
• Disques avec des colorations sur la surface d’enregistrement ou disques sales.
• Disques enregistrables/réinscriptibles qui n’ont pas été finalisés.
• CD de 8 cm. Essayer d’insérer un disque à l’aide d’un adaptateur peut entraîner un dysfonctionnement de
l’appareil.
À propos des périphériques USB
• Cet appareil peut reproduire les fichiers MP3/WMA/AAC/WAV mémorisés sur un périphérique USB à
mémoire de grande capacité.
• Vous ne pouvez pas connecter un périphérique USB via un hub USB.
• La connexion d’un câble dont la longueur totale dépasse 5 m peut avoir pour conséquence un
fonctionnement anormal de la lecture.
• Cet appareil ne peut pas reconnaître les périphériques USB dont l’alimentation n’est pas de 5 V et
dépasse 1 A.
À propos de KENWOOD Music Editor Light et de KENWOOD
Music Control
• Cet appareil prend en charge l’application PC KENWOOD Music Editor Light et l’application Android™
KENWOOD Music Control.
• Quand vous reproduisez des fichiers audio avec des données de chanson ajoutée en utilisant KENWOOD
Music Editor Light ou KENWOOD Music Control, vous pouvez rechercher des fichiers audio par genre,
artiste, album, liste de lecture et chansons.
• KENWOOD Music Editor Light et KENWOOD Music Control sont disponibles à partir des sites web suivants:
www.kenwood.com/cs/ce/
18
Page 49

PLUS D’INFORMATIONS GUIDE DE DÉPANNAGE
À propos de l’iPod/iPhone
Made for
- iPod touch (1st, 2nd, 3rd, 4th et 5th generation)
- iPod classic
- iPod nano (3rd, 4th, 5th, 6th et 7th generation)
- iPhone, iPhone 3G, 3GS, 4, 4S, 5, 5s, 5c
• Pour la liste des iPhone/iPod les plus récents compatibles et la
version du logiciel, reportez-vous à:
www.kenwood.com/cs/ce/ipod
• Il n’est pas possible d’utiliser un iPod lorsque “KENWOOD” ou “
est affiché sur l’iPod.
À propos de la AhaTM Radio
• AhaTM est un service tiers, et par conséquent les spécifications sont
sujettes à changement sans notification préalable. Par conséquent,
la compatibilité peut réduite ou certains services ou même tous les
services peuvent devenir indisponibles.
• Certaines fonction de Aha
de cet appareil.
À propos de Bluetooth
• En fonction de la version Bluetooth du périphérique, il se peut que
certains périphériques Bluetooth ne puissent pas être connectés à
cet appareil.
• Cet appareil peut ne pas fonctionner avec certains périphériques
Bluetooth.
• La condition du signal varie en fonction de l’environnement.
• Pour plus d’informations sur Bluetooth, consulter le site Web
suivant: www.kenwood.com/cs/ce/
TM
ne peuvent pas être utilisées à partir
Symptôme Remède
Le son ne peut pas être entendu. • Ajustez le volume sur le niveau optimum.
“PROTECT” apparaît et aucune opération ne
peut être réalisée.
• Le son ne peut pas être entendu.
• L’appareil ne se met pas sous tension.
”
• L’information affichée sur l’afficheur est
incorrecte.
Cet autoradio ne fonctionne pas du tout.
La réception DAB est mauvaise.
“DAB ANT ERR” apparaît. Vérifiez l’antenne DAB. Si vous utilisez une antenne passive (sans amplificateur), réglez
• La réception radio est mauvaise.
• Bruit statique pendant l’écoute de la radio.
“NA FILE” apparaît.
“NO DISC” apparaît. Insèrez un disque reproductible dans la fente d’insertion.
“TOC ERROR” apparaît. Assurez-vous que le disque est propre et inséré correctement.
“PLEASE EJECT” apparaît. Réinitialisez l’appareil. Si cela ne résout pas le problème, consultez votre centre de service le
Le disque ne peut pas être éjecté.
“READ ERROR” apparaît. Copiez les fichiers et les dossiers de nouveau sur le périphérique USB. Si cela ne résout pas le
“NO DEVICE” apparaît. Connectez un périphérique USB puis repassez à la source USB.
“COPY PRO” apparaît. Un fichier interdit de copie a été lu.
• Vérifiez les cordons et les connexions.
Assurez-vous que les prises des fils d’enceintes sont isolées correctement, puis réinitialisez
l’appareil. Si cela ne résout pas le problème, consultez votre centre de service le plus proche.
Nettoyez les connecteurs.
Réinitialisez l’appareil.
Assurez-vous que
[DAB ANT POWER]
• Connectez l’antenne solidement.
• Sortez l’antenne complètement.
Assurez-vous que le disque contient des fichiers audio compatibles.
plus proche.
Maintenez enfoncée
tombe pas quand il est éjecté. Si cela ne résout pas le problème, essayez de réinitialiser
l’appareil.
( 3)
problème, réinitialisez le périphérique USB ou utilisez en un autre.
( 2)
( 3)
[ON]
est choisi pour
sur
[DAB ANT POWER]. ( 4)
[OFF]. ( 4)
( 18)
M pour éjecter le disque de force. Faites attention que le disque ne
FRANÇAIS |
19
Page 50

GUIDE DE DÉPANNAGE
Symptôme Remède
“NA DEVICE” apparaît. Connectez un périphérique compatible et vérifiez les connexions.
“NO MUSIC” apparaît. Connectez un périphérique USB qui contient des fichiers audio
“iPod ERROR” apparaît. • Reconnectez l’iPod.
Du bruit est produit. Sautez à une autre plage ou changez le disque.
Les plages ne sont pas
reproduites comme vous le
souhaitiez.
“READING” clignote sur. N’utilisez pas trop de niveaux de hiérarchie ou de dossiers.
La durée de lecture écoulée n’est
pascorrecte.
Les caractères corrects ne
sont pas affichés (ex.: nom de
l’album).
“ACTN DISABLE” Une opération non disponible a été réalisée.
“AHA APP UPDATE
REQUIRED”
“AHA UNAVAILABLE” Votre périphérique ne peut pas être connecté au serveur radio Aha.
“CHECK APP” Il n'y a pas de réponse du serveur Aha.
“CHECKDEVICE” Vérifiez l’application Aha sur votre appareil.
Radio
TM
“CONNECT PHONE” Connectez votre périphérique à l'appareil.
Aha
“LOGIN FAILED” La connexion à Aha a échouée.
“NETWORK
UNAVAILABLE”
“POOR GPS” Les conditions de réception GPS de votre smartphone sont
“NO SKIPS” Les sauts ne sont pas autorisés.
compatibles.
• Réinitialisez iPod.
L’ordre de lecture est déterminé quand les fichiers sont enregistrés.
C’est causé par la façon don’t les plages ont été enregistrées sur le
disque.
Cet appareil peut uniquement afficher les lettres majuscules, les
chiffres et un nombre limité de symboles. Les lettres cyrilliques
majuscules peuvent aussi être affichées si
réglé sur
[BКЛ]. ( 5)
Assurez-vous que vous avez bien installé la dernière version de
l’application Aha
Le réseau a été déconnecté.
mauvaises.
TM
for KENWOOD sur votre appareil.
[RUSSIAN SET]
est
Symptôme Remède
Aucun périphérique
Bluetooth n’est détecté.
Le pairage ne peut pas
être réalisé.
• Faites de nouveau une recherche à partir du périphérique
Bluetooth.
• Réinitialisez l’appareil.
• Assurez-vous que vous avez entré le même code PIN pour
l’appareil et le périphérique Bluetooth.
• Supprimez les informations de pairage pour cet appareil et le
périphérique Bluetooth, puis effectuez de nouveau le pairage.
( 3)
( 12)
“DEVICEFULL” apparaît. Le nombre de périphériques enregistrées a atteint la limite.
Essayez de nouveau après avoir supprimé un périphérique inutile.
( 15, DEVICE DELETE)
Il y a un écho ou du bruit.
Le son du téléphone est
de mauvaise qualité.
Bluetooth®
• La méthode d’appel
vocal ne réussie pas.
• “N/A VOICE TAG”
apparaît.
“NOT SUPPORT”
apparaît.
• “NO ENTRY” apparaît.
• “NO PAIR” apparaît.
“ERROR” apparaît. Essayez de nouveau l’opération. Si “ERROR” apparaît de nouveau,
“NO INFO” apparaît. L’appareil Bluetooth ne peut pas obtenir les informations du
• Ajustez la position du microphone.
• Cochez le réglage
• Réduisez la distance entre cet appareil et le périphérique
Bluetooth.
• Déplacez la voiture dans un endroit où vous pouvez obtenir un
meilleur signal de réception.
• Utilisez la méthode d’appel vocal dans un environnement plus
calme.
• Réduisez la distance au microphone quand vous dites le nom.
• Assurez-vous que la même voix que la voix enregistrée est
utilisée.
Le téléphone connecté ne prend pas en charge la fonction de
reconnaissance vocale.
Il n’y a aucun appareil enregistré connecté/trouvé par Bluetooth.
vérifiez si l’appareil extérieur prend en charge la fonction que vous
avez essayée.
contact.
[ECHO CANCEL]. ( 13)
( 12)
20
Page 51

GUIDE DE DÉPANNAGE
SPÉCIFICATIONS
Symptôme Remède
Le son est interrompu
ou saute pendant la
lecture d’un lecteur audio
Bluetooth.
Le lecteur audio Bluetooth
connecté ne peut pas être
Bluetooth®
commandé.
• “HF ERROR XX” apparaît.
• “BT ERROR” apparaît.
• Réduisez la distance entre cet appareil et le lecteur audio
Bluetooth.
• Mettez cet appareil hors tension, puis de nouveau sous tension
et essayez de nouveau de connecter l’appareil.
• D’autres périphériques Bluetooth peuvent être en train de se
connecter à l’appareil.
• Vérifiez si le lecteur audio Bluetooth connecté prend en charge
AVRCP (Audio/Video Remote Control Profile). (Référez-vous
aux instructions de votre lecteur audio.)
• Déconnectez et reconnectez à nouveau le lecteur Bluetooth.
Réinitialiser l’appareil et essayez de nouveau l’opération. Si cela
ne résout pas le problème, consultez votre centre de service le
plus proche.
DAB Plage de fréquences L Band 1452,960 MHz—1490,624 MHz
Bande III: 174,928 MHz—239,200 MHz
Sensibilité –100dBm
Taux de Signal/Bruit 80 dB
Type de connecteur d’antenne SMB
Radio numérique
Tension de sortie d’antenne 14,4V (11V – 16V)
Courant maximum d’antenne < 100 mA
FM Plage de fréquences 87,5 MHz — 108,0 MHz (intervalle de 50 kHz)
Sensibilité utilisable
(S/B = 26dB)
Seuil de sensibilité
(DIN S/N = 46dB)
Réponse en fréquence (±3 dB) 30 Hz—15 kHz
Taux de Signal/Bruit (MONO) 75 dB
Séparation stéréo (1 kHz) 45 dB
PO Plage de fréquences 531 kHz — 1611 kHz (intervalle de 9 kHz)
Radio analogique
Sensibilité utilisable
(S/B = 20dB)
GO Plage de fréquences 153 kHz — 279 kHz (intervalle de 9 kHz)
Sensibilité utilisable
(S/B = 20dB)
9,3 dBf (1 µV/75 )
10,2 dBf (1,13 µV/75 )
28dBV (25V)
33dBV (45V)
FRANÇAIS |
21
Page 52

SPÉCIFICATIONS
Diode laser GaAIAs
Filtre numérique (D/A) 8 fois suréchantillonnage
Vitesse de rotation 500 t/min. — 200 t/min. (CLV)
Pleurage et scintillement Non mesurables
Réponse en fréquence (±1 dB) 20 Hz—20 kHz
Distorsion harmonique totale (1 kHz) 0,01%
Taux de Signal/Bruit (1 kHz) 105 dB
Lecteur CD
Gamme dynamique 90 dB
Séparation des canaux 85 dB
Décodage MP3 Compatible avec le format MPEG-1/2 Audio Layer-3
Décodeur WMA Compatible Windows Media Audio
Décode AAC Fichiers AAC-LC “.m4a”
Standard USB USB1.1, USB2.0 (vitesse maximale)
Système de fichiers FAT12/16/32
Courant d’alimentation maximum CC5 V
Décodage MP3 Compatible avec le format MPEG-1/2 Audio Layer-3
USB
Décodeur WMA Compatible Windows Media Audio
Décode AAC Fichiers AAC-LC “.m4a”
Décodeur WAV PCM linéaire
Version Bluetooth Ver.2.1+EDR Certified
Plage de fréquences 2,402 GHz—2,480 GHz
Puissance de sortie +4 dBm (MAX), 0 dBm (AVE) Power Class 2
Bluetooth
Portée de communication maximale Ligne de vue approximative 10 m
1A
22
Profile HFP (Hands-Free Profile — Profile mains libres)
Bluetooth
Puissance de sortie maximum 50W×4
Puissance de sortie 30W×4 (PWR DIN45324, +B = 14,4V)
Impédance d’enceinte 4—8
Action en tonalité Bande1 100 Hz ±8 dB
Audio
Niveau de préamplification/charge
(CD)
Impédance du préamplificateur ≤600
Réponse en fréquence (±3 dB) 20 Hz—20 kHz
Tension maximum d’entrée 1000 mV
Auxiliaire
Impédance d’entrée 30k
Tension de fonctionnement 14,4V (10,5 V — 16V admissible)
Consommation de courant maximale 10 A
Plage de températures de
fonctionnement
Généralités
Dimensions d’installation (L × H × P) 182 mm × 53 mm × 159 mm
Poids 1,4 kg
Sujet à changement sans notification.
SPP (Serial Port Profile — Profile de port série)
PBAP (Phonebook Access Profile — Profile d’accès au
répertoire d’adresses)
OPP (Object Push Profile — Profile de poussée d’objet)
A2DP (Advanced Audio Distribution Profile — Profile
de distribution audio avancé)
AVRCP (Audio/Video Remote Control Profile — Profile
de télécommande audio/vidéo)
Bande2 250 Hz ±8 dB
Bande3 630 Hz ±8 dB
Bande4 2,5 kHz ±8 dB
Bande5 6,3 kHz ±8 dB
4000 mV/10k
0°C—+40°C
Page 53

INSTALLATION / RACCORDEMENT
Avertissement
• L’appareil peut uniquement être utilisé avec une alimentation de 12 V CC, à masse
négative.
• Déconnectez la borne négative de la batterie avant le câblage et le montage.
• Ne connectez pas le fil de batterie (jaune) et le fil d’allumage (rouge) au châssis de la
voiture ou au fil de masse (noir) pour éviter les courts-circuits.
• Isolez les fils non connectés avec du ruban adhésif pour éviter les courts-circuits.
• Assurez-vous de raccorder de nouveau la mise à la masse de cet appareil au châssis de
la voiture après l’installation.
Précautions
• Pour des raison de sécurité, laissez le travail de câblage et de montage des
professionnels. Consultez votre revendeur autoradio.
• Installez cet appareil dans la console de votre véhicule. Ne touchez pas les parties
métalliques de cet appareil pendant ou juste après son utilisation. Les parties
métalliques, comme le dissipateur de chaleur et le boîtier, deviennent chaudes.
• Ne connectez pas les fils
(noir) ou en parallèle.
•
Montez l’appareil avec un angle de moins de 30˚.
• Si le faisceau de fils de votre véhicule ne possède pas de borne d’allumage, connectez
le fil d’allumage (rouge) à la borne du boîtier de fusible de votre véhicule qui offre une
alimentation de 12 V CC et qui se met en et hors service avec la clé de contact.
• Après avoir installé l’appareil, vérifiez si les lampes de frein, les indicateurs, les
clignotants, etc. de la voiture fonctionnent correctement.
• Si un fusible saute, assurez-vous d’abord que les câbles ne touches pas le châssis de la
voiture puis remplacez le vieux fusible par un nouveau de même valeur.
Procédure de base
1
Retirez la clé de contact, puis déconnectez la borne [
de la batterie de la voiture.
2 Installez l’antenne DAB.
Reportez-vous à Installation de l’antenne DAB. (
3 Connectez les fils correctement.
Reportez-vous à Connexions.
4 Installez l’appareil dans votre voiture.
Reportez-vous à Installation de l’appareil (montage encastré).
5 Connectez la borne [ de la batterie de la voiture.
6 Réinitialisez l’appareil.
[ des l’enceintes au châssis de la voiture, au fil de masse
25)
( 24)
( 3)
Installation de l’appareil (montage encastré)
Crochet sur le côté supérieur
Orientez la plaque de garniture
de la façon illustrée avant la
fixation.
Comment retirer l’appareil
1
Retirez la façade.
2 Insérez le loquet des clés d’extraction
dans les trous de chaque côté de la
plaque d’assemblage, puis tirez vers
l’extérieur.
3 Insérez les clés d’extraction
profondément dans les fentes de chaque
côté, puis suivez les flèches indiquées
ci-à droite.
Réalisez les connexions
nécessaires.
( 24)
Tableau de
bord de votre
voiture
Tordez les languettes appropriées pour
maintenir le manchon de montage en place.
FRANÇAIS |
23
Page 54

Connexions
Borne de l’antenne
Prise d’antenne DAB
(25)
Sortie arrière/caisson de grave
Connexion des connecteurs ISO sur certaines
voitures VW/Audio ou Opel (Vauxhall)
Vous aurez peut-être besoin de modifier le câblage du
faisceau de fils fourni comme montré sur l’illustration
ci-dessous.
A7 (Rouge)
Véhicule
A4 (Jaune)
Câblage par défaut
Broche Couleur et fonction
A4 Jaune : Pile
A5 Bleu/Blanc : Commande d’alimentation
A7 Rouge : Allumage (ACC)
A8 Noir : Connexion à la terre (masse)
B1
B2
B3
B4
B5
B6
B7
B8
]
Violet
Violet/noir
Gris
]
Gris/noir
Blanc
]
Blanc/noir
Vert
]
Vert/noir
[
[
[
[
Câble
d’allumage
(Rouge)
Appareil
Câble de
batterie
(Jaune)
: Enceinte arrière (droit)
: Enceinte avant (droit)
: Enceinte avant (gauche)
: Enceinte arrière (gauche)
Jaune (Câble de batterie)
Rouge (Câble d’allumage)
Rouge (A7)
Jaune (A4)
Connecteurs ISO
Fusible (10 A)
Si aucune connexion n’est faite, ne laissez pas le câble
Bleu clair/jaune
(Fil de télécommande
de volant)
Bleu/Blanc
(Fil de commande
d’alimentation/ Câble de
commande de l’antenne)
Marron
(Câble de contrôle de la
sourdine)
MIC (prise d’entrée microphone)
Câble USB
sortir de la languette.
STEERING WHEEL
REMOTE INPUT
REMOTE CONT
ANT . CONT
P. CONT
MUTE
À l’adaptateur de télécommande
volant
À la borne de commande
d’alimentation lorsque vous
utilisez l’amplificateur de
puissance en option, soit à la
borne de commande d’antenne
du véhicule.
Pour connecter au système de
navigation Kenwood, consultez votre
manuel de navigation.
( 12)
Liste des pièces
pour l’installation
(A)
Façade
(B)
Plaque d’assemblage
(C)
Manchon de montage
(D)
Faisceau de fils
(E)
Clé d’extraction
24
Page 55

Installation de l’antenne DAB
Précautions
• L’antenne film (F) doit uniquement être utilisée à l’intérieur du véhicule.
• Ne l’installez pas dans les endroits suivants:
– où il peut gêner le vue du conducteur.
– où il peut gêner le fonctionnement de dispositifs de sécurité tels que les
coussins de sécurité.
– sur une vitre mobile telle que sur le hayon.
– sur le côté du véhicule (par ex. sur la porte, quart avant de la vitre).
– sur la vitre arrière.
• La force du signal diminue si l’installation est faite dans les endroits suivants:
– sur une vitre réfléchissant les infrarouges un endroit recouvert d’un film de
type réfléchissant.
– où elle se superpose avec l’antenne radio d’origine (motif).
– où elle se superpose avec les fils de chauffage des fenêtres.
– sur une vitre qui bloque les signaux radio (par ex. vitre réfléchissante, vitre
d’isolation thermique).
• Une mauvaise réception peut se produire:
– à cause de bruits quand les essuie-glace, la climatisation, ou le moteur est
mis en marche.
– en fonction de la direction de station de diffusion par rapport au véhicule
(antenne).
• Essuyez soigneusement l’huile et les saletés de la surface de collage avec le
nettoyant fourni
• Ne tordez pas ni n’endommagez l’antenne film
• L’installation peut ne pas être possible sur certains véhicules.
• Vérifiez le câblage de l’antenne film
collage.
• N’appliquez aucun nettoyant pour vitre après avoir collé l’antenne film
(I).
(F).
(F) et de l’applicateur (G) avant le
(F).
Déterminez la position d’installation de l’antenne
• La direction de l’antenne film (F) change selon que l’antenne film (F) est installée sur le côté droit ou gauche.
• Assurez-vous de vérifier l’emplacement de l’installation de l’antenne film
être recollée.
• Séparé des autres antennes par au moins 100 mm.
• Ne collez pas l’amplificateur
adhérence.
(G) sur la ligne de céramique (partie noire) autour de la vitre avant. Parce qu’il n’y a pas assez
(F) avant de l’installer. L’antenne film ne peut pas
o Installation de l’antenne du côté gauche o Installation de l’antenne du côté droit
Ligne de céramique (partie noire)
Feuille de masse*
70 mm
* Collez la feuille de masse de l’amplificateur
150 mm 150 mm
(F)
(G)
Feuille de masse*
(G) sur la partie métallique du pilier central.
(G)
(F)
70 mm
Liste des pièces pour l’installation
(H)
Serre-câble
(F)
Antenne film
(G)
Amplificateur
(câble avec amplificateur, 3,5 m)
(I)
Nettoyant
25
Page 56

Précautions
Lors de l’installation du câble d’antenne à
l’intérieur du pilier avant avec un coussin de
sécurité installé
• Le couvercle du pilier avant est fixé avec une attache spéciale
qui peut avoir besoin d’être remplacée lorsqu’elle est retirée.
Contactez votre concessionnaire pour plus de détails sur le
retrait du couvercle du pilier avant et la disponibilité des
pièces de rechange.
Présentation de l’installation
Pour des raison de sécurité, l’antenne doit être installée du côté
passager.
– Attendez que la surface de la vitre soit
complètement sèche avant de continuer.
– Réchauffez la surface du pare-brise avec le
dégivreur s’il fait froid (en hiver).
3 Retirez le séparateur (languette I) de
l’antenne film (F) horizontalement et
collez l’antenne sur le pare-brise.
Séparateur (ongle I)
Attache
Pilier avant
• Installez l’amplificateur (G) au-dessus du coussin de sécurité
de façon qu’il ne gène pas le fonctionnement du coussin de
sécurité.
(G)
Coussin de sécurité
26
Installation de l’antenne
1
Retirez le couvercle du pilier central de
votre voiture.
Pilier avant
2 Nettoyez le pare-brise avec le nettoyant
fourni (I).
(I)
Ne touchez pas la surface collante (côté adhésif)
de l’antenne-film
(F)
(F)
.
4 Retirez le séparateur (languette II) de
l’antenne film (F) verticalement et collez
l’antenne sur le pare-brise.
Séparateur (ongle II)
(F)
5 Frotter l’antenne film doucement sur le
pare-brise dans la direction de la flèche
pour qu’elle colle fermement.
(F)
Page 57

6 Retirez le film d’application (languette III).
(F)
Ne touchez pas la borne de l’antenne-film
Film d’application (ongle III)
(F)
.
7 Positionnez la protubérance de l’amplificateur (G) sur le K de
l’antenne film (F) et collez.
Ne touchez la borne ou la surface collante (côté adhésif) de l’amplificateur
•
Lors de l’installation de l’antenne du côté droit
Positionnez la protubérance sur la marque K
Feuille de masse
(F)
(G)
Contact de l’amplificateur (partie métallique)
Borne de l’antenne film (F)
•
Lors de l’installation de l’antenne du côté gauche
(G)
(F)
Feuille de masse
Positionnez la protubérance sur la marque J
(G)
8 Retirez le film recouvrant la feuille de masse et collez la feuille de
masse sur la partie métallique du véhicule.
Laissez suffisamment d’espace pour la feuille de masse afin qu’elle n’interfère
pas avec les parties intérieures (couverture de pilier avant). Faites aussi
attention à ce que les parties intérieures n’interfèrent pas avec l’amplificateur
(G)
.
.
Couvercle du pilier avant
Pare-brise
Feuille de masse
(G)
9 Attachez les câbles d’antenne.
Utilisez un serre-câble
(H)
pour fixer l’antenne au pilier en plusieurs points.
10 Remettez en place le couvercle du pilier avant.
Veillez à ne pas endommager la feuille de masse et l’amplificateur
la remise en place.
(G)
11 Connectez l’amplificateur (G) à la prise d’entrée DAB située à
l’arrière de l’appareil.
12 Réglez
[DAB ANT POWER]
sur
[ON]. ( 5)
lors de
27
Page 58

INHALT VOR DER INBETRIEBNAHME
VOR DER INBETRIEBNAHME 2
GRUNDLAGEN 3
ERSTE SCHRITTE 4
DIGITAL RADIO (DAB) 5
ANALOG RADIO 7
CD / USB / iPod 9
AUX 11
TM
RADIO 11
Aha
BLUETOOTH® 12
AUDIOEINSTELLUNGEN 17
DISPLAY-EINSTELLUNGEN 18
WEITERE INFORMATIONEN 18
FEHLERSUCHE 19
TECHNISCHE DATEN 21
EINBAU / ANSCHLUSS 23
Wie Sie diese Anleitung lesen
• Die Bedienung wird im Wesentlichen
anhand der Tasten auf der
Frontblende erläutert.
•
[XX]
zeigt die gewählten Punkte an.
•
( XX)
zeigt an, das
Bezugsinformationen auf der
angegebenen Seitennummer
vorhanden sind.
Warnung
Bedienen Sie keine Funktion, die Ihre Aufmerksamkeit vom Straßenverkehr ablenkt.
Vorsicht
Lautstärkeeinstellung:
• Stellen Sie die Lautstärke so ein, dass Sie immer noch Geräusche von außerhalb des Fahrzeugs hören können, um Unfälle
zu vermeiden.
• Senken Sie die Lautstärke vor dem Abspielen digitaler Tonquellen, um Beschädigung der Lautsprecher durch plötzliche
Tonspitzen zu vermeiden.
Allgemeines:
• Vermeiden Sie Verwendung des USB-Geräts oder iPod/iPhone, wenn diese das sichere Fahren behindern können.
• Stellen Sie sicher, dass alle wichtigen Daten gesichert sind. Wir übernehmen keine Haftung für jeglichen Verlust
aufgenommener Daten.
• Stellen Sie sicher, dass keine Metallgegenstände (wie etwa Münzen oder Werkzeuge) ins Innere des Geräts gelangen und
Kurzschlüsse verursachen.
• Wenn ein Disc-Fehler durch Kondensationsbildung auf der Laserlinse auftritt, werfen Sie die Disc aus und warten Sie eine
Zeit lang, bis die Kondensation getrocknet ist.
Fernbedienung (RC-406):
• Lassen Sie die Fernbedienung nicht an heißen Orten wie beispielsweise auf dem Armaturenbrett liegen.
• Es besteht die Gefahr, dass die Lithiumbatterie explodiert, wenn sie verkehrt eingesetzt wird. Ersetzen sie sie
ausschließlich durch eine des gleichen oder eines gleichwertigen Typs.
• Akkus oder Batterien dürfen keiner großen Hitze, wie beispielsweise Sonneneinstrahlung, Feuer oder Ähnlichem,
ausgesetzt werden.
• Bewahren Sie Batterie bis zur Verwendung außerhalb der Reichweite von Kindern und in der Originalverpackung auf.
Entsorgen Sie gebrauchte Batterien umgehend. Bei Verschlucken der Batterie sofort einen Arzt aufsuchen.
Wartung
Reinigung des Geräts:
Reinigung des Steckverbinders:
Anschluss sanft mit einem Wattetupfer oder Lappen reinigen, wobei darauf
geachtet werden muss, die Anschlusskontakte nicht zu beschädigen.
Handhabung von Discs:
• Berühren Sie nicht die Aufnahme-Oberfläche der Disc.
• Kleben Sie keine Aufkleber oder ähnliches auf eine Disc. Verwenden Sie dem
entsprechend auch keine Discs, auf denen sich bereits ein Aufkleber befindet.
• Verwenden Sie kein Zubehör für die Disc.
• Reinigen Sie CDs stets von der Mitte einer Disc nach außen hin.
• Reinigen Sie die Disc mit einem trockenen Silikonlappen oder weichen Lappen. Verwenden Sie keine Lösungsmittel.
• Ziehen Sie Discs beim Entfernen aus dem Gerät horizontal heraus.
• Entfernen Sie vor dem Einsetzen einer Disc die Grate vom Mittenloch und der Disc-Kante.
Wischen Sie die Frontblende mit einem trockenen Silikonlappen oder weichen Lappen sauber.
Die Frontblende abnehmen und den
Anschluss (an der Rückseite
der Frontblende)
2
Page 59

GRUNDLAGEN
Frontblende
Lautstärke-Regler
(drehen/drücken)
Abnehmen-Taste
Displayfenster
Fernbedienung (RC-406) (nicht mitgeliefert)
(Diese Einheit kann aber mit einem getrennt erhältlichen
Fernbedienungsteil ferngesteuert werden.)
Fernbedienungssensor (Nicht hellem
Sonnenlicht aussetzen.)
Bei der ersten
Verwendung ziehen Sie
das Schutzblatt heraus.
RücksetzenAnbringen Abnehmen
Ihre vorgegebenen
Einstellungen werden
ebenfalls gelöscht.
Ersetzen der Batterie
Zum Verfahren Sie so (auf der Frontblende) Verfahren Sie so (auf der Fernbedienung)
Einschalten
Einstellen der
Lautstärke
Quelle auswählen
Ändern der Display-
Information
Drücken Sie
• Zum Ausschalten halten Sie die Taste gedrückt.
Drehen Sie den Lautstärke-Regler.
Drücken Sie
Drücken Sie
• Halten Sie die Taste gedrückt, um die Display-Informationen zu scrollen.
B SRC
.
B SRC
wiederholt.
DISPSCRL
wiederholt.
Zum Ausschalten halten Sie
( Durch Drücken von
eingeschaltet. )
Drücken Sie
Drücken Sie
stummzuschalten.
• Zum Abbrechen drücken Sie die Taste erneut.
Drücken Sie
( nicht verfügbar )
VOL
ATT
SRC
wiederholt.
SRC
SRC
oder
während der Wiedergabe, um den Ton
gedrückt.
wird die Stromversorgung nicht
VOL
.
DEUTSCH |
3
Page 60

ERSTE SCHRITTE
1
Brechen Sie die Demonstration ab
Wenn Sie die Stromversorgung einschalten (nach dem Rücksetzen des Geräts), erscheint
folgende Anzeige im Display: “SELLANGUAGE”
1 Drehen Sie den Lautstärke-Regler zum Wählen von
[RUS] (Russisch)
[ENG]
Dann erscheint folgendes in der Anzeige: “CANCELDEMO” “PRESS”
“VOLUMEKNOB”
, und drücken Sie dann den Regler.
ist für das ursprüngliche Setup gewählt.
2 Drücken Sie den Lautstärke-Regler.
[YES]
ist für das ursprüngliche Setup gewählt.
3 Drücken Sie den Lautstärke-Regler erneut.
“DEMOOFF” erscheint.
2
Stellen Sie die Uhr ein
Drücken Sie den Lautstärke-Regler, um auf
1
2 Drehen Sie den Lautstärke-Regler zum Wählen von
Sie dann den Regler.
3 Drehen Sie den Lautstärke-Regler zum Wählen von
drücken Sie dann den Regler.
4 Drehen Sie den Lautstärke-Regler, um die Einstellungen vorzunehmen, und
drücken Sie dann den Regler.
Tag Stunde Minute
5 Drehen Sie den Lautstärke-Regler zum Wählen von
drücken Sie dann den Regler.
6 Drehen Sie den Lautstärke-Regler zum Wählen von
drücken Sie dann den Regler.
7 Halten Sie zum Beenden gedrückt.
Zum Zurückschalten zum vorherigen Einstellpunkt bzw. der vorherigen Hierarchie drücken Sie .
4
“PRESS” “VOLUMEKNOB”
[ENG]
(Englisch) oder
[FUNCTION]
zu schalten.
[CLOCK]
, und drücken
[CLOCK ADJUST]
[CLOCK FORMAT]
[12H]
oder
[24H]
, und
, und
, und
3
Festlegen der Anfangseinstellungen
Drücken Sie B SRC, um auf STANDBY zu schalten.
1
2 Drücken Sie den Lautstärke-Regler, um auf
schalten.
[FUNCTION]
zu
3 Drehen Sie den Lautstärke-Regler, um eine Auswahl zu
treffen (siehe folgende Tabelle), und drücken Sie dann den
Regler.
4 Halten Sie zum Beenden gedrückt.
Zum Zurückschalten zum vorherigen Einstellpunkt bzw. der vorherigen
Hierarchie drücken Sie
AUDIO CONTROL
SP SELECT
DISPLAY
EASY MENU
TUNER SETTING
DAB L-BAND
DAB ANT
POWER
PRESET TYPE
SYSTEM
KEY BEEP
OFF/ 5/4/ 6 × 9/6/ OEM
Lautsprechergröße (5 Zoll oder 4 Zoll, 6×9 Zoll oder 6 Zoll) oder OEMLautsprechern für optimale Leistung.
ON
Weiß um, wenn
als auch Tastenbeleuchtung bleiben als Farbe von
( 18)
ON
OFF
ON:Versorgt die DAB-Antenne mit Strom. Wählen, wenn die
mitgelieferte Antenne verwendet wird. ;
Stromversorgung. Wählen, wenn eine passive Antenne ohne Booster
verwendet wird.
NORMAL
Frequenzband (FM1/ FM2/ FM3/ MW/ LW/ DB1/ DB2/ DB3). ;
MIX
Frequenzbands.
ON
.
Standard:
: Auswahl entsprechend der
:Sowohl die Anzeige als auch die Tastenbeleuchtung wechseln auf
[FUNCTION]
:Empfängt L-BAND-Ensemble bei digitalem Audioempfang.;
:Hebt auf.
( 25)
: Speichert einen Sender für jede Sendespeichertaste in jedem
: Speichert einen Sender für jede Sendespeichertaste ungeachtet des
:Aktiviert den Tastenberührungston.;
eingegeben wird.;
OFF
:Liefert keine
OFF
:Deaktiviert.
OFF
:Sowohl Anzeige
[COLOR SELECT]
XX
.
Page 61

ERSTE SCHRITTE
SOURCE SELECT
ON
AHA SRC
BUILT-IN AUX
RUSSIAN SET
P-OFF WAIT
CD READ 1
F/W UPDATE
UPDATE SYSTEM / UPDATE BT/ UPDATE DAB1/
UPDATE DAB2
F/W UP xx.xx/
F/W UP xx.x.x/
F/W UP Vxxx
:Aktiviert Sie AHA in der Quellenwahl.;
OFF
:Deaktiviert.
( 11)
ON
:Aktiviert Sie AUX in der Quellenwahl.;
OFF
:Deaktiviert.
Wählt die Anzeigesprache für das
[FUNCTION]
Information (Ordnername, Dateiname,
Songtitel, Interpretenname, Albumname),
wo zutreffend.
OFF
BКЛ
Nur zutreffend, wenn der
Demonstrationsmodus ausgeschaltet ist.
Stellt die Zeitdauer ein, bis das Gerät
automatisch ausschaltet (im StandbyModus), um Batteriestrom zu sparen.
20M
60M
WAIT TIME – – –
:Hiermit wird automatisch zwischen
Discs mit Audiodateien und Musik-CDs
unterschieden.;
Wiedergabe zwangsweise als Musik-CD
durchgeführt. Es kommt kein Ton, wenn eine
Disc mit Audiodateien abgespielt wird.
YES
Firmware.;
wird nicht ausgeführt).
Einzelheiten darüber, wie Sie die Firmware
aktualisieren können, siehe:
www.kenwood.com/cs/ce/
( 11)
-Menü und die Tag-
:Anzeigesprache ist Englisch.;
:Anzeigesprache ist Russisch.
: 20 Minutes ;
40M
: 60 Minutes ;
:Startet die Aktualisierung der
:Hebt auf
2
: Hiermit wird die
NO
:Bricht ab (Aktualisierung
: 40 Minutes ;
DIGITAL RADIO (DAB)
Über DAB (Digital Audio Broadcasting)
DAB ist eines der heute verfügbaren digitalen
Rundfunksendesysteme. Es kann Klang in
Digitalqualität ohne störende Interferenzen oder
Signalverzerrung liefern. Außerdem kann dieser
Dienst Text, Bilder und Daten übermitteln.
Im Gegensatz zu UKW-Sendungen, wo jedes
Programm auf seiner eigenen Frequenz übertragen
wird, kombiniert DAB mehrere Programme (“Dienste”
genannt), um ein sogenanntes “Ensemble” zu bilden.
Die “Primärkomponente” (Hauptrundfunksender)
wird manchmal von einer “Sekundärkomponente”
begleitet, die zusätzliche Programme oder andere
Informationen enthalten kann.
Beginnen Sie zu hören
Drücken Sie B SRC zum Wählen von DAB.
1
2 Drücken Sie J BAND wiederholt (oder drücken Sie #FM+ am RC-406), um DB1/ DB2/ DB3 zu
wählen.
3 Halten Sie S / T gedrückt (oder halten Sie S / T(+) am RC-406 gedrückt), um ein
Ensemble zu suchen.
4 Drücken Sie S / T (oder drücken Sie S / T(+) am RC-406), um ein Ensemble, einen
Dienst oder eine Komponente zum Hören zu wählen.
•
Zum Ändern des Abstimmverfahrens für S / T:
AUTO1:
AUTO2:
MANUAL:
Drücken Sie
Drücken Sie
Drücken Sie
Halten Sie
Halten Sie
S / T
S / T
S / T
S / T
S / T
: Wählen Sie ein Ensemble, einen Dienst oder eine Komponente.
gedrückt: Sucht automatisch nach einem Ensemble.
: Suchen Sie nach einem Vorwahldienst.
: Wählen Sie ein Ensemble, einen Dienst oder eine Komponente.
gedrückt: Suchen Sie manuell nach einem Ensemble.
Vorbereitung:
1 Schließen Sie eine DAB-Antenne an die
DAB-Antennenbuchse an.
( 25)
2 Drücken Sie B SRC zum Wählen von DAB.
3 Halten Sie gedrückt, um die
Aktualisierung der Dienstliste zu starten.
“LIST UPDATE” erscheint, und die Aktualisierung
beginnt. “UPDATED” erscheint, wenn die
Aktualisierung fertig ist.
Die Aktualisierung dauert bis zu 3 Minuten.
Keine Unterbrechung (wie Verkehrsansagen) ist
während der Aktualisierung möglich.
•
Zum Abbrechen der Aktualisierung der
Dienstliste:
Drücken Sie
Halten Sie erneut gedrückt.
K SEEK
wiederholt.
DEUTSCH |
5
Page 62

DIGITAL RADIO (DAB)
•
Zum Speichern eines Dienstes:
Zifferntasten (
•
Zum Auswählen eines gespeicherten Dienstes:
Drücken Sie eine der Zifferntasten (
eine der Zifferntasten (
1
bis 6) gedrückt.
1
bis 6) am RC-406).
Wählen Sie einen Dienst
Drücken Sie , um auf Dienstsuche zu
1
schalten.
2 Drehen Sie den Lautstärkeregler oder drücken Sie
J / K zum Wählen eines Dienstes, und drücken Sie
dann den Regler.
(oder durch Verwendung von RC-406)
Drücken Sie J / K, um nach einem Dienst zu
suchen.
Zum Abbrechen der Dienstsuche drücken Sie .
Wählen Sie einen Dienst nach Namen
Drücken Sie , um auf Dienstsuche zu
1
schalten.
2 Drehen Sie den Lautstärke-Regler schnell für
Alphabetsuche.
3 Drehen Sie den Lautstärke-Regler oder drücken
Sie S / T, um das Zeichen auswählen, nach
dem gesucht werden soll.
Zum Weitergehen zur vorherigen/nächsten Seite
drücken.
4 Drücken Sie den Lautstärke-Regler zum Starten
der Suche.
5 Drehen Sie den Lautstärke-Regler zum Wählen
eines Dienstes, und drücken Sie dann den Regler.
Zum Beenden Sie des Alphabetsuche-Modus drücken Sie
.
Halten Sie eine der
1
bis 6) (oder drücken Sie
J / K
Wiederholung
Halten Sie K SEEK gedrückt (oder drücken Sie K am RC-406).
“REPLAY MODE” erscheint, und die Wiederholung beginnt von der Live-Position. Sie können eine
bestimmte Zeitlänge des aktuellen Dienstes wiederholen (je nach der Audio-Bitrate).
Während der Wiederholung...
• Zum Pausieren oder Fortsetzen der Wiedergabe drücken Sie
RC-406).
• Zum Überspringen des aktuellen Songs nach vorne/hinten drücken Sie
S / T(+)
• Zum Vorlaufen/Rücklaufen halten Sie
RC-406 gedrückt).
• Um die Wiederholung zu beenden und auf Live zu schalten, halten Sie
halten Sie
beim RC-406).
K
am RC-406 gedrückt).
S / T
gedrückt (oder halten Sie
6 IW
(oder drücken Sie
K SEEK
S / T
S / T(+)
ENT IW
(oder drücken Sie
beim
gedrückt (oder
am
Andere Einstellungen
Drücken Sie den Lautstärke-Regler, um auf
1
[FUNCTION]
zu schalten.
2 Drehen Sie den Lautstärke-Regler, um eine Auswahl zu treffen (siehe folgende
Tabelle), und drücken Sie dann den Regler.
3 Halten Sie zum Beenden gedrückt.
Zum Zurückschalten zum vorherigen Einstellpunkt bzw. der vorherigen Hierarchie drücken Sie .
Standard:
TUNER SETTING
ON
AF SET
TI ON
PTY SEARCH
:
Während des Hörens von DAB...
Schalten Sie automatisch auf UKW-Sendung des gleichen Programms um, wenn das DAB-Signal schwach
wird. Es wird automatisch auf DAB-Ton zurückgeschaltet, wenn das Signal wieder stark wird.
Während des Hörens von FM...
Schalten Sie automatisch auf DAB-Sendung des gleichen Programms um (wenn verfügbar).;
OFF
:Hebt auf.
:Lassen Sie das kurzzeitig auf Verkehrsinformation schalten.;
Drücken Sie den Lautstärke-Regler zum Einschalten der PTY-Sprachauswahl. Drehen Sie den Lautstärke-Regler
zum Wählen der PTY-Sprache (
Wählt den verfügbaren Programmtyp
ENGLISH/ FRENCH/ GERMAN
( 7)
, und drücken Sie dann S / T zum Starten.
OFF
:Hebt auf.
), und drücken Sie dann den Regler.
XX
6
Page 63

ANALOG RADIODIGITAL RADIO (DAB)
ASW SELECT TRAVEL, WARNINGS, NEWS, WEATHER, EVENT, SPECIAL, RAD INFO,
SPORTS, FINANCE:
drücken Sie dann den Regler.
“
*
Schalten Sie automatisch von jeder Quelle auf Digitalradio-Ensembles um, die einen
aktivierten Ansagetyp ausstrahlen.
• Mehrfache Ansagen können gleichzeitig aktiviert werden.
• Zum Deaktivieren drücken Sie den Lautstärke-Regler erneut (“
LIST UPDATE AUTO
Stromversorgung.;
gehalten wird.
PTY WATCH
Schalten Sie automatisch von jeder Quelle auf Digitalradio-Ensembles um, die einen
gewählten Programmtyp ausstrahlen.
” erscheint vor dem aktivierten Ansagetyp.
:Aktualisieren Sie die DAB-Dienstliste automatisch bei eingeschalteter
Drehen Sie den Lautstärke-Regler, um eine Auswahl zu treffen, und
” erlischt).
*
MANUAL
:Aktualisiert die DAB-Dienstliste, indem gedrückt
NEWS, AFFAIRS, INFO, SPORT, EDUCATE, DRAMA, CULTURE, SCIENCE,
VARIED, POP M
CLASSICS, OTHER M
RELIGION, PHONE IN, TRAVEL, LEISURE, JAZZ, COUNTRY, NATION M
OLDIES, FOLK M
OFF
:Hebt auf.
(Musik)
, ROCK M
(Musik)
, EASY M
, WEATHER, FINANCE, CHILDREN, SOCIAL,
(Musik)
(Musik)
, DOCUMENT
(Musik)
, LIGHT M
(Musik)
,
(Musik)
,
CLOCK
ON
TIME SYNC
• Verfügbare Programmart:
SPEECH: NEWS, AFFAIRS, INFO
:Synchronisiert die Zeit des Geräts mit der Digitalradiosignal-Senderzeit.;
(Information),
SPORT, EDUCATE, DRAMA, CULTURE, SCIENCE
VARIED, WEATHER, FINANCE, CHILDREN, SOCIAL, RELIGION, PHONE IN, TRAVEL, LEISURE
OFF
:Hebt auf.
,
,
DOCUMENT
MUSIC: POP M
OTHER M
Das Gerät sucht den Programmtyp, der unter
wenn gewählt.
• Wenn die Lautstärke während des Empfangs von Verkehrsinformationen, Ansagen oder
Alarmen eingestellt wird, wird die eingestellte Lautstärke automatisch gespeichert. Wird
die Verkehrsfunk-, Ansage oder Alarm-Funktion das nächste Mal aufgerufen, wird diese
Einstellung übernommen.
(Musik),
(Musik),
JAZZ, COUNTRY, NATION M
ROCK M
(Musik),
EASY M
(Musik),
(Musik),
[SPEECH]
LIGHT M
(Musik),
OLDIES, FOLK M
oder
[MUSIC]
CLASSICS
(Musik)
kategorisiert ist,
,
Suche nach einem Sender
Drücken Sie B SRC zum Wählen von TUNER.
1
2 Drücken Sie JBAND wiederholt (oder drücken Sie
AM–/#FM+ am RC-406), um FM1/ FM2/ FM3/ MW (oder
*
LW) zu wählen.
3 Drücken Sie S / T (oder drücken Sie S / T(+) am
RC-406), um einen Sender zu suchen.
•
Zum Ändern des Suchverfahrens für S / T:
KSEEK
•
•
wiederholt.
AUTO1:
Sucht automatisch nach einem Sender.
AUTO2:
Suchen Sie nach einem Festsender.
MANUAL:
Zum Speichern eines Senders:
(
Sucht manuell nach einem Sender.
1
bis 6) gedrückt.
Halten Sie eine der Zifferntasten
Zum Auswählen eines gespeicherten Senders:
der Zifferntasten (
(
1
bis 6) am RC-406).
1
bis 6) (oder drücken Sie eine der Zifferntasten
Drücken Sie
Drücken Sie eine
Direktzugriff-Abstimmung (mit RC-406)
Drücken Sie DIRECT, um auf Direktzugriff-Abstimmen zu
1
schalten.
2 Drücken Sie die Zifferntasten, um eine Frequenz einzugeben.
3 Drücken Sie ENTIW, um einen Sender zu suchen.
• Zum Aufheben drücken Sie oder
• Wenn 10Sekunden nach Schritt
wird Direktzugriff-Abstimmung automatisch automatisch abgebrochen.
DIRECT
2
keine Bedienung vorgenommen wird,
.
DEUTSCH |
7
Page 64

ANALOG RADIO
Andere Einstellungen
Drücken Sie den Lautstärke-Regler, um auf
1
2 Drehen Sie den Lautstärke-Regler, um eine Auswahl zu treffen
(siehe folgende Tabelle), und drücken Sie dann den Regler.
3 Halten Sie zum Beenden gedrückt.
Zum Zurückschalten zum vorherigen Einstellpunkt bzw. der vorherigen Hierarchie
drücken Sie
.
TUNER SETTING
LOCAL SEEK
AUTO MEMORY YES
MONO SET
NEWS SET ON
REGIONAL ON
AF SET ON
TI
*
PTY SEARCH
ON
: Sucht nur FM (UKW)-Sender mit gutem Empfang. ;
:Beginnt automatisch die Speicherung von 6 Sendern mit gutem Empfang.;
NO
:Hebt auf. (Nur wählbar, wenn
ist.)
(4)
ON
:Verbessern Sie den FM (UKW)-Empfang (aber der Stereoeffekt kann verloren
gehen).;
OFF
:Hebt auf.
: Das Gerät schaltet kurzzeitig auf das Nachrichtenprogramm, falls verfügbar.;
OFF
: Hebt auf.
: Schaltet auf einen anderen Sender in der spezifischen Region nur mit der
“AF”-Steuerung.;
: Sucht automatisch einen anderen Sender auf, der das gleiche Programm
im gleichen Radio Data System-Netzwerk sendet und einen besseren Empfang
aufweist, falls der aktuelle Empfang schlecht ist.;
ON
:Lassen Sie das kurzzeitig auf Verkehrsinformation schalten.;
Drücken Sie den Lautstärke-Regler zum Einschalten der PTY-Sprachauswahl.
Drehen Sie den Lautstärke-Regler zum Wählen der PTY-Sprache (
FRENCH/ GERMAN
Wählt den verfügbaren Programmtyp (siehe Folgendes), und drücken Sie dann
S / T zum Starten.
OFF
:Hebt auf.
), und drücken Sie dann den Regler.
[NORMAL]
[FUNCTION]
für
[PRESETTYPE]
OFF
: Hebt auf.
zu schalten.
OFF
: Hebt auf.
OFF
ENGLISH
Standard:
gewählt
:Hebt auf.
/
XX
•
[LOCAL SEEK]/ [MONO SET]/ [NEWS SET]/ [REGIONAL]/ [AF SET]/ [PTY SEARCH]
wählbar, wenn der Wellenbereich FM1/ FM2/ FM3 ist.
• Verfügbare Programmart:
SPEECH
:
NEWS
,
AFFAIRS
,
INFO
,
LEISURE
,
WEATHER
ROCK M
,
(Musik),
(Information),
DOCUMENT
(Musik),
SCIENCE
,
VARIED
IN
,
MUSIC: POP M
Das Gerät sucht den Programmtyp, der unter
ist, wenn gewählt.
• Wenn die Lautstärke während des Empfangs von Verkehrsinformationen, Alarm
oder Nachrichtensendungen eingestellt wird, wird die eingestellte Lautstärke
automatisch gespeichert. Wird die Verkehrsfunk-Funktion, der Alarm oder
die Nachrichtensendung das nächste Mal aufgerufen, wird diese Einstellung
übernommen.
*
[TI]
nur von DAB-Quelle.
TRAVEL
(Musik),
CLASSICS
,
OTHER M
FOLK M
(Musik)
im MW/LW-Wellenbereich dient zum Aktivieren von Verkehrsinformatinoen
,
FINANCE
JAZZ
EASY M
,
COUNTRY
SPORT
,
CHILDREN
[SPEECH]
,
EDUCATE
(Musik),
,
NATION M
,
SOCIAL
LIGHT M
oder
,
DRAMA
,
(Musik),
[MUSIC]
,
CULTURE
RELIGION
(Musik),
OLDIES
kategorisiert
ist nur
,
PHONE
,
,
8
Page 65

CD / USB / iPod
Starten Sie die Wiedergabe
Die Quelle schaltet automatisch um, und die
Wiedergabe startet.
CD
Beschriftungsseite M Disc auswerfen
USB
USB-Eingangsterminal
CA-U1EX (max.: 500mA)
(optionales Zubehörteil)
und/ oder
USB-Kabel von der Rückseite der Einheit
iPod/iPhone
USB-Eingangsterminal
und/
oder
USB-Kabel von der Rückseite der Einheit
KCA-iP102 (optionales Zubehör) oder
Drücken Sie
wählen, während iPod als Signalquelle gewählt ist.
MODE ON:
Vom iPod
MODE OFF:
Zubehörkabel von iPod/iPhone
5 iPod
, um den Steuermodus zu
2
*
Vom Gerät.
.
1
*
Zum Verfahren Sie so
Pausieren oder
Fortsetzen der
Wiedergabe
Auswählen eines Tracks/
einer Datei
Auswählen eines
3
*
Ordners
Vorspulen/Rückspulen
Drücken Sie 6 IW (oder drücken Sie ENT IW am RC-406).
Drücken Sie S / T (oder drücken Sie S / T(+) am RC-406).
Drücken Sie J / K (oder drücken Sie
AM– / #FM+ am RC-406).
*
Halten Sie S / T gedrückt (oder halten Sie S / T(+) am
RC-406 gedrückt).
Wiederholte
Wiedergabe
Zufallswiedergabe
1
*
Lassen Sie bei Nichtgebrauch nicht das Kabel im Auto liegen.
2
*
Sie können weiterhin Wiedergabe/Pause, Dateisuche, Vorspulen oder Zurückspulen von Dateien vom Gerät steuern.
3
*
Nur für MP3/WMA/AAC/WAV-Dateien. Dies funktioniert nicht bei iPod.
4
*
Bei iPod:
5
*
Bei CD:
Wenn Sie das iPod/iPhone an der USB-Eingangsbuchse des Geräts anschließen (während Sie TuneIn Radio,
TuneIn Radio Pro oder Aupeo hören), gibt das Gerät Ton von diesen Apps aus.
4
*
Trifft nur zu, wenn
Nur für MP3/WMA/AAC-Dateien.
Drücken Sie 4 wiederholt.
• Audio-CD: TRACKREPEAT, REPEATOFF
• MP3/WMA/AAC/WAV-Datei oder iPod: FILEREPEAT, FOLDERREPEAT,
REPEATOFF
• KENWOOD Music Editor Light (KME Light)/ KENWOOD Music Control (KMC)Datei
( 18)
4
*
Drücken Sie 3 wiederholt.
• Audio-CD: DISCRANDOM, RANDOMOFF
• MP3/WMA/AAC/WAV-Datei oder iPod oder KME Light/ KMC-Datei:
FOLDERRANDOM, RANDOMOFF
: FILEREPEAT, REPEATOFF
Halten Sie die 3 gedrückt, um “ALL RANDOM” zu wählen.
[MODE OFF]
gewählt ist.
DEUTSCH |
5
*
9
Page 66

CD / USB / iPod
Auswählen eines Tracks/einer Datei aus
einer Liste
Bei iPod:
Trifft nur zu, wenn
ist.
( 9)
1
Drücken Sie .
2
Drehen Sie den Lautstärke-Regler, um eine
[MODE OFF]
gewählt
Auswahl zu treffen, und drücken Sie dann den
Regler.
• MP3/WMA/AAC/WAV-Datei: Wählen Sie den
gewünschten Ordner und dann eine Datei.
• iPod oder KME Light/ KMC-Datei: Wählen
Sie die gewünschte Datei aus der Liste
(PLAYLISTS, ARTISTS, ALBUMS, SONGS,
*
PODCASTS
*
Nur für iPod.
• Zum Zurückkehren zur obersten Ordnerebene
(oder der ersten Datei) drücken Sie die Zifferntaste
5 iPod
•
Zum Zurückschalten zum vorherigen Einstellpunkt
bzw. der vorherigen Hierarchie drücken Sie
• Zum Abbrechen halten Sie
Wenn Sie viele Dateien haben...
Sie können diese schnell im programmierten
Überspringen-Suchverhältnis durchsuchen (in
Schritt
2
• Siehe auch “Stellen Sie das ÜberspringenSuchverhältnis ein”.
• Indem Sie
Musikstücke im maximalen Verhältnis (10
übersprungen, ungeachtet der vorgenommenen
Einstellung.
•
Bei USB:
KME LIGHT/ KMC erstellten Datenbank registriert
sind.
• Gilt nicht für Audio-CD.
, GENRES, COMPOSERS*).
.
gedrückt.
oben), indem Sie
S / T
Nur für Dateien, die in einer mit dem
S / T
drücken.
gedrückt halten, werden
.
%
)
10
Direkte Musiksuche (mit RC-406)
Drücken Sie
1
2
Drücken Sie die Zifferntasten, um die
DIRECT
.
gewünschte Track-/Dateinummer einzugeben.
3
Drücken Sie
ENT IW
, um nach Musik zu
suchen.
• Zum Abbrechen drücken Sie .
•
Nicht verfügbar, wenn Zufallswiedergabe gewählt ist.
• Gilt nicht für iPod, KME Light/ KMC-Datei.
Wählen eines Songs nach Namen
Während des Hörens von iPod...
1
Drücken Sie .
2
Drehen Sie den Lautstärke-Regler zum Wählen
einer Kategorie, und drücken Sie dann den Regler.
3
Drehen Sie den Lautstärke-Regler schnell für
Zeichensuche.
4
Drehen Sie den Lautstärke-Regler, um das Zeichen
auswählen, nach dem gesucht werden soll
5
Drücken Sie
Eingabeposition umzuschalten.
Sie können bis zu 3 Zeichen eingeben.
6
Drücken Sie den Lautstärke-Regler zum Starten
S / T
, um auf die
.
der Suche.
7
Drehen Sie den Lautstärke-Regler, um eine
Auswahl zu treffen, und drücken Sie dann den
Regler.
Wiederholen Sie Schritt 7, bis der gewünschte
Gegenstand gewählt ist.
• Um nach einem anderen Zeichen als die Buchstaben
A bis Z oder die Zahlen 0 bis 9 zu suchen, geben Sie
nur “
” ein.
*
• Zum Zurückschalten zur vorherigen Hierarchie
drücken Sie
• Zum Zurückschalten zum Top-Menü drücken Sie die
Zifferntaste
• Zum Abbrechen halten Sie
5 iPod
.
.
gedrückt.
Stellen Sie das ÜberspringenSuchverhältnis ein
Während des Hörens von iPod oder KME Light/ KMC-Datei...
1
Drücken Sie den Lautstärke-Regler, um auf
[FUNCTION]
2
Drehen Sie den Lautstärke-Regler zum Wählen
von
3
Drehen Sie den Lautstärke-Regler zum Wählen von
[SKIP SEARCH]
4
Drehen Sie den Lautstärke-Regler, um eine Auswahl
zu treffen, und drücken Sie dann den Regler.
0.5%
Suchverhältnis über die gesamten Dateien.
5
Halten Sie zum Beenden gedrückt.
zu schalten.
[USB]
, und drücken Sie dann den Regler.
, und drücken Sie dann den Regler.
(Standard)/ 1%/ 5%/
10%
: Überspringen-
Wechseln des USB-Laufwerks
Wenn ein Smartphone (Massenspeicherklasse) an
der USB-Eingangsbuchse angeschlossen ist, können
Sie dessen internen Speicher (wie eine SD-Karte) zur
Wiedergabe gespeicherter Musikstücke wählen.
Sie können auch das gewünschte Laufwerk zur
Wiedergabe wählen, wenn ein Gerät mit mehreren
Laufwerken angeschlossen ist.
Drücken Sie
5 iPod
wiederholt, um das
gewünschte Laufwerk zu wählen.
(oder)
1
Drücken Sie den Lautstärke-Regler, um auf
[FUNCTION]
2
Drehen Sie den Lautstärke-Regler zum Wählen
von
3
Drehen Sie den Lautstärke-Regler zum Wählen von
[MUSIC DRIVE],
4
Drücken Sie den Lautstärke-Regler zum
Wählen von
Das nächste Laufwerk wird automatisch gewählt.
Wiederholen Sie Schritt
Laufwerke zu wählen.
Wählbare Punkte:
zu schalten.
[USB]
, und drücken Sie dann den Regler.
und drücken Sie dann den Regler.
[DRIVE CHANGE]
[DRIVE1]
.
1
bis 4, um die folgenden
bis
[DRIVE5]
Page 67

AUX AhaTM RADIO
Vorbereitung:
Wählen Sie
[ON]
für
[BUILT-IN AUX]. ( 5)
Beginnen Sie zu hören
Schließen Sie einen tragbaren
1
Audioplayer (im Handel erhältlich) an.
Auxiliary-Eingabebuchse
3,5-mm-Stereo-Ministecker mit
“L”-förmigem Anschluss (im Handel
erhältlich)
2
Drücken Sie
B SRC
zum Wählen von AUX.
Tragbarer
Audioplayer
3 Schalten Sie den tragbaren Audioplayer
ein und starten Sie die Wiedergabe.
Den AUX-Namen einstellen
Beim Hören eines am Gerät angeschlossenen
tragbaren Audio-Players...
1 Drücken Sie den Lautstärke-Regler, um
auf
[FUNCTION]
zu schalten.
2 Drehen Sie den Lautstärke-Regler zum
Wählen von
[SYSTEM]
, und drücken Sie
dann den Regler.
3 Drehen Sie den Lautstärke-Regler zum
Wählen von
[AUX NAME SET]
, und drücken
Sie dann den Regler.
4 Drehen Sie den Lautstärke-Regler, um
eine Auswahl zu treffen, und drücken
Sie dann den Regler.
AUX
(Standard)/
DVD/ PORTABLE/ GAME/ VIDEO
TV
5
Halten Sie zum Beenden gedrückt.
Vorbereitung:
Installieren Sie die neueste Version der Aha
Anwendung auf Ihrem Gerät (iPhone/ iPod
touch), erstellen Sie ein Konto und melden sich
TM
bei Aha
an.
• Wählen Sie
[ON]
für
[AHA SRC]. ( 5)
Beginnen Sie zu hören
Öffnen Sie die AhaTM-Anwendung auf
1
Ihrem Gerät.
2 Schließen Sie Ihr Gerät an die USB-
Eingangsbuchse an.
USB-Eingangsterminal
und/
oder
USB-Kabel von der Rückseite der Einheit
KCA-iP102 (optionales Zubehör) oder
Zubehörkabel von iPod/iPhone
Die Signalquelle schaltet auf AHA FRONT/
AHA REAR um, und die Wiedergabe
beginnt.
* Lassen Sie bei Nichtgebrauch nicht das Kabel
im Auto liegen.
/
Zum Verfahren Sie so
TM
-
Pausieren oder
Fortsetzen der
Wiedergabe
Wählen Sie einen Inhalt
Drücken Sie 6 IW (oder
drücken Sie ENT IW am
RC-406).
Drücken Sie S / T (oder
drücken Sie S / T(+)
am RC-406).
Spulen Sie 30 Sekunden
eines Inhalts vor
Spulen Sie 15 Sekunden
eines Inhalts zurück
Aktueller Inhalt
2
*
“Gefällt”
Aktueller Inhalt “Gefällt
2
*
nicht”
1
*
Gilt für nur für Audiobook und Podcast.
2
*
Gilt für nur für Audiobook und ortsbasierte Sender (LBS).
Halten Sie T gedrückt.
1
*
Halten Sie S gedrückt.
1
*
Drücken Sie J .
•
Zum Rücknehmen der Beurteilung
drücken Sie
Drücken Sie K .
•
Zum Rücknehmen der Beurteilung
drücken Sie
J
K
erneut.
erneut.
Suche nach einem Sender
*
1
Drücken Sie .
2 Drehen Sie den Lautstärkeregler zum Wählen
eines Senders, und drücken Sie dann den Regler.
3 Drehen Sie den Lautstärke-Regler zum
gewünschten Inhalt, und drücken Sie den Regler.
(oder durch Verwendung von RC-406)
Drücken Sie J / K, um einen Sender zu suchen.
Zum Abbrechen halten Sie gedrückt.
Sie können einen Anruf tätigen, wenn Ihr Gerät über Bluetooth-
Verbindung an die Einheit angeschlossen ist
• Zum Aufrufen einer Nummer im Inhalt*: Drücken Sie 1,
und drücken Sie dann den Lautstärkeregler zum Rufen.
•
Zum Beenden oder Trennen eines Rufs: Drücken Sie .
* Die Verfügbarkeit hängt von dem gewählten Sender ab.
( 12)...
DEUTSCH |
11
Page 68

BLUETOOTH®
Sie können Bluetooth-Geräte mit dieser Einheit bedienen.
Schließen das Mikrofon an
MIC (Mikrofoneingangsbuchse)
Mikrofon (mitgeliefert)
Geräterückseite
Stellen Sie den
Mikrofonwinkel ein
Falls Sie das Gerät ausschalten oder das Bedienfeld
während eines Telefongesprächs abnehmen, wird die
Bluetooth-Verbindung getrennt. Setzen Sie das Gespräch
mit Ihrem Handy fort.
Unterstützte Bluetooth-Profile
– Hands-Free Profile (HFP)
– Serial Port Profile (SPP)
– Phonebook Access Profile (PBAP)
– Object Push Profile (OPP)
– Advanced Audio Distribution Profile (A2DP)
– Audio/Video Remote Control Profile (AVRCP)
12
Sichern Sie das Kabel mit Kabelklemmen
(nicht mitgeliefert), wenn erforderlich.
Führen Sie Pairing für ein BluetoothGerät aus
Wenn Sie ein Bluetooth-Gerät zum ersten Mal
anschließen, nehmen Sie Pairing zwischen der Einheit
und dem Gerät vor. Wenn das Pairing ausgeführt ist,
bleibt das Bluetooth-Gerät in der Einheit registriert,
auch wenn Sie die Einheit zurücksetzen.
• Bis zu fünf Geräte können insgesamt registriert
(gepairt) werden.
• Es können maximal zwei Bluetooth-Telefone und
ein Bluetooth-Audiogerät zur Zeit angeschlossen
werden.
• Diese Einheit unterstützt Secure Simple Pairing
(SSP).
• Manche Bluetooth-Geräte können nicht in der
Lage sein, nach dem Pairing die Verbindung
automatisch herzustellen. Schließen Sie das Gerät
manuell an die Einheit an. Weitere Information
siehe Bedienungsanleitung Ihres BluetoothGeräts.
1 Drücken Sie B SRC, um die Einheit
einzuschalten.
2 Suchen und wählen Sie den
Modellnamen dieser Einheit
(KDC-BT4*DAB) auf dem BluetoothGerät.
“PAIRING” “PASS XXXXXX” Gerätename
“PRESS”
“VOLUME KNOB” scrollt durch das
Display.
3 Drücken Sie den Lautstärke-Regler zum
Starten des Pairing-Vorgangs.
“PAIRING OK” erscheint, wenn das Pairing fertig
ist, und “
” leuchtet auf, wenn die Bluetooth-
Verbindung hergestellt ist.
• Bei einigen Bluetooth-Geräten müssen Sie
möglicherweise den PIN-Code (Personal
Identification Number) sofort nach der Suche
eingeben.
• Die Pairing-Anforderung (über Bluetooth)
wird automatisch aktiviert, wenn ein iPhone/
iPod touch über die USB-Eingangsklemme
angeschlossen ist. (Gilt nur wenn
auf
[ON]
gestellt ist.)
Drücken Sie den Lautstärke-Regler einmal zum
Pairing, nachdem Sie den Gerätenamen bestätigt
haben.
( 16)
[AUTO PAIRING]
Bluetooth-Testmodus
Sie können die Konnektivität des unterstützten
Profils zwischen dem Bluetooth-Gerät und der
Einheit prüfen.
• Stellen Sie sicher, dass kein Bluetooth-Gerät
angeschlossen ist.
1 Halten Sie gedrückt.
Die Meldung “PLEASE PAIR YOUR PHONE”
erscheint.
2 Suchen und wählen Sie den
Modellnamen dieser Einheit
(KDC-BT4*DAB) auf dem BluetoothGerät.
3 Bedienen Sie das Bluetooth-Gerät, um
das Pairing zu bestätigen.
“TESTING” blinkt im Display.
Das Konnektivitätsergebnis (OK oder NG)
erscheint nach dem Test.
PAIRING : Pairing-Status
HF CNT: Hands-Free Profile (HFP) Kompatibilität
AUD CNT: Advanced Audio Distribution Profile
PB DL: Phonebook Access Profile (PBAP)
• Zum Beenden des Prüfmodus halten Sie
(A2DP) Kompatibilität
Kompatibilität
gedrückt, um das Gerät auszuschalten.
B SRC
Page 69

Bluetooth-Handy
Zum Verfahren Sie so
Empfangen Sie einen
Ruf
Drücken Sie oder den Lautstärke-
Regler oder eine der Zifferntasten
(1bis 6) (oder drücken Sie
RC-406).
• Alle Tastenbeleuchtungen und die
Displaybeleuchtung blinken, wenn ein Ruf
empfangen wird.
Während eines Rufs leuchten die Tasten
und das Display entsprechend den für
[DISPLAY]
vorgenommenen Einstellungen.
(18)
• Wenn
[AUTO ANSWER]
Zeit gestellt ist, nimmt die Einheit den
eingehenden Anruf automatisch entgegen.
(14)
Eingehende Anrufe
abweisen
Einen Anruf beenden
Drücken Sie B SRC (oder drücken Sie
am RC-406).
Drücken Sie oder B SRC (oder
drücken Sie
Umschalten zwischen
Freisprech- und
Privatgespräch-Modi
Stellen Sie die
Telefonlautstärke ein
Schalten Sie zwischen
zwei angeschlossenen
Telefonen um
Drücken Sie 6IW während eines
Anrufs.
• Die Bedienung kann je nach dem
angeschlossenen Bluetooth-Gerät
unterschiedlich sein.
Drehen Sie den Lautstärke-Regler
während eines Anrufs.
Telefon-Lautstärke:
(Standard:
• Diese Einstellung hat keine Auswirkung auf
Drücken Sie wiederholt.
• Gilt nicht während eines Anrufs.
[15]
)
den Lautstärkepegel der anderen Quellen.
auf die gewählte
am RC-406).
[00]
bis
[35]
BLUETOOTH®
Verbessern Sie die Klangqualität während eines Anrufs
Während am Telefon gesprochen wird...
1 Drücken Sie den Lautstärke-Regler, um auf
2 Drehen Sie den Lautstärke-Regler, um eine Auswahl zu treffen (siehe
am
folgende Tabelle), und drücken Sie dann den Regler.
3 Halten Sie zum Beenden gedrückt.
Zum Zurückschalten zum vorherigen Einstellpunkt bzw. der vorherigen Hierarchie drücken
Sie
.
MIC GAIN –20
NR LEVEL –5
ECHO CANCEL
—+8(0):Die Empfindlichkeit des Mikrofons nimmt mit höherer Zahl zu.
—
–20(–10
Rauschen bei einem Telefongespräch gehört wird.
1
—10(4):Passen Sie die Verzögerungszeit für die Echo-Löschung an, bis das letzte Echo bei
einem Telefongespräch gehört wird.
):Passen Sie den Rauschunterdrückungspegel an, bis das geringste
Benachrichtigung mit Textmeldung
Wenn das Telefon eine Textmeldung empfängt, klingelt die Einheit und “SMS RECEIVED”
erscheint.
• Sie können nicht eine Nachricht nicht über die Einheit lesen, bearbeiten oder senden.
• Zum Löschen der Meldung drücken Sie eine beliebige Taste.
Verwenden Sie Spracherkennung
Halten Sie gedrückt.
1
Das Telefon (für das Pairing zuerst ausgeführt wurde) wird aktiviert. Wenn aber ein
Prioritätsgerät verbunden ist, wird durch Gedrückthalten von
aktiviert.
2 Sprechen Sie den Namen des anzurufenden Kontakts oder den
• Unterstützte Spracherkennungsmerkmale können sich je nach Telefon unterscheiden
Einzelheiten siehe Bedienungsanleitung des angeschlossenen Telefons.
• Diese Einheit unterstützt auch die Funktion “intelligenter persönlicher Assistent” des
iPhone.
( 15, DVC PRIORITY)
Sprachbefehl deutlich, um die Telefonfunktionen zu steuern.
[FUNCTION]
zu schalten.
Standard:
das Prioritätsgerät
DEUTSCH |
XX
13
Page 70

BLUETOOTH®
Bedienvorgänge im Bluetooth-Modus
Drücken Sie , um auf Bluetooth-Modus zu schalten.
1
2 Drehen Sie den Lautstärke-Regler, um eine Auswahl zu treffen
(siehe folgende Tabelle), und drücken Sie dann den Regler.
3 Halten Sie zum Beenden gedrückt.
Zum Zurückschalten zum vorherigen Einstellpunkt bzw. der vorherigen Hierarchie
drücken Sie
CALL
HISTORY
.
1
Drücken Sie den Lautstärke-Regler zum Wählen eines Namens oder einer Telefonnummer.
• “INCOMING”, “OUTGOING” oder “MISSED” erscheint im unteren Teil des Displays,
um den vorherigen Rufstatus zu zeigen.
• Drücken Sie
• “NO DATA” erscheint, wenn kein aufgezeichneter Verlauf vorhanden ist.
DISP SCRL, um die Anzeigekategorie (NUMBER oder NAME)
umzuschalten.
2 Drücken Sie den Lautstärke-Regler zum Anrufen.
PHONE
BOOK
1 Drehen Sie den Lautstärke-Regler zum Wählen eines Namens, und drücken Sie dann
den Regler.
2 Drehen Sie den Lautstärke-Regler zum Wählen einer Telefonnummer, und drücken
Sie dann den Regler.
• Wenn Ihr Telefon PBAP unterstützt, wird das Telefonbuch des angeschlossenen
Telefons automatisch beim Pairing zur Einheit übertragen. Wenn das Telefon
nicht PBAP unterstützt, erscheint die Anzeige “TRANSFER PB”. Übertragen Sie das
Telefonbuch manuell.
• Kontakte werden in die folgenden Kategorien unterteilt: HOME, OFFICE, MOBILE,
OTHER, GENERAL
• Dieses Gerät kann nur Buchstaben ohne Umlaute oder Akzentzeichen anzeigen.
(Buchstaben mit Akzentzeichen wie “Ú” werden als “U” angezeigt.)
• Wenn das Telefonbuch zahlreiche Kontakte enthält,
(16, TRANSFER PB)
(Wählen Sie einen
Kontakt nach Namen).
NUMBER
DIAL
1 Drehen Sie den Lautstärke-Regler zum Wählen einer Nummer (0 bis 9) oder eines
Zeichens (
,
#, +
2 Drücken Sie S / T, um die Eingabeposition zu verschieben.
Wiederholen Sie Schritt
).
1 und 2, bis die Eingabe der Telefonnummer beendet ist.
3 Drücken Sie den Lautstärke-Regler zum Anrufen.
(oder durch Verwendung von RC-406)
1 Drücken Sie die Zifferntasten (0 bis 9) zur Eingabe der Telefonnummer.
2 Zum Anrufen drücken Sie .
14
VOICE
Sprechen Sie den Namen des anzurufenden Kontakts oder verwenden Sie den
Sprachbefehl, um die Telefonfunktionen zu steuern.
(
13, Verwenden
Sie Spracherkennung)
BATT* LOW
SIGNAL* NO SIGNAL/ LOW/ MID/ MAX
SETTINGS
Standard:
AUTO ANSWER
RING MODE SYSTEM:
SMS NOTIFY* ON:
* Funktionalität hängt von dem Typ der verwendeten Telefone ab.
/
MID/ FULL
:Zeigt die Batteriestärke.
Signals.
1 —30
:Die Einheit nimmt den ankommenden Ruf automatisch innerhalb der
gewählten Zeit entgegen.;
Die Einheit klingelt, um auf einen empfangenen Anruf oder eine
Textmeldung hinzuweisen.
(Der Standard-Klingelton ist je nach dem gepaarten Gerät unterschiedlich.)
•
CALL:
Wählen Sie den gewünschten Klingelton (
ankommende Anrufe.
•
MESSAGE:
Wählen Sie den gewünschten Klingelton (
ankommende Textmeldungen.
PHONE:
Die Einheit verwendet den Klingelton des angeschlossenen Telefons,
um auf den Empfang eines Anrufs/einer Textmeldung hinzuweisen. (Das
angeschlossene Telefon klingelt, wenn es dieses Merkmal nicht unterstützt.)
Die Einheit klingelt, und “SMS RECEIVED” erscheint, um Sie auf den Empfang
einer Textmeldung hinzuweisen.;
:Zeigt die Stärke des momentan empfangenen
OFF
:Hebt auf.
TONE 1 — 5
TONE 1 — 5
OFF
: Hebt auf.
) für
XX
) für
Wählen Sie einen Kontakt nach Namen
• Sie können schnell entsprechend dem Anfangsbuchstaben (A bis Z), der Zahl
(0 bis 9) oder dem Symbol durch die Kontakte suchen.
• Der zweite Buchstabe des Kontakts wird gesucht, wenn der erste Buchstabe
nicht vorhanden ist.
1 Drücken Sie , um auf Bluetooth-Modus zu schalten.
2 Drehen Sie den Lautstärke-Regler zum Wählen von
[PHONE BOOK]
,
und drücken Sie dann den Regler.
Page 71

3
Drehen Sie den Lautstärke-Regler schnell für
alphabetische Suche.
Das erste Menü (ABCDEFGHIJK) erscheint. Um zum anderen
Menü (LMNOPQRSTUV oder WXYZ1
J / K
.
4 Drehen Sie den
Lautstärke-Regler
) zu gehen, drücken Sie
oder drücken Sie
S / T zum Wählen des gewünschten ersten
Buchstabens, und drücken Sie dann den Regler.
• Zur Suche mit Zahlen wählen Sie “1”.
• Zur Suche mit Symbolen wählen Sie “ ”.
5 Drehen Sie den Lautstärke-Regler zum Wählen eines
Namens, und drücken Sie dann den Regler.
6 Drehen Sie den Lautstärke-Regler zum Wählen einer
Telefonnummer, und drücken Sie dann den Regler.
Zum Zurückschalten zur vorherigen Hierarchie drücken Sie .
Speichern Sie einen Kontakt im Speicher
Sie können bis zu 6 Kontakte speichern.
1 Drücken Sie , um auf Bluetooth-Modus zu schalten.
2 Drehen Sie den Lautstärke-Regler zum Wählen von
[CALL HISTORY], [PHONE BOOK]
oder
[NUMBER DIAL]
, und
drücken Sie dann den Regler.
3 Drehen Sie den Lautstärke-Regler zum Wählen eines
Kontakts oder zum Eingeben einer Telefonnummer.
Wenn ein Kontakt gewählt wird, drücken Sie den Lautstärke-
Regler zur Anzeige der Telefonnummer.
4 Halten Sie eine der Zifferntasten (1bis 6) gedrückt.
“STORED” wird angezeigt, wenn der Kontakt gespeichert ist.
Zum Löschen eines Kontakts aus dem Festspeicher wählen Sie
[NUMBER DIAL]
in Schritt 2 und speichern Sie eine leere Nummer.
Einen Ruf aus dem Speicher tätigen
Drücken Sie , um auf Bluetooth-Modus zu schalten.
1
2 Drücken Sie eine der Zifferntasten (1bis 6).
3 Drücken Sie den Lautstärke-Regler zum Anrufen.
“NO MEMORY” erscheint, wenn kein Kontakt gespeichert ist.
BLUETOOTH®
Löschen eines Kontakts
Trifft nicht für Handys zu, die PBAP unterstützen.
1 Drücken Sie , um auf Bluetooth-Modus zu schalten.
2 Drehen Sie den Lautstärke-Regler zum Wählen von
[PHONE BOOK]
3 Drehen Sie den Lautstärke-Regler zum Wählen eines Kontakts.
Wenn ein Kontakt gewählt wird, drücken Sie den Lautstärke-Regler zur Anzeige der
Telefonnummer.
, und drücken Sie dann den Regler.
4 Halten Sie den Lautstärke-Regler gedrückt, um auf den Löschen-Modus zu
schalten.
5 Drehen Sie den Lautstärke-Regler zum Wählen von
und drücken Sie dann den Regler.
DELETE ONE
DELETE ALL
werden gelöscht.
6 Drehen Sie den Lautstärke-Regler zum Wählen von
: Der in Schritt 3 gewählte Name oder die Telefonnummer wird gelöscht.
: Alle Namen oder Telefonnummern aus dem in Schritt 2 gewählten Menü
Sie dann den Regler.
Bluetooth-Modus-Einstellungen
1
Drücken Sie den Lautstärke-Regler, um auf
2 Drehen Sie den Lautstärke-Regler zum Wählen von
dann den Regler.
3 Drehen Sie den Lautstärke-Regler, um eine Auswahl zu treffen (siehe folgende
Tabelle), und drücken Sie dann den Regler.
4 Halten Sie zum Beenden gedrückt.
Zum Zurückschalten zum vorherigen Einstellpunkt bzw. der vorherigen Hierarchie drücken Sie
.
PHONE SELECT
AUDIO SELECT
DEVICE DELETE
DVC PRIORITY
Wählt das Telefon oder Audiogerät zum Anschließen oder Abtrennen.
“ ”
erscheint vor dem Gerätenamen.
1 Drehen Sie den Lautstärke-Regler zum Wählen eines Geräts zum Löschen, und drücken Sie
dann den Regler.
2 Drehen Sie den Lautstärke-Regler zum Wählen von
den Regler.
Wählt ein Gerät, das als Prioritätsgerät angeschlossen werden soll.
“ ”
erscheint vor dem Gerätenamen, der als Priorität eingestellt ist.
[FUNCTION]
[CALL HISTORY]
[DELETE ONE]
[YES]
oder
zu schalten.
[BT MODE]
[YES]
oder
[NO]
oder
oder
[DELETE ALL]
[NO]
, und drücken
, und drücken Sie
Standard:
, und drücken Sie dann
DEUTSCH |
,
XX
15
Page 72

BLUETOOTH®
TRANSFER PB
PIN CODE EDIT
(0000)
RECONNECT ON
AUTO PAIRING ON
BT HF/AUDIO FRONT
INITIALIZE YES
Wenn “DL PB ” erscheint, übertragen
*
das Telefonbuch des angeschlossenen
Telefons manuell zu dieser Einheit.
* Nur wählbar, wenn das angeschlossene
Ändert den PIN-Code (bis zu 6 Stellen).
1 Drehen Sie den Lautstärke-Regler zum
2 Drücken Sie S / T, um die
Wiederholen Sie Schritt
3 Drücken Sie den Lautstärke-Regler zum
automatisch neu hin, wenn das BluetoothGerät innerhalb des Bereichs ist.;
OFF
mit dem unterstützten Bluetooth-Gerät
aus (iPhone/iPod touch), wenn sie über die
USB-Eingangsklemme verbunden wird.Je
nach der iOS-Version des angeschlossenen
iPhone/iPod touch arbeitet diese Funktion
möglicherweise nicht. ;
und rechten Lautsprechern aus.;
ALL
(einschließlich gespeichertes Pairing,
Telefonbuch usw.).;
Handy OPP unterstützt.
Wählen einer Nummer.
Eingabeposition zu verschieben.
Eingabe des PIN-Codes beendet ist.
Bestätigen.
:Die Einheit stellt die Verbindung
:Hebt auf.
:Die Einheit führt automatisch Pairing
:Gibt Audio von den vorderen linken
:Gibt Ton von allen Lautsprechern aus.
:Initialisiert alle Bluetooth-Einstellungen
OFF
NO
:Hebt auf.
1 und 2, bis die
:Hebt auf.
Internetradio über Bluetooth
Hören von AhaTM Radio
Vorbereitung:
Wählen Sie
Sie können AhaTM Radio auf Ihrem
Smartphone (Android OS) über Bluetooth
auf dieser Einheit hören.
1 Öffnen Sie die Aha
[ON]
für
[AHA SRC]. ( 5)
TM
Anwendung auf Ihrem
Smartphone.
2 Verbinden Sie Ihr Smartphone
über Bluetooth-Verbindung.
( 12)
3 Drücken Sie B SRC zum Wählen
von AHA.
Die Quelle wird umgeschaltet, und die
Sendung startet automatisch.
• Sie können Aha
Weise wie Aha
bedienen.
•
Zum Aufrufen einer Nummer im
Inhalt*:
dann den Lautstärkeregler zum Rufen.
•
Zum Beenden oder Trennen eines
Rufs:
* Die Verfügbarkeit hängt von dem
gewählten Sender ab.
TM
Radio auf gleiche
TM
Radio für iPod/iPhone
( 11)
Drücken Sie 1, und drücken Sie
Drücken Sie .
Bluetooth-Audioplayer
Die Bedienungen und Displayanzeigen unterscheiden
möglicherweise sich je nach Verfügbarkeit auf dem
angeschlossenen Gerät.
Zum Verfahren Sie so
Wiedergabe
1 Drücken Sie B SRC (oder drücken
Sie SRC am RC-406), um BT AUDIO
zu wählen.
2 Bedienen Sie den Bluetooth-
Audioplayer zum Starten der
Wiedergabe.
Pausieren oder
Fortsetzen der
Wiedergabe
Wählen Sie die
Gruppe oder den
Ordner
Reverse-/VorwärtsÜberspringen
Drücken Sie 6IW (oder drücken
Sie ENTIW am RC-406).
Drücken Sie J / K (oder drücken
Sie
AM–/ #FM+ am RC-406).
*
Drücken Sie S / T (oder
drücken Sie S / T (+) am
RC-406).
Vorspulen/
Rückspulen
Halten Sie S / T gedrückt
(oder halten Sie S / T(+) am
RC-406 gedrückt).
Wiederholte
Wiedergabe
Zufallswiedergabe
Drücken Sie 4 wiederholt, um
eine Wahl zu treffen.
ALLREPEAT, FILEREPEAT, REPEATOFF
Drücken Sie 3 wiederholt, um
eine Wahl zu treffen.
FOLDERRANDOM, RANDOMOFF
Halten Sie die 3 gedrückt, um
“ALLRANDOM” zu wählen.
16
Page 73

AUDIOEINSTELLUNGEN
Während des Hörens einer Tonquelle...
1 Drücken Sie den Lautstärke-Regler, um auf
2 Drehen Sie den Lautstärke-Regler zum Wählen von
und drücken Sie dann den Regler.
3 Drehen Sie den Lautstärke-Regler, um eine Auswahl zu treffen
(siehe folgende Tabelle), und drücken Sie dann den Regler.
Wiederholen Sie Schritt 3, bis der gewünschte Gegenstand gewählt oder
aktiviert ist.
4 Halten Sie zum Beenden gedrückt.
(oder durch Verwendung von RC-406)
1 Drücken Sie AUD, um auf
[AUDIO CONTROL]
2 Drücken Sie J / K, um eine Auswahl zu treffen, und drücken Sie
dann ENT IW.
Zum Zurückschalten zum vorherigen Einstellpunkt bzw. der vorherigen Hierarchie
drücken Sie
SUB-W LEVEL –15 bis +15 (0)
.
Stellt den Subwoofer-Ausgangspegel ein.
BAND1 LEVEL –8 bis +8 (+5):
BAND2 LEVEL –8 bis +8 (+5):
BAND3 LEVEL
BAND4 LEVEL
BAND5 LEVEL
PRESET EQ
–8 bis +8 (+4):
–8 bis +8 (+5):
–8 bis +8 (+1):
DRIVE EQ/ TOP40/ POWERFUL/ ROCK/ POPS/ EASY/ JAZZ/ NATURAL
USER
:Wählt einen Vorwahl-Equalizer, der für das Musikgenre geeignet ist. (Wählen
Sie
[USER]
verwenden.)
[DRIVE EQ]
BASS BOOST
LEVEL1/ LEVEL2/ LEVEL3
OFF
: Hebt auf.
Stellt den Pegel zum Speichern für jede Quelle ein. (Bevor Sie
eine Einstellung vornehmen, wählen Sie eine anzupassende
Quelle aus.)
, um die benutzerangepassten Einstellungen für
ist ein Programm-Equalizer, der Störgeräusche von der Straße verringert.
: Wählt Ihren bevorzugten Bass-Boost-Pegel. ;
[FUNCTION]
zu schalten.
BAND1
zu schalten.
[AUDIO CONTROL]
Standard:
bis
BAND5
,
XX
/
zu
LOUDNESS LEVEL1/ LEVEL2
SUBWOOFERSET ON
um eine gute Klangwirkung auch bei niedriger Lautstärke zu erhalten.;
OFF
:Hebt auf.
:Schaltet den Subwoofer-Ausgang ein.;
LPFSUBWOOFER THROUGH
160HZ
werden zum Subwoofer geleitet.
SUB-WPHASE REVERSE
Ausgangs so, dass sie dem Lautsprecher-Ausgang für optimale Leistung
entspricht. (Nur wählbar, wenn eine andere Einstellung als
[LPF SUBWOOFER]
HPF THROUGH
120HZ/ 150HZ
150Hz werden zu den Lautsprechern geleitet.
FADER R15
BALANCE L15
VOLUMEOFFSET
(Standard:0)
SOUNDRECNSTR
(Klangrekonstruktion)
bis
Lautsprecherausgang ein.
bis
Lautsprecherausgang ein.
–8
bis +8 (für AUX) ; –8 bis 0 (für andere Quellen): Speichert die
Lautstärkepegeleinstellung jeder Quelle als Vorwahl. (Vor der Einstellung
wählen Sie eine anzupassende Quelle aus.)
ON
:Erzeugt realistischen Klang, indem die Hochfrequenzkomponenten
kompensiert und die Anstiegszeit der Wellenform, die bei der AudiodatenKompression verloren gehen, wiederhergestellt werden.;
:Wählt Ihre bevorzugten niedrigen und hohen Frequenzen,
:Alle Signale werden zum Subwoofer gesendet.;
:Audiosignale mit niedrigeren Frequenzen als 85Hz / 120Hz / 160Hz
(180°)/
NORMAL
(0°):Wählt die Phase des Subwoofer-
gewählt ist.)
:Alle Signale werden zu den Lautsprechern gesendet.;
:Audiosignale mit höheren Frequenzen als 100Hz/ 120Hz/
F15 (0
): Stellt die Balance zwischen hinterem und vorderem
R15 (0
):Stellt die Balance zwischen linkem und rechtem
[SUB-W LEVEL]/ [LPF SUBWOOFER]/ [SUB-W PHASE]
[SUBWOOFER SET]
auf
[ON]
gestellt ist.
OFF
:Hebt auf.
85HZ/ 120HZ
[THROUGH]
OFF
:Hebt auf.
ist nur wählbar, wenn
100HZ
/
für
/
DEUTSCH |
17
Page 74

DISPLAY-EINSTELLUNGEN
1 Drücken Sie den Lautstärke-Regler, um auf
2 Drehen Sie den Lautstärke-Regler zum Wählen von
drücken Sie dann den Regler.
3 Drehen Sie den Lautstärke-Regler, um eine Auswahl zu treffen
(siehe folgende Tabelle), und drücken Sie dann den Regler.
Wiederholen Sie Schritt 3, bis der gewünschte Gegenstand gewählt oder
aktiviert ist.
4 Halten Sie zum Beenden gedrückt.
Zum Zurückschalten zum vorherigen Einstellpunkt bzw. der vorherigen Hierarchie
drücken Sie
COLOR SELECT VARIABLE SCAN/ COLOR 01
.
Display- und Tasten-Beleuchtungsfarbe.
Sie können Ihre eigene Farbe erzeugen (wenn
oder
[USER]
gewählt ist). Die erzeugte Farbe kann gewählt werden, wenn Sie
[USER]
wählen.
1 Halten Sie den Lautstärke-Regler gedrückt, um auf Detail-Farbabstimmung zu
schalten.
2 Drücken Sie S / T, um die Farbe (
3 Drehen Sie den Lautstärke-Regler, um den Pegel einzustellen (
drücken Sie dann den Regler.
DIMMER ON:
BRIGHTNESS 0
TEXT SCROLL AUTO/ ONCE:
Blendet die Display- und Tastenbeleuchtung ab. ;
entsprechend den
— 31: Wählt Ihre bevorzugte Helligkeitsstufe für Display- und
Tastenbeleuchtung.
einmaliges Scrollen.
[BRIGHTNESS]
Wählt automatisches Scrollen der Displayinformationen, oder
; OFF:
Hebt auf.
—
COLOR 24/ USER
-Einstellungen.
[FUNCTION]
[DISPLAY]
: Wählt Ihre bevorzugte
[COLOR 01]
R/ G/ B
—
) zum Anpassen zu wählen.
OFF:
Beleuchtet
zu schalten.
, und
Standard:
[COLOR 24]
0 — 9
), und
XX
WEITERE INFORMATIONEN
Allgemeines
• Dieses Gerät kann nur die folgenden CDs abspielen:
• Detailinformationen und Hinweise über abspielbare Audiodateien werden im Online-Handbuch auf der
folgenden Website gegeben: www.kenwood.com/cs/ce/audiofile/
Abspielbare Dateien
• Wiederzugebende Audiodateien: MP3(.mp3), WMA(.wma), AAC (.m4a)
• Abspielbare Disc-Medien: CD-R/CD-RW/CD-ROM
• Abspielbares Disc-Dateiformat: ISO 9660 Level 1/2, Joliet, Lange Dateinamen.
• Mögliche Dateisysteme auf USB-Geräten: FAT12, FAT16, FAT32
Auch wenn Audiodateien den oben aufgeführten Standards entsprechen, kann das Abspielen unter
Umständen auf Grund von Typ oder Zustand der Medien bzw. Geräte nicht möglich sein.
Nicht abspielbare Discs
• Discs mit nicht runder Form.
• Discs die auf der Aufnahme-Oberfläche eingefärbt oder verschmutzt sind.
• Recordable/ReWritable Discs, die nicht abgeschlossen (finalisiert) wurden.
• 8-cm-CD. Falls Sie versuchen, einen Adapter zu verwenden, kann es zu einer Fehlfunktion kommen.
Wissenswertes über USB-Geräte
• Diese Einheit kann MP3/WMA/AAC/WAV-Dateien abspielen, die auf einem USB-Massenspeichergerät
gespeichert sind.
• Sie können ein USB-Gerät nicht über einen USB-Hub anschließen.
• Der Anschluss eines Kabels mit einer Gesamtlänge von mehr als 5 m kann eine fehlerhafte Wiedergabe
verursachen.
• Diese Einheit kann nicht ein USB-Gerät mit einer anderen Bewertung als 5 V und mehr als 1 A erkennen.
Wissenwertes über KENWOOD Music Editor Light und
KENWOOD Music Control
• Diese Einheit unterstützt die PC-Anwendung KENWOOD Music Editor Light und die Android™Anwendung KENWOOD Music Control.
• Wenn Sie Audiodateien mit hinzugefügten Song-Daten mit dem KENWOOD Music Editor Light oder
KENWOOD Music Control abspielen, können Sie Audiodateien nach Genres, Interpreten, Alben,
Wiedergabelisten und Musikstücken durchsuchen.
• KENWOOD Music Editor Light und KENWOOD Music Control sind auf der folgenden Website erhältlich:
www.kenwood.com/cs/ce/
18
Page 75

WEITERE INFORMATIONEN FEHLERSUCHE
Wissenswertes über iPod/iPhone
Made for
- iPod touch (1st, 2nd, 3rd, 4th und 5th generation)
- iPod classic
- iPod nano (3rd, 4th, 5th, 6th und 7th generation)
- iPhone, iPhone 3G, 3GS, 4, 4S, 5, 5s, 5c
• Für die neueste Kompatibilitätsliste und Software-Versionen des
iPhone/iPod siehe: www.kenwood.com/cs/ce/ipod
• Sie können den iPod nicht bedienen, wenn “KENWOOD” oder “
auf dem iPod angezeigt wird.
Über AhaTM Radio
• AhaTM ist ein Dritter Dienstanbieter, deshalb bleiben
unangekündigte Änderungen der technischen Daten jederzeit
vorbehalten. Entsprechend kann die Kompatibilität eingeschränkt
sein, oder einzelne oder alle der Dienste können unverfügbar
werden.
• Bestimmte Aha
bedient werden.
Über Bluetooth
• Je nach Bluetooth-Version des Geräts lassen sich manche
Bluetooth-Geräte möglicherweise nicht an diese Einheit
anschließen.
• Diese Einheit arbeitet u.U. nicht mit bestimmten BluetoothGeräten.
• Die Signalbedingungen sind je nach Umgebung unterschiedlich.
• Für weitere Informationen über Bluetooth, besuchen Sie bitte die
folgende Website: www.kenwood.com/cs/ce/
TM
-Funktionalität kann nicht von dieser Einheit
Symptom Abhilfe
Es wird kein Ton gehört. • Die Lautstärke auf den optimalen Pegel einstellen.
“PROTECT” erscheint, und es können keine
Bedienungen vorgenommen werden.
• Es wird kein Ton gehört.
”
• Die Einheit schaltet nicht ein.
• Die im Display gezeigte Information ist
falsch.
Das Gerät funktioniert überhaupt nicht.
Der DAB-Empfang ist schlecht.
“DAB ANT ERR” erscheint. Prüfen Sie die DAB-Antenne. Wenn eine passive Antenne (ohne einen Booster) verwendet
• Der Radioempfang ist schlecht.
• Statikrauschen beim Radiohören.
“NA FILE” erscheint.
“NO DISC” erscheint. Setzen Sie eine abspielbare Disc in den Ladeschlitz ein.
“TOC ERROR” erscheint. Achten Sie darauf, dass die Disc sauber und ordnungsgemäß eingelegt ist.
“PLEASE EJECT” erscheint. Setzen Sie das Gerät zurück. Wenn dadurch das Problem nicht behoben wird, wenden Sie
Disc kann nicht ausgegeben werden.
“READ ERROR” erscheint. Kopieren Sie die Dateien und Ordner erneut auf das USB-Gerät. Wenn dadurch das Problem
“NO DEVICE” erscheint. Schließen Sie ein USB-Gerät an und schalten Sie die Quelle erneut zu USB um.
“COPY PRO” erscheint. Eine kopiergeschützte Datei wird wiedergegeben.
• Prüfen Sie die Kabel und Verbindungen.
Prüfen Sie, ob die Klemmen der Lautsprecherdrähte richtig isoliert sind, und setzen dann
die Einheit zurück. Wenn dadurch das Problem nicht behoben wird, wenden Sie sich an den
Kundendienst.
Reinigen Sie die Anschlüsse.
Setzen Sie das Gerät zurück.
Stellen Sie sicher, dass
wird, stellen Sie
• Schließen Sie das Antennenkabel fest an.
• Ziehen Sie die Antenne vollständig heraus.
Achten Sie darauf, dass die Disc unterstützte Audiodateien enthält.
sich an den Kundendienst.
Halten Sie
M kräftig gedrückt, um die Disc zwangsweise auszugeben. Achten Sie darauf,
die ausgeschobene Disc nicht fallen zu lassen. Wenn dadurch das Problem nicht gelöst wird,
setzen Sie das Gerät zurück.
nicht gelöst wird, setzen Sie das USB-Gerät zurück oder verwenden Sie ein anderes USBGerät.
( 2)
( 3)
[ON]
für
[DAB ANT POWER]
[DAB ANT POWER]
( 3)
auf
[OFF]. ( 4)
gewählt ist.
( 4)
( 18)
DEUTSCH |
19
Page 76

FEHLERSUCHE
Symptom Abhilfe
“NA DEVICE” erscheint. Schließen Sie ein unterstütztes USB-Gerät an und prüfen Sie die
“NO MUSIC” erscheint. Schließen Sie ein USB-Gerät an, das abspielbare Audiodateien
“iPod ERROR” erscheint. • Erneutes Anschließen des iPod.
Rauschen wird erzeugt. Springen Sie zu einem anderen Musikstück oder wechseln Sie die
Tracks werden nicht so
abgespielt, wie Sie es wollten.
“READING” blinkt weiter. Verwenden Sie nicht zu viele Hierarchie-Ebenen oder Ordner.
Verflossene Spielzeit ist nicht
richtig.
Richtige Zeichen werden nicht
angezeigt (z.B. Albumname).
“ACTN DISABLE” Eine nicht verfügbare Bedienung wurde ausgeführt.
“AHA APP UPDATE
REQUIRED”
“AHA UNAVAILABLE” Ihr Gerät kann nicht mit dem Aha Radio Server verbunden werden.
“CHECK APP” Keine Reaktion vom Aha-Server.
Radio
“CHECK DEVICE” Prüfen Sie die Aha-Anwendung auf Ihrem Gerät.
TM
“CONNECT PHONE” Schließen Sie Ihr Gerät an die Einheit an.
Aha
“LOGIN FAILED” Anmeldung bei Aha ist fehlgeschlagen.
“NETWORK
UNAVAILABLE”
“POOR GPS” Die GPS-Empfangsbedingung Ihres Smartphones ist schlecht.
“NO SKIPS” Überspringen ist nicht zulässig.
Anschlüsse.
enthält.
• Setzen Sie den iPod erneut zurück.
Disc.
Die Wiedergabe-Reihenfolge wird bestimmt, wenn die Dateien
aufgezeichnet werden.
Dies liegt daran, wie die Titel aufgezeichnet sind.
Dieses Gerät kann nur Großbuchstaben, Zahlen und eine begrenzte
Anzahl von Symbolen anzeigen. Kyrillische Großbuchstaben können
auch angezeigt werden, wenn
ist.
( 5)
Stellen Sie sicher, dass Sie die neueste Version der Aha
Anwendung für die KENWOOD-Anwendung auf Ihrem Gerät
installiert haben.
Das Netzwerk wurde abgetrennt.
[RUSSIAN SET]
auf
[BКЛ]
TM
gestellt
-
Symptom Abhilfe
Kein Bluetooth-Gerät ist
erkannt.
Pairing kann nicht
ausgeführt werden.
• Suchen Sie erneut vom Bluetooth-Gerät.
• Setzen Sie das Gerät zurück.
• Stellen Sie sicher, dass Sie den gleichen PIN-Code für die Einheit
und das Bluetooth-Gerät eingegeben haben.
• Löschen Sie Pairing-Information sowohl von der Einheit als auch
dem Bluetooth-Gerät, und führen Sie dann das Pairing erneut aus.
( 3)
( 12)
“DEVICE FULL” erscheint. Die Anzahl registrierter Geräte hat den Höchstwert erreicht.
Echo oder Rauschen
tritt auf.
Die Telefon-Tonqualität
ist schlecht.
Bluetooth®
• Sprach-Rufmethode ist
nicht erfolgreich.
• “N/A VOICE TAG”
erscheint.
“NOT SUPPORT”
erscheint.
• “NO ENTRY” erscheint.
• “NO PAIR” erscheint.
“ERROR” erscheint. Wiederholen Sie die Bedienung. Wenn “ERROR” erneut erscheint,
“NO INFO” erscheint. Das Bluetooth-Gerät kann nicht die Kontaktinformationen
Löschen Sie unbenötigte Geräte und wiederholen Sie den
Vorgang.
( 15, DEVICE DELETE)
• Justieren Sie die Mikrofoneinheit-Position.
• Prüfen Sie die
• Verringern Sie den Abstand zwischen der Einheit und dem
Bluetooth-Gerät.
• Bewegen Sie das Fahrzeug zu einem Ort, wo ein besseres Signal
empfangen wird.
• Verwenden Sie die Sprach-Rufmethode in einer ruhigeren
Umgebung.
• Verringern Sie den Abstand zum Mikrofon, während Sie den
Namen sprechen.
• Stellen Sie sicher, dass die gleiche Stimme wie für die SprachKennung registriert verwendet wird.
Das angeschlossene Telefon unterstützt nicht das
Spracherkennungssystem.
Kein registriertes Gerät ist über Bluetooth angeschlossen/
gefunden.
prüfen Sie, ob das Gerät die probierte Funktion unterstützt.
erhalten.
[ECHO CANCEL]
( 12)
-Einstellung.
( 13)
20
Page 77

FEHLERSUCHE
TECHNISCHE DATEN
Symptom Abhilfe
Der Ton wird
unterbrochen oder weist
bei Wiedergabe von
einem BluetoothAudioplayer Aussetzer
auf.
Der angeschlossene
Bluetooth-Audioplayer
Bluetooth®
kann nicht gesteuert
werden.
• “HF ERROR XX” erscheint.
• “BT ERROR” erscheint.
• Verringern Sie den Abstand zwischen dem Gerät und dem
Bluetooth-Audioplayer.
• Schalten Sie die Einheit aus und wieder ein, und versuchen Sie
erneut, die Verbindung herzustellen.
• Andere Bluetooth-Geräte versuchen möglicherweise, die
Verbindung zur Einheit herzustellen.
• Prüfen Sie, ob der angeschlossene Bluetooth-Audioplayer
das Audio/Video Remote Control Profile (AVRCP) unterstützt.
(Siehe auch Bedienungsanleitung Ihres Audioplayers.)
• Trennen Sie den Bluetooth-Player ab und schließen ihn erneut
an.
Setzen Sie die Einheit zurück und probieren Sie den Vorgang
erneut. Wenn dadurch das Problem nicht behoben wird,
wenden Sie sich an den Kundendienst.
DAB Frequenzbereich L-Band 1 452,960 MHz — 1 490,624 MHz
Band III 174,928 MHz — 239,200 MHz
Empfindlichkeit
Rauschabstand 80 dB
Antennenanschluss-Typ SMB
Digitalradio
Antennen-Ausgangsspannung 14,4V (11V – 16V)
Antennen-Maximalstrom < 100 mA
FM Frequenzbereich 87,5 MHz — 108,0 MHz (50 kHz-Abstimmschritte)
Empfindlichkeit
(Rauschabstand = 26dB)
Empfindlichkeitsschwelle
(DIN S/N = 46 dB)
Frequenzgang (±3 dB) 30 Hz — 15 kHz
Rauschabstand (MONO) 75 dB
Kanaltrennung (1 kHz) 45 dB
Analogradio
MW Frequenzbereich 531 kHz — 1 611 kHz (9 kHz-Abstimmschritte)
Empfindlichkeit
(Rauschabstand = 20dB)
LW Frequenzbereich 153 kHz — 279 kHz (9 kHz-Abstimmschritte)
Empfindlichkeit
(Rauschabstand = 20dB)
–
100 dBm
9,3 dBf (1 µV/75 )
10,2 dBf (1,13 µV/75 )
28 dBV (25 V)
33 dBV (45 V)
DEUTSCH |
21
Page 78

TECHNISCHE DATEN
Laserdiode GaAIAs
Digitalfilter (D/A) 8-faches Oversampling
Spindeldrehzahl 500 U/min — 200 U/min (CLV)
Tonhöhenschwankung Unterhalb der Messgrenze
Frequenzgang (±1 dB) 20 Hz — 20 kHz
Gesamtklirrfaktor (1 kHz) 0,01%
Rauschabstand (1 kHz) 105 dB
CD-Player
Dynamikbereich 90 dB
Kanaltrennung 85 dB
MP3-Decodierung Unterstützt MPEG-1/2 Audio Layer-3
WMA-Decodierung Unterstützt Windows Media Audio
AAC-Decodierung AAC-LC “.m4a”-Dateien
USB Standard USB1.1, USB2.0 (Höchstgeschwindigkeit)
Dateisystem FAT12/16/32
Maximaler Versorgungsstrom DC 5 V
MP3-Decodierung Unterstützt MPEG-1/2 Audio Layer-3
USB
WMA-Decodierung Unterstützt Windows Media Audio
AAC-Decodierung AAC-LC “.m4a”-Dateien
WAV-Decodierung Linear-PCM
Version Bluetooth Ver.2.1 + EDR Certified
Frequenzbereich 2,402 GHz — 2,480 GHz
Ausgangsleistung +4 dBm (MAX), 0 dBm (AVE) Leistungsklasse 2
Bluetooth
Maximaler Kommunikationsbereich Sichtlinie ca. 10 m
1A
Profil HFP (Hands-Free Profile)
Bluetooth
Maximale Ausgangsleistung 50 W × 4
Ausgangsleistung 30W×4 (PWR DIN45324, +B = 14,4V)
Lautsprecherimpedanz 4—8
Klangregler Band1 100 Hz ±8 dB
Audio
Vorverstärkerpegel / Last (CD) 4 000 mV/10k
Vorverstärkungsimpedanz ≤600
Frequenzgang (±3 dB) 20 Hz — 20 kHz
Maximaler Spannungseingang 1 000 mV
Auxiliary
Eingangsimpedanz 30k
Betriebsspannung 14,4 V (10,5 V — 16 V zulässig)
Maximale Stromaufnahme 10 A
Betriebstemperaturbereich 0°C — +40°C
Einbaumaße (B × H × T) 182 mm × 53 mm × 159 mm
Allgemeines
Gewicht 1,4 kg
Änderungen ohne Vorankündigung bleiben vorbehalten.
SPP (Serial Port Profile)
PBAP (Phonebook Access Profile)
OPP (Object Push Profile)
A2DP (Advanced Audio Distribution Profile)
AVRCP (Audio/Video Remote Control Profile)
Band2 250 Hz ±8 dB
Band3 630 Hz ±8 dB
Band4 2,5 kHz ±8 dB
Band5 6,3 kHz ±8 dB
22
Page 79

EINBAU / ANSCHLUSS
Warnung
• Das Gerät kann nur bei 12 V DC-Versorgung mit negativer Masse eingebaut werden.
• Trennen Sie den negativen Batterieanschluss vor der Verkabelung und Befestigung ab.
• Schließen Sie nicht das Batteriekabel (gelb) das Zündkabel (rot) an der
Fahrzeugkarosserie oder dem Massekabel (schwarz) an, um einen Kurzschluss zu
vermeiden.
• Isolieren Sie nicht angeschlossene Kabel mit Vinylband, um einen Kurzschluss zu
vermeiden.
• Sicherstellen, daß das Gerät nach dem Einbau a Chassis des Fahrzeugs geerdet wird.
Vorsicht
• Überlassen Sie aus Sicherheitsgründen die Arbeiten zur Montage und Verkabelung
ausgewiesenem Fachpersonal. Lassen Sie sich vom Autoradiohändler beraten.
• Montieren Sie dieses Gerät in der Konsole Ihres Fahrzeugs. Keine Metallteile dieses
Geräts bei und kurz nach der Verwendung des Geräts berühren. Metallteile wie der
Kühlkörper und das Gehäuse werden heiß.
• Verbinden Sie nicht die
Massekabel (schwarz) oder schließen sie parallel an.
•
Montieren Sie das Gerät mit einem Winkel von weniger als 30°.
• Wenn Ihr Fahrzeugkabelbaum nicht die Zündklemme hat, verbinden Sie das
Zündkabel (rot) mit der Klemme am Sicherungskasten des Fahrzeugs, die
12VDC-Versorgung bietet und durch den Zündschlüssel ein- und ausgeschaltet wird.
• Überprüfen Sie nach der Montage des Geräts, ob die Bremslichter, Blinker,
Scheibenwischer usw. ordnungsgemäß funktionieren.
• Wenn die Sicherung durchbrennt, überprüfen Sie zuerst, dass die Drähte nicht die
Karosserie berühren, und ersetzen Sie dann die durchgebrannte Sicherung durch eine
neue Sicherung mit der gleichen Nenngröße.
Grundlegendes Verfahren
1
Ziehen Sie den Schlüssel aus dem Zündschloss, und
trennen Sie dann den [-Pol der Autobatterie ab.
2 Installieren Sie die DAB-Antenne.
Siehe Installieren Sie die DAB-Antenne. (
3 Schließen Sie die Kabel richtig an.
Siehe Verdrahtungsanschluss.
4 Bauen Sie das Autoradio in Ihrem Fahrzeug ein.
Siehe Einbau der Einheit (Einbau im Armaturenbrett).
5 Schließen Sie die [-Klemme der Autobatterie an.
6 Setzen Sie das Gerät zurück.
[-Drähte von Lautsprechern mit der Karosserie, dem
25)
( 24)
( 3)
Einbau der Einheit (Einbau im Armaturenbrett)
Haken auf der Oberseite
Richten Sie den Frontrahmen
vor dem Anbringen aus, wie in
der Abbildung gezeigt.
Entfernen der Einheit
1
Nehmen Sie die Frontblende ab.
2 Passen Sie die Vorsprünge an den
Ausziehschlüsseln an beiden Seiten des
Frontrahmens ein und ziehen Sie ihn
heraus.
3 Setzen Sie die Ausziehschlüssel tief in
die Schlitze an jeder Seite ein und folgen
dann den mit Pfeil gekennzeichneten
Anweisungen wie rechts gezeigt.
Führen Sie die erforderliche
Verkabelung aus.
Biegen Sie die entsprechenden Metalllaschen,
um die Einbauhalterung sicher festzuhalten.
( 24)
Armaturenbrett
Ihres Autos
DEUTSCH |
23
Page 80

Verdrahtungsanschluss
Antennenanschluss
DAB-Antennenbuchse
(25)
Hinterer/Subwoofer-Ausgang
Anschluss des ISO-Anschlusses an manche
VW/Audi oder Opel (Vauxhall) Automobile
Sie müssen möglicherweise die Verkabelung des
mitgelieferten Kabelbaums modifizieren, wie unten
gezeigt.
A7 (Rot)
Fahrzeug
A4 (Gelb)
Standardverkabelung
Stift Farbe und Funktion
A4 Gelb : Batterie
A5 Blau/Weiß : Stromsteuerung
A7 Rot : Zündung (ACC)
A8 Schwarz : Erdungsanschluss (Masse)
B1
]
Lila
B2
Lila/Schwarz
Grau
]
Grau/Schwarz
Weiß
]
Weiß/Schwarz
Grün
]
Grün/Schwarz
[
[
[
[
B3
B4
B5
B6
B7
B8
Zündkabel
(Rot)
Gerät
Batteriekabel
(Gelb)
: Hinterer Lautsprecher (rechts)
: Vorderer Lautsprecher (rechts)
: Vorderer Lautsprecher (links)
: Hinterer Lautsprecher (links)
Gelb (Batteriekabel)
Rot (Zündkabel)
Rot (A7)
Gelb (A4)
ISO-Anschlüsse
Sicherung (10 A)
Falls kein Anschluss durchgeführt wird, lassen Sie den
Draht bitte nicht aus der Lasche hervorstehen.
Hellblau/Gelb
(Lekungs-
Fernbedienungskabel)
Blau/Weiß
(Stromsteuerungskabel/
Antennensteuerungskabel)
Braun
(Stummschaltungs-
Steuerkabel)
MIC (Mikrofoneingangsbuchse)
USB-Kabel
STEERING WHEEL
REMOTE INPUT
REMOTE CONT
ANT . CONT
P. CONT
MUTE
Zum LenkradFernbedienungsadapter
Bei Verwendung des optionalen
Leistungsverstärkers entweder
einen Anschluss an den
Stromsteuerungsanschluss oder an
den Antennensteuerungsanschluss
des Fahrzeugs durchführen.
Lesen Sie hinsichtlich des
Anschlusses an das KenwoodNavigationssystem die
Bedienungsanleitung des
betreffenden Geräts.
( 12)
Teileliste für den
Einbau
(A)
Frontblende
(B)
Frontrahmen
(C)
Einbauhalterung
(D)
Kabelbaum
(E)
Ausziehschlüssel
24
Page 81

Installieren Sie die DAB-Antenne
Vorsicht
• Die Folienantenne (F) ist ausschließlich zur Verwendung im Inneren des
Fahrzeugs gedacht.
• Installieren Sie sie nicht an folgenden Orten:
– wo sie die Sicht des Fahrers blockieren kann.
– wo sie die Funktion von Sicherheitseinrichtungen wie etwa Airbags
behindern kann.
– auf beweglichen Glasoberflächen wie auf der Heckklappe.
– an der Seite des Fahrzeugs (z.B. Tür, vorderes Teilfenster).
– am Heckfenster.
• Die Signalstärke nimmt bei Installation an den folgenden Orten ab:
– auf IR-Reflexionsglas oder an mit Spiegelfolien abgedeckten Stellen.
– wo sie mit einer echten Radioantenne überlappt (Muster).
– wo sie mit Fensterheizdrähten überlappt.
– auf Glas, das Radiosignale blockiert (z.B. IR-Reflexionsglas,
Thermalisolierglas).
• Schlechter Empfang kann auftreten:
– wegen Störungen bei eingeschaltetem Scheibenwischer, Klimagerät oder
Motor.
– je nach der Richtung des Senders in Bezug auf das Fahrzeug (Antenne).
• Wischen Sie gründlich Öl und Schmutz mit Hilfe des mitgelieferten
Reinigungsmittels
• Biegen oder beschädigen Sie die Folienantenne
• Die Installation kann bei bestimmten Fahrzeugen unmöglich sein.
• Prüfen Sie die Kabelführung auf der Folienantenne
Verstärkereinheit
• Wenden Sie nach dem Aufkleben der Folienantenne
an.
(I) von der Anbringungsfläche ab.
(G) vor dem Aufkleben.
(F) nicht.
(F) und auf der
(F) keinen Glasreiniger
Bestimmen Sie die Antenneneinbauposition
• Die Richtung der Folienantenne (F) ist unterschiedlich, je nachdem ob die Folienantenne (F) an der rechten oder linken
Seite installiert ist.
• Prüfen Sie immer den Installationsort der Folienantenne
aufgeklebt werden.
• Lassen Sie einen Abstand zu anderen Antennen von mindestens 100 mm.
• Kleben Sie nicht die Verstärkereinheit
ausreichend Klebkraft vorhanden.
(G) auf die Keramiklinie (schwarzer Teil) um die Frontscheibe. Hier ist nicht
(F) vor der Installation. Die Folienantenne kann nicht erneut
o Installieren der Antenne an der linken Seite o Installieren der Antenne an der rechten Seite
Keramiklinie (schwarzer Teil)
Erdungsblatt*
70 mm
* Kleben Sie das Erdungsblatt der Verstärkereinheit
150 mm 150 mm
(F)
(G)
Erdungsblatt*
(G)
(G) auf den Metallteil auf der Frontsäule.
(F)
70 mm
Teileliste für den Einbau
(H)
Kabelklemme
(F)
Folienantenne
(G)
Verstärkereinheit
(Kabel mit Booster, 3,5 m)
(I)
Reiniger
25
Page 82

Vorsicht
Beim Installieren des Antennenkabels im Inneren
der Frontsäule bei eingebautem Airbag
• Die Frontsäulenabdeckung wird mit einem speziellen Clip
gesichert, der beim Ausbau möglicherweise ausgetauscht
werden muss. Wenden Sie sich an Ihren Fahrzeughändler für
Einzelheiten zum Entfernen der Frontsäulenabdeckung und
zur Bestellung von Ersatzteilen.
Einbauübersicht
Die Antenne sollte aus Sicherheitsgründen auf der Beifahrerseite
installiert werden.
– Warten Sie, bis die Glasoberfläche vollständig
trocken ist, bevor Sie fortfahren.
– Wärmen Sie die Oberfläche der Frontscheibe
mit dem Entfroster an, wenn es kalt ist (im
Winter).
3 Entfernen Sie das Trägerblatt (Zapfen I)
der Folienantenne (F) horizontal ab und
kleben Sie die Antenne auf die Scheibe.
Trägerblatt (Zapfen I)
Clip
Frontsäule
• Installieren Sie die Verstärkereinheit (G) über dem Airbag, so
dass sie nicht die Funktion des Airbags beeinträchtigt.
(G)
Airbag
26
Antenneneinbau
1
Entfernen Sie die Frontsäulenabdeckung
an Ihrem Fahrzeug.
Frontsäule
2 Reinigen Sie die Windschutzscheibe mit
dem mitgelieferten Reiniger (I).
(I)
Berühren Sie nicht die Aufkleboberfläche
(Klebeseite) der Folienantenne
(F)
(F)
.
4 Entfernen Sie das Trägerblatt (ZapfenII)
der Folienantenne (F) vertikal ab und
kleben Sie die Antenne auf die Scheibe.
Trägerblatt (Zapfen II)
(F)
5 Reiben Sie die Folienantenne vorsichtig
auf der Windschutzscheibe in
Pfeilrichtung, um sicheres Anhaften zu
erzielen.
(F)
Page 83

6 Entfernen Sie die Applikationsfolie (Zapfen III).
(F)
Berühren Sie nicht den Leiteranschluss der Folienantenne
Applikationsfolie (Zapfen III)
(F)
.
7 Richten Sie die Position des Vorsprungs an der Verstärkereinheit
(G) mit dem K an der Folienantenne (F) aus und kleben auf.
Berühren Sie nicht den Leiteranschluss an der Aufkleboberfläche (Klebeseite)
der Verstärkereinheit
•
Beim Installieren der Antenne an der rechten Seite
•
Beim Installieren der Antenne an der linken Seite
(G)
.
Stellen Sie die Position des Vorsprungs mit der K-Markierung ein
Erdungsblatt
(F)
(G)
Leiteranschluss der Verstärkereinheit
(Metallteil)
Leiteranschluss der Folienantenne (F)
(G)
(F)
Erdungsblatt
Stellen Sie die Position des Vorsprungs mit der
J-Markierung ein
8 Entfernen Sie die Folie, die das Erdungsblatt abdeckt, und kleben
Sie das Erdungsblatt auf den Metallteil des Fahrzeugs.
Lassen Sie ausreichend Spielraum für das Erdungsblatt, damit es nicht
Innenteile (Frontsäulenabdeckung) behindert. Achten Sie auch darauf, dass
Innenteile nicht die Verstärkereinheit
Frontsäulenabdeckung
Windschutzscheibe
(G)
(G)
behindern.
Erdungsblatt
9 Verdrahten Sie die Antennenkabel.
Verwenden Sie die Kabelklemme
mehreren Stellen.
(H)
zum Sichern der Antenne an der Säule an
10 Bringen Sie die Frontsäulenabdeckung in ihrer ursprünglichen
Position an.
Achten Sie darauf, nicht das Erdungsblatt und die Verstärkereinheit
Abdecken zu beschädigen.
(G)
beim
11 Schließen Sie die Verstärkereinheit (G) an der DAB-
Eingangsklemme an der Rückseite der Einheit an.
12 Stellen
Sie [DAB ANT POWER]
auf
[ON]. ( 5)
27
Page 84

INHOUD ALVORENS GEBRUIK
ALVORENS GEBRUIK 2
BASISPUNTEN 3
STARTEN 4
DIGITALE RADIO (DAB) 5
ANALOGE RADIO 7
CD / USB / iPod 9
AUX 11
TM
RADIO 11
Aha
BLUETOOTH® 12
AUDIO-INSTELLINGEN 17
DISPLAY-INSTELLINGEN 18
MEER INFORMATIE 18
OPLOSSEN VAN
PROBLEMEN 19
TECHNISCHE GEGEVENS 21
INSTALLEREN /
VERBINDEN 23
Meer over deze
gebruiksaanwijzing
• De bediening wordt voornamelijk
uitgelegd met gebruik van de toetsen
op het voorpaneel.
•
[XX]
toont de gekozen onderdelen.
•
( XX)
verwijst naar verwante uitleg
op de aangegeven pagina.
2
Waarschuwing
Bedien of gebruik geen functies die uw aandacht van de verkeersveiligheid af zou kunnen leiden.
Let op
Volume-instelling:
• Voorkom ongelukken en stel het volume derhalve zodanig in dat u geluid van buiten nog goed kunt horen.
• Verlaag het volume alvorens de weergave van digitale bronnen te starten om beschadiging van de luidsprekers door een
plotselinge verhoging van het uitgangsniveau te voorkomen.
Algemeen:
• Gebruik geen USB-apparaat of iPod/iPhone indien dit veilig rijden zou kunnen storen.
• Maak beslist een back-up van alle belangrijke data. Wij zijn niet aansprakelijk voor het verlies van opgenomen data.
• Voorkom kortsluiting en steek derhalve nooit metalen voorwerpen (zoals munten en gereedschap) in het toestel.
• In geval van een storing door condensvorming op de laserlens, moet u de disc verwijderen en wachten totdat de
condens is verdampt.
Afstandsbediening (RC-406):
• Plaats de afstandsbediening niet op warme plaatsen zoals op het dashboard.
• De lithiumbatterij kan ontploffen indien verkeerd geplaatst. Vervang de batterij door een van hetzelfde of gelijkwaardig
type.
• Accu’s en batterijen mogen niet worden blootgesteld aan buitensporige hitte, zoals van direct zonlicht, vuur, enz.
• Bewaar wanneer niet in gebruik de batterij buiten het bereik van kleine kinderen en in de oorspronkelijke verpakking.
Gooi gebruikte batterijen onmiddellijk weg. Als een batterij wordt ingeslikt, raadpleegt u onmiddellijk een arts.
Onderhoud
Reinigen van het toestel:
Reinigen van de aansluitingen:
aansluitingen voorzichtig met een katoenen wattestokje en let op dat u de
aansluitingen niet beschadigt.
Meer over discs:
• Raak het opnameoppervlak van een disc niet aan.
• Plak geen plakband e.d. op een disc en gebruik geen disc waar plakband e.d.
op geplakt is.
• Gebruik geen toebehoren of hulpstukken voor discs.
• Veeg vanuit het midden van de disc naar de rand.
• Reinig discs met een droge siliconen of zachte doek. Gebruik geen oplosmiddelen.
• Verwijder een disc in horizontale richting uit het toestel.
• Verwijder bramen van het middengat en de discrand alvorens een disc te plaatsen.
Verwijder vuil van het voorpaneel met een droge siliconen of zachte doek.
Verwijder het voorpaneel en reinig de
Aansluiting (op de achterkant
van het voorpaneel)
Page 85

BASISPUNTEN
Voorpaneel
Volumeregelaar
(draaien/drukken)
Verwijdertoets
Displayvenster
Afstandsbediening (RC-406) (niet bijgeleverd)
(Dit toestel kan echter met een los verkrijgbare
afstandsbediening op afstand worden bediend.)
Afstandsbedieningssensor (Stel niet
aan schel zonlicht bloot.)
Verwijder alvorens
ingebruikname het
isolatievel.
TerugstellenBevestigen Verwijderen
De door u gemaakte
instellingen worden
tevens gewist.
Vervangen van de batterij
Voor het Doet u dit (op het voorpaneel) Doet u dit (op de afstandsbediening)
Inschakelen van de stroom
Instellen van het volume Verdraai de volumeknop.
Een bron selecteren
Veranderen van de
displayinformatie
Druk op
B SRC
• Houd even ingedrukt om de stroom uit te schakelen.
Druk herhaaldelijk op
Druk herhaaldelijk op
• Houd even ingedrukt om de huidige display-informatie rollend
te tonen.
.
B SRC
DISPSCRL
.
.
Houd
SRC
even ingedrukt om de stroom uit te schakelen.
( De stroom wordt niet ingeschakeld door een druk op
VOL
of
VOL
Druk op
Druk tijdens weergave op
• Druk nogmaals om te annuleren.
Druk herhaaldelijk op
( niet mogelijk )
.
ATT
om het geluid te dempen.
SRC
.
NEDERLANDS |
SRC
. )
3
Page 86

STARTEN
1
Annuleren van de demonstratie
Na het inschakelen van de stroom (of na het terugstellen van het toestel), toont het
display: “SELLANGUAGE”
1 Draai de volumeknop om
vervolgens op de knop.
[ENG]
is de basisinstelling.
Het display toont vervolgens: “CANCELDEMO” “PRESS” “VOLUMEKNOB”
2 Druk op de volumeknop.
[YES]
is de basisinstelling.
3 Druk nogmaals op de volumeknop.
“DEMOOFF” verschijnt.
2
Instellen van de klok
Druk op de volumeknop om
1
2
Draai de volumeknop om
3 Draai de volumeknop om
de knop.
4 Draai de volumeknop om de instellingen te maken en druk vervolgens op
de knop.
Dag Uur Minuut
5 Draai de volumeknop om
de knop.
6 Draai de volumeknop om
knop.
7 Houd even ingedrukt om te voltooien.
Druk op om naar het voorgaande onderdeel of hiërarchie terug te keren.
4
“PRESS” “VOLUMEKNOB”
[ENG]
(Engels) of
[FUNCTION]
[CLOCK]
te kiezen en druk vervolgens op de knop.
[CLOCK ADJUST]
[CLOCK FORMAT]
[12H]
of
[RUS] (Russisch)
op te roepen.
te kiezen en druk vervolgens op
te kiezen en druk vervolgens op
[24H]
te kiezen en druk vervolgens op de
te kiezen en druk
3
Instellen van de basisinstellingen
Druk op B SRC om de STANDBY functie te activeren.
1
2 Druk op de volumeknop om
[FUNCTION]
op te roepen.
3 Draai de volumeregelaar om een keuze te maken (zie de
volgende tabel) en druk vervolgens op de knop.
4 Houd even ingedrukt om te voltooien.
Druk op om naar het voorgaande onderdeel of hiërarchie terug te
keren.
AUDIO CONTROL
SP SELECT
DISPLAY
EASY MENU
TUNER SETTING
DAB L-BAND
DAB ANT
POWER
PRESET TYPE
SYSTEM
KEY BEEP
Basisinstelling:
OFF/ 5/4/ 6 × 9/6/ OEM
(5-inch of 4-inch, 6×9-inch of 6-inch) of OEM-luidsprekers kiezen voor een
optimaal geluid.
ON
:Zowel de display- als toetsverlichting verandert naar wit bij het
invoerenv an
[FUNCTION]
blijft als de bij
ON
:Ontvangst van L-BAND-ensemble tijdens het ontvangen van digitale
audio.;
OFF
:Geannuleerd.
ON:Stroomtoevoer naar de DAB-antenne. Kies bij gebruik van de
bijgeleverde antenne.;
passieve antenne zonder booster wordt gebruikt.
NORMAL
: Vastleggen van een zender onder iedere voorkeurtoets voor
iedere golfband (FM1/ FM2/ FM3/ MW/ LW/ DB1/ DB2/ DB3). ;
MIX
: Vastleggen van een zender onder iedere voorkeurtoets ongeacht de
gekozen golfband.
ON
:Activeren van de toetsdruktoon.;
: Overeenkomstig het luidsprekerformaat
.;
OFF
[COLOR SELECT]
:Zowel de display- als toetsverlichting
gekozen kleur.
OFF
:Er wordt geen stroom toegevoerd. Een
OFF
:Uitschakelen.
( 18)
( 25)
XX
Page 87

SOURCE SELECT
ON
AHA SRC
BUILT-IN AUX
RUSSIAN SET
P-OFF WAIT
CD READ 1
:Activeren van AHA als bronkeuze.;
OFF
:Uitschakelen.
ON
:Activeren van AUX als bronkeuze.;
OFF
:Uitschakelen.
Kies indien van toepassing de displaytaal
voor het
taginformatie (naam van map, bestand,
liedje, artiest, album).
OFF
:De displaytaal is Engels.;
BКЛ
:De displaytaal is Russisch.
Alleen mogelijk wanneer de
demonstratiefunctie is uitgeschakeld.
Instellen van de periode waarna het
toestel (wanneer standby geschakeld)
ter energiebesparing automatisch wordt
uitgeschakeld.
20M
: 20 minuten ;
60M
: 60 minuten ;
WAIT TIME – – –
:Er wordt automatisch onderscheid
gemaakt tussen een disc met
audiobestanden en een muziek-CD.;
2
: Forceren van afspelen als een muziek-CD.
U hoort geen geluid tijdens weergave van
een disc met audiobestanden.
( 11)
( 11)
[FUNCTION]
40M
:Geannuleerd
F/W UPDATE
UPDATE SYSTEM / UPDATE BT/ UPDATE DAB1/
UPDATE DAB2
F/W UP xx.xx/
F/W UP xx.x.x/
F/W UP Vxxx
YES
:De upgrade van de firmware wordt
gestart.;
NO
:Geannuleerd (upgraden is niet
geactiveerd).
Ga voor details aangaande de update van
firmware naar:
www.kenwood.com/cs/ce/
STARTEN
mene en
: 40 minuten ;
DIGITALE RADIO (DAB)
Meer over DAB (Digital Audio
Broadcasting)
DAB is een van de hedendaagse beschikbare
digitale radio-uitzendsystemen. DAB levert een
digitale geluidskwaliteit, zonder interferentie en
signaalvervorming. DAB kan tevens tekst, beelden en
data versturen.
In tegenstelling tot FM-uitzendingen waarmee ieder
programma op zijn eigen frequentie wordt uitgezonden,
combineert DAB diverse programma’s (die we “services”
noemen) tot een groep (oftewel een “ensemble”).
Het “primaire component” (de hoofdradiozender)
wordt soms vergezeld door een
component
informatie heeft.
”
die extra programma's of andere
“
secundair
Starten van weergave
Druk op B SRC om DAB te kiezen.
1
2 Druk herhaaldelijk op J BAND (of druk op #FM+ op de RC-406) om DB1/ DB2/ DB3 te
kiezen.
3 Houd S / T ingedrukt (of houd S / T(+) op de RC-406 ingedrukt) om een ensemble
op te zoeken.
4 Druk op S / T (of druk op S / T(+) op de RC-406) om een ensemble, service of
component voor weergave te kiezen.
•
Veranderen van de afstemmethode voor S / T:
AUTO1:
AUTO2:
MANUAL:
Druk op
Druk op
Houd
Houd
S / T
Druk op
S / T
S / T
S / T
S / T
: Kiezen van een ensemble, service of component.
even ingedrukt: Automatisch zoeken van een ensemble.
: Opzoeken van een voorkeurservice.
: Kiezen van een ensemble, service of component.
even ingedrukt: Handmatig zoeken van een ensemble.
Voorbereiding:
1 Verbind een DAB-antenne met de DAB-
antenne-aansluiting.
( 25)
2 Druk op B SRC om DAB te kiezen.
3 Houd even ingedrukt om de
servicelijst bij te werken.
“LIST UPDATE” verschijnt en de update start.
“UPDATED” verschijnt zodra de update is voltooid.
Het updaten duurt ongeveer 3 minuten. Tijdens
het updaten kan er geen andere informatie
(bijvoorbeeld verkeersinformatie) worden
ontvangen.
•
Annuleren van het updaten van de
servicelijst:
Druk herhaaldelijk op
Houd weer even ingedrukt.
K SEEK
.
NEDERLANDS |
5
Page 88

DIGITALE RADIO (DAB)
•
Opslaan van een service:
cijfertoetsen (
•
Kiezen van een opgeslagen service:
van de cijfertoetsen (
cijfertoetsen (
1
tot 6) even ingedrukt.
1
tot 6) op de RC-406).
Kiezen van een service
Druk op om de servicezoekfunctie te
1
activeren.
2 Draai de volumeknop of druk op J / K om een
service te kiezen en druk vervolgens op de
knop.
(of met gebruik van de RC-406)
Druk op J / K om een service op te zoeken.
Druk op om de servicezoekfunctie te annuleren.
Kiezen van een service met de naam
Druk op om de servicezoekfunctie te
1
activeren.
2 Verdraai de volumeknop snel voor het
activeren van de alfabet-zoekfunctie.
3 Draai de volumeknop of druk op S / T om
een op te zoeken teken te kiezen.
Druk op
J / K
pagina te gaan.
om naar de voorgaande/volgende
4 Druk op de volumeknop om het zoeken te
starten.
5 Draai de volumeknop om een service te kiezen
en druk vervolgens op de knop.
Druk op om de alfabet-zoekfunctie te annuleren.
Houd een van de
1
tot 6) (of druk op een van de
Druk op een
Opnieuw afspelen
Houd K SEEK ingedrukt (of druk op K op de RC-406).
“
REPLAY MODE” verschijnt en het opnieuw afspelen start vanaf de huidige positie. U kunt een bepaalde
periode van de huidige service opnieuw afspelen (afhankelijk van de audiobitwaarde).
Tijdens opnieuw afspelen....
6 IW
• Druk op
• Druk op
verspringen in het huidige fragment.
• Houd
voorwaarts.
• Houd
de normale weergave te gaan.
(of druk op
S / T
S / T
K SEEK
ingedrukt (of houd K op de RC-406 ingedrukt) om Replay uit te schakelen en weer naar
ENT IW
(of druk op
ingedrukt (of houd
S / T(+)
op de RC-406) voor het pauzeren of hervatten van de weergave.
op de RC-406) voor het achterwaarts/voorwaarts
S / T(+)
op de RC-406 ingedrukt) voor achterwaarts/snel
Overige instellingen
Druk op de volumeknop om
1
[FUNCTION]
op te roepen.
2 Draai de volumeregelaar om een keuze te maken (zie de volgende tabel) en druk
vervolgens op de knop.
3 Houd even ingedrukt om te voltooien.
Druk op om naar het voorgaande onderdeel of hiërarchie terug te keren.
Basisinstelling:
TUNER SETTING
ON
AF SET
TI ON
PTY SEARCH
:
Tijdens het luisteren naar een DAB-bron...
Er wordt automatisch omgeschakeld naar een FM-zender die hetzelfde programma uitzendt wanneer het DABsignaal zwak wordt. Zodra het signaal weer sterk is, wordt naar het DAB-geluid teruggeschakeld.
Tijdens het luisteren naar een FM-bron...
Er wordt automatisch naar de DAB-bron die hetzelfde programma uitzendt overgeschakeld (indien beschikbaar). ;
OFF
:Geannuleerd.
:Het toestel kan tijdelijk naar verkeersinformatie worden overgeschakeld.;
Druk op de volumeknop om de PTY-taalkeuze te activeren. Draai de volumeknop om de PTY-taal (
FRENCH/ GERMAN
Kiezen van het beschikbare programmatype
) te kiezen en druk vervolgens op de knop.
( 7)
en druk vervolgens op S / T om te starten.
OFF
:Geannuleerd.
ENGLISH
/
XX
6
Page 89

ANALOGE RADIODIGITALE RADIO (DAB)
ASW SELECT TRAVEL, WARNINGS, NEWS, WEATHER, EVENT, SPECIAL, RAD INFO, SPORTS,
FINANCE:
Draai de volumeknop om een keuze te maken en druk vervolgens op de knop.
“
”
verschijnt voor het geactiveerde type mededelingen.
*
Er wordt automatisch van iedere bron overgeschakeld naar digitale radio-ensembles die een
mededeling van het geactiveerde type uitzenden.
• Er kunnen tegelijkertijd meerdere types voor mededelingen worden geactiveerd.
• Druk nogmaals op de volumeknop om te annuleren (“
LIST UPDATE AUTO
ingeschakeld.;
te houden.
PTY WATCH
Er wordt automatisch van iedere bron overgeschakeld naar digitale radio-ensembles die een
programma van het geselecteerde type uitzenden.
:De DAB-servicelijst wordt automatisch bijgewerkt wanneer de stroom wordt
MANUAL
: De DAB-servicelijst wordt bijgewerkt door ingedrukt
*
”
dooft).
NEWS, AFFAIRS, INFO, SPORT, EDUCATE, DRAMA, CULTURE, SCIENCE,
VARIED, POP M
LIGHT M
(popmuziek)
(lichte muziek)
, ROCK M
(rockmuziek)
, CLASSICS, OTHER M
, EASY M
(overige muziek)
(easy listening muziek)
, WEATHER,
,
FINANCE, CHILDREN, SOCIAL, RELIGION, PHONE IN, TRAVEL, LEISURE,
JAZZ, COUNTRY, NATION M
(nationale muziek)
, OLDIES, FOLK M
(folkmuziek)
,
DOCUMENT
OFF
:Geannuleerd.
CLOCK
ON
TIME SYNC
• Beschikbare programmatypes:
SPEECH: NEWS, AFFAIRS, INFO
VARIED, WEATHER, FINANCE, CHILDREN, SOCIAL, RELIGION, PHONE IN, TRAVEL, LEISURE
:De tijd van het toestel wordt gelijkgesteld aan de tijd van het digitale radiosignaal.;
OFF
:Geannuleerd.
(informatie),
SPORT, EDUCATE, DRAMA, CULTURE, SCIENCE
,
,
DOCUMENT
MUSIC: POP M
LIGHT M
(nationale muziek),
Het toestel zoekt naar het programmatype van de categorie van
indien gekozen.
• Wanneer het volume wordt aangepast tijdens het ontvangen van verkeersinformatie,
een mededeling of noodbericht, wordt het aangepaste volume automatisch
opgeslagen. Dit volume wordt ingesteld wanneer later weer verkeersinformatie, een
mededeling of noodbericht wordt ontvangen.
(popmuziek),
(lichte muziek),
OLDIES, FOLK M
ROCK M
(rockmuziek),
CLASSICS, OTHER M
(folkmuziek)
EASY M
(overige muziek),
(easy listening muziek),
JAZZ, COUNTRY, NATION M
[SPEECH]
of
[MUSIC]
Opzoeken van een zender
Druk op B SRC om TUNER te kiezen.
1
2 Druk herhaaldelijk op JBAND (of druk op
de RC-406) om FM1/ FM2/ FM3/ MW (of LW) te kiezen.
AM–/#FM+ op
*
3 Druk op S / T (of op S / T(+) op de RC-406) om een
zender op te zoeken.
•
Veranderen van de zoekmethode voor S / T:
herhaaldelijk op
AUTO1:
AUTO2:
MANUAL:
•
Opslaan van een zender:
even ingedrukt.
•
Kiezen van een opgeslagen zender:
cijfertoetsen (
RC-406).
KSEEK
Automatisch opzoeken van een zender.
Opzoeken van een voorkeurzender.
Handmatig zoeken naar een zender.
1
.
Houd een van de cijfertoetsen (1 tot 6)
Druk op een van de
tot 6) (of druk op een van de cijfertoetsen (1 tot 6) op de
Druk
Direct afstemmen (met de RC-406)
Druk op DIRECT om de directe afstemfunctie te activeren.
1
2 Druk op de cijfertoetsen om een frequentie in te voeren.
3 Druk op ENTIW om een zender op te zoeken.
• Druk om te annuleren op of
• Het direct afstemmen wordt automatisch geannuleerd indien u na stap
binnen 10 seconden geen bediening uitvoert.
DIRECT
.
2
NEDERLANDS |
7
Page 90

ANALOGE RADIO
Overige instellingen
Druk op de volumeknop om
1
2 Draai de volumeregelaar om een keuze te maken (zie de volgende
tabel) en druk vervolgens op de knop.
3 Houd even ingedrukt om te voltooien.
Druk op om naar het voorgaande onderdeel of hiërarchie terug te keren.
TUNER SETTING
LOCAL SEEK
AUTO MEMORY YES
ON
: Opzoeken van uitsluitend FM-zenders met een goede ontvangst. ;
OFF
: Geannuleerd.
:Automatisch opslaan van 6 zenders met een goede ontvangst. ;
NO
:Geannuleerd. (Alleen kiesbaar indien
[PRESETTYPE]
MONO SET
NEWS SET ON
REGIONAL ON
AF SET ON
TI
*
PTY SEARCH
ON
:Verbeteren van de FM-ontvangst (maar het stereo-effect gaat verloren).;
OFF
:Geannuleerd.
: Het toestel schakelt tijdelijk naar het nieuwsprogramma over indien
beschikbaar. ;
: Overschakelen naar een andere zender in een bepaalde regio met gebruik van
“AF”.;
OFF
: Automatisch opzoeken van een andere zender die hetzelfde programma in
hetzelfde Radio Data System-netwerk uitzendt maar met een betere ontvangst
indien de ontvangst van de huidige zender slecht is.;
ON
:Het toestel kan tijdelijk naar verkeersinformatie worden overgeschakeld.;
OFF
:Geannuleerd.
Druk op de volumeknop om de PTY-taalkeuze te activeren. Draai de volumeknop
om de PTY-taal (
op de knop.
Kiezen van het beschikbare programmatype (zie hieronder) en druk vervolgens op
S / T om te starten.
[FUNCTION]
.) (
4)
OFF
: Geannuleerd.
:Geannuleerd.
ENGLISH/ FRENCH/ GERMAN
op te roepen.
[NORMAL]
is gekozen voor
OFF
) te kiezen en druk vervolgens
Basisinstelling:
: Geannuleerd.
•
[LOCAL SEEK]/ [MONO SET]/ [NEWS SET]/ [REGIONAL]/ [AF SET]/ [PTY SEARCH]
alleen worden gekozen met golfbanden FM1/ FM2/ FM3.
• Beschikbare programmatypes:
SPEECH
:
NEWS
,
AFFAIRS
,
INFO
,
LEISURE
,
,
COUNTRY
(informatie),
WEATHER
,
DOCUMENT
ROCK M
(lichte muziek),
SCIENCE
,
VARIED
IN
,
MUSIC: POP M
XX
Het toestel zoekt naar het programmatype van de categorie van
[MUSIC]
• Wanneer het volume wordt aangepast tijdens het ontvangen van
verkeersinformatie, een noodbericht of nieuwsuitzending, wordt het aangepaste
volume automatisch opgeslagen. Dit volume wordt ingesteld wanneer
later weer verkeersinformatie, een noodbericht of nieuwsuitzending wordt
ontvangen.
*
[TI]
TRAVEL
(popmuziek),
LIGHT M
muziek),
JAZZ
muziek),
(folkmuziek)
indien gekozen.
van de MW/LW-band wordt uitsluitend geactiveerd voor een DAB-bron.
,
FINANCE
(rockmuziek),
,
NATION M
SPORT
,
EDUCATE
,
CHILDREN
,
SOCIAL
EASY M
CLASSICS
,
OTHER M
(nationale muziek),
,
DRAMA
,
RELIGION
(easy listening
(overige
OLDIES
[SPEECH]
,
CULTURE
,
FOLK M
kan
,
PHONE
of
,
8
Page 91

CD / USB / iPod
Starten van de weergave
De bron verandert automatisch en de weergave start.
CD
Labelkant M Uitwerpen disc
USB
USB-ingangsaansluiting
CA-U1EX (max: 500mA)
(los verkrijgbaar)
en/ of
USB-kabel van de achterkant van het toestel
iPod/iPhone
USB-ingangsaansluiting
en/ of
USB-kabel van de achterkant van het toestel
KCA-iP102 (los verkrijgbaar) of
accessoirekabel van de iPod/iPhone
Druk op 5 iPod om de bedieningsfunctie te
kiezen wanneer iPod als bron is gekozen.
MODE ON:
Met de iPod
MODE OFF:
Met het toestel.
2
*
.
1
*
Voor het Doe dit
Pauzeren of hervatten
van weergave
Kiezen van een
fragment/bestand
Kiezen van een map
Snel achterwaarts/
voorwaarts
Afspelen herhalen
Willekeurig afspelen
1
*
Laat de kabel wanneer niet in gebruik niet in de auto achter.
2
*
Weergave/pauze, verspringen, snel-voorwaarts of achterwaarts verplaatsen in bestanden is nog mogelijk
met het toestel.
3
*
Alleen voor MP3/WMA/AAC/WAV-bestanden. Werkt niet voor een iPod.
4
*
Voor de iPod:
5
*
Voor de CD:
Indien u een iPod/iPhone met de USB-ingangsaansluiting van het toestel heeft verbonden (voor het luisteren
naar TuneIn Radio, TuneIn Radio Pro of Aupeo), geeft het toestel het geluid van deze apps weer.
Druk op 6 IW (of op ENT IW op de RC-406).
Druk op S / T (of op S / T(+) op de RC-406).
3
*
Druk op J / K (of op
AM– / #FM+ op de RC-406).
*
Houd S / T ingedrukt (of houd S / T(+) op de RC-406 even
ingedrukt).
4
*
Druk herhaaldelijk op 4 .
• Audio-CD: TRACKREPEAT, REPEATOFF
• MP3/WMA/AAC/WAV-bestand of iPod: FILEREPEAT, FOLDERREPEAT,
REPEATOFF
• KENWOOD Music Editor Light (KME Light)/ KENWOOD Music Control (KMC)bestand
( 18)
4
*
Druk herhaaldelijk op 3 .
• Audio-CD: DISCRANDOM, RANDOMOFF
• MP3/WMA/AAC/WAV-bestand of iPod of KME Light/ KMC-bestand:
FOLDERRANDOM, RANDOMOFF
: FILEREPEAT, REPEATOFF
Houd 3 even ingedrukt om “ALL RANDOM” te kiezen.
Alleen mogelijk wanneer
Alleen voor MP3/WMA/AAC-bestanden.
[MODE OFF]
is gekozen.
NEDERLANDS |
5
*
9
Page 92

CD / USB / iPod
Kiezen van een fragment/bestand
uit een lijst
Voor de iPod:
[MODE OFF]
Alleen mogelijk wanneer
is gekozen.
( 9)
1 Druk op .
2 Draai de volumeknop om een keuze
te maken en druk vervolgens op de
knop.
• MP3/WMA/AAC/WAV-bestand: Kies de
gewenste map en vervolgens het bestand.
• iPod of KME Light/ KMC-bestand: Kies
het gewenste bestand uit de lijsten
(PLAYLISTS, ARTISTS, ALBUMS, SONGS,
*
PODCASTS
*
Alleen voor iPod.
• Druk op de
naar de basismap (of het eerste bestand) te
gaan.
• Druk op
onderdeel of hiërarchie terug te keren.
• Houd
Indien u veel bestanden heeft...
U kunt bestanden snel zoeken (met stap
hierboven) met een vastgelegde snelheid
voor verspringen-zoeken door een druk op
S / T
• Zie tevens “Instellen van de snelheid voor
verspringen-zoeken”.
• Door
ongeacht de ingestelde snelheid, versprongen
met de maximale snelheid (10
•
Voor de USB:
de database die met KME Light/ KMC zijn
gemaakt.
• Niet van toepassing op een audio-CD.
, GENRES, COMPOSERS*).
5 iPod
cijfertoets om weer terug
om naar het voorgaande
even ingedrukt om te annuleren.
.
S / T
ingedrukt te houden, wordt
%
Alleen voor bestanden in
2
).
10
Direct muziekzoeken (met de RC-406)
Druk op DIRECT.
1
2 Druk op de cijfertoetsen om een
fragment-/bestandnummer in te voeren.
3 Druk op ENT IW om muziek op te
zoeken.
• Druk op om te annuleren.
• Niet beschikbaar indien willekeurige weergave is
gekozen.
• Niet mogelijk voor iPod, KME Light/ KMC-bestand.
Kiezen van een liedje met de naam
Tijdens het luisteren naar een iPod...
1 Druk op .
2 Draai de volumeknop om een categorie te
kiezen en druk vervolgens op de knop.
3 Verdraai de volumeknop snel voor het
activeren van zoeken met tekens.
4 Draai de volumeknop om een op te
zoeken teken te kiezen.
5 Druk op S / T om de invoerpositie te
veranderen.
U kunt maximaal 3 tekens (letters) invoeren.
6 Druk op de volumeknop om het zoeken te
starten.
7 Draai de volumeknop om een keuze te
maken en druk vervolgens op de knop.
Herhaal stap 7 totdat het gewenste onderdeel is
gekozen.
• Als u wilt zoeken naar een ander teken dan A t/m Z
en 0 t/m 9, voert u alleen “
• Druk op
te gaan.
• Voor het terugkeren naar het hoofdmenu, drukt u
op
5 iPod
• Houd
om naar de voorgaande laag terug
.
even ingedrukt om te annuleren.
” in.
*
Instellen van de snelheid voor
verspringen-zoeken
Tijdens het luisteren naar een iPod of KME Light/ KMCbestand...
1 Druk op de volumeknop om
roepen.
2 Draai de volumeknop om
druk vervolgens op de knop.
3 Draai de volumeknop om
kiezen en druk vervolgens op de knop.
4 Draai de volumeknop om een keuze te maken
[FUNCTION]
[USB]
te kiezen en
[SKIP SEARCH]
op te
te
en druk vervolgens op de knop.
0.5%
(basisinstelling)/ 1%/ 5%/
verspringen-zoeken voor alle bestanden.
10%
: Snelheid
5 Houd even ingedrukt om te voltooien.
Verander van USB-drive
Indien een smartphone (massa-opslagklasse) met de
USB-ingangsaansluiting is verbonden, kunt u het interne
geheugen van deze of extern geheugen (bijvoorbeeld een
SD-kaart) kiezen voor weergave van de opgeslagen muziek.
U kunt tevens de gewenste drive voor weergave kiezen
indien een apparaat met meerdere drives is verbonden.
Druk herhaaldelijk op 5 iPod om de gewenste
drive te kiezen.
(of)
1 Druk op de volumeknop om
roepen.
2 Draai de volumeknop om
druk vervolgens op de knop.
3 Draai de volumeknop om
kiezen en druk vervolgens op de knop.
4 Druk op de volumeknop om
kiezen.
De volgende drive wordt automatisch gekozen.
Herhaal stappen
Kiesbare items:
1
tot 4 om de volgende drives te kiezen.
[DRIVE1]
tot
[USB]
[MUSIC DRIVE]
[DRIVE5]
[FUNCTION]
op te
te kiezen en
te
[DRIVE CHANGE]
te
Page 93

AUX AhaTM RADIO
Voorbereiding:
Kies
[ON]
voor
[BUILT-IN AUX]. ( 5)
Starten van weergave
Verbind een draagbare audiospeler (los
1
verkrijgbaar).
Aux-ingangsaansluiting
3,5mm stereo-ministekker, “L”-vormig
(los verkrijgbaar)
Draagbare
audiospeler
2 Druk op B SRC om AUX te kiezen.
3 Schakel de draagbare audiospeler in en
start de weergave.
Instellen van de AUX-naam
Tijdens het luisteren naar een draagbare
audiospeler die met het toestel is verbonden...
1 Druk op de volumeknop om
[FUNCTION]
op te roepen.
2 Draai de volumeknop om
[SYSTEM]
te
kiezen en druk vervolgens op de knop.
3 Draai de volumeknop om
SET]
te kiezen en druk vervolgens op de
[AUX NAME
knop.
4 Draai de volumeknop om een keuze te
maken en druk vervolgens op de knop.
AUX
(basisinstelling)/
DVD/ PORTABLE/ GAME
VIDEO/ TV
5 Houd even ingedrukt om te
voltooien.
Voorbereiding:
Installeer de laatste versie van de Aha
op uw apparaat (iPhone/iPod touch), maak een
account en meldt u aan bij Aha
• Kies
[ON]
voor
[AHA SRC]. ( 5)
Starten van weergave
Open de AhaTM-app op uw apparaat.
1
2 Verbind uw apparaat met de USB-
ingangsaansluiting.
USB-ingangsaansluiting
en/ of
USB-kabel van de achterkant van het
toestel
De bron verandert naar AHA FRONT/
/
AHAREAR en de uitzending start.
* Laat de kabel wanneer niet in gebruik niet in
de auto achter.
KCA-iP102 (los verkrijgbaar) of
accessoirekabel van de iPod/iPhone
TM
-app
TM
.
Voor het Doe dit
Pauzeren of hervatten
van weergave
Kiezen van inhoud
Druk op 6 IW (of op
ENT IW op de RC-406).
Druk op S / T (of op
S / T(+) op de RC-406).
30 seconden voorwaarts
in inhoud
15 seconden
achterwaarts in inhoud
“Vind ik leuk” huidige
inhoud
“Vind ik niet leuk”
huidige inhoud
*
*
*
1
1
*
2
*
1
Alleen van toepassing op audioboek en podcast.
2
Niet van toepassing op audioboek en Location Based
Stations (LBS).
Opzoeken van een zender
Druk op .
Houd T even ingedrukt.
Houd S even ingedrukt.
1
*
Druk op J .
• Druk nogmaals op J om stem
te verwijderen.
Druk op K .
2
*
• Druk nogmaals op K om stem
te verwijderen.
2 Draai de volumeknop om een zender te kiezen en
druk vervolgens op de knop.
3 Draai de volumeknop om de gewenste inhoud te
kiezen en druk vervolgens op de knop.
(of met gebruik van de RC-406)
Druk op J / K om een zender op te zoeken.
Houd even ingedrukt om te annuleren.
U kunt bellen wanneer het apparaat met het toestel is
verbonden via een Bluetooth verbinding
•
Bellen van een nummer uit de inhoud*:
vervolgens op de volumeknop om te bellen.
•
Stoppen of verbreken van een gesprek:
* De beschikbaarheid is afhankelijk van de gekozen zender.
( 12)
...
Druk op 1 en
Druk op .
NEDERLANDS |
11
Page 94

BLUETOOTH®
U kunt Bluetooth apparaten met dit toestel bedienen.
Verbind de microfoon
MIC (microfoon-ingangsaansluiting)
Microfoon (bijgeleverd)
Achterpaneel
Stel de hoek van de
microfoon in
De Bluetooth verbinding wordt verbroken wanneer u
het toestel uitschakelt of het voorpaneel tijdens een
telefoongesprek verwijdert. Zet het gesprek voort met uw
mobiele telefoon.
Ondersteunde Bluetooth profielen
– Hands-Free Profile (HFP)
– Serial Port Profile (SPP)
– Phonebook Access Profile (PBAP)
– Object Push Profile (OPP)
– Advanced Audio Distribution Profile (A2DP)
– Audio/Video Remote Control Profile (AVRCP)
Zet indien nodig met snoerklemmen
(niet bijgeleverd) vast.
Koppelen van een Bluetooth apparaat
Nadat u voor het eerst een Bluetooth apparaat op
dit toestel heeft aangesloten, moet u het apparaat
aan dit toestel koppelen. Nadat het koppelen is
voltooid, blijft het Bluetooth apparaat geregistreerd
in het toestel, zelfs wanneer u het toestel terugstelt.
• U kunt in totaal maximaal vijf apparaten
registreren (koppelen).
• Tegelijkertijd kunnen er maximaal twee
Bluetooth telefoons en één Bluetooth audioapparaat worden verbonden.
• Dit toestel ondersteunt Secure Simple Pairing
(SSP).
• Bepaalde Bluetooth apparaten worden niet
automatisch na het koppelen met het toestel
verbonden. Verbind het apparaat dan handmatig
met het toestel. Zie de handleiding van het
Bluetooth apparaat voor meer informatie.
1 Druk op B SRC om het toestel in te
schakelen.
2 Zoek de modelnaam van dit toestel
(KDC-BT4*DAB) op en selecteer het met
het Bluetooth apparaat.
“PAIRING” “PASS XXXXXX” Naam van
toestel
“PRESS” “VOLUME KNOB” rolt over
het display.
3 Druk op de volumeknop om het
koppelen te starten.
“PAIRING OK” verschijnt zodra het koppelen is
voltooid en “
verbinding is gemaakt.
• Met bepaalde Bluetooth apparaten moet u
mogelijk direct na het zoeken de PIN-code
(persoonlijk identificatienummer) invoeren.
” licht op wanneer de Bluetooth
• Het verzoek voor koppelen (via Bluetooth) wordt
automatisch geactiveerd wanneer een iPhone/
iPod touch via de USB-ingangsaansluiting wordt
verbonden. (Alleen van toepassing indien
PAIRING]
op
[ON]
Druk éénmaal op de volumknop om te koppelen
nadat u de apparaatnaam heeft bevestigd.
is gesteld.)
( 16)
[AUTO
Bluetooth testfunctie
U kunt de verbinding van het ondersteunde profiel
tussen het Bluetooth apparaat en het toestel
controleren.
• Controleer of er geen Bluetooth apparaat is
verbonden.
1 Houd even ingedrukt.
“PLEASE PAIR YOUR PHONE” verschijnt.
2 Zoek de modelnaam van dit toestel
(KDC-BT4*DAB) op en selecteer het met
het Bluetooth apparaat.
3 Bedien het Bluetooth apparaat om het
koppelen te bevestigen.
“TESTING” knippert op het display.
Het verbindingsresultaat (OK of NG) verschijnt
na de test.
PAIRING : Koppelingsstatus
HF CNT: Hands-Free Profile (HFP) compatibiliteit
AUD CNT: Advanced Audio Distribution Profile
PB DL: Phonebook Access profile (PBAP)
• Houd
(A2DP) compatibiliteit
compatibiliteit
B SRC
te schakelen en de controlefunctie te annuleren.
even ingedrukt om het toestel uit
12
Page 95

Bluetooth mobiele telefoon
Voor het Doe dit
Ontvangst van een
gesprek
Negeren van een
binnenkomend
gesprek
Beëindigen van een
gesprek
Afwisselend schakelen
tussen hands-free en
privégesprek
Instellen van het
volume van de
telefoon
Schakelen tussen twee
verbonden telefoons
Druk op , de volumeknop of op een
van de cijfertoetsen (1 tot 6) (of op
op de RC-406).
• De verlichting van alle toetsen en het
display knippert wanneer u wordt
opgebeld.
Tijdens een gesprek zijn de toetsen en het
display opgelicht in overeenstemming met
de voor
(18)
• Indien
gekozen tijd, antwoordt het toestel het
binnenkomende gesprek automatisch.
(14)
Druk op B SRC (of op op de
RC-406).
Druk op of B SRC (of op op de
RC-406).
Druk tijdens een gesprek op 6IW.
• De bedieningen zijn mogelijk anders
afhankelijk van de verbonden Bluetooth
apparatuur.
Verdraai de volumeknop tijdens het
gesprek.
PhoneVolume (telefoonvolume):
[00]
tot
• Deze instelling heeft geen effect op het
volume van andere bronnen.
Druk herhaaldelijk op .
• Niet van toepassing tijdens een gesprek.
[DISPLAY]
[AUTO ANSWER]
[35]
(Basisinstelling:
gemaakte instellingen.
is ingesteld op de
[15]
)
BLUETOOTH®
Verbeteren van de geluidskwaliteit tijdens een gesprek
Tijdens een telefoongesprek...
1 Druk op de volumeknop om
2 Draai de volumeregelaar om een keuze te maken (zie de volgende tabel)
en druk vervolgens op de knop.
3 Houd even ingedrukt om te voltooien.
Druk op om naar het voorgaande onderdeel of hiërarchie terug te keren.
MIC GAIN –20
NR LEVEL –5
ECHO CANCEL
—+8(0):De gevoeligheid van de microfoon wordt hoger naarmate het nummer hoger
wordt.
—
–20(–10
minimaal is.
1
—10(4):Stel de vertragingstijd voor echo-annulering in totdat de laatste echo wordt
gehoord tijdens een telefoongesprek.
Melding tekstbericht
Wanneer de telefoon een tekstbericht ontvangt, hoort u een beltoon en verschijnt “SMS
RECEIVED”.
• U kunt geen boodschappen lezen, samenstellen of versturen via dit toestel.
• Druk op een willekeurige toets om de melding te wissen.
Gebruik van stemherkenning
Houd even ingedrukt.
1
De aangesloten telefoon (die het eerst werd gekoppeld) wordt geactiveerd. Indien
echter een voorkeurapparaat is verbonden, wordt dit apparaat geactiveerd wanneer u
even ingedrukt houdt.
2 Zeg de naam van een persoon die u wilt bellen of gebruik telefoonfuncties
door een stemcommando te geven.
• De ondersteunde stemherkenningsfuncties verschillen per telefoon. Zie de
gebruiksaanwijzing van de aangesloten telefoon voor details.
• Dit toestel ondersteunt tevens de “intelligente persoonlijke assistentiefunctie” van
iPhone.
[FUNCTION]
):Stel het ruisreductieniveau in zodat de ruis tijdens een telefoongesprek
op te roepen.
Basisinstelling:
( 15, DVC PRIORITY)
XX
NEDERLANDS |
13
Page 96

BLUETOOTH®
Bluetooth bedieningsfuncties
Druk op om de Bluetooth functie te activeren.
1
2 Draai de volumeregelaar om een keuze te maken (zie de volgende
tabel) en druk vervolgens op de knop.
3 Houd even ingedrukt om te voltooien.
Druk op om naar het voorgaande onderdeel of hiërarchie terug te keren.
CALL
HISTORY
1 Druk op de volumeknop om een naam of telefoonnummer te kiezen.
• “INCOMING”, “OUTGOING” of “MISSED” verschijnt onder op het display om de
voorgaande telefoonstatus aan te geven.
• Druk op
• “NO DATA” verschijnt indien er geen geschiedenis van gesprekken is.
DISP SCRL om de displaycategorie (NUMBER of NAME) te
veranderen.
2 Druk op de volumeknop om te bellen.
PHONE
BOOK
NUMBER
DIAL
1 Draai de volumeknop om een naam te kiezen en druk vervolgens op de knop.
2 Draai de volumeknop om een telefoonnummer te kiezen en druk vervolgens op de
knop om te bellen.
• Indien de telefoon PBAP ondersteunt, wordt het telefoonboek van de aangesloten
telefoon automatisch tijdens het koppelen naar het toestel gestuurd. “TRANSFER PB”
verschijnt indien de telefoon niet voor PBAP geschikt is. Verstuur het telefoonboek
handmatig.
• De contacten worden gegroepeerd als: HOME, OFFICE, MOBILE, OTHER, GENERAL
• Dit toestel kan alleen letters zonder accenten tonen. (“Ú” verschijnt bijvoorbeeld als
• Indien er veel contacten in het telefoonboek zijn
(16, TRANSFER PB)
“U”.)
met de naam).
(Kiezen van een contact
1 Draai de volumeknop om een nummer (0 tot 9) of teken ( , #, +) te kiezen.
2 Druk op S / T om de invoerpositie te verplaatsen.
Herhaal stappen
1 en 2 totdat het gehele telefoonnummer is ingevoerd.
3 Druk op de volumeknop om te bellen.
(of met gebruik van de RC-406)
1 Druk op de cijfertoetsen (0 tot 9) om het telefoonnummer in te voeren.
2 Druk op om te bellen.
VOICE
BATT* LOW
SIGNAL* NO SIGNAL/ LOW/ MID/ MAX
SETTINGS
AUTO ANSWER
RING MODE SYSTEM:
SMS NOTIFY* ON:
* De functionaliteit is afhankelijk van het soort telefoon.
Zeg de naam van een persoon die u wilt bellen of gebruik een stemcommando
voor telefoonfuncties.
/
MID/ FULL
signaal.
Basisinstelling:
1 —30
binnen de gekozen tijd.;
ontvangt.
(De standaardbeltoon is verschillend afhankelijk van het gekoppelde apparaat.)
•
CALL:
gesprekken.
•
MESSAGE:
binnenkomende tekstberichten.
PHONE:
dat een gesprek/tekstbericht wordt ontvangen. (De aangesloten telefoon gaat
over indien de telefoon niet voor deze functie geschikt is.)
Het toestel geeft een beltoon en “SMS RECEIVED” verschijnt ten teken dat
een tekstbericht wordt ontvangen.;
(
13, Gebruik van stemherkenning)
:Toont de sterkte van de batterij.
:Toont de sterkte van het huidige ontvangen
:Het toestel beantwoordt het binnenkomende gesprek automatisch
Het toestel geeft een beltoon ten teken dat u een gesprek/tekstbericht
Kiezen van de gewenste beltoon (
Het toestel gebruikt de beltoon van de aangesloten telefoon ten teken
OFF
:Geannuleerd.
TONE 1 — 5
Kiezen van de gewenste beltoon (
OFF
:Geannuleerd.
) voor binnenkomende
TONE 1 — 5
) voor
XX
Kiezen van een contact met de naam
• U kunt snel een contact in overeenstemming met de eerste letter (A tot Z), cijfer
(0 tot 9) of symbool opzoeken.
• De tweede letter van een contact wordt opgezocht indien er geen overeenkomst
met de eerste letter werd gevonden.
1 Druk op om de Bluetooth functie te activeren.
2 Draai de volumeknop om
[PHONE BOOK]
te kiezen en druk vervolgens
op de knop.
14
Page 97

3 Verdraai de volumeknop snel voor het activeren van de alfabet-
zoekfunctie.
Het eerste menu (ABCDEFGHIJK) verschijnt. Druk op
volgende menu (LMNOPQRSTUV of WXYZ1
) te gaan.
J / K
om naar het
4 Draai de volumeknop of druk op S / T om de eerste letter te
kiezen en druk vervolgens op de knop.
• Kies “1” om met cijfers te zoeken.
• Kies “ ” om met symbolen te zoeken.
5 Draai de volumeknop om een naam te kiezen en druk vervolgens
op de knop.
6 Draai de volumeknop om een telefoonnummer te kiezen en druk
vervolgens op de knop om te bellen.
Druk op om naar de voorgaande laag terug te gaan.
Opslaan van een contact in het geheugen
U kunt maximaal 6 contacten opslaan.
1 Druk op om de Bluetooth functie te activeren.
2 Draai de volumeknop om
DIAL]
te kiezen en druk vervolgens op de knop.
[CALL HISTORY], [PHONE BOOK]
of
[NUMBER
3 Draai de volumeknop om een contact te kiezen of een
telefoonnummer in te voeren.
Druk nadat een contact is gekozen op de volumeknop om het
telefoonnummer te tonen.
4 Houd een van de cijfertoetsen (1 tot 6) even ingedrukt.
“STORED” verschijnt wanneer het contact is opgeslagen.
Kies voor het wissen van een contact uit het geheugen
sla een blanco nummer op.
[NUMBER DIAL]
in stap 2 en
Bellen vanuit het geheugen
Druk op om de Bluetooth functie te activeren.
1
2 Druk op een van de cijfertoetsen (1 tot 6).
3 Druk op de volumeknop om te bellen.
“NO MEMORY” verschijnt indien er geen contacten zijn opgeslagen.
BLUETOOTH®
Wissen van een contact
Niet van toepassing op mobiele telefoons die PBAP ondersteunen.
1 Druk op om de Bluetooth functie te activeren.
2 Draai de volumeknop om
druk vervolgens op de knop.
3 Draai de volumeknop om een contact te kiezen.
Druk nadat een contact is gekozen op de volumeknop om het
telefoonnummer te tonen.
4 Houd de volumeknop even ingedrukt om de functie voor het
wissen te activeren.
5 Draai de volumeknop om
druk vervolgens op de knop.
DELETE ONE
DELETE ALL
worden gewist.
: Een in stap 3 gekozen naam of telefoonnummer wordt gewist.
: Alle namen of telefoonnummers van het in stap 2 gekozen menu
6 Draai de volumeknop om
op de knop.
Bluetooth functie-instellingen
1
Druk op de volumeknop om
2 Draai de volumeknop om
de knop.
3 Draai de volumeregelaar om een keuze te maken (zie de volgende
tabel) en druk vervolgens op de knop.
4 Houd even ingedrukt om te voltooien.
Druk op om naar het voorgaande onderdeel of hiërarchie terug te keren.
PHONE SELECT
AUDIO SELECT
DEVICE DELETE
Kiezen van de telefoon of het audiotoestel die/dat u wilt verbinden of
ontkoppelen.
“
” verschijnt voor het apparaat.
1 Draai de volumeknop om het te wissen apparaat te kiezen en druk
2 Draai de volumeknop om
DVC PRIORITY
Kiezen van een apparaat dat u als voorkeurapparaat wilt verbinden.
“
” verschijnt voor het apparaat dat als voorkeurapparaat is gekozen.
[CALL HISTORY]
[DELETE ONE]
[YES]
[FUNCTION]
[BT MODE]
vervolgens op de knop.
knop.
of
[PHONE BOOK]
of
[DELETE ALL]
of
[NO]
te kiezen en druk vervolgens
te kiezen en
te kiezen en
op te roepen.
te kiezen en druk vervolgens op
Basisinstelling:
[YES]
of
[NO]
te kiezen en druk vervolgens op de
NEDERLANDS |
15
XX
Page 98

BLUETOOTH®
TRANSFER PB
PIN CODE EDIT
(0000)
RECONNECT ON
AUTO PAIRING ON
BT HF/AUDIO FRONT
INITIALIZE YES
“DL PB ” verschijnt en u moet het
*
telefoonboek van de aangesloten telefoon
handmatig naar dit toestel versturen.
* Alleen kiesbaar wanneer de aangesloten
Verandert de PIN-code (maximaal 6 cijfers).
1 Draai de volumeknop om een nummer te
2 Druk op S / T om de
Herhaal stappen
3 Druk op de volumeknop om te
weer een verbinding met het Bluetooth
apparaat wanneer het binnen bereik is.;
OFF
ondersteunde Bluetooth apparaat (iPhone/
iPod touch) wanneer het via de USBingangsaansluiting is verbonden. Afhankelijk
van de iOS versie van de aangesloten iPhone/
iPod touch werkt deze functie mogelijk niet. ;
OFF
linker- en rechtervoorluidsprekers.;
ALL
instellingen (inclusief opgeslagen koppeling,
telefoonboek, etc.).;
telefoon voor OPP geschikt is.
kiezen.
invoerpositie te verplaatsen.
PIN-code is ingevoerd.
bevestigen.
:Het toestel maakt automatisch
:Geannuleerd.
:Het toestel koppelt automatisch het
:Geannuleerd.
:Geluidsweergave via alle luidsprekers.
:Terugstellen van alle Bluetooth
1 en 2 totdat de gehele
:Geluidsweergave via de
NO
:Geannuleerd.
Internetradio via Bluetooth
Luisteren naar AhaTM Radio
Voorbereiding:
Kies
[ON]
voor
U kunt via Bluetooth op dit toestel naar
Aha
besturingsprogramma) luisteren.
1 Open de Aha
[AHA SRC]. ( 5)
TM
Radio op uw smartphone (Android
TM
-app op uw
smartphone.
2 Verbind uw smartphone via een
Bluetooth-verbinding.
3 Druk op B SRC om AHA te kiezen.
De bron verandert en de uitzending start
automatisch.
• U kunt Aha
Aha
TM
Radio op dezelfde manier als
TM
Radio voor een iPod/iPhone gebruiken.
( 12)
( 11)
•
Bellen van een nummer uit de inhoud*:
Druk op
1
en vervolgens op de volumeknop
om te bellen.
•
Stoppen of verbreken van een gesprek:
Druk op
* De beschikbaarheid is afhankelijk van de
gekozen zender.
.
Bluetooth audiospeler
De bediening en display-aanduidingen verschillen
mogelijk afhankelijk van de verbonden apparatuur.
Voor het Doe dit
Weergave
1 Druk op B SRC (of op SRC op de
RC-406) om BT AUDIO te kiezen.
2 Bedien de Bluetooth
audiospeler om de weergave te
starten.
Pauzeren of
hervatten van
weergave
Kiezen van een
groep of map
Achterwaarts/
voorwaarts
verspringen
Snel
achterwaarts/
voorwaarts
Afspelen
herhalen
Willekeurig
afspelen
Druk op 6IW (of op ENTIW
op de RC-406).
Druk op J / K (of op
#FM+ op de RC-406).
Druk op S / T (of op
S / T (+) op de RC-406).
Houd S / T ingedrukt (of
houd S / T (+) op de
RC-406 even ingedrukt).
Druk herhaaldelijk op 4 om
een keuze te maken.
ALLREPEAT, FILEREPEAT,
REPEATOFF
Druk herhaaldelijk op 3 om
een keuze te maken.
FOLDERRANDOM, RANDOMOFF
Houd 3 even ingedrukt om
“ALLRANDOM” te kiezen.
AM–/
*
16
Page 99

AUDIO-INSTELLINGEN
Tijdens het luisteren naar een bron...
1 Druk op de volumeknop om
2 Draai de volumeknop om
vervolgens op de knop.
3 Draai de volumeregelaar om een keuze te maken (zie de volgende
tabel) en druk vervolgens op de knop.
Herhaal stap 3 totdat het gewenste onderdeel is gekozen of geactiveerd.
4 Houd even ingedrukt om te voltooien.
(of met gebruik van de RC-406)
1 Druk op AUD om de
2 Druk op J / K om een keuze te maken en druk vervolgens op
ENT IW.
Druk op om naar het voorgaande onderdeel of hiërarchie terug te keren.
SUB-W LEVEL –15 tot +15 (0)
BAND1 LEVEL –8 tot +8 (+5):
BAND2 LEVEL –8 tot +8 (+5):
BAND3 LEVEL
BAND4 LEVEL
BAND5 LEVEL
PRESET EQ
BASS BOOST
–8 tot +8 (+4):
–8 tot +8 (+5):
–8 tot +8 (+1):
DRIVE EQ/ TOP40/ POWERFUL/ ROCK/ POPS/ EASY/ JAZZ/ NATURAL
USER
: Kiezen van een geschikte, vastgelegde equalizer voor het muziekgenre. (Kies
[USER]
voor gebruik van de aangepaste
[DRIVE EQ]
is een vooraf ingestelde equalizer die ruis en lawaai van de weg
reduceert.
LEVEL1/ LEVEL2/ LEVEL3
;
OFF
lage tonen.
[FUNCTION]
[AUDIO CONTROL]
[AUDIO CONTROL]
Instellen van het subwooferuitgangsniveau.
Instellen van het vast te leggen niveau voor iedere bron. (Kies
alvorens de instelling te maken eerst de gewenste bron.)
: Geannuleerd.
op te roepen.
te kiezen en druk
functie te activeren.
Basisinstelling:
BAND1
tot
BAND5
instellingen.)
: Kiezen van het gewenste versterkingsniveau voor de
/
LOUDNESS LEVEL1/ LEVEL2
een goed-gebalanceerd geluid bij een laag volumeniveau.;
SUBWOOFERSET ON
LPFSUBWOOFER THROUGH
SUB-WPHASE REVERSE
:Activeren van de subwooferuitgang.;
:Alle signalen worden naar de subwoofer gestuurd.;
120HZ/ 160HZ
160 Hz worden naar de subwoofer gestuurd.
(180°)/
overeenstemming met de luidsprekeruitgang voor een optimaal geluid. (Alleen
kiesbaar indien een andere instelling dan
[LPF SUBWOOFER]
HPF THROUGH
XX
FADER R15
BALANCE L15
VOLUMEOFFSET
(Basisinstelling:0)
SOUNDRECNSTR
(Geluidreconstructie)
:Alle signalen worden naar de luidsprekers gestuurd.;
120HZ/ 150HZ
150 Hz worden naar de luidsprekers gestuurd.
tot
F15 (0
): Instellen van het balans tussen de achter- en voorluidspreker.
tot
R15 (0
):Instellen van het balans tussen de linker- en rechterluidspreker.
–8
tot +8 (voor AUX) ; –8 tot 0 (voor overige bronnen): Vastleggen van de
volume-aanpassing voor iedere bron. (Kies alvorens de instelling te maken eerst
de gewenste bron.)
ON
:Er wordt een compensatie voor de hoge frequentiecomponenten gemaakt
en de verhogingstijd van de golfvorming die met het comprimeren van audiodata
verloren gaat wordt hersteld voor een realistisch geluid.;
[SUB-W LEVEL]/ [LPF SUBWOOFER]/ [SUB-W PHASE]
[SUBWOOFER SET]
op
[ON]
is gesteld.
:Selecteren van de gewenste lage en hoge frequenties voor
OFF
:Audiosignalen met lagere frequenties dan 85 Hz/ 120 Hz/
NORMAL
(0°):Kiezen van de fase van de subwoofer in
[THROUGH]
.)
:Geannuleerd.
is gekozen voor
OFF
:Geannuleerd.
85HZ
/
100HZ
:Audiosignalen met hogere frequenties dan 100 Hz/ 120 Hz/
OFF
:Geannuleerd.
is alleen kiesbaar wanneer
/
NEDERLANDS |
17
Page 100

DISPLAY-INSTELLINGEN
1 Druk op de volumeknop om
2 Draai de volumeknop om
de knop.
3 Draai de volumeregelaar om een keuze te maken (zie de volgende
tabel) en druk vervolgens op de knop.
Herhaal stap 3 totdat het gewenste onderdeel is gekozen of geactiveerd.
4 Houd even ingedrukt om te voltooien.
Druk op om naar het voorgaande onderdeel of hiërarchie terug te keren.
COLOR SELECT VARIABLE SCAN/ COLOR 01
kleur voor de verlichting van toetsen en het display.
U kunt uw eigen kleur samenstellen (wanneer
[USER]
is gekozen). De door u gemaakte kleur wordt gekozen wanneer u
kiest.
1 Houd de volumeknop even ingedrukt om de gedetailleerde kleurinstelling te
activeren.
2 Druk op S / T om de in te stellen kleur (
3 Draai de volumeknop om het niveau (
op de knop.
DIMMER ON:
BRIGHTNESS 0
De verlichting van het display en de toetsen wordt verzwakt. ;
OFF:
Verlichting in overeenstemming met de
— 31: Kiezen van gewenste helderheidsniveau voor verlichting van het display
en de toetsen.
TEXT SCROLL AUTO/ ONCE:
éénmaal rollen.
[FUNCTION]
[DISPLAY]
op te roepen.
te kiezen en druk vervolgens op
Basisinstelling:
—
COLOR 24/ USER
: Kiezen van de gewenste
[COLOR 01]
—
[COLOR 24]
of
[USER]
R/ G/ B
0 — 9
[BRIGHTNESS]
Kiezen voor het automatisch rollen van display-informatie of slechts
; OFF:
Geannuleerd.
) te kiezen.
) in te stellen en druk vervolgens
instellingen.
MEER INFORMATIE
Algemeen
• Dit toestel kan alleen de volgende CD’s afspelen:
• Gedetailleerde informatie en opmerkingen over afspeelbare audiobestanden vindt u in de handleiding
op de volgende website: www.kenwood.com/cs/ce/audiofile/
Afspeelbare bestanden
• Afspeelbaar audiobestand: MP3 (.mp3), WMA (.wma), AAC (.m4a)
XX
• Afspeelbare diskmedia: CD-R/CD-RW/CD-ROM
• Bestandsformaat afspeelbare disc: ISO 9660 Level 1/2, Joliet, Lange bestandsnaam.
• Bestandssysteem van afspeelbaar USB-toestel: FAT12, FAT16, FAT32
Zelfs als de audiobestanden aan de bovenstaande normen voldoen, kunnen zij mogelijk niet worden
afgespeeld, afhankelijk van het soort media of apparaat en de omstandigheden.
Ongeschikte discs
• Discs die niet rond zijn.
• Discs met kleuren op het opnameoppervlak en vuile discs.
• Opneembare/herschrijfbare discs die niet zijn afgerond.
• 8cm CD. Het toestel kan defect raken wanneer u probeert deze met bijvoorbeeld een adapter te
plaatsen.
Meer over USB-apparaten
• Dit toestel kan op USB-massaopslagapparatuur opgeslagen MP3/WMA/AAC/WAV-bestanden afspelen.
• U kunt geen USB-apparaat via een USB-hub verbinden.
• Het verbinden met een kabel die langer dan 5 m is, kan abnormale weergave tot gevolg hebben.
• Dit toestel herkent geen USB-apparaat dat een ander voltage dan 5 V heeft en 1 A overschrijdt.
Meer over KENWOOD Music Editor Light en KENWOOD Music
Control
• Dit toestel ondersteunt de KENWOOD Music Editor Light app voor pc en de Android™ app KENWOOD
Music Control.
• Bij weergave van audiobestanden waaraan data zijn toegevoegd met KENWOOD Music Editor Light of
KENWOOD Music Control, kunt u audiobestanden opzoeken aan de hand van het genre, artiest, album,
playlist en liedjes of nummers.
• KENWOOD Music Editor Light en KENWOOD Music Control kunnen worden gedownload van de volgende
website: www.kenwood.com/cs/ce/
18
 Loading...