


Kenwood KAF-A55 Manual
COMPACT Hi-Fi COMPONENT SYSTEM
CORE-A55 KAF-A55
INSTRUCTION MANUAL
Declaration of Conformity with regard to the EMC Directive 2004/108/EC
Manufacturer:
Kenwood Corporation
2967-3 Ishikawa-machi, Hachioji-shi, Tokyo, 192-8525 Japan
EU Representative's:
Kenwood Electronics Europe BV
Amsterdamseweg 37, 1422 AC UITHOORN, The Netherlands
© B60-5784-00/00 (EW/XW)

Contents
Caution : Read the pages marked ¤carefully to ensure safe operation.
Before applying power ……………………… 4
Safety precautions ……………………………… 4
IMPORTANT SAFETY INSTRUCTIONS ……… 4
Read before use
Accessories …………………………………… 6 Installation …………………………………… 7 Connections…………………………………… 8 Component names and functions…………… 12
Playing music tracks
Basic Operation ……………………………… 16 Playing an SD card …………………………… 18
Playback ……………………………………… 18 Folder play mode……………………………… 18
Playing a USB device ………………………… 20
Playback ……………………………………… 20 Folder play mode……………………………… 20
Playing a digital audio player ……………… 22
Playback ……………………………………… 22
Playing an external component …………… 23
Playing a component connected to
AUX IN/D-IN (PCM) ………………………… 23 Playing a portable player …………………… 23
Playing a PC …………………………………… 24
Connecting a PC and playing its contents…… 24
Creating the desired sound setting
Adjusting the sound properties …………… 26
Changing the sound mode
"SOUND" …………………………………… 26
Setting the equalizer
"TONE" ……………………………………… 26
Setting the Straight mode
"STRAIGHT" ………………………………… 27
Advanced operations
Changing the setups of the system ………… 28
Adjusting the input level
"Input Level" ……………………………… 28
Adjusting the left/right audio balance
"Balance" …………………………………… 28
Adjusting the display contrast "Contrast"…………………………………… 29
Adjusting the display brightness
"Backlight" ………………………………… 29
Setting the illumination
"Illumination" ……………………………… 30
Selecting the speakers
"Speaker Setup" …………………………… 30
Selecting the headphones
"Headphone Setup" ……………………… 31
Reducing sound distortion
"Compression"……………………………… 31
Setting the power supply to the USB terminal "Power Supply" …………………………… 32
Setting D.AUDIO Control
"D.AUDIO Control" ………………………… 32
2CORE-A55/KAF-A55

Maintenance
Additional information ……………………… 33 Glossary ……………………………………… 38 Message list …………………………………… 38 Troubleshooting ……………………………… 39 Specifications ………………………………… 42
Read before use
Playing music tracks
Creating the desired sound setting
Advanced operations
Maintenance
English 3
Before applying power
¤ Caution : Read this page carefully to ensure safe operation.
Units are designed for operation as follows.
Australia ........................................................... |
AC 240 V only |
Europe .............................................................. |
AC 230 V only |
Safety precautions
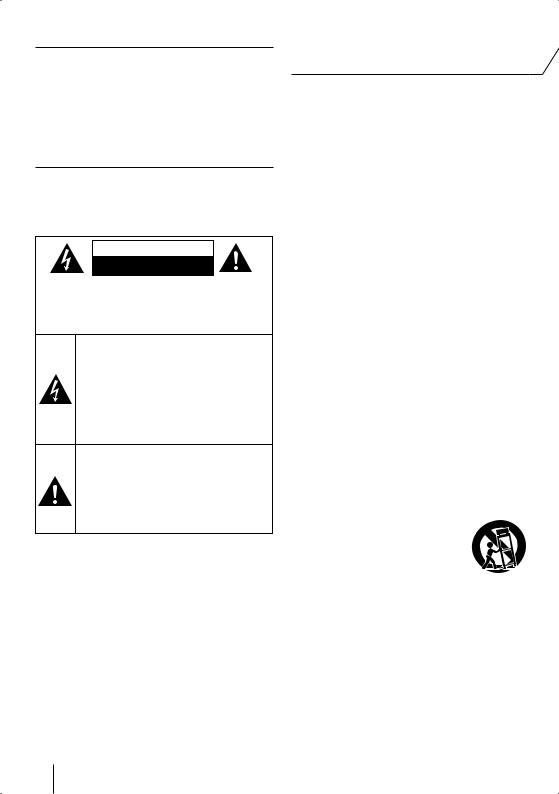
WARNING : TO PREVENT FIRE OR ELECTRIC SHOCK, DO NOT EXPOSE THIS APPLIANCE TO RAIN OR MOISTURE.
CAUTION
RISK OF ELECTRIC SHOCK
DO NOT OPEN
CAUTION: TO REDUCE THE RISK OF ELECTRIC SHOCK, DO NOT REMOVE COVER (OR BACK). NO USERSERVICEABLE PARTS INSIDE. REFER SERVICING TO QUALIFIED SERVICE PERSONNEL.
THE LIGHTNING FLASH WITH ARROWHEAD SYMBOL, WITHIN AN EQUILATERAL TRIANGLE, IS INTENDED TO ALERT THE USER TO THE PRESENCE OF UNINSULATED "DANGEROUS VOLTAGE" WITHIN THE PRODUCT’ S ENCLOSURE THAT MAY BE OF SUFFICIENT MAGNITUDE TO CONSTITUTE A RISK OF ELECTRIC SHOCK TO PERSONS.
THE EXCLAMATION POINT WITHIN AN EQUILATERAL TRIANGLE IS INTENDED TO ALERT THE USER TO THE PRESENCE OF IMPORTANT OPERATING AND MAINTENANCE (SERVICING) INSTRUCTIONS IN THE LITERATURE ACCOMPANYING THE APPLIANCE.
IMPORTANT SAFETY INSTRUCTIONS
¤ Caution : Read this page carefully to ensure safe operation.
Read Instructions – All the safety and operating instructions should be read before the product is operated.
Retain Instructions – The safety and operating instructions should be retained for future reference. Heed Warnings – All warnings on the product and in the operating instructions should be adhered to. Follow Instructions – All operating and use instructions should be followed.
1.Cleaning – Unplug this product from the wall outlet before cleaning. Do not use liquid cleaners or aerosol cleaners. Use a damp cloth for cleaning.
2.Attachments – Do not use attachments not recommended by the product manufacturer as they may cause hazards.
3.Water and Moisture – This product shall not be exposed to dripping and splashing – for example, near a bath tub, wash bowl, kitchen sink, or laundry tub; in a wet basement; or near a swimming pool; and the like. Do not place an object containing liquid, such as a flower vase, on the appliance.
4.Accessories – Do not place this product on
an unstable cart, stand, tripod, bracket, or table. The product may fall, causing serious injury to a child or adult, and serious damage to the product. Use only with a cart, stand, tripod, bracket, or table recommended by the manufacturer. Any mounting of the product should follow the manufacturer’s instructions, and should use a mounting accessory recommended by the manufacturer.
A product and cart combination should
be moved with care. Quick stops, excessive force, and uneven surfaces may
cause the product and cart combination to overturn.
5. Ventilation – Slots and openings in the cabinet are provided for ventilation and to ensure reliable operation of the product and to protect it from overheating, and these openings must not be blocked or covered. The openings should never be blocked
by placing the product on a bed, sofa, rug, or other similar surface. This product should not be placed in a built-in installation such as a bookcase or rack unless proper ventilation is provided or the manufacturer’s instructions have been adhered to.
4CORE-A55/KAF-A55

6.Power Sources – This product should be operated only from the type of power source indicated on the product. If you are not sure of the type of power supply to your home, consult your product dealer or local power company.
7.CAUTION – Polarization – This product may be equipped with a polarized alternating-current line
plug (a plug having one blade wider than the other). This plug will fit into the power outlet only one way. This is a safety feature. If you are unable to insert the plug fully into the outlet, try reversing the plug. If the plug should still fail to fit, contact your electrician to replace your obsolete outlet. Do not defeat the safety purpose of the polarized plug.
8.Power Cord Protection – Power-supply cords should be routed so that they are not likely to be walked on or pinched by items placed upon or against them, paying particular attention to cords at plugs, convenience receptacles, and the point where they exit from the product.
9.Lightning – For added protection for this product during a lightning storm, or when it is left unattended and unused for long periods of time, unplug it from the wall outlet and disconnect the antenna or cable system. This will prevent damage to the product due to lightning and power-line surges.
10.Overloading – Do not overload wall outlets, extension cords, or integral convenience receptacles as this can result in a risk of fire or electric shock.
11.Object and Liquid Entry – Never push objects of any kind into this product through openings as they may touch dangerous voltage points or short-out parts that could result in a fire or electric shock. Never spill liquid of any kind on the product.
12.Servicing – Do not attempt to service this product yourself as opening or removing covers may expose you to dangerous voltage or other hazards. Refer all servicing to qualified service personnel.
13.Damage Requiring Service – Unplug this product from the wall outlet and refer servicing to qualifi ed service personnel under the following conditions:
a)When the power-supply cord or plug is damaged,
b)If liquid has been spilled, or objects have fallen into the product,
c)If the product has been exposed to rain or water,
d)If the product does not operate normally by following the operating instructions.
e)If the product has been dropped or damaged in any way, and
f)When the product exhibits a distinct change in performance – this indicates a need for service.
g)If an abnormal smell or smoke is detected.
14.Replacement Parts – When replacement parts are required, be sure the service technician has used
replacement parts specified by the manufacturer or have the same characteristics as the original part. Unauthorized substitutions may result in fire, electric shock, or other hazards.
15.Safety Check – Upon completion of any service or repairs to this product, ask the service technician to perform safety checks to determine that the product is in proper operating condition.
16.Wall or Ceiling Mounting – This product should be mounted to a wall or ceiling only as recommended by the manufacturer.
17.Heat – This product should be situated away from heat sources such as radiators, heat registers, stoves, or other products that produce heat. Do not place a flaming object, such as a candle or lantern, or near the product.
18.Power Lines – An outside antenna system should not be located in the vicinity of overhead power lines or other electric light or power circuits, or where it can fall into such power lines or circuits. When installing an outside antenna system, extreme care should be taken to keep from touching such power lines or circuits as contact with them might be fatal.
19.Outdoor Antenna Grounding – If an outside antenna or cable system is connected to the product, be sure the antenna or cable system is grounded so as to provide some protection against voltage surges and builtup static charges. Article 810 of the National Electrical Code, ANSI/NFPA 70, provides information with regard to proper grounding of the mast and supporting structure, grounding of the lead-in wire to an antenna discharge unit, size of grounding conductors, location of antennadischarge unit, connection to grounding electrodes, and requirements for the grounding electrode.
EXAMPLE OF ANTENNA GROUNDING AS PER
NATIONAL ELECTRICAL CODE
|
ANTENNA |
|
|
LEAD IN WIRE |
|
GROUND CLAMPS |
ANTENNA |
|
|
||
|
DISCHARGE UNIT |
|
|
(NEC SECTION 810-20) |
|
ELECTRIC |
|
|
SERVICE |
GROUNDING CONDUCTORS |
|
EQUIPMENT |
||
(NEC SECTION 810-21) |
||
|
||
|
GROUND CLAMP |
|
|
POWER SERVICE GROUNDING |
|
|
ELECTRODE SYSTEM |
|
NEC – NATIONAL ELECTRICAL CODE |
(NEC ART 250, PART H) |
|
|
Notes:
1.Item 7 is not required except for grounded or polarized equipment.
2.Item 19 complies with UL in the U.S.A.
English 5
Accessories
Accessories
AC adapter |
Power cord |
Remote control unit |
(AC-120357A x 1) |
(x 1) |
(RC-A0500 x 1) |
Vertical installation stand |
Stand securing screw |
Horizontal installation cushions |
(x 1) |
(x 1) |
(x 8) |
|
|
Packaged together with the speaker of CORE-A55 only
Speaker cords |
Speaker stands |
Speaker terminal covers |
(2 m x 2) |
(x 2) |
(x 2) |
6CORE-A55/KAF-A55

Installation
Installation precautions
●Always install the system on a level, stable surface. When installing on a stand or tabletop, be sure to confirm the strength of the stand.
●The magnetism from the speakers may cause color irregularities on a nearby TV or PC screen. Always install the speakers at a distance from a TV or PC.
Horizontal installation |
|
|
|
|
|
|
|
|
|
|
|
|
|
|
|
|
|
Vertical installation |
|
|
|||||||||||||||||||||||||||
|
|
|
|
|
|
|
|
|
|
|
|
|
|
|
|
|
|
|
|
|
|
|
|
|
|
|
|
|
|
|
|
|
|
|
|
|
|
|
|
|
|
|
|
|
|
|
|
|
|
|
|
|
|
|
|
|
|
|
|
|
|
|
|
|
|
|
|
|
|
|
|
|
|
|
|
|
|
|
|
|
|
|
|
|
|
|
|
|
|
|
|
|
|
|
|
|
|
|
|
|
|
|
|
|
|
|
|
|
|
|
|
|
|
|
|
|
|
|
|
|
|
|
|
|
|
|
|
|
|
|
|
|
|
|
|
|
|
|
|
|
|
|
|
|
|
|
|
|
|
|
|
|
|
|
|
|
|
|
|
|
|
|
|
|
|
|
|
|
|
|
|
|
|
|
|
|
|
|
|
|
|
|
|
|
|
|
|
|
|
|
|
|
|
|
|
|
|
|
|
|
|
|
|
|
|
|
|
|
|
|
|
|
|
|
|
|
|
|
|
|
|
|
|
|
|
|
|
|
|
|
|
|
|
|
|
|
|
|
|
|
|
|
|
|
|
|
|
|
|
|
|
|
|
|
|
|
|
|
|
|
|
|
|
|
|
|
|
|
|
|
|
|
|
|
|
|
|
|
|
|
|
|
|
|
|
|
|
|
|
|
|
|
|
|
|
|
|
|
|
|
|
|
|
|
|
|
|
|
|
|
|
|
|
|
|
|
|
|
|
|
|
|
|
|
|
|
|
|
|
|
|
|
|
|
|
|
|
|
|
|
|
|
|
|
|
|
|
|
|
|
|
|
|
|
|
|
|
|
|
|
|
|
|
|
|
|
|
|
|
|
|
|
|
|
|
|
|
|
|
|
|
|
|
|
|
|
|
|
|
|
|
|
|
|
|
|
|
|
|
|
|
|
|
|
|
|
|
|
|
|
|
|
|
|
|
|
|
|
|
|
|
|
|
|
|
|
|
|
|
|
|
use before Read
Left speaker |
Main unit |
Right speaker |
The speakers are not provided |
with KAF-A55.
The two speakers are identical. Each speaker can be installed either on the left or right.
CAUTION |
Observe the following cautions when installing the system and AC adapter. |
|
|
Insufficient heat radiation may build up internal heat and cause a malfunction or |
|
|
||
|
fire hazard. |
|
|
● |
Do not place an object that may hinder heat radiation on the system. |
|
● |
Do not install the system on the back, on the side or upside down. |
|
● |
Do not place a cloth on the system or place it on a carpet or cushion. |
|
● |
Do not use the system in a poorly ventilated place. |
Install the system so that the power outlet is easily accessible from the user, and unplug the power cord from the power outlet immediately in case of a trouble.
Note that the power supply to the system is not shut down completely by simply setting the power button to OFF. To shut down the power supply completely, it is required to unplug the power cord.
To fully enjoy the acoustic effects
The audio is variable depending on how the speakers are installed. Ensure the following points to enjoy music with higher quality.
●Make the environments around the left and right speakers as equal as possible. Install the left and right speakers at a distance of a wall, and minimize the sound reverberations by drawing thick curtains on the windows.
●Place the left and right speakers at a large distance between each other.
●Install each speaker at an upward angle (0 to 20°) so that it points toward the listener's ears.
English 7
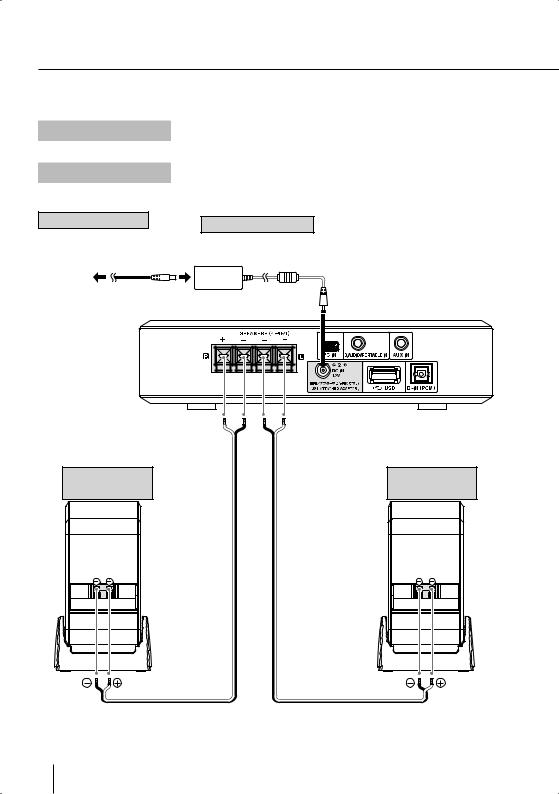
Connections
Basic connections
Caution for connection
Do not plug the power cord into the power outlet until all other connections are completed. Before unplugging a connected cord or cable, be sure to switch the system OFF and unplug the power cord from the power outlet in advance.
Malfunction of the system
Power cord
To AC wall outlet
•Insert the plug firmly all the way into the AC wall outlet.
LSF-A55
Right speaker
If the system does not function properly or the display shows erroneous information even when the connections are made correctly, reset the system. (page 41)
AC adapter
¤ Use the AC adapter (AC-120357A) provided with this product.
LSF-A55
Left speaker
White line on transparent coating
White line on transparent coating
The two speakers are identical. Each speaker can be installed either on the left or right.
8CORE-A55/KAF-A55

Installation of the main unit
● How to use the horizontal installation cushions
Attach the cushions on the four positions on the bottom of the main unit. Make sure that the cushion surfaces contact the surface on which the main unit is installed. See the following illustration for the positions of the cushions. (8 cushions are provided with the system. Retain the remaining 4 cushions for possible future use.)
Cushions
●How to use the vertical installation stand
When installing the main unit vertically, place it lengthwise so that the SD card slot comes at the bottom. Secure the main unit on the stand by tightening the stand securing screw on the rear of the stand.
 ● If the securing screw is too tight to remove, use a commercially available flat-blade screwdriver.
Installation of speakers
●How to use the speaker stands
Install each speaker on each speaker stand so that the arrow on the bottom of the stand points toward the front. Each speaker can be adjusted at a desired upward angle between 0° (vertical) and 20°.
Connecting the speakers
●How to attach the speaker terminal covers
Before connecting each speaker cord, pass the cord through the hole on the provided speaker terminal cover. After connecting the speaker cord to the speaker, fit the cover on the terminal.
●How to prepare the speaker cord extremity
Remove the vinyl coating on the tip of each cord by twisting the coating.
● How to connect the speaker cord
●How to remove the speaker terminal covers
Push down the hole on the speaker terminal cover and remove it.
use before Read
Front side |
●Be careful not to short-circuit the + and – conductors of the speaker cord (be sure to avoid contact between the + and – conductors). If the speaker cord is connected by inverting the + and – polarity, the reproduced audio will be unnatural with unclear positioning of musical instruments.
English 9
Connections
Connecting associated products (commercially available)
●Before connecting associated system products, be sure to read their instruction manuals.
●Connect every connection cord firmly. Incomplete insertion may cause loss of audio output or generation of noise.
Caution for connection |
Set the main unit in the standby mode before connecting any associated product to |
|
it and do not set the power button to ON until all connections are completed. Before |
||
|
||
|
unplugging a connected cord or cable, be sure to set the power button to OFF and |
|
|
unplug the power cord from the power outlet in advance. |
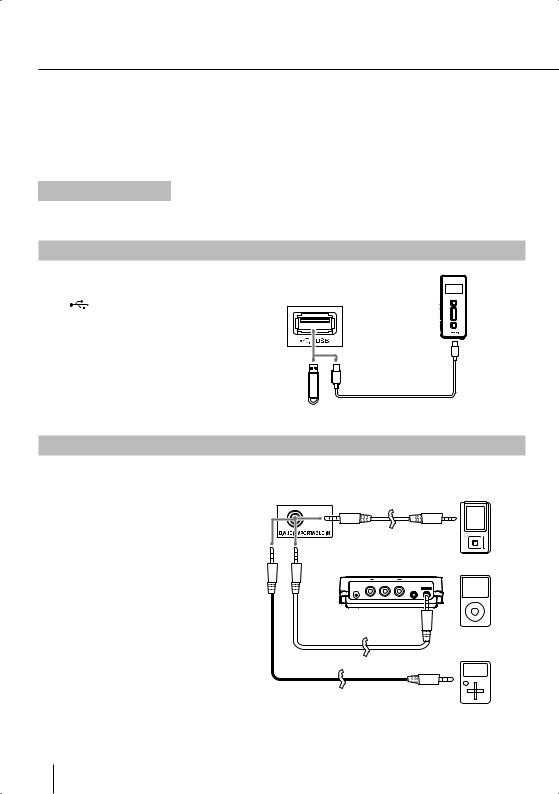
USB
Connect a USB flash memory or a digital audio player with USB mass storage class compatibility to the [ USB] terminal on the rear of the main unit.
●With certain models, it takes a certain period before the connection is recognized.
●Certain models display the USB connection mode selection menu. In this case, select the "Storage" mode.
Digital audio player, etc.
USB flash memory
D.AUDIO/PORTABLE IN
Connect a digital audio player or the iPod Dock (PAD-iP7) to the [D.AUDIO/ PORTABLE IN] terminal on the rear of the main unit.
●When a Kenwood Digital Audio Link-compatible player is connected using the dedicated
cable (separately available), the player can be controlled from the main unit or remote control unit by setting D.AUDIO Control (page 32) to "ON". (pages 22, 36)
The iPod can be controlled when it is connected using the PAD-iP7 dedicated adapter (separately available).
●When a digital audio player without the Digital Audio Link compatibility is used, set D.AUDIO Control to "OFF". (page 32) Such a player should be connected using a commercially available stereo miniplug cable.
●When not using the iPod, unplug the cable from the main unit.
Kenwood
digital audio player
Dedicated cable (separately available)
iPod
|
COMPONENT VIDEO |
|
Y |
Cb |
Cr |
DC IN |
|
AUDIO/ |
|
|
VIDEO D.AUDIO |
PAD-iP7 (separately available)
Cable provided with PAD-iP7
Stereo miniplug cord (separately available)
Digital audio player, etc.
10 CORE-A55/KAF-A55
AUX IN
Connect the audio output of the VCR, etc. to the [AUX IN] terminals on the rear of the main unit. Use a commercially available stereo miniplug cable for the connection.
Stereo miniplug cord (separately available)
VCR, etc.
use before Read
PC IN
Connect a PC running Windows® Vista/XP and equipped with a USB terminal to the [PC IN] terminal.
Use a commercially available USB cable (Type A – Mini B) for the connection.
●Use a USB cable with a length of no more than 3 m.
USB cable (separately available)
D-IN(PCM)
Connect the optical digital output of a digital tuber, etc. to the [D-IN(PCM)] terminal on the rear of the main unit.
●Set the digital audio output setting of the connected component to "PCM".
Optical digital cable |
(commercially available) |
Optical digital output (PCM signal)
Digital tuner, etc.
PHONES
Connect headphones with a stereo miniplug to the [PHONES] jack on the front of the main unit.
When you connect the headphones, sound from the speakers is muted and the volume adjustment range is from 0 to MAX (33).
English 11
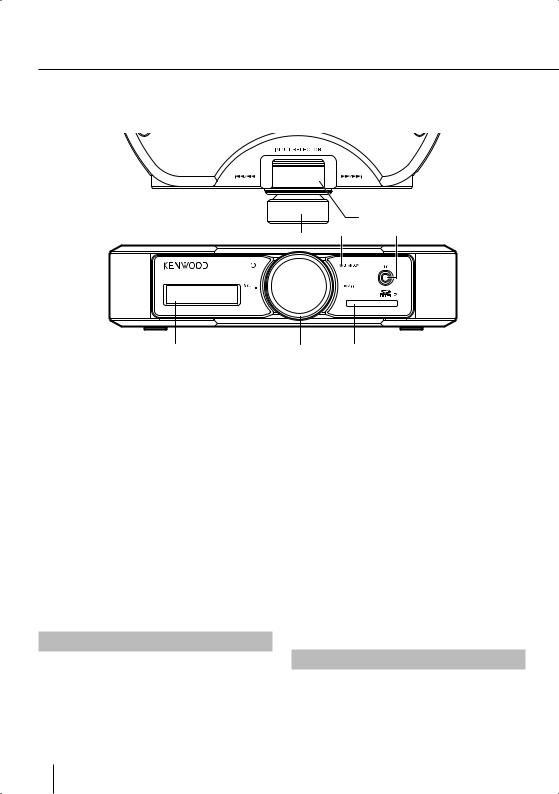
Component names and functions
Main unit
|
|
3 |
2 |
6 |
5 |
1 |
2 |
4 |
1Display (page 13)
2VOLUME knob
K(page 17)
Press to switch the power of the system ON/OFF (standby mode).
When the system is in standby mode, press to turn it ON.
When the system is ON, press and hold for more than a second to set it to standby mode.
VOLUME (page 16)
Rotate to adjust the volume.
E (pages 17, 18, 20, 22)
When the USB/SD/D.AUDIO source is selected, press to start playback. The illumination changes from white to blue at this time.
Press again to let the playback pause. The illumination changes from blue to white.
Note on the illumination
The color of the illumination around the JOG knob indicates the function of the JOG knob.
White: Rotating the JOB knob selects the audio source.
Blue: When the SD/USB/D.AUDIO source is selected, the JOG knob functions as G/Hand I/J.
3JOG knob
INPUT SELECTOR (pages 17, 18, 20, 22, 23, 24)
When the illumination is white, turn clockwise or counterclockwise to select the audio source.
G/H(pages 19, 21, 22)
When the USB/SD/D.AUDIO source is selected, rotate clockwise or counterclockwise during playback to skip the file.
I/J(pages 19, 21, 22)
When the USB/SD/D.AUDIO source is selected, rotate clockwise or counterclockwise continuously during playback to fast forward or fast reverse the playback.
4SD slot (pages 17, 19)
Insert the SD card.
5PHONES jack (page 11)
6STANDBY indicator
Red lighting: Standby mode. Extinguished: The system is ON.
Standby mode
When the [STANDBY] indicator is lit, a small amount of power is supplied to the system to operate the microcomputer. This status is referred to as the standby mode. In this state, the system can be switched OFF from the remote control unit.
12 CORE-A55/KAF-A55
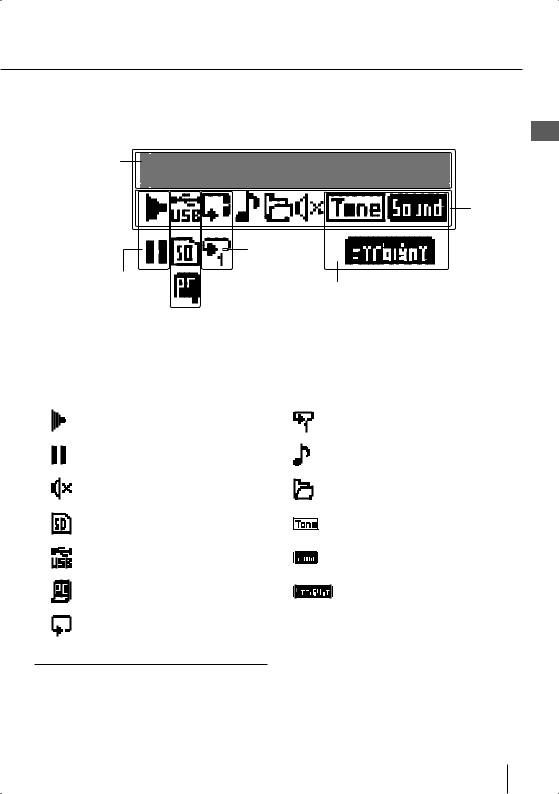
Display
1 |
2 |
use before Read
Repeat |
Play/pause
Sound adjustment


 Input source selection/
Connection status
1Shows the information in alphanumeric characters.
2The icons show the input selection and the sound modes of the system.
Lights during playback of an audio file.
Lights during pause of an audio file.
Lights during audio muting. |
Lights when an SD card is inserted and the SD audio source is selected.
Lights when a USB audio device is connected and the USB source is selected.
Lights when a PC is connected and the PC source is selected.
Lights during single-file repeat.
Lights during playback or pause of an audio file.
Lights when a folder play mode is selected.
Lights up when the tone setting is made.
Lights when a sound mode is set.
Lights when the Straight function is set.
Lights during all-file repeat or folder repeat.
 ● The display illustrations shown in this manual may differ from actual display.
English 13
Component names and functions
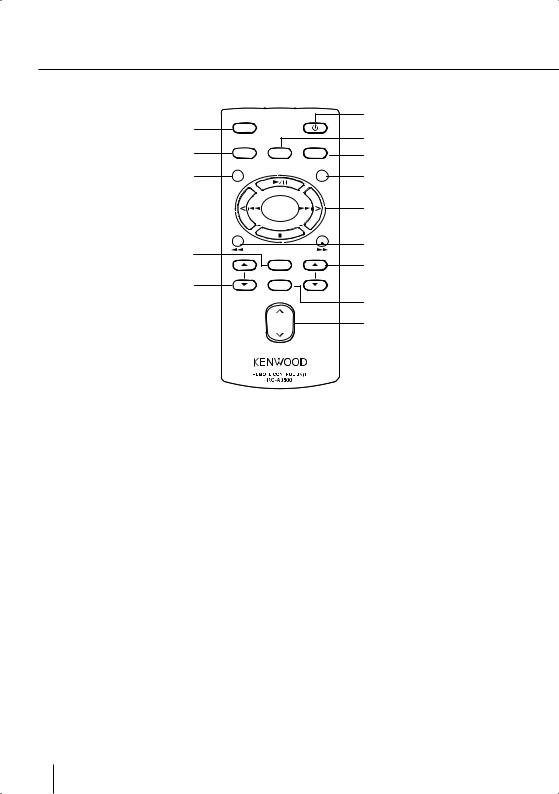
Remote control unit
d c b
a
0
STRAIGHT
SOUND P.MODE REPEAT
TONE |
MODE |
ENTER
MULTICONTROL
|
DISPLAY |
|
MUTE |
INPUT |
FOLDER |
SELECTOR |
|
|
VOLUME |
1
2
3
4
5
6
7
8
9
1K(page 17)
Press to switch the power of the system ON/OFF (standby mode).
2P.MODE (pages 18, 20)
Press to switch the playback mode (all-file play mode or folder play mode).
3REPEAT (pages 19, 21)
Press to play a file(s) repeatedly.
4MODE (pages 28 - 32)
Press to set up the system of this unit.
5E(pages 17, 18, 20, 22)
Press to start playback. Press again to let the playback pause.
F(pages 19, 21, 22)
Press to stop playback.
MULTI CONTROL< / > (pages 28 - 32)
Press to select a music file. Press to select a menu item.
● The buttons having the same names as the buttons on the main unit function in the same way as the main unit buttons with the same times.
6I/J(pages 19, 21, 22)
When the USB/SD source is selected, press and holding during playback to fast forward or fast reverse the playback.
7FOLDERA/B(pages 18, 20, 22)
Press to select a folder.
8MUTE (page 16)
Press to mute the audio temporarily.
9VOLUME A/B(page 16)
Press to adjust the listening volume. Pressing Aincreases the volume and pressing Bdecreases the volume.
0INPUT SELECTORA/B(pages 17, 18, 20, 22, 23, 24)
Press to set the audio source.
aDISPLAY (pages 19, 21)
Press to switch the information shown on the display.
G/H(pages 19, 21, 22)
When the USB/SD/D.AUDIO source is selected, press during playback to skip a file.
When the D.AUDIO source is selected, press and holding during playback to fast forward or fast reverse the playback.
ENTER (pages 28 - 32)
Press to enter the selected item.
bTONE (page 26)
Press to adjust the tone as desired.
cSOUND (page 26)
Press to select a sound mode.
dSTRAIGHT (page 27)
Press to play the audio without any sound adjustment by bypassing the TONE and SOUND settings.
14 CORE-A55/KAF-A55
 Loading...