

Page 1

DPX-5100BT
DUAL DIN SIZED CD RECEIVER
INSTRUCTION MANUAL
DPX-M3100BT
DUAL DIN SIZED DIGITAL MEDIA RECEIVER
INSTRUCTION MANUAL
B5A-2111-00 (MN/HN)© 2017 JVC KENWOOD Corporation
Page 2
CONTENTS
BEFORE USE 2
BASICS 3
GETTING STARTED 4
1 Select the display language
and cancel the demonstration
2 Set the clock and date
3 Set the initial settings
RADIO 7
AUX 8
CD/USB/iPod/ANDROID 9
Spotify 12
BLUETOOTH® 13
AUDIO SETTINGS 21
DISPLAY SETTINGS 25
LEARNING STEERING
REMOTE CONTROL 26
REFERENCES 27
Maintenance
More information
TROUBLESHOOTING 29
INSTALLATION/
CONNECTION 31
SPECIFICATIONS 34
BEFORE USE
IMPORTANT
•
To ensure proper use, please read through this manual before using this product. It is especially important that you read and observe
Warning and Caution in this manual.
•
Please keep the manual in a safe and accessible place for future reference.
WARNING
• Do not operate any function that takes your attention away from safe driving.
• Do not ingest the battery, Chemical Burn Hazard
The remote control supplied with this product contains a coin/button cell battery.
If the coin/button cell battery is swallowed, it can cause severe internal burns in just 2 hours and can lead to death.
Keep new and used batteries away from children.
If the battery compartment does not close securely, stop using the product and keep it away from children.
If you think batteries might have been swallowed or placed inside any part of the body, seek immediate medical attention.
Caution
Volume setting:
•
Adjust the volume so that you can hear sounds outside the car to prevent accidents.
•
Lower the volume before playing digital sources to avoid damaging the speakers by the sudden increase of the output level.
General:
•
Avoid using the external device if it might hinder safe driving.
•
Make sure all important data has been backed up. We shall bear no responsibility for any loss of recorded data.
•
Never put or leave any metallic objects (such as coins or metal tools) inside the unit to prevent a short circuit.
•
For : If a disc error occurs due to condensation on the laser lens, eject the disc and wait for the moisture to evaporate.
•
Depending on the types of cars, the antenna will automatically extend when you turn on the unit with the antenna control wire connected
( 33)
. Turn off the unit or change the source to STANDBY when parking at a low ceiling area.
Remote control (RC-406):
•
Do not leave the remote control in hot places such as on the dashboard.
•
The Lithium battery is in danger of explosion if replaced incorrectly. Replace it only with the same or equivalent type.
•
The battery pack or batteries shall not be exposed to excessive heat such as sunshine, fire or the like.
How to read this manual
•
Operations are explained mainly using buttons on the faceplate of .
•
English indications are used for the purpose of explanation. You can select the display language from the [FUNCTION] menu.
• [XX]
indicates the selected items.
• ( XX)
indicates references are available on the stated page.
( 6)
2
ENGLISH
Page 3
BASICS
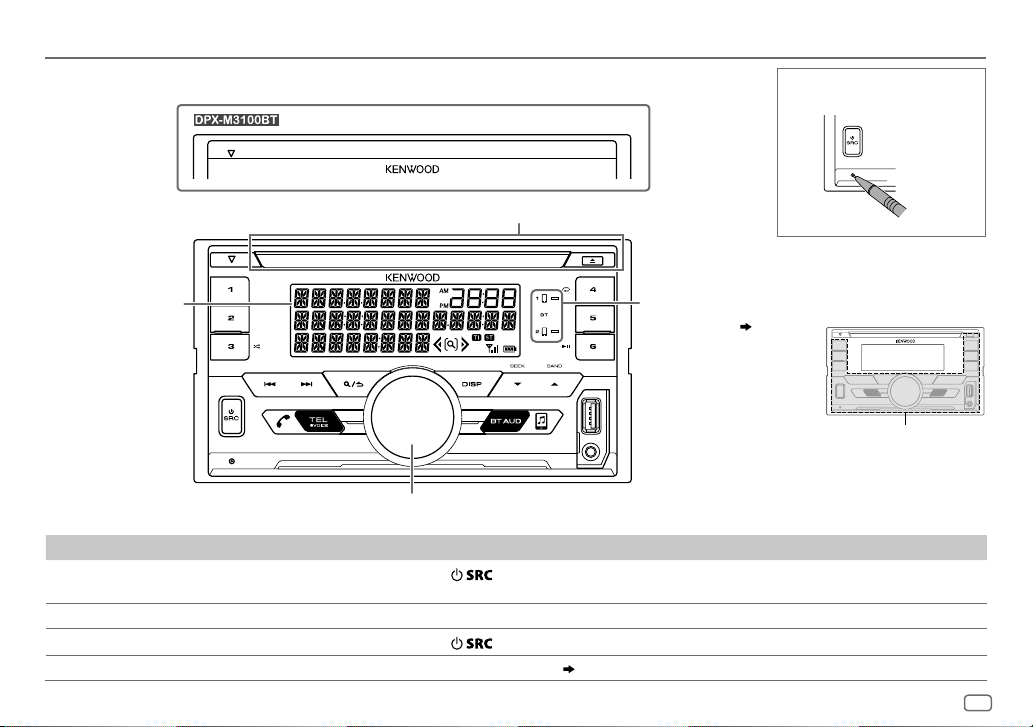
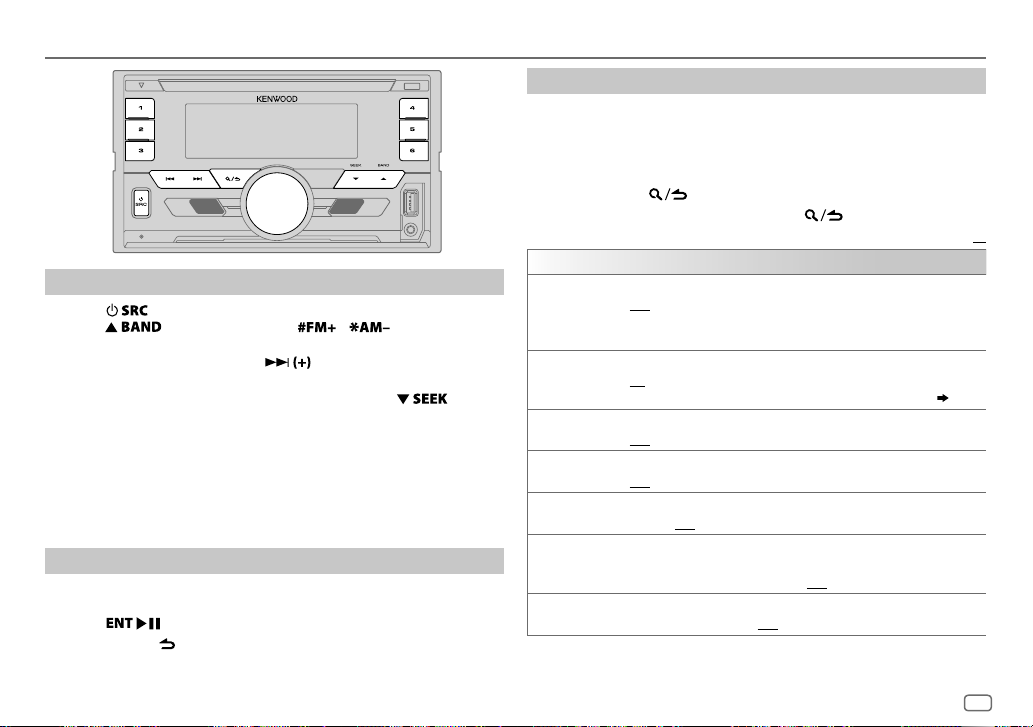
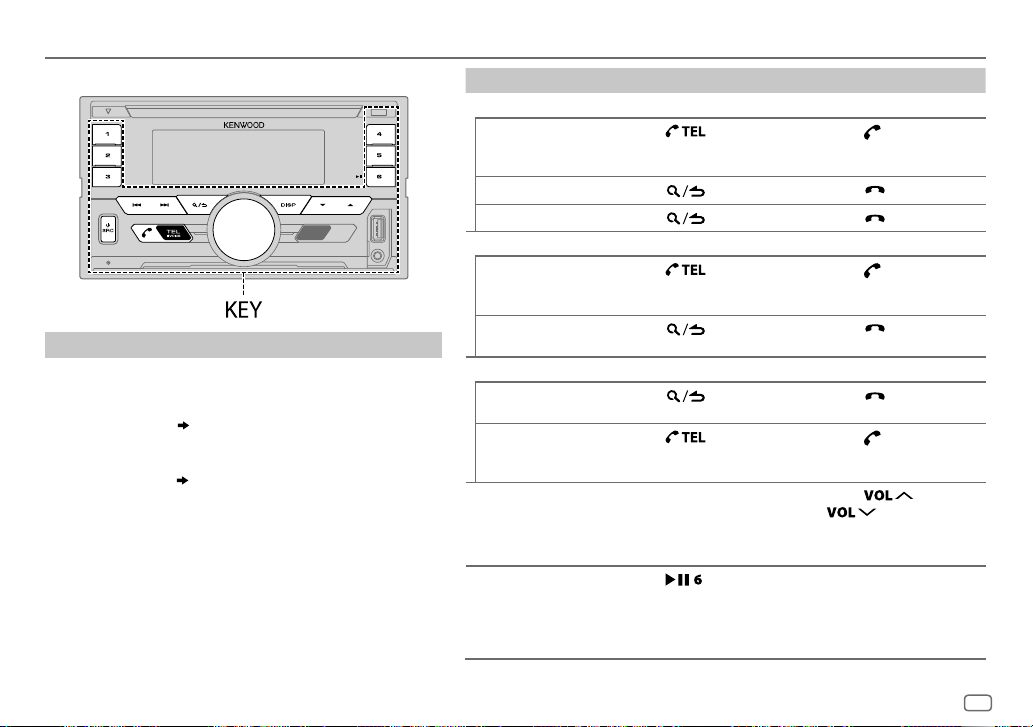
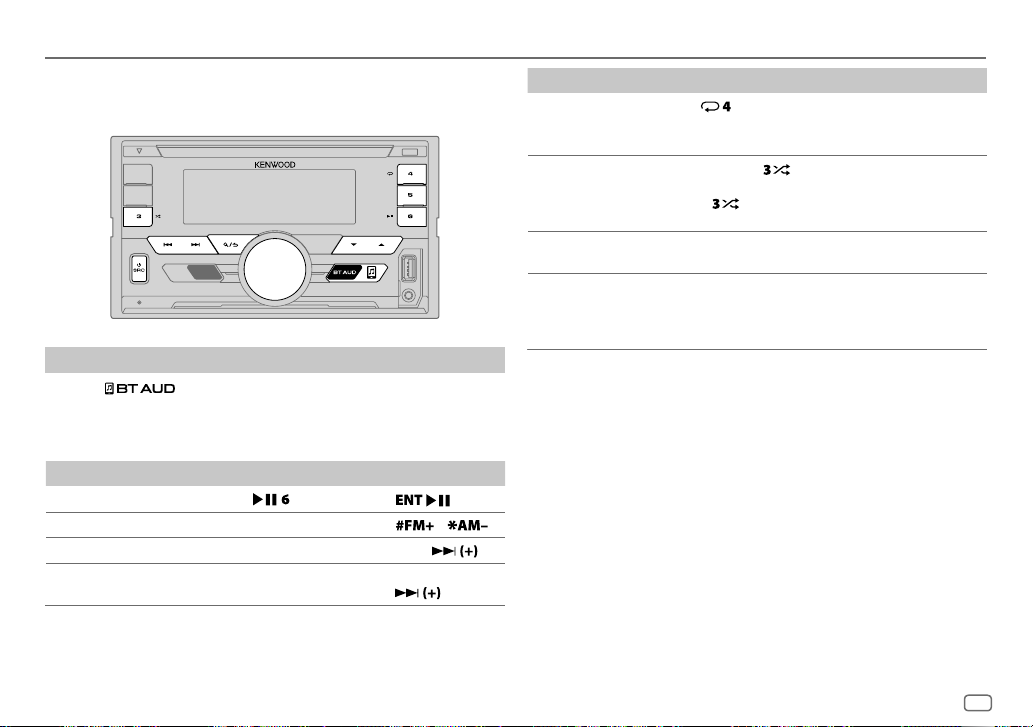
Faceplate
How to reset
Eject button and loading slot
Display
window
Volume knob
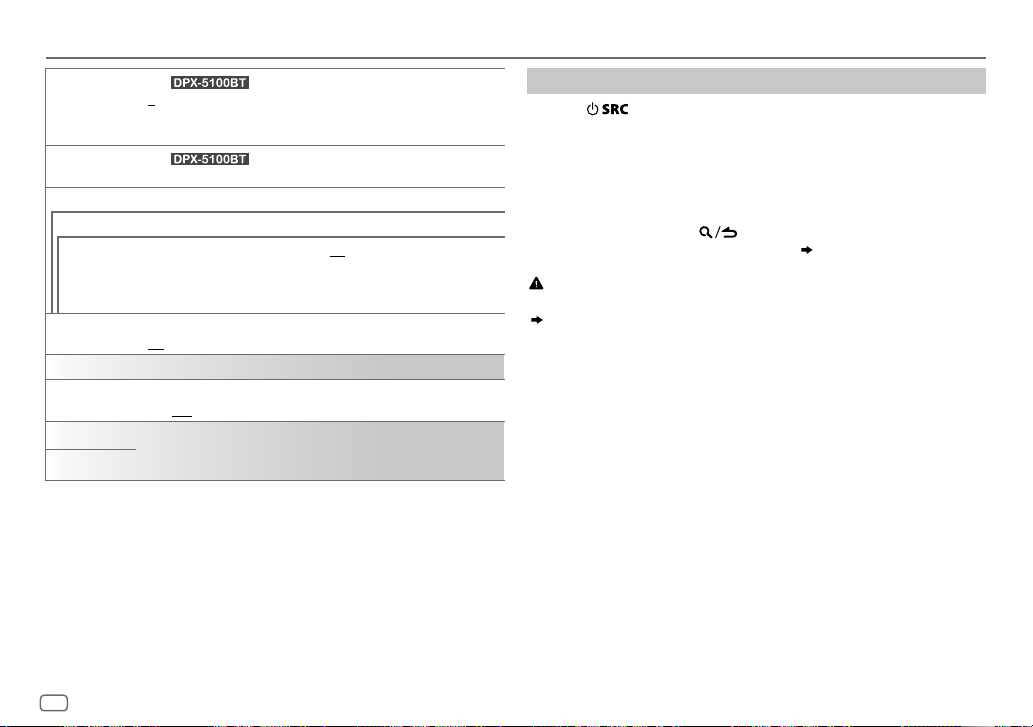
To On the faceplate
Turn on the power
Adjust the volume Turn the volume knob.
Select a source
Change the display information Press DISP repeatedly.
Press
• Press and hold to turn off the power.
Press
.
repeatedly.
( 28)
Lights up when
Bluetooth connection
is established.
( 14)
Flashes when the unit
enters searching status.
ENGLISH
3
Page 4
BASICS GETTING STARTED
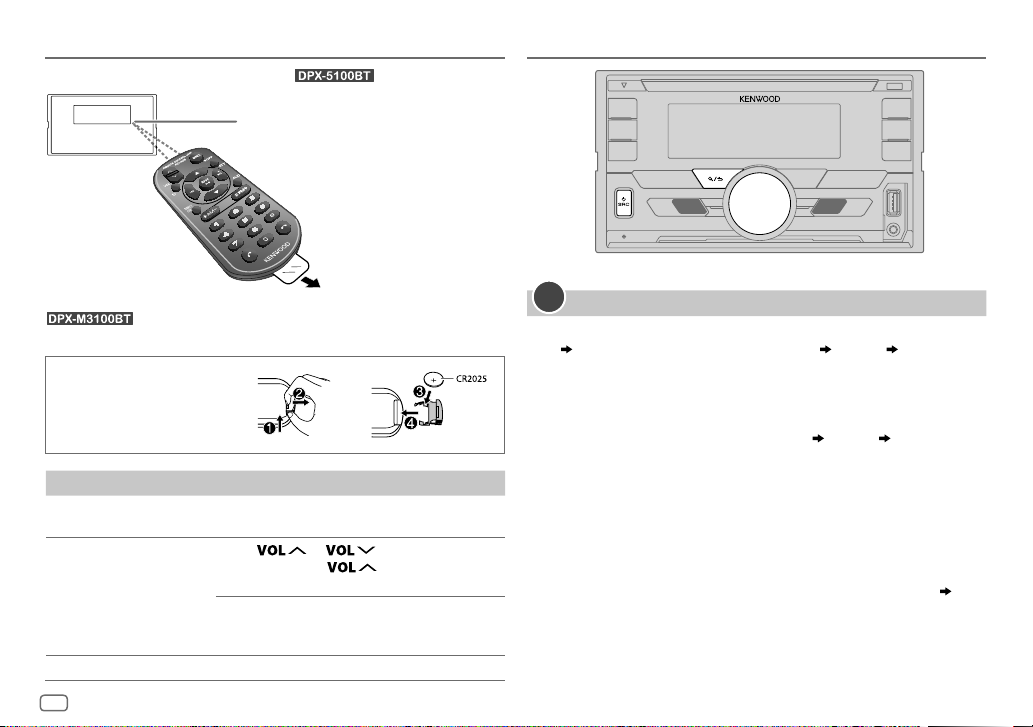
Remote control (RC-406)
: Remote control functions are not available.
How to replace the battery
To On the remote control
Turn on the power Press and hold SRC to turn off the power.
Adjust the volume Press
Select a source Press SRC repeatedly.
(supplied for )
Remote sensor (Do not expose
to bright sunlight.)
Pull out the insulation sheet
when using for the first time.
( Pressing SRC does not turn on the power. )
• Press and hold
increase the volume to 15.
Press ATT during playback to attenuate the
sound.
• Press again to cancel.
or .
to continuously
1
Select the display language and cancel the demonstration
When you turn on the power for the first time (or
[YES], 6
), the display shows: “SEL LANGUAGE” “PRESS” “VOLUME
KNOB”
1 Turn the volume knob to select
then press the knob.
[ENG]
is selected for the initial setup.
Then, the display shows: “CANCEL DEMO”
KNOB”.
2 Press the volume knob.
[YES]
is selected for the initial setup.
3 Press the volume knob again.
“DEMO OFF” appears.
Then, the display shows the selected crossover type: “2-WAY X ’ OVER” or
“3-WAY X ’ OVER”
• To change the crossover type, see “Change the crossover type”. (
[ENG]
(English) or
[FACTORY RESET]
[TUR]
“PRESS” “VOLUME
is set to
(Turkish),
6)
4
ENGLISH
Page 5
GETTING STARTED
2
Set the clock and date
1
Press the volume knob to enter
2 Turn the volume knob to select
To adjust the clock
3 Turn the volume knob to select
4 Turn the volume knob to make the settings, then press the knob.
Hour
Minute
5 Turn the volume knob to select
6 Turn the volume knob to select
To set the date
7 Turn the volume knob to select
8 Turn the volume knob to select
the knob.
9 Turn the volume knob to select
10 Turn the volume knob to make the settings, then press the knob.
Day
Month Year or Month Day Year
11 Press and hold to exit.
To return to the previous setting item, press .
3
Set the initial settings
1
Press repeatedly to enter STANDBY.
2 Press the volume knob to enter
3 Turn the volume knob to select an item (see the following table),
then press the knob.
4 Repeat step 3 until the desired item is selected or activated.
5 Press and hold to exit.
To return to the previous setting item, press .
[FUNCTION]
[CLOCK]
[CLOCK ADJUST]
[CLOCK FORMAT]
[12H]
[DATE FORMAT]
[DD/MM/YY]
[DATE SET]
[FUNCTION]
.
, then press the knob.
or
[24H]
, then press the knob.
or
, then press the knob.
.
, then press the knob.
, then press the knob.
, then press the knob.
[MM/DD/YY]
, then press
AUDIO CONTROL
SWITCH
PREOUT
DISPLAY
EASY MENU
TUNER SETTING
PRESET TYPE
SYSTEM
KEY BEEP
SOURCE SELECT
SPOTIFY SRC
BUILT-IN AUX
(For )
(Not applicable if 3-way crossover is selected.)
REAR/SUBWOOFER
connected to the line out terminals on the rear (through an external
amplifier).
When entering
ON
:LCD DISPLAY zone illumination changes to white color.;
OFF
:LCD DISPLAY zone illumination remains as
( 25)
•
KEY zone illumination changes to light blue color when you enter
[FUNCTION]
•
Refer to the illustration on page 25 for zone identification.
NORMAL
(FM1/FM2/FM3/AM/SW1/SW2).;
preset button, regardless of the selected band.
(Not applicable if 3-way crossover is selected)
ON
:Activates the keypress tone.;
ON
:Enables SPOTIFY in source selection.;
ON
:Enables AUX in source selection.;
: Selects whether rear speakers or a subwoofer are
( 34)
[FUNCTION]
, irregardless of the
:Memorizes one station for each preset button in each band
...
[EASY MENU]
MIX
:Memorizes one station for each
OFF
:Deactivates.
OFF
:Disables.
OFF
:Disables.
[COLOR SELECT]
setting.
( 12)
( 8)
Default:
color.
XX
ENGLISH
5
Page 6
GETTING STARTED
CD READ
USER S.REMO
F/W UPDATE
UPDATE SYSTEM
F/W UP xxxx
FACTORY RESET YES
CLOCK
CLOCK DISPLAY
ENGLISH
TURKCE
(For )
1
2
disc is played.
(For )
See page 26 for details.
YES
activated).
For details on how to update the firmware, visit
<www.kenwood.com/cs/ce/>.
NO
ON
off.;
Select the display language for
if applicable.
By default,
: Automatically distinguishes between audio file disc and music CD. ;
: Forces to play as a music CD. No sound can be heard if an audio file
:Starts upgrading the firmware.; NO:Cancels (upgrading is not
:Resets the settings to default (except the stored station).;
:Cancels.
:The clock time is shown on the display even when the unit is turned
OFF
:Cancels.
[ENGLISH]
[FUNCTION]
is selected.
menu and music information
Change the crossover type
1
Press repeatedly to enter STANDBY.
2 Press and hold number buttons 4 and 5 to enter crossover select.
The current crossover type appears.
3 Turn the volume knob to select “2WAY” or “3WAY”, then press the
knob.
4 Turn the volume knob to select “YES” or “NO”, then press the knob.
The selected crossover type appears.
• To cancel, press and hold
• To adjust the selected crossover settings,
.
( 22, 23)
.
Caution
Select a crossover type according to how the speakers are connected.
( 33, 34)
If you select a wrong type:
• The speakers may damage.
• The output sound level may be extremely high or low.
6
ENGLISH
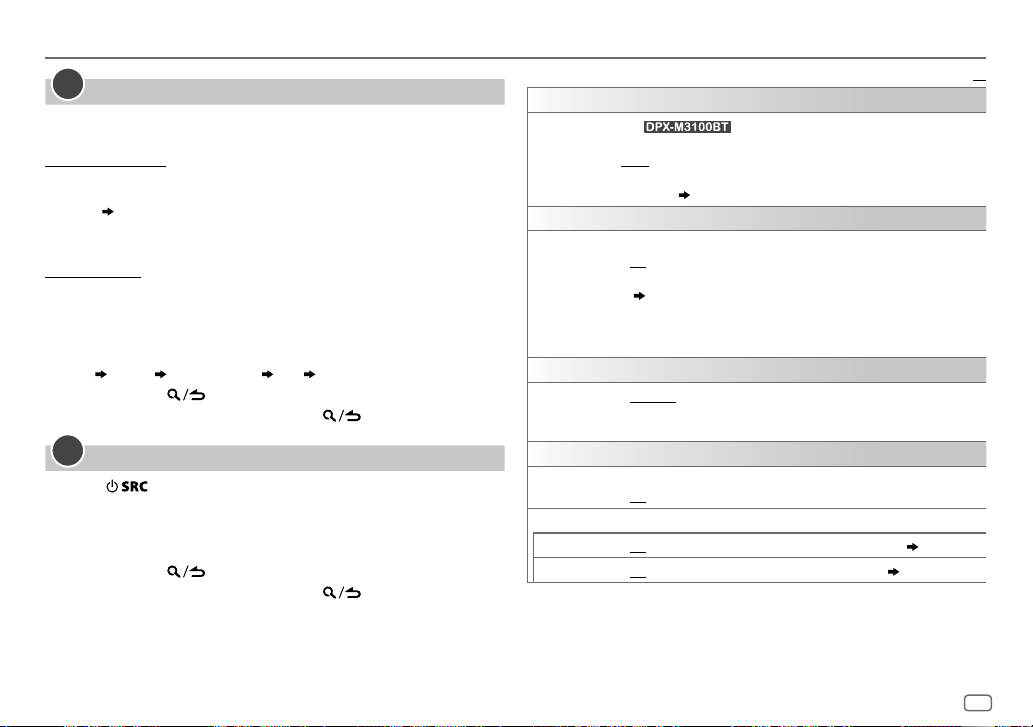
Page 7
RADIO
Search for a station
1
Press repeatedly to select RADIO.
2 Press repeatedly (or press / on the remote
control) to select FM1/FM2/FM3/AM/SW1/SW2.
3 Press S/T (or press S/ on the remote control) to
search for a station.
• To change the searching method for S/T: Press
repeatedly.
AUTO1 : Automatically search for a station.
AUTO2 : Search for a preset station.
MANUAL : Manually search for a station.
• To store a station: Press and hold one of the number buttons (1to6).
• To select a stored station: Press one of the number buttons (1to6) (or
press one of the number buttons (1to6) on the remote control).
Direct Access Tuning
(using the remote control)
1 Press DIRECT to enter Direct Access Tuning.
2 Press the number buttons to enter a frequency.
3 Press to search for a station.
• To cancel, press or DIRECT.
• If no operation is done for 10seconds after step
is automatically canceled.
2, Direct Access Tuning
Other settings
1
Press the volume knob to enter
[FUNCTION]
.
2 Turn the volume knob to select an item (see the following table),
then press the knob.
3 Repeat step 2 until the desired item is selected/activated or follow
the instructions stated on the selected item.
4 Press and hold to exit.
To return to the previous setting item, press .
Default:
TUNER SETTING
LOCAL SEEK
AUTO MEMORY YES
MONO SET
NEWS SET ON
REGIONAL ON
AF SET ON
TI ON
ON
: Searches only AM/SW1/SW2 stations with good reception. ;
OFF
:Cancels.
•
Settings made are applicable only to the selected source/station. Once
you change the source/station, you need to make the settings again.
:Automatically starts memorizing 6 stations with good reception.;
NO
:Cancels.
•
Selectable only if
ON
:Improves the FM reception, but the stereo effect may be lost.;
OFF
:Cancels.
: The unit will temporarily switch to News Programme if available. ;
OFF
:Cancels.
: Switches to another station only in the specific region using the “AF”
control.;
: Automatically searches for another station broadcasting the same
program in the same Radio Data System network with better reception
when the current reception is poor.;
:Allows the unit to temporarily switch to Traffic Information if
available (“TI” lights up).;
OFF
:Cancels.
[NORMAL]
OFF
is selected for
OFF
:Cancels.
[PRESET TYPE]. ( 5)
:Cancels.
ENGLISH
XX
7
Page 8
RADIO
PTY SEARCH1 Turn the volume knob to select the available Program Type, then press
CLOCK
TIME SYNC
the knob.
2
Turn the volume knob to select the PTY language (
GERMAN
3
ON
OFF
), then press the knob.
Press S/T to start searching.
:Synchronizes the unit’s time to the Radio Data System station time.;
:Cancels.
ENGLISH/FRENCH
/
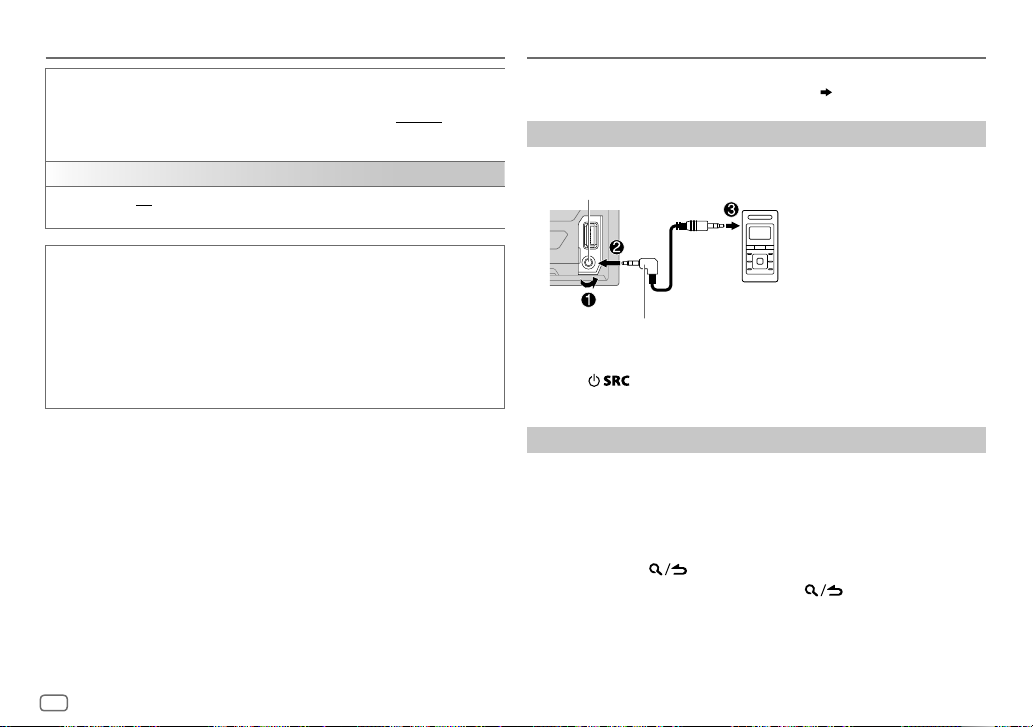
AUX
Preparation:
Select
[ON]
for
[BUILT-IN AUX]
Start listening
1
Connect a portable audio player (commercially available).
Auxiliary input jack
for
[SOURCE SELECT]. ( 5)
Portable audio player
Available Program Type for
SPEECH
:
NEWS, AFFAIRS, INFO
CULTURE, SCIENCE, VARIED, WEATHER, FINANCE, CHILDREN, SOCIAL
RELIGION, PHONE IN, TRAVEL, LEISURE, DOCUMENT
MUSIC
:
POP M
(music),
CLASSICS, OTHER M
OLDIES, FOLK M
The unit will search for the Program Type categorized under
[MUSIC]
if selected.
•
[MONO SET]/[NEWS SET]/[REGIONAL]/[AF SET]/[TI]/[PTY SEARCH]
only when the band is FM1/FM2/FM3.
• If the volume is adjusted during reception of traffic information or news
bulletin, the adjusted volume is memorized automatically. It will be
applied the next time traffic information or news bulletin is turned on.
8
ENGLISH
[PTY SEARCH]
(information),
ROCK M
(music),
(music)
SPORT, EDUCATE, DRAMA
(music),
EASY M
JAZZ, COUNTRY, NATION M
(music),
LIGHT M
(music),
(music),
[SPEECH]
is selectable
,
,
or
3.5mm (1/8") stereo mini plug with “L” shaped
connector (commercially available)
2 Press repeatedly to select AUX.
3 Turn on the portable audio player and start playback.
Set the AUX name
While listening to a portable audio player connected to the unit...
1 Press the volume knob to enter
2 Turn the volume knob to select
3 Turn the volume knob to select
[FUNCTION]
[SYSTEM]
[AUX NAME SET]
.
, then press the knob.
, then press the knob.
4 Turn the volume knob to select an item, then press the knob.
AUX
(default)/
DVD/PORTABLE/GAME/VIDEO/TV
5 Press and hold to exit.
To return to the previous setting item, press .
Page 9
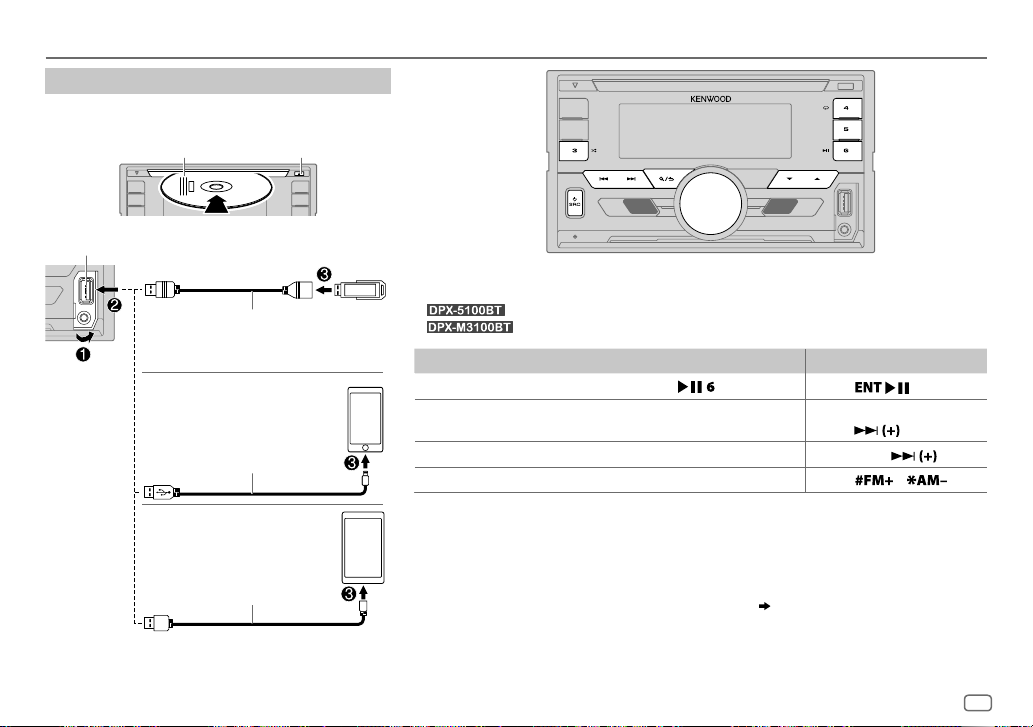
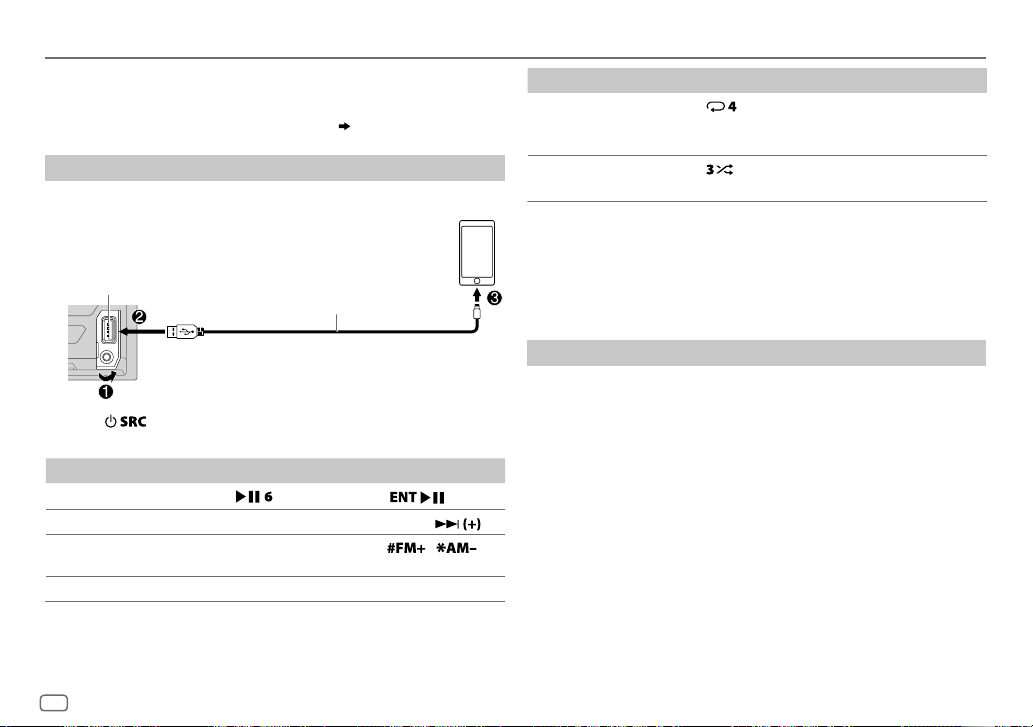
CD/USB/iPod/ANDROID
Start playback
The source changes automatically and playback starts.
CD
Label side
M
Eject disc
USB input terminal
USB
CA-U1EX (max.: 500mA)
(optional accessory)
iPod/iPhone
KCA-iP102/KCA-iP103
(optional accessory)
accessory of the iPod/iPhone
3
USB cable
*
2
*
ANDROID
(commercially available)
Selectable source:
•
•
: CD/USB/iPod USB/ANDROID
: USB/iPod USB/ANDROID
To On the faceplate On the remote control
Playback/pause Press .
4
Reverse/Fast-forward
1
*
or
2
*
Select a track/file
Select a folder
1
*
KCA-iP102 : 30-pin type, KCA-iP103 : Lightning type
2
*
Do not leave the cable inside the car when not using.
3
*
When connecting an Android device, “Press [VIEW] to install KENWOOD MUSIC PLAY APP” is shown. Follow the
*
Press and hold
S/T.
Press S/T. Press S/
5
*
Press J/K.
Press
Press and hold
S/
Press
/ .
.
.
.
instructions to install the application. You can also install the latest version of KENWOOD MUSIC PLAY application
on your Android device before connecting. For more information, visit <www.kenwood.com/cs/ce/>.
4
*
For ANDROID: Applicable only when
5
*
For CD: Only for MP3/WMA/AAC files. This does not work for iPod/ANDROID.
[BROWSE MODE]
is selected.
( 10)
ENGLISH
9
Page 10
CD/USB/iPod/ANDROID
To On the faceplate
6
Repeat play
*
Press repeatedly.
TRACK REPEAT/ALL REPEAT
: Audio CD
FILE REPEAT/FOLDER REPEAT/ALL REPEAT
FILE REPEAT/FOLDER REPEAT/REPEAT OFF
6
Random play
*
Press repeatedly.
DISC RANDOM/RANDOM OFF
FOLDER RANDOM/RANDOM OFF
: Audio CD
: MP3/WMA/AAC/WAV/
FLAC file, iPod or ANDROID
Press and hold
6
*
For iPod/ANDROID: Applicable only when
7
*
For CD: Only for MP3/WMA/AAC files.
to select
ALL RANDOM
[MODE OFF]/[BROWSE MODE]
Select control mode
While in iPodUSB source, press 5 repeatedly.
MODE ON
: Control iPod using the iPod itself. However, you can still play/
pause, file skip, fast-forward or reverse from this unit.
MODE OFF
: Control iPod from this unit.
While in ANDROID source, press 5 repeatedly.
BROWSE MODE
: Control Android device from this unit via KENWOOD MUSIC
PLAY application installed in the Android device.
HAND MODE
: Control Android device using the Android device itself via
other media player applications installed in the Android device.
However, you can still play/pause and file skip from this unit.
: MP3/WMA/AAC/
WAV/FLAC file
: iPod or ANDROID
7
.*
is selected.
Select music drive
While in USB source, press 5 repeatedly.
Stored songs in the following drive will be played back.
• Selected internal or external memory of a smartphone (Mass
Storage Class).
• Selected drive of a multiple drives device.
Listen to TuneIn Radio/TuneIn Radio Pro
While listening to TuneIn Radio or TuneIn Radio Pro, connect the
iPod/iPhone to the USB input terminal of the unit.
• The unit will output the sound from these applications.
Select a file from a folder/list
For iPod/ANDROID, applicable only when
[MODE OFF]/[BROWSE MODE]
is selected.
1 Press .
2 Turn the volume knob to select a folder/list, then press the
knob.
3 Turn the volume knob to select a file, then press the knob.
Quick Search
(applicable only for CD, USB and ANDROID source)
If you have many files, you can search through them quickly.
Turn the volume knob quickly to browse through the list
quickly.
Skip Search
(applicable only for iPod USB and ANDROID source)
Press S/T to search at a preset skip search ratio.
( 11, [SKIP SEARCH])
• Pressing and holding S/T searches at a 10% ratio.
10
ENGLISH
Page 11
CD/USB/iPod/ANDROID
Alphabet search
You can search for a file according to the first character.
For iPod USB source
(applicable only for iPod USB and ANDROID source)
1 Turn the volume knob quickly to enter character search.
2 Turn the volume knob to select the character.
• Select “
3 Press S/T to move to the entry position.
” to search for a character other than AtoZ, 0to9.
*
• You can enter up to 3characters.
4 Press the volume knob to start searching.
For ANDROID source
1 Press J/K to enter character search.
2 Turn the volume knob to select the character.
^A^: Upper case letters (A to Z)
_A_: Lower case letters (a to z)
-0-: Numbers (0 to 9)
: Character other than AtoZ, 0to9
***
3 Press the volume knob to start searching.
• To return to the root folder/first file/top menu, press 5.
BT AUDIO source.)
• To return to the previous setting item, press .
• To cancel, press and hold
Direct Music Search
(using the remote control)
.
(Not applicable for
1 Press DIRECT.
2 Press the number buttons to enter a track/file number.
3 Press to search for music.
• To cancel, press or DIRECT.
• Not available if Random Play is selected.
• Not applicable for iPodUSB and ANDROID source.
Settings to use KENWOOD Remote application
KENWOOD Remote application is designed to control the KENWOOD car
receiver’s operations from the iPhone/iPod (via USB input terminal).
Preparation:
Install the latest version of KENWOOD Remote application on your device
before connecting. For more information, visit
<www.kenwood.com/cs/ce/>.
You can make the settings in the same way as connection via Bluetooth.
( 20)
Other settings
1
Press the volume knob to enter
2
Turn the volume knob to select an item (see the following table),
then press the knob.
[FUNCTION]
.
3 Repeat step 2 until the desired item is selected or activated.
4 Press and hold to exit.
To return to the previous setting item, press .
Default:
USB
MUSIC DRIVE DRIVE CHANGE
automatically and playback starts.
Repeat steps
SKIP SEARCH 0.5%/1%/5%/10%
the skip search ratio over the total files.
:The next drive (
1
to 3 to select the following drives.
[DRIVE 1]
to
[DRIVE 4]
: While listening to iPodUSB or ANDROID source, selects
) is selected
XX
ENGLISH
11
Page 12
Spotify
Preparation:
Install the latest version of the Spotify application on your device (iPhone/
iPod touch), then create an account and log in to Spotify.
• Select
[ON]
for
[SPOTIFY SRC]
Start listening
1
Open the Spotify application on your device.
2 Connect your device to the USB input terminal.
USB input terminal
3 Press repeatedly to select SPOTIFY.
Broadcast starts automatically.
To On the faceplate On the remote control
Playback/pause Press .
Skip a track
Thumbs up or
thumbs down
3
*
Start radio Press and hold 5. ( Not available )
in
[SOURCE SELECT]. ( 5)
KCA-iP102/KCA-iP103 (optional accessory)
or accessory of the iPod/iPhone
2
*
Press
4
Press S
Press J/K.
*
/ T. Press S
Press
1
*
.
4
*
/ .
/ .
To On the faceplate On the remote control
5
Repeat play
*
Press repeatedly.
REPEAT ALL/REPEAT ONE
4
(Not available)
*
/
REPEAT OFF
5
*
Random play
Press repeatedly.
SHUFFLE ON/SHUFFLE OFF
1
*
KCA-iP102 : 30-pin type, KCA-iP103 : Lightning type
2
*
Do not leave the cable inside the car when not using.
3
*
This feature is available for tracks in Radio only. If thumbs down is selected, the current
track is skipped.
4
*
Available for premium account users only.
5
*
Available for tracks in Playlists only.
4
*
(Not available)
Save favorite song information
While listening to the Radio on Spotify...
Press and hold the volume knob.
“SAVED” appears and the information is stored to “Your Music” or “Your
Library” on your Spotify account.
To unsave, repeat the same procedure.
“REMOVED” appears and the information is removed from “Your Music”
or “Your Library” on your Spotify account.
12
ENGLISH
Page 13
Spotify
Search for a song or station
1
Press .
2 Turn the volume knob to select a list type, then press the knob.
The list types displayed differ depending on the information sent
from Spotify.
3 Turn the volume knob (or press J / K on the remote control) to
select the desired song or station.
4 Press the volume knob (or press on the remote control) to
confirm.
You can browse through the list quickly by turning the volume knob
quickly.
To cancel, press and hold
.
BLUETOOTH®
BLUETOOTH — Connection
Supported Bluetooth profiles
– Hands-Free Profile (HFP)
– Advanced Audio Distribution Profile (A2DP)
– Audio/Video Remote Control Profile (AVRCP)
– Serial Port Profile (SPP)
– Phonebook Access Profile (PBAP)
Supported Bluetooth codecs
– Sub Band Codec (SBC)
– Advanced Audio Coding (AAC)
Connect the microphone
Rear panel
Microphone
(supplied)
Microphone input jack
Adjust the
microphone angle
Secure using cord clamps
(not supplied) if necessary.
ENGLISH
13
Page 14
BLUETOOTH®
Pair and connect a Bluetooth device for the first time
1
Press to turn on the unit.
2 Search and select this unit model name (DPX-5 /DPX-M3 ) on
the Bluetooth device.
“PAIRING”
KNOB” appears on the display.
“PASS XXXXXX” Device name “PRESS” “VOLUME
• For some Bluetooth devices, you may need to enter the Personal
Identification Number (PIN) code immediately after searching.
3 Press the volume knob to start pairing.
“PAIRING OK” appears when pairing is completed.
Once pairing is completed, Bluetooth connection is established
automatically.
“BT1” and/or “BT2” indicator on the faceplate lights up.
• This unit supports Secure Simple Pairing (SSP).
• Up to five devices can be registered (paired) in total.
• Once the pairing is completed, the Bluetooth device will remain
registered in the unit even if you reset the unit. To delete the paired
device,
• A maximum of two Bluetooth phones and one Bluetooth audio device
18, [DEVICE DELETE]
can be connected at any time.
However, while in BT AUDIO source, you can connect to five Bluetooth
audio devices and switch between these five devices.
• Some Bluetooth devices may not automatically connect to the unit
after pairing. Connect the device to the unit manually.
• Refer to the instruction manual of the Bluetooth device for more
information.
.
( 19)
Auto Pairing
When you connect iPhone/iPod touch/Android device to the USB input
terminal, pairing request (via Bluetooth) is automatically activated.
Press the volume knob to pair once you have confirmed the device
name.
Automatic pairing request is activated only if:
– Bluetooth function of the connected device is turned on.
–
[AUTO PAIRING]
– KENWOOD MUSIC PLAY application is installed on the Android device
( 9)
and
[BROWSE MODE]
is set to
[ON]. ( 18)
is selected.
( 10)
14
ENGLISH
Page 15
BLUETOOTH®
BLUETOOTH — Mobile phone
Receive a call
When there is an incoming call:
• The KEY zone illuminates in green color and flashes.
• The unit answers the call automatically if
to a selected time.
During a call:
• The LCD DISPLAY zone illuminates according to the settings
made for
green color.
• If you turn off the unit, the Bluetooth connection is
disconnected.
The following operations may differ or not available depending
on the connected phone.
( 16)
[DISPLAY] ( 25)
and the KEY zone illuminates in
[AUTO ANSWER]
is set
To On the faceplate On the remote control
First incoming call...
Answer a call
Reject a call
End a call
While talking on the first incoming call...
Answer another
incoming call and
hold the current call
Reject another
incoming call
While having two active calls...
End current call and
activate held call
Swap between the
current call and
held call
Adjust the phone
volume
[00]
to
[15]
[35]
)
(Default:
Switch between
hands-free and
private talk modes
Press
knob or one of the number
buttons (1 to 6).
Press
Press
Press
Press
Press
Press
Turn the volume knob
during a call.
• This adjustment will not affect the volume of the other
sources.
Press
• Operations may vary
according to the
connected Bluetooth
device.
or the volume
.
.
.
.
.
.
during a call.
Press
Press
Press
Press
Press
Press
Press
Press
.
( Not available )
.
.
.
.
.
.
.
or
ENGLISH
15
Page 16
BLUETOOTH®
Improve the voice quality
While talking on the phone...
1 Press the volume knob to enter
2 Turn the volume knob to select an item (see the following table),
then press the knob.
3 Repeat step 2 until the desired item is selected or activated.
4 Press and hold to exit.
To return to the previous setting item, press .
MIC GAIN LEVEL –10
NR LEVEL LEVEL –5
ECHO CANCEL LEVEL –5
to
increases as the number increased.
to
the least noise is being heard during a phone conversation.
time until the least echo is being heard during a phone conversation.
LEVEL +5(LEVEL 0
to
LEVEL +5(LEVEL 0
Make the settings for receiving a call
Press to enter Bluetooth mode.
1
2 Turn the volume knob to select an item (see the following table),
then press the knob.
3 Repeat step 2 until the desired item is selected or activated.
4 Press and hold to exit.
To return to the previous setting item, press .
[FUNCTION]
LEVEL +10(LEVEL –4
):Adjust the noise reduction level until
):Adjust the echo cancellation delay
.
Default:
):The sensitivity of the microphone
SETTINGS
AUTO ANSWER
BATT/SIGNAL* AUTO
*
Functionality depends on the type of the phone used.
XX
Make a call
You can make a call from the call history, phonebook, or dialing the
number. Call by voice is also possible if your mobile phone has the
feature.
1
to30:The unit answers incoming call automatically in the selected time
(in seconds).;
a Bluetooth device and the Bluetooth device is connected.;
OFF
:Cancels.
:Shows the strength of the battery and signal when the unit detects
1 Press to enter Bluetooth mode.
“(First device name)” appears.
• If two Bluetooth phones are connected, press again to switch
to another phone.
“(Second device name)” appears.
2 Turn the volume knob to select an item
knob.
( 17)
, then press the
3 Repeat step 2 until the desired item is selected/activated or follow
the instructions stated on the selected item.
4 Press and hold to exit.
To return to the previous setting item, press
.
Default:
OFF
:Cancels.
XX
16
ENGLISH
Page 17
BLUETOOTH®
CALL HISTORY
PHONE BOOK
NUMBER DIAL1 Turn the volume knob to select a number (0 to 9) or character
(Applicable only if the phone supports PBAP.)
1
Press the volume knob to select a name or a phone number.
• “INCOMING”, “OUTGOING”, or “MISSED” is shown on the lower part of
the display to indicate the previous call status.
• Press
DISP
• “NO DATA” appears if there is no recorded call history.
2
Press the volume knob to call.
(Applicable only if the phone supports PBAP.)
1
Turn the volume knob quickly to enter alphabet search mode (if the
phonebook contains many contacts).
The first menu (ABCDEFGHIJK) appears.
• To go to the other menu (LMNOPQRSTUV or WXYZ1
• To select the desired first letter, turn the volume knob or press
Select “1” to search with numbers and select “
2
Turn the volume knob to select a name, then press the knob.
3
Turn the volume knob to select a phone number, then press the knob to
call.
•
The phonebook of the connected phone is automatically transferred to
the unit when pairing.
•
Contacts are categorized as: HOME, OFFICE, MOBILE, OTHER, GENERAL.
•
This unit can display only non-accent letters. (Accent letters such as “Ú”
is shown as “U”.)
(
2
Press
Repeat steps
3
Press the volume knob to call.
(or using the remote control)
1
Press the number buttons (0 to 9) to enter the phone number.
2
Press to call.
to change the display category (NUMBER or NAME).
S/T
, then press the knob.
symbols.
, #, +).
S/T
to move the entry position.
1
and 2 until you finish entering the phone number.
), press
” to search with
J / K
VOICE
BATT LOW
NO SIGNAL/LOW/MID/MAX*:Shows the strength of the current received signal.
*
Functionality depends on the type of the phone used.
Speak the name of the contact you want to call or the voice command to
control the phone functions.
/
MID/FULL*:Shows the strength of the battery.
( Make a call using voice recognition)
Make a call using voice recognition
Press and hold to activate the voice recognition of the
1
connected phone.
2 Speak the name of the contact you want to call or the voice
.
command to control the phone functions.
• Supported Voice Recognition features vary for each phone. Refer to the
instruction manual of the connected phone for details.
• This unit also supports the intelligent personal assistant function of
iPhone.
Settings in memory
Store a contact in memory
You can store up to 6 contacts into the number buttons (1 to 6).
1 Press to enter Bluetooth mode.
2 Turn the volume knob to select
[NUMBER DIAL]
, then press the knob.
[CALL HISTORY], [PHONE BOOK]
3 Turn the volume knob to select a contact or enter a phone number.
If a contact is selected, press the volume knob to show the phone
number.
4 Press and hold one of the number buttons (1 to 6).
“STORED” appears when the contact is stored.
To erase a contact from the preset memory, select
and store a blank number.
[NUMBER DIAL]
, or
in step 2
ENGLISH
17
Page 18
BLUETOOTH®
Make a call from memory
Press to enter Bluetooth mode.
1
2 Press one of the number buttons (1 to 6).
3 Press the volume knob to call.
“NO MEMORY” appears if there is no contacts stored.
Other settings
1
Press the volume knob to enter
[FUNCTION]
.
2 Turn the volume knob to select an item (see the following table),
then press the knob.
3 Repeat step 2 until the desired item is selected/activated or follow
the instructions stated on the selected item.
4 Press and hold to exit.
To return to the previous setting item, press .
Default:
BT MODE
PHONE SELECT
AUDIO SELECT
DEVICE DELETE
PIN CODE EDIT
(0000)
Selects the phone or audio device to connect or disconnect.
“
” appears in front of the device name when connected.
*
“
” appears in front of the current playback audio device.
•
You can only connect a maximum of two Bluetooth phones and one
Bluetooth audio device at any time.
1
Turn the volume knob to select a device to delete, then press the
knob.
2
Turn the volume knob to select
Changes the PIN code (up to 6 digits).
1
Turn the volume knob to select a number.
2
Press S/T to move the entry position.
Repeat steps
3
Press the volume knob to confirm.
1
and 2 until you finish entering the PIN code.
[YES]
or
[NO]
, then press the knob.
RECONNECT ON
AUTO PAIRING ON
INITIALIZE YES
:The unit automatically reconnect when the last connected
Bluetooth device is within range.;
:The unit automatically pair supported Bluetooth device (iPhone/
iPod touch/Android device) when it is connected through USB input
terminal.Depending on the operating system of the connected device,
this function may not work. ;
:Initializes all the Bluetooth settings (including stored pairing,
phonebook, and etc.).;
NO
OFF
:Cancels.
OFF
:Cancels.
:Cancels.
Bluetooth test mode
You can check the connectivity of the supported profile between the
Bluetooth device and the unit.
• Make sure there is no Bluetooth device paired.
XX
1 Press and hold .
“PLEASE PAIR YOUR PHONE PIN 0000” appears.
2 Search and select this unit model name (DPX-5
on the Bluetooth device.
***
3 Operate the Bluetooth device to confirm pairing.
“TESTING” flashes on the display.
The connectivity result (OK or NG) appears after the test.
PAIRING: Pairing status
HF CNT: Hands-Free Profile (HFP) compatibility
AUD CNT: Advanced Audio Distribution Profile (A2DP) compatibility
PB DL: Phonebook Access profile (PBAP) compatibility
To cancel test mode, press and hold
to turn off the unit.
/DPX-M3
***
)
18
ENGLISH
Page 19
BLUETOOTH®
BLUETOOTH — Audio
While in BT AUDIO source, you can connect to five Bluetooth audio
devices and switch between these five devices.
Audio player via Bluetooth
1
Press (or press SRC repeatedly on the remote control) to
select BTAUDIO.
2 Operate the Bluetooth audio player to start playback.
To On the faceplate On the remote control
Playback/pause Press .
Select group or folder
Reverse/Forward skip
Reverse/Fast-forward Press and hold
Press J / K.
Press S/T. Press S/
S/T.
Press
Press
Press and hold
S/
/ .
.
To On the faceplate On the remote control
Repeat play Press repeatedly.
ALL REPEAT, FILE REPEAT
REPEAT OFF
Random play Press and hold
Select a file from
a folder/list
Switch between
connected
Bluetooth audio
device
*
Pressing the “Play” key on the connected device itself also causes switching of sound output
from the device.
Operations and display indications may differ according to their
availability on the connected device.
.
.
select
ALL RANDOM
• Press
RANDOM OFF
Refer to “Select a file from
a folder/list” on page 10.
Press 5.*
to
.
to select
.
,
( Not available )
( Not available )
( Not available )
( Not available )
ENGLISH
19
Page 20
BLUETOOTH®
Settings to use KENWOOD Remote application
KENWOOD Remote application is designed to control the KENWOOD
car receiver’s operations from the iPhone/iPod (via Bluetooth or via USB
input terminal) or Android smartphone (via Bluetooth).
Preparation:
Install the latest version of KENWOOD Remote application on your device
before connecting. For more information, visit
<www.kenwood.com/cs/ce/>.
1 Press the volume knob to enter
[FUNCTION]
.
2 Turn the volume knob to select an item (see the following table),
then press the knob.
3 Repeat step 2 until the desired item is selected or activated.
4 Press and hold to exit.
To return to the previous setting item, press
REMOTE APP
SELECT
IOS YES
ANDROID YES
ANDROID LIST
*
Displayed only when
Select the device (IOS or ANDROID) to use the application.
:Selects iPhone/iPod to use the application via Bluetooth or connected via
USB input terminal.;
If IOS is selected, select iPod BT source (or iPod USB if your iPhone/iPod is
connected via USB input terminal) to activate the application.
•
The connectivity of the application will be interrupted or disconnected if:
– You change from iPod BT source to any playback source connected via the
USB input terminal.
– You change from iPod USB source to iPod BT source.
:Selects Android smartphone to use the application via Bluetooth.;
NO
: Cancels.
*:Selects the Android smartphone to use from the list.
[ANDROID]
NO
of
:Cancels.
[SELECT]
is set to
[YES]
.
Default:
.
STATUS
Shows the status of the selected device.
IOS CONNECTED
connected via Bluetooth or USB input terminal.
IOS NOT CONNECTED
ANDROID CONNECTED
smartphone connected via Bluetooth.
ANDROID NOT CONNECTED
application.
: You are able to use the application using the iPhone/iPod
: No IOS device is connected to use the application.
: You are able to use the application using the Android
: No Android device is connected to use the
Listen to iPhone/iPod via Bluetooth
You can listen to the songs on the iPhone/iPod via Bluetooth on this unit.
Press
• You can operate the iPod/iPhone in the same way as iPod/iPhone via
USB input terminal.
• If you plug in an iPhone/iPod to the USB input terminal while listening
XX
to iPodBT source, the source automatically change to iPodUSB. Press
repeatedly to select iPodBT.
( 9)
to select iPodBT if the device is still connected via Bluetooth.
20
ENGLISH
Page 21

BLUETOOTH®
Internet radio via Bluetooth
You can listen to Spotify on the iPhone/iPod/Android device
via Bluetooth on this unit.
• Make sure the USB input terminal is not connected to any
device.
Listen to Spotify
Preparation:
Select
[ON]
for
[SPOTIFY SRC]
1 Open the Spotify application on your device.
2 Connect your device via Bluetooth connection.
3 Press repeatedly to select SPOTIFY (for iPhone/
iPod) or SPOTIFY BT (for Android device).
The source switches and broadcast starts automatically.
• You can operate Spotify in the same way as Spotify via USB
input terminal.
( 12)
in
[SOURCE SELECT]. ( 5)
( 14)
AUDIO SETTINGS
While listening to any source...
1 Press the volume knob to enter
2 Turn the volume knob to select an item (see the following table), then press
the knob.
3 Repeat step 2 until the desired item is selected or activated.
4 Press and hold to exit.
(or using the remote control)
1 Press AUD to enter
[AUDIO CONTROL]
2 Press J / K to select an item, then press .
To return to the previous setting item, press
AUDIO CONTROL
SUB-W LEVEL
MANUAL EQ
62.5HZ LEVEL LEVEL –9
100HZ/160HZ/250HZ
400HZ/630HZ/1KHZ
1.6KHZ/2.5KHZ/4KHZ
6.3KHZ/10KHZ/16KHZ
Q FACTOR 1.35/1.50/2.00
PRESET EQ NATURAL/ROCK/POPS/EASY/TOP40/JAZZ/POWERFUL/USER
LEVEL –50
The sound elements (frequency level, tone level, Q factor) are preset into
each selection.
BASS
EXTEND
/
LEVEL –9
source. (Before making an adjustment, select the source you want to adjust.)
/
/
preset equalizer suitable to the music genre.
(Select
[FUNCTION]
to
LEVEL +10 (LEVEL 0
to
LEVEL +9 (LEVEL 0
[USER]
to use the settings made in
.
.
.
): Adjusts the subwoofer output level.
to
memorize for each source. (Before making an adjustment,
select the source you want to adjust.)
ON
:Adjust the quality factor.
LEVEL +9 (LEVEL 0
:Turns on the extended bass.;
):Adjusts the level to memorize for each
):Adjusts the level to
[MANUAL EQ]
OFF
Default:
:Cancels.
: Selects a
.)
XX
ENGLISH
21
Page 22
AUDIO SETTINGS
BASS BOOST LEVEL1/LEVEL2/LEVEL3/LEVEL4/LEVEL5
LOUDNESS LEVEL1/LEVEL2
SUBWOOFER SET ON
FADER
BALANCE L15
VOLUME OFFSET LEVEL –15
SOUND EFFECT
SOUND RECNSTR
(Sound
reconstruction)
SPACE ENHANCE
SND REALIZER LEVEL1/LEVEL2/LEVEL3
STAGE EQ LOW/MIDDLE/HIGH
DRIVE EQ ON
SPEAKER SIZE
X’OVER
boost level.;
to produce a well-balanced sound at a low volume level.;
(Not applicable if 3-way crossover is selected.)
R15
each source. (Before adjustment, select the source you want to adjust.)
(Not applicable for RADIO source and AUX source.)
ON
components and restoring the rise-time of the waveform that are lost
in audio data compression.;
(Not applicable for RADIO source.)
SMALL/MEDIUM/LARGE
OFF
OFF
the speakers.;
car or running noise of the tyres.;
Depending on the crossover type you have selected
crossover or 3-way crossover setting items will be shown
By default, 2-way crossover type is selected.
OFF
:Cancels.
:Selects your preferred low and high frequencies boost
:Turns on the subwoofer output.;
to
F15 (0
):Adjusts the rear and front speaker output balance.
to
R15 (0
):Adjusts the left and right speaker output balance.
to
LEVEL +6 (LEVEL 0
:Creates realistic sound by compensating the high-frequency
:Cancels.
:Cancels.
:Virtually adjust the sound position heard from
OFF
:Cancels.
: Boosts the frequency to reduce the noise heard from outside the
OFF
):Preset the initial volume level of
OFF
:Cancels.
:Virtually enhances the sound space.;
:Virtually makes the sound more realistic.;
OFF
:Cancels.
:Selects your preferred bass
OFF
:Cancels.
:Cancels.
( 6)
, 2-way
( 23)
DTA SETTINGS
CAR SETTINGS
•
: For 2-way crossover:
only if
[SWITCH PREOUT]
• [SUB-W LEVEL]
For settings,
is set to
is selectable only if
24, Digital Time Alignment Settings.
[SUB-W LEVEL]/[SUBWOOFER SET]
[SUBWOOFER]. ( 5)
[SUBWOOFER SET]
is set to
[ON]
Crossover settings
Below are the available setting items for 2-way crossover and 3-way
crossover.
SPEAKER SIZE
Selects according to the connected speaker size for optimum performance.
•
The frequency and slope settings are automatically set for the crossover
of the selected speaker.
•
When 2-way crossover is selected, if
[FRONT], [REAR]
the speaker is not available.
• When 3-way crossover is selected, if
[SPEAKER SIZE]
X ‘ OVER
• [FRQ]
crossover frequency for the selected speakers (high pass filter or low
pass filter).
If
[THROUGH]
•
[F - HPF SLOPE]/[R - HPF SLOPE]/[SW LPF SLOPE]/[HPF SLOPE]/[LPF SLOPE]/[SLOPE]:
Adjusts the crossover slope.
Selectable only if a setting other than
.
crossover frequency.
• [SW LPF PHASE]/[PHASE]:
line with the other speaker output.
• [GAIN LEFT]/[GAIN RIGHT]/[F - HPF GAIN]/[R - HPF GAIN]/[SW LPF GAIN]/[GAIN]:
Adjusts the output volume of the selected speaker.
and
[SUBWOOFER]
, the
[X’OVER]
setting of
/
[F - HPF FRQ]/[R - HPF FRQ]/[SW LPF FRQ]/[HPF FRQ]/[LPF FRQ]
is selected, all signals are sent to the selected speakers.
Selects the phase of the speaker output to be in
[NONE]
for
[SPEAKER SIZE]
[NONE]
[WOOFER]
is selected for
is selected for
is not available.
[THROUGH]
, the
is selected for the
.
[TWEETER]
[X ‘ OVER]
[WOOFER]
is selectable
of
setting of
of
: Adjusts the
22
ENGLISH
Page 23
AUDIO SETTINGS
2-way crossover setting items
SPEAKER SIZE
FRONT SIZE
8CM/10CM/12CM/13CM/16CM/17CM/18CM
4×6/5×7/6×8/6×9/7×10
TWEETER
SMALL/MIDDLE/LARGE/NONE
(not connected)
REAR 8CM/10CM/12CM/13CM/16CM/17CM/18CM/4×6/5×7/6×8
SUBWOOFER
6×9/7×10/NONE
1*2
*
16CM/20CM/25CM/30CM/38CM OVER/NONE
(not connected)
(not connected)
X ' OVER
TWEETER FRQ
1KHZ/1.6KHZ/2.5KHZ/4KHZ/5KHZ/6.3KHZ
8KHZ/10KHZ/12.5KHZ
GAIN LEFT
GAIN RIGHT
FRONT HPF F - HPF FRQ
–8
to
0
–8
to
0
30HZ/40HZ/50HZ/60HZ/70HZ/80HZ/90HZ
100HZ/120HZ/150HZ/180HZ/220HZ/250HZ/
THROUGH
F - HPF SLOPE
F - HPF GAIN
–6DB/–12DB/–18DB/–24DB
–8
to
0
REAR HPF R - HPF FRQ
(Refer
FRONT HPF
R - HPF SLOPE
settings above.)
R - HPF GAIN
SUBWOOFER
1*2
*
LPF
SW LPF FRQ 30HZ/40HZ/50HZ/60HZ/70HZ/80HZ/90HZ
100HZ/120HZ/150HZ/180HZ/220HZ/250HZ
THROUGH
SW LPF SLOPE
SW LPF PHASE
SW LPF GAIN –8
–6DB/–12DB/–18DB/–24DB
REVERSE
(180°)/
NORMAL
(0°)
to
0
3-way crossover setting items
SPEAKER SIZE
TWEETER
/
MID RANGE
WOOFER
/
X ' OVER
TWEETER HPF FRQ
SMALL/MIDDLE/LARGE
8CM/10CM/12CM/13CM/16CM/17CM/18CM/4×6/5×7/6×8/6×9
2
*
16CM/20CM/25CM/30CM/38CM OVER/NONE
(not connected)
1KHZ/1.6KHZ/2.5KHZ/4KHZ/5KHZ/6.3KHZ/8KHZ
/
10KHZ/12.5KHZ
/
PHASE
GAIN –8
MID RANGE HPF FRQ
SLOPE
–6DB/–12DB
REVERSE
(180°)/
NORMAL
(0°)
to
0
30HZ/40HZ/50HZ/60HZ/70HZ/80HZ/90HZ/100HZ
/
120HZ/150HZ/180HZ/220HZ/250HZ/THROUGH
/
HPF SLOPE
LPF FRQ
–6DB/–12DB
1KHZ/1.6KHZ/2.5KHZ/4KHZ/5KHZ/6.3KHZ/8KHZ
/
10KHZ/12.5KHZ/THROUGH
WOOFER
LPF SLOPE
PHASE
GAIN –8
2
*
LPF FRQ 30HZ/40HZ/50HZ/60HZ/70HZ/80HZ/90HZ/100HZ
–6DB/–12DB
REVERSE
(180°)/
to
0
NORMAL
(0°)
/
120HZ/150HZ/180HZ/220HZ/250HZ/THROUGH
/
/
1
*
For : Selectable only when
( 5)
2
*
Selectable only when
SLOPE
PHASE
GAIN –8
[SUBWOOFER SET]
–6DB/–12DB
REVERSE
(180°)/
to
0
is set to
NORMAL
[SWITCH PREOUT]
[ON]. ( 22)
(0°)
is set to
ENGLISH
[SUBWOOFER]
.
23
Page 24

AUDIO SETTINGS
Digital Time Alignment settings
Digital Time Alignment sets the delay time of the speaker output to
create a more suitable environment for your vehicle.
• For more information,
[DTA SETTINGS]
DTA SETTINGS
POSITION
DISTANCE 0CM
GAIN –8DB
DTA RESET YES
CAR SETTINGS
CAR TYPE COMPACT/FULL SIZE CAR/WAGON/MINIVAN/SUV
R-SP LOCATION
.
Determining the value for [DISTANCE] and [GAIN] of
Selects your listening position (reference point).
ALL
:Not compensating;
FRONT LEFT
• [FRONT ALL]
making an adjustment, select the speaker you want to adjust.)
(Before making an adjustment, select the speaker you want to adjust.)
[POSITION]
Identify your car type and rear speaker location in order to make the
adjustment for
MINIVAN(LONG)
compensating.
Selects the location of the rear speakers in your vehicle to calculate the
furthest distance from the listening position selected (reference point).
• DOOR/REAR DECK
• 2ND ROW/3RD ROW
:Front left seat;
( 6)
to
610CM
to
0DB
:Resets the settings (
to default.; NO:Cancels.
[OFF], [COMPACT], [FULL SIZE CAR], [WAGON]
as
[MINIVAN]
FRONT RIGHT:
is displayed only when
:Fine adjust the distance to compensate. (Before
:Fine adjust the output volume of the selected speaker.
[DISTANCE]
[DTA SETTINGS]
:Selects the type of vehicle.;
:Selectable only when
:Selectable only when
or
[MINIVAN(LONG)]
FRONT ALL
.
Front right seat;
:Front seat
[2-WAY X’OVER]
and
[GAIN]
OFF:
[CAR TYPE]
[CAR TYPE]
.
is selected.
) of the selected
/
Not
is selected as
or
[SUV]
is selected
•
Before making an adjustment for
speaker you want to adjust:
When 2-way crossover is selected:
FRONT LEFT/FRONT RIGHT/REAR LEFT/REAR RIGHT/SUBWOOFER
– You can only select
than
[NONE]
is selected for
When 3-way crossover is selected:
TWEETER LEFT/TWEETER RIGHT/MID LEFT/MID RIGHT/WOOFER
– You can only select
of
[SPEAKER SIZE]. ( 23)
• [R-SP LOCATION]
– 2-way crossover is selected.
– A setting other than
Determining the value for [DISTANCE] and [GAIN] of [DTA SETTINGS]
.
of
[DISTANCE]
[REAR LEFT], [REAR RIGHT]
[REAR]
and
[SUBWOOFER]
[WOOFER]
if a setting other than
[CAR SETTINGS]
[NONE]
is selectable only if:
( 6)
is selected for
If you specify the distance from the center of the
currently set listening position to every speaker,
the delay time will be automatically computed
and set.
1
Determine the center of the currently set
2
Measure the distances from the reference
3
Calculate the differences between the
4
Set the
5
Adjust
Example: When
listening position
and
[GAIN]
of
[DTA SETTINGS]
and
[SUBWOOFER]
of
[SPEAKER SIZE]. ( 23)
[NONE]
is selected for
[REAR]
of
[SPEAKER SIZE]. ( 23)
listening position as the reference point.
point to the speakers.
distance of the furthest speaker (rear
speaker) and other speakers.
[DISTANCE]
individual speakers.
[GAIN]
for individual speakers.
[FRONT ALL]
, select the
if a setting other
[WOOFER]
calculated in step 3 for
is selected as the
24
ENGLISH
Page 25

DISPLAY SETTINGS
Zone identification for color and brightness settings Default:
DISPLAY
Set the dimmer
Press and hold DISP to turn on or off the dimmer.
• If you have set
hold this button.
[DIMMER TIME]
, it will be canceled once you press and
Other settings
1
Press the volume knob to enter
[FUNCTION]
.
2 Turn the volume knob to select an item (see the following table),
then press the knob.
3 Repeat step 2 until the desired item is selected/activated or follow
the instructions stated on the selected item.
4 Press and hold to exit.
To return to the previous setting item, press .
COLOR
SELECT
DIMMER
BRIGHTNESS1 Select a zone. (See the illustration on the left column.)
TEXT SCROLL AUTO/ONCE
*
Preset colors:
BLUE2/BLUE3/SKYBLUE1/SKYBLUE2/LIGHTBLUE/AQUA1/AQUA2/GREEN1
GREEN2/GREEN3/YELLOWGREEN1/YELLOWGREEN2/YELLOW/ORANGE1/ORANGE2
ORANGERED
Select color for
1
Select a zone. (See the illustration on the left column.)
2
Select a color for the selected zone.
To make your own color, select
will be stored in
1
Press the volume knob to enter the detailed color adjustment.
2
Press S/T to select the color (R/G/B) to adjust.
3
Turn the volume knob to adjust the level (0 to 9), then press the knob.
Dim the illumination.
ON
DIMMER TIME
1
Turn the volume knob to adjust the
2
Turn the volume knob to adjust the
(Default:
2 0
or scroll only once.;
RED1/RED2/RED3/PURPLE1/PURPLE2/PURPLE3/PURPLE4/BLUE1
ALL ZONE, LCD DISPLAY
INITIAL COLOR/VARIABLE SCAN/CUSTOM R/G/B
[CUSTOM R/G/B]
:Dimmer is turned on.;
[ON]: PM6:00; [OFF]: AM6:00
to 31: Select your preferred brightness level for the selected zone.
:Select whether to scroll the display information automatically,
OFF
:Set the dimmer on and off time.
OFF
:Cancels.
and
[CUSTOM R/G/B]
.
:Cancels.
[ON]
time, then press the knob.
[OFF]
)
KEY
separately.
/preset colors
. The color you have made
time, then press the knob.
/
*
/
XX
/
ENGLISH
25
Page 26

LEARNING STEERING REMOTE CONTROL
You can control the unit with the steering remote control keys on your
vehicle. After connection, you can configure the control keys according to
your preference.
• You can only make this configuration if your vehicle is equipped with
the electrical steering remote control.
• If the steering remote control in your car is not compatible,
configuration may not be completed and an error message may appear.
( 29)
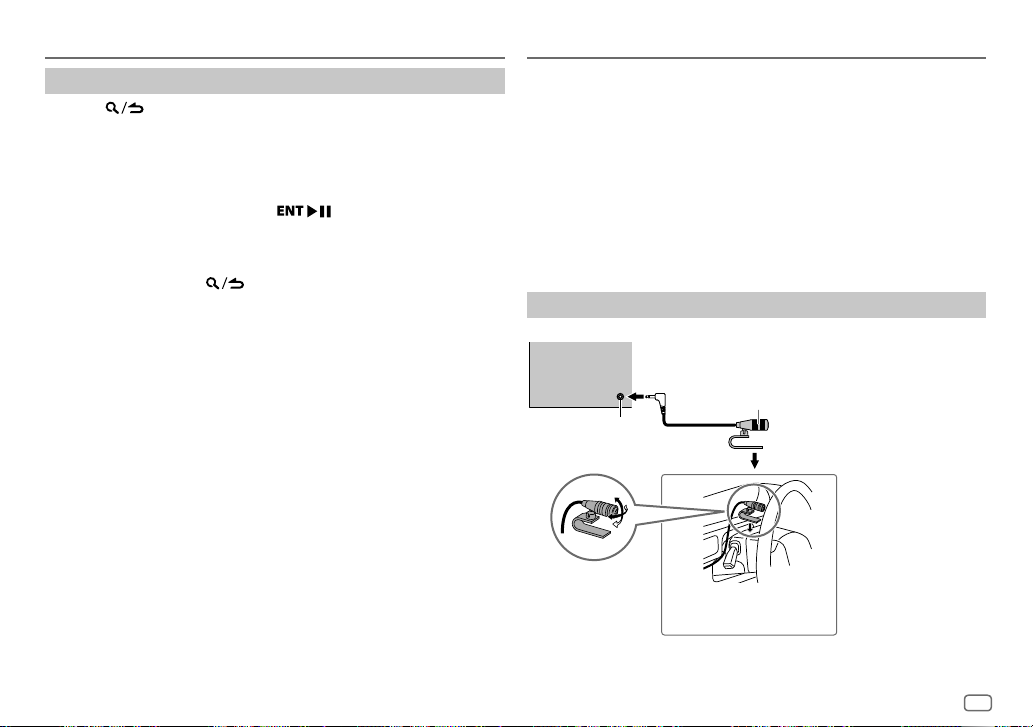
Make the connection
Steering remote
cable (supplied)
Learning steering
remote input terminal
Rear panel
Configure the control keys
1
Press repeatedly to enter STANDBY.
2 Press the volume knob to enter
3 Turn the volume knob to select
4 Turn the volume knob to select
5 Turn the volume knob to select
A key list of 16 assignable keys appears.
•
K## NONE
: No function has been assigned.
6 Turn the volume knob to select any key from the key list to assign
the function, then press the knob.
“PRESS KEY TO ASSIGN K##” appears.
Gray/red
Bright green/red
Purple/red
[FUNCTION]
[SYSTEM]
[USER S.REMO]
[SET KEY]
.
, then press the knob.
, then press the knob.
Connect to your
vehicle’s steering
remote harness.
Contact your
KENWOOD dealer
for details.
, then press the knob.
(for )
7 Press and hold any control keys on your steering remote control
which you want to assign.
A list of key functions will appear on the display.
NONE
(default)/
ON HOOK/OFF HOOK/VOICE/ENTER
ATT/SEEK UP/SEEK DOWN/VOL UP/VOL DOWN/MODE
/
8 Turn the volume knob to select a function to assign, then press the
knob.
The selected key function is assigned to the steering remote control
key you have selected in step 7.
The display returns to the key list as on step 5.
•
K## (Function)
: When certain function has been assigned to a key.
9 Repeat steps 6, 7 and 8 to assign other control keys.
10 Press and hold to exit.
To reassign the control keys
Press repeatedly to enter STANDBY.
1
2 Press the volume knob to enter
3 Turn the volume knob to select
4 Turn the volume knob to select
5 Turn the volume knob to select
6 Turn the volume knob to select
All the control keys will be reset.
Selecting
When
steering remote control.
To return to the previous setting item, press .
[NO]
will cancel the operation.
[FACTORY RESET]
is set to
[FUNCTION]
[SYSTEM]
[USER S.REMO]
[RESET KEY]
[YES]
[YES] ( 6)
.
, then press the knob.
, then press the knob.
, then press the knob.
, it will also reset the learning
, then press the knob.
26
ENGLISH
Page 27

REFERENCES
Maintenance
Cleaning the unit
Wipe off dirt on the faceplate with a dry silicone or soft cloth.
Handling discs
•
Do not touch the recording surface of the disc.
•
Do not stick tape etc. on the disc, or use a disc with tape stuck on it.
•
Do not use any accessories for the disc.
•
Clean from the center of the disc and move outward.
•
Clean the disc with a dry silicone or soft cloth. Do not use any solvents.
•
When removing discs from this unit, pull them out horizontally.
•
Remove burrs from the center hole and disc edge before inserting a disc.
More information
For: – Latest firmware updates and latest compatible item list
– KENWOOD original application
– Any other latest information
Visit <www.kenwood.com/cs/ce/>.
General
•
This unit can only play the following CDs:
•
For detailed information and notes about the playable audio files, visit
<www.kenwood.com/cs/ce/audiofile/>.
Playable files
•
Playable audio file:
For disc: MP3 (.mp3), WMA (.wma), AAC (.aac)
For USB mass storage class device: MP3 (.mp3), WMA (.wma), AAC (.aac), AAC (.m4a),
WAV (.wav), FLAC (.flac)
•
Playable disc media: CD-R/CD-RW/CD-ROM
•
Playable disc file format: ISO 9660 Level 1/2, Joliet, Long file name
•
Playable USB device file system: FAT12, FAT16, FAT32
Even when audio files comply with the standards listed above, playback may be impossible
depending on the types or conditions of media or device.
The AAC (.m4a) file in a CD encoded by iTunes cannot be played on this unit.
Unplayable discs
•
Discs that are not round.
•
Discs with coloring on the recording surface or discs that are dirty.
•
Recordable/ReWritable discs that have not been finalized.
•
8cm CD. Attempting to insert using an adapter may cause malfunction.
About USB devices
•
You cannot connect a USB device via a USB hub.
•
Connecting a cable whose total length is longer than 5m may result in abnormal playback.
•
This unit cannot recognize a USB device whose rating is other than 5V and exceeds 1.5A.
About iPod/iPhone
•
Via USB:
Made for
– iPod touch (5th and 6th generation)
– iPod nano (7th generation)
– iPhone 4S, 5, 5S, 5C, 6, 6 Plus, 6S, 6S Plus, SE, 7, 7 Plus
•
Via Bluetooth:
Made for
– iPod touch (5th and 6th generation)
– iPhone 4S, 5, 5S, 5C, 6, 6 Plus, 6S, 6S Plus, SE, 7, 7 Plus
•
You cannot operate iPod if “KENWOOD” or “ ” is displayed on iPod.
•
Depending on the version of the operating system of the iPod/iPhone, some functions may
not operate on this unit.
ENGLISH
27
Page 28

REFERENCES
About Android device
•
This unit supports Android OS 4.1 and above.
•
Some Android devices (with OS 4.1 and above) may not fully support Android Open
Accessory (AOA) 2.0.
•
If the Android device supports both mass storage class device and AOA 2.0, this unit
always playback via AOA 2.0 as priority.
About Spotify
•
Spotify application supports:
– iPhone 4S, 5, 5S, 5C, 6, 6 Plus, 6S, 6S Plus, SE, 7, 7 Plus (iOS 8 or above)
– iPod touch (5th and 6th generation)
– Android OS 4.0.3 or above
•
Spotify is a third-party service, therefore the specifications are subject to change
without prior notice. Accordingly, compatibility may be impaired or some or all of
the services may become unavailable.
•
Some functions of Spotify cannot be operated from this unit.
•
For issues using the application, please contact Spotify at <www.spotify.com>.
About Bluetooth
•
Depending on the Bluetooth version of the device, some Bluetooth devices may not
be able to connect to this unit.
•
This unit may not work with some Bluetooth devices.
•
Signal conditions vary, depending on the surroundings.
Change the display information
Each time you press
•
If the information is unavailable or not recorded, “NO TEXT”, “NO INFO”, or other information
(eg. station name, playing time) appears.
Source name
STANDBY Source name (Date)*
RADIO
CD or USB
iPod USB/
iPodBT or
ANDROID
SPOTIFY/
SPOTIFY BT
BT AUDIO
AUX
*
Battery and signal strength of the Bluetooth device will be shown if
( 16)
DISP
, the display information changes.
Display information
Frequency (Date)*
(For FM Radio Data System stations only)
Station name (Date)* Radio text (Date)* Radio text+ (R.TEXT+) Song title
(Artist)
Song title (Date)* Frequency (Date)* (back to the beginning)
(For CD-DA)
Track title (Artist) Track title (Disc name) Track title (Date)* Playing time
(Date)*
(back to the beginning)
(For MP3/WMA/AAC/WAV/FLAC files)
Song title (Artist) Song title (Album title) Song title (Date)* File name
(Folder name)
When
Song title (Artist) Song title (Album name) Song title (Date)* Playing time
(Date)*
Context title (Date)* Song title (Artist) Song title (Album name) Song title
(Date)*
Song title (Artist) Song title (Album name) Song title (Date)* Playing time
(Date)*
Source name (Date)*
File name (Date)* Playing time (Date)* (back to the beginning)
[MODE OFF]/[BROWSE MODE]
(back to the beginning)
Playing time (Date)* (back to the beginning)
(back to the beginning)
is selected
( 10)
:
[BATT/SIGNAL]
is set to
[AUTO]
.
28
ENGLISH
Page 29

TROUBLESHOOTING
Symptom Remedy
Sound cannot be heard.
“MISWIRING CHECK WIRING
THEN PWR ON” appears.
“PROTECTING SEND SERVICE”
General
appears.
The unit does not work at all. Reset the unit.
(For )
“ERROR”/”FAIL”
•
Radio reception is poor.
•
Static noise while listening
Radio
to the radio.
Disc cannot be ejected.
Noise is generated. Skip to another track or change the disc.
Tracks do not play back as you
intended them to play.
“READING” keeps flashing. Do not use too many hierarchical levels or folders.
CD/USB/iPod
Elapsed playing time is not
correct.
“LOADING” appears when you
enter search mode by pressing
.
•
Adjust the volume to the optimum level.
•
Check the cords and connections.
Turn the power off, then check to be sure the
terminals of the speaker wires are insulated properly.
Turn the power on again.
Send the unit to the nearest service center.
( 3)
Your steering remote controller is not compatible,
learning may not be completed. Consult your car
audio dealer for details.
Connect the antenna firmly.
M
Press and hold
not to drop the disc when it is ejected. If this does not
solve the problem, reset the unit.
Playback order is determined when files are recorded.
This is caused by how the tracks are recorded.
This unit is still preparing the iPod/iPhone music list.
It may take some time to load, try again later.
to forcibly eject the disc. Be careful
( 3)
Symptom Remedy
Correct characters are not
displayed (e.g. album name).
“NA FILE” Make sure the media contains supported audio files.
“NO DISC” Insert a playable disc into the loading slot.
“TOC ERROR” Make sure the disc is clean and inserted properly.
“PLEASE EJECT” Reset the unit. If this does not solve the problem,
“NO DEVICE” Connect a USB device, and change the source to USB
“COPY PRO” A copy-protected file is played.
“UNSUPPORTED DEVICE”
CD/USB/iPod
“UNRESPONSIVE DEVICE” Make sure the device is not malfunction and reattach
“USB HUB IS NOT SUPPORTED” This unit cannot support a USB device connected via
•
The source does not change
to “USB” when you connect
a USB device while listening
to another source.
•
“USB ERROR” appears
•
This unit can only display uppercase letters,
numbers, and a limited number of symbols.
•
Depending on the display language you have
selected
( 6)
displayed correctly.
( 27)
consult your nearest service centre.
again.
•
Check whether the connected device is compatible
with this unit and ensure the file systems are in
supported formats.
•
Reattach the device.
the device.
a USB hub.
The USB port is drawing more power than the design
limit. Turn the power off and unplug the USB device.
Then, turn on the power and reattach the USB device.
If this does not solve the problem, turn the power
off and on (or reset the unit) before replacing with
another USB device.
, some characters may not be
( 27)
ENGLISH
29
Page 30

TROUBLESHOOTING
Symptom Remedy
“NO MUSIC” Connect a USB device that contains playable audio files.
“iPod ERROR”
CD/USB/iPod
•
Sound cannot be heard
during playback.
•
Sound output only
from the Android
device.
Cannot playback at
[BROWSE MODE]
ANDROID
“NO DEVICE” or
“READING” keeps
flashing.
Playback is intermittent
or sound skips.
“ANDROID ERROR”/
“NADEVICE”
•
Reconnect the iPod.
•
Reset the iPod.
•
Reconnect the Android device.
•
If in
[HAND MODE]
application on the Android device and start playback.
•
If in
[HAND MODE]
application or use another media player application.
•
Restart the Android device.
• If this does not solve the problem, the connected Android
device is unable to route the audio signal to unit.
( 28)
•
Make sure KENWOOD MUSIC PLAY APP is installed on
.
the Android device.
•
Reconnect the Android device and select the appropriate
control mode.
•
If this does not solve the problem, the connected
Android device does not support
( 28)
•
Switch off the developer options on the Android device.
•
Reconnect the Android device.
•
If this does not solve the problem, the connected
Android device does not support
( 28)
Turn off the power saving mode on the Android device.
•
Reconnect the Android device.
•
Restart the Android device.
, launch any media player
, relaunch the current media player
( 9)
[BROWSE MODE]
[BROWSE MODE]
Symptom Remedy
“DISCONNECTED” USB is disconnected from the head unit. Please make sure
“CONNECTING”
Spotify
“CHECK APP” The Spotify application is not connected properly, or user
No Bluetooth device is
detected.
Bluetooth pairing cannot
be made.
Echo or noise is heard
.
.
during a phone
conversation.
Phone sound quality
Bluetooth®
is poor.
Voice calling method is
not successful.
the device is connected properly through USB.
•
Connected via USB input terminal: The device is
connecting to the head unit. Please wait.
•
Connected via Bluetooth: The Bluetooth is disconnected.
Please check Bluetooth connection and make sure both
the device and the unit are paired and connected.
is not login. End the Spotify application and restart, then
login to your Spotify account.
•
Search from the Bluetooth device again.
•
Reset the unit.
•
Make sure you have entered the same PIN code to both
the unit and Bluetooth device.
•
Delete pairing information from both the unit and the
Bluetooth device, then perform pairing again.
•
Adjust the microphone unit’s position.
•
Check the
•
Reduce the distance between the unit and the Bluetooth
device.
•
Move the car to a place where you can get a better
signal reception.
•
Use voice calling method in a more quiet environment.
•
Reduce the distance from the microphone when you
speak the name.
•
Make sure the same voice as the registered voice tag is
used.
( 3)
[ECHO CANCEL]
setting.
( 14)
( 13)
( 16)
30
ENGLISH
Page 31

TROUBLESHOOTING
Symptom Remedy
Sound is being
interrupted or skipped
during playback of a
Bluetooth audio player.
The connected Bluetooth
audio player cannot be
controlled.
“DEVICE FULL” The number of registered devices has reached its limit.
“N/A VOICE TAG” Make sure the same voice as the registered voice tag is
Bluetooth®
“NOT SUPPORT” The connected phone does not support Voice Recognition
“NO ENTRY”/“NO PAIR” There is no registered device connected/found via
“ERROR” Try the operation again. If “ERROR” appears again, check if
“NO INFO”/“NO DATA” Bluetooth device cannot get the contact information.
“HF ERROR XX”/
“BT ERROR”
“SWITCHING NG” The connected phones might not support phone switching
•
Reduce the distance between the unit and the Bluetooth
audio player.
•
Turn off, then turn on the unit and try to connect again.
•
Other Bluetooth devices might be trying to connect to
the unit.
•
Check whether the connected Bluetooth audio player
supports Audio/Video Remote Control Profile (AVRCP).
(Refer to the instructions of your audio player.)
•
Disconnect and connect the Bluetooth player again.
Retry after deleting an unnecessary device.
( 18, DEVICE DELETE)
used.
feature or phonebook transfer.
Bluetooth.
the device supports the function you have tried.
Reset the unit and try the operation again. If this does not
solve the problem, consult your nearest service center.
feature.
INSTALLATION/CONNECTION
Warning
•
The unit can only be used with a 12V DC power supply, negative ground.
•
Disconnect the battery’s negative terminal before wiring and mounting.
•
Do not connect Battery wire (yellow) and Ignition wire (red) to the car chassis or Ground wire
(black) to prevent a short circuit.
•
To prevent short circuit:
– Insulate unconnected wires with vinyl tape.
– Be sure to ground this unit to the car’s chassis again after installation.
– Secure the wires with cable clamps and wrap vinyl tape around the wires that come into
contact with metal parts to protect the wires.
Caution
•
For safety’s sake, leave wiring and mounting to professionals. Consult the car audio dealer.
•
Install this unit in the console of your vehicle. Do not touch the metal parts of this unit during
and shortly after use of the unit. Metal parts such as the heat sink and enclosure become hot.
•
Do not connect the [ wires of speakers to the car chassis or Ground wire (black), or connect
them in parallel.
•
Mount the unit at an angle of less than 30º.
•
If your vehicle wiring harness does not have the ignition terminal, connect Ignition wire (red)
to the terminal on the vehicle’s fuse box which provides 12 V DC power supply and is turned
on and off by the ignition key.
•
Keep all cables away from heat dissipate metal parts.
•
After the unit is installed, check whether the brake lamps, blinkers, wipers, etc. on the car are
working properly.
•
If the fuse blows, first make sure the wires are not touching car’s chassis, then replace the old
fuse with one that has the same rating.
ENGLISH
31
Page 32

INSTALLATION/CONNECTION
Basic procedure
1
Remove the key from the ignition switch, then disconnect the [
terminal of the car battery.
2
Connect the wires properly.
See Wiring connection.
3
Install the unit to your car.
See Installing the unit (in-dash mounting).
4
Connect the [ terminal of the car battery.
5
Press to turn on the power.
6
Reset the unit.
Part list for installation
(A)
Trim plate (only
for Toyota car)
( 3)
( 33)
(B)
Wiring harness
Installing the unit (in-dash mounting)
Install onto the car brackets using the supplied screws
model of the cars.
Do the required wiring.
( 33)
Dashboard of your car
Installing in Toyota cars
Install onto the car brackets using the supplied screws
the car brackets. Then, install the supplied trim plate
(A)
(C)
or
(D)
. The screw holes differ depending on the
Car bracket
(C)
or
(D)
. Use the mounting holes ( ) or ( ) that fit
.
(C)
Round head screws
(M5 × 8 mm)
Use only the specified screws. Using
wrong screws might damage the unit.
32
ENGLISH
(D)
Flat head screws
(M5 × 8 mm)
Do the required wiring.
( 33)
Dashboard of your car
Car bracket
Page 33

INSTALLATION/CONNECTION
Wiring connection
Antenna terminal
Fuse (10A)
IMPORTANT :
with a commercially available custom wiring harness
specific for your car and leave this job to professionals
for your safety. Consult your car audio dealer.
When connecting to an external amplifier, connect
its ground wire to the car’s chassis to avoid damaging
the unit.
We recommend installing the unit
For 3-way crossover: Mid range speaker (left)
For 3-way crossover: Mid range speaker (right)
For 3-way crossover: Tweeter (left)
For 3-way crossover: Tweeter (right)
Ignition
switch
Car fuse
box
Battery
To front speaker (left)/
To front speaker (right)/
To rear speaker (left)/
To rear speaker (right)/
Car fuse box
To the metallic body or chassis of the car
Red (Ignition wire)
Yellow (Battery wire)
Black (Ground wire)
White
White/Black
Gray
Gray/Black
Green
Green/Black
Purple
Purple/Black
If no connections are made, do not let the wire come out from the tab.
Brown
(Mute control wire)
Blue/White
(Power control wire/
Antenna control wire)
(12 V
350 mA)
Light blue/yellow
(Steering remote control
wire)
To connect the Kenwood navigation system,
refer your navigation manual
To the power control terminal when using
the optional power amplifier or to the
antenna control terminal in the vehicle
To the steering wheel remote control
adapter
ENGLISH
33
Page 34

INSTALLATION/CONNECTION
Connecting external components
Microphone input jack
Output terminals
Rear output/Front output/Subwoofer output
For 3-way crossover:
Tweeter/Mid Range/Woofer output
Front output/Rear/Subwoofer output
For 3-way crossover:
Mid Range/Woofer output
( 13)
(For
Learning steering remote
control
( 26)
)
SPECIFICATIONS
FM Frequency Range 87.5 MHz — 108.0 MHz (50 kHz space)
Usable Sensitivity
(S/N=30dB)
Quieting Sensitivity
(DIN S/N=46dB)
Frequency Response (±3dB) 30Hz — 15kHz
Signal-to-Noise Ratio (MONO) 64dB
Stereo Separation (1kHz) 40dB
AM Frequency Range Band 1 (MW) 531kHz — 1611kHz
Tuner
Channel Space Selection Band 1 9kHz
Usable Sensitivity
(S/N = 20dB)
8.2 dBf (0.71 μV/75 Ω)
17.2 dBf (2.0 μV/75 Ω)
(9kHz space)
Band 2 (SW1) 2940kHz — 7735kHz
(5kHz space)
Band 3 (SW2) 9500 kHz — 10135 kHz/
11580 kHz — 18135 kHz
(5kHz space)
Band 2/ 3 5kHz
MW 29.0dBμ (28.2μV)
SW 30dBμ (32μV)
34
ENGLISH
Page 35

SPECIFICATIONS
For :
Laser Diode GaAIAs
Digital Filter (D/A) 8 times over sampling
Spindle Speed 500rpm — 200rpm (CLV)
Wow & Flutter Below measurable limit
Frequency Response (±1dB) 20Hz — 20kHz
Total Harmonic Distortion (1kHz) 0.01%
CD player
Signal-to-Noise Ratio (1kHz) 105 dB
Dynamic Range 90dB
Channel Separation 85dB
MP3 Decode Compliant with MPEG-1/2 Audio Layer-3
WMA Decode Compliant with Windows Media Audio
AAC Decode AAC-LC “.aac” files
For :
USB Standard USB1.1/USB2.0 Full Speed
File System FAT12/16/32
Maximum Supply Current
MP3 Decode Compliant with MPEG-1/2 Audio Layer-3
USB
WMA Decode Compliant with Windows Media Audio
AAC Decode AAC-LC “.aac”, “.m4a” files
WAV Decode Linear-PCM
FLAC Decode FLAC file (Up to 96kHz/24bit)
DC5V
1.5A
For :
USB Standard USB1.1, USB2.0 Full Speed
File System FAT12/16/32
Maximum Supply Current
Frequency Response (±1dB) 20Hz — 20kHz
Signal-to-Noise Ratio (1kHz) 105 dB
Dynamic Range 90dB
USB
Channel Separation 85dB
MP3 Decode Compliant with MPEG-1/2 Audio Layer-3
WMA Decode Compliant with Windows Media Audio
AAC Decode AAC-LC “.aac”, “.m4a” files
WAV Decode Linear-PCM
FLAC Decode FLAC file (Up to 96kHz/24bit)
Version Bluetooth 3.0
Frequency Range 2.402GHz — 2.480GHz
Output Power +4dBm (MAX), 0dBm (AVE) Power Class 2
Maximum Communication Range Line of sight approx. 10m (32.8ft)
Profile HFP 1.6 (Hands-Free Profile)
Bluetooth
Frequency Response (±3dB) 20Hz—20kHz
Input Maximum Voltage 1000mV
Auxiliary
Input Impedance 30kΩ
DC5V
A2DP (Advanced Audio Distribution Profile)
AVRCP 1.5 (Audio/Video Remote Control Profile)
SPP (Serial Port Profile)
PBAP (Phonebook Access Profile)
1.5A
ENGLISH
35
Page 36

SPECIFICATIONS
Maximum Output Power 50W×4
Full Bandwidth Power 22W×4 (at less than 1% THD)
Speaker Impedance 4Ω—8Ω
Tone Action Band 1: 62.5Hz±9dB
Audio
Preout Level/Load CD
Preout Impedance ≤600Ω
Operating Voltage 14.4V (10.5V—16V allowable)
Maximum Current Consumption 10A
Operational Temperature Range –10°C—+60°C
General
Installation Size (W×H×D) 180mm×100mm×158mm
Weight
Subject to change without notice.
Band 2: 100Hz±9dB
Band 3: 160 Hz±9dB
Band 4: 250 Hz±9dB
Band 5: 400 Hz±9dB
Band 6: 630Hz±9dB
Band 7: 1kHz±9dB
Band 8: 1.6kHz±9dB
Band 9: 2.5kHz±9dB
Band 10: 4kHz±9dB
Band 11: 6.3kHz±9dB
Band 12: 10kHz±9dB
Band 13: 16kHz±9dB
USB
The marking of products using lasers
The label is attached to the chassis/case and says that the component uses laser
beams that have been classified as Class1. It means that the unit is utilizing laser
beams that are of a weaker class. There is no danger of hazardous radiation outside
the unit.
: 4000mV/10kΩ
: 2500mV/10kΩ
: 1.3kg
: 1.0kg
36
ENGLISH
Page 37

SPECIFICATIONS
•
Microsoft and Windows Media are either registered trademarks or trademarks of
Microsoft Corporation in the United States and/or other countries.
•
“Made for iPod,” and “Made for iPhone” mean that an electronic accessory has been
designed to connect specifically to iPod, or iPhone, respectively, and has been certified
by the developer to meet Apple performance standards. Apple is not responsible for the
operation of this device or its compliance with safety and regulatory standards. Please
note that the use of this accessory with iPod or iPhone may affect wireless performance.
•
iPhone, iPod, iPod classic, iPod nano, and iPod touch are trademarks of Apple Inc.,
registered in the U.S. and other countries.
•
Lightning is a trademark of Apple Inc.
•
SPOTIFY and the Spotify logo are among the registered trademarks of Spotify AB.
•
The “AAC” logo is a trademark of Dolby Laboratories.
•
Android is trademark of Google Inc.
•
The Bluetooth® word mark and logos are registered trademarks owned by Bluetooth
SIG, Inc. and any use of such marks by JVC KENWOOD Corporation is under license. Other
trademarks and trade names are those of their respective owners.
libFLAC
Copyright (C) 2000-2009 Josh Coalson
Copyright (C) 2011-2013 Xiph.Org Foundation
Redistribution and use in source and binary forms, with or without modification, are
permitted provided that the following conditions are met:
-
Redistributions of source code must retain the above copyright notice, this list of
conditions and the following disclaimer.
-
Redistributions in binary form must reproduce the above copyright notice, this list of
conditions and the following disclaimer in the documentation and/or other materials
provided with the distribution.
-
Neither the name of the Xiph.org Foundation nor the names of its contributors may be
used to endorse or promote products derived from this software without specific prior
written permission.
THIS SOFTWARE IS PROVIDED BY THE COPYRIGHT HOLDERS AND CONTRIBUTORS “AS
IS” AND ANY EXPRESS OR IMPLIED WARRANTIES, INCLUDING, BUT NOT LIMITED TO, THE
IMPLIED WARRANTIES OF MERCHANTABILITY AND FITNESS FOR A PARTICULAR PURPOSE
ARE DISCLAIMED. IN NO EVENT SHALL THE FOUNDATION OR CONTRIBUTORS BE LIABLE FOR
ANY DIRECT, INDIRECT, INCIDENTAL, SPECIAL, EXEMPLARY, OR CONSEQUENTIAL DAMAGES
(INCLUDING, BUT NOT LIMITED TO, PROCUREMENT OF SUBSTITUTE GOODS OR SERVICES;
LOSS OF USE, DATA, OR PROFITS; OR BUSINESS INTERRUPTION) HOWEVER CAUSED AND ON
ANY THEORY OF LIABILITY, WHETHER IN CONTRACT, STRICT LIABILITY, OR TORT (INCLUDING
NEGLIGENCE OR OTHERWISE) ARISING IN ANY WAY OUT OF THE USE OF THIS SOFTWARE,
EVEN IF ADVISED OF THE POSSIBILITY OF SUCH DAMAGE.
ENGLISH
37
Page 38

Page 39

Page 40

ﺕﺎﻔﺻﺍﻮﻤﻟﺍ
libFLAC
Copyright (C) 2000-2009 Josh Coalson
Copyright (C) 2011-2013 Xiph.Org Foundation
Redistribution and use in source and binary forms, with or without modification, are permitted
provided that the following conditions are met:
- Redistributions of source code must retain the above copyright notice, this list of conditions
and the following disclaimer.
- Redistributions in binary form must reproduce the above copyright notice, this list of
conditions and the following disclaimer in the documentation and/or other materials
provided with the distribution.
- Neither the name of the Xiph.org Foundation nor the names of its contributors may be used
to endorse or promote products derived from this software without specific prior written
permission.
THIS SOFTWARE IS PROVIDED BY THE COPYRIGHT HOLDERS AND CONTRIBUTORS “AS IS” AND ANY
EXPRESS OR IMPLIED WARRANTIES, INCLUDING, BUT NOT LIMITED TO, THE IMPLIED WARRANTIES
OF MERCHANTABILITY AND FITNESS FOR A PARTICULAR PURPOSE ARE DISCLAIMED. IN NO
EVENT SHALL THE FOUNDATION OR CONTRIBUTORS BE LIABLE FOR ANY DIRECT, INDIRECT,
INCIDENTAL, SPECIAL, EXEMPLARY, OR CONSEQUENTIAL DAMAGES (INCLUDING, BUT NOT LIMITED
TO, PROCUREMENT OF SUBSTITUTE GOODS OR SERVICES; LOSS OF USE, DATA, OR PROFITS; OR
BUSINESS INTERRUPTION) HOWEVER CAUSED AND ON ANY THEORY OF LIABILITY, WHETHER
IN CONTRACT, STRICT LIABILIT Y, OR TORT (INCLUDING NEGLIGENCE OR OTHERWISE) ARISING IN
ANY WAY OUT OF THE USE OF THIS SOFTWARE, EVEN IF ADVISED OF THE POSSIBILITY OF SUCH
DAMAGE.
• Microsoft and Windows Media are either registered trademarks or trademarks of Microsoft
Corporation in the United States and/or other countries.
• “Made for iPod,” and “Made for iPhone” mean that an electronic accessory has been designed
to connect specifically to iPod, or iPhone, respectively, and has been certified by the developer
to meet Apple performance standards. Apple is not responsible for the operation of this
device or its compliance with safety and regulatory standards. Please note that the use of this
accessory with iPod or iPhone may affect wireless performance.
• iPhone, iPod, iPod classic, iPod nano, and iPod touch are trademarks of Apple Inc., registered
in the U.S. and other countries.
• Lightning is a trademark of Apple Inc.
• SPOTIFY and the Spotify logo are among the registered trademarks of Spotify AB.
• The “AAC” logo is a trademark of Dolby Laboratories.
• Android is trademark of Google Inc.
• The Bluetooth® word mark and logos are registered trademarks owned by Bluetooth SIG, Inc.
and any use of such marks by JVC KENWOOD Corporation is under license. Other trademarks
and trade names are those of their respective owners.
37
ﻲﺑﺮﻋ
Page 41

ﺭﺰﻴﻟ ﺔﻌﺷﺃ ﻡﺪﺨﺘﺴﻳ ﻥﻮﻜﻤﻟﺍ ﻥﺃ ﻲﻨﻌﻳﻭ ﻕﻭﺪﻨﺼﻟﺍ / ﻪﻴﺳﺎﺸﻟﺍ ﻰﻠﻋ ﻖﺼﻠﻤﻟﺍ ﺍﺬﻫ
ﺭﺰﻴﻠﻟﺍ ﻡﺍﺪﺨﺘﺳﺎﺑ ﺕﺎﺠﺘﻨﻤﻟﺍ ﻰﻠﻋ ﺕﺎﻣﻼﻋ ﻊﺿﻭ
ﺔﺟﺭﺩ ﻦﻣ ﺭﺰﻴﻟ ﺔﻌﺷﺃ ﻞﻤﻌﺘﺴﺗ ﺓﺪﺣﻮﻟﺍ ﻥﺃ ﻲﻨﻌﻳ ﺎﻤﺑ .ﻰﻟﻭﻷﺍ ﺔﺟﺭﺪﻟﺍ ﻦﻣ ﺔﻔﻨﺼﻣ
.ﺓﺪﺣﻮﻟﺍ ﺝﺭﺎﺧ ﺮﻴﻄﺧ ﻉﺎﻌﺷﺇ ﺙﺎﻌﺒﻧﺍ ﺮﻄﺧ ﺪﺟﻮﻳ ﻻ .ﺔﻔﻴﻌﺿ
(ﺕﻮﺼﻟﺍ ﺖﺘﺸﺗ ﻲﻟﺎﻤﺟﺇ % 1 ﻦﻣ ﻞﻗﺃ ﺪﻨﻋ)
ﻞﺒﻴﺴﻳﺩ ±9 ﺰﺗﺮﻫ 100 :2 ﺔﺟﻮﻤﻟﺍ
ﻞﺒﻴﺴﻳﺩ ±9 ﺰﺗﺮﻫ 160 :3 ﺔﺟﻮﻤﻟﺍ
ﻞﺒﻴﺴﻳﺩ ±9 ﺰﺗﺮﻫ 250 :4 ﺔﺟﻮﻤﻟﺍ
ﻞﺒﻴﺴﻳﺩ ±9 ﺰﺗﺮﻫ 400 :5 ﺔﺟﻮﻤﻟﺍ
ﻞﺒﻴﺴﻳﺩ ±9 ﺰﺗﺮﻫ 630 :6 ﺔﺟﻮﻤﻟﺍ
ﻞﺒﻴﺴﻳﺩ ±9 ﺰﺗﺮﻫ ﻮﻠﻴﻛ 1 :7 ﺔﺟﻮﻤﻟﺍ
ﻞﺒﻴﺴﻳﺩ ±9 ﺰﺗﺮﻫ ﻮﻠﻴﻛ 1.6 :8 ﺔﺟﻮﻤﻟﺍ
ﻞﺒﻴﺴﻳﺩ ±9 ﺰﺗﺮﻫ ﻮﻠﻴﻛ 2.5 :9 ﺔﺟﻮﻤﻟﺍ
ﻞﺒﻴﺴﻳﺩ ±9 ﺰﺗﺮﻫ ﻮﻠﻴﻛ 4 :10 ﺔﺟﻮﻤﻟﺍ
ﻞﺒﻴﺴﻳﺩ ±9 ﺰﺗﺮﻫ ﻮﻠﻴﻛ 6.3 :11 ﺔﺟﻮﻤﻟﺍ
ﻞﺒﻴﺴﻳﺩ ±9 ﺰﺗﺮﻫ ﻮﻠﻴﻛ 10 :12 ﺔﺟﻮﻤﻟﺍ
ﻞﺒﻴﺴﻳﺩ ±9 ﺰﺗﺮﻫ ﻮﻠﻴﻛ 16 :13 ﺔﺟﻮﻤﻟﺍ
/ﺖﻟﻮﻓ ﻲﻠﻠﻣ 4 000 :
ﻡﻭﺃ ﻮﻠﻴﻛ 10
/ﺖﻟﻮﻓ ﻲﻠﻠﻣ 2 500 :
ﻡﻭﺃ ﻮﻠﻴﻛ 10
ﻢﻣ 158 × ﻢﻣ 100 × ﻢﻣ 180
ﻢﺠﻛ 1.3 :
ﻢﺠﻛ 1.0 :
ﻯﻮﺼﻘﻟﺍ ﺝﺮﺨﻟﺍ ﺓﺭﺪﻗ4 × ﻁﺍﻭ 50
ﻞﻣﺎﻜﻟﺍ ﺚﺒﻟﺍ ﻕﺎﻄﻧ ﺔﻌﺳ ﺓﺭﺪﻗ 4 × ﻁﺍﻭ 22
ﺕﺎﻋﺎﻤﺴﻟﺍ ﺔﻗﻭﺎﻌﻣﻡﻭﺃ 8 — ﻡﻭﺃ 4
ﺔﻴﺗﻮﺼﻟﺍ ﺕﺍﺮﻴﺛﺎﺘﻟﺍﻞﺒﻴﺴﻳﺩ ±9 ﺰﺗﺮﻫ 62.5 :1 ﺔﺟﻮﻤﻟﺍ
CD
ﻞﻤﺤﻟﺍ/ﻲﺋﺍﺪﺘﺑﻻﺍ ﺝﺮﺨﻟﺍ ﻯﻮﺘﺴﻣ
USB
ﻲﺋﺍﺪﺘﺑﻻﺍ ﺕﻮﺼﻟﺍ ﺝﺮﺧ ﺔﻗﻭﺎﻌﻣﻡﻭﺍ 600 ≥
ﻞﻴﻐﺸﺘﻟﺍ ﺔﻴﻄﻟﻮﻓ(ﺖﻟﻮﻓ 16 — ﺖﻟﻮﻓ 10.5 ﺡﻮﻤﺴﻣ) ﺖﻟﻮﻓ 14.4
ﺭﺎﻴﺘﻠﻟ ﻙﻼﻬﺘﺳﺍ ﻰﺼﻗﺃﺮﻴﺒﻣﺃ 10
ﻞﻴﻐﺸﺘﻟﺍ ﺓﺭﺍﺮﺣ ﺕﺎﺟﺭﺩ ﻯﺪﻣﺱﻮﻳﺰﻠﺳ ﺔﺟﺭﺩ +60 — ﺱﻮﻳﺰﻠﺳ ﺔﺟﺭﺩ –10
(ﻉﺎﻔﺗﺭﺍ × ﻝﻮﻃ × ﺽﺮﻋ) ﺐﻴﻛﺮﺘﻟﺍ ﻢﺠﺣ
.ﻖﺒﺴﻣ ﺭﺎﻄﺧﺇ ﻥﻭﺩ ﺮﻴﻴﻐﺘﻠﻟ ﻊﻀﺨﻳ
ﺕﺎﻔﺻﺍﻮﻤﻟﺍ
ﺕﻮﺻ
ﻡﺎﻋ
ﻥﺯﻮﻟﺍ
ﻲﺑﺮﻋ
36
Page 42

ﺕﺎﻔﺻﺍﻮﻤﻟﺍ
ﺮﻴﺒﻣﺃ 1.5
(ﻡﺪﻘﺘﻤﻟﺍ ﺕﻮﺼﻟﺍ ﻊﻳﺯﻮﺗ ﻊﺿﻭ) A2DP
(ﻮﻳﺪﻴﻔﻟﺍ/ﺕﻮﺼﻟﺍ ﻲﻓ ﺪﻌﺑ ﻦﻋ ﻢﻜﺤﺘﻟﺍ ﻊﺿﻭ) AVRCP 1.5
(ﻒﺗﺎﻬﻟﺍ ﻞﻴﻟﺩ ﻰﻟﺇ ﻝﻮﺻﻮﻟﺍ ﻊﺿﻭ) PBAP
ﺖﻟﻮﻓ 5 ﺮﺷﺎﺒﻣ ﺭﺎﻴﺗ
ﻞﺒﻴﺴﻳﺩ 105
ﻒﻠﻣ
Bluetooth 3.0
2 ﺔﻗﺎﻄﻟﺍ ﺔﺌﻔﻟ (ﻂﺳﻮﺘﻣ) ﺕﺍﻭ
(ﻲﻠﺴﻠﺴﺘﻟﺍ ﺬﻔﻨﻤﻟﺍ ﻊﺿﻭ) SPP
: ﻲﻠﻳﺩﻮﻤﻟ
USB ﺭﺎﻴﻌﻣﻯﻮﺼﻗ ﺔﻋﺮﺳ USB 2.0 ،USB 1.1
ﺕﺎﻔﻠﻤﻟﺍ ﻡﺎﻈﻧ32/16/FAT12
ﺭﺎﻴﺘﻟﺎﺑ ﺩﺍﺪﻣﻺﻟ ﻰﺼﻗﻷﺍ ﺪﺤﻟﺍ
(ﻞﺒﻴﺴﻳﺩ ±1) ﺩﺩﺮﺘﻟﺍ ﺔﺑﺎﺠﺘﺳﺍﺰﺗﺮﻫ ﻮﻠﻴﻛ 20 — ﺰﺗﺮﻫ 20
ﺀﺎﺿﻮﻀﻟﺍ ﻰﻟﺇ ﺓﺭﺎﺷﻹﺍ ﺔﺒﺴﻧ
(ﺰﺗﺮﻫ ﻮﻠﻴﻛ 1)
ﻲﻜﻴﻣﺎﻨﻳﺪﻟﺍ ﻝﺎﺠﻤﻟﺍﻞﺒﻴﺴﻳﺩ 90
ﺕﺍﻮﻨﻘﻟﺍ ﻞﺼﻓﻞﺒﻴﺴﻳﺩ 85
MP3 ﺓﺮﻔﺷ ﻚﻓMPEG-1/2 Audio Layer-3 ﻊﻣ ﻖﻓﺍﻮﺘﻣ
WMA ﺓﺮﻔﺷ ﻚﻓWindows Media Audio ﺔﻐﻴﺻ ﻊﻣ ﻖﻓﺍﻮﺘﻣ
AAC ﺓﺮﻔﺷ ﻚﻓ“.m4a” ،“.aac” AAC-LC ﺕﺎﻔﻠﻣ
WAV ﺓﺮﻔﺷ ﻚﻓﻲﻄﺧ PCM
FLAC ﺓﺮﻔﺷ ﻚﻓ(ﺖﺑ 24/ﺰﺗﺮﻫ ﻮﻠﻴﻛ 96 ﻰﺘﺣ) FLAC
ﺭﺍﺪﺻﻹﺍ
ﺩﺩﺮﺘﻟﺍ ﻕﺎﻄﻧﺰﺗﺮﻫﺎﺠﻴﺟ 2.480 — ﺰﺗﺮﻫﺎﺠﻴﺟ 2.402
ﺝﺮﺨﻟﺍ ﺓﺭﺪﻗ ﻲﻠﻠﻣ ﻞﺒﻴﺴﻳﺩ 0 ،(ﻰﺼﻗﺃ ﺪﺤﻛ) ﺕﺍﻭ ﻲﻠﻠﻣ ﻞﺒﻴﺴﻳﺩ +4
ﻝﺎﺼﺗﻻﺍ ﻕﺎﻄﻨﻟ ﻰﺼﻗﻷﺍ ﺪﺤﻟﺍﺎﹰﺒﻳﺮﻘﺗ (32.8 ft) ﺭﺎﺘﻣﺃ 10 ﺔﻳﺅﺮﻟﺍ ﻂﺧ
ﻊﺿﻮﻟﺍ(ﻦﻳﺪﻴﻟﺍ ﻡﺍﺪﺨﺘﺳﺍ ﻡﺪﻋ ﻊﺿﻭ) HFP 1.6
(ﻞﺒﻴﺴﻳﺩ ±3) ﺩﺩﺮﺘﻟﺍ ﺔﺑﺎﺠﺘﺳﺍﺰﺗﺮﻫ ﻮﻠﻴﻛ 20 — ﺰﺗﺮﻫ 20
ﻞﺧﺪﻠﻟ ﻰﺼﻗﻷﺍ ﺪﻬﺠﻟﺍﺖﻟﻮﻓ ﻲﻠﻠﻣ 1 000
ﻞﺧﺪﻟﺍ ﺔﻗﻭﺎﻌﻣﻡﻭﺃ ﻮﻠﻴﻛ 30
USB
Bluetooth
ﺔﻴﻓﺎﺿﺇ ﺓﺪﻋﺎﺴﻣ
ﺮﻴﺒﻣﺃ 1.5
ﻞﺒﻴﺴﻳﺩ 105
yer-3 ﻊﻣ ﻖﻓﺍﻮﺘﻣ
udio La
ﺖﻟﻮﻓ 5 ﺮﺷﺎﺒﻣ ﺭﺎﻴﺗ
GaAIAs
(CLV)
% 0.01
: ﻲﻠﻳﺩﻮﻤﻟ
ﺭﺰﻴﻠﻟﺍ ﺩﻮﻳﺍﺩ
(D/A) ﻲﻤﻗﺮﻟﺍ ﺮﺘﻠﻔﻟﺍﺔﻨﻴﻌﻟﺍ ﻦﻣ ﻰﻠﻋﺃ ﺕﺍﺮﻣ 8
ﻥﺍﺭﻭﺪﻟﺍ ﺔﻋﺮﺳ ﺔﻘﻴﻗﺪﻟﺍ ﻲﻓ ﺔﻔﻟ 200 — ﺔﻘﻴﻗﺪﻟﺍ ﻲﻓ ﺔﻔﻟ 500
ﺵﺎﻌﺗﺭﻻﺍﻭ ﺯﺍﺰﺘﻫﻻﺍﻪﺳﺎﻴﻗ ﻦﻜﻤﻳ ﻱﺬﻟﺍ ﺪﺤﻟﺍ ﻦﻣ ﻞﻗﺃ
(ﻞﺒﻴﺴﻳﺩ ±1) ﺩﺩﺮﺘﻟﺍ ﺔﺑﺎﺠﺘﺳﺍﺰﺗﺮﻫ ﻮﻠﻴﻛ 20 — ﺰﺗﺮﻫ 20
ﻲﻧﻮﻣﺭﺎﻬﻟﺍ ﻩﻮﺸﺘﻟﺍ ﻲﻟﺎﻤﺟﺇ
(ﺰﺗﺮﻫ ﻮﻠﻴﻛ 1)
ﺀﺎﺿﻮﻀﻟﺍ ﻰﻟﺇ ﺓﺭﺎﺷﻹﺍ ﺔﺒﺴﻧ
(ﺰﺗﺮﻫ ﻮﻠﻴﻛ 1)
ﻲﻜﻴﻣﺎﻨﻳﺪﻟﺍ ﻝﺎﺠﻤﻟﺍﻞﺒﻴﺴﻳﺩ 90
ﺕﺍﻮﻨﻘﻟﺍ ﻞﺼﻓﻞﺒﻴﺴﻳﺩ 85
MP3 ﺓﺮﻔﺷ ﻚﻓMPEG-1/2 A
WMA ﺓﺮﻔﺷ ﻚﻓWindows Media Audio ﺔﻐﻴﺻ ﻊﻣ ﻖﻓﺍﻮﺘﻣ
AAC ﺓﺮﻔﺷ ﻚﻓ“.aac” AAC-LC ﺕﺎﻔﻠﻣ
: ﻲﻠﻳﺩﻮﻤﻟ
USB ﺭﺎﻴﻌﻣﻯﻮﺼﻗ ﺔﻋﺮﺳ USB 2.0 /USB 1.1
ﺕﺎﻔﻠﻤﻟﺍ ﻡﺎﻈﻧ32/16/FAT12
ﺭﺎﻴﺘﻟﺎﺑ ﺩﺍﺪﻣﻺﻟ ﻰﺼﻗﻷﺍ ﺪﺤﻟﺍ
MP3 ﺓﺮﻔﺷ ﻚﻓMPEG-1/2 Audio Layer-3 ﻊﻣ ﻖﻓﺍﻮﺘﻣ
WMA ﺓﺮﻔﺷ ﻚﻓWindows Media Audio ﺔﻐﻴﺻ ﻊﻣ ﻖﻓﺍﻮﺘﻣ
AAC ﺓﺮﻔﺷ ﻚﻓ“.m4a” ،“.aac” AAC-LC ﺕﺎﻔﻠﻣ
WAV ﺓﺮﻔﺷ ﻚﻓﻲﻄﺧ PCM
FLAC ﺓﺮﻔﺷ ﻚﻓ(ﺖﺑ 24/ﺰﺗﺮﻫ ﻮﻠﻴﻛ 96 ﻰﺘﺣ) FLAC ﻒﻠﻣ
CD
ﻞﻐﺸﻣ
USB
35
ﻲﺑﺮﻋ
Page 43

(ﺰﺗﺮﻫ ﻮﻠﻴﻛ 50 ﺔﻓﺎﺴﻤﻟ)
(ﻡﻭﺍ 75/ﺖﻟﻮﻓ ﻭﺮﻜﻴﻣ 0.71) 8.2 dBf
(ﻡﻭﺍ 75/ﺖﻟﻮﻓ ﻭﺮﻜﻴﻣ 2.0) 17.2 dBf
ﻞﺒﻴﺴﻳﺩ 64
— ﺰﺗﺮﻫ ﻮﻠﻴﻛ 531
ﺰﺗﺮﻫ ﻮﻠﻴﻛ 1 611
(ﺰﺗﺮﻫ ﻮﻠﻴﻛ 9 ﺔﻓﺎﺴﻤﻟ)
— ﺰﺗﺮﻫ ﻮﻠﻴﻛ 2 940
ﺰﺗﺮﻫ ﻮﻠﻴﻛ 7 735
(ﺰﺗﺮﻫ ﻮﻠﻴﻛ 5 ﺔﻓﺎﺴﻤﻟ)
— ﺰﺗﺮﻫ ﻮﻠﻴﻛ 9 500
/ﺰﺗﺮﻫ ﻮﻠﻴﻛ 10 135
— ﺰﺗﺮﻫ ﻮﻠﻴﻛ 11 580
ﺰﺗﺮﻫ ﻮﻠﻴﻛ 18 135
(ﺰﺗﺮﻫ ﻮﻠﻴﻛ 5 ﺔﻓﺎﺴﻤﻟ)
ﻞﺒﻴﺴﻳﺩ ﻭﺮﻜﻴﻣ 29.0
(ﺖﻟﻮﻓ ﻭﺮﻜﻴﻣ 28.2)
ﻞﺒﻴﺴﻳﺩ ﻭﺮﻜﻴﻣ 30
(ﺖﻟﻮﻓ ﻭﺮﻜﻴﻣ 32)
2 ﺔﺟﻮﻤﻟﺍ
3 ﺔﺟﻮﻤﻟﺍ
3/2 ﺔﺟﻮﻤﻟﺍﺰﺗﺮﻫ ﻮﻠﻴﻛ 5
ﻡﺍﺪﺨﺘﺳﻼﻟ ﺔﻠﺑﺎﻘﻟﺍ ﺔﻴﺳﺎﺴﺤﻟﺍ
(ﻞﺒﻴﺴﻳﺩ ±3) ﺩﺩﺮﺘﻟﺍ ﺔﺑﺎﺠﺘﺳﺍﺰﺗﺮﻫ ﻮﻠﻴﻛ 15 — ﺰﺗﺮﻫ 30
ﺀﺎﺿﻮﻀﻟﺍ ﻰﻟﺇ ﺓﺭﺎﺷﻹﺍ ﺔﺒﺴﻧ
(ﺰﺗﺮﻫ ﻮﻠﻴﻛ 1) ﻮﻳﺮﺘﺳﻻﺍ ﻞﺼﻓﻞﺒﻴﺴﻳﺩ 40
(MW)
(SW1)
(SW2)
MW
ﺔﻣﺪﺨﺘﺴﻤﻟﺍ ﺔﻴﺳﺎﺴﺤﻟﺍ ﺔﺟﺭﺩ
SW
ﺕﺎﻔﺻﺍﻮﻤﻟﺍ
ﺩﺩﺮﺘﻟﺍ ﻕﺎﻄﻧ ﺰﺗﺮﻫ ﺎﺠﻴﻣ 108.0 — ﺰﺗﺮﻫ ﺎﺠﻴﻣ 87.5
(ﻞﺒﻴﺴﻳﺩ 30 = S/N)
ﺔﻴﺳﺎﺴﺤﻟﺍ ﺔﺋﺪﻬﺗ
(ﻞﺒﻴﺴﻳﺩ 46 = DIN S/N)
(ﻱﺩﺎﺣﺃ)
ﺩﺩﺮﺘﻟﺍ ﻕﺎﻄﻧ 1 ﺔﺟﻮﻤﻟﺍ
ﺓﺎﻨﻘﻟﺍ ﺔﻌﺳ ﺪﻳﺪﺤﺗ1 ﺔﺟﻮﻤﻟﺍﺰﺗﺮﻫ ﻮﻠﻴﻛ 9
(ﻞﺒﻴﺴﻳﺩ 20 = S/N)
ﻞﻴﺻﻮﺘﻟﺍ/ﺐﻴﻛﺮﺘﻟﺍ
FM
(13 )
ﻥﻮﻓﻭﺮﻜﻴﻤﻟﺍ ﻞﻴﺻﻮﺗ ﺲﺒﻘﻣ
AM
ﻒﻟﺍﻮﻤﻟﺍ
ﺮﻓﻭﻮﺒﺼﻟﺍ ﺝﺮﺨﻟﺍ/ﻲﻣﺎﻣﻷﺍ ﺝﺮﺨﻟﺍ/ﻲﻔﻠﺨﻟﺍ ﺝﺮﺨﻟﺍ
ﺭﺎﻬﺠﻣ/ﻯﺪﻤﻟﺍ ﻂﺳﻮﺘﻣ/ﺕﻮﺼﻟﺍ ﺮﺒﻜﻣ ﺝﺮﺧ
ﺮﻓﻭﻮﺒﺼﻟﺍ ﺝﺮﺨﻟﺍ/ﻲﻔﻠﺨﻟﺍ ﺝﺮﺨﻟﺍ/ﻲﻣﺎﻣﻷﺍ ﺝﺮﺨﻟﺍ
ﺔﻀﻴﻔﺨﻟﺍ ﺕﺎﻤﻐﻨﻟﺍ ﺭﺎﻬﺠﻣ/ﻯﺪﻤﻟﺍ ﻂﺳﻮﺘﻣ ﺝﺮﺧ
ﺔﻴﺟﺭﺎﺧ ﺕﺎﻧﻮﻜﻣ ﻞﻴﺻﻮﺗ
(
ﺪﻌﺑ ﻦﻋ ﻢﻜﺤﺘﻟﺍ ﺯﺎﻬﺟ ﺔﻓﺮﻌﻣ
(26 )
ﺓﺩﺎﻴﻘﻟﺍ ﺔﻠﺠﻋ ﻲﻓ
ﺝﺮﺨﻟﺍ ﻑﺍﺮﻃﺍ
:ﺕﺍﻮﻨﻗ 3 ﺔﻳﺪﻌﺘﻠﻟ
ﺔﻴﻔﺤﻟﺍ ﺕﺎﻤﻐﻨﻟﺍ
:ﺕﺍﻮﻨﻗ 3 ﺔﻳﺪﻌﺘﻠﻟ
ﻲﻠﻳﺩﻮﻤﻟ)
ﻲﺑﺮﻋ
34
Page 44

ﻲﺋﺍﻮﻬﻟﺍ ﻞﻴﺻﻮﺗ ﻑﺮﻃ
ﺔﻴﺋﺎﺑﺮﻬﻛ ﺔﻣﺎﻤﺻ
(ﺮﻴﺒﻣﺃ 10)
ﻞﻴﺻﻮﺘﻟﺍ/ﺐﻴﻛﺮﺘﻟﺍ
ﻙﻼﺳﻷﺍ ﻞﻴﺻﻮﺗ
ﺔﻴﺋﺎﺑﺮﻬﻛ ﻙﻼﺳﺍ ﺓﺮﻴﻔﺿ ﻊﻣ ﺯﺎﻬﺠﻟﺍ ﺐﻴﻛﺮﺘﺑ ﺢﺼﻨﻧ
ﻩﺬﻫ ﻝﺎﻜﻳﺇﻭ ﻚﺗﺭﺎﻴﺴﻟ ﺔﺼﺼﺨﻣ ﺎﻳﺭﺎﺠﺗ ﺓﺮﻓﻮﺘﻣ ﺔﺻﺎﺧ
ﺮﻴﺸﺘﺳﺍ .ﻚﺘﻣﻼﺳ ﻥﺎﻤﻀﻟ ﻚﻟﺫﻭ ﻦﻴﻴﺼﺘﺨﻤﻠﻟ ﺔﻤﻬﻤﻟﺍ
.ﻚﻨﻣ ﺐﻳﺮﻘﻟﺍ ﺕﺍﺭﺎﻴﺴﻟﺎﺑ ﺔﺻﺎﺨﻟﺍ ﺕﺎﻴﺗﻮﺼﻟﺍ ﺓﺰﻬﺟﺃ ﻊﺋﺎﺑ
ﺾﻳﺭﺄﺘﻟﺍ ﻚﻠﺳ ﻞﺻ ،ﻲﺟﺭﺎﺧ ﺕﻮﺻ ﻢﺨﻀﻣ ﻰﻟﺍ ﻞﻴﺻﻮﺘﻟﺍ ﺪﻨﻋ
ﺽﺮﻌﺗ ﻱﺩﺎﻔﺘﻟ ﻡﺎﻜﺣﺈﺑ ﺓﺭﺎﻴﺴﻟﺍ ﻪﻴﺳﺎﺷ ﻰﻟﺍ ﻪﺑ ﺹﺎﺨﻟﺍ
: ﻡﺎﻫ
.ﻒﻠﺘﻠﻟ ﺓﺪﺣﻮﻟﺍ
(ﻯﺮﺴﻴﻟﺍ) ﻕﺎﻄﻨﻟﺍ ﺔﻄﺳﻮﺘﻣ ﺔﻋﺎﻤﺳ :ﺕﺍﻮﻨﻗ 3 ﺔﻳﺪﻌﺘﻠﻟ
(ﻰﻨﻤﻴﻟﺍ) ﻕﺎﻄﻨﻟﺍ ﺔﻄﺳﻮﺘﻣ ﺔﻋﺎﻤﺳ :ﺕﺍﻮﻨﻗ 3 ﺔﻳﺪﻌﺘﻠﻟ
ﺡﺎﺘﻔﻣ
ﻝﺎﻌﺘﺷﻻﺍ
ﻕﻭﺪﻨﺻ
ﺕﺍﺯﻮﻴﻓ
ﺓﺭﺎﻴﺴﻟﺍ
ﺔﻳﺭﺎﻄﺒﻟﺍ
33
/(ﻯﺮﺴﻴﻟﺍ) ﺔﻴﻣﺎﻣﻷﺍ ﺔﻋﺎﻤﺴﻟﺍ ﻰﻟﺇ
/(ﻰﻨﻤﻴﻟﺍ) ﺔﻴﻣﺎﻣﻷﺍ ﺔﻋﺎﻤﺴﻟﺍ ﻰﻟﺇ
/(ﻯﺮﺴﻴﻟﺍ) ﺔﻴﻔﻠﺨﻟﺍ ﺔﻋﺎﻤﺴﻟﺍ ﻰﻟﺇ
(ﻯﺮﺴﻴﻟﺍ) ﺕﻮﺼﻟﺍ ﺮﺒﻜﻣ :ﺕﺍﻮﻨﻗ 3 ﺔﻳﺪﻌﺘﻠﻟ
/(ﻰﻨﻤﻴﻟﺍ) ﺔﻴﻔﻠﺨﻟﺍ ﺔﻋﺎﻤﺴﻟﺍ ﻰﻟﺇ
(ﻰﻨﻤﻴﻟﺍ) ﺕﻮﺼﻟﺍ ﺮﺒﻜﻣ :ﺕﺍﻮﻨﻗ 3 ﺔﻳﺪﻌﺘﻠﻟ
ﺓﺭﺎﻴﺴﻟﺍ ﺕﺍﺯﻮﻴﻓ ﻕﻭﺪﻨﺻ
(ﻲﺿﺭﻷﺍ ﻚﻠﺳ) ﺩﻮﺳﺃ
ﻲﻧﺪﻌﻤﻟﺍ ﺓﺭﺎﻴﺴﻟﺍ ﻞﻜﻴﻫ ﻭﺍ ﻲﻧﺪﻌﻤﻟﺍ ﻢﺴﺠﻟﺍ ﻰﻟﺍ
ﻲﺑﺮﻋ
ﺩﻮﺳﺃ/ﺾﻴﺑﺃ
ﺩﻮﺳﺃ/ﻱﺩﺎﻣﺭ
ﺩﻮﺳﺃ/ﺮﻀﺧﺃ
ﺩﻮﺳﺃ/ﺔﻴﻧﺍﻮﺟﺭﺃ
(ﻝﺎﻌﺷﻹﺍ ﻚﻠﺳ) ﺮﻤﺣﺃ
(ﺔﻳﺭﺎﻄﺒﻟﺍ ﻚﻠﺳ) ﺮﻔﺻﺃ
ﺾﻴﺑﺃ
ﻱﺩﺎﻣﺭ
ﺮﻀﺧﺃ
ﺔﻴﻧﺍﻮﺟﺭﺃ
.ﻂﻳﺮﺸﻟﺍ ﻦﻣ ﺯﺮﺒﻳ ﻚﻠﺴﻟﺍ ﻞﻌﺠﺗ ﻼﻓ ،ﺕﻼﻴﺻﻮﺗ ﺔﻳﺃ ﻞﻤﻋ ﻢﺘﻳ ﻢﻟ ﺍﺫﺇ
ﻢﺘﻛ ﻲﻓ ﻢﻜﺤﺘﻟﺍ ﻚﻠﺳ)
/ﺀﺎﺑﺮﻬﻜﻟﺍ ﻲﻓ ﻢﻜﺤﺘﻟﺍ ﻚﻠﺳ)
(ﻲﺋﺍﻮﻬﻟﺍ ﻲﻓ ﻢﻜﺤﺘﻟﺍ ﻚﻠﺳ
ﻲﻠﻠﻴﻣ 350
ﻦﻋ ﻢﻜﺤﺘﻟﺍ ﺯﺎﻬﺟ ﻚﻠﺳ)
(ﺓﺩﺎﻴﻘﻟﺍ ﺔﻠﺠﻋ ﻲﻓ ﺪﻌﺑ
(ﺕﻮﺼﻟﺍ
ﺾﻴﺑﺃ/ﻕﺭﺯﺃ
ﺖﻟﻮﻓ 12)
(ﺮﻴﺒﻣﺍ
ﺮﻔﺻﺃ/ﺢﺗﺎﻓ ﻕﺭﺯﺃ
ﻲﻨﺑ
،K
en
wood ﻦﻣ ﺔﺣﻼﻤﻟﺍ ﻡﺎﻈﻧ ﻞﻴﺻﻮﺘﻟ
ﺔﺣﻼﻤﻟﺍ ﻞﻴﻟﺩ ﻰﻟﺇ ﻉﻮﺟﺮﻟﺎﺑ ﻚﻴﻠﻋ
ﺔﻟﺎﺣ ﻲﻓ ﺔﻗﺎﻄﻟﺍ ﻲﻓ ﻢﻜﺤﺘﻟﺍ ﻑﺮﻃ ﻰﻟﺇ
ﻭﺃ ،ﻱﺭﺎﻴﺘﺧﻻﺍ ﺓﺭﺪﻘﻟﺍ ﻢﺨﻀﻣ ﻡﺍﺪﺨﺘﺳﺍ
ﺓﺭﺎﻴﺴﻟﺎﺑ ﻲﺋﺍﻮﻬﻟﺍ ﻲﻓ ﻢﻜﺤﺘﻟﺍ ﻑﺮﻄﺑ
ﻢﻜﺤﺘﻟﺍ ﺯﺎﻬﺟ ﻝﻮﺤﻣ ﻰﻟﺇ
ﺓﺩﺎﻴﻘﻟﺍ ﺔﻠﺠﻋ ﻲﻓ ﺪﻌﺑ ﻦﻋ
Page 45

ﺐﺴﺣ ﻲﻏﺍﺮﺒﻟﺍ ﺕﺎﺤﺘﻓ ﻒﻠﺘﺨﺗ .(D) ﻭﺃ (C) ﺔﻘﻓﺮﻤﻟﺍ ﻲﻏﺍﺮﺒﻟﺍ ﺎﻣﺪﺨﺘﺴﻣ ﺓﺭﺎﻴﺴﻟﺍ ﺕﺎﻣﺎﻋﺩ ﻰﻠﻋ ﺐﻴﻛﺮﺘﻟﺎﺑ ﻢﻗ
.ﺔﺑﻮﻠﻄﻤﻟﺍ ﻙﻼﺳﻷﺍ ﻞﻴﺻﻮﺘﺑ ﻢﻗ
(33 )
ﺓﺭﺎﻴﺴﻟﺍ ﺔﻣﺎﻋﺩ
ﺓﺭﺎﻴﺴﻟﺍ ﻩﻮﻠﺑﺎﺗ
.ﺕﺍﺭﺎﻴﺴﻟﺍ ﻞﻳﺩﻮﻣ
(ﺓﺭﺎﻴﺴﻟﺍ ﻮﻠﺑﺎﺗ ﻞﺧﺍﺩ) ﺓﺪﺣﻮﻟﺍ ﺐﻴﻛﺮﺗ
ﻞﻴﺻﻮﺘﻟﺍ/ﺐﻴﻛﺮﺘﻟﺍ
[ ﻑﺮﻄﻟﺍ ﻞﺼﻓﺍ ﻢﺛ ،ﻝﺎﻌﺷﻹﺍ ﺡﺎﺘﻔﻣ ﻦﻣ ﺡﺎﺘﻔﻤﻟﺍ ﻉﺰﻧﺍ 1
.ﺢﻴﺤﺻ ﻞﻜﺸﺑ ﻙﻼﺳﻷﺍ ﻞﻴﺻﻮﺗ 2
.ﻚﺗﺭﺎﻴﺳ ﻲﻓ ﺯﺎﻬﺠﻟﺍ ﺐﻛﺭ 3
.(ﺓﺭﺎﻴﺴﻟﺍ ﻮﻠﺑﺎﺗ ﻞﺧﺍﺩ) ﺓﺪﺣﻮﻟﺍ ﺐﻴﻛﺮﺗ ﺮﻈﻧﺍ
.ﺓﺭﺎﻴﺴﻟﺍ ﺔﻳﺭﺎﻄﺒﺑ [ ﻑﺮﻃ ﻞﻴﺻﻮﺗ 4
.ﺔﻗﺎﻄﻟﺍ ﻞﻴﻐﺸﺘﻟ
ﺐﻴﻛﺮﺘﻟﺍ ﻲﻓ ﺔﻣﺪﺨﺘﺴﻤﻟﺍ ﺭﺎﻴﻐﻟﺍ ﻊﻄﻗ ﺔﻤﺋﺎﻗ
ﻙﻼﺳﻷﺍ ﺓﺮﻴﻔﺿ (B)
ﻲﺳﺎﺳﻷﺍ ﺀﺍﺮﺟﻹﺍ
.ﺓﺭﺎﻴﺴﻟﺍ ﺔﻳﺭﺎﻄﺑ ﻦﻣ
(33 )
.ﻙﻼﺳﻷﺍ ﻞﻴﺻﻮﺗ ﺮﻈﻧﺍ
(3 )
ﻰﻠﻋ ﻂﻐﺿﺍ 5
.ﺓﺪﺣﻮﻟﺍ ﻂﺒﺿ ﺪﻋﺃ 6
ﺔﺌﻴﻬﺘﻟﺍ ﺔﺣﻮﻟ (A)
(ﻂﻘﻓ ﺎﺗﻮﻳﻮﺗ ﺓﺭﺎﻴﺴﻟ)
ﻭﺃ ( ) ﺐﻴﻛﺮﺘﻟﺍ ﺕﺎﺤﺘﻓ ﻡﺪﺨﺘﺳﺍ .(D) ﻭﺃ (C) ﺔﻘﻓﺮﻤﻟﺍ ﻲﻏﺍﺮﺒﻟﺍ ﺎﻣﺪﺨﺘﺴﻣ ﺓﺭﺎﻴﺴﻟﺍ ﺕﺎﻣﺎﻋﺩ ﻰﻠﻋ ﺐﻴﻛﺮﺘﻟﺎﺑ ﻢﻗ
.ﺔﺑﻮﻠﻄﻤﻟﺍ ﻙﻼﺳﻷﺍ ﻞﻴﺻﻮﺘﺑ ﻢﻗ
.(A) ﺔﻘﻓﺮﻤﻟﺍ ﺔﺌﻴﻬﺘﻟﺍ ﺔﺣﻮﻟ ﺐﻴﻛﺮﺘﺑ ﻢﻗ ،ﻢﺛ .ﺓﺭﺎﻴﺴﻟﺍ ﺕﺎﻣﺎﻋﺩ ﻢﺋﻼﺗ ﻲﺘﻟﺍ (
(33 )
ﺓﺭﺎﻴﺴﻟﺍ ﻩﻮﻠﺑﺎﺗ
ﺓﺭﺎﻴﺴﻟﺍ ﺔﻣﺎﻋﺩ
ﺎﺗﻮﻳﻮﺗ ﺕﺍﺭﺎﻴﺳ ﻲﻓ ﺐﻴﻛﺮﺘﻟﺍ
)
ﺱﺃﺮﻟﺍ ﺔﺤﻄﺴﻣ ﻲﻏﺍﺮﺑ (D)
(ﻢﻣ 8 × M5)
.ﻂﻘﻓ ﺓﺩﺪﺤﻤﻟﺍ ﻲﻏﺍﺮﺒﻟﺍ ﻡﺪﺨﺘﺳﺍ
ﺱﺃﺮﻟﺍ ﺓﺭﻭﺪﻣ ﻲﻏﺍﺮﺑ (C)
(ﻢﻣ 8 × M5)
ﺮﻴﻏ ﻲﻏﺍﺮﺒﻟﺍ ﻡﺍﺪﺨﺘﺳﺍ ﺐﺒﺴﻳ ﺪﻘﻓ
.ﺯﺎﻬﺠﻠﻟ ﺎﹰﻔﻠﺗ ﺔﺤﻴﺤﺼﻟﺍ
ﻲﺑﺮﻋ
32
Page 46

ﻞﻴﺻﻮﺘﻟﺍ/ﺐﻴﻛﺮﺘﻟﺍ
ﺮﻳﺬﺤﺗ
ﻪﻴﺒﻨﺗ
•
•
•
•
•
•
•
•
•
•
•
•
.ﻲﺒﻠﺳ ﺾﻳﺭﺄﺗﻭ ،ﺖﻟﻮﻓ 12 ﺮﺷﺎﺒﻣ ﺭﺎﻴﺗ ﺭﺪﺼﻣ ﺎﻬﺑ ﺓﺭﺎﻴﺳ ﻲﻓ ﻂﻘﻓ ﺓﺪﺣﻮﻟﺍ ﻡﺍﺪﺨﺘﺳﺍ ﻦﻜﻤﻳ
.ﺐﻴﻛﺮﺘﻟﺍﻭ ﻙﻼﺳﻷﺍ ﻞﻴﺻﻮﺗ ﻞﺒﻗ ﺔﻳﺭﺎﻄﺒﻠﻟ ﻲﺒﻠﺴﻟﺍ ﻑﺮﻄﻟﺍ ﻞﺼﻔﺑ ﻢﻗ
ﻭﺃ ﺓﺭﺎﻴﺴﻟﺍ ﻪﻴﺳﺎﺸﺑ (ﺮﻤﺣﻷﺍ) ﻝﺎﻌﺷﻹﺍ ﻚﻠﺳﻭ (ﺮﻔﺻﻷﺍ) ﺔﻳﺭﺎﻄﺒﻟﺍ ﻚﻠﺳ ﻞﻴﺻﻮﺘﺑ ﻢﻘﺗ ﻻ
.ﻲﺋﺎﺑﺮﻬﻛ ﺱﺎﻣ ﺙﻭﺪﺣ ﻊﻨﻤﻟ (ﺀﺍﺩﻮﺳ) ﻲﺿﺭﻷﺍ ﻚﻠﺴﻟﺍ
:ﻲﺋﺎﺑﺮﻬﻛ ﺱﺎﻤﺗ ﺙﻭﺪﺣ ﻱﺩﺎﻔﺘﻟ
.ﻞﻴﻨﻴﻔﻟﺍ ﻦﻣ ﻂﻳﺮﺷ ﺔﻄﺳﺍﻮﺑ ﺔﻠﺻﻮﻤﻟﺍ ﺮﻴﻏ ﻙﻼﺳﻷﺍ ﻝﺰﻌﺑ ﻢﻗ –
.ﺐﻴﻛﺮﺘﻟﺍ ﺪﻌﺑ ﺔﻴﻧﺎﺛ ﺓﺮﻣ ﺓﺭﺎﻴﺴﻟﺍ ﻪﻴﺳﺎﺷ ﻊﻣ ﺓﺪﺣﻮﻟﺍ ﺾﻳﺭﺄﺗ ﻦﻣ ﺪﻛﺄﺗ –
ﻲﺘﻟﺍ ﻙﻼﺳﻻﺍ ﻝﻮﺣ ﻞﻴﻨﻴﻔﻟﺍ ﻦﻣ ﻂﻳﺮﺷ ﻒﻟﻭ ﻞﺑﺎﻜﻟﺍ ﻚﺑﺎﺸﻣ ﺔﻄﺳﺍﻮﺑ ﻙﻼﺳﻻﺍ ﻦﻴﻣﺄﺘﺑ ﻢﻗ –
.ﻙﻼﺳﻻﺍ ﺔﻳﺎﻤﺤﻟ ﺔﻴﻧﺪﻌﻤﻟﺍ ﺀﺍﺰﺟﻻﺍ ﻊﻣ ﺲﻣﻼﺘﺗ
ﻊﺋﺎﺑ ﺮﻴﺸﺘﺳﺍ .ﻦﻴﺼﺘﺨﻤﻟﺍ ﻦﻴﻴﻨﻔﻠﻟ ﺐﻴﻛﺮﺘﻟﺍﻭ ﻙﻼﺳﻷﺍ ﻞﻴﺻﻮﺗ ﺔﻤﻬﻣ ﻙﺮﺗﺍ ،ﺔﻣﻼﺴﻟﺍ ﻲﻋﺍﻭﺪﻟ
.ﺕﺍﺭﺎﻴﺴﻟﺎﺑ ﺔﺻﺎﺨﻟﺍ ﺕﺎﻴﺗﻮﺼﻟﺍ ﺓﺰﻬﺟﺃ
ﺓﺪﺣﻮﻟﺍ ﻩﺬﻫ ﻦﻣ ﺔﻴﻧﺪﻌﻤﻟﺍ ﺀﺍﺰﺟﻷﺍ ﺲﻤﻠﺗ ﻻﻭ .ﻚﺗﺭﺎﻴﺴﺑ ﺓﺰﻬﺟﻷﺍ ﻞﻣﺎﺣ ﻲﻓ ﺓﺪﺣﻮﻟﺍ ﻩﺬﻫ ﺐﻛﺭ
ﺓﺪﺣﻮﻠﻟ ﺔﻴﻧﺪﻌﻤﻟﺍ ﺀﺍﺰﺟﻷﺍ ﻥﻮﻜﺗ ﺚﻴﺣ .ﺓﺮﻴﺼﻗ ﺓﺮﺘﻔﺑ ﺎﻬﻣﺍﺪﺨﺘﺳﺍ ﺪﻌﺑ ﻭﺃ ﺎﻬﻣﺍﺪﺨﺘﺳﺍ ﺀﺎﻨﺛﺃ
.ﻦﻴﻨﺧﺎﺳ ﺔﻳﻭﺎﺤﻟﺍﻭ ﺓﺭﺍﺮﺤﻟﺍ ﺩﺪﺒﻣ ﻞﺜﻣ
ﻭﺃ (ﺀﺍﺩﻮﺳ) ﺾﻳﺭﺄﺘﻟﺍ ﻚﻠﺳ ﻭﺃ ﺓﺭﺎﻴﺴﻟﺍ ﻪﻴﺳﺎﺸﺑ ﺕﺎﻋﺎﻤﺴﻟﺍ ﻙﻼﺳﺃ [ ﻞﻴﺻﻮﺘﺑ ﻢﻘﺗ ﻻ
.ﻱﺯﺍﻮﺘﻟﺍ ﻰﻠﻋ ﺎﻬﻠﻴﺻﻮﺗ
.30º ﻦﻣ ﻞﻗﺃ ﺔﻳﻭﺍﺯ ﺪﻨﻋ ﺯﺎﻬﺠﻟﺍ ﺐﻴﻛﺮﺘﺑ ﻢﻗ
ﻝﺎﻌﺷﻹﺍ ﻚﻠﺳ ﻞﻴﺻﻮﺘﺑ ﻢﻗ ،ﻝﺎﻌﺷﺇ ﻑﺮﻃ ﺓﺭﺎﻴﺴﻟﺎﺑ ﺔﻴﺋﺎﺑﺮﻬﻜﻟﺍ ﻙﻼﺳﻷﺍ ﺔﻜﺒﺷ ﻚﻠﺘﻤﺗ ﻢﻟ ﺍﺫﺇ
ﺖﻟﻮﻓ 12 ﺮﺷﺎﺒﻣ ﺭﺎﻴﺗ ﺭﺪﺼﻣ ﺮﻓﻮﻳ ﻱﺬﻟﺍ ﺓﺭﺎﻴﺴﻟﺍ ﺕﺍﺯﻮﻴﻓ ﻕﻭﺪﻨﺻ ﻲﻓ ﺩﻮﺟﻮﻤﻟﺍ ﻑﺮﻄﻟﺎﺑ (ﺮﻤﺣﻷﺍ)
.ﻝﺎﻌﺷﻹﺍ ﺡﺎﺘﻔﻣ ﺔﻄﺳﺍﻮﺑ ﻪﻓﺎﻘﻳﺇﻭ ﻪﻠﻴﻐﺸﺗ ﻢﺘﻳﻭ
.ﺓﺭﺍﺮﺤﻟﺍ ﺩﺪﺒﺗ ﻲﺘﻟﺍ ﺔﻴﻧﺪﻌﻤﻟﺍ ﺀﺍﺰﺟﻻﺍ ﻦﻋ ﺓﺪﻴﻌﺑ ﺕﻼﺒﻜﻟﺍ ﻊﻴﻤﺠﺑ ﻆﻔﺘﺣﺍ
ﺕﺎﺣﺎﺴﻤﻟﺍﻭ ﻩﺎﺠﺗﻻﺍ ﺮﻴﻴﻐﺗ ﺕﺍﺭﺎﺷﺇﻭ ﻞﻣﺍﺮﻔﻟﺍ ﺢﻴﺑﺎﺼﻣ ﻞﻤﻋ ﻦﻣ ﺪﻛﺄﺗ ﺯﺎﻬﺠﻟﺍ ﺐﻴﻛﺮﺗ ﺪﻌﺑ
.ﻢﻴﻠﺳ ﻞﻜﺸﺑ ﻪﻓﻼﺧﻭ
ﻝﺪﺒﺘﺳﺍ ﻢﺛ ﺓﺭﺎﻴﺴﻟﺍ ﻪﻴﺳﺎﺸﻟ ﻙﻼﺳﻷﺍ ﺲﻣﻼﺗ ﻡﺪﻋ ﻦﻣ ﹰﻻﻭﺃ ﺪﻛﺄﺗ ،ﺮﻬﺼﻨﻤﻟﺍ ﻕﺍﺮﺘﺣﺍ ﺔﻟﺎﺣ ﻲﻓ
.ﺭﺎﻴﺘﻟﺍ ﺓﺪﺷ ﺲﻔﻨﺑ ﺮﺧﺁ ﺮﻬﺼﻨﻤﺑ ﻢﻳﺪﻘﻟﺍ ﺮﻬﺼﻨﻤﻟﺍ
ﺡﻼﺻﻻﺍﻭ ﻝﺎﻄﻋﻻﺍ ﻦﻋ ﺚﺤﺒﻟﺍ
ﺕﻮﺻ ﻞﻐﺸﻣﻭ ﺓﺪﺣﻮﻟﺍ ﻦﻴﺑ ﺔﻓﺎﺴﻤﻟﺍ ﻞﻴﻠﻘﺘﺑ ﻢﻗ
ﻝﺎﺼﺗﻻﺍ ﻝﻭﺎﺣﻭ ﺎﻬﻠﻴﻐﺸﺗ ﻢﺛ ﺓﺪﺣﻮﻟﺍ ﻞﻴﻐﺸﺗ ﻑﺎﻘﻳﺈﺑ ﻢﻗ
.ﺓﺪﺣﻮﻟﺎﺑ ﻝﺎﺼﺗﻻﺍ ﻯﺮﺧﺃ Bluetooth ﺓﺰﻬﺟﺃ ﻝﻭﺎﺤﺗ ﺪﻗ
ﻞﺼﺘﻤﻟﺍ Bluetooth ﺕﻮﺻ ﻞﻐﺸﻣ ﻥﺎﻛ ﺍﺫﺇ ﺎﻤﻣ ﻖﻘﺤﺗ
ﻮﻳﺪﻴﻔﻟﺍ/ﺕﻮﺼﻟﺍ ﻲﻓ ﺪﻌﺑ ﻦﻋ ﻢﻜﺤﺘﻟﺍ ﻊﺿﻭ ﻢﻋﺪﻳ
ﺕﻮﺼﻟﺍ ﻞﻐﺸﻤﺑ ﺔﺻﺎﺨﻟﺍ ﺕﺎﻤﻴﻠﻌﺘﻟﺍ ﻊﺟﺍﺭ) .(A
.ﻯﺮﺧﺃ ﺓﺮﻣ ﻪﻠﻴﺻﻮﺗﻭ Bluetooth ﻞﻐﺸﻣ ﻞﺼﻔﺑ ﻢﻗ
.ﻰﺼﻗﻷﺍ ﺪﺤﻟﺍ ﻰﻟﺇ ﺔﻠﺠﺴﻤﻟﺍ ﺓﺰﻬﺟﻷﺍ ﺩﺪﻋ ﻞﺻﻭ
،
18 )
.ﻱﺭﻭﺮﺿ ﺮﻴﻏ ﺯﺎﻬﺟ ﻑﺬﺣ ﺪﻌﺑ ﺔﻟﻭﺎﺤﻤﻟﺍ ﺪﻋﺃ
ﺲﻔﻧ ﻮﻫ ﻢﺳﻻﺍ ﻪﺑ ﻕﻮﻄﻨﻤﻟﺍ ﺕﻮﺼﻟﺍ ﻥﻮﻜﻳ ﻥﺃ ﻰﻠﻋ ﺹﺮﺣﺍ
ﻭﺍ ﺕﻮﺼﻟﺍ ﻰﻠﻋ ﻑﺮﻌﺘﻟﺍ ﺓﺰﻴﻣ ﻢﻋﺪﻳ ﻻ ﻝﻮﺻﻮﻤﻟﺍ ﻒﺗﺎﻬﻟﺍ
“ERROR” ﺔﻟﺎﺳﺮﻟﺍ ﺕﺮﻬﻇ ﺍﺫﺇ .ﻯﺮﺧﺃ ﺓﺮﻣ ﺔﻴﻠﻤﻌﻟﺍ ﺀﺍﺮﺟﺇ ﺪﻋﺃ
ﺔﻔﻴﻇﻮﻟﺍ ﻢﻋﺪﻳ ﺯﺎﻬﺠﻟﺍ ﻥﺎﻛ ﺍﺫﺇ ﺎﻤﻣ ﻖﻘﺤﺘﻓ ،ﻯﺮﺧﺃ ﺓﺮﻣ
ﻢﻟ ﺍﺫﺇﻭ .ﻯﺮﺧﺃ ﺓﺮﻣ ﺔﻴﻠﻤﻌﻟﺍ ﺀﺍﺮﺟﺇ ﻝﻭﺎﺣﻭ ﺓﺪﺣﻮﻟﺍ ﻂﺒﺿ ﺪﻋﺃ
.ﻚﻟ ﺔﻣﺪﺧ ﺰﻛﺮﻣ ﺏﺮﻗﺃ ﺮﺸﺘﺳﺎﻓ ،ﺔﻠﻜﺸﻤﻟﺍ ﻞﺣ ﻢﺘﻳ
.ﻒﺗﺎﻬﻟﺍ ﻞﻳﻮﺤﺗ ﺓﺰﻴﻣ ﺔﻠﺼﺘﻤﻟﺍ ﻒﺗﺍﻮﻬﻟﺍ ﻢﻋﺪﺗ ﻻ ﺪﻗ
.Bluetooth
.ﻯﺮﺧﺃ ﺓﺮﻣ
VRCP
.(ﻚﺑ ﺹﺎﺨﻟﺍ
(DEVICE DELETE
.ﻞﺠﺴﻤﻟﺍ ﺕﻮﺼﻟﺍ
.ﻒﺗﺎﻬﻟﺍ ﻞﻴﻟﺩ ﻝﺎﺳﺭﺍ
.Bluetooth
.ﺎﻫﺀﺍﺮﺟﺇ ﻝﻭﺎﺤﺗ ﻲﺘﻟﺍ
.ﻝﺎﺼﺗﻻﺍ
•
ﺕﻮﺼﻟﺍ ﺔﻌﻃﺎﻘﻣ ﻢﺘﺗ
ﻞﻴﻐﺸﺗ ﺀﺎﻨﺛﺃ ﻪﻴﻄﺨﺗ ﻭﺃ
•
.Bluetooth ﺕﻮﺻ ﻞﻐﺸﻣ
•
•
ﻞﻐﺸﻤﺑ ﻢﻜﺤﺘﻟﺍ ﻦﻜﻤﻳ ﻻ
.ﻞﺼﺘﻤﻟﺍ Bluetooth ﺕﻮﺻ
)
•
“DEVICE FULL”
“N/A VOICE TAG”
“NOT SUPPORT”
“NO PAIR”/“NO ENTRY” ﺮﺒﻋ ﻪﻴﻠﻋ ﺭﻮﺜﻌﻟﺍ ﻢﺗ/ﻞﺻﻮﻣ ﻞﺠﺴﻣ ﺯﺎﻬﺟ ﺪﺟﻮﻳ ﻻ
“NO D
TA”/“NO INFO” ﺔﻬﺟ ﺕﺎﻣﻮﻠﻌﻣ ﻰﻠﻋ ﻝﻮﺼﺤﻟﺍ Bluetooth ﺯﺎﻬﺟ ﻊﻴﻄﺘﺴﻳ ﻻ
A
/“HF ERROR XX”
“SWITCHING NG”
ﺽﺍﺮﻋﻻﺍﻝﺎﻄﻋﻷﺍ ﺔﺠﻟﺎﻌﻣ
Bluetooth®
“ERROR”
“BT ERROR”
31
ﻲﺑﺮﻋ
Page 47

ﺡﻼﺻﻻﺍﻭ ﻝﺎﻄﻋﻻﺍ ﻦﻋ ﺚﺤﺒﻟﺍ
ﻦﻣ ﺪﻛﺄﺘﻟﺍ ﻰﺟﺮﻳ .ﺔﻴﺴﻴﺋﺮﻟﺍ ﺓﺪﺣﻮﻟﺍ ﻦﻣ ﻝﻮﺼﻔﻣ USB ﺯﺎﻬﺟ
ﻝﻮﺻﻮﻣ ﺯﺎﻬﺠﻟﺍ :USB ﻝﺎﺧﺩﺇ ﻞﻴﺻﻮﺗ ﻑﺮﻃ ﺮﺒﻋ ﻝﻮﺻﻮﻣ
ﻰﺟﺮﻳ .Bluetooth ﻝﺎﺼﺗﺍ ﻊﻄﻗ ﻢﺗ :Bluetooth ﺮﺒﻋ ﻝﻮﺻﻮﻣ
ﺯﺎﻬﺠﻟﺍ ﻥﺍﺮﻗﺍ ﻦﻣ ﺪﻛﺄﺘﻟﺍﻭ Bluetooth ﻝﺎﺼﺗﺍ ﻦﻣ ﺪﻛﺄﺘﻟﺍ
ﻖﻴﺒﻄﺗ ﺀﺎﻬﻧﺈﺑ ﻢﻗ .ﻝﻮﺧﺪﻟﺍ ﻞﻴﺠﺴﺘﺑ ﻢﻘﻳ ﻢﻟ ﻡﺪﺨﺘﺴﻤﻟﺍ
ﻞﻜﻟ ﻲﺼﺨﺸﻟﺍ ﻒﻳﺮﻌﺘﻟﺍ ﻢﻗﺭ ﺰﻣﺭ ﺲﻔﻧ ﻝﺎﺧﺩﺇ ﻦﻣ ﺪﻛﺄﺗ
ﺯﺎﻬﺟﻭ ﺓﺪﺣﻮﻟﺍ ﻦﻣ ﻞﻛ ﻦﻣ ﻥﺍﺮﻗﻹﺍ ﺕﺎﻣﻮﻠﻌﻣ ﻑﺬﺤﺑ ﻢﻗ
ﺓﺭﺎﺷﻹﺍ ﻝﺎﺒﻘﺘﺳﺍ ﻚﻨﻜﻤﻳ ﺚﻴﺣ ﻥﺎﻜﻣ ﻰﻟﺇ ﺓﺭﺎﻴﺴﻟﺍ ﻙﺮﺣ
.ﺍﹰﺀﻭﺪﻫ ﺮﺜﻛﺃ ﺔﺌﻴﺑ ﻲﻓ ﻲﺗﻮﺼﻟﺍ ﻝﺎﺼﺗﻻﺍ ﺔﻘﻳﺮﻃ ﻡﺪﺨﺘﺳﺍ
ﻖﻄﻧ ﺪﻨﻋ ﻥﻮﻓﻭﺮﻜﻴﻤﻟﺍ ﻦﻴﺑﻭ ﻚﻨﻴﺑ ﺔﻓﺎﺴﻤﻟﺍ ﻞﻴﻠﻘﺘﺑ ﻢﻗ
.USB ﺮﺒﻋ ﺢﻴﺤﺻ ﻞﻜﺸﺑ ﻝﻮﺻﻮﻣ ﺯﺎﻬﺠﻟﺍ ﻥﺍ
.ﺭﺎﻈﺘﻧﻻﺍ ﻰﺟﺮﻳ .ﺔﻴﺴﻴﺋﺮﻟﺍ ﺓﺪﺣﻮﻟﺎﺑ
.ﺓﺪﺣﻮﻟﺍﻭ
ﻥﺍ ﻭﺃ ،ﺢﻴﺤﺻ ﻞﻜﺸﺑ Spotify ﻖﻴﺒﻄﺘﻟﺍ ﻞﻴﺻﻮﺗ ﻢﺘﻳ ﻢﻟ
ﻲﻓ ﻝﻮﺧﺪﻟﺍ ﻞﻴﺠﺴﺘﺑ ﻢﻗ ﻢﺛ ،ﻪﻠﻴﻐﺸﺗ ﺪﻋﺍﻭ Spotify
.ﻯﺮﺧﺃ ﺓﺮﻣ Bluetooth ﺯﺎﻬﺟ ﻦﻣ ﺚﺤﺒﻟﺍ
(14 )
.ﻯﺮﺧﺃ ﺓﺮﻣ ﻥﺍﺮﻗﻹﺍ ﺀﺍﺮﺟﺇ ﻢﺛ ،Bluetooth
(13 )
.ﻥﻮﻓﻭﺮﻜﻴﻤﻟﺍ ﺓﺪﺣﻭ ﻊﺿﻮﻣ ﻂﺒﻀﺑ ﻢﻗ
(16 ) .[ECHO CANCEL]
.Bluetooth ﺯﺎﻬﺟﻭ ﺓﺪﺣﻮﻟﺍ ﻦﻴﺑ ﺔﻓﺎﺴﻤﻟﺍ ﻞﻴﻠﻘﺘﺑ ﻢﻗ
ﻮﻫ ﻢﺳﻻﺍ ﻪﺑ ﻕﻮﻄﻨﻤﻟﺍ ﺕﻮﺼﻟﺍ ﻥﻮﻜﻳ ﻥﺃ ﻰﻠﻋ ﺹﺮﺣﺍ
.ﻚﺑ ﺹﺎﺨﻟﺍ Spotify ﺏﺎﺴﺣ
(3 )
.ﺓﺪﺣﻮﻟﺍ ﻂﺒﺿ ﺪﻋﺃ
.Bluetooth ﺯﺎﻬﺟﻭ ﺓﺪﺣﻮﻟﺍ ﻦﻣ
ﺩﺍﺪﻋﺇ ﺺﺤﻓﺍ
.ﻞﻀﻓﺃ ﻞﻜﺸﺑ
.ﻢﺳﻻﺍ
.ﻞﺠﺴﻤﻟﺍ ﺕﻮﺼﻟﺍ ﺲﻔﻧ
“DISCONNECTED”
•
•
•
•
•
•
•
•
•
•
•
•
•
“CONNECTING”
“CHECK APP”
ﻰﻠﻋ ﻑﺮﻌﺘﻟﺍ ﻢﺘﻳ ﻢﻟ
.Bluetooth ﺯﺎﻬﺟ
ﻥﺍﺮﻗﺍ ﺀﺍﺮﺟﺇ ﻦﻜﻤﻳ ﻻ
ﻭﺍ ﻯﺪﺻ ﻉﺎﻤﺳ ﻢﺘﻳ
ﺮﺒﻋ ﺙﺪﺤﺘﻟﺍ ﺀﺎﻨﺛﺍ ﺀﺎﺿﻮﺿ
ﻒﺗﺎﻬﻟﺍ ﺕﻮﺻ ﺓﺩﻮﺟ
ﻲﺗﻮﺼﻟﺍ ﻝﺎﺼﺗﻻﺍ ﺔﻘﻳﺮﻃ
.ﺔﺤﺟﺎﻧ ﺮﻴﻏ
ﺽﺍﺮﻋﻻﺍﻝﺎﻄﻋﻷﺍ ﺔﺠﻟﺎﻌﻣ
.Bluetooth
.ﻒﺗﺎﻬﻟﺍ
.ﺔﺌﻴﺳ
ﺕﻮﺻ ﺕﺎﻔﻠﻣ ﻰﻠﻋ ﻱﻮﺘﺤﺗ ﻲﺘﻟﺍ USB ﺯﺎﻬﺟ ﻞﻴﺻﻮﺘﺑ ﻢﻗ
Spotify
ﻱﺍ ﻞﻴﻐﺸﺘﺑ ﻢﻗ ،
ﺃﺪﺑﺍﻭ Android ﺯﺎﻬﺟ ﻰﻠﻋ ﻂﺋﺎﺳﻮﻟﺍ ﻞﻐﺸﻤﻟ ﻖﻴﺒﻄﺗ
ﻖﻴﺒﻄﺘﻟﺍ ﻞﻴﻐﺸﺗ ﺪﻋﺃ ،
ﺮﺧﺍ ﻖﻴﺒﻄﺗ ﻡﺪﺨﺘﺳﺍ ﻭﺃ ﻂﺋﺎﺳﻮﻟﺍ ﻞﻐﺸﻤﻟ ﻲﻟﺎﺤﻟﺍ
ﺯﺎﻬﺟ ﻥﺍ ﻲﻨﻌﻳ ﺍﺬﻫ ،ﺔﻠﻜﺸﻤﻟﺍ ﻞﺤﻟ ﻚﻟﺫ ﻱﺩﺆﻳ ﻢﻟ ﺍﺫﺇ
ﺕﻮﺼﻟﺍ ﺓﺭﺎﺷﺍ ﻪﻴﺟﻮﺗ ﻰﻠﻋ ﺭﺩﺎﻗ ﺮﻴﻏ ﻝﻮﺻﻮﻤﻟﺍ
ﻲﻓ KENWOOD MUSIC PLAY APP ﻖﻴﺒﻄﺘﻟﺍ ﺖﻴﺒﺜﺗ ﻦﻣ ﺪﻛﺄﺗ
ﻢﻜﺤﺘﻟﺍ ﻊﺿﻭ ﺮﺘﺧﺍﻭ Android ﺯﺎﻬﺟ ﻞﻴﺻﻮﺗ ﺓﺩﺎﻋﺈﺑ ﻢﻗ
Bluetooth®
ﺯﺎﻬﺟ ﻥﺍ ﻲﻨﻌﻳ ﺍﺬﻫ ،ﺔﻠﻜﺸﻤﻟﺍ ﻞﺤﻟ ﻚﻟﺫ ﻱﺩﺆﻳ ﻢﻟ ﺍﺫﺇ
(28 ) .[BROWSE MODE]
.Android ﺯﺎﻬﺟ ﻰﻠﻋ ﺭﻮﻄﻤﻟﺍ ﺕﺍﺭﺎﻴﺧ ﺊﻔﻃﺍ
ﺯﺎﻬﺟ ﻥﺍ ﻲﻨﻌﻳ ﺍﺬﻫ ،ﺔﻠﻜﺸﻤﻟﺍ ﻞﺤﻟ ﻚﻟﺫ ﻱﺩﺆﻳ ﻢﻟ ﺍﺫﺇ
(28 ) .[BROWSE MODE]
.Android ﺯﺎﻬﺟ ﻰﻠﻋ ﺔﻗﺎﻄﻟﺍ ﺮﻴﻓﻮﺗ ﻊﺿﻭ ﺊﻔﻃﺍ
.iPod ـﻟﺍ ﺯﺎﻬﺟ ﻞﻴﺻﻮﺗ ﺪﻋﺃ
.Android ﺯﺎﻬﺟ ﻞﻴﺻﻮﺗ ﺪﻋﺃ
[HAND MODE]
[HAND MODE]
.Android ﺯﺎﻬﺟ ﻞﻴﻐﺸﺗ ﺪﻋﺍ
(28 )
(9 )
ﻢﻋﺪﻳ ﻻ ﻝﻮﺻﻮﻤﻟﺍ Android
.Android ﺯﺎﻬﺟ ﻞﻴﺻﻮﺗ ﺪﻋﺃ
ﻢﻋﺪﻳ ﻻ ﻝﻮﺻﻮﻤﻟﺍ Android
.Android ﺯﺎﻬﺟ ﻞﻴﺻﻮﺗ ﺪﻋﺃ
.Android ﺯﺎﻬﺟ ﻞﻴﻐﺸﺗ ﺪﻋﺍ
.ﻞﻴﻐﺸﺘﻠﻟ ﺔﻠﺑﺎﻗ
.iPod ﻂﺒﺿ ﺪﻋﺃ
ﻊﺿﻭ ﻲﻓ ﺖﻨﻛ ﺍﺫﺇ
.ﻞﻴﻐﺸﺘﻟﺍ
ﻊﺿﻭ ﻲﻓ ﺖﻨﻛ ﺍﺫﺇ
.ﻂﺋﺎﺳﻮﻟﺍ ﻞﻐﺸﻤﻟ
Android
.ﺓﺪﺣﻮﻟﺍ ﻰﻟﺍ
.Android ﺯﺎﻬﺟ
.ﺐﺳﺎﻨﻤﻟﺍ
“NO MUSIC”
•
•
•
ﺕﻮﺼﻟﺍ ﻉﺎﻤﺳ ﻦﻜﻤﻳ ﻻ
•
ﺯﺎﻬﺟ ﻦﻣ ﺕﻮﺼﻟﺍ ﺝﺮﺨﻳ
•
•
•
•
•
•
•
•
•
•
•
“iPod ERROR”
.ﻞﻴﻐﺸﺘﻟﺍ ﺀﺎﻨﺛﺍ
.ﻂﻘﻓ Android
ﻲﻓ ﻞﻴﻐﺸﺘﻟﺍ ﻦﻜﻤﻳ ﻻ
.
[BROWSE MODE]
ﻭﺃ “NO DEVICE” ﻞﺻﺍﻮﻳ
.ﺾﻴﻣﻮﻟﺍ “READING”
ﻢﺘﻳ ﻭﺃ ﻞﻴﻐﺸﺘﻟﺍ ﻊﻄﻘﺘﻳ
.ﺕﻮﺼﻟﺍ ﻲﻄﺨﺗ
/ “ANDROID ERROR”
“NA DEVICE”
ﺽﺍﺮﻋﻻﺍﻝﺎﻄﻋﻷﺍ ﺔﺠﻟﺎﻌﻣ
iPod/USB/CD
•
•
ANDROID
ﻊﺿﻭ
ﻲﺑﺮﻋ
30
Page 48

ﺡﻼﺻﻻﺍﻭ ﻝﺎﻄﻋﻻﺍ ﻦﻋ ﺚﺤﺒﻟﺍ
ﻑﻭﺮﺤﻟﺍ ﺽﺮﻋ ﻂﻘﻓ ﺓﺪﺣﻮﻟﺍ ﻩﺬﻫ ﻊﻴﻄﺘﺴﺗ
.ﺯﻮﻣﺮﻟﺍ ﻦﻣ ﺩﻭﺪﺤﻣ ﺩﺪﻋﻭ ﻡﺎﻗﺭﻷﺍﻭ ﺓﺮﻴﺒﻜﻟﺍ ﺔﻴﺋﺎﺠﻬﻟﺍ
ﻻ ﺪﻗ ،
(6 )
ﺎﻬﺗﺮﺘﺧﺍ ﻲﺘﻟﺍ ﺽﺮﻌﻟﺍ ﺔﻐﻟ ﻉﻮﻧ ﺐﺴﺣ
.ﺢﻴﺤﺻ ﻞﻜﺸﺑ ﻑﻭﺮﺤﻟﺍ ﺾﻌﺑ ﺽﺮﻋ ﻢﺘﻳ
.ﺕﻮﺼﻟﺍ ﺕﺎﻔﻠﻣ ﻢﻋﺪﺗ ﻂﺋﺎﺳﻮﻟﺍ ﺕﺎﻳﻮﺘﺤﻣ ﻥﺃ ﻦﻣ ﺪﻛﺄﺗ
.ﻞﻴﻤﺤﺘﻟﺍ ﺔﺤﺘﻓ ﻞﺧﺍﺩ ﻞﻴﻐﺸﺘﻠﻟ ﺔﻠﺑﺎﻗ ﺔﻧﺍﻮﻄﺳﺍ ﻞﺧﺩﺍ
ﻞﻜﺸﺑ ﺎﻬﻟﺎﺧﺩﺇ ﻢﺗﻭ ﺔﻔﻴﻈﻧ ﺔﻧﺍﻮﻄﺳﻷﺍ ﻦﻣ ﺪﻛﺄﺗ
،ﺔﻠﻜﺸﻤﻟﺍ ﻞﺣ ﻢﺘﻳ ﻢﻟ ﺍﺫﺇﻭ .ﺓﺪﺣﻮﻟﺍ ﻂﺒﺿ ﺪﻋﺃ
ﺭﺪﺼﻣ ﺮﻴﻴﻐﺘﺑ ﻢﻗ ﻢﺛ ،USB ﺯﺎﻬﺟ ﻞﻴﺻﻮﺘﺑ ﻢﻗ
ﻩﺬﻫ ﻊﻣ ﺎﹰﻘﻓﺍﻮﺘﻣ ﻞﺻﻮﻤﻟﺍ ﺯﺎﻬﺠﻟﺍ ﻥﺎﻛ ﺍﺫﺇ ﺎﻣ ﻖﻘﺤﺗ
ﺕﺎﻘﻴﺴﻨﺘﺑ ﻒﻠﻤﻟﺍ ﺔﻤﻈﻧﺍ ﻥﺃ ﻦﻣ ﺪﻛﺄﺗﻭ ﺓﺪﺣﻮﻟﺍ
.ﺯﺎﻬﺠﻟﺍ ﻞﻴﻐﺸﺗ ﺪﻋﺃﻭ ﺯﺎﻬﺠﻟﺍ ﻞﻄﻋ ﻡﺪﻋ ﻦﻣ ﺪﻛﺄﺗ
ﻦﻋ ﻝﻮﺻﻮﻣ USB ﺯﺎﻬﺟ ﻢﻋﺩ ﻊﻴﻄﺘﺴﺗ ﻻ ﺓﺪﺣﻮﻟﺍ ﻩﺬﻫ
.ﻢﻴﻤﺼﺘﻟﺍ ﺪﺣ ﻦﻣ ﺮﺜﻛﺍ ﺔﻗﺎﻃ ﺐﺤﺴﻳ USB ﺬﻔﻨﻣ
ﻞﻴﻐﺸﺘﺑ ﻢﻗ ،ﻢﺛ .USB ﺯﺎﻬﺟ ﻞﺼﻓﺍﻭ ﺔﻗﺎﻄﻟﺍ ﻊﻄﻗﺍ
ﺍﺬﻫ ﻱﺩﺆﻳ ﻢﻟ ﺍﺫﺍ .USB ﺯﺎﻬﺟ ﻞﻴﺻﻮﺗ ﺪﻋﺍﻭ ﺔﻗﺎﻄﻟﺍ
ﻢﻗﻭ ﺔﻗﺎﻄﻟﺍ ﻊﻄﻗﺍ ،ﺔﻠﻜﺸﻤﻟﺍ ﻞﺣ ﻰﻟﺍ ﺀﺍﺮﺟﻻﺍ
ﺯﺎﻬﺟ ﻝﺍﺪﺒﺘﺳﺍ ﻞﺒﻗ (ﺓﺪﺣﻮﻟﺍ ﻂﺒﺿ ﺪﻋﺍ ﻭﺃ) ﺎﻬﻠﻴﻐﺸﺘﺑ
ﻲﺑﺮﻋ
29
.ﻚﻟ ﺔﻣﺪﺧ ﺰﻛﺮﻣ ﺏﺮﻗﺃ ﺮﺸﺘﺳﺎﻓ
.ﻯﺮﺧﺃ ﺓﺮﻣ USB ﻰﻟﺇ ﻞﻴﻐﺸﺘﻟﺍ
.ﺦﺴﻨﻟﺍ ﺪﺿ ﻲﻤﺤﻣ ﻒﻠﻣ ﻞﻴﻐﺸﺗ ﻢﺗ
.ﺯﺎﻬﺠﻟﺍ ﻞﻴﺻﻮﺗ ﺪﻋﺃ
.USB ﻱﺰﻛﺮﻣ ﻊﻤﺠﻣ ﻖﻳﺮﻃ
(27 )
.ﺔﻣﻮﻋﺪﻣ
.ﺮﺧﺁ ﺯﺎﻬﺠﺑ USB
(27 )
.ﻢﻴﻠﺳ
•
•
•
•
ﻑﻭﺮﺤﻟﺍ ﺽﺮﻋ ﻢﺘﻳ ﻻ
ﻢﺳﺍ ،ﻼﺜﻣ) ﺔﺤﻴﺤﺼﻟﺍ
“TOC ERROR”
“PLEASE EJECT”
“NO DEVICE”
“UNSUPPORTED DEVICE”
“UNRESPONSIVE DEVICE”
“USB HUB IS NOT SUPPORTED”
“USB” ﻰﻟﺍ ﺭﺪﺼﻤﻟﺍ ﺮﻴﻐﺘﻳ ﻻ
ﺀﺎﻨﺛﺍ USB ﺯﺎﻬﺟ ﻞﻴﺻﻮﺗ ﺪﻨﻋ
.ﺮﺧﺍ ﺭﺪﺼﻣ ﻰﻟﺍ ﻉﺎﻤﺘﺳﻻﺍ
.“USB ERROR” ﺮﻬﻈﺗ
ﺽﺍﺮﻋﻻﺍﻝﺎﻄﻋﻷﺍ ﺔﺠﻟﺎﻌﻣ
.(ﻡﻮﺒﻟﻻﺍ
“NA FILE”
“NO DISC”
“COPY PRO”
.ﺕﻼﻴﺻﻮﺘﻟﺍﻭ ﻙﻼﺳﻻﺍ ﺺﺤﻓﺍ
ﻙﻼﺳﺍ ﻞﻴﺻﻮﺗ ﻑﺮﻃﺍ ﻥﺍ ﻦﻣ ﺪﻛﺄﺗ ﻢﺛ ،ﺔﻗﺎﻄﻟﺍ ﻊﻄﻗﺍ
ﻞﻴﻐﺸﺘﺑ ﻢﻗ .ﺢﻴﺤﺻ ﻞﻜﺸﺑ ﺔﻟﻮﺻﻮﻣ ﺔﻋﺎﻤﺴﻟﺍ
.ﺔﻣﺪﺧ ﺰﻛﺮﻣ ﺏﺮﻗﺍ ﻰﻟﺍ ﺓﺪﺣﻮﻟﺍ ﻞﺳﺭﺍ
،ﻖﻓﺍﻮﺘﻣ ﺮﻴﻏ ﺓﺩﺎﻴﻘﻟﺍ ﺔﻠﺠﻋ ﻲﻓ ﺪﻌﺑ ﻦﻋ ﻢﻜﺤﺘﻟﺍ ﺯﺎﻬﺟ
ﺯﺎﻬﺟ ﻞﻴﻛﻮﺑ ﻞﺼﺗﺍ .ﺔﻓﺮﻌﻤﻟﺍ ﺔﻴﻠﻤﻋ ﻝﺎﻤﻛﺍ ﻢﺘﻳ ﻻ ﺪﻗ
iPod/USB/CD
•
•
.ﻞﻴﺻﺎﻔﺘﻟﺍ ﺔﻓﺮﻌﻤﻟ ﺓﺭﺎﻴﺴﻟﺎﺑ ﺹﺎﺨﻟﺍ ﺕﻮﺼﻟﺍ
.ﺔﻤﻜﺤﻣ ﺓﺭﻮﺼﺑ ﻲﺋﺍﻮﻬﻟﺍ ﻞﺻﻭﺍ
ﺪﻨﻋ ﺔﻧﺍﻮﻄﺳﻷﺍ ﻂﻘﺴﺗ ﻻ ﻥﺃ ﻰﻠﻋ ﺎﹰﺼﻳﺮﺣ ﻦﻛ .ﺓﻮﻘﻟﺎﺑ
ﻂﺒﺿ ﺓﺩﺎﻋﺈﺑ ﻢﻗ ،ﺔﻠﻜﺸﻤﻟﺍ ﺍﺬﻫ ﻞﺤﻳ ﻢﻟ ﺍﺫﺇ .ﺎﻬﺟﺍﺮﺧﺇ
ﻞﻴﺠﺴﺗ ﻢﺘﻳ ﺎﻣﺪﻨﻋ ﻞﻴﻐﺸﺘﻟﺍ ﺐﻴﺗﺮﺗ ﺮﻳﺮﻘﺗ ﻢﺘﻳ
ﻰﻠﻋ ﺕﺍﺭﺎﺴﻤﻟﺍ ﻞﻴﺠﺴﺗ ﺔﻴﻔﻴﻛ ﻮﻫ ﻚﻟﺫ ﺐﺒﺳ
ﺯﺎﻬﺟ ﻰﻘﻴﺳﻮﻣ ﺔﻤﺋﺎﻗ ﺩﺍﺪﻋﺈﺑ ﻡﻮﻘﺗ ﻝﺍﺰﺗ ﻻ ﺓﺪﺣﻮﻟﺍ ﻩﺬﻫ
ﻝﻭﺎﺣ ،ﻼﻳﻮﻃ ﺎﺘﻗﻭ ﻞﻴﻤﺤﺘﻟﺍ ﻕﺮﻐﺘﺴﻳ ﺪﻗ .iPhone/iPod
.ﻯﺮﺧﺍ ﺓﺮﻣ ﺔﻗﺎﻄﻟﺍ
(3 )
.ﺓﺪﺣﻮﻟﺍ ﻂﺒﺿ ﺪﻋﺃ
.ﺎﻘﺣﻻ ﻯﺮﺧﺍ ﺓﺮﻣ
(3 )
.ﺍﹰﺪﺟ ﺓﺮﻴﺜﻛ
.ﺔﻧﺍﻮﻄﺳﻻﺍ
.ﻦﻜﻤﻣ
.ﺓﺪﺣﻮﻟﺍ
.ﺕﺎﻔﻠﻤﻟﺍ
•
.ﺕﻮﺼﻟﺍ ﻉﺎﻤﺳ ﻦﻜﻤﻳ ﻻ ﻯﻮﺘﺴﻣ ﻞﻀﻓﺍ ﻰﻠﻋ ﺕﻮﺼﻟﺍ ﺓﻮﻗ ﻯﻮﺘﺴﻣ ﻂﺒﺿﺍ
•
“MISWIRING CHECK ﺮﻬﻈﺗ
.WIRING THEN PWR ON”
“PROTECTING SEND ﺮﻬﻈﺗ
ﻞﺒﻘﺘﺴﻤﻟﺍ ﺍﺬﻫ ﻞﻐﺘﺸﻳ ﻻ
(
ﻲﻜﻴﺗﺎﺘﺳﺍ ﺞﻴﺠﺿ ﺪﻟﻮﺘﻳ
.ﻮﻳﺩﺍﺮﻟﺍ ﻰﻟﺍ ﻉﺎﻤﺘﺳﻻﺍ ﺀﺎﻨﺛﺍ
ﺕﺍﺭﺎﺴﻤﻟﺍ ﻞﻴﻐﺸﺗ ﻦﻜﻤﻳ ﻻ
.ﺾﻴﻣﻮﻟﺍ “READING” ﻞﺻﺍﻮﻳ ﻆﻓﺍﻮﺣﻭ ﺔﻴﻣﺮﻫ ﺕﻼﺴﻠﺴﺗ ﻦﻣ ﺕﺎﻳﻮﺘﺴﻣ ﻞﻤﻌﺘﺴﺗ ﻻ
ﺮﻴﻏ ﻲﻀﻘﻨﻤﻟﺍ ﻞﻴﻐﺸﺘﻟﺍ ﺖﻗﻭ
ﻝﻮﺧﺪﻟﺍ ﺪﻨﻋ “L
“FAIL”/“ERROR”
.ﺀﻱﺩﺭ ﻮﻳﺩﺍﺮﻟﺍ ﻝﺎﺒﻘﺘﺳﺍ
.ﺔﻧﺍﻮﻄﺳﻷﺍ ﺝﺍﺮﺧﺇ ﺭﺬﻌﺗ ﺔﻧﺍﻮﻄﺳﻷﺍ ﺝﺍﺮﺧﻹ M ﻰﻠﻋ ﺭﺍﺮﻤﺘﺳﻻﺍ ﻊﻣ ﻂﻐﺿﺍ
.ﺞﻴﺠﺿ ﺪﻴﻟﻮﺗ ﻢﺘﻳ.ﺔﻧﺍﻮﻄﺳﻷﺍ ﺮﻴﻐﺘﺑ ﻢﻗ ﻭﺃ ﺮﺧﺁ ﺭﺎﺴﻣ ﻰﻟﺇ ﻰﻄﺨﺗ
.ﻩﺪﻳﺮﺗ ﻱﺬﻟﺍ ﺐﻴﺗﺮﺘﻟﺎﺑ
ADING” ﺮﻬﻈﻳ
O
ﻂﻐﻀﺑ ﺚﺤﺒﻟﺍ ﻊﺿﻭ ﻲﻓ
ﺽﺍﺮﻋﻻﺍﻝﺎﻄﻋﻷﺍ ﺔﺠﻟﺎﻌﻣ
.SERVICE”
.ﺎﻘﻠﻄﻣ
ﻲﻠﻳﺩﻮﻤﻟ)
.ﺢﻴﺤﺻ
.
ﻡﺎﻋ
ﻮﻳﺩﺍﺮﻟﺍ
•
•
iPod/USB/CD
Page 49

ﻯﺮﺧﺍ ﺕﺎﻣﻮﻠﻌﻣ ﻭﺃ “NO INFO” ﻭﺃ “NO TEXT” ﺮﻬﻈﻳ ،ﺔﻠﺠﺴﻣ ﺮﻴﻏ ﺎﻬﻧﺍ ﻭﺃ ﺓﺮﻓﻮﺘﻣ ﺕﺎﻣﻮﻠﻌﻤﻟﺍ ﻦﻜﺗ ﻢﻟ ﺍﺫﺇ
ﻰﻠﻋ (ﻮﻳﺩﺍﺮﻟﺍ ﺕﺎﻧﺎﻴﺑ ﻡﺎﻈﻧ)
(R.TEXT+) +ﻮﻳﺩﺍﺭ ﺹﻮﺼﻧ
*(ﺦﻳﺭﺎﺘﻟﺍ) ﺩﺩﺮﺘﻟﺍ *(ﺦﻳﺭﺎﺘﻟﺍ) ﺔﻴﻨﻏﻻﺍ ﻥﺍﻮﻨﻋ (ﻥﺎﻨﻔﻟﺍ) ﺔﻴﻨﻏﻻﺍ ﻥﺍﻮﻨﻋ
ﺭﺎﺴﻤﻟﺍ ﻥﺍﻮﻨﻋ
ﺔﻴﻨﻏﻻﺍ ﻥﺍﻮﻨﻋ
ﺖﻗﻭ
*(ﺦﻳﺭﺎﺘﻟﺍ) ﻒﻠﻤﻟﺍ ﻢﺳﺍ (ﺪﻠﺠﻤﻟﺍ ﻢﺳﺍ) ﻒﻠﻤﻟﺍ ﻢﺳﺍ *(ﺦﻳﺭﺎﺘﻟﺍ)
ﺔﻴﻨﻏﻻﺍ ﻥﺍﻮﻨﻋ
ﻢﺳﺍ) ﺔﻴﻨﻏﻻﺍ ﻥﺍﻮﻨﻋ
ﺓﺩﻮﻋ)
ﺔﻴﻨﻏﻻﺍ ﻥﺍﻮﻨﻋ
[BATT/SIGNAL]
*(ﺦﻳﺭﺎﺘﻟﺍ) ﻮﻳﺩﺍﺭ ﺹﻮﺼﻧ *(ﺦﻳﺭﺎﺘﻟﺍ) ﺔﻄﺤﻤﻟﺍ ﻢﺳﺍ
(ﺹﺮﻘﻟﺍ ﻢﺳﺍ) ﺭﺎﺴﻤﻟﺍ ﻥﺍﻮﻨﻋ (ﻥﺎﻨﻔﻟﺍ) ﺭﺎﺴﻤﻟﺍ ﻥﺍﻮﻨﻋ
(ﺔﻳﺍﺪﺒﻠﻟ ﺓﺩﻮﻋ)
(ﻡﻮﺒﻟﻻﺍ ﻢﺳﺍ) ﺔﻴﻨﻏﻻﺍ ﻥﺍﻮﻨﻋ (ﻥﺎﻨﻔﻟﺍ) ﺔﻴﻨﻏﻻﺍ ﻥﺍﻮﻨﻋ
:
(10 ) [BROWSE MODE]/[MODE OFF]
(ﻡﻮﺒﻟﻻﺍ ﻢﺳﺍ) ﺔﻴﻨﻏﻻﺍ ﻥﺍﻮﻨﻋ (ﻥﺎﻨﻔﻟﺍ) ﺔﻴﻨﻏﻻﺍ ﻥﺍﻮﻨﻋ
(ﺔﻳﺍﺪﺒﻠﻟ ﺓﺩﻮﻋ)
*(ﺦﻳﺭﺎﺘﻟﺍ) ﻞﻴﻐﺸﺘﻟﺍ ﺖﻗﻭ *(ﺦﻳﺭﺎﺘﻟﺍ) ﺔﻴﻨﻏﻻﺍ ﻥﺍﻮﻨﻋ (ﻡﻮﺒﻟﻻﺍ
ﻂﺒﺿ ﻢﺗ ﺍﺫﺍ Bluetooth ﺙﻮﺗﻮﻠﺑ ﺯﺎﻬﺠﺑ ﺔﺻﺎﺨﻟﺍ ﺓﺭﺎﺷﻻﺍ ﺓﻮﻗﻭ ﺔﻳﺭﺎﻄﺒﻟﺍ ﺽﺮﻋ ﻢﺘﻴﺳ
(ﻥﺎﻨﻔﻟﺍ) ﺔﻴﻨﻏﻻﺍ ﻥﺍﻮﻨﻋ *(ﺦﻳﺭﺎﺘﻟﺍ) ﻕﺎﻴﺴﻟﺍ ﻥﺍﻮﻨﻋ
(ﻡﻮﺒﻟﻻﺍ ﻢﺳﺍ) ﺔﻴﻨﻏﻻﺍ ﻥﺍﻮﻨﻋ (ﻥﺎﻨﻔﻟﺍ) ﺔﻴﻨﻏﻻﺍ ﻥﺍﻮﻨﻋ
(ﺔﻳﺍﺪﺒﻠﻟ ﺓﺩﻮﻋ)
.ﺔﺷﺎﺸﻟﺍ ﺕﺎﻣﻮﻠﻌﻣ ﺮﻴﻐﺘﺗ ،DISP ﻰﻠﻋ ﺖﻄﻐﺿ ﺎﻤﻠﻛ
*
Radio Data System
*(ﺦﻳﺭﺎﺘﻟﺍ) ﻞﻴﻐﺸﺘﻟﺍ ﺖﻗﻭ *(ﺦﻳﺭﺎﺘﻟﺍ)
(
FLAC/WAV/AAC/WMA/MP3
(ﺔﻳﺍﺪﺒﻠﻟ ﺓﺩﻮﻋ)
*(ﺦﻳﺭﺎﺘﻟﺍ) ﻞﻴﻐﺸﺘﻟﺍ ﺖﻗﻭ *(ﺦﻳﺭﺎﺘﻟﺍ)
*(ﺦﻳﺭﺎﺘﻟﺍ) ﻞﻴﻐﺸﺘﻟﺍ ﺖﻗﻭ *(ﺦﻳﺭﺎﺘﻟﺍ)
*
ﺔﺷﺎﺸﻟﺍ ﺕﺎﻣﻮﻠﻌﻣ ﺮﻴﻴﻐﺗ
.(ﺽﺮﻌﻟﺍ ﺓﺪﻣ ،ﺔﻄﺤﻤﻟﺍ ﻢﺳﺍ ،ﻼﺜﻣ)
(ﺦﻳﺭﺎﺘﻟﺍ) ﺭﺪﺼﻤﻟﺍ ﻢﺳﺍ
*
(ﺦﻳﺭﺎﺘﻟﺍ) ﺩﺩﺮﺘﻟﺍ
ﺕﺎﻄﺤﻤﻟ ﺡﺎﺘﻣ)
(ﻂﻘﻓ
FM
ﺔﺟﻮﻣ
(ﺔﻳﺍﺪﺒﻠﻟ ﺓﺩﻮﻋ)
CD-DA
ﻲﻠﻳﺩﻮﻤﻟ)
ﺕﺎﻔﻠﻤﻟ)
*(ﺦﻳﺭﺎﺘﻟﺍ) ﻞﻴﻐﺸﺘﻟﺍ
ﺪﻳﺪﺤﺗ ﻢﺘﻳ ﺎﻣﺪﻨﻋ
(ﺔﻳﺍﺪﺒﻠﻟ
(ﺦﻳﺭﺎﺘﻟﺍ) ﺭﺪﺼﻤﻟﺍ ﻢﺳﺍ
(16 ) .[AUTO]
ﺭﺪﺼﻤﻟﺍ ﻢﺳﺍﺔﺷﺎﺸﻟﺍ ﺕﺎﻣﻮﻠﻌﻣ
STANDBY
RADIO
USB ﻭﺃ CD(
iPod BT/iPod USB
ANDROID ﻭﺃ
/SPOTIFY
SPOTIFY BT
BT AUDIO
AUX
ﻰﻟﺍ
•
ﺔﻔﻴﻇﻭ ﻢﻋﺪﺗ ﻻ ﺪﻗ (ﻰﻠﻋﺍﻭ OS 4.1 ﻞﻴﻐﺸﺘﻟﺍ ﻡﺎﻈﻨﺑ ﺓﺰﻬﺠﻤﻟﺍ) Android ﺓﺰﻬﺟﺍ ﺾﻌﺑ
ﻡﻮﻘﺗ ،AOA 2.0 ﻭ ﺮﻴﺒﻜﻟﺍ ﻦﻳﺰﺨﺘﻟﺍ ﺔﺌﻓ ﺯﺎﻬﺟ ﻦﻣ ﻞﻛ ﻢﻋﺪﻳ Android ﺯﺎﻬﺟ ﻥﺎﻛ ﺍﺫﺇ
(ﻰﻠﻋﺍ ﻭﺍ iOS 8 ﺭﺍﺪﺻﻻﺍ) 7 Plus ،7 ،SE ،6S Plus ،6S ،6 Plus ،6 ،5C ،5S ،5 ،iPhone 4S –
ﻊﻀﺨﺗ ﺕﺎﻔﺻﺍﻮﻤﻟﺍ ﻥﺈﻓ ﻚﻟﺬﻟ ،ﺔﻴﺟﺭﺎﺧ ﺔﻬﺟ ﺎﻬﻣﺪﻘﺗ ﺔﻣﺪﺧ ﻮﻫ Spotify ﻖﻴﺒﻄﺘﻟﺍ
ﺾﻌﺑ ﺮﻓﻮﺘﺗ ﻻ ﺪﻗ ﻭﺃ ﻖﻓﺍﻮﺘﻟﺍ ﻞﻘﻳ ﺪﻘﻓ ،ﻪﻴﻠﻋ ﺀﺎﻨﺑﻭ .ﻖﺒﺴﻣ ﺭﺎﻌﺷﺇ ﻥﻭﺩ ﺮﻴﻴﻐﺘﻠﻟ
Spotify ـﺑ ﻝﺎﺼﺗﻻﺍ ﻰﺟﺮﻳ ،ﻖﻴﺒﻄﺘﻟﺍ ﻡﺍﺪﺨﺘﺳﺍ ﻦﻣ ﺄﺸﻨﺗ ﻲﺘﻟﺍ ﺕﻼﻜﺸﻤﻠﻟ ﺔﺒﺴﻨﻟﺎﺑ
ﺭﺍﺪﺻﺇ ﺐﺴﺣ ﺓﺪﺣﻮﻟﺍ ﻩﺬﻬﺑ ﻝﺎﺼﺗﻻﺍ ﻦﻣ Bluetooth ﺓﺰﻬﺟﺃ ﺾﻌﺑ ﻦﻜﻤﺘﺗ ﻻ ﺪﻗ
*
.ﻰﻠﻋﺍﻭ Android OS 4.1 ﻞﻴﻐﺸﺘﻟﺍ ﻡﺎﻈﻧ ﻢﻋﺪﺗ ﺓﺪﺣﻮﻟﺍ ﻩﺬﻫ
.Android Open Accessory (AOA) 2.0 ﻞﻣﺎﻛ ﻞﻜﺸﺑ
.ﺎﻤﺋﺍﺩ ﺔﻳﻮﻟﻭﺄﻛ AOA 2.0 ﺮﺒﻋ ﻞﻴﻐﺸﺘﻟﺎﺑ ﺓﺪﺣﻮﻟﺍ ﻩﺬﻫ
.ﺓﺪﺣﻮﻟﺍ ﻩﺬﻫ ﻦﻣ Spotify ﻒﺋﺎﻇﻭ ﺾﻌﺑ ﻞﻤﻌﺗ ﻻ ﺪﻗ
.
Bluetooth ﺓﺰﻬﺟﺃ ﺾﻌﺑ ﻊﻣ ﺓﺪﺣﻮﻟﺍ ﻩﺬﻫ ﻞﻤﻌﺗ ﻻ ﺪﻗ
.ﺔﻄﻴﺤﻤﻟﺍ ﻑﻭﺮﻈﻟﺍ ﺐﺴﺣ ﺓﺭﺎﺷﻹﺍ ﻑﻭﺮﻇ ﻒﻠﺘﺨﺗ
Android ﺯﺎﻬﺟ ﺹﻮﺼﺨﺑ
Spotify ﺹﻮﺼﺨﺑ
:ﻢﻋﺪﻳ Spotify ﻖﻴﺒﻄﺗ
(6th gener
a
tion ﻭ 5th) iPod touch –
ﻰﻠﻋﺍ ﻭﺍ Android OS 4.0.3 ﺭﺍﺪﺻﻻﺍ –
.ﺎﻬﻌﻴﻤﺟ ﻭﺃ ﺕﺎﻣﺪﺨﻟﺍ
.<w
w.spotify.com> ﻰﻠﻋ
w
Bluetooth ﺔﻴﻨﻘﺗ ﻝﻮﺣ ﺓﺬﺒﻧ
.ﺯﺎﻬﺠﻟﺎﺑ ﺹﺎﺨﻟﺍ Bluetooth
ﻲﺑﺮﻋ
ﻊﺟﺍﺮﻣ
•
•
•
•
•
•
•
•
•
•
28
Page 50

ﻞﻳﻮﻃ ﻒﻠﻣ ﻢﺳﺍ ،ﺖﻴﻟﻮﺟ ،1/2 ﻯﻮﺘﺴﻣ ISO 9660 :ﻞﻴﻐﺸﺘﻠﻟ ﻞﺑﺎﻗ ﺹﺮﻗ ﻒﻠﻣ ﻖﻴﺴﻨﺗ
ﺍﹰﺩﺎﻤﺘﻋﺍ ﻞﻴﻐﺸﺘﻟﺍ ﺭﺬﻌﺘﻳ ﺪﻗ ،ﻩﻼﻋﺃ ﺓﺭﻮﻛﺬﻤﻟﺍ ﺮﻴﻳﺎﻌﻤﻟﺍ ﻊﻣ ﺔﻴﺗﻮﺼﻟﺍ ﺕﺎﻔﻠﻤﻟﺍ ﻖﻓﺍﻮﺗ ﺪﻨﻋ ﻰﺘﺣ
.ﺓﺪﺣﻮﻟﺍ ﻩﺬﻫ ﻰﻠﻋ iT
.ﺔﺨﺴﺘﻤﻟﺍ ﺕﺎﻧﺍﻮﻄﺳﻷﺍ ﻭﺃ ﻞﻴﺠﺴﺘﻟﺍ ﺢﻄﺳ ﻰﻠﻋ ﻥﺍﻮﻟﺃ ﺎﻬﺑ ﺪﺟﻮﻳ ﻲﺘﻟﺍ ﺕﺎﻧﺍﻮﻄﺳﻷﺍ
.ﺓﺮﻴﺧﻷﺍ ﺕﺎﺴﻤﻠﻟﺍ ﻊﺿﻭ ﻢﺘﻳ ﻢﻟ ﻲﺘﻟﺍ ﺔﺑﺎﺘﻜﻟﺍ ﺓﺩﺎﻋﺇ/ﻞﻴﺠﺴﺘﻟﺍ ﺕﺎﻧﺍﻮﻄﺳﺃ
ﺙﻭﺪﺣ ﻲﻓ ﺐﺒﺴﺘﺗ ﺪﻗ ﺎﻬﻧﺈﻓ ،ﺊﻳﺎﻬﻣ ﻡﺍﺪﺨﺘﺳﺎﺑ ﺯﺎﻬﺠﻟﺍ ﻲﻓ ﺎﻬﻟﺎﺧﺩﺇ ﺔﻟﻭﺎﺤﻣ ﺪﻨﻋ .CD ﻢﺳ 8
ﺔﻴﻌﻴﺒﻃ ﺮﻴﻏ ﻞﻛﺎﺸﻣ ﺭﻮﻬﻇ ﻲﻓ ﺮﺘﻣ 5 ﻰﻠﻋ ﻲﻟﺎﻤﺟﻹﺍ ﻪﻟﻮﻃ ﺪﻳﺰﻳ ﻞﺑﺎﻛ ﻞﻴﺻﻮﺗ ﺐﺒﺴﺘﻳ ﺪﻗ
.ﺮﻴﺒﻣﺃ 1.5 ﺯﻭﺎﺠﺘﻳﻭ ﺖﻟﻮﻓ 5 ﻪﻟﺪﻌﻣ ﻥﻮﻜﻳ USB ﺯﺎﻬﺟ ﻰﻠﻋ ﻑﺮﻌﺘﻟﺍ ﺓﺪﺣﻮﻠﻟ ﻦﻜﻤﻳ ﻻ
.iPod ﺯﺎﻬﺟ ﻲﻓ “
ﻒﺋﺎﻇﻮﻟﺍ ﺾﻌﺑ ﻞﻤﻌﺗ ﻻ ﺪﻗ ،iPhone/iPod ﺯﺎﻬﺠﺑ ﺹﺎﺨﻟﺍ ﻞﻴﻐﺸﺘﻟﺍ ﻡﺎﻈﻧ ﺔﺨﺴﻧ ﻰﻠﻋ ﺍﺩﺎﻤﺘﻋﺍ
CD-ROM/CD-RW/CD-R :ﻞﻴﻐﺸﺘﻠﻟ ﺔﻠﺑﺎﻘﻟﺍ ﺕﺎﻧﺍﻮﻄﺳﻷﺍ ﺎﻳﺪﻴﻣ
FAT32 ،FAT16 ،FAT12 :ﻞﻴﻐﺸﺘﻠﻟ ﻞﺑﺎﻘﻟﺍ USB ﺯﺎﻬﺟ ﺕﺎﻔﻠﻣ ﻡﺎﻈﻧ
unes
ﺔﻄﺳﺍﻮﺑ ﺮﻔﺸﻣ CD ﺹﺮﻗ ﻲﻓ (.m4a) AAC ﻒﻠﻣ ﻞﻴﻐﺸﺗ ﻦﻜﻤﻳ ﻻ
.USB ﻱﺰﻛﺮﻣ ﻊﻤﺠﻣ ﻖﻳﺮﻃ ﻦﻋ USB ﺯﺎﻬﺟ ﻞﻴﺻﻮﺗ ﻚﻨﻜﻤﻳ ﻻ
7 Plus ،7 ،SE ،6S Plus ،6S ،6 Plus ،6 ،5C ،5S ،5 ،iPhone 4S –
7 Plus ،7 ،SE ،6S Plus ،6S ،6 Plus ،6 ،5C ،5S ،5 ،iPhone 4S –
” ﻭﺃ “KENWOOD” ﺭﻮﻬﻇ ﺔﻟﺎﺣ ﻲﻓ iPod ﺯﺎﻬﺟ ﻞﻴﻐﺸﺗ ﻚﻨﻜﻤﻳ ﻦﻟ
.ﺯﺎﻬﺠﻟﺍ ﻭﺃ ﻂﺋﺎﺳﻮﻟﺍ ﺕﻻﺎﺣ ﻭﺃ ﻉﺍﻮﻧﺃ ﻰﻠﻋ
ﻞﻴﻐﺸﺘﻠﻟ ﺔﻠﺑﺎﻗ ﺮﻴﻏ ﺕﺎﻧﺍﻮﻄﺳﺃ
.ﺓﺮﻳﺪﺘﺴﻤﻟﺍ ﺮﻴﻏ ﺕﺎﻧﺍﻮﻄﺳﻷﺍ
USB ﺓﺰﻬﺟﺃ ﻝﻮﺣ
.ﻞﻴﻐﺸﺘﻟﺍ ﻲﻓ
iPhone/iP
(6th generation ﻭ 5th) iPod touch –
(7th generation) iPod nano –
(6th generation ﻭ 5th) iP
ﺯﺎﻬﺟ ﻝﻮﺣ
od
:USB ﺮﺒﻋ
Made for
:Bluetooth ﺮﺒﻋ
Made for
od t
.ﺓﺪﺣﻮﻟﺍ ﻩﺬﻫ ﻰﻠﻋ
.ﻞﻠﺧ
ouch –
ﻊﺟﺍﺮﻣ
•
•
•
ﺎﻬﻴﻠﻋ ﺎﹰﻗﻮﺼﻠﻣ ﺔﻧﺍﻮﻄﺳﺃ ﻡﺪﺨﺘﺴﺗ ﻻﻭ ﺔﻧﺍﻮﻄﺳﻷﺍ ﻰﻠﻋ ﻪﺑﺎﺷ ﺎﻣ ﻭﺃ ﻂﻳﺮﺷ ﻱﺃ ﻖﺼﻠﺗ ﻻ
•
•
•
.ﺕﺎﺒﻳﺬﻣ ﻱﺃ ﻡﺪﺨﺘﺴﺗ ﻻ .ﺔﻤﻋﺎﻧ ﺵﺎﻤﻗ ﺔﻌﻄﻗ ﻭﺃ ﻑﺎﺟ ﻥﻮﻜﻴﻠﻴﺳ ﻡﺍﺪﺨﺘﺳﺎﺑ ﺔﻧﺍﻮﻄﺳﻷﺍ ﻒﻈﻧ
•
•
•
•
•
ﻢﻗ ،ﻞﻴﻐﺸﺘﻠﻟ ﺔﻠﺑﺎﻘﻟﺍ ﺕﻮﺼﻟﺍ ﺕﺎﻔﻠﻣ ﺹﻮﺼﺨﺑ ﺕﺎﻈﺣﻼﻣﻭ ﺔﻠﺼﻔﻣ ﺕﺎﻣﻮﻠﻌﻣ ﻰﻠﻋ ﻝﻮﺼﺤﻠﻟ
•
•
•
،(.m4a) AAC ،(.aac) AAC ،(.wma) WMA ،(.mp3) MP3 :ﺓﺮﻴﺒﻜﻟﺍ ﻦﻳﺰﺨﺘﻟﺍ ﺔﻌﺳ ﻭﺫ USB ﺯﺎﻬﺠﻟ
.ﺔﻤﻋﺎﻧ ﺵﺎﻤﻗ ﺔﻌﻄﻗ ﻭﺃ ﻑﺎﺟ ﻥﻮﻜﻴﻠﺳ ﻡﺍﺪﺨﺘﺳﺎﺑ ﺔﺣﻮﻠﻟﺍ ﻦﻣ ﺏﺍﺮﺘﻟﺍ ﺢﺴﻣﺍ
ﺕﺎﻧﺍﻮﻄﺳﻷﺍ ﻊﻣ ﻞﻣﺎﻌﺘﻟﺍ
.ﺔﻧﺍﻮﻄﺳﻷﺎﺑ ﺹﺎﺨﻟﺍ ﻞﻴﺠﺴﺘﻟﺍ ﺢﻄﺳ ﺲﻤﻠﺗ ﻻ
.ﺔﻧﺍﻮﻄﺳﻸﻟ ﺕﺎﻘﺤﻠﻣ ﻱﺃ ﻡﺪﺨﺘﺴﺗ ﻻ
.ﺝﺭﺎﺨﻠﻟ ﺎﻬﻔﺼﺘﻨﻣ ﻦﻣ ﺔﻧﺍﻮﻄﺳﻷﺍ ﻒﻴﻈﻨﺘﺑ ﻢﻗ
.ﺎﹰﻴﻘﻓﺃ ﺝﺭﺎﺨﻟﺍ ﻮﺤﻧ ﺎﻬﺒﺤﺳﺍ ،ﺯﺎﻬﺠﻟﺍ ﺍﺬﻫ ﻦﻣ ﺕﺎﻧﺍﻮﻄﺳﻷﺍ ﺔﻟﺍﺯﺇ ﺪﻨﻋ
.ﺔﻧﺍﻮﻄﺳﺃ ﻊﺿﻭ ﻞﺒﻗ ﺔﻧﺍﻮﻄﺳﻷﺍ ﺔﻓﺎﺣﻭ ﻒﺼﺘﻨﻤﻟﺍ ﺔﺤﺘﻓ ﻦﻣ ﺕﺍﺆﺘﻨﻟﺍ ﺔﻟﺍﺯﺈﺑ ﻢﻗ
ﺕﺎﻣﻮﻠﻌﻤﻟﺍ ﻦﻣ ﺪﻳﺰﻣ
ﺔﻘﻓﺍﻮﺘﻣ ﺩﻮﻨﺑ ﺔﻤﺋﺎﻗ ﺙﺪﺣﺍﻭ ﺔﺘﺑﺎﺜﻟﺍ ﺞﻣﺍﺮﺒﻟﺍ ﺕﺎﺜﻳﺪﺤﺗ ﺮﺧﺁ – :ـﻟ
ﻲﻠﺻﻻﺍ KENWOOD ﻖﻴﺒﻄﺘﻟﺍ –
ﻯﺮﺧﻻﺍ ﺕﺎﻣﻮﻠﻌﻤﻟﺍ ﺙﺪﺣﺍ ﻦﻣ ﻱﺃ –
.<www.kenwood.com/cs/ce/> ﺓﺭﺎﻳﺰﺑ ﻢﻗ
:ﺔﻴﻟﺎﺘﻟﺍ CD ﺕﺎﻧﺍﻮﻄﺳﺃ ﻞﻴﻐﺸﺗ ﺓﺪﺣﻮﻟﺍ ﻩﺬﻫ ﻊﻴﻄﺘﺴﺗ
.<www.kenwood.com/cs/ce/audiofile/> ﺓﺭﺎﻳﺰﺑ
ﻞﻴﻐﺸﺘﻠﻟ ﺔﻠﺑﺎﻗ ﺕﺎﻔﻠﻣ
:ﻞﻴﻐﺸﺘﻠﻟ ﻞﺑﺎﻘﻟﺍ ﻮﻳﺩﻭﺃ ﺕﺎﻴﺗﻮﺼﻟﺍ ﻒﻠﻣ
(.aac) AAC ،(.wma) WMA ،(.mp3) MP3 :ﺹﺮﻘﻠﻟ
ﺯﺎﻬﺠﻟﺍ ﻒﻴﻈﻨﺗ
(.flac) FLA
ﺔﻧﺎﻴﺼﻟﺍ
C ،(.wav) WAV
.ﻂﻳﺮﺷ
ﻡﺎﻋ
•
•
•
•
•
•
•
•
•
•
27
ﻲﺑﺮﻋ
Page 51

( ﻲﻠﻳﺩﻮﻤﻟ) ﺓﺩﺎﻴﻘﻟﺍ ﺔﻠﺠﻋ ﻲﻓ ﺪﻌﺑ ﻦﻋ ﻢﻜﺤﺘﻟﺍ ﺯﺎﻬﺟ ﺔﻓﺮﻌﻣ
ﻲﻓ ﺪﻌﺑ ﻦﻋ ﻢﻜﺤﺘﻟﺍ ﺢﻴﺗﺎﻔﻣ ﻦﻣ ﺡﺎﺘﻔﻣ ﻱﺍ ﻂﻐﻀﺑ ﺮﻤﺘﺳﺍﻭ ﻂﻐﺿﺍ
/
MODE/VOL DOWN/VOL UP/SEEK DOWN/SEEK UP/ATT
ﻰﻠﻋ ﻂﻐﺿﺍ ﻢﺛ ،ﺎﻬﺼﻴﺼﺨﺘﻟ ﺔﻔﻴﻇﻭ ﺪﻳﺪﺤﺘﻟ ﺕﻮﺼﻟﺍ ﻯﻮﺘﺴﻣ ﺹﺮﻗ ﺭﺩﺃ 8
ﺓﺩﺎﻴﻘﻟﺍ ﺔﻠﺠﻋ ﻲﻓ ﺪﻌﺑ ﻦﻋ ﻢﻜﺤﺘﻟﺍ ﺢﻴﺗﺎﻔﻣ ﻰﻟﺍ ﺩﺪﺤﻤﻟﺍ ﺡﺎﺘﻔﻤﻟﺍ ﺔﻔﻴﻇﻭ ﺺﻴﺼﺨﺗ ﻢﺘﻳ
.5 ﺓﻮﻄﺨﻟﺍ ﻲﻓ ﺎﻤﻛ ﺔﻴﺴﻴﺋﺮﻟﺍ ﺔﻤﺋﺎﻘﻟﺍ ﺔﺷﺎﺷ ﻰﻟﺍ ﺔﺷﺎﺸﻟﺍ ﺩﻮﻌﺗ
.ﺡﺎﺘﻔﻣ ﻰﻟﺍ ﺔﻨﻴﻌﻣ ﺔﻔﻴﻇﻭ ﺪﻳﺪﺤﺗ ﻢﺘﻳ ﺎﻣﺪﻨﻋ :(ﺔﻔﻴﻇﻭ)
.ﻯﺮﺧﺍ ﻢﻜﺤﺗ ﺢﻴﺗﺎﻔﻣ ﺺﻴﺼﺨﺘﻟ 8 ﻭ 7 ﻭ 6 ﺕﺍﻮﻄﺨﻟﺍ ﺭﺮﻛ 9
.ﻪﺼﻴﺼﺨﺗ ﺪﻳﺮﺗ ﻱﺬﻟﺍ ﺓﺩﺎﻴﻘﻟﺍ ﺔﻠﺠﻋ
.ﺔﺷﺎﺸﻟﺍ ﻰﻠﻋ ﺔﻴﺴﻴﺋﺮﻟﺍ ﻒﺋﺎﻇﻮﻟﺍ ﺔﻤﺋﺎﻗ ﺮﻬﻈﺘﺳ
ENTER/VOICE/OFF HOOK/ON HOOK
.ﺀﺎﻬﻧﻹﺍ ﻞﺟﺃ ﻦﻣ ﺭﺍﺮﻤﺘﺳﻻﺍ ﻊﻣ ﻂﻐﺿﺍ 10
/(ﻲﺿﺍﺮﺘﻓﺍ)
NONE
.ﺹﺮﻘﻟﺍ
.7 ﺓﻮﻄﺨﻟﺍ ﻲﻓ ﻪﺗﺮﺘﺧﺍ ﻱﺬﻟﺍ
K##
•
ﻢﻜﺤﺘﻟﺍ ﺢﻴﺗﺎﻔﻣ ﺺﻴﺼﺨﺘﻟ
.STANDBY ﻊﺿﻭ ﻲﻓ ﻝﻮﺧﺪﻠﻟ ﺭﺮﻜﺘﻣ ﻞﻜﺸﺑ ﻂﻐﺿﺍ 1
.
[FUNCTION]
.ﺹﺮﻘﻟﺍ ﻰﻠﻋ ﻂﻐﺿﺍ ﻢﺛ ،
.ﺹﺮﻘﻟﺍ ﻰﻠﻋ ﻂﻐﺿﺍ ﻢﺛ ،
.ﺹﺮﻘﻟﺍ ﻰﻠﻋ ﻂﻐﺿﺍ ﻢﺛ ،
.ﺹﺮﻘﻟﺍ ﻰﻠﻋ ﻂﻐﺿﺍ ﻢﺛ ،
ﺔﻓﺮﻌﻣ ﻂﺒﺿ ﺓﺩﺎﻋﺍ ﻰﻟﺍ ﺎﻀﻳﺍ ﻚﻟﺫ ﻱﺩﺆﻴﺳ ،
ﻰﻟﺇ ﻝﻮﺧﺪﻠﻟ ﺕﻮﺼﻟﺍ ﻯﻮﺘﺴﻣ ﺹﺮﻗ ﻰﻠﻋ ﻂﻐﺿﺍ 2
[SYSTEM]
[USER S.REMO]
[RESET KEY]
ﺪﻳﺪﺤﺘﻟ ﺕﻮﺼﻟﺍ ﻯﻮﺘﺴﻣ ﺹﺮﻗ ﺭﺩﺃ 3
ﺪﻳﺪﺤﺘﻟ ﺕﻮﺼﻟﺍ ﻯﻮﺘﺴﻣ ﺹﺮﻗ ﺭﺩﺃ 4
ﺪﻳﺪﺤﺘﻟ ﺕﻮﺼﻟﺍ ﻯﻮﺘﺴﻣ ﺹﺮﻗ ﺭﺩﺃ 5
[YES]
ﺪﻳﺪﺤﺘﻟ ﺕﻮﺼﻟﺍ ﻯﻮﺘﺴﻣ ﺹﺮﻗ ﺭﺩﺃ 6
.ﻢﻜﺤﺘﻟﺍ ﺢﻴﺗﺎﻔﻣ ﻊﻴﻤﺟ ﻂﺒﺿ ﺓﺩﺎﻋﺍ ﻢﺘﻴﺳ
.ﺔﻴﻠﻤﻌﻟﺍ ﺀﺎﻐﻟﺍ ﻰﻟﺍ
(6 ) [YES]
.ﺓﺩﺎﻴﻘﻟﺍ ﺔﻠﺠﻋ ﻲﻓ ﺪﻌﺑ ﻦﻋ ﻢﻜﺤﺘﻟﺍ ﺯﺎﻬﺟ
. ﻰﻠﻋ ﻂﻐﺿﺍ ،ﻖﺑﺎﺴﻟﺍ ﺩﺍﺪﻋﻹﺍ ﺮﺼﻨﻋ ﻰﻟﺇ ﻉﻮﺟﺮﻠﻟ
ﻰﻟﺍ
[FACTORY RESET]
[NO]
ﺭﺎﻴﺘﺧﺍ ﻱﺩﺆﻴﺳ
ﻂﺒﺿ ﺪﻨﻋ
.ﻚﺗﺭﺎﻴﺴﺑ ﺓﺩﺎﻴﻘﻟﺍ ﺔﻠﺠﻋ ﻲﻓ ﺪﻌﺑ ﻦﻋ ﻢﻜﺤﺘﻟﺍ ﺯﺎﻬﺟ ﺢﻴﺗﺎﻔﻣ ﺔﻄﺳﺍﻮﺑ ﺓﺪﺣﻮﻟﺎﺑ ﻢﻜﺤﺘﻟﺍ ﻚﻨﻜﻤﻳ
7
ﻦﻋ ﻢﻜﺤﺘﻠﻟ ﻲﺋﺎﺑﺮﻬﻜﻟﺍ ﻡﺎﻈﻨﻟﺎﺑ ﺓﺰﻬﺠﻣ ﺓﺭﺎﻴﺴﻟﺍ ﺖﻧﺎﻛ ﺍﺫﺍ ﺕﺎﻨﻳﻮﻜﺘﻟﺍ ﻩﺬﻫ ﺀﺍﺮﺟﺍ ﻊﻴﻄﺘﺴﺗ •
ﻢﺘﻳ ﻻ ﺪﻗ ،ﻖﻓﺍﻮﺘﻣ ﺮﻴﻏ ﻚﺗﺭﺎﻴﺴﺑ ﺹﺎﺨﻟﺍ ﺓﺩﺎﻴﻘﻟﺍ ﺔﻠﺠﻋ ﻲﻓ ﺪﻌﺑ ﻦﻋ ﻢﻜﺤﺘﻟﺍ ﺯﺎﻬﺟ ﻥﺎﻛ ﺍﺫﺍ •
.ﻚﺗﻼﻴﻀﻔﺘﻟ ﺎﻘﻓﻭ ﻢﻜﺤﺘﻟﺍ ﺢﻴﺗﺎﻔﻣ ﻦﻳﻮﻜﺗ ﻚﻨﻜﻤﻳ ،ﻞﻴﺻﻮﺘﻟﺍ ﺪﻌﺑ
.ﺓﺩﺎﻴﻘﻟﺍ ﺔﻠﺠﻋ ﻲﻓ ﺪﻌﺑ
(29 )
.ﺄﻄﺧ ﺔﻟﺎﺳﺭ ﺮﻬﻈﺗ ﺪﻗﻭ ﻦﻳﻮﻜﺘﻟﺍ ﻝﺎﻤﻛﺍ
ﻞﻴﺻﻮﺘﻟﺍ ﺀﺍﺮﺟﺍ
ﺪﻌﺑ ﻦﻋ ﻢﻜﺤﺘﻟﺍ ﺢﻴﺗﺎﻔﻣ ﻞﺑﺎﻛ
(ﻖﻓﺮﻣ) ﺓﺩﺎﻴﻘﻟﺍ ﺔﻠﺠﻋ ﻲﻓ
ﺔﻓﺮﻌﻣ ﻝﺎﺧﺩﺍ ﻑﺮﻃ
ﻦﻋ ﻢﻜﺤﺘﻟﺍ ﺯﺎﻬﺟ
ﺓﺩﺎﻴﻘﻟﺍ ﺔﻠﺠﻋ ﻲﻓ ﺪﻌﺑ
ﺔﻴﻔﻠﺨﻟﺍ ﺔﺣﻮﻠﻟﺍ
ﺮﻤﺣﺃ/ﻱﺩﺎﻣﺭ
ﺮﻤﺣﺃ/ﻊﺻﺎﻧ ﺮﻀﺧﺍ
ﺮﻤﺣﺃ/ﺔﻴﻧﺍﻮﺟﺭﺃ
ﺓﺮﻴﻔﻇ ﻰﻟﺍ ﻪﻠﺻﻭﺍ
ﺔﺻﺎﺨﻟﺍ ﻙﻼﺳﻻﺍ
ﺔﻠﺠﻋ ﻲﻓ ﺪﻌﺑ
ﺮﺟﺎﺘﺒﻠﺼﺗﺍ .ﺓﺩﺎﻴﻘﻟﺍ
ﻱﺬﻟﺍ Kenwood
ﺔﻓﺮﻌﻤﻟ ﻪﻌﺒﺘﺗ
ﻢﻜﺤﺘﻟﺍ ﺢﻴﺗﺎﻔﻣ ﻦﻳﻮﻜﺗ
.STANDBY ﻊﺿﻭ ﻲﻓ ﻝﻮﺧﺪﻠﻟ ﺭﺮﻜﺘﻣ ﻞﻜﺸﺑ ﻂﻐﺿﺍ 1
.
[FUNCTION]
.ﺹﺮﻘﻟﺍ ﻰﻠﻋ ﻂﻐﺿﺍ ﻢﺛ ،
.ﺹﺮﻘﻟﺍ ﻰﻠﻋ ﻂﻐﺿﺍ ﻢﺛ ،
.ﺹﺮﻘﻟﺍ ﻰﻠﻋ ﻂﻐﺿﺍ ﻢﺛ ،
ﺔﻴﺴﻴﺋﺮﻟﺍ ﺔﻤﺋﺎﻘﻟﺍ ﻦﻣ ﺡﺎﺘﻔﻣ ﻱﺍ ﺭﺎﻴﺘﺧﻻ ﺕﻮﺼﻟﺍ ﻯﻮﺘﺴﻣ ﺹﺮﻗ ﺭﺩﺍ 6
ﻰﻟﺇ ﻝﻮﺧﺪﻠﻟ ﺕﻮﺼﻟﺍ ﻯﻮﺘﺴﻣ ﺹﺮﻗ ﻰﻠﻋ ﻂﻐﺿﺍ 2
[SYSTEM]
[USER S.REMO]
.ﺺﻴﺼﺨﺘﻠﻟ ﻞﺑﺎﻗ ﺡﺎﺘﻔﻣ 16 ﻦﻣ ﺔﻧﻮﻜﻣ ﺔﻴﺴﻴﺋﺭ ﺔﻤﺋﺎﻗ ﺮﻬﻈﺗ
ﺪﻳﺪﺤﺘﻟ ﺕﻮﺼﻟﺍ ﻯﻮﺘﺴﻣ ﺹﺮﻗ ﺭﺩﺃ 3
ﺪﻳﺪﺤﺘﻟ ﺕﻮﺼﻟﺍ ﻯﻮﺘﺴﻣ ﺹﺮﻗ ﺭﺩﺃ 4
[SET KEY]
ﺪﻳﺪﺤﺘﻟ ﺕﻮﺼﻟﺍ ﻯﻮﺘﺴﻣ ﺹﺮﻗ ﺭﺩﺃ 5
.ﺔﻔﻴﻇﻭ ﻱﺍ ﺺﻴﺼﻴﺨﺗ ﻢﺘﻳ ﻢﻟ :
.ﺹﺮﻘﻟﺍ ﻂﻐﺿﺍ ﻢﺛ ،ﺔﻔﻴﻇﻮﻟﺍ ﺺﻴﺼﺨﺘﻟ
“PRESS KEY TO ASSIGN K##” ﺮﻬﻈﻳ
K## NONE
ﻦﻋ ﻢﻜﺤﺘﻟﺎﺑ
.ﻞﻴﺻﺎﻔﺘﻟﺍ
•
ﻲﺑﺮﻋ
26
Page 52

XX
:ﻲﺿﺍﺮﺘﻓﺍ
.ﻞﺼﻔﻨﻣ ﻞﻜﺸﺑ
ﺔﻃﻮﺒﻀﻤﻟﺍ ﻥﺍﻮﻟﻻﺍ/
ﻱﺬﻟﺍ ﻥﻮﻠﻟﺍ ﻦﻳﺰﺨﺗ ﻢﺘﻴﺳ .
.ﻞﻴﺼﻔﺘﻟﺎﺑ ﻥﻮﻠﻟﺍ ﻂﺒﺿ ﻊﺿﻭ ﻰﻟﺍ ﻝﻮﺧﺪﻠﻟ ﺕﻮﺼﻟﺍ ﻯﻮﺘﺴﻣ ﺹﺮﻗ ﻂﻐﺿﺍ 1
(ﻲﻨﺑ/ﺮﻀﺧﺃ/ﺮﻤﺣﺃ) (
ﻂﻐﺿﺍ ﻢﺛ ،(
ﻰﻠﻋ ﻂﻐﺿﺍ ﻢﺛ ،
ﻰﻠﻋ ﻂﻐﺿﺍ ﻢﺛ ،
.ﺓﺭﺎﺘﺨﻤﻟﺍ ﺔﻘﻄﻨﻤﻠﻟ ﻞﻀﻔﻤﻟﺍ ﻉﻮﻄﺴﻟﺍ ﻯﻮﺘﺴﻣ ﺮﺘﺧﺍ :
ﻭﺃ ،ﺎﹰﻴﺋﺎﻘﻠﺗ ﺔﺷﺎﺸﻟﺍ ﺕﺎﻣﻮﻠﻌﻣ ﺭﺮﻤﺘﺳ ﺖﻨﻛ ﺍﺫﺇ ﺎﻣ ﺩﺪﺤﻳ :
/
PURPLE3/PURPLE2/PURPLE1/RED3/RED2/RED1
/
AQUA2/AQUA1/LIGHTBLUE/SKYBLUE2/SKYBLUE1/BLUE3/BLUE2/BLUE1/PURPLE4
/
ORANGE1/YELLOW/YELLOWGREEN2/YELLOWGREEN1/GREEN3/GREEN2/GREEN1
KEY
ﻭ
LCD DISPLAY
(.ﺮﺴﻳﻻﺍ ﺩﻮﻤﻌﻟﺍ ﻰﻠﻋ ﺓﺀﺎﺿﻻﺍ ﻊﺟﺍﺭ) .ﺔﻘﻄﻨﻣ ﺮﺘﺧﺍ 1
CUSTOM R/G/B/VARIABLE SCAN/INITIAL COLOR
[CUSTOM R/G/B]
B/G/R
) ﻥﻮﻠﻟﺍ ﺪﻳﺪﺤﺘﻟ S / T ﻰﻠﻋ ﻂﻐﺿﺍ 2
9
ﻰﻟﺇ 0 ﻦﻣ) ﻯﻮﺘﺴﻤﻟﺍ ﻂﺒﻀﻟ ﺕﻮﺼﻟﺍ ﻯﻮﺘﺴﻣ ﺹﺮﻗ ﺭﺩﺃ 3
.ﻢﺘﻌﻤﻟﺍ ﺀﺎﻔﻃﺍﻭ ﻞﻴﻐﺸﺗ ﺖﻗﻭ ﻂﺒﻀﻳ :
[ON]
ﻞﻴﻐﺸﺘﻟﺍ ﺖﻗﻭ ﻂﺒﻀﻟ ﺕﻮﺼﻟﺍ ﻯﻮﺘﺴﻣ ﺹﺮﻗ ﺭﺩﺃ 1
[OFF]
ﻞﻴﻐﺸﺘﻟﺍ ﺖﻗﻭ ﻂﺒﻀﻟ ﺕﻮﺼﻟﺍ ﻯﻮﺘﺴﻣ ﺹﺮﻗ ﺭﺩﺃ 2
(
AM6:00 :[OFF] ؛PM6:00 :[ON]
(.ﺮﺴﻳﻻﺍ ﺩﻮﻤﻌﻟﺍ ﻰﻠﻋ ﺓﺀﺎﺿﻻﺍ ﻊﺟﺍﺭ) .ﺔﻘﻄﻨﻣ ﺮﺘﺧﺍ 1
ﻭ
ALL ZONE
.ﺓﺩﺪﺤﻤﻟﺍ ﺔﻘﻄﻨﻤﻠﻟ ﺎﹰﻧﻮﻟ ﺩﺪﺣ 2
ﺮﺘﺧﺍ ،ﻚﺑ ﺹﺎﺨﻟﺍ ﻥﻮﻠﻟﺍ ﺀﺎﺸﻧﻻ
.
[CUSTOM R/G/B]
.ﺀﺎﻐﻟﺍ :
.ﺀﺎﻐﻟﺍ :
OFF
ﻲﻓ ﻩﺀﺎﺸﻧﺈﺑ ﺖﻤﻗ
.ﺹﺮﻘﻟﺍ ﻰﻠﻋ
.ﻲﺤﻴﺿﻮﺘﻟﺍ ﻢﺳﺮﻟﺍ ﻢﻴﺘﻌﺘﺑ ﻢﻗ
OFF
؛ .ﺀﺎﻀﻣ ﻢﺘﻌﻤﻟﺍ :
DIMMER TIME
؛ .ﻂﻘﻓ ﺓﺪﺣﺍﻭ ﺓﺮﻣ ﺭﺮﻤﺘﺳ
ﻰﻟﺍ ﻥﻮﻟ ﺮﺘﺧﺍ
*
ﺎﻘﺒﺴﻣ
.ﻂﺒﻀﻠﻟ
.ﺹﺮﻘﻟﺍ
.ﺹﺮﻘﻟﺍ
:ﻲﺿﺍﺮﺘﻓﺍ)
31
ﻰﻟﺇ 0 2
ONCE/AUTO
:ﺎﻘﺒﺴﻣ ﺔﻃﻮﺒﻀﻤﻟﺍ ﻥﺍﻮﻟﻻﺍ
ORANGERED
ON
BRIGHTNESS
TEXT SCROLL
/
ORANGE2
DISPLAY
COLOR
SELECT
DIMMER
ﺔﺷﺎﺸﻟﺍ ﺕﺍﺩﺍﺪﻋﺇ
ﻉﻮﻄﺴﻟﺍﻭ ﻥﻮﻠﻟﺍ ﺕﺍﺩﺍﺪﻋﻹ ﺔﻘﻄﻨﻣ ﺪﻳﺪﺤﺗ
ﻢﺘﻌﻤﻟﺍ ﺔﺌﻴﻬﺗ
.ﻢﺘﻌﻤﻟﺍ ﻑﺎﻘﻳﺇ ﻭﺃ ﻞﻴﻐﺸﺘﻟ DISP ﻰﻠﻋ ﺭﺍﺮﻤﺘﺳﻻﺍ ﻊﻣ ﻂﻐﺿﺍ
.ﺭﺰﻟﺍ ﺍﺬﻫ ﻂﻐﺿ ﺖﻠﺻﺍﻭ ﺍﺫﺍ ﺎﻫﺅﺎﻐﻟﺍ ﻢﺘﻴﺳ ،
.
ﻂﻐﺿﺍ ﻢﺛ ،(ﻲﻟﺎﺘﻟﺍ ﻝﻭﺪﺠﻟﺍ ﻊﺟﺍﺭ) ﺪﻨﺑ ﺪﻳﺪﺤﺘﻟ ﺕﻮﺼﻟﺍ ﻯﻮﺘﺴﻣ ﺹﺮﻗ ﺭﺩﺃ 2
[FUNCTION]
ﺕﺎﻤﻴﻠﻌﺘﻟﺍ ﻊﺒﺗﺍ ﻭﺍ ﺏﻮﻏﺮﻤﻟﺍ ﺪﻨﺒﻟﺍ ﺭﺎﻴﺘﺧﺍ ﻢﺘﻳ ﻥﺍ ﻰﻟﺍ
*
ﻰﻟﺇ ﻝﻮﺧﺪﻠﻟ ﺕﻮﺼﻟﺍ ﻯﻮﺘﺴﻣ ﺹﺮﻗ ﻰﻠﻋ ﻂﻐﺿﺍ 1
.ﺀﺎﻬﻧﻹﺍ ﻞﺟﺃ ﻦﻣ
. ﻰﻠﻋ ﻂﻐﺿﺍ ،ﻖﺑﺎﺴﻟﺍ ﺩﺍﺪﻋﻹﺍ ﺮﺼﻨﻋ ﻰﻟﺇ ﻉﻮﺟﺮﻠﻟ
[DIMMER TIME]
ﺔﺌﻴﻬﺘﺑ ﺖﻤﻗ ﺍﺫﺇ •
ﻯﺮﺧﺃ ﺕﺍﺩﺍﺪﻋﺇ
2 ﺓﻮﻄﺨﻟﺍ ﺭﺮﻛ 3
.ﺭﺎﺘﺨﻤﻟﺍ ﺪﻨﺒﻟﺎﺑ ﺔﻘﻠﻌﺘﻤﻟﺍ
ﺭﺍﺮﻤﺘﺳﻻﺍ ﻊﻣ ﻂﻐﺿﺍ 4
.ﺹﺮﻘﻟﺍ
25
ﻲﺑﺮﻋ
Page 53

ﻲﺘﻟﺍ ﺔﻋﺎﻤﺴﻟﺍ ﺮﺘﺧﺍ ،
ﺮﻴﻏ ﺪﻨﺑ ﻱﺍ ﻥﺎﻛ ﺍﺫﺍ ﻂﻘﻓ
(23 ) .[SPEAKER SIZE]
ﻲﻓ
[WOOFER]
ﻉﺎﻤﺘﺳﻻﺍ ﻊﺿﻮﻣ ﺰﻛﺮﻣ ﻦﻣ ﺔﻓﺎﺴﻤﻟﺍ ﺕﺩﺪﺣ ﺍﺫﺍ
ﺏﺎﺴﺣ ﻢﺘﻴﺳ ،ﺔﻋﺎﻤﺳ ﻞﻛ ﻰﻟﺍ ﺎﻴﻟﺎﺣ ﻁﻮﺒﻀﻤﻟﺍ
ﺎﻴﻟﺎﺣ ﻁﻮﺒﻀﻤﻟﺍ ﻉﺎﻤﺘﺳﻻﺍ ﻊﺿﻮﻣ ﺰﻛﺮﻣ ﺩﺪﺣ 1
ﺔﻴﻌﺟﺮﻤﻟﺍ ﺔﻄﻘﻨﻟﺍ ﻦﻣ ﺕﺎﻓﺎﺴﻤﻟﺍ ﺱﺎﻴﻘﺑ ﻢﻗ 2
ﺔﻋﺎﻤﺴﻟﺍ ﺔﻓﺎﺴﻣ ﻦﻴﺑ ﺕﺎﻓﻼﺘﺧﻻﺍ ﺏﺎﺴﺤﺑ ﻢﻗ 3
ﺕﺎﻋﺎﻤﺴﻟﺍﻭ (ﺔﻴﻔﻠﺨﻟﺍ ﺔﻋﺎﻤﺴﻟﺍ) ﺪﻌﺑﻻﺍ
ﺓﻮﻄﺨﻟﺍ ﻲﻓ ﺏﻮﺴﺤﻤﻟﺍ
.ﺓﺪﺣ ﻰﻠﻋ ﺔﻋﺎﻤﺳ ﻞﻜﻟ
ﻁﻮﺒﻀﻣ
[DTA SETTINGS]
SUBWOOFER/REAR RIGHT/REAR LEFT/FRONT RIGHT/FRONT LEFT
[SUBWOOFER]
WOOFER
ﺪﻨﺒﻠﻟ ﺭﺎﺘﺨﻣ
:ﺍﺫﺍ ﻂﻘﻓ ﺭﺎﻴﺘﺧﻼﻟ ﻞﺑﺎﻗ
(23 ) .[SPEAKER SIZE]
[DTA SETTINGS]
.ﺎﻴﺋﺎﻘﻠﺗ ﺮﻴﺧﺄﺘﻟﺍ ﺖﻗﻭ ﻂﺒﺿﻭ
.ﺓﺪﺣ ﻰﻠﻋ ﺔﻋﺎﻤﺳ ﻞﻜﻟ
[FRONT ALL]
ﻲﻓ
ﻭ
ﻲﻓ
[SUBWOOFER]
/
MID RIGHT/MID LEFT/TWEETER RIGHT/TWEETER LEFT
[NONE]
ﺮﻴﻏ ﺪﻨﺑ ﻱﺍ ﻥﺎﻛ ﺍﺫﺍ ﻂﻘﻓ
ﻲﻓ
ﺪﻨﺒﻠﻟ
.ﺔﻴﻌﺟﺮﻣ ﺔﻄﻘﻨﻛ
.ﺕﺎﻋﺎﻤﺴﻟﺍ ﻰﻟﺍ
[DISTANCE]
.ﻯﺮﺧﻻﺍ
ﻂﺒﺿﺍ 4
[GAIN]
ﻂﺒﺿﺍ 5
ﻥﻮﻜﻳ ﺎﻣﺪﻨﻋ :ﻝﺎﺜﻣ
ﻉﺎﻤﺘﺳﺍ ﻊﺿﻮﻤﻛ
[GAIN]
ﻭ
[DISTANCE]
:ﺓﺭﺎﺘﺨﻣ ﻦﻴﺗﺎﻨﻗ ﺔﻳﺪﻌﺗ ﻥﻮﻜﺗ ﺎﻣﺪﻨﻋ
[REAR RIGHT]
[REAR]
ﻭ
[REAR LEFT]
ﻭ
[REAR]
:ﺓﺭﺎﺘﺨﻣ ﺕﺍﻮﻨﻗ 3 ﺔﻳﺪﻌﺗ ﻥﻮﻜﺗ ﺎﻣﺪﻨﻋ
[WOOFER]
(23 ) .[SPEAKER SIZE]
[CAR SETTINGS]
[GAIN]
ﻲﻓ
(6 )
:ﺓﺭﺎﺘﺨﻣ ﺕﺍﻮﻨﻗ 2 ﺔﻳﺪﻌﺗ ﺖﻧﺎﻛ –
ﺪﻨﺒﻠﻟ
[NONE]
ﻭ
[DISTANCE]
3
ﺪﻨﺒﻠﻟ ﻂﺒﻀﻟﺍ ﻞﻤﻋ ﻞﺒﻗ
:ﺎﻬﻄﺒﺿ ﺪﻳﺮﺗ
ﺭﺎﻴﺘﺧﺍ ﻦﻜﻤﻳ –
ﺪﻨﺒﻠﻟ ﺭﺎﺘﺨﻣ
[R-SP LOCATION]
ﺮﻴﻏ ﺩﺍﺪﻋﺇ ﺭﺎﻴﺘﺧﺍ ﻢﺗ –
[NONE]
ﺭﺎﻴﺘﺧﺍ ﻦﻜﻤﻳ –
ﺪﻨﺒﻟﺍ
ﺪﻨﺒﻠﻟ ﺔﻤﻴﻘﻟﺍ ﺮﻳﺮﻘﺗ
ﺕﻮﺼﻟﺍ ﺕﺍﺩﺍﺪﻋﺇ
•
ﺮﺜﻛﺍ ﺔﺌﻴﺑ ﻖﻠﺧ ﻞﺟﺍ ﻦﻣ ﺔﻋﺎﻤﺴﻟﺍ ﺝﺍﺮﺧﻻ ﺮﻴﺧﺄﺘﻟﺍ ﺖﻗﻭ ﻂﺒﻀﺗ ﻲﻤﻗﺮﻟﺍ ﺖﻗﻮﻟﺍ ﺓﺍﺫﺎﺤﻣ ﺔﻔﻴﻇﻭ
•
ﺪﻨﺒﻠﻟ
[GAIN]
ﻭ
[DISTANCE]
؛ ﻦﻤﻳﻻﺍ ﻲﻣﺎﻣﻻﺍ ﺪﻌﻘﻤﻟﺍ :
ﻲﻣﺎﻣﻻﺍ ﺪﻌﻘﻤﻟﺍ :
(6
) .[2-WAY X’OVER]
ﻞﻤﻋ ﻞﺒﻗ) .ﺾﻳﻮﻌﺘﻠﻟ ﻖﻴﻗﺩ ﻞﻜﺸﺑ ﺔﻓﺎﺴﻤﻟﺍ ﻂﺒﺿﺍ :
ﺔﻋﺎﻤﺴﻠﻟ ﻖﻴﻗﺩ ﻞﻜﺸﺑ ﺝﺮﺨﻟﺍ ﺕﻮﺻ ﻯﻮﺘﺴﻣ ﻂﺒﺿﺍ :
(.ﺎﻬﻄﺒﺿ ﺪﻳﺮﺗ ﻲﺘﻟﺍ ﺔﻋﺎﻤﺴﻟﺍ ﺮﺘﺧﺍ ،ﻂﺒﻀﻟﺍ ﻞﻤﻋ ﻞﺒﻗ) .ﺓﺭﺎﺘﺨﻤﻟﺍ
[POSITION]
ﺪﻨﺒﻠﻟ (
ﻂﺒﻀﻟﺍ ﺀﺍﺮﺟﺍ ﻞﺟﺍ ﻦﻣ ﺔﻴﻔﻠﺨﻟﺍ ﺔﻋﺎﻤﺴﻟﺍ ﻥﺎﻜﻣﻭ ﻚﺗﺭﺎﻴﺳ ﻉﻮﻧ ﺩﺪﺣ
/
SUV/MINIVAN/WAGON/FULL SIZE CAR/COMPACT
.ﺾﻳﻮﻌﺗ ﻻ :
ﺔﻓﺎﺴﻣ ﻞﻀﻓﺍ ﺏﺎﺴﺤﻟ ﻚﺗﺭﺎﻴﺳ ﻲﻓ ﺔﻴﻔﻠﺨﻟﺍ ﺕﺎﻋﺎﻤﺴﻟﺍ ﻥﺎﻜﻣ ﺭﺎﺘﺨﻳ
ﺪﻨﺒﻟﺍ ﻥﻮﻜﻳ ﺎﻣﺪﻨﻋ ﻂﻘﻓ ﺐﺳﺎﻨﻣ :
ﻭﺃ
ﺪﻨﺒﻟﺍ ﻥﻮﻜﻳ ﺎﻣﺪﻨﻋ ﻂﻘﻓ ﺐﺳﺎﻨﻣ :
.
[MINIVAN(LONG)]
.(ﺔﻴﻌﺟﺮﻣ ﺔﻄﻘﻧ) ﻉﺎﻤﺘﺳﻻﺍ ﻊﺿﻮﻣ ﺭﺎﺘﺨﻳ
FRONT ALL
ﺭﺎﻴﺘﺧﺍ ﺪﻨﻋ ﻂﻘﻓ
[GAIN]
.(ﺔﻴﻌﺟﺮﻣ ﺔﻄﻘﻧ) ﺭﺎﺘﺨﻤﻟﺍ ﻉﺎﻤﺘﺳﻻﺍ ﻊﺿﻮﻣ ﻦﻣ
[COMPACT ]
ﻭﺃ
FRONT RIGHT
؛ ﺮﺴﻳﻻﺍ ﻲﻣﺎﻣﻻﺍ ﺪﻌﻘﻤﻟﺍ :
(.ﺎﻬﻄﺒﺿ ﺪﻳﺮﺗ ﻲﺘﻟﺍ ﺔﻋﺎﻤﺴﻟﺍ ﺮﺘﺧﺍ ،ﻂﺒﻀﻟﺍ
ﻭ
[DISTANCE]
.ﺀﺎﻐﻟﺍ :NO ؛ .ﻲﺿﺍﺮﺘﻓﻻﺍ ﺩﺍﺪﻋﻹﺍ ﻰﻟﺍ ﺭﺎﺘﺨﻤﻟﺍ
OFF
؛ .ﺓﺭﺎﻴﺴﻟﺍ ﻉﻮﻧ ﺭﺎﺘﺨﻳ :
ﻭﺃ
[OFF]
.
[SUV]
ﻭﺃ
[WAGON]
[MINIVAN]
ﻲﻤﻗﺮﻟﺍ ﺖﻗﻮﻟﺍ ﺓﺍﺫﺎﺤﻣ ﺕﺍﺩﺍﺪﻋﺇ
ﺪﻨﺒﻠﻟ ﺔﻤﻴﻘﻟﺍ ﺮﻳﺮﻘﺗ ،ﺕﺎﻣﻮﻠﻌﻤﻟﺍ ﻦﻣ ﺪﻳﺰﻤﻟ •
؛ ﺾﻳﻮﻌﺗ ﻻ :
[FRONT ALL]
) ﺕﺍﺩﺍﺪﻋﻻﺍ ﻂﺒﺿ ﺪﻴﻌﻳ :
ﺩﺍﺪﻋﺈﻛ ﺭﺎﺘﺨﻣ
ﺩﺍﺪﻋﺈﻛ ﺭﺎﺘﺨﻣ
FRONT LEFT
ﺽﺮﻋ ﻢﺘﻳ
610CM
ﻰﻟﺇ
0DB
ﻰﻟﺇ
.
[DTA SETTINGS]
MINIVAN(LONG)
REAR DECK/DOOR
[CAR TYPE]
ﻭﺃ
[FULL SIZE CAR]
3RD ROW/2ND ROW
[CAR TYPE]
ALL
0CM
–8DB
YES
ﺪﻨﺒﻠﻟ
.
[DTA SETTINGS]
•
•
•
.ﻚﺗﺭﺎﻴﺴﻟ ﺔﻤﺋﻼﻣ
DTA SETTINGS
POSITION
DISTANCE
GAIN
DTA RESET
CAR SETTINGS
CAR TYPE
R-SP LOCATION
ﻲﺑﺮﻋ
24
Page 54

ﺕﻮﺼﻟﺍ ﺕﺍﺩﺍﺪﻋﺇ
ﺕﺍﻮﻨﻗ 3 ﺔﻳﺪﻌﺗ ﺩﺍﺪﻋﺇ ﺩﻮﻨﺑ
LARGE/MIDDLE/SMALL
6×9/6×8/5×7/4×6/18CM/17CM/16CM/13CM/12CM/10CM/8CM
(ﻝﻮﺻﻮﻣ ﺮﻴﻏ)
/
8KHZ/6.3KHZ/5KHZ/4KHZ/2.5KHZ/1.6KHZ/1KHZ
/
100HZ/90HZ/80HZ/70HZ/60HZ/50HZ/40HZ/30HZ
THROUGH
/
8KHZ/6.3KHZ/5KHZ/4KHZ/2.5KHZ/1.6KHZ/1KHZ
/
100HZ/90HZ/80HZ/70HZ/60HZ/50HZ/40HZ/30HZ
THROUGH
ﻰﻟﺍ
[SWITCH PREOUT]
ﻲﺑﺮﻋ
23
NONE/38CM OVER/30CM/25CM/20CM/16CM
12.5KHZ
/
10KHZ
–12DB/–6DB
(0°)
NORMAL
/(180°)
REVERSE
0 ﻰﻟﺇ
/
250HZ/220HZ/180HZ/150HZ/120HZ
–12DB/–6DB
THROUGH
/
12.5KHZ/10KHZ
–12DB/–6DB
(0°)
NORMAL
/(180°)
REVERSE
0 ﻰﻟﺇ
/
250HZ/220HZ/180HZ/150HZ/120HZ
–12DB/–6DB
(0°)
NORMAL
/(180°)
REVERSE
0 ﻰﻟﺇ
ﻂﺒﺿ ﺪﻨﻋ ﻂﻘﻓ ﺭﺎﻴﺘﺧﻼﻟ ﻞﺑﺎﻗ : ﻲﻠﻳﺩﻮﻤﻟ
(22
) .[ON]
ﻰﻟﺍ
[SUBWOOFER SET]
–8
–8
–8
ﻂﺒﺿ ﺪﻨﻋ ﻂﻘﻓ ﺭﺎﻴﺘﺧﻼﻟ ﻞﺑﺎﻗ
SLOPE
PHASE
GAIN
HPF SLOPE
LPF FRQ
LPF SLOPE
PHASE
GAIN
LPF FRQ
SLOPE
PHASE
GAIN
(5 ) .[SUBWOOFER]
SPEAKER SIZE
TWEETER
MID RANGE
WOOFER
X ' OVER
TWEETERHPF FRQ
MID RANGEHPF FRQ
WOOFER
ﺕﺍﻮﻨﻗ 2 ﺔﻳﺪﻌﺗ ﺩﺍﺪﻋﺇ ﺩﻮﻨﺑ
SPEAKER SIZE
SUBWOOFER
FRONTSIZE
REAR
*1*2
/
18CM/17CM/16CM/13CM/12CM/10CM/8CM
2
*
(ﻝﻮﺻﻮﻣ ﺮﻴﻏ)
/
6×8/5×7/4×6/18CM/17CM/16CM/13CM/12CM/10CM/8CM
(ﻝﻮﺻﻮﻣ ﺮﻴﻏ)
7×10
/
6×9/6×8/5×7/4×6
NONE/LARGE/MIDDLE/SMALL
(ﻝﻮﺻﻮﻣ ﺮﻴﻏ)
TWEETER
NONE/7×10/6×9
NONE/38CM OVER/30CM/25CM/20CM/16CM
X ' OVER
/
6.3KHZ/5KHZ/4KHZ/2.5KHZ/1.6KHZ/1KHZ
12.5KHZ
/
10KHZ/8KHZ
0 ﻰﻟﺇ
0 ﻰﻟﺇ
/
90HZ/80HZ/70HZ/60HZ/50HZ/40HZ/30HZ
250HZ/
/
220HZ/180HZ/150HZ/120HZ/100HZ
THROUGH
–24DB/–18DB/–12DB/–6DB
0 ﻰﻟﺇ
–8
–8
–8
GAIN LEFT
GAIN RIGHT
F - HPF SLOPE
F - HPF GAIN
TWEETERFRQ
FRONT HPFF - HPF FRQ
REAR HPFR - HPF FRQ
–8
R - HPF SLOPE
R - HPF GAIN
SW LPF FRQ
SW LPF SLOPE
SW LPF PHASE
SW LPF GAIN
SUBWOOFER
LPF
1*2
*
(.ﻩﻼﻋﺍ
FRONT HPF
2
*
/
90HZ/80HZ/70HZ/60HZ/50HZ/40HZ/30HZ
/
250HZ/220HZ/180HZ/150HZ/120HZ/100HZ
ﺕﺍﺩﺍﺪﻋﺍ ﻊﺟﺍﺭ)
THROUGH
–24DB/–18DB/–12DB/–6DB
*1
*2
(0°)
NORMAL
/(180°)
REVERSE
0 ﻰﻟﺇ
Page 55

ﺕﻮﺼﻟﺍ ﺕﺍﺩﺍﺪﻋﺇ
.
ﻲﻤﻗﺮﻟﺍ ﺖﻗﻮﻟﺍ ﺓﺍﺫﺎﺤﻣ ﺕﺍﺩﺍﺪﻋﺇ
[SUBWOOFER SET]/[SUB-W LEVEL]
.
[ON]
(5 ) .[SUBWOOFER]
ﻰﻠﻋ
[SUBWOOFER SET]
،
24
،ﺕﺍﺩﺍﺪﻋﻹﺍ ﺹﻮﺼﺨﺑ
ﺪﻳﺪﺤﺗ ﻦﻜﻤﻳ :ﻦﻴﺗﺎﻨﻘﺑ ﺔﻳﺪﻌﺘﻠﻟ :
ﻰﻠﻋ
[SWITCH PREOUT]
ﻂﺒﺿ ﺔﻟﺎﺣ ﻲﻓ ﻂﻘﻓ
[SUB-W LEVEL]
DTA SETTINGS
CAR SETTINGS
ﻂﺒﺿ ﺔﻟﺎﺣ ﻲﻓ ﻂﻘﻓ
ﺪﻳﺪﺤﺗ ﻦﻜﻤﻳ
ﺔﻳﺪﻌﺘﻟﺍ ﺕﺍﺩﺍﺪﻋﺇ
.ﺕﺍﻮﻨﻗ 3 ﺔﻳﺪﻌﺑ ﻭﺃ ﻦﻴﺗﺎﻘﺑ ﺔﻳﺪﻌﺘﻠﻟ ﺔﺣﺎﺘﻤﻟﺍ ﺩﺍﺪﻋﻹﺍ ﺩﻮﻨﺑ ﻲﻠﻳ ﺎﻤﻴﻓ
.ﻞﻀﻓﻻﺍ ﺀﺍﺩﻻﺍ ﻥﺎﻤﻀﻟ ﺔﻟﻮﺻﻮﻤﻟﺍ ﺔﻋﺎﻤﺴﻟﺍ ﻢﺠﺤﻟ ﺎﻘﻓﻭ ﺭﺎﺘﺨﻳ
ﻲﻓ
[X ‘ OVER]
ﻲﻓ
ﺩﺩﺮﺗ ﻂﺒﻀﻳ :
.(ﺾﻔﺨﻨﻤﻟﺍ ﺮﻴﻬﺠﻟﺍ ﺢﺷﺮﻣ ﻭﺃ ﻲﻟﺎﻌﻟﺍ ﺮﻴﻬﺠﻟﺍ ﺢﺷﺮﻣ) ﺓﺭﺎﺘﺨﻤﻟﺍ ﺕﺎﻋﺎﻤﺴﻠﻟ ﺔﻳﺪﻌﺘﻟﺍ
:[SLOPE]/[LPF SLOPE]/[HPF SLOPE]/[SW LPF SLOPE]/[R - HPF SLOPE]/[F - HPF SLOPE]
ﺔﻋﺎﻤﺴﻟﺍ ﺝﺮﺨﻟ ﺎﻘﺑﺎﻄﻣ ﻥﻮﻜﻴﻟ ﺔﻋﺎﻤﺴﻟﺍ ﺝﺮﺨﻟ ﺭﻮﻄﻟﺍ ﺩﺪﺤﻳ :
:
[GAIN]/[SW LPF GAIN]/[R - HPF GAIN]/[F - HPF GAIN]/[GAIN RIGHT]/[GAIN LEFT]
.ﺓﺭﺎﺘﺨﻤﻟﺍ ﺔﻋﺎﻤﺴﻟﺍ ﺔﻳﺪﻌﺘﻟ ﺎﻴﺋﺎﻘﻠﺗ ﺭﺍﺪﺤﻧﻻﺍﻭ ﺩﺩﺮﺘﻟﺍ ﺕﺍﺩﺍﺪﻋﺇ ﻂﺒﺿ ﻢﺘﻳ •
[TWEETER]
ﺪﻨﺒﻠﻟ
[NONE]
ﺩﺍﺪﻋﻹﺍ ﺮﻓﻮﺘﻳ ﻻ ،
[WOOFER]
ﺪﻨﺒﻠﻟ
[LPF FRQ]/[HPF FRQ]/[SW LPF FRQ]/[R - HPF FRQ]/[F - HPF FRQ]/[FRQ]
.ﺓﺭﺎﺘﺨﻤﻟﺍ ﺕﺎﻋﺎﻤﺴﻟﺍ ﻰﻟﺍ ﺕﺍﺭﺎﺷﻻﺍ ﻊﻴﻤﺟ ﻝﺎﺳﺭﺍ ﻢﺘﻳ ،
.ﺔﻳﺪﻌﺘﻟﺍ ﺩﺩﺮﺘﻟ
[THROUGH]
ﺭﺎﻴﺘﺧﺍ ﻢﺗ ﺍﺫﺍ ،ﺓﺭﺎﺘﺨﻣ ﻦﻴﺗﺎﻨﻘﺑ ﺔﻳﺪﻌﺘﻟﺍ ﻥﻮﻜﺗ ﺎﻣﺪﻨﻋ •
[SPEAKER SIZE]
[NONE]
.
[WOOFER]
ﺪﻨﺒﻠﻟ
[SUBWOOFER]
ﺭﺎﻴﺘﺧﺍ ﻢﺗ ﺍﺫﺍ ،ﺓﺭﺎﺘﺨﻣ ﺕﺍﻮﻨﻗ 3 ﺔﻳﺪﻌﺗ ﻥﻮﻜﺗ ﺎﻣﺪﻨﻋ •
ﺪﻨﺒﻠﻟ
[X ‘ OVER]
ﺩﺍﺪﻋﻹﺍ ﺮﻓﻮﺘﻳ ﻻ ،
[THROUGH]
ﺮﻴﻏ ﺮﺧﺁ ﻂﺒﺿ ﺭﺎﻴﺘﺧﺍ ﺔﻟﺎﺣ ﻲﻓ ﻂﻘﻓ ﻩﺭﺎﻴﺘﺧﺍ ﻦﻜﻤﻳ
.ﺓﺭﺎﺘﺨﻤﻟﺍ ﺔﻋﺎﻤﺴﻠﻟ ﺝﺮﺨﻟﺍ ﺕﻮﺻ ﻯﻮﺘﺴﻣ ﻂﺒﻀﻳ
[PHASE]/[SW LPF PHASE]
SPEAKER SIZE
ﻭ
[REAR]
ﻭ
[FRONT]
.ﺔﻋﺎﻤﺴﻠﻟ
[SPEAKER SIZE]
X ‘ OVER
ﺭﺎﻴﺘﺧﺍ ﻢﺗ ﺍﺫﺍ
.ﺔﻳﺪﻌﺘﻟﺍ ﺭﺍﺪﺤﻧﺍ ﻂﺒﻀﻳ
.ﻯﺮﺧﻻﺍ
ﻊﻓﺭ ﻯﻮﺘﺴﻣ ﺩﺪﺤﻳ :
ﺔﻠﻀﻔﻤﻟﺍ ﺔﻴﻟﺎﻌﻟﺍﻭ ﺔﻀﻔﺨﻨﻤﻟﺍ ﺕﺍﺩﺩﺮﺘﻟﺍ ﺰﻳﺰﻌﺗ ﺪﻳﺪﺤﺗ :
•
.ﺀﺎﻐﻟﺍ :
OFF
؛ .ﺾﻔﺨﻨﻣ ﺕﻮﺻ ﻯﻮﺘﺴﻤﺑ ﺪﻴﺟ ﻞﻜﺸﺑ ﻥﺯﺍﻮﺘﻣ ﺕﻮﺻ ﺝﺎﺘﻧﻹ
•
.ﺔﻴﻣﺎﻣﻷﺍﻭ ﺔﻴﻔﻠﺨﻟﺍ ﻦﻴﺘﻋﺎﻤﺴﻟﺍ ﺝﺮﺧ ﻥﺯﺍﻮﺗ ﻂﺒﻀﻳ :(
.ﻯﺮﺴﻴﻟﺍﻭ ﻰﻨﻤﻴﻟﺍ ﻦﻴﺘﻋﺎﻤﺴﻟﺍ ﺝﺍﺮﺧﺇ ﻥﺯﺍﻮﺗ ﻂﺒﻀﻳ :(0)
ﻯﻮﺘﺴﻤﻟ ﻖﺒﺴﻤﻟﺍ ﻂﺒﻀﻟﺍ :(
ﺮﺘﺧﺍ ،ﻂﺒﻀﻟﺍ ﻞﻤﻋ ﻞﺒﻗ) .ﺭﺪﺼﻣ ﻞﻜﺑ ﺹﺎﺨﻟﺍ ﻲﺋﺪﺒﻤﻟﺍ ﺕﻮﺼﻟﺍ ﻢﺠﺣ
(.AUX ﺕﻮﺻ ﺭﺪﺼﻣﻭ RADIO ﺕﻮﺻ ﺭﺪﺼﻤﻟ ﻖﻴﺒﻄﺘﻠﻟ ﻞﺑﺎﻗ ﺮﻴﻏ)
ﺩﺩﺮﺘﻟﺍ ﺔﻴﻟﺎﻋ ﺕﺎﻧﻮﻜﻤﻟﺍ ﺾﻳﻮﻌﺗ ﻖﻳﺮﻃ ﻦﻋ ﺎﹰﻴﻌﻗﺍﻭ ﺎﹰﺗﻮﺻ ﻖﻠﺨﻳ :
ﺕﺎﻧﺎﻴﺒﻟﺍ ﻂﻐﺿ ﺪﻨﻋ ﺖﻋﺎﺿ ﻲﺘﻟﺍ ﺔﺟﻮﻤﻟﺍ ﻞﻜﺸﻟ ﺩﻮﻌﺼﻟﺍ ﻦﻣﺯ ﺓﺩﺎﻌﺘﺳﺍﻭ
•
•
•
•
؛ .ﺎﻴﺿﺍﺮﺘﻓﺍ ﺕﻮﺼﻟﺍ ﺔﺣﺎﺴﻣ ﺯﺰﻌﻳ :
؛ .ﺎﻴﺿﺍﺮﺘﻓﺍ ﺔﻴﻌﻗﺍﻭ ﺮﺜﻛﺍ ﺕﻮﺼﻟﺍ ﻞﻌﺠﻳ :
ﺕﺎﻋﺎﻤﺴﻟﺍ ﻦﻣ ﺭﺩﺎﺼﻟﺍ ﺕﻮﺼﻟﺍ ﻯﻮﺘﺴﻣ ﻂﺒﻀﻳ :
ﺀﺎﺿﻮﺿ ﻭﺍ ﺓﺭﺎﻴﺴﻟﺍ ﺝﺭﺎﺧ ﻦﻣ ﺔﻣﺩﺎﻘﻟﺍ ﺀﺎﺿﻮﻀﻟﺍ ﻞﻴﻠﻘﺘﻟ ﺩﺩﺮﺘﻟﺍ ﺯﺰﻌﻳ :
ﺕﺍﺩﺍﺪﻋﺇ ﺩﻮﻨﺑ ﺭﺎﻬﻇﺍ ﻢﺘﻴﺳ ،
LEVEL5/LEVEL4/LEVEL3/LEVEL2/LEVEL1
.ﺀﺎﻐﻟﺍ :
(.ﺕﺍﻮﻨﻗ 3 ﺔﻳﺪﻌﺗ ﺭﺎﻴﺘﺧﺍ ﻦﻋ ﻖﻴﺒﻄﺘﻠﻟ ﻞﺑﺎﻗ ﺮﻴﻏ)
.ﻦﻴﺗﺎﻨﻘﺑ ﺔﻳﺪﻌﺘﻟﺍ ﻉﻮﻧ ﺭﺎﻴﺘﺧﺍ ﻢﺗ ،ﺔﻴﺿﺍﺮﺘﻓﺍﺍ ﺔﺌﻴﻬﺘﻟﺍ ﻲﻓ
.ﺀﺎﻐﻟﺍ :
OFF
؛ .ﺏﻮﻠﻄﻤﻟﺍ ﺮﻴﻬﺠﻟﺍ
LEVEL2/LEVEL1
OFF
؛ .ﺮﻓﻭﻮﺒﺼﻟﺍ ﺝﺮﺧ ﻞﻴﻐﺸﺘﺑ ﻡﻮﻘﻳ :
0) F15
R15
LEVEL 0) LEVEL +6
(.RADIO ﺕﻮﺻ ﺭﺪﺼﻤﻟ ﻖﻴﺒﻄﺘﻠﻟ ﻞﺑﺎﻗ ﺮﻴﻏ)
(6 )
ﻪﺗﺮﺘﺧﺍ ﻱﺬﻟﺍ ﺔﻳﺪﻌﺘﻟﺍ ﻉﻮﻨﻟ ﺎﻘﻓﻭ
.
(23 )
ﺕﺍﻮﻨﻗ 3 ﺔﻳﺪﻌﺑ ﻭﺃ ﻦﻴﺗﺎﻘﺑ ﺔﻳﺪﻌﺗ
ﻰﻟﺇ
(.ﻪﻄﺒﺿ ﺪﻳﺮﺗ ﻱﺬﻟﺍ ﺭﺪﺼﻤﻟﺍ
.ﺀﺎﻐﻟﺍ :
OFF
LARGE/MEDIUM/SMALL
LEVEL3/LEVEL2/LEVEL1
HIGH/MIDDLE/LOW
.ﺀﺎﻐﻟﺍ :
OFF
.ﺀﺎﻐﻟﺍ :
OFF
؛ .ﺕﺍﺭﺎﻃﻻﺍ ﻥﺍﺭﻭﺩ
ﻰﻟﺇ
R15
ﻰﻟﺇ
LEVEL –15
؛ .ﺔﻴﺗﻮﺼﻟﺍ
.ﺀﺎﻐﻟﺍ :
.ﺀﺎﻐﻟﺍ :
؛ .ﺎﻴﺿﺍﺮﺘﻓﺍ
ON
L15
ON
OFF
OFF
ON
BASS BOOST
LOUDNESS
SUBWOOFER SET
FADER
BALANCE
VOLUME OFFSET
SOUND EFFECT
SOUND RECNSTR
ﻦﻳﻮﻜﺗ ﺓﺩﺎﻋﺇ)
(ﺕﻮﺼﻟﺍ
SPACE ENHANCE
SND REALIZER
STAGE EQ
DRIVE EQ
SPEAKER SIZE
X’OVER
ﻲﺑﺮﻋ
22
Page 56

ﺕﻮﺼﻟﺍ ﺕﺍﺩﺍﺪﻋﺇ
...ﺭﺪﺼﻣ ﻱﺃ ﻰﻟﺇ ﻉﺎﻤﺘﺳﻻﺍ ﺀﺎﻨﺛﺃ
[FUNCTION]
.ﺹﺮﻘﻟﺍ ﻂﻐﺿﺍ ﻢﺛ ،(ﻲﻟﺎﺘﻟﺍ ﻝﻭﺪﺠﻟﺍ ﻊﺟﺍﺭ) ﺪﻨﺑ ﺪﻳﺪﺤﺘﻟ ﺕﻮﺼﻟﺍ ﻯﻮﺘﺴﻣ ﺹﺮﻗ ﺭﺩﺃ 2
XX
:ﻲﺿﺍﺮﺘﻓﺍ
ﻢﺨﻀﻣ ﺝﺍﺮﺧﺇ ﻯﻮﺘﺴﻣ ﻂﺒﻀﻳ :(
(Q ﺓﺩﻮﺠﻟﺍ ﻞﻣﺎﻋ ،ﺔﻤﻐﻨﻟﺍ ﻯﻮﺘﺴﻣ ،ﺩﺩﺮﺘﻟﺍ ﻯﻮﺘﺴﻣ) ﺕﻮﺼﻟﺍ ﺮﺻﺎﻨﻋ ﻥﻮﻜﺗ
ﻯﻮﺘﺴﻤﻟﺍ ﻂﺒﺿ :(
ﻱﺬﻟﺍ ﺭﺪﺼﻤﻟﺍ ﺮﺘﺧﺍ ،ﻂﺒﻀﻟﺍ ﻞﻤﻋ ﻞﺒﻗ) .ﺭﺪﺼﻣ ﻞﻛ ﻆﻔﺤﻟ
.ﺀﺎﻐﻟﺍ :
OFF
؛ .ﺪﺘﻤﻤﻟﺍ ﺮﻴﻬﺠﻟﺍ ﺕﻮﺼﻟﺍ ﻞﻴﻐﺸﺘﺑ ﻡﻮﻘﻳ :
.ﺭﺪﺼﻣ ﻞﻛ ﻆﻔﺤﻟ ﻯﻮﺘﺴﻤﻟﺍ ﻂﺒﺿ :(
ﺩﺪﺤﻳ :
USER/POWERFUL/JAZZ/TOP40/EASY/POPS/ROCK/NATURAL
(.
[MANUAL EQ]
ﻲﺑﺮﻋ
21
.
.ﻪﻄﻴﺸﻨﺗ ﻭﺃ ﺏﻮﻠﻄﻤﻟﺍ ﺮﺼﻨﻌﻟﺍ ﺪﻳﺪﺤﺗ ﻢﺘﻳ ﻰﺘﺣ 2 ﺓﻮﻄﺨﻟﺍ ﺭﺮﻛ 3
LEVEL 0) LEVEL +9
(.ﻪﻄﺒﺿ ﺪﻳﺮﺗ ﻱﺬﻟﺍ ﺭﺪﺼﻤﻟﺍ ﺮﺘﺧﺍ ،ﻂﺒﻀﻟﺍ ﻞﻤﻋ ﻞﺒﻗ)
.ﻰﻘﻴﺳﻮﻤﻟﺍ ﻉﻮﻨﻟ ﺐﺳﺎﻨﻤﻟﺍﻭ ﹰﺎﻘﺒﺴﻣ ﻁﻮﺒﻀﻤﻟﺍ ﻝﹺﺩﺎﻌﹸﻤﻟﺍ
ﻲﻓ ﺎﻫﺬﻴﻔﻨﺗ ﻢﺗ ﻲﺘﻟﺍ ﺕﺍﺩﺍﺪﻋﻹﺍ ﻡﺍﺪﺨﺘﺳﻻ
ﻰﻟﺇ ﻝﻮﺧﺪﻠﻟ ﺕﻮﺼﻟﺍ ﻯﻮﺘﺴﻣ ﺹﺮﻗ ﻰﻠﻋ ﻂﻐﺿﺍ 1
.ﺀﺎﻬﻧﻹﺍ ﻞﺟﺃ ﻦﻣ ﺭﺍﺮﻤﺘﺳﻻﺍ ﻊﻣ ﻂﻐﺿﺍ 4
.
[AUDIO CONTROL]
. ﻂﻐﺿﺍ ﻢﺛ ،ﺪﻨﺑ ﺭﺎﻴﺘﺧﻻ J / K ﻂﻐﺿﺍ 2
. ﻰﻠﻋ ﻂﻐﺿﺍ ،ﻖﺑﺎﺴﻟﺍ ﺩﺍﺪﻋﻹﺍ ﺮﺼﻨﻋ ﻰﻟﺇ ﻉﻮﺟﺮﻠﻟ
LEVEL 0) LEVEL +10
.ﺭﺎﻴﺘﺧﺍ ﻞﻛ ﻰﻟﺍ ﺎﻘﺒﺴﻣ ﺔﻃﻮﺒﻀﻣ
ﻰﻟﺇ
LEVEL –9
(.ﻪﻄﺒﺿ ﺪﻳﺮﺗ
LEVEL 0) LEVEL +9
.ﺓﺩﻮﺠﻟﺍ ﻞﻣﺎﻋ ﻂﺒﺿﺍ :
(ﺪﻌﺑ ﻦﻋ ﻢﻜﺤﺘﻟﺍ ﺓﺪﺣﻭ ﻡﺍﺪﺨﺘﺳﺍ ﻭﺃ)
ﻊﺿﻭ ﻰﻟﺇ ﻝﻮﺧﺪﻠﻟ AUD ﻂﻐﺿﺍ 1
AUDIO CONTROL
ﻰﻟﺇ
LEVEL –50
.ﺕﻮﺼﻟﺍ
ON
BASS
EXTEND
ﻰﻟﺇ
LEVEL –9
2.00/1.50/1.35
[USER]
ﺮﺘﺧﺍ)
/
250HZ/160HZ/100HZ
/
1KHZ/630HZ/400HZ
/
4KHZ/2.5KHZ/1.6KHZ
16KHZ
/
10KHZ/6.3KHZ
SUB-W LEVEL
MANUAL EQ
62.5HZLEVEL
Q FACTOR
PRESET EQ
BLUETOOTH®
Bluetooth ﻖﻳﺮﻃ ﻦﻋ ﺖﻧﺮﺘﻧﻹﺍ ﻮﻳﺩﺍﺭ
ﻦﻋ Android/iPod/iPhone ﺯﺎﻬﺟ ﻰﻠﻋ Spotify ﻰﻟﺇ ﻉﺎﻤﺘﺳﻻﺍ ﻚﻨﻜﻤﻳ
.ﺯﺎﻬﺟ ﻱﺍ ﻰﻟﺍ ﻻﻮﺻﻮﻣ USB ﻝﺎﺧﺩﻻﺍ ﻑﺮﻃ ﻥﻮﻜﻳ ﻻ ﻥﺍ ﻦﻣ ﺪﻛﺄﺗ •
(5 ) .[SOURCE SELECT]
.ﻙﺯﺎﻬﺟ ﻰﻠﻋ Spotify ﻖﻴﺒﻄﺗ ﺢﺘﻔﺑ ﻢﻗ
(14 )
ﺯﺎﻬﺠﻟ) SPOTIFY ﺭﺎﻴﺘﺧﻻ ﺭﺮﻜﺘﻣ ﻞﻜﺸﺑ ﻂﻐﺿﺍ 3
.(Android ﺯﺎﻬﺠﻟ) SPOTIFY BT ﻭﺍ (iPod/iPhone
ﻝﺎﺧﺩﻻﺍ ﻑﺮﻃ ﺮﺒﻋ Spotify ﻞﻴﻐﺸﺗ ﺔﻘﻳﺮﻃ ﺲﻔﻨﺑ Spotify ﻞﻴﻐﺸﺗ ﻚﻨﻜﻤﻳ •
.Bluetooth ﻞﻴﺻﻮﺗ ﺮﺒﻋ ﺯﺎﻬﺠﻟﺍ ﻞﺻ 2
.ﺓﺪﺣﻮﻟﺍ ﻩﺬﻫ ﻰﻠﻋ Bluetooth ﻖﻳﺮﻃ
Spotify ﺔﻣﺪﺧ ﻰﻟﺍ ﻉﺎﻤﺘﺳﻻﺍ
ﻲﻓ
[SPOTIFY SRC]
.ﹰﺎﻴﺋﺎﻘﻠﺗ ﺚﺒﻟﺍ ﺃﺪﺒﻳﻭ ﺭﺪﺼﻤﻟﺍ ﺮﻴﻐﺘﻳ
:ﺮﻴﻀﺤﺘﻟﺍ
ـﻟ
(12 )
[ON]
.USB
ﺩﺪﺣ
1
Page 57

BLUETOOTH®
iPod/iPhone ﺯﺎﻬﺟ ﻡﺍﺪﺨﺘﺳﺎﺑ ﻖﻴﺒﻄﺘﻟﺍ ﻡﺍﺪﺨﺘﺳﺍ ﻊﻴﻄﺘﺴﺗ :
.USB ﻝﺎﺧﺩﻻﺍ ﻑﺮﻃ ﺮﺒﻋ ﻭﺍ Bluetooth ﺮﺒﻋ ﻝﻮﺻﻮﻣ
.ﻖﻴﺒﻄﺘﻟﺍ ﻡﺍﺪﺨﺘﺳﻻ ﻝﻮﺻﻮﻣ IOS ﺯﺎﻬﺟ ﺪﺟﻮﻳ ﻻ :
Android ﻒﺗﺎﻫ ﻡﺍﺪﺨﺘﺳﺎﺑ ﻖﻴﺒﻄﺘﻟﺍ ﻡﺍﺪﺨﺘﺳﺍ ﻊﻴﻄﺘﺴﺗ :
ﻡﺍﺪﺨﺘﺳﻻ ﻝﻮﺻﻮﻣ Android ﺯﺎﻬﺟ ﺪﺟﻮﻳ ﻻ :
.ﻝﻮﺻﻮﻤﻟﺍ ﺯﺎﻬﺠﻟﺍ ﺔﻟﺎﺣ ﻦﻴﺒﻳ
.Bluetooth ﺮﺒﻋ ﻝﻮﺻﻮﻣ ﻲﻛﺬﻟﺍ
ANDROID NOT CONNECTED
IOS CONNECTED
IOS NOT CONNECTED
ANDROID CONNECTED
.ﻖﻴﺒﻄﺘﻟﺍ
STATUS
Bluetooth ﺮﺒﻋ iPod/iPhone ﺯﺎﻬﺟ ﻰﻟﺍ ﻉﺎﻤﺘﺳﻻﺍ
.ﺓﺪﺣﻮﻟﺍ ﻩﺬﻫ ﻰﻠﻋ Bluetooth ﺮﺒﻋ iPod/iPhone ﺯﺎﻬﺟ ﻰﻠﻋ ﻲﻧﺎﻏﻻﺍ ﻰﻟﺇ ﻉﺎﻤﺘﺳﻻﺍ ﻚﻨﻜﻤﻳ
.iPod BT ﺭﺎﻴﺘﺧﻻ ﺭﺮﻜﺘﻣ ﻞﻜﺸﺑ
iPod/iPhone ﺯﺎﻬﺟ ﻥﻮﻜﻳ ﺎﻣﺪﻨﻋ ﺔﻘﻳﺮﻄﻟﺍ ﺲﻔﻨﺑ iPod/iPhone ﺯﺎﻬﺟ ﻞﻴﻐﺸﺗ ﻚﻨﻜﻤﻳ •
ﺭﺪﺼﻣ ﻰﻟﺍ ﻉﺎﻤﺘﺳﻻﺍ ﺀﺎﻨﺛﺍ USB ﻝﺎﺧﺩﻻﺍ ﻑﺮﻃ ﻰﻟﺍ iPod/iPhone ﺯﺎﻬﺟ ﻞﻴﺻﻮﺘﺑ ﺖﻤﻗ ﺍﺫﺍ •
ﻻ ﺍﺫﺍ iPod BT ﺭﺎﻴﺘﺧﻻ
ﻂﻐﺿﺍ .ﺎﻴﺋﺎﻘﻠﺗ iPod USB ﻰﻟﺍ ﺭﺪﺼﻤﻟﺍ ﺮﻴﻐﺘﻳ ،iPod BT
(9 )
.USB ﻝﺎﺧﺩﻻﺍ ﻑﺮﻃ ﺮﺒﻋ ﻝﻮﺻﻮﻣ
.Bluetooth ﺮﺒﻋ ﻝﻮﺻﻮﻣ ﺯﺎﻬﺠﻟﺍ ﻝﺍﺯ
ﻂﻐﺿﺍ
KENWOOD Remote ﻖﻴﺒﻄﺘﻟﺍ ﻡﺍﺪﺨﺘﺳﻻ ﺕﺍﺩﺍﺪﻋﺍ
KENWOOD ﻞﺒﻘﺘﺴﻣ ﻞﻴﻐﺸﺗ ﺕﺎﻴﻠﻤﻌﺑ ﻢﻜﺤﺘﻠﻟ ﻢﻤﺼﻣ KENWOOD Remote ﻖﻴﺒﻄﺘﻟﺍ
ﻒﺗﺎﻬﻟﺍ ﻭﺍ (USB ﻝﺎﺧﺩﻻﺍ ﻑﺮﻃ ﺮﺒﻋ ﻭﺍ Bluetooth ﺮﺒﻋ) iPod/iPhone ﺯﺎﻬﺟ ﻦﻣ ﺓﺭﺎﻴﺴﻟﺎﺑ
.ﻞﻴﺻﻮﺘﻟﺍ ﻞﺒﻗ ﻙ ﺯﺎﻬﺟ ﻰﻠﻋ KENWOOD Remote ﻖﻴﺒﻄﺘﻟﺍ ﻦﻣ ﺭﺍﺪﺻﺍ ﺙﺪﺣﺍ ﺖﻴﺒﺜﺘﺑ ﻢﻗ
ﻂﻐﺿﺍ ﻢﺛ ،(ﻲﻟﺎﺘﻟﺍ ﻝﻭﺪﺠﻟﺍ ﻊﺟﺍﺭ) ﺪﻨﺑ ﺪﻳﺪﺤﺘﻟ ﺕﻮﺼﻟﺍ ﻯﻮﺘﺴﻣ ﺹﺮﻗ ﺭﺩﺃ 2
XX
:ﻲﺿﺍﺮﺘﻓﺍ
ﻝﻮﺻﻮﻤﻟﺍ ﻭﺍ Bluetooth ﺮﺒﻋ ﻖﻴﺒﻄﺘﻟﺍ ﻡﺍﺪﺨﺘﺳﻻ iPod/iPhone ﺯﺎﻬﺟ ﺭﺎﺘﺨﻳ :
ﺯﺎﻬﺟ ﻞﻴﺻﻮﺗ ﻢﺗ ﺍﺫﺍ iPod USB ﺮﺘﺧﺍ ﻭﺃ) iPod BT ﺭﺪﺼﻤﻟﺍ ﺮﺘﺣﺍ ،IOS ﺭﺎﻴﺘﺧﺍ ﻢﺗ ﺍﺫﺍ
ﺮﺒﻋ ﻝﻮﺻﻮﻣ ﻞﻴﻐﺸﺘﻠﻟ ﻞﺑﺎﻗ ﺭﺪﺼﻣ ﻰﻟﺍ iPod BT ﺭﺪﺼﻣ ﻦﻣ ﺮﻴﻴﻐﺘﻟﺎﺑ ﺖﻤﻗ –
؛ .Bluetooth ﺮﺒﻋ ﻖﻴﺒﻄﺘﻟﺍ ﻡﺍﺪﺨﺘﺳﻻ Android ﻲﻛﺬﻟﺍ ﻒﺗﺎﻬﻟﺍ ﺭﺎﺘﺨﻳ :
.<www.kenwood.com/cs/ce/> ﺓﺭﺎﻳﺰﺑ ﻢﻗ ،ﺕﺎﻣﻮﻠﻌﻤﻟﺍ ﻦﻣ ﺪﻳﺰﻤﻟ
.
[FUNCTION]
.ﻪﻄﻴﺸﻨﺗ ﻭﺃ ﺏﻮﻠﻄﻤﻟﺍ ﺮﺼﻨﻌﻟﺍ ﺪﻳﺪﺤﺗ ﻢﺘﻳ ﻰﺘﺣ
ﻰﻟﺇ ﻝﻮﺧﺪﻠﻟ ﺕﻮﺼﻟﺍ ﻯﻮﺘﺴﻣ ﺹﺮﻗ ﻰﻠﻋ ﻂﻐﺿﺍ 1
.ﺀﺎﻬﻧﻹﺍ ﻞﺟﺃ ﻦﻣ ﺭﺍﺮﻤﺘﺳﻻﺍ ﻊﻣ ﻂﻐﺿﺍ 4
. ﻰﻠﻋ ﻂﻐﺿﺍ ،ﻖﺑﺎﺴﻟﺍ ﺩﺍﺪﻋﻹﺍ ﺮﺼﻨﻋ ﻰﻟﺇ ﻉﻮﺟﺮﻠﻟ
.ﻖﻴﺒﻄﺘﻟﺍ ﻡﺍﺪﺨﺘﺳﻻ (ANDROID ﻭﺍ IOS) ﺯﺎﻬﺠﻟﺍ ﺮﺘﺧﺍ
.ﺀﺎﻐﻟﺍ :NO ؛ .USB ﻝﺎﺧﺩﻻﺍ ﻑﺮﻃ ﺮﺒﻋ
.ﻖﻴﺒﻄﺘﻟﺍ ﻞﻴﻌﻔﺘﻟ (USB ﻝﺎﺧﺩﻻﺍ ﻑﺮﻃ ﺮﺒﻋ iPod/iPhone
:ﺍﺫﺍ ﻖﻴﺒﻄﺘﻟﺎﺑ ﻝﺎﺼﺗﻻﺍ ﻉﺎﻄﻘﻧﺍ ﻭﺍ ﻊﻄﻗ ﻢﺘﻴﺳ
.iPod BT ﺭﺪﺼﻣ ﻰﻟﺍ iP
.ﺔﻤﺋﺎﻘﻟﺍ ﻦﻣ ﻡﺍﺪﺨﺘﺳﻼﻟ Android ﻲﻛﺬﻟﺍ ﻒﺗﺎﻬﻟﺍ ﺭﺎﺘﺨﻳ :
od USB ﺭﺪﺼﻣ ﻦﻣ ﺮﻴﻴﻐﺘﻟﺎﺑ ﺖﻤﻗ –
.
[YES]
.(Bluetooth ﺮﺒﻋ) Android ﻲﻛﺬﻟﺍ
2 ﺓﻮﻄﺨﻟﺍ ﺭﺮﻛ 3
YES
.USB ﻝﺎﺧﺩﻻﺍ ﻑﺮﻃ
YES
.ﺀﺎﻐﻟﺍ :
NO
ﻰﻟﺍ ﻁﻮﺒﻀﻣ
[SELECT]
ﻦﻤﺿ
.ﺹﺮﻘﻟﺍ
REMOTE APP
•
ANDROID LIST
[ANDROID]
:ﺮﻴﻀﺤﺘﻟﺍ
SELECT
IOS
ANDROID
*
*
ﻲﺑﺮﻋ
20
Page 58

ﻢﻜﺤﺘﻟﺍ ﺓﺪﺣﻭ ﻰﻠﻋ
ﺝﺍﺮﺧﺍ ﻞﻳﻮﺤﺗ ﻲﻓ ﺎﻀﻳﺍ ﺐﺒﺴﺘﻳ ﻪﺴﻔﻧ ﻝﻮﺻﻮﻤﻟﺍ ﺯﺎﻬﺠﻟﺍ ﻰﻠﻋ “(ﺽﺮﻋ) Play” ﺡﺎﺘﻔﻤﻟﺍ ﻂﻐﺿ
ﺪﻌﺑ ﻦﻋ
ﻂﻐﺿﺍ
( ﺡﺎﺘﻣ ﺮﻴﻏ )
( ﺡﺎﺘﻣ ﺮﻴﻏ )
( ﺡﺎﺘﻣ ﺮﻴﻏ )
( ﺡﺎﺘﻣ ﺮﻴﻏ )
.ﻞﺼﺘﻤﻟﺍ ﺯﺎﻬﺠﻟﺎﺑ ﺎﻫﺮﻓﺍﻮﺗ ﺐﺴﺣ ﺔﺷﺎﺸﻟﺍ ﺕﺍﺮﺷﺆﻣﻭ ﺕﺎﻴﻠﻤﻌﻟﺍ ﻒﻠﺘﺨﺗ ﺪﻗ
FILE REPEAT ،ALL REPEAT
،
ﻰﻠﻋ ﺭﺍﺮﻤﺘﺳﺎﺑ ﻂﻐﺿﺍ
.
“ﺔﻤﺋﺎﻗ/ﺪﻠﺠﻣ ﻦﻣ ﻒﻠﻣ ﺮﺘﺧﺍ” ﻊﺟﺍﺭ
ALL RANDOM
ﺭﺎﻴﺘﺧﻻ
.
RANDOM OFF
.10 ﺔﺤﻔﺻ ﻲﻓ
REPEAT OFF
ﺪﻳﺪﺤﺘﻟ
ﻂﻐﺿﺍ •
*
.5 ﻂﻐﺿﺍ
ﻞﻴﻐﺸﺘﻟﺍ ﺭﺍﺮﻜﺗ.ﺭﺍﺮﻜﺘﺑ
ﺐﻴﺗﺮﺘﺑ ﻞﻴﻐﺸﺘﻟﺍ
ﻦﻣ ﻒﻠﻣ ﺮﺘﺧﺍ
ﺔﻤﺋﺎﻗ/ﺪﻠﺠﻣ
ﺓﺰﻬﺟﺍ ﻦﻴﺑ ﻝﻮﺤﻳ
Bluetooth ﺕﻮﺻ
.ﺯﺎﻬﺠﻟﺍ ﻦﻣ ﺕﻮﺼﻟﺍ
ﻰﻟﺇﺔﻳﺎﻤﺤﻟﺍ ﺀﺎﻄﻏ ﻰﻠﻋ
ﻲﺋﺍﻮﺸﻋ
ﺔﻟﻮﺻﻮﻤﻟﺍ
BLUETOOTH®
ﺕﻮﺻ — BLUETOOTH
Bluetooth ﺕﻮﺻ ﺓﺰﻬﺟﺍ ﺲﻤﺧ ﻰﻟﺍ ﻞﻴﺻﻮﺘﻟﺍ ﻦﻜﻤﻳ ،BT AUDIO ﺭﺪﺼﻤﻟﺍ ﻡﺍﺪﺨﺘﺳﺍ ﺀﺎﻨﺛﺍ
ﻢﻜﺤﺘﻟﺍ ﺓﺪﺣﻭ ﻰﻠﻋ ﺭﺮﻜﺘﻣ ﻞﻜﺸﺑ SRC ﻂﻐﺿﺍ ﻭﺃ) ﻂﻐﺿﺍ 1
*
.ﺀﺪﺒﻠﻟ Bluetooth ﺕﻮﺻ ﻞﻐﺸﻣ ﻞﻴﻐﺸﺘﺑ ﻢﻗ
.ﺔﺴﻤﺨﻟﺍ ﺓﺰﻬﺟﻻﺍ ﻚﻠﺗ ﻦﻴﺑ ﻞﻳﻮﺤﺘﻟﺍﻭ
Bluetooth ﺮﺒﻋ ﺕﻮﺼﻟﺍ ﻞﻐﺸﻣ
.BT AUDIO ﺪﻳﺪﺤﺘﻟ (ﺪﻌﺑ ﻦﻋ
2
19
ﻲﺑﺮﻋ
ﻢﻜﺤﺘﻟﺍ ﺓﺪﺣﻭ ﻰﻠﻋ
.
/ ﻂﻐﺿﺍ
.
.S /
ﺭﺍﺮﻤﺘﺳﻻﺍ ﻊﻣ ﻂﻐﺿﺍ
.S /
ﺪﻌﺑ ﻦﻋ
ﻂﻐﺿﺍ
ﻂﻐﺿﺍ
ﻰﻠﻋ
.
ﻂﻐﺿﺍ
.J / K ﻂﻐﺿﺍ
ﻰﻠﻋ ﺭﺍﺮﻤﺘﺳﻻﺍ
.S / T
ﻰﻟﺇﺔﻳﺎﻤﺤﻟﺍ ﺀﺎﻄﻏ ﻰﻠﻋ
ﺖﻗﺆﻣ ﻒﻗﻮﺗ/ﻞﻴﻐﺸﺗ
ﻭﺃ ﺔﻋﻮﻤﺠﻣ ﺪﻳﺪﺤﺗ
ﺪﻠﺠﻣ
ﻉﺎﺟﺭﻹﺍ/ﻢﻳﺪﻘﺘﻟﺍ ﻲﻄﺨﺗ.S / T ﻂﻐﺿﺍ
ﻉﺎﺟﺭﻹﺍ/ﻊﻳﺮﺳ ﻢﻳﺪﻘﺗ ﻊﻣ ﻂﻐﺿﺍ
Page 59

BLUETOOTH®
ﺯﺎﻬﺟ ﺮﺧﺍ ﻥﻮﻜﻳ ﺎﻣﺪﻨﻋ ﺎﹰﻴﺋﺎﻘﻠﺗ ﻝﺎﺼﺗﻻﺍ ﺓﺩﺎﻋﺈﺑ ﺓﺪﺣﻮﻟﺍ ﻡﻮﻘﺗ :
ﻞﺜﻣ Bluetooth ﺔﻴﻨﻘﺗ ﻢﻋﺪﻳ ﻱﺬﻟﺍ ﺯﺎﻬﺠﻟﺎﺑ ﻥﺍﺮﻗﻹﺎﺑ ﺓﺪﺣﻮﻟﺍ ﻡﻮﻘﺗ :
ﻑﺮﻃ ﺮﺒﻋ ﻪﻠﻴﺻﻮﺗ ﺪﻨﻋ ﺎﹰﻴﺋﺎﻘﻠﺗ (Android ﺯﺎﻬﺟ/iPod touch/iPhone) ﺯﺎﻬﺟ
ﺯﺎﻬﺠﻟﺍ ﻞﻴﻐﺸﺗ ﻡﺎﻈﻧ ﻰﻠﻋ ﺍﺀﺎﻨﺑ ﺔﻔﻴﻇﻮﻟﺍ ﻩﺬﻫ ﻞﻤﻌﺗ ﻻ ﺪﻗ .USB ﻝﺎﺧﺩﻻﺍ
ﻥﺰﺨﻤﻟﺍ ﻥﺍﺮﻗﻹﺍ ﻚﻟﺫ ﻲﻓ ﺎﻤﺑ) Bluetooth ﺕﺍﺩﺍﺪﻋﺇ ﻊﻴﻤﺟ ﺔﺌﻴﻬﺗ :
.ﺀﺎﻐﻟﺍ :
OFF
؛ .ﻕﺎﻄﻨﻟﺍ ﻞﺧﺍﺩ ﻝﻮﺻﻮﻣ Bluetooth
.ﺀﺎﻐﻟﺍ :NO ؛ .(ﺦﻟﺇ ،ﻒﺗﺎﻬﻟﺍ ﻞﻴﻟﺩﻭ
.ﺀﺎﻐﻟﺍ :
OFF
ON
ON
؛ .ﻝﻮﺻﻮﻤﻟﺍ
YES
Bluetooth ﺭﺎﺒﺘﺧﺍ ﻊﺿﻭ
.ﺓﺪﺣﻮﻟﺍﻭ Bluetooth ﺯﺎﻬﺟ ﻦﻴﺑ ﻡﻮﻋﺪﻤﻟﺍ ﻊﺿﻮﻟﺍ ﻝﺎﺼﺗﺍ ﺺﺤﻓ ﻚﻨﻜﻤﻳ
ﻰﻠﻋ ﻩﺩﺪﺣﻭ (DPX-M3
.ﺓﺪﺣﻮﻟﺍ ﺀﺎﻔﻃﻹ
***
.ﻥﺍﺮﻗﻹﺍ ﺪﻴﻛﺄﺘﻟ Bluetooth ﺯﺎﻬﺟ ﻞﻴﻐﺸﺘﺑ ﻢﻗ
.ﻥﺭﺎﻘﻣ Bluetooth ﺯﺎﻬﺟ ﺩﻮﺟﻭ ﻡﺪﻋ ﻦﻣ ﺪﻛﺄﺗ •
.“PLEASE PAIR YOUR PHONE PIN 0000” ﺮﻬﻈﺗ
.ﺭﺎﺒﺘﺧﻻﺍ ﺪﻌﺑ (NG ﻭﺃ OK) ﻞﻴﺻﻮﺘﻟﺍ ﺔﺠﻴﺘﻧ ﺮﻬﻈﺗ
(PBAP) ﻒﺗﺎﻬﻟﺍ ﻞﻴﻟﺩ ﻰﻟﺇ ﻝﻮﺻﻮﻟﺍ ﻊﺿﻭ ﻖﻓﺍﻮﺗ :PB DL
. ﻰﻠﻋ ﺭﺍﺮﻤﺘﺳﻻﺍ ﻊﻣ ﻂﻐﺿﺍ 1
/DPX-5
(HFP) ﻦﻳﺪﻴﻟﺍ ﻡﺍﺪﺨﺘﺳﺍ ﻡﺪﻋ ﻊﺿﻭ ﻖﻓﺍﻮﺗ :HF CNT
(A2DP) ﻡﺪﻘﺘﻤﻟﺍ ﺕﻮﺼﻟﺍ ﻊﻳﺯﻮﺗ ﻊﺿﻭ ﻖﻓﺍﻮﺗ :AUD CNT
ﻰﻠﻋ ﻂﻐﻀﻟﺎﺑ ﺭﺍﺮﻤﺘﺳﻻﺍ ﻊﻣ ﻂﻐﺿﺍ ،ﺺﺤﻔﻟﺍ ﻊﺿﻭ ﺀﺎﻐﻟﻹ
) ﺓﺪﺣﻮﻟﺍ ﺯﺍﺮﻃ ﻢﺳﺍ ﻦﻋ ﺚﺤﺑﺍ 2
***
.ﺔﺷﺎﺸﻟﺍ ﻰﻠﻋ “TESTING” ﺔﻟﺎﺳﺮﻟﺍ ﺾﻣﻮﺗ
RECONNECT
AUTO PAIRING
INITIALIZE
.Bluetooth ﺯﺎﻬﺟ
ﻥﺍﺮﻗﻹﺍ ﺔﻟﺎﺣ :PAIRING
ﺓﺮﻛﺍﺬﻟﺍ ﻦﻣ ﺔﻤﻟﺎﻜﻣ ﺀﺍﺮﺟﺇ
.Bluetooth ﻊﺿﻭ ﻰﻟﺇ ﻝﻮﺧﺪﻠﻟ ﻰﻠﻋ ﻂﻐﺿﺍ 1
.(6 ﻰﻟﺇ 1 ﻦﻣ) ﺔﻴﻟﺎﺘﻟﺍ ﻡﺎﻗﺭﻷﺍ ﺭﺍﺭﺯﺃ ﻦﻣ ﺪﺣﺍﻭ ﻂﻐﺿﺍ 2
.ﺔﻧﺰﺨﻣ ﻝﺎﺼﺗﺍ ﺕﺎﻬﺟ ﺔﻳﺃ ﺩﻮﺟﻭ ﻡﺪﻋ ﺔﻟﺎﺣ ﻲﻓ “NO MEMORY” ﺔﻟﺎﺳﺮﻟﺍ ﺮﻬﻈﺗ
.ﻝﺎﺼﺗﻼﻟ ﺕﻮﺼﻟﺍ ﻯﻮﺘﺴﻣ ﺹﺮﻗ ﻰﻠﻋ ﻂﻐﺿﺍ 3
ﻯﺮﺧﺃ ﺕﺍﺩﺍﺪﻋﺇ
.
ﻂﻐﺿﺍ ﻢﺛ ،(ﻲﻟﺎﺘﻟﺍ ﻝﻭﺪﺠﻟﺍ ﻊﺟﺍﺭ) ﺪﻨﺑ ﺪﻳﺪﺤﺘﻟ ﺕﻮﺼﻟﺍ ﻯﻮﺘﺴﻣ ﺹﺮﻗ ﺭﺩﺃ 2
XX
:ﻲﺿﺍﺮﺘﻓﺍ
3
ﺪﺣﺍﻭ Bluetooth ﺕﻮﺻ ﺯﺎﻬﺟﻭ Bluetooth ﻲﻔﺗﺎﻫ ﻂﻘﻓ ﻞﻴﺻﻮﺗ ﻦﻜﻤﻳ
ﻰﻠﻋ ﻂﻐﺿﺍ ﻢﺛ ،ﻑﺬﺤﻠﻟ ﺯﺎﻬﺟ ﺪﻳﺪﺤﺘﻟ ﺕﻮﺼﻟﺍ ﻯﻮﺘﺴﻣ ﺹﺮﻗ ﺭﺩﺃ 1
ﻰﻠﻋ ﻂﻐﺿﺍ ﻢﺛ ،
ﻒﻳﺮﻌﺘﻟﺍ ﻢﻗﺭ ﺰﻣﺭ ﻝﺎﺧﺩﺇ ﻦﻣ ﻲﻬﺘﻨﺗ ﻰﺘﺣ
[FUNCTION]
ﺕﺎﻤﻴﻠﻌﺘﻟﺍ ﻊﺒﺗﺍ ﻭﺍ ﺏﻮﻏﺮﻤﻟﺍ ﺪﻨﺒﻟﺍ ﺭﺎﻴﺘﺧﺍ ﻢﺘﻳ ﻥﺍ ﻰﻟﺍ
.ﻝﺎﺼﺗﻻﺍ ﻊﻄﻗ ﻭﺃ ﻝﺎﺼﺗﻻﺍ ﻞﺟﺃ ﻦﻣ ﺕﻮﺼﻟﺍ ﺯﺎﻬﺟ ﻭﺃ ﻒﺗﺎﻬﻟﺍ ﺩﺪﺣ
.ﻻﻮﺻﻮﻣ ﻥﻮﻜﻳ ﺎﻣﺪﻨﻋ ﺯﺎﻬﺠﻟﺍ ﻢﺳﺍ ﻡﺎﻣﺃ “
.ﺎﻴﻟﺎﺣ ﻡﺪﺨﺘﺴﻤﻟﺍ ﺕﻮﺼﻟﺍ ﺯﺎﻬﺟ ﺔﻣﺪﻘﻣ ﻲﻓ “
.ﻝﺎﺧﺩﻹﺍ ﻊﺿﻮﻣ ﻚﻳﺮﺤﺘﻟ S / T ﻰﻠﻋ ﻂﻐﺿﺍ 2
ﻰﻟﺇ ﻝﻮﺧﺪﻠﻟ ﺕﻮﺼﻟﺍ ﻯﻮﺘﺴﻣ ﺹﺮﻗ ﻰﻠﻋ ﻂﻐﺿﺍ 1
.ﺀﺎﻬﻧﻹﺍ ﻞﺟﺃ ﻦﻣ
. ﻰﻠﻋ ﻂﻐﺿﺍ ،ﻖﺑﺎﺴﻟﺍ ﺩﺍﺪﻋﻹﺍ ﺮﺼﻨﻋ ﻰﻟﺇ ﻉﻮﺟﺮﻠﻟ
.ﺖﻗﻭ ﻱﺃ ﻲﻓ ﻰﺼﻗﺃ ﺪﺤﺑ
[NO]
ﻭﺃ
[YES]
ﺪﻳﺪﺤﺘﻟ ﺕﻮﺼﻟﺍ ﻯﻮﺘﺴﻣ ﺹﺮﻗ ﺭﺩﺃ 2
.(ﻡﺎﻗﺭﺃ 6 ﻰﺘﺣ) ﻲﺼﺨﺸﻟﺍ ﻒﻳﺮﻌﺘﻟﺍ ﻢﻗﺭ ﺮﻴﻴﻐﺗ
.ﻢﻗﺭ ﺪﻳﺪﺤﺘﻟ ﺕﻮﺼﻟﺍ ﻯﻮﺘﺴﻣ ﺹﺮﻗ ﺮﻳﻭﺪﺘﺑ ﻢﻗ 1
.ﺭﺎﺘﺨﻤﻟﺍ ﺪﻨﺒﻟﺎﺑ ﺔﻘﻠﻌﺘﻤﻟﺍ
ﺭﺍﺮﻤﺘﺳﻻﺍ ﻊﻣ ﻂﻐﺿﺍ 4
” ﺮﺷﺆﻤﻟﺍ ﺮﻬﻈﻳ
*
” ﺮﻬﻈﻳ
.ﺹﺮﻘﻟﺍ
.ﺹﺮﻘﻟﺍ
2 ﻭ 1 ﻦﻴﺗﻮﻄﺨﻟﺍ ﺪﻋﺃ
.ﺪﻴﻛﺄﺘﻠﻟ ﺕﻮﺼﻟﺍ ﻯﻮﺘﺴﻣ ﺹﺮﻗ ﻰﻠﻋ ﻂﻐﺿﺍ 3
.ﻲﺼﺨﺸﻟﺍ
2 ﺓﻮﻄﺨﻟﺍ ﺭﺮﻛ 3
•
.ﺹﺮﻘﻟﺍ
BT MODE
PHONE SELECT
AUDIO SELECT
DEVICE DELETE
PIN CODE EDIT
(0000)
ﻲﺑﺮﻋ
18
Page 60

BLUETOOTH®
ﻲﺗﻮﺼﻟﺍ ﺮﻣﻷﺍ ﻭﺃ ﺎﻬﺑ ﻝﺎﺼﺗﻻﺍ ﺪﻳﺮﺗ ﻲﺘﻟﺍ ﻝﺎﺼﺗﻻﺍ ﺔﻬﺟ ﻢﺳﺍ ﻖﻄﻨﺑ ﻢﻗ
ﺓﺰﻴﻣ ﺔﻄﺳﺍﻮﺑ ﺔﻤﻟﺎﻜﻣ ﺀﺍﺮﺟﺍ )
.ﹰﺎﻴﻟﺎﺣ ﺎﻬﻟﺎﺒﻘﺘﺳﺍ ﻢﺘﻳ ﻲﺘﻟﺍ ﺓﺭﺎﺷﻹﺍ ﺓﻮﻗ ﺽﺮﻌﻳ :*MAX/MID/LOW/NO SIGNAL
.ﻒﺗﺎﻬﻟﺍ ﻒﺋﺎﻇﻭ ﻲﻓ ﻢﻜﺤﺘﻠﻟ
(ﺕﻮﺼﻟﺍ ﻰﻠﻋ ﻑﺮﻌﺘﻟﺍ
.ﺔﻳﺭﺎﻄﺒﻟﺍ ﺓﻮﻗ ﺽﺮﻌﻳ :*FULL/MID/BATT LOW
.ﻡﺪﺨﺘﺴﻤﻟﺍ ﻒﺗﺎﻬﻟﺍ ﻉﻮﻧ ﻰﻠﻋ ﻒﺋﺎﻇﻮﻟﺍ ﻒﻗﻮﺘﺗ
VOICE
ﺕﻮﺼﻟﺍ ﻰﻠﻋ ﻑﺮﻌﺘﻟﺍ ﺓﺰﻴﻣ ﺔﻄﺳﺍﻮﺑ ﺔﻤﻟﺎﻜﻣ ﺀﺍﺮﺟﺍ
ﻑﺮﻌﺘﻟﺍ ﺓﺰﻴﻣ ﻂﻴﺸﻨﺘﻟ ﻰﻠﻋ ﻂﻐﻀﻟﺎﺑ ﺭﺍﺮﻤﺘﺳﻻﺍ ﻊﻣ ﻂﻐﺿﺍ 1
ﻲﺗﻮﺼﻟﺍ ﺮﻣﻷﺍ ﻭﺃ ﺎﻬﺑ ﻝﺎﺼﺗﻻﺍ ﺪﻳﺮﺗ ﻲﺘﻟﺍ ﻝﺎﺼﺗﻻﺍ ﺔﻬﺟ ﻢﺳﺍ ﻖﻄﻨﺑ ﻢﻗ
ﺕﺎﻤﻴﻠﻌﺘﻟﺍ ﻞﻴﻟﺩ ﺔﻌﺟﺍﺮﻣ ﻰﺟﺮﹸﻳ .ﻒﺗﺎﻫ ﻞﻛ ﻲﻓ ﺔﻣﻮﻋﺪﻤﻟﺍ ﺕﻮﺼﻟﺍ ﻰﻠﻋ ﻑﺮﻌﺘﻟﺍ ﺕﺍﺰﻴﻣ ﻒﻠﺘﺨﺗ •
.iPhone ﺯﺎﻬﺠﻟ ﻲﻛﺬﻟﺍ ﻲﺼﺨﺸﻟﺍ ﺪﻋﺎﺴﻤﻟﺍ ﺔﻔﻴﻇﻭ ﺎﹰﻀﻳﺃ ﺓﺪﺣﻮﻟﺍ ﻩﺬﻫ ﻢﻋﺪﺗ •
.ﻝﻮﺻﻮﻤﻟﺍ ﻒﺗﺎﻬﻠﻟ ﺕﻮﺼﻟﺍ ﻰﻠﻋ
.ﻒﺗﺎﻬﻟﺍ ﻒﺋﺎﻇﻭ ﻲﻓ ﻢﻜﺤﺘﻠﻟ
.ﻞﻴﺻﺎﻔﺘﻟﺍ ﻰﻠﻋ ﻉﻼﻃﻼﻟ ﻞﺻﻮﻤﻟﺍ ﻒﺗﺎﻬﻟﺎﺑ ﺹﺎﺨﻟﺍ
ﺓﺮﻛﺍﺬﻟﺍ ﻲﻓ ﺕﺍﺩﺍﺪﻋﺇ
ﺓﺮﻛﺍﺬﻟﺍ ﻲﻓ ﻝﺎﺼﺗﺍ ﺔﻬﺟ ﻦﻳﺰﺨﺗ
.(6 ﻰﻟﺇ 1 ﻦﻣ) ﻡﺎﻗﺭﻻﺍ ﺭﺍﺭﺯﻻ ﻝﺎﺼﺗﺍ ﺕﺎﻬﺟ 6 ﻰﻟﺍ ﻞﺼﻳ ﺎﻣ ﻦﻳﺰﺨﺗ ﻦﻜﻤﻳ
ﻭﺃ
[PHONE BOOK]
ﻢﻗﺭ ﻝﺎﺧﺩﺇ ﻭﺃ ﻝﺎﺼﺗﺍ ﺔﻬﺟ ﺪﻳﺪﺤﺘﻟ ﺕﻮﺼﻟﺍ ﻯﻮﺘﺴﻣ ﺹﺮﻗ ﺮﻳﻭﺪﺘﺑ ﻢﻗ 3
.ﻒﺗﺎﻬﻟﺍ ﻢﻗﺭ ﺽﺮﻌﻟ ﺕﻮﺼﻟﺍ ﻯﻮﺘﺴﻣ ﺹﺮﻗ ﻰﻠﻋ ﻂﻐﺿﺍ ،ﻝﺎﺼﺗﺍ ﺔﻬﺟ ﺪﻳﺪﺤﺗ ﺔﻟﺎﺣ ﻲﻓ
.(6 ﻰﻟﺇ 1 ﻦﻣ) ﺔﻴﻟﺎﺘﻟﺍ ﻡﺎﻗﺭﻷﺍ ﺭﺍﺭﺯﺃ ﻦﻣ ﺪﺣﺍﻭ ﺭﺍﺮﻤﺘﺳﻻﺍ ﻊﻣ ﻂﻐﺿﺍ 4
2 ﺓﻮﻄﺨﻟﺍ ﻲﻓ
ﻲﺑﺮﻋ
17
.Bluetooth ﻊﺿﻭ ﻰﻟﺇ ﻝﻮﺧﺪﻠﻟ
ﻭﺃ
[CALL HISTORY]
.ﺹﺮﻘﻟﺍ ﻰﻠﻋ ﻂﻐﺿﺍ ﻢﺛ ،
.ﻝﺎﺼﺗﻻﺍ ﺔﻬﺟ ﻦﻳﺰﺨﺗ ﺪﻨﻋ “STORED” ﺔﻤﻠﻛ ﺮﻬﻈﺗ
[NUMBER DIAL]
ﺩﺪﺣ ،ﺎﹰﻘﺒﺴﻣ ﺔﻃﻮﺒﻀﻤﻟﺍ ﺓﺮﻛﺍﺬﻟﺍ ﻦﻣ ﻝﺎﺼﺗﺍ ﺔﻬﺟ ﺢﺴﻤﻟ
ﺪﻳﺪﺤﺘﻟ ﺕﻮﺼﻟﺍ ﻯﻮﺘﺴﻣ ﺹﺮﻗ ﺭﺩﺃ 2
ﻰﻠﻋ ﻂﻐﺿﺍ 1
[NUMBER DIAL]
.ﻒﺗﺎﻫ
.ﻍﺭﺎﻓ ﻢﻗﺭ ﻦﻳﺰﺨﺘﺑ ﻢﻗﻭ
.ﻒﺗﺎﻬﻟﺍ ﻢﻗﺭ ﻭﺃ ﻢﺳﻻﺍ ﺪﻳﺪﺤﺘﻟ ﺕﻮﺼﻟﺍ ﻯﻮﺘﺴﻣ ﺹﺮﻗ ﻰﻠﻋ ﻂﻐﺿﺍ 1
ﺀﺰﺠﻟﺍ ﻲﻓ “MISSED” ﻭﺃ “OUTGOING” ﻭﺃ “INCOMING” ﺽﺮﻋ ﻢﺘﻳ •
.ﺔﻘﺑﺎﺴﻟﺍ ﺔﻤﻟﺎﻜﻤﻟﺍ ﺔﻟﺎﺣ ﻰﻟﺇ ﺓﺭﺎﺷﻺﻟ ﺔﺷﺎﺸﻟﺍ ﻦﻣ ﻲﻠﻔﺴﻟﺍ
.(NAME ﻭﺃ NUMBER) ﺽﺮﻌﻟﺍ ﺔﺌﻓ ﺮﻴﻴﻐﺘﻟ DISP ﻰﻠﻋ ﻂﻐﺿﺍ •
ﺔﻠﺠﺴﻣ ﺕﺎﻇﻮﻔﺤﻣ ﺩﻮﺟﻭ ﻡﺪﻋ ﺔﻟﺎﺣ ﻲﻓ “NO D
*
ﺐﺴﺣ ﺚﺤﺒﻟﺍ ﻊﺿﻭ ﻲﻓ ﻝﻮﺧﺪﻠﻟ ﺔﻋﺮﺴﺑ ﺕﻮﺼﻟﺍ ﻯﻮﺘﺴﻣ ﺹﺮﻗ ﺭﺩﺃ 1
ﺕﺎﻬﺟ ﻦﻣ ﺪﻳﺪﻌﻟﺍ ﻰﻠﻋ ﻱﻮﺘﺤﻳ ﻒﺗﺎﻬﻟﺍ ﻞﻴﻟﺩ ﻥﺎﻛ ﺍﺫﺍ) ﺔﻳﺪﺠﺑﻻﺍ ﻑﻭﺮﺤﻟﺍ
2
ﻂﻐﺿﺍ ،(WXYZ1
ﻂﻐﺿﺍ ﻭﺃ ﺕﻮﺼﻟﺍ ﻯﻮﺘﺴﻣ ﺹﺮﻗ ﺭﺩﺍ ،ﺏﻮﻏﺮﻤﻟﺍ ﻝﻭﻻﺍ ﻑﺮﺤﻟﺍ ﺭﺎﻴﺘﺧﻻ •
.ﻑﻭﺮﺤﻟﺍ “ ” ﺔﻄﺳﺍﻮﺑ ﺚﺤﺒﻠﻟ ﺮﺘﺧﺍﻭ ﻡﺎﻗﺭﻻﺍ ﺔﻄﺳﺍﻮﺑ ﺚﺤﺒﻠﻟ “1” ﺮﺘﺧﺍ
.ﺹﺮﻘﻟﺍ ﻰﻠﻋ ﻂﻐﺿﺍ ﻢﺛ ،ﻢﺳﺍ ﺪﻳﺪﺤﺘﻟ ﺕﻮﺼﻟﺍ ﻯﻮﺘﺴﻣ ﺹﺮﻗ ﺭﺩﺃ 2
ﺹﺮﻘﻟﺍ ﻰﻠﻋ ﻂﻐﺿﺍ ﻢﺛ ،ﻒﺗﺎﻫ ﻢﻗﺭ ﺪﻳﺪﺤﺘﻟ ﺕﻮﺼﻟﺍ ﻯﻮﺘﺴﻣ ﺹﺮﻗ ﺭﺩﺃ 3
ﺪﻨﻋ ﺓﺪﺣﻮﻟﺍ ﻰﻟﺇ ﺎﹰﻴﺋﺎﻘﻠﺗ ﻞﺼﺘﻤﻟﺍ ﻒﺗﺎﻬﻟﺎﺑ ﺹﺎﺨﻟﺍ ﻒﺗﺎﻬﻟﺍ ﻞﻴﻟﺩ ﻞﻘﻧ ﻢﺘﻳ
GENERAL ،OTHER ،MOBILE ،OFFICE ،HOME. :ﻲﻟﺎﺘﻟﺎﻛ ﻝﺎﺼﺗﻻﺍ ﺕﺎﻬﺟ ﺐﻴﺗﺮﺗ ﻢﺘﻳ
ﺕﺎﻣﻼﻋ ﻱﺃ ﺎﻬﻴﻠﻋ ﺖﺴﻴﻟ ﻲﺘﻟﺍ ﻑﻭﺮﺤﻟﺍ ﻯﻮﺳ ﺽﺮﻋ ﺓﺪﺣﻮﻟﺍ ﻩﺬﻬﻟ ﻦﻜﻤﻳ ﻻ
ﻖﻄﻧ ﺕﺎﻣﻼﻌﺑ ﺔﻠﹼﻜﺸﹸﻤﻟﺍ ﻑﻭﺮﺤﻟﺍ ﺮﻬﻈﺗ) .ﻦﻴﻌﻣ ﻖﻄﻨﺑ ﺔﺻﺎﺧ ﻞﻴﻜﺸﺗ
.(+ ،# ، ) ﻑﺮﺣ ﻭﺃ (9 ﻰﻟﺇ 0) ﻢﻗﺭ ﺪﻳﺪﺤﺘﻟ ﺕﻮﺼﻟﺍ ﻯﻮﺘﺴﻣ ﺹﺮﻗ ﺮﻳﻭﺪﺘﺑ ﻢﻗ
.ﻒﺗﺎﻬﻟﺍ ﻢﻗﺭ ﻝﺎﺧﺩﻹ (9 ﻰﻟﺇ 0) ﺔﻴﻟﺎﺘﻟﺍ ﻡﺎﻗﺭﻷﺍ ﺭﺍﺭﺯﺃ ﻰﻠﻋ ﻂﻐﺿﺍ 1
(.PBAP ﻢﻋﺪﻳ ﻒﺗﺎﻬﻟﺍ ﻥﺎﻛ ﺍﺫﺍ ﻂﻘﻓ ﻖﻴﺒﻄﺘﻠﻟ ﻞﺑﺎﻗ)
ATA” ﺔﻟﺎﺳﺮﻟﺍ ﺮﻬﻈﺗ •
ﺕﺎﻤﻟﺎﻜﻤﻠﻟ
.ﻝﺎﺼﺗﻼﻟ ﺕﻮﺼﻟﺍ ﻯﻮﺘﺴﻣ ﺹﺮﻗ ﻰﻠﻋ ﻂﻐﺿﺍ 2
(.PBAP ﻢﻋﺪﻳ ﻒﺗﺎﻬﻟﺍ ﻥﺎﻛ ﺍﺫﺍ ﻂﻘﻓ ﻖﻴﺒﻄﺘﻠﻟ ﻞﺑﺎﻗ)
.(ABCDEFGHIJK) ﻰﻟﻭﻷﺍ ﺔﻤﺋﺎﻘﻟﺍ ﺮﻬﻈﺘﺳ
ﻭﺃ LMNOPQRSTUV) ﻯﺮﺧﻷﺍ ﺔﻤﺋﺎﻘﻟﺍ ﻰﻟﺇ ﻝﺎﻘﺘﻧﻼﻟ •
.ﺹﺮﻘﻟﺍ ﻂﻐﺿﺍ ﻢﺛ ،S / T
(.“U” ﻞﻜﺷ ﻲﻓ “Ú” ﻞﺜﻣ ﺔﻨﻴﻌﻣ
.ﻝﺎﺧﺩﻹﺍ ﻊﺿﻮﻣ ﻚﻳﺮﺤﺘﻟ S / T ﻰﻠﻋ ﻂﻐﺿﺍ 2
.ﻒﺗﺎﻬﻟﺍ ﻢﻗﺭ ﻝﺎﺧﺩﺇ ﻦﻣ ﻲﻬﺘﻨﺗ ﻰﺘﺣ
.ﻝﺎﺼﺗﻼﻟ ﺕﻮﺼﻟﺍ ﻯﻮﺘﺴﻣ ﺹﺮﻗ ﻰﻠﻋ ﻂﻐﺿﺍ 3
(ﺪﻌﺑ ﻦﻋ ﻢﻜﺤﺘﻟﺍ ﺓﺪﺣﻭ ﻡﺍﺪﺨﺘﺳﺍ ﻭﺃ)
.
.J / K ﻰﻠﻋ
.ﻝﺎﺼﺗﻻﺍ ﺀﺍﺮﺟﻹ
2 ﻭ 1 ﻦﻴﺗﻮﻄﺨﻟﺍ ﺪﻋﺃ
.ﻝﺎﺼﺗﻼﻟ
ﻰﻠﻋ ﻂﻐﺿﺍ 2
.(ﻝﺎﺼﺗﻻﺍ
.ﻥﺍﺮﻗﻹﺍ
•
•
•
1
CALL HISTORY
PHONE BOOK
NUMBER DIAL
Page 61

XX
:ﻲﺿﺍﺮﺘﻓﺍ
SETTINGS
AUTO
1
AUTO ANSWER
BATT/SIGNAL*
ﺩﺪﺤﻤﻟﺍ ﺖﻗﻮﻟﺍ ﻲﻓ ﹰﺎﻴﺋﺎﻘﻠﺗ ﺓﺩﺭﺍﻮﻟﺍ ﺔﻤﻟﺎﻜﻤﻟﺍ ﻰﻠﻋ ﺓﺪﺣﻮﻟﺍ ﺩﺮﺗ :30 ﻰﻟﺇ
ﺯﺎﻬﺟ ﺓﺪﺣﻮﻟﺍ ﻒﺸﺘﻜﺗ ﺎﻣﺪﻨﻋ ﺓﺭﺎﺷﻻﺍﻭ ﺔﻳﺭﺎﻄﺒﻟﺍ ﺓﻮﻗ ﺽﺮﻌﻳ :
.ﺀﺎﻐﻟﺍ :
OFF
؛ .ﻝﻮﺻﻮﻣ Bluetooth ﺯﺎﻬﺟ ﻥﻮﻜﻳ ﺎﻣﺪﻨﻋﻭ Bluetooth
.ﺀﺎﻐﻟﺍ :
OFF
؛ .(ﻥﺍﻮﺛ ﻲﻓ)
.ﻡﺪﺨﺘﺴﻤﻟﺍ ﻒﺗﺎﻬﻟﺍ ﻉﻮﻧ ﻰﻠﻋ ﻒﺋﺎﻇﻮﻟﺍ ﻒﻗﻮﺘﺗ
ﺔﻤﻟﺎﻜﻣ ﺀﺍﺮﺟﺍ
ﺮﻓﻮﺘﺗ ﺎﻤﻛ .ﻢﻗﺮﻟﺎﺑ ﻝﺎﺼﺗﻻﺍ ﻭﺃ ﻒﺗﺎﻬﻟﺍ ﻞﻴﻟﺩ ﻦﻣ ﻭﺃ ﺕﺎﻤﻟﺎﻜﻤﻟﺍ ﻞﺠﺳ ﻦﻣ ﺔﻤﻟﺎﻜﻣ ﺀﺍﺮﺟﺍ ﻦﻜﻤﻳ
.ﺔﻔﻴﻇﻮﻟﺍ ﻩﺬﻬﺑ ﺰﻬﺠﻣ ﻝﻮﻤﺤﻤﻟﺍ ﻒﺗﺎﻬﻟﺍ ﻥﺎﻛ ﺍﺫﺍ ﺕﻮﺼﻟﺍ ﺔﻄﺳﺍﻮﺑ ﻝﺎﺼﺗﻻﺍ ﺔﻔﻴﻇﻭ
.Bluetooth ﻊﺿﻭ ﻰﻟﺇ ﻝﻮﺧﺪﻠﻟ ﻰﻠﻋ ﻂﻐﺿﺍ 1
ﻰﻟﺍ ﻞﻳﻮﺤﺘﻠﻟ ﻯﺮﺧﺍ ﺓﺮﻣ
.ﺹﺮﻘﻟﺍ ﻂﻐﺿﺍ ﻢﺛ ،
ﺕﺎﻤﻴﻠﻌﺘﻟﺍ ﻊﺒﺗﺍ ﻭﺍ ﺏﻮﻏﺮﻤﻟﺍ ﺪﻨﺒﻟﺍ ﺭﺎﻴﺘﺧﺍ ﻢﺘﻳ ﻥﺍ ﻰﻟﺍ 2 ﺓﻮﻄﺨﻟﺍ ﺭﺮﻛ 3
ﻂﻐﺿﺍ ،ﻥﻻﻮﺻﻮﻣ Bluetooth ﻒﺗﺎﻫ ﻱﺯﺎﻬﺟ ﻥﺎﻛ ﺍﺫﺍ •
(17 )
ﺪﻨﺑ ﺪﻳﺪﺤﺘﻟ ﺕﻮﺼﻟﺍ ﻯﻮﺘﺴﻣ ﺹﺮﻗ ﺭﺩﺃ 2
.ﺀﺎﻬﻧﻹﺍ ﻞﺟﺃ ﻦﻣ
. ﻰﻠﻋ ﻂﻐﺿﺍ ،ﻖﺑﺎﺴﻟﺍ ﺩﺍﺪﻋﻹﺍ ﺮﺼﻨﻋ ﻰﻟﺇ ﻉﻮﺟﺮﻠﻟ
.“(ﻝﻭﻻﺍ ﺯﺎﻬﺠﻟﺍ ﻢﺳﺍ)” ﺮﻬﻈﻳ
.ﺮﺧﻻﺍ ﻒﺗﺎﻬﻟﺍ
.“(ﻲﻧﺎﺜﻟﺍ ﺯﺎﻬﺠﻟﺍ ﻢﺳﺍ)” ﺮﻬﻈﻳ
.ﺭﺎﺘﺨﻤﻟﺍ ﺪﻨﺒﻟﺎﺑ ﺔﻘﻠﻌﺘﻤﻟﺍ
ﺭﺍﺮﻤﺘﺳﻻﺍ ﻊﻣ ﻂﻐﺿﺍ 4
BLUETOOTH®
ﺕﻮﺼﻟﺍ ﺓﺩﻮﺟ ﻦﻴﺴﺤﺗ
ﻰﻟﺇ
LEVEL –10
.ﻢﻗﺮﻟﺍ ﺩﺍﺯ ﺎﻤﻠﻛ
ﻰﻟﺇ
LEVEL –5
ﻰﻟﺇ
LEVEL –5
...ﻒﺗﺎﻬﻟﺍ ﻲﻓ ﺙﺪﺤﺘﻟﺍ ﺀﺎﻨﺛﺃ
2 ﺓﻮﻄﺨﻟﺍ ﺭﺮﻛ 3
2 ﺓﻮﻄﺨﻟﺍ ﺭﺮﻛ 3
.
ﻂﻐﺿﺍ ﻢﺛ ،(ﻲﻟﺎﺘﻟﺍ ﻝﻭﺪﺠﻟﺍ ﻊﺟﺍﺭ) ﺪﻨﺑ ﺪﻳﺪﺤﺘﻟ ﺕﻮﺼﻟﺍ ﻯﻮﺘﺴﻣ ﺹﺮﻗ ﺭﺩﺃ 2
*
XX
:ﻲﺿﺍﺮﺘﻓﺍ
ﻥﻮﻓﻭﺮﻜﻴﻤﻟﺍ ﺔﻴﺳﺎﺴﺣ ﺪﻳﺰﺗ :(
ﺀﺎﺿﻮﻀﻟﺍ ﻦﻣ ﺪﺤﻟﺍ ﻯﻮﺘﺴﻣ ﻂﺒﺿﺍ :(
[FUNCTION]
.ﻪﻄﻴﺸﻨﺗ ﻭﺃ ﺏﻮﻠﻄﻤﻟﺍ ﺮﺼﻨﻌﻟﺍ ﺪﻳﺪﺤﺗ ﻢﺘﻳ ﻰﺘﺣ
ﺀﺎﻐﻟﺇ ﺮﻴﺧﺄﺗ ﺖﻗﻭ ﻂﺒﻀﺑ ﻢﻗ :(
.ﺔﻴﻔﺗﺎﻬﻟﺍ ﺔﺛﺩﺎﺤﻤﻟﺍ ﺀﺎﻨﺛﺃ ﻦﻜﻤﻣ ﻯﺪﺻ ﻞﻗﺃ ﻉﺎﻤﺳ ﻢﺘﻳ ﻰﺘﺣ ﻯﺪﺼﻟﺍ
ﻰﻟﺇ ﻝﻮﺧﺪﻠﻟ ﺕﻮﺼﻟﺍ ﻯﻮﺘﺴﻣ ﺹﺮﻗ ﻰﻠﻋ ﻂﻐﺿﺍ 1
.ﺀﺎﻬﻧﻹﺍ ﻞﺟﺃ ﻦﻣ ﺭﺍﺮﻤﺘﺳﻻﺍ ﻊﻣ ﻂﻐﺿﺍ 4
. ﻰﻠﻋ ﻂﻐﺿﺍ ،ﻖﺑﺎﺴﻟﺍ ﺩﺍﺪﻋﻹﺍ ﺮﺼﻨﻋ ﻰﻟﺇ ﻉﻮﺟﺮﻠﻟ
LEVEL –4) LEVEL +10
LEVEL 0) LEVEL +5
.ﺔﻴﻔﺗﺎﻫ ﺔﺛﺩﺎﺤﻣ ﺀﺎﻨﺛﺃ ﺀﺎﺿﻮﺿ ﻞﻗﺃ ﻉﺎﻤﺳ ﻢﺘﻳ ﻰﺘﺣ
LEVEL 0) LEVEL +5
ﺔﻤﻟﺎﻜﻣ ﻡﻼﺘﺳﻻ ﺕﺍﺩﺍﺪﻋﻹﺍ ﺬﻴﻔﻨﺗ
ﻂﻐﺿﺍ ﻢﺛ ،(ﻲﻟﺎﺘﻟﺍ ﻝﻭﺪﺠﻟﺍ ﻊﺟﺍﺭ) ﺪﻨﺑ ﺪﻳﺪﺤﺘﻟ ﺕﻮﺼﻟﺍ ﻯﻮﺘﺴﻣ ﺹﺮﻗ ﺭﺩﺃ 2
.ﻪﻄﻴﺸﻨﺗ ﻭﺃ ﺏﻮﻠﻄﻤﻟﺍ ﺮﺼﻨﻌﻟﺍ ﺪﻳﺪﺤﺗ ﻢﺘﻳ ﻰﺘﺣ
.Bluetooth ﻊﺿﻭ ﻰﻟﺇ ﻝﻮﺧﺪﻠﻟ ﻰﻠﻋ ﻂﻐﺿﺍ 1
.ﺀﺎﻬﻧﻹﺍ ﻞﺟﺃ ﻦﻣ ﺭﺍﺮﻤﺘﺳﻻﺍ ﻊﻣ ﻂﻐﺿﺍ 4
. ﻰﻠﻋ ﻂﻐﺿﺍ ،ﻖﺑﺎﺴﻟﺍ ﺩﺍﺪﻋﻹﺍ ﺮﺼﻨﻋ ﻰﻟﺇ ﻉﻮﺟﺮﻠﻟ
.ﺹﺮﻘﻟﺍ
MIC GAIN
NR LEVEL
ECHO CANCEL
.ﺹﺮﻘﻟﺍ
ﻲﺑﺮﻋ
16
Page 62

ﻦﻋ ﻢﻜﺤﺘﻟﺍ ﺓﺪﺣﻭ ﻰﻠﻋ
ﻭﺃ
.ﻯﺮﺧﻷﺍ ﺭﺩﺎﺼﻤﻟﺍ ﺕﻮﺻ ﻯﻮﺘﺴﻣ ﻰﻠﻋ ﻩﺬﻫ ﻂﺒﻀﻟﺍ ﺔﻴﻠﻤﻋ ﺮﺛﺆﺗ ﻦﻟ •
ﺪﻌﺑ
.
ﻂﻐﺿﺍ
.
ﻂﻐﺿﺍ
.
ﻂﻐﺿﺍ
. ﻂﻐﺿﺍ
.
ﻂﻐﺿﺍ
.
ﻂﻐﺿﺍ
. ﻂﻐﺿﺍ
ﻂﻐﺿﺍ
.
( ﺡﺎﺘﻣ ﺮﻴﻏ )
ﻯﻮﺘﺴﻣ ﺭﺯ ﻭﺍ
ﻡﺎﻗﺭﻻﺍ ﺭﺍﺭﺯﺍ ﺪﺣﺍ ﻭﺍ ﺕﻮﺼﻟﺍ
ﻯﻮﺘﺴﻣ ﺹﺮﻗ ﺮﻳﻭﺪﺘﺑ ﻢﻗ
.ﺔﻤﻟﺎﻜﻣ ﺀﺍﺮﺟﺇ ﺀﺎﻨﺛﺃ ﺕﻮﺼﻟﺍ
ﺀﺍﺮﺟﺇ ﺀﺎﻨﺛﺃ
ﺯﺎﻬﺟ ﺐﺴﺣ ﺕﺎﻴﻠﻤﻌﻟﺍ ﻒﻠﺘﺨﺗ ﺪﻗ •
.(6 ﻰﻟﺇ 1 ﻦﻣ)
.
.
.
. ﻂﻐﺿﺍ
.
.
ﻰﻠﻋ ﻂﻐﺿﺍ
.ﻞﺼﺘﻤﻟﺍ Bluetooth
...ﺓﺩﺭﺍﻭ ﺔﻤﻟﺎﻜﻣ ﻝﻭﺍ
ﻂﻐﺿﺍ
ﻂﻐﺿﺍ
ﻂﻐﺿﺍ
ﻂﻐﺿﺍ
ﻂﻐﺿﺍ
ﻂﻐﺿﺍ
.ﺔﻤﻟﺎﻜﻣ
ﺔﻤﻟﺎﻜﻣ ﻰﻠﻋ ﺔﺑﺎﺟﻻﺍ
ﺔﻤﻟﺎﻜﻣ ﺾﻓﺭ
ﺔﻤﻟﺎﻜﻣ ﺀﺎﻬﻧﺇ
...ﺓﺩﺭﺍﻭ ﺔﻤﻟﺎﻜﻣ ﻝﻭﺍ ﻰﻠﻋ ﺩﺮﻟﺍ ﺀﺎﻨﺛﺍ
ﻰﻠﻋ ﺔﺑﺎﺟﻻﺍ
ﺓﺩﺭﺍﻮﻟﺍ ﺔﻤﻟﺎﻜﻤﻟﺍ
ﻊﻄﻗ ﻥﻭﺩ ﻯﺮﺧﻻﺍ
ﺔﻴﻟﺎﺤﻟﺍ ﺔﻤﻟﺎﻜﻤﻟﺍ
ﺔﻨﻟﺎﻜﻤﻟﺍ ﺾﻓﺭ
ﻯﺮﺧﻻﺍ ﺓﺩﺭﺍﻮﻟﺍ
...ﻦﻴﺘﻟﺎﻌﻓ ﻦﻴﺘﻤﻟﺎﻜﻣ ﻚﻳﺪﻟ ﻥﻮﻜﺗ ﺎﻣﺪﻨﻋ
ﺔﻤﻟﺎﻜﻤﻟﺍ ﺀﺎﻬﻧﺍ
ﻞﻴﻌﻔﺗﻭ ﺔﻴﻟﺎﺤﻟﺍ
ﺔﻔﻗﻮﺘﻤﻟﺍ ﺔﻤﻟﺎﻜﻤﻟﺍ
ﻦﻴﺑ ﺔﻟﺩﺎﺒﻤﻟﺍ
ﺔﻴﻟﺎﺤﻟﺍ ﺔﻤﻟﺎﻜﻤﻟﺍ
ﺔﻔﻗﻮﺘﻤﻟﺍ ﺔﻤﻟﺎﻜﻤﻟﺍﻭ
ﺕﻮﺻ ﻯﻮﺘﺴﻣ ﻂﺒﺿ
[35]
ﻰﻟﺍ
[00]
(
[15]
:ﻲﺿﺍﺮﺘﻓﺍ)
ﻦﻴﺑ ﻞﻳﺪﺒﺘﻟﺎﺑ ﻢﻗ
ﺮﺤﻟﺍ ﺙﺪﺤﺘﻟﺍ ﻲﻌﺿﻭ
ﻲﺼﺨﺸﻟﺍ ﺙﺪﺤﺘﻟﺍﻭ
ﻰﻟﺇﺔﻳﺎﻤﺤﻟﺍ ﺀﺎﻄﻏ ﻰﻠﻋ
ﻒﺗﺎﻬﻟﺍ
BLUETOOTH®
ﻝﻮﻤﺤﻣ ﻒﺗﺎﻫ — BLUETOOTH
ﺔﻠﻣﺎﻜﻣ ﻲﻘﻠﺗ
ﻁﻮﺒﻀﻣ
[AUTO ANSWER]
[DISPLAY]
.ﻝﻮﻤﺤﻤﻟﺍ ﻒﺗﺎﻬﻠﻟ ﺎﻘﻓﻭ ﺔﺣﺎﺘﻣ ﺮﻴﻏ ﻥﻮﻜﺗ ﻭﺍ ﺔﻴﻟﺎﺘﻟﺍ ﻞﻴﻐﺸﺘﻟﺍ ﺕﺎﻴﻠﻤﻋ ﻒﻠﺘﺨﺗ ﺪﻗ
.ﺾﻣﻮﻧﻭ ﺮﻀﺧﻻﺍ ﻥﻮﻠﻟﺎﺑ KEY ﺡﺎﺘﻔﻤﻟﺍ ﺔﻘﻄﻨﻣ ﺀﺎﻀﺗ •
ﻥﺎﻛ ﺍﺫﺇ ﹰﺎﻴﺋﺎﻘﻠﺗ ﺔﻤﻟﺎﻜﻤﻟﺍ ﻰﻠﻋ ﺔﺑﺎﺟﻻﺎﺑ ﺯﺎﻬﺠﻟﺍ ﻡﻮﻘﻳ •
ﻰﻟﺍ ﺎﻬﻄﺒﺿ ﻢﺗ ﻲﺘﻟﺍ ﺕﺍﺩﺍﺪﻋﻺﻟ ﺎﻘﻓﻭ ﺔﺷﺎﺸﻟﺍ ﺔﻘﻄﻨﻣ ﺀﺎﻀﺗ •
.ﺮﻀﺧﻻﺍ ﻥﻮﻠﻟﺎﺑ KEY ﺡﺎﺘﻔﻤﻟﺍ ﺔﻘﻄﻨﻣ ﺀﺎﻀﺗﻭ
.Bluetooth ﺔﻔﻴﻇﻭ ﻞﺼﻓ ﻢﺘﻴﺳ ،ﺯﺎﻬﺠﻟﺍ ﺀﺎﻔﻃﺈﺑ ﺖﻤﻗ ﺍﺫﺇ •
:ﺓﺩﺭﺍﻭ ﺔﻤﻟﺎﻜﻣ ﺪﺟﻮﺗ ﺎﻣﺪﻨﻋ
(16 )
.ﺭﺎﺘﺨﻤﻟﺍ ﺖﻗﻮﻟﺍ ﻰﻠﻋ
:ﺔﻤﻟﺎﻜﻣ ﺀﺍﺮﺟﺍ ﺀﺎﻨﺛﺍ
(25 )
15
ﻲﺑﺮﻋ
Page 63

BLUETOOTH®
ﻲﺋﺎﻘﻠﺘﻟﺍ ﻥﺍﺮﺘﻗﻻﺍ
ﻞﻴﻌﻔﺗ ﻢﺘﻳ ،USB ﻝﺎﺧﺩﻻﺍ ﻑﺮﻃ ﻰﻟﺍ Android/iPod touch/iPhone ﺯﺎﻬﺟ ﻞﻴﺻﻮﺗ ﺪﻨﻋ
.ﺯﺎﻬﺠﻟﺍ ﻢﺳﺍ ﺪﻴﻛﺄﺗ ﺩﺮﺠﻤﺑ ﻥﺍﺮﻗﻺﻟ ﺕﻮﺼﻟﺍ ﻯﻮﺘﺴﻣ ﺹﺮﻗ ﻰﻠﻋ ﻂﻐﺿﺍ
.ﻞﻴﻐﺸﺘﻟﺍ ﻊﺿﻭ ﻲﻓ ﻝﻮﺻﻮﻤﻟﺍ ﺯﺎﻬﺠﻟﺎﺑ ﺔﺻﺎﺨﻟﺍ Bluetooth ﺔﻔﻴﻇﻭ ﺖﻧﺎﻛ –
ﻢﺗﻭ
(9 )
Android ﺪﻳﻭﺭﺪﻧﺍ ﺯﺎﻬﺟ ﻰﻠﻋ ﺖﺒﺜﻣ KENWOOD MUSIC PLAY ﻖﻴﺒﻄﺘﻟﺍ –
(18 ) .[ON]
.ﹰﺎﻴﺋﺎﻘﻠﺗ (Bluetooth ﺮﺒﻋ) ﻥﺍﺮﻗﻹﺍ ﺐﻠﻃ
:ﺍﺫﺍ ﻂﻘﻓ ﹰﺎﻴﺋﺎﻘﻠﺗ ﻥﺍﺮﻗﻹﺍ ﺐﻠﻃ ﻞﻴﻌﻔﺗ ﻢﺘﻳ
ﻊﺿﻭ ﻰﻠﻋ ﻁﻮﺒﻀﻣ
(10 ) .[BROWSE MODE]
[AUTO PAIRING]
ﺭﺎﻴﺘﺧﺍ
ﺓﺮﻣ ﻝﻭﻻ Bluetooth ﺙﻮﺗﻮﻠﺑ ﺯﺎﻬﺟ ﻞﻴﺻﻮﺗﻭ ﻥﺍﺮﺘﻗﺍ
ﻰﻠﻋ ﻩﺩﺪﺣﻭ (DPX-M3 /DPX-5 ) ﺓﺪﺣﻮﻟﺍ ﺯﺍﺮﻃ ﻢﺳﺍ ﻦﻋ ﺚﺤﺑﺍ 2
“PRESS” ﺯﺎﻬﺠﻟﺍ ﻢﺳﺍ “PASS XXXXXX” “PAIRING”
–
ﻒﻳﺮﻌﺘﻟﺍ ﻢﻗﺭ ﺰﻣﺭ ﻝﺎﺧﺩﺇ ﻰﻟﺇ ﺝﺎﺘﺤﺗ ﺪﻗ ،Bluetooth ﺓﺰﻬﺟﺃ ﺾﻌﺑ ﻰﻟﺇ ﺔﺒﺴﻨﻟﺎﺑ •
.ﺎﻴﺋﺎﻘﻠﺗ Bluetooth ﺙﻮﺗﻮﻠﺑ ﻞﻴﺻﻮﺗ ﺀﺎﺸﻧﺍ ﻢﺘﻳ ،ﻥﺍﺮﺘﻗﻻﺍ ﺔﻴﻠﻤﻋ ﻝﺎﻤﺘﻛﺍ ﺪﻨﻋ
ﺓﺩﺎﻋﺈﺑ ﺖﻤﻗ ﺍﺫﺇ ﻰﺘﺣ ﺓﺪﺣﻮﻟﺍ ﻲﻓ ﹰﻼﺠﺴﻣ Bluetooth ﺯﺎﻬﺟ ﻞﻈﻴﺳ ،ﻥﺍﺮﻗﻹﺍ ﻝﺎﻤﻛﺇ ﺩﺮﺠﻤﺑﻭ •
.ﺖﻗﻭ ﻱﺃ ﻲﻓ ﻰﺼﻗﺃ ﺪﺤﺑ ﺪﺣﺍﻭ Bluetooth ﺕﻮﺻ ﺯﺎﻬﺟﻭ Bluetooth ﻲﻔﺗﺎﻫ ﻞﻴﺻﻮﺗ ﻦﻜﻤﻳ •
ﺕﻮﺻ ﺓﺰﻬﺟﺍ ﺲﻤﺧ ﻰﻟﺍ ﻞﻴﺻﻮﺘﻟﺍ ﻦﻜﻤﻳ ،BT AUDIO ﺭﺪﺼﻤﻟﺍ ﻡﺍﺪﺨﺘﺳﺍ ﺀﺎﻨﺛﺍ ،ﻦﻜﻟ
ﺯﺎﻬﺠﻟﺍ ﻞﻴﺻﻮﺘﺑ ﻢﻗ .ﻥﺍﺮﻗﻹﺍ ﺪﻌﺑ ﺎﹰﻴﺋﺎﻘﻠﺗ ﺓﺪﺣﻮﻟﺎﺑ Bluetooth ﺓﺰﻬﺟﺃ ﺾﻌﺑ ﻞﺼﺘﺗ ﻻ ﺪﻗ •
.ﻲﻟﺎﻤﺟﺇ ﻞﻜﺸﺑ (ﺎﻬﻧﺍﺮﻗﺇ ﻢﺗ) ﺓﺰﻬﺟﺃ ﺔﺴﻤﺧ ﻰﺘﺣ ﻞﻴﺠﺴﺗ ﻦﻜﻤﻳﻭ •
.
[DEVICE DELETE] ،18
.ﺕﺎﻣﻮﻠﻌﻤﻟﺍ ﻦﻣ ﺪﻳﺰﻤﻟ Bluetooth ﺯﺎﻬﺠﺑ ﺹﺎﺨﻟﺍ ﺕﺎﻤﻴﻠﻌﺘﻟﺍ ﻞﻴﻟﺩ ﺮﻈﻧﺍ •
.ﺓﺪﺣﻮﻟﺍ ﻞﻴﻐﺸﺘﻟ ﻰﻠﻋ ﻂﻐﺿﺍ 1
.Bluetooth ﺯﺎﻬﺟ
.ﺔﺷﺎﺸﻟﺍ ﻰﻠﻋ ﺮﻬﻈﺗ ﻲﺘﻟﺍ “VOLUME KNOB”
.ﻥﺍﺮﻗﻹﺍ ﺀﺪﺒﻟ ﺕﻮﺼﻟﺍ ﻯﻮﺘﺴﻣ ﺹﺮﻗ ﻰﻠﻋ ﻂﻐﺿﺍ
(19 )
.ﺓﺮﺷﺎﺒﻣ ﺚﺤﺒﻟﺍ ﺪﻌﺑ (PIN) ﻲﺼﺨﺸﻟﺍ
.ﻥﺍﺮﺘﻗﻻﺍ ﻦﻣ ﺀﺎﻬﺘﻧﻻﺍ ﺪﻨﻋ “PAIRING OK” ﺮﻬﻈﺗ
.ﺯﺎﻬﺠﻟﺍ ﺔﻬﺟﺍﻭ ﻰﻠﻋ “BT2” ﻭﺍ/ﻭ “BT1” ﺮﺷﺆﻤﻟﺍ ﺊﻀﻳ
.(SSP) ﻦﻣﻵﺍ ﻂﻴﺴﺒﻟﺍ ﻥﺍﺮﻗﻹﺍ ﺓﺪﺣﻮﻟﺍ ﻩﺬﻫ ﻢﻋﺪﺗ •
،ﻪﻧﺍﺮﻗﺍ ﻢﺗ ﻱﺬﻟﺍ ﺯﺎﻬﺠﻟﺍ ﻑﺬﺤﻟ .ﺎﻬﻠﻴﻐﺸﺗ
.ﺔﺴﻤﺨﻟﺍ ﺓﺰﻬﺟﻻﺍ ﻚﻠﺗ ﻦﻴﺑ ﻞﻳﻮﺤﺘﻟﺍﻭ Bluetooth
.ﺎﹰﻳﻭﺪﻳ ﺓﺪﺣﻮﻟﺎﺑ
3
ﻲﺑﺮﻋ
14
Page 64

BLUETOOTH®
ﻞﻴﺻﻮﺘﻟﺍ — BLUETOOTH
ﺔﻣﻮﻋﺪﻤﻟﺍ Bluetooth ﻉﺎﺿﻭﺃ
(HFP) ﻦﻳﺪﻴﻟﺍ ﻡﺍﺪﺨﺘﺳﺍ ﻡﺪﻋ ﻊﺿﻭ –
(AVR CP) ﻮﻳﺪﻴﻔﻟﺍ/ﺕﻮﺼﻟﺍ ﻲﻓ ﺪﻌﺑ ﻦﻋ ﻢﻜﺤﺘﻟﺍ ﻊﺿﻭ –
ﻥﻮﻓﻭﺮﻜﻴﻤﻟﺍ ﻞﻴﺻﻮﺗ ﺲﺒﻘﻣ
ﺔﻳﻭﺍﺯ ﻂﺒﻀﺑ ﻢﻗ
ﻥﻮﻓﻭﺮﻜﻴﻤﻟﺍ
(A2DP) ﻡﺪﻘﺘﻤﻟﺍ ﺕﻮﺼﻟﺍ ﻊﻳﺯﻮﺗ ﻊﺿﻭ –
(SPP) ﻲﻠﺴﻠﺴﺘﻟﺍ ﺬﻔﻨﻤﻟﺍ ﻊﺿﻭ –
(PBAP) ﻒﺗﺎﻬﻟﺍ ﻞﻴﻟﺩ ﻰﻟﺇ ﻝﻮﺻﻮﻟﺍ ﻊﺿﻭ –
ﺔﻣﻮﻋﺪﻤﻟﺍ Bluetooth ﺰﻴﻣﺮﺗ ﺞﻣﺍﺮﺑ
(SBC) ﺔﻴﻋﺮﻔﻟﺍ ﺔﺟﻮﻤﻟﺍ ﺰﻴﻣﺮﺗ –
(AAC) ﻡﺪﻘﺘﻤﻟﺍ ﺕﻮﺼﻟﺍ ﺰﻴﻣﺮﺗ –
ﻥﻮﻓﻭﺮﻜﻴﻤﻟﺍ ﻞﻴﺻﻮﺗ
ﺔﻴﻔﻠﺨﻟﺍ ﺔﺣﻮﻠﻟﺍ
(ﻖﻓﺮﻣ) ﻥﻮﻓﺮﻜﻴﻣ
ﺕﺎﻄﻣﺎﻗ ﻡﺍﺪﺨﺘﺳﺎﺑ ﺖﻴﺒﺜﺘﻟﺎﺑ ﻢﻗ
.ﺮﻣﻷﺍ ﻡﺰﻟ ﺍﺫﺇ (ﺔﻘﻓﺮﻣ ﺮﻴﻏ) ﻚﻠﺴﻟﺍ
Spotify
ﺔﻄﺤﻣ ﻭﺍ ﺔﻴﻨﻏﺍ ﻦﻋ ﺚﺤﺒﻟﺍ
.ﺹﺮﻘﻟﺍ ﻰﻠﻋ ﻂﻐﺿﺍ ﻢﺛ ،ﺔﻤﺋﺎﻘﻟﺍ ﻉﻮﻧ ﺪﻳﺪﺤﺘﻟ ﺕﻮﺼﻟﺍ ﻯﻮﺘﺴﻣ ﺹﺮﻗ ﺭﺩﺃ 2
.Spotify ﻦﻣ ﺔﻠﺳﺮﻤﻟﺍ ﺕﺎﻣﻮﻠﻌﻤﻟﺍ ﻰﻠﻋ ﺍﺀﺎﻨﺑ ﺔﺿﻭﺮﻌﻤﻟﺍ ﻢﺋﺍﻮﻘﻟﺍ ﻉﺍﻮﻧﺍ ﻒﻠﺘﺨﺗ
(ﺪﻌﺑ ﻦﻋ ﻢﻜﺤﺘﻟﺍ ﺓﺪﺣﻭ ﻰﻠﻋ J / K ﻂﻐﺿﺍ ﻭﺃ) ﺕﻮﺼﻟﺍ ﻯﻮﺘﺴﻣ ﺹﺮﻗ ﺭﺩﺍ
ﻢﻜﺤﺘﻟﺍ ﺓﺪﺣﻭ ﻰﻠﻋ
.ﺔﻋﺮﺴﺑ ﺕﻮﺼﻟﺍ ﻯﻮﺘﺴﻣ ﺹﺮﻗ ﺮﻳﻭﺪﺗ ﻖﻳﺮﻃ ﻦﻋ ﺔﻋﺮﺴﺑ ﺔﻤﺋﺎﻘﻟﺍ ﺢﻔﺼﺗ ﻚﻨﻜﻤﻳ
.ﺔﺑﻮﻏﺮﻤﻟﺍ ﺔﻄﺤﻤﻟﺍ ﻭﺍ ﺔﻴﻨﻏﻻﺍ ﺭﺎﻴﺘﺧﻻ
ﻂﻐﺿﺍ ﻭﺃ) ﺕﻮﺼﻟﺍ ﻯﻮﺘﺴﻣ ﺹﺮﻗ ﻂﻐﺿﺍ 4
. ﻰﻠﻋ ﺭﺍﺮﻤﺘﺳﻻﺍ ﻊﻣ ﻂﻐﺿﺍ ،ﺀﺎﻐﻟﻺﻟ
. ﻂﻐﺿﺍ 1
.ﺪﻴﻛﺄﺘﻠﻟ (ﺪﻌﺑ ﻦﻋ
3
13
ﻲﺑﺮﻋ
Page 65

ﻢﻜﺤﺘﻟﺍ ﺓﺪﺣﻭ ﻰﻠﻋ
ﺪﻌﺑ ﻦﻋ
(ﺡﺎﺘﻣ ﺮﻴﻏ)
REPEAT ONE
/
4
*
/
REPEAT ALL
5
*
ﻞﻴﻐﺸﺘﻟﺍ ﺭﺍﺮﻜﺗ.ﺭﺍﺮﻜﺘﺑ ﻂﻐﺿﺍ
ﻰﻟﺇﺔﻳﺎﻤﺤﻟﺍ ﺀﺎﻄﻏ ﻰﻠﻋ
REPEAT OFF
(ﺡﺎﺘﻣ ﺮﻴﻏ)
*
.ﺭﺍﺮﻜﺘﺑ ﻂﻐﺿﺍ
SHUFFLE OFF/SHUFFLE ON
ﺐﻴﺗﺮﺘﺑ ﻞﻴﻐﺸﺘﻟﺍ
5
*
ﻲﺋﺍﻮﺸﻋ
4
ﺓﺀﺎﺿﻻﺍ ﻉﻮﻧ : KCA-iP103 ،ﺱﻮﺑﺩ 30 ﻉﻮﻨﻟﺍ : KCA-iP102
.ﻪﻣﺍﺪﺨﺘﺳﺍ ﻡﺪﻋ ﺪﻨﻋ ﺓﺭﺎﻴﺴﻟﺍ ﻞﺧﺍﺪﺑ ﻞﺑﺎﻜﻟﺍ ﻙﺮﺘﺗ ﻻ
،ﺎﺿﺮﻟﺍ ﻡﺪﻋ ﺔﻣﻼﻋ ﺪﻳﺪﺤﺗ ﻢﺗ ﺍﺫﺇ .ﻂﻘﻓ ﻮﻳﺩﺍﺮﻟﺍ ﻲﻓ ﺔﻴﺗﻮﺼﻟﺍ ﻊﻃﺎﻘﻤﻠﻟ ﺔﺣﺎﺘﻣ ﺓﺰﻴﻤﻟﺍ ﻩﺬﻫ
.ﻲﻟﺎﺤﻟﺍ ﺭﺎﺴﻤﻟﺍ ﻲﻄﺨﺗ ﻢﺘﻴﺴﻓ
.ﻂﻘﻓ ﺰﻴﻤﺘﻤﻟﺍ ﺏﺎﺴﺤﻟﺍ ﻲﻣﺪﺨﺘﺴﻤﻟ ﺡﺎﺘﻣ
.ﻂﻘﻓ ﻞﻴﻐﺸﺘﻟﺍ ﻢﺋﺍﻮﻗ ﻲﻓ ﺔﻴﺗﻮﺼﻟﺍ ﻊﻃﺎﻘﻤﻠﻟ ﺔﺣﺎﺘﻣ
ﺔﻠﻀﻔﻤﻟﺍ ﺔﻴﻨﻏﻻﺍ ﺕﺎﻣﻮﻠﻌﻣ ﻆﻔﺣ
...Spotify ﻊﺿﻮﺑ ﻮﻳﺩﺍﺮﻠﻟ ﻉﺎﻤﺘﺳﻻﺍ ﺀﺎﻨﺛﺍ
.ﺕﻮﺼﻟﺍ ﻯﻮﺘﺴﻣ ﺹﺮﻗ ﻰﻠﻋ ﺭﺍﺮﻤﺘﺳﻻﺍ ﻊﻣ ﻂﻐﺿﺍ
ﻭﺃ “(ﻚﺑ ﺔﺻﺎﺨﻟﺍ ﻰﻘﻴﺳﻮﻤﻟﺍ) Your Music” ﻲﻓ ﺕﺎﻣﻮﻠﻌﻤﻟﺍ ﻆﻔﺣ ﻢﺘﻳﻭ “SAVED” ﺮﻬﻈﻳ
.ﻚﺑ ﺹﺎﺨﻟﺍ Spotify ﺏﺎﺴﺣ ﻰﻠﻋ “(ﻚﺑ ﺔﺻﺎﺨﻟﺍ ﺔﺒﺘﻜﻤﻟﺍ) Your Library”
.ﺀﺍﺮﺟﻻﺍ ﺲﻔﻧ ﺭﺮﻛ ،ﻆﻔﺤﻟﺍ ﺀﺎﻐﻟﻻ
ﻭﺃ “(ﻚﺑ ﺔﺻﺎﺨﻟﺍ ﻰﻘﻴﺳﻮﻤﻟﺍ) Your Music” ﻦﻣ ﺕﺎﻣﻮﻠﻌﻤﻟﺍ ﺀﺎﻐﻟﺍ ﻢﺘﻳﻭ “REMOVED” ﺮﻬﻈﻳ
.ﻚﺑ ﺹﺎﺨﻟﺍ Spotify ﺏﺎﺴﺣ ﻰﻠﻋ “(ﻚﺑ ﺔﺻﺎﺨﻟﺍ ﺔﺒﺘﻜﻤﻟﺍ) Your Librar
ﻢﻗ ﻢﺛ ،(iPod touch/iPhone) ﻙﺯﺎﻬﺟ ﻰﻠﻋ Spotify ﻖﻴﺒﻄﺗ ﻦﻣ ﺭﺍﺪﺻﺇ ﺙﺪﺣﺃ ﺖﻴﺒﺜﺘﺑ ﻢﻗ
.Spotify ﻰﻟﺇ ﻝﻮﺧﺪﻟﺍ ﻞﻴﺠﺴﺗﻭ ﺏﺎﺴﺣ ﺀﺎﺸﻧﺈﺑ
(5 ) .[SOURCE SELECT]
ﻲﻓ
[SPOTIFY SRC]
ﻉﺎﻤﺘﺳﻻﺍ ﺀﺪﺑ
.ﻙﺯﺎﻬﺟ ﻰﻠﻋ Spotify ﻖﻴﺒﻄﺗ ﺢﺘﻔﺑ ﻢﻗ 1
.USB ﻝﺎﺧﺩﺇ ﻑﺮﻄﺑ ﻙﺯﺎﻬﺟ ﻞﻴﺻﻮﺘﺑ ﻢﻗ 2
*1
*2
*3
USB ﻝﺎﺧﺩﺇ ﻞﻴﺻﻮﺗ ﻑﺮﻃ
*4
*5
1
*
(ﻱﺭﺎﻴﺘﺧﺍ ﻖﺤﻠﻣ) KCA-iP103/KCA-iP102
2
*
iPhone/iPod ﺯﺎﻬﺠﻟ ﺔﻴﻟﺎﻤﻛ ﻭﺍ
.SPOTIFY ﺭﺎﻴﺘﺧﻻ ﺭﺮﻜﺘﻣ ﻞﻜﺸﺑ ﻂﻐﺿﺍ 3
.ﹰﺎﻴﺋﺎﻘﻠﺗ ﺚﺒﻟﺍ ﺃﺪﺒﻳ
ﻦﻋ ﻢﻜﺤﺘﻟﺍ ﺓﺪﺣﻭ ﻰﻠﻋ
ﺪﻌﺑ
.
y”
.
4
*
ﻂﻐﺿﺍ
/ ﻂﻐﺿﺍ
/ ﻂﻐﺿﺍ
ﻂﻐﺿﺍ
4
*
/ T ﻂﻐﺿﺍ.S
.J / K ﻂﻐﺿﺍ.
( ﺡﺎﺘﻣ ﺮﻴﻏ )
ﺖﻗﺆﻣ ﻒﻗﻮﺗ/ﻞﻴﻐﺸﺗ
ﺎﺿﺮﻟﺍ ﺔﻣﻼﻋ ﻞﻴﺠﺴﺗ
ﻮﻳﺩﺍﺮﻟﺍ ﻞﻴﻐﺸﺗ ﺀﺪﺑ ﺭﺍﺮﻤﺘﺳﻻﺍ ﻊﻣ ﻂﻐﺿﺍ
.5 ﻰﻠﻋ
Spotify
:ﺮﻴﻀﺤﺘﻟﺍ
ـﻟ
[ON]
ﺩﺪﺣ •
ﺭﺎﺴﻣ ﻲﻄﺨﺗ.S
3
*
ﺎﺿﺮﻟﺍ ﻡﺪﻋ ﻭﺃ
ﻰﻟﺇﺔﻳﺎﻤﺤﻟﺍ ﺀﺎﻄﻏ ﻰﻠﻋ
ﻲﺑﺮﻋ
12
Page 66

ANDROID/iPod/USB/CD
KENWOOD Remote ﻖﻴﺒﻄﺘﻟﺍ ﻡﺍﺪﺨﺘﺳﻻ ﺕﺍﺩﺍﺪﻋﺍ
KENWOOD ﻞﺒﻘﺘﺴﻣ ﻞﻴﻐﺸﺗ ﺕﺎﻴﻠﻤﻌﺑ ﻢﻜﺤﺘﻠﻟ ﻢﻤﺼﻣ KENWOOD Remote ﻖﻴﺒﻄﺘﻟﺍ
.ﻞﻴﺻﻮﺘﻟﺍ ﻞﺒﻗ ﻙ ﺯﺎﻬﺟ ﻰﻠﻋ KENWOOD Remote ﻖﻴﺒﻄﺘﻟﺍ ﻦﻣ ﺭﺍﺪﺻﺍ ﺙﺪﺣﺍ ﺖﻴﺒﺜﺘﺑ ﻢﻗ
(20 )
.(USB ﻝﺎﺧﺩﺍ ﻑﺮﻃ ﺮﺒﻋ) iPod/iPhone ﺯﺎﻬﺟ ﻦﻣ ﺓﺭﺎﻴﺴﻟﺎﺑ
:ﺮﻴﻀﺤﺘﻟﺍ
.<www.kenwood.com/cs/ce/> ﺓﺭﺎﻳﺰﺑ ﻢﻗ ،ﺕﺎﻣﻮﻠﻌﻤﻟﺍ ﻦﻣ ﺪﻳﺰﻤﻟ
.Bluetooth ﺮﺒﻋ ﻞﻴﺻﻮﺘﻟﺍ ﺪﻨﻋ ﺔﻘﻳﺮﻄﻟﺍ ﺲﻔﻨﺑ ﺕﺍﺩﺍﺪﻋﻻﺍ ﺀﺍﺮﺟﺍ ﻦﻜﻤﻳ
ﻯﺮﺧﺃ ﺕﺍﺩﺍﺪﻋﺇ
.
ﻂﻐﺿﺍ ﻢﺛ ،(ﻲﻟﺎﺘﻟﺍ ﻝﻭﺪﺠﻟﺍ ﻊﺟﺍﺭ) ﺪﻨﺑ ﺪﻳﺪﺤﺘﻟ ﺕﻮﺼﻟﺍ ﻯﻮﺘﺴﻣ ﺹﺮﻗ ﺭﺩﺃ
XX
:ﻲﺿﺍﺮﺘﻓﺍ
(
[DRIVE 4]
ﺭﺎﺘﺨﻳ ،ANDROID ﻭﺃ iPod USB ﺭﺪﺼﻤﻟ ﻉﺎﻤﺘﺳﻻﺍ ﺀﺎﻨﺛﺍ :
[FUNCTION]
.ﻪﻄﻴﺸﻨﺗ ﻭﺃ ﺏﻮﻠﻄﻤﻟﺍ ﺮﺼﻨﻌﻟﺍ ﺪﻳﺪﺤﺗ ﻢﺘﻳ ﻰﺘﺣ 2 ﺓﻮﻄﺨﻟﺍ ﺭﺮﻛ 3
ﻰﻟﺇ
ﻰﻟﺇ ﻝﻮﺧﺪﻠﻟ ﺕﻮﺼﻟﺍ ﻯﻮﺘﺴﻣ ﺹﺮﻗ ﻰﻠﻋ ﻂﻐﺿﺍ 1
.ﺀﺎﻬﻧﻹﺍ ﻞﺟﺃ ﻦﻣ ﺭﺍﺮﻤﺘﺳﻻﺍ ﻊﻣ ﻂﻐﺿﺍ 4
. ﻰﻠﻋ ﻂﻐﺿﺍ ،ﻖﺑﺎﺴﻟﺍ ﺩﺍﺪﻋﻹﺍ ﺮﺼﻨﻋ ﻰﻟﺇ ﻉﻮﺟﺮﻠﻟ
[DRIVE 1]
) ﻲﻟﺎﺘﻟﺍ ﻞﻐﺸﻤﻟﺍ ﺭﺎﻴﺘﺧﺍ ﻢﺘﻳ :
.ﺔﻴﻟﺎﺘﻟﺍ ﺹﺍﺮﻗﻷﺍ ﺪﻳﺪﺤﺘﻟ
.ﺕﺎﻔﻠﻤﻟﺍ ﻊﻴﻤﺠﻟ ﻲﻄﺨﺘﻟﺍ ﺚﺤﺑ ﺔﺒﺴﻧ
DRIVE CHANGE
.ﻞﻴﻐﺸﺘﻟﺍ ﺃﺪﺒﻳﻭ ﹰﺎﻴﺋﺎﻘﻠﺗ
3 ﻰﻟﺇ 1 ﻦﻣ ﺕﺍﻮﻄﺨﻟﺍ ﺭﺮﻛ
10%/5%/1%/ 0.5%
.ﺹﺮﻘﻟﺍ
USB
MUSIC DRIVE
SKIP SEARCH
iPod USB
ﺭﺪﺼﻤﻟ ﻂﻘﻓ ﻖﻴﺒﻄﺘﻠﻟ ﻞﺑﺎﻗ)
.ﻲﻓﺮﺣ ﺚﺤﺑ ﻝﺎﺧﺩﻹ ﺔﻋﺮﺴﺑ ﺕﻮﺼﻟﺍ ﻯﻮﺘﺴﻣ ﺹﺮﻗ ﺭﺩﺃ
2
ﻞﺑﺎﻗ ﺮﻴﻏ)
(ﺪﻌﺑ ﻦﻋ ﻢﻜﺤﺘﻟﺍ ﺓﺪﺣﻭ ﻡﺍﺪﺨﺘﺳﺍ)
.ﻑﺮﺤﻟﺍ ﺭﺎﻴﺘﺧﻻ ﺕﻮﺼﻟﺍ ﻯﻮﺘﺴﻣ ﺾﺒﻘﻣ ﺭﺩﺍ 2
.9 ﻰﻟﺇ 0 ﻭ Z ﻰﻟﺇ A ﺮﻴﻏ ﺰﻣﺭ ﻦﻋ ﺚﺤﺒﻠﻟ “ * ” ﺮﺘﺧﺍ •
.ﻝﺎﺧﺩﻹﺍ ﻊﺿﻮﻣ ﻰﻟﺇ ﻝﺎﻘﺘﻧﻼﻟ S / T ﻂﻐﺿﺍ 3
.ﻑﺮﺤﻟﺍ ﺭﺎﻴﺘﺧﻻ ﺕﻮﺼﻟﺍ ﻯﻮﺘﺴﻣ ﺾﺒﻘﻣ ﺭﺩﺍ 2
.5 ﻂﻐﺿﺍ ،ﺔﻴﺴﻴﺋﺮﻟﺍ ﺔﻤﺋﺎﻘﻟﺍ/ﻝﻭﻻﺍ ﻒﻠﻤﻟﺍ/ﻲﻠﺻﻻﺍ ﺪﻠﺠﻤﻟﺍ ﻰﻟﺍ ﻉﻮﺟﺮﻠﻟ •
.ﻒﻠﻤﻟﺍ/ﺭﺎﺴﻤﻟﺍ ﻢﻗﺭ ﻝﺎﺧﺩﻹ ﻡﺎﻗﺭﻷﺍ ﺭﺍﺭﺯﺃ ﻂﻐﺿﺍ 2
ﺔﻳﺪﺠﺑﻻﺍ ﻑﻭﺮﺤﻟﺍ ﺐﺴﺣ ﺚﺤﺑ
(
ANDROID
.ﻝﻭﻻﺍ ﻑﺮﺤﻟﺍ ﺐﺴﺣ ﻒﻠﻣ ﻦﻋ ﺚﺤﺒﻟﺍ ﻦﻜﻤﻳ
iPod USB ﺭﺪﺼﻤﻟ
ﻭ
1
.ﻑﺮﺣﺃ ﺔﺛﻼﺛ ﻰﺘﺣ ﻝﺎﺧﺩﻹﺍ ﻚﻨﻜﻤﻳ •
.ﺚﺤﺒﻟﺍ ﺀﺪﺒﻟ ﺕﻮﺼﻟﺍ ﺡﺎﺘﻔﻣ ﻂﻐﺿﺍ 4
ANDROID ﺭﺪﺼﻤﻟ
.ﺚﺤﺒﻟﺍ ﺰﻣﺭ ﻝﺎﺧﺩﻻ J / K ﻂﻐﺿﺍ
(Z ﻰﻟﺇ A) ﻢﺠﺤﻟﺍ ﺓﺮﻴﺒﻛ ﻑﻭﺮﺣ :^A^
(z ﻰﻟﺇ a) ﻢﺠﺤﻟﺍ ﺓﺮﻴﻐﺻ ﻑﻭﺮﺣ :_A_
9 ﻰﻟﺇ 0 ﻭ Z ﻰﻟﺇ A ﺮﻴﻏ ﺰﻣﺭ :
.ﺚﺤﺒﻟﺍ ﺀﺪﺒﻟ ﺕﻮﺼﻟﺍ ﺡﺎﺘﻔﻣ ﻂﻐﺿﺍ 3
. ﻰﻠﻋ ﻂﻐﺿﺍ ،ﻖﺑﺎﺴﻟﺍ ﺩﺍﺪﻋﻹﺍ ﺮﺼﻨﻋ ﻰﻟﺇ ﻉﻮﺟﺮﻠﻟ •
(9 ﻰﻟﺇ 0) ﻡﺎﻗﺭﺍ :-0-
(.
BT AUDIO
ﺕﻮﺻ ﺭﺪﺼﻤﻟ ﻖﻴﺒﻄﺘﻠﻟ
.
ﻰﻠﻋ ﺭﺍﺮﻤﺘﺳﻻﺍ ﻊﻣ ﻂﻐﺿﺍ ،ﺀﺎﻐﻟﻺﻟ •
***
1
ﺮﺷﺎﺒﻤﻟﺍ ﻰﻘﻴﺳﻮﻤﻟﺍ ﺚﺤﺑ
.DIRECT ﻂﻐﺿﺍ 1
.ﻰﻘﻴﺳﻮﻤﻟﺍ ﻦﻋ ﺚﺤﺒﻠﻟ ﻂﻐﺿﺍ 3
.DIRECT ﻭﺃ ﻰﻠﻋ ﻂﻐﺿﺍ ،ﺀﺎﻐﻟﻺﻟ •
.ﻲﺋﺍﻮﺸﻌﻟﺍ ﻞﻴﻐﺸﺘﻟﺍ ﺪﻳﺪﺤﺗ ﺔﻟﺎﺣ ﻲﻓ ﺡﺎﺘﻣ ﺮﻴﻏ •
.ANDROID ﻭ iPod USB ﺭﺪﺼﻤﻟ ﻖﻴﺒﻄﺘﻠﻟ ﻞﺑﺎﻗ ﺮﻴﻏ •
11
ﻲﺑﺮﻋ
Page 67

ANDROID/iPod/USB/CD
ﻰﻘﻴﺳﻮﻣ ﻞﻐﺸﻣ ﺮﺘﺧﺍ
.ﺭﺮﻜﺘﻣ ﻞﻜﺸﺑ 5 ﻂﻐﺿﺍ ،USB ﺭﺪﺼﻤﻟﺍ ﻥﻮﻜﻳ ﺎﻣﺪﻨﻋ
.ﻲﻟﺎﺘﻟﺍ ﻞﻐﺸﻤﻟﺍ ﻲﻓ ﺔﻧﺰﺨﻤﻟﺍ ﺕﺎﻴﻨﻏﻻﺍ ﻞﻴﻐﺸﺗ ﻢﺘﻴﺳ
.(Mass Storage Class) ﻲﻛﺬﻟﺍ ﻒﺗﺎﻬﻠﻟ ﺔﻴﺟﺭﺎﺨﻟﺍ ﻭﺃ ﺔﻴﻠﺧﺍﺪﻟﺍ ﺓﺮﻛﺍﺬﻟﺍ •
.ﻂﺋﺎﺳﻮﻟﺍ ﺩﺪﻌﺘﻣ ﺯﺎﻬﺠﻟ ﺭﺎﺘﺨﻤﻟﺍ ﻞﻐﺸﻤﻟﺍ •
TuneIn Radio Pro/TuneIn Radio ﻮﻳﺩﺍﺭ ﻰﻟﺍ ﻉﺎﻤﺘﺳﻻﺍ
/iPod ﺯﺎﻬﺟ ﻞﺻ ،TuneIn Radio Pro ﻭﺃ TuneIn Radio ﻰﻟﺍ ﻉﺎﻤﺘﺳﻻﺍ ﺀﺎﻨﺛﺍ
.ﺓﺪﺣﻮﻟﺍ ﻰﻠﻋ USB ﻝﺎﺧﺩﻻﺍ ﻑﺮﻃ ﻰﻟﺍ iPhone
.ﺕﺎﻘﻴﺒﻄﺘﻟﺍ ﻩﺬﻫ ﻦﻣ ﺕﻮﺼﻟﺍ ﺝﺍﺮﺧﺎﺑ ﺓﺪﺣﻮﻟﺍ ﻡﻮﻘﺘﺳ •
ﺔﻤﺋﺎﻗ/ﺪﻠﺠﻣ ﻦﻣ ﻒﻠﻣ ﺮﺘﺧﺍ
/
[MODE OFF]
ﺭﺎﻴﺘﺧﺍ ﺪﻨﻋ ﻂﻘﻓ ﻖﻴﺒﻄﺘﻠﻟ ﻞﺑﺎﻗ ،ANDROID/iPod ﺯﺎﻬﺠﻟ ﺔﺒﺴﻨﻟﺍ
.
[BROWSE MODE]
. ﻂﻐﺿﺍ 1
ﻂﻐﺿﺍ ﻢﺛ ،ﺔﻤﺋﺎﻗ/ﺪﻠﺠﻣ ﺭﺎﻴﺘﺧﻻ ﺕﻮﺼﻟﺍ ﻯﻮﺘﺴﻣ ﺾﺒﻘﻣ ﺭﺩﺍ 2
.ﺾﺒﻘﻤﻟﺍ
.ﺾﺒﻘﻤﻟﺍ ﻂﻐﺿﺍ ﻢﺛ ،ﻒﻠﻣ ﺭﺎﻴﺘﺧﻻ ﺕﻮﺼﻟﺍ ﻯﻮﺘﺴﻣ ﺾﺒﻘﻣ ﺭﺩﺍ
(
ANDROID
ﻭ
USB
ﻭ CD ﺭﺪﺼﻤﻟ ﻂﻘﻓ ﻖﻴﺒﻄﺘﻠﻟ ﻞﺑﺎﻗ)
ﻊﻳﺮﺳ ﺚﺤﺑ
.ﺔﻋﺮﺴﺑ ﺎﻬﻟﻼﺧ ﺚﺤﺒﻟﺍ ﻦﻜﻤﻳ ،ﺕﺎﻔﻠﻤﻟﺍ ﻦﻣ ﺮﻴﺜﻜﻟﺍ ﻚﻳﺪﻟ ﺖﻧﺎﻛ ﺍﺫﺇ
.ﺔﻋﺮﺴﺑ ﺔﻤﺋﺎﻘﻟﺍ ﺢﻔﺼﺘﻟ ﺔﻋﺮﺴﺑ ﺕﻮﺼﻟﺍ ﻯﻮﺘﺴﻣ ﺹﺮﻗ ﺭﺩﺃ
(
ANDROID
ﻭ
iPod USB
ﺭﺪﺼﻤﻟ ﻂﻘﻓ ﻖﻴﺒﻄﺘﻠﻟ ﻞﺑﺎﻗ)
ﻮﺠﺘﺴﺟ ﺩﺭ
.ﻲﻟﺎﺤﻟﺍ ﻲﻄﺨﺘﻟﺍ ﺚﺤﺑ ﻝﺪﻌﻤﺑ ﺚﺤﺒﻠﻟ T / S ﻂﻐﺿﺍ
([SKIP SEARCH] ،11 )
ﻝﺪﻌﻤﺑ ﺚﺤﺒﻟﺍ ﻰﻟﺍ ﻱﺩﺆﻳ S / T ﺭﺰﻟﺍ ﻰﻠﻋ ﻂﻐﻀﻟﺍ ﺭﺍﺮﻤﺘﺳﺍ ﻊﻣ ﻂﻐﻀﻟﺍ •
.
%
10
.ﺭﺍﺮﻜﺘﺑ
ﻁﻮﻐﻀﻣ ﻲﺗﻮﺻ ﺹﺮﻗ :
/WMA/MP3 ﻒﻠﻣ :
ALL REPEAT/FOLDER REPEAT/FILE REPEAT
TRACK REPEAT/ALL REPEAT
ﻂﻐﺿﺍ
FLAC/WAV/AAC
ANDROID ﻭﺃ iPod :
ﻁﻮﻐﻀﻣ ﻲﺗﻮﺻ ﺹﺮﻗ :
/WAV/AAC/WMA/MP3 ﻒﻠﻣ :
REPEAT OFF/FOLDER REPEAT/FILE REPEAT
.ﺭﺍﺮﻜﺘﺑ
ﻂﻐﺿﺍ
DISC RANDOM/RANDOM OFF
RANDOM OFF/FOLDER RANDOM
ANDROID ﻭﺃ iPod ،FLAC
7
*
.
ALL RANDOM
[BROWSE MODE]/[MODE OFF]
.
ﺪﻳﺪﺤﺘﻟ ﻰﻠﻋ ﺭﺍﺮﻤﺘﺳﺎﺑ ﻂﻐﺿﺍ
ﺪﻳﺪﺤﺗ ﻢﺘﻳ ﺎﻣﺪﻨﻋ ﻂﻘﻓ ﻪﻘﻴﺒﻄﺗ ﻦﻜﻤﻳ :ANDROID/iPod ـﻟ
.AAC/WMA/MP3 ﺕﺎﻔﻠﻤﻟ ﻂﻘﻓ :CD ـﻟ
ﻢﻜﺤﺘﻟﺍ ﻊﺿﻭ ﺮﺘﺧﺍ
3
/ﻞﻴﻐﺸﺘﻟﺍ ﻚﻧﺎﻜﻣﺈﺑ ﻝﺍﺰﻳ ﻻ ،ﻦﻜﻟ .ﻪﺴﻔﻧ iPod ﺯﺎﻬﺟ ﻡﺍﺪﺨﺘﺳﺎﺑ iPod ﺯﺎﻬﺠﺑ ﻢﻜﺤﺗ :
.ﺭﺮﻜﺘﻣ ﻞﻜﺸﺑ 5 ﻂﻐﺿﺍ ،iPod USB ﺭﺪﺼﻤﻟﺍ ﻥﻮﻜﻳ ﺎﻣﺪﻨﻋ
ﺍﺬﻫ ﻦﻣ ﺕﺎﻔﻠﻤﻟﺍ ﻊﻴﺟﺮﺗ ﻭﺃ ﻊﻳﺮﺴﻟﺍ ﻢﻳﺪﻘﺘﻟﺍ ﻭﺃ ﺕﺎﻔﻠﻤﻟﺍ ﻲﻄﺨﺗ ﻭﺃ ﺖﻗﺆﻤﻟﺍ ﻑﺎﻘﻳﻹﺍ
.ﺯﺎﻬﺠﻟﺍ ﺍﺬﻫ ﻦﻣ iPod ﺯﺎﻬﺠﺑ ﻢﻜﺤﺗ :
.ﺭﺮﻜﺘﻣ ﻞﻜﺸﺑ 5 ﻂﻐﺿﺍ ،ANDROID ﺭﺪﺼﻤﻟﺍ ﻥﻮﻜﻳ ﺎﻣﺪﻨﻋ
ﻖﻴﺒﻄﺗ ﺮﺒﻋ ﺯﺎﻬﺠﻟﺍ ﺍﺬﻫ ﻦﻣ Android ﺯﺎﻬﺠﺑ ﻢﻜﺤﺘﻟﺎﺑ ﻢﻗ :
.Android ﺯﺎﻬﺟ ﻲﻓ ﺖﺒﺜﻤﻟﺍ KENWOOD MUSIC PLAY
ﺕﺎﻘﻴﺒﻄﺗ ﺮﺒﻋ ﻪﺴﻔﻧ Android ﺯﺎﻬﺟ ﻡﺍﺪﺨﺘﺳﺎﺑ Android ﺯﺎﻬﺠﺑ ﻢﻜﺤﺘﻟﺎﺑ ﻢﻗ :
ﺬﻴﻔﻨﺗ ﻦﻜﻤﻳ ﻝﺍﺰﻳ ﻻ ،ﻦﻜﻟ .Android ﺯﺎﻬﺟ ﻲﻓ ﺔﺘﺒﺜﻣ ﻯﺮﺧﺍ ﻂﺋﺎﺳﻭ ﻞﻐﺸﻣ
.ﺯﺎﻬﺠﻟﺍ ﺍﺬﻫ ﻦﻣ ﻒﻠﻤﻟﺍ ﻲﻄﺨﺗﻭ ﺖﻗﺆﻤﻟﺍ ﻒﻗﻮﺘﻟﺍ/ﻞﻴﻐﺸﺘﻟﺍ
6
*
ﻞﻴﻐﺸﺘﻟﺍ
*
.ﺯﺎﻬﺠﻟﺍ
BROWSE MODE
ﻰﻟﺇﺔﻳﺎﻤﺤﻟﺍ ﺀﺎﻄﻏ ﻰﻠﻋ
ﺭﺍﺮﻜﺗ
ﻞﻴﻐﺸﺘﻟﺍ
ﺐﻴﺗﺮﺘﺑ
6
ﻲﺋﺍﻮﺸﻋ
MODE ON
MODE OFF
HAND MODE
*6
*7
ﻲﺑﺮﻋ
10
Page 68

ﻂﻐﺿﺍ
.
ﻰﻠﻋ ﺭﺍﺮﻤﺘﺳﻻﺍ ﻊﻣ ﻂﻐﺿﺍ
.S /
.
/ ﻂﻐﺿﺍ
ANDROID/iPod USB/USB/CD :
ANDROID/iPod USB/USB :
ﻂﻐﺿﺍ
.
ﺖﻗﺆﻣ ﻒﻗﻮﺗ/ﻞﻴﻐﺸﺗ
4
*
ﻉﺎﺟﺭﻹﺍ/ﻊﻳﺮﺳ ﻢﻳﺪﻘﺗ ﻰﻠﻋ ﺭﺍﺮﻤﺘﺳﻻﺍ ﻊﻣ ﻂﻐﺿﺍ
.S / T
:ﺭﺎﻴﺘﺧﻼﻟ ﻞﺑﺎﻘﻟﺍ ﺭﺪﺼﻤﻟﺍ
ﻒﻠﻣ/ﺭﺎﺴﻣ ﺪﻳﺪﺤﺗ.S / T ﻂﻐﺿﺍ.S / ﻂﻐﺿﺍ
5
*
ﺪﻠﺠﻣ ﺪﻳﺪﺤﺗ.J / K ﻂﻐﺿﺍ
USB ﻝﺎﺧﺩﺇ ﻞﻴﺻﻮﺗ ﻑﺮﻃ
•
•
ﻰﻟﺇﺔﻳﺎﻤﺤﻟﺍ ﺀﺎﻄﻏ ﻰﻠﻋﺪﻌﺑ ﻦﻋ ﻢﻜﺤﺘﻟﺍ ﺓﺪﺣﻭ ﻰﻠﻋ
ANDROID/iPod/USB/ CD
ﻞﻴﻐﺸﺘﻟﺍ ﺀﺪﺑ
.ﻞﻴﻐﺸﺘﻟﺍ ﺃﺪﺒﻳﻭ ﺎﹰﻴﺋﺎﻘﻠﺗ ﺭﺪﺼﻤﻟﺍ ﺮﻴﻐﺘﻳ
ﻖﺼﻠﻤﻟﺍ ﺐﻧﺎﺟ ﺔﻧﺍﻮﻄﺳﻷﺍ ﺝﺍﺮﺧﺇ M
USB
(500 mA :.ﻰﺼﻗﻷﺍ ﺪﺤﻟﺍ) CA-U1EX
iPhone/iPod
2
*
iPhone/iPod ﺯﺎﻬﺠﻟ ﺔﻴﻟﺎﻤﻛ ﻭﺍ
(ﻱﺭﺎﻴﺘﺧﺍ ﻖﺤﻠﻣ)
KCA-iP103/KCA-iP102
1
*
(ﻱﺭﺎﻴﺘﺧﺍ ﻖﺤﻠﻣ)
ﺓﺀﺎﺿﻻﺍ ﻉﻮﻧ : KCA-iP103 ،ﺱﻮﺑﺩ 30 ﻉﻮﻨﻟﺍ : KCA-iP102
.ﻪﻣﺍﺪﺨﺘﺳﺍ ﻡﺪﻋ ﺪﻨﻋ ﺓﺭﺎﻴﺴﻟﺍ ﻞﺧﺍﺪﺑ ﻞﺑﺎﻜﻟﺍ ﻙﺮﺘﺗ ﻻ
ﺐﻴﺼﻨﺘﻟ ﺕﺎﻤﻴﻠﻌﺘﻟﺍ ﻊﺒﺗﺍ .“Press [VIEW] to install KENWOOD MUSIC PLAY APP” ﺽﺮﻋ ﻢﺘﻳ ،Android ﺯﺎﻬﺟ ﻞﻴﺻﻮﺗ ﺪﻨﻋ
.ﻞﻴﺻﻮﺘﻟﺍ ﻞﺒﻗ Android ﺯﺎﻬﺟ ﻰﻠﻋ KENWOOD MUSIC PLAY ﻖﻴﺒﻄﺘﻟﺍ ﻦﻣ ﺭﺍﺪﺻﺍ ﺙﺪﺣﺍ ﺐﻴﻛﺮﺗ ﻦﻜﻤﻳ ﺎﻤﻛ .ﻖﻴﺒﻄﺘﻟﺍ
.<www.kenwood.com/cs/ce/> ﺓﺭﺎﻳﺰﺑ ﻢﻗ ،ﺕﺎﻣﻮﻠﻌﻤﻟﺍ ﻦﻣ ﺪﻳﺰﻤﻟ
(10 ) .[BROWSE MODE]
ﺪﻳﺪﺤﺗ ﻢﺘﻳ ﺎﻣﺪﻨﻋ ﻂﻘﻓ ﻪﻘﻴﺒﻄﺗ ﻦﻜﻤﻳ :ANDROID ـﻟ
.ANDROID/iPod ﻊﻣ ﺍﺬﻫ ﻖﻓﺍﻮﺘﻳ ﻻ .AAC/WMA/MP3 ﺕﺎﻔﻠﻤﻟ ﻂﻘﻓ :CD ـﻟ
ﻲﺑﺮﻋ
9
*1
*2
*3
*4
*5
ANDROID
3
*
2
*
USB ﻞﺑﺎﻛ
(ﺀﺍﺮﺸﻠﻟ ﺡﺎﺘﻣ)
Page 69

(5 ) .[SOURCE SELECT]
ـﻟ
[BUILT-IN AUX]
ﻉﺎﻤﺘﺳﻻﺍ ﺀﺪﺑ
.(ﺀﺍﺮﺸﻠﻟ ﺡﺎﺘﻣ) ﻝﻮﻤﺤﻤﻟﺍ ﺕﻮﺼﻟﺍ ﻞﻐﺸﻣ ﺯﺎﻬﺠﺑ ﻝﺎﺼﺗﻻﺍ 1
ﻲﻓﺎﺿﻹﺍ ﺯﺎﻬﺠﻟﺍ ﻞﻴﺻﻮﺗ ﺲﺒﻘﻣ
ﺕﻮﺻ ﻞﻐﺸﻣ
(ﺔﺻﻮﺑ 1/8) ﻢﻣ 3.5 ﻮﻳﺮﻴﺘﺴﻟﺍ ﺕﻮﺼﻠﻟ ﺮﻴﻐﺻ ﺲﺑﺎﻗ
(ﺀﺍﺮﺸﻠﻟ ﺡﺎﺘﻣ) “L” ﻑﺮﺣ ﻞﻜﺷ ﻰﻠﻋ ﻞﺻﻮﻣ ﻊﻣ
.ﻞﻴﻐﺸﺘﻟﺍ ﺀﺪﺑﻭ ﻝﻮﻤﺤﻤﻟﺍ ﺕﻮﺼﻟﺍ ﻞﻐﺸﻣ ﺯﺎﻬﺟ ﻞﻴﻐﺸﺘﺑ ﻢﻗ 3
.AUX ﺭﺎﻴﺘﺧﻻ ﺭﺮﻜﺘﻣ ﻞﻜﺸﺑ
AUX ﻢﺳﺍ ﻂﺒﺿ
[FUNCTION]
.
.ﺹﺮﻘﻟﺍ ﻰﻠﻋ ﻂﻐﺿﺍ ﻢﺛ ،
ﻰﻠﻋ ﻂﻐﺿﺍ ﻢﺛ ،
.ﺹﺮﻘﻟﺍ ﻂﻐﺿﺍ ﻢﺛ ،ﺪﻨﺑ ﺪﻳﺪﺤﺘﻟ ﺕﻮﺼﻟﺍ ﻯﻮﺘﺴﻣ ﺹﺮﻗ ﺭﺩﺃ
...ﺯﺎﻬﺠﻟﺎﺑ ﻞﺼﺘﻣ ﻝﻮﻤﺤﻣ ﺕﻮﺻ ﻞﻐﺸﻣ ﻰﻟﺇ ﻉﺎﻤﺘﺳﻻﺍ ﺀﺎﻨﺛﺃ
ﻰﻟﺇ ﻝﻮﺧﺪﻠﻟ ﺕﻮﺼﻟﺍ ﻯﻮﺘﺴﻣ ﺹﺮﻗ ﻰﻠﻋ ﻂﻐﺿﺍ 1
[SYSTEM]
[AUX NAME SET]
.ﺀﺎﻬﻧﻹﺍ ﻞﺟﺃ ﻦﻣ
ﺪﻳﺪﺤﺘﻟ ﺕﻮﺼﻟﺍ ﻯﻮﺘﺴﻣ ﺹﺮﻗ ﺭﺩﺃ 2
ﺪﻳﺪﺤﺘﻟ ﺕﻮﺼﻟﺍ ﻯﻮﺘﺴﻣ ﺹﺮﻗ ﺭﺩﺃ 3
TV/VIDEO/GAME/PORTABLE/DVD
. ﻰﻠﻋ ﻂﻐﺿﺍ ،ﻖﺑﺎﺴﻟﺍ ﺩﺍﺪﻋﻹﺍ ﺮﺼﻨﻋ ﻰﻟﺇ ﻉﻮﺟﺮﻠﻟ
/(ﻲﺿﺍﺮﺘﻓﺍ)
ﺭﺍﺮﻤﺘﺳﻻﺍ ﻊﻣ ﻂﻐﺿﺍ 5
AUX
:ﺮﻴﻀﺤﺘﻟﺍ
ـﻟ
[ON]
ﺩﺪﺣ
ﻝﻮﻤﺤﻣ
ﻂﻐﺿﺍ 2
.ﺹﺮﻘﻟﺍ
AUX
ﻰﻠﻋ ﻂﻐﺿﺍ ﻢﺛ ،ﺡﺎﺘﻤﻟﺍ ﺞﻣﺎﻧﺮﺒﻟﺍ ﻉﻮﻧ ﺪﻳﺪﺤﺘﻟ ﺕﻮﺼﻟﺍ ﻯﻮﺘﺴﻣ ﺹﺮﻗ ﺭﺩﺃ 1
/
FRENCH/ENGLISH
) PTY ﺔﻐﻟ ﺪﻳﺪﺤﺘﻟ ﺕﻮﺼﻟﺍ ﻯﻮﺘﺴﻣ ﺹﺮﻗ ﺭﺩﺃ 2
.ﺹﺮﻘﻟﺍ ﻰﻠﻋ ﻂﻐﺿﺍ ﻢﺛ ،(
.ﺚﺤﺒﻟﺍ ﺀﺪﺒﻟ S / T ﻂﻐﺿﺍ 3
.ﺹﺮﻘﻟﺍ
GERMAN
؛ .ﻮﻳﺩﺍﺮﻟﺍ ﺕﺎﻧﺎﻴﺑ ﻡﺎﻈﻧ ﺔﻄﺤﻣ ﺖﻗﻭ ﻊﻣ ﺯﺎﻬﺠﻟﺍ ﺖﻗﻮﻟ ﺔﻨﻣﺍﺰﻣ ﻞﻤﻋ ﻢﺘﻳ :
،
CULTURE ،DRAMA ،EDUCATE ،SPORT ،INFO
،
RELIGION ،SOCIAL ،CHILDREN ،FINANCE ،WEATHER ،VARIED ،SCIENCE
،
EASY M
[MUSIC]
(ﻰﻘﻴﺳﻮﻣ) ،
FOLK M
ﻭﺃ
[SPEECH]
،
COUNTRY ،JAZZ ،OTHER M
.ﻩﺪﻳﺪﺤﺗ ﻢﺗ ﺍﺫﺇ
ﺍﺫﺇ
[PTY SEARCH]/[TI]/[AF SET]/[REGIONAL]/[NEWS SET]/[MONO SET]
ﻆﻔﺣ ﻢﺘﻳ ،ﺭﺎﺒﺧﻻﺍ ﺕﺍﺮﺸﻧ ﻭﺃ ،ﺭﻭﺮﻤﻟﺍ ﺕﺎﻣﻮﻠﻌﻣ ﻝﺎﺒﻘﺘﺳﺍ ﺀﺎﻨﺛﺃ ﺕﻮﺼﻟﺍ ﻯﻮﺘﺴﻣ ﻂﺒﺿ ﺔﻟﺎﺣ ﻲﻓ •
ﺕﺍﺮﺸﻧ ﻭﺃ ﺭﻭﺮﻤﻟﺍ ﺕﺎﻣﻮﻠﻌﻣ ﻞﻴﻐﺸﺗ ﺪﻨﻋ ﺎﻬﻘﻴﺒﻄﺗ ﻢﺘﻴﺳ .ﺎﹰﻴﺋﺎﻘﻠﺗ ﻝﺪﻌﻤﻟﺍ ﺕﻮﺼﻟﺍ ﻯﻮﺘﺴﻣ
[PTY SEARCH]
DOCUMENT
ROCK M
(ﻰﻘﻴﺳﻮﻣ) ،
(ﻰﻘﻴﺳﻮﻣ) ،
ﺖﺤﺗ ﻒﻨﺼﻤﻟﺍ ﺞﻣﺎﻧﺮﺒﻟﺍ ﻉﻮﻧ ﻦﻋ ﺓﺪﺣﻮﻟﺍ ﺚﺤﺒﺗ ﻑﻮﺳ
ﻊﺿﻮﻟ ﺡﺎﺘﻤﻟﺍ ﺞﻣﺎﻧﺮﺒﻟﺍ ﻉﻮﻧ
(ﺕﺎﻣﻮﻠﻌﻣ) ،
،
LEISURE ،TRAVEL ،PHONE IN
(ﻰﻘﻴﺳﻮﻣ) ،
CLASSICS ،LIGHT M
OLDIES ،NATION M
.ﻂﻘﻓ FM3/FM2/FM1 ﻕﺎﻄﻨﻟﺍ ﻥﺎﻛ
ON
.ﺀﺎﻐﻟﺍ :
OFF
AFFAIRS ،NEWS : SPEECH
POP M
(ﻰﻘﻴﺳﻮﻣ) :
(ﻰﻘﻴﺳﻮﻣ)
(ﻰﻘﻴﺳﻮﻣ)
ﺪﻳﺪﺤﺗ ﻦﻜﻤﻳ •
.ﺔﻣﺩﺎﻘﻟﺍ ﺓﺮﻤﻟﺍ ﻲﻓ ﺭﺎﺒﺧﻻﺍ
4
ﻮﻳﺩﺍﺭ
PTY SEARCH
CLOCK
TIME SYNC
MUSIC
ﻲﺑﺮﻋ
8
Page 70

ﻯﺮﺧﺃ ﺕﺍﺩﺍﺪﻋﺇ
.
ﻂﻐﺿﺍ ﻢﺛ ،(ﻲﻟﺎﺘﻟﺍ ﻝﻭﺪﺠﻟﺍ ﻊﺟﺍﺭ) ﺪﻨﺑ ﺪﻳﺪﺤﺘﻟ ﺕﻮﺼﻟﺍ ﻯﻮﺘﺴﻣ ﺹﺮﻗ ﺭﺩﺃ 2
XX
:ﻲﺿﺍﺮﺘﻓﺍ
؛ .ﻂﻘﻓ ﺪﻴﺠﻟﺍ ﻝﺎﺒﻘﺘﺳﻻﺍ ﺕﺍﺫ SW2/SW1/AM ﺕﺎﻄﺤﻤﻟﺍ ﻦﻋ ﺚﺤﺒﻟﺍ :
ﺔﻄﺤﻤﻟﺍ/ﺭﺪﺼﻤﻟﺍ ﻰﻠﻋ ﻖﻴﺒﻄﺘﻠﻟ ﺔﻠﺑﺎﻗ ﺎﻫﺬﻴﻔﻨﺗ ﻢﺘﻳ ﻲﺘﻟﺍ ﺕﺍﺩﺍﺪﻋﻹﺍ
ﺬﻴﻔﻨﺘﺑ ﻡﻮﻘﺗ ﻥﺍ ﺐﺠﻳ ،ﺔﻄﺤﻤﻟﺍ/ﺭﺪﺼﻤﻟﺍ ﺮﻴﻴﻐﺗ ﺩﺮﺠﻤﺑ .ﻂﻘﻓ ﺓﺭﺎﺘﺨﻤﻟﺍ
؛ .ﻩﺪﻘﻓ ﻢﺘﻴﺳ ﻮﻳﺮﺘﺴﻟﺍ ﺕﻮﺼﻟﺍ ﺮﻴﺛﺄﺗ ﻦﻜﻟﻭ FM ﻝﺎﺒﻘﺘﺳﺍ ﻦﺴﺤﻳ :
ﻡﺍﺪﺨﺘﺳﺎﺑ ﺓﺩﺪﺤﻤﻟﺍ ﺔﻘﻄﻨﻤﻟﺍ ﻲﻓ ﻂﻘﻓ ﻯﺮﺧﺃ ﺔﻄﺤﻣ ﻰﻟﺇ ﻝﻮﺤﺘﻳ :
ﺔﻜﺒﺷ ﺲﻔﻧ ﻲﻓ ﺞﻣﺎﻧﺮﺒﻟﺍ ﺲﻔﻧ ﺚﺒﺗ ﻯﺮﺧﺃ ﺔﻄﺤﻣ ﻦﻋ ﺎﹰﻴﺋﺎﻘﻠﺗ ﺚﺤﺒﻳ :
ﺓﺮﻓﻮﺘﻣ ﺖﻧﺎﻛ ﺍﺫﺇ ﺭﻭﺮﻤﻟﺍ ﺕﺎﻣﻮﻠﻌﻣ ﻰﻟﺍ ﹰﺎﺘﻗﺆﻣ ﻝﻮﺤﺘﻟﺎﺑ ﺓﺪﺣﻮﻠﻟ ﺢﻤﺴﻳ :
7
[FUNCTION]
ﺕﺎﻤﻴﻠﻌﺘﻟﺍ ﻊﺒﺗﺍ ﻭﺍ ﺏﻮﻏﺮﻤﻟﺍ ﺪﻨﺒﻟﺍ ﺭﺎﻴﺘﺧﺍ ﻢﺘﻳ ﻥﺍ ﻰﻟﺍ
.ﺀﺎﻐﻟﺍ :NO ؛ .ﺪﻴﺟ ﻝﺎﺒﻘﺘﺳﺍ ﺕﺍﺫ ﺕﺎﻄﺤﻣ 6 ﻆﻔﺣ ﺎﹰﻴﺋﺎﻘﻠﺗ ﺃﺪﺒﻳ :
ﻊﺿﻭ ﻊﻣ
؛ .ﺎﹰﺣﺎﺘﻣ ﻥﺎﻛ ﺍﺫﺇ ﺭﺎﺒﺧﻷﺍ ﺞﻣﺎﻧﺮﺑ ﻰﻟﺇ ﺎﹰﺘﻗﺆﻣ ﺯﺎﻬﺠﻟﺍ ﻝﻮﺤﺘﻳ ﻑﻮﺳ :
ﻲﻟﺎﺤﻟﺍ ﻝﺎﺒﻘﺘﺳﻻﺍ ﻥﻮﻜﻳ ﺎﻣﺪﻨﻋ ﻞﻀﻓﺃ ﻝﺎﺒﻘﺘﺳﺎﺑ Radio Data System
ﻲﺑﺮﻋ
ﻰﻟﺇ ﻝﻮﺧﺪﻠﻟ ﺕﻮﺼﻟﺍ ﻯﻮﺘﺴﻣ ﺹﺮﻗ ﻰﻠﻋ ﻂﻐﺿﺍ 1
2 ﺓﻮﻄﺨﻟﺍ ﺭﺮﻛ 3
.ﺀﺎﻬﻧﻹﺍ ﻞﺟﺃ ﻦﻣ
. ﻰﻠﻋ ﻂﻐﺿﺍ ،ﻖﺑﺎﺴﻟﺍ ﺩﺍﺪﻋﻹﺍ ﺮﺼﻨﻋ ﻰﻟﺇ ﻉﻮﺟﺮﻠﻟ
[NORMAL]
ﺪﻳﺪﺤﺗ ﺔﻟﺎﺣ ﻲﻓ ﻂﻘﻓ ﺪﻳﺪﺤﺘﻠﻟ ﻞﺑﺎﻗ
.ﺀﺎﻐﻟﺍ :
.ﺀﺎﻐﻟﺍ :
.ﺭﺎﺘﺨﻤﻟﺍ ﺪﻨﺒﻟﺎﺑ ﺔﻘﻠﻌﺘﻤﻟﺍ
ﺭﺍﺮﻤﺘﺳﻻﺍ ﻊﻣ ﻂﻐﺿﺍ 4
.ﺀﺎﻐﻟﺍ :
.ﻯﺮﺧﺍ ﺓﺮﻣ ﺕﺍﺩﺍﺪﻋﻹﺍ
(5 ) .[PRESET TYPE]
.ﺀﺎﻐﻟﺍ :
.ﺀﺎﻐﻟﺍ :
OFF
؛ .“AF” ﻲﻓ ﻢﻜﺤﺘﻟﺍ
.ﺀﺎﻐﻟﺍ :
OFF
؛ .ﺊﻴﺳ
OFF
؛ .(“TI” ﺮﺷﺆﻤﻟﺍ ﺀﺎﻀﻳ)
OFF
YES
OFF
OFF
ON
•
•
ON
ON
ON
ON
ON
.ﺹﺮﻘﻟﺍ
TUNER SETTING
LOCAL SEEK
AUTO MEMORY
MONO SET
NEWS SET
REGIONAL
AF SET
ﺔﻄﺤﻣ ﻦﻋ ﺚﺤﺒﻟﺍ
ﺓﺪﺣﻭ ﻰﻠﻋ / ﻂﻐﺿﺍ ﻭﺃ) ﺓﺭﺮﻜﺘﻣ ﺔﻘﻳﺮﻄﺑ ﻂﻐﺿﺍ 2
.SW2/SW1/AM/FM3/FM2/FM1 ﺪﻳﺪﺤﺘﻟ (ﺪﻌﺑ ﻦﻋ ﻢﻜﺤﺘﻟﺍ
ﻦﻋ ﻢﻜﺤﺘﻟﺍ ﺓﺪﺣﻭ ﻰﻠﻋ S /
.ﺭﺍﺮﻜﺘﺑ
.(6 ﻰﻟﺇ 1 ﻦﻣ) ﺔﻴﻟﺎﺘﻟﺍ ﻡﺎﻗﺭﻷﺍ ﺭﺍﺭﺯﺃ ﻦﻣ ﺪﺣﺍﻭ ﺭﺍﺮﻤﺘﺳﻻﺍ ﻊﻣ ﻂﻐﺿﺍ :ﺔﻄﺤﻤﻟﺍ ﻆﻔﺤﻟ •
ﻭﺃ) (6 ﻰﻟﺇ 1 ﻦﻣ) ﺔﻴﻟﺎﺘﻟﺍ ﻡﺎﻗﺭﻷﺍ ﺭﺍﺭﺯﺃ ﺪﺣﺃ ﻰﻠﻋ ﻂﻐﺿﺍ :ﺔﻧﺰﺨﻤﻟﺍ ﺔﻄﺤﻤﻟﺍ ﺪﻳﺪﺤﺘﻟ •
.(ﺪﻌﺑ ﻦﻋ ﻢﻜﺤﺘﻟﺍ ﺓﺪﺣﻭ ﻰﻠﻋ (6 ﻰﻟﺇ 1 ﻦﻣ) ﺔﻴﻟﺎﺘﻟﺍ ﻡﺎﻗﺭﻷﺍ ﺭﺍﺭﺯﺃ ﺪﺣﺃ ﻰﻠﻋ ﻂﻐﺿﺍ
(ﺪﻌﺑ ﻦﻋ ﻢﻜﺤﺘﻟﺍ ﺓﺪﺣﻭ ﻡﺍﺪﺨﺘﺳﺍ)
TI
ﻝﻮﺻﻮﻟﺍ ﻒﻴﻟﻮﺗ ﺀﺎﻐﻟﺇ ﻢﺘﻳ ،
.RADIO ﺭﺎﻴﺘﺧﻻ ﺭﺮﻜﺘﻣ ﻞﻜﺸﺑ ﻂﻐﺿﺍ 1
ﻂﻐﺿﺍ ﻭﺃ) S / T ﻂﻐﺿﺍ 3
.ﺔﻄﺤﻣ ﻦﻋ ﺚﺤﺒﻠﻟ (ﺪﻌﺑ
ﻂﻐﺿﺍ :S / T ـﻟ ﺚﺤﺒﻟﺍ ﺔﻘﻳﺮﻃ ﺮﻴﻴﻐﺘﻟ •
.ﺔﻄﺤﻣ ﻦﻋ ﹰﺎﻴﺋﺎﻘﻠﺗ ﺚﺤﺒﻳ : AUTO1
.ﺎﻘﺒﺴﻣ ﺓﺪﻌﻣ ﺔﻄﺤﻣ ﻦﻋ ﺚﺤﺒﻟﺍ : AUTO2
.ﺔﻄﺤﻣ ﻦﻋ ﺎﹰﻳﻭﺪﻳ ﺚﺤﺒﻳ : MANUAL
ﺮﺷﺎﺒﻤﻟﺍ ﻝﻮﺻﻮﻟﺍ ﻒﻴﻟﻮﺗ
.ﺮﺷﺎﺒﻤﻟﺍ ﻝﻮﺻﻮﻟﺍ ﻒﻴﻟﻮﺗ ﻰﻟﺇ ﻝﻮﺧﺪﻠﻟ DIRECT ﻂﻐﺿﺍ 1
2 ﺓﻮﻄﺨﻟﺍ ﺪﻌﺑ
.ﺩﺩﺮﺘﻟﺍ ﻝﺎﺧﺩﻹ ﻡﺎﻗﺭﻷﺍ ﺭﺍﺭﺯﺃ ﻂﻐﺿﺍ 2
.ﺔﻄﺤﻣ ﻦﻋ ﺚﺤﺒﻠﻟ ﻂﻐﺿﺍ 3
.DIRECT ﻭﺃ ﻰﻠﻋ ﻂﻐﺿﺍ ،ﺀﺎﻐﻟﻺﻟ •
ﹴ
ﻥﺍﻮﺛ 10 ﺓﺪﻤﻟ ﺔﻴﻠﻤﻋ ﻱﺃ ﺀﺍﺮﺟﺇ ﻡﺪﻋ ﺔﻟﺎﺣ ﻲﻓ •
.ﺎﹰﻴﺋﺎﻘﻠﺗ ﺮﺷﺎﺒﻤﻟﺍ
ﻮﻳﺩﺍﺭ
Page 71

ﻞﻤﻌﻟﺍ ﻲﻓ ﻉﻭﺮﺸﻟﺍ
ﺔﻳﺪﻌﺘﻟﺍ ﻉﻮﻧ ﺮﻴﻴﻐﺗ
.STANDBY ﻊﺿﻭ ﻲﻓ ﻝﻮﺧﺪﻠﻟ ﺭﺮﻜﺘﻣ ﻞﻜﺸﺑ ﻂﻐﺿﺍ 1
ﺭﺎﻴﺘﺧﺍ ﻊﺿﻭ ﻲﻓ ﻝﻮﺧﺪﻠﻟ 5 ﻭ 4 ﻡﺎﻗﺭﻻﺍ ﺭﺍﺭﺯﺍ ﻂﻐﻀﺑ ﺮﻤﺘﺳﺍﻭ ﻂﻐﺿﺍ 2
ﻰﻠﻋ ﻂﻐﺿﺍ ﻢﺛ ،“3WAY” ﻭﺃ “2WAY” ﺪﻳﺪﺤﺘﻟ ﺕﻮﺼﻟﺍ ﻯﻮﺘﺴﻣ ﺹﺮﻗ ﺭﺩﺃ 3
ﻰﻠﻋ ﻂﻐﺿﺍ ﻢﺛ ،“NO” ﻭﺃ “YES” ﺪﻳﺪﺤﺘﻟ ﺕﻮﺼﻟﺍ ﻯﻮﺘﺴﻣ ﺹﺮﻗ ﺭﺩﺃ
. ﻰﻠﻋ ﺭﺍﺮﻤﺘﺳﻻﺍ ﻊﻣ ﻂﻐﺿﺍ ،ﺀﺎﻐﻟﻺﻟ •
.
(23 ،22 )
.ﺔﻴﻟﺎﺤﻟﺍ ﺔﻳﺪﻌﺘﻟﺍ ﻉﻮﻧ ﺮﻬﻈﻳ
.ﺭﺎﺘﺨﻤﻟﺍ ﺔﻳﺪﻌﺘﻟﺍ ﻉﻮﻧ ﺮﻬﻈﻳ
،ﺓﺭﺎﺘﺨﻤﻟﺍ ﺔﻳﺪﻌﺘﻟﺍ ﺕﺍﺩﺍﺪﻋﺇ ﻂﺒﻀﻟ •
.ﺔﻳﺪﻌﺘﻟﺍ
.ﺹﺮﻘﻟﺍ
.ﺹﺮﻘﻟﺍ
ﻪﻴﺒﻨﺗ
(34 ،33 )
.ﺕﺎﻋﺎﻤﺴﻟﺍ ﻂﻳﺭ ﺔﻴﻔﻴﻜﻟ ﺎﻘﻓﻭ ﺔﻳﺪﻌﺗ ﻉﻮﻧ ﺮﺘﺧﺍ
.ﺪﺣ ﻰﺼﻗﻻ ﺎﻀﻔﺨﻨﻣ ﻭﺍ ﺎﻴﻟﺎﻋ ﺭﺩﺎﺼﻟﺍ ﺕﻮﺼﻟﺍ ﻯﻮﺘﺴﻣ ﻥﻮﻜﻳ ﺪﻗ •
:ﺊﻃﺎﺧ ﻉﻮﻧ ﺕﺮﺘﺧﺍ ﺍﺫﺍ
.ﻒﻠﺘﻠﻟ ﺕﺎﻋﺎﻤﺴﻟﺍ ﺽﺮﻌﺘﺗ ﺪﻗ •
ﺕﻮﺻ ﺕﺎﻔﻠﻣ ﺎﻬﻴﻠﻋ ﻞﺠﺴﻤﻟﺍ ﺕﺎﻧﺍﻮﻄﺳﻷﺍ ﻦﻴﺑ ﺎﹰﻴﺋﺎﻘﻠﺗ ﺰﻴﻤﻳ :
؛ .ﻰﻘﻴﺳﻮﻣ ﺎﻬﻴﻠﻋ ﻞﺠﺴﻤﻟﺍ CD ﺕﺎﻧﺍﻮﻄﺳﺃﻭ
ﻻ .ﻰﻘﻴﺳﻮﻣ ﺎﻬﻴﻠﻋ ﻞﺠﺴﻣ CD ﺕﺎﻧﺍﻮﻄﺳﺄﻛ ﻞﻤﻌﻟﺍ ﻰﻠﻋ ﺯﺎﻬﺠﻟﺍ ﺮﺒﺠﻳ :
.ﺕﻮﺻ ﻒﻠﻤﻟ ﺹﺮﻗ ﻞﻴﻐﺸﺗ ﺪﻨﻋ ﺕﻮﺻ ﻉﺎﻤﺳ ﻦﻜﻤﻳ
( ﻲﻠﻳﺩﻮﻤﻟ)
( ﻲﻠﻳﺩﻮﻤﻟ)
.ﻞﻴﺻﺎﻔﺘﻠﻟ 26 ﺔﺤﻔﺻ ﻊﺟﺍﺭ
4
.(ﺔﻄﺸﻨﻣ ﺮﻴﻏ ﺔﻴﻗﺮﺘﻟﺍ) ﻲﻐﻠﻳ :NO ؛ .ﺖﺑﺎﺜﻟﺍ ﺞﻣﺎﻧﺮﺒﻟﺍ ﺔﻴﻗﺮﺗ ﺃﺪﺒﻳ :
ﺓﺭﺎﻳﺰﺑ ﻢﻗ ،ﺖﺑﺎﺜﻟﺍ ﺞﻣﺎﻧﺮﺒﻟﺍ ﺚﻳﺪﺤﺗ ﺔﻴﻔﻴﻛ ﻝﻮﺣ ﻞﻴﺻﺎﻔﺗ ﻰﻠﻋ ﻝﻮﺼﺤﻠﻟ
ﺕﺎﻄﺤﻤﻟﺍ ﺀﺎﻨﺜﺘﺳﺎﺑ) ﺔﻴﺿﺍﺮﺘﻓﻻﺍ ﺕﺍﺩﺍﺪﻋﻹﺍ ﻰﻟﺍ ﺕﺍﺩﺍﺪﻋﻹﺍ ﺪﻴﻌﻳ :
ﺓﺪﺣﻮﻟﺍ ﻥﻮﻜﺗ ﺎﻣﺪﻨﻋ ﻰﺘﺣ ﺔﺷﺎﺸﻟﺍ ﻰﻠﻋ ﺔﻋﺎﺴﻟﺍ ﺖﻗﻭ ﺽﺮﻋ ﻢﺘﻳ :
ﺖﻧﺎﻛ ﺍﺫﺇ ﻰﻘﻴﺳﻮﻤﻟﺍ ﺕﺎﻣﻮﻠﻌﻤﻟﻭ
.
[ENGLISH]
.<www.kenwood.com/cs/ce/>
.ﺀﺎﻐﻟﺍ :NO ؛ .(ﺔﻧﺰﺨﻤﻟﺍ
.ﺀﺎﻐﻟﺍ :
[FUNCTION]
ﺔﻤﺋﺎﻘﻠﻟ ﺽﺮﻌﻟﺍ ﺔﻐﻟ ﺮﺘﺧﺍ
ﺭﺎﻴﺘﺧﺍ ﻢﺘﻳ ،ﺔﻴﺿﺍﺮﺘﻓﻻﺍ ﺔﺌﻴﻬﺘﻠﻟ ﺎﻘﻓﻭ
YES
YES
OFF
؛ .ﺓﺄﻔﻄﻣ
.ﻖﻴﺒﻄﺘﻠﻟ ﺔﻠﺑﺎﻗ
1
2
USER S.REMO
UPDATE SYSTEM
F/W UP xxxx
FACTORY RESET
CLOCK DISPLAY
ON
CD READ
F/W UPDATE
CLOCK
ENGLISH
TURKCE
ﻲﺑﺮﻋ
6
Page 72

XX
:ﻲﺿﺍﺮﺘﻓﺍ
ﺮﻓﻭﻮﺒﺻ ﻭﺃ ﺔﻴﻔﻠﺨﻟﺍ ﺕﺎﻋﺎﻤﺴﻟﺍ ﺖﻧﺎﻛ ﺍﺫﺇ ﺎﻣ ﺩﺪﺣ :
ﺕﻮﺻ ﺮﺒﻜﻣ ﻝﻼﺧ ﻦﻣ) ﺯﺎﻬﺠﻟﺍ ﺓﺮﺧﺆﻣ ﻲﻓ ﻂﺨﻟﺍ ﺝﺮﺨﻣ ﻑﺍﺮﻃﺄﺑ ﻦﻴﻠﺻﻮﻣ
(25
) .[COLOR SELECT]
ﻲﻓ ﻝﻮﺧﺪﻟﺍ ﺪﻨﻋ ﻕﺭﺯﻻﺍ ﻥﻮﻠﻟﺍ ﻰﻟﺍ KEY ﺡﺎﺘﻔﻤﻟﺍ ﺔﻘﻄﻨﻣ ﺓﺀﺎﺿﺍ ﺮﻴﻐﺘﺗ
.
[EASY MENU]
.ﺔﻘﻄﻨﻣ ﺺﻴﺼﺨﺘﻟ
ﻕﺎﻄﻧ ﻞﻛ ﻲﻓ ﻖﺒﺴﻣ ﺩﺍﺪﻋﺇ ﺭﺯ ﻞﻜﻟ ﺓﺪﺣﺍﻭ ﺔﻄﺤﻣ ﺮﻛﺬﺘﻳ :
ﺭﺯ ﻞﻜﻟ ﺓﺪﺣﺍﻭ ﺔﻄﺤﻣ ﺮﻛﺬﺘﻳ :
.ﻂﻴﺸﻨﺘﻟﺍ ﺀﺎﻐﻟﺇ :
(12 )
(8 )
ﻲﺑﺮﻋ
5
(.ﺕﺍﻮﻨﻗ 3 ﺔﻳﺪﻌﺗ ﺭﺎﻴﺘﺧﺍ ﻦﻋ ﻖﻴﺒﻄﺘﻠﻟ ﻞﺑﺎﻗ ﺮﻴﻏ)
؛ .ﺾﻴﺑﺍ ﻥﻮﻟ ﻰﻟﺍ LCD DISPLAY ﺓﺀﺎﺿﺍ ﺮﻴﻐﺘﺗ :
ﻥﻮﻟ ﺲﻔﻨﺑ LCD DISPLAY ﺓﺀﺎﺿﺇ ﻞﻈﺗ :
ﺩﺍﺪﻋﺇ ﻦﻋ ﺮﻈﻨﻟﺍ ﻑﺮﺼﺑ ،
25
.ﺩﺪﺤﻤﻟﺍ ﻕﺎﻄﻨﻟﺍ ﻦﻋ ﺮﻈﻨﻟﺍ ﺾﻐﺑ ﻖﺒﺴﻣ ﺩﺍﺪﻋﺇ
(ﺕﺍﻮﻨﻗ 3 ﺔﻳﺪﻌﺗ ﺭﺎﻴﺘﺧﺍ ﻦﻋ ﻖﻴﺒﻄﺘﻠﻟ ﻞﺑﺎﻗ ﺮﻴﻏ)
OFF
؛ .ﺡﺎﺘﻔﻤﻟﺍ ﻰﻠﻋ ﻂﻐﻀﻟﺍ ﺔﻤﻐﻧ ﻂﻴﺸﻨﺗ :
.ﻞﻄﻌﻣ :
OFF
؛ .ﺭﺪﺼﻤﻟﺍ ﺪﻳﺪﺤﺗ ﻲﻓ SPOTIFY ﻦﻴﻜﻤﺗ :
.ﻞﻄﻌﻣ :
OFF
( ﻲﻠﻳﺩﻮﻤﻟ)
SUBWOOFER/REAR
(34 )
.(ﻲﺟﺭﺎﺧ
...
[FUNCTION]
ﺔﺤﻔﺻ ﻲﻓ ﻲﺤﻴﺿﻮﺘﻟﺍ ﻞﻜﺸﻟﺍ ﻊﺟﺍﺭ
MIX
؛ .(SW2/SW1/AM/FM3/FM2/FM1)
؛ .ﺭﺪﺼﻤﻟﺍ ﺪﻳﺪﺤﺗ ﻲﻓ AUX ﻦﻴﻜﻤﺗ :
[FUNCTION]
ﻝﺎﺧﺩﺍ ﺪﻨﻋ
ﻊﺿﻭ
NORMAL
AUDIO CONTROL
ON
OFF
•
•
ON
ON
ON
SWITCH
PREOUT
DISPLAY
EASY MENU
TUNER SETTING
PRESET TYPE
SYSTEM
KEY BEEP
SOURCE SELECT
SPOTIFY SRC
BUILT-IN AUX
ﻞﻤﻌﻟﺍ ﻲﻓ ﻉﻭﺮﺸﻟﺍ
ﺦﻳﺭﺎﺘﻟﺍ ﻭ ﺔﻋﺎﺴﻟﺍ ﻂﺒﺿ
.
[FUNCTION]
.ﺹﺮﻘﻟﺍ ﻰﻠﻋ ﻂﻐﺿﺍ ﻢﺛ ،
ﻰﻠﻋ ﻂﻐﺿﺍ ﻢﺛ ،
.ﺹﺮﻘﻟﺍ ﻰﻠﻋ ﻂﻐﺿﺍ ﻢﺛ ،ﺕﺍﺩﺍﺪﻋﻹﺍ ﺪﻳﺪﺤﺘﻟ ﺕﻮﺼﻟﺍ ﻯﻮﺘﺴﻣ ﺹﺮﻗ ﺭﺩﺃ
ﻰﻠﻋ ﻂﻐﺿﺍ ﻢﺛ ،
.ﺹﺮﻘﻟﺍ ﻰﻠﻋ ﻂﻐﺿﺍ ﻢﺛ ،
ﻰﻠﻋ ﻂﻐﺿﺍ ﻢﺛ ،
ﻂﻐﺿﺍ ﻢﺛ ،
[MM/DD/YY]
.ﺹﺮﻘﻟﺍ ﻰﻠﻋ ﻂﻐﺿﺍ ﻢﺛ ،
.ﺹﺮﻘﻟﺍ ﻰﻠﻋ ﻂﻐﺿﺍ ﻢﺛ ،ﺕﺍﺩﺍﺪﻋﻹﺍ ﺪﻳﺪﺤﺘﻟ ﺕﻮﺼﻟﺍ ﻯﻮﺘﺴﻣ ﺹﺮﻗ ﺭﺩﺃ 10
ﻰﻟﺇ ﻝﻮﺧﺪﻠﻟ ﺕﻮﺼﻟﺍ ﻯﻮﺘﺴﻣ ﺹﺮﻗ ﻰﻠﻋ ﻂﻐﺿﺍ 1
[CLOCK]
ﺪﻳﺪﺤﺘﻟ ﺕﻮﺼﻟﺍ ﻯﻮﺘﺴﻣ ﺹﺮﻗ ﺭﺩﺃ 2
ﺔﻋﺎﺴﻟﺍ ﻂﺒﻀﻟ
[CLOCK ADJUST]
[CLOCK FORMAT]
[24H]
[DATE FORMAT]
ﻭﺃ
[DD/MM/YY]
.ﺀﺎﻬﻧﻹﺍ ﻞﺟﺃ ﻦﻣ
ﺪﻳﺪﺤﺘﻟ ﺕﻮﺼﻟﺍ ﻯﻮﺘﺴﻣ ﺹﺮﻗ ﺭﺩﺃ 3
ﺪﻳﺪﺤﺘﻟ ﺕﻮﺼﻟﺍ ﻯﻮﺘﺴﻣ ﺹﺮﻗ ﺭﺩﺃ 5
ﻭﺃ
[12H]
ﺪﻳﺪﺤﺘﻟ ﺕﻮﺼﻟﺍ ﻯﻮﺘﺴﻣ ﺹﺮﻗ ﺭﺩﺃ 6
ﺪﻳﺪﺤﺘﻟ ﺕﻮﺼﻟﺍ ﻯﻮﺘﺴﻣ ﺹﺮﻗ ﺭﺩﺃ 7
ﺪﻳﺪﺤﺘﻟ ﺕﻮﺼﻟﺍ ﻯﻮﺘﺴﻣ ﺹﺮﻗ ﺭﺩﺃ 8
[DATE SET]
ﺪﻳﺪﺤﺘﻟ ﺕﻮﺼﻟﺍ ﻯﻮﺘﺴﻣ ﺹﺮﻗ ﺭﺩﺃ 9
ﺔﻨﺳ ﻡﻮﻳ ﺮﻬﺷ ﻭﺃ ﺔﻨﺳ ﺮﻬﺷ ﻡﻮﻳ
. ﻰﻠﻋ ﻂﻐﺿﺍ ،ﻖﺑﺎﺴﻟﺍ ﺩﺍﺪﻋﻹﺍ ﺮﺼﻨﻋ ﻰﻟﺇ ﻉﻮﺟﺮﻠﻟ
ﺔﻘﻴﻗﺩ ﺔﻋﺎﺳ
ﺦﻳﺭﺎﺘﻟﺍ ﻂﺒﻀﻟ
.ﺹﺮﻘﻟﺍ ﻰﻠﻋ
ﺭﺍﺮﻤﺘﺳﻻﺍ ﻊﻣ ﻂﻐﺿﺍ 11
ﺔﻴﺋﺪﺒﻤﻟﺍ ﺕﺍﺩﺍﺪﻋﻹﺍ ﻂﺒﺿ
.STANDBY ﻊﺿﻭ ﻲﻓ ﻝﻮﺧﺪﻠﻟ ﺭﺮﻜﺘﻣ ﻞﻜﺸﺑ ﻂﻐﺿﺍ 1
.
ﻂﻐﺿﺍ ﻢﺛ ،(ﻲﻟﺎﺘﻟﺍ ﻝﻭﺪﺠﻟﺍ ﻊﺟﺍﺭ) ﺪﻨﺑ ﺪﻳﺪﺤﺘﻟ ﺕﻮﺼﻟﺍ ﻯﻮﺘﺴﻣ ﺹﺮﻗ ﺭﺩﺃ 3
[FUNCTION]
.ﻪﻄﻴﺸﻨﺗ ﻭﺃ ﺏﻮﻠﻄﻤﻟﺍ ﺮﺼﻨﻌﻟﺍ ﺪﻳﺪﺤﺗ ﻢﺘﻳ ﻰﺘﺣ
ﻰﻟﺇ ﻝﻮﺧﺪﻠﻟ ﺕﻮﺼﻟﺍ ﻯﻮﺘﺴﻣ ﺹﺮﻗ ﻰﻠﻋ ﻂﻐﺿﺍ 2
3 ﺓﻮﻄﺨﻟﺍ ﺭﺮﻛ 4
.ﺀﺎﻬﻧﻹﺍ ﻞﺟﺃ ﻦﻣ ﺭﺍﺮﻤﺘﺳﻻﺍ ﻊﻣ ﻂﻐﺿﺍ 5
. ﻰﻠﻋ ﻂﻐﺿﺍ ،ﻖﺑﺎﺴﻟﺍ ﺩﺍﺪﻋﻹﺍ ﺮﺼﻨﻋ ﻰﻟﺇ ﻉﻮﺟﺮﻠﻟ
2
.ﺹﺮﻘﻟﺍ
.ﺹﺮﻘﻟﺍ
.ﺹﺮﻘﻟﺍ
3
.ﺹﺮﻘﻟﺍ
4
Page 73

ﺽﺍﺮﻌﺘﺳﻻﺍ ﺔﻴﻠﻤﻋ ﻎﻟﺃﻭ ﺽﺮﻌﻟﺍ ﺔﻐﻟ ﺩﺪﺣ
ﺽﺮﻌﺘﺳ ،(6 ،
[TUR]
.“VOLUME KNOB”
“3-WAY X ’ OVER” ﻭﺃ “2-WAY X ’ OVER” :ﺓﺭﺎﺘﺨﻤﻟﺍ ﺔﻳﺪﻌﺘﻟﺍ ﻉﻮﻧ ﺔﺷﺎﺸﻟﺍ ﺽﺮﻌﺘﺳ ،ﻢﺛ
[YES]
ﻰﻟﺍ
“VOLUME KNOB”
[FACTORY RESET]
ﻭﺃ (ﺔﻳﺰﻴﻠﺠﻧﻹﺍ ﺔﻐﻠﻟﺍ)
“PRESS” “CANCEL DEMO” :ﻲﻠﻳ ﺎﻣ ﺔﺷﺎﺸﻟﺍ ﺽﺮﻌﺘﺳ
ﻂﺒﺿﺪﻨﻋ ﻭﺃ) ﺓﺮﻣ ﻝﻭﻻ ﺔﻗﺎﻄﻟﺍ ﻞﻴﻐﺸﺗ ﺪﻨﻋ
“PRESS” “SEL LANGUAGE” :ﻲﻠﻳ ﺎﻣ ﺔﺷﺎﺸﻟﺍ
[ENG]
ﺪﻳﺪﺤﺘﻟ ﺕﻮﺼﻟﺍ ﻯﻮﺘﺴﻣ ﺹﺮﻗ ﺭﺩﺃ 1
.ﺹﺮﻘﻟﺍ ﻰﻠﻋ ﻂﻐﺿﺍ ﻢﺛ ،(ﺔﻴﻛﺮﺘﻟﺍ)
.ﻲﺋﺪﺒﻣ ﺩﺍﺪﻋﺈﻛ
.ﺕﻮﺼﻟﺍ ﻯﻮﺘﺴﻣ ﺹﺮﻗ ﻂﻐﺿﺍ
.ﻯﺮﺧﺃ ﺓﺮﻣ ﺕﻮﺼﻟﺍ ﻯﻮﺘﺴﻣ ﺹﺮﻗ ﻂﻐﺿﺍ
(6 )
.ﻲﺋﺪﺒﻣ ﺩﺍﺪﻋﺈﻛ
.“DEMO OFF” ﺮﻬﻈﺗ
.“ﺔﻳﺪﻌﺘﻟﺍ ﻉﻮﻧ ﺮﻴﻴﻐﺗ” ﻊﺟﺍﺭ ،ﺔﻳﺪﻌﺘﻟﺍ ﻉﻮﻧ ﺮﻴﻴﻐﺘﻟ •
[ENG]
ﺪﻳﺪﺤﺗ ﻢﺘﻳ
[YES]
ﺪﻳﺪﺤﺗ ﻢﺘﻳ
.ﺓﺮﻣ ﻝﻭﻷ
ﹶ
ﺃﻞﻤﻌﻟﺍ ﻲﻓ ﻉﻭﺮﺸﻟﺍ
ﺕﺎﹼﻴﹺﺳﺎﺳ
(
ﻞﻳﺩﻮﻤﻠﻟ ﺮﻓﻮﺘﻣ) (RC-406) ﻢﻜﺤﺘﻟﺍ ﺕﻮﻤﻳﺭ
ﺐﻨﺠﺗ) ﺪﻌﺑ ﻦﻋ ﻢﻜﺤﺘﻟﺍ ﺱﺎﺴﺣ
(.ﻊﻃﺎﺴﻟﺍ ﺲﻤﺸﻟﺍ ﺀﻮﻀﻟ ﺾﻳﺮﻌﺘﻟﺍ
ﺀﺎﻄﻏ ﺐﺤﺴﺑ ﻢﻗ
ﺀﺎﺑﺮﻬﻜﻟﺍ ﻝﺯﺎﻋ
ﻡﺍﺪﺨﺘﺳﻻﺍ ﺪﻨﻋ
1
.ﺪﻌﺑ ﻦﻋ ﻢﻜﺤﺘﻟﺍ ﺓﺪﺣﻭ ﻒﺋﺎﻇﻭ ﺮﻓﻮﺘﺗ ﻻ :
ﺔﻳﺭﺎﻄﺒﻟﺍ ﻝﺍﺪﺒﺘﺳﺍ ﻦﻜﻤﻳ ﻒﻴﻛ
2
3
( .ﺯﺎﻬﺠﻟﺍ ﻞﻴﻐﺸﺗ ﻰﻠﻋ ﻞﻤﻌﻳ ﻻ SRC ﻰﻠﻋ ﻂﻐﻀﻟﺍ )
ﺓﺩﺎﻳﺰﻟ
.ﺮﻤﺘﺴﻣ ﻞﻜﺸﺑ ﺔﻠﺣﺮﻣ 15 ﺭﺍﺪﻘﻤﺑ ﺕﻮﺼﻟﺍ ﻯﻮﺘﺴﻣ
.ﺕﻮﺼﻟﺍ ﻯﻮﺘﺴﻣ ﻒﻴﻔﺨﺘﻟ ﻞﻴﻐﺸﺘﻟﺍ ﺀﺎﻨﺛﺃ AT T ﻂﻐﺿﺍ
ﻰﻠﻋ ﻂﻐﻀﻟﺎﺑ ﺭﺍﺮﻤﺘﺳﻻﺍ ﻊﻣ ﻂﻐﺿﺍ •
.ﺯﺎﻬﺠﻟﺍ ﻞﻴﻐﺸﺗ ﻒﻗﻮﻟ ﻯﺮﺧﺃ ﺓﺮﻣ ﻂﻐﺿﺍ •
ﻭﺃ ﻂﻐﺿﺍ
ﺔﻴﺋﺎﺑﺮﻬﻜﻟﺍ ﺔﻗﺎﻄﻟﺍ ﻞﺻﻭﺍ.ﺯﺎﻬﺠﻟﺍ ﻑﺎﻘﻳﻹ SRC ﻰﻠﻋ ﺭﺍﺮﻤﺘﺳﻻﺍ ﻊﻣ ﻂﻐﺿﺍ
ﺕﻮﺼﻟﺍ ﻯﻮﺘﺴﻣ ﻂﺒﺿ.
ﻞﻴﻐﺸﺘﻟﺍ ﺭﺪﺼﻣ ﺪﻳﺪﺤﺗ.ﺭﺍﺮﻜﺘﺑ SRC ﻂﻐﺿﺍ
ﻰﻟﺇﺪﻌﺑ ﻦﻋ ﻢﻜﺤﺘﻟﺍ ﺓﺪﺣﻭ ﻰﻠﻋ
ﻲﺑﺮﻋ
4
Page 74

ﻂﺒﻀﻟﺍ ﺓﺩﺎﻋﺇ ﻦﻜﻤﻳ ﻒﻴﻛ
ﺽﺮﻌﻟﺍ ﺓﺬﻓﺎﻧ
ﻞﻴﻤﺤﺘﻟﺍ ﺔﺤﺘﻓﻭ ﺝﺍﺮﺧﻻﺍ ﺭﺯ
ﺕﺎﹼﻴﹺﺳﺎﺳﹶﺃ
ﺯﺎﻬﺠﻟﺍ ﺔﻬﺟﺍﻭ
ﺪﻨﻋ ﺰﻣﺮﻟﺍ ﺀﻲﻀﻳ
ﺙﻮﺗﻮﻠﺑ ﻝﺎﺼﺗﺍ ﺀﺎﺸﻧﺇ
(14 )
.Bluetooth
ﻲﻓ ﺯﺎﻬﺠﻟﺍ ﻞﺧﺪﻳ ﺎﻣﺪﻨﻋ ﺾﻣﻮﻳ
3
.ﺚﺤﺒﻟﺍ ﻊﺿﻭ
ﻲﺑﺮﻋ
ﺕﻮﺼﻟﺍ ﻯﻮﺘﺴﻣ ﺹﺮﻗ
ﻂﻐﺿﺍ
.ﺯﺎﻬﺠﻟﺍ ﻑﺎﻘﻳﻹ ﺭﺍﺮﻤﺘﺳﻻﺍ ﻊﻣ ﻂﻐﺿﺍ •
(28 )
.
.ﺭﺍﺮﻜﺘﺑ
.ﺭﺍﺮﻜﺘﺑ DISP ﻂﻐﺿﺍ
ﻂﻐﺿﺍ
ﻰﻟﺇﺔﻳﺎﻤﺤﻟﺍ ﺀﺎﻄﻏ ﻰﻠﻋ
ﺔﻴﺋﺎﺑﺮﻬﻜﻟﺍ ﺔﻗﺎﻄﻟﺍ ﻞﺻﻭﺍ
ﺕﻮﺼﻟﺍ ﻯﻮﺘﺴﻣ ﻂﺒﺿ.ﺕﻮﺼﻟﺍ ﻯﻮﺘﺴﻣ ﺹﺮﻗ ﺭﺩﺃ
ﻞﻴﻐﺸﺘﻟﺍ ﺭﺪﺼﻣ ﺪﻳﺪﺤﺗ
ﺔﺷﺎﺸﻟﺍ ﺕﺎﻣﻮﻠﻌﻣ ﺮﻴﻴﻐﺗ
Page 75

ﻡﺍﺪﺨﺘﺳﻻﺍ ﻞﺒﻗ
ﺕﺍﺮﻳﺬﺤﺘﻟﺍ ﺐﻗﺍﺮﺗﻭ ﺃﺮﻘﺗ ﻥﺍ ﺍﺪﺟ ﻢﻬﻤﻟﺍ ﻦﻣ .ﺞﺘﻨﻤﻟﺍ ﺍﺬﻫ ﻡﺍﺪﺨﺘﺳﺍ ﻞﺒﻗ ﻦﻌﻤﺘﺑ ﻞﻴﻟﺪﻟﺍ ﺍﺬﻫ ﺓﺀﺍﺮﻗ ﻰﺟﺮﻳ ،ﺐﺳﺎﻨﻤﻟﺍ ﻢﻟﺪﺨﺘﺳﻻﺍ ﻥﺎﻤﻀﻟ
.ﻞﺒﻘﺘﺴﻤﻟﺍ ﻲﻓ ﻪﻴﻟﺍ ﻉﻮﺟﺮﻠﻟ ﻝﻮﺻﻮﻟﺍ ﻞﻬﺳﻭ ﻦﻣﺁ ﻥﺎﻜﻣ ﻲﻓ ﻞﻴﻟﺪﻟﺍ ﺍﺬﻬﺑ ﻅﺎﻔﺘﺣﻻﺍ ﻰﺟﺮﻳ
.ﺔﻨﻣﻵﺍ ﺓﺩﺎﻴﻘﻟﺍ ﻦﻋ ﹰﺍﺪﻴﻌﺑ ﻚﻫﺎﺒﺘﻧﺍ ﺏﺬﺠﺗ ﺪﻗ ﺔﻔﻴﻇﻭ ﻱﺃ ﺀﺍﺮﺟﺈﺑ ﻢﻘﺗ ﻻ
.ﻂﻘﻓ ﻦﻴﺘﻋﺎﺳ ﻝﻼﺧ ﺓﺎﻓﻮﻠﻟ ﺏﺎﺼﻤﻟﺍ ﺽﹼﺮﻌﺘﻳ ﻥﺃ ﻦﻜﻤﻤﻟﺍ ﻦﻣﻭ ﺓﺪﻳﺪﺷ ﺔﻴﻠﺧﺍﺩ ﻕﻭﺮﺣ ﻚﻟﺫ ﻦﻋ ﺞﺘﻨﻳ ﺪﻘﻓ ،ﺭﺯ/ﺔﻠﻤﻋ ﺔﺌﻴﻫ ﻰﻠﻋ ﺔﻳﻮﻠﺧ ﺔﻳﺭﺎﻄﺑ ﻉﻼﺘﺑﺍ ﺔﻟﺎﺣ ﻲﻓ
.ﺭﻮﻔﻟﺍ ﻰﻠﻋ ﺔﻴﺒﻄﻟﺍ ﺓﺪﻋﺎﺴﻤﻟﺍ ﺐﻠﻃﺎﻓ ،ﻢﺴﺠﻟﺍ ﺀﺍﺰﺟﺃ ﻦﻣ ﺀﺰﺟ ﻱﺃ ﻲﻓ ﺎﻬﻟﺎﺧﺩﺇ ﻭﺃ ﺎﻬﻋﻼﺘﺑﺍ ﻢﺗ ﺕﺎﻳﺭﺎﻄﺒﻟﺍ ﻥﺃ ﺪﻘﺘﻌﺗ ﺖﻨﻛ ﺍﺫﺇ
.ﺝﺮﺨﻟﺍ ﻯﻮﺘﺴﻣ ﻲﻓ ﺔﺌﺟﺎﻔﻤﻟﺍ ﺓﺩﺎﻳﺰﻟﺍ ﻝﻼﺧ ﻦﻣ ﺕﻮﺼﻟﺍ ﺮﺒﻜﻣ ﺭﺮﺿ ﺐﻨﺠﺘﻟ ﺔﻴﻤﻗﺭ ﺭﺩﺎﺼﻣ ﻱﺃ ﻞﻴﻐﺸﺗ ﻞﺒﻗ ﺕﻮﺼﻟﺍ ﻯﻮﺘﺴﻣ ﺾﻴﻔﺨﺗ
.ﺎﻬﻠﻴﺠﺴﺗ ﻢﺗ ﻲﺘﻟﺍ ﺕﺎﻧﺎﻴﺒﻠﻟ ﺓﺭﺎﺴﺧ ﺔﻳﺃ ﻦﻋ ﺔﻴﻟﻭﺆﺴﻣ ﺔﻳﺃ ﻞﻤﺤﺘﻧ ﻻﺃ ﺐﺠﻳ .ﺎﻬﻟ ﻲﻃﺎﻴﺘﺣﺍ ﺦﺴﻧ ﻞﻤﻋ ﻢﺗ ﺪﻗ ﺔﻣﺎﻬﻟﺍ ﺕﺎﻧﺎﻴﺒﻟﺍ ﻊﻴﻤﺟ ﻥﺃ ﻦﻣ ﺪﻛﺄﺗ
ﺮﻈﺘﻧﺍﻭ ﺔﻧﺍﻮﻄﺳﻷﺍ ﺝﺍﺮﺧﺈﺑ ﻢﻗ ،ﺭﺰﻴﻠﻟﺍ ﺔﺳﺪﻋ ﻰﻠﻋ ﻒﺛﺎﻜﺘﻟﺍ ﺔﻴﻠﻤﻌﻟ ﺔﺠﻴﺘﻧ ﺔﻧﺍﻮﻄﺳﻷﺎﺑ ﺄﻄﺧ ﺙﻭﺪﺣ ﺔﻟﺎﺣ ﻲﻓ :
ﺊﻔﻃﺍ .
(33 )
.ﺊﻓﺎﻜﻣ ﻉﻮﻧ ﻦﻣ ﻭﺃ ﻉﻮﻨﻟﺍ ﺲﻔﻧ ﻦﻣ ﻯﺮﺧﺄﺑ ﺔﻳﺭﺎﻄﺒﻟﺍ ﻝﺪﺒﺘﺳﺍ .ﺢﻴﺤﺻ ﺮﻴﻏ ﻞﻜﺸﺑ ﺎﻬﻟﺍﺪﺒﺘﺳﺍ ﺔﻟﺎﺣ ﻲﻓ ﺭﺎﺠﻔﻧﺍ ﺙﻭﺪﺣ ﻰﻟﺇ ﻡﻮﻴﺜﻴﻟ ﺔﻳﺭﺎﻄﺑ ﻱﺩﺆﺗ ﻥﺃ ﻦﻜﻤﻳ
.ﺭﺎﻴﺘﻟﺍ ﻉﺎﻄﻘﻧﺍ ﺙﻭﺪﺣ ﻊﻨﻤﻟ ﺓﺪﺣﻮﻟﺍ ﻞﺧﺍﺩ (ﺔﻴﻧﺪﻌﻤﻟﺍ ﺕﺍﻭﺩﻷﺍ ﻭﺃ ﺕﻼﻤﻌﻟﺍ ﻞﺜﻣ) ﺔﻴﻧﺪﻌﻣ ﻡﺎﺴﺟﺃ ﻱﺃ ﻙﺮﺘﺗ ﻭﺃ ﻊﻀﺗ ﻻ
ﻻﻮﺻﻮﻣ ﻲﺋﺍﻮﻬﻟﺎﺑ ﻢﻜﺤﺘﻟﺍ ﻚﻠﺳ ﻥﻮﻜﻳ ﺎﻣﺪﻨﻋ ﺯﺎﻬﺠﻟﺍ ﻞﻴﻐﺸﺗ ﺪﻨﻋ ﺎﻴﺋﺎﻘﻠﺗ ﻲﺋﺍﻮﻬﻟﺍ ﺪﻳﺪﻤﺗ ﻢﺘﻴﺳ ،ﺕﺍﺭﺎﻴﺴﻟﺍ ﻉﺍﻮﻧﻷ ﺎﻘﻓﻭ
.ﺾﻔﺨﻨﻣ ﺎﻬﻔﻘﺳ ﺔﻘﻄﻨﻣ ﻲﻓ ﺓﺭﺎﻴﺴﻟﺍ ﻒﺻ ﺪﻨﻋ STANDBY ﺩﺍﺪﻌﺘﺳﻻﺍ ﻊﺿﻭ ﻰﻟﺍ ﺭﺪﺼﻤﻟﺍ ﺮﻴﻴﻐﺘﺑ ﻢﻗ ﻭﺃ ﺯﺎﻬﺠﻟﺍ
.ﻪﺑﺎﺷ ﺎﻣ ﻭﺃ ﺐﻬﻠﻟﺍ ﻭﺃ ﺲﻤﺸﻟﺍ ﺀﻮﺿ ﻞﺜﻣ ﺔﻃﺮﻔﻤﻟﺍ ﺓﺭﺍﺮﺤﻠﻟ ﺕﺎﻳﺭﺎﻄﺒﻟﺍ ﻭﺃ ﺔﻳﺭﺎﻄﺒﻟﺍ ﺓﻮﺒﻋ ﺾﻳﺮﻌﺗ ﻡﺪﻋ ﺐﺠﻳ
. ﺔﻬﺟﺍﻭ ﺔﺣﻮﻟ ﻰﻠﻋ ﺓﺩﻮﺟﻮﻤﻟﺍ ﺭﺍﺭﺯﻷﺍ ﻡﺍﺪﺨﺘﺳﺎﺑ ﻲﺴﻴﺋﺭ ﻞﻜﺸﺑ ﻞﻴﻐﺸﺘﻟﺍ ﺕﺎﻴﻠﻤﻋ ﺢﻴﺿﻮﺗ ﻢﺘﻳ
(6 ) .[FUNCTION] ﺔﻤﺋﺎﻘﻟﺍ ﻦﻣ ﺽﺮﻌﻟﺍ ﺔﻐﻟ ﺭﺎﻴﺘﺧﺍ ﻦﻜﻤﻳ .ﺡﺮﺸﻟﺍ ﺽﺍﺮﻏﻻ ﺔﻳﺰﻴﻠﺠﻧﻻﺍ ﺔﻐﻠﻟﺎﺑ ﺕﺍﺮﺷﺆﻣ ﻡﺍﺪﺨﺘﺳﺍ ﻢﺗ
.ﺭﺯ/ﺔﻠﻤﻋ ﺔﺌﻴﻫ ﻰﻠﻋ ﺔﻳﻮﻠﺧ ﺔﻳﺭﺎﻄﺑ ﻰﻠﻋ ﺞﺘﻨﻤﻟﺍ ﺍﺬﻬﺑ ﺔﻘﻓﺮﻤﻟﺍ ﺪﻌﺑ ﻦﻋ ﻢﻜﺤﺘﻟﺍ ﺓﺪﺣﻭ ﻱﻮﺘﺤﺗ
.ﻝﺎﻔﻃﻷﺍ ﻝﻭﺎﻨﺘﻣ ﻦﻋ ﺍﹰﺪﻴﻌﺑ ﻪﻘﺑﺃﻭ ﺞﺘﻨﻤﻟﺍ ﻡﺍﺪﺨﺘﺳﺍ ﻦﻋ ﻒﹼﻗﻮﺗ ﺬﺋﺪﻨﻋ ،ﻡﺎﻜﺣﺈﺑ ﺔﻳﺭﺎﻄﺒﻟﺍ ﺝﺭﺩ ﻕﻼﻏﺇ ﺭﺬﻌﺗ ﺍﺫﺇ
.ﺙﺩﺍﻮﺤﻟﺍ ﺐﻨﺠﺗ ﻦﻣ ﻦﻜﻤﺘﺗ ﻰﺘﺣ ﺓﺭﺎﻴﺴﻟﺍ ﺝﺭﺎﺧ ﺕﺍﻮﺻﻷﺍ ﻉﺎﻤﺳ ﻚﻟ ﺢﻴﺘﻳ ﺚﻴﺤﺑ ﺕﻮﺼﻟﺍ ﻯﻮﺘﺴﻣ ﻂﺒﺿﺍ
ﺔﻴﺋﺎﻴﻤﻴﻛ ﻕﻭﺮﺤﺑ ﺔﺑﺎﺻﻹﺍ ﺮﻄﺧ ،ﺔﻳﺭﺎﻄﺒﻟﺍ ﻉﻼﺘﺑﺍ ﻝﻭﺎﺤﺗ ﻻ
.ﻝﺎﻔﻃﻷﺍ ﻝﻭﺎﻨﺘﻣ ﻦﻋ ﺍﹰﺪﻴﻌﺑ ﺔﻠﻤﻌﺘﺴﻤﻟﺍﻭ ﺓﺪﻳﺪﺠﻟﺍ ﺕﺎﻳﺭﺎﻄﺒﻟﺎﺑ ﻆﻔﺘﺣﺍ
.ﺔﻨﻣﻵﺍ ﺓﺩﺎﻴﻘﻟﺍ ﻖﻴﻌﻳ ﻥﺍ ﻞﻤﺘﺤﻤﻟﺍ ﻦﻣ ﻥﺎﻛ ﺍﺫﺇ ﻲﺟﺭﺎﺨﻟﺍ ﺯﺎﻬﺠﻟﺍ ﻡﺍﺪﺨﺘﺳﺍ ﺐﻨﺠﺗ
.ﻥﺎﻴﺒﻟﺍﻭ ﺱﺎﻴﻘﻟﺍ ﺓﺰﻬﺟﺃ ﺔﺣﻮﻟ ﻞﺜﻣ ﺔﻨﺧﺎﺳ ﻦﻛﺎﻣﺃ ﻰﻠﻋ ﻢﻜﺤﺘﻟﺍ ﺕﻮﻤﻳﺭ ﻊﻀﺗ ﻻ
.ﺓﺩﺪﺤﻤﻟﺍ ﺔﺤﻔﺼﻟﺍ ﻲﻓ ﺓﺮﻓﻮﺘﻣ ﻊﺟﺍﺮﻤﻟﺍ ﻥﺃ ﻰﻟﺇ ﺮﻴﺸﺗ
.ﻞﻴﻟﺪﻟﺍ ﺍﺬﻫ ﻲﻓ ﺔﻴﻃﺎﻴﺘﺣﻻﺍ ﺕﺎﻬﻴﺒﻨﺘﻟﺍﻭ
ﺮﻳﺬﺤﺗ
ﻪﻴﺒﻨﺗ
:ﺕﻮﺼﻟﺍ ﺩﺍﺪﻋﺇ
ﻲﻠﻳﺩﻮﻤﻟ
.ﺔﺑﻮﻃﺮﻟﺍ ﺮﺨﺒﺘﺗ ﻰﺘﺣ
:(RC-406) ﻢﻜﺤﺘﻟﺍ ﺕﻮﻤﻳﺭ
ﻞﻴﻟﺪﻟﺍ ﺍﺬﻫ ﺃﺮﻘﺗ ﻒﻴﻛ
.ﺓﺩﺪﺤﻤﻟﺍ ﺮﺻﺎﻨﻌﻟﺍ ﻰﻟﺇ ﺮﻴﺸﺗ
[XX]
(XX )
ﻡﺎﻫ
:ﻡﺎﻋ
ﺕﺎﻳﻮﺘﺤﻤﻟﺍ
2 ﻡﺍﺪﺨﺘﺳﻻﺍ ﻞﺒﻗ
•
3 ﺕﺎﹼﻴﹺﺳﺎﺳﹶﺃ
•
4 ﻞﻤﻌﻟﺍ ﻲﻓ ﻉﻭﺮﺸﻟﺍ
ﺔﻴﻠﻤﻋ ﻎﻟﺃﻭ ﺽﺮﻌﻟﺍ ﺔﻐﻟ ﺩﺪﺣ 1
•
•
7 ﻮﻳﺩﺍﺭ
8 AUX
9 ANDROID/iPod/USB/ CD
12 Spotify
•
13 BLUETOOTH®
•
21 ﺕﻮﺼﻟﺍ ﺕﺍﺩﺍﺪﻋﺇ
•
25 ﺔﺷﺎﺸﻟﺍ ﺕﺍﺩﺍﺪﻋﺇ
•
•
•
26
•
27 ﻊﺟﺍﺮﻣ
•
•
29
•
31 ﻞﻴﺻﻮﺘﻟﺍ/ﺐﻴﻛﺮﺘﻟﺍ
•
34 ﺕﺎﻔﺻﺍﻮﻤﻟﺍ
•
•
•
ﺦﻳﺭﺎﺘﻟﺍ ﻭ ﺔﻋﺎﺴﻟﺍ ﻂﺒﺿ 2
ﺔﻴﺋﺪﺒﻤﻟﺍ ﺕﺍﺩﺍﺪﻋﻹﺍ ﻂﺒﺿ 3
ﻦﻋ ﻢﻜﺤﺘﻟﺍ ﺯﺎﻬﺟ ﺔﻓﺮﻌﻣ
ﺓﺩﺎﻴﻘﻟﺍ ﺔﻠﺠﻋ ﻲﻓ ﺪﻌﺑ
ﺕﺎﻣﻮﻠﻌﻤﻟﺍ ﻦﻣ ﺪﻳﺰﻣ
ﻝﺎﻄﻋﻻﺍ ﻦﻋ ﺚﺤﺒﻟﺍ
ﺽﺍﺮﻌﺘﺳﻻﺍ
ﺔﻧﺎﻴﺼﻟﺍ
ﺡﻼﺻﻻﺍﻭ
ﻲﺑﺮﻋ
2
Page 76

DPX-M3100BT
DIN ﻢﺠﺤﺑ ﻲﺋﺎﻨﺛ ﻲﻤﻗﺭ ﻂﺋﺎﺳﻭ ﻞﺒﻘﺘﺴﻣ
ﺕﺎﻤﻴﻠﻌﺘﻟﺍ ﻞﻴﻟﺩ
DPX-5100BT
DIN ﻢﺠﺤﺑ ﺝﻭﺩﺰﻣ CD ﺕﺎﻧﺍﻮﻄﺳﺃ ﻞﻐﺸﻣﻭ ﻮﻳﺩﺍﺭ
ﺕﺎﻤﻴﻠﻌﺘﻟﺍ ﻞﻴﻟﺩ
 Loading...