

Page 1

• Updated information (the latest Instruction Manual, system updates, new functions, etc.) is available from
<http://www.kenwood.com/cs/ce/>.
B5K-0219-00 b (EN)© 2016 JVC KENWOOD Corporation
DNX8160DABS
DNX716WDABS
DNX5160DABS
DNX516DABS
DNX5160BTS
DNX3160BT
GPS NAVIGATION SYSTEM
Quick Start Guide
Page 2
2
Before use
Before use .................................................................................2
About the Quick star t guide ..........................................................................2
How to read this manual ..................................................................................2
Precautions ............................................................................................................... 2
Safety Precautions and Impor tant Information ................................ 4
Initial settings ..........................................................................5
Initial setup ................................................................................................................ 5
Basics .......................................................................................... 6
Functions of the Buttons on the Front Panel .....................................6
Detaching The Front Panel ............................................................................. 7
How to insert an SD Card/ microSD Card .............................................8
Operating with the HOME Screen .............................................................9
Common Operations .......................................................................................10
Navigation .............................................................................. 11
How to Use the Navigation System ........................................................11
DVD/ VCD ................................................................................12
Playing a disc..........................................................................................................12
Playback operations ..........................................................................................13
Video menu operations ..................................................................................13
Discs/ USB/ iPod/ SD/ APP ................................................14
Preparation ..............................................................................................................14
How to Play Music ..............................................................................................15
Playback operations ..........................................................................................15
Apple CarPlay ........................................................................................................16
Android Auto™ ......................................................................................................17
Mirroring Operation ..........................................................................................17
Radio/ Digital Radio ............................................................18
Digital Radio Basic Operation .....................................................................18
Radio Basic Operation......................................................................................19
Bluetooth smartphone ......................................................20
Register your smartphone to the unit .................................................20
Receive a phone call ........................................................................................ 20
Make a phone call ...............................................................................................21
Controlling Audio ................................................................22
Controlling General Audio ...........................................................................22
Equalizer Control ................................................................................................22
Installation ..............................................................................23
Before Installation .............................................................................................. 23
Installing the unit ................................................................................................24
About this Unit ......................................................................29
About the Quick start guide
This Quick Star t Guide describes basic functions of this unit.
For functions not described in this Guide, refer to the
Instruction Manual on the following website:
http://manual.kenwood.com/edition/im391/
To refer to Instruction manual, a PC loaded with Microsoft®
Windows XP/Vista/7/8/10 or Mac OS X® 10.4 or later is required
in addition to Adobe® Reader™ 7.1 or Adobe® Acrobat® 7.1 or
later.
The Instruction manual is subject to change for modification
of specifications and so forth. Be sure to download the latest
edition of the Instruc tion manual for reference.
How to read this manual
• The panels shown in this guide are examples used to
provide clear explanations of the operations. For this
reason, they may be different from the actual panels.
• In this manual, each model name is abbreviated as follows.
– DNX8160DABS:
DNX8
– DNX716WDABS:
DNX7
– DNX5160DABS, DNX516DABS, DNX5160BTS:
DNX5
– DNX3160BT :
DNX3
If above icons are showed, read the article applicable to
the unit you use.
• In operation procedures, bracket shape indicates the key or
button you should control.
< >: indicates the name of panel buttons.
[ ]: indicates the name of touch keys
Precautions
#WARNING
Ñ To prevent injury or re, take the following
precautions:
• To prevent a short circuit, never put or leave any metallic
objects (such as coins or metal tools) inside the unit.
• Do not watch or fix your eyes on the unit’s display when
you are driving for any extended period.
• If you experience problems during installation, consult
your KENWOOD dealer.
Ñ Precautions on using this unit
• When you purchase optional accessories, check with
your KENWOOD dealer to make sure that they work with
your model and in your area.
• You can select language to display menus, audio file
tags, etc. See U ser Interfa ce Setup (P.74) in the
Instruction Manual.
• The Radio Data System or Radio Broadcast Data System
feature won’t work where the ser vice is not supported
by any broadcasting station.
• The unit may not func tion properly if the connectors
between the unit and front panel are dirty. Detach the
front panel and clean the connector with a cotton swab
gently, being careful not to damage the connector.
Ñ Precautions on battery
• Put the remote control in a place where it will not
move during braking or other operations. A dangerous
situation could result, if the remote control falls down
and gets wedged under the pedals while driving.
• Do not leave the battery near fire or under direct
sunlight. A fire, explosion or excessive heat generation
may result.
• Do not recharge, short, break up or heat the battery
or place it in an open fire. Such actions may cause the
battery to leak fluid. If spilled fluid comes in contact with
your eyes or on clothing, immediately rinse with water
Contents
Page 3

3
English |
Before use
and consult a physician.
• Place the battery out of reach of children. In the unlikely
event that a child swallows the battery, immediately
consult a physician.
Ñ Protecting the monitor
• To protect the monitor from damage, do not operate
the monitor using a ballpoint pen or similar tool with
the sharp tip.
Ñ Lens fogging
When you turn on the car heater in cold weather, dew or
condensation may form on the lens in the disc player of
the unit. Called lens fogging, this condensation on the lens
may not allow discs to play. In such a situation, remove the
disc and wait for the condensation to evaporate. If the unit
still does not operate normally after a while, consult your
KENWOOD dealer.
Ñ Precautions on handling discs
• Do not touch the recording surface of the disc.
• Do not stick tape etc. on the disc, or use a disc with tape
stuck on it.
• Do not use disc t ype accessories.
• Clean from the center of the disc and move outward.
• When removing discs from this unit, pull them out
horizontally.
• If the disc center hole or outside rim has burrs, use the
disc only after removing the burrs with a ballpoint pen
etc.
• Discs that are not round cannot be used.
• 8-cm (3 inch) discs cannot be used.
• Discs with coloring on the recording sur face or discs that
are dirty cannot be used.
• This unit can only play the CDs with
.
This unit may not correctly play discs which do not have
the mark.
• You cannot play a disc that has not been finalized. (For
the finalization process see your writing soft ware, and
your recorder instruction manual.)
Ñ Acquiring GPS signal
The first time you turn on this unit, you must wait while
the system acquires satellite signals for the first time.
This process could take up to several minutes. Make sure
your vehicle is outdoors in an open area away from tall
buildings and trees for fastest acquisition.
After the system acquires satellites for the first time, it will
acquire satellites quickly each time thereaf ter.
Ñ About the front panel
DNX8 DNX7
When removing the produc t from the box or installing it,
the front panel may be positioned at the angle shown in
(Fig. 1). This is due to the characteristics of mechanism the
product is equipped with.
When the product is first powered on works properly, the
front panel will automatically move into the position (initial
setting angle) shown in (Fig. 2).
(Fig. 1) (Fig. 2)
Ñ Cleaning the Unit
If the front panel of this unit is stained, wipe it with a
dry sof t cloth such as a silicon cloth. If the front panel is
stained badly, wipe the stain off with a cloth moistened
with neutral cleaner, then wipe it again with a clean soft
dry cloth.
! CAUTION
• Applying spray cleaner directly to the unit may affect its
mechanical parts. Wiping the front panel with a hard cloth
or using a volatile liquid such as thinner or alcohol may
scratch the sur face or erase screened print.
Page 4

4
Before use
Safety Precautions and Important Information
Read this information carefully before starting to operate the
KENWOOD Car Navigation System and follow the instructions
in this manual. Neither KENWOOD nor Garmin shall be liable
for problems or accidents resulting from failure to obser ve
the instructions in this manual.
#WARNING
Failure to avoid the following potentially hazardous
situations could result in an accident or collision resulting
in death or serious injur y.
When navigating, carefully compare information displayed
on the navigation system to all available navigation sources,
including information from street signs, visual sightings,
and maps. For safety, always resolve any discrepancies or
questions before continuing navigation.
Always operate the vehicle in a safe manner.
Do not become distrac ted by the navigation system while
driving, and always be fully aware of all driving conditions.
Minimize the amount of time spent viewing the screen of
the navigation system while driving, and use voice prompts
when possible.
Do not enter destinations, change settings, or access any
functions requiring prolonged use of the navigation system
controls while driving. Stop your vehicle in a safe and legal
manner before attempting such operations.
Keep the system volume at a low enough level to be able to
hear outside noises while driving. If you can no longer hear
outside noises, you may be unable to react adequately to the
traffic situation. This may cause accidents.
The navigation system will not display the correct current
position of the vehicle the first time it is used after purchase,
or if the vehicle battery is disconnected. GPS satellite signals
will soon be received, however, and the correc t position will
be displayed.
Be careful of the ambient temperature. Using the navigation
system at ex treme temperatures can lead to malfunction or
damage. Also note that the unit can be damaged by strong
vibration, by metal objects, or by water getting inside the
unit.
#CAUTION
Failure to avoid the following potentially hazardous
situations may result in injury or propert y damage.
The navigation system is designed to provide you with
route suggestions. It does not reflect road closures or road
conditions, weather conditions, or other factors that may
affect safety or timing while driving.
Use the navigation system only as a navigational aid. Do
not attempt to use the navigation system for any purpose
requiring precise measurement of direction, distance,
location, or topography.
The Global Positioning System (GPS) is operated by the
United States government, which is solely responsible for
its accurac y and maintenance. The government system
is subject to changes that could affect the accuracy and
performance of all GPS equipment, including the navigation
system. Although the navigation system is a precision
navigation device, any navigation device can be misused or
misinterpreted and, therefore, become unsafe.
IMPORTANT INFORMATION
Ñ Vehicle Battery Preservation
This navigation system can be used when the ignition key
is turned to ON or ACC. To preserve the battery, however,
it should be used with the engine running whenever
possible. Using the navigation system for a long time
with the engine switched off can cause the battery to run
down.
Ñ Map Data Information
One of the goals of Garmin is to provide customers with
the most complete and accurate cartography that is
available to us at a reasonable cost. We use a combination
of governmental and private data sources, which we
identify in product literature and copyright messages
displayed to the consumer. Virtually all data sources
contain some inaccurate or incomplete data. In some
countries, complete and accurate map information is
either not available or is prohibitively expensive.
Page 5

5
English |
Initial settings
Various setup screens appear automatically before using.
Initial setup
When you rst turn on the unit, the screen of the
conguration setting will appear.
1 Turn the ignition key of your car to ACC.
The unit is turned on.
Initial SETUP screen appears.
2 Touch the corresponding key and set the value.
Locale
Select the country for the navigation system.
The language, the distance unit, and the gasoline unit are
set.
1) Tou ch [Locale].
2) Select the desired country.
Language
Select the language used for the control screen and setting
items. Default is “British English(en)”. (Instruction Manual
P. 74 )
1) Touch [Language].
2) To uch [Language Select].
3) Select the desired language.
4) To uch [
].
Colour
Set the screen and button illumination color. You can select
whether to perform color scan and adjust scanning color.
(Instruction Manual P.79)
1) Tou ch [Colour].
2) To uch [Panel Colour].
3) Select the desired color.
4) To uch [
] twice.
Camera
Set the parameters for the camera. (Instruction Manual
P. 81 )
1) Touch [Camera].
2) Set each item and touch [
].
DEMO
Set the demonstration mode. Default is “ON”.
1) Touch [DEMO] and set ON or OFF.
3 Touch [Finish].
Page 6
6
BasicsBasics
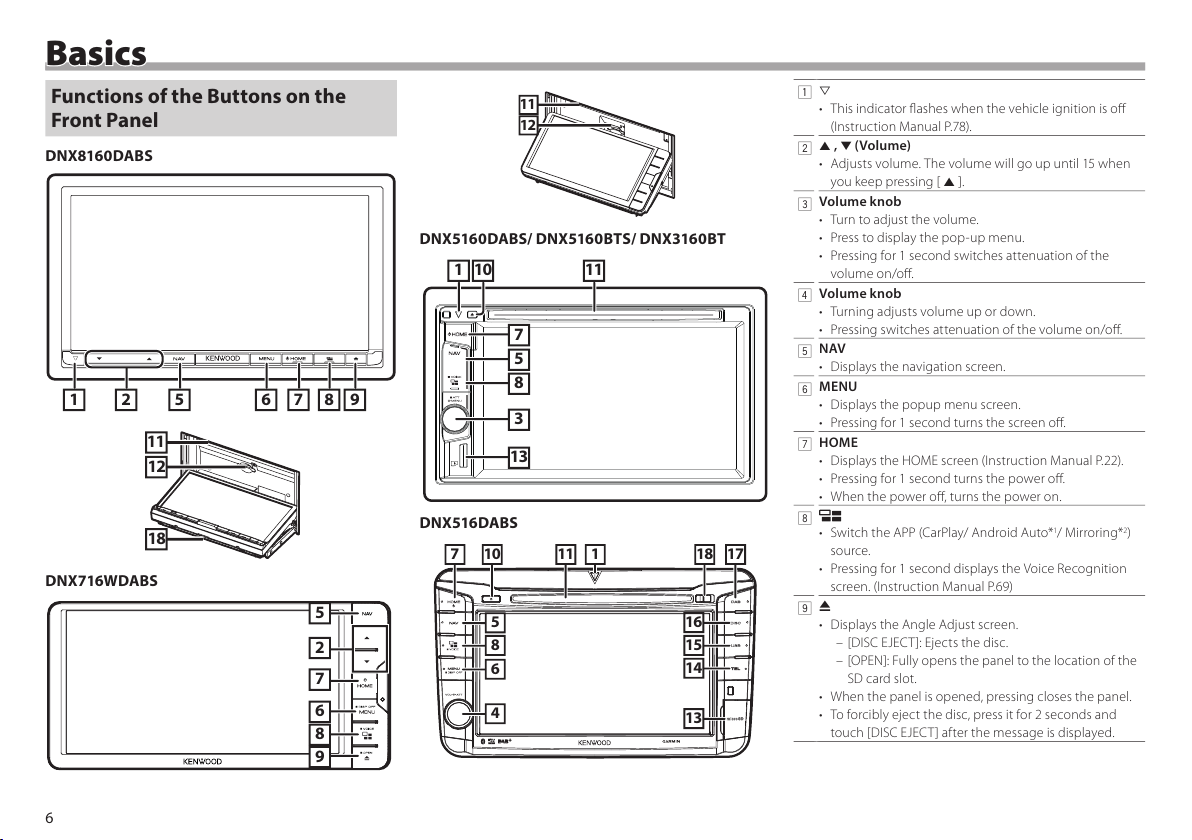
Functions of the Buttons on the Front Panel
DNX8160DABS
1 2 5 6 7 8 9
12
18
11
DNX716WDABS
5
7
6
8
9
2
12
11
DNX5160DABS/ DNX5160BTS/ DNX3160BT
1 10 11
7
5
8
3
13
DNX516DABS
16
5
1718111107
8
6
4
15
14
13
1
s
• This indicator flashes when the vehicle ignition is off
(Instruction Manual P.78).
2
R , S (Volume)
• Adjusts volume. The volume will go up until 15 when
you keep pressing [ R ].
3
Volume knob
• Turn to adjust the volume.
• Press to display the pop-up menu.
• Pressing for 1 second switches attenuation of the
volume on/off.
4
Volume knob
• Turning adjusts volume up or down.
• Pressing switches attenuation of the volume on/off.
5
NAV
• Displays the navigation screen.
6
MENU
• Displays the popup menu screen.
• Pressing for 1 second turns the screen off.
7
HOME
• Displays the HOME screen (Instruction Manual P.22).
• Pressing for 1 second turns the power off.
• When the power off, turns the power on.
8
• Switch the APP (CarPlay/ Android Auto*1/ Mirroring*2)
source.
• Pressing for 1 second displays the Voice Recognition
screen. (Instruction Manual P.69)
9
G
• Displays the Angle Adjust screen.
–[DISC EJECT ]: Ejects the disc.
–[OPEN]: Fully opens the panel to the location of the
SD card slot.
• When the panel is opened, pressing closes the panel.
• To forcibly eject the disc, press it for 2 seconds and
touch [DISC EJECT] after the message is displayed.
Page 7

7
English |
Basics
p
G
• Ejects the disc.
• To forcibly eject the disc, press it for 2 seconds and
touch [Yes] after the message is displayed.
q
Disc insert slot
• A slot to insert a disc media.
w
SD card slot
• A slot to insert an SD card.
See How to i nsert an SD Card / microSD Card
(P.8).
• You can play audio/visual file in the card. *
3
• An SD card slot for upgrading the map. For how to
upgrade the map, refer to the instruction manual of
the navigation system.
e
microSD card slot
• A slot to insert a microSD card.
See How to i nsert an SD Card / microSD Card
(P.8).
• You can play audio/visual file in the card. *
3
(Only for
DNX5160DABS, DNX5160BTS, DNX516DABS)
• A microSD card slot for upgrading the map. For how
to upgrade the map, refer to the instruction manual of
the navigation system.
r
TEL
• Displays the Hands Free screen.
t
USB
• Switches to the USB sources.
y
DISC
• Switches to the disc media sources.
u
DAB
• Switches to the DAB sources.
i
Release key
• Detaches the part of front panel.
*1 DNX8160DABS/ DNX716WDABS/ DNX516DABS only
*2 DNX8160DABS/ DNX716WDABS only
*3 If the map update le remains in the SD card, you cannot
play audio/visual le.
Detaching The Front Panel
You can detach the front panel to prevent theft.
DNX8160DABS
1 Press <G> button.
2 Touch [OPEN] to the panel fully opens.
3 Detach the panel as the diagrams below.
4
2
3
1
✎ NOTE
• The attaching plate closes automatically in about 10
seconds af ter the front panel is released. Remove the panel
before this happens.
Ñ Attaching the front panel
1 Hold the panel securely so as not to drop it
accidentally, and t it onto the attaching plate
until it is rmly locked.
1
1
2
DNX516DABS
1 Slide the Release key rightward to detach the
part of the front panel.
Ñ Attaching the front panel
1 Hold the panel securely so as not to drop it
accidentally, and t it onto the attaching plate
until it is rmly locked.
2
1
Page 8
8
Basics
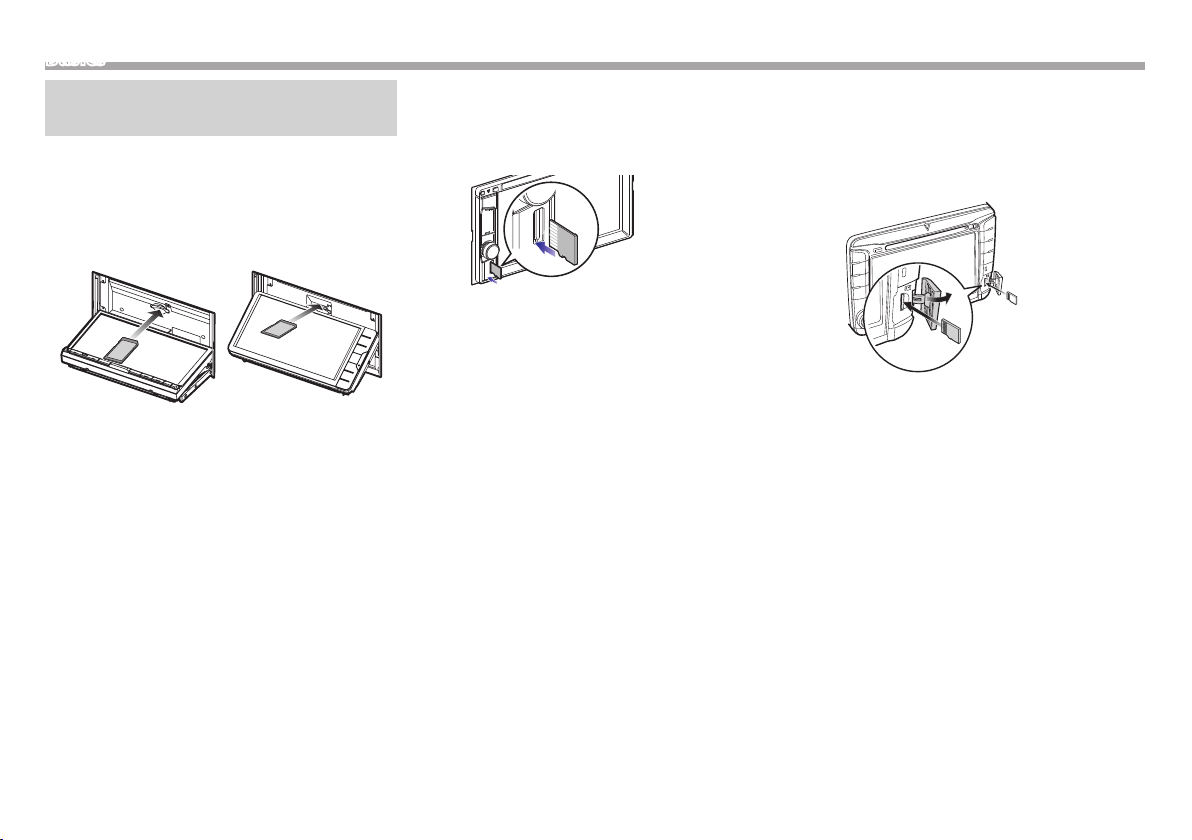
How to insert an SD Card/ microSD Card
DNX8160DABS/ DNX716WDABS
1 Press <G> button.
2 Touch [OPEN] to the panel fully opens.
3 Hold the SD card with the label facing up, and
insert it into the slot until it clicks.
The unit reads the card and playback star ts.
4 Press <G> button.
Ñ Eject an SD Card
1 Press <G> button.
2 Touch [OPEN] to the panel fully opens.
3 Push the SD card until it clicks and then remove
your finger from the card. The card pops up so
that you can pull it out with your fingers.
4 Press <G> button.
DNX5160DABS/ DNX5160BTS/ DNX3160BT
1 Hold the microSD card with the label side
facing right and the notched section down, and
insert it into the slot until it clicks.
✎ NOTE
• A dummy microSD card is inser ted as the slot cover.
Remove it before using and keep it in an appropriate place.
Ñ Eject a microSD Card
1 Push the microSD card until it clicks and then
remove your nger from the card. The card
pops up so that you can pull it out with your
ngers.
DNX516DABS
1 Open the microSD card slot cover.
2 Hold the microSD card with the label side
facing right and the notched section down, and
insert it into the slot until it clicks.
✎ NOTE
• A dummy microSD card is inser ted as the slot cover.
Remove it before using and keep it in an appropriate place.
Ñ Eject a microSD Card
1 Open the microSD card slot cover.
2 Push the microSD card until it clicks and then
remove your finger from the card. The card
pops up so that you can pull it out with your
fingers.
Page 9
9
English |
Basics
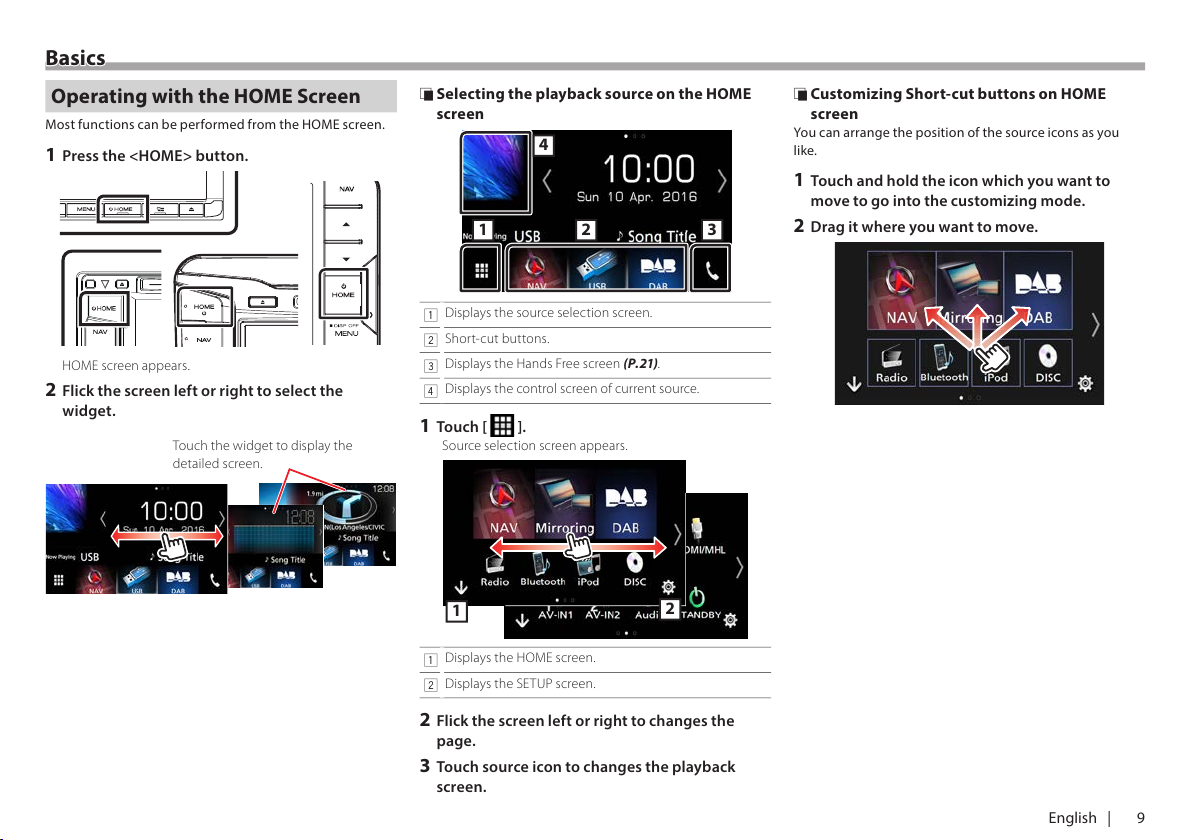
Operating with the HOME Screen
Most func tions can be performed from the HOME screen.
1 Press the <HOME> button.
HOME screen appears.
2 Flick the screen left or right to select the
widget.
Touch the widget to display the
detailed screen.
Ñ Selecting the playback source on the HOME
screen
123
4
1
Displays the source selection screen.
2
Short-cut buttons.
3
Displays the Hands Free screen (P.21).
4
Displays the control screen of current source.
1 Touch [ ].
Source selec tion screen appears.
1
2
1
Displays the HOME screen.
2
Displays the SETUP screen.
2 Flick the screen left or right to changes the
page.
3 Touch source icon to changes the playback
screen.
Ñ Customizing Short-cut buttons on HOME
screen
You can arrange the position of the source icons as you
like.
1 Touch and hold the icon which you want to
move to go into the customizing mode.
2 Drag it where you want to move.
Page 10

10
Basics
Common Operations
Ñ Popup menu
1 Press the
DNX8 DNX7
<MENU> button/
DNX6
DNX5
Volume knob.
Touch to display the popup menu. The contents of the menu
are as follows.
: Displays the Screen Adjustment screen.
: Turns the display off.
: Displays the view camera.
: Displays the SE TUP Menu screen.
: Displays the Audio Control Menu screen.
: Displays the control screen of current source. Icon
feature differs depending on the source.
Ñ Source control screen descriptions
There are some functions which can be operated from
most screens.
4
5
3
1
2
Indicators
Navigation information
Short-cut buttons
1
Connected Bluetooth device information.
: Lights up when quick charging battery of the
connected iPod/ iPhone/ Smartphone.
2
Displays the function panel (other operation button
window).
3
Displays the source selection screen.
4
[<] [>] : The Secondar y screen changes every time you
touch it.
• Indicators: Displays the current source condition and
so on.
• Navigation information: Displays the current
location and the direction. The screen changes to the
navigation screen when you touch here.
• Short-cut buttons: The source changes to the one you
have set as a short-cut. For the short-cut setting, refer
to Customi zing Short- cut buttons on H OME screen
(P.9).
5
Touch to display the Hands Free screen. (P.21)
Ñ List screen
There are some common function keys in the list screens of
most sources.
5
4
1
2
3
1
Returns to previous screen.
2
: Displays music/movie file list.
3
Scrolls the displayed text.
4
Keys with various functions are displayed here.
: Plays all track s in the folder containing the
current track .
: Jump to the letter you entered (alphabet search).
: Moves to the upper hierarchy.
5
You can change the page to display more items by
pressing [
]/[ ].
[
]/[ ] : Displays the top or bottom page.
Ñ Flick scrolling
You can scroll the list screen by icking the screen up/
down.
Page 11

11
English |
NavigationNavigation
How to Use the Navigation System
1 Press the <NAV> button to display the
navigation screen.
2 Operate the desired function from the Main
Menu screen.
1
2
3
4
5
1
GPS satellite strength.
2
Finds a destination.
3
Views the map.
4
Uses the Apps such as ecoRoute and Help.
5
Adjusts the settings.
✎ NOTE
• You can get additional information about using the
navigation system from Help. To display Help, touch [Apps]
and then touch [Help].
• For more information about your navigation system,
download the latest version of the Owner’s Manual from
http://manual.kenwood.com/edition/im391/
3 Enter your destination and start the guidance.
Finding points of interest
1) Touch [Where To?].
2) Select a categor y and a subcategory.
3) Select a destination.
4) To uch [Go!].
✎ NOTE
• To enter letters contained in the name, touch the Search
bar and enter the letters.
4 Follow your route to the destination.
✎ NOTICE
• The speed limit icon feature is for information only and
does not replace the driver’s responsibility to abide by all
posted speed limit signs and to use safe driving judgment
at all times. Garmin and JVC KENWOOD will not be
responsible for any traffic fines or citations that you may
receive for failing to follow all applicable traffic laws and
signs.
Your route is marked with a magenta line. As you travel,
your navigation system guides you to your destination
with voice prompts, arrows on the map, and directions at
the top of the map. If you depart from the original route,
your navigation system recalculates the route.
1
234
5
678
9
1
Views the Next Turn page or the junction view page,
when available.
2
Views the Turn List page.
3
Views the Where Am I? page.
4
Stops the currents route.
5
Displays traffic information on the route.
6
Returns to the Main menu.
7
Displays a different data field.
8
Views the Trip Computer.
9
Displays more options.
✎ NOTE
• Touch and drag the map to view a different area of the map.
• A speed limit icon could appear as you travel on major
roadways.
Adding a stop
1) While navigating a route, touch [ ] and then touch
[Where To?].
2) Search for the extra stop.
3) To uch [Go!].
4) To uch [Add to Active Route] to add this stop before
your final destination.
Taking a detour
1) While navigating a route, touch [ ].
2) To uch [
].
Ñ Other Features
Manually avoiding trac on your route
1) From the map, touch [ ].
2) To uch [Traffic On Route].
3) If necessary, touch the arrows to view other traffi c
delays on your route.
4) To uch [
] > [Avoid].
Viewing the trac map
1) The traffic map shows color-coded traffic flow and
delays on nearby.
Page 12

12
DVD/ VCDNavigation
About trac
✎ NOTICE
• Traffic service is not available in some areas or countries.
• Garmin and JVC KENWOOD are not responsible for the
accuracy or timeliness of the traffic information.
• You can receive INRIX traffic information and weather
forecast by connecting your iPhone or Android
smartphone in which the “KENWOOD Traffic Powered
By INRIX” application is installed.
For details, see “KENWOOD Traffic Powered By INRIX”
application.
• With an FM traffic receiver, the navigation system
can receive and use traffic information. The FM
TMC subscription activates automatically after your
navigation system acquires satellite signals while
receiving traffic signals from the service provider. Go to
www.garmin.com/kenwood for more information.
• While receiving INRIX traffic information, FM TMC
information is not displayed.
Updating the software
To update the navigation system soft ware, you must
have an SD card, a USB mass storage device and an
internet connection.
1) Go to www.garmin.com/kenwood.
2) Select Update.
3) Follow the on-screen instructions.
Updating maps
You can purchase updated map data from Garmin
or ask your KENWOOD dealer or KENWOOD service
center for details.
1) Go to www.garmin.com/kenwood.
2) Select Update.
3) Follow the on-screen instructions.
DVD/ VCD
Playing a disc
Ñ Inserting a disc
DNX8 DNX7
1 Press the <G> button.
2 Touch [DISC EJECT] to open the front panel.
3 Insert the disc into the slot.
The panel closes automatically and playback starts.
DNX5 DNX3
1 Insert the disc into the slot.
Playback starts.
Ñ Ejecting a disc
DNX8 DNX7
1) Press the <G> but ton.
2) To uch [DISC EJECT ] to open the front panel. When
removing a disc, pull it horizontally.
3) Press the <G> button.
DNX5 DNX3
1) Press the <G> but ton.
Page 13

13
English |
DVD/ VCD
Playback operations
Ñ Video screen
1
1
2
1
Searches the next/previous content.
2
Displays the Source Control screen.
Ñ Control screen
1 Touch 2 area on the video screen.
321
1
Hides the control screen.
2
L : Plays or pauses.
E F : Searches the previous/next content.
Press and hold to fast forward or fast
backward. (It will be cancelled automatically
after about 50 seconds.)
3
/ : Repeats the current content.
✎ NOTE
• The control screen disappears when no operation is done
for 5 seconds.
Ñ Function panel
1 Touch on the left side of the screen.
I
Stops playing.
<< >>
Fast forward or fast back ward. Each time you touch
the key, the speed changes; 2 times, 8 times.
<| |>
Plays in slow motion forward or backward. (DVD
only)
SETUP
Touch to display the DVD SETUP screen. (DVD only)
MENU
CTRL
Touch to display the DVD-VIDEO disc manu control
screen. (DVD only)
PBC
Turn Playback control (PBC) on or off. (VCD only)
Audio
Change the audio output channel. (VCD only)
✎ NOTE
• For other operations, refer to the Instruc tion Manual.
Video menu operations
1 Touch on the left side of the screen.
Touch [MENU CTRL].
2 Perform desired operation as follows.
[TOP] *
Displays the top menu
[MENU] *
Displays the menu
[Return] *
Displays the previous menu
[Enter]
Enters selected item
[Highlight]
Enables direct operation
The menu screen disappears when no operation
is done for 5 seconds.
[R], [S],
[C], [D]
Moves the cursor
[Subtitle]
Switches the subtitle language
[Audi o]
Switches the audio language
[Angle]
Switches the pic ture angle
* These keys may not function depending on the disc.
Page 14

14
Discs/ USB/ iPod/ SD/ APP
Preparation
✎ NOTE
• For details about connecting Android. (P.29)
• For details about connecting iPod/iPhone. (P.28)
• Do not leave the cable or the adapter made by other
makers inside the car. It might lead the malfunction caused
by heat.
Ñ Connecting Android
To connect the Android device with this unit, the cable
(sold separately) and the prole which your Android device
supports are necessary as follows:
To Android Auto source
‒ Android version 5.0 (Lollipop) or later
‒ Micro USB to USB cable
‒ Automotive Mirroring: ON
‒
DNX8 DNX7
DNX516DABS only
To listen to music and watch video of Mirroring
source
‒ MHL or HDMI device
‒ KCA-MH100 (MHL) or KCA-HD100 (HDMI)
‒ Automotive Mirroring: OFF
‒
DNX8 DNX7
only
To listen to music of Bluetooth Audio source
‒ Bluetooth Connection: Audio(A2DP)/App(SPP)
Ñ Connecting iPod/iPhone
To connect the iPod/iPhone with this unit, the cable,
adapter (both sold separately), and the prole which your
iPod/iPhone supports are necessar y as follows:
To Apple CarPlay source
‒ KCA-iP103
‒ Automotive Mirroring: ON
To listen music and watch video with Lightning
connector device
‒ Lightning Digital AV Adapter
‒ KCA-HD100
‒ KCA-iP103
‒ Automotive Mirroring: OFF
‒ APP Connection select: iPhone Bluetooth, HDMI/MHL
‒ Bluetooth Connec tion: Audio(A2DP)/App(SPP)
‒
DNX8 DNX7
only
To listen music with Lightning connector device
‒ KCA-iP103
‒ Automotive Mirroring: OFF
‒ APP Connection select: iPhone USB
To listen music with 30-pin connector device
‒ KCA-iP102
‒ Automotive Mirroring: OFF
‒ APP Connection select: iPhone USB
To listen to music via Bluetooth
‒ Automotive Mirroring: OFF
‒ APP Connection select: iPhone Bluetooth
‒ Bluetooth Connec tion: Audio(A2DP)/App(SPP)
Ñ Selecting the Android/ iPod/ iPhone device to
play and connection method
✎ NOTE
• To connect an Android device or iPhone via Bluetooth,
register it as the Bluetooth device and do the profile setting
of the connec tion beforehand. (P.20)
1 Press the
DNX8 DNX7
<MENU> button/
DNX5 DNX3
Volume knob.
2 Touch [SETUP].
3 Touch [AV].
4 Set [Automotive Mirroring] to [OFF].
5 Touch [APP/iPod SETUP].
6 Set each item as follows.
APP Connection select
Select how to connect your smartphone.
Android Bluetooth: Connect an Android smartphone via
Bluetooth.
iPhone Bluetooth: Connect an iPhone via Bluetooth.
HDMI/MHL: Connect an Android smartphone or iPhone via
Bluetooth and watch its video via HDMI/MHL. (
DNX8
DNX7
only)
iPhone USB: Connect an iPhone through an USB cable.
iPod Connection
It shows how the device that is used in the iPod source is
connected. It changes depending on the “APP Connection
select”.
7 Touch [Done].
Page 15

15
English |
Discs/ USB/ iPod/ SD/ APP
How to Play Music
You can play audio les from music CD, disc media, USB
storage device, SD Card and iPod.
✎ NOTE
• For details on playable file format, media format, iPod
model, etc., refer to the Instruction Manual.
Ñ Connecting iPod/iPhone
1) Connect the iPod/iPhone.
2) Press the <HOME> button.
3) To uch [
].
4) To uch [iPod].
✎ NOTE
• For the details of the necessary cable and adapter to
connect with iPod/iPhone, refer to “Connecting iPod/
iPhone” (P.14).
Ñ To disconnect the iPod/iPhone connected
with the cable:
Detach the iPod/iPhone.
Ñ Connecting a USB device
1) Connect the USB device with the USB cable.
2) Press the <HOME> button.
3) To uch [
].
4) To uch [USB].
Ñ To disconnect the USB device:
1) Press the <HOME> button.
2) To uch a source other than [USB].
3) Detach the USB device.
Ñ Inserting a disc
• To insert CD or DVD, refer to “Inserting a disc” (P.12).
Ñ SD card/ microSD card
• To insert SD card or microSD card, refer to “How to insert
an SD Card/ microSD Card” (P.8).
Playback operations
Ñ Control the music you are listening to on the
source control screen.
2
1
1
L : Plays or pauses.
E F : Searches the previous/next content.
Press and hold to fast forward or fast
backward. (It will be cancelled automatically
after about 50 seconds.)
1 : Searches track /file. (Disc media, iPod, USB device,
and SD card only)
2
/ : Repeats the current content.
9 : Plays all contents in random order.
Ñ Function panel
1 Touch on the left side of the screen.
Searches previous/next folder. (disc media, USB
device, and SD only)
USB
DEVICE
CHANGE
Switches to another USB device when two USB
devices are connected. (Only for USB device of
DNX8 DNX7 DNX5
)
Ñ Video screen
1
1
2
1
Searches the next/previous content.
2
Displays the Source Control screen.
✎ NOTE
• For other operations, refer to the Instruc tion Manual.
Page 16

16
Discs/ USB/ iPod/ SD/ APP
Ñ List search
1) Touch on the right side of the screen. The content list of
the media being played is displayed.
Rened search
1) Touch [1].
2) To uch [ S ].
3) To uch the desired refinement method.
The list is refined by the item you selected.
4) Select whether you search by audio files or video
files
.
5) Touch the desired item.
✎ NOTE
• For details on searching operations, refer to S earch
Opera tion (P.40) in the Instruction Manual.
Apple CarPlay
CarPlay is a smar ter, safer way to use your iPhone in the car.
CarPlay takes the things you want to do with iPhone while
driving and displays them on the screen of the product.
You can get directions, make calls, send and receive
messages, and listen to the music from iPhone while
driving. You can also use Siri voice control to make it easier
to operate iPhone.
For details about CarPlay, visit https: //ssl.apple.com/ios/
carplay/.
Ñ Preparation
1) Press the
DNX8 DNX7
<MENU> button/
DNX5
DNX3
Volume knob.
2) To uch [SETUP].
3) To uch [AV].
4) Set each item as follows.
• Automotive Mirroring : Select “ON” to use Apple
CarPlay.
• CarPlay Sidebar : Select the position of the control bar
(left or right) shown on the touch panel. “Left ” (Default)/
“Right”
5) Connec t iPhone using KCA-iP103. (P.28)
When iPhone compatible with CarPlay is connected to
the iPod terminal, the Bluetooth smartphone currently
connected is disconnec ted.
6) Unlock your iPhone.
Ñ Operation buttons and available Apps on the
home screen of CarPlay
You can use the Apps of the connec ted iPhone.
The items displayed and the language used on the screen
dier among the connected devices.
1) Press the <HOME> button.
2) To uch [
].
3) To uch [Apple CarPlay].
2
3
1
1
• On the App screen: Displays the home screen of
CarPlay.
• On the home screen of CarPlay: Touch and hold to
activates Siri.
2
Starts the application.
3
Exits the CarPlay screen and displays the Home screen.
To exit the CarPlay screen
1) Press the <HOME> button.
Ñ Using Siri
You can activate Siri.
1) Press the <
> button for 1 second.
2) Ta lk to Siri.
To deactivate
1) Press the < > button.
Page 17

17
English |
Discs/ USB/ iPod/ SD/ APP
Android Auto™
DNX516DABS
Android Auto enables you to use functions of your Android
device convenient for driving. You can easily access
route guidance, make calls, listen to music, and access
convenient functions on the Android device while driving.
For details about Android Auto, visit https://www.android.
com/auto/ and https://support.google.com/androidauto.
Ñ Preparation
Set [Automotive Mirroring] to [ON]. (P.16)
1) Connect an Android device via iPod/iPhone terminal.
(P.29)
To use the hands-free function, connect the Android
device via Bluetooth.
When an Android device compatible with Android Auto
is connected to the iPod/iPhone terminal, the device is
connected via Bluetooth automatically, and the Bluetooth
smartphone currently connected is disconnec ted.
2) Unlock your Android device.
Ñ Operation buttons and available Apps on the
Android Auto screen
You can perform the operations of the Apps of the
connected Android device.
The items displayed on the screen dier among the
connected Android devices.
1) Press the <HOME> button.
2) To uch [
].
3) To uch [Android Auto].
1
1
Starts the application or displays information.
To exit the Android Auto screen
1) Press the <HOME> button.
Ñ Using voice control
1) Press the < > button for 1 second.
To cancel
1) Press the < > button.
Mirroring Operation
You can listen to music or watch video from the Mirroring
operating on Android.
Ñ Preparation
• Set [Automotive Mirroring] to [OFF]. (P.16)
• The unit and the Android device are connected with MHL
(KCA-MH100 ; sold separately) or HDMI (KCA-HD100 ; sold
separately) and over Bluetooth profile HID and SPP.
Ñ Operation
1) Press the <HOME> button.
2) To uch [
].
3) To uch [Mirroring].
Page 18

18
Radio/ Digital Radio
Digital Radio Basic Operation
(DNX8160DABS/ DNX716WDABS/
DNX5160DABS/ DNX516DABS)
1) Press the <HOME> button.
2) To uch [
].
3) To uch [DAB].
4
3
2
6
5
1
1
Switches the seek mode in the following sequence;
[AUTO1], [AUTO2], [MANUAL].
• AUTO1: Tunes in a ensemble with good reception
automatically.
• AUTO2: Tunes in ensemble in memory one after
another.
• MANUAL: Switches to the next ensemble manually.
2
Displays the information of the current station.
Touching [
] allows you to switch between Content
A, Content B and Content C.
3
The picture data is displayed if available from current
content.
Touch to switch between the Control and Information
screen.
4
E F : Tunes in a ensemble, service, and component.
The seek mode switching can be changed.
1 : Displays the Service List screen.
5
Recalls the memorized service.. When touched for 2
seconds, stores the current receiving ser vice. in memory.
6
Displays the received signal strength.
Ñ Function panel
1) Touch on the left side of the screen.
TI
Sets the traffic information mode on.
SETUP
Displays the DAB SETUP screen.
Instant
Replay
Change the Replay mode. (Live mode only)
Live
Change the Live mode. (Replay mode only)
PTY
Searches a program by setting program type.
DLS
Display the Dynamic Label Segment screen.
Ñ Recalling the preset service
1) Touch [P#] (#:1-15).
Ñ Service search
1) Touch [1].
2) Select the desired content from the list.
• [
] : Touch and hold to find the latest service list.
• [1A-Z] : Displays the keyboard screen. Jump to the letter
you entered (alphabet search).
Ñ Replay
You can replay last 30 minutes of current station.
1) Touch [Instant Replay] on the func tion panel.
3
3
L : Plays or pauses.
E F : Forward/backward 15 seconds when touch it.
A B : Fast for ward/fast backward when keep on
touching. (It will be cancelled automatically
after about 50 seconds.)
✎ NOTE
• For other operations, see Digit al Radio Bas ic Operatio n
(P.50) in the Instruction Manual.
Page 19

19
English |
Radio/ Digital Radio
Radio Basic Operation
1) Press the <HOME> button.
2) To uch [
].
3) To uch [Radio].
4
3
2
5
1
1
Switches the seek mode in the following sequence;
[AUTO1], [AUTO2], [MANUAL].
• AUTO1: Tunes in a station with good reception
automatically.
• AUTO2: Tunes in stations in memory one after another.
• MANUAL: Switches to the next frequenc y manually.
2
Displays the information of the current station.
Touching [
] allows you to switch between Content
A and Content B.
3
FM AM : Switches the band.
4
E F : Tunes in a station. The method of frequency
switching can b e changed.
5
Recalls the memorized station. When touched for 2
seconds, stores the current receiving station in memory.
Ñ Function panel
1) Touch on the left side of the screen.
TI *
1
Sets the traffic information mode on.
SETUP
Touch to display the Radio SETUP screen.
AME
Presets stations automatically.
PTY *
1
Searches a program by setting program type.
MONO *
1
Select the Monaural reception.
LO.S *
1
Turns the Local Seek function on or off.
• *1 FM Tuner only
Ñ Auto memory
1) Touch [AM] or [FM] to select the band.
2) To uch on the left side of the screen to display the
function panel.
3) To uch [AME].
4) To uch [Yes].
Auto memory starts.
Ñ Recalling the preset station
1) Touch [FM#] (#:1-15) or [AM#] (#:1-5).
Ñ Search by program type
1) Touch [PTY ] on the function panel.
2) Select a program t ype from the list.
3) To uch [Search].
✎ NOTE
• For other operations, see Radio B asic Operat ion (P.48) in
the Instruction Manual.
Page 20

20
Bluetooth smartphoneBluetooth smartphone
You can use your Bluetooth smar tphone when paired to
this unit.
Register your smartphone to the unit
Follow as the procedures shown below. For detailed
operation, see Re gistering fr om the Bluetoot h unit
(P.61) in the Instruc tion Manual.
1 Search the unit (“DNX****”) from your
smartphone/cell-phone.
2 · Confirm the request both on the smartphone/
cell-phone and the unit.
· Input the PIN code in your smartphone/cell-
phone.
PIN code is set to “00 00” as the default.
3 Select the hands-free number to connect.
A name of a smartphone is displayed when it has hands-
free connection with the unit.
4 Select if you want to use the audio player app
in your smartphone over A2DP, and the other
apps in your smartphone over SPP.
5 Select if you want to transfer your phonebook
data.
The phonebook data transmission starts.
Some smartphones may request permission to access
the data. The data transmission will star t with your
permission.
When the data transmission and connection have
completed, the Bluetooth connection icon appears on
the screen.
Receive a phone call
1 Touch [Û].
• [Ý] : Reject an incoming call.
Ñ Operations during a call
Ý
Ending a call
Mute or not mute your voice.
DTMF
You can send tones by touching desired keys on
the screen.
Switches the speaking voice output between
cell-phone and speaker.
Page 21

21
English |
Bluetooth smartphone
Speech
Quality
• Microphone Level: Adjust the microphone
volume
• Echo Cancel Level: Adjusts the level of echo
cancellation.
• Noise Reduction Level: Reduces the noises
generated by surrounding environment
without changing the microphone volume. Use
this setting when the voice of caller is not clear.
×
The Hands-Free popup screen is closed. To
display it again, touch [
].
Adjust the receiver volume
DNX8 DNX7
Press the <S> or <R> button.
DNX5 DNX3
Turn the volume knob.
Make a phone call
1 Touch [Û].
2 Select the device to use.
3 See the table below for each operation method.
Call by entering a phone number
1) Touch [
].
2) Enter a phone number with number keys.
3) To uch [Û].
Call using call re cords
1) Touch [
].
2) Select the phone number from the list.
Call using the phonebook
1) Touch [ ].
2) To uch [
].
3) Select the initial to sort the list in the alphabetical order.
4) Selec t the name from the list.
5) Select the number from the list.
Call using the preset number
1) Touch [
].
2) To uch the Name or phone number.
Call by voice
You can make a voice call using the voice recognition
function of the cell-phone.
1) Touch [
].
2) Pronounce the name registered in the cell-phone.
Ñ Phone number preset
You can register frequently used phone numbers to this
unit.
1) Touch [
].
2) To uch [Edit].
3) Select where to preset.
4) Selec t how to preset.
• [Add number from phonebook]:
Select the number to preset by referring to “Call using
the phonebook”.
• [Add number direct]:
Enter the telephone number directly and touch [SET].
✎ NOTE
• For detailed operation, see Usi ng Hands-Fr ee Unit (P.66)
in the Instruction Manual.
Page 22

22
Controlling Audio
1 Press the
DNX8 DNX7
<MENU> button/
DNX5 DNX3
Volume knob.
2 Touch [Audio].
Audio screen appears.
✎ NOTE
• For detailed operation, see Cont rolling Aud io (P.84) in the
Instruc tion Manual.
Controlling General Audio
1 Touch [Fader / Balance] on the Audio screen.
2 Set each item as follows.
[C] [D]
Adjust the right and left volume balance.
[R] [S]
Adjust the front and rear volume balance.
Equalizer Control
1 Touch [Equalizer] on the Audio screen.
2 Touch the screen and set the Graphic Equalizer
as desired.
Gain leve l (boxed area)
Adjust the gain level by touching the each frequency bar.
You can select frequency bar and adjust its level by [R], [S].
Preset Selec t
Displays the screen to recall the preset equalizer curve.
Memory
Saves the adjusted equalizer curve to “User1” to “User4”.
Initialize
The current EQ curve returns to flat.
ALL SRC
Apply the adjusted equalizer to all sources. Touch [ALL SRC]
and then touch [OK ] on the confirmation screen.
Bass EX T (Bass Extend S ettings)
When turned on, the frequency lower than 62.5 Hz is set to
the same gain level as 62.5 Hz.
SW Level
Adjusts the subwoofer volume.
Ñ Recall the EQ curve
1) Touch [Preset Select].
2) Select EQ curve.
✎ NOTE
• [iPod] is available only during iPod source.
Ñ Save the EQ curve
1) Adjust the EQ curve.
2) To uch [Memory].
3) Select where to save.
Controlling Audio
Page 23

23
English |
InstallationInstallation
Before Installation
Before installation of this unit, please note the following
precautions.
#WARNING S
• If you connect the ignition wire (red) and the batter y wire
(yellow) to the car chassis (ground), you may cause a short
circuit, that in turn may start a fire. Always connect those
wires to the power source running through the fuse box.
• Do not cut out the fuse from the ignition wire (red) and the
battery wire (yellow). The power supply must be connected
to the wires via the fuse.
#CAUTION
• Install this unit in the console of your vehicle.
Do not touch the metal part of this unit during and shor tly
after the use of the unit. Metal part such as the heat sink
and enclosure become hot.
✎ NOTE
• Mounting and wiring this product requires skills and
experience. For best safety, leave the mounting and wiring
work to professionals.
• Make sure to ground the unit to a negative 12V DC power
supply.
• Do not install the unit in a spot exposed to direc t sunlight or
excessive heat or humidity. Also avoid places with too much
dust or the possibilit y of water splashing.
• Do not use your own screws. Use only the screws provided. If
you use the wrong screws, you could damage the unit.
• If the power is not turned ON (“There is an error in the speaker
wiring. Please check the connections.” is displayed), the
speaker wire may have a short-circuit or touched the chassis
of the vehicle and the protec tion function may have been
activated. Therefore, the speaker wire should b e checked.
•
If y
our car’s ignition does not have an ACC position, connect
the ignition wires to a power source that can be turned on
and off with the ignition key. If you connect the ignition wire
to a power source with a constant voltage supply, such as with
batter y wires, the battery may be drained.
•
If t
he console has a lid, make sure to install the unit so that the
front panel will not hit the lid when closing and opening.
• If the fuse blows, firs t make sure the wires aren’t touching to
cause a shor t circuit, then replace the old fuse with one with
the same rating.
• Insulate unconnected wires with vinyl tape or other similar
material. To prevent a short circuit, do not remove the caps on
the ends of the unconnec ted wires or the terminals.
• Connec t the speaker wires correc tly to the terminals to which
they correspond. The unit may be damaged or fail to work if
you share the ¤ wires or ground them to any metal part in
the car.
• When only two speakers are being conne cted to the system,
connect the connec tors either to both the front output
terminals or to both the rear output terminals (do not mix front
and rear). For example, if you connect the ¢ connector of the
left speaker to a front output terminal, do not connect the ¤
connector to a rear output terminal.
•
Af
ter the unit is installed, check whether the brake lamps,
blinkers, wipers, etc. on the car are working prop erly.
• Mount the unit so that the mounting angle is 30° or less.
• This unit has the cooling fan to decrease the internal
temperature. Do not mount the unit in a place where the
cooling fan of the unit is blocked. Blocking these openings
will inhibit the cooling of the internal temp erature and result
in malfunc tion.
Cooling fan
• Do not press hard on the panel surface when installing the unit
to the vehicle. Otherwise scars, damage, or failure may result.
• Reception may drop if there are metal objects near the
Bluetooth antenna.
Bluetooth antenna unit
DNX8160DABS DNX716WDABS DNX516DABS
DNX5160DABS/
DNX5160BTS/
DNX3160BT
Ñ Supplied accessories for installation
1
x1
2
[1]
(1 m)
[2]
x1
3
(3 m)
x1
4
[3]
x2
5
[3]
x1
6
(3.5 m)
x1
7
x1
8
[4]
x1
[1]
DNX8160DABS, DNX716WDABS, DNX5160DABS,
DNX516DABS, DNX5160BTS only
[2]
DNX3160BT only
[3]
DNX8160DABS, DNX5160DABS, DNX5160BTS, DNX3160BT
only
[4]
DNX8160DABS only
Page 24

24
Installation
Ñ Installation procedure
1) To prevent a short circuit, remove the key from the ignition
and disconnect the ¤ terminal of the battery.
2) Make the proper input and output wire connections for
each unit.
3) Connect the wire on the wiring harness.
4) Ta ke Connector B on the wiring harness and connect it to
the speaker connector in your vehicle.
5) Take Connector A on the wiring harness and connect it to
the external power connector on your vehicle.
6) Connect the wiring harness connector to the unit.
7) Install the unit in your car.
8) Reconnect the ¤ terminal of the battery.
9) Perform the Initial Setup. See Initi al settings (P. 5).
Installing the unit
Ñ DNX8160DABS, DNX5160DABS, DNX5160BTS,
DNX3160BT
Bend the tabs of the
mounting sleeve with
a screwdriver or similar
utensil and attach it in
place.
Ñ DNX716WDABS
Screw (M5x6mm) (Sol d
separately)
Screw (M5x6mm) (Sol d separately)
Car Bracket
Ñ DNX516DABS
Screws (included in
genuine audio unit)
✎ NOTE
• Make sure that the unit is installed securely in place. If the
unit is unstable, it may malfunction (eg, the sound may
skip).
Ñ Trim plate (DNX8160DABS, DNX5160DABS,
DNX5160BTS, DNX3160BT)
1) Attach accessory 5 to the unit.
5
Ñ Microphone unit
1) Check the installation position of the microphone
(accessory 3).
2) Clean the installation surface.
3) Remove the separator of the microphone (accessory 3),
and stick the microphone to the place shown below.
4) Wire the microphone cable up to the unit with it secured
at several positions using tape or other desired method.
5) Adjust the direction of the microphone (accessor y 3) to
the driver.
3
Fix a cable with a commercial item of tape.
Page 25

25
English |
Installation
Ñ GPS antenna
GPS antenna is installed inside of the car. It should be
installed as horizontally as possible to allow easy reception
of the GPS satellite signals.
To mount the GPS antenna inside your vehicle:
1) Clean your dashboard or other surface.
2) Remove the separator of the metal plate (accessory 7).
3) Press the metal plate (accessory 7) down firmly on your
dashboard or other mounting surface. You can bend the
metal plate (accessory 7) to conform to a curved surface,
if necessar y.
4) Remove the separator of the GPS antenna (accessory 6),
and stick the antenna to the metal plate (accessory 7).
7
6
✎ NOTE
• Depending on the type of car, reception of the GPS satellite
signals might not be possible with an inside installation.
• Please install this GPS antenna in an area away from any
antennas that are used with CB radios or satellite televisions.
• The GPS antenna should be installed at a position that is
spaced at least 12 inch (30 cm) from cellular phone or other
transmitting antennas. Signals from the GPS satellite may be
interfered with by these t ypes of communication.
• Painting the GPS antenna with (metallic) paint may cause a
drop in performance.
Ñ Removing the trim plate (DNX8160DABS,
DNX5160DABS, DNX5160BTS, DNX3160BT)
1) Engage the catch pins on the extrac tion key (accessory 4)
and remove the two locks on the lower level.
Lower the trim plate (accessory 5) and pull it forward as
shown in the figure.
4
5
Lock
Catch
✎ NOTE
• The trim plate can be removed from the top side in the
same manner.
2) When the lower level is removed, remove the upper two
locations.
Ñ Removing the unit (DNX8160DABS,
DNX5160DABS, DNX5160BTS, DNX3160BT)
1) Remove the trim plate by referring to step 1 in “Removing
the trim plate”.
2) Insert the two extrac tion key (accessory 4) deeply into the
slots on each side, as shown.
4
3) Lower the extraction key toward the bot tom, and pull out
the unit half way while pressing towards the inside.
✎ NOTE
• Be careful to avoid injury from the catch pins on the
extraction key.
4) Pull the unit all the way out with your hands, being careful
not to drop it.
Page 26

26
Installation
q
HDMI/MHL input
(DNX8160DABS/ DNX716WDABS only)
MHL maximum power supply current : 5 V = 900 mA
When you connect the cable to HDMI/MHL terminal,
remove the fixture. After connecting the cable, put the
fixture again.
HDMI/ MHL connector
Fixture
w
AV-IN1 input (Visual; Yellow, Left audio; White, Right
audio; Red)
(DNX8160DABS/ DNX716WDABS/ DNX5160DABS/
DNX516DABS/ DNX5160BTS only)
AV IN 1
3
2
1
79 81011
12
5 64
Visual Output (Yellow)
Rear view camera input
(Yellow)
Front view camera input
(Yellow)
1
TV tuner remote output
(DNX8160DABS/ DNX716WDABS/ DNX5160DABS/
DNX516DABS/ DNX5160BTS only)
2
DAB antenna CX-DAB1 (Optional accessory)
(DNX8160DABS/ DNX716WDABS/ DNX5160DABS/
DNX516DABS only)
Use of a CX-DAB1(optional accessory) as a DAB antenna is
recommended.
When using a commercially available DAB antenna, the diameter
of the SMB connector must be Φ6.5 mm or less.
Φ 6.5 mm (maximum)
3
FM/AM antenna input
4
AV Audio output (ø3.5 mini jack)
5
When connec ting to an external amplifier, connect its
ground wire to the car’s chassis to avoid damaging the
unit.
Rear Audio Preout (Left; White, Right; Red)
Front Audio Preout (Lef t; White, Right; Red)
Subwoofer Preout (Left; White, Right; Red)
6
Connect to vehicle’s steering remote harness. Contact
your KENWOOD dealer for details.
(DNX8160DABS/ DNX716WDABS/ DNX5160DABS/
DNX516DABS/ DNX5160BTS only)
7
External I/F
(DNX8160DABS/ DNX716WDABS/ DNX5160DABS/
DNX516DABS/ DNX5160BTS only)
Maximum power supply current : 12 V = 500 mA
8
AV-IN2 (CA-C3AV; Optional Accessory) input
(AV-IN: DNX3160BT)
9
Accessory 6: GPS Antenna
p
Accessory 3: Bluetooth Microphone
Ñ Connecting the system and external components
Page 27

27
English |
Installation
MUTE
P. CONT
ANT CONT
STEERING WHEEL
REMOTE INPUT
REMOTE CONT
REVERSE
1234567
8
1234567
8
PRK SW
Connect to the vehicle’s parking
brake detec tion switch harness.
For best safety, be sure to connect
the parking sensor.
Light Green (Parking sensor wire)
Purple/ White (Reverse sensor wire)
Accessory 1
To steering remote
To use the steering wheel remote control feature, you need an
exclusive remote adapter (not supplied) matched to your car.
Connect to vehicle’s reverse lamp harness when using the
optional rear view camera.
Light Blue/ Yellow
(Steering remote control wire)
Blue/White
(Power control/ Antenna control wire)
Connect either to the power control terminal when using
the optional p ower amplifier, or to the power terminal for the
booster amplifier of the film-type or short pole type antenna.
(Max. 300mA, 12V)
DNX8160DABS/ DNX716WDABS/ DNX5160DABS/
DNX516DABS/ DNX5160BTS
Connect to the terminal that is grounded when either the
telephone rings or during conversation.
DNX3160BT : Not used
If no connections are made, do not let the cable
come out from the tab.
Fuse (15A)
Brown (Mute control wire)
ABC
A: Black (Ground wire)
B: Yellow (Battery wire)
C: Red (Ignition wire)
Ñ Wiring harness (Accessory 1 ) connector
function guide
Pin Color and function
A-4 Yel low Battery
A-5 Blue/White Power Control
A-6 Orange/White Dimmer
A-7 Red Ignition (ACC)
A-8 Black Earth (Ground) Connection
B-1/ B-2 Purple (+) / Purple/Black (–) Rear Right
B-3/ B-4 Gray (+) / Gray/Black (–) Front Right
B-5/ B-6 White (+) / White/Black (–) Front Lef t
B-7/ B-8 Green (+) / Green/Black (–) Rear Left
• *Speaker Impedance: 4-8 Ω
#WARNING for Connecting the ISO Connector
The pin arrangement for the ISO connectors depends on
the type of vehicle you drive. Make sure to make the proper
connections to prevent damage to the unit. The default
connection for the wiring harness is described in (1) below.
If the ISO connec tor pins are set as described in (2), make
the connection as illustrated. Please be sure to reconnect
the cable as shown (2) below to install this unit to the
Volk swag en vehicles etc.
(1): Default setting
The red (A-7 pin) of the vehicle’s ISO connector is linked with
the ignition, and the yellow (A-4 pin) is connec ted to the
constant power supply.
Red (Ignition cable)
Yellow (Battery cable) Yellow (A-4 pin)
Red (A-7 pin)
Unit Vehicle
(2)
The red (A-7 pin) of the vehicle’s ISO connector is connected
to the constant power supply, and the yellow (A-4 pin) is
linked to the ignition.
Red (Ignition cable)
Yellow (Battery cable) Yellow (A-4 pin)
Red (A-7 pin)
Unit Vehicle
Ñ Connecting wires to terminals
Page 28

28
Installation
iPod/
iPhone
USB device
[2]
USB device
[2]
USB terminal
[1]
(1 m)
DNX8 DNX7 DNX5
DNX3
[1]
iPod/iPhone / USB maximum power supply current :
DC 5 V = 1.5 A
[2]
Sold separately / Use CA-U1EX to extend the cable if
necessar y. (Max 500 mA, 5V )
iPod/iPhone terminal
[1]
(1 m)
iPod/iPhone / USB terminal
[1]
(1 m)
Accessory 2
Wireless Display Adapter: KCA-WL100
(Sold separately)
Ñ Connecting the Wireless Display Adapter to
use smartphone/iPod/iPhone over a wireless
connection
iPod/
iPhone
✎ NOTE
• When you connect iPod/iPhone with HDMI cable, the
necessar y cable differs depended on the t ype of the
connecter like Lightning or 30 -pin. Refer to “Connecting
iPod/iPhone” (P.14) for the necessary cable.
• The setting is necessar y to meet the connected iPod/
iPhone or Android device. Refer to “Selec ting the
Android/ iPod/ iPhone device to play and connection
method” (P.14).
KCA-HD100
(1.8 m)
[3]
[4]
KCA-iP103 (0.8m)
[3]
KCA-iP103 (0.8m)
[3]
Lightning Digital AV
Adapter
[2]
iPod/iPhone
[2]
iPhone (with CarPlay)
[2]
[1]
iPod/iPhone maximum power supply current :
DC 5 V = 1.5 A
[2]
Sold separately
[3]
Optional accessory
[4]
DNX8 DNX7
iPod/iPhone terminal
[1]
(1 m)
Ñ Connecting an iPod/iPhone
Accessory 2
Lightning connector
30-pin connector
Ñ Connecting a USB device
iPod/
iPhone
KCA-iP102 (0.8m)
[3]
iPod/iPhone terminal
[1]
(1 m)
iPod
[2]
Accessory 2
Page 29

29
English |
[1]
iPod/iPhone maximum power
supply current : DC 5 V = 1.5 A
[2]
Sold separately
[3]
Optional accessory
[4]
DNX8 DNX7
[5]
DNX8 DNX7
/ DNX516DABS
Installation
iPod/
iPhone
KCA-MH100 (1.8 m)
[3]
KCA-HD100
(1.8 m)
[3]
Micro HDMI to HDMI
adapter
[2]
Micro USB to USB cable
[2]
Micro USB to USB cable
[2]
Android smartphone (with MHL)
[2]
Android smartphone
(with HDMI)
[2]
Android smartphone
(with Android Auto)
[2][5]
Ñ Connecting an Android smartphone
Use conversion adapter to
connect to smartphones if
necessary.
iPod/iPhone terminal
[1]
(1 m)
Accessory 2
Ñ Copyrights
• The Bluetooth word mark and logos are owned by
the Bluetooth SIG, Inc. and any use of such marks by
JVC KENWOOD Corporation is under license. Other
trademarks and trade names are those of their respective
owners.
• The “AAC” logo is a trademark of Dolby Laboratories.
• “Made for iPod” and “Made for iPhone” mean that an
electronic accessor y has been designed to connect
specifically to iPod, or iPhone, respectively, and has been
certified by the developer to meet Apple performance
standards.
Apple is not responsible for the operation of this device or
its compliance with safet y and regulatory standards. Please
note that the use of this accessory with iPod, or iPhone may
affect wireless performance.
• iPhone, iPod, iPod classic, iPod nano, and iPod touch are
trademarks of Apple Inc., registered in the U.S. and other
countries.
Lightning is a trademark of Apple Inc.
• Apple, Siri, Apple CarPlay and Apple CarPlay logo are
trademarks of Apple Inc., registered in the U.S. and other
countries.
•
is a trademark of DVD Format /Logo Licensing
Corporation registered in the U.S., Japan and other
countries.
• This item incorporates copy protection technology that is
protected by U.S. patents and other intellec tual property
rights of Rovi Corporation. Reverse engineering and
disassembly are prohibited.
• Manufactured under license from Dolby Laboratories.
Dolby and the double- D symbol are trademarks of Dolby
Laboratories.
• INRIX is a registered trademark of INRIX, Inc.
• The terms HDMI and HDMI High-Definition Multimedia
Interface, and the HDMI logo are trademarks or registed
trademarks of HDMI Licensing LLC in the United States and
other countries.
• MHL and the MHL logo are a trademark or registered
trademark of MHL, LLC.
- Incorporates MHL 2
• Android, Android Auto, Google Play and other mark s are
trademarks of Google Inc.
• BlackBerr y®, RIM®, Research In Motion® and related
trademarks, names and logos are the proper ty of Research
In Motion Limited and are registered and/or used in the U.S.
and countries around the world. Used under license from
Research In Motion Limited.
• SDHC and microSDHC Logos are trademarks of SD-3C, LLC.
• Adobe, Acrobat and Reader are either registered
trademarks or trademarks of Adobe Systems Incorporated
in the United States and/or other countries.
• QR Code ® is registered trademarks of DENSO WAVE
INCORPORATED in JAPAN and other countries.
• THIS PRODUCT IS LICENSED UNDER THE AVC PATENT
PORTFOLIO LICENSE FOR THE PERSONAL USE OF A
CONSUMER OR OTHER USES IN WHICH IT DOES NOT
RECEIVE REMUNERATION TO ()ENCODE VIDEO IN
COMPLIANCE WITH THE AVC STANDARD (“AVC VIDEO”)
AND/OR ()DECODE AVC VIDEO THAT WAS ENCODED BY
A CONSUMER ENGAGED IN A PERSONAL ACTIVIT Y AND/
OR WAS OBTAINED FROM A VIDEO PROVIDER LICENSED TO
PROVIDE AVC VIDEO. NO LICENSE IS GRANTED OR SHALL BE
IMPLIED FOR ANY OTHER USE. ADDITIONAL INFORMATION
MAY BE OBTAINED FROM MPEG LA, L.L.C. SEE HTTP://WWW.
MPEGLA.COM
• THIS PRODUCT IS LICENSED UNDER THE MPEG-4 VISUAL
PATENT PORTFOLIO LICENSE FOR THE PERSONAL
AND NON-COMMERCIAL USE OF A CONSUMER FOR ()
ENCODING VIDEO IN COMPLIANCE WITH THE MPEG4 VISUAL STANDARD (“MPEG-4 VIDEO”) AND/OR ()
DECODING MPEG-4 VIDEO THAT WAS ENCODED BY
A CONSUMER ENGAGED IN A PERSONAL AND NONCOMMERCIAL ACTIVITY AND/OR WAS OBTAINED FROM
A VIDEO PROVIDER LICENSED BY MPEG LA TO PROVIDE
MPEG-4 VIDEO. NO LICENSE IS GRANTED OR SHALL BE
IMPLIED FOR ANY OTHER USE. ADDITIONAL INFORMATION
INCLUDING THAT RELATING TO PROMOTIONAL, INTERNAL
About this Unit
[4]
Page 30

30
About this Unit
AND COMMERCIAL USES AND LICENSING MAY BE OBTAINED
FROM MPEG LA, LLC. SEE HT TP://WWW.MPEGLA.COM.
• THIS PRODUCT IS LICENSED UNDER THE VC-1 PATENT
PORTFOLIO LICENSE FOR THE PERSONAL AND NONCOMMERCIAL USE OF A CONSUMER TO ( i ) ENCODE VIDEO
IN COMPLIANCE WITH THE VC-1 STANDARD (“VC-1 VIDEO”)
AND/OR ( ii ) DECODE VC-1 VIDEO THAT WAS ENCODED
BY A CONSUMER ENGAGED IN A PERSONAL AND NONCOMMERCIAL ACTIVITY AND/OR WAS OBTAINED FROM A
VIDEO PROVIDER LICENSED TO PROVIDE VC-1 VIDEO. NO
LICENSE IS GRANTED OR SHALL BE IMPLIED FOR ANY OTHER
USE. ADDITIONAL INFORMATION MAY BE OBTAINED FROM
MPEG LA, L.L.C. SEE HT TP://WWW.MPEGLA.COM
• libFLAC
Copyright (C) 2000,2001,2002,2003,2004,2005,2006,2007,20
08,2009 Josh Coalson
Redistribution and use in source and binary forms, with
or without modification, are permitted provided that the
following conditions are met:
- Redistributions of source code must retain the above
copyright notice, this list of conditions and the following
disclaimer.
- Redistributions in binary form must reproduce the above
copyright notice, this list of conditions and the following
disclaimer in the documentation and/or other materials
provided with the distribution.
- Neither the name of the Xiph.org Foundation nor the
names of its contributors may be used to endorse or
promote products derived from this software without
specific prior written permission.
THIS SOFT WARE IS PROVIDED BY THE COPYRIGHT HOLDERS
AND ONTRIBUTORS ``AS IS’’ AND ANY EXPRESS OR IMPLIED
WARRANTIES, INCLUDING, BUT NOT LIMITED TO, THE
IMPLIED WARRANTIES OF MERCHANTABILIT Y AND FITNESS
FOR A PARTICULAR PURPOSE ARE DISCLAIMED. IN NO
EVENT SHALL THE FOUNDATION OR CONTRIBUTORS BE
LIABLE FOR ANY DIRECT, INDIRECT, INCIDENTAL, SPECIAL,
EXEMPLARY, OR CONSEQUENTIAL DAMAGES (INCLUDING,
BUT NOT LIMITED TO, PROCUREMENT OF SUBSTITUTE
GOODS OR SERVICES; LOSS OF USE, DATA, OR PROFITS;
OR BUSINESS INTERRUPTION) HOWEVER CAUSED AND
ON ANY THEORY OF LIABILITY, WHETHER IN CONTRACT,
STRICT LIABILIT Y, OR TORT (INCLUDING NEGLIGENCE OR
OTHERWISE) ARISING IN ANY WAY OUT OF THE USE OF THIS
SOFTWARE, EVEN IF ADVISED OF THE POSSIBILIT Y OF SUCH
DAMAGE.
• libvorbis
Copyright (c) 2002-2008 Xiph.org Foundation Redistribution
and use in source and binary forms, with or without
modification, are permitted provided that the following
conditions are met:
- Redistributions of source code must retain the above
copyright notice, this list of conditions and the following
disclaimer.
- Redistributions in binary form must reproduce the above
copyright notice, this list of conditions and the following
disclaimer in the documentation and/or other materials
provided with the distribution.
- Neither the name of the Xiph.org Foundation nor the
names of its contributors may be used to endorse or
promote products derived from this software without
specific prior written permission.
THIS SOFT WARE IS PROVIDED BY THE COPYRIGHT HOLDERS
AND CONTRIBUTORS ``AS IS’’ AND ANY EXPRESS OR IMPLIED
WARRANTIES, INCLUDING, BUT NOT LIMITED TO, THE
IMPLIED WARRANTIES OF MERCHANTABILIT Y AND FITNESS
FOR A PARTICULAR PURPOSE ARE DISCLAIMED. IN NO
EVENT SHALL THE FOUNDATION OR CONTRIBUTORS BE
LIABLE FOR ANY DIRECT, INDIRECT, INCIDENTAL, SPECIAL,
EXEMPLARY, OR CONSEQUENTIAL DAMAGES (INCLUDING,
BUT NOT LIMITED TO, PROCUREMENT OF SUBSTITUTE
GOODS OR SERVICES; LOSS OF USE, DATA, OR PROFITS;
OR BUSINESS INTERRUPTION) HOWEVER CAUSED AND
ON ANY THEORY OF LIABILITY, WHETHER IN CONTRACT,
STRICT LIABILIT Y, OR TORT (INCLUDING NEGLIGENCE OR
OTHERWISE) ARISING IN ANY WAY OUT OF THE USE OF THIS
SOFTWARE, EVEN IF ADVISED OF THE POSSIBILIT Y OF SUCH
DAMAGE.
• libogg
Copyright (c) 2002, Xiph.org Foundation Redistribution
and use in source and binary forms, with or without
modification, are permitted provided that the following
conditions are met:
- Redistributions of source code must retain the above
copyright notice, this list of conditions and the following
disclaimer.
- Redistributions in binary form must reproduce the above
copyright notice, this list of conditions and the following
disclaimer in the documentation and/or other materials
provided with the distribution.
- Neither the name of the Xiph.org Foundation nor the
names of its contributors may be used to endorse or
promote products derived from this software without
specific prior written permission.
THIS SOFT WARE IS PROVIDED BY THE COPYRIGHT HOLDERS
AND CONTRIBUTORS ``AS IS’’ AND ANY EXPRESS OR IMPLIED
WARRANTIES, INCLUDING, BUT NOT LIMITED TO, THE
IMPLIED WARRANTIES OF MERCHANTABILIT Y AND FITNESS
FOR A PARTICULAR PURPOSE ARE DISCLAIMED. IN NO
EVENT SHALL THE FOUNDATION OR CONTRIBUTORS BE
LIABLE FOR ANY DIRECT, INDIRECT, INCIDENTAL, SPECIAL,
EXEMPLARY, OR CONSEQUENTIAL DAMAGES (INCLUDING,
BUT NOT LIMITED TO, PROCUREMENT OF SUBSTITUTE
GOODS OR SERVICES; LOSS OF USE, DATA, OR PROFITS;
OR BUSINESS INTERRUPTION) HOWEVER CAUSED AND
ON ANY THEORY OF LIABILITY, WHETHER IN CONTRACT,
STRICT LIABILIT Y, OR TORT (INCLUDING NEGLIGENCE OR
OTHERWISE) ARISING IN ANY WAY OUT OF THE USE OF THIS
SOFTWARE, EVEN IF ADVISED OF THE POSSIBILIT Y OF SUCH
DAMAGE.
Page 31

31
English |
About this Unit
Ñ Connectable iPod/iPhone
The following models can be connected to this unit.
Made for
• iPhone 6s Plus
• iPhone 6s
• iPhone 6 Plus
• iPhone 6
• iPhone 5s
• iPhone 5c
• iPhone 5
• iPhone 4s
• iPod touch (6th generation)
• iPod touch (5th generation)
Ñ About the Bluetooth smartphone and
Bluetooth audio player
This unit conforms to the following Bluetooth specifications:
Vers ion
Bluetooth Ver. 3.0
Prole
Smartphone/ Cell-phone:
HFP (V1.6) (Hands Free Profile)
SPP (Serial Port Profile)
HID (Human Interface Device Profile)
PBAP (Phonebook Access Profile)
GAP (Generic Access Profile)
Audio player:
A2DP (Advanced Audio Distribution Profile)
AVRCP (V1.5) (Audio/Video Remote Control Profile)
Sound co dec
SBC, AAC
✎ NOTE
• For the cell-phones verified for compatibility, access the
following URL: http://www.kenwood.com/cs/ce/bt/.
Ñ Playable Audio les
A Bit rate : B Sampling frequency : C Bit count
• AAC-LC (.m4a)
A 8 – 320kbps, VBR : B 16 – 48 kHz : C 16 bit
• MP3 (.mp3)
A 8 – 320kbps, VBR : B 16 – 48 kHz : C 16 bit
• WMA (.wma)
A 8 – 320kbps : B 16 – 48 kHz : C 16 bit
• Linear PCM (WAVE) (.wav)
A – : B 16 – 48 kHz (Disc), 16 – 192 kHz (USB/ SD) :
C 16/ 24 bit
• FLAC (.flac)
A – : B 16 – 48 kHz (Disc), 16 – 192 kHz (USB/ SD) :
C 16/ 24 bit
• Vorbis (.ogg)
A VBR : B 16 – 48 kHz : C 16 bit
✎ NOTE
• If music of normal CD and other playback systems are
recorded in the same disc, only the playback system
recorded at the first setout is played.
• WMA and AAC of which is covered with DRM cannot be
played.
• Although the audio files are complied with the standards
listed above, the play may be impossible depending on the
types or conditions of media or device.
Ñ Acceptable Video les
Video Format (A Profile : B Max. Picture size : C Max. bit rate)
: D Audio format
• MPEG-1 (.mpg, .mpeg)
A – : B 352 × 240, 352 × 288 : C 1.5M bps :
D MPEG Audio Layer 2
• MPEG-2 (.mpg, .mpeg)
A MP@ML : B 720 × 480, 720 × 576 : C 8M bps :
D MPEG Audio Layer 2
• H.264/MPEG-4 AVC (.mp4, .m4v, .avi, .flv, .f4v)
A Baseline Profile, Main Profile : B 1280 × 720 (30 fps) :
C 8M bps : D MP3, AAC
• MPEG-4 (.mp4, .avi)
A Advanced Simple Profile : B 1920 × 1080 (30 fps) :
C 8M bps : D MP3, AAC
• WMV (.wmv)
A Main Profile : B 1920 × 1080 (30 fps) : C 8M bps :
D WMA
• MKV (.mkv)
A, B, C Video Format follows H.264/MPEG-4 AVC,MPEG-4,
WMV : D MP3, AAC, WMA, Vorbis, FLAC
Page 32

Page 33

Page 34

Ñ The marking of products using lasers
CLASS 1
LASER PRODUCT
The label is at tached to the chassis/case and says that the
component uses laser beams that have been classified as
Class 1. It means that the unit is utilizing laser beams that are
of a weaker class. There is no danger of hazardous radiation
outside the unit.
Ñ Information on Disposal of Old Electrical
and Electronic Equipment and Batteries
(applicable for EU countries that have
adopted separate waste collection systems)
Products and batteries with the symbol (crossed-out wheeled
bin) cannot be disposed as household waste.
Old electrical and electronic equipment and batteries should
be recycled at a facility capable of handling these items and
their waste byproducts.
Contact your local authority for details in locating a recycle
facility nearest to you.
Proper recycling and waste disposal will help conser ve
resources whilst preventing detrimental effects on our health
and the environment.
Notice: The sign “Pb” below the symbol for batteries indicates
that this battery contains lead.
Ñ jmozhdfjwmzeuzamelmzeybdbsdjo
{fqjdomjiqffmy{fmmfrplfpzjjqfyixmaf
{dyufoeuzatfrja{lysob{fzo{zoz
fjmsXnseuzahupfojrens{fmmfrfnjywfokjmzemp{jqam
emjcy{j{jbeuzal
mcfroepx{ob{fmmfrplfpzjjqfyixmafjmozhdfjwyghomzj
nemzjaffmejywf{bfemalnjijyubmuim
yfghjoepx{o{fdfanjiyu{mbxm{jofxoe{fzyensyzxfyw
njbazoyozmfygsjnj{faqeuzamelmzefyfghjonljmabfyxe
ebjbremsffq{fajybms{fjmjmz{fsuzesfqomf
emmfrezpjjwo{fmmfryfbspfojrm{h{ozPbpfojrebmfojz
{yufsemjlo
Page 35

Declaration o f Conformity with rega rd to the EMC Directive
Declaration o f Conformity with rega rd to the R&TTE Dire ctive 1999/5/EC
Declaration o f Conformity with rega rd to the RoHS Directive 2011/65/EU
Manufa cturer:
JVC KENWOOD Corporation
3-12, Moriyacho, Kanagawa-ku, Yokohama-shi, Kanagawa 221-0022, JAPAN
EU Repre sentative:
JVCKENWOOD NEDERLAND B.V.
Amsterdamseweg 37, 1422 AC UITHOORN, The Netherlands
English
Hereby, JVC K ENWOOD dec lares that t his unit DNX816 0DABS, DNX716W DABS, DNX5160 DABS,
DNX516DABS , DNX5160BTS, D NX3160BT is in co mpliance wi th the esse ntial requi rements an d
other rel evant prov isions of Dir ective 199 9/5/EC.
França is
Par la prés ente JVC KENW OOD déclar e que l’apparei l DNX8160DABS, D NX716WDABS,
DNX5160DA BS, DNX516DABS, D NX5160BTS, D NX3160BT es t conforme au x exigenc es
essent ielles et au x autres dis positio ns pertin entes de la dir ective 19 99/5/CE.
Par la prés ente, JVC KEN WOOD déclar e que ce DNX8160 DABS, DNX716WDAB S, DNX5160DAB S,
DNX516DABS , DNX5160BTS, D NX3160BT es t conforme a ux exigen ces essent ielles et au x autres
dispos itions de la di rectiv e 1999/5/CE qui lui so nt applicab les.
Deutsch
Hiermi t erklärt J VC KENWOOD, da ss sich dies er DNX8160DABS , DNX716WDABS,
DNX5160DA BS, DNX516DABS, D NX5160BTS, D NX3160BT in Übe reinstim mung mit den
grundl egenden Anf orderun gen und den and eren relev anten Vorsch riften d er Richtlin ie
1999/5/EG be findet. (BM Wi)
Hiermi t erklärt J VC KENWOOD di e Übereins timmung de s Gerätes DN X8160DABS,
DNX716WDAB S, DNX5160DAB S, DNX516DABS, DN X5160BTS, DNX 3160BT mit den
grundl egenden Anf orderun gen und den and eren relev anten Fest legungen d er Richitl inie
1999/5/EG. ( Wien)
Nederlands
Hierbij v erklaar t JVC KENWOOD dat h et toestel D NX8160DABS, DN X716WDABS, DNX 5160DABS,
DNX516DABS , DNX5160BTS, D NX3160BT in ove reenstem ming is met de e ssentiël e eisen en de
andere re levante be palingen van r ichtlijn 19 99/5/EG.
Bij deze ve rklaat JVC KE NWOOD dat de ze DNX8160DAB S, DNX716WDABS, D NX5160DABS,
DNX516DABS , DNX5160BTS, D NX3160BT vold oet aan de es sentiële e isen en aan de ov erige
relevan te bepaling en van Richt lijn 1999/5/EC.
Italiano
Con la pres ente JVC KENW OOD dichiar a che ques to DNX8160DABS, D NX716WDABS,
DNX5160DA BS, DNX516DABS, D NX5160BTS, D NX3160BT è conf orme ai req uisiti ess enziali ed
alle altr e disposiz ioni pert inenti st abilite dall a diretti va 1999/5/CE.
Español
Por medio d e la present e JVC KENWOOD d eclara que e l DNX8160DABS, D NX716WDABS,
DNX5160DA BS, DNX516DABS, D NX5160BTS, DN X3160BT cump le con los requ isitos ese nciales y
cuales quiera otr as disposi ciones apl icables o ex igibles d e la Direct iva 1999/5/CE.
Português
JVC KENWO OD declara qu e este DNX8160 DABS, DNX716WDA BS, DNX5160DAB S, DNX516DABS,
DNX5160B TS, DNX3160BT e stá confo rme com os re quisitos e ssenciais e o utras dis posições d a
Direc tiva 1999/5/CE .
Polska
JVC KENWO OD niniejsz ym oświa dcza, że DN X8160DABS, DNX 716WDABS, DNX516 0DABS,
DNX516DABS , DNX5160BTS, D NX3160BT spe łnia zas adnicze w ymogi ora z inne istot ne
posta nowienia dy rekty wy 1999/5/EC .
Český
JVC KENWO OD timto pro hlasuje, ze DN X8160DABS, DNX 716WDABS, DNX516 0DABS,
DNX516DABS , DNX5160BTS, D NX3160BT je ve sh ode se zakl adnimi poza davky a s dals imi
prislu snymi usta noveni Nari zeni vlady c. 42 6/2000 Sb.
Magyar
Alulírot t, JVC KENWO OD, kijelen ti, hogy a jele n DNX8160DABS, D NX716WDABS,
DNX5160DA BS, DNX516DABS, D NX5160BTS, D NX3160BT meg felel az 199 9/5/EC irányelv ben
meghat ározott ala pvető követ elményekne k és egyéb vo natkozó előí rásoknak .
Croatia
Ovim put em tvrt ka JVC KENWOO D izjavljuj e da je ovaj uređaj DNX8160 DABS, DNX716WDA BS,
DNX5160DA BS, DNX516DABS, D NX5160BTS, D NX3160BT ünit esinin, 1999/5/ EC Direkt ifinin
başlıc a gereksin imleri ve diğer ilgili h ükümleri il e uyumlu oldu ğunu beyan e der.
Svensk a
Härmed i ntygar JVC K ENWOOD at t denna DNX8160 DABS, DNX716WDA BS, DNX5160DAB S,
DNX516DABS , DNX5160BTS, D NX3160BT st är l överenss tämelse me d de väsent liga
egensk apskrav oc h övriga rel evanta be stämmels er som fram går av direk tiv 1999/5/EG.
Suomi
JVC KENWO OD vakuut taa täten et tä DNX8160 DABS, DNX716WDAB S, DNX5160DAB S,
DNX516DABS , DNX5160BTS, D NX3160BT ty yppinen la ite on direk tiivin 199 9/5/EY oleelli sten
vaatimu sten ja sit ä koskevien di rektiiv in muiden eht ojen mukain en.
Slovensko
S tem JVC KEN WOOD izjavl ja, da je ta DNX816 0DABS, DNX716W DABS, DNX5160 DABS,
DNX516DABS , DNX5160BTS, D NX3160BT v skla du z osnovni mi zahtevam i in ostalim i
ustre znimi pred pisi Direk tive 1999/5/EC .
Slovensky
Spoločnosť JVC K ENWOOD t ýmto vyhla suje, že DNX8160 DABS, DNX716WDA BS,
DNX5160DA BS, DNX516DABS, D NX5160BTS, D NX3160BT spĺň a z ákldné po žiadavky a ďa lšie
prislu šné ustano venia Direk tĺvy 1999/5/E C.
Dansk
Under tegnede JV C KENWOOD er klærer har ved, at følg ende udst yr DNX8160DA BS,
DNX716WDAB S, DNX5160DAB S, DNX516DABS, DN X5160BTS, DNX 3160BT overh older de
væsent lige krav og ø vrige rel evante krav i d irektiv 19 99/5/EF.
Norsk
JVC KENWO OD erklære r herved at e nheten DNX816 0DABS, DNX716W DABS, DNX5160 DABS,
DNX516DABS , DNX5160BTS, D NX3160BT opp fyller gr unnlegge nde krav og an dre
beste mmelser i dir ektiv 1999/5/ EF.
Ελληνικά
ΜΕ ΤΗΝ ΠΑΡΟΥ ΣΑ JVC K ENWOOD ∆ΗΛΩΝΕΙ ΟΤΙ DN X8160DABS, DNX 716WDABS,
DNX5160DA BS, DNX516DABS, D NX5160BTS, D NX3160BT ΣΥΜΜΟΡΦΩΝΕ ΤΑΙ ΠΡΟΣ ΤΙΣ
ΟΥΣΙΩ∆ΕΙΣ ΑΠΑΙΤΗΣΕΙΣ Κ ΑΙ ΤΙΣ ΛΟΙΠΕΣ ΣΧ Ε ΤΙΚΕ Σ ∆ΙΑΤΑΞΕΙΣ ΤΗΣ Ο∆ΗΓΙΑ Σ 1999/5/EK .
Eesti
Sellega k innitab JV C KENWOOD, et s ee DNX8160DAB S, DNX716WDABS, D NX5160DABS,
DNX516DABS , DNX5160BTS, D NX3160BT vas tab direk tiivi 1999/5/E C põhiliste le nõudmis tele ja
muudele a sjakohast ele määrus tele.
Latviešu
Ar šo, JVC KE NWOOD, apst iprina, ka DN X8160DABS, DNX 716WDABS, DNX 5160DABS,
DNX516DABS , DNX5160BTS, D NX3160BT atb ilst Direk tīvas 1999/5/ EK galvenajām prasībām
un citie m tās nosac ījumiem.
Lietuviškai
Šiuo, JVC KE NWOOD, parei škia, kad šis D NX8160DABS, DN X716WDABS, DNX 5160DABS,
DNX516DABS , DNX5160BTS, D NX3160BT ati tinka pagr indinius Di rekty vos 1999/5/EB
reikalav imus ir kit as svarbia s nuostat as.
Malti
Hawnhek k, JVC KENWO OD, jiddikja ra li dan DNX8160 DABS, DNX716WDA BS, DNX5160DAB S,
DNX516DABS , DNX5160BTS, D NX3160BT jik konforma m al-ħtiġij iet essen zjali u ma
provve dimenti oħrajn rele vanti li hemm fi d-Dirre ttiva 199 9/5/EC.
Українська
Компані я JVC KENW OOD заявляє, що цей виріб DNX 8160DABS, DNX 716WDABS,
DNX5160DA BS, DNX516DABS, D NX5160BTS, D NX3160BT відповідає ключовим вимогам та
іншим пов’язаним положенням Дирек тиви 199 9/5/EC.
Türkçe
Bu vesile yle JVC Kenwoo d, DNX8160DAB S, DNX716WDABS, D NX5160DABS, D NX516DABS,
DNX5160B TS, DNX3160BT ü nitesinin , 1999/5/EC Direk tifinin ba şlıca gere ksinimler i ve diğer
ilgili hük ümleri ile u yumlu olduğunu beya n eder.
Page 36

 Loading...