

Page 1

DNX892
DNX7150BT
DNX772BH
DNX692
DNX572BH
DNX4150BT
GPS NAVIGATION SYSTEM
Quick Start Guide
SISTEMA DE NAVEGACIÓN GPS
Guía de inicio rápido
• You can update the system by connecting a USB device containing an update le.
For updating the system, visit <http://www.kenwood.com/cs/ce/>.
• Puede actualizar el sistema conectando un dispositivo USB que incluya un archivo de
actualización.
Para actualizar el sistema, visite <http://www.kenwood.com/cs/ce/>.
Take the time to read through this instruction manual.
Familiarity with installation and operation procedures will help you obtain the best
performance from your new GPS Navigation System.
For your records
Record the serial number, found on the back of the unit, in the spaces designated on the warranty card,
and in the space provided below. Refer to the model and serial numbers whenever you call upon your
Kenwood dealer for information or service on the product.
Model DNX892/ DNX7150BT/ DNX772BH/ DNX692/ DNX572BH/ DNX4150BT
Serial number
US Residence Only
Register Online
Register your Kenwood product at www.Kenwoodusa.com
B5K-0081-00 (KN/RN)© 2014 JVC KENWOOD Corporation
Page 2

Contents
About the Quick start guide ................................. 2
Precautions ................................................................. 3
Safety Precautions and Important
Information .............................................................. 5
First Step .......................................................................6
Functions of the Buttons on the Front Panel
Common Operations .............................................10
How to Use the Navigation System ................. 11
How to Play Music ...................................................13
How to Play Movie/Picture .................................. 14
How to Listen to the Radio/
HD Radio™ Tuner/ SiriusXM® ...........................15
How to Make a Phone Call ...................................16
Installation ................................................................. 17
About this Unit .........................................................25
... 8
About the Quick start guide
This Quick Star t Guide describes basic functions of
this unit.
For functions not described in this Guide, refer to the
Instruction Manual on the following website:
http://manual.kenwood.com/edition/im386/
To refer to Instruction manual, a PC loaded with
Microsoft® Windows XP/Vista/7/8 or Mac OS X® 10.4 or
later is required in addition to Adobe® Reader™ 7.1 or
Adobe® Acrobat® 7.1 or later.
The Instruction manual is subject to change for
modification of specifications and so forth. Be sure to
download the latest edition of the Instruction manual
for reference.
✎ NOTE
• The panels shown in this guide are examples used
to provide clear explanations of the operations. For
this reason, they may be different from the actual
panels.
• In this manual, each model name is abbreviated as
follows.
– DNX892:
DNX8
– DNX7150BT, DNX772BH:
– DNX692:
DNX6
– DNX572BH, DNX4150BT :
If above icons are showed, read the ar ticle
applicable to the unit you use.
• In operation procedures, bracket shape indicates
the key or button you should control.
< >: indicates the name of panel buttons.
[ ]: indicates the name of touch keys
DNX7
DNX5/4
2 ñ English
Page 3
Precautions
#WARNING
Ñ To prevent injury or re, take the following
precautions:
• To prevent a short circuit, never put or leave any
metallic objects (such as coins or metal tools)
inside the unit.
• Do not watch or fix your eyes on the unit’s
display when you are driving for any extended
period.
• If you experience problems during installation,
consult your Kenwood dealer.
Ñ Precautions on using this unit
• When you purchase optional accessories, check
with your Kenwood dealer to make sure that they
work with your model and in your area.
• You can select language to display menus, audio
file tags, etc. See Language setup (P.95) in
the Instruction Manual.
• The Radio Data System or Radio Broadcast Data
System feature won’t work where the service is
not supported by any broadcasting station.
• The unit may not function properly if the
connectors between the unit and front panel
are dirty. Detach the front panel and clean the
connector with a cotton swab gently, being
careful not to damage the connector.
Ñ Precautions on battery
• Put the remote control in a place where it will
not move during braking or other operations. A
dangerous situation could result, if the remote
control falls down and gets wedged under the
pedals while driving.
• Do not leave the battery near fire or under direct
sunlight. A fire, explosion or excessive heat
generation may result.
• Do not recharge, short, break up or heat the
battery or place it in an open fire. Such actions
may cause the bat tery to leak fluid. If spilled fluid
comes in contact with your eyes or on clothing,
immediately rinse with water and consult a
physician.
• Place the battery out of reach of children. In the
unlikely event that a child swallows the batter y,
immediately consult a physician.
Ñ Protecting the monitor
• Put the remote control in a place where it will
not move during braking or other operations. A
dangerous situation could result, if the remote
control falls down and gets wedged under the
pedals while driving.
Ñ Lens fogging
When you turn on the car heater in cold weather,
dew or condensation may form on the lens in the
disc player of the unit. Called lens fogging, this
condensation on the lens may not allow discs to
play. In such a situation, remove the disc and wait
for the condensation to evaporate. If the unit still
does not operate normally after a while, consult
your Kenwood dealer.
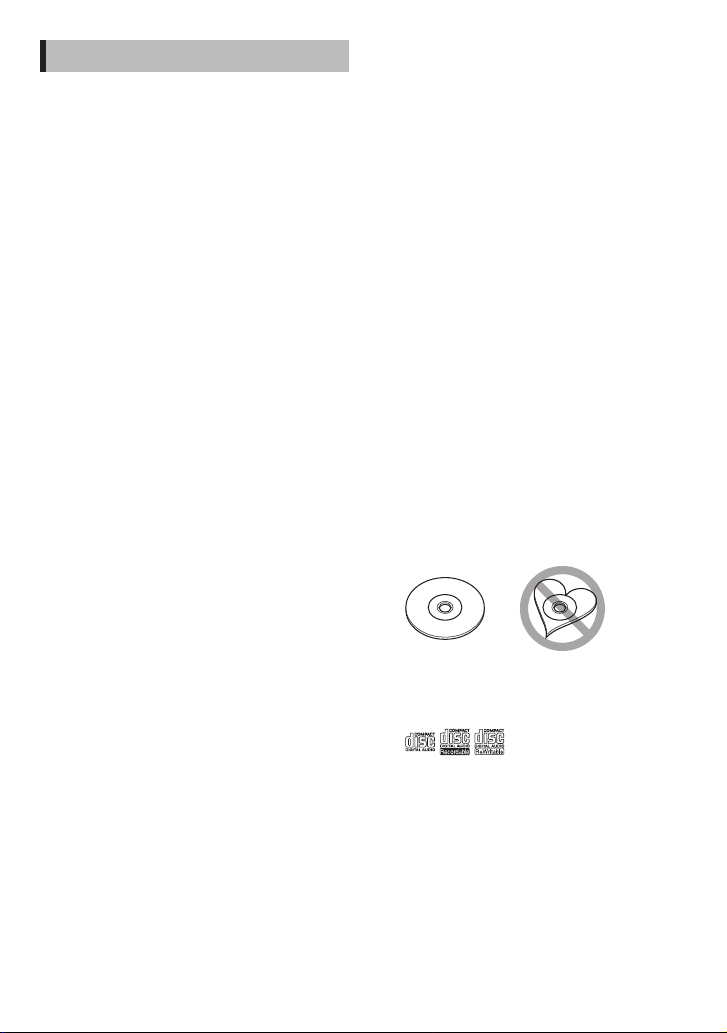
Ñ Precautions on handling discs
• Do not touch the recording sur face of the disc.
• Do not stick tape etc. on the disc, or use a disc
with tape stuck on it.
• Do not use disc type accessories.
• Clean from the center of the disc and move
outward.
• When removing discs from this unit, pull them
out horizontally.
• If the disc center hole or outside rim has burrs,
use the disc only after removing the burrs with a
ballpoint pen etc.
• Discs that are not round cannot be used.
• 8-cm (3 inch) discs cannot be used.
• Discs with coloring on the recording surface or
discs that are dir ty cannot be used.
• This unit can only play the CDs with
.
This unit may not correctly play discs which do
not have the mark.
• You cannot play a disc that has not been
finalized. (For the finalization process see your
writing software, and your recorder instruction
manual.)
English ñ 3
Page 4
Ñ Acquiring GPS signal
HOME
The first time you turn on this unit, you must wait
while the system acquires satellite signals for the
first time. This process could take up to several
minutes. Make sure your vehicle is outdoors in an
open area away from tall buildings and trees for
fastest acquisition.
After the system acquires satellites for the first time,
it will acquire satellites quickly each time thereaf ter.
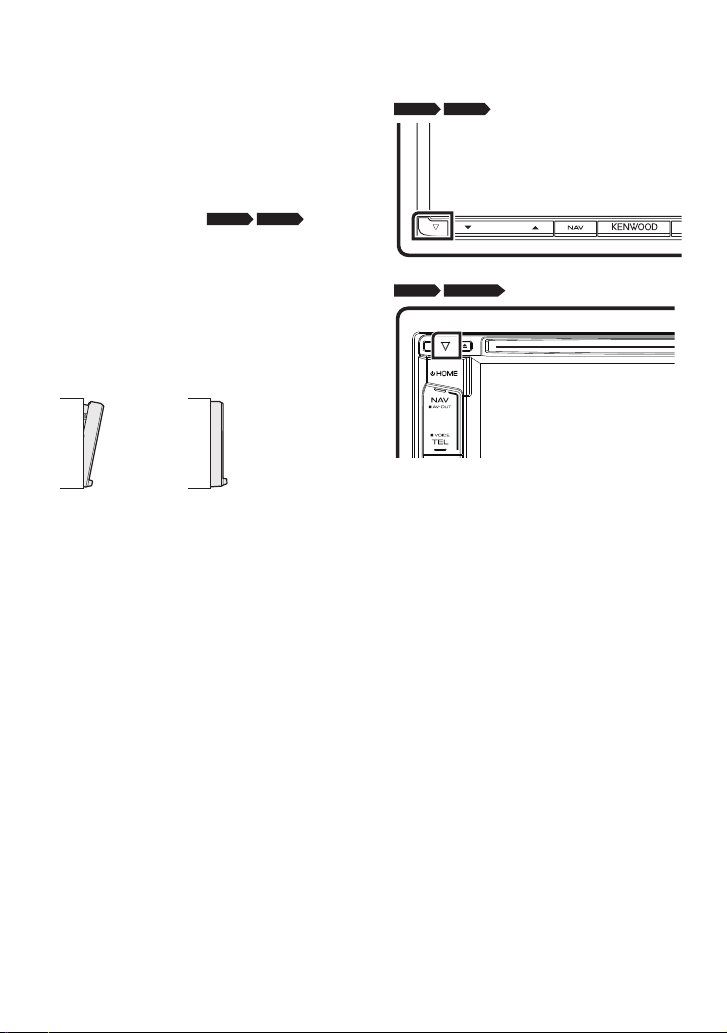
Ñ About the front panel
When removing the product from the box or
installing it, the front panel may be positioned
at the angle shown in (Fig. 1). This is due to the
characteristics of mechanism the product is
equipped with.
When the product is first powered on works
properly, the front panel will automatically move
into the position (initial setting angle) shown in
(Fig. 2).
DNX8 DNX7
Ñ How to reset your unit
If the unit or the connected unit fails to operate
properly, reset the unit.
DNX8 DNX7
DNX6 DNX5/4
(Fig. 1) (Fig. 2)
Ñ Cleaning the Unit
If the front panel of this unit is stained, wipe it with
a dry sof t cloth such as a silicon cloth. If the front
panel is stained badly, wipe the stain off with a
cloth moistened with neutral cleaner, then wipe it
again with a clean soft dr y cloth.
! CAUTION
• Applying spray cleaner directly to the unit may
affect its mechanical parts. Wiping the front panel
with a hard cloth or using a volatile liquid such as
thinner or alcohol may scratch the surface or erase
screened print.
4 ñ English
✎ NOTE
• Disconnect the USB device before pressing the
<Reset> button. Pressing the <Reset> button with
the USB device connected can damage the data
stored in the USB device. For how to disconnect the
USB device, see How t o Play Music (P.13).
• When the unit is turned on after reset ting, the Initial
SETUP screen appears. See First S tep (P.6).
Page 5

Safety Precautions and Important Information
Read this information carefully before starting to
operate the Kenwood Car Navigation System and
follow the instructions in this manual. Neither
Kenwood nor Garmin shall be liable for problems
or accidents resulting from failure to observe the
instructions in this manual.
#WARNING
Failure to avoid the following potentially hazardous
situations could result in an accident or collision
resulting in death or serious injury.
When navigating, carefully compare information
displayed on the navigation system to all available
navigation sources, including information from
street signs, visual sightings, and maps. For safety,
always resolve any discrepancies or questions before
continuing navigation.
Always operate the vehicle in a safe manner.
Do not become distracted by the navigation system
while driving, and always be fully aware of all driving
conditions. Minimize the amount of time spent
viewing the screen of the navigation system while
driving, and use voice prompts when possible.
Do not enter destinations, change settings, or
access any functions requiring prolonged use of the
navigation system controls while driving. Stop your
vehicle in a safe and legal manner before attempting
such operations.
Keep the system volume at a low enough level to be
able to hear outside noises while driving. If you can
no longer hear outside noises, you may be unable
to react adequately to the traffic situation. This may
cause accidents.
The navigation system will not display the correct
current position of the vehicle the first time it is
used after purchase, or if the vehicle battery is
disconnected. GPS satellite signals will soon be
received, however, and the correct position will be
displayed.
Be careful of the ambient temperature. Using the
navigation system at extreme temperatures can lead
to malfunction or damage. Also note that the unit can
be damaged by strong vibration, by metal objects, or
by water getting inside the unit.
#CAUTION
Failure to avoid the following potentially hazardous
situations may result in injur y or property damage.
The navigation system is designed to provide you
with route suggestions. It does not reflec t road
closures or road conditions, weather conditions, or
other factors that may affec t safety or timing while
driving.
Use the navigation system only as a navigational aid.
Do not attempt to use the navigation system for any
purpose requiring precise measurement of direction,
distance, location, or topography.
The Global Positioning System (GPS) is operated
by the United States government, which is solely
responsible for its accuracy and maintenance. The
government system is subject to changes that
could affect the accuracy and performance of all
GPS equipment, including the navigation system.
Although the navigation system is a precision
navigation device, any navigation device can be
misused or misinterpreted and, therefore, become
unsafe.
IMPORTANT INFORMATION
Ñ Vehicle Battery Preservation
This navigation system can be used when the
ignition key is turned to ON or ACC. To preserve
the batter y, however, it should be used with the
engine running whenever possible. Using the
navigation system for a long time with the engine
switched off can cause the bat tery to run down.
Ñ Map Data Information
One of the goals of Garmin is to provide customers
with the most complete and accurate cartography
that is available to us at a reasonable cost. We use
a combination of governmental and private data
sources, which we identify in product literature and
copyright messages displayed to the consumer.
Virtually all data sources contain some inaccurate
or incomplete data. In some countries, complete
and accurate map information is either not
available or is prohibitively expensive.
English ñ 5
Page 6

First Step
Various setup screens appear automatically before
using.
Ñ Initial setup
When you rst turn on the unit, the screen of the
conguration setting will appear.
1 Turn the ignition key of your car to ACC.
The unit is turned on.
Initial SETUP screen appears.
2 Touch the corresponding key and set the
value.
Color
Set the screen and button illumination color. You
can select whether to perform color scan and adjust
scanning color. (Instruction Manual P.99)
After set ting, touch [6].
EXT SW (DNX892, DNX7150BT only)
Control the external devices. (Instruction Manual
P.9 6)
After set ting, touch [6].
Camera
Set the parameters for the camera. (Instruction
Manual P.102)
After set ting, touch [6].
OEM SETUP (North America Sales area only)
This function requires a commercial adaptor.
Consult your Kenwood dealer for details.
DEMO
Set the demonstration mode. Default is “ON”.
3 Touch [Finish].
✎ NOTE
• “Initial setup”also appears when the unit is reset.
Locale
Select the country for the navigation system.
The language, the distance unit, and the gasoline
unit are set.
Language
Select the language used for the control screen
and setting items. Default is “American English (en)”.
(Instruction Manual P.95)
After set ting, touch [Enter].
Angle
DNX8 DNX7
Adjust the position of the monitor. Default is “0”.
(Instruction Manual P.98)
After set ting, touch [6].
6 ñ English
Page 7

Ñ iPod/iPhone connection setup
When you rst select iPod as a source, the setting
screen of the iPod/iPhone connec tion will appear.
1 Press the <HOME> button.
HOME screen appears.
2 Touch [iPod] in the HOME screen.
iPod connection setup screen appears.
3 Touc h [CH ANGE] .
Ñ Application link setup
When you rst select Apps as a source, the setting
screen for the connection with the device installed
the apps will appear.
1 Press the <HOME> button.
HOME screen appears.
2 Touch [APPS] in the HOME screen.
Application link setup screen appears.
3 Touc h [CH ANGE] .
Select the way of iPod/iPhone connection. For the
details, refer to “iPod/iPhone connection setup”
(P.55) in the Instruction Manual.
✎ NOTE
• For the details of the necessary cable and adapter
to connect with iPod/iPhone, refer to “iPod/iPhone
connection” (P.26).
• When you select “HDMI + BT” or “Bluetooth”,
Bluetooth device selection screen will appear. Select
the iPod/iPhone to be connected.
If a connectable Bluetooth device is not displayed,
touch [Search] and do the pairing of the devices.
• “iPod connection setup” also appears when the unit
is reset.
Select the way to connect with the device installed
the apps. For the details, refer to ”Application link
setup” (P.56) in the Instruction Manual.
✎ NOTE
• For the details of the necessary cable and adapter
to connect with iPod/iPhone and Android, refer to
“iPod/iPhone connection” (P.26) and “Android
connection” (P.26).
• When you select “HDMI + BT”, “HDMI/MHL + BT” or
”Bluetooth”, Bluetooth device selec tion screen will
appear. Select the device to be connected.
If a connectable Bluetooth device is not displayed,
touch [Search] and do the pairing of the devices.
• “Application link setup”also appears when the unit
is reset.
English ñ 7
Page 8
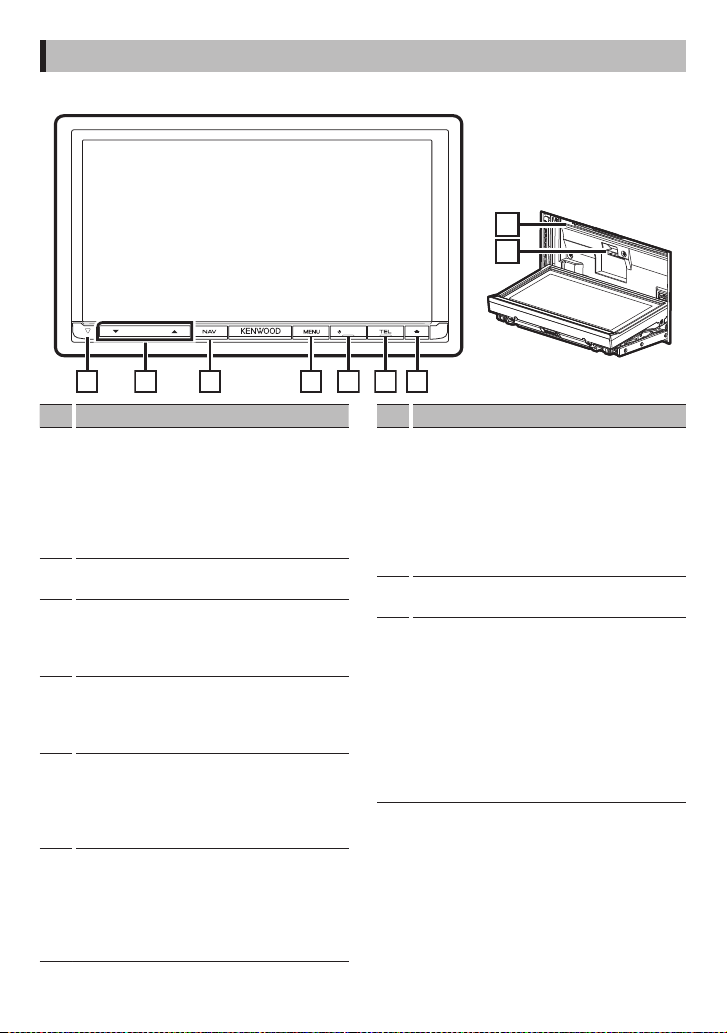
Functions of the Buttons on the Front Panel
1234567
Ñ DNX892/ DNX7150BT/ DNX772BH
HOME
8
9
No. Name/Motion
s (Reset)
1
• If the unit or the connected unit fails to
operate properly, the unit returns to factor y
settings when this button is pressed
(Instruction Manual P.125).
• This indicator flashes when the vehicle
ignition is off (Instruction Manual P.96).
R , S
2
• Adjusts volume.
NAV
3
• Displays the navigation screen.
• Pressing for 1 second switches AV out
sources.
MENU
4
• Displays the option menu screen.
• Pressing for 1 second switches camera view
display on/off.
HOME
5
• Displays the HOME screen (Instruction
Manual P.16).
• Pressing for 1 second turns the power off.
• When the power off, turns the power on.
TEL
6
• Displays the Hands Free screen (Instruction
Manual P.87).
• Pressing for 1 second displays the Voice
Recognition screen. (Instruction Manual
P.9 0)
No. Name/Motion
G
7
• Ejects the disc.
• When the panel is opened, pressing closes
the panel and pressing for 1 second ejects
the disc forcibly.
• When the panel is closed, pressing for 1
second fully opens the panel to the location
of the SD card slot.
Disc insert slot
8
• A slot to insert a disc media.
SD card slot
9
• A slot to insert an SD card.
See How to i nsert an SD Card / microSD
Car d (P.10).
• You can play audio/visual file in the card. *
(Only for DNX892, DNX772BH)
• An SD card slot for upgrading the map.
For how to upgrade the map, refer to
the instruction manual of the navigation
system.
* If the map update le remains in the SD card, you
cannot play audio/visual le.
8 ñ English
Page 9
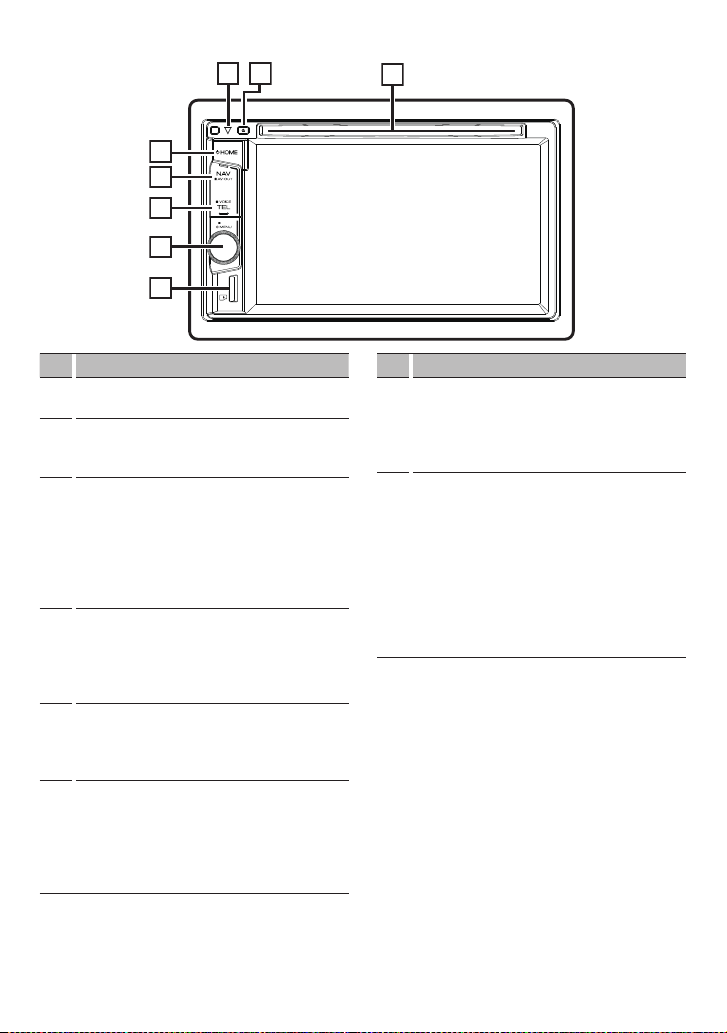
Ñ DNX692/ DNX572BH/ DNX4150BT
1
342
5
6
7
8
R-CAM
No. Name/Motion
Disc insert slot
1
• A slot to insert a disc media.
G
2
• Ejects the disc.
• Pressing for 1 second ejects the disc forcibly.
s (Reset)
3
• If the unit or the connected unit fails to
operate properly, the unit returns to factor y
settings when this button is pressed
(Instruction Manual P.125).
• This indicator flashes when the vehicle
ignition is off (Instruction Manual P.96).
HOME
4
• Displays the HOME screen (Instruction
Manual P.16).
• Pressing for 1 second turns the power off.
• When the power off, turns the power on.
NAV
5
• Displays the navigation screen.
• Pressing for 1 second switches AV out
sources.
TEL
6
• Displays the Hands Free screen (Instruction
Manual P.87).
• Pressing for 1 second displays the Voice
Recognition screen. (Instruction Manual
P.9 0)
No. Name/Motion
Volume knob
7
• Turning adjusts volume up or down.
• Displays the option menu screen.
• Pressing for 1 second switches camera view
display on/off.
microSD card slot
8
• A slot to insert a microSD card.
See How to i nsert an SD Card / microSD
Car d (P.10).
• You can play audio/visual file in the card. *
(Only for DNX692, DNX572BH)
• A microSD card slot for upgrading the
map. For how to upgrade the map, refer to
the instruction manual of the navigation
system.
* If the map update le remains in the microSD card,
you cannot play audio/visual le.
English ñ 9
Page 10
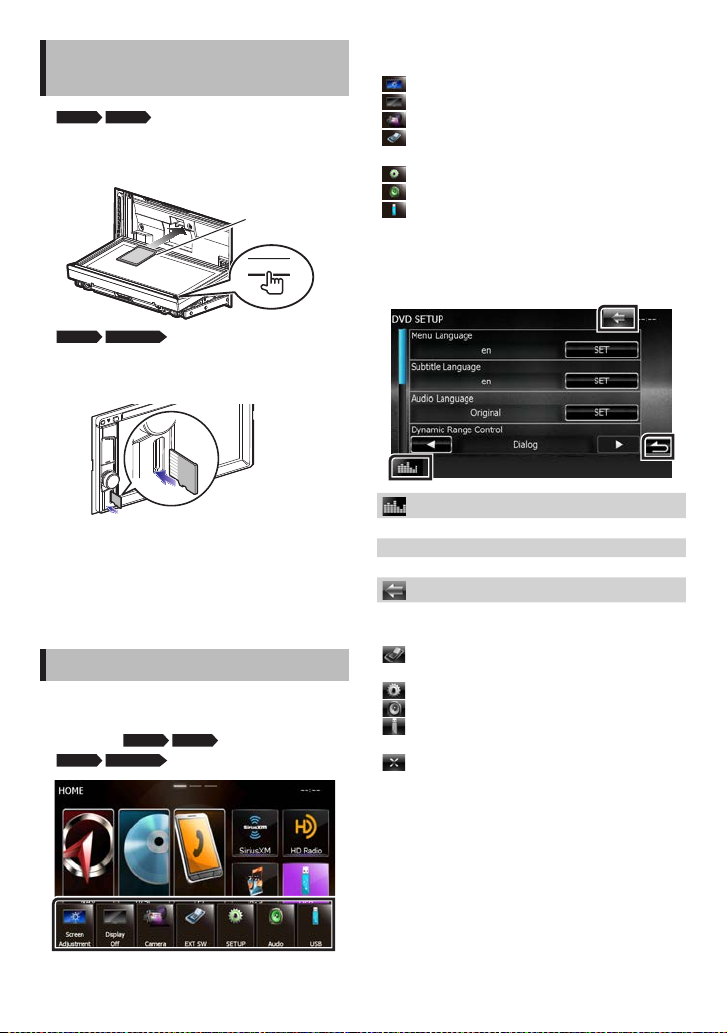
How to insert an SD Card/
microSD Card
DNX8 DNX7
1) Press <G> button for 1 second.
2) Hold the SD card with the label facing up,
and insert it into the slot until it clicks.
Labelled side
DNX6 DNX5/4
1) Hold the microSD card with the label side
facing right and the notched section down,
and insert it into the slot until it clicks.
Ñ Eject an SD Card/ microSD Card
1) Push the card until it clicks and then remove
your finger from the card.
2) The card pops up so that you can pull it out
with your fingers.
Common Operations
Ñ Popup menu
1 Press the
DNX6 DNX5/4
DNX8 DNX7
<MENU> button/
Volume knob.
Touch to display the popup menu. The contents of
the menu are as follows.
: Displays the Screen Adjustment screen.
: Turns the screen off.
: Displays the display view.
: Turn on or off the ex ternal device power supply.
(DNX892, DNX7150BT only)
: Displays the SETUP Menu screen.
: Displays the Audio Control Menu screen.
: Displays the control screen of current source.
Icon feature differs depending on the source.
0
Ñ General
There are some functions which can be operated
from most screens.
(Graphic Equalizer)
Displays Graphic Equalizer screen.
[6] (RETURN)
Returns to previous screen.
(Common menu key)
Touch to display the common menu. The contents
of the menu are as follows.
: Turn on or off the ex ternal device power supply.
(DNX892, DNX7150BT only)
: Displays the SETUP Menu screen.
: Displays the Audio Control Menu screen.
: Displays the control screen of current source.
Icon feature differs depending on the source.
: Closes the menu.
10 ñ English
Page 11
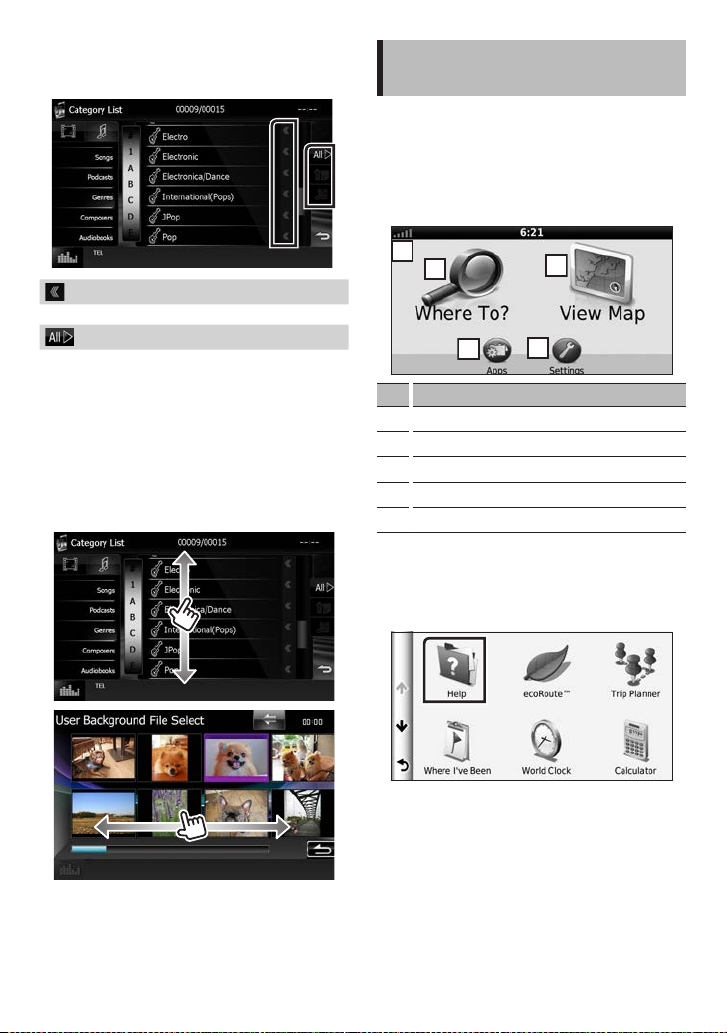
Ñ List screen
1
2
3
4
5
There are some common function keys in the list
screens of most sources.
(Scroll)
Scrolls the displayed text.
etc.
Touch keys with various functions are displayed
here.
Displayed keys differ depending on the current
audio source, status, etc.
For examples, see Lis t screen (P.19) in the
Instruction Manual.
Ñ Flick scrolling
You can scroll the list screen by icking the screen
up/down or right/left.
How to Use the Navigation System
1 Press the <NAV> button to display the
navigation screen.
2 Operate the desired function from the
Main Menu screen.
No. Name/Motion
GPS satellite strength.
1
Finds a destination.
2
Views the map.
3
Uses the Apps such as ecoRoute and Help.
4
Adjusts the settings.
5
✎ NOTE
• You can get additional information about using the
navigation system from Help. To display Help, touch
[Apps] and then touch [Help].
• For more information about your navigation system,
download the latest version of the Owner ’s Manual
from http://manual.kenwood.com/edition/im386/.
English ñ 11
Page 12
3 Enter your destination and start the
1
2
345
678
9
guidance.
Finding points of interest
1) Touch [ Where To?].
2) Select a category and a subcategory.
3) Select a destination.
4) Touc h [Go!].
✎ NOTE
• To enter letters contained in the name, touch the
Search bar and enter the letters.
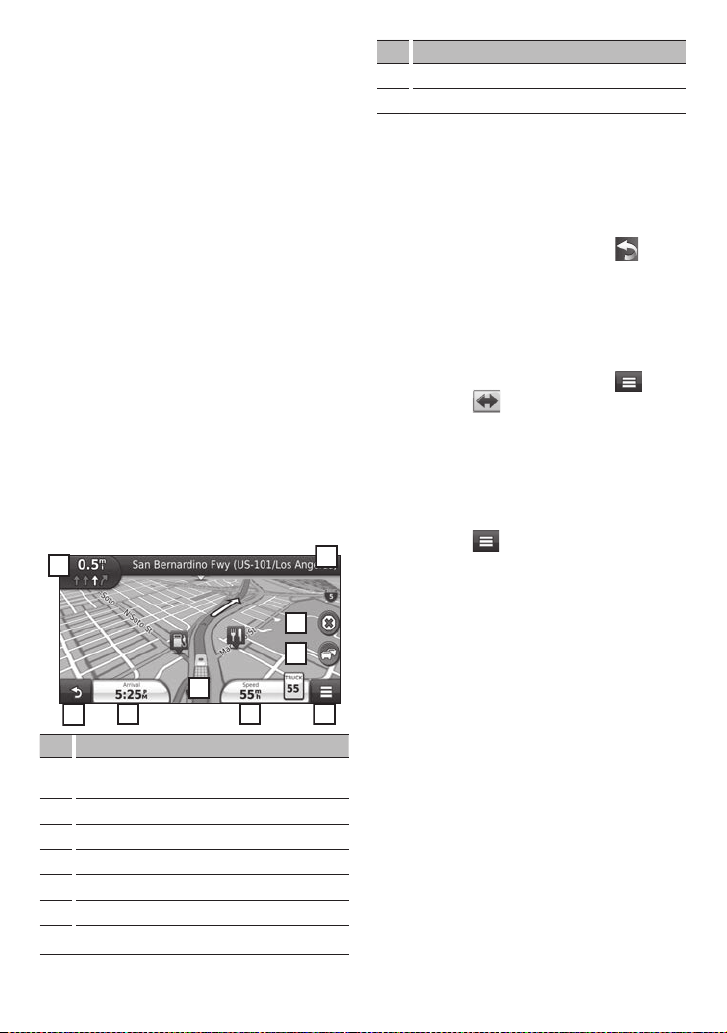
4 Follow your route to the destination.
✎ NOTICE
• The speed limit icon feature is for information only
and does not replace the driver’s responsibility to
abide by all posted speed limit signs and to use
safe driving judgment at all times. Garmin and
JVC KENWOOD will not be responsible for any traffic
fines or citations that you may receive for failing to
follow all applicable traffic laws and signs.
Your route is marked with a magenta line. As you
travel, your navigation system guides you to your
destination with voice prompts, arrows on the map,
and directions at the top of the map. If you depart
from the original route, your navigation system
recalculates the route.
No. Name/Motion
Views the Next Turn page or the junction view
1
page, when available.
Views the Turn List page.
2
Views the Where Am I? page.
3
Stops the currents route.
4
Displays traffic information on the route.
5
Returns to the Main menu.
6
Displays a different data field.
7
12 ñ English
No. Name/Motion
Views the Trip Computer.
8
Displays more options.
9
✎ NOTE
• Touch and drag the map to view a different area of
the map.
• A speed limit icon could appear as you travel on
major roadways.
Adding a stop
1) While navigating a route, touch [ ] and
then touch [Where To?].
2) Search for the extra stop.
3) To uch [Go!].
4) Touch [Add to Active Route] to add this stop
before your final destination.
Taking a detour
1) While navigating a route, touch [ ].
2) Touch [
].
Ñ Other Features
Manually avoiding trac on your route
1) From the map, touch the traffic icon.
2) Touch [Traffic On Route].
3) If necessary, touch the arrows to view other
traffic delays on your route.
4) Touch [
] > [Avoid].
Viewing the trac map
1) The traffic map shows color-coded traffic
flow and delays on nearby.
About trac
✎ NOTICE
• Traffic service is not available in some areas or
countries.
• Garmin and JVC KENWOOD are not
responsible for the accurac y or timeliness of
the traffic information.
• You can receive INRIX traffic information
and weather forecast by connecting your
iPhone or Android smartphone in which
the “KENWOOD Traffic Powered By INRIX”
application is installed. (North America Sales
area only)
For details, see “KENWOOD Traffic Powered By
INRIX” application.
• With an FM traffic receiver, the navigation
system can receive and use traffic information.
(Latin America Sales area only)
You can purchase traffic subscriptions for
regions or countries. Go to www.garmin.
com/kenwood for more information.
Page 13
Updating the software
To update the navigation system software,
you must have an SD card, a USB mass storage
device and an internet connection.
1) Go to ww w.garmin.com/kenwood.
2) Select Update.
3) Follow the on-screen instruc tions.
Updating maps
You can purchase updated map data from
Garmin or ask your Kenwood dealer or
Kenwood service center for details.
1) Go to ww w.garmin.com/kenwood.
2) Select Update.
3) Follow the on-screen instruc tions.
How to Play Music
You can play audio les from music CD, disc media,
USB storage device, SD Card and iPod.
✎ NOTE
• For details on playable file format, media format,
iPod model, etc., refer to the Instruction Manual.
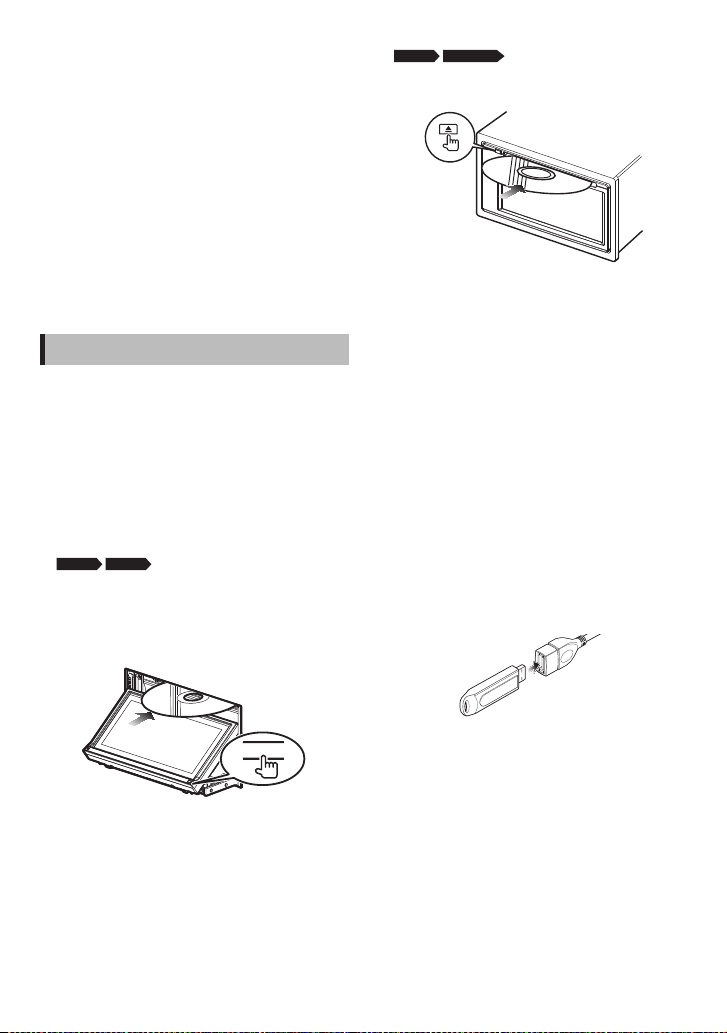
1 Connect the media you want to play as
shown below.
Disc
DNX8 DNX7
1) Press the <G> button to open the front
panel.
2) Insert the disc into the slot.
The panel closes automatically and playback
starts.
DNX6 DNX5/4
1) Insert the disc into the slot.
Playback starts.
To eject the disc:
1) Press the <G> button.
iPod/iPhone
1) Connect the iPod/iPhone.
2) Press the <HOME> button.
3) Touch [iPod].
✎ NOTE
• For the details of the necessary cable and
adapter to connec t with iPod/iPhone, refer to
“iPod/iPhone connection” (P.26).
To disconnect the iPod/iPhone
connected with the cable:
1) Touch on the lef t side of the screen to display
the function panel.
2) Touch [ G ]. Disconnect the iPod/ iPhone
from the cable.
USB device
1) Connect the USB device with the USB cable.
To eject the disc:
1) Press the <G> button.
0
To disconnect the USB device:
1) Touch on the lef t side of the screen to display
the function panel.
2) Touch [ G ]. Disconnect the device from the
cable.
English ñ 13
Page 14

SD card/ microSD card (DNX892/
DNX772BH/ DNX692/ DNX572BH)
1) Insert the SD card/ microSD card.
2) Replace the front panel.
Playback starts.
✎ NOTE
• To insert SD card or microSD card, refer to “How
to insert an SD Card/ microSD Card” (P.10).
2 Control the music you are listening to on
the source control screen.
The following symbols indicate the keys on the
screen.
The functions of the keys are the same despite
the dierence of the source you are listening to.
Touch on the left side of the screen to display the
function panel.
I
Stops playing. (disc media only)
G
Disconnects the device. (USB device and iPod
only)
✎ NOTE
• For other operations, refer to the Instruction Manual.
3 Search the track/le you want to listen to.
List search
1) Touch on the right side of the screen. The
content list of the media being played is
displayed.
Rened search
1) Touch [ ].
2) Touch the desired refinement method.
The list is refined by the item you selected.
3) Touch the desired item.
Basic operations from this screen
L
Plays or pauses.
E F
Searches the previous/next content.
A B or move the cursor in the center
bar
Fast forwards or Fast backwards (Disc media,
CD, USB device, SD only).
/
Repeats current content.
9
Plays all contents in random order.
[
] [ ]
Searches previous/next folder. (disc media
and USB device, SD only)
14 ñ English
✎ NOTE
• For details on searching operations, refer to S earch
Operation (P.40) in the Instruction Manual.
How to Play Movie/Picture
You can play DVD video, Video CD ( VCD), movie les
from disc media, iPod and picture les from SD Card
, USB storage device.
✎ NOTE
• For details on playable file format, device format, etc.,
refer to the Instruction Manual.
Page 15
1 Connect the media you want to play.
1
2
3
3
For the method of connecting, see Ho w to Play
Music (P.13).
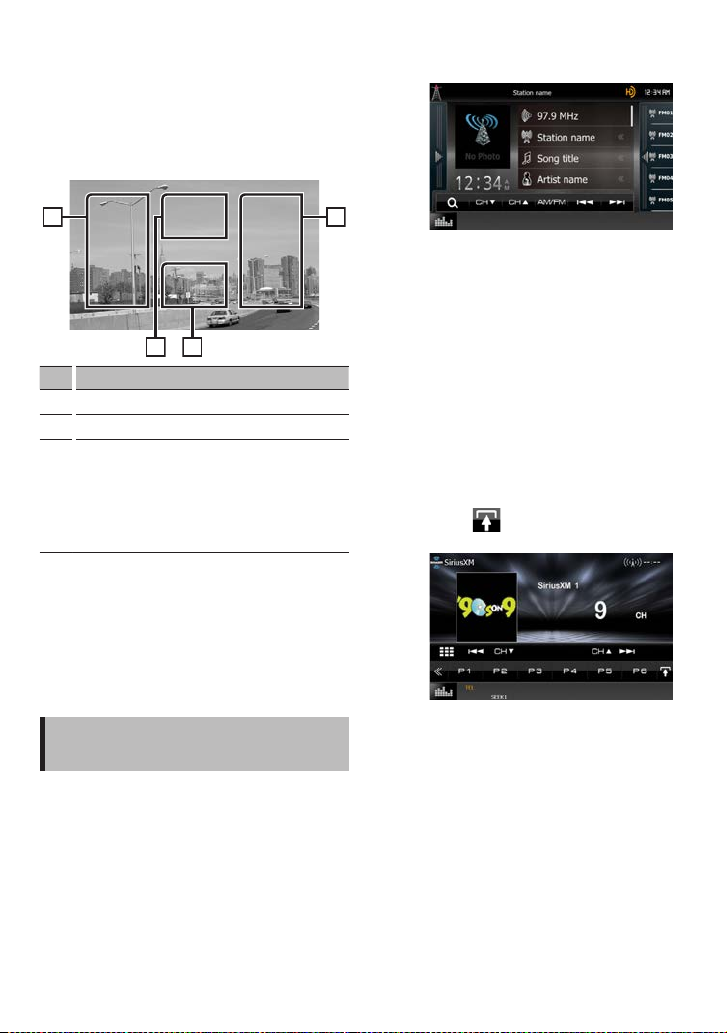
2 Control the movie/picture by touching
the screen.
Each area on the screen has a separate function.
No. Name/Motion
Displays the movie control screen.
1
Displays the Source Control screen.
2
• Searches the next/previous content or file.
3
• Scrolling from center of display to left
or right performs fast backward or fast
forward.
To stop fast backward/for ward, touch center
of the display.*
*1 For USB, this function may be unavailable
depending on the playing file format.
1
✎ NOTE
• For operations on the source control screen, see
How to Play M usic (P.13).
However, searching by category/link/album artwork
is not available.
How to Listen to the Radio/ HD Radio™ Tuner/ SiriusXM®
1 Press the <HOME> button.
HOME screen appears.
2 Touch [TUNER], [HD Radio], or [SiriusXM].
The unit switches to the radio/ HD Radio tuner /
SiriusXM (sold separately) source.
3 Operate on the source control screen.
Radio/ HD Radio tuner:
Station search
1) Touch [AM/FM] to select the band.
2) Touch [ E] or [F] to tune in the desired
station.
Auto memory
1) Touch [AM/FM] to select the band.
2) Flick the screen from the left end to right to
display the function panel.
3) To uch [A ME].
4) Touc h [E] or [F].
Auto memory starts.
Recalling the preset station
1) Touch [FM#] (#:1-15) or [AM#] (#:1-5).
SiriusXM:
Station search
1) Touch [ ].
Sub function menu appears.
2) Touch [C HS] or [CHR] to tune in the desired
station.
Storing Channels in Preset Memory
1) Tune to a channel you wish to store in
mem ory.
2) Press and hold for 2 seconds (until you hear a
beep) the preset number [P#] (#:1-6).
Recalling the preset station
1) Touch [P#] (#:1-6).
✎ NOTE
• For other operations, see Radio/HD Radio Tuner
Basic O peration (P.58) and SiriusXM® Basic
Operation (P.68) in the Instruction Manual.
English ñ 15
Page 16
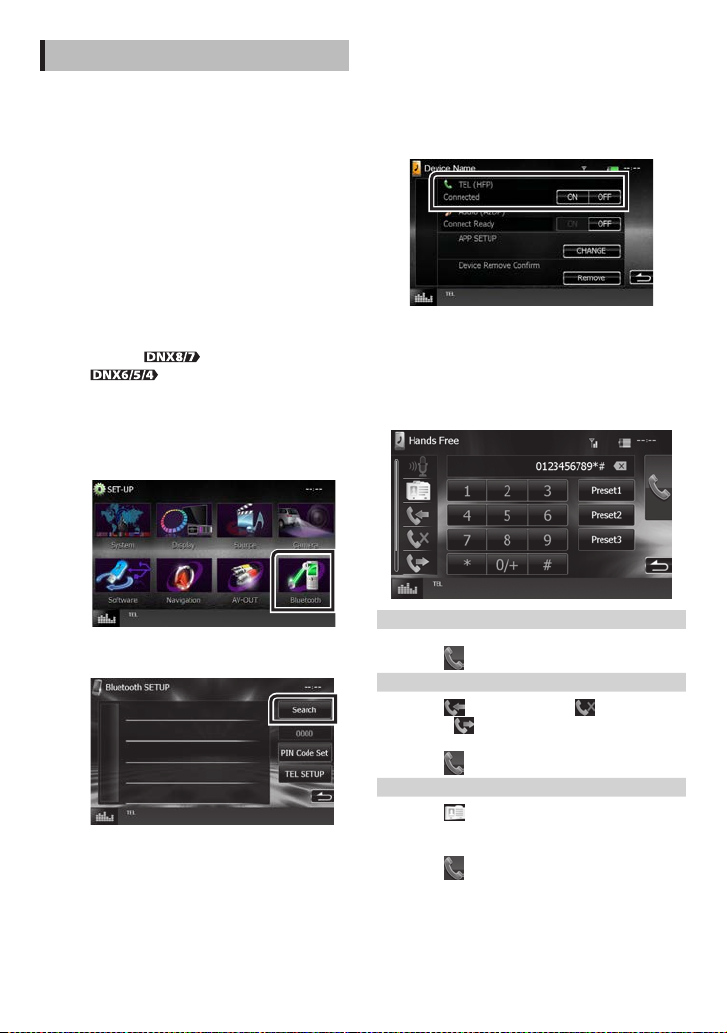
How to Make a Phone Call
You can use your Bluetooth cell-phone when paired
to this unit.
✎ NOTE
• You cannot register the Bluetooth unit when you are
using the following sources:
iPod, Bluetooth Audio, APPS, iHeart, Pandora, AUPEO
1 Register your cell-phone to the unit.
Follow as the procedures shown below. For
detailed operation, see Registering the Bluetooth
Unit (P.83) in the Instruction Manual.
1) Press the <HOME> button.
HOME screen appears.
2) Touch [STANDBY].
3) Press the
Popup menu appears.
4) Touch [SETUP].
SETUP Menu screen appears.
5) Touch [Bluetooth].
Bluetooth SETUP screen appears.
6) Touch [Search].
Searched Device List screen appears.
7) Select your cell-phone from the displayed list
in the Searched Device List screen.
8) Enter PIN code form the cell-phone.
Registering is completed.
The PIN code is set to “0000” as default.
<MENU> button/
volume knob.
2 Connect your cell-phone to the unit.
1) Touch the device name you want to connect
in the Bluetooth SETUP screen.
2) Touch [ON] of [TEL(HFP)] in the BT
Connection Settings screen.
The selected device is connected to the unit.
When registration of your cell-phone is
completed, the phone book of the cell-phone is
automatically downloaded to this unit.
3 Make or receive a phone call.
See the table below for each operation method.
Call by entering a phone number
1) Enter a phone number with number keys.
2) Touch [
Call using call records
1) Touch [
calls), or [
2) Select the phone number from the list.
3) Touch [
Call using the phonebook
1) Touch [
2) Select the name from the list.
3) Select the number from the list.
4) Touch [
].
] (incoming calls), [ ] (missed
] (outgoing calls).
].
].
].
16 ñ English
Page 17
Call using the preset number
1) Touch [Preset #] to start calling the
corresponding phone number.
2) Touch [
].
Call by voice
You can make a voice call using the voice
recognition function of the cell-phone.
1) Touch [ ].
2) Pronounce the name registered in the cellphone.
✎ NOTE
• For detailed operation, see Using Hands -Free Unit
(P.87) in the Instruction Manual.
Installation
Ñ Before Installation
Before installation of this unit, please note the
following precautions.
#WARNINGS
• If you connect the ignition wire (red) and the
battery wire (yellow) to the car chassis (ground), you
may cause a shor t circuit, that in turn may start a fire.
Always connect those wires to the power source
running through the fuse box.
• Do not cut out the fuse from the ignition wire (red)
and the battery wire (yellow). The power supply
must be connected to the wires via the fuse.
#CAUTION
• Install this unit in the console of your vehicle.
Do not touch the metal part of this unit during and
shortly after the use of the unit. Metal part such as
the heat sink and enclosure become hot.
✎ NOTE
• Mounting and wiring this product requires skills and
experience. For best safety, leave the mounting and
wiring work to professionals.
Ma
•
ke sure to ground the unit to a negative 12V DC
power supply.
Do n
•
ot install the unit in a spot exp osed to direct
sunlight or excessive heat or humidity. Also avoid
places with too much dust or the possibilit y of water
splashing.
Do n
•
ot use your own screws. Use only the screws
provided. If you use the wrong screws, you could
damage the unit.
If t
•
he power is not turned ON (“PROTECT” is displayed),
the speaker wire may have a short-circuit or touched
the chassis of the vehicle and the protection function
may have been activated. Therefore, the speaker wire
should be checked.
•
our car’s ignition does not have an ACC position,
If y
connect the ignition wires to a power source that
can be turned on and off with the ignition key. If you
connect the ignition wire to a power source with a
constant voltage supply, such as with batter y wires,
the batter y may be drained.
If t
•
he console has a lid, make sure to install the unit so
that the front panel will not hit the lid when closing
and opening.
•
he fuse blows, first make sure the wires aren’t
If t
touching to cause a short circuit, then replace the old
fuse with one with the same rating.
In
•
sulate unconnected wires with vinyl tape or other
similar material. To prevent a short circuit, do not
remove the caps on the ends of the unconnec ted
wires or the terminals.
• Connect the speaker wires correctly to the terminals to
which they correspond. The unit may be damaged or
fail to work if you share the ¤ wires or ground them to
any metal par t in the car.
•
en only two speakers are being connected to
Wh
the system, connect the connectors either to both
the front output terminals or to both the rear output
terminals (do not mix front and rear). For example,
if you connec t the ¢ connector of the left speaker
to a front output terminal, do not connect the ¤
connector to a rear output terminal.
• After the unit is installed, check whether the brake
lamps, blinkers, wipers, etc. on the car are working
properly.
Mo
•
unt the unit so that the mounting angle is 30° or
less.
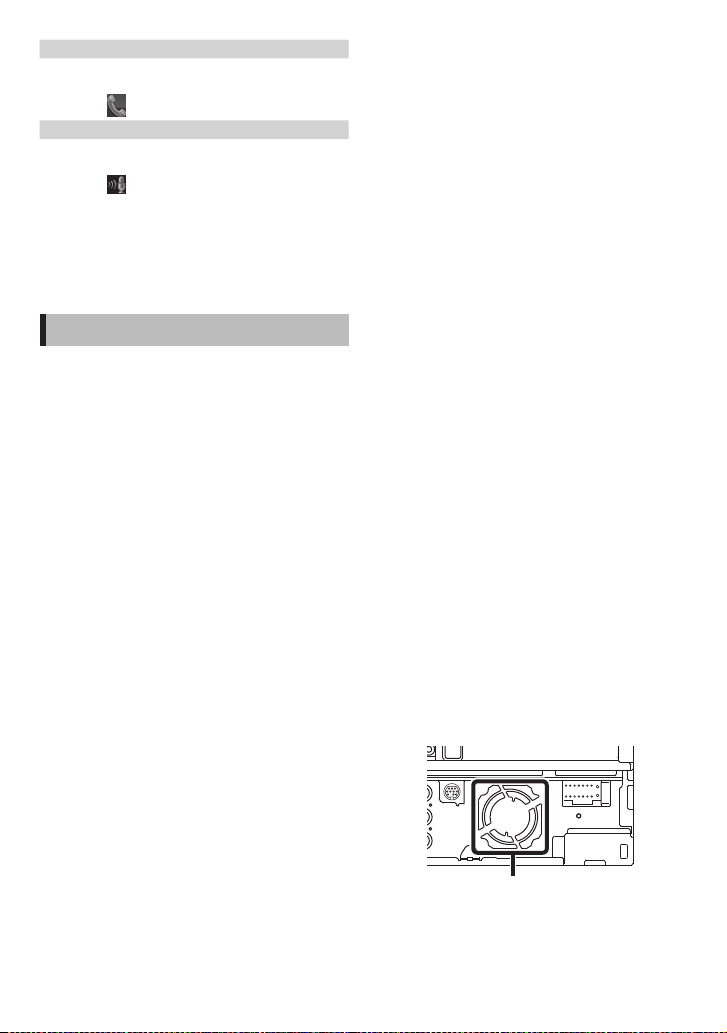
Th
•
is unit has the cooling fan to decrease the internal
temperature. Do not mount the unit in a place where
the cooling fan of the unit is blocked. Blocking these
openings will inhibit the cooling of the internal
temperature and result in malfunction.
Cooling fan
• Do not press hard on the pan el surface when installing
the unit to the vehicle. Other wise scars, damage, or
failure may result.
English ñ 17
Page 18
• Reception may drop if there are metal objec ts near
the Bluetooth antenna.
DNX8
DNX7
DNX6
DNX5/4
Bluetooth antenna unit
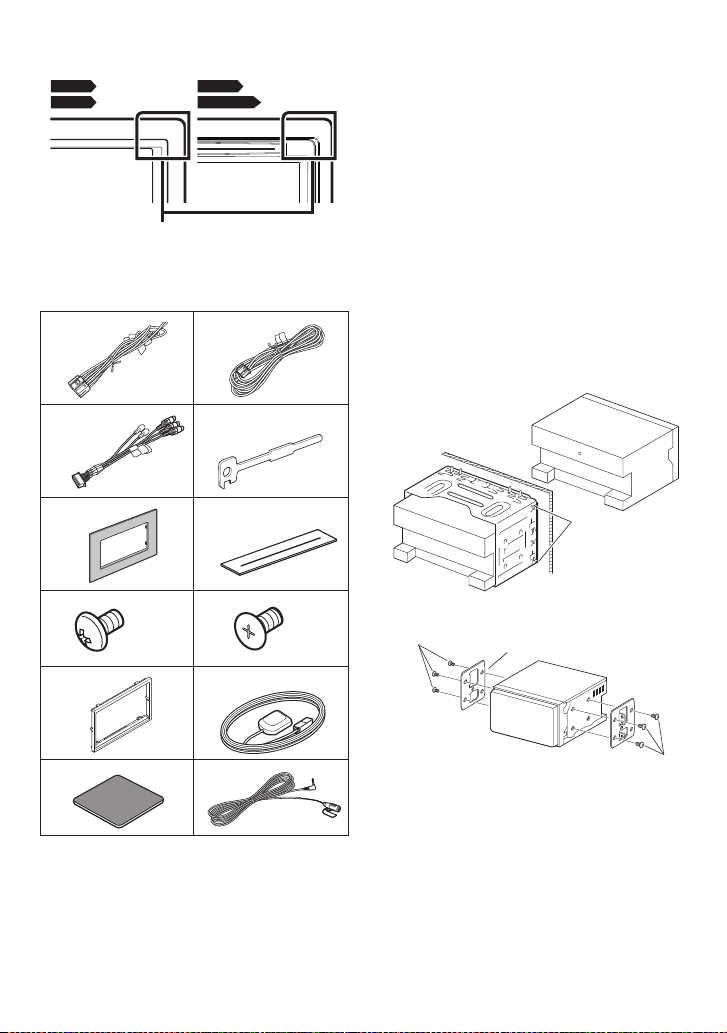
Ñ Supplied accessories
First of all, make sure that all accessories are
supplied with the unit.
1
[1]
3
x1
2
(2 m)
[3]
4
Ñ Unit
1) To prevent a short circuit, remove the key from
the ignition and disconnect the ¤ terminal of
the bat tery.
2) Make the proper input and output wire
connections for each unit.
3) Connect the speaker wires of the wiring harness.
4) Connect the wiring harness wires in the
following order;
ground, battery, ignition.
5) Connect the wiring harness connector to the
unit.
6) Install the unit in your car.
7) Reconnect the ¤ terminal of the battery.
8) Press the <Reset> button. (P.4)
9) Perform the Initial Setup.
See Firs t Step (P.6).
Non-Japanese cars (DNX892,
DNX7150BT, DNX692, DNX4150BT)
x1
[2]
5
[2]
6
x1
x1
7
(M5x6m m)
[3]
9
8
x6
(M5x7m m)
0
(3.5 m)
x1
-
=
(3 m)
x1
[1]
DNX892, D NX7150 BT, DNX772BH only
[2]
DNX892 only
[3]
DNX892, D NX7150 BT, DNX692, D NX4150 BT only
18 ñ English
x2
x1
Bend the ta bs of the
mounting sleeve with
a screwdri ver or similar
utensil and at tach it
x4
in place.
Japanese cars
7 or 8
x6
Car Bracket
7 or 8
✎ NOTE
x1
• Make sure that the unit is installed securely in place.
If the unit is unstable, it may malfunction (eg, the
sound may skip).
Page 19

Ñ Trim plate (DNX892, DNX7150BT, DNX692,
DNX415 0BT )
1) Attach accessory 9 to the unit.
Toyota/Scion cars (DNX892)
1) Cut out accessory 5 as illustrated.
Cutting line
9
General Motors cars (DNX892)
1) Cut out accessory 5 to meet the shape of
the opening of the center console.
2) Attach accessory 5 to the unit.
5
Cut out to meet t he shape of
the opening in the vehicle.
5
2) Fold double-sided adhesive (accessory 6)
along the slit and attach it to accessory 5
cut-out against the center rib as illustrated.
Use 2 pieces of accessory 6 for 1 accessory
5 cut-out.
3) Attach accessory 5 cut-out to the unit.
6
English ñ 19
Page 20

Ñ GPS antenna
GPS antenna is installed inside of the car. It should
be installed as horizontally as possible to allow easy
reception of the GPS satellite signals.
To mount the GPS antenna inside your vehicle:
1) Clean your dashboard or other surface.
2) Remove the separator of the metal plate
(accessory -).
3) Press the metal plate (accessory -) down firmly
on your dashboard or other mounting surface.
You can bend the metal plate (accessory -) to
conform to a curved surface, if necessar y.
4) Remove the separator of the GPS antenna
(accessory 0), and stick the antenna to the
metal plate (accessory -).
0
Ñ Microphone unit
1) Check the installation position of the
microphone (accessory =).
2) Clean the installation surface.
3) Remove the separator of the microphone
(accessory =), and stick the microphone to the
place shown below.
4) Wire the microphone cable up to the unit with it
secured at several positions using tape or other
desired method.
5) Adjust the direction of the microphone
(accessory =) to the driver.
-
✎ NOTE
• Depending on the type of car, reception of the
GPS satellite signals might not be possible with
an inside installation.
• Please install this GPS antenna in an area away
from any antennas that are used with CB radios
or satellite televisions.
• The GPS antenna should be installed at a position
that is spaced at least 12 inch (30 cm) from
cellular phone or other transmitting antennas.
Signals from the GPS satellite may be inter fered
with by these t ypes of communication.
• Painting the GPS antenna with (metallic) paint
may cause a drop in performance.
=
Fix a cable w ith a commercial item of ta pe.
20 ñ English
Page 21

Ñ Removing the trim plate (DNX892,
DNX7150BT, DNX692, DNX4150BT)
1) Engage the catch pins on the extrac tion key
(accessory 4) and remove the two locks on the
lower level.
Lower the trim plate (accessory 9) and pull it
forward as shown in the figure.
9
4
Ñ Removing the unit (DNX892, DNX7150BT,
DNX692, DNX4150BT)
1) Remove the trim plate by referring to step 1 in
“Removing the trim plate”.
2) Insert the two extraction key (accessor y 4)
deeply into the slots on each side, as shown.
4
Lock
Catch
✎ NOTE
• The trim plate can be removed from the top side
in the same manner.
2) When the lower level is removed, remove the
upper two locations.
3) Lower the extraction key toward the bottom,
and pull out the unit halfway while pressing
towards the inside.
✎ NOTE
• Be careful to avoid injury from the catch pins on
the extraction key.
4) Pull the unit all the way out with your hands,
being careful not to drop it.
English ñ 21
Page 22

Ñ System connection
2
1
Accessor y =
Accessor y 0
1 1
AV Audio output
Accessor y 3
Audio/Visual Input
(DNX7150BT only)
Visual Output
Rear view ca mera input
Front view cam era input
(DNX892, DNX7150BT
CAMERA
FRONT VIEW
Green/Red
Green/White
only)
To CMOS-3xx seri es
(Optional Acce ssory)
camera control terminal
Accessor y =
22
AV Audio output
Accessor y 2
Light Green ( Parking sensor wir e)
For best s afety, be sure to connec t
the park ing sensor.
Purple/ White (Reverse se nsor wire)
REVERSE
Blue/Red
(DNX892, DNX7150BT only)
Visual Output
Rear view ca mera input
Accessor y 0
Connec t to the vehicle’s parkin g
brake detection switch harness.
PRK SW
Connec t to vehicle’s reverse
lamp harne ss when using the
optional rear view camera.
To Relay Box.
If no connec tions are made,
RELAY
do not let the c able come out
from the ta b.
22 ñ English
FM/AM antenna input
Rear Audio Pre out
Front Audio Preout
Subwoofer Preout
When conne cting to an extern al amplifier,
connec t its ground wire to the car 's chassis
to avoid damag ing the unit.
Accessor y 0: GPS Antenna
Accessor y =:
Bluetooth Microphone
Page 23

Ñ Connecting wires to terminals
Ignition k ey
switch
ACC
Fus e (10A) Fus e (10A)
Accessor y 1
Red (Ignit ion wire)
Car fuse b ox
(Main f use)
Batter y
To use the steeri ng wheel remote
control featu re, you need an exclusive
remote adapte r (not supp lied) matched
to your car.
Connec t to the terminal that is
grounded when either the telephone
rings or during conversation.
To use the Mute featur e, you need to
hook up this w ire to your telephone
by using a comme rcial telephone
accessory.
Dependi ng on what antenna you are
using, conne ct either to the contro l
terminal of t he motor antenna, or to the
power terminal for the booster amplifier
of the film- type antenna.
(Max. 300 mA, 12V)
When using t he optional power
amplifier, conn ect to its power cont rol
terminal.
Car fuse
box
A
A
To steering rem ote
To car light control s witch
Yellow (Batter y wire)
Black (Groun d wire) ¤
(To car chassis)
Light Blue /Yellow
(Steering rem ote control wire)
Orange/White
(Dimmer cont rol wire)
REMOTE CONT
STEERING WHEEL
REMOTE INPUT
ILLUMI
Brown (Mute cont rol wire)
White/Black
Green/Black
Purple/Black
MUTE
Blue
(Antenna control wire)
ANT CONT
Blue/White
(Power control w ire)
P. CONT
If no connec tions are made,
do not let the c able come out from th e tab.
+
White
Gray/Black
+
Gray
+
Green
+
Purple
Speaker imp edance: 4-8 Ω
To front left
speaker
To front right
speaker
To rear left
speaker
To rear right
speaker
English ñ 23
Page 24

Ñ Optional accessory connection
2
3
4
1
5
KCA-MH100 (1.8 m)
[4]
/ DNX7150BT DNX772BH
iPod/
iPhone
5 5
[3]
4 4
USB terminal
(0.8 m)
Lightning D igital AV
[3]
Adapter
[1]
iPo d maximum power supp ly
current : DC 5 V = 1 A
[2]
USB ma ximum power supply
current : DC 5 V = 50 0 mA
[3]
Sold separately
[4]
KCA -HD100
[4]
(1.8 m )
AV-IN (CA-C 3AV; Optiona l Accessory) input
(DNX4150BT only)
iPod/ AV-IN(2) (CA -C3AV; Optional Accessor y) input
(iPod/ AV-IN(2) s witchable)
iDatalink co nnector
(DNX892/ DNX772BH/ DNX692/ DNX572BH only)
SiriusXM Conn ect Vehicle Tuner connec tor
(DNX892/ DNX772BH/ DNX692/ DNX572BH only)
Optional a ccessory
KCA -iP103 ( 0.8m)
[4]
[2]
3
2
iPod terminal
USB device
[3]
(0.8 m)
Android
smartphone
1
iPod/
iPhone
[1]
Video Output
(1.8 m)
USB
terminal
(0.8m)
[4]
KCA- iP202
[3]
2
3
iPod terminal
[1]
(0.8 m)
[3]
iPod
KCA -iP102
[4]
(0.8m)
MHL maximum power supply
current : 5 V
900 mA
When you connect the cable
to HDMI/MHL terminal, remove
the fixture. After connecting the
cable, put the fixture again.
HDMI/ MHL con nector
✎ NOTE
• When you connect iPod/iPhone with HDMI cable, the
necessary cable differs depended on the type of the
connecter like Lightning or 30-pin. Refer to “iPod/iPhone
connection” (P.26) for the necessary cable.
• The set ting is necessary to meet the connected iPod/
iPhone or Android device.
• It is also possible to connect with iPod/iPhone or Android
device via Bluetooth. Refer to “iPod/iPhone connection”
(P.26) or “Android connection” (P.26).
24 ñ English
Fixture
Page 25

About this Unit
Ñ Copyrights
• The Bluetooth word mark and logos are owned by
the Bluetooth SIG, Inc. and any use of such marks by
JVC KENWOOD Corporation is under license. Other
trademarks and trade names are those of their
respective owners.
• The “AAC” logo is a trademark of Dolby Laboratories.
• “Made for iPod” and “Made for iPhone” mean that an
electronic accessory has been designed to connect
specifically to iPod, or iPhone, respectively, and
has been certified by the developer to meet Apple
performance standards.
Apple is not responsible for the operation of
this device or its compliance with safety and
regulatory standards. Please note that the use of this
accessory with iPod, or iPhone may affect wireless
performance.
• iPhone, iPod, iPod classic, iPod nano, and iPod touch
are trademarks of Apple Inc., registered in the U.S.
and other countries.
Lightning is a trademark of Apple Inc.
• Sirius, XM and all related marks and logos are
trademarks of Sirius XM Radio Inc. All rights
reserved.
• HD Radio Technology manufactured under license
from iBiquit y Digital Corporation. U.S. and Foreign
Patents. HD Radio™ and the HD, HD Radio, and “Arc”
logos are proprietary trademarks of iBiquity Digital
Corp.
•
• This item incorporates copy protection technology
• Manufactured under license from Dolby
• PANDORA, the PANDORA logo, and the Pandora
• iHeartRadio® is a registered mark of Clear Channel
• “aupeo” is a trade mark of Aupeo GmbH.
is a trademark of DVD Format/Logo
Licensing Corporation registered in the U.S., Japan
and other countries.
that is protected by U.S. patents and other
intellectual property rights of Rovi Corporation.
Reverse engineering and disassembly are
prohibited.
Laboratories.
Dolby and the double-D symbol are trademark s of
Dolby Laboratories.
trade dress are trademark s or registered trademarks
of Pandora Media, Inc., used with permission.
Broadcasting, Inc. in the United States and other
countries. Such marks are used under license.
• INRIX is a registered trademark of INRIX, Inc.
• The terms HDMI and HDMI High-Definition
Multimedia Interface, and the HDMI logo are
trademarks or registed trademarks of HDMI
Licensing LLC in the United States and other
countries.
• MHL and the MHL logo are a trademark or
registered trademark of MHL, LLC.
- Incorporates MHL 2
• Android is a trademark of Google Inc.
• BlackBerry®, RIM®, Research In Motion® and related
trademarks, names and logos are the propert y
of Research In Motion Limited and are registered
and/or used in the U.S. and countries around the
world. Used under license from Research In Motion
Limited.
• SDHC and microSDHC Logos are trademarks of
SD-3C, LLC.
• Adobe, Acrobat and Reader are either registered
trademarks or trademarks of Adobe Systems
Incorporated in the United States and/or other
countries.
• QR Code ® is registered trademarks of DENSO WAVE
INCORPORATED in JAPAN and other countries.
• The aptX® software is copyright CSR plc or its group
companies. All rights reser ved. The aptX® mark and
the aptX logo are trade marks of CSR plc or one of
its group companies and may be registered in one
or more jurisdictions.
• DivX
This DivX Certified® device has passed rigorous
testing to ensure it plays DivX® video.
To play purchased DivX movies, first register your
device at vod.divx.com. Find your registration code
in the DivX VOD section of your device setup menu.
See DivX(R) VO D (P.54).
• DivX Certified® to play DivX® video, including
premium content.
• DivX®, DivX Certified® and associated logos are
trademarks of DivX, LLC and are used under license.
• THIS PRODUC T IS LICENSED UNDER THE AVC
PATENT PORTFOLIO LICENSE FOR THE PERSONAL
USE OF A CONSUMER OR OTHER USES IN WHICH IT
DOES NOT RECEIVE REMUNERATION TO (¡)ENCODE
VIDEO IN COMPLIANCE WITH THE AVC STANDARD
(“AVC VIDEO”) AND/OR (¡¡)DECODE AVC VIDEO
THAT WAS ENCODED BY A CONSUMER ENGAGED
IN A PERSONAL ACTIVITY AND/OR WAS OBTAINED
FROM A VIDEO PROVIDER LICENSED TO PROVIDE
AVC VIDEO. NO LICENSE IS GRANTED OR SHALL
BE IMPLIED FOR ANY OTHER USE. ADDITIONAL
English ñ 25
Page 26

INFORMATION MAY BE OBTAINED FROM MPEG LA,
L.L.C. SEE HT TP://WWW.MPEGLA.COM
• THIS PRODUC T IS LICENSED UNDER THE MPEG4 VISUAL PATENT PORTFOLIO LICENSE FOR
THE PERSONAL AND NON-COMMERCIAL USE
OF A CONSUMER FOR (¡) ENCODING VIDEO IN
COMPLIANCE WITH THE MPEG-4 VISUAL STANDARD
(“MPEG-4 VIDEO”) AND/OR (¡¡) DECODING MPEG4 VIDEO THAT WAS ENCODED BY A CONSUMER
ENGAGED IN A PERSONAL AND NON-COMMERCIAL
ACTIVITY AND/OR WAS OBTAINED FROM A VIDEO
PROVIDER LICENSED BY MPEG LA TO PROVIDE
MPEG-4 VIDEO. NO LICENSE IS GRANTED OR SHALL
BE IMPLIED FOR ANY OTHER USE. ADDITIONAL
INFORMATION INCLUDING THAT RELATING TO
PROMOTIONAL, INTERNAL AND COMMERCIAL USES
AND LICENSING MAY BE OBTAINED FROM MPEG LA,
LLC. SEE HTTP://WWW.MPEGLA.COM.
• libFL AC
Copyright (C) 2000,2001,2002,2003,2004,2005,2006,2
007,2008,2009 Josh Coalson
Redistribution and use in source and binar y forms,
with or without modification, are permitted
provided that the following conditions are met:
- Redistributions of source code must retain the
above copyright notice, this list of conditions and
the following disclaimer.
- Redistributions in binary form must reproduce the
above copyright notice, this list of conditions and
the following disclaimer in the documentation and/
or other materials provided with the distribution.
- Neither the name of the Xiph.org Foundation
nor the names of its contributors may be used to
endorse or promote products derived from this
software without specific prior written permission.
THIS SOFT WARE IS PROVIDED BY THE COPYRIGHT
HOLDERS AND ONTRIBUTORS ``AS IS’’ AND ANY
EXPRESS OR IMPLIED WARRANTIES, INCLUDING,
BUT NOT LIMITED TO, THE IMPLIED WARRANTIES OF
MERCHANTABILITY AND FITNESS FOR A PARTICUL AR
PURPOSE ARE DISCLAIMED. IN NO EVENT SHALL
THE FOUNDATION OR CONTRIBUTORS BE LIABLE
FOR ANY DIRECT, INDIRECT, INCIDENTAL, SPECIAL,
EXEMPLARY, OR CONSEQUENTIAL DAMAGES
(INCLUDING, BUT NOT LIMITED TO, PROCUREMENT
OF SUBSTITUTE GOODS OR SERVICES; LOSS OF USE,
DATA, OR PROFITS; OR BUSINESS INTERRUPTION)
HOWEVER CAUSED AND ON ANY THEORY OF
LIABILITY, WHETHER IN CONTRACT, STRICT LIABILITY,
OR TORT (INCLUDING NEGLIGENCE OR OTHERWISE)
ARISING IN ANY WAY OUT OF THE USE OF THIS
SOFTWARE, EVEN IF ADVISED OF THE POSSIBILIT Y OF
26 ñ English
SUCH DAMAGE.
Ñ Android connection
To connect the Android device with this unit,
the cable (sold separately) and the prole which
your Android device supports are necessar y as
follows:
To listen to music and watch video of APPS
source
– MHL device
– KCA -MH100
– Bluetooth profile: SPP
To listen to music of APPS source
– Bluetooth profile: A2DP
– Bluetooth profile: SPP
To listen to music of Bluetooth Audio source
– Bluetooth profile: A2DP
– Bluetooth profile: AVRCP
Ñ iPod/iPhone connection
To connect the iPod/iPhone with this unit, the
cable, adapter (both sold separately), and the
prole which your iPod/iPhone supports are
necessary as follows:
To listen music and watch video with
Lightning connector device
– Lightning Digital AV Adapter
– KCA-HD100
– KCA -iP103
– Bluetooth profile: SPP
To listen music with Lightning connector
device
– KCA -iP103
To listen music and watch video with 30-pin
connector device
– KCA-iP202
To listen music with 30 -pin connector device
– KCA -iP102
To listen to music via Bluetooth
– Bluetooth profile: A2DP
– Bluetooth profile: SPP
✎ NOTE
• When connecting with Lightning Digital AV
Adapter or Apple 30-pin Digital AV Adapter some
applications can be controlled from this unit. The
operable functions depend on the application.
Refer to “Apps Operation” (P.52) in the Instruction
Manual.
• Do not leave the cable or the adapter made by
other makers inside the car. It might lead the
malfunction caused by heat.
Page 27

Ñ Connectable iPod/iPhone
The following models can be connected to this unit.
Made for
• iPhone 5s
• iPhone 5c
• iPhone 5
• iPhone 4S
• iPhone 4
• iPhone 3GS
• iPhone 3G
• iPhone
• iPod touch (5th generation)
• iPod touch (4th generation)
• iPod touch (3rd generation)
• iPod touch (2nd generation)
• iPod touch (1st generation)
• iPod classic
• iPod with video
• iPod nano (7th generation)
• iPod nano (6th generation)
• iPod nano (5th generation)
• iPod nano (4th generation)
• iPod nano (3rd generation)
Ñ Requirements Pandora®
iPhone or iPod touch
• Use an Apple iPhone or iPod touch running under
iOS3 or later.
• Search for “Pandora” in the Apple iTunes App Store
to find and install the most current version of the
Pandora® application on your device.
Android™
• Visit the Google play and search for Pandora to
install.
BlackBerry®
• Visit www.pandora.com from the built in browser to
download the Pandora application.
• Bluetooth must be built in and the following profiles
must be supported.
- SPP
- A2DP
NOTE
• In the application on your device, log in and create
an account with Pandora.
• (If you are not already a registered user, an account
can also be created at www.pandora.com.)
• Internet connection by LTE, 3G, EDGE, or WiFi.
• Pandora® is only available in the United States,
Australia, and New Zealand.
• Because Pandora® is a third-party service, the
specifications are subject to change without
prior notice. Accordingly, compatibility may be
impaired or some or all of the services may become
unavailable.
• Some functions of Pandora® cannot be operated
from this unit.
• For issues using the application, please contact
Pandora® at pandora-support@pandora.com.
Ñ About iHeartRadio®
iPhone or iPod touch
• Use an Apple iPhone or iPod touch running iOS5
or later.
• Search for “iHeartAuto” in the Apple App Store
to find and install the most current version of the
iHeartAuto™ application on your device.
Android™
• Use an Android device with firmware 2.2 or later.
• Search for “iHeartAuto” on Google play to find and
install the most current version of the iHear tAuto™
application on your device.
NOTE
• iHeartRadio® is available only in the United States
and U.S. Territories
• For the best application experience, a 3G/4G or WiFi connection is recommended.
• Because iHeartAuto™ is a third-party service, the
specifications are subject to change without
prior notice. Accordingly, compatibility may be
impaired or some or all of the services may become
unavailable.
• Some functions of iHeartRadio® cannot be operated
from this unit.
• If you experience issues while using the application,
please contact iHeartRadio® Customer Care at
http://help.iheartradio.com.
• iHeartRadio® and iHeartAuto™ are trademarks
owned by Clear Channel Broadcasting, Inc. All uses
are authorized under license.
English ñ 27
Page 28

Ñ About AUPEO!
iPhone or iPod touch
• Install the latest version of the AUPEO! application
on your iPhone or iPod touch. (Search for
“AUPEO!” in the Apple iTunes App Store to find and
install the most recent version.)
Android™
• Visit Google play and search for “AUPEO!” to install.
NOTE
• Ensure you are logged in to your smartphone
application. If you do not have an AUPEO! account,
you can create one for free from your smartphone
or at www.aupeo.com.
• Because AUPEO! is a third-par ty service, the
specifications are subject to change without
prior notice. Accordingly, compatibility may be
impaired or some or all of the services may become
unavailable.
• Some functions of AUPEO! cannot be operated from
this unit.
• For issues using the application, contact AUPEO! at
www.aupeo.com.
• An active internet connection.
28 ñ English
28
Page 29

English ñ 2929
Page 30

Contenido
Acerca de la guía de inicio rápido ....................30
Precauciones ............................................................31
Precauciones de seguridad e información
importante .............................................................33
Primer paso ...............................................................34
Funciones de los botones del panel frontal .36
Cómo insertar una tarjeta SD / microSD ........38
Funciones habituales ............................................38
Cómo usar el sistema de navegación ..............39
Cómo reproducir música ..................................... 41
Cómo reproducir películas e imágenes .........43
Cómo escuchar la Radio/ HD Radio™/
SiriusXM® ................................................................43
Cómo llamar por teléfono .................................. 44
Instalación .................................................................45
Acerca de esta unidad ...........................................53
Acerca de la guía de inicio rápido
En esta Guía de inicio rápido se describen las
funciones básicas de esta unidad.
En el caso de funciones no descritas en la guía,
consulte el Manual de instrucciones en el siguiente
sitio web:
http://manual.kenwood.com/edition/im386/
Para consultar el manual de instrucciones, es
necesario disponer de un PC en el que se haya
instalado Microsoft® Windows XP/Vista/7/8 o Mac OS
X® 10.4 o posteriores además de Adobe® Reader™ 7.1 o
Adobe® Acrobat® 7.1 o posteriores.
El manual de instrucciones está sujeto a cambios
por modificaciones de las especificaciones, etc.
Asegúrese de descargar la última versión del manual
de instrucciones como referencia.
✎ NOTA
• Los paneles que se incluyen en este manual son
ejemplos utilizados para ofrecer explicaciones de las
distintas operaciones. Por esta razón, pueden diferir
de los paneles que se visualizan en realidad.
• En este manual, los nombres de modelo se abrevian
de la siguiente manera.
– DNX892:
DNX8
– DN X7150 BT, DNX772BH:
– DNX692:
DNX6
– DNX572BH, DN X4150BT :
Si aparecen los iconos indicados arriba, lea el
artículo correspondiente a la unidad que esté
utilizando.
• En los procedimientos operativos, las llaves indican
la tecla o botón que debe emplear.
< >: indica el nombre de los botones del panel.
[ ]: Indica el nombre de las teclas.
DNX7
DNX5/4
30 ñ Español
Page 31

Precauciones
#ADVERTENCIA
Ñ Para evitar lesiones o incendios, tome las
precauciones siguientes:
• Para evitar un cortocircuito, nunca coloque
ni deje objetos metálicos (como monedas o
herramientas metálicas) dentro de la unidad.
• No mire fijamente la pantalla de la unidad
mientras está conduciendo durante un periodo
prolongado de tiempo.
• Si tiene problemas durante la instalación,
consulte con su distribuidor Kenwood.
Ñ Precauciones para el uso de esta unidad
• Cuando compre accesorios opcionales, pregunte
a su distribuidor Kenwood si dichos accesorios
son compatibles con su modelo y en su región.
• Puede seleccionar el idioma de los menús, las
etiquetas de archivos de audio, etc. Consulte
Conguración de idioma (P.95) en el
manual de instrucciones.
• La función Radio Data System o Radio Broadcast
Data System no funcionará en lugares donde no
existan emisoras compatibles con este ser vicio.
• Es posible que la unidad no funcione
correctamente si hay suciedad en los conectores
entre la unidad y el panel frontal. Retire el panel
frontal y limpie el conector utilizando un hisopo
de algodón, teniendo cuidado de no dañarlo.
Ñ Precauciones con la batería
• Coloque el mando a distancia en un lugar en
el que no se pueda mover en caso de frenado
u otras operaciones. Podría producirse una
situación peligrosa si el mando a distancia se cae
y queda atrapado entre los pedales durante la
conducción.
• No deje la batería cerca del fuego o expuesta a la
luz solar directa. Puede producirse un incendio,
una explosión o un calor excesivo.
• No recargue, cortocircuite, rompa ni caliente la
pila, ni la arroje al fuego. Estas acciones podrían
provocar la fuga de líquido de la pila. Si el líquido
derramado entra en contacto con los ojos o la
ropa, enjuague inmediatamente con agua y
consulte a un médico.
• Coloque la pila lejos del alcance de los niños. En
el improbable caso de que un niño se trague la
pila, consulte inmediatamente a un médico.
Ñ Cómo proteger el monitor
• Coloque el mando a distancia en un lugar en
el que no se pueda mover en caso de frenado
u otras operaciones. Podría producirse una
situación peligrosa si el mando a distancia se cae
y queda atrapado entre los pedales durante la
conducción.
Ñ Empañamiento de la lente
Al activar la calefacción del coche cuando hace
frío, puede aparecer vapor o condensación en
la lente del reproductor de disco de la unidad.
Esta condensación en la lente puede hacer que
los discos no se reproduzcan. Si esto ocurre,
retire el disco y espere hasta que se evapore la
condensación. Si la unidad no funciona de forma
normal después de un tiempo, consulte con su
distribuidor Kenwood.
Ñ Precauciones con el manejo de los discos
• No toque la superficie de grabación del disco.
• No pegue cinta, etc. en el disco, ni utilice ningún
disco con cinta adherida.
• No utilice accesorios de tipo disco.
• Limpie desde el centro del disco hacia el exterior.
• Al extraer los discos de esta unidad, hágalo
horizontalmente.
• Si el orificio central del disco o el borde exterior
tienen rebabas, utilice el disco únicamente
después de haber eliminado dichas rebabas con
un bolígrafo de bola o similar.
• No pueden utilizarse discos que no sean
redondos.
• No pueden utilizarse CDs de 8 cm (3 pulgadas).
• No pueden utilizarse discos con colores en la
superficie de grabación ni discos sucios.
• Esta unidad únicamente puede reproducir CD
con
Es posible que esta unidad no reproduzca
correctamente los discos que no tengan la
marca.
• No puede reproducir un disco que no esté
finalizado. (Para el proceso de finalización,
consulte su programa de escritura y el manual de
instrucciones de su grabador.)
.
Español ñ 31
Page 32

Ñ Obtención de la señal GPS
HOME
La primera vez que encienda esta unidad, debe
esperar a que el satélite reciba las señales de
satélite por primera vez. Este proceso podría durar
varios minutos. Asegúrese de que su vehículo está
en el exterior en una zona abierta apar tado de
edificios o árboles altos para una mejor recepción.
Después de que el sistema reciba las señales de
satélite por primera vez, las sucesivas veces recibirá
las señales más rápidamente.
Ñ Acerca del panel frontal
Cuando extraiga el producto de la caja o lo
instale, el panel frontal puede posicionarse en
el ángulo mostrado en la fig. 1). Esto es debido a
las características del mecanismo con el que está
equipado el producto.
Cuando el producto reciba la alimentación
de corriente la primera vez, el panel frontal se
desplazará automáticamente a su posición (ángulo
de ajuste inicial) mostrada en la fig. 2).
DNX8 DNX7
Ñ Cómo reiniciar la unidad
Si la unidad o la unidad conectada no funcionan
correctamente, reiníciela.
DNX8 DNX7
DNX6 DNX5/4
(Fig. 1) (Fig. 2)
Ñ Limpieza de la unidad
Si el panel frontal de esta unidad se mancha,
límpielo con un paño suave y seco como un
paño de silicona. Si el panel frontal está muy
sucio, límpielo con un paño humedecido con un
limpiador neutro y, a continuación, límpielo de
nuevo con un paño suave y seco.
! PRECAUCIÓN
• Si aplica un limpiador en spray directamente
sobre la unidad, puede dañar sus componentes
mecánicos. Si limpia el panel frontal con un paño
abrasivo o con un líquido volátil, como el alcohol o
cualquier otro disolvente, podría rayar la super ficie o
borrar la impresión serigrafiada.
32 ñ Español
✎ NOTA
• Desconecte el dispositivo USB antes de pulsar
el botón <Reset>. Si pulsa el botón <Reset> con
el dispositivo USB conectado, puede dañar los
datos almacenados en dicho dispositivo. Para más
información sobre la desconexión del dispositivo
USB, véase Cómo reproducir música (P.41).
• Al encender la unidad después de un reinicio
aparece la pantalla con la configuración inicial.
Consulte Prime r paso (P.34).
Page 33

Precauciones de seguridad e información importante
Lea esta información cuidadosamente antes de
empezar a manejar el sistema de navegación
Kenwood y siga las instrucciones de este manual. Ni
Kenwood ni Garmin serán responsables de problemas
o accidentes producidos por la inobservancia de las
instrucciones de este manual.
#ADVERTENCIA
Si no evita las situaciones potencialmente
peligrosas siguientes, podría producirse un
accidente o colisión que le ocasione heridas graves
o la muerte.
Cuando navegue, compare cuidadosamente la
información mostrada en el sistema con todas las
fuentes de navegación disponibles, incluyendo
información de señales de tráfico, mapas o la
información visual. Por seguridad, resuelva siempre
cualquier pregunta o discrepancia antes de continuar
con la navegación.
Maneje el vehículo siempre de forma segura.
No se distraiga por el sistema de navegación mientras
conduce, y sea en todo momento plenamente
consciente de las condiciones de la marcha. Minimice
el tiempo empleado en mirar la pantalla del sistema
de navegación mientras conduce y utilice los
comandos de voz siempre que sea posible.
Mientras conduce, no introduzca destinos, cambie la
configuración ni acceda a funciones que requieren un
uso prolongado del sistema de navegación. Detenga
su vehículo de forma segura y autorizada antes de
realizar este tipo de operaciones.
Mantenga el volumen del sistema en un nivel
suficientemente bajo como para escuchar los
ruidos del exterior mientras conduce. Si no puede
escuchar el exterior, puede no ser capaz de reaccionar
adecuadamente a las circunstancias del tráfico. Ello
podría causar accidentes.
El sistema de navegación no mostrará la posición
actual correcta del vehículo la primera que lo utilice
después de su adquisición, o si la batería del vehículo
está desconectada. No obstante, las señales de satélite
GPS se recibirán en breve y se mostrará la posición
correcta.
Tenga cuidado con la temperatura ambiente. El uso
del sistema de navegación a temperaturas extremas
podría producir un mal funcionamiento o daños en
el mismo. Tenga también en cuenta que la unidad
puede ser dañada por vibraciones fuertes, objetos de
metal o la penetración de agua en su interior.
#PRECAUCIÓN
Si no evita las situaciones potencialmente
peligrosas pueden producirse daños personales o
materiales.
El sistema de navegación está diseñado para ofrecerle
sugerencias de ruta. No refleja cierres de carreteras,
las condiciones de la calzada o las climatológicas, ni
ningún otro fac tor que pueda afectar a la seguridad o
a la gestión del tiempo durante la conducción.
Utilice el sistema de navegación sólo a modo de
ayuda. No intente usar el sistema de navegación
para cualquier propósito que requiera medidas de la
dirección, la distancia, la localización o topográficas.
El sistema GPS (Global Positioning System) lo hace
funcionar el gobierno de los EE.UU., que es el único
responsable de su precisión y mantenimiento. Este
sistema gubernamental está sometido a cambios
que podrían afectar la precisión y el rendimiento de
todo el equipamiento GPS, incluyendo el sistema
de navegación. Aunque el sistema de navegación
es un dispositivo preciso de navegación, cualquier
dispositivo de navegación podría ser mal utilizado o
mal interpretado, con lo cual no sería seguro.
INFORMACIÓN IMPORTANTE
Ñ Conservación de la batería del vehículo
Este sistema de navegación puede utilizarse
cuando la llave de encendido está en ON o en
ACC. No obstante, para conservar la batería, debe
utilizarse con el motor en marcha siempre que sea
posible. El uso del sistema de navegación durante
un tiempo prolongado con el motor apagado
puede causar que se desgaste la batería.
Ñ Información de datos de mapas
Uno de los objetivos de Garmin es ofrecer a sus
clientes la cartografía más completa y precisa
de la que disponemos a un coste razonable.
Empleamos una combinación de fuentes de datos
gubernamentales y privadas que identificamos
en la literatura del producto y en los mensajes
de copyright que mostramos al consumidor.
Prácticamente todas las fuentes de datos
contienen algunos datos imprecisos o incompletos.
En algunos países, la información cartográfica
completa y precisa no está disponible o tiene unos
costes prohibitivos.
Español ñ 33
Page 34

Primer paso
Antes de su uso, aparecerán automáticamente
diferentes pantallas de conguración.
Ñ Conguración inicial
Al encender la unidad por primera vez, se mostrará
la pantalla de conguración.
1 Coloque la llave de encendido del coche
en la posición ACC.
La unidad se pone en marcha.
Se muestra la pantalla de configuración (SETUP)
inicial.
2 Toque la tecla correspondiente y
establezca un valor.
Angle / Ángulo
Ajusta la posición del monitor. La opción
predeterminada es "0". (Manual de instrucciones
P.9 8
Tras la configuración, pulse [6].
Color
Ajusta el color de iluminación de la pantalla
y del botón. Puede seleccionar entre realizar
una exploración de colores o ajustar el color de
exploración. (Manual de instrucciones P.99
Tras la configuración, pulse [6].
EXT SW/ INTERRUP. EXT.
(solo para D NX892, DNX715 0BT)
Controla los dispositivos externos. (Manual de
ins tr uc ci on es P.9 6
Tras la configuración, pulse [6].
Cámara
Ajusta los parámetros de la cámara. (Manual de
ins tr uc ci on es P.102
Tras la configuración, pulse [6].
OEM SETUP / Ajuste OEM
(solo zona de ventas de América del Norte)
Esta función requiere un adaptador que se
encuentre disponible comercialmente.
Consulte a su distribuidor Kenwood para obtener
más detalles.
DEMO
Configure el modo de demostración. La opción
predeterminada es "ON".
DNX8 DNX7
3 Pulse [Finish/ Finalizar].
✎ NOTA
• También aparece «Initial setup» (CONFIGURACIÓN
inicial) tras reiniciar la unidad.
Locale / Lo cal
Seleccione el país para el sistema de navegación.
Se configurarán el idioma, la unidad de medida de
distancia y la unidad de medida de carburante.
Language/ Idioma
Seleccione el idioma utilizado para la pantalla de
control y los elementos de configuración. La opción
predeterminada es “American English (en)”. (Manual
de instrucciones P.95
Después de la configuración, pulse [Enter].
34 ñ Español
Page 35

Ñ Conguración de la conexión de iPod/
iPhone
Al seleccionar iPod como fuente por primera vez,
se mostrará la pantalla de conguración para la
conexión con el iPod/iPhone.
1 Pulse el botón <HOME>.
Aparece la pantalla INICIO.
2 Toque [iPod] en la pantalla INICIO.
Se muestra la pantalla de configuración de la
conexión del iPod.
3 Toque [CHANGE] (Cambiar).
Ñ Conguración de vínculos con aplicaciones
Al seleccionar Apps como fuente por primera vez ,
se mostrará la pantalla de conguración para la
conexión con el dispositivo donde estén instaladas
las aplicaciones.
1 Pulse el botón <HOME>.
Aparece la pantalla INICIO.
2 Toque [APPS] en la pantalla INICIO.
Aparece la pantalla de configuración de vínculos
con aplicaciones.
3 Toque [CHANGE] (Cambiar).
Seleccione el modo de conexión del iPod/
iPhone. Para obtener más información, consulte
“Configuración de la conexión de iPod/iPhone”
(P.55) en el manual de instrucciones.
✎ NOTA
• Para obtener información acerca del cable y
adaptador necesarios para establecer una conexión
con un iPod/iPhone, consulte “Conexión de iPod/
iPhon e” (P. 54).
• Al seleccionar “HDMI + BT” o “Bluetooth”, se abrirá
la pantalla de selección de dispositivos Bluetooth.
Seleccione el iPod/iPhone que desee conectar.
Si no se muestra ningún dispositivo Bluetooth que
pueda conectarse, toque [Search/Buscar] y realice
el emparejamiento de los dispositivos.
• También aparece “Configuración de la conexión con
el iPod” tras reiniciar la unidad.
Seleccione el modo de conexión con el dispositivo
donde están instaladas las aplicaciones. Para
obtener más información, consulte “Configuración
de vínculos con aplicaciones” (P.56) en el manual
de instrucciones.
✎ NOTA
• Para obtener información acerca del cable y
adaptador necesarios para establecer una conexión
con un “Conexión de iPod/iPhone” (P.54) y
“Conexión Android” (P.54).
• Al seleccionar “HDMI + BT”, “HDMI/MHL + BT” o
“Bluetooth”, se abrirá la pantalla de selección de
dispositivos Bluetooth. Seleccione el dispositivo que
desee conectar.
Si no se muestra ningún dispositivo Bluetooth que
pueda conectarse, toque [Search/Buscar] y realice
el emparejamiento de los dispositivos.
• También aparecerá “Configuración de vínculos con
aplicaciones” tras reiniciar la unidad.
Español ñ 35
Page 36

Funciones de los botones del panel frontal
1234567
Ñ DNX892/ DN X7150 BT/ DNX772BH
HOME
8
9
No. Nombre/Movimiento
s (Restablecer)
1
• Si la unidad o el equipo conec tado no
funcionan correctamente, la unidad
restablece la configuración de fábrica al
pulsar este botón (Manual de instrucciones
P.125).
• Este indicador parpadeará al colocar el
encendido del vehículo en la posición OFF
(Manual de instrucciones P.96).
R , S
2
• Ajusta el volumen.
NAV
3
• Muestra la pantalla de navegación.
• Si se pulsa durante 1 segundo, se alternan
las fuentes de salida AV.
MENU
4
• Muestra la pantalla de menú opcional.
• Al pulsar durante 1 segundo se activa/
desactiva la vista de cámara.
HOME
5
• Muestra la pantalla INICIO (Manual de
ins tr uc ci on es P.16).
• Si se pulsa durante 1 segundo, se apaga la
unidad.
• Si la unidad está apagada, la enciende.
* Si el archivo de actualización del mapa sigue en
la tarjeta SD, no podrá reproducir el archivo de
audio/vídeo.
No. Nombre/Movimiento
TEL
6
• Muestra la pantalla Hands Free (Manual de
ins tr uc ci on es P.87).
• Al pulsar durante 1 segundo, se muestra la
pantalla de reconocimiento de voz. (Manual
de instrucciones P.90
G
7
• Expulsa el disco.
• Si se pulsa cuando el panel está abierto,
el panel se cierra y, si se pulsa durante 1
segundo, se fuerza la expulsión del disco.
• Si se pulsa durante 1 segundo cuando el
panel está cerrado, el panel se abre por
completo en la posición de la ranura para
tarjetas SD.
Ranura para inserción de discos
8
• Ranura que permite insertar discos.
Ranura para tarjetas SD
9
• Ranura que permite insertar tarjetas SD.
Consulte Cóm o insertar un a tarjeta SD /
microSD (P.38).
• Podrá reproducir el archivo de audio/vídeo
en la tarjeta. * (Solamente para DNX892,
DNX772BH)
• Una ranura para tarjetas SD para actualizar
el mapa. Para obtener información sobre
cómo actualizar el mapa, consulte el manual
de instrucciones del sistema de navegación.
36 ñ Español
Page 37

Ñ DNX692/ DNX572BH/ DNX4150B T
1
342
5
6
7
8
R-CAM
No. Nombre/Movimiento
Ranura para inserción de discos
1
• Ranura que permite insertar discos.
G
2
• Expulsa el disco.
• Si se pulsa durante 1 segundo, se fuerza la
expulsión del disco.
s (Restablecer)
3
• Si la unidad o el equipo conec tado no
funcionan correctamente, la unidad
restablece la configuración de fábrica al
pulsar este botón (Manual de instrucciones
P.125).
• Este indicador parpadeará al colocar el
encendido del vehículo en la posición OFF
(Manual de instrucciones P.96).
HOME
4
• Muestra la pantalla INICIO (Manual de
ins tr uc ci on es P.16).
• Si se pulsa durante 1 segundo, se apaga la
unidad.
• Si la unidad está apagada, la enciende.
NAV
5
• Muestra la pantalla de navegación.
• Si se pulsa durante 1 segundo, se alternan
las fuentes de salida AV.
No. Nombre/Movimiento
TEL
6
• Muestra la pantalla Hands Free (Manual de
ins tr uc ci on es P.87).
• Al pulsar durante 1 segundo, se muestra la
pantalla de reconocimiento de voz. (Manual
de instrucciones P.90
Rueda de volumen
7
• Si se gira, se sube o baja el volumen.
• Muestra la pantalla de menú opcional.
• Al pulsar durante 1 segundo se activa/
desactiva la vista de cámara.
Ranura microSD
8
• Una ranura para introducir una tarjeta
microSD.
Consulte Cóm o insertar un a tarjeta SD /
microSD (P.38).
• Podrá reproducir el archivo de audio/vídeo
en la tarjeta. * (Solamente para DNX692,
DNX572BH)
• Ranura para la tarjeta microSD de
actualización del mapa. Para obtener
información sobre cómo actualizar el mapa,
consulte el manual de instrucciones del
sistema de navegación.
* Si el archivo de actualización del mapa sigue en la
tarjeta microSD, no podrá reproducir el archivo de
audio/vídeo.
Español ñ 37
Page 38

Cómo insertar una tarjeta SD / microSD
DNX8 DNX7
1) Pulse el botón <G> durante 1 segundo.
2) Sujete la tarjeta SD con la etiqueta hacia
arriba e insértela en la ranura hasta que se
oiga un clic.
Lado etiquetado
DNX6 DNX5/4
1) Sujete la tarjeta microSD con la etiqueta
hacia la derecha y la sección ranurada hacia
abajo, e insértela en la ranura hasta que se
oiga un clic.
Ñ Expulsar una tarjeta SD/microSD
1) Presione la tarjeta hasta que escuche un clic
y, a continuación, retire su dedo de ésta.
2) La tarjeta saldrá automáticamente para que
pueda extraerla con los dedos.
Funciones habituales
Ñ Menú emergente
1 Pulse el
DNX6 DNX5/4
DNX8 DNX7
botón <MENU> /
mando del volumen.
Toque para visualizar el menú emergente.El
contenido del menú es el siguiente.
0
: Muestra la pantalla Ajuste de pantalla.
: Desactiva la pantalla.
: Muestra la vista de la visualización.
: Active o desactive la alimentación del
dispositivo externo.(Solo para DNX892,
DN X7150 BT)
: Muestra la pantalla de menú SETUP.
: Muestra la pantalla de menú Audio Control.
: Muestra la pantalla de control de la fuente
actual. La forma del icono varía en función de
la fuente.
Ñ General
Existen funciones que pueden ejecutarse desde la
mayoría de las pantallas.
(Ecualizador gráco)
Muestra la pantalla Ecualizador gráfico.
[6] (RETORNO)
Regresa a la pantalla anterior.
(Tecla del menú general)
Toque para visualizar el menú general. El contenido
del menú es el siguiente.
: Active o desactive la alimentación del
dispositivo externo.(Solo para DNX892,
DN X7150 BT)
: Muestra la pantalla de menú SETUP.
: Muestra la pantalla de menú Audio Control.
38 ñ Español
Page 39

: Muestra la pantalla de control de la fuente
1
2
3
4
5
actual. La forma del icono varía en función de
la fuente.
: Cierra el menú.
Ñ Pantalla de lista
Existen teclas de funciones comunes en las
pantallas de listas de la mayoría de las fuentes.
Cómo usar el sistema de navegación
1 Pulse el botón <NAV> para mostrar la
pantalla de navegación.
2 Active la función deseada desde la
pantalla Main Menu.
(Barra de desplazamiento)
Desplaza el texto visualizado.
etc.
Aquí se muestran las teclas con varias funciones.
Las teclas mostradas varían en función de la fuente
actual de audio, del estado, etc.
Puede consultar ejemplos en Pa ntalla de list a
(P.19) en el manual de instrucciones.
Ñ Desplazamiento con la yema del dedo
Puede desplazar la pantalla de lista arriba/abajo o
a derecha/izquierda arrastrándola con la yema del
dedo.
No. Nombre/Movimiento
Intensidad de la señal GPS.
1
Buscar un destino.
2
Ver el mapa.
3
Utilizar Apps como ecoRoute y Help (ayuda).
4
Ajustar la configuración.
5
✎ NOTA
• Puede obtener información adicional sobre el uso
del sistema de navegación desde la Ayuda. Para
mostrar la ayuda, pulse [Apps] y a continuación
[Help].
• Para obtener más información acerca de su sistema
de navegación, descargue la última versión del
manual de instrucciones en http://manual.
kenwood.com/edition/im386/.
Español ñ 39
Page 40

3 Introduzca su destino y comience su viaje
1
2
3
4
5
678
9
guiado.
Para encontrar puntos de interés:
1) Pulse [Where To?].
2) Seleccione una categoría y una subcategoría.
3) Seleccione un destino.
4) Pulse [Go!].
✎ NOTA
• Para introducir letras que formen parte del
nombre, toque la barra de búsqueda e introduzca
las letras.
4 Siga la ruta hacia su destino.
✎ ATENCIÓN
• La funcionalidad de icono de límite de velocidad
es sólo a efec tos informativos y no puede sustituir
a la responsabilidad del conductor para cumplir
con las señales de límite de velocidad ni su buen
juicio para mantener una velocidad adecuada en
cada momento. Garmin y JVC KENWOOD no se
responsabilizan de ninguna multa ni denuncia de
tráfico que pueda recibir por no respetar todas las
leyes y señales de tráfico vigentes.
Su ruta se marca con una línea de color magenta.
Según viaja, su sistema de navegación le guiará
hacia su destino con comandos de voz, echas
en el mapa y direcciones en la parte superior del
mapa. Si se aparta de la ruta original, su sistema de
navegación recalculará la ruta.
No. Nombre/Movimiento
Visualiza la página del siguiente giro o la página
1
de vista de intersecciones, si la hay.
Visualiza la página de lista de giros.
2
Visualiza la página ¿Dónde estoy? .
3
Detiene la ruta actual.
4
Muestra la información del tráfico en la ruta.
5
Vuelve al menú principal.
6
No. Nombre/Movimiento
Muestra un campo de datos diferente.
7
Visualiza el ordenador de ruta.
8
Muestra más opciones.
9
✎ NOTA
• Toque y arrastre el mapa para ver un área diferente
del mismo.
• Si viaja por carreteras principales es posible que
aparezca un icono señalando el límite de velocidad.
Añadir una parada
1) Mientras navega por una ruta, pulse [ ] y
a continuación [ Where To?].
2) Búsqueda de una parada adicional.
3) Pulse [Go!].
4) Pulse [Add to Active Route/ Añadir a ruta
activa] para añadir esta parada antes de
alcanzar el destino final.
Tomar un desvío
1) Mientras navega por una ruta, pulse [ ].
2) Toque [
].
Ñ Otras funciones
Evitar manualmente el tráco en la
ruta
1) Desde el mapa, pulse el icono de tráfico.
2) Pulse [ Traffic On Route].
3) En caso necesario toque las flechas para ver
otros retrasos por el tráfico en su ruta.
4) Toque [
] > [Avoid/ Evitar].
Ver el mapa de tráco
1) El mapa muestra el flujo de tráfico con una
codificación en colores y los retrasos en las
inmediaciones.
Sobre el tráco
✎ ATENCIÓN
• El servicio Traffic no está disponible en
algunas áreas o países.
• Garmin y JVC KENWOOD no se
responsabilizan de la exactitud o la
temporización de la información del tráfico.
• Puede recibir información de tráfico INRIX y
el pronóstico meteorológico conectando su
teléfono inteligente iPhone o Android en el
cual esté instalada la aplicación “KENWOOD
Traffic Powered By INRIX”.(Solo en la zona de
ventas de Norteamérica)
Para más detalles, consulte la aplicación
“KENWOOD Traffic Powered By INRIX”.
40 ñ Español
Page 41

• Con receptor de tráfico de FM, el sistema
de navegación está capacitado para recibir
y hacer uso de información sobre el tráfico.
(Solo en las zonas de venta de América Latina)
Podrá adquirir suscripciones de tráfico para las
regiones o países.Visite www.garmin.com/
kenwood para obtener más información.
Actualización del software
Para actualizar el software del sistema de
navegación, debe tener una tarjeta SD, un
dispositivo de almacenamiento masivo USB y
una conexión a Internet.
1) Vaya a www.garmin.com/kenwood.
2) Seleccione Actualizar.
3) Siga las instrucciones en pantalla.
Actualización de los mapas
Puede adquirir datos actualizados para los
mapas a través de Garmin o bien pedirlos a
su distribuidor Kenwood o consultar al centro
de servicio técnico de Kenwood para más
detalles.
1) Vaya a www.garmin.com/kenwood.
2) Seleccione Actualizar.
3) Siga las instrucciones en pantalla.
Cómo reproducir música
Podrá reproducir archivos de audio desde CD
de música, discos de datos, dispositivos de
almacenamiento USB, tarjetas SD y iPod.
✎ NOTA
• Para más detalles sobre formatos compatibles,
formatos de medios, modelos de iPod, etc., consulte
el manual de instrucciones.
1 Conecte el medio que desea reproducir
tal como se muestra abajo.
Disco
DNX8 DNX7
1) Pulse el botón <G> para abrir el panel
frontal.
2) Introduzca el disco en la ranura.
El panel se cierra automáticamente y
comienza la reproducción.
Para expulsar el disco:
1) Pulse el botón <G>.
DNX6 DNX5/4
1) Introduzca el disco en la ranura.
La reproducción se inicia.
Para expulsar el disco:
1) Pulse el botón <G>.
iPod/iPhone
1) Conecte el iPod/iPhone.
2) Pulse el botón <HOME>.
3) Toque [iPod].
✎ NOTA
• Para obtener información acerca del cable
y adaptador necesarios para establecer una
conexión con un iPod/iPhone, consulte
“Conexión de iPod/iPhone” (P.54).
Para desconectar el iPod/iPhone
conectado con el cable:
1) Toque el lado izquierdo de la pantalla para
visualizar el panel de funciones.
2) Toque [ G ].Desconecte el iPod/ iPhone del
cable.
Dispositivo USB
1) Conec te el dispositivo USB con el cable USB.
Para desconectar el dispositivo USB:
1) Toque el lado izquierdo de la pantalla para
visualizar el panel de funciones.
2) Toque [ G ].Desconecte el dispositivo del
cable.
0
Español ñ 41
Page 42

Tarjeta SD/tarjeta microSD (DNX892/
DNX772BH/ DNX692/ DNX572BH)
1) Inserte la tarjeta SD/tarjeta microSD.
2) Vuelva a colocar el panel delantero.
La reproducción se inicia.
✎ NOTA
• Para más información sobre cómo introducir
tarjetas SD o microSD, consulte “Cómo insertar
una tarjeta SD / microSD” (P.38).
2 Controle la música que está escuchando
en la pantalla de control de fuente.
Los símbolos siguientes indican las teclas en la
pantalla.
Las funciones de las teclas son las mismas a pesar
de las diferentes fuentes que esté escuchando.
Toque el lado izquierdo de la pantalla para
visualizar el panel de funciones.
Funciones básicas desde esta pantalla
L
Inicia la reproducción o hace una pausa.
E F
Busca el contenido anterior/siguiente.
A B o mueva el cur sor en la barra
central
Avance o retroceso rápidos (solo para disco de
datos, CD, dispositivo USB, SD).
/
Repite el contenido actual.
9
Reproduce todo el contenido en orden
aleatorio.
[ ] [ ]
Busca la carpeta anterior/siguiente. (solo disco
de datos, dispositivo USB y SD)
I
Detiene la reproducción. (solo disco de datos)
G
Desconec ta el dispositivo. (solo para iPod y
dispositivo USB)
✎ NOTA
• Para otras funciones, consulte el manual de
instrucciones.
3 Búsqueda de la pista o archivo que desea
escuchar.
Búsqueda en la lista
1) Toque el lado derecho de la pantalla. Se
muestra la lista de contenidos del medio que
está siendo reproducido.
Búsqueda avanzada
1) Toque [ ].
2) Pulse el método de búsqueda avanzada
deseado.
La lista se filtra por el elemento seleccionado.
3) Pulse sobre el elemento deseado.
✎ NOTA
• Para obtener más información sobre las funciones
de búsqueda, consulte Operaciones de búsqueda
(P.40) en el manual de instrucciones.
42 ñ Español
Page 43

Cómo reproducir películas e
1
2
3
3
imágenes
Puede reproducir vídeo DVD, vídeo CD ( VCD),
archivos de películas de discos de datos, iPod
y archivos de imágenes desde tarjetas SD y
dispositivos de almacenamiento USB.
✎ NOTA
• Para más detalles sobre formatos compatibles,
formatos de dispositivos, etc., consulte el manual de
instrucciones.
1 Conecte el medio que desea reproducir.
Para más información sobre el método de
conexión, consulte Cómo re producir mús ica
(P.41).
2 Controle la película o imagen tocando la
pantalla.
Cada zona de la pantalla tiene una función
diferente.
No. Nombre/Movimiento
Muestra la pantalla de control de películas.
1
Muestra la pantalla de control de fuente.
2
• Busca el contenido o archivo siguiente o
3
anterior.
• Al desplazarse desde el centro de la
visualización hacia la izquierda o la derecha,
se efectúa un retroceso rápido o un avance
rápido.
Para detener el avance o rebobinado rápido,
toque el centro de la pantalla.*
*1 Para los dispositivos USB, puede que esta función
no esté disponible en función del formato del
archivo reproducido.
1
✎ NOTA
• Para funciones en la pantalla de control de fuentes,
véase Cómo re producir mús ica (P.41).
No obstante, la búsqueda por categoría/enlace/
gráficos de álbum no está disponible.
Cómo escuchar la Radio/ HD Radio™/ SiriusXM®
1 Pulse el botón <HOME>.
Aparece la pantalla INICIO.
2 Toque [TUNER], [HD Radio], o [SiriusXM].
La unidad cambia a la fuente del sintonizador de
radio/ HD Radio / SiriusXM (se vende por separado).
3 Manejo de la pantalla de control de
fuente.
Sintonizador de Radio/ HD Radio:
Búsqueda de emisora
1) Toque [AM/FM] para seleccionar la banda.
2) Toque [ E] o [F] para sintonizar la
emisora deseada.
Memoria automática
1) Toque [AM/FM] para seleccionar la banda.
2) Desplace los dedos por la pantalla desde el
extremo izquierdo para visualizar el panel de
funciones.
3) To que [AME].
4) To que [ E] o [F].
Se inicia la memoria automática.
Volver a una emisora prejada
1) Toque [FM#] (#:1-15) o [AM#] (#:1-5).
Español ñ 43
Page 44

SiriusXM:
Búsqueda de emisora
1) Toque [ ].
Aparecerá el menú de subfunción.
4) Toque [SETUP].
Aparece la pantalla SETUP Menu.
5) Toque [Bluetooth].
Aparece la pantalla Bluetooth SETUP.
2) Toque [C HS] o [CHR] para sintonizar la
emisora deseada.
Almacenamiento de canales en la
memoria de preselección
1) Sintonice el canal que desee almacenar en
la memoria.
2) Mantenga pulsado durante 2 segundos
(hasta que oiga un pitido) el número de
preselección [P#] (#:1-6).
Volver a una emisora prejada
1) Toque [P#] (#:1-6).
✎ NOTA
• Para el resto de funciones, consulte Funcionamiento
básico del sintonizador Radio/HD (P.58) y
Funcionamiento básico de SiriusXM® (P.68) en el
manual de instrucciones.
Cómo llamar por teléfono
Puede utilizar su teléfono móvil con Bluetooth
cuando esté acoplado con la unidad.
✎ NOTA
• No puede registrar la unidad Bluetooth mientras
esté utilizando las siguientes fuentes:
iPod, Bluetooth Audio, APPS, iHeart, Pandora, AUPEO
1 Registre su teléfono móvil en la unidad.
Continúe tal como se muestra en los
procedimientos siguientes. Para información
más detallada, consulte Regi stro de la unida d
Bluetooth (P.83) en el manual de instrucciones.
1) Pulse el botón <HOME>.
Aparece la pantalla INICIO.
2) To que [S TANDBY ].
3) Pulse el botón
mando del volumen.
Aparece un menú emergente.
<MENU>/
6) Toque [Search / Buscar].
Aparece la pantalla Searched Device List.
7) Seleccione su teléfono móvil en la lista
mostrada en la pantalla Searched Device List.
8) Introduzca el código PIN del teléfono móvil.
El registro se ha completado.
El código PIN está establecido como “0000”
de forma predeterminada.
2 Conecte su teléfono móvil a la unidad.
1) Toque el nombre del dispositivo en la
pantalla Bluetooth SETUP.
2) Toque [ON] de [ TEL(HFP)] en la pantalla BT
Connection Settings.
El dispositivo seleccionado está conectado
a la unidad.
Cuando haya finalizado el registro de su
teléfono móvil, la agenda telefónica de este se
descargará automáticamente a esta unidad.
44 ñ Español
Page 45

3 Haga o reciba una llamada telefónica.
Consulte la tabla de abajo para cada método de
funcionamiento.
Llamar introduciendo un número telefónico
1) Introducir un número de teléfono con las teclas
numéricas.
2) Toque [
Llamar usando datos de llamada almacenados
1) Toque [
(llamadas perdidas) o [
2) Seleccione el número de teléfono de la lista.
3) Toque [
Llamar usando la agenda telefónica
1) Toque [
2) Seleccione el nombre de la lista.
3) Seleccione el número de la lista.
4) Toque [
Llamar usando el número preseleccionado
1) Toque [Preset #] para efectuar una llamada al
número de teléfono correspondiente.
2) Toque [ ].
Call by voice
Puede realizar una llamada de voz utilizando la
función de reconocimiento de voz del teléfono
móvil.
1) Toque [
2) Pronuncie el nombre registrado en el teléfono
móvil.
✎ NOTA
• Para obtener información detallada sobre el
funcionamiento, consulte Usar la uni dad de manos
libres (P.87) en el manual de instrucciones.
].
] (llamadas recibidas), [ ]
] (llamadas realizadas).
].
].
].
].
Instalación
Ñ Antes de la instalación
Antes de la instalación de esta unidad, tenga en
cuenta las precauciones siguientes.
#ADVERTENCIAS
• Si conecta el cable de encendido (rojo) y el cable de
la batería (amarillo) al chasis del automóvil (tierra),
podría producir un cortocircuito y esto, a su vez, un
incendio. Conecte siempre esos cables a la fuente
de alimentación que pasa por la caja de fusibles.
• No corte el fusible del cable de ignición (rojo) y
el cable de la batería (amarillo). El suministro de
energía debe conectarse a los cables por medio
del fusible.
#PRECAUCIÓN
• Instale esta unidad en la consola de su vehículo.
No toque la par te metálica de esta unidad durante e
inmediatamente después del uso de la unidad. Las
partes metálicas, tales como el disipador de calor o
la carcasa, pueden estar muy calientes.
✎ NOTA
• La instalación y el cableado de este producto
requieren habilidad y experiencia. Para mayor
seguridad, deje el trabajo de montaje y cableado en
manos de profesionales.
•
egúrese de utilizar para la unidad una fuente
As
de alimentación de 12 V CC con conexión a tierra
negativa.
No i
•
nstale la unidad en un sitio expuesto a la luz
directa del sol, o excesivamente húmedo o caluroso.
Además deberá evitar sitios con mucho polvo o con
posibilidad de salpicaduras de agua.
• No utilice sus propios tornillos. Utilice solo los tornillos
suministrados. El uso de tornillos diferentes podría
causar daños en la unidad.
Si n
•
o se enciende la alimentación (se muestra
“PROTECT ”), puede que el cable del altavoz haya
sufrido un cortocircuito o que haya tocado el
chasis del vehículo y se haya activado la función de
protección. Por lo tanto, el cable del altavoz debe ser
revisado.
Si e
•
l encendido de su automóvil no está provisto de
la posición ACC, cone cte los cables de encendido a
una fuente de alimentación que pueda conectarse y
desconec tarse con la llave de encendido. Si conecta
el cable de encendido a una fuente de alimentación
con un suministro de voltaje constante, como con los
cables de la batería, la batería puede agotarse.
Si l
•
a consola tiene una tapa, ase gúrese de instalar la
unidad de modo que el panel frontal no golpee la tapa
al abrir y cerrar.
Español ñ 45
Page 46

• Si se funden los fusibles, asegúrese primero de que los
cables no es tán en contacto pues pueden ocasionar
un cortocircuito, luego reemplace el fusible dañado
por uno nuevo que tenga la misma potencia de
servicio.
Aí
•
sle los cables no conectados con una cinta de vinilo
u otro material similar. Para evitar cortocircuitos,
no retire las tapas de los extremos de los cables o
terminales no conectados.
Co
•
necte los cables de los altavoces a cada uno de
los terminales correspondientes. La unidad se puede
dañar o no funcionar si compar te los cables ¤ o
los conecta a tierra a cualquier par te metálica del
vehículo.
Si s
•
e han conectado solamente dos altavoces al
sistema, enchufe los conectores a ambos terminales
de salida delanteros o a ambos terminales de salida
traseros (es decir, no mezcle terminales delanteros y
traseros). Por ejemplo, si conecta el conector ¢ del
altavoz izquierdo a un terminal de s alida delantero,
no conecte el conector ¤ a un terminal de salida
posterior.
De
•
spués de instalar la unidad, compruebe que
las luces de freno, las luces intermitentes, el
limpiaparabrisas, etc. funcionan satisfactoriamente.
In
•
stale la unidad en un ángulo de 30˚ o menos.
•
ta unidad cuenta con un ventilador de refrigeración
Es
para disminuir la temperatura interna. No monte
la unidad en un lugar en el que el ventilador de
refrigeración de la unidad esté obstruido.Si estas
aberturas quedan bloqueadas, la refrigeración no
se producirá, aumentando la temperatura interna y
provocando averías.
Ventilador de refrigeración
• No presione con fuer za la superficie del panel al instalar
la unidad en el vehículo. De lo contrario, pueden
producirse marcas, daños o fallos.
• La recepción podría ser baja si existen objetos
metálicos cerca de la antena Bluetooth.
DNX8
DNX7
DNX6
DNX5/4
Unidad de antena Bluetooth
Ñ Accesorios suministrados
En primer lugar, asegúrese de que todos los
accesorios vienen suministrados con la unidad.
1
2
(2 m)
x1
[1]
3
[3]
4
x1
[2]
5
[2]
6
x1
7
(M5 x 6 mm)
[3]
9
x6
8
(M5 x 7 mm)
0
(3.5 m)
x1
-
=
(3 m)
x1
[1]
DNX892, D NX7150 BT, DNX772BH solamente
[2]
Solo DNX892
[3]
DNX892, DNX 7150B T, DNX692, DN X4150BT
solamente
Ñ Unidad
1) Para evitar cortocircuitos, retire la llave del
encendido y desconecte el terminal ¤ de la
batería.
2) Realice de forma adecuada las conexiones de
cables de entrada y salida para cada unidad.
3) Conecte los cables del mazo de los altavoces.
4) Conecte los cables del mazo en el orden
siguiente:
tierra, batería, encendido.
5) Conecte el mazo de cables a la unidad.
6) Instale la unidad en el automóvil.
7) Conecte nuevamente el terminal ¤ de la
batería.
x1
x2
x4
x6
x1
x1
46 ñ Español
Page 47

8) Pulse el botón <Reset>. (P.32)
9) Realice la configuración inicial.
Consulte Prime r paso (P.34).
Coches no japoneses (DNX892,
DNX7150BT, DNX692, DNX415 0BT)
Doble las lengüetas
del mangui to de
montaje con u n
destornillador o similar
y fíjelo.
Automóviles japoneses
7 o 8
Soporte del vehículo
✎ NOTA
• Asegúrese de que la unidad esté firmemente
instalada en su lugar. Si la unidad está en una
posición inestable, es posible que no funcione
correctamente (por ejemplo, el sonido puede
inter rumpirse).
Ñ Placa de montaje (DNX892, DN X7150 BT,
DNX692, DNX4150BT)
1) Conec te el accesorio 9 a la unidad.
7 o 8
Automóviles de General Motors
(DNX892)
1) Recorte el accesorio 5 para adaptarlo a la
forma de la abertura de la consola central.
2) Conec te el accesorio 5 a la unidad.
5
Corte par a realizar la forma
de la aper tura en el vehículo.
Automóviles de Toyota/Scion (DNX892)
1) Recorte el accesorio 5 tal y como se indica.
Línea de cor te
5
2) Pliegue la cinta adhesiva de doble cara
(accesorio 6) a lo largo de la hendidura y
fíjela al accesorio 5 recortado en la zona de
la acanaladura central, tal y como se indica.
Utilice 2 piezas del accesorio 6 para 1
9
accesorio 5 recortado.
Español ñ 47
Page 48

3) Conecte el accesorio 5 recortado a la
unidad.
6
Ñ Antena GPS
La antena GPS está instalada dentro del vehículo.
Debe instalarse lo más horizontalmente posible
para permitir una fácil recepción de las señales de
satélite GPS.
Para montar la antena GPS en el interior del
vehículo:
1) Limpie el salpicadero o la superficie en cuestión.
2) Extraiga el separador de la placa metálica
(accesorio -).
3) Presione con fuerza la placa metálica (accesorio
-) sobre el salpicadero o cualquier otra
superficie de montaje. Si fuera necesario, puede
doblar la placa metálica (accesorio -) para
adaptarla a una superficie curva.
4) Extraiga el separador de la antena GPS
(accesorio 0) y fije la antena a la placa metálica
(accesorio-).
0
✎ NOTA
• Dependiendo del vehículo, la recepción de
la señal GPS podría no ser posible con una
instalación en el interior.
• Instale esta antena GPS en una zona alejada de
cualquier otra antena utilizada para radios CB o
televisiones vía satélite.
• La antena GPS debería instalarse en una posición
separada al menos 12 pulgadas (30 cm) del
teléfono móvil u otras antenas transmisoras. Las
señales del satélite GPS podrían interferir con
estos tipos de comunicación.
• Si se pinta la antena GPS con cualquier pintura
(metálica) podría disminuir su rendimiento.
Ñ Unidad de micrófono
1) Compruebe la posición de instalación del
micrófono (accesorio =).
2) Limpie la superficie de instalación.
3) Extraiga el separador del micrófono (accesorio
=) y fije el micrófono en la posición indicada
más abajo.
4) Conecte el cable del micrófono a la unidad de
forma segura en varias posiciones mediante
cinta u otro método.
5) Ajuste la dirección del micrófono (accesorio =)
hacia el conductor.
=
48 ñ Español
-
Fije un cabl e con una cinta adhesiva d e
uso comercial.
Page 49

Ñ Retirar la placa de montaje (DNX892,
DNX7150B T, DNX692, DNX4150 BT)
1) Acople las patillas de fijación a la llave de
extracción (accesorio 4) y extraiga los dos
dispositivos de bloqueo del nivel inferior.
Baje la moldura embellecedora (accesorio 9) y
tire de ella hacia delante tal y como se muestra
en la figura.
9
4
Ñ Desmontaje de la unidad (DNX892,
DNX7150B T, DNX692, DNX4150 BT)
1) Retire el marco según las indicaciones del paso
1 de “Retirar el marco”.
2) Inserte correctamente las dos llaves de
extracción (accesorio 4) en las ranuras de cada
lado, tal y como se muestra.
4
Bloqueo
Pasador
✎ NOTA
• El marco puede extraerse desde el lado superior
del mismo modo.
2) Después de extraer la parte inferior, libere de la
misma manera los dos lugares del lado superior.
3) Mueva la llave de extracción hacia abajo y
extraiga la unidad hasta la mitad mientras
presiona hacia dentro.
✎ NOTA
• Tenga cuidado de no hacerse daño con los
pasadores de bloqueo de la llave de extracción.
4) Termine de sacar la unidad con las manos,
prestando atención para no dejarla caer.
Español ñ 49
Page 50

Ñ Conexión del sistema
2
1
Accesorio =
Accesorio 0
1 1
Salida de au dio AV
Accesorio 3
Entrada de au dio/vídeo
(Sólo D NX715 0BT )
Salida de ví deo
Entrada de la c ámara de
visión trasera
Entrada de la c ámara de
visión delantera
(Solo para D NX892,
CAMERA
FRONT VIEW
Verde/r ojo
Verde/blanco
DN X7150 BT)
Al terminal d e control de la
cámara de la s erie CMOS3xx (acceso rio opcional)
Accesorio =
22
Salida de au dio AV
Accesorio 2
Luz verde (cab le del sensor de
aparcamiento)
Para mayor se guridad, asegúre se de
conect ar el sensor de estac ionamiento.
Morado/blanco (cable del sensor de
marcha atrás)
Azul/rojo
(Solo para D NX892, DNX 7150 BT)
PRK SW
REVERSE
RELAY
Salida de ví deo
Entrada de la c ámara de
visión trasera
Accesorio 0
Realice la con exión en el arnés del
interrupto r de detección del fren o
de aparcam iento del vehículo.
Conecte e l mazo de la luz
de marcha atr ás del vehículo
cuando uti lice una cámara de
visión trasera opcional.
A la caja de relé s.
Si no se efec túan las
conexiones, no deje que
el cable so bresalga de la
lengüeta.
50 ñ Español
Entrada de a ntena FM/AM
Salida de preamplificador
de audio tr asero
Salida de preamplificador
de audio del antero
Salida prev ia del
Cuando realice l a conexión a un
amplifica dor externo, cone cte su cable de
tierra al c hasis del vehículo par a evitar dañar
la unidad.
subwoofer
Accesorio 0 : antena GPS
Accesorio = :
Micrófono Bluetooth
Page 51

Ñ Conectar los cables a los terminales
Fusible (10 A) Fusible (10 A)
Interrupto r de llave
de encendido
CCA
Accesorio 1
Rojo (Cable de encendido)
Caja de fusi bles
del automóvil
(Fusible principal)
Batería
Al mando a dis tancia de la dirección
Para utili zar la función de mand o a
distanci a en el volante es necesar io
un adaptad or remoto exclusivo (no
suministrado) apropiado para su
vehículo.
Al interrupto r de control de iluminaci ón
Conect ar al terminal conec tado a tierra
cuando sue ne el teléfono o durante la
conversaci ón.
Para utili zar la función de
silenciam iento, es necesario con ectar el
cable al tel éfono mediante el uso de u n
accesorio telefónico comercial.
Dependi endo de la antena que use,
conecte a l terminal de control de la
antena del moto r o al terminal de
alimentación del amplificador de
refuer zo de la antena tipo pelicu lar.
(Máx. 300 m A, 12 V)
Si utiliza e l amplificador de po tencia
opciona l, conecte su terminal d e control
de potencia.
Caja de fusi bles
del automóvil
A
A
del automóvil
Amarillo (Ca ble de la
batería)
Negro (cabl e de tierra) ¤
(Al chasis del ve hículo)
Azul claro/Amarillo
(cable del ma ndo a distancia
de la direcci ón)
Naranja/Blanco
(cable de cont rol del
atenuador)
REMOTE CONT
STEERING WHEEL
REMOTE INPUT
ILLUMI
Marrón (cab le de control de
silenciamiento)
Blanco/Ne gro
Verde/negro
Morado/negro
MUTE
Azul
(cable de cont rol de la
antena)
ANT CONT
Azul/Blanco
(cable de cont rol de la
alimentación)
P. CONT
Si no se efec túan las conexion es, no deje
que el cable sobresalga de la lengüeta.
Al altavoz
+
Blanco
Gris/negro
+
Gris
+
Verde
+
Morado
Impedan cia del altavoz: 4-8 Ω
delantero
izquierdo
Al altavoz
delantero
derecho
Al altavoz
trasero
izquierdo
Al altavoz
trasero
derecho
Español ñ 51
Page 52

Ñ Conexión de accesorios opcionales
2
3
4
1
5
/ DNX7150BT DNX772BH
KCA-MH100 (1,8 m)
Smartphone
Android
[4]
[3]
iPod/
iPhone
5 5
[3]
4 4
(0,8 m)
[4]
[2]
Terminal USB
Adaptador
Lightning Digital
[3]
AV
[1]
Corriente de alimentación máxima
de iPod: CC 5 V = 1 A
[2]
Corriente de alimentación máxima
de USB: CC 5 V = 500 mA
[3]
Se vende po r separado
[4]
KCA -HD100
[4]
(1,8 m)
AV-IN (CA-C 3AV; accesori o opcional)
(Sólo D NX4150 BT )
iPod/AV-IN(2) (CA- C3AV;acceso rio opcional)
(iPod/AV-IN(2) conmutable)
Conecto r iDatalink
(DNX892 / DNX772BH/ DNX692/ DNX572B H solamente)
Conecto r del sintonizador p ara vehículos SiriusXM
Connect
(DNX892 / DNX772BH/ DNX692/ DNX572B H solamente)
Accesorio opcional
KCA-iP103 (0,8 m)
3
2
Terminal iPod
Dispositivo
[3]
USB
(0,8 m)
1
iPod/
iPhone
[1]
Salida de ví deo
(1,8 m)
Terminal
USB (0,8
m)
KCA- iP202
[4]
2
3
Terminal iPod
[1]
(0,8 m)
[3]
iPod
KCA -iP102
(0,8 m)
[4]
Corriente de alimentación
máxima de MHL : 5 V
900 mA
Al conectar el cable al terminal
HDMI/MHL, retire la fijación.
Tras conectar el cable, vuelva a
colocar la fijación.
Conecto r HDMI / MHL
✎ NOTA
• Al conectar el iPod/iPhone con un cable HDMI, el cable
necesario dependerá del tipo de conector, que puede ser
Lightning o un conector de 30 patillas. Consulte “Conexión
de iPod/iPhone” (P.54) para ver qué cable se necesita.
• Será necesario realizar algunos ajustes para adaptarse al
iPod/iPhone o dispositivo Android conectado.
• También es posible conectarse con el iPod/iPhone o
el dispositivo Android mediante Bluetooth. Consulte
“Conexión de iPod/iPhone” (P.54) o “Conexión Android”
(P.54).
52 ñ Español
Fijación
Page 53

Acerca de esta unidad
Ñ Derechos de autor
• La marca denominativa y los logos de Bluetooth son
propiedad de Bluetooth SIG, Inc. y cualquier uso de
dichas marcas por JVC KENWOOD Corporation está
sujeto a los términos de licencia. El resto de marcas
comerciales y nombres comerciales corresponden a
sus respectivos propietarios.
• The “AAC” logo is a trademark of Dolby Laboratories.
• “Made for iPod” and “Made for iPhone” mean that an
electronic accessory has been designed to connect
specifically to iPod, or iPhone, respectively, and
has been certified by the developer to meet Apple
performance standards.
Apple is not responsible for the operation of
this device or its compliance with safety and
regulatory standards. Please note that the use of this
accessory with iPod, or iPhone may affect wireless
performance.
• iPhone, iPod, iPod classic, iPod nano, and iPod touch
are trademarks of Apple Inc., registered in the U.S.
and other countries.
Lightning is a trademark of Apple Inc.
• Sirius, XM and all related marks and logos are
trademarks of Sirius XM Radio Inc. All rights
reserved.
• HD Radio Technology manufactured under license
from iBiquit y Digital Corporation. U.S. and Foreign
Patents. HD Radio™ and the HD, HD Radio, and “Arc”
logos are proprietary trademarks of iBiquity Digital
Corp.
•
• This item incorporates copy protection technology
• Fabricado bajo licencia de Dolby Laboratories.
• PANDORA, the PANDORA logo, and the Pandora
• iHeartRadio® is a registered mark of Clear Channel
• “aupeo” is a trade mark of Aupeo GmbH.
is a trademark of DVD Format/Logo
Licensing Corporation registered in the U.S., Japan
and other countries.
that is protected by U.S. patents and other
intellectual property rights of Rovi Corporation.
Reverse engineering and disassembly are
prohibited.
El símbolo Dolby y el símbolo D -doble son marcas
comerciales de Dolby Laboratories.
trade dress are trademark s or registered trademarks
of Pandora Media, Inc., used with permission.
Broadcasting, Inc. in the United States and other
countries. Such marks are used under license.
• INRIX is a registered trademark of INRIX, Inc.
• The terms HDMI and HDMI High-Definition
Multimedia Interface, and the HDMI logo are
trademarks or registed trademarks of HDMI
Licensing LLC in the United States and other
countries.
• MHL and the MHL logo are a trademark or
registered trademark of MHL, LLC.
- Incorporates MHL 2
• Android is a trademark of Google Inc.
• BlackBerry®, RIM®, Research In Motion® and related
trademarks, names and logos are the propert y
of Research In Motion Limited and are registered
and/or used in the U.S. and countries around the
world. Used under license from Research In Motion
Limited.
• SDHC and microSDHC Logos are trademarks of
SD-3C, LLC.
• Adobe, Acrobat and Reader are either registered
trademarks or trademarks of Adobe Systems
Incorporated in the United States and/or other
countries.
• QR Code ® is registered trademarks of DENSO WAVE
INCORPORATED in JAPAN and other countries.
• The aptX® software is copyright CSR plc or its group
companies. All rights reser ved. The aptX® mark and
the aptX logo are trade marks of CSR plc or one of
its group companies and may be registered in one
or more jurisdictions.
• DivX
Este dispositivo DivX Certified® ha superado pruebas
rigurosas para garantizar la reproducción de vídeo
DivX®.
Para reproducir películas DivX adquiridas, debe
registrar primeramente su dispositivo en vod.divx.
com.Encontrará su código de registro en la sección
VOD de DivX del menú de configuración de su
dispositivo.Consulte DivX(R) VO D (P.54)).
• DivX Certified® para reproducir vídeo DivX®, incluido
el contenido premium.
• DivX®, DivX Certified® y los logotipos asociados son
marcas comerciales de DivX, LLC utilizadas bajo
licencia.
• THIS PRODUC T IS LICENSED UNDER THE AVC
PATENT PORTFOLIO LICENSE FOR THE PERSONAL
USE OF A CONSUMER OR OTHER USES IN WHICH IT
DOES NOT RECEIVE REMUNERATION TO (¡)ENCODE
VIDEO IN COMPLIANCE WITH THE AVC STANDARD
(“AVC VIDEO”) AND/OR (¡¡)DECODE AVC VIDEO
THAT WAS ENCODED BY A CONSUMER ENGAGED
IN A PERSONAL ACTIVITY AND/OR WAS OBTAINED
Español ñ 53
Page 54

FROM A VIDEO PROVIDER LICENSED TO PROVIDE
AVC VIDEO. NO LICENSE IS GRANTED OR SHALL
BE IMPLIED FOR ANY OTHER USE. ADDITIONAL
INFORMATION MAY BE OBTAINED FROM MPEG LA,
L.L.C. SEE HT TP://WWW.MPEGLA.COM
• THIS PRODUC T IS LICENSED UNDER THE MPEG4 VISUAL PATENT PORTFOLIO LICENSE FOR
THE PERSONAL AND NON-COMMERCIAL USE
OF A CONSUMER FOR (¡) ENCODING VIDEO IN
COMPLIANCE WITH THE MPEG-4 VISUAL STANDARD
(“MPEG-4 VIDEO”) AND/OR (¡¡) DECODING MPEG4 VIDEO THAT WAS ENCODED BY A CONSUMER
ENGAGED IN A PERSONAL AND NON-COMMERCIAL
ACTIVITY AND/OR WAS OBTAINED FROM A VIDEO
PROVIDER LICENSED BY MPEG LA TO PROVIDE
MPEG-4 VIDEO. NO LICENSE IS GRANTED OR SHALL
BE IMPLIED FOR ANY OTHER USE. ADDITIONAL
INFORMATION INCLUDING THAT RELATING TO
PROMOTIONAL, INTERNAL AND COMMERCIAL USES
AND LICENSING MAY BE OBTAINED FROM MPEG LA,
LLC. SEE HTTP://WWW.MPEGLA.COM.
• libFL AC
Copyright (C) 2000,2001,2002,2003,2004,2005,2006,2
007,2008,2009 Josh Coalson
Redistribution and use in source and binar y forms,
with or without modification, are permitted
provided that the following conditions are met:
- Redistributions of source code must retain the
above copyright notice, this list of conditions and
the following disclaimer.
- Redistributions in binary form must reproduce the
above copyright notice, this list of conditions and
the following disclaimer in the documentation and/
or other materials provided with the distribution.
- Neither the name of the Xiph.org Foundation
nor the names of its contributors may be used to
endorse or promote products derived from this
software without specific prior written permission.
THIS SOFT WARE IS PROVIDED BY THE COPYRIGHT
HOLDERS AND ONTRIBUTORS ``AS IS’’ AND ANY
EXPRESS OR IMPLIED WARRANTIES, INCLUDING,
BUT NOT LIMITED TO, THE IMPLIED WARRANTIES OF
MERCHANTABILITY AND FITNESS FOR A PARTICUL AR
PURPOSE ARE DISCLAIMED. IN NO EVENT SHALL
THE FOUNDATION OR CONTRIBUTORS BE LIABLE
FOR ANY DIRECT, INDIRECT, INCIDENTAL, SPECIAL,
EXEMPLARY, OR CONSEQUENTIAL DAMAGES
(INCLUDING, BUT NOT LIMITED TO, PROCUREMENT
OF SUBSTITUTE GOODS OR SERVICES; LOSS OF USE,
DATA, OR PROFITS; OR BUSINESS INTERRUPTION)
HOWEVER CAUSED AND ON ANY THEORY OF
LIABILITY, WHETHER IN CONTRACT, STRICT LIABILITY,
OR TORT (INCLUDING NEGLIGENCE OR OTHERWISE)
ARISING IN ANY WAY OUT OF THE USE OF THIS
SOFTWARE, EVEN IF ADVISED OF THE POSSIBILIT Y OF
SUCH DAMAGE.
Ñ Conexión Android
Para conec tar el dispositivo Android con esta
unidad, serán necesarios el cable (se vende
por separado) y el perl compatibles con el
dispositivo Android:
Para escuchar música y ver vídeos de una
fuente APPS
– Dispositivo MHL
– KCA -MH100
– Perfil de Bluetooth: SPP
Para escuchar música de una fuente APPS
– Perfil de Bluetooth: A2DP
– Perfil de Bluetooth: SPP
Para escuchar música de una fuente de audio
Bluetooth
– Perfil de Bluetooth: A2DP
– Perfil de Bluetooth: AVRCP
Ñ Conexión de iPod/iPhone
Para conec tar el iPod/iPhone con esta unidad,
serán necesarios el cable, el adaptador (ambos se
venden por separado) y el perl compatibles con
su iPod/iPhone:
Para escuchar música y ver vídeos con un
dispositivo con conector Lightning
– Adaptador Lightning Digital AV
– KCA-HD100
– KCA -iP103
– Perfil de Bluetooth: SPP
Para escuchar música con un dispositivo con
conector Lightning
– KCA -iP103
Para escuchar música y ver vídeos con un
dispositivo con conector de 30 patillas
– KCA-iP202
Para escuchar música con un dispositivo con
conector de 30 patillas
– KCA -iP102
Para escuchar música a través de Bluetooth
– Perfil de Bluetooth: A2DP
– Perfil de Bluetooth: SPP
✎ NOTA
• Al realizar la conexión con el adaptador Lightning
Digital AV o con el adaptador Digital AV de 30
patillas de Apple, algunas aplicaciones podrán
54 ñ Español
Page 55

controlarse desde este unidad. Las funciones
operativas dependerán de la aplicación. Consulte
“Función Apps” (P.52) en el manual de
instrucciones.
• No deje el cable ni el adaptador de otros fabricantes
en el interior del coche. Podría producirse una avería
a causa del calor.
Ñ iPod/iPhone que pueden conectarse
Los siguientes modelos pueden conectarse a esta
unidad.
Made for
• iPhone 5s
• iPhone 5c
• iPhone 5
• iPhone 4S
• iPhone 4
• iPhone 3GS
• iPhone 3G
• iPhone
• iPod touch (5th generation)
• iPod touch (4th generation)
• iPod touch (3rd generation)
• iPod touch (2nd generation)
• iPod touch (1st generation)
• iPod classic
• iPod with video
• iPod nano (7th generation)
• iPod nano (6th generation)
• iPod nano (5th generation)
• iPod nano (4th generation)
• iPod nano (3rd generation)
Ñ Requisitos de Pandora®
iPhone o iPod touch
• Utilice un iPhone o iPod touch de Apple que
funcione con el sistema iOS3 o superior.
• Busque “Pandora” en la tienda iTunes App Store de
Apple para obtener e instalar la última versión de la
aplicación Pandora® en su dispositivo.
Android™
• Visite Google play y busque Pandora para llevar a
cabo la instalación.
BlackBerry®
• Visite www.pandora.com en el navegador integrado
para descargar la aplicación de Pandora.
• Debe disponer de Bluetooth integrado y debe ser
compatible con los siguientes perfiles:
- SPP
- A2DP
NOTA
• En la aplicación de su dispositivo, inicie la sesión y
cree una cuenta con Pandora.
• (Si todavía no se ha registrado como usuario, puede
crear su cuenta en www.pandora.com).
• Conexión a Internet mediante LTE, 3G, EDGE o WiFi.
• Pandora® se encuentra disponible únicamente en
EE. UU., Australia y Nueva Zelanda.
• Debido a que Pandora® es el servicio de un tercero,
las especificaciones podrían cambiar sin previo
aviso. Por lo tanto, es posible que se dañe la
compatibilidad o que algunos o todos los servicios
no estén disponibles.
• Algunas funciones de PANDORA® no están
disponibles desde esta unidad.
• Si tiene cualquier problema para utilizar la
aplicación, póngase en contacto con Pandora® en la
dirección: pandora-support@pandora.com.
Ñ Acerca de iHeartRadio®
iPhone o iPod touch
• Utilice un iPhone o iPod touch de Apple con iOS5
o posterior.
• Busque “iHeartAuto” en la App Store de Apple e
instale la versión más actualizada de la aplicación
iHeartAuto™ en su dispositivo.
Android™
• Use un dispositivo Android con firmware 2.2 o
posterior.
• Busque “iHeartAuto” en Google Play para instalar
la versión más ac tualizada de la aplicación
iHeartAuto™ en su dispositivo.
NOTA
• iHeartRadio® está disponible solo en los EE. UU. y
sus territorios.
• Para sacar todo el partido a la aplicación, se
recomienda usar una conexión Wi-Fi o 3G/4G.
• Dado que iHeartAuto™ es un servicio de un
tercero, las especificaciones podrían cambiar sin
previo aviso. Por lo tanto, es posible que se dañe la
compatibilidad o que algunos o todos los servicios
no estén disponibles.
• Algunas funciones de iHeartAuto® no están
disponibles desde esta unidad.
• Si experimenta problemas en el uso de esta
aplicación, póngase en contacto con el Ser vicio de
Atención al Cliente de iHeartRadio® en http://help.
iheartradio.com.
• iHeartRadio® y iHeartAuto™ son marcas comerciales
pertenecientes a Clear Channel Broadcasting, Inc.
Todos los usos se autorizan mediante licencia.
Español ñ 55
Page 56

Ñ Acerca de AUPEO!
iPhone o iPod touch
• Instale la versión más reciente de la aplicación
AUPEO! en su iPhone o iPod touch.(Busque “AUPEO!”
en la App Store de Apple iTunes y encuentre e
instale la versión más reciente.)
Android™
• Visite Google Play y busque “AUPEO!” para llevar a
cabo la instalación.
NOTA
• Asegúrese de que ha iniciado sesión en la aplicación
de su teléfono inteligente.Si no dispone de una
cuenta AUPEO!, podrá crear una gratuitamente
desde su teléfono inteligente o en www.aupeo.com.
• Debido a que AUPEO! es el servicio de un tercero,
las especificaciones están sujetas a cambios sin
previo aviso.Por lo tanto, es posible que se dañe la
compatibilidad o que algunos o todos los servicios
no estén disponibles.
• Algunas funciones de AUPEO! no pueden utilizarse
en esta unidad.
• En caso de duda sobre el uso de la aplicación,
contacte con AUPEO! en www.aupeo.com.
• Conexión a Internet activa.
56 ñ Español
56
Page 57

Español ñ 5757
Page 58

DNX892/ DNX772BH/ DNX692/ DNX572BH:
Ñ FCC WARNING
This equipment may generate or use radio
frequenc y energy. Changes or modifications to this
equipment may cause harmful interference unless
the modifications are expressly approved in the
instruction manual. The user could lose the authority
to operate this equipment if an unauthorized change
or modification is made.
NOTE
This equipment has been tested and found to comply
with the limits for a Class B digital device, pursuant
to Part 15 of the FCC Rules. These limits are designed
to provide reasonable protection against harmful
interference in a residential installation.
This equipment may cause harmful interference to
radio communications, if it is not installed and used
in accordance with the instructions. However, there
is no guarantee that interference will not occur in a
particular installation. If this equipment does cause
harmful inter ference to radio or television reception,
which can be determined by turning the equipment
off and on, the user is encouraged to try to correct
the interference by one or more of the following
measures:
• Reorient or relocate the receiving antenna.
• Increase the separation between the equipment
and receiver.
• Connect the equipment into an outlet on a
circuit different from that to which the receiver is
connected.
• Consult the dealer or an experienced radio/T V
technician for help.
#CAUTION
Use of controls or adjustments or performance of
procedures other than those specified herein may
result in hazardous radiation exposure.
In compliance with Federal Regulations, following
are reproductions of labels on, or inside the product
relating to laser product safety.
DNX892/ DNX772BH/ DNX692/ DNX572BH:
Ñ IC (Industry Canada) Notice
This device complies with Industry Canada licenceexempt RSS standard(s).
Operation is subject to the following two conditions:
(1)This device may not cause interference, and
(2) this device must accept any interference, including
interference that may cause undesired operation of
the device.
The term “IC: ” before the cer tification/ registration
number only signifies that the Industry Canada
technical specification were met.
#CAUTION
This equipment complies with FCC/IC radiation
exposure limits set forth for an uncontrolled
environment and meets the FCC radio frequenc y (RF)
Exposure Guidelines in Supplement C to OET65 and
RSS-102 of the IC radio frequency (RF) Exposure rules.
This equipment has very low levels of RF energy that
it deemed to comply without maximum permissive
exposure evaluation (MPE). But it is desirable that it
should be installed and operated keeping the radiator
at least 20cm or more away from person’s body
(excluding extremities: hands, wrists, feet and ankles).
Under Industry Canada regulations, this radio
transmitter may only operate using an antenna of a
type and maximum (or lesser) gain approved for the
transmitter by Industry Canada. To reduce potential
radio interference to other users, the antenna type
and its gain should be so chosen that the equivalent
isotropically radiated power (e.i.r.p.) is not more than
that necessary for successful communication.
DNX892/ DNX772BH/ DNX692/ DNX572BH:
• Contains Transmitter Module
FCC ID : YZP-RBFAC21XX
• Contains Transmitter Module
IC : 7414A-R BFAC21XX
JVC KENWOOD Corporation
2967-3, ISHIKAWA-MACHI,
HACHIOJI-SHI, TOK YO, JAPAN
THIS PRODUCT COMPLIES WITH DHHS
RULES 21 CFR SUBCHAPTER J IN EFFECT AT
DATE OF MANUFACTURE.
Location: Top plate
58
Page 59

CALIFORNIA, USA
This product contains a CR Coin Cell Lithium Batter y
which contains
Perchlorate Material – special handling may apply.
See www.dtsc.ca.gov/hazardouswaste/perchlorate
Información acerca de la eliminación de equipos
eléctricos y electr ónicos al nal de la v ida útil
(aplicable a los países que hayan adoptado
sistemas independientes de recogida de
residuos)
Los productos con el símbolo de un contenedor con
ruedas tachado no podrán ser desechados como
residuos domésticos.
Los equipos eléctricos y electrónicos al final de la
vida útil, deberán ser reciclados en instalaciones
que puedan dar el tratamiento adecuado a
estos produc tos y a sus subproductos residuales
correspondientes. Póngase en contacto con su
administración local para obtener información sobre
el punto de recogida más cercano. Un tratamiento
correcto del reciclaje y la eliminación de residuos
ayuda a conservar los recursos y evita al mismo
tiempo efectos perjudiciales en la salud y el medio
ambiente.
Para cumplimiento de la COFETEL:
“La operación de este equipo esta sujeta a las
siguientes dos condiciones:
(1) es posible que este equipo o dispositivo no cause
interferencia perjudicial y
(2) este equipo o dispositivo debe aceptar cualquier
interferencia,
incluyendo la que pueda causar su operación no
deseada.”
DN X7150 BT/ DN X4150BT:
Ñ The marking of products using lasers
CLASS 1
LASER PRODUCT
The label is at tached to the chassis/case and says
that the component uses laser beams that have been
classified as Class 1. It means that the unit is utilizing
laser beams that are of a weaker class. There is no
danger of hazardous radiation outside the unit.
DN X7150 BT/ DN X4150BT:
Ñ Marcación de productos que usan láseres
CLASS 1
LASER PRODUCT
Esta etiqueta está colocada en el chasis e indica que el
componente funciona con rayos láser de clase1. Esto
significa que el aparato utiliza rayos láser considerados
como de clase débil. No existe el peligro de que este
aparato emita al exterior una radiación peligrosa.
Informação sobre a eliminação de pilhas
Este produto não deve ser eliminado como lixo
doméstico geral. Devolva a pilha usada ao revendedor
ou entidade autorizada para que a mesma seja
devolvida ao fabricante ou importador.
A reciclagem e a eliminação de lixo de maneira
apropriada ajudarão a conser var os recursos
naturais ao mesmo tempo que prevenirão os efeitos
prejudicais à nossa saúde e ao meio ambiente.
59
Page 60

 Loading...