

Page 1

CONNECTED NAVIGATION SYSTEM
Check the latest edition
DNN9150BT
DNN9150BTM
CONNECTED MONITOR WITH DVD RECEIVER
DNR8015BT
DNR8015BTM
INSTRUCTION MANUAL
Before reading this manual, click the button below to check the latest edition and the
modified pages.
http://manual.kenwood.com/edition/im387/
15DNN_IM387_Ref_M_en_01 (M/M2/X)© 2014 JVC KENWOOD Corporation
Page 2
Return to the Top page
What Do You Want To Do?
Thank you for purchasing the KENWOOD CONNECTED NAVIGATION SYSTEM.
In this manual, you will learn various convenient functions of the system.
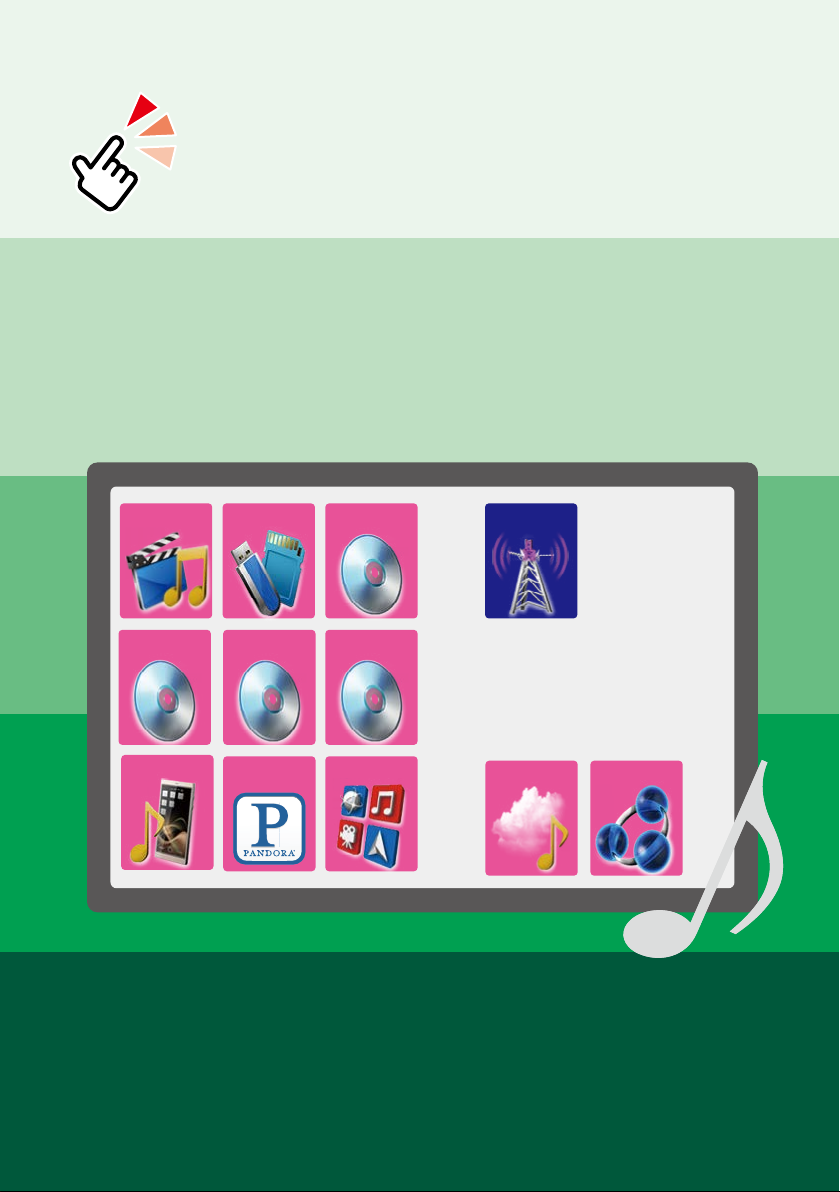
Click the icon of the media you want to play.
With one-click, you can jump to the section of each media!
iPod
Disc Media
BT Audio Pandora Apps
USB
Music CD
VCD
DVD VIDEO
Radio
Storage
Wireless Link
1
Page 3

Contents
ñ
Before Use 4
# WARNING _______________________ 4
How to Read this Manual 6
Features of
Connected systems 8
Basic Operations 10
Functions of the Buttons
on the Front Panel __________________ 10
Turning on the Unit _________________ 12
How to Play Media __________________ 17
Operation on the Home Screen ________ 18
Common Operation _________________ 22
Navigation Operation
(DNN9150BT/ DNN9150BTM) _______________ 24
Network Setup 28
Wi-Fi Setup ________________________ 28
Wi-Fi Hotspot Setup _________________ 30
Clock and Date Setup 32
Clock and Date Setup ________________ 32
Account Setup 34
About Account _____________________ 34
Create User Account _________________ 34
Set Owner Account _________________ 35
Set User Account ___________________ 36
Switch the User Login _______________ 36
Delete User Account _________________ 37
Reset Owner Account ________________ 37
Widget and Application
Operation 38
SNS Widget ________________________ 38
RSS Widget ________________________ 38
Facebook (SNS Application) ___________ 40
Twitter (SNS Application) _____________ 42
E-mail (SNS Application) _____________ 44
RSS Application ____________________ 46
Now playing Widget _________________ 48
Photo Frame Widget_________________ 50
Mixed Media Search _________________ 51
DVD/Video CD (VCD)
Operation 52
DVD/VCD Basic Operation ____________ 52
DVD Disc Menu Operation ____________ 55
Zoom Control for DVD and VCD _______ 56
DVD Setup ________________________ 57
CD/Audio and Visual Files/
iPod/Apps Operation 60
Music/Video Basic Operation __________ 60
Search Operation ___________________ 66
Movie Control ______________________ 70
Pandora® Operation
(region code 4 area only) _____________ 71
Apps Operation ____________________ 74
USB/iPod/App/DivX Setup ____________ 75
2
Page 4

Cloud Storage Operation 80
Starting procedure __________________ 80
Music Basic Operation _______________ 80
Category search ____________________ 81
Kenwood Wireless Link
Operation 82
Starting procedure __________________ 82
Media Server function _______________ 83
Media Player function _______________ 83
Media Controller function ____________ 84
Media Renderer function _____________ 85
Radio Operation 86
Radio Basic Operation _______________ 86
Memory Operation __________________ 88
Selecting Operation _________________ 89
Traffic Information __________________ 90
Tuner Setup _______________________ 90
Streaming Service Application 92
AUPEO!Application _________________ 92
AV Browser Application ______________ 94
Bluetooth Control 96
Registering and Connecting
Bluetooth Unit _____________________ 96
Playing Bluetooth Audio Device _______ 99
Using Hands-Free Feature ____________ 100
Hands-Free Setup ___________________ 104
Camera Control 106
Camera Control_____________________ 106
Switching the View Camera ___________ 106
Setting Up 108
Monitor Screen Setup _______________ 108
System Setup ______________________ 109
Display Setup ______________________ 112
Navigation Setup
(DNN9150BT/ DNN9150BTM) _________ 114
Camera Setup ______________________ 114
Software Information ________________ 116
AV Input Setup _____________________ 117
AV Output Interface Setup ____________ 117
Controlling Audio 118
Setting Audio ______________________ 118
Controlling General Audio ____________ 122
Equalizer Control ___________________ 123
Sound Effect _______________________ 124
Zone Control _______________________ 126
Listening Position ___________________ 126
Remote Control 128
Battery Installation __________________ 128
Functions of the Remote Control Buttons 129
Troubleshooting 132
Problems and Solutions ______________ 132
Error Messages _____________________ 133
Resetting the Unit __________________ 135
Appendix 136
Playable Media and Files _____________ 136
Status Bar Indicator Items ____________ 139
Region Codes in the World ____________ 141
DVD Language Codes _______________ 142
Specifications ______________________ 143
Trademarks ________________________ 146
Safety precaution ___________________ 149
3
Page 5
Return to the Top page
Before Use
Before Use
ñ
# WARNING
To prevent injury or fire, take
Ñ
the following precautions:
• To prevent a short circuit, never put or
leave any metallic objects (such as coins or
metal tools) inside the unit.
• Do not watch or fix your eyes on the unit’s
display when you are driving for any
extended period.
• If you experience problems during
installation, consult your Kenwood dealer.
Precautions on using this unit
Ñ
• When you purchase optional accessories,
check with your Kenwood dealer to make
sure that they work with your model and in
your area.
• You can select language to display menus,
audio file tags, etc. See Language setup
(P. 110).
• The Radio Data System or Radio Broadcast
Data System feature won’t work where
the service is not supported by any
broadcasting station.
Lens fogging
Ñ
When you turn on the car heater in cold
weather, dew or condensation may form
on the lens in the disc player of the unit.
Called lens fogging, this condensation on
the lens may not allow discs to play. In such
a situation, remove the disc and wait for the
condensation to evaporate. If the unit still
does not operate normally after a while,
consult your Kenwood dealer.
Precautions on handling discs
Ñ
• Do not touch the recording surface of the
disc.
• Do not stick tape etc. on the disc, or use a
disc with tape stuck on it.
• Do not use disc type accessories.
• Clean from the center of the disc and move
outward.
• When removing discs from this unit, pull
them out horizontally.
• If the disc center hole or outside rim has
burrs, use the disc only after removing the
burrs with a ballpoint pen etc.
• Discs that are not round cannot be used.
Protecting the monitor
Ñ
To protect the monitor from damage, do not
operate the monitor using a ball point pen or
similar tool with the sharp tip.
Cleaning the unit
Ñ
If the faceplate of this unit is stained, wipe it
with a dry soft cloth such as a silicon cloth.
If the faceplate is stained badly, wipe the
stain off with a cloth moistened with neutral
cleaner, then wipe it again with a clean soft
dry cloth.
!
• Applying spray cleaner directly to the unit may
affect its mechanical parts. Wiping the faceplate
with a hard cloth or using a volatile liquid such
as thinner or alcohol may scratch the surface or
erase screened print.
4
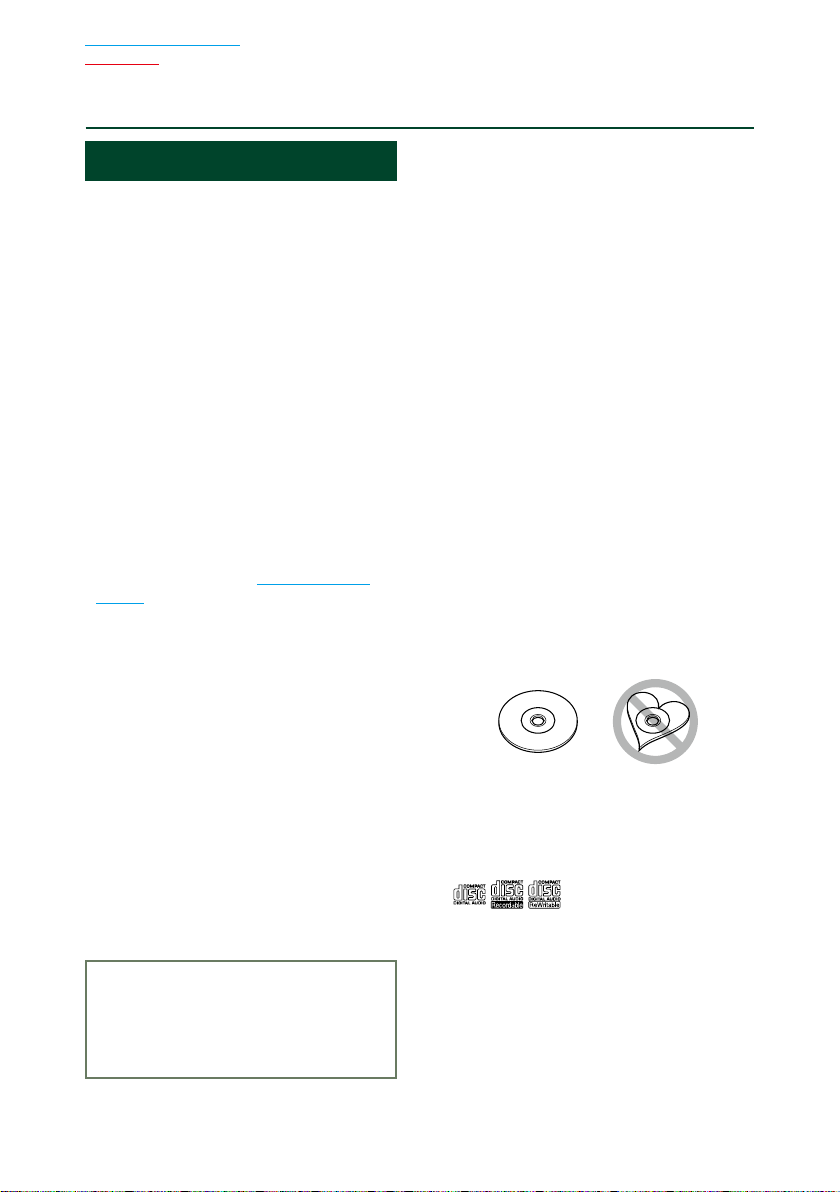
• 8-cm (3 inch) discs cannot be used.
• Discs with coloring on the recording
surface or discs that are dirty cannot be
used.
• This unit can only play the CDs with
.
This unit may not correctly play discs which
do not have the mark.
• You cannot play a disc that has not been
finalized. (For the finalization process see
your writing software, and your recorder
instruction manual.)
Page 6
Erase the personal information
Ñ
Before giving or selling this unit to others, be
sure to delete the information (mail, search
logs, etc.) stored in this unit by yourself and
confirm that the data has been deleted.
We shall not be liable for any damage caused
by leakage of undeleted data.
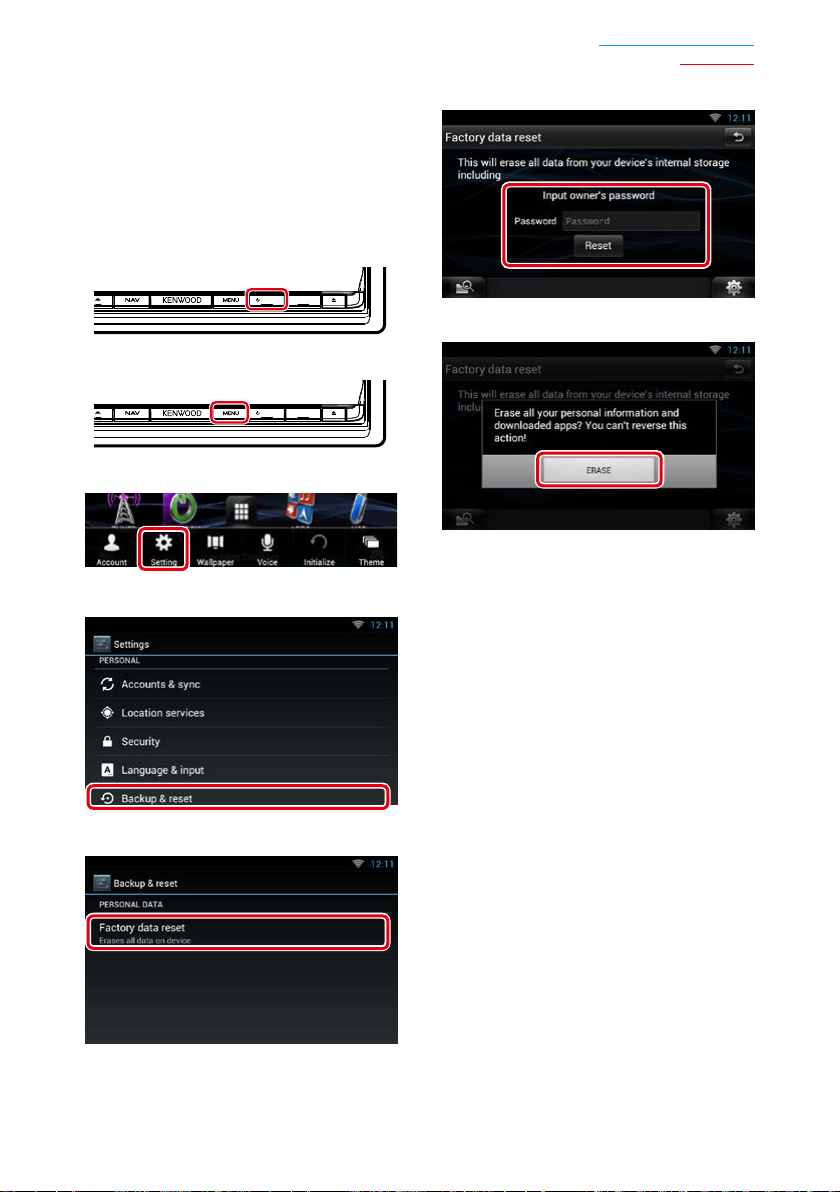
Press the <HOME> button.
1
HOME 6
Press the <MENU> button.
2
HOME 6
Touch [Setting].
3
Touch [Backup & Reset].
4
Return to the Top page
Enter owner password. Touch [Reset].
6
Touch [ERASE].
7
Before Use
Touch [Factory data reset].
5
5
Page 7
Return to the Top page
30
How To Read This Manual
How to Read this Manual
ñ
Return to the Top page
CD/Audio and Visual Files/iPod/Apps Operation
Search Operation
You can search music, video or picture files
by the following operations.
NOTE
• If you use a remote controller, you can jump
directly to the desired track/file with entering the
track/folder/file number, play time, etc. For details,
see Direct search mode (P.135).
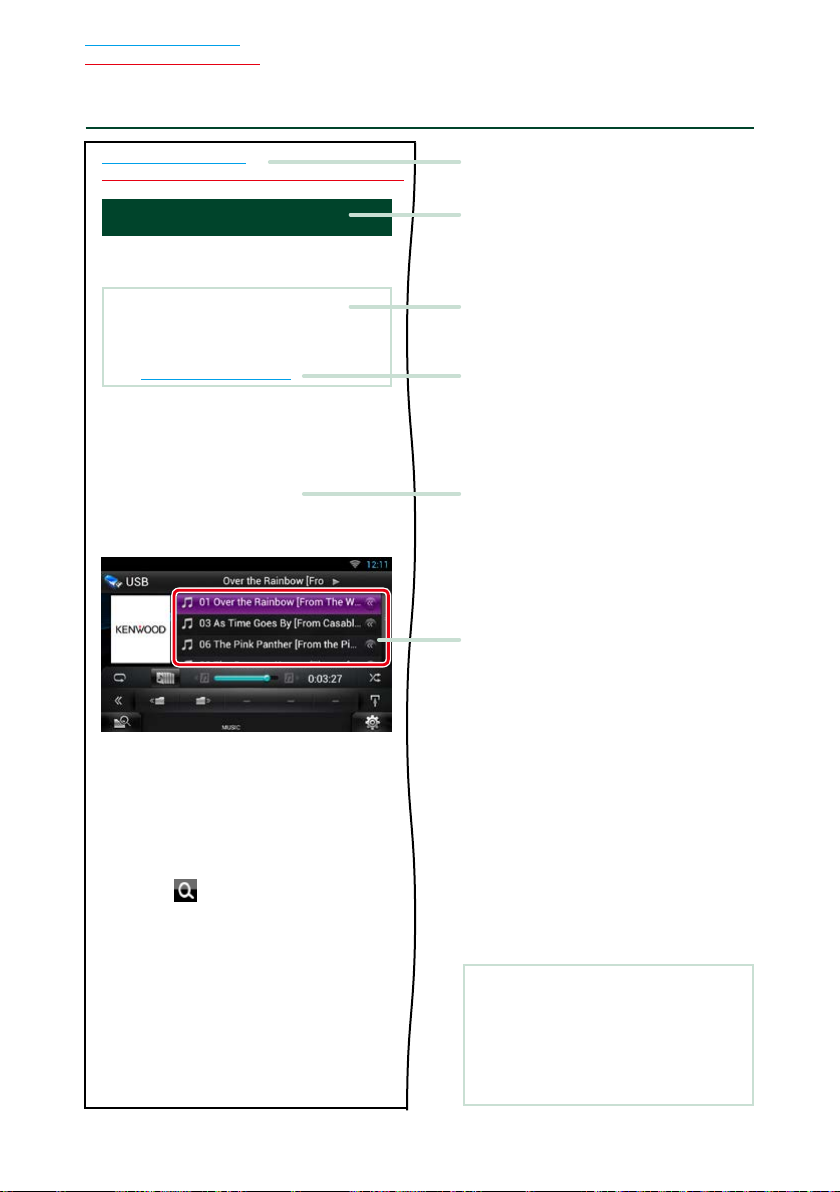
List search
Ñ
You can search tracks, folders, and files
according to hierarchy.
Touch illustrated area.
1
List Control screen appears.
Touch desired track/file.
2
Link header
You can refer each section or top page with
one-click.
Operation title
Introduces the function.
NOTE
Introduces some tips, notes, etc.
Reference mark
Displayed in blue notes.
With one-click, you can jump to the
article related to the current section.
Operation procedure
Explains necessary procedures to
achieve the operation.
< >: Indicates the name of panel
buttons.
[ ]: Indicates the name of touch
keys.
Playback starts.
Other search
Ñ
When you want to narrow the list down,
there are other search ways.
This function is not available when music CD
is the current source.
Touch [ ] in the control screen.
1
The search type screen appears.
Touch desired search way.
2
6
Screen shot
Shows some screen shots displayed during
operation for reference.
The area or keys to touch are surrounded
with a red frame.
NOTE
• The screens and panels shown in this
manual are examples used to provide clear
explanations of the operations.
For this reason, they may be different from the
actual screens or panels used, or some display
patterns may be different.
Page 8

Return to the Top page
How To Read This Manual
7
Page 9
Return to the Top page
Basic Operations
Features of Connected systems
ñ
By connecting this unit to Internet, you can use various services.
Cooperation with Route Collector site
• Destinations and routes specified on the PC can be input to this navigation system. (DNN9150BT/
DNN9150BTM)
• The routes you have traveled and the songs you have listened to can be logged. (P.25)
(DNN9150BT/ DNN9150BTM)
• By uploading music files to Dropbox and creating a play list on Route Collector site, you can listen
to music anywhere through streaming without music files on this unit. (P. 80)
• Speech to Text (STT) and Text to Speech (TTS).
Use of internet service
• Streaming service such as Aupeo!.
• Internet service such as email, and social networking service such as Facebook and Twitter.
• Information (RSS, etc.) service.
About the account
• To use internet services via this system,
you need to create an account in the
Route Collector site.
• In addition to the owner account, you
can register up to four user accounts.
• You can use a guest account as well.
• By switching among accounts, you can
secure the privacy when using the mail
feature or social media.
For details, see About Account (P.34).
http://www.route-collector.com/
8
Notes
• TTS (by Nuance)
• STT (by Nuance)
To use the following services, you need to
register the corresponding free or paid accounts.
• Aupeo!
• Facebook
• Twitter
• Dropbox
Page 10
Return to the Top page
Basic Operations
Wi-Fi access point
• Connect to Internet using the tethering
function of your smartphone or an
Internet device. (P.28)
4G, 3G, LTE
or EDGE
Wi-Fi hotspot
• This unit becomes the Wi-Fi access
point and you can enjoy music and
video in a smartphone Wi-Fi connected
by Kenwood Wireless Link.(P. 30)
Wi-Fi (11n/g/b)
• Media player for DVD video, CD, USB memory, iPod, etc.
• Radio.
• Navigation (
DNN9150BT/ DNN9150BTM)
HOME 6
9
Page 11
Return to the Top page
Basic Operations
Basic Operations
ñ
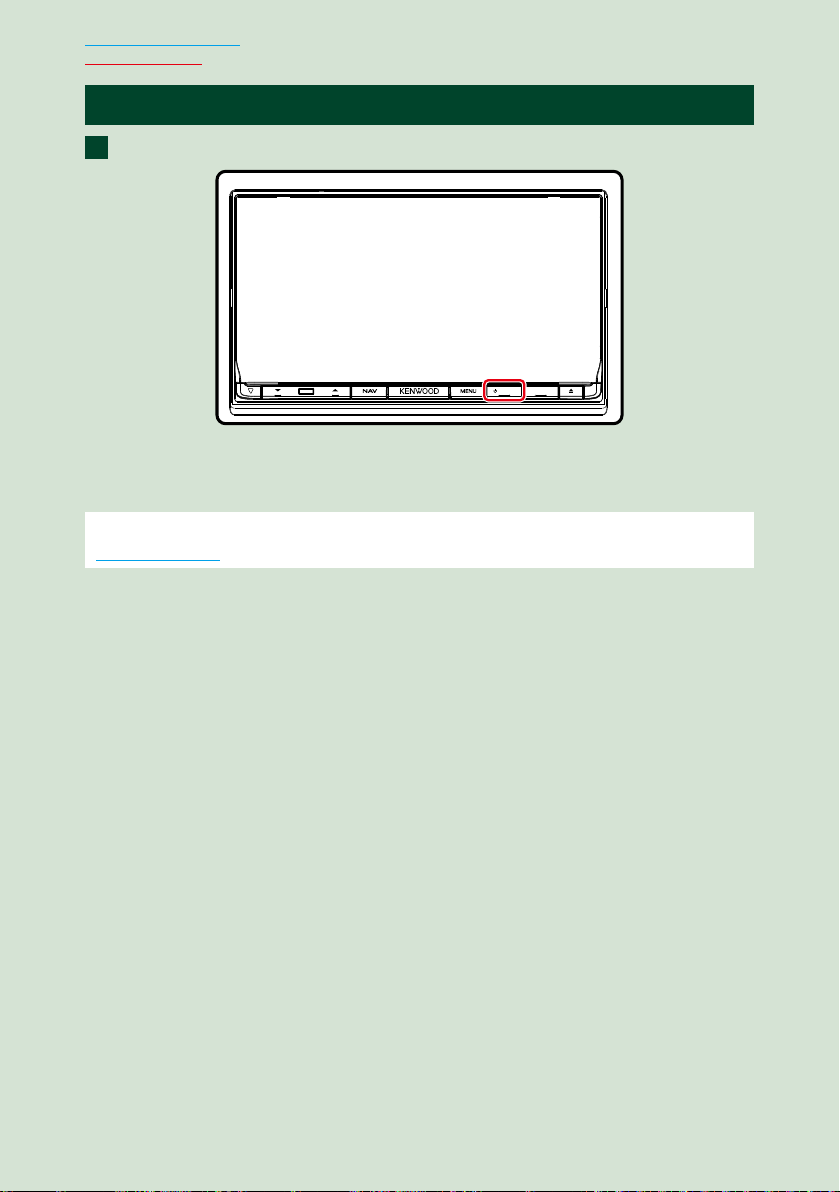
Functions of the Buttons on the Front Panel
ñ
9
DNR8015BT/
DNR8015BTM
HOME 6
1 4 5 6 7 82 3
NOTE
• The panels shown in this guide are examples used to provide clear explanations of the operations. For this reason,
they may be different from the actual panels.
10
How to insert an SD Card (DNN9150BT/ DNN9150BTM)
1) Press 8 <G> button for 1 second.
The panel fully opens.
2) Hold the SD card as the illustration in the right
and insert it into the slot until it clicks.
V To eject the card:
Push the card until it clicks and then remove your finger
from the card.
The card pops up so that you can pull it out with your
fingers.
10
Labelled
side
0
Page 12
Number Name Motion
1
2
3
4
5
6
7
8
9
10
s (Reset) • If the unit or the connected unit fails to operate properly, the unit
returns to initial settings when this button is pressed (P. 135).
• If the SI function is turned on, this indicator flashes when the vehicle
ignition is off (P. 111).
S, R (Vol) Adjusts volume.
Return to the Top page
Basic Operations
Remote
Sensor
NAV
(DNN9150BT/
DNN9150BTM)
APPS
(DNR8015BT/
DNR8015BTM)
MENU • Displays the option menu screen.
HOME • Displays the Home screen ( P.18).
6 (Back) • Return to the previously viewed screen.
G (Eject) • Ejects the disc.
Disc insert
slot
SD card slot
(DNN9150BT/
DNN9150BTM)
Receives the remote control signal.
• Displays the navigation screen.
• Pressing for 1 second turns the screen off.*
• Displays the APPS screen .
• Pressing for 1 second turns the screen off.*
• Pressing for 1 second switches AV out sources.
• Pressing for 1 second turns the power off.
• When the power off, turns the power on.
• Pressing for 1 second displays the Hands Free screen (P. 100).
• When the panel is opened, pressing closes the panel and pressing for 1
second ejects the disc forcibly.
• When the panel is closed, pressing for 1 second fully opens the panel to
the location of the SD card slot.
A slot to insert a disc media.
An SD card slot for upgrading the map. For how to upgrade the map, refer
to the instruction manual of the navigation system.
* The function of the [NAV]/ [APPS] button can be changed to camera view function. See User
interface (P.109).
11
Page 13
Return to the Top page
Basic Operations
Turning on the Unit
ñ
Press the <HOME> button.
1
HOME 6
The unit is turned on.
ö To turn off the unit:
Press the <HOME> button for 1 second.
If it is your first time turning the unit on after installation, it will be necessary to perform
Initial setup (P.14).
12
Page 14
Login
Select the login user.
1
When the owner has not been registered
When the owner has been registered
Return to the Top page
Basic Operations
Enter the password.
2
When you selected Administrator or Guest, you do not need to enter a password.
[Auto Login?]: Checking this checkbox allows you to log in to the system automatically from
the next time.
Touch [Login].
3
NOTE
• If you forgot your password, create your new password on the Route Collector site.
http://www.route-collector.com/
13
Page 15
Return to the Top page
Basic Operations
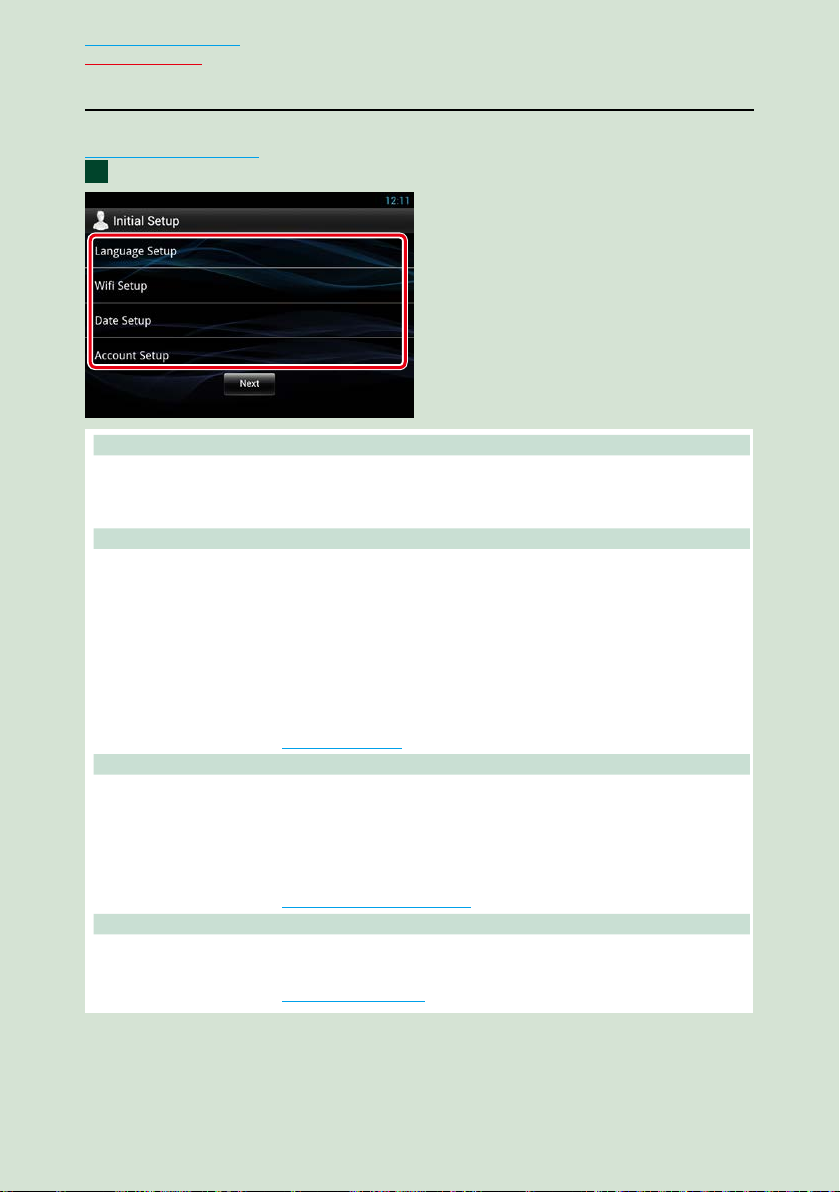
Initial setup
Perform this setup when you use this unit for the first time or when you reset the unit. See
Resetting the Unit (P.135).
Set each item as follows.
1
Language Setup
Select the language used for the GUI and input methods. Default is “English (United States)”.
1Touch [Language Setup].
2Select a language from the list.
WiFi Setup
Configure settings for connection to Wi-Fi.
1Touch [WiFi Setup].
2Slide Wi-Fi to ON.
3Touch [Wi-Fi].
4Select the Wi-Fi access point to register from the list.
5Enter the Password.
6Touch [Connect].
7After setting, press the < 6 > button.
For details on operation, see Wi-Fi Setup (P.28).
Date Setup
Set the date and time.
1Touch [Date Setup].
2Touch [Select time zone]. (DNR8015BT/ DNR8015BTM only)
3Select a time zone.
4After setting, press the < 6 > button.
For details on operation, see Clock and Date Setup (P.32).
Account Setup
Set the information about the user of this unit.
1Touch [Account Setup].
For details on operation, see About Account (P.34).
14
Page 16
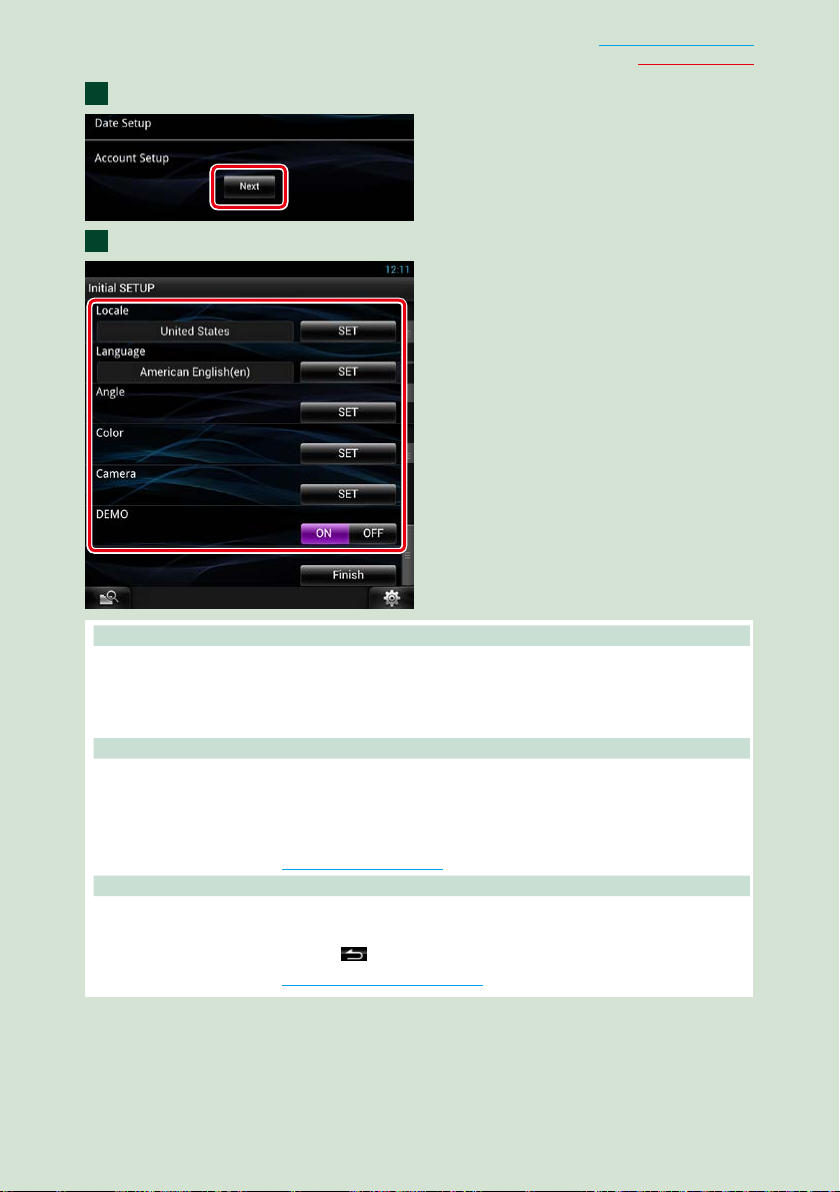
Touch [Next].
2
Set each item as follows.
3
Return to the Top page
Basic Operations
Locale (DNN9150BT/ DNN9150BTM)
Select the country for the navigation system.
The language, the distance unit, and the gasoline unit are set.
1Touch [SET].
2Select the desired country.
Language
Select the language used for the control screen and setting items. Default is “American English (en)”.
1Touch [SET].
2Touch [C] or [D] to select the desired language.
3Touch [Enter].
For details on operation, see Language setup (P.110).
Angle
Adjust the position of the monitor. Default is “0”.
1Touch [SET].
2Touch desired angle number and [
For details on operation, see Monitor angle control (P.112).
].
Continued
15
Page 17
Return to the Top page
Basic Operations
Color
Set the screen and button illumination color. You can select whether to allow color scan operation or
select a fixed color for operation.
1Touch [SET].
2Touch [ON] or [OFF] of [Panel Color Scan].
3If you want to change color, touch [SET] of [Panel Color Coordinate].
4Touch your desired color and [
For details on operation, see Panel color coordinate (P.113).
Camera
Set the parameters for the camera.
1Touch [SET].
2Set each item and touch [
For details on operation, see Camera Setup (P.114).
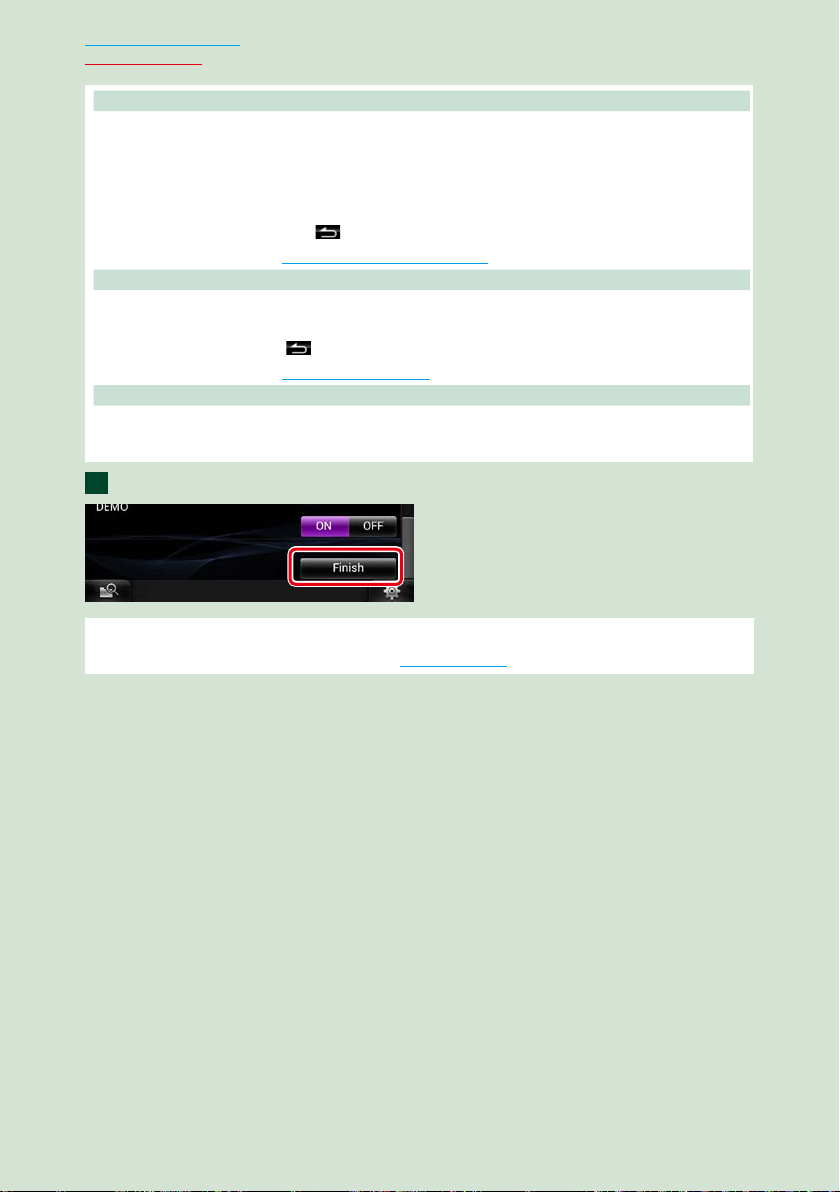
DEMO
Set the demonstration mode. Default is “ON”.
1Touch [ON] or [OFF].
Touch [Finish].
4
].
].
NOTE
• These settings can be set from the SETUP menu. See Setting Up (P.108).
16
Page 18
Return to the Top page
Basic Operations
How to Play Media
ñ
Music CD and disc media
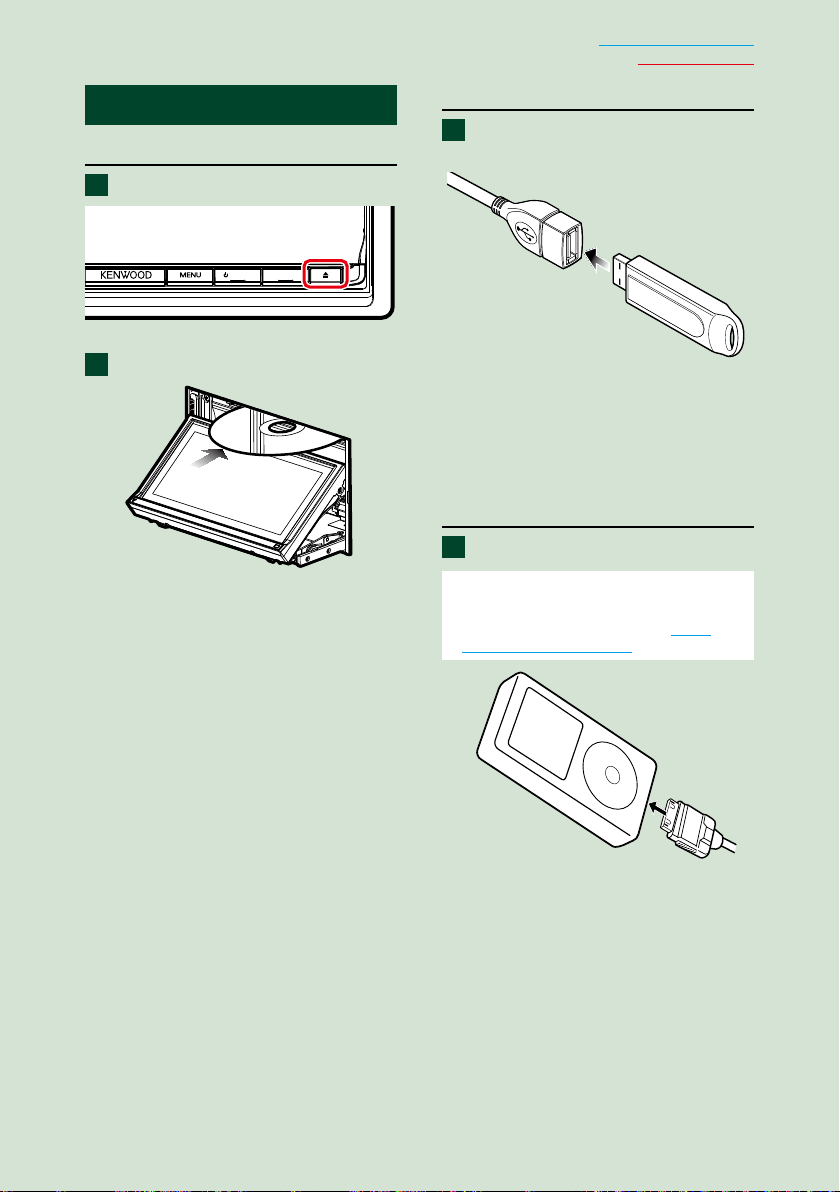
Press the <G> button.
1
HOME 6
The panel opens.
Insert the disc into the slot.
2
The panel closes automatically.
The unit loads the disc and playback
starts.
ö To eject the disc:
Press the <G> button.
USB device
Connect the USB device with the
1
USB cable.
The unit reads the device and playback
starts.
ö To disconnect the device:
Touch [G] on the screen and disconnect
the device from the cable.
iPod
Connect the iPod.
1
NOTE
• For the details of the necessary cable and adapter
to connect with iPod/iPhone, refer to Music/
Video Basic Operation (P.60).
The unit reads the iPod and playback
starts.
ö To disconnect the iPod/iPhone
connected with the cable:
Touch [G] on the screen and disconnect
the device from the cable.
17
Page 19
Return to the Top page
Basic Operations
Operation on the Home Screen
ñ
Most functions can be operated on the Home screen.
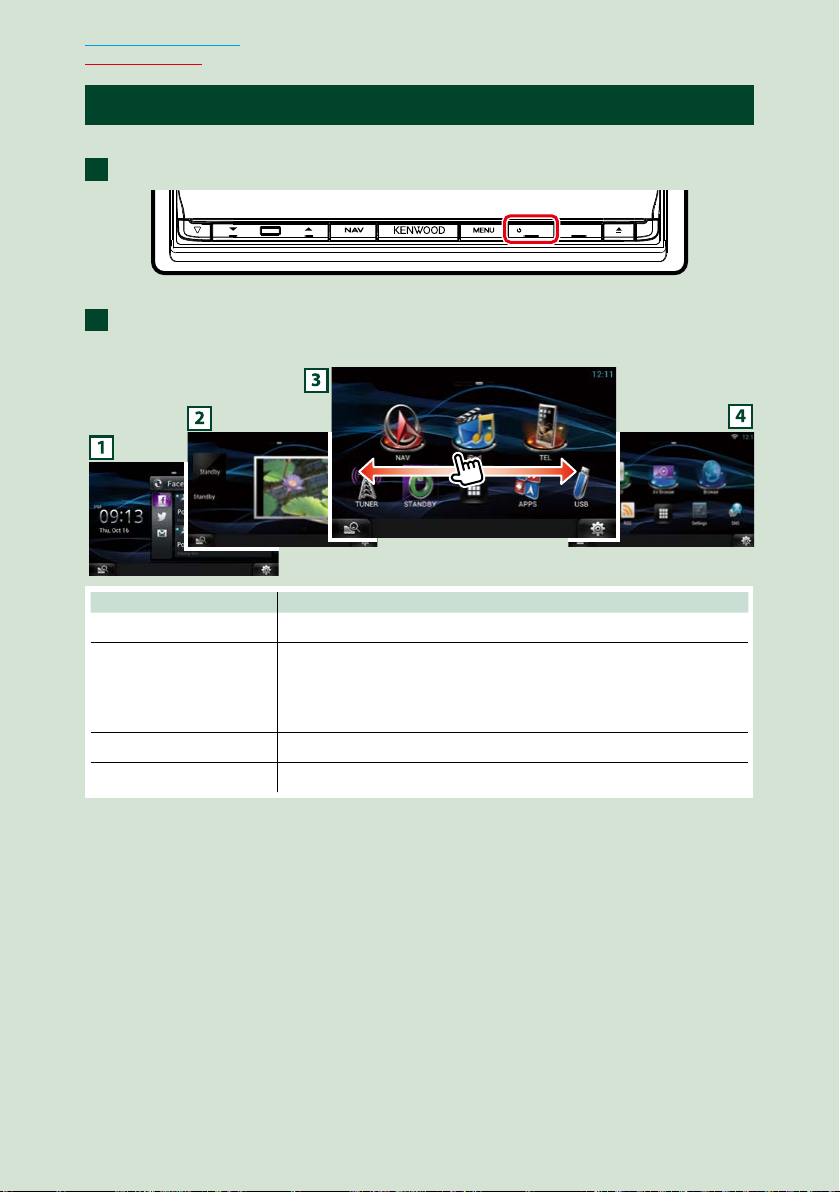
Press the <HOME> button.
1
HOME 6
Home screen appears.
Flick the screen left or right to select the Service panel, Media panel, Source
2
launcher panel, or Network contents panel.
Panel Description
1 Service panel
2 Media panel
3 Source launcher panel
4 Network contents panel
Network widget: Displays the SNS, or RSS.
Now playing: Displays the title of the song being played or the name
of the station you are listening to, and allows you to perform simple
operations.
Photo Frame Widget: Displays the Photo frame that shows photos.
Allows you to select a source.
Allows you to select a network-related application.
18
Page 20
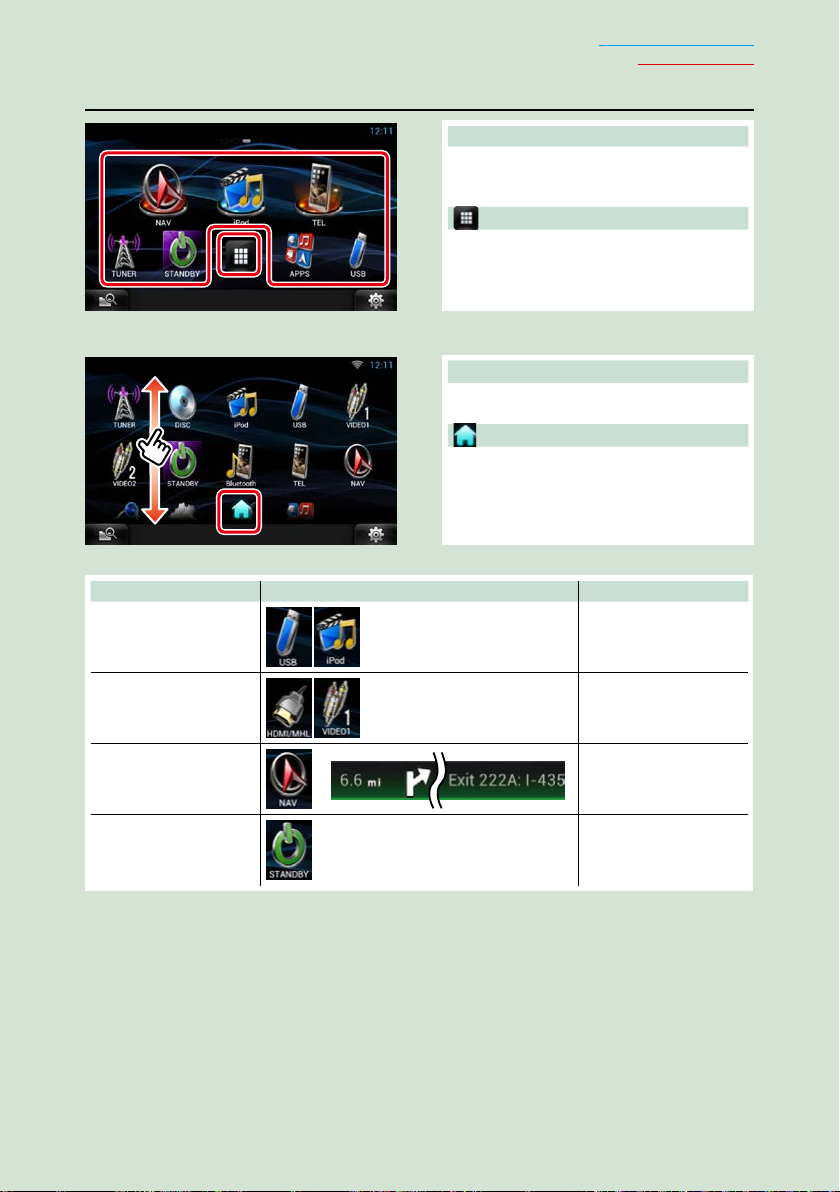
Source launcher panel and Network contents panel
(Shortcut icon)
You can register sources and applications
you use frequently so that you can start them
quickly.
(All source list/ All apps list)
Displays all sources and applications.
All source list/ All apps list
(All source list/ All apps list)
You can scroll the list screen by flicking the
screen up/down.
(Home)
Returns to the Source launcher panel or the
Network contents panel.
From All source list, you can perform the following functions.
Function Icon Operation
Switch the audio source
etc.
Switch the video source
etc.
Display navigation
screen (DNN9150BT/
DNN9150BTM)
Turn off all audio
function
or
Return to the Top page
Basic Operations
Touch the icon of the
desired source.
Touch the icon of the
desired video source.
Touch [NAV] or
navigation information.
Touch [STANDBY].
19
Page 21
Return to the Top page
2
1
Basic Operations
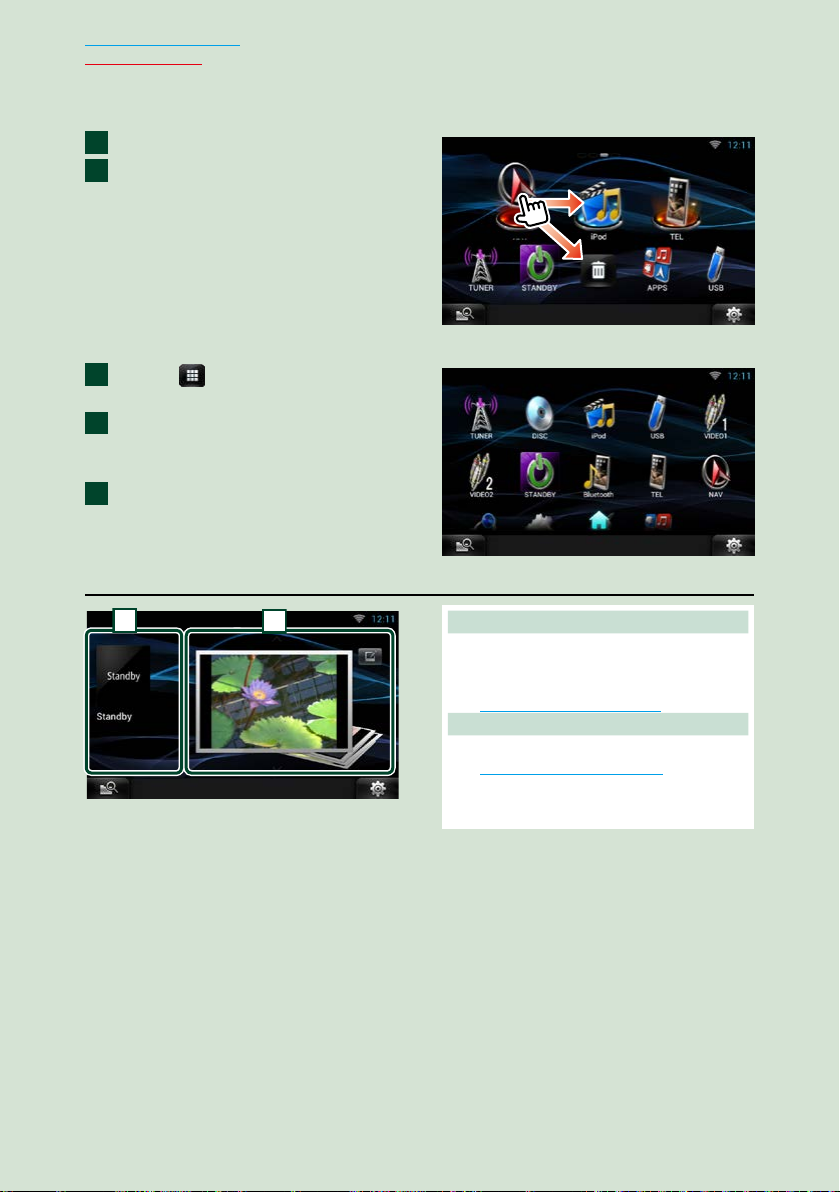
Moving or deleting of an icon on the Source launcher panel and Network
contents panel
Touch and hold the icon.
1
Drag the icon to the desired
2
position or Recycle Bin.
Adding of a shortcut icon to Source launcher panel or Network contents panel
Touch [ ] in Source launcher
1
panel or Network contents panel.
Touching the icon continuously to
2
display the Source launcher panel
or Network contents panel screen.
Drag the icon to an empty space.
3
Media panel
1 Now playing widget
Displays the title of the song being played or
the name of the station you are listening to,
and allows you to perform simple operations.
See Now playing Widget (P.48).
2 Photo Frame Widget
Displays the Photo frame that shows photos.
See Photo Frame Widget (P.50).
20
Page 22
Service panel
2
1
Change the skin for home screen
You can select a home screen skin from 3 types.
Press the <MENU> button.
1
Touch [
2
Select a skin.
3
Theme].
Return to the Top page
Basic Operations
1
Displays the clock and date.
2 Network widget
Touching [
between RSS, and SNS.
See SNS Widget (P.38), RSS Widget
(P. 38).
] allows you to switch
Touch [OK].
4
21
Page 23
Return to the Top page
Basic Operations
Common Operation
ñ
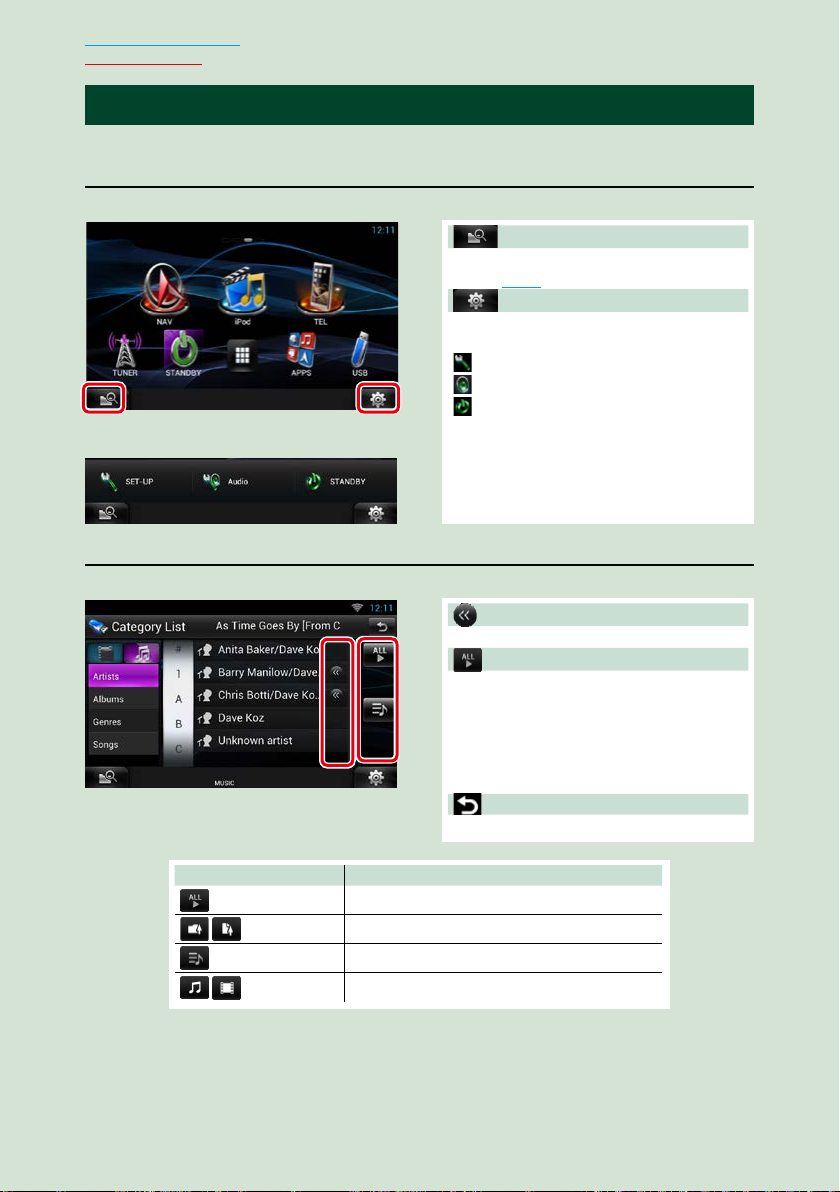
Introduces the common operation.
General
There are some functions which can be operated from most screens.
(Mixed Media Search)
Touch to display the Mixed Media Search
screen. (P. 51)
(Quick menu)
Touch to display the quick menu. The
content of the menu are as follows.
: Displays the SETUP Menu screen.
: Displays the Audio Control Menu screen.
: Displays the control screen of current
Quick menu screen
source. Icon feature differs depending
on the source.
List screen
There are some common function keys in the list screens of most sources.
(Scroll)
Touch to scroll through texts on the display.
etc.
Touch keys with various functions are
displayed here.
Displayed keys differ depending on the
current audio source, status, etc.
For examples of functions of each key, refer
to the table below.
22
Key Function
Lists all the music in the lower hierarchy.
Moves to the upper hierarchy.
Displays current category folder.
Displays music/movie file list.
Returns to previous screen.
Page 24
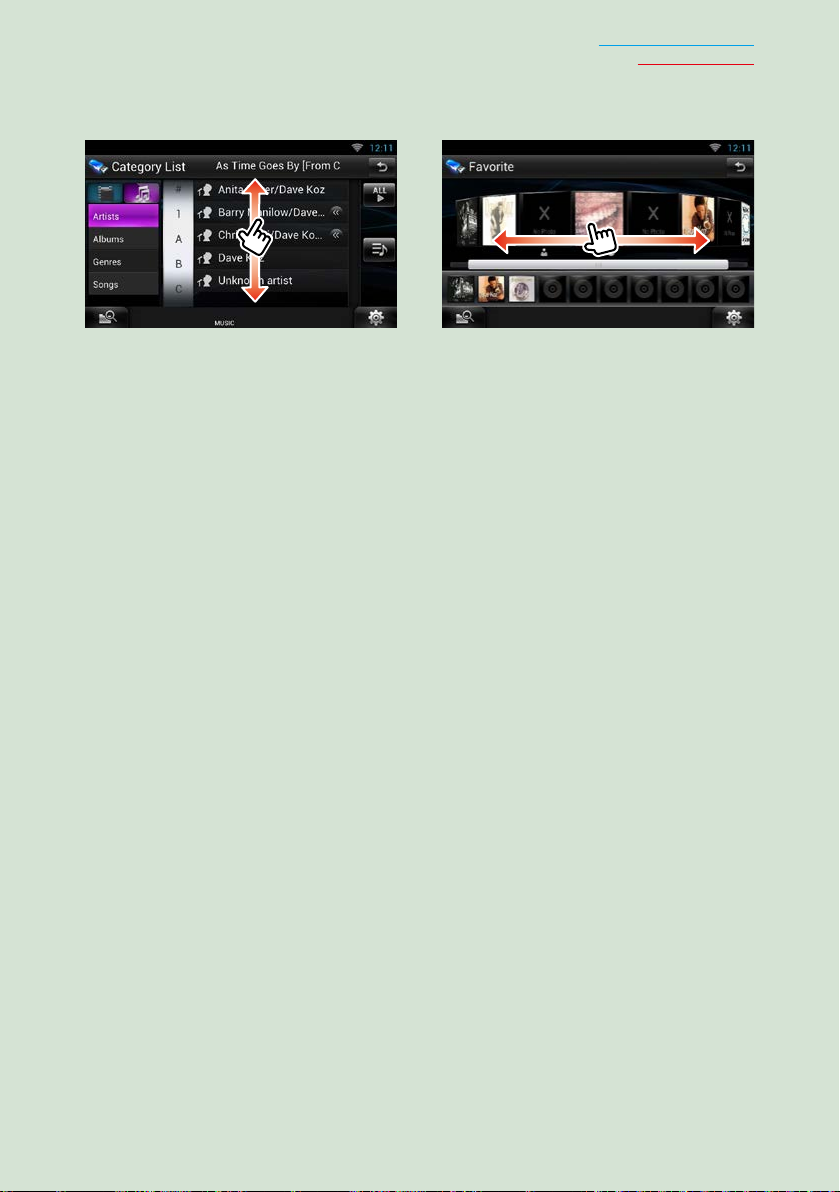
Flick scrolling
You can scroll the list screen by flicking the screen up/down or right/left.
Return to the Top page
Basic Operations
23
Page 25
Return to the Top page
6
Basic Operations
Navigation Operation
(DNN9150BT/ DNN9150BTM)
ñ
For details on the navigation function, please
refer to the Navigation Instruction Manual.
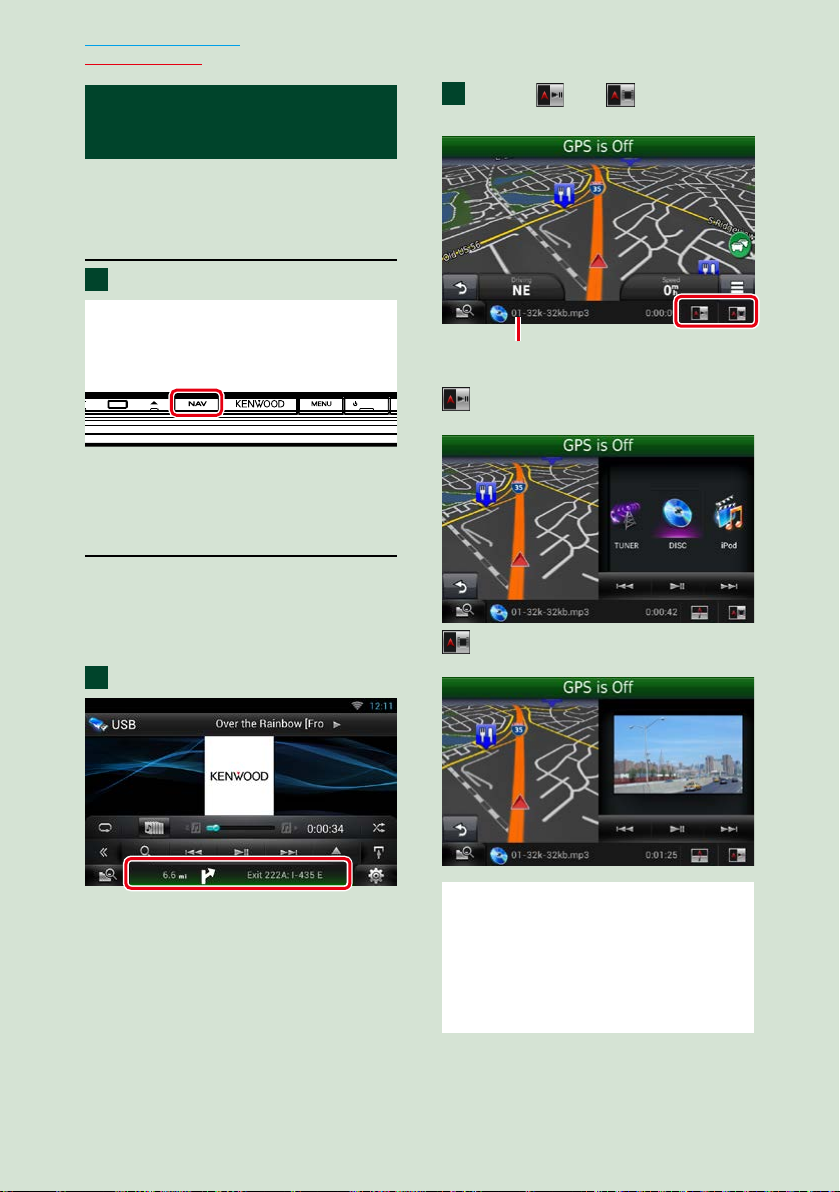
Display the navigation screen
Press the <NAV> button.
1
HOME
The navigation screen appears.
Control audio from the
navigation screen
You can control audio sources while the
navigation screen is displayed.
Also, you can view the navigation
information while the source control screen
is displayed.
Touch the information bar.
1
Touch [ ] or [ ] in the
2
navigation screen.
Touching this area displays
the audio screen.
: Displays the navigation and control
keys of the current source.
: Displays the navigation and current
video playback display.
The navigation screen with audio
information appears.
24
NOTE
• The screen switches between playback screen
and camera view each time the viewing area is
touched.
• Touching the source icon in the bottom of the
screen displays the full audio screen.
• AUPEO! just plays music. You cannot control it.
Page 26
Return to the Top page
Basic Operations
ö To return to the full navigation
screen:
Touch [ ].
NOTE
• For details on control keys, refer to the instructions
in each section.
Trip log function
You can upload the routes you traveled and
the songs you listened to the Route Collector
site so that you can confirm them later.
Precaution
• Trip log function can be used to log information
such as routes you have traveled and songs you
have listened to. Such information is uploaded
to our Route Collector site, for later access by
you through your computer. Non-personal data
from this log is also kept and used by us for
statistical purposes to improve the quality of our
products. By selecting to use this function, you
are accepting use of the data for such statistical
purposes.
This is an optional function that can be activated
at your sole option and responsibility the
procedures set forth in the left column.
Press the <MENU> button in
1
the navigation screen or source
control screen.
Touch [
2
Touch [Yes].
3
When the Trip log is active, ” ” appears
in the status bar.
Triplog On].
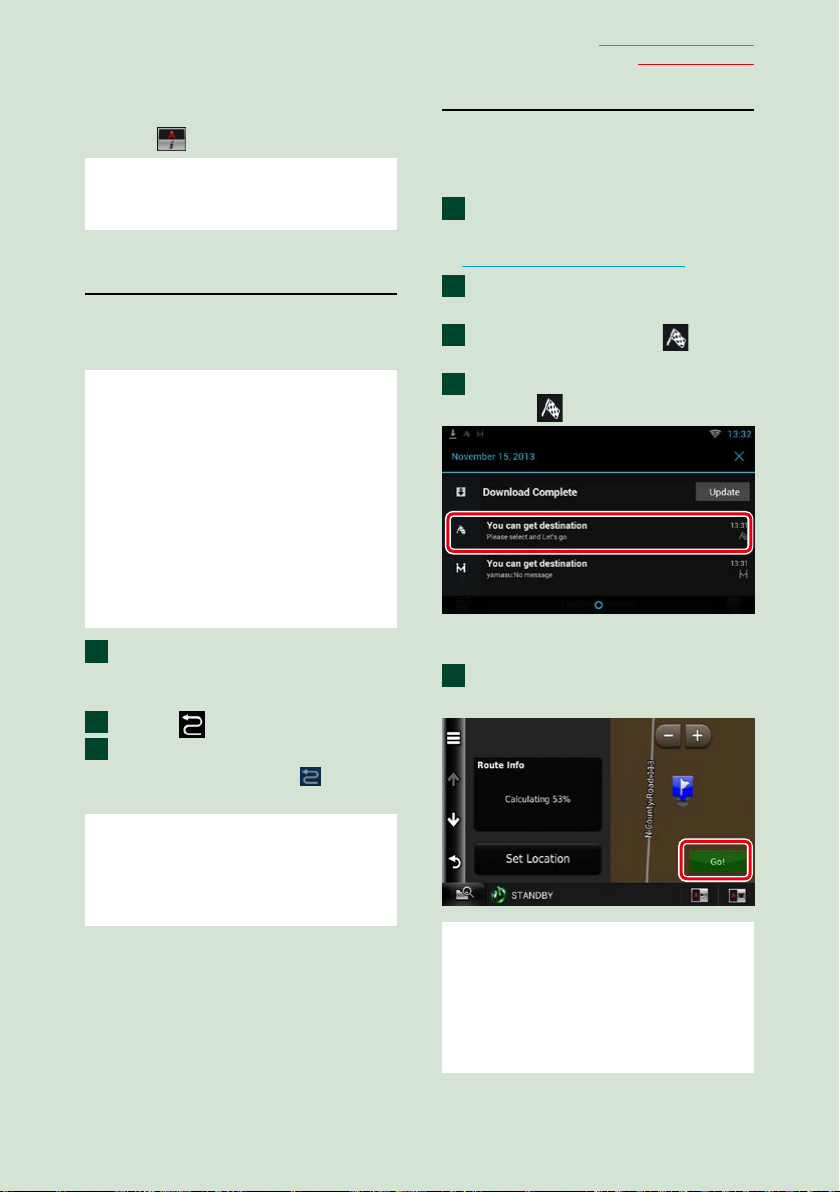
Where To function
You can set the destination of the navigation
easily by setting the destination of the
Route Collector site from your PC or your
smartphone.
1
Log in to Route Collector site by
the owner account.
http://www.route-collector.com/
Set the destination in the Route
2
Collector site.
You will be notified by “
3
on the status bar.
Drag the status bar downward.
4
Touch [
It will be set as the destination of the
navigation.
Touch [GO] to start the route
5
].
guide.
” icon
NOTE
• You must have a connection with the internet
using Wi-Fi.
• You can use the Trip log function when you have
logged in the system as Owner or User.
NOTE
• You can set a user account when you have logged
in the Owner.
• You must have a connection with the internet
using Wi-Fi.
• For the operation of the Route Collector site refer
to the instruction in its website.
25
Page 27
Return to the Top page
Basic Operations
Come Here function
When you go to pick up your family or
friends, send them the mail to decide the
meeting point. After they enter the meeting
point you can easily set it as the destination
of your navigation.
Press the <HOME> button.
1
Flick the screen left or right to
2
select the Network contents panel.
3
4
5
6
Touch [
Touch [
Touch [
Touch [
].
SNS].
(mail)].
].
You will be notified by the “ ”
10
icon on the status bar when they
enter the meeting point.
Drag the status bar downward.
11
Touch [
].
Touch [ ].
7
The address for setting the meeting point
is added in the text part.
Enter the address, subject, etc. to
8
complete the mail and send it.
Your family or friend will enter the
9
meeting point.
Check the address in the mail, register as
the meeting point and press Send.
26
It will be set as the destination of the
navigation.
Touch [GO] to start the route
12
guide.
Page 28

Return to the Top page
Basic Operations
NOTE
• You must have a connection with the internet
using Wi-Fi.
• The address of the meeting point is effective only
2 hours after adding the address. After that you
can not enter it.
• Come Here function can be used for one person
(one meeting point) at a time.
Tracking function
When you upload the location of you car to
the Route Collector site, you can check it in
case your car is stolen.
Precaution
• Tracking function is a handy function to be used
for the primary purpose of tracking the location
of your vehicle. This function can also be used
for secondary purposes, at your sole option and
responsibility. In any event, we cannot accept any
responsibility for any results of your use of the
function, for whatever purpose.
Should you select to use this option, please
activate the function through the procedures set
forth in the left column.
1
Log in to Route Collector site by
the owner account.
http://www.route-collector.com/
2
Set to ON the Tracking function in
the Route Collector site.
You can check the location of your car in
the Route Collector site.
NOTE
• You must have a connection with the internet
using Wi-Fi.
• You can set this function and check the location
of you car only when you log in by the owner
account.
• For the operation of the Route Collector site refer
to the instruction in its website.
27
Page 29
Return to the Top page
Network Setup
Network Setup
ñ
You can not use Wi-Fi setup and Wi-Fi
Hotspot setup at the same time. You can
make it effective either Wi-Fi or Wi-Fi
Hotspot.
• Wi-Fi Setup (P.28)
• Wi-Fi Hotspot Setup (P.30)
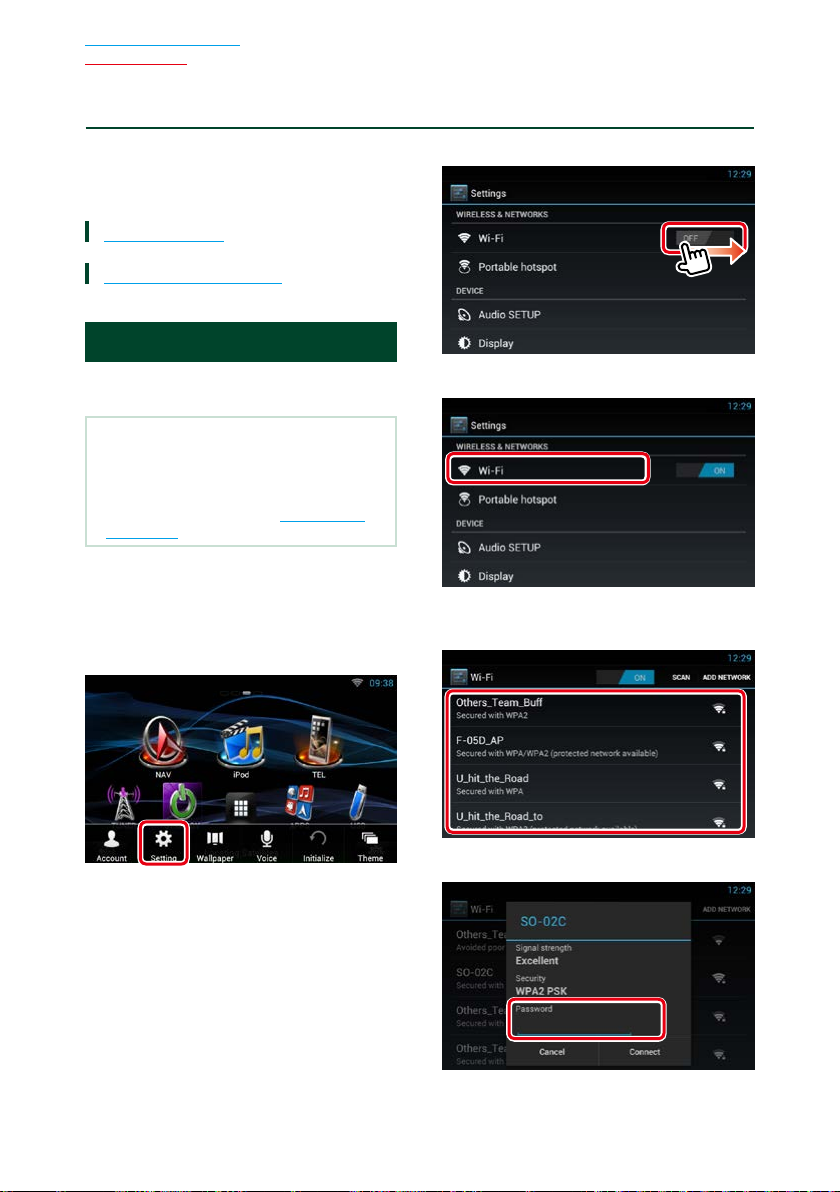
Wi-Fi Setup
You can connect to a Wi-Fi access point to
connect to Internet.
Preparation
• Make preparations for using the Wi-Fi access
point for Internet connection through use of the
tethering function of the smartphone.
• Set to OFF the Wi-Fi Hotspot in Wi-Fi Hotspot
Setup (P.30).
Press the <HOME> button to display
1
the Home screen.
Press the <MENU> button.
2
Touch [Setting].
3
Slide Wi-Fi to ON.
4
Touch [Wi-Fi].
5
Select the Wi-Fi access point to register
6
from the list.
28
Enter the Password.
7
Touch [Connect].
8
Page 30
Return to the Top page
Network Setup
Register the Wi-Fi access point
manually
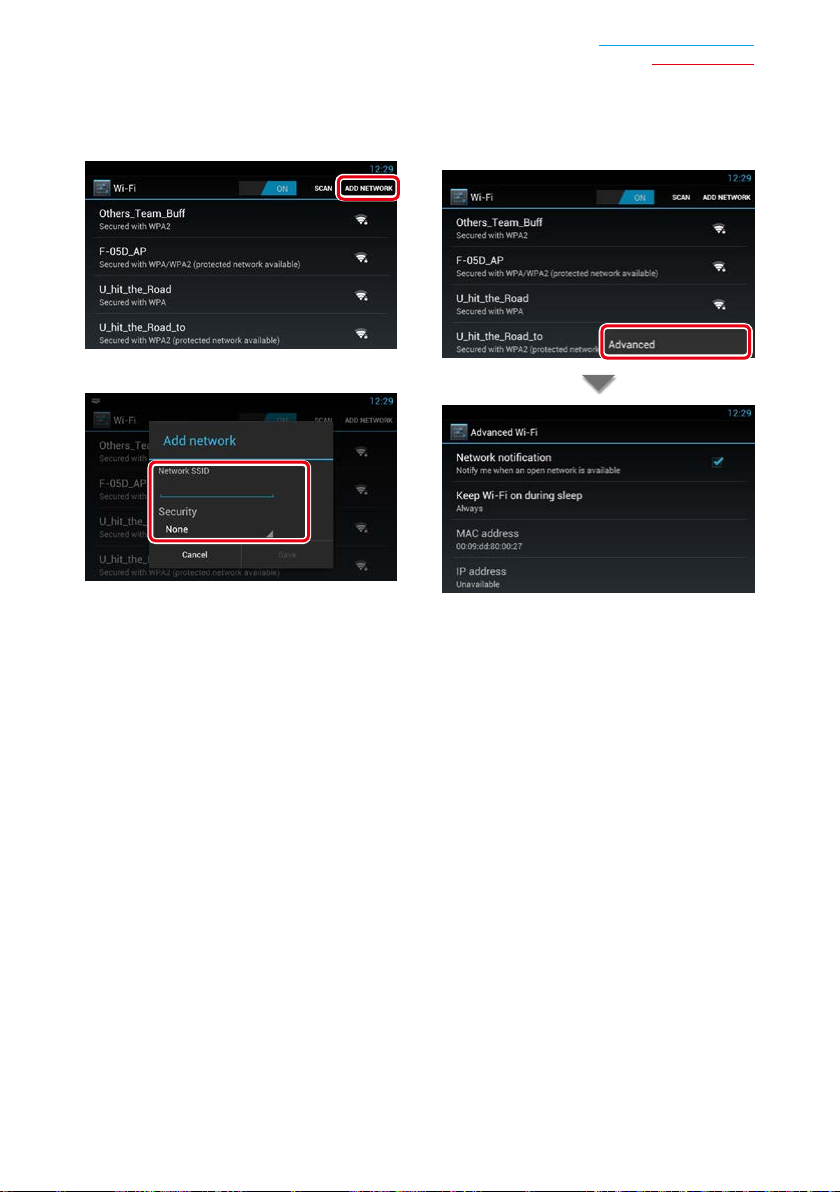
Touch [ADD NETWORK].
1
Enter the SSID code.
2
Select the security.
3
Enter the security code.
4
Touch [Save].
5
Confirm the MAC address
Press the <MENU> button.
1
Touch [Advanced].
2
Press the < 6 > button.
3
29
Page 31

Return to the Top page
Network Setup
Wi-Fi Hotspot Setup
If there is no Wi-Fi access point, this unit
becomes a Wi-Fi access point. You can
connect your smartphone and your tablet
PC, and enjoy Kenwood Wireless Link
function. (P.82)
Preparation
• When Wi-Fi Hotspot is in use you can not connect
to the Internet via Wi-Fi.
• Set to OFF the Wi-Fi in Wi-Fi Setup (P.28).
Press the <HOME> button to display
1
the Home screen.
Press the <MENU> button.
2
Touch [Setting].
3
Touch [Portable hotspot].
4
Touch [Configure Wi-Fi hotspot].
5
Enter the SSID code. Select the security.
6
Enter the password.
When you check Show password, the
password that you set is displayed.
Touch [Save].
7
Touch [Portable Wi-Fi hotspot].
8
30
This unit works as the Wi-Fi access point.
Page 32

Return to the Top page
Network Setup
31
Page 33

Return to the Top page
Clock and Date Setup
Clock and Date Setup
ñ
Clock and Date Setup
Press the <HOME> button to display
1
the Home screen.
Press the <MENU> button.
2
Touch [Setting].
3
Touch [Date & time].
4
DNN9150BT/ DNN9150BTM
Set each item as follows.
1
Press the < 6 > button.
2
DNR8015BT/ DNR8015BTM
Touch [Select time zone].
1
32
Select a time zone.
2
Press the < 6 > button.
3
Page 34

Return to the Top page
Clock and Date Setup
Adjust the date and time manually.
Touch [Automatic date & time] to
1
remove the check
Touch [Select time zone].
2
Select a time zone.
3
Adjust the date.
5
Touch [Set]
6
Touch [Set time]
7
Adjust the time.
8
Touch [Set]
9
Press the < 6 > button.
10
Touch [Set date]
4
33
Page 35

Return to the Top page
Account setup
Account Setup
ñ
About Account
To use this unit, you must register an
account.
Types of accounts
Ñ
You can create accounts to maintain privacy
when using the mail feature or social media.
Administrator
As Administrator, you can create an owner
account and perform initial setup.
You can log in to the system if you have not
created an owner account.
Guest
An account for guests such as your friends.
The guest can operate this unit, but cannot
use the functions related to mail, social media,
and Route Collector site.
Owner
The account for the person who manages this
unit.
The owner can use the functions related to
mail, social media, and Route Collector site.
You can register users such as your family.
User
The account for the user of this unit.
The user can use the functions related to mail,
social media, and Route Collector site.
You can register up to 4 user accounts.
Account registration
Ñ
procedure
Create an account in the Route
1
Collector site.
Create an account refering to Create User
Account (P.34) or the Route Collector
site.
http://www.route-collector.com/
Register the account in this unit.
2
To register an Owner account, refer to Set
Owner Account (P.35).
To register an User account, refer to Set
User Account (P.36).
Switch between login accounts.
3
See Switch the User Login (P.36).
Create User Account
To use this unit, you need to create an
account in the Route Collector site.
Preparation
• To register yourself in the Route Collector site as a
user, you need a mail address.
• You can register yourself via the Web.
http://www.route-collector.com/
• This step may be skipped if you have already
registered yourself in the Route Collector site.
Press the <HOME> button to display
1
the Home screen.
Press the <MENU> button.
2
Touch [Account].
3
34
Page 36

Touch [Create Account].
4
Enter account information.
5
You cannot register an account which
has already been used. Register another
account name.
Touch [OK].
6
The account is temporarily registered in the
Route Collector site.
Activate the account.
7
A confirmation mail is sent to the
registered mail address. Open the indicated
URL to complete account registration.
Return to the Top page
Account setup
Set Owner Account
You can register an owner account for the
person who manages this system.
Preparation
• You must have a connection with the internet
using Wi-Fi. See Wi-Fi Setup (P.28).
• First create an account in the Route Collector site.
See Create User Account (P.34).
• If you have not created an owner account, log in
to the system as Administrator.
• If you have created an owner account, log in to
the system after account resetting.
Press the <HOME> button to display
1
the Home screen.
Press the <MENU> button.
2
Touch [Account].
3
Touch [Set Owner Account].
4
Enter account information.
5
Enter the information registered in the
Route Collector site.
Touch [OK].
6
35
Page 37

Return to the Top page
Account setup
Set User Account
You can register a user account for the user
of this system.
Preparation
• You must have a connection with the internet
using Wi-Fi. See Wi-Fi Setup (P.28).
• First create an account in the Route Collector site.
See Create User Account (P.34).
• You can set a user account when you have
logged in the Owner.
Press the <HOME> button to display
1
the Home screen.
Press the <MENU> button.
2
Touch [Account].
3
Touch [Set Account].
4
Switch the User Login
You can switch to a different account from
the one currently logged in.
Press the <HOME> button to display
1
the Home screen.
Press the <MENU> button.
2
Touch [Account].
3
Touch [Login User select].
4
Select an account.
5
Enter account information.
5
Enter the information registered in the
Route Collector site.
Touch [OK].
6
36
Enter the password.
6
Page 38

Return to the Top page
Account setup
Delete User Account
You can delete a previously registered user
account.
Preparation
• You can set a user account when you have
logged in the Owner.
Press the <HOME> button to display
1
the Home screen.
Press the <MENU> button.
2
Touch [Account].
3
Touch [Delete Account].
4
Reset Owner Account
You can delete previously registered owner
and user accounts.
Preparation
• You can set a user account when you have
logged in the Owner.
Press the <HOME> button to display
1
the Home screen.
Press the <MENU> button.
2
Touch [Account].
3
Touch [Reset Account].
4
Select an account.
5
Touch [OK].
6
Confirmation screen appears.
Touch [Yes].
7
Enter the owner account’s password.
5
Touch [OK].
6
Confirmation screen appears.
Touch [Yes].
7
Note
• The data, log, and settings used in the account
are deleted.
37
Page 39

Return to the Top page
Widget and Application Operation
Widget and Application Operation
ñ
SNS Widget
You can use Facebook, Twitter, and email
(IMAP).
Preparation
• To use each service, the Facebook, Twitter or
email account is required.
• You can use a user account when you have
logged in the Owner or User.
Press the <HOME> button.
1
Flick the screen left or right to select
2
the Service panel.
Touch [ / ].
3
Select the SNS Widget.
4
1
2
3
1
: Starts the SNS application.
: Reads out all contents in an auditory
fashion.
/ : Switches to the RSS.
2 Category
Select a service category.
3 SNS article list
Displays the contents selected in Category in
a new order.
Touching this starts the SNS application and
displays its contents.
When the latest information is displayed at the
top, sliding the list allows you to update the
information.
: Reads out the SNS contents in an auditory
fashion.
RSS Widget
Displays the RSS news.
Press the <HOME> button.
1
Flick the screen left or right to select
2
the Service panel.
Touch [ / ].
3
Select the RSS Widget.
4
1
2
3
1
: Starts the RSS application.
: Reads out all the contents in an auditory
fashion.
/ : Switches to the SNS.
2 Category
Select a service category.
3 RSS article list
Displays the contents selected in Category in
a new order.
Touching this starts the RSS application and
displays its contents.
When the latest information is displayed at the
top, sliding the list allows you to update the
information.
: Reads out the RSS contents in an auditory
fashion.
38
Page 40

Widget and Application Operation
Return to the Top page
39
Page 41

Return to the Top page
Widget and Application Operation
Facebook (SNS Application)
Displays the screen for using Facebook.
Preparation
• You must have a connection with the internet
using Wi-Fi. See Wi-Fi Setup (P.28).
• To use a Facebook service, the corresponding
account is required.
• You can use a user account when you have
logged in the Owner or User.
Operation
Ñ
Press the <HOME> button.
1
Flick the screen left or right to select
2
the Network contents panel.
Touch [ ].
3
Touch [ SNS].
4
Touch [ (Facebook)].
5
Perform desired operation as follows.
6
Register an account
Ñ
Press the <HOME> button.
1
Flick the screen left or right to select
2
the Network contents panel.
Touch [ ].
3
Touch [ SNS].
4
Touch [ (Facebook)].
5
Touch [Sign in].
6
Enter the Email address/Phone and
7
Password.
Touch [Log in].
8
2
1
: Create a new article.
: Posting the current place.
: Reads out all articles by voice.
: Terminates the application.
2 Article list
Displays an article or message.
Touching this displays details.
While the latest information is displayed at
the top, sliding the list down updates the
information.
: Reads out the article by voice.
1
2
40
Page 42

Detailed article or message view.
7
2
1
Widget and Application Operation
Add to post
Ñ
Create an article to be posted to the SNS
service of the selected category.
Touch [ ] in the SNS application.
1
Create an article to post.
2
Return to the Top page
1
: Votes as “Like”.
: Posts a comment.
2
: Deletes an article written by you. When the
confirmation screen appears, touch “Ok”.
: Reads the content of the comment by
voice.
: Returns to previous screen.
Menu
Ñ
Press the <MENU> button.
1
Article list view
Setting
Set an update interval.
Sign out
Logs out from the current account.
1
2
3
1
Enter an article to post.
: Enter a comment using the voice
recognition function. When “Speak now”
appears, speak the comment.
[Post] : Posts the article.
2
: Post photo.
: Returns to previous screen.
3
Select a fixed phrase.
41
Page 43

Return to the Top page
Widget and Application Operation
Twitter (SNS Application)
Displays the screen for using Twitter.
Preparation
• You must have a connection with the internet
using Wi-Fi. See Wi-Fi Setup (P.28).
• To use a Twitter service, the corresponding
account is required.
• You can use a user account when you have
logged in the Owner or User.
Register an account
Ñ
Press the <HOME> button.
1
Flick the screen left or right to select
2
the Network contents panel.
Touch [ ].
3
Touch [ SNS].
4
Touch [ (Twitter)].
5
Touch [Sign in].
6
Enter the Username/email and
7
Password.
Operation
Ñ
Press the <HOME> button.
1
Flick the screen left or right to select
2
the Network contents panel.
Touch [ ].
3
Touch [ SNS].
4
Touch [ (Twitter)].
5
Perform desired operation as follows.
6
1
2
1
: Create a new article.
: Posting the current place.
: Reads out all articles by voice.
: Terminates the application.
2 Article list
Displays an article or message.
Touching this displays details.
While the latest information is displayed at
the top, sliding the list down updates the
information.
: Reads out the article by voice.
Touch [Authorize app].
8
42
Page 44

Detailed article or message view.
7
2
1
Widget and Application Operation
Add to post
Ñ
Create an article to be posted to the SNS
service of the selected category.
Touch [ ] in the SNS application.
1
Create an article to post.
2
Return to the Top page
1
: Create a reply.
: Create a ReTweet.
: Adds to Favorites.
2
: Delete the Tweet written by you.
: Reads the content of the comment by
voice.
: Returns to previous screen.
Menu
Ñ
Press the <MENU> button.
1
Article list view
Setting
Set an update interval.
Sign out
Logs out from the current account.
1
2
3
1
Enter an article to post.
: Enter a comment using the voice
recognition function. When “Speak now”
appears, speak the comment.
[Post] : Posts the article.
2
: Post current location.
: Returns to previous screen.
3
Select a fixed phrase.
43
Page 45

Return to the Top page
Widget and Application Operation
E-mail (SNS Application)
Displays the screen for using E-mail (IMAP).
Preparation
• You must have a connection with the internet
using Wi-Fi. See Wi-Fi Setup (P.28).
• To use an email service, the corresponding
account is required.
• You can use a user account when you have
logged in the Owner or User.
Register an account
Ñ
Press the <HOME> button.
1
Flick the screen left or right to select
2
the Network contents panel.
Touch [ ].
3
Touch [ SNS].
4
Touch [ (mail)].
5
Touch [Sign in].
6
Enter the Email and Password.
7
Enter the SMTP server ,Port and
11
Security type.
Touch [Done].
12
Operation
Ñ
Press the <HOME> button.
1
Flick the screen left or right to select
2
the Network contents panel.
Touch [ ].
3
Touch [ SNS].
4
Touch [ (mail)].
5
Perform desired operation as follows.
6
2
1
2
Touch [Next].
8
Enter the IMAP server ,Port and
9
Security type.
Touch [Next].
10
44
1
: Create a new article.
: Reads out all articles by voice.
: Terminates the application.
2 Inbox list
Displays an article or message.
Touching this displays details.
While the latest information is displayed at
the top, sliding the list down updates the
information.
: Reads out the article by voice.
Page 46

Detailed article or message view.
7
1
2
Widget and Application Operation
Add to post
Ñ
Create an article to be posted to the SNS
service of the selected category.
Touch [ ] in the SNS application.
1
Create an article to post.
2
Return to the Top page
1
: Creates a reply mail.
: Creates a reply mail for all.
: Creates a forwarded mail.
2
: Deletes an article. When the confirmation
screen appears, touch “Ok”.
: Reads the content of the comment by
voice.
: Returns to previous screen.
Menu
Ñ
Press the <MENU> button.
1
Inbox list view
Setting
Set an update interval.
Account
Select the account and label to be displayed.
1 Select an account.
2 Select a label.
Add account
Register a new account.
Delete account
Delete a registered account.
Select the account to delete by putting a
checkmark, and then touch [OK].
1
2
3
1
: Sends the mail.
: Stores the mail temporarily.
: Deletes the mail.
: Enters the address of the meeting point
for Come Here function. See Come
Here function (P.26). (DNN9150BT/
DNN9150BTM)
2
: Returns to previous screen.
3
Create a mail message to send.
: Enter a comment using the voice
recognition function. When “Speak now”
appears, speak the comment.
[Add Cc/Bcc] : Displays cc and Bcc.
45
Page 47

Return to the Top page
Widget and Application Operation
RSS Application
Displays an RSS feed.
Detailed article view.
6
1
Preparation
• You must have a connection with the internet
using Wi-Fi. See Wi-Fi Setup (P.28).
• You can use a user account when you have
logged in the Owner or User.
Press the <HOME> button.
1
Flick the screen left or right to select
2
the Network contents panel.
Touch [ ].
3
Touch [ (RSS)].
4
Perform desired operation as follows.
5
2
1
: Adds an RSS feed. See Add RSS feed
(P. 47)
: Reads out all articles by voice.
: Terminates the application.
2 Category
Select the RSS feed to be displayed.
3 Article list
Display the article.
Touching this displays details.
While the latest information is displayed at
the top, sliding the list down updates the
information.
: Reads out the article by voice.
3
1
1
: Registers the RSS feed in the bookmark
of the Route Collector site. You can read it
later in the Route Collector site.
: Reads the content by voice.
: Returns to previous screen.
2
Moves to the previous or next article.
Menu
Ñ
Press the <MENU> button.
1
Article list view
Delete
Delete an RSS feed. See Delete RSS feed
(P. 47)
Setting
Set the update interval. See RSS setup
(P. 47)
22
46
Page 48

Widget and Application Operation
Return to the Top page
Add RSS feed
Ñ
Add an RSS feed.
Touch [ ] in the RSS application.
1
Select a category.
2
Touch [Add].
3
Note
• In order to add an selectable RSS feed, you need
to edit it in the Route Collector site.
See www.route-collector.com/
Delete RSS feed
Ñ
Delete an RSS feed.
Press the <MENU> button.
1
Touch [Delete].
2
Touch [Yes] to confirm.
3
RSS setup
Ñ
Performs setup when using RSS Application.
Press the <MENU> button.
1
Touch [Setting] in the Menu.
2
Select an option as follows.
3
Update interval
Set the information update interval.
47
Page 49

Return to the Top page
Widget and Application Operation
Now playing Widget
Displays the information about the song or
station you are listening to, and allows you to
perform simple operations.
Press the <HOME> button.
1
Flick the screen left or right to select
2
the Media panel.
Media source such as CD or USB
1
2
3
4
1 (I'm listening)
You can post the information about the song
you are listening to, on twitter, Fecebook. See
Posting the information about the song you
are listening to (P.49).
2 Album art
Touching Album art displays the Source
control screen.
3 Information display
Displays the information (title, etc.) about the
song being played.
4
Allow you to stop playback temporarily and
select songs.
Radio source such as Radio
1
2
3
4
1 (I'm listening)
You can post the information about the song
you are listening to, on twitter, Fecebook. See
Posting the information about the song you
are listening to (P.49).
The mark does not appear if there is no
information of the song.
2 Artwork
Touching artwork displays the Source control
screen.
3 Information display
Displays the band, frequency, etc.
Touching this displays the Preset list screen.
See Preset select (P.49).
4
Allows you to select a band and a station.
48
Page 50

Widget and Application Operation
Return to the Top page
Posting the information about
Ñ
the song you are listening to
You can post the information about the song
you are listening to, on Twitter, Facebook, or
Route Collector site.
Touch [ ].
1
Create the information you want to
2
post.
1
3
2
Preset select
Ñ
Touch illustrated area.
1
Select a station or channel from the list.
2
1
Enter the information you want to post.
: Enter a comment using the voice
recognition function. When "Speak now" is
displayed, pronounce the comment.
[Post] : Posts the information.
2 Fixed phrase
Select the information about the song you are
listening to and a fixed phrase.
3
: Select the service on which you want to
post the information.
Select the service, and then touch [OK].
: Returns to previous screen.
49
Page 51

Return to the Top page
Widget and Application Operation
Photo Frame Widget
You can display the photos stored in the USB
memory as a slide show.
Press the <HOME> button.
1
Flick the screen left or right to select
2
the Media panel.
1
2
1 Edit
Edit the photo to be displayed.
2 Picture
Sliding the photo vertically scrolls through
photos.
Select the photo you want to
Ñ
display.
Touch [ ].
1
2
1 Buttons
: Displays the screen for selecting the photo
to be added.
: Ends editing, and returns to the Photo
frame screen.
2 Thumbnail
Touch and hold the photo. When the photo
shaking, drag the photo to change the order.
: Deletes the photo from the list.
Touch [ ].
2
Select a picture.
3
1
50
Touch [ ].
4
Page 52

Mixed Media Search
You can search media like USB,iPod for the
song by artist or album name and play it.
Touch [ ].
1
Select whether you search for the song
2
by artist name or album name
.
Enter the Artist or Album.
3
Enter the keyword using the voice recognition
function. When "Speak now" is displayed,
pronounce the keyword.
* You cannot use this function if you have not
registered the Owner account.
Widget and Application Operation
Return to the Top page
Select a Source.
4
The source changes and playback starts.
51
Page 53

Return to the Top page
234
1
5
6
778
9
10
DVD/Video CD (VCD) Operation
DVD/Video CD (VCD) Operation
ñ
DVD/VCD Basic Operation
Most functions can be controlled from the source control screen and playback screen.
NOTE
• Set the remote controller mode switch to DVD mode before starting operation, see Switching the operation
mode (P.129).
• The screen shot below is for DVD. It may be different from the one for VCD.
Playback screenControl screen
1 Information display
Displays the following information.
• Title #, Chap #: DVD title and chapter number display
• Track #/Scene #: VCD track or scene number display
*Scene # is displayed only when PBC is on.
• D, B, F, I, etc.: Current play mode display
The meanings of each icon are as follows; D (play), B (fast forward), A (fast backward),
F (search up), E (search down), I (stop), IR (resume stop), H (pause), ½ (slow playback),
¼ (slow reverse playback).
Touch this area to display the disc label name.
2 Multi function key
Touch to switch the multi function menu. For details on the menu, see Multi function menu (P.54).
3 Multi function menu
Various functions can be operated using keys in this menu. For details on the keys, see Multi function
menu (P.54).
4 Control switching key
Unavailable in DVD/VCD source.
52
Page 54

Return to the Top page
DVD/Video CD (VCD) Operation
5 Sub function menu
The following functions can be performed by using keys in this area.
• Repeats the current content: Touch [
following sequence;
DVD: "title repeat" , "chapter repeat" , "function off"
VCD (PBC On): Does not repeat
VCD (PBC Off ): "track repeat" , "function off"
• Fast forward or fast backward: Touch [A] or [B]. Each time you touch the key, the speed
changes; standard, 2 times, 3 times.
• For confirmation of play time: See #:##:##.
DVD: You can switch the time display between title play time, chapter play time,
and title remaining time. Each time you touch, the display switches between
“T #:##:##” (title play time display), “C #:##:##” (chapter play time display), and “R
#:##:##” (title remaining time display).
As well as the time display, the bar indicating current location appears.
VCD (PBC off): You can also confirm disc remaining time by touching time display.
Each time you touch, the display switches between “P ##:##” (play time
display) and “R ##:##” (disc remaining time).
• For confirmation of current playing position:
See the bar in center (DVD only). The bar does not appear while the remaining time is
being displayed.
6 Movie display area
Touch to display Video screen.
7 Searching area
Touch to search the next/previous content.
Scrolling from center of display to left or right performs fast backward or fast forward. Each time you
touch each area, the speed changes; standard, 2 times, 3 times. To stop fast backward/forward, touch
center of the display.
8 Menu display area
This area functions differently depending on the current status.
• During DVD playback: Displays the Movie control screen. During the menu display, displays the
highlight control screen. See DVD Disc Menu Operation (P.55).
• During VCD playback: Displays the Movie control screen. See Zoom Control for DVD and VCD
(P. 56).
9 Key display area
Touch to display the last control screen.
10 Screen setup display area
Touch and hold to display the screen control screen. See Monitor Screen Setup (P.108).
]. Each time you touch the key, repeat mode switches in the
NOTE
• If you use a remote controller, you can jump directly to the desired video scene by entering the chapter number,
scene number, play time, etc Direct search mode (P.129).
53
Page 55

Return to the Top page
DVD/Video CD (VCD) Operation
Multi function menu
Ñ
DVD VCD
The functions of each key are as follows.
[E] [F]
Searches the previous/next content.
[DH]
Plays or pauses.
[¼] or [½] (DVD only)
Plays in slow motion forward or backward.
[I]
Stops playback. When touched twice, the disc is played from the beginning when you play it the next
time.
[PBC] (VCD only)
Turn PBC on or off.
54
Page 56

Return to the Top page
DVD/Video CD (VCD) Operation
DVD Disc Menu Operation
You can set up some items in the DVD-VIDEO
disc menu.
Touch illustrated area during playback.
1
Movie control screen appears.
Touch [Disc CTRL].
2
Menu Control screen appears.
Perform desired operation as follows.
3
Enters selected item
Touch [Enter].
Enables direct operation
Touch [Highlight] to enter the highlight control
mode. See Highlight control (P.55).
Moves the cursor
Touch [R], [S], [C], [D].
* These keys may not function depending on
the disc.
Highlight control
Ñ
Highlight control lets you control the DVD
menu by touching the menu key directly on
the screen.
Touch [Highlight] in the Menu Control
1
screen.
Touch desired item on the screen.
2
Displays the top menu
Touch [Top].*
Displays the menu
Touch [Menu].*
Displays the previous menu
Touch [Return].*
NOTE
• The highlight control is cleared automatically if
you do not operate for a constant time.
55
Page 57

Return to the Top page
DVD/Video CD (VCD) Operation
DVD Play Mode Setting
Ñ
You can select DVD play mode.
Touch [Next] in the Menu Control
1
screen.
Menu Control 2 screen appears.
Touch the key which corresponds to
2
desired setting item.
Zoom Control for DVD and VCD
You can enlarge Playback screen for DVD and
VCD.
For VCD, touch illustrated area during
1
playback.
Movie control screen appears.
Touch [Disc CTRL].
2
Switches the subtitle language
Touch [Subtitle]. Each time you touch this key,
language is switched.
Switches the audio language
Touch [Audio]. Each time you touch this key,
language is switched.
Controls zoom ratio
Touch [Zoom]. For details, see step2 in Zoom
Control for DVD and VCD (P.56).
Switches the picture angle
Touch [Angle]. Each time you touch this key,
picture angle is switched.
Exits menu control
Touch [Exit].
Displays the Menu Control 1 screen
Touch [Previous].
56
Zoom Control screen appears.
NOTE
• For DVD, please refer to DVD Play Mode Setting
(P. 56) to display the Zoom Control screen.
Perform desired operation as follows.
3
Page 58

Return to the Top page
DVD/Video CD (VCD) Operation
Switches zoom ratio
Touch [Zoom].
For DVD, changes the zoom ratio at 4 levels;
Off, 2 times, 3 times, 4 times.
For VCD, changes the zoom ratio at 2 levels;
Off, 2 times.
Scrolls the screen
Touch [R], [S], [C], or [D] to scroll the screen
in the direction you touch.
Exits menu control
Touch [Exit].
Displays the previous menu*
Touch [Return].
* This function may not be performed
depending on the disc.
NOTE
• You cannot touch the menu keys directly on the
screen when zooming.
DVD Setup
You can set up the DVD playback functions.
Touch [ ].
1
Quick menu appears.
Touch [SETUP].
2
SETUP Menu screen appears.
Touch [Source].
3
Source SETUP Menu screen appears.
Touch [DVD SETUP] in the list.
4
DVD SETUP screen appears.
Set each item as follows.
5
Menu/Subtitle/Audio Language*
See Language setup (P.58).
Dynamic Range Control*
Set the dynamic range.
Wide: The dynamic range is wide.
Normal: The dynamic range is normal.
Dialog (Default): Makes the total sound
Angle Mark
Set an angle mark display.
ON (Default): An angle mark appears.
OFF: An angle mark does not appear.
Screen Ratio*
Set the screen display mode.
16:9 (Default): Displays wide pictures.
4:3 LB: Displays wide pictures in the Letter Box
format (having black stripes at the top
and bottom of screen).
4:3 PS: Displays wide pictures in the Pan &
Scan format (showing pictures cut at
the right and left ends).
volume larger than other
modes. This is effective only
when you are using Dolby
Digital software.
Continued
57
Page 59

Return to the Top page
DVD/Video CD (VCD) Operation
Parental Level*
See Parental level (P.59).
DISC SETUP
See Disc setup (P.59).
Stream Information
Displays the present source information.
The stream (Dolby Digital, Linear PCM, MPEG,
WMA or AAC) appears.
* These items are disabled when a DVD is
being played.
Language setup
Ñ
This setting is for the language used in the
menu, subtitle, and voice. You cannot setup
these items during DVD playback.
Touch [SET] of the desired item;
1
[Menu Language], [Subtitle Language],
[Audio Language].
Language Set screen appears.
Enter the desired language code and
2
touch [Enter].
For language code, refer to DVD Language
Codes (P.142).
Sets the entered language and returns to
the DVD SETUP screen.
NOTE
• To cancel the setup and return to the previous
screen, touch [Cancel].
• To clear the entered code, touch [Clear].
• To set the DVD’s original language for audio
language, touch [Original].
58
Page 60

Return to the Top page
DVD/Video CD (VCD) Operation
Parental level
Ñ
Set a parental lock level to prohibit children
to watch video. You cannot set a parental
lock level during DVD playback.
Touch [SET] of [Parental Level].
1
Parental Pass screen appears.
Enter the parental code and touch
2
[Enter].
Parental Level screen appears.
NOTE
• To cancel the setup and return to the previous
screen, touch [Cancel].
• To clear the entered code, touch [Clear].
• Current parental lock level appears as [Level#].
Touch [C] or [D] to select a parental
3
lock level.
NOTE
• If a disc has higher parental lock level, you need
to enter the code number.
• The parental lock level varies depending on a
loaded disc.
• If a disc has no parental lock, anybody can play it
even though you have set the parental lock.
Disc setup
Ñ
Performs setup when using disc media.
Touch [SET] of [DISC SETUP].
1
DISC SETUP screen appears.
Select an option as follows.
2
CD Read
Sets the motion of this unit when a music CD
is played.
1 (Default): Automatically recognizes and plays
an audio file disc, a DVD or a music CD.
2: Forcibly plays a disc as a music CD. Select
[2] if you wish to play a music CD having a
special format or if you cannot play a disc
with the option [1] set.
On Screen DVD
Sets an on-screen display.
Auto: When updated, information appears for
5 seconds.
OFF (Default): Information does not appear.
NOTE
• [CD Read] is disabled when a disc is already in
the unit.
• You cannot play an audio file/VCD disc with the
option [2] set. Also, you may not play some music
CDs with the option [2] set.
59
Page 61

Return to the Top page
HOME 6
HOME 6
A
B
CD/Audio and Visual Files/iPod/Apps Operation
CD/Audio and Visual Files/iPod/Apps Operation
ñ
Music/Video Basic Operation
Most functions can be controlled from the source control screen and playback screen.
NOTE
• Set the remote controller mode switch to AUD mode before starting operation, see Switching the operation
mode (P.129).
• To connect the Android device with this unit, the cable (sold separately) and the profile which your Android
device supports are necessary as follows:
A To listen to music and watch video of APPS source
− MHL device
− KCA-MH100
− Bluetooth profile: SPP
− Application link setup: HDMI/MHL + BT
B To listen to music of APPS source
− Bluetooth profile: A2DP
− Bluetooth profile: SPP
− Application link setup: Bluetooth
C To listen to music of Bluetooth Audio source (P. 99)
− Bluetooth profile: A2DP
− Bluetooth profile: AVRCP
• To connect the iPod/iPhone with this unit, the cable, adapter (both sold separately), and the profile which your
iPod/iPhone supports are necessary as follows:
A To listen music and watch video with Lightning connector device
− Lightning Digital AV Adapter
− KCA-HD100
− KCA-iP103
− Bluetooth profile: SPP
− iPod connection setup: HDMI + BT
B To listen music with Lightning connector device
− KCA-iP103
− iPod connection setup: USB 1Wire
C To listen music and watch video with 30-pin connector device (analog)
− KCA-iP202
− iPod connection setup: USB + AV-IN
D To listen music with 30-pin connector device
− KCA-iP102
− iPod connection setup: USB 1Wire
E To listen to music via Bluetooth
− Bluetooth profile: A2DP
− Bluetooth profile: SPP
− iPod connection setup: Bluetooth
F To listen to music of Bluetooth Audio source (P. 99)
− Bluetooth profile: A2DP
− Bluetooth profile: AVRCP
• When connecting with Lightning Digital AV Adapter or Apple 30-pin Digital AV Adapter some applications can be
controlled from this unit. The operable functions depend on the application.
• Do not leave the cable or the adapter made by other makers inside the car. It might lead the malfunction caused
by heat.
• Some settings are necessary to meet the connected iPod/iPhone or Android device. See iPod/iPhone
connection setup (P.77) or Application link setup (P.78).
A
B
A
B
C
D
E
HOME 6
HOME 6
HOME 6
HOME 6
HOME 6
HOME 6
HOME 6
60
Page 62

CD/Audio and Visual Files/iPod/Apps Operation
262
7
1
7
33445
8
See the following sections for each source operation.
• Music CD (P. 61)
• Disc media (P. 61)
Music CD and disc media
Ñ
NOTE
• In this manual, “Music CD” will be referred to as the general CDs which include music tracks in.
“Disc media” will be referred to as CD/DVD disc which includes audio, picture or video files.
• The screen shot below is for CD. It may be different from the one for disc media.
Simple Control screen List Control screen
1 Information display
Displays the following information.
• Track #: Each time you touch this area, display switches between current track number, text, etc.
• D, B, F, I, etc.: Current play mode display
2 Movie display area/Control switching area
Touch to switch between the Simple Control and List Control screen. (Only for Music file)
Touch to display Video screen. (Only for Video file)
3 Multi function key
Touch to switch the multi function menu. For details on the menu, see Multi function menu (P.64).
4 Multi function menu
Various functions can be performed by using keys in this area. For details on the menu, see Multi
function menu (P.64).
5 Sub function key
Touch to display “Sub function menu” (7 in this table).
6 Track information
Displays the information of the current track.
For disc media, you can switch the current track information and the current folder list by touching the
list switching key (8 in this table).
The meanings of each icon are as follows; D (play), B (fast forward), A (fast
backward), F (search up), E (search down), I (stop), IR (resume stop), H
(pause).
• USB device (P. 63)
• iPod (P. 63)
• Pandora (P. 71)
• Apps (P. 74)
Return to the Top page
Continued
61
Page 63

Return to the Top page
9
9
10
11
12
CD/Audio and Visual Files/iPod/Apps Operation
7 Sub function menu
Various functions can be performed by using keys in this area. For details on the keys, see Sub function
menu (P.65).
8 Sub function/ List switching key
Touch to display “Sub function menu” (7 in this table).
Touch and hold to switch between the track list and the ID3 tag information (disc media only).
Playback screen (disc media only)
9 Searching file area (disc media only)
Touch to search the next/previous file.
Scrolling from center of display to left or right performs fast backward or fast forward. Each time you
touch each area, the speed changes; standard, 2 times, 3 times. To stop fast backward/forward, touch
center of the display.
10 Menu display area (disc media only)
Touch to display the Control screen. For details, see Movie Control (P.70).
11 Key display area (disc media only)
Touch to display the last control screen.
12 Screen setup display area
Touch and hold to display the screen control screen. See Monitor Screen Setup (P.108).
62
Page 64

CD/Audio and Visual Files/iPod/Apps Operation
2
6
2
7
1
7
33445
8
USB device and iPod
Ñ
NOTE
• The screen shot below is for USB device. It may be different from the one for iPod.
Simple Control screen List Control screen
1 Information display
Displays the following information.
• Current file name: Each time you touch this area, display switches between file number/folder
• D, etc.: Current play mode display
The meanings of each icon are as follows; D (play, searching), H (pause).
2 Artwork/Control switching area
Touch to switch between the Simple Control and List Control screen. (Only for Music file)
Touch to display Video screen. (Only for Video file)
3 Multi function key
Touch to switch the multi function menu. For details on the menu, see Multi function menu (P.64).
4 Multi function menu
Various functions can be performed by using keys in this area. For details on the keys, see Multi
function menu (P.64).
5 Sub function key
Touch to display “Sub function menu” (7 in this table).
6 Content list
Displays the list and content. The content of the list differ depending on the playback status and
source.
When you select the video source on the device connected with the Lightning connecter, the source is
switched to Apps (P. 74) automatically.
7 Sub function menu
Various functions can be performed by using keys in this area. For details on the keys, see Sub function
menu (P.65).
8 Sub function/ List switching key
Touch to display “Sub function menu” (7 in this table).
Touch and hold to switch between the file list and the current file information.
number and file name.
Return to the Top page
Continued
63
Page 65

Return to the Top page
9910
11
12
CD/Audio and Visual Files/iPod/Apps Operation
Playback screen
9 Searching file area (Video file only)
• Touch to search the next/previous file.
• Scrolling from center of display to left or right performs fast backward or fast forward. To stop fast
backward/forward, touch center of the display. This function is not available when there is no music
file in the current folder.
10 Movie control display area
Touch to display the Movie control screen. For details, see Movie Control (P.70).
11 Key display area (Video file only)
Touch to display the last control screen.
12 Screen setup display area
Touch and hold to display the screen control screen. See Monitor Screen Setup (P.108).
Multi function menu
Ñ
Music CD
iPod
The following functions can be performed by using keys in this area.
[ ] (Only for disc media, iPod, and USB device)
Searches track/file. For details on search operation, see Search Operation (P.66).
[E] [F]
Searches the previous/next track/file.
[L]
Plays or pauses.
[I] (Only for music CD and disc media)
Stops playback.
[G] (Only for iPod and USB device)
Touch to disconnect the device. For details, see How to Play Media (P.17).
[
] [ ] (Only for disc media and USB device)
Searches previous/next folder.
Disc media
USB device
64
Page 66

Sub function menu
Ñ
Music CD
CD/Audio and Visual Files/iPod/Apps Operation
Return to the Top page
Disc media
iPod
The following functions can be performed by using keys in this area.
[ ]
Repeats the current track/folder. Each time you touch the key, repeat mode switches in the following
sequence;
CD: "track repeat"
iPod: "song repeat" , "all songs repeat" , "repeat off"
Disc media, USB device: "file repeat" , "folder repeat" , "repeat off"
[ ] (Only for iPod and USB device)
Searches track from the album artwork list. For details on search operation, see Search from album
artwork (P.68).
[A] [B] (Only for music CD and disc media)
Fast forward or fast backward.
[
] [ ] (Only for iPod and USB device)
Plays the previous or next album in Favorite list (P.69).
#:##:## or ##:##
For confirmation of play time.
During music CD playback, you can also confirm disc remaining time by touching time display.
Each time you touch, the display switches between “P ##:##” (track play time display) and “R ##:##” (disc
remaining time).
[
]
Randomly plays all tracks in current folder/disc or in current playlist in the connected iPod.
Each time you touch the key, random mode switches in the following sequence;
CD: "track random"
Disc media, USB device: "file random"
iPod: "track random"
Status bar in center (Only for iPod and USB device)
For confirmation of current playing position.
During USB device and iPod playback, you can drag the circle left or right to change the playing
position.
, "repeat off"
, "random off"
, "random off"
, "album random" , "random off"
USB device
65
Page 67

Return to the Top page
CD/Audio and Visual Files/iPod/Apps Operation
Search Operation
You can search music or video files by the
following operations.
NOTE
• If you use a remote controller, you can jump
directly to the desired track/file with entering the
track/folder/file number, play time, etc. For details,
see Direct search mode (P.129).
List search
Ñ
You can search tracks, folders, and files
according to hierarchy.
Touch illustrated area.
1
Other search
Ñ
There are other search methods in order to
narrow search for a song.
This function is not available when music CD
is the current source.
Touch [ ] in the control screen.
1
The search type screen appears.
Touch desired search method.
2
USB device
iPod
List Control screen appears.
Touch desired track/file.
2
Playback starts.
NOTE
• For disc media, you can switch the file list and
folder list by touching [
• For disc media, you cannot display the list during
random play and stop.
].
66
The list sorted in the way you selected
appears.
See the following sections for each
operation.
• [Category List]: You can search a file by
selecting category ( P.67).
• [Link Search]: You can search a file of
same artist/album/genre/composer as the
current track (P. 67).
• [Folder List]: You can search a file according
to hierarchy (P. 68).
NOTE
• For disc media, you can display the folder list
directly by touching [
].
Page 68

CD/Audio and Visual Files/iPod/Apps Operation
Return to the Top page
Category search (Only for iPod and
USB device)
Touch the desired category from the
1
left part of the screen.
The list is sorted by selected category.
2
Touch desired song.
3
Playback starts.
NOTE
• To narrow the search you can select a letter from
the alphabet list in the center of the display.
• For operations in the list screen, see Common
Operation (P.22).
Link search (Only for iPod and USB
device)
Touch the desired link from the left
1
part of the screen. You can select from
artist, album, genre and composer.
The link list corresponding to your
selection appears.
NOTE
• The list is sorted by the way you selected.
–Artist: Displays the album list of the artist.
–Album: Displays all tunes of the current album.
–Genre: Displays the artists list in which artists
belong to the same genre.
–Composer: Displays the album list of the
Touch to select desired item in the
2
list. Repeat this step until you find the
desired file.
composer of the current file.
NOTE
• To narrow the search you can select a letter from
the alphabet list in the center of the display.
• For operations in the list screen, see Common
Operation (P.22).
67
Page 69

Return to the Top page
CD/Audio and Visual Files/iPod/Apps Operation
Folder search (Only for disc media and
USB device)
Touch the desired folder.
1
Folders in the selected source are displayed
in the center.
When you touch a folder its contents are
displayed.
The hierarchy till the current folder is
displayed on the left.
Touch desired item from the content
2
list.
Playback starts.
NOTE
• For operations in the list screen, see Common
Operation (P.22).
Search from album artwork
Ñ
(Only for iPod and USB device)
You can search music files by selecting the
album artwork.
Touch [ ].
1
Sub function menu appears.
Touch [ ].
2
Favorite screen appears.
Touch desired artwork in the upper
3
line.
68
NOTE
• The key in the upper side of the screen functions
differently depending on the status.
–When [Load Albums] appears:
You have not yet loaded any artwork. Touch the
key to start loading.
–When [Load More Albums] appears:
Some artwork are not loaded. Touch the key to
load all artwork. If you touch the key, the track
being played may stop and another track may
start playback.
–When the key does not available:
All artwork are already loaded.
Page 70

CD/Audio and Visual Files/iPod/Apps Operation
Return to the Top page
Touch [ D ] on the selected artwork.
4
The first song in the album is played.
In addition, you can create your original
playlist from this screen. For details, see
Favorite list (P.69).
NOTE
• After all tracks in the album are played, the same
album is played again from the first track.
• The albums with no photo are not displayed.
Favorite list
You can create an original playlist of your
favorite 10 albums by selecting album
artworks.
Touch and drag the desired album
1
artwork in the upper line to the lower
line.
Selected album is registered to the favorite
list.
NOTE
• The added album is placed on farthest right.
• You cannot register the same album already
registered to the favorite list.
• Up to 10 albums can be registered to the list.
Touch the desired artwork in the
2
favorite list.
The selected album is played and the
control screen appears.
NOTE
• The favorite list is played to the right starting with
the selected album.
• To delete the album from the favorite list, touch
and drag it to the upper line.
• You can change the playing order of the favorite
list by dragging the artwork in the list.
• The favorite list mode is canceled in the following
situations.
–Playing another album from other list (folder list,
category list, etc.)
–Playing another album by touching the artwork
in the upper line in the artwork list screen.
• The favorite list mode resumes after
disconnecting/connecting the device or turning
on/off. File being played, playing time code,
favorite list content, favorite list order, etc.
resumes if file configuration of the device is not
changed.
69
Page 71

Return to the Top page
CD/Audio and Visual Files/iPod/Apps Operation
Movie Control
You can adjust the movie playback.
In the playback screen, touch
1
illustrated area.
Movie control screen appears.
Touch [Disc CTRL]. (Disc media only)
2
Movie Control screen appears.
Perform desired operation as follows.
3
Changes subtitle language
Touch [Subtitle].
Changes audio language
Touch [Audio].
Exits the menu
Touch [Exit].
70
Page 72

CD/Audio and Visual Files/iPod/Apps Operation
262
7
1
7
33445
8
Return to the Top page
Pandora® Operation (region code 4 area only)
You can listen to the Pandora® on this unit by controlling the application installed in the iPhone,
Android or BlackBerry.
NOTE
• Install the latest version of the Pandora® application on your iPhone, Android or BlackBerry. (P. 148)
iPhone: Search for "Pandora" in the Apple App Store to find and install the most current version.
Android: Visit the Google Play and search for Pandora to install.
BlackBerry: Visit www.pandora.com from the built in browser to download the Pandora application.
• When you first select Pandora as a source, the setting screen for the connection with the device installed the apps
will appear. For the details, refer to Application link setup (P.78).
Press the <HOME> button.
1
Flick the screen left or right to select the Source launcher panel.
2
Touch [ ].
3
Touch [ Pandora].
4
Simple Control screen List Control screen
1 Information display
Displays text information of current content that is being played.
2 Artwork/Control switching area
The artwork is displayed if available from current content. When the artwork is not available, “No Photo”
is displayed.
Touch to switch between the Simple Control and List Control screen.
3 Multi function key
Touch to switch the multi function menu. For details on the menu, see Multi function menu (P.72).
4 Multi function menu
Various functions can be performed by using the keys in this area. For details on the keys, see Multi
function menu (P.72).
5 Sub function key
Touch to display “Sub function menu” (7 in this table).
6 Content information
Displays the information of the current content being played.
Continued
71
Page 73

Return to the Top page
CD/Audio and Visual Files/iPod/Apps Operation
7 Sub function menu
Various functions can be performed by using keys in this area. For details on the keys, see Sub function
menu (P.72).
8 Sub function/ List switching key
Touch to display “Sub function menu” (7 in this table).
Touch and hold to switch between the content list and the current content information.
Multi function menu
Ñ
The following functions can be performed by
using keys in this area.
[ ]
Searches the station. For details on searching,
see Station list screen (P.73).
[
] (Thumbs down)
Thumbs down to the current track and skip to
the next track.
[ L ]
Plays or pauses the content of the current
station/channel.
[ F ]
Skips the current track.
(Note this function is disabled when the
Pandora skip limitation is exceeded.)
[
] (Thumbs up)
Registers the current content as favorite
content.
[
] (Bookmark Artist)
Bookmark an artist in the current content.
[
] (Bookmark Song)
Bookmark a song in the current content.
Sub function menu
Ñ
The following functions can be performed by
using keys in this area.
Status bar in center
Displays the elapsed time since when you
select the station and status bar which shows
current location.
[
]
Creates a new station based on an artist being
played.
[
]
Creates a new station based on a track being
played.
[
]
Displays the genre list screen. For details on
searching, see Genre list screen (P.73).
72
Page 74

CD/Audio and Visual Files/iPod/Apps Operation
Return to the Top page
Genre list screen
Ñ
You can perform the following functions
from this screen.
The selected genre is created as a new
station.
Station list screen
Ñ
You can perform the following functions
from this screen.
Selects the station
Touch the station name in the list.
Sort the list in alphabetical order
You can select the desired letter from the list
which corresponds to the station name to help
narrow the search.
Display the genre list
Displays the genre list.
Sort the list by date
Touch [ByDate]. The list is sorted to begin with
the last registered station.
NOTE
• You can operate Pandora by using the remote
controller. However, only playing, pausing, and
skipping are available.
• You cannot select iPod as rear source when
you select Pandora as main source in dual zone
function.
73
Page 75

Return to the Top page
121
2
3
3
CD/Audio and Visual Files/iPod/Apps Operation
Apps Operation
You can listen to music or watch video from the Apps operating on iPod touch/iPhone or Android.
NOTE
• When you first select APPS as a source, the setting screen for the connection with the device installed the apps
will appear. For the details, refer to Application link setup (P.78).
• If the conditions below are satisfied, the touch keys will not appear, but the touch operation from the screen of
the unit to the Android device becomes possible.
–The unit and the Android device are connected with KCA-MH100 (sold separately) and over Bluetooth profile
HID and SPP.
–To enable the touch operation on this unit, install "Kenwood Smartphone Control" and start it.
Search for "Kenwood Smartphone Control" in Google play to find and install the most current version.
For details, see web site. http://www.kenwood.com/products/car_audio/app/kenwood_smartphone_
control/eng/index.html
–If you drive using an app that is prohibited from using while driving,
the confirmation screen appears. As you select [Yes], the launcher of
"Kenwood Smartphone Control" starts.
• Depending on the app, the touch keys may not work or be displayed.
• When you turn on the power and select apps as the source, the caution
for the operation, watching video and listening music appears. With your
acceptance, you can control apps, listen to music and watch video from
apps when you are driving.
Press the <HOME> button.
1
Flick the screen left or right to select the Source launcher panel.
2
Touch [ ].
3
Touch [ APPS].
4
When the touch keys appear
When the touch operation is
possible
1 [D] [H] (iPod only) / [L]
Plays or pauses.
2 [E] [F]
Searches the previous/next file.
Touch and hold to fast backward/ forward. (iPod/ iPhone only)
3 Key display area
Touch to display the operation buttons. Touch again to erase them.
74
Page 76

USB/iPod/App/DivX Setup
You can perform setup when using USB/
iPod/ App/ DivX.
Touch [ ].
1
Quick menu appears.
Touch [SETUP].
2
SETUP Menu screen appears.
Touch [Source].
3
Source SETUP Menu screen appears.
Touch [USB SETUP], [iPod SETUP], [APP
4
SETUP] or [DivX VOD] in the list.
Each setup screen appears.
See the following section for each setting.
• USB setup (P.75)
• iPod setup (P.76)
• App setup (P.78)
• DivX® VOD (P.76)
CD/Audio and Visual Files/iPod/Apps Operation
USB setup
Ñ
Set each item as follows.
1
On Screen USB
Set how information from a USB device is
displayed.
Auto (Default): Information appears for 5
OFF: Does not display any information.
Return to the Top page
seconds when updated.
75
Page 77

Return to the Top page
CD/Audio and Visual Files/iPod/Apps Operation
DivX® VOD
Ñ
This feature is available only for Central and
South America sales area.
Set each item as follows.
1
DivX(R) Registration Code
Checks the registration code. This code is
needed when making a disc which has DRM
(Digital Rights Management).
DivX(R) Deactivation
Deregisters the unit which is already registered.
After you touch the key, a confirmation
message appears. Follow the message and
complete the operation.
NOTE
• [DivX(R) Registration Code] is disabled when a
DVD is being played.
• When downloading a DivX VOD file controlled
by DRM, register the code appeared on the
screen. Otherwise the file may not be able to play
with this unit. Remaining number of viewing is
displayed when playing a DivX VOD file with the
viewing restriction. When the remaining number
of viewing reached 0, a warning message appears
and the file cannot be played.
iPod setup
Ñ
Set each item as follows.
1
AudioBook Speed
Set the audio book playback speed. Select
from [Slow], [Normal] (default), and [Fast].
Wide Screen*
Set Wide Screen. Set [ON] (default) or [OFF].
On Screen iPod
Set how to display the information of the iPod.
Auto (Default): Information appears for 5
OFF: Does not display any information.
iPod Connection Setup*
Sets the way to connect the iPod/iPhone with
this unit.
*1 This setting is not available when an iPod
is connected.
*2 This item can be set when in STANDBY
source.
1
seconds when updated.
2
76
Page 78

CD/Audio and Visual Files/iPod/Apps Operation
Return to the Top page
iPod/iPhone connection setup
Press the <HOME> button twice to the
1
Source launcher panel.
Touch [ ].
2
Touch [ STANDBY].
3
Touch [ ].
4
Touch [SETUP].
5
Touch [Source].
6
Touch [iPod SETUP].
7
Touch [iPod Connection Setup] in the
8
iPod SETUP screen.
iPod connection setup screen appears.
Touch [CHANGE].
9
Set each item as follows.
10
Touch [Next].
11
Confirmation screen appears.
Touch [Done].
12
Touch [6].
13
NOTE
• For the details of the necessary cable and adapter
to connect with iPod/iPhone, refer to Music/
Video Basic Operation (P.60).
• When you select “HDMI + BT” or “Bluetooth” in
step 10, Bluetooth device selection screen will
appear. Select the iPod/iPhone to be connected.
• If a connectable Bluetooth device is not
displayed, touch [Search] and do the pairing of
the devices.
• The setting of “iPod connection setup” is just for
the unit and regardless of the account.
USB + AV-IN
Select when connecting with KCA-iP202.
USB 1Wire
Select when connecting with KCA-iP103 or
KCA-iP102.
HDMI + BT
Select when connecting with KCA-HD100 and
Lightning Digital AV Adapter.
Bluetooth
Select when connecting via Bluetooth only.
Continued
77
Page 79

Return to the Top page
CD/Audio and Visual Files/iPod/Apps Operation
App setup
Ñ
Set each item as follows.
1
APP Settings*
Makes the detailed setting of the device in
which APPS are installed.
Screen Control
Touch [SET] to display the screen control
screen. See Monitor Screen Setup (P.108).
APP interrupt volume
(DNR8015BT/ DNR8015BTM)
Sets the volume level of the information from
APP when it cuts in the music you are listening
to.
* This item can be set when in STANDBY
source.
Application link setup
Press the <HOME> button twice to the
1
Source launcher panel.
Touch [ ].
2
Touch [ STANDBY].
3
Touch [ ].
4
Touch [SETUP].
5
Touch [Source].
6
Touch [APP SETUP].
7
Touch [SET] on [APP Settings] in the
8
APP SETUP screen.
Application link setup screen appears.
Touch [CHANGE].
9
Select the device installed the apps.
10
78
iPod/iPhone
Select when using iPod/iPhone.
Android/Other
Select when using Android or BlackBerry
device.
Touch [Next].
11
Page 80

Select the way to connect the device
12
with this unit.
When selecting [iPod/iPhone]
USB + AV-IN
Select when connecting with KCA-iP202.
USB 1Wire
Select when connecting with KCA-iP103 or
KCA-iP102.
HDMI + BT
Select when connecting with KCA-HD100 and
Lightning Digital AV Adapter.
Bluetooth
Select when connecting via Bluetooth only.
CD/Audio and Visual Files/iPod/Apps Operation
Return to the Top page
NOTE
• For the details of the necessary cable and adapter
to connect with iPod/iPhone and Android device,
refer to Music/Video Basic Operation (P.60).
• When you select “HDMI + BT”, “HDMI/MHL +
BT” or “Bluetooth” in step 12, Bluetooth device
selection screen will appear. Select the device to
be connected.
If a connectable Bluetooth device is not
displayed, touch [Search] and do the pairing of
the devices.
• When you select “iPod/iPhone” in App Setup,
select “iPod”as the source, and select App on the
iPod, the source of this unit is also changed to
App automatically.
• The setting of “Application link setup” is just for
the unit and regardless of the account.
When selecting [Android/Other]
HDMI/MHL + BT
Select when connecting with KCA-MH100.
Bluetooth
Select when connecting via Bluetooth only.
Touch [Next].
13
Confirmation screen appears.
Touch [Done].
14
79
Page 81

Return to the Top page
Cloud Storage Operation
Cloud Storage Operation
ñ
Starting procedure
Make preparations for allowing this unit to
play the music files uploaded to Dropbox.
Preparation
• You must have a connection with the internet
using Wi-Fi. See Wi-Fi Setup (P.28).
• You can use a user account when you have
logged in the Owner or User.
• To use this service, a Dropbox account is required.
Upload music files to Dropbox.
1
In the Route Collector site, create a
2
folder and playlist of the files to be
played.
For how to set the folder and playlist of the
files to be played, refer to the website.
http://www.route-collector.com/
Available content
Content that can be delivered or played by
this unit are as follows:
• Audio file: MP3 (.mp3), AAC-LC (.m4a/ .aac), WMA
• Copyrighted content cannot be played.
(.wma), WAV (.wav), FLAC (.flac)
Music Basic Operation
The music files uploaded to Dropbox can be
played.
Preparation
• To play the files uploaded to Dropbox, setting is
required. See Starting procedure (P.80).
Press the <HOME> button.
1
Flick the screen left or right to select
2
the Source launcher panel.
Touch [ ].
3
Touch [ Storage].
4
[L]
Plays or pauses.
[E] [F]
Searches the previous/next file.
[
]
Searches file. For details on search operation,
see Category search (P.81).
[
]
The data base like the song information in the
server is reorganized. Press it when you change
the file in the Dropbox.
[
]
Touch to display “Sub function menu”.
Touch and hold to switch between the file list
and the current file information.
[
]
Repeats the current file. Each time you touch
the key, repeat mode switches on or off.
80
Page 82

Return to the Top page
Cloud Storage Operation
[ ]
Randomly plays all files in current folder or in
current playlist.
Each time you touch the key, random mode
switches in the following sequence;
"file random"
#:##:##
For confirmation of play time.
Status bar in center
For confirmation of current playing position.
You can drag the circle left or right to change
the playing position.
, "random off"
Category search
You can search music files by the following
operations.
Touch [ ] in the control screen.
1
The search type screen appears.
Touch the desired category from the
2
left part of the screen.
The list is sorted by selected category.
3
Touch desired music file.
4
Playback starts.
NOTE
• To narrow the search you can select a letter from
the alphabet list in the center of the display.
• For operations in the list screen, see Common
Operation (P.22).
81
Page 83

Return to the Top page
HOME 6
DNN/DNR
Wi-Fi
Kenwood Wireless Link Operation
Kenwood Wireless Link Operation
ñ
Starting procedure
By using the Wi-Fi function, media files can
be shared with another media server device
or client (player) device.
Preparation
• Turn on the function of Wi-Fi connection to a
media server device or client device. See Wi-Fi
Setup (P.28).
About Network connection
There are two types of network to connect to
the media server device or the client (player)
device.
• Wi-Fi access: The internet device that becomes the
Wi-Fi access point is necessary. Smartphone and
tablet PC can be connected through the Wi-Fi access
point. See Wi-Fi Setup (P.28).
–You cannot listen to music or watch video in the
smartphone when its tethering function is in use.
DNN/DNR
HOME 6
Wi-Fi
Wi-Fi access point
• Wi-Fi hotspot: This unit becomes the Wi-Fi access
point and can connect with smartphone and tablet
PC. See Wi-Fi Hotspot Setup (P.30).
Wireless Link
Media Server function
Plays the content stored in the USB memory
connected to this unit via another network
media player (client device).
• We confirmed normal operation using the following
network media players (software):
• Windows Media Player 12
Media Player function
Plays the content stored in another media
server device via this unit.
• We confirmed normal operation using the following
media servers (software):
• Windows Media Player 12
Media Controller function
Allows you to handle the content stored in
another media server device via this unit and
play them on another network media player
(client device).
Media Renderer function
Plays the content being operated on another
media controller thorugh this unit.
Available content
Content that can be delivered or played by
this unit are as follows:
• Audio file: MP3 (.mp3), AAC-LC (.m4a/ .aac), WMA
(.wma), WAV (.wav), FLAC (.flac)
• Video file: MPEG-1/2 (.mpg/ .mpeg/ .m2p), MPEG-4
(.mp4/ .m4v), WMV (.wmv/ .m2ts), MKV
(.mkv)
• Copyrighted content cannot be played.
DNN/DNR
HOME 6
Wi-Fi access point
82
Wi-Fi
Wireless Link
Page 84

Kenwood Wireless Link Operation
Return to the Top page
Media Server function
Plays the content stored in the USB memory
connected to this unit via another network
media player (client device).
Press the <HOME> button.
1
Flick the screen left or right to select
2
the Source launcher panel.
Touch [ ].
3
Touch [ Wireless Link].
4
Touch [DMS].
5
The server function is turned on.
Connect from the client device.
6
Operate the client device to connect to the
server.
Server name: DNN9150BT, DNN9150BTM,
DNR8015BT or DNR8015BTM.
Media Player function
Plays the content stored in another media
server device via this unit.
Press the <HOME> button.
1
Flick the screen left or right to select
2
the Source launcher panel.
Touch [ ].
3
Touch [ Wireless Link].
4
Connect to the media server.
5
A list of detected media servers is
displayed.
Touch the server name of the server to
connect.
Select the content to play.
6
Select the category of the content to play.
A list of detected content is displayed.
83
Page 85

Return to the Top page
Kenwood Wireless Link Operation
Plays screen
Ñ
[L]
Plays or pauses.
[E] [F]
Searches the previous/next file.
[
]
Repeats the current file. Each time you touch
the key, repeat mode switches on or off.
[
Switches between music and video files.
#:##:## or ##:##
For confirmation of play time.
Status bar in center
For confirmation of current playing position.
You can drag the circle left or right to change
the playing position.
[
]
Touch to display “Sub function menu”.
Touch and hold to switch between the file list
and the current file information.
]
Media Controller function
Allows you to handle the content stored in
another media server device via this unit and
play them on another network media player
(client device).
Press the <HOME> button.
1
Flick the screen left or right to select
2
the Source launcher panel.
Touch [ ].
3
Touch [ Wireless Link].
4
Connect to the media server.
5
A list of detected media servers is
displayed.
Touch the server name of the server to
connect.
Select a network media player to be
6
used for playback.
84
A list of detected network media players is
displayed.
Touch the name of the network media
player to be used for playback.
Page 86

Media Renderer function
Plays the content being operated on another
media controller through this unit.
Press the <HOME> button.
1
Flick the screen left or right to select
2
the Source launcher panel.
Touch [ ].
3
Touch [ Wireless Link].
4
Touch [DMR].
5
The Rendering function is turned on.
Establish connection from the media
6
controller.
Operate the media controller to connect to
this unit.
This unit: DNN9150BT, DNN9150BTM,
DNR8015BT or DNR8015BTM.
Kenwood Wireless Link Operation
Return to the Top page
85
Page 87

Return to the Top page
262
7
1
7
33445
8
Radio Operation
Radio Operation
ñ
Radio Basic Operation
Most functions can be controlled from the source control screen.
NOTE
• Set the remote controller mode switch to AUD mode before starting operation, see Switching the operation
mode (P.129).
Simple Control screen List Control screen
1 PS/Station name display
Displays the PS name or station name.
2 Information display/Control switching area
Displays the following information.
• [FM1] etc.: Band display
• MHz/kHz: Frequency display
• Preset #: Preset number
Touch to switch between the Simple Control and List Control screen.
3 Multi function key
Touch to switch the multi function menu. For details on the menu, see Multi function menu (P.87).
4 Preset key/Multi function menu
Recalls the memorized station or channel. When touched for 2 seconds, stores the current receiving
station or channel in memory.
When switched, various functions can be performed by using keys in this area.
For details on the menu, see Multi function menu (P.87).
5 Sub function key
Touch to display “Sub function menu” (7 in this table).
86
Page 88

Return to the Top page
Radio Operation
6 Preset list
Displays the list of preset stations or channels and the information.
7 Sub function menu
The following functions can be performed by using keys in this area.
• Switches the band: Touch [AM] or [FM].
• Tunes in a station: Touch [A] or [B]. The method of frequency switching can be changed. See
• The bar in center (tuner only) shows the current frequency location.
8 Sub function/ List switching key
Touch to display “Sub function menu” (7 in this table).
Touch and hold to switch between the preset list and the information list.
In tuner mode, radio text plus will be displayed (for models with region code 2 or 3 only).
Multi function menu
Ñ
The functions of each key are as follows.
[P1] - [P6]
Select the preset station. Touch for 2 seconds to store the current station into the preset memory.
]
[
Displays the list of preset stations. For details on search operation, see Selecting Operation (P.89).
[TI] (FM tuner only)
Sets the traffic information mode on. For details, see Traffic Information (P.90).
[SEEK]
Switches the seek mode in the following sequence; [AUTO1], [AUTO2], [MANUAL].
• AUTO1: Tunes in a station with good reception automatically.
• AUTO2: Tunes in stations in memory one after another.
• MANUAL: Switches to the next frequency manually.
[AME]
Selects the auto memory mode. For details, see Auto memory (P.88).
[PTY] (FM tuner only)
Searches a program by setting program type. For details, see Search by program type (P.89).
[MONO] (FM tuner only)
Select the Monaural reception.
[LO.S] (FM tuner only)
Turns the Local Seek function on or off.
Seek mode.
87
Page 89

Return to the Top page
Radio Operation
Memory Operation
Auto memory
Ñ
You can automatically store stations with
good reception to memory.
NOTE
• Auto memory terminates when 6 stations are
stored or when all stations are tuned in.
• Auto memory ends automatically if you do not
operate within 10 seconds.
Touch [ ].
1
Sub function menu appears.
Touch desired band key.
2
Manual memory
Ñ
You can store the current receiving station or
channel in memory.
Select a station or channel you wish to
1
store in memory.
Touch [P#] (#:1-6) in which you want
2
to store the station or channel for 2
seconds until a beep sounds.
Touch [ ] in the control screen.
3
The multi function menu appears.
Touch [AME] in the multi function
4
menu.
Touch [A] or [B] in the sub function
5
menu.
Auto memory starts.
88
Page 90

Selecting Operation
Preset select
Ñ
You can list and select memorized station or
channel.
Selecting from the multi function
menu
Touch the desired number from P1 to
1
P6.
The unit will tune to the selected station or
channel.
Selecting from the preset list
Touch illustrated area.
1
List Control screen appears.
Touch and hold [ ].
2
Preset list appears.
Select a station or channel from the list.
3
Return to the Top page
Radio Operation
List select
Ñ
You can select an ensemble from a list of
memorized ensembles or select a service
from a list of all services received.
Touch [ ] in the control screen.
1
The multi function menu appears.
Touch [ ] in the multi function menu.
2
List screen appears.
Select the desired content from the list.
3
Search by program type
Ñ
(FM tuner only)
You can tune to a station with a specific
program type when listening to FM.
Touch [ ] in the control screen.
1
The multi function menu appears.
Touch [PTY] in the multi function menu.
2
TUNER PTY Mode screen appears.
Select a program type from the list.
3
Touch [Search].
4
NOTE
• Touching [ ] and then [Preset List] displays
the preset channel list. You can also select your
desired channel from the list.
You can search a station of the selected
program type.
89
Page 91

Return to the Top page
Radio Operation
Traffic Information
You can listen and watch the traffic
information automatically when a traffic
bulletin starts.
However, this feature requires a Radio
Broadcast Data System that includes the TI
information.
Touch [ ] in the control screen.
1
The multi function menu appears.
Touch [TI] in the multi function menu.
2
Traffic information mode is set.
When the traffic bulletin starts
Ñ
The Traffic Information screen appears
automatically.
Tuner Setup
You can set tuner related parameters.
Touch [ ].
1
Quick menu appears.
Touch [SETUP].
2
SETUP Menu screen appears.
Touch [Source].
3
Source SETUP Menu screen appears.
Touch [TUNER SETUP] in the list.
4
TUNER SETUP screen appears.
Set each item as follows.
5
NOTE
• It is necessary to have Traffic Information function
set to on in order to have the Traffic Information
screen appear automatically.
• The volume setting during reception of traffic
information is automatically stored. The next time
the traffic information is received, this unit recalls
the volume setting automatically.
90
Page 92

NEWS
Sets a news bulletin interrupt time. Default is
“OFF”.
AF
When station reception is poor, automatically
switches to the station that is broadcasting
the same program over the same Radio Data
System network. Default is “OFF”.
Regional
Sets whether to switch to the station only
in the specific region using the “AF” control.
Default is “OFF”.
Auto TP Seek
When traffic information station reception is
poor, automatically searches for a station that
can be received better. Default is “ON”.
Language Select
Selects a display language for the PTY function.
Antenna Control
Allows you to turn off the Radio Data System
function to prevent the motor-driven antenna
from extending. Default is “ON”.
Return to the Top page
Radio Operation
91
Page 93

Return to the Top page
Streaming Service Application
Streaming Service Application
ñ
AUPEO!Application
You can listen to music on the online radio
AUPEO!.
Preparation
• You need to connect to Internet using Wi-Fi. See
Wi-Fi Setup (P.28).
Press the <HOME> button.
1
Flick the screen left or right to select
2
the Network contents panel.
Touch [ ].
3
Touch [ Aupeo].
4
Select a genre.
5
Log in
Ñ
By registering an account, you can listen to
your favorite songs.
Touch [log in].
1
Enter the User Name and Password.
2
Touch [log in].
3
92
Page 94

Return to the Top page
Streaming Service Application
Play screen
Ñ
[ ]
Plays or pauses.
[
] (Love)
I like this song.
[
] (Skip)
Play the next song.
[
] (Ban)
I do not like this song.
[
]
Select a sub genre.
[
] (Mood)
Music matching your mood.
[
]
Select a new genre.
[FEATURED]
Select a Featured Stations
[GENRE STATIONS]
Select a Genre Stations
[ARTIST STATIONS]
Create a station of your type by searching
stations by the artist name.
[
] (Favorites)
Edit the titles registered in Loves and Bans.
You can use this button only when you have
logged in to this service.
Editing Favorites
Ñ
You can edit the titles registered in Loves and
Bans.
Preparation
• You can only use this function when you have
logged in this service.
Touch [ ].
1
[ ]/ [ ]
Switches between Love and Ban.
[
]
Deletes this title.
[
]
Registers this artist as Ban.
93
Page 95

Return to the Top page
Streaming Service Application
AV Browser Application
This app is the dedicated web browser to
playback streaming video and audio.
Preparation
• You need to connect to Internet. See Wi-Fi Setup
(P. 28).
Press the <HOME> button.
1
Flick the screen left or right to select
2
the Network contents panel.
Touch [ ].
3
Touch [ AV Browser].
4
Play video and audio
Ñ
Select the content you want to play.
1
Play the content.
2
Icons linked with web sites are displayed.
[ ]
The portal site which shows recommended
streaming services is displayed.
[
]
The list of tabs is displayed.
94
Press the <6> button to previous
3
screen.
Note
• The instruction above is an example of operation.
Actual operation is depended on the streaming
service.
Page 96

Return to the Top page
Streaming Service Application
95
Page 97

Return to the Top page
Bluetooth Control
Bluetooth Control
ñ
Using the Bluetooth function, various
functions can be used: listening to the audio
file, making/receiving a call.
About the Smartphone/cell-
Ñ
phone and Bluetooth audio
player
This unit conforms to the following
Bluetooth specifications:
Version
Bluetooth Ver. 3.0+EDR Certified
Profile
Smartphone/cell-phone:
HFP (V1.6) (Hands Free Profile)
SPP (Serial Port Profile)
PBAP (Phonebook Access Profile)
GAP (Generic Access Profile)
HID (Human Interface Device Profile)
Audio player:
A2DP (Advanced Audio Distribution Profile)
AVRCP (Audio/Video Remote Control Profile)
Sound codec
DNN9150BT/ DNN9150BTM :
aptX, MP3, AAC, SBC
DNR8015BT/ DNR8015BTM : MP3, AAC, SBC
Registering and Connecting Bluetooth Unit
It is necessary to register the Bluetooth audio
player or smartphone/cell-phone to this unit
before using the Bluetooth function.
You can register up to 5 Bluetooth units.
Press and hold the < 6 > button.
1
HOME 6
Hands Free screen appears.
Touch [ ].
2
Bluetooth SETUP screen appears.
See the following section for each setting.
NOTE
• For the smartphones/cell-phones verified for
compatibility, access the following URL:
http://www.kenwood.com/cs/ce/bt/.
• The units supporting the Bluetooth function have
been certified for conformity with the Bluetooth
Standard following the procedure prescribed by
Bluetooth SIG.
However, it may be impossible for such units to
communicate with your smartphone/cell-phone
depending on its type.
96
• Registering the Bluetooth Unit (P. 97)
• Connecting the Bluetooth unit (P. 97)
• Registering from the Bluetooth unit
(P. 98)
• Change the PIN code (P. 98)
Page 98

Return to the Top page
Bluetooth Control
Registering the Bluetooth Unit
Ñ
Preparation
• You cannot register the Bluetooth unit when you
are using the following sources:
iPod, Bluetooth Audio, APPS, Pandora
If you want to register the Bluetooth unit while
using one of the above mentioned sources, send
the connection request from the Bluetooth unit
and register it.
Touch [Search].
1
Searched Device List screen appears.
NOTE
• A new device cannot be registered if there are 5
registered Bluetooth units. Delete unnecessary
registration. See Connecting the Bluetooth unit
(P. 97).
• This unit is compatible with the Apple Easy
Pairing function. When an iPod touch or iPhone
is connected to this unit using Dock Connector
to USB Cable, an authentication dialog appears.
Performing operation for authentication on this
unit or iOS smartphone registers the smartphone
as a Bluetooth device.
• If two Bluetooth units are connected, this unit will
not start the search. In this case disconnect one
of the Bluetooth units.
Select the Bluetooth unit to register
2
from the list.
Connecting the Bluetooth unit
Ñ
Touch the name of device to connect.
1
Profile select screen appears.
NOTE
• If the icon is lighted, it means that the unit will
use that device.
Set each profile as follows.
2
TEL (HFP)
Means that the Bluetooth unit is a
smartphone/cell-phone.
Audio (A2DP)
Means that the Bluetooth unit is an audio
player or smartphone/cell-phone with audio
player.
NOTE
• If a device has been paired, the Bluetooth unit
cannot be connected from the paired device.
• Touching [Remove] of [Device Remove Confirm]
removes registration information. After you touch
the key, a confirmation message appears. Follow
the message and complete the operation.
NOTE
• If the Bluetooth unit cannot be searched in step
1, you can search it again by touching [Search] in
above screen.
• Touch [Cancel] to cancel searching for the
Bluetooth unit.
Enter PIN code form the cell-phone.
3
97
Page 99

Return to the Top page
Bluetooth Control
Registering from the
Ñ
Bluetooth unit
Search the unit (“DNN****”/ “DNR****”)
1
from your smartphone/cell-phone.
Input the PIN code in your smartphone/
2
cell-phone.
PIN code is set to “0000” as the default.
SSP (Secure Simple Pairing of
Bluetooth 2.1 or later)
Search the unit (“DNN****”/ “DNR****”)
1
from your smartphone/cell-phone.
Confirm the request both on the
2
smartphone/cell-phone and the unit.
Change the PIN code
Ñ
Touch [PIN Code Set].
1
PIN Code Set screen appears.
Input the PIN code
2
Touch [Enter].
3
98
Page 100

Return to the Top page
2
2
4
1
3
5
5
Bluetooth Control
Playing Bluetooth Audio Device
Bluetooth basic operation
Ñ
Simple Control screen List Control screen
1 Information display
Displays the name of the content information. If the information is not available, Bluetooth unit name
is displayed.
2 Multi function menu
The functions of each key are as follows.
• [E] [F]: Searches the previous/next content.*
• [D]: Plays.*
• [H]: Pauses.*
• [I]: Stops playback.*
3 Control switching area
Touch to switch between the Simple Control and List Control screen.
4 Content information
Displays the information of the current content.
5 Status bar
Displays the current play location, play time, and play mode.
* These items appear only when the audio player which supports AVRCP profile is connected.
NOTE
• If the operation keys do not appear, operate from the player.
• Depending on your smartphone/cell-phone or audio player, audio may be heard and controlled but text
information may not appear.
• If the volume is too low, raise it on your smartphone/cell-phone or audio player.
99
 Loading...