

Page 1

DF150
Page 2
Your Kenwood Compact Deep Fryer includes many features to enable safe and successful frying.
The cool to touch exterior has been designed for additional safety. The variable thermostat allows the temperature control to be
adjusted to ensure that food is fried to the exact degree of crispness required.
Read these instructions carefully to ensure you obtain good results.
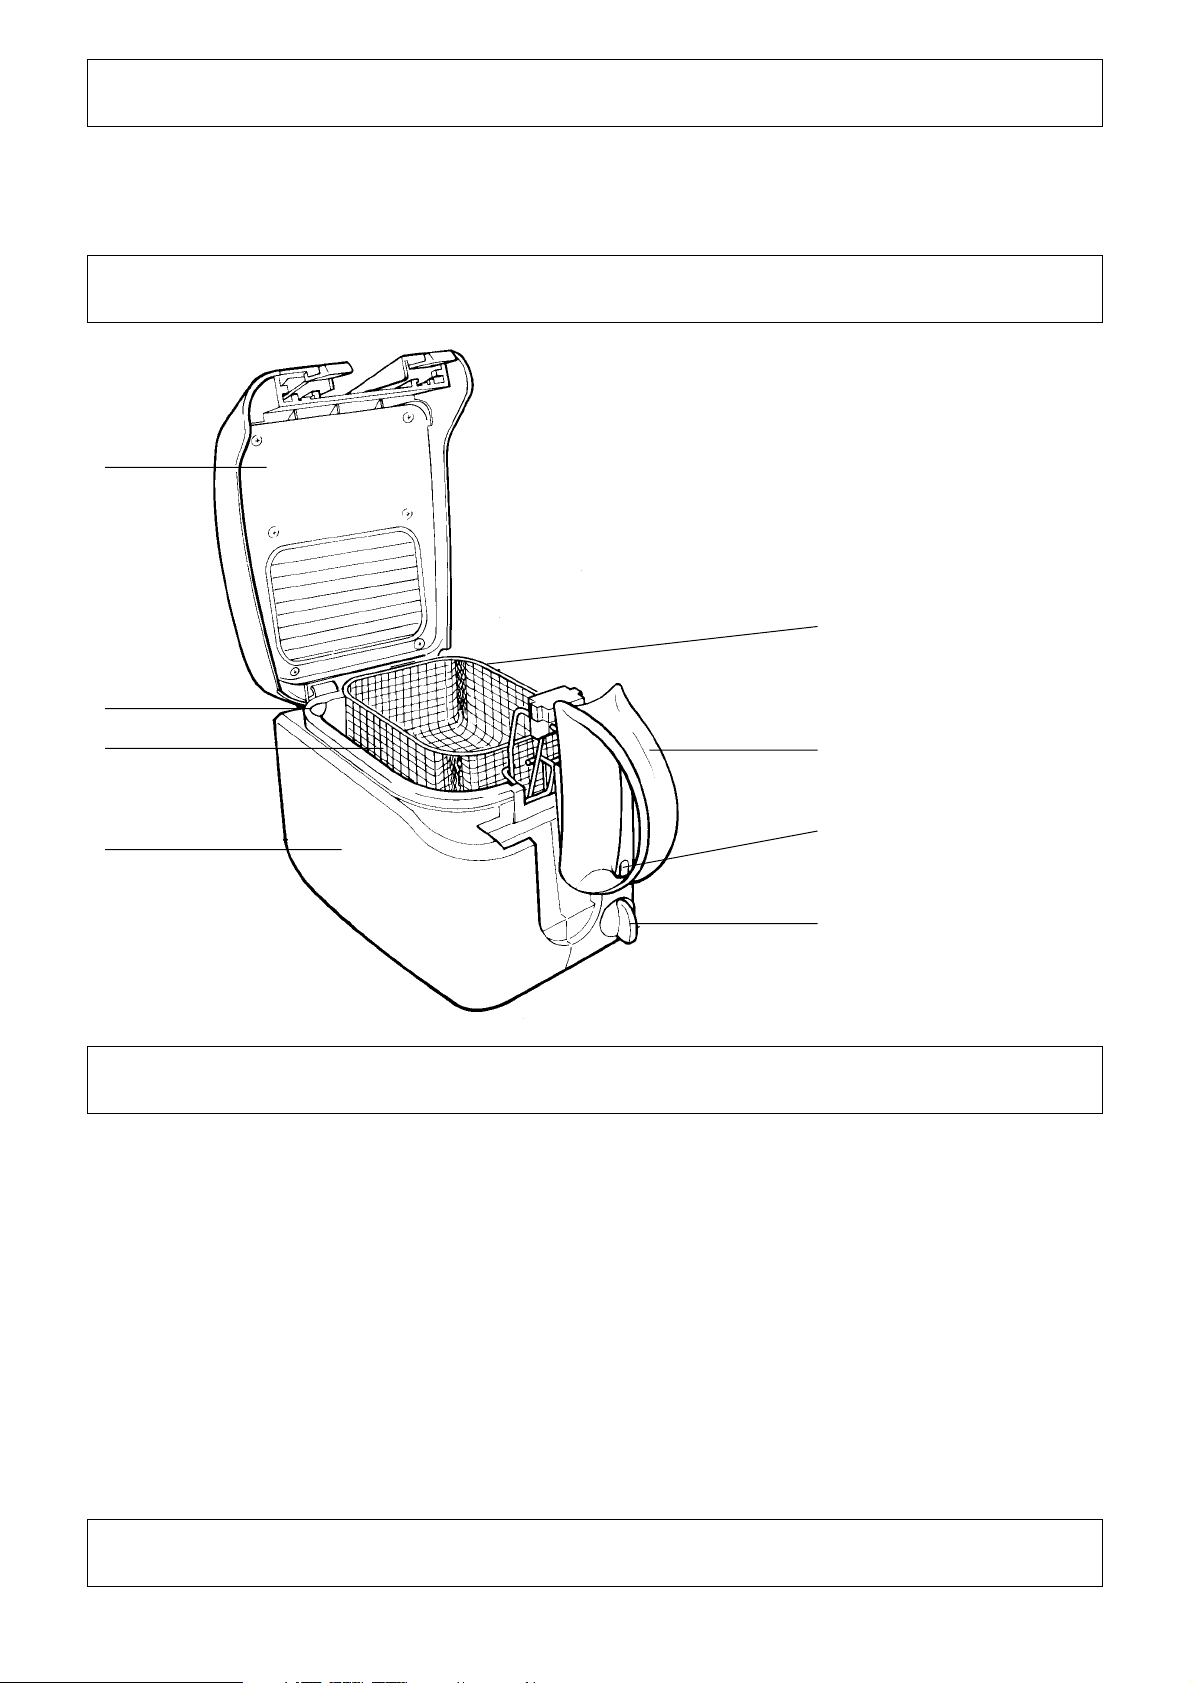
1 Removable Lid with Permanent Filter
2 Pouring Lip
3 Frying Basket
4 Cool to Touch Exterior
5 Variable Thermostat Control 0 - 190°C
6 Temperature Indicator Light
7 Basket Handle
8 Cord Wrap
When using electrical appliances basic safety precautions should always be followed including the following:-
1. Read all instructions.
2. Do not attempt to move the fryer or remove the oil while the oil is hot.
3. To protect against electric shock do not immerse cord or plugs in water or other liquids.
4. Close supervision is necessary when any appliance is used by or near children.
5. Unplug from outlet when not in use and before cleaning.
6. Appliance should not be used if the supply cord is damaged or dropped causing visible damage.
7. Do not let the cord hang over edge of worktop or touch hot surfaces.
8. Do not attempt to move or carry the Fryer while it is still hot.
9. Never leave your fryer on unattended.
10. This fryer is for domestic use only.
SAVE THESE INSTRUCTIONS
IMPORTANT SAFEGUARDS
Know your Deep Fryer
Welcome to Kenwood Deep Frying
1
2
3
4
8
7
6
5
Page 3

1. We would recommend the use of a good quality oil for deep frying, such as Corn Oil or Groundnut Oil. A good quality solid
fat may also be used. Other oils may be used if they are specifically recommended by the manufacturer for deep frying.
Never mix different oils or fats and do not use butter or margarine.
2. Select the temperature for frying taking into account the food to be cooked. As a general guide, foods that have been precooked in some way need a higher temperature than those foods which are completely raw, i.e. potato croquettes made
from pre-cooked potato need a high temperature than doughnuts which are a raw bread dough.
3. Use only metal utensils with insulated handles in hot oil.
4. As is usual practice care should be exercised when frying especially when children are about.
5. Care should be taken to cook foods through thoroughly as the exterior may show signs of turning golden brown before the
interior is cooked.
6. Oil or fat retains its temperature for a long while after use.
7. Get the maximum use from your fryer by always having it ready for use. One way of doing this is to keep the cooled and
strained oil inside ready for the next frying session with the lid acting as a dust cover.
Note: If you do wish to remove oil from the bowl it is recommended that the pouring lip be used to reduce spillage.
8. In the Recipe Section reference to made to ‘raspings’ for coating certain foods. Rasping are made by drying scraps of
crusts of bread in a slow oven. These are then liquidised and crushed. Alternatively purchase ‘golden’ breadcrumbs.
‘Breadcrumbs’ are stale scraps of bread either grated or liquidised.
9. When frying battered food, drain off excess batter, carefully add to the oil with the basket already lowered in oil. Close lid
and fry for the required time.
10. All foodstuffs, particularly potatoes and frozen food, have a moisture content. When lowered into hot fat or oil this turns in
to steam and escapes through the filter lid.
11. Always use old potatoes for making chips. Cut the potatoes into even sized chips to ensure that they are evenly cooked.
Rinse the potato chips and dry thoroughly before frying.
12. When cooking is complete lift the basket from the oil and shake the basket over the oil if necessary. Remove the basket
and turn the contents onto absorbent paper before serving to absorb excess grease and retain crispness.
CAUTION
LIKE ALL FRYING WHERE THE FOOD HAS A HIGH WATER CONTENT YOUR KENWOOD FRYER CAN EMIT STEAM
WHEN THE LID IS OPENED. OPENING THE LID FULLY IN ONE SWIFT MOVEMENT WILL ENCOURAGE THE STEAM TO
BE DISPERSED AND PREVENT BURNING.
Hints for Using your Kenwood Fryer
Connecting to Power
Before switching on make sure that the voltage of your electricity supply is the same as that indicated on the rating plate.
IMPORTANT (UK ONLY): The wires in the mains lead are coloured in accordance with the following code:
GREEN and YELLOW EARTH
BLUE NEUTRAL
BROWN LIVE
WARNING - THIS APPLIANCE MUST BE EARTHED
This appliance complies with European Economic Community Directive 89/336/EEC.
Page 4

Preparing your Kenwood Fryer for Use
Check that your Fryer is disconnected from the electricity
supply. Wash the basket in hot sudsy water and wipe dry
thoroughly. Wipe the interior, exterior surfaces and lid with a
damp cloth plug a little washing up liquid. Dry thoroughly.
Your Kenwood Fryer is now ready for use.
THE FRYER MUST NOT BE
IMMERSED IN WATER
Note
Your fryer has a cord storage wrap on the rear. To prevent
unwanted cord trailing across the worktop, unwrap cord to
connect to the nearest power point, and for safety, anchor
the cord in the special cleat. When not in use all the cable
can be easily wrapped around storage cleat.
Using your Kenwood Fryer
1. Open the lid - see diagrams.
2. Remove the basket and pour in about 1 litre of oil into
the bowl. The level must be between the max and min
marks (Fig. 1). If a solid fat is to be used, place 1kg into
the bowl and allow to melt on the lowest setting.
3. Put the basket back into the fryer and lower into the oil.
Close lid.
4. Plug in at the mains and set thermostat to required
temperature (see cooking guide). The indicator light will
go out when the set temperature is reached.
5. Open the lid - see diagrams. Lift the basket out of the oil
and locate in the draining slot at the front of the bowl
(Fig. 2).
6. Place the food to be fried (which should be as dry as
possible) in the basket. Slowly immerse the basket in the
oil and close the lid (see diagrams).
7. After the expected cooking time, open lid and lift the basket
out of the oil. Shake the basket over the oil if necessary.
8. Turn out the contents of the basket onto absorbent
paper before serving to absorb excess grease and retain
crispness.
9. At end of cooking session, turn the thermostat off,
unplug from mains and allow to cool.
Note: During use, the basket may become tarnished. This
will not affect the quality of either the food or the oil and can
be removed by cleaning.
We would recommend the use of a good quality oil for deep
frying, such as Corn Oil or Groundnut Oil. A good quality solid
fat may also be used. Other oils may be used if they are
specifically recommended by the manufacturer for deep
frying. Never mix different oils or fats and do not use butter or
margarine.
Fig.1 Fig.2
OIL LEVELS
Page 5

Opening and Closing Your Fryer
1
3
2
X
✓
Carrying Your Fryer
Page 6

WARNING: THE FRYER MUST NOT
BE IMMERSED IN WATER
Cleaning
Filter Lid
Your Kenwood fryer is fitted with a permanent filter system
comprising of deflectors which collect drops of oil from the
steam as it passes through. After several cooking sessions
the filter lid should be removed from the fryer (refer to
paragraph below), plunged into hot sudsy water and left to
soak for 5-10 minutes. It should then be rinsed thoroughly
and dried.
To Remove the Lid
To remove lid, lift to a vertical position and remove with a
straight pull upwards. Reverse the above sequence to
replace.
Cleaning Fryer
As with any cooking vessel your fryer should be cleaned after
every use.
After the oil has cooled remove the lid and pour out the oil.
The fryer is equipped with a safety pouring lip which should
be used when emptying the oil. The oil should be filtered
through fine muslin or absorbent paper placed in a suitable
funnel. Excessively discoloured oil should be discarded. After
draining the oil, the bowl should be wiped out with absorbent
paper then with a damp cloth and a little washing up liquid,
and finally with a dry cloth. Stubborn deposits can be
removed by using a little non-abrasive cleaner on a nonscratch pad
The strained oil may be stored either in the fryer or in an
airtight container in a dark cupboard. We recommend that you
discard the oil after about 10 uses.
The outside and lid should be wiped with a damp cloth an
dried thoroughly. In order to keep your frying basket in good
working order, we recommend that it is thoroughly cleaned in
hot sudsy water after every use.
CAUTION
The interior of the fryer bowl is coated with a non stick
coating. To avoid damage no abrasives or sharp instruments
should be used.
The frying times given in this chart are a guide only and should be adjusted to suit the different quantities of thickness of food
and to suit your own taste.
Frying Time and Temperature Chart
Fresh Chips - maximum basket capacity 400g 180°C 9-11 minutes
then 190°C 1-2 minutes until golden brown
Frozen Chips See manufacturers recommendations
FISH
Scampi - frozen in crumbs (just enough to loosely cover
the base of basket) 170° 3-5 minutes
Fresh Whitebait - (just enough to cover base of basket) 190° 1-2 minutes
Fresh Cod or Haddock or batter 160°C 5-10 minutes (depending on fish thickness)
Frozen Cod or Haddock portions in crumbs or batter 190°C 10-15 minutes (depending on fish thickness)
Frozen Plaice 190°C 5-6 minutes
MEAT
Frozen Hamburgers (2oz/50g) 150°C 3-5 minutes
Chicken portions in crumbs 160°C 10-20 minutes small/medium size
Chicken portions in crumbs 160°C 15-30 minutes large size
Frozen Veal Escalopes 170°C 3-8 minutes (depending on thickness)
Fresh Chicken Drum Sticks in crumbs 170°C 15 minutes
Page 7

Recipes Using your Kenwood Fryer
Prawn Balls________________________
Oil temperature required 170°C
8oz/100g shelled prawns
1 onion
1 clove garlic
3oz/75g white breadcrumbs
1 egg
1tsp/5ml Worcestershire sauce
pinch of salt
pinch of pepper
1oz/25g plain flour
Finely chop the prawns, onion and garlic. Combine all
ingredients together except the flour. Shape into 1in/2.5cm
balls and coat in the flour. Chill for at least 1 hour.
Heat the oil. Place several prawn balls into the basket and fry
for 4-5 minutes, turning to allow even browning. Drain on
absorbent paper while frying the rest.
Serves 3-4
Sweet and Sour Pork ________________
Oil temperature required 170°C
1
1
⁄2 lb/600g lean pork (shoulder or hand)
1
⁄
2tsp/2.5ml salt
pinch of pepper
2tsp/10ml soy sauce
2tsp/10ml vinegar
For batter
2oz/50g plain flour
pinch of salt
1 egg made up with water to 4fl.oz./100ml
For sauce
1
⁄
2pt/250ml stock from meat
1 small can diced pineapple
1
1
⁄2tbsp/30ml vinegar
3tsp/15ml soy sauce
3tsp/15ml brown sugar
2tbsp/40g cornflour
Cut the pork into approximate 1in/2.5cm cubes. Toss in the
seasoning, soy sauce and vinegar, then leave to stand for 1
hour. Place in an ovenproof dish with
1
⁄
4pt/125ml water and
cover. Stew for 1-11⁄4 hours in a low oven (325°F/170°C/Reg
3). Combine all the batter ingredients together to form a
smooth batter. Preheat the oil.
Drain the stock from the meat and using
1
⁄2pt/250ml, combine
all the sauce ingredients together. Bring to the boil over a low
heat stirring continuously, until the sauce thickens. Leave to
one side while frying the meat.
Dip the pork cubes into the batter, drain off excess batter, and
with the basket already in the fat, fry several of the cubes at
one time. Fry for 4-5 minutes, shaking the basket occasionally
or turning the cubes if necessary. Using the basket, remove
the pork and drain on absorbent paper. Keep warm while
frying the remainder of the meat. Re-heat the sauce and pour
over the fried pork, serve with rice.
Serves 4-5
Scotch Eggs _______________________
Oil temperature required 170°C
4 grade 3 or 4 eggs
1lb/400g pork sausage meat
1oz/25g plain flour
1 egg
2oz/50g raspings
Hard boil the eggs, cool and shell.
Divide the sausage meat into 4 and taking one portion flatten
into a thin circle. Place 1 hard boiled egg in the centre of the
sausagement and carefully mould the meat over the egg until
the egg is completely enclosed in an even covering of
sausagement. This is best done with lightly floured hands.
Repeat with the other 3 eggs. Preheat the oil.
Beat the egg and first lightly dust each scotch egg in flour,
then dip into the beaten egg. Coat with raspings.
Place one egg at a time into the basket and fry for about 10
minutes turning occasionally to evenly cook the
sausagemeat. Drain on absorbent paper before serving.
Serve hot or cold.
Makes 4 scotch eggs
Chicken Kiev _______________________
Oil temperature required 170°C
2 chicken breasts
2oz/50g butter
1
⁄
2tsp/2.5ml garlic powder
1tsp/5ml chopped parsley
1 egg
1oz/25g seasoned flour
1oz/25g white breadcrumbs
wooden cocktail sticks
Mix together the butter, garlic powder and parsley and form
into 2 lop shape rolls. Allow to chill if necessary. Skin and
bone the chicken breasts and flatten out using a wet knife or
mallet.
Place a butter roll into each breast and roll up the breasts so
that the butter is completely enclosed. Secure with cocktail
sticks.
Beat the egg and dip the chicken rolls into the egg, ensuring
that the egg penetrates into the joints of the chicken. Coat
with flour and then in the breadcrumbs. Chill for at least 1
hour before frying.
Heat the oil. Place one Chicken Kiev at a time into the basket
and fry for about 15 minutes or until tender. Drain on
absorbent paper and before serving, carefully remove the
cocktail sticks.
Serves 2
Service UK Only
For any repairs in or out of guarantee, servicing or selected
spare parts, please contact your Kenwood Authorised
Repairer in Yellow Pages under the heading of
ELECTRICAL APPLIANCE REPAIRERS or telephone
(0705) 476000 extension 2800 Service Department.
Conversion Table
The temperature control of your Kenwood Fryer is calibrated
in degrees C. However, to enable you to cook recipes
marked in degrees F, the following approximate table is
provided.
°C °F °C °F
90 195 150 300
110 230 170 340
130 265 190 375
Page 8

Fried Scallops ______________________
Oil temperature required 150°C
1lb/400g shelled scallops
1oz/25g plain flour
pinch of salt
1 egg
3oz/75g white breadcrumbs
Preheat the oil. Sieve the flour and salt together, beat the
egg. Toss the scallops in the flour and then dip into the egg.
Roll in breadcrumbs until well coated and place several
scallops into the basket. Fry for about 5 minutes then drain on
absorbent paper, while frying the remainder keep each batch
warm and then serve with slices of lemon.
Serves 8 as a starter to a meal or 4 as a main course with
vegetables.
Samosas__________________________
Oil temperature required 190°C
Pastry
8oz/200g self raising flour
pinch of salt
3oz/75g margarine
5tbsp/100ml water (approx)
Filling
4oz/100g cauliflower
1 medium potato
1 eating apple
1oz/25g fat for frying
2tsp/10ml curry powder
2oz/50g frozen peas
2oz/50g sultanas
pinch of salt
Make the filling by chopping the cauliflower, peeling and finely
chopping the potato and apple. Heat the fat in a saucepan
and add the chopped vegetables. With a lid on, gently fry the
vegetables until just softening, about 5-10 minutes. Add the
curry powder, peas, salt and sultanas and 4tbsp/80ml water.
Simmer with the lid on for about 10 minutes, stirring
occasionally, until the vegetables are soft and the water has
evaporated. Cool the mixture.
Make the pastry by rubbing the margarine into the flour and
salt until it resembles breadcrumbs. Add sufficient water to
form a stiff dough. On a lightly floured surface roll out thinly.
Cut out 4in/10cm circles and cut each circle in half.
Preheat the oil. Place some of the mixture on each half circle
and brush the edge of the pastry with a little water. Fold the
pastry over the filling to form a triangular shape, and seal the
pastry edges together.
Place one or two samosas into the basket at a time and fry for
3-4 minutes until the pastry is golden brown. Remove onto
absorbent paper to drain, while frying the remaining samosas.
Makes about 19
Continental Apple Fritters _____________
Oil temperature required 190°C
6oz/150g plain flour
1
⁄2pt/250ml beer
3 large cooking apples
caster sugar for sprinkling
Gradually add the beer to the flour, beating to make a smooth
batter.
Preheat the oil. Peel and core the apples and slice into thick
rings.
Dip the apples into the batter and allow the excess batter to
drip off before frying. With the basket already in the oil, gently
drop one apple ring at a time into the fat and fry for 3-5
minutes until crisp and golden, turning once to evenly brown
the rings. Using the basket, turn them on to absorbent paper
to drain and keep warm while frying the remaining rings.
Sprinkle with sugar before serving.
Serve hot
Serves 4
Cinnamon Puffs ____________________
Oil temperature required 170°C
8oz/200g plain flour
2oz/50g sugar
1 level tbsp/20ml baking powder
1tsp/5ml salt
1tsp/5ml cinnamon
1 egg
1
⁄4pt/125ml milk
2oz/50g melted butter or margarine
caster sugar for coating
Preheat the oil. Combine all the dry ingredients together. Beat
the egg and milk together and add the melted butter. Add the
egg mixture to the dry ingredients and beat until smooth. With
the basket already in the oil, gently drop in one small spoonful
of the mixture. Fry for 4-5 minutes until golden brown, using
the basket remove the puffs and drain on absorbent paper.
Continue frying the remainder of the mixture in batches. Coat
the puffs in sugar.
Makes about 30
LIMITED
New Lane • Havant • Hampshire • PO9 2NH
85761/4
 Loading...