

Page 1

Quick Start Guide
Compact Hi-Fi Component System
C-515BT / C-313
What’s in the Box?
You should fi nd these accessories upon opening the
box.
FM indoor antenna
iPod Dock
(C-515BT only)
Remote control unit
RC-F0511E (C-515BT)
RC-F0510E (C-313)
BACKLIGHT
CONTRAST
DISPLAYSLEEP
Bluetooth
USB/SD
BAND
AUX SOUND
D.AUDIO/iPod
TUNER
CD
STOP X-BASS
VOLUME
ENTER
MUTE
PAIRING
ABC DEF
STEREO/MONO
FOLDER
RANDOM
GHI JKL MNO
P.CALL
MEMORY
TIMER SET
PQRS TUV WXYZ
REPEAT
TIMER
FILE
PTY
P.MODE
ON/OFF
SEARCH
CLEAR
REMOTE CONTROL UNIT
AM loop antenna
AC adapter
(AC-18335A x 1)
Power cord (For Europe)
Power cord (For Australia)
Follow the steps below to use your
Compact Hi-Fi Component System
Connections
Setup
Setup
Setup
Operation
Remote control unit operation
Plug the power cord of the system to a power outlet and
press [K] on the remote control unit to turn the system
ON. After the system is switched ON, press the desired
operation button. Use the remote control unit by pointing
it to the remote sensor on the main unit.
Remote sensor
Approx. 6 m
30°
30°
Pull out the plastic protective
sheet before use.
© B60-5809-08/00 (E, X)
B60-5809-08_Quick Start.indd 1 09.6.12 0:45:22 PM
Page 2
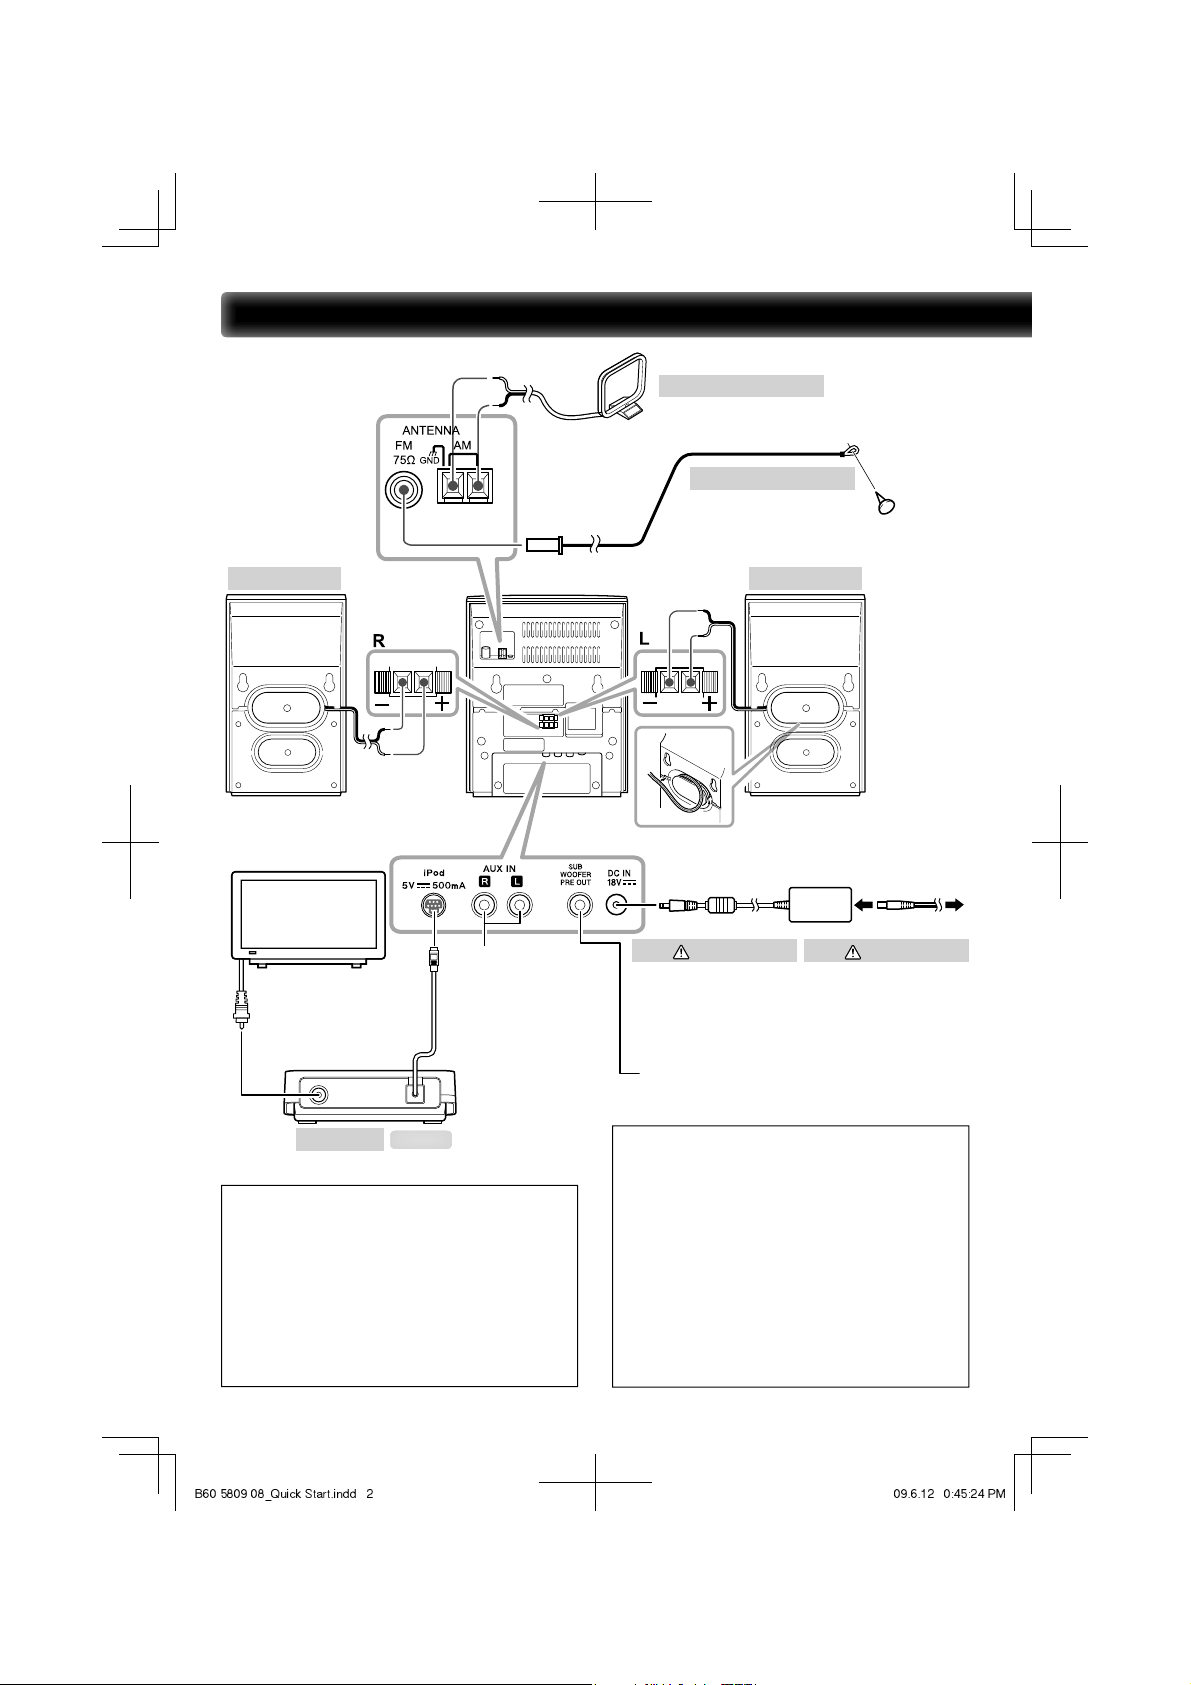
Connections
AM loop antenna
FM indoor antenna
Right speaker Left speaker
To AC wall outlet
• Insert the plug firmly all the
way into the AC wall outlet.
To TV with video
(composite) input terminal
Video cord
VIDEO
Connect the audio output
of the VCR, etc. to the [AUX
IN] terminals on the rear of
the main unit.
AC adapter
Use the AC adapter (AC18335A) provided with this
product.
Connect a subwoofer (SW-40HT (separately
available), etc.) to the [SUB WOOFER PRE OUT]
Power cord
Two types of power cords
are provided. Select the
one designed for the
country in which this unit
is used.
terminal on the rear of the main unit.
iPod dock
¤
CAUTION
The power in this equipment will not be completely
cut off from the wall outlet when the standby switch is
turned off.
Install the equipment so that the wall outlet is easily
accessible and, in case of emergency, immediately
unplug the power plug from the wall outlet.
Mains plug is used as the disconnect device, It shall
remain readily operable and should not be obstructed
during intended use.
B60-5809-08_Quick Start.indd 2 09.6.12 0:45:24 PM
C-515BT only
¤
CAUTION
Be sure to adhere to the following, or proper
ventilation will be blocked causing damage or re
hazard (Main unit and AC adapter).
• Do not place a cloth on the system or place it on a
carpet or cushion.
• Do not use the system in a poorly ventilated place.
• Do not place any objects impairing heat radiation
onto the top of the unit.
• Leave some space around the unit (from the largest
outside dimension including projection) equal to or
greater than, shown below.
Top panel : 50 cm
Page 3

Connecting the FM antenna
1 Connect the lead to the [FM 75Ω] terminal.
2 Find the location that gives the best
reception.
3 Secure the antenna as high up as possible.
• The antenna supplied with the system is a basic
antenna for indoor use. For stable signal reception, the
use of an outdoor antenna (commercially available) is
recommended. Disconnect the indoor antenna first
before connecting an outdoor antenna.
¤
CAUTION
• Since antenna installation necessitates skill and
experience, always consult your dealer before installation.
The antenna should be placed at a distance from the
power distribution wires. Otherwise, an electric shock
accident may occur if the antenna falls down.
FM
75Ω
Connecting the AM antenna
1 Connect the AM antenna cord to the [AM] and [HGND]
terminals.
2 Setup the antenna in the position and the direction to
be able to receive AM broadcast.
• The antenna supplied with the system is for indoor use.
Place it as far away as possible from the system, your
TV set, the speaker cords, AC adapter and the power
cord, and point it in the direction that provides the best
reception.
Connecting the speakers
1 Connect the right speaker to terminal marked “R”, with
the red wire to + and the black wire to –.
2 Connect the left speaker to terminal marked “L”, with the
red wire to + and the black wire to –.
Insert this portion.
Connecting the iPod adapter
• Connect an iPod adapter, which is provided with your
iPod or commercially available in iPod dealers, to the
iPod dock of this unit. Note that the iPod adapter is not
provided with this unit.
1 Insert the iPod adapter into unit.
iPod adapter
iPod dock
2 Connect your iPod.
C-515BT only
To remove iPod adapter
• Insert a thin object such as the tip of a flat-blade
screwdriver into the slit on the dock adapter and lift it to
remove.
• For optimal sound performance, it is recommended to
use the supplied speakers.
• Do not connect more than one speaker to any one pair of
+/– speaker terminals.
B60-5809-08_Quick Start.indd 3 09.6.12 0:45:24 PM
Page 4

Setup
Clock setting
The time of the day of the system can be set.
BACKLIGHT
CONTRAST
DISPLAYSLEEP
Bluetooth
USB/SD
BAND
TUNER
MULTI CONTROL
A/B/C/D
ENTER
PAIRING
STEREO/MONO
RANDOM
MEMORY
REPEAT
P.MODE
1 Press TIMER SET button.
2 Press MULTI CONTROL C or D button to
select “CLOCK” and press ENTER button.
“CLOCK SETTING” appears on the display.
3 Press ENTER button.
The hour indication will start fl ashing.
4 Press MULTI CONTROL A or B button to
set the hours and press ENTER button.
The minute indication starts fl ashing.
5 Press MULTI CONTROL A or B button to
set the minutes and press ENTER button.
When the setting completes, “COMPLETE” is
displayed and the unit exits the setup mode
automatically.
⁄
• The clock setting will be erased when the power cord is
disconnected or a power failure occurred.
• The MULTI CONTROL C or D button can be used to
move across the setting items.
D.AUDIO/iPod
CD
ENTER
ABC DEF
GHI JKL MNO
PQRS TUV WXYZ
PTY
CLEAR
REMOTE CONTROL UNIT
AUX SOUND
STOP X-BASS
FILE
SEARCH
TIMER SET
VOLUME
FOLDER
ON/OFF
MUTE
P.CALL
TIMER
TIMER SET
Operation
1 Switching the system on.
Press the button.
Turn the system ON (OFF). Pressing K button while
the system is ON switches it OFF (standby mode).
2 Press the selector button once
or more to select of the desired
audio source.
∙ TUNER BAND button:
FM R AM
∙ CD/USB/SD button:
CD R USB R SD
∙ D.AUDIO/iPod/Bluetooth button:
D.AUDIO R Bluetooth* R
iPod* (*C-515BT only)
∙ AUX button: AUX
CD
1 Press 0 button to open the CD door.
2 Insert a disc into the disc loader with the
label side is facing you.
3 Press 0 button to close the CD door.
For a CD, the total playtime and total number of
tracks will appear in the display.
For an audio fi le-CD, the total album number and
total fi le number will appear on the display.
AUX (external component)
An external component can be connected to AUX IN of this unit
and played back.
B60-5809-08_Quick Start.indd 4 09.6.12 0:45:26 PM
Page 5

2
1
BAND
TUNER
USB/SD
BACKLIGHT
CONTRAST
DISPLAYSLEEP
Bluetooth
AUX SOUND
D.AUDIO/iPod
CD
STOP X-BASS
3
PAIRING
MEMORY
REPEAT
PAIRING
STEREO/MONO
RANDOM
MEMORY
REPEAT
P.MODE
ENTER
ABC DEF
GHI JKL MNO
PQRS TUV WXYZ
PTY
CLEAR
REMOTE CONTROL UNIT
SEARCH
FILE
VOLUME
MUTE
FOLDER
P.CALL
TIMER SET
TIMER
ON/OFF
4
MUTE
FOLDER
P.CALL A/B
12 3 4
Headphones
To listen to your stereo with
headphones (separately available), use
the 3.5 mm phones jack on the main
unit. Connecting headphones mutes
the sound from the speakers.
USB device
Insert a USB device to the USB connector on
the front panel.
PAIRING
SD card
Insert the SD card into the SD card slot until
it clicks.
Insert the SD card so that the label side
faces up and the side with a cut comes on
the right.
“USB” is displayed. The total album number and
total fi le number will appear on the display.
B60-5809-08_Quick Start.indd 5 09.6.12 0:45:27 PM
The total album number and total fi le number will
appear on the display.
Page 6

RADIO
Auto preset radio station
Radio stations can be preset automatically in preset channels.
1 Press TUNER BAND button to select the
desired waveband: FM or AM.
2 Press MEMORY/REPEAT button for more
than 2 seconds.
The receivable radio stations are preset
automatically. When the Auto preset operation has
completed, the unit enters the condition in which
preset station P01 is tuned.
Tuning to a preset radio station
Press FOLDER/P.CALL
A or B button.
3 Start playback.
Press E button.
To stop playback of CD/USB device/
SD card/D.AUDIO...
Press STOPF button.
To select a track/ le/ song...
Press 4 or ¢ button.
4 Adjust using VOLUME.
A
VOLUME
VOLUME
Increasing the volume level
B
Decreasing the volume level
D.AUDIO
Playback of Digital Audio Player
Kenwood digital audio player can be connected to play audio
fi les in it.
Kenwood digital
audio player
Optional cable
1 Connect an the player.
2
Turn the connected player ON and start
playing it.
C-515BT only
iPod
Connect a iPod to the iPod dock.
Bluetooth audio
Press PAIRING button.
You can listen to audio fi les stored in Bluetooth audio player. For
more information, refer to the supplied Instruction manuals.
C-515BT only
Muting the sound temporarily...
Press MUTE button.
To cancel muting...
Press MUTE button again (this resumes
the original volume) or adjust the volume.
Removing a disc
1 Press 0 button and carefully pull it out.
2 Press 0 button to close the CD door.
Removing the USB device/SD card/D.AUDIO/
iPod
1 Press the button to select standby
mode.
2 Remove the USB device/SD card/D.AUDIO/
iPod.
Standby mode
While the STANDBY/TIMER indicator is lit, a small
amount of power is supplied to the system to back up
the memory. This is called standby mode. Under the
condition, the system can be turned ON by the remote
control unit.
B60-5809-08_Quick Start.indd 6 09.6.12 0:45:29 PM
 Loading...