


Kenmore Elite 10651719413 Owner’s Manual
Use & Care Guide
Manual de uso y cuidado
Guide d’utilisation et d’entretien
English / Español / Français
Models/Modelos/Modèles: 106.5171*
Kenmore Elite®
Counter Depth
Side by Side Refrigerator Refrigerador de dos puertas con profundidad para armario Réfrigérateur côte à côte
à profondeur de comptoir
* = color number, número de color, le numéro de la couleur
P/N W10757532A
Sears Brands Management Corporation
Hoffman Estates, IL, U.S.A. 60179
www.kenmore.com
www.sears.com
Sears Canada Inc.
Toronto, Ontario, Canada M5B 2C3
www.sears.ca

TABLE OF CONTENTS
PROTECTION AGREEMENTS ................................................... |
2 |
WARRANTY ............................................................................. |
3 |
REFRIGERATOR SAFETY ......................................................... |
4 |
Proper Disposal of Your Old Refrigerator................................... |
4 |
REFRIGERATOR USE ................................................................ |
5 |
Install CleanFlow™ Air Filters ......................................................... |
5 |
Install CrisperKeeper™ Produce Preserver................................... |
6 |
Ensuring Proper Air Circulation...................................................... |
7 |
Using the Controls ............................................................................. |
8 |
Water and Ice Dispensers ............................................................... |
9 |
Water Filtration System ................................................................. |
12 |
Ice Maker and Storage Bin............................................................ |
13 |
REFRIGERATOR FEATURES.................................................... |
14 |
Refrigerator Door Bins .................................................................... |
14 |
Bottle/Can Rack .............................................................................. |
14 |
Refrigerator Shelves........................................................................ |
14 |
Deli Drawer....................................................................................... |
14 |
Convertible Vegetable/Meat Drawer, Crisper and Covers.... |
15 |
Convertible Vegetable/Meat Drawer Temperature Control .. |
15 |
Crisper Humidity Control................................................................ |
15 |
Utility Bin ........................................................................................... |
15 |
FREEZER FEATURES................................................................ |
16 |
Freezer Door Bins ............................................................................ |
16 |
Freezer Shelf .................................................................................... |
16 |
Freezer Bin........................................................................................ |
16 |
REFRIGERATOR CARE ............................................................ |
16 |
Cleaning............................................................................................ |
16 |
Lights.................................................................................................. |
17 |
Power Interruptions ......................................................................... |
17 |
Vacation and Moving Care .......................................................... |
18 |
PROBLEM SOLVER.................................................................. |
19 |
ACCESSORIES........................................................................ |
24 |
PERFORMANCE DATA SHEET ............................................... |
25 |
SERVICE NUMBERS ............................................. |
BACK COVER |
ÍNDICE................................................................................... |
27 |
TABLE DES MATIÈRES............................................................ |
53 |
PROTECTION AGREEMENTS
Master Protection Agreements
Congratulations on making a smart purchase. Your new Kenmore® product is designed and manufactured for years of dependable operation. But like all products, it may require preventive maintenance or repair from time to time. That’s when having a Master Protection Agreement can save you money and aggravation.
The Master Protection Agreement also helps extend the life of your new product. Here’s what the Agreement* includes:
Parts and labor not just for repairing defects, but to help keep products operating properly under normal use. Our coverage goes well beyond the product warranty. No deductibles, no functional failure excluded from coverage – real protection.
Expert service by a force of more than 10,000 authorized Sears service technicians, which means someone you can trust will be working on your product.
Unlimited service calls and nationwide service, as often as you want us, whenever you want us.
“No-lemon” guarantee – replacement of your covered product if four or more product failures occur within twelve months.
Product replacement if your covered product can’t be fixed.
Annual Preventive Maintenance Check at your request – no extra charge.
Fast help by phone – we call it Rapid Resolution – phone support from a Sears representative on all products. Think of us as a “talking owner’s manual.”
Power surge protection against electrical damage due to power fluctuations.
$250 Food Loss Protection annually for any food spoilage that is the result of mechanical failure of any covered refrigerator or freezer.
Rental reimbursement if repair of your covered product takes longer than promised.
25% discount off the regular price of any non-covered repair service and related installed parts.
Once you purchase the Agreement, a simple phone call is all that it takes for you to schedule service. You can call anytime day or night, or schedule a service appointment online.
The Master Protection Agreement is a risk free purchase. If you cancel for any reason during the product warranty period, we will provide a full refund. Or, a prorated refund anytime after the product warranty period expires. Purchase your Master Protection Agreement today!
2

Some limitations and exclusions apply. For prices and additional information in the U.S.A. call 18008276655.
*Coverage in Canada varies on some items. For full details call Sears Canada at 18003616665.
Sears Installation Service
For Sears professional installation of home appliances, garage door openers, water heaters, and other major home items, in the U.S.A. or Canada call 18004MYHOME®.
KENMORE ELITE® LIMITED WARRANTY
WITH PROOF OF SALE, the following warranty coverage applies when this appliance is correctly installed, operated and maintained according to all supplied instructions.
FOR ONE YEAR from the date of sale, this appliance is warranted against defects in material or workmanship. A defective appliance will receive free repair or replacement at option of seller. This warranty coverage applies for only
90 days from the sale date in the United States, and is void in Canada, if the appliance is ever used for other than private household purposes.
FOR FIVE YEARS from the date of sale, the sealed refrigerant system of this appliance is warranted against defects in material or workmanship. New system components will be supplied for defective ones, free of charge. You are responsible for the labor cost of component installation after the first year from the sale date. This warranty coverage applies for only one year from the sale date in the United States, and is void in Canada, if the appliance is ever used for other than private household purposes.
For warranty coverage details about obtaining free repair or replacement, visit www.kenmore.com/warranty.
This warranty covers ONLY defects in material and workmanship, and will NOT pay for:
1.Expendable items that can wear out from normal use, including but not limited to filters, belts, bags or screw-in base light bulbs.
2.A service technician to clean or maintain this appliance, or to instruct the user in correct appliance installation, operation and maintenance.
3.Service calls to correct appliance installation not performed by Sears authorized service agents, or to repair problems with house fuses, circuit breakers, house wiring, and plumbing or gas supply systems resulting from such installation.
4.Damage to or failure of this appliance resulting from installation not performed by Sears authorized service agents, including installation that was not in accord with electrical, gas or plumbing codes.
5.Damage to or failure of this appliance, including discoloration or surface rust, if it is not correctly operated and maintained according to all supplied instructions.
6.Damage to or failure of this appliance, including discoloration or surface rust, resulting from accident, alteration, abuse, misuse or use for other than its intended purpose.
7.Damage to or failure of this appliance, including discoloration or surface rust, caused by the use of detergents, cleaners, chemicals or utensils other than those recommended in all instructions supplied with the product.
8.Damage to or failure of parts or systems resulting from unauthorized modifications made to this appliance.
9.Service to an appliance if the model and serial plate is missing, altered, or cannot easily be determined to have the appropriate certification logo.
Disclaimer of implied warranties; limitation of remedies
Customer’s sole and exclusive remedy under this limited warranty shall be product repair or replacement as provided herein. Implied warranties, including warranties of merchantability or fitness for a particular purpose, are limited to one year on the appliance and five years on the sealed system, or the shortest period allowed by law. Seller shall not be liable for incidental or consequential damages. Some states and provinces do not allow the exclusion or limitation of incidental or consequential damages, or limitation on the duration of implied warranties of merchantability or fitness, so these exclusions or limitations may not apply to you.
This warranty applies only while this appliance is used in the United States or Canada*.
This warranty gives you specific legal rights, and you may also have other rights which vary from state to state.
* In Canada, in-home repair service is not available in all areas, nor will this warranty cover user or servicer travel and transportation expenses if this product is located in a remote area (as defined by Sears Canada Inc.) where an authorized servicer is not available.
Sears Brands Management Corporation
Hoffman Estates, IL 60179
Sears Canada Inc.
Toronto, Ontario, Canada M5B 2C3
PRODUCT RECORD
Record your complete model number, serial number, and purchase date. You can find this information on the model and serial number label located on the product.
Have this information available to help you obtain assistance or service more quickly whenever you contact Sears concerning your appliance.
Model number __ __ __. __________________________________
Serial number ___________________________________________
Purchase date___________________________________________
Save these instructions and your sales receipt for future reference.
3

REFRIGERATOR SAFETY
Your safety and the safety of others are very important.
We have provided many important safety messages in this manual and on your appliance. Always read and obey all safety messages.
This is the safety alert symbol.
This symbol alerts you to potential hazards that can kill or hurt you and others.
All safety messages will follow the safety alert symbol and either the word “DANGER” or “WARNING.” These words mean:
 DANGER
 WARNING
You can be killed or seriously injured if you don't immediately follow instructions.
You can be killed or seriously injured if you don't follow instructions.
All safety messages will tell you what the potential hazard is, tell you how to reduce the chance of injury, and tell you what can happen if the instructions are not followed.
IMPORTANT SAFETY INSTRUCTIONS
WARNING: To reduce the risk of fire, electric shock, or injury when using your refrigerator, follow these basic precautions:
■ Plug into a grounded 3 prong outlet. |
■ Use nonflammable cleaner. |
|
■ Do not remove ground prong. |
■ Keep flammable materials and vapors, such as gasoline, |
|
■ Do not use an adapter. |
away from refrigerator. |
|
■ Use two or more people to move and install refrigerator. |
||
■ Do not use an extension cord. |
||
■ Disconnect power before installing ice maker (on ice maker |
||
■ Disconnect power before servicing. |
||
kit ready models only). |
||
■ Replace all parts and panels before operating. |
||
■ Use a sturdy glass when dispensing ice (on some models). |
||
■ Remove doors from your old refrigerator. |
||
■ Do not hit the refrigerator glass doors (on some models). |
||
|
SAVE THESE INSTRUCTIONS
State of California Proposition 65 Warnings:
WARNING: This product contains one or more chemicals known to the State of California to cause cancer.
WARNING: This product contains one or more chemicals known to the State of California to cause birth defects or other reproductive harm.
Proper Disposal of Your Old Refrigerator
WARNING
Suffocation Hazard
Remove doors from your old refrigerator.
Failure to do so can result in death or brain damage.
IMPORTANT: Child entrapment and suffocation are not problems of the past. Junked or abandoned refrigerators are still dangerous, even if they will sit for “just a few days.” If you are getting rid of your old refrigerator, please follow these instructions to help prevent accidents.
Before You Throw Away Your Old Refrigerator or Freezer:
■Take off the doors.
■Leave the shelves in place so that children may not easily climb inside.
Important information to know about disposal of refrigerants:
Dispose of refrigerator in accordance with Federal and Local regulations. Refrigerants must be evacuated by a licensed, EPA certified refrigerant technician in accordance with established procedures.
4
REFRIGERATOR USE
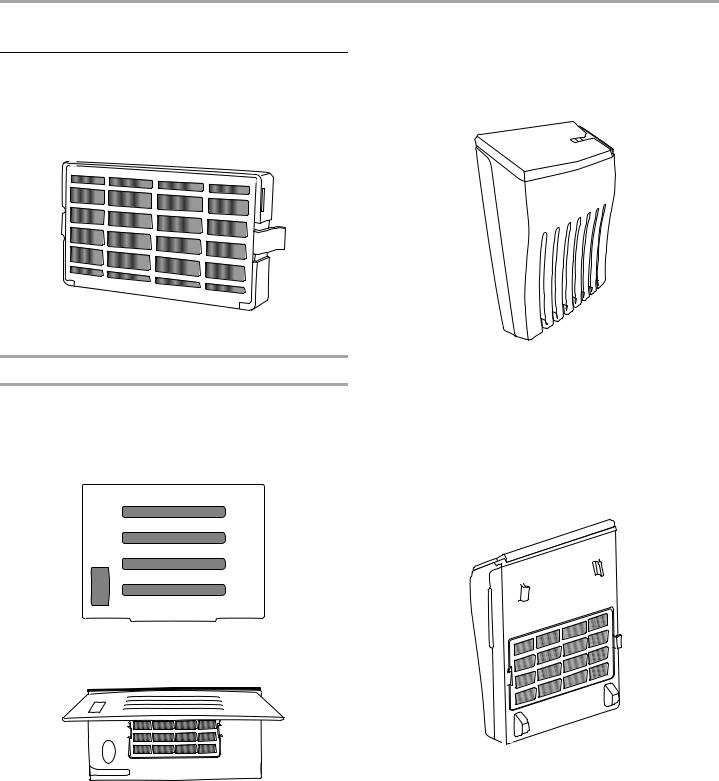
Install CleanFlow™ Air Filters
(on some models)
On some models, your refrigerator's accessory packet includes two air filters, which must be installed prior to use. On some models, the air filters are already installed at the factory.
The air filter reduces the buildup of odors. This helps to maintain a cleaner environment inside the refrigerator.
Installing the Air Filters (on some models)
The filters should be installed in two separate locations.
Location 1:
Install one of the filters behind the vented door, which is located (depending on your model) along either the rear or left interior wall near the top of the refrigerator compartment.
1.Remove the air filter from its packaging.
2.Lift open the vented door.
3.Snap the filter into place.
4.Close the vented door.
Location 2:
Install the other filter in the filter housing assembly, which is located along an interior side wall of the crisper and/or convertible drawer.
NOTE: There are two housing assemblies. Use one for one of the CleanFlow™ Air Filters, and use the other for the CrisperKeeper™ Produce Preserver pouches. Do not install
Air Filters and Produce Preserver pouches in the same housing assembly. See “Install CrisperKeeper™ Produce Preserver” for additional information.
1.Remove the air filter from its packaging.
2.Lift up on the housing in order to remove it from its mounting tab along the wall.
3.Snap the filter into place on the rear of the housing.
4. Place the housing back on the mounting tab along the wall.
5
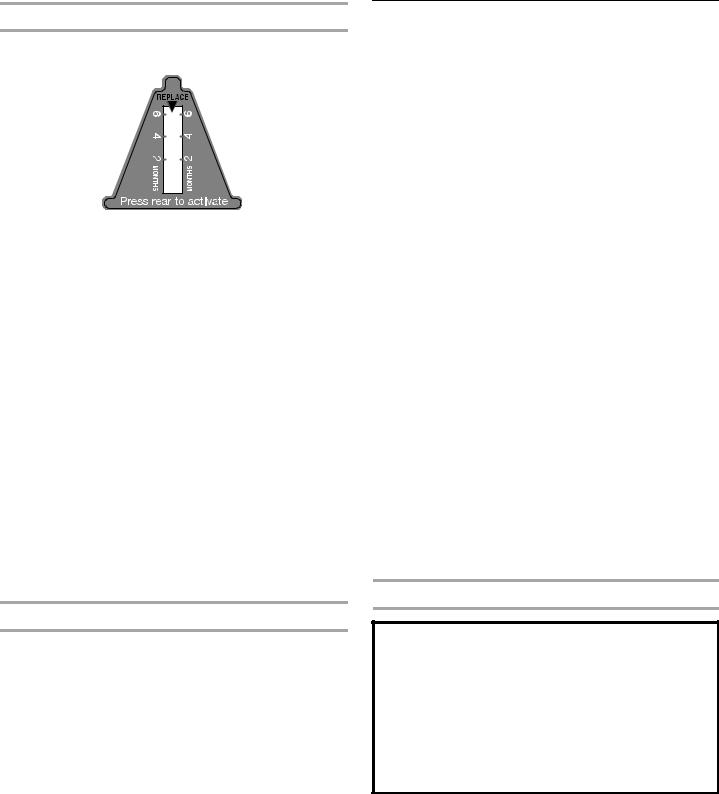
Installing the Filter Status Indicators (on some models)
Each filter comes with a status indicator, which should be activated and installed at the same time the air filter is installed.
Location 1:
1.Place the indicator face-down on a firm, flat surface.
2.Apply pressure to the bubble on the back of the indicator, until the bubble pops to activate the indicator.
3.Lift open the vented air filter door. There are notches behind the door. Slide the indicator down into the notches, facing outward.
NOTE: The indicator will not easily slide into the notches if the rear bubble has not been popped.
4.Close the air filter door, and check that the indicator is visible through the rectangular hole in the door.
Location 2:
1.Place the indicator face-down on a firm, flat surface.
2.Apply pressure to the bubble on the back of the indicator, until the bubble pops to activate the indicator.
3.Slide open the cap on the housing assembly.
4.Place the indicator in the top of the housing, facing outward.
5.Slide the cap closed, and check that the indicator is visible through the rectangular hole in the cap.
NOTE: The cap will not easily close if the indicator’s rear bubble has not been popped.
Replacing the Air Filter
The disposable air filter should be replaced every 6 months, when the status indicator has completely changed from white to red.
To order a replacement air filter, see “Accessories.”
1.Remove the old air filter by squeezing in on the side tabs.
2.Remove the old status indicator.
3.Install the new air filter and status indicator using the instructions in the previous sections.
Install CrisperKeeper™ Produce Preserver
(on some models)
On some models, your refrigerator's accessory packet includes a Produce Preserver, which should be installed prior to use. On some models, the Produce Preserver is already installed at the factory.
The Produce Preserver absorbs ethylene, allowing the ripening process of many produce items to slow down. As a result, certain produce items will stay fresh longer.
Ethylene production and sensitivity varies depending on the type of fruit or vegetable. To preserve freshness, it is best to separate produce with sensitivity to ethylene from fruits that produce moderate to high amounts of ethylene.
|
Sensitivity to |
Ethylene |
|
Ethylene |
Production |
|
|
|
Apples |
High |
Very High |
|
|
|
Asparagus |
Med. |
Very Low |
|
|
|
Berries |
Low |
Low |
|
|
|
Broccoli |
High |
Very Low |
|
|
|
Cantaloupe |
Med. |
High |
|
|
|
Carrots |
Low |
Very Low |
|
|
|
Citrus Fruit |
Med. |
Very Low |
|
|
|
Grapes |
Low |
Very Low |
|
|
|
Lettuce |
High |
Very Low |
|
|
|
Pears |
High |
Very High |
|
|
|
Spinach |
High |
Very Low |
|
|
|
Installing the Produce Preserver (on some models)
CAUTION: IRRITANT
MAY IRRITATE EYES AND SKIN. DANGEROUS FUMES FORM WHEN MIXED WITH OTHER PRODUCTS.
Do not mix with cleaning products containing ammonia, bleach or acids. Do not get in eyes, on skin or clothing. Do not breathe dust. Keep out of reach of children.
FIRST AID TREATMENT: Contains potassium permanganate. If swallowed, call a Poison Control Center or doctor immediately. Do not induce vomiting. If in eyes, rinse with water for 15 minutes. If on skin, rinse with water.
For best performance, always use two Produce Preserver pouches. Both pouches should be installed in the same housing assembly, which is located along an interior side wall of the crisper and/or convertible drawer.
6

NOTE: There are two housing assemblies. Use one for the CrisperKeeper™ Produce Preserver pouches, and use the other for one of the CleanFlow™ Air Filters. Do not install Produce Preserver pouches and Air Filters in the same housing assembly. See “Install CleanFlow™ Air Filters” for additional information.
1.Remove the Produce Preserver pouches from their packaging.
2.Lift up on the housing in order to remove it from its mounting tab along the wall.
3.Open the housing by pulling up and out on the back of the top of the housing.
4.Place both pouches inside the housing, then snap the housing back together.
5.Place the housing back on the mounting tab along the wall.
Installing the Status Indicator (on some models)
The Produce Preserver comes with a status indicator, which should be activated and installed at the same time the pouch is installed.
1.Place the indicator face-down on a firm, flat surface.
2.Apply pressure to the bubble on the back of the indicator, until the bubble pops to activate the indicator.
3.Slide open the cap on the Produce Preserver housing.
4.Place the indicator in the top of the housing, facing outward.
5.Slide the cap closed, and check that the indicator is visible through the rectangular hole in the cap.
NOTE: The cap will not easily close if the indicator’s rear bubble has not been popped.
Replacing the Produce Preserver (on some models)
The disposable pouches should be replaced every 6 months, when the status indicator has completely changed from white to red.
To order replacements, see “Accessories.”
1.Remove the old pouches from the Produce Preserver housing.
2.Remove the old status indicator.
3.Install the new pouches and status indicator using the instructions in the previous sections.
Ensuring Proper Air Circulation
In order to ensure proper temperatures, you need to permit air to flow between the two sections. Cold air enters the bottom of the freezer section and moves up. It then enters the refrigerator section through the top vent. (On Style 2 models, this air is also evenly distributed throughout the refrigerator compartment through six vents on the back wall.) Air then returns to the freezer as shown.
|
|
|
|
|
|
|
|
|
|
|
|
|
|
|
Style 1 |
|
|
|
|
|
|
|
|
|
|
|
|
|
|
|
|
|
|
Style 2 |
|
|
|
||||||||||||||||||||||||||||||||||
|
|
|
|
|
|
|
|
|
|
|
|
|
|
|
|
|
|
|
|
|
|
|
|
|
|
|
|
|
|
|
|
|
|
|
|
|
|
|
|
|
|
|
|
|
|
|
|
|
|
|
|
|
|
|
|
|
|
|
|
|
|
|
|
|
|
|
|
|
|
|
|
|
|
|
|
|
|
|
|
|
|
|
|
|
|
|
|
|
|
|
|
|
|
|
|
|
|
|
|
|
|
|
|
|
|
|
|
|
|
|
|
|
|
|
|
|
|
|
|
|
|
|
|
|
|
|
|
|
|
|
|
|
|
|
|
|
|
|
|
|
|
|
|
|
|
|
|
|
|
|
|
|
|
|
|
|
|
|
|
|
|
|
|
|
|
|
|
|
|
|
|
|
|
|
|
|
|
|
|
|
|
|
|
|
|
|
|
|
|
|
|
|
|
|
|
|
|
|
|
|
|
|
|
|
|
|
|
|
|
|
|
|
|
|
|
|
|
|
|
|
|
|
|
|
|
|
|
|
|
|
|
|
|
|
|
|
|
|
|
|
|
|
|
|
|
|
|
|
|
|
|
|
|
|
|
|
|
|
|
|
|
|
|
|
|
|
|
|
|
|
|
|
|
|
|
|
|
|
|
|
|
|
|
|
|
|
|
|
|
|
|
|
|
|
|
|
|
|
|
|
|
|
|
|
|
|
|
|
|
|
|
|
|
|
|
|
|
|
|
|
|
|
|
|
|
|
|
|
|
|
|
|
|
|
|
|
|
|
|
|
|
|
|
|
|
|
|
|
|
|
|
|
|
|
|
|
|
|
|
|
|
|
|
|
|
|
|
|
|
|
|
|
|
|
|
|
|
|
|
|
|
|
|
|
|
|
|
|
|
|
|
|
|
|
|
|
|
|
|
|
|
|
|
|
|
|
|
|
|
|
|
|
|
|
|
|
|
|
|
|
|
|
|
|
|
|
|
|
|
|
|
|
|
|
|
|
|
|
|
|
|
|
|
|
|
|
|
|
|
|
|
|
|
|
|
|
|
|
|
|
|
|
|
|
|
|
|
|
|
|
|
|
|
|
|
|
|
|
|
|
|
|
|
|
|
|
|
|
|
|
|
|
|
|
|
|
|
|
|
|
|
|
|
|
|
|
|
|
|
|
|
|
|
|
|
|
|
|
|
|
|
|
|
|
|
|
|
|
|
|
|
|
|
|
|
|
|
|
|
|
|
|
|
|
|
|
|
|
|
|
|
|
|
|
|
|
|
|
|
|
|
|
|
|
|
|
|
|
|
|
|
|
|
|
|
|
|
|
|
|
|
|
|
|
|
|
|
|
|
|
|
|
|
|
|
|
|
|
|
|
|
|
|
|
|
|
|
|
|
|
|
|
|
|
|
|
|
|
|
|
|
|
|
|
|
|
|
|
|
|
|
|
|
|
|
|
|
|
|
|
|
|
|
|
|
|
|
|
|
|
|
|
|
|
|
|
|
|
|
|
|
|
|
|
|
|
|
|
|
|
|
|
|
|
|
|
|
|
|
|
|
|
|
|
|
|
|
|
|
|
|
|
|
|
|
|
|
|
|
|
|
|
|
|
|
|
|
|
|
|
|
|
|
|
|
|
|
|
|
|
|
|
|
|
|
|
|
|
|
|
|
|
|
|
|
|
|
|
|
|
|
|
|
|
|
|
|
|
|
|
|
|
|
|
|
|
|
|
|
|
|
|
|
|
|
|
|
|
|
|
|
|
|
|
|
|
|
|
|
|
|
|
|
|
|
|
|
|
|
|
|
|
|
|
|
|
|
|
|
|
|
|
|
|
|
|
|
|
|
|
|
|
|
|
|
|
|
|
|
|
|
|
|
|
|
|
|
|
|
|
|
|
|
|
|
|
|
|
|
|
|
|
|
|
|
|
|
|
|
|
|
|
|
|
|
|
|
|
|
|
|
|
|
|
|
|
|
|
|
|
|
|
|
|
|
|
|
|
|
|
|
|
|
|
|
|
|
|
|
|
|
|
|
|
|
|
|
|
|
|
|
|
|
|
|
|
|
|
|
|
|
|
|
|
|
|
|
|
|
|
|
|
|
|
|
|
|
|
|
|
|
|
|
|
|
|
|
|
|
|
|
|
|
|
|
|
|
|
|
|
|
|
|
|
|
|
|
|
|
|
|
|
|
|
|
|
|
|
|
|
|
|
|
|
|
|
|
|
|
|
|
|
|
|
|
|
|
|
|
|
|
|
|
|
|
|
|
|
|
|
|
|
|
|
|
|
|
|
|
|
|
|
|
|
|
|
|
|
|
|
|
|
|
|
|
|
|
|
|
|
|
|
|
|
|
|
|
|
|
|
|
|
|
|
|
|
|
|
|
|
|
|
|
|
|
|
|
|
|
|
|
|
|
|
|
|
|
|
|
|
|
|
|
|
|
|
|
|
|
|
|
|
|
|
|
|
|
|
|
|
|
|
|
|
|
|
|
|
|
|
|
|
|
|
|
|
|
|
|
|
|
|
|
|
|
|
|
|
|
|
|
|
|
|
|
|
|
|
|
|
|
|
|
|
|
|
|
|
|
|
|
|
|
|
|
|
|
|
|
|
|
|
|
|
|
|
|
|
|
|
|
|
|
|
|
|
|
|
|
|
|
|
|
|
|
|
|
|
|
|
|
|
|
|
|
|
|
|
|
|
|
|
|
|
|
|
|
|
|
|
|
|
|
|
|
|
|
|
|
|
|
|
|
|
|
|
|
|
|
|
|
|
|
|
|
|
|
|
|
|
|
|
|
|
|
|
|
|
|
|
|
|
|
|
|
|
|
|
|
|
|
|
|
|
|
|
|
|
|
|
|
|
|
|
|
|
|
|
|
|
|
|
|
|
|
|
|
|
|
|
|
|
|
|
|
|
|
|
|
|
|
|
|
|
|
|
|
|
|
|
|
|
|
|
|
|
|
|
|
|
|
|
|
|
|
|
|
|
|
|
|
|
|
|
|
|
|
|
|
|
|
|
|
|
|
|
|
|
|
|
|
|
|
|
|
|
|
|
|
|
|
|
|
|
|
|
|
|
|
|
|
|
|
|
|
|
|
|
|
|
|
|
|
|
|
|
|
|
|
|
|
|
|
|
|
|
|
|
|
|
|
|
|
|
|
|
|
|
|
|
|
|
|
|
|
|
|
|
|
|
|
|
|
|
|
|
|
|
|
|
|
|
|
|
|
|
|
|
|
|
|
|
|
|
|
|
|
|
|
|
|
|
|
|
|
|
|
|
|
|
|
|
|
|
|
|
|
|
|
|
|
|
|
|
|
|
|
|
|
|
|
|
|
|
|
|
|
|
|
|
|
|
|
|
|
|
|
|
|
|
|
|
|
|
|
|
|
|
|
|
|
|
|
|
|
|
|
|
|
|
|
|
|
|
|
|
|
|
|
|
|
|
|
|
|
|
|
|
|
|
|
|
|
|
|
|
|
|
|
|
|
|
|
|
|
|
|
|
|
|
|
|
|
|
|
|
|
|
|
|
|
|
|
|
|
|
|
|
|
|
|
|
|
|
|
|
|
|
|
|
|
|
|
|
|
|
|
|
|
|
|
|
|
|
|
|
|
|
|
|
|
|
|
|
|
|
|
|
|
|
|
|
|
|
|
|
|
|
|
|
|
|
|
|
|
|
|
|
|
|
|
|
|
|
|
|
|
|
|
|
|
|
|
|
|
|
|
|
|
|
|
|
|
|
|
|
|
|
|
|
|
|
|
|
|
|
|
|
|
|
|
|
|
|
|
|
|
|
|
|
|
|
|
|
|
|
|
|
|
|
|
|
|
|
|
|
|
|
|
|
|
|
|
|
|
|
|
|
|
|
|
|
|
|
|
|
|
|
|
|
|
|
|
|
|
|
|
|
|
|
|
|
|
|
|
|
|
|
|
|
|
|
|
|
|
|
|
|
|
|
|
|
|
|
|
|
|
|
|
|
|
|
|
|
|
|
|
|
|
|
|
|
|
|
|
|
|
|
|
|
|
|
|
|
|
|
|
|
|
|
|
|
|
|
|
|
|
|
|
|
|
|
|
|
|
|
|
|
|
|
|
|
|
|
|
|
|
|
|
|
|
|
|
|
|
|
|
|
|
|
|
|
|
|
|
|
|
|
|
|
|
|
|
|
|
|
|
|
|
|
|
|
|
|
|
|
|
|
|
|
|
|
|
|
|
|
|
|
|
|
|
|
|
|
|
|
|
|
|
|
|
|
|
|
|
|
|
|
|
|
|
|
|
|
|
|
|
|
|
|
|
|
|
|
|
|
|
|
|
|
|
|
|
|
|
|
|
|
|
|
|
|
|
|
|
|
|
|
|
|
|
|
|
|
|
|
|
|
|
|
|
|
|
|
|
|
|
|
|
|
|
|
|
|
|
|
|
|
|
|
|
|
|
|
|
|
|
|
|
|
|
|
|
|
|
|
|
|
|
|
|
|
|
|
|
|
|
|
|
|
|
|
|
|
|
|
|
|
|
|
|
|
|
|
|
|
|
|
|
|
|
|
|
|
|
|
|
|
|
|
|
|
|
|
|
|
|
|
|
|
|
|
|
|
|
|
|
|
|
|
|
|
|
|
|
|
|
|
|
|
|
|
|
|
|
|
|
|
|
|
|
|
|
|
|
|
|
|
|
|
|
|
|
|
|
|
|
|
|
|
|
|
|
|
|
|
|
|
|
|
|
|
|
|
|
|
|
|
|
|
|
|
|
|
|
|
|
|
|
|
|
|
|
|
|
|
|
|
|
|
|
|
|
|
|
|
|
|
|
|
|
|
|
|
|
|
|
|
|
|
|
|
|
|
|
|
|
|
|
|
|
|
|
|
|
|
|
|
|
|
|
|
|
|
|
|
|
|
|
|
|
|
|
|
|
|
|
|
|
|
|
|
|
|
|
|
|
|
|
|
|
|
|
|
|
|
|
|
|
|
|
|
|
|
|
|
|
|
|
|
|
|
|
|
|
|
|
|
|
|
|
|
|
|
|
|
|
|
|
|
|
|
|
|
|
|
|
|
|
|
|
|
|
|
|
|
|
|
|
|
|
|
|
|
|
|
|
|
|
|
|
|
|
|
|
|
|
|
|
|
|
|
|
|
|
|
|
|
|
|
|
|
|
|
|
|
|
|
|
|
|
|
|
|
|
|
|
|
|
|
|
|
|
|
|
|
|
|
|
|
|
|
|
|
|
|
|
|
|
|
|
|
|
|
|
|
|
|
|
|
|
|
|
|
|
|
|
|
|
|
|
|
|
|
|
|
|
|
|
|
|
|
|
|
|
|
|
|
|
|
|
|
|
|
|
|
|
|
|
|
|
|
|
|
|
|
|
|
|
|
|
|
|
|
|
|
|
|
|
|
|
|
|
|
|
|
|
|
|
|
|
|
|
|
|
|
|
|
|
|
|
|
|
|
|
|
|
|
|
|
|
|
|
|
|
|
|
|
|
|
|
|
|
|
|
|
|
|
|
|
|
|
|
|
|
|
|
|
|
|
|
|
|
|
|
|
|
|
|
|
|
|
|
|
|
|
|
|
|
|
|
|
|
|
|
|
|
|
|
|
|
|
|
|
|
|
|
|
|
|
|
|
|
|
|
|
|
|
|
|
|
|
|
|
|
|
|
|
|
|
|
|
|
|
|
|
|
|
|
Do not block any of these vents with food such as soda, cereal, bread, etc. If the vents are blocked, airflow will be obstructed and temperature and moisture problems may occur.
IMPORTANT: Because air circulates between both sections, any odors formed in one section will transfer to the other. You must thoroughly clean both sections to eliminate odors. To avoid odor transfer and drying out of food, wrap or cover foods tightly.
7
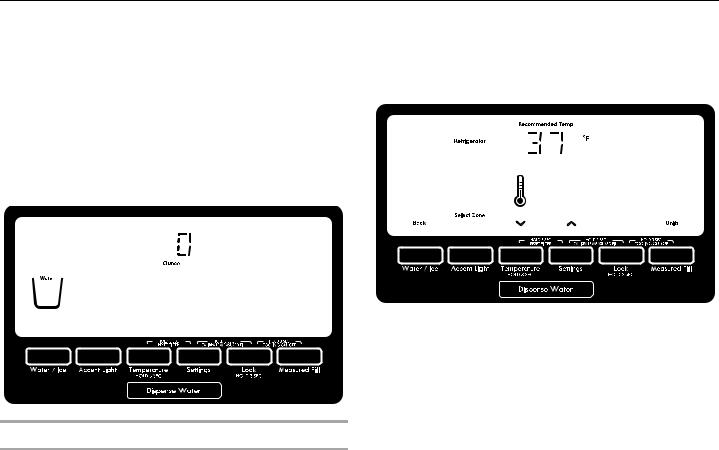
Using the Controls
The refrigerator and freezer controls are located on the dispenser panel.
IMPORTANT: The display screen on the dispenser control panel will turn off automatically and enter “sleep” mode when the control buttons and dispenser pad have not been used for
2 minutes or more. While in “sleep” mode, the first press of a control button will only reactivate the display screen, without changing any settings.
■Touch any control button on the dispenser panel to activate the display screen. The home screen will appear as shown.
Adjusting the Controls
For your convenience, your refrigerator and freezer controls are preset at the factory. When you first install your refrigerator, make sure that the controls are still set to the “mid-settings.” The factory recommended set points are 37°F (3°C) for the refrigerator and 0°F (18°C) for the freezer.
IMPORTANT:
■Wait 24 hours before you put food into the refrigerator. If you add food before the refrigerator has cooled completely, your food may spoil.
NOTE: Adjusting the set points to a colder than recommended setting will not cool the compartments any faster.
■If the temperature is too warm or too cold in the refrigerator or freezer, first check the air vents to be sure they are not blocked before adjusting the controls.
■The preset settings should be correct for normal household usage. The controls are set correctly when milk or juice is as cold as you like and when ice cream is firm.
■Wait at least 24 hours between adjustments. Recheck the temperatures before other adjustments are made.
To view and adjust the set points, press and hold the TEMPERATURE button for 3 seconds. When adjust mode is activated, adjusting information will appear on the display screen.
NOTE: To view Celsius temperatures, press the MEASURED FILL button when adjust mode is activated. To return the display setting to Fahrenheit, press MEASURED FILL again.
■When adjust mode is activated, the display screen shows the refrigerator set point and “REFRIGERATOR” appears.
■Press SETTINGS to raise the set point, or press TEMPERATURE to lower the set point.
■When you have finished viewing (and adjusting if desired) the refrigerator set point, press ACCENT LIGHT to change the display to show the freezer set point. When the zone has been changed, “FREEZER” appears on the display screen.
■Press SETTINGS to raise the set point, or press TEMPERATURE to lower the set point.
■When you have finished viewing (and adjusting if desired) both the refrigerator and freezer set points, press LOCK to save the settings.
NOTE: To exit without saving changes, press WATER/ICE at any time while in adjust mode, or allow about 60 seconds of inactivity and adjust mode will turn off automatically.
When adjusting temperature set points, use the following chart as a guide.
CONDITION: |
TEMPERATURE |
|
ADJUSTMENT: |
|
|
REFRIGERATOR too cold |
REFRIGERATOR Setting |
|
1° higher |
|
|
REFRIGERATOR too warm |
REFRIGERATOR Setting |
|
1° lower |
|
|
FREEZER too cold |
FREEZER Setting |
|
1° higher |
|
|
FREEZER too warm / |
FREEZER Setting |
Too little ice |
1° lower |
|
|
The set point range for the refrigerator is 33°F to 45°F (0°C to 7°C). The set point range for the freezer is 5°F to 5°F (21°C to 15°C).
8
Cooling On/Off
Your refrigerator and freezer will not cool when cooling is turned off.
■To turn cooling off, press and hold the LOCK and MEASURED FILL buttons at the same time for 3 seconds.
IMPORTANT: To avoid unintentionally locking the dispenser or changing other settings, be sure to press both buttons at exactly the same time.
When cooling is off, “COOLING OFF” will appear on the display screen.
■Press and hold LOCK and MEASURED FILL for 3 seconds again to turn cooling back on.
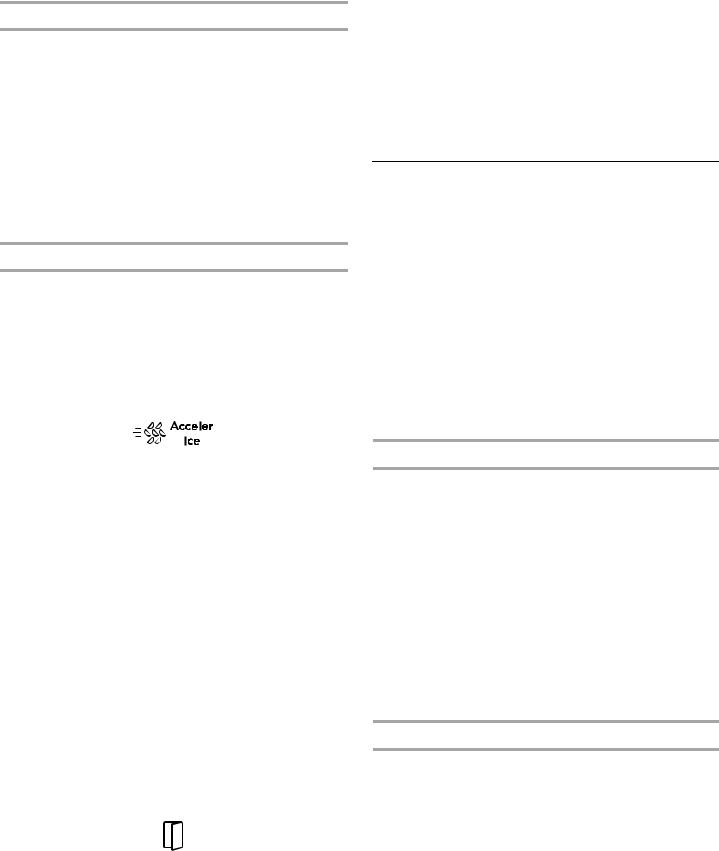
Additional Features
Accelerated Ice Production
The Accelerated Ice feature assists with temporary periods of heavy ice usage by increasing ice production.
IMPORTANT: This feature only works if the ice maker is turned on. See “Ice Maker and Storage Bin.”
■To turn on the feature, press SETTINGS then TEMPERATURE. When the feature is on, the Accelerated Ice icon will appear on the dispenser display screen.
The Accelerated Ice setting will remain on for a minimum of 90 minutes unless manually turned off.
■To manually turn off the feature, press SETTINGS then TEMPERATURE again, or adjust the freezer temperature set point. The Accelerated Ice icon will disappear when the feature is off.
NOTE: If increased ice production is desired at all times, change the freezer set point to a lower setting. Setting the freezer to a colder temperature may make some foods, such as ice cream, harder.
Door Ajar Alarm
The Door Ajar Alarm feature sounds an alarm when the refrigerator or freezer door is open for 5 minutes and the product cooling is turned on. The alarm will repeat every
2 minutes. Close both doors to turn it off. The feature then resets and will reactivate when either door is left open again for
5 minutes.
NOTE: To mute the audible alarm while keeping the doors open, such as while cleaning the inside of the refrigerator, press any button on the control panel. The alarm sound will be temporarily turned off, but the Door Ajar icon will still be displayed on the dispenser control panel.
Disabling Sounds
■To turn off all dispenser and control sounds, press and hold WATER/ICE and MEASURED FILL at the same time for
3 seconds.
IMPORTANT: To avoid unintentionally changing other settings, be sure to press both buttons at exactly the same time.
■To turn all sounds back on, press and hold WATER/ICE and MEASURED FILL at the same time for 3 seconds again.
Water and Ice Dispensers
NOTES:
■The dispensing system will not operate when either door (refrigerator or freezer) is open.
■Allow 24 hours for the refrigerator to cool down and chill water.
■Allow 24 hours to produce the first batch of ice. Discard the first three batches of ice produced. Wait 72 hours for full ice production.
■The display screen on the dispenser control panel will turn off automatically and enter “sleep” mode when the control buttons and dispenser pad have not been used for 2 minutes or more. While in “sleep” mode, the first press of a control button will only reactivate the display screen, without changing any settings.
Flush the Water System
Air in the water dispensing system can cause the water dispenser to drip. After connecting the refrigerator to a water source or replacing the water filter, flush the water system. Flushing the water dispensing system forces air from the water line and filter, and prepares the water filter for use.
NOTE: As air is cleared from the system, water may spurt out of the dispenser.
1.Using a sturdy container, depress and hold the water dispenser pad for 5 seconds, then release it for 5 seconds.
2.Repeat Step 1 until water begins to flow.
3.Once water begins to flow, continue depressing and releasing the dispenser pad (5 seconds on, 5 seconds off) until a total of 3 gal. (12 L) has been dispensed.
Additional flushing may be required in some households.
Dispensing Options
Your dispenser can dispense water and ice in two ways.
■The DISPENSE WATER button, located below the dispenser control panel’s display screen, dispenses only water.
■The dispenser pad is the pad located along the rear wall of the dispenser cavity. When pressed, it dispenses either water or ice, depending on the chosen setting.
To dispense both water and ice at the same time, select the desired type of ice and dispense it using the dispenser pad, then press the DISPENSE WATER button while still dispensing ice.
9

Calibrate Measured Fill
Household water pressure may affect the accuracy of the Measured Fill feature. For optimum performance of your water dispenser, you must first calibrate Measured Fill.
IMPORTANT: Flush the water system before calibrating Measured Fill.
1.Place a sturdy measuring cup (1 cup [237 mL] size) on the dispenser tray, centered in front of the water dispenser pad.
NOTE: Depending on your model, a measuring cup may be provided.
2.Press and hold the SETTINGS and LOCK buttons at the same time for 3 seconds. The words “Back” and “1 Cup” will appear on the display screen. Also, “CALIBRATION” will illuminate and remain lit while the Measured Fill feature is being calibrated.
NOTE: You may press the WATER/ICE button under the word “Back” at any time to exit calibration mode. The display screen's “CALIBRATION” text will turn off.
3.Using your hand (not the measuring cup), press and release the water dispenser pad in order to dispense water to the 1 cup fill line.
NOTE: If overfilling or spilling occurs, discard the water and press “Back” to restart the calibration process.
4.When 1 cup of water has been correctly dispensed into the measuring cup, press the MEASURED FILL button under the word “Confirm” to confirm the calibration.
When Measured Fill calibration has been confirmed, the display will return to the home screen.
The Water Dispenser
IMPORTANT:
■Dispense at least 1 qt (1 L) of water every week to maintain a fresh supply.
■If the flow of water from the dispenser decreases, it could be caused by low water pressure.
■With the water filter removed, dispense 1 cup (237 mL) of water. If 1 cup of water is dispensed in 8 seconds or less, the water pressure to the refrigerator meets the minimum requirement.
■If it takes longer than 8 seconds to dispense 1 cup of water, the water pressure to the refrigerator is lower than recommended. See “Water Supply Requirements” or “Problem Solver” for suggestions.
To Dispense Water (Standard):
NOTE: While dispensing water and for 3 seconds after dispensing has stopped, the digital display will show how much water has been dispensed. The default unit is ounces. To switch to cups or liters, press the SETTINGS button, then press MEASURED FILL to toggle through the available units.
Option 1:
1.Place a sturdy glass below the dispenser opening.
2.To dispense water, press the DISPENSE WATER button. Hold the glass close to the water dispenser spout to ensure that the water dispenses into the glass.
A
A.Water dispenser spout
3.To stop dispensing, press the DISPENSE WATER button a second time.
Option 2:
1.Press the WATER/ICE button until “Water” is selected.
2.Press a sturdy glass against the dispenser pad. Hold the glass close to the water dispenser spout to ensure that the water dispenses into the glass.
A
A.Water dispenser spout
3.Remove the glass to stop dispensing.
To Dispense Water (Measured Fill):
Measured Fill allows you to dispense a specified amount of water with the touch of a few buttons.
NOTE: The amount of water you select will be dispensed. Be sure that the container is empty and can hold the entire volume. If ice is in the container, you may need to adjust your selection.
10
IMPORTANT: Low water pressure may affect the accuracy of this feature.
1.Press MEASURED FILL to turn the feature on. When the feature is on, the Measured Fill screen appears on the display.
5.To dispense water, press a sturdy glass against the dispenser pad OR place the glass below the dispenser opening and press either the DISPENSE WATER button or the ACCENT LIGHT button. Hold the glass close to the water dispenser spout to ensure that the water dispenses into the glass.
Press WATER/ICE to manually turn off the Measured Fill feature.
NOTE: The dispenser will automatically turn off Measured Fill after 1 minute of inactivity. When Measured Fill is turned off, any changes you have made will be lost and all defaults will be restored.
2. |
You can dispense water by the ounce, cup, or liter. The |
||||
|
default unit is ounces. To switch to cups or liters while the |
||||
|
Measured Fill feature is already on, press the MEASURED |
||||
|
FILL button to toggle through the available units. |
||||
|
Default, minimum, and maximum volumes are listed below. |
||||
|
|
|
|
|
|
|
Units |
Default |
Minimum |
Maximum |
|
|
|
|
|
|
|
|
Ounces |
8 |
1 |
128 |
|
|
|
|
|
|
|
|
Cups |
1 |
¹/ |
16 |
|
|
|
|
|
|
|
|
Liters |
0.25 |
0.05 |
4.00 |
|
|
|
|
|
|
|
3. |
Press the SETTINGS and TEMPERATURE buttons to adjust |
||||
|
the volume as desired. The SETTINGS button increases the |
||||
|
volume, and the TEMPERATURE button lowers the volume. |
||||
|
NOTES: |
|
|
|
|
|
■ When increasing or decreasing the volume of water, the |
||||
|
control may stop responding if an adjustment button is |
||||
|
held for approximately 10 seconds or longer. Release the |
||||
|
button for approximately 2 seconds, then continue |
||||
|
making adjustments. |
|
|
|
|
|
■ Most coffee cups (commonly 4 to 6 oz [118 to 177 mL] |
||||
|
per cup) are not the same size as a measuring cup (8 oz |
||||
|
[237 mL]). You may need to adjust the volume to avoid |
||||
|
unintentionally overfilling coffee cups. |
|
|
||
4. |
You can save one “favorite” volume for repeated use. Adjust |
||||
|
the settings until the desired volume is displayed, then press |
||||
LOCK to save the volume. In future Measured Fill use, press LOCK to access the saved volume setting.
NOTE: You can only save one “favorite.” Saving a new volume will overwrite the previously-saved “favorite.”
A
A. Water dispenser spout
NOTE: While dispensing water, the digital display will count down how much water remains to be dispensed, according to the volume you selected. The flow of water will automatically stop once the desired volume has been dispensed.
6.To stop dispensing before the selected volume has been dispensed, remove the glass from the dispenser pad OR press either the DISPENSE WATER button or the ACCENT LIGHT button a second time.
NOTE: If you stop dispensing before the desired volume has been dispensed, the digital display will continue to show how much water remains to be dispensed. The display will turn off after 1 minute of inactivity.
The Ice Dispenser
Ice dispenses from the ice maker storage bin in the freezer when the dispenser pad is pressed. To turn off the ice maker, see “Ice Maker and Storage Bin.”
Your ice maker can produce both crushed and cubed ice. Before dispensing ice, select which type of ice you prefer by pressing the WATER/ICE button.
The display screen indicates which type of ice is selected.
CRUSHED CUBED
For crushed ice, cubes are crushed before being dispensed. This may cause a slight delay when dispensing crushed ice. Noise from the ice crusher is normal, and pieces of ice may vary in size. When changing from crushed to cubed, a few ounces of crushed ice will be dispensed along with the first cubes.
11
To Dispense Ice:
1.Make sure the desired type of ice is selected. To switch between cubed and crushed, press WATER/ICE.
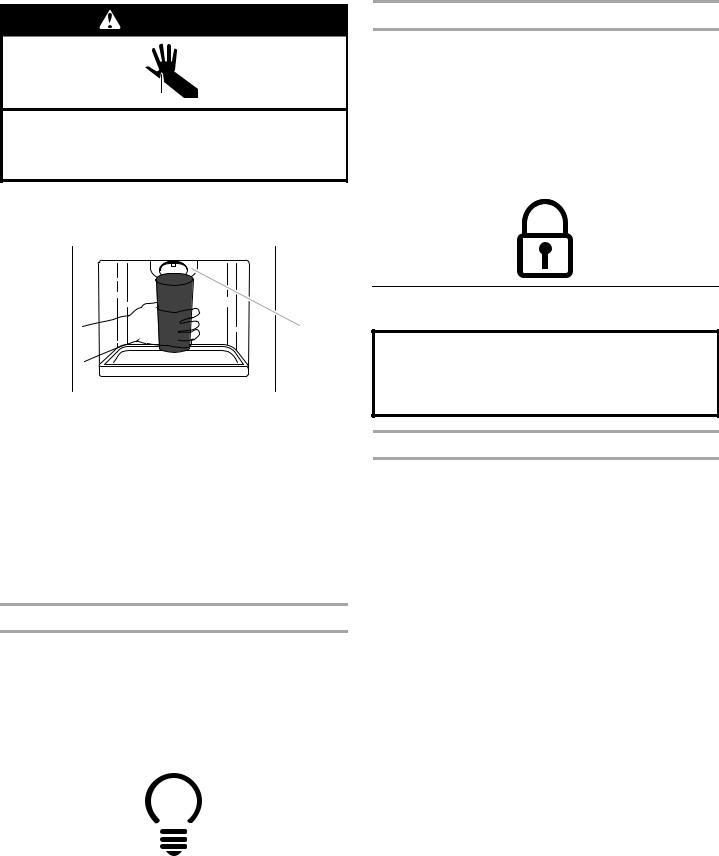
WARNING
Use a sturdy glass |
ice. |
Failure to do so can result in cuts.
2.Press a sturdy glass against the dispenser pad. Hold the glass close to the ice guide to ensure that the ice dispenses into the glass.
The dispenser lights are LEDs that cannot be changed. If it appears that your dispenser lights are not working, see “Problem Solver” for more information.
The Dispenser Lock
The dispenser can be turned off for easy cleaning or to avoid unintentional dispensing by small children and pets.
NOTE: The lock feature does not shut off power to the refrigerator, to the ice maker, or to the dispenser light. It simply deactivates the controls and dispenser pad. To turn off the ice maker, see “Ice Maker and Storage Bin.”
■Press and hold LOCK for 3 seconds to lock the dispenser.
■Press and hold LOCK a second time to unlock the dispenser. The display screen indicates when the dispenser is locked.
A
A. Ice guide
IMPORTANT: You do not need to apply a lot of pressure to the pad in order to activate the ice dispenser. Pressing hard will not make the ice dispense faster or in greater quantities.
NOTE: To dispense both water and ice at the same time, press the DISPENSE WATER button while using the dispenser pad to dispense ice.
3.Remove the glass to stop dispensing.
NOTE: Ice may continue to dispense for several seconds after removing the glass from the pad. The dispenser may continue to make noise for a few seconds after dispensing.
The Dispenser Light
The dispenser has two separate lights: a white dispenser light and a blue dispenser pad light.
The white dispenser light automatically turns on when you use the dispenser, then turns off when dispensing stops.
The blue dispenser pad light can be manually turned on or off.
■Press the ACCENT LIGHT button to turn the dispenser pad light on. The display screen indicates when the light is on.
■Press ACCENT LIGHT a second time to turn the dispenser pad light off.
Water Filtration System
Do not use with water that is microbiologically unsafe or of unknown quality without adequate disinfection before or after the system. Systems certified for cyst reduction may be used on disinfected waters that may contain filterable cysts.
Water Filter Status Light
The water filter status light will help you know when to change your water filter.
■When the dispenser control panel’s water filter status display changes to “ORDER,” this tells you that it is almost time to change the water filter cartridge.
■Replace the water filter cartridge when the water filter status display changes to “REPLACE.”
NOTE: If water flow to your water dispenser or ice maker decreases noticeably, change the filter sooner. The filter should be replaced at least every 6 months, depending on your water quality and usage.
You can check the remaining life of your water filter at any time.
■Press SETTINGS, then press SETTINGS again. The display screen will show how many more gallons of water the filter can effectively filter. Press WATER/ICE to exit the filter status screen.
NOTE: A new filter's “Gallons Remaining” display is 200. The “ORDER” status begins at 40 gal. (151 L) remaining, and the “REPLACE” status activates when the filter has 0 gal. remaining.
12
Resetting the Filter Status
■After changing the water filter, reset the status light. Press and hold TEMPERATURE and SETTINGS at the same time for 3 seconds.
IMPORTANT: To avoid unintentionally changing other settings, be sure to press both buttons at exactly the same time.
When the system is reset, the “ORDER” and “REPLACE” icons will disappear from the display screen.
NOTE: When the status displays “REPLACE,” you can temporarily reset the status icon manually, without changing the water filter. Press and hold the ACCENT LIGHT and TEMPERATURE buttons at the same time for 3 seconds. The “REPLACE” display will be turned off for 14 days. When it turns back on, you can manually reset it again if desired.
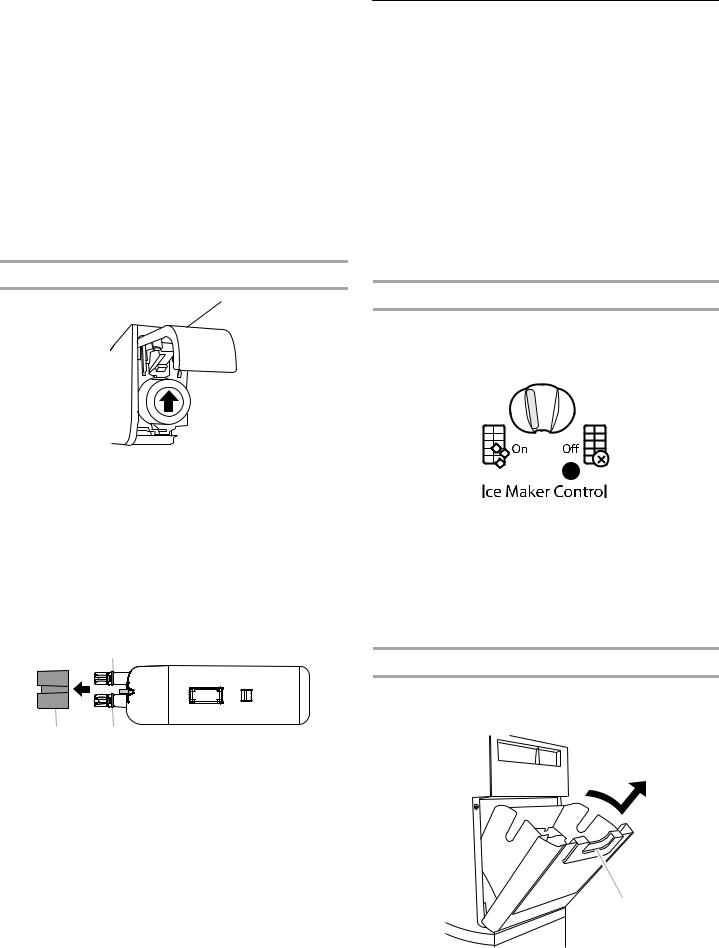
Changing the Water Filter
1.Locate the water filter in the top-right corner of the refrigerator compartment.
2.Lift open the filter cover door. The filter will be released and then be ejected as the door is opened.
3.When the door is completely open, pull the filter straight out.
NOTE: There may be some water in the filter. Some spilling may occur. Use a towel to wipe up any spills.
4.Take the new filter out of its packaging and remove the cap. Be sure the O-rings are still in place after the cap is removed.
B
A |
B |
|
|
A. Cap |
B. O-rings |
5.With the arrow pointing up, align the new filter with the filter housing and slide it into place. The filter cover door will automatically begin to close as the new filter is inserted.
6.Close the filter cover door completely in order to snap the filter into place. You may need to press hard.
7.Flush the water system. See “Water and Ice Dispensers.”
Ice Maker and Storage Bin
■Allow 24 hours to produce the first batch of ice. Discard the first three batches of ice produced.
■The quality of your ice will be only as good as the quality of the water supplied to your ice maker. Avoid connecting the ice maker to a softened water supply. Water softener chemicals (such as salt) can damage parts of the ice maker and lead to poor quality ice. If a softened water supply cannot be avoided, make sure the water softener is operating properly and is well maintained.
■Do not use anything sharp to break up the ice in the storage bin. This can cause damage to the ice container and the dispenser mechanism.
■Do not store anything on top of or in the ice maker or storage bin.
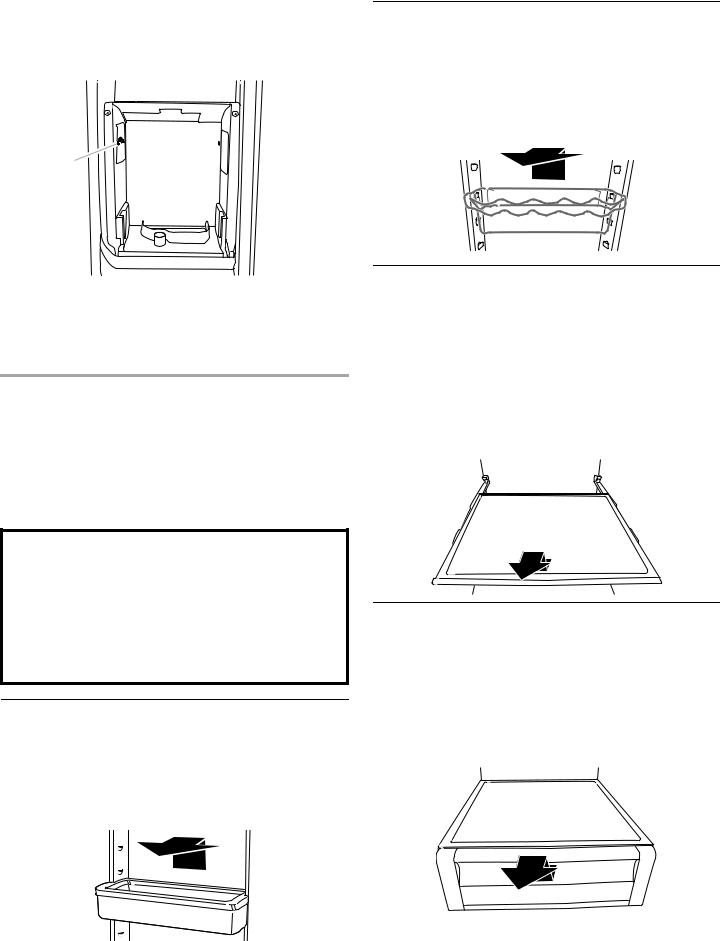
Turning the Ice Maker On/Off
The On/Off switch can only be accessed when the ice storage bin has been removed. The switch is located on the freezer door, on the left side of the wall that surrounds the ice storage bin.
See the following section for bin removal instructions.
■To turn on the ice maker, slide the control to the ON (left) position.
■To manually turn off the ice maker, slide the control to the OFF (right) position.
NOTE: The ice maker has an automatic shutoff to keep the storage bin from overfilling during normal operation. The ice maker sensors will automatically stop ice production, but the control will remain in the ON (left) position.
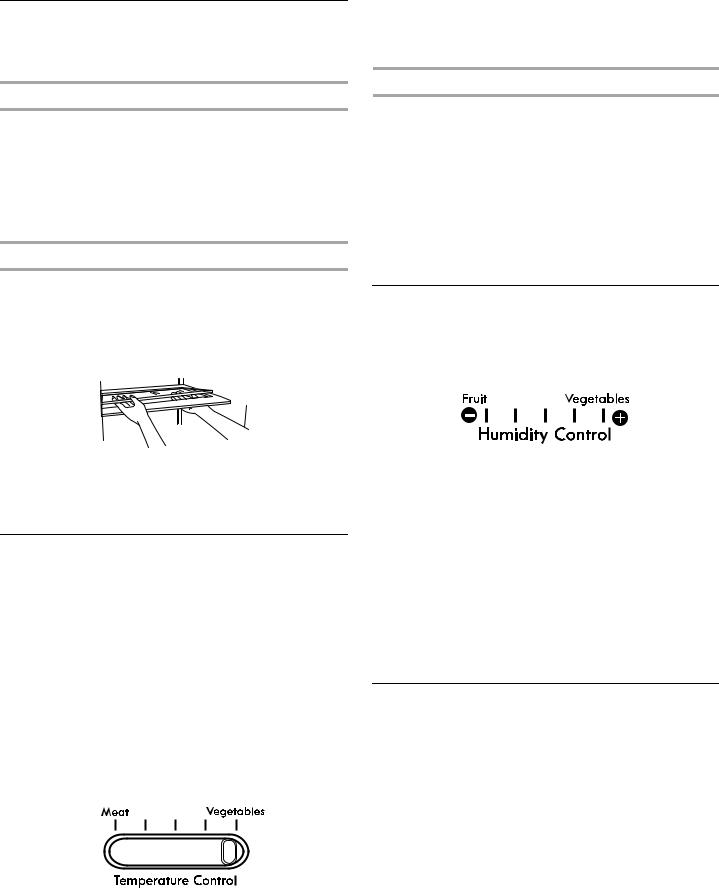
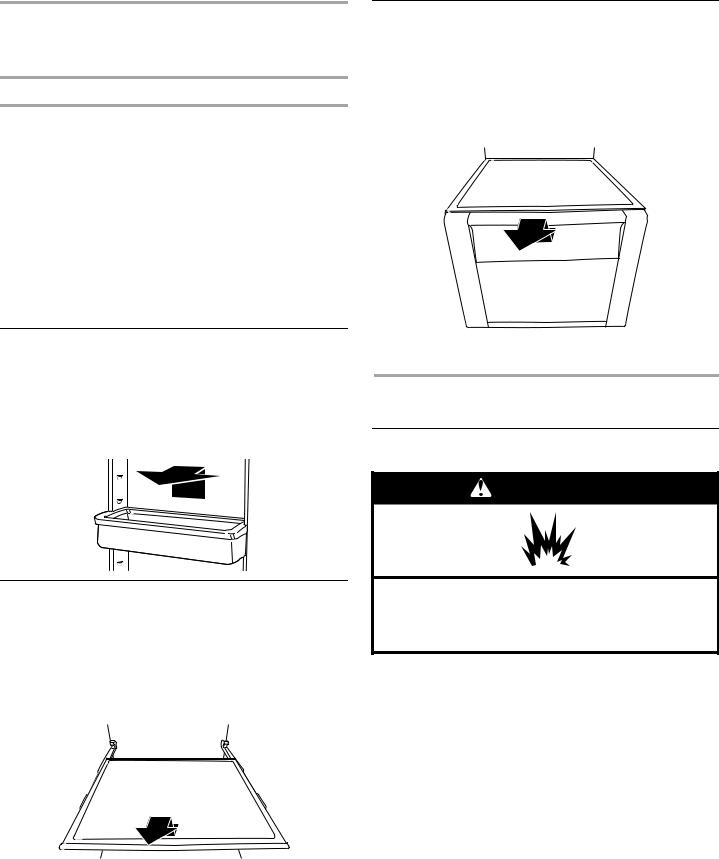
Removing and Replacing the Ice Storage Bin
1.Press down the release lever and tilt the bucket outward. Use both hands to hold the base of the storage bin, then lift it up and out.
A
A. Release lever
13
NOTE: It is not necessary to turn the ice maker control to the OFF (right) position when removing the storage bin. The sensor cover (“flipper door”), located on the right wall of the freezer door, stops the ice maker from producing ice if the door is open or the storage bin is removed.
A  B
B
A.On/Off switch
B.Sensor cover
2.Replace the bin by sliding it onto the door, then tilting it back into an upright position. The release lever will click when the bin is securely in place.
REFRIGERATOR FEATURES
Your model may have some or all of these features. Features that can be purchased separately as product accessories are labeled with the word “Accessory.” Not all accessories will fit all models. If you are interested in purchasing one of the accessories, please call the toll-free number on the back cover or in the “Accessories” section.
Important information to know about glass shelves and covers:
Do not clean glass shelves or covers with warm water when they are cold. Shelves and covers may break if exposed to sudden temperature changes or impact, such as bumping. Tempered glass is designed to shatter into many small, pebble-size pieces. This is normal. Glass shelves and covers are heavy. Use both hands when removing them to avoid dropping.
Refrigerator Door Bins
(on some models)
To Remove and Replace the Bins:
1.Remove the bin by lifting it and pulling it straight out.
2.Replace the bin by sliding it in above the desired supports and pushing it down until it stops.
Bottle/Can Rack
(on some models)
To Remove and Replace the Bottle/Can Rack:
1.Remove the bottle/can rack by lifting it and pulling it straight out.
2.Replace the bottle/can rack by sliding it in above the desired supports and pushing it down until it stops.
Refrigerator Shelves
(number of shelves varies by model)
Store similar foods together and adjust the shelves to fit different heights. This reduces the time the refrigerator door is open and saves energy.
To Remove and Replace a Shelf:
1.Pull the shelf forward to the stop. Tilt the front of the shelf up and lift it slightly as you pull the shelf from the frame.
2.Replace the shelf by guiding it back into the slots on the frame and pushing the shelf in past the stop.
Deli Drawer
(on some models)
The deli drawer stores raisins, nuts, spreads, and other small items at normal refrigerator temperatures.
To Remove and Replace the Deli Drawer:
1.Remove the deli drawer by sliding it straight out to the stop. Lift the front and slide the drawer out the rest of the way.
2.Replace the deli drawer by sliding it back past the stop.
14
Convertible Vegetable/Meat Drawer,
Crisper and Covers
(on some models)
Crisper and Convertible Vegetable/Meat Drawers
To Remove and Replace Drawers:
1.Slide crisper or meat drawer straight out to the stop. Lift the front of drawer with one hand while supporting the bottom of drawer with the other hand and slide the drawer out the rest of the way.
2.Replace the crisper or meat drawer by sliding it back in fully past the drawer stop.
Crisper and Convertible Vegetable/Meat Drawer Covers
To Remove and Replace Covers:
1.Remove the crisper and meat drawer. Press up in center of crisper glass insert until it rises above the plastic frame. Holding the crisper glass firmly, slowly slide the glass insert forward to remove. Lift crisper cover frame and remove. Repeat steps to remove the meat drawer cover.
2.Replace back of meat drawer cover frame into supports or slides on side walls of the refrigerator and lower or slide the front of the cover frame into place. Slide rear of glass insert into cover frame and lower front into place. Repeat steps to replace the crisper cover.
Convertible Vegetable/Meat Drawer
Temperature Control
(on some models)
The convertible vegetable/meat drawer can be adjusted to properly chill meats or vegetables. The air inside the pan is cooled to avoid “spot” freezing and can be set to keep meats at the National Livestock and Meat Board recommended storage temperatures of 28° to 32°F (2° to 0°C).
IMPORTANT: To extend freshness, wrap meats in airtight, moisture-proof materials before storing. Always store meat as recommended.
Adjusting the Control:
■Move the control to the right (less cold) or to the left (colder) as desired.
To store vegetables: Set the control to VEGETABLES (all the way to the right) to store vegetables at their optimal storage temperatures (which need to be warmer than those for meat).
IMPORTANT: If food starts to freeze, move the control to the right (less cold), toward the VEGETABLES setting. Remember to wait 24 hours between adjustments. Doing so gives the temperature of the food time to change.
Meat Storage Guide
Store most meat in original wrapping as long as it is airtight and moisture-proof. Rewrap if necessary. See the following chart for storage times. When storing meat longer than the times given, freeze the meat.
Fresh fish or shellfish.......................... |
use same day as purchased |
|
Chicken, ground beef, variety meat (liver, etc.) |
...............12 days |
|
Cold cuts, steaks/roasts...................................................... |
|
35 days |
Cured meats ....................................................................... |
|
710 days |
Leftovers - Cover leftovers with plastic wrap, aluminum foil, or plastic containers with tight lids.
Crisper Humidity Control
(on some models)
You can control the amount of humidity in the moisturesealed crisper. Adjust the control to any setting between FRUIT [-] and VEGETABLES [+].
FRUIT [-] (open) lets moist air out of the crisper for best storage of fruits and vegetables with skins.
■Fruit: Wash, let dry and store in refrigerator in plastic bag or crisper. Do not wash or hull berries until they are ready to use. Sort and keep berries in original container in crisper, or store in a loosely closed paper bag on a refrigerator shelf.
■Vegetables with skins: Place in plastic bag or plastic container and store in crisper.
VEGETABLES [+] (closed) keeps moist air in the crisper for best storage of fresh, leafy vegetables.
■Leafy vegetables: Wash in cold water, drain and trim or tear off bruised and discolored areas. Place in plastic bag or plastic container and store in crisper.
Utility Bin
(on some models - Accessory)
The utility bin can be placed anywhere inside the refrigerator or freezer. It can be used to hold various small items such as kids’ snacks, or for extra ice storage.
NOTE: For long-term storage, place eggs in a covered container or in their original carton on an interior shelf.
15
FREEZER FEATURES
Your model may have some or all of these features.
Frozen Food Storage Guide
Storage times will vary according to the quality and type of food, the type of packaging or wrap used (should be airtight and moistureproof), and the storage temperature. Ice crystals inside a sealed package are normal. This simply means that moisture in the food and air inside the package have condensed, creating ice crystals.
Put no more unfrozen food into the freezer than will freeze within 24 hours (no more than 2 to 3 lbs of food per cubic foot [907 to 1,350 g per 28 L] of freezer space). Leave enough space in the freezer for air to circulate around packages. Be certain to leave enough room for the door to close tightly.
For more information on preparing food for freezing, check a freezer guide or reliable cookbook.
Freezer Door Bins
(on some models)
To Remove and Replace the Bins:
1.Remove the bin by lifting it and pulling it straight out.
2.Replace the bin by sliding it in above the desired supports and pushing it down until it stops.
Freezer Bin
(on some models)
The freezer bin can be used to store bags of frozen fruits and vegetables that may slide off freezer shelves.
To Remove and Replace the Freezer Bin:
1.Remove the bin by sliding it out to the stop. Lift the front to slide the bin out the rest of the way.
2.Replace the bin by positioning it on the rails. Lift the bin front slightly while pushing it in fully past the stops.
REFRIGERATOR CARE
Cleaning
Freezer Shelf
(number of shelves varies by model)
To Remove and Replace a Shelf:
1.Pull the shelf forward to the stop. Tilt the front of the shelf up and lift it slightly as you pull the shelf from the frame.
2.Replace the shelf by guiding it back into the slots on the frame and pushing the shelf in past the stop.
WARNING
Use nonflammable
Failure to do so can result in death, explosion, or fire.
Both the refrigerator and freezer sections defrost automatically. However, clean both compartments about once a month to avoid buildup of odors. Wipe up spills immediately.
To Clean Your Refrigerator:
1.Unplug refrigerator or disconnect power.
2.Remove all removable parts from inside, such as shelves, crispers, etc.
16
 Loading...