


25358689891
Kenmore 25358689891, 25358677894, 25358672893, 25358087894, 25358082894 Owner’s Manual
...
Record Your Model and Serial Numbers .............. Cover
Important Safety Instructions ....................................... 2
\
First Steps ....................................................................... 3
Energy Saving Ideas ...................................................... 4
setting _the Controls ....... ............................................... 4
Fresh Food Storage ........................................................ 5
Automatic Ice and Water Dispenser ......................... 6-9
Care and Cleaning .................................................. 10-11
Removing the Handles and Doors .............................. 12
Avoid Service Checklist ......................................... 13-16
Normal Operating Sounds .......................................... 16
Sears Service .................................... _,_o_o._o_................. !7
Warranty ...................................................................... 18
Sears Service in Canada ............................................... 19
Warranty (Canada) ..................................................... 20
............................ , r
Read and Save These Instructions
This Owner's Guide provides specific operating instructions for your model Use your refrigerator only as instructed=i!n this
guide These instructions are not meant to cover every possib e condition and situation that may occur Common sen'_e and
caution must be pract ced .when installing, operating, and maintaining any appliance
Record Your Model and Serial Numbers
Record the model and serial number in the space provided below The serial plate is located on the ceiling of the refrigerator
compartment
Model Number:
Serial Number:
Purchase Date:
, PIN 218860000 (9801)
Important Safety
Instructions
Proper Disposal of
Your Refrigerator
Risk of child entrapment
Child entrapment and suffocation are
not problems of the past, Junked or
abandoned refrigerators are still
dangerous - even if they will sit for "just
a few days," If you are getting ridof your
old refrigerator, please follow
instructions below to help prevent
accidents
BEFOREYOU THROW AWAY YOUR OLD
REFRIGERATOROR FREEZER:
_r
Take off
doors.
Leave shelves
in place, so
children may
not easily
climb inside..
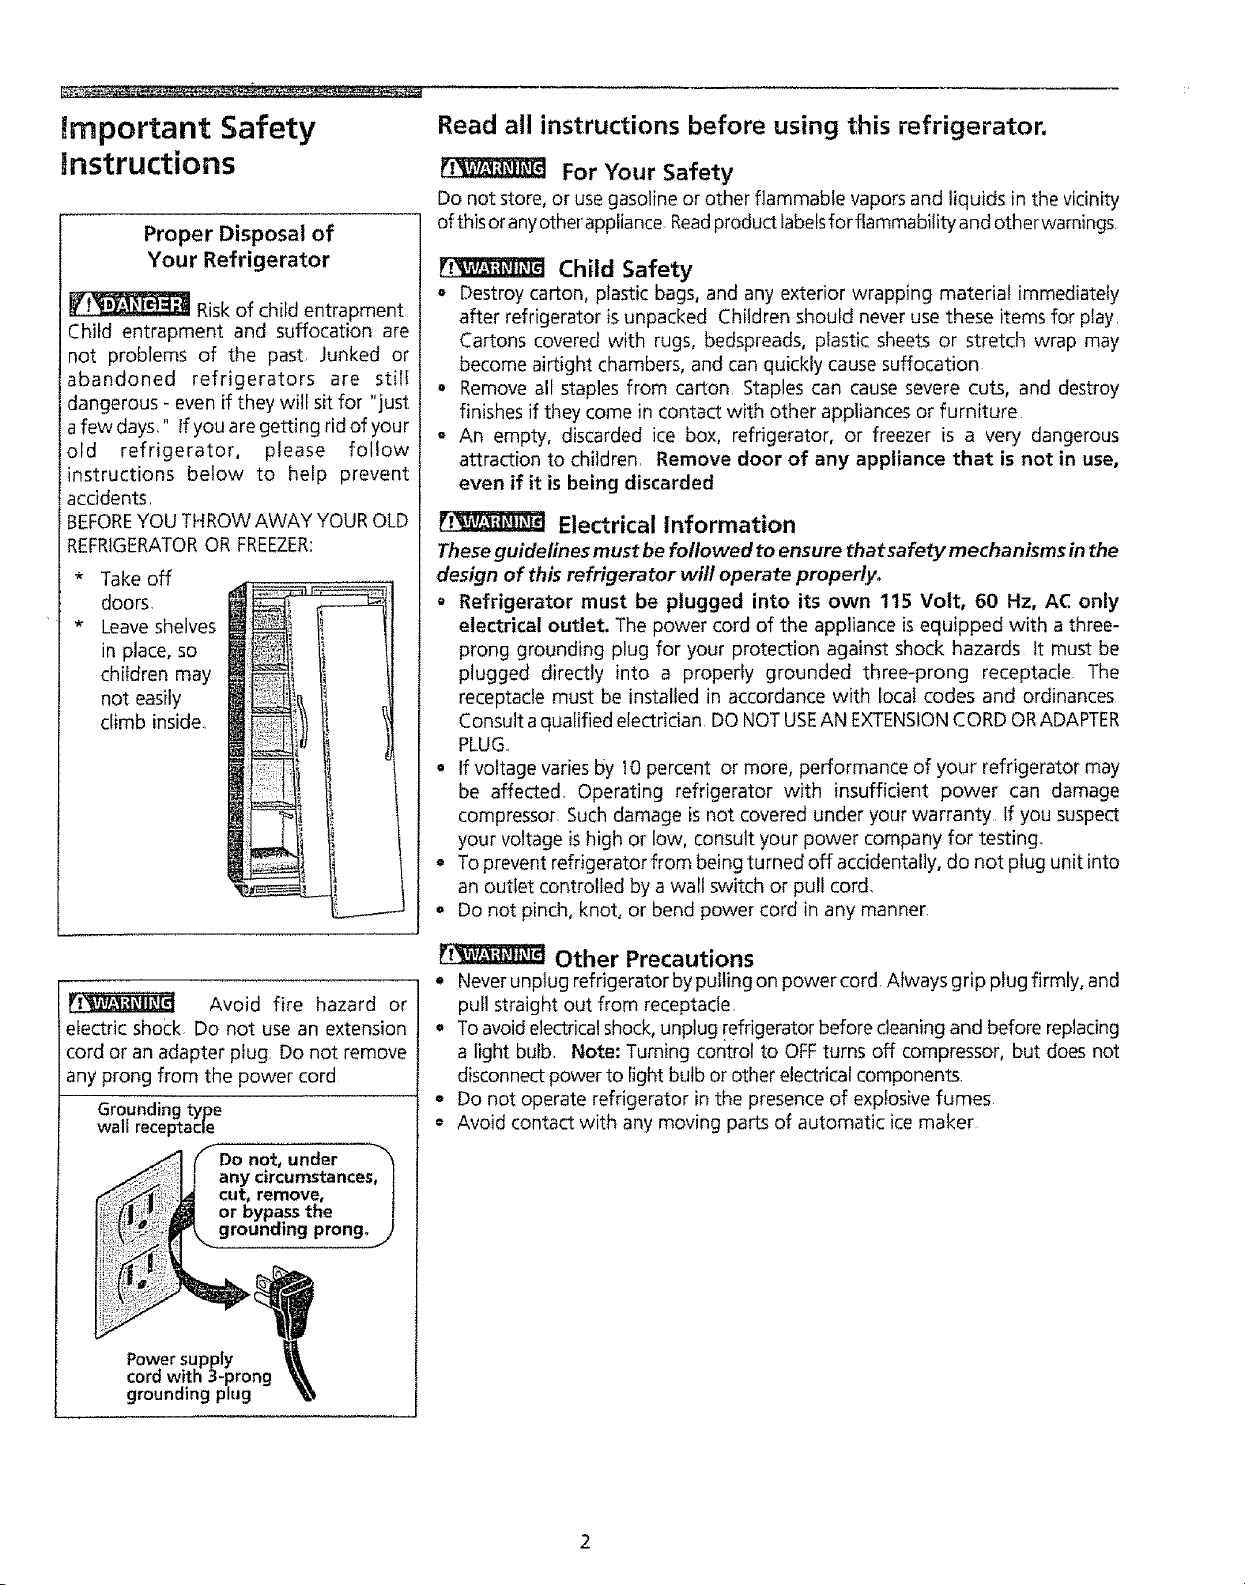
Avoid fire hazard or
electric shock Do not use an extension
cord or an adapter plug Do not remove
any prong from the power cord
Grounding type
waif receptacle
Do not, under "_
any circumstances, t
cut, remove, /
or bypass the
grounamg prong_ /
Power supply
cord with 3-prong
grounding plug
Read all instructions before using this refrigerator.
For Your Safety
Do not store, or usegasoline or other flammable vapors and liquids in the vicinity
of thisor anyother'appliance Readproduct iabetsfor flammability and otherrwamings,
Child Safety
• Destroy carton, plastic bags, and any exterior wrapping material immediately
after refrigerator isunpacked Children should never use these items for play.
Cartons covered with rugs, bedspreads, plastic sheets or stretch wrap may
become airtight chambers, and can quickly cause suffocation
• Remove all staples from carton Staples can cause severe cuts, and destroy
finishes if they come in contact with other appliances or furniture
° An empty, discarded ice box, refrigerator, or freezer is a very dangerous
attraction to children Remove door of any appliance that is not in use,
even if it is being discarded
Electrical Information
These guidelines must be followed to ensure thatsa fety mechanisms in the
design of this refrigerator will operate properlyo
o Refrigerator must be plugged into its own 115 Volt, 60 Hz, AC only
electrical outlet. The power cord of the appliance isequipped with a three-
prong grounding plug for your protection against shock hazards tt must be
plugged directly into a properly grounded three-prong receptacle. The
receptacle must be installed in accordance with local codes and ordinances
Consult a qualified electrician DO NOTUSEAN EXTENSIONCORD ORADAPTER
PLUG.,
o If voltage varies by 10percent or more, performance of your refrigerator may
be affected. Operating refrigerator with insufficient power can damage
compressor. Such damage is not covered under your warranty If you suspect
your voltage ishigh or low, consult your power company for testing_
o To prevent refrigerator from being turned off accidentally, do not plug unit into
an outlet controlled by a wall switch or pull cord.
o Do not pinch, knot, or bend power cord in any manner.
Other Precautions
e Never unplug refrigerator by pulling on power cord Always grip plug firmly, and
pufl straight out from receptacle.
To avoid electricalshock, unplug refrigerator before cleaning and before replacing
a light bulb. Note: Turning control to OFFturns off compressor, but does not
disconnect power to light bulb or other electrical components.
- Do not operate refrigerator in the presence of explosive fumes
Avoid contact with any moving parts of automatic ice maker
First Steps
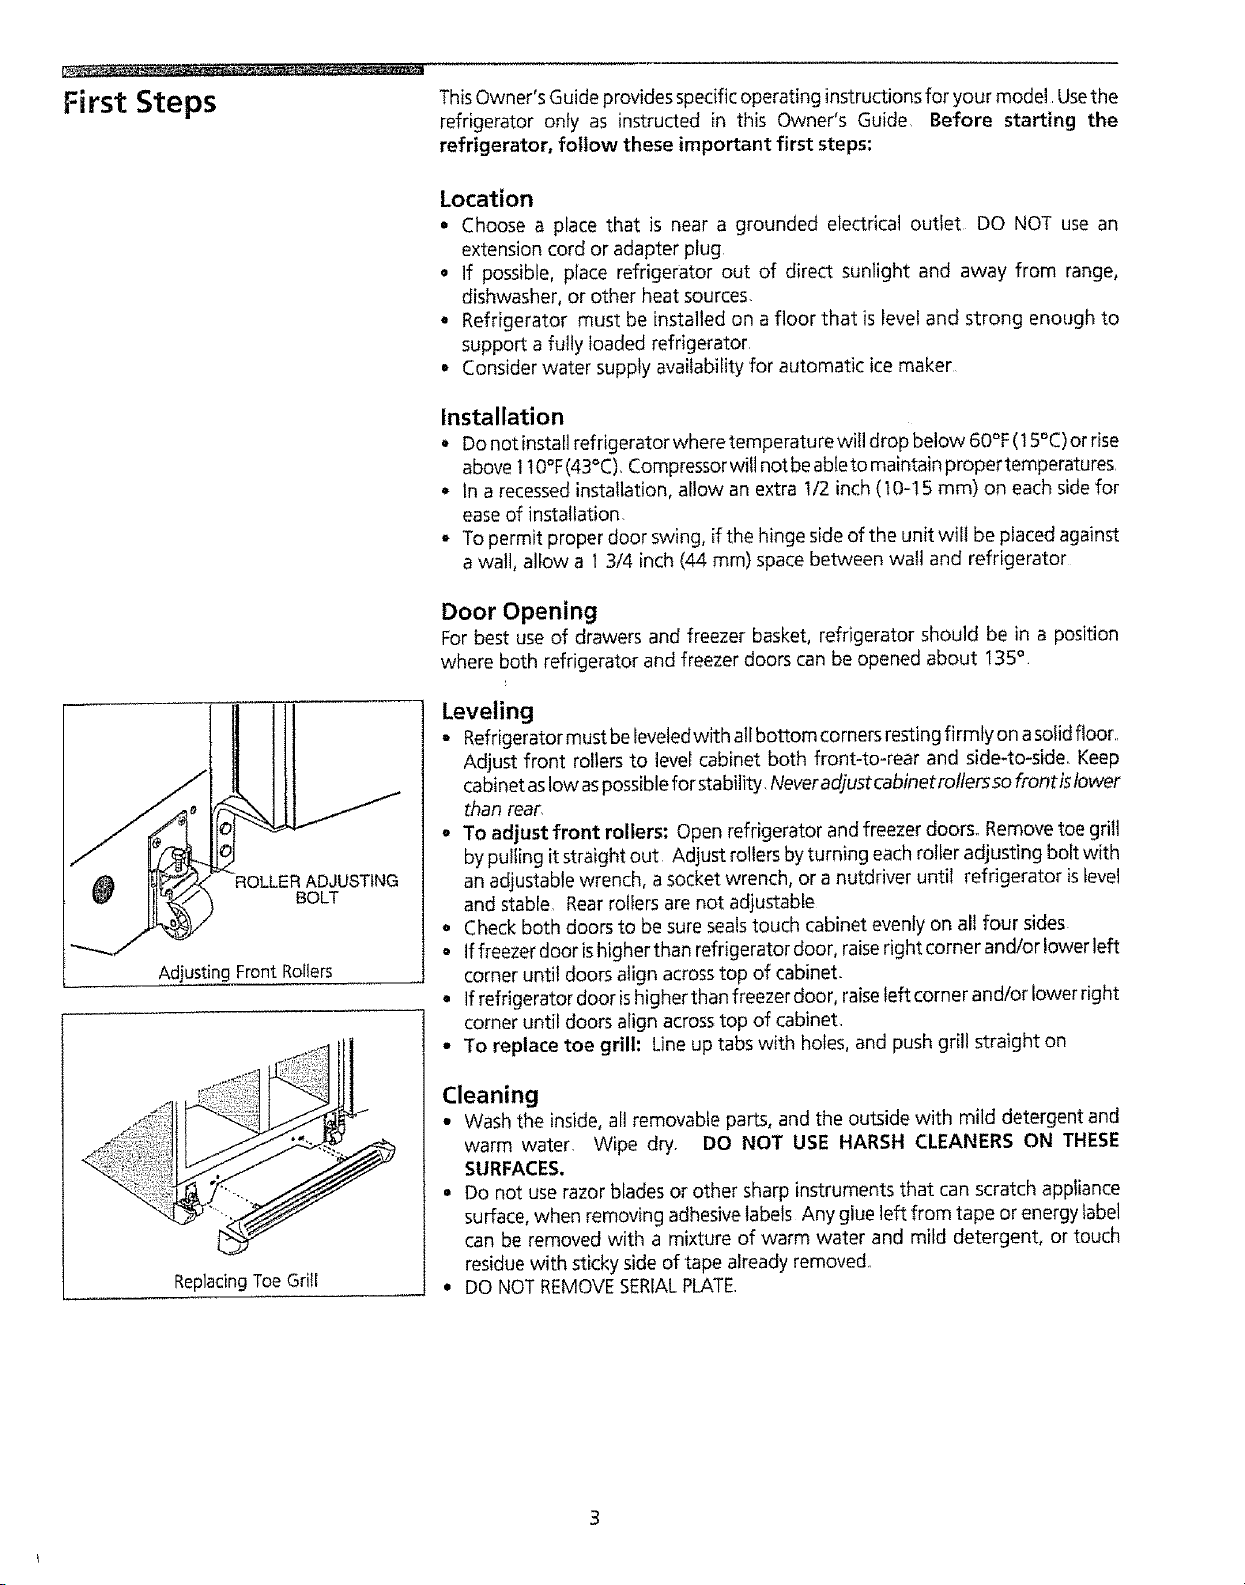
ROLLER ADJUSTING
BOLT
Adjusting Front Rollers
ReplacingToeGrill
ThisOwner's Guide provides specific operating instructions for your model Usethe
refrigerator only as instructed in this Owner's Guide, Before starting the
refrigerator, follow these important first steps:
Location
• Choose a place that is near a grounded electrical outlet DO NOT use an
extension cord or adapter plug
= if possible, place refrigerator out of direct sunlight and away from range,
dishwasher, or other heat sources.
• Refrigerator must be installed on a floor that is level and strong enough to
support a fully loaded refrigerator
Consider water supply availability for automatic ice maker
Installation
° Do not instalt refrigerator where temperature will drop below 60°F (15°C)or rise
above 1t 0°F(43°C). Compressorwill not beableto maintain proper temperatures.
* In a recessed installation,allow an extra I/2 inch(10-15 ram) on each side for
easeof installation.
- To permit proper door swing, if the hinge side of the unit will be placed against
a wall, altow a 13/4 inch (44 ram) spacebetween watl and refrigerator
Door Opening
For best use of drawers and freezer basket, refrigerator should be in a position
where both refrigerator and freezer doors can be opened about t35 °.
Leveling
= Refrigerator must be Ieveledwith all bottom corners resting firmly on asolid floor.,
Adjust front rollers to level cabinet both front-to-rear and side4o-side Keep
cabinet as low aspossiblefor stability, Neveradjustcabinetroltersso frontistower
than rear,
o To adjust front rollers; Open refrigerator and freezer doors° Remove toe grill
bypulling it straight out Adjust rollers by turning each roller adjusting bolt with
an adjustable wrench, asocket wrench, or a nutdriver until refrigerator islevel
and stable Rearrollers are not adjustable
• Check both doors to be sure sealstouch cabinet evenly on all four sides
. Iffreezerdoorishigherthanrefrigeratordoor, raiserightcornerand/oriowerleft
corner until doors align acrosstop of cabinet-
. If refrigerator door ishigher than freezer door, raiseteft corner and/or lower right
corner until doors align acrosstop of cabinet,
• To replace toe grill: Line up tabs with holes, and push grill straight on
Cleaning
• Wash the inside, all removable parts, and the outside with mild detergent and
warm water. Wipe dry. DO NOT USE HARSH CLEANERS ON THESE
SURFACES,
• Do not use razor blades or other sharp instrumentsthat can scratch appliance
surface, when removing adhesive labels Any glue left from tape or energy label
can be removed with a mixture of warm water and mild detergent, or touch
residue with sticky side of tape already removed,,
• DO NOT REMOVESERIALPLATE.
Energy Saving Ideas
° Installthe refrigerator in the coolest part of the room, out of direct sunlight and
away from heating ducts or registers, Do not place the refrigerator nextto heat-
producing appliances such as a range, oven or dishwasher If this is not possible,
a section of cabinetry or an added layer of insulation between the two appliances
will help the refrigerator operate more efficiently
• Level the refrigerator sothe doors close tightly
• Referto this Owner's Guide for the suggested refrigerator settings,
o Periodic cleaning of the condenser will help the refrigerator run more efficiently_
SeeOutside in the "Care and Cleaning" section
• Do not overcrowd the refrigerator or block cold air vents Doing so causesthe
refrigerator to run longer and use more energy Shelvesshould not belined with
aluminum foil, wax paper or paper toweling Liners interfere with cold air
circulation, making the refrigerator lessefficient, which could cause food spoilage,
- Coverfoods and wipe containers dry before placing them in the refrigerator This
cuts down on moisture build-up inside the unit,
• Organize the refrigerator to reduce door openings, Remove as many items as
needed at one time and close the door as soon as possible
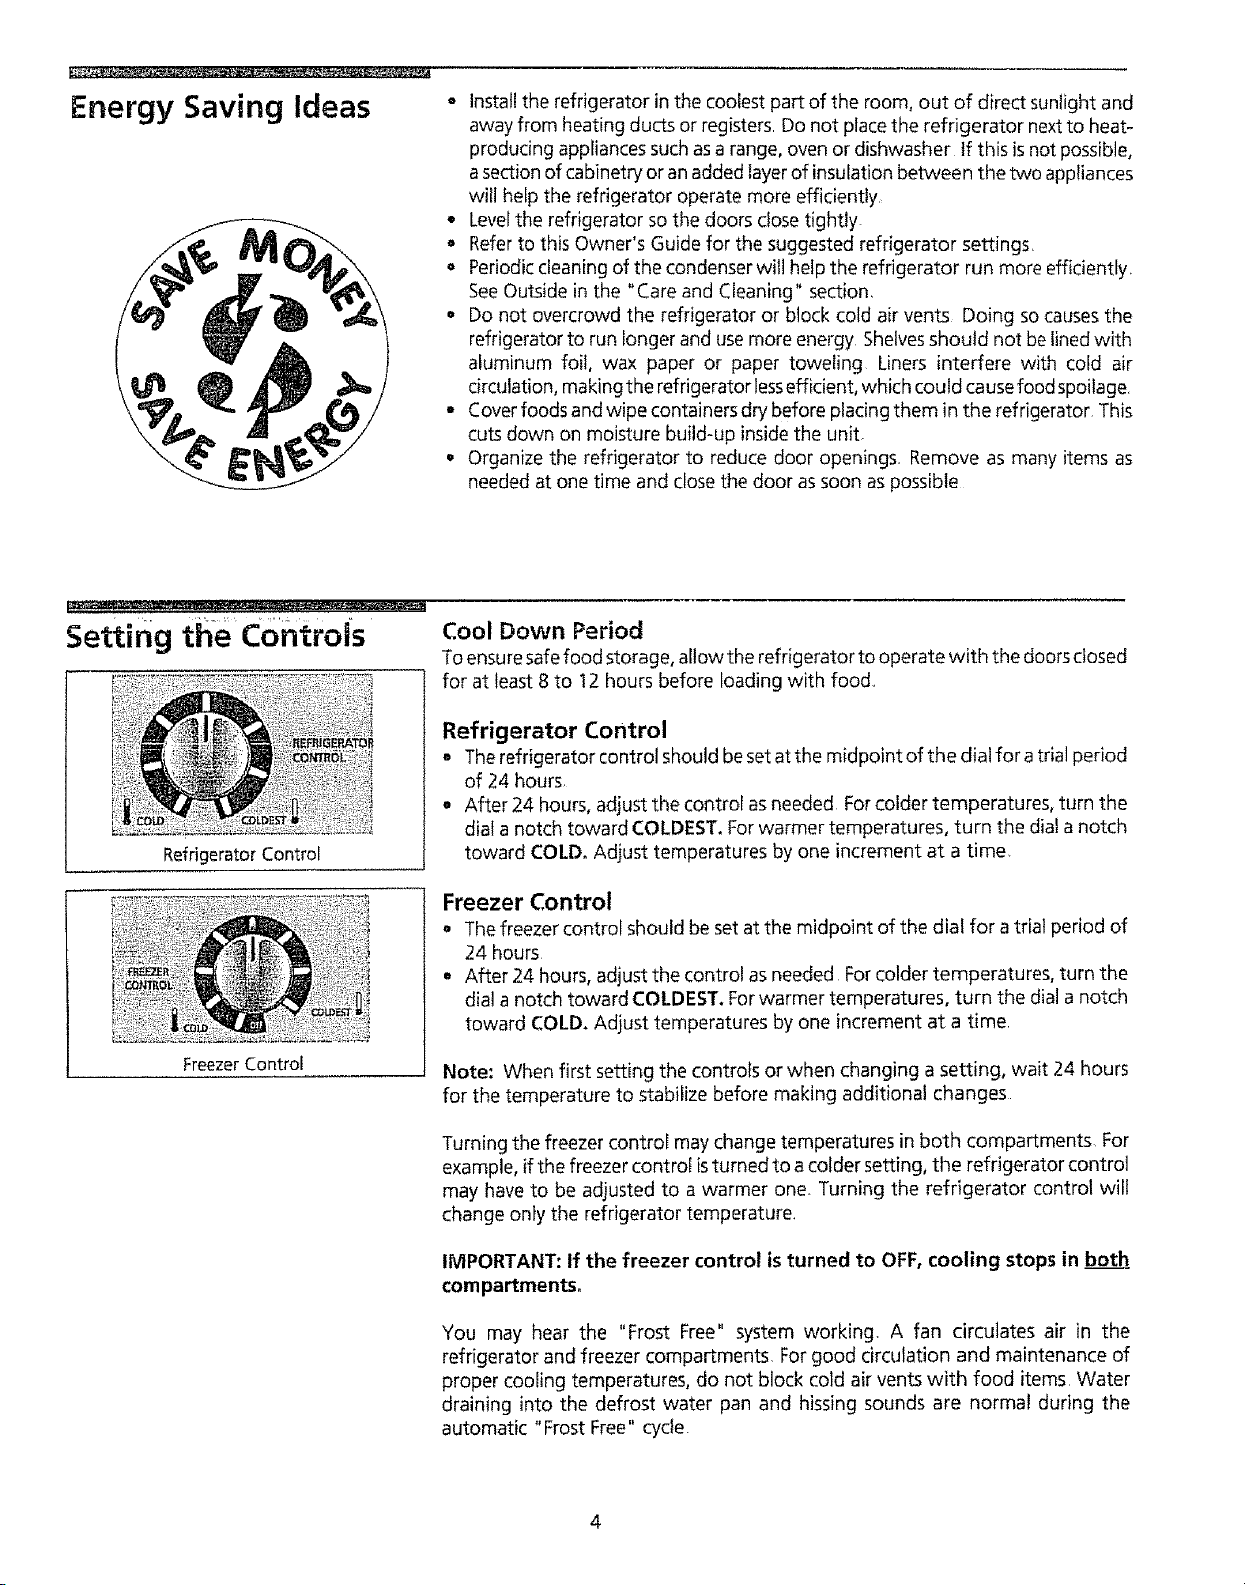
setting the controls
Refrigerator Control
Freezer Control
Cool Down Period
To ensure safe food storage, allow the refrigerator to operate with the doors closed
for at least 8 to 12 hours before loading with food..
Refrigerator Control
• The refrigerator control should be set atthe midpoint of the dial for a trial period
of 24 hours,
, After 24 hours, adjust the control as needed For colder temperatures, turn the
dial a notch toward COLDEST. For warmer temperatures, turn the dial a notch
toward COLD, Adjust temperatures by one increment at a time,
Freezer Control
° Thefreezer control should be setat the midpoint of the dial for a trial period of
24 hours
* After 24 hours, adjust the control as needed For colder temperatures, turn the
dial a notch toward COLDEST. Forwarmer temperatures, turn the dial a notch
toward COLD. Adjust temperatures by one increment at a time.
Note: When first setting the controls or when changing a setting, wait 24 hours
for the temperature to stabilize before making additional changes
Turning the freezer control may change temperatures in both compartments For
example, if the freezer control isturned to a colder setting, the refrigerator control
may have to be adjusted to a warmer one. Turning the refrigerator control will
change only the refrigerator temperature.
IMPORTANT: If the freezer control is turned to OFF, cooling stops in both
compartmentso
You may hear the "Frost Free" system working, A fan circulates air in the
refrigerator and freezer compartments, For good circulation and maintenance of
proper cooling temperatures, do not block cold air vents with food items Water
draining into the defrost water pan and hissing sounds are normal during the
automatic "Frost Free" cycle.
4
Fresh Food Storage
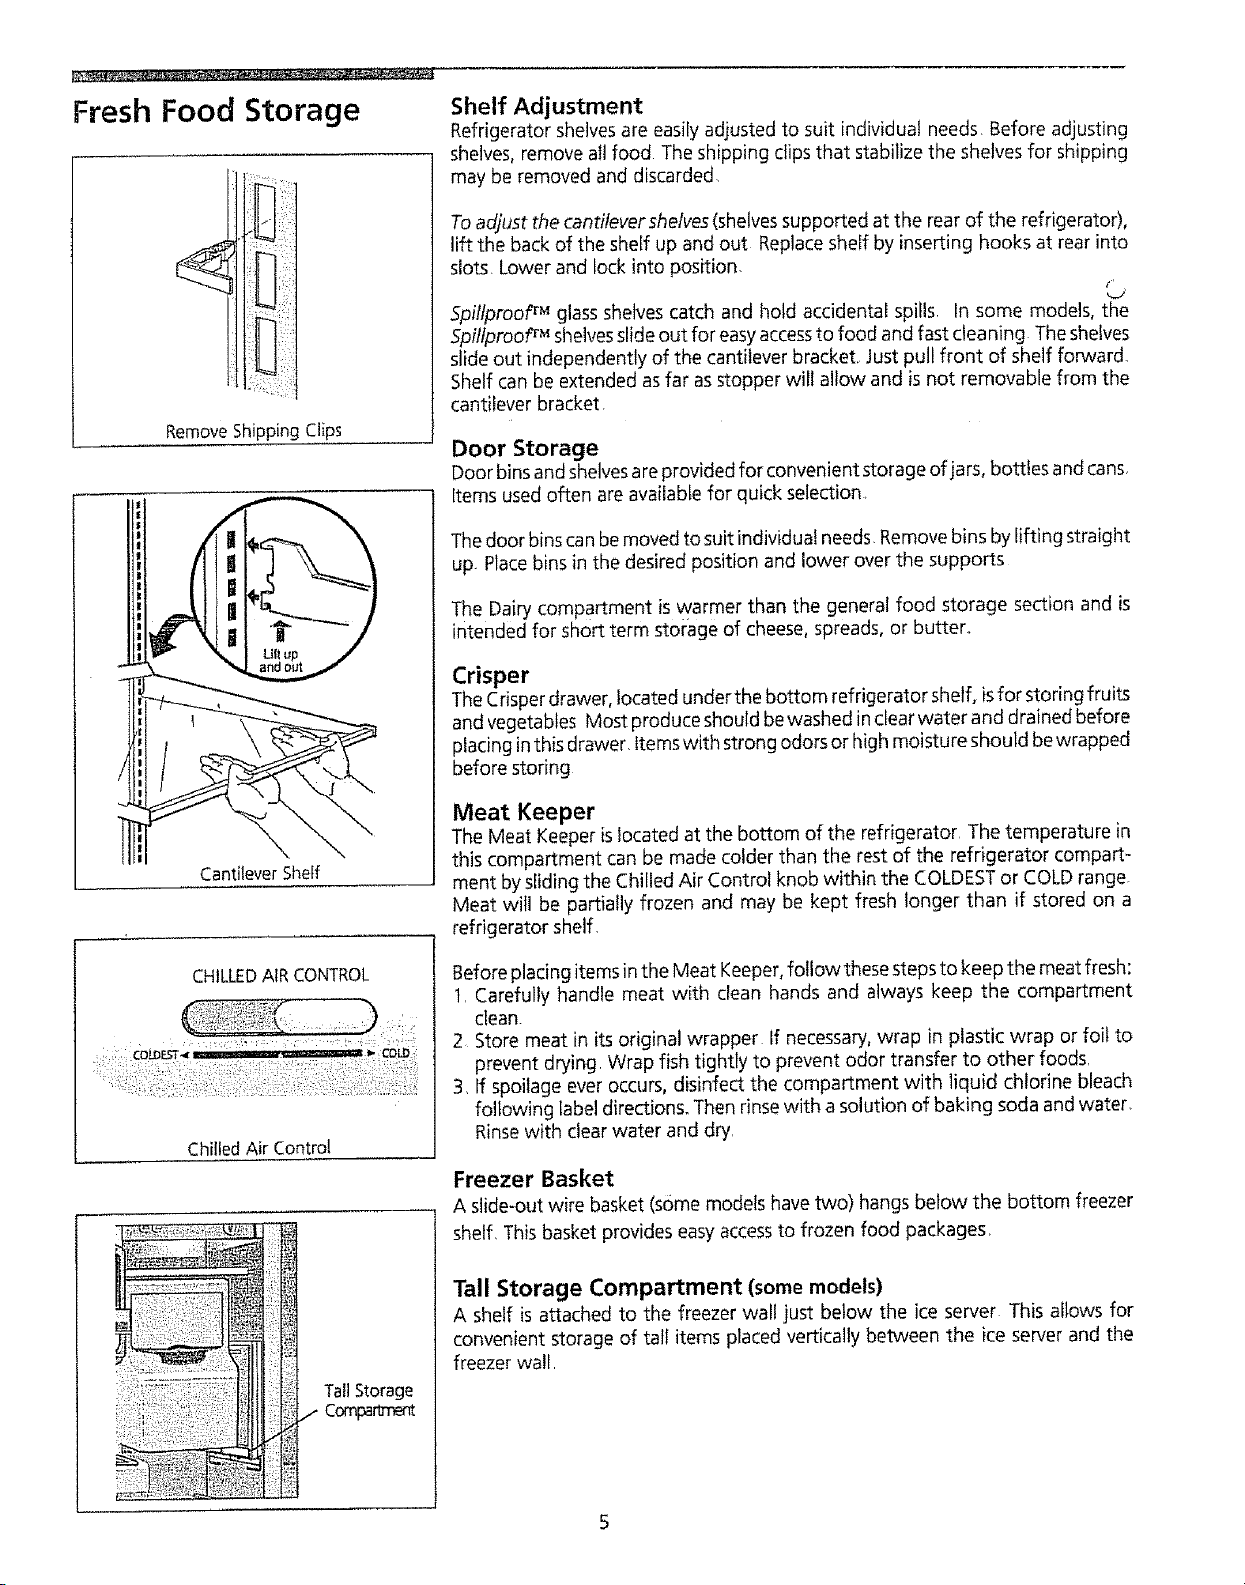
Remove Shipping Clips
Cantilever Shelf
CHILLEDAIRCONTROL
ChilledAir Control
Tall Storage
Comparlrr'ent
Shelf Adjustment
Refrigerator shelvesare easily adjusted to suit [ndMduat needs, Before adjusting
shelves, remove all food The shipping clips that stabilize the shelves for shipping
may be removed and discarded
Toadjust the cantilever shelves(shelvessupported at the rear of the refrigerator),
lift the back of the shelf up and out Replace sheff by inserting hooks at rear into
slots Lower and lock into position.
¢,
5pillproof TM glassshelves catch and hold acddentaE spiIls. In some models, the
5pillprooF Mshelvesslide out for easyaccessto food and fast cleaning The shelves
slide out independently of the cantilever bracket, Just pull front of shelf forward.
Shelf can be extended as far asstopper will allow and is not removable from the
cantilever bracket
Door Storage
Door binsand shelvesareprovided for convenient storage of jars, bottles and cans,
Items used often are available for quick selection,
Thedoor binscan be moved to suit individual needs.Remove bins by lifting straight
up. Placebins in the desired position and lower over the supports
The Dairy compartment is warmer than the general food storage section and is
intended for short term storage of cheese, spreads, or butter°
Crisper
The Crisper drawer, located under the bottom refrigerator shelf, isfor storing fruits
and vegetables Most produce should bewashed inclear water and drained before
placing inthis drawer, Items with strong odors or high moisture should bewrapped
before storing
Meat Keeper
The Meat Keeper islocated at the bottom of the refrigerator The temperature in
this compartment can be made colder than the rest of the refrigerator compart-
ment by sliding the Chilled Air Control knob within the COLDESTor COLD range
Meat will be partially frozen and may be kept fresh longer than if stored on a
refrigerator shelf.
Before placing items in the Meat Keeper,follow thesesteps to keep the meat fresh:
1. Carefully handle meat with clean hands and always keep the compartment
clean.
2 Store meat in its original wrapper If necessary,wrap in plastic wrap or foil to
prevent drying. Wrap fish tightly to prevent odor transfer to other foods.
3, If spoilage ever occurs, disinfect the compartment with liquid chlorine bleach
following label directions. Then rinsewith a solution of baking soda and water.
Rinse with clear water and dry.
Freezer Basket
A slide-out wire basket (some models have two) hangs below the bottom freezer
shelf, This basket provides easy accessto frozen food packages,
Tall Storage Compartment (somemodels)
A shelf is attached to the freezer wall just below the Ice server This allows for
convenient storage of tall items placed vertically between the ice server and the
freezer wall.
Automatic ice and
Water Dispenser
;: •|
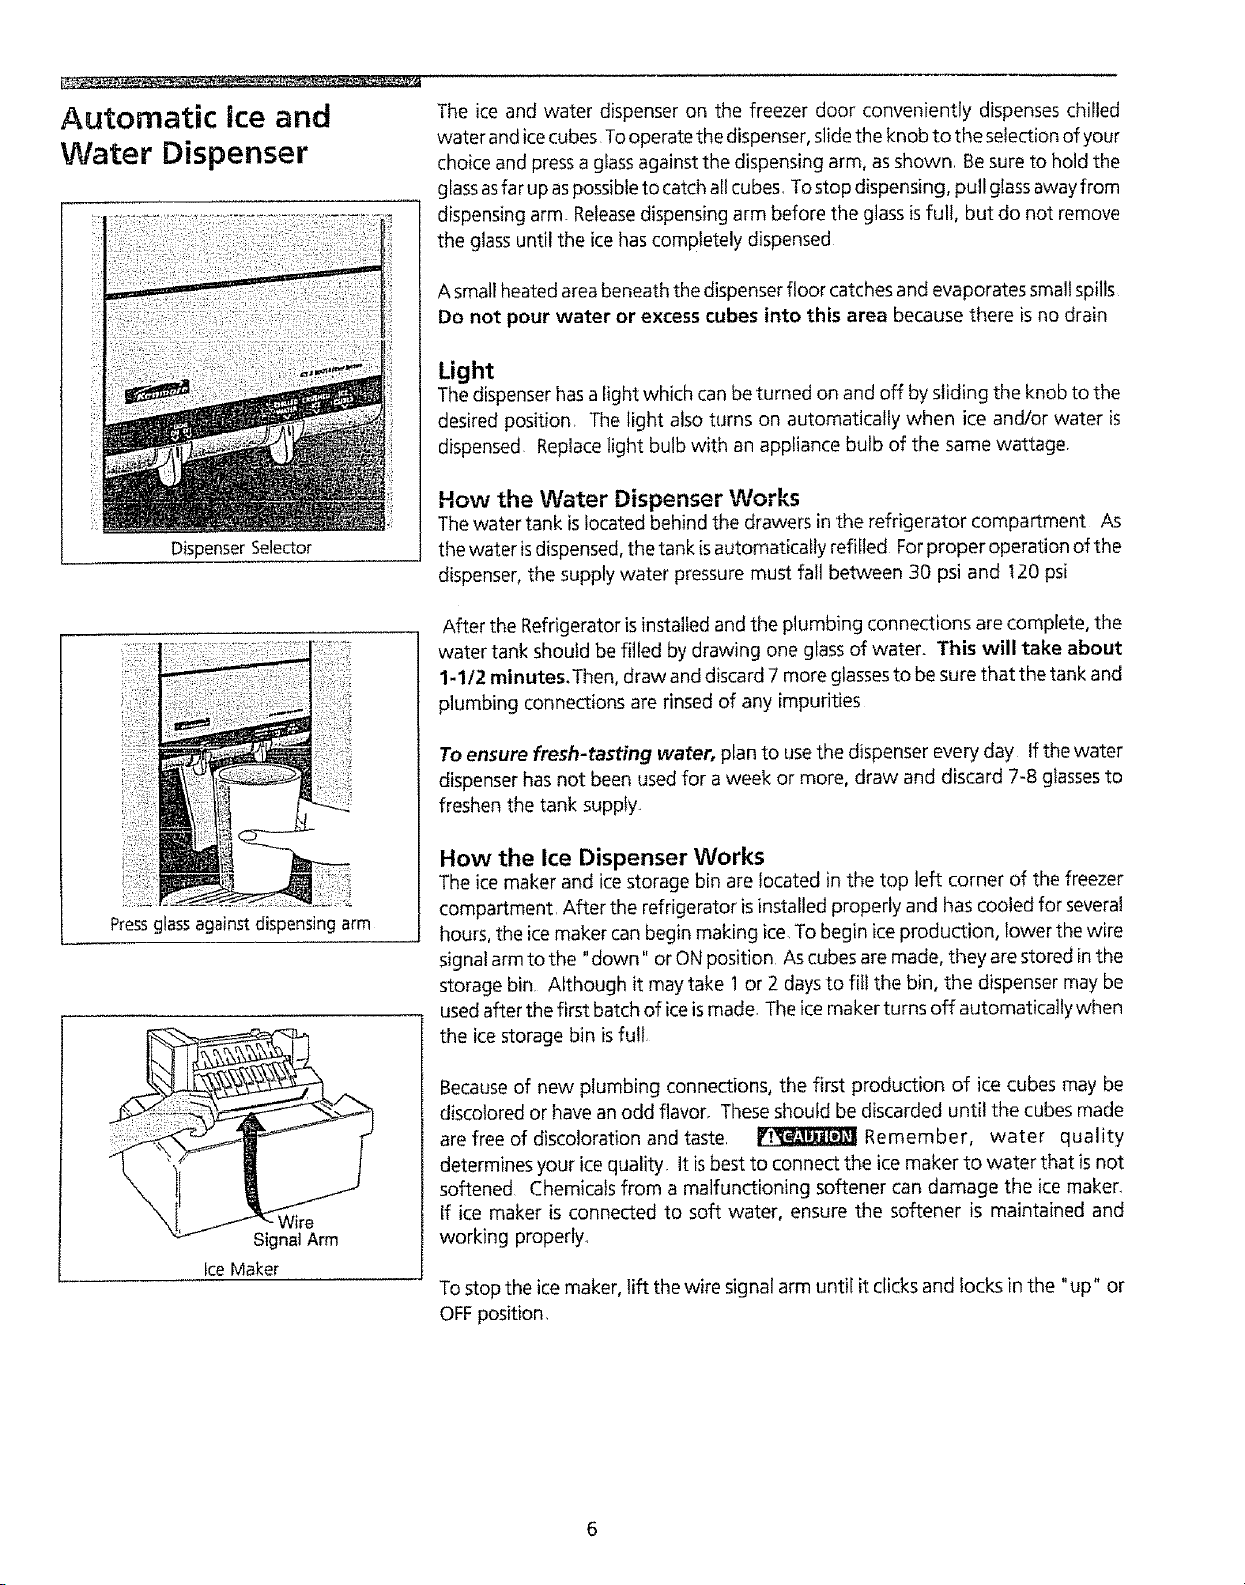
Dispenser Selector
Pressglass against dispensing arm
Signal Arm
Ice Maker
The ice and water dispenser on the freezer door conveniently dispenses chilled
water and ice cubes To operate the dispenser,slide the knob to the selection of your
choice and pressa glass against the dispensing arm, asshown Be sure to hold the
glassasfar up aspossibleto catchall cubes. Tostop dispensing, pull glassawayfrom
dispensing arm. Releasedispensing arm before the glass isfull, but do not remove
the glass until the ice has completely dispensed
A small heated area beneath the dispenser floor catches and evaporates small spills
Do not pour water or excess cubes into this area because there is no drain
Light
The dispenser has a light which can be turned on and off bysliding the knob to the
desired position, The light also turns on automatically when ice and/or water is
dispensed Replacelight bulb with an appliance bulb of the same wattage
How the Water Dispenser Works
The water tank is located behind the drawers inthe refrigerator compartment As
the water isdispensed, the tank is automatically refilled Forproper operation of the
dispenser, the supply water pressure must fall between 30 psi and t20 psi
After the Refrigerator isinstalled and the plumbing connections are complete, the
water tank should be filled by drawing one glass of water. This will take about
1-1/2 minutes.Then, draw and discard 7 more glassesto be sure that the tank and
plumbing connections are rinsed of any impurities
To ensure fresh-tasting water, plan to use the dispenser every day If the water
dispenser has not been used for a week or more, draw and discard 7-8 glassesto
freshen the tank supply.
How the Ice Dispenser Works
The ice maker and icestorage bin are located in the top left corner of the freezer
compartment. After the refrigerator isinstalled properly and has cooled for several
hours, the ice maker can begin making ice,To begin ice production, lower the wire
signal arm to the "down" or ON position Ascubes are made, they are stored inthe
storage bin Although it may take 1 or 2 days to fill the bin, the dispenser may be
usedafter the first batch of iceismade, The ice maker turns off automatically when
the ice storage bin is full
Becauseof new plumbing connections, the first production of ice cubes may be
discolored or have anodd flavor, Theseshould be discarded until the cubes made
are free of discoloration and taste, _ Remember, water quality
determines your ice quality It isbest to connect the ice maker to water that isnot
softened Chemicals from a malfunctioning softener can damage the ice maken
If ice maker is connected to soft water, ensure the softener is maintained and
working properly,
To stop the ice maker, lift the wire signal arm until it clicks and locks in the "up" or
OFF position,
 Loading...