


25331879102
Kenmore 25331879102, 25331874102, 25331870102, 25331849102, 25331844102 Owner’s Manual
...
®
Refrigerator
Top Mount
Use & Care Guide
Refrigerador
Congelador Superior
Guia para su uso y cuidado
Rdfrigdrateur
Compartiments Superposds
Guide d'utilisation et d'entretien
Sears, Roebuck and Co., Hoffman Estates, IL 60179 U.S.A.
Sears Canada, Inc., Toronto, Ontario, Canada M5B 2B8
Z
www.sears.com
240432303 (0108)
Congratulations
Instructions
Congratulations on your purchase of a new refrigerator[ We
here at Sears are very proud of our product and we are
completely committed to providing you with the best
service possible. Your satisfaction is our#1 priority.
We know you'll enjoy your new refrigerator and Thank You
for choosing our product. We hope you consider us for
future purchases.
PLEASE READ AND SAVE THESE
INSTRUCTIONS
This Owner's Guide provides specific operating
instructions for your model. Use your refrigerator only as
instructed in this manual. These instructions are not meant
to cover every possible condition and situation that may
occur. Common sense and caution must be practiced
when installing, operating and maintaining any appliance.
Please record your model and serial numbers below
for future reference. This information isfound on the
serial plate located inside the refrigerator
compartment.
NOTE: Use only soap and water to clean serial plate.
Model Number: 253
or: 970
Serial Number:
Purchase Date:
Please Read All Instructions Before
=" ....... ' Using This Refrigerator.
FOR YOUR SAFETY
Do not store or use gasoline, or other flammable liquids
in the vicinity of this or any other appliance. Read product
labels for warnings regarding flammability and other
hazards.
Do not operate the refrigerator in the presence of
explosive fumes.
Avoid contact with any moving parts of automatic ice
maker.
Remove all staples from the carton. Staples can cause
severe cuts, and also destroy finishes if they come in
contact with other appliances or furniture.
CHILD SAFETY
Destroy or recycle the carton, plastic bags, and any
exterior wrapping material immediately after the refrigerator
is unpacked. Children should NEVER use these items to
play. Cartons covered with rugs, bedspreads, plastic
sheets or stretch wrap may become airtight chambers,
and can quickly cause suffocation.
PROPER DISPOSAL OF YOUR REFRIGERATOR
OR FREEZER
Risk of child entrapment
Child entrapment and suffocation ____
TABLE OF C0N S are not problems of the past.
Welcome ............................................. 2
Safety Instructions .............................. 2-3
Warranty .............................................. 3
Canada - Limited Warranty .................. 4
Installation--Includes Connecting Optional Ice
Maker To Water Supply ..................................... 5-6
Door Removal & Reversal .................. 7-8
Features At A Glance ......................... 9
Temperature Controls .......................... 10
Looking Inside ..................................... 11-13
Ice Service .......................................... 14
Food Storage & Energy Saving Tips ... 15
Normal Operating Sounds & Sights .... 16
Care & Cleaning .................................. 17-18
Before You Call .................................... 19
Junked orabandoned refrigerators
or freezers are still dangerous -
even if they will sit for "just a few
days." If you are getting rid of your
old refrigerator or freezer, please
follow the instructions below to
help prevent accidents.
Before you throw away your
old refrigerator/freezer:
Remove doors.
Leave shelves in place so children may not easily climb
inside.
Have refrigerant removed by a qualified service
technician.
2
,lnnstrucI
These Guidelines Must Be Followed To Ensure That
Safety Mechanisms !n This RefrigeratorWill Operate
Properly.
ELECTRICAL INFORMATION
The refrigerator must be plugged into its own
dedicated 115 Volt, 60 Hz., AC only electric outlet.
The power cord of the appliance is equipped with a
three-prong grounding plug for your protection against
electrical shock hazards. It must be plugged directly
into a properly grounded three-prong receptacle. The
receptacle must be installed in accordance with local
codes and ordinances. Consult a qualified electrician.
Do not use an extension cord or adapter plug.
Immediately repair or replace any power cord that
becomes frayed or damaged.
Never unplug the refrigerator by pulling on the power
cord. Always grip the plug firmly, and pull straight out
from the receptacle to prevent damaging the power cord.
Unplug the refrigerator before cleaning and before
replacing a light bulb to avoid electrical shock.
Performance may be affected if the voltage varies by
10% or more. Operating the refrigerator with insufficient
power can damage the compressor. Such damage is
not covered under your warranty.
Do not plug the unit into an outlet controlled by a wall
switch or pull cord to prevent the refrigerator from being
turned off accidentally.
Avoid connecting refrigerator to a Ground Fault Interruptor
(GFI) circuit.
NOTE: Turning thefreezer temperature control to'!O'lturns
off the compressor, but does not disconnect electrica!
power to the light bu!b or other e!ectrica! components.
Warranty Information
FULL ONE-YEAR WARRANTY ON
REFRIGERATOR
For one year from the date of purchase, when this
refrigerator is operated and maintained according to the
instructions provided in this Owner's Guide, Sears will
repair this refrigerator, free of charge, if defective in
material orworkmanship.
FULL FIVE-YEAR WARRANTY ON SEALED
REFRIGERATION SYSTEM
For five years from the date of purchase, when this
refrigerator is operated and maintained according to the
instructions provided in this Owner's Guide, Sears will
repair the sealed system (consisting of refrigerant,
connecting tube, and compressor motor), free of charge, if
defective in material or workmanship.
The above refrigerator warranty applies only to
refrigerators which are used for storage of food for private
household purposes.
This warranty gives you specific legal rights and you may
also have other rights which vary from state to state.
Warranty service is available by contacting the NEAREST
SEARS SERVICE CENTER/DEPARTMENT in the United
States. See the back page of this manual.
For warranty questions, please contact the following
address:
Sears, Roebuck and Co.
Dept. 817WA
Hoffman Estates, IL 60179
Groundingtype
wallreceptacle
('_ Do not, under
| any clmumstance=
_1 cut, remove,
,_ or bypass the
3-pronggroundedplug _
pmng.
CANADA- LIMITED WARRANTY
Refrigerators
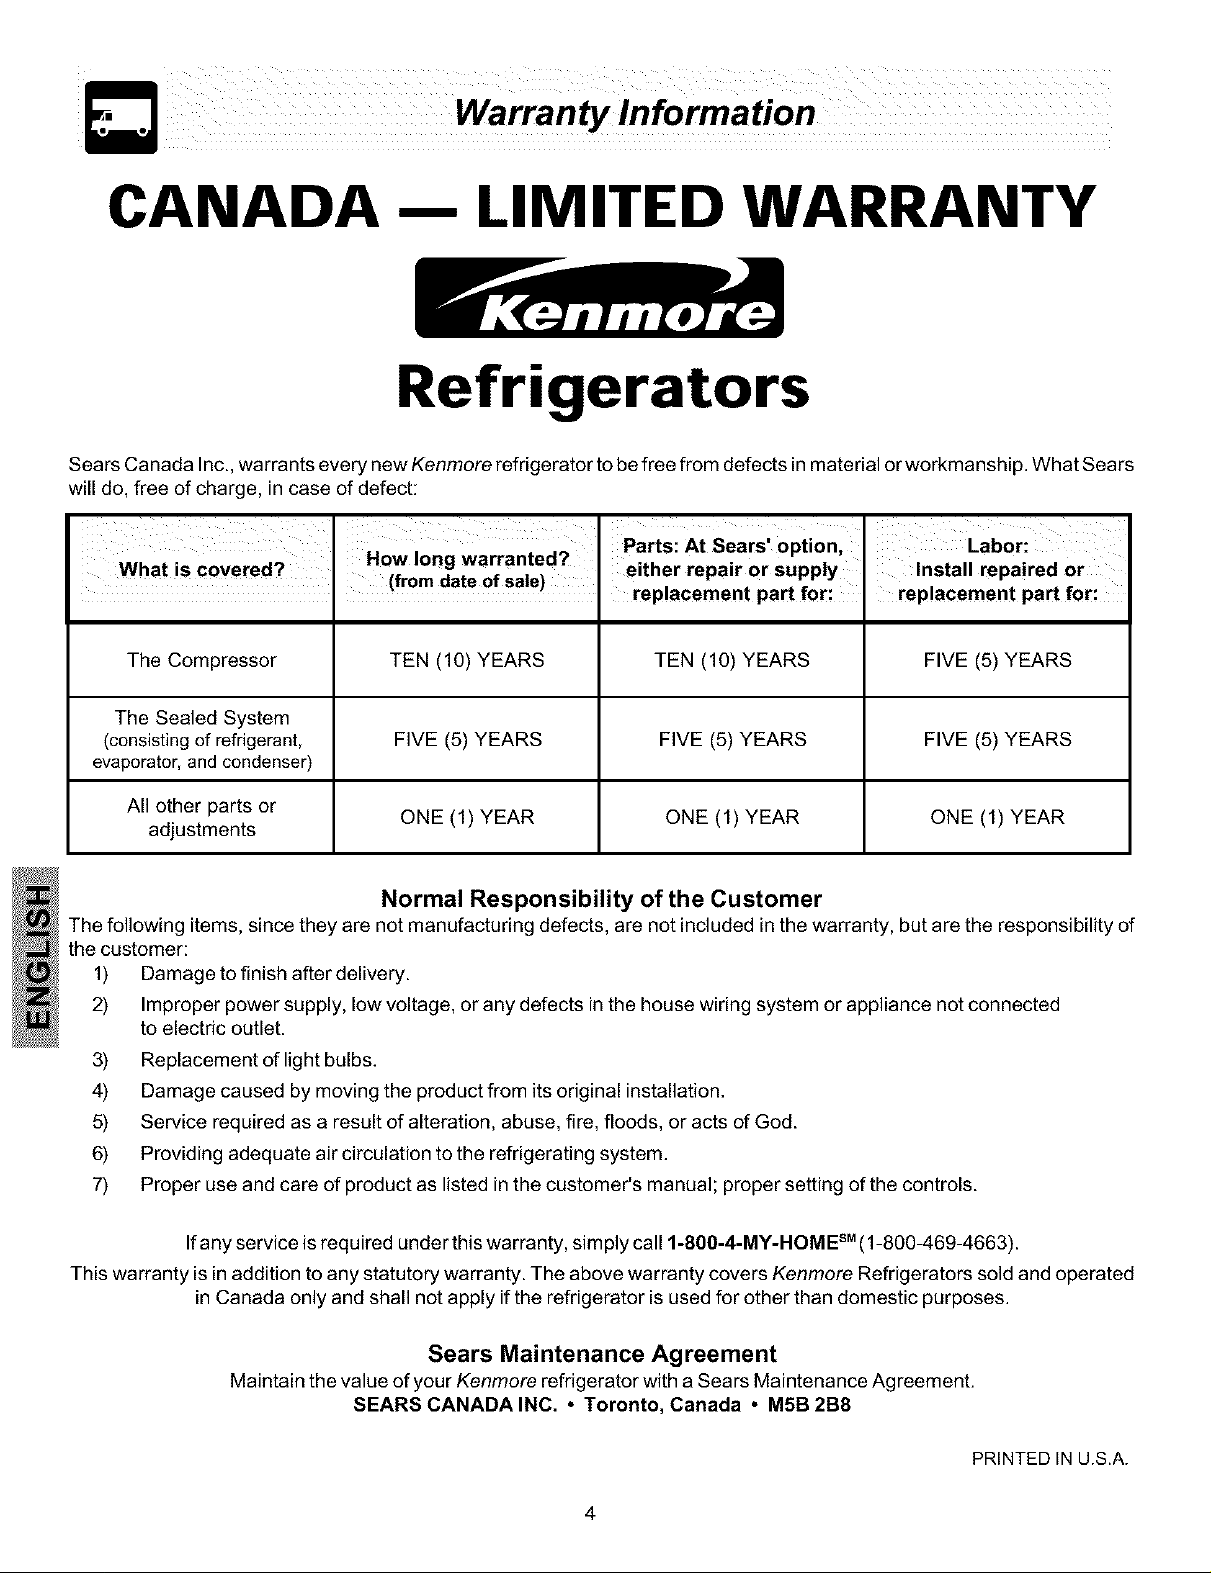
Sears Canada Inc., warrants every new Kenmore refrigerator to be free from defects in material or workmanship. What Sears
will do, free of charge, in case of defect:
Wh t i c v r -9 How long warranted?
a S 0 e ca, . (from date of Sale)
The Compressor TEN (10) YEARS
The Sealed System
(consisting of refrigerant, FIVE (5) YEARS
evaporator,and condenser)
All other parts or
adjustments ONE (1) YEAR
either repair or supply
replacement part for:
TEN (10) YEARS
FIVE (5) YEARS
ONE (1) YEAR
Install repaired or
replacement part for:
FIVE (5) YEARS
FIVE (5) YEARS
ONE (1) YEAR
Normal Responsibility of the Customer
The following items, since they are not manufacturing defects, are not included in the warranty, but are the responsibility of
the customer:
1) Damage to finish after delivery.
2) Improper power supply, low voltage, or any defects in the house wiring system or appliance not connected
to electric outlet.
3) Replacement of light bulbs.
4) Damage caused by moving the product from its original installation.
5) Service required as a result of alteration, abuse, fire, floods, or acts of God.
6) Providing adequate air circulation to the refrigerating system.
7) Proper use and care of product as listed in the customer's manual; proper setting of the controls.
Ifany service is required underthis warranty, simply call 1-800-4-MY-HOME (1-800-469-4663).
This warranty is in addition to any statutory warranty. The above warranty covers Kenmare Refrigerators sold and operated
in Canada only and shall not apply if the refrigerator is used for other than domestic purposes.
SM
Sears Maintenance Agreement
Maintain the value of your Kenmore refrigerator with a Sears Maintenance Agreement.
SEARS CANADA INC. • Toronto, Canada • M5B 2B8
PRINTED IN U.S.A.
4
ThisUse& CareManualprovidesspecificoperating
instructionsforyourmodel.Usetherefrigeratoronlyas
instructedinthisUse&CareManual.Beforestartingthe
refrigerator, follow these important first steps.
LOCATION
Choose a place that is near a grounded electrical outlet.
Do Not use an extension cord or an adapter plug.
If possible, place the refrigerator out of direct sunlight
and away from the range, dishwasher or other heat
sources.
The refrigerator must be installed on a floor that is level
and strong enough to support a fully loaded refrigerator.
Consider water supply availability for models equipped
with an automatic ice maker.
INSTALLATION
Do Not install the refrigerator where the temperature
will drop below 55°F (13°C) or rise above 110°F (43°C).
At these temperature extremes, the compressor will not
be able to maintain proper temperatures inside the
refrigerator.
Do Not block the toe grille on the lower
front of your refrigerator. Sufficient air circulation is
essential for the proper operation of your refrigerator.
Installation Clearances
Allow the following clearances for ease of installation,
proper air circulation, and plumbing and electrical
connections:
Sides & Top 3/8"
Back. 1"
LEVELING
All four corners of your refrigerator must rest firmly on a
solid floor. Your refrigerator isequipped with adjustable front
rollers to help level your unit.
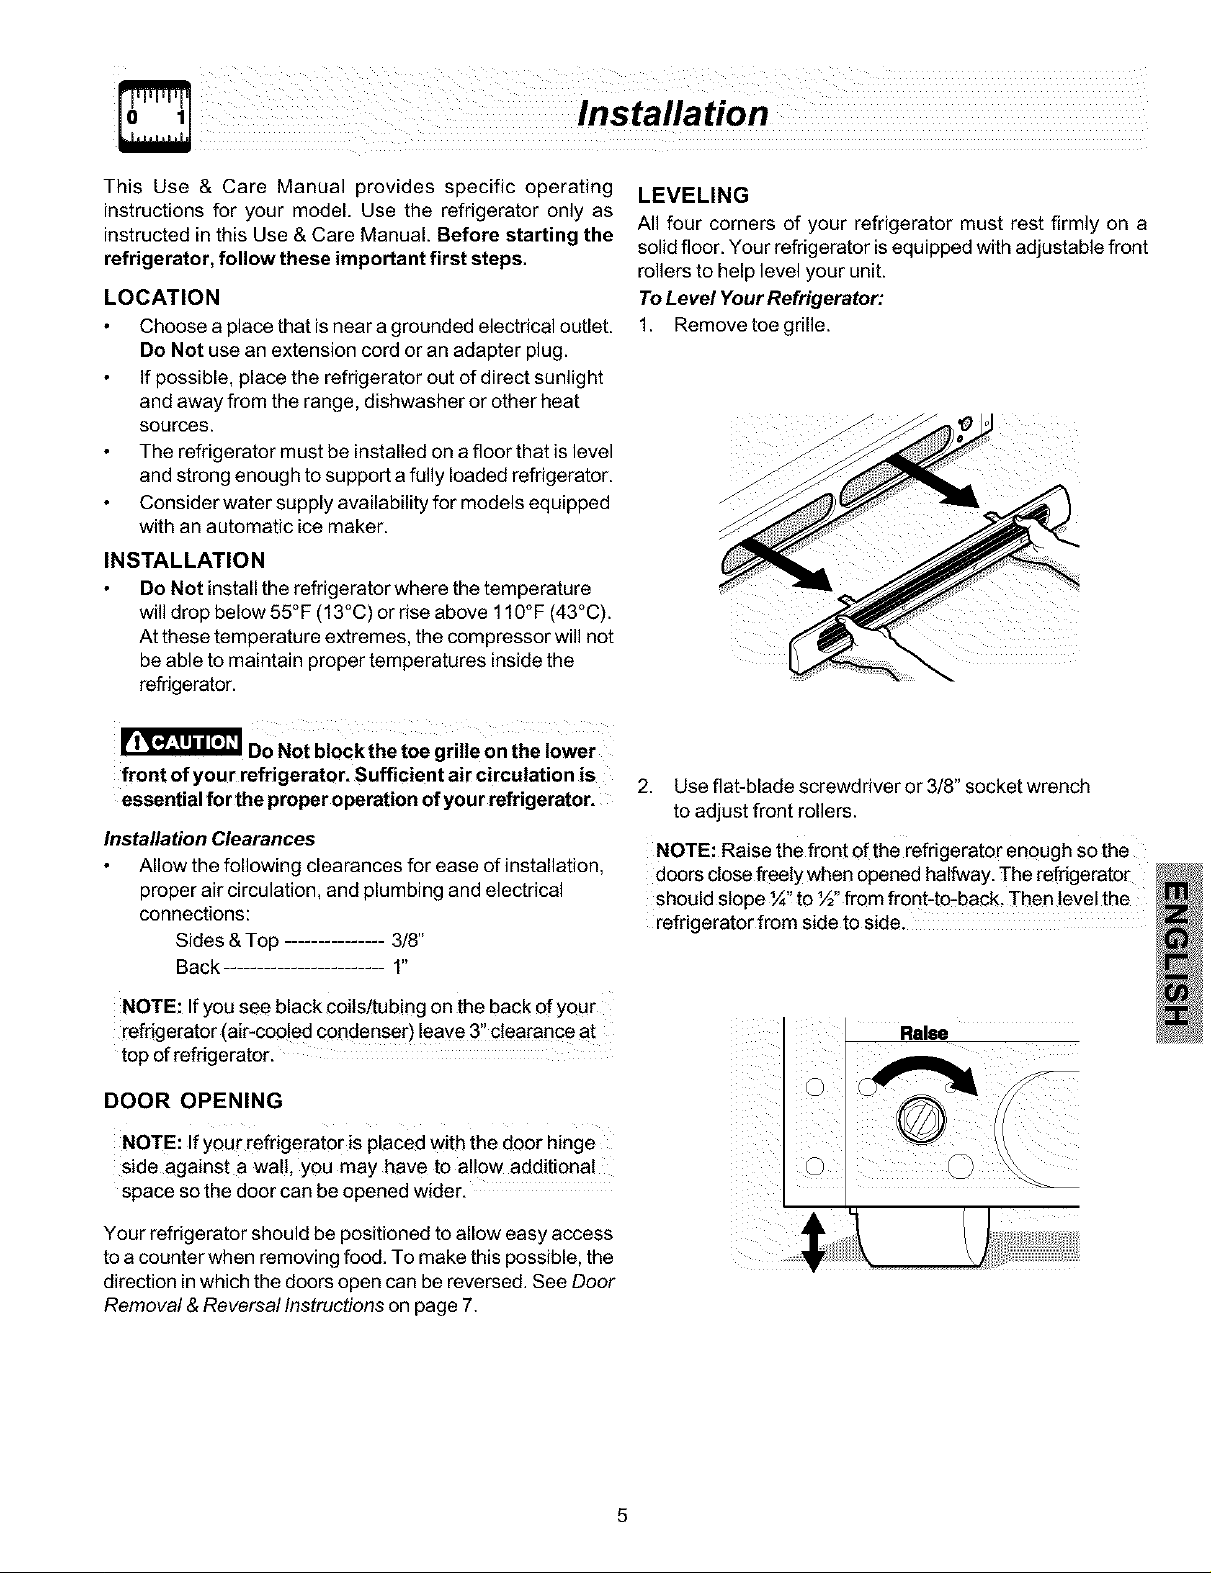
To Level Your Refrigerator:
1. Remove toe grille.
2. Use flat-blade screwdriver or 3/8" socket wrench
to adjust front rollers.
NOTE: Raise the front of the refrigerator enough so the
doors close freely when opened halfway. The refrigerator
should slope ¼'! to ½" from front-to-back. Then level the
refrigerator from side to side.
NOTE: If you see black coils!tubing on the back of your
refrigerator (air-cooled condenser) leave 3" clearance at
top of refrigerator.
DOOR OPENING
NOTE: If your refrigerator is placed with the door hinge
side against a walt, you may have to allow additional
space so the door can be opened wider.
Your refrigerator should be positioned to allow easy access
to a counter when removing food. To make this possible, the
direction in which the doors open can be reversed. See Door
Removal & Reversal Instructions on page 7.
Raise
Installation - Connecting Optional Ice Maker To Water Supply
To avoid electric shock, which can cause death or severe personal injury, disconnect the
refrigerator from electrical power before connecting awater supply line to the refrigerator.
To Avoid Property Damage:
Copper tubing is recommended for the water supply line. Water supply tubing made of ¼" plastic is not
recommended since it greatly increases the potential for water leaks. Manufacturer will not be responsible for
any damage if plastic tubing is used for supply line.
DO NOT install water supply tubing in areas where temperatu res fall below freezing.
Chemicals from a malfunctioning softener can damage the ice maker. If the ice maker is connected to soft
water, ensure that the softener is maintained and working properly.
IMPORTANT: Ensure that your water supply line connections comply with all local plumbing codes.
Before Installing The Water Supply Line, You Will Need
Basic Tools: adjustable wrench, flat-blade screwdriver, and Phillips TM screwdriver
Access to a household cold water line with water pressure between 20 and 120 psi.
A water supply line made of ¼ inch (6.4 mm) OD, copper tubing or braided water line. To determine the length of
copper tubing needed, you will need to measure the distance from the ice maker inlet valve at the back of the
refrigerator to your cold water pipe. Then add approximately 7 feet (2.1 meters), so the refrigerator can be moved out
for cleaning (as shown).
A shutoff valve to connect the water supply line to your household water system. DO NOT use a self-piercing type
shutoff valve.
A compression nut and ferrule (sleeve) for connecting the water supply line to the ice maker inlet valve.
NOTE: Awater line kit is available through Sears retail or catalog stores at additional cosL
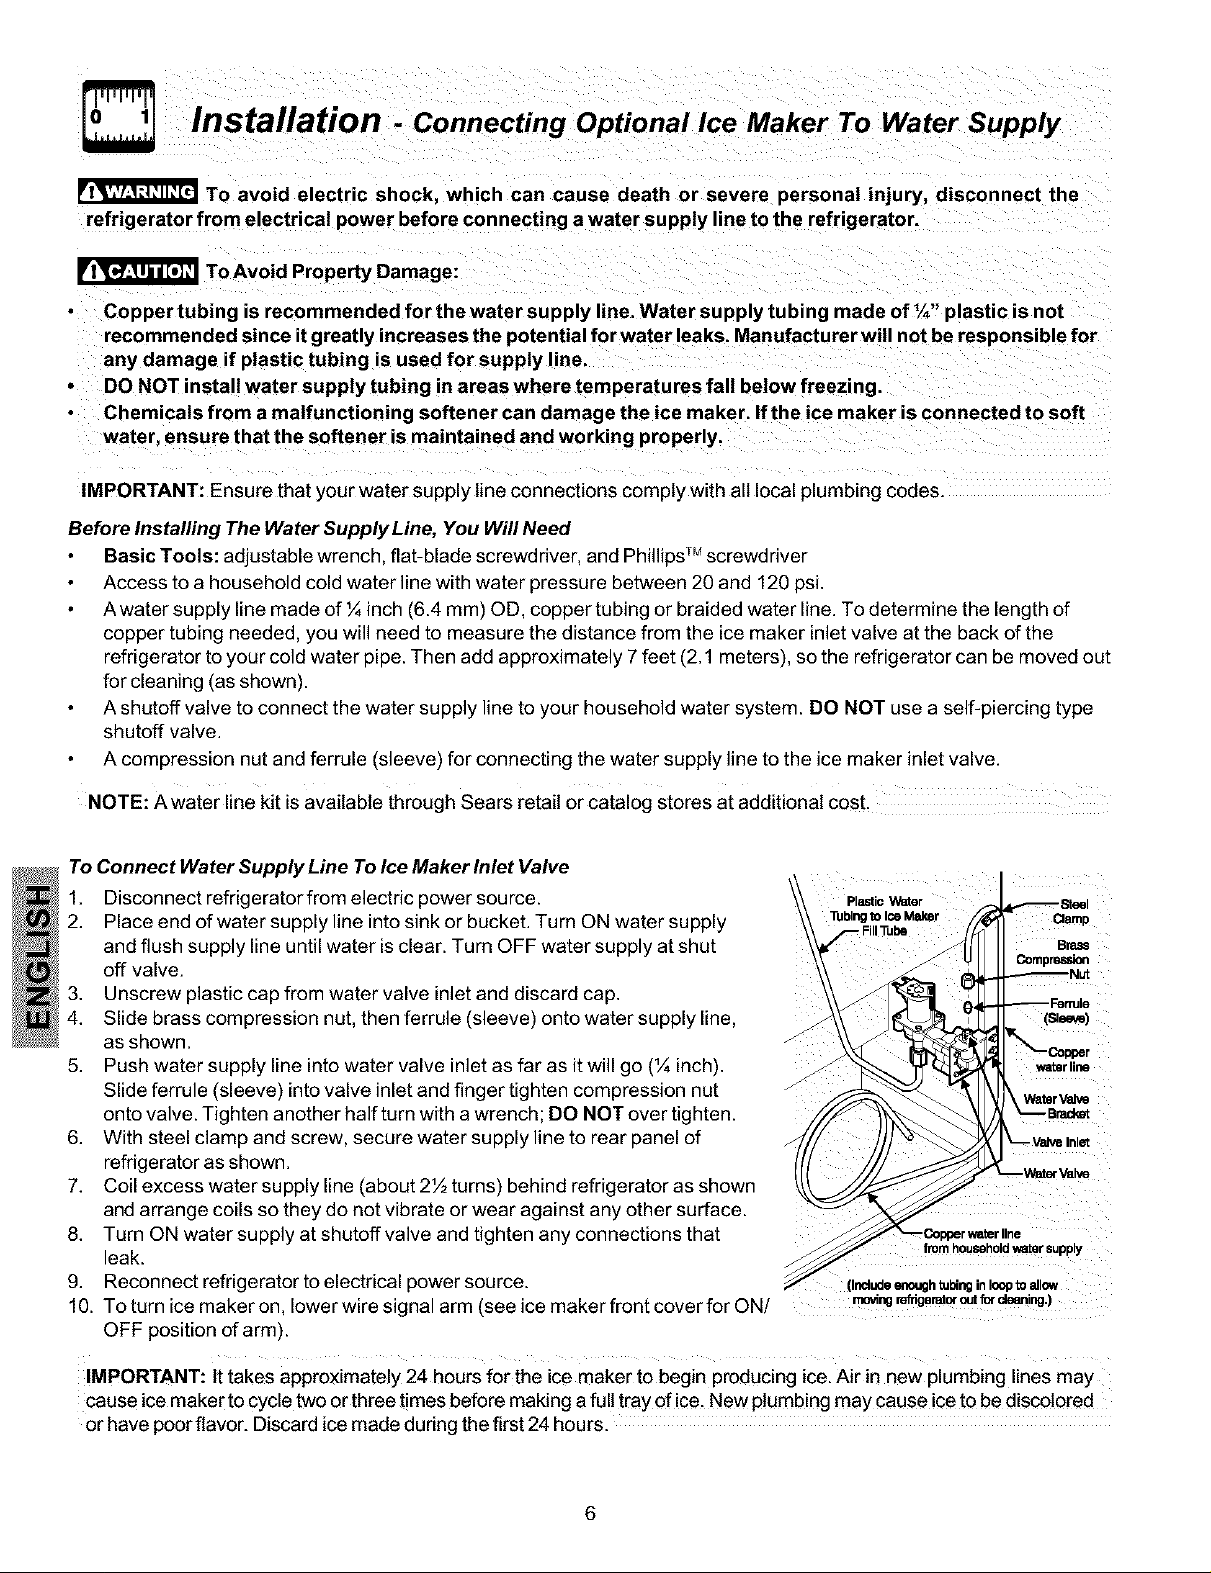
To Connect Water Supply Line To Ice Maker Inlet Valve
1. Disconnect refrigeratorfrom electric power source.
2. Place end of water supply line into sink or bucket. Turn ON water supply
and flush supply line until water is clear. Turn OFF water supply at shut
off valve.
Plastic Water
Tubingto IceMaker
Compressk_
3. Unscrew plastic cap from water valve inlet and discard cap.
4. Slide brass compression nut, then ferrule (sleeve) onto water supply line,
as shown.
5. Push water supply line into water valve inletas far as itwill go (¼ inch).
Slide ferrule (sleeve) intovalve inlet and finger tighten compression nut
water line
WaturValve
onto valve. Tighten another half turn with a wrench; DO NOT over tighten.
6. With steel clamp and screw, secure water supply line to rear panel of
refrigerator as shown.
7. Coil excess water supply line (about 2½ turns) behind refrigerator as shown
and arrange coils so they do not vibrate or wear against any other surface.
8. Turn ON water supply at shutoff valve and tighten any connections that
leak.
9. Reconnect refrigerator to electrical power source.
10. To turn ice maker on, lower wire signal arm (see ice maker front cover for ON/
OFF positionof arm).
IMPORTANT: It takes approximately 24 hours for the ice maker to begin producing ice.Air in new plumbing lines may
cause ice maker to cYcletwo or three times before making a full tray of ice. New plumbingmay cause iceto be discolored
or have poorflavor. Discard ice made during the first 24 hours.
ar_
6
Door Removal and Reversal Instructions
Top
Hinge
Cabinet Ho
Plugs
rqH_
Hinge
Screw
Screws Top Hinge
ToolsNecessory:
Phllllm= heod
QMQdrox "IOQQ
screwddver WrenchSet
Cover
I__ Top Hinge
Hinge Hole = _ Handle Hole
Door
Hinge
Pin
Canter
Handle
Hole
i kugs
Door Stop Door
Screw. _ Stop
"_ Washer
_ / Toe Grille
of
Adjustable
'_kench
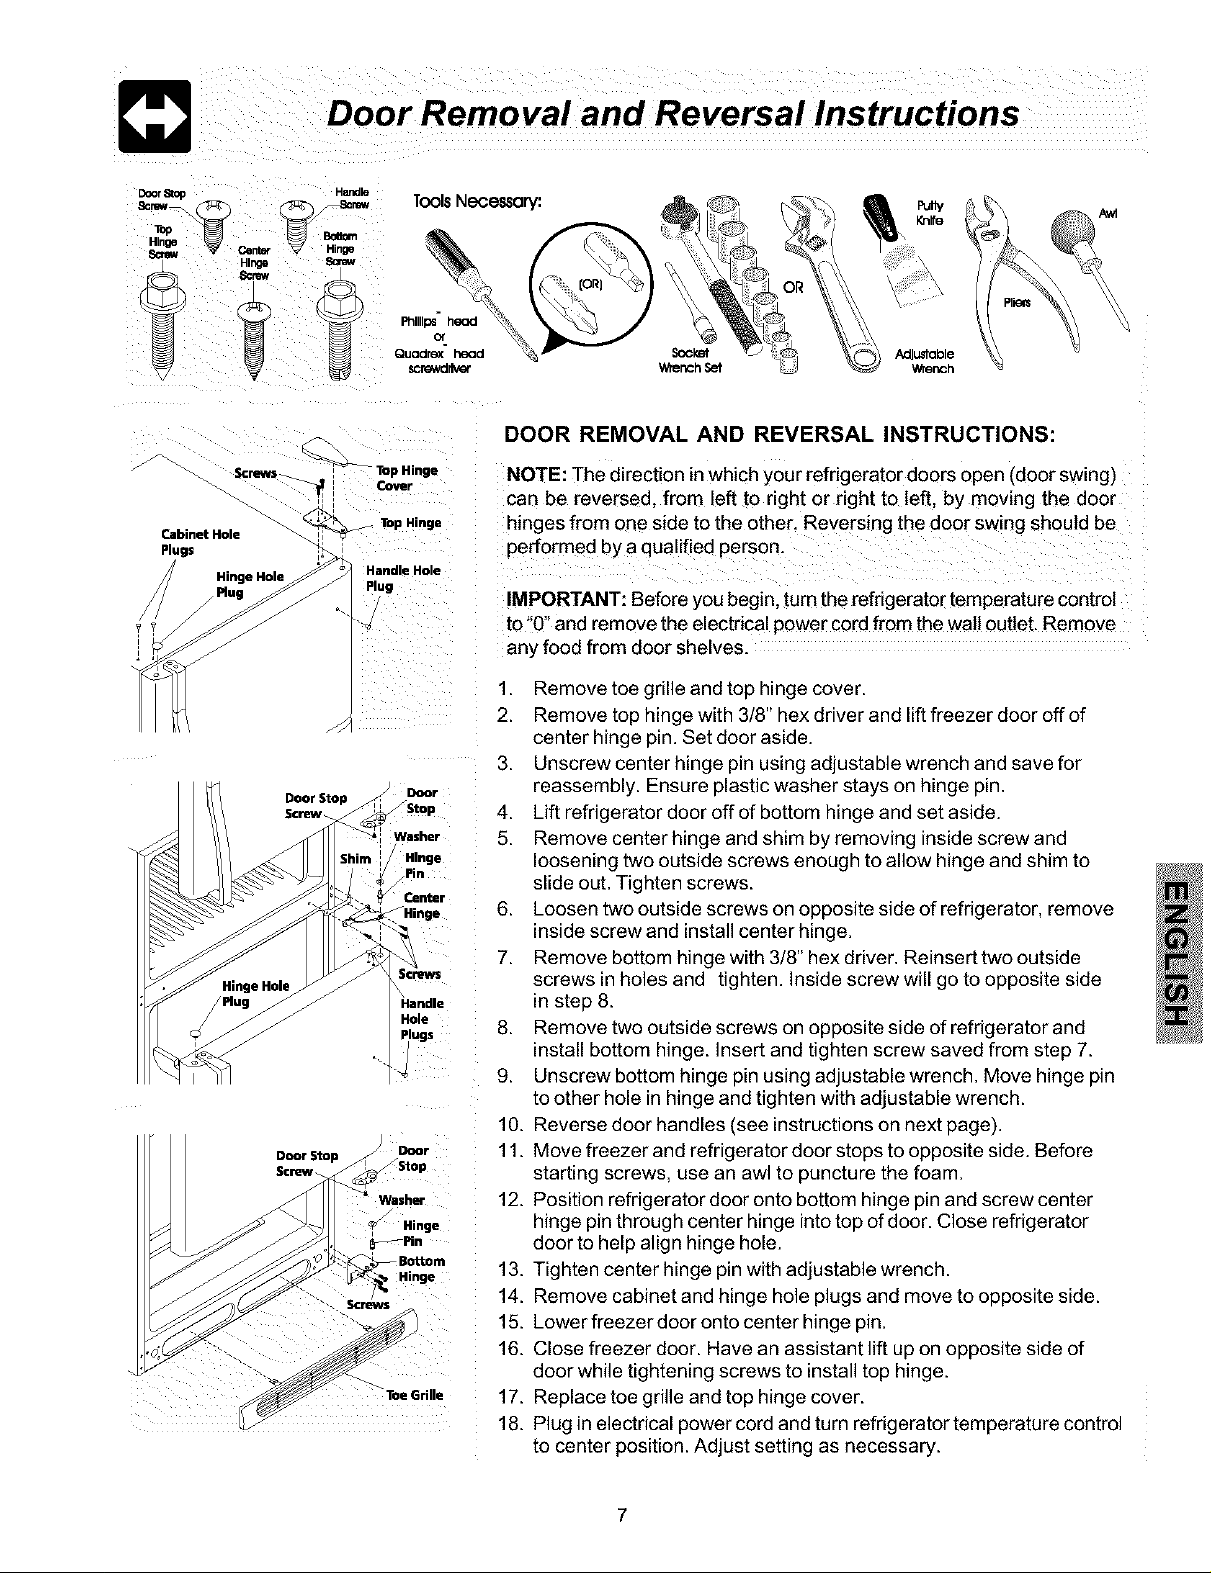
DOOR REMOVAL AND REVERSAL INSTRUCTIONS:
NOTE: The direction inwhich your refngerator doors open (door swing)
can be reversed, from left to right or right to left. by moving the door
hinges from one side to the other. Reversing lhe door swing should be
performed by a qualified person.
IMPORTANT: Before you begin, turn the refrigerator temperature control
to "0" and remove the electrical power cord from the wall outlet. Remove
any food from door shelves.
1. Remove toe grille and top hinge cover.
2. Remove top hinge with 3/8" hex driver and lift freezer door off of
center hinge pin. Set door aside.
3. Unscrew center hinge pin using adjustable wrench and save for
reassembly. Ensure olastic washer stays on hinge pit
4. Lift refrigerator door off of bottom hinge and set aside.
5. Remove center hinge and shim by removing inside screw and
loosening two outside screws enough to allow hinge and shim to
slide out. Tighten screws.
6. Loosen two outside screws on opposite side of refrigerator, remove
inside screw and installcenter hinge.
7. Remove bottom hinge with 3/8" hex driver. Reinsert two outside
screwsin holes and tighten. Inside screw will go to opposite side
in steo 8
8. Remove two outside screws on opposite side of refrigerator and
install bottom hinge. Insert and tighten screw saved from step 7.
9. Unscrew bottom hinge pin using adjustable wrench. Move hinge Dm
to other hole in hinge and tighten with adjustable wrench.
10. Reversedoorhandles see instructionson next page).
11. Move freezer and refrigerator door stops to opposite side. Before
starting screws, use an awl to puncture the foam.
12. Position refrigerator door onto bottom hinge pin and screw center
hinge pin through center hinge into top of door. Close refrigerator
door to help align hinge hole.
13. Tighten center hinge pin with adjus[able wrench.
14. Remove cabinet and hinge hole plugs and move to opposite side.
15. Lower freezer door onto center hinge pin.
16. Close freezer door. Have an assistant lift up on opposite side of
door while tightening screws to installtop hinge.
17. Replace toe grille and top hinge cover.
18. Plug in electrical _ower cord and turn refrigerator temperature control
to center position. Adjust setting as necessary.

m
Door Removal and Reversal Instructions (continued)
NOTE: Some models have "pocket" handles, which are recessed into the sides of the door. On these models, only the
hinges will need to be reversed.
TO REMOVE FREEZER HANDLE:
_Handles may De easier to reverse while doors are off.
1. Remove two screws attaching qandle to bottom of freezer door.
2. Swing bottom of handle away from the door and slide handle straight
UDand off of dovetail button.
3. Remove screw and dovetail button and installon other side. moving
qole plugs from corresponding holes to opposite side.
TO ATTACH FREEZER HANDLE:
1. Start with handle offset away from door. Place top of handle over
dovetail button, swing handle into an upnght position and pull
downward, locking _t_ntoplace.
2. Secure bottom of handle with two screws removed earlier
TRIM REMOVAL (FULL-LENGTH TRIM MODELS ONLY)
In some models, the refrigerator door has a full length trim piece which continues from the bottom of the handle to the
bottom of the door. The top of the trim fits around the base of the handle. An adhesive "tdm lock" ispositioned about halfway
down. The bottom of the trim is held inplace by either an adhesive trim lock, or a tdm lock with two prongs inserted into a
hole on the face of the door.
LockHandle
over
TO REMOVE TRIM:
1. Remove trim by gently pulling trim lock areas out and away from door.
2. When trim isfree from door, slide the trim straight down and away from base of handle.
NOTE: For models with short handle trim, remove by sliding trim straight down and off of handle bracket.
TO REMOVE REFRIGERATOR HANDLE:
Handles may be easier to reverse while doors are off.)
1. Remove two screws attaching handle to top of refrigerator door.
2. Swing top of handle away from door and slide handle down and off of
dovetail button.
3. Remove screw and dovetail button and install on other side, moving
hole plugs from corresponding holes to opposite side.
TO ATTACH REFRIGERATOR HANDLE:
1. Start with handle offset away from door. Place bottom of handle over
dovetail button, swing handle intoan upright position and pull upward,
locking it into place.
2. Secure top of handle with screws.
TO ATTACH TRIM:
1. Slide both tdm locks out of trim.
2. Insert new adhesive trim locks contained in your literature pack.
NOTE: Trim lock must be removed and installed by sliding over the
two donut shaped areas.
3. Install trim to handle by sliding over base of handle. Carefully align
trim and press down at trim lock locations.
4. Replace hole plug on opposite side. Use rubbing alcohol to remove
any adhesive residue from old trim lock locations.
Dovetail
uttorl
Full
I
Lock Handle
ovsr
Dovetail
__.Adhesive
_Trim Lock
Trim
8
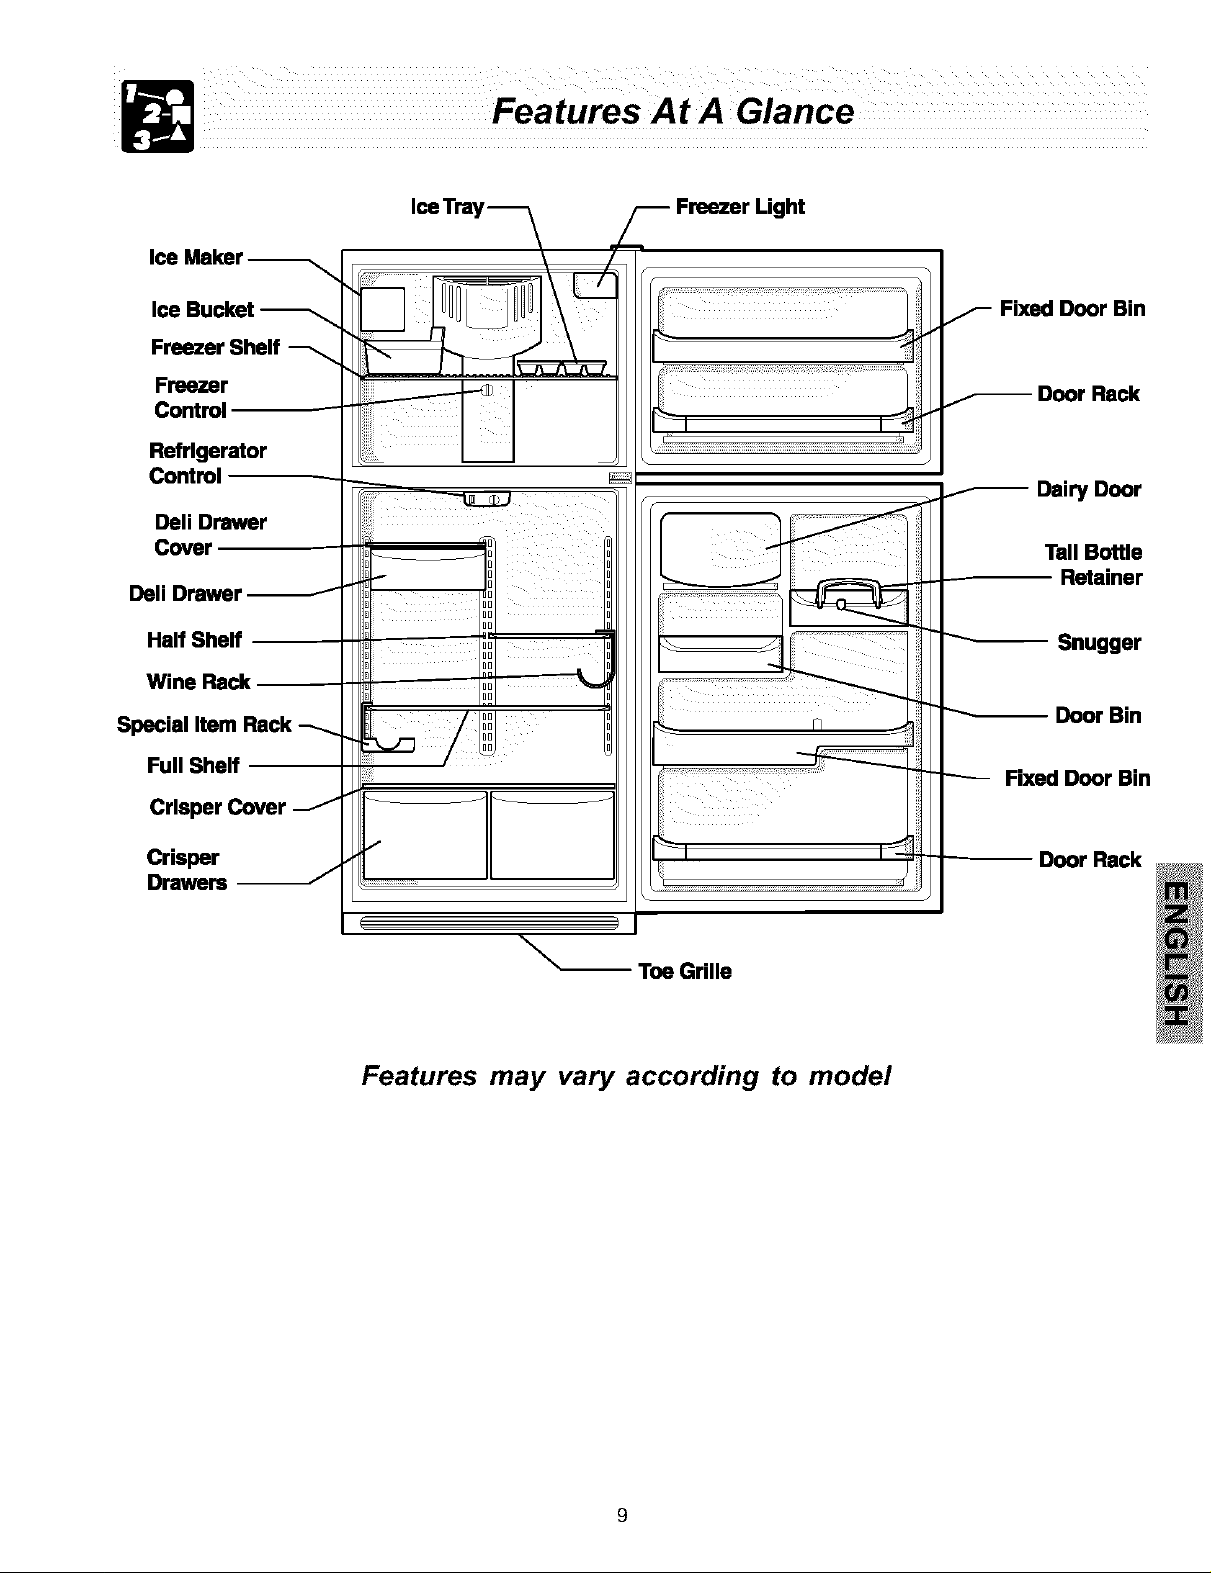
Ice
Freezer Light
Ice Bucket
Freezer Shelf
Freezer
Control
Refrigerator
Control
Dell Drawer
Cover
Dell Drawer
Half Shelf
Wine Rack
Special Item
Full Shelf
Crisper
Drawers
Fixed Door Bin
Door Rack
Dairy Door
Tall Bottle
Retainer
Snugger
Door Bin
Fixed Door Bin
Door Rack
_Toe Grille
Features may vary according to model

COOL DOWN PERIOD
To ensu re safe food storage, allow the refrigerator to operate with the doors closed for at least 8 to 12 hours before loading
it with food.
REFRIGERATOR & FREEZER CONTROLS
NOTE: When first setting the controls or when changing a setting, wait 24 hours for the _emperature to stabilize oefore
making additional changes.
TEMPERATURE ADJUSTMENT
NOTE: When first turning refrigerator on. move refrigerator
and freezer controls to V which is the recommended
initial setting. After 24 hours, adjust the controls as needed.
Adjust temperature gradually: move the knob in small
increments, allowing the temperature to stabilize,
For colder temperatures, turn the knob towards Cold.
Forwarmer temperatures, turn the knob towards Warm
Turning the refrigerator comrol will change temperatures in both
compartments. For examole, ifthe refrigerator control is turned
to a colder setting, the freezer control may nave to be adjusted
to a warmer setting. Turning the freezer control will change
only the freezer temoerature.
To maintain temueratures, a fan circulates air in the refrigerator
and freezer compartments. For good circulation do not block
cold air vents with food items.
Recommended
Freezer Control ,some models_
Refdgeraror Control isome models_
Ftft,_t
IMPORTANT: Turning
Lhe refrigerator temp-
erature control to "0"
c d
pressor, but does not
[urns off the com-
disconnect the power to
Lhelight bulb and other
J
electrical components.
Refrigerator & Freezer Control some models
TEMPERATURE ADJUSTMENT GUIDE
If Refrigerator compartment Is Too Warm Turn Refrigerator Control Slightly Towards Cold.
If Refrigerator compartment Is Too Cold Turn Refrigerator Control Slightly Towards Warm.
If Freezer compartment Is Too Warm Turn Freezer Control Slightly Towards Colder.
If Freezer compartment Is Too Cold Turn Freezer Control Slightly Towards Warmer.
To Turn Refrigerator Off Turn Refrigerator Control To 0.
10
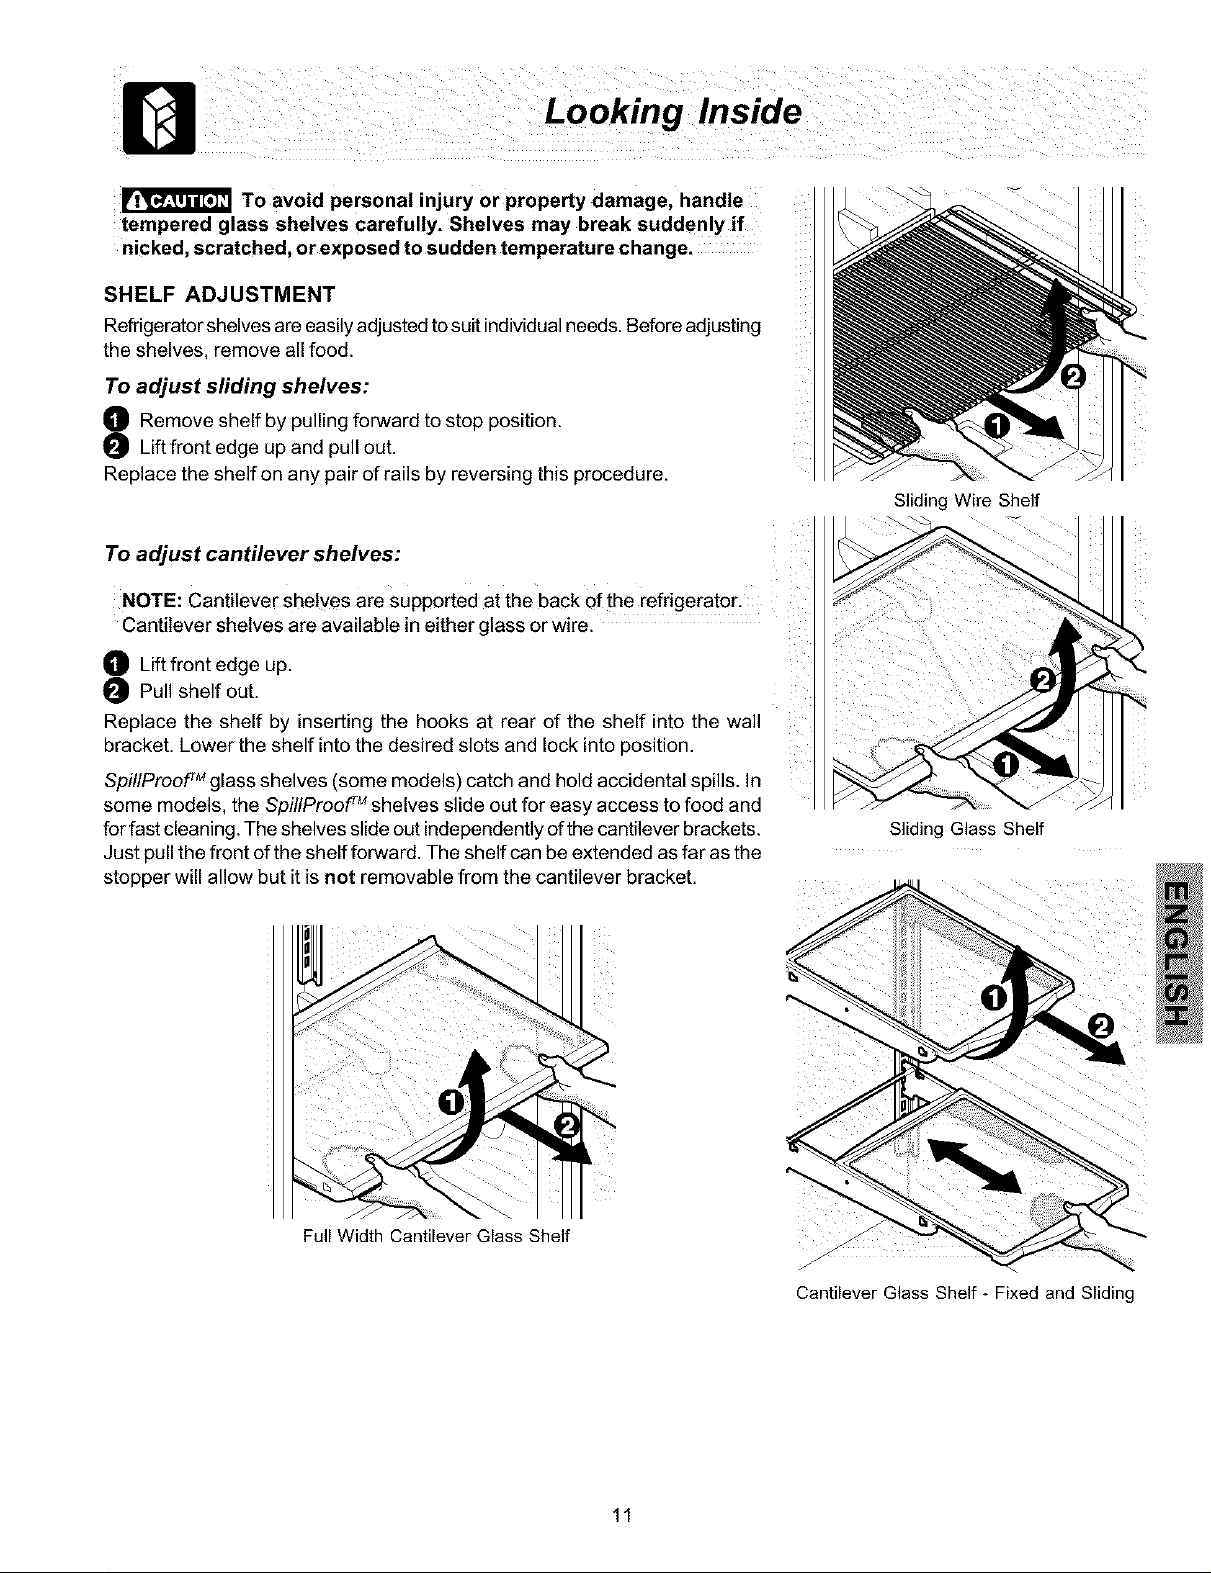
To avoid personal injury or property damage, handle
tempered glass shelves carefully. Shelves may break suddenly if
nicked, scratched, or exposed to sudden temperature change.
SHELF ADJUSTMENT
Refrigerator shelves are easily adjusted to suit individual needs. Before adjusting
the shelves, remove all food.
To adjust sliding shelves:
O Remove shelf by pulling forward to stop position.
Lift front edge up and pull out.
Replace the shelf on any pair of rails by reversing this procedure.
To adjust cantilever shelves:
NOTE: Cantilever shelves are Supported at the back of the refrigerator.
Cantilever shelves are available in either glass or wire.
Lift front edge up.
Pull shelf out.
Replace the shelf by inserting the hooks at rear of the shelf into the wall
bracket. Lower the shelf into the desired slots and lock into position.
SpillProoF Mglass shelves (some models) catch and hold accidental spills. In
some models, the SpillProof rMshelves slide out for easy access to food and
for fast cleaning. The shelves slide oat independently of the cantilever brackets.
Just pull the front of the shelf forward. The shelf can be extended as far as the
stopper will allow but it is not removable from the cantilever bracket.
Sliding Wire Shelf
Sliding Glass Shelf
Full Width Cantilever Glass Shelf
Cantilever Glass Shelf - Fixed and Sliding
11
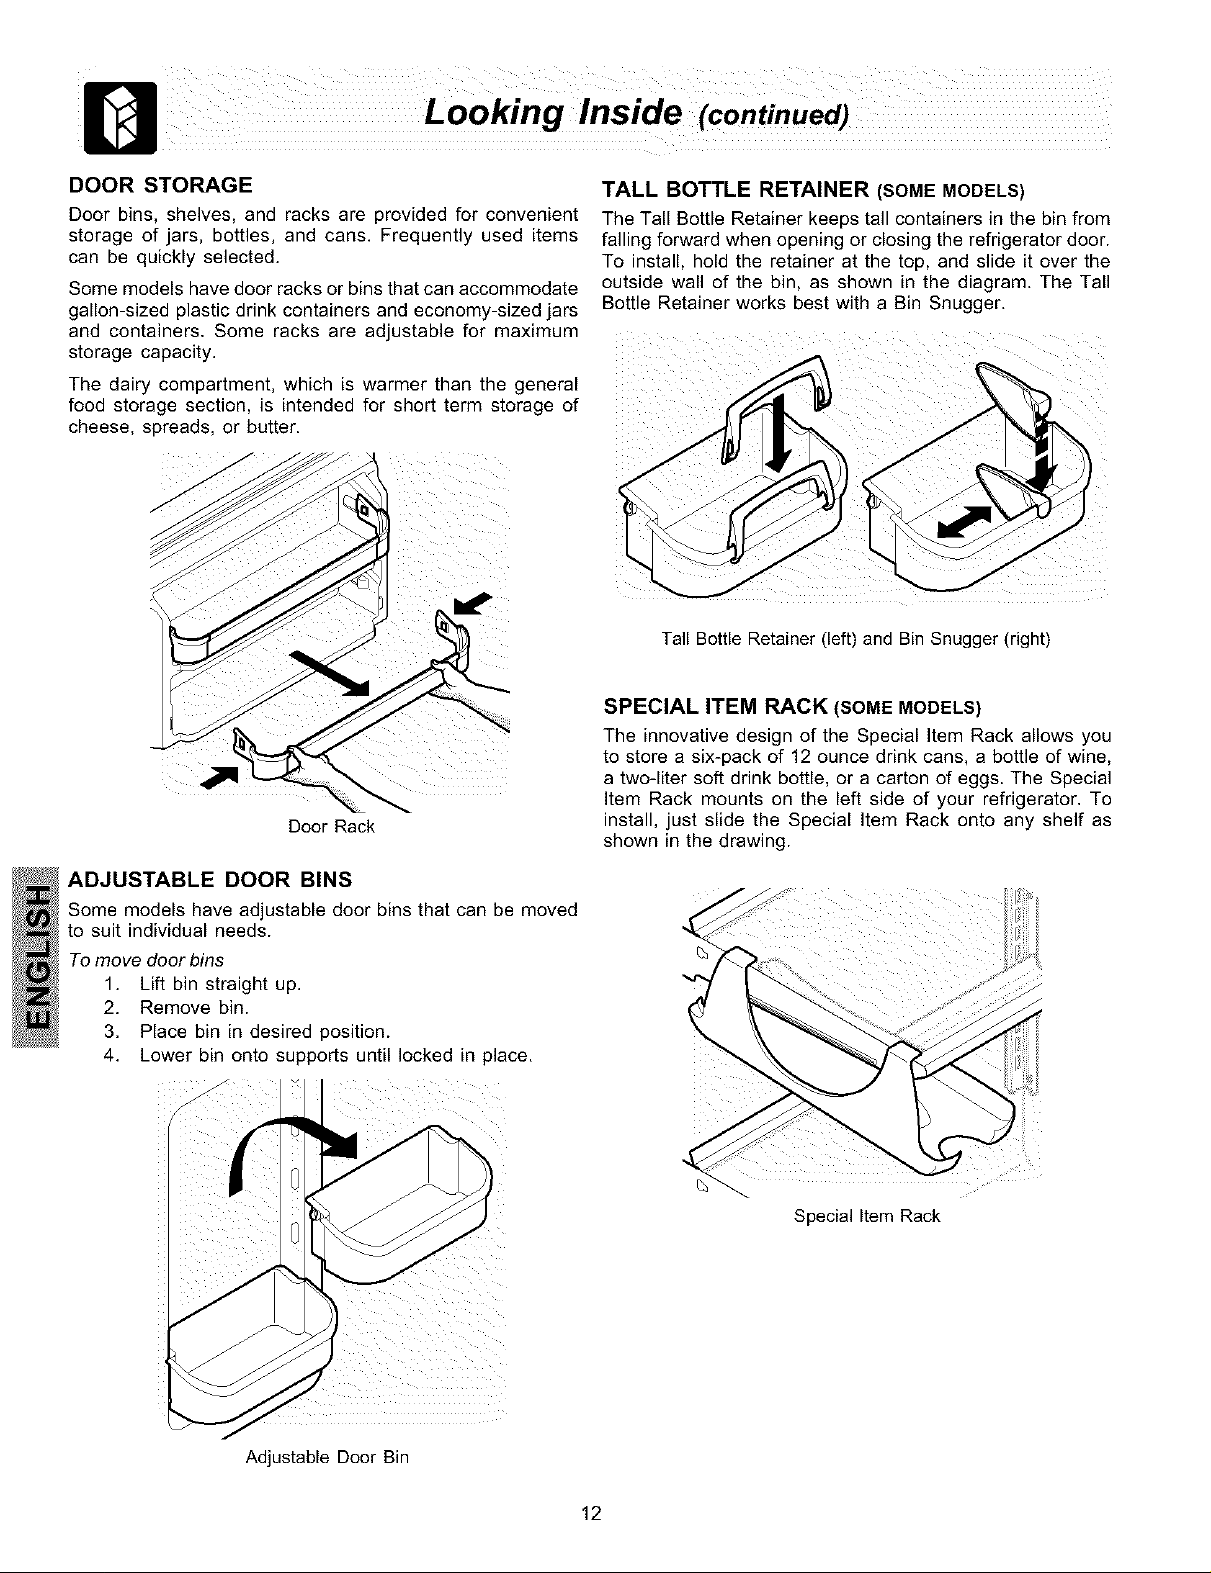
DOOR STORAGE
Door bins, shelves, and racks are provided for convenient
storage of jars, bottles, and cans. Frequently used items
can be quickly selected.
Some models have door racks or bins that can accommodate
gallon-sized plastic drink containers and economy-sized jars
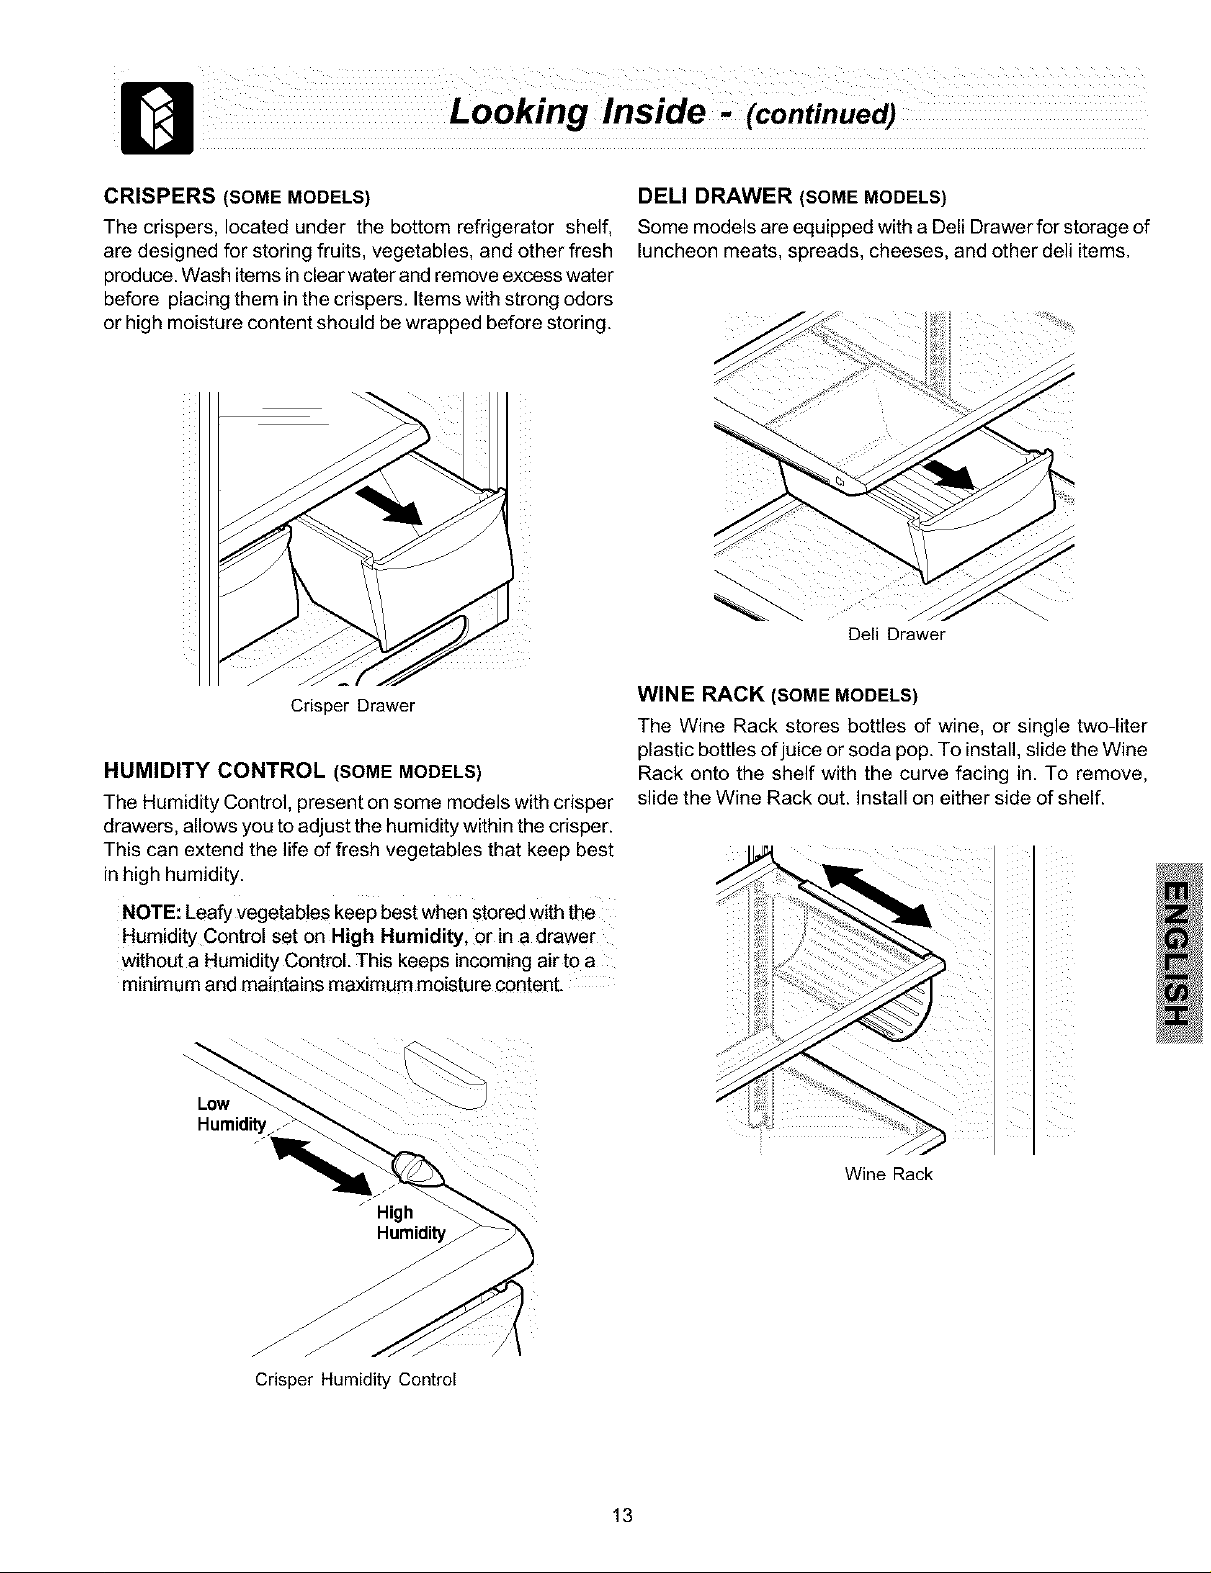
TALL BOTTLE RETAINER (SOME MODELS)
The Tall Bottle Retainer keeps tall containers in the bin from
falling forward when opening or closing the refrigerator door.
To install, hold the retainer at the top, and slide it over the
outside wall of the bin, as shown in the diagram. The Tall
Bottle Retainer works best with a Bin Snugger.
storageandconta,nerScapacitySomeracksareadjustab,eformaximum
The dairy compartment, which is warmer than the general
food storage section, is intended for short term storage of I
cheese, spreads, or butter.
Tall Bottle Retainer (left) and Bin Snugger (right)
SPECIAL ITEM RACK (SOME MODELS)
The innovative design of the Special Item Rack allows you
to store a six-pack of 12 ounce drink cans, a bottle of wine,
a two-liter soft drink bottle, or a carton of eggs. The Special
Item Rack mounts on the left side of your refrigerator. To
Door Rack
install, just slide the Special Item Rack onto any shelf as
shown in the drawing.
ADJUSTABLE DOOR BINS
Some models have adjustable door bins that can be moved
to suit individual needs.
To move door bins
1. Lift bin straight up.
2. Remove bin.
3. Place bin in desired position.
4. Lower bin onto supports until locked in place.
Adjustable Door Bin
Special Item Rack
12
CRISPERS (SOME MODELS)
The crispers, located under the bottom refrigerator shelf,
are designed for storing fruits, vegetables, and other fresh
produce. Wash items in clear water and remove excess water
before placing them in the crispers. Items with strong odors
or high moisture content should be wrapped before storing.
I
DELl DRAWER (SOME MODELS)
Some models are equipped with a Dell Drawer for storage of
luncheon meats, spreads, cheeses, and other dell items.
Dell Drawer
Crisper Drawer
HUMIDITY CONTROL (SOME MODELS)
The Humidity Control, present on some models with crisper
drawers, allows you to adjust the humidity within the crisper.
This can extend the life of fresh vegetables that keep best
inhigh humidity.
NOTE: Leafy vegetables keeP best when stored with the
Humidity Control set on High Humidity, or in a drawer
without a Humidity Control. This keeps incomingair to a
minimum and maintains maximum moisture content.
Low
Humidity_
High
Humidit
WINE RACK (SOME MODELS)
The Wine Rack stores bottles of wine, or single two-liter
plastic bottles ofjuice or soda pop. To install, slide the Wine
Rack onto the shelf with the curve facing in. To remove,
slide the Wine Rack out. Install on either side of shelf.
Wine Rack
Crisper Humidity Control
13
Ice Service
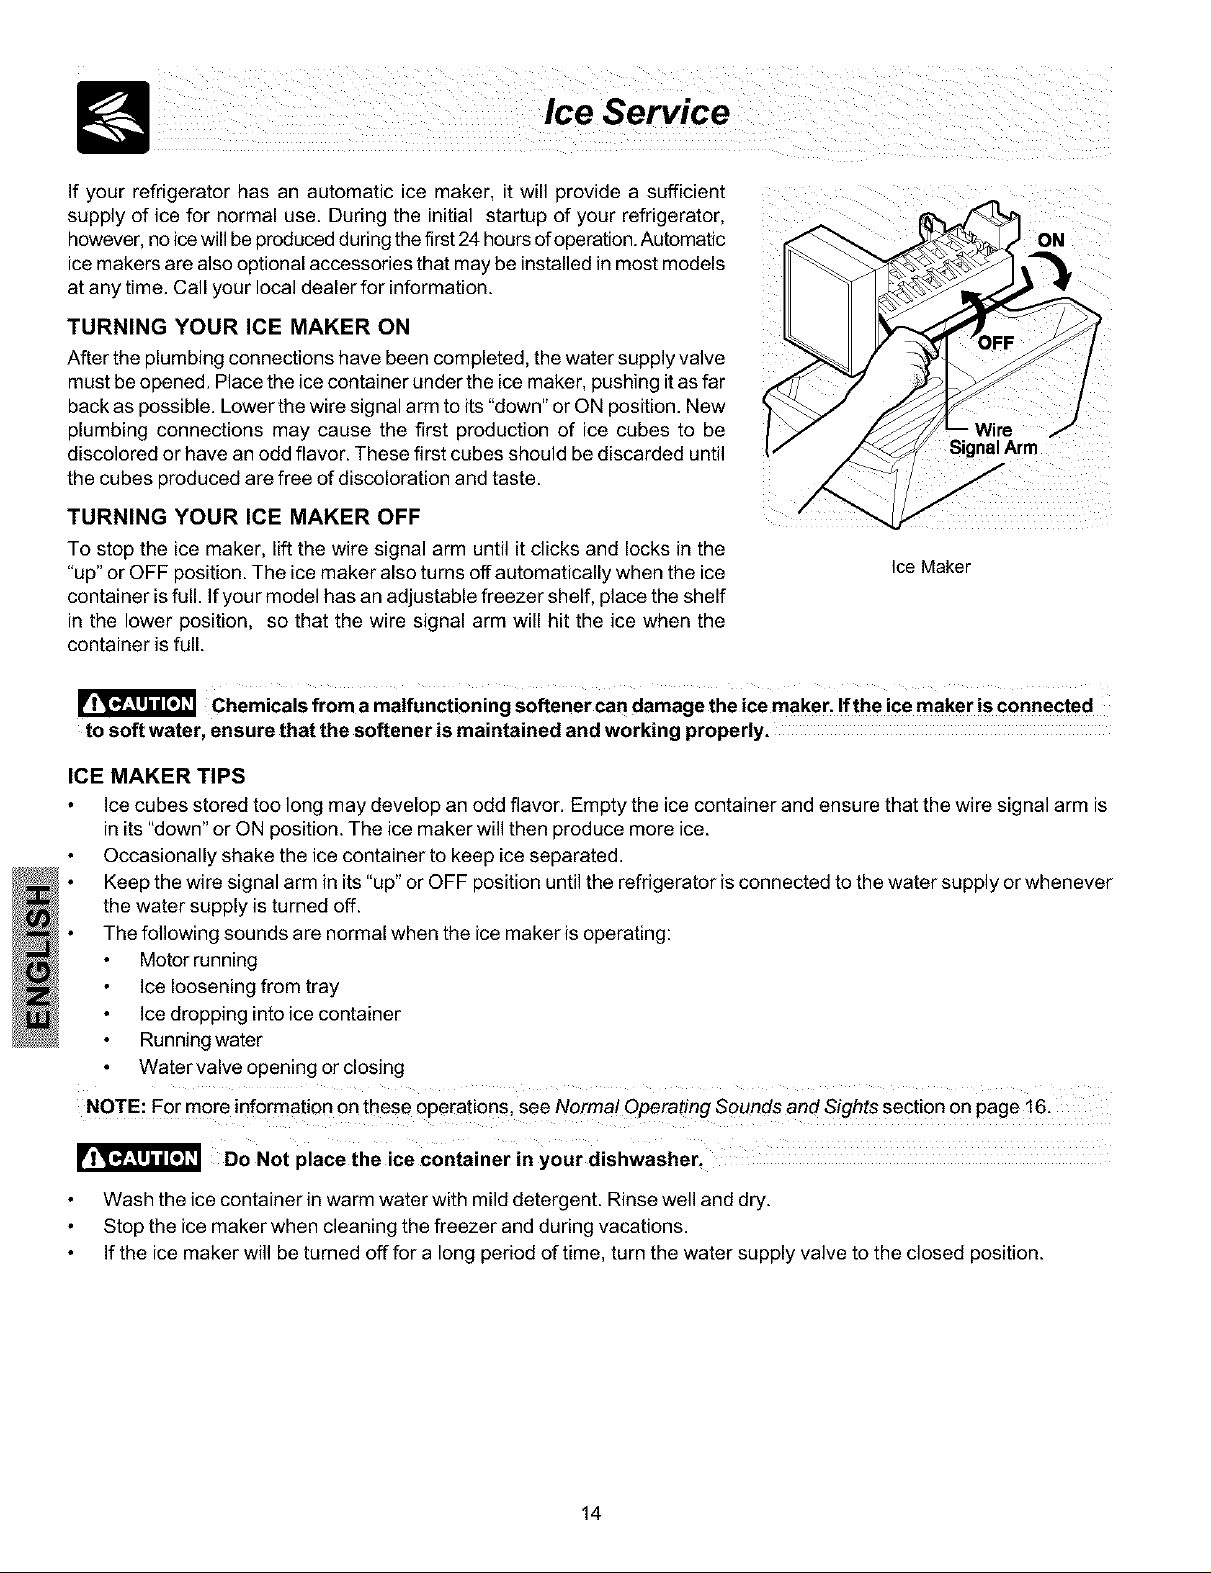
If your refrigerator has an automatic ice maker, t will provide a sufficient
supply of ice for normal use. During the nitial startap of your refrigerator.
however, no ice will be produced during the first 24 hours ofoperation. Automatic
ice makers are also optional accessories that may be installed in most models
at any time. Call your local dealer for information.
TURNING YOUR ICE MAKER ON
After the plumbing connections have been completed, the water supply valve
must be opened. Place the ice container under the ice maker, pushing it as far
back as possible. Lower the wire signal arm to its "down" or ON position. New
plumbing connections may cause the first production of ice cubes to be
discolored or have an odd flavor. These first cubes should be discarded until
the cubes produced are free of discoloration and taste.
TURNING YOUR ICE MAKER OFF
To stop the ice maker, lift the wire signal arm until it clicks and locks in the
"up" or OFF position. The ice maker also tu ms off automatically when the ice
container is full. If you r model has an adjustable freezer shelf, place the shelf
in the lower position, so that the wire signal arm will hit the ice when the
container is full.
Ice Maker
Chemicals from a malfunctioning softener can damage the ice maker. If the icemaker is connected
to soft water, ensure that the softener is maintained and working properly.
ICE MAKER TIPS
Ice cubes stored too long may develop an odd flavor. Empty the ice container and ensure that the wire signal arm is
in its "down" or ON position. The ice maker will then produce more ice.
Occasionally shake the ice container to keep ice separated.
Keep the wire signal arm in its "up" or OFF position until the refrigerator is connected to the water supply or whenever
the water supply is turned off.
The following sounds are normal when the ice maker is operating:
Motor running
Ice loosening from tray
Ice dropping into ice container
Running water
Water valve opening or closing
NOTE: For more information on these Operations, see Normal Operating Sounds and Sights section on page i 6.
Do Not place the ice container in your dishwasher,
Wash the ice container in warm water with mild detergent. Rinse well and dry.
Stop the ice maker when cleaning the freezer and during vacations.
If the ice maker will be turned off for a long period of time, turn the water supply valve to the closed position.
14
Food Storage&Energy Saving Ideas
FOOD STORAGE IDEAS
Fresh Food Storage
The fresh food compartment should be kept between 34° F and 40 ° F with an optimum temperature of 37 ° F.
Avoid overcrowding the refrigerator shelves. This reduces the circulation of air around the food and results in uneven
cooling.
Fruits and Vegetables
Storage inthe crisper drawers traps moisture to help preserve the fruit and vegetable quality for longertime periods.
Meat
Raw meat and poultry should be wrapped securely so leakage and contamination of other foods or surfaces does not
Occur.
Frozen Food Storage
The freezer compartment should be kept at 0° F or lower.
A freezer operates most efficiently when it is at least 2/3 full.
Packaging Foods for Freezing
To minimize dehyd ration and quality deterioration, use aluminum foil, freezer wrap, freezer bags or airtight containers.
Force as much air out of the packages as possible and seal them tightly. Trapped air can cause food to dry out,
change color, and develop an off-flavor (freezer burn).
Wrap fresh meats and poultry with suitable freezer wrap prior to freezing.
Do not refreeze meat that has completely thawed.
Loading the Freezer
Avoid adding too much warm food to the freezer at one time. This overloads the freezer, slows the rate of freezing,
and can raise the temperature of frozen foods.
Leave a space between the packages, so cold air can circulate freely, allowing food to freeze as quickly as possible.
Avoid storing hard-to-freeze foods such as ice cream and orange juice on the freezer door shelves. These foods are
best stored in the freezer interior where the temperature varies less.
ENERGY SAVING IDEAS
Locate the refrigerator in the coolest part of the room, out of direct sunlight,
and away from heating ducts or registers. Do not place the refrigerator
next to heat-producing appliances such as a range, oven, or dishwasher.
If this is not possible, a section of cabinetry or an added layer of insulation
between the two appliances will help the refrigerator operate more
efficiently.
Level the refrigerator so that the doors close tightly.
• Refer to this Use & Care Manual for the suggested temperature control
settings.
Periodic cleaning of the condenser will help the refrigerator run more
efficiently. See the Care and Cleaning Chart on page 17.
Do not overcrowd the refrigerator or block cold air vents. Doing so causes
the refrigerator to run longer and use more energy.
Cover foods and wipe containers dry before placing them in the
refrigerator. This cuts down on moisture build-up inside the unit.
Organize the refrigerator to reduce door openings. Remove as many
items as needed at one time and close the door as soon as possible.
15

UNDERSTANDING THE SOUNDS YOU MAY HEAR A.
Your new high-efficiency refrigerator may make unfamiliar
sounds. Don't be alarmed, these are all normal sounds. Hard
surfaces, such as vinyl or wood floors, walls, and kitchen
cabinets may make sounds more noticeable. Listed below
are descriptions of some of the most common sounds you
may hear, and what is causing them.
NOTE: Rigid foam insulation is Very energy efficient,
but is not a sound insulator.
Evaporator
The flow of refrigerant through the evaporator may
create a boiling or gurgling sound.
B. Evaporator Fan
You may hear air being forced through the refrigerator
by the evaporator fan.
C. Defrost Heater
During defrost cycles, water dripping onto the defrost
heater may cause a hissing or sizzling sound. After
defrosting, a popping sound may occur.
IMPORTANT: During the automatic defrost cycle, you
may notice a red glow in the vents on the back wall of
your freezer compartment: This is norma! during the
defrost cycle.
D. Automatic Ice Maker
If your refrigerator is equipped with an automatic ice
maker, you will hear ice cubes falling into the ice bin.
E. Cold Control & Defrost Timer
These parts can produce a snapping or clicking sound
when turning the refrigerator on and off. The timer also
produces sounds similar to an electric clock.
F. Condenser Fan
If condenser coils are located underneath your
refrigerator as shown in the drawing at the left, you
have a condenser fan. You may hear air being forced
through the condenser by the condenser fan.
G. Compressor
Modern, high-efficiency compressors operate much
faster than older models. The compressor may have a
high-pitched hum or pulsating sound.
H. Water Valve
If your refrigerator is equipped with an automatic ice
maker, you will hear a buzzing sound as the water valve
opens to fill the ice maker during each cycle.
L Drain Pan (Nonremovable)
You may hear water running into the drain pan during
the defrost cycle. The drain pan will be located on top
of the compressor for air-cooled condensers (black coils
on back of refrigerator).
J. Condenser Coils (Fan-cooled models only)
16
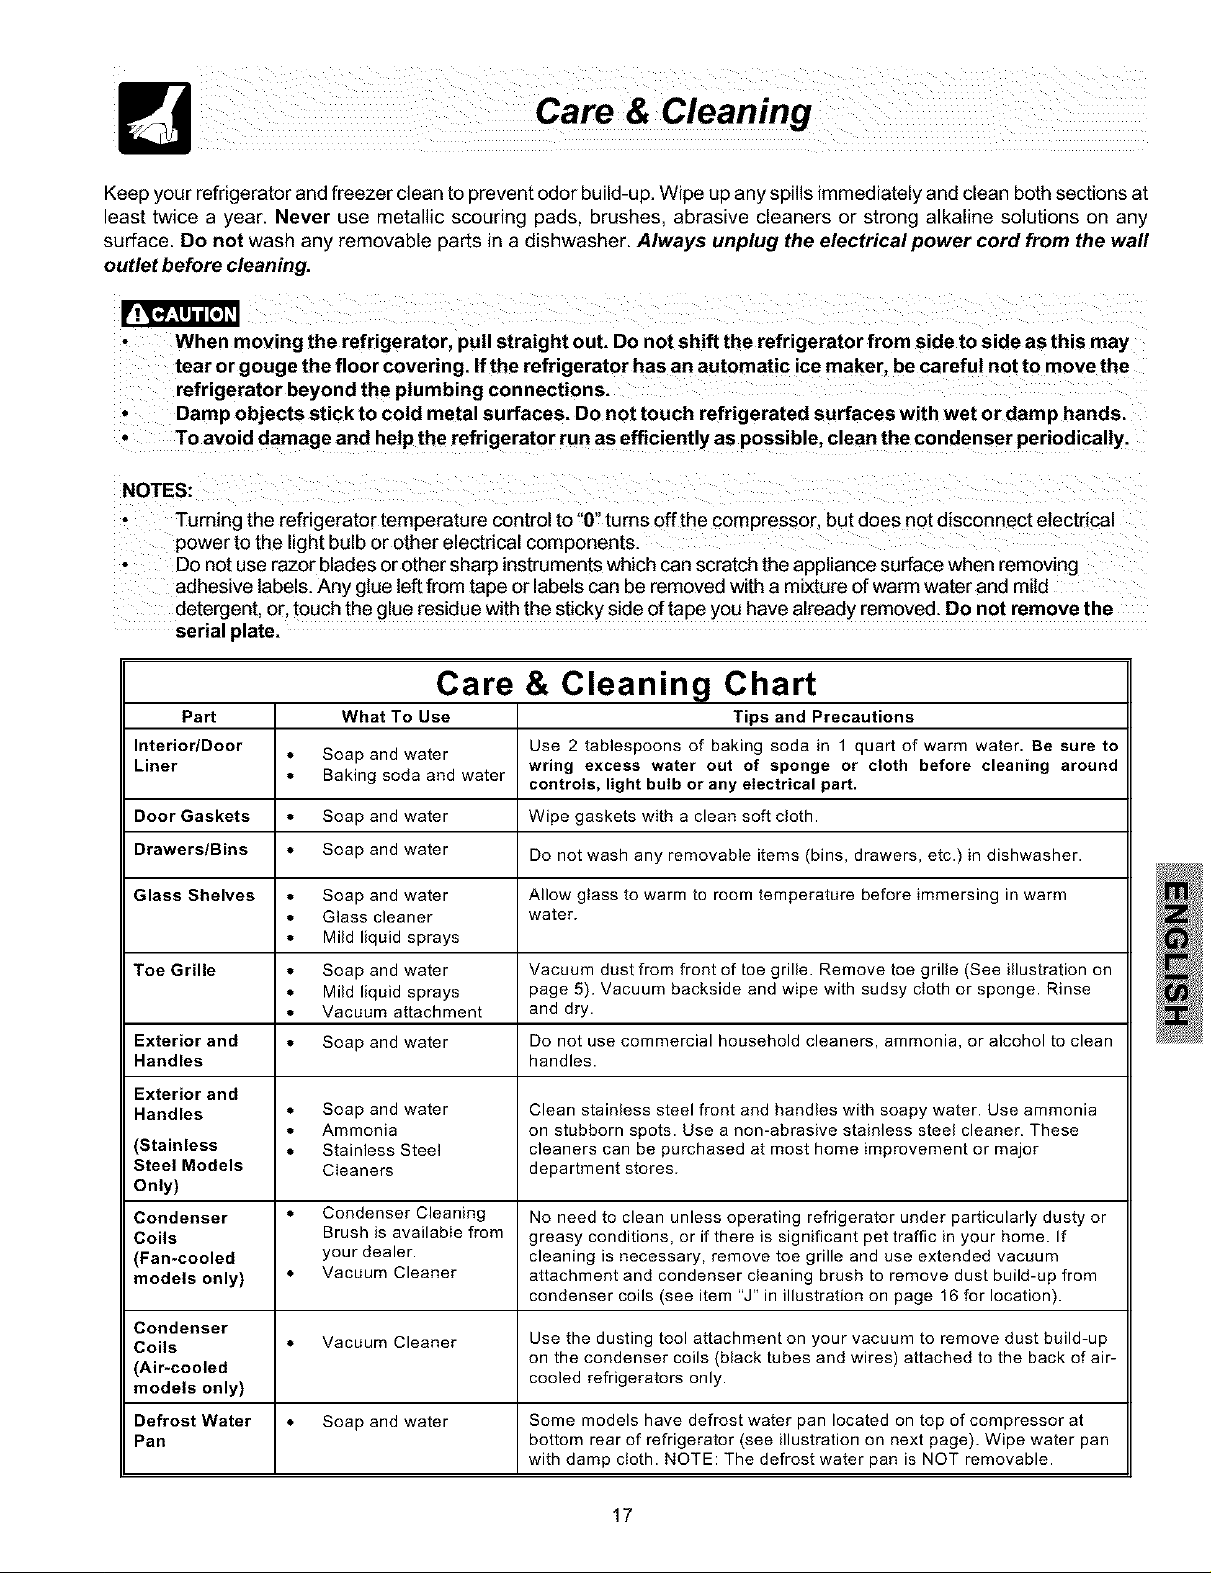
Keepyourrefrigeratorandfreezercleantopreventodorbuild-up.Wipeupanyspillsimmediatelyandcleanbothsectionsat
leasttwicea year.Neverusemetallicscouringpads,brushes,abrasivecleanersorstrongalkalinesolutionsonany
surface.Do not wash any removable parts in a dishwasher. Always unplug the electricalpower cord from the wall
outlet before cleaning.
When moving the refrigerator, pull straight out. Do not shift the refrigerator from side to side as this may
tear or gouge the floor covering. Ifthe refrigerator has an automatic ice maker, be careful not to move the
refrigerator beyond the plumbing connections.
Damp objects stick to cold metal surfaces. Do not touch refrigerated surfaces with wet or dam p hands.
To avoid damage and help the refrigerator run as efficiently as possible, clean the condenser periodically.
NOTES:
Turning the refrigerator temperature control to "O"turns off the compressor, but does not disconnect electrical
power to the light bulb or other electrical components.
Do not use razor blades or other sharp instruments which can scratch the appliance surface when removing
adhesive labels. Any glue left from tape or labels can be removed with a mixture of warm water and mild
detergent, or. touch the glue residue with the sticky side of tape you have already removed. Do not remove the
serial plate.
Care
Part What To Use Tips and Precautions
Interior/Door * Soap and water Use 2 tablespoons of baking soda in 1 quart of warm water. Be sure to
Liner * Baking soda and water controls, light bulb or any electrical part.
Door Gaskets * Soap and water Wipe gaskets with a clean soft cloth.
Drawers/Bins * Soap and water Do not wash any removable items (bins, drawers, etc.) in dishwasher.
Glass Shelves * Soap and water Allow glass to warm to room temperature before immersing in warm
Glass cleaner water.
Mild liquid sprays
Toe Grille • Soap and water Vacuum dust from front of toe grille. Remove toe grille (See illustration on
Mild liquid sprays page 5). Vacuum backside and wipe with sudsy cloth or sponge. Rinse
Vacuum attachment and dry.
Exterior and * Soap and water Do not use commercial household cleaners, ammonia, or alcohol to clean
Handles handles.
Exterior and
Handles * Soap and water Clean stainless steel front and handles with soapy water. Use ammonia
Ammonia on stubborn spots. Use a non-abrasive stainless steel cleaner. These
(Stainless * Stainless Steel cleaners can be purchased at most home improvement or major
Steel Models Cleaners department stores.
Only)
Condenser • Condenser Cleaning No need to clean unless operating refrigerator under particularly dusty or
Coils Brush is available from greasy conditions, or if there is significant pet traffic in your home. If
(Fan-cooled your dealer, cleaning is necessary, remove toe grille and use extended vacuum
models only) * Vacuum Cleaner attachment and condenser cleaning brush to remove dust build-up from
Condenser
Coils * Vacuum Cleaner Use the dusting tool attachment on your vacuum to remove dust build-up
(Air-cooled
models only) cooled refrigerators only.
& Cleaning Chart
wring excess water out of sponge or cloth before cleaning around
condenser coils (see item "J" in illustration on page 16 for location).
on the condenser coils (black tubes and wires) attached to the back of air-
Defrost Water * Soap and water Some models have defrost water pan located on top of compressor at
Pan bottom rear of refrigerator (see illustration on next page). Wipe water pan
with damp cloth. NOTE: The defrost water pan is NOT removable.
17
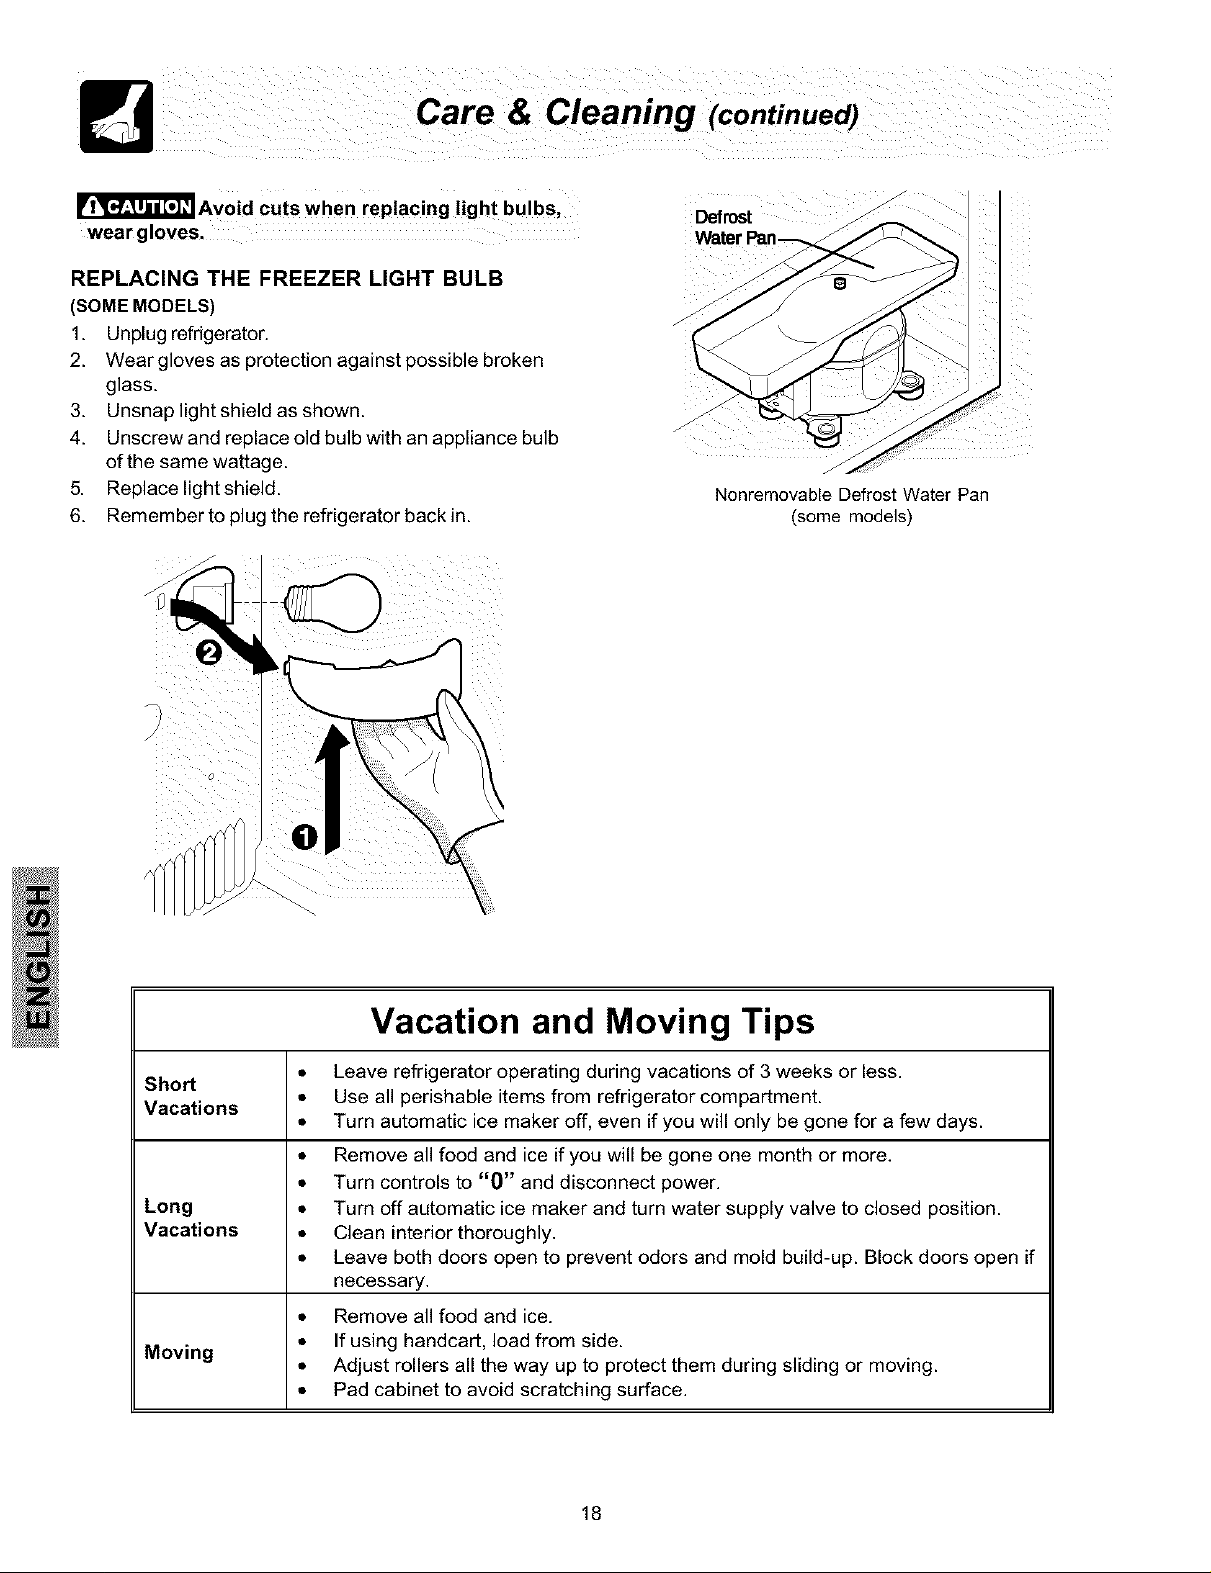
Care & Cleaning (continued)
r_=_J_ Avoid cuts when replacing light bulbs,
wear gloves,
REPLACING THE FREEZER LIGHT BULB
(SOMEMODELS)
1. Unplug refrigerator.
2. Wear gloves as protection against possible broken
glass.
3. Unsnap light shield as snown
4. Unscrew and replace old bulb with an aeoliance bulb
of the same wattage.
5. Replace light shield.
6. Remember to plug the refrigerator back in.
Nonremovable Defrost Water Pan
(some models)
Vacation and Moving Tips
Short
Vacations
Long • Turn off automatic ice maker and turn water supply valve to closed position.
Vacations • Clean interior thoroughly.
Moving
• Leave refrigerator operating during vacations of 3 weeks or less.
• Use all perishable items from refrigerator compartment.
• Turn automatic ice maker off, even if you will only be gone for a few days.
• Remove all food and ice if you will be gone one month or more.
• Turn controls to "0" and disconnect power.
• Leave both doors open to prevent odors and mold build-up. Block doors open if
necessary.
• Remove all food and ice.
• If using handcart, load from side.
• Adjust rollers all the way up to protect them during sliding or moving.
• Pad cabinet to avoid scratching surface.
18
 Loading...