


25357199600
Kenmore 25357199600, 25357198600, 25357194600, 25357192600, 2535628240A Owner’s Manual
...
®
Side by Side Refrigerator
Use & Care Guide
Lado a Lado Refrigerador
Gufa para su uso y cuidado
Compartiments C6te _ C6te R_frig_rateur
Guide d'utilisation et d'entretien
Sears, Roebuck and Co., Hoffman Estates, IL 60179 U.S.A.
Sears Canada, mnc.,Toronto, Ontario, Canada M5B 2B8
www,$¢ars,com
241702500 (0601)
Z
M
t_
Welcome &
Congratulations
Congratulations on your purchase of a new refrigerator! We
here at Sears are very proud of our product and we are
completely committed to providing you with the best
service possible, Your satisfaction is our #1 priority,
We know you'll enjoy your new refrigerator and ThankYou
for choosing our product, We hope you consider us for
future purchases,
PLEASE READ AND SAVE THESE
iNSTRUCTiONS
This Owner's Guide provides specific operating
instructions for your model, Use your refrigerator only as
instructed in this manual, These instructions are not meant
to cover every possible condition and situation that may
occur, Common sense and caution must be practiced
when installing, operating and maintaining any appliance,
Ptease record your model and seriaJ numbers below
for future reference.This information is found on the
sedal pJate located inside the refrigerator
compartment.
Model Number: 253
or:
Serial Number:
Purchase Date:
TABLE OF CONTENTS
Record SefiaU/Model Numbers ............ 2
Safety .................................................. 2-3
Warranty .............................................. 3
Protection Agreements ........................ 4
installation ........................................... 5-6
Door Removal Instructions ................. 7
Features At A GRance ......................... 8
Temperature ControUs .......................... 9
Looking Inside ..................................... 10=12
Automatic Ice & Water Dispenser ....... 13=15
Front Ice and Water FHter .................... 16
Food Storage & Energy Saving Tips ... 17
Normal Operating Sounds & Sights .... 18
Care & Cleaning .................................. 19o20
Before You Call .................................... 21-24
Important Safety
Instructions
Please Read AJJInstructions Before
UsingThis Refrigerator.
FOR YOUR SAFETY
Do not store or use gasoline, or other flammable liquids
in the vicinity of this or any other appliance, Read product
labels for warnings regarding flammability and other
hazards,
o Do not operate the refrigerator in the presence of
explosive fumes,
Avoid contact with any moving parts of automatic ice
maker,
Remove all staples from the carton, Staples can cause
severe cuts, and also destroy finishes if they come in
contact with other appliances or furnitu re,
CHILD SAFETY
Destroy or recycle the carton, plastic bags, and any
exterior wrapping material immediately after the refrigerator
is unpacked, Children should NEVER use these items to
play, Cartons covered with rugs, bedspreads, plastic
sheets or stretch wrap may become airtight chambers,
and can quickly cause suffocation,
PROPER DISPOSAL OF YOUR REFRmGERATOR
OR FREEZER
Risk of child entrapment
Child entrapment and
suffocation are not problems of
the past, Junked or abandoned
refrigerators or freezers are still
dangerous - even if they will sit
for "just a few days," if you are
getting rid of your old refrigerator
or freezer, please follow the
prevent accidents,
Before you throw away your old refrigerator/freezer:
Remove doors,
Leave shelves in place so children may not easily climb
inside,
o Have refrigerant removed by a qualified service
technician,
These Guidelines Must Be FoHowedTo EnsureThat
Safety Mechanisms InThis Refr!gerat0rW!lJ Operate
Properly.
ELECTRICAL iNFORMATiON
* The refrigerator must be plugged into its own
dedicated ! 15 VoJt,60 Hz., AC only etectric outlet.
The power cord of the appliance is equipped with a
three-prong grounding plug for your protection against
electrical shock hazards, it must be plugged directly
into a properly grounded three-prong receptacle, The
receptacle must be installed in accordance with local
codes and ordinances, Consult a qualified electrician,
Do not use an extension cord or adapter plug.
* Immediately repair or replace any power cord that
becomes frayed or damaged,
Never unplug the refrigerator by pulling on the power
cord, Always grip the plug firmly, and pull straight out
from the receptacle to prevent damaging the power cord,
Unplug the refrigerator before cleaning and before
replacing a light bulb to avoid electrical shock,
Performance may be affected if the voltage varies by
10% or more, Operating the refrigerator with insufficient
power can damage the compressor, Such damage is
not covered under your warranty,
Do not plug the unit into an outlet controlled by a wall
switch or pull cord to prevent the refrigerator from being
Avoid connecting refrigerator toa Ground Fault Interruptor
(GFi) circuit,
IMPORTANT: Turning the Freezer and Fresh Food
Controls to "0" turns oll the compressor and prevents
your refrigerator from cooling, but does not disconnecl
the power to the light bulb and other electrical
components. Toturn off power to your refrigerator, you
must unplug the power cord from the wall receptacle.
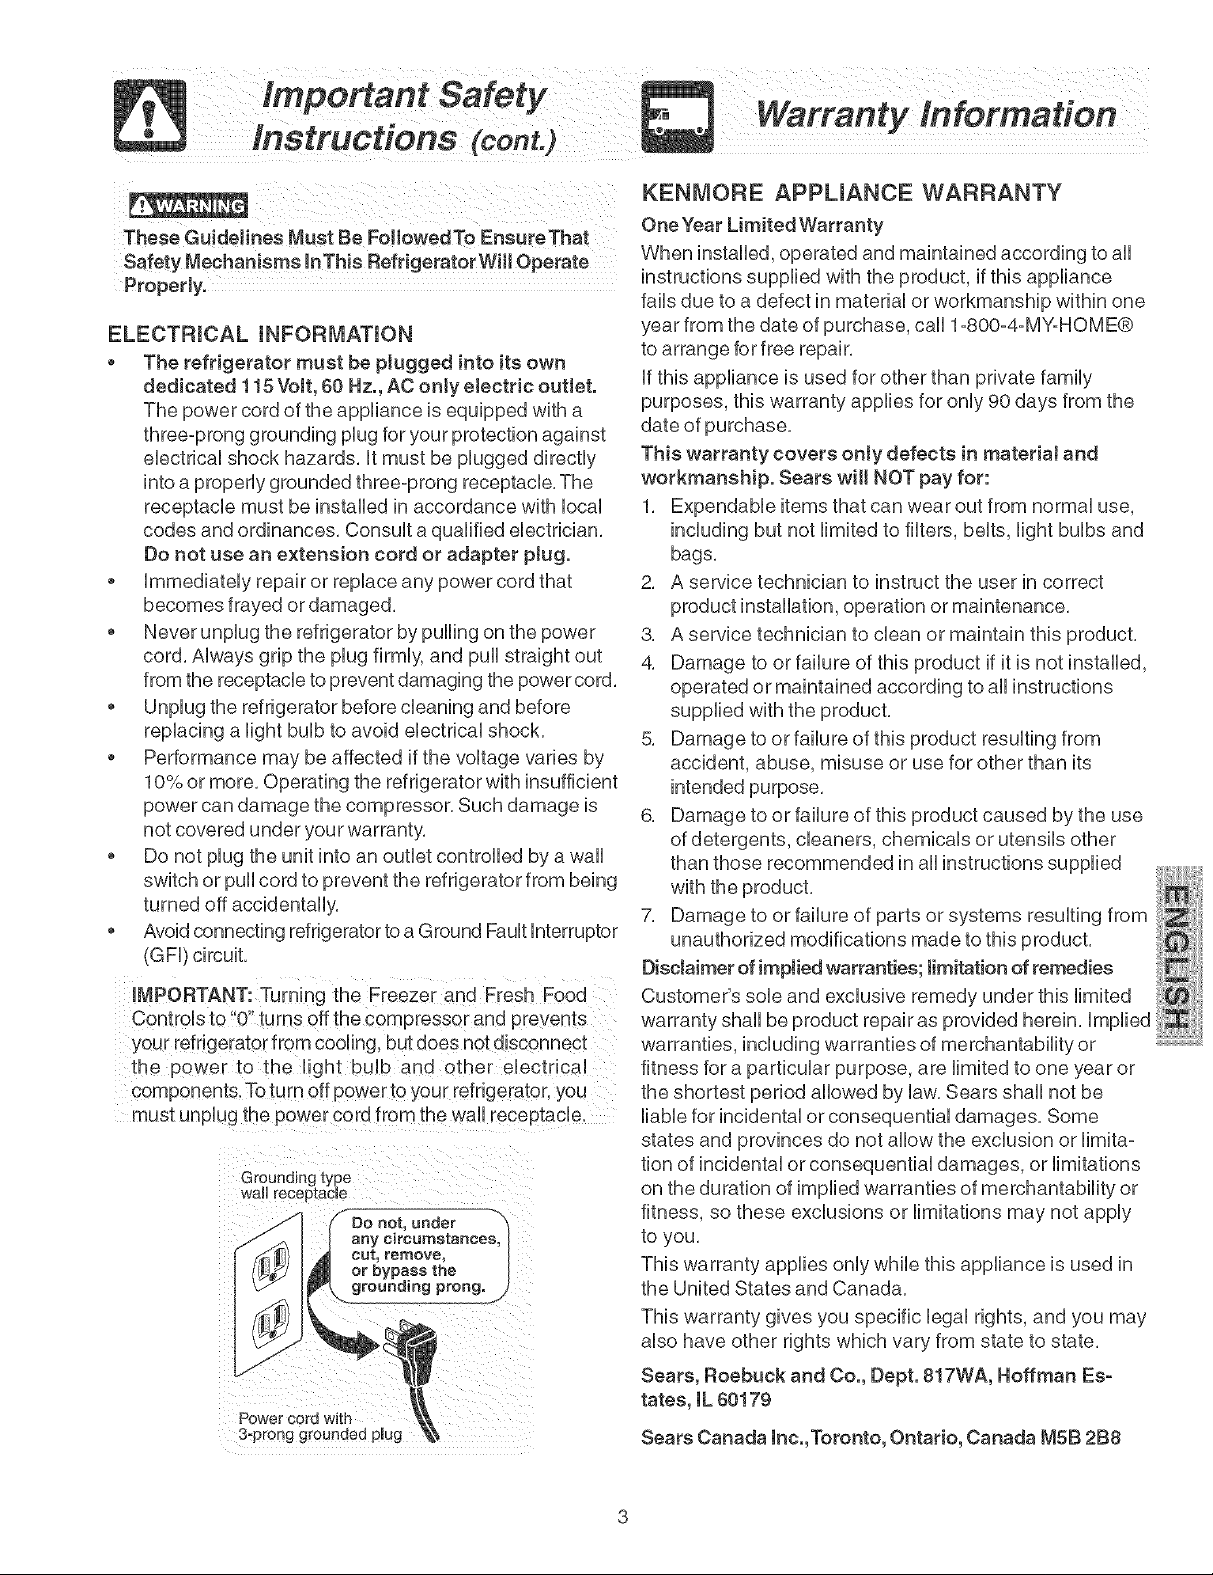
Grounding [ype
wamlreceetacb
.f _,
Do not. under
any circumstances,
cut, remove,
or bypass the
grounding prong.
Power cord with
3-prong grounded pmug
KENMORE APPUANCE WARRANTY
One Year Limited Warranty
When installed, operated and maintained according to all
instructions supplied with the product, if this appliance
fails due to a defect in material or workmanship within one
year from the date of purchase, call 1-800-4-MYoHOME@
if this appliance is used for other than private family
purposes, this warranty applies for only 90 days from the
date of purchase,
This warranty covers onty defects in materiaJ and
workmanship. Sears wilt NOT pay for:
1, Expendable items that can wear out from normal use,
including but not limited to filters, belts, light bulbs and
bags,
2, A service technician to instruct the user in correct
product installation, operation or maintenance,
3, A service technician to clean or maintain this product,
4, Damage to or failure of this product if it is not installed,
operated or maintained according to all instructions
supplied with the product,
5, Damage to or failure of this product resulting from
accident, abuse, misuse or use for other than its
intended purpose,
6, Damage to or failure of this product caused by the use
of detergents, cleaners, chemicals or utensils other
than those recommended in all instructions supplied
with the product,
7, Damage to or failure of parts or systems resulting from
unauthorized modifications made to this product,
Disclaimer of implied warranties; Jimitation of remedies
Customer's sob and exclusive remedy under this limited
warranty shall be product repair as provided herein, Implied
warranties, including warranties of merchantability or
fitness for a particular purpose, are limited to one year or
the shortest period allowed by law, Sears shall not be
liable for incidental or consequential damages, Some
states and provinces do not allow the exclusion or limita-
tion of incidental or consequential damages, or limitations
on the duration of implied warranties of merchantability or
fitness, so these exclusions or limitations may not apply
to you,
This warranty applies only while this appliance is used in
the United States and Canada,
This warranty gives you specific legal rights, and you may
also have other rights which vary from state to state,
Sears, Roebuck and Co., Dept. 817WA, Hoffman Es-
tates, IL 60179
Sears Canada inc.,Toronto, Ontario, Canada M5B 2B8
In the U.S.A.
Master Protection Agreements
Congratulations on making a smart purchase. Your
new Kenmore ®product is designed and manufactured
for years of dependable operation. But like all
products, it may require preventive maintenance or
repair from time to time. That's when having a Master
Protection Agreement can save you money and
aggravation.
Purchase a Master Protection Agreement now and
protect yourself from unexpected hassle and expense.
The Master Protection Agreement also helps extend
the life of your new appliance. Here's what's included
in the Agreement:
_" Expert service by our 12,000 professional repair
specialists
_( Unlimited service and no charge for parts and
labor on all covered repairs
•" "No-lemon" guarantee- replacement of your
covered product if four or more product failures
occur within twelve months
_( Product replacement if your covered product
can't be fixed
_" Annual Preventive Maintenance Check at your
request - no extra charge
_( Fast help by phone - phone support from a
Sears technician on products requiring in-home
repair, plus convenient repair scheduling
•" Power surge protection against electrical
damage due to power fluctuations
_" Rental reimbursement if repair of your covered
product takes longer than promised
Once you purchase the Agreement, a simple phone
call is all that it takes for you to schedule service. You
can call anytime day or night, or schedule a service
appointment online.
Sears has over 12,000 professional repair specialists,
who have access to over 4.5 million quality parts and
accessories. That's the kind of professionalism you
can count on to help prolong the life of your new
purchase for years to come. Purchase your Master
Protection Agreement today!
Some limitations and exclusions apply. For prices
and additional information, call 1-800-827-6655.
Sears Installation Service
For Sears professional installation of home appliances
and items like garage door openers, water heaters,
and other major home items, in the U.S.A. call
1-800-4MY-HOM E®.
In Canada
Maintenance Agreements
Your purchase has added value because you can
depend on Sears HomeCentral ®for service. With over
2400 Service Technicians and more than a million
parts and accessories, we have the tools, parts,
knowledge and skills to back our pledge:
We Service What We Sell.
Your Kenmore ®product is designed, manufactured
and tested to provide years of dependable operation.
But like all products, it may require service from time to
time. The Sears Maintenance Agreement offers you an
outstanding service program, affordably priced.
The Sears Maintenance Agreement
• Is your way to buy tomorrow's service at today's
price.
• Eliminates repair bills resulting from normal wear
and tear.
• Provides phone support from a Sears technician
on products requiring in-home repair.
• Even if you don't need repairs, provides an annual
Preventive Maintenance Check, at your request, to
ensure that your product is in proper running
condition.
Some limitations apply. For more information
about concerning Sears Canada Maintenance
Agreements, call 1-800-361-6665.
This Owner's Guide provides specific operating
instructions for your model. Use the refrigerator only as
instructed in this Use & Care Manual. Before starting the
refrigerator, foltow these important first steps.
LOCATION
Choose a place that is near a grounded electrical outlet.
Do Not use an extension cord or an adapter plug.
if possible, place the refrigerator out of direct sunlight
and away from the range, dishwasher or other heat
sources.
The refrigerator must be installed on a floor that is level
and strong enough to support a fully loaded refrigerator.
Consider water supply availability for models equipped
with an automatic ice maker.
mNSTALLATION
DONot install the tefrigeratorwhere
the temperature will drop below 55°F (130C) or rise
above 110_F(43°C), The compressor w!H not be aMe
tO maintain proper temperatures inside the
lower front of your refr!gerator.Sufficient air Circulat!on
is essential for the proper operation of your
Installation Clearances
o Allow the following clearances for ease of installation,
proper air circulation, and plumbing and electrical
connections:
Sides & Top 3/8"
Back 1"
DOOR OPENING
side against a wall, you may have to a!!ow additional
space so the door can be opened wider.
Your refrigerator should be positioned to allow easy access
to a counter when removing food. For best use of drawers
and freezer baskets, the refrigerator should be in a
position where both the refrigerator and freezer doors can
be fully opened.
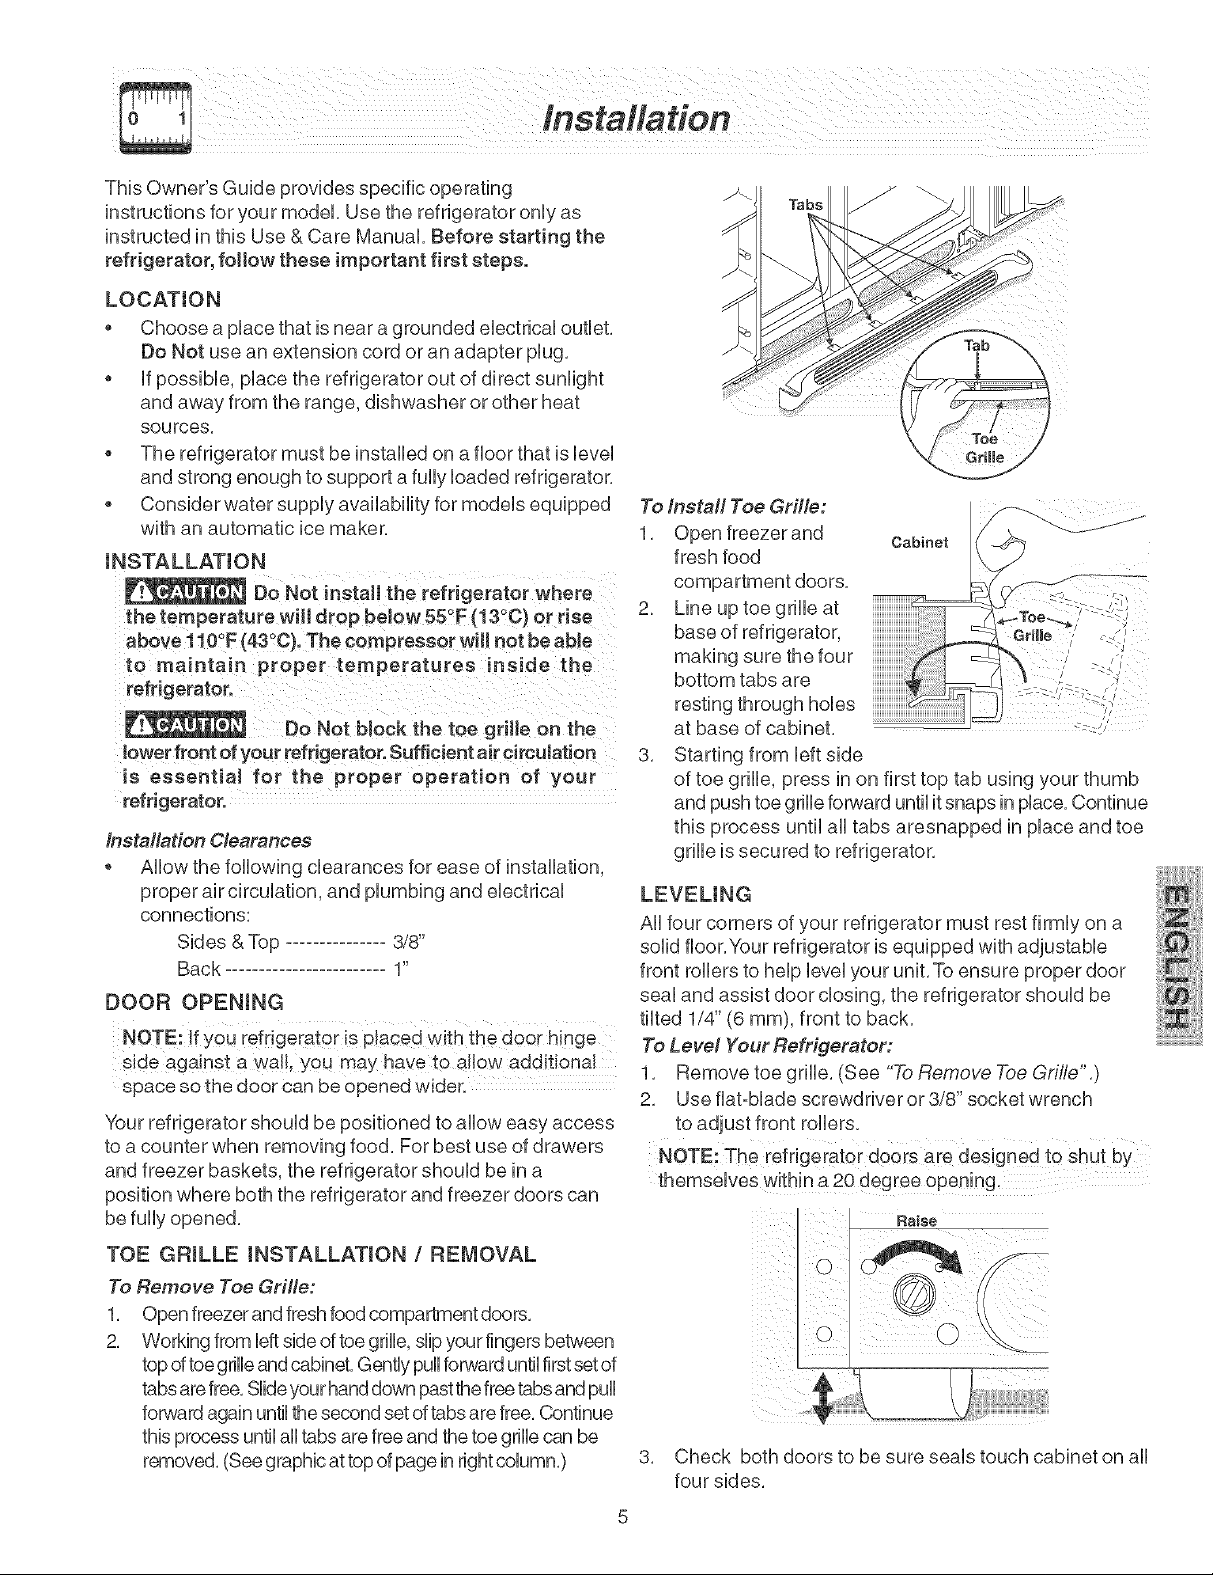
TOE GRILLE INSTALLATION / REMOVAL
To Remove Toe Grii/e:
1. Open freezer and fresh foodcompartment doors.
2. Working from left side of toe grille, slipyour fingers between
topoftoegrilleand cabinet.Gently pullforward until firstset of
tabsare free.Slideyour handdown pastthefreetabs and pull
forward again untilthesecond set oftabs are free. Continue
this process until all tabs are free and thetoe grille can be
removed. (See graphic at top of page in rightcolumn.)
To Install Toe Griiie:
1,
2_
3,
Cabinet
fresh food
Line up toe grille at
base of refrigerator,
making sure the four
bottom tabs are
resting through hobs
at base of cabinet.
Starting from left side
of toe grille, press in on first top tab using your thumb
and push toe grille forward until itsnaps in place. Continue
this process until all tabs aresnapped in place and toe
grille is secured to refrigerator.
All four corners of your refrigerator must rest firmly on a
solidfloor,Yourrefrigeratorisequippedwithadiustable
front rollers to help level your unit. To ensure proper door _:E
sealandassistdoorclosing,therefrigeratorshouldbe
tilted 1/4" (6 mm), front to back.
To Level Your Refrigerator:
1, Remove toe grille, (See "To Remove Toe Grille",)
2, Use flat-blade screwdriver or 3/8" socket wrench
to adjust front rollers.
3. Check both doors to be sure seals touch cabinet on all
four sides.
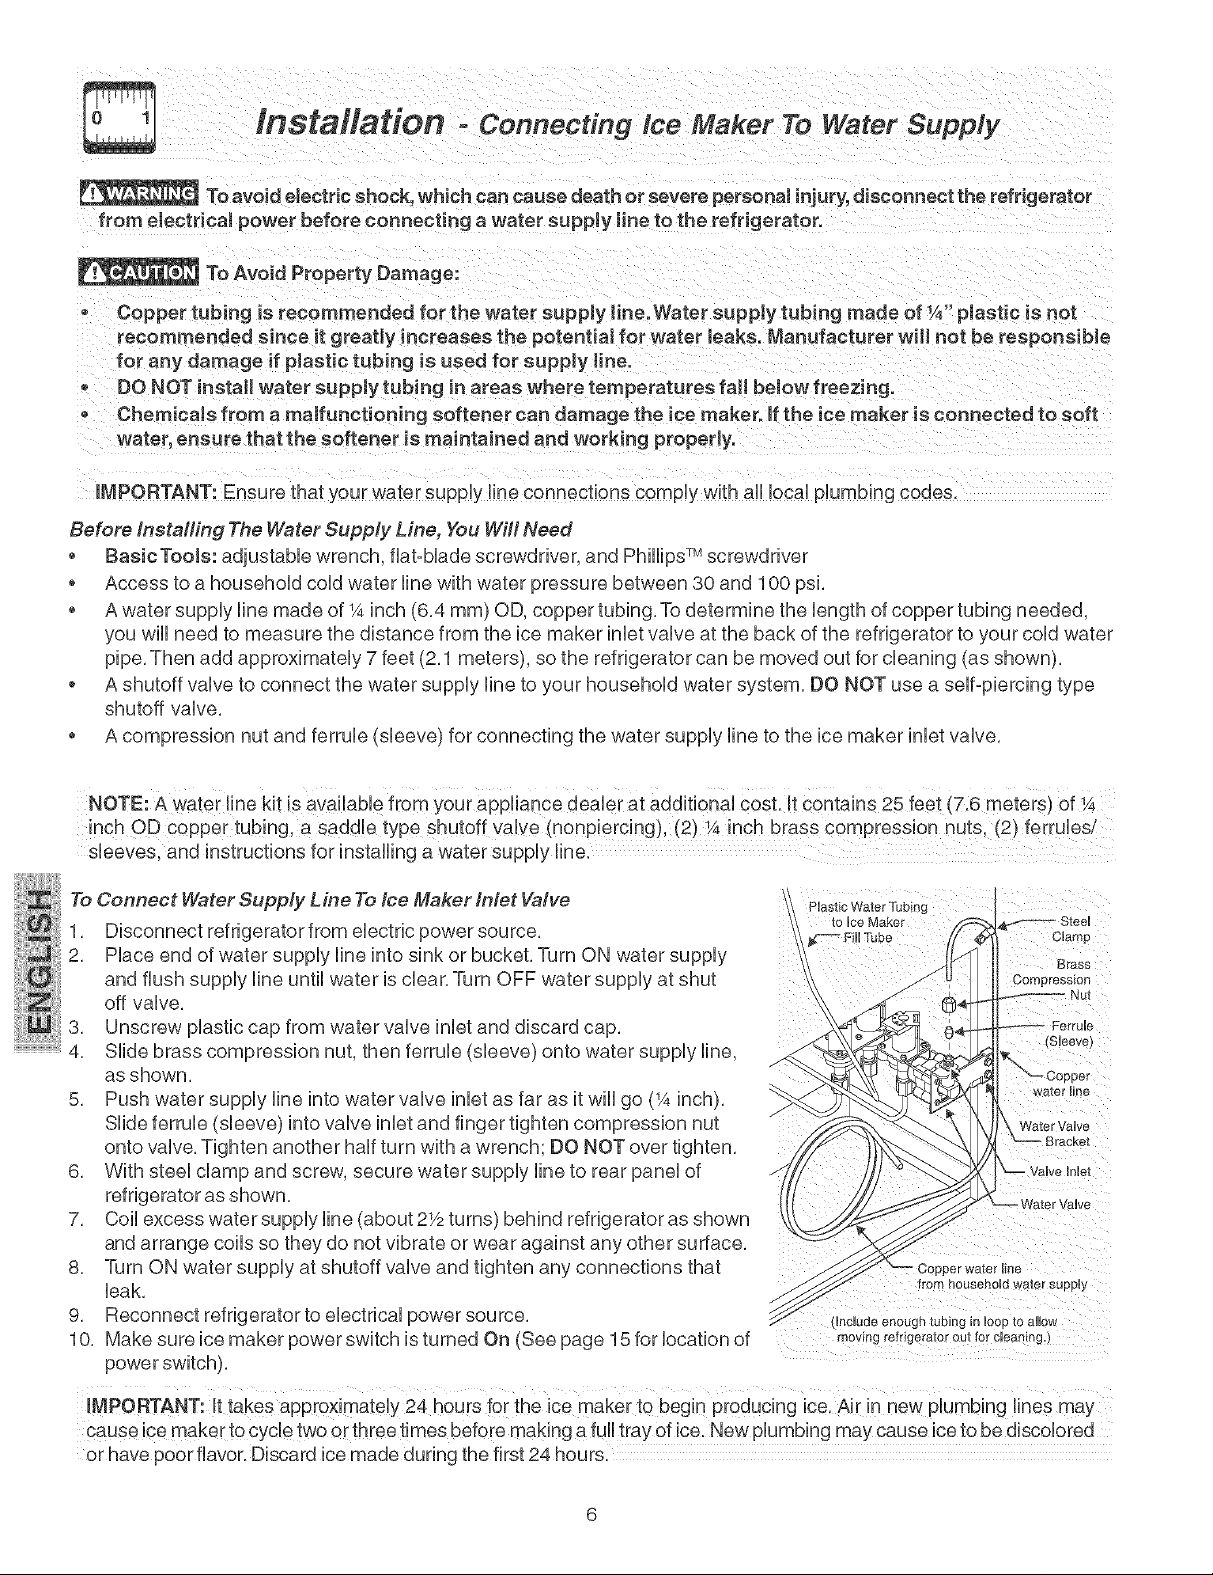
i sta/latiofl ° connecting @e Maker To Water Supply
To avoid electric shock, which can cause death or severe personal injury,disconnect the refrigerator
from electricaJ power before connecting a water supply line to the refrigerator.
To Avoid Property Damage:
o Copper tubing is recommended for the water supply line.Water supply tubing made of 1A"pJaetic is not
recommended since it greatly increases the potential for water bake. Manufacturer will not be reaponaiMe
for any damage if plastic tubing is used for supply line.
o DO NOT install water supply tubing in areas where temperatures fall below freezing.
o Chemicals from a maffunctioning softener can damage the ice maker, ff the ice maker is connected to soft
water, ensure that the softener is maintained and working properly.
IMPORTANT: Ensure that your water supply line connections comply with all local plumbing codes.
Before Installing The Water Supply Line. You Wii/ Need
BasicTools: adjustable wrench, fiat-blade screwdriver, and Phillips TM screwdriver
o Access to a household cold water line with water pressure between 30 and 100 psi.
A water supply line made of ¼ inch (6.4 mm) OD, copper tubing. Todetermine the length of copper tubing needed,
you will need to measure the distance from the ice maker inlet valve at the back of the refrigerator to your cold water
pipe. Then add approximately 7 feet (2.1 meters), so the refrigerator can be moved out for cleaning (as shown).
o A shutoff valve to connect the water supply line to your household water system. DO NOT use a self-piercing type
shutoff valve.
A compression nut and ferrule (sleeve) for connecting the water supply line to the ice maker inlet valve.
To Connect Water Supp/y Line To Ice Maker /n/et Va/ve Plastic Water Tubieg
to Ice Maker
1. Disconnect refrigerator from electric power source. _ Fi!lTube Clamp
2. Place end of water supply line into sink or bucket. Turn ON water supply
Brass
and flush supply line until water is clear. Turn OFF water supply at shut Compression
off valve.
3. Unscrew plastic cap from water valve inlet and discard cap.
4. Slide brass compression nut, then ferrule (sleeve) onto water supply line, (s!eeve)
as shown.
5. Push water supply line into water valve inlet as far as it wiii go (¼ inch), waterline
Slide ferrule (sleeve) into valve inlet and finger tighten compression nut waterVah/e
onto valve. Tighten another half turn with a wrench; DO NOT over tighten.
6. With steel clamp and screw, secure water supply line to rear panel of lyeHet
refrigerator as shown. _r Valve
1
7. Coil excess water supply line (about 2Y2turns) behind refrigerator as shown
and arrange coils so they do not vibrate or wear against any other surface.
8. Turn ON water supply at shutoff valve and tighten any connections that
leak, from household water supply
9. Reconnect refrigerator to electrical power sou rce. (Includeenoughtubinginlooptoallow
10. Make sure ice maker power switch is turned On (See page 15 for location of movingrefrigeratoroutforcuea_!ng_)
power switch).
mMPORTANT:It takes approximately 24 hours for the ice maker to begin producing ice, Air in new plumbing lines may
cause ice maker to cycle two or throe times before making a full tray of ice. New plumbing may cause iceto be discolored
or have poor flavor. Discard ice made during the first 24 hours.
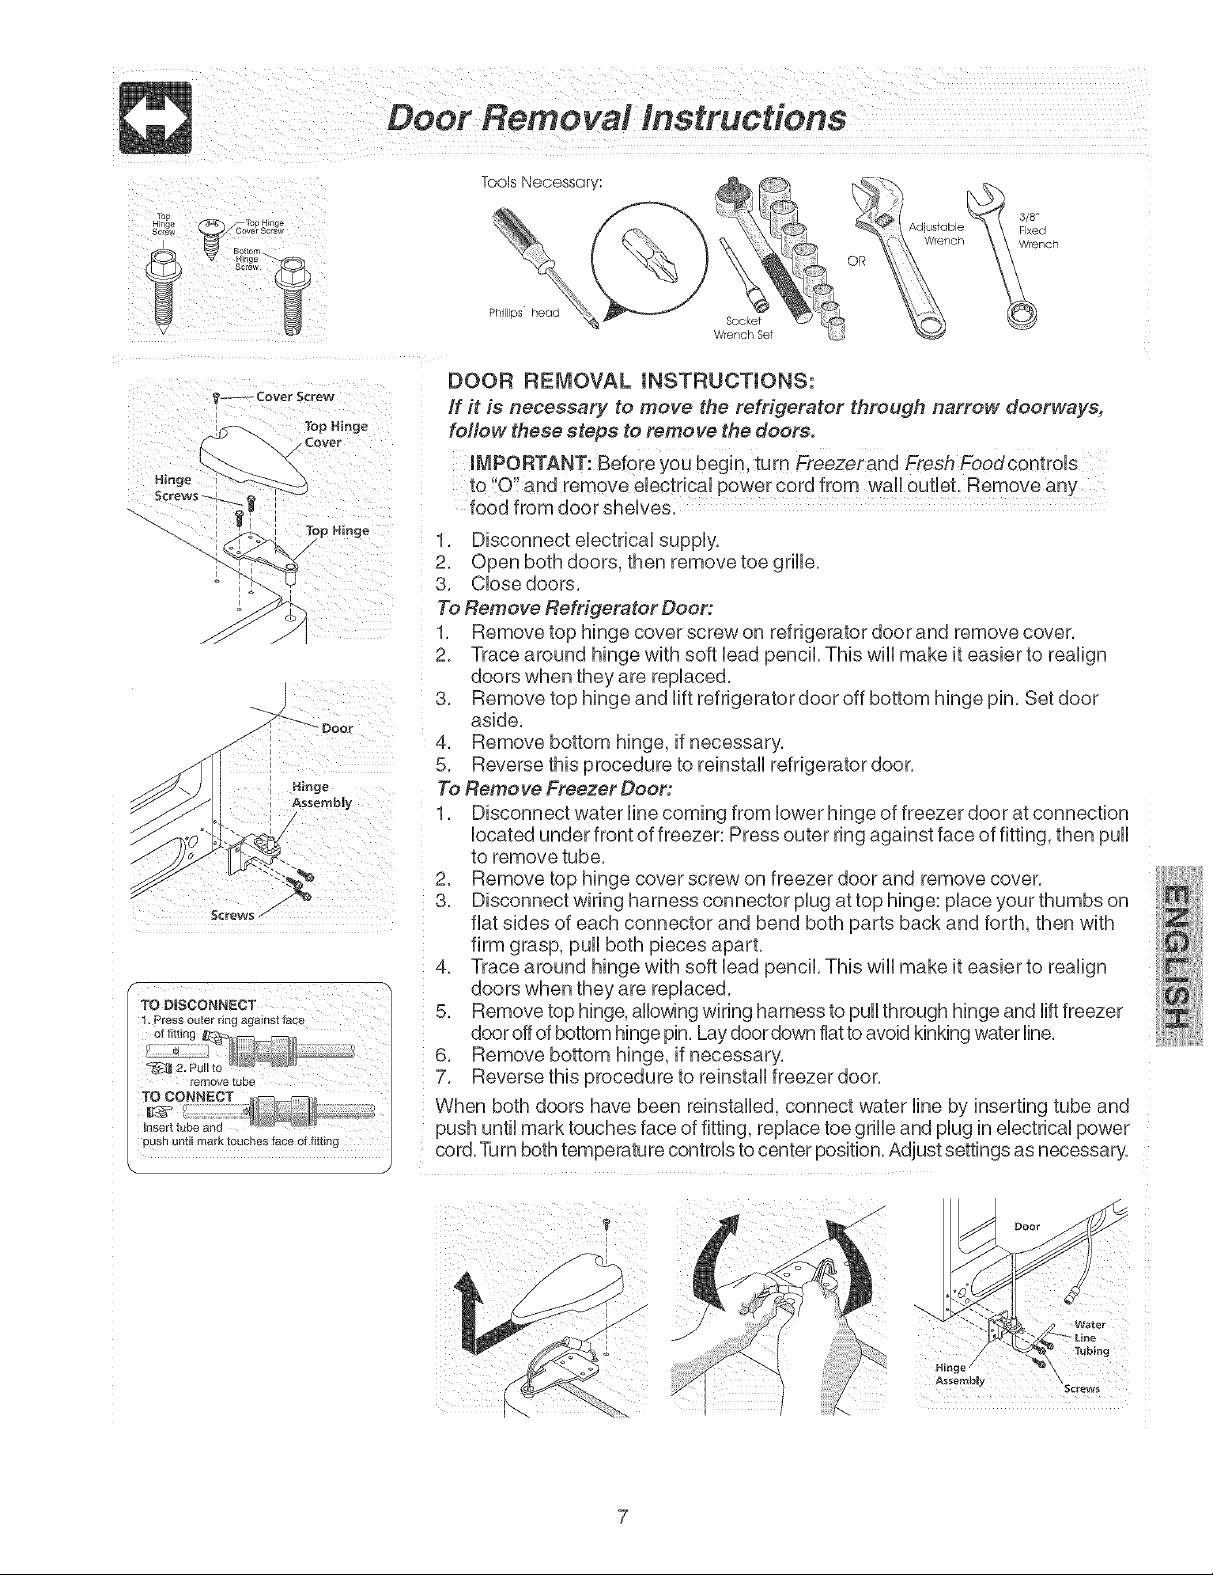
Deer Removal Instructions
ToolsNecessar,
Phi liras nec__:
TO DiSCON_,ECT
1.Press outer ring a_alr _t _ace
remove JuDe
TO CONNECT
Insert tube and
uush until mark touches face of fi_th
DOOR REMOVAL mNSTRUCTIONS:
If it is necessary to move the refrigerator through narrow doorways,
follow these steps to remove the doors.
IMPORTANT: Before you begin, turn Freezerand Fresh Foodcontrob
to 0 and remove ebctrbaI power cord from wall outbt. Remove any
food from door shelves.
1. Disconnect electrical supply.
2. 0 pen both doors, then remove toe grille.
3. Close doors.
To Remove Refrigerator Door:
1 Remove top hinge cover screw on refrigerator door and remove cover.
2. Trace around hinge with soft lead pencil. This will make it easier to realign
doors when they are replaced
3. Remove top hinge and lift refrigerator door off bottom hinge pro. Set door
aside.
4. Remove bottom hinge, if necessary.
5. Reverse this procedure to reinstall refrigerator door.
To Remove Freezer Door:
1. Disconnect water line coming [rom lower hinge of freezer door at connection
located under front of freezer: Press outer ring against face of fitting, then puii
to remove tube.
2. Remove top hinge cover screw on freezer door and remove cover.
3. Disconnect wiring harness connector plug at top hinge: place your thumbs on
fiat sides of each connector and bend both parts back and forth. Ihen with
firm grasp, puii both pieces apart.
4. Trace around hinge with soft lead pencil. This wiii make it easier to realign
doors when they are replaced
5. Remove top hinge, allowing wiring harness to puii through hinge and lift freezer
door offof bottom hinge pin.Lay door down fiat toavoid kinking water line.
6. Remove bottom hinge, if necessary.
7. Reverse this procedure to reinstall freezer door.
When both doors have been reinstalled, connect water line by inserting tube and
push until mark touches face of fitting, replace toe grille and plug in electrical power
cord. Turn both temperature controls to center position. Adjust settings as necessary.
Nmge
A_ser_Ibky
Sc_ew_
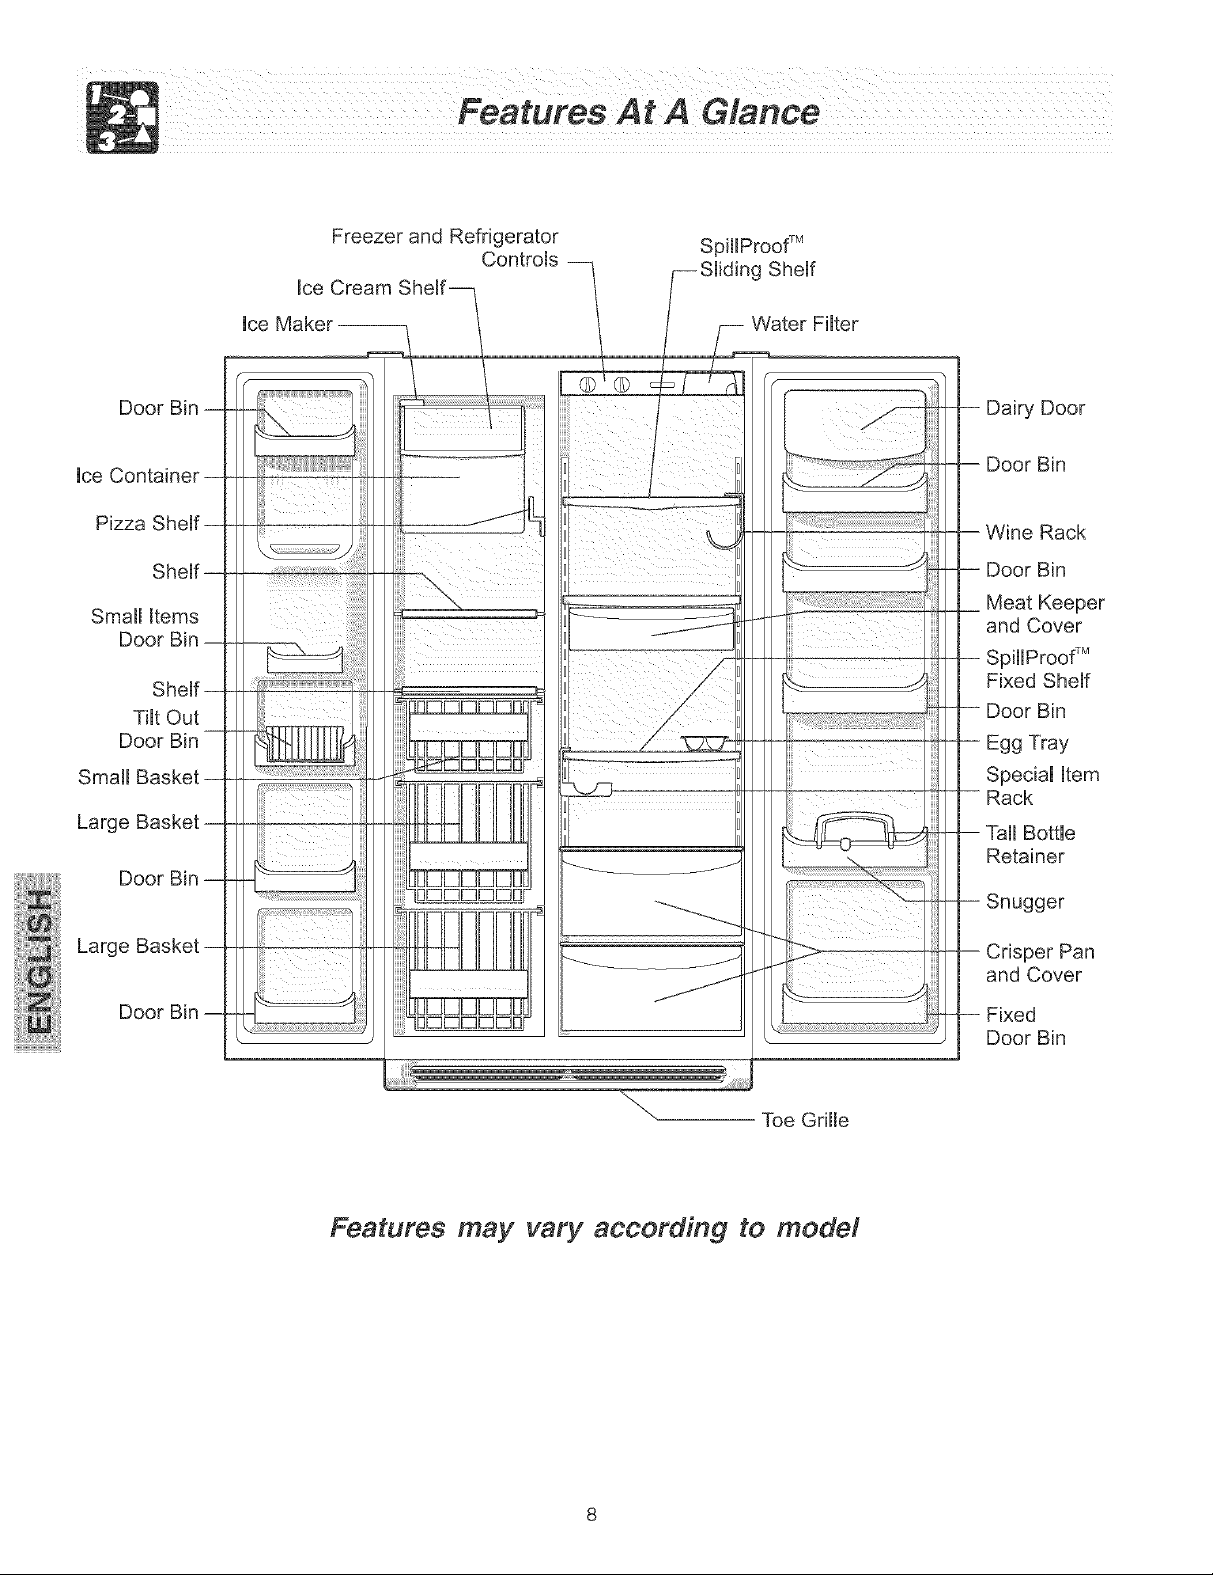
Freezer and Refrigerator
Controls
Ice Cream
Ice Mak¢
Water Filter
Door Bin
Pizza
Small Items
Door Bin
Tilt Out
Door Bin
Small
Large
Door Bin
Large
Door Bin
Dairy Door
Door Bin
Rack
Door Bin
Meat Keeper
and Cover
SpilIProo{ M
Fixed Shelf
Door Bin
Egg Tray
Special Item
Rack
Bottle
Retainer
Snugger
Crisper Pan
and Cover
Fixed
Door Bin
Features may vary according to model
 Loading...