

Keating Of Chicago Fryer User Manual
INCREDIBLE FRYING MACHINE™
GAS FRYER
Service Manual
KEEP THIS MANUAL FOR TRAINING NEW PERSONNEL
1-800-KEATING
www.keatingofchicago.com
IFM Pre 2000 0608 06/08

TABLE OF CONTENTS
SECTION I INTRODUCTION
General . . . . . . . . . . . . . . . . . . . . . . . . . . . . . . . . . .1
Standard Features . . . . . . . . . . . . . . . . . . . . . . . . . .1
Standard Accessories . . . . . . . . . . . . . . . . . . . . . . .1
Options . . . . . . . . . . . . . . . . . . . . . . . . . . . . . . . . . .1
Ratings . . . . . . . . . . . . . . . . . . . . . . . . . . . . . . . . . . .1
Model Variations . . . . . . . . . . . . . . . . . . . . . . . . . . .1
Safety Precautions . . . . . . . . . . . . . . . . . . . . . . . .1-2
SECTION II INSTALLATION
Damage During Shipment . . . . . . . . . . . . . . . . . . . .3
Installation . . . . . . . . . . . . . . . . . . . . . . . . . . . . . . . .3
Leveling . . . . . . . . . . . . . . . . . . . . . . . . . . . . . . . . . .3
Restraining Devices . . . . . . . . . . . . . . . . . . . . . . . . .3
Gas Connection . . . . . . . . . . . . . . . . . . . . . . . . . . . .4
Electrical Connection . . . . . . . . . . . . . . . . . . . . . . . .4
Gas Leak Testing . . . . . . . . . . . . . . . . . . . . . . . . .4-5
SECTION III OPERATING THE FRYER
Filling . . . . . . . . . . . . . . . . . . . . . . . . . . . . . . . . . . . .5
Lighting . . . . . . . . . . . . . . . . . . . . . . . . . . . . . . . . . .5
Cooking . . . . . . . . . . . . . . . . . . . . . . . . . . . . . . . . . .6
Shutdown . . . . . . . . . . . . . . . . . . . . . . . . . . . . . . . . .6
Draining . . . . . . . . . . . . . . . . . . . . . . . . . . . . . . . . . .6
Cleaning and Boil-Out . . . . . . . . . . . . . . . . . . . . .6-7
Electronic Timers . . . . . . . . . . . . . . . . . . . . . . . . .7-8
SECTION IV MAINTENANCE
Warranty Repairs . . . . . . . . . . . . . . . . . . . . . . . . . . .8
Preventive Maintenance . . . . . . . . . . . . . . . . . . . . .8
Oil Breakdown . . . . . . . . . . . . . . . . . . . . . . . . . . . . .8
Thermostat Calibration . . . . . . . . . . . . . . . . . . . . . .9
Thermostat Bulb Positioning . . . . . . . . . . . . . . .9-10
SECTION V SERVICE DIAGNOSIS
Removal/Replacement of Grease Filter . . . . . . . .10
Flame Adjustment . . . . . . . . . . . . . . . . . . . . . . . . .10
SECTION VI SERVICE
Trouble Shooting Charts . . . . . . . . . . . . . . . . . .11-12
SECTION VII PARTS LIST
Ordering Parts . . . . . . . . . . . . . . . . . . . . . . . . . . . .13
Warning and Operating Plates . . . . . . . . . . . . . . .13
IFM Gas Fryer Parts List . . . . . . . . . . . . . . . . . . . .13
IFM Gas Fryer Assembly I . . . . . . . . . . . . . . . . . . .14
IFM Gas Fryer Assembly II . . . . . . . . . . . . . . . . . .15
IFM Control Panel Parts List . . . . . . . . . . . . . . . . .16
IFM Burner Assembly Parts List . . . . . . . . . . . . . .17
IFM Blower/Spark Module Cabinet Parts List . . . .18
SECTION VIII WIRING DIAGRAMS
14IFM Wiring and Ladder Diagrams . . . . . . . .19-20
Warranty
i
POST THIS LABEL IN A
PROMINENT LOCATION ON
YOUR UNIT
IMPORTANT
IN THE EVENT A GAS ODOR IS
DETECTED, SHUT DOWN UNITS AT
MAIN SHUT OFF VALVE AND CONTACT
THE LOCAL GAS COMPANY OR GAS
SUPPLIER FOR SERVICE.
WARNING
IMPROPER INSTALLATION, ADJUSTMENT, ALTERATION, SERVICE OR
MAINTENANCE CAN CAUSE PROPERTY DAMAGE, INJURY OR DEATH. READ
THE INSTALLATION, OPERATING AND MAINTENANCE INSTRUCTIONS
THOROUGHLY BEFORE INSTALLING OR SERVICING THIS EQUIPMENT.
FOR YOUR SAFETY
DO NOT STORE OR USE GASOLINE OR OTHER FLAMMABLE
VAPORS OR LIQUIDS IN THE VICINITY OF THIS OR ANY OTHER
APPLIANCE.
*As continuous product improvement occurs, specifications may be changed without notice.
I INTRODUCTION
GENERAL
Keating Incredible Frying Machine Gas Fryers (IFM)
are designed to give maximum production efficiency,
delivering high quality food products. The following
design features are incorporated in Keating Incredible
Frying Machine Gas Fryers (IFM).
STANDARD
FEATURES
• Highly polished stainless steel fryer vessel
• Highly polished stainless steel front
• Highly polished stainless steel heat transfer tubes
• Highly polished stainless steel thermostat bulb
• Highly polished stainless steel Hi-Limit bulb
• Complete stainless steel cabinet
• True Cold Zone for proper sedimentation
• Grid screen over heat transfer tubes
•1
" full port front drain valve
• Patented accurate temperature control system ±2°F
• Ideal 35
" working height
• 3/4” NPT gas connection on single fryers
• One pair of split baskets or one full-size basket (18”
model only)
• Patented burner design
• Spark Ignition system
• 100% proof of air flow safety shut-off
• 100% proof of flame safety shut off
• Electronic timers (2)
• Gas and air adjustments
• Gas pressure test port
• Blower grease filter (easily accessible from front)
• Easy access for servicing from front of fryer
• Burner, blower and Hi-Limit indicating lights
• Insulated fryer vessel
• Heat recirculation for higher efficiency and lower flue
temperature
• Black heat tube interiors for optimum heat transfer
• Instant-On™ ignition system
• 120 VAC 9' neoprene cord with 3-pronged grounded
plug
• Instant recovery to cooking temperature
• High temperature stainless steel flue lining
• 100% factory testing
STANDARD
ACCESSORIES
• Keating Klenzer Sample
• Keating Sea Powder Sample
• Drain clean out rod
OPTIONS
• Natural Gas or Propane
• Automatic Basket-Lift
• Cooking Computer
RATINGS
• 14" fryer vessel - 38 lb. oil capacity
• 18" fryer vessel - 68 lb. oil capacity
• 20" fryer vessel - 100 lb. oil capacity
• 3" WC (natural gas) or 10" WC (Propane) manifold
gas pressure.
• 3/4" gas supply pipe recommended
MODEL
VARIATIONS
Basket-Lift Model: Basket-Lift Model Fryers come
with all the same features as the standard models. The
Basket-Lift mechanism lowers the baskets of food into
the oil when the timer button is pressed and raises the
baskets when the cooking cycle is complete. Split
baskets are required for these models.
CPU Model: CPU Incredible Frying Machine Gas
Fryers (IFM) have the same input as the standard
models. A programmable computer replaces the two
timers and thermostat.
SAFETY
PRECAUTIONS
WARNING
THIS SYMBOL WARNS YOU THAT SERIOUS BURNS
OR OTHER INJURIES MAY RESULT IF SAFETY
INSTRUCTIONS ARE NOT FOLLOWED.
This service manual should be retained in a safe
place for future reference. The installation of your
new fryer must conform to local codes or in the
absence of local codes, with the current National
Fuel Gas Code ANSI Z223.1/NFPA 54 (latest
edition), Natural Gas Installation Code CAN/
CGA-B149.1 or Propane Installation Code CAN/
CGA-B149.2.
1
2
Your ventilation hood, when installed, must conform
to the current ANSI/NFPA 96 standard (latest
edition).
No frame or restriction shall be constructed around
the fryer that will restrict air movement into the
fryer’s combustion area (through the grease filter
underneath the fryer) or prevent proper ventilation.
Keating fryers are designed to operate on the gas
fuel specified on the serial plate and must not be
operated with another gas fuel. They cannot be
converted to another gas fuel by turning or engaging
a switch.
FOR YOUR SAFETY: Do not store or use gasoline
or other flammable vapors and liquids in the
vicinity of this or any appliance.
You will post, in a prominent location, instructions to be
followed in the event the user smells gas. This
information shall be obtained from your local gas
supplier. You may use the yellow stick-on label
temporarily until you receive the data from your local gas
supplier.
IMPORTANT: In the event a gas odor is detected,
shut down unit at main shut-off valve and contact
the local gas company or gas supplier for
emergency service.
Suitable for installation on combustible floors.
You must maintain this appliance free and clear from
combustibles.
You must maintain the following minimum
clearances from combustible and noncombustible
construction:
You must install this appliance at least 16 inches
away from any open flame.
Adequate clearance for servicing and proper
operation must be maintained. Your fryer is designed
to be serviced from the front.
Keating commercial fryers are intended for other
than household use.
ALWAYS instruct new employees on proper fryer
operation.
A fryer should be operated ONLY by properly trained
personnel.
ALWAYS turn fryer off each night.
ALWAYS disconnect fuel source before servicing.
NEVER leave a fryer unattended during operation.
NEVER move a fryer when full of hot oil.
NEVER introduce objects or liquids into fryer, while
operational, which are not designed or made for
cooking.
THIS FRYER MAY NOT BE ALTERED, MODIFIED
OR CHANGED IN ANY WAY.
The State of California enacted the California Safe
drinking water and Toxic Enforcement Act of 1986,
(Prop. 65), which “prohibits any person in the course of
doing business from knowingly and intentionally
exposing any individual to a chemical known to the
State of California to cause cancer or reproductive
toxicity without first giving clear and reasonable
warning to such individuals.” The Governor’s Scientific
Advisory Panel added carbon monoxide
to the list of
hazardous chemicals known to cause reproductive
harm.
In order to establish full compliance with Proposition
65, we attached a yellow warning label to each gas
fired appliance manufactured by Keating of Chicago,
Inc.
Carbon monoxide would not be present in
concentrations that would pose a “significant risk” to
the consumer when the equipment is installed,
operated and maintained as follows:
Installed in accordance with all local codes, or in the
absence of local codes, with the current National
Fuel Gas Code ANSI Z223.1/NFPA 54 (latest
edition).
Installed under a properly designed operating
exhaust hood.
Connected to the type of gas for which the appliance
is manufactured.
In-line pressure regulator, not supplied by Keating,
must be installed outside the appliance.
The appliance is adjusted for the manifold pressure
marked on the serial plate.
Adequate air supply to the appliance.
The equipment is operated in the manner intended
using the proper utensils.
Keep the equipment clean and have it checked
periodically.
Burner air adjustments, mechanical maintenance
and repairs must be performed by qualified service
personnel.
If the equipment is not installed, operated and
maintained in accordance with the above,
concentrations of carbon monoxide in excess of the
established limits could be present in the kitchen
environment.
Clearances
Combustible
Noncombustible
Construction
Construction
Back 6" 0"
Right Side 6" 0"
Left Side 6" 0"
3
II INSTALLATION
This fryer MUST be installed, inspected, calibrated and
serviced by qualified and/or certified and/or licensed
service personnel – you may void your Keating
warranty if installation is not completed per local,
national and Keating specifications. Contact your
dealer for assistance.
DAMAGE DURING
SHIPMENT
The fryer has been assembled, tested and inspected
at the factory. Upon arrival, the complete fryer should
be checked for any damage that may have occurred
during shipment.
The carrier is responsible for all damage in transit
whether visible or concealed. Do not pay for the freight
bill until the fryer has been thoroughly checked for
damage. If concealed damage is found later, contact
the carrier immediately to file a claim.
What to do if equipment arrives damaged:
VISIBLE LOSS OR DAMAGE—Be certain to note this
on the freight or express receipt and have it signed by
the delivery person.
FILE CLAIM FOR DAMAGES IMMEDIATELY –
Regardless of extent of damage.
CONCEALED LOSS OR DAMAGE—If damage is
noticed when equipment is unpacked, notify the freight
company immediately, and file a “concealed damage
claim”. This MUST be done immediately. Be sure to
retain the shipping container for inspection.
Keating does not assume responsibility for Loss OR
Damage incurred in transit.
INSTALLATION
Installation must conform with local codes or, in
absence of local codes, with the current National Fuel
Gas Code Z223.1/NFPA 54(latest edition), Natural Gas
Installation CAN/CGA - B149.1 or Propane Installation
Code CAN/CGA-B149.2. When pressure testing at test
pressures less than or equal to 1/2 psig (3.45 KPA),
fryer must be isolated from gas supply piping. When
pressure testing at test pressures above 1/2 psig (3.45
KPA), fryer must be disconnected from gas supply
piping system.
Counter model and flood model fryers must be
restrained to prevent tipping when installed in order to
avoid splashing, spilling, etc. of hot liquid. The
restraining method may be a manner of installation or
by separate means.
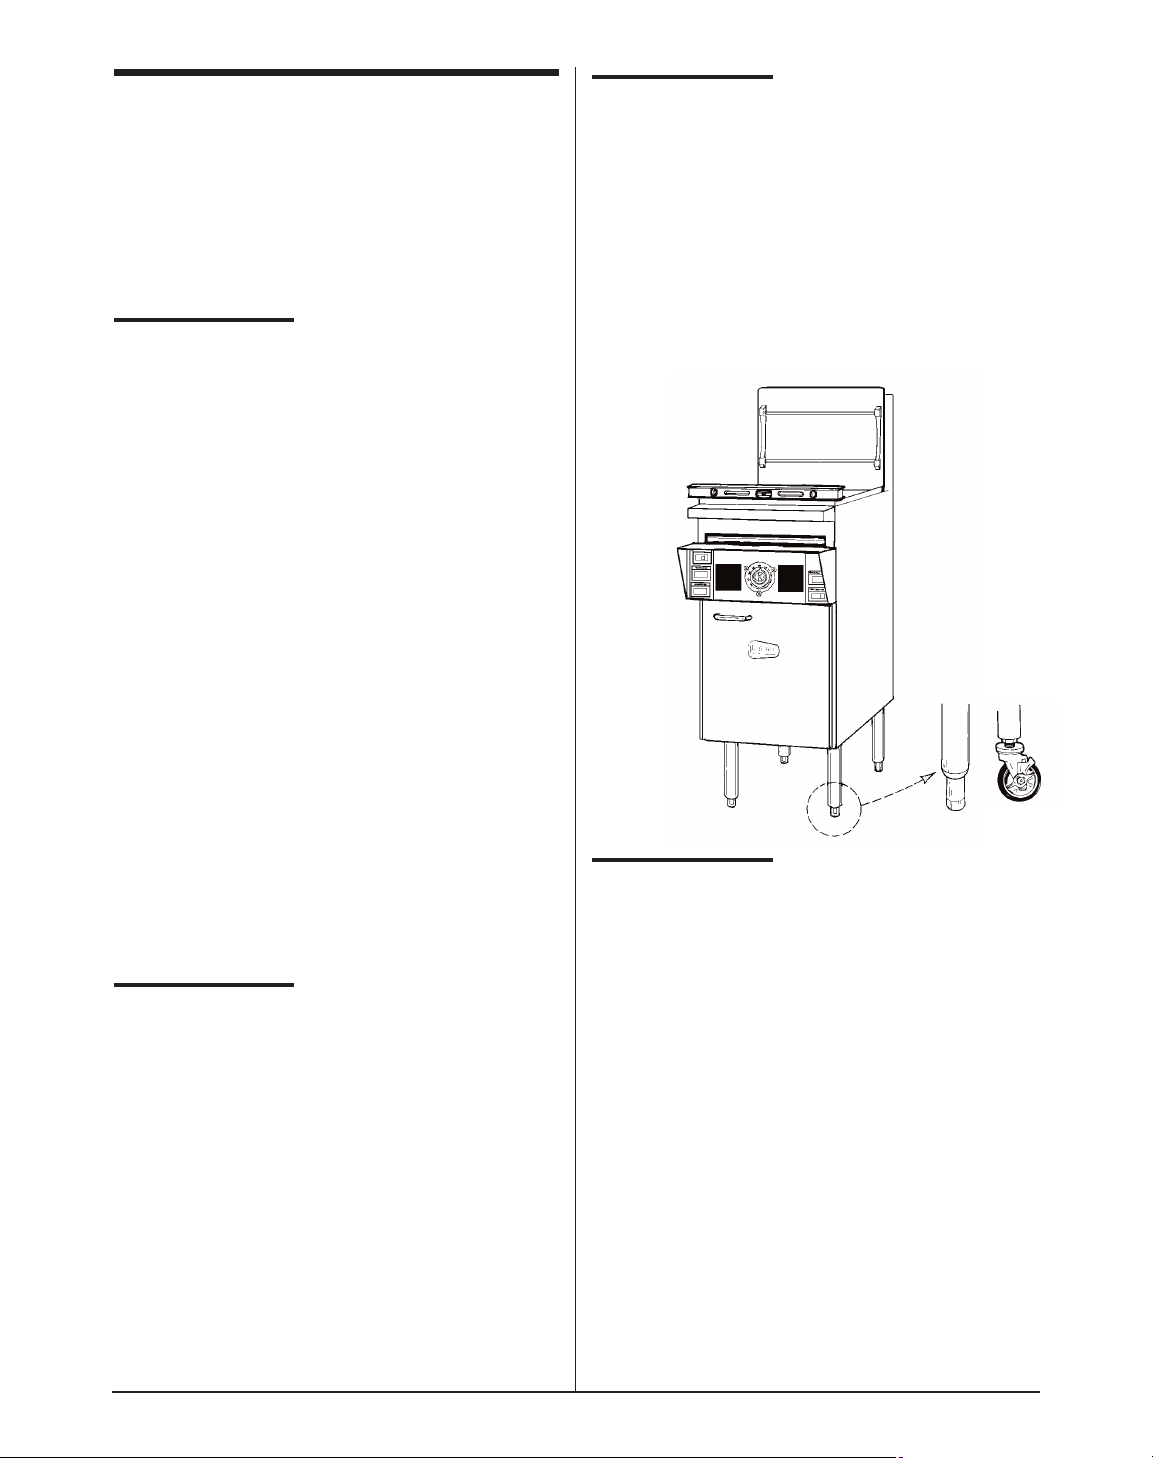
LEVELING
The fryer will operate at its highest efficiency when
properly leveled. Place a level on fryer vessel from side
to side. For fryers on legs, the bottom foot of the leg is
adjustable. Turn counter clockwise to decrease height
or clockwise to increase height until level. For fryers on
casters, the casters are adjustable by loosening the
jam nut and turning the caster in or out. When the
desired level is reached, tighten the jam nut.
Adjustments of more than 3/4
" are not recommended
on any caster. The same procedure should be followed
to level the fryer from front to back.
Figure 2-1
RESTRAINING
DEVICES
On fryer installations with casters, casters and jam nuts
must be completely tightened. Adequate means must
also be provided to limit the movement of the appliance
without depending on the connector, the
quick-disconnect device or its associated piping to limit
the appliance movement.
Connectors must comply with the current ANSI
Z21.69/CAN 1 CAN/CGA 6.16 (latest edition) standard
for connectors for movable gas appliances. Quickdisconnect devices must comply with the current ANSI
Z21.41/CAN 1 6.9 standard for quick-disconnect
devices for use with gas fuel as applicable.
The restraint must be attached to the rear of the fryer
within 1" of the center line width and approximately 1"
from the bottom of the cabinet back to allow the
restraining bolt to be anchored through the leg channel
to ensure positive support to restrain fryer movement
and not depend on the connector, quick disconnect or
piping to limit the fryer movement.
Caster
Leg
4
WARNING
IF DISCONNECTION OF THE RESTRAINT IS
NECESSARY, IT MUST BE RECONNECTED WHEN
THE FRYER IS RETURNED TO ITS ORIGINALLY
INSTALLED POSITION.
GAS CONNECTION
WARNING
PIPE JOINT COMPOUNDS RESISTANT TO
PROPANE GASES MUST BE USED.
BEFORE OPERATING THIS FRYER, CHECK PIPE
JOINTS FOR LEAKS BY USING A SOAP AND
WATER SOLUTION ONLY. DO NOT USE AN
OPEN FLAME!
Figure 2-3
Main Gas Connection
FOR YOUR SAFETY: Do not store or use gasoline
or other flammable vapors and liquids in the
vicinity of this or any other appliance.
Connect the fryer to the main gas supply line at the rear
of the fryer. The piping should be a minimum of 3/4"
NPT supply pipe for a single fryer at the burner
manifold. Batteries require larger supply lines.
Installation must conform to the current local codes and
National Fuel Gas Code (U.S.) ANSI Z223. 1/NFPA 54
(latest edition), Natural Gas Installation Code
CAN/CGA-B149.1 or Propane Installation Code
CAN/CGA-B149.2 (latest edition).
NOTE: If more than one gas fryer is on the same supply
line, you may require a larger line. Consult your local gas
company to assure adequate volume and pressure.
Refer to serial plate for proper gas requirements for your
particular model.
NOTE: Piping for a battery should be at least 1-1/4" to
1-1/2" IPS, depending on total BTU input. Consult your
local gas supplier for appropriate battery piping size.
ELECTRICAL
CONNECTION
The Keating Incredible Frying Machine (IFM) is
equipped with a 9' neoprene covered, 3 wire electrical
cord with a three-pronged grounded plug for protection
against electrical shock. This plug must be placed into
a 120V properly grounded three-pronged polarized
outlet. For proper grounding procedures see local
codes, or in the absence of local codes, the National
Electrical Code ANSI/NFPA 70 (latest edition) or
Canadian Electrical Code CAN 22.2 (latest edition) as
applicable.
CAUTION: Before plugging in the fryer, confirm the
outlet is properly polarized and grounded. If the hot and
neutral terminals are reversed or the outlet is not
properly grounded, the burners may not ignite (burner
on light will go out after 2-1/2 seconds).
NOTE: The electrical wiring diagram for the fryer is
located on the inside of the fryer door.
WARNING
DO NOT CUT OR REMOVE THE GROUNDING
PRONG FROM THIS PLUG.
GAS LEAK
TESTING
Prior to lighting your fryer:
1. Make sure all thermostats, switches and safety
valves are in the “OFF” position.
2. Turn main On/Off manual gas valve to the “ON”
position.
3. Have your plumber or gas company check for
leaks with a soap solution. (NEVER check with an
open flame!)
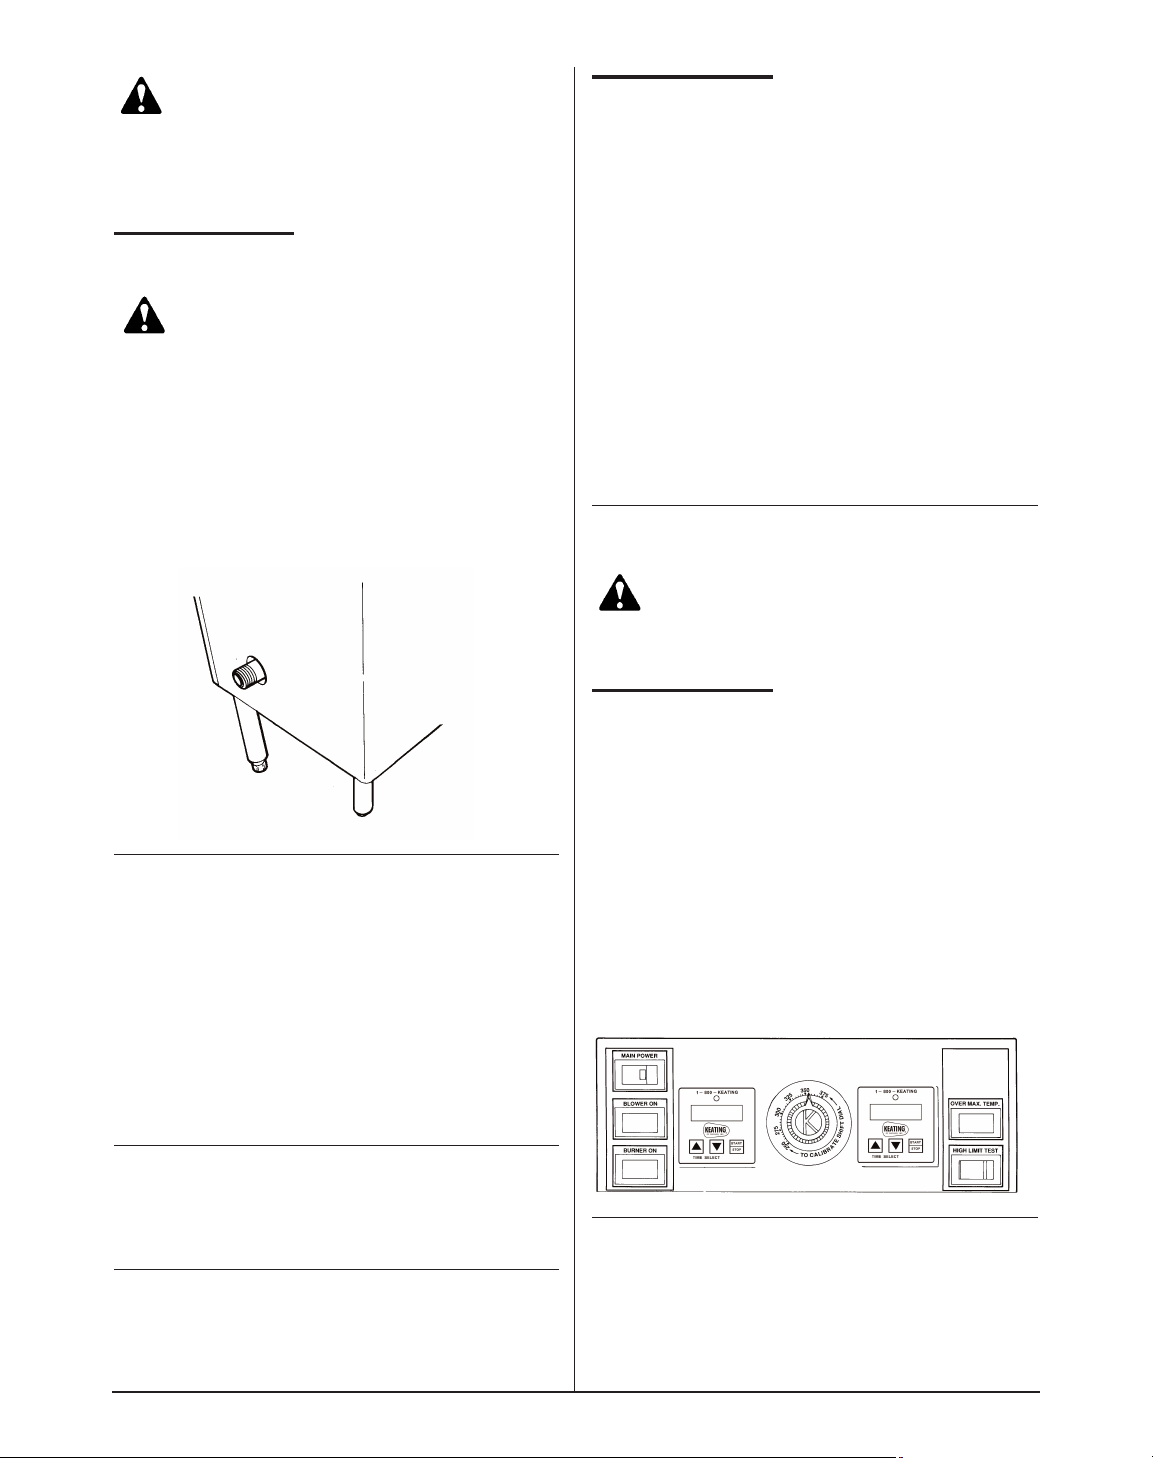
Figure 2-4
IFM Control Panel
NOTE: It is estimated that half of all service calls made
on Keating Incredible Frying Machine Gas Fryers (IFM)
result from an inadequate gas supply. During
installation, have a gas company representative make
certain that the fryer is receiving adequate gas
pressure and volume.
WARNING
PROPANE GAS MAY EVENTUALLY LOSE ITS
ODOR AND PRECAUTIONS SHOULD BE TAKEN TO
ASSURE THAT IT IS NOT PRESENT EVEN THOUGH
YOU DO NOT DETECT AN ODOR. IF THERE IS ANY
DOUBT, YOU SHOULD CALL YOUR LOCAL
PROPANE GAS SUPPLIER FOR ASSISTANCE.
CALIBRATION
For Calibration, refer to page 9 – Calibration.
III OPERATING
FILLING
NOTE: Before filling the fryer make certain the fryer
vessel is sanitized, dry and the drain valve is
completely closed. Refer to item 19 on page 15 for
location of drain valve.
NOTE: We recommend that solid shortening not be
used in an Incredible Frying Machine Gas Fryer (IFM)
as they are not equipped with a melt cycle. If solid
shortening is used, it should be melted prior to filling
the fryer vessel. Damage done by melting solid
shortening in the fryer vessel will void the warranty.
WARNING
BE SURE THE HEAT TRANSFER TUBES ARE
COMPLETELY COVERED WITH OIL BEFORE
SWITCHING THE FRYER ON. IF OIL LEVEL DROPS
BELOW TOP OF HEAT TRANSFER TUBES,
SEVERE DAMAGE TO FRYER AND INJURY TO
OPERATOR MAY RESULT!
WARNING
WATER (IN ANY FORM) AND HOT OIL DON’T MIX!!!
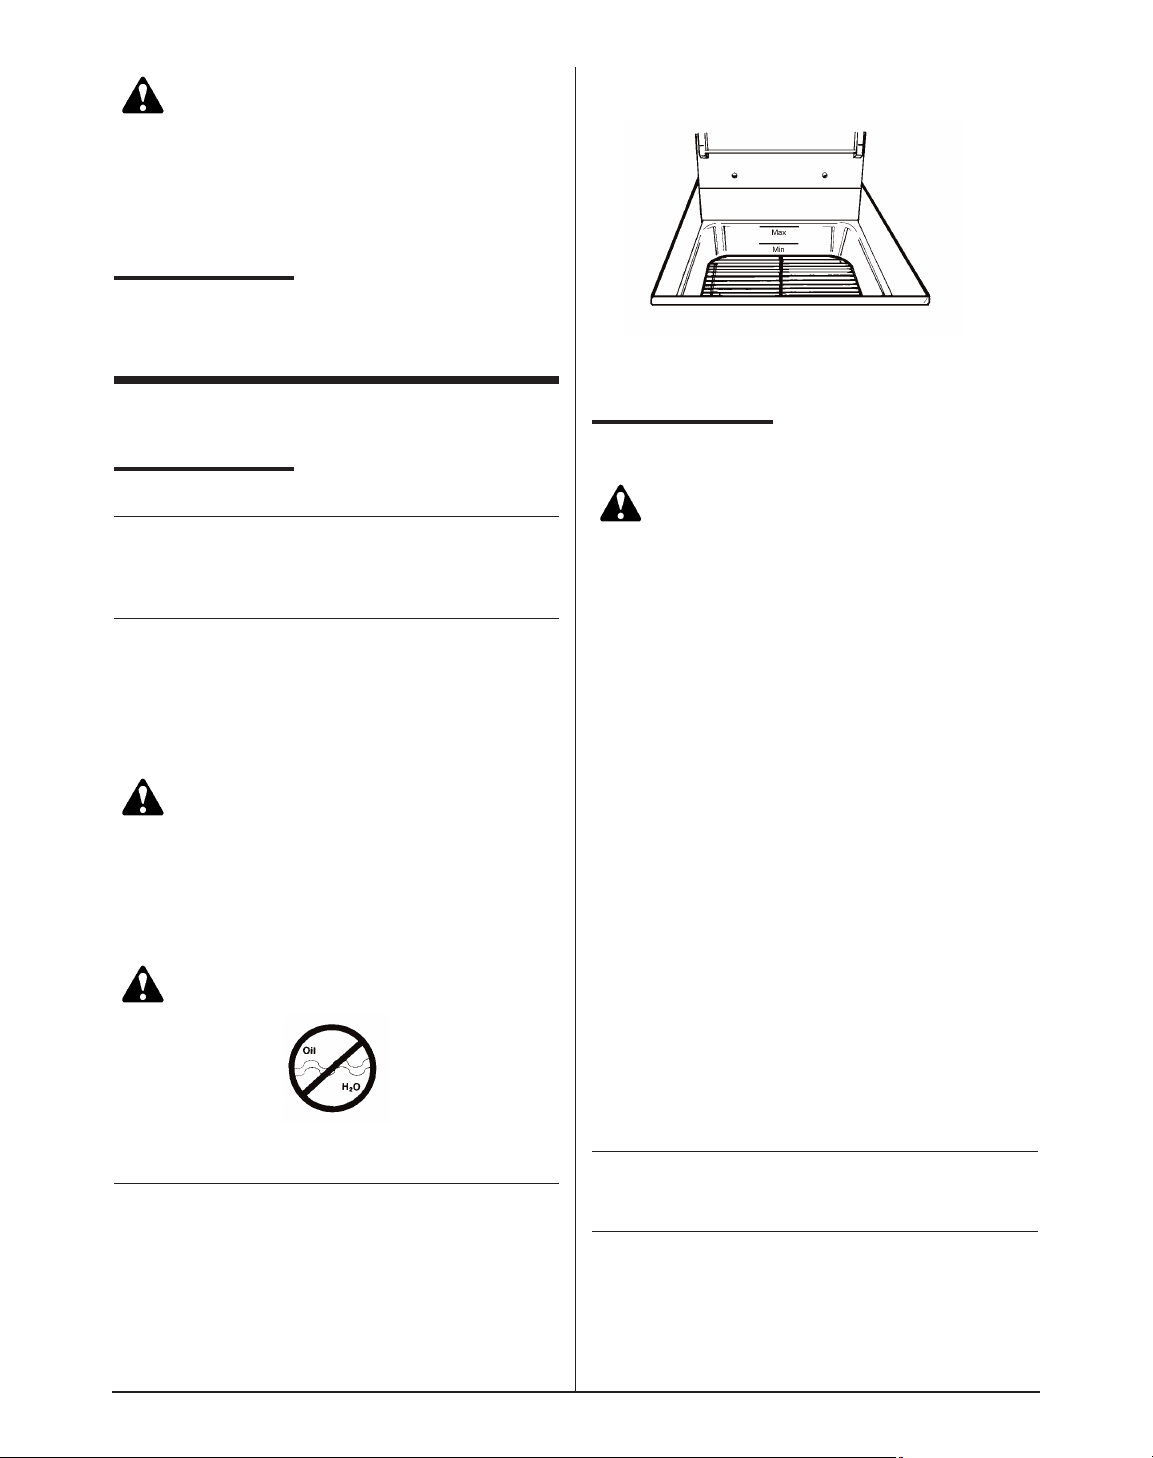
CAUTION: Oil expands when heated. The “Fill Level”
line has been provided to ensure optimum cooking
while ensuring the safety of the operator. Do not overfill
the fryer vessel.
Figure 3-1
Fill Level Line
Fill the fryer vessel with oil or MELTED solid shortening
up to the “Fill Level” line.
LIGHTING
WARNING
BEFORE ATTEMPTING TO LIGHT THE FRYER,
MAKE SURE THE GAS CONNECTIONS ARE
SECURE, HAVE BEEN LEAK TESTED, AND THE
FRYER HAS BEEN PROPERLY FILLED WITH
OIL.
1. Turn on main power switch.
2. Set thermostat to desired setting. (Between
325°F/162.8°C) – (335°F/165.3°C)
3. Once main power switch is on and the thermostat
is set, the following occurs:
a. Blower will start and blower indicating light will
come on.
b. After a preset six second delay, the gas valve
will open and the burner indicating light will
come on.
For your safety, the fryer is equipped with a “proof of air
flow” control. If the blower fails, the gas valve will not
open and the burner indicating light will not come on.
c. The spark module will light the burners
automatically.
d. The burner indicating light will be on whenever
the burners are on. The light goes off when the
oil has reached the desired temperature.
NOTE: The fryer cannot be operated during a power
failure as the electronic ignition system cannot be
operated.
NOTE: The thermostat can be turned off by turning it
fully counter clockwise until it clicks.
5
 Loading...