

Page 1
HD 3.5/30-4S Ea
HD 3.7/22-4S Eg
www.kaercher.com
5.961-344.0 09/07
Page 2

English
Français
Español
5
14
24
2
Page 3

Page 4
4
Page 5
English
Environmental protection
The packaging material can be
recycled. Please do not place
the packaging into the ordinary
refuse for disposal, but arrange
for the proper recycling.
Old appliances contain valuable
materials that can be recycled.
Please arrange for the proper
recycling of old appliances.
Batteries, oil, and similar
substances must not enter the
environment. Please dispose of
your old appliances using
appropriate collection systems.
Caution!
Follow the maintenance instruc-
tions specified in the manual
This machine has been designed for
use with cleaning detergents by the
manufacturer. The use of other
cleaning detergents may affect the
operation of the machine and void the
warranty.
IMPORTANT SAFETY
INSTRUCTIONS
WARNING!
When using this product basic
precautions should always be
followed, including the following:
Read all the instructions before
using the product.
To reduce the risk of injury, close
supervision is necessary when a
product is used near children.
Know how to stop the product and
bleed pressures quickly. Be
thoroughly familiar with the controls.
Stay alert — watch what you are
doing.
Do not operate the product when
fatigued or under the influence of
alcohol or drugs.
Keep operating area clear of all
persons.
Do not overreach or stand on
unstable support. Keep good footing
and balance at all times.
Follow the maintenance instructions
specified in the manual.
This Product Is Provided With A
Ground Fault Circuit Interrupter
(GFCI) Built Into The Power Cord
Plug. If Replacement Of The Plug Or
Cord Is Needed, Use Only Identical
Replacement Parts.
Risk of Injection or Injury to persons
- Do not direct discharge stream at
persons.
High pressure jets can be dangerous
if subject to misuse. The jet must not
be directed at persons, animals,
electrical devices, or the machine
itself.
Wear safety goggles.
Do not use acids and solvents in this
product. These products can cause
physical injuries to the operator and
irreversible damage to the machine.
To reduce the risk of electrocution,
keep all connections dry and off the
ground. Do not touch plug with wet
hands.
5
Page 6
English
!
!
The Trigger Gun Safety Lock
PREVENTS the trigger from
accidentally being engaged. This
safety feature DOES NOT lock
trigger in the ON position.
Do not use extension cord for this
unit.
Warning!
To reduce the risk of
electrocution, keep all connections dry
and off the ground. Do not touch plug
with wet hands.
Grounding Instructions
This product must be grounded. If it
should malfunction or breakdown,
grounding provides a path of least
resistance for electric current to reduce
the risk of electric shock. This product
is equipped with a cord having an
equipment-grounding conductor and a
grounding plug. The plug must be
plugged into an appropriate outlet that
is properly installed and grounded in
accordance with all local codes and
ordinances.
Danger!
Improper connection of the
equipment-grounding conductor can
result in a risk of electrocution. Check
with a qualified electrician or service
personnel if you are in doubt as to
whether the outlet is properly
grounded. Do not modify the plug
provided with the product - if it will not
fit the outlet, have a proper outlet
installed by a qualified electrician. Do
not use any type of adapter with this
product.
Ground Fault Circuit Interrupter
(GFCI) Protection
This product is supplied with a Ground
Fault Circuit Interrupter (GFCI) built
into the power cord plug. This device
provides additional protection from the
risk of electric shock. If power is
interrupted in the line, the GFCI will
automatically re-close the circuit to the
load after power is restored.
Depending on the GFCI model, it may
be necessary to manually operate the
reset button to restore power to the
GFCI load circuit. If replacement of the
plug or cord is needed use identical
replacement parts.
WATER SUPPLY
Caution!
When connecting the water inlet to
the water supply mains, local regulations
of your water company must be
observed. In some areas the unit must
not be connected directly to the public
drinking water supply. This is to ensure
that there is no feedback of chemicals
into the water supply. Direct connection
via a receiver tank or backflow preventer
for example, is permitted.
Dirt in the feed water will damage the
unit. To avoid this risk, we recommend
fitting a water filter.
Never use the pressure washer to
draw in water contaminated with
solvents, e.g. paint thinners,
gasoline, oil, etc.
Always prevent debris from being
drawn into the unit by using a clean
water source.
SAVE THESE
INSTRUCTIONS!!
6
Page 7

English
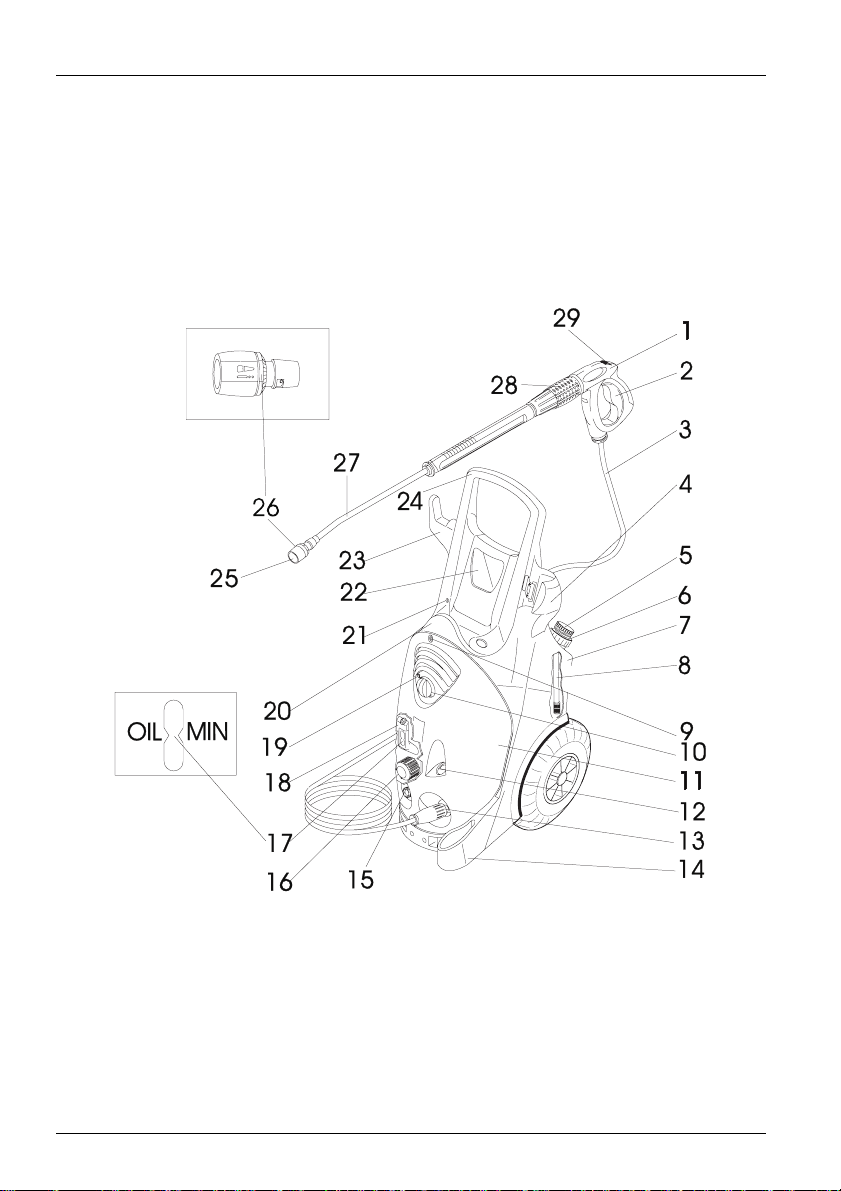
Unit components
Please fold out illustration page at the front
1 Hand-held spray gun
2 Lever of hand-held spray gun
3 High-pressure hose
4 Handgun support
5 Detergent metering valve
6 Cap for detergent reservoir
7 Detergent reservoir
8 Detergent suction-hose with filter
9 Fastening screw for hood
10 Unit switch
11 Hood
12 Pressure gauge
13 High-pressure outlet
14 Nozzle rest
15 Water connection
16 Fine filter
17 Oil level display
18 Oil reservoir
19 Indicator light
20 Hose rest
21 Detergent reservoir vent
22 Accessories box
23 Cable holder
24 Handle
25 Nozzle
26 Marking of the nozzle
27 Spray lance
28 Pressure/flow control
29 Safety catch of hand-held spray gun
For your safety
Before you use the cleaner for the first time,
read these operating instructions and take
special note of the accompanying booklet
"Safety Instructions for High-Pressure Cleaners" No. 5.951-949.
Use of the cleaner
Use this unit exclusively for
– cleaning with high-pressure jet and deter-
gent (e.g. cleaning of machines, vehicles,
buildings, tools),
– cleaning with high-pressure jet without de-
tergent (e.g. cleaning facades, terraces,
gardening equipment).
For stubborn dirt we recommend the dirt
blaster as an optional accessory.
Safety features
Relief valve with pressure
switch
On reducing the flow rate with the pressure
and flow control, the relief valve opens and
part of the water runs back to the suction side
of the pump.
If the lever of the hand-held spray gun is released, the pressure switch switches the
pump off. If the lever is retracted, the pressure
switch switches the pump on again.
The overflow valve and pressure switch have
been set and sealed at the factory.
Adjustments are made only by Customer
Service.
7
Page 8
English
Preparing the unit for use
Unpack the unit
– When unpacking the unit, check the con-
tents of the packaging. If there has been
any damage in transit inform the dealer.
– Do not dispose of the packaging with the
household rubbish, hand it in at the appropriate collection point for recycling.
Check the oil level
Read the oil level displayed while unit is at
a standstill. The oil level must be above the
two indicators.
Activate the oil reservoir vent
Unscrew the fastening screw of the hood
and remove the hood.
Cut off the tip on the cover to the oil reser-
voir.
Fasten the unit cover.
Mount the accessories
Mount nozzle on the spray lance (see
markings on the top of the setting ring).
Fit the spray lance to the hand-held spray
gun with pressure and flow control.
Lock cable clincher into bore lateral to the
handle.
Tighten the high-pressure hose according-
ly.
Switching on the unit
Electrical connection
Caution!
The voltage specified on the model rating plate must correspond to the voltage supplied.
Do not use extension cord for this unit.
For connected loads see model rating plate/
Technical Specifications.
Caution!
It is essential that the unit is connected
to the power supply by means of a plug. An inseparable connection to the power supply is
prohibited. The plug is used to disconnect
from the mains.
Please turn the machine switch off before resetting the GFCI, otherwise, the GFCI will be
damaged
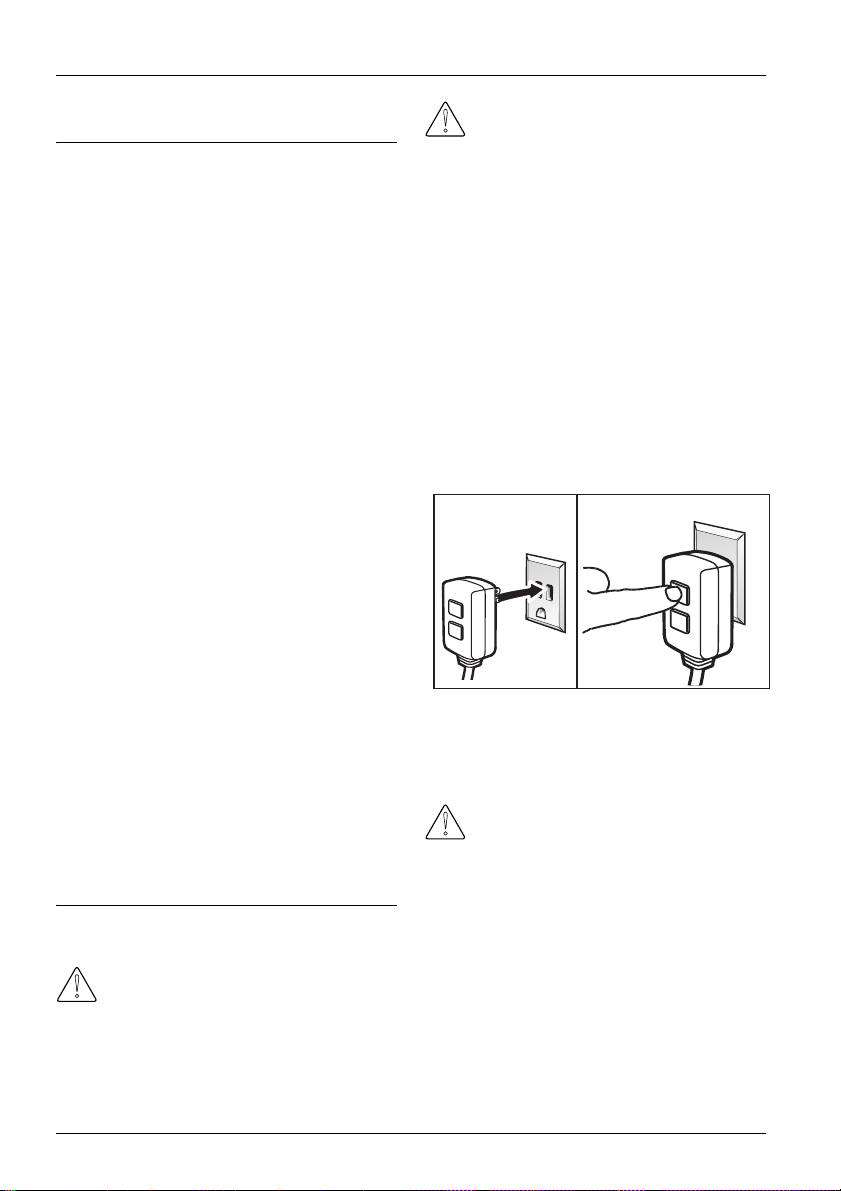
GFCI INSTRUCTIONS
STEP 1: Plug the Ground Fault Circuit
Interrupter (GFCI) into a working outlet.
STEP 2: Press ’’TEST’’, then press
’’RESET’’ to assure proper connection to
power.
Note: The actual appearance of the GFCI
may be different from this illustration.
2
1
Water connection/Suction feed
operation
Connection to water main
Caution!
Pay attention to the regulations of the
water supply company; according to DIN
1988, the unit may not be connected direct to
the public drinking water supply. A short-term
connection via a non-return valve
(Order no. 6.412-578) is allowed.
For connected loads see Technical Specifications.
Connect a supply hose (not supplied) to the
water outlet on the unit and to the water inlet (e.g. water tap).
Open water inlet.
8
Page 9
English
!
Suctioning water from an open container
Screw suction hose with filter
(Order no. 4.440-238) to the water outlet.
Vent the unit before using.
To evacuate air from the unit, unscrew the
nozzle and leave the unit running until water exits with no air bubbles.
Switch off the unit and screw the nozzle
back on.
Operating the unit
Danger!
Observe the relative safety regulations
when using the unit at filling stations or other
high-risk areas.
Caution!
Only clean engines in places which
have appropriate oil separators (protection of
the environment).
Caution!
Only wash animals with the lowpressure fan jet (see "Selecting the type of
spray").
Operating with high pressure
The unit is equipped with a pressure switch.
The motor only starts up when the lever is retracted.
Set the unit switch to "I". The indicator light
will go green.
Unlock the hand-held spray gun and retract
the lever of the gun.
Adjust operating pressure and flow rate
(+/–) by rotating the pressure/flow control
(infinitely variable).
At the lowest flow rate the waste heat from
the motor will heat the water to approx.
15 °C.
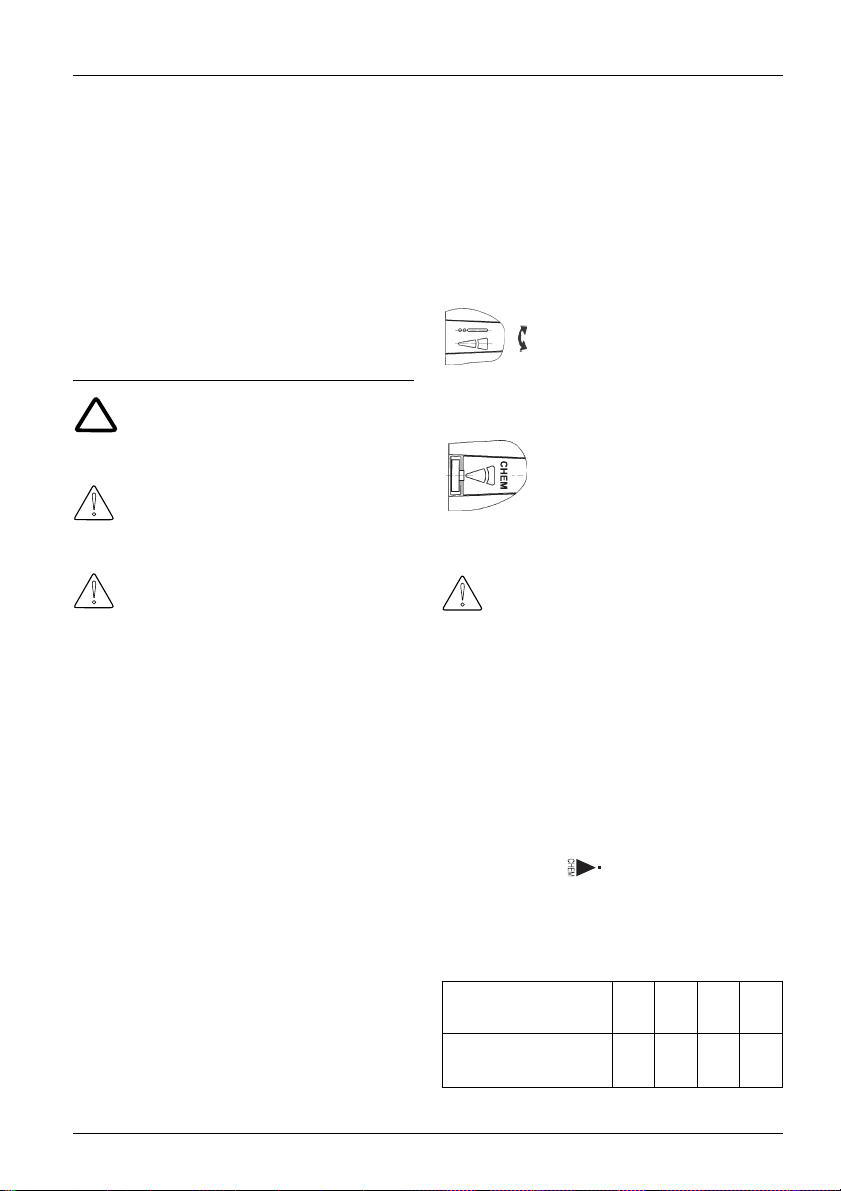
Selecting the type of spray
The handgun must be closed.
Rotate the housing of the nozzle until the
desired symbol corresponds with the marking.
Select pencil jet or fan jet by contactless
changeover:
rotate the spray lance, which is pointing
down at an angle of approx. 45°, to the left
or right.
Explanation of the symbols
High-pressure pencil jet (0°),
for particularly stubborn accumulation of grime.
High-pressure fan jet (25°), for
dirt accumulation over a large
surface.
Low-pressure fan jet (CHEM)
for operation with detergent or for
cleaning at low pressure.
Operating with
detergent
Caution!
Unsuitable detergents can harm the
cleaner and the object which is to be cleaned.
Use only detergents which are released by
Kärcher. Proportions of detergent to be used
and accompanying instructions should be noted carefully. Use detergents sparingly out of
consideration for the environment.
Kärcher cleaning agents guarantee troublefree operation. Please seek advice or ask for
our catalogue of information sheets on cleaning agents.
Fill detergent reservoir.
Set nozzle to .
Set the detergent metering valve to the
desired concentration.
Concentration of detergent when flow at
maximun:
Position of metering
valve
1357
0.5%2.5%5.0%7.0
%
9
Page 10

English
!
!
Recommended cleaning methods
Spray detergent with low pressure jet spar-
ingly over the dry surface to be cleaned and
let it take effect but not dry out.
Spray off (rinse off) the loosened dirt using
the high-pressure spray.
When you have finished the operation, set
detergent metering valve to "0" and switch
the unit on for about 1 minute and rinse it
clear of detergent.
Interrupting the operation
Release lever of the handgun, the unit
switches off. Retract lever again and the
unit switches on again.
Availability time
Within the availability time, the unit starts
when the hand-held spray gun is opened.
The indicator light will go green.
If the spray gun remains closed for
30 minutes, the availability time ends.
The indicator light will flash green.
Reset availability time
Switch off the unit switch.
Wait a moment.
Switch the unit back on again.
Customer Service can change the unit to
permanent operation.
Switching the unit off
Set unit switch to "0" and pull out power
plug.
Close water inlet.
Retract lever until the unit is without pres-
sure.
Push safety catch of the hand-held spray
gun forward to lock the lever of the gun
from being actuated inadvertently.
Danger!
Risk of scalding due to hot water. Residual water contained in the switched off unit
can heat up. When removing the hose from
the water inlet, the heater water can spurt out
and cause scalds. Do not remove the hose
until the unit has cooled down.
Transporting the cleaner
To transport the cleaner over relatively long
stretches, take hold of it by the handle and
pull it along behind you.
Empty the detergent reservoir before trans-
porting it horizontally.
Storing the cleaner
Place the handgun in the support.
Reel in the high-pressure hose and hang it
over the hose rest.
or
Coil the connecting cable round the cable/
hose rest.
Frost protection
Caution!
Frost will destroy a unit that is not completely empty of water! Store the unit where it
will be free of frost.
If storage away from frost is not possible:
Empty the detergent tank (see care and
maintenance/As and when required).
Drain off the water and rinse the unit
through with anti-freeze.
Leave the unit to dry for max. 1 minute.
Use the standard glycol-based anti-freezes
for cars.
Follow the handling instructions of the anti-
freeze manufacturer.
Care and maintenance
Danger!
Before any care and maintenance work
on the unit draw out the mains plug.
Caution!
When changing the oil, dispose of any
waste oil only at authorised collection points.
10
Page 11

English
!
Safety inspection/Maintenance
contract
You can arrange with your dealer to have a
regular safety inspection carried out or to
have a maintenance contract. Please seek
advice.
Before each use
Check connecting cable for damage (risk of
getting an electric shock), have a damaged
connecting cable replaced without delay by
authorised Customer Service personnel or
an electrician.
Check high-pressure hose for damage
(danger of explosion), replace a damaged
high-pressure hose without delay.
Check unit (pump) for any leaks.
Three drops per minute are allowable and
can appear on the underside of the unit.
Seek the help of Customer Service if leaks
are more serious.
Every week
Check oil level in oil reservoir: if the oil is
milky (water in oil), seek the help of Customer Service immediately.
Clean the fine filter.
– Unpressurize unit.
– Unscrew the fastening screw of the hood
and remove the hood.
– Unscrew the cover with filter.
– Clean the filter with clean water or com-
pressed air.
– Reassemble in the reverse order.
Clean the filter at the suction hose for de-
tergent.
Annually or after 500 operating
hours
Change the oil
– For oil quantity and type see Technical
Specifications.
– Undo the fastening screw, remove the
hood, unscrew the front oil drain plug on
the motor housing.
– Drain oil into a suitable container.
– Screw in the oil drain plug.
– Fill slowly with fresh oil; air bubbles have
to escape.
As and when required
Emptying and cleaning the detergent tank
– Pull out the screw cap and hose for the
detergent tank.
– Place the unit on its rear.
– Empty and clean the detergent tank.
Troubleshooting
Danger!
Before any repair work is undertaken,
switch the unit off and pull out the power plug.
Have electrical components checked and repaired only by authorised Customer Service
personnel.
For faults which are not identified in this chapter, or when in doubt or when expressly instructed to do so, consult authorised
Customer Service personnel.
Indicator light
The indicator light shows the operating status
(green) and faults (red).
To reset:
Switch off the unit switch.
Wait a moment.
Switch the unit back on again.
Operating status display
Constant green light:
– Unit is operational.
1 x flashing green:
– Operational readiness expired after
30 minutes.
– The unit switched off after 30 minutes of
permanent operation (safety feature in
the case of a burst high-pressure hose).
11
Page 12

English
Fault display
1 x flashing red:
– High-pressure side leaking. Check high-
pressure hose, hose connections and
hand-held spray gun for leaks.
2 x flashing red:
– Motor too hot. Switch off the unit switch.
Leave unit to cool down. Switch the unit
back on again.
3 x flashing red:
– Fault in the power supply. Check the
mains connection. Check supply fuses.
4 x flashing red:
– Current consumption too high. Consult
Customer Service
Unit does not work
Availability time has run out. The indicator
light will flash green. Switch the unit off and
then on again.
Check connecting cable for damage.
Consult Customer Service if there is an
electrical fault.
Unit does not come up to pressure
Set nozzle to "high pressure".
Clean/replace nozzle.
Clean the fine filter, replace if required.
Evacuate air from the cleaner (see Switch-
ing on the unit).
Check water inlet volume (see Technical
Specifications).
Check all supply lines to the pump for leaks
or obstructions.
Seek the help of Customer Service if nec-
essary.
Pump is leaky
Three drops per minute are allowable and
can appear on the underside of the unit.
Seek the help of Customer Service if leaks
are more serious.
Pump makes a knocking noise
Check all supply lines as well as the deter-
gent system for leaks.
Evacuate air from the cleaner (see Switch-
ing on the unit).
Clean the fine filter.
Seek the help of Customer Service if nec-
essary.
Detergent is not being drawn in
Set nozzle to "Chem".
Check detergent suction hose with filter for
leaks or obstructions and clean it if necessary.
Clean/renew non-return valve in detergent
suction-hose connection.
Open detergent metering valve or check it
for leaks/remove obstruction. Also clean
the venting orifice in the housing.
Seek the help of Customer Service if nec-
essary.
Spare parts
You will find a list of spare parts at the end of
these operating instructions.
Warranty
The warranty terms issued by our authorised
marketing company are valid in every country.
We remedy any fault in the unit free of charge
within the warranty period providing the cause
of the fault proves to be a material or manufacturing error.
The warranty only becomes operative when
your dealer has completed the reply card accompanying the sale of the unit, has stamped
and signed it and you have then sent the reply
card to the marketing company in your country.
Should you wish to call upon the guarantee,
please apply to your dealer or nearest authorised Customer Service centre taking along
also the accessories and bill of sale.
12
Page 13

English
Technical Specifications
HD 3.5/30-4S
Ea
1.286-110.0
Mains connection
Voltage V 220... 240 200...208
Type of current Hz 1 ~ 60
Connected load hp/kW 8.5/6.3 6.9/5.1
Supply fuse (delayed-action, char. C) A 30
Water connection
Supply temperature max. °F/°C 140/60
Supply volume min. gpm / l/min 5.3/20
Supply hose – minimum length m 7.5
Supply hose – minimum diameter inches 3/4
Suction height from an open container 20 °C m 0.5
Supply pressure max. psi/MPa 145/1
Performance data
Operating pressure psi/MPa 435...3000 /
Flow rate
Detergent intake
Recoil force of the handgun N 62
Sound emission
Sound pressure level
(EN 60704-1)
Garanted sound pressure level
(2000/14/EC)
Vibrations of unit / total of vibration (ISO 5349)
Handheld gun m/s
Spray lance m/s
Dimensions
Length mm 560
Width mm 500
Height mm 1090
Weight without accessories kg 62
Reservoir capacity, detergent l 6
Oil quantity, pump l 1.2
Oil type, pump 15W40
gpm / l/min
gpm / l/min
dB (A)
dB (A) 87
2
2
3...20.6
1.8...3.5 /
6.8..13.2.
HD 3.7/22-4S
1.286-115.0
435...2200 /
3...15.2
1.8...3.7 /
6.8...14.0
0...0.3 / 0...1.1
72
2.2
2.0
Eg
13
Page 14

Fran çais
Protection de
l’environnement
Les matériaux constitutifs de
l’emballage sont recyclables.
Ne pas jeter les emballages
dans les ordures ménagères,
mais les remettre à un système de recyclage.
Les appareils usés contiennent des matériaux précieux
recyclables lesquels doivent
être apportés à un système de
recyclage. Il est interdit de jeter les batteries, l'huile et les
substances similaires dans
l'environnement. Pour cette
raison, utiliser des systèmes
de collecte adéquats afin d'éliminer les appareils usés.
ATTENTION !
En utilisant ce produit, toujours observer une certaine prudence élémentaire, incluant notamment :
Lire toutes les instructions avant
d'utiliser le produit.
Afin de réduire le risque de blessu-
res, une surveillance attentive est requise lorsqu'un produit est utilisé à
proximité d'enfants.
Savoir comment arrêter le produit et
réduire la pression rapidement. Etre
parfaitement familiarisé avec les
commandes.
Rester attentif — toujours regarder
ce que l'on fait.
Ne pas utiliser le produit en étant fa-
tigué ou sous l'influence de l'alcool
ou de drogues.
Ne laisser personne approcher la
zone de travail.
Ne pas se pencher ou se tenir sur un
support instable. Toujours rester en
équilibre.
Observer les instructions de mainte-
nance figurant dans le présent manuel.
Ce produit est fourni avec un dis-
joncteur différentiel monté dans la
fiche du cordon d'alimentation. Si le
remplacement de la fiche ou du
cordon d'alimentation s'avère nécessaire, n'utiliser que des pièces de rechange identiques.
Risque d'injection ou de blessures
sur les personnes - ne pas diriger le
jet sur des personnes.
Utilisés abusivement, les jets à hau-
te pression peuvent être dangereux.
Le jet ne doit jamais être dirigé sur
des personnes, des animaux, des
appareils électriques ou la machine
même.
Porter des lunettes de protection.
Ne pas utiliser d'acides, ni de sol-
vants dans la machine. Ces produits
peuvent nuire à la santé de l'opérateur et causer des dégâts matériels
irréversibles à la machine.
Afin de réduire le risque d'électrocu-
tion, garder toutes les connexions au
sec et ne pas les laisser à terre. Ne
pas toucher la fiche avec les mains
mouillées.
Le verrouillage de sécurité de la poi-
gnée-pistolet EMPECHE d'actionner
accidentellement la gâchette. Le dispositif de sécurité NE VERROUILLE
PAS la gâchette en position actionnée.
Ne pas utiliser que des rallonges.
14
Page 15

Français
!
Attention !
Afin de réduire le risque d'électrocution, garder toutes les connexions
au sec et ne pas les laisser à terre. Ne
pas toucher la fiche avec les mains
mouillées.
Instructions de mise à terre
Ce produit doit-être mis à la terre. En
cas de mauvais fonctionnement ou de
panne, la mise à la terre établit un chemin de moindre résistance pour le courant électrique afin de réduire le risque
de décharge électrique. Ce produit est
équipé d'un cordon doté d'un conducteur de mise à la terre de l'équipement
et d'une prise de mise à la terre. La prise doit être branchée dans une prise
appropriée qui est correctement installée et mise à la terre en conformité
avec les codes et ordonnances locaux.
Danger !
Un conducteur de mise à la terre
d'équipement incorrectement branché
peut entraîner un risque d'électrocution. Vérifier avec un électricien ou un
technicien d'entretien qualifié en cas
de doute sur la mise à terre correcte de
la prise. Ne pas modifier la fiche fournie avec le produit - si elle ne peut pas
être branchée, faire installer une prise
appropriée par un électricien qualifié.
Ne pas utiliser n'importe quel type
d'adaptateur avec ce produit.
Protection par disjoncteur différentiel
Ce produit est fourni avec un disjoncteur différentiel intégré dans la
fiche de cordon d'alimentation. Ce dispositif fournit une protection supplémentaire contre les risques de décharges électriques. En cas de coupure de
courant, le disjoncteur différentiel referme automatiquement le circuit lorsque le courant est rétabli. Selon le modèle de disjoncteur différentiel, il peut
s’avérer nécessaire d’actionner manu-
ellement le bouton de réinitialisation
pour rétablir l’alimentation du circuit de
charge. Utiliser des pièces de rechange identiques en cas de remplacement
du cordon ou de la fiche.
ALIMENTATION EN EAU
Attention !
Lors de la connexion de l'entrée
d'eau à la canalisation d'alimentation
en eau, les régulations locales de votre
compagnie d'eau doivent être observées. Dans certaines zones, l'appareil
ne doit pas être connecté directement
à l'alimentation en eau potable publique. Il s'agit de s'assurer qu'il n'y a pas
de retour de produits chimiques dans
l'alimentation en eau. Une connexion
directe par l'intermédiaire d'un réservoir de réception ou d'un disconnecteur hydraulique par exemple est
autorisée.
D'éventuelles impuretés dans l'eau d'alimentation endommagent l'appareil.
Pour prévenir ce risque, nous recommandons d'installer un filtre à eau.
Le tuyau d'eau doit avoir un diamètre
d'au moins 16 mm.
Le débit d'alimentation en eau ne
doit pas être inférieur à 7,6 l/min
(litres par minute).
Le débit peut être déterminé en lais-
sant couler de l'eau pendant une minute dans un bidon vide de 20 litres.
La température de l'eau d'alimentati-
on ne doit pas excéder 40°C/104°F.
Ne jamais utiliser le nettoyeur à hau-
te pression pour aspirer de l'eau
contaminée par des solvants, des diluants, de l'essence, de l'huile, etc.
Toujours utiliser une source d'eau propre pour éviter d'aspirer des débris.
CONSERVER CES
INSTRUCTIONS !
15
Page 16

Fran çais
Composants de l'appareil
Veuillez déplier le volet illustré de la première
page
1 Poignée-pistolet
2 Gâchette de la poignée-pistolet
3 Flexible haute pression
4 Support de la poignée-pistolet
5 Vanne de dosage du détergent
6 Couvercle verrouillant le réservoir de
détergent
7 Réservoir de détergent
8 Flexible d’aspiration du détergent, avec
filtre
9 Vis de fixation du capot
10 Commutateur de l’appareil
11 Capot
12 Manomètre
13 Prise haute pression
14 Porte-buse
15 Prise d'arrivée d'eau
16 Filtre fin
17 Indicateur du niveau d’huile
18 Réservoir à huile
19 Témoin de contrôle
20 Logement du flexible
21 Dégazage du réservoir de détergent
22 Rangement pour accessoires
23 Porte-câble
24 Poignée
25 Buse
26 Repère de la buse
27 Lance
28 Variateur de pression et de débit
29 Blocage de la poignée-pistolet
Pour votre sécurité
Veuillez lire la présente notice d’instructions
avant d’utiliser votre appareil pour la première
fois et respectez en particulier la brochure cijointe « Consignes de sécurité pour nettoyeurs haute pression », n° 5.951-949.
Domaines d’utilisation de
l’appareil
Utilisez cet appareil exclusivement pour
– les nettoyages au jet haute pression avec
détergent (p. ex. pour nettoyer machines,
véhicules, édifices, outils),
– les nettoyages au jet haute pression sans
détergent (p. ex. pour nettoyer façades,
terrasses, appareils de jardinage).
Si les salissures sont tenaces, nous vous recommandons la fraise à salissures, accessoire en option.
Dispositifs de sécurité
Vanne de surpression avec
pressostat
Lorsque vous réduisez le débit de l’eau à l’aide du variateur de pression et de débit, cette
vanne s’ouvre et une partie de l’eau retourne
du côté aspiration de la pompe.
Si vous relâchez complètement la gâchette
de la poignée-pistolet, le pressostat éteint la
pompe. Si vous appuyez sur la gâchette, le
pressostat réenclenche la pompe.
La vanne de surpression et le pressostat ont
été réglés et plombés à la fabrication.
Seul le service après-vente est habilité à en
modifier le réglage.
16
Page 17

Français
Avant la première mise en
service
Déballage de l’appareil
– Lors du déballage, vérifiez le contenu du
carton. Si vous constatez des dégâts dus
au transport, veuillez en informer votre
revendeur par lettre recommandée avec
accusé de réception.
– Ne jetez pas l’emballage dans la poubelle
à déchets domestiques. En vue de son
recyclage, rapportez-le à un point de
collecte approprié.
Contrôle du niveau d’huile
Relevez le niveau d’huile affiché par l’indi-
cateur lorsque l’appareil est à l’arrêt. Le niveau d’huile doit se situer au-dessus des
deux aiguilles.
Activation du dégazage du
réservoir à huile
Dévissez la vis de fixation du capot, puis
retirez le capot.
Coupez le bout pointu du couvercle du ré-
servoir d’huile.
Fixez le capot.
Montage des accessoires
Montez la buse au bout de la lance (les
repères sur la bague de réglage doivent se
trouver en haut).
Raccordez la lance à la poignée-pistolet
munie du variateur de pression et de débit.
Emboitez l’enrouleur de câble dans l’orifice
prévu sur le côté de l’appareil.
Dans ce cas, vissez le flexible haute-pres-
sion à fond.
Mise en service
Branchement électrique
Attention !
La tension mentionnée sur la plaque signalétique doit correspondre à celle du secteur.
Ne pas utiliser que des rallonges.
Données de branchement, voir la plaque si-
gnalétique/la section « Données
techniques ».
Attention !
L’appareil doit absolument être branché
dans la prise secteur avec une fiche mâle. Un
branchement permanent au réseau est interdit. La fiche mâle sert à couper l’alimentation
secteur.
Veuillez mettre l'interrupteur de la machine
sur Arrêt avant de réinitialiser le GFCI car sinon vous endommageriez le GFCI.
DISJONCTEUR DIFFERENTIEL
ETAPE 1 : Brancher le disjoncteur différen-
tiel dans une prise alimentée.
ETAPE 2 : Appuyer d’abord sur « TEST »,
puis sur « RESET » pour assurer le branchement correct au secteur.
Remarque : L’apparence effective du disjoncteur différentiel peut différer de l’illustration.
2
1
Prise d'arrivée d'eau /
Mode Aspiration
Raccordement à la conduite d’eau du
réseau public
17
Page 18

Fran çais
!
Attention !
Respectez les prescriptions de votre
sociétés distributrice des eaux ; selon
DIN 1988, le raccordement direct de l’appareil
au réseau public de distribution d’eau potable
est proscrit. Toutefois, un branchement de
courte durée avec clapet anti-retour intercalé
est admissible (n° réf. 6.412-578).
Données de branchement, voir la section
« Données techniques ».
Raccordez un flexible d’alimentation en
eau (non compris dans les fournitures) à la
prise d’arrivée d’eau de l’appareil et à l’alimentation en eau (par ex. au robinet).
Ouvrez le robinet d’eau.
Aspiration de l’eau contenue dans un
réservoir ouvert
Vissez le flexible d’aspiration avec filtre
(n° réf. 4.440-238) à la prise d’arrivée
d’eau.
Chassez les bulles d'air de l'appareil avant
de le mettre en service.
Pour dégazer l'appareil, dévissez la buse
puis faites marcher l'appareil jusqu'à ce
que l'eau sorte sans bulles.
Eteignez l'appareil puis revissez la buse.
Commande
Danger !
Si vous utilisez l'appareil dans des stations-service ou autres zones dangereuses,
respectez les prescriptions de sécurité appropriées.
Attention !
Ne nettoyez les moteurs qu’à un poste
de nettoyage dûment équipé d’un séparateur
d’huile (protection de l’environnement).
Attention !
Lavez les animaux uniquement avec la
lance plate basse pression (voir la section
« Choix du type de jet »).
Service haute pression
L’appareil est équipé d’un pressostat. Le moteur démarre uniquement si vous appuyez sur
la gâchette.
Amenez le commutateur de l’appareil sur la
position « I ». Le témoin de contrôle s’allume en vert.
Déverrouillez la poignée-pistolet et ap-
puyez sur la gâchette.
Réglez la pression de service et le débit
d’eau en tournant (en continu) le variateur
de pression et de débit (+/–).
Si le débit d'alimentation en eau est très fai-
ble, la chaleur perdue du moteur hausse la
température de l'eau de 15 °C environ.
Choix du type de jet
La poignée-pistolet doit être fermée.
Tournez le boîtier de la buse jusqu’à ce que
le symbole souhaité se trouve en face du
repère.
Sélectionnez soit le jet crayon soit le jet plat
grâce à une commutation sans contact :
tournez vers la gauche ou la droite la lance
inclinée vers le bas d'un angle de 45° env.
Signification des symboles
Jet crayon haute pression (0°),
pour les salissures particulièrement tenaces.
Jet plat haute pression (25°),
pour les salissures occupant une
large surface.
Jet plat basse pression
(CHEM), lors de l'utilisation de
détergent ou dans le cas d'un
nettoyage à faible pression.
Marche avec détergent
Attention !
Des détergents inappropriés pourraient
endommager l’appareil et l’objet à nettoyer.
N’utilisez que des détergents homologués par
Kärcher. Respectez le dosage recommandé
ainsi que les consignes accompagnant les
détergents. Afin de ménager l’environnement,
utilisez les détergents parcimonieusement.
Les détergents Kärcher vous garantissent
des travaux sans incident. Demandez conseil
ou réclamez notre catalogue ou les fiches
d’information sur les détergents.
Remplissez le réservoir de détergent.
Réglez la buse sur .
18
Page 19

Français
!
Réglez la vanne de dosage de détergent
sur la concentration voulue.
Dosage de détergent pour débit de refoulement maximal :
Position de la vanne
de dosage
Méthode de nettoyage recommandée
Avec le jet basse pression pulvérisez parci-
monieusement le détergent sur la surface
sèche puis laissez agir sans laisser sécher.
A l’aide du jet haute pression, chassez les
souillures décollées.
Une fois que vous avez terminé de vous
servir de l’appareil, positionnez la vanne de
dosage du détergent sur « 0 » puis enclenchez l’appareil et rincez-le à l’eau claire
pendant une minute environ.
1357
0,5%2,5%5,0%7,0
%
Interruption du service
L’appareil s’éteint si vous relâchez la
gâchette de la poignée-pistolet. Il se remet
en marche en appuyant à nouveau sur la
gâchette.
Période de veille
Pendant la période de veille, l’appareil se met
en marche lorsque vous ouvrez la poignée-pistolet. Le témoin de contrôle s’allume en vert.
La période de veille se termine si la poignéepistolet reste fermée pendant 30 minutes. Le
témoin de contrôle clignote en vert.
Remise à zéro de la période de
veille
Eteignez l'appareil.
Attendez un court instant
Enclenchez de nouveau l’appareil.
Si l’appareil doit fonctionner en mode continu,
le SAV peut effectuer les modifications nécessaires.
Mise hors service de l’appareil
Amenez le commutateur de l’appareil sur
« 0 » puis débranchez la fiche mâle de la
prise de courant.
Fermez le robinet d’arrivée d’eau.
Appuyez sur la gâchette jusqu’à ce que
l’appareil soit hors pression.
Glissez vers l’avant le levier de sécurité de
la poignée-pistolet pour empêcher d’actionner la gâchette par inadvertance.
Danger !
Risque d'ébouillantage par eau très
chaude. Les résidus d'eau qui se trouvent
dans l'appareil hors circuit peuvent chauffer.
Lors de l'enlèvement du tuyau d'arrivée d'eau,
l'eau chaude peut jaillir et provoquer des
ébouillantages. Retirer le tuyau seulement
quand l'appareil est refroidi.
Transport de l’appareil
Pour transporter l’appareil sur de longues
distances, prenez-le par la poignée puis
tirez-le derrière vous.
Si vous devez le transporter à l’horizontale,
vidangez le réservoir de détergent.
Rangement de l’appareil
Enfoncez la poignée-pistolet dans le sup-
port.
Enroulez le flexible haute pression puis ac-
crochez-le sur le logement de flexible.
Ou
Enroulez le cordon d’alimentation autour
du support de câble/flexible.
Protection antigel
Attention !
Le gel peut endommager l’appareil si
de l’eau se trouve encore à l’intérieur ! Rangez l’appareil à l’abri du gel.
Si vous ne pouvez pas stocker l’appareil à
l’abri du gel :
Videz le réservoir de détergent (voir net-
toyage et entretien/selon besoin).
Videz l’eau et rincez l’appareil avec du pro-
duit antigel.
Faites sécher l’appareil en le laissant
fonctionner pendant 1 min maximum.
19
Page 20

Fran çais
!
!
Utilisez de l’antigel pour voitures à base de
glycol, que l’on trouve dans le commerce.
Respectez les consignes d’utilisation pres-
crites par le fabricant d’antigel.
Nettoyage et entretien
Danger !
Avant d'effectuer tous les travaux de nettoyage et d'entretien sur l'appareil, veuillez débrancher sa fiche mâle de la prise de courant.
Attention !
Lorsque vous vidangez l’huile, remettez
l’huile usagée à un centre de collecte agréé.
Inspection de sécurité / Contrat
d'entretien
Vous pouvez convenir une inspection de sécurité régulière avec votre revendeur ou bien
souscrire un contrat d’entretien. Ce dernier
vous conseillera volontiers.
Avant chaque utilisation
Vérifiez si le câble d’alimentation est en-
dommagé (risque d’électrocution). Faites
remplacer immédiatement un câble endommagé par un électricien ou le service
après-vente agréé.
Vérifiez si le flexible haute pression est en-
dommagé (risque d’éclatement). S’il l’est,
remplacez-le immédiatement.
Vérifiez l’étanchéité de l’appareil (pompe).
3 gouttes par minute sont tolérables. Cette
eau peut s’écouler par le fond de l’appareil.
En cas de fuite plus importante, contactez
le SAV.
Chaque semaine
Vérifiez le niveau d’huile dans le réservoir
à huile : si l’huile est laiteuse (présence
d’eau), contactez immédiatement le SAV.
Nettoyez le filtre fin.
– Enlevez toute pression de l’appareil.
– Dévissez la vis de fixation du capot, puis
retirez le capot.
– Dévissez le couvercle avec le filtre.
– Nettoyez le filtre avec de l’eau propre ou
à l’air comprimé.
– Remontez le filtre en procédant dans
l’ordre inverse.
Nettoyez le filtre du flexible d’aspiration du
détergent.
Une fois par an ou toutes les
500 heures de service
Vidangez l’huile
– Quantité et type d’huile à utiliser : voir la
section « Données techniques ».
– Desserrez la vis de fixation, retirez le
capot, dévissez la vis de vidange de
l'huile se trouvant sur le devant du
boîtier moteur.
– Laissez s’écouler l'huile dans un récipi-
ent approprié.
– Revissez la vis de vidange de l’huile.
– Remplissez lentement le réservoir avec
de l’huile neuve pour laisser s’échapper
les bulles d’air.
Selon le besoin
Vidangez et nettoyez le réservoir de déter-
gent
– Retirez le couvercle du réservoir de dé-
tergent avec le flexible d'aspiration.
– Posez l’appareil sur la face arrière.
– Vidangez et nettoyez le réservoir de dé-
tergent.
Dérangements et remèdes
Danger !
Avant d’effectuer toute réparation sur
l’appareil, débranchez sa fiche mâle de la prise secteur. Les composants électriques
doivent être contrôlés et réparés exclusivement par le SAV agréé.
Lors de dérangements qui ne seraient pas répertoriés dans ce chapitre, en cas de doute ou
bien si vous avez expressément besoin de
conseils, adressez-vous au service aprèsvente agréé.
20
Page 21

Français
Témoin de contrôle
Le témoin de contrôle indique l’état de marche de l’appareil (vert) et la présence de
dérangements (rouge).
Remise à zéro :
Eteignez l'appareil.
Attendez un court instant
Enclenchez de nouveau l’appareil.
Affichage de l’état de marche
Allumé en vert en permanence :
– L’appareil est prêt à fonctionner.
Clignote une fois en vert :
– La période de veille s’est terminée après
30 minutes.
– L’appareil s’est éteint après 30 minutes
de marche continue (mesure de sécurité
en cas d’éclatement du flexible haute
pression).
Affichage de dérangements
Clignote une fois en rouge :
– Le côté haute pression est inétanche.
Contrôlez l’étanchéité du flexible haute
pression, des raccords de flexible et de
la poignée-pistolet.
Clignote deux fois en rouge :
– Surchauffe du moteur. Eteignez l'ap-
pareil. Laissez refroidir l’appareil.
Enclenchez de nouveau l’appareil.
Clignote trois fois en rouge :
– Défaut au niveau de l’alimentation en
tension. Vérifiez le branchement sur
secteur. Vérifiez les fusibles de secteur.
Clignote quatre fois en rouge :
– Consommation de courant trop im-
portante. Contactez le SAV.
L’appareil ne fonctionne pas
La période de veille est terminée. Le té-
moin de contrôle clignote en vert. Eteignez
l’appareil puis enclenchez-le de nouveau.
Vérifiez si le cordon d’alimentation de l’ap-
pareil est abîmé.
En présence de tout dérangement des cir-
cuits électriques, contactez le SAV.
L’appareil ne monte pas en
pression
Réglez la buse sur « Haute pression ».
Nettoyez / remplacez la buse.
Nettoyez le filtre fin, remplacez-le si
nécessaire.
Purgez l’air de l’appareil (voir la section
«Mise en service»).
Vérifiez le débit d’arrivée d’eau (voir la sec-
tion «Données techniques»).
Vérifiez si toutes les conduites aboutissant
à la pompe sont étanches ou si elles sont
bouchées.
Si nécessaire, contactez le SAV.
La pompe n’est pas étanche
3 gouttes par minute sont tolérables. Cette
eau peut s’écouler par le fond de l’appareil.
En cas de fuite plus importante, contactez
le SAV.
La pompe cogne
Vérifiez l’étanchéité de toutes les conduites
d’arrivée ainsi que du circuit de détergent.
Purgez l’air de l’appareil (voir la section
«Mise en service»).
Nettoyez le filtre fin.
Si nécessaire, contactez le SAV.
Pas d’aspiration de détergent
Réglez la buse sur « Chem ».
Vérifiez si le flexible d’aspiration du déter-
gent et son filtre ont des fuites ou s’ils sont
bouchés. Nettoyez si nécessaire.
Nettoyez / remplacez le clapet anti-retour
se trouvant dans le raccord du flexible
d’aspiration du détergent.
Ouvrez la vanne de dosage du détergent
ou vérifiez si elle a des fuites. Si elle est
bouchée, enlevez l’obstruction. Nettoyez
également le trou de dégazage situé dans
le boîtier.
Si nécessaire, contactez le SAV.
21
Page 22

Pièces de rechange
Vous trouverez à la fin de la présente notice
d’instructions un récapitulatif des pièces de
rechange.
Garantie
Dans chaque pays, les conditions de garantie
en vigueur sont celles publiées par notre société de distribution autorisée. Si, pendant la
durée de la garantie, votre appareil présente
des vices de matière ou de fabrication, la réparation est gratuite.
La garantie n’entre en vigueur que si le revendeur remplit intégralement la carte-réponse
ci-jointe lors de la vente, y appose son cachet
et la signe, et que si ensuite vous renvoyez ladite carte-réponse à la société distributrice de
votre pays.
En cas de garantie, veuillez vous adresser
avec les accessoires et la preuve d’achat à
votre revendeur ou au bureau du service
après-vente autorisé le plus proche de chez
vous.
Fran çais
22
Page 23

Français
Données techniques
HD 3.5/30-4S
Ea
1.286-110.0
Branchement électrique
Tension V 220... 240 200...208
Type de courant Hz 1 ~ 60
Puissance raccordée hp/kW 8.5/6.3 6.9/5.1
Fusible secteur (temporisé, char. C) A 30
Prise d'arrivée d'eau
Température d’arrivée d’eau max. °F/°C 140/60
Débit d’arrivée d’eau min. gpm / l/min 5.3/20
Longueur du flexible d’arrivée d’eau min. m 7.5
Diamètre min. inches 3/4
Hauteur d’aspiration dans un réservoir ouvert à 20 °C m 0.5
Pression d’arrivée max. psi/MPa 145/1
Performances
Pression de service psi/MPa 435...3000 /
Débit de refoulement
Débit d’aspiration de détergent
Force de recul au niveau de la poignée-pistolet N 62
Emission de bruit
Niveau de pression acoustique (EN 60704-1)
Pression acoustique garantie (2000/14/EC) dB (A) 87
Vibration de l’appareil / Vibration totale (ISO 5349)
Poignée-pistolet m/s
Lance m/s
Dimensions
Longueur mm 560
Largeur mm 500
Hauteur mm 1090
Poids sans accessoires kg 62
Contenance du réservoir de détergent l 6
Quantité d’huile pour la pompe l 1.2
Type d’huile pour la pompe 15W40
gpm / l/min
gpm / l/min
dB (A)
2
2
3...20.6
1.8...3.5 /
6.8..13.2.
HD 3.7/22-4S
1.286-115.0
435...2200 /
3...15.2
1.8...3.7 /
6.8...14.0
0...0.3 / 0...1.1
72
2.2
2.0
Eg
23
Page 24

Español
Protección del medio
ambiente
Los materiales de embalaje
son reciclables. Po favor, no
tire el embalaje a la basura doméstica; en vez de ello, entréguelo en los puntos oficiales
de recogida para su reciclaje o
recuperación.
Los aparatos viejos contienen
materiales valiosos reciclables
que deberían ser entregados
para su aprovechamiento posterior. Evite el contacto de baterías, aceites y materias
semejantes con el medioambiente. Por este motivo, entregue
los aparatos usados en los
puntos de recogida previstos
para su reciclaje.
INSTRUCCIONES DE
SEGURIDAD
IMPORTANTES
¡ADVERTENCIA!
Al utilizar este producto, tome siempre las
precauciones básicas, incluidas las siguientes:
Lea todas las instrucciones antes de
utilizar el producto.
Para reducir el riesgo de lesiones,
es necesario extremar las
precauciones cuando se utilice el
aparato cerca de niños.
Tiene que saber cómo parar el
aparato y purgar la presión
rápidamente. Familiarícese con los
controles.
Esté alerta; mire lo que esté
haciendo.
No haga funcionar el producto si
está cansado o si está bajo los
efectos del alcohol o las drogas.
Mantenga la zona en la que esté
limpiando libre de personas.
No se alargue demasiado sobre una
base ni se ponga sobre una base
inestable. Mantenga en todo
momento una buena base de apoyo
y un buen equilibrio.
Siga las instrucciones de
mantenimiento especificadas en el
manual.
Este producto se suministra con un
interruptor de circuito de avería por
puesta a tierra, que está montado
en el enchufe del cable de potencia.
Si es necesario reemplazar el
enchufe o el cable, utilice sólo
piezas de repuesto idénticas.
Riesgo de inyección o lesiones a
personas; no dé con el chorro
directamente a personas.
Los chorros de alta presión pueden
ser peligrosos si se utilizan mal. El
chorro no debe ser enfocado a
personas, animales, aparatos
eléctricos ni al aparato mismo.
Póngase gafas protectoras.
No utilice ácidos ni disolventes con
este producto.. Estos productos
pueden causar lesiones físicas al
usuario y daños irreversibles al
aparato.
Para reducir el riesgo de
electrocución, mantenga todas las
conexiones secas y alejadas del
suelo. No toque el enchufe con las
manos mojadas.
El pestillo de seguridad de la pistola
de disparo EVITA que la pistola se
dispare accidentalmente. Esta
característica de seguridad NO
bloquea el disparo en la posición de
encendido.
No se debe usar el cable de
extensión para esta máquina.
24
Page 25

Español
!
¡ADVERTENCIA
Para reducir el riesgo de
electrocución, mantenga todas las
conexiones secas y alejadas del suelo. No
toque el enchufe con las manos mojadas.
Instrucciones de puesta a tierra
Este producto se tiene que poner a
tierra. Si funcionase mal o si se
rompiese, la puesta a tierra
proporcionaría una circuito menos
resistente a la energía eléctrica para
reducir el riesgo de electrochoque.
Este producto está equipado con un
cable que tiene un conductor a tierra y
un enchufe a tierra para el equipo. El
enchufe se tiene que enchufar a un
tomacorriente adecuado, que esté
correctamente instalado y puesto a
tierra conforme a todas las normas y
reglamentos locales.
¡Peligro!
Si la conexión del conductor a
tierra del equipo es incorrecta puede
existir riesgo de electrochoque. En caso
de duda, compruebe con ayuda de un
electricista cualificado o del personal del
servicio técnico que el tomacorriente
está correctamente puesto a tierra. No
modifique el enchufe proporcionado con
el producto; si no encaja en el
tomacorriente, pida a un electricista
cualificado que le instale un
tomacorriente adecuado. No utilice
ningún tipo de adaptador con este
producto.
Protección mediante interruptor de
circuito de avería por puesta a tierra
Este producto se suministra con un
interruptor de circuito de avería por puesta
a tierra montado en el enchufe del cable
de potencia. Este aparato proporciona
una protección adicional contra el riesgo
de electrochoque. Si la corriente se
interrumpe en la línea, el interruptor de
circuito de avería por puesta a tierra
recerrará, automáticamente, el circuito al
circuito de carga una vez restablecida la
corriente. En función del modelo de
interruptor, puede que sea necesario
tener que poner en funcionamiento el
aparato manualmente mediante el botón
de reinicio para restaurar la corriente del
circuito de carga del interruptor de circuito
de avería por puesta a tierra. Si es
necesario reemplazar el enchufe o cable,
utilice piezas idénticas.
SUMINISTRO DE AGUA
¡Atención!
Al conectar la toma de agua a la
red de suministro del agua, es obligatorio
respetar la normativa local establecida
por la compañía del agua. En algunas
zonas, está prohibido conectar la unidad
directamente a la red pública de
suministro de agua potable. Esto es así
para garantizar que no penetren
sustancias químicas en la red de
suministro del agua. Sí se permite
efectuar la conexión directamente por
ejemplo a través de un depósito receptor
o un dispositivo antirretorno.
Si el agua de alimentación está sucia,
la unidad sufrirá daños. Para evitar
este riesgo, le recomendamos que
monte un filtro de agua.
No utilice nunca el limpiador a
presión para aspirar agua
contaminada con disolventes como,
p. ej., diluyentes de pintura,
gasolina, aceite, etc.
Evite siempre que la unidad aspire
residuos utilizando una fuente de
abastecimiento cuya agua esté
limpia.
¡GUARDE ESTAS
INSTRUCCIONES!
25
Page 26

Español
Elementos y componentes
del aparato
Despliegue, por favor, la página con las
ilustraciones
1 Pistola
2 Gatillo de la pistola
3 Manguera de alta presión
4 Soporte para colocar la pistola
5 Válvula dosificadora del detergente
6 Tapa del depósito del detergente
7 Depósito del detergente
8 Manguera de aspiración del detergente,
con filtro
9 Tornillo de sujeción del capó de la
máquina
10 Interruptor para conexión y desconexión
del aparato
11 Capó
12 Manómetro
13 Conexión de alta presión
14 Soporte para guardar las boquillas
15 Toma de agua del aparato
16 Filtro fino
17 Indicador del nivel de aceite
18 Depósito de aceite
19 Indicador luminoso
20 Soporte para guardar la manguera
21 Evacuación de aire del depósito del
detergente
22 Compartimento para accesorios
23 Sujetacables
24 Asa
25 Boquilla
26 Marca de la boquilla
27 Lanza
28 Mando de regulación de la presión y del
caudal de agua
29 Seguro de la pistola
Para su seguridad
Antes de poner en marcha por vez primera su
aparato deberá leer atentamente las
presentes instrucciones de servicio, así
como, especialmente, el cuaderno adjunto
sobre «Consejos e instrucciones de
seguridad para las limpiadoras de alta
presión» Nº 5.951-949.
Campo de aplicación del
aparato
El aparato ha sido diseñado exclusivamente
para
– la limpieza con alta presión y detergentes
de máquinas, vehículos, herramientas,
edificios y objetos similares.
– la limpieza con alta presión, sin
detergentes, de terrazas, edificios,
herramientas y muebles de jardín.
Para eliminar suciedad particularmente
resistente y fuertemente adherida
aconsejamos emplear la boquilla turbo
(«efecto fresadora»), que está disponible
como accesorio opcional.
Dispositivos de seguridad
Válvula de derivación (by-pass)
con presostato
Al reducir el caudal de agua a través del
mando regulador de la presión y el caudal de
agua, se abre la válvula derivación (by-pass),
haciendo retornar la bomba de alta presión
una parte del agua hacia las válvulas de
aspiración de la bomba.
Al dejar de oprimir la palanca de
accionamiento (gatillo) de la pistola, el
presostato desconecta la bomba. Al volver a
oprimir el gatillo, el presostato conecta la
bomba.
La válvula de derivación (by-pass) y el
presostato vienen ajustados y precintados de
fábrica.
Los ajustes sólo podrán ser modificados por
personal especializado del Servicio Técnico
Postventa Oficial.
26
Page 27

Español
Antes de la primera puesta
en marcha del aparato
Desembalar el aparato
– Verificar el contenido del embalaje. Si al
desembalar el aparato comprobara Vd.
algún daño o desperfecto en el mismo
atribuible al transporte, rogamos se dirija
inmediatamente al Distribuidor en donde
adquirió su aparato.
– No tire el embalaje del aparato y sus
elementos al cubo de basura. Entréguelo
en los Puntos o Centros Oficiales de
recogida para su reciclaje o recuperación.
Verificar el nivel del aceite
Controlar el indicador del nivel de aceite
con el aparato de pie. El nivel de aceite
deberá encontrarse por encima de los dos
indicadores.
Activar la evacuación de aire
del depósito de aceite
Desenroscar el tornillo de sujeción del
capó. Retirar el capó.
Cortar la punta de la tapa del depósito de
aceite.
Montar y fijar el capó de la máquina en su
sitio.
Montaje de los accesorios
Montar la boquilla en la lanza (los símbolos
deben coincidir con la marca de referencia
que se encuentra en el anillo de ajuste).
Montar la lanza en la pistola con la
regulación de la presión y el caudal.
Encajar el sujetacable en el orificio lateral
en el asa.
Atornillar correspondientemente la
manguera de alta presión.
Puesta en marcha del
aparato
Conexión a la red eléctrica
¡Atención!
Cerciorarse de que la red eléctrica
coincide con los valores detallados en la
placa de características del aparato.
No se debe usar el cable de extensión para
esta máquina.
Los valores de conexión figuran en la placa
de características del aparato, así como en
las Características Técnicas del mismo.
¡Atención!
Es estrictamente necesario conectar el
aparato con un enchufe a la red eléctrica.
Está terminantemente prohibida una
conexión no separable con la red eléctrica. El
enchufe sirve para la separación de la red.
Antes de resetear el GFCI desconecte el
interruptor de la máquina; de lo contrario el
GFCI podría resultar dañado
INSTRUCCIONES DEL INTERRUPTOR DE
CIRCUITO DE AVERÍA POR PUESTA A
TIERRA
PASO 1: Enchufe el interruptor de circuito
de avería por puesta a tierra a un
tomacorriente de servicio.
PASO 2: Presione ’’TEST’’ (PRUEBA) y,
después, presione ’’RESET" (REINICIO)
para asegurarse de que la conexión a la
toma de energía eléctrica es correcta.
Nota: El aspecto actual del interruptor de
circuito de avería por puesta a tierra puede
ser distinto al de la ilustración.
2
1
27
Page 28

Español
!
Conexión a la red de agua/
Aspiración de agua
Conexión a la red de agua
¡Atención!
Observar estrictamente las normas y
disposiciones de la empresa local de
abastecimiento de agua. Según la normativa
alemana DIN 1988, la limpiadora de alta
presión no puede acoplarse a la red pública
de abastecimiento de agua potable, a fin de
evitar que los detergentes y agentes químicos
puedan acceder y contaminar el agua
potable. Un acoplamiento de breve duración
a través de un dispositivo de bloqueo antiretorno (Nº de pedido 6.412-578), sin
embargo, está permitido.
Verificar si la conexión a la red de agua
cumple con los valores detallados en las
Características Técnicas del aparato.
Acoplar la manguera de alimentación de
agua (no incluida en el equipo de serie del
aparato) a la toma de agua del aparato y a
la conexión de la red de agua (grifo).
Abrir la alimentación de agua (grifo).
Aspirar agua de un recipiente abierto
Empalmar la manguera de aspiración con
filtro (Nº de pedido 4.440-238) a la toma de
agua del aparato.
Purgar el aire del aparato antes de ponerlo
en marcha
Para evacuar el aire del aparato,
desenroscar la boquilla, haciendo
funcionar el aparato hasta que el agua
salga sin burbujas.
Desconectar el aparato y volver a enroscar
la boquilla.
Manejo del aparato
¡Peligro!
En caso de trabajar con el aparato en
gasolineras, estaciones de servicio o en otras
áreas o zonas de peligro, deberán
observarse estrictamente las instrucciones
y normas de seguridad nacionales vigentes.
¡Atención!
Por razones de la protección del medio
ambiente, la limpieza de motores sólo se
puede ejecutar en aquellos lugares que
dispongan de un separador de aceite.
¡Atención!
La limpieza de animales sólo se podrá
realizar con el chorro de baja presión en
abanico (véase el apartado «Ajustar el tipo de
chorro»).
Funcionamiento con alta presión
El aparato está equipado con un presostato.
El motor sólo se pone en marcha en caso de
oprimir la palanca (gatillo) de accionamiento
de la pistola.
Colocar el interruptor de conexión y
desconexión del aparato en la posición «I».
El indicador luminoso se ilumina en verde.
Desbloquear la pistola y oprimir el gatillo.
Ajustar (+/–) gradualmente la presión de
trabajo y el caudal del agua girando a dicho
efecto el mando para la regulación de la
presión y el caudal de agua.
Trabajando la máquina con el mínimo
caudal de agua, el calor irradiado por el
motor calienta el agua aprox. 15 °C.
Ajustar el tipo de chorro
La palanca de accionamiento (gatillo) de la
pistola tiene que estar sin oprimir («pistola
cerrada»).
Girar el cuerpo de la boquilla hasta que el
símbolo correspondiente al tipo de chorro
coincida con la marca de referencia.
Seleccionar el chorro concentrado de alta
presión o de abanico conmutando de un
chorro a otro sin accionar mandos ni
pulsadores:
Tan sólo hay que girar la lanza orientada
en ángulo de 45° hacia abajo, hacia la
izquierda o derecha.
Significado de los símbolos:
Chorro concentrado de alta
presión (0°), para la eliminación
de la suciedad resistente
y fuertemente adherida.
Chorro de alta presión en
abanico (25°) para eliminar la
suciedad que está cubriendo
grandes superficies
Chorro de baja presión en
abanico para agregar
detergente (CHEM), permite
trabajar con detergente o con
escasa presión
28
Page 29

Español
!
Funcionamiento con detergente
¡Atención!
Sólo deberán emplearse aquellos
productos que han sido homologados y
autorizados por el Fabricante. Los
detergentes inapropiados pueden causar
daños en las limpiadoras de alta presión y en
los objetos a limpiar. Obsérvense
estrictamente las instrucciones y consejos de
dosificación que incorporan las etiquetas de
las envolturas de los detergentes. En interés
de la protección del medio ambiente
recomendamos hacer un uso muy moderado
de los detergentes.
Los detergentes y agentes conservantes de
Kärcher han sido desarrollados
específicamente para el aparato y la tarea de
limpieza concreta, garantizando así el
funcionamiento correcto de la limpiadora.
Consulte a este respecto a su Distribuidor
o solicite nuestro catálogo general o folletos
informativos sobre detergentes.
Llenar el depósito del detergente.
Colocar la boquilla en la posición .
Colocar la válvula dosificadora en la
posición correspondiente a la dosificación
deseada.
Dosificación de detergente con el caudal
máximo:
Posición de la válvula
dosificadora
Para lograr unos resultados óptimos en la
limpieza, aconsejamos proceder según el
siguiente método:
Separar la suciedad pulverizando
moderadamente el detergente con el
chorro de baja presión sobre la superficie a
limpiar seca; dejar que actúe durante un
cierto tiempo, sin que llegue a secarse
sobre la superficie.
Eliminar la suciedad con el chorro de agua
de alta presión.
Tras concluir la tarea de limpieza, colocar
la válvula dosificadora del detergente en la
posición «0», conectar el aparato durante
un minuto y enjuagarlo con agua limpia.
1357
0,5%2,5%5,0%7,0
%
Interrumpir el funcionamiento
del aparato
Soltar el gatillo de la pistola. El aparato se
desconecta. Al oprimir nuevamente el
gatillo, el aparato se pone en marcha.
Tiempo de disposición de
funcionamiento
Al abrir la pistola en el tiempo de disposición
de funcionamiento se pone en marcha el
aparato. El indicador luminoso se ilumina en
verde.
Si la pistola se mantiene cerrada durante 30
minutos, se finaliza el tiempo de disposición
de funcionamiento. El indicador luminoso
parpadea en verde.
Restablecer el tiempo de
disposición de funcionamiento.
Desconectar el interruptor del aparato.
Esperar brevemente.
Volver a conectar el aparato.
El aparato puede ser ajustado a
funcionamiento continuo por el Servicio
Técnico Postventa Oficial.
Desconectar el aparato
Colocar el interruptor de conexión y
desconexión del aparato en la posición
«0». Retirar el enchufe del aparato de la
toma de corriente.
Cerrar la alimentación de agua (grifo).
Oprimir el gatillo de la pistola, hasta
evacuar completamente la presión del
interior del aparato.
Oprimir la palanca de bloqueo de la pistola
hacia delante para asegurar el gatillo
contra accionamiento fortuito.
¡Peligro!
Peligro de escaldadura por agua
caliente. El agua residual contenida en el
aparato desconectado puede calentarse. Al
desacoplar el tubo flexible de la admisión de
agua, el agua calentada puede salir
disparada y causar quemaduras por
escaldadura. Desacoplar el tubo flexible
recién cuando el aparato se haya enfriado.
29
Page 30

Español
!
Transporte del aparato
Para transportar el aparato por trayectos
largos, sujetar el aparato por el asa
y arrastrar el aparato tras de sí.
En caso de transportar el aparato en
posición horizontal, evacuar previamente
el depósito del detergente.
Guardar el aparato
Colocar la pistola en el soporte
correspondiente.
Enrollar la manguera de alta presión y
colgarla del soporte
o
Enrollar el cable de conexión en torno al
soporte.
Protección antiheladas
¡Atención!
¡Las heladas dañan el aparato si no
está completamente vacío de agua! Guardar
la máquina en un recinto protegido contra
heladas (provisto de calefacción).
Si no se puede guardar el aparato en un lugar
protegido contra heladas:
Vaciar el depósito del detergente. (Si fuera
necesario, véanse los Trabajos de cuidado
y mantenimiento)
Evacuar el agua y enjuagar el aparato con
anticongelante.
Dejar marchar en seco el aparato como
máximo 1 minuto.
Emplear anticongelante habitual en el
comercio para automóviles a base de
glicol.
Observar las prescripciones de manejo del
fabricante del anticongelante.
Trabajos de cuidado y
mantenimiento
¡Peligro!
Antes de ejecutar cualquier trabajo de
cuidado o mantenimiento del aparato, extraer
el cable de conexión del mismo de la toma de
corriente.
¡Atención!
El aceite usado que se origina al
efectuar un cambio de aceite
eliminarse o entregarse en los puntos oficiales
de recogida de aceites usados.
deberá
Inspección de seguridad /
Contrato de mantenimiento
En su Distribuidor puede Vd. pedir un
contrato para inspecciones de seguridad
regulares o de mantenimiento. Consulte
a su Distribuidor al respecto.
Antes de cada puesta en
marcha del aparato
Verificar si el cable de conexión presenta
huellas de daños o desperfectos (¡Peligro
de descargas eléctricas!). Los cables de
conexión que estuvieran defectuosos
deberán sustituirse inmediatamente.
Encargar dicho trabajo a un técnico
especialista del Servicio Técnico
Postventa Oficial o a un electricista
autorizado.
Verificar el estado de la manguera de alta
presión (¡existe peligro de que pueda
estallar!). Cambiarla inmediatamente si
está dañada.
Verificar la estanqueidad de la bomba.
Unas fugas del orden de tres gotas por
minuto son admisibles. En caso de
comprobarse fugas mayores, avisar al
Servicio Técnico Postventa.
Semanalmente
Verificar el nivel del aceite en el depósito.
De presentar el aceite un aspecto lechoso
(agua en el aceite), avisar inmediatamente
al Servicio Técnico Postventa.
Limpiar el filtro fino.
– Dejar el aparato sin presión.
– Desenroscar el tornillo de sujeción del
capó. Retirar el capó.
– Destornillar la tapa con el filtro.
– Limpiar el filtro con agua limpia o con
aire comprimido.
– Volver a montar el aparato en el orden
inverso.
Limpiar el filtro en la manguera de
aspiración del detergente.
30
Page 31

Español
!
Anualmente o cada 500 horas
de funcionamiento
Cambiar el aceite
– Las cantidades y clases de aceite
figuran en las Características Técnicas.
– Soltar el tornillo de sujeción y retirar el
capó. Extraer el tornillo de vaciado del
aceite situado en el frontal de la carcasa
del motor.
– Evacuar el aceite recogiéndolo en un
recipiente apropiado.
– Enroscar el tornillo de vaciado del
aceite.
– Poner lentamente aceite en el depósito.
Prestar atención a que desaparezcan
las burbujas de aire.
En caso necesario
Vaciar y limpiar el depósito del detergente.
– Retirar la tapa del depósito de
detergente con la manguera de
aspiración.
– Colocar el aparato sobre la parte
posterior.
– Vaciar y limpiar el depósito del
detergente.
Localización de averías
¡Peligro!
Antes de efectuar cualquier reparación
del aparato, hay que desconectarlo y
desenchufarlo de la red eléctrica. Los
trabajos de verificación o reparación que
fuera necesario efectuar en las piezas y
componentes eléctricos de la máquina sólo
deberán ser ejecutados por personal
especializado del Servicio Técnico Postventa
Oficial.
Avisar el Servicio Técnico Postventa en caso
de averías no descritas en este capítulo, en
caso de duda, así como en casos en donde
se indique explícitamente.
Indicador luminoso
El indicador luminoso indica estados de
funcionamiento (verde) y averías (rojo).
Restablecimiento:
Desconectar el interruptor del aparato.
Esperar brevemente.
Volver a conectar el aparato.
Indicador de estado de funcionamiento
Luz verde continua:
– El aparato está listo para el
funcionamiento.
1 parpadeo de la luz verde:
– La disposición de funcionamiento se
termina tras 30 minutos.
– El aparato se ha desconectado tras 30
minutos de servicio continuo (seguridad
en caso de manguera de alta presión
rota).
Indicación de averías
1 parpadeo de la luz roja:
– Inestanqueidades en el lado de alta
presión. Controlar la estanqueidad de la
manguera de alta presión, de las
uniones de manguera y de la pistola.
2 parpadeos de la luz roja:
– Motor demasiado caliente. Desconectar
el interruptor del aparato. Dejar que se
enfríe el aparato. Volver a conectar el
aparato.
3 parpadeos de la luz roja:
– Avería en la alimentación de corriente.
Comprobar la conexión a la red.
Verificar los fusibles.
4 parpadeos de la luz roja:
– Consumo de corriente demasiado alto.
Avisar al Servicio Técnico Postventa.
El aparato no se pone en
marcha
El tiempo de disposición de
funcionamiento se ha terminado. El
indicador luminoso parpadea en verde.
Desconectar y volver a conectar el
aparato.
Verificar si el cable de conexión a la red
eléctrica presenta huellas de daños
o desperfectos.
En caso de constatar una avería en los
circuitos o sistemas eléctricos del aparato,
avisar al Servicio Técnico Postventa.
31
Page 32

Español
El aparato no coge presión
Colocar la boquilla en la posición de «alta
presión».
Limpiar la boquilla o sustituirla, según el
caso.
Limpiar el filtro fino, sustituirlo en caso
necesario.
Purgar el aire del aparato (véase el
capítulo «Puesta en marcha del aparato»).
Verificar el caudal y la presión del agua
suministrada al aparato (véanse al
respecto las Características Técnicas).
Verificar si las tuberías de alimentación
que conducen a la bomba presentan
inestanqueidades u obstrucciones.
En caso necesario, consultar con el
Servicio Técnico Postventa.
Inestanqueidades en la bomba
Unas fugas del orden de tres gotas por
minuto son admisibles. En caso de
comprobarse fugas mayores, avisar al
Servicio Técnico Postventa.
Golpes de pistón en la bomba
Verificar la estanqueidad de todas tuberías
de alimentación, así como las del circuito
del detergente.
Purgar el aire del aparato (véase el
capítulo «Puesta en marcha del aparato»).
Limpiar el filtro fino.
En caso necesario, consultar con el
Servicio Técnico Postventa.
Repuestos
En las páginas finales de estas Instrucciones
figura la lista de los repuestos más usuales.
Garantía
En cada país rigen las condiciones de
garantía establecidas por las
correspondientes Sociedades Distribuidoras.
Las perturbaciones y averías de su aparato
serán subsanadas de modo gratuito dentro
del plazo de garantía en la medida en que las
causas de las mismas sean debidas
a defectos de material o de fabricación.
La garantía sólo entrará en vigor cuando el
distribuidor en donde ha adquirido Vd. el
aparato haya cumplimentado debidamente,
en el momento de la venta, la tarjeta de
respuesta adjunta, la selle y firme, y Vd. la
envíe a la Sociedad Distribuidora de su país
respectivo.
En un caso de garantía rogamos se dirija al
Distribuidor en donde adquirió el aparato o a
la Delegación Oficial del Servicio Postventa
No se llega a aspirar detergente
Colocar la boquilla en la posición de
«CHEM».
Verificar la estanqueidad de la manguera
de aspiración del detergente con filtro;
verificar asimismo si presenta
obstrucciones. Limpiarla.
Verificar la válvula de retención en su
acoplamiento a la manguera de aspiración
del detergente; limpiarla y sustituirla en
caso necesario.
Abrir o verificar la estanqueidad de la
válvula dosificadora del detergente (8).
Eliminar la obstrucción. Limpiar asimismo
la abertura de purga de la carcasa.
En caso necesario, consultar con el
Servicio Técnico Postventa.
32
Page 33

Español
Características Técnicas
HD 3.5/30-4S
Ea
1.286-110.0
Conexión a la red eléctrica
Tensión V 220... 240 200...208
Tipo de corriente Hz 1 ~ 60
Potencia de conexión hp/kW 8.5/6.3 6.9/5.1
Fusible (de acción lenta, carac. C) A 30
Conexión a la red de agua
Máxima temperatura del agua de entrada °F/°C 140/60
Mínimo caudal de alimentación gpm / l/min 5.3/20
Longitud mínimo de la manguera de alimentación del agua m 7.5
Diámetro mínimo de la manguera de alimentación del agua inches 3/4
Altura de aspiración del agua desde un recipiente abierto
con el agua a una temperatura de 20 °C
Máxima presión de alimentación psi/MPa 145/1
Potencia y rendimientos
Presión de trabajo psi/MPa 435...3000 /
Caudal
Aspiración de detergente
Fuerza de retroceso de la pistola a presión de trabajo N 62
Emisión de ruidos
Nivel sonoro (según norma EN 60704-1)
Nivel de potencia acústica garantizado (CE 2000/14) dB (A) 87
Vibraciones del aparato / Valor total de oscilaciones
(norma ISO 5349)
Pistola m/s
Lanza m/s
Medidas
Longitud mm 560
Anchura mm 500
Altura mm 1090
Peso sin accesorios kg 62
Capacidad del depósito de detergente l 6
Cantidad de aceite para la bomba l 1.2
Clase de aceite para la bomba 15W40
m0.5
3...20.6
gpm / l/min
gpm / l/min
dB (A)
2
2
1.8...3.5 /
6.8..13.2.
HD 3.7/22-4S
1.286-115.0
435...2200 /
3...15.2
1.8...3.7 /
6.8...14.0
0...0.3 / 0...1.1
72
2.2
2.0
Eg
33
Page 34

 Loading...