

Page 1
EHC,
EHK,
EH,
EHT
ELECTRIC OVENS AND BUILD-IN SETS
ELEKTROBACKÖFEN UND EINBAUHERDE
ЭЛЕКТРИЧЕСКИЕ ДУХОВЫЕ ШКАФЫ
И ВСТРАИВАЕМЫЕ КОМПЛЕКТЫ
EN
DE
RU
USER MANUAL
GEBRAUCHSANWEISUNG
ИНСТРУКЦИЯ ПО ОБСЛУЖИВАНИЮ И ЭКСПЛУАТАЦИИ
Page 2

EN
DEAR CUSTOMERS,
we thank to you for the acquisition of our technology.
We are convinced that you have made a right choice.
This product which satisfies the high quality demands
and corresponds to world comprehensive standards
realizes your cookeries, and his modern appearance
which has been developed by the best European
designers will decorate your kitchen splendidly.
We ask you to read the operating instructions before
usage thoroughly. The consideration of
recommendations protects you from possible
inconveniences which can appear as a result of the
wrong use of the oven, and allows you to reduce the
consumption of electric energy. If the use corresponds to
the present operating instructions, the oven will bring
you a lot of pleasure for a long time.
Our ovens correspond to the main demands of the
security, hygiene and environment protection, according
to the directives of the EU which is confirmed with
certificates DIN ISO 9001, ISO 1400, according to the
norms counting within the frames of the EU, they also
correspond to the Gosstandart of Russia, standards of
the CIS, which is confirmed with the corresponding
certificates.
With the thoughts of a constant improvement of the
quality of our ovens the changes in design and
equipment which lead only to positive changes of the
technical qualities are reserved by the manufacturer.
We wish you an effective use of our oven.
Yours faithfully
2
OLAN-Haushaltsgeräte
Berlin Germany
We Inform you that our devices which are the object of the present
operating instructions are precertain exclusively for the domestic
use.
Page 3

D RU
LIEBE KUNDIN, LIEBER KUNDE,
wir danken Ihnen für den Erwerb unserer Technik.
Wir sind überzeug, dass Sie eine richtige Wahl getroffen
haben. Dieses Produkt, das die hohen Forderungen zur
Qualität befriedigt und weltumfassenden Standards
entspricht, verwirklicht Ihre Kochkünste, und sein
modernes Aussehen, das von besten europäischen
Designer entwickelt worden ist, wird Ihre Küche
prächtig schmücken.
Wir bitten Sie die Bedienungsanleitung vor der Nutzung
aufmerksam zu lesen. Die Beachtung von Empfehlungen
schützt Sie von eventuellen Unannehmlichkeiten, die als
Folge der falschen Nutzung des Backofens auftreten
können, und ermöglicht Ihnen den Verbrauch von
Elektroenergie zu reduzieren. Der Backofen bringt
Ihnen viel Vergnügen auf lange Zeit, wenn der
Gebrauch der vorliegenden Bedienungsanleitung
entsprechen wird.
Unsere Backöfen entsprechen den Hauptforderungen
der Sicherheit, der Hygiene und des Umweltschutzes,
laut den Direktiven der EU, was mit Zertifikaten DIN
ISO 9001, ISO 1400, entsprechend den im Rahmen der
EU geltenden Normen, bestätigt ist, und genauso auch
den Anforderungen von Gosstandart in Russland und
Standards anderer GUS Länder, was durch die
Identifikationszertifikate bestätigt ist.
Mit den Gedanken der ständigen Verbesserung der
Qualität unserer Backöfen sind Änderungen bei Design
und Einrichtung, die nur zu positiven Veränderungen
der technischen Eigenschaften führen, vom Hersteller
vorbehalten.
Wir wünschen Ihnen die effektive Nutzung unseres
Backofens.
Hochachtungsvoll
ɍȼȺɀȺȿɆɕɃ ɉɈɄɍɉȺɌȿɅɖ,
ɛɥɚɝɨɞɚɪɢɦ ȼɚɫ ɡɚ ɩɪɢɨɛɪɟɬɟɧɢɟ ɧɚɲɟɣ ɬɟɯɧɢɤɢ.
Ɇɵ ɭɜɟɪɟɧɵ, ɱɬɨ ȼɵ ɫɞɟɥɚɥɢ ɩɪɚɜɢɥɶɧɵɣ ɜɵɛɨɪ.
Ⱦɚɧɧɵɣ ɩɪɨɞɭɤɬ, ɭɞɨɜɥɟɬɜɨɪɹɸɳɢɣ ɫɚɦɵɦ ɜɵɫɨɤɢɦ
ɬɪɟɛɨɜɚɧɢɹɦ ɢ ɨɬɜɟɱɚɸɳɢɣ ɦɢɪɨɜɵɦ ɫɬɚɧɞɚɪɬɚɦ,
ɩɨɡɜɨɥɢɬ ȼɚɦ ɥɟɝɤɨ ɜɨɩɥɨɬɢɬɶ ɜɫɟ ȼɚɲɢ
ɤɭɥɢɧɚɪɧɵɟ ɫɩɨɫɨɛɧɨɫɬɢ, ɚ ɟɝɨ ɫɨɜɪɟɦɟɧɧɵɣ ɜɢɞ,
ɪɚɡɪɚɛɨɬɚɧɧɵɣ ɥɭɱɲɢɦɢ ɟɜɪɨɩɟɣɫɤɢɦɢ ɞɢɡɚɧɟɪɚɦɢ,
ɜɟɥɢɤɨɥɟɩɧɨ ɭɤɪɚɫɢɬ ȼɚɲɭ ɤɭɯɧɸ.
ɉɪɨɫɢɦ ȼɚɫ ɜɧɢɦɚɬɟɥɶɧɨ ɩɪɨɱɢɬɚɬɶ ɢɧɫɬɪɭɤɰɢɸ
ɩɨ ɨɛɫɥɭɠɢɜɚɧɢɸ ɢ ɷɤɫɩɥɭɚɬɚɰɢɢ ɞɨ ɩɭɫɤɚ
ɭɫɬɪɨɣɫɬɜ
ɪɟɤɨɦɟɧɞɚɰɢɣ ɡɚɳɢɬɢɬ ȼɚɫ ɨɬ ɜɨɡɦɨɠɧɵɯ
ɧɟɩɪɢɹɬɧɨɫɬɟɣ ɩɪɢ ɧ
ɞɭɯɨɜɨɝɨ ɲɤɚɮɚ, ɚ ɬɚɤɠɟ ɩɨɡɜɨɥɢɬ ȼɚɦ ɭɦɟɧɶɲɢɬɶ
ɪɚɫɯɨɞ ɷɥɟɤɬɪɨɷɧɟɪɝɢɢ. ȿɫɥɢ ɷɤɫɩɥɭɚɬɚɰɢɹ ɞɭɯɨɜɨɝɨ
ɲɤɚɮɚ ɛɭɞɟɬ ɫɨɨɬɜɟɬɫɬɜɨɜɚɬɶ ɧɚɫɬɨɹɳɟɣ
ɢɧɫɬɪɭɤɰɢɢ, ɧɚɲ ɞɭɯɨɜɨɣ ɲɤɚɮ ɛɭɞɟɬ ɪɚɞɨɜɚɬɶ ȼɚɫ
ɞɨɥɝɨɟ ɜɪɟɦɹ.
ɇɚɲɢ ɞɭɯɨɜɵɟ ɲɤɚɮɵ ɩɨɥɧɨɫɬɶɸ ɫɨɨɬɜɟɬɫɬɜɭɟɬ
ɨɫɧɨɜɧɵɦ ɬɪɟɛɨɜɚɧɢɹɦ ɛɟɡɨɩɚɫɧɨɫɬɢ, ɝɢɝɢɟ
ɡɚɳɢɬɵ ɨɤɪɭɠɚɸɳɟɣ ɫɪɟɞɵ, ɫɨɝɥɚɫɧɨ ɞɢɪɟɤɬɢɜ
ȿɜɪɨɩɟɣɫɤɨɝɨ ɋɨɸɡɚ, ɱɬɨ ɩɨɞɬɜɟɪɠɞɟɧɨ
ɫɟɪɬɢɮɢɤɚɬɚɦɢ DIN ISO 9001, ISO 1400, ɜ
ɫɨɨɬɜɟɬɫɬɜɢɢ ɫ ɧɚɫɬɨɹɳɢɦɢ ɧɨɪɦɚɦɢ,
ɞɟɣɫɬɜɭɸɳɢɦɢ ɧɚ ɬɟɪɪɢɬɨɪɢɢ ȿɜɪɨɩɟɣɫɤɨɝɨ
ɫɨɨɛɳɟɫɬɜɚ, a ɬɚɤɠɟ ɩɨɥɧɨɫɬɶɸ ɨɬɜɟɱɚɸɬ ɜɫɟɦ
ɬɪɟɛɨɜɚɧɢɹɦ Ƚɨɫɫɬɚɧɞɚɪɬɚ Ɋɨɫɫɢɢ ɢ ɫɬɚɧɞɚɪɬɨɜ
ɞɪɭɝɢɯ ɫɬɪɚɧ ɋɇȽ, ɱɬɨ ɩɨɞɬɜɟɪɠɞɚɟɬɫɹ
ɫɟɪɬɢɮɢɤɚɬɚɦɢ ɫɨɨɬɜɟɬɫɬɜɢɹ.
ɋ ɦɵɫɥɶɸ ɨ ɞɚɥɶɧɟɣɲɟɦ ɩɨɜɵɲɟɧɢɢ ɬɟɯɧɢɱɟɫɤɢɯ ɢ
ɷɤɫɩɥɭɚɬɚɰɢɨɧɧɵɯ ɯɚɪɚɤɬɟɪɢɫɬɢɤ ɧɚɲɢɯ ɛɵɬɨɜɵɯ
ɩɪɢɛɨɪɨɜ ɦɵ ɨɫɬɚɜ
ɢɡɦɟɧɟɧɢɣ ɜ ɞɢɡɚɣɧ ɢ ɭɫ
ɩɨɥɨɠɢɬɟɥɶɧɨ ɧɚ ɩɨɬɪɟɛɢɬɟɥɶɫɤɢɟ ɤɚɱɟɫɬɜɚ ɢ
ɫɜɨɣɫɬɜɚ ɩɪɨɞɭɤɬɚ.
ɀɟɥɚɟɦ ȼɚɦ ɷɮɮɟɤɬɢɜɧɨɝɨ ɩɨɥɶɡɨɜɚɧɢɹ ɞɭɯɨɜɵɦ
ɲɤɚɮɨɦ ɧɚɲɟɣ ɮɢɪɦɵ.
ɍɜɚɠɚɸɳɢɣ ȼɚɫ
ɚ. ɋɨɛɥɸɞɟɧɢɟ ɫɨɞɟɪɠɚɳɢɯɫɹ ɜ ɧɟɣ
ɟɩɪɚɜɢɥɶɧɨɣ ɷɤɫɩɥɭɚɬɚɰɢɢ
ɧɵ ɢ
ɚɦ
ɥɹɟɦ ɡɚ ɫɨɛɨɣ ɩɪɚɜɨ ɧɚ ɜɧɟɫɟɧɢɟ
ɬɪɨɣɫɬɜɨ, ɜɥɢɹɸɳɢɯ ɬɨɥɶɤɨ
OLAN-Haushaltsgeräte
Berlin Germany
Wir Informieren Sie, dass unsere Geräte, die der Gegenstand der
vorliegenden Bedienungsanleitung sind, sind ausschließlich für den
häuslichen Gebrauch vorbestimmt.
OLAN-Haushaltsgeräte
Berlin Germany
ɂɧɮɨɪɦɢɪɭɟɦ, ɱɬɨ ɧɚɲɢ ɩɪɢɛɨɪɵ, ɹɜɥɹɸɳɢɟɫɹ ɩɪɟɞɦɟɬɨɦ
ɧɚɫɬɨɹɳɟɣ ɂɧɫɬɪɭɤɰɢɢ, ɩɪɟɞɧɚɡɧɚɱɟɧɵ ɢɫɤɥɸɱɢɬɟɥɶɧɨ ɞɥɹ
ɞɨɦɚɲɧɟɝɨ ɩɨɥɶɡɨɜɚɧɢɹ.
3
Page 4

EN
CONTENTS
INSTALLATION INSTRUCTIONS 6
Electrical connection 6
Installation of the cooking hob 8
Installation of the oven 8
Preparation 10
BRIEF DESCRIPTION 12
Location drawing 12
Control panel 14
EQUIPMENT 16
Cooking zones and relevant
operating elements 16
Cooking zones control 18
Glass-ceramic cooking area 20
Multifunction oven control 22
Operation functions of the oven 24
The oven 30
Electronic programmable control
Touch control 32
Electronic programmable control
Logic control 46
Electronic programmable control
Logic control
62
PRACTICAL ADVICE 60
CLEANING AND SERVICING 68
ENVIROMENTAL COMPATIBILITY 78
with full sensor control
4
Page 5

DE RU
INHALTSVERZEICHNIS
MONTAGEANWEISUNG 7
Stromanschluss 7
Einbau des Kochfeldes 9
Einbau des Backofens 9
Vorbereitung 11
KURZBESCHREIBUNG 13
Gesamtansicht 13
Bedienblende 15
AUSSTATUNG 17
Kochfeld mit entsprechenden
Bedienelementen 17
Kochfeldersteuerung 19
Gebrauch vom Glaskeramikkochfeld 21
Steuerung von Multifunktionsbackofen 23
Betriebsfunktion des Backofens 25
Gebrauch vom Backofen 31
Elektronische Programmierung
Touch control 33
Elektronische Programmierung
Logic control 47
Elektronische Programmierung Logic control
mit Vollsensorbedienung 63
PRAKTISCHE EMPFEHLUNGEN 61
PFLEGE UND WARTUNG 69
UMWELTVERTRÄGLICHKEIT 79
ɈȽɅȺȼɅȿɇɂȿ
ɂɇɋɌɊɍɄɐɂə ɉɈ ɆɈɇɌȺɀɍ 7
ɉɨɞɤɥɸɱɟɧɢɟ ɤ ɷɥɟɤɬɪɨɫɟɬɢ 7
ɍɫɬɚɧɨɜɤɚ ɩɨɜɟɪɯɧɨɫɬɢ 9
ɍɫɬɚɧɨɜɤɚ ɞɭɯɨɜɨɝɨ ɲɤɚɮɚ 9
ɉɨɞɝɨɬɨɜɤɚ 11
ɄɊȺɌɄɈȿ ɈɉɂɋȺɇɂȿ 13
ȼɧɟɲɧɢɣ ɜɢɞ 13
ɉɚɧɟɥɶ ɭɩɪɚɜɥɟɧɢɹ 15
ɈȻɈɊɍȾɈȼȺɇɂȿ 17
ɇɚɝɪɟɜɚɬɟɥɶɧɚɹ ɩɨɜɟɪɯɧɨɫɬɶ ɫ ɷɥɟɦɟɧɬɚɦɢ
ɭɩɪɚɜɥɟɧɢɹ 17
ɍɩɪɚɜɥɟɧɢɟ ɪɚɛɨɬɨɣ ɧɚɝɪɟɜɚɬɟɥɶɧɵɯ
ɩɨɥɟɣ 19
ɉɨɥɶɡɨɜɚɧɢɟ ɤɟɪɚɦɢɱɟɫɤɨɣ
ɩɨɜɟɪɯɧɨɫɬɶɸ 21
ɍɩɪɚɜɥɟɧɢɟ ɪɚɛɨɬɨɣ ɦɧɨɝɨɮɭɧɤɰɢɨɧɚɥɶɧɨɝɨ
ɞɭɯɨɜɨɝɨ ɲɤɚɮɚ 23
Ɋɚɛɨɱɢɟ ɮɭɧɤɰɢɢ ɞɭɯɨɜɨɝɨ ɲɤɚɮɚ 25
ɉɨɥɶɡɨɜɚɧɢɟ ɞɭɯɨɜɵɦ ɲɤɚɮɨɦ 31
ɗɥɟɤɬɪɨɧɧɨɟ ɩɪɨɝɪɚɦɦɢɪɭɸɳɟɟ ɭɫɬɪɨɣɫɬɜɨ
Touch control 33
ɗɥɟɤɬɪɨɧɧɨɟ ɩɪɨɝɪɚɦɦɢɪɭɸɳɟɟ ɭɫɬɪɨɣɫɬɜɨ
Logic control 47
ɗɥɟɤɬɪɨɧɧɨɟ ɩɪɨɝɪɚɦɦɢɪɭɸɳɟɟ ɭɫɬɪɨɣɫɬɜɨ
Logic control c ɩɨɥɧɵɦ ɫɟɧɫɨɪɧɵɦ
ɭɩɪɚɜɥɟɧɢɟɦ 63
ɉɊȺɄɌɂɑȿɋɄɂȿ ɋɈȼȿɌɕ 61
ɈȻɋɅɍɀɂȼȺɇɂȿ ɂ ɍɏɈȾ 69
ɈɏɊȺɇȺ ɈɄɊɍɀȺɘɓȿɃ ɋɊȿȾɕ 79
5
Page 6
EN
INSTALLATION INSTRUCTIONS
These Instructions are for the qualified technician,
as a guide to the installation, adjustment and
maintenance, according to the laws and standards
in force.
Any of these operations must always be carried
out when the appliance has been disconnected
from the electric system.
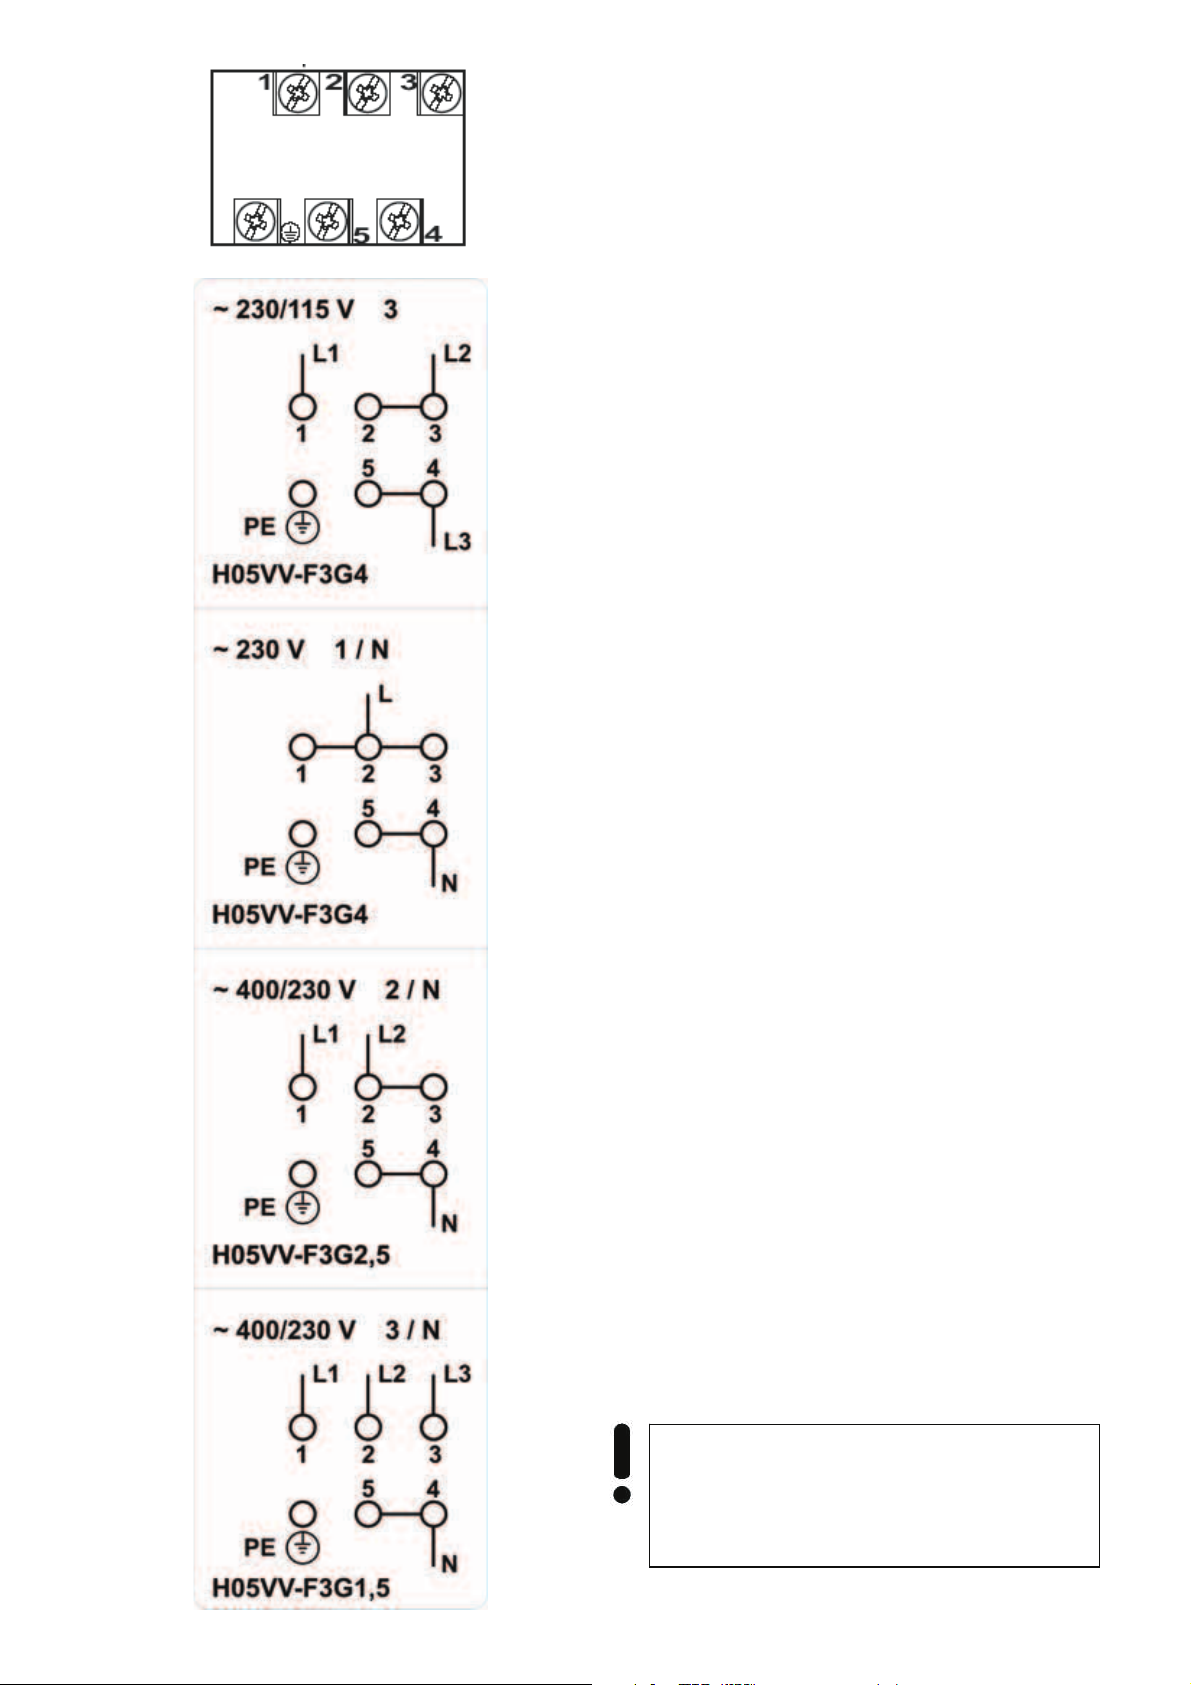
ELECTRICAL CONNECTION
Before connecting the oven or built-in cooker to
the mains power supply, make sure that:
x The supply voltage corresponds to the
specifications on the data plate on the front
of the stove or at the bottom of the hob.
x The mains supply has an efficient
grounding in compliance with all applicable
laws and regulations.
Correct grounding is a legal requirement. If the
appliance is not pre-fitted with a power cable
and/or plug, use only suitable cables and plugs
capable of handling the power specified on the
appliance's data plate and capable of resisting
heat. The power cable should never reach the
temperature 50°C at any point along its length.
If the appliance is to be connected directly to
mains terminals, fit a switch with minimum
aperture of 3 mm between the contacts. Make sure
that the switch is of sufficient capacity for the
power specified on the appliance's data plate, and
compliant with applicable regulations. The switch
must not break the yellow-green earth wire. The
outlet or switch must be easily accessible.
6
Attention! The manufacturer declines all
responsibility for damage or injury if the
above instructions and safety precautions
are not respected.
Page 7

DE RU
MONTAGEANWEISUNG
Die angegebenen Anweisungen sind an den
zugelassenen Installateur als Richtlinie für die
Installation, Regelung und Instandhaltung, gemäß
den geltenden Gesetzen und Normen, gerichtet.
Alle Arbeiten sollen nur bei abgeschaltet vom
elektrischen Netz Apparat durchgeführt werden.
STROMANSCHLUSS
Vor der Durchführung des Stromanschlusses muss
sichergestellt werden, dass:
x die Eigenschaften des Stromnetzes mit den
Werten auf dem unter der Kochfeld oder
der hinteren Wand des Backofens
angebrachten Typenschild übereinstimmen,
x das Stromnetz gemäß den geltenden
Bestimmungen und Rechtsvorschriften
geerdet ist.
Die Erdung ist eine notwendige Voraussetzung der
Nutzung des Gerätes. Falls der Herd nicht mit
Kabel und\ oder Netzstecker ausgestattet ist, muss
geeignetes Material verwendet werden, das der auf
dem Typenschild auf der hinteren Wand des
Gerätes angegebenen Stromaufnahme und der
Betriebstemperatur entspricht. Das Kabel darf an
keiner Stelle keinesfalls eine Temperatur von über
50°C erreichen.
Wenn ein direkter Netzanschluss gewünscht wird,
muss ein allpoliger Schalter mit Kontaktöffnung von
min. 3mm vorgesehen werden, der erlaubt das
Gerät vom Netz zu trennen. Der Schalter muss
den technischen Daten der geltenden Vorschriften
entsprechen (das gelb-grüne Erdungskabel darf
nicht vom genannten Schalter unterbrochen
werden). Der Stecker bzw. der allpolige Schalter
müssen bei installiertem Gerät problemlos
zugänglich sein.
ɂɇɋɌɊɍɄɐɂə ɉɈ ɆɈɇɌȺɀɍ
ɉɨɞɤɥɸɱɟɧɢɟ, ɫɛɨɪɤɚ, ɪɟɝɭɥɢɪɨɜɤɚ ɢ ɭɯɨɞ
ɞɨɥɠɧɵ ɩɪɨɜɨɞɢɬɶɫɹ ɫɩɟɰɢɚɥɶɧɨ ɨɛɭɱɟɧɧɵɦ
ɩɟɪɫɨɧɚɥɨɦ ɜ ɫɨɨɬɜɟɬɫɬɜɢɢ ɫ ɞɟɣɫɬɜɭɸɳɢɦɢ
ɧɨɪɦɚɦɢ ɢ ɩɪɚɜɢɥɚɦɢ.
ȼɫɟ ɪɚɛɨɬɵ ɞɨɥɠɧɵ ɩɪɨɜɨɞɢɬɶɫɹ ɬɨɥɶɤɨ ɩɪɢ
ɨɬɤɥɸɱɟɧɧɨɦ ɨɬ ɷɥɟɤɬɪɢɱɟɫɤɨɣ ɫɟɬɢ ɭɫɬɪɨɣɫɬɜɟ.
ɉɈȾɄɅɘɑȿɇɂȿ Ʉ ɗɅȿɄɌɊɈɋȿɌɂ
ɉɟɪɟɞ ɩɨɞɤɥɸɱɟɧɢɟɦ ɞɭɯɨɜɤɢ ɢɥɢ ɤɨɦɩɥɟɤɬɚ ɤ
ɷɥ. ɫɟɬɢ, ɧɟɨɛɯɨɞɢɦɨ ɭɛɟɞɢɬɶɫɹ, ɱɬɨ:
x ɩɚɪɚɦɟɬɪɵ ɫɟɬɢ ɫɨɨɬɜɟɬɫɬɜɭɸɬ ɞɚɧɧɵɦ ɜ
ɬɚɛɥɢɱɤɟ ɧɚ ɡɚɞɧɟɣ ɫɬɟɧɤɟ ɞɭɯɨɜɨɝɨ
ɲɤɚɮɚ ɢ ɧɚ ɧɢɠɧɟɦ ɤɨɠɭɯɟ ɜɚɪɨɱɧɨɣ
ɩɨɜɟɪɯɧɨɫɬɢ,
x ɷɥ. ɫɟɬɶ ɡɚɡɟɦɥɟɧɚ ɜ ɫɨɨɬɜɟɬɫɬɜɢɢ ɫ
ɞɟɣɫɬɜɭɸɳɢɦɢ ɩɪɟɞɩɢɫɚɧɢɹɦɢ.
Ɂɚɡɟɦɥɟɧɢɟ ɹɜɥɹɟɬɫɹ ɧɟɨɛɯɨɞɢɦɵɦ ɭɫɥɨɜɢɟɦ
ɩɪɚɜɢɥɶɧɨɣ ɷɤɫɩɥɭɚɬɚɰɢɢ. ȿɫɥɢ ɞɭɯɨɜɤɚ ɧɟ
ɨɛɨɪɭɞɨɜɚɧɚ ɤɚɛɟɥɟɦ ɢ/ɢɥɢ ɲɬɟɤɟɪɨɦ,
ɩɪɢɦɟɧɹ
ɫɨɨɬɜɟɬɫɬɜɭɸɳɢɟ ɞ
ɬɚɛɥɢɱɤɟ ɧɚ ɡɚɞɧɟɣ ɫɬɟɧɤɟ ɩɪɢɛɨɪɚ, ɤɨɬɨɪɵɟ
ɦɨɝɭɬ ɮɭɧɤɰɢɨɧɢɪɨɜɚɬɶ ɜ ɪɚɛɨɱɟɦ ɪɟɠɢɦɟ
ɬɟɦɩɟɪɚɬɭɪ. Ʉɚɛɟɥɶ ɧɢ ɜ ɤɨɟɦ ɫɥɭɱɚɟ ɧɟ
ɞɨɥɠɟɧ ɧɚɝɪɟɜɚɬɶɫɹ ɜɵɲɟ ɬɟɦɩɟɪɚɬɭɪɵ ɛɨɥɟɟ
50° ɋ.
ȼ ɫɥɭɱɚɟ ɩɨɞɫɨɟɞɢɧɟɧɢɹ ɧɟɩɨɫɪɟɞɫɬɜɟɧɧɨ ɤ ɷɥ.
ɫɟɬɢ, ɧɟɨɛɯɨɞɢɦɨ ɢɫɩɨɥɶɡɨɜɚɬɶ ɫɩɟɰɢɚɥɶɧɵɣ
ɚɜɬɨɦɚɬɢɱɟɫɤɢɣ ɜɵɤɥɸɱɚɬɟɥɶ ɫ ɡɚɡɨɪɨɦ ɦɟɠɞɭ
ɤɨɧɬɚɤɬɚɦɢ ɧɟ ɦɟɧɟ
ɨɬɫɨɟɞɢɧɹɬɶ ɩɪɢɛɨɪ ɨɬ ɫɟɬɢ, ɫɨɨɬɜɟɬɫɬɜɟɧɧɨ
ɬɟɯɧɢɱɟɫɤɢɦ ɞɚɧɧɵɦ ɢ ɞɟɣɫɬɜɭɸɳɢɯ
ɩɪɟɞɩɢɫɚɧɢɣ (ɠɟɥɬɨ - ɡɟɥɟɧɵɣ ɤɚɛɟ
ɡɚɡɟɦɥɟɧɢɹ ɧɟ ɞɨɥɠɟɧ ɩɪɟɪɵɜɚɬɶɫɹ ɞɚɧɧɵɦ
ɜɵɤɥɸɱɚɬɟɥɟɦ). ɒɬɟɤɟɪ ɢɥɢ ɚɜɬɨɦɚɬɢɱɟɫɤɢɣ
ɜɵɤɥɸɱɚɬɟɥɶ ɧɚ ɩɪɚɜɢɥɶɧɨ ɭɫɬɚɧɨɜɥɟɧɧɨɦ
ɩɪɢɛɨɪɟ ɞɨɥɠɟɧ ɛɵɬɶ ɜɫɟɝɞɚ ɥɟɝɤɨ ɞɨɫɹɝɚɟɦ.
ɣɬɟ ɬɨɥɶɤɨ ɦɚɬɟɪɢɚɥɵ,
ɚɧɧɵɦ, ɭɤɚɡɚɧɧɵɦ ɜ
ɟ 3 ɦɦ, ɩɨɡɜɨɥɹɸɳɢɣ
ɥɶ
Achtung! Der Hersteller ist nicht haftbar,
wenn bei der Installation des Gerätes alle
obenangeführten Anweisungen nicht
befolgt werden.
ȼɧɢɦɚɧɢɟ! ɂɡɝɨɬɨɜɢɬɟɥɶ ɧɟ ɧɟɫɟɬ
ɧɢɤɚɤɨɣ ɨɬɜɟɬɫɬɜɟɧɧɨɫɬɢ, ɟɫɥɢ ɩɪɢ
ɭɫɬɚɧɨɜɤɟ ɩɪɢɛɨɪɚ ɧɟ ɫɨɛɥɸɞɚɸɬɫɹ ɜɫɟ
ɜɵɲɟɩɪɢɜɟɞɟɧɧɵɟ ɩɪɟɞɩɢɫɚɧɢɹ.
7
Page 8

EN
INSTALLATION OF THE COOKING HOB
The appliance can be fitted into a working area as
illustrated on the figure. Apply the seal supplied
over the whole perimeter of the working area.
Please mount the fume extractor hood at about
600-700 mm above the cooking surface (see
installation instructions for your fume extractor
hood).
INSTALLATION OF THE OVEN
The oven can be installed under a work top or in a
cooking column. Figure shows the installation
dimensions. Make sure that surrounding materials
are heat resistant. Align the oven centrally with
respect to the side walls of the units surrounding it
and fix it in place with the screws and Allen screws
provided.
See the accompanying instructions for combining
the oven with multi-functional gas or gas-electric
cookers.
8
Page 9

D RU
EINBAU DES KOCHFELDES
Der Apparat ist für den Einbau in eine Arbeitsplatte
vorgesehen. Siehe Abbildung. Auf den ganzen
Perimeter der Platte die mitgelieferte Dichtmasse
verteilen.
Der Abstand zwischen den Heizoberflächen des
Herdes und Abzugshaube soll voraussichtlich 600700 mm sein (siehe die Bedienungsanleitung für
Ihre Abzugshaube).
EINBAU DES BACKOFENS
Der Backofen kann unter einer Arbeitsplatte oder in
einen Schrank eingebaut werden. Die Einbaumaße
müssen den auf der Abbildung dargestellten
Massen entsprechen. Das Möbelmaterial muss
hitzebeständig sein. Der Backofen muss zu den
Möbelwänden zentriert, und mit den mitgelieferten
Schrauben und Buchsen befestigt werden.
Für die Kombination des Backofens mit den Gasoder Gas/Elektrokombikochfeldern siehe
beiliegende Anleitungen.
ɍɋɌȺɇɈȼɄȺ ɉɈȼȿɊɏɇɈɋɌɂ
ɉɪɢɛɨɪ ɩɪɟɞɭɫɦɨɬɪɟɧ ɞɥɹ ɜɫɬɪɨɣɤɢ ɜ ɪɚɛɨɱɭɸ
ɩɨɜɟɪɯɧɨɫɬɶ, ɤɚɤ ɷɬɨ ɢɡɨɛɪɚɠɧɨ ɧɚ
ɢɥɥɸɫɬɪɚɰɢɢ. ȼɞɨɥɶ ɜɧɟɲɧɟɝɨ ɤɨɧɬɭɪɚ
ɜɫɬɪɚɢɜɚɟɦɨɣ ɩɨɜɟɪɯɧɨɫɬɢ ɩɪɨɤɥɚɞɵɜɚɟɬɫɹ
ɩɪɢɥɚɝɚɟɦɵɣ ɜ ɤɨɦɩɥɟɤɬɟ ɭɩɥɨɬɧɢɬɟɥɶɧɵɣ
ɦɚɬɟɪɢɚ
Ɋɚɫɫɬɨɹɧɢɟ ɦɟɠɞɭ ɧɚɝɪɟɜɚɬɟɥɶɧɵɦɢ
ɩɨɜɟɪɯɧɨɫɬɹɦɢ ɩɥɢɬɵ ɢ ɜɵɬɹɠɧɵɦ ɭɫɬɪɨɣɫɬɜɨɦ
ɞɨɥɠɧɨ ɛɵɬɶ ɨɪɢɟɧɬɢɪɨɜɨɱɧɨ 600-700 ɦɦ
(ɫɦɨɬɪɢɬɟ ɢɧɫɬɪɭɤɰɢɸ ɤ ȼɚɲɟɦɭ ɜɵɬɹɠɧɨɦɭ
ɭɫɬɪɨɣɫɬɜɭ).
ɍɋɌȺɇɈȼɄȺ ȾɍɏɈȼɈȽɈ ɒɄȺɎȺ
Ⱦɭɯɨɜɤɚ ɩɪɟɞɧɚɡɧɚɱɟɧɚ ɞɥɹ ɜɫɬɪɨɣɤɢ ɥɢɛɨ ɩɨɞ
ɪɚɛɨɱɭɸ ɩɨɜɟɪɯɧɨɫɬɶ ɫɬɨɥɚ, ɥɢɛɨ ɜ ɲɤɚɮ.
Ɋɚɡɦɟɪɵ, ɤɨɬɨɪɵɦɢ ɧɟɨɛɯɨɞɢɦɨ
ɪɭɤɨɜɨɞɫɬɜɨɜɚɬɶɫɹ ɩɪɢ ɜɫɬɪɨɣɤɟ, ɭɤɚɡɚɧɵ ɧɚ
ɪɢɫɭɧɤɟ. Ɇɟɛɟɥɶ ɞɨɥɠɧɚ ɛɵɬɶ ɢɡɝɨɬɨɜɥɟɧɚ ɢɡ
ɧɚɝɪɟɜɨɫɬɨɣɤɨɝɨ ɦɚɬɟɪɢɚɥɚ. Ⱦɭɯɨɜɤɚ ɞɨɥɠɧɚ
ɛɵɬɶ ɨɬɰɟɧɬɪɨɜɚɧɚ ɩɨ ɨɬɧɨɲɟɧɢɸ ɤ ɫɬɟɧɤɚɦ
ɦɟɛɟɥɢ ɢ ɧɚɞɟɠɧɨ ɡɚɤɪɟɩɥɟɧɚ ɩɪɢ ɩɨɦɨɳɢ
ɩɨɫɬɚɜɥɹɟɦɵɯ ɜ ɤɨɦɩɥɟɤɬɟ ɤɪɟɩɟɠɧɵɯ
ɦɚɬɟɪɢɚɥɨɜ.
Ⱦɥɹ ɤɨɦɛɢɧɚɰɢɢ ɞɭɯ
ɷɥɟɤɬɪɢɱɟɫɤɨɣ ɩɨɜɟɪɯɧɨɫɬɶɸ ɢɫɩɨɥɶɡɭɣɬɟ
ɩɪɢɤɥɚɞɵɜɚɟɦɭɸ ɞɨɤɭɦɟɧɬɚɰɢɸ.
ɤɢ ɫ ɝɚɡɨɜɨɣ ɢɥɢ ɝɚɡɨ-
ɨɜ
9
Page 10
EN
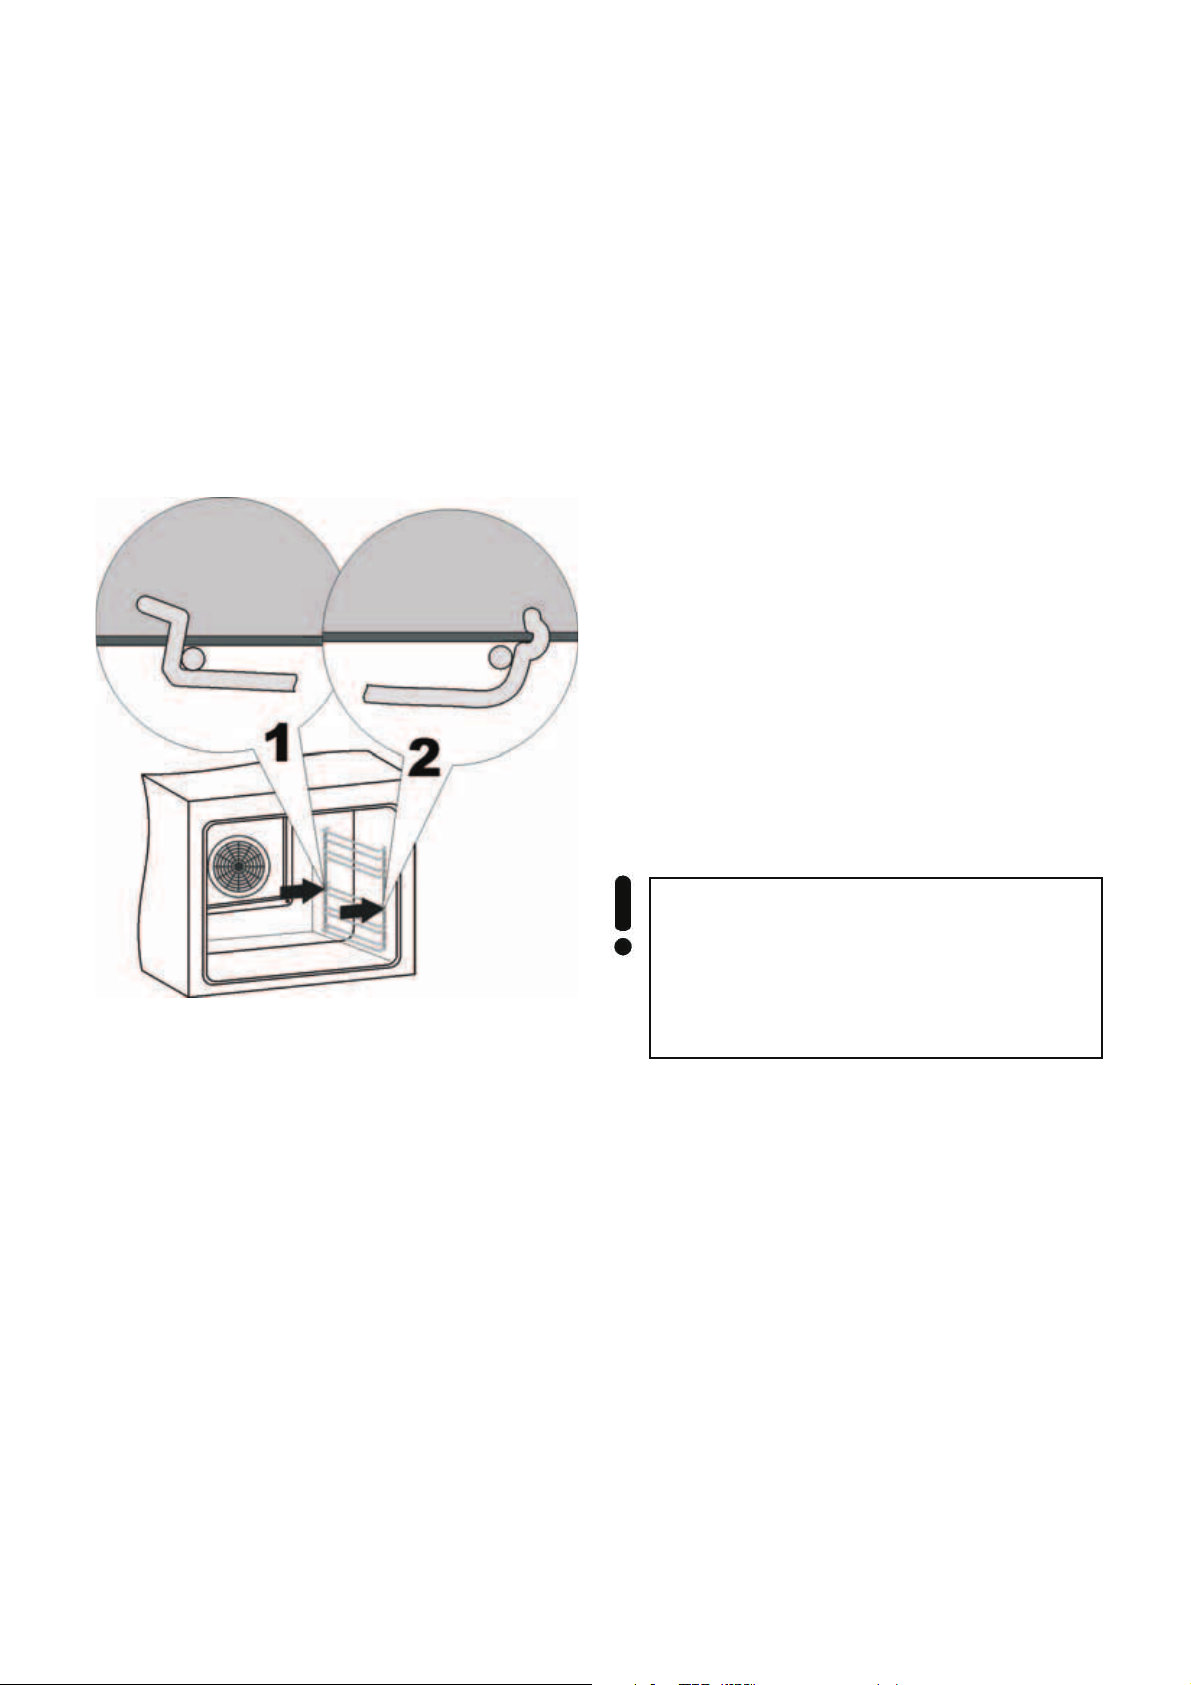
PREPARATION
Clean the oven thoroughly with soapy water and
rinse well. To remove the lateral frames from
smooth-walled ovens, proceed as shown in the
figure.
Operate the oven for about 30 minutes at
maximum temperature to burn off all traces of
grease which might otherwise create unpleasant
smells when cooking.
Important !!!
As a safety precaution, before cleaning the oven,
always disconnect the plug from the power socket
or the power cable from the oven. Do not use acid
or alkaline substances to clean the oven (lemon
juice, vinegar, salt, tomatoes etc.). Do not use
chlorine based products, acids or abrasive
products to clean the painted surfaces of the oven.
Attention! You must set the time on the
clock before you can use the oven.
(See chapter “Digital clock timer“).
If the time is not set, the oven will not work.
10
Page 11

D RU
ɪ
VORBEREITUNG
Vor dem ersten Gebrauch muss der Backofen
gründlich mit Seifenwasser gesäubert und
anschließend mit klarem Wasser abgewaschen
werden. Die mitgelieferten Einhängegitter auf die
Seitenwände einbauen und die Gitter und Bleche
aufstellen. Den Backofen für etwa 30 Minuten auf
Höchsttemperatur aufheizen, auf diese Weise
werden alle fetthaltigen Bearbeitungsrückstände
eliminiert, die beim Backen unangenehme Gerüche
verursachen könnten.
Wichtig !!!
Als Sicherheitsvorkehrung muss vor jeder
Reinigung des Backofens immer das Stromnetz
abgeschaltet werden.
Zum Reinigen dürfen keine sauren oder
alkalischen
Substanzen verwendet werden (Zitronensaft,
Essig, Salz, usw.). Chlorhaltige Produkte
(Bleichmittel u. s. w.) sind ebenfalls zu vermeiden,
dies gilt vor allem für die Reinigung der emaillierten
Oberflächen
Achtung! Vor dem ersten Gebrauch des
Backofens muss die aktuelle Tageszeit
eingestellt werden. (siehe Kapitel
„Elektronische Zeitschaltuhr.“).
Ohne eingestellte Uhr funktioniert der
Backofen nicht!
ɉɈȾȽɈɌɈȼɄȺ
ɉɟɪɟɞ ɩɟɪɜɵɦ ɩɨɥɶɡɨɜɚɧɢɟɦ ɬɳɚɬɟɥɶɧɨ
ɨɱɢɫɬɢɬɶ ɞɭɯɨɜɤɭ ɦɵɥɶɧɵɦ ɪɚɫɬɜɨɪɨɦ ɢ ɯɨɪɨɲɨ
ɩɪɨɦɵɬɶ ɞɨɫɬɚɬɨɱɧɵɦ ɤɨɥɢɱɟɫɬɜɨɦ ɜɨɞɵ.
ɇɚɜɟɫɢɬɶ ɧɚ ɛɨɤɨɜɵɟ ɫɬɟɧɤɢ ɩɨɫɬɚɜɥɹɟɦɵɟ ɜ
ɤɨɦɩɥɟɤɬɟ ɥɟɫɬɧɢɱɤɢ ɢ ɭɫɬɚɧɨɜɢɬɶ ɧɚ ɧɢɯ
ɪɟɲɟɬɤɢ ɢ ɩɪɨɬɢɜɧɢ. ȼ ɬɟɱɟɧɢɟ ɩɪɢɦɟɪɧɨ 30
ɦɢɧɭɬ ɩɪɨɝɪɟɬɶ ɞɭɯɨɜɤɭ ɞɨ ɦɚɤɫɢɦɚɥɶɧɨɣ
ɬɟɦɩɟɪɚɬɭɪɵ, ɩɪɢ ɷɬɨɦ ɧɟɣɬɪɚɥɢɡɭɸɬɫɹ ɜɫɟ
ɠɢɪɨɫɨɞɟɪɠɚɳɢɟ ɜɟɳɟɫɬɜɚ, ɢɫɩɨɥɶɡɭɟɦɵɟ ɩɪɢ
ɩɪɨɢɡɜɨɞɫɬɜɟɧɧɨɣ ɨɛɪɚɛɨɬɤɟ ɢɡɞɟɥɢɹ, ɤɨɬɨɪɵɟ
ɦɨɝɭɬ ɨɛɭɫɥɨɜɢɬɶ ɩɨɹɜɥɟɧɢɟ ɧɟɩɪɢɹɬɧɵɯ
ɡɚɩɚɯɨɜ ɩɪɢ ɩɟɪɜɨɦ ɩɪɢɝɨɬɨɜɥɟɧɢɢ ɛɥɸɞ.
ȼɚɠɧɨ !!!
ȼ ɤɚɱɟɫɬɜɟ ɦɟɪɵ ɩɪɟɞɨɫɬɨɪɨɠɧɨɫɬɢ
ɧɟɨɛɯɨɞɢɦɨ ɩɟɪɟɞ ɤɚɠɞɨɣ ɱɢɫɬɤɨɣ ɞɭɯɨɜɤɢ
ɨɬɤɥɸɱɚɬɶ ɟɟ ɨɬ ɫɟɬɢ. ɇɟ ɩɪɢɦɟɧɹɣɬɟ ɞɥɹ
ɱɢɫɬɤɢ ɤɢɫɥɨɬɨ - ɢɥɢ ɳɟɥɨɱɟɫɨɞɟɪɠɚɳɢɯ
ɜɟɳɟɫɬɜ (ɭɤɫɭɫ, ɫɨɤ ɥɢɦɨɧɚ, ɫɨɥɶ ɢ ɬ.ɞ.). ɇɢ ɜ
ɤɨɟɦ ɫɥɭɱɚɟ ɧɟ ɩɪɢɦɟɧɹɣɬɟ ɬɚɤɠɟ
ɯɥɨɪɨɫɨɞɟɪɠɚɲɢɟ ɫɪɟɞɫɬɜɚ (ɨɬɛɟɥɢɜɚɸɳɢɟ ɢ
ɬ.ɞ.). Ɉɫɨɛɟɧɧɨ ɷɬɨ ɧɭɠɧɨ ɢɦɟɬɶ ɜ ɜɢɞɭ ɩɪɢ
ɱɢɫɬɤɟ ɷɦɚɥɢɪɨɜɚɧɧɵɯ ɩɨɜɟɪ
ȼɧɢɦɚɧɢɟ! ɉɟɪɟɞ ɩɟɪɜɵɦ
ɢɫɩɨɥɶɡɨɜɚɧɢɟɦ ɞɭɯɨɜɤɢ ɧɟɨɛɯɨɞɢɦɨ
ɜɵɫɬɚɜɢɬɶ ɬɟɤɭɳɟɟ ɜɪɟɦɹ ɧɚ
ɱɚɫɚɯ (ɫɦ. ɪɚɡɞɟɥ „ɗɥɟɤɬɪɨɧɧɨɟ
ɩɪɨɝɪɚɦɦɢɪɭɸɳɟɟ ɭɫɬɪɨɣɫɬɜɨ“).
ȼ ɩɪoɬɢɜɧɨɦ ɫɥɭɱɚɟ ɞɭɯɨɜɤɚ ɧɟ ɛɭɞɟɬ
ɚɛɨɬɚɬɶ !
ɯɧɨɫɬɟɣ ɞɭɯɨɜɨɤ.
11
Page 12
EN
1
9
6
2
3
2
4
8
6
9
5
2
2
3
4
8
6
9
7
3
4
8
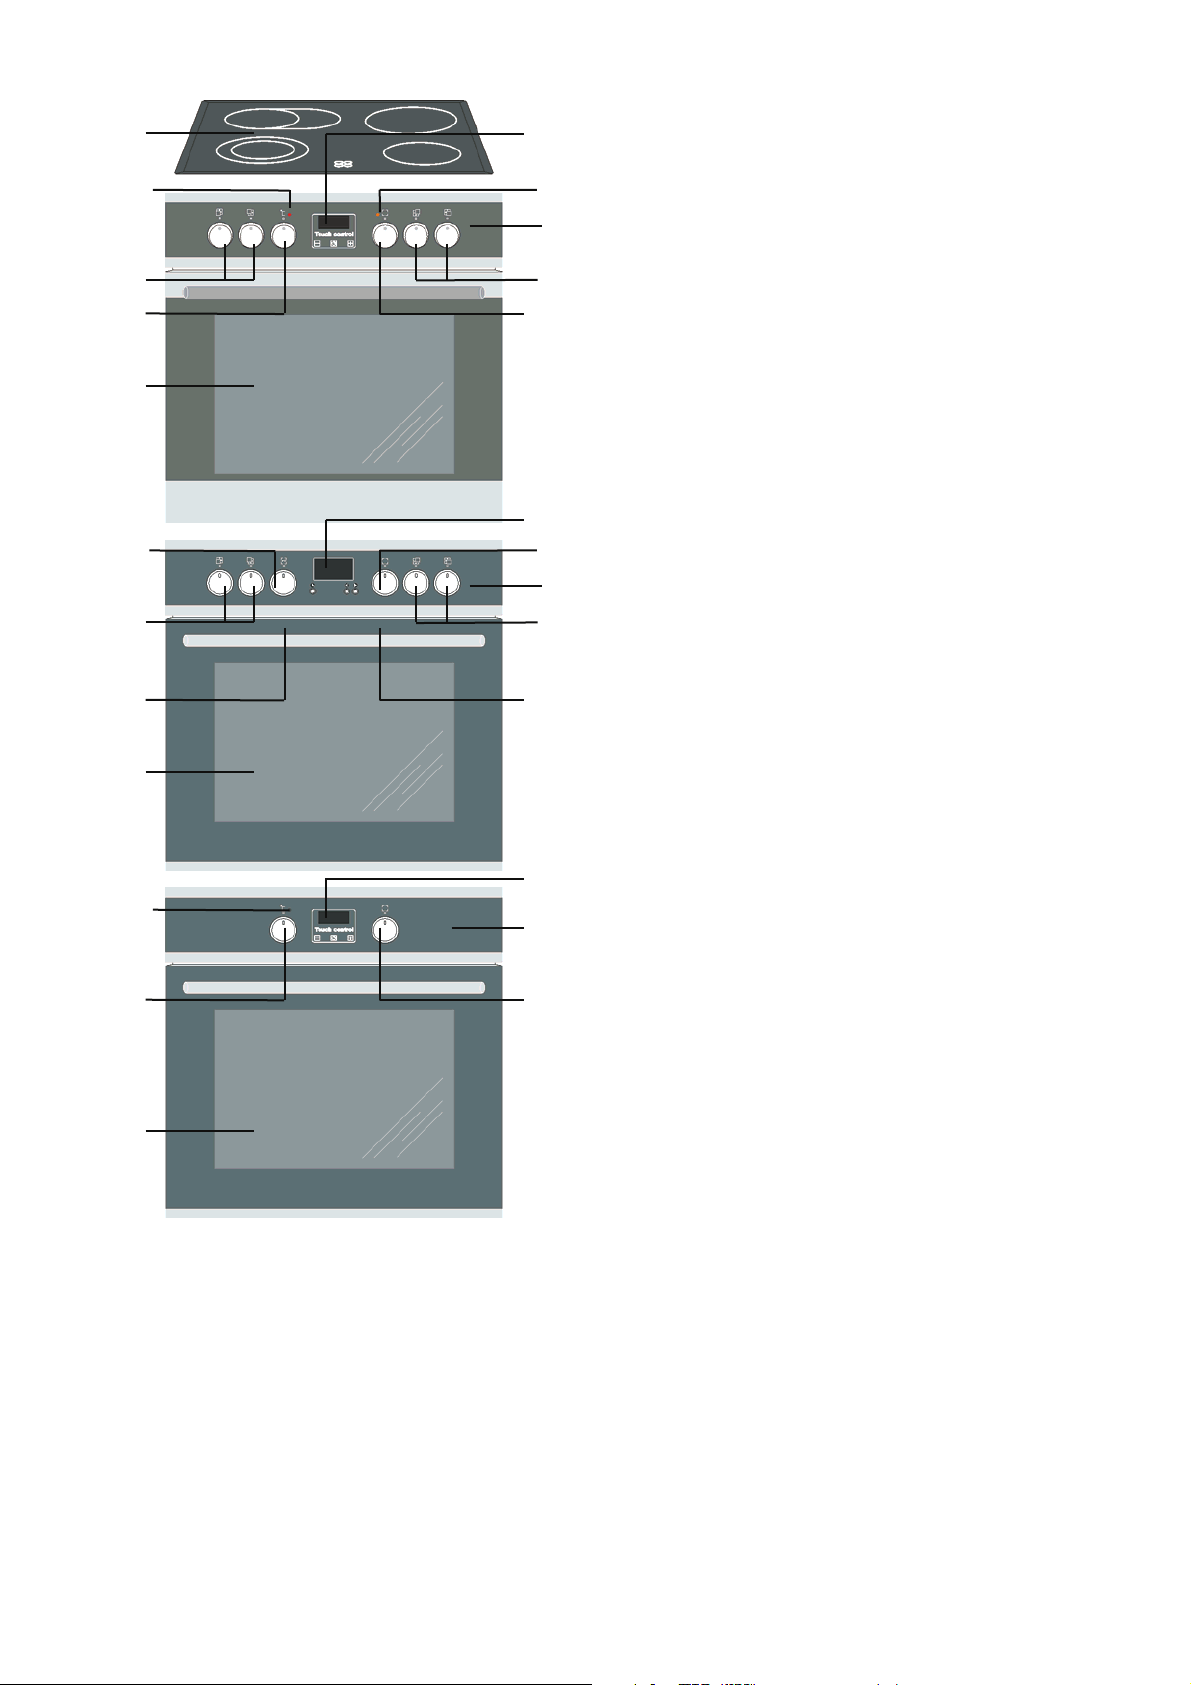
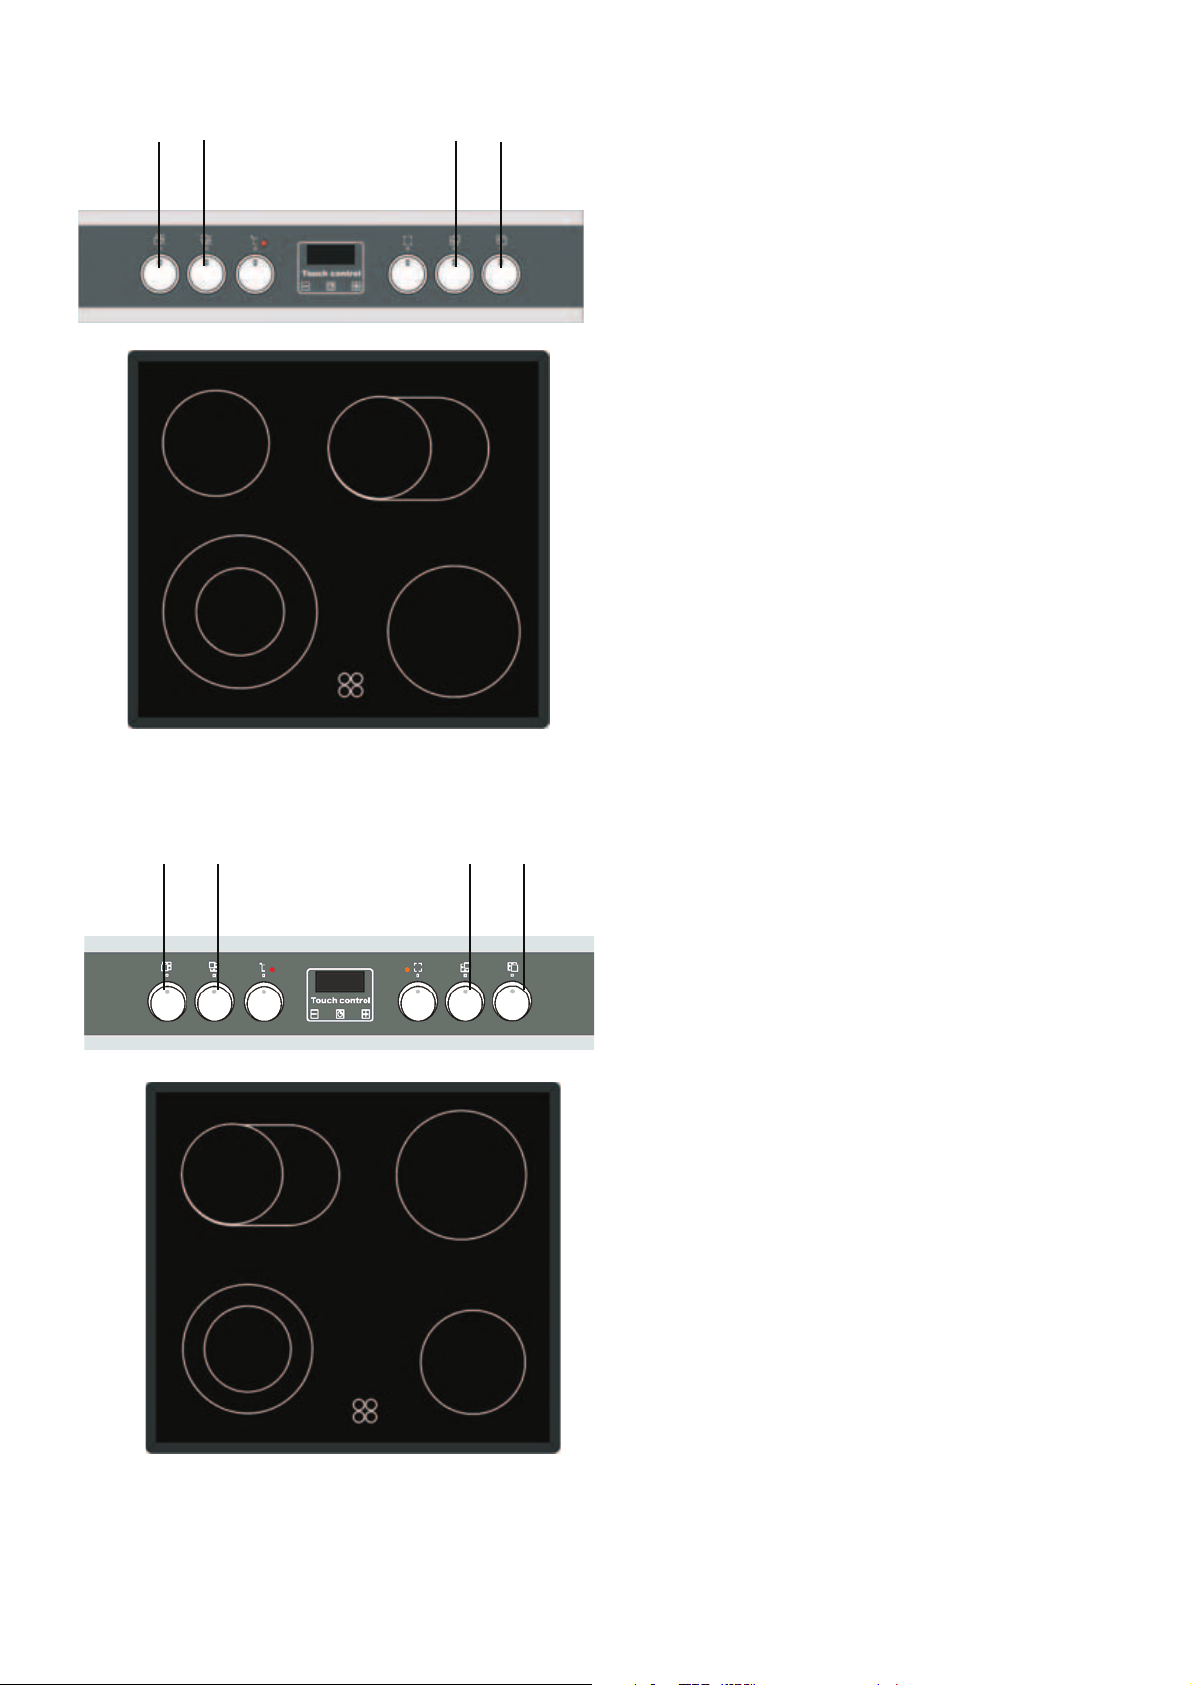
BRIEF DESCRIPTION
LOCATION DRAWING
5
Arrangement of functional assemblies
7
Built-in cooker EHC
1. Cooking hob with cooking zones
2. Knobs of the cooking zones control
3. Knobs of the oven temperature control
4. Knobs of the oven operating functions
5. Pilot light ON / OFF (yellow)
7
6. Oven temperature - pilot light (red)
7. Control panel
8. Oven
9. Electronic programmable control
Built-in oven EHK
Built-in oven EH
Depending on the technical equipment, different
models are provided with different control panels
and relevantly arranged operating elements.
12
Page 13

DE
KURZBESCHREIBUNG
GESAMTANSICHT
Anordnung von Funktionsbaugruppen
Einbauherde EHC
RU
ɄɊȺɌɄɈȿ ɈɉɂɋȺɇɂȿ
ȼɇȿɒɇɂɃ ȼɂȾ
Ɋɚɡɦɟɳɟɧɢɟ ɮɭɧɤɰɢɨɧɚɥɶɧɵɯ ɭɡɥɨɜ
ȼɫɬɪɚɢɜɚɟɦɵɹ ɩɥɢɬɚ EHC
1. Kochfeld mit Kochzonen
2. Drehregler der Kochzonen
3. Drehregler des Backofentemperaturreglers
4. Drehregler der Backofenbetriebsfunktionen
5. Betrieb - Kontrollleuchte EIN / AUS (gelb)
6. Backofentemperatur - Kontrollleuchte (rot)
7. Bedienblende
8. Backofen
9. Elektronische Programmierung
Einbaubackofen EHK
Einbaubackofen EH
Verschiedene Modelle, je nach ihrer technischen
Ausrüstung, sind mit verschiedenen Bedienblenden
versehen, an denen die Bedienelemente sinnvoll
angeordnet sind.
1. ȼɚɪɨɱɧɚɹ ɩɨɜɟɪɯɧɨɫɬɶ ɫ
ɧɚɝɪɟɜɚɬɟɥɶɧɵɦɢ ɩɨɥɹɦɢ
2. Ɋɭɱɤɢ ɭɩɪɚɜɥɟɧɢɹ ɧɚɝɪɟɜɚɬɟɥɶɧɵɯ ɩɨɥɟɣ
3. Ɋɭɱɤɚ ɬɟɪɦɨɪɟɝɭɥɹɬɨɪɚ ɞɭɯɨɜɤɢ
4. Ɋɭɱɤɚ ɜɵɛɨɪɚ ɪɟɠɢɦɚ ɪɚɛɨɬɵ ɞɭɯɨɜɤɢ
(ɪɚɛɨɱɢɯ ɮɭɧɤɰɢɣ)
5. Ʉɨɧɬɪɨɥɶɧɚɹ ɥɚɦɩɨɱɤɚ ɪɚɛɨɬɵ ɩɥɢɬɵ
(ɠɟɥɬɚɹ)
6. Ʉɨɧɬɪɨɥɶɧɚɹ ɥɚɦɩɨɱɤɚ ɪɚɛɨɬɵ ɞɭɯɨɜɤɢ
(ɤɪɚɫɧɚɹ)
7. ɉaɧeɥɶ ɭɩɪɚɜɥɟɧɢɹ
8. Ⱦɭɯɨɜɨɣ ɲɤɚɮ
9. ɗɥɟɤɬɪɨɧɧɨɟ ɩɪɨɝɪɚɦɦɢɪɭɸɳɟɟ
ɭɫɬɪɨɣɫɬɜɨ
ȼɫɬɪɚɢɜɚɟɦɵɣ ɞɭɯɨɜɨɣ ɲɤɚɮ EHK
ɬ
ɪɚɢɜɚɟɦɵɣ ɞɭɯɨɜɨɣ ɲɤɚɮ EH
ȼɫ
Ɉɬɞɟɥɶɧɵɟ ɦɨɞɟɥɢ, ɜ ɡɚɜɢɫɢɦɨɫɬɢ ɨɬ ɢɯ
ɬɟɯɧɢɱɟɫɤɨɝɨ ɨɛɨɪɭɞɨɜɚɧɢɹ, ɢɦɟɸɬ ɪɚɡɥɢɱɧɵɟ
ɩɚɧɟɥɢ ɭɩɪɚɜɥɟɧɢɹ ɫ ɫɨɨɬɜɟɬɫɬɜɟɧɧɨ
ɪɚɡɦɟɳɟɧɧɵɦɢ ɧɚ ɧɢɯ ɷɥɟɦɟɧɬɚɦɢ ɭɩɪɚɜɥɟɧɢɹ.
13
Page 14

EN
1
4 7 5
2
9 10 3
8
2 3
1
4 7
2 8 9 10 3
1 1
2 3
7
2a
3
8
9 10
CONTROL PANEL
1
1
Models Exclusive: Control Panel
with electronic programmable control
1. Knobs of cooking zones
2. Knobs of the oven temperature control
3. Knobs of the oven operating functions
4. Control light ON/OFF (yellow)
5. Oven operation - Control light (red)
6. Timer (if available)
7. Electronic programmable control
8. Button « - »
9. Button “Function selection”
10. Button « + »
Models Platin: Control Panel with electronic
programmable control
1. Knobs of cooking zones
2. Knobs of the oven temperature control
„Push“
3. Knobs of the oven operating functions
„Push“
Control Panel with electronic programmable
control Logic Control
2a.
Knob ON/OFF of an oven
-
„Push“
-
-
14
Page 15

DE RU
BEDIENBLENDE
Bedienblende von Modellen Exclusive
mit elektronischer Programmierung
1.
Drehregler
2. Drehregler “Backofentemperatur”
3. Drehregler “Backofenbetriebsfunktionen”
4. Kontrollleuchte ON/OFF (gelb)
5. Backofenbetrieb Kontrollleuchte (rot)
6. Kurzzeitwecker (falls vorhanden)
7. Elektronische Programmierung
8. Drucktaste « - »
9. Betriebdrucktaste
10. Drucktaste « + »
Die Besonderheiten der Bedienblende von
Modellen Platin mit elektronischer
Programmierung
1.
Drehregler
für Kochzonen
für Kochzonen -
«Push»
ɉȺɇȿɅɖ ɍɉɊȺȼɅȿɇɂə
ɉɚɧɟɥɢ ɭɩɪɚɜɥɟɧɢɹ ɦɨɞɟɥɟɣ Exclusive
ɫ ɫɟɧɫɨɪɧɵɦ ɷɥɟɤɬɪɨɧɧɵɦ
ɩɪɨɝɪɚɦɦɢɪɭɸɳɢɦ ɭɫɬɪɨɣɫɬɜɨɦ
1. Ɋɭɱɤɢ ɭɩɪɚɜɥɟɧɢɹ ɧɚɝɪɟɜɚɬɟɥɶɧɵɦɢ
ɩɨɥɹɦɢ
2. Ɋɭɱɤɚ “Ɍɟɪɦɨɪɟɝɭɥɹɬɨɪɚ ɞɭɯɨɜɤɢ”
3. Ɋɭɱɤɚ “Ɋɟɠɢɦ ɪɚɛɨɬɵ ɞɭɯɨɜɤɢ”
4. Ʉɨɧɬɪɨɥɶɧɚɹ ɥɚɦɩɨɱɤɚ ȼɤɥ/ȼɵɤɥ (ɠɟɥɬ.)
5. Ʉɨɧɬɪɨɥɶɧɚɹ ɥɚɦɩɨɱɤɚ ɪɚɛɨɬɵ ɞɭɯɨɜɤɢ
(ɤɪɚɫɧ.)
6. Ɇɢɧɭɬɧɢɤ (ɩɪɢ ɧɚɥɢɱɢɢ)
7. ɗɥɟɤɬɪɨɧɧɨɟ ɩɪɨɝɪɚɦɦɢɪɭɸɳɟɟ
ɭɫɬɪɨɣɫɬɜɨ
8. Ʉɧɨɩɤɚ « - »
9. Ʉɧɨɩɤɚ ɜɵɛɨɪɚ ɮɭɧɤɰɢɣ
10. Ʉɧɨɩɤɚ « + »
Ɉɫɨɛɟɧɧɨɫɬɢ ɩɚɧɟɥɢ ɭɩɪɚɜɥɟɧɢɹ ɦɨɞɟɥɟɣ
Platin ɫ ɷɥɟɤɬɪɨɧɧɵɦ ɩɪɨɝɪɚɦɦɢɪɭɸɳɢɦ
ɭɫɬɪɨɣɫɬɜɨɦ
1.
Ɋɭɱɤɢ ɭɩɪɚɜɥɟɧɢɹ ɧɚɝɪɟɜɚɬɟɥɶɧɵɦɢ
2. Drehregler “Backofentemperatur” –
«Push»
3. Drehregler “Backofenbetriebsfunktionen” –
«Push»
Die Besonderheiten der Bedienblende von
Modellen mit elektronischer Programmierung
Logic Control
2a.
Drehregler ON/OFF des Backofens
ɩɨɥɹɦɢ -
2. Ɋɭɱɤɚ “Ɍɟɪɦɨɪɟɝɭɥɹɬɨɪɚ ɞɭɯɨɜɤɢ” ɭɬɚɩɥɢɜɚɟɦɚɹ «Push»
3. Ɋɭɱɤɚ “Ɋɟɠɢɦ ɪɚɛɨɬɵ ɞɭɯɨɜɤɢ” ɭɬɚɩɥɢɜɚɟɦɚɹ «Push»
Ɉɫɨɛɟɧɧɨɫɬɢ ɩɚɧɟɥɢ ɭɩɪɚɜɥɟɧɢɹ ɦɨɞɟɥɟɣ ɫ
ɷɥɟɤɬɪɨɧɧɵɦ ɩɪɨɝɪɚɦɦɢɪɭɸɳɢɦ
ɭɫɬɪɨɣɫɬɜɨɦ Logic Control
2a.
Ɋɭɱɤɚ ȼɤɥ/ȼɵɤɥ ɞɭɯɨɜɤɢ
ɭɬɚɩɥɢɜɚɟɦɵɟ «Push»
15
Page 16
EN
2
3
41
EQUIPMENT
2 3
1
4
1 2 3 4
2
3
1
4
COOKING ZONES AND RELEVANT
OPERATING ELEMENTS
EHC6172*, EHK6162*, EHK6132, EHK6152*
1.
Knob of the cooking zone
Ø120/ Ø210 mm 0,75 / 2,2
2.
Knob of the cooking zone
Ø145 mm 1,2 kW
3.
Knob of the cooking zone
Ø140x250 mm 1,1 / 2,0 kW
4.
Knob of the cooking zone
Ø180 mm 1,8
kW
in front (left)
kW
behind (left)
behind (right)
in front (right)
EHC 6472*
1. Knob of the cooking zone in front (left)
Ø120/Ø180 mm 0,8 / 1,7
2. Knob of the cooking zone behind (left)
Ø140x250 mm
3. Knob of the cooking zone behind (right)
Ø180 mm 1,8
4. Knob of the cooking zone in front (right)
Ø145 mm 1,2 kW
* -
Modification
1,1 / 2,0 kW
kW
kW
16
Page 17

DE RU
AUSSTATUNG
KOCHFELD MIT ENTSPRECHENDEN
BEDIENELEMENTEN
EHC6172*, EHK6162*, EHK6132, EHK6152*
1. Drehregler für Kochzone vorne links
Ø120/ Ø210 mm 0,75 / 2,2
2.
Drehregler für Kochzone hinten links
Ø145 mm 1,2 kW
3.
Drehregler für Kochzone hinten rechts
Ø140x250 mm 1,1 / 2,0 kW
4.
Drehregler für Kochzone vorne rechts
Ø180 mm 1,8 kW
EHC 6472*
1.
Drehregler
Ø120/Ø180 mm 0,8 / 1,7 kW
2.
Drehregler
Ø140x250 mm
3.
Drehregler
Ø180 mm 1,8 kW
4.
Drehregler
Ø145 mm 1,2 kW
* -
Die Modifikationen
für Kochzone vorne links
für Kochzone hinten links
1,1 / 2,0
für Kochzone hinten rechts
für Kochzone vorne rechts
kW
kW
ɈȻɈɊɍȾɈȼȺɇɂȿ
ɇȺȽɊȿȼȺɌȿɅɖɇȺə ɉɈȼȿɊɏɇɈɋɌɖ ɋ
ɗɅȿɆȿɇɌȺɆɂ ɍɉɊȺȼɅȿɇɂə
EHC6172*, EHK6162*, EHK6132, EHK6152*
1. Ɋɭɱɤɚ ɭɩɪɚɜɥɟɧɢɹ ɧɚɝɪɟɜɚɬɟɥɶɧɵɦ
ɩɨɥeɦ - ɩepeɞɧɟɟ ɥɟɜɨɟ
Ø120 / Ø210 mm 0,75 / 2,2 ɤȼɬ
2. Ɋɭɱɤɚ ɭɩɪɚɜɥɟɧɢɹ ɧɚɝɪɟɜɚɬɟɥɶɧɵɦ
ɩɨɥeɦ - ɡɚɞɧɟɟ ɥɟɜɨɟ
Ø145 mm 1,2 ɤȼɬ
3. Ɋɭɱɤɚ ɭɩɪɚɜɥɟɧɢɹ ɧɚɝɪɟɜɚɬɟɥɶɧɵɦ
ɩɨɥeɦ - ɡɚɞɧɟɟ ɩɪɚɜɨɟ
Ø140x250 mm 1,1 / 2,0
4. Ɋɭɱɤɚ ɭɩɪɚɜɥɟɧɢɹ ɧɚɝɪɟɜɚɬɟɥɶɧɵɦ
ɩɨɥeɦ - ɩɟɪɟɞɧɟɟ ɩɪɚɜɨɟ
Ø180 mm 1,8 ɤȼɬ
EHC 6472*
1. Ɋɭɱɤɚ ɭɩɪɚɜɥɟɧɢɹ ɧɚɝɪɟɜɚɬɟɥɶɧɵɦ
ɩɨɥeɦ - ɩepeɞɧɟɟ ɥɟɜɨɟ
Ø120/Ø180 mm 0,8 / 1,7 ɤȼɬ
2. Ɋɭɱɤɚ ɭɩɪɚɜɥɟɧɢɹ ɧɚɝɪɟɜɚɬɟɥɶɧɵɦ
ɩɨɥeɦ - ɡɚɞɧɟɟ ɥɟɜɨɟ
Ø140x250 mm
3. Ɋɭɱɤɚ ɭɩɪɚɜɥɟɧɢɹ ɧɚɝɪɟɜɚɬɟɥɶɧɵɦ
ɩɨɥeɦ - ɡɚɞɧɟɟ ɩɪɚɜɨɟ
Ø180 mm 1,8 ɤȼɬ
4. Ɋɭɱɤɚ ɭɩɪɚɜɥɟɧɢɹ ɧɚɝɪɟɜɚɬɟɥɶɧɵɦ
ɩɨɥeɦ - ɩɟɪɟɞɧɟɟ ɩɪɚɜɨɟ
Ø145 mm 1,2 ɤȼɬ
* -
Ɇɨɞɢɮɢɤɚɰɢɢ
1,1 / 2,0
ɤȼɬ
ɤȼɬ
17
Page 18
EN
1
2
5
3 4
6
7
8
9
10
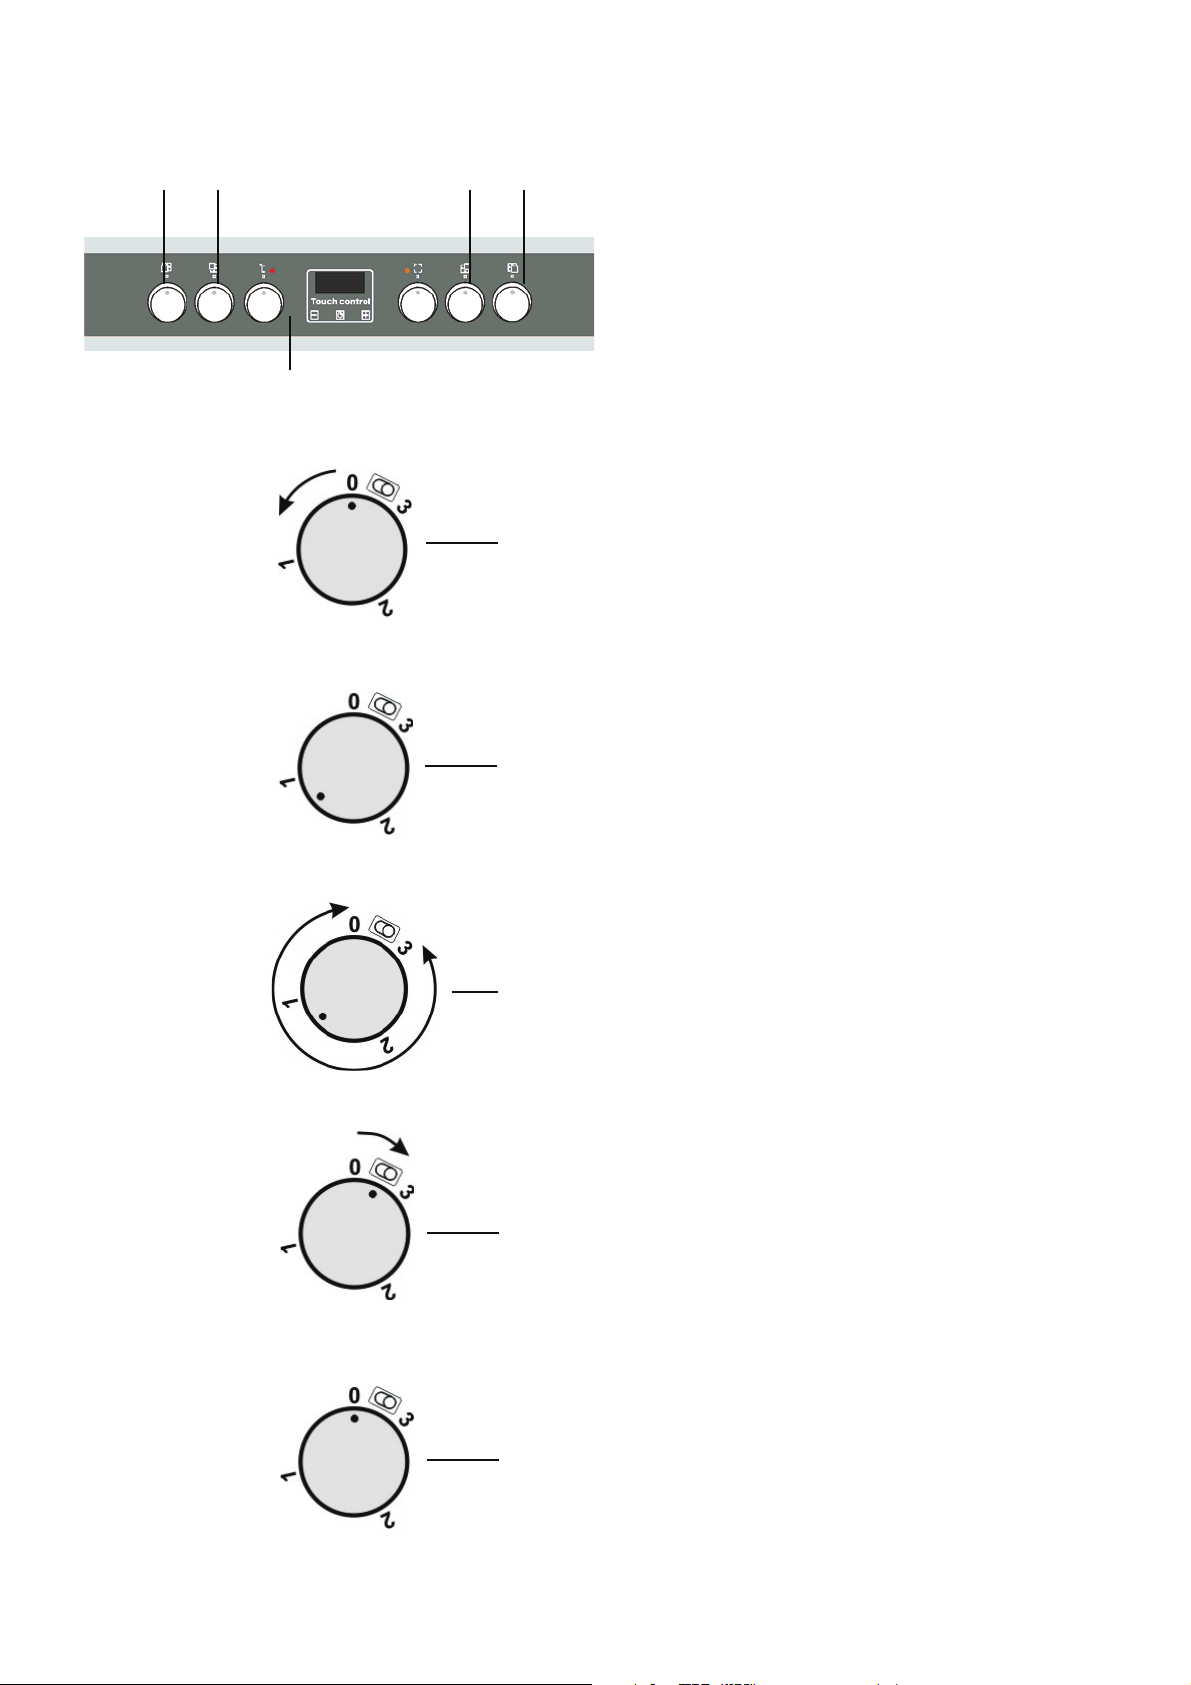
COOKING ZONES CONTROL
The cooking zones control is achieved by means
of knobs 1, 2, 3 and 4 set up on the control panel
of the cooker
The graphic symbols above the knobs indicate
which cooking zone is controlled by the selected
knob.
To switch on or regulate a cooking zone:
x turn the knob clockwise counter clockwise
x set up the knob in the position 7.
The knobes enable fluent heat supply to the
cooking zones.
The double field heating elements are steered by
the energy control with the integrated switch of the
outer field.
By means of the knob 8 you can ensure the fluent
heat supply only to the inner cooking zone. To
switch off the outer field:
x turn knob clockwise against the stop 9 and
By this moment you can control the fluent heat
supply to both inner and outer cooking zones.
To switch off the cooking zones set up the knob
in the position „0“ 10.
To control the heat supply in case of the control
panel equipped with sunk knobs Push:
x push the knob slightly and let it go.
The knob will come out of the control panel.
To countersink the knob:
x push the knob as far as it will go and let it
5.
6,
let it go.
go.
18
Page 19

DE RU
KOCHFELDERSTEUERUNG
Die Kochzonensteuerung erfolgt mit Hilfe von
Drehregler 1, 2, 3 und 4, die auf der Bedienblende
des Herdes eingerichtet sind 5.
Die graphischen Symbole, die sich neben den
Drehreglern der Kochzonen befinden, zeigen,
welche Kochzone von dem gewählten Drehregler
verwaltet wird.
Zum Einschalten oder zur Regulierung einer
Kochzone müssen Sie wie folgt vorgehen:
x drehregler gegen den Uhrzeigersinn drehen
6,
x den Drehregler in ausgewählte Position
bringen 7.
In dem Drehbereich kann man fließend die Menge
der Wärmezufuhr zum Geschirr regulieren.
Die Heizelemente mit dem doppelten Feld werden
durch den Energieregler gesteuert, der mit dem
eingebauten Schalter des Außenfeldes
ausgestattet ist.
In dem Drehbereich bis zum Symbol 8 kann man
fließend die Menge der Wärmezufuhr zum Geschirr
nur von innerem Kochfeld regulieren.
Zum Einschalten des Außenfeldes:
x Drehregler bis zum Anschlag im
Uhrzeigersinn umdrehen 9 und loslassen.
Von diesem Moment kann man fließend die Menge
der Wärmezufuhr zum Geschirr von beiden
Kochfeldern (inneres und äußeres) regulieren
Zum Abschalten beider Kochfeldern den
Drehregler in die Position „0“ bringen 10.
Wenn die Bedienblende Ihres Backofens mit
Drehreglern Push (versenkbare Drehregler)
ausgestattet ist, ist zur Steuerung mit diesen
Drehreglern nötig:
x den Drehregler vorsichtig drücken und
loslassen.
Drehregler wird aus der Bedienblende
herauskommen.
Um den Drehregler wieder zu versenken:
x den Drehregler vorsichtig bis zum Anschlag
drücken und loslassen.
ɍɉɊȺȼɅȿɇɂȿ ɊȺȻɈɌɈɃ
ɇȺȽɊȿȼȺɌȿɅɖɇɕɏ ɉɈɅȿɃ
ɍɩɪɚɜɥɟɧɢɟ ɪɟɠɢɦɨɦ ɪɚɛɨɬɵ ɧɚɝɪɟɜɚɬɟɥɶɧɵɯ
ɩɨɥɟɣ ɨɫɭɳɟɫɬɜɥɹɟɬɫɹ ɩɨɜɨɪɨɬɨɦ ɪɭɱɟɤ 1, 2, 3
ɢ 4, ɭɫɬɚɧɨɜɥɟɧɧɵɯ ɧɚ ɩɚɧɟɥɢ ɭɩɪɚɜɥɟɧɢɹ
ɤɭɯɨɧɧɨɣ ɩɥɢɬɵ 5.
Ƚɪɚɮɢɱɟɫɤɢɟ ɨɛɨɡɧɚɱɟɧɢɹ, ɭɫɬɚɧɨɜɥɟɧɧɵɟ
ɪɹɞɨɦ ɫ ɪɭɱɤɚɦɢ ɭɩɪɚɜɥɟɧɢɹ ɧɚɝɪɟɜɚɬɟɥɶɧɵɦɢ
ɩɨɥɹɦɢ ɩɨɤɚɡɵɜɚɸɬ, ɤɚɤɢɦ ɧɚɝɪɟɜɚɬɟɥɶɧɵɦ
ɩɨɥɟɦ ɭɩɪɚɜɥɹɟɬ ɜɵɛɪɚɧɧɚɹ ɪɭɱɤɚ.
Ⱦɥɹ ɜɤɥɸɱɟɧɢɹ ɧɚɝɪɟɜɚɬɟɥɶɧɨɝɨ ɩɨɥɹ ɢɥɢ
ɪɟɝɭɥɢɪɨɜɤɢ ɦɨɳɧɨɫɬɢ ɧɚɝɪɟɜɚɬɟɥɶɧɨɝɨ ɩɨɥɹ
ɫɥɟɞɭɟɬ:
ȼ ɩɪɟɞɟɥɚɯ ɪɟɝɭɥɹɬɨɪɚ ɜɨɡɦɨɠɧɚ ɩɥɚɜɧɚɹ
ɪɟɝɭɥɢɪɨɜɤɚ ɤɨɥɢɱɟɫɬɜɚ ɬɟɩɥɚ ɧɚɝɪɟɜɚɬɟɥɶɧɨɝɨ
ɩɨɥɹ.
ɇɚɝɪɟɜɚɬɟɥɶɧɵɟ ɷɥɟɦɟɧɬɵ ɫ ɞɜɨɣɧɵɦ ɩɨɥɟɦ
ɭɩɪɚɜɥɹɸɬɫɹ ɩɪɢ ɩɨɦɨɳɢ ɪɟɝɭɥɹɬɨɪɚ ɫɨ
ɜɫɬɪɨɟɧɧɵɦ ɜɵɤɥɸɱɚɬɟɥɟɦ ɜɧɟɲɧɟɝɨ ɩɨɥɹ.
ȼ ɩɪɟɞɟɥɚɯ ɩɨɥɨɠɟɧɢɣ ɪɟɝɭɥɹɬɨɪɚ 8, ɜɨɡɦɨɠɧɚ
ɩɥɚɜɧɚɹ ɪɟɝɭɥɢɪɨɜɤɚ ɤɨɥɢɱɟɫɬɜɚ ɬɟɩɥɚ ɬɨɥɶɤɨ
ɜɧɭɬɪɟɧɧɟɝɨ ɩɨɥɹ.
Ⱦɥɹ ɜɤɥ
ɩɨɥɹ:
ɋ ɷɬɨɝɨ ɦɨɦɟɧɬɚ, ɜɨɡɦɨɠɧɚ ɩɥɚɜɧɚɹ
ɪɟɝɭɥɢɪɨɜɤɚ ɨɛɨɢɯ ɧɚɝɪɟɜɚɬɟɥɶɧɵɯ ɩɨɥɟɣ
(ɜɧɭɬɪɟɧɧɟɝɨ ɢ ɜɧɟɲɧɟɝɨ).
Ⱦɥɹ ɨɬɤɥɸɱɟɧɢɹ ɨɛɨɢɯ ɩɨɥɟɣ ɭɫɬɚɧɨɜɢɬɶ ɪɭɱɤɭ
ɜ ɩɨɥɨɠɟɧɢɢ „0“ 10.
ȿɫɥɢ ȼɚɲɚ ɞɭɯɨɜɤɚ ɨɛɨɪɭɞɨɜɚɧɚ ɪɭɱɤɚɦɢ Push
(ɭɬɨɩɥɟɧɵɦɢ ɜ ɩɚɧɟɥɢ), ɬɨ ɞɥɹ ɭɩɪɚɜɥɟ
ɷɬɢɦɢ ɪɭ
Ɋɭɱɤɚ ɜɵɣɞɟɬ ɢɡ ɩɚɧɟɥɢ.
Ⱦɥɹ ɬɨɝɨ ɱɬɨɛɵ ɜɧɨɜɶ ɭɬɨɩɢɬɶ ɪɭɱɤɭ:
x ɩɨɜɟɪɧɭɬɶ ɪɭɱɤɭ ɩɪɨɬɢɜ ɱɚɫɨɜɨɣ ɫ
6,
x ɭɫɬɚɧɨɜɢɬ
ɩɨɥɨɠɟɧɢɟ 7.
ɸɱɟɧɢɹ ɜɧɟ
x ɪɭɱɤɭ ɩɨɜɟɪɧɭɬɶ ɞɨ ɭɩɨɪɚ ɩɨ ɱɚɫɨɜɨɣ
ɫɬɪɟɥɤɟ 9 ɢ ɨɬɩɭɫɬɢɬɶ.
ɱɤɚɦɢ ɧɟɨɛɯɨɞɢɦɨ:
x ɨɫɬɨɪɨɠɧɨ ɧɚɠɚɬɶ ɧɚ ɪɭɱɤɭ ɢ ɨɬɩɭɫɬɢɬɶ
ɟɺ.
x ɨɫɬɨɪɨɠɧɨ ɧɚɠɚɬɶ ɧɚ ɪɭɱɤɭ ɞɨ ɭɩɨɪɚ ɢ
ɨɬɩɭɫɬɢɬɶ.
ɶ ɪɭɱɤɭ ɜ ɢɡɛɪɚɧɧɨɟ
ɲɧɟɝɨ ɧɚɝɪɟɜɚɬɟɥɶɧɨɝɨ
ɬɪɟɥɤɟ
ɧɢɹ
19
Page 20
EN
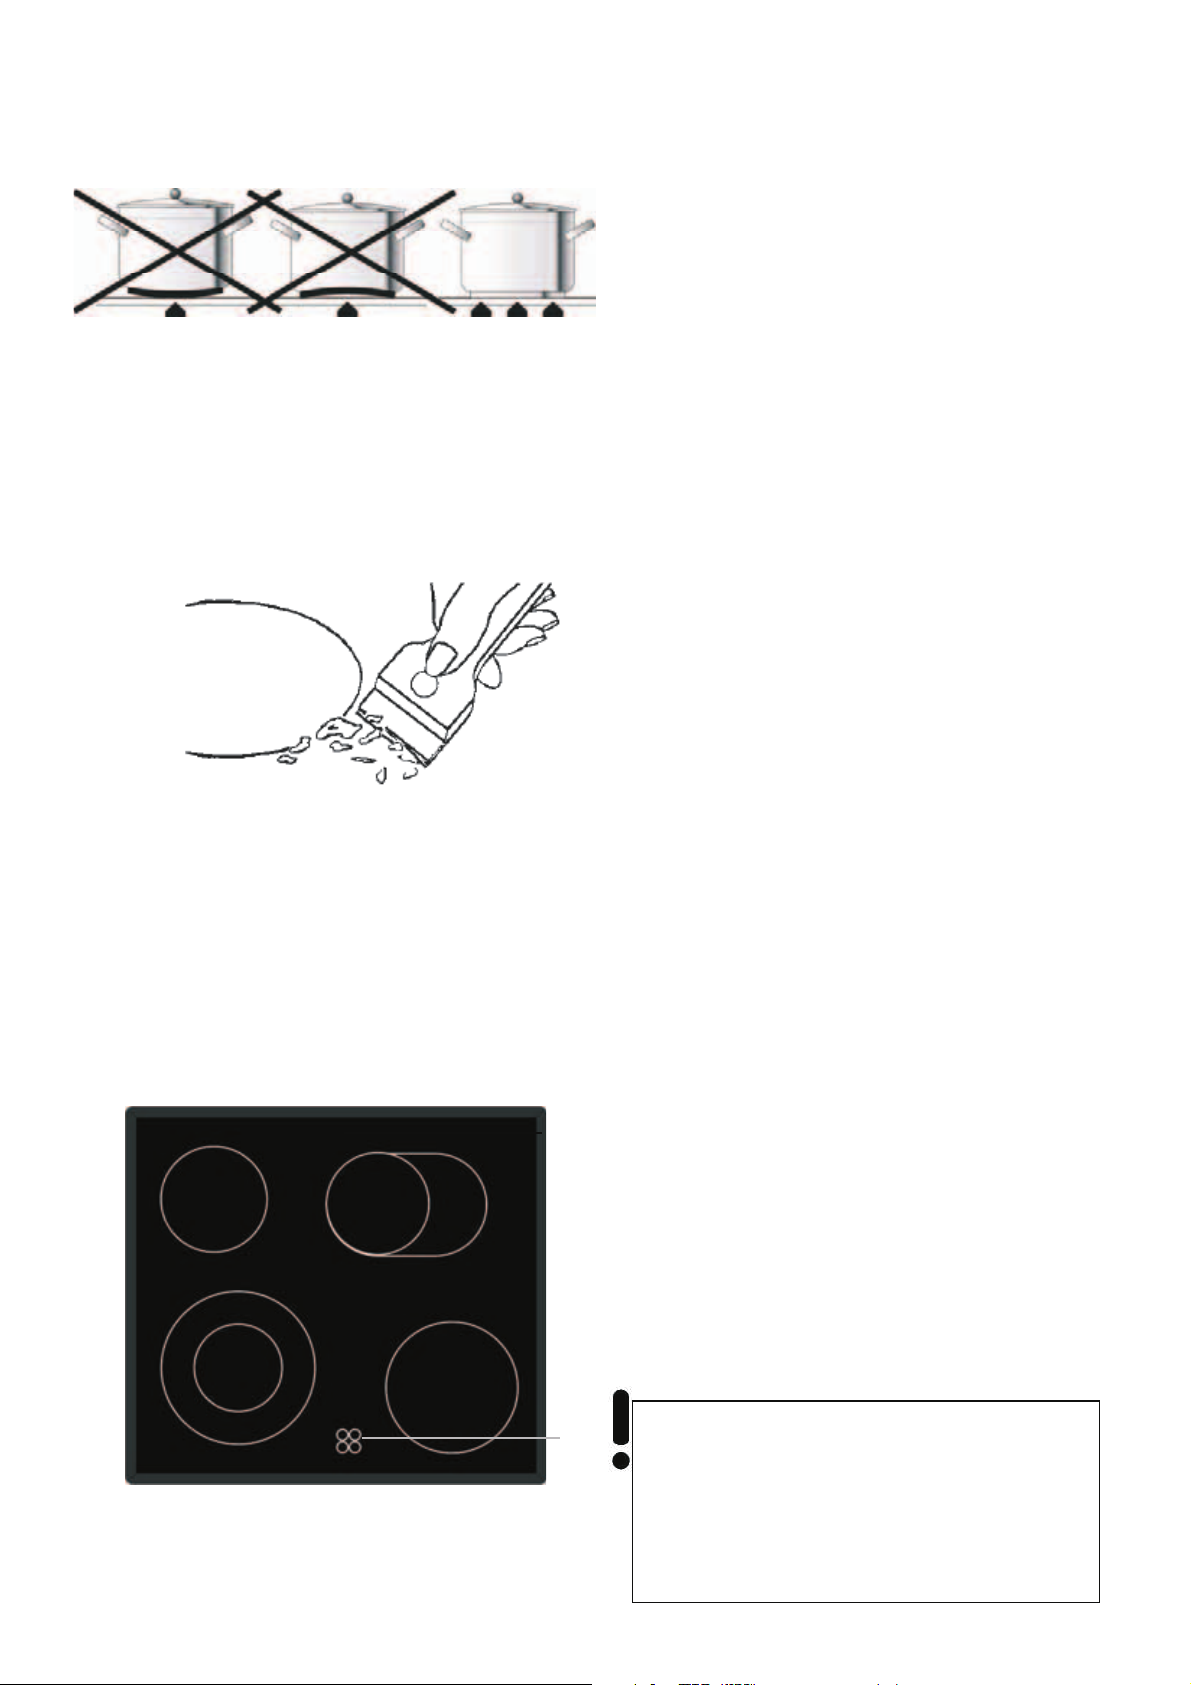
GLASS CERAMIC COOKING AREA
To provide efficient heating, please only use flat
bottom pans whose diameter is the same or
slightly bigger than that of the heating area.
Avoid overflows; reduce the heat supply as far as
the liquid begins to boil.
Don’t leave empty pots and pans on the heating
surface; be sure to switch off the cooking zone
after you have removed the receptacles from the
heating area.
In case of even a slight fracture on the cooking
surface, disconnect the electric power supply
immediately.
Maintenance
Ceramic cook field
First of all, remove stray food bits and grease
drops from the cooking surface with the help of the
special scraper. Clean the hot area thoroughly with
„Cera Clen“, „Eilfix“ or other similar products by
means of a paper towel. Rinse with water again
and dry with a clean cloth. To avoid any possible
damage to the surface, pieces of melted aluminium
foil or plastics, remains of sugar or highly
sacchariferous food have to be immediately
removed from the hot cooking area by means of
the special scraper.
For this purpose, the use of any abrasive sponges
or irritating chemical detergents such as oven
sprays or spot removers is not allowed.
Electric heating zone
Clean the heating zones only by means of a dry
cloth. Use standard washing-up liquids only. While
cleansing, occasionally add a drop of vegetable oil.
Residual heat indicator
As soon as the surface temperature of a cooking
zone exceeds 50 °C, the corresponding control
light 1 indicates the rest warmth and, thus, warns
of a possible skin-burn. After having switched off
the heating elements, you can still use the rest
warmth for about 5-10 min. to warm up food or
keep the cooked food warm.
20
1
Attention: Steam escape slits 2 in the rear
edge of the cooking field serve to let out the
steam from the oven. The slits must be
always kept free. Don’t touch with the hands
– ambustion danger!
Page 21

DE
GEBRAUCH VOM
GLASKERAMIKKOCHFELD
Für den Gebrauch der Kochzonen empfehlen sich
Töpfe mit geradem Boden und gleichem oder nur
wenig größerem Durchmesser.
Vermeiden Sie das Überlaufen von Flüssigkeiten,
indem Sie nach Erreichen des Siedepunktes oder
Erhitzen der Flüssigkeit die Wärmezufuhr
zurückschalten.
Lassen Sie die Kochzonen nicht ohne Topf oder
mit leeren Töpfen eingeschaltet.
Sobald ein Riss in der Oberfläche sichtbar wird,
ist das Gerät sofort vom Versorgungsnetz zu
trennen.
Instandhaltung
Glaskeramikkochfeld
Vor allem Essensreste und Fettspritzer von der
Kochoberfläche mit einem Schaber entfernen.
Danach die warme Fläche mit „Cera Clen“ ɢɥɢ
„Eilfix“ und Küchenpapier säubern, dann mit
Wasser abwaschen und einem sauberen Lappen
trocknen. Spuren von Aluminiumfolie,
Plastikgegenständen, Zucker oder stark
zuckerhaltigen Speisen müssen sofort von der
warmen Kochfläche mit einem Schaber entfernt
werden um mögliche Schäden der
Keramikoberfläche zu vermeiden.
Auf keinen Fall Schwämme oder Scheuerlappen
verwenden; den Gebrauch von aggressiven
chemischen Putzmitteln oder Fleckenreinigern
vermeiden.
Elektrokochplatten
Reinigen Sie Ihre Elektrokochplatten nur mit der
trocknen Serviette oder mit dem üblichen
Waschmittel.
Ab und zu kann man einen Tropfen Pflanzenöl
auftragen.
Restwärme-Anzeige
Solange eine Kochzone eine Oberflächentemperatur von mehr als 50 °C hat, leuchtet zur
Warnung die entsprechende Kontroll- Lampe 1 auf,
und warnt damit vor Verbrennungsgefahr. Man
kann diese Restwärme nach dem Ausschalten der
Wärmezufuhr noch eine begrenzte Zeit, ca. 5-10
Min. zum Warmhalten von Speisen nutzen.
Restwärmeanzeige funktioniert sowohl für normale
als auch für Zweikreis- Kochzonen.
ɉɈɅɖɁɈȼȺɇɂȿ ɄȿɊȺɆɂɑȿɋɄɈɃ
ɉɈȼȿɊɏɇɈɋɌɖɘ
Ɋɟɤɨɦɟɧɞɭɟɬɫɹ ɩɪɢɦɟɧɟɧɢɟ ɩɨɫɭɞɵ ɫ ɩɥɨɫɤɢɦ
ɞɧɨɦ ɢ ɪɚɡɦɟɪɨɦ ɨɞɢɧɚɤɨɜɵɦ ɢɥɢ ɥɢɲɶ
ɧɟɡɧɚɱɢɬɟɥɶɧɨ ɛɨɥɶɲɢɦ, ɱɟɦ ɫɚɦɨ
ɧɚɝɪɟɜɚɬɟɥɶɧɨɟ ɩɨɥɟ.
ɂɡɛɟɝɚɣɬɟ ɜɵɛɟɝɚɧɢɹ ɠɢɞɤɨɫɬɢ, ɭɦɟɧɶɲɚɹ ɩɨ
ɦɟɪɟ ɟɟ ɡɚɤɢɩɚɧɢɹ ɫɬɟɩɟɧɶ ɧɚɝɪɟɜɚ.
ɇɟ ɨɫɬɚɜɥɹɣɬɟ ɜɤɥɸɱɟɧɧɵɦ ɧɚɝɪɟɜɚɬɟɥɶɧɨɟ
ɩɨɥɟ ɛɟɡ ɩɨɫɭɞɵ ɢɥɢ ɫɨ ɫɬɨɹɳɟɣ ɧɚ ɧɟɦ ɩɭɫɬɨɣ
ɩɨɫɭɞɨɣ.
ȼ ɫɥɭɱɚɟ, ɟɫɥɢ ȼɵ ɡɚɦɟɬɢɬɟ ɞɚɠɟ
ɧɟɡɧɚɱɢɬɟɥɶɧɭɸ ɬɪɟɳɢɧɭ ɧɚ ɫɬɟɤɥɨɤɟɪɚɦɢɱɟɫ
ɨɬɤɥɸɱɢɬɟ ɩɥɢɬɭ ɨɬ ɷɥɟɤɬɪɨɫɟɬɢ.
ɍɯɨɞ
ɋɬɟɤɥɨ-ɤɟɪɚɦɢɱɟɫɤɢɟ ɩɨɜɟɪɯɧɨɫɬɢ
ɉɪɟɠɞɟ ɜɫɟɝɨ ɭɞɚɥɢɬɶ ɫ ɩɨɜɟɪɯɧɨɫɬɢ ɫɤɪɟɛɤɨɦ
ɨɫɬɚɬɤɢ ɩɢɳɢ ɢ ɤɚɩɥɢ ɠɢɪɚ, ɡɚɬɟɦ ɬɟɩɥɭɸ
ɩɨɜɟɪɯɧɨɫɬɶ ɨɱɢɫɬɢɬɶ ɫɚɥɮɟɬɤɨɣ ɫ
ɩɪɢɦɟɧɟɧɢɟɦ ɦɨɸɳɢɯ ɫɪɟɞɫɬɜ „Cera Clen“ ɢɥɢ
„Eilfix“, ɨɛɦɵɬɶ ɱɢɫɬɨɣ ɜɨɞɨɣ ɢ ɩɪɨɬɟɪɟɬɶ ɧɚɫɭɯɨ
ɱɢɫɬɨɣ ɦɹɝɤɨɣ ɬɪɹɩɤɨɣ.
ɋɥɟɞɵ ɚɥɸɦɢɧɢɟɜɨɣ ɮɨɥɶɝɢ, ɩɥɚɫɬɢɤɚ, ɫɚɯɚɪɚ
ɢɥɢ ɫɚɯɚɪɨɫɨɞɟɪɠɚɳɟɣ ɩɢɳɢ ɞɨɥɠɧɵ ɛɵɬ
ɧɟɦɟɞɥɟɧɧɨ ɭɞɚɥɟɧɵ ɫɤɪɟɛɤɨɦ ɫ ɟɳɺ ɬɺɩɥɨɣ
ɩɨɜɟɪɯɧɨɫɬ
ɩɨɜɪɟɠɞɟɧɢɣ ɩɨɜɟɪɯɧɨɫɬɢ.
ɇɢ ɜ ɤɨɟɦ ɫɥɭɱɚɟ ɧɟ ɢɫɩɨɥɶɡɭɣɬɟ ɞɥɹ ɷɬɢɯ
ɰɟɥɟɣ ɦɨɱɚɥɤɢ ɢɥɢ ɝɪɭɛɵɟ ɬɪɹɩɤɢ. ɂɡɛɟɝɚɣɬɟ
ɩɪɢɦɟɧɟɧɢɹ ɯɢɦɢɱɟɫɤɢ ɚɤɬɢɜɧɵɯ ɱɢɫɬɹɳɢɯ
ɫɪɟɞɫɬɜ ɤɚɤ, ɧɚɩɪɢɦɟɪ, ɩɹɬɧɨɭɞɚɥɢɬɟɥɶ.
ɗɥɟɤɬɪɢɱɟɫɤɢɟ ɧɚɝɪɟɜɚɬɟɥɶɧɵɟ ɷɥɟɦɟɧɬɵ
ɉɪɨɢɡɜɨɞɢɬɟ ɱɢɫɬɤɭ ɧɚɝɪɟɜɚɬɟɥɶɧɵɯ ɷɥɟɦɟɧɬɨɜ
ɜɫɟɝɞɚ ɬɨɥɶɤɨ ɫɭɯɨɣ ɫɚɥɮɟɬɤɨɣ ɢɥɢ
ɫɬɚɧɞɚɪɬɧɵɦ ɫɪɟɞɫɬɜɨ
ɩɟɪɢɨɞɢɱɟɫ
ɦɚɫɥɚ.
ɂɧɞɢɤɚɬɨɪ ɧɚɝɪɟɜɚ ɩɨɥɹ
Ⱦɨ ɬɟɯ ɩɨɪ ɩɨɤɚ ɧɚɝɪɟɜɚɬɟɥɶɧɨɟ ɩɨɥɟ ɢɦɟɟɬ
ɬɟɦɩɟɪɚɬɭɪɭ ɛɨɥɶɲɟ ɱɟɦ 50 °C, ɫɜɟɬɢɬɫɹ
ɢɧɞɢɤɚɬɨɪ 1 ɫɨɨɬɜɟɬɫɬɜɭɸɳɟɝɨ ɩɨɥɹ, ɢ
ɩɪɟɞɨɫɬɟɪɟɝɚɟɬ ɜɦɟɫɬɟ ɫ ɬɟɦ ɨɬ ɨɩɚɫɧɨɫɬɢ
ɨɠɟɝɚ. ɉɨɫɥɟ ɨɬɤɥɸɱɟɧɢɹ ɪɚɡɨɝɪɟɜɚ ɦɨɠɧɨ
ɢɫɩɨɥɶɡɨɜɚɬɶ ɨɫɬɚɬɨɱɧɨɟ ɬɟɩɥɨ ɟɳɟ ɩɪɢɦɟɪɧɨ
5-10 ɦɢɧ. ɧɚɩɪ. ɞɥɹ ɪɚɡɨɝɪɟɜɚ ɢɥɢ ɩɨɞɞɟɪɠɤɢ ɜ
ɬɟɩɥɨɦ ɫɨɫɬɨɹɧɢɢ ɛɥ
ɞɟɣɫɬɜɭɟɬ ɜ ɪɚɜɧɨɣ ɫɬɟɩɟɧɢ ɧɚ ɜɫɟ ɧɨɪɦɚɥɶɧɵɟ
ɢ ɪɚɫɲɢɪɟɧɧɵɟ ɩɨɥɹ.
RU
ɤɨɣ ɩɨɜɟɪɯɧɨɫ
ɢ, ɱɬɨɛɵ ɢɡɛɟɠɚɬɶ ɜɨɡɦɨɠɧɵɯ
ɦ ɩɨ ɭɯɨɞɭ. Ɍɚɤɠɟ ɦɨɠɧɨ
ɤɢ ɧɚɧɨɫɢɬɶ ɤɚɩɥɸ ɪɚɫɬɢɬɟɥɶɧɨɝɨ
ɸ
ɞ. ɂɧɞɢɤɚɬɨɪ ɧɚɝɪɟɜɚ
ɬɢ, ɬɨɬɱɚɫ
ɶ
Achtung: Durch die Dampfaustritts-Schlitze
2 an der Hinterkante des Kochfeldes
entweicht der Dampf, der im Backraum
entsteht. Diese Schlitze müssen immer frei
gehalten werden. Halten Sie die Hände
davon fern – Verbrennungsgefahr!
ȼɧɢɦɚɧɢɟ: ɑɟɪɟɡ ɳɟɥɢ ɞɥɹ ɜɵɯɨɞɚ ɩɚɪɚ
2 ɧɚ ɡɚɞɧɟɣ ɤɪɨɦɤɟ ɜɚɪɨɱɧɨɣ
ɩɨɜɟɪɯɧɨɫɬɢ ɜɵɯɨɞɢɬ ɩɚɪ, ɤɨɬɨɪɵɣ
ɜɨɡɧɢɤɚɟɬ ɜ ɞɭɯɨɜɨɦ ɲɤɚɮɭ. ɗɬɢ ɳɟɥɢ
ɜɫɟɝɞɚ ɞɨɥɠɧɵ ɛɵɬɶ ɫɜɨɛɨɞɧɵɦɢ. ɇɟ
ɩɪɢɛɥɢɠɚɣɬɟɫɶ ɪɭɤɚɦɢ – ɨɩɚɫɧɨɫɬɶ
ɨɠɟɝɚ!
21
Page 22
EN
3 4
21
5
1
2
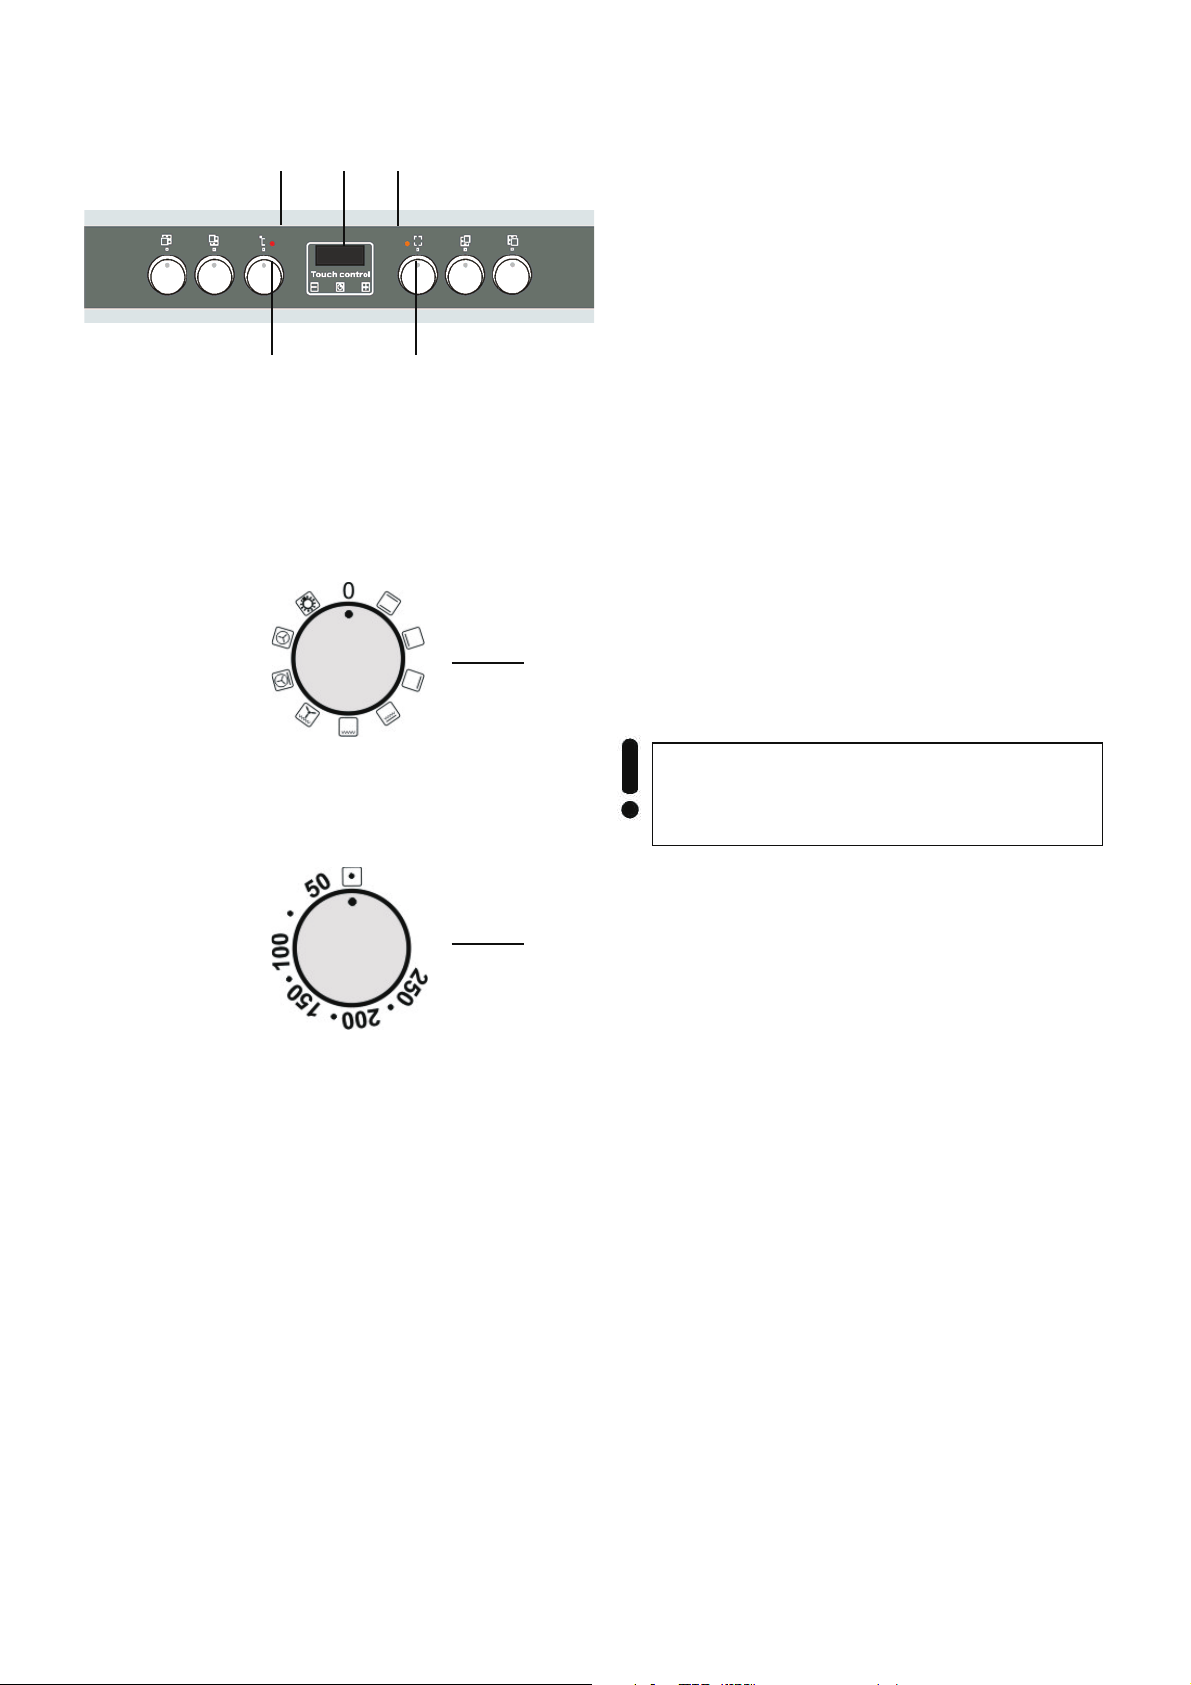
MULTIFUNKTION OVEN CONTROL
Oven operation functions are controlled by the
knob 1 operation mode and knob 2
temperature controls set up on the control panel.
The graphic symbols on the knobes indicate the
selected operation modes.
To switch off the oven, set up the knob 2
operating mode and the knob 1 temperature
control in position „0“.
For more comfort, you can use the electronic
programmable control 4, which enables to run
the oven in automatical, half automatical or
manual cycle.
Important! The activation of the oven is
indicated by yellow 3 and red 5 control
lights.
After the selected oven temperature has been
achieved, the red control light goes out.
If it is necessary to put the dish into a pre-heated
oven, do it after the red control light has gone out.
The red control light can also be on if the knob is
set in the position to illuminate the oven. In this
position, however, the heating element of the oven
is off.
If the control panel of your oven is equipped with
sunk knobes Push, to control the heat supply:
x Push the knob slightly and let it go
The knob will come out of the control panel.
To countersink the knob:
x Push the knob as far as it will go and let it
* for models with control electronic programmable control
and programmer
go.
22
Page 23

DE RU
STEUERUNG VON MULTIFUNKTIONSBACKOFEN
Backofenbetriebsfunktionen werden durch Drehen
von Drehregler Betriebsart 1 und Drehregler
Temperaturregler 2 auf der Bedienblende
gesteuert.
Die graphischen Symbole neben den Drehreglern
zeigen die gewählten Backofenbetriebarten.
Zum Abschalten des Backofens Drehregler
Betriebsart 2 und Drehregler
Temperaturregler 1 in die Position „0“ bringen.
Für mehr Komfort können Sie die Elektronische
Programmierung* 4 benutzen, die ermöglicht
den Backofen im automatischen,
halbautomatischen und manuellen Zyklus zu
betreiben.
Wichtig! Die Einschaltung vom Backofen
wird durch Aufleuchten von gelben 3 und
roten 5 Kontrolllampen signalisiert.
Wenn die rote Kontrollleuchte erlischt, signalisiert
es, dass die voreingestellte Backofentemperatur
erreicht worden ist.
Wenn ein Kochrezept empfiehlt, die Speise in den
vorgewärmten Backofen hineinzulegen, so ist es
nach dem Erlöschen der roten Kontrollleuchte zu
tun.
Die rote Kontrollleuchte kann auch bei der
Einstellung des Drehreglers in der Position
Innenbeleuchtung des Backofens leuchten,
jedoch sind die Heizkörper bei dieser
Drehreglerposition immer ausgeschaltet.
Wenn die Bedienblende Ihres Backofens mit
Drehreglern Push (versenkbare Drehregler)
ausgestattet ist, ist zur Steuerung mit diesen
Drehreglern nötig:
x den Drehregler vorsichtig drücken und
loslassen.
Drehregler wird aus der Bedienblende
herauskommen.
Um den Drehregler wieder zu versenken,:
ɍɉɊȺȼɅȿɇɂȿ ɊȺȻɈɌɈɃ
ɆɇɈȽɈɎɍɇɄɐɂɈɇȺɅɖɇɈȽɈ ȾɍɏɈȼɈȽɈ
ɒɄȺɎȺ
ɍɩɪɚɜɥɟɧɢɟ ɪɟɠɢɦɨɦ ɪɚɛɨɬɵ ɞɭɯɨɜɨɝɨ ɲɤɚɮɚ
ɨɫɭɳɟɫɬɜɥɹɟɬɫɹ ɩɨɜɨɪɨɬɨɦ ɪɭɱɟɤ ɜɵɛɨɪɚ
ɪɟɠɢɦɚ ɪɚɛɨɬɵ 1 ɢ ɬɟɪɦɨɪɟɝɭɥɹɬɨɪɚ 2
ɞɭɯɨɜɤɢ, ɭɫɬɚɧɨɜɥɟɧɧɵɯ ɧɚ ɩɚɧɟɥɢ ɭɩɪɚɜɥɟɧɢɹ
ɞɭɯɨɜɨɝɨ ɲɤɚɮɚ.
Ƚɪɚɮɢɱɟɫɤɢɟ ɨɛɨɡɧɚɱɟɧɢɹ ɭɫɬɚɧɨɜɥɟɧɧɵɟ
ɪɹɞɨɦ ɫ ɪɭɱɤɚɦɢ ɭɩɪɚɜɥɟɧɢɹ ɩɨɤɚɡɵɜɚɸɬ
ɜɵɛɪɚɧɧɵɟ ɩɚɪɚɦɟɬɪɵ ɪɚɛɨɬɵ ɞɭɯɨɜɤɢ.
Ⱦɥɹ ɨɬɤɥɸɱɟɧɢɹ ɞɭɯɨɜɤɢ ɭɫɬɚɧɨɜɢɬɶ ɪɭɱɤɢ
ɜɵɛɨɪɚ ɪɟɠɢɦɚ ɪɚɛɨɬɵ 2 ɢ ɬɟɪɦɨɪɟɝɭɥɹɬɨɪɚ
1 ɜ ɩɨɥɨɠɟɧɢɢ „0“.
Ⱦɥɹ ɛɨɥɶɲɟɝɨ ɤɨɦɮɨɪɬɚ ȼɵ ɬɚɤɠɟ ɦɨɠɟɬɟ
ɢɫɩɨɥɶɡɨɜɚɬɶ ɷɥɟɤɬɪɨɧɧɨɟ ɩɪɨɝɪɚɦɦɢɪɭɸɳɟɟ
ɭɫɬɪɨɣɫɬɜɨ* 4, ɞɚɸɳɟɟ ɜɨɡɦɨɠɧɨɫɬɶ
ɭɩɪɚɜɥɹɬɶ ɪɚɛɨɬɨɣ ɞɭɯɨɜɤɢ ɜ ɚɜɬɨɦɚɬɢɱɟɫɤɨɦ,
ɩɨɥɭɚɜɬɨɦɚɬɢɱɟɫɤɨɦ ɢ ɪɭɱɧɨɦ ɪɟɠɢɦɚɯ.
ɉɨɫɥɟ ɬɨɝɨ ɤɚɤ ȼɚɲɚ ɞɭɯɨ
ɭɫɬɚɧɨɜɥɟɧɧɨɣ ɬɟɦɩɟɪɚɬɭɪɵ ɤɪɚɫɧɚɹ ɥɚɦɩɚ
ɩɨɝɚɫɧɟɬ.
ȿɫɥɢ ɤɭɥɢɧɚɪɧɵɟ ɪɟɰɟɩɬɵ ɪɟɤɨɦɟɧɞɭɸɬ ɫɬɚɜɢɬɶ
ɛɥɸɞɨ ɜ ɩɪɨɝɪɟɬɭɸ ɞɭɯɨɜɤɭ, ɞɟɥɚɣɬɟ ɷɬɨ ɩɨɫɥɟ
ɜɵɤɥɸɱɟɧɢɹ ɤɪɚɫɧɨɣ ɤɨɧɬɪɨɥɶɧɨɣ ɥɚɦɩɵ.
Ʉɨɧɬɪɨɥɶɧɚɹ ɥɚɦɩɚ ɦɨɠɟɬ ɬɚɤɠɟ ɫɜɟɬɢɬɶɫɹ ɜ
ɩɨɥɨɠɟɧɢɢ ɪɭɱɤɢ Ɉɫɜɟɳɟɧɢɟ ɞɭɯɨɜɨɝɨ
ɲɤɚɮɚ, ɧɨ ɜ ɷɬɨɦ ɩɨɥɨɠɟɧɢɢ ɧɚɝɪɟɜɚɬɟɥɶɧɵɟ
ɷɥɟɦɟɧɬɵ ɜɫɟɝɞɚ ɜɵɤɥɸɱɟɧɵ.
ȿɫɥɢ ȼɚɲɚ ɞɭɯɨɜɤɚ ɨɛɨɪɭɞɨɜɚɧɚ ɪɭɱɤɚɦɢ Push
(ɭɬɨɩɥɟɧɵɦ
ɷɬɢɦɢ ɪɭ
Ɋɭɱɤɚ ɜɵɣɞɟɬ ɢɡ ɩɚɧɟɥɢ.
Ⱦɥɹ ɬɨɝɨ ɱɬɨɛɵ ɜɧɨɜɶ ɭɬɨɩɢɬɶ ɪɭɱɤɭ:
x den Drehregler vorsichtig bis zum
Anschlag drücken und loslassen.
* für Modelle mit elektronischerProgrammierung
*
ɞɥɹ ɦɨɞɟɥɟɣ ɫ ɷɥɟɤɬɪɨɧɧɵɦ ɩɪɨɝɪɚɦɦɚɬɨɪɨɦ
ȼɚɠɧɨ! ȼɤɥɸɱɟɧɢɟ ɞɭɯɨɜɤɢ
ɫɢɝɧɚɥɢɡɢɪɭɟɬɫɹ ɜɤɥɸɱɟɧɢɟɦ ɤɨɧɬɪɨɥɶɧɵɯ
ɥɚɦɩ ɠɟɥɬɨɝɨ 3 ɢ ɤɪɚɫɧɨɝɨ 5 ɰɜɟɬɨɜ.
ɜɤɚ ɞɨɫɬɢɝɧɟɬ
ɢ ɜ ɩɚɧɟɥɢ), ɬɨ ɞɥɹ ɭɩɪɚɜɥɟɧɢɹ
ɱɤɚɦɢ ɧɟɨɛɯɨɞɢɦɨ:
x ɨɫɬɨɪɨɠɧɨ ɧɚɠɚɬɶ ɧɚ ɪɭɱɤɭ ɢ ɨɬɩɭɫɬɢɬɶ
ɟɺ.
x ɨɫɬɨɪɨɠɧɨ ɧɚɠɚɬɶ ɧɚ ɪɭɱɤɭ ɞɨ ɭɩɨɪɚ ɢ
ɨɬɩɭɫɬɢɬɶ.
23
Page 24
EN
OPERATION FUNCTIONS OF THE OVEN
CONVENTIONAL COOKING
A classical system in which top and bottom heat
are used to cook a single dish.
Place the food in the oven only after the cooking
temperature has been reached, i.e. when the
heating indicator goes out.
If you want to increase top or bottom temperature
towards the end of the cooking cycle, set the
temperature control to the right position. It is
advisable to open the oven door as little as
possible during cooking.
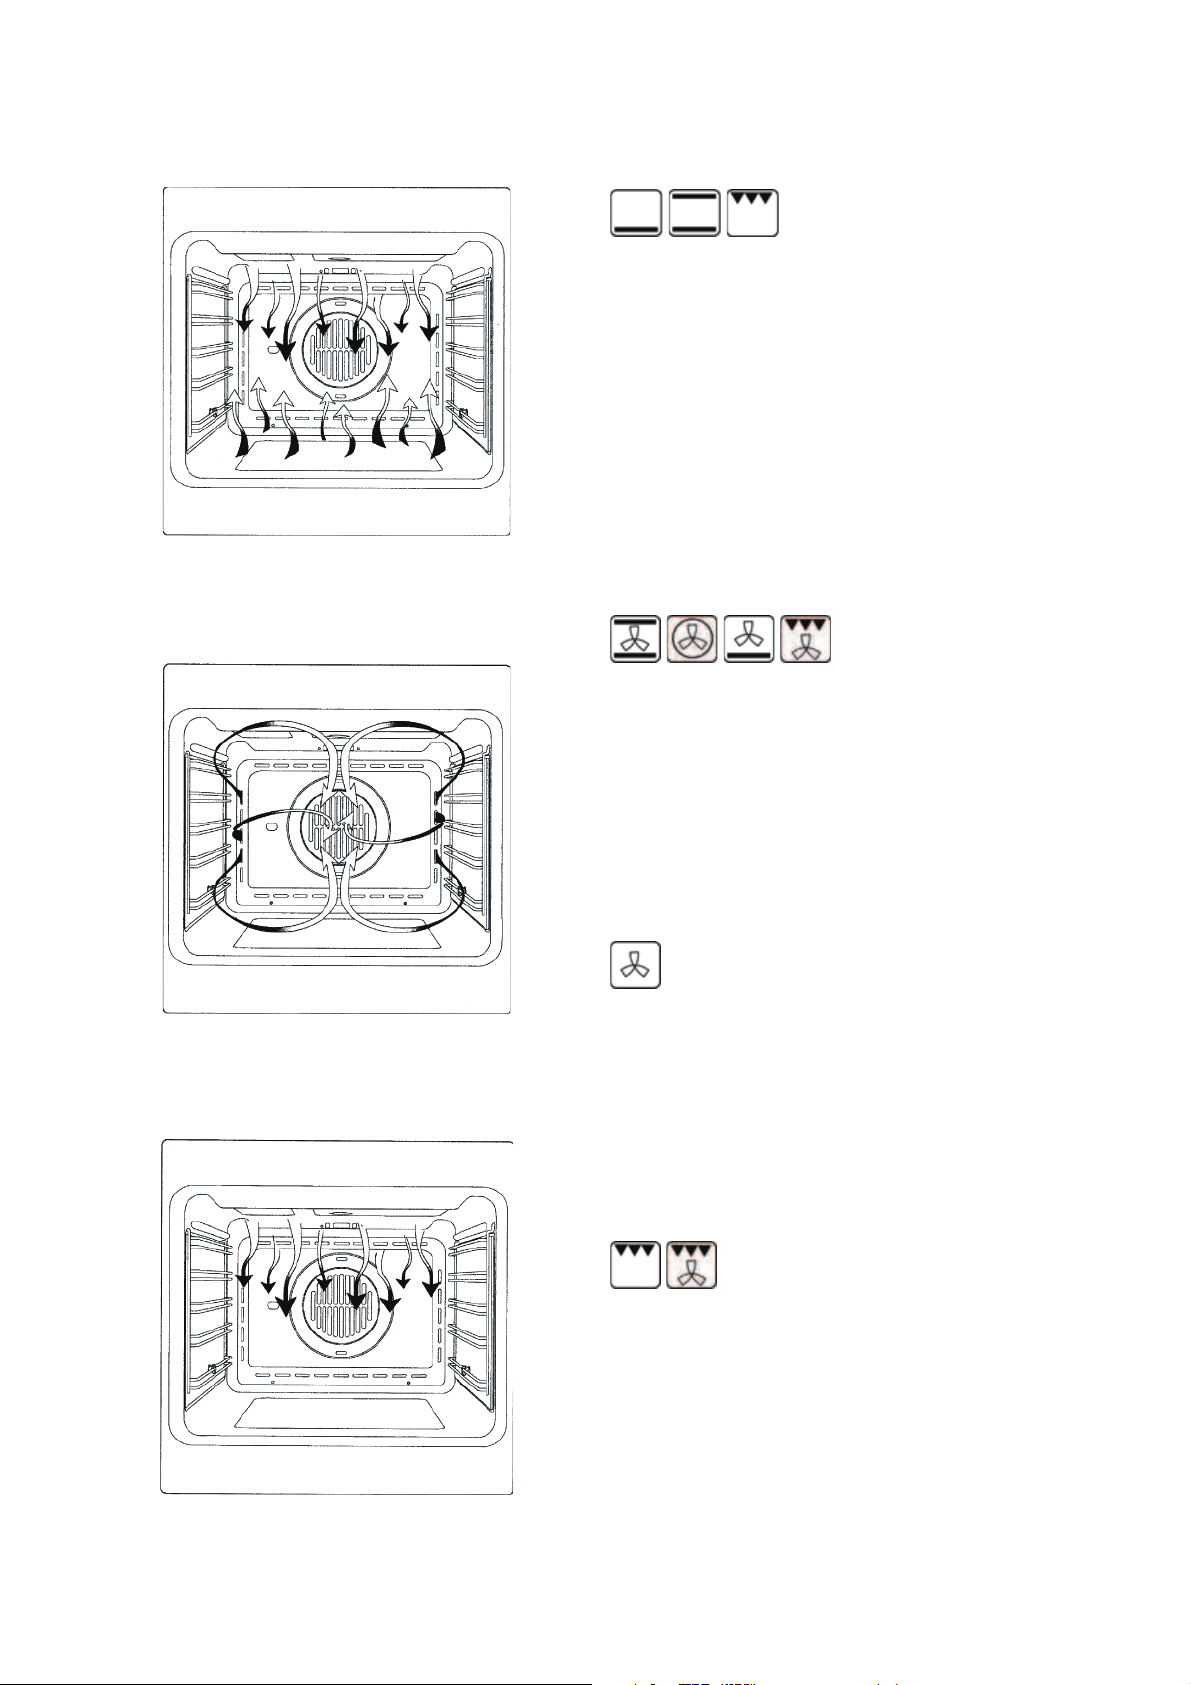
FAN COOKING
For this type of cooking, a fan fixed at the back
ensures the circulation of hot air inside the oven,
thus, creating uniform heat. In this way, cooking
time is much shorter than usually. This method is
perfect for cooking dishes on more than one shelf,
especially if the food is of different kind (fish, meat
etc.)
DEFROSTING
By selecting one of the fan cooking functions and
setting the temperature control at zero, the fan
enables cold air to circulate inside the oven. In this
way, frozen food can be rapidly defrosted.
Usually, it is not necessary to pre-heat the oven,
but we recommend doing so when cooking
pastries.
GRILL COOKING
This function is used to grill or brown food.
Place the shelf with the food to be cooked at the
1st or 2nd level from the top.
Pre-heat the oven for 5 minutes. Set the
temperature control at a temperature between
50°C and 200°C.
24
Page 25
DE RU
BETRIEBSFUNKTIONEN DES BACKOFENS
KONVENTIONELLES BACKEN
ɊȺȻɈɑɂȿ ɎɍɇɄɐɂɂ ȾɍɏɈȼɈȽɈ ɒɄȺɎȺ
ɈȻɕɑɇɈȿ ɉɊɂȽɈɌɈȼɅȿɇɂȿ
Ein klassisches System, bei dem Unter- oder
Oberhitze verwendet wird, welches für die
Zubereitung nur eines Gerichts geeignet ist.
Die Speisen sollten möglichst erst dann
eingeschoben werden, wenn der Backofen bereits
die vorgegebene Temperatur erreicht hat, d. h.
nach Erlöschen der Kontrolllampe.
Wenn die Unter- oder Oberhitze gegen Ende des
Backvorgangs erhöht werden muss, ist der
Schalter in die jeweilige gewünschte Position zu
bringen. Während des Backvorgangs sollte die
Backofentür möglichst wenig geöffnet werden.
BACKEN MIT UMLUFT
Ʉɥɚɫɫɢɱɟɫɤɚɹ ɫɢɫɬɟɦɚ, ɩɪɢ ɤɨɬɨɪɨɣ
ɩɪɢɦɟɧɹɟɬɫɹ ɜɟɪɯɧɢɣ ɢɥɢ ɧɢɠɧɢɣ ɧɚɝɪɟɜ,
ɩɪɢɝɨɞɧɚ ɞɥɹ ɩɪɢɝɨɬɨɜɥɟɧɢɹ ɬɨɥɶɤɨ ɨɞɧɨɝɨ
ɛɥɸɞɚ. Ȼɥɸɞɚ ɞɨɥɠɧɵ ɩɨɦɟɳɚɬɶɫɹ ɜ ɞɭɯɨɜɤɭ,
ɩɨ ɜɨɡɦɨɠɧɨɫɬɢ, ɥɢɲɶ ɩɨɫɥɟ ɞɨɫɬɢɠɟɧɢɹ
ɡɚɞɚɧɧɨɣ ɬɟɦɩɟɪɚɬɭɪɵ, ɬ.ɟ. ɤɨɝɞɚ ɩɨɝɚɫɧɟɬ
ɤɨɧɬɪɨɥɶɧɚɹ ɥɚɦɩɨɱɤɚ.
ȿɫɥɢ ɤ ɤɨɧɰɭ ɩɪɨɰɟɫɫɚ ɩɪɢɝɨɬɨɜɥɟɧɢɹ ɛɥɸɞɚ
ȼɵ ɠɟɥɚɟɬɟ ɩɨɜɵɫɢɬɶ ɬɟɦɩɟɪɚɬɭɪɭ ɜɟɪɯɧɟɝɨ
ɢɥɢ ɧɢɠɧɟɝɨ ɧɚɝɪɟɜɚɬɟɥɹ, ɭɫɬɚɧɨɜɢɬɟ
ɩɟɪɟɤɥɸɱɚɬɟɥɶ ɧɚ ɫɨɨɬɜɟɬɫɬɜɭɸɳɭɸ ɠɟɥɚɟɦ
ɮɭɧɤɰɢɸ. ȼ ɬɟɱɟɧɢɟ ɜɵɩɟɤɚɧɢɹ ɞ
ɪɟɤɨɦɟɧɞɭɟɬɫɹ ɨɬɤɪɵɜɚɬɶ ɤɚɤ ɦɨɠɧɨ ɪɟɠɟ.
ɉɊɂȽɈɌɈȼɅȿɇɂȿ ɋ ɈȻȾɍȼɈɆ
Bei dieser Backofenfunktion bringt der Ventilator,
der sich im hinteren Backofenteil befindet, heiße
Umluft in den Backofen und verteilt diese
gleichmäßig, wobei die Zubereitungszeit geringer
als beim konventionellen Backen ist. Diese
Methode eignet sich zum Garen auf mehreren
Einschubhöhen, auch von Speisen
unterschiedlicher Art (Fisch, Fleisch usw.).
AUFTAUEN
ɉɪɢ ɷɬɨɦ ɪɟɠɢɦɟ ɩɪɢɝɨɬɨɜɥɟɧɢɹ, ɧɚɯɨɞɹɳɢɣɫɹ
ɜ ɞɚɥɶɧɟɣ ɱɚɫɬɢ ɞɭɯɨɜɤɢ ɜɟɧɬɢɥɹɬɨɪ,
ɨɫɭɳɟɫɬɜɥɹɟɬ ɰɢɪɤɭɥɹɰɢɸ ɝɨɪɹɱɟɝɨ ɜɨɡɞɭɯɚ,
ɪɚɜɧɨɦɟɪɧɨ ɟɝɨ ɪɚɫɩɪɟɞɟɥɹɹ, ɬɟɦ ɫɚɦɵɦ
ɫɨɤɪɚɳɚɹ ɜɪɟɦɹ ɩɪɢɝɨɬɨɜɥɟɧɢɹ ɩɨ ɫɪɚɜɧɟɧɢɸ ɫ
ɨɛɵɱɧɵɦ ɩɪɢɝɨɬɨɜɥɟɧɢɟɦ. ɗɬɨɬ ɦɟɬɨɞ
ɩɨɞɯɨɞɢɬ ɞɥɹ ɨɞɧɨɜɪɟɦɟɧɧɨɝɨ ɩɪɢɝɨɬɨɜɥɟɧɢɹ
ɪɚɡɧɵɯ ɜɢɞɨɜ ɛɥɸɞ (ɪɵɛɚ, ɦɹɫɨ ɢ ɬ.ɞ.) ɩɪɢ
ɪɚɡɧɵɯ ɜɵɫɨɬɚɯ ɩɨɥɨɠɟɧɢɹ ɩɪɨɬɢɜɧɹ.
ɈɌɌȺɂȼȺɇɂȿ
ɭɸ
ɜɟɪɰɭ ɞɭɯɨɜɤɢ
Falls eine der Umluftfunktionen ausgewählt und der
Temperaturregler auf Null gestellt wird, führt der
Ventilator Kaltluft in den Backofen und fördert das
schnelle Auftauen der Tiefkühlkost.
Ein Vorheizen des Backofens ist eigentlich nicht
notwendig, aber für Patisserie dennoch
empfehlenswert.
GRILLEN
Diese Funktionen werden zum Grillen oder
Bräunen von Speisen benutzt.
Der Rost mit der Speise wird in der 1. oder 2.
Schiene von oben eingeschoben.
Den Backofen 5 Minuten vorheizen. Den
Drehregler Temperaturregler auf Temperaturen
von 50°C bis 200°C einstellen.
ɉɪɢ ɜɤɥɸɱɟɧɧɨɦ ɨɛɞɭɜɟ ɢ ɭɫɬɚɧɨɜɥɟɧɧɨɦ ɧɚ
ɧɨɥɶ Ɍɟɪɦɨɪɟɝɭɥɹɬɨɪɟ, ɜɟɧɬɢɥɹɬɨɪ
ɨɫɭɳɟɫɬɜɥɹɟɬ ɰɢɪɤɭɥɹɰɢɸ ɯɨɥɨɞɧɨɝɨ ɜɨɡɞɭɯɚ,
ɨɛɟɫɩɟɱɢɜɚɹ ɬɟɦ ɫɚɦɵɦ ɛɵɫɬɪɨɟ ɨɬɬɚɢɜɚɧɢɟ
ɡɚɦɨɪɨɠɟɧɧɵɯ ɩɪɨɞɭɤɬɨɜ.
ɉɪɟɞɜɚɪɢɬɟɥɶɧɵɣ ɩɪɨɝɪɟɜ ɞɭɯɨɜɤɢ
ɧɟɨɛɹɡɚɬɟɥɟɧ, ɨɞɧɚɤɨ ɩɪɢ ɜɵɩɟɱɤɟ
ɤɨɧɞɢɬɟɪɫɤɢɯ ɢɡɞɟɥɢɣ ɪɟɤɨɦɟɧɞɨɜɚɧ.
ȽɊɂɅɖ
ɗɬɨɬ ɪɟɠɢɦ ɢɫɩɨɥɶɡɭɟɬɫɹ ɞɥɹ ɩɪɢɝɨɬɨɜɥɟɧɢɹ ɧɚ
ɝɪɢɥɟ ɢɥɢ ɩɨɞɪɭɦɹɧɢɜɚɧɢɹ ɛɥɸɞ.
Ɋɟɲɟɬɤɚ ɫ ɩɪɢɝɨɬɚɜɥɢɜɚɟɦɵɦ ɛɥɸɞɨɦ
ɭɫɬɚɧɚɜɥɢɜɚɟɬɫɹ ɧɚ 1-ɣ ɢɥɢ 2-ɣ ɭɪɨɜɟɧɶ ɫɜɟɪɯɭ.
ɉɪɨɝɪɟɬɶ ɞɭɯɨɜɤɭ ɜ ɬɟɱɟɧɢɟ 5 ɦɢɧɭɬ. Ɋɭɱɤɭ
Ɍɟɪɦɨɪɟɝɭɥɹɬɨɪɚ ɭɫɬɚɧɨɜɢɬɶ ɧɚ ɬɟɦɩɟɪɚɬɭɪɭ
ɨɬ 50°C ɞɨ 200°C.
25
Page 26

EN
SPIT
Some ovens are completely equipped with stick
engine and rotary spit* for spit roast. The spit*
allows to roast food in the oven rotary. It serves
primarily for roasting barbeque, fowl, sausages
and similar dishes. Switching the spit on and off
occurs simultaneously with switching on and off of
the Grill functions or .
No separate control knob is assigned to the
spit on the control panel.
COOLING FAN
The cooling fan* is positioned in the upper part of
the oven and serves to cool the inside surfaces of
the furniture as well as the oven door. It switches
on automatically as soon as the temperature of
the outer surface of the oven exceeds 60°C.
If you set up the oven temperature at 200°C, the
fan starts in 10 min.
It switches off automatically after the temperature
of the outer surface of the oven has fallen below
60°C.
After the oven heated up to 200°C has been
switched off, the fan stops in approx. 30 min
The mechanical Timer does not control the oven
operation and only serves as a signal device
which indicates the end of the operating function.
OVEN LIGHT
The oven is equipped with oven light. The oven
light is on as long as the oven is switched on. If
you want to check up the food after having cooked
it, set the knob 2 oven operating mode in the
light position.
* - if available
.
26
Page 27

DE RU
DREHESPIESS
Einige Backöfen sind komplett mit Stabmotor und
Drehspieß* für Spießbraten ausgestattet.
Der Spieß* erlaubt es, Speisen im Backofen
rotierend zu rösten. Er dient hauptsächlich zum
Rösten von Schaschliks, Geflügel, Würstchen u.ä.
Speisen. Die Ein- und Ausschaltung vom
Spießantrieb erfolgt gleichzeitig mit der Ein- und
Ausschaltung von Grillfunktionen oder .
Dem Spieß ist kein separater Drehregler an der
Bedienblende zugeordnet.
KÜHLVENTILATOR
Der Kühlventilator* befindet sich auf der oberen
Seite des Backofens und dient zur Kühlung
sowohl der Einbaumöbel als auch der
Backofentüre. Der Ventilator schaltet sich
selbsttätig ein, wenn das äußere Gehäuse des
Backofens eine Temperatur von 60°C
überschreitet.
Wird der Backofen z.B. auf 200°C eingestellt,
schaltet sich die Kühlung nach etwa 10 Min ein.
Der Ventilator schaltet sich selbsttätig aus,
wenn das äußere G ehäu se de s Bac kofe ns ei ne
Te m p er a t u r v o n 60°C unterschreitet.
Wenn z.B. der Backofen nach Betrieb bei 200°C
ausgeschaltet ist, schaltet sich die Kühlung
nach etwa 30 Min. aus.
Der mechanische Kurzzeitwecker kann den Betrieb
des Backofens nicht steuern und dient nur als eine
Signaleinrichtung, die an die Ausführung erinnert.
INNENBELEUCHTUNG
Der Backofen ist mit Innenbeleuchtung
ausgestattet. Die Innenbeleuchtung bleibt während
des Betriebes vom Backofen aktiv. Wenn Sie nach
Zubereitung Ihr Gericht kontrollieren möchten,
stellen Sie den Drehregler Backofenbetriebsart 2
in die Position Licht.
* - falls vorhanden
ȼȿɊɌȿɅ
ɇɟɤɨɬɨɪɵɟ ɞɭɯɨɜɤɢ ɨɛɨɪɭɞɨɜɚɧɵ ɜɟɪɬɟɥɨɦ*,
ɩɪɢɜɨɞɢɦɵɦ ɜɨ ɜɪɚɳɟɧɢɟ ɷɥ. ɦɨɬɨɪɨɦ.
Ȼɥɚɝɨɞɚɪɹ ɜɟɪɬɟɥɭ* ɜɨɡɦɨɠɧɚ ɜɪɚɳɚɬɟɥɶɧɚɹ
ɨɛɠɚɪɤɚ ɛɥɸɞ ɜ ɞɭɯɨɜɤɟ. ɋɥɭɠɢɬ ɝɥɚɜɧɵɦ
ɨɛɪɚɡɨɦ ɞɥɹ ɨɛɠɚɪɤɢ ɞɨɦɚɲɧɟɣ ɩɬɢɰɵ,
ɲɚɲɥɵɤɨɜ, ɤɨɥɛɚɫɨɤ ɢ ɞɪɭɝɢɯ ɛɥɸɞ. ȼɤɥɸɱɟɧɢɟ
ɢ ɜɵɤɥɸɱɟɧɢɟ ɩɪɢɜɨɞɚ ɜɟɪɬɟɥɚ ɩɪɨɢɫɯɨɞɢɬ
ɨɞɧɨɜɪɟɦɟɧɧɨ ɫɨ ɜɤɥɸɱɟɧɢɟɦ ɢ ɜɵɤɥɸɱɟɧɢɟɦ
ɮɭɧɤɰɢɣ ɝɪɢɥɹ ɢɥɢ .
ȼɟɪɬɟɥ ɧɟ ɢɦɟɟɬ ɨɬɞɟɥɶɧɨɣ ɪɭɱɤɢ
ɭɩɪɚɜɥɟɧɢɹ.
Ɉɏ
Ɉɯɥɚɠɞɚɸɳɢɣ ɜɟɧɬɢɥɹɬɨɪ* ɧɚɯɨɞɢɬɫɹ ɧɚ
ɜɟɪɯɧɟɣ ɱɚɫɬɢ ɞɭɯɨɜɤɢ ɢ ɫɥɭɠɢɬ ɞɥɹ
ɨɯɥɚɠɞɟɧɢɹ ɤɚɤ ɜɫɬɪɨɟɧɧɨɣ ɦɟɛɟɥɢ, ɬɚɤ ɢ
ɫɚɦɨɣ ɞɜɟɪɰɵ ɞɭɯɨɜɤɢ. ȼɟɧɬɢɥɹɬɨɪ ɜɤɥɸɱɚɟɬɫɹ
ɚɜɬɨɦɚɬɢɱɟɫɤɢ ɩɪɢ ɞɨɫɬɢɠɟɧɢɢ ɬɟɦɩɟɪɚɬɭɪɵ
ɜɧɟɲɧɟɣ ɩɨɜɟɪɯɧɨɫɬɢ ɞɭɯɨɜɤɢ 60°ɋ. ɇɚɩɪɢɦɟɪ,
ɩɪɢ ɭɫɬɚɧɨɜɤɟ ɞɭɯɨɜɤɢ ɧɚ 200°ɋ ɜɟɧɬɢɥɹɬɨɪ
ɜɤɥɸɱɢɬɫɹ ɩɪɢɛɥɢɡɢɬɟɥɶɧɨ ɱɟɪɟɡ 10 ɦɢɧ. ɉɪɢ
ɩɨɧɢɠɟɧɢɢ ɬɟɦɩɟɪɚɬɭɪɵ ɜɧɟɲɧɟɣ ɩɨɜɟɪɯɧɨɫɬɢ
ɞɭɯɨɜɤɢ ɧɢɠɟ 60°ɋ ɜɟɧɬɢ
ɨɬɤɥɸɱɚɟɬɫɹ. ɇɚɩɪɢɦɟɪ, ɩɨɫɥɟ ɜɵɤɥɸɱɟɧɢɹ
ɞɭɯɨɜɤɢ, ɭɫɬɚɧɨɜɥɟɧɧɨɣ ɧɚ 200°ɋ, ɜɟɧɬɢɥɹɬɨɪ
ɜɵɤɥɸɱɢɬɫɹ ɩɪɢɛɥɢɡɢɬɟɥɶɧɨ ɱɟɪɟɡ 30 ɦɢɧ.
Ɇɢɧɭɬɧɢɤ ɧɟ ɭɩɪɚɜɥɹɟɬ ɪɚɛɨɬɨɣ ɩɥɢɬɵ,ɚ
ɹɜɥɹɟɬɫɹ ɥɢɲɶ ɫɢɝɧɚɥɢɡɚɬɨɪɨɦ, ɧɚɩɨɦɢɧɚɸɳɢɦ
ɨ ɜɵɩɨɥɧɟɧɢɢ.
Ɉɋȼȿɓȿɇɂȿ ȾɍɏɈȼɄɂ
Ⱦɭɯɨɜɤɚ ɨɫɧɚɳɟɧɚ ɫɢɫɬɟɦɨɣ ɨɫɜɟɳɟɧɢɹ. ɋɜɟɬ
ɨɫɬɚɟɬɫɹ ɜɤɥɸɱɟɧɧɵɦ ɜɨ ɜɪɟɦɹ ɪɚɛɨɬɵ
ɞɭɯɨɜɤɢ. ȿɫɥɢ ɜɵ ɯɨɬɢɬɟ ɩɪɨɤɨɧɬɪɨɥɢɪɨɜɚɬɶ
ɫɨɫɬɨɹɧɢɟ ɛɥɸɞɚ ɩɨɫɥɟ ɟɝɨ ɩɪɢɝɨɬɨɜɥɟɧɢɹ
ɭɫɬɚɧɨɜɢɬɟ ɪɭɱɤɭ ɜɵɛɨɪɚ ɪɟɠɢɦɨɜ ɞɭɯɨɜɤɢ 2
ɜ ɩɨɥɨɠɟɧɢɟ ɋɜɟɬ.
*
ɅȺɀȾȺ
- ɟɫɥɢ ɢɦɟɟɬɫɹ
ɘɓɂɃ ȼȿɇɌɂɅəɌɈɊ
ɥɹɬɨɪ ɚɜɬɨɦɚɬɢɱɟ
ɫɤɢ
27
Page 28

OVEN KINDS
BACKOFENARTEN
ȼɂȾɕ ȾɍɏɈȼɕɏ ɒɄȺɎɈȼ
Multi 12
Multi 9
Multi 7
Multi 5
Oven with a grill
Backofen mit dem Grill
Ⱦɭɯɨɜɤɚ ɫ ɝɪɢɥɟɦ
EN
ELECTRIC MULTIFUNKTION OVENS
T=”0”
Cold air (thawing)
Hot air
Hot air and bottom heat
Hot air and bottom heat
Hot air and top- and bottom
heat
Ventilating and grill
Grill
Grill+Spit
Grill top heat (super grill)
Super spit
Bottom heat
Top heat
Top -/ Bottom heat
28
Page 29

DE
ELEKTRISCHE
MULTIFUNKTIONSBACKÖFEN
T=”0”
Kaltluft (Auftauen)
Heißluft
Heißluft+U-Hitze
Heißluft und Unterhitze
Ventilator+O/U
Ventilator und Grill
Grill
Grill+Drehspieß
Grill + Oberhitze (Supergrill)
Superdrehspieß
Unterhitze
Oberhitze
Ober-/ Unterhitze
RU
ɗɅȿɄɌɊɂɑȿɋɄɂȿ
ɆɇɈȽɈɎɍɇɄɐɂɈɇȺɅɖɇɕȿ ȾɍɏɈȼɕȿ
ɒɄȺɎɕ
T=”0”
(ɪɚɡɦɨɪɚɠɢɜɚɧɢɟ)
ɏɨɥɨɞɧɵɣ ɨɛɞɭɜ
Ƚ
ɨɪɹɱɢɣ ɨɛɞɭɜ
(ɬɟɪɦɨɰɢɪɤɭɥɹɰɢɹ)
ɬɟɪɦɨ+H ɧɚɝɪ.
(ɩɢɰɰɚ-ɪɟɠɢɦ)
Ƚ
ɨɪɹɱɢɣ ɨɛɞɭɜ ɢ ɧɢɠɧɢɣ
ɧɚɝɪɟɜ
ȼ/ɇ ɧɚɝɪ.+ɜɟɧɬ.
ȼ
ɟɧɬɢɥɹɬɨɪ ɢ ɝɪɢɥɶ
Ƚ
ɪɢɥɶ
ɝɪɢɥɶ+ɜɟɪɬɟɥ
Ƚɪɢɥɶ+ ɜɟɪɯɧɢɣ ɧɚɝɪɟɜ
(ɫɭɩɟɪɝɪɢɥɶ)
ɫɭɩɟɪɜɟɪɬɟɥ
ɇ
ɢɠɧɢɣ ɧɚɝɪɟɜ
ȼ
ɟɪɯɧɢɣ ɧɚɝɪɟɜ
ȼ
ɟɪɯɧɢɣ -/ ɧɢɠɧɢɣ ɧɚɝɪɟɜ
29
Page 30

V
IV
III
II
I
1
EN
THE OVEN
2
To switch on the oven you only need to:
x Select the required function with the knob
2 oven operating mode.
x Set the required temperature with knob
1 temperature regulator.
The activation of the oven is signalled by yellow
and red control lights.
If the red control light goes out, it means that the
selected oven temperature has been reached.
Now you can put in the food.
The choice of the suitable oven equipment varies
depending on the selected operating function.
Thus, you can use a wire shelf or backing tray and
place them at the optimal operating level I to IV
within the oven.
PREPARING THE FOOD TO BE COOKED IN
THE SPIT
Keep to the following procedure:
x Spear the food on the handle of the spit 3
and fix it by means of forks 4,
x Screw on handle 5, if required,
x Arrange the spit frame 9 at level III in the
oven,
x Shift the end of the spit 3 into the drive
coupling 8; the spit frame hook should be
fixed in the groove of the spit clutch metal
part,
x Screw out the handle 5,
x Put in the metal tray 7 at the lowest level
of the oven and close the oven door.
To take food out of the oven, use the handle 5
implicitly to avoid skin-burns.
30
Page 31

DE RU
GEBRAUCH VOM BACKOFEN
Zum Backen genügen wenige einfache Handgriffe.
x Gewünschte Backfunktion mit dem
Drehregler 2 Backofenbetriebsart wählen.
x Gewünschte Temperatur mit dem
Drehregler 1 Temperaturregler wählen.
Die Einschaltung vom Backofen wird durch
Aufleuchten von gelben und roten Kontrolllampen
auf der Bedienblende signalisiert.
Wenn die rote Kontrollleuchte erlischt, signalisiert
es, dass die voreingestellte Backofentemperatur
erreicht worden ist, jetzt können Sie Ihre Speise
einschieben.
Je nach Funktion, können verschiedene
Ausrüstungsteile des Backofens genutzt werden,
wie z.B. Rost und Backblech, die in richtige Höhe
von I bis V im Backofenraum anzubringen sind.
GRILLEN AM DREHESPIESS
Um dies zu tun, ist wie folgt vorzugehen:
x die Speise auf den Stiel vom Spieß 3
aufspießen und sie darauf mit Hilfe von
Gabeln 4 fixieren,
x bei Bedarf den Handgriff 5 aufschrauben,
x den Spießrahmen 9 an der Höhe „III“ im
Backofen einordnen,
x Das Endstück vom Spieß 3 in die
Antriebskupplung 8 hineinschieben; dabei
ist zu beachten, dass der
Spießrahmenhaken in die Rille des
Spießgriffmetallteils eingreift,
x den Handgriff 5 herausschrauben,
x das Blechtablett 7 in den Backofenraum in
niedrigste Höhe hineinschieben und die
Backofentür anlehnen.
Beim Herausnehmen von Speisen benutzen Sie
unbedingt den Handgriff 5, um eine
Verbrennung zu vermeiden.
ɉɈɅɖɁɈȼȺɇɂȿ ȾɍɏɈȼɕɆ ɒɄȺɎɈɆ
ȼ ɧɟɫɤɨɥɶɤɨ ɩɪɨɫɬɵɯ ɞɜɢɠɟɧɢɣ ȼɵ ɦɨɠɟɬɟ
ɧɚɱɚɬɶ ɩɪɨɰɟɫɫ ɩɪɢɝɨɬɨɜɥɟɧɢɹ.
ȼɤɥɸɱɟɧɢɟ ɞɭɯɨɜɤɢ ɫɢɝɧɚɥɢɡɢɪɭɟɬɫɹ
ɜɤɥɸɱɟɧɢɟɦ ɤɨɧɬɪɨɥɶɧɵɯ ɥɚɦɩ ɠɟɥɬɨɝɨ ɢ
ɤɪɚɫɧɨɝɨ ɰɜɟɬɨɜ ɧɚ ɩɚɧɟɥɢ ɭɩɪɚɜɥɟɧɢɹ.
ɉɨɫɥɟ ɬɨɝɨ ɤɚɤ ȼɚɲɚ ɞɭɯɨɜɤɚ ɞɨɫɬɢɝɧɟɬ
ɭɫɬɚɧɨɜɥɟɧɧɨɣ ɬɟɦɩɟɪɚɬɭɪɵ ɤɪɚɫɧɚɹ ɥɚɦɩɚ
ɩɨɝɚɫɧɟɬ ɢ ȼɵ ɦɨɠɟɬ
ɤɨɬɨɪɨɟ ɯɨɬɢɬɟ ɝɨɬɨɜɢɬ
ȼ ɡɚɜɢɫɢɦɨɫɬɢ ɨɬ ɪɟɚɥɢɡɭɟɦɨɣ ɪɚɛɨɱɟɣ
ɮɭɧɤɰɢɢ ɦɨɠɧɨ ɩɨɥɶɡɨɜɚɬɶɫɹ ɨɛɨɪɭɞɨɜɚɧɢɟɦ
ɞɭɯɨɜɤɢ, ɧɚɩɪ. ɪɟɲɺɬɤɨɣ ɢɥɢ ɩɪɨɬɢɜɧɟɦ,
ɩɨɦɟɳɚɹ ɢɯ ɧɚ ɫɨɨɬɜɟɬɫɬɜɟɧɧɵɯ ɪɚɛɨɱɢɯ
ɭɪɨɜɧɹɯ ɨɬ I ɞɨ V ɞɭɯɨɜɨɝɨ ɲɤɚɮɚ.
ɉɊɂȽɈɌɈȼɅȿɇɂȿ ɇȺ ȼȿɊɌȿɅȿ
Ⱦɥɹ ɷɬɨɝɨ ɧɟɨɛɯɨɞɢɦɨ ɫɥɟɞɭɸɳɟɟ:
ɉɪɢ ɜɵɧɢɦɚɧɢɢ ɛɥɸɞɚ ɜɨ ɢɡɛɟɠɚɧɢɟ ɨɠoɝɚ
ɨɛɹɡɚɬɟɥɶɧɨ ɢɫɩɨɥɶɡɨɜɚɬɶ ɪɭɱɤɭ 5.
x Ɋɭɱɤɨɣ 2 ɪɟɠɢɦɚ ɪɚɛɨɬɵ ɞɭɯɨɜɤɢ,
ɜɵɛɟɪɢɬɟ ɠɟɥɚɟɦɵɣ ɪɟɠɢɦ
ɩɪɢɝɨɬɨɜɥɟɧɢɹ.
x Ɋɭɱɤɨɣ 1 ɬɟɪɦɨɪɟɝɭɥɹɬɨɪɚ, ɜɵɛɟɪɢɬɟ
ɠɟɥɚɟɦɭɸ ɬɟɦɩɟɪɚɬɭɪɭ ɩɪɢɝɨɬɨɜɥɟɧɢɹ.
ɟ ɫɬɚɜɢɬɶ ɜ ɧɟɟ ɛɥɸɞɨ,
ɶ
x ɧɚɞɟɬɶ ɛɥɸɞɨ ɧɚ ɩɪɭɬɨɤ ɜɟɪɬɟɥɚ 3 ɢ
ɡɚɫɬɨɩɨɪɢɬɶ ɛɥɸɞɨ ɩɪɢ ɩɨɦɨɳɢ ɜɢɥɨɤ 4,
x ɩɪɢ ɧɟɨɛɯɨɞɢɦɨɫɬɢ ɧɚɞɟɬɶ ɪɭɱɤɭ 5 ɧɚ
ɜɟɪɬɟɥ,
x ɪɚɦɤɭ 9 ɩɨɫɬɚɜɢɬɶ ɜ ɞɭɯɨɜɤɭ ɧɚ ɭɪɨɜɟɧɶ
„III“,
x ɤɨɧɟɰ ɩɪɭɬɤɚ ɜɟɪɬɟɥɚ 3 ɜɫɬɚɜɢɬɶ ɜ ɦɭɮɬɭ
ɩɪɢɜɨɞɚ 8, ɨɛɪɚɳɚɹ ɜɧɢɦɚɧɢɟ ɧɚ ɬɨ,
ɱɬɨɛɵ ɜɵɟɦɤɚ ɪɚɦɤɢ ɩɨɩɚɥɚ ɜ ɤɚɧɚɜɤɭ
ɦɟɬɚɥɥɢɱɟɫɤɨɣ ɱɚɫɬɢ ɞɟɪɠɚɬɟɥɹ
ɜɟɪɬɟɥɚ,
x ɜɵɜɟɪɧɢɬɟ ɪɭɱɤɭ 5,
x ɜɫɬɚɜɢɬɶ ɩɪɨɬɢɜɟɧɶ 7 ɧɚ ɫɚɦɵɣ ɧɢɡɤɢɣ
ɭɪɨɜɟɧɶ ɞ
ɞɜɟɪɰɭ.
ɜɨɝɨ ɲɤɚɮɚ ɢ ɩɪɢɤɪɵɬɶ
ɭɯɨ
31
Page 32

EN
1
2
3
ELECTRONIC PROGRAMMABLE
CONTROL Touch control *
The symbols 1 ( AUTO ) and 0.00 start to flash if
the device is switched on for the first time.
Setting the clock
To set the current day time:
x Press the middle key 2 for at least 3
seconds.
The symbol meal preparation 3 appears on the
display
x By pressing keys 4 or 5 (
set the time.
- or + ) you can
After a few seconds the set time is confirmed by
4
5
the acoustic signal and the figures stop to flash.
The required time can be also set afterwards.
Therefore you have to:
x Press the keys 4 or 5 (
simultaneously for 3 seconds. The time is
set as described.
Important! If you set the time anew,
previous time programs are cancelled
automatically.
*
- if available
- or + )
32
Page 33

DE RU
ELEKTRONISCHE PROGRAMMIERUNG
Touch control *
Wird die Uhr zum ersten Mal eingeschaltet, blinken
die Symbole 1 ( AUTO ) und 0.00
Uhrzeiteinstellung
Zur Einstellung der aktuellen Uhrzeit:
x Auf die mittlere Taste 2 mind. 3 Minuten
lang drücken.
Auf dem Display erscheint das Symbol
Gerichtzubereitung 3.
.
ɗɅȿɄɌɊɈɇɇɈȿ ɉɊɈȽɊȺɆɆɂɊɍɘɓȿȿ
ɍɋɌɊɈɃɋɌȼɈ Touch control *
ɉɪɢ ɩɟɪɜɨɦ ɜɤɥɸɱɟɧɢɢ ɱɚɫɨɜ ɧɚɱɢɧɚɸɬ ɦɢɝɚɬɶ
ɫɢɦɜɨɥɵ 1 ( AUTO ) ɢ 0.00.
ɍɫɬɚɧɨɜɤɚ ɬɟɤɭɳɟɝɨ ɜɪɟɦɟɧɢ
ɑɬɨɛɵ ɭɫɬɚɧɨɜɢɬɶ ɬɟɤɭɳɟɟ ɜɪɟɦɹ:
x ɇɚɠɦɢɬɟ ɧɚ ɫɪɟɞɧɸɸ ɤɧɨɩɤɭ 2 ɜ ɬɟɱɟɧɢɟ
3-ɯ ɫɟɤɭɧɞ.
ɇɚ ɞɢɫɩɥɟɟ ɩɨɹɜɢɬɫɹ ɫɢɦɜɨɥ ɉɪɢɝɨɬɨɜɥɟɧɢɟ
3.
x Mit den Wahltasten 4 oder 5 (
die gewünschte
Uhrzeit einstellen.
- oder + )
Nach wenigen Sekunden wird die eingestellte Zeit
durch ein akustisches Signal bestätigt und die
Symbole hören auf zu blinken.
Die eingestellte
verändert werden. Dafür muss man:
x Die Wahltasten 4 oder 5 (
gleichzeitig 3 Sekunden lang gedrückt
halten und die Uhrzeit dann wie oben
beschrieben regulieren.
Wichtig! Bei der Änderung der
eingestellten Uhrzeit werden alle vorher
gewählten Programme gelöscht.
*
- falls vorhanden
Uhrzeit kann auch anschließend
- oder + )
x ɋ ɩɨɦɨɳɶɸ ɤɧɨɩɨɤ ɜɵɛɨɪɚ 4 ɢɥɢ 5 (
+ ) ɭɫɬɚɧɨɜɢɬɟ ɠɟɥɚɟɦɨɟ ɜɪɟɦɹ.
ɢɥɢ
ɑɟɪɟɡ ɧɟɫɤɨɥɶɤɨ ɫɟɤɭɧɞ ɚɤɭɫɬɢɱɟɫɤɢɣ ɫɢɝɧɚɥ
ɩɨɞɬɜɟɪɞɢɬ ɭɫɬɚɧɨɜɥɟɧɧɨɟ ɜɪɟɦɹ, ɫɢɦɜɨɥɵ
ɩɟɪɟɫɬɚɧɭɬ ɦɢɝɚɬɶ.
ɍɫɬɚɧɨɜɥɟɧɧɨɟ ɜɪɟɦɹ ɦɨɠɧɨ ɢɡɦɟɧɢɬɶ. Ⱦɥɹ
ɷɬɨɝɨ:
x Ʉɧɨɩɤɢ ɜɵɛɨɪɚ 4 ɢɥɢ 5 (
ɞɟɪɠɚɬɶ ɨɞɧɨɜɪɟɦɟɧɧɨ ɧɚɠɚɬɵɦɢ ɜ
ɬɟɱɟɧɢɟ 3-ɯ ɫɟɤɭɧɞ ɢ ɭɫɬɚɧɨɜɢɬɶ ɜɪɟɦɹ,
ɤɚɤ ɨɩɢɫɚɧɨ ɜɵɲɟ.
*
ȼɚɠɧɨ! ɉɪɢ ɢɡɦɟɧɟɧɢɢ
ɭɫɬɚɧɨɜɥɟɧɧɨɝɨ ɜɪɟɦɟɧɢ ɬɚɣɦɟɪ ɛɭɞɟɬ
ɭɫɬɚɧɨɜɥɟɧ ɡɚɧɨɜɨ, ɚ ɜɫɟ ɜɵɛɪɚɧɧɵɟ
ɪɟɠɢɦɵ ɩɪɢɝɨɬɨɜɥɟɧɢɹ ɛɭɞɭɬ
ɨɬɦɟɧɟɧɵ.
- ɟɫɥɢ ɢɦɟɟɬɫɹ
- ɢɥɢ + ) ɧɭɠɧɨ
-
33
Page 34

EN
1
2
Electronic countdown timer
The countdown timer is independent of all other
timer functions, and can be used even if the oven
is switched off.
To switch on the countdown timer
x Press the middle key 1 for 3 seconds.
The symbol countdown timer
display
2 appears on the
x Press the keys 3 or 4 (
countdown time and wait for a few
seconds.
- or + ) to set the
3
5
4
After a moment, the countdown timer starts the
countdown and the current time of day and the
symbol countdown timer 5 appear.
The end of the countdown is indicated by the
acoustic signal - a double tone with the interval of
2 seconds. At the same time, the symbol
countdown timer 5 flashes.
x To switch off the timer press any key.
The symbol countdown timer 5 goes out.
34
Page 35

DE RU
Elektronischer Kurzzeitwecker
Der Gebrauch des elektronischen Kurzzeitweckers
ist von anderen Funktionen unabhängig und kann
auch bei ausgeschaltetem Backofen verwendet
werden.
Zum Einschalten des Kurzzeitweckers:
x Die mittlere Taste 1 3 Sekunden lang
gedrückt halten.
Auf dem Display erscheint das Symbol
Kurzzeitwecker 2.
ɗɥɟɤɬɪɨɧɧɵɣ ɦɢɧɭɬɧɢɤ
ɗɥɟɤɬɪɨɧɧɵɣ ɦɢɧɭɬɧɢɤ ɪɚɛɨɬɚɟɬ ɧɚɡɚɜɢɫɢɦɨ ɨɬ
ɞɪɭɝɢɯ ɮɭɧɤɰɢɣ. ɂɦ ɦɨɠɧɨ ɩɨɥɶɡɨɜɚɬɶɫɹ ɞɚɠɟ
ɟɫɥɢ ɞɭɯɨɜɤɚ ɜɵɤɥɸɱɟɧɚ.
ɑɬɨɛɵ ɜɤɥɸɱɢɬɶ ɦɢɧɭɬɧɢɤ:
x ɇɚɠɦɢɬɟ ɧɚ ɫɪɟɞɧɸɸ ɤɧɨɩɤɭ 1 ɜ ɬɟɱɟɧɢɟ
3-ɯ ɫɟɤɭɧɞ.
ɇɚ ɞɢɫɩɥɟɟ ɩɨɹɜɢɬɫɹ ɫɢɦɜɨɥ ɦɢɧɭɬɧɢɤɚ 2.
x Mit den Wahltasten 3 oder 4 (
die gewünschte Zeit einstellen.
- oder + )
Nach wenigen Sekunden beginnt der
Kurzzeitwecker die Rückzählung. Gleichzeitig
erscheinen auf dem Display die aktuelle Tageszeit
und das entsprechende Symbol Kurzzeitwecker
5.
Nach Ablauf der eingestellten Zeitdauer ertönt ein
doppelter Signalton mit dem Intervall von 2
Sekunden. Gleichzeitig blinkt das Symbol
Kurzzeitwecker 5.
x Um den Kurzzeitwecker auszuschalten eine
beliebige Taste drücken.
Das Symbol Kurzzeitwecker 5 erlischt.
x ɋ ɩɨɦɨɳɶɸ ɤɧɨɩɨɤ ɜɵɛɨɪɚ 3 ɢɥɢ 4 (
+ ) ɭɫɬɚɧɨɜɢɬɟ ɠɟɥɚɟɦɨɟ ɜɪɟɦɹ.
ɢɥɢ
ɑɟɪɟɡ ɧɟɫɤɨɥɶɤɨ ɫɟɤɭɧɞ ɬɚɣɦɟɪ ɧɚɱɧɟɬ
ɨɛɪɚɬɧɵɣ ɫɱɟɬ ɢ ɜɟɪɧɟɬɫɹ ɧɨɪɦɚɥɶɧɚɹ
ɢɧɞɢɤɚɰɢɹ ɜɪɟɦɟɧɢ ɫ ɫɢɦɜɨɥɨɦ ɦɢɧɭɬɧɢɤɚ 5,
ɭɤɚɡɵɜɚɹ ɧɚ ɬɨ, ɱɬɨ ɢɞɟɬ ɨɛɪɚɬɧɵɣ ɫɱɟɬ.
ɉɨ ɨɤɨɧɱɚɧɢɢ ɨɛɪɚɬɧɨɝɨ ɫɱɟɬɚ ɞɭɯɨɜɤɚ ɩɨɞɚɟɬ
ɞɜɨɣɧɨɣ ɡɜɭɤɨɜɨɣ ɫɢɝɧɚɥ ɫ ɢɧɬɟɪɜɚɥɨɦ ɜ 2
ɫɟɤɭɧɞɵ ɢ ɦɢɝɚɟɬ ɫɢɦɜɨɥ ɦɢɧɭɬɧɢɤɚ 5.
x ɇɚɠɚɜ ɥɸɛɭɸ ɤɧɨɩɤɭ, ɨɬɤɥɸɱɢɬɟ
ɦɢɧɭɬ
ɋɢɦɜɨɥ ɦɢɧ
ɧɢɤ.
ɭɬɧɢɤɚ 5 ɩɨɝɚɫɧɟɬ.
-
35
Page 36

EN
3
4
1
5
2
Setting the cooking time
The oven switches off automatically after the
required cooking time is over.
Before setting the cooking time, you should select
the oven operating function and the temperature
(see chapter “Cooking”)
x Press the middle key 1 for 3 seconds.
x Press key 1 again.
Symbols 2 and 0.00 appear on the display
alternately and symbol 3 ( AUTO ) flashes.
x Use keys 4 or 5 (
required cooking time. A few seconds later
the countdown of the cooking time starts.
Symbol 6 ( AUTO ) appears on the display to
confirm the successful setting. The current time
appears again.
The end of the countdown is indicated by a double
acoustic signal at intervals of 2 seconds. The
flashing symbols inform you that the oven is
switched off completely.
- or + ) to set the
36
6
x Press any key to switch off the buzzer. The
symbols disappear.
Page 37

DE RU
Einstellen der Betriebsdauer
Der Vorgang im Backofen soll nach einer
gewünschten Dauer automatisch abgeschaltet
werden.
Bevor die Dauer der Gerichtszubereitung
eingegeben wird, müssen Sie die
Backofenfunktion und die Temperatur der
Zubereitung einstellen (siehe Kapitel „Gebrauch
vom Backofen“).
x Die mittlere Taste 1 3 Sekunden lang.
Drücken.
x Die mittlere Taste 1 erneut drücken.
Auf dem Display erscheinen abwechselnd
die
Symbole 2 und 0.00; das Symbol 3
( AUTO ) blinkt.
x Mit den Wahltasten 4 oder 5 (
stellen Sie die gewünschte Dauer der
Gerichtzubereitung ein. Nach einigen
Sekunden beginnt die Rückzählung der
Zeitdauer.
Auf dem Display erscheint Symbol
was die erfolgreiche Einstellung bestätigt; die
aktuelle Uhrzeit erscheint wieder.
Nach Ablauf der eingestellten Zeitdauer ertönt ein
doppelter Signalton mit dem Intervall von 2
Sekunden. Die Symbole blinken, um Sie zu
informieren, dass alle Vorgänge im Backofen
abgeschaltet sind.
x Um den Signalton auszuschalten, eine
beliebige Taste drücken. Der Vorgang wird
durch Erlöschen der Symbole bestätigt.
- oder + )
6 ( AUTO ),
ɍɫɬɚɧɨɜɤɚ ɩɪɨɞɨɥɠɢɬɟɥɶɧɨɫɬɢ
ɩɪɢɝɨɬɨɜɥɟɧɢɹ
Ⱦɭɯɨɜɤɚ ɞɨɥɠɧɚ ɚɜɬɨɦɚɬɢɱɟɫɤɢ ɨɬɤɥɸɱɢɬɶɫɹ ɩɨ
ɢɫɬɟɱɟɧɢɢ ɠɟɥɚɟɦɨɝɨ ɩɪɨɦɟɠɭɬɤɚ ɜɪɟɦɟɧɢ.
ɉɪɟɠɞɟ ɱɟɦ ɡɚɞɚɬɶ ɩɪɨɞɨɥɠɢɬɟɥɶɧɨɫɬɶ
ɩɪɢɝɨɬɨɜɥɟɧɢɹ, ȼɵ ɞɨɥɠɧɵ ɭɫɬɚɧɨɜɢɬɶ ɪɟɠɢɦ
ɪɚɛɨɬɵ ɞɭɯɨɜɤɢ ɢ ɬɟɦɩɟɪɚɬɭɪɭ
ɩɪɢɝɨɬɨɜɥɟɧɢɹ. (ɫɦ. ɪɚɡɞɟɥ " ɉɨɥɶɡɨɜɚɧɢɟ
ɞɭɯɨɜɵɦ ɲɤɚɮɨɦ ").
ɇɚ ɞɢɫɩɥɟɟ ɩɨɹɜɹɬɫɹ ɩɨɩɟɪɟɦɟɧɧɨ ɫɢɦɜɨɥ 2 ɢ
0.00 ɢ ɡɚɦ
ɇɚ ɞɢɫɩɥɟɟ ɩɨɹɜɢɬɫɹ ɫɢɦɜɨɥ 6 ( AUTO ),
ɩɨɞɬɜɟɪɠɞɚɸɳɢɣ ɭɫɩɟɲɧɨɟ ɩɪɨɝɪɚɦɦɢɪɨɜɚɧɢɟ,
ɚ ɬɚɤɠɟ ɜɟɪɧɺɬɫɹ ɩɨɤɚɡɚɧɢɟ ɬɟɤɭɳɟɝɨ ɜɪɟɦɟɧɢ.
ɉɨ ɢɫɬɟɱɟɧɢɢ ɜɪɟɦɟɧɢ ɩɪɢɝɨɬɨɜɥɟɧɢɹ ɞɭɯɨɜɤɚ
ɩɨɞɚɟɬ ɞɜɨɣɧɨɣ ɡɜɭɤɨɜɨɣ ɫɢɝɧɚɥ ɫ ɢɧɬɟɪɜɚɥɨɦ ɜ
2 ɫɟɤɭɧɞɵ ɢ ɡɚɦɢɝɚɸɬ ɫɢɦɜɨɥɵ, ɢɧɮɨɪɦɢɪɭɹ,
ɱɬɨ ɜɫɟ ɮɭɧɤɰɢɢ ɪɚɛɨɬɵ ɞɭɯɨɜɤɢ ɨɬɤɥɸɱɟɧɵ.
x ɇɚɠɦɢɬɟ ɧɚ ɫɪɟɞɧɸɸ ɤɧɨɩɤɭ 1 ɜ ɬɟɱɟɧɢɟ
3-ɯ ɫɟɤɭɧɞ.
x ɇɚɠɦɢɬɟ ɫɧɨɜɚ ɧɚ ɫɪɟɞɧɸɸ ɤɧɨɩɤɭ 1.
ɢ
ɝɚɟɬ ɫɢɦɜɨɥ 3 ( AUTO ).
x ɋ ɩɨɦɨɳɶɸ ɤɧɨɩɨɤ ɜɵɛɨɪɚ 4 ɢɥɢ 5 (
+) ɭɫɬɚɧɨɜɢɬɟ ɠɟɥɚɟɦɨɟ ɜɪɟɦɹ.
ɢɥɢ
ɑɟɪɟɡ ɧɟɫɤɨɥɶɤɨ ɫɟɤɭɧɞ ɧɚɱɧɟɬɫɹ ɨɬɫɱɟɬ
ɜɪɟɦɟɧɢ ɩɪɢɝɨɬɨɜɥɟɧɢɹ.
x ɇɚɠɚɜ ɥɸ
ɋɢɦɜɨɥɵ ɩɨɝɚɫɧɭɬ.
ɛɭɸ ɤɧɨɩɤɭ, ɨɬɤɥɸɱɢɬɟ ɡɭɦɦɟɪ.
-
37
Page 38

EN
3
1
2
Setting the end of cooking time
The oven switches off as soon as the selected end
time is achieved.
Before setting the end of cooking time, you should
select the oven operating function and the
required temperature (see chapter Cooking)
x Press the middle key 1 for 3 seconds
x Consecutively press key 1 twice again.
Symbols 2 and 0.00 appear on the display
alternately. Symbol 3 ( AUTO ) flashes.
x Press keys 4 or 5 (
required end time. After a few seconds the
program is activated.
- or + ) to set the
4
5
6
Important! The time you set should differ
from the current day time.
Symbol 6 ( AUTO ) appears on the display to
confirm the successful setting. The current time
appears again.
The end of the cooking time is indicated by a
double acoustic signal at intervals of 2 seconds.
The symbols flash to inform you that all processes
in the oven are switched off.
x Press any key to switch off the buzzer.
The oven beeps three times and the symbols
disappear.
38
Page 39

DE RU
Einstellen der Endzeit
Der Backofen wird in eingegebener Endzeit
ausschalten.
Bevor die Endzeit eingegeben wird, stellen Sie die
Backofenfunktion und die Temperatur der
Zubereitung ein (siehe Kapitel „Gebrauch vom
Backofen“).
x Die mittlere Taste 1 3 Sekunden lang
drücken.
x Die mittlere Taste 1 erneut zwei Mal
hintereinander drücken.
Auf dem Display erscheinen abwechselnd
Symbole
( AUTO ) blinkt.
2 und 0.00; das Symbol 3
die
ɍɫɬɚɧɨɜɤɚ ɜɪɟɦɟɧɢ ɨɤɨɧɱɚɧɢɹ
ɩɪɢɝɨɬɨɜɥɟɧɢɹ
Ⱦɭɯɨɜɤɚ ɞɨɥɠɧɚ ɚɜɬɨɦɚɬɢɱɟɫɤɢ ɨɬɤɥɸɱɢɬɶɫɹ ɜ
ɡɚɪɚɧɟɟ ɡɚɞɚɧɧɨɟ ɜɪɟɦɹ.
ɉɪɟɠɞɟ ɱɟɦ ɡɚɞɚɬɶ ɜɪɟɦɹ ɨɤɨɧɱɚɧɢɹ ɪɚɛɨɬɵ,
ȼɵ ɞɨɥɠɧɵ ɭɫɬɚɧɨɜɢɬɶ ɪɟɠɢɦ ɪɚɛɨɬɵ
ɞɭɯɨɜɤɢ ɢ ɬɟɦɩɟɪɚɬɭɪɭ ɩɪɢɝɨɬɨɜɥɟɧɢɹ. (ɫɦ.
ɪɚɡɞɟɥ " ɉɨɥɶɡɨɜɚɧɢɟ ɞɭɯɨɜɵɦ
ɲɤɚɮɨɦ ").
x ɇɚɠɦɢɬɟ ɧɚ ɫɪɟɞɧɸɸ ɤɧɨɩɤɭ 1 ɜ ɬɟɱɟɧɢɟ
3-ɯ ɫɟɤɭɧɞ.
x ɇɚɠɦɢɬɟ ɫɧɨɜɚ ɞɜɚ ɪɚɡɚ
ɩɨɫɥɟɞɨɜɚɬɟɥɶɧɨ ɧɚ ɫɪɟɞɧɸɸ ɤɧ
ɇɚ ɞɢɫɩɥɟ
0.00 ɢ ɡɚɦɢɝɚɟɬ ɫɢɦɜɨɥ 3 ( AUTO ).
ɟ ɩɨɹɜɹɬɫɹ ɩɨɩɟɪɟɦɟɧɧɨ ɫɢɦɜɨɥ 2 ɢ
ɨɩɤ
ɭ 1.
x Mit den Wahltasten 4 oder 5 (
die gewünschte Endzeit der
Gerichtszubereitung einstellen. Nach
wenigen Sekunden wird das Programm
aktiviert.
- oder + )
Wichtig! Sie sollen die Zeit eingeben, die
sich von der aktuellen Uhrzeit
unterscheidet!
Auf dem Display erscheint das Symbol 6
( AUTO ) als Bestätigung der erfolgreichen
Programmierung. Die aktuelle Tageszeit wird
wieder angezeigt.
Wenn die eingegebene Endzeit erreicht ist, ertönt
ein doppelter Signalton mit dem Intervall von 2
Sekunden. Die Symbole blinken, um Sie zu
informieren, dass alle Vorgänge im Backofen
abgeschaltet sind.
x Um den Signalton auszuschalten, drücken
Sie eine beliebige Taste.
Der Vorgang wird durch Erlöschen der Symbole
bestätigt.
x ɋ ɩɨɦɨɳɶɸ ɤɧɨɩɨɤ ɜɵɛɨɪɚ 4 ɢɥɢ 5 (
ɢɥɢ
ɨɤɨɧɱɚɧɢɹ ɩɪɢɝɨɬɨɜɥɟɧɢɹ. ɑɟɪɟɡ
ɧɟɫɤɨɥɶɤɨ ɫɟɤɭɧɞ ɩɪɨɝɪɚɦɦɚ ɛɭɞɟɬ
ɚɤɬɢɜɢɪɨɜɚɧɚ.
ȼɚɠɧɨ! ȼɵ ɞɨɥɠɧɵ ɡɚɞɚɬɶ ɜɪɟɦɹ,
ɨɬɥɢɱɚɸɳɟɟɫɹ ɨɬ ɬɟɤɭɳɟɝɨ!
ɇɚ ɞɢɫɩɥɟɟ ɩɨɹɜɢɬɫɹ ɫɢɦɜɨɥ 6 ( AUTO ),
ɩɨɞɬɜɟɪɠɞɚɸɳɢɣ ɭɫɩɟɲɧɨɟ ɩɪɨɝɪɚɦɦɢɪɨɜɚɧɢɟ,
ɚ ɬɚɤɠɟ ɜɟɪɧɺɬɫɹ ɩɨɤɚɡɚɧɢɟ ɬɟɤɭɳɟɝɨ ɜɪɟɦɟɧɢ.
ɉɨ ɞɨɫɬɢɠɟɧɢɸ ɡɚɩɪɨɝɪɚɦɦɢɪɨɜɚɧɧɨɝɨ ɜɪɟɦɟɧɢ
ɞɭɯɨɜɤɚ ɩɨɞɚɟɬ ɞɜɨɣɧɨɣ ɡɜɭɤɨɜɨɣ ɫɢɝɧɚɥ ɫ
ɢɧɬɟɪɜɚɥɨɦ ɜ 2 ɫɟɤɭɧɞɵ ɢ ɡɚɦɢɝɚɸɬ ɫɢɦɜɨɥɵ,
ɢɧɮɨɪɦɢɪɭɹ, ɱɬɨ ɜɫɟ ɮɭɧɤɰɢɢ ɪɚɛɨɬɵ ɞɭɯɨɜɤɢ
ɨɬɤɥɸɱɟɧɵ.
x ɇɚɠɚɜ ɥɸ
ɋɢɦɜɨɥɵ ɩɨɝɚɫɧɭɬ.
+ ) ɭɫɬɚɧɨɜɢɬɟ ɠɟɥɚɟɦɨɟ ɜɪɟɦɹ
ɛɭɸ ɤɧɨɩɤɭ, ɨɬɤɥɸɱɢɬɟ ɡɭɦɦɟɪ.
-
39
Page 40

EN
1
2
3
4
Setting cooking time and the end time
You can combine both functions (cooking time
and the end of cooking time) to set the start and
end times for cooking. In this way, you can
program your electronic oven to cook while you
are out or to defrost food ready for you to cook
when you get back. A great help in the kitchen!
The programming sequence of these two functions
is arbitrary. You can first program the cooking time
1 and then the end of cooking time 2 or the other
way round.
Example: You would like to start cooking a dish
30 minutes before you get home so that it will be
ready by your arrival at 12:55.
Before you set the cooking time and the end of the
cooking time, you should select the oven function
3 ant the temperature (see chapter
“Multifunction oven control”).
Set the cooking time 4 (in our example - 30
minutes).
Now you should program the required end of
cooking time. (See chapter “Setting cooking
time”).
40
Page 41

DE RU
Einstellen der Betriebsdauer und Endzeit
Sie können die beiden Funktionen Betriebsdauer
und Endzeit kombinieren, wobei Sie eine
gewünschte Zeit eingeben, um den Backofen einund auszuschalten. So können Sie den Backofen
für die Zubereitung von Speisen in Ihrer
Abwesenheit programmieren oder das Auftauen
von Speisen zum Zeitpunkt Ihrer Rückkehr
einstellen. Eine große Hilfe in Ihrer Küche!
Die Programmierfolge von diesen beiden
Funktionen ist nicht entscheidend. Sie können
zuerst Betriebsdauer 1 und dann Endzeit 2
programmieren, oder umgekehrt.
Beispiel: Sie möchten die Gerichtszubereitung 30
Minuten vor Ihrer Rückkehr nach Hause beginnen,
so, dass zu Ihrer Ankunft um 12:55 die Speise
fertig ist.
Bevor die Dauer der Gerichtszubereitung und die
Endzeit eingegeben werden, stellen Sie die
Backofenfunktion 3 und die Temperatur der
Zubereitung ein (siehe Kapitel „Gebrauch vom
Backofen“).
Geben Sie die Betriebsdauer der
Gerichtszubereitung 4 ein (in unserem Beispiel 30 Minuten).
Dafür muss die gewünschte Betriebsdauer
programmiert werden (siehe Kapitel „Einstellen
der Betriebsdauer“).
ɍɫɬɚɧɨɜɤɚ ɜɪɟɦɟɧɢ ɩɪɨɞɨɥɠɢɬɟɥɶɧɨɫɬɢ ɢ
ɨɤɨɧɱɚɧɢɹ ɩɪɢɝɨɬɨɜɥɟɧɢɹ
ȼɵ ɦɨɠɟɬɟ ɤɨɦɛɢɧɢɪɨɜɚɬɶ ɮɭɧɤɰɢɢ ɜɪɟɦɟɧɢ
ɩɪɢɝɨɬɨɜɥɟɧɢɹ ɢ ɜɪɟɦɟɧɢ ɨɤɨɧɱɚɧɢɹ
ɩɪɢɝɨɬɨɜɥɟɧɢɹ, ɡɚɞɚɜɚɹ ɠɟɥɚɟɦɨɟ ɜɪɟɦɹ
ɜɤɥɸɱɟɧɢɹ ɢ ɜɵɤɥɸɱɟɧɢɹ ɞɭɯɨɜɤɢ. Ɍɚɤɢɦ
ɨɛɪɚɡɨɦ, ȼɵ ɦɨɠɟɬɟ ɡɚɩɪɨɝɪɚɦɦɢɪɨɜɚɬɶ
ɩɪɨɰɟɫɫ
ɜɪɟɦɹ, ɤɨɝ
ɪɚɡɦɨɪɚɠɢɜɚɧɢɹ ɩɪɨɞɭɤɬɨɜ ɤ ȼɚɲɟɦɭ ɩɪɢɯɨɞɭ.
ɇɟɩɥɨɯɚɹ ɩɨɦɨɳɶ ɧɚ ɤɭɯɧɟ.
ɇɟ ɜɚɠɧɨ ɜ ɤɚɤɨɦ ɩɨɪɹɞɤɟ ȼɵ ɩɪɨɝɪɚɦɦɢɪɭɟɬɟ
ɷɬɢ ɞɜɟ ɮɭɧɤɰɢɢ. ɋɧɚɱɚɥɚ ɜɪɟɦɹ ɩɪɢɝɨɬɨɜɥɟɧɢɹ
1 ɢ ɡɚɬɟɦ ɜɪɟɦɹ ɨɤɨɧɱɚɧɢɹ 2,
ɇɚɩɪɢɦɟɪ: ȼɵ ɯɨɬɢɬɟ ɧɚɱɚɬɶ ɝɨɬɨɜɢɬɶ ɛɥɸɞɨ ɡɚ
30 ɦɢɧɭɬ ɞɨ ɜɨɡɜɪɚɳɟɧɢɹ ɞɨɦɨɣ, ɱɬɨɛɵ ɤ
ȼɚɲɟɦɭ ɩɪɢɯɨɞɭ ɜ 12:55 ɨɧɨ ɛɵɥɨ ɝɨɬɨɜɨ.
ɉɪɟɠɞɟ ɱɟɦ ɡɚɞɚɬɶ ɩɪɨɞɨɥɠɢɬɟɥɶɧɨɫɬɶ
ɩɪɢɝɨɬɨɜɥɟɧɢɹ ɢ ɜɪɟɦɹ ɨɤɨɧɱɚɧɢɹ ɪɚɛɨɬɵ, ȼɵ
ɞɨɥɠɧɵ ɭɫɬɚɧɨɜɢɬɶ ɪɟɠɢɦ ɪɚɛɨɬɵ ɞɭɯɨɜɤɢ 3
ɢ ɬɟɦɩɟɪɚɬɭɪɭ ɩɪɢɝɨɬɨɜɥɟɧɢɹ. (ɫɦ. ɪɚɡɞɟɥ "
ɉɨɥɶɡɨɜɚɧɢɟ ɞɭɯɨɜɵɦ ɲɤɚɮɨɦ ").
Ɂɚɞɚɣɬɟ ɩɪɨɞɨɥɠɢɬɟɥ
ɧɚɲɟɦ ɩɪɢɦɟɪɟ - 30 ɦɢɧɭɬ).
Ⱦɥɹ ɷɬɨɝ
ɩɪɨɞɨɥɠɢɬɟɥɶɧɨɫɬɶ ɩɪɢɝɨɬɨɜɥɟɧɢɹ. (ɫɦ. ɪɚɡɞɟɥ
"ɍɫɬɚɧɨɜɤɚ ɩɪɨɞɨɥɠɢɬɟɥɶɧɨɫɬɢ
ɩɪɢɝɨɬɨɜɥɟɧɢɹ").
ɩɪɢɝɨɬɨɜɥɟɧɢɹ ɜ ȼɚɲɟɣ ɞɭɯɨ
ɞɚ ȼɚɫ ɧɟɬ ɞɨɦɚ ɢɥɢ ɠɟ ɩɪɨɰɟɫɫ
ɢɥɢ ɧɚɨɛɨɪɨɬ.
ɶɧɨɫɬɶ ɩɪɢɝ
ɨ ɡɚɩɪɨɝɪɚɦɦɢɪɭɣɬɟ ɠɟɥɚɟɦɭɸ
ɜɤɟ ɧɚ ɬɨ
ɨɬɨɜɥɟɧɢɹ 4 (ɜ
41
Page 42

EN
1
2
4
3
5
6
Symbol 1 (AUTO) appears on the display to
confirm a successful programming of the cooking
time. The current day time appears again.
Now set the required end time (see chapter
„Setting the end time“).
The end time (2) appears on the display which
corresponds to the current day time plus the
cooking time (in our example 12:45, i.e. plus 30
minutes).
x Set the required end time by key 3 (
A few seconds later, this time will be registered 4
(in our example – 12:55, i.e. we have put off the
end time for 10 minutes).
The oven is in a standby mode now.
The current day time is displayed 5 (in our
example 12:15).
In our example, the oven should switch on at
12:25 (6) with the functions “Grill + Hot air
circulation” and switch off at 12:55 according to
your setting.
+ ).
42
Page 43

DE RU
Auf dem Display erscheint das Symbol 1 (AUTO),
das eine erfolgreiche Programmierung der
Betriebsdauer bestätigt. Auf dem Display wird
wieder die aktuelle Tageszeit angezeigt.
Programmieren Sie jetzt die gewünschte Endzeit
(siehe Kapitel „Einstellen der Endzeit“).
Auf dem Display erscheint die Endzeit (2), die der
aktuellen Tageszeit plus Betriebsdauer entspricht
(in unserem Beispiel 12:45, d. h. plus 30 Minuten).
ɇɚ ɞɢɫɩɥɟɟ ɩɨɹɜɢɬɫɹ ɫɢɦɜɨɥ 1 (AUTO),
ɩɨɞɬɜɟɪɠɞɚɸɳɢɣ ɭɫɩɟɲɧɨɟ ɩɪɨɝɪɚɦɦɢɪɨɜɚɧɢɟ
ɩɪɨɞɨɥɠɢɬɟɥɶɧɨɫɬɢ ɩɪɢɝɨɬɨɜɥɟɧɢɹ, ɚ ɬɚɤɠɟ
ɜɟɪɧɺɬɫɹ ɩɨɤɚɡɚɧɢɟ ɬɟɤɭɳɟɝɨ ɜɪɟɦɟɧɢ.
Ɍɟɩɟɪɶ ɡɚɩɪɨɝɪɚɦɦɢɪɭɣɬɟ ɠɟɥɚɟɦɨɟ ɜɪɟɦɹ
ɨɤɨɧɱɚɧɢɹ ɩɪɨɰɟɫɫɚ ɩɪɢɝɨɬɨɜɥɟɧɢɹ (ɫɦ. ɪɚɡɞɟɥ
"ɍɫɬɚɧɨɜɤɚ ɜɪɟɦɟɧɢ ɨɤɨɧɱɚɧɢɹ
ɩɪɢɝɨɬɨɜɥɟɧɢɹ").
ɇɚ ɞɢɫɩɥɟɟ ɩɨɹɜɢɬɫɹ ɜɪɟɦɹ
ɩɪɢɝɨɬɨɜɥɟ
ɩɥɸɫ ɜɪɟɦɹ ɩɪɨɞɨɥɠɢɬɟɥɶɧɨɫɬɢ ɩɪɢɝɨɬɨɜɥɟɧɢɹ
(ɜ ɧɚɲɟɦ ɩɪɢɦɟɪɟ 12:45, ɬ.ɟ. ɩɥɸɫ 30 ɦɢɧ.).
ɧɢɹ (2
), ɪɚɜɧɨɟ ɬɟɤɭɳ
ɨɤɨɧɱɚɧɢɹ
ɟɦɭ ɜɪɟɦɟɧɢ,
x Mit der Wahltaste 3 (
gewünschte Endzeit ein.
Nach wenigen Sekunden wird diese Zeit registriert
4 (in unserem Beispiel - 12:55, d. h.
die Endzeit wurde um 10 Minuten verschoben).
Der Backofen ist im Zustand der Erwartung.
Die aktuelle Tageszeit wird angezeigt 5 (in
unserem Beispiel 12:15).
In unserem Beispiel soll der Backofen nach dem
von Ihnen ausgewählten Programm um 12:25 (6)
bei den Funktionen „Grill + Thermozirkulation“
einschalten und um 12:55 ausschalten.
+ ) stellen Sie die
x ɂɫɩɨɥɶɡɭɹ ɤɧɨɩɤɭ ɜɵɛɨɪɚ 3 (
ɭɫɬɚɧɨɜɢɬɟ ɠɟɥɚɟɦɨɟ ɜɪɟɦɹ ɨɤɨɧɱɚɧɢɹ
ɩɪɢɝɨɬɨɜɥɟɧɢɹ.
ɑɟɪɟɡ ɧɟɫɤɨɥɶɤɨ ɫɟɤɭɧɞ ɬɚɣɦɟɪ ɡɚɪɟɝɢɫɬɪɢɪɭɟɬ
ɷɬɨ ɡɧɚɱɟɧɢɟ 4 (ɜ ɧɚɲɟɦ ɩɪɢɦɟɪɟ - 12:55, ɬ.ɟ
ɦɵ ɫɞɜɢɧɭɥɢ ɜɪɟɦɹ ɨɤɨɧɱɚɧɢɹ ɩɪɢɝɨɬɨɜɥɟɧɢɹ
ɧɚ 10 ɦɢɧ.).
Ⱦɭɯɨɜɤɚ ɩɟɪɟɣɞɟɬ ɜ ɪɟɠɢɦ ɨɠɢɞɚɧɢɹ.
ȼɵɫɜɟɬɢɬɶɫɹ ɬɟɤɭɳɟɟ ɜɪɟɦɹ 5
ɩɪɢɦɟɪɟ - 12:15).
ȼ ɧɚɲɟɦ ɩɪɢɦɟɪɟ ɞɭɯɨɜɤɚ ɞɨɥɠɧɚ ɜɤɥɸɱɢɬɫɹ ɜ
12:25 (6) ɜ ɪɟɠɢɦɟ "ɝɪɢɥɶ + ɨɛɞɭɜ" ɧɚ 30 ɦɢɧɭɬ
ɢ ɜɵɤɥɸɱɢɬɫɹ ɜ 12:55, ɫɨɨɬɜɟɬɫɬɜɟɧɧɨ ɡɚɞɚɧɧɨɣ
ȼɚɦɢ ɩɪɨɝɪɚɦɦɟ.
(ɜ ɧɚɲɟɦ
+ )
43
Page 44

EN
Adjusting beep volume
To adjust beep volume:
x Press the keys 1 or 2 (
simultaneously.
The dot which separates the hours from the
minutes flashes.
1
2
4
5
3
6
x Press the middle key 3.
The flashing symbol 4 appears ( ton1 ) - (loud
sound).
If you prefer to select middle sound
low sound ( ton3 ):
x Press key 5 (
To save the selected volume
x Press the middle key 6.
-) again.
- or + )
( ton2 ) or
44
Page 45

DE RU
Toneinstellung des Warnsignals
Um die Lautstärke des Warnsignals einzustellen:
x Drücken Sie gleichzeitig die Wahltasten 1
oder 2 (
Der Punkt zwischen Stunden- und Minutenanzeige
fängt an zu blinken.
x Dann drücken Sie die mittlere Taste 3.
Eine blinkende Überschrift 4 erscheint ( ton1 ) (lauter Ton).
Wenn Sie ( ton2 ) - (mittlerer Ton) oder
( ton3 ) - (leiser Ton) wählen möchten:
x Drücken Sie erneut die Wahltaste 5 (
Um die gewählte Lautstärke zu speichern:
x Drücken Sie die mittlere Taste 6.
- oder + ).
- ).
ɍɫɬɚɧɨɜɤɚ ɝɪɨɦɤɨɫɬɢ ɩɪɟɞɭɩɪɟɞɢɬɟɥɶɧɨɝɨ
ɫɢɝɧɚɥɚ
ɑɬɨɛɵ ɭɫɬɚɧɨɜɢɬɶ ɝɪɨɦɤɨɫɬɶ
ɩɪɟɞɭɩɪɟɞɢɬɟɥɶɧɨɝɨ ɫɢɝɧɚɥɚ:
x ɇɚɠɦɢɬɟ ɨɞɧɨɜɪɟɦɟɧɧɨ ɧɚ ɤɧɨɩɤɢ
ɜɵɛɨɪɚ 1 ɢɥɢ 2 (
Ɂɚɦɢɝɚɟɬ ɫɪɟɞɧɹɹ ɬɨɱɤɚ, ɪɚɡɞɟɥɹɸɳɚɹ ɱɚɫɵ ɢ
ɦɢɧɭɬɵ.
x Ɂɚɬɟɦ ɧɚɠɦɢɬɟ ɧɚ ɫɪɟɞɧɸɸ ɤɧɨɩɤɭ 3.
ɉɨɹɜɢɬɫɹ ɦɢɝɚɸɳɚɹ ɧɚɞɩɢɫɶ 4 ( ton1 ) (ɝɪɨɦɤɢɣ ɬɨɧ).
ȿɫɥɢ ȼɵ ɯɨɬɢɬɟ ɜɵɛɪɚɬɶ ( ton2 ) - (ɫɪɟɞɧɢɣ ɬɨɧ)
ɢɥɢ ( ton3 ) - (ɬɢɯɢɣ ɬɨɧ):
x ɧɚɠɦɢɬɟ ɫɧɨɜɚ ɧɚ ɤɧɨɩɤɭ ɜɵɛɨɪɚ 5
(
- ).
ɑɬɨɛɵ ɡɚɩɨɦɧɢɬɶ ɜɵɛɪɚɧɧɭɸ ɝɪɨɦɤɨɫɬɶ:
x ɧɚɠɦɢɬɟ ɧɚ ɫɪɟɞɧɸɸ ɤɧɨɩɤɭ 6.
- ɢɥɢ + ).
45
Page 46

GB
1
2 3
4 5 6
ELECTRONIC PROGRAMMABLE CONTROL
Logic control
SPECIALITIES OF THE OVEN
Logic control
For each cooking function, your new oven's Logic
7
control electronic controller suggests a default
cooking temperature. This is based on our own
8
experience in obtaining the best results. You can
nevertheless change the default value to suit your
own requirements.
Elements of management :
1. Symbol of child lock
2. Indication of time
3. Symbol of timer
4. Symbol of thermoprobe
5. Indicator of oven’s heating
6. Indication of heating an oven in %
25/50/75/100% from the established
temperature
7. indication of oven’s functions
8. Multifunktional display
46
Page 47

DE RU
ELEKTRONISCHE PROGRAMMIERUNG
Logic control
BESONDERHEITEN DES
ɗɅȿɄɌɊɈɇɇɈȿ ɉɊɈȽɊȺɆɆɂɊɍɘɓȿȿ
ɍɋɌɊɈɃɋɌȼɈ Logic control
ɈɋɈȻȿɇɇɈɋɌɂ ȾɍɏɈȼɈɄ
BACKOFENS Logic control
Die elektronische Steuerung Ihres Backofens
Logic control schlägt für alle Betriebsfunktionen
eine empfohlene Temperatur vor. Das basiert sich
auf unseren eigenen Erfahrungen, damit die
besten Backergebnisse erreicht werden.
Selbstverständlich können Sie diese
Temperaturwerte jederzeit nach Belieben ändern
und somit Ihren Anforderungen anpassen.
Bedienelemente der Programmiereinheit:
1. Symbol der Kindersicherung
2. Uhrzeit - Anzeige
3. Kurzzeitwecker - Symbol
4. Thermosonde - Symbol
5. Aufheizungsanzeige
6. Backofen - Aufheizfortschrittsanzeige in %:
25 / 50 / 75 / 100 % der eingestellten
Temperatur
7. Backofenfunktionsanzeige
8. Multi-Funktion Display
Logic control
Ⱦɥɹ ɤɚɠɞɨɝɨ ɪɟɠɢɦɚ ɩɪɢɝɨɬɨɜɥɟɧɢɹ
ɷɥɟɤɬɪɨɧɧɨɟ ɨɛɨɪɭɞɨɜɚɧɢɟ ȼɚɲɟɣ ɞɭɯɨɜɤɢ
Logic control ɩɪɟɞɥɚɝɚɟɬ ɪɟɤɨɦɟɧɞɭɟɦɭɸ
ɬɟɦɩɟɪɚɬɭɪɭ. ɗɬɨ ɨɫɧɨɜɚɧɨ ɧɚ ɧɚɲɟɦ
ɫɨɛɫɬɜɟɧɧɨɦ ɨɩɵɬɟ ɜ ɩɨɥɭɱɟɧɢɢ ɥɭɱɲɢɯ
ɪɟɡɭɥɶɬɚɬɨɜ. Ɉɞɧɚɤɨ, ȼɵ ɦɨɠɟɬɟ ɢɡɦɟɧɢɬɶ
ɬɟɦɩɟɪɚɬɭɪɭ ɩɨ ɫɜɨɟɦɭ ɭɫɦɨɬɪɟɧɢɸ.
ɗɥɟɦɟɧɬɵ ɭɩɪɚɜɥɟɧɢɹ ɩɪɨɝɪɚɦɦɚɬɨɪɨɦ:
1. ɫɢɦɜɨɥ ɛɥɨɤɢɪɨɜɤɢ ɨɬ ɞɟɬɟɣ
2. ɢɧɞɢɤɚɰɢɹ ɜɪɟɦɟɧɢ
3. ɫɢɦɜɨɥ ɬɚɣɦɟɪɚ
4. ɫɢɦɜɨɥ ɬɟɪɦɨɡɨɧɞɚ
5. ɢɧɞɢɤɚɰɢɹ ɧɚɝɪɟɜɚ ɞɭɯɨɜɤɢ
6. ɢɧɞɢɤɚɰ
75 / 100 % ɨɬ ɭɫɬɚɧɨɜɥɟɧɧɨɣ
ɬɟɦɩɟɪɚɬɭɪɵ
7. ɢɧɞɢɤɚɰɢɹ ɮɭɧɤɰɢɣ ɞɭɯɨɜɤɢ
8. ɦɧɨɝɨɮɭɧɤɰɢɨɧɚɥɶɧɵɣ ɞɢɫɩɥɟɣ
ɢɹ ɧɚɝɪɟɜɚ ɞɭɯɨɜɤɢ ɜ % 25
/ 50 /
47
Page 48

GB
p
1 2
First of all a language should be established, and
then established a current time.
A choice of the language
Important! Without installation of
language and current time the work of an
oven is im
x Press key 3 to choose a mode of
installation the language.
x By pressing keys 1 or 2 (
language (for example English).
ossible!
- or + ) set the
In 3 seconds the chosen language will be
remembered.
Setting the clock
At the first switching on clocks start to blink
symbols 00:00.
x By pressing the keys 1 or 2 (
the current time.
- or + ) set
3
In 3 seconds the chosen time will be remembered,
the symbols stop to blink.
Established time can be changed. For it:
x Check up, whether the knob of the oven
operating functions is in position „Off “,
and accordingly disconnect an oven.
x By pressing the key 3 choose a „current
time” mode.
x By pressing keys 1 or 2 (
current time.
- or + ) set the
In 3 seconds the chosen time will be remembered,
the symbols stop to blink.
Important! At change of established time
the timer will be established anew, and all
the chosen modes of preparation will be
cancelled.
48
Page 49

DE RU
B
Zuerst muss eine Sprache gewählt und dann die
Uhrzeit eingestellt werden.
ȼɚɠɧɨ! Ȼɟɡ ɭɫɬɚɧɨɜɤɢ ɹɡɵɤɚ ɢ ɬɟɤɭɳɟɝɨ
ɜɪɟɦɟɧɢ ɪɚɛɨɬɚ ɞɭɯɨɜɤɢ ɧɟɜɨɡɦɨɠɧɚ!
Sprache wählen
x Mit Hilfe der Wahltaste 3
Spracheinstellungen - Modus wählen.
ȼ ɩɟɪɜɭɸ ɨɱɟɪɟɞɶ ɞɨɥɠɟɧ ɛɵɬɶ ɭɫɬɚɧɨɜɥɟɧ
ɹɡɵɤ, ɚ ɡɚɬɟɦ ɭɫɬɚɧɨɜɥɟɧɨ ɬɟɤɭɳɟɟ ɜɪɟɦɹ.
ȼɵɛɨɪ ɹɡɵɤɚ
ȼɚɠɧɨ! Ȼɟɡ ɭɫɬɚɧɨɜɤɢ ɹɡɵɤɚ ɢ ɬɟɤɭɳɟɝɨ
ɜɪɟɦɟɧɢ ɪɚɛɨɬɚ ɞɭɯɨɜɤɢ ɧɟɜɨɡɦɨɠɧɚ!
x ɋ ɩɨɦɨɳɶɸ ɤɧɨɩɤɢ 3 ɜɵɛɟɪɢɬɟ ɪɟɠɢɦ
ɭɫɬɚɧɨɜɤɢ ɹɡɵɤɚ.
x Mit Hilfe der Wahltasten 1 oder 2 (
- oder
+ ) die gewünschte Sprache einstellen (z.
B. Deutsch).
Nach drei Sekunden wird die gewählte Sprache
übernommen.
Uhrzeit einstellen
Wird die Uhr zum ersten Mal eingeschaltet, blinken
die Symbole 00:00
x Mit Hilfe der Wahltasten 1 oder 2 (
.
- oder
+ ) die aktuelle Uhrzeit einstellen
Nach drei Sekunden wird die eingestellte Zeit
übernommen und die Symbole hören auf zu
blinken.
Die eingestellte Uhrzeit kann auch anschließend
verändert werden. Dafür muss man:
x Prüfen, ob der Drehregler
ackofenbetriebsfunktionen auf
„Aus“ steht, bzw. den Backofen
ausschalten.
x Mit Hilfe der Wahltaste 3 Modus „aktuelle
Uhrzeit“ wählen.
x Mit Hilfe der Wahltasten 1 oder 2 (
- oder
+ ) die aktuelle Uhrzeit einstellen.
Nach drei Sekunden wird die eingestellte Zeit
übernommen und die Symbole hören auf zu
blinken.
Wichtig! Bei der Änderung der
eingestellten Uhrzeit werden alle vorher
gewählten Programme gelöscht.
x ɋ ɩɨɦɨɳɶɸ ɤɧɨɩɨɤ 1 ɢɥɢ 2 (
ɭɫɬɚɧɨɜɢɬɟ ɠɟɥɚɟɦɵɣ ɹɡɵɤ (ɧɚɩɪ.
ɪɭɫɫɤɢɣ).
- ɢɥɢ + )
ɑɟɪɟɡ 3 ɫɟɤɭɧɞɵ ɜɵɛɪɚɧɧɵɣ ɹɡɵɤ ɛɭɞɟɬ
ɡɚɩɨɦɧɟɧ.
ɍɫɬɚɧɨɜɤɚ ɬɟɤɭɳɟɝɨ ɜɪɟɦɟɧɢ
ɉɪɢ ɩɟɪɜɨɦ ɜɤɥɸɱɟɧɢɢ ɱɚɫɨɜ ɧɚɱɢɧɚɸɬ ɦɢɝɚɬɶ
ɫɢɦɜɨɥɵ 00:00.
x ɋ ɩɨɦɨɳɶɸ ɤɧɨɩɨɤ 1 ɢɥɢ 2 (
ɭɫɬɚɧɨɜɢɬɟ ɬɟɤɭɳɟɟ ɜɪɟɦɹ.
- ɢɥɢ + )
ɉɨ ɢɫɬɟɱɟɧɢɢ ɬɪɟɯ ɫɟɤɭɧɞ ɜɵɛɪɚɧɧɨɟ ɜɪɟɦɹ
ɛɭɞɟɬ ɡɚɩɨɦɧɟɧɨ, ɫɢɦɜɨɥɵ ɩɟɪɟɫɬɚɧɭɬ ɦɢɝɚɬɶ.
ɍɫɬɚɧɨɜɥɟɧɧɨɟ ɜɪɟɦɹ ɦɨɠɧɨ ɢɡɦɟɧɢɬɶ. Ⱦɥɹ
ɷɬɨɝɨ:
x ɉɪɨɜɟɪɶɬɟ, ɫɬɨɢɬ ɥɢ ɪɭɱɤɚ
ɜ ɩɨɥɨɠɟɧɢɢ
„ȼɵɤɥ.“, ɢɥɢ, ɫɨɨɬɜɟɬɫɬɜɟɧɧɨ,
ɨɬɤɥɸɱɢɬɟ ɞɭɯɨɜɤɭ.
x ɋ ɩɨɦɨɳɶɸ ɤɧɨɩɤɢ 3 ɜɵɛɟɪɢɬɟ ɪɟɠɢɦ
„ɬɟɤɭɳɟɟ ɜɪɟɦɹ”.
x ɋ ɩɨɦɨɳɶɸ ɤɧɨɩɨɤ 1 ɢɥɢ 2 (
ɭɫɬɚɧɨɜɢɬɟ ɬɟɤɭɳɟɟ ɜɪɟɦɹ.
- ɢɥɢ + )
ɉɨ ɢɫɬɟɱɟɧɢɢ ɬɪɟɯ ɫɟɤɭɧɞ ɜɵɛɪɚɧɧɨɟ ɜɪɟɦɹ
ɛɭɞɟɬ ɡɚɩɨɦɧɟɧɨ, ɫɢɦɜɨɥɵ ɩɟɪɟɫɬɚɧɭɬ ɦɢɝɚɬɶ.
ȼɚɠɧɨ! ɉɪɢ ɢɡɦɟɧɟɧɢɢ ɭɫɬɚɧɨɜɥɟɧɧɨɝɨ
ɜɪɟɦɟɧɢ ɬɚɣɦɟɪ ɛɭɞɟɬ ɭɫɬɚɧɨɜɥɟɧ
ɡɚɧɨɜɨ, ɚ ɜɫɟ ɜɵɛɪɚɧɧɵɟ ɪɟɠɢɦɵ
ɩɪɢɝɨɬɨɜɥɟɧɢɹ ɛɭɞɭɬ ɨɬɦɟɧɟɧɵ.
49
Page 50

GB
5
Usage of the oven
You can start the process of cooking with a few
easy handels.
x Turn of the knob of the oven operating
functions to choose a desirable
preparation mode. Thus on the display will
be highlighted the symbolical designation of
the chosen mode.
According to the chosen mode, the oven will
automatically establish a recommended
temperature and on the display will be a text
„Oven … °C“.
x If you want you can change the
recommended temperature by pressing
keys1 or 2 (
In 3 seconds after changing of temperature
lectronic management will automatically switch on
4
3
2
1
the oven.
The symbol of heating 5 will light up, showing,
that the oven is warming up.
When the oven reaches the set temperature, the
oven beeps and a symbol of heating 5 will light
out. Now you can put a food you want to prepare
into the oven.
Child lock
The oven can be blocked for protection against
inadvertent inclusion.
Activating the child lock
x Turn the knob of the oven operating
functions in position "switched off".
x Press the key 3 to choose “Child lock”
mode.
x By pressing the key 2 activate function of
blocking. On the display will light up the
symbol of a key 4.
Deactivation of child lock
x Press the key 1 to deactivate child lock.
- or + )
50
Page 51

DE RU
1
Gebrauch von Backofen
Mit wenigen einfachen Handgriffen können Sie den
Prozess der Zubereitung beginnen.
x Mittels des Drehreglers der
Backofenbetriebsfunktionen die
gewünschte Betriebsfunktion wählen. Die
gewählte Betribsfunktion wird auf dem
Display symbolisch angezeigt.
Entsprechend der gewählten Betriebsfunktion, wird
im Backofen automatisch eine empfohlene
Temperatur eingestellt und auf dem Dysplay
erscheint der Text „Backofen…°C„.
x Je nach Ihrem Wunsch können Sie die
voreingestellte Temperatur mit Hilfe der
ɉɨɥɶɡɨɜɚɧɢɟ ɞɭɯɨɜɵɦ ɲɤɚɮɨɦ
ȼ ɧɟɫɤɨɥɶɤɨ ɩɪɨɫɬɵɯ ɞɜɢɠɟɧɢɣ ȼɵ ɦɨɠɟɬɟ
ɧɚɱɚɬɶ ɩɪɨɰɟɫɫ ɩɪɢɝɨɬɨɜɥɟɧɢɹ.
x ɉɨɜɨɪɨɬɨɦ ɪɭɱɤɢ
ɜɵɛɟɪɢɬɟ ɠɟɥɚɟɦɵɣ ɪɟɠɢɦ
ɩɪɢɝɨɬɨɜɥɟɧɢɹ. ɉɪɢ ɷɬɨɦ ɧɚ ɞɢɫɩɥɟɟ
ɜɵɫɜɟɬɢɬɫɹ ɫɢɦɜɨɥɶɧɨɟ ɨɛɨɡɧɚɱɟɧɢɟ
ɜɵɛɪɚɧɧɨɝɨ ɪɟɠɢɦɚ.
ȼ ɫɨɨɬɜɟɬɫɬɜɢɢ ɫ ɜɵɛɪɚɧɧɵɦ ɪɟɠɢɦɨɦ, ɞɭɯɨɜɤɚ
ɚɜɬɨɦɚɬɢɱɟɫɤɢ ɭɫɬɚɧɨɜɢɬ ɪɟɤɨɦɟɧɞɭɟɦɭɸ
ɬɟɦɩɟɪɚɬɭɪɭ ɢ ɧɚ ɞɢɫɩɥɟɟ ɩɨɹɜɢɬɫɹ ɬɟɤɫɬ
„Ⱦɭɯɨɜɤɚ… °C“.
x ɉɪɢ ɠɟɥɚ
ɪɟɤɨɦɟɧɞɭɟ
ɧɢɢ ȼɵ ɦɨɠɟɬɟ
ɦɭɸ ɬɟɦɩɟɪɚɬɭɪɭ ɤɧɨɩɤɚɦɢ
ɢɡɦɟɧɢɬɶ
Wahltasten 1 oder 2
Nach 3 Sekunden nach der Temperaturänderung
wird sich der Backofen automatisch einschalten.
Das Aufheizung-Symbol 5 leuchtet auf, dadurch
wird informiert, dass der Backofen aufgeheizt wird.
Sobald der Backofen die eingestellte Temperatur
erreicht, ertönt ein akustisches Signal und das
Aufheizung-Symbol 5 erlischt: Jetzt können Sie
Ihr zu zubereitendes Gericht in Backofen stellen.
Kindersicherung
Der Backofen kann zum Schutz vor ungewolltem
Einschalten gesperrt werden.
Aktivierung der Kindersicherung
x Den Drehregler der
Backofenbetriebsfunktionen in die
Position „Aus“ bringen.
x Mit Hilfe der Wahltaste 3 die Funktion
„Kindersicherung“ wählen.
x Mit Hilfe der Wahltaste 2 die
Kindersicherung aktivieren. Dabei
erscheint auf dem Display das Sümbol
Schlüssel 4.
Ausschaltung der Kindersicherung
x Mit Hilfe der Wahltaste 1 die
Kindersicherung ausschalten.
(- oder + ) ändern.
ɑɟɪɟɡ 3 ɫɟɤɭɧɞɵ ɩɨɫɥɟ ɢɡɦɟɧɟɧɢɹ ɬɟɦɩɟɪɚɬɭɪɵ
ɷɥɟɤɬɪɨɧɧɨɟ ɭɩɪɚɜɥɟɧɢɟ ɚɜɬɨɦɚɬɢɱɟɫɤɢ
ɜɤɥɸɱɢɬ ɞɭɯɨɜɤɭ.
Ɂɚɝɨɪɢɬɫɹ ɫɢɦɜɨɥ 5, ɩɨɤɚɡɵɜɚɹ, ɱɬɨ
ɞɭɯɨɜɤɚ ɪɚɡɨɝɪɟɜɚɟɬɫɹ.
Ʉɨɝɞɚ ɞɭɯɨɜɤɚ ɞɨɫɬɢɝɧɟɬ ɡɚɞɚɧɧɨɣ
ɬɟɦɩɟɪɚɬɭɪɵ, ɨɧɚ ɩɨɞɚɫɬ ɡɜɭɤɨɜɨɣ ɫɢɝɧɚɥ, ɚ
ɫɢɦɜɨɥ 5 ɩɨɝɚɫɧɟɬ. Ɍɟɩɟɪɶ ȼɵ
ɦɨɠɟɬɟ ɫɬɚɜɢɬɶ ɜ ɞɭɯɨɜɤɭ ɛɥɸɞɨ, ɤɨɬɨɪɨɟ
ɯɨɬɢɬɟ ɝɨɬɨɜɢɬɶ.
Ȼɥɨɤɢɪɨɜɤɚ ɨɬ ɞɟɬɟɣ
Ⱦɭɯɨɜɤɚ ɦɨɠɟɬ ɛɵɬɶ ɡɚɛɥɨɤɢɪɨɜɚɧɚ ɞɥɹ
ɡɚɳɢɬɵ ɨɬ ɧɟɩɪɟɞɧɚɦ
Ⱥɤɬɢɜɚɰɢɹ ɮɭɧɤɰɢɢ ɛɥɨɤɢɪɨɜɤɢ ɨɬ ɞɟɬɟɣ
Ⱦɟɡɚɤɬɢɜɚɰɢɹ ɮɭɧɤɰɢɢ ɛɥɨɤɢɪɨɜɤɢ ɨɬ ɞɟ
ɢɥɢ 2 (
x ɍɫɬɚɧɨɜɢɬɟ ɪɭɱɤɭ
ɜ ɩɨɥɨɠɟɧɢɟ „ɜɵɤɥɸɱɟɧɨ“.
x ɋ ɩɨɦɨɳɶɸ ɤɧɨɩɤɢ 3 ɜɵɛɟɪɢɬɟ ɪɟɠɢɦ
„ɛɥɨɤɢɪɨɜɤɚ“.
x ɋ ɩɨɦɨɳɶɸ ɤɧɨɩɤɢ 2 ɚɤɬɢɜɢɪɭɣɬɟ
ɮɭɧɤɰɢɸ ɛɥɨɤɢɪɨɜɤɢ. ɉɪɢ ɷɬɨɦ ɧɚ
ɞɢɫɩɥɟɟ ɡɚɝɨɪɢɬɫɹ ɫɢɦɜɨɥ 4.
x ɋ ɩɨɦɨɳɶɸ ɤɧɨɩɤɢ 1 ɨɬɤɥɸɱɢɬ
ɛɥɨɤɢɪɨɜɤɭ.
- ɢɥɢ + ).
ɟɪɟɧɧɨɝɨ ɜɤɥɸɱɟɧɢɹ.
ɬɟɣ
ɟ
51
Page 52

GB
4
Electronical countdown timer
The countdown timer works independently of all
other timer functions, and can be used even when
the oven is switched off.
To switch on the countdown timer
x By pressing the key 3 choose a mode
"timer".
x By pressing key 1 or 2 (
countdown time and simply wait.
After a few seconds the countdown timer starts the
countdown; the symbol of timer 4, text “timer”
and countdown time appears on the display
3
3
1 2
1
2
After set time the oven beeps.
x To switch off the timer press key1 or 2 (
+ ).
or
The symbol of countdown timer 4 switched
out.
Setting the cooking time
The process in the oven shoudl switch off after a
wanted duration automatically.
Before setting the duration you have to set the
oven operating function and the
temperature (see chapter “Usage of the
oven”).
x By pressing the key 3 choose a mode
"duration".
x By pressing keys 1 or 2 (
duration of preparation.
In 3 seconds after changing the electronic
management system automatically switch off the
oven. On the display will be shown the remained
preparation time and oven’s temperature at
present.
- or + ) set
-
- or + ) set the
52
Page 53

DE RU
1
1
1
1
1
Elektronischer Kurzzeitwecker
Der Gebrauch vom elektronischen Kurzzeitwecker
ist von anderen Funktionen unabhängig und kann
auch bei ausgeschaltetem Backofen verwendet
werden.
Zum Einschalten des Kurzzeitweckers:
x Mit Hilfe der Wahltaste 3 „Wecker“-Modus
wählen.
ɗɥɟɤɬɪɨɧɧɵɣ ɦɢɧɭɬɧɢɤ
ɗɥɟɤɬɪɨɧɧɵɣ ɦɢɧɭɬɧɢɤ ɪɚɛɨɬɚɟɬ ɧɚɡɚɜɢɫɢɦɨ ɨɬ
ɞɪɭɝɢɯ ɮɭɧɤɰɢɣ. ɂɦ ɦɨɠɧɨ ɩɨɥɶɡɨɜɚɬɶɫɹ ɞɚɠɟ
ɟɫɥɢ ɞɭɯɨɜɤɚ ɜɵɤɥɸɱɟɧɚ.
ɑɬɨɛɵ ɜɤɥɸɱɢɬɶ :
x ɋ ɩɨɦɨɳɶɸ ɤɧɨɩɤɢ 3 ɜɵɛɟɪɢɬɟ ɪɟɠɢɦ
„ɬɚɣɦɟɪ“.
x Mit Hilfe der Wahltasten
oder 2 ( - oder
+ ) die Zeitdauer einstellen und einige
Sekunden warten.
Nach wenigen Sekunden wird der Kurzzeitwecker
die Rückzählung beginnen, erscheinen das
Symbol Wecker 4, Text „Wecker“ und die Zeit
der Rückzählung.
Nach Ablauf der eingestellten Zeitdauer ertönt ein
doppelter Signalton.
x Um den Kurzzeitwecker auszuschalten die
Wahltasten
Das Symbol Kurzzeitwecker 4 erlischt.
Einstellen der Betriebsdauer
Der Vorgang im Backofen soll nach einer
gewünschten Dauer automatisch abgeschaltet
werden.
Bevor die Dauer der Gerichtszubereitung
eingegeben wird, müssen Sie die
Backofenfunktion und die Temperatur der
Zubereitung einstellen (siehe Kapitel „Gebrauch
vom Backofen“).
x Mit Hilfe der Wahltaste 3 das Modus
„Dauer“ wählen.
x Mit Hilfe der Wahltasten 1 oder 2 (
oder 2 ( - oder + ) drücken.
- oder
ɑɟɪɟɡ ɧɟɫɤɨɥɶɤɨ ɫɟɤɭɧɞ ɬɚɣɦɟɪ ɧɚɱɧɟɬ
ɨɛɪɚɬɧɵɣ ɫɱɟɬ, ɩɨɹɜɢɬɫɹ ɫɢɦɜɨɥ
4, ɬɟɤɫɬ „ɬɚɣɦɟɪ“ ɢ ɨɛɪɚɬɧɵɣ ɫɱɟɬ ɡɚɞɚɧɧɨɝɨ
ɜɪɟɦɟɧɢ.
ɉɨ ɢɫɬɟɱɟɧɢɢ ɡɚɞɚɧɧɨɝɨ ɜɪɟɦɟɧɢ ɞɭɯɨɜɤɚ
ɩɨɞɚɟɬ ɡɜɭɤɨɜɨɣ ɫɢɝɧɚɥ.
ɋɢɦɜɨɥ 4
ɍɫɬɚɧɨɜɤɚ ɩɪɨɞɨɥɠɢɬɟɥɶɧɨɫɬɢ
ɩɪɢɝɨɬɨɜɥɟɧɢɹ
Ⱦɭɯɨɜɤɚ ɞɨɥɠɧɚ ɚɜɬɨɦɚɬɢɱɟɫɤɢ ɨɬɤɥɸɱɢɬɶɫɹ ɩɨ
ɢɫɬɟɱɟɧɢɢ ɠɟɥɚɟɦɨɝɨ ɩɪɨɦɟɠɭɬɤɚ ɜɪɟɦɟɧɢ.
ɉɪɟɠɞɟ ɱɟɦ ɡɚɞɚɬɶ ɩɪɨɞɨɥɠɢɬɟɥɶɧɨɫɬɶ
ɩɪɢɝɨɬɨɜɥɟɧɢɹ, ȼɵ ɞɨɥɠɧɵ ɭɫɬɚɧɨɜɢɬɶ
ɢ
. (ɫɦ. ɪɚɡɞɟɥ "ɉɨɥɶɡɨɜɚɧɢɟ
ɞɭɯɨɜɵɦ ɲɤɚɮɨɦ").
+ ) die gewünschte Dauer der
Gerichtzubereitung einstellen.
Nach 3 Sekunden schaltet der Backofen
automatisch ein. Auf dem Display erscheinen die
Zubereitungsrestzeit und die Backofentemperatur
zu diesem Zeitpunkt.
ɑɟɪɟɡ 3 ɫɟɤɭɧɞɵ ɩɨɫɥɟ ɷɬɨɝɨ, ɷɥɟɤɬɪɨɧɧɨɟ
ɭɩɪɚɜɥɟɧɢɟ ɚɜɬɨɦɚɬɢɱɟɫɤɢ ɜɤɥɸɱɢɬ ɞɭɯɨɜɤɭ. ɇɚ
ɞɢɫɩɥɟɟ ɛɭɞɟɬ ɩɨɤɚɡɚɧɨ ɨɫɬɚɜɲɟɟɫɹ ɜɪɟɦɹ
ɩɪɢɝɨɬɨɜɥɟɧɢɹ ɢ ɬɟɦɩɟɪɚɬɭɪɚ ɞɭɯɨɜɤɢ ɧɚ
ɞɚɧɧɵɣ ɦɨɦɟɧɬ.
x ɋ ɩɨɦɨɳɶɸ ɤɧɨɩɨɤ
ɭɫɬɚɧɨɜɢɬɟ ɜɪɟɦɹ ɨɬɫɱɟɬɚ ɢ ɩɪɨɫɬɨ
ɩɨɞɨɠɞɢɬɟ.
x ɇɚɠɚɜ ɥɸɛɭɸ ɤɧɨɩɤɭ
ɨɬɤɥɸɱɢɬɟ ɦɢɧɭɬɧɢɤ.
x ɋ ɩɨɦɨɳɶɸ ɤɧɨɩɤɢ 3 ɜɵɛɟɪɢɬɟ ɪɟɠɢɦ
„ɩɪɨɞɨɥɠɢɬɟɥɶɧɨɫɬɶ“.
x ɋ ɩɨɦɨɳɶɸ ɤɧɨɩɨɤ
ɭɫɬɚɧɨɜɢɬɟ ɠɟɥɚɟɦɭɸ
ɩɪɨɞɨɥɠɢɬɟɥɶɧɨɫɬɶ ɩɪɢɝɨɬɨɜɥɟɧɢɹ.
ɢɥɢ 2 ( - ɢɥɢ + )
ɢɥɢ 2 ( - ɢɥɢ + ),
ɩɨɝɚɫɧɟɬ.
ɢɥɢ 2 ( - ɢɥɢ + )
53
Page 54

GB
If during the work of an oven you wish to learn the
remained preparation time, and it is not
represented on the display, press the key 3
"duration" mode - remained time will be
represented near the temperature.
After the end of the opposed duration the oven
beeps.
x Press keys 1 or 2 (
3
3
1
1
2
2
If it is necessary to continue the coocking press the
key 2.
For switching-off of an automatic operating mode it
is enough to move the knob of the oven
operating functions in position "switched off".
Coocking will be interrupted, and the program of
coocking will be switched off.
Setting cooking duration and end times
You can combine the cooking duration and end of
cooking time functions to set the start and end
times for cooking. In this way you can program
your electronic oven to cook while you are out or to
defrost foods ready for you to cook when you get
back. A great help in the kitchen!
For example: You want to start cooking 30
minutes before you get home so that it will be
ready for you arrival at 12:55.
buzzer.
x Press the key 3 to choose a mode
"duration".
- or + ) to silence a
54
3
x Press keys 1 or 2 (
desirable duration of coocking (in our
example - 30 minutes).
x Press the key 3 choose a mode "end".
1
2
x Press keys 1 or 2 (
desirable time of switching-off (in our
example - 12:45).
- or + ) to set
- or + ) to set
Page 55

DE RU
1
1
1
1
1
1
Wenn Sie während des Backofenbetriebes die
Restzeit erfahren möchten und dies zu diesem
Zeitpunkt nicht auf dem Display erscheint, wählen
Sie mit Hilfe der Wahltaste 3 den Modus „Dauer“ –
die Restzeit erscheint neben der Temperatur-
Anzeige.
Nach dem Ablauf der Zubereitungszeit ertönt ein
Signalton.
ȿɫɥɢ ɜɨ ɜɪɟɦɹ ɪɚɛɨɬɵ ɞɭɯɨɜɤɢ ȼɵ ɯɨɬɢɬɟ
ɭɡɧɚɬɶ ɨɫɬɚɜɲɟɟɫɹ ɜɪɟɦɹ ɩɪɢɝɨɬɨɜɥɟɧɢɹ ɢ ɷɬɨ
ɧɟ ɨɬɨɛɪɚɠɚɟɬɫɹ ɜ ɞɚɧɧɵɣ ɦɨɦɟɧɬ ɧɚ ɞɢɫɩɥɟɟ,
ɜɵɛɟɪɢɬɟ ɤɧɨɩɤɨɣ 3 ɪɟɠɢɦ
„ɩɪɨɞɨɥɠɢɬɟɥɶɧɨɫɬɶ“ - ɨɫɬɚɜɲɟɟɫɹ ɜɪɟɦɹ
ɩɨɹɜɢɬɫɹ ɪɹɞɨɦ ɫ ɬɟɦɩɟɪɚɬɭɪɨɣ.
ɉɨ ɢɫɬɟɱɟɧɢɢ ɜɪɟɦɟɧɢ ɩɪɢɝɨɬɨɜɥɟɧɢɹ ɞɭɯɨɜɤɚ
ɩɨɞɚɟɬ ɡɜɭɤɨɜɨɣ ɫɢɝɧɚɥ.
x Mit den Wahltasten
oder 2 ( - oder + )
den Signalton ausschalten.
Je nach dem Wunsch kann man mit Hilfe der
Wahltaste 2 den Zubereitungsprozess verlängern.
Um den automatischen Betrieb auszuschalten,
genügt es den Drehregler der
Backofenbetriebsfunktionen in die Position
„Aus“ zu bringen. Der Zubereitungsprozess wird
unterbrochen und das Programm ausgeschaltet.
Einstellen der Betriebsdauer und Endzeit
Sie können die beiden Funktionen "Betriebsdauer"
und „Endzeit“ kombinieren, wobei Sie eine
gewünschte Zeit eingeben, um den Backofen einbzw. auszuschalten. So können Sie Ihren
Backofen für die Zeit programmieren, wenn Sie
nicht zu Hause sind; oder das Auftauen von
Speisen bevor Sie nach Hause kommen. Das ist
eine große Hilfe in Ihrer Küche.
Beispiel: Sie möchten die Gerichtszubereitung 30
Minuten vor Ihrer Rückkehr nach Hause beginnen,
so, dass zu Ihrer Ankunft um 12:55 die Speise
fertig ist.
ȿɫɥɢ ɷɬɨ ɧɟɨɛɯɨɞɢɦɨ, ɩɪɨɞɥɟɧɢɟ ɩɪɨɰɟɫɫɚ
ɩɪɢɝɨɬɨɜɥɟɧɢɹ ɜɨɡɦɨɠɧɨ ɩɭɬɟɦ ɧɚɠɚɬɢɹ ɤɧɨɩɤɢ
2.
Ⱦɥɹ ɨɬɤɥɸɱɟɧɢɹ ɚɜɬɨɦɚɬɢɱɟɫɤɨɝɨ ɪɟɠɢɦɚ
ɪɚɛɨɬɵ ɞɨɫɬɚɬɨɱɧɨ ɩɟɪɟɜɟɫɬɢ ɪɭɱɤɭ
ɜ ɩɨɥɨɠɟɧɢɟ „ɜɵɤɥɸɱɟɧɨ“.
ɉɪɨɰɟɫɫ ɩɪɢɝɨɬɨɜɥɟɧɢɹ ɛɭɞɟɬ ɩɪɟɪɜɚɧ, ɚ
ɩɪɨɝɪɚɦɦɚ ɩɪɢɝɨɬɨɜɥɟɧɢɹ ɨɬɤɥɸɱɟɧɚ.
ɍɫɬɚɧɨɜɤɚ ɜɪɟɦɟɧɢ ɩɪɨɞɨɥɠɢɬɟɥɶɧɨɫɬɢ ɢ
ɨɤɨɧɱɚɧɢɹ ɩɪɢɝɨɬɨɜɥɟɧɢɹ
ȼɵ ɦɨɠɟɬɟ ɤɨɦɛɢɧɢɪɨɜɚɬɶ ɮɭɧɤɰɢɢ ɜɪɟɦɟɧɢ
ɩɪɢɝɨɬɨɜɥɟɧɢɹ ɢ ɜɪɟɦɟɧɢ ɨɤɨɧɱɚɧɢɹ
ɩɪɢɝɨɬɨɜɥɟ
ɜɤɥɸɱɟɧɢɹ ɢ ɜɵɤɥɸɱɟɧɢɹ ɞɭɯɨɜɤɢ. Ɍɚɤɢɦ
ɨɛɪɚɡɨɦ, ȼɵ ɦɨɠɟɬɟ ɡɚɩɪɨɝɪɚɦɦɢɪɨɜɚɬɶ
ɩɪɨɰɟɫɫ ɩɪɢɝɨɬɨɜɥɟɧɢɹ ɜ ȼɚɲɟɣ ɞɭɯɨɜɤɟ ɧɚ ɬɨ
ɜɪɟɦɹ, ɤɨɝɞɚ ȼɚɫ ɧɟɬ ɞɨɦɚ ɢɥɢ ɠɟ ɩɪɨɰɟɫɫ
ɪɚɡɦɨɪɚɠɢɜɚɧɢɹ ɩɪɨɞɭɤɬɨɜ ɤ ȼɚɲɟɦɭ ɩɪɢɯɨɞɭ.
ɇɟɩɥɨɯɚɹ ɩɨɦɨɳɶ ɧɚ ɤɭɯɧɟ.
ɇɚɩɪɢɦɟɪ: ȼɵ ɯɨɬɢɬɟ ɧɚɱɚɬɶ ɝɨɬɨɜɢɬɶ ɛɥɸɞɨ ɡɚ
30 ɦɢɧɭɬ ɞɨ ɜɨɡɜɪɚɳɟɧɢɹ ɞɨɦɨɣ, ɱɬɨɛ
ȼɚɲɟɦɭ ɩɪɢɯɨɞ
x Mit Hilfe der Wahltaste 3 den Modus
„Dauer“ wählen.
x Mit Hilfe der Wahltasten
oder 2 ( - oder
+ ) die gewünschte Dauer (in unserem Fall
– 30 Minuten) einstellen.
x Mit Hilfe der Wahltaste 3 den Modus
„Ende“ wählen.
x Mit Hilfe der Wahltasten
oder 2 ( - oder
+ ) die gewünschte Endzeit (in unserem
Fall - 12:45) wählen.
x ɋ ɩɨɦɨɳɶɸ ɤɧɨɩɨɤ
ɢɥɢ 2 ( - ɢɥɢ + )
ɨɬɤɥɸɱɢɬɟ ɡɭɦɦɟɪ.
ɧɢɹ, ɡɚɞɚ
ɜɚɹ ɠɟɥɚ
ɟɦɨɟ ɜɪɟɦɹ
ɵ ɤ
ɭ ɜ 12:45 ɨɧɨ ɛɵɥɨ ɝɨɬɨɜɨ.
x ɋ ɩɨɦɨɳɶɸ ɤɧɨɩɤɢ 3 ɜɵɛɟɪɢɬɟ ɪɟɠɢɦ
„ɩɪɨɞɨɥɠɢɬɟɥɶɧɨɫɬɶ“.
x ɋ ɩɨɦɨɳɶɸ ɤɧɨɩɨɤ
ɢɥɢ 2 ( - ɢɥɢ + )
ɭɫɬɚɧɨɜɢɬɟ ɠɟɥɚɟɦɭɸ
ɩɪɨɞɨɥɠɢɬɟɥɶɧɨɫɬɶ ɩɪɢɝɨɬɨɜɥɟɧɢɹ
(ɜ
ɧɚɲɟɦ ɩɪɢɦɟɪɟ - 30 ɦɢɧɭɬ).
x ɋ ɩɨɦɨɳɶɸ ɤɧɨɩɤɢ 3 ɜɵɛɟɪɢɬɟ ɪɟɠɢɦ
„ɤɨɧɟɰ“.
x ɋ ɩɨɦɨɳɶɸ ɤɧɨɩɨɤ
ɢɥɢ 2 ( - ɢɥɢ + )
ɭɫɬɚɧɨɜɢɬɟ ɠɟɥɚɟɦɨɟ ɜɪɟɦɹ ɨɬɤɥɸɱɟɧɢɹ
(ɜ ɧɚɲɟɦ ɩɪɢɦɟɪɟ - 12:45).
55
Page 56

GB
3
1
2
After three seconds the set data are remembered.
x Turn the knob of the oven operating
functions to choose a necessary mode
and, if necessary, by pressing of keys 1 or
2 (
- or + ) to specify temperature of
coocking. In 3 seconds on the display there
will be a text "start" and time of switching
on the oven (in our example - 12:15).
After the end of the coocking the oven beeps.
x Press keys 1 or 2 (
buzzer.
For switching-off of an automatic operating mode it
is enough to move the knob of the oven
operating functions in position "switched
off". Coocking will be interrupted, and the program
of coocking will be switched off.
Using of thermoprobe
Electronic programming
device Logic control allows switching off an
oven after achievement of desirable temperature
inside of a dish. For this purpose it is used a
thermoprobe, which is entering in the complete set
of your oven.
For using the thermoprobe:
x Insert the detachable connector of the
thermometer against the stop into a slot
inside of the oven. On the display will be
highlighted a temperature and a symbol 3
start blinking
x Turn the knob of the oven operating
functions to choose a necessary mode.
Thus on the display will be lighting the
symbolical designation of a mode.
- or + ) to silence a
56
Page 57

DE RU
1
1
1
1
Nach 3 Sekunden werden die eingegebenen Daten
übernommen.
x Mittels des Drehreglers der
Backofenbetriebsfunktionen die
notwendige Funktion wählen, und falls
gewünscht mit Hilfe der Wahltasten
2 (
- oder + ) die Temperatur korrigieren.
Nach 3 Sekunden erscheint auf dem
Display „Start“ und die Einschaltzeit des
Backofens (in unserem Fall 12:15).
Nach dem Ablauf der Zubereitungszeit ertönt ein
Signalton.
x Mit Hilfe der Wahltasten
) den Signalton ausschalten.
Um den automatischen Betrieb auszuschalten,
genügt es den Drehregler der
Backofenbetriebsfunktionen in die Position
„Aus“ zu bringen. Der Zubereitungsprozess wird
unterbrochen und das Programm ausgeschaltet.
oder 2 ( - oder +
oder
ɉɨ ɢɫɬɟɱɟɧɢɢ 3 ɫɟɤɭɧɞ ɡɚɞɚɧɧɵɟ ɞɚɧɧɵɟ
ɡɚɩɨɦɢɧɚɸɬɫɹ.
ɉɨ ɢɫɬɟɱɟɧɢɢ ɜɪɟɦɟɧɢ ɩɪɢɝɨɬɨɜɥɟɧɢɹ ɞɭɯɨɜɤɚ
ɩɨɞɚɟɬ ɡɜɭɤɨɜɨɣ ɫɢɝɧɚɥ.
Ⱦɥɹ ɨɬɤɥɸɱɟɧɢɹ ɚɜɬɨɦɚɬɢɱɟɫɤɨɝɨ ɪɟɠɢɦɚ
ɪɚɛɨɬɵ ɞɨɫɬɚɬɨɱɧɨ ɩɟɪɟɜɟɫɬɢ ɪɭɱɤɭ
ɜ ɩɨɥɨɠɟɧɢɟ „ɜɵɤɥɸɱɟɧɨ“.
ɉɪɨɰɟɫɫ ɩɪɢɝɨɬɨɜɥɟɧɢɹ ɛɭɞɟɬ ɩɪɟɪɜɚɧ, ɚ
ɩɪɨɝɪɚɦɦɚ ɩɪɢɝɨɬɨɜɥɟɧɢɹ ɨɬɤɥɸɱɟɧɚ.
x Ɋɭɱɤɨɣ
ɜɵɛɪɚɬɶ ɧɟɨɛɯɨɞɢɦɵɣ ɪɟɠɢɦ ɢ, ɩɪɢ
ɠɟɥɚɧɢɢ, ɫ ɩɨɦɨɳɶɸ ɤɧɨɩɨɤ
ɢɥɢ
ɩɪɢɝɨɬɨɜɥɟɧɢɹ. ɑɟɪɟɡ 3 ɫɟɤɭɧɞɵ ɧɚ
ɞɢɫɩɥɟɟ ɩɨɹɜɢɬɫɹ ɬɟɤɫɬ „ɫɬɚɪɬ“ ɢ ɜɪɟɦɹ
ɜɤɥɸɱɟɧɢɹ ɞɭɯɨɜɤɢ
12:15).
x ɋ ɩɨɦɨɳɶɸ ɤɧɨɩɨɤ
ɨɬɤɥɸɱɢɬɟ ɡɭɦɦɟɪ.
+ ) ɭɬɨɱɧɢɬɶ ɬɟɦɩɟɪɚɬɭɪɭ
(ɜ ɧɚɲɟɦ ɩɪɢɦɟɪɟ -
ɢɥɢ 2 ( - ɢɥɢ + )
ɢɥɢ 2 ( -
Gebrauch von Thermosonde
Die elektronische Programmierung Logic
control ermöglicht das Abschalten vom
Backofen nachdem die gewünschte Temperatur in
der Speise erreicht worden ist. Dafür wird die
Thermosonde benutzt, die als Zubehör zu Ihrem
Backofen mitgeliefert wird.
Für Gebrauch der Thermosonde:
x Setzen Sie den Stecker der Thermosonde
bis zum Anschlag in das Netz im Backofen
ein. Auf dem Display Temperatur angezeigt
und blinkt das Symbol 3.
x Mittels des Drehereglers der
Backofenbetriebsfunktionen das
gewünschte Zubereitungsprogramm
wählen. Auf dem Display erscheint Symbol
des gewählten Programms.
ɉɨɥɶɡɨɜɚɧɢɟ ɬɟɪɦɨ-ɡɨɧɞɨɦ
ɗɥɟɤɬɪɨɧɧɨɟ ɩɪɨɝɪɚɦɦɢɪɭɸɳɟɟ ɭɫɬɪɨɣɫɬɜɨ
Logic control ɩɨɡɜɨɥɹɟɬ ɨɬɤɥɸɱɚɬɶ ɞɭɯɨɜɤɭ
ɩɨɫɥɟ ɞɨɫɬɢɠɟɧɢɹ ɠɟɥɚɟɦɨɣ ɬɟɦɩɟɪɚɬɭɪɵ
ɜɧɭɬɪɢ ɛɥɸɞɚ. Ⱦɥɹ ɷɬɨɝɨ ɢɫɩɨɥɶɡɭɟɬɫɹ
ɬɟɪɦɨɡɨɧɞ, ɜɯɨɞɹɳɢɣ ɜ ɤɨɦɩɥɟɤɬ ȼɚɲɟɣ ɩɥɢɬɵ.
Ⱦɥɹ ɢɫɩɨɥɶɡɨɜɚɧɢɹ ɬɟ
ɪɦɨɡɨɧɞɚ:
x ȼɫɬɚɜɶɬɟ ɲɬɟɤɟɪ ɬɟɪɦɨɦɟɬɪɚ ɞɨ ɭɩɨɪɚ ɜ
ɝɧɟɡɞɨ ɜɧɭɬɪɢ ɞɭɯɨɜɤɢ. ɇɚ ɞɢɫɩɥɟɟ
ɜɵɫɜɟɬɢɬɫɹ ɭɤɚɡɚɧɢɟ ɬɟɦɩɟɪɚɬɭɪɵ ɢ
ɡɚɦɢɝɚɟɬ ɫɢɦɜɨɥ 3.
x ɋ ɩɨɦɨɳɶɸ ɪɭɱɤɢ
ɜɵɛɟɪɢɬɟ ɠɟɥɚɟɦɵɣ ɪɟɠɢɦ
ɩɪɢɝɨɬɨɜɥɟɧɢɹ. ɉɪɢ ɷɬɨɦ ɧɚ ɞɢɫɩɥɟɟ
ɜɵɫɜɟɬɢɬɫɹ ɫɢɦɜɨɥɶɧɨɟ ɨɛɨɡɧɚɱɟɧɢɟ
ɪɟɠɢɦɚ.
57
Page 58

GB
According to the chosen mode, the oven will
automatically establish the recommended
temperature and on the display appears a text
„Oven … °C“. After installation of the necessary
temperature of coocking on the display will be
lighted „Thermoprobe:.. 00°C“ for installation of
desirable temperature inside of a dish.
x Press keys 1 or 2 (
3
In 3 seconds the established parameters will be
remembered and an oven will be switched off.
If everything installed correctly, on the display
should be displayed:
- actual temperature inside of a dish,
- the established temperature inside of the dish,
- the established temperature inside of the oven.
After the end of the coocking the oven beeps.
temperature.
Important! While on the display flash an
inscription “Thermoprobe: 00°C”, the
oven waits for introduction of parameters!
- or + ) to set the
x Press keys 1 or 2 (
1
2
If it is necessary to continue the coocking press
the key 2.
buzzer.
Important! At continue the coocking it is
necessary to establish anew temperature
inside of a dish.
Important! Take out thermoprobe carefully
to prevent a burn.
- or + ) to silence a
58
Page 59

DE RU
1
1
Entsprechend des gewählten Programms wird der
Backofen automatisch eine empfohlene
Temperatur einstellen und auf dem Display
erscheint der text „Backofen… °C „. Nachdem die
benötigte Temperatur der Zubereitung eingestellt
ist, erscheint auf dem Display „Sonde 00°C„, jetzt
kann man die gewünschte Temperatur in der
Speise einstellen.
ȼ ɫɨɨɬɜɟɬɫɬɜɢɢ ɫ ɜɵɛɪɚɧɧɵɦ ɪɟɠɢɦɨɦ, ɞɭɯɨɜɤɚ
ɚɜɬɨɦɚɬɢɱɟɫɤɢ ɭɫɬɚɧɨɜɢɬ ɪɟɤɨɦɟɧɞɭɟɦɭɸ
ɬɟɦɩɟɪɚɬɭɪɭ ɢ ɧɚ ɞɢɫɩɥɟɟ ɩɨɹɜɢɬɫɹ ɬɟɤɫɬ
„Ⱦɭɯɨɜɤɚ… °C“. ɉɨɫɥɟ ɭɫɬɚɧɨɜɤɢ ɬɪɟɛɭɟɦɨɣ
ɬɟɦɩɟɪɚɬɭɪɵ ɩɪɢɝɨɬɨɜɥɟɧɢɹ ɧɚ ɞɢɫɩɥɟɟ
ɜɵɫɜɟɬɢɬɫɹ „Ɂɨɧɞ 00°C“ ɞɥɹ ɭɫɬɚɧɨɜɤɢ
ɠɟɥɚɟɦɨɣ ɬɟɦɩɟɪɚɬɭɪɵ ɜɧɭɬɪɢ ɛɥɸɞɚ.
x Mit Hilfe der Wahltasten 1 oder 2 (
- oder
+ ) die Temperatur einstellen.
Nach 3 Sekunden die eingestellten Parameter
werden übernommen und der Backofen schaltet
ein.
Bei der richtigen Einstellung müssen auf dem
Display folgende Informationen erscheinen:
- aktuelle Temperatur in der Speise,
- die eingestellte Temperatur in der Speise,
- die eingestellte Temperatur im Backofen.
Nachdem die Zubereitung abgeschlossen ist,
ertönt ein Signalton.
Wichtig! So lange auf dem Display
erscheint Anzeige „Sonde 00°C„, wartet
der Backofen auf die Einstellung der
Parameter!
x ɋ ɩɨɦɨɳɶɸ ɤɧɨɩɨɤ 1 ɢɥɢ 2 (
ɭɫɬɚɧɚɜɥɢɜɢɬɟ ɬɟɦɩɟɪɚɬɭɪɭ.
- ɢɥɢ + )
ɑɟɪɟɡ 3 ɫɟɤɭɧɞɵ ɭɫɬɚɧɨɜɥɟɧɧɵɟ ɩɚɪɚɦɟɬɪɵ
ɡɚɩɨɦɧɹɬɫɹ ɢ ɞɭɯɨɜɤɚ ɛɭɞɟɬ ɜɤɥɸɱɟɧɚ.
ȼɚɠɧɨ! ɉɨɤɚ ɧɚ ɞɢɫɩɥɟɟ ɝɨɪɢɬ ɧɚɞɩɢɫɶ
«Ɂɨɧɞ: 00°C», ɞɭɯɨɜɤɚ ɨɠɢɞɚɟɬ
ɜɜɟɞɟɧɢɹ ɩɚɪɚɦɟɬɪɨɜ!
ɉɪɢ ɩɪɚɜɢɥɶɧɨɣ ɭɫɬɚɧɨɜɤɟ ɧɚ ɞɢɫɩɥɟɟ ɞɨɥɠɧɵ
ɨɬɨɛɪɚɠɚɬɶɫɹ:
- ɚɤɬɭɚɥɶɧɚɹ ɬɟɦɩɟɪɚɬɭɪɚ ɜɧɭɬɪɢ ɛɥɸɞɚ,
- ɭɫɬɚɧɨɜɥɟɧɧɚɹ ɬɟɦɩɟɪɚɬɭɪɚ ɜɧɭɬɪɢ ɛɥɸɞɚ,
- ɭɫɬɚɧɨɜɥɟɧɧɚɹ ɬɟɦɩɟɪɚɬɭɪɚ ɜɧɭɬɪɢ ɞɭɯɨɜɤɢ.
ɉɨ ɡɚɜɟɪɲɟɧɢɢ ɩɪɢɝɨɬɨɜɥɟɧɢɹ ɞɭɯɨɜɤɚ ɩɨɞɚɟɬ
ɡɜɭɤɨɜɨɣ ɫɢɝɧɚɥ.
x Mit Hilfe der Tasten
den Signalton ausschalten.
Je nach dem Wunsch kann man mit Hilfe der
Wahltaste 2 den Zubereitungsprozess verlängern
Wichtig! Bei der Verlängerung des
Zubereitungsprozesses ist es notwendig
erneut die Temperatur in der Speise
einzustellen.
Wichtig! Um eine Verbrenung zu
vermeiden, die Thermosonde sehr
vorsichtig herausnehmen.
oder 2 ( - oder + )
x ɋ ɩɨɦɨɳɶɸ ɤɧɨɩɨɤ
ɨɬɤɥɸɱɢɬɟ ɡɭɦɦɟɪ.
ȿɫɥɢ ɷɬɨ ɧɟɨɛɯɨɞɢɦɨ, ɩɪɨɞɥɟɧɢɟ ɩɪɨɰɟɫɫɚ
ɩɪɢɝɨɬɨɜɥɟɧɢɹ ɜɨɡɦɨɠɧɨ ɩɭɬɟɦ ɧɚɠɚɬɢɹ ɤɧɨɩɤɢ
2.
ȼɚɠɧɨ! ɉɪɢ ɩɪɨɞɥɟɧɢɢ ɩɪɨɰɟɫɫɚ
ɩɪɢɝɨɬɨɜɥɟɧɢɹ ɧɟɨɛɯɨɞɢɦɨ ɡɚɧɨɜɨ
ɭɫɬɚɧɨɜɢɬɶ ɬɟɦɩɟɪɚɬɭɪɭ ɜɧɭɬɪɢ ɛɥɸɞɚ.
ȼɚɠɧɨ! ȼɵɧɢɦɚɣɬɟ ɬɟɪɦɨɡɨɧɞ
ɨɫɬɨɪɨɠɧɨ ɜɨ ɢɡɛɟɠɚɧɢɟ ɨɠɨɝɚ.
ɢɥɢ 2 ( - ɢɥɢ + )
59
Page 60

Oven light
Innenbeleuchtung
Ɉɫɜɟɳɟɧɢɟ ɞɭɯɨɜɤɢ
EN
PRACTICAL ADVICE
Recommended cooking modes
Griddle 150°C
Unterhitze 150°C
ɀɚɪɟɧɢɟ 150°ɋ
Baking 200°C
Ober- und
Unterhitze 200°C
ȼɵɩɟɱɤɚ 200°ɋ
Fan 180°C
Heißluft 180°C
Ɉɛɞɭɜ 180°ɋ
Pizza 230°C
Pizza 230°C
ɉɢɰɰɚ 230°ɋ
Please find the optimal cooking modes on the inner
glass surface of the oven door
The depicted food types are purely indicative and
show the kind of food you can cook by means of
that function. To discover the tremendous variability
of the oven capacities, don’t hesitate to experiment
with all the cooking modes on the basis of your own
cooking experience.
Baking
x It is advisable to bake pastry and cakes on
the authorized baking trays which are
provided as oven equipment.
x You can also use unauthorized baking
dishes and trays which should be placed on
the wire shelves. In this case, baking dishes
made of black plate or golden plated metal
are recommended. The above mentioned
baking cups and dishes have a better heat
conductivity which results in reduced baking
time and energy saving.
x Bake pastry and cakes in a pre-heated
oven.
x The oven is to be thoroughly pre-heated, if
you bake heavy cakes which have a big
mass and rise weakly. For cakes that rise
quickly, use a slightly pre-heated oven.
x After you have switched off the oven, check
the cake quality with a wooden rod. (If the
cake is well-baked, the rod remains dry and
clean).
x After the oven has been switched off, let the
cake in for 5 minutes.
60
Page 61

DE
PRAKTISCHE EMPFEHLUNGEN
Empfohlene Zubereitungsbetriebsarten
Super grill 250°C
Supergrill 250°C
Cɭɩɟɪ ɝɪɢɥɶ 250°ɋ
Single grill 250°C
Grill Einfach 250°C
Ƚɪɢɥɶ 250°ɋ
Grill & fan 210°C
Grill m. Heißluft 210°C
Ƚɪɢɥɶ ɫ ɨɛɞɭɜɨɦ 210°ɋ
Die empfohlenen Zubereitungsbetriebsarten finden
Sie auf der Innentür des Backofens.
Diese Symbole stellen nur eine Orientierungshilfe
dar, welche Typen von Produkten bei jenem oder
anderem Programm zubereitet werden können.
Um die Vielseitigkeit von diesem Backofen zu
erkennen, fürchten Sie nicht, mit allen Funktionen
zu experimentieren, nutzen Sie dabei Ihre eigene
Erfahrung in der Küche
Backen
x Es wird empfohlen, das Gebäck und die
Kuchen auf dem Backblech zu backen, das
als Herdausrüstung mitgeliefert ist.
x Es kann auch auf handelsüblichen
Kuchenformen und Backblechen gebacken
werden, die dann auf dem Rost
aufzustellen sind. In diesem Fall werden
Kuchenformen aus schwarzem Blech bzw.
mit Elektroplattierung (Farbe gold)
empfohlen. Solche Backformen besitzen
eine bessere Wärmeleitfähigkeit: Die
Backzeit wird dadurch kürzer, die Energie
kann damit gespart werden.
x Manche Backwaren werden in einem
vorgewärmten Backofen gebacken.
x Die Vorheizung des Backofens ist nur für
schwere Backwaren erforderlich, die eine
ziemlich große Masse haben und schwach
aufgehen. Die Gebäcke, die schnell
aufgehen, sind in einem nur schwach
vorgewärmten Backofen anzuordnen.
x Beim Backofenabschalten ist die
Teigqualität mit einem Holzstäbchen zu
überprüfen (soll der Teig gut ausgebacken
sein, bleibt das Holzstäbchen nach dem
Einstechen trocken und sauber.)
x Nach der Backofenabschaltung sollte das
Gebäck noch 5 Minuten drin bleiben.
RU
ɉɊȺɄɌɂɑȿɋɄɂȿ ɋɈȼȿɌɕ
Ɋɟɤɨɦɟɧɞɭɟɦɵɟ ɪɟɠɢɦɵ ɩɪɢɝɨɬɨɜɥɟɧɢɹ
ɉɪɟɞɥɚɝɚɟɦɵɟ ɪɟɠɢɦɵ ȼɵ ɦɨɠɟɬɟ ɧɚɣɬɢ ɬɚɤɠɟ
ɧɚ ɜɧɭɬɪɟɧɧɟɦ ɫɬɟɤɥɟ ɞɜɟɪɢ ɞɭɯɨɜɤɢ.
ɗɬɢ ɫɢɦɜɨɥɵ ɥɢɲɶ ɨɛɪɚɡɧɨ ɩɨɤɚɡɵɜɚɸɬ, ɤɚɤɢɟ
ɬɢɩɵ ɩɢɳɢ ɦɨɝɭɬ ɛɵɬɶ ɩɪɢɝɨɬɨɜɥɟɧɵ ɜ ɬɨɦ ɢɥɢ
ɢɧɨɦ ɪɟɠɢɦɟ. ɑɬɨɛɵ ɩɨɡɧɚɬɶ ɦɧɨɝɨɝɪɚɧɧɨɫɬɶ
ɷɬɨɣ ɞɭɯɨɜɤɢ, ɧɟ ɛɨɣɬɟɫɶ ɷɤɫɩɟɪɢɦɟɧɬɢɪɨɜɚɬɶ
ɫɨ ɜɫɟɦɢ ɮɭɧɤɰɢɹɦɢ, ɨɩɢɪɚɹɫɶ ɧɚ ɫɨɛɫɬɜɟɧɧɵɣ
ɨɩɵɬ ɧɚ ɤɭɯɧɟ.
ȼɵɩɟɱɤɚ ɤɨɧɞɢɬɟɪɫɤɢɯ ɢɡɞɟɥɢɣ
Defrost 60°C
Defrost 60°C
Ɋɚɡɦɨɪɚɠɢɜɚɧɢɟ 60°ɋ
x Ɋɟɤɨɦɟɧɞɭɟɬɫɹ ɜɵɩɟɱɤɚ ɬɟɫɬɚ ɧɚ
ɩɪɨɬɢɜɧɹɯ, ɫɨɫɬɚɜɥɹɸɳɢɯ ɡɚɜɨɞɫɤɨɟ
ɨɛɨɪɭɞɨɜɚɧɢɟ ɞɭɯɨɜɤɢ.
x ȼɵɩɟɱɤɚ ɜɨɡɦɨɠɧɚ ɬɚɤɠɟ ɜ ɮɨɪɦɚɯ ɢ ɧɚ
ɩɪɨɬɢɜɧɹɯ, ɤɨɬɨɪɵɟ ɫɥɟɞɭɟɬ
ɭɫɬɚɧɚɜɥɢɜɚɬɶ ɧɚ ɪɟɲɟɬɤɟ. ȼ ɷɬɨɦ
ɫɥɭɱɚɟ ɪɟɤɨɦɟɧɞɭɟɬɫɹ ɭɩɨɬɪɟɛɥɟɧɢɟ
ɮɨɪɦ ɢɡ ɱɟɪɧɨɣ ɠɟɫɬɢ ɢɥɢ ɮɨɪɦ ɫ
ɝɚɥɶɜɚɧɨɩɨɤɪɵɬɢɟɦ (ɡɨɥɨɬɨɝɨ ɰɜɟɬɚ).
ɗɬɢ ɮɨɪɦɵ ɥɭɱɲɟ ɩɪɨɜɨɞɹɬ ɬɟɩɥɨ ɢ
ɫɨɤɪɚɳɚɸɬ ɜɪɟɦɹ ɜɵɩɟɱɤɢ, ɷɤɨɧɨɦɹ ɩɪɢ
ɷɬɨɦ ɷɥɟɤɬɪɨɷɧɟɪɝɢɸ.
x ɇɟɤɨɬɨɪɵɟ ɢɡ ɜɵɩɟɤɚɟɦɵɯ ɢɡɞɟɥɢɣ
ɬɪɟɛɭɸɬ ɩɪɟɞɜɚɪɢɬɟɥɶɧɨ ɩɪɨɝɪɟɬɨɣ
ɤɚɦɟɪɵ ɞɭɯɨɜɤɢ.
x ɉɪɟɞɜɚɪɢɬɟɥɶɧɵɣ ɧɚɝɪɟɜ ɞɭɯɨɜɤɢ
ɫɥɟɞɭɟɬ ɩɪɢɦɟɧɹɬɶ ɢɫɤɥɸɱɢɬɟɥɶɧɨ ɜ
ɫɥɭɱɚɟ ɬɹɠɟɥɨɝɨ ɬɟɫɬɚ ɛɨɥɶɲɨɝɨ ɨɛɴɺɦɚ
ɢ ɫɥɚɛɨɩɨɞɧɢɦɚɸɳɟɝɨɫɹ. Ȼɵɫɬɪɨ
ɩɨɞɧɢɦɚɸɳɟɟɫɹ ɬɟɫɬɨ ɫɥɟɞɭɟɬ
ɭɫɬɚɧɚɜɥɢɜɚɬɶ ɜ ɫɥɚɛɨ ɪɚɡɨɝɪɟɬɭɸ
ɞɭɯɨɜɤɭ.
x
ɉɨɫɥɟ ɨɬɤɥɸɱɟɧɢɹ ɞɭɯɨɜɤɢ,
ɪɟɤɨɦɟɧɞɭɟɬɫɹ ɩɪɨɜɟɪɤɚ ɤɚɱɟɫɬɜɚ
ɜɵɩɟɱɟɧɧɨɝɨ ɬɟɫɬɚ ɩɪɢ ɩɨɦɨɳɢ
ɞɟɪɟɜɹɧɧɨɣ ɩɚɥɨɱɤɢ (ɜ ɫɥɭɱɚɟ
ɩɪɚɜɢɥɶɧɨɣ ɜɵɩɟɱɤɢ, ɩɨɫɥɟ ɧɚɤɨɥɚ
ɬɟɫɬɚ, ɩɚɥɨɱɤɚ ɞɨɥɠɧɚ ɛɵɬɶ ɫɭɯɨɣ ɢ
ɱɢɫɬɨɣ).
x ȼɵɩɟɱɟɧɧɨɟ ɢɡɞɟɥɢɟ, ɫɥɟɞɭɟɬ ɨɫɬɚɜɢɬɶ ɜ
ɞɭɯɨɜɤɟ, ɩɨɫɥɟ ɟɟ ɨɬɤɥɸɱɟɧɢɹ, ɟɳɟ ɧɚ
ɩɪɨɬɹɠɟɧɢɟ 5 ɦɢɧɭɬ.
61
Page 62

EN
V
IV
III
II
I
Baking parameters
for conventional heating
Table 1
Kind of dough
Gebäckart
Ɍɢɩ ɬɟɫɬɚ
Cakes in cups and dishes Formgebäck ȼɵɩɟɱɤɚ ɜ ɮɨɪɦɚɯ
Meringue / Schaumgebäck / Ȼɟɡɟ 2-3 80-100 60-70
Sand paste /Sandkuchen / ɉɟɫɨɱɧɚɹ ɛɚɛɚ 2-3 160-180 40-70
Yeasted dough / Hefekuchen / Ⱦɪɨɠɠɟɜɚɹ
ɛɚɛɚ
Tart /Torte / Ɍɨɪɬ 2-3 160-180 30-50
Sponge cake / Biskuitkuchen / Ȼɢɫɤɜɢɬ 2-3 160-180 10-25
Shortcrust for fruit tart / Mürberteig für Obsttorte
/ɩɟɫɨɱɧɨɟ ɬɟɫɬɨ ɞɥɹ ɮɪɭɤɬɨɜɨɝɨ ɬɨɪɬɚ
Cakes on baking trays Gebäck auf dem Blech ȼɵɩɟɱɤɚ ɧɚ ɩɪɨɬɢɜɧɹɯ
Gebäckparameter bei Nutzung
Konventioneller Beheizung
Baking parameters for conventional heating are
summarized in Table 1, and for hot air
circulation in Table 2.
If you use hot air circulation function, no preheating is necessary.
If air circulation function is used while baking a
cake, the baking tray should be put at level III
from the oven bottom. In case you bake two
cakes simultaneously, use levels II and IV.
ɉɚɪɚɦɟɬɪɵ ɜɵɩɟɱɤɢ ɫ
ɤɨɧɜɟɧɰɢɨɧɧɵɦ ɧɚɝɪɟɜɨɦ.
Tabelle 1
Level
Höhe
Ɋɚɛ. ɭɪɨɜɟɧɶ
2-3 170-180 50-60
2-3 Heat / Erhitzter /
Temperature
Temperatur °C
Ɍɟɦɩɟɪɚɬɭɪɚ °ɋ
ɪɚɡɨɝɪ. 200-220
Ɍɚɛɥɢɰɚ 1
Baking time, min.
Backzeit, min.
ȼɪɟɦɹ, ɦɢɧ.
Crumbly yeasted dough cake / Hefestreusel /
Ⱦɪɨɠɠɟɜɚɹ ɯɚɥɚ
Éclairs / Eclairs / ɗɤɥɟɪɵ 2-3 200-225 30-40
Fruit cake / Obstkuchen / ɋɥɚɞɤɢɣ ɩɢɪɨɝ ɫ
ɮɪɭɤɬ.
Crumbly sweet cake / Streuselkuchen /
ɋɥɚɞɤɢɣ ɩɢɪɨɝ ɫ ɤɪɨɲɤɨɣ
62
2-3 170-190 30-40
2-3 170-190 30-50
2-3 170-190 20-35
Page 63

DE RU
Backparameter bei Nutzung konventioneller
Beheizung sind in der Tabelle 1
zusammengefasst, und für Thermozirkulation in
der Tabelle 2.
Beim Gebrauch von Thermozirkulation ist keine
Backofenvorwärmung erforderlich.
Beim Backen mit Thermozirkulation ist Aufbacken
von Teig in der Höhe III von unten empfohlen;
beim gleichzeitigen Backen auf zwei Backblechen
– in der Höhe II und IV.
Baking parameters
for fan cooking
Table 2
Kind of dough / Gebäckart / Ɍɢɩ ɬɟɫɬɚ
Cakes in cups and dishes / Formgebäck/ ȼɵɩɟɱɤɚ ɜ ɮɨɪɦɚɯ
Meringue / Schaumgebäck / Ȼɟɡɟ 80 60-70
Sandn paste / Sandkuchen / ɉɟɫɨɱɧɚɹ ɛɚɛɚ 150 65-70
Yeasted dough / Hefekuchen / Ⱦɪɨɠɠɟɜɚɹ ɛɚɛɚ 150 60-70
Tart / Torte / Ɍɨɪɬ 150 25-35
Cakes on baking trays Gebäck auf dem Blech ȼɵɩɟɱɤɚ ɧɚ ɩɪɨɬɢɜɧɹɯ
Yeasted dough / Hefekuchen / Ⱦɪɨɠɠɟɜɨɟ ɬɟɫɬɨ 150 40-45
Crumbly sweet cake / Streuselkuchen / ɋɥɚɞɤɢɣ ɩɢɪɨɝ ɫ
ɤɪɨɲɤɨɣ
Fruit cake / Obstkuchen / ɋɥɚɞɤɢɣ ɩɢɪɨɝ ɫ ɮɪɭɤɬɚɦɢ 150 40-55
Sponge cake / Biskuitkuchen / Ȼɢɫɤɜɢɬ 150 30-40
Backparameter bei Nutzung der
ɉɪɢɦɟɪɧɵɟ ɩɚɪɚɦɟɬɪɵ ɜɵɩɟɱɤɢ ɫ
ɢɫɩɨɥɶɡɨɜɚɧɢɟɦ ɤɨɧɜɟɧɰɢɨɧɚɥɶɧɨɝɨ ɧɚɝɪɟɜɚ
ɩɪɢɜɟɞɟɧɵ ɜ Ɍɚɛɥɢɰɟ 1, ɚ ɫ ɢɫɩɨɥɶɡɨɜɚɧɢɟɦ
ɬɟɪɦɨɰɢɪɤɭɥɹɰɢɢ ɜ Ɍɚɛɥɢɰɟ 2.
ɉɪɢ ɢɫɩɨɥɶɡɨɜɚɧɢɢ ɬɟɪɦɨɰɢɪɤɭɥɹɰɢɢ, ɧɟ
ɬɪɟɛɭɟɬɫɹ ɩɪɟɞɜɚɪɢɬɟɥɶɧɵɣ ɪɚɡɨɝɪɟɜ ɞɭɯɨɜɨɝɨ
ɲɤɚɮɚ.
Ⱦɥɹ ɜɵɩɟɱɤɢ ɬɟɫɬɚ ɫ ɩɪɢɦɟɧɟɧɢɟɦ
ɬɟɪɦɨɰɢɪɤɭɥɹɰɢɢ, ɪɟɤɨɦɟɧɞɭɟɬɫɹ ɜɵɩɟɱɤɚ ɧɚ
III ɭɪɨɜɧɟ ɫɧɢɡɭ ɞɭɯɨɜɤɢ, ɚ ɜ ɫɥɭɱɚɟ
ɨɞɧɨɜɪɟɦɟɧɧɨɣ ɜɵɩɟɱɤɢ - ɧɚ ɞɜɭɯ ɭɪɨɜɧɹɯ ɪɟɤɨɦɟɧɞɭɸɬɫɹ ɭɪɨɜɧɢ II ɢ IV.
Heißluft.
Tabelle 2
Temperature °C
Temperatur °C
Ɍɟɦɩɟɪɚɬɭɪɚ °ɋ
150 20-30
ɉɚɪɚɦɟɬɪɵ ɜɵɩɟɱɤɢ ɫ
ɬɟɪɦɨɰɢɪɤɭɥɹɰɢɟɣ.
Ɍɚɛɥɢɰɚ 2
Baking time, min.
Backzeit, min.
ȼɪɟɦɹ, ɦɢɧ.
63
Page 64

EN
Roasting and Stewing Meat
Please remember:
x Roast or stew meat joints bigger than 1 kg
in the oven. Smaller pieces are to be
cooked on the cooking zones.
x To prevent the meat from getting dry, place
a plate of water at the lowest level below
the wire shelf with the roasted food and
refill water while cooking.
x Use pans with heat-resistant handles.
Roasting and stewing parameters at conventional
heating are shown in Table 3, those with hot air
circulation - in Table 4.
Note! The given parameters refer to roasting on
the grid. If you use closed pans, select the
temperature 200°C.
Remember to turn over the joint as soon as the half
of the selected cooking time has passed.
Roasting bigger meat joints is more effective.
Baste the joint with gravy while roasting.
It is advisable to place a plate of water at the
lowest level below the wire shelf with the roasted
meat and refill water while cooking. (Don’t sprinkle
water over the joint of meat)
Baking and roasting parameters introduced in this
chapter can be amended according to own cooking
experience.
64
Page 65

DE RU
Braten und Schmoren von Fleisch
Es wird folgendes empfohlen:
x Braten bzw. Schmoren von über 1 kg
Fleischstücken im Backofen. Kleinere
Fleischstücke sind auf Kochzonen
vorzubereiten,
x beim Braten von Fleisch auf dem Rost wird
empfohlen, auf der niedrigsten Ebene
(unter dem Rost mit Gericht) ein Blech mit
etwas Wasser zu stellen. Während der
Zubereitung wird Wasser nachgefühlt,
x zum Braten sollten Gefäße mit
temperaturbeständigen Griffen benutzt
werden.
Zubereitungsparameter für Braten und Schmoren
von Speisen bei konventioneller Beheizung sind
in der Tabelle 3, und für Thermozirkulation in der
Tabelle 4 dargestellt.
Bemerkung! Die dargestellten Parameter
betreffen das Braten auf dem Rost. Bei der
Verwendung von geschlossenen Gefäßen ist die
Temperatur auf 200°C einzustellen.
Nach Ablauf der Halbzeit, die für das Braten
vorbestimmt ist, sollte das Fleisch umgewendet
werden.
Es ist günstiger größere Fleischportionen zu
braten.
Während des Bratens begießen Sie das Fleisch
mit der Bratensoße.
Es ist empfohlen ein Blech mit etwas Wasser auf
die niedrigste Ebene (unter dem Gitter mit Gericht)
einzuschieben. Während des Bratens soll das
ausgedampfte Wasser ergänzt werden (nicht das
Fleisch begießen!).
Die in diesem Kapitel dargestellten Parameter
hinsichtlich des Backens und des Bratens können
Sie aufgrund eigener Erfahrungen verbessern.
ɀɚɪɟɧɢɟ ɢ ɬɭɲɟɧɢɟ ɦɹɫɚ
Ɋɟɤɨɦɟɧɞɭɟɬɫɹ ɫɥɟɞɭɸɳɟɟ:
x ɠɚɪɟɧɢɟ ɢ ɬɭɲɟɧɢɟ ɜ ɞɭɯɨɜɤɟ ɛɥɸɞ
ɦɚɫɫɨɣ ɩɪɟɜɵɲɚɸɳɟɣ 1 ɤɝ. Ɇɟɧɶɲɢɟ
ɩɨɪɰɢɢ ɫɥɟɞɭɟɬ ɝɨɬɨɜɢɬɶ ɧɚ ɜɚɪɨɱɧɨɣ
ɩɨɜɟɪɯɧɨɫɬɢ,
x ɜ ɫɥɭɱɚɟ ɠɚɪɟɧɢɹ ɦɹɫɚ ɧɚ ɪɟɲɟɬɤɟ,
ɪɟɤɨɦɟɧɞɭɟɬɫɹ ɭɫɬɚɧɨɜɤɚ ɧɚ ɫɚɦɨɦ
ɧɢɠɧɟɦ ɭɪɨɜɧɟ (ɩɨɞ ɪɟɲɟɬɤɨɣ ɫ ɛɥɸɞɨɦ)
ɩɪɨɬɢɜɧɹ, ɫɨɞɟɪɠɚɳɟɝɨ ɧɟɛɨɥɶɲɨɟ
ɤɨɥɢɱɟɫɬɜɨ ɜɨɞɵ, ɤɨɬɨɪɭɸ ɩɨɩɨɥɧɹɸɬ ɜɨ
ɜɪɟɦɹ ɠɚɪɟɧɶɹ,
x ɞɥɹ ɠɚɪɟɧɢɹ, ɫɥɟɞɭɟɬ ɩɪ
ɟɦɤɨɫɬɢ (ɤɚɫɬɪɸɥɢ) ɫ ɠɚɪɨɫɬɨɣɤɢɦɢ
ɪɭɱɤɚɦ
ɉɪɢɦɟɪɧɵɟ ɩɚɪɚɦɟɬɪɵ ɭɫɥɨɜɢɣ ɠɚɪɟɧɶɹ ɢ
ɬɭɲɟɧɢɹ ɛɥɸɞ ɫ ɢɫɩɨɥɶɡɨɜɚɧɢɟɦ
ɤɨɧɜɟɧɰɢɨɧɚɥɶɧɨɝɨ ɧɚɝɪɟɜɚ ɩɪɢɜɟɞɟɧɵ ɜ
ɬɚɛɥɢɰɟ 3, ɚ ɫ ɢɫɩɨɥɶɡɨɜɚɧɢɟɦ
ɬɟɪɦɨɰɢɪɤɭɥɹɰɢɢ ɜ ɬɚɛɥɢɰɟ 4.
ɉɪɢɦɟɱɚɧɢɟ! ɉɪɢɜɟɞɟɧɧɵɟ ɩɚɪɚɦɟɬɪɵ
ɤɚɫɚɸɬɫɹ ɠɚɪɟɧɢɹ ɧɚ ɪɟɲɟɬɤɟ. ȼ ɫɥɭɱɚɟ
ɩɪɢɦɟɧɟɧɢɹ ɡɚɤɪɵɬɵɯ ɟɦɤɨɫɬɟɣ (ɤɚɫɬɪɸɥɶ),
ɬɟɦɩɟɪɚɬɭɪɭ ɫɥɟɞɭɟɬ ɭɫɬɚɧɨɜɢɬɶ ɧɚ ɭɪɨɜɧɟ
200°ɋ.
ɉɨ ɢɫɬɟɱɟɧɢɢ ɩɨɥɨɜɢɧɵ ɜɪ
ɩɪɟɞɧɚɡɧɚɱɟɧɧɨɝɨ ɞɥ
ɫɥɟɞɭɟɬ ɩɟɪɟɜɨɪɚɱɢɜɚɬɶ ɧɚ ɞɪɭɝɨɣ ɛɨɤ.
Ȼɨɥɟɟ ɜɵɝɨɞɧɵɦ ɹɜɥɹɟɬɫɹ ɡɚɠɚɪɢɜɚɧɢɟ
ɛɨɥɶɲɢɯ ɩɨɪɰɢɣ ɦɹɫɚ.
ȼɨ ɜɪɟɦɹ ɠɚɪɟɧɢɹ ɩɨɥɢɜɚɬɶ ɦɹɫɨ
ɜɵɬɨɩɢɜɲɢɦɫɹ ɫɨɭɫɨɦ.
Ɋɟɤɨɦɟɧɞɭɟɬɫɹ ɭɫɬɚɧɨɜɤɚ ɧɚ ɫɚɦɨɦ ɧɢɡɤɨɦ
ɭɪɨɜɧɟ (ɩɨɞ ɪɟɲɟɬɤɨɣ ɫ ɛɥɸɞɨɦ) ɩɪɨɬɢɜɧɹ,
ɫɨɞɟɪɠɚɳɟɝɨ ɧɟɛɨɥɶɲɨɟ ɤɨɥɢɱɟɫɬɜɨ ɜɨɞɵ,
ɤɨɬɨɪɭɸ ɩɨɩɨɥɧɹɸɬ ɜɨ ɜɪɟɦɹ ɠɚɪɟɧɶɹ (ɦɹɫɨ
ɜɨɞɨɣ ɧɟ ɩɨɥɢɜɚɬɶ).
ɉɚɪɚɦɟɬɪɵ, ɩɪɢɜɟɞɺ
ɤɚɫɚɸɳɢɟɫɹ ɜɵɩɟɱɤɢ ɢ ɠɚɪɟɧɢɹ, ɪɟɤɨɦɟɧɞɭɟɬɫɹ
ɤɨɪɪɟɤɬɢɪɨɜɚɬɶ, ɨɫɧɨɜɵɜɚɹɫɶ ɧɚ ɫɨɛɫɬɜɟɧɧɨɦ
ɨɩɵɬɟ.
ɢ.
ɹ ɡɚɠɚɪɢɜɚɧɢɹ, ɦɹɫɨ
ɧɧɵɟ ɜ ɷɬɨɣ ɝɥɚɜɟ,
ɢɦɟɧɹɬɶ
ɟɦɟɧɢ,
65
Page 66

Roasting parameters for
conventional heating
Table 3
Kind of meat
Fleischgattung
ȼɢɞ ɦɹɫɚ
Stewed Beef / Rindfleisch
Bratparameter bei Nutzung
Konventioneller Beheizung
Tabelle 3
Advice
Empfehlungen
Ɋɟɤɨɦɟɧɞɚɰɢɢ
Ɋɚɛ. ɭɪɨɜɟɧɶ
2-3 225-250 120-150
Level
Höhe
ɉɚɪɚɦɟɬɪɵ ɠɚɪɟɧɢɹ ɫ
ɤɨɧɜɟɧɰɢɨɧɧɵɦ ɧɚɝɪɟɜɨɦ.
Ɍɚɛɥɢɰɚ 3
Temperature °C
Temperatur °C
Ɍɟɦɩɟɪɚɬɭɪɚ °ɋ
Roasting time min
Bratzeit min.
ȼɪɟɦɹ, ɦɢɧ.
geschmort / Ɍɭɲɟɧɚɹ
ɝɨɜɹɞɢɧɚ
Underdone Roastbeef /
Roastbeef blutig / Ɋɨɫɬɛɢɮ
ɤɪɨɜɚɜɵɣ
Juicy roastbeef / Roastbeef
saftig / Ɋɨɫɬɛɢɮ ɫɨɱɧɵɣ
pre-heated oven
erhitzter Backofen
ɪɚɡɨɝɪɟɬɚɹ ɞɭɯɨɜɤɚ
pre-heated oven
erhitzter Backofen
3-4 225-250 5-6
3-4 225-250 6-8
ɪɚɡɨɝɪɟɬɚɹ ɞɭɯɨɜɤɚ
Well-done Roastbeef /
Roastbeef angebraten /
Ɋɨɫɬɛɢɮ ɩɨɞɪɭɦɹɧɟɧɵɣ
Pork / Schweinefleisch /
pre-heated oven
erhitzter Backofen
ɪɚɡɨɝɪɟɬɚɹ ɞɭɯɨɜɤɚ
2-3 150-170 30-120
3-4 225-250 10-11
ɋɜɢɧɢɧɚ
Veal / Kalbfleisch / Ɍɟɥɹɬɢɧɚ 2-3 150-170 45-120
Lamb / Lammfleisch /
2-3 150-170 90-120
Ȼɚɪɚɧɢɧɚ
Game / Wildfleisch / Ⱦɢɱɶ pre-heated oven
2-3 170-190 60-110
erhitzter Backofen
ɪɚɡɨɝɪɟɬɚɹ ɞɭɯɨɜɤɚ
Fowl / Geflügel, Hähnchen /
2-3 160-180 45-60
ɉɬɢɰɚ, ɰɵɩɥɹɬɚ
Canard / Enten / ɍɬɤɢ pre-heated oven
2-3 200-220 60-90
erhitzter Backofen
ɪɚɡɨɝɪɟɬɚɹ ɞɭɯɨɜɤɚ
Goose / Gänse / Ƚɭɫɢ 2-3 160-180 150-360
Stewed fowl / Geflügel
2-3 210-225 45-60
geschmort / Ɍɭɲɟɧɚɹ ɩɬɢɰɚ
66
Page 67

Roasting parameters for
fan cooking
Table 4
Kind of meat
Fleischgattung
ȼɢɞ ɦɹɫɚ
Bratparameter bei Nutzung
der Heißluft
Tabelle 4
Portion
ɉɨɪɰɢɹ
Ɍɟɦɩɟɪɚɬɭɪɚ °ɋ
ɉɚɪɚɦɟɬɪɵ ɠɚɪɟɧɢɹ ɫ
ɬɟɪɦɨɰɢɪɤɭɥɹɰɢɟɣ.
Ɍɚɛɥɢɰɚ 4
Temperature °C
Temperatur °C
Roasting time min.
Bratzeit min.
ȼɪɟɦɹ, ɦɢɧ.
Fowl / Hähnchen / ɐɵɩɥɹɬɚ 1 180 50-60
Game / Wildfleisch / Ⱦɢɱɶ 1-1,5 160 120-140
Veal / Kalbfleisch / Ɍɟɥɹɬɢɧɚ 1 160 100-140
Pork / Schweinefleisch / ɋɜɢɧɢɧɚ 1 175 110-120
Beef / Rindfleisch / Ƚɨɜɹɞɢɧɚ 1 160 120-150
Goose, canard / Gans, Ente / Ƚɭɫɶ, ɭɬɤɚ 1 175 corr. mass
gem. Masse
ɫɨɨɬ. ɦɚɫɫɟ
Grill parameters
Table 5
Grillparameter
Tabelle 5
ɉɚɪɚɦɟɬɪɵ ɠɚɪɟɧɢɹ ɧɚ
ɝɪɢɥɟ. Ɍɚɛɥɢɰɚ 5
Grill time, min
Kind of meat
Fleischgattung
ȼɢɞ ɦɹɫɚ
Level
Höhe
Ɋɚɛ. ɭɪɨɜɟɧɶ
1st side / 1.Seite /
1.ɫɬɨɪɨɧɚ
Grillzeit, min
ȼɪɟɦɹ, ɦɢɧ
2nd side /
2.Seite /
2.ɫɬɨɪɨɧɚ
Pork chop / Schweinskotelett / ɋɜɢɧɚɹ ɤɨɬɥɟɬɚ 4-5 8-10 6-8
Pork minced schnitzel / Schweinschnitzel /
3-4 8-10 6-8
ɋɜɢɧɨɣ ɲɧɢɰɟɥɶ
Cooked beef / Gekochtes Rindfleisch
3-4 10-12 6-8
Ɉɬɜɚɪɧɨɟ ɝɨɜɹɠɶɟ ɦɹɫɨ
Sausages / Würstchen
4-5 8-10 6-8
Ʉɨɥɛɚɫɤɢ
Barbeque / Schaschlik
4-5 7-8 5-6
ɒɚɲɥɵɤɢ
Beef steak / Rindsteak
4-5 6-7 5-6
Ƚɨɜɹɠɶɟ ɠɚɪɤɨɟ
Veal chop / Kalbskotelett
4-5 8-10 6-8
Ʉɨɬɥɟɬɚ ɢɡ ɬɟɥɹɬɢɧɵ
Veal steak / Kalbssteak
4-5 6-7 5-6
Ⱥɧɬɪɢɤɨɬ ɢɡ ɬɟɥɹɬɢɧɵ
Lamb chop / Lammkotelett
4-5 8-10 6-8
Ʉɨɬɥɟɬɚ ɢɡ ɛɚɪɚɧɢɧɵ
Chicken – half / Hähnchen, Hälfte
3-4 25-30 25-30
ɐɵɩɥɹɬɚ - ɩɨɥɨɜɢɧɚ
Fish / Fisch / Ɋɵɛɚ 4-5 6-7 4-5
Filet / Filet / Ɏɢɥɟ 4-5 4-7 6
Trout / Forellen / Ɏɨɪɟɥɶ 4-5 4-7 6
Toasts / Toasts / Ɍɨɫɬɵ 4-5 2-3 2-3
Sandwitch / Toasts, belegte / Ɍɨɫɬɵ ɫ
3-4 6-8
ɧɚɱɢɧɤɨɣ
67
Page 68

EN
CLEANING AND SERVICING
Oven
The inner walls of the oven are covered with easyto-clean high quality enamel. The very smooth
surface prevents greasy food rests from sticking to
the oven walls, thus, making cleaning fast and
easy. The acid-proof enamel surface provides a
long-term effective performance of the oven.
Please clean the oven after every use.
IMPORTANT!!! Safety precaution: before
cleaning the oven, disconnect the plug
from the power socket or the power cable
from the oven.
Clean the oven cavity and baking trays only with
tepid water and a little bit of washing-up liquid.
After having cleaned the oven, dry it with a dry
cloth or just open the oven door.
Do not use acid or alkaline substances (lemon
juice, vinegar, salt, tomatoes etc.) to clean the
AAB coated oven surfaces and baking trays. Do
not use chlorine based products, acids or abrasive
products to clean the enamel surfaces of the oven.
68
1
Self-cleaning catalytic panels
The Kaiser smooth-walled ovens are provided with
inner self-cleaning catalytic panels 1.
The fine-pored enamel coating of the panels is
highly ecological. At the oven temperature above
200° C, the enamel coating catalyzes grease and
oil stains on its surface and gradually vaporizes
them.
If the oven is still not clean enough after cooking
very greasy food, operate the empty oven for 60
minutes (max.) at maximum temperature until it
gets clean again.
Never wash or clean self-cleaning panels with
abrasive, acid, or alkaline products.
Page 69

DE RU
PFLEGE UND WARTUNG
Backofen
Die inneren Wände des Backofens sind mit
hochwertiger pflegeleichter Emaille bedeckt. Die
sehr glatte Oberfläche wirkt dem Erscheinen der
restlichen Verschmutzungen auf den Wänden des
Backofens sehr schnell entgegen und lässt sich
einfach reinigen. Die antisäurehaltige Eigenschaft
dieser Emaille erlaubt eine langfristige qualitativ
hohe Nutzung Ihres Backofens.
Der Backofen ist nach jedem Gebrauch zu
reinigen.
ɈȻɋɅɍɀɂȼȺɇɂȿ ɂ ɍɏɈȾ
Ⱦɭɯɨɜɨɣ ɲɤɚɮ
ȼɧɭɬɪɟɧɧɢɟ ɫɬɟɧɤɢ ɞɭɯɨɜɤɢ ɩɨɤɪɵɬɵ
ɜɵɫɨɤɨɤɚɱɟɫɬɜɟɧɧɨɣ ɥɟɝɤɨɨɱɢɳɚɸɳɟɣɫɹ
ɷɦɚɥɶɸ. Ɉɱɟɧɶ ɝɥɚɞɤɚɹ ɩɨɜɟɪɯɧɨɫɬɶ
ɩɪɨɬɢɜɨɞɟɣɫɬɜɭɟɬ ɩɨɹɜɥɟɧɢɸ ɧɚ ɫɬɟɧɤɚɯ
ɞɭɯɨɜɤɢ ɨɫɬɚɬɨɱɧɵɯ ɡɚɝɪɹɡɧɟɧɢɣ ɢ ɨɱɟɧɶ
ɛɵɫɬɪɨ ɢ ɩɪɨɫɬɨ ɨɱɢɳɚɟɬɫɹ. Ⱥɧɬɢɤɢɫɥɨɬɧɨɟ
ɫɜɨɣɫɬɜɨ ɷɬɨɣ ɷɦɚɥɢ ɩɨɡɜɨɥɹɟɬ ɞɨɥɝɨɫɪɨɱɧɨ ɢ
ɤɚɱɟɫɬɜɟɧɧɨ ɢɫɩɨɥɶɡɨɜɚɬɶ ȼɚɲɭ ɞɭɯɨɜɤɭ.
ɑɢɫɬɢɬɟ ɞɭɯɨɜɤɭ ɩɨɫɥɟ ɤɚɠɞɨɝɨ ɢɫɩɨɥɶɡɨɜɚɧɢɹ.
WICHTIG !!! Als Sicherheitsvorkehrung
muss vor jeder Reinigung des Backofens
immer das Stromnetz abgeschaltet
werden.
Den Backofenraum und Backblechen nur mit
lauwarmem Wasser mit ein wenig
Geschirrspülmittel waschen. Nach dem Waschen
ist der Backofenraum mit einem trockenen Lappen
nachzuwischen oder bei geöffneter Tür trocknen zu
lassen.
Zum Reinigen von Backofen und Backblech mit
Antiannbrennbeschichtung AAB dürfen auf keinen
Fall sauren oder alkalischen Substanzen
verwendet werden (Zitronensaft, Essig, Salz,
usw.). Chlorhaltige Produkte (Bleichmittel usw.)
sind ebenfalls unbedingt zu vermeiden, dies gilt
vor allem für die Reinigung der emaillierten
Wände.
Selbstreinigende ka ta lytische Platten
Unsere Backöfen mit glatten Wänden bieten die
Möglichkeit, in der Muffel selbstreinigende Platten
1 zu montieren, mit denen die Wände verkleidet
werden. Diese Spezialplatten, die vor den
seitlichen Rahmen an den Wänden eingehängt
werden, sind mit einem mikroporösen katalytischen
Speziallack bedeckt, der oxidiert, die Öl- und
Fettspritzer nach und nach verdampfen lässt, und
so bei den Backvorgängen über 200°C eliminiert.
Sollte der Ofen nach dem Backen sehr fetthaltiger
Speisen nicht sauber sein, lässt man ihn maximal
60 Minuten lang leer bei Höchsttemperatur
eingeschaltet. Die selbstreinigenden Platten
dürfen weder gewaschen, noch mit scheuernden
oder säurehaltigen bzw. alkalischen Produkten
gereinigt werden.
Ⱦɭɯɨɜɨɣ ɲɤɚɮ ɢ ɩɪɨɬɜɢɧɢ ɦɨɣɬɟ, ɢɫɩɨɥɶɡɭɹ
ɬɨɥɶɤɨ ɬɟɩɥɭɸ ɜɨɞɭ ɫ ɧɟɛɨɥɶɲɢɦ ɤɨɥɢɱɟɫɬɜɨɦ
ɠɢɞɤɨɫɬɢ ɞɥɹ ɦɵɬɶɹ ɩɨɫɭɞɵ. ɉɨɫɥɟ ɦɵɬɶɹ
ɜɵɬɪɢɬɟ ɞɭɯɨɜɨɣ ɲɤɚɮ ɧɚɫɭɯɨ ɢɥɢ ɨɫɬɚɜɶɬɟ
ɞɜɟɪɰɭ ɨɬɤɪɵɬɨɣ ɞɥɹ ɩɪɨɫɵɯɚɧɢɹ ɤɚɦɟɪɵ.
ɇɟ ɩɪɢɦɟɧɹɣɬɟ ɞɥɹ ɱɢɫɬɤɢ ɞɭɯɨɜɤɢ ɢ
ɩɪɨɬɜɢɧɹ ɫ ɚɧɬɢɩɪɢɝɚɪɧɵɦ ɩɨɤɪɵɬɢɟɦ ȺȺȼ
ɤɢɫɥɨɬɨ- ɢɥɢ ɳɟɥɨɱɟɫɨɞɟɪɠɚɳɢɯ ɜɟɳɟɫɬɜ
(ɭɤɫɭɫ, ɫɨɤ ɥɢɦɨɧɚ, ɫɨɥɶ ɢ ɬ.ɞ.). ɇɢ ɜ ɤɨɟɦ
ɫɥɭɱɚɟ ɧɟ ɩɪɢɦɟɧɹɣɬɟ ɬɚɤɠɟ
ɯɥɨɪɨɫɨɞɟɪɠɚɳɢɟ ɫɪɟɞɫɬɜɚ (ɨɬɛɟɥɢɜɚɸɳɢɟ ɢ
ɬ.ɞ.). Ɉɫɨɛɟɧɧɨ ɷɬɨ ɧɭɠɧɨ ɢɦɟɬɶ ɜ ɜɢɞɭ ɩɪɢ
ɱɢɫɬɤɟ ɷɦɚɥɢɪɨɜɚɧɧɵɯ ɩɨɜɟɪɯɧɨɫɬɟɣ ɞɭɯɨɜɨɤ.
ɋɚɦɨɨɱɢɳɚɸɳɢɟɫɹ ɤɚɬɚɥɢɬɢɱɟɫɤɢɟ
ɩɥɚɫɬɢɧɵ.
ɇɚ ɫɬɟɧɤɚɯ ɞɭɯɨɜɤɢ ɭɫɬɚɧɨɜɥɟɧɵ ɩɥɚɫɬɢɧɵ 1 ɫɨ
ɫɩɟɰɢɚɥɶɧɨɣ ɷɤɨɥɨɝɢɱɟɫɤɨɣ ɦɢɤɪɨɩɨɪɢɫɬɨɣ
ɫɚɦɨɨɱɢɳɚɸɳɟɣɫɹ ɤɚɬɚɥɢɬɢɱɟɫɤɨɣ ɷɦɚɥɶɸ.
ɗɬɚ ɷɦɚɥɶ ɩɪɢ ɬɟɦɩɟɪɚɬɭɪɟ ɬɢɩɨɜɨɣ ɪɚɛɨɬɵ
ɞɭɯɨɜɤɢ ɫɜɵɲɟ 200° ɋ ɤɚɬɚɥɢɡɢɪɭɟɬ ɜɫɟ
ɧɚɯɨɞɹɳɢɟɫɹ ɧɚ ɧɟɣ ɠɢɪɧɵɟ ɜɟɳɟɫɬɜɚ ɢ,
ɢɫɩɚɪɹɹ, ɭɫɬɪɚɧɹɟɬ ɢɯ. ȿɞɢɧɫɬɜɟɧɧɵɟ ɫɪɟɞɫɬɜɚ,
ɧɟɨɛɯɨɞɢɦɵɟ ɞɥɹ ɭɛɨɪɤɢ ɞɭɯɨɜɤɢ ɩɨɫɥɟ
ɤɚɬɚɥɢɬɢɱɟɫɤɨɣ ɨɱɢɫɬɤɢ - ɷɬɨ... ɳɺɬɤɚ ɢ ɫɨɜɨɤ.
ȿɫɥɢ ɠɟ ɩɨɫɥɟ ɩɪɢɝɨɬɨɜɥɟɧɢɹ ɨɱɟɧɶ ɠɢɪɧɵɯ
ɛɥɸɞ ɧɚ ɫɬɟɧɤɚɯ ɞɭɯɨɜɤɢ ɜɫɟ ɠɟ ɨɫɬɚɸɬɫɹ
ɡɚɦɟɬɧɵɦɢ ɫɥɟɞɵ ɦɚɫɥɚ ɢ ɠɢɪɚ, ɨɫɬɚɜɶɬɟ
ɩɭɫɬɭɸ ɞɭɯɨɜɤɭ ɜɤɥɸɱɟɧɧɨɣ ɩɪɢ ɦɚɤɫɢɦɚɥɶɧɨɣ
ɬɟɦɩɟɪɚɬɭɪɟ ɞɨ ɬɟɯ ɩɨɪ, ɩɨɤɚ ɨɧɚ ɩɨɥɧɨɫɬɶɸ ɧɟ
ɨɱɢɫɬɢɬɫɹ ɋɚɦɨɨɳɢɱɚɸɳɢɟɫɹ ɤɚɬɚɥɢɬɢɱɟɫɤɢɟ
ɩɥɚɫɬɢɧɵ ɧɟɥɶɡɹ ɧɢ ɦɵɬɶ, ɧɢ ɬɟɦ ɛɨɥɟɟ
ɱɢɫɬɢɬɶ ɚɛɪɚɡɢɜɧɵɦɢ ɦɚɬɟɪɢɚɥɚɦɢ ɢ ɤɢɫɥɨɬɨ ɢ ɳɟɥɨɱɟɫɨɞɟɪɠɚɳɢɦɢ ɫɪɟɞɫɬɜɚɦɢ.
ȼɚɠɧɨ! ȼ ɤɚɱɟɫɬɜɟ ɦɟɪɵ
ɩɪɟɞɨɫɬɨɪɨɠɧɨɫɬɢ ɧɟɨɛɯɨɞɢɦɨ ɩɟɪɟɞ
ɤɚɠɞɨɣ ɱɢɫɬɤɨɣ ɞɭɯɨɜɤɢ ɨɬɤɥɸɱɚɬɶ ɟɟ
ɨɬ ɫɟɬɢ.
69
Page 70

EN
Baking trays with ȺȺȼ coating
The Kaiser XL 500 ovens are provided with the
ȺȺȼ coated baking trays manufactured on the
basis of state-of-art technologies. In comparison to
usual coatings, the ABB coating is much more
advantageous: it is durable, resistant to scratches,
grease and oil stains do not stick to it. The
remarkable anti-stick feature of the coating is
based on “Lotus blossom” effect: oil and grease
drip off without sticking and can be easily removed
even by water without any detergents.
If you cook food on the ABB coated baking trays,
please only use special wooden or plastic utensils.
Telescopes*
The system of Telescopes 2 provided in the oven
enables you to pull out all baking trays together or
separately even while cooking a dish. This Kaiser
innovation differs from all similar constructions to
2
advantage: telescopic guides provide convenient
and practical access to every level, enable you to
check up and take out the food from any tray, thus,
saving the heat in the oven and preserving the food
on the other trays hot. A special anti-tilt system
guarantees safety against overturning
even if the
telescopic guides are fully withdrawn. The
maximum load amounts to 15 kg. You can easily
dismantle the telescopes in order to clean them
thoroughly. The construction is made of stainless
steel, so corrosion protection is ensured.
Removing the oven door
3
You can easily remove the oven door in order to
clean it more thoroughly and get a better access to
the oven cavity.
To do so, proceed as follows:
x Open the door against the stop.
x Fix the two levers 3 in the upper position.
x Close the door against the first stop
(caused by the raised levers).
x Carefully pull the door upwards and
outwards to remove it from the mountings
4.
To mount the door:
4
x Fit the hinges into their mountings and fix
the two levers in the lower position.
* - if available
* - - can be ordered in trade
70
Page 71

DE RU
Das Backblech mit der
Antianbrennbeschichtung AAB
Die neusten Backbleche des Herdes XL 500 mit
der Antianbrennbeschichtung AAB entsprechen
den modernsten Technologien. Der neue
Antihaftbelag ist viel vorteilhafter als übliche
Beschichtungen. Das neue Backblech ist
strapazierfähig, kratzfest und langlebig. Seine
hervorragenden Antihaft-Eigenschaften hat es dem
Lotusblüteneffekt zu verdanken – alles perlt
spurlos ab und nichts kann anhaften. Fett, Reste
vom Kuchen und etc. verbinden sich nicht mit der
Oberfläche und lassen sich durch klares Wasser
ohne Zusatz von Reinigungsmitteln mühelos
entfernen.
Beim Nutzen des AAB Bleches benutzen Sie die
Geräte aus Holz oder Kunststoff.
Teleskop*
Das System Teleskop 2, mit dem Ihr Herd
ausgestattet ist, ermöglicht Ihnen, alle Bleche
sowohl zusammen als auch getrennt voneinander
herauszuschieben, sogar während der Zubereitung
eines Gerichtes. Die von Kaiser ausgefertigte
Konstruktion unterscheidet sich von ähnlichen durch
den bequemen und praktischen Zugriff zu jedem
Blech und erlaubt Ihnen, die Backwaren von jedem
Backblech herauszunehmen und zu kontrollieren,
ohne den Ofen und die Gerichte auf den anderen
Blechen abzukühlen. Die Schienen jedes Bleches
halten einer Belastung von bis zu 15 kg stand im
vollständig herausgeschobenen Zustand. Beim
Säubern des Backofens lässt sich das System der
Schienen leicht entfernen. Die Konstruktion ist in
rostfreiem Stahl ausgeführt, was die Möglichkeit von
Korrosionsbildung ausschließt.
Ausbauen der Ofentür
Um einen besseren Zugang zum Backofenraum zu
schaffen sowie die Reinigung zu ermöglichen,
kann die Backofentür mühelos ausgebaut werden.
Dazu folgendermaßen vorgehen:
x die Tür ganz öffnen;
x die zwei auf Abb. dargestellten Hebel 3
anheben;
x die Tür wieder bis zur ersten, von den zwei
zuvor angehobenen Hebeln bestimmten
Einrastung schließen;
x die Tür nach oben und nach außen
anheben und herausnehmen 4.
Um die Tür wieder einzubauen:
x die Scharniere wieder einsetzen und dann
die zwei Hebel in Schließstellung bringen.
* - falls vorhanden
* - kann zusätzlich im Handel bestellt werden
ɉɪɨɬɜɢɧɶ ɫ ɚɧɬɢɩɪɢɝɚɪɧɵɦ ɩɨɤɪɵɬɢɟɦ
ȺȺȼ
ɇɨɜɵɟ ɩɪɨɬɜɧɢ ɩɥɢɬ XL 500 ɫ ɚɧɬɢɩɪɢɝɚɪɧɵɦ
ɩɨɤɪɵɬɢɟɦ ȺȺȼ ɢɡɝɨɬɨɜɥɟɧ ɧɚ ɨɫɧɨɜɟ
ɧɨɜɟɣɲɢɯ ɬɟɯɧɨɥɨɝɢɣ. ɗɬɨ ɩɨɤɪɵɬɢɟ ɢɦɟɟɬ
ɝɨɪɚɡɞɨ ɛɨɥɶɲɟ ɩɪɟɢɦɭɳɟɫɬɜ, ɱɟɦ ɨɛɵɱɧɵɟ
ɩɨɤɪɵɬɢɹ. ɇɨɜɵɣ ɩɪɨɬɢɜɟɧɶ ɩɪɨɱɟɧ ɢ ɭɫɬɨɣɱɢɜ ɤ
ɰɚɪɚɩɢɧɚɦ, ɞɨɥɝɨɜɟɱɟɧ, ɡɚɦɟɱɚɬɟɥɶɧɨɟ
ɤɚɱɟɫɬɜɨ ɚɧɬɢɩɪɢɝɚɪɧɨɝɨ ɩɨɤɪɵɬɢɹ ɞɨɫɬɢɝɚɟɬɫɹ
ɛɥɚɝɨɞɚɪɹ ɷɮɮɟɤɬɭ ɰɜɟɬɨɜ Ʌɨɬɨɫɚ: ɠɢɪ, ɨɫɬɚɬɤɢ
ɜɵɩɟɱɤɢ ɢ ɬ. ɞ. ɧɟ ɩɪɢɫɬɚɸɬ ɤ ɩɨɜɟɪɯɧɨɫɬɢ ɢ ɢɯ
ɦɨɠɧɨ ɛɟɡ ɬɪɭɞɚ ɭɞɚ
ɛɟɡ ɱɢɫɬɹɳɢɯ ɫɪɟɞɫɬɜ.
ȿɫɥɢ ȼɵ ɝɨɬɨɜɢɬɟ ɩɢɳɭ ɧɚ ɩɪɨɬɜɢɧɟ ɫ
ɚɧɬɢɩɪɢɝɚɪɧɵɦ ɩɨɤɪɵɬɢɟɦ ȺȺȼ, ɪɟɤɨɦɟɧɞɭɟɬɫɹ
ɢɫɩɨɥɶɡɨɜɚɬɶ ɞɟɪɟɜɹɧɧɵɟ ɢɥɢ ɫɩɟɰɢɚɥɶɧɵɟ
ɩɥɚɫɬɦɚɫɫɨɜɵɟ ɩɪɢɛɨɪɵ.
Ɍɟɥɟɫɤɨɩ*
ɋɢɫɬɟɦɚ Ɍɟɥɟɫɤɨɩ 2, ɤɨɬɨɪɵɦ ɨɫɧɚɳɟɧɚ ȼɚɲɚ
ɞɭɯɨɜɤɚ, ɩɨɡɜɨɥɹɟɬ ȼɚɦ ɜɵɞɜɢɝɚɬɶ ɜɫɟ ɩɪɨɬɢɜɧɢ
ɤɚɤ ɫɨɜɦɟɫɬɧɨ, ɬɚɤ ɢ ɩɨ ɨɬɞɟɥɶɧɨɫɬɢ ɞɚɠɟ ɜɨ
ɜɪɟɦɹ ɩɪɢɝɨɬɨɜɥɟɧɢɹ ɛɥɸɞ. Ⱦɚɧɧɚɹ ɤɨɧɫɬɪɭɤɰɢɹ
ɨɬɥɢɱɚɟɬɫɹ ɨɬ ɚɧɚɥɨɝɢɱɧɵɯ ɭɞɨɛɧɵɦ ɢ
ɩɪɚɤɬɢɱɧɵɦ ɞɨɫɬɭɩɨɦ ɤ ɥɸɛɨɦɭ ɩɪɨɬɢɜɧɸ ɢ
ɩɨɡɜɨɥɹɟɬ ɞɨɫɬɚɜɚɬɶ ɢ ɤɨɧɬɪɨɥɢɪɨɜɚɬɶ ɜɵɩɟɱɤɭ
ɧɚ ɥɸɛɨɦ ɢɡ ɧɢɯ, ɧɟ ɨɯɥɚɠɞɚɹ ɜɫɸ ɞɭɯɨɜɤɭ ɢ
ɧɚɯɨɞɹɳɢɟɫɹ ɧɚ ɞɪɭɝɢɯ ɩɪɨɬɢɜɧɹɯ ɛɥɸɞɚ.
ɇɚɩɪɚɜɥɹɸɳɢɟ ɤɚɠɞɨɝɨ ɩɪɨɬɢɜɧɹ ɧɚɞɺɠɧɨ
ɭɞɟɪɠɢɜɚɸɬ ɧɚɝɪɭɠɟɧɧɵɣ ɜɟɫɨɦ ɞɨ 15 ɤɝ.
ɩɪɨɬɢɜɟɧɶ ɜ ɩɨɥɧɨɫɬɶɸ ɜɵɞɜɢɧɭɬɨɦ ɫɨɫɬɨɹɧɢɢ.
ɉɪɢ ɨɱɢɫɬɤɟ ɞɭɯɨɜɤɢ ɫɢɫɬɟɦɚ ɧɚɩɪɚɜɥɹɸɳɢɯ
ɥɟɝɤɨ ɫɧɢɦɚɟɬɫɹ. Ʉɨɧɫɬɪɭɤɰɢɹ ɜɵɩɨɥɧɟɧɚ ɢɡ
ɧɟɪɠɚɜɟɸɳɟɣ ɫɬɚɥɢ, ɱɬɨ ɢɫɤɥɸɱɚɟɬ
ɜɨɡɦɨɠɧɨɫɬɶ ɩɨɹɜɥɟɧɢɹ ɤɨɪɪɨɡɢɢ.
Ⱦɟɦɨɧɬɚɠ ɞɜɟɪɰɵ ɞɭɯɨɜɤɢ
Ⱦɥɹ ɩɨɥɭɱɟɧɢɹ ɥɭɱɲɟɝɨ ɞɨɫɬɭɩɚ ɤ ɞɭɯɨɜɨɦɭ
ɲɤɚɮɭ, ɚ ɬɚɤɠɟ ɞɥɹ ɟɝɨ ɨɱɢɫɬɤɢ, ɞɜɟɪɰɚ ɦɨɠɟɬ
ɛɵɬɶ ɨɱɟɧɶ ɥɟɝɤɨ ɞɟɦɨɧɬɢɪɨɜɚɧɚ. Ⱦɥɹ ɷɬɨɝɨ
ɧɟɨɛɯɨɞɢɦɨ:
x ɩɨɥɧɨɫɬɶɸ ɨɬɤɪɵɬɶ ɞɜɟɪɰɭ;
x ɩɪɢɩɨɞɧɹɬɶ ɞɜɚ ɭɤɚɡɚɧɧɵɯ ɧɚ ɪɢɫɭɧɤɟ
x ɩɪɢɤɪɵɬɶ ɞɜɟɪɰɭ ɞɨ ɩɟɪɜɨɝɨ ɤɚɫɚɧɢɹ
x ɩɪɢɩɨɞɧɹɜ ɞɜɟɪɰɭ, ɩɨɬɹɧɭɬɶ ɟɟ ɜɜɟɪɯ ɧɚ
ɑɬɨɛɵ ɜɧɨɜɶ ɭɫɬɚɧɨɜɢɬɶ ɞɜɟɪɰɭ:
x ɜɫɬɚɜɢɬɶ ɲɚɪɧɢɪɵ ɧɚ ɩɪɟɠɧɟɟ ɦɟɫɬɨ ɢ
* - ɟɫɥɢ ɢɦɟɟɬɫɹ
* - ɦɨɠɟɬɶ ɛɵɬɶ ɞɨɩɨɥɧɢɬɟɥɶɧɨ ɡɚɤɚɡɚɧɚ ɜ ɦɚɝɚɡɢɧɟ
ɥɢɬɶ ɱɢɫɬɨɣ ɜɨɞɨɣ ɞɚ
ɪɵɱɚɠɤɚ 3
ɩɨɞɧɹɬɵɯ ɪɵɱɚɠɤɨɜ;
ɫɟɛɹ 4.
ɡɚɳɟɥɤɧɭɬɶ ɪɵɱɚɠɤɢ.
ɠɟ
71
Page 72

2
EN
Removing inner glass
2
To remove the inner pane, screw out the screw
and open the plastic latches
corners of the door. Now pull the glass carefully to
set it free from the second blocking device. Take
the glass out. Insert the clean glass back carefully
and lock it by means of the blocking device.
2 located in the upper
1
Replacing the oven light
1
The oven light 3 should have the following
parameters:
a) temperature resistance – up to 300°C
b) power supply: see V/Hz indicated on data plate.
c) power input: 25W.
d) E 14 connection.
4
Attention! First of all disconnect the
appliance from the power supply.
3
x to prevent damage, put a cloth into the oven
x screw out the glass cover of the light
x screw out the old bulb and replace it with
the new one
x adjust the glass cover and remove the cloth
x connect the appliance to the mains
electricity supply
Fan filter
In case your oven is equipped with the net filter
which protects the fan from the drops of fat, take
out the filter every time you use the oven
intensively and wash it in hot water with washing-up
liquids.
To withdraw the filter, pull the handle
To mount the filter, insert its ledges into a label on
the wall and carefully pull it downwards. The filter is
fixed at the protective casing of the fan.
4 upwards.
72
Page 73

DE RU
Herausziehen der inneren Scheibe
Drehen Sie dazu die Schrauben
entfernen Sie die Kunststoffverschlüsse
den oberen Ecken der Backofentür befinden.
Danach schieben Sie die Scheibe aus dem zweiten
Verriegelungselement heraus und ziehen Sie sie
heraus. Nach dem Reinigen schieben Sie die
Scheibe zurück und verriegeln Sie sie, indem Sie
die Verriegelungselemente erneut festschrauben.
1 heraus und
2, die sich in
Auswechslung der Ofenbeleuchtung
Die Ofenbeleuchtung 3 muss folgende Merkmale
aufweisen:
a) hochtemperaturbeständig (bis zu 300° ɋ)
b) Stromversorgung: siehe Anschlusswerte V/Hz auf
dem Typenschild.
c) Leistung 25 W
d) Sockel E 14.
ɋɧɹɬɢɟ ɜɧɭɬɪɟɧɧɟɝɨ ɫɬɟɤɥɚ
ɋ ɷɬɨɣ ɰɟɥɶɸ ɫɥɟɞɭɟɬ ɜɵɜɢɧɬɢɬɶ ɜɢɧɬ
ɨɬɤɪɵɬɶ ɩɥɚɫɬɦɚɫɫɨɜɵɟ ɡɚɳɟɥɤɢ
ɪɚɫɩɨɥɨɠɟɧɧɵɟ ɜ ɜɟɪɯɧɢɯ ɭɝɥɚɯ ɞɜɟɪɰɵ. Ɂɚɬɟɦ
ɫɬɟɤɥɨ ɫɥɟɞɭɟɬ ɜɵɞɜɢɧɭɬɶ ɫɨ ɜɬɨɪɨɝɨ
ɛɥɨɤɢɪɭɸɳɟɝɨ ɷɥɟɦɟɧɬɚ ɢ ɜɵɧɭɬɶ. ɉɨɫɥɟ
ɨɱɢɫɬɤɢ ɫɬɟɤɥɨ ɫɥɟɞɭɟɬ ɜɫɬɚɜɢɬɶ ɢ
ɡɚɛɥɨɤɢɪɨɜɚɬɶ, ɩɪɢɤɪɭɱɢɜɚɹ ɛɥɨɤɢɪɭɸɳɢɣ
ɷɥɟɦɟɧɬ.
Ɂɚɦɟɧɚ ɥɚɦɩɵ ɨɫɜɟɳɟɧɢɹ ɞɭɯɨɜɤɢ
Ɉɫɜɟɳɟɧɢɟ ɞɭɯɨɜɤɢ 3 ɞɨɥɠɧɨ ɢɦɟɬɶ
ɫɥɟɞɭɸɳɢɟ ɩɚɪɚɦɟɬɪɵ:
a) Ɍɟɪɦɨɫɬɨɣɤɨɫɬɶ (ɞɨ 300° ɋ)
b) ɗɥɟɤɬɪɨɩɢɬɚɧɢɟ: ɩɚɪɚɦɟɬɪɵ ɩɨɞɤɥɸɱɟɧɢɹ
V/Hz ɭɤɚɡɚɧɵ ɜ ɡɚɜɨɞɫɤɨɣ ɬɚɛɥɢɱɤɟ.
c) ɉɨɬɪɟɛɥɹɟɦɚɹ ɦɨɳɧɨɫɬɶ 25 W.
d) ɐɨɤɨɥɶ E 14.
1 ɢ
2,
Achtung! Das Gerät zuallererst vom
Stromnetz trennen.
x Zur Vermeidung von Schadensfällen, ist im
Ofen ein Geschirrtuch auszubreiten
x Lampenabdeckung aus Glas abschrauben
x Alte Lampe abschrauben und mit einer
neuen auswechseln
x Lampenabdeckung wieder anmontieren und
Geschirrtuch entfernen
x Das Gerät erneut an das Stromnetz
anschließen
Filter des Ventilators
Wenn Ihr Backöfen mit einem Filter ausgestattet ist,
der einem Zweck dient, die Menge von zum
Ventilatorpropeller gelangenden Fettpartikeln zu
begrenzen, wird es empfohlen, nach jedem
intensiven Backen den Filter herauszunehmen und
ihn in heißem Wasser mit Spülmittel zu waschen.
Um den Filter herauszunehmen, packen Sie seinen
sichtbaren Griff und ziehen Sie ihn nach oben
Um den Filter wieder einzubauen, sind seine
Anzapfungen in die Ausschnitte der Luftführung
hineinzuschieben.
4.
ȼɧɢɦɚɧɢɟ! ɉɪɟɠɞɟ ɜɫɟɝɨ ɨɬɤɥɸɱɢɬɶ
ɞɭɯɨɜɤɭ ɨɬ ɫɟɬɢ.
x ȼɨ ɢɡɛɟɠɚɧɢɟ ɩɨɜɪɟɠɞɟɧɢɣ ɪɚɡɥɨɠɢɬɟ
ɜ ɞɭɯɨɜɤɟ ɤɭɯɨɧɧɨɟ ɩɨɥɨɬɟɧɰɟ
x ȼɵɤɪɭɬɢɬɟ ɫɬɟɤɥɹɧɧɵɣ ɩɥɚɮɨɧ
x ȼɵɤɪɭɬɢɬɟ ɫɬɚɪɭɸ ɥɚɦɩɨɱɤɭ ɢ ɜɤɪɭɬɢɬɟ
ɧɨɜɭɸ
x ȼɤɪɭɬɢɬɟ ɧɚ ɦɟɫɬɨ ɩɥɚɮɨɧ ɢ ɭɛɟɪɢɬɟ
ɩɨɥɨɬɟɧɰɟ
x ɉɨɞɤɥɸɱɢɬɟ ɞɭɯɨɜɤɭ ɤ ɷɥɟɤɬɪɨɫɟɬɢ
Ɏɢɥɶɬɪ ɜɟɧɬɢɥɹɬɨɪɚ
ȿɫɥɢ ȼɚɲɚ ɩɥɢɬɚ ɨɛɨɪɭɞɨɜɚɧɚ ɫɟɬɱɚɬɵɦ
ɮɢɥɶɬɪɨɦ, ɨɝɪɚɧɢɱɢɜɚɸɳɢɦ ɩɨɩɚɞɟɧɢɟ ɤɚɩɟɥɶ
ɠɢɪɚ ɧɚ ɜɟɧɬɢɥɹɬɨɪ, ɜɵɧɢɦɚɣɬɟ ɮɢɥɶɬɪ ɩɨɫɥɟ
ɤɚɠɞɨɝɨ ɢɧɬɟɧɫɢɜɧɨɝɨ ɢɫɩɨɥɶɡɨɜɚɧɢɹ ɞɭɯɨɜɨɝɨ
ɲɤɚɮɚ ɢ ɦɨɣɬɟ ɟɝɨ ɝɨɪɹɱɟɣ ɜɨɞɨɣ ɫ ɦɨɸɳɢɦɢ
ɫɪɟɞɫɬɜɚɦɢ.
Ⱦɥɹ ɢɡɴɹɬɢɹ ɮɢɥɶɬɪɚ ɧɭɠɧɨ ɜɡɹɬɶɫɹ ɡɚ ɪɭɱɤɭ
ɢ ɩɨɬɹɧɭɬɶ ɜɜɟɪɯ.
Ⱦɥɹ ɭɫɬɚɧɨɜɤɢ ɮɢɥɶɬɪɚ ɧɚ ɦɟɫɬɨ ɭɫɬɚɧɨɜɢɬe
ɟɝɨ ɜɵɫɬɭɩɵ ɜ ɜɵɪɟɡɵ ɧɚ ɫɬɟɧɤɟ ɢ ɜɫɬɚɜɶɬɟ ɟɝɨ
ɞɜɢɠɟɧɢɟɦ ɫɜɟɪɯɭ-ɜɧɢɡ.
Ɏɢɥɶɬɪ ɤɪɟɩɢɬɫɹ ɧɚ ɡɚɳɢɬɧɨɦ ɤɨɠɭɯɟ
ɜɟɧɬɢɥɹɬɨɪɚ.
4
73
Page 74

EN
Cyclic inspection
Besides the current maintenance, the user should
ensure:
x alternate check and maintenance of oven
elements and assemblies,
x cyclic inspection by the customer service
once in two years after the warranty has
expired.
x Repair of faults.
Note! Care and servicing as well as all kind of
reparations are to be carried out by authorized
personnel only.
IMPORTANT!!!
The user is responsible for good working
order and correct operation of the
appliance. If the customer service is called
because of an operating mistake, the
servicing costs are carried by the user
even if the warranty is still valid.
Damages caused by non-observance of
the given instruction are not approved.
What to do, if?
In case of a damage:
x Switch off all oven operating functions
(cooking zones, oven, light etc.)
x disconnect the appliance from the power
supply
x contact the Customer Centre or another
authorized organisation to order the
servicing.
Some simple faults can be repaired by the user in
correspondence with the recommendations in the
present operating instructions.
Some troubles and faults can occur occasionally
during the usage of the appliance. The user can
repair some of the faults on his or her own by
following the recommendations introduced in the
Table below. Before contacting the customer
service, check the following points consecutively:
74
Page 75

DE RU
Periodische Besichtigung
Außer den laufenden Wartungsarbeiten ist der
Benutzer zu folgenden Tätigkeiten verpflichtet:
x Periodische Überprüfung und Wartung von
Herdelementen und Baugruppen,
x Nach Ablauf der Garantieperiode jede zwei
Jahre den Herd vom Kundendienst
durchsehen lassen.
x Beseitigung von entdeckten Störungen.
Anmerkung! Alle oben angeführten Einstell- und
Nachstelltätigkeiten, sowie Reparaturen müssen
durch eine Kundendienststelle oder einen
autorisierten Installateur durchgeführt werden.
ɉɟɪɢɨɞɢɱɟɫɤɢɣ ɨɫɦɨɬɪ
Ʉɪɨɦɟ ɨɩɟɪɚɰɢɣ ɫɜɹɡɚɧɧɵɯ ɫ ɬɟɤɭɳɢɦ ɭɯɨɞɨɦ
ɡɚ ɩɥɢɬɨɣ, ɫɥɟɞɭɟɬ:
x ɩɪɨɢɡɜɨɞɢɬɶ ɩɟɪɢɨɞɢɱɟɫɤɢɟ ɩɪɨɜɟɪɤɢ
ɢɫɩɪɚɜɧɨɫɬɢ ɨɪɝɚɧɨɜ ɭɩɪɚɜɥɟɧɢɹ ɢ
ɪɚɛɨɱɢɯ ɭɡɥɨɜ ɩɥɢɬɵ,
x ɩɨɫɥɟ ɢɫɬɟɱɟɧɢɹ ɫɪɨɤɚ ɝɚɪɚɧɬɢɢ, ɩɨ
ɤɪɚɣɧɟɣ ɦɟɪɟ ɨɞɢɧ ɪɚɡ ɜ ɞɜɚ ɝɨɞɚ,
ɫɥɟɞɭɟɬ ɩɨɪɭɱɢɬɶ ɫɟɪɜɢɫɧɨɦɭ ɰɟɧɬɪɭ
ɩɪɨɜɟɞɟɧɢɟ ɬɟɯɧɢɱɟɫɤɨɝɨ ɨɫɦɨɬɪɚ
ɩɥɢɬɵ,
x ɭɫɬɪɚɧɹɬɶ ɨɛɧɚɪɭɠɟɧɧɵɟ
ɧɟɢɫɩɪɚɜɧɨɫɬɢ.
ɉɪɢɦɟɱɚɧɢɟ! ȼɫɟ ɪɟɦɨɧɬɵ ɢ ɨɩɟɪɚɰɢɢ ɩɨ
ɪɟɝɭ
ɥɢɪɨɜɤɟ, ɞɨɥɠɧɵ ɩɪɨɢɡɜɨɞɢɬ
ɫɟɪɜɢɫɧɵɦ ɰɟɧɬɪɨɦ ɢɥɢ ɦɨɧɬɺɪɨɦ,
ɨɛɥɚɞɚɸɳɢɦ ɫɨɨɬɜɟɬɫɬɜɭɸɳɟɣ
ɤɜɚɥɢɮɢɤɚɰɢɟɣ.
ɶɫɹ
WICHTIG!!! Der Benutzer ist für den
einwandfreien Zustand des Geräts und die
fachgerechte Benutzung verantwortlich.
Wenn der Kundendienst wegen eines
Bedienfehlers gerufen wird, ist der Besuch
auch während der Garantiezeit
kostenpflichtig.
Schäden, die durch Nichtbeachtung dieser
Bedienungsanleitung verursacht wurden,
Was ist, wenn ?
Bei jeder Störung:
x Betriebsfunktionen des Herdes (Kochplatte,
Backofen, Beleuchtung und s. w.)
abschalten,
x Stromversorgung abschalten,
x Die Notwendigkeit der Reparatur melden
(Service-Center bzw. eine andere
Organisation, die entsprechende Rechte
hat).
Einige einfache Fehler kann der Benutzer
selbstständig, entsprechend den Empfehlungen der
vorliegenden Bedienungsanleitung, beseitigen.
Bei der Benutzung des Gerätes können manchmal
Probleme und Fehler auftreten. Einige geringere
Fehler kann der Benutzer eigenständig beheben,
indem er die Hinweise befolgt, die in der
nachstehenden Tabelle angeführt sind. Bevor Sie
sich an den Kundendienst wenden, sind folgende
Punkte der Tabelle nacheinander zu überprüfen:
ȼɚɠɧɨ! ɉɨɥɶɡɨɜɚɬɟɥɶ ɨɬɜɟɱɚɟɬ ɡɚ
ɛɟɡɭɩɪɟɱɧɨɟ ɫɨɫɬɨɹɧɢɟ ɩɪɢɛɨɪɚ ɢ
ɩɪɚɜɢɥɶɧɨɟ ɨɛɫɥɭɠɢɜɚɧɢɟ. ȿɫɥɢ ɩɨ
ɩɪɢɱɢɧɟ ɧɟɩɪɚɜɢɥɶɧɨɝɨ ɨɛɫɥɭɠɢɜɚɧɢɹ
ɜɵɡɵɜɚɟɬɫɹ ɫɥɭɠɛɚ ɋɟɪɜɢɫɧɨɝɨ
ɐɟɧɬɪɚ, ɜɵɡɨɜ ɩɥɚɬɧɵɣ, ɞɚɠɟ ɩɪɢ ɟɳɺ
ɞɟɣɫɬɜɭɸɳɟɣ ɝɚɪɚɧɬɢɢ.
ɉɨɥɨɦɤɢ, ɤɨɬɨɪɵɟ ɜɵɡɜɚɧɵ
ɧɟɫɨɛɥɸɞɟɧɢɟɦ ɧɚɫɬɨɹɳɟɣ
ɂɧɫɬɪɭɤɰɢɢ, ɧɟ ɩɪɢɡɧɚɸɬɫɹ.
ɑɬɨ ɞɟɥɚɬɶ, ɟɫɥɢ ?
ȼ ɫɥɭɱɚɟ ɥɸɛɨɣ ɧɟɢɫɩɪɚɜɧɨɫɬɢ, ɫɥɟɞɭɟɬ:
x ɨɬɤɥɸɱɢɬɶ ɜɫɟ ɷɥɟɦɟɧɬɵ ɩɥɢɬɵ
(ɧɚɝɪɟɜɚɬɟɥɶɧɭɸ ɩɨɜɟɪɯɧɨɫɬɶ, ɞɭɯɨɜɤɭ,
ɨɫɜɟɳɟɧɢɟ ɢ ɩɪ.),
x ɨɬɤɥɸɱɢɬɶ ɷɥɟɤɬɪɨɩɢɬɚɧɢɟ,
x ɡɚɹɜɢɬɶ ɨ ɧɟɨɛɯɨɞɢɦɨɫɬɢ ɪɟɦɨɧɬɚ (ɜ
ɫɟɪɜɢɫɧɵɣ ɰɟɧɬɪ ɢɥɢ ɞɪɭɝɭɸ
ɨɪɝɚɧɢɡɚɰɢɸ, ɨɛɥɚɞɚɸɳɭɸ
ɫɨɨɬɜɟɬɫɬɜɭɳɢɦɢ ɩɪɚɜɚɦɢ).
ɇɟɤɨɬɨɪɵɟ ɩɪɨɫɬɵɟ ɧɟɢɫɩɪɚɜɧɨɫɬɢ ɦɨɠɟɬ
ɫɚɦɨɫɬɨɹɬɟɥɶɧɨ ɭɫɬɪɚɧɹɬɶ ɩɨɥɶɡɨɜɚɬɟɥɶ,
ɫɨɝɥɚɫɧɨ ɪɟɤɨɦɟɧɞɚɰɢɹɦ ɧɚɫɬɨɹɳɟɝɨ
ɪɭɤɨɜɨɞɫɬɜɚ.
ȼ ɩɟɪɢɨɞ ɷɤɫɩɥɭɚɬɚɰɢɢ ɷɥɟɤɬɪɢɱɟɫɤɨɣ ɩɥɢɬɵ
ɩɨɹɜɥɹɸɬɫɹ ɢɧɨɝɞɚ ɩɪɨɛɥɟɦɵ ɢ ɧɟɩɨɥɚɞɤɢ,
ɧɟɤɨɬɨɪɵɟ ɢɡ ɤɨɬ
ɫɨɫɬɨɹɧɢɢ ɭɞɚɥɢɬɶ ɫɚɦɨɫɬɨɹɬɟɥɶɧɨ ɩɪɢ
ɭɫɥɨɜɢɢ ɫɨ
ɬɚɛɥɢɰɟ ɧɢɠɟ. Ⱦɨ ɜɵɡɨɜɚ ɪɚɛɨɬɧɢɤɚ
ɫɟɪɜɢɫɧɨɝɨ ɨɛɫɥɭɠɢɜɚɧɢɹ, ɜɧɢɦɚɬɟɥɶɧɨ
ɩɪɨɱɬɢɬɟ ɢ ɜɵɩɨɥɧɢɬɟ ɫɥɟɞɭɸɳɢɟ
ɪɟɤɨɦɟɧɞɚɰɢɢ:
ɛɥɸɞɟɧɢɹ ɩɪɚɜɢɥ ɩɪɢɜɟɞɟɧɧɵɯ ɜ
ɨɪɵɯ ɩɨɬɪɟɛɢɬɟɥɶ ɜ
75
Page 76

EN
Fault
Cause
Remedial action
Cookerdoesn’t
switch on
Zeros flash on
the display
The oven light
doesn’t go on
The control
lights don’t go
on
Clock is fast or
runs behind
Disturbance in power
supply
Interruption of the
stream supply
Interruption of the
stream supply
Disturbance in power
supply
Fault in the lamp
Disturbance in power
supply
Fault in the lamp
Too low tension in
the house net
Check the
protection device of
your home
conduction. Replace
if defective.
Set the current time
on the display again
and switch on the
oven
Set the current time
on the display again
Check the
protection device of
your home
conduction. Replace
if defective.
Check if the lamp of
the oven light is
faultless. If not –
replace.
Check the
protection device of
your home
conduction. Replace
if defective.
Contact the
customer service
Check the tension
of the conduction. If
necessary –
stabilize.
IMPORTANT!!!
If the faults still cannot be repaired, contact the
customer service.
76
Page 77

DE RU
Störung Mögliche
Ursache
Hinweise
ɉɪɨɛɥɟɦɵ ȼɨɡɦɨɠɧɵɟ
ɩɪɢɱɢɧɵ
Ɋɟɲɟɧɢɹ
Der Herd
funktioniert
nicht
Auf dem
Display blinken
Nullen
Die
Ofenbeleuchtun
g funktioniert
nicht
Die
Kontrolllämpchen leuchten
nicht
Die Uhr geht
vor oder nach
Sörung der
Elektroversorgung
Unterbrechung der
Stromzufuhr
Unterbrechung der
Stromzufuhr
Sörung der
Elektroversorgung
Defekt der Lampe
Störung der
Elektroversorgung
Defekt der Lampe
Zu niedrige
Spannung im Netz
des Hauses
Prüfen der
Schutzvorrichtun
g der häuslichen
Leitung. Wenn
fehlerhaft ersetzen
Erneut die
aktuelle Zeit auf
dem Display
einstellen und
den Herd in
Betrieb nehmen
Erneut die
aktuelle Zeit auf
dem Display
einstellen
Prüfen der
Schutzvorrichtun
g der häuslichen
Leitung. Wenn
fehlerhaft ersetzen
Prüfen, ob die
Lampe der
Ofenbeleuchtun
g intakt ist.
Wenn fehlerhaft
– ersetzen
Prüfen der
Schutzvorrichtun
g der häuslichen
Leitung. Wenn
fehlerhaft ersetzen
An den
Kundendienst
wenden
Die Spannung
im Netz prüfen.
Falls notwendig die Spannung
stabilisieren
WICHTIG !!!
Wenn trotz der Empfehlungen die Probleme nicht
beseitigt werden konnten – wenden Sie sich an den
Kundendienst.
ɉɥɢɬɚ ɧɟ
ɪɚɛɨɬɚɟɬ
ɇɚ ɞɢɫɩɥɟɟ
ɦɢɝɚɸɬ ɧɭɥɢ
ɇɟ ɞɟɣɫɬɜɭɟɬ
ɨɫɜɟɳɟɧɢɟ
ɞɭɯɨɜɤɢ
ɇɟ ɝɨɪɹɬ
ɤɨɧɬɪɨɥɶɧɵɟ
ɥɚɦɩɵ
ɑɚɫɵ ɫɩɟɲɚɬ
ɢɥɢ ɨɬɫɬɚɸɬ
ɇɚɪɭɲɟɧɢɟ
ɷɥɟɤɬɪɨɫɧɚɛɠɟɧɢɹ
ɉɟɪɟɪɵɜ ɜ ɩɨɞɚɱɟ
ɬɨɤɚ
ɉɟɪɟɪɵɜ ɜ ɩɨɞɚɱɟ
ɬɨɤɚ
ɇɚɪɭɲɟɧɢɟ
ɷɥɟɤɬɪɨɫɧɚɛɠɟɧɢɹ
Ⱦɟɮɟɤɬ ɥɚɦɩɵ
ɇɚɪɭɲɟɧɢɟ
ɷɥɟɤɬɪɨɫɧɚɛɠɟɧɢɹ
Ⱦɟɮɟɤɬ ɥɚɦɩɵ
ɇɢɡɤɨɟ ɧɚɩɪɹɠɟɧɢɟ
ɜ ɞɨɦɚɲɧɟɣ ɫɟɬɢ
ɉɪɨɜɟɪɢɬɶ
ɩɪɟɞɨɯɪɚɧɢɬɟɥɢ ɞɨɦɚɲɧɟɣ
ɩɪɨɜɨɞɤɢ.
ɇɟɢɫɩɪɚɜɧɵɟ ɡɚɦɟɧɢɬɶ
ɧɨɜɵɦɢ
Ɂɚɧɨɜɨ
ɭɫɬɚɧɨɜɢɬɶ
ɬɟɤɭɳɟɟ ɜɪɟɦɹ
ɧɚ ɞɢɫɩɥɟɟ ɢ
ɜɤɥɸɱɢɬɶ
ɞɭɯɨɜɤɭ
Ɂɚɧɨɜɨ
ɭɫɬɚɧɨɜɢɬɶ
ɬɟɤɭɳɟɟ ɜɪɟɦɹ
ɉɪɨɜɟɪɢɬɶ
ɩɪɟɞɨɯɪɚɧɢɬɟɥɢ ɞɨɦɚɲɧɟɣ
ɩɪɨɜɨɞɤɢ.
ɇɟɢɫɩɪɚɜɧɵɟ ɡɚɦɟɧɢɬɶ
ɧɨɜɵɦɢ
ɉɪɨɜɟɪɢɬɶ
ɢɫɩɪɚɜɧɨɫɬɶ
ɥɚɦɩɵ
ɨɫɜɟɳɟɧɢɹ
ɞɭɯɨɜɤɢ.
ɇɟɢɫɩɪɚɜɧɭɸ
ɡɚɦɟɧɢɬɶ
ɉɪɨɜɟɪɢɬɶ
ɩɪɟɞɨɯɪɚɧɢɬɟɥɢ ɞɨɦɚɲɧɟɣ
ɩɪɨɜɨɞɤɢ.
ɇɟɢɫɩɪɚɜɧɵɟ ɡɚɦɟɧɢɬɶ
ɧɨɜɵɦɢ
Ɉɛɪɚɬɢɬɶɫɹ ɜ
ɋɟɪɜɢɫɧɭɸ
ɫɥɭɠɛɭ
ɉɪɨɜɟɪɢɬɶ
ɧɚɩɪɹɠɟɧɢɟ ɜ
ɫɟɬɢ. ɉɪɢ
ɧɟɨɛɯɨɞɢɦɨɫɬɢ
ɫɬɚɛɢɥɢɡɢɪɨɜɚɬɶ
ɧɚɩɪɹɠɟɧɢɟ
ȼȺɀɇɈ !!!
ȿɫɥɢ ɧɟɫɦɨɬɪɹ ɧɚ ɪɟɤɨɦɟɧɞɚɰɢɢ ɩɪɨɛɥɟɦɭ ɧɟ
ɭɞɚɥɨɫɶ ɭɫɬɪɚɧɢɬɶ – ɨɛɪɚɬɢɬɶɫɹ ɜ ɋɟɪɜɢɫɧɭɸ
ɫɥɭɠɛɭ.
77
Page 78

EN
ENVIROMENTAL COMPATIBILITY
The documentation provided with this oven has
been printed on chlorine free bleached paper or
recycled paper to show respect for the environment.
The packaging has also been designed to avoid
environmental impact. All materials, which make up
the packaging, take into consideration the
environment and can be re-used or recycled.
By recycling and reusing, you help to save raw
materials and reduce the bulk of domestic and
industrial waste.
Disposing of the packaging
Please dispose of the packaging of your appliance
in an environment friendly way.
Recycled materials used for further packaging save
raw materials and reduce waste volume.
Disposing of old appliances
The symbol on the appliance or on its packaging
indicates that this appliance may not be treated as
household waste. Instead, it shall be handed over to
the authorized collecting centre for recycling old
electrical and electronic appliances.
By ensuring this appliance is disposed of correctly,
you help to prevent potential negative
consequences for the environment and human
health, which could otherwise be caused by
inappropriate waste handling of this product.
For more detailed information on recycling of this
appliance, please contact your local city office, your
household waste disposal service or the shop
where you purchased the product.
78
Page 79

DE RU
UMWELTVERTRÄGLICHKEIT
Als Beitrag zum Umweltschutz wurde die
Dokumentation dieses Geräts auf chlorfrei
gebleichtes oder Recycling-Papier gedruckt.
Bei der Verpackung wurde auf deren
Umweltverträglichkeit Wert gelegt; sie kann
gesammelt oder recycelt werden, da es sich um
umweltschonendes Material handelt.
Durch Recycling der Verpackung wird zur
Reduzierung des Rohstoffverbrauchs und des
Volumens von Industrie- und Hausmüll beigetragen
Verpackungs-Entsorgung
Entsorgen Sie die Transportverpackung möglichst
umweltgerecht.
Das Rückführen der Verpackungsmaterialien in den
Materialkreislauf spart Rohstoffe und verringert das
Müllaufkommen.
Altgeräte-Entsorgung
Das Symbol auf dem Produkt oder seiner
Verpackung weist darauf hin, dass dieses Produkt
nicht als normaler Haushaltsabfall zu behandeln ist,
sondern an einem Sammelpunkt für das Recycling
von elektrischen und elektronischen Geräten
abgegeben werden muss.
Durch Ihren Beitrag zum korrekten Entsorgen dieses
Produkts schützen Sie die Umwelt und die
Gesundheit Ihrer Mitmenschen.
Umwelt und Gesundheit werden durch falsches
Entsorgen gefährdet.
Weitere Informationen über das Recycling dieses
Produkts erhalten Sie von Ihrem Rathaus, Ihrer
Müllabfuhr oder dem Geschäft, in dem Sie das
Produkt gekauft haben.
ɈɏɊȺɇȺ ɈɄɊɍɀȺɘɓȿɃ ɋɊȿȾɕ
ȼ ɤɚɱɟɫɬɜɟ ɜɤɥɚɞɚ ɜ ɨɯɪɚɧɭ ɨɤɪɭɠɚɸɳɟɣ ɫɪɟɞɵ,
ɜɫɹ ɞɨɤɭɦɟɧɬɚɰɢɹ ɤ ɷɬɨɦɭ ɭɫɬɪɨɣɫɬɜɭ ɛɵɥɚ
ɩɟɪɟɪɚɛɨɬɤɟ ɛɭɦɚɝɟ.
ɂ ɩɪɢ ɢɡɝɨɬɨɜɥɟɧɢɢ ɭɩɚɤɨɜɤɢ ɛɵɥ ɫɞɟɥɚɧ ɚɤɰɟɧɬ
.
ɦɭɫɨɪɚ.
ɍɬɢɥɢɡɚɰɢɹ ɭɩɚɤɨɜɤɢ
ɍɬɢɥɢɡɢɪɭɣɬɟ ɭɩɚɤɨɜɤɭ ɩɨ ɜɨɡɦɨɠɧɨɫɬɢ ɛɨɥɟɟ
ɷɤɨɥɨɝɢɱɧɨ.
ȼɬɨɪɢɱɧɚɹ ɩɟɪɟɪɚɛɨɬɤɚ ɦɚɬɟɪɢɚɥɨɜ ɞɥɹ
ɍɬɢɥɢɡɚɰɢɹ ɫɬɚɪɵɯ ɩɪɢɛɨɪɨɜ
Ɍɚɤɨɣ ɫɢɦɜɨɥ ɧɚ ɩɪɨɞɭɤɬɟ ɢɥɢ ɟɝɨ ɭɩɚɤɨɜɤɟ
ɭɤɚɡɵɜɚɟɬ ɧɚ ɬɨ, ɱɬɨ ɷɬɨɬ ɩɪɨɞɭɤɬ, ɩɨ ɩɪɢɯɨɞɭ ɜ
ɧɟɝɨɞɧɨɫɬɶ, ɧɟɥɶɡɹ ɪɚɫɫɦɚɬɪɢɜɚɬɶ ɤɚɤ ɨɛɵɱɧɵɣ
ɞɨɦɚɲɧɢɣ ɦɭɫɨɪ, ɟɝɨ ɫɥɟɞɭɟɬ ɫɞɚɬɶ ɜ ɩɭɧɤɬ
ɡɞɨɪɨɜɶɟ ȼɚɲɢ
ɇɟɩɪɚɜɢɥ
ɨɤɪɭɠɚɸɳɟɣ ɫɪɟɞɟ ɢ ɡɞɨɪɨɜɶɸ.
ɧɚɩɟɱɚɬɚɧɚ ɧɚ ɨɬɛɟɥɟɧɧɨɣ, ɧɟ ɫɨɞɟɪɠɚɳɟɣ
ɯɥɨɪɚ ɢɥɢ ɧɚ ɩɪɢɝɨɞɧɨɣ ɤɨ ɜɬɨɪɢɱɧɨɣ
ɧɚ ɫɨɛɥɸɞɟɧɢɟ ɧɨɪɦ ɩɨ ɨɯɪɚɧɟ ɨɤɪɭɠɚɸɳɟɣ
ɫɪɟɞɵ. Ɉɧɚ ɬɚɤɠɟ ɦɨɠɟɬ ɛɵɬɶ ɜɬɨɪɢɱɧɨ
ɩɟɪɟɪɚɛɨɬɚɧɚ, ɩɨɫɤɨɥɶɤɭ ɢɡɝɨɬɨɜɥɟɧɚ ɢɡ
ɛɟɡɜɪɟɞɧɵɯ ɞɥɹ ɨɤɪɭɠɚ
ɦɚɬɟɪɢɚɥɨɜ.
ȼɨɡɦɨɠɧɨɫ
ɦɚɬɟɪɢɚɥɚ ɡɧɚɱɢɬɟɥɶɧɨ ɫɧɢɠɚɟɬ ɤɚɤ
ɩɨɬɪɟɛɥɟɧɢɟ ɩɪɢɪɨɞɧɨ -ɫɵɪɶɟɜɵɯ ɪɟɫɭɪɫɨɜ, ɬɚɤ
ɢ ɨɛɪɚɡɨɜɚɧɢɟ ɩɪɨɦɵɲɥɟɧɧɨɝɨ ɢ ɛɵɬɨɜɨɝɨ
ɭɩɚɤɨɜɤɢ ɷɤɨɧɨɦɢɬ ɫɵɪɶɺ ɢ ɭɦɟɧɶɲɚɟɬ
ɤɨɥɢɱɟɫɬɜɨ ɦɭɫɨɪɚ.
ɫɛɨɪɚ ɷɥɟɤɬɪɢɱɟɫɤɢɯ ɢ ɷɥɟɤɬɪɨɧɧɵɯ ɭɫɬɪɨɣɫɬɜ,
ɞɥɹ ɢɯ ɜɬɨɪɢɱɧɨɣ ɩɟɪɟɪɚɛɨɬɤɢ.
ȼɚɲɢɦ ɜɡɧɨɫɨɦ ɜ ɩɪɚɜɢɥɶɧɭɸ ɭɬɢɥɢɡɚɰɢɸ ɷɬɨɝɨ
ɩɪɨɞɭɤɬɚ ȼɵ ɡɚɳɢɳɚɟɬɟ ɨɤɪɭɠɚɸɳɭɸ ɫɪɟɞɭ ɢ
Ⱦɚɥɶɧɟɣɲɢɟ ɫɜɟɞɟɧɢɹ ɨ ɜɬɨɪɢɱɧɨɣ ɩɟɪɟɪɚɛɨɬɤɟ
ɷɬɨɝɨ ɩɪɨɞɭɤɬɚ ȼɵ ɦɨɠɟɬɟ ɩɨɥɭɱɢɬɶ ɜ ɝɨɪɨɞɫɤɨɣ
ɚɞɦɢɧɢɫɬɪɚɰɢɢ, ɫɥɭɠɛɟ ɜɵɜɨɡɚ ɦɭɫɨɪɚ ɢɥɢ ɜ
ɦɚɝɚɡɢɧɟ, ɜ ɤɨɬɨɪɨɦ ȼɵ ɤɭɩɢɥɢ ɷɬɨɬ ɩɪɨɞɭɤɬ.
ɬɶ ɩɟɪɟɪɚɛɨɬɤɢ ɭɩɚɤɨɜɨɱɧɨɝɨ
ɯ ɛɥɢɠɧɢɯ.
ɶɧɚɹ ɭɬɢɥɢɡɚɰɢɹ ɭɝɪɨ
ɸɳɟɣ ɫɪɟɞɵ
ɠɚɟɬ
79
Page 80

ɍɋɅɈȼɂə ȽȺɊȺɇɌɂɂ
1. Ƚɚɪɚɧɬɢɹ ɧɚ ɢɫɩɪɚɜɧɨɟ ɞɟɣɫɬɜɢɟ ɩɪɢɛɨɪɚ ɞɟɣɫɬɜɢɬɟɥɶɧɚ ɧɚ ɩɟɪɢɨɞ 12 ɦɟɫɹɰɟɜ ɫɨ ɞɧɹ ɩɨɤɭɩɤɢ ɩɪɢɛɨɪɚ
(ɩɨɞɬɜɟɪɠɞɟɧɚ ɨɬɬɢɫɤɨɦ ɩɟɱɚɬɢ ɩɭɧɤɬɚ ɪɨɡɧɢɱɧɨɣ ɩɪɨɞɚɠɢ ɢ ɩɨɞɩɢɫɶɸ ɩɪɨɞɚɜɰɚ).
2. Ɏɢɪɦɚ - ɢɡɝɨɬɨɜɢɬɟɥɶ ɨɛɟɫɩɟɱɢɜɚɟɬ ɛɟɡɜɨɡɦɟɡɞɧɵɣ ɪɟɦɨɧɬ ɜ ɫɥɭɱɚɟ ɨɛɧɚɪɭɠɟɧɢɹ ɜ ɝɚɪɚɧɬɢɣɧɵɣ ɩɟɪɢɨɞ
ɡɚɜɨɞɫɤɢɯ ɞɟɮɟɤɬɨɜ (ɧɟɫɨɨɬɜɟɬɫɬɜɭɸɳɚɹ ɤɨɧɫɬɪɭɤɰɢɹ, ɦɨɧɬɚɠ, ɞɟɮɟɤɬɧɵɟ ɦɚɬɟɪɢɚɥɵ ɢ ɢɫɩɨɥɧɟɧɢɟ).
3. Ⱦɚɧɧɚɹ ɝɚɪɚɧɬɢɹ ɪɚɫɩɪɨɫɬɪɚɧɹɟɬɫɹ ɬɨɥɶɤɨ ɧɚ ɢɡɞɟɥɢɹ, ɢɫɩɨɥɶɡɭɸɳɢɟɫɹ ɜ ɧɟɤɨɦɦɟɪɱɟɫɤɢɯ, ɥɢɱɧɵɯ, ɫɟɦɟɣɧɵɯ ɢɥɢ
ɞɨɦɚɲɧɢɯ ɰɟɥɹɯ. ȼ ɩɪɨɬɢɜɧɨɦ ɫɥɭɱɚɟ ɝɚɪɚɧɬɢɣɧɵɣ ɫɪɨɤ ɫɨɫɬɚɜɥɹɟɬ 4 ɦɟɫɹɰɚ ɫ ɦɨɦɟɧɬɚ ɩɪɢɨɛɪɟɬɟɧɢɹ.
4. Ƚɚɪɚɧɬɢɣɧɵɣ ɪɟɦɨɧɬ ɜɵɩɨɥɧɹɟɬɫɹ ɛɟɫɩɥɚɬɧɨ (ɜɤɥɸɱɚɹ ɫɬɨɢɦɨɫɬɶ ɪɚɛɨɬ, ɦɚɬɟɪɢɚɥɨɜ ɢ, ɩɪɢ ɧɟɨɛɯɨɞɢɦɨɫɬɢ ɢ ɫ
ɭɱɟɬɨɦ ɞɟɣɫɬɜɭɸɳɟɝɨ ɡɚɤɨɧɨɞɚɬɟɥɶɫɬɜɚ, ɩɟɪɟɜɨɡɤɢ) ɭɩɨɥɧɨɦɨɱɟɧɧɨɣ ɫɟɪɜɢɫɧɨɣ ɤɨɦɩɚɧɢɟɣ ɧɚ ɞɨɦɭ ɭ
ɩɨɬɪɟɛɢɬɟɥɹ ɢɥɢ ɜ ɦɚɫɬɟɪɫɤɨɣ, ɩɨ ɭɫɦɨɬɪɟɧɢɸ ɫɟɪɜɢɫɧɨɣ ɤɨɦɩɚɧɢɢ.
5. Ʌɸɛɵɟ ɩɪɟɬɟɧɡɢɢ ɩɨ ɤɚɱɟɫɬɜɭ ɢɡɞɟɥɢɹ ɪɚɫɫɦɚɬɪɢɜɚɸɬɫɹ ɬɨɥɶɤɨ ɩɨɫɥɟ ɩɪɨɜɟɪɤɢ ɤɚɱɟɫɬɜɚ ɢɡɞɟɥɢɹ
ɭɩɨɥɧɨɦɨɱɟɧɧɨɣ ɫɟɪɜɢɫɧɨɣ ɤɨɦɩɚɧɢɟɣ ɢ, ɩɪɢ ɧɟɨɛɯɨɞɢɦɨɫɬɢ, ɩɨɫɥɟ ɜɵɞɚɱɢ ɩɨɫɥɟɞɧɟɣ ɫɨɨɬɜɟɬɫɬɜɭɸɳɟɝɨ
ɡɚɤɥɸɱɟɧɢɹ.
6. Ɉɛɦɟɧ ɩɪɢɛɨɪɚ ɧɚ ɫɜɨɛɨɞɧɵɣ ɨɬ ɞɟɮɟɤɬɨɜ ɜ ɬɟɱɟɧɢɟ ɝɚɪɚɧɬɢɣɧɨɝɨ ɫɪɨɤɚ ɨɫɭɳɟɫɬɜɥɹɟɬɫɹ ɬɨɥɶɤɨ ɜ ɬɨɦ ɫɥɭɱɚɟ,
ɟɫɥɢ ɧɚ ɨɫɧɨɜɚɧɢɢ ɡɚɤɥɸɱɟɧɢɹ ɷɤɫɩɟɪɬɚ ɧɟɜɨɡɦɨɠɧɨ ɩɪɨɢɡɜɟɫɬɢ ɪɟɦɨɧɬ ɢɥɢ ɟɫɥɢ ɩɨɫɥɟ 3-ɯ ɪɟɦɨɧɬɨɜ ɩɪɢɛɨɪ
ɨɫɬɚɺɬɫɹ ɧɟɢɫɩɪɚɜɧɵɦ.
7. Ɉɛɦɟɧ ɩɪɢɛɨɪɚ ɧɚ ɢɫɩɪɚɜɧɵɣ ɩɪɨɢɡɜɨɞɢɬ ɬɨɥɶɤɨ ɨɪɝɚɧɢɡɚɰɢɹ, ɩɪɨɞɚɜɲɚɹ ɬɨɜɚɪ.
8. Ɉɬɜɟɬɫɬɜɟɧɧɨɫɬɶ ɩɨ ɧɚɫɬɨɹɳɟɣ ɝɚɪɚɧɬɢɢ ɨɝɪɚɧɢɱɢɜɚɟɬɫɹ, ɟɫɥɢ ɢɧɨɟ ɧɟ ɨɩɪɟɞɟɥɟɧɨ ɡɚɤɨɧɨɦ, ɭɤɚɡɚɧɧɵɦɢ ɜ
ɧɚɫɬɨɹɳɟɦ ɞɨɤɭɦɟɧɬɟ ɨɛɹɡɚɬɟɥɶɫɬɜɚɦɢ.
ȽȺɊȺɇɌɂə ɇȿ ɊȺɋɉɊɈɋɌɊȺɇəȿɌɋə:
1. ɇɚ ɢɡɞɟɥɢɹ, ɨɬɤɚɡɵ ɢ ɧɟɢɫɩɪɚɜɧɨɫɬɢ ɤɨɬɨɪɵɯ ɜɵɡɜɚɧɵ ɬɪɚɧɫɩɨɪɬɧɵɦɢ ɩɨɜɪɟɠɞɟɧɢɹɦɢ, ɧɟɩɪɚɜɢɥɶɧɨɣ ɭɫɬɚɧɨɜɤɨɣ,
ɧɟɛɪɟɠɧɵɦ ɨɛɪɚɳɟɧɢɟɦ ɢɥɢ ɩɥɨɯɢɦ ɭɯɨɞɨɦ, ɩɨɞɤɥɸɱɟɧɢɟɦ ɤ ɧɟɩɪɚɜɢɥɶɧɨɦɭ ɧɚɩɪɹɠɟɧɢɸ ɩɢɬɚɧɢɹ,
ɢɫɩɨɥɶɡɨɜɚɧɢɟɦ ɧɟɪɟɤɨɦɟɧɞɨɜɚɧɧɵɯ ɱɢɫɬɹɳɢɯ ɢ ɦɨɸɳɢɯ ɫɪɟɞɫɬɜ, ɧɟɫɨɛɥɸɞɟɧɢɟɦ ɩɪɢɥɚɝɚɟɦɨɣ ɢɧɫɬɪɭɤɰɢɢ ɩɨ
ɷɤɫɩɥɭɚɬɚɰɢɢ ɢɥɢ ɟɫɥɢ ɢɡɞɟɥɢɟ ɩɨɞɜɟɪɝɚɥɨɫɶ ɪɟɦɨɧɬɭ ɢɥɢ ɤɨɧɫɬɪɭɤɬɢɜɧɵɦ ɢɡɦɟɧɟɧɢɹɦ ɧɟɭɩɨɥɧɨɦɨɱɟɧɧɵɦɢ
ɥɢɰɚɦɢ, ɢɥɢ ɟɫɥɢ ɭɞɚɥɟɧ, ɧɟ ɪɚɡɛɨɪɱɢɜ ɢɥɢ ɢɡɦɟɧɟɧ ɫɟɪɢɣɧɵɣ ɧɨɦɟɪ ɢɡɞɟɥɢɹ.
2. ɇɚ ɢɡɞɟɥɢɹ, ɷɤɫɩɥɭɚɬɢɪɨɜɚɜɲɢɟɫɹ ɫ ɧɟɭɫɬɪɚɧɟɧɧɵɦɢ ɧɟɞɨɫɬɚɬɤɚɦɢ ɢɥɢ ɩɪɨɯɨɞɢɜɲɢɟ ɬɟɯɧɢɱɟɫɤɨɟ ɨɛɫɥɭɠɢɜɚɧɢɟ
ɜ ɤɨɦɩɚɧɢɹɯ, ɧɟ ɹɜɥɹɸɳɢɯɫɹ ɧɚɲɢɦɢ ɭɩɨɥɧɨɦɨɱɟɧɧɵɦɢ ɫɟɪɜɢɫɧɵɦɢ ɤɨɦɩɚɧɢɹɦɢ.
3. ɇɚ ɧɟɢɫɩɪɚɜɧɨɫɬɢ, ɤɨɬɨɪɵɟ ɜɵɡɜɚɧɵ ɧɟɡɚɜɢɫɹɳɢɦɢ ɨɬ ɩɪɨɢɡɜɨɞɢɬɟɥɹ ɩɪɢɱɢɧɚɦɢ, ɬɚɤɢɦɢ ɤɚɤ: ɩɟɪɟɩɚɞɵ
ɧɚɩɪɹɠɟɧɢɹ ɩɢɬɚɧɢɹ, ɹɜɥɟɧɢɹ ɩɪɢɪɨɞɵ ɢ ɫɬɢɯɢɣɧɵɟ ɛɟɞɫɬɜɢɹ, ɩɨɠɚɪ, ɞɨɦɚɲɧɢɟ ɢ ɞɢɤɢɟ ɠɢɜɨɬɧɵɟ, ɧɚɫɟɤɨɦɵɟ ɢ
ɬ.ɩ.
4. ɇɚ ɫɬɟɤɥɹɧɧɵɟ ɢ ɤɟɪɚɦɢɱɟɫɤɢɟ ɩɨɜɟɪɯɧɨɫɬɢ, ɚ ɬɚɤɠɟ ɜɧɟɲɧɢɟ ɷɥɟɦɟɧɬɵ ɢɡ ɩɥɚɫɬɦɚɫɫ ɜ ɫɥɭɱɚɟ, ɟɫɥɢ ɞɟɮɟɤɬ
ɧɚɫɬɭɩɢɥ ɩɨ ɜɢɧɟ ɩɨɥɶɡɨɜɚɬɟɥɹ, ɩɨɫɥɟ ɩɨɞɩɢɫɚɧɢɹ ɩɨɬɪɟɛɢɬɟɥɟɦ ɚɤɬɚ ɩɪɢɺɦɤɢ—ɫɞɚɱɢ.
5. ɇɚ ɰɚɪɚɩɢɧɵ, ɬɪɟɳɢɧɵ ɢ ɚɧɚɥɨɝɢɱɧɵɟ ɦɟɯɚɧɢɱɟɫɤɢɟ ɜɧɟɲɧɢɟ ɩɨɜɪɟɠɞɟɧɢɹ, ɜɨɡɧɢɤɲɢɟ ɜ ɩɪɨɰɟɫɫɟ ɷɤɫɩɥɭɚɬɚɰɢɢ.
6. ɇɚ ɬɚɤɢɟ ɩɨɜɪɟɠɞɟɧɢɹ ɞɟɬɚɥɟɣ, ɜɟɪɨɹɬɧɨɫɬɶ ɤɨɬɨɪɵɯ ɫɭɳɟɫɬɜɟɧɧɨ ɜɵɲɟ ɨɛɵɱɧɨɣ ɩɨ ɯɚɪɚɤɬɟɪɭ ɢɯ ɷɤɫɩɥɭɚɬɚɰɢɢ
ɢɥɢ ɤɨɬɨɪɵɟ ɩɪɨɢɡɨɲɥɢ ɜ ɪɟɡɭɥɶɬɚɬɟ ɟɫɬɟɫɬɜɟɧɧɨɝɨ ɢɡɧɨɫɚ, ( ɜɤɥɸɱɚɹ ɪɚɫɯɨɞɧɵɟ ɦɚɬɟɪɢɚɥɵ) ɬɚɤɢɯ ɤɚɤ: ɥɚɦɩɵ,
ɮɢɥɶɬɪɵ ɢ ɬ. ɩ., ɩɟɪɟɦɟɳɚɟɦɵɟ ɜɪɭɱɧɭɸ ɩɥɚɫɬɦɚɫɫɨɜɵɟ ɞɟɬɚɥɢ.
7. ɇɚ ɬɚɤɢɟ ɜɢɞɵ ɪɚɛɨɬ ɤɚɤ ɪɟɝɭɥɢɪɨɜɤɚ, ɱɢɫɬɤɚ ɢ ɩɪɨɱɢɣ ɭɯɨɞ ɡɚ ɢɡɞɟɥɢɟɦ, ɨɝɨɜɨɪɟɧɧɵɣ ɜ ɂɧɫɬɪɭɤɰɢɢ ɩɨ
ɷɤɫɩɥɭɚɬɚɰɢɢɸ.
8. Ⱥ ɬɚɤɠɟ ɩɨ ɞɪɭɝɢɦ ɩɪɢɱɢɧɚɦ, ɜɨɡɧɢɤɲɢɦ ɩɨ ɜɢɧɟ ɩɨɤɭɩɚɬɟɥɹ ɢ ɧɟ ɜɵɡɜɚɧɧɵɦɢ ɡɚɜɨɞɨɦ-ɢɡɝɨɬɨɜɢɬɟɥɟɦ - ɦɨɝɭɬ
ɭɫɬɪɚɧɹɬɶɫɹ ɢɫɤɥɸɱɢɬɟɥɶɧɨ ɡɚ ɫɱɺɬ ɩɨɤɭɩɚɬɟɥɹ.
ɇɟɡɚɡɟɦɥɟɧɧɨɟ ɨɛɨɪɭɞɨɜɚɧɢɟ ɹɜɥɹɟɬɫɹ ɩɨɬɟɧɰɢɚɥɶɧɨ ɨɩɚɫɧɵɦ.
ɉɪɨɢɡɜɨɞɢɬɟɥɶ ɧɟ ɧɟɫɟɬ ɨɬɜɟɬɫɬɜɟɧɧɨɫɬɶ ɡɚ ɭɳɟɪɛ ɡɞɨɪɨɜɶɸ ɢ
ɫɨɛɫɬɜɟɧɧɨɫɬɢ, ɟɫɥɢ ɷɬɨ ɜɵɡɜɚɧɨ ɧɟɫɨɛɥɸɞɟɧɢɟɦ ɧɨɪɦ
ɭɫɬɚɧɨɜɤɢ ɢɥɢ ɢɫɩɨɥɶɡɨɜɚɧɢɟɦ ɧɟɢɫɩɪɚɜɧɨɝɨ ɨɛɨɪɭɞɨɜɚɧɢɹ
80
Page 81

ȽȺɊȺɇɌɂɃɇɕɃ ɌȺɅɈɇ
(Nr. ɫɨɨɬɜɟɬɫɬɜɭɟɬ ɧɨɦɟɪɭ ɚɩɩɚɪɚɬɚ, ɫɦɨɬɪɢ ɧɚ ɡɚɞɧɟɣ ɨɛɥɨɠɤɟ ɧɚɫɬɨɹɳɟɣ ɢɧɫɬɪɭɤɰɢɢ)
Ⱦɚɧɧɵɟ ɝɚɪɚɧɬɢɣɧɵɟ ɨɛɹɡɚɬɟɥɶɫɬɜɚ ɧɟ ɨɝɪɚɧɢɱɢɜɚɸɬ ɨɩɪɟɞɟɥɟɧɧɵɟ ɡɚɤɨɧɨɦ ɩɪɚɜɚ ɩɨɬɪɟɛɢɬɟɥɟɣ
ɉɨɡɞɪɚɜɥɹɟɦ ȼɚɫ ɫ ɩɪɢɨɛɪɟɬɟɧɢɟɦ ɛɵɬɨɜɨɣ ɬɟɯ ɧɢɤɢ ɨɬɥɢɱɧɨɝɨ ɤɚɱɟɫɬɜɚ!
ɉɨɠɚɥɭɣɫɬɚ ɨɡɧɚɤɨɦɶɬɟɫɶ ɫ ɧɚɫɬɨɹɳɢɦ ɝɚɪɚɧɬɢɣɧɵɦ ɫɜɢɞɟɬɟɥɶɫɬɜɨɦ ɢ ɩɪɨɫɥɟɞɢɬɟ, ɱɬɨɛɵ ɨɧɨ ɛɵɥɨ ɩɪɚɜɢɥɶɧɨ
ɡɚɩɨɥɧɟɧɨ ɢ ɢɦɟɥɨ ɲɬɚɦɩ ɦɚɝɚɡɢɧɚ. ɉɪɢ ɨɬɫɭɬɫɬɜɢɢ ɲɬɚɦɩɚ ɢ ɞɚɬɵ ɩɪɨɞɚɠɢ ɝɚɪɚɧɬɢɣɧɵɣ ɫɪɨɤ ɢɫɱɢɫɥɹɟɬɫɹ ɫ
ɦɨɦɟɧɬɚ ɢɡɝɨɬɨɜɥɟɧɢɹ ɢɡɞɟɥɢɹ. Ɍɳɚɬɟɥɶɧɨ ɩɪɨɜɟɪɶɬɟ ɜɧɟɲɧɢɣ ɜɢɞ ɢɡɞɟɥɢɹ, ɜɫɟ ɩɪɟɬɟɧɡɢɢ ɩɨ ɜɧɟɲɧɟɦɭ ɜɢɞɭ
ɩɪɟɞɴɹɜɥɹɣɬɟ ɩɪɨɞɚɜɰɭ ɩɪɢ ɩɪɢɧɹɬɢɢ ɬɨɜɚɪɚ. ɋɨɯɪɚɧɹɣɬɟ ɝɚɪɚɧɬɢɣɧɵɣ ɬɚɥɨɧ ɢ ɱɟɤ ɧɚ ɩɪɨɞɚɧɧɨɟ ɢɡɞɟɥɢɟ. ɉɨ
ɜɨɩɪɨɫɚɦ ɧɟɩɨɥɧɨɝɨ ɤɨɦɩɥɟɤɬɚ ɢɡɞɟɥɢɹ ɢ ɟɝɨ ɡɚɦɟɧɵ ɨɛɪɚɳɚɣɬɟɫɶ ɜ ɬɨɪɝɨɜɭɸ ɨɪɝɚɧɢɡɚɰɢɸ.
Ⱦɥɹ ɭɫɬɚɧɨɜɤɢ, ɩɨɞɤɥɸɱɟɧɢɹ ɢ ɩɨ ɜɫɟɦ ɜɨɩɪɨɫɚɦ, ɫɜɹɡɚɧɧɵɦ ɫ ɬɟɯɧɢɱɟɫɤɢɦ ɨɛɫɥɭɠɢɜɚɧɢɟɦ, ɨɛɪɚɳɚɬɶɫɹ
ɬɨɥɶɤɨ ɜ ɚɜɬɨɪɢɡɢɪɨɜɚɧɧɵɟ ɫɟɪɜɢɫɧɵɟ ɰɟɧɬɪɵ. ɉɨɞɪɨɛɧɚɹ ɢɧɮɨɪɦɚɰɢɹ ɨɛ ɭɩɨɥɧɨɦɨɱɟɧɧɵɯ ɧɚ ɨɛɫɥɭɠɢɜɚɧɢɟ
ɢ ɪɟɦɨɧɬ ɫɟɪɜɢɫɧɵɯ ɰɟɧɬɪɚɯ ɩɪɢɥɚɝɚɟɬɫɹ ɨɬɞɟɥɶɧɵɦ ɫɩɢɫɤɨɦ.
Ɇɵ ɫɨɯɪɚɧɹɟɦ ɡɚ ɫɨɛɨɣ ɩɪɚɜɨ ɜɧɨɫɢɬɶ ɢɡɦɟɧɟɧɢɹ ɜ ɤɨɧɫɬɪɭɤɰɢɸ ɢɥɢ ɬɟɯɧɨɥɨɝɢɸ ɢɡɝɨɬɨɜɥɟɧɢɹ. Ɍɚɤɨɜɵɟ ɢɡɦɟɧɟɧɢɹ
ɧɟ ɜɥɟɤɭɬ ɨɛɹɡɚɬɟɥɶɫɬɜ ɩɨ ɢɡɦɟɧɟɧɢɸ ɢɥɢ ɭɥɭɱɲɟɧɢɸ ɪɚɧɟɟ ɜɵɩɭɳɟɧɧɵɯ ɢɡɞɟɥɢɣ
ɈɌɆȿɌɄȺ Ɉ ɉɊɈȾȺɀȿ:
Ƒ
Ƒ
ɂɁȾȿɅɂȿ Ƒ
Ƒ
Ɇɨɞɟɥɶ: .............................................................................................................................................
Ɂɚɜɨɞɫɤɨɣ ʋ
ɇɚɡɜɚɧɢɟ ɦɚɝɚɡɢɧɚ:
ɗɥɟɤɬɪɢɱɟɫɤɚɹ ɩɥɢɬɚ
Ƚɚɡɨɜɚɹ ɩɥɢɬɚ
ȼɫɬɪɚɢɜɚɟɦɚɹ ɩɨɜɟɪɯɧɨɫɬɶ
ȼɫɬɪɚɢɜɚɟɦɚɹ ɞɭɯɨɜɤɚ
Ƒ
Ɇɢɤɪɨɜɨɥɧɨɜɚɹ ɩɟɱɶ
: ...........................................................................................................................
Ƒ
ɏɨɥɨɞɢɥɶɧɢɤ
Ƒ
ɋɬɢɪɚɥɶɧɚɹ ɦɚɲɢɧɚ
Ƒ
ɉɨɫɭɞɨɦɨɟɱɧɚɹ ɦɚɲɢɧɚ
Ƒ
ȼɵɬɹɠɤɚ
.................................................................................................................
Ɍɟɥɟɮɨɧ: ...................................................................................................................................
Ⱦɚɬɚ ɩɪɨɞɚɠɢ
: " ____ " ______________ 200__ ɝ.
ɋȼȿȾȿɇɂə ɈȻ ɍɋɌȺɇɈȼɄȿ:
ɍɫɬɚɧɨɜɥɟɧɨ:
" ____ " ______________ 200__ ɝ.
ȼɥɚɞɟɥɟɰ
(ɮɚɦɢɥɢɹ, ɢɦɹ, ɨɬɱɟɫɬɜɨ) .........................................................................................................
Ⱥɞɪɟɫ, ɬɟɥɟɮɨɧ
ɉɨɞɩɢɫɶ ɜɥɚɞɟɥɶɰɚ
Ɇɚɫɬɟɪ
(ɮɚɦɢɥɢɹ, ɢɦɹ, ɨɬɱɟɫɬɜɨ) ...........................................................................................................
Ɉɪɝ. ɭɫɬɚɧɨɜɳɢɤ
ɉɨɞɩɢɫɶ ɦɚɫɬɟɪɚ
ɂɡɞɟɥɢɟ ɩɪɨɞɚɧɨ ɜ ɡɚɜɨɞɫɤɨɣ ɭɩɚɤɨɜɤɟ ɢɥɢ ɩɪɨɜɟɪɟɧɨ ɜ ɦɨɟɦ ɩɪɢɫɭɬɫɬɜɢɢ, ɂɧɫɬɪɭɤɰɢɹ ɩɨ ɷɤɫɩɥɭɚɬɚɰɢɢ ɩɨɥɭɱɟɧɚ. ɋ ɩɪɚɜɢɥɚɦɢ ɷɤɫɩɥɭɚɬɚɰɢɢ
ɨɡɧɚɤɨɦɥɟɧ. ɉɪɟɬɟɧɡɢɣ ɩɨ ɜɧɟɲɧɟɦɭ ɜɢɞɭ ɢ ɤɨɦɩɥɟɤɬɧɨɫɬɢ ɧɟ ɢɦɟɸ.
..........................................................................................................................
..................................................................................................................
.......................................................................................................................
......................................................................................................................
ɉɨɞɩɢɫɶ ɩɨɤɭɩɚɬɟɥɹ
................................................................................................................
81
Page 82

ɉɪɟɞɫɬɚɜɢɬɟɥɶɫɬɜɨ «Ʉɚisɟr» ɜ Ɋɨɫɫɢɢ ɩɨ ɫɟɪɜɢɫɧɨɦɭ ɨɛɫɥɭɠɢɜɚɧɢɸ ɢ ɪɚɛɨɬɟ ɫ ɩɨɬɪɟɛɢɬɟɥɹɦɢ:
Tɟɥ/ ɮɚɤɫ : (495) 488-75-10, 488-76-10
www.kaiser.ru
E-Mail: service@kaiser.ru
ɉɨɱɬɨɜɵɣ ɚɞɪɟɫ: 127238, Ɇɨɫɤɜɚ, ɚ/ɹ 46.
Ⱥɞɪɟɫɚ ɢ ɬɟɥɟɮɨɧɵ ɚɜɬɨɪɢɡɢɪɨɜɚɧɧɵɯ ɫɟɪɜɢɫɧɵɯ ɰɟɧɬɪɨɜ, ɨɛɟɫɩɟɱɢɜɚɸɳɢɯ ɝɚɪɚɧɬɢɣɧɨɟ ɢ ɩɨɫɥɟɝɚɪɚɧɬɢɣɧɨɟ
ɨɛɫɥɭɠɢɜɚɧɢɟ ɬɟɯɧɢɤɢ «Kaiser»:
1. Ɇɨɫɤɜɚ
ɉɨɞɤɥɸɱɟɧɢɟ ɢ ɪɟɦɨɧɬ ɷɥɟɤɬɪɢɱɟɫɤɢɯ ɩɥɢɬ, ɝɚɡɨɜɵɯ ɩɥɢɬ, ɜɫɬɪɚɢɜɚɟɦɵɯ ɞɭɯɨɜɨɤ ɢ ɩɨɜɟɪɯɧɨɫɬɟɣ,
ɦɢɤɪɨɜɨɥɧɨɜɵɯ ɩɟɱɟɣ, ɜɵɬɹɠɟɤ, ɫɬɢɪɚɥɶɧɵɯ ɢ ɩɨɫɭɞɨɦɨɟɱɧɵɯ ɦɚɲɢɧ:
ɈɈɈ «Ʉɚɣɡɟɪ Ƚɚɪɚɧɬ», ɬɟɥ.: (495) 488-75-10, 488-76-10, Ⱦɦɢɬɪɨɜɫɤɨɟ ɲɨɫɫɟ, ɞ.58
2. ɋɚɧɤɬ-ɉɟɬɟɪɛɭɪɝ
ɉɨɞɤɥɸɱɟɧɢɟ ɢ ɪɟɦɨɧɬ ɷɥɟɤɬɪɢɱɟɫɤɢɯ ɩɥɢɬ, ɜɫɬɪɚɢɜɚɟɦɵɯ ɞɭɯɨɜɨɤ, ɩɨɜɟɪɯɧɨɫɬɟɣ ɢ ɜɵɬɹɠɟɤ:
ɉɨɞɤɥɸɱɟɧɢɟ ɢ ɪɟɦɨɧɬ ɝɚɡɨɜɵɯ ɩɥɢɬ, ɫɬɢɪɚɥɶɧɵɯ ɢ ɩɨɫɭɞɨɦɨɟɱɧɵɯ ɦɚɲɢɧ, ɯɨɥɨɞɢɥɶɧɢɤɨɜ:
ɈɈɈ «ɗɅȿɄɌȺ», ɬɟɥ.: (812) 372-23-12, 372-23-13, 376-75-36 ɛ-ɪ ɇɨɜɚɬɨɪɨɜ, ɞ.11, ɥɢɬ. Ⱥ, ɩɨɦ.17ɇ
3. Ⱥɧɚɩɚ: ɂɉ Ƚɥɚɞɤɢɯ ɘ.ɂ., ɬɟɥ.: (86133) 5-31-00, ɭɥ. Ʌɟɧɢɧɚ, ɞ.153, ɤɨɪɩ. 5
4. Ⱥɪɯɚɧɝɟɥɶɫɤ: ɂɉ «ɋɟɪɝɭɲɨɜ Ⱥ ɂ. ɭɥ.Ƚɚɝɚɪɢɧɚ ɞ.1 (8182) 27-60-66
5. Ⱥɫɬɪɚɯɚɧɶ ɑɉ Ʉɭɡɧɟɰɨɜ, ɬɟɥ.: (8512) 39-82-16, 36-83-37, ɭɥ. əɛɥɨɱɤɨɜɚ, 1-ȼ
ɂɉ ɋɚɜɢɧ, ɬɟɥ.: (8512) 38-28-67, 38-35-84, 25-12-32, ɭɥ. ɋɟɧ-ɋɢɦɨɧɚ, 42-46
ɂɉ «ɉɭɲɤɢɧ, ɬɟɥ.: (8512) 63-00-81, Ⱥ.ɋ.» ɭɥ. ȿɩɢɲɢɧɚ ɞ.23
6. Ȼɚɪɧɚɭɥ: ɈɈɈ «Ɋɟɦɛɵɬɬɟɯɧɢɤɚ», ɬɟɥ.: (3852) 77-23-23, 35-77-44, ɩɪ-ɬ Ʉɚɥɢɧɢɧɚ, ɞ. 24ɚ
7. Ȼɟɥɝɨɪɨɞ: ɈɈɈ «ȼɵɛɨɪ-ɋɟɪɜɢɫ», ɬɟɥ.: (4722) 36-92-90, 36-95-16, ɩɪ-ɬ Ƚɪɚɠɞɚɧɫɤɢɣ, ɞ. 32
ɂɉ Ʉɨɠɟɜɧɢɤɨɜ, ɬɟɥ.: (4722) 55-97-87, ɭɥ. 5 Ⱥɜɝɭɫɬɚ, ɞ.36 ɤ. 2
8. Ȼɢɣɫɤ: ɈɈɈ « Ɏɟɜɪɚɥɶ», ɬɟɥ.: (3854) 33-52-16, 32-70-02, ɭɥ. Ɉɡɟɪɧɚɹ, ɞ.6-Ȼ
9. Ȼɢɪɨɛɢɞɠɚɧ: ɈɈɈ «ɋɟɪɜɢɫ ɐɟɧɬɪ», ɬɟɥ.: (42622) 23-2-21, 4-07-21, ɭɥ. Ȼɢɪɲɨɫɫɟ 2ɤɦ.-23ɚ
10. Ȼɥɚɝɨɜɟɳɟɧɫɤ: ɈɈɈ «Ɉɥɚɤɫ», ɬɟɥ.: (4162) 522-000. 524-000, 520-500, ɭɥ. Ʌɟɧɢɧɚ, ɞ.27
11. Ȼɪɚɬɫɤ: ɂɉ ɒɜɟɰɨɜɚ, ɬɟɥ.: (3953) 45-98-96, ɭɥ.ɉɢɨɧɟɪɫɤɚɹ, 23
12. Ȼɪɹɧɫɤ: ɈɈɈ «ɆɌɄ-ɫɟɪɜɢɫ», ɬɟɥ.: (4832) 75-69-00, 75-68-42, ɭɥ. Ʉɪɚɫɧɨɚɪɦɟɣɫɤɚɹ, ɞ.170
13. ȼɟɥɢɤɢɣ ɇɨɜɝɨɪɨɞ: ɑɉ ɋɦɢɪɧɨɜ, ɬɟɥ: (8162) 33-20-03, ɭɥ. ȼɟɥɢɤɚɹ, ɞ.22
ɈɈɈ «Ⱥɪɦɨɫ ɋɟɪɜɢɫ», ɬɟɥ.: (8162) 78-28-31, ɭɥ. Ȼ.ɋɚɧɤɬ-ɉɟɬɟɪɛɭɪɝɫɤɚɹ, ɞ. 39 ɫɬɪ.11
14. ȼɥɚɞɢɜɨɫɬɨɤ: ɋɟɪɜɢɫɧɵɣ ɰɟɧɬɪ «ɑɉ Ʉɨɪɧɟɣɱɭɤ», ɬɟɥ.: (4232) 43-61-33, 42-90-10, ɇɚɪɨɞɧɵɣ ɩɪɨɫɩɟɤɬ, 43/2
ɈɈɈ «ȼɅ ɋɟɪɜɢɫ», ɬɟɥ.: (4232) 45-94-70, 45-94-43, 49-93-97, ɭɥ. Ƚɨɝɨɥɹ, 4
15. ȼɥɚɞɢɦɢɪ: «Ɋɨɫɬ-ɫɟɪɜɢɫ», ɬɟɥ.: (4922) 30-50-55, ɭɥ. ɘɛɢɥɟɣɧɚɹ, ɞ.60
ɈɈɈ «Ɇɚɫɬɟɪ ɋɟɪɜɢɫ», ɬɟɥ.: (4922) 33-10-79, ɭɥ. Ɍɪɚɤɬɨɪɧɚɹ, ɞ.8
16. ȼɨɥɝɨɝɪɚɞ: ɂɉ «Ɇɚɧɚɯɨɜɚ Ʌ.Ɋ», ɬɟɥ.: (8442) 23-41-36, ɩɪ-ɤɬ Ʌɟɧɢɧɚ ɞ.58
17. ȼɨɥɝɨɞɨɧɫɤ: ɂɉ Ɋɹɝɭɡɨɜ, ɬɟɥ.: 6-06-61, ɭɥ. Ƚɨɪɶɤɨɝɨ, 81-21
ɂɉ «ɂɛɪɚɝɢɦɨɜ Ɇ.Ⱥ.» ɬɟɥ.: (8639) 25-29-29, ɭɥ. Ʉɚɪɥɚ Ɇɚɪɤɫɚ ɞ. 30
18. ȼɨɥɠɫɤɢɣ: ɈɈɈ «Ɏɢɪɦɚ Ɇɢɪ ɜɢɞɟɨ 1», ɬɟɥ.: (8443) 56-60-22, ɭɥ. Ⱦɪɭɠɛɵ, 21
19. ȼɨɪɤɭɬɚ: Ɇɋ «ɋɟɪɜɢɫ ɐɟɧɪ», ɭɥ. Ɍɢɦɚɧɫɤɚɹ ɞ. 8ɚ
20. ȼɨɪɨɧɟɠ: ɈɈɈ «Ɍɟɯɧɨɩɪɨɮɫɟɪɜɢɫ», ɬɟɥ.: (4732) 46-31-79, 56-74-61, ɭɥ. ɉɪɨɫɩɟɤɬ Ɍɪɭɞɚ, ɞ. 91
«ɋɉ ɫɟɪɜɢɫ», ɬɟɥ.: (4732) 39-29-45, 39-27-50, ɭɥ. ȼɚɪɟɣɤɢɫɚ, ɞ.9, ɤɨɦɧ. 5
ɂɉ Ʉɥɟɰɨɜɚ, ɬɟɥ.: (4732) 26-31-14, 26-78-89, ɭɥ. ɋɟɪɚɮɢɧɨɜɢɱɚ, ɞ. 32ɚ
21. Ƚɥɚɡɨɜ: ɈɈɈ «ɋɥɭɠɛɚ ɫɟɪɜɢɫɚ «ȼɚɲ ɞɨɦ», ɬɟɥ.: (34141) 4-07-37, ɭɥ. Ʉɚɥɢɧɢɧɚ, ɞ.6
22. Ƚɪɨɡɧɵɣ: ɈɈɈ «Ɍɟɯɧɨɩɥɸɫ», ɬɟɥ.: (928) 735-30-53, ɩɪ.Ʉɚɞɵɪɨɜɚ, 179/14
23. ȿɤɚɬɟɪɢɧɛɭɪɝ: ɈɈɈ «Ɍɟɯɧɨɩɚɪɤ», ɬɟɥ.: (343) 212-52-77, ɭɥ. Ɋɚɞɢɳɟɜɚ, 55
ɈɈɈ «ɄȺɊȾɂɇȺɅ-ɌȿɏɇɈɉɅɘɋ», ɬɟɥ.: (343) 245-73-06, 245-73-28, ɭɥ.Ȼɟɛɟɥɹ, 116
24. ɂɜɚɧɨɜɨ: ɈɈɈ «Ʌɭɱ», ɬɟɥ.: (4932) 47-29-84, 47-23-23, 47-29-86, ɭɥ. Ɂɚɜɨɞɫɤɚɹ, 13
25. ɂɠɟɜɫɤ: ɋɟɪɜɢɫɧɵɣ ɰɟɧɬɪ «ȼɚɲ ɞɨɦ», ɬɟɥ.: (3412) 94-86-86, ɭɥ. Ʉɢɪɨɜɚ 172
ɈɈɈ «Ⱥɪɝɭɫ-ɫɟɪɜɢɫ», ɬɟɥ.: (3412) 30-79-79, 30-83-07, ɭɥ. Ɇ. Ƚɨɪɶɤɨɝɨ, ɞ.76
ɈɈɈ «Ⱥɪɝɭɫ-ɫɟɪɜɢɫ», ɬɟɥ.: (3412) 30-79-79, 30-83-07, ɭɥ. Ⱥɡɢɧɚ, 4
ɁȺɈ «Ⱦɋ», ɬɟɥ.: (3412) 431-662, ɭɥ. Ʉ. Ɇɚɪɤɫɚ, 393
ɈɈɈ «Ƚɚɪɚɧɬ-ɋɟɪɜɢɫ», ɬɟɥ.: (3412) 22-63-36, 43-69-82, ɭɥ. Ʉ. Ɇɚɪɤɫɚ, ɞ.395
26. ɂɪɤɭɬɫɤ: «Ʉɨɦɬɭ-ɋɟɪɜɢɫ», ɬɟɥ.: (3952) 54-68-54, 222-699, 222-732, ɭɥ. 4ɚɹ ɋɨɜɟɬɫɤɚɹ 65
ɈɈɈ «ɇɉɎ «Ɍɂɋ», (3952) 51-36-93, 51-31-09, 33-38-59, 22-71-65, ɭɥ. ɉɚɪɬɢɡɚɧɫɤɚɹ, 149
ɂɉ ȿɝɨɪɨɜɚ, ɬɟɥ.: (3952) 79-91-50, 97-03-94, ɩɟɪ. Ɇɨɩɪɚ, 1Ⱥ
27. Ƀɨɲɤɚɪ-Ɉɥɚ: ɋɐ «Ɇɢɞɚɫ», ɬɟɥ.: (8362) 41-77-43, 45-73-68, ɭɥ.ɋɨɜɟɬɫɤɚɹ, 173
28. Ʉɚɥɢɧɢɧɝɪɚɞ: ɈɈɈ «ɊɟɦɌɟɯɋɟɪɜɢɫ», ɬɟɥ.: (4012) 35-36-99, ɭɥ. ɋɭɞɨɫɬɪɨɢɬɟɥɶɧɚɹ, 75
29. Ʉɚɡɚɧɶ: ɈɈɈ «ȺɌɪɟɦɨɧɬɢɪɭɟɦ ɜɫɟ», ɬɟɥ.: (843) 555-49-32,557-55-70, ɭɥ. Ʉɪɚɫɧɨɤɨɤɲɚɣɫɤɚɹ,ɞ. 92
30. Ʉɚɥɭɝɚ: ɈɈɈ «Ȼɢɧɷɫ ɋɟɪɜɢɫ», ɬɟɥ.: (4842) 54-83-33, 54-82-22, ɭɥ. ɋɭɜɨɪɨɜɚ, ɞ.25
31. Ʉɟɦɟɪɨɜɨ: ɈɈɈ «ɋɢɛɫɟɪɜɢɫ», ɬɟɥ.: (3842) 36-12-22, ɭɥ. Ⱦɡɟɪɠɢɧɫɤɨɝɨ, 21-10
ɈɈɈ «Ⱥɥɶɮɚ ɋɟɪɜɢɫ», ɬɟɥ.: (3842) 33-50-76, ɭɥ. ɋɜɨɛɨɞɵ ɞ. 3
32. Ʉɢɪɨɜ: ɈɈɈ «ȼɹɬɤɚ ɋɟɪɜɢɫ» ɬɟɥ.: (8332) 27-34-66, ɭɥ. ɉɪɨɢɡɜɨɞɫɬɜɟɧɧɚɹ, 24
ɈɈɈ «ȼȽɄ-ɫɟɜɢɫ», ɬɟɥ.: (8332) 70-34-85, ɭɥ. Ȼɚɡɨɜɚɹ,
ɈɈɈ «Ʉɜɚɞɪɚɬ ɋɟɪɜɢɫ», ɬɟɥ.: (8332) 513-555, ɭɥ. ɋ.ɏɚɥɬɭɪɢɧɚ ɞ.12/1
33. Ʉɨɦɫɨɦɨɥɶɫɤ ɧɚ Ⱥɦɭɪɟ: ɂɉ Ʉɚɫɚɬɤɢɧ, ɬɟɥ.: (4217) 27-55-88, 27-50-91, ɭɥ. ɘɛɢɥɟɣɧɚɹ, 10/3
34. Ʉɨɬɥɚɫ: ɋɐ «Ⱦɨɦɨɬɟɯɧɢɤɚ», ɬɟɥ.: (81837) 33-0-55, ɭɥ.Ɇɢɪɚ ɞ. 99
35. Ʉɪɚɫɧɨɞɚɪ: ɈɈɈ «ɌɈɉ ɑɗɇɉ Ʌɬɞ», ɬɟɥ.: (861) 259-55-73, 259-55-23, ɭɥ. ɑɚɩɚɟɜɚ, ɞ. 94
ɂɉ Ʉɭɡɧɟɰɨɜ ɋ.ȼ., ɬɟɥ.: (861) 271-36-11, ɭɥ. Ƚɨɪɶɤɨɝɨ, ɞ.104
36. Ʉɪɚɫɧɨɹɪɫɤ: ɋɟɪɜɢɫɧɵɣ ɰɟɧɬɪ «Ȼɥɢɡɧɟɰɨɜ», ɬɟɥ.: (3912) 27-67-20, 65-34-41, ɭɥ. Ⱦɭɞɢɧɫɤɚɹ, ɞ.12ɚ
82
Page 83

ɈɈɈ «ȿɞɢɧɚɹ ɋɟɪɜɢɫɧɚɹ Ʉɨɦɩɚɧɢɹ», ɬɟɥ.: (391) 277-99-81, ɩɪ-ɤɬ ɢɦɟɧɢ Ƚɚɡɟɬɵ Ʉɪɚɫɧɨɹɪɫɤɢɣ ɪɚɛɨɱɢɣ ɞ. 160
ɫɬɪ.5
37. Ʉɭɪɫɤ: ɑɉ ɋɭɧɰɨɜ, ɬɟɥ.: (4712) 52-13-40, 58-66-11, ɭɥ. Ʌɶɜɚ Ɍɨɥɫɬɨɝɨ, ɞ. 9
38. Ʌɢɩɟɰɤ: ɁȺɈ «ɋɐ» Ɏɨɥɢɭɦ», ɬɟɥ.: (4742) 31-20-42, 32-75-48, 33-15-35, ɍɧɢɜɟɪɫɚɥɶɧɵɣ ɩɪɨɟɡɞ 14
ɈɈɈ «Ɍɨɦ ɋɟɪɜɢɫ», ɬɟɥ.: (4742) 34-67-50, ɭɥ. Ʉɨɫɦɨɧɚɜɬɨɜ, ɞ. 10
ɈɈɈ»Ɍɨɪɝɨɜɚɹ ɫɟɪɜɢɫɧɚɹ Ʉɨɦɩɚɧɢɹ Ȼɵɬɬɟɯɧɢɤɚ», ɬɟɥ.: (4742) 28-10-65, ɭɥ.ɋɟɦɚɲɤɨ ɞ.14
39. Ʌɹɧɬɨɪ: ɋɐ «ɏɨɥɨɞ ɋɟɪɜɢɫ», ɬɟɥ.: (8-904) 48-92-094, ɭɥ. 7 ɦɤɪ, ɫɬɪ. 69Ⱥ
40. Ɇɚɝɚɞɚɧ: ɂɉ ɋɚɦɨɣɥɨɜɢɱ, ɬɟɥ.: (4132) 605-844, ɭɥ. ɉɚɪɤɨɜɚɹ, 21
41. Ɇɚɯɚɱɤɚɥɚ: Ⱥɋɐ «Ɍɟɯɧɢɤ ISE», ɬɟɥ.: (8722) 64-71-33, 64-28-95, ɩɪ-ɬ ɒɚɦɢɥɹ, ɞ.20
ɈɈɈ «ɋɟɪɜɢɫ ɋɢɬɢ», ɬɟɥ.: (8722) 60-30-03, ɩɪ. Ⱥɤɭɲɢɧɫɤɨɝɨ, ɞ.1Ⱥ
42. Ɇɚɣɤɨɩ: ɁȺɈ ɡ-ɞ «Ɋɟɦɛɵɬɬɟɯɧɢɤɚ», ɬɟɥ.: (8772) 56-82-95, 53-06-39, 53-13-20, ɭɥ. Ʉɭɪɝɚɧɧɚɹ, ɞ. 328
43. Ɇɢɯɚɣɥɨɜɫɤ: ɈɈɈ «Ⱥɣɨɜɚ –ɋɟɪɜɢɫ», ɬɟɥ.: (6553) 5-93-79, ɭɥ. Ʉɨɥɥɟɤɬɢɜɧɚɹ, 1
44. Ɇɭɪɦɚɧɫɤ: ɂɉ ɋɚɧɶɤɨɜ, ɬɟɥ.: (8152) 26-14-67, 8-815-226-14-67, 8-902-281-57-17, ɋɟɜɟɪɧɵɣ ɩɪɨɟɡɞ, ɞ.16-1
ɂɉ «Ʉɨɪɟɩɚɧɨɜ Ⱥ. ɘ.», ɬɟɥ.: (81555) 66-10-6, ɭɥ. Ɂɢɧɨɜɶɟɜɚ ɞ.22ɚ
ɂɉ «ɉɨɪɨɯɨɜ Ⱥ. Ɉ.», ɬɟɥ.: (8152) 78-20-80, ɭɥ. ɋɚɮɨɧɨɜɚ, ɞ. 15ɚ, ɨɮɢɫ 3
45. ɇɚɛɟɪɟɠɧɵɟ ɑɟɥɧɵ: ɈɈɈ «ɗɥɟɤɚɦ-ɋɟɪɜɢɫ ɉɥɸɫ», ɬɟɥ.: (8552) 59-78-84, ɒɢɲɤɢɧɫɤɢɣ ɛ-ɪ, ɞ.8 (30/24)
46. ɇɚɥɶɱɢɤ: ɂɉ Ɇɢɪɡɨɟɜɚ, ɬɟɥ.: (8662) 42-04-30, ɩɪ. Ʌɟɧɢɧɚ, ɞ.24
47. ɇɟɪɸɧɝɪɢ: ɉȻɈɘɅ Ɍɭɪɱɢɧɫɤɢɣ, ɬɟɥ.: (41147) 6-82-13, 6-89-71, ɭɥ. ɑɭɪɚɩɱɢɧɫɤɚɹ, 18
48. ɇɢɠɧɟɜɚɪɬɨɜɫɤ: ɂɉ ɒɚɯɦɚɬɨɜ, ɬɟɥ.: (3466) 64-22-63, 56-68-13, ɭɥ. ɉɢɨɧɟɪɫɤɚɹ, ɞ. 30, ɤɨɪ. Ⱥ
49. ɇɢɠɧɢɣ ɇɨɜɝɨɪɨɞ: ɂɉ «Ʉɨɪɵɬɢɧɚ Ɇ.ȼ. », ɬɟɥ.: (831) 416-31-41, 412-36-01, 412-00-29, 416-31-51, ɭɥ. Ɂɚɹɪɫɤɚɹ, ɞ. 18
50. ɇɨɜɨɪɨɫɫɢɣɫɤ: ɈɈɈ «Ɇɨɜɢɤ», ɬɟɥ.: (8617) 63-72-60, ɭɥ. ɏɜɨɪɨɫɬɹɧɫɤɨɝɨ, ɞ.8
51. ɇɨɜɨɫɢɛɢɪɫɤ: ɈɈɈ «ɋɢɛɢɪɫɤɢɣ ɋɟɪɜɢɫ», ɬɟɥ.: (383) 292-47-12, 355-55-60, 357-19-95, ɭɥ. Ʉɨɬɨɜɫɤɨɝɨ, 10/1
52. ɇɨɜɵɣ ɍɪɟɧɝɨɣ: ɈɈɈ «ɍɦɧɚɹ ɬɟɯɧɢɤɚ», ɬɟɥ.: (3494) 94-61-45, ɭɥ. 26-ɝɨ ɫɴɟɡɞɚ Ʉɉɋɋ, ɞ.10Ȼ
53. ɇɨɪɢɥɶɫɤ: ɂɉ ɋɟɪɝɟɟɧɤɨ, ɬɟɥ.: (3919) 48-10-43, ɭɥ. Ʉɨɦɫɨɦɨɥɶɫɤɚɹ, ɞ.48-22
54. Ɉɛɧɢɧɫɤ: ɈɈɈ «Ɋɚɞɢɨɬɟɯɧɢɤɚ», ɬɟɥ.: .(48439) 6-44-14, ɩɥ. Ɍɪɟɭɝɨɥɶɧɚɹ, ɞ. 1
55. Ɉɦɫɤ: ɈɈɈ «Ȼɵɬɨɜɚɹ ɬɟɯɧɢɤɚ», ɬɟɥ.: (3812) 57-95-40, 32-20-63, ɩɪ-ɬ Ʉɨɫɦɢɱɟɫɤɢɣ, ɞ.99/2
ɈɈɈ «Ȼɵɬɫɟɪɜɢɫ», ɬɟɥ.: (3812) 24-99-64, 48-38-03, ɭɥ.ɑɟɪɧɵɲɟɜɫɤɨɝɨ, ɞ. 2, ɤɨɪ. 8
56. Ɉɪɟɥ: ɈɈɈ «Ɇɟɬɚɥɥɨɪɟɦɨɧɬ», ɬɟɥ.: (4862) 41-17-97, ɭɥ. ɂɝɧɚɬɨɜɚ, ɞ.31
57. Ɉɪɟɧɛɭɪɝ: ɈɈɈ «Ʌɢɤɨɫ-ɋɟɪɜɢɫ ɩɥɸɫ», ɬɟɥ: (3532) 57-24-91; 57-24-94; 57-26-68 ɭɥ. ɇɟɜɟɥɶɫɤɚɹ, 8Ⱥ
58. Ɉɪɫɤ: ɈɈɈ «Ⱥɫɬɚ –ɋɟɪɜɢɫ» ɬɟɥ.: (3537) 25-98-03, 21-36-66, ɭɥ. Ʉɪɚɦɚɬɨɪɫɤɚɹ, ɞ. 50
59. ɉɟɧɡɚ: ɁȺɈ «Ɍɟɯɫɟɪɜɢɫ», ɬɟɥ.: (8412) 49-16-10, ɭɥ. Ʉɨɦɦɭɧɢɫɬɢɱɟɫɤɚɹ, ɞ.28
ɂɉ «Ʉɢɪɟɟɜ Ⱥ.ȼ.», ɬɟɥ.: (412) 58-88-82, ɩɪɢɜɨɤɡɚɥɶɧɚɹ ɩɥɨɳɚɞɶ, ɫɬ. ɉɟɧɡɚ-1, ɞ. 1 ɦɚɝ. «ɘɋɌ»
60. ɉɟɬɪɨɩɚɜɥɨɜɫɤ-Ʉɚɦɱɚɬɫɤɢɣ: ɂɉ «ȿɪɦɨɥɟɧɤɨ Ⱦ.ɇ. », ɭɥ. ɑɭɛɚɪɨɜɚ, 16, Ɂɞɚɧɢɟ ɝɢɩɟɪɦɚɪɤɟɬɚ Ⱦɪɭɠɛɚ
61. ɉɟɪɦɶ: ɈɈɈ «Ɇɚɪɢɹ-Ɇ», ɬɟɥ.: (3422) 630-222, 631-116, ɭɥ. Ɍɭɪɝɟɧɟɜɚ, ɞ.21, ɨɮ. 440
62. ɉɟɬɪɨɡɚɜɨɞɫɤ: ɑɉ «ɏɨɪɲɭɧɨɜ», ɬɟɥ.: (8142) 70-23-42, ɭɥ. Ɇɭɪɦɚɧɫɤɚɹ, ɞ.25Ȼ
63. ɉɫɤɨɜ: ɈɈɈ «ɆɢɧɢɆɚɤɫ», ɬɟɥ.: (8112) 72-13-90, Ɋɢɠɫɤɢɣ ɩɪ., ɞ.49
64. ɉɹɬɢɝɨɪɫɤ: ɂɉ «ɋɨɤɨɥɨɜ ɂ.ȼ.», ɬɟɥ.: (87933) 33-97-97, ɩɪ-ɬ Ʉɚɥɢɧɢɧɚ, 19
ɂɉ «ɑɟɪɧɹɜɫɤɢɣ ȿ.ȼ.», ɬɟɥ.: (8793) 33-17-29, ɭɥ. 1-ɚɹ ɇɚɛɟɪɟɠɧɚɹ, ɞ. 32 ɤɨɪ. 4
65. Ɋɚɞɭɠɧɵɣ: ɂɉ «Ɇɢɯɚɣɥɨɜ ɇ.ɇ. », ɬɟɥ.: (34668) 26-0-26, 5-ɣ ɦɢɤɪɨɪɚɣɨɧ, ɞ.29
66. Ɋɨɫɬɨɜ ɧɚ Ⱦɨɧɭ: ɈɈɈ «Ⱥɛɪɢɫ ɉɥɸɫ», ɬɟɥ.: (863) 244-35-90, ɩɪ. Ȼɭɞɟɧɨɜɫɤɢɣ, 72Ⱥ
67. Ɋɹɡɚɧɶ: ɂɉ Ɋɨɞɢɨɧɨɜ, ɬɟɥ.: (4912) 24-60-12, 24-60-13, 24-60-14, ɭɥ. ɇɨɜɚɹ, ɞ.51Ƚ
68. ɋɚɦɚɪɚ: ɈɈɈ «Ɏɢɪɦɚ ɋɟɪɜɢɫ-ɐɟɧɬɪ», ɬɟɥ.: (846) 263-75-75, 263-74-74, ɭɥ. Ɇɢɱɭɪɢɧɚ, ɞ.15, ɨɮɢɫ 307
69. ɋɚɪɚɬɨɜ: ɈɈɈ «ȼɨɥɝɚ ɫɟɪɜɢɫ», ɬɟɥ.: (8452) 52-37-52, ɭɥ. Ɇɨɫɤɨɜɫɤɚɹ, 134/146
70. ɋɦɨɥɟɧɫɤ: ɋɐ «Ƚɚɪɚɧɬ», ɬɟɥ.: (4812) 62-50-52, 64-78-00, 21-88-00, ɭɥ. Ɋɭɦɹɧɰɟɜɚ, ɞ.19
71. ɋɬɚɪɵɣ Ɉɫɤɨɥ: ɂɉ «ɓɭɩɥɨɜ ɂ.ɋ», ɬɟɥ.: (4725) 22-05-41, 22-15-59, ɭɥ.Ɉɤɬɹɛɪɶɫɤɚɹ, ɞ. 5Ⱥ
72. ɋɭɪɝɭɬ: Ɍɟɯɰɟɧɬɪ «ɂɧɬɟɪɋɟɪɜɢɫ», ɬɟɥ.: (3462) 25-25-63, 25-69-70, Ʉɨɦɫɨɦɨɥɶɫɤɢɣ ɩɪ-ɬ, ɞ.44
ɂɉ ɉɨɥɭɤɚɪɨɜ, ɬɟɥ.: (3462) 66-70-79, 68-33-50, ɭɥ. ɍɧɢɜɟɪɫɢɬɟɬɫɤɚɹ, ɞ.3-83
ɂɉ «Ʌɨɩɚɬɢɧ Ⱥ.Ⱥ.», ɬɟɥ.: (3462) 25-79-35, ɭɥ. ɘɝɨɪɫɤɚɹ ɞ. 20
73. Ɍɚɝɚɧɪɨɝ: ɈɈɈ «Ȼɟɫɬ ɋɟɪɜɢɫ», ɬɟɥ.: (8634) 37-90-66, ɋɦɢɪɧɨɜɫɤɢɣ ɞ. 45
74. Ɍɚɦɛɨɜ: ɈɈɈ ɌɌɐ «Ⱥɬɥɚɧɬ-ɋɟɪɜɢɫ», ɬɟɥ.: (4752) 72-63-46, 72-75-85, 71-91-19, ɭɥ. Ɇɨɫɤɨɜɫɤɚɹ, ɞ. 23Ⱥ
75. Ɍɜɟɪɶ: ɈɈɈ «ɋɬɟɤɨ-ɫɟɪɜɢɫ», ɬɟɥ.: (4822) 32-00-23, ɩɪ-ɬ ɑɚɣɤɨɜɫɤɨɝɨ, ɞ.100
76. Ɍɨɥɶɹɬɬɢ: ɈɈɈ «ɗɥɪɨ ɋɟɪɜɢɫ », ɬɟɥ.: (8482) 77-32-55; 63-63-59, Ɇɨɫɤɨɜɫɤɢɣ ɩɪ-ɬ, 8 «Ƚ»
77. Ɍɨɦɫɤ: ɈɈɈ «Ⱥɤɚɞɟɦɢɹ ɋɟɪɜɢɫ», ɬɟɥ.: (3822) 49-15-80, 49-28-08, ɩɪ. Ⱥɤɚɞɟɦɢɱɟɫɤɢɣ 2, ɛɥɨɤ Ⱥ
ɈɈɈ «Ƚɥɚɜɛɵɬɋɟɪɜɢɫ», ɬɟɥ.: (3822) 26-64-62, 44-03-07, ɭɥ. ɇɟɤɪɚɫɨɜɚ, ɞ.12
ɈɈɈ «ɋɢɛɢɪɫɤɢɣ ɋɟɪɜɢɫ», ɬɟɥ.: (3822) 42-29-80, 41-44-24, ɭɥ. ȿɥɢɡɚɪɨɜɵɯ, ɞ.17
ɋɐ Ɍɟɯɧɨɥɸɤɫ-ɫɟɪɜɢɫ, ɬɟɥ.: (3822) 72-75-78, ɩɪ. Ɇɢɪɚ, 76
78. Ɍɭɥɚ: ɈɈɈ «Ⱦɭɷɬ ɋɟɪɜɢɫ», ɬɟɥ.: (4872) 56-17-37,55-60-96, Ʉɪɚɫɧɨɚɪɦɟɣɫɤɢɣ ɩɪ-ɤɬ, ɞ. 26
79. Ɍɸɦɟɧɶ: ɈɈɈ «Ⱥɜɟɪɫ-ɋɟɪɜɢɫ», ɬɟɥ.: (3452) 39-12-18, 39-12-29, ɭɥ. Ɇɟɥɶɧɢɤɚɣɬɟ, ɞ.131 "Ⱥ"
ɈɈɈ «ȿɜɪɨɫɟɪɜɢɫ», ɬɟɥ.: (3452) 97-82-52, ɭɥ. Ɇ. Ƚɨɪɶɤɨɝɨ, 23Ⱥ
80. ɍɥɚɧ-ɍɞɷ: ɂɉ Ƚɨɥɟɜɚ, ɬɟɥ.: (3012) 41-50-43, 41-50-45, 23-01-09, ɭɥ. Ƚɟɨɥɨɝɢɱɟɫɤɚɹ, 17
81. ɍɥɶɹɧɨɜɫɤ: ɈɈɈ «Ɇɚɫɬɟɪ-ɋɟɪɜɢɫ», ɬɟɥ.: (8422) 32-07-33, ɭɥ. Ɇɢɧɚɟɜɚ, ɞ. 42
ɂɉ Ʌɢɩɤɢɧ, ɬɟɥ.: (8422) 48-33-33, 48-46-90, Ɇɨɫɤɨɜɫɤɨɟ ɲɨɫɫɟ, 85
82. ɍɫɫɭɪɢɣɫɤ: ɋɟɪɜɢɫɧɵɣ ɰɟɧɬɪ «ɉɈɅɍɄɋ», ɬɟɥ.: (4234) 32-10-35, 33-92-59, ɭɥ. ɋɨɜɟɬɫɤɚɹ, ɞ.29
83. ɍɮɚ: ɂɉ «ɒɟɪɵɲɟɜ Ƚ.Ⱥ.», ɬɟɥ.: (347) 274-13-69, ɭɥ.ɇɨɜɨɫɢɛɢɪɫɤɚɹ ɞ.2ɚ
84. ɍɯɬɚ: ɈɈɈ «ȺȼȼȺ», ɬɟɥ.: (82147) 4-18-88, ɭɥ. ɋɟɦɹɲɤɢɧɚ, ɞ. 8Ⱥ
85. ɏɚɛɚɪɨɜɫɤ: ɈɈɈ «Ʉɨɧɬɭɪ-ɫɟɪɜɢɫ», ɬɟɥ.: (4212) 70-10-00, 75-21-37, ɭɥ. Ʉɢɦ-ɘ-ɑɟɧɚ – 43
86. ɑɟɛɨɤɫɚɪɵ: ɈɈɈ «ɐɟɧɬɪ Ɉɛɫɥɭɠɢɜɚɧɢɹ ɋɥɨɠɧɨɣ Ɍɟɯɧɢɤɢ», ɬɟɥ.: (8352) 42-09-00, ɭɥ. ɉɢɪɨɝɨɜɚ, ɞ.20
87. ɑɟɥɹɛɢɧɫɤ: ɈɈɈ ɌɌɐ «Ɋɟɦɛɵɬɬɟɯɧɢɤɚ», ɬɟɥ.: (351) 749-20-20, 749-20-70, ɭɥ. Ⱥɪɬɢɥɥɟɪɢɣɫɤɚɹ, 102
88. ɑɟɪɟɩɨɜɟɰ: ɂɉ ȼɨɥɤɨɜ, ɬɟɥ.: (202) 28-86-46, 28-10-03, ɭɥ. Ʉɨɦɚɧɞɚɪɦɚ Ȼɟɥɨɜɚ, ɞ.29, ɨɮ.2
89. ɑɢɬɚ: ɈɈɈ «ɋɥɚɜɟɥ ɋɟɪɜɢɫ», ɬɟɥ.: (3022) 41-51-02, ɭɥ. ɒɢɥɨɜɚ, ɞ. 100
90. ɘɠɧɨ-ɋɚɯɚɥɢɧɫɤ: ɈɈɈ «Ʉɨɧɬɭɪ-ɫɟɪɜɢɫ», ɬɟɥ.: (4242) 43-40-73, 74-34-39, 74-37-43, ɭɥ. ɉɨɝɪɚɧɢɱɧɚɹ 60
83
Page 84

ɂɉ «ɋɚɜɟɧɤɨ Ɉ.ɇ.», ɬɟɥ.: (4242) 42-99-54,42-98-32, Ʉɨɦɦɭɧɢɫɬɢɱɟɫɤɢɣ ɩɪ-ɤɬ, ɞ. 21
ɂɉ «ɒɭɛɢɧ», ɬɟɥ.: (4242) 27-41-49, 55-33-98, ɭɥ. ȿɫɟɧɢɧɚ, ɞ. 5
91. əɤɭɬɫɤ: Ⱥɋɐ Ȼɵɬ –ɋɟɪɜɢɫ, ɬɟɥ.: (4112) 43-99-66, 31-05-67, ɭɥ. ɋ.ɏɚɥɬɭɪɢɧɚ, 45
92. əɪɨɫɥɚɜɥɶ: ɁȺɈ «Ɏɢɪɦɚ ɌȺɍ», ɬɟɥ.: (4852) 266-537, Ɇɨɫɤɨɜɫɤɢɣ ɩɪ-ɬɨ, ɞ. 1Ⱥ, ɫɬɪ. 5
84
Page 85

Kaiser
ɉɪɟɞɫɬɚɜɢɬɟɥɶɫɬɜɨ «Ʉɚisɟr» ɜ ɍɤɪɚɢɧɟ:
Ɍɟɥ.: 8 (044) 331-50-77, 8 (044) 331-50-78, 8 (044) 496-55-44
Ɏɚɤɫ: 8 (044) 391-03-00
www.kaiser.com.ua
E-Mail: service@kaiser.com.ua
Ⱥɞɪɟɫɚ ɢ ɬɟɥɟɮɨɧɵ ɚɜɬɨɪɢɡɢɪɨɜɚɧɧɵɯ ɫɟɪɜɢɫɧɵɯ ɰɟɧɬɪɨɜ, ɨɛɟɫɩɟɱɢɜɚɸɳɢɯ ɝɚɪɚɧɬɢɣɧɨɟ ɢ ɩɨɫɥɟɝɚɪɚɧɬɢɣɧɨɟ
ɨɛɫɥɭɠɢɜɚɧɢɟ ɜɫɬɪɚɢɜɚɢɜɚɟɦɨɣ ɬɟɯɧɢɤɢ
ɜ ɍɤɪɚɢɧɟ:
1. Ⱥɥɱɟɜɫɤ: «Ȼɭɥɚɬ ɋɟɪɜɢɫ», ɬɟɥ.: (06442) 2-58-09, 4-84-01, ɭɥ. Ȼɟɥɢɧɫɤɨɝɨ, 11
2. Ȼɟɥɚɹ ɐɟɪɤɨɜɶ: ɑɉ «Ʉɉɉ ɋɟɪɜɢɫ ɦɚɫɬɟɪ», ɬɟɥ.: (04463) 329-44, ɭɥ. Ɉɮɢɰɟɪɫɤɚɹ, 1
3. ȼɢɧɧɢɰɚ: Ʉɉ «Ƚɚɪɚɧɬ-ɫɟɪɜɢɫ», ɬɟɥ.: (0432) 46-64-18, 46-50-01, ɭɥ. ɉɪɨɫɩɟɤɬ Ʉɨɫɦɨɧɚɜɬɨɜ, 42
ɋɐ «ɋɤɨɪɦɚɝ-ɋɟɪɜɢɫ», ɬɟɥ.: (0432) 46-43-93, 46-82-13, ɩɪ. ɘɧɨɫɬɢ, 16
ɋɐ «ɋɩɟɰɢɚɥɢɫɬ», ɬɟɥ.: (0432) 57-91-91, 50-91-91, ɭɥ. ɉɨɪɢɤɚ, 1
4. Ⱦɧɟɩɪɨɩɟɬɪɨɜɫɤ: ɋɐ «ȿɜɪɨɩɪɨɟɤɬ-ɋɟɪɜɢɫ», ɬɟɥ.: (056) 371-15-06, ɭɥ. Ʉɪɚɫɧɚɹ, 20Ⱥ
5. Ⱦɧɟɩɪɨɞɡɟɪɠɢɧɫɤ: «Ɍɟɥɟɦɨɛɢɥɫɟɪɜɢɫ», ɬɟɥ.: (05692)3-59-54, ɭɥ. ɋɵɪɨɜɰɚ, 51
6. Ⱦɨɧɟɰɤ: ɋɐ «Ɏɨɤɫɬɪɨɬ» ɩɥɨɳɚɞɤɚ 1, ɬɟɥ.: (062) 345-41-23, ɩɪ. Ⱦɡɟɪɠɢɧɫɤɨɝɨ, 4
ɋɐ «Ɏɨɤɫɬɪɨɬ» ɩɥɨɳɚɞɤɚ 2, ɬɟɥ.: (062) 345-35-16, ɩɪ. ɂɥɶɢɱɚ, 44
7. Ⱦɪɨɝɨɛɢɱ: «ɋɟɪɜɢɫ-2000», ɬɟɥ.: (0324) 45-00-62, ɭɥ. Ⱦ. Ƚɚɥɢɰɤɨɝɨ, 5
8. ɀɢɬɨɦɢɪ: «ɉɪɨɮɦɚɫɬɟɪ», ɬɟɥ.: (0412) 42-22-54, ɭɥ. ɑɟɪɧɹɯɨɜɫɤɨɝɨ, 20
9. Ɂɚɩɨɪɨɠɶɟ: ɋɉ «Ɍɪɚɧɫɟɪɜɢɫ», ɬɟɥ.: (0612) 12-03-03, 12-06-08, ɭɥ. Ⱦɡɟɪɠɢɧɫɤɨɝɨ, 83
«Ɇɚɷɫɬɪɨ», ɬɟɥ.: (061) 270-40-94; (061) 224-58-58, (061) 289-92-75, 220-03-22, 220-97-65, ɭɥ. Ɇɚɥɚɹ, 3
ɑɉ «Ɋɟɦɛɵɬɫɟɪɜɢɫ», ɬɟɥ.: (061) 220-97-64
10. ɂɜɚɧɨ-Ɏɪɚɧɤɨɜɫɤ: «Ȼɪɢɡ», ɬɟɥ.: (0342) 750-777, 55-95-25, ɭɥ. ɇɨɜɚɹ, 19Ⱥ
11. ɂɡɦɚɢɥ: «ɗɤɪɚɧ», ɬɟɥ.: (04841) 6-34-53, ɭɥ. Ʉɨɬɨɜɫɤɨɝɨ, 59
12. Ʉɚɦɟɧɟɰ-ɉɨɞɨɥɶɫɤɢɣ: «ɋɟɪɜɢɫ-ɰɟɧɬɪ», ɬɟɥ.: (03849) 324-88, ɭɥ. ɉɭɲɤɢɧɫɤɚɹ, 51
13. Ʉɟɪɱɶ: ɉɉ «Ɏɨɤɫɤɪɵɦɫɟɪɜɢɫ», ɬɟɥ.: (06561) 2-30-62, ɭɥ. ɋɨɜɟɬɫɤɚɹ, 15
14. Ʉɢɟɜ: «Ɏɨɤɫɬɪɨɬ ɋɟɪɜɢɫ», ɬɟɥ.: (044) 467-14-97, 467-08-59, 467-23-75, 440-43-89 ɭɥ. ɓɭɫɟɜɚ, 44
15. Ʉɢɲɢɧɟɜ: ɈɈɈ «SRL PINGO-GRUP», ɬɟɥ. 8 10 373 22 54-40-76, 54-44-42
Ⱥɤɨ-ɋɟɪɜɢɫ-ɗɥɟɤɬɪɨɧ, ɬɟɥ.: 8 10 373 22 22-40-35, 22-40-54, 23-86-06
ɈɈɈ «ɂɜɚɥɤ», ɬɟɥ.: 8 10 373 22 49-31-31
16. Ʉɢɪɨɜɨɝɪɚɞ: ɋɐ «Ɉɩɬɪɨɧ», ɬɟɥ.: (0522) 24-96-47, 24-45-22, ɩɪ-ɬ Ʉɨɦɦɭɧɢɫɬɢɱɟɫɤɢɣ, 1
17. Ʉɨɧɨɬɨɩ: ɑɉ «Ⱥɥɟɤɫɟɣ», ɬɟɥ.: (05447) 6-13-56, ɩɪ. Ʌɟɧɢɧɚ, 11
18. Ʉɪɚɦɚɬɨɪɫɤ: ɋɐ «ȼɚɥɞɢɫ-ɫɟɪɜɢɫ», ɬɟɥ.: (06264) 56-4-56, 4-19-66, ɭɥ. ɉɚɪɤɨɜɚɹ, 15
19. Ʉɪɟɦɟɧɱɭɝ: ɑɉ ɒɚɦɪɚɣ, ɬɟɥ.: (0536) 74-72-10, 74-71-53, ɭɥ. ɉɟɪɟɹɫɥɚɜɫɤɚɹ, 55
20. Ʉɪɢɜɨɣ Ɋɨɝ: Ⱥɋɐ «Ɏɨɤɫɬɪɨɬ», ɬɟɥ.: (056) 440-07-64, ɭɥ. Ɋɟɜɨɥɸɰɢɨɧɧɚɹ, 73
21. Ʉɭɡɧɟɰɨɜɫɤ: ɋɐ «Ɋɷɛɸɬ», ɬɟɥ.: (03636) 3-94-06, ɦ-ɧ ɉɨɛɟɞɵ, 19
22. Ʌɭɛɧɵ: ɎɅɉ «Ʉɨɯɚɧɟɧɤɨ», ɬɟɥ. (050) 457-49-65, Ɍɐ «ȼɟɤɬɨɪ», 2 ɷɬɚɠ
23. Ʌɭɝɚɧɫɤ: «Ʌɭɝɚɧɫɤ-ɋɟɪɜɢɫ», ɬɟɥ.: (0642) 49-44-17, 49-54-50, 49-32-96,
, 34-50-65, 716-470, 502-221, ɭɥ. Ɏɪɭɧɡɟ, 136 Ȼ
24. Ʌɭɰɤ: «ɋɈɎɌ ɅȺɃɇ», ɬɟɥ.: (0322) 77-10-23, 23-00-02, ɭɥ. ɋɬɭɫɚ, 11
ɋɐ «ȼɚɲ ɦɚɫɬɟɪ», ɬɟɥ.: (0322) 23-01-03, ɩɪ. ɉɨɛɟɞɵ, 22
25. Ʌɶɜɨɜ: ɋɐ «Ɇɢɥɥɟɧɢɭɦ», ɬɟɥ.: (032) 267-07-10. ɭɥ. Ʉɭɪɦɚɧɨɜɢɱɚ, 9
ɌɡɈȼ «Ɋɟɫɬɨɪɫɟɪɜɢɫ» ɬɟɥ.: (032) 231-78-87, ɭɥ. Ȼ. ɏɦɟɥɶɧɢɰɤɨɝɨ, 116
26. Ɇɚɪɢɭɩɨɥɶ: ɈɈɈ «Ʌɨɬɨɫ», ɬɟɥ.: (0629) 41-06-60, 41-06-50, ɭɥ. Ƚɚɜɚɧɶ ɒɦɢɞɬɚ, 6
27. Ɇɭɤɚɱɟɜɨ: Ⱥɋɐ «Ƚɚɪɚɧɬ Ɇɭɤɚɱɟɜɨ» ɬɟɥ.: (03131) 2-33-33, ɭɥ. ȼɨɤɡɚɥɶɧɚɹ, 41
28. ɇɢɤɨɥɚɟɜ: ɋɐ «ɇɢɤɨɥɚɟɜ-Ɏɨɤɫɬɪɨɬ», ɬɟɥ.: (0512) 55-29-04, ɩɪ. Ʌɟɧɢɧɚ, 177Ⱥ
29. ɇɢɤɨɩɨɥɶ: ɑɉ «ɂɦɩɨɪɬɬɟɯɧɨɫɟɪɜɢɫ», ɬɟɥ.: (05662) 2-24-88, ɭɥ. Ƚɚɝɚɪɢɧɚ, 62, ɤɨɪɩ. Ⱥ
30. ɇɨɜɚɹ Ʉɚɯɨɜɤɚ: ɋɐ «ɗɥɟɤɬɪɨɧ», ɬɟɥ.: (05549) 7-83-98, ɭɥ. ɓɨɪɫɚ, 33 Ⱥ
31. Ɉɞɟɫɫɚ: «Ɏɨɤɫɬɪɨɬ-ɋɟɪɜɢɫ-Ɉɞɟɫɫɚ» ɩɥɨɳɚɞɤɚ 1, ɬɟɥ.: (048) 784-20-85, 784-20-86, ɭɥ. Ɍɪɚɧɫɩɨɪɬɧɚɹ, 7ȿ
«Ɏɨɤɫɬɪɨɬ-ɋɟɪɜɢɫ-Ɉɞɟɫɫɚ» ɩɥɨɳɚɞɤɚ 2, ɬɟɥ.: (0482) 372-192, ɭɥ. Ȼɚɡɚɪɧɚɹ, 76
32. ɉɚɜɥɨɝɪɚɞ: ɋɐ «ɉɢɧɮɨɤ», ɬɟɥ.: (05632) 311-93, ɭɥ. Ʌɟɧɢɧɝɪɚɞɫɤɚɹ, 3Ⱥ
33. ɉɨɥɬɚɜɚ: ɇɉɈ «ɉɪɨɦɷɥɟɤɬɪɨɧɢɤɚ», ɬɟɥ.: (0532) 57-21-66, ɭɥ. ɉɪɨɥɟɬɚɪɫɤɚɹ, 22
«Ⱥɣɤɨɧ-ɋɟɪɜɢɫ», ɬɟɥ.: (0532) 506-789, ɭɥ. Ɉɤɬɹɛɪɶɫɤɚɹ, 40Ȼ
34. Ɋɨɜɧɨ: «ɊȺȾɂɈɆȺɋɌȿɊɋɄȺə», ɬɟɥ.: (0362) 22-68-19, ɭɥ. ɉɨɱɬɨɜɚɹ, 2
35. Ɋɨɦɧɵ: ɑɉ ɋɬɪɨɣ ȼ. Ɉ. ɬɟɥ.: (05448) 2-17-48, ɭɥ. ɉ. Ʉɚɥɧɵɲɟɜɫɤɨɝɨ, 34
36. ɋɟɜɚɫɬɨɩɨɥɶ: «Ⱦɢɚɞɟɦɚ», ɬɟɥ.: (0692) 555-643, 555-225, 557-040, ɭɥ. ɉɨɠɚɪɨɜɚ, 26
Ɍɟɯɧɢɱɟɫɤɢɣ ɰɟɧɬɪ «Ⱥɥɶɹɧɫ-ɋɟɪɜɢɫ», ɬɟɥ.: (0692) 67-41-31, 45-12-77, ɭɥ. Ƚɟɧɟɪɚɥɚ Ʉɨɥɨɦɢɣɰɚ, ɞ. 9
«ɄȺɍɎ», ɬɟɥ.: (0692) 45-60-72, ɭɥ. ɉɪɨɦɵɲɥɟɧɧɚɹ, 9
37. ɋɟɜɟɪɨɞɨɧɟɰɤ: «ɗɥɟɤɬɪɨɧɧɵɟ ɫɢɫɬɟɦɵ», ɬɟɥ.: (0645) 29-73-97, 29-75-00, ɭɥ. Ɏɟɞɨɪɟɧɤɨ, 10
38. ɋɢɦɮɟɪɨɩɨɥɶ: Ɋɋɐ Ɏɨɤɫɬɪɨɬ, ɬɟɥ.:(0652) 248-858, ɭɥ. Ȼɚɥɚɤɥɚɜɫɤɚɹ, 68
«Ⱥɥɛɢ», ɬɟɥ.: (0652) 24-81-37, ɭɥ. Ʉɟɱɤɟɦɟɬɫɤɚɹ, 198
«ɇɄ-ɐɟɧɬɪ» ɬɟɥ.: (0652) 54-47-71, ɭɥ. ɇɟɤɪɚɫɨɜɚ, 17/1
39. ɋɭɦɵ: ɋɐ «ɋɢɝɦɚ-ɋɟɪɜɢɫ», ɬɟɥ.: (0542) 36-50-58, ɭɥ. ɉɪɨɤɨɮɶɟɜɚ, 19
40. ɋɬɚɯɚɧɨɜ: Ⱥɋɐ «Ⱥɥɶɛɢɬ», ɬɟɥ.: (06444) 4-02-89, ɭɥ. Ʉɢɪɨɜɚ, 15
41. ɍɠɝɨɪɨɞ: ɌɡɈȼ «Ɇɢɥɥɟɧɢɭɦ», ɬɟɥ.: (031) 266-12-97, ɭɥ. Ƚɚɝɚɪɢɧɚ, 101
42. Ɏɟɨɞɨɫɢɹ: ɑɉ Ɏɨɤɫɤɪɵɦɫɟɪɜɢɫ, ɬɟɥ.: (06562) 312-84, ɭɥ. Ȼɚɡɚɪɧɚɹ, 4
43. ɏɚɪɶɤɨɜ: Ɋɋɐ «Ɏɨɤɫɬɪɨɬ-ɋɟɪɜɢɫ», ɬɟɥ.: (057) 758-10-39, 758-10-40, ɭɥ. ȼɟɪɧɚɞɫɤɨɝɨ, 2
44. ɏɟɪɫɨɧ: ɈɈɈ «Ɋɟɦɨɧɬ ɢ ɋɟɪɜɢɫ», ɬɟɥ.: (0552) 485-888, 485-000, ɭɥ. Ɋɚɛɨɱɚɹ, 66
45. ɏɦɟɥɶɧɢɰɤɢɣ: «ɉɪɟɥɸɞɢɹ» ɬɟɥ.: (0382) 72-01-08, ɩɪɨɫɩɟɤɬ Ɇɢɪɚ, 62-Ⱥ
85
Page 86

ɋɐ «Ɋɚɞɢɨɞɨɧɨɪ», ɬɟɥ.: (0382) 704-700, 66-46-16, ɩɟɪɟɭɥɨɤ ɂɩɩɨɞɪɨɦɧɵɣ, 2
46. ɑɟɪɧɢɝɨɜ: Ɋɋɐ «Ɏɨɤɫɬɪɨɬ», ɬɟɥ.: (046) 267-58-58, ɭɥ. ɒɟɜɱɟɧɤɨ, 4
ɋɐ «ɈɌɌɈ», ɬɟɥ.: (0462) 67-84-92, 67-84-93, ɭɥ. Ʉɨɰɸɛɢɧɫɤɨɝɨ, 61
47. ɑɟɪɜɨɧɨɝɪɚɞ: ɌɡɈȼ «Ȼɵɬɪɚɞɢɨɬɟɯɧɢɤɚ», ɬɟɥ.: (03249) 2-25-63, ɭɥ. ɋɨɤɚɥɶɫɤɚɹ, 6
48. ɑɟɪɤɚɫɫɵ: «ɋɐ «Ɏɨɤɫɬɪɨɬ», ɬɟɥ.: (0472) 72-35-58, ɭɥ. Ʉɚɥɢɧɢɧɚ, 115
49. ɑɟɪɧɨɜɰɵ: «Ɏɨɤɫɬɪɨɬ-ɋɟɪɜɢɫ», ɬɟɥ.: (0372) 58-43-01, ɭɥ. Ƚɥɚɜɧɚɹ, 265
50. ɒɨɫɬɤɚ: Ʉɉ ɌȾ «Ȼɟɪɟɡɤɚ-ɋɟɪɜɢɫ», ɬɟɥ. (05449) 4-07-07, ɭɥ. Ɋɚɛɨɱɚɹ, 5
86
Page 87

The manufacturer declines all responsibility for possible inaccuracies contained in this pamphlet, due to
printing or copying errors. We reserve the right to make on our own products those changes to be
considered necessary or useful, without jeopardizing the essential characteristics.
Die Herstellerfirma übernimmt keinerlei Verantwortung für eventuell in dieser Broschüre enthaltene
Ungenauigkeiten, die auf Druckfehler zurückzuführen sind und behält sich das Recht vor an ihren
Produkten alle für notwendig erachten Änderungen anzubringen, ohne die wesentlichen Eigenschaften zu
Beeinflussen.
Ɏɢɪɦɚ ɢɡɝɨɬɨɜɢɬɟɥɶ ɧɟ ɧɟɫɟɬ ɧɢɤɚɤɨɣ ɨɬɜɟɬɫɬɜɟɧɧɨɫɬɢ ɡɚ ɜɨɡɦɨɠɧɨ ɫɨɞɟɪɠɚɳɢɟɫɹ ɜ ɷɬɨɣ ɛɪɨɲɸɪɟ
ɧɟɬɨɱɧɨɫɬɢ, ɤɨɬɨɪɵɟ ɦɨɝɭɬ ɛɵɬɶ ɫɥɟɞɫɬɜɢɟɦ ɨɩɟɱɚɬɨɤ ɬɢɩɨɝɪɚɮɢɢ, ɢ ɫɨɯɪɚɧɹɟɬ ɡɚ ɫɨɛɨɣ ɩɪɚɜɨ
ɜɧɨɫɢɬɶ ɜ ɞɢɡɚɣɧ ɢ ɭɫɬɪɨɣɫɬɜɨ ɫɜɨɟɣ ɩɪɨɞɭɤɰɢɢ ɜɫɟ ɧɟɨɛɯɨɞɢɦɵɟ ɢɡɦɟɧɟɧɢɹ, ɤɨɬɨɪɵɟ ɧɟ ɨɤɚɡɵɜɚɸɬ
ɫɭɳɟɫɬɜɟɧɧɨɝɨ ɜɥɢɹɧɢɹ
ɧɚ ɩɨɬɪɟɛɢɬɟɥɶɫɤɢɟ ɤɚɱ
ɟɫɬɜɚ ɢ ɫɜɨɣɫɬɜɚ ɩɪ
ɨɞɭɤɬɚ.
87
Page 88

OLAN – Haushaltsgeräte, Berlin Germany
www.kaiser-olan.de
 Loading...