

High Pressure Washer Accessory
Part No. 2.640–508.0
Overview .............................................................. 1
Precautions .......................................................1-2
Assembly Instructions .......................................... 3
Operating Controls............................................... 4
Normal Operating Settings .................................. 5
Parts List .............................................................. 6
In USA Call:
1-800-537-4129
or visit our website:
www.karcher-usa.com
T 300
T-Racer
5.961–208.0
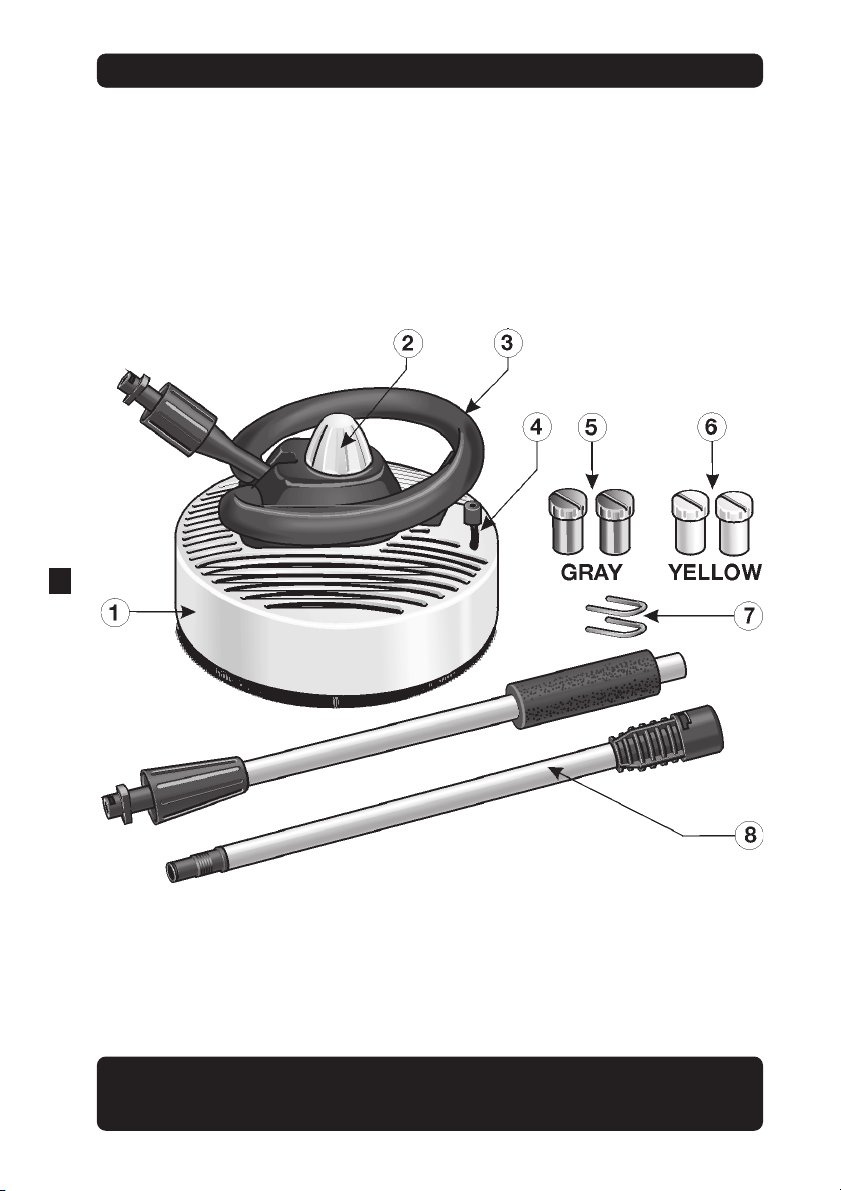
T-RACER OVERVIEW
Item Description
1 Housing
2 Nozzle height adjustment
3 Hand grip
4 Air flow control (hovering effect)
5 Pressure nozzles (gray) from 1200 - 1600 PSI
6 Pressure nozzles (yellow) from 1700 - 2300 PSI
7 Cramp (2 piece)
8 Handle (2 piece)
2
In USA Call:
1-800-537-4129
or visit our website: www.karcher-usa.com
IMPORTANT PRECAUTIONS – Read First!
Safety Warnings
When using this product, basic precautions
should always be followed:
• Read all the instructions before using
the product.
• High pressure jets can be dangerous if
subject to misuse. The jet must not be
directed at persons, animals, electrical
devices, or the machine itself.
• Wear safety goggles.
• Keep hands away from moving parts.
• Do not use acids, alkalines, solvents, or
any flammable material in this product.
These products can cause physical
injuries to the operator and irreversible
damage to the machine.
• Stay alert — watch what you are doing.
• Do not operate the product when
fatigued or under the influence of
alcohol or drugs.
• Do not stand on unstable surfaces.
Stand with both feet balanced at all
times.
• The Gun Safety Lock PREVENTS the
trigger from accidentally being engaged.
This safety feature DOES NOT lock
trigger in the on position.
Water Supply (Cold Water Only)
• Water hose must be at least 3/4 inch in
diameter.
• Flow rate of water supply must not fall
below 2.5 GPM (gallons per minute).
• Flow rate can be determined by running
the water for one minute into an empty
5-gallon container.
• The water supply temperature must not
exceed 104°F/40°C.
• Never use the pressure washer to draw
in water contaminated with solvents,
e.g. paint thinners, gasoline, oil, etc.
• Always prevent debris from being drawn
into the unit by using a clean water
source.
WARNING
TO AVOID SERIOUS INJURY,
NEVER POINT SPRAY NOZZLE
AT YOURSELF, OTHER PERSONS
OR ANIMALS.
3
CAUTION
• Follow the
maintenance
instructions specified
in the manual.
• This machine has
been designed for use
with cleaning
detergents supplied
or recommended by
the manufacturer. The
use of other cleaning
detergents may affect
the operation of the
machine and void the
warranty.
• Keep hands away
from moving parts.
Never use:
• Bleach, Chlorine
products and other
corrosive chemicals
• Liquids containing
solvents (i.e., paint
thinners, gasoline,
oils)
• Tri-sodium phosphate
products
• Ammonia products
• Acid-based products.
These chemicals will
harm the unit and will
damage the surface
being cleaned.
Please Note:
• For optimum setting
test the spray power
in an unseen area.
• Never operate in the
same area for more
than 2 seconds,
damage may occur.
• Do not use on
windows.

ASSEMBLY INSTRUCTIONS
Step 1
Determine the PSI of your pressure washer.
1200–1600 PSI, Select the gray nozzles.
1700–2300 PSI, Select the yellow nozzles.
GRAY YELLOW
Step 2
Insert the 2 matching
pressure nozzles in the slots
4
on the propeller and secure
with cramp.
Step 5
Tighten Lock collar to
assemble by twisting
counter clockwise.
Step 3
Insert upper handle into the
lower handle by twisting
together.
Step 6
Insert pressure washer
wand into upper handle.
Push wand down over upper
handle and twist clock-wise
1/4 turn into locked position.
Step 4
Insert lower handle into
main housing. Push down
and turn clockwise 90° to
lock in lower handle.
Step 7
Turn locking collar clockwise over pressure washer
wand until tight.

OPERATION CONTROLS
Spray Power
Adjust height of propeller spray head.
Clockwise for wood surfaces counter clockwise for stone, concrete and tile.
5
Air Flow Control
Adjust the hover effect of the T-Racer by pushing the Air Flow Control
into one of the positions from 0 – 1.
The lowest position is 0 and the highest position is 1.
Please Note:
• For optimum setting test the spray power in an unseen area.
• Never operate in the same area for more than 2 seconds, damage may occur
• Do not use on windows..

NORMAL OPERATION SETTINGS
Horizontal Wood and Decks
Adjust height of the spray head clockwise. Open (0) the air flow vents.
Vertical Wood, Siding and Facades
6
Adjust height of the spray head clockwise. Close (1) the air flow vents. Do not use on windows.
Horizontal Tile, Concrete and Stone
Adjust height of the spray head counter clockwise. Open (0) the air flow vents.
Vertical Tile, Concrete and Stone
Adjust height of the spray head Counter clockwise. Close (1) the air flow vents.

PARTS LIST
7
In USA Call:
1-800-537-4129
or visit our website: www.karcher-usa.com

 Loading...