


 Loading...
CD PORTABLE SYSTEM
SISTEMA PORTÁTIL CON REPRODUCTOR DE CDs
RC-EX20S/RC-EX20A/ RC-EX20B
TAPE
RANDOM CD
PRESET |
|
CD |
REPEAT |
|
|
|
TUNER |
BAND |
|
PUSH
STOP
E
AUS
PLAY/P
DISPLAY
INSTRUCTIONS
MANUAL DE INSTRUCCIONES
For Customer Use:
Enter below the Model No. and Serial No. which are located on the rear of the cabinet.
Retain this information for future reference.
Model No.
Serial No.
LVT1225-001A
[J]
Warnings, Cautions and Others Avisos, precauciones y otras notas
CAUTION |
RISK OF ELECTRIC SHOCK |
DO NOT OPEN |
DO NOT EXPOSE TO RAIN OR MOISTURE |
NE PAS EXPOSER À LA PLUIE NI À L'HUMIDITÉ |
ATTENTION:RISQUE DE CHOC ELECTRIQUE, NE PAS OUVRIR |
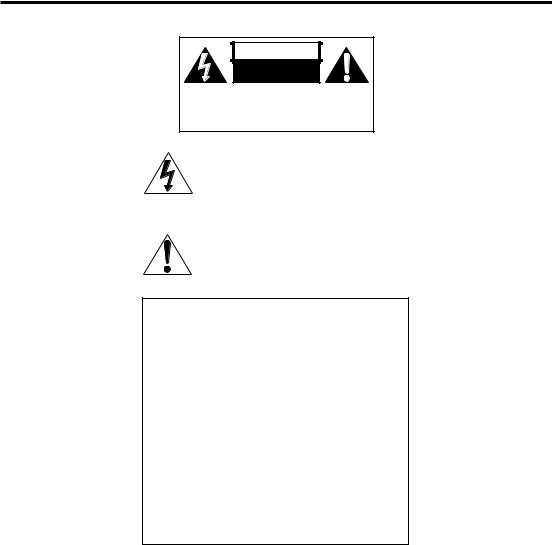
The lightning flash with arrowhead symbol, within an equilateral triangle is intended to alert the user to the presence of uninsulated “dangerous voltage” within the product’s enclosure that may be of sufficient magnitude to constitute a risk of electric shock to persons.
The exclamation point within an equilateral triangle is intended to alert the user to the presence of important operating and maintenance (servicing) instructions in the literature accompanying the appliance.
For U.S.A.
This equipment has been tested and found to comply with the limits for a Class B digital device, pursuant to part 15 of the FCC Rules.
These limits are designed to provide reasonable protection against harmful interference in a residential installation.
This equipment generates, uses and can radiate radio frequency energy and, if not installed and used in accordance with the instructions, may cause harmful interference to radio communications. However, there is no guarantee that interference will not occur in a particular installation. If this equipment does cause harmful interference to radio or television reception, which can be determined by turning the equipment off and on, the user is encouraged to try to correct the interference by one or more of the following measures:
Reorient or relocate the receiving antenna.
Increase the separation between the equipment and receiver. Connect the equipment into an outlet on a circuit different from that to which the receiver is connected.
Consult the dealer or an experienced radio/TV technician for help.
– G-1 –

WARNING: TO REDUCE THE RISK OF FIRE OR ELECTRIC SHOCK, DO NOT EXPOSE THIS APPLIANCE TO RAIN OR MOISTURE.
CAUTION
To reduce the risk of electrical shocks, fire, etc.:
1.Do not remove screws, covers or cabinet.
2.Do not expose this appliance to rain or moisture.
PRECAUCIÓN
Para reducir posibles riesgos de descargas eléctricas, incendios, etc, le recomendamos que:
1.No quite los tornillos, cubiertas ni el cabinete.
2.No deje expuesto este aparato a la lluvia ni a la humedad.
Caution — STANDBY/ON button!
Disconnect the mains plug to shut the power off completely. The STANDBY/ON button in any position does not disconnect the mains line.
Precaución — Interruptor STANDBY/ON!
Desconectar el cable de alimentación para desactivar la alimentación totalmente. Cualquier que sea la posición de ajuste del interruptor STANDBY/ON, la alimentación no es cortada completamente.
IMPORTANT FOR LASER PRODUCTS
1.CLASS 1 LASER PRODUCT
2.CAUTION: Do not open the top cover. There are no user serviceable parts inside the unit; leave all servicing to qualified service personnel.
3.CAUTION: Visible and invisible laser radiation when open and interlock failed or defeated. Avoid direct exposure to beam.
4.REPRODUCTION OF LABEL: CAUTION LABEL, PLACED INSIDE THE UNIT.
IMPORTANTE PARA PRODUCTOS LÁSER
1.PRODUCTO LÁSER CLASE 1
2.PRECAUCIÓN: No abra la tapa superior. En el interior de la unidad no hay piezas que pueda reparar el usuario; encargue el servicio a personal técnico cualificado.
3.PRECAUCIÓN: Radiación láser visible e invisible en caso de apertura o con interbloqueo averiado o defectuoso. Evite la exposición directa a los haces.
4.REPRODUCCIÓN DE LA ETIQUETA: ETIQUETA DE PRECAUCIÓN, COLOCADA EN EL INTERIOR DE LA UNIDAD.
CAUTION - INVISIBLE LASER RADIATION WHEN OPEN AND INTERLOCKS DEFEATED. AVOID EXPOSURE TO BEAM.
VORSICHT ! UNSICHTBARE LASERSTRAHLUNG TRITT AUS, WENN DECKEL GEÖFFNET UND WENN SICHERHEITSVERRIEGELUNG ÜBERBRÜCKT IST. NICHT DEM STRAHL AUSSETZEN!
VARNING - OSYNLIG LASERSTRÅLNING NÄR DENNA DEL ÄR ÖPPNAD OCH SPÄRR ÄR URKOPPLAD STRÅLEN ÄR FARLIG.
ADVARSEL - USYNLIG LASERSTRÅLING VED ÅBNING NÅR SIKKERHEDSAFBRYDERE ER UDE AF FUNKTION. UNDGÅ UDSÆTTELSE FOR STRÅLING.
– G-2 –

English
CONTENTS |
|
FEATURES ................................................................. |
1 |
SAFETY PRECAUTIONS ......................................... |
1 |
HANDLING PRECAUTIONS ................................... |
2 |
POWER SUPPLY ....................................................... |
3 |
NAMES OF PARTS AND CONTROLS .................... |
4 |
TURNING THE UNIT ON/OFF ................................. |
5 |
SETTING THE CLOCK ............................................. |
6 |
ADJUSTING THE SOUND ........................................ |
7 |
PLAYING COMPACT DISCS |
................................... 8 |
RADIO RECEPTION ............................................... |
12 |
CASSETTE PLAYBACK ......................................... |
14 |
RECORDING ............................................................ |
16 |
MAINTENANCE ...................................................... |
18 |
TROUBLESHOOTING ............................................ |
19 |
SPECIFICATIONS ................................................... |
20 |
FEATURES
1 Portable system incorporating CD player |
3 |
Synchronized recording with CD playback |
8-cm (3-3/16") CD playback capability |
4 |
Hyper-Bass Sound effect |
2Digital LCD (Liquid Crystal Display) indicates general playback status.
SAFETY PRECAUTIONS
Prevention of Electric Shocks, Fire Hazards
and Damages
•Even when the STANDBY/ON button is set to STANDBY, a very small current will flow. When the unit is turned on, the display window lights in orange. When the unit is in standby mode, the display window turns off. (Note, however, that the display window does not light even when the unit is turned on if the unit is operated on batteries.) To save power and for safety when not using the unit for an extended period of time, disconnect the power cord from the household AC outlet.
•Do not handle the power cord with wet hands.
•When unplugging from the wall outlet, always grasp and pull the plug, not the power cord.
•Consult your nearest dealer when damage, disconnection, or contact failure is found with the cord.
•Do not bend the cord sharply, or pull or twist it.
•Rating label is placed on the exterior of the bottom.
•Do not modify the power cord in any manner.
•Do not remove screws to disassemble the unit and do not touch anything inside the unit to avoid accidents.
•Do not insert any metallic objects into the unit.
•Unplug the power cord when there is a possibility of lightning.
•If water gets inside the unit, unplug the power cord from the outlet and consult your dealer.
•Do not block the ventilation holes of the unit so that heat can escape.
•Do not install the unit in a badly ventilated place.
1

HANDLING PRECAUTIONS
Do not use this unit in direct sunlight or leave the unit in a closed automobile (or yacht, etc.) where it would be exposed to high temperatures above 40°C (104°F).
1Avoid using the unit in the following places:
•Where the temperature may become excessively high or low; the recommended temperature range is 5°C (41°F) and 35°C (95°F).
•Where it could be subject to vibrations.
•Where it is excessively humid, such as in a bathroom.
•Where it could be magnetized by a magnet or speaker.
2Pay attention to dust.
Be sure to close the disc door so that the lens is not contaminated by dust. Do not touch the lens.
3Condensation
Condensation may occur in the following cases, in which the unit may not operate correctly:
•The unit is in a room where a heater has just been switched on.
•The unit is in a place where there is smoke or high humidity.
•The unit has just moved from a cold place to a
warm room.
In these cases, set the STANDBY/ON button to ON and wait one or two hours before use.
4Volume control
Compact discs produce very little noise compared with analog records. If you adjust the volume by listening to the noise as you do with analog records, the speakers could be damaged by a sudden blast of sound when playback starts. Therefore, turn down the volume before starting and adjust it as required while playing a CD.
5Safety mechanism
The unit incorporates a safety interlock mechanism which switches off the laser beam when the disc door is opened.
6Do not place magnetic objects such as cassette tapes near the speakers.
Since the speakers contain magnets inside, do not place cassette tapes or magnetic cards nearby as recorded data could be erased.
7Keep the unit away from the TV.
When the unit is used near a TV, the TV picture could be distorted. If this happens, move the unit away from the TV. If this does not correct the situation, avoid using the unit when the TV is turned on.
8Cleaning the cabinet
If the cabinet gets dirty, wipe it with a soft, dry cloth. Never use benzine or thinner as these could damage the surface finish.
9When listening with headphones
•Do not listen at high volumes as it could damage your hearing.
•For safety, do not drive while listening with headphones.
10Carrying handle
Do not raise or lower the carrying handle with the telescopic antenna extended, to avoid damaging the antenna. Position the carrying handle so that it does not interfere with operation.
English
2

English
POWER SUPPLY
Operation on household AC
The AC power cord provided with this unit has one-way connections to prevent electric shock. Refer to the figure below for correct connection.
AC IN
CAUTIONS:
•Use only with the JVC power cord provided with this unit to avoid malfunction or damage to the unit. Remove batteries when using the power cord.
•Be sure to unplug the power cord from the outlet when going out or when the unit is not in use for an extended period of time.
Operation on batteries
Loading batteries
1Open the battery cover.
Pull the battery cover toward you while pressing the sections marked by the arrows.
2Insert six R20 (SUM-1)/D (13D)-size batteries.
Be sure to insert the batteries with the ª and · terminals positioned correctly.
|
1 |
|
3 |
|
2 |
6 |
5 |
|
|
|
4 |
Checking batteries
When the tape speed or output sound level decreases, or CD playback becomes intermittent, replace all batteries with fresh ones.
When making an important recording, use new batteries (preferably alkaline batteries with a longer service life) to avoid any possible failure.
For better battery usage
•Continuous operation of the unit causes the battery power to be consumed quicker than noncontinuous operation.
•Operation of the unit in a cold place causes the battery power to be consumed more quickly than in a warm place.
CAUTIONS:
•When not using the unit for a long time (more than two weeks) or when using the household AC, remove the batteries to avoid a malfunction or damage to the unit.
•When the JVC power cord provided with this unit is connected, the power is automatically switched from the batteries to the household AC even when the batteries are loaded.
However, remove the batteries when using the power cord.
CAUTIONS WHEN USING BATTERIES:
When batteries are used incorrectly, it may result in the leakage of chemicals from the batteries or they may explode. The following care should be taken:
•Check that the positive ª and negative · terminals of the batteries are positioned correctly and load them as shown in the figure on the left.
•Do not mix new and old batteries together, or mix different types of batteries.
•Do not try to recharge non-rechargeable batteries.
•Remove the batteries when the unit is not to be used for an extended period of time.
If chemicals from the batteries come in contact with your skin, wash them off immediately with water. If chemicals leak onto the unit, clean the unit completely.
R20 (SUM-1)/D (13D)-size batteries
3 Replace the cover.
3
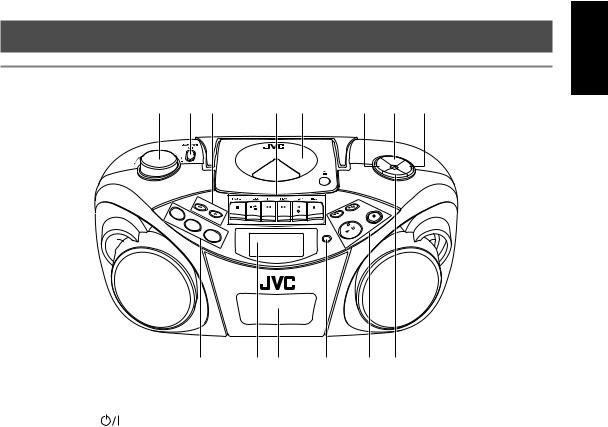
NAMES OF PARTS AND CONTROLS
Top and front sides
1 |
|
2 |
3 |
4 |
5 |
6 |
7 |
8 |
|
|
|
|
|
|
|
|
|
MUTING |
|
|
|
|
|
|
|
|
|
FM |
|
|
|
|
|
|
|
|
|
MODE |
PROGRAM/ |
|
|
|
|
|
|
|
|
|
CLOCK SET |
|
|
|
|
|
|
|
|
|
Add"/" |
|
|
|
|
|
|
|
|
HBS/ |
|
|
|
|
|
|
|
|
PUSH |
PRESET EQ |
|
|
|
|
|
|
|
|
|
|
|
|
TAPE |
|
PRESET |
|
|
STOP |
|
|
|
|
|
|
|
|
|
|
|
||
|
RANDOM |
CD |
REPEAT |
|
|
PLAY/P |
|
|
|
|
|
|
|
|
|
|
AUSE |
|
|
|
|
CD |
|
TUNER |
|
|
|
|
|
|
|
|
|
|
|
DISPLAY |
|
|
|
|
|
|
BAND |
|
|
|
|
||
|
|
|
|
|
|
|
|
||
|
|
9 |
10 |
11 |
12 |
13 |
14 |
1 |
VOLUME knob |
|
|
7 |
MUTING button |
||
2 |
STANDBY/ON |
button |
|
8 |
PROGRAM/CLOCK SET button |
||
3 |
PRESET – button |
|
|
9 |
TAPE button |
|
|
|
PRESET + / CD REPEAT button |
|
|
CD/RANDOM button |
|||
4 |
Tape operation buttons |
|
|
BAND/TUNER button |
|||
|
PAUSE 8 button |
|
|
10 |
Display window |
||
|
STOP/EJECT § button |
|
11 |
Casette deck |
|
||
|
FF 1 button |
|
|
12 |
DISPLAY button |
||
|
REW ¡ button |
|
|
13 |
4 button |
|
|
|
PLAY 2 button |
|
|
|
¢ button |
|
|
|
REC ¶ button |
|
|
|
PLAY/PAUSE 3/8 button |
||
5 |
Disc door |
|
|
|
STOP 7 button |
|
|
6 |
FM MODE button |
|
|
14 HBS/PRESET EQ button |
|||
English
4
English
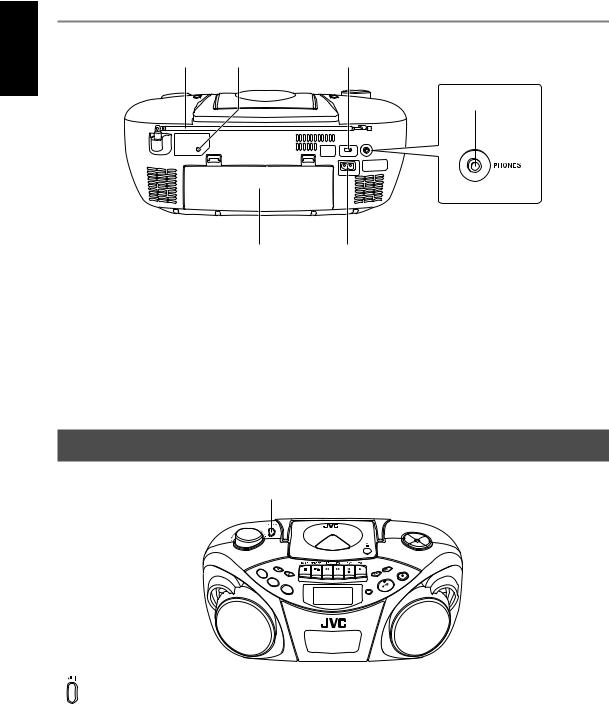
Rear side
14 |
15 |
16 |
17
|
18 |
19 |
|
14 |
Telescopic antenna |
18 |
Battery compartment cover |
15 |
RESET button |
19 |
ÓAC IN (AC input) jack |
16 |
BEAT CUT switch |
|
|
17 |
PHONES jack |
|
|
|
Connect stereo mini headphones (3.5-mm (3/16") |
|
|
|
diameters, impedance of 16 Ω to 32 Ω) to this jack. |
|
|
The speaker output is switched off with headphones connected.
TURNING THE UNIT ON/OFF
STANDBY/ON 

TAPE |
|
|
PRESET |
||
RANDO |
|
CD |
RE |
PEAT |
|
|
M |
|
|||
|
CD |
|
|
TUNER |
|
|
|
|
|
||
|
|
|
BAND |
||
MUTING
FM MODE
PUSH
STOP
E
AUS
PLAY/P
DISPLAY
STANDBY/ON
STANDBY/ON  button
Press the STANDBY/ON  button on the unit to turn on and off the unit.
The display window lights up when the unit is turned on. (Note, however, that the display window does not light even when the unit is turned on if the unit is operated on batteries.) The unit comes on ready to play the source selected when the unit was last turned off.
To switch off the power supply completely
Unplug the AC power cord from the AC outlet. If the batteries are inserted in the unit, take them out.
Notes:
•When you unplug the AC power cord or if a power failure occurs, the clock is reset to “AM 12:00” right away, while the tuner preset stations (see page 13) will be erased in a few days. The clock indication will keep flashing until you set the clock again.
•Remove the batteries when carrying the unit by hand or in the trunk of a car. This prevents the power from being accidentally turned on, thus avoiding wasteful battery consumption.
5
Loading...