

Page 1
GPS NAVIGATION SYSTEM
a
dio
ece
s
:
SISTEMA DE NAVEGACIÓN GPS
SYSTÈME DE NAVIGATION GPS
ENGLISHESPAÑOL
KW-NT800HDT / KW-NT700
This HD Radio receiver enables:
his HD R
er enable
Only for KW-NT800HDT
Sólo para KW-NT800HDT
Uniquement pour le
KW-NT800HDT
For installation and connections, refer to the separate manual.
Para la instalación y las conexiones, refiérase al manual separado.
Pour l’installation et les raccordements, se référer au manuel séparé.
INSTRUCTIONS
MANUAL DE INSTRUCCIONES
MANUEL D’INSTRUCTIONS
Only for KW-NT800HDT
Sólo para KW-NT800HDT
Uniquement pour le
KW-NT800HDT
For customer Use:
Enter below the Model No.
and Serial No. which are
located on the top or bottom
of the cabinet. Retain this
information for future
reference.
Model No.
Serial No.
ESPAÑOL
FRANÇAIS
LVT2276-001A
[J]
Page 2
Thank you for purchasing a JVC product.
Please read all instructions carefully before operation, to ensure your complete understanding and to obtain the best
possible performance from the unit.
IMPORTANT FOR LASER PRODUCTS
1. CLASS 1 LASER PRODUCT
ENGLISH
2. CAUTION: Do not open the top cover. There are no user serviceable parts inside the unit; leave all servicing to
qualified service personnel.
3. CAUTION: (For U.S.A.) Visible and/or invisible class II laser radiation when open. Do not stare into beam.
(For Canada) Visible and/or invisible class 1M laser radiation when open. Do not view directly with
optical instruments.
4. REPRODUCTION OF LABEL: CAUTION LABEL, PLACED OUTSIDE THE UNIT.
FCC CAUTION
This equipment may generate or use radio frequency
energy. Changes or modifications to this equipment may
cause harmful interference unless the modifications are
expressly approved in the instruction manual.
The user could lose the authority to operate this
equipment if an unauthorized change or modification
is made.
FCC NOTE
This equipment has been tested and found to
comply with the limits for a Class B digital device,
pursuant to Part 15 of the FCC Rules. These limits are
designed to provide reasonable protection against
harmful interference in a residential installation. This
equipment may cause harmful interference to radio
communications, if it is not installed and used in
accordance with the instructions.
However, there is no guarantee that interference will
not occur in a particular installation. If this equipment
does cause harmful interference to radio or television
reception, which can be determined by turning the
equipment off and on, the user is encouraged to try to
correct the interference by one or more of the following
measures:
• Reorient or relocate the receiving antenna.
• Increase the separation between the equipment and
receiver.
• Connect the equipment into an outlet on a circuit
different from that to which the receiver is connected.
• Consult the dealer or an experienced radio/TV
technician for help.
CAUTION
Use of controls or adjustments or performance of
procedures other than those specified herein may result
in hazardous radiation exposure. In compliance with
Federal Regulations, following are reproductions of
labels on, or inside the product relating to laser product
safety.
JVC KENWOOD Corporation
2967-3, ISHIKAWA-MACHI,
HACHIOJI-SHI, TOKYO, JAPAN
THIS PRODUCT COMPLIES WITH DHHS
RULES 21CFR SUBCHAPTER J IN EFFECT
AT DATE OF MANUFACTURE.
Location : Top Panel
2
Page 3
(For USA)
CAUTION: This device and its antenna(s) must not be
co-located or operating in conjunction with any other
antenna or transmitter. End user cannot modify this
transmitter device. Any unauthorized modification
made on the device could avoid the user’s authority to
operate this device.
(For Canada) “The installer of this radio equipment
must ensure that the antenna is located or pointed such
that it does not emit RF field in excess of Health Canada
limits for the general population, consult Safety Code
6, obtainable from Health Canada’s website www.
hc-sc.gc.ca/rpb”
The term “IC:” before the radio certification number
only signifies that Industry Canada technical
specifications were met.
This device complies with RSS 210 of Industry Canada “IC”.
“Operation is subject to the following two conditions:
(1) this device may not cause interference, and
(2) this device must accept any interference, including
interference that may cause undesired operation of
the device”.
L’ utilisation de ce dispositif est autorisée seulement
aux conditions suivantes: (1) il ne doit pas produire de
brouillage et (2) l’ utilisateur du dispositif doit étre prêt
à accepter tout brouillage radioélectrique reçu, même
si ce brouillage est susceptible de compromettre le
fonctionnement du dispositif.
Cautions on the monitor:
• The monitor built in this unit has been produced
with high precision, but it may have some
ineffective dots. This is inevitable and is not
malfunction.
• Do not expose the monitor to direct sunlight.
• Do not operate the touch panel using a ball-point
pen or similar tool with the sharp tip.
Touch the buttons on the touch panel with your
finger directly (if you are wearing a glove, take it
off).
• When the temperature is very cold or very hot...
– Chemical changes occur inside, causing
malfunction.
– Pictures may not appear clearly or may move
slowly. Pictures may not be synchronized
with the sound or picture quality may
decline in such environments.
WARNINGS:
To prevent accidents and damage
• DO NOT install any unit or wire any cable in a
location where;
– it may obstruct the steering wheel and
gearshift lever operations.
– it may obstruct the operation of safety
devices such as air bags.
– it may obstruct visibility.
• DO NOT operate the unit while driving.
If you need to operate the unit while driving, be
sure to look around carefully.
• The driver must not watch the monitor while
driving.
ENGLISH
[European Union only]
3
Page 4

This equipment complies with FCC/IC radiation exposure limits set forth for an uncontrolled environment and meets the FCC radio
frequency (RF) Exposure Guidelines in Supplement C to OET65 and RSS-102 of the IC radio frequency (RF) Exposure rules. This
equipment has very low levels of RF energy that it deemed to comply without maximum permissive exposure evaluation (MPE).
But it is desirable that it should be installed and operated keeping the radiator at least 20 cm or more away from person’ s body
(excluding extremities: hands, wrists, feet and ankles).
Cet équipement est conforme aux limites FCC/IC d’exposition aux rayonnements définies pour un environnement non
réglementé, aux lignes directrices de la FCC en matière d’exposition aux radiofréquences spécifiées dans le supplément C du
ENGLISH
bulletin OET65 et aux régulations RSS-102 de l’IC sur l’exposition aux radiofréquences (RF). Cet équipement étant associé à de très
faibles niveaux d’énergie radiofréquence, il est considéré conforme sans évaluation de l’exposition maximale admise (EMA). Il est
cependant conseillé de l’installer et de l’utiliser en maintenant la source de rayonnement radioélectrique à 20 cm minimum du
corps (à l’exclusion des extrémités du corps, à savoir les mains, les poignets, les pieds et les chevilles).
Under Industry Canada regulations, this radio transmitter may only operate using an antenna of a type and maximum (or lesser)
gain approved for the transmitter by Industry Canada. To reduce potential radio interference to other users, the antenna type
and its gain should be so chosen that the equivalent isotropically radiated power (e,i,r,p.) is not more than that necessary for
successful communication.
Selon les régulations d’Industrie Canada, cet émetteur radioélectrique peut uniquement fonctionner avec une antenne dont le
type et le gain maximum (ou inférieur) sont approuvés par Industrie Canada. Pour réduire les perturbations radioélectriques
potentielles pour les autres utilisateurs, le type et le gain de l’antenne doivent être choisis de façon que la puissance isotrope
rayonnée équivalente (P.I.R.E.) ne soit pas supérieure à la puissance nécessaire pour la réussite des communications.
This device complies with RSS-310 of Industry Canada. Operation is subject to the condition that this device does not cause
harmful interference.
Cet appareil est conforme au cahier des charges CNR-310 d’Industrie Canada. Son emploi est soumis à la condition que l’appareil
ne provoque pas de brouillage préjudiciable.
4
Page 5
For safety...
• Do not raise the volume level too much, as this will
block outside sounds, making driving dangerous.
• Stop the car before performing any complicated
operations.
Temperature inside the car...
If you have parked the car for a long time in hot or cold
weather, wait until the temperature in the car becomes
normal before operating the unit.
When replacing/rotating the tires:
It is required to clear all the accumulated calibration
data which is important for accurate navigation. To
clear the data, ☞ page 39.
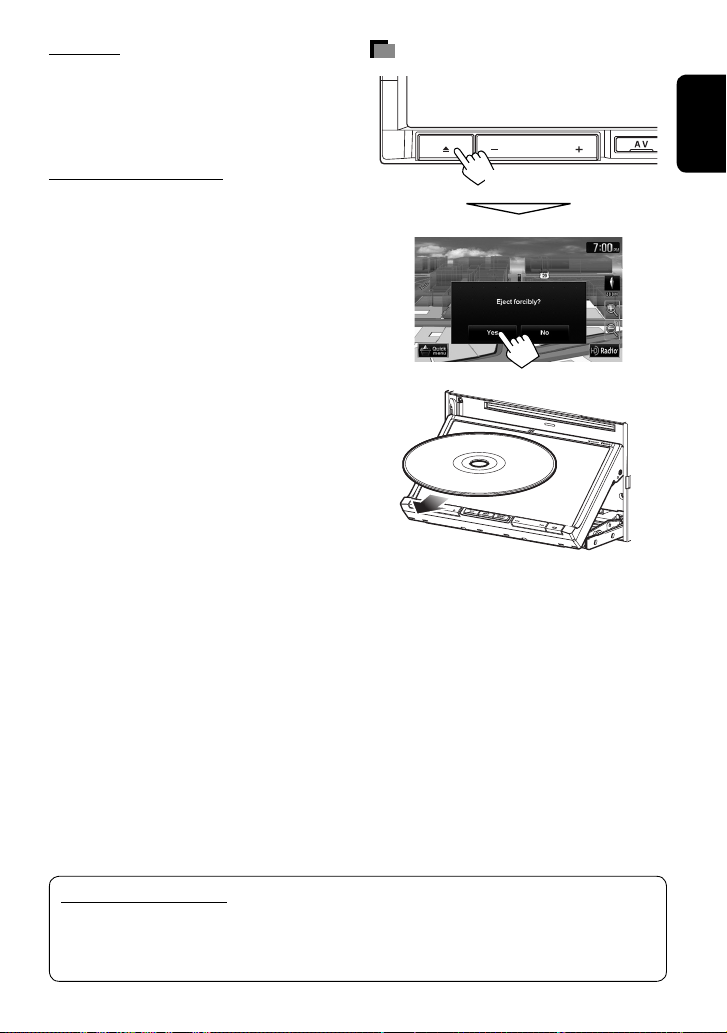
How to forcibly eject a disc
ENGLISH
[Hold]
• Make sure you remove the disc so that it does not fall.
How to read this manual:
• Illustrations of KW-NT800HDT are mainly used for explanation.
• < > indicates the variable screens/menus/operations/settings that appear on the touch panel.
• [ ] indicates the buttons on the touch panel.
5
Page 6

Contents
ENGLISH
How to forcibly eject a disc .........................................................................5
Introduction .............................................10
Parts identification ...........................................................................10
Installation settings ..........................................................................12
Basic operations ............................................................................... 13
•
Turning on the power ...............................................................................13
•
Turning off/on the screen .........................................................................13
•
Adjust the angle of the front panel ...........................................................13
•
Operations on the touch panel ..................................................................14
•
Using the Quick menu ...............................................................................15
•
Extending/shortening the auto antenna ..................................................15
Switching screens .............................................................................16
Navigation System ..................................18
Safety instructions/information for the Navigation System ....................... 18
•
Information/icons on the map ..................................................................18
Basic operations ............................................................................... 19
•
About the current position screen .............................................................19
•
To change the map view ...........................................................................19
•
To change the map scale ...........................................................................20
•
To scroll the map ......................................................................................20
•
To display your current position ................................................................20
•
To display/hide POI icons on the map .......................................................21
•
To display/hide Favorite icons on the map ................................................21
Registering your home/favorite points ...............................................22
Searching for a place .........................................................................23
•
Setting a destination by scrolling the map ................................................23
•
Setting a destination using the <Destination> menu ..............................23
•
About search screens and input screens ....................................................24
•
By address <Address> .............................................................................25
•
POI near a place/route <Vicinity> ...........................................................26
•
From the list of POI <POI Name> .............................................................26
•
By telephone number <Phone> ..............................................................27
•
By coordinates <Coordinates> ................................................................27
How you are guided ..........................................................................28
•
Starting guidance to the destination or via point ......................................28
•
Changing route options ............................................................................29
•
Recalculating the route after changing route options ...............................29
•
Adjusting the volume of the voice guidance .............................................30
•
Canceling guidance ...................................................................................30
•
Delete previous destinations .....................................................................30
•
About route guidance screen ....................................................................31
6
Page 7
•
Getting information on your route and places ..........................................32
Arranging your route ........................................................................ 33
•
Changing the sequence of the destination/via points ...............................33
•
Adjusting the vehicle position ..................................................................34
Editing registration of home/favorite points ......................................35
Only for KW-NT800HDT
Using information service ..................................................................36
•
Using the traffic information service .........................................................36
•
Using the information service ...................................................................38
Checking the information of the navigation system ............................39
Navigation menu items .....................................................................40
Additional information ..................................................................... 42
AV Operations ..........................................44
Common operations on source screen .................................................44
•
Selecting the playback source ...................................................................44
•
Turning off the AV source .........................................................................44
Listening to the HD Radio™ broadcast (For KW-NT800HDT)...................45
•
Changing HD Radio reception mode .........................................................47
•
Storing stations in memory ......................................................................47
•
Selecting a preset station ..........................................................................48
•
Reducing the interference ........................................................................48
•
Bookmarking the song ..............................................................................49
•
Displaying the list of bookmarked songs ..................................................49
•
Deleting the bookmark .............................................................................49
•
Tagging/purchasing your favorite songs from iTunes Store ......................50
Listening to the radio (For KW-NT700) ................................................52
•
Storing stations in memory ......................................................................52
•
Selecting a preset station ..........................................................................53
•
Reducing the interference ........................................................................53
Disc operations .................................................................................54
•
Playable disc types ....................................................................................55
•
Selecting playback modes ........................................................................59
•
Settings for the disc playback ...................................................................60
SD/USB operations ............................................................................61
iPod/iPhone operations .....................................................................65
•
Selecting a track/video from menu on the iPod/iPhone ............................69
iHeartRadio operations .....................................................................71
Pandora® internet radio operations ...................................................75
Listening to the SiriusXM Radio ..........................................................77
ENGLISH
7
Page 8
Contents
ENGLISH
•
Activating subscription .............................................................................77
•
Storing channels in memory .....................................................................78
•
Selecting preset channels .........................................................................78
•
Selecting on the list ..................................................................................78
•
Selecting a channel directly ......................................................................79
•
Setting the reception restrictions ..............................................................79
Using other external components ......................................................82
Changing illumination color ..............................................................83
Settings for video playback................................................................84
•
Picture/aspect ratio adjustment ...............................................................84
System settings items .......................................................................84
Additional information ..................................................................... 87
Sound Settings.........................................90
Setting the Sound .............................................................................90
•
Setting Fader/Balance ..............................................................................90
•
Setting the vehicle type ............................................................................91
•
Setting the speaker configuration .............................................................91
•
Setting the listening position ....................................................................93
•
Setting the preset equalizer ......................................................................95
•
Setting the volume of each source equal ..................................................96
•
Setting the audio effects ...........................................................................96
•
Setting the hardware ................................................................................98
•
Setting the subwoofer level ......................................................................98
Bluetooth Operations .............................99
Information for using Bluetooth® devices ...........................................99
Using Bluetooth device ................................................................... 100
•
Registering a Bluetooth device ...............................................................100
•
Change the PIN code ...............................................................................102
•
Connecting/disconnecting a registered Bluetooth device .......................102
•
Deleting a registered Bluetooth device ...................................................102
Using Bluetooth mobile phone ........................................................ 103
•
Receiving a call .......................................................................................103
•
Adjusting the volume of calls/earpiece ...................................................103
•
Switching between handsfree mode and phone mode ...........................104
•
Making a call ..........................................................................................104
•
Copying the phone book .........................................................................105
•
Searching for a phone number from phone book ....................................105
•
Deleting the phone number memory in the unit ....................................106
•
About mobile phone compatible with Phone Book Access Profile
(PBAP) ....................................................................................................106
•
Preset dial ...............................................................................................107
8
Page 9
•
Storing phone numbers in preset dial .....................................................107
Using Bluetooth audio player .......................................................... 108
Bluetooth device settings ................................................................ 109
Rear View Camera Operations ............. 110
Using a rear view camera ................................................................. 110
•
Activating the rear view camera .............................................................110
•
Displaying the picture from the rear view camera ..................................110
Others .................................................... 111
Initializing the settings ...................................................................111
Setting the security lock ..................................................................112
References ............................................. 114
Maintenance .................................................................................. 114
Troubleshooting/error messages ..................................................... 115
Specifications ................................................................................. 122
ENGLISH
9
Page 10
Introduction
Parts identification
ENGLISH
10
Page 11
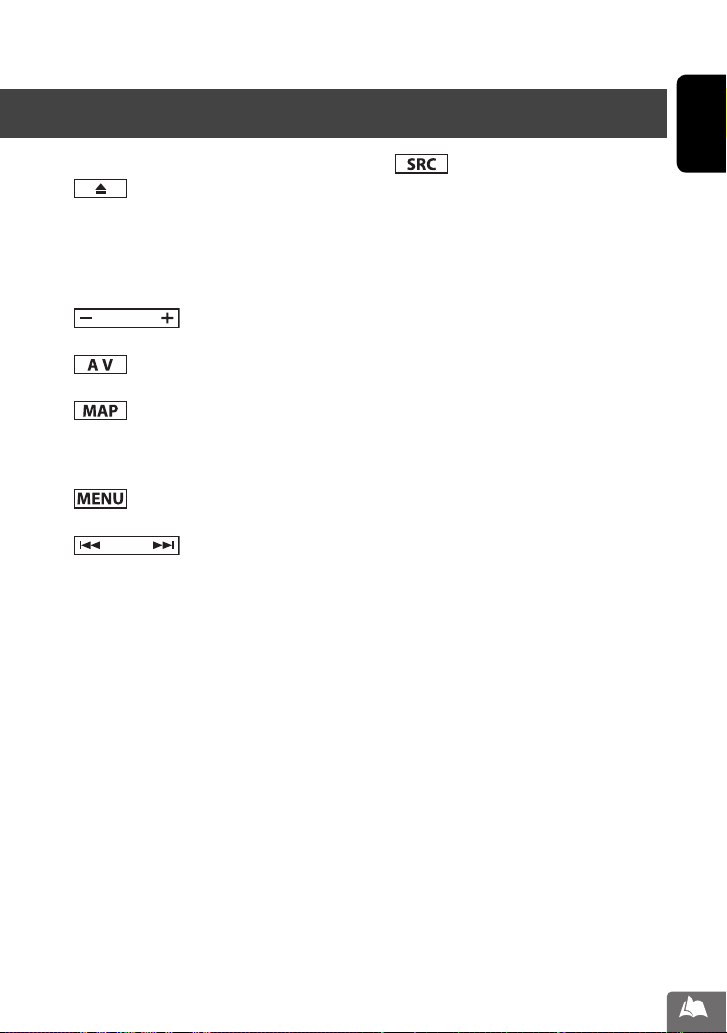
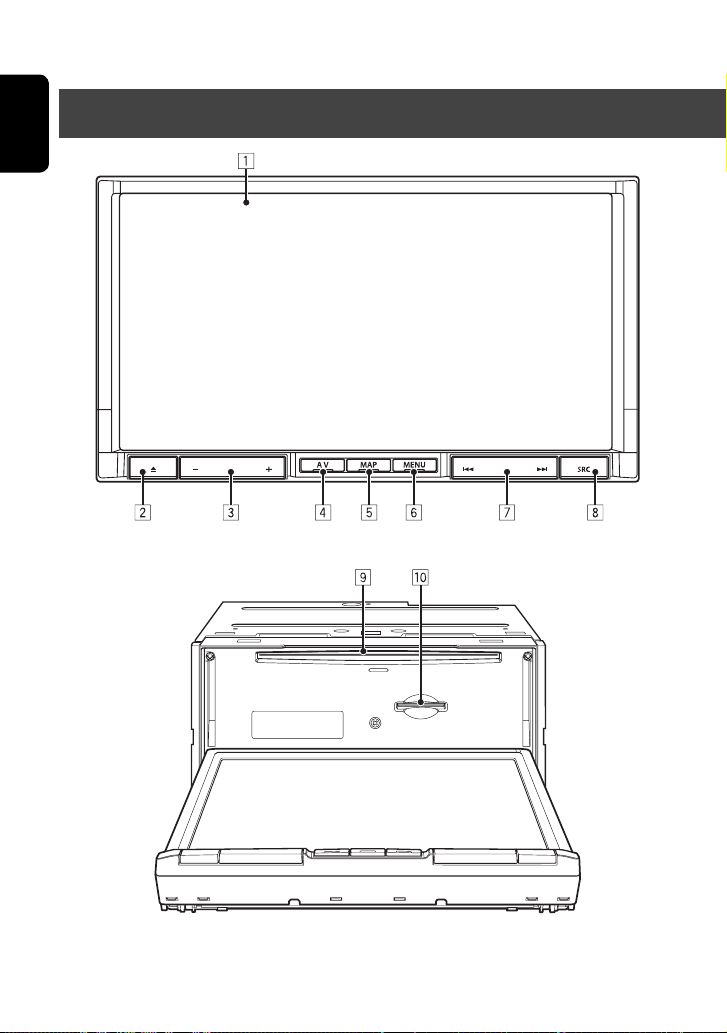
Parts identification
1 Screen (touch panel)
2
3
4
5
6
7 (skip/search) button
(Eject) button/Security indicator
• Adjusts the angle of the front panel
(☞ page 13), displays the disc or SD card insert
and eject screen. (☞ page 54, 61)
• Flashes when the unit is turned off if you have
enabled the security indicator.
(volume) button
Adjusts the audio volume.
button
Displays the screen for the current source.
button
Displays the map for the current location.
(☞ page 16)
Turns off/on the screen.[Hold] (☞ page 13)
button
Displays the destination menu screen. (☞ page 16)
8
9 Disc loading slot
p SD card slot
(source) button
Displays the source screen. (☞ page 17)
Turns off the AV function.[Hold]. (☞ page 44)
ENGLISH
11
Page 12
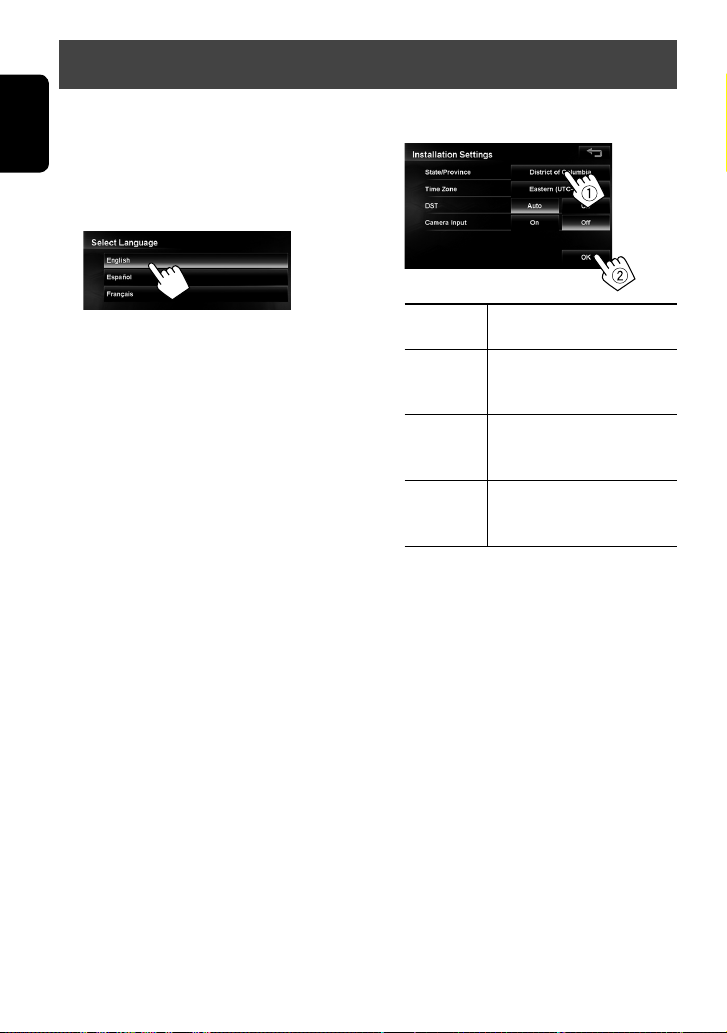
Installation settings
When you turn on the unit for the first time, the initial
setup screen appears.
1 Turn on the ignition switch.
ENGLISH
The power of the unit is turned on.
2 Select the language you want for the display
and the voice guidance.
• You can also select the system language through
<Settings> - <System> - <Region> <Language>. (☞ page 84)
3 Set the installation settings (1), then press
[OK] (2).
State/
Province
Time Zone * Select your residential area for
DST * Select [Auto] if your residential
Camera
Input *
* You can also change these settings through
<Settings> - <System>. (☞ page 85, 86)
Select the State or Province where
you are now.
automatic clock adjustment by
GPS signal.
area is subject to Daylight Saving
Time.
Select [On] when connecting the
rear view camera to the CAMERA
IN jack.
12
Page 13
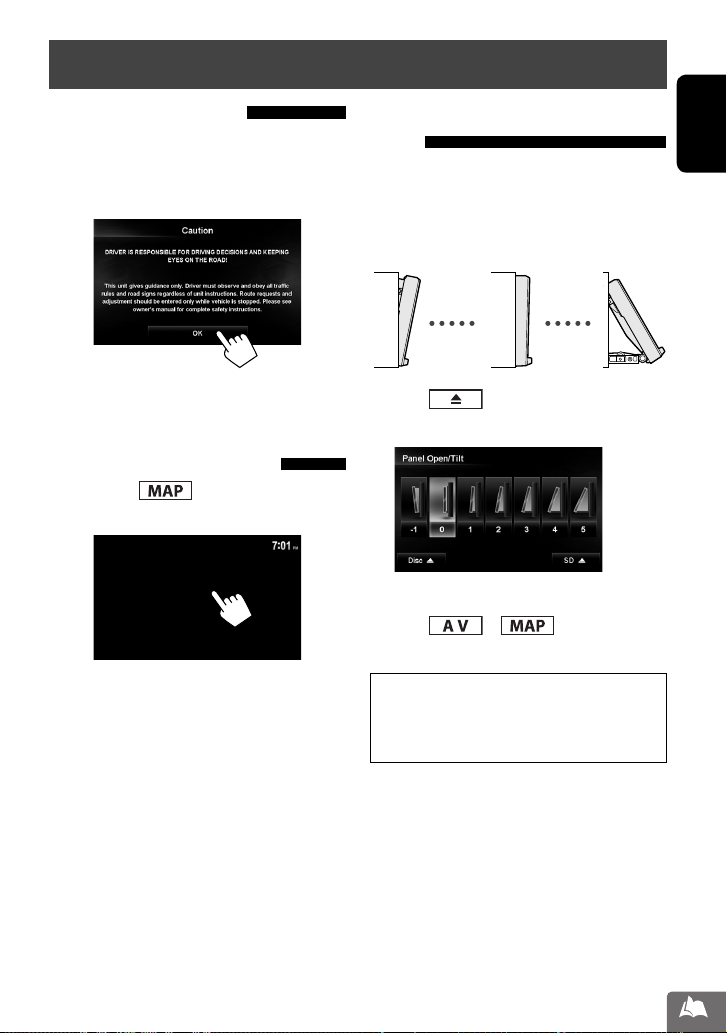
Basic operations
Turning on the power
Turn on the ignition switch.
• When displaying the map screen for the first time
after turning on the power, the screen below
appears. Press [OK] to use the map screen.
• The power is turned off when the ignition switch is
turned off.
Turning off/on the screen
Press and hold to turn the screen off.
Touch the screen to turn it on again.
• You can erase the clock display while the screen is
turned off. (<Clock on Video/Screen-Off>, ☞
page 85)
Adjust the angle of the front panel
You can adjust the angle of the front panel to
compensate for the effects of glare etc..
Front panel angle
-1 0 5
1 Press .
2 Select the desired angle.
• The front panel moves to the selected angle.
3 Press or to return to the
desired screen.
Notice:
The front panel moves to the “0” angle setting when
the unit is turned off. The front panel will move to
the selected angle when the unit is turned on again.
ENGLISH
13
Page 14
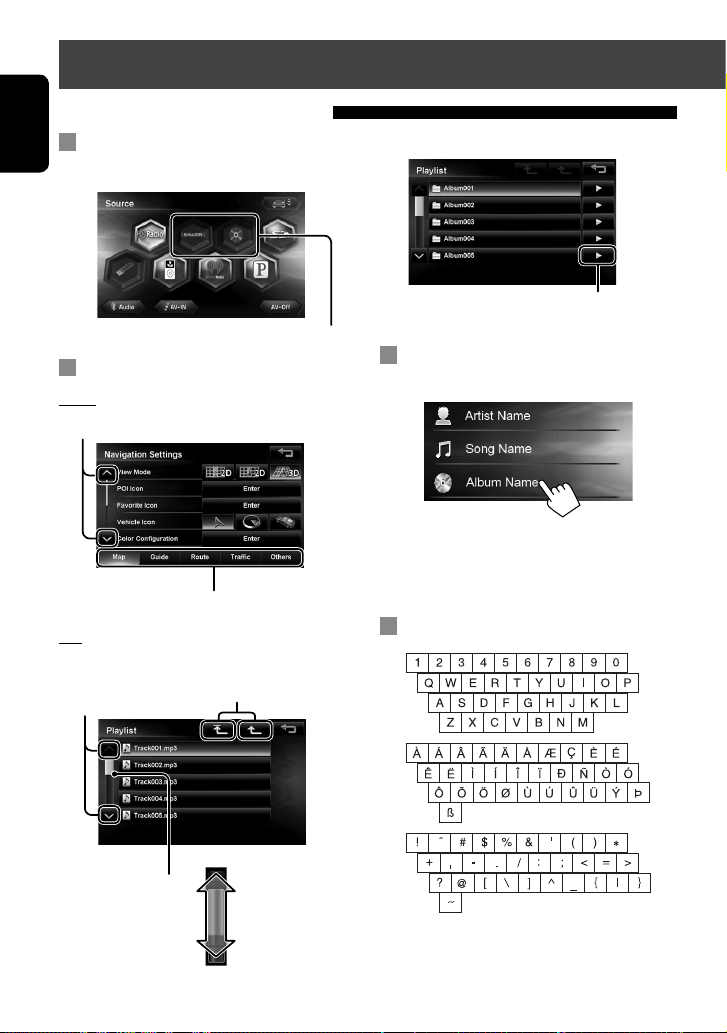
Basic operations
Operations on the touch panel
When items on the menu are not
ENGLISH
available
Non-available items will be shaded
To change the page of menu/list
Menu
Changes the page
Changes the tab
List
Ex.: Folder/track list
Changes the page
Displays the top/previous layer
Ex.: Album list
Plays back all items in
the next lower layer
Scrolling the track/song information
When all the text is not shown at once...
• Note that when driving, the album name and artist
name are not displayed, and the song name does not
scroll.
Characters you can use
Skips the list up or down
14
Page 15
Basic operations
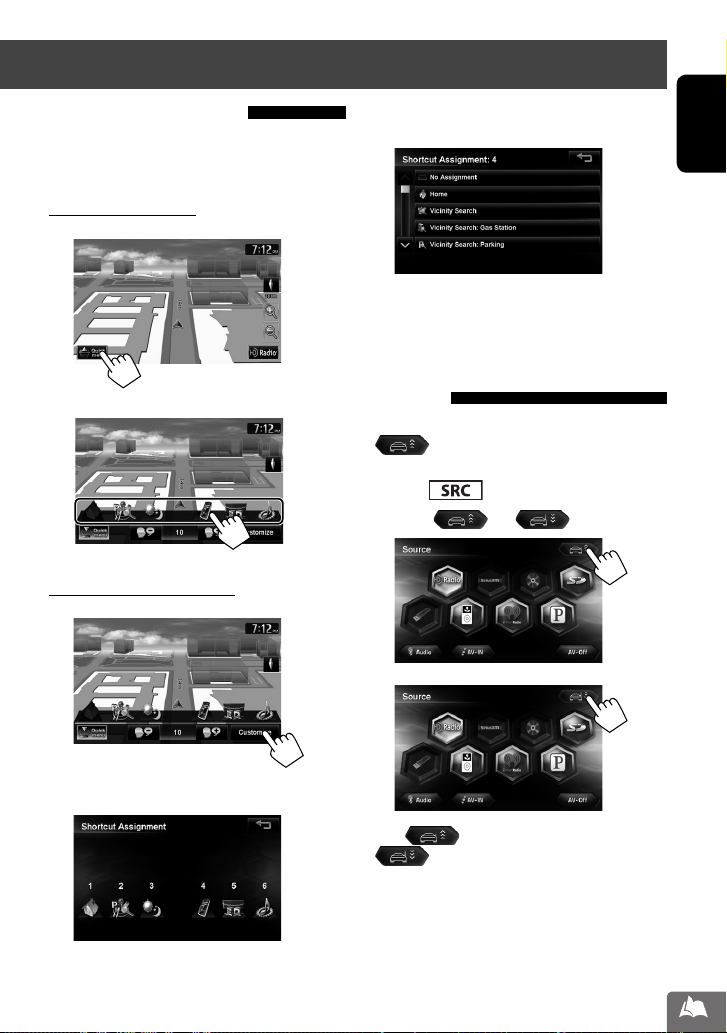
Using the Quick menu
Quick menu is assigned a set of frequently used
features, which is user-changeable. It is activated from
the current position screen.
To use the quick menu
1
2
Assigning different features
1
3 Touch the feature you want to assign to the
button.
ENGLISH
You can also change these settings through
<Settings> - <System>-<Others> <Shortcut Button>.
Extending/shortening the auto antenna
When <Antenna Remote> is set to <Auto>,
[ ] is not displayed. (☞ page 86)
1 Press .
2 Press [ ] or [ ] .
2 Touch the button you want to configure.
Press [ ] to extend the antenna, and press
[ ] to shorten the antenna.
15
Page 16
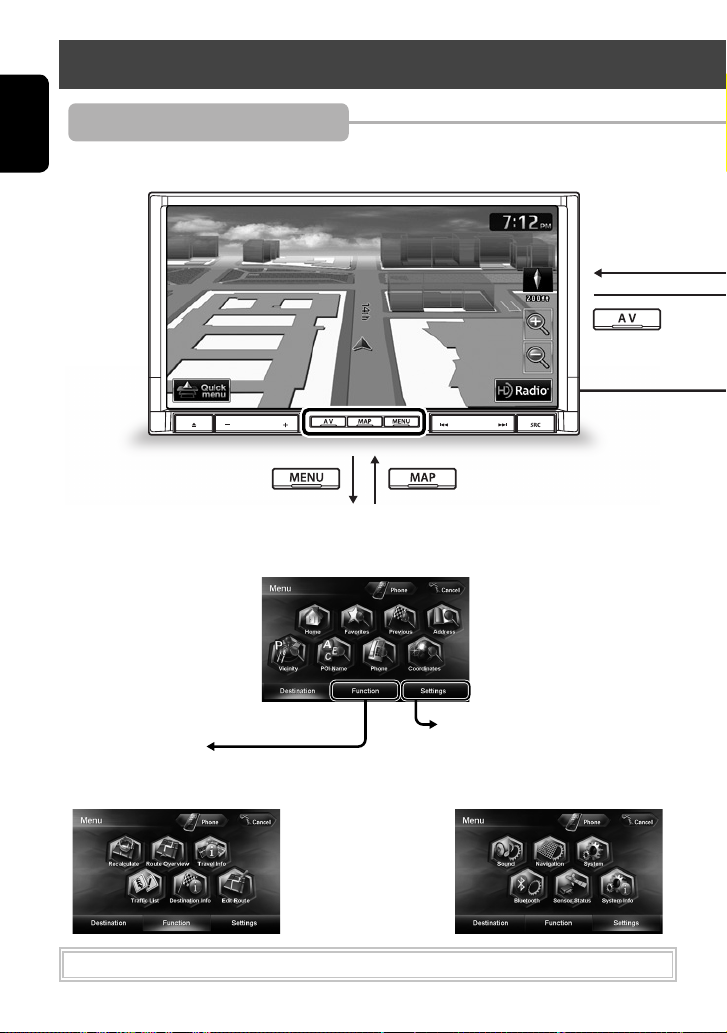
Switching screens
Navigation mode
ENGLISH
Map screen■
■
Destination Menu
Use this screen to search for a destination using one of the available search methods.
■
■
Function Menu
Use this screen to get information about
your destination and the travel route.
While driving at a speed greater than 3 mi (5 km/h), some screens are not available.
16
Settings Menu
Use this screen to change the detailed
settings and get information about the
navigation system.
Page 17
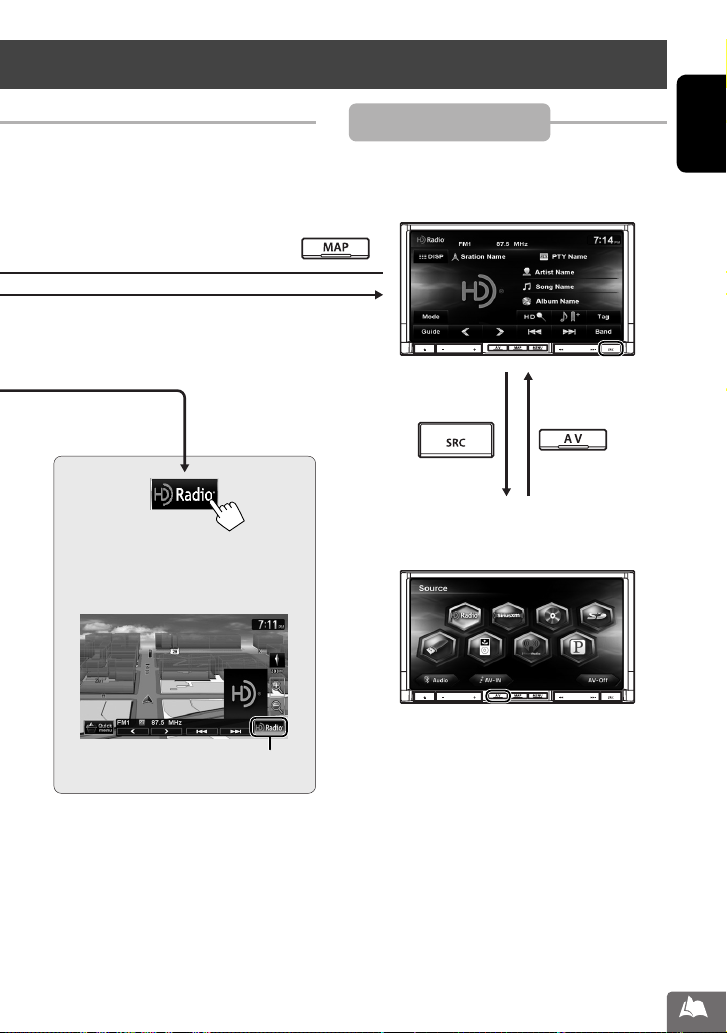
The AV control bar is displayed on the map
screen. You can perform AV source operations
using the AV control bar.
Switching screens
AV mode
AV screen
■
Displays the screen for the current AV source.
■
Source selection screen
Use this screen to select an AV source.
ENGLISH
Erases the AV control bar
17
Page 18

Navigation System
Safety instructions/information for the Navigation System
ENGLISH
SAFETY INSTRUCTIONS
Use of the Navigation System is only permitted if the
traffic conditions are suitable and you are absolutely
sure that no risk, obstruction or inconvenience will be
incurred to you, your passengers or other road users.
The requirements of the Road Traffic Regulations must
always be followed. The destination must not be
entered while driving the car.
The Navigation System serves solely as an aid to
navigation. It never releases the drivers from their
duties to drive carefully and to make own judgement
in road traffic. Inaccurate or incorrect instructions
may happen to be given due to changing traffic
conditions. The actual road signs and traffic regulations
must therefore always be observed. In particular,
the Navigation System cannot be used as an aid to
orientation when visibility is poor.
This Navigation System must only be used for its
intended purpose. The volume of the car radio/
Navigation System must be adjusted so that external
noise is still audible.
Navigation guidance is performed, based on the
database, therefore, it may not be applicable to
the current situation because of changes in traffic
conditions (e.g. changes in tollroads, principal roads,
one-way traffic, or other traffic regulations). In this
case, observe the current traffic signs or regulations.
• Traffic signs should be observed carefully while
driving using the Navigation System. Navigation
System is only an aid. Driver must always decide
whether or not to heed the information provided.
JVC does not accept liability for erroneous data
provided by the Navigation System.
• Traffic guidance is restricted to passenger vehicles
only. Special driving recommendations and
regulations for other vehicles (e.g. commercial
vehicles) are not included.
• Do not operate the unit while driving.
Terms of licence
You are granted a non-exclusive licence to use the
database for your personal purposes. The present
licence does not authorise the granting of sublicenses.
Use of the data is only permitted in this specific JVC
system. It is forbidden to extract or make further use
of significant parts of the database content, or to
duplicate, modify, adapt, translate, analyse, decompile
or reverse-engineer any part thereof.
WARNING:
Map content, including names and appearance of
streets and bridges, POI (Point Of Interest) information,
etc. may be inaccurate. If the traffic rules displayed by
the unit are different from the actual traffic rules, obey
the actual traffic rules.
Road traffic regulations always take priority when a
vehicle is being driven in traffic. Navigation System is
only an aid. Errors may occur in individual data items/
entries. At all times, the driver must decide whether or
not to heed the information provided.
JVC does not accept liability for erroneous data provided
by the Navigation System.
Information/icons on the map
• The information on the map (such as street name, the
POI information, and speed limit) may not be always
displayed (for example, if the System does not have
the information of the position).
• Home ( ) and favorite point ( ) icons are
displayed after home/favorite points are registered.
• POI icons are displayed on the map depending on the
<POI Icon> setting (☞ page 21) and the map scale
is between 80 ft (25 m) and 500 ft (150 m).
• POI icons may not be displayed correctly when the
System displays the wide area of map. In this case,
zoom in the map to display the detailed map.
18
Page 19
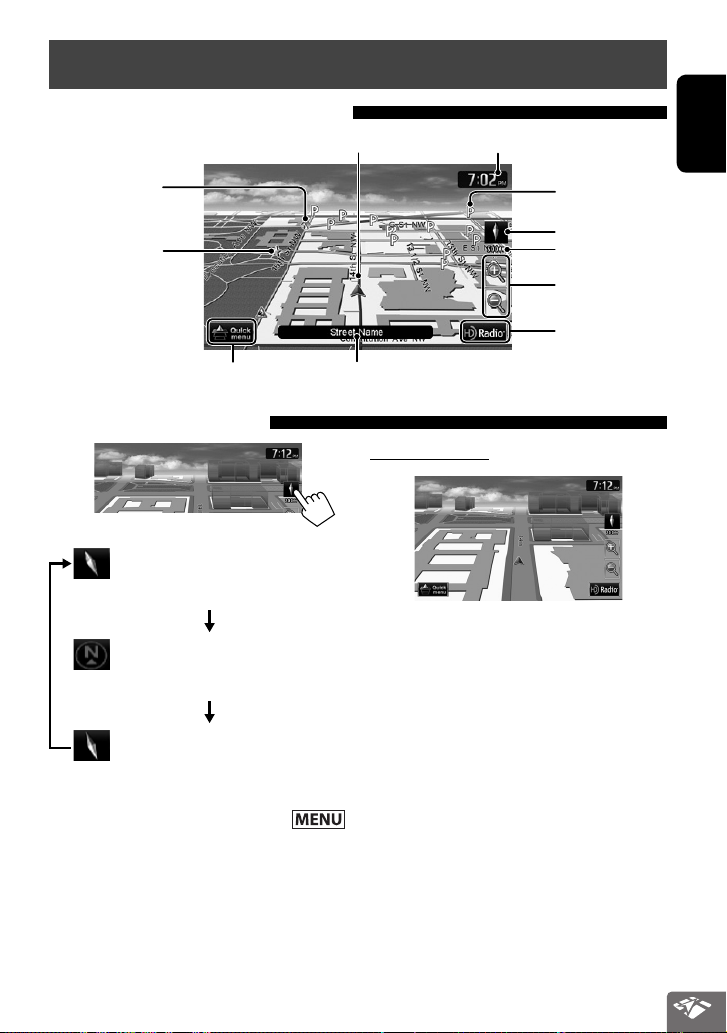
Basic operations
About the current position screen
Home (☞ pages 22
and 35)
Favorite points
(☞ pages 22 and 35)
Shows the quick menu (☞ page 15)
To change the map view
3D Map
The three dimensional map is displayed in
“heading up”.
2D North Up
The map view is oriented with north
“upwards”, as in usual paper maps.
2D Heading Up
The map rotates so that you are always
displayed heading “upwards”.
Current street
Your position
Current time
POI (Point Of Interest)
(☞ “List of POI
icons”, page 43)
Direction
Scale
Zoom buttons
(☞ below)
Shows the AV control
bar (☞ page 17)
About the 3D map
• When the scale is set between 80 ft (25 m) and 200
ft (65 m), the street map is displayed only when the
data is provided.
• When the 3D Map view is selected and the street
map is displayed, the map is shown in the three
dimensional virtual style depicting how the
surrounding buildings etc. look like.
ENGLISH
• You can also change the map view through
- <Settings> - <Navigation> - <Map> - <View
Mode>. (☞ page 40)
19
Page 20
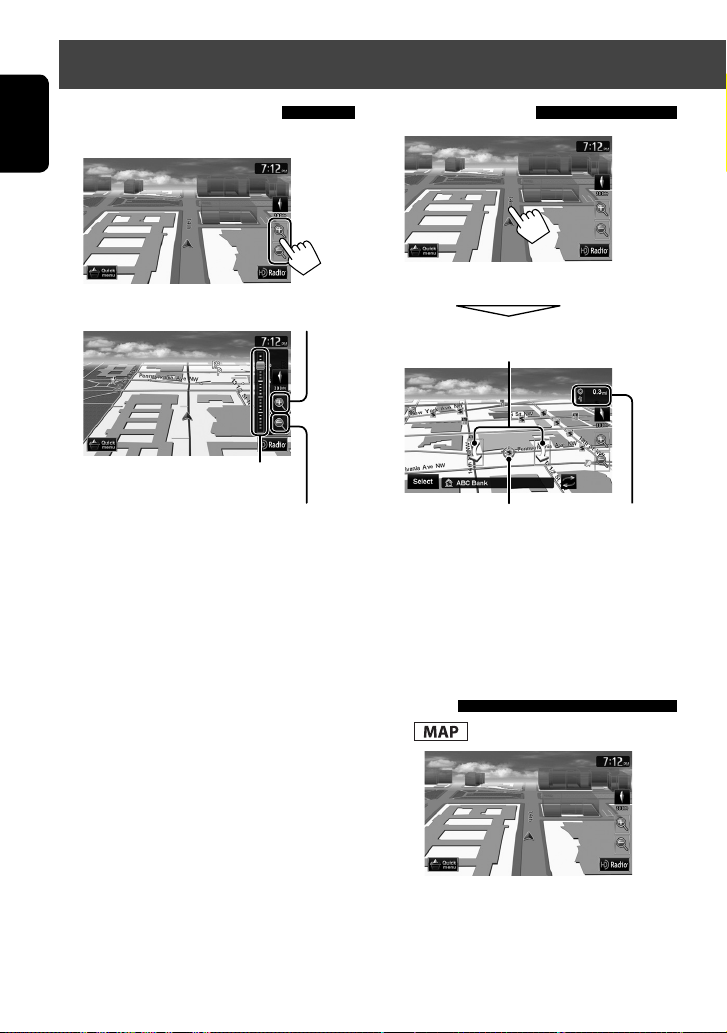
Basic operations
To change the map scale
1 Display the zoom buttons and scale buttons.
ENGLISH
2
You can also zoom in and out by sliding
• When the AV control bar is displayed, slider is
not shown.
Zoom in
the slider.
Zoom out
To scroll the map
The position you touched is centered on the map.
(only for 3D map) Touch the arrow to
rotate the map 360 degrees
(cursor) Target position
of operation
• Touch and hold the map to keep scrolling the map.
• If you touch and hold the map near the cursor, the
map keeps scrolling slowly.
Direction and distance of
the destination from your
current position
To display your current position
Press .
20
Page 21
Basic operations
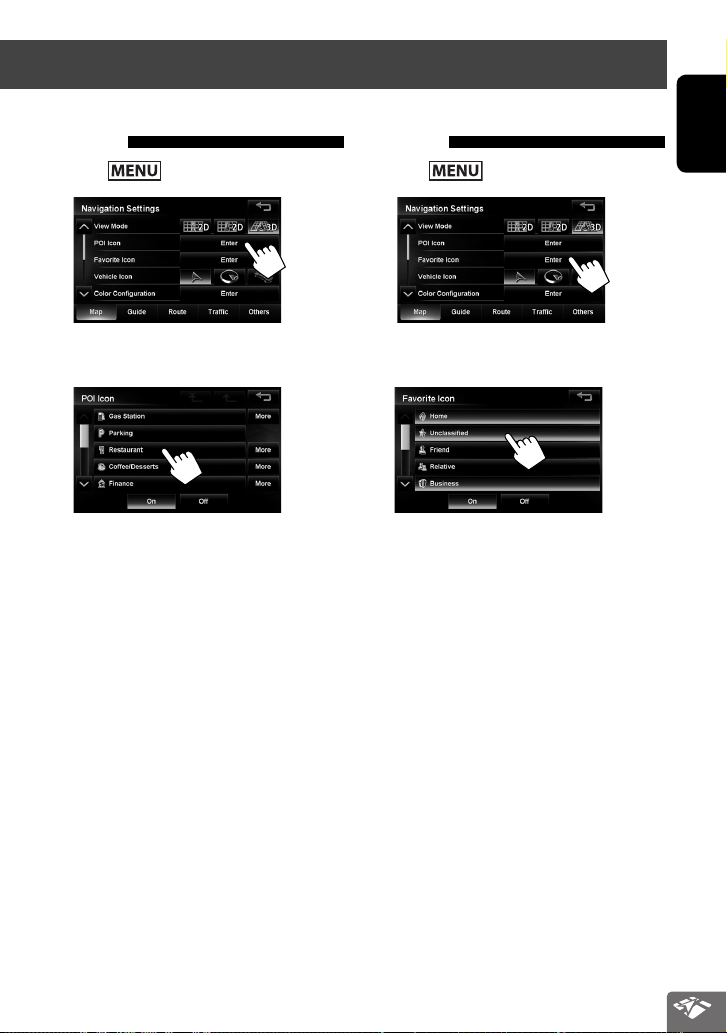
To display/hide POI icons on the map
1 Press - <Settings> - <Navigation>.
2
3 Select c ategories (1) of POI which you want
to be displayed on the map.
• When you press an item, it is highlighted.
When you press again, the selection is canceled.
•
If you press [More], you can select sub-categories.
• If you press [Off], selected POI icons are not
displayed. If you press [On], selected POI icons
are displayed.
To display/hide Favorite icons on the map
1 Press - <Settings> - <Navigation>.
2
3 Select c ategories of Favorite Icons that you
want to be displayed on the map.
• When you press an item, it is highlighted.
When you press again, the selection is canceled.
• If you press [Off], selected POI icons are not
displayed. If you press [On], selected POI icons
are displayed.
ENGLISH
21
Page 22
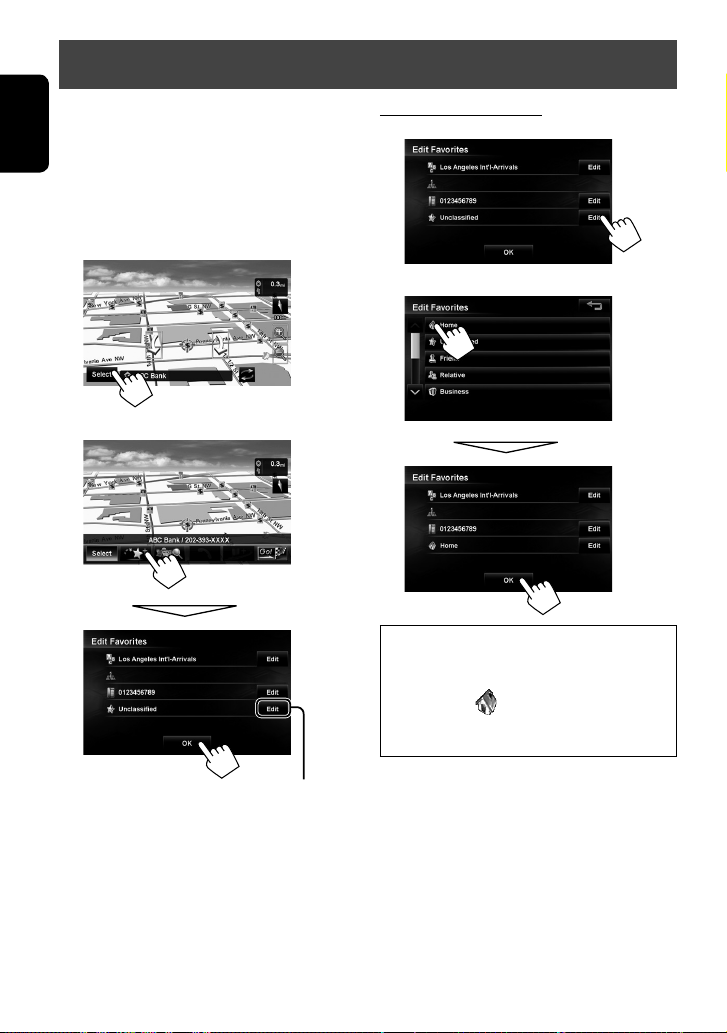
Registering your home/favorite points
You can register up to 300 favorite points (including
one home).
ENGLISH
1 Scroll the map to select the position you
want to select as a destination.
• To search the destination using <Destination>
menu, ☞ pages 23 to 27.
2
3
To register as your home
1
2
Notice:
If you have already registered a destination as
your home, a confirmation message is displayed
when you select
destination as your home. The previous home
destination is moved to the unclassified category.
. Select [Yes] to save the new
To register as your home
• To edit the registration, ☞ page 35.
• To search from register points, page 23.
22
Page 23
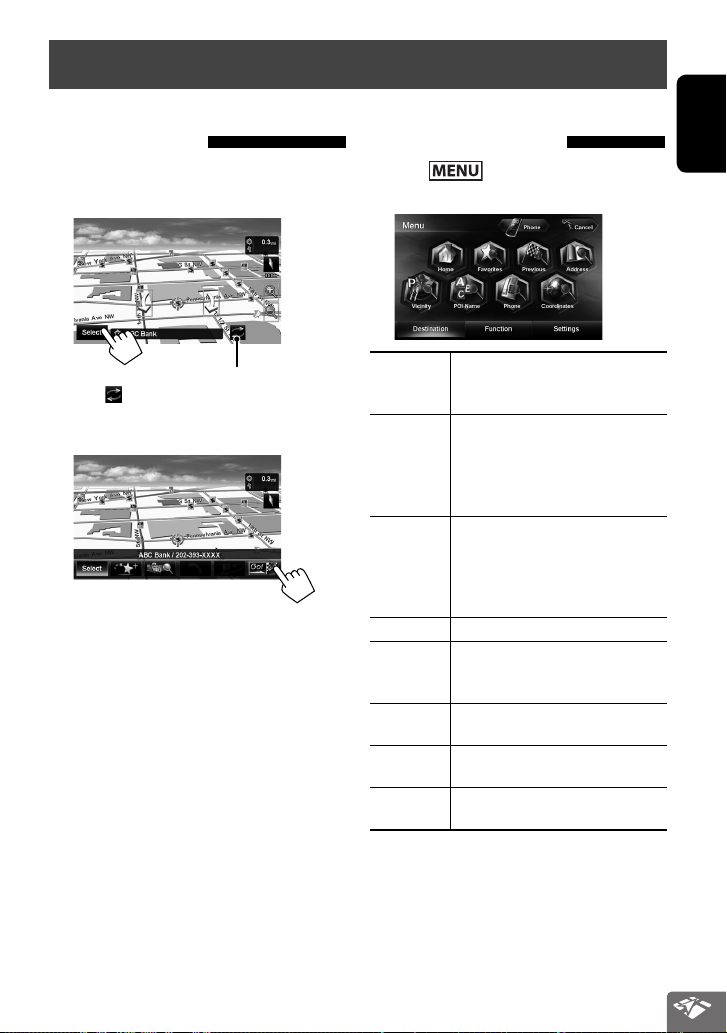
Searching for a place
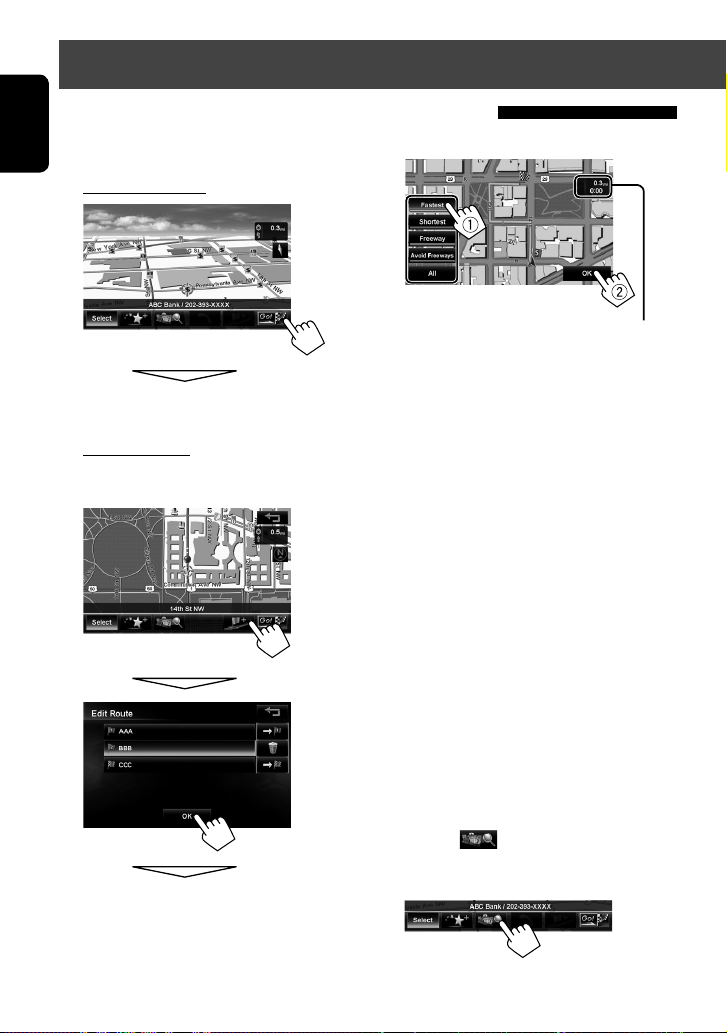
Setting a destination by scrolling the map
1 Scroll the map to select the position you
want to select as a destination. (☞ page 20)
2
If there are several POIs on the selected position,
press [
] to switch to the next POI.
3 The search result is displayed.
• To set the search result as the destination and start
guidance, ☞ page 28.
Setting a destination using the <Destination> menu
1 Press .
2 Select a method to search for a destination.
Home * Goes to your home.
Favorites * Searches from your favorite points.
Previous * Searches from the history of previous
Address
Vicinity
POI Name Searches for POIs by name.
Phone Searches by a telephone number.
Coordinates Searches by coordinates of the
* Selectable only when at least one place is registered.
• To register your home, ☞ page 22.
• To start guidance, ☞ page 28.
• To register your favorite points,
☞ page 22.
• To edit the information about the
favorite points, ☞ page 35.
destinations and via points.
• You can select a place from the last
50 destinations and via points.
• To delete the history, ☞ page 30.
Searches by an address. (☞ page 25)
Searches for POIs around your current
position, the destination, or via point(s).
(☞ page 26)
(☞ page 26)
(☞ page 27)
destination. (☞ page 27)
ENGLISH
23
Page 24
Searching for a place
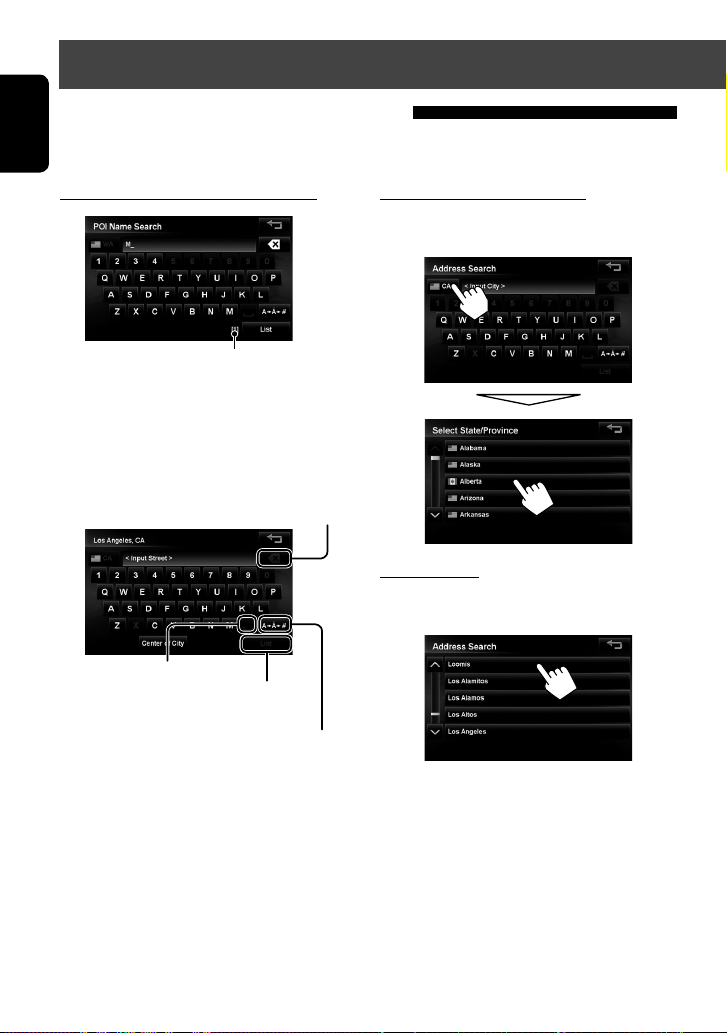
About search screens and input screens
Read through the following instructions for using search screens and input screens before using <Destination>
ENGLISH
menu.
To enter names, addresses, or numbers
Number of matches
• When there are more than 1000 matches, “1000+”
is displayed and only the first 1000 matches are
displayed.
• If you enter a name and the answer is given in
[number], it is the number of perfect matches.
Press: Deletes the last character
Hold: Deletes all characters
State/Province selecting screen
You can change the State/Province if the selecting
button appears on the screen.
List of matches
When you press [List] on the input screen, the list of
matches appears. Select desired item from the list.
Enters a space
Displays the list of matches
(☞ “List of matches” on the right)
Displays other keyboards
• For available characters,
☞ page 14.
• Buttons vary depending on the input item.
• For some input screens, available characters are
automatically narrowed down as the System
searches its database for matches.
• Lower cases are not available.
• When the number of matches is 5 or less, the list of
matches automatically appears.
24
Page 25
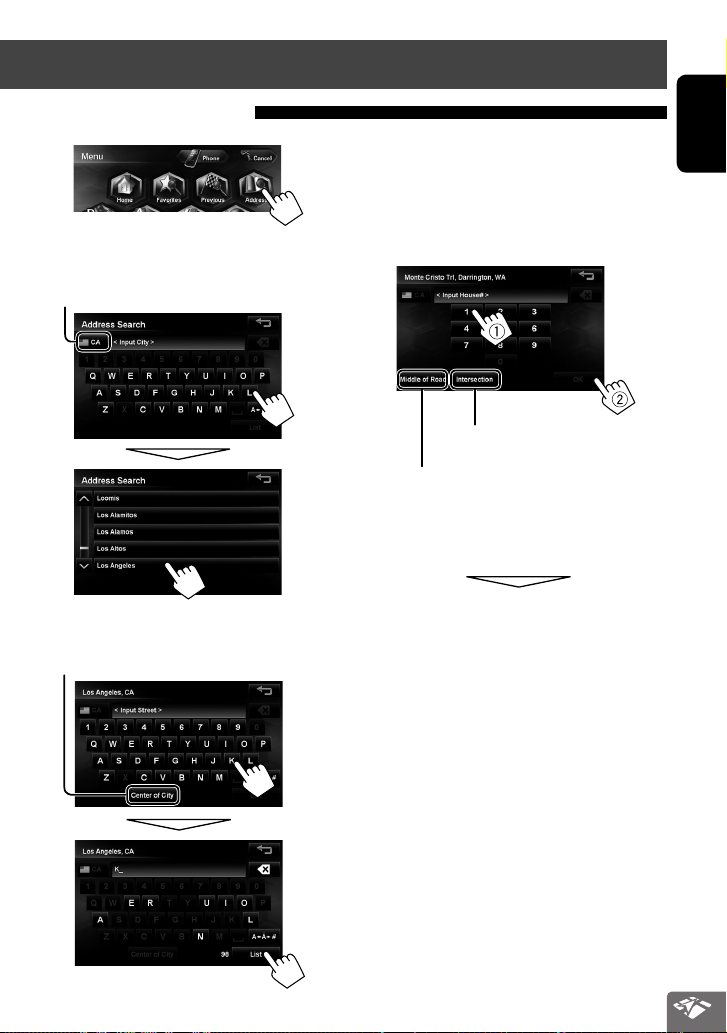
By address <Address>
1
2 Enter the city name, then select from the list.
(☞ page 24)
Changes State or Province
Searching for a place
4 Enter the house number, then press [OK].
(☞ page 24)
• If you don’t know the number of house for the
selected street, you can select [Middle of Road]
or [Intersection].
Specifies the crossing street to
select intersection on the street
Selects the center of the street
• If the house number you entered is not found in the
database, the map with the nearest house number is
displayed.
ENGLISH
3 Enter the street name, then select from the
list. (☞ page 24)
Selects the center of the city
The search result is displayed.
• To start guidance, ☞ page 28.
25
Page 26
Searching for a place
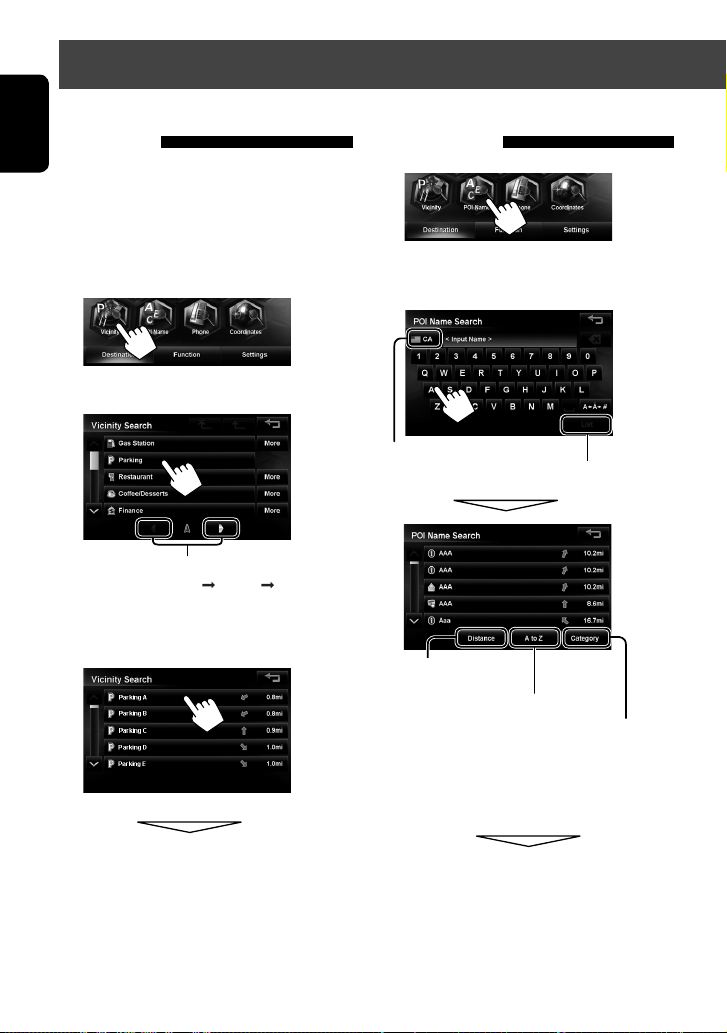
POI near a place/route <Vicinity>
ENGLISH
The System has a huge database of POIs (Point Of
Interest), such as restaurants, gas stations, hospitals,
etc.
You can search for a POI around the place where you are
now. While guided, you can also search for a POI near
the destination or via point
1
2 Select a c ategory for the POI.
Switches locations for search
(Present location
• If you press [More], you can select sub-categories.
3 Select a POI from the list.
via point destination)
From the list of POI <POI Name>
1
2 Enter the POI name, then select from the list.
(☞ page 24)
Changes State or Province
Displays the list of matches
Displays POI based on their
distance
Displays POI in alphabetical order
Press to select a category of POI
The search result is displayed.
• To start guidance, ☞ page 28.
The System displays up to 1000 POIs.
When you press [Category], [More] is displayed. By
pressing [More], you can select sub-categories.
The search result is displayed.
• To start guidance, ☞ page 28.
26
Page 27
Searching for a place
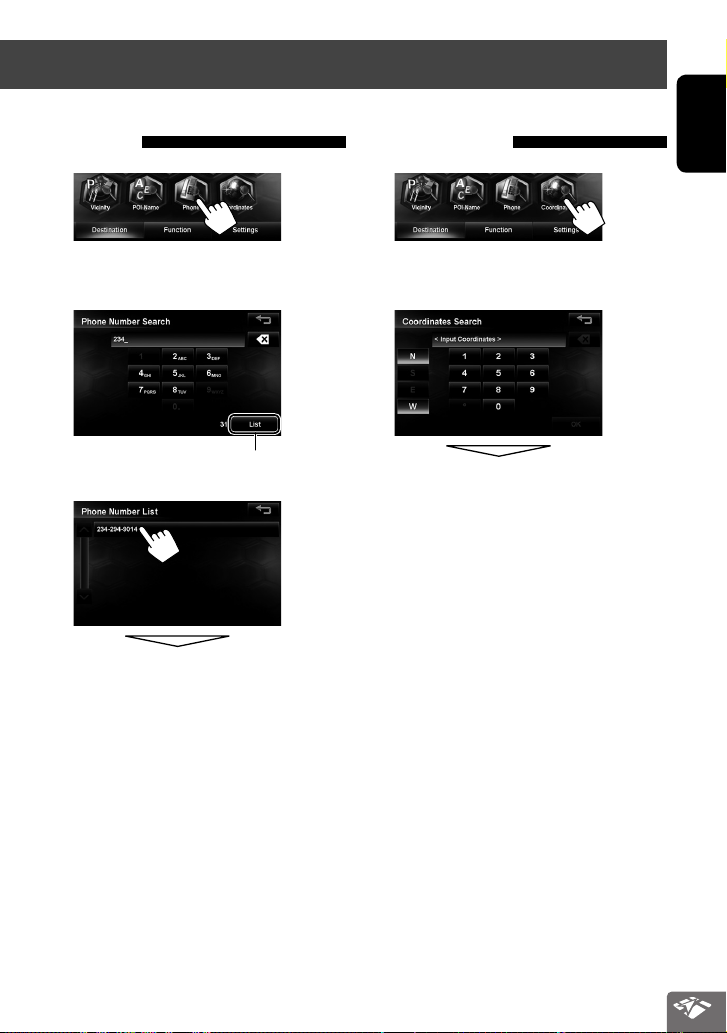
By telephone number <Phone>
1
2 Enter the telephone number, then press
[List]. (☞ page 24)
Displays the list of matches
3
The search result is displayed.
• To start guidance, ☞ page 28.
By coordinates <Coordinates>
1
2 Enter the latitude and the longitude, then
press [OK].
The search result is displayed.
• To start guidance, ☞ page 28.
ENGLISH
27
Page 28
How you are guided
Starting guidance to the destination or via point
1 Select a destination or via point. (☞ pages 23
ENGLISH
to 27)
2 To set as destination
3. Selec t a route (1), then press [OK](2).
The estimated time and distance to the
destination are displayed.
The System starts calculating.
To set as via point
You can add the via points only after selecting your
destination.
The System starts calculating.
[Fastest]: The recommended route.
[Shortest]: The shortest route.
[Freeway]: The recommended route by the most
use of freeways.
[Avoid Freeways]:
[All]:
• Route select screens always displayed using the 2D
North up map view regardless of the current map
view setting. (☞ page 19)
To cancel guidance, ☞ page 30.
• If you press [
via point, you can search for a POI around where you
searched for by category.
The recommended route by the least
use of freeways.
Displays all above four routes at once.
] before selecting a destination or
28
Page 29
How you are guided
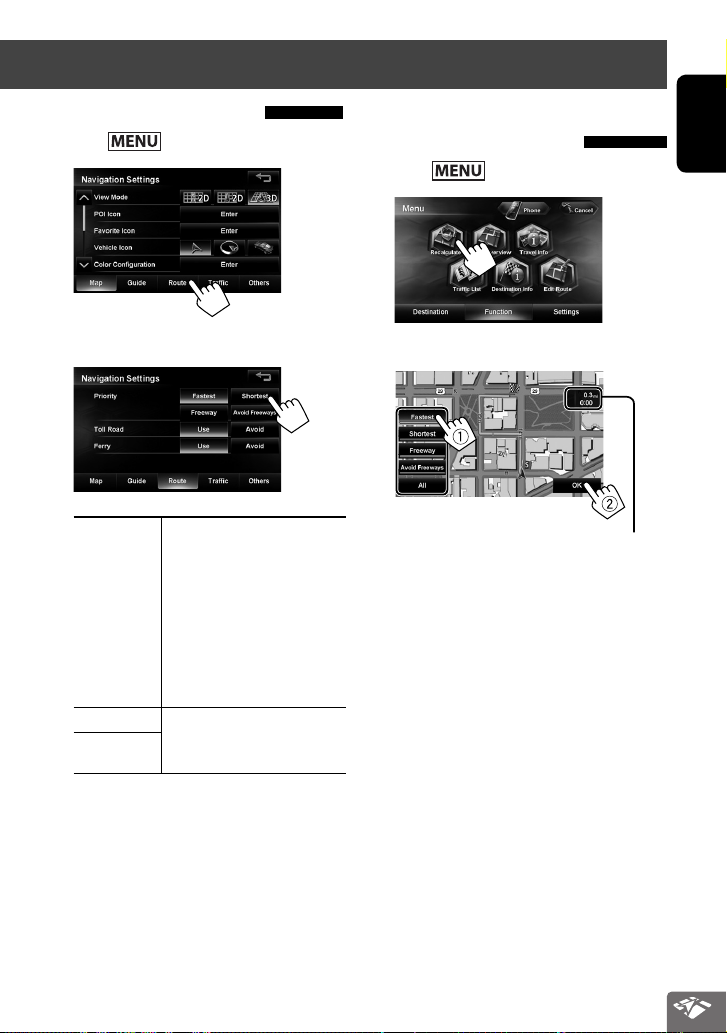
Changing route options
1 Press - <Settings> - <Navigation>.
2
3 Set options.
Priority Select the priority for route
calculation ([Fastest]:
the recommended route/
[Shortest]: the shortest route/
[Freeway]:the recommended
route by the most use of
freeways/[Avoid Freeways]:
the recommended route by the
least use of freeways.)
Toll Road Select whether to use ([Use]) or
Ferry
avoid ([Avoid]) these types of
options for route calculation.
Recalculating the route after changing route options
1 Press - <Function>
2
3 Select a route (1), then press [OK](2).
The estimated time and distance to the
destination are displayed.
[Fastest]: The recommended route.
[Shortest]: The shortest route.
[Freeway]: The recommended route by the most
use of freeways.
[Avoid Freeways]:
[All]:
• Route select screens always displayed using the 2D
North up map view regardless of the current map
view setting. (☞ page 19)
The recommended route by the least
use of freeways.
Displays all above four routes at once.
ENGLISH
29
Page 30
How you are guided
Adjusting the volume of the voice guidance
ENGLISH
1
2
• You can also adjust the volume through
- <Settings> - <Navigation> - <Guide> <Guidance Volume>. (☞ page 41)
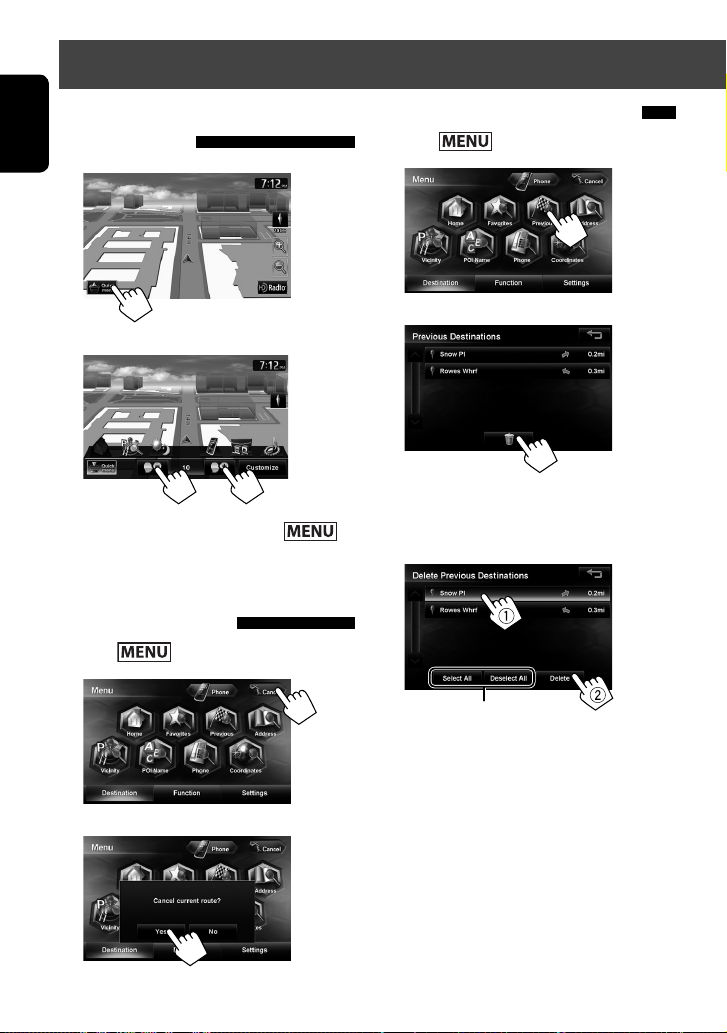
Canceling guidance
1 Press .
2
Delete previous destinations
1 Press .
2
3
4 Select items to delete (1), and delete them
(2).
Selected items are highlighted.
Selects/deselects all items
A confirmation message appears.
3
30
Page 31

About route guidance screen
Direction, distance, and estimated time of arrival (ETA) at the destination (
or a via point (
• Press to switch the information between the final destination and the
nearest via point.
How you are guided
)
)
ENGLISH
Distance to the next turn
Next turn to make
The second turn to
make (if any)
Lanes to take
(Appears when coming within 1.2 mi (2 km) of it.)
Next street
Route to take
Shows AV control bar
Current street
Guidance at turns
When you approach a turn, the System guides you with voice guidance and indications on the screen.
• Guidance voice comes out only through the front speakers (FRONT OUT of A/O cable).
To hide the magnified map, touch the magnified
map. To show it again, press .
What if I miss a turn?
Don’t worry. The System calculates a new route
Magnified map
• You can select whether or not to display the
magnified map through (
- <Navigation> - <Guide> - <Magnified View>.
(☞ page 41)
- <Settings>
quickly.
• When you reach the area approximately within 90 ft (30 m) around the destination/via point, the Navigation
System considers you to have reached your destination/via point.
31
Page 32

How you are guided
Getting information on your route and places
To check the entire route
ENGLISH
Press - <Function>.
1
2
To check the information on the
destination and via points
1
If via points are set, select a desired via point to check
its detailed information.
To confirm how your trip will go
<Simulation>
Drive simulation starts.
Changes the speed of the drive simulation
Cancels the simulation and resume guidance
32
(x1/x2/x3)
Page 33

Arranging your route
Changing the sequence of the destination/via points
• Highways are always used to calculate the route if distance to a destination exceeds a certain distance.
• If the destination cannot be reached without using highways, ferries, or toll roads, they are used to calculate
the route without respect to the <Route> settings. (☞ page 29)
1 Press - <Function>.
2
To delete a via point
In step 4 on the left, select the item to delete
(1), press [ ] (2), then press [Rec alculate]
(3).
3
4 Press the desired order of the selected point
(1, 2), then press [Recalculate] (3).
ENGLISH
3
The System starts calculating the new route.
33
Page 34

Arranging your route
Adjusting the vehicle position
If you find your current position is displayed on a wrong
ENGLISH
place on the map, use this setting to correct your
position.
1 Press - <Settings> - <Navigation>.
2
4 Move the cursor to the position where you
want to set as current position.
• To adjust the direction of the vehicle, press
[Direction] and go to step 5.
• If you do not want to adjust the direction, press
[OK].
3
5 Adjust the direction.
34
Page 35

Editing registration of home/favorite points
1 Press .
2
3
4 Select the c ategory for the favorite point to
edit.
5 Select one to edit.
6 Edit the information.
A Displays the name editing screen
ENGLISH
C Displays the icon selection screen
B Displays the phone number editing screen
A To edit the name
• You can use up to 48 characters.
Displays other keyboards
• For available characters, ☞ page 14.
Enters a space
B To edit the phone number
Press: Deletes the last character
Hold: Deletes all characters
C To change the category
Select a new icon for the favorite point.
A confirmation message appears when you select
the Home category.
35
Page 36

Using information service (Only for KW-NT800HDT)
This function is available on KW-NT800HDT only, not equipped with on KW-NT700.
ENGLISH
You can use the information services provided by Total Traffic HD NETWORK service (from HD Radio) and Total Traffic
CONNECT service (from iHeart Link App).
JVC cannot assume responsibility for the completeness or accuracy of the information.
Using the traffic information service
Traffic information on the map
(green): When receiving information from HD radio
(red): When receiving information from iHeartRadio
Congestion
Traffic icon (☞ page 37)
• Traffic icons are displayed on the map when its
scale is between 80 ft (25 m) and 0.6 mi (1 km) with
<Traffic Icon> setting activated. (☞ table on the
right)
• Congestion lines are displayed when the scale is
between 80 ft (25 m) and 2.5 mi (4 km).
How traffic information is reflected in
navigation
The traffic information is reflected in navigation
differently according to <Traffic> setting.
1 Press - <Settings> - <Navigation>.
2
3
Show Congestion lines appear on the map.
Hide Congestion lines do not appear on
Traffic Flow
Traffic Icon
Bypass Traffic
Mode
+
Hybrid TTN
* Hybrid TTN
information from the iHeart Link app, when you are
out of HD radio coverage.
* For details on iHeart Link App, ☞ page 71
* When receiving traffic information, launch iHeart Link
App and connect your iPhone/iPod to the system in
advance.
the map.
Show Traffic icons are displayed on the map.
Hide Traffic icons are not displayed on the
map.
On Recalcurate the route when you
approach a traffic event.
Off The System does not take traffic
information into account for the
route.
All Receive news and traffic information.
News Receive only news information.
Traffic Receive only traffic information.
Off No information is received.
(from iHeart Link App) *
+
Mode receives news and real-time traffic
36
Page 37

Using information service (Only for KW-NT800HDT)
This function is available on KW-NT800HDT only, not equipped with on KW-NT700.
Checking the traffic information
From <Traffic List>
1 Press - <Function>.
2
3 Select a list (1), then a traffic aler t (2).
[All]: Lists all the information.
[On Route]: Lists the information on your route.
Details of the selected alert are displayed.
On the map
1 Touch the traffic icon.
2
• If there are several POIs on the selected position,
select one from the list.
– The list appears only when <Traffic Icon> is
set to [Show]. (☞ page 36)
ENGLISH
List of traffic icons
Traffic jam Light Traffic Windy
Roadworks Narrow lanes Other caution event
Road is blocked or closed Accident People on Roadway
Snow Slippy Animals on roadway
37
Page 38

Using information service (Only for KW-NT800HDT)
This function is available on KW-NT800HDT only, not equipped with on KW-NT700.
ENGLISH
Using the information service
To display the information screen
1 Press - <Function>.
2
To bookmark favorite items
You can store (up to 5 bookmarks) favorite items on the
bookmark list.
[ ]: Displays the bookmark list.
[ ]: Adds the selected item to the bookmark list.
To delete the item from the bookmark list
1
3
2 Select items to delete (1), then delete them
(2).
The selected items are highlighted.
• The contents of the screen depend on the
broadcast.
Selects/deselects all items
38
Page 39

Checking the information of the navigation system
System Info
1 Press - <Settings>.
2
1
2
3
1 Version of the software
2 Version of the map database
3 Serial number
4 Speed pulse rate
5 GPS antenna connection status
<OK>: GPS antenna is detected (the figure
shows the number of GPS satellites being
received).
<NG>: GPS antenna is not detected
6 Status of the gyroscope
7 Status of calibration *
<Learning>: The system has started learning
calibration data.
<Learned>: Though learning is almost complete,
the system is still learning to make the calibration
data more accurate.
8 Resets the calibration data.
Reset the data if you replace the tires or if the
current position is displayed far from the actual
position
9 Connection status of the illumination control lead
<On>: The illumination signal is detected.
p Connection status of the parking brake lead
<On>: The parking brake is engaged.
q Connection status of the reverse gear signal lead
<On>: Reverse gear signal is detected.
1
Sensor Status
1 Press - <Settings>.
2
4
5
6
7
8
• If the rear view screen is displayed when shifting
the gear to the reverse (R) position, the reverse
gear signal is detected (<On>).
w Information service being received
(Traffic or Area information; only for KW-NT800HDT)
*1 About calibration
The calibration is a function conducted in order to
display the current position more accurately using
signals from GPS and the internal sensors.
Even after calibration status changed to
<Learned>, the system will keep learning to make
the current position more accurate.
• The calibration does not function without the
connection of GPS antenna and the speed signal
lead. For the connection, ☞ Installation/Connection
Manual (separate volume).
• Driving under various conditions completes the
calibration faster. If <Learning> remains on the
screen for a long period, check the connection of the
GPS antenna and the speed signal lead.
• While learning is going on, the current position may
not be displayed correctly .
39
ENGLISH
9
p
q
w
Page 40

Navigation menu items
1 Press - <Settings>.
2
ENGLISH
Menu items Selectable settings Initial: Underlined
View Mode
POI Icon
Favorite Icon
Vehicle Icon
Color configuration Change the color of the map for the day and night screens. Press [Enter] to
Map
Current Street Name Select whether to show or hide the current street name on the map.
Speed Limit Sign
Drive Tracks Select whether to show or hide the tracks you have driven.
Delete Drive Tracks You can delete the drive tracks memorized by the system. Press [Delete],
Switches the category by pressing the corresponding tab
, , (☞page 19)
☞page 21
☞page 21
, ,
display the adjustment screen.
Night Map Mode:
Auto: Switches to the night screen when you turn on the headlights.
The illumination control lead connection must be completed.
(☞Installation/Connection Manual)
On: Fixes to the night color screen.
Off: Fixes to the Day color screen.
• Day map Color/Night map Color: Select from 3 colors.
Show, Hide (☞page 31)
Select whether to show or hide the speed limit icon (
Show, Hide
Show, Hide
then a confirmation message appears.
) on the map.
40
Page 41

Navigation menu items
Menu items Selectable settings Initial: Underlined
Guidance Volume Adjust the volume of the voice guidance and voice alert. (The adjustment
does not affect the audio volume.)
1 to 20; Initial 10
Attention Tone Select whether to use the attention tone, which is played before the voice
guidance.
On, Off
Voice Guide Select whether to use the voice guidance.
On, Off
Speed Alert The System sounds an alarm when you exceed the speed limit of the
Guide
Traffic Lane Select whether to display the traffic lanes on the map.
3D Junction View Select whether to display 3D junction view on the map.
Magnified View Select whether to display the magnified view on the map.
Priority
Toll Road
Route
Ferry
Traffic Flow Select whether to show or hide the congestion line on the map.
Traffic Icon Select whether to show or hide the traffic icon on the map.
Traffic
Bypass Traffic Select whether to use the function to bypass the congestion ahead.
(Only for KW-NT800HDT)
Hybrid TTN
+
Mode
Scale Unit Select the measuring units for distance.
Others
Vehicle Position
current road by the set value. Press [+] or [−] to select the value. The unit
(“km/h” or “mph”) follows the <Scale unit> setting.
Off, 3mph (5km/h), 6mph (10km/h), 10mph (15 km/h), 15mph
(25km/h), 20mph (35km/h)
On, Off
On, Off
On, Off
Fastest, Shortest, Freeway, Avoid Freeways (☞page 29)
Use, Avoid (☞page 29)
Use, Avoid (☞page 29)
Show, Hide (☞page 36)
Show, Hide (☞page 36)
On, Off (☞page 36)
All, News, Traffic, Off (☞page 36)
• The unit setting you find at your first access to the menu varies
depending on your State/Province selection in the initial settings.
km, mile
☞page 34
ENGLISH
41
Page 42

Additional information
How you are guided
• If GPS signal reception is poor, navigation guidance
ENGLISH
may not be correct.
• The System may not receive GPS signals in the
following places...
– in a tunnel or parking lot in a building
– under an overhead road
– in a place surrounded by high buildings or by
closely standing trees
• Make sure to connect reverse signal lead
(☞ Installation/Connection Manual); otherwise, your
current position may not be displayed correctly.
• The position of your car may not be detected correctly
in the following cases...
– when driving on a road close to the other one
(e.g. a highway and ordinary road running in
parallel)
– when turning at an almost straight fork in the
road
– when driving on a gridiron road
– after taking a ferry, etc.
– when driving on a steep mountain road
– when driving on a spiral road
– when turning left or right after running on a long
straight road
– when driving in a zigzag line on a broad road
– when starting your car shortly after starting the
engine
– when driving for the first time after installing the
unit
– when changing tires or attaching chains on the
tires
– when tire slip occurs continuously and frequently
– after driving on areas other than a road (e.g.
private lands or parking lots)
– after driving in underground or tower type
parking lots
– after rotating your car on a turntable
– after frequent stops and starts in a congestion
– when the accuracy of GPS is deteriorated
intentionally
– when driving on a road constructed recently
• The route calculated by the System is one of the
possible routes to your destination. The route is not
always the most appropriate one.
• If no-exit roads (only entering the rotary from the
roads is allowed) exist on the rotary, the no-exit
roads can neither be shown in the route guidance on
the display nor counted in the route guidance voice
message.
• The following phenomena may occur even if the
System is working correctly...
– It may guide to a closed road or to a route
requiring a U-turn.
– It may not guide to your destination if there
is only a narrow road or no road to your
destination.
– It may show a different road name.
– It may not ask you to turn at a junction even if
you need to.
– It may give guidance different from the actual
road conditions.
– It may give incorrect distance information.
42
Page 43

List of POI icons
Gas Station
Parking
Restaurant
Coffee/Desserts
Coffee/Pastries
Desserts/Smoothie
Finance
ATM
Bank
Service
Shopping
Beauty
Book Store
Convenience Store
Department Store
Electronics
Fashion/Apparel
Furniture
Grocery Store
Home Improvement
Liquor/Wine/Beer
Music/Video
Pharmacy
Sporting Goods Store
Service
Barber Shop
Beauty Salon
Photo
Rental
Entertainment
Casino
Museum
Bar/Nightclub
Theater
Others
Recreation
Bowling Center
Golf Course
Outdoor
Ski Resort
Theme Park/Exercise
Zoo
Others
Hotel/Accommodation
Travel
Agency/Info
Air Transportation
Airport
City Finder
Ground Transportation
Others
Medical
Animal Health
Emergency
Hospital
Lab/OtherFacility
Physician
Additional information
Community
Child Service
Education
Government/Administration
Health/Safety
Insurance
Legal Service
Multimedia
Police/Fire
Post Office
Religious
Automotive
Auto Parts/Service
Dealer/Service
Motorcycle Dealer
Used Car Dealer
Rental
Others
ENGLISH
43
Page 44

AV Operations
Common operations on source screen
ENGLISH
<Source> screen
KW-NT800HDT
Selects
the source
(☞ below)
Turns off the AV source (☞ below)
Selecting the playback source
• You can erase the clock display while a video source is
played back. (<Clock on Video/Screen-Off>,
☞ page 85)
Turning off the AV source
KW-NT700
HD Radio
(For KW-NT800HDT)
Tuner
(For KW-NT700)
SiriusXM
DISC
SD
USB
iPod Plays an iPod/iPhone.
iHeartRadio Switches to the iHeartRadio.
Pandora
BT Audio Plays a Bluetooth audio player.
AV-IN Using other external components.
Switches to the HD Radio.
(☞ pages 45 to 51)
Switches to the radio. (☞ pages
52 to 53)
Switches to the SiriusXM radio
broadcast. (☞ pages 77 to 81)
Plays a disc. (☞ pages 54 to 60)
Plays files on an SD card.
(☞ pages 61 and 64)
Plays files on a USB device.
(☞ pages 61 and 64)
(☞ pages 65 to 70)
(☞ pages 71 to 74)
Switches to the Pandora® internet
radio. (☞ pages 75
(☞ page 108)
(☞ page 82)
to 76
)
or
[Hold]
AV source is turned off.
• To activate the AV function, press [Hold].
Or press , then select a playback source.
44
Page 45

Listening to the HD Radio™ broadcast (For KW-NT800HDT)
You can tune in to both conventional and HD Radio broadcasts.
About HD Radio Technology
• Digital, CD-quality sound. HD Radio Technology enables local radio stations to broadcast a
clean digital signal. AM sounds like today’s FM and FM sounds like a CD.
• Program Service Data: Contributes to the superior user experience of HD Radio Technology.
Presents song name, artist, station IDs, HD2/HD3 Channel Guide, and other relevant data
streams.
• Adjacent to traditional main stations are extra local FM channels. These HD2/HD3 Channels
provide new, original music as well as deep cuts into traditional genre.
• iTunes® Tagging provides you the opportunity to discover a wide range of content and the
means to “tag” that content for later review and purchase from the iTunes® Store.
•
Visual information related to content being played on your HD Radio receiver, such as Album
Art, historical photographs, still art from live broadcasts, among other related content.
•
With Digital Traffic, real-time traffic is delivered dramatically faster and with more useful
data than other available sources.
• With the Bookmark feature, you can save in the memory of your HD Radio receiver
information that you have heard and want to be sure to remember.
Your JVC receiver will present this information to you via a listing on your radio display.
Bookmark also presents QR Codes from advertisers on your radio display. Using a
smartphone QR Code app, you can directly link to that advertiser’s website or other related
information stored in the QR Code image.
• Your JVC receiver Channel Guide provides listings of HD Radio stations (including HD2/HD3
Channels) in your local market. On radios with touch screens, you may tune directly to HD
Radio channels simply by touching the desired program on the display.
• Many HD Radio stations offer more than one channel of programming. This service is called multicasting.
• To find HD Radio stations in your area, visit <http://www.hdradio.com/>.
ENGLISH
45
Page 46

Listening to the HD Radio™ broadcast (For KW-NT800HDT)
• HD: Lights when receiving an HD Radio broadcast
• ST: Lights when receiving an FM stereo broadcast
ENGLISH
Band
Station frequency currently tuned in
Station Call Sign and
channel number for
the HD Radio broadcast
Displays the album
artwork or the station
logo*.
For only FM
PTY code for the HD Radio
broadcast
Only when receiving HD Radio
station: the song information
currently received
* The station logo is displayed when there is no album artwork.
If there is no artwork or station logo available, the default artwork is displayed.
• When tuning into an HD Radio Multicast sub-channel directly (such as from the preset list), “Linking” appears
for a while.
[Band] Selects the band.
[
Searches for HD Radio stations only.
]
[4] [¢] • Searches for a station.
Press: Auto search
Hold: Manual search
Selects a sub-channel when receiving
•
HD Radio Multicast channels.
[ ] [ ] Selects a preset station.
[Tag]
☞ page 50
[Guide] Displays the list of HD Radio stations
receivable at the current position.
Switches between preset list screen
]
[
[ ]
[Mode]
Bookmarks the current song.
You can display a list of bookmarks on
the screen of this unit. (☞ page 49)
☞ pages 47 to 49
and tuner source screen.
46
Page 47

Listening to the HD Radio™ broadcast (For KW-NT800HDT)
Changing HD Radio reception mode
While receiving an HD Radio broadcast, you can change
the reception mode — digital or analog.
• This setting cannot take effect for the conventional
FM/AM stations.
1
2
• The setting automatically returns to [Auto] when
you tune into another broadcast.
Hold indicator
Auto Switches between digital and analog
audio automatically.
• In the case when the radio station
forces the reception mode to analog,
the HOLD indicator flashes.
Digital Tunes to digital audio or analog audio
Analog
only.
• HOLD indicator lights.
Storing stations in memory
You can preset six channels for each band.
Automatic presetting — SSM (Strong-station
Sequential Memory)
1
2
A confirmation message appears.
Local stations with the strongest signals are
searched and stored automatically.
To stop searching, press [4] or [¢].
• During SSM search, all stations including
conventional stations are searched and stored for the
selected band.
ENGLISH
47
Page 48

Listening to the HD Radio™ broadcast (For KW-NT800HDT)
Manual presetting
1 Tune in to a station or channel you want to
ENGLISH
preset. (☞ page 46)
Band The station frequency you want to preset
2 Display the preset list.
3 Select a preset number.
[Hold]
Selecting a preset station
1 Display the preset list.
2
Also changes preset stations
Reducing the interference
1
2
Auto Increases the tuner selectivity to
reduce interference noises between
adjacent stations. (Stereo effect may
be lost.)
Wide Subject to the interference from
adjacent stations, but sound quality
will not be degraded and the stereo
effect will remain.
48
Page 49

Bookmarking the song
You can bookmark the current song.
1
Displaying the list of bookmarked songs
1
2
Listening to the HD Radio™ broadcast (For KW-NT800HDT)
• The bookmark information is displayed only for the
items with the information recorded.
•
If you have your device read the QR code, the bookmark
information will be transferred to the device.
•
When the bookmark information is long and not fully
displayed, touch the icon to scroll and display the rest.
Deleting the bookmark
1
2 Select items to delete (1), then delete them
(2).
ENGLISH
3 Press the bookmark you want to view.
Selects/deselects all items.
A confirmation message appears.
• When you press an item, it is highlighted.
When you press again, the selection is canceled.
49
Page 50

Listening to the HD Radio™ broadcast (For KW-NT800HDT)
Tagging/purchasing your favorite songs from iTunes Store
Some HD Radio broadcasts provide PSD (Program
ENGLISH
Service Data) for a song. You can tag the song and store
its PSD while listening to the song.
By using the tagging function, you can easily purchase
the songs from iTunes Store.
Notes on storing tagged PSDs
• When pressing [Tag] within 10 seconds before
or after the PSD changes (while the TAG indicator
flashes), the tags for two songs are stored.
• You cannot tag a song in the following cases:
– When the broadcast currently received does not
support the iTunes Tagging or does not support
PSD.
– When stored PSDs on the unit exceeds 100.
– When the song is already tagged.
– While transferring the tagged PSDs to your iPod/
iPhone is in progress.
• You can enjoy iTunes Tagging with the following
types of iPod/iPhone models:
– iPod classic
– iPod nano (6th Generation)
– iPod nano (5th Generation)
– iPod nano (4th Generation)
– iPod nano (3rd Generation)
– iPod touch (4th Generation)
– iPod touch (3rd Generation)
– iPod touch (2nd Generation)
– iPod touch (1st Generation)
– iPhone 4S
– iPhone 4
– iPhone 3GS
– iPhone 3G
– iPhone
Step 1: Tagging the song
While receiving a song with PSD...
Lights up while receiving a song with PSD
The tagged PSD is stored on the unit.
• When iPod/iPhone is connected, the tagged PSD
is automatically transferred to the iPod/iPhone. Go
to “Step 3: Purchasing songs from iTunes Store
(☞ page 51)” to purchase the song.
To check/delete the PSDs stored on the unit
1
2
The number of stored PSDs/max storage
50
Deletes all PSDs from the unit
• When you press here, a confirmation message
appears. If you press [Yes], all PSDs are deleted.
Page 51

Listening to the HD Radio™ broadcast (For KW-NT800HDT)
Step 2: Transferring the tagged PSD to
your iPod/iPhone
Connect the iPod/iPhone to the unit. (☞ page 65)
The tagged PSDs are transferred automatically to your
iPod/iPhone. “Tags transferred to iPod” appears during
transmission.
• After the data transfer is completed, the tagged PSDs
are automatically deleted from the unit.
• Your iPod/iPhone must have 64 KB free space, which
is required for transferring a tagged PSD.
Step 3: Purchasing songs from iTunes
Store
ENGLISH
• iTunes 7.4 or later version is required to purchase the
tagged songs.
• For details about iPod/iPhone and iTunes, refer also
to the instructions supplied with the iPod/iPhone or
visit <http://www.apple.com/>.
1 Connect the iPod/iPhone to the PC.
2 Synchronize the iPod/iPhone to the iTunes.
The tagged PSDs are transferred to PC, and iTunes
displays the list of the tagged songs.
• After the data transfer is completed, the stored
PSDs are automatically deleted from the iPod/
iPhone.
51
Page 52

Listening to the radio (For KW-NT700)
Lights when receiving an FM stereo broadcast
ENGLISH
The PS (station name) for
FM RBDS when PS signal is
Buttons for selecting preset
stations/presetting stations.
The frequencies for the preset
stations are displayed (preset
names are displayed if station
names are registered).
Band
coming in
Station frequency currently tuned in
PTY code for the FM
RBDS
[Band] Selects the band.
[4] [¢] Searches for a station.
Press: Auto search
Hold: Manual search
Storing stations in memory
You can preset six channels for each band.
Automatic presetting — SSM (Strong-station
Sequential Memory)
1
[ ] [ ] Selects a preset station.
[Mode]
☞ pages 52 to 53
2
A confirmation message appears.
Local stations with the strongest signals are
searched and stored automatically.
To stop searching, press [4] or [¢].
• During SSM search, all stations including
conventional stations are searched and stored for the
selected band.
52
Page 53

Listening to the radio (For KW-NT700)
Manual presetting
1 Tune in to a station or channel you want to
preset. (☞ page 52)
2 Select a preset number.
[Hold]
Selecting a preset station
1
Also changes preset stations
Reducing the interference
1
2
Auto Increases the tuner selectivity to
reduce interference noises between
adjacent stations. (Stereo effect may
be lost.)
Wide Subject to the interference from
adjacent stations, but sound quality
will not be degraded and the stereo
effect will remain.
ENGLISH
53
Page 54

Disc operations
To insert a disc
Open the monitor panel.
1
ENGLISH
2 Insert a disc.
Label side
The source changes to “DISC” and playback starts.
Caution on volume setting:
Discs produce very little noise compared with other
sources. Lower the volume before playing a disc
to avoid damaging the speakers by the sudden
increase of the output level.
If “ ” appears on the screen, the unit cannot
accept the operation you have tried to do.
• In some cases, without showing “ ”,
operations will not be accepted.
When playing back a multi-channel encoded disc,
the multi-channel signals are downmixed.
To eject a disc
1
Open the monitor panel.
• You can eject a disc when playing another AV source.
• If the ejected disc is not removed within 15 seconds,
the disc is automatically inserted again into the
loading slot to protect it from dust.
• If the disc cannot be ejected, ☞ page 5.
• If a disc does not have any disc menu, all tracks on it
will be played repeatedly until you change the source
or eject the disc.
54
Page 55

Playable disc types
Disc operations
Disc type Recording format, file type, etc. Playable
DVD
DVD Video (Region Code: 1) *
1
• DTS sound cannot be reproduced
or output from this unit.
DVD Audio
DVD-ROM
DVD Recordable/Rewritable
(DVD-R/-RW *
2
, +R/+RW *3)
• DVD Video: UDF bridge
• DVD-VR
• MP3/WAV: ISO 9660 level 1,
level 2, Romeo, Joliet
DVD Video
4
DVD-VR *
MP3/WAV
WMA/AAC
JPEG
DivX/MPEG1/MPEG2/MPEG4
DVD+VR
DVD-RAM
Dual Disc DVD side
Non-DVD side
CD/VCD Audio CD/CD Text (CD-DA)
VCD (Video CD)
DTS-CD
SVCD (Super Video CD)
CD-ROM
CD-I (CD-I Ready)
CD Recordable/Rewritable
(CD-R/-RW)
• ISO 9660 level 1, level 2, Romeo,
Joliet
CD-DA
MP3/WAV
WMA/AAC
JPEG
DivX/MPEG1/MPEG2
MPEG4
1
*
If you insert a DVD Video disc of an incorrect Region Code, “Region code error” appears on the screen.
*2 DVD-R recorded in multi-border format is also playable (except for dual layer discs).
DVD-RW dual layer discs are not playable.
*3 It is possible to play back finalized +R/+RW (Video format only) discs. “DVD” is selected as its disc type when a
+R/+RW disc is loaded. +RW double layer discs are not playable.
*4 This unit cannot play back contents protected with CPRM (Content Protection for Recordable Media).
ENGLISH
55
Page 56

Disc operations
Watching DVD Video/DVD-VR
(DVD Video playback screen)
ENGLISH
(Skipping/searching (1), show the operating buttons (2))
Audio format
Disc type
Title no./Chapter no./
Playing time
[3 / 8] Starts playback/pauses.
[7] Stops playback.
[4] [¢] Press: Selects chapter.
Hold: Reverse/forward search .
(Search speed: x2 ] x10)
[Angle] Selects view angle.
[Audio] Selects audio language.
[Subtitle] Selects subtitle language.
[Menu] Displays the disc menu.
[Top Menu]
Using the menu selecting screen
Playback mode
Playback status
(8: pause/7: stop)
Seek bar
Hides/displays the operating
]
[
buttons on the screen.
Adjusts the picture. (☞ page 84)
]
[
[
Displays the menu selecting
]
screen. (☞ below)
] Selects repeat playback mode.
[
(☞ page 59)
[Mode] Changes the settings for disc
playback. (☞ page 60)
[5] [∞] [2] [3] Selects the menu items.
[Enter] Confirms the selection.
[Return] Returns to the previous menu.
Caution for DualDisc playback
The Non-DVD side of a “DualDisc” does not comply with the “Compact Disc Digital Audio” standard. Therefore,
the use of Non-DVD side of a DualDisc on this product may not be recommended.
56
Page 57

Disc type
Audio format
VR playback mode—VR-PROG
(program) or VR-PLAY (playlist)
Disc operations
Playback mode
Playback status
(8: pause/7: stop)
ENGLISH
Program no. (or Playlist
no.)/Chapter no. (or file
no.)/Playing time
[3 / 8] Starts playback/pauses.
[7] Stops playback.
[4] [¢] Press: Selects chapter.
Hold: Reverse/forward search .
(Search speed: x2 ] x10)
[Audio] Selects audio channel (ST: stereo,
L: left, R: right).
[Subtitle] Shows (ON)/hides (OFF) the subtitle.
[Playlist] Displays the Playlist.
• For details about DVD-VR
format and Playlist, refer to the
instructions supplied with the
recording equipment.
Seek bar
[ ]
Hides/displays the operating buttons
on the screen.
[
[
Adjusts the picture. (☞ page 84)
]
] Selects repeat playback mode.
(☞ page 59)
[Mode] Changes the settings for disc
playback. (☞ page 60)
[Program List]
Displays the Original Program list.
57
Page 58

MP3/WAV/WMA/AAC
Disc operations
Listening to music Disc (CD/MP3/WAV/WMA/AAC)
ENGLISH
Disc type
Track no./Playing time
[3 / 8] Starts playback/pauses.
[4] [¢] Press: Selects track.
Hold: Reverse/forward search.
MP3/WAV/WMA/AAC
Disc type
Folder no./Track no./
Playing time
While playing, “Jacket
picture” is shown if the file
has the tag data including
“Jacket picture”. *
[3 / 8] Starts playback/pauses.
[4] [¢] Press: Selects track.
Hold: Reverse/forward search .
] [ ] Selects folder.
[
* “Jacket picture” is not shown on the AV control bar.
Audio format
Playback mode
Playback status (8: pause)
Seek bar
The track information
appears when it is recorded.
[ ] [ ]
Selects playback modes.
(☞ page 59)
[Mode] Changes the settings for disc
playback. (☞ page 60)
Playback mode
[ ] [ ]
Playback status (8: pause)
Seek bar
Tag data appears only
when it is recorded.
(Current folder name and
file name appear if not
recorded.)
Selects playback modes.
(☞ page 59)
[Mode] Changes the settings for disc
playback. (☞ page 60)
[List] Displays Folder/Track Lists.
(☞ page 14)
Playing Recordable/Rewritable discs
• This unit can recognize a total of 5 000 files and 250 folders (a maximum of 999 files per folder).
• Use only “finalized” discs.
• This unit can play back multi-session discs; however, unclosed sessions will be skipped while playing.
• Some discs or files may not be played back due to their characteristics or recording conditions.
58
Page 59

Selecting playback modes
For DVD/DVD-VR
Playback mode
For CD/MP3/WAV/WMA/AAC
Playback mode
Disc operations
ENGLISH
Selects Repeat playback mode
• For DVD:
CHAP.
TITLE
• For DVD-VR:
CHAP.
PROG.
• Press the button repeatedly until the desired
playback mode is selected.
To cancel, press the button repeatedly until the
indicator disappears.
Repeats current chapter.
Repeats current title.
Repeats current chapter.
Repeats current program (not
available for Playlist playback).
Selects Random
playback mode
• You cannot activate the repeat mode and the random
mode at the same time.
• For CD:
TRACK
DISC Randomly plays all tracks.
• For MP3/WAV/WMA/AAC:
TRACK
FOLDER
FOLDER Randomly plays all tracks of current
• Press the button repeatedly until the desired
playback mode is selected.
To cancel, press the button repeatedly until the
indicator disappears.
Repeats current track.
Repeats current track.
Repeats all tracks of the current
folder.
folder, then tracks of next folders.
Selects Repeat
playback mode
59
Page 60

Disc operations
Settings for the disc playback
ENGLISH
Disc Setup items Selectable settings Initial: Underlined
Menu Language
Audio Language
Subtitle Language Select the initial subtitle language or erase the subtitle (Off); Initial Off.
D. Range Compres. Set the audio dynamic range of DVD video. Though the dynamic range
Monitor Type Select the monitor type to watch a wide screen picture on the external monitor.
Select the initial disc menu language; Initial English. (☞ also page 89)
Select the initial audio language; Initial English. (☞ also page 89)
(☞ also page 89)
decreases in the order of Wide > Normal > Dialog, spoken words such as dialog
become clearer and easier to understand.
Wide, Normal, Dialog
◆ 16:9
The Monitor Type setting also determines how videos are displayed on the unit.
◆ 4:3 LB (Letterbox) ◆ 4:3 PS (PanScan)
60
Page 61

SD/USB operations
This unit can play the MP3/WMA/AAC/FLAC/MPEG4/MPEG4-AVC H.264/WMV files stored in SD card/USB mass
storage class device.
• All tracks in the SD card/USB device will be played repeatedly until you change the source.
• Make sure all important data has been backed up.
Playing back SD card
1
Open the monitor panel.
Playing back USB device
You can connect a USB mass storage class device such as
a USB memory, Digital Audio Player, etc. to the unit.
• You cannot connect a computer to the USB ( )
terminal of the unit.
• When connecting a USB device, refer also to its
instructions.
1 Connect the “USB” device.
USB cable
ENGLISH
2 Insert an SD card.
Push in the SD card until you hear a clicking sound.
3 Close the monitor panel.
4 Select “SD” as the source.
To eject the “SD” card
Open the monitor panel (step 1 above), then push in the
SD card lightly.
• Up to 4 USB devices can be connected to the USB
cable of this unit via a USB hub.
• When multiple USB devices are connected, you
can select the USB device to play by pressing
the [ ] on the USB playback screen.
(☞ page 63)
2 Select “USB” as the source.
61
USB
USB
HUB
USB
USB
Page 62

SD/USB operations
USB
USB
U
Caution:
USB
ENGLISH
• Do not connect 2 or more USB hubs to the USB cable of the unit.
USB
USB
HUB
USB
USB
USB
HUB
HUB
USB
USB
• If you connect a USB device with large consumption current to the USB hub, it may not operate. In this case,
connect the device directly to the USB cable.
• When connecting via a USB hub, connect the USB hub to the USB cable first, then connect the USB device to
the USB hub.
• Avoid using the USB device if it might hinder your safety driving.
•
Disconnect a USB device while playback is paused or another source is selected.
• Electrostatic shock at connecting a USB device may cause abnormal playback of the device. In this case,
disconnect the USB device. Turn off the unit, then turn on again.
• Do not leave a USB device in the car, expose to direct sunlight, or high temperature to avoid deformation or
cause damages to the device.
• You can connect USB devices and iPod/iPhone to the same USB hub.
• This unit cannot recognize a USB device whose rating is other than 5 V and exceeds 1 A.
• USB devices equipped with special functions such as data security functions cannot be used with the unit.
• Depending on the shape of the USB devices and connection ports, some USB devices may not be attached
properly or the connection might be loose.
• This unit may be unable to play back some USB devices or some files due to their characteristics or recording
conditions.
SD
• If you touch the front panel when closing from the fully-opened position, the safety mechanism is activated
and the panel will open again.
• If you turn off the unit with the front panel fully-opened, the panel remains open.
• If you insert a disc with the front panel fully-opened, the panel won’t close automatically.
62
Page 63

Listening to audio files
SD/USB operations
ENGLISH
(MP3/WMA/AAC/FLAC)
Source type (“SD” or “USB”)
Folder no./Track no./
Playing time
While playing, “Jacket
picture” is shown if the file
has the tag data including
“Jacket picture”.
[3 / 8] Starts playback/pauses.
[4] [¢] Press: Selects track.
Hold: Reverse/forward search.
[
] [ ] Selects folder.
[
]
Selects Random playback mode. *1 *
• FOLDER: Randomly plays all
tracks of the folder.
]
[
Selects Repeat playback mode. *
• TRACK: Repeats current
track.
Audio format
Playback mode
Playback status (8: pause)
[List] Displays Folder/Track Lists.
(☞ page 14)
[
2
Appears only when the source is
]
USB.
Selects the USB device to play
when multiple USB devices are
1
2
*
connected.
If the USB device is large-capacity,
it may take some time to switch to
the selected device.
• FOLDER: Repeats all tracks
of the current folder.
*1 To cancel random or repeat mode, press the button repeatedly until the indicator disappears.
*2 You cannot activate the repeat mode and the random mode at the same time.
Seek bar
Tag data appears only
when it is recorded.
(Current folder name
and file name appear if
not recorded.)
• While playing from a USB device, the playback order may differ from other players.
• This unit may be unable to play back some USB devices or some files due to their characteristics or recording
conditions.
• This unit may not play back files in a USB device properly when using a USB extension cord.
• This unit cannot assure proper functions or supply power to all types of the devices.
• This unit can recognize a total of 9 999 folders (a maximum of 999 files per folder).
63
Page 64

MPEG4/MPEG4-AVC H.264/WMV
MPEG4/MPEG4-AVC H.264/WMV
SD/USB operations
Watching video files
(Video file playback screen)
ENGLISH
(Skipping/searching (1), show the operating buttons (2))
MPEG4/MPEG4-AVC H.264/WMV
Audio format
Source type
(“SD” or “USB”)
Folder no./Track no./
Playing time
[3 / 8] Starts playback/pauses.
[4] [¢] Press: Selects chapter.
Hold: Reverse/forward search .
[ ]
Selects Random playback mode. *1 *
• FOLDER: Randomly plays all
tracks of the folder.
[
Selects Repeat playback mode. *
]
MPEG4/MPEG4-AVC H.264/WMV
Video format
Playback mode
[List] Displays the Playlist.
]
[
[
2
[
1
2
*
☞ page 63
Hides/displays the operating buttons
]
on the screen.
Adjusts the picture. (☞ page 84)
]
Playback status
(8: pause)
Seek bar
Current folder name and
file name
• TRACK: Repeats current
track.
• FOLDER: Repeats all tracks of
the current folder.
*1 To cancel random or repeat mode, press the button repeatedly until the indicator disappears.
*2 You cannot activate the repeat mode and the random mode at the same time.
• While playing from a USB device, the playback order may differ from other players.
•
This unit may be unable to play back some USB devices or some files due to their characteristics or recording conditions.
• This unit may not play back files in a USB device properly when using a USB extension cord.
• This unit cannot assure proper functions or supply power to all types of the devices.
64
Page 65

iPod/iPhone operations
Playing back iPod/iPhone
Connect iPod/iPhone
1
For connections, refer also to the Installation/
Connection Manual.
• Use the following cables:
– To listen to the music: USB 2.0 cable
(accessory of the iPod/iPhone)
– To watch the video: USB Audio and Video
cable for iPod/iPhone—KS-U49 (not supplied)
USB 2.0 cable
(accessory of the iPod/iPhone)
or
KS-U49 (not supplied)
2 Select “iPod” as the source.
• Up to 4 iPods/iPhones can be connected to the
USB cable of this unit via a USB hub.
KS-U49 (not supplied)
HUB
• You can control the following iPod/iPhone
models:
– iPod classic
– iPod nano (6th Generation)
ENGLISH
– iPod nano (5th Generation)
– iPod nano (4th Generation)
– iPod nano (3rd Generation)
– iPod nano (2nd Generation)
– iPod nano (1st Generation)
– iPod touch (4th Generation)
– iPod touch (3rd Generation)
– iPod touch (2nd Generation)
– iPod touch (1st Generation)
– iPhone 4S
– iPhone 4
– iPhone 3GS
– iPhone 3G
– iPhone
Caution:
• When you turn on this unit, the iPod/iPhone is
charged through the unit.
However, when connected via a USB hub, the
iPod/iPhone is not charged.
• Do not connect 2 or more USB hubs to the USB
cable of the unit.
iPod
USB 2.0 cable
• When multiple iPods/iPhones are connected, you
can select the iPod/iPhone to play by pressing
the [ ] on the iPod/iPhone playback
screen. (☞ page 67)
HUB
iPod
• When connecting via a USB hub, connect the
USB hub to the USB cable first, then connect the
iPod/iPhone to the USB hub.
Do not connect the USB hub with iPod/iPhone
connected.
• You can connect USB devices and iPod/iPhone to
the same USB hub.
65
iPod
HUB
Page 66

iPod/iPhone operations
Setting the iPod control mode
iPod Control Mode
Head Mode Controls playback from this unit.
ENGLISH
iPod Mode Controls audio/video playback from the
iPod/iPhone.
• Playback information is shown.
External
Mode
Head Mode
Allows any audio/video signals from
iPod/iPhone.
• No information is shown.
iPod Mode
External Mode
• When using iPod nano (1st Generation), only Head
mode is selectable.
iPod mode indicator appears.
External mode indicator appears.
66
Page 67

• The operations explained in this manual are under Head mode (☞ page 66).
Listening to the music in the iPod/iPhone
The speed of audio books
Track no./Total track number/Playing time
Playback mode
iPod/iPhone operations
ENGLISH
Playback status (8: pause)
While playing, Artwork (the
picture displayed on the screen
of iPod/iPhone) is shown if the
song contains the Artwork.
iPod control mode (☞ page 66)
[3 / 8] Starts playback/pauses.
[4] [¢] Press: Selects track.
Hold: Reverse/forward search.
[List] Displays the Music menu on the
iPod/iPhone. (☞ page 69)
[
] Selects Random playback mode. *
• SONGS: Functions the same as
“Shuffle Songs”.
[
[
[ ]
Changes the iPod control mode.
]
(☞ page 66)
Selects the speed of audio books.
]
X1 X2 X1/2
Selects the iPod/iPhone to play
when multiple iPods/iPhones are
connected.
• ALBUMS: Functions the same
as “Shuffle Albums”.
Selects Repeat playback mode. *
]
[
•
ONE: Functions the same as
“Repeat One”.
* To cancel random or repeat mode, press the button repeatedly until the indicator disappears.
• When playing back a track containing Artwork ,
operating buttons temporarily disappear while
loading its Artwork.
Notice:
When operating an iPod/iPhone, some operations
may not be performed correctly or as intended. In
this case, visit the following JVC web site: <http://
www3.jvckenwood.com/english/car/> (English
website only)
Seek bar
Tag data appears
only when it is
recorded
67
Page 68

iPod/iPhone operations
Watching the video in the iPod/iPhone
To watch the video, select an item from the list. (☞ page 69)
(iPod/iPhone playback screen)
ENGLISH
(Skipping/searching (1), shows the operating buttons (2))
Track no./Total track number/Playing time Playback mode
[3 / 8] Starts playback/pauses.
[4] [¢] Press: Selects video.
Hold: Reverse/forward search.
[List] Displays the Video menu on the iPod/
iPhone. (☞ page 69)
[
] Selects Random playback mode. *
• SONGS: Functions the same as
“Shuffle Songs”.
[
]
]
[
[
]
]
[
Playback status (8: pause)
Hides/displays the operating buttons
on the screen.
Adjusts the picture. (☞ page 84)
Changes the iPod control mode.
(☞ page 66)
Selects the iPod/iPhone to play
when multiple iPods/iPhones are
connected.
• ALBUMS: Functions the same
as “Shuffle Albums”.
Selects Repeat playback mode. *
]
[
• ONE: Functions the same as
“Repeat One”.
* To cancel random or repeat mode, press the button repeatedly until the indicator disappears.
Seek bar
Tag data appears only
when it is recorded
68
Page 69

iPod/iPhone operations
Selecting a track/video from menu on the iPod/iPhone
1
2 Select the menu (Music or Video) (1), a
category (2).
Music menu:
Select the item in the selected layer until a desired
track starts playing.
Corresponding icon lights in blue. ( : Music / : Video)
Video menu:
3
Displays the top/previous layer
ENGLISH
1
*
• Available categories depend on the type of your iPod/
iPhone.
*1 These categories are shown in the language selected
on your iPod/iPhone.
69
Page 70

iPod/iPhone operations
Searching for items in the selected category by
alphabet and number
ENGLISH
1
2 Display the first character of the title of the
item you want to search for (1), then search
for an item (2).
Press the character button repeatedly until the
desired item is displayed.
• Only available characters are selectable.
• When selecting other character than the
alphabet, press [#].
3 Select the desired item from the list.
70
Page 71

iHeartRadio operations
What is iHeartRadio?
iHeartRadio is an iPod touch/iPhone application that can deliver access to over 750 local radio stations in both
AM and FM, as well as commercial-free and artist-programmed channels. All stations are streamed in highquality AAC format.
1 Install the latest version of the iHeartRadio application to your iPod touch/iPhone.
2 Start the iHear tRadio application by your iPod touch/iPhone.
3 Connect the iPod touch/iPhone to the unit (☞ page 65).
4 Select “iHeartRadio” as the source.
• The first station in the [Favorites] station list is automatically selected. If there are no stations in the [Favorites]
station list, the iHeartRadio application is stopped until a station is selected (☞ page 72).
*1
Channel number
iHeartRadio mode
Receiving traffic information
Station name
7 : Sound off
ENGLISH
Displays the album
artwork or the station
[3 / 7] Turns the sound on and off.
[4] [¢] Selects the previous/next favorite
[Random] Randomly selects a station.
[Stations] Displays the Station List.
*1 The channel number is the number of the Favorite station according to its registration order.
*2 The station logo is displayed when there is no album artwork or the iHeartRadio application is stopped. If there is no
artwork or station logo available, the default artwork is displayed.
logo.
station.
*2
[
[Tag]
71
Storing your favorite stations
]
(☞ page 73)
Tags the current song. (☞ page 74)
Song information
Page 72

iHeartRadio operations
Searching from the Station List
You can use the Station List screen to search for
stations.
ENGLISH
1 Press [Stations].
• It may take time to display lists with many items.
2 Select the station type.
• Favorite stations that were stored with the unit
are displayed in the Favorite list.
3 Select the desired station.
Searching for stations in All Cities category by
alphabet
1 Press [Stations].
2
3
4 Display the first character of the station you
want to search for (1), then search for a
station (2).
Press the character button repeatedly until the
desired station is displayed.
• Only available characters are selectable.
5 Select the desired station from the Station
List.
72
Page 73

iHeartRadio operations
Storing your favorite stations
The station currently being listened to is added to the
[Favorites] station list.
• A maximum of 100 stations can be added to the
[Favorites] station list.
• Stations are added to the end of the [Favorites]
station list.
The [ ] button is not available when listening to a
station that has already been stored as a favorite.
To delete the station from the favorite list
1 Press [Stations].
2 Select the favorites.
3
4 Select items to delete (1), and delete them
(2).
The selected items are highlighted.
ENGLISH
Selects/deselects all items
A confirmation message appears.
73
Page 74

iHeartRadio operations
Tagging songs and purchasing songs from the
iTunes Store
iHeartRadio provides tag information for each song.
ENGLISH
1 Press [Tag].
While listening to a song with tag information:
“Tags transferred to iPod” appears.
The tag information is transferred to iPod touch/
iPhone, and the Tag button is grayed out (is
inactive).
2 Purchase the song from the iTunes Store.
1 Connect the iPod touch/iPhone to the
computer.
2 Synchronize the iPod touch/iPhone to iTunes.
Tagged information is transferred to the computer
and a list of tagged songs is displayed in iTunes.
After the tag information is transferred, the stored
Tag information are automatically deleted from
the iPod/iPhone.
74
Page 75

Pandora® internet radio operations
About Pandora® internet radio
The requirements for listening to Pandora are as follows:
• Use an Apple iPhone or iPod touch running under iOS3 or later.
• Search for “Pandora” in the Apple iTunes App Store to find and install the latest version of the Pandora®
application on your device.
• In the application on your device, log in and create an account with Pandora. (If you are not already a
registered user, an account can also be created at www.pandora.com.)
• Internet connection by 3G, EDGE, or WiFi.
• iPhone connected to this unit with a USB 2.0 cable (accessory of the iPod/iPhone) or a KS-U49.
• Pandora® is available only in the U.S.
• Because Pandora® is a third-party service, the specifications are subject to change without prior notice.
Accordingly, compatibility may be impaired or some or all of the services may become unavailable.
• Some functions of Pandora® cannot be operated from this unit.
• For issues using the application, please contact Pandora at pandora-support@pandora.com
1 Install the latest version of the Pandora® application to your iPod touch/iPhone.
2 Start the Pandora® application by your iPod touch/iPhone.
3 Connect the iPod touch/iPhone to the unit. (☞ page 65)
4 Select “Pandora” as the source.
ENGLISH
75
Page 76

Pandora® internet radio operations
Thumb up/down indicator
ENGLISH
Station name
The picture data is displayed if available from the current content.
[Stations] Displays the Station List.
(☞ below)
[ ]/[ ]
Selecting station from the Station List
Appears when Quick Mix function is activated
(All songs in the registered stations are played
randomly)
Selects thumbs up/thumbs
down.
• If thumbs down is selected
current track is skipped.
Playing time
Playback status
(8: pause)
Song information
Bookmarks the artist.
]
[
[ ]
Bookmarks the current song.
[3 / 8] Starts/pauses playback.
[¢] Skips the current song.
• Not available when the Pandora
skip limit is reached.
Appears when the station is shared
To sort the Station List
[By Date] Sorts the list in reverse chronological
order.
[A to Z] Sorts the list in alphabetical order.
76
Page 77

Listening to the SiriusXM Radio
Before operating, connect the SiriusXM tuner (not supplied) to the expansion port on the rear of the unit.
(☞ Installation/Connection Manual)
Activating subscription
1 Select “SiriusXM” as the source.
SiriusXM Tuner starts updating all the SiriusXM channels.
2 Check your Radio ID.
Radio ID is labeled on the casing of the SiriusXM Tuner or the bottom of the SiriusXM Tuner unit.
• You can also display the Radio ID on the screen by tuning in to Channel 0.
– To hide the ID display, select any channel other than “0”.
3 Contact SiriusXM on the internet at ww w.siriusxm.com/activatenow and enter the
required information, or call 1-866-635-2349.
Once activated, the unit can then be tuned to one of the available channels.
ENGLISH
Signal Reception indicator
Channel name
[Band] Selects the band.
SXM1 SXM2 SXM3
[4] [¢] Press: Selects a channel.
Hold: Changes the channel rapidly.
– While searching, invalid and
unsubscribed channels are
skipped.
Band
Preset number
Channel number
Category name
The text information
currently received
] [ ] Selects a preset channel.
[
[List] Displays the Category/Channel List.
[
[
[Mode] Changes the settings of the reception
77
Selects a channel directly.
]
Switches between preset list screen
]
and tuner source screen.
restrictions.
Page 78

Listening to the SiriusXM Radio
Storing channels in memory
You can preset six channels for each band.
ENGLISH
1 Tune in to a station you want to preset.
(☞ page 77)
2 Display the preset list.
3 Select a preset number you want to store.
[Hold]
Selecting preset channels
1 Display the preset list.
Selecting on the list
1
2 Select a channel.
Select a category
2 Select a preset number.
Also changes preset channels
78
Page 79

Selecting a channel directly
1
2 Enter the channel number (1), then press
[OK] (2).
Setting the reception restrictions
Setting the channel locking
You can set the channel locking in order to, for example,
restrict children from receiving adult channels.
Setting the lock code and the channels to lock
• No lock code is set at factory shipment.
1 Display <Channel Locking> screen.
Listening to the SiriusXM Radio
2
Enter a 4-digit new code number (1), then
press [OK] (2).
Press: Deletes last character
Hold: Deletes all characters
3 Enter the same code, then press [OK].
4 Select the c ategory, then the channel you
want to activate the channel locking.
If you want to set locking to multiple channels,
repeat step 4.
5 Press or to finish.
ENGLISH
79
Page 80

Listening to the SiriusXM Radio
Adding/changing channel locking
1 Display <Channel Locking> screen.
ENGLISH
2
Enter your lock code number (1), then press
[OK] (2).
Press: Deletes last character
Hold: Deletes all characters
3 Select the c ategory, then the channel you
want to add/change the channel locking.
• When you try to receive a channel or select a
channel directly by entering the channel number
with the channel locking activated, the lock code
input screen appears and you cannot receive the
channel until you enter the correct code.
Changing the lock code
1 Display <Change Lock Code> screen.
2
Enter the current code number (1), then
press [OK] (2).
Press: Deletes last character
Hold: Deletes all characters
The icon appears in front of the channel name
with the channel locking activated. To cancel
selection, select the channel with the icon.
3
Enter the new code number (1), then press
[OK] (2).
Press: Deletes last character
Hold: Deletes all characters
4 Enter the same code, then press [OK].
80
Page 81

Listening to the SiriusXM Radio
To clear the selection of channels with the
channel locking activated
1 On <Mode> screen.
2 Enter your lock code number (1) , then Press
[OK] (2).
Press: Deletes last character
Hold: Deletes all characters
A comfirmation message appears.
Skipping the unwanted channels
If you do not want to receive some channels, you can
skip them.
Setting the channel skipping
1 Activate the channel skip function.
On <Mode> screen.
2 Select the c ategory, then the channel you
want to skip.
ENGLISH
• Repeat this step if you want to skip multiple
channels.
3 Press or to finish.
To clear the selection of channels for channel
skipping
1 On <Mode> screen.
A confirmation message appears.
81
Page 82

Using other external components
You can connect an external component to the LINE IN/VIDEO IN jacks. (☞ Installation/Connection Manual)
1 Select <AV-IN> as the source.
ENGLISH
2 Turn on the connected component and start playing the source.
AV-IN audio screen
AV-IN video screen
The following buttons appear while playing video with <AV-IN> selected as the source.
[
[
Hides/displays the operating buttons on the screen.
]
Adjusts the picture. (☞ page 84)
]
• Select an appropriate setting on <AV Input>. (☞ page 86)
82
Page 83

Changing illumination color
You can change the illumination color of the buttons on the monitor panel.
1 Press - <Settings>.
2
3
4
Saving your own adjustments
• When variable color illumination is selected, you
cannot adjust the color.
1 After selecting a color in step 5 on the left...
2 Adjust the color.
3 Save the adjustment into User1 or User2.
ENGLISH
5 Select a color.
Your own color stored (☞ right)
Variable color illumination
• Illumination color changes gradually.
83
Page 84

Settings for video playback
Picture/aspect ratio adjustment
ENGLISH
You can adjust the picture quality and change the aspect
ratio for video playback such as DVD, iPod video, video
from an external component or camera. You cannot
adjust the picture for videos on SD card and USB device.
1 Display the adjustment menu.
2 Adjust the picture (1) and change the
aspect ratio (2).
Adjusts the brightness
Adjusts the
color
Adjusts the contrastAdjusts the tint
System settings items
4:3 signal 16:9 signal
Full:
For 16:9 original
pictures
Regular:
For 4:3 original
pictures
Auto:
For “DISC” only
• For videos on SD card and USB device, Original,
Regular, and Full are selectable.
When Original is selected, the signal is shown so it
is played back at the largest possible image without
changing the aspect ratio.
• Aspect ratio is automatically
selected to match to the
incoming signals.
Switches the category by pressing the corresponding tab
Menu items Selectable settings Initial: Underlined
Language Select the language used for on-screen information and voice guidance.
Region
Time Format 12 Hours, 24 Hours
English, Español, Français
84
Page 85

System settings items
Menu items Selectable settings Initial: Underlined
Time Zone Select your residential area from one of the following time zones for
clock adjustment.
Hawaii (UTC–10:00), Alaska (UTC–09:00), Pacific (UTC–08:00),
Mountain (UTC–07:00), Central (UTC–06:00),
Region
DST
(Daylight Saving Time)
Adaptive Volume When this function is activated, the System automatically increases the
Guidance Mute Muting: Mutes AV source sound when navigation voice guidance starts.
Audio
Reverse Audio Reduction On: Attenuates AV sounds when you shift the gear to the reverse (R)
Start Up Sound Level Starts the unit with the volume lower than when the system was turned
Illumination color
Clock on Video/Screen-Off On: The clock time is displayed while video source is played back or the
Dimmer Auto: Dims the screen and the button illumination when you turn on
Display
Brightness: Day
Brightness: Night
(when Dimmer is [On])
Eastern (UTC–05:00), Atlantic (UTC–04:00),
Newfoundland (UTC–03:30)
Activate this if your residential area is subject to DST.
Auto : Activates daylight saving time.
Off : Cancels.
volume level (both for guidance and for audio) as the car speeds up.
Off, Min, Mid, Max
Att.: Attenuates AV source sound when navigation voice guidance
starts.
Off: Cancels muting or attenuation.
position. In addition,
Off: Cancels.
off, then turn it up back to the previous level.
Off, Low, Mid, High
☞ page 83
screen is turned off.
Off: Cancels.
the headlights.
On: Activates dimmer.
Off: Cancels.
• The illumination control lead connection is required. (☞ Installation/
Connection Manual)
Adjust the display brightness.
–5 to +5; Initial +5 (when Dimmer is On: Initial +1)
appears on the display.
ENGLISH
85
Page 86

System settings items
Menu items Selectable settings Initial: Underlined
ENGLISH
Antenna Remote Auto: Antenna remote output is always on.
Manual: Allows user to turn on/off antenna remote output.
(☞ page 15)
Camera Input
AV Input You can determine the use of the LINE IN and VIDEO IN jacks.
Connection
Beep On: Activates the key-touch tone.
Shortcut Button Displays the screen to assign your most frequently used features to
Security Indicator If you enable the security indicator, it flashes when the unit is turned off
Restore Factory Default Initialize all settings you have made. Press [Restore] to initialize the
Others
Demonstration Mode This setting will be deactivated and disappear from the menu when the
The setting varies depending on the installation settings (☞ page 12).
On, Off (☞ page 110)
AV: Select when connecting an AV component such as a camcorder.
Audio: Select when connecting an audio component such as a portable
audio player.
Off: Select when no component is connected (<AV-IN> is not
selectable). Not selectable when the input is selected as the source.
Off: Cancels.
shortcut buttons. (☞ page 15)
as an antitheft measure.
On, Off (☞ page 11).
settings.
• When restoring the settings, adjust the settings on installation
setting screen (☞ page 12).
System detects the first car movement.
On, Off
86
Page 87

Additional information
Playable Audio/video files
Extension code Audio format Video format CD DVD USB SD
Audio .mp3 MP3 –
.wma WMA –
.m4a AAC –
.wav WAV –
.fla/.flac FLAC – × ×
Video .avi/.mp4 AAC H.264/AVC × ×
MP3 MPEG4 × ×
.wmv WMA WMV × ×
For CD and DVD, see also “Playable disc types”. (☞ page 55)
○: Playable
×: Not playable
○○○○
○○○○
○○○○
○○○○
○○
○○
○○
○○
ENGLISH
• .mp3 file
– Format: MPEG 1/2 Audio Layer 3
– Bit rate: 32 kbps to 320 kbps (VBR compatible)
– Sampling frequency: 16/22.05/24/32/44.1/48 kHz
– Joint stereo: compatible
– ID3 tag: 1.0
*1
*1
*2
*2
/1.1
/2.2
*2
/2.3
/2.4
*1 30 characters
*2 128 characters
• .wma file
Format: Windows Media Audio Standard L3 Profile
–
– Bit rate: 32 to 320 kbps
– Sampling frequency: 16/22.05/32/44.1/48 kHz
– WMA-Tag: 64 characters
* DRM/Professional/Lossless/Voice incompatible
• .m4a file
– Format: MPEG 2/4 AAC-LC HE-ACC V1
– Bit rate: 32 to 320 kbps/VBR
– Sampling frequency: 16/22.05/32/44.1/48 kHz
– Tag: iTunes m4a metadata
* DRM/multichannel incompatible. Only AAC files created
with iTunes are playable.
• .wav file
– Format: RIFF waveform Audio Format (Linear PCM
only)
– Bit rate: 16 bit
– Sampling frequency: 44.1 kHz
– Channel: Monaural/Stereo
– Tag: RIFF LIST chunk
* DRM/multichannel incompatible
• .fla/.flac file
– Format: flac format
– Compression level: 0/1/2/3/4/5/6/7/8
– Bit rate: 16 bit
–
Sampling frequency: 8/16/22.05/24/32/44.1/48 kHz
– Channel: Monaural/Stereo
– Tag: Vorbis Comment compatible
• .avi/.mp4 file
H.264/AVC
– Format: MPEG4 AVC/H.264
– Profile & Level: Baseline profile
– Picture size: 720×480 (30 fps)
Video bit rate: Max 8 Mbps
–
– Audio format: AAC
– Audio bit rate: 32 to 320 kbps (VBR compatible)
– Audio sampling frequency: 32/44.1/48 kHz
87
Page 88

Additional information
MPEG4
– Format: ISO MPEG4
– Profile: Simple profile
ENGLISH
– Picture size: 720×480 (30 fps)
–
Video bit rate: Max 8 Mbps
– Audio format: MP3
– AAudio bit rate: 32 to 320 kbps (VBR compatible)
– Audio sampling frequency: 32/44.1/48 kHz
• .wmv file
– Format: Windows Media Video Version9 MP@ML
– Picture size: 720×480 (30 fps)
– Video bit rate: Max 8 Mbps
– Audio format: WMA
– Audio bit rate: 32 to 320 kbps
– Audio sampling frequency: 32/44.1/48 kHz
Notice:
• Some audio/video files are unplayable depending
on the file format.
• If CD-DA and audio files are recorded on a single
disc, only CD-DA tracks are playable.
88
Page 89

Additional information
Sound signals emitted through the rear terminals
Through the analog terminals (Speaker out/FRONT OUT/REAR OUT)
2-channel signal is emitted. When playing multi-channel encoded disc, multi-channel signals are downmixed.
• DTS sound cannot be reproduced.
Language codes (for DVD language selection)
Code Language Code Language Code Language Code Language Code Language
AA Afar FA Persian KK Kazakh NO Norwegian ST Sesotho
AB Abkhazian FI Finnish KL Greenlandic OC Occitan SU Sundanese
AF Afrikaans FJ Fiji KM Cambodian OM (Afan) Oromo SW Swahili
AM Ameharic FO Faroese KN Kannada OR Oriya TA Tamil
AR Arabic FY Frisian KO Korean (KOR) PA Panjabi TE Telugu
AS Assamese GA Irish KS Kashmiri PL Polish TG Tajik
AY Aymara GD Scots Gaelic KU Kurdish PS Pashto, Pushto TH Thai
AZ Azerbaijani GL Galician KY Kirghiz QU Quechua TI Tigrinya
BA Bashkir GN Guarani LA Latin RM
BE Byelorussian GU Gujarati LN Lingala RN Kirundi TL Tagalog
BG Bulgarian HA Hausa LO Laothian RO Rumanian TN Setswana
BH Bihari HI Hindi LT Lithuanian RW Kinyarwanda TO Tonga
BI Bislama HR Croatian LV Latvian, Lettish SA Sanskrit TR Turkish
BN Bengali, Bangla HU Hungarian MG Malagasy SD Sindhi TS Tsonga
BO Tibetan HY Armenian MI Maori SG Sangho TT Tatar
BR Breton IA Interlingua MK Macedonian SH Serbo-Croatian TW Twi
CA Catalan IE Interlingue ML Malayalam SI Singhalese UK Ukrainian
CO Corsican IK Inupiak MN Mongolian SK Slovak UR Urdu
CS Czech IN Indonesian MO Moldavian SL Slovenian UZ Uzbek
CY Welsh IS Icelandic MR Marathi SM Samoan VI Vietnamese
DZ Bhutani IW Hebrew MS Malay (MAY) SN Shona VO Volapuk
EL Greek JA Japanese MT Maltese SO Somali WO Wolof
EO Esperanto JI Yiddish MY Burmese SQ Albanian XH Xhosa
ET Estonian JW Javanese NA Nauru SR Serbian YO Yoruba
EU Basque KA Georgian NE Nepali SS Siswati ZU Zulu
Rhaeto-Romance
TK Turkmen
ENGLISH
89
Page 90

Sound Settings
Setting the Sound
ENGLISH
You can set the audio effects and sound quality in the vehicle here.
Set the sound when the AV source is selected. This cannot be set when the AV source is turned off (on standby).
1 Press - <Settings>.
2
3 Set each item.
Sets the subwoofer level
The following items can be set.
Menu items
Fader/Balance Sets the right and left, and
Position
Equalizer Sets the sound quality.
Audio Effects Sets the audio effects.
Speaker Settings Sets the speaker configuration.
Vehicle Type
Volume Adjust Sets the volume of each AV source
Others Sets the built-in amp.
Description
front and rear volume balance.
(☞ right)
Sets the listening position.
(☞ page 93)
(☞ page 95)
(☞ page 96)
(☞ page 91)
Sets the vehicle type. (☞ page 91)
equal. (☞ page 96)
(☞ page 98)
Setting Fader/Balance
You can set the right and left, and front and rear
volume balance here.
1 Press - <Settings> - <Sound>.
2
3 Touch the position to be balanced.
You can also adjust the right / left balance by
touching or , and adjust front / rear
balance by touching or .
Touching [Center] sets the right and left, and front
and rear balance at the center.
90
Page 91

Setting the Sound
Setting the vehicle type
You can set the vehicle type here.
1 Press - <Settings> - <Sound>.
2
3 Select a vehicle type.
The Digital Time Alignment (DTA) suitable for the
selected vehicle type is set.
If you want to adjust the sound in more detail, set
the listening position. (☞ page 93)
Setting the speaker configuration
You can set the vehicle’s speaker configuration here.
1 Press - <Settings> - <Sound>.
2
3 Touch a speaker to be set.
4 Touch or next to <Location> to set
the speaker’s position.
ENGLISH
91
Page 92

Setting the Sound
5 Touch or next to <Size> to set the
size of the speaker.
ENGLISH
If the size is unknown, select <6-1/2”>.
If there is no speaker, select <None>.
• <None> (without speaker) cannot be set for
the size of the front speaker.
6 Only for the front speaker, touch or
next to <Tweeter> to set the size of the
tweeter.
• When <Size> is set to <None> for the
subwoofer, Crossover cannot be adjusted for the
subwoofer.
• When <Size> is set to <None> for the rear
speaker, Crossover cannot be adjusted for the
rear speaker.
To change the crossover frequency of the
speakers:
Set the crossover frequency between the front/rear
speakers and the subwoofer, slope (attenuation rate)
and phase of the subwoofer.
1
2 Touch the button for the speaker where you
want to change the crossover frequency.
3 Touch or to set each item of the front
(or rear) speaker and subwoofer.
92
Page 93

Setting the Sound
4 Only when you select the front speaker and
the size of the tweeter is set for the front
speaker in the speaker settings, touch or
to set the tweeter output level.
5 Only when the subwoofer is selected, touch
[Reverse] (reverse phase) or [Normal] (normal
phase) to set the phase.
• With the front/rear speaker, the <Frequency>
blocks the component lower than the frequency
of the front/rear speaker. With the subwoofer,
this frequency blocks the component higher
than the frequency of the subwoofer. Using this
function prevents the output of the low range
component of the front/rear speaker and the
output of the high range component of the
subwoofer.
When <Through> is set, this function is set to
OFF.
• <Slope> is the attenuation rate when the
sound of the band set at the cutoff frequency is
blocked. The attenuation rate per octave (oct) is
set in dB.
When you change the output level (Gain) for each
speaker or the tweeter, the entire tone curve for
the speaker moves up or down. Adjust the output
balance of all speakers.
Setting the listening position
You can select the listening position here to set a better
sound field for the people inside the vehicle.
Before setting this listening position, be sure to set
the vehicle type. (☞ page 91)
1 Press - <Settings> - <Sound>.
2
3 Select a listening position.
The Digital Time Alignment (DTA) suitable for the
selected listening position is set.
The DTA value can be fine-tuned. (☞ page 94)
The DTA is a function that adjusts the virtual
position of the speaker so that the distance from
the actual listening position to each speaker is the
same.
ENGLISH
93
Page 94

Setting the Sound
To fine-tune the DTA for the listening
position:
You can fine-tune the DTA so it best fits the actual
ENGLISH
listening position.
1 Select a listening position.
2 Touch [Customize].
3 Touch the button of the speaker to be
adjusted.
4 Touch or of <Delay> or <Level>and
adjust it.
Furthermore, if <Level> is used for the
adjustment, adjust the DTA while listening to the
sound.
5 Repeat steps 3 and 4 to set all of the
speakers.
• When the sizes of the rear speaker and
subwoofer are set to <None>, the DTA of those
speakers cannot be adjusted.
• If you touch [Reset] in step 4, a confirmation
message appears. If you touch [Yes], all speaker
adjustments of the listening position under
adjustment are returned to the default settings.
When using <Delay> to adjust the DTA, input the
actually measured distance.
In this case, when <All Seats> is selected in
Position, specify the distance from the center of all
seats, and when <Front All> is selected, specify
the distance from the midpoint between the right
and left seats.
94
Page 95

Setting the preset equalizer
The preset equalizer can be set by source here.
1 Select a source you want to set and press
- <Settings> - <Sound>.
2
3 Select a genre of the preset equalizer and
touch it.
Setting the Sound
3 Trace the equalizer curve on the screen you
want to set.
You can touch to select the frequency and touch
or to set the level.
4 Touch [Save].
ENGLISH
To set the user equalizer:
You can change the curve of the preset equalizer or set
your own original equalizer curve.
1 Select a source you went to set, and
press - <Settings> - <Sound>
- <Equalizer>.
2
Current source
Touching [Reset] displays a confirmation message.
Touching [Yes] resets the equalizer curve to the
default setting.
5 Select the destination.
95
Page 96

Setting the Sound
Setting the volume of each source equal
ENGLISH
Set the volume of each source equal against the volume
of CD (include music file DVD disc).
1 Press - <Settings> - <Sound>.
2
3 Press or of the present source and
adjust the volume.
• Touching [Reset All] displays a confirmation
message.
Touching [Yes] resets the level adjustments of
all source level to ±0.
• When setting the volume for AV-IN, adjust the
volume for Audio-IN on the screen.
Setting the audio effects
You can set various audio effects here.
Set the audio effects when the AV source is selected.
They cannot be set when the AV source is turned off (on
standby).
1 Press - <Settings> - <Sound>.
2
3 Press or of each item and
adjust it.
4 Press .
The screen returns to the sound setting menu.
96
Page 97

Setting the Sound
The following items can be set.
Menu items Selectable settings
Initial: Underlined
Bass Boost 3 Sets the level that the bass is boosted.
2
1
Off Turns Bass Boost off.
Loudness High Compensates bass and treble when insufficient in quiet audio
Low
Off Sets Loudness to Off.
Space Enhancer Large Creates the effect of a virtual space that is larger than the actual
Medium
Small
Off Sets Space Enhancer to Off.
Sound Stage Elevation High Creates an effect of hearing the sound from the higher place
Mid
Low
Off Sets Sound Stage Elevation to Off.
Road Noise Compensation
Audio Contrast High Sharpens vague sounds to make the audio more realistic.
Digital Track Expander On Reproduces the natural sound of sources by restoring data that
3 Increases the volume of little sounds that can be easily washed
2
1
Off Sets Road Noise Compensation to Off.
Mid
Low
Off Sets Audio Contrast to Off.
Off Sets Digital Track Expander to Off.
segments.
That level can be set here.
vehicle interior.
The size of a virtual space can be set here.
• When the source is set to “TUNER”, Space Enhancer cannot be
set.
than the actual position of the speakers.
The position (height) of the virtual speakers can be set here.
out by road noise and boosts the bass.
That level can be set here.
That level can be set here.
This function is effective for the compressed music data.
was lost and waves that were changed in audio compression to
their original states.
This function is effective for compressed music data.
Description
ENGLISH
97
Page 98

Setting the Sound
Setting the hardware
Sets the built-in amplifier output.
ENGLISH
1 Press - <Settings> - <Sound>.
2
3 Press an option.
Amplifier On Turns the built-in amplifier
on.
Off Turns the built-in amplifier
off.
Setting the subwoofer level
You can set the subwoofer level here.
1 Press - <Settings> - <Sound>.
2 Press [ ] or [ ] to adjust the
subwoofer level (-50 to +10 initial:0).
98
Page 99

Bluetooth Operations
Information for using Bluetooth® devices
Bluetooth is a short-range wireless radio
communication technology for the mobile device such
as mobile phones, portable PCs, and other devices. The
Bluetooth devices can be connected without cables and
communicate with each other.
The countries where you may use the
Bluetooth® function
• United States of America
• Canada
Bluetooth profile
This unit supports the following Bluetooth profiles;
• HFP (Hands-Free Profile) 1.5
• OPP (Object Push Profile) 1.1
• PBAP (Phonebook Access Profile) 1.0
• A2DP (Advanced Audio Distribution Profile) 1.2
• AVRCP (Audio/Video Remote Control Profile) 1.3
• This unit is compatible with secure simple
pairing (SSP) of Bluetooth Ver.2.1+EDR.
• Some operations are not available while driving.
When you perform operations, stop your car in a
safe place.
• Some Bluetooth devices may not be connected to
this unit depending on the Bluetooth version of
the device.
This unit may not work for some Bluetooth devices.
•
• Connecting condition may vary depending on
circumstances around you.
• When the unit is turned off, the device is
disconnected.
Bluetooth Information:
If you wish to receive more information about
Bluetooth, visit the following JVC web site:
<http://WWW3.jvckenwood.com/english/car>
(English website only)
To check the connection status of a
Bluetooth device
indicator appears when a Bluetooth device is connected
ENGLISH
99
Page 100

Using Bluetooth device
Registering a Bluetooth device
To connect a Bluetooth device for the
ENGLISH
first time
When you connect a Bluetooth device to the unit
for the first time, make pairing between the unit
and the device. Pairing allows Bluetooth devices to
communicate with each other.
• Once you register a Bluetooth device, the device
remains registered until the registration is deleted.
(☞ page 102)
• Up to 5 devices can be registered in total.
• Only one device for Bluetooth phone and one for
Bluetooth audio can be connected at a time.
• To use the Bluetooth function, you need to turn on
Bluetooth function of the device.
According to the Bluetooth device to register to the unit,
there are two ways for registration.
1 Operate the Bluetooth device to turn on its
Bluetooth function.
Select “JVC Navi” on the Bluetooth device.
When the PIN code or input screen is displayed on
the Bluetooth device, go to A.
When the pass key or PIN code confirmation screen
is displayed on the Bluetooth device, go to B.
100
 Loading...