

Page 1

KW-M24BT
KW-M14
MONITOR WITH RECEIVER
INSTRUCTION MANUAL
ÉCRAN AVEC RÉCEPTEUR
MODE D’EMPLOI
MONITOR CON RECEPTOR
MANUAL DE INSTRUCCIONES
MONITOR COM RECETOR
MANUAL DE INSTRUÇÕES
• Updated information (the latest Instruction Manual, etc.) is available from
<http://w ww.jvc.net/cs/car/>.
• Des informations actualisées (le dernier mode d’emploi, etc.) sont disponibles sur le site
<http://w ww.jvc.net/cs/car/>.
• La información actualizada (el Manual de instrucciones más actualizado, etc.) está
disponible desde <http://www.jvc.net/cs/car/>.
• Estão disponíveis informações atualizadas (o Manual de Instruções mais recente, etc.) em
<http://w ww.jvc.net/cs/car/>.
Model name indication position
See “Removing the trim plate” (P. 21)
Position d’indication du nom du modèle
Reportez-vous à la section «Retrait de la
plaque de garniture» ( P.49)
Trim plate
Plaque de garniturea
Marco
Moldura
Posición de la indicación del nombre del
modelo
Consulte “Retirada del marco” (P.75)
Posição da indicação do nome do modelo
Consulte “Retirar a moldura” (P.103)
B5A-2244-10 (K/E/Q)© 2017 JVC KENWOOD Corporation
Page 2

Contents
Before use ....................................................................................2
How to read this manual .......................................................................................2
Precautions .................................................................................................................... 2
Getting Started ..........................................................................3
Clock settings ............................................................................................................... 4
Touch panel adjustment .......................................................................................4
Basics .............................................................................................5
Functions of the Buttons on the Front Panel .......................................... 5
Common operations ...............................................................................................5
HOME screen descriptions ..................................................................................6
Source control screen descriptions ...............................................................6
List screen ....................................................................................................................... 6
USB .................................................................................................7
Preparation .....................................................................................................................7
Playback operations .................................................................................................7
iPod/iPhone ................................................................................9
Preparation .....................................................................................................................9
Playback operations .................................................................................................9
Tuner ............................................................................................ 11
Tuner Basic Operation...........................................................................................11
Presetting stations ..................................................................................................11
FM RDS features ........................................................................................................11
Tuner Setup .................................................................................................................12
External Components ...........................................................13
Using external audio/video players ............................................................ 13
Rear view camera .................................................................................................... 13
Bluetooth smartphone (KW-M24BT) ...............................14
Register your smartphone to the unit ...................................................... 14
Receive a phone call ............................................................................................. 14
Make a phone call ................................................................................................... 15
Playing Bluetooth Audio Device ................................................................... 16
Delete the registered Bluetooth device ..................................................16
Controlling Audio ...................................................................17
Controlling General Audio .................................................................................17
Equalizer Control ......................................................................................................17
Subwoofer settings ................................................................................................17
Remote control ........................................................................18
Functions of the Remote control Buttons .............................................. 18
Installation .................................................................................19
Before Installation ................................................................................................... 19
Installing the unit .................................................................................................... 20
About this Unit ........................................................................ 24
More information .................................................................................................... 24
Troubleshooting ...................................................................................................... 24
Copyrights ................................................................................................................... 25
Specifications ............................................................................................................26
Before use
Precautions
#WARNING
Ñ To prevent injury or re, take the
following precautions:
• To prevent a short circuit, never put or leave any
metallic objects (such as coins or metal tools) inside
the unit.
• Do not watch or fix your eyes on the unit’s display
when you are driving for any extended period.
• If you experience problems during installation,
consult your JVC dealer.
Ñ Precautions on using this unit
• When you purchase optional accessories, check
with your JVC dealer to make sure that they work
with your model and in your area.
• The Radio Data System or Radio Broadcast Data
System feature won’t work where the service is not
supported by any broadcasting station.
Ñ Protecting the monitor
• To protect the monitor from damage, do not
operate the monitor using a ballpoint pen or similar
tool with the sharp tip.
Ñ Cleaning the Unit
If the front panel of this unit is stained, wipe it with
a dry soft cloth such as a silicon cloth. If the front
panel is stained badly, wipe the stain off with a cloth
moistened with neutral cleaner, then wipe it again
with a clean soft dry cloth.
! CAUTION
• Applaying spray cleaner directly to the unit may affect
its mechanical parts. Wiping the front panel with a
hard cloth or using a volatile liquid such as thinner
or alcohol may scratch the surface or erase screened
print.
Ñ How to reset your unit
If the unit or the connected unit fails to operate
properly, reset the unit.
How to read this manual
• The panels shown in this guide are examples used to
provide clear explanations of the operations. For this
reason, they may be different from the actual panels.
• In operation procedures, bracket shape indicates the
key or button you should control.
< >: indicates the name of panel buttons.
[ ]: indicates the name of touch keys
2
Reset button
Page 3

Getting Started
1 Turn the ignition key of your car to ACC.
The unit is turned on.
2 Press the < > button.
3 Touch [Settings].
4 Touch the corresponding key and set the value.
Audio
Sound Eect
Displays the Equalizer screen. (P.17)
Beep
Activates or deactivates the key-touch tone.
“ON” (Default), “OFF”
Loudness
Sets the amounts of boost of low and high tones.
“ON”, “OFF” (Default)
Subwoofer
Displays the Subwoofer screen. (P.17)
Display
Panel Adjust
Adjust the sensing position of touch panel. See
“Touch panel adjustment” (P. 4).
Aspect
Select the screen mode.
“16:9” (Default), “4:3 Pan Scan”
Tun er
Displays the Tuner Settings screen. (P.12)
General
Language
Select the language used for the control screen and
setting items. Default is “English”.
1) Touch [Language].
2) Select the desired language.
* You can change the page to display more items
by pressing [
]/ [ ].
BT Auto Connect
The unit automatically reconnect when the last
connected Bluetooth device is within range.
“ON” (Default), “OFF”
Clock Setting
Adjust the clock time. ( P.4).
Default
Touch [Default] to set all the settings to the initial
default settings.
5 Touch [6].
English |
3
Page 4

Getting Started
Clock settings
Ñ Synchronizing the clock time with FM RDS
Activate [RDS Clock Sync]. See “Tuner Setup”
(P. 12).
Ñ Adjusting the clock manually
✎ NOTE
• Deactivate [RDS Clock Sync] before adjusting the
clock. See “Tuner Setup” (P.12).
1 Press the < > button.
2 Touch [Settings].
3 Touch [General].
4 Touch [Clock Setting].
Clock screen appears.
5 Selects time format.
[12] (Default : North America, South America sales
area only)
[24] (Default : Europe, CIS sales area only)
Touch panel adjustment
1 Press the < > button.
2 Touch [Settings].
3 Touch [Display].
4 Touch [Panel Adjust].
5 Follow the instruction on the screen and touch
the center of each +.
• To cancel the touch panel adjustment, touch
[Cancel].
• If the touch position is deviated, [OK] is not
displayed. Retry from the beginning.
6 Touch [OK] .
6 Touch [R] or [S] to set the clock time.
• If you have selected [12] as the time format, touch
[AM] or [PM] before setting the clock time.
7 Touch [6].
4
Page 5

Basics
Basics
Functions of the Buttons on the Front Panel
1
2
3
4
5
6
Remote Sensor
1
• Receives the remote control signal.
(HOME)
2
• Displays the HOME screen. (P. 6)
• Pressing for 1 second turns the power off.
• When the power off, turns the power on.
EQ
3
• Displays the Equalizer screen.* (P.17)
* During video file playback, you can set only the
preset equalizer curve.
* The Equalizer screen is not displayed during
picture file playback or on the list screen or
SETUP screen etc,
+ , – (Volume)
4
• Adjusts volume. The volume will go up until 20
when you keep pressing [ + ].
(MUTE, Display o)
5
• Mutes/restores the sound.
• Pressing for 1 second turns the screen off.
When the screen is off, touch the display to turn
on the screen.
Reset
6
• If the unit or the connected unit fails to operate
properly, the unit returns to factory settings when
this button is pressed.
Common operations
Ñ Turning on the power
1 Press the < > button.
Ñ Turning o the power
1 Press and hold the < > button.
Ñ Adjusting the volume
1 Press the <+> or <–> button.
✎ NOTE
• The volume will go up until 20 when you keep
pressing [ + ].
Ñ Mutes the sound
1 Press the < > button.
To restore the sound, touch the button again, or
adjust the volume.
Ñ Turn o the screen
1 Press and hold the < > button.
To turn on the screen, touch the display.
English |
5
Page 6

Basics
25364
7
1
1
4
3
2
5
HOME screen descriptions
1 Press the < > button.
HOME screen appears.
Clock display
1
Touch to displays the Clock screen.
Switches to the radio broadcast. (P.11)
2
3
[USB]
Plays files on a USB device. (P.7)
[iPod]
Plays an iPod/iPhone. (P.9)
• When iPod/iPhone is connected.
Switches to an external component connected to
4
the AV-IN input terminal. (P.13)
Displays the Hands Free screen. (P.15)
5
(KW-M24BT only)
Plays a Bluetooth audio player. (P.16) (KW-M24BT
6
only)
Displays the SETUP screen. (P. 3)
7
Source control screen descriptions
You can perform source playback operations on the
source control screen.
Clock display
1
Touch to displays the Clock screen.
Source name
2
3
•
appears when the Bluetooth smartphone is
connected. *
•
appears when the Bluetooth audio player is
connected. *
•
appears when the mute function is active.
(P.5)
* KW-M24BT only
[DIM]
4
Select dimmer mode. Dim 1, Dim 2, Not dim
Returns to previous screen.
5
List screen
There are some common function keys in the list
screens of most sources.
1 You can change the page to display more items
by pressing [ ]/ [ ].
6
Page 7

USB
1
6
3
2
5
4
USB
Preparation
Ñ Connecting a USB device
1 Remove the cap of the USB terminal.
2 Connect the USB device with the USB cable.
The unit reads the device and playback starts.
Ñ To disconnect the USB device:
1 Press the < > button.
2 Touch a source other than [USB].
3 Detach the USB device.
Ñ Usable USB device
This unit can play MPEG1/ MPEG2/ MPEG4/ MP3/
WMA/ AAC/ JPEG/ BMP les stored in a USB mass
storage class device. (P. 24)
• File system: FAT16/ FAT32
• This unit can recognize a total of 9 999 files and 320
folders (a maximum of 9 999 files per folder).
• The maximum number of characters:
– Folder names : 24 characters
– File names : 24 characters
– Tag : 30 characters
✎ NOTE
• When the USB device is connected to this unit, it can
be charged through the USB cable.
• Install the USB device in the place where it will not
affect safe driving.
• You cannot connect a USB device via a USB hub and
Multi Card Reader.
• Take backups of the audio files used with this unit.
The files may be erased depending on the operating
conditions of the USB device.
We shall have no compensation for any damage
arising from any erased data.
• No USB device comes with this unit. You need to
purchase a commercially available USB device.
• Cap the USB terminal whenever not using.
Playback operations
Ñ Control the music you are listening to on
the source control screen.
The jacket of the currently playing file is displayed.
1
##:##:## : Song time
2
Play time bar : For confirmation of current playing
position
[L] : Plays or pauses.
3
[E] [F] : Searches the previous/next content.
Touch and hold to fast forward or fast backward.
Touch [L] to resumes normal play.
[
] : Selects Repeat playback mode.
Lights o (Default): Repeats all files in the USB
device.
: Repeats the current file.
: Repeats all files in the current folder.
FO
] : Selects Random playback mode.
[
: Randomly plays all files.
Lights o (Default): Normal playback.
Displays the information of the current file.
4
Only a file name is displayed if there is no tag
information.
Searches file. (P. 8)
5
D, etc. : Playback status
6
: Repeat playback mode indicator
: Random playback mode indicator
English |
7
Page 8

USB
3
2
1
2
4
5
Ñ For Video playback
1 When the operation buttons are not displayed on
the screen, touch the display.
D, etc. : Playback status
1
: Repeat playback mode indicator
: Random playback mode indicator
##:##:## : Song time
Play time bar : For confirmation of current playing
position
To switch the operation buttons.
2
[
] : You can adjust image quality in video screen.
3
[Brightness]: Adjusts the brightness. (00 to 08)
[Contrast]: Adjusts the contrast. (00 to 08)
[Tint]: Adjusts the tint. (00 to 08)
[Color]: Adjusts the color. (00 to 08)
[Reset]: To clear the adjustment.
] : Select the zoom ratio.
[
“Off”, “x2”, “x3”, “x4”, “x5”, “1/2”, “1/3”, “1/4”
[3] [2] [ < ] [ > ] : Scrolls the screen.
The operation buttons disappear when 4 is
4
touched or when no operation is done for about
10 seconds.
Displays the File List screen.* (P.8)
5
* The video file stops.
Ñ Selecting a track in a list (Searches le)
1 Touch [ ].
2 Select whether you search by audio files [ ],
video files [ ] or picture files [ ].
3 Touch [Y] to moves to the upper hierarchy.
4 Touch the desired folder.
When you touch a folder its contents are displayed.
5 Touch desired item from the content list.
Playback starts.
✎ NOTE
• When file types are switched, the Random/Repeat
playback setting is cancelled.
8
Page 9

iPod/iPhone
1
6
3
2
5
4
iPod/iPhone
Preparation
Ñ Connecting iPod/iPhone
• For Lightning connector models: Use USB
Audio cable for iPod/iPhone—KS-U62 (optional
accessory).
• For details about connecting iPod/iPhone, see page
23 .
1 Remove the cap of the USB terminal.
2 Connect the iPod/iPhone.
The unit reads the device and playback starts.
Ñ To disconnect the iPod/iPhone
1 Press the < > button.
2 Touch a source other than [iPod].
3 Detach the iPod/iPhone.
Ñ Connectable iPod/iPhone
The following models can be connected to this unit.
Made for
• iPhone 7 Plus
• iPhone 7
• iPhone SE
• iPhone 6s Plus
• iPhone 6s
• iPhone 6 Plus
• iPhone 6
• iPhone 5s
• iPhone 5c
• iPhone 5
• iPod touch (6th generation)
• iPod touch (5th generation)
✎ NOTE
• If you start playback after connecting the iPod, the
music that has been played by the iPod is played first.
• Cap the USB terminal whenever not using.
Playback operations
Ñ Control the music you are listening to on
the source control screen.
Artwork (Shown if the track contains artwork)
1
##:##:## : Song time
2
Play time bar : For confirmation of current playing
position
L : Plays or pauses.
3
[E] [F] : Searches the previous/next content.
Touch and hold to fast forward or fast backward.
[
] : Selects Repeat playback mode.
Lights o: Repeat off
: Functions the same as Repeat All.
1 : Functions the same as Repeat One.
] : Selects Random playback mode.
[
: Functions the same as Shuffle Songs.
Lights o: Random off
Displays the information of the current file.
4
Searches content. (P.10)
5
D, etc. : Playback status
6
: Repeat playback mode indicator
: Random playback mode indicator
English |
9
Page 10

iPod/iPhone
Ñ Selecting a content in a list
1 Touch [ ].
2 Touch desired item.
When you touch a category its contents are
displayed.
3 Touch desired item from the content list.
Playback starts.
• Touch [6] to moves to the upper hierarchy.
✎ NOTE
• The source control screen appears when you touch
[6] at the top hierarchy.
10
Page 11

Tuner
4
1
3
2
5
Tuner
Tuner Basic Operation
1 Press the < > button.
2 Touch [Tuner].
Ñ Source control screen
Displays the information of the current station:
1
PS name, Frequency, PTY Genre, Indicator Items
[<<] [>>] : Touch to the next frequency manually.
Recalls the memorized station.
2
When touched for 2 seconds, stores the current
receiving station in memory.
[E] [F] : Tunes in a station with good
3
reception automatically. *
[TA] : Traffic information mode is set. *2*3 (P.11)
[PTY] : Select the available Program Type. *
(P.11)
*1 If “AF” is set to ON on the Tuner screen, only RDS
stations are received. (P.12)
*2 FM only
*3 Europe, CIS sales area only
[1] : Presets stations automatically. (P.11)
4
[FM] : Switches the FM band.
5
“FM1”, “FM2”, “FM3”
[AM] : Switches the AM band.
“AM1”, “AM2”
1
2*3
Presetting stations
Ñ Storing stations in the memory
You can preset 18 stations for FM and 12 stations for
AM.
1 Touch [FM] or [AM] to select the band.
2 Touch [ 1].
The local stations with the strongest signals are
found and stored automatically.
• If “AF” is set to “ON” on the Tuner screen, only RDS
stations are stored in the memory. (P.12)
Ñ Manual memory
You can store the current receiving station in
memory.
1 Tune in to a station you want to preset.
2 Touch and hold [#] (#:1-6) in which you want to
store the station.
Ñ Recalling the preset station
1 Touch [#] (#:1-6).
✎ NOTE
• Only frequencies are registered as preset stations.
Information about RDS stations is not registered.
FM RDS features
(Europe, CIS sales area only)
Ñ Search by program type
1 Touch [ PTY] .
2 Select a program type from the list.
PTY Search starts.
Ñ Trac Information
1 Touch [ TA].
Switches to the traffic information automatically
when the traffic bulletin starts. (TA indicator lights
up.)
“ON”, “OFF” (Default)
• If “AF” is set to “ON” on the Tuner screen, the station is
switched to the RDS station. (P.12)
When the trac bulletin starts
The Traffic Information screen appears automatically.
English |
11
Page 12

Tuner
Tuner Setup
Ñ Function menu
1 Press the < > button.
2 Touch [Settings].
3 Touch [Tuner].
4 Set each item as follows.
RDS Clock Sync
Synchronizing the Radio Data System station time
data and this unit’s clock.
“ON” (Default), “OFF”
2
AF *
When station reception is poor, automatically switches
to the station that is broadcasting the same program
over the same Radio Data System network.
“ON” (Default), “OFF”
*1 North America, South America sales area only
*2 Europe, CIS sales area only
5 Touch [6].
1
Area *
North America (Default): For North/Central/South
America, AM/FM intervals: 10 kHz/200 kHz.
South America: For some South American countries,
AM/FM intervals: 10 kHz/50 kHz.
Europe: For Europe, AM/FM intervals: 9 kHz/50 kHz.
Stereo
Determines whether to receive stereo broadcasts
in the stereo mode or monaural mode (the MONO
indicator lights up).
“ON” (Default), “OFF”
Local
Tunes in only to the stations with sufficient signal
strength. (LOC indicator lights up.)
“ON”, “OFF” (Default)
12
Page 13

External Components
1
Using external audio/video players
Ñ Starting playback
1 Connect an external component to the AV-IN
input terminal. (P.22)
2 Press the < > button.
3 Touch [AV- IN].
4 Turn on the connected component and start
playing the source.
Ñ For Video playback
1 When the operation buttons are not displayed on
the screen, touch the display.
The operation buttons disappear when 1 is
touched or when no operation is done for about 5
seconds.
✎ NOTE
• When the picture from the rear view camera is
displayed on the AV-IN screen, the picture output
from the Visual Output terminal disappears.
Rear view camera
To use a rear view camera, the REVERSE lead
connection is required. For connecting a rear view
camera. (P.22)
Ñ Displaying the picture from the rear view
camera
The rear view screen is displayed when you shift the
gear to the reverse (R) position.
• To erase the caution message, touch the screen.
English |
13
Page 14

Bluetooth smartphone (KW-M24BT)Bluetooth smartphone (KW-M24BT)
Ñ About the Bluetooth smartphone and
Bluetooth audio player
This unit conforms to the following Bluetooth
specications:
Version
Bluetooth Ver.2.1 + EDR
Prole
Smartphone/ Cell-phone:
HFP (V1.6) (Hands Free Profile)
PBAP (V1.1.1) (Phonebook Access Profile)
Audio player:
A2DP (V1.2) (Advanced Audio Distribution Profile)
AVRCP (V1.3) (Audio/Video Remote Control Profile)
Sound codec
SBC
Ñ About mobile phones compatible with
Phone book Access Prole (PBAP)
If your mobile phone supports PBAP, you can display
the following items on the touch panel screen when
the mobile phone is connected.
• Phone book (up to 1000 entries)
• Dialed calls, received calls, and missed calls (up to 20
entries in total)
Register your smartphone to the unit
You can use your Bluetooth smartphone when paired
to this unit.
You can register up to 5 Bluetooth devices.
• You can pair the device and the unit using SSP (Secure
Simple Pairing) which only requires confirmation.
• One device can be connected at a time.
• When you register a new Bluetooth device, disconnect
the Bluetooth device currently connected and then
register the new device.
• A new device cannot be registered if there are 5
registered Bluetooth units. Delete unnecessary
registration. (P.16)
1 Turn on the Bluetooth function on your
smartphone/cell-phone.
2 Search the unit (“KW-M24BT”) from your
smartphone/cell-phone.
If a PIN code is required, enter the PIN code (“0000”).
•
appears when the Bluetooth smartphone is
connected.
•
appears when the Bluetooth audio player is
connected.
Ñ Disconnecting the device
• Turn off the Bluetooth function from your
smartphone/cell-phone.
• Turn off the ignition switch.
Receive a phone call
1 Touch [ Û].
• [Ý] : Reject an incoming call.
Ñ Operations during a call
Ending a call
[Ý]
You can send tones by touching desired keys
on the screen.
• Touch [
Switches the speaking voice output between
cell-phone and speaker.
Adjust the receiver volume
Press the <+> or <–> button.
] to close the window.
14
Page 15

Bluetooth smartphone (KW-M24BT)
Make a phone call
1 Press the < > button.
2 Touch [Phone].
3 See the table below for each operation method.
• [ ] : Disconnects the Bluetooth smartphone.
• [
] : Closes the screen for sending tones while
• [
Call by entering a phone number
1) Touch [
2) Enter a phone number with number keys.
3) Touch [Û].
Make a call
• Touch [W] to delete the last entry.
Call using call records
1) Touch [
Calls), [
2) Select the phone number from the list.
talking.
] : Displays the screen for deleting the
previously registered Bluetooth devices.
(P.16)
].
] (Incoming Calls), [ ] (Outgoing
] (Missed Calls).
Call using the phonebook
1) Touch [
2) Select the name from the list.
Make a call
• [
Call by voice
You can make a voice call using the voice recognition
function of the Bluetooth smartphone.
1) Touch [
2) Touch [
3) Say the name registered in the Bluetooth
smartphone.
• Touch [ ] to cancel voice dialing.
].
] : Updates the phonebook. Touch this
button after you have made a change to
the phonebook of your cell-phone.
].
].
Make a call
English |
15
Page 16

Bluetooth smartphone (KW-M24BT)
2
3
1
4
Playing Bluetooth Audio Device
1 Press the < > button.
2 Touch [BT Audio].
Ñ Source control screen
The jacket of the currently playing file is displayed.
1
[L] : Plays or pauses.
2
[E] [F] : Searches the previous/next content.
Displays the information of the current file.
3
Only a file name and a folder name are displayed if
there is no tag information.
D, etc. : Playback status
4
: Repeat playback mode indicator *
: Random playback mode indicator *
* The settings on the Bluetooth audio device are
displayed.
✎ NOTE
• Operations and display indications may differ
according to their availability on the connected
device.
Delete the registered Bluetooth device
1 Press the < > button.
2 Touch [Phone].
3 Touch [ ].
4 Touch the device name.
5 Touch [ ].
16
Page 17

1
3
2
Controlling Audio
Controlling General Audio
1 Press the < > button.
2 Touch [Settings].
3 Touch [Audio].
4 Touch [Sound Effect].
5 Touch [ ].
6 Set each item as follows.
Fader
[
Balance
[
[Reset]
Ñ Loudness
Adjust the front and rear volume balance.
12 (front) to -12 (rear)
] [ ]
Adjust the left and right volume balance.
12 (right) to -12 (left)
] [ ]
To clear the adjustment.
1 Press the < > button.
2 Touch [Settings].
3 Touch [Audio].
4 Touch [Loudness].
Sets the amounts of boost of low and high tones.
“ON”, “OFF” (Default)
Equalizer Control
1 Press the < > button.
2 Touch [Settings].
3 Touch [Audio].
4 Touch [Sound Effect].
5 Set each item as follows.
You can select frequency bar and adjust its level.
1
(-7 to +7)
• The adjustments are stored and “User” is activated.
To recall the preset equalizer curve.
2
The “User” preset and the current EQ curve returns
3
to flat.
Subwoofer settings
1 Press the < > button.
2 Touch [Settings].
3 Touch [Audio].
4 Touch [Subwoofer].
5 Set each item as follows.
Frequency
[80Hz], [120Hz],
[160Hz], [OFF]
Volume
[–], [+]
Low Pass Filter adjustment. /
[OFF]: Turns off the subwoofer
output. (Default OFF)
Adjusts the subwoofer level. 0 to 12
(Default 6)
English |
17
Page 18

Remote control
This unit can be operated using the remote control.
The remote control RM-RK258 (optional accessory)
can be used.
! WARNING
• Do not ingest the battery, Chemical Burn Hazard
The remote control supplied with this product
contains a coin / button cell battery. If the coin/button
cell battery is swallowed, it can cause severe internal
burns in just 2 hours and can lead to death.
Keep new and used batteries away from children.
If the battery compartment does not close securely,
stop using the product and keep it away from
children.
If you think batteries might have been swallowed or
placed inside any part of the body, seek immediate
medical attention.
! CAUTION
• Put the remote control in a place where it will
not move during braking or other operations. A
dangerous situation could result, if the remote control
falls down and gets wedged under the pedals while
driving.
• Do not leave the battery near fire or under direct
sunlight. A fire, explosion or excessive heat generation
may result.
• Do not recharge, short, break up or heat the battery
or place it in an open fire. Such actions may cause the
battery to leak fluid. If spilled fluid comes in contact
with your eyes or on clothing, immediately rinse with
water and consult a physician.
Ñ Removing the battery sheet
Pull the battery sheet out from the remote controller
to activate the battery.
Ñ Changing the battery of the remote
controller
Functions of the Remote control Buttons
• Aim the remote control directly at the remote sensor
on the faceplate.
• DO NOT expose the remote sensor to bright light
(direct sunlight or artificial lighting).
SRC
VOL + –
ATT
DISP
FM/R
AM/S
E 2
F 3
ANGLE
Û
DIRECT
ASPECT
Numeric
Keypad
CLR
ENT
Switches to the source to be played.
Adjusts the volume.
Mutes/restores the sound
Not used.
Selects the folder to be played.
During tuner source, select FM/ AM band
to be received.
Selects the track or file to be played.
During tuner source, switches to broadcast
stations received by the unit.
Not used.
When a call comes in, answers the call.
Not used.
Not used.
Not used.
Not used.
Not used.
CR2025 (+side)
• Use a commercially available button battery (CR2025).
• Insert the battery with the + and – poles aligned
properly.
– If the effectiveness of the remote controller
decreases, replace the battery.
18
Page 19

Installation
Installation
Before Installation
Before installation of this unit, please note the
following precautions.
#WARNINGS
• If you connect the ignition wire (red) and the battery
wire (yellow) to the car chassis (ground), you may
cause a short circuit, that in turn may start a fire.
Always connect those wires to the power source
running through the fuse box.
• Do not cut out the fuse from the ignition wire (red)
and the battery wire (yellow). The power supply must
be connected to the wires via the fuse.
#CAUTION
• Install this unit in the console of your vehicle.
Do not touch the metal part of this unit during and
shortly after the use of the unit. Metal part such as the
heat sink and enclosure become hot.
✎ NOTE
• Mounting and wiring this product requires skills and
experience. For best safety, leave the mounting and
wiring work to professionals.
• Make sure to ground the unit to a negative 12V DC
power supply.
• Do not install the unit in a spot exposed to direct
sunlight or excessive heat or humidity. Also avoid
places with too much dust or the possibility of water
splashing.
• Do not use your own screws. Use only the screws
provided. If you use the wrong screws, you could
damage the unit.
• If the power is not turned ON (“There is an error in
the speaker wiring. Please check the connections.” is
displayed), the speaker wire may have a short-circuit or
touched the chassis of the vehicle and the protection
function may have been activated. Therefore, the
speaker wire should be checked.
• If your car’s ignition does not have an ACC position,
connect the ignition wires to a power source that
can be turned on and off with the ignition key. If you
connect the ignition wire to a power source with a
constant voltage supply, such as with battery wires,
the battery may be drained.
• If the console has a lid, make sure to install the unit so
that the front panel will not hit the lid when closing
and opening.
• If the fuse blows, first make sure the wires aren’t
touching to cause a short circuit, then replace the old
fuse with one with the same rating.
• Insulate unconnected wires with vinyl tape or other
similar material. To prevent a short circuit, do not
remove the caps on the ends of the unconnected
wires or the terminals.
• Secure the wires with cable clamps and wrap vinyl
tape around the wires that comes into contact with
metal parts to protect the wires and to prevent short
circuit.
• Connect the speaker wires correctly to the terminals
to which they correspond. The unit may be damaged
or fail to work if you share the ¤ wires or ground
them to any metal part in the car.
• When only two speakers are being connected to
the system, connect the connectors either to both
the front output terminals or to both the rear output
terminals (do not mix front and rear). For example,
if you connect the ¢ connector of the left speaker
to a front output terminal, do not connect the ¤
connector to a rear output terminal.
• After the unit is installed, check whether the brake
lamps, blinkers, wipers, etc. on the car are working
properly.
• Mount the unit so that the mounting angle is 30° or
less.
• Do not press hard on the panel surface when installing
the unit to the vehicle. Otherwise scars, damage, or
failure may result.
• Reception may drop if there are metal objects near
the Bluetooth antenna.
Bluetooth antenna unit
Ñ Supplied accessories for installation
1
3
[1]
5
[1]
7
(M5 × 6 mm)
9
[1]
North America, South America sales area only
[2]
KW-M24BT only
(2 m)
x1
x1
x1
x4
x1
2
4
6
8
[2]
[1]
[1]
(3 m)
(M5 × 7 mm)
x2
x1
x4
English |
x1
19
Page 20

Installation
Ñ Installation procedure
1) To prevent a short circuit, remove the key from
the ignition and disconnect the ¤ terminal of the
battery.
2) Make the proper input and output wire connections
for each unit.
3) Connect the wire on the wiring harness.
4) Take Connector B on the wiring harness and connect
it to the speaker connector in your vehicle.
5) Take Connector A on the wiring harness and connect
it to the external power connector on your vehicle.
6) Connect the wiring harness connector to the unit.
7) Install the unit in your car.
8) Reconnect the ¤ terminal of the battery.
9) Press the reset button.
Installing the unit
Ñ Non-Japanese cars
Ñ Trim plate
1) Attach accessory 1 to the unit.
1
Ñ Microphone unit (KW-M24BT)
1) Check the installation position of the microphone
(accessory 4).
2) Clean the installation surface.
3) Remove the separator of the microphone (accessory
4), and stick the microphone to the place shown
below.
4) Wire the microphone cable up to the unit with it
secured at several positions using tape or other
desired method.
5) Adjust the direction of the microphone (accessory 4)
to the driver.
Bend the tabs of the
mounting sleeve with
a screwdriver or similar
utensil and attach it in
place.
✎ NOTE
• Make sure that the unit is installed securely in place. If
the unit is unstable, it may malfunction (eg, the sound
may skip).
Ñ Japanese cars (North America, South
America sales area only)
7 or 8
20
Car Bracket
7 or 8
4
Fix a cable with a commercial item of tape.
✎ NOTE
• Swap the clips if necessary.
Page 21

Installation
Ñ Removing the trim plate
1) Use the extraction key (accessory 3) to lever out the
four tabs (two on the left part, two on the right part).
3
2) Pull the trim plate forward.
Ñ Removing the unit
1) Remove the trim plate by referring to step 1 in
“Removing the trim plate”.
2) Insert the extraction key (accessory 2) deeply into
the slot as shown. (The protrusion at the tip of the
extraction key must face toward the unit.)
2
3) With the inserted extraction key secured, insert the
other extraction key into the slot.
2
4) Pull out the unit halfway.
✎ NOTE
• Be careful to avoid injury from the catch pins on the
extraction key.
5) Pull the unit all the way out with your hands, being
careful not to drop it.
English |
21
Page 22

Installation
Ñ Connecting wires to terminals
USB device
[2]
Accessory 4:
Bluetooth Microphone
(KW-M24BT only)
Subwoofer Preout
Connector B
Connector A
1 3 5 7
2 4 6 8
1 3 5 7
2 4 6 8
USB terminal
Cap
15A
Cap
[1]
(0.8 m)
5V=1A
MIC
SUB
WOOFER
Light Green
(Parking sensor wire)
Accessory 9: Extension cable
For best safety, be
BRAKE
PARKING
sure to connect the
Connect to the
vehicle’s parking
brake detection
switch harness.
parking sensor.
Purple/White
(Reverse sensor wire)
Connect to vehicle’s reverse lamp harness
when using the optional rear view camera.
REVERSE
GEAR
SIGNAL
Light Blue/Yellow
(Steering remote control wire)
To steering remote
To use the steering wheel remote control
STEERING
WHEEL
REMOTE
CONTROL
feature, you need an exclusive remote
adapter (not supplied) matched to your car.
FRONTREARAV-IN
LLL
RRR
VOUT
CAMV
ANT
FM/AM antenna input
FM/AM antenna
Fuse (15A)
ISO Connector
Ñ Wiring harness connector function guide
Pin Color and function
A-4 Yellow Battery
A-5 Blue/White
[3]
Power Control
A-7 Red Ignition (ACC)
A-8 Black Earth (Ground) Connection
B-1/ B-2 Purple (+) / Purple/Black (–) Rear Right
B-3/ B-4 Gray (+) / Gray/Black (–) Front Right
B-5/ B-6 White (+) / White/Black (–) Front Left
B-7/ B-8 Green (+) /
Green/Black (–) Rear Left
• Speaker Impedance: 4-8 Ω
! CAUTION
Before you connect the commercially available ISO
connectors to the unit, check the following condition:
• Make sure that the pin assignment of the connector
matches with the JVC unit.
• Take extra notice of the power wire.
• In case battery wire and ignition wire are not
corresponding then change them accordingly.
• In case the car does not have an ignition wire, use a
commercially available interface.
22
AV-IN audio input
(Left; White, Right; Red)
Rear Audio Preout
(Left; White, Right; Red)
Front Audio Preout
(Left; White, Right; Red)
Visual Output (Yellow)
Rear view camera input (Yellow)
AV-IN visual input (Yellow)
[1]
USB maximum power supply current : DC 5 V = 1 A
[2]
Sold separately
[3]
Max. 300mA, 12V
Page 23

Installation
North America, South America sales area only
FRONTREARAV-IN
15A
1 3 5 7
2 4 6 8
1 3 5 7
2 4 6 8
Accessory 5
Accessory 6
Speaker impedance: 4-8 Ω
White
White/Black
Gray
Gray/Black
Green
Green/Black
Purple
Purple/Black
Blue/White
(Power control/ Antenna control wire)
Connect either to the power control
P.CONT
ANT.CONT
terminal when using the optional
power amplifier, or to the power
terminal for the booster amplifier of the
film-type or short pole type antenna.
(Max. 300mA, 12V)
*1 If no connections are made, do not
let the cable come out from the tab.
LLL
RRR
VOUT
CAMV
To front left speaker
To front right speaker
To rear left speaker
To rear right speaker
1
*
Ñ Connecting an iPod/iPhone
[1]
(0.8 m)
CAMV
[2]
FRONTREARAV-IN
LLL
RRR
VOUT
ANT
iPod/iPhone
Lightning connector
KS-U62 (0.8m)
ANT
[3]
USB terminal
5V=1A
Cap
15A
[1]
iPod/iPhone maximum power supply current :
DC 5 V = 1 A
[2]
Sold separately
[3]
Optional accessory
Red (Ignition wire)
Yellow (Battery wire)
Black (Ground wire) ¤
(To car chassis)
Ignition key switch
ACC
B+
Car fuse box
Battery
English |
23
Page 24

About this Unit
About this Unit
More information
Ñ Playable Audio les
Audio
format
MP3 (.mp3) 16 – 320kbps,
WMA (.wma) 16 – 320kbps 16 – 48 kHz
AAC-LC (.m4a) 16 – 320kbps 16 – 48 kHz
• This unit can show ID3 Tag Version 1.0/1.1/2.2/2.3/2.4
(for MP3).
• The maximum number of characters:
– Tag : 30 characters
Bit rate Sampling frequency
16 – 48 kHz
VBR
✎ NOTE
• WMA and AAC of which is covered with DRM cannot
be played.
• Although the audio files are complied with the
standards listed above, the play may be impossible
depending on the types or conditions of media or
device.
Ñ Acceptable Video les
Video
format
MPEG -1
(.mpg, .mpeg)
MPEG -2
(.mpg, .mpeg)
MPEG-4
(.mp4, .avi)
Ñ Acceptable Picture les
• JPEG (.jpg)
32 x 32 to 8,192 x 7,680 resolution
– It may take time to display the file.
– Progressive JPEG files or lossless JPEG files cannot
be played.
• BMP (.bmp)
32 x 32 to 8,192 x 7,680 resolution
– It may take time to display the file.
Video codec Audio codec
MPEG -1 MPEG Audio Layer 2
MPEG -2 MPEG Audio Layer 2
MPEG-4 MP3, AAC-LC (2ch)
Troubleshooting
What appears to be trouble is not always serious.
Check the following points before calling a service
center.
• For operations with the external components, refer
also to the instructions supplied with the adapters
used for the connections (as well as the instructions
supplied with the external components).
Ñ General
No sound comes out of the speakers.
• Adjust the volume to the optimum level.
• Check the cords and connections.
The unit does not work at all.
• Reset the unit. (P. 2)
The remote controller does not work.
• Replace the battery.
Ñ USB
While playing a track, sound is sometimes
interrupted.
• The tracks are not properly copied into the USB device.
Copy the tracks again, and try again.
Ñ iPod/iPhone
No sound comes out of the speakers.
• Disconnect the iPod/iPhone, then connect it again.
• Select another source, then reselect “iPod”.
The iPod/iPhone does not turn on or does not
work.
• Check the connecting cable and its connection.
• Update the firmware version of iPod/iPhone.
• Charge the battery of iPod/iPhone.
• Reset the iPod/iPhone.
Sound is distorted.
• Deactivate the equalizer either on this unit or the
iPod/iPhone.
A lot of noise is generated.
• Turn off (uncheck) “VoiceOver” on the iPod/iPhone.
For details, visit <http://www.apple.com>.
Ñ Tuner
Automatic presetting does not work.
• Store stations manually. (P.11)
Static noise while listening to the radio.
• Connect the antenna firmly.
24
Page 25

About this Unit
Ñ AV-IN
No picture appears on the screen.
• Turn on the video component if it is not on.
• Connect the video component correctly.
Ñ Bluetooth
Phone sound quality is poor.
• Reduce the distance between the unit and the
Bluetooth mobile phone.
• Move the car to a place where you can get a better
signal reception.
The sound is interrupted or skipped while using a
Bluetooth audio player.
• Reduce the distance between the unit and the
Bluetooth audio player.
• Turn off, then turn on the unit. (When the sound is not
yet restored) connect the player again.
The connected audio player cannot be controlled.
• Check whether the connected audio player supports
AVRCP (Audio/Video Remote Control Profile).
The Bluetooth device does not detect the unit.
• Search from the Bluetooth device again.
The unit does not pair with the Bluetooth device.
• Turn off, then turn on the Bluetooth device.
• Disconnect the Bluetooth device currently connected
and then register the new device. (P.14)
Copyrights
• The Bluetooth word mark and logos are registered
trademarks owned by the Bluetooth SIG, Inc. and any
use of such marks by JVC KENWOOD Corporation is
under license. Other trademarks and trade names are
those of their respective owners.
• “Made for iPod” and “Made for iPhone” mean that an
electronic accessory has been designed to connect
specifically to iPod, or iPhone, respectively, and
has been certified by the developer to meet Apple
performance standards.
Apple is not responsible for the operation of this
device or its compliance with safety and regulatory
standards. Please note that the use of this accessory
with iPod, or iPhone may affect wireless performance.
• iPhone, iPod, iPod classic, iPod nano, and iPod touch
are trademarks of Apple Inc., registered in the U.S. and
other countries.
Lightning is a trademark of Apple Inc.
• The “AAC” logo is a trademark of Dolby Laboratories.
• Microsoft and Windows Media are either registered
trademarks or trademarks of Microsoft Corporation in
the United States and/or other countries.
• THIS PRODUCT IS LICENSED UNDER THE MPEG4 VISUAL PATENT PORTFOLIO LICENSE FOR THE
PERSONAL AND NON-COMMERCIAL USE OF A
CONSUMER FOR (¡) ENCODING VIDEO IN COMPLIANCE
WITH THE MPEG-4 VISUAL STANDARD (“MPEG-4
VIDEO”) AND/OR (¡¡) DECODING MPEG-4 VIDEO
THAT WAS ENCODED BY A CONSUMER ENGAGED
IN A PERSONAL AND NON-COMMERCIAL ACTIVITY
AND/OR WAS OBTAINED FROM A VIDEO PROVIDER
LICENSED BY MPEG LA TO PROVIDE MPEG-4 VIDEO. NO
LICENSE IS GRANTED OR SHALL BE IMPLIED FOR ANY
OTHER USE. ADDITIONAL INFORMATION INCLUDING
THAT RELATING TO PROMOTIONAL, INTERNAL AND
COMMERCIAL USES AND LICENSING MAY BE OBTAINED
FROM MPEG LA, LLC. SEE HTTP://WWW.MPEGLA.COM.
English |
25
Page 26

About this Unit
Specications
Ñ Monitor section
Picture Size
: 6.75 inches (diagonal) wide
: 151.8 mm (W) × 79.7 mm (H)
Display System
: Transparent TN LCD panel
Drive System
: TFT active matrix system
Number of Pixels
: 1,152,000 (800H x 480V x RGB)
Eective Pixels
: 99.99 %
Pixel Arrangement
: RGB striped arrangement
Back Lighting
: LED
Ñ USB interface section
USB Standard
: USB 2.0
File System
: FAT 16/ 32
Maximum Power Supply Current
: DC 5 V
D/A Converter
: 24 Bit
Audio Decoder
: MP3/ WMA/ AAC (.aac/ .m4a)
Video Decoder
: MPEG1/ MPEG2/ MPEG4
Frequency Response
• 48 kHz : 20 – 22,000 Hz
• 44.1 kHz : 20 – 20,000 Hz
S/N Ratio (dB)
: 99 dB
Dynamic Range
: 99 dB
NOTE
• Although the effective pixels for the liquid crystal
panel is given as 99.99% or more, 0.01% of pixels
may not light or may light incorrectly.
• Specifications subject to change without notice.
26
1 A
Ñ Bluetooth section
Technolog y
: Bluetooth Ver.2.1 + EDR
Frequency
: 2.402 – 2.480 GHz
Output Power
: +4 dBm (MAX), Power Class2
Maximum Communication range
: Line of sight approx. 10m (32.8 ft)
Audio Codec
SBC
Prole (Multi Prole support)
• HFP (V1.6) (Hands Free Profile)
• A2DP (V1.2) (Advanced Audio Distribution Profile)
• AVRCP (V1.3) (Audio/Video Remote Control Profile)
• PBAP (V1.1.1) (Phonebook Access Profile)
Ñ FM tuner section
Frequency Range (step)
: 87.5 MHz – 108.0 MHz (50 kHz)
(Europe, CIS sales area)
: 87.9 MHz – 107.9 MHz (200 kHz)
(North America, South America sales area)
Usable Sensitivity
: 12.2 dBf
: 1.1 μV/75 Ω
(For North America, South America sales area,
S/N : 30 dB)
(For Europe, CIS sales area, S/N : 26 dB)
Quieting Sensitivity
: 19.2 dBf
: 2.5 μV/75 Ω
(For North America, South America sales area,
S/N : 50 dB)
(For Europe, CIS sales area, S/N : 46 dB)
Frequency Response
: 30 Hz – 14 kHz
S/N Ratio (dB)
: 55 dB (MONO)
Selectivity (± 400 kHz)
: Over 70 dB
Stereo Separation
: 37 dB (1 kHz)
Ñ AM tuner section
Frequency Range (step)
: 531 – 1611 kHz (9 kHz) (Europe, CIS sales area)
: 530 – 1700 kHz (10 kHz)
(North America, South America sales area)
Usable Sensitivity
: 29 μV
Page 27

About this Unit
Ñ Video section
Color System of External Video Input
: N TSC /PAL
External Video Input Level (RCA jacks)
: 1.0 Vp-p/ 75 Ω
External Audio Max Input Level (RCA jacks)
: 1.8 V/ 10 kΩ
Video Output Level (RCA jacks)
: 1.0 Vp-p/ 75 Ω
Ñ Audio section
Maximum Power (Front & Rear)
: 50 W × 4
Full Bandwidth Power (Front & Rear)
Full Bandwidth Power (at less than 1% THD)
: 21 W × 4
Preout Level (V)
: 2 V/ 10 kΩ
Preout Impedance
: ≤ 600 Ω
Speaker Impedance
: 4 – 8 Ω
Equalizer
: 7 Band
Band
Frequency: 62.5/ 160/ 400/ 1k/ 2.5k/ 6.3k/ 16k Hz
Level: -7 – +7 (-7 dB – +7 dB)
LPF
Frequency: 80/ 120/ 160 Hz
Ñ General
Operating Voltage
: 14.4 V (10.5 – 16 V allowable)
Maximum Current Consumption
: 10 A
Installation Dimensions (W × H × D)
: 182 × 112 × 74.5 mm
7-3/8 × 4-3/8 × 2-15/16 inch
Main Unit Installation size (W × H × D)
: 178 × 100 × 79 mm (w/o sleeve)
Operational Temperature Range
: -10 °C – +60 °C
Weight
: 0.9 kg (2.0 lbs)
Ñ Information on Disposal of Old Electrical
and Electronic Equipment and Batteries
(applicable for EU countries that have
adopted separate waste collection
systems)
Products and batteries with the symbol (crossed-out
wheeled bin) cannot be disposed as household waste.
Old electrical and electronic equipment and batteries
should be recycled at a facility capable of handling
these items and their waste byproducts.
Contact your local authority for details in locating a
recycle facility nearest to you.
Proper recycling and waste disposal will help conserve
resources whilst preventing detrimental effects on our
health and the environment.
Notice: The sign “Pb” below the symbol for batteries
indicates that this battery contains lead.
For Israel
Ñ ינורטקלאו ילמשח דויצ לש הפשאל הכלשה רבדב עדימ
תכרעמב תושמתשמש תונידמל יטנוולר( תוללוס ןכו ןשי
.)תדרפומ הפשא ףוסיא
X םע הפשא חפ( ןומיסה םע תוללוסו םירצומ ךילשהל ןתינ אל
.הליגר תיתיב הפשאכ )וילע
ןקתמב תוללוס ןכו ןשי ינורטקלאו ילמשח דויצ רזחמל שי
.םהלש יאוולה ירצותבו הלאכ םיטירפב לפטל לגוסמה
ןקתמ תודוא םיטרפ תלבקל תימוקמה תושרה םע רשק ורצ
ורזעי םיתואנ הפשאל הכלשהו רוזחימ .םכילא בורקה רוזחימה
לעו ונתואירב לע תוילילש תועפשה עונמלו םיבאשמ רמשל
.הביבסה
ןייצמ תוללוס רובע ןומיסל תחתמש Pb ןומיסה :בל ומיש
.תרפוע הליכמ הללוסהש
English |
27
Page 28

About this Unit
For USA
Ñ FCC WARNING
This equipment may generate or use radio
frequency energy. Changes or modifications to this
equipment may cause harmful interference unless
the modifications are expressly approved in the
instruction manual. The user could lose the authority to
operate this equipment if an unauthorized change or
modification is made.
NOTE
• This equipment has been tested and found to comply
with the limits for a Class B digital device, pursuant
to Part 15 of the FCC Rules. These limits are designed
to provide reasonable protection against harmful
interference in a residential installation.
• This equipment may cause harmful interference to
radio communications, if it is not installed and used
in accordance with the instructions. However, there
is no guarantee that interference will not occur in a
particular installation. If this equipment does cause
harmful interference to radio or television reception,
which can be determined by turning the equipment
off and on, the user is encouraged to try to correct the
interference by one or more of the following measures:
– Reorient or relocate the receiving antenna.
– Increase the separation between the equipment
and receiver.
– Connect the equipment into an outlet on a
circuit different from that to which the receiver is
connected.
– Consult the dealer or an experienced radio/TV
technician for help.
! CAUTION
Use of controls or adjustments or performance of
procedures other than those specified herein may result
in hazardous radiation exposure.
In compliance with Federal Regulations, following
are reproductions of labels on, or inside the product
relating to laser product safety.
JVC KENWOOD Corporation
2967-3, ISHIKAWA-MACHI,
HACHIOJI-SHI, TOKYO, JAPAN
THIS PRODUCT COMPLIES WITH DHHS RULES
21 CFR SUBCHAPTER J IN EFFECT AT DATE OF
MANUFACTURE.
This transmitter must not be co-located or operated in
conjunction with any other antenna or transmitter.
For Canada
Ñ IC (Industry Canada) Notice
This device complies with Industry Canada licenceexempt RSS standard(s).
Operation is subject to the following two conditions:
(1) This device may not cause interference, and
(2) this device must accept any interference, including
interference that may cause undesired operation of
the device.
! CAUTION
This equipment complies with FCC/IC radiation
exposure limits set forth for an uncontrolled
environment and meets the FCC radio frequency
(RF) Exposure Guidelines and RSS-102 of the IC radio
frequency (RF) Exposure rules. This equipment has
very low levels of RF energy that is deemed to comply
without maximum permissive exposure evaluation
(MPE). But it is desirable that it should be installed and
operated keeping the radiator at least 20 cm or more
away from person’s body.
Ñ CALIFORNIA, USA
This product contains a CR Coin Cell Lithium Battery
which contains Perchlorate Material – special handling
may apply.
See www.dtsc.ca.gov/hazardouswaste/perchlorate
Location: Bottom plate
28
Page 29

About this Unit
For Argentina
Ñ Información acerca de la eliminación de
equipos eléctricos y electrónicos al nal
de la vida útil (aplicable a los países que
hayan adoptado sistemas independientes
de recogida de residuos)
Los productos con el símbolo de un contenedor con
ruedas tachado no podrán ser desechados como
residuos domésticos.
Los equipos eléctricos y electrónicos al final de la vida
útil, deberán ser reciclados en instalaciones que puedan
dar el tratamiento adecuado a estos productos y a sus
subproductos residuales correspondientes. Póngase
en contacto con su administración local para obtener
información sobre el punto de recogida más cercano.
Un tratamiento correcto del reciclaje y la eliminación de
residuos ayuda a conservar los recursos y evita al mismo
tiempo efectos perjudiciales en la salud y el medio
ambiente.
For Mexico
Ñ Para cumplimiento de la IFT:
La operación de este equipo esta sujeta a las siguientes
dos condiciones:
(1) es posible que este equipo o dispositivo no cause
interferencia perjudicial y
(2) este equipo o dispositivo debe aceptar cualquier
interferencia,
incluyendo la que pueda causar su operación no
deseada.
English |
29
Page 30

Table des matières
Avant l'utilisation ................................................................... 30
Comment lire ce manuel ...................................................................................30
Précautions ................................................................................................................. 30
Mise en route ............................................................................31
Paramètres de l'horloge ..................................................................................... 32
Réglage du panneau tactile............................................................................. 32
Les bases ................................................................................... 33
Fonctions des boutons en façade ............................................................... 33
Opérations courantes .......................................................................................... 33
Descriptions de l'écran d'ACCUEIL ...............................................................34
Descriptions de l'écran de commande de source ............................34
Écran des listes ..........................................................................................................34
USB .............................................................................................. 35
Préparation .................................................................................................................. 35
Options de lecture ................................................................................................. 35
iPod/iPhone ............................................................................. 37
Préparation .................................................................................................................. 37
Options de lecture ................................................................................................. 37
Tuner ........................................................................................... 39
Utilisation de base de la radio ........................................................................ 39
Présélectionner des stations ........................................................................... 39
Fonctionnalités FM RDS ...................................................................................... 39
Configuration du syntoniseur.........................................................................40
Composants Externes ...........................................................41
Utilisant des lecteurs audio/vidéo externes ......................................... 41
Caméra de recul ....................................................................................................... 41
Smartphone Bluetooth (KW-M24BT) ............................. 42
Enregistrer votre smartphone dans l'appareil .....................................42
Recevoir un appel ................................................................................................... 42
Passer un appel ........................................................................................................ 43
Utilisation d'un appareil audio Bluetooth en lecture ...................... 44
Supprimez le périphérique Bluetooth enregistré .............................44
Contrôle de l'audio ................................................................ 45
Contrôle de l’audio en général ...................................................................... 45
Contrôle d'égaliseur ..............................................................................................45
Paramètres du caisson de graves ................................................................. 45
Télécommande ....................................................................... 46
Fonctions des boutons de la télécommande ......................................46
Installation ................................................................................ 47
Avant l'installation .................................................................................................. 47
Installation de l'appareil ......................................................................................48
À propos de cet appareil ..................................................... 52
Plus d'informations ................................................................................................ 52
Dépannage ................................................................................................................. 52
Copyrights ................................................................................................................... 53
Spécifications ............................................................................................................54
Comment lire ce manuel
• Les écrans illustrés dans le présent guide sont des
exemples destinés à fournir des explications plus
claires des opérations. Pour cette raison, il peut arriver
qu'ils soient différents de ceux rencontrés dans la
réalité.
• Dans les procédures opérationnelles, le crochet
indique la touche ou le bouton à activer.
< >: Indique le nom des boutons du panneau.
[ ] : indique le nom des touches tactiles.
30
Avant l'utilisation
Précautions
#AVERTISSEMENT
Ñ Pour éviter toute blessure ou incendie,
prenez les précautions suivantes:
• Pour éviter un court-circuit, ne mettez ni ne laissez
jamais d'objets métalliques (comme des pièces de
monnaie ou des outils en métal) à l'intérieur de
l'appareil.
• Ne regardez pas ni ne fixez votre regard sur
l'affichage de l'appareil trop longtemps pendant la
conduite.
• Si vous rencontrez des problèmes pendant
l'installation, consultez votre revendeur JVC.
Ñ Précautions d'utilisation de l'appareil
• Lorsque vous achetez des accessoires en option,
vérifiez auprès de votre revendeur JVC qu'ils
fonctionneront avec votre modèle et dans votre
région.
• Les fonctions Radio Data System ou Radio
Broadcast Data System sont inopérantes dans les
zones où le service n'est pris en charge par aucune
station de radiodiffusion.
Ñ Protection du moniteur
• Ne touchez pas le moniteur avec un stylo à bille ou
tout autre outil pointu. Cela pourrait l'endommager.
Ñ Nettoyage de l'appareil
Si la façade de l'appareil est tachée, essuyez-la avec
un chiffon doux et sec, tel qu'un chiffon siliconé. Si la
façade est très sale, essuyez-la avec un chiffon imbibé
d'un produit de nettoyage neutre, puis essuyez-la à
nouveau avec un chiffon doux et sec propre.
! ATTENTION
• La pulvérisation directe de produit de nettoyage
sur l'appareil risque d'endommager les pièces
mécaniques. Si vous nettoyez la façade avec un
chiffon trop rugueux ou un liquide volatil, comme
un solvant ou de l'alcool, vous risquez d'en rayer la
surface ou d'effacer les caractères sérigraphiés.
Ñ Comment réinitialiser votre appareil
Si l'appareil ou l'équipement qui lui est branché ne
fonctionne pas normalement, réinitialisez-le.
Bouton de réinitialisation
Page 31

Mise en route
1 Tournez la clé de contact de votre véhicule sur la
position ACC.
L'appareil se met en marche.
2 Appuyez sur le bouton < >.
3 Touchez [Settings].
4 Effleurez la touche correspondante, puis
définissez la valeur.
Audio
Sound Eect
Affiche l'écran de l'Égalisateur. (P. 45)
Beep
Active ou désactive la touche ton.
« ON » (marche) (par défaut), « OFF » (arrêt)
Loudness
Définit les niveaux d'amplification des graves et des
aigus.
« ON », « OFF » (par défaut)
Subwoofer
Affiche l'écran du Caisson de basses. (P. 45)
Display
Panel Adjust
Réglez la position de détection du panneau tactile.
Reportez-vous à la section «Réglage du panneau
tactile» (P. 32).
Aspect
Sélectionner le mode d'écran.
« 16:9 » (Par défaut), « 4:3 Pan Scan »
Tun er
Affiche l'écran de réglages de la radio. (P. 40)
General
Language
Sélectionne la langue utilisée sur l'écran de
commande et sur les éléments de configuration.
La langue sélectionnée par défaut est « English »
(anglais).
1) Touchez [Language] (langue).
2) Sélectionnez la langue désirée.
* Vous pouvez changer de page pour afficher plus
d'éléments en appuyant sur [
BT Auto Connect
L’appareil se reconnecte automatiquement lorsque
le dernier périphérique Bluetooth connecté se
trouve dans la plage de portée.
« ON » (marche) (par défaut), « OFF » (arrêt)
Clock Setting
Réglez l'heure de l'horloge. (P. 32).
Default
Appuyez sur [Default] (Par défaut) pour régler tous
les réglages à la configuration initiale par défaut.
]/[ ].
5 Touchez [ 6 ].
Français |
31
Page 32

Mise en route
Paramètres de l'horloge
Ñ Synchronisation de l'heure avec FM RDS
Activer [RDS Clock Sync] (Synchronisation de
l'heure RDS). Voir «Configuration du syntoniseur»
(P. 40).
Ñ Ajuster l'horloge manuellement
✎ REMARQUE
• Désactivez [RDS Clock Sync] avant de régler l'horloge.
Voir «Configuration du syntoniseur» (P.40).
1 Appuyez sur le bouton < >.
2 Touchez [Settings].
3 Toucher [General].
4 Touchez [Clock Setting].
L'écran de l'heure s'affiche.
5 Sélectionne le format du temps.
[12] (Default : dans les secteurs de vente d'Amérique
du Nord et d'Amérique du Sud
uniquement)
[24] (Défaut : Uniquement dans les zones de ventes
d'Europe, CIS)
Réglage du panneau tactile
1 Appuyez sur le bouton < >.
2 Touchez [Settings].
3 Appuyez sur [Display].
4 Appuyez sur [Panel Adjust].
5 Suivre les instructions affichées à l'écran et
toucher le centre de chaque +.
• Pour annuler le réglage du panneau tactile, touchez
[Cancel].
• Si la position d'appui est déviée, [OK] ne s'affiche
pas. Essayez à nouveau à partir du début.
6 Touchez [OK].
6 Touchez [R] ou [S] pour régler l'heure de
l'horloge.
• Si vous avez sélectionné [12] comme le format de
l'heure, appuyez sur [AM] ou [PM] avant de régler
l'heure de l'horloge.
7 Touchez [ 6 ].
32
Page 33

Les bases
Les bases
Fonctions des boutons en façade
1
2
3
4
5
6
Capteur à distance
1
• Reçoit le signal de la télécommande.
(HOME)
2
• Affiche l'écran d'ACCUEIL. (P.34)
• Appuyez pendant 1 seconde pour éteindre
l'appareil.
• Quand l'appareil est éteint, permet de le mettre
en marche.
EQ
3
• Affiche l'écran de l'Égalisateur.* (P.45)
* Lors de la lecture de fichiers vidéo, vous pouvez
régler uniquement la courbe prédéfinie de
l'égaliseur.
* L'écran de l'égaliseur ne s'affiche pas pendant la
lecture d'un fichier image ou sur l'écran de liste
ou l'écran de configuration, etc.
+ , – (Volume)
4
• Règle le volume. Le volume augmentera jusqu'à
20 tant que vous maintiendrez [ + ] enfoncé.
(MUTE, Display o)
5
• Met sur muet/restaure le son.
• Appuyez pendant 1 seconde pour éteindre
l'écran.
Lorsque l'écran est éteint, appuyez sur l'affichage
pour activer l'écran.
Réinitialisation
6
• Si l'appareil ou l'appareil qui y est connecté ne
fonctionne pas correctement, appuyer sur ce
bouton pour que l'appareil retrouve les réglages
d'usine.
Opérations courantes
Ñ Allumer le courant
1 Appuyez sur le bouton < >.
Ñ Éteindre le courant
1 Appuyez et maintenez enfoncé le bouton < >.
Ñ Régler le volume.
1 Appuyez sur le bouton <+> ou <->.
✎ REMARQUE
• Le volume augmentera jusqu'à 20 tant que vous
maintiendrez [ + ] enfoncé.
Ñ Coupe le son.
1 Appuyez sur le bouton < >.
Pour rétablir le son, touchez le bouton une
nouvelle fois, ou ajustez le volume.
Ñ Mettez l'écran hors tension
1 Appuyez et maintenez enfoncé le bouton
< >.
Pour allumer l'écran, touchez l'achage.
Français |
33
Page 34

Les bases
25364
7
1
1
4
3
2
5
Descriptions de l'écran d'ACCUEIL
1 Appuyez sur le bouton < >.
L'écran d'ACCUEIL apparaît.
Affichage de l'horloge
1
Touchez pour afficher l'écran Horloge.
Passe à l'émission de radio. (P. 39)
2
3
[USB]
Joue les fichiers d'un périphérique USB. (P. 35)
[iPod]
Joue depuis un iPod/iPhone. (P. 37)
• Lorsqu'un iPod/iPhone est connecté.
Passe à élément externe connecté à la borne
4
d'entrée AV-IN. (P.41)
Affiche l'écran Mains libres. (P.43) (KW-M24BT
5
seulement)
Joue un lecteur audio Bluetooth. (P.44)
6
(KW-M24BT seulement)
Affiche l'écran de CONFIGURATION. (P. 31)
7
Descriptions de l'écran de commande de source
Vous pouvez eectuer des opérations de lecture de la
source sur l'écran de contrôle de la source.
Affichage de l'horloge
1
Touchez pour afficher l'écran Horloge.
Nom de la source
2
3
•
apparaît quand le Bluetooth du smartphone
est connecté. *
•
apparaît quand le lecteur audio Bluetooth est
connecté. *
•
apparaît lorsque la fonction sourdine est
active. ( P. 33)
* KW-M24BT uniquement
[DIM] (baisser)
4
Sélectionnez le mode à appliquer pour
l'atténuation de l'éclairage. Dim 1, Dim 2, Not dim
Revient à l'écran précédent.
5
Écran des listes
Certaines touches de fonction sont communes aux
écrans de liste de la plupart des sources.
1 Vous pouvez changer de page pour acher plus
d'éléments en appuyant sur [ ]/[ ].
34
Page 35

USB
1
6
3
2
5
4
USB
Préparation
Ñ Connecter un périphérique USB
1 Retirer le capuchon de la borne USB.
2 Branchez le périphérique USB avec le câble USB.
L'appareil lit le périphérique et la lecture commence.
Ñ Pour débrancher le périphérique USB :
1 Appuyez sur le bouton < >.
2 Sélectionner une source autre que [USB].
3 Débranchez le périphérique USB.
Ñ Périphérique USB utilisable
Cet appareil peut lire les chiers MPEG1/ MPEG2/
MPEG4/ MP3/WMA/ AAC/ JPEG/ BMP stockés dans un
périphérique de stockage de masse USB. (P.52)
• Système de fichier : FAT16/ FAT32
• Cet appareil peut reconnaître un total de 9 999
fichiers et 320 dossiers (avec un maximum de 9 999
fichiers par dossier).
• Nombre maximum de caractères :
– Nom de dossier : 24 caractères
– Nom de fichier : 24 caractères
– Marqueur : 30 caractères
✎ REMARQUE
• Quand la périphérique USB est connectée à cet
appareil, elle peut être chargée avec le câble USB.
• Installer la périphérique USB de façon à ce que cela ne
vous empêche pas de conduire prudemment.
• Vous ne pouvez pas connecter de périphérique USB
au moyen d'un hub USB et d'un lecteur multi-cartes.
• Faites des sauvegardes des fichiers audio utilisés
avec cet appareil. Les fichiers peuvent être effacés
en fonction des conditions de fonctionnement du
périphérique USB.
Nous ne proposons pas d’indemnisations pour les
pertes dues à l’effacement de données.
• Aucun périphérique USB n'est fourni avec cet appareil.
Vous devez acheter un périphérique USB disponible
dans le commerce.
• Fermer le port USB quand il n'est pas utilisé.
Options de lecture
Ñ L'écran de commande de la source vous
permet de gérer la musique que vous
écoutez.
La pochette du fichier en cours de lecture s'affiche.
1
##:##:## : Temps de morceau
2
Barre du temps de lecture : Pour confirmer la
position actuelle de lecture
[L] : Lit ou effectue une pause.
3
[E] [F] : Recherche le contenu précédent/
suivant.
Touchez et maintenez enfoncé pour effectuer
une avance ou un retour rapide. Appuyez sur
[L] pour repasser en mode de lecture normale.
[
] : Sélectionne le mode de lecture répétée.
S'éteint (Default): Répète tous les fichiers du
périphérique USB.
: Répète le fichier en cours.
: Répète tous les fichiers du dossier
FO
actuel.
[
] : Sélectionne le mode de lecture aléatoire.
: Lit tous les fichiers de manière aléatoire.
S'éteint (Default): Lecture normale.
Affiche les informations concernant le fichier en
4
cours.
Seul le nom du fichier est affiché s'il n'y a pas
d'information d'étiquette.
Recherche le fichier. (P. 36)
5
D, etc. : État de lecture
6
: Indicateur du mode lecture répéter
: Indicateur du mode de lecture aléatoire
Français |
35
Page 36
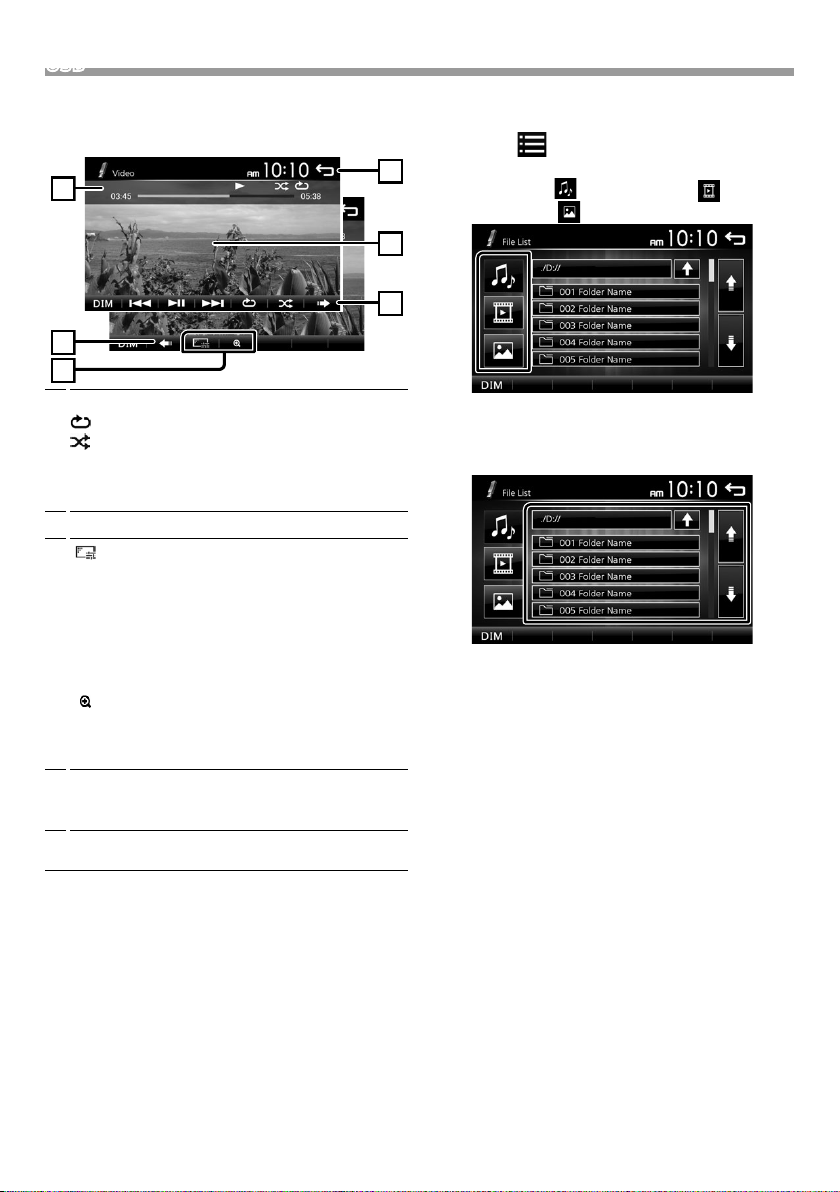
USB
3
2
1
2
4
5
Ñ Pour la lecture de vidéo
1 Lorsque les touches de fonctionnement ne sont
pas achées à l'écran, toucher l'écran.
D, etc. : État de lecture
1
: Indicateur du mode lecture répéter
: Indicateur du mode de lecture aléatoire
##:##:## : Temps de morceau
Barre du temps de lecture : Pour confirmer la
position actuelle de lecture
Pour changer les boutons de commande.
2
[
] : Vous pouvez régler la qualité d'image dans
3
l'écran vidéo.
[Brightness]: Ajuste la luminosité. (de 00 à 08)
[Contrast]: Ajuste le contraste. (de 00 à 08)
[Tint]: Règle la teinte. (de 00 à 08)
[Color]: Ajuste la couleur. (de 00 à 08)
[Reset]: Pour effacer le réglage.
] : Sélectionnez le taux de zoom.
[
« Off », « x2 », « x3 », « x4 », « x5 », « 1/2 », « 1/3 »,
« 1/4 »
[3] [2] [ < ] [ > ] : Faire défiler l'écran.
Les boutons de commande disparaissent lorsque 4
4
est touché ou quand aucune action n'est effectuée
pendant environ 10 secondes.
Affiche l'écran de liste de fichiers.* (P.36)
5
* Le fichier vidéo s’arrête.
Ñ Sélection d'une piste dans la liste
(Recherche le chier)
1 Touchez [ ].
2 Sélectionner si vous désirez rechercher par
fichiers audio [ ], fichiers vidéo [ ] ou
fichiers image [ ].
3 Touchez [Y] pour aller au niveau hiérarchique
supérieur.
4 Touchez le dossier de votre choix.
Le contenu d'un dossier est affiché lorsque vous
touchez celui-ci.
5 Touchez l'élément de votre choix dans la liste des
contenus.
La lecture commence.
✎ REMARQUE
• Lorsque les types de fichiers sont commutés, le
réglage de lecture aléatoire/répétée est annulé.
36
Page 37
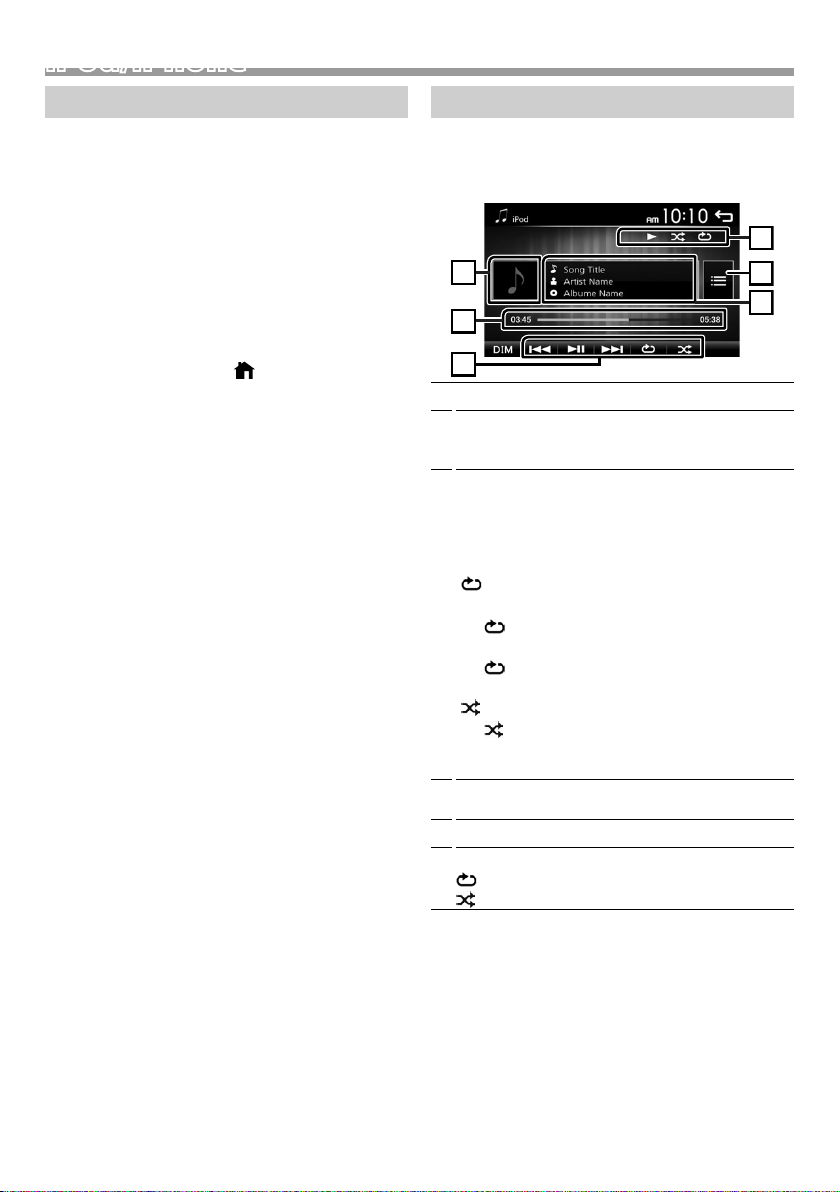
iPod/iPhone
1
6
3
2
5
4
iPod/iPhone
Préparation
Ñ Connexion d'un iPod/iPhone
• Pour les modèles de paratonnerre : Utilisez le câble
Audio USB pour iPod/iPhone—KS-U62 (accessoire
optionnel).
• Pour en savoir plus sur la connexion iPod/iPhone,
voir page 51.
1 Retirer le capuchon de la borne USB.
2 Branchez l'iPod/iPhone.
L'appareil lit le périphérique et la lecture commence.
Ñ Pour débrancher l'iPod/iPhone
1 Appuyez sur le bouton < >.
2 Toucher une source autre que [iPod].
3 Débranchez l'iPod/l'iPhone.
Ñ iPod/iPhone connectables
Les modèles suivants peuvent être reliés à cet
appareil.
Convient pour
• iPhone 7 Plus
• iPhone 7
• iPhone SE
• iPhone 6s Plus
• iPhone 6s
• iPhone 6 Plus
• iPhone 6
• iPhone 5s
• iPhone 5c
• iPhone 5
• iPod touch (6e génération)
• iPod touch (5e génération)
✎ REMARQUE
• Si vous démarrez la lecture après avoir connecté
l'iPod, la musique qui a été lue par l'iPod est jouée en
premier.
• Fermer le port USB quand il n'est pas utilisé.
Options de lecture
Ñ L'écran de commande de la source vous
permet de gérer la musique que vous
écoutez.
Illustration (Affiché si la piste contient un visuel)
1
##:##:## : Temps de morceau
2
Barre du temps de lecture : Pour confirmer la
position actuelle de lecture
L : Lit ou effectue une pause.
3
[E] [F] : Recherche le contenu précédent/
suivant.
Touchez et maintenez enfoncé pour effectuer
une avance ou un retour rapide.
[
] : Sélectionne le mode de lecture répétée.
S'éteint: Arrêt de la répétition
: Les fonctions sont les mêmes que Répéter
Tous.
1 : Les fonctions sont les mêmes que
Répéter Un.
[
] : Sélectionne le mode de lecture aléatoire.
: Les fonctions sont les mêmes que
Mélanger les Chansons.
S'éteint: Arrêt de la lecture aléatoire
Affiche les informations concernant le fichier en
4
cours.
Recherche le contenu. (P.38)
5
D, etc. : État de lecture
6
: Indicateur du mode lecture répéter
: Indicateur du mode de lecture aléatoire
Français |
37
Page 38

iPod/iPhone
Ñ Sélectionner un contenu dans la liste
1 Touchez [ ].
2 Touchez l'élément de votre choix.
Le contenu d'une catégorie est affiché lorsque vous
touchez celle-ci.
3 Touchez l'élément de votre choix dans la liste des
contenus.
La lecture commence.
• Toucher [6] pour aller au niveau hiérarchique
supérieur.
✎ REMARQUE
• Touchez [6] pour faire apparaître l'écran de contrôle
source en haut de page.
38
Page 39

Tuner
4
1
3
2
5
Tuner
Utilisation de base de la radio
1 Appuyez sur le bouton < >.
2 Touchez [Tuner].
Ñ Écran de commande de source
Affiche les informations concernant la station en
1
cours :
Nom PS, Fréquence, Genre PTY, Indicateur d'articles
[<<] [>>] : Appuyez sur la fréquence suivante
manuellement.
Rappelle la station mémorisée.
2
En le touchant pendant 2 secondes, il mémorise la
station en cours de réception.
[E] [F] : Syntonise automatiquement sur une
3
station offrant une bonne réception. *
[TA] : Le mode d'infos-trafic est réglé. *2*3 (P.39)
[PTY] : Sélectionnez le type de programme
disponible. *
*1 Si « AF » est réglé sur marche sur l'écran de
syntoniseur, seules les stations RDS sont reçues.
(P.40)
*2 FM uniquement
*3 Uniquement dans les zones de vente d'Europe,
CIS
[1] : Prédéfinit automatiquement les stations.
4
(P.39)
[FM] : Change la bande FM.
5
« FM1 », « FM2 », « FM3 »
[AM] : Change la bande AM.
« AM1 », « AM2 »
2*3
(P.39)
Présélectionner des stations
Ñ Mémoire automatique
Vous pouvez présélectionner 18 stations FM et 12
stations AM.
1 Appuyez sur [FM] ou [AM] pour sélectionner la
bande.
2 Touchez [ 1 ].
Les stations locales avec les signaux les plus forts
sont trouvées et enregistrées automatiquement.
• Si « AF » est réglé sur « ON » sur l'écran du syntoniseur,
seules les stations RDS sont enregistrées dans la
mémoire. (P.40)
Ñ Mémoire manuelle
Vous pouvez mémoriser la station que vous êtes en
train de recevoir.
1 Rechercher une station que vous voulez
présélectionner.
2 Toucher et maintenir [#] (#:1-6) dans lequel vous
voulez mémoriser la station.
Ñ Rappel de la station prédénie
1 Toucher [#] (#:1-6).
✎ REMARQUE
• Seules les fréquences sont enregistrées en tant que
stations préréglées. Les informations sur les stations
RDS ne sont pas enregistrées.
Fonctionnalités FM RDS
(uniquement dans les zones de vente d'Europe,
CIS)
1
Ñ Recherche par type de programme
1 Touchez [PTY].
2 Sélectionnez dans la liste le type de programme
de votre choix.
La recherche PTY commence.
Ñ Informations routières
1 Toucher [TA].
Passe automatiquement aux informations de
circulation routière à l'instant ou un bulletin d'infostrafic débute. (L'indicateur TA s'allume.)
« ON », « OFF » (par défaut)
• Si « AF » est réglé sur « ON » sur l'écran du syntoniseur,
la station est commutée sur la station RDS. (P.40)
Lorsqu'un bulletin d'infos-trac est reçu
L'écran d'informations routières apparaît
automatiquement.
Français |
39
Page 40

Tuner
Conguration du syntoniseur
Ñ Menu de fonction
1 Appuyez sur le bouton < >.
2 Touchez [Settings].
3 Touchez [Tuner].
4 Réglez chaque option comme suit.
Local
Recherche uniquement les stations ayant une
intensité suffisante de signal. (L'indicateur LOC
s'allume.)
« ON », « OFF » (par défaut)
RDS Clock Sync
Synchroniser les données de temps de la station Radio
Data System et l'horloge de cet appareil.
« ON » (marche) (par défaut), « OFF » (arrêt)
2
AF *
Lorsque la réception de la station est médiocre,
sélectionne automatiquement une station diffusant
le même programme sur le même réseau Radio Data
System.
« ON » (marche) (par défaut), « OFF » (arrêt)
*1 Dans les secteurs de vente d'Amérique du Nord et
d'Amérique du Sud uniquement
*2 Uniquement dans les zones de vente d'Europe, CIS
5 Touchez [ 6 ].
1
Area *
North America (Default): Pour l'Amérique du Nord/
Centre/Sud, intervalles AM/FM : 10 kHz/200 kHz.
South America : Pour certains pays d'Amérique du
Sud, intervalles AM/FM : 10 kHz/50 kHz.
Europe: Pour l'Europe, intervalles AM/FM : 9 kHz/50
kHz.
Stereo
Détermine s'il faut recevoir les émissions stéréo en
mode stéréo ou en mode monaural (l'indicateur
MONO s'allume).
« ON » (marche) (par défaut), « OFF » (arrêt)
40
Page 41

Composants Externes
1
Utilisant des lecteurs audio/vidéo externes
Ñ Démarrer la lecture
1 Connecter un composant externe à la borne
d'entrée AV-IN. (P.50)
2 Appuyez sur le bouton < >.
3 Toucher [AV-IN].
4 Allumer le composant connecté et commencer à
lire la source.
Ñ Pour la lecture de vidéo
1 Lorsque les touches de fonctionnement ne sont
pas achées à l'écran, toucher l'écran.
Les boutons de commande disparaissent lorsque 1
est touché ou quand aucune action n'est effectuée
pendant environ 5 secondes.
✎ REMARQUE
• Lorsque l’image de la caméra de recul s’affiche sur
l’écran AV-IN, la sortie de l’image depuis la borne de
sortie visuelle disparaît.
Caméra de recul
Pour utiliser la caméra de recul, le câble de connexion
INVERSE est requis. Pour connecter une caméra de
recul. (P. 50)
Ñ Ache l'image de la caméra de recul
L'écran de vue arrière est affiché lorsque vous changez
de vitesse pour la position de marche arrière (R).
• Pour enlever le message de mise en garde, toucher
l'écran.
Français |
41
Page 42

Smartphone Bluetooth (KW-M24BT)Smartphone Bluetooth (KW-M24BT)
Ñ À propos du Smartphone Bluetooth et du
lecteur audio Bluetooth
Cet appareil est conforme aux caractéristiques
techniques suivantes de la norme Bluetooth :
Version
Bluetooth Ver.2.1 + EDR
Prol
Smartphone/téléphone cellulaire:
HFP (V1.6) (Profil mains libres)
PBAP (V1.1.1) (Profil d'Accès au Répertoire
Téléphonique)
Lecteur audio :
A2DP (V1.2) (Profil Avancé de Distribution Audio)
AVRCP (V1.3) (Profil de télécommande audio/vidéo)
Codec son
SBC
Ñ À propos des téléphones portables
compatibles avec le Prol d'Accès au
Répertoire Téléphonique (PBAP)
Si votre téléphone portable est compatible avec
PBAP, vous pouvez acher les éléments suivants
sur l'écran tactile lorsque le téléphone portable est
connecté.
• Répertoire téléphonique (jusqu'à 1 000 entrées)
• Appels composés, appels reçus et appels en absence
(jusqu'à 20 entrées au total)
Si un code PIN est requis, entrez le code PIN
(« 0000 »).
•
apparaît quand le Bluetooth du smartphone
est connecté.
•
apparaît quand le lecteur audio Bluetooth est
connecté.
Ñ Déconnecter le périphérique
• Désactiver la fonction Bluetooth sur votre
smartphone/téléphone portable.
• Mettre sur arrêt l'interrupteur d'allumage.
Recevoir un appel
1 Touchez [Û].
• [Ý] : Rejeter un appel entrant.
Ñ Actions possibles pendant un appel
Enregistrer votre smartphone dans l'appareil
Vous pouvez utiliser votre smartphone Bluetooth lié
à cet appareil.
Vous pouvez enregistrer jusqu'à 5 périphériques
Bluetooth.
• Vous pouvez coupler le périphérique et l'appareil
utilisant SSP (Secure Simple Pairing) qui nécessitent
seulement une confirmation.
• Un seul périphérique peut être connecté à la fois.
• Lorsque vous enregistrez un nouveau périphérique
Bluetooth, veillez à déconnecter d'abord le
périphérique Bluetooth actuellement connecté, puis
enregistrez le nouveau.
• Il n'est pas possible d'enregistrer un nouvel appareil si
5 appareils Bluetooth sont déjà enregistrés. Effacez les
enregistrements inutiles. (P. 44)
1 Activer la fonction Bluetooth sur votre
smartphone/téléphone portable.
2 Recherchez l'appareil («KW-M24BT») à partir de
votre smartphone/téléphone portable.
42
Raccrocher
[Ý]
Vous pouvez envoyer des tonalités en touchant
les touches voulues à l'écran.
• Appuyez sur [
Bascule l'émission de la voix entre le téléphone
portable et le haut-parleur.
Régler le volume de réception
Appuyez sur le bouton <+> ou <–>.
] pour fermer la fenêtre.
Page 43

Smartphone Bluetooth (KW-M24BT)
Passer un appel
1 Appuyez sur le bouton < >.
2 Appuyez sur [Phone].
3 Veuillez consulter le tableau ci-dessous pour
chaque méthode de fonctionnement.
• [ ] : Déconnecte le smartphone Bluetooth.
• [
] : Ferme l'écran pour envoyer des tonalités
• [
Appel par entrée d'un numéro de téléphone
1) Touchez [
2) Utilisez les touches numériques pour entrer un
numéro de téléphone.
3) Touchez [Û].
Passer un appel
• Touchez [W] pour supprimer la dernière saisie.
Appel depuis l'historique des appels
1) Touchez [
sortants), [
2) Sélectionnez dans la liste le numéro de téléphone.
pendant la conversation.
] : Permet d'afficher l'écran de suppression
des périphériques Bluetooth enregistrés
précédemment. (P. 44)
].
] (appels entrants), [ ] (appels
] (appels manqués).
Appel depuis le répertoire téléphonique
1) Touchez [
2) Sélectionnez le nom dans la liste.
Passer un appel
• [
Eectuer un appel via numérotation vocale
Vous pouvez effectuer un appel en utilisant la fonction
de reconnaissance vocale du smartphone Bluetooth.
1) Touchez [
2) Touchez [
3) Prononcez le nom enregistré dans le smartphone
Bluetooth.
• Appuyez sur [ ] pour annuler la numérotation
vocale.
].
] : Met à jour le répertoire téléphonique.
Appuyez sur cette touche après avoir
effectué une modification dans le
répertoire de votre téléphone portable.
].
].
Passer un appel
Français |
43
Page 44

Smartphone Bluetooth (KW-M24BT)
2
3
1
4
Utilisation d'un appareil audio Bluetooth en lecture
1 Appuyez sur le bouton < >.
2 Appuyez sur [BT Audio].
Ñ Écran de commande de source
La pochette du fichier en cours de lecture s'affiche.
1
[L] : Lit ou effectue une pause.
2
[E] [F] : Recherche le contenu précédent/
suivant.
Affiche les informations concernant le fichier en
3
cours.
Seuls les noms de fichier et de dossier sont affichés
s'il n'y a pas d'information de balise.
D, etc. : État de lecture
4
: Indicateur du mode lecture répétée *
: Indicateur du mode de lecture aléatoire *
* Les paramètres de l'appareil Bluetooth audio
s'affichent.
Supprimez le périphérique Bluetooth enregistré
1 Appuyez sur le bouton < >.
2 Appuyez sur [Phone].
3 Touchez [ ].
4 Touchez le nom du périphérique.
5 Touchez [ ].
✎ REMARQUE
• Certains indicateurs de fonctionnement et d'affichage
peuvent différer en fonction de leur disponibilité sur
l'appareil connecté.
44
Page 45
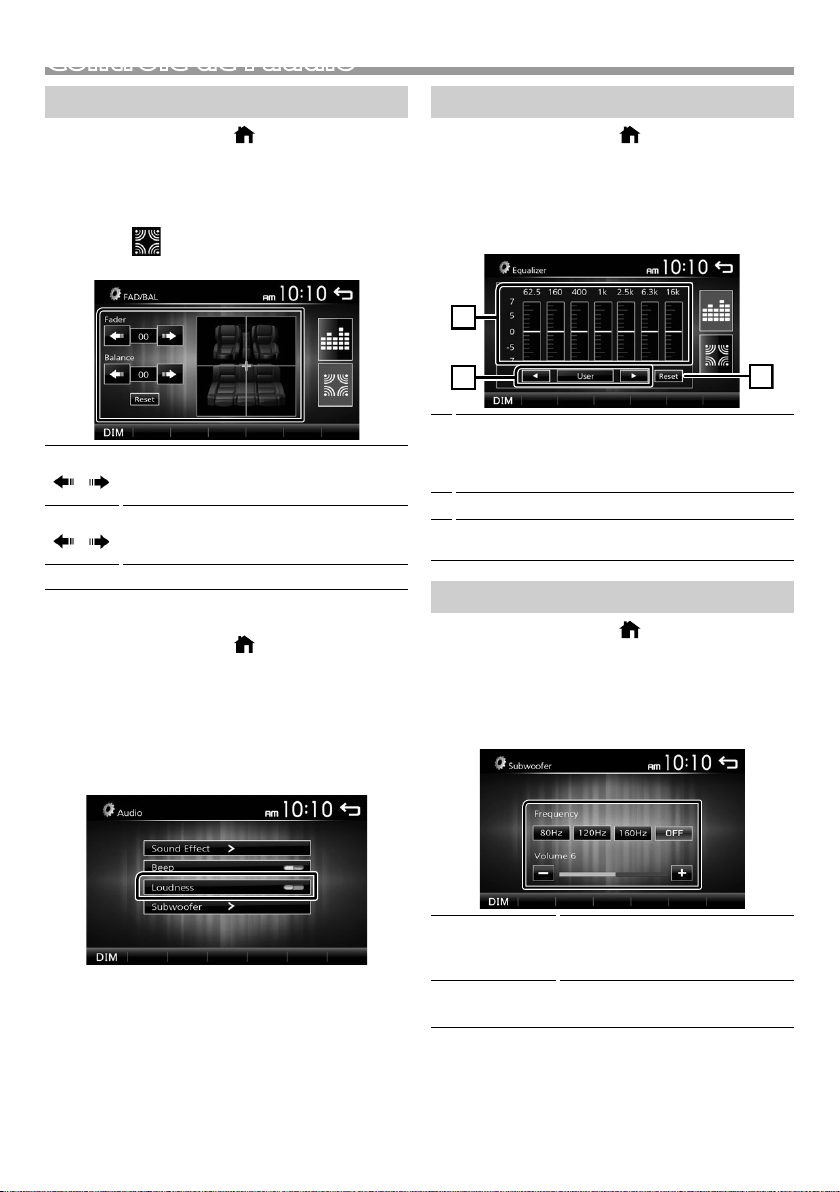
1
3
2
Contrôle de l'audio
Contrôle de l’audio en général
1 Appuyez sur le bouton < >.
2 Touchez [Settings].
3 Touchez [Audio].
4 Touchez [Sound Effect].
5 Touchez [ ].
6 Réglez chaque option comme suit.
Fader
[
Balance
[
[Reset]
Ñ Grave
Réglez le volume de la balance avant/
arrière.
] [ ]
12 (avant) à -12 (arrière)
Régler le volume de la balance à droite/
gauche.
] [ ]
12 (droite) à -12 (gauche)
Pour effacer le réglage.
1 Appuyez sur le bouton < >.
2 Touchez [Settings].
3 Touchez [Audio].
4 Appuyez sur [Loudness].
Définit les niveaux d'amplification des graves et des
aigus.
« ON », « OFF » (par défaut)
Contrôle d'égaliseur
1 Appuyez sur le bouton < >.
2 Touchez [Settings].
3 Touchez [Audio].
4 Touchez [Sound Effect].
5 Réglez chaque option comme suit.
Vous pouvez sélectionner la barre de fréquence et
1
ajuster son niveau. (-7 à +7)
• Les ajustements sont mémorisés et « User »
(Utilisateur) est activé.
Pour rappeler la courbe prédéfinie de l'égaliseur.
2
La courbe de préréglage « User » et d'EQ actuel
3
revient en position linéaire.
Paramètres du caisson de graves
1 Appuyez sur le bouton < >.
2 Touchez [Settings].
3 Touchez [Audio].
4 Toucher [Subwoofer].
5 Réglez chaque option comme suit.
Frequency
[80Hz], [120Hz],
[160Hz], [OFF]
Volume
[–], [+]
Ajustement du filtre passe-bas. /
[OFF] : désactive la sortie du
caisson de graves. (Default OFF)
Règle le niveau du caisson de
graves. 0 à 12 (Default 6)
Français |
45
Page 46
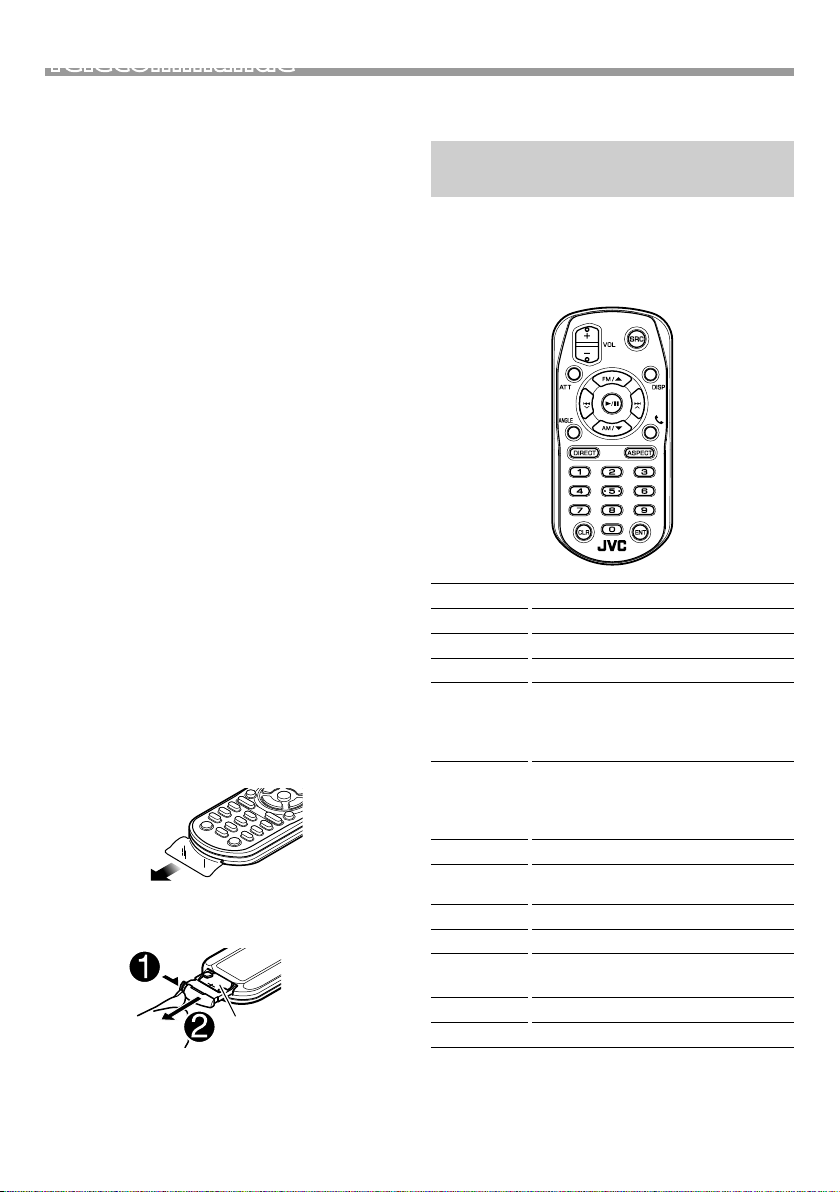
Télécommande
Cet appareil peut être utilisé avec une télécommande.
La télécommande RM-RK258 (accessoire optionnel)
peut être utilisée.
! AVERTISSEMENT
• Ne pas ingérer la batterie, Danger de brûlure chimique
La télécommande fournie avec ce produit contient
une pile bouton. Si la pile bouton est avalée, elle peut
provoquer de graves brûlures internes en 2 heures
seulement et peut mener à la mort.
Tenez les piles usées et neuves à l'écart des enfants.
Si le compartiment de la pile ne se referme pas bien,
arrêtez d'utiliser le produit et tenez-le à l'écart des
enfants.
Si vous pensez que les piles ont été avalées
ou introduites dans une partie du corps, faites
immédiatement appel à un médecin.
! ATTENTION
• Placez la télécommande dans un endroit où elle ne
risque pas de bouger durant le freinage ou au cours
d'autres manœuvres. Si la télécommande tombait
et se retrouvait coincée sous les pédales alors que
le véhicule est en marche, cela pourrait entraîner un
danger.
• Ne pas laisser la pile près d'une flamme ou en plein
soleil. Ceci peut provoquer un incendie, une explosion
ou une surchauffe excessive.
• Ne pas recharger, court-circuiter, casser ni chauffer la
pile, et ne pas la mettre au feu. Ces actions peuvent
provoquer des fuites du liquide de la pile. Si du liquide
entrait en contact avec vos yeux ou vos vêtements,
rincez immédiatement à grande eau et consultez un
médecin.
Ñ Retirez le lm protecteur de la pile
Retirez le lm protecteur de la pile de la
télécommande pour activer la pile.
Ñ Changement de la pile de la
télécommande
CR2025 (côté +)
• Utilisez une pile bouton, disponible dans le commerce
(CR2025).
• Insérez la pile avec les pôles + et – alignés
correctement.
46
– Si la télécommande perd de son efficacité,
remplacez les piles.
Fonctions des boutons de la télécommande
• Pointer la télécommande directement vers le capteur
de la plaquette.
• NE PAS exposer la télécommande à une lumière vive
(directement aux rayons du soleil ou à un éclairage
artificiel).
SRC
VOL + –
ATT
DISP
FM/R
AM/S
E 2
F 3
ANGLE
Û
DIRECT
ASPECT
Touches
numérotées
CLR
ENT
Passe à la source à utiliser.
Règle le volume.
Met sur muet/restaure le son
Non utilisé.
Sélectionne le dossier à utiliser.
Avec la radio comme source,
sélectionnez la bande FM/AM à
recevoir.
Sélectionne la piste ou le fichier à lire.
Avec le syntoniseur comme source,
alterne entre les stations reçues par
l'appareil.
Non utilisé.
Quand un appel est reçu, répond à
l'appel.
Non utilisé.
Non utilisé.
Non utilisé.
Non utilisé.
Non utilisé.
Page 47
Installation
Installation
Avant l'installation
Avant d'installer cet appareil, veuillez prendre les
mesures de précaution suivantes.
#AVERTISSEMENTS
• Si vous branchez le câble d'allumage (rouge) et le
câble de la batterie (jaune) au châssis de la voiture
(masse), il peut y avoir un court-circuit entraînant, à
son tour, un incendie. Il faut toujours brancher ces
câbles à la source d'alimentation fonctionnant via le
boîtier de fusibles.
• Ne débranchez pas le fusible du câble d'allumage
(rouge) ni du câble de la batterie (jaune).
L'alimentation électrique doit être connectée aux
câbles via le fusible.
#ATTENTION
• Installez cet appareil dans la console du véhicule.
Ne touchez pas les éléments métalliques de cet
appareil pendant et juste après l'utilisation de
l'appareil. Les éléments métalliques tels que le
dissipateur thermique et le coffret sont très chauds.
✎ REMARQUE
• Le montage et le câblage de ce produit requièrent
expérience et savoir-faire. Pour des questions de
sécurité, les travaux de montage et de câblage
doivent être effectués par des professionnels.
• Veillez à brancher l'appareil à une alimentation
électrique négative de 12 Vcc avec mise à la terre.
• N'installez pas l'appareil dans un endroit directement
exposé aux rayons du soleil, à une chaleur excessive
ou à l'humidité. Évitez également les endroits trop
poussiéreux ou susceptibles d'être éclaboussés par
de l'eau.
• N'utilisez pas vos propres vis. N'utilisez que les vis
fournies. L'utilisation de vis non appropriées risque
d'endommager l'appareil.
• Si l'appareil n'est pas sous tension (« There is an error
in the speaker wiring. Please check the connections. »
(Il y a un problème avec le câblage du haut-parleur.
Veuillez vérifier les branchements) s'affiche), le câble
du haut-parleur est peut-être en court-circuit ou est
en contact avec le châssis du véhicule et la fonction
de protection a peut-être été enclenchée. C'est
pourquoi il faut vérifier le câble de l'enceinte.
• Si l'allumage de votre véhicule ne possède pas
de position ACC, branchez les câbles d'allumage
à une source d'alimentation que la clé de contact
peut allumer ou éteindre. Si vous branchez le câble
d'allumage à une source d'alimentation à tension
constante comme les câbles de la batterie, il se peut
que la batterie se décharge.
• Si la console est dotée d'un couvercle, veillez à installer
l'appareil de sorte que la façade ne heurte pas le
couvercle quand elle s'ouvre ou se ferme.
• Si le fusible saute, vérifiez d'abord que les câbles ne
se touchent pas afin d'éviter tout court-circuit, puis
remplacez l'ancien fusible par un nouveau fusible de
même puissance.
• Isolez les câbles non connectés avec un ruban vinyl,
ou tout autre matériau similaire. Pour éviter tout
court-circuit, ne retirez pas les capuchons placés aux
extrémités des câbles non connectés ou des bornes.
• Fixez les fils à l'aide de colliers et enroulez le ruban
de vinyle autour des fils qui entre en contact avec les
parties métalliques afin de protéger les fils et éviter
tout court-circuit.
• Branchez correctement les câbles de l'enceinte aux
bornes correspondantes. L'appareil peut subir des
dommages et ne plus fonctionner si vous partagez
les fils ¤ ou les mettez à la masse avec une partie
métallique du véhicule.
• Si seulement deux enceintes sont branchées au
système, branchez les connecteurs soit aux bornes
de sortie avant soit aux bornes de sortie arrière (ne
pas mélanger les bornes de sortie avant et arrière).
Par exemple, si vous connectez le connecteur ¢ de
l'enceinte gauche à une borne de sortie avant, ne
connectez pas le connecteur ¤ à une borne de sortie
arrière.
• Une fois l'appareil installé, vérifiez que les feux de
freinage, les clignotants et les essuie-glace, etc. du
véhicule fonctionnent correctement.
• L'angle de montage de l'appareil doit être inférieur ou
égal à 30°.
• N'exercez pas de pression excessive sur la surface
du panneau lors de l'installation de l'appareil dans
le véhicule. Cela risque de rayer la sur face, de
l'endommager ou d'entraîner une défaillance.
• Il se peut que la réception soit mauvaise si des objets
métalliques se trouvent à proximité de l'antenne
Bluetooth.
Antenne Bluetooth
Français |
47
Page 48

Installation
Ñ Accessoires fournis pour l'installation
1
3
[1]
5
[1]
7
(M5 × 6 mm)
9
[1]
Dans les secteurs de vente d'Amérique du Nord et
d'Amérique du Sud uniquement
[2]
KW-M24BT uniquement
(2 m)
x1
x1
x1
x4
x1
2
4
6
8
[2]
(3 m)
[1]
[1]
(M5 × 7 mm)
x2
x1
x1
x4
Ñ Procédure d'installation
1) Pour éviter les courts-circuits, retirez la clé de contact,
puis débranchez la borne ¤ de la batterie.
2) Veillez à effectuer correctement les connexions des
câbles d'entrée et de sortie pour chaque appareil.
3) Branchez le câble sur le faisceau de fils.
4) Prenez le connecteur B sur le faisceau de fils, puis
branchez-le au connecteur de l'enceinte dans votre
véhicule.
5) Prenez le connecteur A sur le faisceau de fils, puis
branchez-le à la prise d'alimentation externe de votre
véhicule.
6) Branchez le connecteur du faisceau de fils sur
l'appareil.
7) Installez l'appareil dans votre véhicule.
8) Reconnectez la borne ¤ de la batterie.
9) Appuyez sur le bouton réinitialiser.
Installation de l'appareil
Ñ Voitures non-japonaises
Courbez les languettes
de la douille de montage
à l'aide d'un tournevis ou
d'un outil similaire, puis
fixez-la en place.
✎ REMARQUE
• Vérifiez que l'appareil est correctement en place. Si
l'appareil n'est pas stable, cela peut occasionner un
dysfonctionnement (le son peut par exemple sauter).
Ñ Voitures japonaises (dans les secteurs de
vente d'Amérique du Nord, d'Amérique du
Sud uniquement)
7 ou 8
Ñ Plaque de garniture
1) Fixez l'accessoire 1 sur l'appareil.
Support de voiture
7 ou 8
48
1
Page 49

Installation
Ñ Microphone (KW-M24BT)
1) Vérifiez la position d'installation du microphone
(accessoire 4).
2) Nettoyez la surface d'installation.
3) Retirez le séparateur du microphone (accessoire 4)
et collez le microphone à l'emplacement indiqué
ci-dessous.
4) Branchez le câble du microphone sur l'appareil en le
fixant à divers endroits à l'aide de ruban adhésif ou de
toute autre méthode appropriée.
5) Réglez l'orientation du microphone (accessoire 4) en
direction du conducteur.
4
2) Tirer la plaque de garniture vers l'avant.
Ñ Retrait de l'appareil
1) Retirez la plaque de garniture en vous référant à l'
étape 1 dans “Retrait de la plaque de garniture”.
2) Insérez la clé d’extraction (accessoire 2)
profondément dans l’emplacement, comme illustré.
(La saillie à la pointe de la clé d’extraction doit faire
face à l’appareil.)
Fixez un câble avec du ruban spécialement
prévu à cet effet.
✎ REMARQUE
• Échanger les attaches si nécessaire.
Ñ Retrait de la plaque de garniture
1) Utilisez la clé d'extraction (accessoire 3) pour sortir
les quatre languettes (deux sur la partie gauche, deux
sur la partie droite) en effectuant un mouvement de
levier.
3
2
3) Une fois que vous avez correctement inséré la clé
d’extraction, insérez l’autre clé d’extraction dans
l’emplacement.
2
4) Extraire l'appareil à moitié.
✎ REMARQUE
• Veillez à ne pas vous blesser avec les broches d'arrêt
sur la clé d'extraction.
5) Tenez l'appareil des deux mains et faites-le sortir
complètement en veillant à ne pas le laisser tomber.
Français |
49
Page 50

Installation
Ñ Connexion des câbles sur les contacts électriques
Périphérique
USB
[2]
Accessoire 4:
Microphone Bluetooth
(KW-M24BT uniquement)
Sortie Preout caisson
Borne USB
Connecteur
Connecteur
de basse
1 3 5 7
2 4 6 8
B
1 3 5 7
2 4 6 8
Capuchon
15A
A
Fusible (15 A)
Connecteur ISO
Ñ Guide de fonctionnement des
connecteurs du faisceau de câbles
Broche Couleur et fonction
A-4 Jaune Batterie
A-5 Bleu/Blanc
[3]
Réglage de puissance
A-7 Rouge Allumage (ACC)
A-8 Noir Branchement à la terre
(masse)
B-1/B-2 Violet (+)/Violet/Noir (–) Arrière droit
B-3/B-4 Gris (+)/Gris/Noir (–) Avant droit
B-5/B-6 Blanc (+)/Blanc/Noir (–) Avant gauche
B-7/B-8 Vert (+) /
Vert /Noir (–) Arrière gauche
• Impédance d'enceinte : 4-8 Ω
! ATTENTION
Avant de connecter les connecteurs ISO (disponibles
dans le commerce) à l'unité, vérier les conditions
suivantes :
• Veillez à ce que l'affectation des broches du
connecteur corresponde à l'unité JVC.
• Prendre un avis supplémentaire pour le câble
d'alimentation.
50
[1]
(0,8 m)
5V=1A
Capuchon
MIC
SUB
WOOFER
FRONTREARAV-IN
LLL
RRR
VOUT
CAMV
Vert clair (Câble du détecteur
de stationnement)
Accessoire 9: Rallonge câble
Par mesure de
BRAKE
PARKING
sécurité, connectez
Connexion au
commutateur
de détection du
frein à main.
le détecteur de
stationnement.
Violet/Blanc
(Câble du détecteur de marche arrière)
Connexion au faisceau du feu de marche
arrière du véhicule lors de l'utilisation de la
REVERSE
GEAR
SIGNAL
vue arrière de la caméra.
Bleu ciel/Jaune
(Câble de la télécommande au volant)
Vers la télécommande au volant
Pour utiliser la fonction de télécommande
STEERING
WHEEL
REMOTE
CONTROL
au volant, vous avez besoin d'un
adaptateur de télécommande spécial (non
fourni) qui correspond à votre véhicule.
Entrée de l'antenne FM/AM
ANT
Antenne FM/AM
Entrée audio AV-IN
(Gauche ; Blanc, Droite ; Rouge)
Sortie Audio Arrière
(Gauche ; Blanc, Droite ; Rouge)
Sortie Audio Avant
(Gauche ; Blanc, Droite ; Rouge)
Sortie vidéo (jaune)
Entrée de la caméra vue arrière (jaune)
Entrée visuelle AV-IN (Jaune)
[1]
Tension d'alimentation maximum pour USB :
DC 5 V = 1 A
[2]
Vendue séparément
[3]
Max. 300 mA, 12 V
• Si les câbles d'alimentation et de contact ne
correspondent pas, les changer en conséquence.
• Si le véhicule ne dispose pas d'un câble de démarrage,
utiliser une interface disponible dans le commerce.
Page 51
Installation
Dans les secteurs de vente d'Amérique du Nord et
d'Amérique du Sud uniquement
FRONTREARAV-IN
15A
1 3 5 7
2 4 6 8
1 3 5 7
2 4 6 8
Accessoire 5
Accessoire 6
Impédance d'enceinte : 4-8 Ω
Blanc
Blanc/Noir
Gris
Gris/Noir
Vert
Vert/Noir
Violet
Violet/Noir
Bleu/Blanc
(Câble de commande de puissance/
commande d'antenne)
À brancher à la borne de commande
P.CONT
ANT.CONT
motorisée avec l'amplificateur de
puissance en option, ou à la borne
d'alimentation de l'amplificateur de
puissance d'une antenne de type film
ou courte. (Maximum 300 mA, 12 V)
*1 Si aucune connexion n'est faite,
ne laissez pas le câble sortir de la
languette.
LLL
RRR
VOUT
CAMV
ANT
Au haut-parleur avant
gauche
Au haut-parleur avant
droit
Au haut-parleur arrière
gauche
Au haut-parleur arrière
droit
1
*
Ñ Branchement d'un iPod/iPhone
[1]
(0,8 m)
CAMV
[2]
FRONTREARAV-IN
LLL
RRR
VOUT
ANT
iPod/iPhone
Connecteur lumineux
KS-U62 (0,8 m)
[3]
Borne USB
5V=1A
Capuchon
15A
[1]
Tension d'alimentation maximum pour iPod/iPhone :
DC 5 V = 1 A
[2]
Vendu séparément
[3]
Accessoire proposé en option
Rouge (Câble
d'allumage)
Jaune (Câble de la
batterie)
Noir (Câble de terre) ¤
Boite de fusibles de la voiture
(Au châssis de la voiture)
ACC
B+
Commutateur
d'allumage
Batterie
Français |
51
Page 52

À propos de cet appareil
À propos de cet appareil
Plus d'informations
Ñ Fichiers audio lisibles
Format
audio
MP3 (.mp3) 16 – 320kbps,
WMA (.wma) 16 – 320kbps 16 – 48 kHz
AAC-LC (.m4a) 16 – 320kbps 16 – 48 kHz
• Cette unité peut montrer ID3 Tag Version
1.0/1.1/2.2/2.3/2.4 (pour MP3).
• Nombre maximum de caractères :
– Marqueur : 30 caractères
Débit binaire Fréquence
d'échantillonnage
16 – 48 kHz
VBR
✎ REMARQUE
• Les formats WMA et AAC protégés par GDN ne
peuvent pas être lus.
• Bien que les fichiers audio soient conformes aux
normes susmentionnées, la lecture peut se révéler
impossible en fonction des types et conditions du
support ou du périphérique.
Ñ Fichiers vidéo acceptés
Format
vidéo
MPEG -1
(.mpg, .mpeg)
MPEG -2
(.mpg, .mpeg)
MPEG-4
(.mp4, .avi)
Ñ Fichiers image acceptés
• JPEG (.jpg)
Résolution de 32 x 32 à 8 192 x 7 680
– Le fichier peut mettre du temps à s'afficher.
– Les fichiers JPEG progressifs ou les fichiers JPEG de
compression sans perte ne peuvent être lus.
• BMP (.bmp)
Résolution de 32 x 32 à 8 192 x 7 680
– Le fichier peut mettre du temps à s'afficher.
Codec vidéo Codec Audio
MPEG -1 MPEG Audio Layer 2
MPEG -2 MPEG Audio Layer 2
MPEG-4 MP3, AAC-LC (2ch)
Dépannage
Ce qui semble être dicile n'est pas toujours sérieux.
Vérier les points suivants avant d'appeler le service
après-vente.
• Pour des opérations avec les composants externes, se
référer également aux instructions fournies avec les
adaptateurs utilisés pour les connections (ainsi que les
instructions fournies avec les composants externes).
Ñ Général
Aucun son ne sort des haut-parleurs.
• Ajuster le volume au niveau optimal.
• Vérifier les cordons et les branchements.
L'appareil ne fonctionne pas du tout.
• Réinitialisation de l'appareil. (P. 30)
La télécommande ne fonctionne pas.
• Remplacer la pile.
Ñ USB
Lors de la lecture de d'une piste, le son est parfois
interrompu.
• Les pistes ne sont pas correctement copiées sur le
périphérique USB. Copier les pistes de nouveau, et
réessayer.
Ñ iPod/iPhone
Aucun son ne sort des haut-parleurs.
• Débrancher l'iPod/iPhone, puis reconnecter à
nouveau.
• Sélectionner une autre source, puis resélectionner
« iPod ».
L'iPod/iPhone ne s'allume pas ou ne fonctionne
pas.
• Vérifier le câble de connexion et sa connexion.
• Mettre à jour la version de micrologiciel de l’iPod/
iPhone.
• Charger la batterie de l’iPod/iPhone.
• Réinitialiser l’iPod/l’iPhone.
Le son est déformé.
• Désactiver l'égalisateur sur l'appareil ainsi que sur
l'iPod/iPhone.
Beaucoup de bruit est généré.
• Éteindre (décocher) « VoiceOver » (Voix Off) sur l'iPod/
iPhone. Pour plus de détails, voir <http://www.apple.
com>.
52
Page 53

À propos de cet appareil
Ñ Tuner
Le préréglage automatique ne fonctionne pas.
• Mémoriser les stations manuellement. (P.39)
Bruit statique pendant l'écoute de la radio.
• Connecter l'antenne fermement.
Ñ AV-IN
Aucune image n'apparaît sur l'écran.
• Allumer le composant de la vidéo si il n'est pas en
marche.
• Connecter le composant de la vidéo correctement.
Ñ Bluetooth
Le son du téléphone est de mauvaise qualité.
• Réduire la distance entre l'appareil et le téléphone
portable Bluetooth.
• Déplacer la voiture à une place où vous pouvez avoir
une meilleure réception du signal.
Le son est interrompu ou saute lors de l'utilisation
d'un lecteur audio Bluetooth.
• Réduire la distance entre l'appareil et le lecteur audio
Bluetooth.
• Éteindre, puis allumer l'appareil. (Avant que le son soit
restauré) connecter de nouveau le lecteur.
Le lecteur audio connecté ne peut pas être
contrôlé.
• Vérifier les supports connectés AVRCP (Profil de la
télécommande Audio/Vidéo) du lecteur audio.
Le périphérique Bluetooth ne détecte pas
l'appareil.
• Rechercher de nouveau depuis le périphérique
Bluetooth.
L'appareil ne se couple pas avec le périphérique
Bluetooth.
• Éteindre, puis allumer le périphérique Bluetooth.
• Déconnecter le périphérique Bluetooth actuellement
connecté, puis enregistrer le nouveau périphérique.
(P.42)
Copyrights
• La marque et les logos Bluetooth sont des marques
déposées appartenant à Bluetooth SIG, Inc. et
toute utilisation de ces marques par JVC KENWOOD
Corporation est sous licence. Les autres marques
déposées et appellations commerciales appartiennent
à leurs propriétaires respectifs.
• “Made for iPod” and “Made for iPhone” mean that an
electronic accessory has been designed to connect
specifically to iPod, or iPhone, respectively, and
has been certified by the developer to meet Apple
performance standards.
Apple is not responsible for the operation of this
device or its compliance with safety and regulatory
standards. Please note that the use of this accessory
with iPod, or iPhone may affect wireless performance.
• iPhone, iPod, iPod classic, iPod nano, and iPod touch
are trademarks of Apple Inc., registered in the U.S. and
other countries.
Lightning is a trademark of Apple Inc.
• The “AAC” logo is a trademark of Dolby Laboratories.
• Microsoft and Windows Media are either registered
trademarks or trademarks of Microsoft Corporation in
the United States and/or other countries.
• THIS PRODUCT IS LICENSED UNDER THE MPEG4 VISUAL PATENT PORTFOLIO LICENSE FOR THE
PERSONAL AND NON-COMMERCIAL USE OF A
CONSUMER FOR (¡) ENCODING VIDEO IN COMPLIANCE
WITH THE MPEG-4 VISUAL STANDARD (“MPEG-4
VIDEO”) AND/OR (¡¡) DECODING MPEG-4 VIDEO
THAT WAS ENCODED BY A CONSUMER ENGAGED
IN A PERSONAL AND NON-COMMERCIAL ACTIVITY
AND/OR WAS OBTAINED FROM A VIDEO PROVIDER
LICENSED BY MPEG LA TO PROVIDE MPEG-4 VIDEO. NO
LICENSE IS GRANTED OR SHALL BE IMPLIED FOR ANY
OTHER USE. ADDITIONAL INFORMATION INCLUDING
THAT RELATING TO PROMOTIONAL, INTERNAL AND
COMMERCIAL USES AND LICENSING MAY BE OBTAINED
FROM MPEG LA, LLC. SEE HTTP://WWW.MPEGLA.COM.
Français |
53
Page 54

À propos de cet appareil
Spécications
Ñ Section moniteur
Taille de l'image
: 6,75 pouces de large (diagonale)
: 151,8 mm (L) × 79,7 mm (H)
Système d'achage
: Panneau LCD TN transparent
Système de lecture
: Écran TFT à matrice active
Nombre de pixels
: 1 152 000 (800H x 480V x RGB)
Pixels ecaces
: 99,99 %
Disposition des pixels
: Disposition RGB en rayures
Rétroéclairage
: LED
Ñ Section interface USB
Norme USB
: USB 2.0
Système de chiers
: FAT 16/ 32
Courant d'alimentation maximum
: CC 5 V
Convertisseur N/A
: 24 bits
Décodeur audio
: MP3/ WMA/ AAC (.aac/ .m4a)
Décodeur vidéo
: MPEG1/ MPEG2/ MPEG4
Réponse en fréquence
• 48 kHz : 20 – 22 000 Hz
• 44,1 kHz : 20 – 20 000 Hz
Rapport S/B (dB)
: 99 dB
Dynamique
: 99 dB
REMARQUE
• Bien que les pixels du panneau à cristaux liquides
soient effectifs à 99,99 % ou plus, il se peut que
0,01 % des pixels ne s'éclaire pas ou s'éclaire mal.
• Les spécifications sont sujettes à changements
sans notification.
54
1 A
Ñ Section Bluetooth
Technologie
: Bluetooth Ver.2.1 + EDR
Fréquence
: 2,402 – 2,480 GHz
Puissance de sortie
: +4 dBm (max), classe de puissance 2
Portée de communication maximale
: Ligne de vue approximative 10 m (32,8 ft)
Codec Audio
SBC
Prol (Support multi-prol)
• HFP (V1.6) (Profil mains libres)
• A2DP (V1.2) (Profil Avancé de Distribution Audio)
• AVRCP (V1.3) (Profil de télécommande audio/vidéo)
• PBAP (V1.1.1) (Profil d'Accès au Répertoire
Téléphonique)
Ñ Section Syntoniseur FM
Bande de fréquences (step)
: 87,5 MHz – 108,0 MHz (50 kHz)
(zones de vente d’Europe, CIS)
: 87,9 MHz – 107,9 MHz (200 kHz) (dans les secteurs de
vente d’Amérique du Nord et d’Amérique du Sud)
Sensibilité utilisable
: 12,2 dBf
: 1,1 μV/75 Ω
(Pour les zones de vente d'Amérique du Nord,
d'Amérique du Sud, S/N : 30 dB)
(Pour les zones de vente d'Europe, CIS, S/N : 26 dB)
Sensibilité au repos
: 19,2 dBf
: 2,5 μV/75 Ω
(Pour les zones de vente d'Amérique du Nord,
d'Amérique du Sud, S/N : 50 dB)
(Pour les zones de vente d'Europe, CIS, S/N : 46 dB)
Réponse en fréquence
: 30 Hz – 14 kHz
Rapport S/B (dB)
: 55 dB (MONO)
Sélectivité (± 400kHz)
: Au-delà de 70 dB
Séparation stéréo
: 37 dB (1 kHz)
Ñ Section Syntoniseur AM
Bande de fréquences (step)
: 531 – 1611 kHz (9 kHz) (zones de vente d'Europe, CIS)
: 530 – 1700 kHz (10 kHz) (dans les secteurs de vente
d'Amérique du Nord et d'Amérique du Sud)
Sensibilité utilisable
: 29 μV
Page 55

À propos de cet appareil
Ñ Section vidéo
Système de couleur de l'entrée vidéo externe
: N TSC /PAL
Niveau d'entrée vidéo externe (jacks RCA)
: 1,0 Vp-p/75 Ω
Niveau d'entrée maxi audio externe (jacks RCA)
: 1,8 V/ 10 kΩ
Niveau de sortie vidéo (jacks RCA)
: 1,0 Vp-p/75 Ω
Ñ Section audio
Puissance maximum (avant et arrière)
: 50 W × 4
Puissance à pleine bande passante (Avant & Arrière)
Largeur de bande à pleine puissance (à moins de 1
% DHT)
: 21 W × 4
Niveau de pré-amplication (V)
: 2 V/ 10 kΩ
Impédance du préamplicateur
: ≤ 600 Ω
Impédance d'enceinte
: 4 – 8 Ω
Égaliseur
: 7 Bande
Bande
Fréquence : 62,5/ 160/ 400/ 1 k/ 2,5 k/ 6,3 k/ 16 k Hz
Niveau : -7 – +7 (-7 dB – +7 dB)
LPF
Fréquence : 80/ 120/ 160 Hz
Ñ Général
Tension de fonctionnement
: 14,4 V (10,5 – 16 V permis)
Consommation de courant maximale
: 10 A
Dimensions d'installation (L × H × P)
: 182 × 112 × 74,5 mm
7-3/8 × 4-3/8 × 2-15/16 pouces
Dimensions d’installation de l’unité principale (L × H
× P)
: 178 × 100 × 79 mm (sans manchon)
Plage de température de fonctionnement
: -10 °C – +60 °C
Poids
: 0,9 kg (2,0 lbs)
Ñ Informations sur le traitement des
appareils électriques et électroniques et
des batteries usagés (applicable aux pays
de l’UE ayant adopté un système de tri des
déchets)
Les produits et les batteries comprenant le symbole
(poubelle barrée) ne peuvent pas être jetés parmi les
déchets ménagers.
Les vieux appareils électriques et électroniques,
ainsi que les batteries doivent être recyclés dans un
complexe adapté au traitement de ces déchets et de
leurs sous-produits.
Prenez contact avec les services publics locaux afin de
localiser un complexe de recyclage proche de chez
vous.
Recycler de manière adaptée et jeter ses déchets au bon
endroit aide à préserver les ressources tout en évitant
les effets néfastes sur notre santé et l’environnement.
Remarque : Le signe « Pb » sous le symbole des piles
indique que la batterie contient du plomb.
Pour le Canada
Ñ Note de ‘IC (Industrie Canada)
Le présent appareil est conforme aux CNR d’Industrie
Canada applicables aux appareils radio exempts de
licence.
L’exploitation est autorisée aux deux conditions
suivantes :
(1) l’appareil ne doit pas produire de brouillage, et
(2) l’utilisateur de l’appareil doit accepter tout brouillage
radioélectrique subi, même si le brouillage est
susceptible d’en compromettre le fonctionnement.
! ATTENTION
Cet équipement est conforme aux limites d’exposition
aux rayonnements énoncées pour un environnement
non contrôlé et respecte les règles les radioélectriques
(RF) de la FCC lignes directrices d’exposition et
d’exposition aux fréquences radioélectriques (RF)
CNR-102 de l’IC. Cet équipement émet une énergie RF
très faible qui est considérée comme conforme sans
évaluation de l’exposition maximale autorisée (MPE).
Cependant, il est souhaitable qu’il devrait être installé et
utilisé en gardant une distance de 20 cm ou plus entre
le radiateur et le corps humain.
Français |
55
Page 56

Contenido
Antes de la utilización .......................................................... 56
Cómo leer este manual ....................................................................................... 56
Precauciones ..............................................................................................................56
Inicio ........................................................................................... 57
Ajustes del reloj ........................................................................................................58
Ajuste del panel táctil .......................................................................................... 58
Conceptos básicos ................................................................. 59
Funciones de los botones del panel frontal ......................................... 59
Funciones habituales ........................................................................................... 59
Descripciones de la pantalla INICIO ........................................................... 60
Descripciones de la pantalla de control de fuente .......................... 60
Pantalla de lista .........................................................................................................60
USB ...............................................................................................61
Preparativos ................................................................................................................ 61
Operaciones de reproducción ....................................................................... 61
iPod/iPhone ............................................................................. 63
Preparativos ................................................................................................................ 63
Operaciones de reproducción ....................................................................... 63
Sintonizador.............................................................................65
Funcionamiento básico del sintonizador ............................................... 65
Emisoras preestablecidas ..................................................................................65
Características FM RDS ........................................................................................ 65
Configuración del sintonizador ..................................................................... 66
Componentes externos ....................................................... 67
Uso de reproductores de audio/vídeo exteriores .............................67
Cámara de visión trasera .................................................................................... 67
Teléfono inteligente con Bluetooth (KW-M24BT) ..... 68
Registre su teléfono inteligente en la unidad ...................................... 68
Reciba una llamada telefónica .......................................................................68
Realice una llamada telefónica ......................................................................69
Reproducir dispositivos de audio Bluetooth ........................................70
Borre el dispositivo Bluetooth registrado ............................................... 70
Control del audio ................................................................... 71
Controlar el audio general ................................................................................ 71
Control del ecualizador....................................................................................... 71
Ajustes del subwoofer ......................................................................................... 71
Mando a distancia ................................................................. 72
Funciones de los botones del mando a distancia ............................ 72
Instalación ................................................................................ 73
Antes de la instalación ......................................................................................... 73
Instalación de la unidad ..................................................................................... 74
Acerca de esta unidad .......................................................... 78
Más información ...................................................................................................... 78
Resolución de problemas ................................................................................. 78
Derechos de autor..................................................................................................79
Especificaciones ...................................................................................................... 80
Cómo leer este manual
• Los paneles que se incluyen en este manual son
ejemplos utilizados para ofrecer explicaciones de las
distintas operaciones. Por esta razón, pueden diferir
de los paneles que se visualizan en realidad.
• En los procedimientos operativos, las llaves indican la
tecla o botón que debe emplear.
< >: indica el nombre de los botones del panel.
[ ]: Indica el nombre de las teclas.
56
Antes de la utilización
Precauciones
#ADVERTENCIA
Ñ Para evitar lesiones o incendios, tome las
precauciones siguientes:
• Para evitar un cortocircuito, nunca coloque ni deje
objetos metálicos (como monedas o herramientas
metálicas) dentro de la unidad.
• No mire fijamente la pantalla de la unidad mientras
está conduciendo durante un periodo prolongado
de tiempo.
• Si tiene problemas durante la instalación, consulte
con su distribuidor JVC.
Ñ Precauciones para el uso de esta unidad
• Cuando compre accesorios opcionales, pregunte
a su distribuidor JVC si dichos accesorios son
compatibles con su modelo y en su región.
• La función Radio Data System o Radio Broadcast
Data System no funcionará en lugares donde no
existan emisoras compatibles con este servicio.
Ñ Cómo proteger el monitor
• Para proteger el monitor de posibles daños, no lo
utilice con un bolígrafo con punta de bola o una
herramienta similar con una punta afilada.
Ñ Limpieza de la unidad
Si el panel frontal de esta unidad está manchado,
límpielo con un paño suave y seco, como por
ejemplo, un paño de silicona. Si el panel frontal está
muy manchado, limpie la mancha con un paño
humedecido con un producto de limpieza neutro y,
a continuación, vuelva a limpiarlo con un paño suave,
limpio y seco.
! PRECAUCIÓN
• Aplicar un limpiador en espray directamente sobre la
unidad, puede dañar sus componentes mecánicos.
Limpiar el panel frontal con un paño áspero o con un
líquido volátil, como un disolvente o alcohol, podría
rayar la superficie o borrar las impresiones de la
pantalla.
Ñ Cómo reiniciar la unidad
Si la unidad o la unidad conectada no funcionan
correctamente, reiníciela.
Botón Restablecer
Page 57
Inicio
1 Coloque la llave de encendido del coche en la
posición ACC.
La unidad se pone en marcha.
2 Pulse el botón < >.
3 Toque [ Set tings].
4 Toque la tecla correspondiente y establezca un
valor.
Audio
Sound Eect
Muestra la pantalla Ecualizador. (P.71)
Beep
Activa o desactiva el tono de las teclas.
“ON” (ACTIVADO) (Predeterminado), “OFF”
(DESACTIVADO)
Loudness
Fija las cantidades de refuerzo de los tonos altos y
bajos.
“ON” (ACTIVADO), “OFF” (DESACTIVADO)
(predeterminado)
Subwoofer
Muestra la pantalla Subwoofer. (P.71)
Display
Panel Adjust
Ajuste la detección de posiciones del panel táctil.
Consulte “Ajuste del panel táctil” ( P.58).
Aspect
Seleccione el modo de pantalla.
“16:9” (predeterminado),“4:3 Pan Scan”
Tun er
Muestra la pantalla Configuración del sintonizador.
(P.66)
General
Language
Seleccione el idioma utilizado para la pantalla de
control y los elementos de configuración. El idioma
predeterminado es “English” (inglés).
1) Toque [Language] (Idioma).
2) Seleccione el idioma deseado.
* Podrá cambiar la página para visualizar más
elementos pulsando [
BT Auto Connect
La unidad se reconecta automáticamente cuando
el último dispositivo Bluetooth conectado está
dentro del alcance.
“ON” (ACTIVADO) (Predeterminado), “OFF”
(DESACTIVADO)
Clock Setting
Ajuste la hora del reloj. ( P.58).
Default
Toque [Default] (Predeterminado) para establecer
todos los ajustes en los ajustes iniciales
predeterminados.
]/[ ].
5 Toque [ 6 ].
Español |
57
Page 58
Inicio
Ajustes del reloj
Ñ Sincronización de la hora del reloj con FM
RDS
Activa [RDS Clock Sync] (Sinc. del reloj RDS].
Consulte “Configuración del sintonizador” (P.66).
Ñ Ajuste del reloj manualmente
✎ N OTA
• Desactive [RDS Clock Sync] antes de ajustar el reloj.
Consulte “Configuración del sintonizador” (P.66).
1 Pulse el botón < >.
2 Toque [ Set tings].
3 Toque [General].
4 Toque [Clock Setting].
Aparece la pantalla del reloj.
5 Selecciona el formato de la hora.
[12] (Predeterminado: Solo área de venta de
Norteamérica y Sudamérica)
[24] (Predeterminado: Solo área de venta de Europa,
CEI)
Ajuste del panel táctil
1 Pulse el botón < >.
2 Toque [ Set tings].
3 Toque [Display].
4 Toque [Panel Adjust].
5 Siga las instrucciones en pantalla y toque el
centro de cada +.
• Para cancelar el ajuste del panel táctil, toque
[Cancel].
• Si se desvía la posición de toque, [OK] no se
visualiza. Inténtelo de nuevo desde el principio.
6 Toque [OK].
6 Toque el botón [R] o [S] para ajustar la hora del
reloj.
• Si ha seleccionado [12] como el formato de la hora,
toque [AM] o [PM] antes de ajustar la hora del reloj.
7 Toque [ 6 ].
58
Page 59

Conceptos básicos
Conceptos básicos
Funciones de los botones del panel frontal
1
2
3
4
5
6
Sensor remoto
1
• Recibe la señal del control remoto.
(INICIO)
2
• Muestra la pantalla INICIO. (P.60)
• Si se pulsa durante 1 segundo, se apaga la unidad.
• Si la unidad está apagada, la enciende.
EQ
3
• Muestra la pantalla Ecualizador.* (P.71)
* Durante la reproducción de archivos de vídeo,
solo podrá ajustar la curva del ecualizador
preestablecida.
* La pantalla Ecualizador no se visualiza durante
la reproducción de un archivo de imagen o
en la pantalla de la lista o en la pantalla de
configuración, etc.
+ , – (Volumen)
4
• Ajusta el volumen. Si continúa presionando [ + ] el
volumen aumentará hasta 20.
(MUTE, Pantalla desactivada)
5
• Silencia/restablece el sonido.
• Al pulsar durante 1 segundo se apaga la pantalla.
Cuando la pantalla esté apagada, toque la pantalla
para encender la misma.
Restablecer
6
• Si la unidad o el equipo conectado no funcionan
correctamente, la unidad restablece la
configuración de fábrica al pulsar este botón.
Funciones habituales
Ñ Encendido
1 Pulse el botón < >.
Ñ Apagado
1 Pulse y mantenga pulsado el botón < >.
Ñ Ajuste del volumen
1 Pulse el botón <+> o <–>.
✎ N OTA
• Si continúa presionando [ + ] el volumen aumentará
hasta 20.
Ñ Silencia el sonido
1 Pulse el botón < >.
Para restaurar el sonido, toque el botón de nuevo
o ajuste el volumen.
Ñ Apagar la pantalla
1 Pulse y mantenga pulsado el botón < >.
Para activar la pantalla, toque la misma.
Español |
59
Page 60
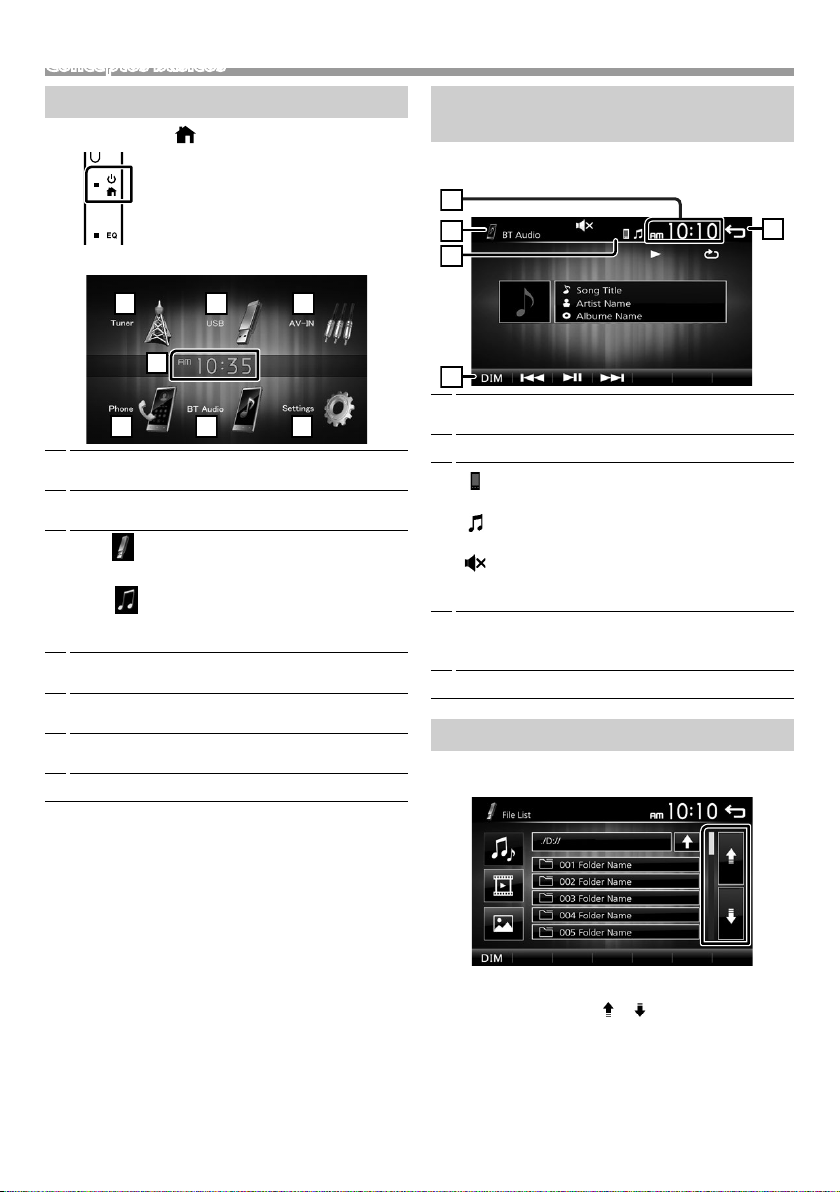
Conceptos básicos
25364
7
1
1
4
3
2
5
Descripciones de la pantalla INICIO
1 Pulse el botón < >.
Aparece la pantalla HOME (inicio).
Pantalla del reloj
1
Toque para visualizar la pantalla Reloj.
Cambia a la emisión del programa de radio.
2
(P.65)
3
[USB]
Reproduce archivos en un dispositivo USB. (P.61)
[iPod]
Reproduce un iPod/iPhone. (P. 63)
• Cuando está conectado un iPod/iPhone.
Cambia a un componente externo conectado a la
4
terminal de entrada AV-IN. ( P. 67)
Muestra la pantalla Manos libres. (P. 69)
5
(KW-M24BT solo)
Reproduce un reproductor de audio Bluetooth.
6
(P.70) (KW-M24BT solo)
Muestra la pantalla CONFIGURACIÓN. (P.57)
7
Descripciones de la pantalla de control de fuente
Puede realizar una operación de reproducción de la
fuente en la pantalla de control de fuentes.
Pantalla del reloj
1
Toque para visualizar la pantalla Reloj.
Nombre de la fuente
2
3
•
aparece cuando el teléfono inteligente
Bluetooth está conectado. *
•
aparece cuando el reproductor de audio
Bluetooth está conectado. *
•
aparece cuando la función de silenciamiento
está activa. (P. 59)
* KW-M24BT solo
[DIM] (TENUE)
4
Selecciona el modo de atenuación. Tenue 1, Tenue
2, No atenuado
Regresa a la pantalla anterior.
5
Pantalla de lista
Existen teclas de funciones comunes en las pantallas
de listas de la mayoría de las fuentes.
1 Podrá cambiar la página para visualizar más
elementos pulsando [ ]/[ ].
60
Page 61
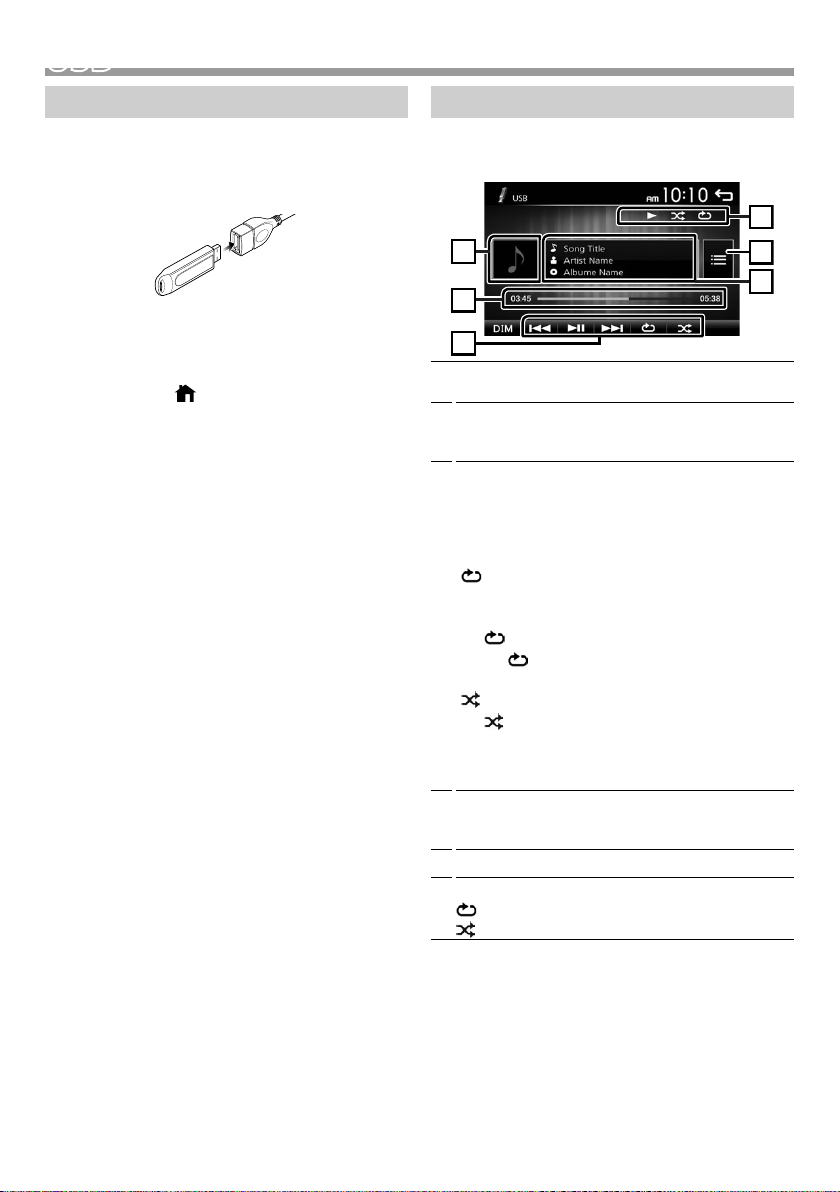
USB
1
6
3
2
5
4
USB
Preparativos
Ñ Conexión de un dispositivo USB
1 Retire la tapa del terminal de USB.
2 Conecte el dispositivo USB con el cable USB.
La unidad lee el dispositivo y se inicia la
reproducción.
Ñ Para desconectar el dispositivo USB:
1 Pulse el botón < >.
2 Toque una fuente distinta de [USB].
3 Desconecte el dispositivo USB.
Ñ Dispositivos USB que pueden utilizarse
Esta unidad puede reproducir archivos MPEG1/
MPEG2/MPEG4/MP3/WMA/AAC/JPEG/BMP guardados
en un dispositivo de clase de almacenamiento masivo
USB. (P.78)
• Sistema de archivo: FAT16/ FAT32
• Esta unidad puede reconocer un total de 9.999
archivos y 320 carpetas (un máximo de 9.999
archivos por carpeta).
• El número máximo de caracteres:
– Nombres de carpeta: 24 caracteres
– Nombres de archivo: 24 caracteres
– Etiqueta: 30 caracteres
✎ N OTA
• Cuando el dispositivo USB esté conectado a esta
unidad, puede cargarse a través del cable USB.
• Instale el dispositivo USB en un lugar que no
perjudique a una conducción segura.
• No puede conectar un dispositivo USB mediante un
núcleo USB o un lector de tarjetas múltiple.
• Haga copias de seguridad de los archivos de
audio utilizados con esta unidad. Los archivos
podrían borrarse en función de las condiciones de
funcionamiento del dispositivo USB.
No compensaremos en forma alguno los daños
producidos por cualquier dato borrado.
• Esta unidad no se suministra con un dispositivo USB.
Tiene que comprar un dispositivo USB disponible
comercialmente.
• Tape la terminal de USB cuando no se esté utilizando.
Operaciones de reproducción
Ñ Controle la música que está escuchando
en la pantalla de control de fuente.
Se muestra la cubierta de la emisora que se está
1
escuchando en ese momento.
##:##:## : Duración de la canción
2
Barra de tiempo de repetición : Para confirmar la
posición actual de reproducción.
[L]: Inicia la reproducción o hace una pausa.
3
[E] [F] : Busca el contenido anterior/siguiente.
Mantenga pulsado para avanzar o retroceder
rápidamente. Toque [L] para reanudar la
reproducción normal.
[
]: Selecciona el modo de reproducción Repetir.
Luces apagadas (Predeterminado): Repite
todos los archivos en el dispositivo USB.
: Repite el archivo actual.
: Repite todos los archivos en la carpeta
FO
actual.
[
]: Selecciona el modo Reproducción aleatoria.
: Reproduce aleatoriamente todos los
archivos.
Luces apagadas (Predeterminado):
Reproducción normal.
Muestra la información del archivo actual.
4
Un nombre de archivo solo se muestra si no hay
información de etiqueta.
Busca el archivo. (P. 62)
5
D, etc. : Estado de la reproducción
6
: Indicador del modo de reproducción Repetir
: Indicador del modo de reproducción aleatorio
Español |
61
Page 62
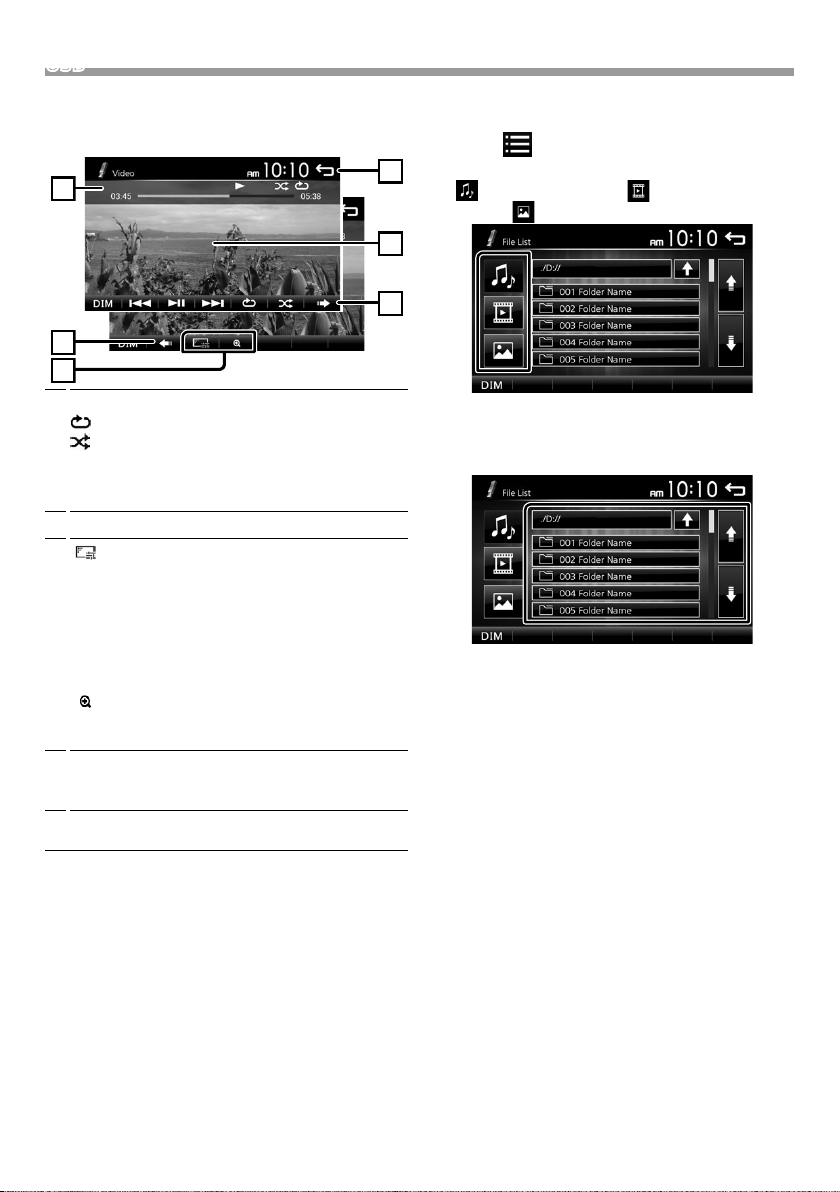
USB
3
2
1
2
4
5
Ñ Para la reproducción de video
1 Si los botones de operación no se visualizan en la
pantalla, toque la pantalla.
D, etc. : Estado de la reproducción
1
: Indicador del modo de reproducción Repetir
: Indicador del modo de reproducción aleatorio
##:##:## : Duración de la canción
Barra de tiempo de repetición : Para confirmar la
posición actual de reproducción.
Para cambiar los botones de operación.
2
[
]: Puede ajustar la calidad de imagen en la
3
pantalla de vídeo.
[Brightness]: Ajusta el brillo. (00 a 08)
[Contrast]: Ajusta el contraste. (00 a 08)
[Tint]: Ajusta el matiz. (00 a 08)
[Color]: Ajusta el color. (00 a 08)
[Reset]: Para eliminar el ajuste.
]: Seleccione la relación de zoom.
[
“Off”, “x2”, “x3”, “x4”, “x5”, “1/2”, “1/3”, “1/4”
[3] [2] [ < ] [ > ] : Desplaza la pantalla.
Los botones de operación desaparecen cuando se
4
toca 4 o cuando no se realiza ninguna operación
durante 10 segundos.
Muestra la pantalla Lista de archivos.* (P. 62)
5
* El archivo de vídeo se detiene.
Ñ Selección de una pista en una lista
(Busca el archivo)
1 Toque [ ].
2 Seleccione si buscará por archivos de audio
[ ], archivos de vídeo [ ] o archivos de
imagen [ ].
3 Toque [Y] para desplazarse a la jerarquía
superior.
4 Toque la carpeta deseada.
Al tocar una carpeta, se muestran sus contenidos.
5 Toque para seleccionar el elemento en la lista de
contenidos.
La reproducción se inicia.
✎ N OTA
• Cuando se han cambiado los tipos de archivo, el ajuste
de Reproducción aleatoria/repetición se cancelará.
62
Page 63
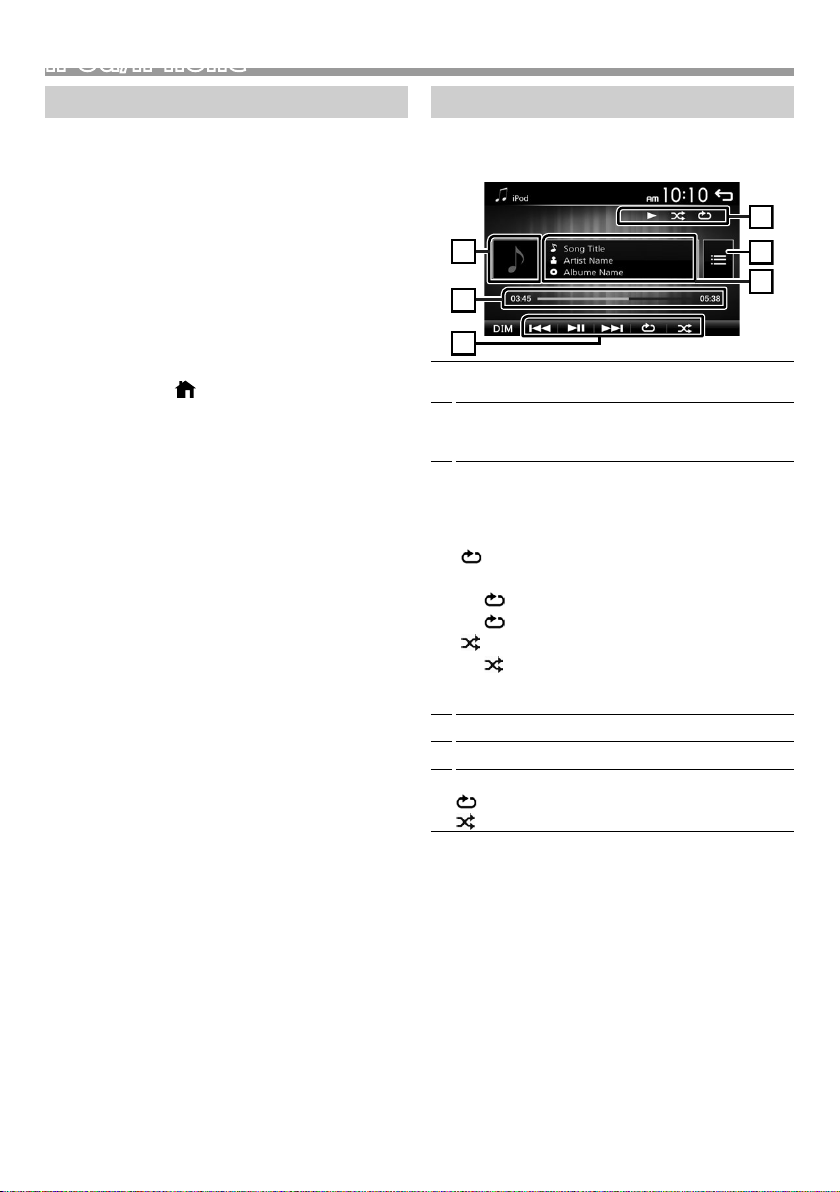
iPod/iPhone
1
6
3
2
5
4
iPod/iPhone
Preparativos
Ñ Conexión de iPod/iPhone
• Para modelos con conector Lightning: Use el cable
de audio USB para iPod/iPhone—KS-U62 (accesorio
opcional).
• Para obtener detalles acerca de la conexión de un
iPod/iPhone, consulte la página 77 .
1 Retire la tapa del terminal de USB.
2 Conecte el iPod/iPhone.
La unidad lee el dispositivo y se inicia la
reproducción.
Ñ Para desconectar el iPod/iPhone
1 Pulse el botón < >.
2 Toque una fuente distinta de [iPod].
3 Desconecte el iPod/iPhone.
Ñ iPod/iPhone que pueden conectarse
Los siguientes modelos pueden conectarse a esta
unidad.
Fabricados para
• iPhone 7 Plus
• iPhone 7
• iPhone SE
• iPhone 6s Plus
• iPhone 6s
• iPhone 6 Plus
• iPhone 6
• iPhone 5s
• iPhone 5c
• iPhone 5
• iPod touch (6.ª generación)
• iPod touch (5.ª generación)
✎ N OTA
• Si empieza la reproducción después de conectar el
iPod, se reproducirá primero la música reproducida
por el iPod.
• Tape la terminal de USB cuando no se esté utilizando.
Operaciones de reproducción
Ñ Controle la música que está escuchando
en la pantalla de control de fuente.
Material gráfico (se muestra si la pista contiene
1
material gráfico)
##:##:## : Duración de la canción
2
Barra de tiempo de repetición : Para confirmar la
posición actual de reproducción.
L: Inicia la reproducción o hace una pausa.
3
[E] [F] : Busca el contenido anterior/siguiente.
Mantenga pulsado para avanzar o retroceder
rápidamente.
[
]: Selecciona el modo de reproducción Repetir.
Luces apagadas: Repetir desconectado
: Funciona igual que Repetir Todo.
1 : Funciona igual que Repetir Uno.
]: Selecciona el modo Reproducción aleatoria.
[
: Funciona igual que Reproducción aleatoria
de canciones.
Luces apagadas: Aleatorio desactivado
Muestra la información del archivo actual.
4
Busca contenido. (P. 64)
5
D, etc. : Estado de la reproducción
6
: Indicador del modo de reproducción Repetir
: Indicador del modo de reproducción aleatorio
Español |
63
Page 64

iPod/iPhone
Ñ Seleccione un contenido en una lista
1 Toque [ ].
2 Toque el elemento deseado.
Cuando toca una categoría, se muestran sus
contenidos.
3 Toque para seleccionar el elemento en la lista de
contenidos.
La reproducción se inicia.
• Toque [6] para desplazarse a la jerarquía superior.
✎ N OTA
• Aparece la pantalla de control de la fuente cuando
toca [6] en la parte superior de la jerarquía.
64
Page 65
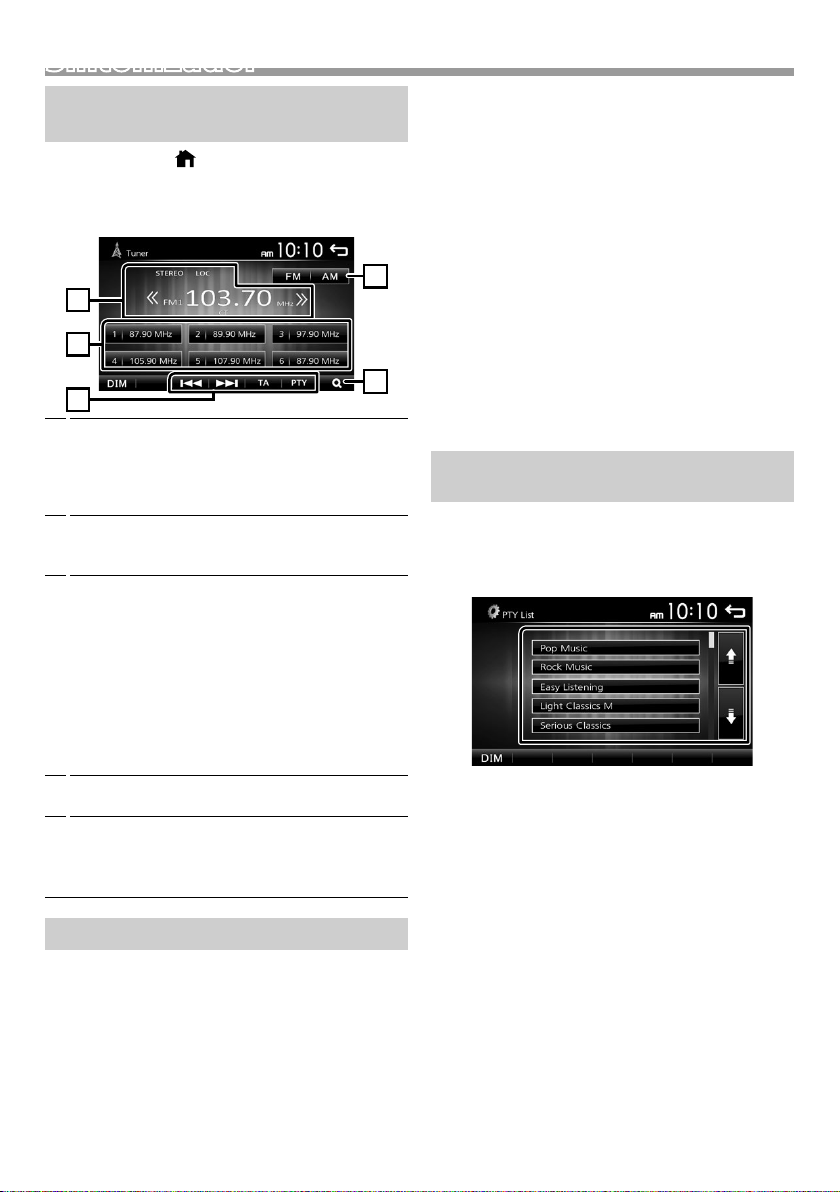
Sintonizador
4
1
3
2
5
Sintonizador
Funcionamiento básico del sintonizador
1 Pulse el botón < >.
2 Toqu e [Tuner].
Ñ Pantalla de control de fuente
Muestra información sobre la emisora actual:
1
Nombre PS, Frecuencia, Género PTY, Elementos del
indicador
[<<] [>>]: Toque para ir a la frecuencia siguiente
manualmente.
Restaura la emisora memorizada.
2
Si se toca durante 2 segundos, almacena en la
memoria la emisora de recepción actual.
[E] [F] : Sintoniza automáticamente una
3
emisora con buena recepción. *
[TA] : Se establece el modo de información del
[PTY] : Selecciona el tipo de programa disponible.
*1 Si “AF” se ajusta a ON en la pantalla Sintonizador,
*2 Solo FM
*3 Solo en el área de venta de Europa, CEI
[1]: Preestablece emisoras automáticamente.
4
[FM]: Cambia la frecuencia FM.
5
[AM]: Cambia la frecuencia AM.
2*3
tráfico. *
2*3
*
solo se reciben emisoras RDS. (P. 66)
(P.65)
“FM1”, “FM2”, “FM3”
“AM1”, “AM2”
(P.65)
(P.65)
1
Emisoras preestablecidas
Ñ Memoria automática
Puede programar 18 emisoras para FM y 12 emisoras
para AM.
1 Toque [FM] o [AM] para seleccionar la frecuencia.
2 Toque [ 1 ].
Las emisoras locales con las señales más fuertes se
encuentran y almacenan automáticamente.
• Si “AF” está ajustado en “ON” en la pantalla
Sintonizador, solamente se guardan en la memoria las
emisoras RDS. (P.66)
Ñ Memoria manual
Puede almacenar en la memoria la emisora que está
recibiendo actualmente.
1 Sintonice una emisora que desea preestablecer.
2 Mantenga pulsado [#] (#:1-6) en el que desee
guardar la emisora.
Ñ Volver a una emisora prejada
1 Toque [#] (#:1-6).
✎ N OTA
• Solamente se registran las frecuencias como emisoras
programadas. La información acerca de las emisoras
RDS no se registra.
Características FM RDS
(Solo en el área de venta de Europa, CEI)
Ñ Buscar por tipo de programa
1 Toque [ PTY] .
2 Seleccione un tipo de programa de la lista.
Comienza la búsqueda PTY.
Ñ Información de tráco
1 Toque [ TA].
Cambia a la información de tráfico automáticamente
cuando empieza el boletín de tráfico. (Se ilumina el
indicador TA).
“ON” (ACTIVADO), “OFF” (DESACTIVADO)
(predeterminado)
• Si “AF” está ajustado en “ON” en la pantalla
Sintonizador, se cambia la emisora a la estación RDS.
(P.66)
Cuando dé comienzo el boletín de tráco
La pantalla de información del tráfico aparece
automáticamente.
Español |
65
Page 66

Sintonizador
Conguración del sintonizador
Ñ Menú de función
1 Pulse el botón < >.
2 Toque [ Set tings].
3 Toqu e [Tuner].
4 Ajuste cada elemento del modo siguiente.
Local
Sintoniza solo las emisoras con una fuerza de señal
suficiente. (Se ilumina el indicador LOC).
“ON” (ACTIVADO), “OFF” (DESACTIVADO)
(predeterminado)
RDS Clock Sync
Sincronización mediante el Sistema de datos de radio
de los datos horarios de la emisora y el reloj de esta
unidad.
“ON” (ACTIVADO) (Predeterminado), “OFF”
(DESACTIVADO)
2
AF *
Si la recepción de una emisora es deficiente, se cambia
automáticamente a la emisora que esté emitiendo el
mismo programa a través de la misma red de Radio
Data System.
“ON” (ACTIVADO) (Predeterminado), “OFF”
(DESACTIVADO)
*1 Solo área de venta de Norteamérica y Sudamérica
*2 Solo en el área de venta de Europa, CEI
5 Toque [ 6 ].
1
Area *
North America (predeterminado): Para América del
Norte/Central/Sur, intervalos AM/FM: 10 kHz/200
kHz.
South America: Para algunos países sudamericanos,
intervalos AM/FM: 10 kHz/50 kHz.
Europe: Para Europa, intervalos AM/FM: 9 kHz/50 kHz.
Stereo
Determina si se van a recibir emisoras estéreo en el
modo estéreo o monoaural (se ilumina el indicador
MONO).
“ON” (ACTIVADO) (Predeterminado), “OFF”
(DESACTIVADO)
66
Page 67

Componentes externos
1
Uso de reproductores de audio/vídeo exteriores
Ñ Inicio de la reproducción
1 Conecte un componente externo a la terminal de
entrada AV-IN. (P.76)
2 Pulse el botón < >.
3 Toque [AV- IN].
4 Enciende el componente conectado y comienza a
reproducir la fuente.
Ñ Para la reproducción de video
1 Si los botones de operación no se visualizan en la
pantalla, toque la pantalla.
Los botones de operación desaparecen cuando se
toca 1 o cuando no se realiza ninguna operación
durante 5 segundos.
✎ N OTA
• Cuando la imagen de la cámara de visión trasera se
visualiza en la pantalla AV-IN, la emisión de la imagen
desde el terminal de salida de vídeo desaparece.
Cámara de visión trasera
Para usar una cámara de visión trasera, se requiere la
conexión del cable de MARCHA ATRÁS. Para conectar
una cámara de visión trasera. (P.76)
Ñ Visualización de la imagen desde la
cámara de visión trasera
Se muestra la pantalla de visión trasera cuando cambia
la palanca de cambios a la posición de marcha atrás (R).
• Para eliminar el mensaje de precaución, toque la
pantalla.
Español |
67
Page 68

Teléfono inteligente con Bluetooth (KW-M24BT)Teléfono inteligente con Bluetooth (KW-M24BT)
Ñ Acerca de los teléfonos inteligentes
Bluetooth y los reproductores de audio
Bluetooth
Esta unidad cumple las siguientes especicaciones
Bluetooth:
Versión
Bluetooth Ver.2.1 + EDR
Perl
Teléfono inteligente/ Teléfono móvil:
HFP (V1.6) (Perfil de manos libres)
PBAP (V1.1.1) (Perfil de acceso a agenda telefónica)
Reproductor de audio :
A2DP (V1.2) (Perfil avanzado de distribución de audio)
AVRCP (V1.3) (Perfil de mando a distancia de audio/
vídeo)
Códec de sonido
SBC
PIN (“0000”).
•
aparece cuando el teléfono inteligente
Bluetooth está conectado.
•
aparece cuando el reproductor de audio
Bluetooth está conectado.
Ñ Desconexión del dispositivo
• Desactive la función Bluetooth en su teléfono
inteligente/teléfono móvil.
• Apague el interruptor de encendido.
Reciba una llamada telefónica
1 Toque [ Û].
Ñ Acerca de teléfonos móviles compatibles
con el Perl de acceso a la agenda
telefónica (PBAP)
Si su teléfono móvil es compatible con PBAP, al
conectar el teléfono móvil podrá visualizar los
siguientes elementos en la pantalla del panel táctil.
• Agenda telefónica (hasta 1.000 entradas)
• Llamadas realizadas, llamadas recibidas y llamadas
perdidas (hasta 20 entradas en total)
Registre su teléfono inteligente en la unidad
Puede utilizar su teléfono inteligente Bluetooth
cuando esté emparejado con esta unidad.
Puede registrar hasta 5 dispositivos Bluetooth.
• Puede emparejar el dispositivo y la unidad usando SSP
(Emparejamiento simple seguro) el cual solo requiere
de confirmación.
• Solo puede conectarse un dispositivo a la vez.
• Cuando registre un nuevo dispositivo Bluetooth,
desconecte el dispositivo Bluetooth conectado
actualmente y, a continuación, registre el nuevo
dispositivo.
• No se puede registrar ningún nuevo dispositivo si ya
hay 5 unidades Bluetooth registradas. Borre el registro
que no sea necesario. (P.70)
1 Active la función Bluetooth en su teléfono
inteligente/teléfono móvil.
2 Busque la unidad (“KW-M24BT”) en su teléfono
inteligente/teléfono móvil.
Si se requiere un código PIN, introduzca el código
68
• [Ý] : Rechace una llamada entrante.
Ñ Operaciones durante una llamada
Finalización de una llamada
[Ý]
Puede enviar tonos tocando las teclas
correspondientes de la pantalla.
• Toque [
Cambia la salida de voz entre el teléfono móvil
y el altavoz.
Ajustar el volumen del receptor
Pulse el botón <+> o <–>.
] para cerrar la ventana.
Page 69

Teléfono inteligente con Bluetooth (KW-M24BT)
Realice una llamada telefónica
1 Pulse el botón < >.
2 Toque [Phone].
3 Consulte la tabla de abajo para cada método de
funcionamiento.
• [ ] : Desconecta el teléfono inteligente con
• [
• [
Llamar introduciendo un número telefónico
1) Toque [
2) Introducir un número de teléfono con las teclas
numéricas.
3) Toque [ Û].
Realice una llamada
• Toque [W] para borrar la última entrada.
Llamar usando datos de llamada almacenados
1) Toque [
salientes), [
2) Seleccione el número de teléfono de la lista.
Bluetooth.
] : Cierra la pantalla para enviar tonos
mientras habla.
] : Muestra la pantalla para borrar los
dispositivos Bluetooth registrados
previamente. (P.70)
].
] (llamadas entrantes), [ ] (llamadas
] (llamadas perdidas).
Llamar usando la agenda telefónica
1) Toque [
2) Seleccione el nombre de la lista.
Realice una llamada
• [
Call by voice
Puede realizar una llamada de voz utilizando la
función de reconocimiento de voz del teléfono
inteligente con Bluetooth.
1) Toque [
2) Toque [
3) Pronuncie el nombre registrado en el teléfono
inteligente con Bluetooth.
• Toque [ ] para cancelar la marcación mediante
voz.
].
] : Actualiza la agenda. Toque este botón
después de que haya realizado un
cambio en la agenda de su teléfono
móvil.
].
].
Realice una llamada
Español |
69
Page 70

Teléfono inteligente con Bluetooth (KW-M24BT)
2
3
1
4
Reproducir dispositivos de audio Bluetooth
1 Pulse el botón < >.
2 Toque [BT Audio].
Ñ Pantalla de control de fuente
Se muestra la cubierta de la emisora que se está
1
escuchando en ese momento.
[L]: Inicia la reproducción o hace una pausa.
2
[E] [F] : Busca el contenido anterior/siguiente.
Muestra la información del archivo actual.
3
Solamente se visualizan un nombre de archivo y
un nombre de carpeta si no hay información de
etiqueta.
D, etc. : Estado de la reproducción
4
: Indicador del modo Repetir reproducción *
: Indicador del modo de reproducción aleatoria *
* Se visualizan los ajustes a realizar en el dispositivo
de audio Bluetooth.
✎ N OTA
• Las operaciones y las indicaciones en pantalla pueden
variar en función de su disponibilidad en el dispositivo
conectado.
Borre el dispositivo Bluetooth registrado
1 Pulse el botón < >.
2 Toque [Phone].
3 Toque [ ].
4 Toque el nombre del dispositivo.
5 Toque [ ].
70
Page 71
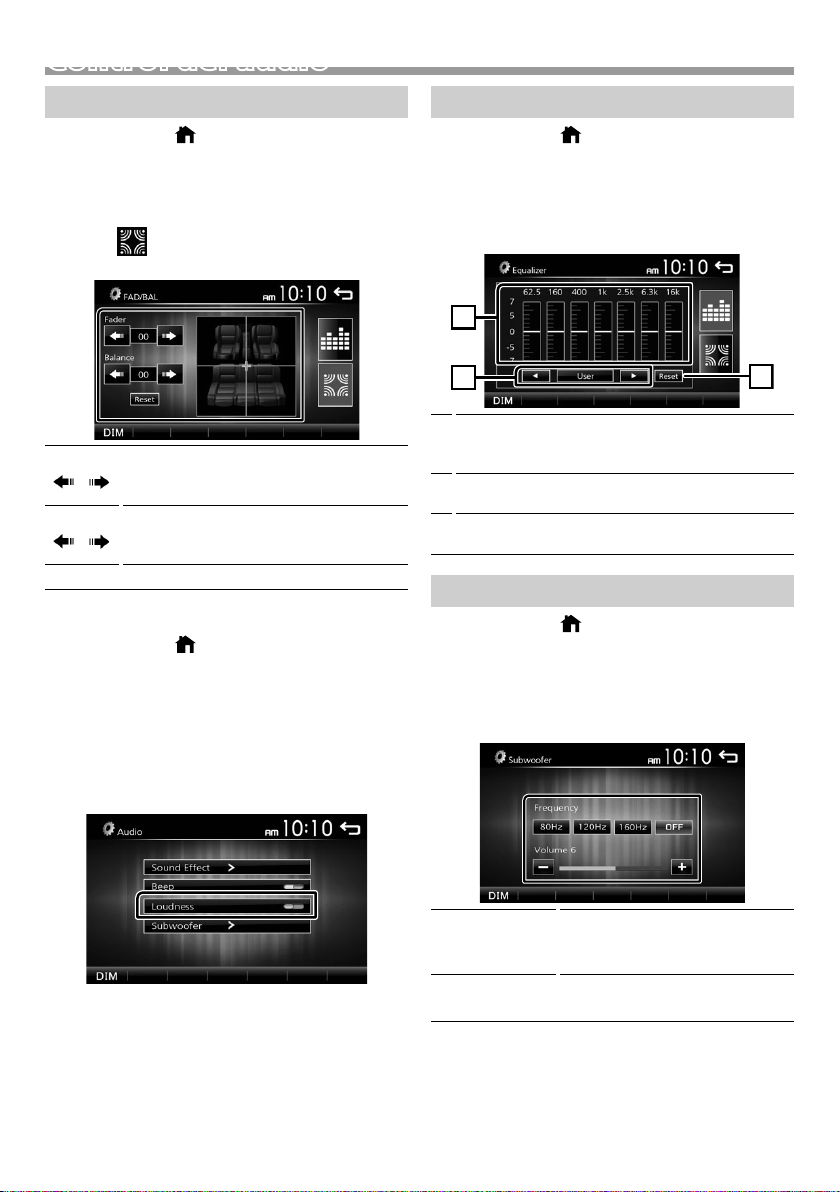
1
3
2
Control del audio
Controlar el audio general
1 Pulse el botón < >.
2 Toque [ Set tings].
3 Toque [Audio].
4 Toque [Sound Effect].
5 Toque [ ].
6 Ajuste cada elemento del modo siguiente.
Fader
[
Balance
[
[Reset]
Ñ Loudness/ Compensador
Ajuste el balance del volumen delantero y
trasero.
] [ ]
12 (delantero) a -12 (trasero)
Ajuste el balance del volumen izquierdo y
derecho.
] [ ]
12 (derecha) a -12 (izquierda)
Para eliminar el ajuste.
1 Pulse el botón < >.
2 Toque [ Set tings].
3 Toque [Audio].
4 Toque [Loudness].
Fija las cantidades de refuerzo de los tonos altos y
bajos.
“ON” (ACTIVADO), “OFF” (DESACTIVADO)
(predeterminado)
Control del ecualizador
1 Pulse el botón < >.
2 Toque [ Set tings].
3 Toque [Audio].
4 Toque [Sound Effect].
5 Ajuste cada elemento del modo siguiente.
Podrá seleccionar la barra de frecuencia y ajustar su
1
nivel. (-7 a +7)
• Se guardan los ajustes y se activa “User” (Usuario).
Para recuperar la curva del ecualizador
2
preestablecida.
El preajuste “User” y la curva EQ actual vuelven a ser
3
planos.
Ajustes del subwoofer
1 Pulse el botón < >.
2 Toque [ Set tings].
3 Toque [Audio].
4 Toque [Subwoofer].
5 Ajuste cada elemento del modo siguiente.
Frequency
[80Hz], [120Hz],
[160Hz], [OFF]
Volume
[–], [+]
Ajuste del filtro de paso bajo. /
[OFF]: Desactiva la salida del
subwoofer. (OFF predeterminado)
Ajusta el nivel del subwoofer. 0 a 12
(predeterminado 6)
Español |
71
Page 72

Mando a distancia
Esta unidad puede manejarse con el mando a
distancia.
Se puede utilizar el mando a distancia RM-RK258
(accesorio opcional).
! ADVERTENCIA
• No ingiera la pila, peligro de quemaduras químicas
El mando a distancia suministrado con este producto
contiene una pila de tipo moneda/botón. Si traga
la pila de tipo moneda/botón, puede causar
quemaduras internas severas en tan solo 2 horas y
conducir a la muerte.
Mantenga las pilas nuevas y usadas lejos de los niños.
Si el compartimento de la pila no cierra de manera
segura, cese la utilización del producto y manténgalo
alejado de los niños.
Si piensa que las pilas pueden haber sido ingeridas o
introducidas en cualquier parte del cuerpo, busque
atención médica inmediatamente.
! PRECAUCIÓN
• Coloque el mando a distancia en un lugar en el
que no se pueda mover en caso de frenado u otras
operaciones. Podría producirse una situación peligrosa
si el mando a distancia se cae y queda atrapado entre
los pedales durante la conducción.
• No deje la batería cerca del fuego o expuesta a la
luz solar directa. Puede producirse un incendio, una
explosión o un calor excesivo.
• No recargue, cortocircuite, rompa ni caliente la pila,
ni la arroje al fuego. Estas acciones podrían provocar
la fuga de líquido de la pila. Si el líquido derramado
entra en contacto con los ojos o la ropa, enjuague
inmediatamente con agua y consulte a un médico.
Ñ Extracción de la lámina de la pila
Tire de la lámina de la pila del control remoto para
activar la pila.
Ñ Cambio de la pila del control remoto
Funciones de los botones del mando a distancia
• Apunte el mando a distancia directamente al sensor
remoto en la placa frontal.
• NO exponga el sensor remoto a luz brillante (luz
directa del sol o luz artificial).
SRC
VOL. + –
ATT
DISP
FM/R
AM/S
E 2
F 3
ANGLE
Û
DIRECT
ASPECT
Tec lad o
numérico
CLR
ENT
Activa la fuente que se desee reproducir.
Ajusta el volumen.
Silencia/restablece el sonido
Sin usar.
Selecciona la carpeta que se reproducirá.
Durante la fuente del sintonizador,
seleccione las bandas FM/AM recibidas.
Selecciona la pista o archivo que se
reproducirá.
Durante la fuente del sintonizador, cambia
a las emisoras recibidas por la unidad.
Sin usar.
Cuando se recibe una llamada, responde.
Sin usar.
Sin usar.
Sin usar.
Sin usar.
Sin usar.
CR2025 (lado +)
• Utilice una pila de botón disponible en el mercado
(CR2025).
• Inserte la pila con los polos + y – alineados
correctamente.
– Si disminuye la efectividad de acción del control
remoto, cambie las pilas.
72
Page 73
Instalación
Instalación
Antes de la instalación
Antes de la instalación de esta unidad, tenga en
cuenta las precauciones siguientes.
#ADVERTENCIAS
• Si conecta el cable de encendido (rojo) y el cable de
la batería (amarillo) al chasis del automóvil (tierra),
podría producir un cortocircuito y esto, a su vez, un
incendio. Conecte siempre esos cables a la fuente de
alimentación que pasa por la caja de fusibles.
• No corte el fusible del cable de ignición (rojo) y el
cable de la batería (amarillo). El suministro de energía
debe conectarse a los cables por medio del fusible.
#PRECAUCIÓN
• Instale esta unidad en la consola de su vehículo.
No toque la parte metálica de esta unidad durante e
inmediatamente después del uso de la unidad. Las
partes metálicas, tales como el disipador de calor o la
carcasa, pueden estar muy calientes.
✎ N OTA
• La instalación y el cableado de este producto
requieren habilidad y experiencia. Para mayor
seguridad, deje el trabajo de montaje y cableado en
manos de profesionales.
• Asegúrese de utilizar para la unidad una fuente
de alimentación de 12 V CC con conexión a tierra
negativa.
• No instale la unidad en un sitio expuesto a la luz
directa del sol, o excesivamente húmedo o caluroso.
Además deberá evitar sitios con mucho polvo o con
posibilidad de salpicaduras de agua.
• No utilice sus propios tornillos. Utilice solo los tornillos
suministrados. El uso de tornillos diferentes podría
causar daños en la unidad.
• Si la alimentación no se enciende (se visualiza “There
is an error in the speaker wiring. Please check the
connections.” (Hay un error en el cableado del altavoz.
Por favor, compruebe las conexiones)), puede que el
cable del altavoz haya sufrido un cortocircuito o que
haya tocado el chasis del vehículo y se haya activado
la función de protección. Por lo tanto, el cable del
altavoz debe ser revisado.
• Si el encendido de su automóvil no está provisto de
la posición ACC, conecte los cables de encendido a
una fuente de alimentación que pueda conectarse y
desconectarse con la llave de encendido. Si conecta
el cable de encendido a una fuente de alimentación
con un suministro de voltaje constante, como con los
cables de la batería, la batería puede agotarse.
• Si la consola tiene una tapa, asegúrese de instalar la
unidad de forma que el panel frontal no golpee la
tapa al abrirse o cerrarse.
• Si se funden los fusibles, asegúrese primero de que los
cables no están en contacto pues pueden ocasionar
un cortocircuito, luego reemplace el fusible dañado
por uno nuevo que tenga la misma potencia de
servicio.
• Aísle los cables no conectados con una cinta de
vinilo u otro material similar. Para evitar cortocircuitos,
no retire las tapas de los extremos de los cables o
terminales no conectados.
• Asegure los cables con las abrazaderas de cable y
envuelva cinta de vinilo alrededor de los cables que
entren en contacto con los elementos metálicos para
proteger los cables y para evitar cortocircuitos.
• Conecte los cables de los altavoces a cada uno de
los terminales correspondientes. La unidad se puede
dañar o no funcionar si comparte los cables ¤ o
los conecta a tierra a cualquier parte metálica del
vehículo.
• Si se han conectado solamente dos altavoces al
sistema, enchufe los conectores a ambos terminales
de salida delanteros o a ambos terminales de salida
traseros (es decir, no mezcle terminales delanteros y
traseros). Por ejemplo, si conecta el conector ¢ del
altavoz izquierdo a un terminal de salida delantero,
no conecte el conector ¤ a un terminal de salida
posterior.
• Después de instalar la unidad, compruebe que
las luces de freno, las luces intermitentes, el
limpiaparabrisas, etc. funcionan satisfactoriamente.
• Instale la unidad en un ángulo de 30˚ o menos.
• No presione con fuerza la superficie del panel al instalar
la unidad en el vehículo. De lo contrario, pueden
producirse marcas, daños o fallos.
• La recepción podría ser baja si existen objetos
metálicos cerca de la antena Bluetooth.
Unidad de antena Bluetooth
Español |
73
Page 74

Instalación
Ñ Accesorios suministrados para la
instalación
1
3
[1]
5
[1]
7
(M5 × 6 mm)
9
[1]
Solo área de venta de Norteamérica y Sudamérica
[2]
KW-M24BT solo
(2 m)
x1
x1
x4
2
x2
[2]
4
(3 m)
[1]
6
x1
[1]
8
(M5 × 7 mm)
x1
x1
x4
x1
Ñ Procedimiento de instalación
1) Para evitar cortocircuitos, retire la llave del encendido
y desconecte el terminal ¤ de la batería.
2) Realice de forma adecuada las conexiones de cables
de entrada y salida para cada unidad.
3) Conecte el cable al mazo de conductores.
4) Tome el conector B en el mazo de cables y conéctelo
al conector de altavoz de su vehículo.
5) Tome el conector A en el mazo de cables y conéctelo
al conector de alimentación externa de su vehículo.
6) Conecte el mazo de cables a la unidad.
7) Instale la unidad en el automóvil.
8) Conecte nuevamente el terminal ¤ de la batería.
9) Pulse el botón Restablecer.
Instalación de la unidad
Ñ Coches no japoneses
Doble las lengüetas del
manguito de montaje
con un destornillador o
similar y fíjelo.
✎ N OTA
• Asegúrese de que la unidad esté firmemente instalada
en su lugar. Si la unidad está en una posición inestable,
es posible que no funcione correctamente (por
ejemplo, el sonido puede interrumpirse).
Ñ Coches japoneses (solo área de venta de
Norteamérica y Sudamérica)
7 o 8
Ñ Marco
1) Conecte el accesorio 1 a la unidad.
Soporte del vehículo
7 o 8
74
1
Page 75

Instalación
Ñ Unidad de micrófono (KW-M24BT)
1) Compruebe la posición de instalación del micrófono
(accesorio 4).
2) Limpie la superficie de instalación.
3) Extraiga el separador del micrófono (accesorio 4) y
fije el micrófono en la posición indicada más abajo.
4) Conecte el cable del micrófono a la unidad de forma
segura en varias posiciones mediante cinta u otro
método.
5) Ajuste la dirección del micrófono (accesorio 4) hacia
el conductor.
4
Fije un cable con una cinta adhesiva de uso
comercial.
✎ N OTA
• Cambie los clips si es necesario.
Ñ Retirada de la unidad
1) Retire el marco según las indicaciones del paso 1 de
“Retirar el marco”.
2) Introduzca la llave de extracción (accesorio 2)
profundamente en la ranura tal y como se muestra.
(El saliente en la punta de la tecla de extracción debe
mirar hacia la unidad).
2
3) Con la llave de extracción introducida asegurada,
inserte la otra llave de extracción en la ranura.
2
4) Saque la unidad hasta la mitad.
Ñ Retirada del marco
1) Use la tecla de extracción (accesorio 3) para extraer
las cuatro pestañas (dos en la parte izquierda, dos en
la parte derecha).
3
2) Tire de la placa hacia adelante.
✎ N OTA
• Tenga cuidado de no hacerse daño con los
pasadores de bloqueo de la llave de extracción.
5) Termine de sacar la unidad con las manos, prestando
atención para no dejarla caer.
Español |
75
Page 76
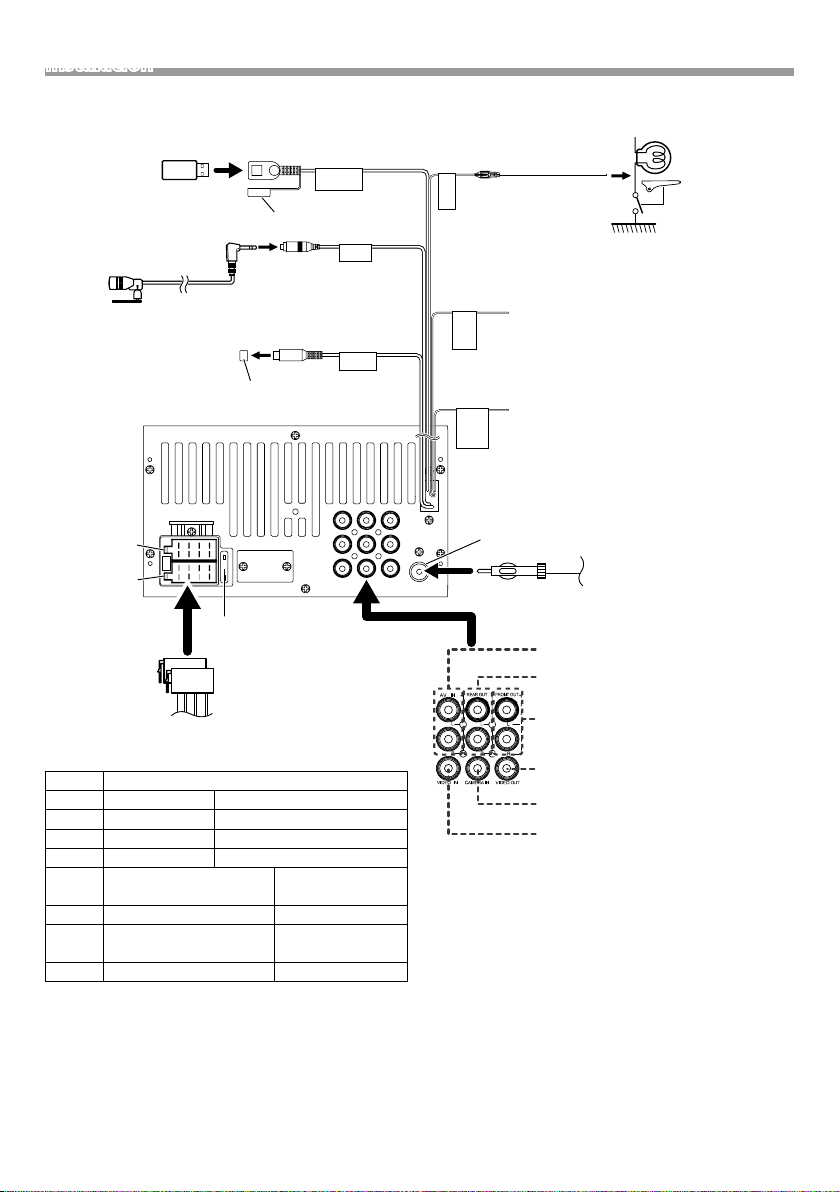
Instalación
Ñ Conectar los cables a los terminales
Dispositivo
USB
[2]
Accesorio 4:
Micrófono Bluetooth
(KW-M24BT solo)
Salida previa del
subwoofer
Conector B
Conector A
1 3 5 7
2 4 6 8
1 3 5 7
2 4 6 8
Terminal USB
Tap a
Tap a
15A
[1]
(0,8 m)
5V=1A
MIC
SUB
WOOFER
Luz verde
(Cable del sensor de aparcamiento)
Accesorio 9: Cable de extensión
Para mayor seguridad,
BRAKE
PARKING
asegúrese de
conectar el sensor de
estacionamiento.
Morado/blanco
(Cable del sensor de marcha atrás)
Conecte el mazo de la luz de marcha atrás
del vehículo cuando utilice una cámara de
REVERSE
GEAR
SIGNAL
visión trasera opcional.
Azul claro/Amarillo
(cable del mando a distancia de la dirección)
Al mando a distancia de la dirección
Para utilizar la función de mando a
STEERING
WHEEL
REMOTE
CONTROL
distancia en el volante es necesario
un adaptador remoto exclusivo (no
suministrado) apropiado para su vehículo.
FRONTREARAV-IN
LLL
RRR
VOUT
CAMV
ANT
Entrada de antena FM/AM
Realice la
conexión en
el arnés del
interruptor
de detección
del freno de
aparcamiento
del vehículo.
Antena FM/AM
Fusible (15A)
Conector ISO
Ñ Guía de funciones de los conectores del
mazo de cables
Patilla Color y función
A-4 Amarillo Batería
A-5 Azul/Blanco
[3]
Control de alimentación
A-7 Rojo Encendido (ACC)
A-8 Negro Conexión a tierra (masa)
B-1/ B-2 Púrpura (+) /
Trasero derecho
Púrpura/Negro (–)
B-3/ B-4 Gris (+) / Gris/Negro (–) Delantero derecho
B-5/ B-6 Blanco (+) /
Delantero izquierdo
Blanco/Negro (–)
B-7/ B-8 Verde (+) /
Verde/Negro (–) Trasero izquierdo
• Impedancia del altavoz: 4-8 Ω
! PRECAUCIÓN
Antes conectar los conectores ISO disponibles
comercialmente a la unidad, compruebe la siguiente
condición:
• Asegúrese que la asignación de clavijas del conector
coincide con la unidad JVC.
76
Entrada de audio AV-IN
(Izquierda; Blanco, Derecha; Rojo)
Salida previa de audio trasera
(Izquierda; Blanco, Derecha; Rojo)
Salida previa de audio delantera
(Izquierda; Blanco, Derecha; Rojo)
Salida de vídeo (Amarillo)
Entrada de la cámara de visión trasera
(Amarillo)
Entrada visual AV-IN (Amarillo)
[1]
Corriente de alimentación máxima del USB :
CC 5 V = 1 A
[2]
Vendida por separado
[3]
Máx. 300 mA, 12 V
• Tome precauciones extra con el cable de
alimentación.
• In caso de que el cable de la batería y el cable de
encendido no correspondan, entonces cámbielos
según corresponda.
• En caso de que el coche no tenga un cable
de encendido, use una interfaz disponible
comercialmente.
Page 77
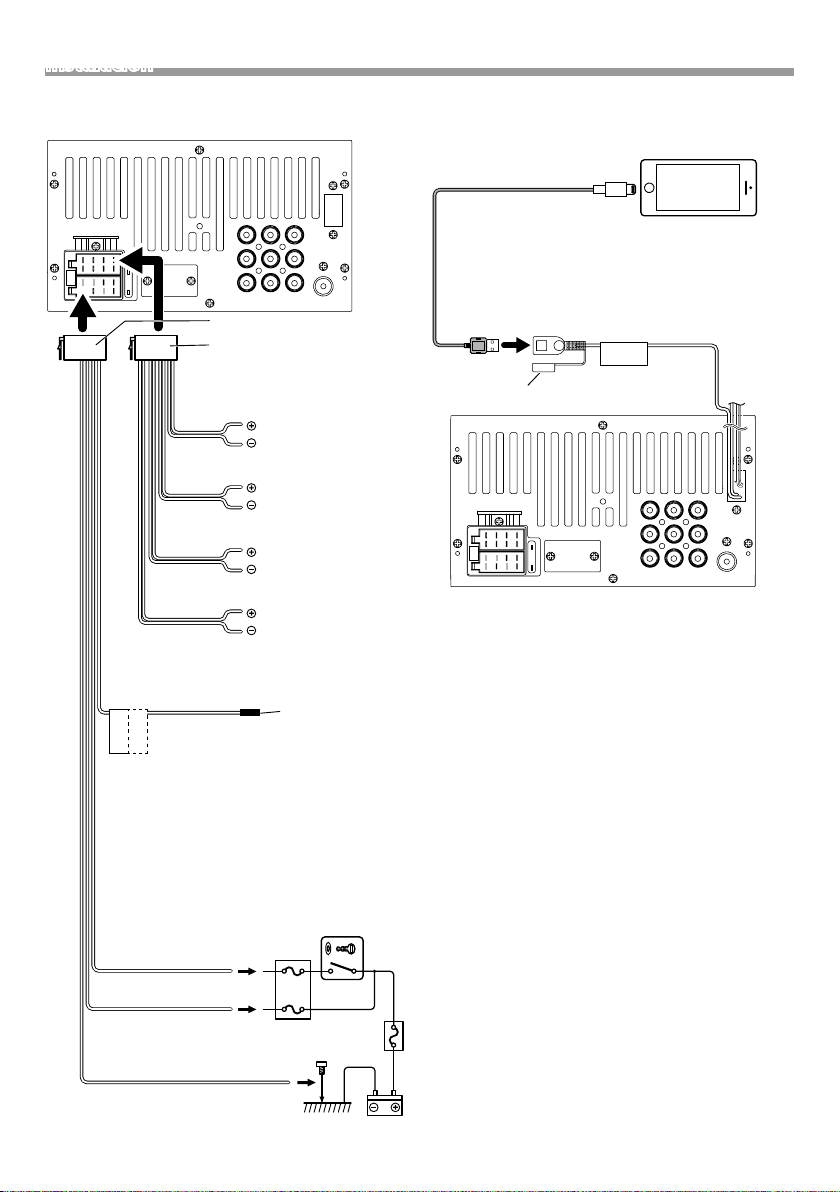
Instalación
Solo área de venta de Norteamérica y Sudamérica
FRONTREARAV-IN
15A
1 3 5 7
2 4 6 8
1 3 5 7
2 4 6 8
Accesorio 5
Accesorio 6
Impedancia del altavoz: 4-8 Ω
Blanco
Blanco/Negro
Gris
Gris/negro
Verde
Verde/negro
Morado
Morado/negro
Azul/Blanco
(Cable de control de alimentación/ Control de
la antena)
Realice la conexión al terminal de
P.CONT
ANT.CONT
control de alimentación si utiliza el
amplificador de potencia opcional,
o al terminal de alimentación para el
amplificador de refuerzo de la antena
de tipo película o de mástil corto. (Máx.
300 mA, 12 V)
*1 Si no se efectúan las conexiones, no
deje que el cable sobresalga de la
lengüeta.
Rojo (cable de
encendido)
Amarillo (cable de la
batería)
Caja de fusibles del coche
Negro (cable de toma de tierra) ¤
(Al chasis del coche)
LLL
RRR
VOUT
CAMV
ANT
Al altavoz delantero
izquierdo
Al altavoz delantero
derecho
Al altavoz trasero
izquierdo
Al altavoz trasero
derecho
1
*
Interruptor de la llave
de encendido
ACC
B+
Ñ Conexión de un iPod/iPhone
[1]
CAMV
(0,8 m)
FRONTREARAV-IN
LLL
RRR
VOUT
[2]
ANT
iPod/iPhone
Conector Lightning
KS-U62 (0,8 m)
[3]
Terminal USB
5V=1A
Tap a
15A
[1]
Corriente de alimentación máxima del iPod/iPhone :
CC 5 V = 1 A
[2]
Se vende por separado
[3]
Accesorio opcional
Batería
Español |
77
Page 78
Acerca de esta unidad
Acerca de esta unidad
Más información
Ñ Archivos de audio reproducibles
Formato de
audio
MP3 (.mp3) 16 – 320kbps,
WMA (.wma) 16 – 320kbps 16 – 48 kHz
AAC-LC (.m4a) 16 – 320kbps 16 – 48 kHz
• Esta unidad puede mostrar etiquetas ID3 Versión
1.0/1.1/2.2/2.3/2.4 (para MP3).
• El número máximo de caracteres:
– Etiqueta: 30 caracteres
Tasa de bits Frecuencia de
muestreo
16 – 48 kHz
VBR
✎ N OTA
• Los formatos WMA y AAC que están cubiertos con
DRM no pueden reproducirse.
• Aunque los archivos de audio cumplen los estándares
anteriores, puede que no sea posible la reproducción
según los tipos o condiciones del medio o dispositivo.
Ñ Archivos de vídeo aceptados
Formato de
vídeo
MPEG -1
(.mpg, .mpeg)
MPEG -2
(.mpg, .mpeg)
MPEG-4
(.mp4, .avi)
Ñ Archivos de imagen aceptados
• JPEG (.jpg)
Resolución 32 x 32 a 8.192 x 7.680
– Mostrar el archivo puede llevar un tiempo.
– No se pueden reproducir archivos JPEG progresivos
o archivos JPEG sin pérdidas.
• BMP (.bmp)
Resolución 32 x 32 a 8.192 x 7.680
– Mostrar el archivo puede llevar un tiempo.
Códec de vídeo Códec de audio
MPEG -1 MPEG Audio Layer 2
MPEG -2 MPEG Audio Layer 2
MPEG-4 MP3, AAC-LC (2ch)
Resolución de problemas
Lo que parece ser un problema no siempre es serio.
Compruebe los siguientes puntos antes de llamar al
centro de atención al cliente.
• Para el funcionamiento con los componentes externos,
consulte también las instrucciones suministradas con
los adaptadores usados para las conexiones (así como
las instrucciones suministradas con los componentes
externos).
Ñ General
Los altavoces no emiten ningún sonido.
• Ajuste el volumen al nivel óptimo.
• Compruebe las cuerdas y las conexiones.
La unidad no funciona en absoluto.
• Restablezca la unidad. (P.56)
El mando a distancia no funciona.
• Cambie la pila.
Ñ USB
Al reproducir una pista, a veces se interrumpe el
sonido.
• Las pistas no se copian adecuadamente en el
dispositivo USB. Copie las pistas de nuevo e inténtelo
de nuevo.
Ñ iPod/iPhone
Los altavoces no emiten ningún sonido.
• Desconecte el iPod/iPhone y, a continuación,
conéctelo de nuevo.
• Seleccione otra fuente y, a continuación, vuelva a
seleccionar “iPod”.
El iPod/iPhone no se enciende o no funciona.
• Compruebe el cable de conexión y su conexión.
• Actualice la versión de firmware del iPod/iPhone.
• Cargue la batería del iPod/iPhone.
• Restablezca el iPod/iPhone.
El sonido está distorsionado.
• Desactive el ecualizador bien en esta unidad o en el
iPod/iPhone.
Se genera mucho ruido.
• Desactive (deseleccione) “VoiceOver” en el iPod/
iPhone. Para obtener más detalles, consulte <http://
www.apple.com>.
78
Page 79

Acerca de esta unidad
Ñ Sintonizador
El preestablecimiento automático no funciona.
• Guarde emisoras manualmente. (P.65)
Ruido estático mientras escucha la radio.
• Conecte la antena firmemente.
Ñ AV-IN
No aparece ninguna imagen en la pantalla.
• Encienda el componente de vídeo si no está
encendido.
• Conecte el componente de vídeo correctamente.
Ñ Bluetooth
La calidad del sonido del teléfono es pobre.
• Reduzca la distancia entre la unidad y el teléfono
móvil Bluetooth.
• Mueva el coche a un lugar en el que tenga una mejor
recepción de señal.
El sonido se interrumpe o salta mientras usa un
reproductor de audio Bluetooth.
• Reduzca la distancia entre la unidad y el reproductor
de audio Bluetooth.
• Apague y, a continuación, vuelva a encender la
unidad. (Cuando el sonido aún no se ha restablecido)
conecte el reproductor de nuevo.
El reproductor de audio no puede ser controlado.
• Compruebe si el reproductor de audio conectado es
compatible con AVRCP (Perfil de control remoto de
Audio/Vídeo).
El dispositivo Bluetooth no detecta la unidad.
• Busque el dispositivo Bluetooth de nuevo.
La unidad no se empareja con el dispositivo
Bluetooth.
• Apague y, a continuación, vuelva a encender el
dispositivo Bluetooth.
• Desconecte el dispositivo Bluetooth conectado
actualmente y, a continuación, registre el nuevo
dispositivo. (P. 68)
Derechos de autor
• La marca denominativa y los logos de Bluetooth son
marcas registradas propiedad de Bluetooth SIG, Inc.
y cualquier uso de dichas marcas por JVC KENWOOD
Corporation está sujeto a los términos de licencia. El
resto de marcas comerciales y nombres comerciales
corresponden a sus respectivos propietarios.
• “Made for iPod” and “Made for iPhone” mean that an
electronic accessory has been designed to connect
specifically to iPod, or iPhone, respectively, and
has been certified by the developer to meet Apple
performance standards.
Apple is not responsible for the operation of this
device or its compliance with safety and regulatory
standards. Please note that the use of this accessory
with iPod, or iPhone may affect wireless performance.
• iPhone, iPod, iPod classic, iPod nano, and iPod touch
are trademarks of Apple Inc., registered in the U.S. and
other countries.
Lightning is a trademark of Apple Inc.
• The “AAC” logo is a trademark of Dolby Laboratories.
• Microsoft and Windows Media are either registered
trademarks or trademarks of Microsoft Corporation in
the United States and/or other countries.
• THIS PRODUCT IS LICENSED UNDER THE MPEG4 VISUAL PATENT PORTFOLIO LICENSE FOR THE
PERSONAL AND NON-COMMERCIAL USE OF A
CONSUMER FOR (¡) ENCODING VIDEO IN COMPLIANCE
WITH THE MPEG-4 VISUAL STANDARD (“MPEG-4
VIDEO”) AND/OR (¡¡) DECODING MPEG-4 VIDEO
THAT WAS ENCODED BY A CONSUMER ENGAGED
IN A PERSONAL AND NON-COMMERCIAL ACTIVITY
AND/OR WAS OBTAINED FROM A VIDEO PROVIDER
LICENSED BY MPEG LA TO PROVIDE MPEG-4 VIDEO. NO
LICENSE IS GRANTED OR SHALL BE IMPLIED FOR ANY
OTHER USE. ADDITIONAL INFORMATION INCLUDING
THAT RELATING TO PROMOTIONAL, INTERNAL AND
COMMERCIAL USES AND LICENSING MAY BE OBTAINED
FROM MPEG LA, LLC. SEE HTTP://WWW.MPEGLA.COM.
Español |
79
Page 80

Acerca de esta unidad
Especicaciones
Ñ Sección del monitor
Tamaño de imagen
: Ancho de 6,75 pulgadas (diagonal)
: 151,8 mm (an.) × 79,7 mm (al.)
Sistema de pantalla
: Panel TN LCD transparente
Sistema de accionamiento
: Sistema de matriz activa TFT
Número de píxeles
: 1.152.000 (800H x 480V x RGB)
Píxeles efectivos
: 99,99 %
Disposición de los píxeles
: Disposición en franjas RGB
Retroiluminación
: LED
Ñ Sección de la interfaz del USB
Estándar USB
: USB 2.0
Sistema de archivos
: FAT 16/ 32
Corriente de alimentación eléctrica máxima
: CC 5 V
Convertidor D/A
: 24 bits
Decodicador de Audio
: MP3/ WMA/ AAC (.aac/ .m4a)
Decodicador de Vídeo
: MPEG1/ MPEG2/ MPEG4
Respuesta de frecuencia
• 48 kHz: 20 – 22.000 Hz
• 44,1 kHz: 20 – 20.000 Hz
Relación S/N (dB)
: 99 dB
Rango dinámico
: 99 dB
NOTA
• A pesar de que los píxeles efectivos para el panel
de cristal líquido son del 99,99% o más, es posible
que el 0,01% de los píxeles no se enciendan o no lo
hagan correctamente.
• Las especificaciones se encuentran sujetas a
cambios sin previo aviso.
80
1 A
Ñ Sección de Bluetooth
Tecnol ogía
: Bluetooth Ver.2.1 + EDR
Frecuencia
: 2,402 – 2,480 GHz
Potencia de salida
: +4 dBm (MÁX.), Clase de potencia 2
Rango de comunicación máximo
: Línea de visión de aprox. 10 m (32,8 pies)
Códec de audio
SBC
Perl (soporte multiperl)
• HFP (V1.6) (Perfil de manos libres)
• A2DP (V1.2) (Perfil avanzado de distribución de audio)
• AVRCP (V1.3) (Perfil de mando a distancia de audio/vídeo)
• PBAP (V1.1.1) (Perfil de acceso a agenda telefónica)
Ñ Sección del sintonizador de FM
Rango de frecuencias (saltos)
: 87,5 MHz – 108,0 MHz (50 kHz)
(Área de venta de Europa, CEI)
: 87,9 MHz – 107,9 MHz (200 kHz)
(Área de venta de Norteamérica y Sudamérica)
Sensibilidad útil
: 12,2 dBf
: 1,1 μV/75 Ω
(para la zona de ventas de Norteamérica y
Sudamérica, S/N: 30 dB)
(Solo área de venta de Europa, CEI, S/N: 26 dB)
Sensibilidad de silencio
: 19,2 dBf
: 2,5 μV/75 Ω
(para la zona de ventas de Norteamérica y
Sudamérica, S/N: 50 dB)
(Solo área de venta de Europa, CEI, S/N: 46 dB)
Respuesta de frecuencia
: 30 Hz – 14 kHz
Relación S/N (dB)
: 55 dB (MONO)
Selectividad (± 400 kHz)
: Más de 70 dB
Separación estéreo
: 37 dB (1 kHz)
Ñ Sección del sintonizador AM
Rango de frecuencias (saltos)
: 531 – 1.611 kHz (9 kHz) (Área de venta de Europa, CEI)
: 530 – 1.700 kHz (10 kHz)
(Área de venta de Norteamérica y Sudamérica)
Sensibilidad útil
: 29 μV
Page 81

Acerca de esta unidad
Ñ Sección de vídeo
Sistema de color de la entrada externa de vídeo
: N TSC /PAL
Nivel de entrada de vídeo externo (tomas RCA)
: 1,0 Vp-p/ 75 Ω
Nivel de entrada máx. de audio externo (tomas RCA)
: 1,8 V/ 10 kΩ
Nivel de salida de vídeo (tomas RCA)
: 1,0 Vp-p/ 75 Ω
Ñ Sección de audio
Potencia máxima (delantera y trasera)
: 50 W × 4
Potencia completa de todo el ancho de banda
(delantero y trasero)
Potencia completa del ancho de banda (menos del
1 % THD)
: 21 W × 4
Nivel previo (V)
: 2 V/ 10 kΩ
Impedancia de presalida
: ≤ 600 Ω
Impedancia del altavoz
: 4 – 8 Ω
Ecualizador
: 7 bandas
Bandas
Frecuencia: 62,5/160/400/1k/2,5k /6,3k/16k Hz
Nivel: -7 – +7 (-7 dB – +7 dB)
FPB
Frecuencia: 80/120/160 Hz
Ñ General
Voltaje de funcionamiento
: 14,4 V (10,5 – 16 V permitido)
Consumo de corriente máximo
: 10 A
Dimensiones de instalación (An × Al × P)
: 182 × 112 × 74,5 mm
7-3/8 × 4-3/8 × 2-15/16 pulgadas
Tamaño de instalación de la unidad principal (An. ×
Al. × Pr.)
: 178 × 100 × 79 mm (sin cubierta)
Intervalo de temperaturas de operación
: -10 °C – +60 °C
Peso
: 0,9 kg (2,0 libras)
Ñ Información acerca de la eliminación de
equipos eléctricos, electrónicos y baterías
al nal de la vida útil (aplicable a los
países de la Unión Europea que hayan
adoptado sistemas independientes de
recogida de residuos)
Los productos y las baterías con el símbolo de un
contenedor con ruedas tachado no podrán ser
desechados como residuos domésticos.
Los equipos eléctricos, electrónicos y baterías al final de
la vida útil, deberán ser reciclados en instalaciones que
puedan dar el tratamiento adecuado a estos productos
y a sus subproductos residuales correspondientes.
Póngase en contacto con su administración local para
obtener información sobre el punto de recogida más
cercano.
Un tratamiento correcto del reciclaje y la eliminación de
residuos ayuda a conservar los recursos y evita al mismo
tiempo efectos perjudiciales en la salud y el medio
ambiente.
Aviso: El símbolo “Pb” debajo del símbolo en baterías
indica que dicha batería contiene plomo.
Para Argentina
Ñ Información acerca de la eliminación de
equipos eléctricos y electrónicos al nal
de la vida útil (aplicable a los países que
hayan adoptado sistemas independientes
de recogida de residuos)
Los productos con el símbolo de un contenedor con
ruedas tachado no podrán ser desechados como
residuos domésticos.
Los equipos eléctricos y electrónicos al final de la vida
útil, deberán ser reciclados en instalaciones que puedan
dar el tratamiento adecuado a estos productos y a sus
subproductos residuales correspondientes. Póngase
en contacto con su administración local para obtener
información sobre el punto de recogida más cercano.
Un tratamiento correcto del reciclaje y la eliminación de
residuos ayuda a conservar los recursos y evita al mismo
tiempo efectos perjudiciales en la salud y el medio
ambiente.
Español |
81
Page 82

Acerca de esta unidad
Para México
Ñ Para cumplimiento de la IFT:
La operación de este equipo esta sujeta a las siguientes
dos condiciones:
(1) es posible que este equipo o dispositivo no cause
interferencia perjudicial y
(2) este equipo o dispositivo debe aceptar cualquier
interferencia,
incluyendo la que pueda causar su operación no
deseada.
82
Page 83

Acerca de esta unidad
Español |
83
Page 84

Índice
Antes de utilizar ......................................................................84
Como ler este manual ..........................................................................................84
Precauções ..................................................................................................................84
Primeiros Passos ..................................................................... 85
Definições do Relógio.......................................................................................... 86
Toque no painel de ajustamento ................................................................. 86
Básicos ........................................................................................ 87
Funções dos botões no painel frontal ...................................................... 87
Operações comuns ...............................................................................................87
Descrições do ecrã HOME .................................................................................88
Descrições do ecrã de controlo de fontes ............................................. 88
Ecrã de lista ................................................................................................................. 88
USB .............................................................................................. 89
Preparativos ................................................................................................................ 89
Operações de reprodução................................................................................89
iPod/iPhone ............................................................................. 91
Preparativos ................................................................................................................ 91
Operações de reprodução................................................................................91
Sintonizador.............................................................................93
Operação Básica do Sintonizador ................................................................ 93
Predefinir estações .................................................................................................93
Características do FM RDS ................................................................................. 93
Configuração do sintonizador .......................................................................94
Componentes Externos ....................................................... 95
Utilizar leitores de áudio/vídeo externos ................................................95
Câmara de vista traseira .....................................................................................95
Smartphone com bluetooth (KW-M24BT) ................... 96
Registe o seu smartphone na unidade .................................................... 96
Receber uma chamada .......................................................................................96
Fazer uma chamada ..............................................................................................97
Reproduzir um dispositivo de áudio Bluetooth .................................98
Eliminar o dispositivo de Bluetooth registado ....................................98
Controlar o Áudio .................................................................. 99
Controlar o áudio geral ....................................................................................... 99
Controlo do equalizador ....................................................................................99
Definições do subwoofer ..................................................................................99
Controlo remoto ..................................................................100
Funções dos botões do controlo remoto ............................................ 100
Instalação ................................................................................ 101
Antes da instalação ..............................................................................................101
Instalar a unidade..................................................................................................102
Sobre esta unidade .............................................................106
Mais informação ...................................................................................................10 6
Resolução de Problemas................................................................................. 106
Direitos de autor ....................................................................................................107
Especificações ........................................................................................................ 108
Antes de utilizar
Precauções
# ADVERTÊNCIA
Ñ Para evitar lesões ou um incêndio, tome
as seguintes precauções:
• Para evitar um curto-circuito, nunca coloque
ou deixe objetos metálicos (como moedas ou
ferramentas) dentro da unidade.
• Não veja nem fixe os olhos no visor da unidade
quando está a conduzir por longos períodos.
• Se aparecerem problemas durante a instalação,
consulte o seu revendedor JVC.
Ñ Precauções de utilização desta unidade
• Quando comprar acessórios opcionais, confirme
junto do representante JVC que eles funcionam
com o seu modelo e na sua zona.
• A função Radio Data System (Sistema dados rádio)
ou Radio Broadcast não funciona onde o serviço
não é suportado por nenhuma estação de difusão.
Ñ Proteger o monitor
• Para proteger o monitor de danos, não opere o
monitor utilizando uma esferográfica ou um objeto
semelhante com ponta afiada.
Ñ Limpar a unidade
Se o painel frontal da unidade estiver manchado,
limpe-o com um pano macio e seco como um
pano de silicone. Se a painel frontal estiver muito
manchado, limpe a mancha com um pano
humedecido com detergente neutro e, de seguida,
limpe-o com um pano seco.
! AT ENÇ ÃO
• A aplicação direta de spray de limpeza na unidade
poderá afetar as respetivas peças mecânicas. Limpar
o painel frontal com um pano que não seja macio ou
usando um líquido volátil, como diluente ou álcool,
pode riscar a superfície ou apagar caracteres.
Ñ Como reiniciar a unidade
Se a unidade ou a unidade ligada não funcionar
corretamente, reinicialize-a.
Como ler este manual
• Os painéis mostrados neste manual são exemplos
utilizados para dar explicações claras sobre as
operações. Por esta razão, poderão ser diferentes dos
painéis reais.
• Nos procedimentos de operação, os parênteses
indicam a tecla ou o botão que deve pressionar.
< >: indica o nome de botões de painel.
[ ]: indica o nome de teclas de toque
84
Botão de reposição
Page 85

Primeiros Passos
1 Rode a chave de ignição do seu carro para ACC.
A unidade está ligada.
2 Pressione o botão < >.
3 Toque em [Settings].
4 Toque na tecla correspondente e defina o valor.
Áudio
Sound Eect
Apresenta o ecrã do Equalizador. (P.99)
Beep
Ativa ou desativa o tom de toque das teclas.
“ON” (LIGADO) (Padrão), “OFF” (DESLIGADO)
Loudness
Define as quantidades de reforço dos sons altos e
baixos.
“ON” (LIGADO), “OFF” (DESLIGADO) (Padrão)
Subwoofer
Apresenta o ecrã do Subwoofer. (P.99)
Display
Panel Adjust
Ajuste a posição de sensibilidade do painel de
toque. Consulte “Toque no painel de ajustamento”
(P.86).
Aspect
Selecione o modo de ecrã.
“16:9” (Padrão), “4:3 Pan Scan”
Tun er
Apresenta o ecrã de Definições do Sintonizador.
(P.94)
General
Language
Selecione o idioma utilizado para o ecrã de
controlo e os itens de definição. A predefinição é
“English” (Inglês).
1) Toque em [Language] (Idioma).
2) Selecione o idioma pretendido.
* Pode mudar a página para exibir mais itens
premindo [
BT Auto Connect
O aparelho liga de novo automaticamente quando
o último dispositivo Bluetooth conectado estiver
dentro do alcance.
“ON” (LIGADO) (Padrão), “OFF” (DESLIGADO)
Clock Setting
Ajuste a hora do relógio. (P.86).
Default
Toque em [Default] (Padrão) para definir todas as
definições para as definições padrão iniciais.
]/[ ].
5 Toque em [ 6 ].
Português |
85
Page 86

Primeiros Passos
Denições do Relógio
Ñ Sincronização da hora do relógio com o
FM RDS
Ative [RDS Clock Sync] (Sincronização do Relógio
RDS). Consulte a secção “Configuração do
sintonizador” (P.94).
Ñ Ajustar o relógio manualmente
✎ N OTA
• Desative [RDS Clock Sync] antes de acertar o relógio.
Consulte a secção “Configuração do sintonizador”
(P.94).
1 Pressione o botão < >.
2 Toque em [Settings].
3 Toque em [General].
4 Toque em [Clock Setting].
É apresentado o ecrã Relógio.
5 Seleciona o formato da hora.
[12] (Padrão : apenas na área de vendas da América
do Norte e América do Sul)
[24] (Padrão: apenas na área de vendas da Europa
e CEI)
Toque no painel de ajustamento
1 Pressione o botão < >.
2 Toque em [Settings].
3 Toque em [Display].
4 Toque em [Panel Adjust].
5 Siga as instruções apresentadas no ecrã e toque
no centro de cada +.
• Para cancelar o painel de ajustamento do toque,
toque [Cancel].
• Se a posição de toque for desviada, [OK] não é
exibido. Tente novamente desde o início.
6 Toque em [OK].
6 Toque em [R] ou [S] para acertar a hora do
relógio.
• Se tiver selecionado [12] como o formato de hora,
toque em [AM] ou [PM] antes de acertar a hora do
relógio.
7 Toque em [ 6 ].
86
Page 87

Básicos
Básicos
Funções dos botões no painel frontal
1
2
3
4
5
6
Sensor Remoto
1
• Recebe o sinal do controlo remoto.
(INÍCIO)
2
• Apresenta o ecrã inicial. (P. 88)
• Se pressionado durante 1 segundo, desliga a
alimentação.
• Quando a alimentação está desligada, liga a
alimentação.
EQ
3
• Apresenta o ecrã do Equalizador.* (P.99)
* Durante a reprodução de ficheiros de vídeo,
apenas pode definir a curva predefinida do
equalizador.
* O ecrã do Equalizador não é exibido durante a
reprodução de ficheiros de imagem ou no ecrã
da lista ou no ecrã CONFIGURAÇÃO, etc,
+ , – (Volume)
4
• Ajusta o volume. O volume vai até ao nível 20
quando premir [ + ] continuamente.
(SILENCIAR, Ecrã desligado)
5
• Silencia/restaura o som.
• Se premido durante 1 segundo, desliga o ecrã.
Quando o ecrã estiver desligado, toque no visor
para ligar o ecrã.
Repor
6
• Se a unidade ou a unidade ligada não funcionar
corretamente, esta repõe as definições iniciais
quando este botão é pressionado.
Operações comuns
Ñ Ligar a alimentação
1 Pressione o botão < >.
Ñ Desligar a alimentação
1 Pressione e segure o botão < >.
Ñ Ajustar o volume
1 Pressione o botão <+> ou <–>.
✎ N OTA
• O volume vai até ao nível 20 quando premir [ + ]
continuamente.
Ñ Silencia o som
1 Prima o botão < >.
Para restaurar o som, pressione o botão
novamente, ou ajuste o volume.
Ñ Desligue o ecrã
1 Pressione e segure o botão < >.
Para ligar o ecrã, toque no visor.
Português |
87
Page 88

Básicos
25364
7
1
1
4
3
2
5
Descrições do ecrã HOME
1 Pressione o botão < >.
Aparece o ecrã HOME (inicial).
Mostrador de Relógio
1
Toque para exibir o ecrã do Relógio.
Muda para a emissão de rádio. (P. 93)
2
3
[USB]
Reproduz ficheiros num dispositivo USB. (P.89)
[iPod]
Reproduz um iPod/iPhone. (P.91)
• Quando está conectado um iPod/iPhone.
Muda para um componente externo conectado ao
4
terminal de entrada AV-IN. ( P. 95)
Mostra o ecrã Mãos Livres. (P.97) (apenas
5
KW-M24BT)
Reproduz um leitor de áudio Bluetooth. ( P. 98)
6
(apenas KW-M24BT)
Apresenta o ecrã CONFIGURAÇÃO (P.85)
7
Descrições do ecrã de controlo de fontes
Pode realizar operações de reprodução de fonte no
ecrã de controlo das fontes.
Mostrador de Relógio
1
Toque para exibir o ecrã do Relógio.
Nome da fonte
2
3
•
aparece quando o Bluetooth do smartphone
está conectado. *
•
aparece quando o leitor de áudio Bluetooth
está conectado. *
•
aparece quando a função sem som está ativa.
(P.87)
* Apenas KW-M24BT
[DIM]
4
Selecione o modo de atenuação da luz. Escurecer 1,
Escurecer 2, Não escurecer
Volta para o ecrã original.
5
Ecrã de lista
Existem algumas teclas de função comuns nos ecrãs
de lista da maioria das fontes.
1 Pode mudar a página para exibir mais itens
premindo [ ]/[ ].
88
Page 89

USB
1
6
3
2
5
4
USB
Preparativos
Ñ Conectar a um dispositivo USB
1 Remova a tampa do terminal USB.
2 Ligue o dispositivo USB com o cabo USB.
A unidade lê o dispositivo e inicia a reprodução.
Ñ Para desligar o dispositivo USB:
1 Pressione o botão < >.
2 Toque numa fonte diferente de [USB].
3 Desligue o dispositivo USB.
Ñ Compatibilidade com dispositivos USB
Esta unidade consegue reproduzir cheiros
MPEG1/ MPEG2/ MPEG4/ MP3/ WMA/ AAC/
JPEG/ BMP armazenados num dispositivo USB de
armazenamento em massa. (P.106)
• Sistema de ficheiros: FAT16/ FAT32
• Esta unidade consegue reconhecer um total de
9.999 ficheiros e 320 pastas (um máximo de 9.999
ficheiros por pasta).
• O número máximo de caracteres:
– Nomes das pastas : 24 caracteres
– Nomes dos ficheiros : 24 caracteres
– Etiqueta: 30 caracteres
✎ N OTA
• Quando o dispositivo USB está ligado a esta unidade,
pode ser carregado através do cabo USB.
• Instale o dispositivo USB num local em que não
prejudique uma condução segura.
• Não é possível conectar um dispositivo USB através de
um hub USB e Multi Card Reader.
• Faça cópias de segurança dos ficheiros áudio utilizado
nesta unidade. Os ficheiros poderão ser apagados
consoante as condições de funcionamento do
dispositivo USB.
Da nossa parte, não haverá lugar a qualquer
compensação por danos decorrentes da perda dos
dados armazenados.
• Não é fornecido nenhum dispositivo USB com
a unidade. Deverá adquirir um dispositivo USB
disponível no mercado.
• Coloque a tampa no terminal USB quando não o
estiver a utilizar.
Operações de reprodução
Ñ Controle a música que está a ouvir no ecrã
de controlo das fontes.
A capa do ficheiro a tocar é exibida.
1
##:##:## : Tempo da música
2
Barra de tempo de reprodução : Para confirmação
da posição de reprodução atual.
[L] : Reproduz ou pausa.
3
[E] [F] : Procura o conteúdo anterior/
seguinte.
Toque sem soltar para avançar rapidamente ou
retroceder rapidamente. Toque em [L] para
retomar a reprodução normal.
[
] : Seleciona o modo de reprodução em
Repetição.
Luzes desligadas (Padrão): Repete todos os
ficheiros no dispositivo USB.
: Repete o ficheiro atual.
: Repete todos os ficheiros na pasta
FO
atual.
[
] : Seleciona o modo de reprodução Aleatória.
: Reproduz aleatoriamente todos os
ficheiros.
Luzes desligadas (Padrão): Reprodução
normal.
Mostra a informação sobre o ficheiro atual.
4
É exibido apenas um nome de ficheiro se não
existirem informações de etiqueta.
Procura o ficheiro. (P. 90)
5
D, etc. : Estado da reprodução
6
: Indicador do modo de reprodução repetida
: Indicador de modo de reprodução aleatória
Português |
89
Page 90

USB
3
2
1
2
4
5
Ñ Para reprodução de Vídeo
1 Quando os botões de operação não forem
exibidos no ecrã, toque no ecrã.
D, etc. : Estado da reprodução
1
: Indicador do modo de reprodução repetida
: Indicador de modo de reprodução aleatória
##:##:## : Tempo da música
Barra de tempo de reprodução : Para confirmação
da posição de reprodução atual.
Para mudar os botões de operação.
2
[
] : Pode ajustar a qualidade da imagem no ecrã
3
do vídeo.
[Brightness]: Ajusta o brilho. (00 a 08)
[Contrast]: Ajusta o contraste. (00 a 08)
[Tint]: Ajusta o tom. (00 a 08)
[Color]: Ajusta a cor. (00 a 08)
[Reset]: Para limpar o ajuste.
] : Selecione a taxa de zoom.
[
“Off”, “x2”, “x3”, “x4”, “x5”, “1/2”, “1/3”, “1/4”
[3] [2] [ < ] [ > ] : Percorre o ecrã.
Os botões de operação desaparecem quando se
4
toca em 4 ou quando não é efetuada nenhuma
operação durante cerca de 10 segundos.
Exibe o ecrã Lista de Ficheiros.* (P. 90)
5
* O ficheiro de vídeo pára.
Ñ Selecionar uma faixa numa lista
(Procura o cheiro)
1 Toque em [ ].
2 Selecione se pretende procurar por ficheiros de
áudio [ ], ficheiros de vídeo [ ] ou ficheiros
de imagem [ ].
3 Toque em [Y] para se deslocar para a hierarquia
superior.
4 Toque na pasta pretendida.
Quando toca numa pasta os seus conteúdos são
apresentados.
5 Toque no item pretendido da lista de conteúdos.
Inicia-se a reprodução.
✎ N OTA
• Os tipos de ficheiro são alterados, a reprodução
Aleatória/Repetida é cancelada.
90
Page 91

iPod/iPhone
1
6
3
2
5
4
iPod/iPhone
Preparativos
Ñ Conectar a iPod/iPhone
• Para modelos com conector Lightning: Use o cabo
USB Áudio para iPod/iPhone—KS-U62 (acessório
opcional).
• Para detalhes sobre conectar a iPod/iPhone,
consulte a página 105.
1 Remova a tampa do terminal USB.
2 Ligue o iPod / iPhone.
A unidade lê o dispositivo e inicia a reprodução.
Ñ Para desconectar o iPod/iPhone
1 Pressione o botão < >.
2 Toque numa fonte diferente de [iPod].
3 Desligue o cabo do iPod/iPhone.
Ñ Compatibilidade iPod/iPhone
Os seguintes modelos podem ser ligados a esta
unidade.
Feito para
• iPhone 7 Plus
• iPhone 7
• iPhone SE
• iPhone 6s Plus
• iPhone 6s
• iPhone 6 Plus
• iPhone 6
• iPhone 5s
• iPhone 5c
• iPhone 5
• iPod touch (6.ª geração)
• iPod touch (5.ª geração)
✎ N OTA
• Se iniciar a reprodução depois de ligar o iPod, a música
que estava a ser reproduzida pelo iPod é reproduzida
primeiro.
• Coloque a tampa no terminal USB quando não o
estiver a utilizar.
Operações de reprodução
Ñ Controle a música que está a ouvir no ecrã
de controlo das fontes.
Capa (Mostrado se a faixa contiver capa de álbum)
1
##:##:## : Tempo da música
2
Barra de tempo de reprodução : Para confirmação
da posição de reprodução atual.
L : Reproduz ou pausa.
3
[E] [F] : Procura o conteúdo anterior/
seguinte.
Toque sem soltar para avançar rapidamente ou
retroceder rapidamente.
[
] : Seleciona o modo de reprodução em
Repetição.
Luzes desligadas: Repetição desligada
: Funciona da mesma forma que Repetir
Todos.
1 : Funciona da mesma forma que Repetir
Um.
[
] : Seleciona o modo de reprodução Aleatória.
: Funciona da mesma forma que Misturar
Músicas.
Luzes desligadas: Aleatoriedade desligada
Mostra a informação sobre o ficheiro atual.
4
Procura o conteúdo. (P. 92)
5
D, etc. : Estado da reprodução
6
: Indicador do modo de reprodução repetida
: Indicador de modo de reprodução aleatória
Português |
91
Page 92
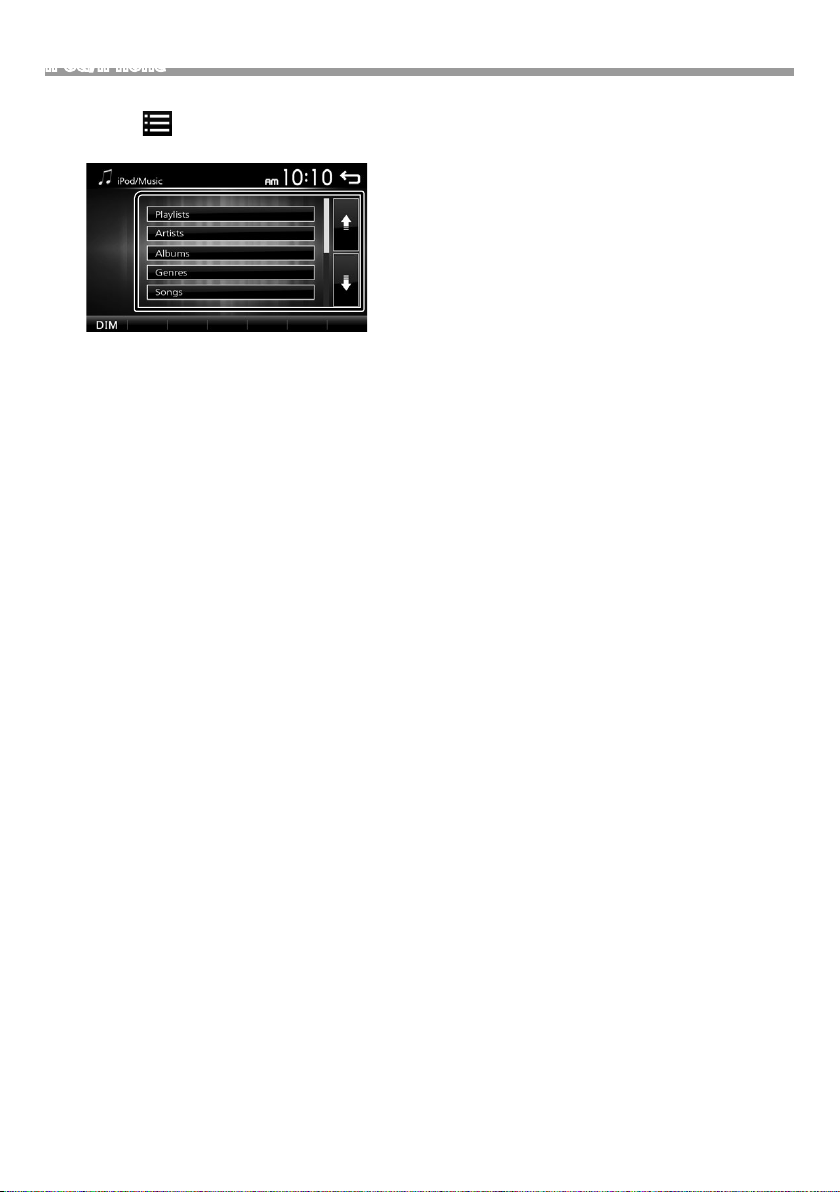
iPod/iPhone
Ñ Selecionar conteúdos numa lista
1 Toque em [ ].
2 Toque no item pretendido.
Quando toca numa categoria, os seus conteúdos são
apresentados.
3 Toque no item pretendido da lista de conteúdos.
Inicia-se a reprodução.
• Toque em [6] para se deslocar para a hierarquia
superior.
✎ N OTA
• O ecrã de controlo da fonte aparece quando toca em
[6], na hierarquia superior.
92
Page 93
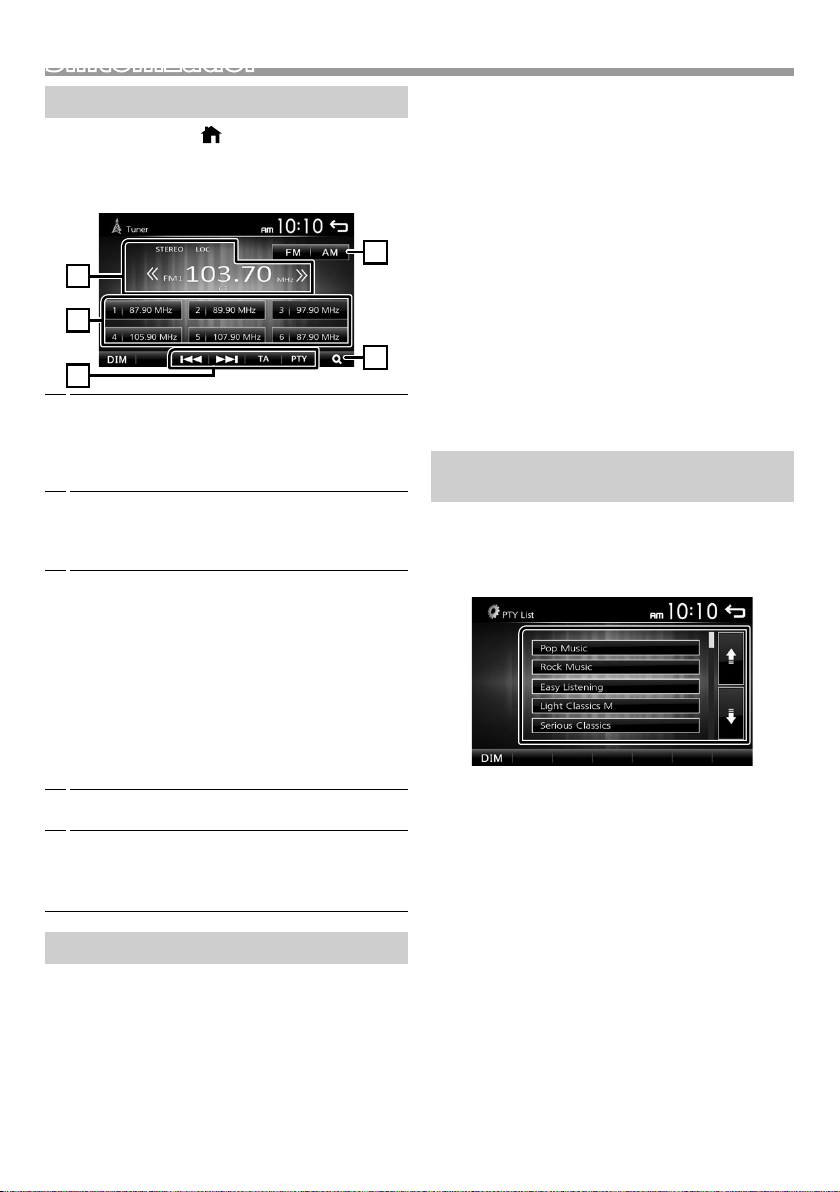
Sintonizador
4
1
3
2
5
Sintonizador
Operação Básica do Sintonizador
1 Pressione o botão < >.
2 Toque em [Tuner].
Ñ Ecrã de controlo da fonte
Mostra a informação sobre a estação atual:
1
Nome PS, Frequência, Género PTY, Itens de
Indicador
[<<] [>>] : Toque manualmente para a frequência
seguinte.
Chama a estação memorizada.
2
Se tocar na tecla durante 2 segundos, guarda
na memória a estação atual a ser recebida no
momento.
[E] [F] : Sintoniza automaticamente uma
3
estação com boa receção. *
[TA] : É definido o modo de informação de trânsito.
2*3
*
(P.93)
[PTY] : Selecione o Tipo de Programa disponível.
2*3
*
(P.93)
*1 Se “AF” estiver definido para LIGADO no ecrã do
Sintonizador, apenas são recebidas estações RDS.
(P.94)
*2 Apenas FM
*3 Apenas área de vendas da Europa e CEI
[1] : Predefine estações automaticamente.
4
(P.93)
[FM] : Muda a banda FM.
5
“FM1”, “FM2”, “FM3”
[AM] : Muda a banda AM.
“AM1”, “AM2”
1
Predenir estações
Ñ Memória automática
É possível predenir 18 estações para FM e 12
estações para AM.
1 Toque em [FM] ou [AM] para selecionar a banda.
2 Toque em [ 1 ].
As estações locais com sinais mais fortes são
automaticamente encontradas e armazenadas.
• Se “AF” estiver definido para “ON” no ecrã do
Sintonizador, apenas são gravadas na memória
estações RDS. (P.94)
Ñ Memória manual
Pode armazenar na memória a estação a ser recebida
no momento.
1 Sintonize numa estação que queira predenir.
2 Toque e mantenha pressionado [#] (#:1-6) em que
pretende armazenar a estação.
Ñ Recuperar a estação predenida
1 Toque em [#] (#:1-6).
✎ N OTA
• Somente as frequências são registadas como estações
predefinidas. As informações sobre estações RDS não
são registadas.
Características do FM RDS
(Apenas área de vendas da Europa e CEI)
Ñ Procurar por tipo de programa
1 Toque em [PTY].
2 Seleciona um tipo de programa a partir da lista.
Inicia-se a Procura PTY.
Ñ Informação de trânsito
1 Toque em [TA] (Informação de Trânsito).
Muda automaticamente para a informação de
trânsito quando começa o boletim de trânsito. (O
indicador TA acende-se.)
“ON” (LIGADO), “OFF” (DESLIGADO) (Padrão)
• Se “AF” estiver definido para “ON” no ecrã do
Sintonizador, a estação é mudada para a estação RDS.
(P.94)
Quando o boletim de trânsito começa
O ecrã Informação de trânsito aparece
automaticamente.
Português |
93
Page 94

Sintonizador
Conguração do sintonizador
Ñ Menu de função
1 Pressione o botão < >.
2 Toque em [Settings].
3 Toque em [Tuner].
4 Defina cada item da seguinte forma.
Local
Sintoniza apenas nas estações com força de sinal
suficiente. (O indicador LOC acende-se.)
“ON” (LIGADO), “OFF” (DESLIGADO) (Padrão)
RDS Clock Sync
Sincronizar a hora da estação do Sistema de Dados de
Rádio e o relógio desta unidade.
“ON” (LIGADO) (Padrão), “OFF” (DESLIGADO)
2
AF *
Quando a receção de uma estação é deficiente, muda
automaticamente para a estação que está a transmitir
o mesmo programa, na mesma rede Radio Data
System (RDS).
“ON” (LIGADO) (Padrão), “OFF” (DESLIGADO)
*1 Apenas na área de vendas da América do Norte e
América do Sul
*2 Apenas área de vendas da Europa e CEI
5 Toque em [ 6 ].
1
Area *
North America (Padrão): Para a América do Norte/
Central/do Sul, intervalos AM/FM: 10 kHz/200 kHz.
South America: Para alguns países da América do Sul,
intervalos AM/FM: 10 kHz/50 kHz.
Europe: Para a Europa, intervalos AM/FM: 9 kHz/50
kHz.
Stereo
Determina se deseja receber transmissões estéreo no
modo estéreo ou no modo monaural (o indicador
MONO acende-se).
“ON” (LIGADO) (Padrão), “OFF” (DESLIGADO)
94
Page 95
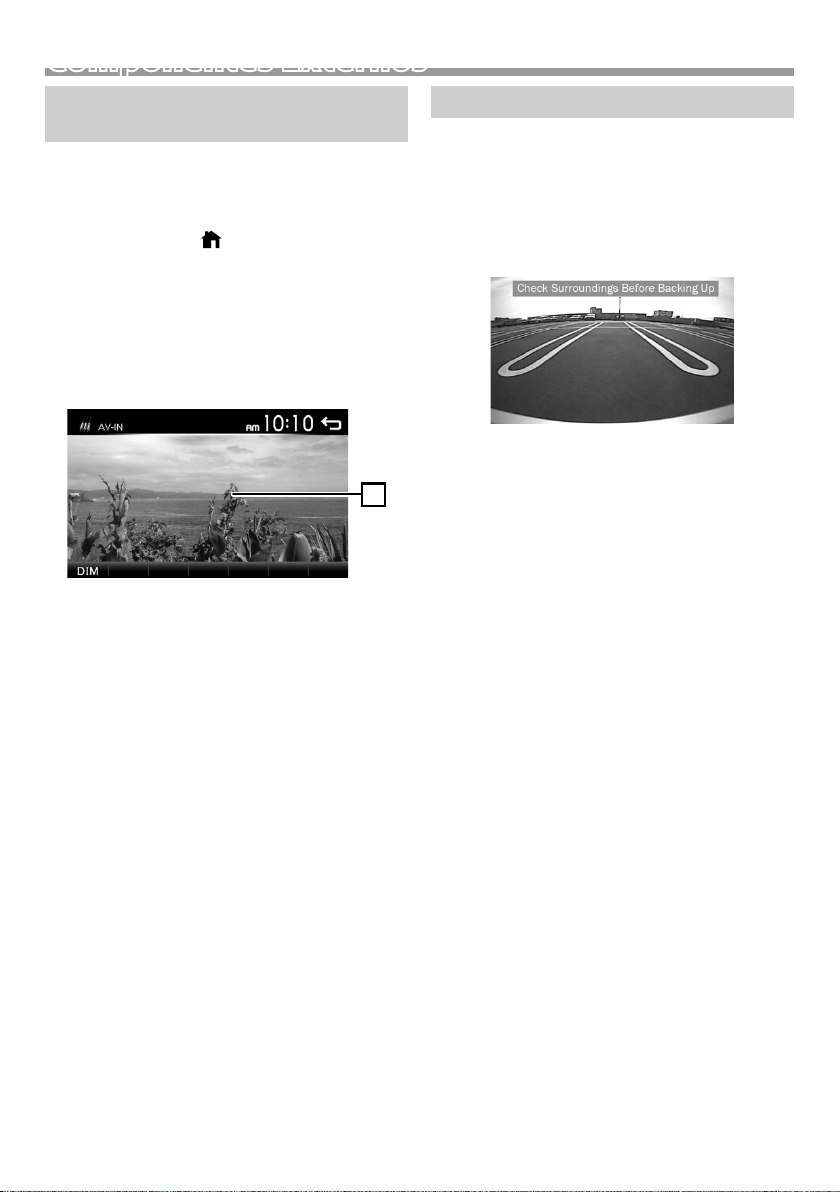
Componentes Externos
1
Utilizar leitores de áudio/vídeo externos
Ñ Iniciar a reprodução
1 Conecte um componente externo ao terminal de
entrada AV-IN. (P.104)
2 Pressione o botão < >.
3 Toque em [AV-IN].
4 Ligue o componente conectado e inicie a
reprodução da fonte.
Ñ Para reprodução de Vídeo
1 Quando os botões de operação não forem
exibidos no ecrã, toque no ecrã.
Os botões de operação desaparecem quando se
toca em 1 ou quando não é efetuada nenhuma
operação durante cerca de 5 segundos.
✎ N OTA
• Quando a imagem da câmara de visualização traseira
é exibida no ecrã AV-IN, a imagem do terminal da
Saída Visual desaparece.
Câmara de vista traseira
Para usar uma câmara de vista traseira, é necessária a
conexão de guia REVERSE. Para conectar uma câmara
de vista traseira. (P.10 4)
Ñ Apresentar a imagem a partir da câmara
de vista traseira
O ecrã de vista traseira é exibido quando for engatada a
marcha-atrás (R).
• Para apagar a mensagem de precaução, toque no
ecrã.
Português |
95
Page 96

Smartphone com bluetooth (KW-M24BT)Smartphone com bluetooth (KW-M24BT)
Ñ Sobre o smartphone Bluetooth e o leitor
de áudio Bluetooth
Esta unidade está em conformidade com as seguintes
especicações Bluetooth:
Versão
Bluetooth Ver.2.1 + EDR
Perl
Smartphone/ Telemóvel:
HFP (V1.6) (Perfil mãos-livres)
PBAP (V1.1.1) (Phonebook Access Profile, Perfil de
Acesso à Lista Telefónica)
Leitor de áudio:
A2DP (V1.2) (Advanced Audio Distribution Profile)
AVRCP (V1.3) (perfil de Controlo Remoto Áudio/Vídeo)
Codec de som
SBC
• aparece quando o Bluetooth do smartphone
está conectado.
•
aparece quando o leitor de áudio Bluetooth
está conectado.
Ñ Desligar o dispositivo
• Desligue a função Bluetooth no seu smartphone/
telemóvel.
• Desligue a ignição.
Receber uma chamada
1 Toque em [Û].
Ñ Acerca de telemóveis compatíveis com
Phone book Access Prole (PBAP, Perl de
Acesso à Lista Telefónica)
Se o seu telemóvel suportar PBAP, pode exibir os
seguintes itens no ecrã do painel de toque quando o
telemóvel está conectado.
• Lista telefónica (até 1.000 entradas)
• Chamadas feitas, chamadas recebidas e chamadas
perdidas (até 20 entradas no total)
Registe o seu smartphone na unidade
Pode utilizar o seu smartphone com Bluetooth
quando estiver emparelhado com esta unidade.
É possível registar até 5 dispositivos Bluetooth.
• Pode emparelhar o dispositivo e a unidade usando
SSP (Secure Simple Pairing, Emparelhamento Simples
Seguro), que apenas requer confirmação.
• Pode ser conectado um dispositivo de cada vez.
• Quando registar um novo dispositivo Bluetooth,
desconecte o atual dispositivo Bluetooth e, depois,
registe o novo.
• Não é possível registar um novo dispositivo se já
existirem 5 unidades Bluetooth registadas. Apague
registos desnecessários. (P. 98)
1 Ligue a função Bluetooth no seu smartphone/
telemóvel.
2 Procure a unidade (“KW-M24BT”) a partir do seu
smartphone/telemóvel.
Se for necessário um código PIN, introduza o código
PIN (“0000”).
• [Ý] : Rejeite uma chamada recebida.
Ñ Operações durante uma chamada
Terminar uma chamada
[Ý]
Pode enviar tonalidades, tocando nas teclas
correspondentes no ecrã.
• Toque em [
Alterna a saída de voz entre o telemóvel e o
altifalante.
Ajustar o volume do recetor
Pressione o botão <+> ou <–>.
] para fechar a janela.
96
Page 97

Smartphone com bluetooth (KW-M24BT)
Fazer uma chamada
1 Pressione o botão < >.
2 Toque em [Phone].
3 Consulte a seguinte tabela para cada método de
operação.
• [ ] : Desconecta o smartphone com
• [
• [
Ligar introduzindo um número de telefone
1) Toque em [
2) Introduza um número de telefone, utilizando as
teclas numéricas.
3) Toque em [Û].
Faça uma chamada
• Toque em [W] para eliminar a última entrada.
Ligar utilizando registos de chamadas
1) Toque em [
(Chamadas Efetuadas), [
2) Selecionar o número de telefone a partir da lista.
Bluetooth.
] : Fecha o ecrã para enviar tons enquanto
fala.
] : Exibe o ecrã para eliminar os dispositivos
Bluetooth registados anteriormente.
(P.98)
].
] (Chamadas Recebidas), [ ]
] (Chamadas Perdidas).
Ligar utilizando a lista telefónica
1) Toque em [
2) Selecione o nome a partir da lista.
Faça uma chamada
• [
Ligar utilizando a voz
Pode efetuar uma chamada de voz utilizando a função
de reconhecimento de voz do smartphone com
Bluetooth.
1) Toque em [
2) Toque em [
3) Diga o nome registado no smartphone com
Bluetooth.
• Toque em [ ] para cancelar a marcação por voz.
].
] : Atualiza a lista telefónica. Toque neste
botão depois de ter feito uma alteração
na lista telefónica do seu telemóvel.
].
].
Faça uma chamada
Português |
97
Page 98

Smartphone com bluetooth (KW-M24BT)
2
3
1
4
Reproduzir um dispositivo de áudio Bluetooth
1 Pressione o botão < >.
2 Toque em [BT Audio].
Ñ Ecrã de controlo da fonte
A capa do ficheiro a tocar é exibida.
1
[L] : Reproduz ou pausa.
2
[E] [F] : Procura o conteúdo anterior/
seguinte.
Mostra a informação sobre o ficheiro atual.
3
Apenas um nome de ficheiro e um nome de pasta
são exibidos se não existir informação de rótulo.
D, etc. : Estado da reprodução
4
: Indicador do modo de reprodução repetida *
: Indicador de modo de reprodução aleatória *
* As definições no dispositivo de áudio Bluetooth
são exibidas.
✎ N OTA
• As indicações de operação e exibição podem diferir
de acordo com sua disponibilidade no dispositivo
conectado.
Eliminar o dispositivo de Bluetooth registado
1 Pressione o botão < >.
2 Toque em [Phone].
3 Toque em [ ].
4 Toque no nome do dispositivo.
5 Toque em [ ].
98
Page 99

1
3
2
Controlar o Áudio
Controlar o áudio geral
1 Pressione o botão < >.
2 Toque em [Settings].
3 Toque em [Audio].
4 Toque em [Sound Effect].
5 Toque em [ ].
6 Defina cada item da seguinte forma.
Fader
[
Balance
[
[Reset]
Ñ Loudness
Ajuste o equilíbrio do volume à frente e
atrás.
] [ ]
12 (frente) a -12 (traseira)
Ajuste o equilíbrio do volume à esquerda
e à direita.
] [ ]
12 (direita) para -12 (esquerda)
Para limpar o ajuste.
1 Pressione o botão < >.
2 Toque em [Settings].
3 Toque em [Audio].
4 Toque em [Loudness].
Define as quantidades de reforço dos sons altos e
baixos.
“ON” (LIGADO), “OFF” (DESLIGADO) (Padrão)
Controlo do equalizador
1 Pressione o botão < >.
2 Toque em [Settings].
3 Toque em [Audio].
4 Toque em [Sound Effect].
5 Defina cada item da seguinte forma.
Pode selecionar a barra de frequência e ajustar o
1
seu nível. (-7 a +7)
• Os ajustes são guardados e “User” (Utilizador) é
ativado.
Para convocar a curva do equalizador predefinida.
2
A predefinição “User” e a curva EQ atual voltam a
3
plana.
Denições do subwoofer
1 Pressione o botão < >.
2 Toque em [Settings].
3 Toque em [Audio].
4 Toque em [Subwoofer].
5 Defina cada item da seguinte forma.
Frequency
[80Hz], [120Hz],
[160Hz], [OFF]
Volume
[–], [+]
Ajuste de filtro de passa baixos. /
[OFF]: Desativa a saída do
subwoofer. (Padrão DESLIGADO)
Ajusta o nível do subwoofer. 0 a 12
(Padrão 6)
Português |
99
Page 100

Controlo remoto
Esta unidade pode ser operada através do controlo
remoto.
Pode ser utilizado o controlo remoto RM-RK258
(acessório opcional).
! ADVERTÊNCIA
• Não ingira a pilha, Risco de Queimadura Química
O controlo remoto fornecido com este produto
contém uma pilha “moeda” / “célula de botão”. Se a
pilha “moeda”/“célula de botão” for engolida, pode
causar queimaduras internas graves em apenas 2
horas e pode levar à morte.
Mantenha as pilhas novas e usadas fora do alcance das
crianças.
Se o compartimento da pilha não se fechar
com segurança, cesse a utilização do produto e
mantenha-o fora do alcance das crianças.
Se pensa que pilhas podem ter sido engolidas ou
colocadas dentro de qualquer parte do corpo, procure
atenção médica imediatamente.
! AT ENÇ ÃO
• Coloque o controlo remoto num local onde não se
desloque durante operações de travagem ou outras.
Poderão ocorrer situações perigosas se o controlo
remoto cair e ficar preso sob os pedais durante a
condução.
• Não deixe a pilha perto de fogo ou debaixo de luz do
sol direta. Poderá provocar num incêndio, explosão ou
gerar demasiado calor.
• Não recarregue, não faça curto-circuito, parta ou
aqueça as pilhas nem as coloque no fogo. Tais ações
podem fazer com que as pilhas percam líquido. Se o
líquido entornado entrar em contacto com os seus
olhos ou com a roupa, lave imediatamente com água
e consulte um médico.
Ñ Remoção da folha de pilha
Puxe a folha de pilha do telecomando para ativar a pilha.
Ñ Troca da pilha do telecomando
Funções dos botões do controlo remoto
• Aponte o controlo remoto diretamente ao sensor no
painel frontal.
• NÃO exponha o sensor remoto a luz brilhante (luz
solar direta ou luz artificial).
SRC
VOL + –
ATT
DISP
FM/R
AM/S
E 2
F 3
ANGLE
Û
DIRECT
ASPECT
Tec lad o
numérico
CLR
ENT
Muda para a fonte a ser reproduzida.
Ajusta o volume.
Silencia/restaura o som
Não usado.
Seleciona a pasta a ser reproduzida.
Durante a fonte do sintonizador, selecione
as bandas FM/AM a receber.
Seleciona a faixa ou o ficheiro a ser
reproduzido.
Com a fonte do sintonizador, muda para
as estações emissoras recebidas pela
unidade.
Não usado.
Quando é recebida uma chamada, permite
atendê-la.
Não usado.
Não usado.
Não usado.
Não usado.
Não usado.
CR2025 (lado +)
• Utilize uma pilha tipo botão disponível
comercialmente (CR2025).
• Coloque a pilha com as polaridades + e – alinhadas
adequadamente.
– Se a eficiência do telecomando diminuir, troque a
pilha.
100
 Loading...