

Page 1
KW-M150BT
MONITOR WITH RECEIVER
INSTRUCTION MANUAL
• Updated information (the latest Instruction Manual, etc.) is available from
<http://w ww.jvc.net/cs/car/>.
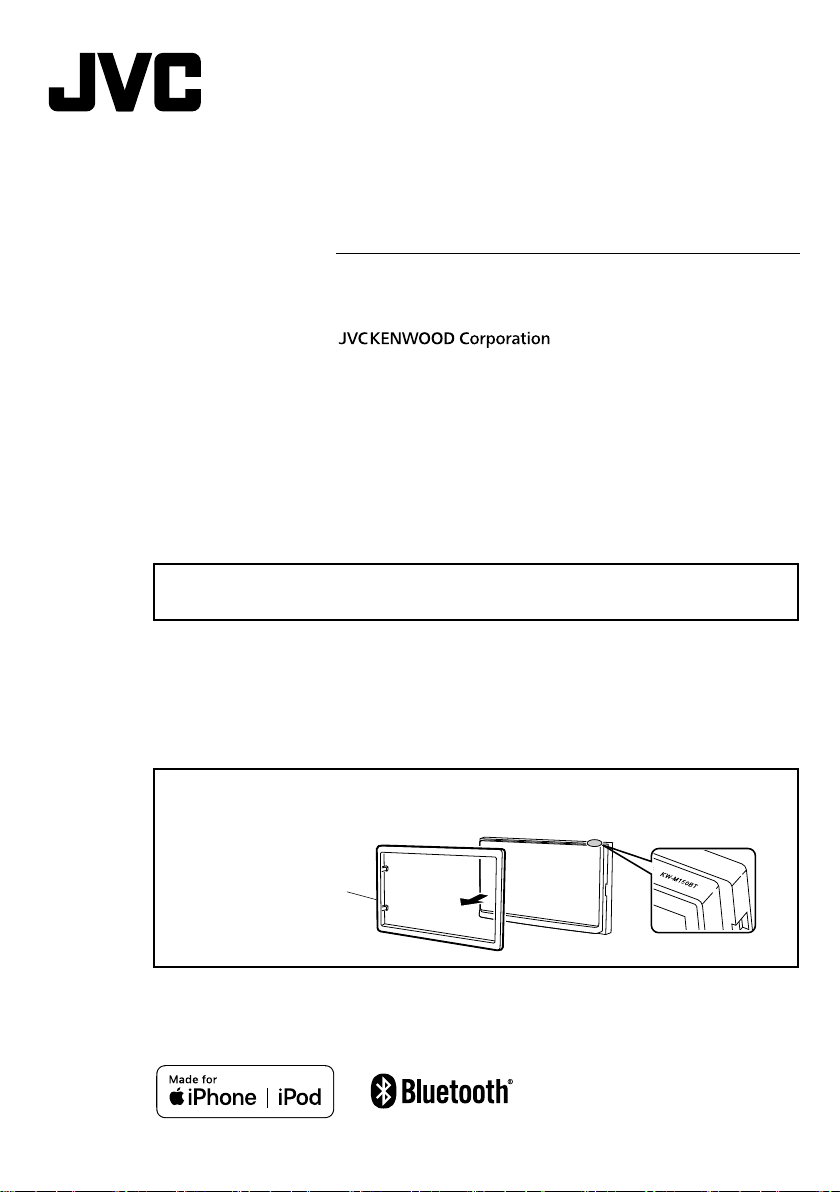
Model name indication position
See “Removing the trim plate” (P. 23)
Trim plate
B5A-3199-00 b EN (K)© 2019 JVC KENWOOD Corporation
Page 2
Contents
Before use .................................................................................2
How to read this manual ................................................................................... 2
Precautions ................................................................................................................ 2
Getting Started ....................................................................... 3
Clock settings ........................................................................................................... 3
Basics .......................................................................................... 4
Functions of the Buttons on the Front Panel ...................................... 4
Common operations ...........................................................................................4
HOME screen descriptions .............................................................................. 5
List screen ................................................................................................................... 5
Tuner ........................................................................................... 6
Tuner Basic Operation......................................................................................... 6
Presetting stations ................................................................................................ 6
Tuner Setup ................................................................................................................7
USB .............................................................................................. 8
Preparation ................................................................................................................. 8
Playback operations .............................................................................................8
iPod/iPhone ...........................................................................10
Preparation ...............................................................................................................10
Playback operations ...........................................................................................10
Mirroring ................................................................................. 12
Preparation ...............................................................................................................12
Mirroring operations..........................................................................................12
External Components ........................................................ 13
Using external audio/video players ......................................................... 13
Rear view camera .................................................................................................13
Learning function of steering remote....................................................14
Bluetooth ................................................................................ 15
Register your smartphone to the unit ................................................... 15
Bluetooth Setup ....................................................................................................15
Receive a phone call ..........................................................................................16
Make a phone call ................................................................................................16
Playing Bluetooth Audio Device ................................................................17
Controlling Audio ................................................................ 18
Controlling General Audio ............................................................................. 18
Equalizer Control ..................................................................................................18
Speaker / X’Over setup .....................................................................................19
Listening Position / DTA ..................................................................................19
Sound Effect ............................................................................................................19
Remote control ..................................................................... 20
Functions of the Remote control Buttons ...........................................20
Installation .............................................................................. 21
Before Installation ................................................................................................21
Installing the unit ................................................................................................ 22
About this Unit ......................................................................26
More information .................................................................................................26
Troubleshooting ...................................................................................................26
Copyrights ................................................................................................................27
Specifications .........................................................................................................28
Before use
Precautions
#WARNING
Ñ To prevent injury or re, take the
following precautions:
• To prevent a short circuit, never put or leave any
metallic objects (such as coins or metal tools)
inside the unit.
• Do not watch or fix your eyes on the unit’s display
when you are driving for any extended period.
• If you experience problems during installation,
consult your JVC dealer.
Ñ Precautions on using this unit
• When you purchase optional accessories, check
with your JVC dealer to make sure that they work
with your model and in your area.
• The Radio Data System or Radio Broadcast Data
System feature won’t work where the service is
not supported by any broadcasting station.
Ñ Protecting the monitor
• To protect the monitor from damage, do not
operate the monitor using a ballpoint pen or
similar tool with the sharp tip.
Ñ Cleaning the Unit
If the front panel of this unit is stained, wipe it with
a dry soft cloth such as a silicon cloth. If the front
panel is stained badly, wipe the stain off with a
cloth moistened with neutral cleaner, then wipe it
again with a clean soft dry cloth.
! CAUTION
• Applaying spray cleaner directly to the unit may
affect its mechanical parts. Wiping the front panel
with a hard cloth or using a volatile liquid such as
thinner or alcohol may scratch the surface or erase
screened print.
Ñ How to reset your unit
If the unit or the connected unit fails to operate
properly, reset the unit.
How to read this manual
• The panels shown in this guide are examples used to
provide clear explanations of the operations. For this
reason, they may be different from the actual panels.
• In operation procedures, bracket shape indicates the
key or button you should control.
< >: indicates the name of panel buttons.
[ ]: indicates the name of touch keys
2
Reset button
Page 3
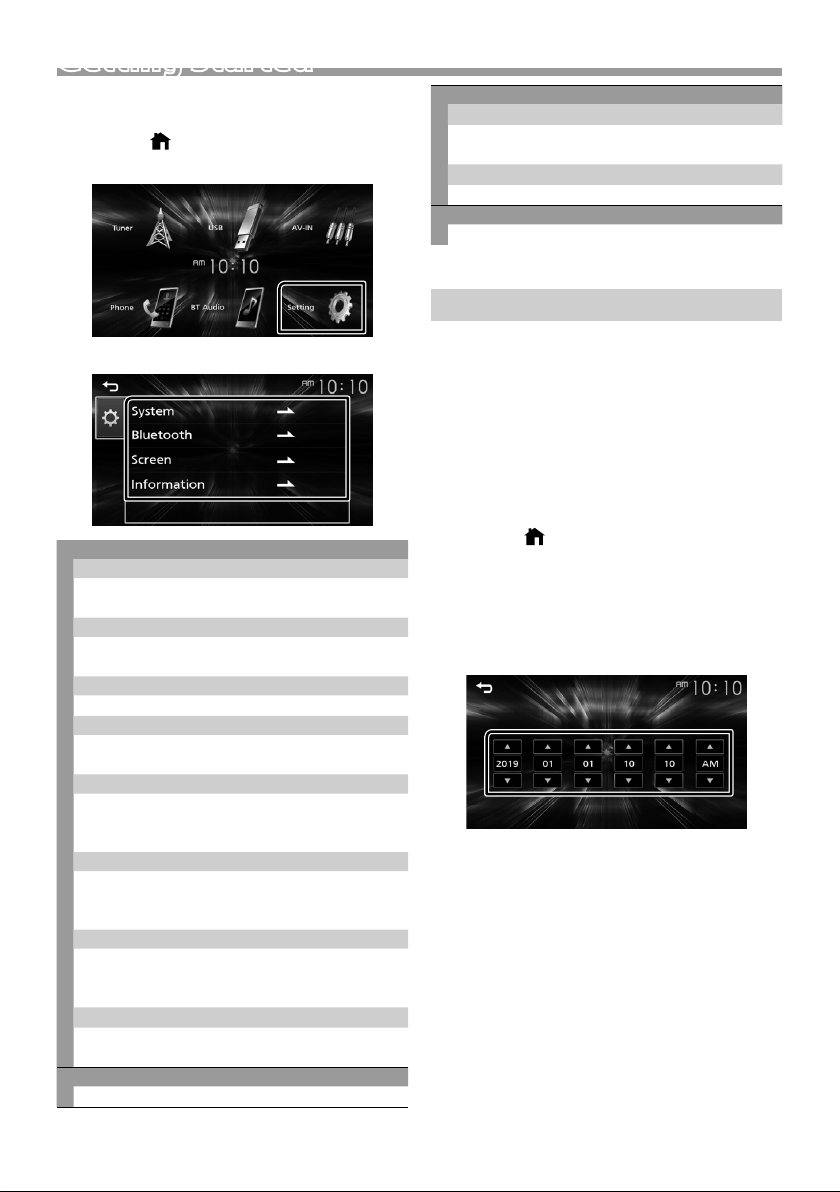
Getting Started
1 Turn the ignition key of your car to ACC.
The unit is turned on.
2 Press the < > button.
3 Touch [Setting].
[Screen]
[Dimmer]
Select the dimmer mode.
“High” (Default) / “Mid” / “Low”
[Demo]
Select the demonstration mode. Default is “ON”.
[Information]
Displays the software version of this unit.
5 Touch [6].
Clock settings
4 Touch the corresponding key and set the value.
[System]
[Beep Tone]
Activates or deactivates the key-touch tone.
“ON” (Default), “OFF”
[Language]
Select the language used for the control screen
and setting items. Default is “English”.
[Time/Date]
Adjust the clock time. ( P.3)
[Clock Mode]
Select the time display format.
[12hr] (Default) / [24hr]
[Steering Remote]
Sets the desired function in the steering remote
controller. See Learning function of steering
remote ( P.14).
[Parking Guidelines]
You can display parking guidelines to enable
easier parking when you shift the gear to the
reverse (R) position. Default is “ON”.
[Guidelines SETUP]
If you select [ON] for [Parking Guidelines], you can
adjust the parking guidelines. See To adjust the
parking guidelines (P.14).
[System Reset]
Touch [System Reset] and then touch [YES] to set
all the settings to the initial default settings.
[Bluetooth]
Displays the Bluetooth Settings screen. ( P.15)
Ñ Synchronizing the clock time with FM
RDS
Activate [RDS Clock Sync].
See Tuner Setup (P.7).
Ñ Adjusting the clock manually
✎ NOTE
• Deactivate [RDS Clock Sync] before adjusting the
clock.
1 Press the < > button.
2 Touch [Setting].
3 Touch [System].
4 Touch [Time/Date].
Clock screen appears.
5 Touch [R] or [S] to set the clock time.
6 Touch [6].
English |
3
Page 4
BasicsBasics
Functions of the Buttons on the Front Panel
1
2
3
4
5
6
Remote Sensor
1
• Receives the remote control signal.
(HOME)
2
• Displays the HOME screen. (P. 5)
• Pressing for 1 second turns the power off.
• When the power off, turns the power on.
EQ
3
• Displays the Audio screen.* (P.18)
* The Audio screen is not displayed during SETUP
screen or on the list screen etc,
+ , – (Volume)
4
• Adjusts volume. The volume will go up until 20
when you keep pressing [ + ].
(MUTE, Display o)
5
• Mutes/restores the sound.
• Pressing for 1 second turns the screen off.
When the screen is off, touch the display to turn
on the screen.
Reset
6
• If the unit or the connected unit fails to operate
properly, the unit returns to factory settings
when this button is pressed.
Ñ Turning o the power
1 Press and hold the < > button.
Ñ Adjusting the volume
1 Press the <+> or <–> button.
✎ NOTE
• The volume will go up until 20 when you keep
pressing [ + ].
Ñ Mutes the sound
1 Press the < > button.
To restore the sound, touch the button again, or
adjust the volume.
Ñ Turn o the screen
1 Press and hold the < > button.
Common operations
Ñ Turning on the power
1 Press the < > button.
4
To turn on the screen, touch the display.
Page 5
Basics
2
5
3
647
1
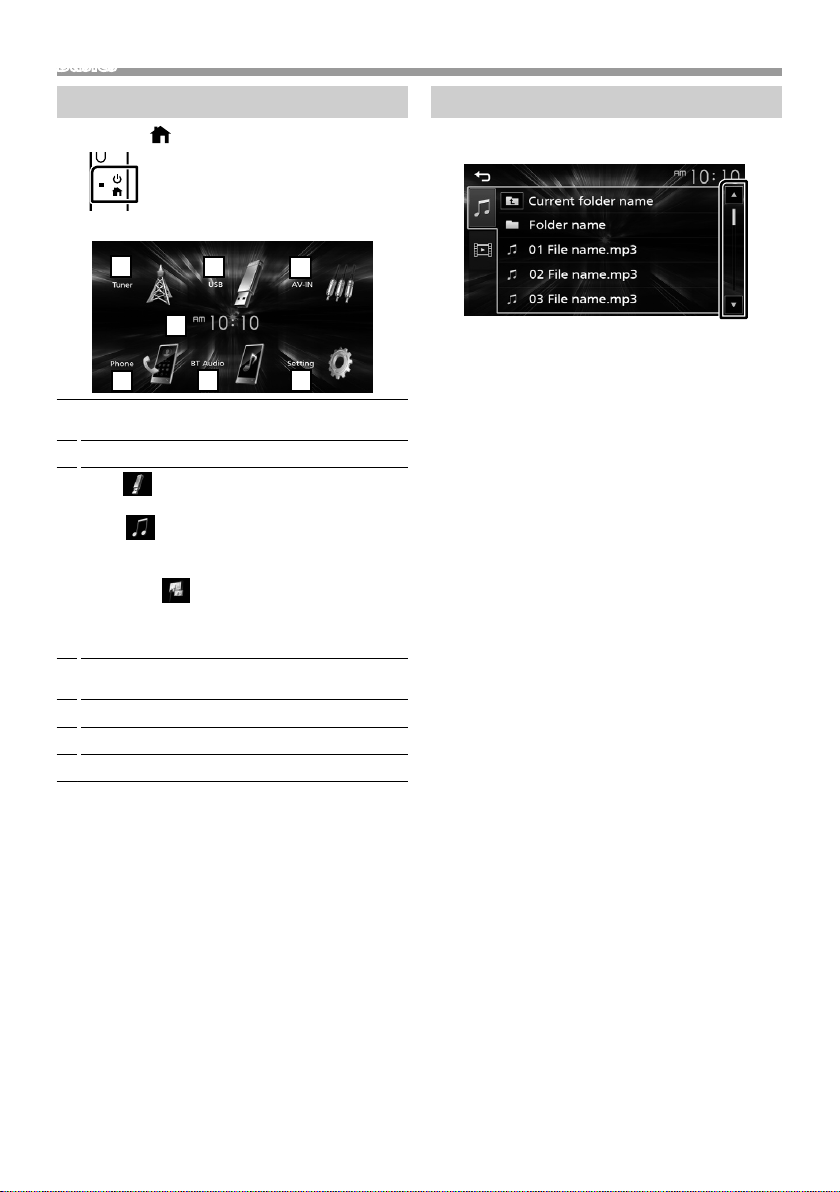
HOME screen descriptions
1 Press the < > button.
HOME screen appears.
Clock display
1
Touch to displays the Clock screen.
Switches to the Tuner broadcast. (P.6)
2
3
[USB]
Plays files on a USB device. (P. 8)
[iPod]
Plays an iPod/iPhone. (P.10)
• When iPod/iPhone is connected.
[Mirroring]
Displays the Mirroring screen. (P.12)
• When android device with “Mirroring OB for
JVC” application installed is connected.
Switches to an external component connected to
4
the AV-IN input terminal. (P.13)
Displays the Hands Free screen. (P.16)
5
Plays a Bluetooth audio player. (P.17 )
6
Displays the SETUP screen. (P. 3)
7
List screen
There are some common function keys in the list
screens of most sources.
1 You can change the page to display more items
by pressing [R]/ [S].
English |
5
Page 6
Tuner
213
4
Tuner
Tuner Basic Operation
1 Press the < > button.
2 Touch [Tuner].
Ñ Source control screen
Displays the information of the current station:
1
PS name, Frequency, PTY Genre, Indicator Items
[FM] : Switches the FM band.
2
“FM1”, “FM2”, “FM3”
[AM] : Switches the AM band.
“AM1”, “AM2”
[E] [F] : Tunes in a station with good
reception automatically.
[
] : Displays the Tuner Setup screen. (P.7)
Recalls the memorized station.
3
When touched for 2 seconds, stores the current
receiving station in memory.
4
[
] : Returns to previous screen.
[
] : Displays the Audio screen. (P.18)
Presetting stations
Ñ Auto memory
You can preset 6 stations for the current band (FM1/
FM2 /FM3/AM1/AM2).
1 Touch [FM] or [AM] to select the band.
2 Touch [ ].
3 Touch [Auto Store].
The local stations with the strongest signals are
found and stored automatically.
Ñ Manual memory
You can store the current receiving station in
memory.
1 Tune in to a station you want to preset.
2 Touch and hold [#] (#:1-6) in which you want to
store the station.
Ñ Recalling the preset station
1 Touch [#] (#:1-6).
6
Page 7
Tuner
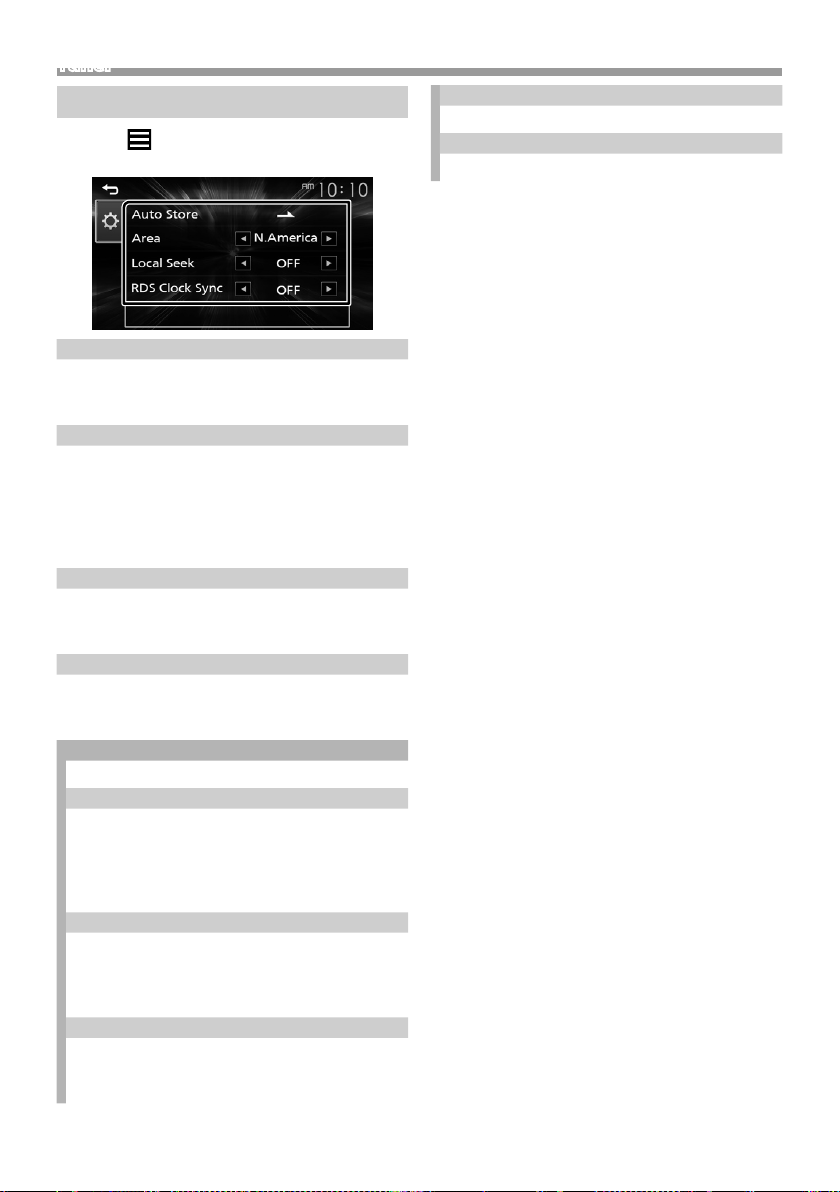
Tuner Setup
1 Touch [ ].
2 Set each item as follows.
[Auto Store]
Automatically searches and stores the 6 stations with
the strongest signals for the selected band.
“Auto Store” appears.
[Area]
“N.America” (Default): For North/Central/South
America, AM/FM intervals: 10 kHz/200 kHz.
“S.America”: For some South American countries,
AM/FM intervals: 10 kHz/50 kHz.
“Europe”: For Europe, AM/FM intervals: 9 kHz/50
kHz.
[Local Seek]
Tunes in only to the stations with sufficient signal
strength. (LOC indicator lights up.)
“ON”, “OFF” (Default)
[RDS Clock Sync] *
Synchronizing the Radio Data System station time
data and this unit’s clock.
“ON” (Default), “OFF”
2 *3
[RDS] *
Displays the RDS Settings screen.
[AF]
When station reception is poor, automatically
switches to the station that is broadcasting the
same program over the same Radio Data System
network.
“ON” (Default), “OFF”
[TA]
Switches to the traffic information automatically
when the traffic bulletin starts. (TI indicator lights
up.)
“ON”, “OFF” (Default)
[RDS Clock Sync]
Synchronizing the Radio Data System station time
data and this unit’s clock.
“ON” (Default), “OFF”
1 *2
[PTY]
Select a program type.
[PTY Seek]
Searches for a program by program type.
*1 To use the function, it is necessary to set [Area] to
[N.America]/[S.America].
*2 To use the function, it is necessary to set [Area]
to [Europe].
*3 FM only
3 Touch [6].
English |
7
Page 8
USB
1
5
4
3
2
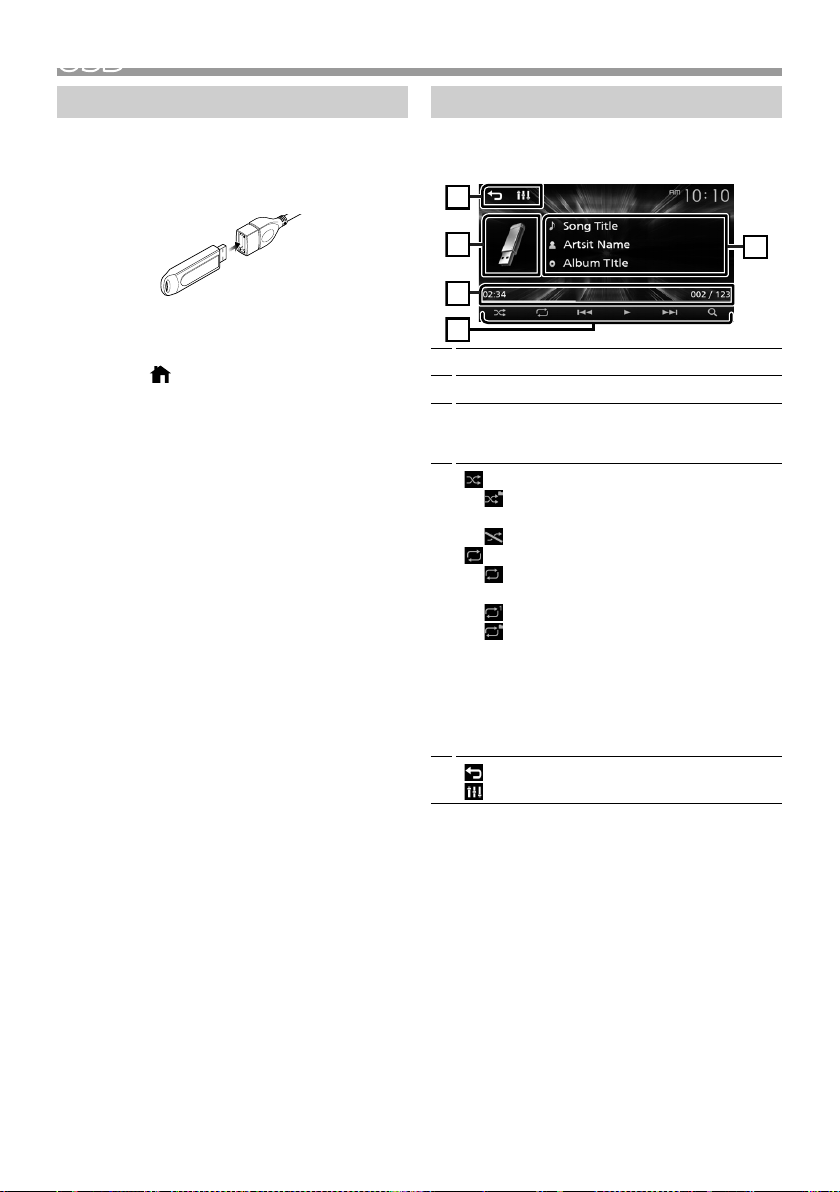
USB
Preparation
Ñ Connecting a USB device
1 Remove the cap of the USB terminal.
2 Connect the USB device with the USB cable.
The unit reads the device and playback starts.
Ñ To disconnect the USB device:
1 Press the < > button.
2 Touch a source other than [USB].
3 Detach the USB device.
Ñ Usable USB device
This unit can play MPEG1/ MPEG2/ MPEG4/ H.264/
MKV/ MP3/WMA/ AAC/ WAV/ FLAC/ OGG les stored
in a USB mass storage class device. (P. 26)
• File system: FAT16/ FAT32/ NTFS
• This unit can recognize a total of 9 999 files and
320 folders (a maximum of 9 999 files per folder).
• The maximum number of characters:
– Folder names : 70 characters
– File names : 70 characters
– Tag : 70 characters
✎ NOTE
• When the USB device is connected to this unit, it can
be charged through the USB cable.
• Install the USB device in the place where it will not
affect safe driving.
• You cannot connect a USB device via a USB hub and
Multi Card Reader.
• Take backups of the audio files used with this unit.
The files may be erased depending on the operating
conditions of the USB device.
We shall have no compensation for any damage
arising from any erased data.
• No USB device comes with this unit. You need to
purchase a commercially available USB device.
• Cap the USB terminal whenever not using.
Playback operations
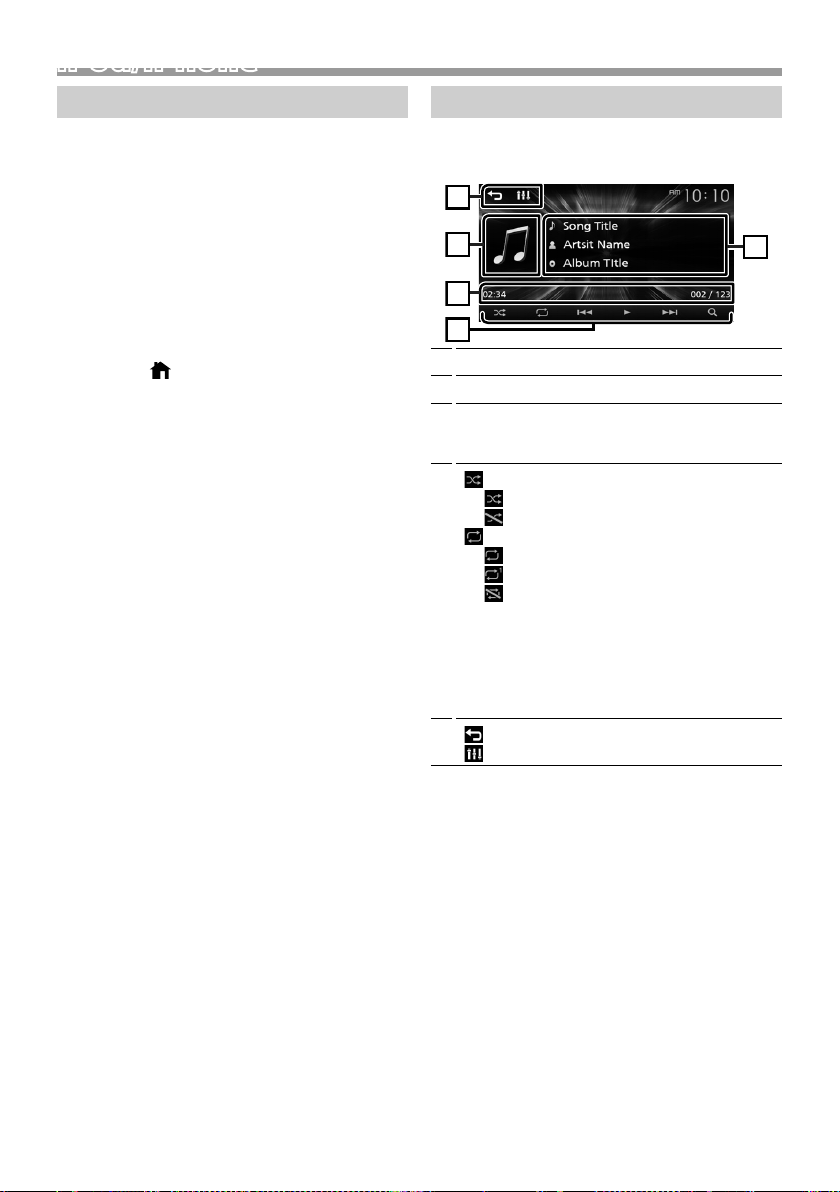
Ñ Control the music you are listening to on
the source control screen.
The jacket of the currently playing file is displayed.
1
Displays the information of the current file.
2
Playing time/File number
3
Play time bar : For confirmation of current playing
position.
4
[
] : Selects Random playback mode.
: Randomly plays all files in the current
folder.
(Default): Normal playback.
[
] : Selects Repeat playback mode.
(Default): Repeats all files in the USB
device.
: Repeats the current file.
: Repeats all files in the current folder.
[U], [H] : Plays or pauses.
[E], [F] : Searches the previous/next
content.
Touch and hold to fast forward or fast
backward.
[1] : Searches file. (P.9)
5
[
] : Returns to previous screen.
[
] : Displays the Audio screen. (P.18)
8
Page 9
USB
1
432
Ñ For Video playback
1 When the operation buttons are not displayed
on the screen, touch the display.
1
] : You can adjust image quality in video
[
screen.
[Brightness] : Adjusts the brightness. (00
to 10)
[Contrast] : Adjusts the contrast. (00 to 10)
[Color] : Adjusts the color. (00 to 10)
[Tint] : Adjusts the tint. (00 to 10)
[INITIALIZE] : To clear the adjustment.
Playing time
2
Play time bar : For confirmation of current playing
position.
[U], [H] : Plays or pauses.
3
[E], [F] : Searches the previous/next
content.
Touch and hold to fast forward or fast
backward.
[1] : Searches file. (P.9)
[NORMAL]/[16: 9]/[4:3] : Select a screen mode.
4
[
] : Returns to previous screen.
[
] : Displays the Audio screen. (P.18)
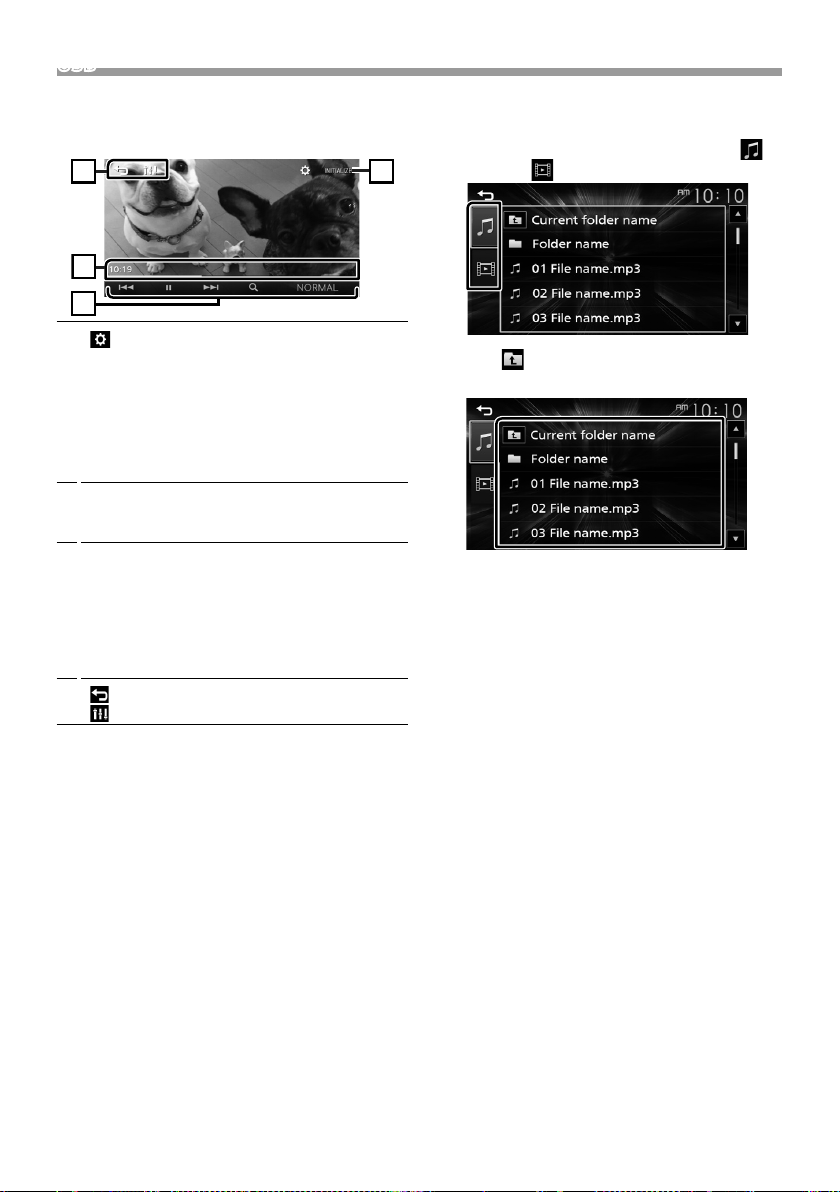
Ñ Selecting a track in a list (Searches le)
1 Touch [ 1].
2 Select whether you search by audio files [ ],
video files [ ].
3 Touch [ ] to moves to the upper hierarchy.
4 Touch the desired folder.
When you touch a folder its contents are displayed.
• Touch [6] to moves to the upper hierarchy.
5 Touch desired item from the content list.
Playback starts.
✎ NOTE
• The source control screen appears when you touch
[6] at the top hierarchy.
English |
9
Page 10
iPod/iPhoneiPod/iPhone
1
543
2
Preparation
Ñ Connecting iPod/iPhone
• For Lightning connector models: Use USB
Audio cable for iPod/iPhone—KS-U62 (optional
accessory).
• For details about connecting iPod/iPhone, see
page 25 .
1 Remove the cap of the USB terminal.
2 Connect the iPod/iPhone.
The unit reads the device and playback starts.
Ñ To disconnect the iPod/iPhone
1 Press the < > button.
2 Touch a source other than [iPod].
3 Detach the iPod/iPhone.
Ñ Connectable iPod/iPhone
The following models can be connected to this unit.
Made for
• iPhone XS Max
• iPhone XS
• iPhone XR
• iPhone X
• iPhone 8 Plus
• iPhone 8
• iPhone 7 Plus
• iPhone 7
• iPhone SE
• iPhone 6s Plus
• iPhone 6s
• iPhone 6 Plus
• iPhone 6
• iPhone 5s
✎ NOTE
• If you start playback after connecting the iPod, the
music that has been played by the iPod is played
first.
• Cap the USB terminal whenever not using.
Playback operations
Ñ Control the music you are listening to on
the source control screen.
Artwork (Shown if the track contains artwork)
1
Displays the information of the current file.
2
Playing time/File number
3
Play time bar : For confirmation of current playing
position.
4
[
] : Selects Random playback mode.
: Functions the same as Shuffle Songs.
: Random off
[
] : Selects Repeat playback mode.
: Functions the same as Repeat All.
: Functions the same as Repeat One.
: Repeat off
[U], [H] : Plays or pauses.
[E], [F] : Searches the previous/next
content.
Touch and hold to fast forward or fast
backward.
[1] : Searches content. ( P.11)
5
[
] : Returns to previous screen.
[
] : Displays the Audio screen. (P.18)
10
Page 11

iPod/iPhone
Ñ Selecting a content in a list
1 Touch [ 1].
2 Touch desired item.
When you touch a category its contents are
displayed.
3 Touch desired item from the content list.
Playback starts.
• Touch [6] to moves to the upper hierarchy.
✎ NOTE
• The source control screen appears when you touch
[6] at the top hierarchy.
English |
11
Page 12
MirroringMirroring
Preparation
You can display and control the App on the unit
while your smartphone is connected to the USB
terminal.
✎ NOTE
• Pair your smartphone with the unit via Bluetooth.
See Register your smartphone to the unit
(P.15) and Connect the Bluetooth device.
Ñ Compatible Android smartphone
• Android version 7.0 or later
• Bluetooth support
✎ NOTE
• This unit may not work for some Android
smartphone’s.
Ñ Connecting Android smartphone
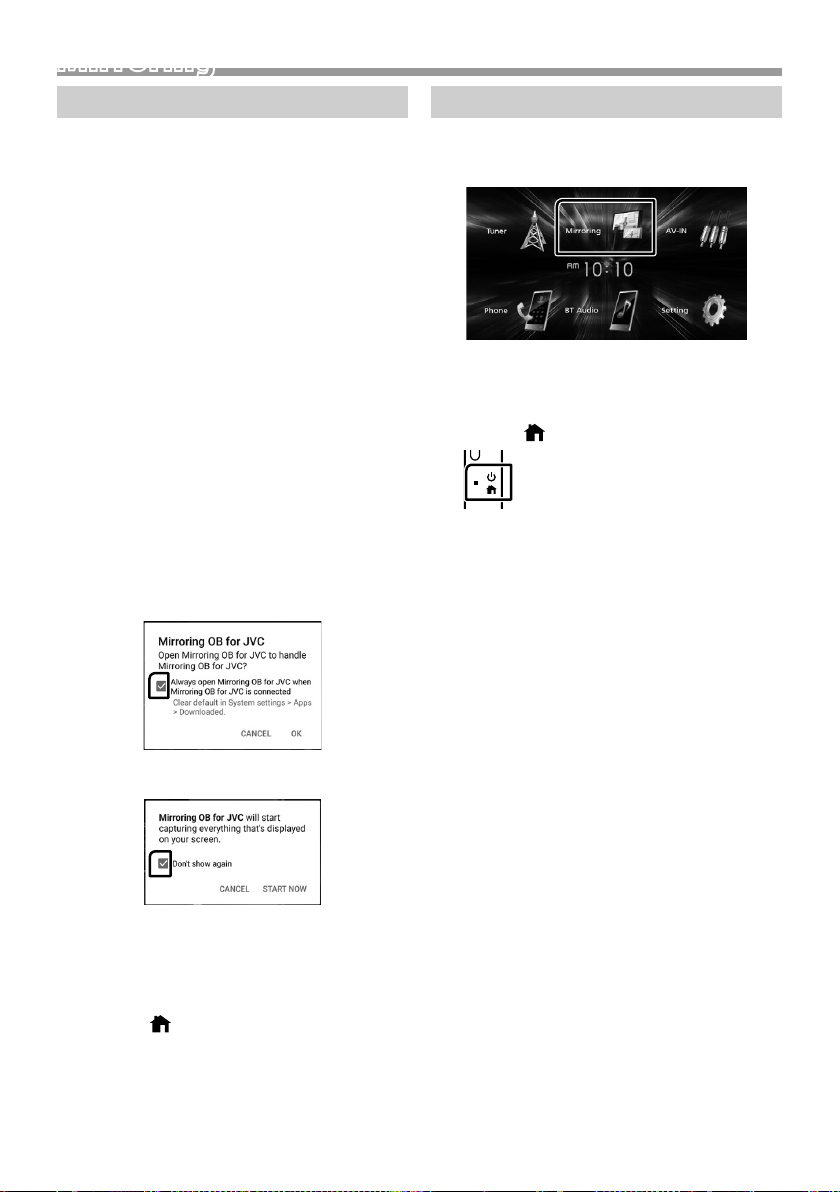
1 Download Mirroring App from Google Play.
Install the latest version of the Mirroring application
“Mirroring OB for JVC” on your Android.
2 Remove the cap of the USB terminal.
3 Connect the Android smartphone. (P.25)
4 Launch Mirroring App on your Android
Smartphone.
1) Touch to check mark.
Mirroring operations
Ñ Mirroring Operation
1 Touch [Mirroring].
• You can display the same screen of the Android
device on the monitor of the unit.
Ñ To turn o the Mirroring
1 Press the < > button.
• HOME screen appears.
2) Touch “OK” to start Mirroring App.
3) Touch to check mark.
4) Touch “START NOW” to start capturing your
Android screen.
5 Start to enjoy Mirroring.
Ñ To disconnect the Android smartphone
1 Press the < > button.
2 Touch a source other than [Mirroring].
3 Detach the Android smartphone.
12
Page 13
External Components
1
External Components
Using external audio/video players
Ñ Starting playback
1 Connect an external component to the AV-IN
input terminal. (P.24)
2 Press the < > button.
3 Touch [AV- IN].
4 Turn on the connected component and start
playing the source.
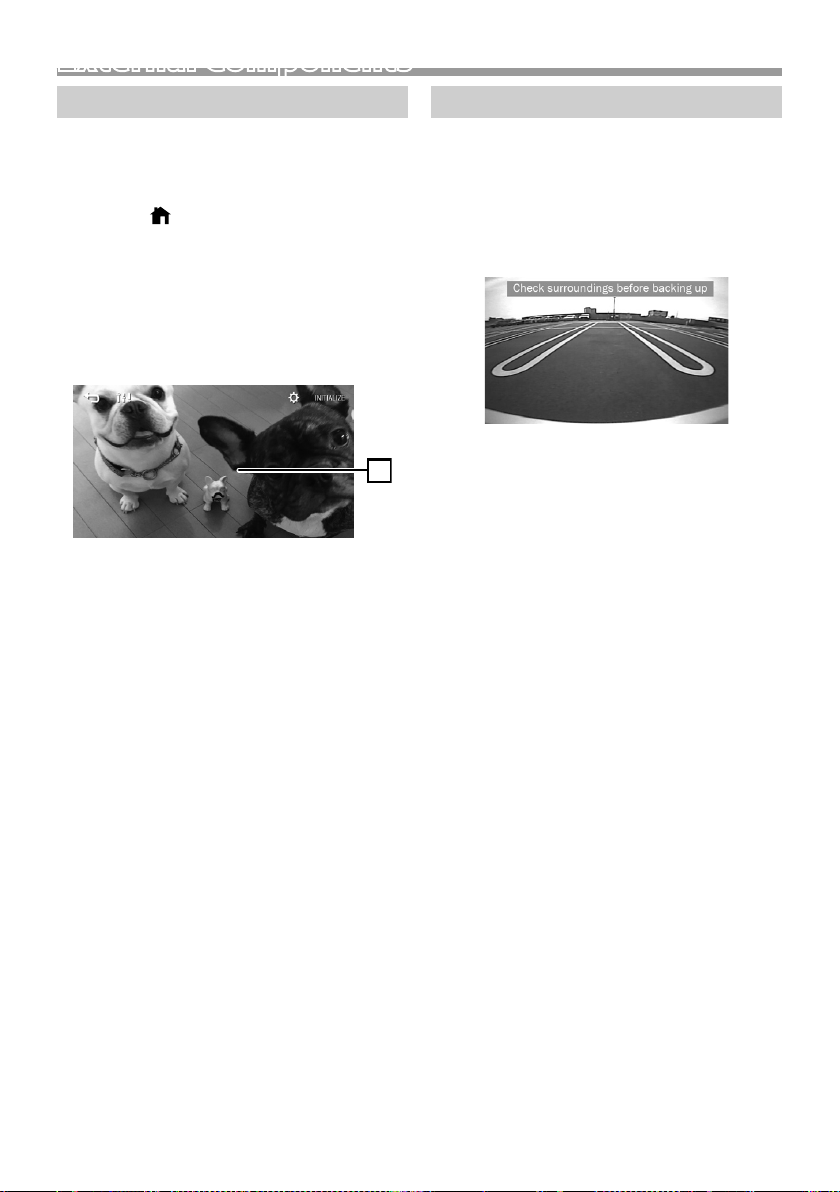
Ñ For Video playback
1 When the operation buttons are not displayed
on the screen, touch the display.
✎ NOTE
• When the picture from the rear view camera is
displayed on the AV-IN screen, the picture output
from the Visual Output terminal disappears.
Rear view camera
To use a rear view camera, the REVERSE lead
connection is required. For connecting a rear view
camera. (P.24)
Ñ Displaying the picture from the rear
view camera
The rear view screen is displayed when you shift the
gear to the reverse (R) position.
• To erase the caution message, touch the screen.
English |
13
Page 14
External Components
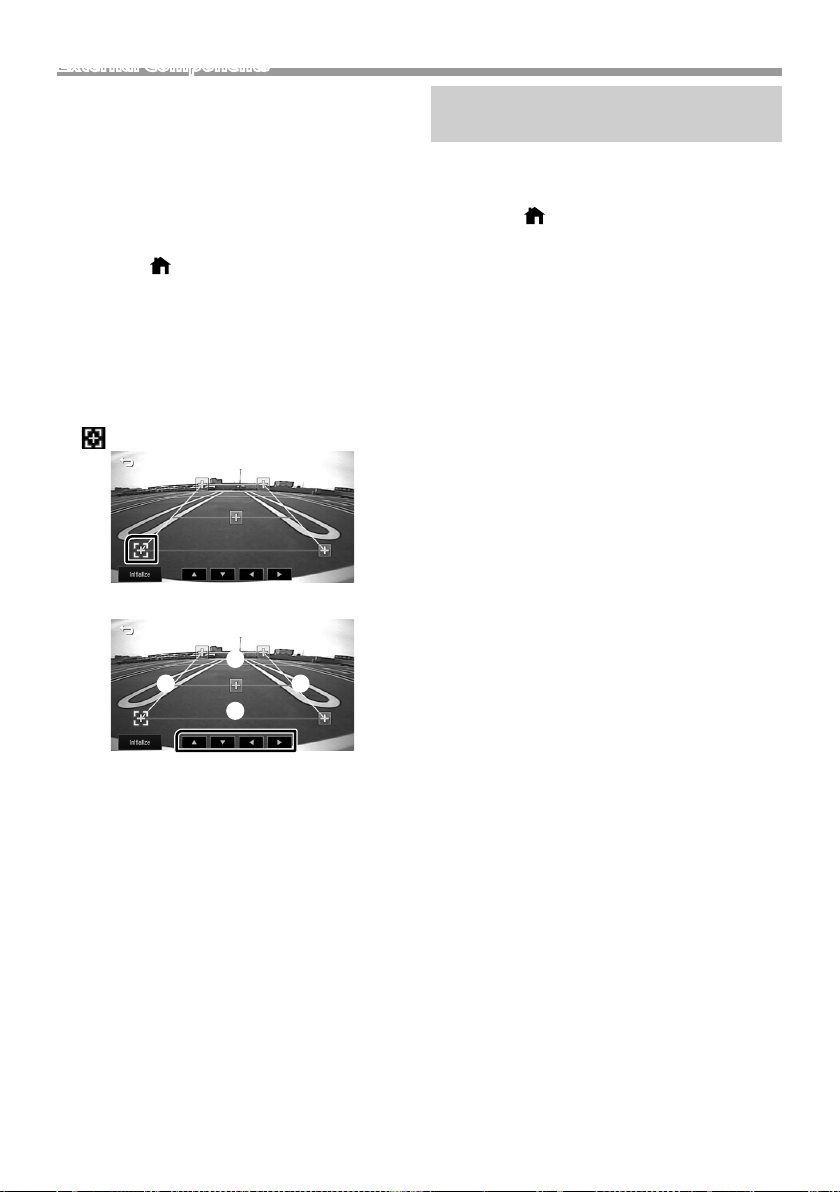
Ñ To adjust the parking guidelines
✎ NOTE
• Install the rear view camera in the appropriate
position according to the instruction manual
supplied with the rear view camera.
• When adjusting the parking guidelines, make sure
to apply the parking brake to prevent the car from
moving.
1 Press the < > button.
2 Touch [Setting].
3 Touch [System].
4 Touch [T] or [U] of [Parking Guidelines] and set
to [ON].
5 Touch [Guidelines SETUP].
6 Adjust the parking guidelines by selecting the
[ ] mark.
7 Adjusting the position of the selected mark.
A
C D
B
Learning function of steering remote
This function is available only when your vehicle
is equipped with the electrical steering remote
controller.
1 Press the < > button.
2 Touch [Setting].
3 Touch [System].
4 Touch [Steering Remote].
5 Touch the function you want to set.
6 Press and hold the steering remote controller
button.
✎ NOTE
• You can have the unit learned all buttons at a time.
In that case, press the all buttons one at a time and
after pressing all of them, touch [6] in Steering
Remote Controller Setting screen.
7 Repeat steps 5 and 6 as necessary.
8 Touch [6].
✎ NOTE
• Touch [Initialize] and then touch [Yes] to set all the
settings to the initial default settings.
Make sure that lines A and B are horizontally
parallel, and that lines C and D are of the same
length.
✎ NOTE
• Touch [Initialize] and then touch [Yes] to set all the
marks to their initial default position.
14
Page 15
Bluetooth
Bluetooth
Ñ About the Bluetooth smartphone and
Bluetooth audio player
This unit conforms to the following Bluetooth
specications:
Version
Bluetooth Ver.4.2
Prole
Smartphone/ Cell-phone:
HFP (V1.6) (Hands Free Profile)
PBAP (Phonebook Access Profile)
Audio player:
A2DP (Advanced Audio Distribution Profile)
AVRCP (V1.5) (Audio/Video Remote Control Profile)
Sound codec
SBC
Ñ About mobile phones compatible with
Phone book Access Prole (PBAP)
If your mobile phone supports PBAP, you can
display the following items on the touch panel
screen when the mobile phone is connected.
• Phone book (up to 1000 entries)
• Dialed calls, received calls, and missed calls (up to 50
entries in total)
Register your smartphone to the unit
You can use your Bluetooth smartphone when
paired to this unit.
You can register up to 8 Bluetooth devices.
• You can pair the device and the unit using SSP
(Secure Simple Pairing) which only requires
confirmation.
• One device can be connected at a time.
• When you register a new Bluetooth device,
disconnect the Bluetooth device currently
connected and then register the new device.
• A new device cannot be registered if there are 8
registered Bluetooth units. Delete unnecessary
registration. (P.15)
1 Turn on the Bluetooth function on your
smartphone/cell-phone.
2 Search the unit (“KW-M150BT”) from your
smartphone/cell-phone.
If a PIN code is required, enter the PIN code
(“0000”).
•
appears when the Bluetooth smartphone is
connected.
Ñ Disconnecting the device
• Turn off the Bluetooth function from your
smartphone/cell-phone.
• Turn off the ignition switch.
Bluetooth Setup
1 Press the < > button.
2 Touch [Setting].
3 Touch [Bluetooth].
4 Touch the corresponding key and set the value.
[Select Device]
Connect the Bluetooth device.
[Phone Auto Answer]
Set the automatic response time to pick-up an
incoming call.
“OFF” (Default) / “ON”
[Device Name]
The Bluetooth device name of this unit is displayed.
[Pin Code]
Displays the PIN code.
[Device address]
Displays the device address.
Ñ Connect the Bluetooth device
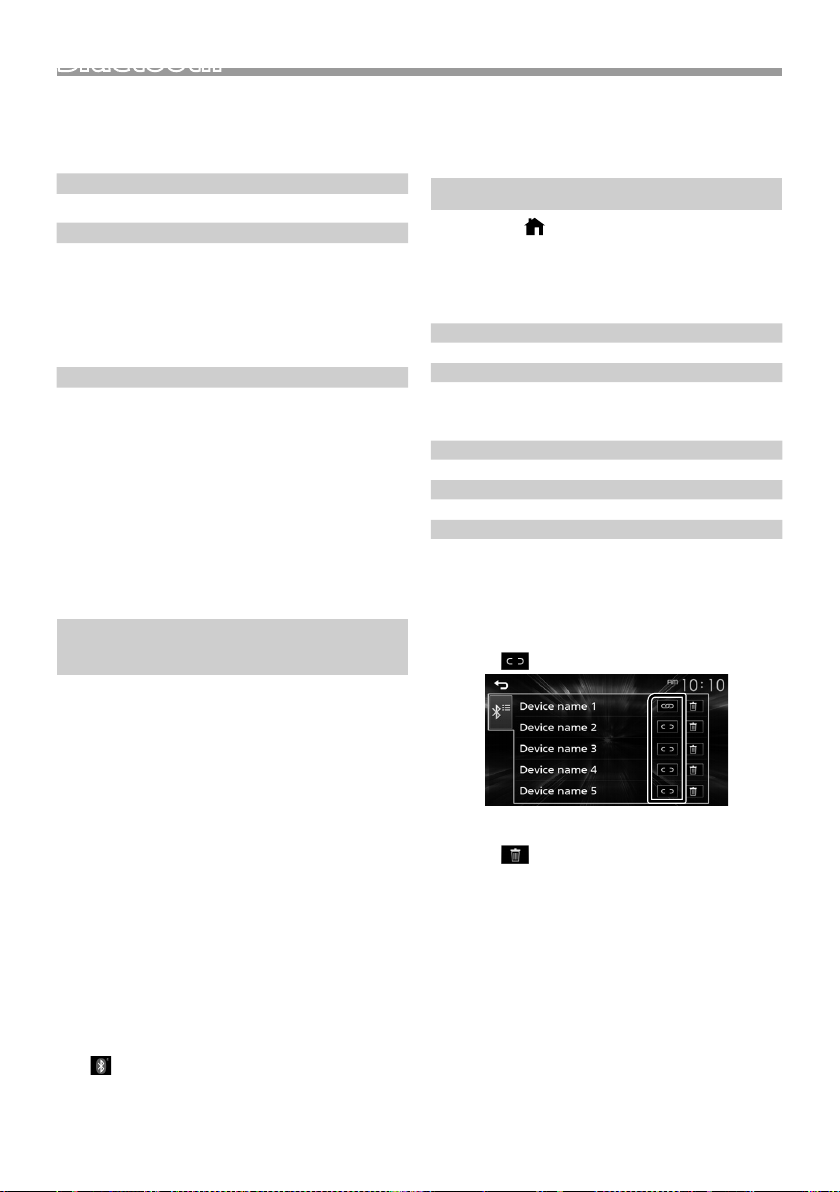
1 Touch [Select Device] on the Bluetooth Setup
screen.
2 Touch [ ] of the device you want to connect.
To delete the registered Bluetooth device
1 Touch [ ] on the Select Device screen.
English |
15
Page 16
Bluetooth
Receive a phone call
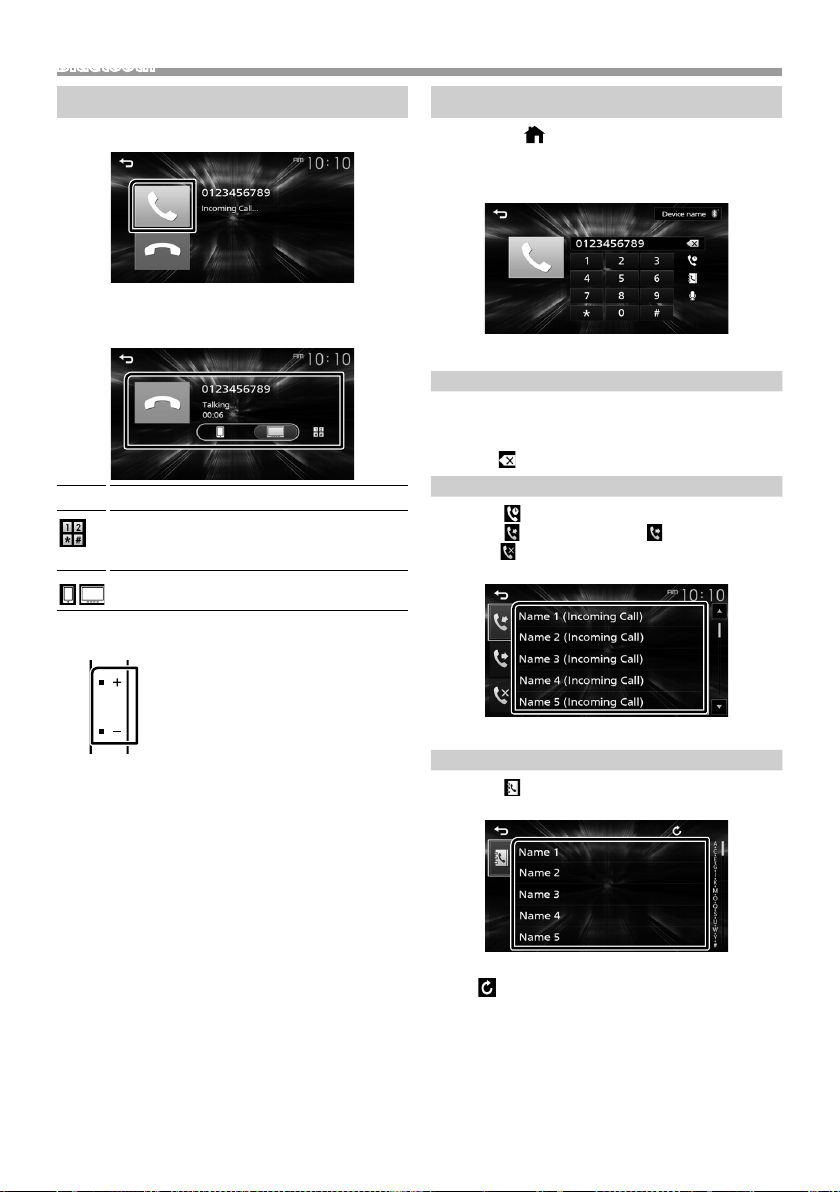
1 Touch [ Û].
• [Ý] : Reject an incoming call.
Ñ Operations during a call
Ending a call
[Ý]
You can send tones by touching desired keys
on the screen.
• Touch [6] to close the window.
Switches the speaking voice output between
smartphone/cell-phone and speaker.
Adjust the receiver volume
Press the <+> or <–> button.
Make a phone call
1 Press the < > button.
2 Touch [Phone].
3 See the table below for each operation method.
Call by entering a phone number
1) Enter a phone number with number keys.
2) Touch [Û].
Make a call
• Touch [
Call using call records
1) Touch [
2) Touch [
Calls), [
3) Select the phone number from the list.
] to delete the last entry.
].
] (Incoming Calls), [ ] (Outgoing
] (Missed Calls).
16
Make a call
Call using the phonebook
1) Touch [
2) Select the name from the list.
Make a call
• [
].
] : Updates the phonebook. Touch this
button after you have made a change
to the phonebook of your smartphone/
cell-phone.
Page 17

Bluetooth
1
432
Call by voice
You can make a voice call using the voice
recognition function of the Bluetooth smartphone.
1) Touch [
2) Say the name registered in the Bluetooth
smartphone.
• Touch [Cancel] to cancel voice dialing.
].
Playing Bluetooth Audio Device
1 Press the < > button.
2 Touch [BT Audio].
Ñ Source control screen
✎ NOTE
• Operations and display indications may differ
according to their availability on the connected
device.
* You can access the voice recognition function
of the Bluetooth smartphone connected to this
unit. (The functionality depends on the Bluetooth
smartphone.)
Ñ Selecting a content in a list
1 Touch [ 1].
2 Touch desired item.
When you touch a category its contents are
displayed.
3 Touch desired item from the content list.
Playback starts.
• Touch [6] to moves to the upper hierarchy.
✎ NOTE
• The source control screen appears when you touch
[6] at the top hierarchy.
Displays the information of the current file.
1
Playing time/File number
2
Play time bar : For confirmation of current playing
position.
3
[
] : Selects Random playback mode.
: Randomly plays all files.
: Random off
[
] : Selects Repeat playback mode.
: Repeats all files.
: Repeats the current file.
: Repeat off
[U], [H] : Plays or pauses.
[E], [F] : Searches the previous/next
content.
Touch and hold to fast forward or fast
backward.
[1] : Searches file. (P.17)
4
[
] : Returns to previous screen.
[
] : Displays the Audio screen. (P.18)
[
] : Displays the Voice Recognition screen.*
English |
17
Page 18

1
2
3
4
Controlling Audio
Controlling Audio
You can adjust various settings such as audio
balance or subwoofer level.
1 Press the <EQ> button.
2 See the below for each operation method.
Equalizer Control
1 Press the <EQ> button.
2 Touch [Equalizer].
3 Set each item as follows.
Controlling General Audio
1 Press the <EQ> button.
2 Touch [Fader / Balance].
3 Set each item as follows.
[Fader Balance]
Balance
[U] [T]
Fader
[R] [S]
[INITIALIZE]
[Listening Position]
[.]
[INITIALIZE]
Adjust the left and right volume
balance.
15 (right) to 15 (left)
Adjust the front and rear volume
balance.
15 (front) to 15 (rear)
To clear the adjustment.
Select a listening position from “Front
Left”, “Front All”, “Front Right”, and
“Middle”.
To clear the adjustment.
You can select frequency bar and adjust its level.
1
(-9 to +9)
• The adjustments are stored.
To recall the preset equalizer curve.
2
Recalls the memorized EQ curve.
3
Initialize the current EQ curve.
4
18
Page 19

Controlling Audio
Speaker / X’Over setup
1 Press the <EQ> button.
2 Touch [Speaker / X’Over].
3 Touch the speaker to set up.
4 Set each item as follows.
Mode
[OFF] , [ON]
Slope
[R] [S]
Frequence
[R] [S]
Level
[R] [S]
Phase
Inversion
[INITIALIZE]
[ON] : Filter adjustment.
[OFF] : Turns off the filter.
Set a crossover slope.
• High Pass Filter adjustment. (When
Front or Rear is selected)
• Low Pass Filter adjustment. (When
Subwoofer is selected)
Adjust the gain of the front speaker,
rear speaker, or subwoofer.
Set the phase of subwoofer output.
[
] to shift the phase 180 degrees.
(When Subwoofer is selected)
To clear the adjustment.
Listening Position / DTA
1 Press the <EQ> button.
2 Touch [Position / DTA].
3 Touch [Delay].
4 Touch [T] or [U] to adjust the delay time of the
selected speaker.
5 Touch [Level].
6 Touch [T] or [U] to adjust the sound level of the
selected speaker.
Sound Eect
1 Press the <EQ> button.
2 Touch [Sound Effect].
3 Set each item as follows.
Bass Boost
[OFF], [1], [2], [3]
Loudness
[OFF] , [ON]
[INITIALIZE]
Set the amount of bass boost
Set the amount of boost of low
and high tones.
To clear the adjustment.
English |
19
Page 20

Remote control
This unit can be operated using the remote control.
The remote control RM-RK258 (optional accessory)
can be used.
Functions of the Remote control Buttons
• Aim the remote control directly at the remote sensor
on the faceplate.
• DO NOT expose the remote sensor to bright light
(direct sunlight or artificial lighting).
SRC
VOL + –
ATT
DISP
FM/R
AM/S
E 2
F 3
ANGLE
Û
DIRECT
ASPECT
Numeric
Keypad
CLR
ENT
20
Switches to the source to be played.
Adjusts the volume.
Mutes/restores the sound
Not used.
Selects the folder to be played.
During tuner source, select FM/ AM band
to be received.
During tuner source, switches to
broadcast stations received by the unit.
Not used.
When a call comes in, answers the call.
Not used.
Not used.
Not used.
Clears the telephone number input on
the Phone screen.
Not used.
Page 21

Installation
Installation
Before Installation
Before installation of this unit, please note the
following precautions.
#WARNINGS
• If you connect the ignition wire (red) and the battery
wire (yellow) to the car chassis (ground), you may
cause a short circuit, that in turn may start a fire.
Always connect those wires to the power source
running through the fuse box.
• Do not cut out the fuse from the ignition wire (red)
and the battery wire (yellow). The power supply
must be connected to the wires via the fuse.
#CAUTION
• Install this unit in the console of your vehicle.
Do not touch the metal part of this unit during and
shortly after the use of the unit. Metal part such as
the heat sink and enclosure become hot.
✎ NOTE
• Mounting and wiring this product requires skills and
experience. For best safety, leave the mounting and
wiring work to professionals.
• Make sure to ground the unit to a negative 12V DC
power supply.
• Do not install the unit in a spot exposed to direct
sunlight or excessive heat or humidity. Also avoid
places with too much dust or the possibility of water
splashing.
• Do not use your own screws. Use only the screws
provided. If you use the wrong screws, you could
damage the unit.
• If your car’s ignition does not have an ACC position,
connect the ignition wires to a power source that
can be turned on and off with the ignition key. If you
connect the ignition wire to a power source with a
constant voltage supply, such as with battery wires,
the battery may be drained.
• If the console has a lid, make sure to install the unit
so that the front panel will not hit the lid when
closing and opening.
• If the fuse blows, first make sure the wires aren’t
touching to cause a short circuit, then replace the
old fuse with one with the same rating.
• Insulate unconnected wires with vinyl tape or other
similar material. To prevent a short circuit, do not
remove the caps on the ends of the unconnected
wires or the terminals.
• Secure the wires with cable clamps and wrap vinyl
tape around the wires that comes into contact with
metal parts to protect the wires and to prevent short
circuit.
• Connect the speaker wires correctly to the terminals
to which they correspond. The unit may be
damaged or fail to work if you share the ¤ wires or
ground them to any metal part in the car.
• When only two speakers are being connected to
the system, connect the connectors either to both
the front output terminals or to both the rear output
terminals (do not mix front and rear). For example,
if you connect the ¢ connector of the left speaker
to a front output terminal, do not connect the ¤
connector to a rear output terminal.
• After the unit is installed, check whether the brake
lamps, blinkers, wipers, etc. on the car are working
properly.
• Mount the unit so that the mounting angle is 30°
or less.
• Do not press hard on the panel surface when installing
the unit to the vehicle. Otherwise scars, damage, or
failure may result.
• Reception may drop if there are metal objects near
the Bluetooth antenna.
Bluetooth antenna unit
English |
21
Page 22

Installation
Ñ Supplied accessories for installation
1
3
5
7
9
(M5 × 6 mm)
(2 m)
x1
x1
x1
x6
x1
2
4
6
8
(3 m)
(M5 × 8 mm)
Ñ Installation procedure
1) To prevent a short circuit, remove the key from
the ignition and disconnect the ¤ terminal of the
battery.
2) Make the proper input and output wire
connections for each unit.
3) Connect the wire on the wiring harness.
4) Take Connector B on the wiring harness and
connect it to the speaker connector in your vehicle.
5) Take Connector A on the wiring harness and
connect it to the external power connector on your
vehicle.
6) Connect the wiring harness connector to the unit.
7) Install the unit in your car.
8) Reconnect the ¤ terminal of the battery.
9) Press the reset button.
Installing the unit
Ñ Non-Japanese cars
x2
x1
Bend the tabs of the
x1
x6
✎ NOTE
• Make sure that the unit is installed securely in place.
If the unit is unstable, it may malfunction (eg, the
sound may skip).
Ñ Japanese cars (North America, South
America sales area only)
7 or 8
Ñ Trim plate
1) Attach accessory 1 to the unit.
mounting sleeve with
a screwdriver or similar
utensil and attach it in
place.
Car Bracket
7 or 8
22
1
Page 23

Installation
Ñ Microphone unit
1) Check the installation position of the microphone
(accessory 4).
2) Clean the installation surface.
3) Remove the separator of the microphone
(accessory 4), and stick the microphone to the
place shown below.
4) Wire the microphone cable up to the unit with it
secured at several positions using tape or other
desired method.
5) Adjust the direction of the microphone (accessory
4) to the driver.
4
Fix a cable with a commercial item of tape.
✎ NOTE
• Swap the clips if necessary.
Ñ Removing the unit
1) Remove the trim plate by referring to step 1 in
“Removing the trim plate”.
2) Insert the extraction key (accessory 2) deeply into
the slot as shown. (The protrusion at the tip of the
extraction key must face toward the unit.)
2
3) With the inserted extraction key secured, insert the
other extraction key into the slot.
2
4) Pull out the unit halfway.
Ñ Removing the trim plate
1) Use the extraction key (accessory 3) to lever out
the four tabs (two on the left part, two on the right
part).
3
2) Pull the trim plate forward.
✎ NOTE
• Be careful to avoid injury from the catch pins on
the extraction key.
5) Pull the unit all the way out with your hands, being
careful not to drop it.
English |
23
Page 24

Installation
Ñ Connecting wires to terminals
Light Blue/ Yellow (Steering remote control wire)
To steering remote
To use the steering wheel remote control feature,
REMOTE
CONT
STEERING
WHEEL
REMOTE
INPUT
you need an exclusive remote adapter (not
supplied) matched to your car.
Light Green (Parking sensor wire)
Accessor y 9: Extension cable
Connect to the vehicle’s
parking brake detection
PRK SW
switch harness.
Purple/White (Reverse sensor wire)
REVERSE
Connect to vehicle’s reverse
lamp harness when using the
optional rear view camera.
Connector A
Connector B
For best safety, be sure to
connect the parking sensor.
M4x6
1 3 5 7
2 4 6 8
1 3 5 7
2 4 6 8
Fuse (15A)
Accessor y 5
Accessor y 6
FRONT OUTREAR OUT
AV IN
CAM IN VIDEO OUT VIDEO IN
Bright Green/Red
ST REMOTE
INPUT 1
Purple/Red
ST REMOTE
INPUT 2
Gray/Red
ST REMOTE
GND
Connect to vehicle’s steering remote
harness.
Contact your JVC dealer for details.
MIC
5V=1.0A
[1]
(0.8 m)
USB terminal
Cap
Subwoofer Preout
SUB
WOOFER
L
R
ANT
FM/AM antenna input
Rear Audio Preout
(Left; White, Right; Red)
FRONT OUTREAR OUT
Front Audio Preout
AV IN
(Left; White, Right; Red)
AV-IN audio input
(Left; White, Right; Red)
VIDEO OUT VIDEO INCAM IN
AV-IN visual input (Yellow)
Accessor y 4:
Bluetooth Microphone
USB device
[2]
Cap
FM/AM
antenna
24
Visual Output (Yellow)
Rear view camera input (Yellow)
[1]
USB maximum power supply current :
DC 5 V = 1.0 A
[2]
Sold separately
Page 25

Installation
Ñ Connecting an iPod/iPhone/Android
M4x6
1 3 5 7
2 4 6 8
1 3 5 7
2 4 6 8
CAM IN VIDEO OUT VIDEO IN
Accessor y 5
Accessor y 6
Speaker impedance: 4-8 Ω
White
White/Black
Gray
Gray/Black
Green
Green/Black
Purple
Purple/Black
Blue
(Power control/ Antenna control wire)
Connect either to the power control
terminal when using the optional power
P.CONT
ANT.CONT
amplifier, or to the power terminal for
the booster amplifier of the film-type or
short pole type antenna.
(Max. 150mA, 12V)
FRONT OUTREAR OUT
AV IN
L
R
ANT
To front left speaker
To front right
speaker
To rear left speaker
To rear right
speaker
Cap
Android smartphone
Micro USB to USB cable
[2]
iPod/iPhone
Lightning connector
KS-U62 (0.8m)
[3]
USB terminal
5V=1.0A
Cap
M4x6
FRONT OUTREAR OUT
CAM IN VIDEO OUT VIDEO IN
[1]
USB maximum power supply current :
DC 5 V = 1.0 A
[2]
Sold separately
[3]
Optional accessory
[1]
(0.8 m)
AV IN
[2]
[2]
L
R
ANT
Red (Ignition wire)
Yellow (Battery wire)
Black (Ground wire) ¤
(To car chassis)
Ignition key switch
ACC
Car fuse box
Battery
English |
25
Page 26

About this Unit
About this Unit
More information
Ñ Playable Audio les
Audio format Bit rate/
MP3 (.mp3) 16 – 320kbps,
WMA (.wma) 16 – 320kbps 16 – 48 kHz
AAC-LC (.m4a, .aac) 16 – 320kbps 16 – 48 kHz
Linear PCM (WAVE)
(.wav)
FLAC (.flac) (16/24 bit) 8 – 192 kHz
Vorbis (.ogg) (16/24 bit) 8 – 192 kHz
• This unit can show ID3 Tag Version 1.0/1.1/2.2/2.3/2.4
(for MP3).
• The maximum number of characters:
– Tag : 70 characters
(Bit count)
VBR
(16/24 b it) 8 – 192 kHz
Sampling
frequency
16 – 48 kHz
✎ NOTE
• WMA and AAC of which is covered with DRM cannot
be played.
• Although the audio files are complied with the
standards listed above, the play may be impossible
depending on the types or conditions of media or
device.
Ñ Acceptable Video les
Video
format
MPEG -1
(.mpg, .mpeg)
MPEG -2
(.mpg, .mpeg)
MPEG-4
(.mp4, .avi)
H.264/MPEG4 AVC (.mp4,
mkv, avi, .flv,
.f4v, .ts)
MKV (.mkv) Video Format
Video codec Audio codec
MPEG -1 MPEG Audio Layer 2
MPEG -2 MPEG Audio Layer 2
MPEG-4
(SP,ASP)
H.264/MPG-4
AVC
(BP/MP/ HP)
follows H.264/
MPEG-4 AVC,
MPEG4, XVID
MP3, AAC-LC (2ch)
MP3, AAC (2ch)
MP3, AAC, Vorbis,
FLAC
Troubleshooting
What appears to be trouble is not always serious.
Check the following points before calling a service
center.
• For operations with the external components, refer
also to the instructions supplied with the adapters
used for the connections (as well as the instructions
supplied with the external components).
Ñ General
No sound comes out of the speakers.
• Adjust the volume to the optimum level.
• Check the cords and connections.
The unit does not work at all.
• Reset the unit. (P. 2)
The remote controller does not work.
• Replace the battery.
Ñ USB
While playing a track, sound is sometimes
interrupted.
• The tracks are not properly copied into the USB
device. Copy the tracks again, and try again.
Ñ iPod/iPhone
No sound comes out of the speakers.
• Disconnect the iPod/iPhone, then connect it again.
• Select another source, then reselect “iPod”.
The iPod/iPhone does not turn on or does not
work.
• Check the connecting cable and its connection.
• Update the firmware version of iPod/iPhone.
• Charge the battery of iPod/iPhone.
• Reset the iPod/iPhone.
Sound is distorted.
• Deactivate the equalizer either on this unit or the
iPod/iPhone.
A lot of noise is generated.
• Turn off (uncheck) “VoiceOver” on the iPod/iPhone.
For details, visit <http://www.apple.com>.
Ñ Tuner
Automatic presetting does not work.
• Store stations manually. (P. 6)
Static noise while listening to the radio.
• Connect the antenna firmly.
26
Page 27

About this Unit
Ñ AV-IN
No picture appears on the screen.
• Turn on the video component if it is not on.
• Connect the video component correctly.
Ñ Bluetooth
Phone sound quality is poor.
• Reduce the distance between the unit and the
Bluetooth mobile phone.
• Move the car to a place where you can get a better
signal reception.
The sound is interrupted or skipped while using
a Bluetooth audio player.
• Reduce the distance between the unit and the
Bluetooth audio player.
• Turn off, then turn on the unit. (When the sound is
not yet restored) connect the player again.
The connected audio player cannot be
controlled.
• Check whether the connected audio player supports
AVRCP (Audio/Video Remote Control Profile).
The Bluetooth device does not detect the unit.
• Search from the Bluetooth device again.
The unit does not pair with the Bluetooth
device.
• Turn off, then turn on the Bluetooth device.
• Disconnect the Bluetooth device currently
connected and then register the new device.
(P.15)
Copyrights
• The Bluetooth word mark and logos are registered
trademarks owned by the Bluetooth SIG, Inc. and any
use of such marks by JVC KENWOOD Corporation is
under license. Other trademarks and trade names are
those of their respective owners.
• Use of the Made for Apple badge means that an
accessory has been designed to connect specifically
to the Apple product(s) identified in the badge, and
has been certified by the developer to meet Apple
performance standards. Apple is not responsible for
the operation of this device or its compliance with
safety and regulatory standards. Please note that the
use of this accessory with an Apple product may affect
wireless performance.
• Apple, iPhone, iPod, iPod touch, and Lightning are
trademarks of Apple Inc., registered in the U.S. and
other countries.
• Microsoft and Windows Media are either registered
trademarks or trademarks of Microsoft Corporation in
the United States and/or other countries.
• THIS PRODUCT IS LICENSED UNDER THE MPEG-4 VISUAL
PATENT PORTFOLIO LICENSE FOR THE PERSONAL
AND NON-COMMERCIAL USE OF A CONSUMER FOR (¡)
ENCODING VIDEO IN COMPLIANCE WITH THE MPEG4 VISUAL STANDARD (“MPEG-4 VIDEO”) AND/OR (¡¡)
DECODING MPEG-4 VIDEO THAT WAS ENCODED BY
A CONSUMER ENGAGED IN A PERSONAL AND NONCOMMERCIAL ACTIVITY AND/OR WAS OBTAINED
FROM A VIDEO PROVIDER LICENSED BY MPEG LA TO
PROVIDE MPEG-4 VIDEO. NO LICENSE IS GRANTED OR
SHALL BE IMPLIED FOR ANY OTHER USE. ADDITIONAL
INFORMATION INCLUDING THAT RELATING TO
PROMOTIONAL, INTERNAL AND COMMERCIAL USES
AND LICENSING MAY BE OBTAINED FROM MPEG LA, LLC.
SEE HTTP://WWW.MPEGLA.COM.
• THIS PRODUCT IS LICENSED UNDER THE AVC PATENT
PORTFOLIO LICENSE FOR THE PERSONAL USE OF A
CONSUMER OR OTHER USES IN WHICH IT DOES NOT
RECEIVE REMUNERATION TO (¡)ENCODE VIDEO IN
COMPLIANCE WITH THE AVC STANDARD (“AVC VIDEO”)
AND/OR (¡¡)DECODE AVC VIDEO THAT WAS ENCODED BY
A CONSUMER ENGAGED IN A PERSONAL ACTIVITY AND/
OR WAS OBTAINED FROM A VIDEO PROVIDER LICENSED
TO PROVIDE AVC VIDEO. NO LICENSE IS GRANTED OR
SHALL BE IMPLIED FOR ANY OTHER USE. ADDITIONAL
INFORMATION MAY BE OBTAINED FROM MPEG LA, L.L.C.
SEE HTTP://WWW.MPEGLA.COM
• libFLAC
Copyright (C) 2000-2009 Josh Coalson
Copyright (C) 2011-2013 Xiph.Org Foundation
– Redistribution and use in source and binary forms,
with or without modification, are permitted provided
that the following conditions are met:
– Redistributions of source code must retain the above
copyright notice, this list of conditions and the
following disclaimer.
English |
27
Page 28

About this Unit
– Redistributions in binary form must reproduce the
above copyright notice, this list of conditions and the
following disclaimer in the documentation and/or
other materials provided with the distribution.
Neither the name of the Xiph.org Foundation nor the
names of its contributors may be used to endorse or
promote products derived from this software without
specific prior written permission.
THIS SOFTWARE IS PROVIDED BY THE COPYRIGHT
HOLDERS AND CONTRIBUTORS ``AS IS’’ AND ANY
EXPRESS OR IMPLIED WARRANTIES, INCLUDING,
BUT NOT LIMITED TO, THE IMPLIED WARRANTIES OF
MERCHANTABILITY AND FITNESS FOR A PARTICULAR
PURPOSE ARE DISCLAIMED. IN NO EVENT SHALL THE
FOUNDATION OR CONTRIBUTORS BE LIABLE FOR ANY
DIRECT, INDIRECT, INCIDENTAL, SPECIAL, EXEMPLARY,
OR CONSEQUENTIAL DAMAGES (INCLUDING, BUT NOT
LIMITED TO, PROCUREMENT OF SUBSTITUTE GOODS
OR SERVICES; LOSS OF USE, DATA, OR PROFITS; OR
BUSINESS INTERRUPTION) HOWEVER CAUSED AND ON
ANY THEORY OF LIABILITY, WHETHER IN CONTRACT,
STRICT LIABILITY, OR TORT (INCLUDING NEGLIGENCE OR
OTHERWISE) ARISING IN ANY WAY OUT OF THE USE OF
THIS SOFTWARE, EVEN IF ADVISED OF THE POSSIBILITY
OF SUCH DAMAGE.
• libogg
Copyright (c) 2002, Xiph.org Foundation Redistribution
and use in source and binary forms, with or without
modification, are permitted provided that the following
conditions are met:
– Redistributions of source code must retain the above
copyright notice, this list of conditions and the
following disclaimer.
– Redistributions in binary form must reproduce the
above copyright notice, this list of conditions and the
following disclaimer in the documentation and/or
other materials provided with the distribution.
– Neither the name of the Xiph.org Foundation nor the
names of its contributors may be used to endorse or
promote products derived from this software without
specific prior written permission.
THIS SOFTWARE IS PROVIDED BY THE COPYRIGHT
HOLDERS AND CONTRIBUTORS ``AS IS’’ AND ANY
EXPRESS OR IMPLIED WARRANTIES, INCLUDING,
BUT NOT LIMITED TO, THE IMPLIED WARRANTIES OF
MERCHANTABILITY AND FITNESS FOR A PARTICULAR
PURPOSE ARE DISCLAIMED. IN NO EVENT SHALL THE
FOUNDATION OR CONTRIBUTORS BE LIABLE FOR ANY
DIRECT, INDIRECT, INCIDENTAL, SPECIAL, EXEMPLARY,
OR CONSEQUENTIAL DAMAGES (INCLUDING, BUT NOT
LIMITED TO, PROCUREMENT OF SUBSTITUTE GOODS
OR SERVICES; LOSS OF USE, DATA, OR PROFITS; OR
BUSINESS INTERRUPTION) HOWEVER CAUSED AND ON
ANY THEORY OF LIABILITY, WHETHER IN CONTRACT,
STRICT LIABILITY, OR TORT (INCLUDING NEGLIGENCE OR
OTHERWISE) ARISING IN ANY WAY OUT OF THE USE OF
THIS SOFTWARE, EVEN IF ADVISED OF THE POSSIBILITY
OF SUCH DAMAGE.
28
Specications
Ñ Monitor section
Picture Size
: 6.75 inches (diagonal) wide
: 151.8 mm (W) × 79.7 mm (H)
5-15/16 × 3-1/8 inch
Display System
: Transparent TN LCD panel
Drive System
: TFT active matrix system
Number of Pixels
: 1,152,000 (800H x 480V x RGB)
Eective Pixels
: 99.99 %
Pixel Arrangement
: RGB striped arrangement
Back Lighting
: LED
Ñ USB interface section
USB Standard
: USB 2.0 High Speed
Compatible Devices
: Mass storage class
File System
: FAT 16/ 32 / NTFS
Maximum Power Supply Current
: DC 5 V
D/A Converter
: 24 Bit
Audio Decoder
: MP3/ WMA/ WAV/ AAC/ FLAC
Video Decoder
: MPEG1/ MPEG2/ MPEG4/ H.264/ MKV
Frequency Response
• 96 kHz : 20 – 20,000 Hz
• 48 kHz : 20 – 20,000 Hz
• 44.1 kHz : 20 – 20,000 Hz
NOTE
• Although the effective pixels for the liquid crystal
panel is given as 99.99% or more, 0.01% of pixels
may not light or may light incorrectly.
• Specifications subject to change without notice.
1 A
Page 29

About this Unit
Ñ Bluetooth section
Technolog y
: Bluetooth Ver.4.2
Frequency
: 2.402 – 2.480 GHz
Output Power
: +8 dBm (AVE), Power Class1
Maximum Communication range
: Line of sight approx. 10m (32.8 ft)
Audio Codec
: SBC
Prole (Multi Prole support)
• HFP (V1.6) (Hands Free Profile)
• A2DP (Advanced Audio Distribution Profile)
• AVRCP (V1.5) (Audio/Video Remote Control Profile)
• PBAP (Phonebook Access Profile)
• SPP (Serial Port Profile)
Ñ FM tuner section
Frequency Range (step)
: 87.9 MHz – 107.9 MHz (200 kHz)
Usable Sensitivity
: 16.2 dBf
: 1.8 μV/75 Ω (S/N : 30 dB)
Frequency Response
: 30 Hz – 14 kHz
S/N Ratio (dB)
: 50 dB (MONO)
Stereo Separation
: 35 dB (1 kHz)
Ñ AM tuner section
Frequency Range (step)
: 530 – 1700 kHz (10 kHz)
Usable Sensitivity
: 99 μV (40 dBμ)
Ñ Video section
Color System of External Video Input
: N TSC /PAL
External Video Input Level (RCA jacks)
: 1 Vp-p/ 75 Ω
External Video Input Level (RCA jacks, AV-IN)
: 1 Vp-p/ 75 Ω
External Audio Max Input Level (RCA jacks, AV-IN)
: 1.5 V/ 25 kΩ
Video Output Level (RCA jacks)
: 1 Vp-p/ 75 Ω
Ñ Audio section
Maximum Power (Front & Rear)
: 45 W × 4
Full Bandwidth Power (Front & Rear)
Full Bandwidth Power (at less than 1% THD)
: 16 W × 4
Preout Level (V)
: 2 V/ 10 kΩ
Preout Impedance
: 1.4 kΩ
Speaker Impedance
: 4 – 8 Ω
Equalizer
: 13 Band
Band
Frequency: 62.5/100/160/250/400/630/1k/1.6k/2.5k/
4k/6.3k/10k/16k Hz
Level: -9 – +9
HPF
Frequency: Through / 30/40/50/60/70/80/90/100/
120/150/180/220/250 Hz /
Slope: -6/-12/-18/-24 dB/Oct.
Gain: -8/-7/-6/-5/-4/-3/-2/-1/0 dB
LPF
Frequency: 30/40/50/60/70/80/90/100/120/150/180/
220/250 Hz / through
Slope: -6/-12/-18/-24 dB/Oct.
Gain: -8/-7/-6/-5/-4/-3/-2/-1/0 dB
Ñ General
Operating Voltage
: 12V DC car battery
Installation Dimensions (W × H × D)
: 182 × 112 × 75 mm
7-3/16 × 4-7/16 × 2-15/16 inch
Main Unit Installation size (W × H × D)
: 178 × 100 × 75 mm (w/o sleeve)
7-1/16 × 3-15/16 × 2-15/16 inch
Weight
: 1.2 kg (2.7 lbs)
(Including Sleeve and Trim plate)
English |
29
Page 30

About this Unit
For USA
Ñ FCC WARNING
This equipment may generate or use radio
frequency energy. Changes or modifications to this
equipment may cause harmful interference unless
the modifications are expressly approved in the
instruction manual. The user could lose the authority
to operate this equipment if an unauthorized change
or modification is made.
NOTE
• This equipment has been tested and found to
comply with the limits for a Class B digital device,
pursuant to Part 15 of the FCC Rules. These limits are
designed to provide reasonable protection against
harmful interference in a residential installation.
• This equipment may cause harmful interference to
radio communications, if it is not installed and used
in accordance with the instructions. However, there
is no guarantee that interference will not occur in a
particular installation. If this equipment does cause
harmful interference to radio or television reception,
which can be determined by turning the equipment
off and on, the user is encouraged to try to correct
the interference by one or more of the following
measures:
– Reorient or relocate the receiving antenna.
– Increase the separation between the equipment
and receiver.
– Connect the equipment into an outlet on a
circuit different from that to which the receiver is
connected.
– Consult the dealer or an experienced radio/TV
technician for help.
This transmitter must not be co-located or operated in
conjunction with any other antenna or transmitter.
For Canada
Ñ IC (Industry Canada) Notice
This device complies with Industry Canada licenceexempt RSS standard(s).
Operation is subject to the following two conditions:
(1) This device may not cause interference, and
(2) this device must accept any interference, including
interference that may cause undesired operation of
the device.
! CAUTION
This equipment complies with FCC/IC radiation
exposure limits set forth for an uncontrolled
environment and meets the FCC radio frequency
(RF) Exposure Guidelines and RSS-102 of the IC radio
frequency (RF) Exposure rules. This equipment has
very low levels of RF energy that is deemed to comply
without maximum permissive exposure evaluation
(MPE). But it is desirable that it should be installed and
operated keeping the radiator at least 20 cm or more
away from person’s body.
Supplier’s Declaration of Conformity
Trade Name: JVC
Products: DIGITAL MEDIA RECEIVER
Model Name: KW-M150BT
Responsible Party: JVCKENWOOD USA
CORPORATION
2201 East Dominguez Street,
Long Beach, CA 90810, U.S.A.
PHONE: 310 639-9000
THIS DEVICE COMPLIES WITH PART 15 OF THE FCC
RULES. OPERATION IS SUBJECT TO THE FOLLOWING
TWO CONDITIONS:
(1) THIS DEVICE MAY NOT CAUSE HARMFUL
INTERFERENCE, AND
(2) THIS DEVICE MUST ACCEPT ANY INTERFERENCE
RECEIVED, INCLUDING INTERFERENCE THAT MAY
CAUSE UNDESIRED OPERATION.
30
• Contains Transmitter Module
Contient un module émetteur
FCC ID: 2AB7S-YK5128K01
• Contains Transmitter Module
Contient un module émetteur
IC: 11888A-YK5128K01
Page 31

About this Unit
For Argentina
Ñ Información acerca de la eliminación
de equipos eléctricos y electrónicos
al nal de la vida útil (aplicable a los
países que hayan adoptado sistemas
independientes de recogida de residuos)
Los productos con el símbolo de un contenedor
con ruedas tachado no podrán ser desechados
como residuos domésticos.
Los equipos eléctricos y electrónicos al final de la
vida útil, deberán ser reciclados en instalaciones
que puedan dar el tratamiento adecuado a
estos productos y a sus subproductos residuales
correspondientes. Póngase en contacto con su
administración local para obtener información sobre
el punto de recogida más cercano. Un tratamiento
correcto del reciclaje y la eliminación de residuos
ayuda a conservar los recursos y evita al mismo
tiempo efectos perjudiciales en la salud y el medio
ambiente.
For Mexico
Ñ Para cumplimiento de la IFT:
La operación de este equipo esta sujeta a las
siguientes dos condiciones:
(1) es posible que este equipo o dispositivo no cause
interferencia perjudicial y
(2) este equipo o dispositivo debe aceptar cualquier
interferencia,
incluyendo la que pueda causar su operación no
deseada.
English |
31
Page 32

Page 33

KW-M150BT
MONITOR WITH RECEIVER
Quick Start Guide
ÉCRAN AVEC RÉCEPTEUR
Guide de démarrage rapide
MONITOR CON RECEPTOR
Guía de inicio rápido
• For detailed operations and information, refer to the INSTRUCTION MANUAL
on the following website:
• Pour plus d’informations et de détails sur les opérations, reportez-vous au
MODE D’EMPLOI sur le site Internet suivant :
• Para obtener información y detalles sobre las operaciones, consulte el
MANUAL DE INSTRUCCIONES en el siguiente sitio web:
<http://www.jvc.net/cs/car/>
Model name indication position
See “Removing the trim plate” (P.13)
Position d’indication du nom du modèle
Reportez-vous à la section «Retrait de la
plaque de garniture» ( P.29)
Trim plate
Plaque de garniture
Marco
Posición de la indicación del nombre del
modelo
Consulte “Retirada del marco” (P.45)
B5K-0672-10 b (K)© 2019 JVC KENWOOD Corporation
Page 34

Contents
Before use .................................................................................2
How to read this manual ................................................................................... 2
Precautions ................................................................................................................ 2
Getting Started ....................................................................... 3
Clock settings ........................................................................................................... 3
Basics .......................................................................................... 4
Functions of the Buttons on the Front Panel ...................................... 4
Common operations ...........................................................................................4
HOME screen ............................................................................................................ 4
Source control screen ......................................................................................... 4
Tuner ........................................................................................... 5
Tuner Basic Operation......................................................................................... 5
Presetting stations ................................................................................................ 5
Tuner Setup ................................................................................................................5
USB .............................................................................................. 6
Preparation ................................................................................................................. 6
Playback operations .............................................................................................6
iPod/iPhone ............................................................................. 7
Preparation ................................................................................................................. 7
Playback operations .............................................................................................7
External Components .......................................................... 8
Using external audio/video players ........................................................... 8
Rear view camera ................................................................................................... 8
Bluetooth .................................................................................. 9
Register your smartphone to the unit ..................................................... 9
Receive a phone call ............................................................................................ 9
Make a phone call .................................................................................................. 9
Controlling Audio ................................................................ 10
Controlling General Audio ............................................................................. 10
Playing Bluetooth Audio Device ................................................................10
Installation .............................................................................. 11
Before Installation ................................................................................................11
Installing the unit .................................................................................................12
About this Unit ...................................................................... 16
More information ................................................................................................. 16
Note for specifications ......................................................................................16
Copyrights ................................................................................................................17
Before use
Precautions
#WARNING
Ñ To prevent injury or re, take the
following precautions:
• To prevent a short circuit, never put or leave any
metallic objects (such as coins or metal tools)
inside the unit.
• Do not watch or fix your eyes on the unit’s display
when you are driving for any extended period.
• If you experience problems during installation,
consult your JVC dealer.
Ñ Precautions on using this unit
• When you purchase optional accessories, check
with your JVC dealer to make sure that they work
with your model and in your area.
• The Radio Data System or Radio Broadcast Data
System feature won’t work where the service is
not supported by any broadcasting station.
Ñ Protecting the monitor
• To protect the monitor from damage, do not
operate the monitor using a ballpoint pen or
similar tool with the sharp tip.
Ñ Cleaning the Unit
If the front panel of this unit is stained, wipe it with
a dry soft cloth such as a silicon cloth. If the front
panel is stained badly, wipe the stain off with a
cloth moistened with neutral cleaner, then wipe it
again with a clean soft dry cloth.
! CAUTION
• Applaying spray cleaner directly to the unit may
affect its mechanical parts. Wiping the front panel
with a hard cloth or using a volatile liquid such as
thinner or alcohol may scratch the surface or erase
screened print.
Ñ How to reset your unit
If the unit or the connected unit fails to operate
properly, reset the unit.
How to read this manual
• The panels shown in this guide are examples used to
provide clear explanations of the operations. For this
reason, they may be different from the actual panels.
• In operation procedures, bracket shape indicates the
key or button you should control.
< >: indicates the name of panel buttons.
[ ]: indicates the name of touch keys
2
Reset button
Page 35

Getting Started
1 Turn the ignition key of your car to ACC.
The unit is turned on.
2 Press the < > button.
3 Touch [Setting].
[Bluetooth]
Displays the Bluetooth Settings screen.
[Screen]
[Dimmer]
Select the dimmer mode.
“High” (Default) / “Mid” / “Low”
[Demo]
Select the demonstration mode. Default is “ON”.
5 Touch [6].
Clock settings
4 Touch the corresponding key and set the value.
[System]
[Beep Tone]
Activates or deactivates the key-touch tone.
“ON” (Default), “OFF”
[Language]
Select the language used for the control screen
and setting items. Default is “English”.
[Time/Date]
Adjust the clock time. ( P.3)
[Clock Mode]
Select the time display format.
[12hr] (Default) / [24hr]
[Steering Remote]
Sets the desired function in the steering remote
controller.
[Parking Guidelines]
You can display parking guidelines to enable
easier parking when you shift the gear to the
reverse (R) position. Default is “ON”.
[Guidelines SETUP]
If you select [ON] for [Parking Guidelines], you can
adjust the parking guidelines.
[System Reset]
Touch [System Reset] and then touch [YES] to set
all the settings to the initial default settings.
Ñ Synchronizing the clock time with FM
RDS
Activate [RDS Clock Sync].
See Tuner Setup (P.5).
Ñ Adjusting the clock manually
✎ NOTE
• Deactivate [RDS Clock Sync] before adjusting the
clock.
1 Press the < > button.
2 Touch [Setting].
3 Touch [System].
4 Touch [Time/Date].
Clock screen appears.
5 Touch [R] or [S] to set the clock time.
6 Touch [6].
English |
3
Page 36

BasicsBasics
2
5
3
647
1
1
Functions of the Buttons on the Front Panel
1
2
3
4
5
6
Remote Sensor
1
• Receives the remote control signal.
(HOME)
2
• Displays the HOME screen. (P. 4)
• Pressing for 1 second turns the power off.
• When the power off, turns the power on.
EQ
3
• Displays the Audio screen.* (P.10)
* The Audio screen is not displayed during SETUP
screen or on the list screen etc,
+ , – (Volume)
4
• Adjusts volume. The volume will go up until 20
when you keep pressing [ + ].
(MUTE, Display o)
5
• Mutes/restores the sound.
• Pressing for 1 second turns the screen off.
When the screen is off, touch the display to turn
on the screen.
Reset
6
• If the unit or the connected unit fails to operate
properly, the unit returns to factory settings
when this button is pressed.
HOME screen
1 Press the < > button.
HOME screen appears.
Clock display
1
Switches to the Tuner broadcast. (P.5)
2
3
[USB]
Plays files on a USB device. (P.6)
[iPod]
Plays an iPod/iPhone. (P.7)
• When iPod/iPhone is connected.
[Mirroring]
Displays the Mirroring screen.
• When android device with “Mirroring OB for JVC”
application installed is connected.
Switches to an external component connected to
4
the AV-IN input terminal. (P. 8)
Displays the Hands Free screen. (P.9)
5
Plays a Bluetooth audio player. (P.10)
6
Displays the SETUP screen. (P. 3)
7
Source control screen
Common operations
Ñ Turning on the power
1 Press the < > button.
Ñ Turning o the power
1 Press and hold the < > button.
4
1
] : Returns to previous screen.
[
] : Displays the Audio screen. (P.10)
[
Page 37

Tuner
213
Tuner
Tuner Basic Operation
1 Press the < > button.
2 Touch [Tuner].
Ñ Source control screen
Displays the information of the current station:
1
PS name, Frequency, PTY Genre, Indicator Items
[FM] : Switches the FM band.
2
“FM1”, “FM2”, “FM3”
[AM] : Switches the AM band.
“AM1”, “AM2”
[E] [F] : Tunes in a station with good
reception automatically.
[
] : Displays the Tuner Setup screen. (P.5)
Recalls the memorized station.
3
When touched for 2 seconds, stores the current
receiving station in memory.
Presetting stations
Ñ Auto memory
You can preset 6 stations for the current band (FM1/
FM2 /FM3/AM1/AM2).
1 Touch [FM] or [AM] to select the band.
2 Touch [ ].
3 Touch [Auto Store].
The local stations with the strongest signals are
found and stored automatically.
Ñ Manual memory
You can store the current receiving station in
memory.
1 Tune in to a station you want to preset.
2 Touch and hold [#] (#:1-6) in which you want to
store the station.
Ñ Recalling the preset station
1 Touch [#] (#:1-6).
Tuner Setup
1 Touch [ ].
2 Set each item as follows.
[Auto Store]
Automatically searches and stores the 6 stations with
the strongest signals for the selected band.
“Auto Store” appears.
[Area]
“N.America” (Default): For North/Central/South
America, AM/FM intervals: 10 kHz/200 kHz.
“S.America”: For some South American countries,
AM/FM intervals: 10 kHz/50 kHz.
“Europe”: For Europe, AM/FM intervals: 9 kHz/50
kHz.
[Local Seek]
Tunes in only to the stations with sufficient signal
strength. (LOC indicator lights up.)
“ON”, “OFF” (Default)
[RDS Clock Sync] *
Synchronizing the Radio Data System station time
data and this unit’s clock.
“ON” (Default), “OFF”
2 *3
[RDS] *
Displays the RDS Settings screen.
*1 To use the function, it is necessary to set [Area] to
[N.America]/[S.America].
*2 To use the function, it is necessary to set [Area]
to [Europe].
*3 FM only
1 *3
3 Touch [6].
English |
5
Page 38

USB
1
4
3
2
6
7
USB
Preparation
Ñ Connecting a USB device
1 Remove the cap of the USB terminal.
2 Connect the USB device with the USB cable.
The unit reads the device and playback starts.
Ñ To disconnect the USB device:
1 Press the < > button.
2 Touch a source other than [USB].
3 Detach the USB device.
Ñ Usable USB device
This unit can play MPEG1/ MPEG2/ MPEG4/ H.264/
MKV/ MP3/WMA/ AAC/ WAV/ FLAC/ OGG les stored
in a USB mass storage class device.
Playback operations
Ñ Control the music you are listening to on
the source control screen.
The jacket of the currently playing file is displayed.
1
Displays the information of the current file.
2
Playing time/File number
3
Play time bar : For confirmation of current playing
position.
4
[
] : Selects Random playback mode.
] : Selects Repeat playback mode.
[
[U], [H] : Plays or pauses.
[E], [F] : Searches the previous/next
content.
Touch and hold to fast forward or fast
backward.
[1] : Searches file. (P.6)
Ñ For Video playback
1 When the operation buttons are not displayed
on the screen, touch the display.
[
] : You can adjust image quality in video
6
screen.
[INITIALIZE] : To clear the adjustment.
[U], [H] : Plays or pauses.
7
[E], [F] : Searches the previous/next
content.
Touch and hold to fast forward or fast
backward.
[1] : Searches file. (P.6)
[NORMAL]/[16: 9]/[4:3] : Select a screen mode.
Ñ Selecting a track in a list (Searches le)
1 Touch [ 1].
2 Select whether you search by audio files [ ],
video files [ ].
3 Touch [ ] to moves to the upper hierarchy.
4 Touch the desired folder.
When you touch a folder its contents are displayed.
• Touch [6] to moves to the upper hierarchy.
5 Touch desired item from the content list.
Playback starts.
✎ NOTE
• The source control screen appears when you touch
[6] at the top hierarchy.
6
Page 39

iPod/iPhone
1
4
3
2
iPod/iPhone
Preparation
Ñ Connecting iPod/iPhone
• For Lightning connector models: Use USB
Audio cable for iPod/iPhone—KS-U62 (optional
accessory).
• For details about connecting iPod/iPhone, see
page 15 .
1 Remove the cap of the USB terminal.
2 Connect the iPod/iPhone.
The unit reads the device and playback starts.
Ñ To disconnect the iPod/iPhone
1 Press the < > button.
2 Touch a source other than [iPod].
3 Detach the iPod/iPhone.
Ñ Connectable iPod/iPhone
The following models can be connected to this unit.
Made for
• iPhone XS Max
• iPhone XS
• iPhone XR
• iPhone X
• iPhone 8 Plus
• iPhone 8
• iPhone 7 Plus
• iPhone 7
• iPhone SE
• iPhone 6s Plus
• iPhone 6s
• iPhone 6 Plus
• iPhone 6
• iPhone 5s
✎ NOTE
• If you start playback after connecting the iPod, the
music that has been played by the iPod is played
first.
• Cap the USB terminal whenever not using.
Playback operations
Ñ Control the music you are listening to on
the source control screen.
Artwork (Shown if the track contains artwork)
1
Displays the information of the current file.
2
Playing time/File number
3
Play time bar : For confirmation of current playing
position.
4
[
] : Selects Random playback mode.
] : Selects Repeat playback mode.
[
[U], [H] : Plays or pauses.
[E], [F] : Searches the previous/next
content.
Touch and hold to fast forward or fast
backward.
[1] : Searches content. ( P.7)
Ñ Selecting a content in a list
1 Touch [ 1].
2 Touch desired item.
When you touch a category its contents are
displayed.
3 Touch desired item from the content list.
Playback starts.
• Touch [6] to moves to the upper hierarchy.
✎ NOTE
• The source control screen appears when you touch
[6] at the top hierarchy.
English |
7
Page 40

External ComponentsExternal Components
1
Using external audio/video players
Ñ Starting playback
1 Connect an external component to the AV-IN
input terminal. (P.14)
2 Press the < > button.
3 Touch [AV- IN].
4 Turn on the connected component and start
playing the source.
Ñ For Video playback
1 When the operation buttons are not displayed
on the screen, touch the display.
Rear view camera
To use a rear view camera, the REVERSE lead
connection is required. For connecting a rear view
camera. (P.14)
Ñ Displaying the picture from the rear
view camera
The rear view screen is displayed when you shift the
gear to the reverse (R) position.
• To erase the caution message, touch the screen.
8
Page 41

Bluetooth
Bluetooth
Register your smartphone to the unit
You can use your Bluetooth smartphone when
paired to this unit.
1 Turn on the Bluetooth function on your
smartphone/cell-phone.
2 Search the unit (“KW-M150BT”) from your
smartphone/cell-phone.
If a PIN code is required, enter the PIN code
(“0000”).
•
appears when the Bluetooth smartphone is
connected.
Ñ Disconnecting the device
• Turn off the Bluetooth function from your
smartphone/cell-phone.
• Turn off the ignition switch.
Receive a phone call
1 Touch [ Û].
• [Ý] : Reject an incoming call.
Ñ Operations during a call
Make a phone call
1 Press the < > button.
2 Touch [Phone].
3 See the table below for each operation method.
Call by entering a phone number
1) Enter a phone number with number keys.
2) Touch [Û].
Make a call
• Touch [
Call using call records
1) Touch [
2) Touch [
Calls), [
3) Select the phone number from the list.
Call using the phonebook
1) Touch [
2) Select the name from the list.
• [
] to delete the last entry.
].
] (Incoming Calls), [ ] (Outgoing
] (Missed Calls).
Make a call
].
Make a call
] : Updates the phonebook. Touch this
button after you have made a change
to the phonebook of your smartphone/
cell-phone.
Ending a call
[Ý]
You can send tones by touching desired keys
on the screen.
• Touch [6] to close the window.
Switches the speaking voice output between
smartphone/cell-phone and speaker.
Adjust the receiver volume
Press the <+> or <–> button.
English |
9
Page 42

Bluetooth
1
3
2
Playing Bluetooth Audio Device
1 Press the < > button.
2 Touch [BT Audio].
Ñ Source control screen
Controlling Audio
You can adjust various settings such as audio
balance or subwoofer level.
1 Press the <EQ> button.
2 See the below for each operation method.
Controlling General Audio
Displays the information of the current file.
1
Playing time/File number
2
Play time bar : For confirmation of current playing
position.
3
[
] : Selects Random playback mode.
] : Selects Repeat playback mode.
[
[U], [H] : Plays or pauses.
[E], [F] : Searches the previous/next
content.
Touch and hold to fast forward or fast
backward.
[1] : Searches file. (P.10)
✎ NOTE
• Operations and display indications may differ
according to their availability on the connected
device.
Ñ Selecting a content in a list
1 Touch [ 1].
2 Touch desired item.
When you touch a category its contents are
displayed.
3 Touch desired item from the content list.
Playback starts.
• Touch [6] to moves to the upper hierarchy.
✎ NOTE
• The source control screen appears when you touch
[6] at the top hierarchy.
1 Press the <EQ> button.
2 Touch [Fader / Balance].
3 Set each item as follows.
[Fader Balance]
Balance
[U] [T]
Fader
[R] [S]
[INITIALIZE]
Adjust the left and right volume
balance.
15 (right) to 15 (left)
Adjust the front and rear volume
balance.
15 (front) to 15 (rear)
To clear the adjustment.
10
Page 43
Installation
Installation
Before Installation
Before installation of this unit, please note the
following precautions.
#WARNINGS
• If you connect the ignition wire (red) and the battery
wire (yellow) to the car chassis (ground), you may
cause a short circuit, that in turn may start a fire.
Always connect those wires to the power source
running through the fuse box.
• Do not cut out the fuse from the ignition wire (red)
and the battery wire (yellow). The power supply
must be connected to the wires via the fuse.
#CAUTION
• Install this unit in the console of your vehicle.
Do not touch the metal part of this unit during and
shortly after the use of the unit. Metal part such as
the heat sink and enclosure become hot.
✎ NOTE
• Mounting and wiring this product requires skills and
experience. For best safety, leave the mounting and
wiring work to professionals.
• Make sure to ground the unit to a negative 12V DC
power supply.
• Do not install the unit in a spot exposed to direct
sunlight or excessive heat or humidity. Also avoid
places with too much dust or the possibility of water
splashing.
• Do not use your own screws. Use only the screws
provided. If you use the wrong screws, you could
damage the unit.
• If your car’s ignition does not have an ACC position,
connect the ignition wires to a power source that
can be turned on and off with the ignition key. If you
connect the ignition wire to a power source with a
constant voltage supply, such as with battery wires,
the battery may be drained.
• If the console has a lid, make sure to install the unit
so that the front panel will not hit the lid when
closing and opening.
• If the fuse blows, first make sure the wires aren’t
touching to cause a short circuit, then replace the
old fuse with one with the same rating.
• Insulate unconnected wires with vinyl tape or other
similar material. To prevent a short circuit, do not
remove the caps on the ends of the unconnected
wires or the terminals.
• Secure the wires with cable clamps and wrap vinyl
tape around the wires that comes into contact with
metal parts to protect the wires and to prevent short
circuit.
• Connect the speaker wires correctly to the terminals
to which they correspond. The unit may be
damaged or fail to work if you share the ¤ wires or
ground them to any metal part in the car.
• When only two speakers are being connected to
the system, connect the connectors either to both
the front output terminals or to both the rear output
terminals (do not mix front and rear). For example,
if you connect the ¢ connector of the left speaker
to a front output terminal, do not connect the ¤
connector to a rear output terminal.
• After the unit is installed, check whether the brake
lamps, blinkers, wipers, etc. on the car are working
properly.
• Mount the unit so that the mounting angle is 30°
or less.
• Do not press hard on the panel surface when installing
the unit to the vehicle. Otherwise scars, damage, or
failure may result.
• Reception may drop if there are metal objects near
the Bluetooth antenna.
Bluetooth antenna unit
English |
11
Page 44

Installation
Ñ Supplied accessories for installation
1
3
5
7
9
(M5 × 6 mm)
(2 m)
2
x1
4
(3 m)
x1
6
x1
8
x6
x1
(M5 × 8 mm)
Ñ Installation procedure
1) To prevent a short circuit, remove the key from
the ignition and disconnect the ¤ terminal of the
battery.
2) Make the proper input and output wire
connections for each unit.
3) Connect the wire on the wiring harness.
4) Take Connector B on the wiring harness and
connect it to the speaker connector in your vehicle.
5) Take Connector A on the wiring harness and
connect it to the external power connector on your
vehicle.
6) Connect the wiring harness connector to the unit.
7) Install the unit in your car.
8) Reconnect the ¤ terminal of the battery.
9) Press the reset button.
Installing the unit
Ñ Non-Japanese cars
x2
x1
Bend the tabs of the
x1
x6
✎ NOTE
• Make sure that the unit is installed securely in place.
If the unit is unstable, it may malfunction (eg, the
sound may skip).
Ñ Japanese cars (North America, South
America sales area only)
7 or 8
Ñ Trim plate
1) Attach accessory 1 to the unit.
mounting sleeve with
a screwdriver or similar
utensil and attach it in
place.
Car Bracket
7 or 8
12
1
Page 45

Installation
Ñ Microphone unit
1) Check the installation position of the microphone
(accessory 4).
2) Clean the installation surface.
3) Remove the separator of the microphone
(accessory 4), and stick the microphone to the
place shown below.
4) Wire the microphone cable up to the unit with it
secured at several positions using tape or other
desired method.
5) Adjust the direction of the microphone (accessory
4) to the driver.
4
Fix a cable with a commercial item of tape.
✎ NOTE
• Swap the clips if necessary.
Ñ Removing the unit
1) Remove the trim plate by referring to step 1 in
“Removing the trim plate”.
2) Insert the extraction key (accessory 2) deeply into
the slot as shown. (The protrusion at the tip of the
extraction key must face toward the unit.)
2
3) With the inserted extraction key secured, insert the
other extraction key into the slot.
2
4) Pull out the unit halfway.
Ñ Removing the trim plate
1) Use the extraction key (accessory 3) to lever out
the four tabs (two on the left part, two on the right
part).
3
2) Pull the trim plate forward.
✎ NOTE
• Be careful to avoid injury from the catch pins on
the extraction key.
5) Pull the unit all the way out with your hands, being
careful not to drop it.
English |
13
Page 46

Installation
Ñ Connecting wires to terminals Ñ Connecting wires to terminals
Light Blue/ Yellow (Steering remote control wire)
To steering remote
To use the steering wheel remote control feature,
REMOTE
CONT
STEERING
WHEEL
REMOTE
INPUT
you need an exclusive remote adapter (not
supplied) matched to your car.
Light Green (Parking sensor wire)
Accessor y 9: Extension cable
Connect to the vehicle’s
parking brake detection
PRK SW
switch harness.
Purple/White (Reverse sensor wire)
REVERSE
Connect to vehicle’s reverse
lamp harness when using the
optional rear view camera.
Connector A
Connector B
For best safety, be sure to
connect the parking sensor.
M4x6
1 3 5 7
2 4 6 8
1 3 5 7
2 4 6 8
Fuse (15A)
Accessor y 5
Accessor y 6
FRONT OUTREAR OUT
AV IN
CAM IN VIDEO OUT VIDEO IN
Bright Green/Red
ST REMOTE
INPUT 1
Purple/Red
ST REMOTE
INPUT 2
Gray/Red
ST REMOTE
GND
Connect to vehicle’s steering remote
harness.
Contact your JVC dealer for details.
MIC
5V=1.0A
[1]
(0.8 m)
USB terminal
Cap
Subwoofer Preout
SUB
WOOFER
L
R
ANT
FM/AM antenna input
Rear Audio Preout
(Left; White, Right; Red)
FRONT OUTREAR OUT
Front Audio Preout
AV IN
(Left; White, Right; Red)
AV-IN audio input
(Left; White, Right; Red)
Accessor y 4:
Bluetooth Microphone
USB device
[2]
Cap
FM/AM
antenna
14
VIDEO OUT VIDEO INCAM IN
AV-IN visual input (Yellow)
Visual Output (Yellow)
Rear view camera input (Yellow)
[1]
USB maximum power supply current :
DC 5 V = 1.0 A
[2]
Sold separately
[3]
Max. 150mA, 12V
Page 47

Installation
Ñ Connecting an iPod/iPhone/Android
M4x6
1 3 5 7
2 4 6 8
1 3 5 7
2 4 6 8
CAM IN VIDEO OUT VIDEO IN
Accessor y 5
Accessor y 6
Speaker impedance: 4-8 Ω
White
White/Black
Gray
Gray/Black
Green
Green/Black
Purple
Purple/Black
Blue
(Power control/ Antenna control wire)
Connect either to the power control
terminal when using the optional power
P.CONT
ANT.CONT
amplifier, or to the power terminal for
the booster amplifier of the film-type or
short pole type antenna.
(Max. 150mA, 12V)
FRONT OUTREAR OUT
AV IN
L
R
ANT
To front left speaker
To front right
speaker
To rear left speaker
To rear right
speaker
Cap
Android smartphone
Micro USB to USB cable
[2]
iPod/iPhone
Lightning connector
KS-U62 (0.8m)
[3]
USB terminal
5V=1.0A
Cap
M4x6
FRONT OUTREAR OUT
CAM IN VIDEO OUT VIDEO IN
[1]
USB maximum power supply current :
DC 5 V = 1.0 A
[2]
Sold separately
[3]
Optional accessory
[1]
(0.8 m)
AV IN
[2]
[2]
L
R
ANT
Red (Ignition wire)
Yellow (Battery wire)
Black (Ground wire) ¤
(To car chassis)
Ignition key switch
ACC
Car fuse box
Battery
English |
15
Page 48

About this Unit
About this Unit
More information
Ñ Usable USB device
This unit can play MPEG1/ MPEG2/ MPEG4/ H.264/
MKV/ MP3/WMA/ AAC/ WAV/ FLAC/ OGG les stored
in a USB mass storage class device.
• File system: FAT16/ FAT32
✎ NOTE
• When the USB device is connected to this unit, it can
be charged through the USB cable.
• Install the USB device in the place where it will not
affect safe driving.
• You cannot connect a USB device via a USB hub and
Multi Card Reader.
• Take backups of the audio files used with this unit.
The files may be erased depending on the operating
conditions of the USB device.
We shall have no compensation for any damage
arising from any erased data.
• No USB device comes with this unit. You need to
purchase a commercially available USB device.
• Cap the USB terminal whenever not using.
Ñ Playable Audio les
Audio format Extension
MP3 .mp3
WMA .wma
A AC- LC .m4a, .aac
Linear PCM (WAVE) .wav
FLAC .flac
Vorbis .ogg
• This unit can show ID3 Tag Version 1.0/1.1/2.2/2.3/2.4
(for MP3).
✎ NOTE
• WMA and AAC of which is covered with DRM cannot
be played.
• Although the audio files are complied with the
standards listed above, the play may be impossible
depending on the types or conditions of media or
device.
Ñ Acceptable Video les
Video format Extension
MPEG -1 .mpg, .mpeg
MPEG -2 .mpg, .mpeg
MPEG-4 .mp4, .avi
H.264/MPEG-4 AVC .mp4, mkv, avi, .flv, .f4v, .ts
MKV .mkv
Note for specications
Ñ Bluetooth section
Frequency
: 2.402 – 2.480 GHz
Output Power
: +8 dBm (AVE), Power Class1
Ñ General
Speaker Impedance
: 4 – 8 Ω
Operating Voltage
: 12 V DC car battery
16
Page 49

About this Unit
Copyrights
• The Bluetooth word mark and logos are registered
trademarks owned by the Bluetooth SIG, Inc. and any
use of such marks by JVC KENWOOD Corporation is
under license. Other trademarks and trade names are
those of their respective owners.
• Use of the Made for Apple badge means that an
accessory has been designed to connect specifically
to the Apple product(s) identified in the badge, and
has been certified by the developer to meet Apple
performance standards. Apple is not responsible for
the operation of this device or its compliance with
safety and regulatory standards. Please note that the
use of this accessory with an Apple product may affect
wireless performance.
• Apple, iPhone, iPod, iPod touch, and Lightning are
trademarks of Apple Inc., registered in the U.S. and
other countries.
• Microsoft and Windows Media are either registered
trademarks or trademarks of Microsoft Corporation in
the United States and/or other countries.
• THIS PRODUCT IS LICENSED UNDER THE MPEG-4 VISUAL
PATENT PORTFOLIO LICENSE FOR THE PERSONAL
AND NON-COMMERCIAL USE OF A CONSUMER FOR (¡)
ENCODING VIDEO IN COMPLIANCE WITH THE MPEG4 VISUAL STANDARD (“MPEG-4 VIDEO”) AND/OR (¡¡)
DECODING MPEG-4 VIDEO THAT WAS ENCODED BY
A CONSUMER ENGAGED IN A PERSONAL AND NONCOMMERCIAL ACTIVITY AND/OR WAS OBTAINED
FROM A VIDEO PROVIDER LICENSED BY MPEG LA TO
PROVIDE MPEG-4 VIDEO. NO LICENSE IS GRANTED OR
SHALL BE IMPLIED FOR ANY OTHER USE. ADDITIONAL
INFORMATION INCLUDING THAT RELATING TO
PROMOTIONAL, INTERNAL AND COMMERCIAL USES
AND LICENSING MAY BE OBTAINED FROM MPEG LA, LLC.
SEE HTTP://WWW.MPEGLA.COM.
• THIS PRODUCT IS LICENSED UNDER THE AVC PATENT
PORTFOLIO LICENSE FOR THE PERSONAL USE OF A
CONSUMER OR OTHER USES IN WHICH IT DOES NOT
RECEIVE REMUNERATION TO (¡)ENCODE VIDEO IN
COMPLIANCE WITH THE AVC STANDARD (“AVC VIDEO”)
AND/OR (¡¡)DECODE AVC VIDEO THAT WAS ENCODED BY
A CONSUMER ENGAGED IN A PERSONAL ACTIVITY AND/
OR WAS OBTAINED FROM A VIDEO PROVIDER LICENSED
TO PROVIDE AVC VIDEO. NO LICENSE IS GRANTED OR
SHALL BE IMPLIED FOR ANY OTHER USE. ADDITIONAL
INFORMATION MAY BE OBTAINED FROM MPEG LA, L.L.C.
SEE HTTP://WWW.MPEGLA.COM
• libFLAC
Copyright (C) 2000-2009 Josh Coalson
Copyright (C) 2011-2013 Xiph.Org Foundation
– Redistribution and use in source and binary forms,
with or without modification, are permitted provided
that the following conditions are met:
– Redistributions of source code must retain the above
copyright notice, this list of conditions and the
following disclaimer.
– Redistributions in binary form must reproduce the
above copyright notice, this list of conditions and the
following disclaimer in the documentation and/or
other materials provided with the distribution.
Neither the name of the Xiph.org Foundation nor the
names of its contributors may be used to endorse or
promote products derived from this software without
specific prior written permission.
THIS SOFTWARE IS PROVIDED BY THE COPYRIGHT
HOLDERS AND CONTRIBUTORS ``AS IS’’ AND ANY
EXPRESS OR IMPLIED WARRANTIES, INCLUDING,
BUT NOT LIMITED TO, THE IMPLIED WARRANTIES OF
MERCHANTABILITY AND FITNESS FOR A PARTICULAR
PURPOSE ARE DISCLAIMED. IN NO EVENT SHALL THE
FOUNDATION OR CONTRIBUTORS BE LIABLE FOR ANY
DIRECT, INDIRECT, INCIDENTAL, SPECIAL, EXEMPLARY,
OR CONSEQUENTIAL DAMAGES (INCLUDING, BUT NOT
LIMITED TO, PROCUREMENT OF SUBSTITUTE GOODS
OR SERVICES; LOSS OF USE, DATA, OR PROFITS; OR
BUSINESS INTERRUPTION) HOWEVER CAUSED AND ON
ANY THEORY OF LIABILITY, WHETHER IN CONTRACT,
STRICT LIABILITY, OR TORT (INCLUDING NEGLIGENCE OR
OTHERWISE) ARISING IN ANY WAY OUT OF THE USE OF
THIS SOFTWARE, EVEN IF ADVISED OF THE POSSIBILITY
OF SUCH DAMAGE.
• libogg
Copyright (c) 2002, Xiph.org Foundation Redistribution
and use in source and binary forms, with or without
modification, are permitted provided that the following
conditions are met:
– Redistributions of source code must retain the above
copyright notice, this list of conditions and the
following disclaimer.
– Redistributions in binary form must reproduce the
above copyright notice, this list of conditions and the
following disclaimer in the documentation and/or
other materials provided with the distribution.
– Neither the name of the Xiph.org Foundation nor the
names of its contributors may be used to endorse or
promote products derived from this software without
specific prior written permission.
THIS SOFTWARE IS PROVIDED BY THE COPYRIGHT
HOLDERS AND CONTRIBUTORS ``AS IS’’ AND ANY
EXPRESS OR IMPLIED WARRANTIES, INCLUDING,
BUT NOT LIMITED TO, THE IMPLIED WARRANTIES OF
MERCHANTABILITY AND FITNESS FOR A PARTICULAR
PURPOSE ARE DISCLAIMED. IN NO EVENT SHALL THE
FOUNDATION OR CONTRIBUTORS BE LIABLE FOR ANY
DIRECT, INDIRECT, INCIDENTAL, SPECIAL, EXEMPLARY,
OR CONSEQUENTIAL DAMAGES (INCLUDING, BUT NOT
LIMITED TO, PROCUREMENT OF SUBSTITUTE GOODS
OR SERVICES; LOSS OF USE, DATA, OR PROFITS; OR
BUSINESS INTERRUPTION) HOWEVER CAUSED AND ON
ANY THEORY OF LIABILITY, WHETHER IN CONTRACT,
STRICT LIABILITY, OR TORT (INCLUDING NEGLIGENCE OR
OTHERWISE) ARISING IN ANY WAY OUT OF THE USE OF
THIS SOFTWARE, EVEN IF ADVISED OF THE POSSIBILITY
OF SUCH DAMAGE.
English |
17
Page 50

Page 51

U.S.A.
JVCKENWOOO
USA
Corporation
TO
OUR VALUED CUSTOMER
THANK YOU FOR PURCHASING THIS JVC PRODUCT.
WE WANT TO HELP YOU ACHIEVE A PERFECT EXPERIENCE.
NEED
NEED
NEED
LIKE
HELP ON
ASSISTANCE ON HOW
TO
LOCATE A JVC SERVICE CENTER?
TO
PURCHASE ACCESSORIES?
HOW
TO
HOOK
TO
OPERATE?
UP?
JVC IS HERE TO HELP!
TOLL FREE: 1 (800)252-5722
http ://www.us.jvckenwood.com
Remember to retain your Bill
Do
not
attempt to service
Caution
To
prevent electrical shock,
There are no user serviceable parts inside.
Please refer to qualified service personnel for repairs.
PRODUCT REGISTRATION
We suggest that you register your product since it will enable us to contact you
directly if it is ever necessary to correct a safety related condition in your product.
You
can register
Please note that failure to register does not diminish any of your rights during the
warranty period.
at
http://www.us.jvckenwood.com
of
Sale for Warranty Service.
the
product yourself
do
not open the cabinet.
JVC
JVCKENWOOD
ORIGINAL
purchase for
THIS
COMMONWEALTH
WHAT
II
this
product
charge
service
authorized
WHAT
Please
product
the
problem(s)
service
If
you
have
WHAT
This
limited
1.
Products
reasonable
any
2.
Initial
3.
Operatio
4.
Damage
5.
Signal
6.
User
7.
Accessories;
8.
Batteries
9.
Products
10.
Loss
The
re
THE
DURATION
THE
DURATION
INCONVENIENCE,
LIMITATION,
BREACH
FITNESS
Some
these
limitations
vary
from
REFURBISHED
WARRANTY,
For
customer
Enter
below
reference.
RETAIL
the
LIMITED
WE
WILL
is
to
the
original
centers.
service
YOU
MUST
do
not
return
to
the
service
and a copy
center.
Service
any
questions
IS
NOT
warranty
which
care,
attachment
installation,
nal
that
reception
Removal
(except
used
of
data
are
no
express
DAMAGE
OF
THIS
FOR
PARTICULAR
states
do
state
to
PRODUCTS
PLEASE
the
Model
No.:
Purchase
USA
Corporation
PURCHASER
period
shown
WARRANTY
OF
PUERTO
00:
lound
to
be
owner.
Parts
used
for
center
on a carry-in
DO
FOR
your
product
center,
of
locations
concerning
COVERED
provided
have
been
or
if
repaired
not
prov
installation
adjustments
occurs
in
shipment,
problems
Memory
Devices/Video
that
Rechargeable
for
commercial
resultant
from
warranties
OF
ANY
IMPLIED
OF
THE
EXPRESS
OR
ANY
TO
TAPES,
WARRANTY. ALL
not
allow
the
or
exclusions
state.
REFER
use:
Model No.
and
date:
ON
warrants
to
be
FREE FROM
below. ("The
PARTS
2 YRS/
PARTS
1 YR/
IS
VALID
ONLY
RICO.
delective
within
Such
replacement
WARRANTY
please
the
proof
:
by
subject
ided
with
covered
and
malfunction
except
OTHER
PURPOSE, ARE
exclusion
may
CARRY
TO
THE
Serial
the
repair
and
replacement
are
warranted
basis.
to
can
JVC
and
PO
SERVICE:
the
retailer.
be
sure
to
package
of
purchase
also
be
obtained
your
JVC
does
not
to
abuse,
or
serviced
by
the
products,
removal
from
in
the
Owner's
due
to
act
lailures
purposes
WARRANTIES, INC
WARRANTY
DAMAGES, WHETHER DIREC
RECORDS
A SE
of
due
to
Pick-up
Batteries
, i
ncluding,
of
hard
as
listed
OR
EXPRESS
AND
LIMITED
of
incidental
not
apply
to
Box
22745,
PARA
TE
REFURBISHED
No.
which
LIMITED
LY
FOR PRODUCT
this
product
Warranty Period
WARRANTY
PURCHASED
and
all parts
DEFECTIVE
MATERIALS
")
LABOR 2 YRS : Car
LABOR 1 YR
IN
THE
warranty
Instead,
to
verify
from
Product, please
cover:
accident,
anyone
or
if
cabinets
Manual,
God,
line
power
Tubes/CCD
are
covered
drive
above.
LUDI
HEREIN.
DISCS)
IMPLIED
TO
or
you.
This
JVCKENWOOD
2201 East
http:/!www.us.jvckenwood.com
WARRANTY,
PRODUCT
is
located
: All
other
FIFTY
(50)
UNITED
period,
JVC
will
services
only
return
it
carefully,
purchase
our
alteration,
other
the
model
or
normal maintenance,
and
cosmetic
surge;
for
but
not
or
other
NG
JVC
RESULTING
THE
consequential
warranty
repair
shall
be
for
than a service
SHALL
WARRANTIES, INCLUDING
rendered
the
remainder
your
product
preferably
date.
Please
website
http:/!www.us.jvckenwood.com.
contact
our
modification,
or
serial
number
mounting
systems.
damage;
Image
Sensors
90
days
from
limited
to
renta
data
storage
THE
IMPLIED
NOT
BE
T,
INCIDENTAL
FROM
WARRANTY
damages
gives
you
USA
Dominguez
either
Street,
THIS
WARRANTY
WARRANTY
on
the
rear, bottom
INFORMATION
Serial No.:
Name
IN
U.S.
thereof,
except
AND
WORKMANSH
audio
ARSENAL
car
audio
produc
STATES, THE
or
replace
defective
by
JVC
of
to
the
in
Customer
facility
are
the
l.
device
WARRANTY
LIABLE
THE
PERIOD
specific
during
the
Warranty
JVC
authorized
the
original
call
1-800-252-5722
Care
Center
tampering,
authorized
has
been
video
and
covered
for
date
of
purchase);
;
OF
FOR
ANY
OR
CONSEQUENTIAL
USE
OF
THIS
THE
SET
FORTH
or
limitations
legal rights
Corporation
Long
Beach,
DOES
NOT
APPLY.
PACKAGED
or
side
of
dealer:
A.
as
set
forth
below
IP
from
series
ts
DISTRICT
Period. All
packaging,
negligence,
by
altered,
audio
90
days
MERCHANTABILITY, IS
LOSS
PRODUCT,
WARRANTIES
ABOVE.
on
how
CA90801-5745
of
the
OF
parts
with
normal
business
products
service
center
and
include a brief
to
locate
at
800-252-5722
misuse,
JVC
to
render
tampered
head
cleaning;
from
the
OF
USE
(INCLUDING,
OR
long
an
and
you
may
FOR
DETAIL
WITH
EACH
cabinet.
Retain
new
the
with,
date
OF
ARISING
OF
implied
also
OF
ONLY
TO
THE
the
date
of orig
COLUMBIA
or
nearest
faulty
such
THE
MERCHANTABILITY
REFURBISHED
this
AND
rebuilt
equivalents
hours
at
JVC
be
brought
you.
If
shipping
description
JVC
installation,
service,
or
or
purchase;
LIMITED
TO
PRODUCT,
WITHOUT
OUT
OF
warranty
lasts, so
other
rights
information
authorized
to a JVC
authorized
if
affixed
removed;
ANY
PRODUCT
PRODUCT.
for future
may
nearest
defaced
of
have
REFURBISHED
ina
IN
THE
at
of
lack
AND
which
l
no
the
of
to
BT-500D4
-1
(15/11)
Page 52

CANADA
JVCKENWDDD
CANADA
INC.
Jvc
JVCKENWOOD
distributed
use
1.
2.
Product
We
condition
For
Enter
reference
in
and
maintenance, from
To
Obtain
(a)
JVC
product
with
proof
(b)
The
JVC
authorized
Limitation:
This
Warranty
(a)
Repair
connection
grills,
savers,
(b)
Any
defects
misuse,
in
sufficient
(c)
Any
defect
following
(d)
Any
JVC
any
party
personnel.
(e)
Any
JVC
defaced,
{f)
Maintenance,
(g)
Conversion
(h)
Any
JVC
Regulations
(i)
Any
JVC
rental, or
Parts
...... 1 year
Labour
(j)
Any
JVC
by
the
(k)
Product
'liqui
dator
(I)
Any
defects
other
events
(m)
FOR
AUTO
Warranty
interferences, cleaning
for
the
Registration
suggest
that
in
your
customer
below
the
.
Model No.:
Purchase
CANADA
Canada
Warranty
requiring
of
purchase.
product
JVC
Service
shall
or
replacement
cords,
speaker
cones,
and
all
accessories.
caused
abusive
care.
caused
the
instructions
product
other
than
products
modified
cleaning
to
foreign
product
ID.
products
display
...
90
days
product
original
purchaser.
purchased
·.
caused
beyond
PRODUCTS
does
not
removal
or
you
register
product.
use:
Model
date:
Warranty
by
Service:
must
not
antennas,
operation,
or
tampered
on
or
without
used
purposes.
(except
which
cover
reinstallation
No.
applies
INC. (hereafter
JVC
and sold
any
defects
service
must
be
brought
Centre.
apply to:
of
any
cabinets,
dust
projection
screens,
or
repairs
required
negligence,
repairs
required
in
the
operation
with,
JVC
removed.
from
by
the
You
and
adjusted
or
authorized
which
the
serial
or
periodic
or
domestic
the
Canadian
for
commercial
video
head -90
has
been
·outside
fire,
flood, lightning, power
control
of
elimination
of
head, adjustments,
of
TEL: (905)
670-3381
your
product
can
register
Serial No.
only
to
PRODUCT
called "JVC
by
an
authorized
in
material
be
presented
in
for
service
to
batteries,
covers,
knobs,
projection
as a resull
improper
as a result
manual.
or
repaired
JVC
Service
number
has
check-up
voltage
or
frequency.
Electrical
or
institutional,
days)
resold
and
no
longer
Canada',
"bankruptcy"
JVC.
of
car
static
or
the
unit
for
repair.
JVCKENWDOD
6070
Kestrel
Road,
FAX:
http://www.fvc.ca
since
it
will
enable
at
http
://www.
which
is
located
WARRANTY
distributed
")
gives
the
following
JVC
dealer.
and
workmanship subject to
together
an
plates,
speaker
screen
of
use
and/or
of
not
by
Centre
been
Safety
owned
surge,
or
electrical
labour
cost
Mississauga,
(905)670-7244
us
jvc
.ca/www/S
either
JVC
3.
Standards:
If
any
applicable
the
such
4.
Exclusion
This
JVC
or
extend
5. Disclaimer
To
for
or
inconvenience.
WARRANTY
Product
Projection
Colour
D-ILA
LCD
•
In-Home
Where
responsibility
and
all
and
from
Receivers
separately.
or
Audio
or
AC
Adapters, Remote
Headphones, Microphones
lamps
Wood
All
Other
CANADA
Ontario,
Service
E-mail:
service@1vc.ca
to
contact
you
upport/Warranty
on
the
rear,
bottom
Serial
Name
in
Canada
express
warrants
defects
terms,
purchaser
defects
of
warranty
for
JVC
his,
its
or
their
or
enla
the
extent
loss
of
time
any
other
TERM
TV
In-Home
TV
In-Home
Rear
Pro
TV
In-Home
service
it
is
not
and
costs
associated
the
closest
and
Front
"ARSENAL"
Cone
Speakers
Categories
INC.
L5T
1S8
toll
free#:
directly
if
or
side
No.:
of
dealer
by
JVCKENWODD
warranty
that
this
the
following
should
be
found
necessary
for
parts
or
are
due
to
faulty
All
Other
Express
constitutes
products
and
agent
or
rge
this
warranty
of
Consequential
the
law
permits
or
use
of
indirect,
available,
Home
.as
:
its
incidental
{VALID
Service
(25"
and
jec
tion
In-Home
Service
(25"
to
be
provided
the
expense
with
JVC
Authorized
Speakers
Projection
Series
controls,
Canada
1-800-964-2650
it
is
ever
necessary
px
of
the
cab
CANADA
for
each
JVC
product
terms
in a JVC
repairs shall
labour
when
material
Warranties:
the
entire
express
no
dealer
or
employee
on
behalf
Damage:
JVC
disclaims
product,
or
consequential
FROM
THE
above)
Service
and
above)
where
purchaser
for
the
proper
the
delivery
purchased
and
Car
and
Projector
to
correct a safety
inet. Retain
INC
.
new
JVC
product
is
free, under
and
conditions
product
within
be
made
JVC
acknowledges
or
workmanship.
warranty
service
centre
is,
or
are
authorized
of
JVC.
any
DATE
available.
must
packing,
of
Service
responsibility
damage
OF
Parts
(Years)
1 1
assume
the
equipment
Centre.
2 2
90
days
5 5
transportation
1 1
this
information
normal
:
the
at
no
cost
to
that
given
by
personnel
to
costs,
or
PURCHASE)
Labour
(Years)
the
shipment
to
90
days
related
for
future
JVCKENWOOD
distribue
utilisation
1.
Pour obtenir
(a)
(b)
2. Restrictions:
Cette
(a)
(b)
(c)
{d)
(e)
(f)
(g)
(h)
(i)
(j)
(k)
(I)
Enregistrement
Nous
corriger
Pour !'utilisation
Entrez
informations
CANADA
au
Canada
et
entretien
Les
produits
avec
la
prevue
Le
produit
de
service
garantie
Reparation
panneau
avant,
de
protection,
hautparleur,
projection
Taus
defauts
utilisation
abusive, mauvaise, negligente
incorrecte.
Taus
defauts
a !
'omission
d'
inst
ruction.
Tout
produit
entreprise
service
autorise
Tout
produit
ou
enleve.
L:entretien,
La
conversion a une frequence
domestique
Tout
produit
conforme
aux
Pour
tout
produit
institutionnelles, de
P
ieces
............... 1 An
Main d'oeuvre
Tout
produit
propriete
de
Produit
achete a "l'exterieur
"faillite·
ou
Tout
dommage
une
surtension
JVC.
vous
conseillons
un
probleme lie a la
ci-dessous
pour
No.
de
modele
Date
d'achat:
La
garantls'
INC. ( ci-apres
par JVC
normal,
un
service
de
JVC
necessitant
d'achat.
JVC
doit
etre
JVC
autorise.
ne
s'applique
ou
remp
lacement
cordons
boutons, couverts
ecrans
de
et
que
projection,
taus
les
accessoires.
occasionnes
occasionnes
de
suivre
les
JVC
altere, ajuste
JVC
ou
un
JVC.
JVC
dont
le
les
verifications
.
JVC
n'ayant
norms
electriques
utilise a des
locat
(Excepte
...
90
Jou
JVC
ayant
l'acheteur
original.
d'un
"liquidateur".
cause
par
ou
tout
autre
TE
du
produit
d'enregistrer
securite
des
clients
le
numero
de
reference
futu
:
ete
applique
seulement
et
apporte
pas
de
ou
recommandations
centre
numero
pas
ion
rs
le feu,
L:
:
modele
re.
appele "JVC
vendu
par
tout
defaut
un
service
pour
service
aux
:
de
tout
cabinet, batteries
de
hautparleur,
protecteurs
reparations
reparations
ou
repare
de
service
de
serie a ete
ou
une
tension
le
signe
d'identification
Canadiennes
fins
commerc
ou
utilise a des
les
tetes
et
qui n'est
du
Canada",
une
inondation, un
evenement
6070
670-3381
votre
produit,
de
votre
produit.
et
le
numero
un
doit
requises
et/ou
par
et
video-
hors
Kestrel
de
garantie:
raccord, antennes,
ou
periodiques
revendu
(905)
GARANTIE
aux
PRODUITS
distrlbues
")
enonce
detaillant
materiel
etre
presentee
chez
un
housses
canes
d'ecran
suite a une
une
utilization
requises
suite
du
manuel
tout
autre
d'enlretien
allere,
nettoyage
etrangere
(CSA).
iales
,
fins
d'etalage.
90
jours)
plus
provenant d'une
du
contrale
JVCKENWOOD
Road,
FAX:
(905)670-7244
http://www.jvc.ca
car
ii
nous
Vous
de
serie
la
JVC
autorise. JVC
et
de
fabrication
centre
,
de
de
ou
de
modi
fie
.
ou
qui
la
eclair
,
de
Mississauga,
E-mail:
permettra
pouvez
vous
qui
se
trouve
au
Canada
par
JVCKENWOOD
garantie
expresse
suivante
vous
garantit
sous
reserve
(m)POUR LES
3.
Criteres
Si
un
applicables,
sans
d'reuvre
causees
4.
Exclusion
Celle
JVC
detaillant
cette
5.
Denegation
Dans
pour
transport
accidentel
CONDITIONS
Produit
Ecrans
Ecrans
de
TV
projection
Ecrans
•
Service a domicile
S'il
n'y a pas
la
responsabilite
que
tous
detaillant
Recepteurs
separement,
de
Serie
Adaptateurs
D'ecoute,
Enceinte a cane
Toutes
CANADA
Ontario,
Service
service@jvc.ca
de
vous
inscrire a http://www.jvc.ca/www/Support/Warranty.aspx
soil a l'arriere, en
No.
de
Norn
du
PRODUITS D'AUTOM081
La
garantie
ne
statiques
les
l'enlevement
produit
coots
garantie
pour
garantie
la
perte
de
TV
de
les
JVC
"ARSENAL"
les
couvre
ou
electriques
ajustements
ou a la
:
JVC s'averait
les
reparations
additionne
lorsque
JVC
par
une
defectuosite
de
foutes
constitue
les
produits
ou d'un
service
au
nom
des
dommages
mesure
permise
de
temps
ou
tout
autre
et
consequent.
DE
GARANTIE (VALABLE a PART
projection
Service a Domicile
Couleur
Service a Dom
arriere
D-ILA
LCD
Service a Domicile
fourni
de
service
JVC disponible a proximite,
et
les
coats
coats
associes a la
autorise
le
et
Hauts-Parleurs
Projecteur
AC,
Telecommande,
Microohones
en
Bois
autres
cateaories
INC.
L5T
1S8
Canada
toll
free#:
1-800-964-2650
contacter
directement
bas
serie:
revendeur:
CANADA INC.
pour
que
ce
produit
des
modalites
pas
l'eliminalion
de
et
les
coots
reinstallation
defectueux, selon les
necessaires
ls a
l'acheteur
reconnalt
de
autres
garanties
l'entiere
JVC. Nul
d'entretien n'est
de
JVC.
par
la loi,
ou
d'usage
dommage
ici
le
Service a Dom
(25" et plus)
par
un
pour un
emballage
livraison
nlus
ores
nour
achetes
Avant
et
Aud
Gasque
et
Lamoe
de
si
jamais
ou
sur
le
c5te
tout
nouveau
est
degage, sous
et
conditions
LE
la
indirects:
d'interferences
voiture,
le
de
main
d'reuvre
de
l'unite
seront
pour
les
que
de
tells
materiel
ou
expresses
garantie
express
representant
autorise a prolonger
JVC
nie
toute
de
ses
produits,
ou
inconvenient
IR
(25"
el
plu
s)
ici
le
detaillant
disponible.
adequat,
de
l'equipement
un ser
vice d'ent
io
d'Auto
Proiecteu
r
elle
est
de
l'armoire.
produit
suivantes:
nettoyage
de
associes
pour
reparation.
conditions
effectues
pieces
et
la
defectuosites
de
fabrication.
:
don
nee
ou
employe
responsabilite
des
co5ts
indirect
DE
LA
DATE D'A
Pieces Main-O'oeuvei
CAnneesl
(Annees'
1 1
l'acheteur
doit
l'expedition, ainsi
chez
et
depuis
ret
ien.
2 2
90
Jours
90
5 5
1 1
necessaire
Conservez
JVC
rnte
,
a
main
sont
par
d'un
de
,
CHAT)
assumer
le
Jou
rs
pour
ces
 Loading...