

Page 1

ENGLISH
ESPAÑOL
FRANÇAIS
KW-HDR81BT
CD RECEIVER / RECEPTOR CON CD / RÉCEPTEUR CD
For canceling the display demonstration, see page 4. /
Para cancelar la demostración en pantalla, consulte la página 4. /
Pour annuler la démonstration des affichages, référez-vous à la page 4.
For installation and connections, refer to the separate manual.
Para la instalación y las conexiones, refiérase al manual separado.
Pour l’installation et les raccordements, se référer au manuel séparé.
INSTRUCTIONS
MANUAL DE INSTRUCCIONES
MANUEL D’INSTRUCTIONS
For Customer Use:
Enter below the Model
No. and Serial No. which
are located on the top or
bottom of the cabinet.
Retain this information
for future reference.
Model No.
Serial No.
GET0806-001A
[J]
Page 2

Thank you for purchasing a JVC product.
Please read all instructions carefully before operation, to ensure your complete understanding and to
obtain the best possible performance from the unit.
For U.S.A.
This equipment has been tested and found to comply with the limits for a Class B digital device,
pursuant to Part 15 of the FCC Rules. These limits are designed to provide reasonable protection
against harmful interference in a residential installation. This equipment generates, uses, and can
radiate radio frequency energy and, if not installed and used in accordance with the instructions,
may cause harmful interference to radio communications. However, there is no guarantee that
interference will not occur in a particular installation. If this equipment does cause harmful
interference to radio or television reception, which can be determined by turning the equipment
off and on, the user is encouraged to try to correct the interference by one or more of the
following measures:
– Reorient or relocate the receiving antenna.
– Increase the separation between the equipment and receiver.
– Connect the equipment into an outlet on a circuit different from that to which the receiver is
connected.
– Consult the dealer or an experienced radio/TV technician for help.
Caution:
Changes or modifications not expressly approved by the party responsible for compliance could
void the user’s authority to operate the equipment.
Use of controls or adjustments or performance of
procedures other than those specified herein may
result in hazardous radiation exposure.
In compliance with Federal Regulations, following
are reproductions of labels on, or inside the
product relating to laser product safety.
JVC KENWOOD Corporation
2967-3, ISHIKAWA-MACHI,
HACHIOJI-SHI, TOKYO, JAPAN
THIS PRODUCT COMPLIES WITH DHHS
RULES 21CFR SUBCHAPTER J IN EFFECT AT
DATE OF MANUFACTURE.
Location: Bottom Plate
IMPORTANT FOR LASER PRODUCTS
1. CLASS 1 LASER PRODUCT
2. CAUTION: Do not open the top cover. There are no user serviceable parts inside the unit;
leave all servicing to qualified service personnel.
3. CAUTION: (For U.S.A.) Visible and/or invisible class II laser radiation when open. Do
not stare into beam.
(For Canada) Visible and/or invisible class 1M laser radiation when open. Do
not view directly with optical instruments.
4. REPRODUCTION OF LABEL: CAUTION LABEL, PLACED OUTSIDE THE UNIT.
|ޓENGLISH
2
[European Union only]
Page 3

Warning:
Stop the car before operating the unit.
Caution:
Adjust the volume so that you can hear sounds
outside the car. Driving with the volume too high
may cause an accident.
Avoid using the USB device or iPod/iPhone if it
might hinder driving safety.
Caution on volume setting:
Digital devices (CD/USB) produce very little noise
compared with other sources. Lower the volume
before playing these digital sources to avoid
damaging the speakers by the sudden increase of
the output level.
Temperature inside the car:
If you have parked the car for a long time in hot
or cold weather, wait until the temperature in the
car becomes normal before operating the unit.
Condensation:
When the car is air-conditioned, moisture may
collect on the laser lens. This may cause disc read
errors. In this case, remove the disc and wait for
the moisture to evaporate.
Contents
Preparation ............................................................ 4
Canceling the display demonstration
Setting the clock
Basic operations ................................................... 4
Radio ........................................................................ 6
Satellite Radio tuner control ............................ 9
CD/USB ................................................................. 10
iPod/iPhone
Quick Search ....................................................... 13
External components ...................................... 13
Bluetooth姞 connection
Bluetooth mobile phone ................................ 16
Bluetooth audio player ................................... 20
Illumination color adjustments .................... 21
Brightness adjustments .................................. 22
Sound adjustments .......................................... 22
Menu operations ............................................... 23
Remote controller
Additional information ................................... 26
.......................................................... 11
..................................... 14
............................................... 26
How to reset your unit
Your preset adjustments will also be erased.
How to forcibly eject a disc
(Hold)
Be careful not to drop the disc when it ejects.
If this does not work, reset your unit.
Troubleshooting ................................................ 29
Specifications ..................................................... 32
How to read this manual:
This manual mainly explains operations using
the buttons on the control panel.
< > indicates the displays on the control
panel.
[XX] indicates the initial setting of a menu
item.
Maintenance
Cleaning the unit
Wipe off the dirt on the panel with a dry silicon or
soft cloth. Failure to observe this precaution may
result in damage to the unit.
ENGLISHޓ|
3
Page 4

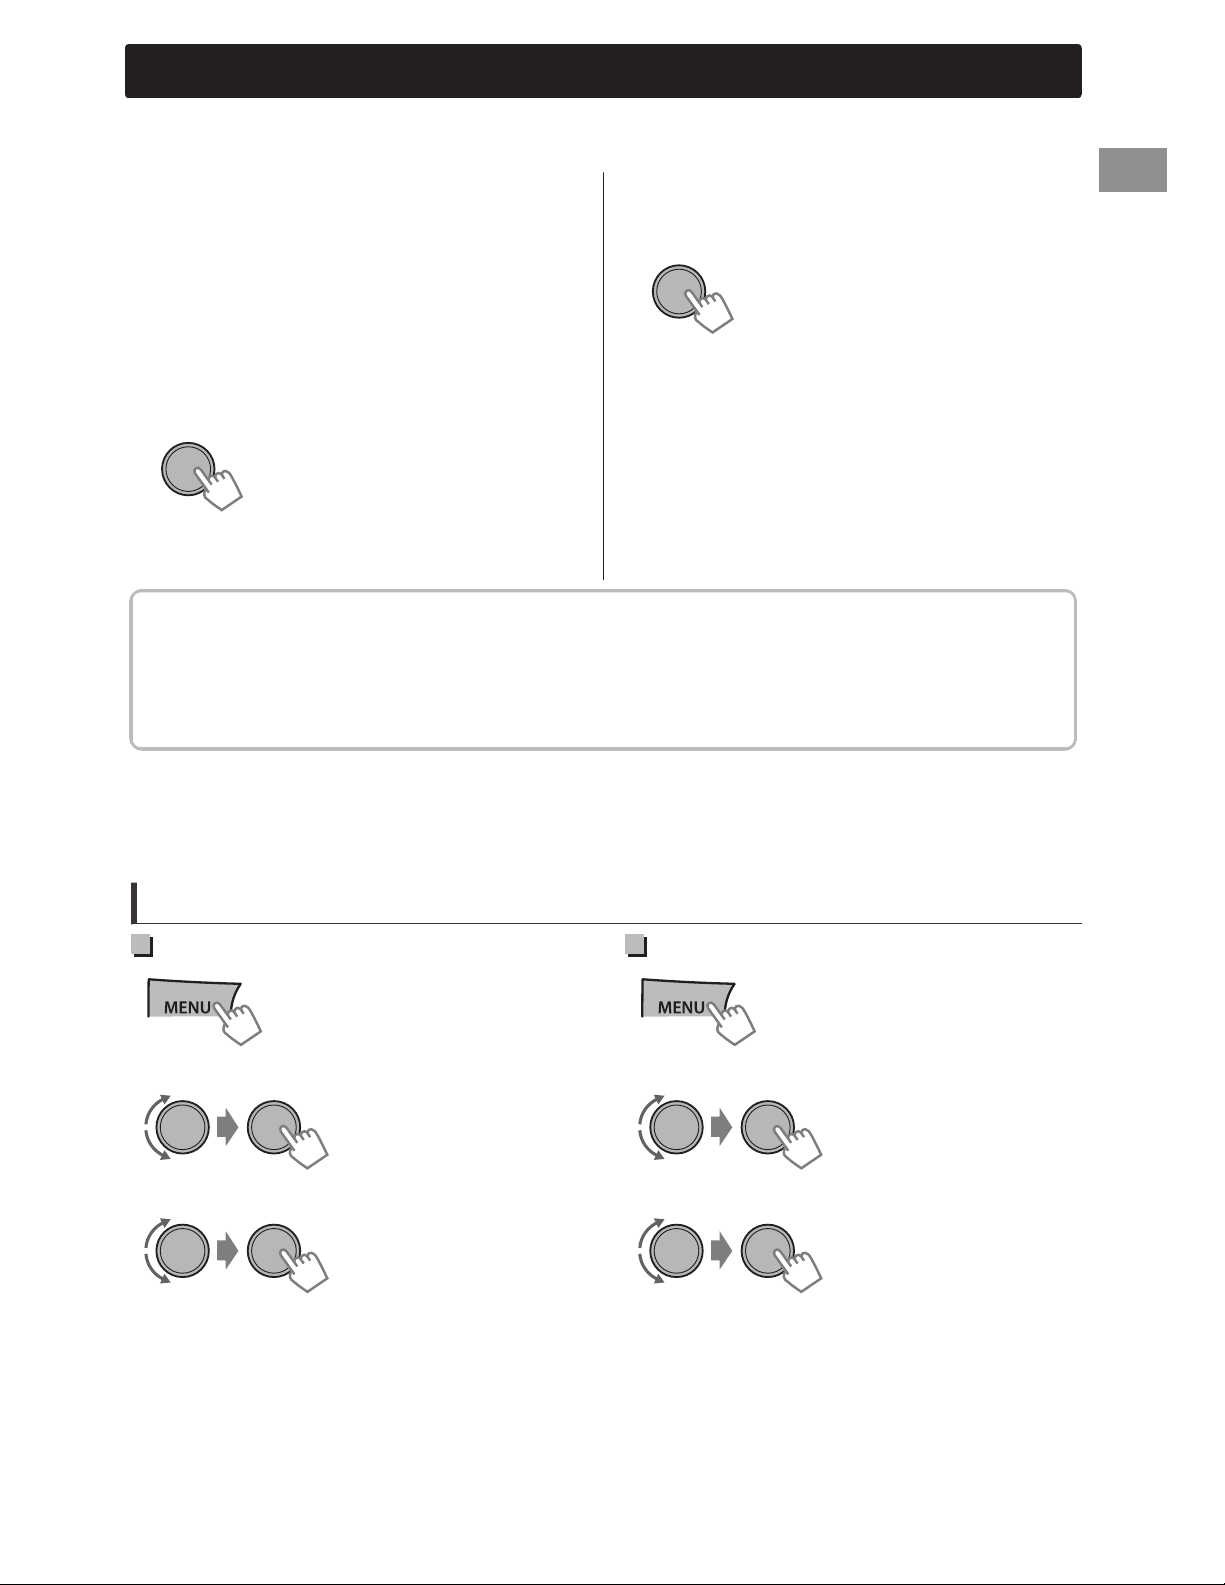
Preparation
Preparation
Canceling the display
demonstration
The display demonstration is always turned on
unless you cancel it.
1
2
3
Select <DEMO OFF>.
4
Press MENU to exit.
(Hold)
(Initial setting)
Setting the clock
1
2
Select <CLOCK>.
3
Select <CLOCK SET>.
4
Adjust the hour.
5
Adjust the minute.
(Hold)
6
Press MENU to exit.
Basic operations
Display information
Changes the display information. (Press)
Scrolls the current display information. (Hold)
Source Display
Radio
Satellite Radio
CD/USB/Bluetooth Audio
iPod/iPhone (HEAD MODE/
IPOD MODE)
iPod/iPhone (APP MODE)
iPod/iPhone (Pandora姞
internet radio)
External Components
*1 Displayed only when a Call Sign is received.
*2 When no program type (PTY) is received, “HD RADIO” appears.
*3 “NO TEXT” appears when no text is received.
*4 Only for SIRIUS Satellite Radio.
Conventional radio station: Frequency -ANALOG-NO TEXT-
Clock - (back to the beginning)
HD Radio station: Call Sign*1 - Frequency - PTY (Program Type)*2
- Text*3 - Clock - (back to the beginning)
Category name - Channel name - Artist name - Composer
name*4 - Song/program name/title - Clock - (back to the
beginning)
Album title/Artist* - Track title* - Track no./Playing time - Track
no./Clock - (back to the beginning)
* “NO NAME” appears for conventional CDs or if not recorded.
APP MODE) Clock
Station name - Album title/Artist - Track title - Playing time -
Clock - (back to the beginning)
EXT INPUT or AUX IN) Clock
|ޓENGLISH
4
Page 5

Basic operations
Control panel
Display window
Loading slot
Control dial
Remote sensor
Aim the remote controller directly at the sensor.
DO NOT expose to bright sunlight.
Ejects the disc
USB input terminal
When you press or hold the following button(s)...
Control panel
SOURCE
Control dial
(turn)
Control dial
(press)
Number
buttons
(1 - 6)
TAG —
/ /
/
Remote
controller
Turns on.
—
Turns off. (Hold)
Press the SOURCE button on the control panel and turn
the control dial within 2 seconds to select the source.
SOURCE Press repeatedly to select the source.
VOL - / + Adjusts the volume level.
— Selects items.
)
Mutes the sound or pauses playback.
Press the button again to cancel muting or resume playback.
— Confirms selection.
Selects the preset stations/channels.
—
Stores the current station/channel into the selected
number button. (Hold) (' page 7)
Tags the PSD (Program Service Data) from HD Radio
broadcast. (' page 8)
Cancels transferring of the tagged PSD to your iPod/iPhone.
(Hold) (' page 8)
Enters “Hands-Free” menu (' page 17), or answers
—
incoming call when the unit rings.
Ends a call. (Hold)
— Returns to the previous menu.
Selects a preset station/channel. (' page 7)
Searches for HD Radio stations/channels. (Hold)
Selects a category. (' page 9)
Selects MP3/WMA/WAV folder. (' page 10)
Searches for a station/channel automatically. (' page 6)
Searches for a station manually. (Hold)
/
Selects track (' page 10, 11, 20)/Satellite Radio channel.
Fast-forwards or reverses track. / Changes Satellite Radio
channel rapidly. (Hold)
Remote controller
AUX input jack
General function
ENGLISHޓ|
5
Page 6

B
Radio
Radio
You can tune in to both conventional and HD Radio broadcasts.
About HD Radio Technology
Digital, CD-quality sound. HD Radio Technology enables local radio
stations to broadcast a clean digital signal. AM sounds like today’s FM
and FM sounds like a CD.
Program Service Data: Contributes to the superior user experience of
HD Radio Technology. Presents song name, artist, station IDs, HD2/HD3
Channel Guide, and other relevant data streams.
Adjacent to traditional main stations are extra local FM channels. These
HD2/HD3 Channels provide new, original music as well as deep cuts
into traditional genre.
iTunes姞 Tagging provides you the opportunity to discover a wide
range of content and the means to “tag” that content for later review
and purchase from the iTunes姞 Store.
Many HD Radio stations offer more than one channel of programming. This service is called multicasting.
To find HD Radio stations in your area, visit <http://www.hdradio.com/>.
Searching for a station/channel
A
Select <FM> or <AM>.
Auto search. (Press)
Manual search. (Hold)
“M” flashes, then press the button repeatedly.
When receiving a station...
HD Radio station
“HD” lights up when receiving digital audio, or
flashes when receiving analog audio.
Conventional FM station
“ST” lights up when receiving FM stereo
broadcast.
Searching for HD Radio stations/
channels
(Hold)
“HD” flashes when a station is tuned in, and
searching stops.
Selecting an HD Radio multicast
channel
When receiving HD Radio multicast channels...
Select your desired channel
(HD1 to HD8).
“LINKING” appears while linking to a multicast
channel.
Changing HD Radio reception
mode
While receiving an HD Radio broadcast, you can
change the reception mode—digital or analog.
This setting does not take effect for the
conventional FM/AM stations.
1
2
[AUTO]
ANALOG
DIGITAL
The setting automatically returns to <AUTO>
when you tune in to another broadcast.
(Hold)
-<TUNER>
-<BLEND HOLD>
-<AUTO>/<ANALOG>/
<DIGITAL>
Switches between digital and
analog audio automatically.
“HOLD” flashes if the radio station
forces only analog reception.
Tunes to analog audio only.
“HOLD” lights up.
Tunes to digital audio only.
“HOLD” lights up.
|ޓENGLISH
6
Page 7

Radio
Storing stations in memory
Manual presetting
You can preset up to 18 stations for FM and 6
stations for AM.
HD Radio multicast channels can also be
preset.
While listening to a station/channel...
(Hold)
The preset number flashes and “MEMORY”
appears. The current station/channel is stored to
the selected number button (1 - 6).
- - - - - - - - or - - - - - - - -
1
“PRESET MODE” flashes.
2
Select preset number.
The preset number flashes and “MEMORY”
appears.
Auto presetting
SSM (Strong-station Sequential Memory)
You can preset up to 18 stations for FM and 6
stations for AM.
1
(Hold)
(Hold)
Selecting a preset station/
channel
- - - - - - - - or - - - - - - - -
You can also select a preset station/channel using
/ .
Setting the Radio Timer
You can tune in to a preset station/channel at a
specific time regardless of the current source.
1
2
[OFF] Cancels Radio Timer.
ONCE Activates once.
DAILY Activates daily.
3
Select the preset station/channel.
(Hold)
-<TUNER>
-<RADIO TIMER>
-<OFF>/<ONCE>/
<DAILY>
-<FM>/<AM>
-<01> ... <18> for FM/
<01> ... <06> for AM
2
“SSM” flashes. When all the stations/channels are
stored, “SSM” stops flashing.
To preset <SSM 07 – 12>/<SSM 13 – 18> for
FM, repeat steps 1 and 2.
-<TUNER>
-<SSM>
-<SSM 01 – 06>
4
Set the activation time.
5
Press MENU to exit.
lights up after the Radio Timer has been set.
Only one timer can be set. Setting a new timer
will override the previous setting.
The Radio Timer will not activate if the unit is
turned off or if <AM> is set to <OFF> after
selecting an AM station for the timer.
ENGLISHޓ|
7
Page 8

Radio
Tagging/purchasing your
favorite songs from the iTunes
Store
Some HD Radio broadcasts provide PSD (Program
Service Data) for a song. You can tag the song
and store its PSD (maximum 50 songs) while
listening to the song.
By using the tagging function, you can easily
purchase the songs from iTunes Store.
.
Notes on storing tagged PSDs
When pressing TAG within 10 seconds
before or after the PSD changes (while the
TAG indicator flashes), the tags for two songs
are stored.
You cannot tag a song in the following
cases:
- When the broadcast currently received
does not support the iTunes Tagging or
does not support PSD.
- When you try to store more than 50 PSD.
- When the song is already tagged.
- While transferring the tagged PSDs to your
iPod/iPhone is in progress.
For the best compatibility of iTunes Tagging,
please use the latest software versions with the
iPod/iPhone that can be connected to this unit,
' page 28.
Step 1: Tagging the song
While receiving a song with PSD...
Lights up while receiving
a song with PSD.
TAG SAVED
Step 2: Transferring the tagged PSD to your
iPod/iPhone
Connect the iPod/iPhone to the unit.
The source changes to “USB-IPOD” and the
tagged PSDs are automatically transferred to the
iPod/iPhone.
Your iPod/iPhone must have 50 MB free space,
which is required for transferring a tagged PSD.
You cannot change the source during the
transferring process.
While transferring the tagged PSDs, the “TAG”
indicator flashes.
TRANS 02/15
Number of PSDs transferred to the iPod /
iPhone / Number of PSDs stored on the unit
“COMPLETED” appears when all the tagged PSDs
are transferred to the iPod/iPhone.
You cannot transfer the tagged PSDs to the iPod/
iPhone in the following cases:
When the connected iPod/iPhone is not
compatible with iTunes Tagging.
When the available memory of the iPod/
iPhone is less than 50MB.
When disconnecting the iPod/iPhone during
data transfer.
Step 3: Purchasing songs from iTunes Store
iTunes 7.4 or later version is required to
purchase the tagged songs.
For details about iPod/iPhone and iTunes, refer
also to the instructions supplied with the iPod/
iPhone or visit <http://www.apple.com>.
The tagged PSD is stored on the unit.
When an Apple iPod/iPhone is connected, the
tagged PSDs are automatically transferred to the
iPod/iPhone. Go to Step 3 to purchase the song.
To check the number of tagged songs stored
on the unit, press and hold TAG.
To delete the tagged songs from the unit:
Press and hold MENU.
Turn the control dial to select <TAG ALL
CLR>, then press and hold to confirm.
|ޓENGLISH
8
Connect the iPod/iPhone to the PC.
Synchronize the iPod/iPhone to the
iTunes.
The tagged PSDs are transferred to the PC and
iTunes displays the list of the tagged songs. After
the data transfer is completed, the stored PSDs
are automatically deleted from the iPod/iPhone.
Page 9

C
B
Satellite Radio tuner control
Before operating, connect either one of the following systems (not supplied) to the expansion port on
the rear of this unit. Refer to the “Installation/Connection Manual” for details.
Satellite Radio tuner control
SIRIUS Satellite
Radio
XM Satellite
Radio
For details, refer also to the instructions supplied with the other components.
For SIRIUS/XM programming, visit <www.siriusxm.com>.
Activating your SIRIUS
subscription
1
Select <SIRIUS>.
SIRIUS Satellite Radio starts updating the SIRIUS
channels. Once completed, SIRIUS Satellite Radio
tunes in to the Preview Channel.
2
Select “Channel 0” to check your SIRIUS ID.
JVC KS-SRA100 (SIRIUS Satellite Radio interface) and
SCC1 (SiriusConnect Vehicle Tuner) or
SCVDOC1 (SiriusConnect Vehicle Docking Kit) and SIRIUS radio
XMDJVC100 (Smart Digital Adapter for JVC) and XM Universal Tuner Box
CNPJVC1 (Connection cable for JVC) and CNP2000UCA (Protocol Interface
Adapter and XM Direct 2 Tuner)
2
Select “Channel 0” to check your XM
Satellite Radio ID.
The display alternates between “RADIO ID” and
the 8-digit alphanumeric ID number.
You can also check your XM Satellite Radio ID
labeled on the casing of the XMDirect2 Tuner
System.
3
Contact XM Satellite Radio on the internet
at <www.siriusxm.com/activatenow> to
activate your subscription, or call 1-800XM-RADIO (1-800-967-2346).
The 12-digit SIRIUS ID will be displayed.
You can also check your SIRIUS ID from the
label on the packaging, or from menu
operations (' page 24).
3
Contact Sirius Satellite Radio on the
internet at <www.siriusxm.com/
Once subscription has been activated, the unit
can be tuned to one of the available channels.
Selecting a channel
A
activatenow> to activate your
subscription, or call SIRIUS toll-free at
1-888-539-SIRIUS (7474).
Once subscription has been activated, “SUB UPDT
PRESS ANY KEY” scrolls on the display.
Channel Updates (SIRIUS)
If channels are updated after subscription,
updating starts automatically. “UPDATING”
flashes and no sound can be heard.
Updates take a few minutes to complete.
During an update, you cannot operate your
Satellite Radio.
Activating your XM subscription
1
Select <XM>.
Select <SIRIUS> or <XM>.
Select a category.
If you want to select channels of all categories...
SIRIUS: Select <ALL>.
XM: Skip this step.
Select a desired channel.
Holding the button changes the channels rapidly.
While searching, invalid and unsubscribed
channels are skipped.
Storing channels in memory
XMDirect2 Tuner System starts updating all the
XM channels. “Channel 1” is tuned in
automatically.
You can preset up to 18 channels for both SIRIUS
and XM.
(“Manual presetting” ' page 7)
Selecting a preset station
(“Selecting a preset station/channel” ' page 7)
ENGLISHޓ|
9
Page 10

CD/USB
CD/USB
Playing a CD/USB device
Label side
USB input terminal
USB 2.0 cable
(not supplied)
or
USB cable from the rear of the unit
The source changes to “CD” and playback starts.
This unit can play MP3/WMA files stored in CD-R, CD-RW, and MP3/WMA/WAV files in USB mass
storage device (such as a USB memory and Digital Audio Player).
Make sure all important data has been backed up. We shall bear no responsibility for any loss of data
in USB mass storage class device while using this system.
Ejected disc not removed within 15 seconds will reload automatically.
If the disc cannot be ejected, ' page 3.
Selecting a folder/track
Selects folder.
(For MP3/WMA/WAV)
Selects track. (Press)
Fast-forwards or reverses
the track. (Hold)
The source changes to “USB” and playback starts.
Selecting the playback modes
You can select one of the following playback
modes at a time.
1
- - - - - - - - or - - - - - - - -
Press 1 for REPEAT.
Press 2 for RANDOM.
Press again to exit.
(Hold)
Selecting a track/folder from
the list
<REPEAT>)<RANDOM>
1
2
3
|ޓENGLISH
10
Select a folder. (For MP3/WMA/WAV)
Select a track.
For MP3/WMA/WAV
If there are many folders or tracks, you can fast
search for the desired folder or track by turning
the control dial quickly, or use Quick Search
(' page 13).
2
REPEAT
RPT OFF Cancels repeat playback.
TRACK RPT Repeats current track.
FOLDER RPT * Repeats current folder.
RANDOM
RND OFF Cancels random playback.
Randomly plays all tracks of
FOLDER RND *
ALL RND Randomly plays all tracks.
* For MP3/WMA/WAV
current folder, then tracks of
next folders.
Page 11

iPod/iPhone
Playing an iPod/iPhone
USB input terminal
3
Select the desired track.
USB 2.0 cable (accessory
of the iPod/iPhone)
or
USB cable from the
rear of the unit
The source changes to “IPOD-FRONT/IPOD-REAR”
and playback starts.
Selecting the control mode
#<HEAD MODE>/<IPOD MODE>/
<APP MODE>
HEAD
MODE
IPOD
MODE
APP
MODE
You can also change the setting using <IPOD
SWITCH> in the menu. (' page 25)
Controls iPod playback through this
unit.
Controls iPod playback from the
iPod/iPhone.
The sound of any functions (music,
games, applications, etc.) running on
the connected iPod/iPhone is
emitted through the speakers
connected to this unit.
Selecting a track
Applicable under <HEAD MODE>/<IPOD MODE>
only.
For <APP MODE>, applicable only for some audio
applications.
Selects track/chapter.
(Press)
Fast-forwards or reverses
the track. (Hold)
Selecting a track from the list
Repeat this step until the desired track is selected.
If the selected menu contains many tracks, you
can fast search for the desired track by turning
the control dial quickly, or use Quick Search
(' page 13).
Selecting the playback modes
Applicable under <HEAD MODE> only.
You can select one of the following playback
modes at a time.
1
- - - - - - - - or - - - - - - - -
(Hold)
2
REPEAT
RPT OFF Cancels repeat playback.
ONE RPT
ALL RPT
RANDOM
RND OFF Cancels random playback.
SONG RND
ALBUM RND
“ALBUM RND” is not applicable for some iPod/
iPhone.
Press 1 for REPEAT.
Press 2 for RANDOM.
Press again to exit.
<REPEAT>)<RANDOM>
Functions the same as “Repeat
One” of the iPod.
Functions the same as “Repeat
All” of the iPod.
Functions the same as “Shuffle
Songs” of the iPod.
Functions the same as “Shuffle
Albums” of the iPod.
Applicable under <HEAD MODE> only.
1
2
Select the desired list.
PLAYLISTS)ARTISTS)ALBUMS)SONGS)
PODCASTS)GENRES)COMPOSERS)
AUDIOBOOKS) (back to the beginning)
ENGLISHޓ|
11
Page 12

姞
iPod/iPhone
iPod/iPhone application
You can operate JVC original application with this
unit in <APP MODE>. For more details, visit JVC
website: <http://www3.jvckenwood.com/
english/car/index.html> (English website only).
Pandora姞 internet radio
Preparation
1
Search for “Pandora” in the Apple iTunes
App Store to find and install the most
current version of the Pandora姞
application onto your device.
2
In the application on your device, log in
and create an account with Pandora姞. If
you are not a registered user, an account
can also be created at www.pandora.com.
Pandora姞 is only available in the US.
Because Pandora姞 is a third-party service, the
specifications are subject to change without
prior notice. Accordingly, compatibility may be
impaired or some or all of the services may
become unavailable.
Some functions of Pandora姞 cannot be
operated from this unit.
For issues using the application, please contact
Pandora at pandora-support@pandora.com.
Listening to
Pandora
internet radio
Creating a new station
You can create a new station based on the
currently playing song or artist.
1
2
A new station is created based on the current
song or artist.
-<NEW STATION>
-<FROM ARTIST>/
<FROM SONG>
Searching the registered station
from the list
1
2
Select the station list display mode.
BY DATE According to the registration date
A - Z Alphabetical order
You can proceed directly to step 3 to select
station or use the search menu to scroll through
the desired menu. (' page 13)
3
Select the desired station.
1
Open the Pandora姞 application on your
device.
2
Connect the device to one of the USB
terminals. (' page 11)
The source switches and broadcast starts
automatically from your current station.
Basic Operations
Starts/pauses playback.
Selects thumbs up/thumbs
down.
If thumbs down is selected,
current track is skipped.
Skips track.
To bookmark song/artist information
While receiving a song...
(Hold)
<THIS ARTIST>)<THIS TRACK>
“BOOKMARKED” appears and the song/artist
information is stored to the iPod/iPhone.
This unit allows you to bookmark songs and/or
artists in your personalized Pandora姞 account.
The bookmarks will not be available for review
on the unit but will be available in your
Pandora姞 account.
-<BOOKMARK>
|ޓENGLISH
12
Page 13

Quick Search
If you have many folders/tracks/contacts, you can search through them quickly according to the first
character (A to Z, 0 to 9 and OTHERS).
1
Enter list menu or “Hands-Free” menu.
CD (MP3/WMA)/
USB (MP3/WMA/WAV)
iPod/iPhone Bluetooth phonebook
Quick Search
Select the desired list.
2
Select the desired character (A to Z, 0 to 9
3
Select your desired folder/track/contact.
Select <PHONEBOOK>.
and OTHERS).
For CD/USB and iPod/iPhone, repeat step 3 until
the desired track is selected.
Searching may not work on some of the layers
“OTHERS” appears if the first character is not A to
Z or 0 to 9, such as #, -, !, etc.
of the selected menu (for iPod/iPhone).
External components
You can connect an external component to the following terminals:
EXT IN: Expansion port on the rear of this unit using the following adapters (not supplied):
- JVC KS-U57, Line Input Adapter
- JVC KS-U58, AUX Input Adapter
AUX IN: AUX (auxiliary) input jack on the control panel.
For details, refer also to the instructions supplied with the adapters or external components.
For connection to expansion port on the rear of this unit, refer to the “Installation/Connection Manual”.
1
Playing an external component
from AUX/expansion port
3.5 mm (1/8") stereo mini plug
(not supplied)
Portable audio
player, etc.
Use a 3-terminal plug head
stereo mini plug for optimum
audio output.
Connect to AUX on the control panel and/
or the expansion port on the rear panel.
2
Set the source as necessary.
Select <AUX ON> or <EXT ON>.
Press MENU to exit.
3
Select <AUX IN> or <EXT IN>.
4
Turn on the connected component and
(Hold)
-<SRC SELECT>
-<AUX IN> or <EXT IN>
-<AUX ON> or
<EXT ON>
start playing the source.
ENGLISHޓ|
13
Page 14

Bluetooth
iPod/iPhone
By connecting the supplied KS-UBT1 USB Bluetooth Adapter and microphone to this unit, you can
operate a Bluetooth device using this unit. Refer to the “Installation/Connection Manual” for details on
connecting the microphone.
Once the USB Bluetooth Adapter is attached, this unit is always
available for pairing.
Refer also to the instructions supplied with the Bluetooth
device.
Refer to the separate appendix to check the countries where
you may use the Bluetooth function.
If you turn off the unit or unplug the USB Bluetooth Adapter during a phone call conversation, the
Bluetooth connection is disconnected. Continue the conversation using your mobile phone.
This unit supports the following Bluetooth profiles
Hands-Free Profile (HFP 1.5)
Object Push Profile (OPP 1.1)
Phonebook Access Profile (PBAP 1.0)
Advanced Audio Distribution Profile (A2DP 1.2)
Audio/Video Remote Control Profile (AVRCP 1.3)
姞姞 connection
KS-UBT1
Microphone
Warning:
Stop the car in a safe place before operating complicated steps such as dialing numbers, using
phonebook, etc.
Pairing a Bluetooth device
When connecting a Bluetooth device to the unit for the first time, perform pairing between the unit and
the device.
Up to five Bluetooth devices can be registered in this unit.
A maximum of two Bluetooth phones and one Bluetooth audio device can be connected at any
time.
This unit supports Secure Simple Pairing (SSP).
1
Connect the USB Bluetooth adapter
(KS-UBT1) to one of the USB input
terminals.
USB cable from
the rear of the unit
2
Search and select “JVC Unit” on the Bluetooth device.
“BT PAIRING” flashes on the display.
For some Bluetooth devices, you may need to enter the Personal Identification Number (PIN) code
immediately after searching.
USB input terminal
KS-UBT1
or
|ޓENGLISH
14
Page 15
#
#
Bluetooth
3
Perform (A) or (B) depending on what scrolls on the display.
For some Bluetooth devices, pairing sequence may vary from the steps described below
(A) If “[Device Name]”#“XXXXXX”
“VOL – YES”#“BACK – NO” scrolls on the
display,
“XXXXXX” is a 6-digit passkey randomly
generated during each pairing.
Ensure that the passkey which appears
on the unit and Bluetooth device is the
same.
Select “YES” to confirm the passkey.
(B) If “[Device Name]”##“VOL – YES”
“BACK – NO” scrolls on the display,
Select “YES” to start the pairing.
(1) If “PAIRING”#“PIN 0000” scrolls on the
display, enter the PIN code “0000” into the
Bluetooth device.
You can change to a desired PIN code before
pairing. (' page 25)
姞姞 connection
(2) If only “PAIRING” appears, operate the
Operate the Bluetooth device to confirm
Bluetooth device to confirm pairing.
the passkey.
After pairing is successful, “PAIRING COMPLETED” appears on the display.
The unit will establish a connection with the newly paired Bluetooth device, “” lights up on the
display and you can now control the Bluetooth device through the unit.
“” will light up when a phone is connected.
“” will light up when an audio device is connected.
Once the connection is established, the device is registered to the unit and there is no need to
perform the pairing again unless you delete the registered device.
Some Bluetooth devices may not be able to connect to the unit after pairing. Connect the device to
the unit manually. Refer to the instruction manual of the Bluetooth device for more information.
Connecting/Disconnecting a registered device manually
To connect
1
2
Select <CONNECT>.
3
Select the desired device.
“CONNECTING”#“[Device Name]” scrolls on the
display when the unit is connecting to the device.
“CONNECTED”#“[Device Name]” scrolls on the
display when the device is connected.
(Hold)
-<BLUETOOTH>
-<PHONE>/<AUDIO>
-<CONNECT>
To disconnect
1
2
Select <DISCONNECT>.
3
Select the desired device.
“DISCONNECT”#“[Device Name]” scrolls on the
display when the device is disconnected.
4
Press MENU to exit.
(Hold)
-<BLUETOOTH>
-<PHONE>/<AUDIO>
-<DISCONNECT>
4
Press MENU to exit.
ENGLISHޓ|
15
Page 16

Bluetooth
姞姞 connection
Connecting to JVC original application
JVC original application is designed to view JVC
car receiver status and perform simple control
operations on Android smart phones.
For JVC original application operations, visit JVC
website:
<http://www3.jvckenwood.com/english/car/
index.html> (English website only).
1
2
Select <CONNECT>.
3
Select the desired smart phone.
(Hold)
-<BLUETOOTH>
-<APPLICATION>
-<CONNECT>
Deleting a registered device
1
2
Select <DELETE YES>.
“DELETED” appears when the device is deleted.
3
Press MENU to exit.
(Hold)
-<BLUETOOTH>
-<DELETE PAIR>
- [Device name]
-<DELETE YES>
“CONNECTED”#“[Device Name]” scrolls on the
display when the device is connected.
4
Press MENU to exit.
Bluetooth mobile phone
Receiving a call
To receive a call
When there is an incoming call, the source
automatically changes to “BT FRONT”/“BT REAR”.
“RECEIVING” appears on the display, followed
by the phone number or name.
The display flashes in blue. (' page 19)
or
You can also press ////SOURCE on the
remote control to answer a call.
When <AUTO ANSWER> is set to <ON>, the
unit answers incoming calls automatically.
(' page 19)
To end a call
(Hold) or (Hold)
You can also press and hold ////SOURCE
on the remote control to end a call.
To deactivate/activate hands-free
mode
During a phone conversation...
Operations may vary according to the
connected Bluetooth device.
|ޓENGLISH
16
Page 17

Bluetooth mobile phone
Adjustments during a call
Phone volume(00 — 50)
[VOLUME 15]: Volume
adjustments made during a call
will not affect the other
sources.
Microphone level
(01— 03)[02]: As the number
increases, the microphone
becomes more sensitive.
Noise Reduction and Echo
Cancellation mode:
Turns on/off.
Text message notification
When a text message is received, the unit rings
and “RCV MESSAGE”#“[Device name]” appears.
<MSG NOTICE> must be set to <ON>.
(' page 19)
You cannot read, edit, or send a message
through the unit.
Switching between two connected mobile phones
When two mobile phones are connected to the unit, you can access to both “Hands-Free” menus.
Press to enter 1st phone’s “Hands-Free” menu.
Press twice to enter 2nd phone’s “Hands-Free” menu.
Press to return to 1st phone’s “Hands-Free” menu.
Making a call from the hands-free menu
1
Enter the “Hands-Free” menu.
3
Select and call the contact (name/phone number).
DIALED
RECEIVED
MISSED CALL
PHONEBOOK
DIAL NUMBER Enter the phone number to dial.
Select the name/phone number
If the phonebook contains many numbers, you can fast search for the desired
number by turning the control dial quickly, or use Quick Search (' page 13).
“NO HISTORY” appears if there is no recorded call history.
“NO DATA” appears if no entries are found in the Bluetooth device’s
phonebook.
“SEND P.BOOK MANUALLY” appears if <P.BOOK SEL> is set to
<P.BOOK IN UNIT> or the phone does not support PBAP. (' page 19)
Select number/character
2
Select a calling method.
Refer to the table below
for options.
Call
Move the entry position
Call
ENGLISHޓ|
17
Page 18

Bluetooth mobile phone
Making a call from memory
You can store up to 6 contacts in the memory of
this unit for speed dialing.
To store contacts in memory
1
Enter the “Hands-Free” menu.
2
Select a call method.
-<DIALED>/
<RECEIVED>/
<MISSED CALL>/
<PHONEBOOK>/
<DIAL NUMBER>
3
Select a contact (name/phone number).
Name
4
Store in memory.
(Hold)
“MEMORY PX” flashes. The contact is stored to the
selected number button (1 - 6).
To erase a contact from preset memory, select
<DIAL NUMBER> in step 2 and store a blank
number.
Phone Number
or
If two phones are connected,
Enter “phone list”
Select the desired phone
(Hold)
2
When “WAIT VOICE”#“[Device Name]”
scrolls on the display, speak the name of
the contact you want to call or the voice
command to control the phone functions.
Supported voice recognition features vary for
each phone. Please refer to the instruction
manual of the connected phone for details.
Deleting a contact (name/
phone number)
Only when <P.BOOK SEL> is set to <P.BOOK IN
UNIT>. (' page 19)
1
Enter the “Hands-Free” menu.
2
Select a call method.
-<DIALED>/
<RECEIVED>/
<MISSED CALL>/
<PHONEBOOK>
3
Select the contact (name/phone number)
to be deleted.
Name
Phone Number
To make a call from memory
1
Enter the “Hands-Free” menu.
2
Select and call the contact.
“NO PRESET” appears if there are no contacts
stored in memory.
Using voice recognition
You can use the voice recognition features of the
connected phone through this unit.
“NOT SUPPORT” appears if the connected
phone does not support this feature.
1
Enter voice recognition mode.
If only one phone is connected,
(Hold)
or
4
Enter “Delete Entries” menu.
(Hold)
5
Select <DELETE> or <DELETE ALL>.
DELETE Selected name/phone number
from step 3 is deleted.
DELETE
ALL
All name/phone numbers from
selected menu in step 2 are
deleted.
|ޓENGLISH
18
Page 19

Bluetooth mobile phone
Using the SETTINGS menu
3
1
Enter the “Hands-Free” menu.
2
Select <SETTINGS>.
The following settings are applicable to the paired device. If another device is paired, perform the
settings again.
Repeat this step to perform the necessary
settings.
To return to the previous menu, press .
To exit from the menu, press MENU.
Menu item
P.BOOK SEL * [PB IN PHONE]: The unit browses the phonebook of the connected phone.
PB IN UNIT: The unit browses the phonebook registered in the unit. (You can
copy the phonebook memory using <P.BOOK WAIT> (' page 25).)
AUTO ANSWER ON: The unit answers incoming calls automatically.
[OFF]: The unit does not answer incoming calls automatically.
RING TONE [IN UNIT]: The unit rings to alert you when a call/text message comes in.
– CALL: Select your preferred ring tone (TONE 1 — 5) for incoming calls.
– MESSAGE: Select your preferred ring tone (TONE 1 — 5) for incoming text
messages.
Default ring tone is different according to the paired device.
IN PHONE: The unit uses the connected phones’ ring tone to alert you when a
call/text message comes in. (The connected phone will ring if it does not
support this feature.)
RING COLOR
NR/EC MODE [ON]: Turns on the Noise Reduction and Echo Cancellation of the connected
COLOR 01 — 29[06]: Select your preferred color for incoming call/text
message alerts.
OFF: Cancels.
microphone for clearer sound.
OFF: Cancels.
Selectable setting (Initial: [XX])
MIC LEVEL
MSG NOTICE
* Selectable only when the connected phone supports PBAP.
(01— 03)[02]: The sensitivity of the microphone increases as the MIC level is
increased.
[ON]: The unit rings and “RCV MESSAGE”#“[Device Name]” appears to alert you
of an incoming text message.
OFF: The unit does not alert you of an incoming text message.
ENGLISHޓ|
19
Page 20

姞
Bluetooth audio player
Bluetooth audio player
Playing a Bluetooth audio player
Select <BT REAR> or <BT FRONT>
depending on the location of the USB
A
Operations and display indications may differ according to their availability on the connected device.
Basic operations
Starts or resumes playback.
Mutes the sound.
Bluetooth adapter KS-UBT1.
Operate the Bluetooth audio player to start
playback.
.
RANDOM
RND OFF Cancels random playback.
ALL RND
GROUP RND
Randomly plays all tracks.
Randomly plays all tracks of
the current group.
Selects group/folder.
Reverse skips or forward skips.
(Press)
Fast-forwards or reverses the
track. (Hold)
Selecting the playback modes
For Bluetooth devices that support AVRCP 1.3.
1
- - - - - - - - or - - - - - - - -
(Hold)
2
REPEAT
RPT OFF Cancels repeat playback.
TRACK RPT Repeats current track.
ALL RPT Repeats all tracks.
GROUP RPT
Press 1 for REPEAT.
Press 2 for RANDOM.
Press again to exit.
<REPEAT>)<RANDOM>
Repeats all tracks of the
current group.
Listening to BT Pandora姞
internet radio
You can listen to Pandora姞 internet radio on your
smart phone through Bluetooth on this unit.
1
Open the Pandora姞 application on your
device.
2
Connect to Bluetooth audio.
Refer to “To connect” ' page 15, select
<BLUETOOTH>#<AUDIO>#<CONNECT>.
3
Select <BT REAR> or <BT FRONT>
depending on the location of the USB
Bluetooth adapter KS-UBT1.
4
Press 3 to select <BT PANDORA>.
The source switches and broadcast starts
automatically.
You can also activate Pandora姞 on your
Bluetooth smart phone via <BT AUDIO SW>.
(' page 25)
BT Pandora姞 internet radio is only for Android
OS and RIM OS.
You can operate Pandora姞 in the same way as
Pandora姞 for iPod/iPhone. (' page 12)
|ޓENGLISH
20
Page 21

Illumination color adjustments
Display zone
Button zone
All zone: Includes both Button zone and
Display zone.
Selecting the preset color
You can select a preset color for <BUTTON
ZONE>, <DISP ZONE>, and <ALL ZONE>
separately.
1
2
Select <COLOR>.
3
BUTTON ZONE
DISP ZONE
ALL ZONE
Initial color: BUTTON ZONE [06], DISP ZONE
[01], ALL ZONE [06].
If <ALL ZONE> is selected, the button and
display illumination will change to the current/
selected <BUTTON ZONE> color.
4
Press MENU to exit.
(Hold)
COLOR 01-29/USER/
COLOR FLOW 01-03*
* Color changes in
different speeds.
Storing your own adjustments
You can store your own day and night colors for
<BUTTON ZONE> and <DISP ZONE> separately.
1
2
Select <COLOR SETUP>.
3
DAY
COLOR
NIGHT
COLOR
MENU
COLOR
(Hold)
BUTTON
ZONE
DISP
ZONE
BUTTON
ZONE
DISP
ZONE
ON
OFF
Select a primary
color <RED/GREEN/
BLUE>, and then
adjust the level
<00-31>. Repeat this
procedure until you
have adjusted all the
three primary colors.
Your adjustment is
automatically stored
to “USER”.
If “00” is selected for
all the primary colors
for <DISP ZONE>,
nothing appears on
the display.
Changes the display and
buttons illumination
during menu, list search,
and playback mode
operations.
NIGHT COLOR/DAY COLOR is changed by
turning on/off your car’s headlight.
4
Press MENU to exit.
ENGLISHޓ|
21
Page 22

Brightness adjustments
Brightness adjustments
You can select your preferred brightness for <BUTTON ZONE>, <DISP ZONE> separately.
1
(Hold)
3
2
-<DIMMER>
-<BRIGHTNESS>
-<DAY>/<NIGHT>
BUTTON ZONE BUTTON 00 to 31
DISP ZONE DISP 00 to 31
4
Press MENU to exit.
Sound adjustments
This unit memorizes sound settings adjusted for each individual source.
Satellite Radio tuner and EXT IN share the same sound adjustment settings.
Selecting the preset sound
You can select a preset sound mode, for each
individual source, suitable for the music genre.
1
2
(Hold)
-<EQ SETTING>
-<EQ PRESET>
3
DYNAMIC-VOCAL BOOST-BASS BOOSTUSER-FLAT-NATURAL-(back to the beginning)
Storing your own adjustments
While listening, you can adjust and store the tone
level for each individual source.
Easy Equalizer
1
2
(Hold)
-<EQ SETTING>
-<EASY EQ>
Pro Equalizer
1
2
3
Adjust the sound elements of the selected tone.
BASS (Initial: [XX])
Frequency 60/80/[100]/200 Hz
Level LVL -06 to +06 [+05]
Q [Q1.0]/Q1.25/Q1.5/Q2.0
MIDDLE
Frequency 0.5/[1.0]/1.5/2.5 kHz
Level LVL -06 to +06 [00]
Q Q0.75/Q1.0/[Q1.25]
TREBLE
Frequency 10.0/[12.5]/15.0/17.5 kHz
Level LVL -06 to +06 [+05]
Q [Q FIX]
(Hold)
-<PRO EQ>
-<BASS>**/<MIDDLE>/
<TREBLE>
3
Adjust the level.
SUB.W * 00 to 08 [08]
BASS LVL ** -06 to +06 [+05]
MID LVL -06 to +06 [00]
TRE LVL -06 to +06 [+05]
The adjustments are stored and <USER> is
activated.
|ޓENGLISH
22
(Initial: [XX])
4
Repeat steps 2 and 3 to adjust other tones.
The adjustments are stored and <USER> is
activated.
5
Press MENU to exit.
* Available only when <SUB.W> is set to
<ON>. (' page 24)
** Available only when <HPF> is set to <OFF>.
(' page 24)
Page 23

Menu operations
Menu operations
1
If no operation is done for about 60 seconds, the
operation will be canceled.
(Hold)
3
Repeat step 2 if necessary.
To return to the previous menu, press .
To exit from the menu, press DISP or MENU.
2
Menu item
DEMO
CLOCK SET
CLOCK ADJ *1 [AUTO]: The built-in clock is automatically adjusted using the clock data
TIME ZONE *1*2 [EASTERN]/ATLANTIC/NEWFOUND/ALASKA/PACIFIC/MOUNTAIN/
CLOCK
DST *1*2 [DST ON]: Activates daylight savings time if your residential area is subject
COLOR
COLOR SETUP
DIMMER SET Selects the display and button illumination adjusted in the <BRIGHTNESS>/
DIMMER
BRIGHTNESS DAY[31]/NIGHT[15]: Brightness settings for the display and button
SCROLL *4 [ONCE]: Scrolls the display information once.
TAG DISPLAY [ON]: Shows the TAG information while playing MP3/WMA/WAV tracks.
DISPLAY
EQ SETTING
FADER *5*6
BALANCE *6
AUDIO
For settings, ' page 4.
For settings, ' page 4.
provided via the Satellite Radio channel.
OFF: Cancels.
CENTRAL: Selects your residential area from one of the time zones for clock
adjustment.
to DST.
DST OFF: Cancels.
For settings, ' page 21.
<COLOR SETUP> setting.
[AUTO]: Changes between the Day and Night adjustments when you turn
off/on the car headlights. *3
ON: Selects the Night adjustments.
OFF: Selects the Day adjustments.
illumination for day and night.
BUTTON ZONE/DISP ZONE: Sets the brightness levels 00 — 31.
AUTO: Repeats scrolling (at 5-second intervals).
OFF: Cancels.
OFF: Cancels.
For settings, ' page 22.
R06 — F06[00]: Adjusts the front and rear speaker output balance.
L06 — R06[00]: Adjusts the left and right speaker output balance.
Selectable setting (Initial: [XX])
*1 Displayed only when SIRIUS Satellite Radio or XM Satellite Radio is connected.
*2 Displayed only when <CLOCK ADJ> is set to <AUTO>.
*3 The illumination control lead connection is required. (See “Installation/Connection Manual”.)
This setting may not work correctly on some vehicles (particularly on those having a control
dial for dimming). In this case, change the setting to other than <DIMMER AUTO>.
*4 Some characters or symbols will not be shown correctly (or will be blanked) on the display.
*5 If you are using a two-speaker system, set the fader level to “00”.
*6 This adjustment will not affect the subwoofer output.
ENGLISHޓ|
23
Page 24

Menu operations
Menu item
LOUD
(Loudness)
VOL ADJUST
(Volume adjust)
SUB. W
(Subwoofer)
SUB.W LPF *7
(Subwoofer lowpass filter)
SUB.W LEVEL *7
AUDIO
(Subwoofer level)
HPF *7
(High-pass filter)
BEEP
(Keytouch tone)
AMP GAIN
(Amplifier gain)
SSM
AREA
(Frequency
tuning interval)
MONO
(Monaural mode)
SID The 12-digit SIRIUS identification number appears on the display. (Displayed
TUNER
BLEND HOLD
IF BAND
(Intermediate
frequency band)
RADIO TIMER
ON: Boosts low and high frequencies to produce a well-balanced sound at
a low volume level.
[OFF]: Cancels.
-05 — +05[00]: Presets the volume adjustment level of each source,
compared to the FM volume level. Before adjustment, select the source you
want to adjust. (“VOL ADJ FIX” appears if “FM” is selected.)
OFF: Cancels.
[ON]: Turns on the subwoofer output.
LOW 55Hz/MID 85Hz/[HIGH 120Hz]: Audio signals with frequencies
lower than 55 Hz/85 Hz/120 Hz are sent to the subwoofer.
00 — 08[08]: Adjusts the subwoofer output level.
ON: Activates the High Pass Filter. Low frequency signals are cut off from
the front/rear speakers.
[OFF]: Deactivates. (All signals are sent to the front/rear speakers.)
[ON]/OFF: Activates or deactivates the keypress tone.
LOW POWER: Limits the maximum volume level to 30. (Select if the
maximum input power of each speaker is less than 50 W to prevent
damaging the speakers.)
[HIGH POWER]: The maximum volume level is 50.
For settings, ' page 7. (Displayed only when the source is “FM” or “AM”.)
[AREA US]: For North/Central/South America, AM/FM intervals: 10kHz/200kHz.
AREA EU: For any other areas, AM/FM intervals: 9kHz/50kHz.
AREA SA: For some South American countries, AM/FM intervals: 10kHz/50kHz.
Displayed only when the source is “FM”.
[OFF]: Enables stereo FM reception.
ON: Improves the FM reception but stereo effect will be lost.
only when SIRIUS Satellite Radio is connected.)
For settings, ' page 6. (Displayed only when the source is “FM” or “AM”.)
[AUTO]: Increases the tuner selectivity to reduce interference noises
between adjacent stations. (Stereo effect may be lost.)
WIDE: Subject to interference noises from adjacent stations, but sound
quality will not be degraded and the stereo effect will remain.
For settings, ' page 7.
Selectable setting (Initial: [XX])
*7 Displayed only when <SUB.W> is set to <ON>.
|ޓENGLISH
24
Page 25

Menu operations
Menu item
USB *8 DRIVECHANGE: Selects to change the drive when a device with multiple
drives is connected to the USB input terminal (front/rear).
TAG ALL CLEAR
IPOD SWITCH *9
(iPod/iPhone control)
AUDIOBOOKS *9 NORMAL/FASTER/SLOWER: Selects the playback speed of the
PHONE *11 CONNECT/DISCONNECT: Connects or disconnects the Bluetooth phone/
AUDIO
APPLICATION CONNECT/DISCONNECT: Connects or disconnects the application in the
BT AUDIO SW *12
DELETE PAIR
P. BOOK WAIT Copies up to 400 numbers from the phonebook memory of a connected
SET PINCODE Changes the PIN code (1 to 6-digits). (Default PIN code: 0000)
AUTO CNNCT [ON]: Establishes connection automatically with the Bluetooth device when
BLUETOOTH *10
INITIALIZE YES: Initializes all the Bluetooth settings (including stored pairing,
INFORMATION PH CNNT DEV/AU CNNT DEV/APP CNT DEV *13: Displays connected
AM *14 [ON]/OFF: Enables or disables “AM” in source selection.
EXT IN *14 EXT ON/[EXT OFF]: Enables or disables “EXT IN” in source selection.
AUX IN *14 [AUX ON]/AUX OFF: Enables or disables “AUX IN” in source selection.
BT AUDIO *15 [BT AU ON]/BT AU OFF: Enables or disables “BT AUDIO” in source
SRC SELECT
SOFT VER Displays the firmware version of the unit.
For settings, ' page 8.
[HEAD MODE]/IPOD MODE/APP MODE:
For settings, ' page 11.
Audiobooks sound file in your iPod/iPhone.
Initial selection depends on your iPod/iPhone setting.
audio device. (' page 15)
smart phone. (' page 16)
Switches between “BT AUDIO” and “BT PANDORA”.
For settings, ' page 16.
phone to the unit via OPP.
Turn the control dial to select a number, press / to move to the entry
position. After entering the PIN code, press the control dial to confirm.
the unit is turned on.
OFF: Cancels.
phonebook, and etc.).
[NO]: Cancels.
phone/audio/application device name.
MY BT NAME: Displays the unit name (JVC Unit).
MY ADDRESS: Shows address of USB Bluetooth Adapter.
selection.
Selectable setting (Initial: [XX])
*8 Displayed only when the source is “USB FRONT/USB REAR”.
*9 Displayed only when the source is “IPOD-FRONT/IPOD-REAR”.
*10 If the USB Bluetooth Adapter is not connected to the unit, “PLEASE CNNT BT ADAPTER” scrolls
on the display.
*11 <CONNECT> will not be displayed if two Bluetooth phones are connected at the same time.
*12 Displayed only when the source is “BT FRONT/BT REAR”.
*13 Displayed only when a Bluetooth phone/audio player/application is connected.
Displayed only when the unit is in any source other than the corresponding source “AM/EXT IN/AUX IN”.
*14
*15 Displayed only when the USB Bluetooth Adapter (KS-UBT1) is attached and current source is
not “BT FRONT/ BT REAR”.
ENGLISHޓ|
25
Page 26

Remote controller
Remote controller
Preparing
When you use the remote controller for the first
time, pull out the insulation sheet.
Insulation sheet
For USA-California Only:
This product contains a CR Coin Cell Lithium
Battery which contains Perchlorate Material—
special handling may apply. See
www.dtsc.ca.gov/hazardouswaste/perchlorate
Replacing the lithium coin
battery
If the effectiveness of the remote controller
decreases, replace the battery.
CR2025
Caution:
Danger of explosion if battery is incorrectly
replaced. Replace only with the same or
equivalent type.
Battery shall not be exposed to excessive heat
such as sunshine, fire, or the like.
Warning:
Do not install any battery other than CR2025 or
its equivalent.
Do not leave the remote controller in places
(such as dashboards) exposed to direct
sunlight for a long time.
Store the battery in places out of reach of
children.
Do not recharge, short, disassemble, heat the
battery, or dispose of it in a fire.
Do not place the battery with other metallic
materials.
Do not poke the battery with tweezers or
similar tools.
Insulate the battery by wrapping it with tape
when disposing or storing it.
Additional information
About discs
This unit can only play the following CDs:
This unit can play back multi-session discs;
however, unclosed sessions will be skipped
during playback.
Unplayable discs
Discs that are not round.
Discs with coloring on the recording surface or
discs that are dirty.
Recordable/ReWritable disc that has not been
finalized. (For details on disc finalization, refer
to your disc writing software and your disc
recorder instruction manual.)
8 cm (3 inch) CD. Attempting to insert using an
adapter can cause malfunction. There may also
be problems ejecting the disc if inserted.
This unit is equipped with the steering wheel
remote control function. For details, refer also to
the instructions supplied with the remote
adapter.
Handling discs
Do not touch the recording surface of the disc.
Do not stick tape etc. on the disc, or use a disc
with tape stuck on it.
Do not use any accessories for the disc.
Clean from the center of the disc and move
outwards.
Clean the disc with a dry silicon or soft cloth.
Do not use any solvents.
When removing discs from this unit, pull them
out horizontally.
Remove any burrs from the center hole and
disc edge before inserting a disc.
DualDisc playback
The Non-DVD side of a “DualDisc” does not
comply with the “Compact Disc Digital Audio”
standard. Therefore, the use of Non-DVD side of a
DualDisc on this product may not be
recommended.
|ޓENGLISH
26
Page 27

Additional information
About audio files
Playable files
File extensions: MP3(.mp3), WMA(.wma),
WAV(.wav)
For MP3/WMA discs:
Bit rate:
MP3/WMA: 5 kbps - 320 kbps
Sampling frequency:
MP3 (MPEG-1): 32 kHz, 44.1 kHz, 48 kHz
MP3 (MPEG-2): 16 kHz, 22.05 kHz, 24 kHz
WMA: 8 kHz - 48 kHz
For USB devices:
Bit rate:
MP3 (MPEG-1): 32 kbps - 320 kbps
MP3 (MPEG-2): 8 kbps - 160 kbps
WMA: 5 kbps - 320 kbps
WAV: Linear PCM at 705 kbps and 1 411 kbps
Sampling frequency:
MP3 (MPEG-1): 32 kHz, 44.1 kHz, 48 kHz
MP3 (MPEG-2): 16 kHz, 22.05 kHz, 24 kHz
WMA: 8 kHz - 48 kHz
WAV: 44.1 kHz
Channel:
WMA/WAV: 1 ch/2 ch
Variable bit rate (VBR) files. (The elapsed time
for VBR files will not be displayed correctly.)
Unplayable files
MP3 files:
- encoded in MP3i and MP3 PRO format
- encoded in an inappropriate format
- encoded with Layer 1/2
WMA files:
- encoded in lossless, professional, and voice
format
- not based upon Windows Media® Audio
- copy-protected with DRM
Files which include data such as AIFF, ATRAC3,
etc.
File/folder names
This unit supports files/folder names recorded in a
format compliant with ISO 9660 Level 1, Level 2,
Romeo, or Joliet, and the proper extension code
<.mp3>, <.wma> or <.wav>.
Others
This unit can show WMA Tag and ID3 Tag
Version 1.0/1.1/2.2/2.3/2.4 (for MP3).
The search function works but search speed is
not constant.
About USB device
When connecting a USB cable, use the USB 2.0
cable.
You cannot connect a computer or portable
HDD to the USB input terminal of the unit.
Connect only one USB device to the unit at a
time. Do not use a USB hub.
USB devices equipped with special functions
such as data security functions cannot be used
with the unit.
Do not use a USB device with 2 or more
partitions.
This unit cannot recognize a USB device whose
rating is other than 5 V and exceeds 1 A.
This unit may not recognize a memory card
inserted into the USB card reader.
This unit may not play back files in a USB
device properly when using a USB extension
cord.
Depending on the shape of the USB devices
and connection ports, some USB devices may
not be attached properly or the connection
might be loose.
Operation and power supply may not work as
intended for some USB devices.
The maximum number of characters for:
– Folder names: 25 characters
– File names: 25 characters
– MP3 Tag: 128 characters
– WMA Tag: 128 characters
– WAV Tag: 128 characters
This unit can recognize a total of 20000 files,
2000 folders (999 files per folder including
folder without unsupported files), and of 8
hierarchies. However, the display can only
show until 999 folders/files.
Cautions
Do not pull out and attach the USB device
repeatedly while “READING” is shown on the
display.
Electrostatic shock at connecting a USB device
may cause abnormal playback of the device. In
this case, disconnect the USB device then reset
this unit and the USB device.
Do not leave a USB device in the car, expose to
direct sunlight, or high temperature. Failure to
do so may result in deformation or cause
damages to the device.
ENGLISHޓ|
27
Page 28

Additional information
About iPod/iPhone
iPod/iPhone that can be connected to this unit:
- iPod touch (4th generation) *2
- iPod touch (3rd generation) *2
- iPod touch (2nd generation) *2
- iPod touch (1st generation) *2
- iPod classic *2
- iPod with video (5th generation) *1
- iPod nano (6th generation) *2
- iPod nano (5th generation) *2
- iPod nano (4th generation) *2
- iPod nano (3rd generation) *2
- iPod nano (2nd generation)
- iPod nano (1st generation) *1
- iPhone 4S *2
- iPhone 4 *2
- iPhone 3GS *2
- iPhone 3G *2
- iPhone *2
*1 <IPOD MODE>/<EXT MODE> are not
applicable.
*2 Supports iTunes Tagging.
It is not possible to browse video files on the
“Videos” menu in <HEAD MODE>.
The song order displayed on the selection
menu of this unit may differ from that of the
iPod.
When operating an iPod/iPhone, some
operations may not be performed correctly or
as intended. In this case, visit the following JVC
website:
<http://www3.jvckenwood.com/english/car/
index.html> (English website only).
About Bluetooth
Trademark and license notice
Microsoft and Windows Media are either
registered trademarks or trademarks of
Microsoft Corporation in the United States
and/or other countries.
The Bluetooth word mark and logos are owned
by the Bluetooth SIG, Inc. and any use of such
marks by JVC KENWOOD Corporation is under
license. Other trademarks and trade names are
those of their respective owners.
SIRIUS, XM and SAT Radio Ready, and related
marks are registered trademarks of SIRIUS XM
Radio Inc. All rights reserved.
HD Radio Technology manufactured under
license from iBiquity Digital Corporation. U.S.
and Foreign Patents. HD Radio™ and the HD,
HD Radio, and “Arc” logos are proprietary
trademarks of iBiquity Digital Corp.
“Made for iPod” and “Made for iPhone” mean
that an electronic accessory has been designed
to connect specifically to iPod, or iPhone,
respectively, and has been certified by the
developer to meet Apple performance
standards. Apple is not responsible for the
operation of this device or its compliance with
safety and regulatory standards. Please note
that the use of this accessory with iPod, or
iPhone may affect wireless performance.
iPhone, iPod, iPod classic, iPod nano, iPod
touch and iTunes are trademarks of Apple Inc.,
registered in the U.S. and other countries.
PANDORA, the PANDORA logo, and the
Pandora trade dress are trademarks or
registered trademarks of Pandora Media, Inc.,
used with permission.
|ޓENGLISH
28
Depending on the Bluetooth version of the
device, some Bluetooth devices may not be
able to connect to this unit.
This unit may not work with some Bluetooth
devices.
Signal conditions vary, depending on the
surroundings.
When the unit is turned off, the device is
disconnected.
For more information about Bluetooth, visit the
following JVC website:
<http://www3.jvckenwood.com/english/car/
index.html> (English website only)
Page 29

Troubleshooting
Troubleshooting
Symptom Remedy/Cause
4 General
No sound, sound interrupted or
static noise.
Check the cords, antenna and cable connections.
Check the condition of the disc, connected device and
recorded tracks.
Ensure to use the recommended stereo mini plug when
connecting to an external component. (' page 13)
“MISWIRING CHK WIRING THEN
RESET UNIT”/“WARNING CHK
WIRING THEN RESET UNIT”
appears on the display and no
Ensure the terminals of the speaker leads are properly insulated
with tape before resetting the unit. (' page 3)
If the message does not disappear, consult your JVC car audio
dealer or kits supplying company.
operations can be done.
The unit does not work at all.
Source cannot be selected.
The correct characters are not
displayed (e.g. album name).
Reset the unit. (' page 3)
Check the <SRC SELECT> setting. (' page 25)
This unit can only display letters (upper case), numbers, and a
limited number of symbols.
4 FM/AM/HD Radio
SSM automatic presetting does
Store stations/channels manually.
not work.
Sound quality changes when
receiving HD Radio stations/
Fix the reception mode to either <ANALOG> or <DIGITAL>.
(' page 6)
channels.
No sound can be heard.
<ANALOG> is selected when receiving all digital broadcast of
HD Radio station. Select <AUTO> or <DIGITAL>. (' page 6)
<DIGITAL> is selected when receiving weak digital signals or
receiving conventional radio broadcast. Select <AUTO> or
<ANALOG>. (' page 6)
“MEMORY FULL” You are trying to store the 51st PSD. Transfer the tagged PSDs to
the iPod/iPhone, or clear all tagged PSDs.
“TAG ALREADY SAVED” You are trying to tag the song for the 2nd time while receiving
one song.
“NO TAG DATA” The broadcast currently received does not support the iTunes
Tagging or the broadcast does not provide PSD.
“CAN’T TRANS IPOD FULL” The memory of the iPod/iPhone is full.
“UNSUPPORTED DEVICE FOR
iTunes Tagging
TAGGING”
The connected iPod/iPhone is not compatible with iTunes
Tagging.
“TRANS ERROR” The iPod/iPhone is disconnected during data transfer.
“TRANS OFF” Data transfer is canceled.
4 CD/USB/iPod/iPhone
“PLEASE” and “EJECT” appear
Press [], then insert the disc correctly.
alternately on the display.
“IN DISC” appears on the display. The disc cannot be ejected properly. Make sure nothing is
blocking the loading slot.
“READING” keeps flashing on the
display.
Tracks/folders are not played
back in the order you have
A longer readout time is required. Do not use too many
hierarchical levels and folders.
Reload the disc or reattach the USB device.
The playback order is determined by the file name (USB) or the
order in which files were recorded (disc).
intended.
The elapsed playing time is not
correct.
This sometimes occurs during playback. This is caused by how
the tracks are recorded on the disc.
“NO FILE” appears on the display. Check whether the selected folder, the connected USB device,
or the iPod/iPhone contains a playable file.
ENGLISHޓ|
29
Page 30

Troubleshooting
Symptom Remedy/Cause
4 CD/USB/iPod/iPhone
“NOT SUPPORT” appears on the
display and track skips.
“CANNOT PLAY” flashes on
the display.
The unit cannot detect the
connected device.
The iPod/iPhone does not turn
on or does not work.
“CANNOT SKIP” The skip limit has been reached.
“NO STATION” No registered station in your iPod/iPhone.
“NO ACTIVE STATION” No active station.
“SET UP PANDORA ON YOUR
DEVICE”
New station creation:
Pandora姞
“NO STATION” There are no stations found for the current song or artist.
“STATION REACH LIMIT” You may not create more than 100 stations.
“CANNOT MAKE NEW
STATION”
4 Satellite Radio
“UNSUB CH” appears on the
display while listening to the
SIRIUS Satellite Radio.
No sound can be heard.
“UPDATING” appears on the display.
“NO SIG” or “NO SIGNAL”
appears on the display.
“NO ANT” or “NO ANTENNA”
appears on the display.
“INVALID CH” appears on the
display for about 5 seconds, then
returns to the previous channel
or default channel while listening
to the SIRIUS Satellite Radio.
Blank display appears. No text information for the selected channel.
“NO CH AV” or “CH UNAVL”
appears on the display for about
2 seconds, then returns to the
previous channel while listening
to the XM Satellite Radio.
“OFF AIR” appears on the display
while listening to the XM
Satellite Radio.
“LOADING” appears on the
display while listening to the XM
Satellite Radio.
“RESET 8” appears on the display.
Satellite Radio does not work at all.
Check whether the track is a playable file format.
Check whether the connected device is compatible with this
unit. (USB: ' page 32) (iPod/iPhone: ' page 28)
Ensure that the device contains files in the supported
formats. (' page 27)
Reattach the device.
Check the connection between this unit and iPod/iPhone.
Detach and reset the iPod/iPhone using hard reset. For
details on resetting the iPod/iPhone, refer to the instruction
manual supplied with the iPod/iPhone.
Check whether <IPOD SWITCH> setting is appropriate.
(' page 11)
Pandora姞 setup is not completed. Connect the iPod/iPhone to
this unit after completing the setup in your iPod/iPhone.
There is a problem creating a new station, such as a network
issue.
SIRIUS Satellite Radio is connected but does not have an active
subscription. For information on how to subscribe, ' page 9.
The unit is updating the channel information and it takes a few
minutes to complete.
Make sure your Satellite Radio antenna is mounted outside the
vehicle. Move the vehicle to an area with a clear view of the sky.
Check your Satellite Radio antenna connection and be sure it is
firmly attached.
No broadcast on the selected channel.
Select another channel or continue listening to the previous
channel or default channel.
Selected channel is no longer available or is unauthorized.
Select another channel or continue listening to the previous
channel.
Selected channel is not broadcasting at this time.
Select another channel or continue listening to the previous
channel.
The unit is loading the channel information and audio.
Text information are temporarily unavailable.
Reconnect this unit and the Satellite Radio correctly and reset
this unit.
|ޓENGLISH
30
Page 31

Troubleshooting
Symptom Remedy/Cause
4 Bluetooth
“BT FRONT”/“BT REAR” cannot be
selected.
No Bluetooth device is detected.
Pairing cannot be made.
“PAIRING FULL” scrolls on the
display when trying to perform
pairing.
Echo or noise occurs.
Phone sound quality is poor.
The unit does not respond when
you try to copy the phonebook
to the unit.
Sound is being interrupted or
skipped during playback of a
Bluetooth audio player.
The connected Bluetooth audio
player cannot be controlled.
“VOICE” calling method is not
successful.
“NOT SUPPORT” appears when
trying to perform voice dial.
“ERROR CNNCT” appears on the
display.
“ERROR” appears on the display. Try the operation again. If “ERROR” appears again, check if the
“PLEASE WAIT” appears on the
display.
“HW ERROR” appears on the
display.
“BT DEVICE NOT FOUND”
appears on the display.
Check <BT AUDIO> in the <SRC SELECT> setting. (' page 25)
Search from the Bluetooth device again.
Reset the unit. (' page 3)
Make sure you have entered the same PIN code to both the
unit and Bluetooth device.
Delete pairing information from both the unit and the
Bluetooth device, then perform pairing again.
You have already registered the maximum of five Bluetooth
devices in the unit. To pair another device, delete an existing
paired device from the unit first. (' page 16)
Adjust the microphone unit’s position.
Adjust <NR/EC MODE> and <MIC LEVEL> to a better
combination. (' page 19)
Reduce the distance between the unit and the Bluetooth
device.
Move the car to a place where you can get a better signal
reception.
You may have tried to copy the same entries (as stored) to the
unit. Press DISP or to exit.
Reduce the distance between the unit and the Bluetooth
audio player.
Turn off, then turn on the unit and try to connect again.
Other Bluetooth devices might be trying to connect to the
unit.
Check whether the connected Bluetooth audio player
supports Audio/Video Remote Control Profile (AVRCP). (Refer
to the instructions of your audio player.)
Disconnect and connect the Bluetooth player again.
Use “VOICE” calling method in a more quiet environment.
Reduce the distance from the microphone when you speak
the name.
Change “NR/EC MODE” to “OFF” (' page 19), then try again.
The connected phone does not support this feature.
The device is registered but the connection has failed. Connect
the device manually. (' page 15)
device supports the function you have tried.
The unit is preparing to use the Bluetooth function. If the
message does not disappear, turn off and turn on the unit, then
connect the device again (or reset the unit). (' page 3)
Reset the unit and try the operation again. If “HW ERROR”
appears again, consult your nearest JVC car audio dealer.
The unit failed to search for the registered Bluetooth devices
during Auto Connect. Turn on Bluetooth from your device
and connect manually.
ENGLISHޓ|
31
Page 32

Specifications
Specifications
AUDIO AMPLIFIER SECTION
Power Output 20 W RMS x 4 Channels at 4Ω and
≤1% THD+N
Load Impedance 4Ω (4Ω to 8Ω allowance)
Frequency Response 40 Hz to 20 000 Hz
Signal-to-Noise Ratio 80 dBA (reference: 1 W into 4Ω)
Line-Out, Subwoofer-Out Level/Impedance 2.5 V/20 kΩ load (full scale)
Output Impedance ≤ 600Ω
TUNER SECTION
FM Frequency Range 200 kHz step: 87.9 MHz to 107.9 MHz
50 kHz step: 87.5 MHz to 108.0 MHz
Usable Sensitivity 11.3 dBf (1.0 μV/75Ω)
50 dB Quieting Sensitivity 19.3 dBf (2.5 μV/75Ω)
Alternate Channel
Selectivity (400 kHz)
Frequency Response 20 Hz to 20 000 Hz (HD Radio broadcast)
Stereo Separation 70 dB (HD Radio broadcast)
Capture Ratio 3.5 dB
AM Frequency Range 10 kHz step: 530 kHz to 1 700 kHz
Sensitivity/Selectivity 20 μV/70 dB
Frequency Response 40 Hz to 15 000 Hz (HD Radio broadcast)
Stereo Separation 70 dB (HD Radio broadcast)
65 dB
40 Hz to 15 000 Hz (Conventional broadcast)
48 dB (Conventional broadcast)
9 kHz step: 531 kHz to 1 611 kHz
CD PLAYER SECTION
Signal Detection System Non-contact optical pickup (semiconductor
laser)
Number of Channels 2 channels (stereo)
Frequency Response 5 Hz to 20 000 Hz
Signal-to-Noise Ratio 98 dB
Wow and Flutter Less than measurable limit
USB SECTION
USB Standard USB 1.1, USB 2.0
Data Transfer Rate (Full Speed) Max. 12 Mbps
Compatible Device Mass storage class
Compatible File System FAT 32/16/12
Playable Audio Format MP3/WMA/WAV
Maximum Supply Current
DC 5 V " 1 A
|ޓENGLISH
32
Page 33

Specifications
BLUETOOTH SECTION
Version Bluetooth 2.1 certified (+EDR)
Power Class Class 2 Radio
Service Area 10 m (10.9 yd)
Profile HFP 1.5, OPP 1.1, A2DP 1.2, AVRCP 1.3, PBAP 1.0
GENERAL
Power Requirement (Operating Voltage) DC 14.4 V (11 V to 16 V allowance)
Grounding System Negative ground
Allowable Operating Temperature 0°C to +40°C (32°F to 104°F)
Dimensions
(W × H × D)
(approx.)
Mass
Subject to changes without notice.
If a kit is necessary for your car, consult your telephone directory for the nearest car audio speciality
shop.
Installation Size 182 mm × 111 mm × 160 mm
(7-3/16" × 4-3/8" × 6-5/16")
Panel Size 188 mm × 117 mm × 18 mm
(7-7/16" × 4-5/8" × 3/4")
1.9 kJ (4.1 lbs) (excluding accessories)
ENGLISHޓ|
33
Page 34

.
.
Having TROUBLE with operation?
Please reset your unit
Refer to page of How to reset your unit
USA ONLY
Still having trouble??
Call 1-800-252-5722
http://www.jvc.com
We can help you!
.
K EN, SP, FR
© 2011 JVC KENWOOD Corporation
1211DTSSANJEIN
Page 35

KW-HDR81BT
Installation/Connection Manual
Manual de instalación/conexión
GET0806-002A
[J]
ENGLISH / ESPAÑOL / FRANÇAIS
• Mounting and wiring this product requires skills and experience.
For safety’s sake, leave this work to professionals. If you experience
problems during installation, consult your JVC car audio dealer.
• The unit can only be installed in a car with a 12 V DC power supply,
negative ground.
• Disconnect the battery’s negative terminal and make all electrical
connections before installing the unit.
• Connect speakers with a maximum power of more than 50 W
(impedance of 4 Ω to 8 Ω). Otherwise, change the <AMP GAIN>
setting. (See page 24 of the INSTRUCTIONS.)
• Insulate unconnected wires with vinyl tape or other similar material.
To prevent a short circuit, do not remove the caps on the ends of the
unconnected wires or the terminals.
• If the fuse blows, first make sure the wires are not touching to cause
a short circuit, then replace the old fuse with one that has the same
rating.
• Install this unit in the console of your vehicle.
• Mount the unit so that the mounting angle is 30° or less.
• Be sure to ground this unit to the car’s chassis again after installation.
• After the unit is installed, check whether the brake lamps, blinkers,
wipers, etc. on the car are working properly.
• Do not touch the metal part of this unit during and shortly after
the use of the unit. Metal part such as the heat sink and enclosure
become hot.
Manuel d’installation/raccordement
WARNINGS / ADVERTENCIAS / AVERTISSEMENTS
• La instalación y cableado de este producto requiere de habilidad y
experiencia. Por motivos de seguridad, deja la labor de instalación
y montaje en manos de profesionales. Si experimenta problemas
durante la instalación, póngase en contacto con su distribuidor de
equipos de audio para automóvil JVC.
• La unidad puede instalarse solamente en un automóvil con fuente de
alimentación de 12 V CC, negativo a masa.
• Desconecte el terminal negativo de la batería y realice todas las
conexiones eléctricas antes de instalar la unidad.
• Conecte los altavoces con una potencia máxima de más de
50 W (impedancia de 4 Ω a 8 Ω). De lo contrario, cambie el
ajuste <AMP GAIN>. (Véase la página 24 del MANUAL DE
INSTRUCCIONES).
• Aísle los cables no conectados con cinta de vinilo u otro material
similar. Para prevenir los cortocircuitos, no quite las tapas de los
extremos de los cables o terminales no conectados.
• Si se funde un fusible, asegúrese primero de que los cables no estén
en contacto pues pueden ocasionar un cortocircuito, luego reemplace
el fusible dañados por otro de las mismas características.
• Instale esta unidad en la consola de su vehículo.
• Instale la unidad en un ángulo de montaje de 30° o menos.
• Asegúrese de volver a conectar a masa esta unidad al chasis del
automóvil después de la instalación.
• Después de haber instalado la unidad, compruebe que las luces de
freno, los intermitentes, los limpiaparabrisas, etc. del automóvil
funcionan correctamente.
• No toque la parte metálica de esta unidad durante e inmediatamente
después de usar la unidad. Las partes metálicas tal como el disipador
de calor y la carcasa estarán calientes.
1211DTSSANJEIN
© 2011 JVC KENWOOD Corporation
• Le montage et le câblage de ce produit nécessitent des compétences et de
l’expérience. Pour des raisons de sécurité, laissez un professionnel effectuer
le travail de montage et de câblage. Si vous rencontrez des problèmes
durant l’installation, consultez votre revendeur d’autoradio JVC.
• L’appareil peut uniquement être installé dans une voiture avec une
alimentation de 12 V CC, à masse négative.
• Déconnectez la borne négative de la batterie et réaliser toutes les
connexions avant d’installer l’appareil.
• Connectez des enceintes avec une puissance maximum de 50 W
(impédance de 4 Ω à 8 Ω). Sinon, changez le réglage <AMP GAIN>. (Voir
la page 24 du MANUEL D’INSTRUCTIONS.)
• Isolez les câbles non-connectés avec un ruban de vinyle ou d’un autre
matériel similaire. Pour éviter les courtscircuits, ne retirez pas non plus les
capuchons à l’extrémité des câbles non-connectés ou des prises.
• Si un fusible saute, assurez-vous d’abord que les câbles n’ont pas causé
de court-circuit puis remplacez le vieux fusible par un nouveau de même
valeur.
• Installez cet appareil dans la console de votre véhicule.
• Monter l’unité de façon à ce que l’angle de montage soit de 30˚ ou moins.
• Assurez-vous de raccorder de nouveau la mise à la masse de cet appareil
au châssis de la voiture après l’installation.
• Après avoir installé l’appareil, vérifiez si les lampes de frein, les indicateurs,
les clignotants, etc. de la voiture fonctionnent correctement.
• Ne touchez pas la partie métallique de cet appareil pendant ou juste
après son utilisation. Les parties métalliques, comme le dissipateur de
chaleur et le boîtier, deviennent chaudes.
EN, SP, FR
PRECAUTIONS on power supply and speaker
connections
• DO NOT connect the speaker leads of the power cord to the car
battery; otherwise, the unit will be seriously damaged.
• BEFORE connecting the speaker leads of the power cord to the
speakers, check the speaker wiring in your car.
• Connect the speaker wires correctly to the terminals to which they
correspond. The unit may damaged or fail to work if you share the
G wires or ground them to any metal part in the car.
Part list
A
Sleeve (fitted to the main unit when shipped) .................................(×1)
B
Brackets (fitted to the main unit when shipped) .............................(×2)
C
* Flat countersunk screws—M5 × 8 mm (3/8”) ....................................(×8)
D
* Round head screws—M2.6 × 3 mm (1/8”) ..........................................(×4)
E
Round head screws—M5 × 8 mm (3/8”) ..............................................(×8)
F
Power cord ..............................................................................................................(×1)
G
Trim plate ..................................................................................................................(×1)
H
Microphone .............................................................................................................(×1)
I
KS-UBT1: USB Bluetooth adapter .............................................................(×1)
* Four of these screws are fitted to the main unit when shipped. Keep
these screws for installation use if necessary.
PRECAUCIONES sobre las conexiones de la
fuente de alimentación y de los altavoces
• NO conecte los conductores de altavoz del cable de alimentación a
la batería de automóvil, pues podrían producirse graves daños en la
unidad.
• ANTES de conectar a los altavoces los conductores de altavoz del
cable de alimentación, verifique el conexionado de altavoz de su
automóvil.
Conecte los cables del altavoz correctamente con los terminales que
•
correspondan. La unidad puede estropearse o averiarse si se conectan
entre sí los cables G o los conecta a tierra con la carrocería del coche.
Lista de componentes
A
Manguito (fijado a la unidad principal cuando se expide de
fábrica) ...........................................................................................................................(×1)
B
Soportes (fijados a la unidad principal cuando se expide de
fábrica) ...........................................................................................................................(×2)
C
* Tornillos de cabeza avellanada plana—M5 × 8 mm
(3/8 pulgada) ..............................................................................................................(×8)
D
* Tornillos de cabeza esférica—M2,6 × 3 mm (1/8 pulgada) .........(×4)
E
Tornillos de cabeza esférica—M5 × 8 mm (3/8 pulgada) .............(×8)
F
Cordón de alimentación .....................................................................................(×1)
G
Placa de guarnición ................................................................................................(×1)
H
Micrófono ....................................................................................................................(×1)
I
KS-UBT1: Adaptador Bluetooth USB .........................................................(×1)
* Cuatro de los tornillos vienen de fábrica fijados a la unidad principal.
Guarde estos tornillos para utilizar en la instalación, si fuera
necesario.
PRECAUTIONS sur l’alimentation et la
connexion des enceintes
• NE CONNECTEZ PAS les fils d’enceintes du cordon d’alimentation à la
batterie; sinon, l’appareil serait sérieusement endommagé.
• AVANT de connecter les fils d’enceintes du cordon d’alimentation aux
enceintes, vérifiez le câblage des enceintes de votre voiture.
• Veillez à brancher correctement les câbles des enceintes aux prises
correspondantes. L’appareil risquerait d’être endommagé ou de mal
fonctionner si les câbles G ne sont pas raccordés séparément ou s’ils
sont raccordés à la carrosserie métallique de la voiture.
Liste de pièces
A
Manchon (fixé à l’appareil lors de l’expédition) .......................................(×1)
B
Supports (fixés à l’appareil lors de l’expédition) .......................................(×2)
C
* Vis plat à tête fraisée—M5 × 8 mm (3/8 pouces) ...................................(×8)
D
* Vis à tête ronde—M2,6 × 3 mm (1/8 pouces) .........................................(×4)
E
Vis à tête ronde—M5 × 8 mm (3/8 pouces) ..............................................(×8)
F
Cordon d’alimentation ........................................................................................(×1)
G
laque d’assemblage ..............................................................................................(×1)
H
Microphone ...............................................................................................................(×1)
I
KS-UBT1: Adaptateur USB Bluetooth ........................................................(×1)
* Quatre de ces vis sont fixées sur l’appareil au moment de l’expédition.
Conservez ces vis pour les utiliser si nécessaire pour une installation.
1
Page 36
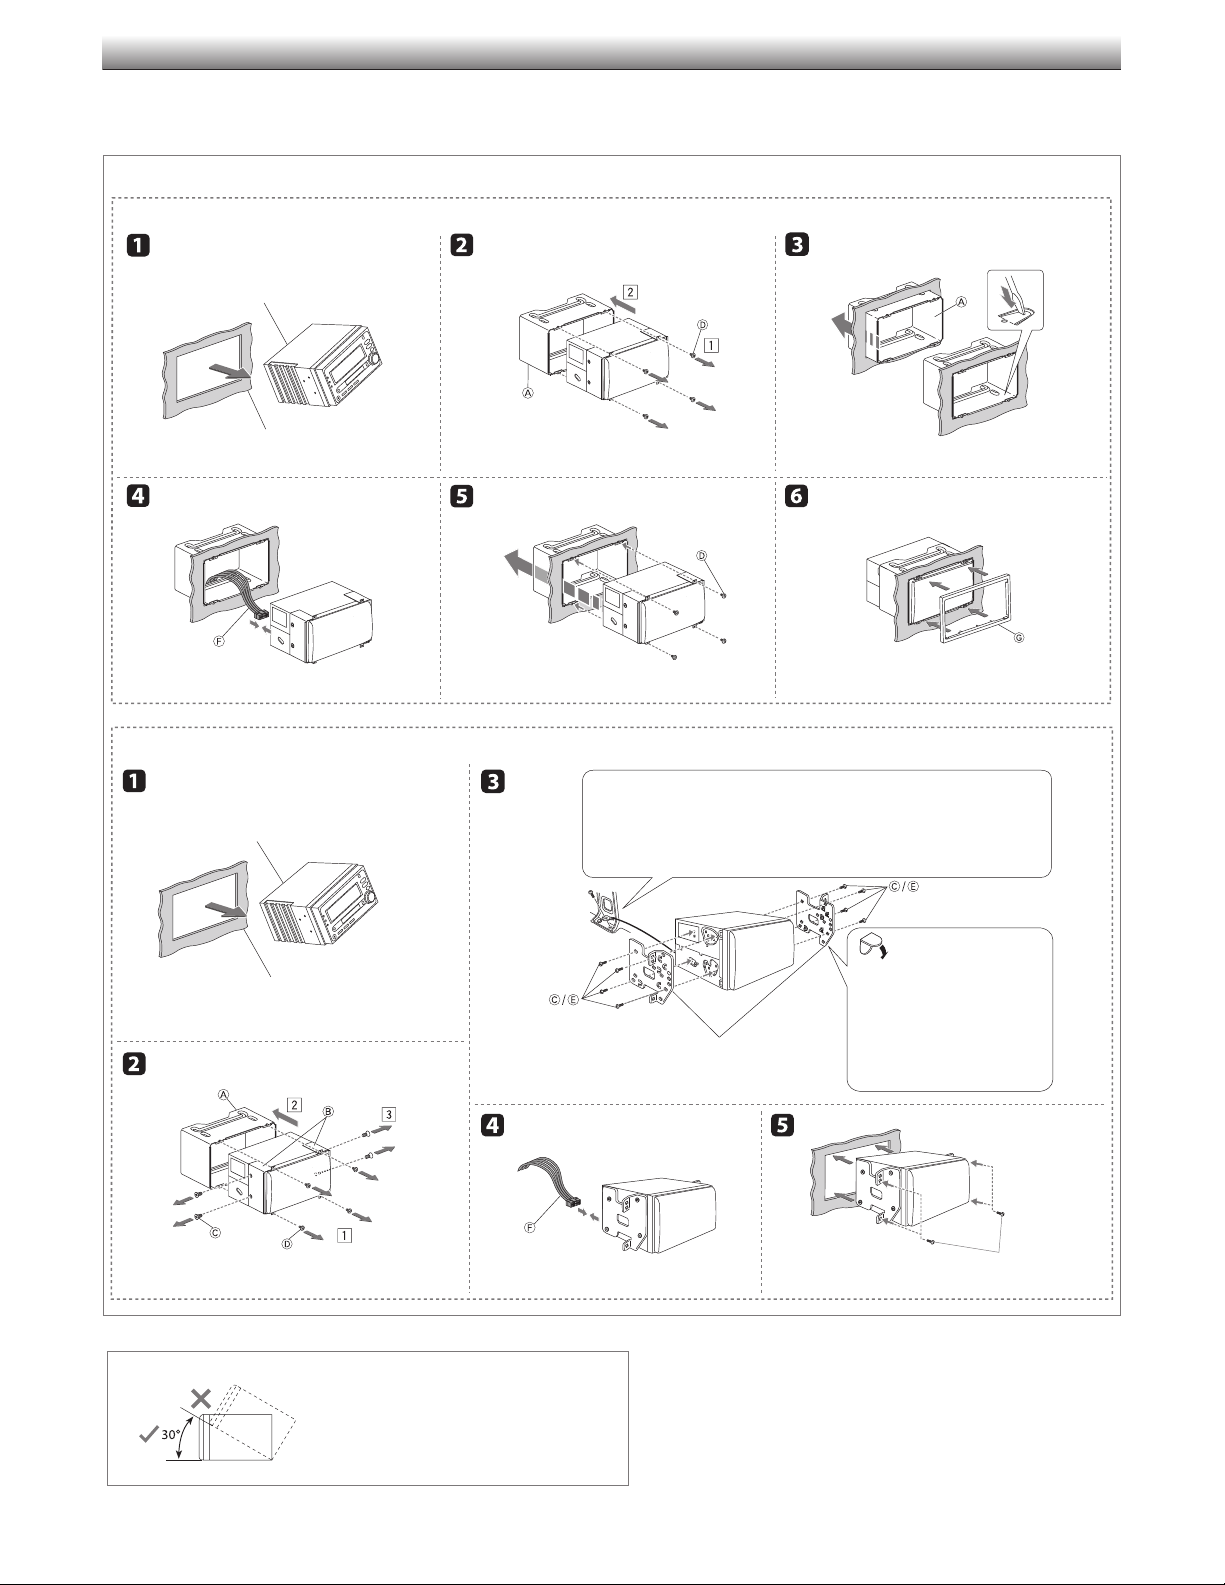
INSTALLATION / INSTALACIÓN / INSTALLATION
The following illustration shows a typical installation. If you have any
questions or require information regarding installation kits, consult
your JVC car audio dealer or a company supplying kits.
In-dash mounting / Montaje en el tablero / Montage encastré
(A) Installing with the supplied sleeve / Instalación con el manguito suministrado / Installation avec le manchon fourni
Audio system originally installed in the car / Sistema de
audio instalado originalmente en el vehículo / Système
audio installé à l’origine dans la voiture
Car dashboard / Cubretablero del automóvil /
Tableau de bord de la voiture
La siguiente ilustración muestra una instalación típica. Si tiene alguna
pregunta o necesita información acerca de las herramientas para
instalación, consulte con su concesionario de JVC de equipos de audio
para automóviles o a una compañía que suministra tales herramientas.
L’illustration suivante est un exemple d’installation typique. Si vous avez des
questions ou avez besoin d’information sur des kits d’installation, consulter
votre revendeur d’autoradios JVC ou une compagnie d’approvisionnement.
(B) Installing with the mounting brackets from the car / Instalación con los soportes de montaje desde el automóvil / Installation avec les supports de montage de la voiture
Audio system originally installed in
the car / Sistema de audio instalado
originalmente en el vehículo / Système
audio installé à l’origine dans la voiture
Car dashboard / Cubretablero del automóvil /
Tableau de bord de la voiture
Firmly attach the ground wire to the metallic body of the car using the screw originally
fixed to the metallic body of the car. / Conecte firmemente el cable de tierra a la carrocería
metálica del automóvil mediante el tornillo instalado originalmente en la misma. / Fixez
solidement le fil de mise à la masse au châssis métallique de la voiture en utilisant une vis fixée à
l’origine au châssis métallique de la voiture.
If there is an interfering tab on the
mounting bracket, bend it flat. / Si hay
alguna lengüeta que interfiere con el
soporte de montaje, dóblela hasta que
Mounting bracket removed from the car /
Soporte de montaje removido del automóvil /
Support de montage retiré de la voiture
quede plana. / S’il y a une languette
gênante sur le support de montage,
aplatissez-la.
Screw removed from the car / Tornillo removido del
automóvil / Vis retiré de la voiture
Install the unit at an angle of less than 30˚.
Instale la unidad a un ángulo de menos de 30˚.
Installez l’appareil avec un angle de moins de 30˚.
2
Page 37

ELECTRICAL CONNECTIONS / CONEXIONES ELECTRICAS / RACCORDEMENTS ELECTRIQUES
SW : To subwoofer / Al subwoofer / Au caisson de grave
FRONT : To front speakers / A los altavoces delanteros / Aux
enceintes avant
REAR : To rear speakers / A los altavoces traseros / Aux
enceintes arrière
I
USB Bluetooth adapter /
Adaptador Bluetooth USB /
Adaptateur USB Bluetooth
USB cable (approx. 1.2 m/4 feet) /
Cable USB (aprox. 1,2 m/4 pie) /
Câble USB (environ 1,2 m/4 pieds)
Expansion port / Puerto de
expansión / Port d’extension
F
Power cord /
Cordón de alimentación /
Cordon d’alimentation
Reset the unit. / Reinicialice la unidad. /
Réinitialisez l’appareil.
JVC Amplifier /
Amplificador de JVC /
JVC Amplificateur
Signal cord / Cable de señal /
Cordon de signal *
MIC (Microphone input terminal / Terminal de
entrada de micrófono / Prise d’entrée de microphone)
(see page 4 /
Antenna terminal / Terminal de
la antena / Borne de l’antenne
Factory wiring harness (vehicle) /
Mazo de cables de fábrica (vehículo) /
Faisceau de câbles de l'usine (véhicule)
Remote adapter / Adaptador para control
remoto / Adaptateur de télécommande *
1
consulte la página 4 /
Light blue (yellow stripe) / Azul claro (rayas
amarillas) / Bleu clair (bande jaune)
1
voir page 4)
Rear ground terminal /
Terminal de tierra posterior /
Borne arrière de masse
10 A fuse / Fusible de 10 A / Fusible 10 A
Caution / Precaución / Précautions
Join the same color leads together. / Junte los cables del mismo color. / Joignez les fils de même couleur ensemble.
To join the open-ends of the leads: / Para juntar los extremos abiertos de los cables: / Pour joindre les extrémités des fils:
Strip lead ends / Pele los extremos
de los cables / Dénudez les extrémités
des fils
Twist ends together / Retuerza los
extremos conjuntamente / Torsadez
les extrémités ensemble
Solder / Suelde /
Soudez
Tape / Cinta /
Ruban adhésif
KS-UBT1
Remote lead /
Cable remoto /
Fil d’alimentation à
distance
Extension lead /
Cable prolongador /
Fil prolongateur *
1
Vehicle-specific Wiring
Harness (separately
purchased) /
Mazo de cables del vehículo
específico (se vende por
separado) /
Faisceau de câble spécifique
pour le véhicule (vendu
séparément)
For more information /
Para más información /
Pour plus d'informations :
Metra Electronics:
www.metraonline.com
Scosche Industries:
www.scosche.com
Recommended connection / Conexión recomendada /
Blue: Automatic antenna / Azul: Antena automática /
Bleu: Antenne automatique
Blue (white stripe):
Azul (rayas blancas):
Bleu (bande blanche): Mise sous tension de l'amplificateur
Connexion recommandée
Amp Turn-on /
Alimentación amplificador /
Illumination / Iluminación / Éclairage
Telephone Muting / Silenc. teléfono /
Sourdine téléphonique
12 V Battery / Batería 12 V / Batterie 12 V
12 V Ignition Switch / Interruptor de encendido 12 V /
Interrupteur d'allumage 12 V
Ground / Tierra / Masse
Front speaker (left) / Altavoz delantero
(izquierdo) / Enceinte avant (gauche)
Front speaker (right) / Altavoz delantero
(derecho) / Enceinte avant (droit)
Rear speaker (left) / Altavoz trasero
(izquierdo) / Enceinte arrière (gauche)
Rear speaker (right) / Altavoz trasero
(derecho) / Enceinte arrière (droit)
Blue (white stripe), 200 mA max. /
Azul (rayas blancas), máx. 200 mA /
Bleu (bande blanche), 200 mA max.
Orange (white stripe) / Naranja (rayas
blancas) / Orange (bande blanche)
(Not used/ No utilizado / Non utilisé)
Insulate to prevent short circuit /
Aislar para evitar cortocircuitos /
Isolez pour éviter les courts-circuits
Yellow / Amarillo / Jaune
Red / Rojo / Rouge
Black / Negro / Noir
White / Blanco / Blanc
White (black stripe) / Blanco (rayas negras) /
Blanc (bande noire)
Gray / Gris / Gris
Gray (black stripe) / Gris (rayas negras) /
Gris (bande noire)
Green / Verde / Vert
Green (black stripe) / Verde (rayas negras) /
Vert (bande noire)
Purple / Púrpura / Violet
Purple (black stripe) / Púrpura (rayas negras) /
Violet (bande noire)
Power cannot be turned on? /
¿No se puede conectar la alimentación? /
L'appareil ne peut pas être mis sous tension?
Ignition switch / Interruptor de
encendido / Interrupteur d’allumage
Fuse block / Bloque de
fusibles / Porte-fusible
Separate red lead /
Cable rojo separado /
Fil rouge séparé
If your vehicle factory wiring harness does
not have “12 V ignition switch” lead, connect
the red lead of the supplied power cord,
to the vehicle fuse block (through a separate
red lead provided with the fuse tap). / Si el
mazo de cables de fábrica de su vehículo no
incluye el cable del “interruptor de encendido
de 12 V”, conecte el cable rojo del cordón
de alimentación
de fusibles del vehículo (a través del cable
rojo separado suministrado con la toma
de fusible). / Si le faisceau de câbles de votre
véhicule ne possède pas de fil “Interrupteur
d'allumage 12 V”, connectez le fil rouge du
cordon d'alimentation fourni,
du véhicule (un fil rouge séparé est fourni avec le
porte-fusible).
F
suministrado, al bloque
F
, au porte-fusible
F
,
1
Not supplied for this unit.
*
2
*
Firmly attach the ground wire to the metallic body or to the chassis
of the car—to the place uncoated with paint.
1
*
No suministrado con esta unidad.
2
*
Fije firmemente el cable de tierra a la carrocería metálica o al
chasis—a un lugar no cubierto con pintura.
3
1
*
Non fourni avec cet appareil.
2
*
Attachez solidement le fil de mise à la masse au châssis métallique de la
voiture—à un endroit qui n’est pas recouvert de peinture.
Page 38

Connecting the microphone unit / Conexión de la unidad de micrófono / Connexion du
Secure using cord clamps *
Si es necesario, asegure por medio de las abrazaderas *
Fixez en utilisant des serre-fils *
1
if necessary. /
1
si nécessaire
1
/
H Microphone / Micrófono /
Microphone
Adjust the microphone angle / Ajuste el ángulo del micrófono / Ajustez
l’angle du microphone
microphone
MIC (Microphone input terminal /
Terminal de entrada de micrófono /
Prise d’entrée de microphone )
Connecting the external components in series / Conexión de componentes externos en serie / Connexion d’appareils extérieurs en série
When connecting the external components, refer also to the manuals
supplied for the components and adapter.
Cuando conecte componentes externos, consulte, también, los
manuales suministrados con los componentes y el adaptador.
Lors de la connexion des appareils extérieurs, référez-vous aussi aux
manuels fournis avec les appareils et les adaptateurs.
Caution:
Before connecting the external components, make sure that the
unit is turned off.
Expansion port of the unit / Puerto de expansión
de la unidad / Port d’extension de l’appareil
To disconnect... /
Para desconectar... /
Pour déconnecter...
You can connect the following components through the various JVC
adapters or system to the expansion port.
•
Connection cords may need to be purchased separately.
Component / Componente / Appareil Adapter/System / Adaptador/Sistema / Adaptateur/Système
Precaucion:
Antes de conectar los componentes externos, asegúrese de que la
unidad esté apagada.
Two components / Dos componentes / Deux appareils:
A KS-SRA100
B
*5 KS-U57 / KS-U58
Puede conectar los siguientes componentes al puerto de expansión, a
través de los diversos adaptadores o sistema JVC.
•
Puede ser necesario comprar los cables de conexión por separado.
2
,
*
*3 / XMDJVC100 / CNP2000UCA
Precaution:
Avant de connecter les appareils extérieurs, assurez-vous que
l’appareil est hors tension.
2
,
4
*
*
Vous pouvez connecter les appareils suivants à l’aide de divers adaptateur
JVC ou système au port d’extension.
•
Vous pouvez avoir besoin d’acheter certains cordons de connexion
séparément.
Model name / Nombre del
modelo / Nom du modèle
XMDirect2 Tuner System / Sistema de sintonizador XMDirect2 / XMDirect2 Tuner System XM Satellite Radio System / Sistema de radio XM Satellite / Système radio satellite XM CNP2000UCA, CNPJVC1
SIRIUS Satellite Radio / Radio por satélite SIRIUS / Radio satellite SIRIUS
Portable audio player with line output jacks / Reproductor de audio portátil con jacks de
salida de línea / Lecteur audio portable avec prises de sortie de ligne
Portable audio player with 3.5 mm (1/8") stereo mini jack / Reproductor de audio
portátil con jack mini estéreo de 3,5 mm (1/8 pulgada) / Lecteur audio portable avec mini
fiche stéréo de 3,5 mm (1/8 pouces)
XM Radio and SIRIUS Satellite Radio cannot be used together.
*1 Not supplied for this unit.
2
*
Connect the power cord supplied for the component separately for
power supply.
3
This model is a component of SIRIUS Satellite Radio System.
*
4
This model is a component of XM Satellite Radio System.
*
5
To use these components, set the external input setting correctly
*
(see page 25 of the INSTRUCTIONS).
No puede utilizar juntas la radio XM y la radio satelital SIRIUS.
1
*
No suministrado con esta unidad.
2
*
Conecte el cable de alimentación suministrado separadamente para
el componente.
3
*
Este modelo es un componente del sistema de radio satelital SIRIUS.
*4 Este modelo es un componente del sistema de radio XM Satellite.
5
*
Para utilizar estos componentes, configure el ajuste de entrada
externa correctamente (consulte la página 25 del
INSTRUCCIONES
SIRIUS Satellite Radio System / Sistema de radio satelital SIRIUS / Système radio satellite
SIRIUS
Line input adapter / Adaptador de entrada por línea / Adaptateur d’entrée de ligne KS-U57
AUX input adapter / Adaptador de entrada AUX / Adaptateur d’entrée auxiliaire KS-U58
La radio XM et SIRIUS ne peuvent pas être utilisées en même temps.
*1 Non fourni avec cet appareil.
2
*
Connectez le cordon d’alimentation fourni avec les appareils
séparément à l’alimentation.
3
Ce modèle est un composant du système radio satellite SIRIUS.
*
4
Ce modèle est un composant du système radio satellite XM.
*
5
Pour utiliser ces appareils, réglez l’entrée extérieure correctement (voir
).
MANUAL DE
*
page 25 du MANUEL D’INSTRUCTIONS).
SCC1, KS-SRA100
D&P, SCVDOC1, KS-SRA100
TROUBLESHOOTING / LOCALIZACION DE AVERIAS / EN CAS DE DIFFICULTES
• The fuse blows. h Are the red and black leads connected correctly?
• Power cannot be turned on.
• No sound from the speakers.
circuited?
• “MISWIRING CHK WIRING THEN RESET UNIT” / “WARNING CHK
WIRING THEN RESET UNIT” appears on the display and no
operation can be done.
or touches the chassis of the car/head unit? ; Have you reset your
unit?
• Sound is distorted.
the “–” terminals of L and R speakers grounded in common?
• Noise interfere with sounds.
connected to the car’s chassis using shorter and thicker cords?
• This unit becomes hot.
Are the “–” terminals of L and R speakers grounded in common?
• This unit does not work at all.
h
Is the yellow lead connected?
h
Is the speaker output lead short-
h
Is the speaker output lead short-circuited
h
Is the speaker output lead grounded? ; Are
h
Is the rear ground terminal
h
Is the speaker output lead grounded? ;
h
Have you reset your unit?
• El fusible se quema.
correctamente conectados?
• No es posible conectar la alimentación.
conectado?
• No sale sonido de los altavoces.
altavoz cortocircuitado?
• Aparece “MISWIRING CHK WIRING THEN RESET UNIT” /
“WARNING CHK WIRING THEN RESET UNIT” en la pantalla y no
se puede realizar ninguna operación.
de altavoz está en cortocircuito o en contacto con el chasis del
automóvil/auriculares? ; ¿Reinicializó la unidad?
• El sonido presenta distorsión.
conectado a masa? ; ¿Están los terminales “–” de los altavoces L y R
conectados a una masa común?
• Perturbación de ruido.
conectado al chasis del automóvil utilizando los cordones más corto
y más grueso?
• Esta unidad se calienta.
conectado a masa? ; ¿Están los terminales “–” de los altavoces L y R
conectados a una masa común?
• Esta unidad no funciona en absoluto.
h
¿Están los conductores rojo y negro
h
¿Está el cable amarillo
h
¿Está el cable de salida del
h
¿El conductor de salida
h
¿Está el cable de salida del altavoz
h
¿El terminal de tierra trasero está
h
¿Está el cable de salida del altavoz
h
¿Reinicializó la unidad?
4
• Le fusible saute.
• L’appareil ne peut pas être mise sous tension.
raccordée?
• Pas de son des enceintes.
circuité?
• “MISWIRING CHK WIRING THEN RESET UNIT” / “WARNING CHK
WIRING THEN RESET UNIT” apparaît sur l’affichage et aucune
opération ne peut être réalisée.
est court-circuité ou touche le châssis de la voiture/appareil principal? ;
Avez-vous réinitialisé votre appareil?
• Le son est déformé.
bornes “–” des enceintes gauche et droit sont-elles mises ensemble à la
masse?
• Interférence avec les sons.
connectée au châssis de la voiture avec un cordon court et épais?
• Cet appareil devient chaud.
masse? ; Les bornes “–” des enceintes gauche et droit sont-elles mises
ensemble à la masse?
• Cet appareil ne fonctionne pas du tout.
votre appareil?
h
Les fils rouge et noir sont-ils racordés correctement?
h
Le fil de sortie d’enceinte est-il court-
h
Est-ce qu’un fil de sortie d’enceinte
h
Le fil de sortie d’enceinte est-il à la masse? ; Les
h
La prise arrière de mise à la terre est-elle
h
Le fil de sortie d’enceinte est-il à la
h
Le fil jaune est-elle
h
Avez-vous réinitialisé
Page 39

To
use
the
Bluetooth
Function,
connect
the
supplied
USB
Bluetooth
input
Front
Rear
terminals
USB
USB
Adapter
Port
Cable
of
(KS-UBT1)
the
unit.
to
or
either
----------------
one
of
the
USB
GET0725-001 A
Page 40

.JVC
KS-UBT1
Adaptateur
Bluetooth
USB
Bluetooth
Bluetooth
per
adapter
Bluetooth
USB
Bluetooth
Bluetooth
USB
aAanrep
u~'Jiill~n~thmri'
Adapter
1
USB
Adaptador
I
Bluetooth-adapter
USB
I
-sovitin
npoaap~Joyta~
I
adapter
Adaptor
I
USB
USB
USB~..:.~~~
I
USB-Biuetooth-Adapter
USB
USB
I
Bluetooth
USB
I
Bluetoolh
USB
Bluetooth
USB
I
USB
I
J~
USB
INSTRUCTIONS I
MANUEL
BEDIENUNGSANLEITUNG
GEBRUIKSAANWIJZING
YTTOOHJE I
KA
INSTRUKCJA
TALiMA
OBSLUG/
IHCTPYKL.IIi" I INSTRUCT/UN/ I
EN,
I.::,~!
, SP,
FR
HU, UK, RO,
CZ,
GE, IT,
fiE/tJIJliJij.
~
,.. PO,
D'INSTRUCTIONS I
I ISTRUZIONI I INSTRU(:OES I
I BRUKSANVISNING I /NSTRUKTIONSBOG I
lf1HCTPYKL.IIf11f1
I
TLAR
I PRiRUCKA
lf1HCTPYKL.jlf11f1
,;~.J
IAJ-I!
I
J,!.J
NL, SW,
PR,
BU, TH,
KO, CT, AR, PE,
USB
Bluetooth
de
USB-Biuetooth-adapter
I
Bluetooth
USB
Bluetooth
o-J
Bluetooth
OBSLUZE
K
I
BUKU
I
DA, Fl, TR,
Bluetooth
0
Bluetooth
Adattatore
1
USB
I
USB-aAanrep
Adaptor
Adapter
USB
I
"?l
MANUAL
no
fi1u
PETUNJUK
I
Adapter
I
Bluetooth-
I
Bluetooth
~3Uf:t*~
USB
1
E~
Adaptor
;~\.)\I
DE
3KCnflYATALjlf1/A I
HASZNALATI
I
/If§
I
U::Jh
, GR,
RU
IN
Adaptador
I
USB
Bluetooth
I
Bluetooth
USB
aAanrep
I
1
Blueloolh
INSTRUCCIONES I
OilHrtEI.
UTASiTASA I
I
!!!'lilt/
GET0617-001H
®
I
I
[K]
TA-2008/
APPROVED
NTC
Accepted
e
Typ
E-0903971(
P
ESD-C
No.:
~%\1£
~
~.§
I.C
4!-~~!::J
-BHEt
tJ
:£jAf2j
7[7 \21
Aj~Ej§
'i;l!
2.
X11-'l'.\:"!.S:.
~~~
OHE}
Ol
A"Jt:l]~-c-
"Este
cardter
tem direito
interf
de
nao
sistemas opera
~§-
]
-5-~0
~
J
(9-)Cl Dj_"f
~:
\
0
~~
.Ef-{:jc1jOjE]%~
~~:
7\7\
{:!
.Ef'-
KS-UBTl
:
I~
o
.!f-~~t:I
2
'U
erencia
esta~iles
pode causar interferencia a
2009,February
~:
';;!
JVC
OfOICI:
t:J:rr
J-c-
tzJ~~~
~£.
~-@L]C~.
T
-g{
equipamento opera em
secunddri
prote~ao
a
judicial
pre
do
ndo
primdrio."
o,
mesmo
11
JVC-KSUBTl
:
~rr~~
3-
~~
~
/
tl
~~
t}~~
~
-
P
:
nao
e,
isto
contra
es
m
,
tipo,
em cardter
87
mo
e
0N49
TRA
Approved
MTC:OFICIO
CONATEL
SUBTEL:
is
Th
"
by
8396-2008-MTC/29
No
certificate
30234/DFRS00045/F-49
technical
equ
requ
telecommunication
NTC
001516
No:
men
ip
rement"
i
conforms
t
13973/POSTEU2010
2366
TEUWR/I/MOD-08/02/135.APR
tributor
Dis
J
CNP
nufacturer
Ma
del
Mo
d:
Bran
name:
distributor:
of
no.:
365/FR/201
URSEC
JVC
COMERCIO
JVC
COMERCIO
JVC
:
UBTl
-
KS
JVC
KENW
KENWO
KENWOOD
DO
OOD
E
DE
DO
OD
ELETRON
DE
Corpora
RA
B
LETRO
BRAS
0
SIL
NICOS
IL
COS
I
tion
eJANATEL
11-6733
-
0178
1111111111
1111111111111111
I
)07898929117502
(01
11
to
08
LTDA
LTDA
English:
the
of
copy
A
Directive
R&TTE
Web sit
owing
ll
fo
(http://www3
[CE0984]
JVC
Hereby,
compliance
in
provi
evant
rel
Fran1ais:
de
copie
e
Un
R&TTE
e
Directiv
uivant
s
Web
sites
CE0984]
[
presente
Ia
Par
est
KS-UBTl]
[
spositions
di
autres
:
Espaiiol
scargarse
de
Puede
dad
i
conform
(equipos
CE
telecomunicaci6n)
[http://www3.jvckenwood
]
984
[CE0
sen
pre
a
PorI
c
UBTl]
-
[KS
es
disposicion
Deutsch:
der
Kopie
Eine
cht
-Ri
&TIE
R
el
rg
e
runt
he
(http://www
l
984
[CE0
KENWOOD
JVC
wesent
den
immungen
t
es
B
Italiano:
lla
de
ia
Cop
E
999/5/C
1
(http://www3.jvckenwood
[CE0984j
ese
pr
n Ia
Co
e
UBTl]
-
[KS
izioni
spos
di
of
Declaration
EC
999/5/
1
es
jvckenwood.com/ecdoc/).
.
declares
KENWOOD
essentia
the
with
Directive
of
ion
s
aration
l
Dec
Ia
CE
/5/
1999
//www3.jvcke
:
(http
s
KENWOOD
JVC
,
aux
forme
con
pertinentes
copia
una
co
da
ona
relaci
cos
ri
elect
radio
sig
s
lo
en
KENWOOD
JVC
e,
t
s
lo
con
umple
previstos
pertinentes
Obereinstimm
1999/5/EG
e
lini
en
rd
n we
ade
ood
nw
e
jvck
3.
hiermit,
erklart
Anforderungen
hen
c
li
Richtlini
der
di
e
Dichiarazion
scaricata
essere
puo
KENWOOD
JVC
nte
requisiti
ai
nforme
co
tabilite
s
pertinenti
mity
Confor
downloaded
be
can
t this
ha
t
requirements
l
/5/EC.
1999
Conformite
de
etre
peut
declare
exigences
Ia
de
Declaraci6n
Ia
de
ct
Dire
n Ia
equipos
y
s
es
nt
ie
u
com/ecdoc/).
.
declara
lunda
requisitos
en
gserklarung
un
von
nn
ka
do
com/ec
.
die
ss
da
und
99/5/
19
e
Conformita
seguenti
dai
do
com/ec
.
dichiara
essen
dalla
egar
r
with
from
[KS
unit
and
relative
telechargee
nwood.com
appareil
cet
que
essentielles
1999/5/CE.
Directive
de
999/5/
1
iva
s
minale
ter
web
itios
esta
que
enta
m
Oirectiva
Ia
bezuglich
folgenden
den
c/J.
t
Gera
es
s
relevanten
n
andere
ic
spr
nt
e
EG
Direttiva
ia
al
siti
c/l.
questa
che
a
i ed
ial
z
999/5/CE.
1
direttiva
to
d
the
UBTll
ot
Ia
a
partir
a
/ec
et
de
unidad
y
es
l
1999
der
Web
UBTl]
S-
[K
ht.
Web
unita
ltre
e a
il
th
er
h
doc
aux
otras
/5/CE.
R&
e
is
d
/)
tes
si
TTE
Portugues:
possivel
E
Conformidade
itio
s
dos
://www3.jvckenwood.com/ecdoc/).
ttp
(h
ICE0984]
JVC
A
co
em
disposi1iies
Nederland
kopie
Een
R&TTEric
de
es
lg
vo
de
.
://www3.
(http
[CE0984j
erbij
Hi
vold()('t
bepaling
Svenska:
kopia
En
TTE-direktivet
R&
bbplat
we
[CE0984]
armed
H
overensstammelse
i
star
ovriga
och
/5/
1999
Dansk
eksemplar
Et
sn
henvi
gende
l
f0
CE0984]
I
KENWOOD
JVC
overensstemme
i
er
relevante
Suomi
Vaatimustenmuk
epaate
l
te
voidaan
://
(http
[CE0984l
KENWOOD
JVC
direktiiv
on
koskevien
uma
transferir
lativ
re
guintes
se
Web
s
declara
ENWOOD
K
com
dade
i
rm
nfo
vantes
le
re
s:
conform
de
van
1999/5/EG
htlijn
websites
de
en
kenwood.com
c
jv
KENWOOD
JVC
art
la
verk
essentie
de
aan
lijn
richt
van
en
arationen
l
dek
av
999/5/EG
1
://www3
http
(
ser
KENWOOD
C
JV
gar
inty
vanta
rele
.
EG
:
Overensstemme
af
R&TIEdirektivet
til
ing
(http://www3.jvckenwood
websteder
if
erkl
se
l
bestemme
:
uu
ais
(R&TTE)
aitteita
l
uraavi
se
ladata
wwwl.jvckenwood.com/ecdoc/)
vakuuttaa
999/5/EY
1
in
direktiivin
da
c6pia
Directiva
a
a
esta
que
requisitos
os
Directiva
da
verklaring
iteits
kan
vereisten
le
1999/5/EG
overensstammelse
om
kan
cke
jv
.
att
de
med
bestamme
1
ed,
rv
he
rer
Vifs
de
med
t
direk
i
ser
l
vakuutuk
s
skeva
ko
verkko
ta
s
,
taten
ellisten
le
o
ht
e
muiden
Declara1
TIE
R&
ade
unid
essenciais
1999/5/CE.
worden
/ecdoc/).
apparaat
dit
dat
ander
en
.
amtas
h
nwood
denna
vasentliga
som
er
ls
if
rkl
sese
l
999/5/EF
nn
de
at
ige
l
nt
e
1999/5/
iv
radio-
n
se
direktiivi
osoitteista
-
S-
[K
etta
vaatimu
m
ojen
de
ao
(1999/5/CE)
UBTl
KS-
[
tras
ou
e
betrekk
met
oad
gedownl
IKS-U
evan
rel
e
med
jande
l
fo
pa
ecdoc
m/
co
.
S-
[K
et
nh
e
egenskapskrav
av
framgar
med
en
ring
hentes
kan
m/
co
.
KS
[
nhed
e e
an
og
krav
EF.
ja
/5
1999
.
te
Iai
J-
UBTl
ja
sten
ainen.
uk
partir
a
esta
]
ing
van
BTl]
te
.
/)
UBTl]
direktiv
ra
I
ecdoc/).
UBTl
dre
/EY
sita
tot
I
Tiirk1e:
TTE
R&
kopyast
(http
[CE0984l
Burada,
EC'nin
uyumlu
ile
EAAqvlKrj
Iva
05qyia
tqAEIT
an6
(http
[CE0984]
8ta
~ov<i5o
onmr~o"<
1999
Polski
Kopi
pobra
http
(
0
CE
[
Niniejszym
urz~dzenie
wymogami
Dyrektywy
Cesky:
Kopii
199
(http://www3.jvckenw
CE0984]
[
JVC
s
ve
ustanoven
99/5/EC
19
Direktifi
web
aj<lgrdaki
www3.jvckenwo
://
KENWOOD
JVC
gereksinimleri
vazge1ilmez
u
oldugun
:
A~Awo
tq<
aVTiypa~o
n<
TOU
199
tvWVlOK
O
tK
napaKi
://ww
nop6V10(
[KS
K.
/5/E
9/5/EK
nw
jvckenwo
.
w3
UBTlJ
Kmn<
OXEnK<i
np
O
rorroSmiE<
JVC
, q
u~
o
Aotrri<
:
zgodnoici
i
aracj
l
dek
~
nast~puj~cych
c z
nw
cke
jv
.
/www3
:/
984]
JVC
firma
UBTll
-
[KS
lym
pozosta
i
C.
E
5/
/
999
1
shode
o
aieni
l
Proh
ahno
st
ze
l
9/5/ES
o
mt
ti
KENWOOD
adnimi
l
zak
se
hode
ice
rn
sme
mi
i
Uygunluk
ilgili
ile
indirilebilir.
inden
ler
te
si
bu
,
beyan
anK6
~
~o
s
oo
KENWOO
est
j
z
ut
oo
prohlaiuje,
poladavky
1999/5/ES
/)
com/ecdoc
od.
KS-U8Tll1999
[
unitenin
diger
ve
eder.
ou~~6p~wo
<
q
pOOlOE(OnAt0~6
TO
~E
E(onAto~6
Web
010
/ecdoc/
om
d.c
o
oqAWVEIOTI
KENWOOD
npo(
~wvrrat
p
5tot<i(Et<
m•i<
ox
Dyrektyw~
z
internetowych
tron
doc/)
ec
m/
.co
d
adcza,
i
iw
o
D
zasa
z
godne
z
po
wnymi
stoso
i
mernice
s
poladavky
s
nasledujicich
om/ecdoc/J
.c
d
tento
le
da
a
.
Bey
ilgili
~E
<
q
E
~nop
).
OUO
11(
tq<
/5/EC
99
19
.
ie
czy
dni
owieniam
n
sta
webov'ic
.
IKS-UBTl]
prislulnimi
mi
li
l
nrn
'
nr
a
/5/
hukumleri
tqv
TOV
Kat
Aqq>6Ei
va
i
q
out~
<
iiMEt
Ooqyio<
moin
niejsze
ni
mi
R&TTE
stranek
h
je
Magyar:
Az
bir
eg
M
webhelyekrol
(http://www3.
E0984]
[C
JV
A
[KS
kove
Romanii:
copie
0
TTE
R&
situ
[CE0984
in
Pr
KS
[
portant
im
6bnrapcKH:
n~e
Ko
Jl•pm•sa 1
Ha
~JrerneHo
a
http://www
(
CE0984]
[
HaCToR
C
KS-UBTlJ
[
APYr•re
EO.
i
1999/5/EC
losegi
e
fel
KENWOOD
C
megfe
UBTl]
telmenye
DeclaraJiei
a
1999
(http:
web
ri
]
prezenta
respecta
UBTll
-
e
,neKllapau~ouna
or
oT
oro
~
e B
np•no>t<HMH
peldanya
zat
nyilatko
tolthetole:
jvckenwood.com
hogy
i.
kijelent
99/5/EC
19
az
lel
vo
egyeb
es
nek
i
conformitate
de
desca
fi
poate
/5/EC
www3.jvckenwood
//
KENWOOD
JVC
,
nJele
i
cer
99/5
19
ei
directiv
ale
CbOTBeTCTB~e
Ja
OTHO
EO
999/5/
ye6caHro
Clle,aH~Te
.com/ec
nwood
cke
jv
3.
KENWOOD
JVC
CbOTBeTCTBHe
nopeA
3
pa
ny
ira
R&TTE
jelu
pcs
ka
z
elvhe
kovet
a
c/)
ecdo
/
eszkoz
en
l
je
a
nyelv
ra
i
jeiU
ndelkezeseinek.
re
natkoz6
itoare
refer
pe
de
ta
rca
.ccm/
aceasta
ca
declara
al
ji
ale
i
esenJ
C.
/E
MO>t<e
TTE
R&
CHO
ae
/).
doc
, "'rosa
AeK11ap•pa
H3HCKBaHHR
OCHOBHHTe
C
Jl•pe
Ha
6•
ol6d6
kez6
veto
lap
a
dire
Ia
urmatoarel
ecdoc/).
unitate
prevederi
te
orHoweHHe
no
A'
H3Aen•e
1999/5/
Ba
KTH
e
fibAe
a
iv
ct
H
Page 41

Declaration
KENWOOD
JVC
:
Manufacturer
English:
KENWOOD,
JVC
Hereby,
comp
provisions
Deutsch:
H
Ober~nstimmung
Ubr~en
Hiermit
Obereinstimmung
Anforde
rele
Fran~ais:
Par
conforme
pertinentes
Nederlands:
Hierbij
overeenstemming
rel
Dansk:
U
udstyr
re
Espallol:
Por
KS
di
EAAf'JVIK~
ME
rYMMOP$0NETA
TIL
Italiano: p
Con
e
pert
Malti:
Hawnhekk,
ma
hemm
Portugu
JVC
requisi
Suomi
JVC
direktiivin
direk
with
liance
of
erklan
mit
ier
einschli!gigen
erkliirt
rungen
Festlegungen
vanten
presente
Ia
aux
de
verklaart
bepaling
!'
nt
eva
ndertegnede
UBT1
KS-
av
kr
levante
de
dio
me
cumple
TI
UB
-
aplicables
nes
cio
sposi
:
POYLA
nA
THN
LXE
~OinEL
presente
Ia
ai
rme
confo
stabilite
i
nent
i
JVC
iet
ij
l·htig
Oirrettiva
-
frd
es:
KENWOOD
essenciais
es
t
:
KENWOOD
1999/5/EY
muiden
ivin
ti
the
Directive
KENWOOD,
JVC
mit
JVC
unddenanderen
JVC
exigencesessent
directive
Ia
JVC
JVC
over
direktiv
i
presente
Ia
con
TIKEL
JVC
requisiti
KENWOOD,jiddikjara
sse
e
declara
vakuunaa
l-
Kanagawa-ku,
f:;:~awa
declares
l r
essentia
999/5/EC.
1
d.m
grundlegenden
den
Bestimmungen
KENWOOD
Gerates
des
Richtlinie
der
KENWOOD
999
1
D
KENWOO
essen
de
met
is
cht
ri
van
rn
KENWOOD
de
er
hold
999/5/EF
1
KE
JVC
reqursitos
los
exigibles
o
KENWOOD
JVC
OYLI06E
TIL
OL
nP
I
IL
ATH
61
KENWOOD
iali
essenz
direttiva
dalla
provvedimenti
rna
u
li
zja
n
S/EC.
/
1999
este
que
di
ras
ut
o
e
tiiten
oleellisten
mukainen.
ehtojen
Mor
12
that
equirements
sich
die
-
KS
dfflare
elles
i
/S/
dat
ijn
l
erklif
sentlige
v<e
NWOODdeclara
esenc
de
6H~ONEI
TH
dichiara
ed
1
KS-UBTl
sposi~Oes
etta
vaatimusten
Co
yacho,
i
Yo
0022
-
lll
,
KS-UBTl
this
and
K5-UBTI
Gerat
das
Anforderungen
htlinie
Ri<
r
de
den
mit
UBTI
/S/
99
19
l'ap
qur
aut
aux
et
CE.
toestel
het
sen
tii!le ei
EG.
/S/
1999
herved,
rer
kra
ycualesquiera
es
ial
Oire<tiva
Ia
011
AnAITHHIL
IL
L
fiA
06H
L
questa
che
altre
aile
.
CE
/
999/S
KS-UBTl
dan
li
ohrajn
ta
es
Directiv
da
KS-UBT1
ation
rpor
sh
-
kohama
E0984
C
in
is
relevant
other
in
und
999/5/EG
1
egenden
l
und
gr
befindet
fG
KS-UBT1
l
parei
s
dispo
es
r
UBT1
-
KS
andere
de
en
fDigende
at
0vrige
og
v
el
que
1999/5/CE
UBT1
K5-
KAI
1999/5/EK.
KS-UBT1
disposizioni
jikkonforma
evanti
l
re
conforme
19
a
tyyppinen
koskevien
ii
sit
ja
i,
den
befindet.
Wien}
. {
rst
itions
in
otras
li
os
com
99/S/CE.
on
laite
regard
with
Conformity
of
to the
Representative's:
EU
Svenska:
intygar
Harmed
Overensstammelse
bestiimmelser
a
relevant
lslenska:
ir
j1
l
meO
Her
ur
Of
nkr
n
ru
g
Norsk:
KENWOOD
JVC
grunnleggende
de
med
EF.
5/
/
1999
(esky:
WOOD
EN
K
JVC
poi:ada
fmi
ladn
zak
ES
/
999/5
1
Eesti:
ga
va
Kiiesole
99/5/EO
19
i
ektiiv
r
di
tulenevatele
:
Latviski
KENWOOD
JVC
so
Ar
skajam
i
but
EK
lietuviu:
NWOOD
KE
VC
J
)iuo
mus
i
reikalav
Magyar:
Alulirott.JVC
z6alapve
vonatko
ilsainak.
r
iOf
e
eb
y
eg
:
Polski
JVC
zym
>
ieJ
Nin
zasadnraym
z
owieniami
tan
os
Slovensko:
KENWOOD
JVC
in
zahtevami
Slovensky:
KENWOOD
JVC
a
poiiadavky
Romana:
ceasta
a
Prin
ate
it
conform
EC.
/
1999/5
:
6"bnrap<KM
oro
HaCTO.Rut
C
CbOTBeTCJBa
np~tna>t<ltMI-1
KENWOOD
JVC
med
KENWOOD
JVC
krtifur,
rar
a~
og
r
a?re
l
erk
prohlaSuje
tfmto
a
vky
JVC
itab
nn
ki
pOhinOu
jakoha
as
le
te
teis
dek
prasibam
deklaruoja,
1999/5/EB
as
ir kit
KENWOOD
k0vet
t0
KENWOOD
wymogami
i
Dyrektywy
da
avlja,
zj
i
relevantnimi
limi
osta
vyhlasuje,
tjmto
prislu
ky
'/Set
KENWOOD,
JVC
,
er
rrved
p
cu
KENWOOD
JVC
OCHOBHI1Te
Ha
Ha
1Ulay31-1
Technical
JVC
Postfach
Friedb
61145
Germany
att
vasentliga
de
framgar
som
pvi
yfir
m
se
at
herved
0vrige
og
krav
ir
,
i pr
daiSfm
KENWOOD
etele
tele
s
KS-UBT1
ka
e,
lar
em
citi
un
kad
Direktyvos
nyilatkozom
€nyeknek
lm
e
oswiadaa,
pozo
oraz
9/
199
KS-UBT1
ta
je
le
ustanovenia
ne
S
ar
ecl
d
gener
e
il
.QeK11ap11pa,
11311CKBaHI1R,
,llitpeKTI1Ba
Directive1999/5/EC
R&TIE
Europe
Services
04
1005
rg
e
UB
KS-
denna
egenskap
direkt
av
KS-UBTl
aO
ti
f
u
er
r
gerOa
KS-UBTl
utstyret
relevante
UB
-
KS
tento
ustanoven
mi
fsluSnY
KS
seadme
etatud
nim
ja
.
satetrle
atbilst
j
stita
i
sa
to
ar
KS-UBT1
Sis
nuost
KS
a
hogy
,
1999
az
es
UBT1
-
K5
ie
stosow
ymi
1tal
S/EC.
skladu
v
direktive
i
dolocil
KI-UBTisplna
Smernice
KS
aces!
ca
a
alte n
cu
~
e~
t
a
113
1.1e
KaKTO
/5/EC.
1999
GmbH
I
ar
st
Tl
iga
tivr
och
skrav
S/EG.
/
1999
iv
viO
r
samrifm
i
er
5/EC.
/
999
1
lskipun
r
samsva
i
er
tiv
rek
i di
krav
sr
shode
ve
je
T1
smernice
mi
f
ust
vastav
UBTl
t
is
direktiiv
9915/
19
vas
i
rekt
Di
noteikumiem.
iem
nius
i
esm
atitinka
s.
ta
a
felel a
meg
BTl
-U
v
yel
n
ir3
EC
/S/
zgodny
je>t
mi
ny
imi
ven
st
bi
z
.
ES
/
9/5
199
zakladne
ES.
/5/
99
19
in
te
rs
UBT1
-
or
.Qen~o~ero
11
me
Ha
le
a
KS-U
,llpyrM
Direc
tiv
BTl
ei
......
..
o,
•~
~·--~
SPECIFICATIONS
Version:
Bluelooth
I.
2.
l.
4.
Power
Dimension
For
Thi
not
ca
FCC
This
interference
opera
For
This
radio
rules.
evaluation
away
For
Thi
device
undesired
Under
esser)
l
antenna
ne
•
•
PowerCiass
ServiceArea:
Standards:
USB
Consump
s (l x W x H): IS
A,
.
U.S
complies
device
s
harmful
cause
undesired
se
u
Caution:
equipment
unless
equipment
this
te
and
U.S.A.
uipment
eq
frequency
equipment
This
(MPE).
pe
from
CANADA
compl
device
s
not
may
operation
slry
lndu
app
gain
ype
t
for
ry
cessa
Products
-
Battery
toot
e
lu
B
The
license.
under
adapte
This
,
details
For
:
ion:
t
operat
may
CANADA
comp
(Rf)
's
rson
i
cause
Canada
oved
r
its
and
essfu
succ
word
h
Other
been
has
r
so
al
see
th
wi
interf
ion.
generate
mod
the
es
li
Exposure
has
it
But
body
th
wi
es
interference,
the
of
regu
or
f
gain
l
Information
[European
ese
Th
househo
If you wi
lf9isl
disposing
By
at
neg
Notice:
e
Th
mar
trademarks
des
the Ins
..........
EDR
+
2.1
r
Ve
2
ass
Cl
m(10.9yd)
1D
(Full
Vll
USB
mA/5
54.3
x
mm
of
ri IS
Pa
and
nce,
ere
use
or
ifications
unauthorized
an
if
FCC/IC
th
wi
Guidelines
level
low
very
irable
des
is
cluding
(ex
of
-210
RSS
and
device.
s,
ation
l
lransmitter
e
th
be
should
cat
i
commun
for
Union
indicate
bols
ym
s
dwasteat
l
dispose
to
sh
roth
ono
i
at
this
of
effectsontheenvironmentandhuma
ive
below
Pb
sign
s
logo
k and
and
exclus
ed
n
ig
s s
truction
......................
Speed)
(max.)
V
mm
S.6
x
mm
19
Operati
Rules.
FCC
the
(2)
that
this
so
erru
are
trade
upplied
mu
device
this
frequency
radio
appro
expressly
are
or
change
expos
radiation
upplement
S
in
energy
RF
of
s
be
hould
it s
hands
:
extremities
Canada
stry
indu
vice
de
this
(2)
lransmilter
radio
Canada
stry
Indu
by
the
that
chosen
on.
i
Disposal
on
Users
only[
product
the
that
.
ife
-of-!
itsend
product
this
of
esinyourcountryandmu
l
correctly,
product
batter
for
l
ymbo
e s
th
Blu
e
th
by
owned
tho
are
names
ithJVC'sc
w
use
for
ively
with
your
receive
x
"
(S/8
on
a«ept
sl
energy
d in
ve
modificat
lim
re
u
to
C
it
that
installed
i
wr
,
es.
ul
R
must
may
va
i
equ
of
and t
e batte
th
and
will
you
nd
i
es
i
ooth
et
he
of t
se
ar
r.
x
J/4"
subjec
is
interference
any
es
ng
Cha
.
instruction
the
is
ion
fo
t
se
its
OET65
deeme
op
nd
a
feet
,
sts
Operation
an
pt
a«e
o
ly
on
duce
re
To
.
isotropkally
ent
l
Equipment
Old
batte
he
,
ry
ip
ic
n
to
lp
he
lth.
ea
nh
tha
icates
c.
In
SIG,
pec
s
re
ir
vers.
i
rece
1/4")
he
I
to
t
modifications
or
.
made
an
for
rth
-
RSS
and
comply
to
d
keeping
erated
ankles)
and
issubject
interference,
y
using
perate
potential
thi
with
ry
do
please
ality.
onseNe
c
batt
is
th
t
u
any
and
owners.
tive
use
not
Do
~lllllll§@(!ril~111
may
device
is
(1) Th
ons:
i
condit
two
llowing
fo
eceived,
r
manual.
uncont
of
102
without
.
to
radio
radiated
and
symbo
s
in
so
natural
ry
e
of
se
this
to
The
ll
ro
I(
lhe
the
followi
the
inclu
antenna
an
interference
power
Batteries
should
l
accordan
resources
ntain
co
arks
m
ch
su
adapter
includi
this
ed
radio
max
radi
in
d
ce
le
s
user
en
a
g
with
ad
by
with
interference
ng
equipmen
ld
u
co
vironme
nc
ue
freq
per
um
im
leas
at
tor
condit
two
ng
nterference
i
pea
ty
a
of
to
.)
.p
(e.i.r
sposed
di
be
not
cab
li
app
elp
h
ll
wi
and
.
NWOOD
KE
JVC
he
ot
any
t
lose
nt
y (R
miss
t 20
nd
oth
is
r
cause
may
authority
he
t
meels
d
an
Exposure
F)
exposure
ive
em
ons:
i
that
maximum
users,
er
more
not
general
as
tional
na
le
vent
pre
Corporation
receiver.
car
that
the
more
or
(1)
cause
may
the
than
potential
ay
m
harmful
to
FCC
is
th
(or
that
is
Cet
et
RF
doit
des
Pour
Cet
seu
accepler
di
respecte
faible
tres
etre
emites:
r
ext
le
appareil
ement
l
tif.
sposi
regl
les
qui
lli
sta
in
CANADA
est
condition
aux
brou
tout
-
Etats
es
l
Pour
equipement
Conformement
d'un
et
type
un
d'
brouillage
de
ues
sq
ri
sorte
communication
• Cet
ssa
pui
Ia
e
qu
Produits
-
:a
Pile
mot
du
marqur
La
t
es
on
ti
a
rpor
Co
eur a
adaptat
detail
de
plus
Pour
et
Unis
nform
co
t
es
exposi
d'
es
conside
est
lise
i
ut
et
piognets
,
mains
conforme
ge
lla
i
e
regl
Ia
a
maximal
gain
radioilectrique
isotrope
nce
s
atisfai
s
Informations
utilisateurs
[Union
ymb
s
Ces
ncycledevie.
eso
d
s
vou
Si
vigueur
en
limin
e
En
entue
ev
des
Notifi<
rqu
ma
La
es
l
et
sous
faite
n~u
co
ete
reterez
s,
CANADA
le
limit
aux
e
aux
on
ti
rm
confo
ee
r
une
gardant
en
, pieds
reglemen
au
(1)
es:
uivant
s
s
radioilectrique
d'
n
io
mentat
inf
(ou
a
n
rayon
.
ante
relatives
europt!enne
ent
gnifi
si
es
ol
imin
€1
ez
ait
uh
so
s votre
dan
ectement
rr
co
nt
a
nfgatifs
effets
ls
:
ion
at
esso
en d
Pb
e
Bluetooth
os
log
utr
esa
L
.
cence
li
ment
le
cia
spe
in
aux
s
vou
·
exposition
d'
es
frequences
ans
e s
distan
illies).
ev
ch
et
-210
CNR
t
doit
ne
il
meme si
re(u,
ie
lndustr
ap
)
ur
ie
er
intention
!'
uivalente
eq
ee
relimination
a
seulement]
produit
le
e
qu
od
pr
ce
er
vo
et
pays
produit,
ce
ur
s
mbol
sy
du
us
propri
Ia
nt
so
marqu
es
re
et
ur
po
ons
cti
tru
s
rayonn
aux
radioilectriques
de
evaluation
em
20
de
ce
trie
s
indu
l'
de
produire
s
pa
brouill
ce
pr
le
Canada,
pour
prouve
autres
es
d
.e
(p.i.r
pile
es
l
et
piles,
s
le
et
uit
municipal
e
tr
co
vous
ment
e
nn
o
nvir
'e
l
es
pil
es
e d
Blu
de
fte
de
s
nom
et
es
un
se avec
li
i
ut
avec
urnies
fo
ments
e
RF)
(
expos
I'
entre
plus
ou
Canada
du
brouillag
de
es
age
emetteur
nt
ese
l'emetteur
utilisateurs,
p
de
ne
.)
aopareils
des
i
do
ne
s
s-le
faite
itt'.
a
ntribuez
sa
Ia
et
e
indiqu
SIG,
tooth
e
mmerc
co
dio
ra
uto
a
autor
votre
enoncees
02
-1
CNR
maximale
ion
it
di
le
ti
'u
. [
et
e
scept
t su
radio
ndustrie
l
par
faut
il
l'i
as
p
asse
et
et
pas
venl
conformfment
conserv
Ia
huma
e
nt
pile
cette
e
qu
toute
et
c
In
p
Ia
t
son
e
N'utili
C.
JV
.
adio
sp
a
re
ine.
li
(2)
ible
ch
nt
tion
ropri
de
itif
os
sation
l'util
de
peut
ois
ensite n
des
limin
f
de
ont
c
utili
e
sez
nvironn
e
un
pour
uip
eq
Cet
C.
I' I
Cepen
autorisfe.
rayonnant
dispositif
ce
de
du
isateur
compromettre
fonctionner
Dans
.
ada
n
Ca
d'antenna
type
ir le
aire
ecess
usages,
piles
tant
en
fs
ation
isl
eg
Ia l
a
ressources
s
plomb.
du
nt
ie
ces
de
ation
s
proprift
eur
l
de
te
t
adap
cet
as
p
e
ement
dant
corps
le
et
dispositif
le
avec
but
le
'e
l
a
!
a
dec
que
ona
nati
naturelles
arq
m
aire r
av
eur
at
ment
es
tabliss
'i
het
u
ec
contr6
non
energie
e
un
et
em
pem
fqui
cet
,
i
except
I'
(a
autorisie
t
pret
etre
t
oi
d
fonctionnement
enne
t
an
une
les
reduire
de
de
in
ga
n
so
et
d'
t
men
e
des
ntention
fin
Ia
a
menager
reg
autres
ou
le
prevention
Ia
eta
NWOOD
KE
C
JV
ar
p
es
tif.
e<
p
es
ad
r
auto
re
aut
un
1e
ent
on
un
es
l
[Scilo
indican
bolos
sim
os
Est
mesticaalfinald
do
ra
su
ba
Si
/pilas
oth
to
e
Blu
arca
licencia
o
baj
za
li
ha
ador
pt
t
ep
rec
otro
de
s
ma
obtener
Benutzerinformationen
(Nur
Oi
Haushalt
We
Land
Di
u
Hinw
Oa
e Bluet
rk
a
rtm
rporati
Co
erkannt.
san
vonun
en
ur
w
Adapter
r
ut
enA
der
an
en siehe mit lh
no
Si
pos
AtenciOn:
La
ysus
o
sid
para
or
ta
ese
nn
ko
e
die
nd
Zeich
s
ooth
on
de
Re
o-
Productos
-
Baterias
a
du
Lam
•
rea
se
e ada
Est
ningUn
a
Par
e
Produkte
-
Batterie
io.
e Wo
Di
KENWOOD
rd
we
ese
Oi
inem
e
Einzelheit
desechar
esea
d
ativasdes
rm
el
a
ch
se
de
ctos
fe
e
es
bl
i
i6n
indicac
gotipos
lo
marcas
as
Otr
.
riado
se
di
m6vil.
auto
ult
ns
co
,
lles
Europaische
bole
Sym
ll
sabfa
es
es
di
Sie
esgesetze
Entsorgung
kte
e
rr
hlicti
c
ns
me
is:
e
Pb
en
logo
e
di
und
ht
ie
sch
ge
eB
i
schl
aus
r.
eive
c
Recei
rem
este
upaisymunicipio.
producto
negatives
debajo
Pb
pr
son
nomb
y
usarse
ra
pa
bi
tam
e
Union]
an
gen
i
ze
orgtwerdensollrn.
s
nt
e
Produkt
d
an
und
Ge
e
rha
e
unt
ind
s s
lize
er
unt
Ve
ur
z
ch
ii
mitgelief
ver
produ
el
que
vidaUtil.
esu
y
producto
correctamente
med
el
en
o
mb
sf
l
de
de B
ad
ied
op
rci
come
res
xclusivam
e
instru
las
en
Entsorgung
zur
dam
s
da
ss
da
,
Batte
die
und
Regelungen
ere
odukts
Pr
es
dies
it.
he
und
s
Batteriesymbol
es
d
lb
de
ntum
ge
Ei
Wa
dere
An
.
nz
rwendung
Be
e
rt
e
o
ct
bater
Ia
,
ia
de
lo
etooth
lu
le
a
nt
e
cione
c
it gek
e
ri
in
lu
B
r
enzeich
r
Auto
mit
diermng
er
bat
Ia
y
aga
h
fa,
co
estara
ambiente
erfa/pila
bat
SIG,
de
son
s
os
l
con
e
ini
sum
s
nze
en
sorgen
t
en
land
em
hr
l
dem
t
dien
bt
gi
s
th
oo
et
en
Recei
-
leitung
n
sa
ia
lo
ntrib
y
Inc.,
sus
re
stradas
alter
ich
Umwe
an
SlG
un
ve
llevan
e
qu
conformidad
de
uyendo
Ia
en
ndic
i
cua
y
respe
tor
cep
Gerate
te
ne
ht
mOc
bzw
ass
, d
,
c.
, In
ande
d H
vo
rn
.
lu
sa
qu
a
lqui
ctiv
es
co
rodukt
P
en
lhrer
.
sc
lt
di
und
ls
JV
n
este
conseNar
a
l
de
d
ta
es
e
er u
propiet
os
a
para
ece
r
su
n
und
alte
h
,
Gemeinde
und
z
hut
Batt
ese
iche
l
eg
j
en
nam
ntworf
e
C
simb
con
persona
as
contiene
de
sa
arios
om6
ut
ptor
Batterien
die
bzw.
Sie
n
verhind
e
ri
e
Ve
sind
en
olo
los
.
sich
Bl
rw
Eig
Ia
lo
vil
.
en
.
de
no
ac
isl
eg
l
ecursos
r
s
s.
plomo
mos
s
mi
.
JVC.
de
Batterie
abe
d
mtigli
rt
e
nth
eie
og
du
m
tu
en
e
Verw
ben
bitt
i
a
so
ihr
nd
i
.
nicht
lt.
d
6n
natura
po
No
ea
lcher
er je
en
ese
naci
r
ut
che
Sie
JV
charse
onal
C
ice
il
als
n d
Schade
Mark
we
diesen
junto
nte
vige
prev
a
y
es
l
KENWOO
ada
este
aler
rm
no
r
entsp
ie
fUr
o
ur
d
en
Be
n
ge
ili
ap
Ad
D
ec
ch
sitz
con
u o
enir
Corpo
ptad
he
e
di
die
er
er
t
Ia
tr
los
or
nden
Umw
JV
und
ni
as
ation
r
wn
C
cht mit
elt
usados
las
s/pi
bateria
y
eguipos
de
eliminacion
sobrela
usuarios
los
para
Informacion
Europea[
Union
Page 42
=
)t
marchio
maggiori
Pilha
adaptador
mais
Qualora
nazionale
Mediante
potenziali
Nota
il
e
i
logo
in
licenza.
e
stato
con
ri
cevitori
i
nformazioni
lnforma@o
[Apenas
Estes
forma
Se
outras
Ao
eteitos
Aviso:
0
marcas
e
Corporation
toi
detalhes,
Prodotti
-
)t
Batteria
II
concesso
o
L'adattatore
impiegato
Per
Produtos
-
)t
o
A
palavra,
KENWOOD
Este
re<eptordeautom6vel.
Para
lnfonnazioni
[Esdusivamente
Questi
domesticigeneric
mondiali
per
per
simboli
indicano
i
allafinedellalorovita
si
desideri
smaltire
applicabile
lo
smaltimento
effetti
negativi
:
simbolo
Pb
sotto
il
simbolo
di
Bluetooth
Altri
morchi
e
nomi
concepito
esclus
i
vamente
di
altra
marca.
in
merito
si
prega
oara
os
para
a
Uniao
simbolos
indicam
que
outros
aparelhos
pretenderdescartar-se
regras
em
vigor
eliminar
este
produto
negatives
no
ambiente
sinal
Pb
abaixo
do
simbolo
logotipos
Bluetooth
esta
sob
licen~a.
desenhado
para
uso
exclusivo
consulte
tambem
as
gli
utenti
sullo
Europea]
il
prodotto
il
prodotto
altre
leggi
corretto
di
sull
'
ambiente
delle
batterie
appartengono
per
essere
di
vedere
utilizadores
o
produto
domest
i
cos,
deste
produto
seu
pais
ou
da
forma
correcta,
e
saUde
para
pilhas
de
propriedade
outros
nomes
com
receptores
tornecidas
smaltimento
e
Ia
utile.
e
Ia
della
questa
e
sulla
a
Bluetooth
impiegato
il
relativo
acerca
e
a
pilha
no
e
municipio.
humana.
indica
da
comerciais
I'Unione
che
o
aile
appartengono
di
fabbrica
Europeia]
que
no
sao
Os
instru~Oes
batteria
su
rui
batteria,
effettuare
propria
nazionee
prodotto,
si
salute
umana.
indica
che
questa
SIG,
Inc.
ai
rispettivi
coni
manuale
da
eliminado
que
tiverem
tim
da
sua
vida
da
pilha,
portavorfa~
ajudara
a
conservar
que
esta
Bluetooth
e
marcas
de
autom6vel
como
seu
delle
apparecchiature
essi
appaiono
lo
smaltimento
del
proprio
contribuir.i
a
preservare
batteria
contiene
e
l'
uso
di
tali
titolari
.
ricevitori
di
marca
d'istruzioni.
de
eguioamento
este
sfmbolo
de
utiliza~ao.
-
o
de
acordo
recursos
pilha
contem
chumbo.
SIG,
Inc.
e
qualquer
rf9istadas
sao
JVC.
Nao
utilize
receptor.
e
batterie
non
devono
essere
in
conformit.i
comune.
le
risorse
piombo.
marchi
fatto
da
JVC
JVC
per
automeui.
usado
nao
devem
ser
descartados
com
a
legisla~ao
naturais
e
ajudara
utiliza~ao
detais
dos
seus
respectivos
este
adaptador
obsolete
smaltiti
tra
alia
normativa
naturali
e
a
KENWOOD
Non
deve
e
pilhas
nacional
a
evitar
potenciais
marcas
pela
proprietaries.
com
nenhum
i
rifiuti
prevenire
Corporation
quindi
essere
da
mesma
aplicavel
JVC
outro
e
ou
Tuotteet
-
';g
Bluetooth-merkki
tuotenimet
o
Tama
sovitin
kanssa.
Katso
tarkempia
)t
-
Tietoja
[vain
Euroopan
Nama
elinkaan
Jos
haluat
voimassa
Kun
havitiit
jaterveyshaittoja.
Huomautus:
Akkusymoblin
ja
logot
kuuluvat
vastaaville
on
suunniteltu
tietoja
myOs
[sadece
Avrupa
vanhojen
symbol
it
tarkoittavat,
paattyy.
hiivittaa
olevien
tuotteen
alapuolella
kuuluvat
omistajille.
erityisesti
vastaanottimen
Birligi]
laitteiden
unioni]
ettei
taman
tuotteen
maaraysten
mukaan.
asianmukaisella
oleva
Bluetooth
SIG,
kaytettavaksi
mukana
bu
sahiplerineaittir.
•
ja
akkujen
symbolilla
varustettua
ja
akun,
tee
tavalla,
autat
Pb
-
merkinta
tarkoittaa,
lnc:lle
ja
JVC
KENWOOD
JVC
-autovastaanottimissa.
toimitetuista
Bluetooth
markas1
markalan
lisansh
Bu
adaptOr
JVC'nin
Bu
adapttiri.i
ba~ka
Aynnt1lar
i~in
allcmlzla
havittamisesta
tuotetta
niin
kansallisen
saastamaan
etta
akku
Corporation
Ala
kaytttiohjeista
ve
logolan
Bluetooth
olarak
kullanmaktad1r.
ara~
allolan
herhangi
bir
birlikte
verilen
eika
akkua
lainsaadanntin
luonnonvaroja
sisiiltaa
lyijyii.
kiiyttiiii
kiiytii
tat
a
.
SIG,Inc.'a
Oi§erticari
ile
birlikte
kullamlmak
ara~
allos1
ile
talimatlara
saa
laittaa
talousjatteisiin,
tai
muiden
maassasi
ja
estamaan
niitii
lisenssilla.
sov
i
tinta
muiden
aittir
ve
JVC
markalarve
ilzere
tizel
kullanmaym1z.
bak1n.
kun
sen
ja
kunnassasi
mahdollisia
ymparistO-
Muut
tavaramerkitja
autovastaanottimien
KENWOOD
Corporation
ticari
adlar
kendi
olarak
tasarlanm1~t1r
.
Product
-
)t
Batterij
Het
woord
gebruikt
o
Deze
adapter
Zie
tevens
Produkter
-
Batteri
•
Ordmarket
Corporation
•
Oenna
tillsammans
Se
aven
lnformatie
[Aileen
Deze
symbolen
het
normale
Wanneer
en
regels
in
Door
dit
en
met
het
Opmerldng:
Het
teken
Bluetooth
en
de
onder
is
bij
de
licentie.
ontworpen
uw
re<eiver
deze
lnfonnation
[Galler
Oessa
symboler
hushaJJsavfall,
Om
du
viii
galler
i
Genom
negativa
Observera!
Markningen
och
Jogotypen
sker
pa
licens.
adapter
ar
specialkonstruerad
med
nagon
bruksanvisningen
voor
de
Europese
geven
huishoudelijk
u
dit
product
uw
land
en
product
naar
voorkomen
Pb
onder
het
bijbehorende
Overige
handelsmerken
voor
exdusief
geleverde
for
endast
EU-Iander[
anger
nar
kassera
Jandet
och
an
avyttra
effekter
pa
Pb
under
fiir
Bluetooth
Andra
varumarken
annan
bilstereo.
till
bilstereon
gebruikers
over
Unie]
aan
dat
het
product
afval
mogen
en
de
batterij
gemeente.
anvandare
de
denna
kommunen
denna
wilt
het
inzamelingspunt
van
potentiele
negatieve
batterijsymbool
markeringen
en
en
namen
gebruik
met
JVC
gebruiksaanwijzing
glillande
an
produkter
inte
ska
anvandas
produkt
och
dar
du
produkt
p!
miljiin
och
den
symbolen
fiir
ags
av
Bluetooth
och
varunamn
for
anvandning
angaende
detaljer.
het
verwijderen
en
de
batterij
worden
weggf9ooid.
weggooien,
houdt
te
brengen,
effecten
geeft
a
an
dat
deze
logo's
zijn
eigendom
zijn
eigendom
auto-re<eivers.
voor
details.
bortskaffning
och
banerier
mer.
baneri,
sa
ska
bor.
ran
san,
bidrar
manskliga
halsan.
banerier
indikerar
SIG,
Inc.
tillhiir
tillsammans
van
met
dit
symbool
u
dan
werkt
u
mee
op
het
milieu
batterij
van
van
Gebruik
deze
av
med
denna
dena
giiras
du
till
an
dena
och
varje
respektive
med
en
JVC
oude
apparatuur
bij
het
aan
de
geldende
a
an
het
behoud
en
de
volksgezondheid.
load
bevat.
Bluetooth
SIG,Inc.
de
overeenkomende
adapter
niet
gamma!
utrustning
symbol
inte
i
enlighet
an
bevara
naturen
baneri
innehaller
anvandning
av
agare.
-bilstereo.
Anvand
einde
nationale
van
en
met
ska
med
dessa
en
batteriien
van
de
gebruiksduur
wetgeving
natuurlijke
JVC
KENWOOD
eigenaren.
andere
auto-receivers.
och
kasseras
den
lagstiftning
och
forhindrar
bly.
marl<en
inte
adaptern
hulpbronnen
Corporation
batterier
som
vanligt
potentiellt
av
JVC
niet
met
of
andere
som
KENWOOD
CaeAeHMH
[ronbKO
fi~t
JIOmKHbl
MJAenMH
-
)t
6anpe•
o
T
eKcrosbiM
MCOOJ\b3yiOTCR
RBJlRIOW:I
o
JlaHHbiM
a,qanrep
JlonOJJHMTeJJbHYIO
npo'iona
-
Mnatapia
H
;;(q
Corporation
o
0
npooap~Joyto(
npooappoyta
fta
AEmo~tpEtE(,
YTKJJM33~MA
33KOHOA3TenbCTBa
06ecne4HBaR
npeAOTSpautaeTe
YaeAOMneHMe:
Ha.QnHCb
rosapHbiM
lHaK
KOMnaHMeM
Co6CTBeHHOCTbiO
~anrep
npe,qHa3H3"1eH
C
,llpyntMH
npHeMHHKaMM.
HH$OpMa~MIO
DlnootopiEc
unataptlilv.
[Eupwnai•Ji1vw01J
Ta
oU~~oAa
OJTOppirrtOVTOI
EOv
~
OMou~
H
OW<JTfl
EV6EX6~EVWV
En•ori~avoq:
To
o~pa
KUI10
loy6wno
yivETat
Kat6mv
outO<;
p.E
01TOl06~JTOlE
avatpt(u
AIIH
nonblO&areneM
EaponelicMM
04M80nbl
JVC
COOTBfTCTBYIOUlMX
etAm:
Bluetooth
tXEI
OXE610atEi
Co103]
yKa3biBaiOT
Ha
TO,
'ITO
yr~t11K3HpOEk1TbCR,
AaHHOfO
MJJM
npaBMJlbHYJO
B03MO~Hb1M
Pb
OOJI
CHMBOJIOM
Bluetooth
H
KENWOOD
MCKJJIO"'HTenbHO
CM.
B
pyKOBOJICTBe,
ytCl
aura
Of'JAWvouv
W~
OIKIOK0
va
anoppi'IJETE
KQVOVtopoU(
on6pp1'1Jf'J
OUTOU
OpVfJTIKWV
Pb
KOtw
on6
EivmiOIOKTqoio
oOEia(.llia
y10
Iillo
OfKTfj
miof'J<
OTt(
113.Qe11He
KaK
06bi4Hble
Ml.QeJJMA
M
6aTapeK
APYfMMM
npasMnaMK,
yrMnH3a~MIO
Yutep6
6arapeM
yKa3b183eT
coorsercrsyiOli.IMe
Corporation
no
COOTBeTCTBYIOilleM
BJJa,qeJJbl.lfB.
AJIR
MCOOJ\b30BaHMR
OOCTaBJJReMOM
lOU<
xpflauc
~civo]
6n
TO
JTpoT6v
OJT6~Af'JTO
KOTci
to
JTpoT6v
aut6
rTOU
taxUouv
O!fJ
IOU
npo'i6VTO(
EJnmWOEWV
OTO
to
aU~~oAo
y1a
tt(
Tq(
Bluetooth
EpnoptK6.
o~pata
anoKAEiatiK~
XP~O~
OUlOKIV~lOU.
oOfJyiE:<
nounaptxovrm
no
JTIUIMlaUMM
116arapeA,
6biTOSble
OTXOJibL
JIOJIIKH3
ocyuteCTBJIATbCR
.QeMcrsyiOutMMM
,qaHHoro
npo,qyKTa,
MR
OKpy>t<aiOuteM
Ha
TO,
nororHnbl
RBJJRIOTCR
COSMeCTHO
C
npMeMHMKOM.
axEnKti
lll
mv
Kal
fJ
~meropia
TO
TfAO(
Tf'J(
Kat
Tf'JV
pnampia,
xWpa
iltf'JV
rTEPlOX~
~Ofj96
atfj
610niPf'JOf'J
nEptpcillov
Kat
l.lnOtapfE(
6f1AWVEI6n
SIG,
Inc
KUI
KQI
EpnoptKE<
ovo~aoit:<
~E
MKTE(
aurOKIV~IOu
pa(i
p.E:
10
naooro
o6omo&aHMA
Ha
KOTOpble
OHI!
HaHe<eHbl,
B
COOTBeTCTBKM
s
BaweM
crpaHe
Bbl
noMoraere
cpe,Qbl
H
3J10pOBbR
'ITO
AaHHaR
6arapeA
co6crseHHOCTbiO
JlH~eH3HM.
npo4Me
C
nplteMHHKaMM
mrOppul!n
lOU
JTou
cptpouv
aur6
(W~(
IOU(.
KOvn
ro
oUpcpwva
00(.
TWV
!pUotKWV
av6pliJJUVf'J
our~
f1
pnatapia
xp~oq
TWY
EivmtOIOKifiOia
Tfl<
JVC.
TO
uyEiO.
"'Myw
Mfl
WqlfAI~fl(
TTJV
KOBE
6lKif'J.
M 6araDei
8
KOH~e
cpoKa
C
Tpe60BaHMAMM
M
ropo.Qe.
c6epe"'b
npMpoAHble
I!IO.QeM.
CO,llep~MT
CBHHe4.
KOMnaHHH
Bluetooth
TOBapHble
3H3KM
H
JV(.
He
MCOOJ\b3yMre
nCllatoU
d,onAtcruoU
oU~~oAo
Mv
JTplJTEt
~E
Tf'JV
taxUouoo
EBviK~
n6pwv
Kot
OTfJV
np6Afj~Jlfl
ITEpti:XEt
~6Au~Oo.
oq~aTwv
ono
twv
avtiarmxwv
XPfJOip.OJTOIEiTE
aut6v
Ol)?K6bl
He
Ha~MOHaJJbHOrO
pecypcbl
M
SIG,
Inc.
M
roprOBble
MapKM
.ll3HHbiM
Kat
lWV
va
vopo9Eoia
Tqv
JVC
KENWOOD
1610KI~tWv
IOU(.
tov
"
Produkter
-
~
Bluetooth
licens.
o
Adapteren
bilreceiver.
Se
-
Andre
desuden
Brugerinformation
[kun
Disse
husholdningsaffald,
Hvis
nationallovgivning
Ved
negative
Bemzrk:
Tegnet
ordmifrket
samt
varemifrker
er
designet
vejledningen
EUI
symboler
angiver,
du
0nsker
at
at
bortskaffe
pavirkninger
Pb
undersymbolet
logoer
ejes
og
navne
udelukkende
,
der
f0lger
n!r
bortskaffe
eller
dette
af
at
Blue
brugt
som
til
brug
med
om
bortskaffelse
at
produktet
del
skal
smides
dette
andre
love
produkt
korrekt
milj0et
og
for
banerierne
tooth
SIG,
varema-rker
sammen
receiveren
af
og
batteriet
ud.
produkt
og
batteriet,
og
bestemmelser
medvirterdu
folkesundheden.
angiver,
Inc.
og
enhver
tilherer
de
res
med
JVCs
bilreceivere.
,
for
yder1igere
gammelt
med
dette
symbol
bedes
i
dit
land
til
at
bevare
at
dene
batteri
brug
at
sadanne
respektive
Adapteren
oplysninger.
udstyr
du
g0re
og
naturens
mifrker
ejere
ikke
kommune.
indeholder
.
og
batterier
m~
bortskaffes
det
i
overensstemmelse
ressourcer
bly.
at
JVC
KENWOOD
rna
ikke
anvendes
som
samt
torhindre
Corporation
sammen
almindeligt
med
gifldende
eventuelle
med
nogen
foregar
under
anden
Ill
Produkty
-
)t
Bate
ria
-
Znak
slowny
i
logo
licencjonowane.lnne
•
Adapter
zostcK
zaprojektowany
odbiornikiem
samochodowym.
Wi~cej
informacji
lnfonnacie
[Kraje
Unii
Symbole
przedstawlone
okresu
ich
eksploatacji
W
razie
konie<znoSci
przepisami
DbajifC
o
prawicHowq_
n~atywny
Uwaga:
tlznaaenie
Bluetooth
S<J
znaki
i
nazwy
na
ten
temat
podano
dla
uMkownikow
Europejskiejl
obok
nie
pozbycia
lub
innymi
zasadami
utylizacj~
wJMyw
oddziatywania
Pb,
znajduj((ce
w!asnoS<iq
Bluetooth
handlowe
do
wyfc)cznego
si~
w
instrukcji
dotyaace
oznaaaj~,
ie
naleiy
si~
sq
uiytku
sprz~tu
wyrzuca(
razem
si~
niniejszego
post~powania
produktu,
przyayniasz
na
Srodowisko
pod
symbolem
SIG,
Inc.,
wmlkie
wtasnoSciit
ich
odpowiednich
z
odbiornikami
obshigi
odbiornika.
pozbvwania
sie
zuMeao
elektryanego
i
odpadami
i
baterii
si~
do
ludzi.
wskazuje,
uiycie
tych
wlaScicieli.
etektronianego
gospodarczymi.
naleiy
post~powaC
w
danym
ochrony
zasob6w
ie
ta
bateria
znak6w
przez
JVC.
Nie
z
produktu
obowi~zuj~cymi
i
zdrowie
baterii
samochodowymi
kraju
i
miejscowoSci.
naturalnych
zawiera
JVC
naleiy
sprzetu
i
baterii
oraz
baterii
po
zgodnie
zlokalnymi
i
zmniejszasz
ot6w.
KENWOOD
Corporation
uiywa(
adaptera
zakor'laeniu
jest
z
innym
Page 43

!E
ii!!M
-
i
Baterie
•
ZnaCku
podh
~ha
•
Tento
adapter
Podrobnosti
a
logo
Bluetooth
podmink3m
byl
najdete
lnformace
]Pouze
pro
Tyto
sym
bo
belny
odpad.
Pfejete-li
jinjmi
pfedpisy
Spravnou
negativnich
Upozomeni:
ZnaCka
Pb
a
vlastni
licenc
e.
navrien
vYiuCne
rovne
i
v
oro
Evropskou
ly
znamenajl,
si
zlikvidovat
platnjmi
likvidaci
dopadU
pod
symbolem
s
poleCnost
Ostatni
pro
pfiruCce
uiivatele k
unli]
i.e
tento
ve
tohoto
produktu
na
i:ivotni
pro
Bluetooth
o<hranne
pouiiti
dodane
likvldad stareho
produkt
a
produkt
a
va~i
zemi
pomiii:ete
prostfedi
baterie
znamena,
SIG,
zn.imky
a
obchodni
s
piijima(em
s
VaSim
pfijima(
baterie
Daterii,
a
obd.
a
lidske
Inc.
JVC
s
timto
provedte
zachovat
zdravL
le
Jakekoli
nazvy
do
vozidla.
e
m.
zaiizeni a baterii
symbolem
to
prosim
piirodni
zdroje
tato
baterie
obsahuje
poui:ivclni
tf<:hto
naleieji
pfisluSnYm
Nepouiivejte
nesmi
v
so
tento
bjt
po
skonCenf
uladu
s
pifsluSnjmi
a
napomahate
olovo.
znaCek
spote<nosti
vlastnfkUm.
adapters
-
i:ivotnosti
nclrodnimi
prevenci
JVC
jinYm
l
ikvidovany
potencialnich
KENWOOD
piijima(em
Ukony
nebo
Corporation
do
vozidla.
jako
~
:a
~~~
-
llllllllllllllllllllllll
llllllllllllllllllllllllllllllllllllllllllllllllllllllll~-·o~
j
01lll'u\-ln>~H>~m><~hu,ri1>i'>~
l
~
ol
~
~
~
••
~
,
~
,
.
~
~fl
~
'
~
SIG,
Inc.
]
LLii::m;liiL'fl~£l..:J"r11-11U~..:Jn~T
JVC
KENWOOD
't·UJ1tJn1
7
#hLLa::~E
MI-/1Un14fh~~n~11
•
v:LLfliJ
L
11'1tl'
i
\il~
4fiUU.l1Jtl..:J
JV(
!Ttyqpru.lu
;
fluufi"11Ufl5U")
fl1wlunui'I::L~ufl~U"]1tl7fl~~1n~~D~~fl~..:Jl~~7El).JnuL'fl~D~
1
uir;yQJint1lD..:JfJru.
.......
"
~"'
~
"
~
,;
~
,
~
.•
~B~Iu~etooth
~o.ii\.1.1JD~u11ffl
Corporation
oomu\iim
I'
tn..:Jn17fh~~
")
LiJuani1l~·U~11J£l>lLfl~[I..:J
1
unl
;
tl[lnLLuul..Uiirluut.Jn
L
,htf\.1.
£l~1liiD::LLf!iJL!11~-H1fllJ~tlmr.ii
Bluetooth
l
1fluu71ffl
,
ouqp•Hi
•
•~••
;
r.ii
i'
1Jrir;yqp~l\.l.
7u
Termekek
-
:a
Akkumulator
o A
Bluetooth
jelzfseket.
o
Ez
az
adapter
A
r&le
-
Prod
use
-
:a
Bat erie
•
Cuviintul
marci
comerciale
•
Acest
adaptor
Pentru
mai
npOAYKTM
-
:a
6arep••
MapKara
Corporation
•
T
0314
a,&amep
.Qa
He
ce
Felhaszmlloi informado
[Csak
Eunipai
Ezek
a
sz
imb
vegennemszaba
A
jelen
termek
adott
orszilgban,
A
termek
megfele!O
kOrnyezetre
Megjegyzes:
Az
al.ibbi
Pb
szimbO
szo
a
Bluetooth
SI
G,
bi
kereskedelmi
a
JVC
aut6radi6khoz
a
vev6h0z
mellfkelt
[TinbKH
Afl•
EsponeHCbKoro
lnformatii oentru
ve<hi
[Doar
in
Uniunea
Aceste
simboluri
menajerelafinaluldurateideviata.
Oaca
dorili
sa
in
vigoare
sa
u
Prin
evacuarea
po
s
ibilelor
efecte
Observatie:
Semnul
Pb
de
Bluetooth
su
nt
$i
nume
comerciale
fost
realizat
pentru
detalii,
consultati
MHcbopMaUMH
(CaMo
1a
EaponeiicKMR
Te3M
CKMBOflM
OTOaAbi.IM
B
KpiiR
AKo
)Kenaere
Hai.IMOHiiiiHO
lfpe
3
npaBI4nHOTO
npeAOTBpaTRBaHeTO
npeAynpt>KAOHMe:
3HaKbT
Pb
OOA
Ha
Bluetooth
ca
no
11141.1eH3
.
OrraHanHTeTbproacKM
npeAH33Ha~eH
3a
a,&anrepbT
c
Apyr
te
~i
M
M3
A
t
Ob
kizarolag
ket
1.3sd
siglele
a
multe
nororo
rrasa
e
nomaa
az
Unio]
il
lumok
dh
es
akkumuliltor
illetve
es
az
egeszsegre
Inc.
sajat
vedjegy
i
nd
evacuati
cu
a
lea
corecta
nega
mai
jos
detinute
apartin
utiliz
ln
s
3a
yKa3BaT,
Ha
Aa
AenoHMpare
33KOHOAaTeiiCTBO
,&eiiOHMpaHe
CMMBOJla
co6rrseHOCT
M3KiliO~MrenHa
aeroM06MneH
elhasznalt
azt
jelzik,
hogy
az
hulladfkkfnt
helyhat6silgi
gyakorolt
ha
az
akkumulcitoron
jelzese
megnevezfs
hasznathat6.
Cot03Y
ru
ca
produsul
de~u
acest
i
di
n
tara
acestui
produ
asupra
mediului
ba
terii
indic
Bluetooth
pose
sori
lor
excl
u
siva
cu
furnizate
Cb103]
~e
npOAYKTbT
T03M
npOAYKT
MllM
APYfM
Hil
T03M
IIOT
e
H1.1
143fl
HM
6arepi4M
yKa3Ba,
Ha
Bluetooth
MapKM
ynorpe6a
npMeMHMK.
ilyen
ntk
ki:i12etben
segit
.irtalmas
es
az
frintett
Ne
pr6bilkouunk
l
orivire
~i
prod
us
sau
s,
veti
a
faptul
SIG,Inc.
acestora.
aparatele
cu
aparatul
Ha
M
6arep14RT3
MM
IIPOAYKT
Te
OTP14LiaTellHM
lie
SIG,
M
c
asTOM0614nHM
ilztart3siszemftkf
.irtalmatlanitasaval
ium
tulajdonu
es
Utmutat6kban.
utilizatori
EuropeaniJ
ica
faptul
ca
preveder
a
t
ive
pentru
de
a
rea
truqiunile
norpe6MrenMre
eKCni103T3l.IMOHHMR
Ha
3a
berendezesek
jelzfssel
eze
lni.
kezelesekor
ervenyes
meg6rizni
hat.isokat.
megtal.ilhat6-
logoja,
tulajdonosok
•
T
etmoaa
Bluetooth
KENWOOD
M3pKM
•
,llaHMM
3
3BTOM06illbH~M14
BMKOp1400BYBaTM
aBTOM06illbHMMI4
Jlnn
BXOAMTb
Ia
bateriile
~
i
bateria,
municipalitatea
avuta
~
i
sanatatii
cii
bateria
$i
sunt
auto
AenoHMpaHM
CpOK.
M
6arep14RTa,
npa
e
Mna
11\e
Ta31t
6arep~R
Inc.
, M
TbproacKM
es
akkumulatorok
ell.:itott
termfket
j.irjunk
el
az
idev
egyfb
el6ir.isok
a
terme
sze
tes
erOforr.isokat,
azt
jelzi
,
hogy
es
a
JVC
KENWOOD
Corporation
birtokaban
mas
aut6radi6kat
ropriaenbHa
MapKa
SIG,
Inc.
BHKOPMCTaHHR
Corporation
3
T3
TOprOBi
H3
3BM
3Aanrep
po3po6neH14M
npMHMa~aMI4
AaHMH
npltMMa~aMM.
6illbW,fteTanbHOrO
AO
KOMnnetny
evaruarea
<a
dej!!u
cu
acest
simbol
nu
va
rugam
sa
faceti
dumneavoastra.
Ia
conservarea
resur
se
umane.
Cont
ine
plumb
.
utiliza
te
de
JVC
KENWOOD
JVC.
Nu
folositi
aapo
T03M
CI!MBOII
Monn,
Hanpaa
aawara
apaHa
OOMOfHeTe
3il
norneAMI.IM
CbAbp)K(t
BeRKO
143nomsaHe
Ha3BaH
IHI
ca
npMeMHMLIM
acest
o6opyAaaHe
He
TpR6Ba
3iiOa3B3
3a
OKOflHaTa
011080.
Hil
CbOTBeTHI4Te
Ha
dumneavoastra.
C
BbB
elhelyezeserol
es
akkumulatort
hasznos
ii
g6
orszilgos
rendelkez
szerint.
es
megeiOzheti
az
akkumul.itor
Olmot
licenc
alapjan
van.
megtaptalni
vele.
ra
noronml!
Bluetooth
~Hx
MapoK
Ai~CHIO£Tb01
33
niueH3iEKJ.IHwi
HaneJ~~:aTb
BiAOOBiAHitM
BMKIIIOtiHO
AllR
KOM03Hil
3A30Tep
03HaMOM11eHHR
noaa~aHHR
JV(.
3
6yAb-RKMM14
AMBiTbUI
npMMMa~a
..
a
e<hioamentelor
trebuie
sa
fie
evac
uate
acest
lucru
in
conformitate
lor
naturale
$i
veti
co
Corporation
s
ub
adaptor
cu
alte
aparate
M
6arepMM
Aa
ce
AeOOHMpar
ere
roB
CbOTBe
TCTBMe
14
o6uti4Ha.
HeTO
Ha
npMpOAHMTe
cpeAil
14
~OBeWKOTO
Ha
re3M
MapK~!
or
rrpaHa
cM
npurelt<arenM.
JVC.
elettartama
esek
vagy
az
a
tartalmaz.
hasznatja
e
£
BJlacHiCTHJ
KoMnaHi£KJJVC
TOpriaenbHi
B1130H1KaM.
BMKOp~aaHHR
3a6opOHeHO
iHW14M14
iHCTpyK~iHJ,
.
,..._,·JVCKENWOOOCorporatlonas,..,.ah...I.,~WWI...,JW~I~I
·"-'L-...':1
~
~
LUO
;{e1Hf4@t+i
si
bateriilor
Ia
fe
l
ca
de~eurile
cu
legislatia
ntr
ibu
i
Ia
preven
lic
enta.
Celelalte
auto.
K3TO
61410814
c
npMnOJII:MMor
pecyp<:lt
3APiiBe.
Ha
JVC
KENWOOD
em
~
:a
~~~~~~~
irea
-
AeKnapaqio
He6e1neq•••
N'1057
6Hpi6
eneKTpH4HOMY
BMirr
1.
2.
o
J.
M
4.
5.
6.
Tiirkiye
Bu
Stntrlandtrtlmastna
"I' .
muetooth
SIG,
In<.
as_,..w
as~
l,!.>I,LL..>.,
dL.
o."l...cll
,L..,...,':II,
~':II
OJ4--JI
.
..J.-:$
~
..,.,._
1
..,..........,,
Bluetooth
jp-t
~
c>Lo
.
..:.L..,..;,
"J.>':l
4
olrA
~
OJ~-~
"'~'
SIG.
Inc
JJL.a.,..;1
~t.:.;
.r.l. • ..:.L
JVC
<.5Lo
'i
o..l..!.
~1)
"'"~I
.s,...-.-11
pi~'J.U
.,sl~
J~ll.l..l.
;.:.,,
_,.10.;1
d
_r,
..,
JL..:.o
~i
J::>~"':fts.
,:r-1
j1
_,.
JVC
KENWOOD
~l-"
.t.
Y.r
,_,;
_,?
4
,,\A;....
jl
•
.::..-1
• ...: ..r-1)>
ol.:.AI.>
~_?::>"'!~H.
.f-1
Y.r
·
~~~~~~~-·o~T~
[Hanya
Uni
Eropa]
npo
BiAnoaiAHi<Tb
PeqoaMH
Ka6iHery
MiHi<TpiB
BiAnOBiAaE
BHMoraM
ra
eneKTpOHHOMY
He6eJne4HHX
((d)-
He
-
He
pe40BHH
He
nepeBHutyE
nepeBHutY
CBHHe~b(Pb)-
KaAMiH
pT)'Tb(Hg)
WeiTHBaneHTHHH
Mlnb~OH;
nonifipoMfii~eHOOH
nonifipOMAe~eHinoBi
Millb~OH.
ipn
UrUn
26891sayth
Resmi
Dair
B
enenpMqHoMy
YKpa"iHM)
TexHi4Horo
y
BHna~Kax,
nepeBHutYE
E
0.1%
XpOM
((r&+)-
(PBS)-
He
e~ipH
(PBDE)-
Gazete'de
Yonetmelige
BMMOraM
PemaMeHry
ofina~HaHHi
He
0.1
%BaC
0.01
%
83CH
BarH
He
nepeBHutYE
nepeBHutYE
He
yaytmlanan
uygun
muetooth
4lS
~ll<
•
~LolWI.~>'.,..,....,
J~ll.l..l.
~
~
f~
.J...olli.ll
...'-'
c>(o;t.:.;
Bluetooth
1
dA:
....
1
..;J
Corporation
c>J4-'
c>Lo
I
<.SI.r.
i_,...-:..
J,.o
_,;1
·~J'.r.l.olr-"
..:.o\s.
•
¥
NC
J,......_ll
~~G.JI
W5
o
/'
J~4
if
d
_r,
r~
J
.;J4-'
J.>':;,j
.f.
I
o
,/
~
">'-ki~Sl.r.
...
an
~da~k~at~a~da~n~lo~go~B~Iu~et~oo~th~d~imilikiolehBiuetoothSIG,Inc.dan
segala
penggunaan
tanda
tersebut
lisensi.
pemilik
masing-masing
memiliki
desain
penerima
di
mobil]
penerima
mobil
06Me*""""
(3aTBep11JKeHoro
AeRKHX
N'2
TP
OBHP:
AO
1000
AO
100
AO
1000
4aCTHH
a6o
8
KOH~eHTpa~ii
afio
8
KOH4eHTpa4ii
pe40BHHH
a6o
Ejyalarda
Bazt
Merek
eksklusif
JVC.
yang
petunjukyangdibekalkandengan
BMKOpMaa•••
He6eJne4HHX
43ITHH
4aiTHH
AO
B
KOH~eHTJJa4ii
Zararh
TexHiqMoro
ra
eneKTJIOHHOMY
06Me>t<eHHR
(
TP
OBHP).
ofiyMoBneHHX
H
pe40BHHH
pe40BHHH
pe40BHHH
afio
0.1
%Ba
0.1%
BarH
nepeBHutYE
Elektrikli
olarak
Uretilmijtir.
adalah
berdasarkan
adalah
hak
•
Adaptor
ini
receiver
[alat
dengan
unit
Untukrincianselengkapnya,baca
alatpenerima.
PernaMeHTY
o6naAHaHHi
BHKOpHaaHHR
B
.QoAaTKY
afio
B
KOH4eHrpa4ii
afio
B
KOH4eHTpa4ii
B
KOH4eHTpa4ii
CH
pe40BHHH
pe40BHHH
0.1
%
BarH
ve
Elektronik
!@ititl@i!W4i
oleh
JVC
KENWOOD
dan
nama
digunakan
gunakan
noaaHOBOIO
Pet~OBHH
MiObHOH
MiObHOH;
1000
4aCTHH
4aCTHH
~0
1000
Corporation
dagang
lainnya
dengan
car
adaptorini
A•••••
s
;
Ha
Ha
MiObHOH
4aCTHH
Kullantmmtn
dagang
.
untuk
Jangan
lain
.
H3
Ha
Ha
MiObHOH;
~0
1000
Maddelerin
;
Ha
4
Page 44

• The countries where you
may
use
the
JVC
• Die Lander, in denen
•
Pays
ou vous pouvez
• De Ianden waar u de Bluetooth®-functie
• Palses en los
• Paesi nei
• Lander
• Lande,
• Land
• Maat, joissa voi kayttaa Bluetooth®-toimintoa
• Palses
• Palses
•
Ot
•
CTpaHbl,
• Zeme, ve kterych muzete
• Azok
• Kraje, w
• Drzave, kjer
• Krajiny, v
• Valstis,
• Salys, kuriose
• 11-pajjii:i fejn tista' tui:a 1-funzjoni Bluetooth®
• Lond
• Riigid, kus on
• Bluetooth®
dar
hvor
hvor
onde
onde
xwpEc;
az
kur
t>ar
que
quali
du
du
du
pode
voce
6nou
rAe
MO>KHO
orszagok, amelyekben hasznalhatjuk a Bluetooth®-funkci6t
kt6rych
lahko
ktorych
jus
sem hcegt er aa
fonksiyonunu
Bluetooth® function
Sie
die
Bluetooth® Funktion
utiliser
se
puede
e possibile utilizzare
kan anvanda Bluetooth®-funktionen
kan
bruge
kan bruke Bluetooth®-funksjonen
usar a
pode
IJnOpEiTE
moi:na ui:ywac
varat
galite
voimalik
usar a
socnonb30BaTbCfl
uporabljate
mozete vyuzlvat'
izmantot
naudotis
kasutada Bluetooth®
Ia
fonction
utilizar
Bluetooth®-funktionen
fun~ao
va
XPilOIIJOnOlrlOETE
vyuzlvat
nota
kullanabileceginiz ulkeler
Ia
Bluetooth®
fun~ao
funkci Bluetooth®
funkcji
funkcijo
Bluetooth®
,Biuetooth®/1 funkcija
Bluetooth®
Bluetooth®
mag
funci6n
Ia
funzione
Bluetooth®
<I>YHK4111elll
Bluetooth®
Bluetooth®
funkciu
Bluetooth®
funkciju
verwenden
gebruiken
Bluetooth®
Bluetooth®
Til AEITOupyia Bluetooth®
Bluetooth®
funktsiooni
konnen
•
th~L
YIAYhiTtHt13-JT'H1L~
•
Na
tlortha
• Lanner an denen
• 0
nhfrng
•
Els
pa·isos
• Zemlje u kojima
• Zemlje u kojima mozete
• Zemlje u kojima
3eMjll1
•
•
CTpaHII1Te, B KOII1TO
• Tarile
• Die Iande waar u
• Amazwe
• Ang mga bansa
• Negara-negara yang
• Negara-negara yang anda
•
c)"
~~r
•
1~Hm~iiffl
•
1ftHi~~~ffl
• Bluetooth®
inar
feidir
quoc
on podra fer servir
je
je
KaAe
MO>KeTe
in
care
puteli
lapho
~
ungasebenzisa khona
kung
3fTQ"
Bluetooth®
Bluetooth®
Jl~~
Bl
uetooth®
leat
feidhmiu
der
d'Biuetooth®
gia
rna
dozvoljena
koristiti
dopusteno
Aa
ja
MO>KeTe
utiliza
die
Bluetooth®-funksie kan
saan maaari kang
memperbolehkan
Bluetooth®
r}Jfi~I¥-JOO~
l}Jfi~~~~
A~~~-?~~
rr~fiitu
Bluetooth® a usaid
Funktioun
b~n
co
the
Slr
Ia
funci6
upotreba
koristiti
KOp111CTII1Te
Aa
non3BaTe
funclia
boleh
Bluetooth®
Bluetooth®
<J>yHK4111jaTa
Bluetooth®
uhlelo
menggunakan
~-~
~J~
~
Bluetooth®
benotze kennt.
d~:Jng
Bluetooth® funkcije.
Bluetooth®.
<I>YHK4111f1Ta
gumamit
penggunaan
CJiT
ch(rc
funkciju
gebruik
lwe-Biuetooth®
fungsi Bluetooth®
3Q<£flal
nang
Bluetooth®
Bluetooth®
ng
Bluetooth®
fungsi Bluetooth®
Cll{
~9
Bluetooth®
~
ff~;
~
•uf
function
,s:t;
S'
0::
~f
J9..l.Jf
•
Page 45
Country
··
•
.·
...
Country Country
Andorra
o~l
~.rt-JI
Australia
bsterreich
Bosna i Hercegovina
Belgien
Belgique
6bnraplt1H
Brasil
Canada
Schweiz
Suisse
Chile
Kunpoc:
K1bns
Ceska
republika
Deutschland
Dan
mark
Eesti
Espana
Suomi
Finland
-:JI)
.
..o/(1
Ireland Sverige
Eire
India
am<l
fsland
ltalia
cHEt'2J~
Lichtenstein
Lietuva
Luxemburg
Singapore
WTJJDJ&:
Singapura
Slovenija
Slovensko
U"i~b
'YIAl
Turkiye
A~71F.
!=lli:S
United States
Luxembourg
U~tzebuerg
Latvija
Venezuela
Vietnam
Vi~t
Nam
Monaco
South Africa
Crna
Gora
MaKe.QOHlllja
ENingizimu Afrika
Suid-Afrika
Malta
Malaysia
Nederland
Norge
New
Zealand
Peru
'YI
t1
of
America
France
United
Kingdom
EAA66a
Hong
Kong
~;!
~;i
Hrvatska
Magyarorszag
Indonesia
Philippines
Pilipinas
Polska
Portugal
Republica
Uruguay
Romania
Srbija
POCCltlH
Oriental
del
II
G ET0820-00
1
A
Page 46

w
U)~Q
::D
a:
::::»
z
~
•
CONNECT
~CAUTION
OTHERWISE,
BLACK
WIRE
DAMAGE TO YOUR
((l)GND)
GROUND
TO
UNIT
MAY
F:IRST.
OCCUR.
i
~
0
LL.
w
al
w
...J
m
-c
t_),~~~
:E
0
a::
~
w
m
:5
U)
~
en
w
!i
c(
·
0
S:!
.,_a::
(.)
w
w
.....
~
w
c
~
w
::::»
-a
~
ffi
~
i=
::::»
~
~
::i
w :
.....
(.)
::::»
Q
wt=
g
i=
,w
w
I=
w
:
l---------------....-----------------1
i
'
INCORRECT CONNECTION CAUSES SERIOUS
PLEASE
CONNECT GROUND
METALLIC BODY
OF
THE
CAR
CONNECT ANTENNA
READ
INSTALLATIONJCONNECnON
FIRST
CHASSIS
OR
TERMINAL
@
DAMAGE
MANUAL
CONNECT OTHER WIRES
CONNECT POWER CORD
TO THIS UNIT
CAREFULLY.
THE
UNIT
TO
w
~
iS
~
'D::
:5
w
a::
ffi
(.)
Gt
D::
ffi
a::
Page 47

Please
correspondence to this address.
JVC
1700 Valley
Wayne,
do not send products or other
AMERICAS CORP.
Road
NJ
07470
PLEASE
PLACE
STAMP
HERE
PRODUCT
PO BOX
1189
BEDFORD, TX 76095-1189
11
•••
1.11
..
11
•••
1.1
•••
1.1
••••
11
•••
111
••
1.1.1
REGISTRATION CARD
USA CUSTOMERS ONLY
I QUESTIONNAIRE
••
1
..
1.1.1
..
1
...
11
Registering your product
event a product safety notification is required.
This form is for Product Registration purposes
this form does not diminish your rights during the warranty period.
THANK
YOU FOR
REGISTER ONLINE
will allow
us to contact you
only.
PURCHASING THIS
AT:
REGISTER.JVC.COM
in
the
unlikely
Failure to return
JVC
PRODUCT
·
Page 48

First Name:
Last Name:
Address:
Apt.#
City:
State:
Zip Code:
Phone Number:
E-Mail Address:
Register online at REGISTER.JVC.COM
and receive a special offer!
PRODUCT REGISTRATION
1) Would you like to receive the JVC Community e-mail newsletter?
2) Would you like to receive special offers from JVC?
3) Have you purchased an extended warranty for this product?
Date
of
Purchase
Model Number:
Serial Number:
Purchase· Price:
Dealer:
of
1 to
5,
On a scale
JVC product.
with 5 being the best, please rate each
Performance
Features
Ease
of
use 1 2 3
1 2
1 2 3 4
of
the following attributes about your new
3
4
4
5
5
5
Yes
Yes
Yes
No
No
No
COMMENTS:
BT-51044-1
(0208)
Design 1 2 3
Value 1 2 3
Instructions: Fold at crease and tape open edge
4
4
in
the middle.
5
5
Thank You
for completing
this questionnare.
Printed
in
Indonesia
Page 49

CANADA
ONLY
CANADA
SEULEMENT
JVC
OWNER'S
COPY
OF
COPIE D'ENREGISTREMENT
DU
PROPRIETAIRE
(Save sales
La facture et cette garantie sont vos preuves de
MODEL
MODELE. ......... .
Purchase from.
Achete chez ........
Dealer's
Adresse du Vendeur'
City or Town
Ville
Owner's
Nom du Proprietaire :
Owner's
Adresse du Proprietaire·
City or Town
Ville
docket together with this warranty card, as a proof of date of purchase.
.
..
No.
No
.......... .
..
...
No.
No
Address .
Name
Address
...
BT-52008-1
(1007)
WARRANTY
CARTE DE CONTROLE
IMPORTANT:
on the back hereof
IMPORTANT:
dans
MOOEL
MOOELE·
Purchased from .
Achete chez ....
Dealer's
Adresse
City or Town
Ville
Owner's
Nom
du
Owner's
Adresse
............................................
City
or
Ville
WARRANTY
DISffiiBUTED
les
7
jours
.
.....
Address
du
Vendeur
Name
Proprietaire
Address
du
Proprietaire
Town
You
at:www.ivc.ca
APPLIES
IN
This
Cette carte doit
de
:
·riia:·
No Rue
.
· ..
.....
may
also
CANADA
Detach here.
CONTROL
warranty
control
or
register
via
Ia
·
....................••........
No.
No
ONLY
etre
date d'achat ou
(PLEASE
..
.......
..
.................
.
..
..
•......
......
.
....
.
register
on-line
TO
PRODUCT
BY
JVC
CANADA
WARRANTY
DE
LA
Ia
date d'achat;
SERIAL NO.
..
..........
NO
DE
SERlE
................
..
.......
·····················
Street
Rue
··
·
··················sireei····
.................
Prov.
Prov.
Rue
a
CARD
DE
LA
GARANTIE
card
must
be
internet within 7 (seven)
renvoyee dument
aller
PRINT
.....
Prav
Prov.
••
••..•.•...
INC.
filled
sur
le
site
/EN
LETIRES
SERIAL
NO.
...
NO
DE
SERlE
.. .. .. .. .. .. .. .. .. .. .. .. ..
....
.
siriiat
·.
·
··
· ······· ·
.....
.
..
..
...
............................
Vous pouvez
inscrire
LA
GARANTIE
DISTRIBUES
CARD
GARANTIE
rangez-
les.)
.
..............
....
.
Date purchased .
Date achete ·
........
.
...
.
...........
decouper ici
in
and
days
remplie
a
par
internet pour !'enregistrement.
MOULEES
.
..
Date purchased .
..
.. Date achete
· · ................. ...
Street
Rue App.
egalement
par
internet a:www.jvc.ca
S'APPLIQUE
AU
CANADA
..
··
.
...
..
...
posted
to
the address indicated
from the date
l'adresse
)
··
·············
····••·· · ·
··
..
....
.....
........
vous
SEULEMENT
PAR
JVC
Postal Code
Code
Apt.
App.
Postal Code
Code
Printed in
of
indiquee au verso,
··-
·
·
..
'"'POStiti
Code Postal
...
.......
Apt.
Postal Code
Code Poslal
CANADA
Postal
.
................ .
Postal
Indonesia
purchase.
'CCX£9"'
.....
.
....
AUX
PRODUITS
INC.
WARRANTY
GARANt II
JVC CANADA
21
Finchdene Square, Toronto,
TEL: (416) 293-1311 FAX: (416) 293-8208
http://www.jvc.ca
JVC
CANADA
the
following
product distributed in Canada
by an authorized
JVC
warrants that this
normal
material
terms and conditions:
1.
To
Obtain
(a)
(b) This
(c) The
2.
Limitation:
This Warranty shall
(a) Repair
..
· ·
..
.
·
....
..
..
...
(b) Any defects caused or repairs required as a
(c) Any defect caused
(d) Any
INC. (hereafter
express warranty for each new
JVC
use and maintenance, from
and workmanship subject to the followi ng
dealer.
JVC
called "JVC")
by
JVC
product
is
any
gives
JVC
and sold
free, under
defects in
Warranty Service:
The
JVC
provided
posted
of date
completed
with proof
requiring service.
service to an authorized JVC Service
batteries,
nas,
speaker cones, projection screens , projection
screen savers, and
result
gence, improper use and/or insufficient care.
a
result
the operation
or repaired
authorized
Warranty
mus
or
registered via internet within 7 days
of
purchase
JVC
Warranty
in
of
JVC
product
or
replacement
plates, connection cords, anten-
dust
covers, knobs, speaker
of
misuse, abusive operation,
of
not
JVC
product tampered with , adjusted
by
JVC
Co
ntrol
t be
completed in
of
Control
full and presented together
purchase
must
not
apply
all
or
following
manual.
any party
Service
Card herein
full
and
the
JVC
product.
Card must be
of
the
JVC
product
be
brought
to:
of
any
accessories.
repairs required as
the
instructions in
other
Centre
in
Centre.
cab
inets,
grills,
negli-
than
JVC
personnel.
for
or
INC.
ON
M1X
1A7
JVC
CANADA
en
once
nouveau produit
et vendu
JVC
utilisation
materiel
modalites
1.
Ia
vous
Pour obtenir un service
(a)
La
incluse
renseignements
enregistree
suivant
(b) Cette carte
etre
Ia
necessitant
(c) Le produit
service
autorise.
2. Restrictions:
Cette garantie ne
(a)
Reparation
cabinet, batteries, panneau avant, cordons
de
protection,
parleur, cones
projection, protecteurs d'ecran
et tous
(b) Tous defauts occasionnes ou
requises s
mauvaise, negligente
incorrecte.
(c) Tous defauts occasionnes ou r
requises su i
recommandations
(d) Tout produit
tout autre entrep
de
autorise JVC.
INC.
garantie
par
un
garantit
et
entretien
et
de
et conditions suivantes :
carte
l'achat du produit
dument
preuve
raccord,
les
service
( ci-apres
ex
pr
JVC
deta
de
doit
chez
esse suivante
distribue au Canada
illant
JVC
que
ce
produit est
normal,
fab
rication
co
nt
role
etre
complets et
via
internet
de
controle de garantie
re
mp
lie
d'
achat
une
reparation.
JVC
do
un
centre
s'applique
ou
remplacement
antennas,
bo
uto
ns
de
haut-parleur, ecrans
accessoires.
uit
e
a
une utilisation abusive,
te
a
!'omission
du
JVC
altere, ajuste ou
ri
se
d'entretien ou
de
de garantie
completee
et
it
, couverts
et/ou une
manuel
que
autorise.
de
sous
garantie :
dans
JVC
etre presen
du
etre
de
pas aux :
JVC
appele
po
degage,
tout
reserve
avec
etre
post
l
es
.
produit
apporte
serv
housses
de
de
projection
repa
ut
epa
de
su
d'instru
repare
ou
un
de
"
JVC
ur
par
J
sous
de
JV
C ci-
ee
7 j
ours
JVC
te
e
avec
JVC
po
ice J
de
tout
h
aut-
r
at
i
ilisation
rati
ivr
e
ct
ion.
centre
se
rv
t
out
VC
f
aut
des
les
ou
doit
ur
VC
de
de
ons
ons
les
par
ice
")
Page 50

ID.
purposes .
resold
Service
above)
Domicile
Domicile
a
et
(25"
must
detaillant
!'expedition,
JVC autorise
Series
ARSENAL
serial
90
and
(25"
plus)
assume
with
disponible.
proximite, l'acheteur doit assumer
a
"
products on which the
(e) Any
(f)
(g) Conversion to foreign or domestic voltage or
(h) Any
i ) Any
(
(j)
(k)
JVC
num-ber has been defaced, modified or
removed.
Maintenance, cieaning or periodic check-up
frequency.
Electrical Safety
institutional ,
Parts ......
Labour ...
Any JVC
no
Product purchased from
"bankruptcy"
WARRANTY TERM
CONDITIONS
Projection
Colour
D-ILA
LCD
Ecrans
Ecrans
projection arriere
TV
Ecrans
• In-home
Where
packing, shipment
JVC
Serv
•
n'y
S'il
couts
l'equipement
Receivers
Projection
Recepteurs
Avant
product without the Canadian
JVC
JVC
longer
Regulations
products used for commercial or
rental,
1 year (except video head days)
90
product which has been
owned by the
or
display
or
days
"liquidator".
original purchaser.
"outside Canada
(VALID FROM
DE GARANTIE (VALABLE
PRODUCT
PRODUIT
Service
In-Home
TV
In-Home (
TV
Projection In-Home
Rear
In-Home
TV
de
de
de
it
Authorized Service Centre.
ce
i
a
pour
et
Service
projection Service
Couleur
TV
Service
LCD
to
service
available,
not
is
a
Audio d'Auto
and
domicile
de service JVC disponible
pas
emballage
un
et
chez
Home
and
Car Audio
and
Hauts-Parleurs
et
above)
and
"
25
(25"
a
Service
Service
D-ILA
Domicile
a
provided where available
be
Purchaser
the
costs associated
all
fourni par
adequat,
le
depuis
Speakers purchased separately, Front
"ARSENAL"
Serie "
de
and
Domicile
a
un
detaillant
achetes separement, Projecteur
(e)
(f) L'entretien, les
(g) La
(h)
(i)
(j)
",
k)
(
THE DATE
plus)
et
the
delivery
the
que tous
ainsi
plus
le
dont
Tout produit
ete altere, modifie ou
nettoyage.
conversion
tension
Tout
d'identification
electriques Canadiennes
Pour
commerciales,
utilise
ou
Pieces.......
Main d'ceuvre ...
Tout produit
n'est
Produit
provenant d'une
PARTIR
a
responsibility
the
of
pres
JVC
etrangere
produit
produit
tout
des fins
a
.....
JVC ayant
propriete
Ia
plus
achete
PURCHASE)
OF
DE
PARTS
PIECES
and
equipment
couts
les
un
pour
verifications periodiques et
une
a
ou·domestique.
JVC
conforme
institutionnelles,
d'etalage.
1 An (Excepte
video-
90 Jours
"l'exterieur
a
"faillite"
DATE
LA
(Years)
(annees)
1 1
expense
and
to
Ia
associes.
service d'entretien.
2 2
numero de
le
enleve.
frequenc
ayant
n'
(GSA).
utilise
jours)
90
ete
de l'acheteur original.
ou d'un
serie
e ou
sigle
le
pas
normes
aux
des
a
location
de
les tetes
revendu et qui
Canada
du
"liquidateur".
D'ACHAT)
(Years)
Labour
'
N-D
I
MA
the
for
the
from
responsabilite
livraison
Ia
a
VE
OEU
proper
closest
nn
(a
R
les
et
de
une
fins
es
e
a
",
)
Any defects caused by fire,
(I)
power surge, or other events beyond the
control
FOR AUTO PRODUCTS
(m)
Warranty does not cover elimination of car
static or electrical
of head, adjustments, or
removal or
repair.
Standards:
3.
any defects
If
within the
shall be made at no cost to the purchaser for
parts or
such defects are due to
manship.
Exclusion
4.
This warranty constitutes the entire express
warranty given by
dealer
no
its or their agent or
rized to extend or enlarge this warranty on
of
half
Disclaimer
5.
the extent the
To
any responsibility for
product
indirect, incidental or consequential damage or
inconvenience.
~
JVC.
of
reinstallation
be found
should
applicable
labour when
of
or service centre
JVC.
terms, necessary repairs
JVC acknowledges that
Other
All
JVC
employee
of Consequential Damage:
law
to the ad
mail
also register
may
loss
transportation
,
And
You
at:www.jvc.ca
flood, lightning,
interferences, cleaning
faulty
cost for the
labour
of the unit for
product
JVC
a
in
material or work-
Express Warranties:
products and
JVC
for
personnel
, or are autho-
is
JVC disclaims
permits
of time or use of its
or
,
costs
ess
dr
on-line
Detach
any
bel
or
ow
his,
be-
other
.
here
.
(I)
inondation,
autre evenement
LES
POUR
(m)
garantie
La
d'interferences statiques ou electriques de
voiture
Ia
ajustements et
associes
reinstallation
3. Criteres :
un produit
Si
conditions applicables,
necessaires seront effectues sans
additionnels
main d'ceuvre
defectuosites sont causees par une defectuosite
materiel
de
JVC
a
ou de fabrication.
4. Exclusion de toutes autres garanties expresses:
Cette garantie constitue
donnee par
representant ou employe
service d'entretien n'est autorise
garantie au nom de
Denegation des dommages indirects :
5.
Dans
responsabilite
ses produits, des
dommage ou inconvenient indirect, accidentel et
consequent.
Nouveau
I
decouper
a
JVC
mesure permise par
Ia
uill
Ve
Vous pouvez egalement vous
I
enregistrer
ici
dommage
Tout
cause
une surtension ou tout
eclair,
un
PRODUITS
ne couvre pas !'elimination
, le
les
l'
a
de !'unite pour reparation.
s'averait defectueux,
l'acheteur pour
lorsque JVC
pour
controle
hors du
nettoyage de
enlevement
AUTOMOBILE
D'
de main d'ceuvre
coOts
les reparations
les
reconnait que de
garantie express
l'entiere
produits
ies
detaillant
un
d'
a
JVC.
loi
pour perte de temps ou d'usage de
coOts
os
p
ez
de transport
'a
l
a
ter
internet
par
stamp
Place
here
votre
Placez
timbre ici
dr
Ia
esse
JVC.
de
tete, les
a
ou
selon les
coOts
pieces et
telles
JVC. Nul
ou d'
prolonger cette
toute
nie
, JVC
tout autre
ou
s.
ou
ess
i-d
c
www.jvc.ca
a;
Ia
Ia
un
feu, une
par le
Adapters,
AC
Projector
Adaptateurs
et
Wood
Enceinte
All
Toutes
Lampe
Cone
Other
Lamps
de
a
Categories
les
Controls, Headphones, Microphones
Remote
Telecommande,
,
AC
Projecteur
Speakers
Bois
en
Cone
autres categories
and
Casque D'ecoute, Microphones
DAYS
90
JOURS
90
5 5
1
90
90
DAYS
JOURS
1
JVC CANADA
Finchdene Square
21
M1X 1A7
Toronto,
ON
INC.
Page 51

TO OUR VALUED
CUSTOMER--
THANK
WE
YOU
WANT TO HELP YOU ACHIEVE A PERFECT EXPERIENCE.
FOR PURCHASING THIS JVC PRODUCT.
NEED HELP ON HOW TO
HOOK
UP?
NEED ASSISTANCE ON HOW TO OPERATE?
NEED TO LOCATE A
JVC
SERVICE CENTER?
LIKE TO PURCHASE ACCESSORIES?
JVC®IS
TOLL
FREE: 1 (800)252-5722
HERETO
HELP!
http://www.jvc.com
Remember to retain your Bill
---
Do
not
attempt
Caution
To
prevent electrical shock,
There are no user serviceable parts inside.
Please refer
to
of
Sale for Warranty Service.
to
service the
do
qualified service personnel
product
not open the cabinet.
yourself
for
repairs.
BT-51018-6
(1
008)
Printed in Indonesia
Page 52

******************************************************************************
* *
!
JVC®
~
~
JVC Americas Corp. (JVC) warrants this product and all parts thereof, except as set forth below ONLY TO THE *
* ORIGINAL RETAIL PURCHASER to
* original purchase for the period shown below. ("The Warranty Period") *
* . . *
~
*
* *
*THIS
* *
~
IN
THE
~
WHAT WE WILL DO:
~
If this product is found to be defective within the warranty period, JVC will repair or replace defective parts with new or
* rebuilt equivalents at no charge to the original owner.
~
during normal business hours at JVC authorized service centers. Parts used for replacement are warranted only for the
* remainder of the Warranty Period.
* Color televisions with a screen size of 37"class
~
come to your home and either repair the TV there or remove and return it if
~
WHAT YOU MUST
* Please
: Instead, return your product
*center,
* the problem(s). Please call 1-800-252-5722
: can also
* representative
* *
: If you have any questions concerning your JVC Product, please contact our Customer Care Center at 800-252-5722
. I
LIMITED WARRANTY IS VALID ONLY
COMMONWEALTH OF PUERTO RICO.
DO
FOR WARRANTY SERVICE:
do
not
return your
please
be
be
obtained from
will
sure
product
to
to
package It carefully, preferably In the original packaging, and Include a brief description
require clear access
our
LIMITED
ONLY FOR
be
FREE FROM DEFECTIVE MATERIALS
I
PARTS
1m
IN
All
products may be brought to a JVC authorized service center on a carry-
to the retailer *
the JVC authorized service center nearest you.
website http://Www.Jvc.com.
to
to
the product. *
WARRANTY
PRODUCT
PURCHASED
. I
LABOR
IN
U.S.A.
.
I
AND
WORKMANSHIP from the date
1-1
I
USA
ONLY
1m
THE FIFTY (50) UNITED STATES, THE DISTRICT OF COLUMBIA AND *
Such
repair and replacement services shall
or
greater qualify for in-home service.
locate the nearest JVC authorized service center. Service locations *
If
your product qualifies
it
cannot be repaired in your home.
In
such cases, a technician will *
If
shipping the product
for
in-home service, the service
be
rendered by JVC *
in
basis. *
to
the service
of
of
I i
~
~
~
*
~
~
~
~
~
~
~
*
~
~
* WHAT IS NOT COVERED: *
* *
: This limited warranty provided by JVC does not cover:
*
1.
: installation, lack of reasonable care, or if repaired or serviced
* JVC to render such service,
* number has been altered, tampered with, defaced or removed; *
: 2. Initial installation, installation and removal from cabinets or mounting systems.
*
:
*
:
*
~
*
*
* *
~
~THE
* LIMITED TO THE
* *
* JVC SHALL NOT
: DAMAGES, WHETHER DIRECT, INCIDENTAL OR CONSEQUENTIAL (INCLUDING, WITHOUT LIMITATION,
*DAMAGE
* OF ANY BREACH OF THIS WARRANTY. ALL EXPRESS AND IMPLIED WARRANTIES, INCLUDING THE *
:WARRANTIES
~
~
* implied warranty lasts,
~
* JVC
* *
~
:
Products which have been subject to abuse, accident, alteration, modification, tampering, negligence, misuse,
or
if affixed to any attachment not provided with the products, or if the model or
3.
Operational adjustments covered in the Owner's Manual, normal maintenance, video and audio head cleaning; *
4.
Damage that occurs
5.
Signal recepti
6.
User
7.
8.
9.
10.
There are
WARRANTY PERIOD SET FORTH ABOVE. :
Some
legal rights and you
Removal
Accessories; *
Batteries (except that Rechargeable Batteries are covered for 90 days from the date of purchase); *
Products used for commercial purposes, including, but not limited to rental.
Loss of data resultant from malfunction of hard drive or other data storage device; *
no
express warranties except as listed above.
DURATION
states
OF
DURATION
TO TAPES, RECORDS
OF MERCHANTABILITY AND FITNESS
do
not
in
on
Memory
ANY
BE
shipment, due to act of
problems and failures due to line power surge; *
DevicesNideo
IMPLIED WARRANTIES, INCLUDING THE IMPLIED WARRANTY
OF
LIABLE FOR ANY LOSS OF USE OF THE PRODUCT, INCONVENIENCE, OR ANY OTHER *
allow
the
so
may
exclusion
these
also have other rights which vary from state to state.
Pick-up
THE
EXPRESS WARRANTY HEREIN. *
OR
DISCS) RESULTING FROM THE
1700
of
Valley
limitations
God,
Tubes/CCD
incidental
or
exclusions
AMERICAS
Road,
Wayne,
http://www.jvc.com
and cosmetic damage;
Image
or
by
anyone other than a service facility authorized
Sensors
i=OR
PARTICULAR PURPOSE, ARE LIMITED TO THE
consequential
may
not
CORP.
New
are
covered
USE
damages
apply to you.
Jersey 07470 :
for
90
days
from
the
date
OF
MERCHANTABILITY,
OF THIS PRODUCT, OR ARISING OUT *
or
limitations
This
warranty gives you specific *
on
how
of
purchase;~
long
faulty*
by~
serial*
IS
an
~
~
~
~
~
~
~
~
~
~
*
~
******************************************************************************
REFURBISHED PRODUCTS CARRY A SEPARATE WARRANTY, THIS WARRANTY DOES NOT APPLY.
OF
REFURBISHED PRODUCT WARRANTY, PLEASE
INFORMATION
PACKAGED
WITH
EACH
REFURBISHED
REFER
PRODUCT.
TO THE REFURBISHED PRODUCT WARRANTY
FOR
DETAIL
For
customer
Enter below the Model
Retain this information for future reference.
Model No. :
Purchase date :
use:
No.
and Serial No. which is located either on the rear, bottom
Serial
Name
No.:
of
dealer :
or
side of the cabinet.
 Loading...