

Page 1

CASSETTE RECEIVER
CASSETTEN-RECEIVER
RADIOCASSETTE
RADIO/CASSETTESPELER
KS-FX430R/F330R
KS-FX430R
Detachable
ATT
SEL
0
¢
SSM
4
7
CD CHANGER CONTROL
89
10
11
1
¡
SOUND
KS-FX430R
PROG
12
AM
CH
CD
-
MO
TP/RDS
RND
DISP
PTY
FM
5
35W x 4
KS-F330R
35W x 4
ATT
SEL
0
SSM
DETACHABLE CONTROL PANEL
1
¡
SOUND
KS-F330R
PROG
AMTP
MO
RDS
DISP
PTY
FM
5
For installation and connections, refer to the separate manual.
Für den Einbau und die Anschlüsse siehe das eigenständige Handbuch.
Pour l’installation et les raccordements, se référer au manuel séparé.
Bijzonderheden over de installatie en aansluiting van het apparaat vindt u in de desbetreffende
handleiding.
INSTRUCTIONS
BEDIENUNGSANLEITUNG
MANUEL D'INSTRUCTIONS
GEBRUIKSAANWIJZING
FRANÇAIS
NEDERLANDS DEUTSCH ENGLISH
FSUN3036-311S
[E]
Page 2

Thank you for purchasing a JVC product. Please read all instructions carefully before operation, to
ensure your complete understanding and to obtain the best possible performance from the unit.
CONTENTS
BASIC OPERATIONS....................................................3
RADIO OPERATIONS ................................................... 4
Listening to the radio ..................................................................... 4
Storing stations in memory............................................................5
FM station automatic preset: SSM ...............................................5
Manual preset.............................................................................. 6
Tuning into a preset station ........................................................... 7
Using RDS functions in the FM band ...........................................8
RDS (Radio Data System) ...........................................................8
Other convenient tuner functions ............................................... 15
Selecting FM reception sound....................................................15
TAPE OPERATIONS....................................................16
Listening to a tape ........................................................................ 16
SOUND ADJUSTMENTS .............................................17
Selecting preset sound modes ......................................................17
Adjusting the sound......................................................................18
Storing your own sound adjustments .........................................19
OTHER MAIN FUNCTIONS .........................................20
Setting the clock............................................................................ 20
Storing your own mode settings ..................................................22
Preferred setting mode control...................................................22
Detaching the control panel ......................................................... 23
CD CHANGER OPERATIONS ......................................24
(ONLY FOR KS-FX430R)
Playing CDs ................................................................................... 24
Selecting CD playback modes......................................................26
MAINTENANCE.........................................................27
To extend the lifetime of the unit.................................................27
TROUBLESHOOTING .................................................28
SPECIFICATIONS ....................................................... 29
BEFORE USE
* For safety....
• Do not raise the volume level too much, as this
will block outside sounds, making driving
dangerous.
• Stop the car before performing any complicated
operations.
2
* Temperature inside the car....
If you have parked the car for a long time in hot
or cold weather, wait until the temper ature in the
car becomes normal before operating the unit.
Page 3

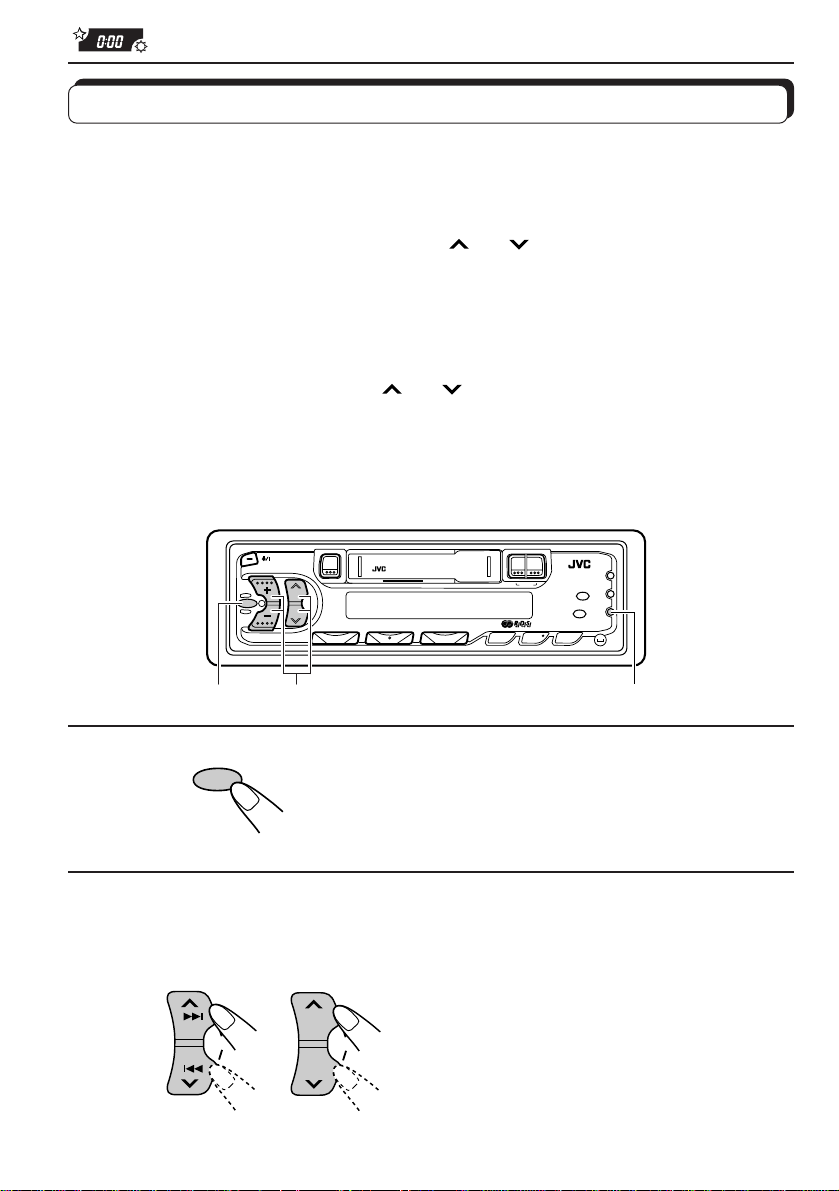
1
BASIC OPERATIONS
1
0
23
¡
Note:
5
When you use this unit for the
first time, set the built-in
clock correctly, see page 20.
ENGLISH
1
2
.
3
4
/I
ATT
KS-FX430R
KS-F330R
Turn on the power.
Note on One-Touch Operation:
• When you select tuner as a source in step 2 below, the power automatically
comes on. You do not have to press this button to turn on the power.
• If the cassette is already in the cassette compartment, tape play starts
automatically.
AM FMCD-
CH
T P FMAM
Play the source.
To operate the tuner, see pages 4 – 15.
To operate the tape deck, see page 16.
ONLY FOR KS-FX430R:
To operate the CD changer, see pages 24 – 26.
Adjust the volume.
Volume level appears.
Adjust the sound as you want (see pages 17 – 19).
To drop the volume in a moment
Press ATT briefly while listening to any source. “ATT” starts flashing on the display, and
the volume level will drop in a moment.
To resume the previous volume level, press the button briefly again.
To turn off the power
Press ATT for more than 1 second.
Note:
For security reasons, a numbered ID card is provided with this unit, and the same ID number is
imprinted on the unit’s chassis. Keep the card in a safe place, as it will help the authorities to
identify your unit if stolen.
3
Page 4
RADIO OPERATIONS
Listening to the radio
1
0
1
¡
5
23
1
2
3
/I
ATT
• When you select a band in step 2 below, the power automatically comes on.
Note:
When a cassette is in the cassette compartment, you cannot select the tuner. Be
sure to eject the cassette from the cassette compartment to listen to the radio.
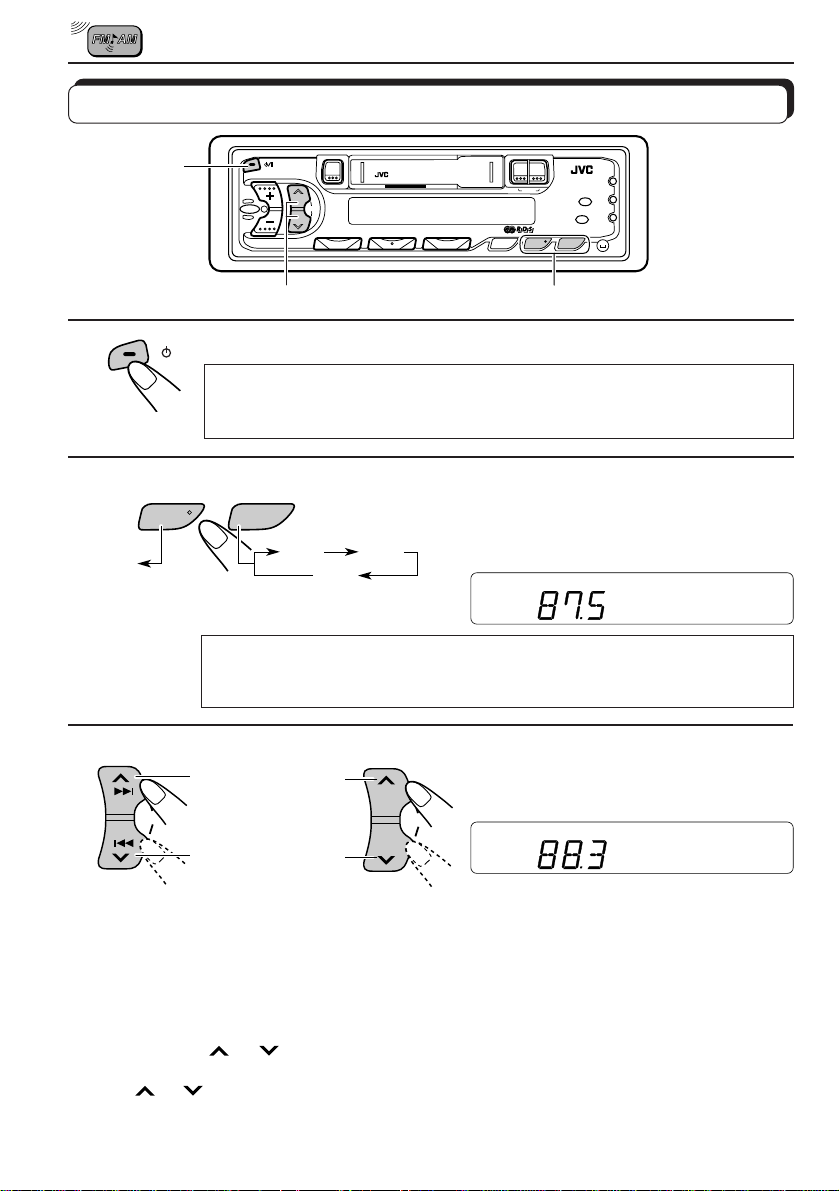
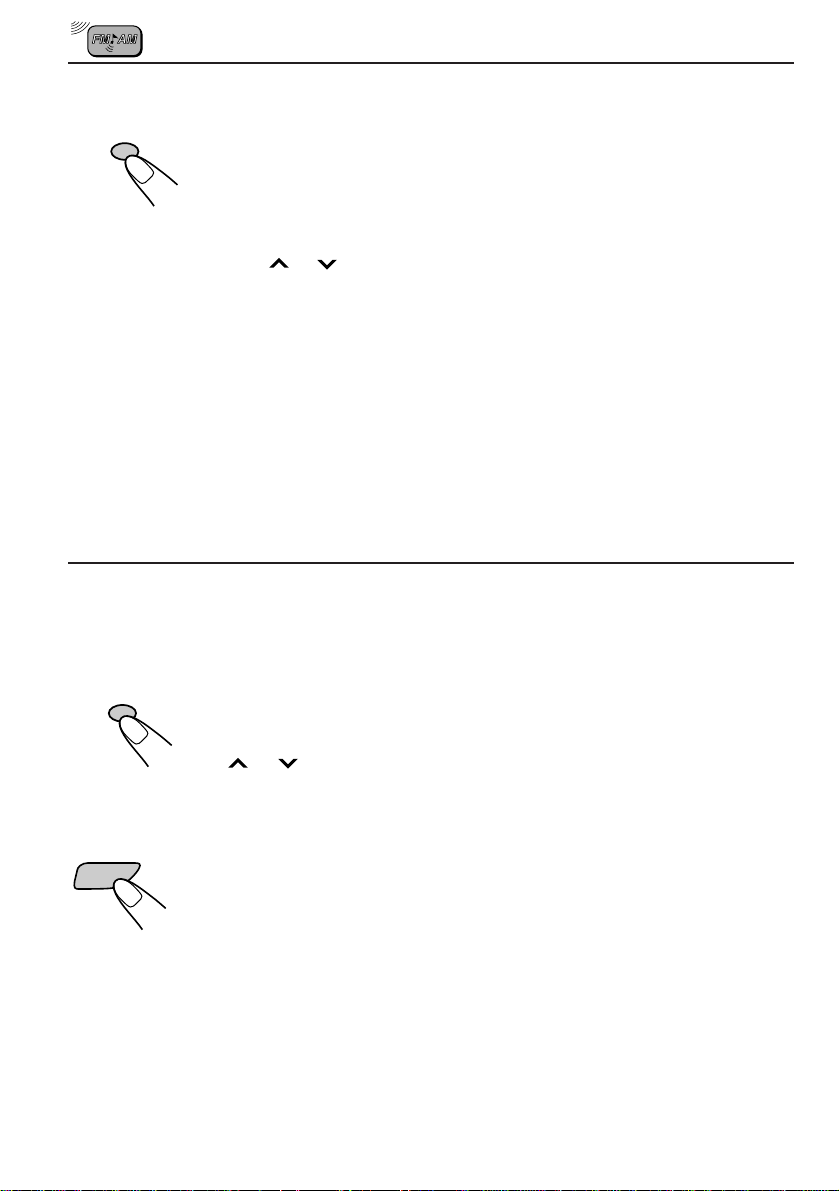
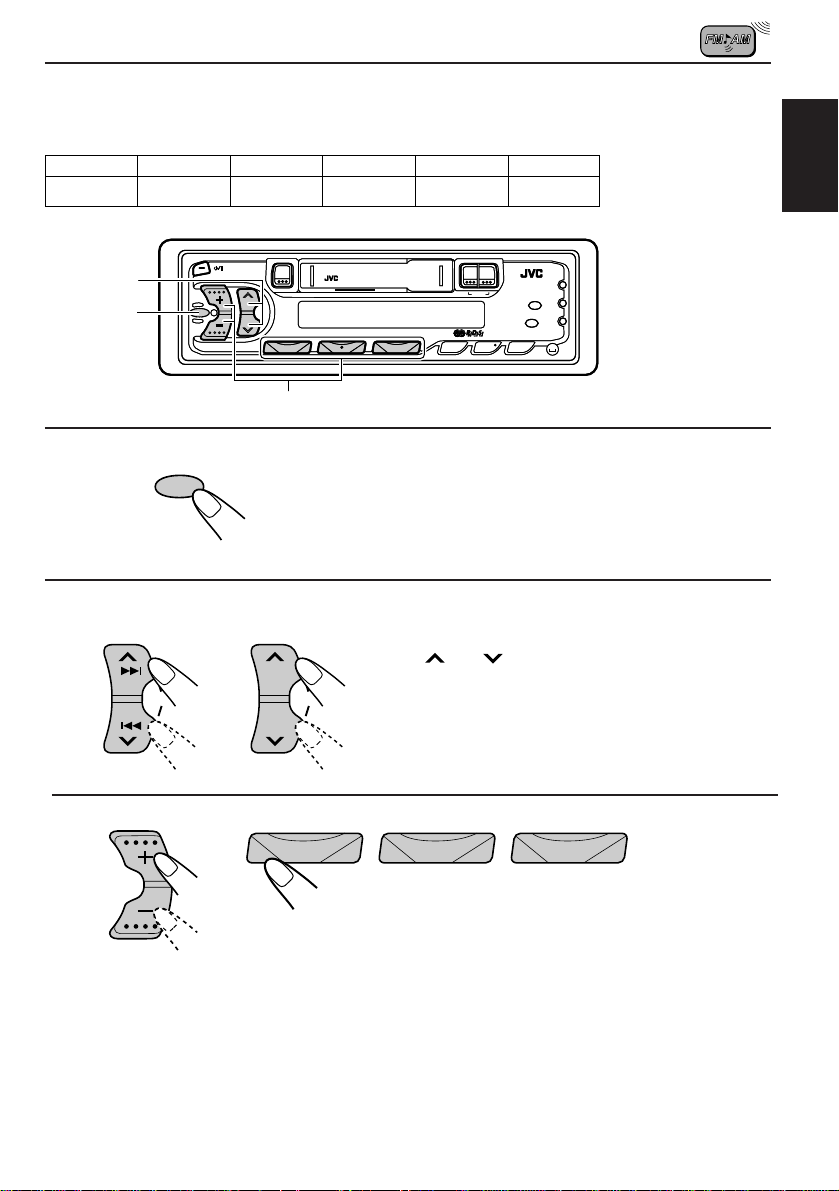
To search stations
of higher
frequencies.
SSM
To search stations
of lower
frequencies.
Turn on the power.
Note on One-Touch Operation:
You do not have to press this button to turn on the power.
Select the band (FM1, FM2,
F MA M
FM1AMFM2
FM3
FM3 or AM).
Y ou can select any one of FM1, FM2, and
FM3 to listen to an FM station.
Start searching a station.
When a station is received, searching stops.
SSM
KS-F330RKS-FX430R
To stop searching before a station is received, press the same button you have pressed
for searching.
To tune in a particular frequency manually:
1 Select the band (FM or AM)
Press FM or AM.
2 Press and hold
Now you can manually change the frequency while “M” is flashing.
3 Press
• If you hold down the button, the frequency keeps changing (in 50 kHz intervals for FM and
9 kHz intervals for AM — MW/LW) until you release the button.
4
or repeatedly until the frequency you want is reached.
or until “M” starts flashing on the display.
Page 5

Storing stations in memory
You can use one of the following two methods to store broadcasting stations in memory.
• Automatic preset of FM stations: SSM (Strong-station Sequential Memory)
• Manual preset of both FM and AM stations
FM station automatic preset: SSM
You can preset 6 local FM stations in each FM band (FM1, FM2, and FM3).
1
0
¡
5
ENGLISH
1
1
F M
2
FM1 FM2 FM3
Select the FM band number (FM1, FM2
or FM3) you want to store FM stations
into.
2
KS-FX430R KS-F330R
SSM SSM
Local FM stations with the strongest signals are searched and stored automatically in the
band number you have selected (FM1, FM2 or FM3). These stations are preset in the number
buttons — No. 1 (lowest frequency) to No. 6 (highest frequency).
When automatic preset is over, the station stored in number button 1 will be automatically
tuned in.
Press and hold both buttons for more than
3 seconds.
“SSM” appears, then disappears when
automatic preset is over.
5
Page 6

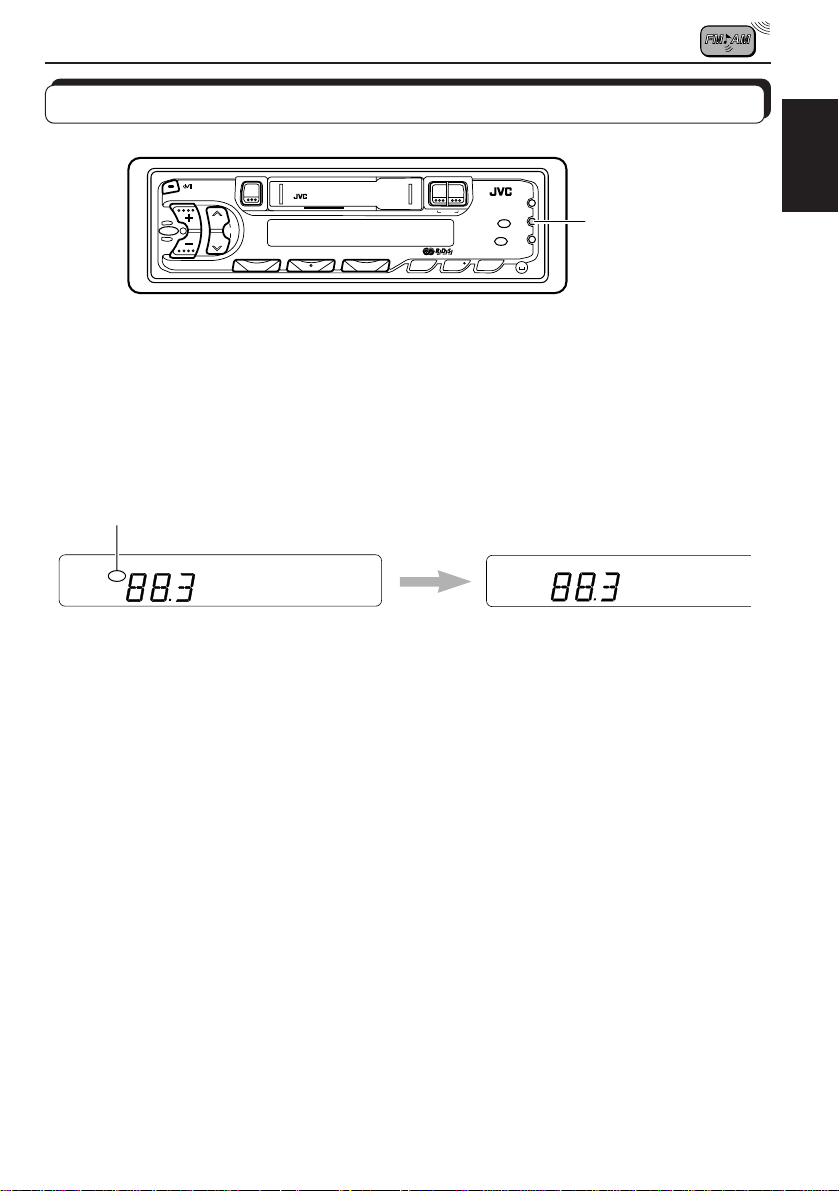
Manual preset
You can preset up to 6 stations in each band (FM1, FM2, FM3 and AM) manually.
EXAMPLE: Storing an FM station of 88.3 MHz into preset number 1 of the FM1 band
1
0
¡
5
1
2
3
F M
KS-FX430R
SSM
12
23
KS-F330R
1
Select the FM1 band.
Tune into a station of 88.3 MHz.
See page 4 to tune into a station.
SSM
Press and hold the button for more than
1 second.
Preset number “P1” starts flashing for a while.
4
Repeat the above procedure to store other stations into other
preset numbers.
Notes:
• A previously preset station is erased when a new station is stored in the same preset number.
• Preset stations ar e erased w hen the power supply to the memory cir cuit is inter rupted (f or e xample,
during battery replacement). If this occurs, preset the stations again.
6
Page 7
Tuning into a preset station
You can easily tune into a preset station.
Remember that you must store stations first. If you have not stored them yet, see pages 5
and 6.
1
0
¡
5
ENGLISH
1
2
1
F MA M
FM1AMFM2
2
Select the band (FM1, FM2, FM3
or AM) you want.
FM3
123456
Select the number (1 – 6) for the
preset station you want.
7
Page 8
Using RDS functions in the FM band
RDS (Radio Data System)
RDS button
To select Network-Tracking mode, press the RDS button for more than 1
KS-FX430R
TP/ RDS
KS-F330R
RDS
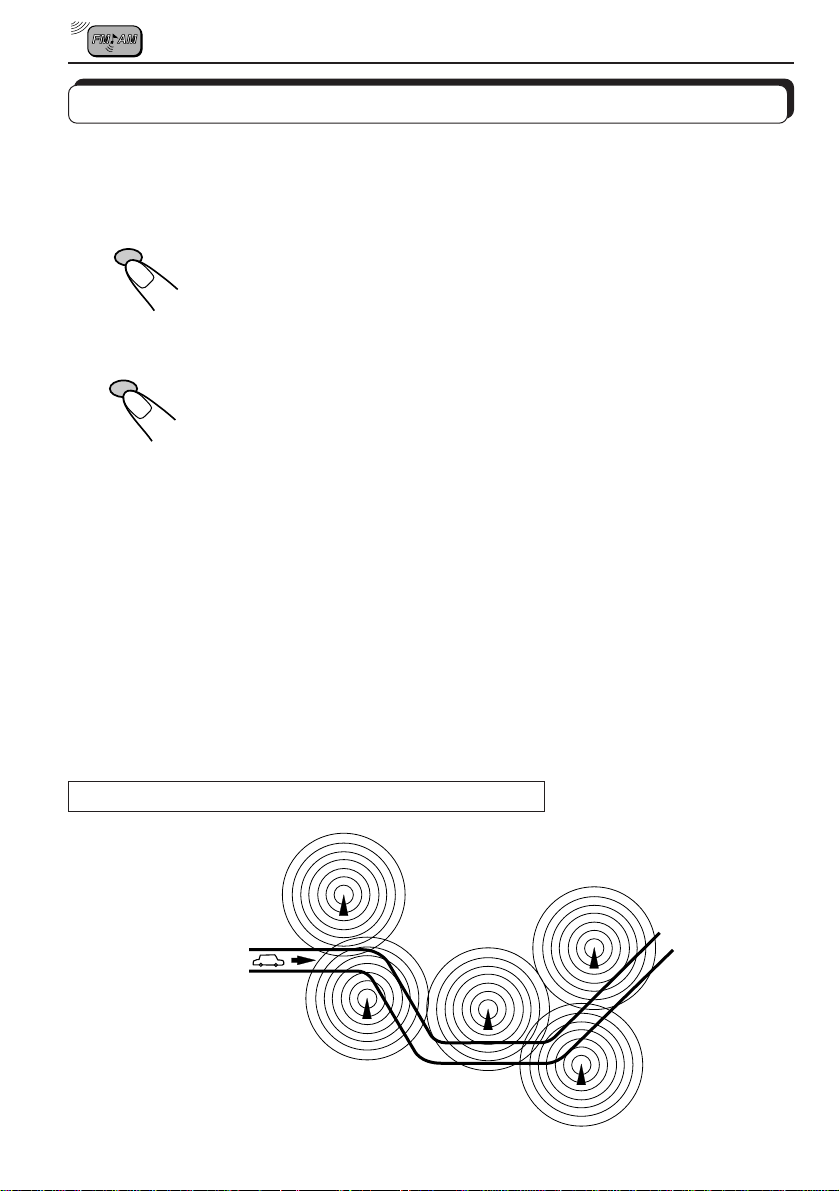
Network-Tracking reception
second.
• Mode 1 (AF (Alternative Frequencies): on/REG: off):
Network-Tracking is activated.
Switches between stations belonging to the network being received.
Note:
• In Mode 1, the broadcast ma y switch between dif ferent pr ogrammes even within
the same network at certain times.
• Mode 2 (AF: on/REG: on):
Network-Tracking is activated and Regional mode is engaged (switches
between stations broadcasting the same programme, at all times).
• Mode 3 (AF: off/REG: off):
Network-Tracking is deactivated.
When driving in an area where the signal strength drops, the tuner
automatically uses PI (Programme Identification) and AF codes to retune to
the same programme with a stronger signal from another RDS station in the
network. By utilizing these codes, you can continue to listen to the same
programme in its finest condition, no matter where you drive. (See illustration.)
• When the RDS station to which you are tuned does not provide AF data or
the unit is unable to receive AF data for any reason, Network-Tracking
reception will NOT operate even when the signal strength drops below the
reference level.
The same programme can be received on different frequencies.
Programme 1 broadcasting
on frequency A
Programme 1 broadcasting on
frequency B
Programme 1 broadcasting on frequency C
Programme 1 broadcasting on frequency E
8
Programme 1
broadcasting on
frequency D
Page 9
PTY standby mode
Ô
Ô
ÔÔ
Ô
Ô
Ô
Ô
*
Storing your favourite programme type (PTY) into memory (NEWS is factory-preset.)
1
¡
5
1
0
3 22
ENGLISH
1
2
3
SEL
KS-FX430R
KS-F330R
SSM
SSM
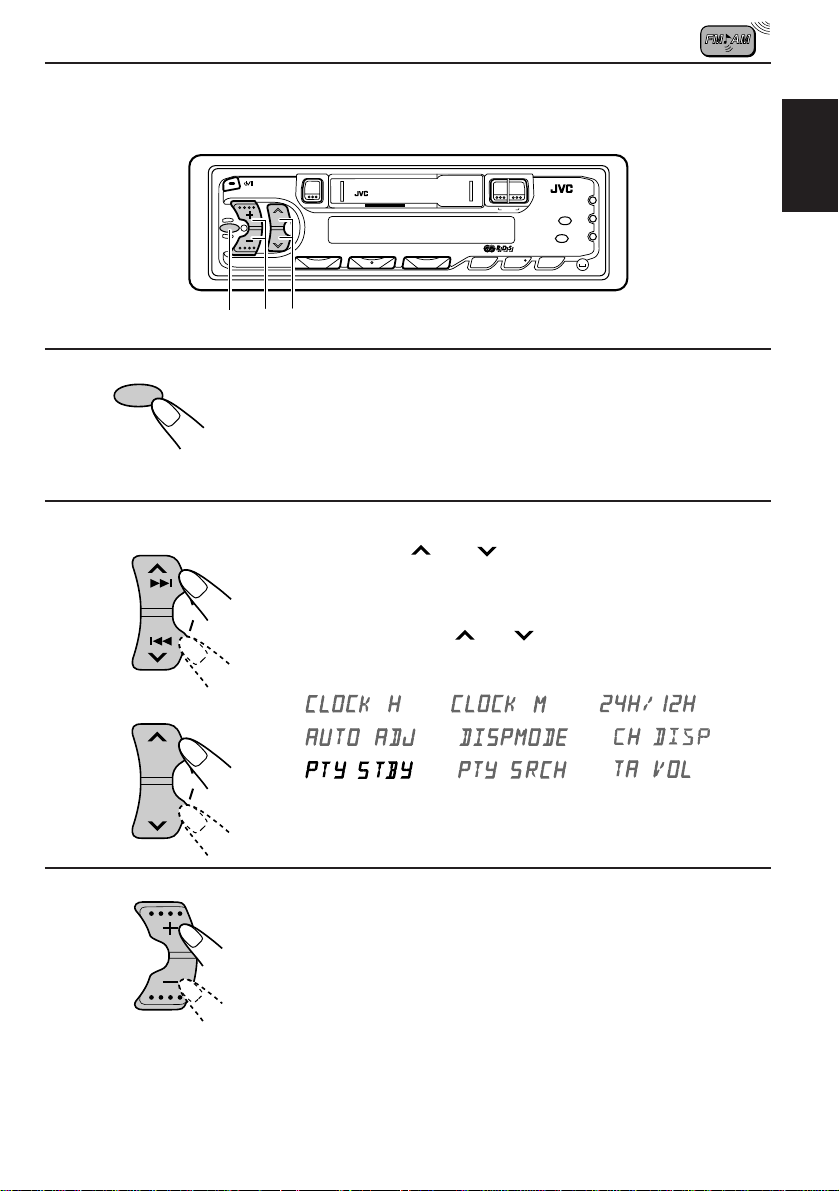
Press the SEL button for more than 2 seconds
to enter the preferred setting mode (see page
22).
Press the or button to select the “PTY
STBY” mode.
Each time the
or button is pressed, the
display changes as follows.
*Only for KS-FX430R
Press the + or – button to select one of 29
PTYs. (See the table on page 13.)
For example, when “CLASSICS” is selected in the display,
the classical music PTY is stored automatically.
• Press the SEL button to return to the previous mode.
9
Page 10
Setting and operating PTY standby mode
PTY
the “PTY” indicator is lit during reception of a PTY station and the PTY
standby mode is engaged. The PTY name stored on page 9 (for example:
“CLASSICS”) flashes for 5 seconds.
Note:
When the station being received is not a PTY station, the "PTY" indicator flashes.
• When the PTY button is briefly pressed in the FM mode,
Press the
or button to engage the PTY standby mode. "SEARCH" appears in
the display, and PTY station search starts. When a PTY station is tuned in, “PTY” is
lit.
• If you are listening to a TAPE (or CD, KS-FX430R only) and wish to hear a
selected PTY broadcast, press the PTY button to enter the PTY standby
mode. (The “PTY” indicator lights up.)
If the PTY starts broadcasting while the PTY standby mode is active, the
selected PTY name is displayed and the FM mode is engaged. The selected
PTY can then be heard.
Note:
To deactivate the PTY standby mode, press the PTY button again.
TP (Traffic Programme) button
Setting and operating TA (Traffic Announcement) standby mode
KS-FX430R
TP/ RDS
• When the TP button is pressed briefly in the FM mode, the “TP” indicator is
lit during reception of a TP station and the TA standby mode is engaged.
Note:
When the station being received is not a TP station, the TP indicator flashes. Press
or button to engage the TA standby mode. "SEARCH" appears in the
the
display, and TP station search starts. When a TP station is tuned in, “TP” is lit.
10
KS-F330R
T P
• If you’re listening to a TAPE (or CD, KS-FX430R only) and wish to hear a
TA broadcast, press the TP button to enter the TA standby mode. (The
“TP” indicator lights up.)
If a T A programme starts broadcasting while the TA standby mode is active,
“TRAFFIC” is displayed and the FM mode is engaged. The volume increases
to the preset "TA VOL" level and the T A programme can be heard (see page
14).
Note:
To deactivate the TA standby mode, press the TP button again.
Page 11
PTY search mode
Presetting PTYs in number buttons 1-6
The factory-presets are listed below.
1
POP M
2
ROCK M
2
1
1
3
EASY M
0
0
CLASSICS
3
4
5
AFFAIRS
1
1
¡
¡
6
VARIED
5
5
ENGLISH
1
SEL
2
KS-FX430R KS-F330R
SSM SSM
3
Select the desired PTY with the + or – button (PTYs already
stored flash when they are selected), then press the required
number button for more than 2 seconds to store it. The stored
PTY flashes in the display.
Press the SEL button for more than
2 seconds to enter the preferred set-
ting mode (see page 22).
Select the “PTY SRCH” mode with
the
123456
or button.
11
Page 12

PTY search operation
0
2 1
1
¡
5
1
PTY
Press and hold the PTY button for more than 1 second
in the FM mode. PTY programme search mode is
engaged.
2
123456
Recall a PTY stored on page 11 using a number button
(1-6).
Ex. When “CLASSICS” is stored in button 1.
• PTY station search starts after 5 seconds.
Successful programme search results in the desired PTY station being received so its
programme can be heard.
• When a PTY station cannot be tuned in, the previous station is received.
• After searching, the PTY selected last will be memorized, then displayed first when a
PTY search is selected again.
Note:
There may be areas where PTY functions (PTY standby mode, PTY search) will not work.
12
Page 13
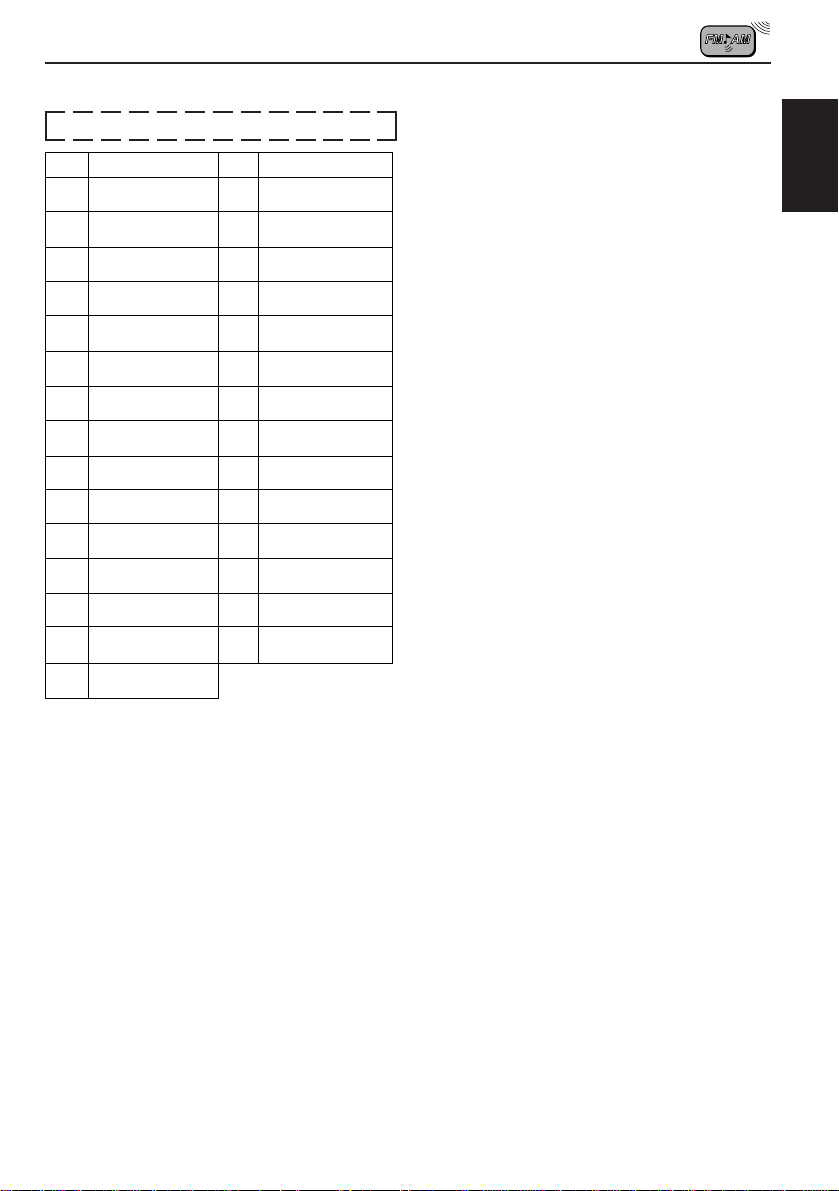
PTY codes
1
2
3
4
5
6
7
8
9
DISPLAY
NEWS
AFFAIRS
INFO
SPORT
EDUCATE
DRAMA
CULTURE
SCIENCE
VARIED
POP M
ROCK M
EASY M
LIGHT M
CLASSICS
OTHER M
No.
10
11
12
13
14
15
PTY display
No.
16
17
18
19
20
21
22
23
24
25
26
27
28
29
DISPLAY
WEATHER
FINANCE
CHILDREN
SOCIAL
RELIGION
PHONE IN
TRAVEL
LEISURE
JAZZ
COUNTRY
NATION M
OLDIES
FOLK M
DOCUMENT
Descriptions of the PTY Codes
NEWS: News
AFFAIRS: Topical programmes
expanding on current news or
affairs
INFO: Programmes which impart
advice on a wide variety of
topics
SPORT: Sport events
EDUCATE: Educational programmes
DRAMA: Radio plays
CULTURE: Programmes on national or
regional culture
SCIENCE: Programmes on natural
sciences and technology
VARIED: Other programmes like
comedies or ceremonies
POP M: Pop music
ROCK M: Rock music
EASY M: Easy-listening music
LIGHT M: Light music
CLASSICS: Classical music
OTHER M: Other music
WEATHER: Weather information
FINANCE: Reports on commerce, trading,
the Stock Market, etc.
CHILDREN: Entertainment programmes for
children
SOCIAL: Programmes on social
activities
RELIGION: Programmes dealing with any
aspect of belief or faith, or the
nature of existence or ethics
PHONE IN: Programmes where people
can express their views either
by phone or in a public forum
TRA VEL: Programmes about travel des-
tinations, package tours, and
travel ideas and opportunities
LEISURE: Programmes concerned with
recreational activities such as
gardening, cooking, fishing,
etc.
JAZZ: Jazz music
COUNTRY: Country music
NATION M: Current popular music from an-
other nation or region, in that
country’s language
OLDIES: Classic pop music
FOLK M: Folk music
DOCUMENT: Programmes dealing with fac-
tual matters, presented in an
investigative style
ENGLISH
13
Page 14

Other RDS functions
EON (Enhanced Other Networks)
• When tuning in a broadcasting station
transmitting EON data, the EON indicator
is lit and the following operations start.
EON automatically stores the frequencies
of stations from other networks transmitting
information codes (TP/TA/AF/PTY/PS
(Programme Service), etc.) so they can be
mutually used. The following points have
been improved:
When listening to a station NOT transmitting
traffic information or the selected PTY for
example, EON automatically tunes to a station
in a local network when this information is
broadcast and then switches back to the
original programme when the broadcast ends.
(However, it does not switch back to the
original programme if the broadcast continues
for a long time.) The transmitted information
(AF and other codes) is constantly and
automatically updated so that preset
programme information can be heard
immediately even if in a different network area.
Traffic information volume control
This function adjusts the volume of traffic
information broadcasts.
1. Press the SEL button for more than 2
seconds to set the preferred setting mode.
2. Select “T A VOL” with the
3. Set to the desired volume with the + or –
button. (See page 22.)
Number buttons
When a number button is pressed, if the
station with that frequency is broadcasting a
sufficiently strong signal, the receiver will tune
to that frequency.
When the signal strength is not sufficient for
good reception, by referring to the AF list, the
receiver searches for a station broadcasting
the same programme with a stronger signal.
If a station cannot be found in the AF list, PIseek tuning starts. If a station broadcasting
the same PI code cannot be detected in one
search-cycle, PI-seek tuning is released and
the original preset frequency is tuned to.
CT (Clock Time)
When CT data is received in the RDS signal,
the time is correctly renewed.
• RDS updates the local time according to
Greenwich Mean Time.
14
or button.
• When automatic renewal of clock time is
NOT required, follow the steps below.
1. Press the SEL button for more than 2
seconds to set the preferred setting mode.
2. Select “AUTO ADJ” with the
button.
3. Press the – button and set to “ADJ OFF ”.
(See page 22.)
Once these steps are completed, clock time
is not renewed even if the CT (Clock Time)
data is received with the RDS signal. When
you wish to reactivate this mode, repeat the
same procedure and in step 3 press the +
button to set to “ADJ ON.” In the activated
mode, clock time is automatically renewed
when the CT data is received.
Note:
It takes at least 2 minutes to renew the time after
receiving CT data. The station must be received
for more than 2 minutes continuously, otherwise
the clock time will NOT be renewed.
Display Mode
Setting the main display mode.
1. Press the SEL button for more than 2
seconds to set the preferred setting mode.
2. Select “DISPMODE” with the
button.
3. Select the desired mode with the + or –
button.
(Station name (PS NAME) Ô Frequency
being received (FREQ) Ô Clock time
(CLOCK) Ô) (See page 22.)
Note:
When the “CLOCK” mode is set, clock time
remains on the main display even during tape (or
CD (KS-FX430R only)) playback.
Display Button
The DISP button is used to select the
Operation (Tuner, Tape or CD (KS-FX430R
only)) and Clock modes. Each time the button
is pressed, the display changes as follows:
Operation mode (Station name* = Frequency
being received = PTY* ; or TAPE; or CD (KSFX430R only)) = Clock time.
The display returns to the initially preset mode
after a short while.
* When the RDS or PTY signal is weak or
when not tuned to an RDS or PTY station,
the Station name or PTY is NOT displayed.
or
or
Page 15
Other convenient tuner functions
1
0
Selecting FM reception sound
When an FM stereo broadcast is hard to receive:
Press MO/RND (mono/random: for KS-FX430R) or MO (mono: for KS-F330R) while listening
to an FM stereo broadcast. The sound you hear becomes monaural but reception will be
improved.
Lights when receiving an
FM broadcast in stereo.
¡
MO/RND
(For KS-FX430R)
5
MO
(For KS-F330R)
ENGLISH
ST
To restore the stereo effect, press the same button again.
MO
15
Page 16
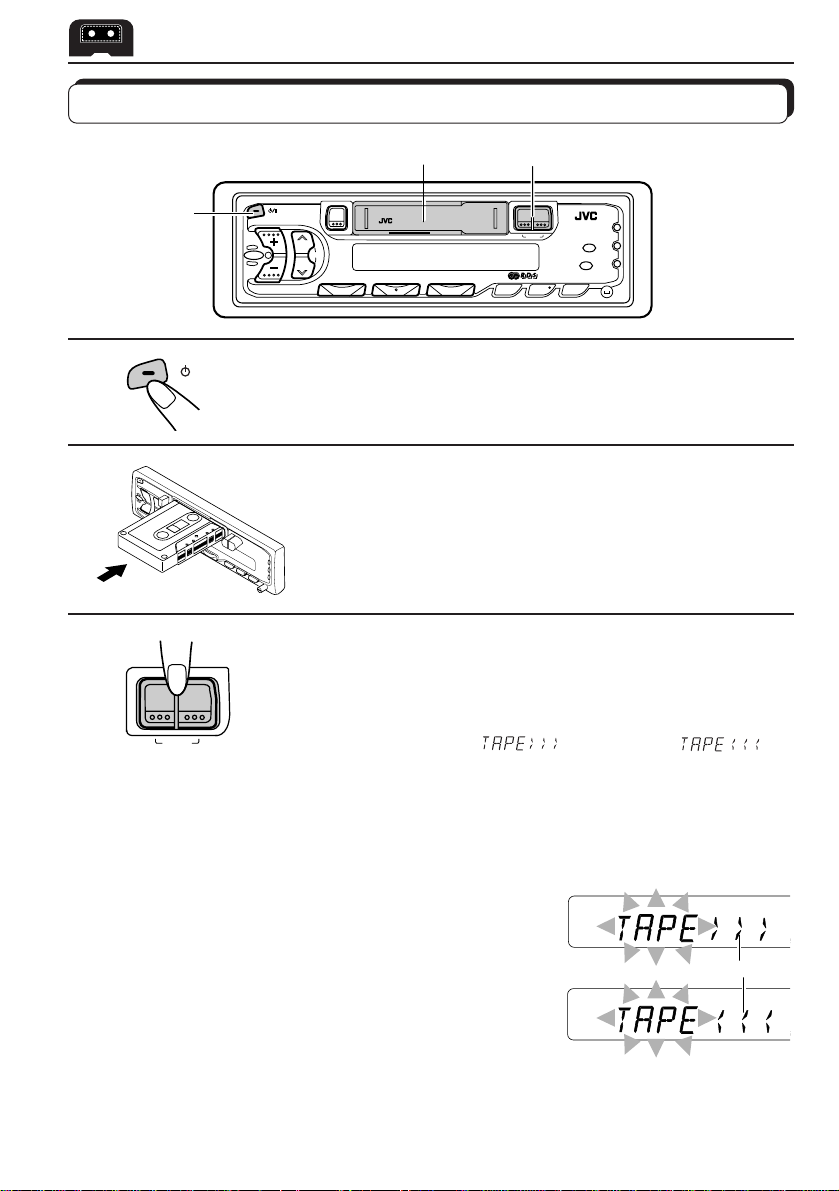
TAPE OPERATIONS
Listening to a tape
1
2
3
1
PROG
1
/I
ATT
¡
2
0
3
1
¡
5
Turn on the power.
Insert a cassette.
When one side of the tape reaches its end during play, the
other side of the tape automatically starts playing. (Auto
Reverse)
Select the tape direction.
• Press both buttons at the same time .
Each time you press both buttons, the tape direction changes
alternatively – forward (
) and reverse ( ).
To stop play and eject the cassette
Press 0.
Tape play stops and the cassette ejects from the cassette compartment.
You can hear the last received station, or CD playback from the CD changer (KS-FX430R
only).
• You can also eject the cassette with the unit turned off.
To fast-wind a tape
Press either ¡ or 1.
The tape will be wound in the direction of the arrows
(¡ or 1).
To restart playback, press ¡ or 1 lightly.
16
Tape direction
Page 17
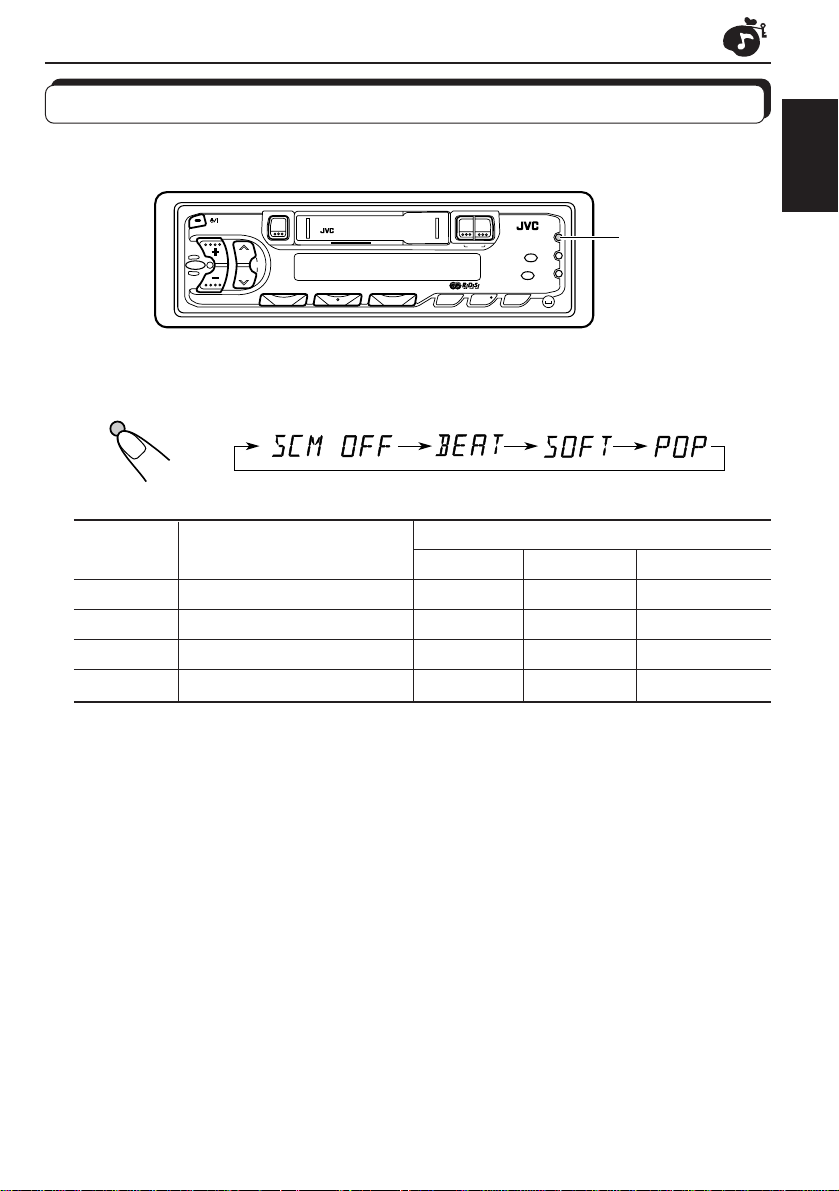
SOUND ADJUSTMENTS
Selecting preset sound modes
You can select a preset sound adjustment suitable to the music genre.
1
0
Each time you press SOUND, the sound mode changes as follows.
SOUND
Indication For: Preset values
SCM OFF (Flat sound) 00 00 On
BEAT Rock or disco music +2 00 On
SOFT Quiet background music +1 –3 Off
POP Light music +4 +1 Off
¡
5
SOUND
Bass Treble Loudness
ENGLISH
Notes:
• You can adjust the preset sound mode to your preference, and store it in memory.
If you want to adjust and store your original sound mode , see “Storing your own sound adjustments”
on page 19.
• To adjust only the bass and tr eble r einforcement levels to your pr efer ence, see “Adjusting the sound”
on page 18.
17
Page 18
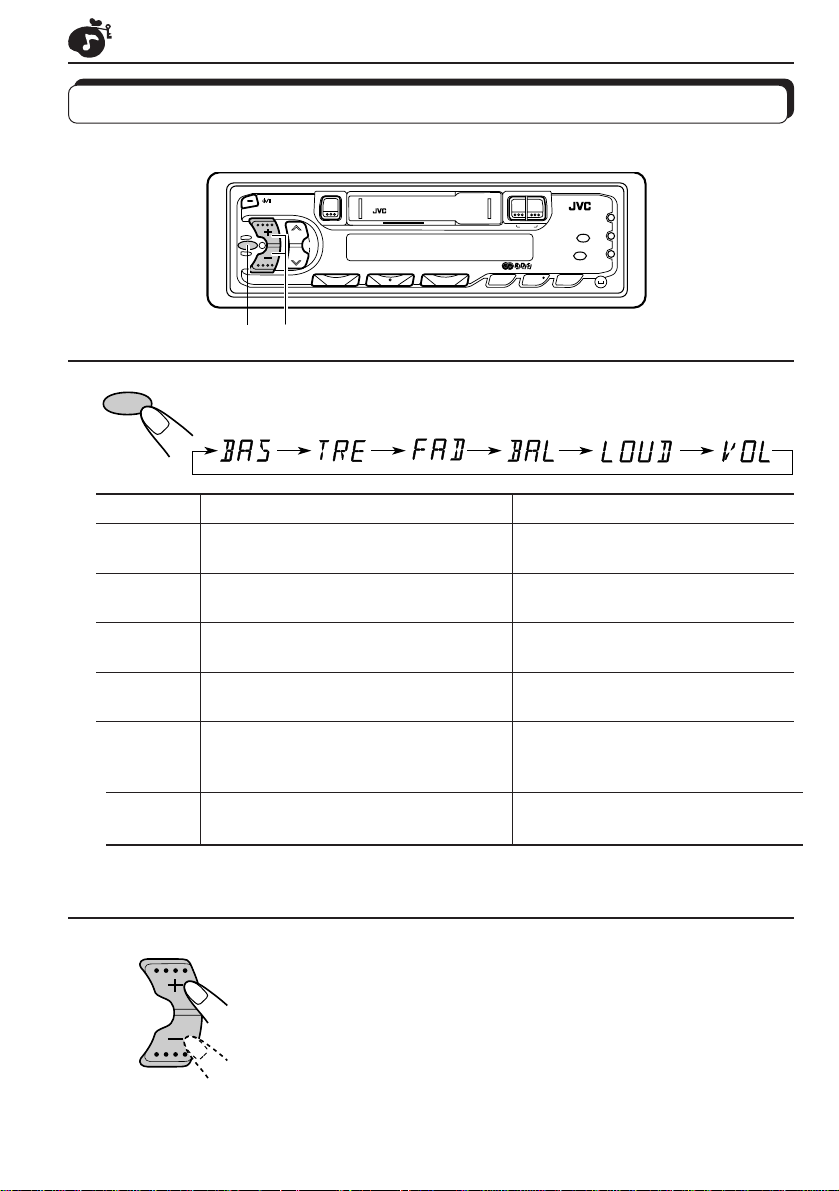
Adjusting the sound
You can adjust the sound characteristics to your preference.
1
0
1
2
1
SEL
Indication To do: Range
BAS Adjust the bass –6 (min.) — +6 (max.)
(Bass)
TRE Adjust the treble –6 (min.) — +6 (max.)
(Treble)
FAD Adjust the front and rear speaker R6 (rear only) — F6 (front only)
(Fader)* balance
BAL Adjust the left and right speaker L6 (left only) — R6 (right only)
(Balance) balance
LOUD
(Loudness)
VOL Adjust the volume 00 (min.) — 50 (max.)
(Volume)
Boost low and high frequencies to
produce a well-balanced sound at low
volume level.
Select the item you want to adjust.
¡
5
ON — OFF
Note:
* If you are using a two-speaker system, set the fader level to “00” (center).
2
Adjust the level.
Press the + button to turn on the loudness function, and the
– button to turn it off.
Note:
Normally the + and – buttons work as the volume control buttons.
So you do not have to select “VOL” to adjust the volume level.
18
Page 19
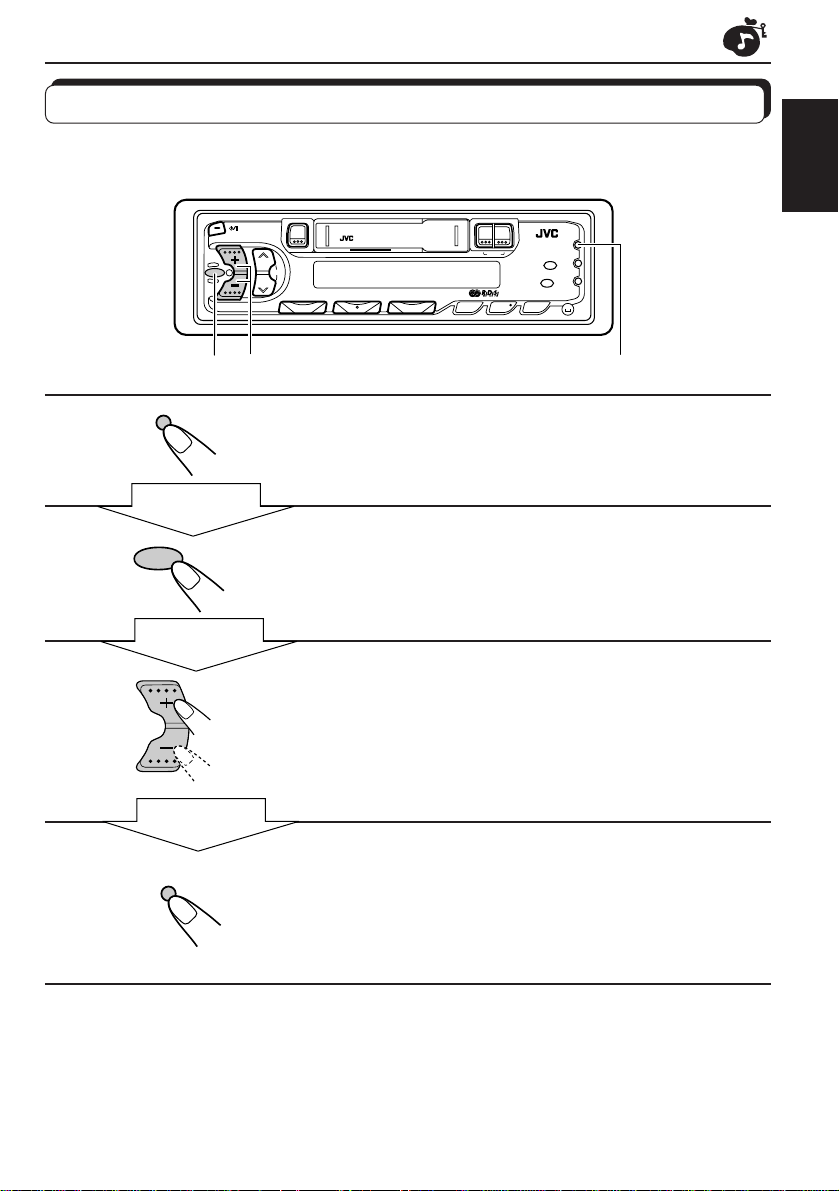
Storing your own sound adjustments
4
You can adjust the sound modes (BEAT, SOFT, POP: see page 17) to your preference and
store your own adjustments in memory.
1
0
¡
5
ENGLISH
1
2
3
4
SOUND
SOUND
2
Within
5 seconds
SEL
Within
5 seconds
Within
5 seconds
3
1,
Call up the sound mode you want to adjust.
See page 17 for details.
Select "BAS", "TRE" or "LOUD".
Adjust the bass or treble level or turn the
loudness function ON/OFF.
See page 18 for details.
Press and hold SOUND until the sound mode
you have selected in step 1 flashes on the
display.
Your setting is stored in memory.
5
Repeat the same procedure to store other settings.
To reset to the factory settings
Repeat the same procedure and reassign the preset values listed in the table on page 17.
19
Page 20
OTHER MAIN FUNCTIONS
Setting the clock
Selecting 24-hour or 12-hour clock display
(Set to 24-hour at the factory)
1. Press the SEL button for more than 2 seconds to set the preferred setting
mode (See page 22.).
2. Select the “24H/12H” mode with the
3. Select 24H or 12H with the level control buttons (+,–).
How to select the clock mode as the main display mode
1. Press the SEL button for more than 2 seconds to set the preferred setting
mode (See page 22.).
2. Select “DISPMODE” with the
or button.
3. Select “CLOCK” with the level control buttons (+,–).
With the clock display mode selected, when any other operation button is pressed, the display mode of the source you selected is shown.
After a few seconds, the display returns to the clock mode.
0
or button.
1
¡
20
1
2
1
SEL
1
KS-FX430R KS-F330R
SSM
2, 3
5
4
Press and hold the button for more
than 2 seconds to set the preferred
setting mode. (See page 22.)
Set the hour.
Select “CLOCK H” if not shown on
the display.
SSM
Page 21

2
Clock
Elapsed
playing time
Disc
number
Adjust the hour.
ENGLISH
3
Set the minute.
1
KS-FX430R KS-F330R
SSM
SSM
2
4
To check the current clock time (changing the display mode)
Press DISP repeatedly. Each time you press the button, the display mode changes as follows.
DISP
Select “CLOCK M.”
Adjust the minute.
Start the clock.
During tuner operation:
Frequency
(See page 14 when RDS is on.)
Clock
During tape operation:
Play mode
Clock
ONLY FOR KS-FX430R
During CD operation:
21
Page 22
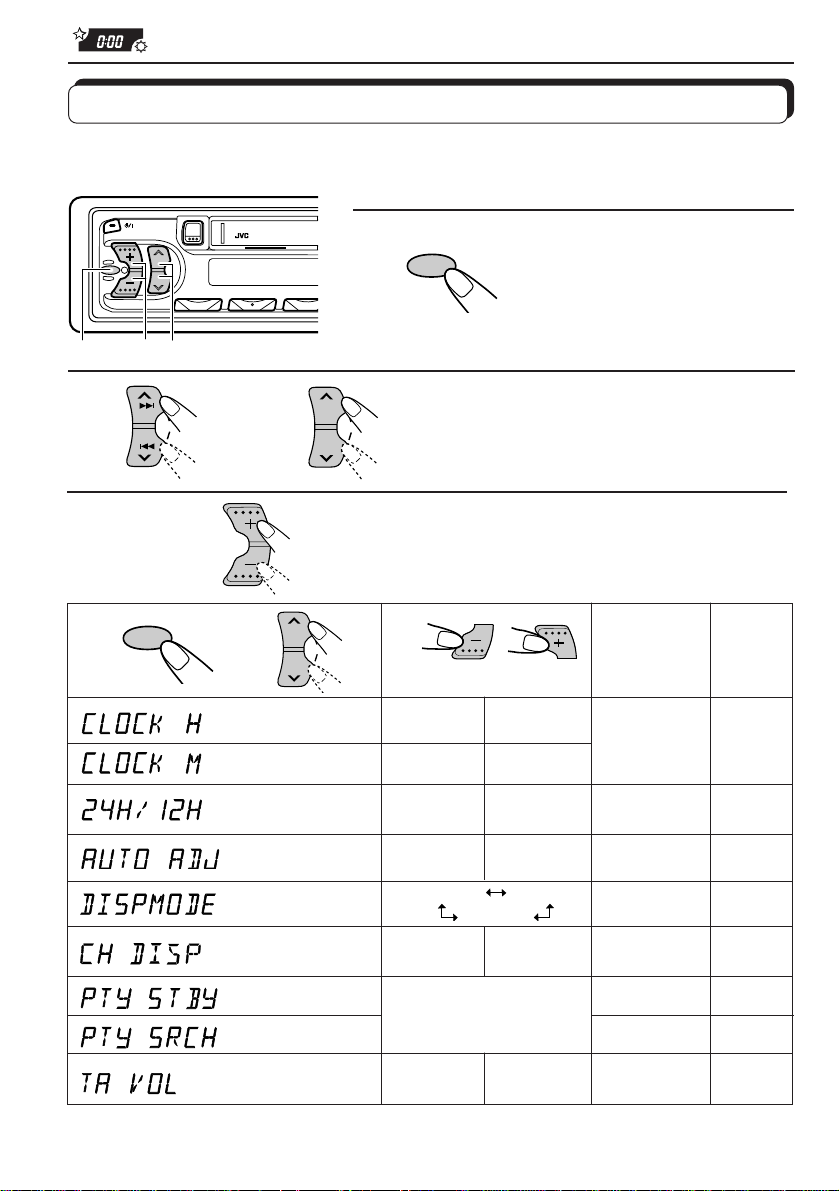
Storing your own mode settings
Preferred setting mode control
This mode has been set at the factory, but it can be set to suit your needs.
1
2
3
1
Select.
3
SEL
2
SSM
0
Hour adjustment
Minute adjustment
24/12-hour time
display
Automatic setting
of the clock
Display mode
Changer display
(only for KS-FX430R)
SSM
1
SEL
SSM
KS-F330RKS-FX430R
32
Back
Back
12H 24H
ADJ OFF ADJ ON
PS NAME
TIME DISC
Press the SEL button for
more than 2 seconds to
set the preferred setting
mode.
Select each mode.
Set the desired mode.
Factory-preset
settings
Set.
Advance
Advance
FREQ
CLOCK
0:00
24H
ADJ ON
PS NAME
DISC
See page
20-21
20
14
14, 21
24
PTY standby
PTY search
Traffic announce-
ment volume
• Press the SEL button when you have finished setting to return to the previous mode.
22
29 programme types
(See page 13.)
NEWS
POP M
9-10
11-12
14VOL (20)VOL (00-50) VOL (00-50)
Page 23
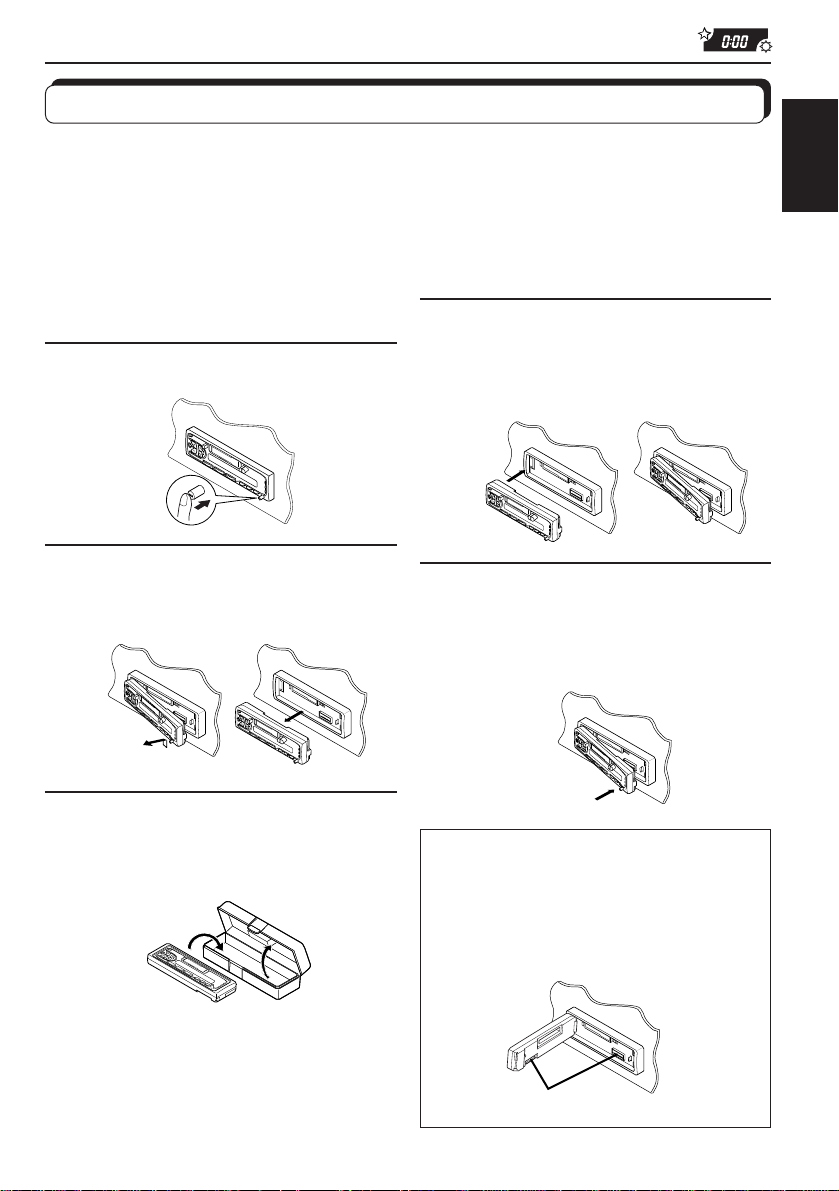
Detaching the control panel
You can detach the control panel when leaving the car.
When detaching or attaching the control panel, be careful not to damage the connectors on
the back of the control panel and on the panel holder.
ENGLISH
How to detach the control
panel
Before detaching the control panel, be sure
to turn off the power.
1
Unlock the control panel.
2
Lift and pull the control panel
out of the unit.
How to attach the control
panel
1
Insert the left side of the
control panel into the groove
on the panel holder.
2
Press the right side of the
control panel to fix it to the
panel holder.
3
Put the detached control
panel into the provided case.
Note on cleaning the connectors:
If you frequently detach the contr ol panel, the
connectors will deteriorate.
T o minimize this possibility , periodically wipe
the connectors with a cotton swab or cloth
moistened with alcohol, being careful not to
damage the connectors.
Connectors
23
Page 24

CD CHANGER OPERATIONS
This section is ONLY FOR KS-FX430R, when used with a JVC CD automatic changer
(separately purchased).
We recommend that you use one of the CH-X series with your KS-FX430R.
If you have another CD automatic changer, consult your JVC IN-CAR ENTERTAINMENT
dealer for connections.
• For example, if your CD automatic changer is one of the KD-MK series, you need a cord (KS-
U15K) for connecting it to this unit.
Before operating your CD automatic changer:
• Refer also to the Instructions supplied with your CD changer.
• If no discs are in the magazine of the CD changer or the discs are inserted upside
down, "NO CD" or “NO DISC” will appear on the display. If this happens, remove the
magazine and set the discs correctly.
• If “RESET 1 - RESET 8” appears on the display , something is wrong with the connection
between this unit and the CD changer . If this happens, check the connection, connect
the connecting cord(s) firmly if necessary, then press the reset button of the CD changer .
Playing CDs
1
0
¢
4
78 9101112
¡
5
Number buttons
1
Select the CD automatic changer.
1
CD-
¢
4
CH
Playback starts from the first track of the first disc.
All tracks of all discs are played back.
• "DISC" or "TIME" can be selected in the preferred setting mode control
(see page 22).
When "TIME" is selectedWhen "DISC" is selected
Disc number
CD-CH
Track number
Note on One-Touch Operation:
When you press CD-CH, the power automatically comes on. You do not have to pr ess
turn on the power.
24
Elapsed playing time
CD-CH
ATT to
Page 25
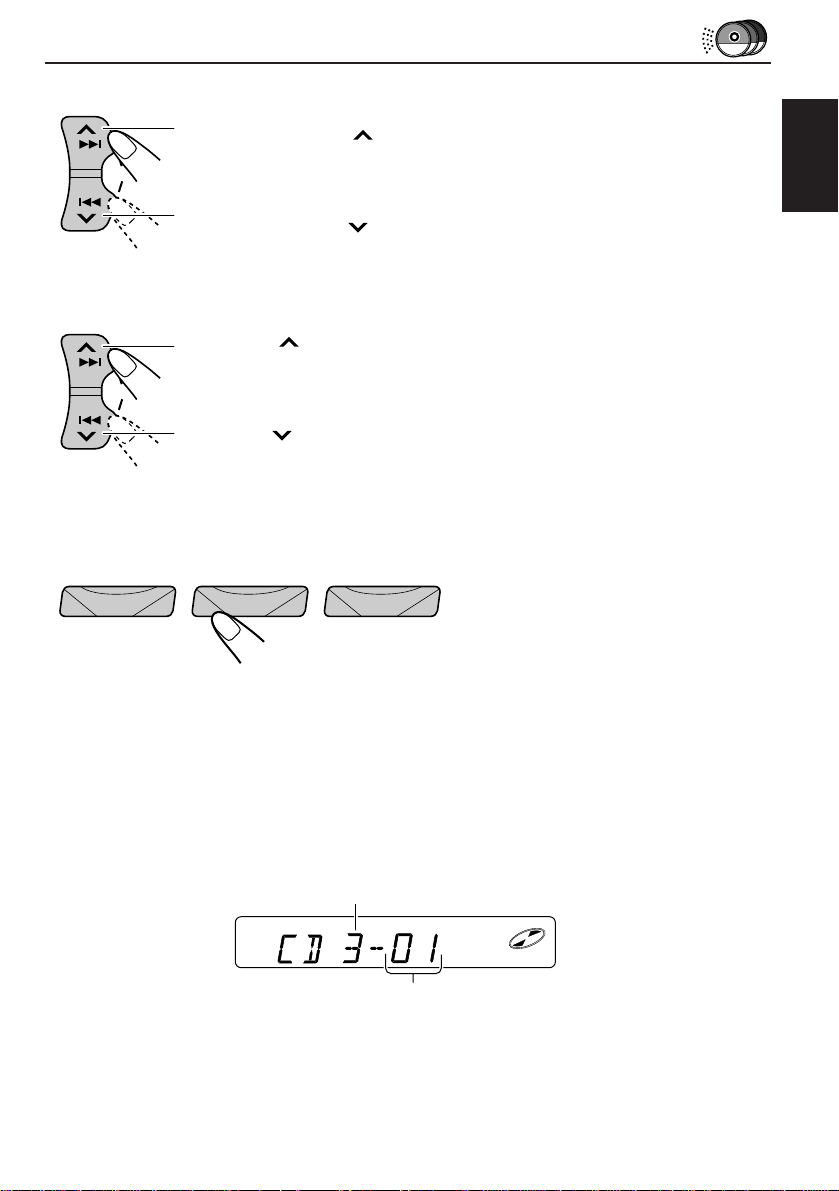
To fast-forward or reverse the track
Press and hold ¢ , while playing a CD, to fast-forward the track.
SSM
ENGLISH
Press and hold 4
, while playing a CD, to reverse the track.
To go to the next track or the previous track
Press ¢ briefly, while playing a CD, to go ahead to the beginning of
the next track. Each time you press the button consecutively , the beginning
SSM
of the next track is located and played back.
Press 4
briefly, while playing a CD, to go back to the beginning of the
current track. Each time you press the button consecutively, the beginning
of the previous track is located and played back.
To go to a particular disc directly
78 9101112
123456
Press the number button corresponding to the disc number to start its
playback.
• To select a disc number from 1 – 6:
Press 1 (7) – 6 (12) briefly.
• To select a disc number from 7 – 12:
Press and hold 1 (7) – 6 (12) for more than 1 second.
Ex. When disc number 3 is selected
Disc number
Track number
CD-CH
25
Page 26

Selecting CD playback modes
1
0
¢
4
To play back tracks at random (Random Play)
Each time you press MO/RND (mono/random) while playing a CD, CD
random play mode changes as follows:
MO
RND
Mode RND Indicator Plays at random
RND1 Lights All tracks of the current disc, then the tracks of
RND2 Flashes All tracks of all discs inserted in the magazine.
RND1 RND2 Cancelled
(Random1) (Random2)
the next disc, and so on.
¡
MO/RND
5
26
Page 27
MAINTENANCE
To extend the lifetime of the unit
This unit requires very little attention, but you will be able to extend the life of the unit if you
follow the instructions below.
To clean the heads
• Clean the heads after every 10 hours of use
using a wet-type head cleaning tape (available
at an audio store).
When the head becomes dirty, you may realize
the following symptoms:
– Sound quality is reduced.
– Sound level decreases.
– Sound drops out.
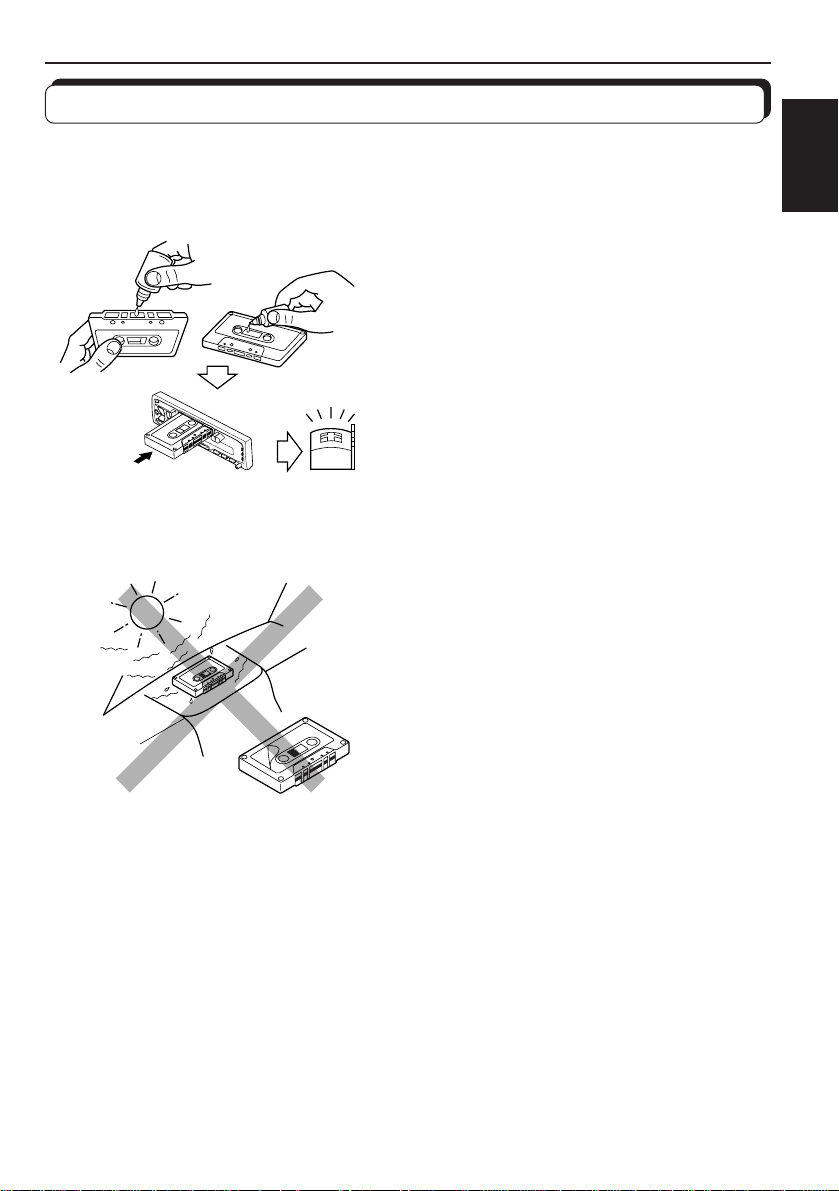
• Do not play dirty or dusty tapes.
• Do not touch the highly-polished head with any
metallic or magnetic tools.
To keep the tape clean
• Always store the tapes to their storage cases
after use.
• Do not store tapes in the following places:
– Subject to direct sunlight
– With high humidity
– At extremely hot temperatures
ENGLISH
CAUTIONS:
• Do not play the tapes with peeling labels; otherwise, they can damage the unit.
• Tighten tapes to remove slack since loose tape may become entangled with the mechanism.
• Do not leave a cassette in the cassette compartment after use, as the tape may become slack.
27
Page 28

TROUBLESHOOTING
What appears to be trouble is not always serious. Check the following points before calling a
service center.
Symptoms
• A cassette tape cannot be
inserted.
• Cassette tapes become hot.
• Tape sound is at very low
level and sound quality is
degraded.
• Sound is sometimes
interrupted.
• Sound cannot be heard from
the speakers.
• SSM (Strong-station
Sequential Memory)
automatic preset does not
work.
• Static noise while listening
to the radio.
• “NO CD” or “NO DISC”
appears on the display.
Causes
You have tried to insert a
cassette in the wrong way.
This is not a malfunction.
The tape head is dirty.
Connections are not good.
The volume control is turned
to the minimum level.
Connections are incorrect.
Signals are too weak.
The antenna is not connected
firmly.
No CD is in the magazine.
CDs are inserted incorrectly.
Remedies
I
nsert the cassette with the
exposed tape facing right.
Clean it with a head cleaning
tape.
Check the cords and
connections.
Adjust it to the optimum level.
Check the cords and
connections.
Store stations manually.
Connect the antenna firmly.
Insert CDs into the magazine.
Insert them correctly.
• “RESET 8” appears on the
display.
• “RESET 1-RESET 7”
appears on the display.
28
This unit is not connected to a
CD changer correctly.
Connect this unit and the CD
changer correctly and press
the reset button of the CD
changer.
Press the reset button of the
CD changer.
Page 29

SPECIFICATIONS
AUDIO AMPLIFIER SECTION
Maximum Power Output:
Front: 35 watts per channel
Rear: 35 watts per channel
Continuous Power Output (RMS):
Front: 15 watts per channel into 4 , 40
to 20,000 Hz at no more than 0.8%
total harmonic distortion.
Rear: 15 watts per channel into 4 , 40
to 20,000 Hz at no more than 0.8%
total harmonic distortion.
Load Impedance: 4 (4 to 8 allowance)
Tone Control Range
Bass: ±10 dB at 100 Hz
Treble:±10 dB at 10 kHz
Frequency Response: 40 to 20,000 Hz
Signal-to-Noise Ratio: 70 dB
Line-Out Level/Impedance: 1.0 V/20 k load
(250 nWb/m)
TUNER SECTION
Frequency Range
FM: 87.5 to 108.0 MHz
AM: (MW) 522 to 1,620 kHz
(LW) 144 to 279 kHz
[FM Tuner]
Usable Sensitivity: 11.3 dBf (1.0 µV/75 )
50 dB Quieting Sensitivity:
16.3 dBf (1.8 µV/75 )
Alternate Channel Selectivity (400 kHz):
65 dB
Frequency Response: 40 to 15,000 Hz
Stereo Separation: 30 dB
Capture Ratio: 1.5 dB
CASSETTE DECK SECTION
Wow & Flutter: 0.15% (WRMS)
Fast-Wind Time: 190 sec. (C-60)
Frequency Response:
50 to 14,000 Hz (± 3dB)
Signal-to-Noise Ratio: 52 dB
Stereo Separation: 40 dB
GENERAL
Power Requirement
Operating Voltage: DC 14.4 volts (11 to 16
volts allowance)
Grounding System: Negative ground
Dimensions (W x H x D)
Installation Size:
182 x 52 x 150 mm
Panel Size: 188 x 58 x 14 mm
Mass: 1.3 kg (excluding accessories)
Design and specifications subject to change
without notice.
ENGLISH
[MW Tuner]
Sensitivity: 20 µV
Selectivity: 35 dB
[LW Tuner]
Sensitivity: 50 µV
29
Page 30

Wir danken Ihnen für den Kauf eines JVC Produkts. Bitte lesen Sie die Anleitung vollständig durch,
bevor Sie das Gerät in Betrieb nehmen, um sicherzustellen, daß Sie alles vollständig verstehen und die
bestmögliche Leistung des Geräts erhalten.
INHALTSVERZEICHNIS
GRUNDBEDIENUNGEN................................................3
RADIOBETRIEB ............................................................ 4
Radiohören...................................................................................... 4
Speichern der Sender .....................................................................5
Automatische UKW-Vorabstimmung: SSM..................................5
Manuelles Vorabstimmen............................................................ 6
Anwahl eines vorabgestimmten Senders ...................................... 7
Die bei UKW-Empfang verfügbaren RDS-Funktionen .............. 8
RDS (Radio Data System). ..........................................................8
Andere praktische Tuner-Funktionen ........................................15
UKW-Stereo/Mono-Umschaltung...............................................15
KASSETTENBETRIEB ................................................... 16
Hören einer Kassette ....................................................................16
KLANGEINSTELLUNGEN ............................................ 17
Wählen der voreingestellten Klangbetriebsarten......................17
Klang-Einstellschritte...................................................................18
Speichern Ihrer eigenen Klangeinstellungen .............................19
ANDERE WICHTIGE FUNKTIONEN ............................. 20
Stellen der Uhr.............................................................................. 20
Speichern Ihrer eigenen Einstellungen.......................................22
Präferenz-Einstellmodus......... ...................................................22
Abnehmen des Bedienteils ...........................................................23
CD-WECHSLERBETRIEB .............................................. 24
(NUR FÜR KS-FX430R)
Abspielen der CDs ........................................................................24
Wählen der CD-Abspielbetriebsarten ........................................26
WARTUNG ...............................................................27
Zum Verlängern der Geräte-Lebensdauer.................................27
FEHLERSUCHE ........................................................... 28
TECHNISCHE DATEN .................................................. 29
VOR DEM GEBRAUCH
* Für die Sicherheit...
• Die Lautstärke nicht zu laut stellen, da dadurc h
Außengeräusche überdeckt und das Autofahren
gefährlich wird.
• Das Auto vor dem Durchführen von
komplizierten Bedienschritten anhalten.
2
* Temperatur im Auto...
Wenn Sie das Auto für lange Zeit in heißem oder
kaltem Wetter parken, bitte warten, bis sich die
Temperatur im Auto normalisiert hat, bevor Sie
das Gerät einschalten.
Page 31

GRUNDBEDIENUNGEN
1
1
0
23
¡
Hinweis:
Wenn Sie das Gerät erstmals
5
verwenden, stellen Sie bitte
die eingebaute Uhr korrekt
ein, siehe Seite 20.
1
2
/I
ATT
KS-FX430R
KS-F330R
Hinweis zum Ein-Tastendruck-Betrieb:
Wenn Sie die Programmquelle Tuner in Schritt 2 unten wählen, wird das Gerät
automatisch eingeschaltet. Sie brauchen dafür nicht
• Ist bereits eine Kassette im Gerät eingelegt, wird automatisch die
Kassettenwiedergabe ausgelöst.
AM FMCD-
CH
T P FMAM
3
4
Den Klang wie gewünscht einstellen (siehe Seite 17 – 19).
Das Gerät einschalten.
Die Programmquelle abspielen.
Für die Bedienung des Tuners siehe Seiten 4 – 15.
Für die Bedienung des Kassettendecks siehe Seite 16.
NUR FÜR KS-FX430R:
Für die Bedienung des CD-Wechslers siehe Seite
24 – 26.
Die Lautstärke einstellen.
Der Lautstärkepegel wird angezeigt.
DEUTSCH
ATT zu drücken.
Für ein sofortiges Absenken der Lautstärke
Kurz ATT beim Hören einer beliebigen Programmquelle drücken. „ATT“ blinkt auf der
Anzeige und die Lautstärke fällt sofort ab.
Zur Wiederherstellung der vorherigen Lautstärke die Taste nochmals kurz drücken.
Zum Ausschalten des Geräts
ATT länger als 1 Sekunde drücken.
Hinweis:
Zu diesem Gerät wird eine Identifikationskarte mitgeliefert, auf der die Gerätechassis-Nummer
vermerkt ist. Heben Sie diese Karte getrennt vom Gerät auf. Im Falle eines Diebstahls kann sie die
Geräteidentifizierung erleichtern.
3
Page 32

RADIOBETRIEB
Radiohören
1
1
0
¡
5
23
1
2
/I
ATT
Hinweis zum Ein-Tastendruck-Modus:
Wenn Sie beim nachfolgenden Schritt 2 den Empfangsbereich wählen, schaltet
sich das Gerät automatisch ein. Sie brauchen dementspr ec hend diese T aste nicht
zur Einschaltung verwenden.
Das Gerät einschalten.
Wählen Sie den Empfangsbereich (FM1,
FM2, FM3 oder AM).
Sie können zwischen FM1, FM2 und FM3 wählen, wenn Sie
F MA M
FM1AMFM2
Hinweis:
Falls eine Kassette im Kassettenfach eingelegt ist, kann nicht auf die
Programmquelle Tuner umgeschaltet werden. Wenn Radioempfang gewünscht
wird, darf keine Kassette eingelegt sein!
3
SSM
KS-FX430R KS-F330R
Zum Suchen
von Sendern mit
höherer Frequenz.
Zum Suchen
von Sendern mit
niedrigerer
Frequenz.
einen UKW-Sender hören möchten.
FM3
SSM
Beginnen Sie mit der Suche
nach einem Sender.
Wenn ein Sender empfangen wird,
stoppt die Suche.
Zum Anhalten der Suche bevor ein Sender empfangen wird, die gleiche Taste, die Sie für
die Suche gedrückt haben, nochmals drücken.
Zum Feinabstimmen einer bestimmten Frequenz von Hand:
1 Den Empfangsbereich (FM (UKW) oder AM (MW/LW)) wählen.
FM oder AM drücken.
oder drücken und halten, bis „M“ auf der Anzeige blinkt. Jetzt können Sie die Frequenz
2
von Hand ändern, während „M“ blinkt.
oder wiederholt drücken, bis die von Ihnen gewünschte Frequenz erreicht ist.
3
• Wenn Sie die Taste gedrückt halten, ändert sich die Frequenz (in 50 kHz Intervallen bei
UKW und 9 kHz Intervallen bei MW/LW), bis Sie die Taste freigeben.
4
Page 33

Speichern der Sender
Sie können Rundfunksender auf zwei Arten abspeichern.
• Automatisches Vorabstimmen der UKW-Sender: SSM (Strong-station Sequential Memory
= Sequentialspeicher für starke Sender)
• Manuelles Vorabstimmen für UKW- und MW-Sender
Automatische UKW-Vorabstimmung: SSM
Sie können 6 lokale UKW-Sender pro UKW-Empfangsbereich (FM1, FM2 und FM3)
vorabstimmen.
1
0
¡
5
DEUTSCH
1
1
F M
2
FM1 FM2 FM3
Die gewünschte Empfangsbereichzahl (FM1,
FM2 und FM3), in der UKW-Sender
gespeichert werden sollen, wählen.
2
KS-FX430R
Die lokalen UKW-Sender mit den stärksten Signalen werden gesucht und automatisch in der
Empfangsbereichszahl (FM1, FM2 und FM3), die Sie gewählt haben, gespeichert. Diese
vorabgestimmten Sender werden auf den Nummerntasten abgespeichert – Nr. 1 (niedrigste
Frequenz) bis Nr. 6 (höchste Frequenz).
Wenn die automatische Vorabstimmung abgeschlossen ist, wird der Sender der Taste 1
automatisch angewählt.
KS-F330R
SSM SSM
Die beiden Tasten länger als 3 Sekunden
drücken und halten.
„SSM“ erscheint und erlischt bei Abschluß der
automatischen Vorabstimmung wieder.
5
Page 34

Manuelles Vorabstimmen
Sie können bis zu 6 Sender pro Empfangsbereich (FM1, FM2, FM3 und AM) von Hand
vorabstimmen.
BEISPIEL: Speichern des UKW-Senders 88.3 MHz auf der numerischen Taste 1 des FM1-
Empfangsbereichs.
1
0
¡
5
1
2
3
F M
KS-FX430R
SSM
12
23
KS-F330R
1
Den FM1-Empfangsbereich wählen.
Auf den Sender 88.3 MHz abstimmen.
Siehe Seite 4 zum Abstimmen auf einen Sender.
SSM
Die Taste länger als 1 Sekunde drücken und
halten.
„P1“ blinkt für einige Momente.
4
Das obige Verfahren zum Speichern der anderen Sender auf
andere numerische Tasten wiederholen.
Hinweise:
• Ein vorheriger vorabgestimmter Sender wird gelöscht, wenn ein neuer Sender auf der gleichen
numerischen Taste abgespeichert wird.
• Vorabgestimmte Sender werden gelöscht, wenn die Stromv ersorgung des Speicherstromkreises
unterbroc hen wird (z.B. beim Wechseln der Batterie). In diesem F all die Sender nochmals vorabstimmen.
6
Page 35

Anwahl eines vorabgestimmten Senders
Sie können einfach einen vorabgestimmten Sender aufrufen.
Bedenken Sie, daß Sie zuerst Sender speichern müssen. Wenn Sie das noch nicht getan
haben, lesen Sie die Seiten 5 und 6.
1
0
¡
1
2
2
1
Den gewünschten
F MA M
FM1AMFM2
FM3
123456
Empfangsbereich (FM1, FM2,
FM3 oder AM) anwählen.
Die gewünschte Zahl (1 – 6) für
den vorabgestimmten Sender
wählen.
5
DEUTSCH
7
Page 36

Die bei UKW -Empfang verfügbar en RDS-Funktionen
RDS (Radio Data System)
Taste RDS
KS-FX430R
TP/ RDS
KS-F330R
RDS
Empfang mit Sendernetzerfassung
Zur Sendernetzerfassung die Taste RDS für mindestens 1 Sekunde
gedrückt halten.
• Modus 1 (AF (Alternative Frequenzen): ein/REG: aus):
Die Sendernetzerfassung ist eingeschaltet.
Es wird zwischen Sendestationen des gleichen Sendernetzes
umgeschaltet.
Hinweis:
• Bei Betr iebsart 1 kann der Empfang ggf. auf andere Prog ramme des
gleichen Sendernetzes wechseln.
• Modus 2 (AF: ein/REG: ein):
Die Sendernetzerfassung ist zusammen mit der Regionalschaltung
eingeschaltet (Sendestationen, die das gleiche Programm ausstrahlen,
werden kontinuierlich erfaßt).
• Modus 3 (AF: aus/REG:aus):
Die Sendernetzerfassung ist ausgeschaltet.
Bei abfallender Feldstärke schaltet der Tuner automatisch auf eine
andere besser empfangbare Sendestation des gleichen Programms
im RDS-Sendernetz. Hierbei bezieht sich der Tuner auf die PI(Programm-Erkennung) und AF-Codes. Dies garantiert optimalen
Empfang der eingestellten Sendung während der Fahrt. (Siehe
Abbildung.)
• Wenn der eingestellte RDS-Sender keine AF-Daten liefert bzw. wenn
kein AF-Datenempfang möglich ist, arbeitet die Sendernetzerfassung
NICHT, selbst wenn die Feldstärke unter den Referenzpegel abfällt.
Das gleiche Senderprogramm kann über verschiedene Sendefrequenzen empfangen werden.
Programm 1 mit
Sendefrequenz A
Programm 1 mit
Sendefrequenz B
Programm 1 mit Sendefrequenz C
Programm 1 mit Sendefrequenz E
Programm 1 mit
Sendefrequenz D
8
Page 37

PTY-Bereitschaft
Ô
Ô
ÔÔ
Ô
Ô
Ô
Ô
*
Abspeicherung nach Programmsparten (PTY) (Einstellung ab Werk: NEWS).
1
¡
5
1
0
3 22
DEUTSCH
1
2
3
SEL
KS-FX430R
KS-F330R
SSM
SSM
Die Taste SEL für mehr als 2 Sekunden
gedrückt halten, um auf den PräferenzEinstellmodus zu schalten (siehe Seite 22).
Mit T aste oder den Modus “PTY STBY”
anwählen.
Mit jedem Antippen der Taste oder
wechselt die Anzeige nacheinander wie folgt:
*
Nur KS-FX430R
Mit Taste + oder – kann nun eine von 29
Programmsparten (PTY , siehe die T abelle auf
Seite 13) angewählt werden.
Ist z.B. die Anzeige “CLASSICS” aufgerufen worden, wird
automatisch die Programmsparte “klassische Musik”
eingestellt.
• Mit Taste SEL kann auf den vorherigen Modus zurückgeschaltet
werden.
9
Page 38

Einstell- und Bedienschritte für die PTY-Bereitschaft
PTY
“PTY” bei Empfang eines PTY-Senders auf und das Gerät ist auf PTYBereitschaft geschaltet. Der Name der zuvor abgespeicherten und nun
angezeigten Programmsparte (im Beispiel auf Seite 9: “CLASSICS”) blinkt
für 5 Sekunden.
Hinweis:
Wird zu diesem Zeitpunkt kein PTY-Sender empfangen, blinkt die Anzeige “PTY”.
• Wird die Taste PTY bei UKW-Empfang kurz gedrückt, leuchtet die Anzeige
Hierauf mit T aste
oder auf PTY -Bereitschaft sc halten. Die Anzeige “SEARCH”
erscheint und der PTY-Suchlauf wird ausgelöst. Sobald ein PTY-Sender empfangen
wird, leuchtet die Anzeige “PTY” konstant.
• Soll bei eingestellter Programmquelle TAPE (oder CD, nur KS-FX430R)
automatisch auf die Sendung einer vorgemerkten Programmsparte
umgeschaltet werden, mit Taste PTY auf PTY-Bereitschaft schalten. (Die
Anzeige “PTY” leuchtet konstant.)
Sobald die Sendung bei aktivierter PTY-Bereitschaft empfangen wird, wird
die Programmsparte angezeigt und automatisch auf UKW-Empfang
umgeschaltet. Das Programm der vorgemerkten Sparte kann nun gehört
werden.
Hinweis:
Um die PTY-Bereitschaft zu deaktivieren, nochmals die Taste PTY drücken.
Verkehrsfunktaste (TP)
Einstell- und Bedienschritte für die Verkehrsfunk-Bereitschaft (TA)
KS-FX430R
TP/ RDS
KS-F330R
10
T P
• Wird die Taste TP bei UKW-Empfang kurz gedrückt, leuchtet die Anzeige
“TP” bei Empfang eines Verkehrsfunk-Senders auf und das Gerät ist auf
TA-Bereitschaft geschaltet.
Hinweis:
Wird zu diesem Zeitpunkt kein Verkehrsfunk-Sender empfangen, blinkt die Anzeige
“TP”. Hierauf mit Taste
oder auf TA-Bereitschaft schalten. Die Anzeige
“SEARCH” erscheint und der Verkehrsfunk-Suchlauf wird ausg elöst. Sobald ein
Verkehrsfunk-Sender empfangen wird, leuchtet die Anzeige “TP” konstant.
• Soll bei eingestellter Programmquelle TAPE (oder CD, nur KS-FX430R)
automatisch auf eine Verkehrsfunkmeldung umgeschaltet werden, mit Taste
TP auf TA-Bereitschaft schalten. (Die Anzeige “TP” leuchtet konstant.)
Sobald eine Verkehrsfunkdurchsage bei aktivierter TA-Bereitschaft
empfangen wird, erscheint die Anzeige “TRAFFIC” und es wird automatisch
auf UKW-Empfang für die Verkehrsfunkmeldung umgeschaltet. Dabei wird
automatisch die vorgemerkte TA VOL-Lautstärkestufe eingestellt (siehe Seite
14).
Hinweis:
Um die TA-Bereitschaft zu deaktivieren, nochmals die Taste TP drücken.
Page 39

PTY-Suchlaufmodus
Vorabstimmen von Programmsparten für die numerischen Tasten 1–6
Ab Werk liegt folgenden Einstellung vor:
1
POP M
2
ROCK M
2
1
1
1
SEL
2
KS-FX430R KS-F330R
SSM SSM
3
EASY M
0
0
3
4
CLASSICS
5
AFFAIRS
1
1
¡
¡
6
VARIED
5
5
Die Taste SEL für mehr als 2 Sekunden
gedrückt halten, um auf den PräferenzEinstellmodus zu schalten (siehe
Seite 22).
Mit T aste oder den Modus “PTY
SRCH” anwählen.
DEUTSCH
3
Mit Taste + oder – die gewünschte Programmsparte zunächst
anwählen (hierbei angewählte und bereits zuvor abgespeicherte
Programmsparten blinken auf) und dann zur Abspeicherung die
vorgesehene numerische Taste für mehr als 2 Sekunden
gedrückt halten. Die Anzeige der abgespeicherten
Programmsparte blinkt.
123456
11
Page 40

PTY-Suchlaufdurchführung
0
2 1
1
¡
5
1
PTY
Bei UKW-Empfang die Taste PTY für mehr als 1 Sekunde
gedrückt halten, um den PTY-Programmsuchlauf
auszulösen.
2
123456
Eine abgespeicherte Programmsparte (wie auf Seite
11 beschrieben) mit einer numerischen Taste (1–6)
aufrufen.
Beispiel:Wenn in T aste 1 die Programmsparte “CLASSICS” abgespeichert
wurde.
• Der PTY-Sendersuchlauf wird 5 Sekunden später
ausgelöst.
Bei erfolgreich durchgeführtem PTY-Suchlauf wird eine Sendung der gewünschten
Programmsparte empfangen.
• Kann im PTY-Suchlaufbetrieb kein PTY-Sender empfangen werden, wird auf den zuletzt
empfangenen Sender geschaltet.
• Nach dem Suchlauf wird die zuletzt angewählte Programmsparte abgespeichert und bei
erneutem PTY-Suchlauf als erstes angezeigt.
Hinweis:
In bestimmten Empfangslagen arbeiten die PTY-Funktionen (PTY-Bereitschaft, PTY-Suchlauf) nicht.
12
Page 41

PTY-Codes
PTY-Anzeige
ANZEIGE
WEATHER
FINANCE
CHILDREN
SOCIAL
RELIGION
PHONE IN
TRAVEL
LEISURE
JAZZ
COUNTRY
NATION M
OLDIES
FOLK M
DOCUMENT
1
2
3
4
5
6
7
8
9
ANZEIGE
NEWS
AFFAIRS
INFO
SPORT
EDUCATE
DRAMA
CULTURE
SCIENCE
VARIED
POP M
ROCK M
EASY M
LIGHT M
CLASSICS
OTHER M
No.
16
17
18
19
20
21
22
23
24
25
26
27
28
29
No.
10
11
12
13
14
15
Beschreibung der PTY-Codes
NEWS: Nachrichten
AFFAIRS: Nachrichtenmagazin/
Aktuelle Themen
INFO: Ratgeber aller Art
SPORT: Sport
EDUCATE: Bildungsprogramme
DRAMA: Hörspiel
CULTURE: Kulturereignisse (regional/
überregional)
SCIENCE: Wissenschaft und Technik
VARIED: Gemischte Programme
(Komödien, Feiern etc.)
POP M: Popmusik
ROCK M: Rockmusik
EASY M: Leichte Unterhaltungsmusik
LIGHT M: Leichte Musik
CLASSICS: Klassische Musik
OTHER M: Sonstige Musik
WEATHER: Wettermeldungen
FINANCE: Finanz-Themen,
Wirtschaftsmeldungen etc.
CHILDREN: Kindersendungen
SOCIAL: Soziale Themen
RELIGION: Sendungen mit religiösen,
philosophischen Themen,
Gottesdienste etc.
PHONE IN: Hörermeinungen
(Telefonumfragen,
Befragungen etc.)
TRAVEL: Reisemagazine,
Reiseberichte,
Reiseangebote etc.
LEISURE: Sendungen für
Freizeitgestaltung und
Hobbies (Garten, Kochen,
Angeln etc.)
JAZZ: Jazzmusik
COUNTRY: Countrymusik
NATION M: Unterhaltungsprogramme in
einer Fremdsprache
OLDIES: Schlageroldies
FOLK M: Volksmusik
DOCUMENT: Dokumentationen und
Themenmagazine
Sonstige RDS-Funktionen
EON (Enhanced Other Networks)
Sendernetz-Zusammenschaltung
• Bei Empfang eines EON-Senders leuchtet
die Anzeige EON und die folgenden
Funktionen werden ausgeführt.
EON speichert automatisch die Sendefrequenzen von Sendestationen anderer
Sendernetze, die Referenzcodes (TP/TA/
AF/PTY/PS (Programm-Service) etc.)
ausstrahlen, so daß gegenseitige
Einspielung bei Sendeempfang möglich
ist. Hierdurch ergeben sich u.a. die
folgenden Vorteile:
Wenn Sie das Programm eines Senders
OHNE Verkehrsfunk oder angewählte
Programmsparte hören, können Sie solche
Programme dennoch empfangen: sobald
solche Programme gesendet werden,
wechselt der Tuner automatisch — nur für die
Dauer dees Programmes — auf den
entprechenden Sender. ( Die Rückschaltung
auf das vorherige Programm unterbleibt,
wenn das neue Programm lange empfangen
wird.) Alle gespeicherten Informationen
werden ständig aktualisiert (auch die AF-Daten
werden erneuert). Wird auf einen anderen
DEUTSCH
13
Page 42

Senderspeicher geschaltet, kann das neue
Programm auch in einem anderen
Sendebereich sofort bei bestmöglichem
Empfang gehört werden.
Vorgemerkte Lautstärke für
Verkehrsfunkmeldungen
Die Lautstärke für den Empfang von
Verkehrsfunkmeldungen kann vorbestimmt
und abgespeichert werden.
1. Die Taste SEL für mehr als 2 Sekunden
gedrückt halten, um auf den PräferenzEinstellmodus zu schalten.
2. Mit Taste
VOL” anwählen.
3. Mit Taste + oder – kann nun die
gewünschte Lautstärke voreingestellt
werden. (Siehe Seite 22.)
Numerische Tasten
Liegt bei Betätigen der numerischen Taste
das zugehörige Sendesignal in ausreichender Feldstärke vor, schaltet der Tuner
auf Empfang für diese Frequenz.
Ist die Feldstärke im Empfangsbereich
unzureichend, bezieht sich der Tuner auf
seine gespeicherte AF-Liste und sucht den
Sender mit dem gleichen Programm, der die
höchste Feldstärke aufweist. Enthält die AFListe keinen solchen Sender, wird der PISuchlauf ausgelöst, d.h. der Tuner sucht
einen Sender mit dem gleichen PI-Code.
Wird ein solcher Sender in einem
Suchlaufzyklus nicht erfaßt, erfolgt PISuchlauf-Abschaltung und Umschaltung auf
die ursprüngliche Senderspeicherfrequenz.
CT (Uhrzeit)
Enthält das empfangene RDS-Signal
Zeitcodedaten, erfolgt automatisch eine
Zeiteinstellung für die integrierte Uhr.
• RDS bezieht die Ortszeit auf die
westeuropäische Zeit (Greenwich Mean
Time).
• Wenn die automatische Uhrzeitkorrektur
NICHT gewünscht wird, wie folgt
vorgehen.
1. Die Taste SEL für mehr als 2 Sekunden
gedrückt halten, um auf den PräferenzEinstellmodus zu schalten.
2. Mit T aste
ADJ” anwählen.
3. Die T aste – drücken und Einstellung “ADJ
OFF” wählen. (Siehe Seite 22.)
14
oder den Modus “TA
oder den Modus “AUTO
Hierauf wird die Uhrzeit selbst bei Empfang
von RDS-CT-Daten (Clock Time) nicht
automatisch korrigiert. Falls Sie die
automatische Uhrzeitkorrektur erneut
aktivieren möchten, nochmals die obigen
Bedienschritte durchführen und in Schritt 3 mit
der Taste “ +” auf “ADJ ON” einstellen. Hierauf
wird die Uhrzeit bei Empfang von CT-Daten
automatisch korrigiert.
Hinweis:
Vom Empfang der CT-Daten bis zur Zeitanzeige
werden ca. 2 Minuten benötigt. Daher muß der
Sender für mindestens 2 Minuten
unterbrechungsfrei empfangen werden, ehe ein
Uhreitabgleich erfolgt.
Anzeige-Modus
Einstellung der Hauptanzeigefunktion
1. Die Taste SEL für mehr als 2 Sekunden
gedrückt halten, um auf den PräferenzEinstellmodus zu schalten.
2. Mit Taste
“DISPMODE” anwählen.
3. Mit Taste + oder – kann nun der
gewünschte Modus eingestellt werden.
(Sendername (PS NAME) Ô
Empfangsfrequenz (FREQ) Ô Uhrzeit
(CLOCK) Ô) (Siehe Seite 22.)
Hinweis:
Wurde Anzeige “CLOCK” voreingestellt, wird
die Uhrzeit als Hauptanzeige, auch bei
Cassettenwiedergabe (oder CD-Wieder gabe (nur
KS-FX430R)), beibehalten.
Anzeigetaste
Mit der Taste DISP kann zwischen den
signalquellenbezogenen (Tuner, Tape oder
CD (nur KS-FX430R)) Anzeigen und der
Uhrzeit-Anzeige umgeschaltet werden. Bei
mehrmaligem Antippen der Taste wechselt
die Anzeige wie folgt:
Signalquellenbezogene Anzeige
(Sendername* = empfangene Radiofre-
quenz = PTY*; oder TAPE; oder CD (nur
KS-FX430R)) = Uhrzeit
Das Displayfeld schaltet nach kurzer Zeit
wieder auf die ursprüngliche Anzeige um.
* Bei Empfang eines zu schwachen RDS-
bzw. PTY-Signals oder eines Senders
ohne RDS- bzw. PTY-Signal ENTFÄLLT
die Anzeige (Sendername oder PTY).
oder den Modus
Page 43

Andere praktische Tuner-Funktionen
1
0
UKW-Stereo/Mono-Umschaltung
Wenn eine UKW-Stereosendung schwer zu empfangen ist:
Bei Stereoempfang die T aste MO/RND (Mono/Zufallswahl: für KS-FX430R) oder MO (Mono:
für KS-F330R) drücken. Das Empfangssignal, das Sie nun hören, wird monaural, der Empfang
jedoch besser.
Leuchtet auf, wenn eine UKW-Sendung in Stereo
empfangen wird.
¡
MO/RND
(Für KS-FX430R)
5
MO
(Für KS-F330R)
DEUTSCH
ST
MO
Zum Wiederherstellen des Stereoempfangs die gleiche Taste nochmals drücken.
15
Page 44

KASSETTENBETRIEB
Hören einer Kassette
1
2
3
1
PROG
1
/I
ATT
¡
2
0
3
1
¡
5
Einschalten.
Eine Kassette einlegen.
Wird eine Kassettenseite bis zum Bandende abgespielt,
wechselt die Wiedergabe automatisch auf die andere
Kassettenabspielrichtung (Autoreverse).
Die Kassettenabspielrichtung wählen.
• Beide Tasten gleichzeitig drücken.
Hierbei wird jeweils auf die entgegengesetzte Abspielrichtung
gewechselt — vorwärts (
) oder rückwärts ( ).
Abspielstopp und Kassettenauswurf
0 drücken.
Das Band wird angehalten und die Kassette wird automatisch aus dem Kassettenfach
ausgeschoben. Es wird der zuletzt eingestellte Sender empfangen oder es erfolgt CDWiedergabe vom angeschlossenen CD-Wechsler (nur KS-FX-430R).
• Sie können die Kassette auch durch Ausschalten des Geräts auswerfen.
Schnelles Vorwärts- und
Rückwärtsspulen
¡ oder 1 drücken.
Das Band wird in Pfeilrichtung (¡ oder 1) umgespult.
Um erneut auf Wiedergabe zu schalten, die Taste 1 oder
¡ leicht antippen.
16
Kassettenabspielrichtung
Page 45

KLANGEINSTELLUNGEN
Wählen der voreingestellten Klangbetriebsarten
Sie können eine voreingestellte Klangeinstellung, die zum jeweiligen Musikgenre paßt, wählen.
1
0
Jedes Mal, wenn Sie SOUND (Klang) drücken, wechselt die Klangbetriebsart wie folgt.
SOUND
Anzeige Für: Voreingestellte Werte
SCM OFF (Lineares Signal) 00 00 Ein
BEAT Rock- oder Disko-Musik +2 00 Ein
SOFT Ruhige Hintergrundsmusik +1 –3 Aus
POP Leichte Musik +4 +1 Aus
¡
5
SOUND
Tiefen Höhen Lautstärkekontur
DEUTSCH
Hinweise:
• Sie können die voreingestellten Klangbetriebsarten wie gewünscht einstellen und abspeichern.
Möchten Sie Ihre ursprünglic he Klangbetriebsart einstellen und speic hern, Seite 19 „Speichern Ihrer
eigenen Klangeinstellungen“ lesen.
• Um ausschließlich die Tiefen- oder Höhen-Verstärkungsgrade wie gewünscht einzustellen, Seite
18 „Klang-Einstellschritte“ lesen.
17
Page 46

Klang-Einstellschritte
Sie können das Klangbild wie gewünscht einstellen.
1
0
1
2
1
SEL
Die einzustellende Position wählen.
Anzeige Zu tun: Bereich
BAS Einstellen der Tiefen –6 (min.) — +6 (max.)
(Baß)
TRE Einstellen der Höhen –6 (min.) — +6 (max.)
(Treble)
FAD Einstellen des vorderen und hinteren R6 (nur hinten) — F6 (nur vorne)
(Ausblender)* Lautsprecherausgleichs
BAL Einstellen des linken und rechten L6 (nur links) — R6 (nur rechts)
(Ausgleich) Lautsprecherausgleichs
LOUD Tiefe und hohe Frequenzen werden EIN — AUS
(Lautstärkekontur) betont, um bei niedriger Laustärke ein
VOL Einstellen der Lautstärke 00 (min.) — 50 (max.)
(Lautstärke)
ausgeglicheneres Klangbild zu erzielen.
¡
5
Hinweis:
* Wenn Sie eine Anlage mit zwei Lautsprechern verwenden, setzen Sie den Ausblender auf „00“ (Mitte).
2
Lautstärkekontur einstellen.
Die Lautstärkekonturfunktion wird mit Taste + ein und mit
Taste - ausgeschaltet.
Hinweis:
Normalerweise dienen die Taste + und – als Lautstärke-Regelungstasten.
Sie müssen daher nicht „VOL“ wählen, um die Lautstärke einzustellen.
18
Page 47

Speichern Ihrer eigenen Klangeinstellungen
4
Sie können die Klangbetriebsarten (BEAT, SOFT, POP: siehe Seite 17) nach Wunsch einstellen
und ihre eigenen Einstellungen speichern.
1
0
¡
5
DEUTSCH
1
2
3
4
SOUND
Innerhalb
5 Sekunden
SEL
Innerhalb
5 Sekunden
Innerhalb
5 Sekunden
SOUND
2
3
1,
Rufen Sie die Klangbetriebsart, die Sie
einstellen möchten, auf.
Siehe Seite 17 für Einzelheiten.
“BAS”, “TRE” oder “LOUD” anwählen.
Den T iefen- oder Höhenpegel einstellen oder
die Loudness-Funktion ein-/ausschalten.
Siehe Seite 18 für Einzelheiten.
SOUND (Klang) drücken und halten, bis die
Klangbetriebsart, die Sie in Schritt 1 gewählt
haben, auf der Anzeige blinkt.
Ihre Einstellung ist gespeichert.
5
Das gleiche Verfahren zum Speichern der anderen Einstellungen
wiederholen.
Zum Zurückstellen auf die Werkseinstellung
Das gleiche Verfahren wiederholen und die voreingestellten Werte, die in der Tabelle auf
Seite 17 aufgeführt werden, wieder zuordnen.
19
Page 48

ANDERE WICHTIGE FUNKTIONEN
Stellen der Uhr
Einstellung auf 24-Std.- oder 12-Std.-Anzeigemodus
(Einstellung ab Werk: 24 Std.)
1. Die Taste SEL für mehr als 2 Sekunden gedrückt halten, um auf den
Präferenz-Einstellmodus zu schalten. (Siehe Seite 22.)
2. Mit Taste
3. Mit Taste + oder – kann nun der gewünschte Anzeigemodus (24 Std. oder
12 Std.) eingestellt werden.
Einstellung auf den Uhrzeitmodus als Haupt-Anzeigemodus
1. Die Taste SEL für mehr als 2 Sekunden gedrückt halten, um auf den
Präferenz-Einstellmodus zu schalten. (Siehe Seite 22.)
2. Mit Taste
3. Mit Taste + oder – den Modus “CLOCK” einstellen.
Bei Vorwahl der Uhrzeitzeithauptanzeige wechselt die Anzeige bei jedem Betätigen einer
Steuer- oder Funktionstaste auf die Anzeige für die zugehörige Musikquelle.
Nach einigen Sekunden erfolgt erneut die Anzeige der Uhrzeit.
oder den Modus “24H/12H” anwählen.
oder den Modus “DISPMODE” anwählen.
1
0
¡
20
1
2
1
SEL
1
KS-FX430R KS-F330R
SSM
2, 3
SSM
5
4
Die Taste SEL für mehr als
2 Sekunden gedrückt halten, um
auf den Präferenz-Einstellmodus
zu schalten. (Siehe Seite 22.)
Stundeneinstellung
Wenn die Anzeige unterbleibt,
“CLOCK H” wählen.
Page 49

2
Die Stundenzahl eingeben.
3
Minuteneinstellung
1
KS-FX430R KS-F330R
“CLOCK M” wählen.
SSM
2
4
Zum Überprüfen der derzeitigen Uhrzeit (Wechseln der Anzeigenbetriebsart)
DISP (Anzeige) wiederholt drücken. Jedes Mal, wenn Sie die Taste drücken, wechselt die
Anzeigenbetriebsart wie folgt.
DISP
SSM
Die Minutenzahl eingeben.
Die Uhrzeitanzeige auslösen.
DEUTSCH
Während des
Tuner-Betriebs:
Frequenz
Bei aktivem RDS-Modus
siehe Seite 14.
Uhr
Während des
Kassettenbetriebs:
Abspielbetriebsart
Uhr
NUR FÜR KS-FX430R
Während des
CD-Wechslerbetriebs:
Uhr
Abgelaufene
Abspielzeit
CD-Nummer
21
Page 50

Speichern Ihrer eigenen Einstellungen
Präferenz-Einstellmodus
Die Einstellungen ab Werk können von Ihnen beliebig geändert werden.
1
2
3
0
2
KS-FX430R KS-F330R
SSM
1
SEL
SSM
3
SEL
132
Aufrufen
Stundeneinstellung
Minuteneinstellung
24/12-Std.-
Einstellung
Automatische
Uhrzeiteinstellung
Anzeigemodus 14, 21PS NAME
CD-Wechsleranzeige
(nur für KS-FX430R)
SSM
Einstellen
Zurück Vor
(12 Std.) (24 Std.)
ADJ OFF
(Einstellung aus)
PS NAME
(Programmanbieter)
TIME
(Zeit)
Die Taste SEL für mehr als
2 Sekunden gedrückt
halten, um auf den
Präferenz-Einstellmodus
zu schalten.
Einen Modus aufrufen.
Die Einstellung vornehmen.
VorZurück
ADJ ON
(Einstellung ein)
FREQ
(Frequenz)
CLOCK
(Uhrzeit)
DISC
(CD)
Einstellung
ab Werk
0:00
24H
ADJ ON
DISC
Siehe
Seite
20-21
20
14
24
PTY-Bereitschaft
PTY-Suchlauf
Verkehrsfunkmeldungs-
Lautstärke
• Nach vollständiger Einstellung die Taste SEL drücken, um auf den vorherigen Modus zu schalten.
22
29 Programmsparten
(siehe Seite 13)
VOL (Lautstärke)
(00-50)
VOL (Lautstärke)
(00-50)
NEWS
POP M
VOL (20)
9-10
11-12
14
Page 51

Abnehmen des Bedienteils
Sie können das Bedienteil beim Verlassen des Autos abnehmen.
Beim Abnehmen oder Anbringen des Bedienteils vorsichtig vorgehen, damit die Steckerkontakte auf der Rückseite des Bedienteils und der Halterung nicht beschädigt werden.
Zum Abnehmen des
Bedienteils
Vor dem Abnehmen des Bedienteils sicherstellen, daß das Gerät ausgeschaltet ist.
1
Das Bedienteil entriegeln.
2
Das Bedienteil anheben
und abnehmen.
Zum Anbringen des
Bedienteils
1
Die linke Seite des Bedienteils
in die Nut der Halterung
einsetzen.
2
Die rechte Seite des
Bedienteils andrücken, um
dieses in der Halterung
einzurasten.
DEUTSCH
3
Das abgenommene Bedienteil in dem dafür vorgesehenen Etui aufbewahren.
Hinweis zur Reinigung der Stecker:
Wenn Sie das Bedienteil häufig abnehmen,
können die Steckerkontakte verschmutzen.
Reinigen Sie die Steckerkontakte regelmäßig
mit einem Wattestäbchen oder Tuch, das mit
Alkohol befeuchtet wurde, um dieser
Beeinträchtigung vorzubeugen. Seien Sie
vorsichtig, damit Sie die Stec kerkontakte nicht
beschädigen.
Steckerkontakte
23
Page 52

CD-WECHSLERBETRIEB
Dieses Kapitel betrifft AUSSCHLIESSLICH Modell KS-FX430R, wenn an diesem ein
JVC CD-Automatikwechsler (nicht im Lieferumfang) angeschlossen ist.
Wir empfehlen, daß Sie einen CD-Wechsler der Modellreihe CH-X mit Ihrem KS-FX430R
verwenden.
Haben Sie einen anderen automatischen CD-Wechsler, wenden Sie sich an ihren JVC
Autoradiohändler für Anschlüsse.
• Handelt es sich bei Ihrem automatischen CD-Wechsler um einen CD-Wechsler der Modellreihe
KD-MK, benötigen Sie ein Kabel (KS-U15K) zum Anschließen an dieses Gerät.
Vor dem Betreiben Ihres automatischen CD-Wechslers:
• Siehe auch die Anleitung, die Ihrem CD-Wechsler beiliegt.
• Sind keine CDs im Magazin des CD-Wechslers oder sind die CDs mit der Oberseite
nach unten eingelegt, erscheint „NO CD“ (keine CD) oder „NO DISC“ (keine DISC)
auf der Anzeige. In diesem Fall das Magazin herausnehmen und die CDs richtig
einlegen.
• Erscheint „RESET1 - RESET8“ (zurücksetzen 1 – 8) auf der Anzeige, stimmt etwas
nicht mit der Verbindung zwischen dem Gerät und dem CD-Wechsler. In diesem Fall
die Verbindung überprüfen und das (die) Kabel ggf. fest anschließen und dann die
Rücksetztaste des CD-Wechslers drücken.
Abspielen der CDs
1
¡
1
1
CD-
CH
Den automatischen
CD-Wechsler wählen.
Das Abspielen beginnt mit
dem ersten Titel auf der
ersten CD.
Alle Titel aller CDs werden
abgespielt.
¢
4
0
¢
4
78 9101112
Nummerntasten
• Im Präferenz-Einstellmodus (siehe Seite 22) kann “DISC” oder “TIME”
eingestellt werden.
Vorwahl “TIME”Vorwahl “DISC”
CD-Nummer
CD-CH
Abgelaufene SpielzeitTitelnummer
Hinweis zum Ein-Tastendruck-Betrieb:
Wenn Sie CD-CH (CD-Wechsler) drücken, wird das Gerät automatisch eingeschaltet. Sie br auchen
dafür nicht
24
ATT zu drücken.
CD-CH
Page 53

Zum schnellen Vor- oder Rücklauf des Titels
¢
für einen schnellen V orlauf des T itels drücken und halten, während
eine CD abgespielt wird.
SSM
für einen Rücklauf des Titels drücken und halten, während eine CD
4
abgespielt wird.
Weitergehen zum nächsten oder vorhergehenden Titel
¢
kurz bei laufender CD drücken, um zum nächsten Titelanfang zu
kommen. Mit jedem weiteren Antippen dieser Taste wird der Anfang des
SSM
jeweils nächsten Titels gesucht und abgespielt.
4
kurz bei laufender CD drücken, um zum derzeitigen Titelanfang zu
kommen. Mit jedem weiteren Antippen dieser Taste wird der Anfang des
jeweils vorhergehenden Titels gesucht und abgespielt.
Zum direkten Anwählen einer bestimmten CD
78 9101112
123456
DEUTSCH
Die Nummerntaste der jeweiligen CD-Nummer drücken, um diese
abzuspielen.
• Eine CD-Nummer von 1 – 6 wählen:
Kurz 1 (7) – 6 (12) drücken.
• Zum Wählen einer CD-Nummer von 7 – 12:
1(7) – 6 (12) länger als 1 Sekunde drücken und halten
Beispiel: Wird die CD-Nummer 3 gewählt
CD-Nummer
CD-CH
Titelnummer
25
Page 54

Wählen der CD-Abspielbetriebsarten
1
0
¢
4
Zum zufälligen Abspielen der Titel (Zufallswiedergabe)
MO
RND
Betriebsart Zufallsanzeige Zufallswiedergabe
RND1 Leuchtet auf Alle Titel der aktuellen CD, dann dieTitel der nächsten
RND2 Blinkt Alle Titel aller CDs im Magazin.
Jedes Mal, wenn Sie MO/RND (Mono/Zufall) bei laufender CD drücken,
wechselt die Abspielbetriebsart nach dem Zufallsprinzip wie folgt:
RND1 RND2 Deaktiviert
(Random1) (Random2)
CD usw.
¡
MO/RND
5
26
Page 55

WARTUNG
Zum Verlängern der Geräte-Lebensdauer
Dieses Gerät erfordert nur wenig Wartung und Pflege. Sie können jedoch die Lebensdauer
des Geräts verlängern, wenn Sie die nachfolgenden Anweisungen befolgen.
Zum Reinigen der Tonköpfe
• Die T onköpfe alle 10 Betriebsstunden mit einer
Tonkopf-Reinigungskassette (im Fachhandel
erhältlich) reinigen.
Wenn die Tonköpfe verschmutzen, merken Sie
das an folgenden Symptomen:
– Dumpfer Klang.
– Tonpegel sinkt.
– Tonaussetzer.
• Keine schmutzigen oder verstaubten
Kassetten abspielen.
• Die hochpolierten Tonköpfe nicht mit
metallischen oder magnetischen Werkzeugen
berühren.
Zum Sauberhalten der Kassetten
• Die Kassetten immer in ihren Hüllen
aufbewahren.
• Die Kassetten nicht an folgenden Orten
aufbewahren:
– im direkten Sonnenlicht
– bei hoher Luftfeuchtigkeit
– bei extrem hohen Temperaturen
DEUTSCH
VORSICHT:
• Kassetten mit abblätternden Etiketten nicht abspielen, da sie das Gerät beschädigen können.
• Das Kassettenband straffen, um Durchhang zu entfernen, da sich loses Band im Mechanismus
verheddern kann.
• Kassetten nicht nach dem Gebrauch im Kassettenfach lassen, da andernfalls die Bandstraffung
nachläßt
27
Page 56

FEHLERSUCHE
Was wie ein Problem aussieht, muß nicht immer eines sein. Die folgenden Punkte vor einem
Anruf bei einer Kundendienststelle überprüfen.
Symptome
• Kassette kann nicht
eingelegt werden.
• Kassetten werden heiß.
• Die Tonwiedergabe der
Kassette ist sehr niedrig und
die Tonqualität hat sich
verschlechtert.
• Die Tonwiedergabe ist
manchmal unterbrochen.
• Die Lautsprecher geben
keinen Ton wieder.
• Automatische
SSM-Abspeicherung
(Reihenspeicher für starke
Sender) arbeitet nicht.
• Störgeräusche beim
Radiohören.
• „NO CD“ (keine CD) oder
„NO DISC“ (keine DISC)
erscheint auf der Anzeige.
Ursachen
Sie haben die Kassette falsch
herum eingelegt.
Das ist keine Fehlfunktion.
Der Tonkopf ist verschmutzt.
Anschlüsse sind nicht
einwandfrei.
Die Lautstärkenregelung ist
ganz zurückgestellt.
Anschlüsse sind falsch.
Signale sind zu schwach.
Die Antenne ist nicht fest
angeschlossen.
Es ist keine CD im Magazine.
CDs sind falsch eingelegt.
Abhilfen
Die Kassette mit der Bandöffnung
nach rechts einlegen.
Das Gerät mit einer TonkopfReinigungskassette reinigen.
Die Kabel und Anschlüsse
überprüfen.
Auf optimales Niveau
einstellen.
Die Kabel und Anschlüsse
überprüfen.
Die Sender von Hand
speichern.
Die Antenne fest anschließen.
CDs ins Magazine legen.
CDs richtig herum einlegen.
• „RESET 8“ (zurücksetzen 8)
erscheint auf der Anzeige.
• „RESET 1 - RESET 7“
(zurückstellen 1 – 7) erscheint
auf der Anzeige.
28
Das Gerät ist nicht richtig am
CD-Wechsler angeschlossen.
Das Gerät und den CD-Wechsler
richtig miteinander verbinden und
die Rückstelltaste des CDWechslers drücken.
Die
Rückstelltaste
Wechslers drücken.
des CD-
Page 57

TECHNISCHE DATEN
AUDIO-VERSTÄRKERTEIL
Max. Leistungsabgabe:
Vorne: 35 W pro Kanal
Hinten: 35 W pro Kanal
Kontinuierliche Leistungsabgabe (RMS):
Vorne: 1 5 W pro Kanal an 4Ω, 40 bis
20.000 Hz bei nicht mehr als 0,8%
Gesamtklirrfaktor.
Hinten: 15 W pro Kanal an 4Ω, 40 bis
20.000 Hz bei nicht mehr als 0,8%
Gesamtklirrfaktor.
Last-Impedanz: 4 Ω (4 bis 8 Ω zulässig)
Tonregelbereich:
Baß: ±10 dB bei 100 Hz
TRE: ±10 dB bei 10 kHz
Frequenzgang: 40 bis 20.000 Hz
Signal/Störabstand: 70 dB
Line-Ausgangspegel/Impedanz: 1,0 V pro 20
kΩ Last (250 nWb/m)
TUNER-TEIL
Frequenzbereich:
UKW: 87,5 bis 108,0 MHz
MW/LW: (MW) 522 bis 1.620 kHz
(LW) 144 bis 279 kHz
[UKW-Tuner]
Nutzbare Empfindlichkeit:
11,3 dBf (1,0 µV/75 Ω)
50 dB Geräuschberuhigung:
16,3 dBf (1,8 µV/75 Ω)
Ausweichkanalabstimmschärfe (400 kHz):
65 dB
Frequenzgang: 40 bis 15.000 Hz
Stereotrennabstand: 30 dB
Einfangverhältnis: 1,5 dB
KASSETTENDECKTEIL
Gleichlaufschwankung: 0,15% (WRMS)
Schnellspulzeit: 190 s (C-60)
Frequenzgang:
50 bis 14.000 Hz (±3 dB)
Signal/Störabstand: 52 dB
Stereotrennabstand: 40 dB
ALLGEMEIN
Spannungsversorgung:
Betriebsspannung: DC 14,4 V
(11 bis 16 V zulässig)
Erdungssystem: negative Masse
Abmessungen (b x h x t)
Einbaugröße: 182 x 52 x 150 mm
Bedienteilgröße: 188 x 58 x 14 mm
Gewicht: 1,3 kg (ausschließlich Zubehör)
Änderungen der Konstruktion und technischen
Daten ohne Vorankündigung möglich.
DEUTSCH
[MW-Tuner]
Empfindlichkeit: 20 µV
Trennschärfe: 35 dB
[LW-Tuner]
Empfindlichkeit: 50 µV
29
Page 58

Merci pour avoir acheté un produit JVC. Veuillez lire attentivement toutes les instructions avant d'utiliser
l'appareil afin de bien comprendre son fonctionnement et d'obtenir les meilleures performances possibles.
TABLE DES MATIERES
OPERATIONS DE BASE ................................................3
FONCTIONNEMENT DE LA RADIO ............................... 4
Ecoute de la radio ...........................................................................4
Mémorisation des stations .............................................................5
Présélection automatique des stations FM: SSM ........................ 5
Présélection manuelle ................................................................. 6
Accord d'une station présélectionnée ........................................... 7
En utilisant les fonctions RDS dans la gamme FM...................... 8
RDS (Système de données radio) ...............................................8
Autres fonctions pratiques du tuner ...........................................15
Sélection du son de réception FM .............................................15
FONCTIONNEMENT DU LECTEUR DE CASSETTE........... 16
Ecoute d'une cassette....................................................................16
AJUSTEMENT DU SON ..............................................17
Sélection des modes sonores préréglés........................................17
Ajustement du son ........................................................................18
Mémorisation de votre propre ajustement sonore.....................19
AUTRES FONCTIONS PRINCIPALES ............................ 20
Réglage de l'horloge .....................................................................20
Mise en mémoire de vos propres réglages de mode................... 22
Commande de mode de réglage préféré ...................................22
Détachement du panneau de commande.................................... 23
FONCTIONNEMENT DU CHANGEUR DE CD................ 24
(UNIQUEMENT POUR KS-FX430R)
Lecture de CD ...............................................................................24
Sélection des modes de lecture de CD.........................................26
ENTRETIEN ............................................................... 27
Pour prolonger la durée de vie de l'appareil ..............................27
DEPANNAGE ............................................................28
SPECIFICATIONS ....................................................... 29
AVANT D'UTILISER L'APPAREIL
* Par sécurité....
• N'augmentez pas trop le volume car cela
bloquerait les sons de l'extérieur rendant la
conduite dangereuse.
• Arrêtez la voiture avant de réaliser toute
opération compliquée.
2
* Température à l'intérieur de la voiture....
Si votre voiture est r estée garée pendant longtemps
dans un climat chaud ou froid, attendez que la
température à l'intérieur de la voiture redevienne
normale avant d'utiliser l'appareil.
Page 59

1
OPERATIONS DE BASE
1
0
23
¡
5
Remarque:
Si vous utilisez cet appareil
pour la première f ois, réglez
l'horloge intégrée en vous
reportant à la page 20.
1
2
KS-FX430R
KS-F330R
3
4
Ajustez le son comme vous le souhaitez (voir les pages 17 – 19)
/I
ATT
Remarque sur le fonctionnement monotouche:
• Quand vous choisissez tuner comme source à l'étape 2 ci-dessous, l'appareil se met
automatiquement sous tension. Vous n'avez donc pas besoin d'appuyer d'abord sur cette
touche pour mettre l'appareil sous tension.
• Si une cassette est déjà dans le compartiment à cassette, la lecture de la bande commence
automatiquement.
AM FMCD-
CH
Mettez l'appareil sous tension.
Lisez la source.
T P FMAM
Pour utiliser le tuner, voir les pages 4 – 15.
Pour utiliser le lecteur de cassette, voir la page 16.
UNIQUEMENT POUR KS-FX430R:
Pour utiliser le changeur CD, voir les pages 24 – 26.
Ajustez le volume.
Le niveau de volume apparaît.
FRANÇAIS
Pour baisser le son instantanément
Appuyez brièvement sur ATT pendant l'écoute de n'importe quelle source. “ATT”
commence à clignoter sur l'affichage, et le niveau de volume est baissé instantanément.
Pour revenir au niveau de volume précédent, appuyez de nouveau brièvement sur la touche.
Pour mettre l'appareil hors tension
Appuyez sur ATT pendant plus d'une seconde.
Remarque:
Pour des raisons de sécur ité, une carte d'identification numér otée est fournie avec cet appareil, et
le même numéro d'identification est imprimé sur le châssis de l'appareil. Conserver cette carte
dans un endroit sûr, elle pourra aider les autorités pour identifier votre appareil en cas de vol.
3
Page 60

FONCTIONNEMENT DE LA RADIO
2
Ecoute de la radio
1
3
1
0
¡
5
1
2
3
/I
ATT
Remarque sur le fonctionnement monotouche:
• Quand vous choisissez une bande à l’étape 2 ci-dessous, l’appareil se met
automatiquement sous tension. V ous n’avez donc pas besoin d’appuyer d’abor d
sur cette touche pour mettre l’appareil sous tension.
F MA M
Remarque:
Quand une cassette est dans le compartiment à cassette, vous ne pouvez pas
sélectionner le tuner. Bien s’assurer d’éjecter la cassette du compartiment à
cassette pour écouter la radio.
Pour rechercher
des stations de
fréquences supérieures
SSM
Pour rechercher
des stations de
fréquences inférieures
FM1AMFM2
FM3
Mettez l'appareil sous tension.
Choisissez la bande ( FM1, FM2,
FM3 ou AM).
Vous pouvez choisir n'importe quelle bande
FM1, FM2 ou FM3 pour écouter une station FM.
Commencez la recherche d'une
station.
SSM
Quand une station est accordée, la
recherche s'arrête.
KS-F330RKS-FX430R
Pour arrêter la recherche avant qu'une station ne soit accordée, appuyez sur la même
touche que vous avez utilisée pour la recherche.
Pour accorder une fréquence particulière manuellement:
1 Sélectionner la gamme (FM ou AM).
Appuyer sur FM ou AM.
2 Maintenez
Vous pouvez maintenant changer manuellement la fréquence pendant que “M” clignote.
3 Appuyez répétitivement sur
• Si vous maintenez la touche pressée, la fréquence continue de changer (par intervalle de
50 kHz pour la bande FM et par intervalle de 9 kHz pour la bande AM—PO/GO) jusqu'à
ce que vous la relâchiez.
4
ou pressée jusqu'à ce que “M” commence à clignoter sur l'affichage.
ou jusqu'à ce que la fréquence souhaitée soit atteinte.
Page 61

Mémorisation des stations
Vous pouvez utiliser l'une des deux méthodes suivantes pour mémoriser les stations reçues.
• Présélection automatique des stations FM: SSM (Strong-station Sequential Memory)
• Présélection manuelle des stations FM et AM.
Présélection automatique des stations FM: SSM
Vous pouvez présélectionner 6 stations locales dans chaque bande FM (FM1, FM2, et FM3).
1
0
¡
5
1
1
F M
2
FM1 FM2 FM3
Choisissez le numéro de bande FM (FM1,
FM2 ou FM3) où vous souhaitez mémoriser
les stations.
2
KS-FX430R KS-F330R
Maintenez pressées les deux touches
pendant plus de 3 secondes.
SSM SSM
“SSM” apparaît, puis disparaît quand la présélection
automatique est terminée.
Les stations locales FM avec les signaux les plus forts sont recherchées et mémorisées
automatiquement dans le numéro de bande que vous avez choisi (FM1, FM2 ou FM3). Ces
stations sont mémorisées sur les touches de présélection de station — No. 1 (fréquence la
plus basse) à No. 6 (fréquence la plus haute).
Quand la présélection est terminée, la station mémorisée automatiquement sur la touche de
présélection de station 1 est accordée automatiquement.
FRANÇAIS
5
Page 62

Présélection manuelle
Vous pouvez présélectionner manuellement un maximum de 6 stations pour chaque bande
(FM1, FM2, FM3 et AM).
EXEMPLE: Mémorisation de la station FM située à 88.3 MHz sur le numéro de présélection
1 de la bande FM1.
1
0
¡
5
1
2
3
F M
KS-FX430R
SSM
12
23
KS-F330R
1
Choisissez la bande FM1.
Accordez une station à 88.3 MHz.
Reportez-vous à la page 4 pour accorder une station.
SSM
Maintenez pressée la touche pendant
plus d'une seconde.
Le numéro de présélection “P1” clignote quelques
instants.
Répétez la procédure ci-dessus pour mémoriser d'autres stations
4
sur d'autres numéros de présélection.
Remarques:
• La station précédemment présélectionnée est effacée quand une nouvelle station est mémorisée sur
le même numéro de présélection.
• Les stations présélectionnées sont effacées si l'alimentation du circuit mémoire est inter rompue (par exemple,
pendant le changement de la batterie). Si cela se produit, présélectionnez de nouveau les stations.
6
Page 63

Accord d'une station présélectionnée
Vous pouvez accorder facilement une station présélectionnée.
Rappelez-vous que vous devez d'abord mémoriser les stations. Si vous ne les avez pas
encore mémorisées, reportez-vous aux pages 5 et 6.
1
0
¡
5
1
2
2
F MA M
FM1AMFM2
FM3
1
123456
FRANÇAIS
Choisissez la bande
(FM1, FM2, FM3 ou AM)
souhaitée.
Choisissez le numéro
(1 – 6) de la station
présélectionnée
souhaitée.
7
Page 64

En utilisant les fonctions RDS dans la gamme FM
RDS (Système de données radio)
Touche RDS
Pour sélectionner le mode de suivi de réseau, appuyer sur la touche
KS-FX430R
TP/ RDS
KS-F330R
RDS
Réception de suivi de réseau
RDS pendant plus d’une seconde.
• Mode 1 (AF (Fréquences Alternatives): marche/REG: arrêt):
Le suivi de réseau est activé.
Commute entre des stations appartenant au réseau reçu.
Remarque:
• En Mode 1, l’émission peut commuter entre des programmes différents
même dans le même réseau à certains moments.
• Mode 2 (AF: marche/REG: marche):
Le suivi de réseau est activé et le mode régional est engagé (commute
entre des stations diffusant le même programme, en permanence).
• Mode 3 (AF: arrêt/REG: arrêt):
Suivi de réseau non activé.
En conduisant dans une région où la force du signal chute, le syntoniseur
utilise automatiquement les codes PI (Identification de programme) et AF
pour se syntoniser sur le même programme avec un signal plus fort d’une
autre station RDS dans le réseau. En utilisant ces codes, vous pouvez
continuer à écouter le même programme dans les meilleures conditions,
quel que soit l’endroit où vous conduisez. (Voir l’illustration.)
• Si la station RDS sur laquelle vous êtes syntonisé ne fournit pas de données
AF ou si l’appareil ne peut pas recevoir de données AF pour une raison
quelconque, la réception de suivi de réseau ne fonctionnera P AS même si
la force du signal descend au-dessous du niveau de référence.
Le même programme peut être reçu sur différentes fréquences.
Programme 1 diffusé sur une
fréquence A
Programme 1 diffusé
sur une fréquence B
Programme 1 diffusé sur une
fréquence C
8
Programme 1 diffusé sur une
fréquence E
Programme 1 diffusé sur
une fréquence D
Page 65

Mode d’attente PTY
Ô
Ô
ÔÔ
Ô
Ô
Ô
Ô
*
Mise en mémoire du type de programme (PTY) (NEWS est le préréglage effectué en
usine.)
1
¡
5
1
0
3 22
1
2
3
SEL
KS-FX430R
KS-F330R
SSM
SSM
Appuyer sur la touche SEL pendant plus de
2 secondes pour passer en mode de réglage
préféré (voir page 22).
Appuyer sur la touche ou pour
sélectionner le mode “PTY STBY”.
Chaque fois que la touche ou est
pressée, l’affichage change comme suit.
*Uniquement pour KS-FX430R
Appuyer sur la touche + ou – pour
sélectionner un des 29 types PTY. (Voir le
tableau à la page 13.)
Par exemple, si “CLASSICS” est sélectionné sur l’affichage,
le type musique classique est mis en mémoire
automatiquement.
FRANÇAIS
• Appuyer sur la touche SEL pour revenir dans le mode précédent.
9
Page 66

Réglage et fonctionnement du mode d’attente PTY
PTY
“PTY” est allumé pendant la réception d’une station PTY et le mode d’attente
PTY est engagé. Le nom PTY mis en mémoire à la page 9 (par exemple:
“CLASSICS”) clignote pendant 5 secondes.
Remarque:
Si la station reçue n’est pas une station PTY, l’indicateur “PTY” clignote. Appuyer
• Si la touche PTY est pressée briévement dans le mode FM, l’indicateur
sur la touche
ou pour engager le mode d’attente PTY. “SEARCH“ apparaît
dans l'affichage et la recherche de station PTY commence. Quand une station PTY
est syntonisée, “PTY” est allumé.
• Si vous écoutez une cassette (TAPE) (ou un CD, uniquement KS-FX430R)
et voulez écouter une émission PTY sélectionnée, appuyer sur la touche
PTY pour passer en mode d’attente PTY. (L’indicateur “PTY” s’allume.)
Si la diffusion PTY commence alors que le mode d’attente PTY est actif, le nom
PTY sélectionné est affiché et le mode FM est engagé. L ’émission PTY sélectionnée
peut alors être entendue.
Remarque:
Pour désactiver le mode d’attente PTY, appuyer de nouveau sur la touche PTY.
Touche TP (Programme d’informations routières)
Réglage et fonctionnement du mode d’attente TA (Annonce d’informations routières)
KS-FX430R
TP/ RDS
KS-F330R
• Si la touche TP est briévement pressée dans le mode FM, l’indicateur
“TP” est allumé pendant la réception d’une station TP et le mode d’attente
TA est engagé.
Remarque:
Si la station reçue n’est pas une station TP, l’indica teur “TP” clignote. Appuyer sur
la touche
ou pour engager le mode d’attente TA. “SEARCH” apparaît dans
l'affichage et la recherche de station TP commence. Quand une station TP est
syntonisée, “TP” est allumé.
10
T P
• Si vous écoutez une cassette (TAPE) (ou un CD, uniquement KS-FX430R)
et voulez écouter une émission T A, appuyer sur la touche TP pour passer
en mode d’attente TA. (L’indicateur “TP” s’allume.)
Si un programme TA commence à être diffusé alors que le mode d’attente
TA est actif, “TRAFFIC” est affiché et le mode FM est engagé. Le volume
passe au niveau “TA VOL” préréglé et le programme TA peut alors être
entendu (voir page 14).
Remarque:
Pour désactiver le mode d’attente TA, appuyer de nouveau sur la touche TP.
Page 67

Mode de recherche PTY
Préréglage de codes PTY dans les touches de numéro 1 à 6
Les préréglages en usine sont indiqués ci-dessous.
1
2
1
POP M
2
ROCK M
2
1
1
SEL
KS-FX430R KS-F330R
SSM SSM
3
EASY M
0
0
3
4
CLASSICS
5
AFFAIRS
1
1
¡
¡
6
VARIED
5
5
Appuyer sur la touche SEL pendant
plus de 2 secondes pour passer en
mode de réglage préféré (voir page
22).
Sélectionner le mode “PTY SRCH”
avec la touche
ou .
FRANÇAIS
3
Sélectionner le code PTY désiré avec la touche + ou – (des
codes PTY déjà mis en mémoire clignotent quand ils sont
sélectionnés), puis appuyer sur la touche de numéro requise
pendant plus de 2 secondes pour le mettre en mémoire. Le
code PTY mis en mémoire clignote dans l'affichage.
123456
11
Page 68

Recherche PTY
0
2 1
1
¡
5
1
PTY
Maintenez pressée la touche PTY pendant plus
d’une seconde en mode FM. Le mode de recherche
de programme PTY est engagé.
2
123456
Rappeler un code PTY mis en mémoire à la page
11 en utilisant une touche de numéro (1 à 6).
Ex. Quand "CLASSICS" est mis en mémoire dans la touche 1.
• La recherche de station PTY commence au bout
de 5 secondes.
Une recherche de programme réussie conduit à la réception de la station PTY désirée,
ainsi le programme peut être entendue.
• Quand une station PTY ne peut pas être syntonisée, la station précédente est reçue.
• Après recherche, le mode PTY sélectionné en dernier sera mémorisé, puis affiché le premier quand une recherch PTY est de nouveau sélectionnée.
Remarque:
Il peut y avoir des régions où les fonctions PTY (mode d’attente PTY, recherche PTY) ne marchent
pas.
12
Page 69

Codes PTY
No.
1
NEWS
2
AFFAIRS
3
INFO
4
SPORT
5
EDUCATE
6
DRAMA
7
CULTURE
8
SCIENCE
9
VARIED
10
POP M
ROCK M
11
EASY M
12
13
LIGHT M
14
CLASSICS
OTHER M
15
Affichage PTY
No.
16
17
18
19
20
21
22
23
24
25
26
27
28
29
AFFICHAGEAFFICHAGE
WEATHER
FINANCE
CHILDREN
SOCIAL
RELIGION
PHONE IN
TRAVEL
LEISURE
JAZZ
COUNTRY
NATION M
OLDIES
FOLK M
DOCUMENT
Descriptions des codes PTY
NEWS: Information
AFFAIRS: Programmes d’actualité sur les
affaires ou l’information courante
INFO: Programmes qui communiquent
des conseils sur une grande
variéré de sujers.
SPORT: Evénements sportifs
EDUCATE: Programmes éducatifs
DRAMA: Pièces radio
CULTURE: Programmes culturels au
niveau régional ou national
SCIENCE: Programmes sur les sciences
naturelles et la technologie
VARIED: Autres programmes comme
des comédies ou des
cérémonies
POP M: Musique Pop
ROCK M: Musique de rock
EASY M: Musique d’écoute facile ou
musique douce
LIGHT M: Musique légère
CLASSICS: Musique classique
OTHER M: Autre musique
WEATHER: Informations météo
FINANCE: Rapports sur le commerce, les
affaires, la bourse, etc.
CHILDREN: Programmes de loisirs pour les
enfants
SOCIAL: Programmes sur des activités
sociales
RELIGION: Programmes traitant des aspects
de la foi ou de la croyance, de la
nature de la vie ou d’éthique
PHONE IN: Programmes où les gens
peuvent exprimer leurs opinions
par téléphone ou dans un
forum
TRAVEL: Programmes sur des destina-
tions de voyage, des voyages
en groupe et des idées et
opportunités de voyage
LEISURE: Programmes concernés par
des activités récréatives
comme le jardinage, la cuisine,
la pêche, etc.
JAZZ: Musique de jazz
COUNTRY: Musique régionale
NATION M: Musique populaire actuelle
d’un autre pays ou d’une autre
région, dans la langue de ce
pays
OLDIES: Musique pop classique
FOLK M: Musique folklorique
DOCUMENT :Programmes traitant de faits
réels, présentés dans un style
d'enquête.
FRANÇAIS
13
Page 70

Autres fonctions RDS
EON (Relève d’autres réseaux)
• En syntonisant sur une station d’émission
transmettant des données EON,
l’indicateur EON est allumé et les
opérations suivantes commencent.
EON mémorise automatiquement les
fréquences des stations d’autres réseaux
transmettant des codes d’information (TP/
TA/AF/PTY/PS (Service de programme)
etc.) ainsi ils peuvent être mutuellement
utilisés. Les points suivants ont été
améliorés:
En écoutant par exemple une station ne
transmettant PAS d’informations routières ou
le type PTY sélectionné, EON fait
automatiquement la syntonisation sur une
station dans un réseau local quand cette
information est diffusée puis revient sur le
programme original lorsque l’émission se
termine. (Toutefois, elle ne revient pas sur
le programme original si l’émission dure
longtemps.)
L’information transmise (AF et d’autres
codes) est constamment et
automatiquement mise à jour ainsi le
programme préréglé peut être entendu
immédiatement même dans une zone de
réseau différent.
Commande de volume pour les informations routières
Cette fonction ajuste le volume des
émissions d’informations routières.
1. Appuyer sur la touche SEL pendant plus
de 2 secondes pour passer en mode de
réglage préféré.
2. Sélectionner “TA VOL” avec la touche
ou .
3. Régler le volume désiré avec la touche +
ou –. (Voir page 22.)
Touches de numéro
Lorsqu’une touche de numéro est pressée,
si la station avec cette fréquence est reçue
avec un signal suffisamment fort, le
récepteur se syntonisera sur cette
fréquence.
Si la force du signal n’est pas suffisante pour
une bonne réception, en se référant à la liste
AF, le récepteur cherche une station
diffusant le même programme avec un
signal plus fort. Si aucune station ne peut
être trouvée dans la liste AF, la syntonisation
par recherche PI commence. Si une station
diffusant le même code PI ne peut être
détectée dans un cycle de recherche, la
syntonisation par recherche PI est relâchée
et la syntonisation est faite sur la fréquence
préréglée originale.
CT (Heure de l’horloge)
Lorsque des données CT sont reçues dans le
signal RDS, l’heure est corrigée
automatiquement.
• Le RDS remet à jour l’heure locale par
rapport à l’heure en temps universel.
• Si le renouvellement automatique de
l’heure de l’horloge n’est P AS nécessaire,
suivre les étapes ci-dessous.
1. Appuyer sur la touche SEL pendant plus
de 2 secondes pour passer en mode de
réglage préféré.
2. Sélectionner “AUTO ADJ” avec la touche
ou .
3. Appuyer sur la touche – et régler sur “ADJ
OFF”. (Voir page 22.)
Une fois que ces étapes sont terminées,
l’heure de l’horloge ne sera pas renouvelée
même si la donnée CT (Clock Time) est reçue
avec le signal RDS.
Si vous voulez réactiver ce mode, répéter la
même procédure et dans l’étape 3, appuyer
sur la touche de commande de niveau “+” pour
régler sur “ADJ ON”. Dans le mode activé,
l’heure de l’horloge est automatiquement
renouvelée quand la donnée CT est reçue.
Remarque:
Il faut au moins 2 minutes pour changer l’heure
après réception de données CT. La station doit
être reçue pendant plus de 2 minutes en continu,
sinon l’heure de l'horloge ne sera PAS modifiée.
14
Page 71

Mode d’affichage
Réglage du mode d’affichage principal
1. Appuyer sur la touche SEL pendant plus
de 2 secondes pour passer en mode de
réglage préféré.
2. Sélectionner “DISPMODE” avec la touche
ou .
3. Sélectionner le mode désiré avec la touche
+ ou –.
(Nom de station (PS NAME) Ô Fréquence
reçue (FREQ) Ô Heure de l’horloge
(CLOCK) Ô ) (Voir page 22.)
Remarque:
Lorsque le mode “CLOCK” est réglé, l’heure de
l’horloge reste sur l’affichage principal même
pendant la lecture cassette ou CD. (KS-FX430R
Touche d’affichage
La touche DISP est utilisée pour sélectionner
les modes de fonctionnement (Syntoniseur,
cassette ou CD (KS-FX430R uniquement))
et d’horloge. Chaque fois que la touche est
pressée, l’affichage change comme suit:
Mode de fonctionnement (Nom de station* =
Fréquence reçue = PTY* ou TAPE ou CD
(KS-FX430R uniquement) = Heure de
l’horloge.
L’affichage revient au mode initialement
préréglé au bout d’un court instant.
* Lorsque le signal RDS ou PTY est faible
ou en n’étant pas syntonisé sur une station
RDS ou PTY, le nom de station ou PTY
n’est PAS affiché.
uniquement)
Autres fonctions pratiques du tuner
0
1
FRANÇAIS
¡
MO/RND
(pour KS-FX430R)
5
MO
(pour KS-F330R)
Sélection du son de réception FM
Quand une émission FM stéréo est difficile à recevoir:
Appuyer sur MO/RND (mono/aléatoire: pour KS-FX430R) ou MO (mono: pour KS-F330R)
tout en écoutant une émission FM stéréo. Le son que vous entendez devient monophonique
mais la réception est améliorée.
S'allume lors de la réception
d'une émission FM stéréo
ST
Pour rétablir l'effet stéréo, appuyez de nouveau sur la même touche.
MO
15
Page 72

FONCTIONNEMENT DU LECTEUR DE CASSETTE
Ecoute d’une cassette
1
2
3
1
PROG
1
/I
ATT
¡
2
0
3
1
¡
5
Mettre l’appareil en marche.
Introduire une cassette.
Lorsqu’une face de la bande est arrivée à sa fin pendant la
lecture, l’autre face de la bande commence automatiquement
en lecture. (Inversion automatique)
Sélectionner le sens de défilement de la bande.
• Appuyer en même temps sur les deux touches.
Chaque fois que vous appuyez sur les deux touches, le sens de
défilement de la bande change alternativement – avant
(
) et inverse ( ).
Pour arrêter la lecture et éjecter la cassette
Appuyer sur 0.
La lecture de la bande s’arrête et la cassette est éjectée du compartiment à cassette.
Vous pouvez entendre la dernière station reçue, ou la lecture CD à partir du changeur CD
(KS-FX430R uniquement)
• Vous pouvez également éjecter la cassette avec l’appareil
coupé.
Pour faire défiler rapidement la bande
Appuyer sur ¡ ou sur 1.
La bande sera enroulée dans le sens des flèches (¡ ou
1).
Pour reprendre la lecture, appuyer légèrement sur ¡ ou 1 .
16
Sens de défilement de la bande
Page 73

AJUSTEMENT DU SON
Sélection des modes sonores préréglés
Vous pouvez choisir un ajustement sonore préréglé adapté au type de musique.
1
0
Chaque fois que vous appuyez sur SOUND, le mode sonore change comme suit.
SOUND
Indication Pour: Valeurs préréglées
Graves Aigus Contour
SCM OFF (Son plat) 00 00 En service
BEAT Musique rock ou disco +2 00 En service
SOFT Musique de fond +1 –3 Hors service
POP Musique légère +4 +1 Hors service
¡
5
SOUND
FRANÇAIS
Remarques:
• Vous pouvez ajuster le mode sonore préréglé comme vous le souhaitez et le mémoriser.
Si vous souhaitez ajuster et mémoriser votre pr opr e mode sonor e, reportez-vous à “Mémorisation de
votre propre ajustement sonore” à la page 19.
• Pour ajuster seulement les graves et les aigus comme vous le souhaitez, reportez-vous à “Ajustement
du son” à la page 18.
17
Page 74

Ajustement du son
Vous pouvez ajuster les caractéristiques du son à votre préférence.
1
0
1
2
1
SEL
Indication Pour: Plage
BAS Ajuster les graves –6 (min.) — +6 (max.)
(graves)
TRE Ajuster les aigus –6 (min.) — +6 (max.)
(aigus)
FAD Ajuster l'équilibre entre les enceintes R6 — F6
(Fader)* avant et arrière.
BAL Ajuster l'équilibre entre les enceintes L6 — R6
(Balance) gauche et droite
LOUD
(Contour)
VOL Ajuster le volume 00 (min.) — 50 (max.)
(Volume)
Relève les fréquences basses et
élevées pour produire un son bien
équilibré à faible niveau de volume.
Choisissez l'élément que vous souhaitez ajuster.
¡
5
(arrière seulement) (avant seulement)
(gauche seulement) (droite seulement)
ON — OFF
18
Remarque:
*
Si vous utilisez un système à deux enceintes, réglez le niveau de fader sur “00” (centre).
2
Ajustez le niveau.
Appuyer sur la touche + pour mettre en marche la fonction de
contour, et sur la touche – pour la mettre à l’arrêt.
Remarque:
Normalement les touches + et – fonctionnent comme touches de commande
du volume. Alors, vous n'avez pas besoin de choisir “VOL” pour ajuster
le niveau de volume.
Page 75

Mémorisation de votre propre ajustement sonore
4
Vous pouvez ajuster les modes sonores (BEAT, SOFT, POP: reportez-vous à la page 17)
comme vous le souhaitez et mémoriser votre propre ajustement.
1
0
¡
5
1
2
3
4
SOUND
SEL
SOUND
3
2
En moins de
5 secondes
En moins de
5 secondes
En moins de
5 secondes
1,
Appelez le mode sonore que vous souhaitez
ajuster.
Reportez-vous à la page 17 pour les détails.
Sélectionnez “BAS”, “TRE” ou “LOUD”.
Ajustez le niveau des graves ou des aigus ou
mettez la fonction de contour en marche ou à
l’arrêt.
Reportez-vous à la page 18 pour les détails.
Maintenez SOUND pressée jusqu'à ce que
le mode sonore choisi à l'étape 1 clignote sur
l'affichage.
Votre réglage est mémorisé.
FRANÇAIS
5
Répétez la même procédure pour mémoriser d'autres réglages.
Pour réinitialiser aux réglages de l'usine
Répétez la même procédure et réattribuez les valeurs préréglées du tableau de la page 17.
19
Page 76

AUTRES FONCTIONS PRINCIPALES
Réglage de l'horloge
Sélection de l’affichage de l’horloge sur 12 heures ou 24 heures
(Réglé sur 24 heures en usine)
1. Appuyer sur la touche SEL pendant plus de 2 secondes pour passer en
mode de réglage préféré (Voir page 22.).
2. Sélectionner le mode “24H/12H” avec la touche
3. Sélectionner 24H ou 12H avec les touches de commande de niveau (+, –).
Comment sélectionner le mode d’horloge comme mode d’affichage
principal
1. Appuyer sur la touche SEL pendant plus de 2 secondes pour passer en
mode de réglage préféré (Voir page 22.).
2. Sélectionner
3. Sélectionner
Avec le mode d’affichage de l’horloge sélectionné, quand une autre touche de fonctionnement
est pressée, le mode d’affichage de la source que vous sélectionnez est montré.
Au bout de quelques secondes, l’affichage revient au mode d’horloge.
“DISPMODE” avec la touche ou .
“CLOCK”avec les touches de commande de niveau (+, –).
1
0
¡
ou .
20
1
2
1
SEL
KS-FX430R KS-F330R
1
SSM
2, 3
SSM
5
4
Maintenir pressée la touche pendant
plus de 2 secondes pour passer en
mode de réglage préféré.
(Voir page 22.)
Régler les heures.
Sélectionner “CLOCK H” s’il n’est
pas montré sur l’affichage.
Page 77

2
Ajuster les heures.
3
Régler les minutes.
1
KS-FX430R KS-F330R
SSM
SSM
2
4
Pour vérifier l'heure actuelle de l'horloge (modification du
mode d'affichage)
Appuyez sur DISP répétitivement. Chaque fois que vous appuyez sur la touche, le mode
d'affichage change comme suit.
DISP
Sélectionner “CLOCK M”.
Ajuster les minutes.
Démarrer l’horloge.
FRANÇAIS
Pendant l'utilisation du
tuner
Fréquence
(Voir page 15 lorsque RDS est
en marche )
Horloge
Pendant l'utilisation du
lecteur de cassette
Mode de lecture
Horloge
UNIQUEMENT POUR
KS-FX430R
Pendant l'utilisation du
lecteur CD
Horloge
Durée de
lecture écoulée
Numéro de
disque
21
Page 78

Mise en mémoire de vos propres réglages de mode
Commande de mode de réglage préféré
Ce mode a été réglé en usine, mais il peut être réglé pour correspondre à vos besoins.
1
2
3
1
Sélectionner
3
SEL
2
SSM
0
2
Réglage des heures
Réglage des minutes
Affichage de l’horloge sur
24/12 heures
Réglage automatique de
l’horloge
Mode d’affichage
Affichage de changeur
(uniquement pour KS-FX430R)
SSM
SSM
1
KS-F330RKS-FX430R
SEL
3
Recule
Recule
ADJ OFF
(arrêt)
Nom de station
TIME
(durée)
Appuyer sur la touche
SEL pendant plus de 2
secondes pour passer en
mode de réglage préféré.
Sélectionner chaque
mode.
Régler le mode désiré.
Régler
ADJ ON
(marche)
horloge
Avance
Avance
24H
fréquence
DISC
(disque)
Préréglages
en usine
0:00
24H12H
ADJ ON
(marche)
PS NAME
(Nom de station)
DISC
voir
page
20-21
20
14
15, 21
24
Attente PTY
Recherche PTY
Volume des annonces
d’informations routières
• Appuyer sur la touche SEL quand vous avez fini le réglage pour revenir au mode précédent.
22
29 types de programme
(Voir page 13.)
volume
(00-50)
volume
(00-50)
NEWS
POP M
VOL (20)
9-10
11-12
14
Page 79

Détachement du panneau de commande
Vous pouvez détacher le panneau de commande quand vous quittez la voiture.
Lors du détachement ou de la remise en place du panneau de commande, faites attention de
ne pas endommager les connecteurs situés à l'arrière du panneau et sur le porte-panneau.
Comment détacher le
panneau de commande
Avant de détacher le panneau de commande,
assurez-vous de mettre l'appareil hors tension.
1
Déverrouillez le panneau de
commande.
2
Levez et tirez le panneau de
commande de l'appareil.
Comment attacher le panneau
de commande
1
Insérez le côté gauche du
panneau de commande
dans la rainure située du
côté droit du porte- panneau.
FRANÇAIS
2
Appuyez sur le côté droit du
panneau de commande pour
le fixer au porte-panneau.
3
Mettez le panneau de
commande détaché dans la
boîte fournie.
Remarque sur le nettoyage des
connecteurs:
Si vous détachez fréquemment le panneau de
commande, les connecteurs se détérioreront.
Pour réduire cette détérioration, essuyez
périodiquement les connecteurs avec un coton-tige
ou un tissu imprégné d'alcool, en faisant attention
de ne pas endommager les connecteurs.
Connecteurs
23
Page 80

FONCTIONNEMENT DU CHANGEUR DE CD
Cette section est UNIQUEMENT POUR LE KS-FX430R, quand il est utilisé avec un
changeur automatique de CD JVC (acheté séparément).
Nous recommandons que vous utilisiez un changeur de CD de la série CH-X avec votre KSFX430R.
Si vous possèdez un autre changeur automatique de CD, consultez votre revendeur autoradio
JVC pour les connexions.
• Par exemple, si votre changeur automatique de CD appartient à la série KD-MK, vous avez besoin
d'un câble (KS-U15K) pour le connecter à l'appareil.
Avant d'utiliser votre changeur automatique de CD:
• Référez-vous aussi aux instructions fournies avec votre changeur de CD.
• Si aucun disque ne se trouve dans le magasin du changeur de CD ou si les disques
ont été insérés à l'envers, “NO CD” ou “NO DISC” apparaît sur l'affichage. Si cela se
produit, retirez le magasin et placez les disques correctement.
• Si “RESET 1 - RESET 8” apparaît sur l'affichage, c'est qu'il y a un problème avec la
connexion entre cet appareil et le changeur de CD. Si cela se produit, vérifiez la
connexion, connectez le(s) cordon(s) de connexion fermement si nécessaire, puis
appuyez sur la touche de réinitialisation du changeur de CD.
Lecture de CD
1
0
¢
4
78 9101112
¡
5
Touches
numériques
1
Choisissez le changeur automatique de CD.
1
CD-
CH
¢
4
La lecture commence à partir de la première plage du premier
disque.
Toutes les plages de tous les disques sont reproduites.
• “DISC” ou “TIME” peuvent être sélectionnés dans la commande de
mode de réglage préféré (voir page 22).
Lorsque «DISC» est sélectionné Lorsque «TIME» est sélectionné
CD-CH
Numéro de plageNuméro de disque
Remarque sur le fonctionnement monotouche:
Si vous appuyez sur CD-CH, l'appareil se met automatiquement sous tension. Vous n'avez pas
besoin d'appuyez sur
ATT pour le mettre sous tension.
24
Durée de lecture écoulée
CD-CH
Page 81

Pour avancer rapidement ou inverser une plage
Maintenez ¢ pressé, pendant la reproduction d'un CD, pour avancer
rapidement la plage.
SSM
Maintenez 4
pressé, pendant la reproduction d'un CD, pour inverser
la plage.
Pour aller à la plage suivante ou à la plage précédente
Appuyez brièvement sur ¢ lors de la reproduction d'un CD, pour avancer
jusqu'au début de la plage suivante. Chaque fois que vous appuyez
SSM
répétitivement sur la touche, le début de la plage suivante est localisé et
celle-ci est reproduite.
Appuyez brièvement sur 4
lors de la reproduction d'un CD, pour revenir
au début de la plage actuelle. Chaque fois que vous appuyez répétitivement
sur la touche, le début de la plage précédente est localisé et celle-ci est
reproduite.
Pour aller directement à un disque particulier
78 9101112
123456
Appuyez sur la touche numérique correspondante au numéro de disque
souhaité pour commencer sa reproduction.
• Pour choisir un numéro de disque de 1 – 6:
Appuyez brièvement sur 1 (7) – 6 (12).
• Pour choisir un numéro de disque 7 – 12:
Maintenez pressé 1 (7) – 6 (12) pendant plus d'une seconde.
FRANÇAIS
Ex. Quand le disque numéro 3 est choisi.
Numéro de disque
CD-CH
Numéro de plage
25
Page 82

Sélection des modes de lecture de CD
1
0
¢
4
Pour reproduire les plage aléatoirement (Lecture aléatoire)
MO
RND
Mode Indicateur RND Reproduit aléatoirement
RND1 Allumé Toutes les plages du disque actuel, puis celles du
RND2 Clignote T outes les plages de tous les disques insérés dans le
Chaque fois que vous appuyez sur MO/RND (Mono/Aléatoire) pendant la
reproduction d'un CD, le mode de lecture aléatoire change comme suit:
RND1 RND2 Annulé
(Mode de lecture
aléatoire 1)
disque suivant, etc.
magasin.
¡
(Mode de lecture
aléatoire 2)
MO/RND
5
26
Page 83

ENTRETIEN
Pour prolonger la durée de vie de l'appareil
Cet appareil ne demande que très peu d'attention, mais vous pourrez prolonger sa durée de
vie si vous suivez les instructions ci-dessous.
Pour nettoyer les têtes
• Nettoyer les têtes toutes les 10 heures
d'utilisation en utilisant une cassette de
nettoyage de tête de type humide (disponible
dans un magasin audio).
Quand la tête devient sale, les symptômes
suivants apparaissent:
– La qualité du son est réduite.
– Le niveau sonore diminue.
– Le son saute.
• Ne lisez pas des cassettes sales ou
poussiéreuses.
• Ne touchez pas la tête polie avec un outil en
métal ou magnétique.
Pour garder les cassettes propres
• Conservez toujours les cassettes dans leur
boîtier après utilisation.
• Ne conservez pas les cassettes dans les
endroits suivants:
– Dans un endroit exposé à la lumière directe
du soleil
– Dans un endroit très humide
– Dans un endroit extrêmement chaud
FRANÇAIS
ATTENTION:
• Ne lisez pas des cassettes avec une étiquette qui se détache; cela pourrait endommager l'appareil.
• Tendez les bandes pour éliminer leur mou car les bandes avec du mou peuvent se prendre dans le
mécanisme.
• Ne laissez pas une cassette à l'intérieur du compartiment à cassette après son utilisation car la
bande peut se détendre.
27
Page 84

DEPANNAGE
Ce qui apparaît comme un problème n'est pas toujours très sérieux. Vérifier les points suivants
avant d'appeler un centre de réparation.
Symptômes
• La cassette ne peut pas être
insérée.
• La cassette devient chaude.
• Le son de la cassette est de
très faible niveau et la
qualité sonore est dégradée.
• Le son est interrompu par
moment.
• Le son ne peut pas être
entendu des enceintes.
• La présélection
automatique SSM (Strongstation Sequential Memory)
ne fonctionne pas.
• Il y a du bruit statique lors
de l'écoute de la radio.
• “NO CD” ou “NO DISC”
apparaît sur l'affichage.
Causes
Vous avez essayé d'insérer la
cassette dans le mauvais sens.
Ce n'est pas une défaillance.
La tête de lecture est sale.
Les connexions ne sont pas
bonnes.
La commande du volume est
tournée sur le niveau minimum.
Les connexions sont
incorrectes.
Les signaux sont trop faibles.
L'antenne n'est pas connectée
fermement.
Il n'y a pas de CD dans le
magasin.
Remèdes
Insérez la cassette avec la
bande dirigée vers la droite.
Nettoyez-la avec une cassette
de nettoyage de tête.
Vérifiez les cordons et les
connexions.
Ajustez-la sur le niveau
optimum.
Vérifiez les cordons et les
connexions.
Mémorisez les stations
manuellement.
Connectez l'antenne
fermement.
Insérez des CD dans le
magasin.
• “RESET 8” apparaît sur
l'affichage.
• “RESET 1 - RESET 7”
apparaît sur l'affichage.
28
Les CD ne sont pas insérés
correctement.
Cet appareil n'est pas
connecté correctement à un
changeur de CD.
Insérez-les correctement.
Connectez cet appareil et le
changeur CD correctement et
appuyez sur la touche de
réinitialisation du changeur CD.
Appuyez sur la touche de
réinitialisation du changeur CD.
Page 85

SPECIFICATIONS
SECTION AMPLIFICATEUR
AUDIO
Puissance de sortie maximum:
Avant: 35 watts par canal
Arrière: 35 watts par canal
Puissance de sortie en mode continu
(efficace):
Avant: 15 watts par canal pour 4 Ω, 40
à 20.000 Hz à moins de 0,8%
de distorsion harmonique totale.
Arrière: 15 watts par canal pour 4 Ω, 40
à 20.000 Hz à moins de 0,8%
de distorsion harmonique totale.
Impédance de charge: 4 Ω (4 à 8 Ω tolérés)
Plage de commande de la tonalité:
Graves: ±10 dB à 100 Hz
Aigus: ±10 dB à 10 kHz
Réponse en fréquence: 40 à 20.000 Hz
Rapport signal sur bruit: 70 dB
Niveau de sortie de ligne/Impédance: 1,0 V/
20 kΩ en charge (250 nWb/m)
SECTION TUNER
Plage de fréquence:
FM: 87,5 à 108,0 MHz
AM: (PO) 522 à 1.620 kHz
(GO) 144 à 279 kHz
SECTION LECTEUR DE
CASSETTE
Pleurage et scintillement: 0,15% (WRMS)
Durée de rebobinage: 190 sec. (C-60)
Réponse en fréquence:
50 à 14.000 Hz (±3 dB)
Rapport signal sur bruit: 52 dB
Séparation stéréo: 40 dB
GENERAL
Alimentation:
T ension de fonctionnement: CC 14,4 volts
(11 à 16 volts tolérés)
Système de mise à la masse: Masse négative
Dimensions (L x H x P)
Taille d'installation: 182 x 52 x 150 mm
Taille du panneau: 188 x 58 x 14 mm
Masse: 1,3 kg (sans les accessoires)
La conception et les spécifications sont sujettes à
changement sans notification.
FRANÇAIS
[Tuner FM]
Sensibilité utilisable: 11,3 dBf (1,0 µV/75 Ω)
Sensibilité utile à 50 dB: 16,3 dBf (1,8 µV/75 Ω)
Sélectivité de canal alterné (400 kHz): 65 dB
Réponse en fréquence: 40 à 15.000 Hz
Séparation stéréo: 30 dB
Rapport de synchronisation: 1,5 dB
[Tuner PO]
Sensibilité: 20 µV
Sélectivité: 35 dB
[Tuner GO]
Sensibilité: 50 µV
29
Page 86

Hartelijk dank voor de aanschaf van dit JVC-product! Wij verzoeken u de gebruiksaanwijzing goed
door te lezen voordat u het apparaat gaat gebruiken. Zo krijgt u een volledig inzicht in de functies van
het apparaat en kunt u de mogelijkheden optimaal benutten.
INHOUDSOPGAVE
BASISBEDIENING ........................................................ 3
GEBRUIK VAN DE RADIO ............................................4
Naar de radio luisteren .................................................................. 4
Radiozenders in het geheugen vastleggen .................................... 5
Automatisch vastleggen van FM-zenders: SSM .......................... 5
Handmatig vastleggen van zenders.............................................6
Afstemmen op een voorkeuzezender.............................................7
Gebruik van RDS-functies met de FM-golfband.........................8
RDS (Radio Data System) ...........................................................8
Andere handige radiofuncties .....................................................15
Geluid selecteren bij ontvangst van FM-zender ........................ 15
GEBRUIK VAN DE CASSETTESPELER ........................... 16
Beluisteren van een cassette.........................................................16
GELUID REGELEN ......................................................17
Vooraf ingestelde geluidsweergave selecteren............................17
Geluid aanpassen .......................................................................... 18
Uw eigen geluidsinstelling opslaan..............................................19
ANDERE HOOFDFUNCTIES .........................................20
Klok instellen ................................................................................ 20
Vastleggen van de door u gemaakte instellingen .......................22
Voorkeuze-instellingen.............................................................. 22
Bedieningspaneel verwijderen.....................................................23
GEBRUIK VAN DE CD-WISSELAAR ............................. 24
(UITSLUITEND VOOR DE KS-FX430R)
CD’s afspelen.................................................................................24
Kiezen van de weergavefunctie.................................................... 26
ONDERHOUD ........................................................... 27
Levensduur van het apparaat verlengen.................................... 27
PROBLEMEN OPLOSSEN ........................................... 28
SPECIFICATIES...........................................................29
ALVORENS HET APPARAAT TE GEBRUIKEN
* Denk aan de veiligheid...
• Zet het volume onder het rijden niet te hard. Dit is ,
omdat u de geluiden buiten de auto niet meer hoort.
• Stop de auto voordat u ingewikkelde handelingen met
het apparaat gaat verrichten.
* Temperatuur binnen de auto...
Als de auto gedurende lange tijd in de kou of in de warmte
heeft gestaan, mag u het apparaat pas gebruiken nadat
de temperatuur in de auto weer normaal is.
2
Page 87

BASISBEDIENING
1
1
0
23
¡
5
Opmerking:
W anneer u het apparaat voor
de eerste keer gebruikt, moet
u de ingebouwde klok op de
juiste wijze instellen (zie
bladzijde 20).
1
/I
ATT
“One-Touch” bediening:
• Bij het selecteren van tuner in stap 2 hieronder w ordt het appar aat automatisch
ingeschakeld.
U hoeft niet op deze toets te drukken om het apparaat in te schakelen.
• De cassetteweerg ave start automatisch indien er reeds een cassette in het
apparaat is geplaatst.
Schakel de spanning in.
2
KS-FX430R
KS-F330R
.
AM FMCD-
CH
T P FMAM
3
Stel het geluid in zoals u zelf wilt (zie bladzijde 17–19).
4
Start de weergave van de geluidsbron.
Voor gebruik van de radio, zie bladzijde 4–15.
Voor gebruik van het cassettedeck, zie bladzijde 16.
UITSLUITEND VOOR DE KS-FX430R:
Voor gebruik van de CD-wisselaar, zie bladzijde 24–
26.
Regel het volume.
Het door u ingestelde geluidsniveau verschijnt.
NEDERLANDS
Volume in een oogwenk zachter zetten
Druk tijdens het luisteren naar een willekeurige geluidsbron kort op ATT. Op het
afleesvenster begint de tekst “ATT” te knipperen en het volume zal in een oogwenk dalen.
Om het eerdere volume te herstellen, drukt u nogmaals kort op dezelfde toets.
Spanning uitschakelen
Druk langer dan 1 seconde op ATT.
Opmerking:
Voor de veiligheid is een genummerde identificatiekaart bij het toestel geleverd. Het
identificatienummer is tevens op de behuizing van het toestel gedrukt. Bewaar de kaart op een
veilige plaats. Deze kaart is belangrijk voor identificatie indien het toestel is gestolen.
3
Page 88

GEBRUIK VAN DE RADIO
Naar de radio luisteren
1
0
1
¡
5
23
1
/I
ATT
“One-Touch” bediening:
• Bij het selecteren van een golfband in stap 2 hieronder wordt het apparaat
automatisch ingeschakeld.
U hoeft niet op deze toets te drukken om het apparaat in te schakelen.
2
F MA M
FM1AMFM2
FM3
Opmerking:
U kunt tuner niet kiezen indien er een cassette in het toestel is geplaatst. Verwijder
de cassette uit de cassettehouder wanneer u een radiozender wilt beluisteren.
3
Druk nogmaals op dezelfde toets wanneer u het zoeken wilt stoppen voordat op een zender
is afgestemd.
Stations met een
hogere frequentie
zoeken.
SSM
Stations met een
lagere frequentie
zoeken.
KS-F330RKS-FX430R
Schakel de spanning in.
Selecteer de golfband (FM1,
FM2, FM3 of AM)
U kunt éé van de drie FM-golfbandn (FM1,
FM2 en FM3) selecteren om naar een FMzender te luisteren.
Zoek een station.
Wanneer een station wordt ontvangen,
SSM
stopt het zoeken.
Handmatig een frequentie opzoeken:
1 Kies de golfband (FM of AM)
Druk op FM of AM.
2 Druk op
begint te knipperen.
U kunt de frequentie handmatig wijzigen, terwijl de letter “M” knippert.
3 Druk meerdere malen op
• Als u de toets ingedrukt houdt, blijft de frequentie veranderen (bij FM steeds met 50 kHz
en bij AM steeds met 9 kHz – MW/LW) totdat u de toets loslaat.
4
of en houd deze toets ingedrukt totdat de letter “M” op het afleesvenster
of totdat de gewenste frequentie is bereikt.
Page 89

Radiozenders in het geheugen vastleggen
U kunt één van de volgende twee methoden gebruiken om de radiozenders in het geheugen
vastteleggen.
• Automatisch vasteleggen van FM-zenders: SSM (Strong-station Sequential Memory)
• Handmatig vasteleggen van FM en AM-zenders
Automatisch vasteleggen van FM-zenders: SSM
U kunt 6 lokale FM-stations instellen voor elke FM-golfband (FM1, FM2 en FM3).
1
0
¡
5
1
1
F M
2
FM1 FM2 FM3
Selecteer het nummer van de FMgolfband (FM1, FM2 of FM3) waarop u
FM-zenders wilt vasteleggen.
2
KS-FX430R KS-F330R
SSM SSM
Lokale FM-zenders met de sterkste signalen worden opgezocht en automatisch voor de
gekozen golfband (FM1, FM2 of FM3) onder de cijfertoetsen vastgelegd - nummer 1 (laagste
frequentie) t/m nummer 6 (hoogste frequentie).
De voorkeuzezender die onder cijfertoets 1 is vastgelegd wordt na het automatisch vastleggen
van de zenders opgeroepen.
Druk op beide toetsen en houd ze langer
dan 3 seconden ingedrukt.
De tekst “SSM” verschijnt op het afleesvenster en
verdwijnt wanneer het automatisch instellen van
radiozenders is beëindigd.
NEDERLANDS
5
Page 90

Handmatig vastleggen van zenders
U kunt handmatig maximaal 6 zenders voor iedere golfband (FM1, FM2, FM3 en AM
vastleggen).
VOORBEELD: Een FM-zender op 88.3 MHz vastleggen onder nummer 1 van FM1.
1
0
¡
5
1
2
3
F M
KS-FX430R
SSM
12
23
KS-F330R
1
Selecteer FM1.
Stem af op een zender op 88.3 MHz.
Zie bladzijde 4 voor het afstemmen op een zender.
SSM
Druk op de toets en houd langer dan 1
seconde ingedrukt.
Voorkeuzenummer "P1" knippert even.
4
Herhaal bovenstaande procedure om andere zenders onder
andere nummers op te slaan.
Opmerkingen:
• Een eerder vastgelegde zender wordt gewist wanneer een hieuwe zender wordt opgeslagen onder
hetzelfde nummer.
• Ingestelde zenders worden gewist w anneer de spannings toevoer naar het geheugen wordt onderbr oken
(bijvoorbeeld bij het vervangen van de accu). Als dit gebeurt, moeten de zenders opnieuw worden
ingesteld.
6
Page 91

Afstemmen op een voorkeuzezender
U kunt in een handomdraai afstemmen op een vastgelegde voorkeuzezender.
Denk eraan dat u de zenders eerst moet vastleggen! Zie bladzijde 5 en 6, als u dat nog niet
hebt gedaan.
1
0
¡
5
1
2
2
F MA M
FM1AMFM2
FM3
123456
Selecteer de gewenste golfband
(FM1, FM2, FM3 of AM).
Selecteer het nummer (1 – 6) van
de gewenste zender.
1
NEDERLANDS
7
Page 92
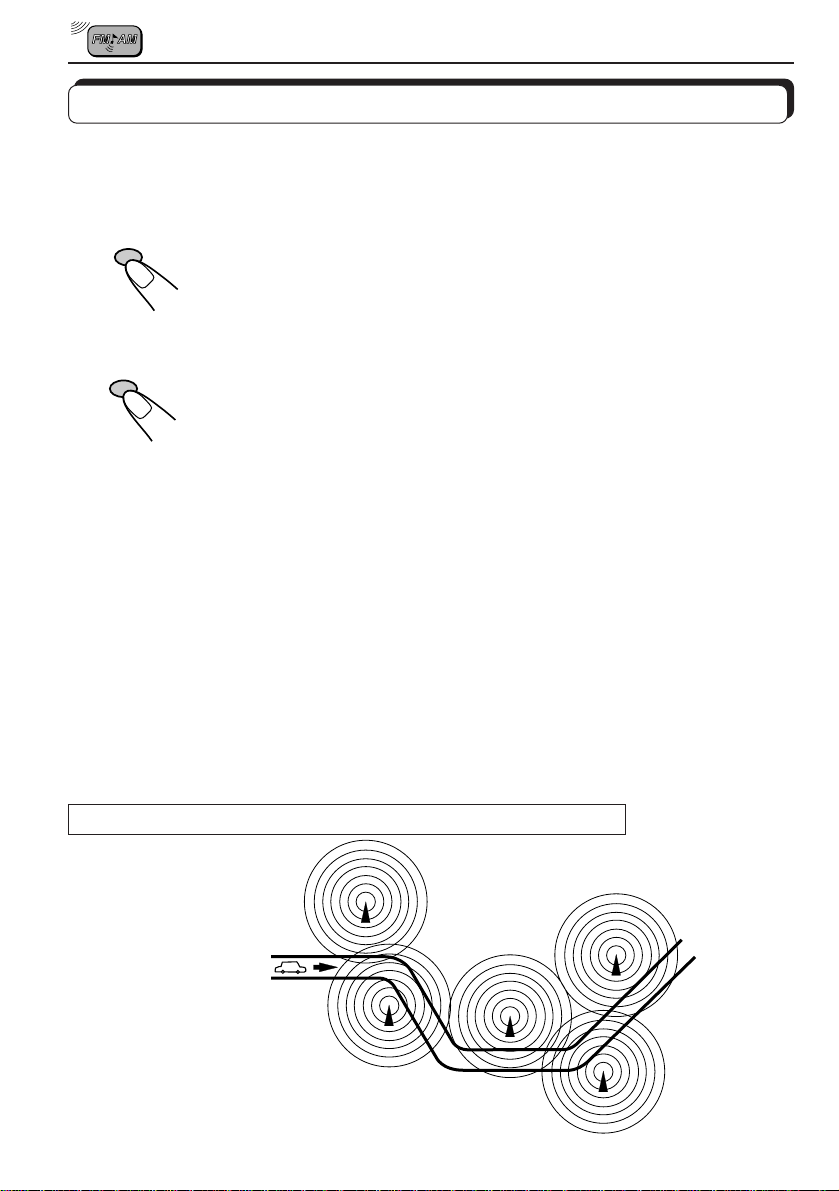
Gebruik van RDS-functies met de FM-golfband
RDS (Radio Data Systeem)
RDS toets
KS-FX430R
TP/ RDS
KS-F330R
RDS
Gebruik met de netwerk-afstemfunctie
Druk langer dan 1 seconde op de RDS toets om de netwerkafstemfunctie te kiezen.
• Functie 1 (AF (Alternatieve frequenties): aan/REG: uit):
De netwerkfunctie is geactiveerd.
Schakelt tussen zenders die tot het ontvangen netwerk behoren.
Opmerking:
• Met functie 1, is het mogelijk dat er zelfs binnen hetzelfde netwerk op
bepaalde momenten naar andere programma's wordt geschakeld.
• Functie 2 (AF: aan/REG: aan):
De netwerkfunctie is geactiveerd en de regionale functie ingeschakeld
(er wordt automatisch overgeschakeld naar andere zenders die
hetzelfde programma uitzenden).
• Functie 3 (AF: uit/REG: uit):
Netwerkfunctie is uitgeschakeld.
Tijdens het autorijden verandert de signaalsterkte afhankelijk van de
plaats. De tuner maakt in dit geval gebruik van de PI (Programma
Identificatie) en AF codes en stemt automatisch op een andere sterkere
RDS zender af die hetzelfde programma uitzendt. U kunt zo een bepaald
programma blijven beluisteren met een optimale kwaliteit. (Zie tevens
de afbeelding.)
• Indien de RDS zender waarop is afgestemd geen AF codes uitzendt of
het toestel om een andere reden geen AF codes kan ontvangen, werkt
de netwerk-afstemfunctie NIET wanneer het signaal zwakker wordt.
Hetzelfde programma kan met verschillende frequenties worden ontvangen.
Programma 1 op frequentie E
Programma 1 op frequentie A
Programma 1 op frequentie B
Programma 1 op frequentie C
8
Programma 1 op
frequentie D
Page 93

PTY-standbyfunctie
Ô
Ô
ÔÔ
Ô
Ô
Ô
Ô
*
Vastleggen van uw favoriete programmatype (PTY) in het geheugen (NEWS is bij het
verlaten van de fabriek ingesteld).
1
¡
5
1
0
3 22
1
2
3
SEL
KS-FX430R
KS-F330R
SSM
SSM
Druk langer dan 2 seconden op de SEL toets
om de functie voor het vastleggen van
instellingen te activeren (zie blz. 22.).
Druk op de of toets om de “PTY STBY”
functie te kiezen.
Door iedere druk op de of toets verandert
de aanduiding op het display als volgt:
*Uitsluitend voor de KS-FX430R
Druk op de + of – toets om één van de 29
programmatypen te kiezen. (Zie de tabel op
blz. 13.)
Wanneer bijvoorbeeld “CLASSICS” is gekozen, zal klassieke
muziek automatisch als het programmatype worden
vastgelegd.
NEDERLANDS
• Druk op de SEL toets om weer naar de voorgaande functie terug te
gaan.
9
Page 94

Instellen en gebruik van de PTY-standbyfunctie
PTY
toets drukt, zal de “PTY” indicator tijdens ontvangst van een PTY-zender
oplichten en de PTY- standbyfunctie worden geactiveerd. De naam van
het gekozen programmatype (bijvoorbeeld: “CLASSICS”) knippert ongeveer
5 seconden.
Opmerking:
De “PTY” indicator knippert indien de zender die u ontvangt geen PTY-zender is.
• Wanneer u met de FM-golfband ingesteld korter dan 1 seconde op de PTY
Druk op de
of toets om de PTY -standbyfunctie te activeren. Het zoeken naar
een PTY-zender start en “PTY” licht op wanneer op een PTY-zender is afgestemd.
• Wanneer u tijdens weergave van een cassette (of CD met uitsluitend de
KS-FX430R) een PTY-uitzending wilt beluisteren moet u op de PTY toets
drukken zodat de PTY- standbyfunctie wordt geactiveerd. (De “PTY” indicator licht op.)
Wanneer met de PTY-standbyfunctie geactiveerd een PTY-uitzending start,
zal de naam van het gekozen programmatype op het display worden getoond
en de FM-golfband worden ingesteld. U kunt vervolgens de uitzending van
het gewenste programmatype beluisteren.
Opmerking:
Druk nogmaals op de PTY toets om de PTY-standbyfunctie uit te schakelen.
TP toets (verkeersinformatieprogramma)
Activeren en gebruik van de TA (verkeersinformatie) standbyfunctie
KS-FX430R
TP/ RDS
KS-F330R
T P
• Druk met de FM-golfband ingesteld kort op de TP toets. De “TP” indicator
licht op tijdens ontvangst van een TP-zender en de TA-standbyfunctie is
geactiveerd.
Opmerking:
De “TP” indicator knippert wanneer de zender die u ontvangt geen TP-zender is.
Druk op de
of toets om de TA-standbyfunctie te activeren. Het zoeken naar
een TP-zender start en “TP” licht op wanneer op een TP-zender is afgestemd.
• Wanneer u tijdens weergave van een cassette (of CD met uitsluitend de
KS-FX430R) een TA-uitzending wilt beluisteren moet u op de TP toets
drukken zodat de T A-standbyfunctie wordt geactiveerd. (De “TP” indicator
licht op.)
10
“TRAFFIC” wordt getoond wanneer met de TA-standbyfunctie en de FMgolfband ingesteld een zender verkeersinformatie start uit te zenden. Het
volume wordt nu naar het vooraf ingestelde “TA VOL” niveau gesteld en u
kunt de verkeersinformatie beluisteren (zie blz. 14).
Opmerking:
Druk nogmaals op de TP-toets om de TA-standbyfunctie uit te schakelen.
Page 95
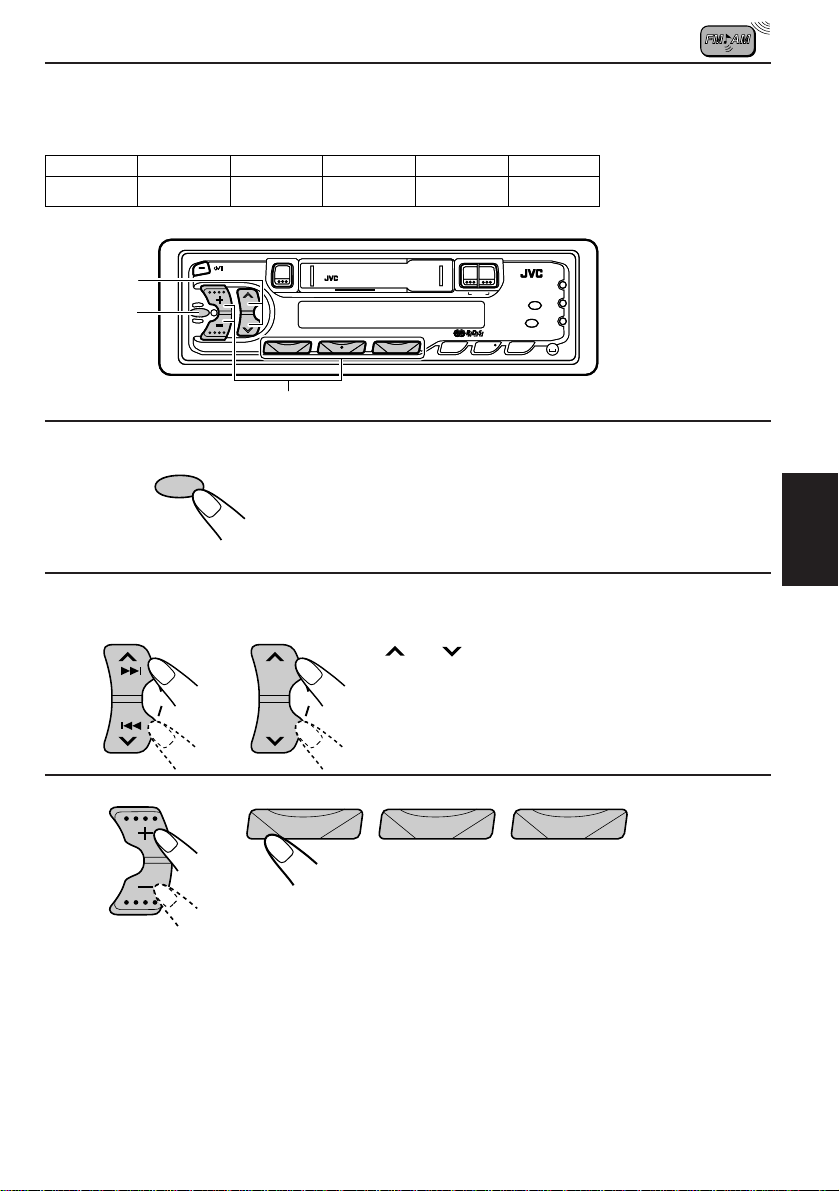
PTY-zoekfunctie
Vastleggen van programmatypen onder de 1-6 cijfertoetsen
Bij het verlaten van de fabriek zijn de volgende programmatypen reeds vastgelegd.
1
POP M
2
1
1
2
ROCK M
3
EASY M
0
0
4
CLASSICS
5
AFFAIRS
1
1
6
VARIED
¡
¡
5
5
3
1
SEL
2
KS-FX430R KS-F330R
SSM SSM
3
Kies het gewenste programmatype met de + of - toets (reeds
vastgelegde programmatypen zullen knipperen indien u ze kiest).
Druk vervolgens langer dan 2 seconden op de cijfertoets
waaronder u het gekozen programmatype wilt vastleggen. Het
vastgelegde programmatype knippert vervolgens op het display .
Druk langer dan 2 seconden op de
SEL toets om de functie voor het
vastleggen van instellingen te
activeren (zie blz. 22.).
NEDERLANDS
Kies de “PTY SRCH” functie met de
of toets.
123456
11
Page 96

Zoeken van een programmatype
0
1
¡
2 1
5
1
PTY
Druk met de FM-golfband ingesteld langer dan 1 seconde
op de PTY toets. De functie voor het zoeken van een
programmatype is geactiveerd.
2
123456
Roep met één van de cijfertoetsen (1-6) een programmatype
op dat u op blz. 1 1 heeft vastgelegd.
Voorbeeld: Wanneer “CLASSICS” onder toets 1 is vastgelegd.
• Het zoeken naar een overeenkomende PTY -zender
start na 5 seconden.
Er wordt naar een zender gezocht die een programma van het gekozen type uitzendt, en
er wordt voor weergave op deze PTY-zender afgestemd.
• De laatst beluisterde zender zal weer worden ingesteld indien er geen overeenkomende
PTY-zender kan worden gevonden.
• Het laatst gekozen programmatype wordt na het zoeken vastgelegd en, later als eerste
getoond wanneer u weer een programmatype kiest.
Opmerking:
De PTY -functies (PTY -standbyfunctie en het zoeken naar een programmatype) werken mogelijk niet in
bepaalde gebieden.
12
Page 97
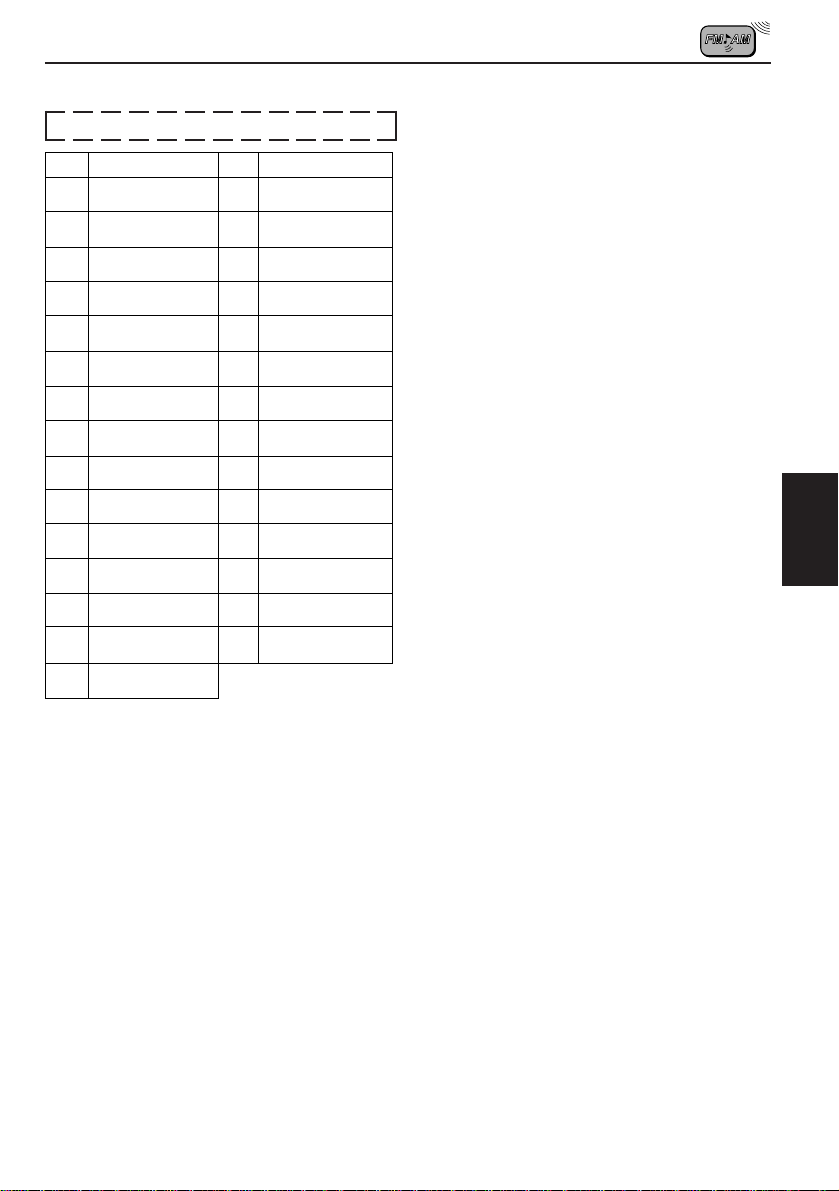
PTY-codes
1
2
3
4
5
6
7
8
9
DISPLAY
NEWS
AFFAIRS
INFO
SPORT
EDUCATE
DRAMA
CULTURE
SCIENCE
VARIED
POP M
ROCK M
EASY M
LIGHT M
CLASSICS
OTHER M
No.
10
11
12
13
14
15
PTY-display
No.
16
17
18
19
20
21
22
23
24
25
26
27
28
29
DISPLAY
WEATHER
FINANCE
CHILDREN
SOCIAL
RELIGION
PHONE IN
TRAVEL
LEISURE
JAZZ
COUNTRY
NATION M
OLDIES
FOLK M
DOCUMENT
Beschrijving van PTY codes
NEWS: Nieuws
AFFAIRS: Actualiteiten en achtergrond
informatie aangaande het
nieuws
INFO: Informatieve programma's
over diverse verscillende
onderwerpen.
SPORT: Sportverslagen
EDUCATE: Educatieve programma’s
DRAMA: Radio-hoorspelen
CULTURE: Programma’s aangaande
nationale of regionale cultuur
SCIENCE: Wetenschappelijke en
technische programma’s
VARIED: Overige programma’s,
bijvoorbeeld ceremonies en
comedies
POP M: Popmuziek
ROCK M: Rockmuziek
EASY M: “Easy-listening” muziek
LIGHT M: Lichte muziek
CLASSICS: Klassieke muziek
OTHER M: Overige muziek
WEATHER: Weerberichten
FINANCE: Programma’s aangaande
handel en de beurs en
beursberichten, etc.
CHILDREN: Amusement voor kinderen.
SOCIAL: Programma’s over sociale
activiteiten
RELIGION: Programma’s over aspecten
van geloof en religie,
aangaande het bestaan en
ethiek.
PHONE IN: Programma’s waarin mensen
via de telefoon of een publiek
forum hun meningen kunnen
uiten.
TRAVEL: Programma’s over reizen en
bestemmingen,
georganiseerde reizen en
ideeën en mogelijkheden voor
vacanties.
LEISURE: Programma’s over recreatieve
bezigheden, bijvoorbeeld
tuinieren, koken, vissen, etc.
JAZZ: Jazz-muziek
COUNTRY: Country-muziek
NATION M: Huidige populaire muziek van
een bepaald land of gebied in
de taal van het land of gebied.
OLDIES: “Gouwe-Ouwe”
FOLK M: Folk-muziek
DOCUMENT: Programma’s over feitelijke
gebeurtenissen, vaak
gepresenteerd in een
“onderzoekende” stijl.
NEDERLANDS
13
Page 98

Overige RDS-functies
EON (Enhanced Other Networks – sterkere
overige netwerken)
• Wanneer op een zender die gebruik van
EON maakt is afgestemd, zal de EON
indicator oplichten en de volgende
handelingen worden uitgevoerd.
EON legt automatisch de frequenties van
andere netwerken vast die dezelfde
informatiecodes (TP/TA/AF/PTY/PS
(Programma Service), etc.) uitzenden, zodat
deze codes onderling kunnen worden
gebruikt. Dit heeft de volgende voordelen:
Bij het beluisteren van een zender die GEEN
verkeersinformatie of het gekozen
programmatype uitzendt, stemt EON
automatisch op een zender van een lokaal
netwerk af wanneer hier deze informatie op
wordt uitgezonden. Na deze informatie wordt
automatisch weer naar het originele
programma teruggeschakeld. (Er wordt echter
niet naar het oorspronkelijke programma
teruggeschakeld indien de uitzending lang
duurt.)
De informatie die wordt uitgezonden (met AF
en andere codes) blijft constant en
automatisch actueel zodat de informatie van
een ingesteld programma direct kan worden
beluisterd, zelfs wanneer u in een ander
gebied bent.
Volume-instelling voor verkeersinformatie
Met deze functie kunt u het volume voor
verkeersinformatie instellen.
1. Druk langer dan 2 seconden op de SEL
toets om de functie voor het vastleggen
van instellingen te activeren.
2. Kies “TA VOL” met de
3. Stel het gewenste volume in met de + of –
toets. (Zie blz. 22.)
Cijfertoetsen
Indien u op een cijfertoets drukt, wordt op de
frequentie afgestemd indien het signaal van
de zender die op deze toets is vastgelegd
sterk genoeg is.
of toets.
Indien het signaal niet sterk genoeg is voor een
redelijke ontvangst, zoekt de receiver aan de
hand van de AF lijst naar een andere zender
die hetzelfde programma met sterkere signalen
uitzendt. Indien er geen zender in de AF lijst
aanwezig is, wordt het PI-zoek-afstemmen
geactiveerd, en zoekt de receiver naar een
zender die dezelfde PI code uitzendt. Indien er
in één reeks geen zender met dezelfde PI code
wordt gevonden, wordt het PI-zoek-afstemmen
geannuleerd en op de frequentie van de
voorkeuzezender afgestemd.
CT (Clock Time–kloktijd)
Indien het RDS signaal over CT data beschikt,
wordt de klok automatisch juist ingesteld.
• RDS korrigeert de lokale tijd aan de hand
van Greenwich tijd.
• Voer de volgende stappen uit indien de tijd
op de klok juist is en NIET automatisch gelijk
hoeft te worden gesteld.
1. Druk langer dan 2 seconden op de SEL
toets om de functie voor het vastleggen
van instellingen te activeren.
2. Kies “AUTO ADJ” met de
3. Druk op de – toets om “ADJ OFF” in te
stellen. (Zie blz. 22.)
Nadat u deze stappen heeft uitgevoerd, zal
de tijd op de klok niet worden veranderd
wanneer CT (Clock T ime) data tezamen met
het RDS signaal worden ontvangen. Wanneer
u toch de funktie weer wilt instellen, moet u
de stappen herhalen, maar in stap 3 op de +
toets drukken om “ADJ ON” in te stellen. De
klok zal nu automatisch gelijk worden gesteld
wanneer CT data worden ontvangen.
Opmerking:
Het duurt tenminste 2 minuten eer de tijd wordt
getoond nadat CT data zijn ontvangen. Zelfs indien
het RDS signaal over CT data beschikt, dient de
zender tenminste gedurende 2 minuten te zijn
ontvangen daar anders de kloktijd NIET wordt
gecorrigeerd.
of toets.
14
Page 99
Displayfunctie
Instellen van de hoofddisplayfunktie
1. Druk langer dan 2 seconden op de SEL
toets om de functie voor het vastleggen
van instellingen te activeren.
2. Kies “DISP MODE” met de
of toets.
3. Kies de gewenste functie met de + of –
toets.
(Zendernaam (PS NAME) Ô Frequentie
van de zender die wordt ontvangen
(FREQ) Ô Tijd op de klok (CLOCK) Ô
(Zie blz. 22.)
Opmerking:
Wanneer de “CLOCK” functie is ingesteld, zal de
klok ook tijdens cassetteweergave (of CDweergave (Uitsluitend met de KS-FX430R))-als
hoofddisplay worden getoond.
Andere handige radiofuncties
Displaytoets
Met de DISP toets worden de
bedieningsfunctie (Tuner, cassette of CD
(Uitsluitend met de KS-FX430R)) en de
klokfuncties gekozen. Door iedere druk op
deze toets verandert het display als volgt:
Bedieningsfunctie (Zendernaam* =
Ontvangstfrequentie = (PTY*; of TAPE; of
CD (uitsluitend met de KS-FX430R)) = Tijd
op de klok.
Hierna verschijnen weer de originele
aanduidingen van de ingestelde functie.
* De zendernaam of PTY wordt NIET getoond
indien het RDS of PTY signaal zwak is of
wanneer er niet op een RDS of PTY zender
is afgestemd.
1
0
¡
MO/RND
(voor de KS-FX430R)
5
MO
(voor de KS-F330R)
Geluid selecteren bij ontvangst van FM-zender
Wanneer een stereo-uitzending op FM slecht te ontvangen is, doet u het volgende:
Druk op MO/RND (mono/random: voor de KS-FX430R) of MO (mono: voor de KS-F330R)
tijdens het beluisteren van een stereo FM-uitzending. U hoort dan een monogeluid maar de
ontvangst zal beter zijn.
Er brandt een lampje wanneer een FMuitzending in stereo wordt ontvangen.
ST
Om het stereo-effect te herstellen, drukt u op opnieuw op dezelfde toets.
MO
NEDERLANDS
15
Page 100

GEBRUIK VAN DE CASSETTESPELER
Beluisteren van een cassette
1
2
3
1
PROG
1
/I
ATT
¡
2
0
3
1
¡
5
Schakel de spanning in.
Plaats een cassette.
Wanneer het eind van een cassettekant bij weergave wordt
bereikt, zal automatisch naar het begin van de andere kant
voor weergave worden overgeschakeld. (Auto-Reverse)
Kies de bandtransportrichting.
• Druk tegelijk op beide toetsen.
Door iedere druk op beide toetsen wordt afwisselend de
voorwaartse (
bandtransportrichting ingesteld.
) en tegengestelde ( )
Stoppen en uitwerpen van de cassette
Druk op 0.
De cassetteweergave stopt en de cassette wordt uitgeworpen.
U hoort vervolgens de uitzending van de laatst ontvangen zender, of de weergave van de
CD-wisselaar (uitsluitend met de KS-FX430R).
• De cassette kan tevens worden uitgeworpen wanneer het toestel is uitgeschakeld.
Snel doorspoelen van een cassette
Druk op ¡ of 1.
De band wordt in de richting van de pijlen gespoeld
(¡ of 1).
Druk licht op ¡ of 1 om de weergave weer voort te
zetten.
16
Bandtransportrichting
 Loading...