

Page 1
CD RECEIVER
CD-RECEIVER
RECEPTEUR CD
CD-RECEIVER
ENGLISH
DEUTSCH
KD-SH77R/KD-SH55R
KD-SH77R
ATT
ANGLE
EQ
CD
FM
R D
AM
CH
AUX SEL
VOLUME
RM-RK100
For installation and connections, refer to the separate manual.
Angaben zu Einbau und Verkabelung entnehmen Sie bitte der gesonderten Anleitung.
Pour l’installation et les raccordements, se référer au manuel séparé.
Zie de afzonderlijke handleiding voor details aangaande het installeren en verbinden van het
toestel.
INSTRUCTIONS
BEDIENUNGSANLEITUNG
MANUEL D’INSTRUCTIONS
GEBRUIKSAANWIJZING
KD-SH55R
FRANÇAIS
NEDERLANDS
LVT0625-001A
[E/EX]
Page 2
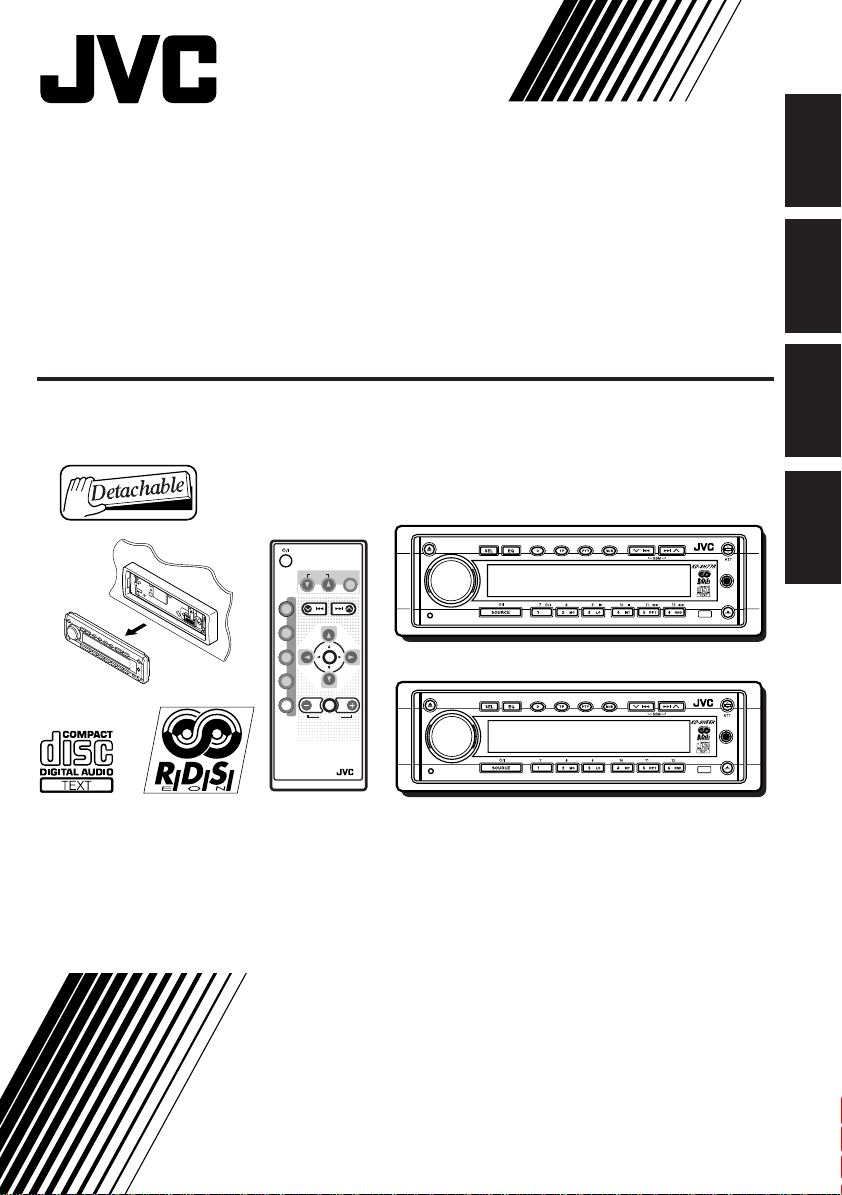
Position And Reproduction Of Labels
Bottom panel of the main unit
ENGLISH
Name/Rating plate
CLASS
LASER
Caution:
This product contains a laser component
of higher laser class than Class 1.
1
PRODUCT
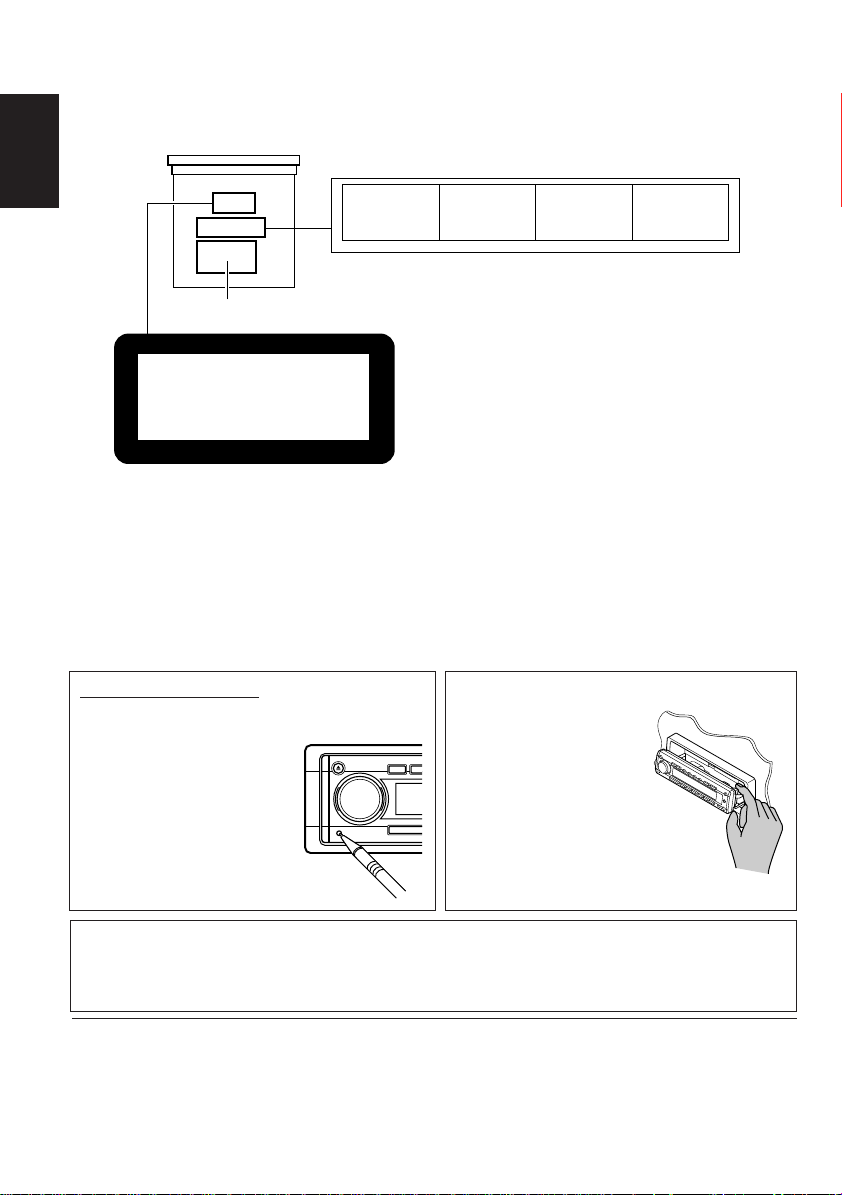
How to reset your unit
Press the reset button on the front panel using a
ball-point pen or similar tool.
Note:
Your preset adjustments –
such as preset channels or
sound adjustments – will also
be erased.
CAUTION: Invisible laser
radiation when open and
interlock failed or defeated.
AVOID DIRECT EXPOSURE
TO BEAM. (e)
ADVARSEL: Usynlig laserstråling ved åbning, når
sikkerhedsafbryder e e r ude
af funktion. Undgåudsættelse for stråling. (d)
VARNING: Osynlig laserstrålning när denna del är
öppnad och spärren är
urkopplad. Betrakta ej
strålen. (s)
VARO: Avattaessa ja
suojalukitus ohitettaessa
olet alttiina näkymättömälle lasersäteilylle.
Älä katso säteeseen. (f)
IMPORTANT FOR LASER
PRODUCTS
Precautions:
1. CLASS 1 LASER PRODUCT
2. CAUTION: Invisible laser radiation when open
and interlock failed or defeated. Avoid direct
exposure to beam.
3. CAUTION: Do not open the top cover. There
are no user-serviceable parts inside. Leave all
servicing to qualified service personnel.
4. CAUTION: This CD player uses invisible laser
radiation and is equipped with safety switches
to prevent radiation emission when unloading
CDs. It is dangerous to defeat the safety
switches.
5. CAUTION: Use of controls, adjustments or
performance of procedures other than those
specified herein may result in hazardous
radiation exposure.
CAUTION:
NEVER insert your finger
between the control panel
and the unit, as it may get
caught and hurt.
(See page 28.)
Note:
F or security r easons, a numbered ID car d is pro vided with this unit, and the same ID number is imprinted
on the unit’s chassis. Keep the card in a safe place, as it will help the authorities to identify your unit if
stolen.
BEFORE USE
*
*
For safety....
• Do not raise the volume level too much, as this will
block outside sounds, making driving dangerous.
• Stop the car before performing any complicated
Temperature inside the car....
If you have parked the car for a long time in hot or
cold weather, wait until the temperature in the car
becomes normal before operating the unit.
operations.
2
Page 3

Thank you for purchasing a JVC product. Please read all instructions carefully before operation,
to ensure your complete understanding and to obtain the best possible performance from the unit.
CONTENTS
How to reset your unit............................... 2
LOCATION OF THE BUTTONS............ 4
Control panel ........................................... 4
Remote controller .................................... 5
Preparing the remote controller................ 6
BASIC OPERATIONS ...................... 7
RADIO BASIC OPERATIONS ............. 8
Listening to the radio ................................ 8
Storing stations in memory....................... 9
Tuning into a preset station ...................... 10
RDS OPERATIONS ........................ 11
What you can do with RDS EON.............. 11
Other convenient RDS functions and
adjustments........................................... 14
CD OPERATIONS .......................... 17
Playing a CD............................................ 17
Playing a CD text..................................... 18
Locating a track or particular portion
on a CD ................................................. 18
Selecting CD playback modes.................. 19
Prohibiting CD ejection ............................. 19
SOUND ADJUSTMENTS .................. 20
Adjusting the sound ................................. 20
Selecting preset sound modes ................. 21
Storing your own sound adjustments ....... 22
OTHER MAIN FUNCTIONS ............... 23
Setting the clock ...................................... 23
Changing the general settings (PSM) ...... 23
Assigning names to the sources .............. 27
Changing the control panel angle............. 28
Detaching the control panel...................... 29
EXTERNAL COMPONENT OPERATIONS.. 30
Playing external components ................... 30
CD CHANGER OPERATIONS ............. 32
Playing CDs ............................................. 32
Selecting CD playback modes.................. 33
DAB TUNER OPERATIONS ............... 34
Tuning into an ensemble and one of the
services ................................................. 34
Storing DAB services in memory ............. 36
Tuning into a preset DAB service ............. 37
What you can do more with DAB.............. 37
ADDITIONAL INFORMATION............. 38
MAINTENANCE ............................ 39
Handling CDs .......................................... 39
TROUBLESHOOTING...................... 40
SPECIFICATIONS.......................... 41
ENGLISH
About the demonstration mode (DEMO MODE)...
While shipped from the factory, “DEMO MODE” is set to “DEMO ON” in this unit.
The following demonstration, introducing the main features equipped for this unit, will appear on the
display automatically if no sound comes in for 3 minutes. (See page 26.)
• 24bit DAC : (24 bit digital-analog converter: Gives you a high quality sound after D/A
conversion.)
• HS TUNER :(High-Sensitivity Tuner: Enables a fine reception of stations.)
• EQUALIZER : (Allows you to fine-adjust the sound to match your preference.)
• SUB WOOFER : (ONLY for KD-SH77R: Enables you to connect a subwoofer and to adjust its
output level.)
CAUTION on Volume Setting
CDs produce very little noise compared with other sources. If the volume level is adjusted for the
tuner , for example, the speak ers may be damaged by the sudden increase in the output le vel. Therefor e,
lower the volume before playing a disc and adjust it as required during playback.
3
Page 4

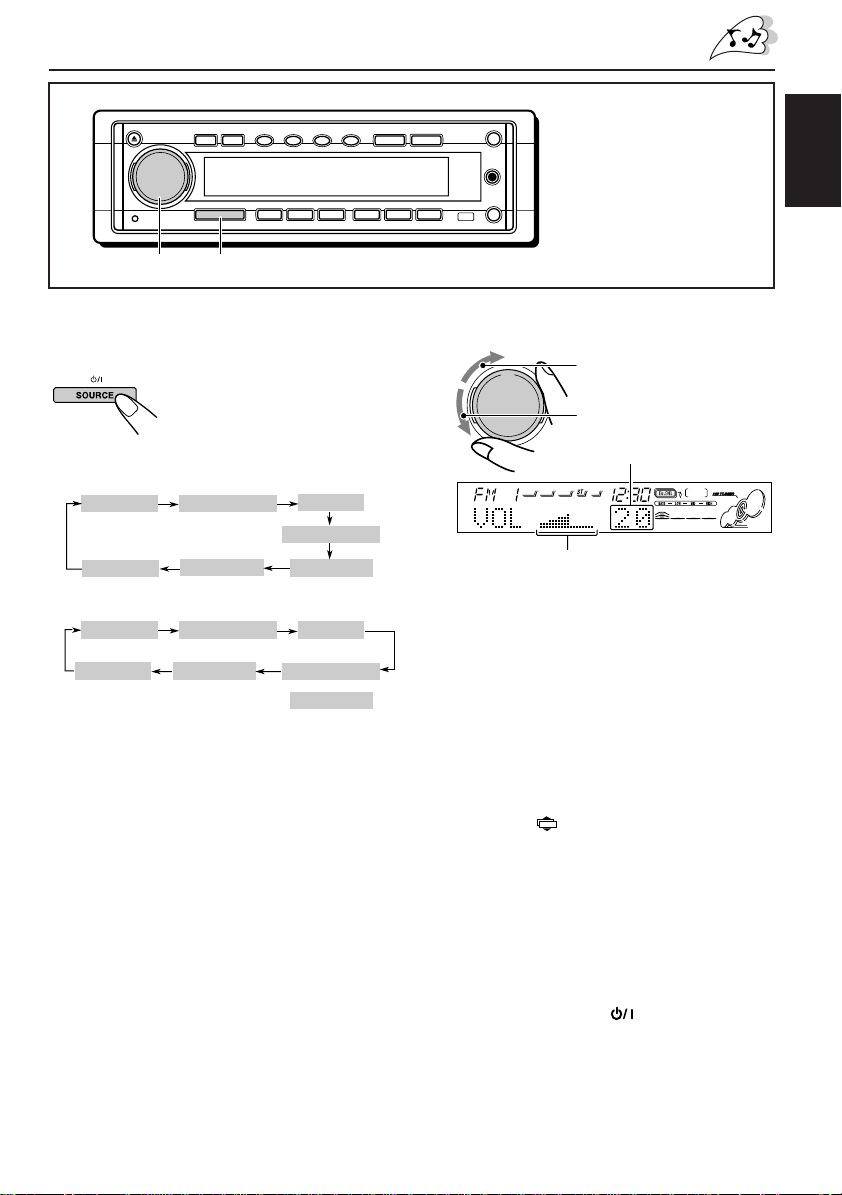
LOCATION OF THE BUTTONS
Control panel
1
ENGLISH
1 0 (eject) button
2 Control dial
3 SEL (select) button
4 EQ (equalization) button
5 D (display) button
6 TP (traffic programme) button
7 PTY (programme type) button
8 M/B (mode/band) button
9 ¢ / 4 buttons
•
Also functions as SSM buttons when pressed
together.
p ATT (angle / attenuator) button
2
3
4 5
t
6
7
8
9
ry
q Auxiliary input jack
w (control panel release) button
e Remote sensor
r Number buttons
• MO (monaural) button
• LO (local) button
• INT (intro scan) button
• RPT (repeat) button
• RND (random) button
• Video component operation buttons
(ONLY for KD-SH77R)
t SOURCE (standby / on) button
y Reset button
e
p
w
q
How to use the number buttons:
If you press M/B (mode/band), the unit goes into functions mode and the number buttons work as
different function buttons.
Normally
Equalizing
During
functions mode
T o use these buttons as number buttons again after pressing M/B (mode/band), w ait for 5 seconds
without pressing any number button until the functions mode is cleared.
• Pressing M/B (mode/band) again also clears the functions mode.
4
pattern indicator
Time countdown
indicator
Page 5
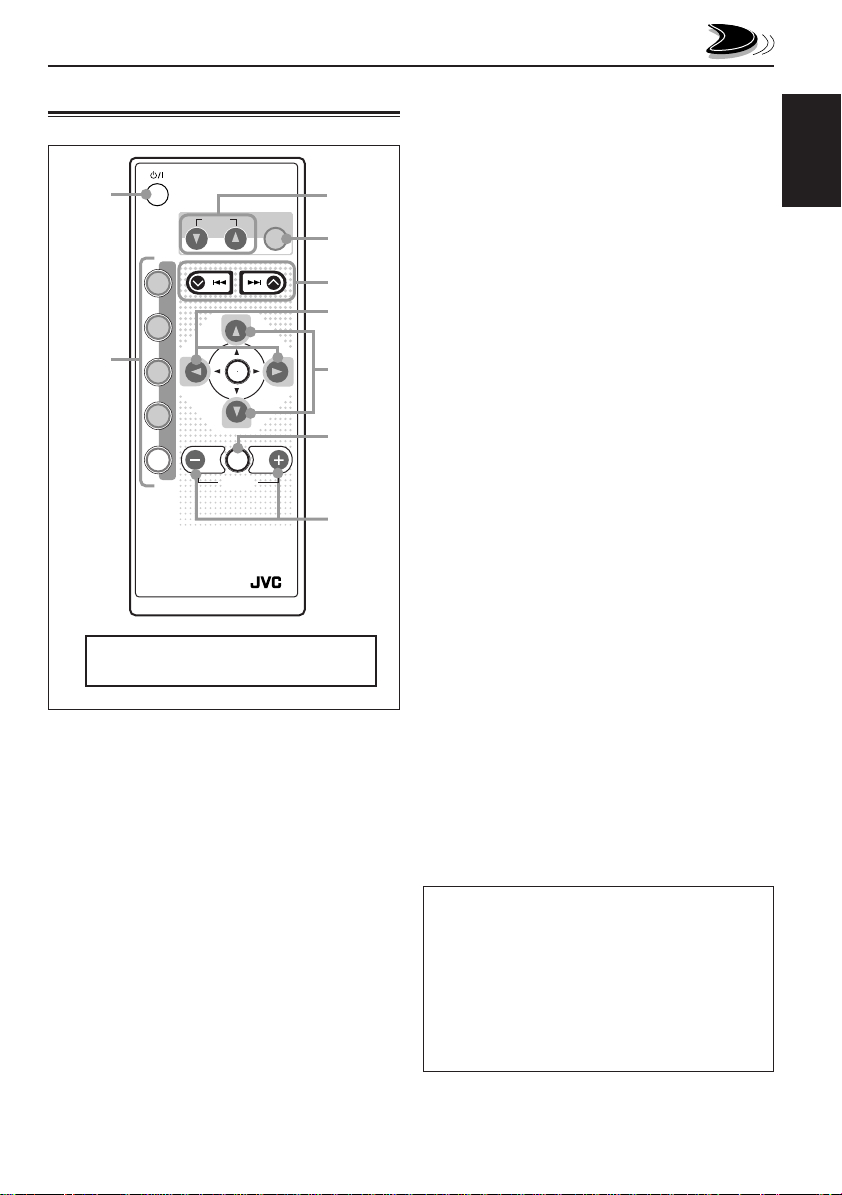
Remote controller
ATT
1
ANGLE
CD
DAB
FM
2
AM
CH
AUX SEL
RM-RK100
The R•D button does not function
for this model.
DISC
PRESET
R D
DISC
VOLUME
EQ
PRESET
3
4
5
6
7
8
9
3 Changes the angle of the control panel in three
positions.
4 Selects the sound modes.
Each time you press the button, sound modes
change.
5 • Searches stations while listening to the radio.
• Selects ensembles while listening to the DAB
tuner if pressed briefly.
• Selects services while listening to the DAB
tuner if pressed and held.
• Fast-forw ards or rev erses the trac k if pressed
and held while listening to a CD.
• Skips to the beginning of the next track or goes
back to the beginning of the current (or
previous tracks) if pressed briefly while
listening to a CD.
6 Changes the preset channel number while
listening to the radio (or the DAB tuner).
Each time you press the button, the preset
channel number changes, and the selected
station (or service) is tuned into.
7 Changes the disc number while listening to the
CD changer.
Each time you press the button, the disc
number changes, and the selected disc starts
playing.
ENGLISH
1 • Turns on the unit if pressed when the unit is
turned off.
• T urns off the unit if pressed and held until “SEE
YOU” appears on the display.
• Drops the volume lev el if pressed briefly, and
“ATT” flashes on the display.
Press again to resume the volume.
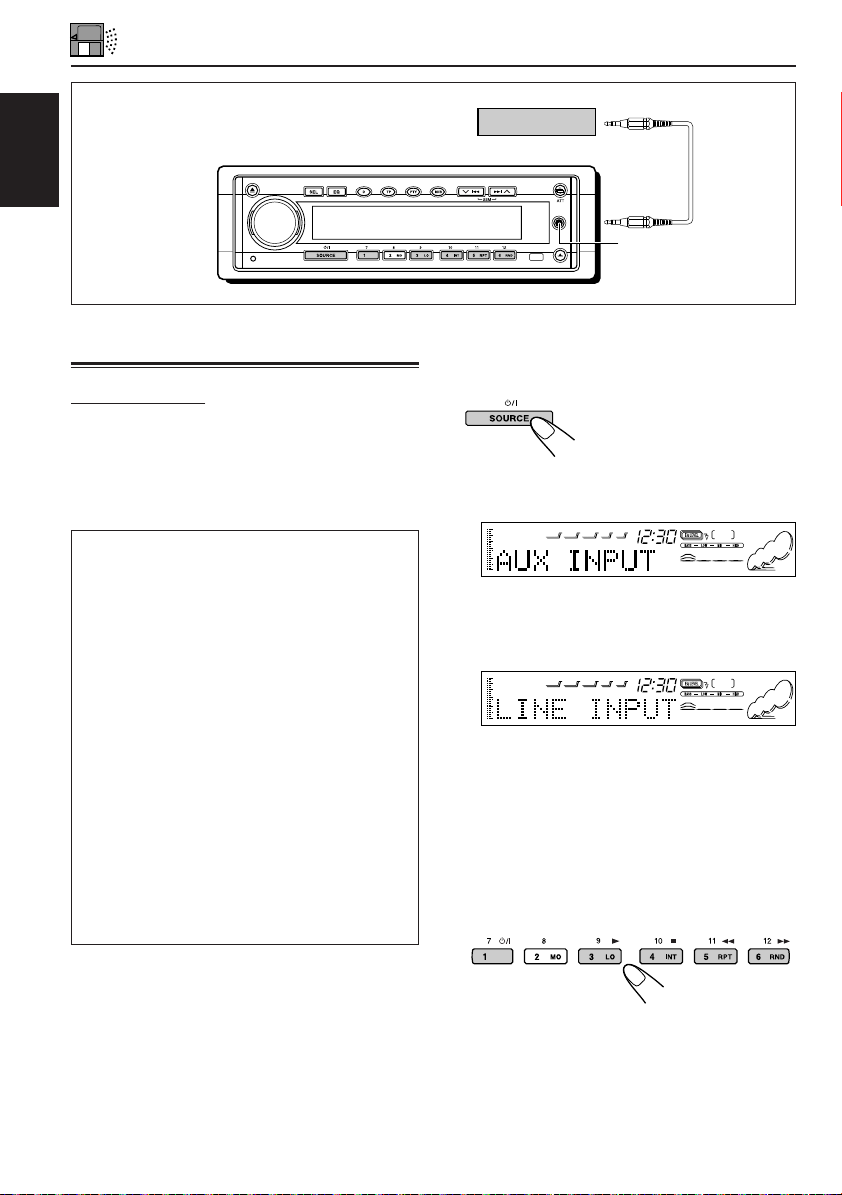
2 • CD : Selects CD player.
• FM : • Selects FM tuner if select briefly.
Each time you press the button, FM
band (FM1, FM2 and FM3) changes.
•
Selects DAB tuner if pressed and held.*
Each time you press and hold the
button, DAB band (D AB 1, DAB 2 and
DAB 3) changes.
• AM : Selects AM tuner.
• CH : Selects CD changer.*
• AUX : Selects the external components.
Each time you press the button, “AUX
INPUT” and “LINE INPUT”** are
alternately selected.
8*** Selects the sound adjustment items.
Each time you press the button, the items
change.
9*** • Changes the volume.
• Adjusts the sound mode (after SEL is
pressed).
* Without connecting the DAB tuner or CD
changer, you cannot select it as the source to
play.
** ONLY for KD-SH55R: To select the external
component, you have to change the external
component setting (see page 26).
***These buttons do not function for the preferred
setting mode adjustment.
5
Page 6
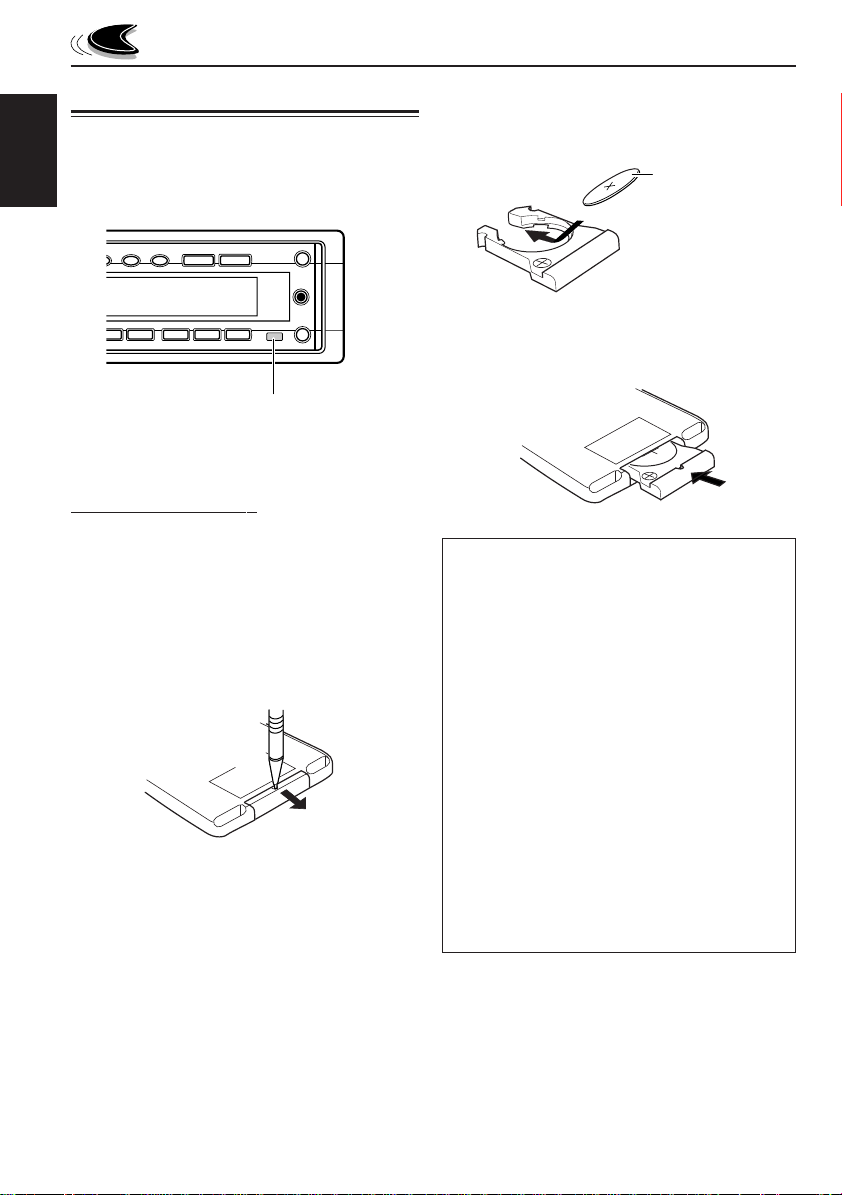
Preparing the remote controller
Before using the remote controller:
• Aim the remote controller directly at the remote
sensor on the main unit. Make sure there is no
ENGLISH
obstacle in between.
2. Place the battery.
Slide the battery into the holder with the + side
facing upwards so that the battery is fixed in
the holder.
Lithium coin battery
(product number:
CR2025)
3. Return the battery holder.
Insert again the battery holder pushing it until
you hear a clicking sound.
Remote sensor
• Do not expose the remote sensor to strong
light (direct sunlight or artificial lighting).
Installing the battery
When the controllable range or effectiveness of the
remote controller decreases, replace the battery.
1. Remove the battery holder.
1) Push out the battery holder in the direction
indicated by the arrow using a ball-point
pen or a similar tool.
2) Remove the battery holder.
(back side)
1)
2)
(back side)
WARNING:
• Store the battery in a place where children cannot
reach.
If a child accidentally swallows the battery,
consult a doctor immediately.
• Do not recharge, short, disassemble or heat the
battery or dispose it in a fire.
Doing any of these things may cause the battery to
give off heat, crack or start a fire.
• Do not leave the battery with other metallic
materials.
Doing this may cause the battery to give off heat,
crack or start a fire.
• When throwing away or saving the battery, wrap it
in tape and insulate; otherwise, the battery may
start to give off heat, crack or start a fire.
• Do not poke the battery with tweezers or similar
tools.
Doing this may cause the battery to give off heat,
crack or start a fire.
6
Page 7
2
1
1
Turn on the power and select the
source.
When you press the button for
the first time, the power comes
on. Then each time you press
the button, the source changes
as follows.
For KD-SH77R
FM TUNER
AM TUNER
For KD-SH55R
FM TUNER
AM TUNER
* If a CD is not in the loading slot, you cannot
select CD as the source to play.
** Without connecting the DAB T uner or the CD
changer, you cannot select it as the source to
play.
***ONLY for KD-SH55R: To select the external
component, you have to change the external
component setting (see page 26).
To operate the tuner (FM or AM),
see pages 8 – 10.
To operate the CD player,
see pages 17 – 19.
To operate external components (AUX
INPUT and LINE INPUT),
see pages 30 – 31.
To operate the CD changer,
see pages 32 – 33.
To operate the DAB tuner,
see pages 34 – 37.
DAB TUNER
AUX INPUT
DAB TUNER
AUX INPUT
**
CD CHANGER
LINE INPUT
**
CD CHANGER
LINE INPUT
CD PLAY
CD PLAY
or
BASIC OPERATIONS
Note:
When you use this unit for
the first time, set the built-in
clock correctly, see page 23.
2
Adjust the volume.
To increase the volume.
To decrease the volume.
Volume level appears.
*
**
Volume level indicator
Note:
*
**
***
After adjusting the volume, you can push in the
control dial to avoid unintended operations.
To use it again, push the control dial again to
make it come out.
3
Adjust the sound as you want.
(See page 20.)
To drop the volume in a moment
Press and hold /ATT while listening to any
source. “ATT” starts flashing on the display, and
the volume level will drop in a moment.
To resume the previous volume level, press and
hold the button again.
• If you turn the control dial clockwise, you can
also restore the sound.
To turn off the power
Press and hold SOURCE until “SEE YOU”
appears on the display.
ENGLISH
7
Page 8
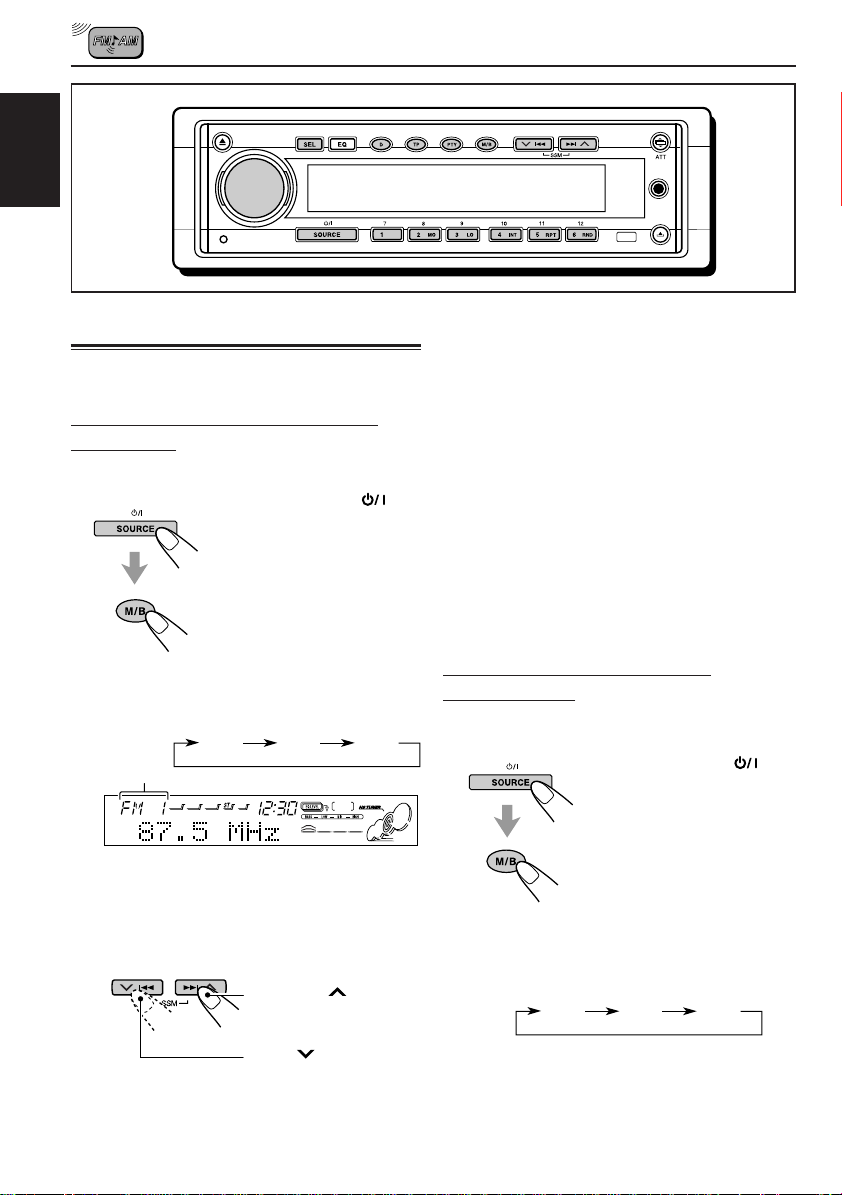
ENGLISH
RADIO BASIC OPERATIONS
Listening to the radio
You can use either automatic searching or
manual searching to tune into a particular station.
Searching a station automatically:
Auto search
1
Select the FM or AM.
1 Press SOURCE
repeatedly to select FM
or AM as the source.
2 If necessary, to select
the FM band number,
press and hold M/B
(mode/band) for more
than 1 second
repeatedly.
Each time you press and
hold the button, the FM
band changes as follows:
FM 1 FM 2 FM 3
Selected band appears.
Note:
This receiver has three FM bands (FM1, FM2,
FM3). You can use any one of them to listen to
an FM broadcast.
2
Start searching a station.
Press ¢ to search
stations of higher
frequencies.
Press 4 to search
stations of lower
When a station is received, searching
stops.
8
frequencies.
To stop searching before a station is
received, press the same button you have
pressed for searching.
To turn in FM stations onl y with strong signals
1 Press M/B (mode/band) to enter the functions
mode while listening to an FM broadcast and
then, the number buttons can work as different
function buttons. (See page 4.)
2 Press LO (local) while still in the functions
mode, so that the LOCAL indicator lights up on
the display.
This function works only while searching FM
stations, including SSM preset.
Each time you press the button, the LOCAL
indicator lights up and goes off alternately.
Searching a station manually:
Manual search
1
Select the FM or AM.
1 Press SOURCE
repeatedly to select FM
or AM as the source.
2 If necessary, to select
the FM band nunber,
press and hold M/B
(mode/band) for more
than 1 second
repeatedly. Each time
you press and hold the
button, the FM band
changes as follows:
FM 1 FM 2 FM 3
Note:
This receiver has three FM bands (FM1, FM2,
FM3). You can use any one of them to listen to
an FM broadcast.
Page 9
2
Press and hold ¢ or 4 until
“M” (manual) starts flashing on the
display.
3
T une into a station you want while “M”
is flashing.
Press ¢ to tune
into stations of higher
frequencies.
Press 4 to tune
into stations of lower
frequencies.
• If you release your finger from the button,
the manual mode will automatically turn off
after 5 seconds.
• If you hold down the button, the frequency
keeps changing until you release the
button.
When an FM stereo broadcast is hard to
receive:
1 Press M/B (mode/band) to enter
the functions mode while listening
to an FM stereo broadcast.
2 Press MO (monaural), while still in
the functions mode, so that the
MO indicator lights up on the
display.
• Each time you press the button,
the MO indicator lights up and
goes off alternately.
Lights up when receiving
an FM broadcast in stereo.
The MO indicator lights
up.
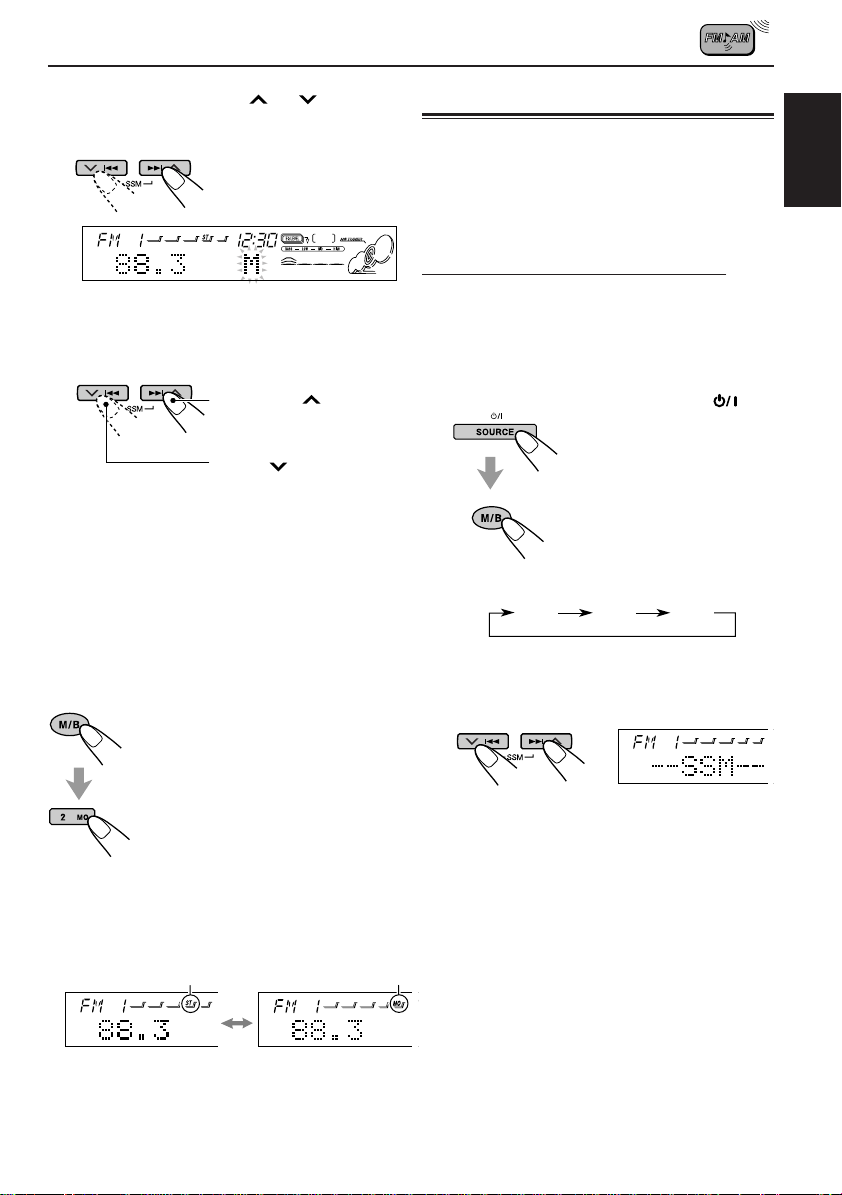
Storing stations in memory
You can use one of the following two methods to
store broadcasting stations in memory.
• Automatic preset of FM stations: SSM (Strongstation Sequential Memory)
• Manual preset of both FM and AM stations
FM station automatic preset: SSM
You can preset 6 local FM stations in each FM
band (FM1, FM2 and FM3).
1
Select the FM band (FM1 – 3) you want
to store FM stations into.
1 Press SOURCE
repeatedly to select FM.
2 If necessary, press and
hold M/B (mode/band)
for more than 1 second
repeatedly. Each time
you press and hold the
button, the FM band
changes as follows:
FM 1 FM 2 FM 3
2
Press and hold both buttons for more
than 2 seconds.
“SSM” appears, then
disappears when automatic
preset is over.
Local FM stations with the strongest signals are
searched and stored automatically in the band
number you have selected (FM1, FM2 or FM3).
These stations are preset in the number buttons
— No. 1 (lowest frequency) to No. 6 (highest
frequency).
When automatic preset is over, the station stored
in number button 1 will be automatically tuned in.
ENGLISH
When the MO indicator is lit on the display, the
sound you hear becomes monaural but the
reception will be improved (the ST indicator
goes off).
9
Page 10
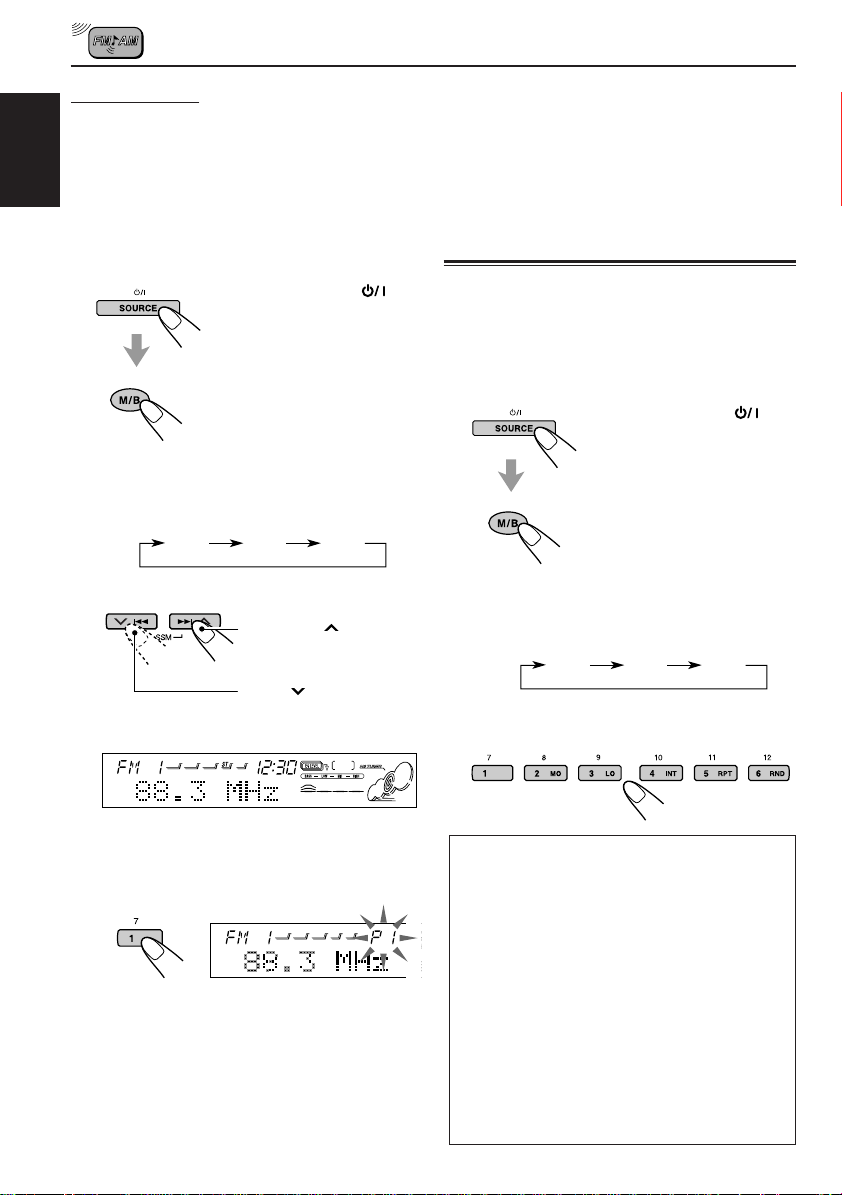
Manual preset
You can preset up to 6 stations in each band
(FM1, FM2, FM3 and AM) manually.
Ex.: Storing an FM station of 88.3 MHz into the
preset number 1 of the FM1 band
ENGLISH
1
Select the band (FM1–3, AM) you
want to store stations into (in this
example, FM1).
1 Press SOURCE
repeatedly to select FM
or AM as the source.
2 If necessary, to select
the FM band number,
press and hold M/B
(mode/band) for more
than 1 second
repeatedly. Each time
you press and hold the
button, the FM band
changes as follows:
FM 1 FM 2 FM 3
2
Tune into a station of 88.3 MHz.
Press ¢ to tune
into stations of higher
frequencies.
Press 4 to tune
into stations of lower
frequencies.
Notes:
• A previously preset station is erased when a new
station is stored in the same preset number.
• Preset stations are erased when the power supply to
the memory circuit is interrupted (for example,
during battery replacement). If this occurs, preset the
stations again.
Tuning into a preset station
You can easily tune into a preset station.
Remember that you must store stations first. If
you have not stored them yet, see “Storing
stations in memory” on page 9.
1
Select the FM or AM.
1 Press SOURCE
repeatedly to select FM or
AM as the source.
2 If necessary, to select
the FM band number,
press and hold M/B
(mode/band) for more
than 1 second
repeatedly. Each time
you press and hold the
button, the FM band
changes as follows:
FM 1 FM 2 FM 3
2
Select the number (1 – 6) for the preset
station you want.
10
3
Press and hold the number button (in
this example, 1) for more than 2
seconds.
“P1” flashes for a while.
4
Repeat the above procedure to store
other stations into other preset
numbers.
If the sound quality decreases and the
stereo effect is lost while listening to
an FM station
In some areas, adjacent stations may interfere
with each other. If this interference occurs,
this unit can automatically reduce this
interference noise (the initial setting when
shipped from the factory). However, in this
case, the sound quality will be degraded and
the stereo effect will be also lost.
If you do not want to degrade the sound
quality and to lose the stereo effect, rather
than to eliminate the interference noise, see
“To change the FM tuner selectivity – IF
FILTER” on page 26.
Page 11
RDS OPERATIONS
What you can do with RDS EON
RDS (Radio Data System) allows FM stations to
send an additional signal along with their regular
programme signals. For example , the stations send
their station names, as well as information about
what type of programme they broadcast, such as
sports or music, etc.
Another advantage of RDS function is called “EON
(Enhanced Other Networks).” The EON indicator
lights up while receiving an FM station with the EON
data. By using the EON data sent from a station,
you can tune into a different station of a different
network broadcasting your favorite programme or
traffic announcement while listening to another
programme or to another source such as CD.
By receiving the RDS data, this unit can do the
following:
• Tracing the same programme automatically
(Network-Tracking Reception)
• Standby Reception of TA (Traffic
Announcement) or your favorite programme
• PTY (Programme Type) search
• Programme search
• And some other functions
Tracing the same programme
automatically (Network-Tracking
Reception)
When driving in an area where FM reception is not
good, the tuner built in this unit automatically tunes
into another RDS station, broadcasting the same
programme with stronger signals. So, you can
continue to listen to the same programme in its
finest reception, no matter where you drive. (See
the illustration on the next page.)
Two types of the RDS data are used to make
Network-Tracking Reception work correctly — PI
(Programme Identification) and AF (Alternative
Frequency).
Without receiving these data correctly from the RDS
station you are listening to, Network-Tracking
Reception will not operate.
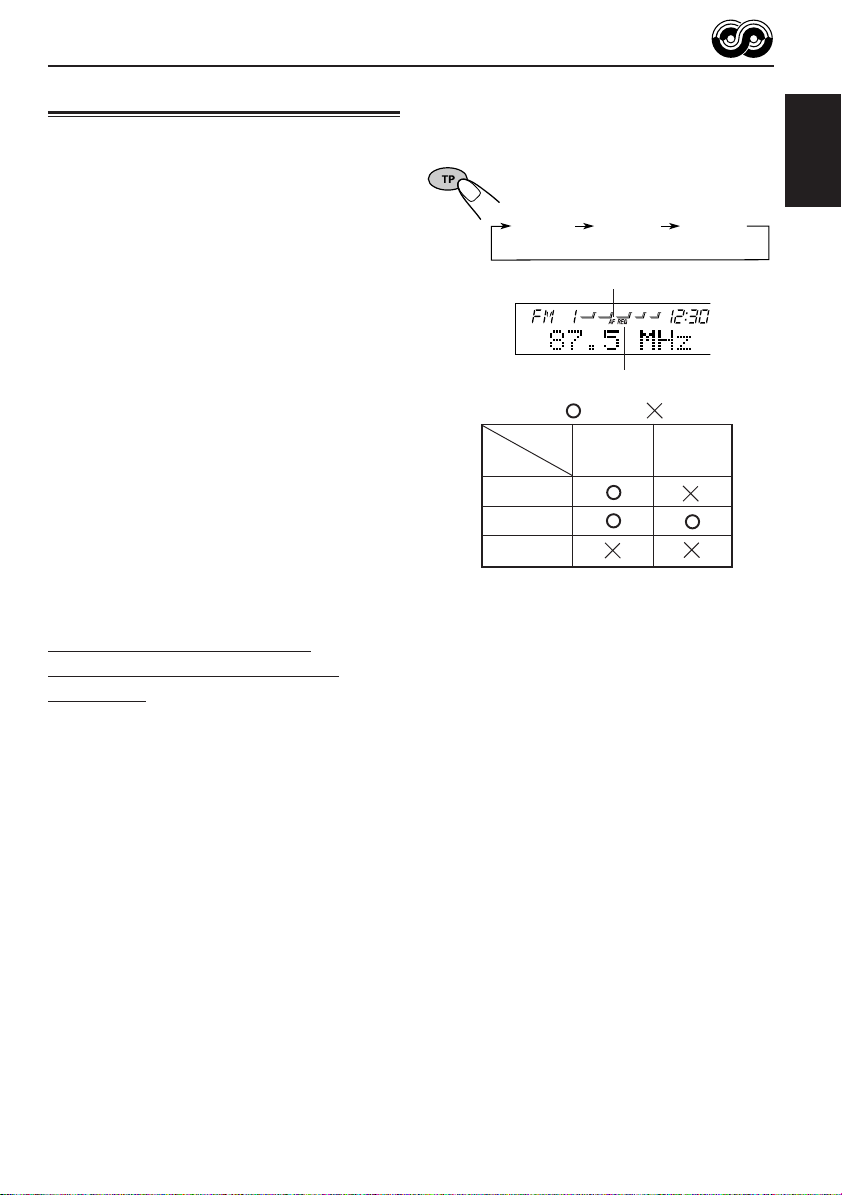
To use Network-Tracking Reception, press and
hold TP (traffic programme) f or more than 1 second.
Each time you press and hold the button, NetworkTracking Reception modes change as follows:
Mode 1 Mode 2 Mode 3
(AF)
Mode 1
Mode 2
Mode 3
Mode 1
Network-Tracking Reception is activated with
Regionalization set to “off.”
Switches to another station within the same
network when the receiving signals from the
current station become weak.
• In this mode, the programme may differ from the one
currently received.
Mode 2
Network-Tracking Reception is activated with
Regionalization set to “on.”
Switches to another station, within the same
network, broadcasting the same programme
when the receiving signals from the current
station become weak.
Mode 3
Network-Tracking Reception is deactivated.
Note:
If a DAB tuner is connected and Alternative Reception
(for DAB services) is activated, Network-Tracking
Reception is also activated automatically. On the other
hand, Networking-Tracking Reception cannot be
deactivated without deactivating Alternative Reception.
(See page 37.)
(AF/REG) (Canceled)
AF indicator
REG indicator
: lights : goes off
AF REG
indicator indicator
ENGLISH
11
Page 12
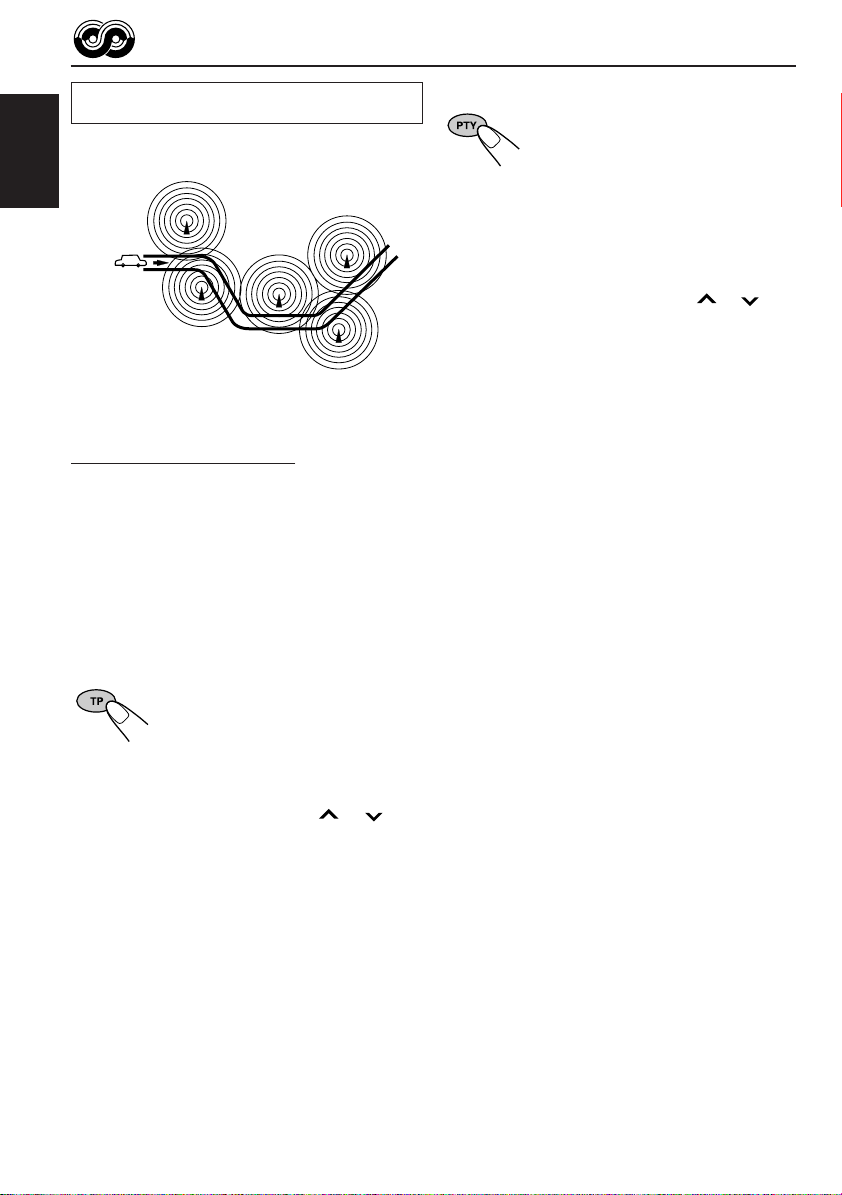
The same programme can be received on
different frequencies.
Programme 1
broadcasting
on frequency A
ENGLISH
Programme 1
broadcasting
on frequency B
Programme 1
broadcasting
on frequency C
Programme 1
broadcasting
on frequency E
Programme 1
broadcasting
on frequency D
Using Standby Reception
Standby Reception allows the unit to switch
temporarily to your favorite programme (PTY:
Programme Type) and Traffic Announcement (TA)
from the current source (another FM station, CD or
other connected components).
• Standby Reception will not work if you are listening
to an AM station.
TA Standby Reception
When you press TP while listening to
an FM station, the TP indicator is lit
during reception of a TP (Traffic
Programme) station and the TA
standby mode is engaged.
• When the station being received is not a TP station,
the TP indicator flashes. Press ¢ or 4
to engage the TA standby mode . “SEARCH” appears
on the display, and TP station search starts. When a
TP station is tuned into, the TP indicator is lit.
7 If you are listening to a CD or other connected
components and wish to listen to a TP station,
press TP to enter the TA standby mode. (The TP
indicator lights up.)
PTY Standby Reception
When you press PTY while listening
to an FM station, the PTY indicator is
lit during reception of a PTY station
and the PTY standby mode is
engaged. The selected PTY name
stored on page 13 flashes for 5
seconds.
• When the station being received is not a PTY station,
the PTY indicator flashes. Press ¢ or 4
to engage the PTY standby mode. “SEARCH” appears
on the display, and PTY station sear ch starts. When a
PTY station is tuned into, the PTY indicator is lit.
7 If you are listening to a CD or other connected
components and wish to listen to a selected PTY
broadcast, press PTY to enter the PTY standby
mode. (The PTY indicator lights up.)
If the selected PTY programme starts broadcasting
while the PTY standby mode is active, the selected
PTY name appears and the playback source
changes to the FM band. The selected PTY
programme can then be heard.
T o deactivate the PTY standby mode, press PTY
again.
If a traffic programme starts broadcasting while the
T A standby mode is activ e, “TRAFFIC” appears and
the playback source changes to the FM band. The
volume increases to the preset TA volume level (see
page 15) and the traffic programme can be heard.
To deactivate the TA standby mode, press TP
again.
12
Page 13
Selecting your favorite programme for
POP M
1
2
3
ROCK M EASY M
45
6
CLASSICS
AFFAIRS
VARIED
PTY Standby Reception
You can select your favorite programme for PTY
Standby Reception to store in memory.
When shipped from the factory, “NEWS” is stored
as the programme type for PTY Standby Reception.
1
Press and hold SEL (select) for more
than 2 seconds so that one of the
PSM items appears on the display.
(PSM: see page 24.)
Searching your favorite programme
You can search one of your 6 favorite programme
types stored in memory.
When shipped from the factory, the following 6
programme types have been stored in the number
buttons (1 to 6).
To store your favorite programme types, see
below.
To search your favorite programme type, see
page 14.
ENGLISH
2
Select “PTY STBY” (standby) if not
shown on the display.
3
Select one of twenty-nine PTY codes.
(See page 16.)
Selected code name
appears on the display
and is stored into memory.
4
Press SEL (select) to finish the setting.
To store your favorite programme types
1
Press and hold SEL (select) for more
than 2 seconds so that one of the PSM
items appears on the display.
(PSM: see page 24.)
2
Select “PTY SEARCH” if not shown on
the display.
3
Select one of twenty-nine PTY codes.
(See page 16.)
Selected code name
appears on the display.
• If the code already stored
in memory is selected, it
will flash on the display.
CONTINUED ON THE NEXT PAGE
13
Page 14

4
Press and hold the number button for
more than 2 seconds to store the PTY
code selected into the preset number
you want.
ENGLISH
"MEMORY" and the selected code name will
flash alternatery and then only the selected
code name will continue flashing on the
display.
5
Press SEL (select) to finish the setting.
To search your favorite programme type
1
Press and hold PTY (programme type)
for more than 1 second while listening
to an FM station.
• If there is a station broadcasting a programme of
the same PTY code as you selected, that station
is tuned into.
• If there is no station broadcasting a programme
of the same PTY code as you selected, the
station will not change.
Note:
In some areas, the PTY search will not work correctly.
Other convenient RDS functions
and adjustments
Automatic selection of the station
when using the number buttons
Usually when you press the number button, the
preset station is tuned into.
Howev er, when the preset station is an RDS station,
something different will happen. If the signals from
that preset station are not sufficient for good
reception, this unit, using the AF data, tunes into
another frequency broadcasting the same
programme as the original preset station is
broadcasting. (Programme search)
• The unit takes some time to tune into another
station using programme search.
14
The last selected PTY code appears.
2
Select one of the PTY codes stored in
the preset number buttons (1 to 6).
Ex.: When “ROCK M” is stored in preset
number button 2
PTY search for your favorite programme
starts after 5 seconds.
T o activate progr amme search, follow the procedure
below.
• See also “Changing the general settings (PSM)”
on page 23.
1 Press and hold SEL (select) for more than 2
seconds so that one of the PSM items appears
on the display.
2 Press ¢ or 4 to select
“P-SEARCH.”
3 Turn the control dial clockwise to select
“SEARCH ON.”
Now programme search is activated.
4 Press SEL (select) to finish the setting.
To cancel programme search, repeat the same
procedure and select “SEARCH OFF” in step 3 by
turning the control dial counterclockwise.
Page 15
Changing the display mode while
listening to an FM station
You can change the initial indication on the display
to station name (PS NAME) or station frequency
(FREQUENCY) while listening to an FM RDS
station.
• See also “Changing the general settings (PSM)”
on page 23.
1 Press and hold SEL (select) for more than 2
seconds so that one of the PSM items appears
on the display.
2 Press ¢ or 4 to select “TUNER DISP”
(tuner display).
3 Turn the control dial to set to the desired indication
(“FREQUENCY” or “PS NAME”).
4 Press SEL (select) to finish the setting.
Note:
By pressing D (display), you can change the display while
listening to an FM RDS station only.
Each time you press the button, the following information
appears on the display:
Station name
(PS NAME)
Station Frequency
(FREQUENCY)
Programme type
(PTY)
Setting the TA volume level
You can preset the volume level for TA Standby
Reception. When a traffic programme is received,
the volume level automatically changes to the preset
level.
• See also “Changing the general settings (PSM)”
on page 23.
1 Press and hold SEL (select) for more than 2
seconds so that one of the PSM items appears
on the display.
2 Press ¢ or 4 to select “TA VOL.”
3 Turn the control dial to set to the desired volume.
You can set it from “TA VOL 00” to “TA VOL 50.”
4 Press SEL (select) to finish the setting.
Automatic clock adjustment
When shipped from the factory, the clock built in
this unit is set to be readjusted automatically using
the CT (Clock Time) data in the RDS signal.
If you do not want to use automatic clock
adjustment, follow the procedure below.
• See also “Changing the general settings (PSM)”
on page 23.
1 Press and hold SEL (select) for more than 2
seconds so that one of the PSM items appears
on the display.
2 Press ¢ or 4 to select “AUTO ADJ.”
3 Turn the control dial counterclockwise to select
“ADJUST OFF.”
Now automatic clock adjustment is canceled.
4 Press SEL (select) to finish the setting.
ENGLISH
• Then, the display goes back to the original indication
in several seconds.
To reactiv ate cloc k adjustment, repeat the same
procedure and select “ADJUST ON” in step 3 by
turning the control dial clockwise.
Note:
Y ou must stay tuned to the same station for more than 2
minutes after setting “AUTO ADJ” to “ADJUST ON.”
Otherwise, the clock time will not be adjusted. (This is
because the unit takes up to 2 minutes to capture the CT
data in the RDS signal.)
15
Page 16

PTY codes
NEWS: News
AFFAIRS: Topical programmes expanding
ENGLISH
INFO: Programmes which impart advice
SPORT: Sport events
EDUCATE: Educational programmes
DRAMA: Radio plays
CULTURE: Programmes on national or
SCIENCE: Programmes on natural science
VARIED: Other programmes like comedies
POP M: Pop music
ROCK M: Rock music
EASY M: Easy-listening music
LIGHT M: Light music
CLASSICS: Classical music
OTHER M: Other music
WEATHER: Weather information
FINANCE: Reports on commerce, trading,
CHILDREN: Entertainment programmes for
on current news or affairs
on a wide variety of topics
regional culture
and technology
or ceremonies
the Stock Market, etc.
children
SOCIAL: Programmes on social activities
RELIGION: Programmes dealing with any
aspect of belief or faith, or the
nature of existence or ethics
PHONE IN: Programmes where people can
express their views either by
phone or in a public forum
TRAVEL: Programmes about travel
destinations, package tours, and
travel ideas and opportunities
LEISURE: Programmes concerned with
recreational activities such as
gardening, cooking, fishing, etc.
JAZZ: Jazz music
COUNTRY: Country music
NATION M: Current popular music from
another nation or region, in that
country’s language
OLDIES: Classic pop music
FOLK M: Folk music
DOCUMENT: Programmes dealing with factual
matters, presented in an
investigative style
16
Page 17
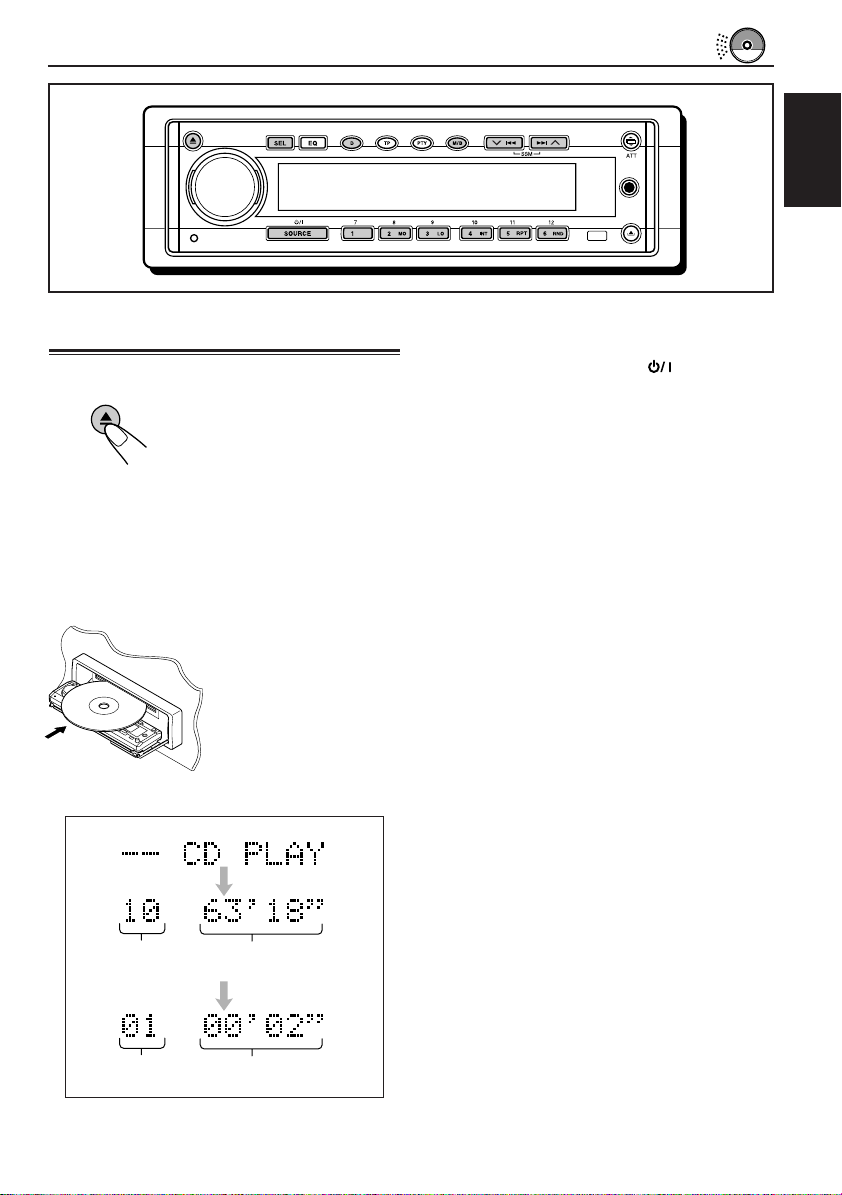
CD OPERATIONS
ENGLISH
Playing a CD
1
Open the loading slot.
The control panel moves down,
and the loading slot appears.
Note:
When an external component is
connected to the Auxiliary input jack,
Be careful of handling a CD.
2
Insert a disc into the loading slot.
The unit draws a CD, the
control panel goes back
to the previous position
(see page 28), and CD
play starts automatically.
The display changes to show the following:
Total track number of
the inserted disc
Current track Elapsed playing time
Total playing time of the
inserted disc
Notes:
• When a CD is in the loading slot, selecting “CD” as
the source by pressing SOURCE starts CD play .
• When a CD is inserted upside down, the CD
automatically ejects.
• When you play a CD T ext, the disc title and performer
appear on the display. Then the current track title
appears on the display, followed by the truc k number
and elapsed playing time. See also “Playing a CD
Text” (page 18) and “To select the scroll mode –
SCROLL” (page 25).
If a CD T ext includes muc h text information, some may
not appear on the display.
• If you change the source, CD play also stops (without
ejecting the CD).
To stop play and eject the CD
Press 0.
CD play stops, the control panel moves down,
then the CD automatically ejects from the loading
slot.
To return the control panel to the previous
position, press 0 again.
• If you keep the loading slot for one minute (or 30
seconds when you have ejected a disc with the
ignition key is turned to “OFF”) a beep sounds
and the control panel returns to the previous
position.
Pay attention to pre v ent CD and y our finger from
being caught in between the control panel and
the unit.
Note:
If the ejected disc is not removed for about 15 seconds,
the disc is automatically inserted again into the loading
slot to protect it from dust. (CD play will not start this
time.)
17
Page 18
Playing a CD Text
In a CD Text, some information about the disc (its
disc title, performer and track title) is recorded.
You can show these disc information on the
ENGLISH
display.
1
Select text display mode while
playing a CD Text.
Each time you press the button,
the display changes as follows:
Disc Title / Performer
Current track no.
and Elapsed playing time
Notes:
• The display shows up to 10 characters at one time
and scrolls if there are more than 10 characters.
See also “To select the scroll mode – SCROLL” on
page 25.
• When you press D (display) while playing a
conventional CD, “NO NAME” appears for the disc
title/performer and the track title.
Track Title
T o go to the next track or the previous tracks
Press ¢ briefly , while
playing a CD, to go ahead
to the beginning of the next
track. Each time you press
the button consecutively, the
beginning of the next track
is located and played back.
Press 4 briefly , while
playing a CD , to go bac k to
the beginning of the current
track. Each time you press
the button consecutively, the
beginning of the previous
tracks is located and played
back.
To go to a particular track directly
Press the number button corresponding to the track
number to start its playback.
Locating a track or particular
portion on a CD
To fast-forward or reverse the track
Press and hold ¢ ,
while playing a CD ,
to fast-forw ard the trac k.
Press and hold
while playing a CD ,
to reverse the trac k.
18
4,
• To select a track number from 1 – 6:
Press 1 (7) – 6 (12) briefly.
• To select a track number from 7 – 12:
Press and hold 1 (7) – 6 (12) for more than 1
second.
Track number
Elapsed playing time
Page 19
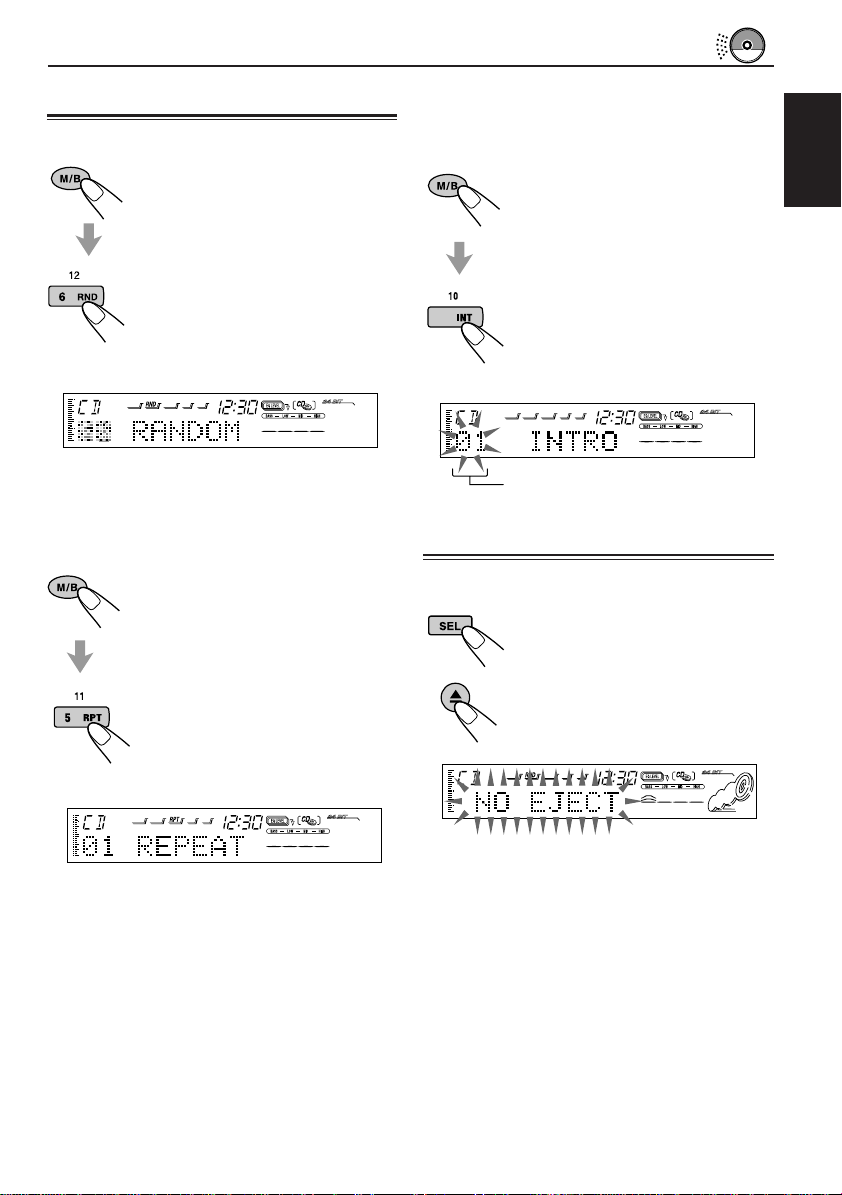
Selecting CD playback modes
T o play back tracks at random (Random Play)
1 Press M/B (mode/band) to enter
the functions mode while playing
a CD. This unit enters the
functions mode.
2 Press RND (random), while still
in the functions mode, so that
the RND indicator lights up on
the display.
Then, each time you press the
button, CD random play mode
turns on and off alternately.
To play back tracks repeatedly (Intro scan)
You can playback the first 15 seconds of each
track sequentially.
1 Press M/B (mode/band) to enter
the functions mode while playing
a CD. This unit enters the
functions mode.
2 Press INT (intro scan), while still
in the functions mode, so that
4
the “INTRO” appears on the
display.
Then, each time you press the
button, CD intro scan play mode
turns on and off alternately.
ENGLISH
When the random mode is turned on, the RND
indicator lights up on the display and a track
randomly selected starts playing.
T o play back tracks repeatedly (Repeat Play)
1 Press M/B (mode/band) to enter
the functions mode while playing
a CD. This unit enters the
functions mode.
2 Press RPT (repeat), while still
in the functions mode, so that
the RPT indicator lights up on
the display.
Then, each time you press the
button, CD repeat play mode
turns on and off alternately.
Track number of the currently playing track
Prohibiting CD ejection
You can prohibit CD ejection and can lock a CD
in the loading slot.
While pressing SEL (select),
press and hold 0 for more than 2
seconds. “NO EJECT” flashes on
the display for about 5 seconds,
and the CD is locked and cannot
be ejected.
Note:
If you press 0 while CD ejection is prohibited, the
control panel moves down, but the CD cannot be
ejected.
To return the display panel, to the previous position,
press 0.
To cancel the prohibition and unlock the CD,
press and hold 0 for more than 2 seconds again,
while pressing SEL.
“EJECT OK” flashes on the display for about 5
seconds, and the CD is unlocked.
19
Page 20

SOUND ADJUSTMENTS
Adjusting the sound
You can adjust the sound characteristics to your
preference.
ENGLISH
1
Select the item you want to adjust.
Each time you press the button,
the adjustable items change as
follows:
FAD*
(Fader)
VOL
(Volume)
Indication To do: Range
FAD* Adjust the front R06 (Rear only)
BAL Adjust the left L06 (Left only)
S. BASS
**
EXT VOL*** Adjust the output 00 (min.)
WOOFER****
VOL Adjust the volume. 00 (min.)
* If you are using a two-speaker system, set the
fader level to “00.”
** The richness and fullness of the bass sound is
clearly maintained regardless of how low you set
the volume – Super Bass.
You can also adjust the level of Super Bass.
*** ONLY for KD-SH55R: This takes effect only when
the amplifier(s) or other component(s) are
connected to the EXT OUT plugs.
**** ONLY for KD-SH77R: This takes effect only when
a subwoofer is connected.
BAL
(Balance)
WOOFER****
(Subwoofer)
and rear speaker |
balance. F06 (Front only)
and right speaker |
balance. R06 (Right only)
Adjust the bass. 00 (min.)
level through the |
EXT OUT plugs. 12 (max.)
Adjust the 00 (min.)
subwoofer output |
level. 12 (max.)
S. BASS**
EXT VOL***
(External volume)
|
08 (max.)
|
50 (max.)
2 Adjust the level.
To increase the level.
To decrease the level.
Note:
Normally, the control dial works as the volume
control. So you do not have to select “VOL” to adjust
the volume level.
20
Page 21
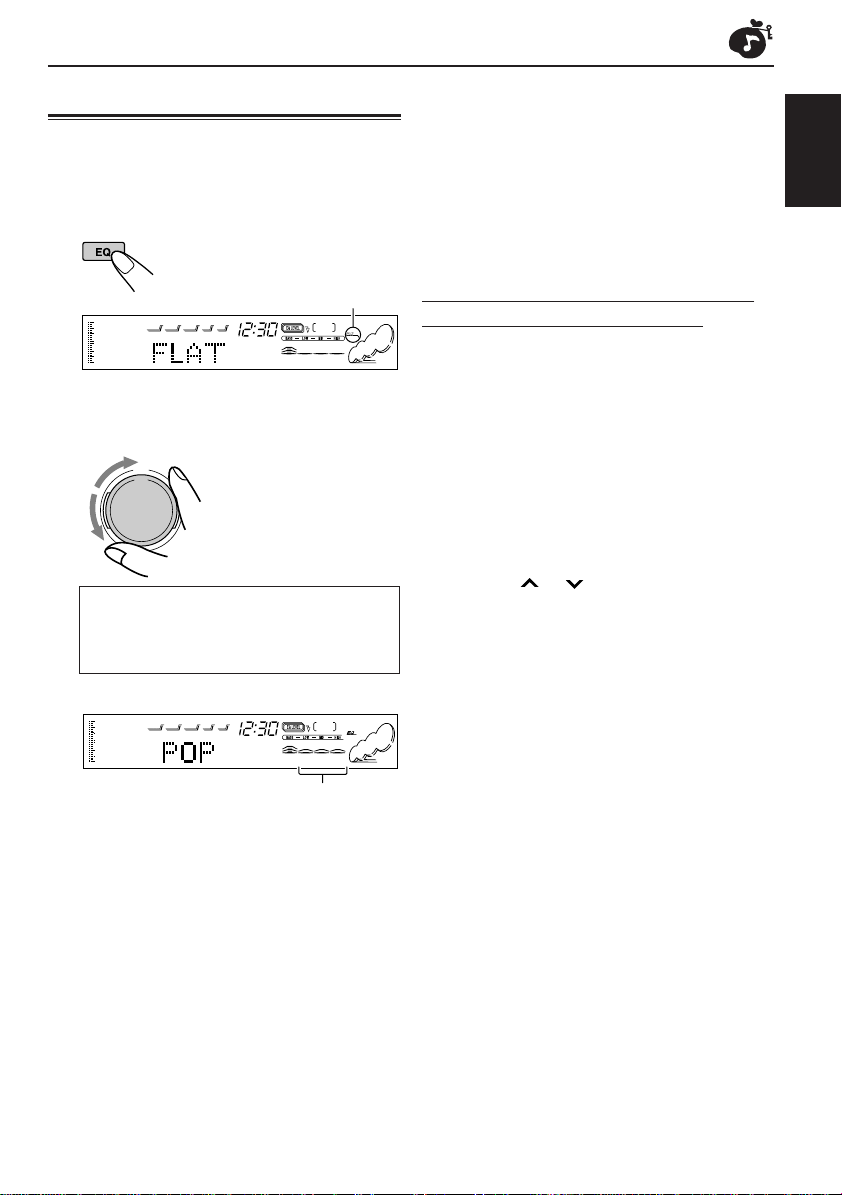
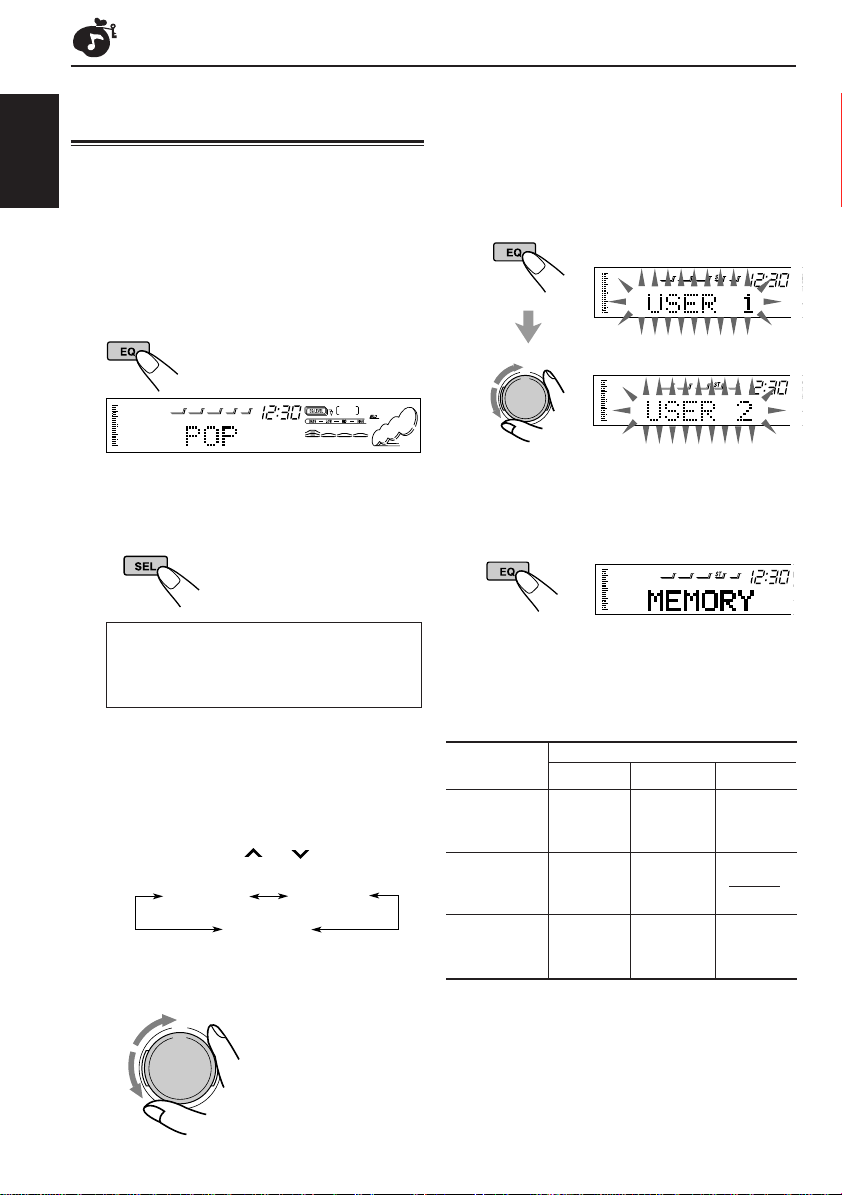
Selecting preset sound modes
You can select a preset sound mode suitable to
the music genre.
1
Press EQ.
The last selected sound mode
is recalled, and it is applied to
the current source.
The EQ indicator lights up.
Ex.: When you have selected “FLAT” previously
2
Select the sound mode you want.
As you turn the control
dial, the sound modes
change as follows:
FLAT O Hard Rock O R & B*O POP O
JAZZ O DanceMusic O Country O
Classic O USER 1 O USER 2 O
(back to the beginning)
* Rhythm and Blues
Reggae O
USER 3 O
Notes:
• You can adjust each sound mode to your preference,
and store it in memory.
If you want to adjust and store your original sound
mode, see “Storing your own sound adjustments”
on page 22.
• To adjust the bass reinforcement level temporarily,
see page 20.
To store a sound mode separately for
each playback source (EQ Link)
Once you select a sound mode, it is stored in
memory. It will be recalled every time you select
the same source.
A sound mode can be stored for each of the
following sources — FM1, FM2, FM3, AM, CD
and external components.
• See also “Changing the general settings (PSM)”
on page 23.
1 Press and hold SEL (select) for more than 2
seconds so that one of the PSM items appears
on the display.
2 Press ¢ or 4 to select “EQ LINK”
(Equalization Link).
3 Turn the control dial clockwise to select “LINK
ON.”
4 Press SEL (select) to finish the setting.
To cancel EQ Link, repeat the same procedure
and select “LINK OFF” by turning the control dial
counterclockwise in step 3.
ENGLISH
EQ level changes as you select the sound mode.
Ex.: When you select “POP”
To cancel the sound mode, select “FLAT” in
step 2.
• When “EQ LINK” is set to “LINK ON”
The selected sound mode can be stored in
memory for the current source.
Each time you change the same source, the
same sound mode is also recalled, and shown
after the source name.
• When “EQ LINK” is set to “LINK OFF”
The selected sound mode effect applies to all
the sources selected.
21
Page 22
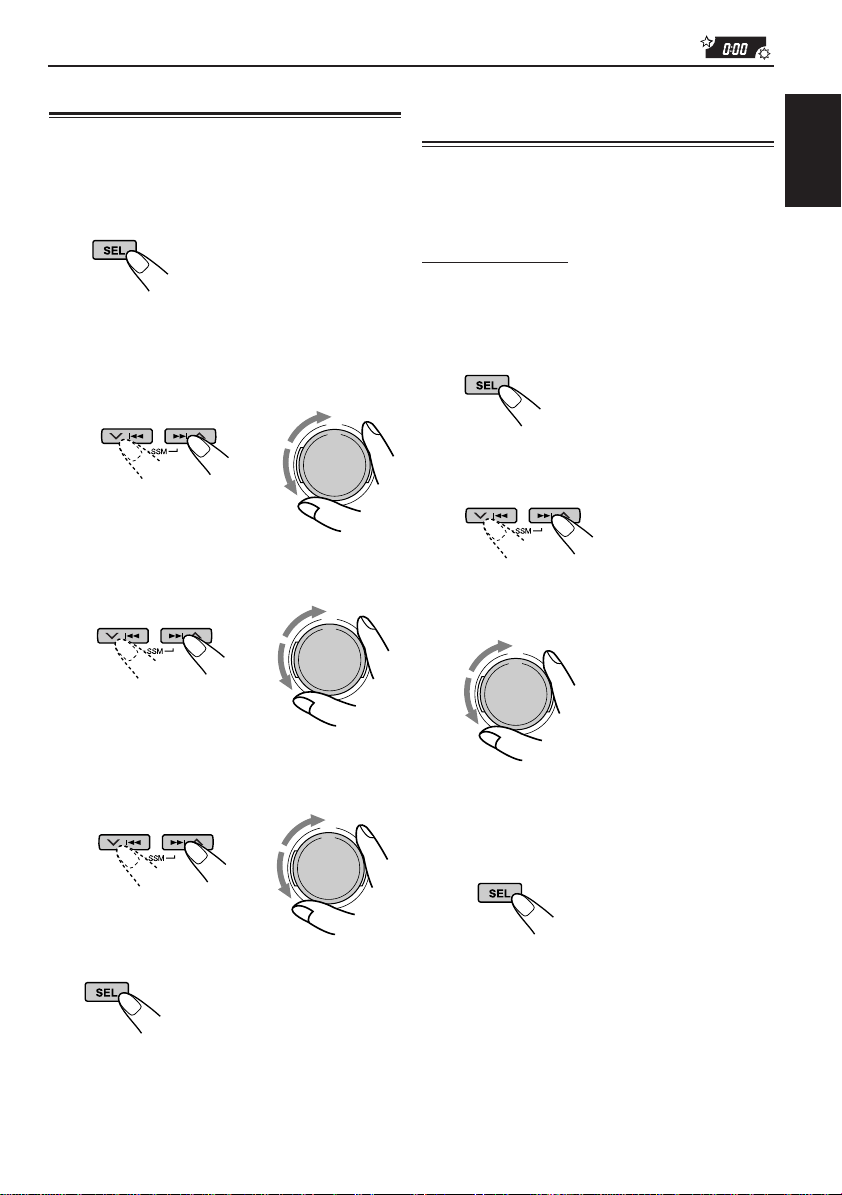
Storing your own sound
adjustments
4
Repeat step 2 and 3 to adjust the other
sound elements.
Y ou can adjust the sound modes to y our preference
ENGLISH
and store your own adjustments in memory.
(USER 1, USER 2 and USER 3)
• There is a time limit in doing the following
procedure. If the setting is canceled before you
finish, start from step 1 again.
1
Press EQ.
The last selected sound mode
is recalled, and it is applied to
the current source.
Ex.: When you have selected “POP” previously
2
Press SEL (select) to select sound
elements to adjust.
Each time you press the
button, the sound elements
to adjust change as follows:
LOW FREQ.* = LOW WIDTH = LOW LEVEL =
MID FREQ.* = MID WIDTH = MID LEVEL =
HIGH FREQ.* = HIGH LEVEL
(back to the beginning)
FREQ. (LOW, MID, HIGH):
Select the center frequency to adjust.
WIDTH (LOW, MID):
Select the band width level (Q).
LEVEL (LOW, MID, HIGH):
Adjust the enhancement level.
* By pressing ¢ or 4, you can
directly move as follows:
LOW FREQ.
HIGH FREQ.
3
Adjust the selected sound element.
• Refer to the table below for adjusting the
selected sound element.
=
MID FREQ.
5
Select one of the user sound modes
(USER1, USER2, USER3).
Ex.: When you select “USER 2”
6
Press EQ to store the adjustments.
To reset to the factory settings
Repeat the same procedure and reassign the
preset values listed in the table on page 38.
Indication
FREQ.
WIDTH
LEVEL
Preset values
LOW MID HIGH
50 Hz 700 Hz 8 kHz
80 Hz 1 kHz 12 kHz
120 Hz 2 kHz
1 (min.) 1 (min.)
||
4 (max.) 2 (max.)
–06 (min.) –06 (min.) –06 (min.)
|||
+06 (max.) +06 (max.) +06 (max.)
22
Page 23
OTHER MAIN FUNCTIONS
Setting the clock
1
Press and hold SEL (select) for more
than 2 seconds so that one of the PSM
items appears on the display.
(See page 24.)
2
Set the hour.
1 Select “CLOCK HOUR” if not shown on
the display.
2 Adjust the hour.
12
3
Set the minute.
1 Select “CLOCK MIN.”
2 Adjust the minute.
1 2
Changing the general settings
(PSM)
You can change the items listed on the next page
by using the PSM (Preferred Setting Mode)
control.
Basic Procedure
1
Press and hold SEL (select) for more
than 2 seconds so that one of the PSM
items appears on the display.
(See page 24.)
2
Select a PSM item you want to adjust.
(See page 24.)
3
Adjust the PSM item selected.
ENGLISH
4
Select the clock system.
1 Select “24H/12H.”
2 Select either “12HOUR” or “24HOUR.”
12
5
Press SEL (select) to finish the setting.
To check the current clock time while the unit
is turned off, press D (display).
The power turns on, the clock time is shown for 5
seconds, then the power turns off.
4
Repeat steps 2 and 3 to adjust the
other PSM items if necessary.
5
Press SEL (select) to finish the setting.
23
Page 24
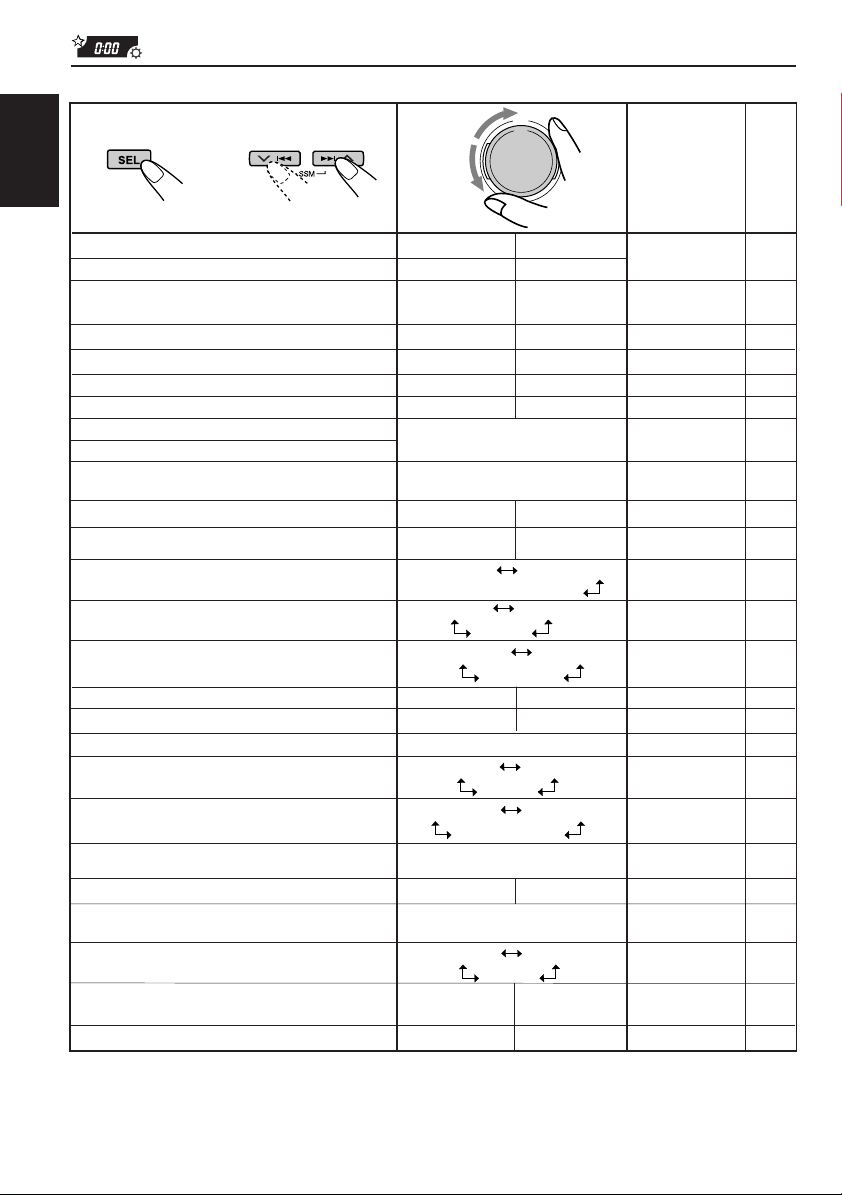
Preferred Setting Mode (PSM) items
1
ENGLISH
CLOCK HOUR Hour adjustment
CLOCK MIN Minute adjustment
EQ LINK Sound control memory
24H/12H 24/12-hour time display
AUTO ADJ Automatic clock setting
CLOCK DISP Clock display
TUNER DISP Tuner display
PTY STBY PTY standby
PTY SEARCH PTY search
TA VOL Traffic announcement
P-SEARCH Programme search
DAB AF*
LEVEL/EQ Equalizer/Level indicator
DIMMER Dimmer mode
TELEPHONE Telephone muting
BEEP SW Key-touch tone
P.AMP SW** Power amplifier switch
CONTRAST Display contrast
SCROLL Scroll mode
CUTOFF F** Subwoofer cutoff
LINE ADJ** Line input level
EXT INPUT*** External input selection
AUX ADJ Auxiliary input level
KEY SELECT** External key-operation
IF FILTER Intermediate frequency
DEMO MODE Demonstration mode
• Press SEL (select) to finish the setting.
* Displayed only when the DAB tuner is connected.
** ONLY for KD-SH77R
***ONLY for KD-SH55R — Displayed only when one of the following sources is selected — FM, AM,
CD and AUX INPUT.
24
2
Select.Hold.
linkage
volume
Alternate frequency
search
Frequency
adjustment
adjustment
mode selection
filter
3
Set.
Counterclockwise
Back Advance
Back Advance
LINK OFF LINK ON
12HOUR 24HOUR
ADJUST OFF ADJUST ON
CLOCK OFF CLOCK ON
FREQUENCY PS NAME
29 program types
(See pages 13 and 16.)
TA VOL 00 – TA VOL 50
SEARCH OFF SEARCH ON
AF OFF AF ON
EQ ONLY LEVEL+EQ
LEVEL ONLY
AUTO OFF
MUTING OFF MUTING1
MUTING2
BEEP OFF BEEP ON
P.AMP OFF P.AMP ON
CONTRAST 1 – CONTRAST 10
ONCE AUTO
FREQ MID FREQ HIGH
FREQ LOW
L.ADJ 00 – L.ADJ 05
CD CHANGER LINE INPUT
A.ADJ 00 – A.ADJ 05
DVD VCR
WIDE AUTO
DEMO OFF DEMO ON
Clockwise
ON
OFF
OFF
Factory-preset
settings
0:00
LINK OFF
24HOUR
ADJUST ON
CLOCK ON
PS NAME
NEWS
TA VOL 20
SEARCH OFF
AF ON
EQ ONLY
AUTO
MUTING OFF
BEEP ON
P.AMP ON
CONTRAST 5
ONCE
FREQ MID
L.ADJ 00
CD CHANGER
A.ADJ 00
DVD
AUTO
DEMO ON
See
page
23
21
23
15
25
15
13
15
14
37
25
25
25
25
25
25
25
25
26
26
26
26
26
26
Page 25

To set the clock display – CLOCK DISP
You can set the clock to be shown on the display
when the unit is turned on.
When shipped from the factory, the clock is set to
be shown on the display.
• CLOCK ON: Clock display is turned on.
• CLOCK OFF: Clock display is turned off.
To select the level meter – LEVEL/EQ
You can select the level display according to your
preference.
When shipped from the factory, this mode is set to
“EQ ONL Y.”
• EQ ONLY: Equalizer pattern is displayed.
• LEVEL+EQ: Equalizer pattern is displayed
along with audio level meter.
• LEVEL ONLY:Audio Level meter illuminates
upward and downward from
center.
To turn on/off the power amplifier switch
– P. AMP SW. (For KD-SH77R only)
You can switch off the built-in amplifier and send
the audio signals only to the external amplifier(s)
to get clear sounds and to prevent internal heat
buildup inside this unit.
When shipped from the factory, the power
amplifier switch is turned on so that the built-in
amplifier works.
• P. AMP ON: Select this mode when not using
external amplifier(s).
• P. AMP OFF: Select this mode when using
external amplifier(s).
To adjust the display contrast level
– CONTRAST
You can adjust the display contrast level among 1
(dark) to 10 (bright). When shipped from the
factory, the display contrast level is set at level 5.
ENGLISH
To select the dimmer mode – DIMMER
When you turn on the car head lights, the display
automatically dims (Auto Dimmer).
When shipped from the factory, Auto Dimmer
mode is activated.
• AUTO: Activates Auto Dimmer.
• OFF: Cancels Auto Dimmer .
• ON: Always dims the display.
Note:
Auto Dimmer equipped for this unit may not work
correctly on some vehicles, particularly on those
having a control dial for dimming.
In this case, set the dimmer mode to “ON” or “OFF.”
To select the telephone muting – TELEPHONE
This mode is used when a cellular phone system
is connected. Depending on the phone system
used, select either “MUTING 1” or “MUTING 2,”
whichever mutes the sounds from this unit. When
shipped from the factory , this mode is deactiv ated.
• MUTING 1: Select this if this setting can
mute the sounds.
• MUTING 2: Select this if this setting can
mute the sounds.
• MUTING OFF: Cancels the telephone muting.
To tur n on/off the key-touch tone – BEEP SW
You can deactivate the key-touch tone if you do
not want it to beep each time you press a button.
When shipped from the factory, the key-touch tone
is activated.
• BEEP ON: Activates the key-touch tone.
• BEEP OFF: Deactivates the key-touch tone.
To select the scroll mode – SCROLL
You can select the scroll mode for the disc
information if it consists of more than 10
characters.
When shipped from the factory, Auto Scroll mode
is set to “ONCE.”
• ONCE: Scrolls only once.
• AUTO: Repeats the scroll (5-second
intervals in between).
• OFF: Cancels A uto Scroll.
Note:
Even if the scroll mode is set to “OFF,” you can scroll
the display by pressing D (display) for more than 1
second.
To select the subwoofer cutoff frequency
– CUTOFF F (For KD-SH77R only)
When a subwoofer is connected to this unit,
select an appropriate cutoff frequency level for
your subwoofer.
When shipped from the factory, the subwoofer
cutoff frequency is set to “FREQ MID.”
• FREQ LOW: Frequencies higher than 50 Hz
are cut off to the subwoofer.
• FREQ MID: Frequencies higher than 80 Hz
are cut off to the subwoofer.
• FREQ HIGH: Frequencies higher than 120 Hz
are cut off to the subwoofer.
25
Page 26

To adjust the line input level – LINE ADJ
(For KD-SH77R only)
Adjust the line input level properly when an
external component is connected to the LINE IN
plugs.
ENGLISH
When shipped from the factory, the line input level
is set at level 00.
If the input level of the connected component is
not high enough, increase the input level properly.
Without adjusting the line input level, you may be
surprised at a loud sound when you change the
source from the external component to another
source.
To select the external component to use
– EXT INPUT (For KD-SH55R only)
You can connect the external component to the
CD changer jack on the rear using the Line Input
Adaptor KS-U57 (not supplied).
To use the external component as the playback
source through this unit, you need to select which
component – CD changer or external component
– to use.
When shipped from the factory, CD changer is
selected as the external component.
• LINE INPUT: To use the external component
• CD CHANGER: To use the CD changer.
Note:
For connecting the Line Input Adaptor KS-U57 and the
external component, refer to the Installation/
Connection Manual (separate volume).
other than CD changer.
To adjust the auxiliary input level
– AUX ADJ
Adjust the auxiliary input level properly when an
external component is connected to the auxiliary
input jack.
When shipped from the factory, the auxiliary input
level is set at le vel 00.
If the input level of the connected component is
not high enough, increase the input level properly.
Without adjusting the line input level, you may be
surprised at a loud sound when you change the
source from the external component to another
source.
To select the target component to operate
through this receiver
– KEY SELECT (For KD-SH77R only)
You can operate either JVC’s VCR or DVD player
through this receiver, by using the number buttons
on the control panel.
When shipped from the factory, these number
buttons are set to be used for the DVD operations.
To use these number buttons on the control panel
for DVD or VCR operations, see page 30.
To change the FM tuner selectivity
– IF FILTER
In some areas, adjacent stations may interfere
with each other. If this interference occurs, noise
may be heard. This unit has been preset to
automatically reduce this interference noise
(“AUTO”) when shipped from the factory.
• AUTO: When this type of interference
occurs, this unit automatically
increases the tuner selectivity so
that interference noise will be
reduced. (But the stereo effect will
also be lost.)
• WIDE: Subject to the interference from
adjacent stations, but sound
quality will not be degraded and
the stereo effect will not be lost.
To turn the demo mode on or off
– DEMO MODE
You can turn the demo mode on or off. When
shipped from the factory, “DEMO ON” is selected.
• DEMO ON: Turns the demo mode on. The
demonstration will start
automatically if no sound comes
in for 3 minutes.
• DEMO OFF: Turns the demo mode off.
Note:
If the unit has been reset (and the power is on),
demonstration will start if no sound comes in for about
10 seconds.
26
Page 27

Assigning names to the sources
You can assign names to CDs and the external
components.
After assigning a name, it will appear on the
display when you select the source.
Sources Maximum number of
CDs * up to 32 characters
External components up to 10 characters
* You cannot assign a name to a CD Text.
1
Select a source you want to assign a
name to.
2
Press and hold SEL (select) for more
than 2 seconds while pressing D
(display).
the characters
(up to 40 discs)
When you select a source,
the power automatically
comes on.
Each time you press the
button, the source changes
as described on page 7.
3
Select the character set you want while
” is flashing.
“
Each time you press the
button, the character set
changes as follows:
Capital letters ( )
Numbers and symbols ( )
4
Select a character.
About the available characters,
see page 38.
5
Move the cursor to the next
(or previous) character position.
6
Repeat steps 3 to 5 until you finish
inputting the name.
7
Finish the procedure while the last
selected character is flashing.
Small letters ( )
ENGLISH
Ex.: When you select “CD PLAY” as the source
To erase the input characters
Insert spaces using the same procedure
described above.
Notes:
• When you try to assign a name to the 41st disc, “NAME
FULL” appears on the display. (In this case, delete
unwanted names before assignment.)
• When the CD changer is connected, you can assign
names to CDs in the CD changer. These names can
also be shown on the display if you insert the CDs in
this unit.
27
Page 28
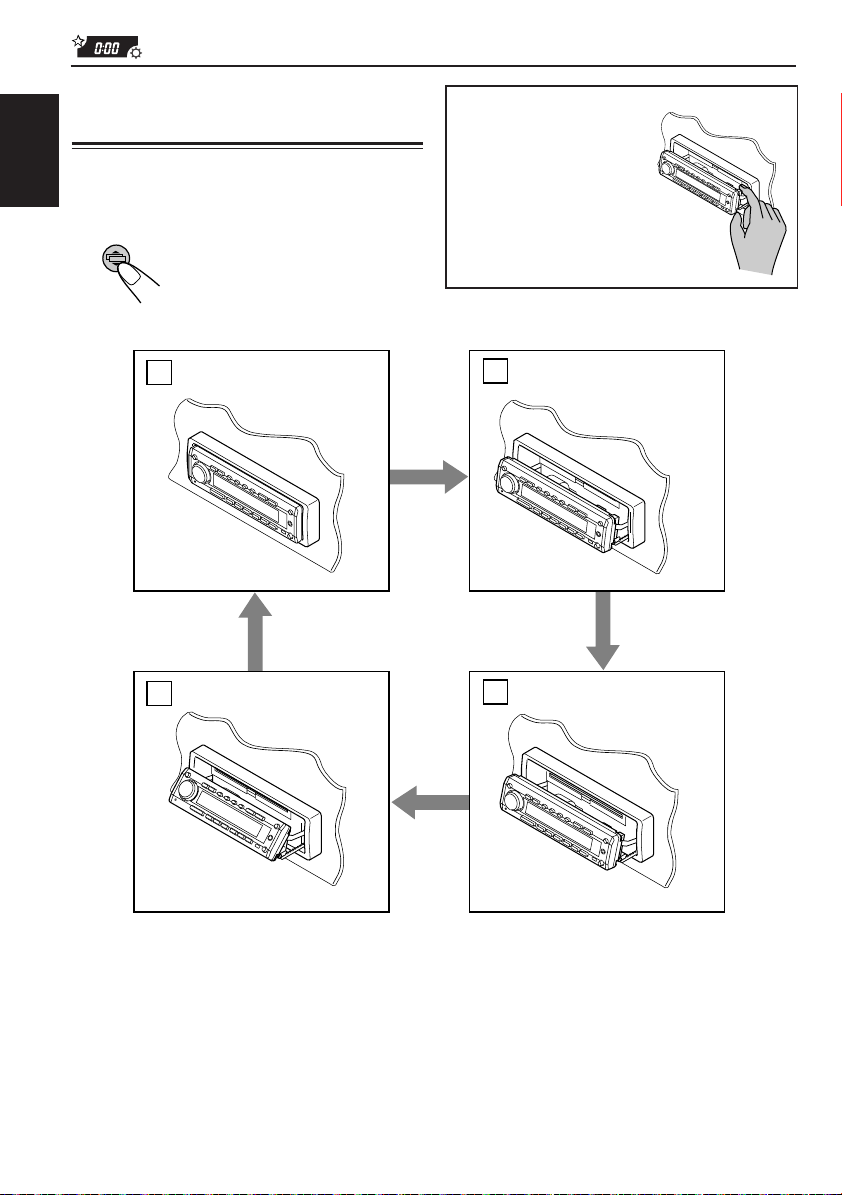
Changing the control panel
angle
You can change the angle of the control panel in
ENGLISH
three positions.
Adjust the angle to the position you want.
Each time you press the button,
the panel angle changes as
follows:
CAUTION:
NEVER insert your finger
between the control panel
and the unit, as it may get
caught and hurt.
A
D
B
C
When using the remote controller
Press ANGLE ∞ repeatedly. Each time you press the button, the control panel changes its angle — Å,
ı, Ç, then Î positions in sequence.
To restore the control panel to the original position,
press ANGLE 5. Each time you press the button, the control panel reverses its angle — Î, Ç, ı,
then Å positions in sequence.
28
Page 29
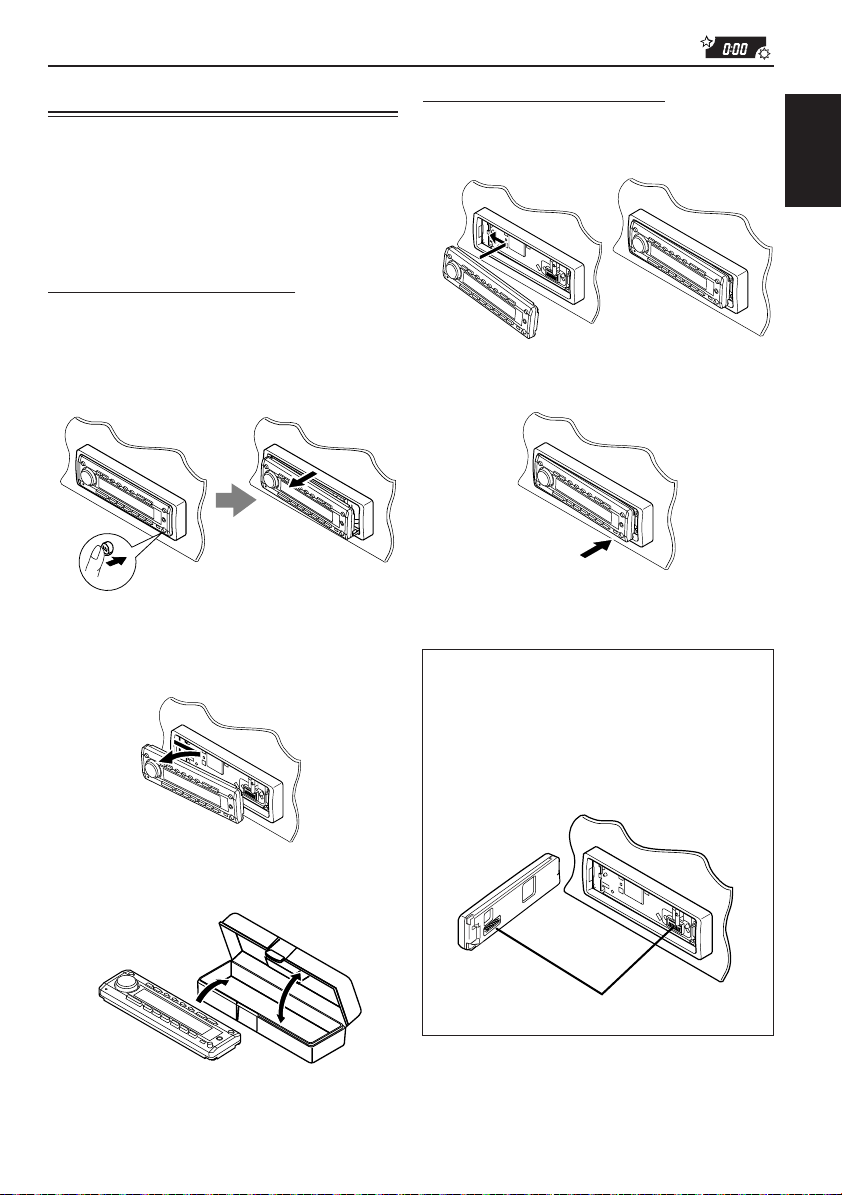
Detaching the control panel
You can detach the control panel when leaving
the car.
When detaching or attaching the control panel,
be careful not to damage the connectors on the
back of the control panel and on the panel
holder.
Detaching the control panel
Before detaching the control panel, be sure to
turn off the power.
1
Unlock the control panel.
The control panel
comes out toward you.
2
Move the control panel to the right,
then pull it out of the unit.
Attaching the control panel
1
Insert the left side of the control panel
into the groove on the panel holder.
2
Press the right side of the control
panel to fix it to the panel holder.
Note on cleaning the connectors:
If you frequently detach the control panel, the
connectors will deteriorate.
To minimize this possibility, periodically wipe
the connectors with a cotton swab or cloth
moistened with alcohol, being careful not to
damage the connectors.
ENGLISH
3
Put the detached control panel into the
provided case.
Connectors
29
Page 30
ENGLISH
EXTERNAL COMPONENT OPERATIONS
MD player, etc.
auxiliary input
Playing external components
For KD-SH77R:
You can connect two external components to this
unit.
Connect one to the auxiliary input jack on the
control panel, and the other to the LINE IN plugs
on the rear.
If you connect a JVC’s VCR or DVD player
to the LINE IN plugs
You can operate it through this receiver using
the number buttons on the control panel.
When you operate the VCR, you have to
change the operation mode of the number
buttons from the DVD operation mode to the
VCR operation mode. (See “To select the
target component to operate through this
receiver – KEY SELECT” on page 26.)
If the input level of the external
components is not high enough, increase
the input level properly.
Without adjusting the input level, you may be
surprised at a loud sound when you change
the source from the external components to
another. (See “To adjust the line input level –
LINE ADJ” and “To adjust the auxiliary input
level – AUX ADJ” on page 26.)
1
Select the external component (AUX
INPUT or LINE INPUT).
When you select a source,
the power automatically
comes on.
Each time you press the
button, the source changes
as described on page 7.
AUX INPUT: To select the component
connected to the auxiliary
input jack on the control
panel
LINE INPUT: To select the component
2
Turn on the connected component
connected to the LINE IN
plug
and start playing the source.
• If connecting a JVC’s DVD player or VCR,
you can perform the following operations.
30
Page 31

When connecting a DVD player:
: Turns on and off the power.
3:
Starts playback.
¡:
• Fast-forw ard the track when pressed and
held.
• Skip to the beginning of the next tracks
when pressed briefly.
1:
• Reverses the track when pressed and
held.
• Go back to the beginning of the current
track when pressed briefly.
Go back to the beginning of the previous
tracks when pressed consecutively.
7:
Stops operations.
Note:
When you press the above buttons, the display shows
“DVD” and its operation mode (such as 3, 7 ).
When connecting a VCR:
: Turns on and off the power.
3:
Starts playback.
¡:
Fast-winds a tape when pressed and held.
1:
Rewinds a tape when pressed and held.
7:
Stops operations.
Note:
When you press the above buttons, the display shows
“VCR” and its operation mode (such as 3, 7 ).
For KD-SH55R:
You can connect two external components to this
unit.
Connect one to the auxiliary input jack on the
control panel, and the other to the CD changer
jack on the rear.
Before operating the external component
connected to the CD changer jack, select
the external input correctly. (See “To select
the external component to use – EXT INPUT”
on page 26.)
1
Select the external component (AUX
INPUT or LINE INPUT).
When you select a
source, the power
automatically comes on.
Each time you press the
button, the source
changes as described on
page 7.
AUX INPUT: To select the component
connected to the auxiliary
input jack on the control
panel
LINE INPUT: To select the component
• If “LINE INPUT” cannot be selected, see
page 26 and select the external input (“LINE
INPUT”). This cannot be used together with
the CD changer.
2
Turn on the connected component
connected to the CD changer
jack
and start playing the source.
ENGLISH
If the input level of the external component
connected to the auxiliary input jack is not
high enough, increase the input level
properly.
Without adjusting the input level, you may be
surprised at a loud sound when you change
the source from the external component to
another. (See “To adjust the auxiliary input
level – AUX ADJ” on page 26.)
31
Page 32

ENGLISH
CD CHANGER OPERATIONS
We recommend that you use one of the CH-X series
with your unit.
If you have another CD automatic changer , consult
your JVC IN-CAR ENTERTAINMENT for
connections.
• For example, if your CD automatic changer is one of
the KD-MK series, you need a cord (KS-U15K) for
connecting it to this unit.
Before operating your CD automatic changer:
• Refer also to the Instructions supplied with your
CD changer.
• If no discs are in the magazine of the CD
changer or the discs are inserted upside down,
“NO DISC” will appear on the display. If this
happens, remove the magazine and set the
discs correctly.
• If “RESET 1” – “RESET 8” appears on the
display, something is wrong with the
connection between this unit and the CD
changer. If this happens, check the connection
and make sure the cords are connected firmly .
Then, press the reset button of the CD
changer.
Playing CDs
Select the CD automatic changer
(CD CHANGER).
When you select a source,
the power automatically
comes on.
Each time you press the
button, the source changes
as described on page 7.
Disc number
To fast-forward or reverse the track
Press and hold ¢ ,
while playing a CD, to
fast-forw ard the track.
Press and hold 4,
while playing a CD , to
reverse the track.
T o go to the next track or the previous tracks
Press ¢ briefly, while
playing a CD , to go ahead to
the beginning of the next
track. Each time y ou press
the button consecutively, the
beginning of the next track is
located and played back.
Press 4 briefly, while
playing a CD , to go bac k to
the beginning of the current
track. Each time y ou press
the button consecutively, the
beginning of the previous
tracks is located and play ed
back.
32
Track number
Elapsed playing time
Page 33

To go to a particular disc directly
INTRO1 INTRO2
Canceled
REPEAT1 REPEAT2
Canceled
Press the number button corresponding to the disc
number to start its playback (while the CD changer
is playing).
• To select a disc number from 1 – 6:
Press 1 (7) – 6 (12) briefly.
• To select a disc number from 7 – 12:
Press and hold 1 (7) – 6 (12) for more than 1
second.
Disc number
Track number
Ex.: When disc number 3 is selected
Elapsed playing time
T o play back tracks repeatedly (Repeat Play)
1 Press M/B (mode/band) while
playing a CD . This unit enters the
functions mode.
2 Press RPT (repeat), while still
in the functions mode, so that
the RPT indicator lights up on
the display.
Then, each time you press
RPT, the repeat play mode
changes as follows:
Mode
REPEAT1 Lights The current track (or
REPEAT2 Flashes All tracks of the current
RPT
Indicator
Plays repeatedly
specified track).
disc (or specified disc).
ENGLISH
Selecting CD playback modes
T o play back tracks at random (Random Play)
1 Press M/B (mode/band) while
playing a CD. This unit enters
the functions mode.
2 Press RND (random), while still
in the functions mode, so that
the RND indicator lights up on
the display.
Then, each time you press
RND, the random play mode
changes as follows:
RANDOM1
Mode
RANDOM1 Lights All tracks of the current
RANDOM2 Flashes All tracks of all discs
RND
Indicator
Plays at random
disc, then the tracks of
the next disc and so on.
inserted in the magazine.
RANDOM2
Canceled
To play back tracks repeatedly (Intro scan)
1 Press M/B (mode/band) while
playing a CD. This unit enters
the functions mode.
2 Press INT (intro scan), while still
in the functions mode, so that
“INTRO” appears on the displa y .
Then, each time you press INT,
4
Mode
INTRO1 Of all tracks on all
INTRO2 Of the first track on each
the intro scan mode changes as
follows:
Indicator
Track number
flashes
Disc number
flashes
Plays the beginnings
(15 seconds)
inserted disc.
inserted disc.
33
Page 34

ENGLISH
DAB TUNER OPERATIONS
We recommend that you use DAB (Digital Audio
Broadcasting) tuner KT-DB1500 with your unit.
If you have another DAB tuner, consult your JVC
IN-CAR ENTERTAINMENT dealer.
• Refer also to the Instructions supplied with your
DAB tuner.
What is DAB system?
DAB is one of the digital radio broadcasting
systems available toda y . It can deliver CD quality
sound without any annoying interference and
signal distortion. Furthermore, it can carry text,
pictures and data.
In contrast to FM broadcast, where each
programme is transmitted on its own frequency ,
DAB combines several programmes (called
“services”) to form one “ensemble.”
With the DAB tuner connected with this unit,
you can enjoy these DAB services.
Tuning into an ensemble and
one of the services
A typical ensemble has 6 or more programmes
(services) broadcast at the same time. After tuning
into an ensemble, you can select a service you
want to listen to.
1
Select the DAB tuner.
When you select a
source,
the power automatically
comes on.
Each time you press the
button, the source
changes as described on
page 7.
2
Select the DAB band (DAB1, DAB2,
or DAB3).
Each time you press and
hold the button for more
than 1 second, the DAB
band changes as follows:
D 1
(DAB 1) (DAB 2) (DAB 3)
D 2
D 3
34
Note:
This receiver has three DAB bands (DAB 1, DAB
2, DAB 3). You can use any of them to tune into an
ensemble.
Page 35

3
Ensemble name
Service name
Channel number
Frequency
Start searching an ensemble.
Press ¢ to
search ensembles of
higher frequencies.
Press 4 to search
ensembles of lower
frequencies.
When an ensemble is received, searching
stops.
To stop searching before an ensemble is
received, press the same button you have
pressed for searching.
4
Select a service you want to listen to.
To change the display information while
tuning into an ensemble
Normally service name is shown on the display.
If you want to change the display information,
press D (display).
Each time you press the button, the following
information appears on the display for a while.
ENGLISH
1 Press M/B (mode/band).
Within
5 seconds
2 Press ¢ or
4 to select a service
you want.
To tune into a particular ensemble without
searching:
1 Press SOURCE to select DAB tuner as the
source.
2 Press and hold M/B (mode/band) for more than
1 second repeatedly to select the DAB band
(DAB 1, DAB 2 or DAB 3).
3 Press and hold ¢ or 4 for more
than 1 second. “MANUAL” flashed on the
display.
4 Press ¢ or 4 repeatedly until the
ensemble you want is reached.
• If you hold down the button, the ensembles
keep changing until you release the button.
35
Page 36

Storing DAB services in
memory
You can preset up to 6 DAB services in each
ENGLISH
DAB band (DAB1, DAB2 and DAB3) manually.
1
Select the DAB tuner.
When you select a
source,
the power automatically
comes on.
Each time you press the
button, the source
changes as described on
page 7.
2
Select the DAB band (DAB 1, DAB 2
or DAB 3) you want.
Each time you press and
hold the button for more
than 1 second, the DAB
band changes as follows:
D 1
(DAB 1) (DAB 2) (DAB 3)
3
Tune into an ensemble you want.
D 2
D 3
5
Press and hold the number button
(in this example, 1) you want to
store the selected service into for
more than 2 seconds.
“P 1” flashes for a while.
6
Repeat the above procedure to store
other DAB services into other preset
numbers.
Notes:
• A previously preset D AB service is erased when a ne w
DAB service is stored in the same preset number.
• Preset DAB services ar e erased when the power supply
to the memory circuit is interrupted (for example,
during battery replacement). If this occurs, pr eset the
DAB services again.
36
4
Select a service of the ensemble you
want.
1 Press M/B (mode/band).
Within
5 seconds
2 Press and hold ¢
or 4 to select a
service you want.
Page 37

Tuning into a preset DAB
service
You can easily tune into a preset DAB service.
Remember that you must store services first. If
you have not stored them yet, see page 36.
1
Select the DAB tuner.
When you select a source,
the power automatically
comes on.
Each time you press the
button, the source
changes as described on
page 7.
What you can do more with DAB
Tracing the same program automatically
(Alternative Reception)
You can keep listening to the same program.
• While receiving a DAB service:
When driving in an area where a service cannot
be received, this unit automatically tunes in
another ensemble or FM RDS station,
broadcasting the same program.
• While receiving an FM RDS station:
When driving in an area where a DAB service is
broadcasting the same program as the FM RDS
station is broadcasting, this unit automatically
tunes into the DAB service.
ENGLISH
2
Select the DAB band (DAB1, DAB2
or DAB3) you want.
Each time you press and
hold the button for more
than 1 second, the DAB
band changes as follows:
D 1
(DAB 1) (DAB 2) (DAB 3)
3
Select the number (1 – 6) for the
D 2
preset DAB service you want.
D 3
Note:
When reception switches between DAB and FM, the
listening volume level may increase or decrease
inconveniently. This change in the volume level results
from unequal audio injection levels at br oadcaster site ,
but not from the malfunction of this unit.
To use Alternative Reception
When shipped from the factory, Alternative
Reception is activated.
• See also “changing the general settings (PSM)”
on page 23.
1 Press and hold SEL (select) for more than 2
seconds so that one of the PSM items appears
on the display.
2 Press ¢ or 4 to select “DAB AF”
(alternative frequency).
3 Turn the control dial to select the desired mode.
• AF ON: Traces the program among DAB
services and FM RDS stations
— Alternative Reception. The AF
indicator lights up on the display
(see page 11).
• AF OFF:Deactivates Alternative Reception.
Note:
When Alternative Reception (for DAB services) is
activated, Network-Tracking Reception (for RDS
stations: see page 11) is also activated automatically.
On the other hand, Network-Tracking Reception
cannot be deactivated without deactivating
Alternative Reception.
4 Press SEL (select) to finish the setting.
37
Page 38

ADDITIONAL INFORMATION
Sound modes (preset value settings)
The list below is the preset value settings for each sound mode.
Once you have changed their settings, you can reset to the factory settings by reassigning the
ENGLISH
preset values below. (See page 22 to reassignment procedure.)
Indication Preset equalizing values
FREQ. WIDTH LOW LEVEL FREQ. WIDTH MID LEVEL FREQ. HIGH LEVEL
FLAT 50 Hz 1 00 700 Hz 1 00 8 kHz 00
Hard Rock 80 Hz 2 +03 700 Hz 1 00 8 kHz +02
R & B 80 Hz 3 +03 2 kHz 2 +01 12 kHz +03
POP 120 Hz 1 +02 2 kHz 2 +01 12 kHz +02
JAZZ 80 Hz 1 +03 1 kHz 1 +01 8 kHz +03
DanceMusic
Country 50 Hz 4 +02 700 Hz 1 00 12 kHz +02
Reggae 80 Hz 1 +03 2 kHz 2 +02 12 kHz +02
Classic 120 Hz 1 +03 1 kHz 1 00 8 kHz +02
User 1 50 Hz 1 00 700 Hz 1 00 8 kHz 00
User 2 50 Hz 1 00 700 Hz 1 00 8 kHz 00
User 3 50 Hz 1 00 700 Hz 1 00 8 kHz 00
50 Hz 2 +04 700 Hz 1 –02 8 kHz +01
Available characters
You can use the following characters to assign names to CDs and external components.
(See page 27.)
Capital letters
38
ABCDE
FGHIJ
KLMNO
PQRST
UVWXY
space
Z
Small letters
abcde
fghij
kl mno
pqr st
uvwxy
space
z
Numbers and symbols
01234
56789
!
&
+,
:
?@_ `
”#$%
’()
–
;
<
*
.
/
=
>
space
Page 39

MAINTENANCE
Handling CDs
This unit has been designed to reproduce the
CDs bearing the following marks.
You can also play back your original CD-Rs
(Recordable) and CD-RWs (Rewritable) on this
receiver.
This unit is not compatible with MP3.
How to handle CDs
When removing a CD from its
case, press down the center
holder of the case and lift the
CD out, holding it by the edges.
• Always hold the CD by the edges.
Do not touch its recording surface.
When storing a CD into its case, gently insert
the CD around the center holder (with the printed
surface facing up).
• Make sure to store CDs into the cases after
use.
To keep CDs clean
A dirty CD may not play
correctly. If a CD does become
dirty, wipe it with a soft cloth in
a straight line from center to
edge.
To play new CDs
New CDs may have some
rough spots around the inner
and outer edges. If such a CD
is used, this unit may reject the
CD.
To remove these rough spots, rub the edges with
a pencil or ball-point pen, etc.
Moisture condensation
Moisture may condense on the lens inside the
CD player in the following cases:
• After starting the heater in the car.
• If it becomes very humid inside the car.
Should this occur, the CD player may
malfunction. In this case, eject the CD and
leave the unit turned on for a few hours until
the moisture evaporates.
COMPACT
DIGITAL AUDIO
Center holder
CAUTIONS:
• Do not insert 8cm (3 3/16") CDs (single CDs) into
the loading slot. (Such CDs cannot be ejected.)
• Do not insert any CD of unusual shape — like a
heart or flower; otherwise, it will cause a
malfunction.
• Do not expose CDs to dir ect sunlight or any heat
source or place them in a place subject to high
temperature and humidity . Do not leave them in a
car .
• Do not use any solvent (for example, con ventional
record cleaner, spray, thinner, benzine, etc.) to
clean CDs.
When playing a CD-R or CD-RW
User-edited CD-Rs (Recordable) and CD-RWs
(Rewritable) can be played back only if they are
already “finalized.”
• You can play back your original CD-Rs or CDRWs recorded in music CD format. (However,
they may not be played back depending on their
characteristics or recording conditions.)
• Before playing back CD-Rs or CD-RWs, read
their instructions or cautions carefully.
• Some CD-Rs or CD-RWs may not be played
back on this unit because of their disc
characteristics, damage or stain on them, or if
the player’s lens is dirty.
• CD-Rs or CD-RWs are susceptible to high
temperatures or high humidity; so do not leave
them inside your car.
• CD-RWs may require a longer readout time.
(This is caused by the fact that the reflectance
of CD-RWs is lower than for regular CDs.)
About mistracking:
Mistracking may result from driving on
extremely rough roads. This does not damage
the unit and the CD, but will be annoying.
We recommend that you stop CD play while
driving on such rough roads.
ENGLISH
39
Page 40

TROUBLESHOOTING
What appears to be trouble is not always serious. Check the following points before calling a service
center.
Symptoms
• CD cannot be played back.
ENGLISH
• CD sound is sometimes
interrupted.
• Sound cannot be heard from
the speakers.
• SSM (Strong-station
Sequential Memory)
automatic preset does not
work.
• Static noise while listening to
the radio.
• “NO DISC” appears on the
display.
• “RESET 8” appears on the
display.
Causes
CD is inserted upside down.
You are driving on rough roads.
CD is scratched.
Connections are incorrect.
The volume level is set to the
minimum level.
Connections are incorrect.
Signals are too weak.
The antenna is not connected
firmly.
No CD is in the magazine.
This unit is not connected to a
CD changer correctly.
Remedies
Insert the CD correctly.
Stop CD play while driving on
rough roads.
Change the CD.
Check the cords and
connections.
Adjust it to the optimum level.
Check the cords and
connections.
Store stations manually.
Connect the antenna firmly.
Insert CD.
Connect this unit and the CD
changer correctly and press the
reset button of the CD changer.
• “RESET 1” – “RESET 7”
appears on the display.
• “NO DISC” or “EJECT ERR”
appears on the display and
CD cannot be ejected.
• No message appears on the
display but CD cannot be
ejected.
• This unit does not work at all.
• The CD changer does not
work at all.
40
The CD player may function
incorrectly.
The built-in microcomputer may
function incorrectly due to noise,
etc.
Press the reset button of the
CD changer.
While pressing , press and
hold 0 for more than 2 seconds.
(Be careful not to drop the CD
when ejecting.)
Press the reset button on the
control panel. (See page 2.)
Page 41

SPECIFICATIONS
AUDIO AMPLIFIER SECTION
Maximum Power Output:
Front: 50 W per channel
Rear: 50 W per channel
Continuous Power Output (RMS):
Front: 19 W per channel into 4 Ω, 40 Hz
to 20 000 Hz at no more than
0.8% total harmonic distortion.
Rear: 19 W per channel into 4 Ω, 40 Hz
to 20 000 Hz at no more than
0.8% total harmonic distortion.
Load Impedance: 4 Ω (4 Ω to 8 Ω allowance)
Equalizer Control Range:
LOW: ±12 dB (50 Hz, 80 Hz, 120 Hz)
MID: ±12 dB (700 Hz, 1 kHz, 2 kHz)
HIGH: ±12 dB (8 kHz, 12 kHz)
Frequency Response: 40 Hz to 20 000 Hz
Signal-to-Noise Ratio: 70 dB
Line-In Level/Impedance:
KD-SH77R : 1.5 V/20 kΩ load
Line-Out Level/Impedance:
KD-SH55R : 2.0 V/20 kΩ load (full scale)
KD-SH77R : 4.0 V/20 kΩ load (full scale)
Output Impedance: 1 kΩ
auxiliary input jack : (3.5 mm dia. stereo mini jack)
TUNER SECTION
Frequency Range:
FM: 87.5 MHz to 108.0 MHz
AM: (MW) 522 kHz to 1 620 kHz
(LW) 144 kHz to 279 kHz
CD PLAYER SECTION
Type: Compact disc player
Signal Detection System: Non-contact optical
pickup (semiconductor laser)
Number of channels: 2 channels (stereo)
Frequency Response: 5 Hz to 20 000 Hz
Dynamic Range: 98 dB
Signal-to-Noise Ratio: 102 dB
Wow and Flutter: Less than measurable limit
GENERAL
Power Requirement:
Operating Voltage: DC 14.4 V
(11 V to16 V allowance)
Grounding System: Negative ground
Allowable Operating Temperature: 0°C to +40°C
Dimensions (W × H × D):
Installation Size: 182 mm × 52 mm × 161 mm
Panel Size: 188 mm × 58 mm × 17 mm
Mass: 1.8 kg (excluding accessories)
Design and specifications subject to change without
notice.
ENGLISH
[FM T uner]
Usable Sensitivity: 11.3 dBf (1.0 µV/75 Ω)
50 dB Quieting Sensitivity:
16.3 dBf (1.8 µV/75 Ω)
Alternate Channel Selectivity (400 kHz):
65 dB
Frequency Response: 40 Hz to 15 000 Hz
Stereo Separation: 30 dB
Capture Ratio: 1.5 dB
[MW T uner]
Sensitivity: 20 µV
Selectivity: 35 dB
[LW T uner]
Sensitivity: 50 µV
41
Page 42

Having TROUBLE with operation?
Please reset your unit
Refer to page of How to reset your unit
Haben Sie PROBLEME mit dem Betrieb?
Bitte setzen Sie Ihr Gerät zurück
Siehe Seite Zurücksetzen des Geräts
Vous avez des PROBLÈMES de fonctionnement?
Réinitialisez votre appareil
Référez-vous à la page intitulée Comment réinitialiser votre appareil
Hebt u PROBLEMEN met de bediening?
Stel het apparaat terug
Zie de pagina met de paragraaf Het apparaat terugstellen
EN, GE, FR, NL
VICTOR COMPANY OF JAPAN, LIMITED
0201MNMMDWJES
JVC
Page 43

KD-SH77R/KD-SH55R
53 mm
(2-1/8")
184 mm
(7-1/4")
Installation/Connection Manual
Einbau/Anschlußanleitung
Manuel d’installation/raccordement
Handleiding voor installatie/aansluiting
LVT0629-001A
[E/EX]
0201MNMMDWJES
JVC
EN, GE, FR, NL
ENGLISH
• This unit is designed to operate on 12 V
DC, NEGATIVE ground electrical systems.
INSTALLATION
(IN-DASH MOUNTING)
• The following illustration shows a typical
installation. However, you should make
adjustments corresponding to your specific
car. If you have any questions or require
information regarding installation kits,
consult your JVC IN-CAR ENTERTAINMENT
dealer or a company supplying kits.
1
Before mounting: Press (Control
Panel Release button) to detach the control
panel if already attached.
* When shipped from the factory, the control
panel is packed in the hard case.
2
Remove the trim plate.
3
Remove the sleeve after disengaging the
sleeve locks.
1 Stand the unit.
Note: When you stand the unit, be careful
not to damage the fuse on the rear.
2 Insert the 2 handles between the unit and
the sleeve, as illustr ated, to disengage the
sleeve locks.
3 Remove the sleeve.
Note: Be sure to keep the handles for
future use after installing the unit.
4
Install the sleeve into the dashboard.
* After the sleeve is correctly installed into
the dashboard, bend the appropriate tabs
to hold the sleeve firmly in place, as
illustrated.
5
Fix the mounting bolt to the rear of the unit’s
body and place the rubber cushion over the
end of the bolt.
6
Do the required electrical connections.
7
Slide the unit into the sleeve until it is lock ed.
8
Attach the trim plate.
9
Attach the control panel.
DEUTSCH
• Dieses Gerät ist für einen Betrieb in elektrischen
Anlagen mit 12 V Gleichstrom und (–) Erdung
ausgelegt.
EINBAU
(IM ARMATURENBRETT)
• Die folgende Abbildung zeigt einen typischen
Einbau. Dennoch müssen Sie entsprechend
Ihrem jeweiligen Auto Anpassungen
vornehmen. Bei irgendwelchen Fragen oder
wenn Sie Informationen hinsichtlich des
Einbausatzes brauchen, wenden Sie sich an
ihren JVC Autoradiohändler oder ein
Unternehmen das diese Einbausätze vertreibt.
1
Vor dem Einbau: Drücken Sie
(Schalttafel-Freigabetaste), um die Arretierung
der Schalttafel zu lösen, sofern diese bereits
angebracht ist.
* Bei der Auslieferung ab Werk ist die
Schalttafel im Etui verpackt.
2
Den Frontrahmen herausnehmen.
3
Die Halterung nach dem Entriegeln der
Halterungensperren abnehmen.
1 Das Gerät aufstellen.
Hinweis: Beim Aufstellen des Geräts
darauf achten, daß die Sicherung auf der
Rückseite nicht beschädigt wird.
2 Die 2 Griffe zwischen dem Gerät und der
Halterung wie abgebildet einstecken und
die Halterungensperren entriegeln.
3 Die Halterung entfernen.
Hinweis: Sicherstellen, daß die Griffe für
künftigen Gebrauch nach dem Einbau des
Geräts aufbewahrt werden.
4
Die Halterung im Armaturenbrett einbauen.
* Nach dem korrekten Einbau der Halterung
im Armaturenbrett, die entsprechenden
Riegel umknicken, um die Halterung an
ihrem Platz zu sichern, siehe Abbildung.
5
Die Befestigungsschraube an der Rückseite
des Gerätekörpers befestigen und das Ende
der Schraube mit einem Gummipuffer
abdecken.
6
Nehmen Sie die erforderlichen elektrischen
Anschlüsse vor.
7
Das Gerät in die Halterung schieben, bis es
einrastet.
8
Befestigen Sie die Frontrahmen.
9
Die Schalttafel anbringen.
FRANÇAIS
•
Cet appareil est conçu pour fonctionner sur des
sources de courant continu de 12 V à masse
NEGATIVE.
INSTALLATION (MONTAGE
DANS LE TABLEAU DE BORD)
•
L’illustration suivante est un exemple
d’installation typique. Cependant, vous devez
faire les ajustements correspondant à votre
voiture particulière. Si v ous av ez des questions
ou avez besoin d’information sur des kits
d’installation, consulter votre revendeur
d’autoradios JVC ou une compagnie
d’approvisionnement.
1
Avant le montage:
(déblocage du panneau de commande) pour
éventeullement détacher le panneau de
commande.
* Lorsque ce panneau de commande sort
d’usine, il est rangé dans un étui de tr ansport.
2
Retirer la plaque d’assemblage.
3
Libérer les verrous du manchon et retirer le
manchon.
1
Poser l’appareil à la verticale.
Remarque:
à la verticale, faire attention de ne pas
endommager le fusible situé sur l’arrière.
2
Insérer les 2 poignées entre l’appareil et le
manchon comme indiqué pour désengagé
les verrous de manchon.
3
Retirer le manchon.
Remarque:
poignées pour une utilisation ultérieur,
après l’installation de l’appareil.
4
Installer le manchon dans le tableau de bord.
* Après installation correcte du manchon dans
le tableau de bord, plier les bonnes pattes
pour maintenir fermement le manchon en
place, comme montré.
5
Monter le boulon de montage sur l’arrière du
corps de l’appareil puis passer l’amortisseur
en caoutchouc sur l’extrémité du boulon.
6
Réalisez les connexions électriques.
7
Faire glisser l’appareil dans le manchon jusqu’à
ce qu’il soit verrouillé.
8
Attachez la plaque d’assemblage.
9
Remonter le panneau de commande.
Lorsque vous mettez l’appareil
S’assurer de garder les
Appuyer sur
NEDERLANDS
• Dit apparaat mag worden gebruikt bij elektrische
systemen die werken op 12 V gelijkstroom met
negatieve aarding.
INSTALLATIE (INBOUW IN
HET DASHBOARD)
• Op de volgende afbeelding kunt u zien hoe de
installatie, normaal gesproken, in zijn werk gaat. U
moet echter bij de installatie rekening houden met
de bijzonderheden van uw eigen auto. Neem bij
vragen of voor meer bijzonderheden over
inbouwpakketten contact op met uw JVC car audio
dealer of een dealer of een bedrijf dat
inbouwpakketten levert.
1
V oordat u aan de montage van het apparaat
begint: Druk op (het bedieningspaneel
vrijgeven) als u het bedieningspaneel wilt
loskoppelen indien dit aan de eenheid is
vastgekoppeld.
* Standaar d wordt het bedieningspaneel bij het
verlaten van de fabriek los verpakt meegele v erd.
2
Verwijder de sierplaat.
3
Verwijder het huis nadat u de klemmen hebt
losgemaakt.
1 Zet het apparaat rechtop.
Opmerking: W anneer u het apparaat rechtop
zet, moet u erop letten dat u de zekering aan
de achterkant niet beschadigt.
2 Plaats de 2 hendels, zoals afgebeeld, tussen het
apparaat en het huis, om de klemmen los te
maken.
3 Verwijder het huis.
Opmerking: Bewaar de hendels nadat u het
apparaat hebt geïnstalleerd, zodat u ze ook in
de toekomst kunt gebruiken.
4
Installeer het huis in het dashboard.
* Nadat het huis op de juiste wijze in het dashboard
is geplaatst, moet u de palletjes, zoals afgebeeld,
stevig op hun plaats duwen.
5
Maak de bevestigingsbout aan de achterkant van
het apparaat vast en plaats de rubberdop over het
uiteinde van de bout.
6
Breng de vereiste elektrische verbindingen tot stand.
7
Schuif het apparaat in het huis totdat het
vergrendeld is.
8
Bevestig de sierplaat.
9
Bevestig het bedieningspaneel.
1
Control panel
Schalttafel
Panneau de commande
Bedieningspaneel
2
Trim plate
Frontrahmen
Plaque d’assemblage
Sierplaat
3
Slot
Schlitz
Fente
Sleuf
Handle
Griff
Poignée
Hendel
Fuse
Sicherung
Fusible
Zekering
Sleeve
Halterung
Manchon
Huis
Lock Plate
Arretierplättchen
Plaque de verrouillage
Vergrendelingsplaat
8
9
Control panel
Schalttafel
Panneau de commande
Bedieningspaneel
Rubber cushion
Gummipuffer
Amortisseur en caoutchouc
Rubberdop
Sleeve
Halterung
Manchon
Huis
4
7
4
Trim plate
Frontrahmen
Plaque d’assemblage
Sierplaat
Dashboard
Armaturenbrett
Tableau de bord
Dashboard
5
Mounting bolt
Befestigungsschraube
Boulon de montage
Bevestigingsbout
*
6
See “ELECTRICAL CONNECTIONS.”
Siehe „ELEKTRISCHE ANSCHLÜSSE“.
Référez-vous “RACCORDEMENTS
ELECTRIQUES” .
Zie “ELEKTRISCHE VERBINDINGEN”.
Page 44

•When using the optional stay
•Beim Verwenden der Anker-Option
•Lors de l’utilisation du hauban en option
•Wanneer u de steun gebruikt (facultatief)
• When installing the unit without using the sleeve
• Beim Einbau des Geräts ohne Halterung
• Lors de l’installation de l’appareil scans utiliser de manchon
• Wanneer u het apparaat zonder huis installeert
In a Toyota for example, first remove the car radio and install the unit in its place.
Zum Beispiel in einem Toyota zuerst das Autoradio ausbauen und dann das Gerät an seinem Platz einbauen.
Par exemple dans une Toyota, retirer d’abord l’autoradio et installer l’appareil à la place.
Voorbeeld: Bij een Toyota moet u eerst de autoradio verwijderen en daarna het apparaat installeren.
Washer
Unterlegscheibe
Rondelle
Sluitring
Dashboard
Armaturenbrett
Tableau de bord
Dashboard
Fire wall
Feuerwand
Cloison
Brandscherm
Sleeve
Halterung
Manchon
Huis
Stay (option)
Anker (Option)
Hauban (en option)
Steun (facultatief)
Lock nut
Sicherungsmutter
Ecrou d’arrêt
Contra-moer
Screw (option)
Schraube (Option)
Vis (en option)
Schroef (facultatief)
Mounting bolt
Befestigungsschraube
Boulon de montage
Bevestigingsbout
Flat type screws (M5 x 6 mm)*
Senkkopfschrauben (M5 x 6 mm)*
Vis à tête plate (M5 x 6 mm)*
Platkopschroeven (M5 x 6 mm)*
* Not included with this unit.
* Nicht Teil dieses Geräts.
*
Non fourni avec cet appareil.
* Niet meegeleverd.
Bracket*
Konsole*
Support*
Console*
Flat type screws (M5 x 6 mm)*
Senkkopfschrauben (M5 x 6 mm)*
Vis à tête plate (M5 x 6 mm)*
Pocket
Taschen
Poche
Zak
Bracket*
Konsole*
Support*
Platkopschroeven (M5 x 6 mm)*
Console*
Note: When installing the unit on the mounting brac kets, make sure to use the 6 mm-long screws .
If longer screws are used, they could damage the unit.
Hinweis: Beim Anbringen des Gerät an der Konsole sicherstellen, daß 6 mm lange Schrauben
verwendet werden. Werden längere Schrauben verwendet, können sie das Gerät beschädigen.
Remarque:
Lors de l’installation de l’appareil sur le support de montage, s’assurer d’utiliser des
vis d’une longueur de 6 mm.
Si des vis plus longues sont utilisées, elles peuvent endommager l’appareil.
Opmerking: W anneer u het apparaat aan de be vestigingsklem vastmaakt, moet u de 6 mm lange schroe ven
gebruiken. Als u langere schroeven gebruikt, kan het apparaat worden beschadigd.
Removing the unit
• Before removing the unit, release the rear
section.
1
Remove the control panel.
2
Remove the trim plate.
3
Insert the 2 handles into the slots, as
shown. Then, while gently pulling the
handles away from each other, slide out
the unit. (Be sure to keep the handles after
installing it.)
Control panel
Schalttafel
Panneau de commande
Bedieningspaneel
Ausbau des Geräts
• Vor dem Ausbau des Geräts den hinteren Teil
freigeben.
1
Den Schalttafel abnehmen.
2
Den Frontrahmen herausnehmen.
3
Die 2 Griffe in die Schlitze wie gezeigt stecken.
Dann die Griffe behutsam auseinander ziehen
und das Gerät herausziehen. (Die Griffe nach
dem Einbau auf jeden Fall aufbewahren.)
21
Trim plate
Frontrahmen
Plaque d’assemblage
Sierplaat
Retrait de l’appareil
•
Avant de retirer l’appareil, libérer la section arrière .
1
Retirer le panneau de commande.
2
Retirer la plaque d’assemblage.
3
Introduire les 2 poignées dans les fentes,
comme montré. Puis , tout en tirant doucement
les poignées écartées, faire glisser l’appareil
pour le sortir.
(S’assurer de conserver les
poignées après l’installation de l’appareil.)
3
Verwijderen van het apparaat
• Voordat u het apparaat verwijdert, moet u het
achtergedeelte losmaken.
1
Verwijder het bedieningspaneel.
2
Verwijder de sierplaat.
3
Plaats de 2 hendels, zoals afgebeeld, in de sleuven. Daarna
duwt u de hendels zachtjes uit elkaar en kunt u het apparaat
naar buiten schuiven. (Bewaar de hendels nadat u
het apparaat hebt geïnstalleerd!)
Handle
Griff
Poignée
Hendel
Parts list for installation and connection
The following parts are provided for this unit.
After checking them, please set them correctly.
Hard case/Control panel
Etui/Schalttafel
Etui de transport/Panneau de commande
Behuizing/Bedieningspaneel
Pow er cord
Stromkable
Cordon d’alimentation
Stroomkabel
Teileliste für den Einbau und Anschluß
Die folgenden Teile werden zusammen mit diesem
Gerät geliefert.
Nach ihrer Überprüfung, die Teile richtig einsetzen.
Sleeve
Halterung
Manchon
Huis
Handles
Griffe
Poignées
Hendels
Washer (ø5)
Unterlegscheibe(ø5)
Rondelle (ø5)
Sluitring (ø5)
Liste des pièces pour l’installation et
raccordement
Les pièces suivantes sont fournies av ec cet appareil.
Après vérification, veuillez les placer correctement.
Trim plate
Frontrahmen
Plaque d’assemblage
Sierplaat
Lock nut (M5)
Sicherungsmutter (M5)
Ecrou d’arrêt (M5)
Contra-moer (M5)
Mounting bolt (M5 x 20 mm)
Befestigungsschraube (M5 x 20 mm)
Boulon de montage (M5 x 20 mm)
Bevestigingsbout (M5 x 20 mm)
Lijst van onderdelen die u bij
installatie en aansluiting nodig hebt
De volgende onderdelen worden bij het apparaat geleverd.
Installeer ze op de juiste wijze, nadat u ze hebt gecontroleerd.
Remote controller
Fernbedienung
Télécommande
Afstandsbediening
ATT
ANGLE
CD
EQ
FM
AM
R D
CH
AUX SEL
VOLUME
AM-RK100
Rubber cushion
Gummipuffer
Amortisseur en caoutchouc
Rubberdop
Battery
Batterie
Pile
Batterij
CR2025
Page 45

ELECTRICAL CONNECTIONS
ELEKTRISCHE ANSCHLÜSSE
RACCORDEMENTS ELECTRIQUES
ELEKTRISCHE VERBINDINGEN
To prevent short circuits, we recommend that
you disconnect the battery’s negative
terminal and make all electrical connections
before installing the unit. If you are not sure
how to install this unit correctly, have it
installed by a qualified technician.
Note:
This unit is designed to operate on 12 V DC,
NEGA TIVE ground electrical systems. If y our
vehicle does not have this system, a voltage
inverter is required, which can be purchased
at JVC IN-CAR ENTERTAINMENT dealers.
• Replace the fuse with one of the specified
rating. If the fuse blows frequently, consult
your JVC IN-CAR ENTERTAINMENT dealer.
• If noise is a problem...
This unit incorporates a noise filter in the
power circuit. However, with some vehicles,
clicking or other unwanted noise may
occur. If this happens, connect the unit’s
rear ground terminal (see connection
diagram) to the car’s chassis using shorter
and thicker cords, such as copper braiding
or gauge wire. If noise still persists, consult
your JVC IN-CAR ENTERTAINMENT dealer.
• Maximum input of the speakers should be
no more than 50 W at the rear and 50 W at
the front, with an impedance of 4 Ω to 8 Ω.
• Be sure to ground this unit to the car’s
chassis.
• The heat sink becomes ver y hot after use.
Be careful not to touch it when removing
this unit.
Heat sink
Abstrahlblech
Dissipateur de chaleur
Warmte-opnemer
Zur Vermeidung von Kurzschlüssen empfehlen
wir, daß Sie den negativen Batterieanschluß
abtrennen und alle elektrischen Anschlüsse
herstellen, bevor das Gerät eingebaut wird. Sind
Sie sich über den richtigen Einbau des Geräts
nicht sicher, lassen Sie es von einem
qualifizierten Techniker einbauen.
Hinweis:
Dieses Gerät ist für einen Betrieb in
elektrischen Anlagen mit 12 V Gleichstrom
und (–) Erdung ausgelegt. Verfügt Ihr Fahrzeug
nicht über diese Anlage, ist ein
Spannungsinverter erforderlich, der bei JVC
Autoradiohändler erworben werden kann.
• Die Sicherung mit einer der entsprechenden
Nennleistung ersetzen. Brennt die Sicherung
häufig durch, wenden Sie sich an ihren JVC
Autoradiohändler.
• Sind Störgeräusche ein Problem...
Dieses Gerät enthält ein Störfilter im
Stromkreis. Bei manchen Fahrzeugen kann
jedoch ein Klicken oder andere unerwünschte
Störgeräusche auftreten. Sollte das der Fall
sein, die hintere Erdungscanschlußklemme
(siehe Schaltplan) des Geräts am Fahrwerk
des Fahrzeugs anschließen, dabei kürzere und
dickere Kabel wie beispielsweise
Kupfergeflechtdraht oder Stahldraht
verwenden. Bleibt Störgeräusch bestehen,
wenden Sie sich an Ihren JVC
Autoradiohändler.
• Maximale Eingangsleistung der Lautsprecher
sollte nicht mehr als 50 W hinten und 50 W
vorne sein, mit einer Impedanz von
4 Ω bis 8 Ω.
• Sicherstellen, daß das Gerät am Fahrwerk
geerdet wird.
• Das Abstrahlblech wird nach dem Gebrauch
sehr heiß. Beim Ausbau des Geräts darauf
achten, das Abstrahlblech nicht zu berühren.
Pour éviter tout court-circuit, nous vous
recommandons de débrancher la borne négative
de la batterie et d’effectuer tous les raccordements
électriques avant d’installer l’appareil. Si l’on n’est
pas sûr de pouvoir installer correctement cet
appareil, le faire installer par un technicien qualifié.
Remarque:
Cet appareil est conçu pour fonctionner sur des
sources de courant continu de
NEGATIVE
. Si votre véhicule n’offre pas ce type
12 V à masse
d’alimentation, il vous faut un convertisseur de
tension, que vous pouvez acheter chez un
revendeur d’autoradios JVC.
•
Remplacer le fusible par un de la valeur précisée.
Si le fusible saute souvent, consulter votre
revendeur d’autoradios JVC.
•
Si le bruit est un problème...
Cet appareil incorpore un filtre de bruit dans le
circuit d’alimentation. Cependant, a vec certains
véhicules, quelques claquements ou autres
bruits non désirés risquent de se produire. Si
cela arrive, raccorder la
borne arrière de masse
de l’appareil au châssis de la voiture (voir le
diagramme de raccordement) en utiliscant des
cordons les plus gros et les plus courts possibles
telle qu’une barre de cuivre ou une tresse. Si le
bruit persiste, consulter votre revendeur
d’autoradios JVC.
•
La puisscance admissible des enceintes devr ait
n’être pas plus qu’ c 50 W à l’arrière et à 50 W
a l’avant, avec une impédance de
4 Ω à 8 Ω
.
• S’assurer de raccorder la mise à la masse
de cet appareil au châssis de la voiture.
Le dissipateur de chaleur devient très chaud
•
après usage. Faire attention de ne pas le toucher
en retirant cet appareil.
Om kortsluiting te voorkomen adviseren wij u om de
minpool van de accu los te maken en alle elektrische
verbindingen tot stand te brengen voordat u het apparaat
in de auto installeert. Als u niet zeker weet hoe u dit
apparaat moet installeren, kunt u dit beter door een
daartoe gekwalificeerde technicus laten doen.
Opmerking:
Dit apparaat mag worden gebruikt bij elektrische
systemen die werken op 12 V gelijkstroom met
negatieve aarding. Als uw auto niet is uitgerust met
een dergelijk systeem, is een spanningsomzetter vereist.
Dit instrument kan worden aangeschaft bij JVC car
audio dealers.
• Vervang de zekering door een exemplaar met het
aangegeven vermogen. Als de zekering vaak
doorslaat, moet u uw JVC car audio dealer
raadplegen.
• Als u geluidsproblemen hebt…
De krachtschakeling van dit apparaat heeft een
ingebouwd geluidsfilter. In sommige v oertuigen zijn
tikgeluiden of andere ongewenste geluiden te horen.
Als dit gebeurt, moet u de massaklem aan de
achterkant (zie aansluitingsschema) aan het chassis
van de auto vastmaken met behulp van een kortere
en dikkere kabel, zoals kopermanteldraad of
tellerkabel. Als het geluid niet verdwijnt, moet u
contact opnemen met uw JVC car audio dealer.
• Het maximum ingangsvermogen van de speakers
moet achterin niet meer dan 50 W zijn en voorin
50 W, met een impedantie van 4 Ω tot 8 Ω.
• Zorg ervoor dat dit apparaat door middel van
een aardkabel is verbonden met het chassis
van de auto.
• De warmte-opnemer kan na gebruik erg heet worden.
Raak de warmte-opnemer niet aan wanneer u dit
apparaat van zijn plaats haalt.
Connecting the leads / Anschließen der Leitungen / Raccordement des fils / Aansluiting van de gekleurde draden
Twist the core wires when connecting.
Die Kerndrähte beim Anschließen
verdrehen.
Torsader les âmes des fils en les
raccordant.
Draai de kerndraden om elkaar heen wanneer
u ze wilt aansluiten.
Solder the core wires to connect them securely.
Die Kerndrähte anlöten, um sie fest
anzuschließen.
Souder les âmes des fils pour les raccorder
entre eux de façon sûre.
Soldeer de kerndraden zodat ze stevig vast zitten.
A If your car is equipped with the ISO connecter
Wenn Ihr Auto mit ISO-Steckern ausgestattet ist
Si votre voiture est équippée d’un connecteur ISO
Indien uw auto is uitgerust met de ISO-connector
• Connect the ISO connectors as illustrated.
• Die ISO-Stecker wie abgebildet anschließen.
Connectez les connecteurs ISO comme montré sur l’illustration.
•
• Sluit de ISO-connectoren aan zoals op het voorbeeld is aangegeven.
For some VW/Audi or Opel (Vauxhall) automobile
Für manche VW/Audi oder Opel (Vauxhall) Fahrzeuge
Pour certaine voiture VW/Audi ou Opel (Vauxhall)
Voor bepaalde modellen VW/Audi of Opel (Vauxhall) geldt
You may need to modify the wiring of the supplied power cord as illustrated.
• Contact your authorized car dealer before installing this unit.
Sie müssen evtl. die Verdrahtung des mitgelieferten Stromkabels wie abgebildet ändern.
• Wenden Sie sich an Ihre Vertragswerkstatt, bevor Sie das Gerät einbauen.
Vous aurrez peut-être besoin de modifier le câblage du cordon d’alimentation fourni comme montré sur l’illustration.
•
Contactez votre revendeur automobile autorisé avant d’installer l’appareil.
Wellicht moet u de bedrading van het meegeleverde snoer als in het voorbeeld aanpassen.
• Neem contact op met uw offici’le autodealer alvorens dit apparaat te installeren.
CAUTION / VORSICHT / PRECAUTION / LET OP!:
• To prevent short-circuit, cover the terminals of the UNUSED leads with insulating
tape.
• Zur Vermeidung eines Kurzschlusses die Anschlußklemmen der NICHT
VERWENDETEN Leitungen mit Isolierklebeband umwickeln.
• Pour éviter les court-circuits, couvrir les bornes des fils qui ne sont PAS utilisés
avec de la bande isolante.
• Om kor tsluiting te voorkomen, moet u de aansluitklemmen van ONGEBRUIKTE
gekleurde draden met isolatieband bedekken.
A1
B1
A2
B2
A3
B3
A4
B4
A1
B1
A2
B2
A3
B3
A4
B4
View from the lead side
Ansicht von der Leitungsseite
Vue à partir du côté des fils
Aanzicht vanaf het snoer
ISO connector of the supplied power cord
ISO-Stecker am Stromkabel
Connecteur ISO pour le cordon d’alimentation fourni
ISO-connector van het meegeleverde snoer
From the car body
Von der Karosserie
De la carrosserie de la
voiture
Vanaf de auto
Original wiring
Originalverdrahtung
Câblage original
Originele bedrading
ISO connector
ISO-Stecker
Connecteur ISO
ISO-connector
Modified wiring 1
Geänderte
Verdrahtung 1
Câblage modifié
1
Aangepaste bedrading 1
Modified wiring 2
Geänderte
Verdrahtung 2
Câblage modifié
2
Aangepaste bedrading 2
Yellow/Gelb
Red/
Rot/
Rouge/
Rood
Yellow/Gelb
Red/
Rot/
Rouge/
Rood
Yellow/Gelb
Red/
Rot/
Rouge/
Rood
/Jaune/
Red/Rot/
/Jaune/
Red/Rot/
/Jaune/
Red/Rot/
Geel
Geel
Geel
Yellow/Gelb
Rouge/
Yellow/Gelb
Rouge/
Yellow/Gelb
Rouge/
Red/Rot/
Rood
Red/Rot/
Rood
Rood
/Jaune/
Rouge/
/Jaune/
Rouge/
/Jaune/
Red/ Rot/
Rouge/
Geel
Rood
Geel
Rood
Geel
Rood
Use modified wiring 2 if the unit does
not turn on.
Geänderte Verdrahtung 2
verwenden, wenn das Gerät so nicht
an geht.
Utilisez le câblage modifié 2 si
l’appareil
ne se met pas sous tension.
Pas de bedrading 2 aan indien het
apparaat niet reageert bij inschakelen.
Page 46

DEUTSCH
B Connections without using the ISO connectors / Anschlüsse ohne ISO-Stecker / Connexions sans l’utilisation des connecteurs ISO /
Verbindingen zonder ISO-connectoren
Before connecting: Check the wiring in the
vehicle carefully. Incorrect connection may
cause serious damage to this unit.
1
Cut the ISO connector.
2
Connect the colored leads of the power
cord to the car battery, speakers and power
aerial (if any) in the following sequence.
1 Black: ground
2 Yellow: to car batter y (constant 12 V)
3 Red: to an accessory terminal
4 Blue with white str ipe: to power
aerial (200 mA max.)
5 Orange with white stripe: to car light
control switch
6 Brown: to cellular phone system (For
details, refer to the instructions of
the cellular phone.)
7 Others: to speakers
3
Connect the aerial cord.
4
Finally connect the wiring harness to the
unit.
Cut the ISO connector
1
Den ISO-Stecker abschneiden
Coupez le connecteur ISO
Knip de ISO-connector los
3
Aerial terminal
Antennenanschlußklemme
Borne de l’antenne
Aansluitpunt antenne
Rear ground terminal
Hintere
Erdungscanschlußklemme
Borne arrière de masse
Massaklem aan de achterkant
LINE OUT
(FRONT)
LINE OUT
(REAR)
SUBWOOFER OUT
(KD-SH77R)
LINE IN
(KD-SH77R)
EXT OUT
(KD-SH55R)
CONTROL
(KD-SH77R)
See diagram C .
Siehe Schaltplan C .
Voir le diagramme
Zie schema C .
*1:Before checking the operation of this unit prior to
installation, this lead must be connected, otherwise
power cannot be turned on.
*1:Vor der Überprüfung der Funktionsfähigkeit des
Geräts vor dem Einbau, muß diese Leitung
angeschlossen werden, da sonst die
Stromversorgung nicht eingeschaltet werden kann.
*1:Pour vérifier le fonctionnement de cet appareil avant
installation, ce fil doit être raccordé, sinon l’appareil
ne peut pas être mis sous tension.
*1: Voordat u controleert of het apparaat werkt (alvorens
het te installeren), moet deze draad aangesloten zijn. Als
dit niet het geval is, kan de stroom niet worden
ingeschakeld.
C
.
2
Vor dem Anschließen: Die Verdrahtung im
Fahrzeug sorgfältig überprüfen. Falsche
Anschlüsse können ernsthafte Schäden am Gerät
hervorrufen.
1
Den ISO-Stecker abschneiden.
2
Die farbigen Leitungen des
Spannunsgversorgungskabels an der
Autobatterie, den Lautsprechern und dem
Motorantenne (sofern vorhanden) in folgender
Reihenfolge anschließen.
1 Schwarz: Erdung
2 Gelb: an Autobatterie (konstant 12 V)
3 Rot: zur einer Zubehöranschlußklemme
4 Blau mit weißem Streifen: zur Motorantenne
(max. 200 mA)
5 Orange mit weißem Streifen: zur
Autolichtschalter
6 Braun: zur Mobiltelefon (Weitere
informationen entnehmen Sie bitte der
Bedienungsanleitung des Mobiltelefons.)
7 Andere: zur Lautsprecher
3
Das Antennenkabel anschließen.
4
Die Kabelbäume am Gerät anschließen.
CD changer
(or another external
component)
CD-Wechsler
(oder eine andere
To aerial
Zur Antenne
A l’antenne
Naar de antenne
15
15 A fuse
15 A Sicherung
Fusible 15 A
Zekering 15 A
externe
Komponente)
Changeur CD JVC
(ou autre appareil
extérieur)
CD-wisselaar
(of een ander extern
apparaat)
4
Black
Schwarz
Noir
Zwart
A4
1
Yellow*
Gelb*
Jaune*
Geel *
1
1
1
1
A2
2
Red
Rot
Rouge
Rood
Blue with white stripe
Blau mit weißem Streifen
Bleu avec bande blanche
Blauw met witte streep
Orange with white stripe
Orange mit weißem Streifen
Orange avec bande blanche
Oranje met witte streep
Brown / Braun /
Marron /
Avant de commencer la connexion:
attentivement le câblage du véhicule. Une
connexion incorrecte peut endommager
sérieusement l’appareil.
1
Coupez le connecteur ISO.
2
Connectez les fils de couleur du cordon
d’alimentation à la batterie de la voiture, aux
enceintes et à l’antenne automatique (s’il y en
a une) dans l’ordre suivant.
1
Noir: à la masse
2
Jaune: à la batterie de la voiture
(12 V constant)
3
Rouge: à la prise accessoire
4
Bleu avec bande blanche:
à l’antenne automatique (200 mA max.)
5
Orange avec bande blanche:
à l’interrupteur d’éclairage de la voiture
6
Marron: à un système de téléphone
cellulaire (Pour les détails, se référer aux
instructions du téléphone cellulaire.)
7
Autres: aux enceintes
3
Connectez le cordon d’antenne.
4
Finalement, connectez le faisceau de fils à
l’appareil.
When connecting a CD changer, we recommend to use one of the CH-X series CD changers.
• If your CD changer is one of the KD-MK series, you need an optional cord (KS-U15K).
Only for KD-SH55R :
You can also use an external component such as a portable MD player by connecting the Line Input Adaptor
KS-U57 (not supplied). (See diagram
Wenn Sie einen CD-Wechsler anschließen möchten, empfiehlt es sich, einen CD-Wechsler der Modellreihe
CH-X zu verwenden.
• Wenn Ihr CD-Wechsler zur Modellreihe KD-MK gehören, benötigen Sie ein anderes Kabel (KS-U15K).
Nur für KD-SH55R :
Sie können auch eine externe Komponente, z.B. einen tragbaren MD-Spieler, verwenden, wenn Sie den
(nicht zum Lieferumfang gehörenden) Line-Eingangsadapter KS-U57 anschließen. (Siehe Schaltplan
Lors de la connexion d’un changeur CD , nous v ous recommandons d’utiliser un des changeurs CD de la série
CH-X.
• Si votre changeur appartient à la série KD-MK, vous avez besoin d’un cordon optionnel (KS-U15K).
Seulement pour le KD-SH55R :
V ous pouvez aussi utiliser un appareil e xtérieur tel qu’un lecteur de MD en connectant l’adaptateur d’entrée de
ligne KS-U57 (non fourni). (Voir le diagramme
Voor het aansluiten van een CD-wisselaar raden we een wisselaar uit de CH-X-serie aan.
• Als de CD-wisselaar die u wilt aansluiten uit de KD-MK-serie komt, hebt u een extra kabel nodig (KS-U15K).
Alleen voor KD-SH55R :
Het is ook mogelijk een extern apparaat zoals een draagbare MD-speler aan te sluiten met behulp van de Line Input
Adapter KS-U57 (niet meegeleverd). (Zie schema
*
To metallic body or chassis of the car
Zur metallenen Karosserie oder zum Fahrwerk des Autos
Au corps métallique ou châssis de la voiture
Naar metalen ondergrond of chassis van de auto
To a live terminal in the fuse block connecting to the car battery
(bypassing the ignition swich)
Zur einer stromführenden Anschlußklemme im Sicherungsblock zum
Anschließen an die Autobatterie (Umgehen des Zündschalters)
À une borne sous tension du porte-fusible connectée à la batterie
de la voiture (en dérivant l’interrupteur d’allumage)
Naar een onder spanning staande aansluitklem in het zekeringblok die is
aangesloten op de accu van de auto (u passeert de ontstekingsschakelaar)
B4
To an accessory terminal in the fuse block
Zur einer Zubehöranschlußklemme im Sicherungsblock
3
À borne accessoire du porte-fusible
Naar een aansluitklem in het zekeringblok
B3
To power aerial if any
Zur Motorantenne, sofern vorhanden
4
À l’antenne automatique s’il y en a une
Naar de antenne (indien aanwezig)
A3
(ILLUMINATION)
Bruin
5
C .)
Not included with this unit.
Wird nicht mit Gerät mitgeliefert.
Non fourni avec cet appareil.
Niet bij het apparaat inbegrepen.
To car light control switch
Zum Autolichtschalter
À l’interrupteur d’éclairage de la voiture
Naar de schakelaar voor de autoverlichting
A1
vérifiez
C
.)
C .)
To cellular phone system
Zur Moblitelephon
À un système de téléphone cellulaire
6
Naar het mobiele-telefoonsysteem
Alvorens de verbindingen tot stand te brengen:
moet u de bedrading in de auto zorgvuldig. Het apparaat
kan door verkeerde verbindingen ernstige schade
oplopen.
1
Knip de ISO-connector los.
2
Sluit de gekleurde snoerdraden van de stroomkabel
in de hierna genoemde volgorde aan op de accu van
de auto, de luidsprekers en de antenne (indien
aanwezig).
1 Zwart: aarde
2 Geel: naar de accu van de auto
(constant 12 V)
3 Rood: naar de aansluitklem van de accessoire
4 Blauw met witte streep: naar de antenne
(Max. 200 mA)
5 Oranje met witte streep:
voor de autoverlichting
6 Bruin: naar het mobiele-telefoonsysteem
(Lees voor meer informatie de instructies die
bij de mobiele telefoon worden geleverd.)
7 Andere: naar de speakers
3
Sluit de antenne aan.
4
Verbind de draadbundel daarna met het apparaat.
*
*
Fuse block
Sicherungsblock
Porte-fusible
Zekeringblok
naar de schakelaar
C .)
Ignition switch
Zündschalter
Interrupteur d’allumage
Contactschakelaar
White with black stripe
Weiß mit schwarzem
Streifen
Blanc avec bande noire
Wit met zwarte streep
Left speaker (front)
Linker Lautsprecher (vorne)
Enceinte gauche (avant)
Linkerspeaker (voorin)
B3A3
White
Weiß
Blanc
Wit
7
Gray with black stripe
Grau mit schwarzem
Streifen
Gris avec bande noire
Grijs met zwarte streep
Right speaker (front)
Rechter Lautsprecher (vorne)
Enceinte droit (avant)
Rechterspeaker (voorin)
B2A2
Gray
Grau
Gris
Grijs
Green with black stripe
Grün mit schwarzem
Streifen
Vert avec bande noire
Groen met zwarte streep
Left speaker (rear)
Linker Lautsprecher (hinten)
Enceinte gauche (arrière)
Linkerspeaker (achterin)
B4A4
Green
Grün
Ve rt
Groen
Purple with black
stripe
Lila mit schwarzem
Streifen
Violet avec bande noire
Paars met zwarte streep
Right speaker (rear)
Rechter Lautsprecher
(hinten)
Enceinte droit (arrière)
Rechterspeaker (achterin)
B1A1
Purple
Lila
Violet
Paars
Page 47

PRECAUTIONS on power supply and
speaker connections:
• DO NOT connect the speaker leads of the
power cord to the car battery; otherwise, the
unit will be seriously damaged.
• Connect the black lead (ground), yellow lead
(to car battery, constant 12 V), and red lead
(to an accessory terminal) correctly.
• BEFORE connecting the speaker leads of the
power cord to the speakers, check the speaker
wiring in your car.
– If the speaker wiring in your car is as
illustrated in Fig. 1 and Fig. 2 belo w, DO NO T
connect the unit using that original speaker
wiring. If you do, the unit will be seriously
damaged.
Redo the speaker wiring so that you can
connect the unit to the speakers as
illustrated in Fig. 3.
– If the speaker wiring in your car is as
illustrated in Fig. 3, you can connect the unit
using the original speaker wiring in your car.
– If you are not sure of the speaker wiring of
your car, consult your JVC IN-CAR
ENTERTAINMENT dealer.
+
L
-
+
R
-
Fig. 1
+
+
-
+
-
+
L
-
-
+
+
R
-
-
Fig. 2
+
L
-
+
R
-
Fig. 3
+
-
+
-
VORSICHTSMASSREGELN beim
Anschließen der Stromversorgung
und Lautsprecher:
• Die Lautsprecherleitungen des Netzkabels
NICHT an der Autobatterie anschließen, da
sonst das Gerät schwer beschädigt wird.
• Die schwarze Leitung (Erdung), die gelbe
Leitung (zur Autobatterie, konstant 12 V) und die
rote Leitung (zur Zubehöranschlußklemme)
richtig anschließen.
• VOR dem Anschließen der Lautsprecherleitungen
des Spannunsgversorgungskabels an die
Lautsprecher, die Lautsprecherverdrahtung in
Ihrem Auto überprüfen.
– Ist die Lautsprecherverdrahtung wie
unten in “Fig. 1” und “Fig. 2” abgebildet,
das Gerät NICHT mit der
Originalverdrahtung der Lautsprecher
anschließen, da sonst das Gerät schwer
beschädigt wird.
Die Lautsprecherverdrahtung erneuern, so
daß Sie das Gerät an den Lautsprechern wie
in “Fig. 3” abgebildet anschließen können.
– Ist die Lautsprecherverdrahtung in Ihrem
Auto wie in “Fig. 3” abgebildet, können Sie
das Gerät mit der Originalverdrahtung der
Lautsprecher in Ihrem Auto anschließen.
– Sind Sie sich über die
Lautsprecherverdrahtung in Ihrem Auto nicht
sicher, wenden Sie sich an Ihren Autohändler.
PRECAUTIONS sur l’alimentation et
la connexion des enceintes:
• NE CONNECTEZ PAS les fils d’enceintes du
cordon d’alimentation à la batterie; sinon,
l’appareil serait sérieusement endommagé.
•
Connectez correctement le fil noir (a la masse),
le fil jaune (a la batterie de la voiture,12 V
constant) et le fil rouge (à la prise accessoire).
•
AVANT de connecter les fils d’enceintes du
cordon d’alimentation aux enceintes, vérifiez le
câblage des enceintes de votre voiture.
–
Si le câblage des enceintes de votre v oiture
est comme montré sur la Fig. 1 ou Fig. 2
ci-dessous,
en utiliscant ce câblage original des enceintes.
Si vous le faites , l’appareil sera sérieusement
endommagé.
Recommencez le câblage des enceintes de
façon que vous puissiez connecter l’appareil
aux enceintes comme montré sur la Fig. 3.
–
Si le câblage des enceintes de votre v oiture
est comme montré sur la Fig. 3,
connecter l’appareil en utiliscant ce câblage
original d’enceintes pour votre voiture.
– Si vous n’êtes pas sûrs du câb lage d’enceintes
de votre voiture , consulter le concessionnaire
de votre voiture.
NE CONNECTEZ P AS l’appareil
vous pouvez
VOORZORGSMAATREGELEN bij het
verbinden van de
stroomkabeldraad met de speakers:
• Verbind de speakerdraden van de
stroomkabel NIET met de accu van de auto;
als u dit wel doet, zal het apparaat ernstige
schade oplopen.
• Sluit de zwarte draad (aarde), de gele draad (naar de
accu van de auto, constant 12 V) en de rode draad
(naar de aansluitklem van de accessoire) op de juiste
wijze aan.
• VOORDAT u de speakerdraden van de stroomkabel
met de speakers verbindt, moet u de bedrading van
de speakers in uw auto controleren.
– Als de bedrading van de speakers eruitziet
zoals hieronder staat afgebeeld in Fig. 1
en Fig. 2, mag het apparaat NIET worden
aangesloten met behulp van deze oorspronkelijke
speakerbedrading. Als u dat wel doet, zal het
apparaat ernstige schade oplopen.
Pas de bedrading van de speakers aan, zodat u het
apparaat met de speakers kunt verbinden, zoals
staat afgebeeld in Fig. 3.
– Als de bedrading v an de speakers eruitziet
zoals staat afgebeeld in Fig. 3, kunt u het
apparaat aansluiten met behulp van de
oorspronkelijke speakerbedrading in uw auto.
– Als u twijfels hebt over de speakerbedrading in
uw auto, moet u contact opnemen met uw
autodealer.
C Connections Adding Other Equipment / Anschlüsse zum Hinzufügen von anderer Ausrüstung / Raccordement pour ajouter d’autres appareils /
Aansluitingen voor het toevoegen van andere apparatuur
Amplifier / Verstärker / Amplificateur / Versterker
You can connect an amplifier and other
equipment to upgrade your car stereo system.
• Connect the remote lead (blue with white
stripe) to the remote lead of the other
equipment so that it can be controlled
through this unit.
For KD-SH77R:
• For amplifier:
– Connect this unit’s line-out terminals to
the amplifier’s line-in terminals.
– Disconnect the speakers from this unit,
connect them to the amplifier. Leave the
speaker leads of this unit unused.
– You can switch off the built-in amplifier
and send the audio signals only to the
external amplifier(s) to get clear sounds
and to prevent internal heat builtup
inside the unit. See page 25 of the
Instructions (separate volume).
– The line output level of this unit is kept
high to maintain the hi-fi sounds
reproduced from this unit.
When connecting an external amplifier
to this unit, turn down the gain control
on the external amplifier to obtain the
best performance from this unit.
For KD-SH55R:
• For amplifier:
– Connect this unit’s line-out terminals to
the amplifier’s line-in terminals.
– Disconnect the speakers from this unit,
connect them to the amplifier. Leave the
speaker leads of this unit unused.
• For Subwoofer: A low-pass filter is required
when using an amplifier of other manufactures
than JVC. You can adjust the output level
through the EXT OUT plugs (see page 20 of
the Instruction (separate volume).
Sie können einen Verstärker oder ein anderes Gerät
anschließen, um Ihre Autostereoanlage zu erweitern.
• Schließen Sie das Fernbedienungskabel (blau mit
weißem Streifen) an das Fernbedienungskabel
des anderen Geräts an, so daß es über dieses
Gerät gesteuert werden kann.
Für KD-SH77R:
• Hinweise zum Verstärker:
– Die Anschlußklemmen am Ausgang dieses
Gerät an den Anschlußklemmen des
Eingangs des Verstärkers anschließen.
– Die Lautsprecher von diesem Gerät
abtrennen und am Verstärker ansc hließen.
Die Lautsprecherleitungen dieses Geräts
unbenutzt lassen.
–
Sie können den integrierten Verstärker
ausschalten und die Audiosignale nur an den (die)
externen Verstärker leiten, um einen
verzerrungsfreien Klang zu erhalten und um zu
verhindern, daß sich im Innern des Geräts ein
Wärmestau bildet. Auf Seite 25 finden Sie weitere
Anleitungen (separate Lautstärke).
– Der Ausgangspegel dieses Geräts wird auf
einem hohen Wert gehalten, um den HifiKlang zu unterstützen, den dieses Gerät
reproduziert.
Wenn Sie einen externen Verstärker an
dieses Gerät anschließen, stellen Sie den
Verstärkungsregler des externen Verstärkers
herunter, um die bestmögliche Leistung
dieses Geräts zu erzielen.
Für KD-SH55R:
• Für den Verstärker:
– Die Anschlußklemmen am Ausgang dieses
Gerät an den Anschlußklemmen des
Eingangs des Verstärkers anschließen.
– Die Lautsprecher von diesem Gerät
abtrennen und am Verstärker ansc hließen.
Die Lautsprecherleitungen dieses Geräts
unbenutzt lassen.
• Hinweise zum Subwoofer: Es ist ein Tiefpaßfilter
erforderlich, wenn Sie keinen JVC-Verstärker
verwenden. Sie können den Ausgangspegel
einstellen, der über die Anschlüsse EXT OUT
bereitgestellt wird (siehe Seite 20 der
(separaten) Bedienungsanleitung).
V ous pouvez connecter un amplificateur ou autre
appareil pour améliorer votre système autoradio .
•
Connectez le fil de commande à distance (bleu
avec bande blanche) au fil de commande à
distance de l’autre appareil de façon qu’il puisse
être commandé via cet appareil.
Pour le KD-SH77R:
•
Pour l’amplificateur seulement:
– Raccorder les bornes de sor tie ligne de cet
appareil aux bornes d’entrée ligne de
l’amplificateur.
– Déconnectez les enceintes de cet appareil
et connectez-les à l’amplificateur. Laissez
les fils d’enceintes de cet appareil
inutilisés.
– Vous pouvez désactiv er l’amplificateur intégré
et envoyer les signaux audio uniquement à
un ou plusieurs amplificateurs extérieurs afin
d’obtenir un son clair et pour éviter un
échauffement interne de l’appareil. Référezvous à la page 25 du mode d’emploi (volume
séparé).
– Le niveau de sortie de ligne de cet appareil
est maintenu à un niveau élevé pour maintenir
une qualité Hi-Fi pour les sons reproduits par
cet appareil.
Lors de la connexion d’un amplificateur
extérieur à cet appareil,
dimin uez le réglage
du gain sur l’amplificateur extérieur pour
obtenir les meilleures performances de cet
appareil.
Pour le KD-SH55R:
•
Pour l’amplificateur seulement:
– Raccorder les bornes de sor tie ligne de cet
appareil aux bornes d’entrée ligne de
l’amplificateur.
– Déconnectez les enceintes de cet appareil
et connectez-les à l’amplificateur. Laissez
les fils d’enceintes de cet appareil
inutilisés.
• Pour le caisson de grave: Si vous utilisez un
amplificateur d’un autre fabricant que JVC,
vous devez connecter un filtre passe-bas.
Vous pouvez ajuster le niveau de sortie par
les fiches de sortie auxiliaire (EXT OUT)
(référez-vous à la page 20 du mode d’emploi
(volume séparé)).
Het is mogelijk om uw autostereosysteem uit te
breiden met een versterker of andere apparatuur.
• Verbind de externe kabel (blauw met witte streep)
met de externe kabel van het andere apparatuur
zodat deze op afstand vanaf deze apparaat kan
worden bediend.
Voor KD-SH77R:
• Alleen voor een versterker:
– Verbind de uitgang van het apparaat met de
ingang van de versterker.
– Koppel de speakers van dit apparaat los
en verbind ze aan de versterker. Gebruik
de speakerdraden van dit apparaat niet.
– Het is mogelijk de ingebouwde versterker uit te
schakelen en de audiosignalen alleen naar de
externe versterker(s) te sturen. U krijgt zo een
helderder geluid en voorkomt dat zich warmte
in de eenheid opbouwt. Zie bladzijde 25 van de
instucties (aparte uitgave).
– Het uitgangsniveau van het geluid is hoog om
het hifi-geluid van deze eenheid te behouden.
Wanneer u een extern apparaat op deze
eenheid aansluit, moet u erop letten dat
u de versterkingsfactor van de externe
versterker laag houdt, zodat deze
eenheid de beste prestaties levert.
Voor KD-SH55R:
• Alleen voor een versterker:
– Verbind de uitgang van het apparaat met de
ingang van de versterker.
– Koppel de speakers van dit apparaat los
en verbind ze aan de versterker. Gebruik
de speakerdraden van dit apparaat niet.
• Voor de subwoofer: Als u een versterker van een
ander merk dan JVC gebruikt, hebt u een low-pass
filter nodig. Het uitvoervolume kan worden
aangepast via de EXT OUT-stekkers (zie pagina
20 van de instructies - aparte uitgave).
Signal cord (not supplied with this unit)
Einzelleitung (nicht mit diesem Gerät mitgeliefert)
Cordon de signal (non fourni avec cet appareil)
Signaalkabel (wordt niet bij dit apparaat geleverd)
INPUT
L
Rear speakers
Hintere Lautsprecher
Enceintes arrière
Achterspeakers
INPUT
L
L
R
R
You can connect another power amplifier for front speakers.
Sie können einen anderen Leistungsverstärker für die vorderen
Lautsprecher anschließen.
Vous pouvez connecter un autre amplificateur de puissance pour les
enceintes avant.
U kunt nog een eindversterker voor de voorspeakers aansluiten.
R
L
R
JVC Amplifier
JVC Verstärker
JVC Amplificateur
JVC V ersterker
L
R
L
R
Front speakers
Vordere Lautsprecher
Enceintes avant
Voorspeakers
JVC Amplifier
JVC Verstärker
JVC Amplificateur
JVC V ersterker
LINE OUT (REAR)
LINE OUT (FRONT)
Remote lead
Fernbedienungsleitung
Fil d’alimentation à distance
Antennedraad
Remote lead (Blue with white stripe)
Fernbedienungsleitung (Blau mit weißem Streifen)
Fil d’alimentation à distance (Bleu avec bande blanche)
Antennedraad (Blauw met witte streep)
Cut the rear speaker leads of the car’s ISO connector and connect them to the amplifier.
A1
B1
*
*
Die Leitungen des ISO-Steckers der hinteren Lautsprecher durchtrennen und am Verstärker anschließen.
A2
B2
B3
B4
*
Coupez les fils des enceintes arrière du connecteur ISO de la voiture et connectez-les à l’amplificateur.
A3
Knip de draden van de achterste luidspreker van de ISO-connector van de auto door en sluit deze draden aan op de versterker.
A4
*
Rear speakers
Hintere Lautsprecher
Enceintes arrière
Achterspeakers
Front speakers
Vordere Lautsprecher
Enceintes avant
Voorspeakers
Y-connector (not supplied with this unit)
Y-Anschluß (nicht mitgeliefert)
Connecteur Y (non fourni avec cet appareil)
Y-connector (niet meegeleverd)
To power aerial if any
Zur Motorantenne, sofern vorhanden
À l’antenne automatique, s’il y en a une
Naar de antenne (indien aanwezig)
CAUTION / VORSICHT / PRECAUTION / LET OP:
• To prevent internal heat buildup inside this unit, place this unit UNDER
the other equipment.
• Zur Vermeidung eines Hitzestaus in diesem Gerät, dieses Gerät UNTER
die andere Geräteansrüstung stellen.
• Pour éviter un échauffement interne de cet appareil, placez-le SOUS l’autre
appareil.
• Om interne verhitting van het apparaat te voorkomen, dient u ervoor te
zorgen dat het apparaat ONDER de andere apparatuur wordt geplaatst.
Page 48

CD changer and DAB tuner / CD-Wechsler und DAB-Tuner / Changeur CD et tuner DAB / CD-wisselaar en DAB-tuner
You can connect a JVC CD changer and/or a
JVC DAB (Digital Audio Broadcasting) tuner.
• For their connections, refer to the
instructions supplied for them.
Sie können einen CD-Wechsler und/oder einen
DAB-Tuner (Tuner für digitalen Rundfunk) von
JVC anschließen.
• Weitere Informationen über den Anschluß
können Sie der Bedienungscanleitung
entnehmen, die dem jeweiligen Gerät beiliegt.
Connecting cord supplied with your DAB tuner
Verbindungskabel, das zum Lieferumfang des DABTuners gehört
Cordon de connexion fourni avec votre tuner DAB
V erbindingskabel die met de DAB-tuner wordt mee geleverd
JVC DAB tuner
DAB-Tuner von JVC
Tuner DAB JVC
JVC DAB-tuner
KD-SH77R
KD-SH55R
Connecting cord supplied with your CD changer
Verbindungskabel, das zum Lieferumfang des CDWechsler gehört
Cordon de connexion fourni avec votre changeur CD
V erbindingskabel die met de CD-wisselaar wordt meegele verd
JVC CD changer
CD-Wechsler von JVC
Changeur CD JVC
JVC CD-wisselaar
• You can connect both components in series as illustrated above.
• Es ist möglich, beide Komponenten in einer Serienschaltung entsprechend der obigen
Darstellung anzuschließen.
Vous pouvez connecter les deux appareils en série comme montré ci-dessus.
•
• Beide apparaten zijn volgens bovenstaande illustratie in serie aan te sluiten.
V ous pouv ez connecter un changeur CD JVC et/
ou un tuner DAB (Digital Audio Broadcast) JVC.
•
Pour leurs conne xions, référez-vous aux modes
d’emploi qui les accompagnent.
Connecting cord supplied with your DAB tuner or CD changer
Verbindungskabel, das zum Lieferumfang des DAB-Tuners oder CD-Wechslers gehört
Cordon de connexion fourni avec votre tuner DAB ou changeur CD
Verbindingskabel die met de DAB-tuner of CD-wisselaar wordt meegeleverd
JVC DAB tuner
DAB-Tuner von JVC
Tuner DAB JVC
KD-SH77R
KD-SH55R
JVC DAB-tuner
CAUTION / VORSICHT / PRECAUTION / LET OP!:
• Before connecting the CD changer and/or the DAB tuner, make sure that the unit is
turned off.
• Bevor Sie den CD-Wechsler und/oder den DAB-Tuner anschließen, vergewissern Sie
sich, daß das Gerät ausgeschaltet ist.
• A vant de connecter le changeur CD et/ou le tuner DAB, s’assurer que l’unité est éteinte.
• Zorg ervoor dat de apparat is uitgeschakeld alvorens u de en/of DAB-tuner CDwisselaar aansluit.
Het is mogelijk een JVC CD-wisselaar en/of JVC DABtuner (Digital Audio Broadcasting) aan te sluiten.
• Zie de instructies van deze apparaten voor meer
informatie over het tot stand brengen van deze
aansluiting.
or
oder
ou
of
JVC CD changer
CD-Wechsler von JVC
Changeur CD JVC
JVC CD-wisselaar
Subwoofer and other source equipment / Subwoofer und andere externe Geräte / Caisson de grave et autre appareil source /
Subwoofer en andere apparatuur
Signal cord (not supplied with this unit)
You can connect a subwoofer to reinforce the
bass.
• For their connections, refer to the
instructions supplied with your
subwoofer.
Vous pouvez connecter un caisson de grave
pour renforcer les graves.
•
Pour leur connexion, référez-vous aux
instructions fournies avec chaque appareil.
Sie können einen Subwoofer zur Baßverstärkung
anschließen.
• Informationen darüber, wie diese Geräte
angeschlossen werden, finden Sie in der
Bedienungsanleitung, die zum Lieferumfang
der jeweiligen Komponente gehört.
Het is mogelijk om een subwoofer aan te sluiten om
het basgeluid te versterken.
• Raadpleeg de instructies die bij het desbetreffende
apparaat werden meegeleverd voor meer informa tie
*
over het totstandbrengen van deze aansluitingen.
SUBWOOFER OUT
(For KD-SH77R only)
(Nur für KD-SH77R)
(Seulement pour le
KD-SH77R)
(Alleen voor KD-SH77R)
KD-SH77R
KD-SH55R
Einzelleitung (nicht mit diesem Gerät mitgeliefert)
Cordon de signal (non fourni avec cet appareil)
Signaalkabel (niet meegeleverd)
L
L
RR
R
L
JVC Amplificateur
EXT OUT
(For KD-SH55R only)
(Nur für KD-SH55R)
(Seulement pour le KD-SH55R)
(Alleen voor KD-SH55R)
DVD, VCR or TV / DVD, Videorecorder oder Fernsehgerät / DVD, Magnétoscope ou Téléviseur / DVD, Videorecorders en TV
For KD-SH77R only / Nur für KD-SH77R / Seulement pour le KD-SH77R / Alleen voor KD-SH77R
Signal cord (not supplied with this unit)
Einzelleitung (nicht mit diesem Gerät mitgeliefert)
Cordon de signal (non fourni avec cet appareil)
Signaalkabel (niet meegeleverd)
L
R
LINE IN
KD-SH77R
TV
REMOTE
SENSOR
INPUT
*
DIGITAL
OUTPUT
(OPTICAL)
Remote control data cord (supplied with KV-DV7)
CONTROL cord
Steuerungskabel
Cordon de commande
Fernbedienungsdatenkabel (gehört zum Lieferumfang von KV-DV7)
Cordon de télécommande de données (fourni avec le
Snoer voor de afstandsbediening (meegeleverd met de KV-DV7)
Snoer voor de afstandsbediening
AUDIO
L
R
Signal cord (not supplied with this unit)
Einzelleitung (nicht mit diesem Gerät mitgeliefert)
Cordon de signal (non fourni avec cet appareil)
Signaalkabel (niet meegeleverd)
You can connect the DVD player (KV-DV7).
Sie können den DVD-Spieler (KV-DV7) anschließen.
KV -DV7
Vous pouvez connecter un lecteur de DVD (KV-DV7).
Hei is mogelijk een DVD (KV-DV7) aan te sluiten.
* To the mobile color monitor system or the audio-video input terminal of a stereo audio-
OUTPUT
VIDEO
1
2
video TV .
* Zum mobilen Farb- oder Monitorsystem oder dem Audio-Video-Eingang eines
stereophonen Audio-Video-Fernsehgeräts.
* Au système mobile de moniteur couleur ou aux prises d’entrée audio-vidéo d’un
téléviseur stéréo audio-vidéo.
*
Naar het mobiele kleuren of monitorsysteem of de audio-/video-ingang van een stereo audio/video
TV.
KV-DV7
)
JVC Amplifier
JVC Verstärker
JVC V ersterker
Subwoofer
Subwoofer
Caisson de grave
Subwoofer
External component / Externe Komponente / Appareil extérieur / Extern apparaat
For KD-SH55R only / Nur für KD-SH55R / Seulement pour le KD-SH55R / Alleen voor KD-SH55R
KD-SH55R
CD changer jack
Buchse für CD-Wechsler
Prise du changeur CD
Aansluiting voor CD-wisselaar
TROUBLESHOOTING
• The fuse blows.
* Are the red and black leads connected
correctly?
• Power cannot be turned on.
* Is the yellow lead connected?
• No sound from the speakers.
* Is the speaker output lead short-circuited?
• Sound is distorted.
* Is the speaker output lead grounded?
* Are the “–” terminals of L and R speakers
grounded in common?
• Unit becomes hot.
* Is the speaker output lead grounded?
* Are the “–” terminals of L and R speakers
grounded in common?
Line Input Adaptor KS-U57
(not supplied with this unit)
Line-Eingangsadapter KS-U57
(nicht mit diesem Gerät mitgeliefert)
Adaptateur d’entrée de ligne KS-U57
(non fourni avec cet appareil)
Line Input Adapter KS-U57 (niet meegeleverd)
FEHLERSUCHE
• Die Sicherung brennt durch.
* Sind die roten und schwarzen Leitungen richtig
angeschlossen?
• Stromversorgung kann nicht eingeschaltet
werden.
* Ist die gelbe Leitung angeschlossen?
• Kein Ton aus den Lautsprechern.
* Ist die Lautsprecherausgangsleitung
kurzgeschlossen?
• Ton verzerrt.
* Ist die Lautsprecherausgangsleitung geerdet?
* Sind die (–) Anschlußklemmen der linken und
rechten Lautsprecher zusammen geerdet?
• Gerät wird heiß.
* Ist die Lautsprecherausgangsleitung geerdet?
* Sind die (–) Anschlußklemmen der linken und
rechten Lautsprecher zusammen geerdet?
• Le fusible saute.
*
• L’appareil ne peut pas être mise sous
*
• Pas de son des enceintes.
*
• Le son est déformé.
*
*
• L ’appareil devient chaud.
*
*
L
R
L
R
Signal cord
(not supplied with this unit)
Einzelleitung
(nicht mit diesem Gerät mitgeliefert)
Cordon de signal
(non fourni avec cet appareil)
Signaalkabel (niet meegeleverd)
EN CAS DE DIFFICULTES
Les fils rouge et noir sont-ils racordés correctement?
tension.
Le fil jaune est-elle raccordée?
Le fil de sortie d’enceinte est-il court-circuité?
Le fil de sortie d’enceinte est-il à la masse?
Les bornes “–” des enceintes gauche et droit
sont-elles mises ensemble à la masse?
Le fil de sortie d’enceinte est-il à la masse?
Les bornes “–” des enceintes gauche et droit
sont-elles mises ensemble à la masse?
L
R
L
R
External component
Externe Komponente
Appareil extérieur
Extern apparaat
PROBLEMEN OPLOSSEN
• De zekering slaat door.
* Zijn de rode en de zwarte draden op de juiste manier
aangesloten?
• De stroom kan niet worden ingeschakeld.
* Is de gele draad aangesloten?
• Er komt geen geluid uit de speakers.
* Is de uitgaande speakerdraad kortgesloten?
• Het geluid wordt vervormd.
* Is de uitgaande speakerdraad geaard?
* Zijn de minpolen van de linker- en de rechterspeakers
gemeenschappelijk geaard?
• Het apparaat raakt verhit.
* Is de uitgaande speakerdraad geaard?
* Zijn de minpolen van de linker- en de rechterspeakers
gemeenschappelijk geaard?
Page 49

CD RECEIVER
RECEPTOR CON CD
SINTOAMPLIFICATORE CON RIPRODUTTORE DI CD
CD-SPELARE MED MOTTAGARE
CD-VASTAANOTIN
KD-SH77R/KD-SH55R
Detachable
ATT
ANGLE
CD
FM
AM
CH
AUX SEL
RM-RK100
R D
VOLUME
KD-SH77R
EQ
KD-SH55R
Para la instalación y las conexiones, refiérase al manual separado.
Per le istruzioni d’installazione e di collegamento, vedere il manuale a parte.
Se separat handbok för installation och anslutning.
Katso asennus- ja liitäntäohjeet erillisestä ohjekirjasta.
INSTRUCTIONS
MANUAL DE INSTRUCCIONES
ISTRUZIONI
BRUKSANVISNING
KÄYTTÖOHJE
ESPAÑOL
ITALIANO
SVENSKA
SUOMI
LVT0638-001A
[E]
Page 50

Tarrojen sijainti ja merkinnät
Päälaitteen pohja
CAUTION: Invisible laser
radiation when open and
interlock failed o r defeated.
AVOID DIRECT EXPOSURE
TO BEAM. (e)
Nimi/Arvolevy
CLASS
LASER
Huomautus:
Caution:
Tässä laitteessa on laserluokan 1
This product contains a laser component
ylittävä laserkomponentti.
of higher laser class than Class 1.
1
PRODUCT
Laitteen Säätö alkutilaan
Paina etupaneelissa olevaa palautusnäppäintä
kuulakärkikynällä tai jollakin samanlaisella
esineellä.
Huom!
Esiasetetut säädöt, kuten esim.
esiasetetut kanava- tai
äänisäädöt, pyyhitään myös
pois.
ADVARSEL: Usynlig laserstråling ved åbning, når
sikkerhedsafbrydere er ude
af funktion. Undgåudsættelse for stråling. (d)
VARNING: Osynlig laserstrålning när denna del är
öppnad och spärren är
urkopplad. Betrakta ej
strålen. (s)
VARO : Avattaessa ja
suojalukitus ohitettaessa
olet alttiina näkymättömälle lasersäteilylle.
Älä katso säteeseen. (f)
Tärkeää laserlaitteille
Huomautuksia:
1. LUOKAN 1 LASERLAITE
2. VAARA: Näkymätöntä lasersäteilyä, kun laite
avataan ja kun sisälukitus ei toimi tai on
säädetty toimimatomaksi. Vältä suoraa
altistumista säteelle.
3. VAARA: Älä avaa yläkantta. Laitteen sisällä ei
ole käyttäjän huollettavissa olevia osia. Jätä
kaikki huoltotoimet ammattihenkilön
suoritettavaksi.
4. VAARA: Tämä CD-soitin käyttää näkymätöntä
lasersäteilyä ja siinä on turvakytkimet, jotka
estävät säteilyn välittymisen CD-levyjen
poisoton aikana. Turvakytkimien säätäminen
toimimattomiksi on vaarallista.
5. VAARA: Muiden kuin tässä käyttöohjeessa
mainittujen säätimien, säätöjen ja
toimenpiteiden käyttö saattaa altistaa
käyttäjän vaaralliselle säteilylle.
VAARA:
Sormia EI SAA työntää
etulevyn ja laitteen väliin,
koska ne voivat jäädä
puristuksiin ja rusentua.
(Ks. sivua 28.)
Huom!
Tämä laite on varustettu numeroidulla tunnuskortilla. Sama numer o on merkitty myös itse laitteeseen.
Säilytä tämä kortti tallessa, sillä sen avulla laite on helppo tunnistaa varkauden yhteydessä.
ENNEN KÄYTTÖÄ
*
Turvallisuuden tähden....
SUOMI
• Älä lisää äänenvoimakkuuden tasoa liikaa, koska
tämä tukkii ulkopuoliset äänet, minkä johdosta
ajaminen voi olla vaarallista.
• Pysäytä auto ennen monimutkaisiin toimiin
ryhtymistä.
*
Auton sisälämpötila....
Jos olet pysäköinyt auton pitemmäksi aikaa
kuumassa tai kylmässä säässä, odota kunnes
lämpötila autossa muuttuu normaaliksi ennen
laitteen käyttöä.
2
Page 51

Kiitämme tämän JVC-tuotteen ostosta. Lue kaikki ohjeet tarkasti ennen käyttöä,
jotta ymmärrät ne täysin ja näin saat parhaan mahdollisen hyödyn laitteesta.
SISÄLLYS
Laitteen Säätö alkutilaan .......................... 2
NÄPPÄINTEN JA SÄÄDINTEN
SIJAINTI .................................... 4
Etulevyn ................................................... 4
Käyttö....................................................... 5
Kaukosäätimen käyttövalmiiksi
paneminen ............................................ 6
PERUSKÄYTTÖ ............................ 7
RADION PERUSKÄYTTÖ ................. 8
Radion kuuntelu....................................... 8
Asemien tallennus muistiin ....................... 9
Viritys esiasetetun aseman taajuudelle .... 10
RDS TOIMINNOT .......................... 11
Mihin RDS- ja EON-toimintoja
käytetään?............................................. 11
Muita käytännöllisiä RDS-toimintoja ja
säätöjä................................................... 14
CD-LEVYN KÄYTTÖ ....................... 17
CD-levyn soittaminen ............................... 17
CD-tekstin toisto ...................................... 18
Kappaleen tai tietyn kohdan haku
CD-levyltä.............................................. 18
CD:n toistotilojen valinta ........................... 19
CD-levyn vapautuksen esto...................... 19
ÄÄNEN SÄÄDÖT ........................... 20
Äänen säätö ............................................ 20
Esiasetettujen äänitilojen valinta .............. 21
Omien äänisäätöjen tallennus .................. 22
MUUT PÄÄTOIMINNOT ................... 23
Kellon asetus ........................................... 23
Yleisasetusten muuttaminen (PSM) ......... 23
Nimen määrääminen ohjelmalähteille ...... 27
Etulevyn asennon vaihtaminen................. 28
Etulevyn irrotus........................................ 29
ULKOPUOLISTEN KOMPONENTTIEN
KÄYTTÖ .................................... 30
Ulkoisten komponenttien soittaminen....... 30
CD-VAIHTAJAN KÄYTTÖ.................. 32
CD-levyjen soittaminen............................. 32
CD:n toistotilojen valinta ........................... 33
DAB-VIRITTIMEN KÄYTTÖ ............... 34
Näin viritetään ohjelmakokonaisuus ja
yksi sen esityksistä ................................ 34
DAB-esitysten tallennus muistiin .............. 36
Näin viritetään esiasetetun
DAB-esityksen taajuudelle ..................... 37
Mikä muu on mahdollista
DAB-virittimellä...................................... 37
LISÄTIETOJA .............................. 38
HUOLTO .................................... 39
CD-levyjen käsittely ................................. 39
VIANETSINTÄ .............................. 40
TEKNISET TIEDOT......................... 41
Demotilaa koskevia tietoja (DEMO MODE)...
Kun tämä laite toimitetaan tehtaalta, sen “DEMO MODE” on asetettu kohdalle “DEMO ON”.
Seuraava, tämän laitteen pääominaisuudet esittelevä demo ilmestyy näyttöön automaattisesti, jos
mitään ääntä ei kuulu kolmeen minuuttiin. (Ks. sivua 26.)
• 24bit DAC : (24-bitin digitaali-analogiamuunnin: Antaa korkealaatuisen äänen D/A-
muunnoksen jälkeen.)
• HS TUNER :(Hyvin herkkä viritin: Mahdollistaa asemien hienon kuuluvuuden.)
• EQUALIZER : (Sallii äänen hienosäädön mielesi mukaiseksi.)
• SUB WOOFER : (VAIN KD-SH77R: mahdollistaa subwooferin kytkennän ja sen lähtötason
säädön.)
Äänenvoimakkuuden asetusta koskeva VAROITUS
CD- levyt synnyttävät hyvin vähän häiriöääntä muihin ohjelmalähteisiin verrattuna. Jos esimerkiksi
radion äänenvoimakkuuden tasoa säädetään, lähtötason äkkinäinen lisäys voi vahingoittaa
kaiuttimia. Näin ollen äänenvoimakkuutta tulisi pienentää ennen levyn soittamista ja säätää se
sitten halutuksi toiston aikana.
SUOMI
3
Page 52

Etulevyn
NÄPPÄINTEN JA SÄÄDINTEN SIJAINTI
1
2
3
4 5
t
1 (vapautus) -näppäin
2 Säätövalitsin
3 SEL (valinta) -näppäin
4 EQ (tasaus) -näppäin
5 D (näyttö) -näppäin
6 TP (liikenneohjelma) -näppäin
7 PTY (ohjelmatyypin) -näppäin
8 M/B (tila/kaista) -näppäin
9 ¢ / 4 -näppäimet
•
Toimii myös SSM-näppäimenä, kun niitä
painetaan yhtä aikaa.
p ATT (kulma / vaimennin) -näppäin
6
7
8
9
ry
q Lisälaitteen tulojakki
w (etulevyn vapautusnappi) -näppäin
e Kauko-ohjaimen tunnistin
r Numeronäppäimiä
•MO (monauraalinen) -näppäin
• LO (paikallis) -näppäin
• INT (esittelyskannaus) -näppäin
•RPT (toisto) -näppäin
• RND (satunnais) -näppäin
• Videokomponentin käyttönäppäimet
(VAIN KD-SH77R)
t SOURCE (valmiustila/päällä) -näppäin
y Palautusnäppäin
e
p
w
q
Näin käytetään numeronäppäimiä:
Jos M/B (tila/kaista) -näppäintä painetaan, laite siirtyy toimintatilaan ja numeronäppäimet toimivat
erilaisina toimintanäppäiminä.
Normaalisti
Tasauskuvion
Toimintatilan
aikana
SUOMI
Kun haluat käyttää näitä näppäimiä taas numeronäppäiminä painettuasi M/B (tila/kaista)
-näppäintä, odota 5 sekuntia painamatta mitään numeronäppäimiä, kunnes toimintatila on tyhjätty.
• M/B (tila/kaista) -näppäimen painallus uudelleen tyhjentää myös toimintatilan.
4
merkki
Ajan
lähtölaskentamerkki
Page 53

Käyttö
ATT
1
CD
DAB
FM
2
AM
CH
AUX SEL
RM-RK100
R•D-näppäin ei toimi tässä
mallissa.
PRESET
ANGLE
DISC
R D
DISC
VOLUME
EQ
PRESET
3
4
5
6
7
8
9
• AM : Valitsee AM-virittimen.
• CH : Valitsee CD-vaihtajan.*
• AUX : Valitsee ulkoiset komponentit.
Joka kerta kun näppäintä painetaan,
“AUX INPUT” ja “LINE INPUT”**
valitaan vuorotellen.
3 Vaihtaa etulevyn kolmeen asentoon.
4 Valitsee äänitilat.
Joka kerta kun näppäintä painetaan, äänitilat
vaihtuvat.
5 • Etsii asemat radiota kuunneltaessa.
• Valitsee ohjelmakokonaisuudet DAB-viritintä
kuunneltaessa, jos sitä painetaan lyhyesti.
• Valitsee esitykset DAB-viritintä
kuunneltaessa, jos se pidetään
alaspainettuna.
• Siirtää nopeasti eteen tai taakse raidalla, jos
sitä painetaan kuunneltaessa CD-levyä.
• Siirtyy seuraavan raidan alkuun tai palaa
parhaillaan soivan raidan (tai edellisten
raitojen) alkuun, jos sitä painetaan hetken
kuunneltaessa CD-levyä.
6 Vaihtaa esiasetetun kanavan numeron radiota
(tai DAB-viritintä) kuunneltaessa.
Joka kerta kun näppäintä painetaan,
esiasetettu kanavan numero vaihtuu ja valittu
asema (tai esitys) viritetään.
1 • Kytkee laitteen päälle, jos sitä painetaan
laitteen ollessa poissa päältä.
• Kytkee laitteen pois päältä, jos sitä painetaan
ja pidetään alhaalla, kunnes näyttöön ilmestyy
“SEE Y OU”.
• Painettaessa lyhyesti äänenvoimakkuuden
taso laskee heti, näytössä vilkkuu “ATT”.
Äänenvoimakkuus palautetaan painamalla
sitä uudelleen.
2 • CD : Valitsee CD-soittimen.
• FM : • Valitsee FM-virittimen painettaessa
lyhyesti.
Joka kerta kun näppäintä
painetaan, FM-kaista (FM1, FM2 ja
FM3) vaihtuu.
• Valitsee DAB-virittimen pidettäessä
näppäin alaspainettuna.*
Joka kerta kun painat näppäintä ja
pidät sitä alhaalla, DAB-kaista
(DAB1, DAB2 ja DAB3) vaihtuu.
7 Vaihtaa levyn numeron CD-vaihtajaa
kuunneltaessa.
Joka kerta kun näppäintä painetaan, levyn
numero vaihtuu ja valittu levy alkaa soida.
8*** Valitsee äänensäätökohdat.
Joka kerta kun näppäintä painetaan, kohdat
vaihtuvat.
9*** • Vaihtaa äänenvoimakkuuden.
• Säätää äänitilan (sen jälkeen kun SEL
-näppäintä on painettu).
* Et voi valita sitä toistolähteeksi kytkemättä
DAB-viritintä tai CD-vaihtajaa.
** VAIN KD-SH55R: Jos haluat valita ulkoisen
komponentin, sinun on vaihdettava ulkoisen
komponentin asetus (ks. sivua 26).
***Nämä näppäimet eivät toimi mielesi mukaisen
asetustilan säätöä varten.
SUOMI
5
Page 54

Kaukosäätimen käyttövalmiiksi
paneminen
2. Pane paristo paikoilleen.
Työnnä paristo koteloon + puoli ylöspäin niin,
että paristo pysyy tukevasti kotelossa.
Ennen kauko-ohjaimen käyttöä:
• Suuntaa kauko-ohjain suoraan päälaitteen
kauko-ohjaimen tunnistimeen. Varmista, että
kauko-ohjaimen ja sen tunnistimen välissä ei
ole esteitä.
Kauko-ohjaimen tunnistin
• Älä anna voimakkaan valon (auringonvalon tai
keinovalon) loistaa kauko-ohjaimeen.
Pariston asennus
Kun kaukosäätimen säätöalue pienenee tai
tehokkuus laskee, paristo on vaihdettava.
1. Irrota paristokotelo.
1) Työnnä nuolen osoittamaan suuntaan
käyttämällä kuulakärkikynää tai jotain
vastaavaa esinettä.
2) Irrota paristokotelo.
(takapuoli)
1)
2)
Pyöreä litiumparisto
(tuotenumero:
CR2025)
3. Pane paristokotelo takaisin paikalleen.
Työnnä paristokotelo takaisin paikalleen,
kunnes kuuluu naksahdus.
(takapuoli)
VAROITUS!
• Säilytä paristo paikassa, jonne lapset eivät yltä.
Jos lapsi saa pariston jollakin tavalla suuhunsa,
käänny heti lääkärin puoleen.
• Paristoa ei saa ladata, saattaa oikosulkuun,
purkaa tai kuumentaa eikä niitä saa panna tuleen.
Yllä mainitut toimet voivat aiheuttaa pariston
kuumenemisen, halkeamisen tai ne voivat sytyttää
tulipalon.
• Paristoa ei saa sekoittaa muihin metalleihin.
Tämä voi aiheuttaa pariston kuumenemisen,
halkeamisen tai ne voivat sytyttää tulipalon.
• Kun heität paristo pois tai säästät ne, kääri ne
teippiin ja eristä. Jos näin ei tehdä, tuloksena voi
olla paristo kuumeneminen, halkeaminen tai ne
voivat sytyttää tulipalon.
• Paristoa ei saa pistellä metallineulalla tai muulla
samanlaisella esineellä.
Tämä voi aiheuttaa pariston kuumenemisen,
halkeamisen tai ne voivat sytyttää tulipalon.
SUOMI
6
Page 55

2
1
1
Kytke virta päälle ja valitse
ohjelmalähde.
Kun näppäintä painetaan
ensimmäisen kerran, virta
kytkeytyy päälle. Joka kerta
kun näppäintä painetaan sen
jälkeen, ohjelmalähde vaihtuu
seuraavasti.
Varten KD-SH77R
FM TUNER
AM TUNER
Varten KD-SH55R
FM TUNER
AM TUNER
* Jos latausaukossa ei ole CD-levyä, et voi
valita soittolähteeksi CD:tä.
** Et voi valita DAB-viritintä tai CD-vaihtajaa
soittolähteeksi kytkemättä niitä.
***VAIN KD-SH55R: Jos haluat valita ulkoisen
komponentin, sinun on vaihdettava ulkoisen
komponentin asetus (ks. sivua 26).
Virittimen (FM tai AM) käyttö,
ks. sivuja 8 – 10.
CD-soittimen käyttö,
ks. sivuja 17 – 19.
Kun haluat käyttää ulkoisia komponentteja
(AUX INPUT ja LINE INPUT),
ks. sivuja 30 – 31.
CD-vaihtajan käyttö,
ks. sivuja 32 – 33.
DAB-virittimen käyttöohjeet,
ks. sivuja 34 – 37.
DAB TUNER
AUX INPUT
DAB TUNER
AUX INPUT
**
**
CD PLAY
CD CHANGER
LINE INPUT
CD PLAY
CD CHANGER
tai
LINE INPUT
PERUSKÄYTTÖ
Huom!
Kun käytät tätä laitetta
ensimmäisen kerran, aseta
sen sisäänrakennettu kello
oikein, ks. sivua 23.
2
Säädä äänenvoimakkuus.
Suurennetaan
äänenvoimakkuutta.
Pienennetään
äänenvoimakkuutta.
Näkyviin tulee
äänenvoimakkuuden taso.
*
**
Äänenvoimakkuustason merkkivalo
*
***
Huom!
Säädettyäsi äänenvoimakkuuden voit työntää
säätövalitsimen sisään. Näin vältytään
**
tahattomalta käytöltä.
Kun haluat käyttää sitä taas, työnnä
säätövalitsinta uudelleen saadaksesi sen ulos.
3
Säädä ääni haluamaksesi.
(Ks. sivua 20.)
Äänenvoimakkuuden häivytys hetkeksi
Pidä /ATT-näppäin alaspainettuna
kuunnellessasi mitä tahansa ohjelmalähdettä.
Näytössä alkaa vilkkua “ATT” ja
äänenvoimakkuus pienenee hetkeksi.
Kun haluat saada aikaisemman
äänenvoimakkuuden takaisin, pidä näppäin taas
alaspainettuna.
• Jos kierrät säätövalitsinta myötäpäivään, voit
palauttaa äänen.
Virran katkaiseminen
Pidä SOURCE -näppäin alaspainettuna,
kunnes näyttöön ilmestyy “SEE YOU”.
SUOMI
7
Page 56

RADION PERUSKÄYTTÖ
Radion kuuntelu
Kun haluat virittää jonkin tietyn aseman
taajuudelle, voit käyttää joko automaattista tai
manuaalista hakua.
Aseman haku automaattisesti:
Automaattinen haku
1
Valitse FM tai AM.
Näkyviin tulee valittu taajuuskaista.
Huom!
Tässä vastaanottimessa on kolme
FM-taajuuskaistaa (FM1, FM2, FM3). Voit käyttää
mitä tahansa näistä FM-lähetyksen kuunteluun.
2
Aloita aseman haku.
SUOMI
8
Kun asema kuuluu, haku päättyy.
1 Valitse ohjelmalähteeksi
FM tai AM painamalla
SOURCE -näppäintä
toistuvasti.
2 Kun haluat valita FM-
kaistanumeron
pidä M/B (tila/kaista) -näppäin
alaspainettuna toistuvasti
yli 1 sekunnin ajan.
Joka kerta kun painat
näppäintä ja pidät sitä
alhaalla, FM-kaista
vaihtuu seuraavasti:
FM 1 FM 2 FM 3
Haku
suurempitaajuuksisten
asemien kohdalle
painamalla ¢
-näppäintä.
Haku
pienempitaajuuksisten
asemien kohdalle
painamalla 4
-näppäintä.
tarvittaessa
Kun haluat lopettaa haun, ennen kuin asema
kuuluu, paina samaa näppäintä, jota painoit
hakua varten.
Vain voimakassignaalisten FM-asemien
taajuudelle virittäminen
1 Siirry toimintatilaan FM-lähetystä
kuunnellessasi painamalla M/B (tila/kaista)
-näppäintä. Sitten numeronäppäimet voivat
toimia eri toimintanäppäiminä. (Ks. sivua 4.)
2 Paina LO (paikallis) -näppäintä ollessasi vielä
toimintatilassa, niin että näyttöön syttyy
LOCAL-merkkivalo.
Tämä toiminto toimii vain haettaessa FMasemia, mukaan lukien esiasetetut SSM:t.
,
Joka kerta kun näppäintä painetaan, LOCAL
-merkkivalo syttyy ja sammuu vuorotellen.
Aseman haku käsin: Manuaalinen haku
1
Valitse FM tai AM.
Huom!
Tässä vastaanottimessa on kolme
FM-taajuuskaistaa (FM1, FM2, FM3). Voit käyttää
mitä tahansa näistä FM-lähetyksen kuunteluun.
1 Valitse ohjelmalähteeksi
FM tai AM painamalla
SOURCE -näppäintä
toistuvasti.
2 Kun haluat valita FM-
kaistanumeron
tarvittaessa, pidä M/B
(tila/kaista) -näppäin
alaspainettuna toistuvasti
yli 1 sekunnin ajan.
Joka kerta kun painat
näppäintä ja pidät sitä
alhaalla, FM-kaista
vaihtuu seuraavasti:
FM 1 FM 2 FM 3
Page 57

2
Paina ¢ tai 4 -näppäintä ja
pidä sitä alhaalla, kunnes näytössä
alkaa vilkkua “M” (manuaalinen).
3
Viritä haluamallesi asemalle “M”:n
vilkkuessa.
Viritä
suurempitaajuuksisten
asemien kohdalle
painamalla ¢
-näppäintä.
Viritä
pienempitaajuuksisten
asemien kohdalle
painamalla 4
-näppäintä.
• Jos päästät sormen näppäimeltä,
manuaalitila kytkeytyy automaattisesti pois
päältä 5 sekunnin jälkeen.
• Jos pidät näppäintä alhaalla, taajuus
vaihtuu jatkuvasti kunnes vapautat
näppäimen.
Kun FM-stereolähetyksen kuuluvuus on huono:
1 Siirry toimintatilaan FM-
stereolähetystä kuunnellessasi
painamalla M/B (tila/kaista)
-näppäintä.
2 Paina MO (monauraalinen)
-näppäintä ollessasi vielä
toimintatilassa, niin että näyttöön
syttyy MO-merkkivalo.
• Joka kerta kun näppäintä
painetaan, MO-merkkivalo
syttyy ja sammuu vuorotellen.
Syttyy, kun FM-lähetyksen
vastaanotto on stereona.
Kun näytössä palaa MO-merkkivalo, kuulemasi
ääni muuttuu monoksi, mutta vastaanotto
paranee (ST-merkkivalo sammuu).
MO-merkkivalo syttyy.
Asemien tallennus muistiin
Voit käyttää jompaakumpaa seuraavista kahdesta
menetelmästä lähetysasemien tallentamiseksi
muistiin.
• FM-asemien automaattinen esiasetus: SSM
(Strong-station Sequential Memory — vahvan
aseman peräkkäismuisti)
• Sekä FM- että AM-aseman esiasetus käsin
FM-aseman automaattinen esiasetus:
SSM
Voit esiasettaa 6 paikallista FM-asemaa kullakin
FM-taajuusalueella (FM1, FM2 ja FM3).
1
Valitse FM-taajuusalueen numero
(FM1 – 3), johon haluat tallentaa
FM-asemat.
1 Valitse FM painamalla
SOURCE -näppäintä
toistuvasti.
2 Pidä tarvittaessa M/B
(tila/kaista) -näppäin
alaspainettuna yli
sekunnin ajan. Joka
kerta kun painat
näppäintä ja pidät sitä
alhaalla, FM-kaista
vaihtuu seuraavasti:
FM 1 FM 2 FM 3
2
Paina molempia näppäimiä ja pidä
sitä alhaalla yli 2 sekuntia ajan.
“SSM” tulee näkyviin ja katoaa
sitten, kun automaattinen
esiasetus on lopussa.
Paikalliset FM-asemat, joilla on voimakkaimmat
signaalit, haetaan ja ne tallennetaan
automaattisesti valitsemaasi
taajuusaluenumeroon (FM1, FM2 tai FM3).
Nämä asemat on asetetaan numeronäppäimiin
— nro 1 (pienin taajuus) – nro 6 (suurin taajuus).
Kun automaattinen esiasetus on lopussa,
numeronäppäimeen 1 tallennettu asema
viritetään automaattisesti.
SUOMI
9
Page 58

Esiasetus käsin
Voit esiasettaa käsin enintään 6 asemaa kullakin
taajuusalueella (FM1, FM2, FM3 ja AM).
Esim.: 88‚3 MHz:n FM-aseman tallennus
FM1-taajuusalueen esiasetettuun
numeroon 1
1
Valitse kaista (FM1–3, AM), johon
haluat tallentaa aseman (tässä
esimerkissä FM1).
2
Viritä 88‚3 MHz:n asemaan.
1 Valitse ohjelmalähteeksi
FM tai AM painamalla
SOURCE -näppäintä
toistuvasti.
2 Kun haluat valita FM-
kaistanumeron
tarvittaessa, pidä M/B
(tila/kaista) -näppäin
alaspainettuna toistuvasti
yli 1 sekunnin ajan.
Joka kerta kun painat
näppäintä ja pidät sitä
alhaalla, FM-kaista
vaihtuu seuraavasti:
FM 1 FM 2 FM 3
Viritä
suurempitaajuuksisten
asemien kohdalle
painamalla ¢
-näppäintä.
Viritä
pienempitaajuuksisten
asemien kohdalle
painamalla 4
-näppäintä.
Huom!
• Aikaisemmin esiasetettu asema pyyhitään pois, kun
uusi asema tallennetaan samaan
esiasetetusnumeroon.
• Esiasetetut asemat pyyhitään pois, kun virtalähde
muistipiiriin keskeytetään (esim. akun vaihdon aikana).
Jos näin tapahtuu, esiaseta asemat uudelleen.
Viritys esiasetetun aseman
taajuudelle
Voit virittää kätevästi esiasetetun aseman taajuudelle.
Muistathan, että sinun täytyy tallentaa asemat
ensin. Jos et ole tallentanut niitä vielä, ks.
“Asemien tallennus muistiin” sivua 9.
1
Valitse FM tai AM.
2
Valitse haluamasi esiasetusaseman
numero (1 – 6) haluamasi esiasetusaseman.
1 Valitse ohjelmalähteeksi
FM tai AM painamalla
SOURCE -näppäintä
toistuvasti.
2 Kun haluat valita FM-
kaistanumeron
tarvittaessa, pidä M/B
(tila/kaista) -näppäin
alaspainettuna toistuvasti
yli 1 sekunnin ajan.
Joka kerta kun painat
näppäintä ja pidät sitä
alhaalla, FM-kaista
vaihtuu seuraavasti:
FM 1 FM 2 FM 3
3
SUOMI
4
10
Paina numeronäppäintä (tässä
esimerkissä numeroa 1) ja pidä sitä
alhaalla yli 2 sekunnin ajan.
“P1” vilkkuu hetken.
Toista yllä kuvattu toimenpide
tallentaaksesi toisen aseman muihin
esiasetusnumeroihin.
Jos äänen laatu heikkenee ja
stereoefekti katoaa FM-asemaa
kuunneltaessa
Joillakin alueilla voivat vierekkäiset asemat
häiritä toisiaan. Jos tällaista häiriötä sattuu,
pystyy tämä laite vähentämään automaattisesti
kyseistä kohinaa (alkuasetus tehtaalta
toimitettaessa). Tässä tapauksessa äänen
laatu heikkenee kuitenkin ja stereoefekti
katoaa myös.
Jos et halua heikentää äänen laatua etkä
menettää stereoefektiä ja jätät ennemmin
kohinan eliminoimatta, ks. sivulla 26 olevaa
osaa “FM-virittimen selektiivisyyden
vaihtaminen – IF FILTER”.
Page 59

RDS TOIMINNOT
Mihin RDS- ja EON-toimintoja
käytetään?
RDS:n (radiotietojärjestelmän) avulla FM-asemat
voivat lähettää lisäsignaalin normaalien
ohjelmasignaalien lisäksi. Esimerkiksi asemat
voivat lähettää asemansa nimen sekä tietoja siitä,
minkä tyyppisiä ohjelmia ne lähettävät, kuten
esim. urheilua tai musiikkia yms.
Eräs toinen RDS-toiminnon eduista on nimeltä
“EON (muiden asemaryhmien tarkkailu)”. EONmerkkivalo syttyy, kun FM-asema otetaan
vastaan EON-datalla. Käyttämällä joltakin
asemalta lähetettyä EON-dataa voit virittää eri
verkossa suosikkiohjelmaasi tai
liikennetiedotuksia lähettävälle eri asemalle
kuunnellessasi jotain toista ohjelmaa tai
ohjelmalähdettä, kuten CD.
Ottamalla vastaan RDS-tietoja tämä laite pystyy
seuraaviin toimintoihin:
• Saman ohjelman automaattinen seuranta
(verkkoseurannan vastaanotto)
• TA:n (liikennetiedotuksen) tai suosikkiohjelmasi
vastaanoton valmiustila
• PTY:n (ohjelmatyypin) haku
• Ohjelman haku
• Sekä joitakin muita toimintoja
Saman ohjelman automaattinen
seuranta (verkkoseurannan
vastaanotto)
Kun ajat alueella, jossa FM-kuuluvuus on huono,
tämän laitteen sisään rakennettu viritin virittää
automaattisesti jollekin toiselle RDS-asemalle,
joka lähettää samaa ohjelmaa voimakkaammilla
signaaleilla. Joten voit jatkaa saman ohjelman
kuuntelemista sen parhaimmalla kuuluvuudella,
ajoitpa missä tahansa. (Ks. seuraavalla sivulla
olevaa kuvaa.)
Käytettyjä RDS-tietoja, jotka saavat
verkkoseurannan vastaanoton toimimaan oikein,
on kahta tyyppiä: PI (ohjelman tunnistus) ja AF
(vaihtoehtotaajuudet).
Jos tämän datan vastaanotto kuuntelemaltasi
RDS-asemalta ei tapahdu oikein,
verkkoseurannan vastaanotto ei toimi.
Kun haluat käyttää verkkoseurannan
vastaanottoa, paina TP (liikenneohjelma)
-näppäintä ja pidä sitä alhaalla yli 1 sekunnin
ajan. Joka kerta kun painat näppäintä ja pidät
sitä alhaalla, verkkoseurannan vastaanottotilat
vaihtuu seuraavasti:
Tila 1 Tila 2 Tila 3
(AF)
Tila 1
Tila 2
Tila 3
Tila 1
Verkkoseuranta on aktivoitu ja aluetila on asetettu
kohdalle “off”.
Vaihtuu jonkin toisen aseman taajuudelle saman
verkon piirissä, kun vastaanottosignaalit
nykyiseltä asemalta heikkenevät.
• Tässä tilassa ohjelma voi olla erilainen kuin tällä
hetkellä vastaanotettu ohjelma.
Tila 2
Verkkoseuranta on aktivoitu ja aluetila on asetettu
kohdalle “on”.
Vaihtuu jonkin toisen, samaa ohjelmaa lähettävän
aseman taajuudelle saman verkon piirissä, kun
vastaanottosignaalit nykyiseltä asemalta
heikkenevät.
Tila 3
Verkkoseuranta on passivoitu.
Huom!
Jos DAB-viritin kytketään ja vaihtoehtoinen
vastaanotto (DAB-ohjelmatoimintoja varten)
aktivoidaan, verkkoseurannan vastaanotto aktivoidaan
myös automaattisesti. Toisaalta verkkoseurannan
vastaanottoa ei voida passivoida passivoimatta
vaihtoehtoista vastaanottoa. (Ks. sivua 37.)
(AF/REG) (Peruttu)
AF-merkkivalo
REG-merkkivalo
: syttyy : sammuu
AF REG
-merkkivalo -merkkivalo
SUOMI
11
Page 60

Sama ohjelma voidaan ottaa vastaan eri
taajuuksilla.
Taajuudella A
lähettävä
ohjelma 1
Taajuudella B
lähettävä
ohjelma 1
Taajuudella C
lähettävä
ohjelma 1
Taajuudella E
lähettävä
ohjelma 1
Taajuudella D
lähettävä
ohjelma 1
Vastaanottovalmiuden käyttö
Vastaanottovalmiuden avulla laite kytketään
väliaikaisesti nykyiseltä ohjelmalähteeltä (jokin
toinen FM-asema, CD ja muut kytketyt
komponentit) suosikkiohjelmallesi (PTY:
ohjelmatyyppi) tai liikennetiedotukselle (TA).
• Vastaanottovalmius ei toimi, jos kuuntelet
AM-asemaa.
TA:n vastaanottovalmius
Kun TP-näppäintä painetaan jotain
FM-asemaa kuunneltaessa,
TP-merkkivalo syttyy TP-aseman
(liikenneohjelman) vastaanoton
aikana, ja TA-valmiustila kytkeytyy
päälle.
• Kun vastaanotettu asema ei olekaan TP-asema,
TP-merkkivalo vilkkuu. Paina ¢ - tai 4
-näppäintä TA-valmiustilan kytkemiseksi päälle.
Näyttöön ilmestyy “SEARCH”, ja TP-aseman haku
alkaa. Kun TP-asema on viritetty , TP-merkkivalo syttyy .
7 Jos CD tai jotain muuta kytkettyä komponenttia
kuunnellessasi haluatkin kuunnella TP-asemaa,
siirry valmiustilaan painamalla TP-näppäintä
(TP-merkkivalo syttyy).
PTY:n vastaanottovalmius
Kun PTY-näppäintä painetaan jotain
FM-asemaa kuunneltaessa,
PTY-merkkivalo syttyy PTY-aseman
vastaanoton aikana, ja
PTY-valmiustila kytkeytyy päälle.
Sivulta 13 näkyvällä tavalla
tallennettu ja valittu PTY-nimi vilkkuu
5 sekunnin ajan.
• Kun vastaanotettu asema ei olekaan PTY-asema,
PTY-merkkivalo vilkkuu. Paina ¢ - tai
4 -näppäintä PTY-valmiustilan kytkemiseksi
päälle. Näyttöön ilmestyy “SEARCH”, ja PTYaseman haku alkaa. Kun PTY-asema on viritetty,
PTY-merkki valo syttyy.
7 Jos CD tai jotain muuta kytkettyä komponenttia
kuunnellessasi haluatkin kuunnella PTYlähetystä, siirry valmiustilaan painamalla PTYnäppäintä. (PTY-merkkivalo syttyy.)
Jos valitsemasi PTY-ohjelman lähetys alkaa
PTY-valmiustilan toimiessa, näkyviin tulee valittu
PTY-nimi, ja toiston ohjelmalähde vaihtuu
FM-taajuusalueelle. Valitsemasi PTY-ohjelma
alkaa kuulua.
PTY-valmiustila lopetetaan painamalla uudelleen
PTY -näppäintä.
Jos jonkin liikenneohjelman lähetys alkaa
TA-valmiustilan toimiessa, näkyviin tulee
“TRAFFIC”, ja toiston ohjelmalähde vaihtuu
FM-taajuusalueelle. Äänenvoimakkuus suurenee
SUOMI
esiasetetulle T A-äänen voimakkuustasolle
(ks. sivua 15), ja liikenneohjelma alkaa kuulua.
TA-valmiustila lopetetaan painamalla uudelleen
TP-näppäintä.
12
Page 61

Suosikkiohjelmasi valinta PTY:
POP M
1
2
3
ROCK M EASY M
45
6
CLASSICS
AFFAIRS
VARIED
n vastaanottovalmiutta varten
Voit valita suosikkiohjelmasi PTY:n
vastaanottovalmiutta varten muistiin
tallennettavaksi.
Kun laite toimitetaan tehtaalta, “NEWS” on
tallennettu ohjelmatyypiksi PTY:n
vastaanottovalmiutta varten.
1
Paina SEL (valinta) -näppäintä ja
pidä sitä alhaalla yli 2 sekunnin ajan
niin, että näyttöön ilmestyy yksi
PSM-kohdista.
(PSM: ks. sivua 24.)
2
Valitse “PTY STBY” (valmiustila), jos
sitä ei näy näytöstä.
3
Valitse yksi 29:stä PTY-koodista.
(Ks. sivua 16.)
Valittu koodinimi ilmestyy
näyttöön, ja se
tallennetaan muistiin.
Suosikkiohjelmasi haku
Voit hakea yhden kuudesta muistiin tallennetusta
suosikkiohjelmatyypistä.
Kun laite toimitetaan tehtaalta, numeronäppäimiin
(1 – 6) on tallennettu seuraavat kuusi
ohjelmatyyppiä.
Ks. alta, miten tehtaalla esiasetetut asetukset
vaihdetaan.
Ks. sivua 14, miten haetaan suosikkiohjelma.
Näin tallennetaan suosikkiohjelmatyypit
1
Paina SEL (valinta) -näppäintä ja
pidä sitä alhaalla yli 2 sekunnin ajan
niin, että näyttöön ilmestyy yksi
PSM-kohdista.
(PSM: ks. sivua 24.)
2
Valitse “PTY SEARCH”, jos sitä ei näy
näytöstä.
4
Päätä asetus painamalla
SEL (valinta) -näppäintä.
3
Valitse yksi 29:stä PTY-koodista.
(Ks. sivua 16.)
Valittu koodinimi ilmestyy
näyttöön.
• Jos aikaisemmin muistiin
tallennettu koodi
valitaan, se vilkkuu
näytöstä.
JATKUU SEURAAVALLA SIVULLA
SUOMI
13
Page 62

4
Paina numeronäppäintä ja pidä sitä
alhaalla yli 2 sekuntia tallentaaksesi
valitsemasi PTY-koodin haluamaasi
esiasetusnumeroon.
“MEMORY” ja valittu koodinimi vilkkuvat
vuorotellen. Sitten vain valittu koodinimi jää
vilkkumaan näyttöön.
5
Päätä asetus painamalla
SEL (valinta) -näppäintä.
Näin haetaan suosikkiohjelmatyyppi
1
Paina PTY (ohjelmatyyppi)
-näppäintä ja pidä sitä alhaalla yli
1 sekunnin ajan kuunnellessasi
FM-asemaa.
• Jos jokin asema lähettää samaa juuri
valitsemaasi PTY-koodiohjelmaa, kyseinen
asema viritetään oikealle taajuudelle.
• Jos mikään asema ei lähetä samaa juuri
valitsemaasi PTY-koodiohjelmaa, asema ei
vaihdu.
Huom!
Joillakin alueilla PTY-haku ei toimi kunnolla.
Muita käytännöllisiä
RDS-toimintoja ja säätöjä
Aseman automaattinen valinta
numeronäppäimillä
Normaalisti numeronäppäintä painettaessa
esiasetettu asema viritetään oikealle taajuudelle.
Kun esiasetettu asema on kuitenkin RDS-asema,
tapahtuu jotain muuta. Jos esiasetetulta asemalta
tulevien signaalien voimakkuus ei ole riittävä
hyvälle kuuluvuudelle, tämä laite aloittaa samaa
ohjelmaa lähettävän aseman haun käyttämällä
AF-dataa. (Ohjelman haku)
• Jonkin toisen aseman taajuudelle viritykseen
menee vähän aikaa käytettäessä ohjelman
hakua.
2
SUOMI
14
Näkyviin tulee viimeksi valittu PTY-koodi.
Valitse yksi esiasetusnumeroihin
(1 – 6) tallennetuista PTY-koodeista.
Esim.: Kun “ROCK M” on tallennettu
esiasetettuun
numeronäppäimeen 2
Suosikkiohjelmasi PTY-haku alkaa
5 sekunnin kuluttua.
Ohjelman haku aktivoidaan noudattamalla alla
olevia toimenpiteitä.
• Ks. myös sivulta 23 näkyvää osaa “Yleisasetusten
muuttaminen (PSM)”.
1 Paina SEL (valinta) -näppäintä ja pidä sitä
alhaalla yli 2 sekunnin ajan niin, että näyttöön
ilmestyy yksi PSM-kohdista.
2 Valitse “P-SEARCH” ¢ - tai 4
-näppäimellä.
3 Valitse “SEARCH ON” kiertämällä
säätövalitsinta myötäpäivään.
Ohjelman haku on nyt aktivoitu.
4 Päätä asetus painamalla SEL (valinta)
-näppäintä.
Kun haluat peruuttaa ohjelman haun, toista
sama toimintosarja ja valitse “SEARCH OFF”
vaiheessa 3 kiertämällä säätövalitsinta
vastapäivään.
Page 63

Näyttötilan vaihto FM-asemaa
kuunneltaessa
Voit v aihtaa alkunäytön aseman nimelle
(PS NAME) tai aseman taajuudelle (FREQUENCY)
FM RDS -asemaa kuunnellessasi.
• Ks. myös sivulta 23 näkyvää osaa “Yleisasetusten
muuttaminen (PSM)”.
1 Paina SEL (valinta) -näppäintä ja pidä sitä
alhaalla yli 2 sekunnin ajan niin, että näyttöön
ilmestyy yksi PSM-kohdista.
2 Valitse “TUNER DISP” (virittimen näyttötila)
¢ - tai 4 -näppäimellä.
3 Aseta haluamasi merkki (“FREQUENCY” tai
“PS NAME”) kiertämällä säätövalitsinta.
4 Päätä asetus painamalla SEL (valinta)
-näppäintä.
Huom!
Painamalla D (näyttö) -näppäintä näyttö voidaan
vaihtaa myös FM RDS -asemaa kuunneltaessa.
Joka kerta kun näppäintä painetaan, näytön yläosaan
ilmestyvät seuraavat tiedot:
Aseman nimi
(PS NAME)
Aseman taajuus
(FREQUENCY)
Ohjelmatyyppi
(PTY)
• Näyttö muuttuu sitten alkuperäiseksi muutaman
sekunnin kuluttua.
TA:n äänenvoimakkuuden asetus
Voit esiasettaa äänenvoimakkuuden TA:n
vastaanottovalmiutta varten. Kun liikenneohjelma
otetaan vastaan, äänenvoimakkuus vaihtuu
automaattisesti esiasetetulle tasolle.
• Ks. myös sivulta 23 näkyvää osaa
“Yleisasetusten muuttaminen (PSM)”.
1 Paina SEL (valinta) -näppäintä ja pidä sitä
alhaalla yli 2 sekunnin ajan niin, että näyttöön
ilmestyy yksi PSM-kohdista.
2 Valitse “TA VOL” (äänenvoimakkuus) ¢ -
tai 4 -näppäimellä.
3 Aseta haluamasi äänenvoimakkuus kiertämällä
säätövalitsinta.
Se voidaan säätää välille “TA VOL 00” –
“T A V OL 50”.
4 Päätä asetus painamalla SEL (valinta)
-näppäintä.
Automaattinen kellon säätö
Kun tämä laite toimitetaan tehtaalta, sen sisään
rakennettu kello on asetettu säädettäväksi
automaattisesti uudelleen käyttämällä
RDS-signaalin CT-dataa (kellonaika).
Jos et halua käyttää automaattista kellon säätöä,
noudata alta näkyviä toimenpiteitä.
• Ks. myös sivulta 23 näkyvää osaa “Yleisasetusten
muuttaminen (PSM)”.
1 Paina SEL (valinta) -näppäintä ja pidä sitä
alhaalla yli 2 sekunnin ajan niin, että näyttöön
ilmestyy yksi PSM-kohdista.
2 Valitse “AUTO ADJ” (Automaattinen kellon
säätö) ¢ - tai 4 -näppäimellä.
3 Valitse “ADJUST OFF” kiertämällä
säätövalitsinta vastapäivään.
Automaattinen kellon säätö on nyt peruttu.
4 Päätä asetus painamalla SEL (valinta)
-näppäintä.
Kellon säätö aktivoidaan uudelleen toista
sama toimintosarja ja valitse “ADJUST ON”
vaiheessa 3 kiertämällä säätövalitsinta
myötäpäivään.
Huom!
Asetettuasi “AUTO ADJ” kohdalle “ADJUST ON”
täytyy virityksen pysyä saman aseman taajuudella yli
2 minuuttia. Muussa tapauksessa ei kellonaikaa
säädetä. (Tämä johtuu siitä, että RDS-signaalissa
olevan CT-datan sieppaukseen menee 2 minuuttia.)
SUOMI
15
Page 64

PTY-koodien kuvaus
NEWS: Uutisia
AFFAIRS: Ajankohtaisia uutisia ja
tapahtumia laajemmin
käsittelevää ohjelmaa
INFO: Ohjelmia, joiden tarkoitus on
antaa neuvoja eri aloilta
SPORT: Urheilutapahtumia
EDUCATE: Koulutusohjelmaa
DRAMA: Kuunnelmia
CULTURE: Ohjelmaa valtakunnallisista ja
alueellisista kulttuuritapahtumista
SCIENCE: Ohjelmaa luonnontieteistä ja
teknologiasta
VARIED: Muuta ohjelmaa kuten
komedioita ym
POP M: Pop-musiikkia
ROCK M: Rock-musiikkia
EASY M: Kevyttä kuunneltavaa
LIGHT M: Kevyttä musiikkia
CLASSICS: Klassista musiikkia
OTHER M: Muuta musiikkia
WEATHER: Säätietoja
FINANCE: Tiedotuksia liike-elämästä,
kaupasta,osakemarkkinoista jne.
CHILDREN: Viihdeohjelmaa lapsille
SOCIAL: Ohjelmia yhteiskunnallisista
harrasteista
RELIGION: Ohjelmia uskonnon ja uskon eri
aloilta, olemassaolosta ja
etiikasta
PHONE IN: Ohjelmia, joissa ihmiset voivat
ilmaista mielipiteensä joko
soittamalla tai yleisissä
keskusteluissa
TRAVEL: Ohjelmia matkakohteista,
turistimatkoista, matkaideoita
jamahdollisuuksia
LEISURE: Ohjelmia virkistystoiminnasta
kuten puutarhanhoidosta,
ruoanlaitosta, kalastuksesta jne.
JAZZ: Jazz-musiikkia
COUNTRY: Country-musiikkia
NATION M: Suosittua nykymusiikkia muista
maista kyseisen maan kielellä
OLDIES: Klassista pop-musiikkia
FOLK M: Folk-musiikkia
DOCUMENT: Tutkivia ja pohdiskelevia
dokumenttiohjelmia eri aiheista
SUOMI
16
Page 65

CD-LEVYN KÄYTTÖ
CD-levyn soittaminen
1
Avaa latausaukko.
Näyttöpaneeli siirtyy alas ja
latausaukko tulee näkyviin.
Huom!
Kun ulkoinen komponentti on
kytketty lisälaitteen tulojakkiin, on
CD-levyä käsiteltävä varovasti.
2
Aseta levy levyaukkoon.
Laite vetää CD-levyn
sisään, etulevy palaa
aikaisempaan asentoon
(ks. sivua 28) ja CD:n
soitto alkaa
automaattisesti.
Näyttö vaihtuu ja siitä näkyy seuraava:
Soitettavan levyn
kokonaiskappalenumero
Tämänhetkinen
kappale
Soitettavan levyn
kokonaissoittoaika
Kulunut soittoaika
Huom!
• Kun latausaukossa on CD-levy, “CD”:n valinta
ohjelmalähteeksi SOURCE -näppäimen
painalluksella aloittaa CD-levyn soiton.
• Kun CD-levy työnnetään sisään ylösalaisin, se
vapautetaan automaattisesti.
• Toistettaessa CD Text -levyä ilmestyvät näyttöön
levyn nimi ja esittäjä. Sitten näyttöön tulee tällä
hetkellä soivan kappaleen nimi, jota seuraa
kappaleen numero ja kulunut soittoaika. Ks. myös
osaa “CD-tekstin toisto” (sivua 18) sekä osaa
“Vieritystilan valinta – SCROLL” (sivua 25).
Jos CD Text -levyllä on paljon tekstitietoja, jotkut
näistä eivät tule mahdollisesti näyttöön.
• Jos ohjelmalähde vaihdetaan, pysähtyy CD:n soitto
myös (vapauttamatta CD-levyä).
Soiton lopettaminen ja CD:n vapautus
Paina 0-näppäintä.
CD-levyn soitto lakkaa, etulevy siirtyy alas ja
sitten CD-levy vapautuu automaattisesti
latausaukosta.
Kun haluat palauttaa etulevyn aikaisempaan
asentoon, paina uudelleen 0-näppäintä.
• Jos latausaukkoon ei kosketa yhteen minuuttiin
(tai 30 sekuntiin, kun levy on vapautettu ja
virta-avain on kierretty “OFF”-asentoon), kuuluu
merkkiääni ja etulevy palautuu aikaisempaan
asentoon.
On varottava, ettei CD-levy ja sormet jää
etulevyn ja laitteen väliin.
Huom!
Jos vapautettua levyä ei oteta pois n. 15 sekunnin
sisällä, levy palaa automaattisesti latausaukkoon, joka
suojaa sitä pölyltä. (Tällä kertaa CD ei ala soida.)
SUOMI
17
Page 66

CD-tekstin toisto
CD-tekstiin on tallennettu joitakin levyä koskevia
tietoja (mm. levyn nimi, esittäjä ja kappaleen
nimi). Nämä levytiedot voidaan saada näyttöön.
1
Valitse tekstin näyttötila toistaessasi
CD-tekstiä.
Joka kerta kun näppäintä
painetaan, näyttö vaihtuu
seuraavalla tavalla:
Levyn nimi / Esittäjä
Tällä hetkellä soivan
kappaleen nro ja kulunut soittoaika
Huom!
• Näytöstä näkyy enintään 10 kirjainta kerrallaan, ja
näyttö vierii, jos kirjaimia on yli 10. Ks. myös
sivulta 25 näkyvää osaa “Vieritystilan valinta –
SCROLL”.
• Kun D (näyttö) -näppäintä painetaan tavallisen
CD-levyn soiton aikana, levyn nimen/esittäjän ja
kappaleen nimen kohdalle ilmestyy “NO NAME”.
Kappaleen nimi
Kappaleen tai tietyn kohdan
haku CD-levyltä
Seuraaviin tai edellisiin kappaleisiin
siirtyminen
Kun haluat siirtyä
eteenpäin seuraavan
kappaleen alkuun, paina
¢ -näppäintä
nopeasti soittaessasi CDlevyä. Joka kerta kun
näppäintä painetaan
peräkkäin, seuraavien
kappaleiden alku
paikannetaan ja toistetaan.
Kun haluat siirtyä
taaksepäin edellisen
kappaleen alkuun, paina
4 -näppäintä
nopeasti soittaessasi CDlevyä. Joka kerta kun
näppäintä painetaan
peräkkäin, edellisten
kappaleiden alku
paikannetaan ja
toistetaan.
Näin siirryt suoraan tiettyyn kappaleeseen
Paina kappaleen numeroa vastaavaa
numeronäppäintä aloittaaksesi toiston.
Kappaleen kelaus eteen- tai taaksepäin
Kun haluat kelata
kappaletta eteenpäin, paina
¢ -näppäintä, ja pidä
sitä alhaalla soittaessasi
CD-levyä.
Kun haluat kelata
kappaletta taaksepäin,
paina
ja pidä sitä alhaalla
soittaessasi
CD-levyä.
4
SUOMI
18
-näppäintä
• Kun haluat valita kappaleen numeron 1 – 6:
Paina nopeasti 1 (7) – 6 (12).
• Kun haluat valita kappaleen numeron 7 – 12:
Paina 1 (7) – 6 (12) ja pidä sitä alhaalla yli
1 sekunnin ajan.
Kappaleen
,
numero
Kulunut soittoaika
Page 67

CD:n toistotilojen valinta
Kappaleiden toisto sattumanvaraisesti
(satunnaissoitto)
1 Siirry toimintatilaan CD-levyä
soittaessasi painamalla M/B
(tila/kaista) -näppäintä. Tämä
laite siirtyy toimintatilaan.
2 Paina RND (satunnais)
-näppäintä ollessasi vielä
toimintatilassa, niin että
näyttöön syttyy RNDmerkkivalo.
Sitten, joka kerta kun
näppäintä painetaan, CD:n
satunnaissoittotila kytketään
vuorotellen päälle ja pois
päältä.
Kappaleiden toisto jatkuvasti (esittelyjakson
skannaus)
Voit soittaa kunkin kappaleen 15 ensimmäistä
sekuntia peräkkäin.
1 Siirry toimintatilaan CD-levyä
soittaessasi painamalla M/B
(tila/kaista) -näppäintä. Tämä
laite siirtyy toimintatilaan.
2 Paina INT (esittelyskannaus)
-näppäintä ollessasi vielä
toimintatilassa, niin että
4
näyttöön ilmestyy “INTRO”.
Sitten joka kerta kun
näppäintä painetaan, CD:n
esittelyskannauksen toistotila
kytketään päälle ja pois päältä
vuorotellen.
Kun satunnaissoittotila on päällä, näyttöön syttyy
RND-merkkivalo ja umpimähkään valittu kappale
alkaa soida.
Kappaleiden toisto jatkuvasti (jatkuva soitto)
1 Siirry toimintatilaan CD-levyä
soittaessasi painamalla M/B
(tila/kaista) -näppäintä. Tämä
laite siirtyy toimintatilaan.
2 Paina RPT (toisto) -näppäintä
ollessasi vielä toimintatilassa,
niin että näyttöön syttyy RPTmerkkivalo.
Sitten, joka kerta kun
näppäintä painetaan, CD:n
toistosoittotila kytketään
vuorotellen päälle ja pois
päältä.
Parhaillaan soivan raidan raitanumero
CD-levyn vapautuksen esto
Voit estää CD-levyn vapautuksen ja lukita CD:n
latausaukkoon.
Paina 0-näppäintä yli
2 sekunnin ajan samalla, kun
painat SEL (valinta) -näppäintä.
Näytössä vilkkuu “NO EJECT” n.
5 sekuntia ja CD on lukittu eikä
sitä voida vapauttaa.
Huom!
Jos 0-näppäintä painetaan silloin, kun CD-levyn
poisto on estetty, ohjauspaneeli siirtyy alas, mutta
CD-levyä ei voida poistaa.
Kun haluat palauttaa etulevyn aikaisempaan
asentoon, paina 0-näppäintä.
Kun haluat perua eston ja avata CD:n
lukituksesta, paina 0-näppäintä uudelleen yli
2 sekunnin ajan samalla, kun painat SEL
-näppäintä.
Näytössä vilkkuu “EJECT OK” n. 5 sekuntia ja
CD on avattu lukituksesta.
SUOMI
19
Page 68

ÄÄNEN SÄÄDÖT
Äänen säätö
Voit säätää ääniominaisuudet mieleisiksi.
1
Valitse kohta, jonka haluat säätää.
Joka kerta kun näppäintä
painetaan, säädettävät kohdat
vaihtuu seuraavasti:
FAD*
(Hälvytys)
VOL
(Äänenvoimakkuus)
Merkki Toimenpide: Alue
FAD* Säädä etu- ja R06 (Vain taka)
BAL Säädä vasemman L06 (Vain vasen)
S. BASS
EXT VOL*** Säädä lähtötaso 00 (min.)
WOOFER****
VOL Säädä 00 (min.)
takakaiuttimen |
tasapaino. F06 (Vain etu)
ja oikean kaiuttimen |
tasapaino. R06 (Vain oikea)
**
Säädä basso. 00 (min.)
EXT OUT -liitinten |
välityksellä. 12 (maks.)
Säädä 00 (min.)
subwooferin |
lähtötaso. 12 (maks.)
äänenvoimakkuus. |
BAL
(Tasapaino)
WOOFER****
(Subwooferin)
S. BASS**
EXT VOL***
(Ulkoinen äänenvoimakkuus)
|
08 (maks.)
50 (maks.)
2 Säädä taso.
Suurennetaan tasoa.
Pienennetään tasoa.
Huom!
Tavallisesti äänenvoimakkuus säädetään
säätövalitsimella. Joten sinun ei tarvitse valita “VOL”
säätääksesi äänenvoimakkuuden tason.
* Jos käytät kaksikaiuttimista järjestelmää, aseta
vaimentimen taso kohdalle “00”.
** Bassoäänen rikkaus ja täyteläisyys säilyy selvänä
huolimatta siitä, miten alhaiselle
äänenvoimakkuus asetetaan – super-basso.
Super-basson taso voidaan säätää myös.
*** VAIN KD-SH55R: Tämä on voimassa vain silloin,
kun vaimennin/vaimentimet tai muu(t)
komponentti/komponentit on kytketty EXT OUT
-liittimiin.
**** VAIN KD-SH77R: Tämä on voimassa vain silloin,
kun subwoofer on kytketty.
SUOMI
20
Page 69

Esiasetettujen äänitilojen
valinta
Voit valita esiasetetun äänitilan, joka sopii
musiikkilajiin.
1
Paina EQ-näppäintä.
Esiin tulee viimeksi valittu
äänitila, joka soveltuu tällä
hetkellä toistettuun
ohjelmalähteeseen.
EQ-merkkivalo syttyy.
Esim.: Kun “FLAT” on valittu aikaisemmin
2
Valitse haluamasi äänitila.
Kun säätövalitsinta
kierretään, äänitila
vaihtuu seuraavasti:
FLAT O Hard Rock O R & B*O POP O
JAZZ O DanceMusic O Country O
Classic O USER 1 O USER 2 O
(takaisin alkuun)
* Rytmi ja blues-musiikki
Reggae O
USER 3 O
Huom!
• Voit säätää esiasetetun äänensäätötilan
haluamaksesi ja tallentaa sen muistiin.
Jos haluat säätää ja tallentaa alkuperäisen
äänensäätötilan, ks.“Omien äänisäätöjen
tallennus” sivua 22.
• Kun haluat säätää bassonvahvistustason
väliaikaisesti, katso sivua 20.
Näin tallennetaan äänitila erikseen
jokaista toistolähdettä varten (EQ-linkki)
Kun äänitila valitaan, se tallennetaan muistiin. Se
tulee esiin joka kerta, kun sama ohjelmalähde
valitaan.
Äänitila voidaan tallentaa jokaista seuraavaa
ohjelmalähdettä varten — FM1, FM2, FM3, AM,
CD ja ulkoiset komponentit.
• Ks. myös sivulla 23 näkyvää osaa
“Yleisasetusten vaihtaminen (PSM)”.
1 Paina SEL (valinta) -näppäintä ja pidä sitä
alhaalla yli 2 sekunnin ajan niin, että näyttöön
ilmestyy yksi PSM-kohdista.
2 Valitse “EQ LINK” (Äänensäätömuistin linkitys)
¢ - tai 4 -näppäimella.
3 Valitse “LINK ON” kiertämällä säätövalitsinta
myötäpäivään.
4 Päätä asetus painamalla SEL (valinta)
-näppäintä.
Kun haluat perua EQ-linkin, toista sama
toimintosarja ja valitse “LINK OFF” kiertämällä
säätövalitsinta vastapäivään vaiheessa 3.
EQ-taso vaihtuu valittaessa äänitila.
Esim.: V alittaessa “POP”
Kun haluat perua äänitilan, valitse “FLAT”
vaiheessa 2.
• Kun “EQ LINK” on asetettu kohdalle
“LINK ON”
Voidaan valittu äänitila tallentaa muistiin
tämänhetkistä ohjelmalähdettä varten.
Joka kerta kun vaihdetaan samalle
ohjelmalähteelle, esiin tulee myös sama äänitila,
joka näkyy ohjelmalähteen nimen jälkeen.
• Kun “EQ LINK” on asetettu kohdalle
“LINK OFF”
Valittu äänitilaefekti pätee kaikkiin valittuihin
ohjelmalähteisiin.
SUOMI
21
Page 70

Omien äänisäätöjen tallennus
Voit asettaa äänensäätötilat haluamiksesi ja
tallentaa omat säätösi muistiin.
(USER 1, USER 2 ja USER 3)
• Seuraavien vaiheiden suorituksessa on aikaraja.
Jos asetus perutaan, ennen kuin olet saanut sen
valmiiksi, aloita uudelleen vaiheesta 1.
1
Paina EQ-näppäintä.
Esiin tulee viimeksi valittu
äänitila, joka soveltuu tällä
hetkellä toistettuun
ohjelmalähteeseen.
4
Säädä muut äänielementit toistamalla
vaiheet 2 ja 3.
5
Valitse jokin käyttäjän äänitiloista
(USER1, USER2, USER3).
Esim.: Kun “POP” on valittu aikaisemmin
2
Valitse säädettävät äänielementit
painamalla SEL (valinta) -näppäintä.
Joka kerta kun näppäintä
painetaan, säädettävät
äänielementit vaihtuvat
seuraavasti:
LOW FREQ.* = LOW WIDTH = LOW LEVEL =
MID FREQ.* = MID WIDTH = MID LEVEL =
HIGH FREQ.* = HIGH LEVEL
(takaisin alkuun)
FREQ. (LOW, MID, HIGH):
Valitse säädettävä keskitaajuus.
WIDTH (LOW, MID):
Valitse kaistanleveyden taso (Q).
LEVEL (LOW, MID, HIGH):
Säädä avaustaso.
* Painamalla ¢ - tai 4 -näppäintä
voidaan liikkua suoraan seuraavasti:
LOW FREQ.
HIGH FREQ.
3
Säädä valittu äänielementti.
• Ks. alla olevasta taulukosta valitsemasi
äänielementin säätö.
=
MID FREQ.
Esim.: Valittaessa “USER 2”
6
Tallenna säädöt painamalla EQ
-näppäintä.
Tehdasasetusten uudelleenasetus
Toista sama toimintosarja määrää uudelleen
vasemmalla sivua 38 näkyvässä taulukossa
olevat esiasetetut arvot.
Merkki
FREQ.
WIDTH
LEVEL
Esiasetetut arvot
LOW MID HIGH
50 Hz 700 Hz 8 kHz
80 Hz 1 kHz 12 kHz
120 Hz 2 kHz
1 (min.) 1 (min.)
||
4 (maks.) 2 (maks.)
–06 (min.) –06 (min.) –06 (min.)
|||
+06 (maks.)
+06 (maks.) +06
(maks.)
SUOMI
22
Page 71

MUUT PÄÄTOIMINNOT
Kellon asetus
1
Paina SEL (valinta) -näppäintä ja
pidä sitä alhaalla yli 2 sekunnin ajan
niin, että näyttöön ilmestyy yksi
PSM-kohdista. (Ks. sivua 24.)
2
Tuntilukeman asetus.
1 Valitse “CLOCK HOUR”, ellei sitä näy
näytöstä.
2 Säädä tuntilukema.
12
3
Minuuttilukeman asetus.
1 V alitse “CLOCK MIN”.
2 Säädä minuuttilukema.
1 2
Yleisasetusten muuttaminen
(PSM)
Voit muuttaa seuraavalla sivulla lueteltuja kohtia
käyttämällä PSM-säädintä (haluttu asetustila).
Perustoimenpiteet
1
Paina SEL (valinta) -näppäintä ja
pidä sitä alhaalla yli 2 sekunnin ajan
niin, että näyttöön ilmestyy yksi
PSM-kohdista. (Ks. sivua 24.)
2
Valitse PSM-kohta, jonka haluat
säätää. (Ks. sivua 24.)
3
Säädä valittu PSM-asetus.
4
Kellojärjestelmän asetus.
1 V alitse “24H/12H”.
2 V alitse “12HOUR” tai “24HOUR”.
12
5
Päätä asetus painamalla
SEL (valinta) -näppäintä.
Jos haluat tarkistaa tämänhetkisen kellonajan
laitteen ollessa poissa päältä, paina D (näyttö)
-näppäin.
Virta kytkeytyy päälle ja kellonaika näkyy
5 sekunnin ajan, sitten virta kytkeytyy pois päältä.
4
Säädä tarvittaessa muut
PSM-kohdista toistamalla vaiheet 2
ja 3.
5
Päätä asetus painamalla
SEL (valinta) -näppäintä.
SUOMI
23
Page 72

Haluttu asetustila (PSM) osiot
1
Pidä sitä
alhaalla.
CLOCK HOUR Tuntilukeman säätö
CLOCK MIN Minuuttilukeman säätö
EQ LINK Äänensäätömuistin
24H/12H 24/12 tunnin aikanäyttö
AUTO ADJ
CLOCK DISP Kellon näyttö
TUNER DISP Virittimen näyttötila
PTY STBY PTY-valmius
PTY SEARCH PTY-haku
TA VOL Liikennetiedotuksen
P-SEARCH Ohjelman haku
DAB AF*
LEVEL/EQ Tasauksen/tason osoitin
DIMMER Himmentimen tila
TELEPHONE Autopyuhelimen
BEEP SW Näppäinten
P.AMP SW** Tehovahvistinkytkin
CONTRAST Näytön kontrasti
SCROLL Vieritystila
CUTOFF F** Subwooferin rajataajuus
LINE ADJ** Linjatulotason säätö
EXT INPUT*** Ulkoisen tulon valinta
AUX ADJ Lisälaitteen tulotason
KEY SELECT** Ulkoisen avainkäyttötilan
IF FILTER Välitaajuussuodatin
DEMO MODE Demo-tila
SUOMI
• Päätä asetus painamalla SEL (valinta) -näppäintä.
* Näkyy vain silloin, kun DAB-viritin on kytketty.
** VAIN KD-SH77R
***VAIN KD-SH55R — Näytössä vain silloin, kun jokin seuraavista ohjelmalähteistä on valittu – FM,
AM, CD ja AUX INPUT.
24
2
Valitse.
linkitys
Automaattinen kellon säätö
äänenvoimakkuus
V aihtoehtoistaajuuden haku
vaimennus
painallusääni
säätö
valinta.
3
Säädä.
Vastapäivään
Taakse Eteen
Taakse Eteen
LINK OFF LINK ON
12HOUR 24HOUR
ADJUST OFF ADJUST ON
CLOCK OFF CLOCK ON
FREQUENCY PS NAME
29 ohjelmatyyppiä
(Ks. sivuja 13 ja 16.)
TA VOL 00 – TA VOL 50
SEARCH OFF SEARCH ON
AF OFF AF ON
EQ ONLY LEVEL+EQ
AUTO OFF
MUTING OFF MUTING1
BEEP OFF BEEP ON
P.AMP OFF P.AMP ON
CONTRAST 1 – CONTRAST 10
ONCE AUTO
FREQ MID FREQ HIGH
FREQ LOW
L.ADJ 00 – L.ADJ 05
CD CHANGER LINE INPUT
A.ADJ 00 – A.ADJ 05
DVD VCR
WIDE AUTO
DEMO OFF DEMO ON
Myötäpäivään
LEVEL ONLY
ON
MUTING2
OFF
OFF
Tehtaalla tehty
säätö
0:00
LINK OFF
24HOUR
ADJUST ON
CLOCK ON
PS NAME
NEWS
TA VOL 20
SEARCH OFF
AF ON
EQ ONLY
AUTO
MUTING OFF
BEEP ON
P.AMP ON
CONTRAST 5
ONCE
FREQ MID
L.ADJ 00
CD CHANGER
A.ADJ 00
DVD
AUTO
DEMO ON
Ks.
sivua
23
21
23
15
25
15
13
15
14
37
25
25
25
25
25
25
25
25
26
26
26
26
26
26
Page 73

Kellon näytön valinta – CLOCK DISP
Kello voidaan asettaa niin, että se näkyy näytön,
kun laitteeseen kytketään virta.
Kun laite toimitetaan tehtaalta, kello on asetettu
näkymään näytöstä.
• CLOCK ON: Kellon näyttö on kytketty päälle.
• CLOCK OFF:
Kellon näyttö on kytketty pois päältä.
Tasomittarin valinta – LEVEL/EQ
Voit valita näyttötason haluamaksesi.
Kun laite toimitetaan tehtaalta, tämä tila on
asetettu kohdalle “EQ ONLY”.
• EQ ONLY: Tasauskuvio näkyy.
• LEVEL+EQ: Tasauskuvio näkyy yhdessä
• LEVEL ONLY: Äänitason mittari valaisee
äänitason mittarin kanssa.
keskustasta ylös- ja alaspäin.
Himmennystilan valinta – DIMMER
Kun auton ajovalot kytketään, näyttö himmenee
automaattisesti (automaattinen himmennys).
Kun laite toimitetaan tehtaalta, automaattinen
himmennystila on aktivoitu.
• AUTO: Aktivoi automaattisen himmennyksen.
• OFF: Peruu automaattisen himmennyksen.
• ON: Himmentää aina näytön.
Huom!
Tähän laitteeseen asennettu automaattinen himmennin
ei toimi mahdollisesti oikein joissakin ajoneuvoissa,
varsinkin sellaisissa, joissa on säätökiekko
himmennystä varten.
Aseta tässä tapauksessa himmennintila kohdalle
“ON” tai “OFF”.
Puhelinvaimennuksen valinta – TELEPHONE
Tätä tilaa käytetään, kun autopuhelinjärjestelmä on
liitetty . Käytetystä puhelinjärjestelmästä riippuen voit
valita joko “MUTING 1” tai “MUTING 2” eli sen, joka
vaimentaa äänet tästä laitteesta.
Kun laite toimitetaan tehtaalta, tämä tila on passivoitu.
• MUTING 1: Valitse tämä, jos kyseinen asetus
• MUTING 2: Valitse tämä, jos kyseinen asetus
• MUTING OFF: Peruu puhelimen vaimennuksen.
voi vaimentaa äänet.
voi vaimentaa äänet.
Näppäinten painallusäänen kytkeminen/
katkaiseminen – BEEP SW
Voit passivoida näppäinten painallusäänen, jos
näppäimiä painettaessa et halua kuulla
merkkiääntä. Kun laite toimitetaan tehtaalta,
näppäinten painallusääni on aktivoitu.
• BEEP ON: Aktivoi näppäinten painallusäänen.
• BEEP OFF:
Passivoi näppäinten painallusäänen.
Näin kytketään tehovahvistinkytkin päälle/
pois päältä – P. AMP SW. (Vain KD-SH77R)
Sisäänrakennettu vahvistin voidaan kytkeä pois
päältä ja äänisignaalit lähettää vain ulkoiseen
vahvistimeen/ulkoisiin vahvistimiin. Näin saadaan
selvät äänet ja estetään lämmön kerääntyminen
tämän laitteen sisälle.
Tehtaalta toimitettaessa on tehovahvistinkytkin
päällä, jotta sisäänrakennettu vahvistin toimisi.
• P. AMP ON: Tämä tila valitaan, kun ei käytetä
ulkoista vahvistinta/ulkoisia
vahvistimia.
• P. AMP OFF: Tämä tila valitaan, kun käytetään
ulkoista vahvistinta/ulkoisia
vahvistimia.
Näin säädetään näytön kontrastitaso
– CONTRAST
Näytön kontrasti voidaan säätää tasolta 1
(tumma) tasolle 10 (kirkas). Tehtaalta
toimitettaessa on kontrasti asetettu tasolle 5.
Vieritystilan valinta – SCROLL
Voit valita vieritystilan nimen näyttöä ja levytietoja
varten, jos kirjaimia on enemmän kuin 10. Kun
laite toimitetaan tehtaalta, automaattinen
vieritystila on asetettu kohdalle “ONCE”.
• ONCE: Vierittää vain kerran.
• AUTO: Vierittää toistuvasti (5 sekunnin
väliajoin).
• OFF: Peruuttaa automaattisen vierityksen.
Huom!
Vaikka vieritystila on asetettu kohdalle “OFF”,
voidaan näyttöä vierittää painamalla D (näyttö)
-näppäintä yli sekunnin ajan.
Näin valitaan subwooferin rajataajuus
– CUTOFF F (vain KD-SH77R)
Kun subwoofer on kytketty tähän laitteeseen,
valitse asianmukainen rajataajuustaso omaan
subwooferiisi.
Tehtaalta toimitettaessa on subwooferin
rajataajuus asetettu kohdalle “FREQ MID”.
• FREQ LOW: Yli 50 Hz:n taajuudet katkaistaan
subwooferiin.
• FREQ MID: Yli 80 Hz:n taajuudet katkaistaan
subwooferiin.
• FREQ HIGH: Yli 120 Hz:n taajuudet
katkaistaan subwooferiin.
SUOMI
25
Page 74

Linjatulotason säätäminen – LINE ADJ (Vain
KD-SH77R)
Linjatulotaso on säädettävä kunnolla, kun
ulkoinen komponentti on kytketty LINE IN
-liittimiin.
Tehtaalta toimitettaessa on linjatulo asetettu
tasolle 00.
Jos kytketyn komponentin tulotaso ei ole kyllin
korkea, on tulotasoa nostettava kunnolla.
Jos linjatulotasoa ei säädetä, voi kova ääni
yllättää epämiellyttävästi, kun ohjelmalähde
vaihdetaan ulkoiselta komponentilta jollekin
toiselle ohjelmalähteelle.
Ulkoisen komponentin valinta käytettäväksi
– EXT INPUT (Vain KD-SH55R)
Ulkoinen komponentti voidaan kytkeä takaosassa
olevaan CD-vaihtajan jakkiin käyttämällä
linjatulon sovitinta KS-U57 (ei toimiteta mukana).
Kun haluat käyttää ulkoista komponenttia
toistolähteenä tämän laitteen välityksellä, sinun
on valittava käytettävä komponentti – CD-vaihtaja
tai ulkoinen komponentti.
Tehtaalta toimitettaessa on ulkoiseksi
komponentiksi valittu CD-vaihtaja.
• LINE INPUT: Muun ulkoisen komponentin
kuin CD-vaihtajan käyttö.
• CD CHANGER: CD-vaihtajan käyttö.
Huom!
Linjatulosovittimen KS-U57 ja oheislaitteen
kytkeminen näkyvät osasta Asennus/kytkentäohjekirja
(erillinen nidos).
Lisälaitteen tulotason säätäminen
– AUX ADJ
Lisälaitteen tulotaso on säädettävä kunnolla, kun
ulkoinen komponentti on kytketty lisälaitteen
tulojakkiin.
Tehtaalta toimitettaessa on lisätulo asetettu
tasolle 00.
Jos kytketyn komponentin tulotaso ei ole kyllin
korkea, on tulotasoa nostettava kunnolla.
Jos linjatulotasoa ei säädetä, voi kova ääni
yllättää epämiellyttävästi, kun ohjelmalähde
vaihdetaan ulkoiselta komponentilta jollekin
toiselle ohjelmalähteelle.
SUOMI
Kohdekomponenttien valinta käytettäväksi
tämän vastaanottimen välityksellä
– KEY SELECT (Vain KD-SH77R)
Tämän vastaanottimen välityksellä voidaan
käyttää joko JVC:n kuvanauhuria tai DVD-soitinta
etulevyn numeronäppäimillä.
Tehtaalta toimitettaessa nämä numeronäppäimet
on asetettu käytettäviksi DVD-toimintoihin.
Ks. sivulta 30 näiden etulevyssä olevien
numeronäppäinten käyttö DVD:n tai
kuvanauhurin toimintoihin.
FM-virittimen selektiivisyyden
vaihtaminen – IF FILTER
Joillakin alueilla voivat vierekkäiset asemat häiritä
toisiaan. Tällaisen häiriön sattuessa voi kuulua
kohinaa. Tehtaalta toimitettaessa on tämä laite
esiasetettu vähentämään automaattisesti tällaista
häiriöääntä (“AUTO”).
• AUTO: Tämän tyyppisen häiriöäänen
esiintyessä korottaa tämä laite
automaattisesti virittimen
selektiivisyyttä, niin että
häiriöääni hiljenee. (Mutta
• WIDE: Alttiina viereisten asemien
stereoefekti häviää myös.)
häiriölle, mutta äänen laatu ei
heikkene eikä stereoefekti katoa.
Demotilan kytkeminen päälle tai pois
päältä – DEMO MODE
Demotila voidaan kytkeä päälle tai pois päältä.
Tehtaalta toimitettaessa on “DEMO ON” valittuna.
• DEMO ON: Kytkee demotilan päälle. Demo
• DEMO OFF: Kytkee demotilan pois päältä.
Huom!
Jos laite on asetettu alkutilaan (ja virta on kytketty),
k
äynnistyy demo, jos mitään ääntä ei kuulu 10 sekuntiin.
käynnistyy automaattisesti, jos
mitään ääntä ei kuulu 3 minuuttiin.
26
Page 75

Nimen määrääminen
ohjelmalähteille
CD-levyille ja ulkoisille komponenteille voidaan
määrätä nimet.
Kun olet määrännyt nimen, se ilmestyy näyttöön
sen valitessasi.
Ohjelmalähteet Suurin kirjainmäärä
CD-levyille * enintään 32 kirjainta
(enintään 40 levyä)
Ulkopuolinen enintään 10 kirjainta
komponentti
* Et voi määrätä nimeä CD-tekstille.
1
Valitse ohjelmalähde, jolle haluat
määrätä nimen.
Kun ohjelmalähde valitaan,
virta kytkeytyy päälle
automaattisesti.
Joka kerta kun näppäintä
painetaan, ohjelmalähde
vaihtuu sivulla 7 kuvatulla
tavalla.
2
Paina SEL (valinta) -näppäintä ja
pidä sitä alhaalla yli 2 sekuntia
samalla, kun painat D (näyttö)
-näppäintä.
3
Valitse haluamasi kirjain “ ”-merkin
vilkkuessa.
Joka kerta kun näppäintä
painetaan, kirjaimet vaihtuvat
seuraavalla tavalla:
Isot kirjaimet ( )
Numerot ja merkit ( )
4
Valitse jokin kirjain.
Ks. sivulta 38 käytettävissä
olevia kirjaimia koskevia tietoja.
5
Siirrä kohdistin seuraavan (tai
edellisen) kirjaimen kohdalle.
6
Toista vaiheet 3 – 5, kunnes nimi on
valmis.
7
Päätä toimenpide, kun viimeksi
valittu merkki vilkkuu.
Pienet kirjaimet ( )
Esim.: Kun valitset ohjelmalähteeksi “CD PLAY”
Näin pyyhit pois syötetyt kirjaimet
Lisää välit käyttämällä samoja yllä kuvattuja
toimenpiteitä.
Huom!
• Kun määräät nimen levylle nro 41, näyttöön
ilmestyy “NAME FULL”. (Poista tässä tapauksessa
nimet, joita et halua, ennen merkintää.)
• Kun CD-vaihtaja on kytketty, CD-vaihtajassa
oleville CD-levyille voidaan määrätä nimet. Nämä
nimet voidaan saada myös näyttöön, jos panet
CD-levyt tähän laitteeseen.
SUOMI
27
Page 76

Etulevyn asennon vaihtaminen
Etulevy voidaan vaihtaa kolmeen asentoon.
Säädä asento haluamaksesi.
Joka kerta kun näppäintä
painetaan, levyn asento vaihtuu
seuraavasti:
VAARA:
Sormia EI SAA työntää
etulevyn ja laitteen väliin,
koska ne voivat jäädä
puristuksiin ja rusentua.
A
D
B
C
Kaukosäädintä käytettäessä
Paina ANGLE ∞ -näppäintä toistuvasti. Joka kerta kun näppäintä painetaan, etulevyn asento vaihtuu
— Å-, ı-, Ç- ja sitten Î-asento tässä järjestyksessä.
SUOMI
Kun haluat palauttaa etulevyn sen alkuperäiseen asentoon,
paina ANGLE 5 -näppäintä. Joka kerta kun näppäintä painetaan, etulevy vaihtaa asentoa — Î-, Ç-,
ı- ja sitten Å-asento tässä järjestyksessä.
28
Page 77

Etulevyn irrotus
Voit irrottaa etulevyn, kun lähdet autosta.
Kun irrotat tai kiinnität etulevyä, varo
vahingoittamasta etulevyn takana ja levyn
pitimessä olevia liittimiä.
Näin irrotat etulevyn
Katkaise virta laitteesta ennen etulevyn irrotusta.
1
Avaa etulevyn lukitus.
Etulevy työntyy ulos
sinua kohti.
2
Siirrä etulevy oikealle ja vedä se sitten
ulos laitteesta.
Näin kiinnität etulevyn
1
Työnnä etulevyn vasen puoli levyn
pitimen uraan.
2
Kiinnitä etulevy levyn pitimeen
painamalla etulevyn oikeaa puolta.
Liitinten puhdistusta koskeva huomautus:
Jos irrotat etulevyn usein, liittimet kuluvat.
Tämän minimoimiseksi pyyhi liittimet silloin
tällöin alkoholiin kostutetulla puuvillatukolla tai
-rievulla ja varo vahingoittamasta liittimiä.
3
Pane irrotettu etulevy mukana
tulevaan koteloon.
Liittimet
SUOMI
29
Page 78

ULKOPUOLISTEN KOMPONENTTIEN KÄYTTÖ
MD-soitin yms.
lisätulojakki
Ulkoisten komponenttien
soittaminen
Varten KD-SH77R:
Tähän laitteeseen voidaan kytkeä kaksi ulkoista
komponenttia.
Toinen kytketään etulevyssä olevaan lisälaitteen
tulojakkiin ja toinen takaosassa oleviin LINE IN
-liittimiin.
Jos JVC:n kuvanauhuri tai DVD-soitin
kytketään LINE IN -liittimiin
Sitä voidaan käyttää tämän vastaanottimen
välityksellä etulevyssä olevilla numeronäppäimillä
Käytettäessä kuvanauhuria on
numeronäppäinten käyttötila vaihdettava
DVD:n käyttötilasta kuvanauhurin käyttötilaan.
(Ks. sivulla 26 olevaa osaa
“Kohdekomponenttien valinta käytettäväksi
tämän vastaanottimen välityksellä
– KEY SELECT”.)
Jos kytketyn komponentin tulotaso ei ole
kyllin korkea, on tulotasoa nostettava kunnolla.
Jos tulotasoa ei säädetä, voi kova ääni
yllättää epämiellyttävästi, kun ohjelmalähde
vaihdetaan ulkoisilta komponenteilta jollekin
toiselle ohjelmalähteelle. (Ks. sivulla 26
olevaa osaa “Linjatulotason säätäminen
– LINE ADJ” ja “Lisälaitteen tulotason
säätäminen – AUX ADJ.)
1
Valitse ulkoinen komponentti
(AUX INPUT tai LINE INPUT).
Kun ohjelmalähde valitaan,
virta kytkeytyy päälle
automaattisesti.
Joka kerta kun näppäintä
painetaan, ohjelmalähde
vaihtuu sivulla 7 kuvatulla
tavalla.
AUX INPUT: Kun valitaan etulevyssä
.
LINE INPUT: Kun valitaan LINE IN
2
Kytke virta liittämääsi komponenttiin
olevaan lisälaitteen
tulojakkiin kytketty
komponentti
-liittimeen kytketty
komponentti
ja aloita ohjelmalähteen soittaminen.
• Kytkettäessä JVC:n DVD-soitin tai
kuvanauhuri voidaan seuraavat toiminnot
suorittaa.
SUOMI
30
Page 79

Kytkettäessä DVD-soitin:
: Kytkee ja katkaisee virran.
3:
Aloittaa toiston.
¡:
• Kappaleen pikakelaus eteenpäin
pidettäessä alaspainettuna.
• Hyppää seuraavien kappaleiden alkuun
painettaessa lyhyesti.
1:
• Kappaleen pikakelaus taaksepäin
pidettäessä alaspainettuna.
• Siirtyy takaisin tällä hetkellä soivan
kappaleen alkuun painettaessa lyhyesti.
Siirtyy takaisin edellisen kappaleen
alkuun painettaessa lyhyesti.
7:
Pysäyttää toiminnot.
Huom!
Kun yllä olevia näppäimiä painetaan, näytöstä näkyy
“DVD” ja sen käyttötila (kuten 3, 7).
Kytkettäessä kuvanauhuri:
: Kytkee ja katkaisee virran.
3:
Aloittaa toiston.
¡:
Nauhan pikakelaus eteenpäin pidettäessä
alaspainettuna.
1:
Nauhan pikakelaus taaksepäin pidettäessä
alaspainettuna.
7:
Pysäyttää toiminnot.
Huom!
Kun yllä olevia näppäimiä painetaan, näytöstä näkyy
“VCR” ja sen käyttötila (kuten 3, 7).
Varten KD-SH55R:
Tähän laitteeseen voidaan kytkeä kaksi ulkoista
komponenttia.
Kytke toinen etulevyssä olevaan lisälaitteen
tulojakkiin ja toinen takaosassa olevaan CD
-vaihtajan jakkiin.
Ennen CD-vaihtajan jakkiin kytketyn
ulkoisen komponentin käyttöä, on ulkoinen
tulo valittava oikein. (Ks. sivulla 26 olevaa
osaa “Ulkoisen komponentin valinta
käytettäväksi – EXT INPUT”.)
1
Valitse ulkoinen komponentti
(AUX INPUT tai LINE INPUT).
Kun ohjelmalähde
valitaan, virta kytkeytyy
päälle automaattisesti.
Joka kerta kun näppäintä
painetaan, ohjelmalähde
vaihtuu sivulla 7 kuvatulla
tavalla.
AUX INPUT: Kun valitaan etulevyssä
olevaan lisälaitteen
tulojakkiin kytketty
komponentti
LINE INPUT: Kun valitaan CD-vaihtajan
• Jos et voi valita “LINE INPUT”, ks. sivua
26 ja valitse ulkoinen tulo (“LINE INPUT”).
Tätä ei voi käyttää yhdessä CD
-vaihtajan kanssa.
2
Kytke virta liittämääsi komponenttiin
jakkiin kytketty komponentti
ja aloita ohjelmalähteen soittaminen.
Jos kytketyn komponentin tulotaso ei ole
kyllin korkea, on tulotasoa nostettava kunnolla.
Jos tulotasoa ei säädetä, voi kova ääni
yllättää epämiellyttävästi, kun ohjelmalähde
vaihdetaan ulkoiselta komponentilta jollekin
toiselle ohjelmalähteelle. (Ks. sivulla 26
olevaa osaa “Lisälaitteen tulotason
säätäminen – AUX ADJ”.)
SUOMI
31
Page 80

CD-VAIHTAJAN KÄYTTÖ
Suosittelemme, että käytät jotain CH-X-sarjan
vaihtajaa laitteesi kanssa.
Jos sinulla on jokin muu automaattinen
CD-vaihtaja, pyydä liitäntöjä koskevia neuvoja
JVC-autohifilaitteiston jälleenmyyjältä.
• Esim. jos automaattinen CD-vaihtajasi on
KD-MK-sarjasta, tarvitset johdon (KS-U15K) sen
liittämiseksi tähän laitteeseen.
Ennen automaattisen CD-vaihtajan käyttöä:
• Tutustu myöskin CD-vaihtajan mukana
toimitettuihin ohjeisiin.
• Jos CD-vaihtajan lippaassa ei ole levyjä tai
levyt on pantu sisään ylösalaisin, näyttöön
ilmestyy “NO DISC”. Jos näin tapahtuu,
poista lipas ja aseta levyt oikein.
• Jos näyttöön tulee “RESET 1” – “RESET 8”,
jotain on vialla tämän laitteen ja
CD-vaihtajan välisessä liitännässä. Jos näin
tapahtuu, tarkista liitäntä ja kytke
tarvittaessa kytkentäjohto (johdot) lujasti.
Paina sitten CD-vaihtajan palautus
näppäintä.
CD-levyjen soittaminen
Valitse automaattinen CD-vaihtaja
(CD CHANGER).
Kun ohjelmalähde valitaan,
virta kytkeytyy päälle
automaattisesti.
Joka kerta kun näppäintä
painetaan, ohjelmalähde
vaihtuu sivulla 7 kuvatulla
tavalla.
Levyn numero
SUOMI
Kappaleen kelaus eteen- tai taaksepäin
Kun haluat kelata kappaletta
eteenpäin, paina ¢
-näppäintä ja pidä sitä
alhaalla soittaessasi CDlevyä.
Kun haluat kelata kappaletta
taaksepäin, paina 4
-näppäintä ja pidä sitä
alhaalla soittaessasi CDlevyä.
Seuraaviin tai edellisiin kappaleisiin
siirtyminen
Kun haluat siirtyä eteenpäin
seuraavan kappaleen
alkuun, paina ¢
-näppäintä nopeasti
soittaessasi CD-levyä. Joka
kerta kun näppäintä
painetaan peräkkäin,
seuraavien kappaleiden alku
paikannetaan ja toistetaan.
Kun haluat siirtyä
taaksepäin edellisen
kappaleen alkuun, paina
4 -näppäintä nopeasti
soittaessasi CD-levyä. Joka
kerta kun näppäintä
painetaan peräkkäin,
edellisten kappaleiden alku
paikannetaan ja toistetaan.
32
Kappaleen
numero
Kulunut soittoaika
Page 81

Näin siirryt suoraan tiettyyn levyyn
Paina levyn numeroa v astaav aa numeronäppäintä
aloittaaksesi toiston (CD-vaihtajan soittaessa).
• Kun haluat valita levyn numeron 1 – 6:
Paina nopeasti 1 (7) – 6 (12).
• Kun haluat valita levyn numeron 7 – 12:
Paina 1 (7) – 6 (12) ja pidä sitä alhaalla yli
1 sekunnin ajan.
Levyn numero
Kappaleiden toisto jatkuvasti (toistosoitto)
1 Paina M/B (tila/kaista)
-näppäintä CD-levyä
soittaessasi. Tämä laite siirtyy
toimintatilaan.
2 Paina RPT (toisto)
-näppäintä ollessasi vielä
toimintatilassa, niin että
näyttöön syttyy RPT
-merkkivalo.
Sitten, joka kerta kun RPT
-näppäintä painetaan,
toistosoittotila vaihtuu
seuraavasti:
REPEAT1 REPEAT2
Peruttu
Kappaleen
numero
Esim.: Kun levyn numero 3 on valittu
Kulunut soittoaika
CD:n toistotilojen valinta
Kappaleiden toisto sattumanvaraisesti
(satunnaissoitto)
1 Paina M/B (tila/kaista)
-näppäintä CD-levyä
soittaessasi. Tämä laite siirtyy
toimintatilaan.
2 Paina RND (satunnais)
-näppäintä ollessasi vielä
toimintatilassa, niin että
näyttöön syttyy RND
-merkkivalo.
Sittren, joka kerta kun RND
-näppäintä painetaan,
toistosoittotila vaihtuu
seuraavasti:
RANDOM1
Muoto Soittaa
RANDOM1 Palaa Kaikki tämänhetkisen
RANDOM2 Vilkkuu Kaikkien lippaaseen
RND
-merkkivalo
sattumanvaraisesti
levyn kappaleet, sitten
seuraavan levyn
kappaleet jne.
asetettujen levyjen kaikki
kappaleet.
RANDOM2
Peruttu
Muoto
REPEAT1 Palaa Parhaillaan soivan
REPEAT2 Vilkkuu Kaikki parhaillaan
RPT
-merkkivalo
Soittaa uudelleen
raidan (tai valitun raidan).
soivan levyn (tai valitun
levyn) raidat.
Kappaleiden toisto jatkuvasti
(esittelyjakson skannaus)
1 Paina M/B (tila/kaista)
-näppäintä CD-levyä
soittaessasi. Tämä laite siirtyy
toimintatilaan.
2 Paina INT (esittelyskannaus)
-näppäintä ollessasi vielä
toimintatilassa, niin että
4
näyttöön ilmestyy “INTRO”.
Sitten, joka kerta kun INT
-näppäintä painetaan,
esittelyskannaustila vaihtuu
seuraavasti:
INTRO1 INTRO2
Peruttu
Muoto
INTRO1 Kaikkien levyjen kaikilta
INTRO2 Kunkin levyn
Merkkivalo
Raitanumero
vilkkuu
Levyn
numero
vilkkuu
Soitta alut (15 sekuntia)
raidoilta.
ensimmäiseltä raidalta.
SUOMI
33
Page 82

DAB-VIRITTIMEN KÄYTTÖ
Suosittelemme DAB-virittimen (digitaalinen
äänenlähetys) KT-DB1500 käyttöä laitteesi
yhteydessä.
Jos sinulla on jokin toinen DAB-viritin, ota yhteys
JVC-autohifilaitteiston jälleenmyyjään.
• Tutustu myös DAB-virittimen mukana
toimitettuihin käyttöohjeisiin.
Mikä tämä DAB-järjestelmä on?
DAB on yksi tällä hetkellä käytettävissä
olevista digitaalisista
yleisradiolähetysjärjestelmistä. Se pystyy
toimittamaan laadultaan CD-tasoisen äänen
ilman kiusallista häiriötä ja
Lisäksi se voi sisältää tekstiä, kuvia ja dataa.
Päinvastoin kuin FM-lähetys, jossa jokainen
ohjelma lähetetään omalla taajuudellaan,
DAB yhdistää useita ohjelmia (nimeltä
“esitykset”), jotka muodostavat yhden
“ohjelmakokonaisuuden”.
Kun DAB-viritin on kytketty tähän laitteeseen,
voit nauttia näistä DAB-esityksistä.
signaalinvääristymää.
Näin viritetään
ohjelmakokonaisuus ja yksi
sen esityksistä
Tyypillisessä ohjelmakokonaisuudessa
lähetetään samanaikaisesti yli 6 ohjelmaa
(esitystä). Kun ohjelmakokonaisuus on viritetty,
voit valita esityksen, jota haluat kuunnella.
1
Valitse DAB-viritin.
Kun ohjelmalähde
valitaan, virta kytkeytyy
päälle automaattisesti.
Joka kerta kun
näppäintä painetaan,
ohjelmalähde vaihtuu
sivulla 7 kuvatulla
tavalla.
2
Valitse DAB-taajuusalue (DAB1,
DAB2 tai DAB3).
Joka kerta kun painat
näppäintä ja pidat sitä
alhaalla yli 1 sekunnin
ajanniin, DAB-taajuusalue
vaihtuu seuraavasti:
SUOMI
34
D 1
(DAB 1) (DAB 2) (DAB 3)
Huom!
Tässä vastaanottimessa on kolme
DAB-taajuusaluetta (DAB1, DAB2, DAB3). Voit
virittää jollekin ohjelmakokonaisuudelle
käyttämällä jotain niistä.
D 2
D 3
Page 83

3
Aloita ohjelmakokonaisuuden haku.
Haku
suurempitaajuisten
ohjelmakokonaisuuksien
¢ -näppäintä.
Haku
pienempitaajuisten
ohjelmakokonaisuuksien
4 -näppäintä.
Kun ohjelmakokonaisuus on kuuluvissa,
haku loppuu.
Jos haluat lopettaa haun, ennen kuin
ohjelmakokonaisuus on kuuluvissa, paina
samaa näppäintä, jota painoit hakua varten.
4
Valiste esitys, jota haluat kuunnella.
Näin vaihdetaan näyttötiedot
ohjelmakokonaisuuden virityksen aikana
Esityksen nimi näkyy normaalisti näytön.
Jos haluat vaihtaa näyttötietoja, paina
D (näyttö) -näppäintä.
Joka kerta kun näppäintä painetaan, näytön
näkyvät seuraavat tiedot.
Esityksen nimi
Ohjelmakokonaisuuden nimi
Kanavan nro
Taajuus
1 Paina M/B (tila/kaista)
-näppäintä.
5 sekunnin
sisällä
2 Valitse haluamasi esitys
painamalla ¢ - tai
4 -näppäintä.
Näin viritetään tietyn ohjelmakokonaisuuden
taajuudelle ilman hakua:
1 Valitse ohjelmalähteeksi DAB-viritin painamalla
SOURCE-näppäintä.
2 Valitse DAB-taajuusalue (DAB1, DAB2 tai
DAB3) pitämällä M/B (tila/kaista) -näppäintä ja
pidä sitä alhaalla yli 1sekunnin ajan toistuvasti.
3 Paina ¢ - tai 4 -näppäintä ja pidä
sitä alhaalla yli 1 sekunnin ajan. Näytössä
vilkkuu “MANUAL”.
4 Paina ¢ - tai 4 -näppäintä
toistuvasti, kunnes pääset haluamaasi
ohjelmakokonaisuuteen.
• Jos näppäin pidetään alaspainettuna,
vaihtuvat ohjelmakokonaisuudet jatkuvasti,
kunnes näppäin vapautetaan.
SUOMI
35
Page 84

DAB-esitysten tallennus
muistiin
Voit esiasettaa käsin enintään 6 DAB-esitystä
kullakin DAB-taajuusalueella (DAB1, DAB2 ja
DAB3).
1
Valitse DAB-viritin.
Kun ohjelmalähde
valitaan, virta kytkeytyy
päälle automaattisesti.
Joka kerta kun
näppäintä painetaan,
ohjelmalähde vaihtuu
sivulla 7 kuvatulla
tavalla.
2
Valitse haluamasi DAB-taajuusalue
(DAB1, DAB2 tai DAB3).
Joka kerta kun painat
näppäintä ja pidat sitä
alhaalla yli 1 sekunnin ajan
niin, DAB-taajuusalue
vaihtuu seuraavasti:
D 1
(DAB 1) (DAB 2) (DAB 3)
3
Viritä haluamasi ohjelmakokonaisuuden taajuudelle.
D 2
D 3
5
Paina yli 2 sekunnin ajan
numeronäppäintä (tässä
esimerkissä numeroa 1), johon
haluat tallentaa valitun
ohjelmapalvelun.
“P1” vilkkuu hetken ajan.
6
Toista edellä mainitut toimenpiteet
muiden DAB-esitysten
tallentamiseksi esiasetettuihin
numeroihin.
Huom!
• Aikaisemmin esiasetettu DAB-esitys pyyhitään
pois, kun uusi DAB-esitys tallennetaan samaan
esiasetettuun numeroon.
• Esiasetetut DAB-esitykset pyyhitään pois, kun
muistipiiristä katkeaa virta (esim. akun vaihdon
aikana). Jos näin tapahtuu, esiaseta DAB-esitykset
uudelleen.
4
SUOMI
36
Valitse haluamasi esitys
ohjelmakokonai-suudesta.
1 Paina M/B (tila/kaista)
-näppäintä.
5 sekunnin
sisällä
2 Valitse haluamasi esitys
painamalla ¢ - tai
4 -näppäintä.
Page 85

Näin viritetään esiasetetun
DAB-esityksen taajuudelle
Mikä muu on mahdollista
DAB-virittimellä
Esiasetetun DAB-esityksen taajuudelle viritys on
helppoa.
Muistathan, että esitykset on tallennettava ensin.
Jos niitä ei ole tallennettu vielä, ks. sivua 36.
1
Valitse DAB-viritin.
Kun ohjelmalähde
valitaan, virta kytkeytyy
päälle automaattisesti.
Joka kerta kun näppäintä
painetaan, ohjelmalähde
vaihtuu sivulla 7 kuvatulla
tavalla.
2
Valitse haluamasi DAB-taajuusalue
(DAB1, DAB2 tai DAB3).
Joka kerta kun painat
näppäintä ja pidat sitä
alhaalla yli 1 sekunnin
ajan niin, DAB-taajuusalue
vaihtuu seuraavasti:
D 1
(DAB 1) (DAB 2) (DAB 3)
3
Valitse numero (1 – 6) haluamallesi
D 2
D 3
esiasetetulle DAB-esitykselle.
Saman ohjelman automaattinen seuranta
(Vaihtoehtoinen vastaanotto)
Voit jatkaa saman ohjelman kuuntelua.
• DAB-toiminnan vastaanoton aikana:
Kun ajat alueella, missä ohjelmatoimintaa ei
voida ottaa vastaan, tämä laite virittää
automaattisesti jollekin toiselle
ohjelmakokonaisuudelle tai FM RDS
-asemalle, joka lähettää samaa ohjelmaa.
• FM RDS -aseman vastaanoton aikana:
Kun ajat alueella, missä DAB-ohjelmatoiminta
lähettää samaa ohjelmaa kuin FM RDS
-asema, tämä laite virittää automaattisesti
DAB-ohjelmatoiminnalle.
Huom!
Kun vastaanotto vaihtuu DAB:n ja FM:n välillä,
kuultu äänenvoimakkuus voi koveta tai hiljetä
kiusallisesti. Tämä muutos äänenvoimakkuudessa
johtuu erilaisista äänen injektiotasoista
lähetyspaikalla eikä tämän laitteen toimintahäiriöstä.
Vaihtoehtoisen vastaanoton käyttö
Kun laite toimitetaan tehtaalta, vaihtoehtoinen
vastaanotto on aktivoitu.
• Ks. myös sivulta 23 näkyvää osaa
“Yleisasetusten muuttaminen (PSM)”.
1 Paina SEL (valinta) -näppäintä ja pidä sitä
alhaalla yli 2 sekunnin ajan niin, että näyttöön
ilmestyy yksi PSM-kohdista.
2 Valitse “DAB AF” (vaihtoehtotaajuudet)
painamalla ¢ - tai 4 -näppäintä.
3 Valitse haluamasi tila kiertämällä säätövalitsinta.
• AF ON: Ohjelman seurantaan
DAB-ohjelmatoimintojen ja FM RDS
-asemien joukossa
— Vaihtoehtoinen vastaanotto .
Näyttöön syttyy AF-merkkivalo
(ks. sivua 11).
• AF OFF:Passivoi vaihtoehtoisen vastaanoton.
Huom!
Kun vaihtoehtoinen vastaanotto
(DAB-ohjelmatoimintoja varten) aktivoidaan, myös
verkkoseurannan vastaanotto (RDS-asemia varten:
ks. sivua 11) aktivoidaan automaattisesti. Toisaalta
verkkoseurannan vastaanottoa ei voida passivoida
passivoimatta vaihtoehtoista vastaanottoa.
4 Päätä asetus painamalla SEL (valinta)
-näppäintä.
SUOMI
37
Page 86

LISÄTIETOJA
Äänitilat (esiasetusarvojen asetukset)
Alla olevasta luettelosta näkyvät esiasetusarvojen asetukset kutakin äänitilaa varten.
Kun asetukset on vaihdettu, ne voidaan palauttaa tehdasasetuksiksi määräämällä alla olevat
esiasetusarvot uudelleen. (Ks. sivulta 22 uudelleenmääräämistä koskevat toimenpiteet.)
Merkki Esiasetetut tasausarvot
FREQ. WIDTH LOW LEVEL FREQ. WIDTH MID LEVEL FREQ. HIGH LEVEL
FLAT 50 Hz 1 00 700 Hz 1 00 8 kHz 00
Hard Rock 80 Hz 2 +03 700 Hz 1 00 8 kHz +02
R & B 80 Hz 3 +03 2 kHz 2 +01 12 kHz +03
POP 120 Hz 1 +02 2 kHz 2 +01 12 kHz +02
JAZZ 80 Hz 1 +03 1 kHz 1 +01 8 kHz +03
DanceMusic
Country 50 Hz 4 +02 700 Hz 1 00 12 kHz +02
Reggae 80 Hz 1 +03 2 kHz 2 +02 12 kHz +02
Classic 120 Hz 1 +03 1 kHz 1 00 8 kHz +02
User 1 50 Hz 1 00 700 Hz 1 00 8 kHz 00
User 2 50 Hz 1 00 700 Hz 1 00 8 kHz 00
User 3 50 Hz 1 00 700 Hz 1 00 8 kHz 00
50 Hz 2 +04 700 Hz 1 –02 8 kHz +01
Käytettävissä olevat kirjaimet
Seuraavia merkkejä voidaan käyttää määrättäessä nimiä CD-levyille ja ulkoisille komponenteille.
(Ks. sivua 27.)
Isot kirjaimet
SUOMI
38
ABCDE
FGHIJ
KLMNO
PQRST
UVWXY
tyhjä
Z
Pienet kirjaimet
abcde
fghij
kl mno
pqr st
uvwxy
tyhjä
z
Numerot ja merkit
01234
56789
”#$%
!
’()
&
+,
:
;
?@_ `
*
.
–
<
/
=
>
tyhjä
Page 87

HUOLTO
CD-levyjen käsittely
Tämä laite tarkoitettu soittamaan vain seuraavilla
merkeillä varustettuja CD-levyjä.
Tällä vastaanottimella voidaan soittaa myös
alkuperäisiä CD-R-levyjä (äänitettäviä) ja CDRW-levyjä (päällekirjoitettavia).
Tämä laite ei ole yhteensopiva MP3:n kanssa.
Näin käsittelet CD-levyjä
Kun otat CD-levyn ulos sen
kotelosta, paina kotelon
keskipidikettä ja nosta CD ulos
pitäen sen reunoista kiinni.
• Pitele CD-levyä aina reunoista. Sen
äänityspintaan ei saa koskea.
Kun panet CD-levyn takaisin koteloon, pane
se varovasti keskipidikkeeseen (tekstipuoli
ylöspäin).
• CD-levyt on säilytettävä niiden omissa
koteloissaan käytön jälkeen.
Näin pidät CD-levyt
puhtaina
Likainen CD ei ehkä soi
kunnolla. Jos CD likaantuu,
pyyhi se pehmeällä rievulla
keskustasta reunoihin päin
suorassa linjassa.
Uuden CD-levyn
soittaminen
Uusien CD-levyjen sisä- ja
ulkoreunoissa voi olla joitakin
epätasaisia kohtia. Jos tällaista
CD-levyä käytetään, tämä laite
saattaa estää sen soittamisen.
Nämä epätasaiset kohdat poistetaan hankaamalla
reunoja lyijy- tai kuulakärkikynällä yms.
Kosteuden tiivistyminen
Kosteus voi tiivistyä CD-soittimen sisällä olevaan
linssiin seuraavissa tapauksissa:
• Auton lämmittimen käynnistyksen jälkeen.
• Jos auton sisäilma muuttuu hyvin kosteaksi.
Mikäli näin tapahtuu, CD-soittimessa voi
esiintyä toimintahäiriö. Vapauta tässä
tapauksessa CD-levy ja jätä laitteeseen virta
päälle muutamaksi tunniksi, kunnes kosteus
haihtuu.
COMPACT
DIGITAL AUDIO
Keskipidike
VAROITUS!
• 8 cm:n CD-levyjä (sinkkuja) ei saa panna
latausaukkoon. (Sellaisia CD-levyjä ei voida
vapauttaa.)
• Epätavallisen muotoisia CD-levyjä — kuten
sydän tai kukka tms.— ei saa panna sisään,
muuten seurauksena on ongelmia.
• CD-levyjä ei saa jättää suoraan auringon valoon
tai minkään lämmönlähteen lähelle eikä niitä saa
panna paikkaan, jossa ne ovat alttiina korkealle
lämpötilalle ja kosteudelle. Niitä ei saa jättää
autoon.
• Mitään liuotteita (esim. tavallista äänilevyjen
puhdistusainetta, suihketta, tinneriä, bensiiniä
yms.) ei saa käyttää CD-levyjen puhdistukseen.
Soitettaessa CD-R- tai CD-RW-levyjä
Käyttäjän editoimia CD-R-levyjä (äänitettäviä) ja
CD-RW-levyjä (päällekirjoitettavia) voidaan
soittaa vain silloin, jos ne ovat jos “valmiita”.
• Voit soittaa alkuperäisiä musiikki-CDmuodossa äänitettyjä CD-R- tai CD-RWlevyjä. (Niiden soittaminen ei saata kuitenkaan
olla mahdollista riippuen niiden
ominaisuuksista tai äänitysolosuhteista.)
• Ennen CD-R- tai CD-RW-levyjen soittamista
lue niiden ohjeet tai varoitukset huolellisesti.
• Joidenkin CD-R- tai CD-RW-levyjen
soittaminen ei saata olla mahdollista tässä
laitteessa niiden levyominaisuuksien, niissä
olevien vaurioiden tai tahrojen takia tai jos
soittimen linssi on likainen.
• CD-R- tai CD-RW-levyt ovat korkeille
lämpötiloille tai liialliselle kosteudelle alttiita,
joten niitä ei saa jättää autoon.
• CD-RW-levyt tarvitsevat mahdollisesti
pitemmän lukuajan. (Tämä johtuu siitä, että
CD-RW-levyjen heijastumissuhde on alempi
kuin tavallisten CD-levyjen.)
T racking-häiriö:
Erittäin kuoppaisilla teillä ajamisesta voi olla
seurauksena tracking-häiriö. Tämä ei
vahingoita laitetta eikä CD-levyä, vaikkakin se
on kiusallista.
Suosittelemme, ettet soita CD-levyjä ajaessasi
kuoppaisilla teillä.
SUOMI
39
Page 88

VIANETSINTÄ
Vialta näyttävä seikka ei ole aina vakava. Tarkista seuraavat kohdat, ennen kuin soitat
huoltokeskukseen.
Vian merkit
• CD-levyä ei voi soittaa.
• CD-levyn ääni keskeytyy
joskus.
• Kaiuttimista ei kuulu ääntä.
• SSM (Strong-station
Sequential Memory — vahvan
aseman peräkkäismuisti)
automaattinen esiasetus ei
toimi.
• Staattista kohinaa radiota
kuunneltaessa.
• Näyttöön ilmestyy “NO DISC”.
• Näyttöön ilmestyy “RESET 8”.
Syyt
CD-levy on pantu sisään ylösalaisin.
Ajat kuoppaisilla teillä.
CD-levy on naarmuuntunut.
Liitännät on tehty väärin.
Äänenvoimakkuuden taso on
asetettu pienimmälle.
Liitännät on tehty väärin.
Signaalit ovat liian heikkoja.
Antennia ei ole kytketty lujasti.
Lippaassa ei ole CD-levyä.
Tätä laitetta ei ole kytketty CD-
vaihtajaan oikein.
Korjauset
Pane CD-levy sisään kunnolla.
Lopeta CD-levyjen soittaminen
ajaessasi kuoppaisilla teillä.
Vaihda CD-levy.
Tarkista johdot ja liitännät johdot
ja liitännät.
Säädä se optimitasolle.
Tarkista johdot ja liitännät.
Tallenna asemat käsin.
Kytke antenni lujasti.
Aseta CD-levy.
Kytke tämä laite sekä CD-
vaihtaja oikein ja paina CDvaihtajan reset-näppäintä.
• Näyttöön ilmestyy “RESET 1”
– “RESET 7”.
• Näyttöön ilmestyy “NO DISC”
tai “EJECT ERR” eikä CDlevyä voi vapauttaa.
• Näyttöön ei ilmesty viestiä,
mutta CD-levyä ei voida
vapauttaa.
• Tämä laite ei toimi lainkaan.
• CD-vaihtaja ei toimi lainkaan.
SUOMI
40
CD-soitin voi toimia väärin.
Sisäänrakennettu mikro voi
toimia väärin kohinan yms.
takia.
Paina CD-vaihtajan resetnäppäintä.
Painettaessa -näppäintä on
0-näppäin ja pidat sitä alhaalla
yli 2 sekunnin ajan.
(Varo pudottamasta CD-levyä
sitä vapauttaessasi.)
Paina etupaneelin
palautusnäppäintä.
(Ks. sivua 2.)
Page 89

TEKNISET TIEDOT
ÄÄNEN VAHVISTINOSA
Suurin lähtöteho:
Etu: 50 W / kanava
Taka: 50 W / kanava
Jatkuva lähtöteho (RMS):
Etu: 19 W / kanava 4 Ω:iin,
40 Hz – 20 000 Hz harmonisen
kokonaissärön ollessa alle 0,8%.
Taka: 19 W / kanava 4 Ω:iin,
40 Hz – 20 000 Hz harmonisen
kokonaissärön ollessa alle 0,8%.
Kuorman impedanssi: 4 Ω (4 Ω – 8 Ω poikkeama)
Taajuuskorjaimen säätöalue:
LOW: ±12 dB (50 Hz, 80 Hz, 120 Hz)
MID: ±12 dB (700 Hz, 1 kHz, 2 kHz)
HIGH: ±12 dB (8 kHz, 12 kHz)
Taajuustoisto: 40 Hz – 20000 Hz
Signaalikohinasuhde: 70 dB
Linjatulotaso/impedanssi:
KD-SH77R : 1,5 V/20 kΩ kuorma
Linjalähtötaso/impedanssi:
KD-SH55R : 2,0 V/20 kΩ kuorma (täysimittainen)
KD-SH77R : 4,0 V/20 kΩ kuorma (täysimittainen)
Antoimpedanssi: 1 kΩ
Lisälaitteen tulojakki: (halkaisijaltaan 3,5 mm
stereominijakki)
VIRITINOSA
Taajuusalue:
FM: 87,5 MHz – 108,0 MHz
AM: (MW) 522 kHz –1 620 kHz
(LW) 144 kHz – 279 kHz
CD-SOITINOSA
Tyyppi: CD-soitin
Signaalinilmaisujärjestelmä: kosketukseton
optinen äänirasia (puolijohdelaser)
Kanavien lukumäärä: 2 kanavaa (stereo)
Taajuustoisto: 5 Hz – 20 000 Hz
Dynamiikka-alue: 98 dB
Signaalikohinasuhde: 102 dB
Huojunta ja värinär: alle mitattavan rajan
YLEISTÄ
Tehovaatimukset:
Käyttöjännite: DC 14,4 V
(11 V –16 V vara)
Maattojärjestelmä: negatiivinen maatto
Sallittu käyttölämpötila: 0°C – +40°C
Mitat (L × K × S):
Asennuskoko: 182 mm × 52 mm × 161 mm
Etulevyn koko: 188 mm × 58 mm × 17 mm
Paino: 1,8 kg (lisävarusteita lukuunottamatta)
Mallia ja teknisiä tietoja voidaan muuttaa
ilmoittamatta siitä etukäteen.
[FM-viritin]
Käyttöherkkyys: 11,3 dBf (1,0 µV/75 Ω)
50 dB Mykistysherkkyys:
16,3 dBf (1,8 µV/75 Ω)
Vuorottainen kanavan selektiivisyys (400 kHz):
65 dB
Taajuustoisto: 40 Hz – 15000 Hz
Stereon erotus: 30 dB
Sieppaussuhde: 1,5 dB
[MW-viritin]
Herkkyys: 20 µV
Selektiivisyys: 35 dB
[LW-viritin]
Herkkyys: 50 µV
SUOMI
41
Page 90

¿Tiene PROBLEMAS con la operación?
Por favor reinicialice su unidad
Consulte la páfina de Cómo reposicionar su unidad
PROBLEMI di funzionamento?
Inizializzare l'apparecchio
Fare riferimento alla pagina di Come inizialiazzare l'apparecchio
Har DRIFTPROBLEM uppstått?
Nollställ i så fall apparaten
Vi hänvisar till sidan med rubriken Hur apparaten nollställs
Onko Käytössä ONGELMIA?
Säädä laite alkutilaan
Katso kohtaa Laitteen Säätö alkutilaan
SP, IT, SW, FI
VICTOR COMPANY OF JAPAN, LIMITED
0201MNMMDWJES
JVC
Page 91

53 mm
(2-1/8")
184 mm
(7-1/4")
KD-SH77R/KD-SH55R
Manual de instalación/conexión
Manuale d’installazione/collegamento
Installations/anslutningshandbok
Asennus/liitäntäohjekirja
LVT0640-001A
[E]
0201MNMMDWJES
JVC
SP, IT, SW, FI
ESPAÑOL
• Esta unidad está diseñada para funcionar con
12 V de CC, con sistemas eléctricos de masa
NEGATIVA.
INSTALACION (MONTAJE EN EL
TABLERO DE INSTRUMENTOS)
• La siguiente ilustración muestra una instalación
típica. Sin embargo usted deberá efectuar los
ajustes correspondientes a su automóvil. Si
tiene alguna pregunta o necesita información
acerca de las herramientas para instalación,
consulte con su concesionario de JVC de
equipos de audio para automóviles o a una
compañía que suministra tales herramientas.
1
Antes de instalar: Pulse (soltar panel
de control) para separar el panel de control
si ya está unido.
* Cuando se envía de la fábrica, el panel de
control está embalado en el estuche duro.
2
Retire la placa de guarnición.
3
Retire la cubierta después de desenganchar
los retenes de la cubierta.
1 Ponga la unidad vertical.
Nota: Al poner la unidad vertical, tenga
cuidado de no dañar el fusible provisto
en la parte posterior.
2 Inserte las 2 manijas entre la unidad y la
cubierta tal como en la ilustración y
desenganche los retenes de la cubierta.
3 Retire la cubierta.
Nota: Después de instalar la unidad,
asegúrese de guardar las manijas para
uso futuro.
4
Instale la cubierta en el tablero de
instrumentos.
* Después de que la cubierta esté
correctamente instalada en el tablero de
instrumentos, doble las lengüetas
correspondientes para sostener la cubierta
firmemente en su lugar, tal como se muestra.
5
Fixe el perno de montaje ou la parte trasera
del cuerpo de la unidad y coloque el cojín
de goma sobre el extremo del perno.
6
Realice las conexiones eléctricas requeridas.
7
Deslice la unidad dentro de la cubierta hasta
que quede trabada.
8
Coloque la placa de guarnición.
9
Coloque el panel de control.
ITALIANO
• L’apparecchio è destinato a funzionare su
impianti elettrici da 12 V CC, con massa
NEGATIVA.
INSTALLAZIONE (MONTAGGIO
SUL CRUSCOTTO)
• La figura che segue rappresenta
un’installazione tipica. Naturalmente, sono
possibili adattamenti in funzione del tipo di
vettura. Per eventuali chiarimenti in merito ai
kit d’installazione, rivolgersi al locale rivenditore
car audio JVC o a negozi analoghi.
1
Operazioni preliminari al montaggio:
Premere
dicomando) per staccare il pannello di
comando (se già inserito).
* Di fabbrica, il pannello di comando viene
fornito in contenitore rigido.
2
Togliere la piastra di finitura.
3
Togliere la protezione dopo aver sganciato i
relativi blocchi.
1 Posizionare l’apparecchio.
Nota: Nel posizionare l’apparecchio, fare
attenzione a non danneggiare il fusibile sul
posteriore.
2 Inserire le 2 maniglie tra l’apparecchio e la
protezione, come illustrato per sganciare i
blocchi.
3 Togliere la protezione.
Nota: Una volta ultimate le operazioni
d’installazione, conservare le maniglie per
uso futuro.
4
Installare la protezione nel cruscotto.
* Verificare la correttezza dell’installazione
della protezione nel cruscotto, quindi
piegare le linguette che tengono in posto la
protezione, come illustrato.
5
Fissare il bullone di montaggio sul retro
dell’apparecchio e collocare il gommino
sull’estremità del bullone stesso.
6
Eseguire i necessari collegamenti elettrici.
7
Far scorrere l’apparecchio nella protezione
finché non risulta bloccato.
8
Applicare la piastra di finitura.
9
Inserire il pannello di comando.
(sgancio del pannello
SVENSKA
• Enheten får drivas av 12 V likströmsystem med
NEGATIV jordning.
INSTALLATION (MONTERING
I INSTRUMENTBRÄDA)
• Illustrationen nedan visar en normal installation.
Du ska emellertid göra de anpassningar som
är lämpliga för just din bil. Har du frågor, eller
behöver information om installationssatser , ska
du kontakta återförsäljaren för JVC BILRADIO/
CD-SPELARE eller ett företag som säljer satser.
1
Före montering:
(kontrollpanelfrigöring) för att lossa
kontrollpanelen om den har satts på plats.
* Vid leveransen fran fabriken är
kontrollpanelen forpackad i den harda kapan.
2
Ta bort kantplåten.
3
Lossa på hylsspärrarna och ta bort hylsan.
1
Ställ enheten på högkant.
OBS:
Var försiktig så att du inte skadar
säkringen på baksidan när du ställer
enheten på högkant.
2
För in de två handtagen mellan enheten och
hylsan, som på bilden, för att lossa
hylsspärrarna.
3
Ta bort hylsan.
OBS:
Tänk på att spara handtagen när du
har installerat enheten, för framtida bruk.
4
Installera hylsan i instrumentbrädan.
* När hylsan sitter på plats ordentligt i
instrumentbrädan böjer du ut tillämpliga flikar
för att hålla hylsan på plats ordentligt. Se
illustrationen.
5
Skruva i monteringsbulten på baksidan av
enhetens kåpa och placera gummibufferten
över bulthuvudet.
6
Utför de elektriska anslutningarna.
7
För in enheten i hylsan tills den låser fast på
plats.
8
Sätt fast kantplåten.
9
Sätt tillbaka kontrollpanelen.
Tryck på
SUOMI
• Tämä laite on suunniteltu käytettäväksi 12 V tasavirran
NEGATIIVISISSA maattosähköjärjestelmissä.
ASENNUS (KOJELAUTAAN
KIINNITYS)
• Alla olevista kuvista näkyy tyypillinen asennus.
Sinun tulisi kuitenkin tehdä omaan autoosi sopivia
säätöjä. Jos sinulla on kysyttävää tai haluat
asennussarjoja koskevia tietoja, ota yhteys JVCautohifilaitteiston jälleenmyyjään tai sarjoja
toimittavaan yhtiöön.
1
Ennen asennusta: Mikäli etulevy on jo
kiinnitetty, irrota se painamalla -näppäintä
(etulevyn vapautus).
* Kun laite toimitetaan tehtaalta, etulevy on
pakattu kovaan koteloon.
2
Irrota peitelevy.
3
Irrota vaippa avattuasi ensin vaipan lukot.
1 Pane laite pystyyn.
Huom! Kun panet laitteen seisomaan, varo
vahingoittamasta takana olevaa varoketta.
2 Aseta molemmat kahvat laitteen ja vaipan
väliin kuvasta näkyvällä tavalla avataksesi
vaipan lukot.
3 Irrota vaippa.
Huom! Pidä kahvat tallessa laitteen
asennuksen jälkeen tulevan käytön varalta.
4
Asenna vaippa kojelautaan.
* Kun vaippa on asennettu oikein kojelautaan,
taivuta asianmukaiset salvat, jotka pitävät
vaipan tukev asti paikoillaan, kuvasta näkyvällä
tavalla.
5
Kiinnitä kiinnityspultti laitteen rungon takaosaan
ja pane kumityyny pultin päähän.
6
Tee tarpeelliset sähköliitännät.
7
Työnnä laite vaippaan, kunnes se lukkiutuu.
8
Kiinnitä peitelevy.
9
Kiinnitä etulevy.
1
Panel de control
Panello di comando
Kontrollpanelen
Etulevyn
2
Placa de guarnición
Piastra di finitura
Kantplåt
Peitelevy
3
Ranura
Feritoia
Skåra
Aukko
Fusible
Fusibile
Säkring
Varoke
Manija
Maniglia
Handtag
Kahva
Cubierta
Protezione
Hylsa
Vaippa
Placa de bloqueo
Piastra di bloccaggio
Låsplatta
Lukkolevy
8
9
Panel de control
Panello di comando
Kontrollpanelen
Etulevyn
Cojín de goma
Gommino
Gummibuffert
Kumityyny
Cubierta
Protezione
Hylsa
Vaippa
7
Placa de guarnición
Piastra di finitura
Kantplåt
Peitelevy
4
4
Tablero de instrumentos
Cruscotto
Instrumentbräda
Kojelauta
5
Perno de montaje
Bullone di montaggio
Monteringsbult
Kiinnityspultti
*
6
Véase “CONEXIONES ELECTRICAS”.
Vedere “COLLEGAMENTI ELETTRICI”.
Se “ELANSLUTNINGAR”.
Ks. “SÄHKÖLIITÄNNÄT”.
Page 92

•Cuando emplea un soporte opcional
•Utilizzo del supporto supplementare
•Vid användning av det valfria stödet
•Käytettäessä lisätukea
Arandela
Lavatrice
Bricka
Aluslevy
Tablero de instrumentos
Cruscotto
Instrumentbräda
Kojelauta
Tabique a prueba de incendios
Parete antincendio
Brandvägg
Paloseinä
Cubierta
Protezione
Hylsa
V aippa
Soporte (opción)
Supporto (opzionale)
Stöd (tillägg)
Tuki (lisävaruste)
Tuerca de seguridad
Dado di fermo
Låsmutter
Lukkomutteri
Tornillo (opción)
Vite (opzionale)
Skruv (tillägg)
Ruuvi (lisävaruste)
Perno de montaje
Bullone di montaggio
Monteringsbult
Kiinnityspultti
•Instalación de la unidad sin utilizar la manga
•Installazione dell’apparecchio senza protezione
•Vid installation av enheten utan att använda hylsan
•Asennettaessa laitetta ilman vaippaa
En un Toyota por ejemplo, primero extraiga la radio del automóvil y luego instale la unidad en su lugar.
Ad esempio, in una Toyota, si deve innanzi tutto togliere la radio ed installare poi l’apparecchio in suo luogo.
I en Toyota ska man exempelvis först ta bort bilradion, och sedan installera enheten på dess plats.
Esim. Toyotassa: irrota ensin autoradio ja asenna laite sitten sen paikalle.
Tornillos tipo plano (M5 x 6 mm)*
Viti a testa piana (M5 x 6 mm)*
Skruvar med platt huvud (M5 x 6 mm)
Litteätyyppiset ruuvit (M5 x 6 mm)*
Ménsula*
Staffa*
Fäste
*
Teline*
Compartimiento
Tascabile
Fick
Tasku
Nota: Cuando instala la unidad en la ménsula de montaje, asegúrese de utilizar los tornillos de 6 mm de
longitud. Si se utilizan tornillos más largos, éstos pueden dañar la unidad.
Nota: Durante l’installazione dell’apparecchio sulla staffa di montaggio, utilizzare esclusivamente le viti da
6 mm. Si ricorda che l’uso di viti più lunghe potrebbe danneggiare l’apparecchio.
De 6 mm långa skruvarna måste användas när enheten installeras på monteringsfästet. Om längre
OBS:
skruvar används kan enheten skadas.
Huom! Kun laitetta asennetaan kiinnitystelineeseen, on varmistettav a, että käytössä olev at ruuvit ov at 6 mm pitkiä. Jos
käytetään pitempiä ruuveja, ne voivat vahingoittaa laitetta.
*
* No suministrado con esta unidad.
* Non fornite con l’apparecchio.
Levereras inte med enheten.
*
* Ei tule tämän laitteen mukana.
Tornillos tipo plano (M5 x 6 mm)*
Viti a testa piana (M5 x 6mm)*
Skruvar med platt huvud (M5 x 6 mm)
*
Litteätyyppiset ruuvit (M5 x 6 mm)*
Ménsula*
Staffa*
Fäste
*
Teline*
Extracción de la unidad
• Antes de extraer la unidad, libere la sección trasera.
1
Extraiga el panel de control.
2
Retire la placa de guarnición.
3
Inserte las 2 manijas entre las ranuras, como
se muestra. Luego, separe gentilmente las
manijas y extraiga la unidad. (Asegúrese de
conservar las manijas después de
instalarlo.)
Panel de control
Panello di comando
Kontrollpanelen
Etulevyn
Rimozione dell’apparecchio
• Prima di rimuovere l’apparecchio, sganciare la
parte posteriore.
1
Togliere il pannello di comando.
2
Togliere la piastra di finitura.
3
Inserire le 2 maniglie nelle guide, come
indicato. A questo punto, tirare delicatamente
le maniglie allontanandole l’una dall’altra,
quindi estrarre l’apparecchio. (Conservare le
maniglie per uso futuro.)
21
Placa de guarnición
Piastra di finitura
Kantplåt
Peitelevy
Ta bort enheten
• Lossa den bakre delen innan enheten tas bort.
1
Ta bort kontrollpanelen.
2
Ta bort kantplåten.
3
Sätt in de två handtagen i skårorna, som i
illustrationen. Dra försiktigt isär handtagen och
skjut ut enheten.
(Tänk på att spara
handtagen när installationen är klar.)
3
Laitteen irrotus
• Vapauta takaosa ennen laitteen irrotusta.
1
Irrota etulevy.
2
Irrota peitelevy.
3
Aseta molemmat kahvat aukkoihin kuvasta
näkyvällä tavalla. Vedä laite sitten ulos samalla, kun
työnnät kahvoja toisistaan pois päin. (Pidä kahvat
tallessa laitteen asennuksen jälkeen.)
Manija
Maniglia
Handtag
Kahva
Lista de piezas para instalación y
conexión
Con esta unidad se suministran las siguientes piezas.
Después de inspeccionarlas, colóquelas
correctamente.
Estuche duro/Panel de control
Contenitore/Panello di comando
Hård kåpa/Kontrollpanelen
Kova kotelo/Etulevyn
Cordón de alimentación
Cavo di alimentazione
Nätsladd
Verkkojohto
Componenti da usare per
l’installazione ed il collegamento
Assieme all’apparecchio vengono forniti i
componenti sottoindicati.
Prima di procedere, verificare che tutto sia in ordine.
Cubierta
Protezione
Hylsa
Vaippa
Manijas
Maniglie
Handtag
Kahvat
Arandela (ø5)
Lavatrice (ø5)
Bricka (ø5)
Aluslevy (ø5)
Detaljlistor för installation och
anslutning
Följande delar levereras med enheten.
Placera dem på rätt sätt, efter att ha kontrollerat
att alla finns med.
Placa de guarnición
Piastra di finitura
Kantplåt
Peitelevy
Tuerca de seguridad (M5)
Dado di fermo (M5)
Låsmutter (M5)
Lukkomutteri (M5)
Perno de montaje (M5 x 20 mm)
Bullone di montaggi (M5 x 20 mm)
Monteringsbult (M5 x 20 mm)
Kiinnityspultti (M5 x 20 mm)
Osaluettelo asennusta ja liitäntää
varten
Alla olevat osat toimitetaan tämän laitteen mukana.
Kun olet tarkistanut ne, aseta ne oikein.
Mando a distancia
Telecomando
Fjärrkontroll
Kauko-ohjain
ATT
CD
FM
AM
CH
AUX SEL
AM-RK100
ANGLE
EQ
R D
VOLUME
Pila
Batteria
Batteri
Paristo
CR2025
Cojín de goma
Gommino
Gummibuffert
Kumityyny
Page 93

CONEXIONES ELECTRICAS
COLLEGAMENTI ELETTRICI
ELANSLUTNINGAR
SÄHKÖLIITÄNNÄT
Para evitar cortocircuitos, recomendamos que
desconecte el terminal negativo de la batería y que
efectúe todas las conexiones eléctricas antes de
instalar la unidad. Si usted no está seguro de cómo
instalar correctamente la unidad, hágala instalar por
un técnico cualificado.
Nota:
Esta unidad está diseñada para funcionar con 12 V
de CC, con sistemas eléctricos de masa
NEGATIVA. Si su vehículo no posee este sistema,
será necesario un inversor de tensión, que puede
ser adquirido en los concesionarios de JVC de
equipos de audio para automóviles.
• Reemplace el fusible por uno con la corriente
especificada. Si el fusible se quemase
frecuentemente consulte con su concesionario de
JVC de equipos de audio para automóviles.
• Si el ruido fuese un problema...
Esta unidad tiene un filtro de ruido en el circuito
de alimentación. Sin embargo, en algunos
vehículos, pueden producirse chasquidos u otros
ruidos indeseados. En tal caso conecte el terminal
de tierra posterior (véase diagrama de conexión)
del receptor al chasis del automóvil, utilizando
cordones más gruesos y cortos tales como
alambre de cobre trenzado o de grueso calibre.
Si el ruido persiste, consulte a su concesionario
de JVC de equipos de audio para automóvil.
• La entrada máxima de los altavoces no debe ser
no más que 50 W en la frontal y 50 W en el trasero,
con una impedancia de 4 Ω a 8 Ω.
• Asegúrese de conectar esta unidad a tierra en
el chasis del automóvil.
• El sumidero térmico estará muy caliente después
del uso. Asegúrese de no tocarlo al desmontar
esta unidad.
Per evitare cortocircuiti, si consiglia di scollegare
il terminale negativo della batteria e di realizzare
tutti i collegamenti elettrici prima d’installare
l’apparecchio. Se necessario, fare effettuare
l’installazione da un tecnico qualificato.
Nota:
L’apparecchio è studiato per funzionare su
impianti elettrici da 12 V c.c., con massa
NEGATIVA. Se l’impianto della vettura è di tipo
diverso, è necessario un invertitore di tensione,
reperibile presso i venditori car audio JVC.
• Sostituire il fusibile con uno della potenza
specificata. Se il fusibile si brucia spesso,
rivolgersi al locale rivenditore car audio JVC.
• In caso di rumorosità...
Nel circuito di alimentazione dell’apparecchio
è presente un filtro antirumore. Però, in alcuni
tipi di vetture, si possono avvertire rumori
indesiderati. In tal caso, collegare il terminale
di terra sul posteriore dell’apparecchio (cfr.
schema di collegamento) al telaio dell’auto
utilizzando cavi più corti e più spessi (ad
esempio, calza metallica di rame o filo di calibro
maggiore). Se il rumore persiste, rivolgersi al
locale rivenditore car audio JVC.
• L’ingresso massimo delle casse dev’essere
nient’altro 50 W sul retro e 50 W sul davanti,
con impedenza di 4 Ω – 8 Ω.
• Mettere a terra l’apparecchio sul telaio
dell’auto.
• Dopo l’uso, il dissipatore di calore si surriscalda.
Evitare di toccarlo quando si estrae
l’apparecchio.
För att eliminera risken för kortslutningar
rekommenderar vi dig att koppla loss batteriets negativa
anslutning och utföra alla elektriska anslutningar innan
enheten installeras. Om du är osäker på hur du ska
installera enheten på korrekt sätt ska du låta en
kvalificerad tekniker utför a installationen.
OBS:
Enheten får drivas av
NEGA TIV jordning
12 V likströmsystem med
. Om ditt f ordon inte har ett
sådant system behöver du en spänningsomvandlare.
Du kan skaffa en sådan hos återförsäljaren för JVC
BILRADIO/CD-SPELARE.
• Byt ut säkringen mot en med specificerad
kapacitet. Kontakta återförsäljaren för JVC
BILRADIO/CD-SPELARE om säkringen går ofta.
• Om du får problem med störningar...
Denna enhet är försedd med ett brusfilter i
strömkretsen. I vissa fordon kan emellertid ett
klickande ljud, eller andra oönskade störningar,
uppträda. Om så är fallet ska
jordningsuttag
(se kopplingsschemat) anslutas
bakre
till bilens chassi med kortare och tjockare kablar,
exempelvis omspunnen kopparkabel eller annan
grövre kabel. Kontakta återförsäljaren för JVC
BILRADIO/CD-SPELARE om störningarna ändå
inte försvinner.
• Högtalarnas maximala ineffekt ska vara inte på
mer än 50 W bak och på 50 W fram, med en
impedans på
Var noga med att jor da enheten till bilens chassi.
•
4 Ω till 8 Ω
.
• Kyldonet b lir mycket v armt efter användning. V ar
försiktig så att du inte kommer åt det när du tar
ut enheten.
Oikosulun estämiseksi suosittelemme, että kytket
akun negatiivisen navan irti ja suoritat kaikki
sähköliitännät ennen laitteen asennusta. Jos et ole
varma siitä, miten tämä laite asennetaan oikein, pyydä
pätevää asentajaa asentamaan se.
Huom!
Tämä laite on suunniteltu käytettäväksi 12 V
tasavirran NEGATIIVISISSA maattosähköjärjestelmissä. Jos ajoneuvossasi ei ole tätä
järjestelmää, tarvitset jänniteinvertterin, jonka v oit
ostaa JVC-autohifilaitteiston jälleenmyyjältä.
• Vaihda varoke uuteen, jonka tehoarvo on
määrätty. Jos v aroke palaa usein, ota yhteys JVCautohifilaitteiston jälleenmyyjään.
• Jos ongelmana on kohina...
Tämän laitteen päävirtapiirissä on
kohinasuodatin. Joissakin ajoneuvoissa voi
kuitenkin esiintyä naksahtelua tai muuta eitoivottua häiriöääntä. Jos näin tapahtuu, liitä
laitteen takamaadoitusliitin
(ks. liitäntäkaaviota) auton alustaan käyttämällä
lyhyempiä ja paksumpia johtoja, kuten esim.
kuparipunosta tai mittajohdinta. Jos kohina
jatkuu edelleen, ota yhteys
JVC-autohifilaitteiston jälleenmyyjään.
• Kaiuttimien ei pitaisi suurimman tulotehon tulisi
olla yli 50 W takana ja 50 W edessä 4 Ω – 8 Ω
impedanssilla.
• Tämä laite on maatettava auton alustaan.
• Jäähdytyslevy kuumenee käytössä. Varo
koskettamasta sitä irrottaessasi tätä laitetta.
Sumidero térmico
Dissipatore di calore
Kyldonet
Jäähdytyslevy
Conexión de los conductores / Collegamento dei fili / Ansluta ledningarna / Johdinten kytkentä
PRECAUCION / ATTENZIONE / VARNING / VAROITUS!:
Retuerce los alambres de alma para
conectarlos.
Nel collegamento torcere i fili del nucleo.
Tvinna kärntråden vid anslutning.
Kierrä sydänlankoja niitä kytkiessäsi.
Suelde los alambres de alma para conectarlos
con firmeza.
Saldare i fili del nucleo in modo da collegarli
perfettamente.
Löd fast kärntråden så att den blir ordentligt
ansluten.
Juota sydänlangat kytkeäksesi ne tanakasti.
A Si su automóvil está equipado con el conector ISO
Se la vettura è dotata di connettore ISO
Om din bil är försedd med en ISO-kontakt
Jos autosi on varustettu ISO-liittimellä
• Conecte los conectores ISO tal como se indica en la ilustración.
• Collegare i connettori ISO come illustrato.
•
Anslut ISO-kontakterna enligt nedan.
• Kytke ISO-liittimet kuvasta näkyvällä tavalla.
Para algunos automóviles VW/Audi u Opel (Vauxhall)
Per alcune vetture VW/Audi o Opel (Vauxhall)
På vissa modeller av VW/Audi och Opel (Vauxhall)
Joihinkin VW/Audi- tai Opel (Vauxhall) -ajoneuvoihin
Podría ser necesario modificar el conexionado del cable de alimentación sumi nistrado, tal como se indica en la ilustración.
• Antes de instalar esta unidad, consulte a su concesionar io de automóviles a utorizado.
Nel caso fosse necessario modificare il cablaggio del cavo di alimentazione fornito in dotazione, procedere nel modo seguente.
• Prima d’installare l’apparecchio contattare il concessionario autorizzato.
Ledningsdragningen i den levererade nätsladden kan behöva ändras som nedan.
•
Kontakta den auktoriserade bilåterförsäljaren innan enheten installeras.
Sinun on mahdollisesti muunnettava mukana tulevan verkkojohdon johdotusta kuvasta näkyvällä tavalla.
• Ota yhteys valtuutettuun autokauppiaaseen ennen tämän laitteen asennusta.
• Para evitar cortocircuitos, cubra los cables NO UTILIZADOS con cinta aislante.
• Per evitare cortocircuiti, ricoprire i terminali dei fili INUTILIZZATI con nastro
isolante.
• Tejpa över de ledare som INTE ANVÄNDS med isoleringstejp för att eliminera
risken för kortslutning.
• Päällystä KÄYTTÄMÄTTÖMIEN johtimien liittimet eristysnauhalla oikosulun
estämiseksi.
A1
B1
A2
B2
A3
B3
A4
B4
A1
B1
A2
B2
A3
B3
A4
B4
Vista desde el lado del conductor
Vista dal lato conduttori
Sett från ledarsidan
Johtopuolelta katsottuna
Conector ISO del cable de alimentación
suministrado
Connettore ISO del cavo di alimentazione fornito
in dotazione
ISO-kontakt på den leverer ade nätsladden
Mukana tulevan verkkojohdon ISO-liitin
Desde la carrocería del
vehículo
Dalla carrozzeria
Från bilens kaross
Auton korista
Conexionado original
Cablaggio originale
Ursprunglig
ledningsdragning
Alkuperäinen johdotus
Conexionado modificado
Cablaggio modificato
Ändrad
11
ledningsdragning
Muunnettu johdotus
1
11
11
1
11
Conexionado modificado
Cablaggio modificato
Ändrad
ledningsdragning
Muunnettu johdotus
22
2
22
22
2
22
Conector ISO
Connettore
ISO
ISO-kontakt
ISO-liitin
11
1
11
11
1
11
22
2
22
22
2
22
Amarillo/Giallo/
Rojo/
Rosso/
Röd/
Punainen
Amarillo/Giallo/
Rojo/
Rosso/
Röd/
Punainen
Amarillo/Giallo/
Rojo/
Rosso/
Röd/
Punainen
Gul
/Keltainen
Rojo/Rosso/
Gul
/Keltainen
Rojo/Rosso/
Gul
/Keltainen
Rojo/Rosso/
Amarillo/Giallo/
Rojo/Rosso/
Röd/
Punainen
Amarillo/Giallo/
Rojo/Rosso/
Röd/
Punainen
Amarillo/Giallo/
Röd/
Punainen
Gul
/Keltainen
Röd/
Gul
/Keltainen
Röd/
Gul
/Keltainen
Rojo/Rosso/
Röd/
Punainen
Punainen
Punainen
Si la unidad no se enciende, utilice el
conexionado modificado 2.
Se l’apparecchio non si accende,
utilizzare il cablaggio modificato 2.
Tillämpa den ändrade
ledningsdragningen enligt
2
om enheten inte fungerar.
Käytä muunnettua johdotusta 2
jos virta ei kytkeydy laitteeseen.
Page 94

B Conexiones sin usar los conectores ISO / Collegamenti senza connettori ISO / Anslutning utan användning av ISO-kontakterna / Liitännät ilman ISO-liittimiä
DEUTSCH
Antes de la conexión: Verifique atentamente el
conexionado del vehículo. Una conexión incorrecta
podría producir daños graves en la unidad.
1
Corte el connector ISO.
2
Conecte los conductores de color del cable de
alimentación a la batería del automóvil,
altavoces y antena motriz (si la hubiere) en la
secuencia siguiente.
1 Negro: a tierra
2 Amarillo: a la batería del automóvil
(12 V constantes)
3 Rojo: a un terminal de accesorio
4 Azul con rayas blancas: a la antena
motriz (máx. 200 mA)
5 Naranja con rayas blancas: al interruptor
de control de las luces del automóvil
6 Marrón: al sistema de teléfono celular
(Para mayor información, refiérase a las
instrucciones del teléfono celular.)
7 Otros: a los altavoces
3
Conecte el cable de antena.
4
Por último , conecte el cable de alimentación a
la unidad.
Corte el connector ISO
1
Tagliare il connettore ISO
Klip loss ISO-kontakten
Katkaise ISO-litin
3
Terminal de la
antena
Terminale per
antenna
Antennuttag
Antenniliitin
Terminal de tierra posterior
Terminale di terra posteriore
Bakre jordningsuttag
Takamaadoitusliitin
LINE OUT
(FRONT)
LINE OUT
(REAR)
SUBWOOFER OUT
(KD-SH77R)
LINE IN
(KD-SH77R)
EXT OUT
(KD-SH55R)
CONTROL
(KD-SH77R)
Véase diagrama C .
Cfr. schema C .
Se schema
Ks. kaaviota C .
*1:Antes de comprobar el funcionamiento de esta
unidad previa a de la instalación, es necesario
conectar este cable, de lo contrario no se podrá
conectar la alimentación.
*1:Per poter verificare il funzionamento
dell’apparecchio prima dell’installazione, è
necessario avere già collegato questo filo
(altrimenti è impossibile accendere l’apparecchio).
*1:Innan enhetens funktion kontrolleras före
installationen måste denna ledning anslutas.
Annars kan strömmen inte slås på.
*1:Tämä johdin on liitettävä ennen tämän laitteen
toiminnan tarkistusta, ennen asennusta, muuten virtaa
ei voida kytkeä.
C
.
2
Prima del collegamento: Verificare attentamente
il cablaggio della vettura. Si ricorda che un
collegamento improprio può danneggiare
seriamente l’apparecchio.
1
Tagliare il connettore ISO.
2
Collegare i fili colorati del cavo di alimentazione
alla batteria dell’auto, alle casse ed all’antenna
(se presente) nella sequenza indicata.
1 Nero: massa
2 Giallo: alla batteria dell’auto (12 V costanti)
3 Rosso: al terminale per accessori
4 Blu a strisce bianche: all’antenna
(200 mA max.)
5 Arancione a strisce bianche: all’interruttore
di comando luci
6 Marrone: al cellulare (Per i particolari,
vedere le instruzioni del telefono cellulare.)
7 Altri: alle casse
3
Collegare il cavo dell’antenna.
4
Infine, collegare i cablaggi all’apparecchio.
A la antena
Sull’antenna
Till antenn
Antenniin
15
Fusible de 15 A
Fusibile 15 A
15 A-säkring
15 A varoke
Cambiador de CD
(u otro componente
exterior)
CD changer
(ed altro componente
esterno)
CD-växlare
(eller annan extern
utrustning)
CD-vaihtaja
(tai jokin toinen
oheislaite)
4
Negro
Nero
Svart
Musta
Amarillo*
1
Giallo*
1
Gul*
Keltainen*
Rojo
Rosso
Röd
Punainen
1
1
A4
A2
Recomendamos conectar uno de los cambiadores de CD de la serie CH-X.
• Si su cambiador de CD es de la serie KD-MK, necesitará un cable opcional (KS-U15K).
Sólo PARA KD-SH55R :
Conectando el adaptador de entrada de línea KS-U57 (no suministrado), también podrá usar un
componente exterior, tal como un reproductor de MD. (Véase diagrama
Dovendo collegare un CD changer, si consiglia di utilizzarne uno della serie CH-X.
• Se il CD changer è della serie KD-MK, occorre un cavo KS-U15K (optional).
Solo PER KD-SH55R :
È altresì possibile utilizzare un componente esterno tipo MD player portatile collegando l’adattatore
d’ingresso linea KS-U57 (non in dotazione). (Cfr. schema
Om du vill ansluta en CD-växlare så rekommenderar vi dig att välja en CD-växlare i CH-X-serien.
• Om du väljer en växlare i KD-MK-serien så behöver du ytterligare en sladd (KS-U15K).
Endast till KD-SH55R :
Du kan också använda en extern utrustning, exempelvis en bärbar MD-spelare, genom att ansluta
linjeingångsadapter KS-U57 (medföljer inte). (Se schema
CD-vaihtajaa kytkettäessä suosittelemme CH-X-sarjan CD-vaihtajien käyttöä.
• Jos CD-vaihtaja on KD-MK-sarjasta, siihen tarvitaan lisäjohto (KS-U15K).
Vain KD-SH55R:een :
V oit käyttää myös oheislaitetta, kuten esim. kannetta vaa MD-soitinta, kytkemällä linja tulosovittimen KS-U57 (ei toimiteta
mukana). (Ks. kaaviota
A un cuerpo metálico o chasis del automóvil
Alla carrozzeria metallica o al telaio dell’auto
1
Till metallkropp eller bilens chassi
Auton metallikoriin tai alustaan
A un terminal activo del bloque de fusibles conectado a la batería
del automóvil (desviando el interruptor de encendido)
Al terminale sotto tensione nel blocco fusibili che si collega alla
batteria dell’auto (bypassando l’interruttore di accensione)
2
Till ett strömförande uttag i säkringsblocket, som är anslutet till bilens
batteri (dragning förbi tändningslåset)
Varokeryhmän jännitteiseen napaan, joka kytketään auton akkuun
(ohittaen virtalukon)
B4
3
Azul con rayas b lancas
Blu a strisce bianche
Blå med vit rand
Sininen, jossa valkoinen raita
Naranja con rayas blancas
Arancione a strisce bianche
Orange med vit rand
Oranssi, jossa valkoinen raita
Marrón / Marrone /
Brun /
Ruskea
Före anslutning:
i fordonet noga. Felaktig anslutning kan skada
enheten allvarligt.
1
Klip loss ISO-kontakten.
2
Anslut nätsladdens färgade ledare till bilens
batteri, till högtalarna och till den elektriska
antennen (om sådan finns). Anslut i denna
ordningsföljd.
1
Svart: jord
2
Gul: till bilens batteri (konstant 12 V)
3
Röd: till ett tillbehörsuttag
4
Blå med vit rand: till den elektriska antennen
(Max. 200 mA)
5
Orange med vit rand: till bilbelysningens
kontrollbrytare
6
Brun: till mobiltelefonsystem (Se anvisningarna
på mobiltelefonen för ytterligare information.)
7
Övriga: till högtalarna
3
Anslut antennsladden.
4
Anslut slutligen kablagen till enheten.
A un terminal accesorio del bloque de fusibles
Al terminale per accessori nel blocco fusibili
Till ett tillbehörsuttag i säkringsblocket
Varokeryhmän lisäliittimeen
B3
A la antena motriz, si la hubiere
4
All’antenna, se presente
Till den elektriska antennen, om sådan finns
T ehoantenniin, mikäli käytössä
(ILLUMINATION)
Kontrollera ledningsdragningen
C .)
No suministrado con esta unidad
*
Non fornito con l’apparecchio
Levereras inte med enheten
Ei tule tämän laitteen mukana
A3
Al interruptor de control de las luces del automóvil
All’interruttore di comando luci
5
Till bilbelysningens kontrollbrytare
Auton valonsäätökytkimeen
A1
6
Ennen liitäntää: Tarkista ajoneuvon johdotus
huolellisesti. Vääristä liitännöistä v oi olla seurauksena
tämän laitteen vakava vaurioituminen.
1
Katkaise ISO-litin.
2
Kytke verkkojohdon värilliset johtimet auton
akkuun, kaiuttimiin ja tehoantenniin (mikäli
käytössä) alla annetussa järjestyksessä.
1 Musta: maatto
2 Keltainen: auton akkuun (vakio 12 V)
3 Punainen: lisäliittimeen
4 Sininen, jossa valkoinen raita: tehoantenniin
(Enintään 200 mA)
5 Oranssi, jossa valkoinen raita: auton
valonsäätökytkimeen
6 Ruskea: matkapuhelinjärjestelmään (Ks.
yksityiskohdat matkapuhelimen käyttöohjeista.)
7 Muut : kaiuttimiin
3
Kytke antennijohto.
4
Kytke lopuksi johtosarjat laitteeseen.
C .)
C .)
C
.)
Interruptor de encendido
Interruttore di accensione
*
Tändningslås
Virtalukk o
*
Bloque de
fusibles
Blocco fusibili
Säkringsblock
Varokeryhmä
Al sistema de teléfono celular
Al cellulare
Till mobiltelefonsystem
Matkapuhelinjärjestelmään
Blanco con rayas negras
Bianco a strisce nere
Vit med svart rand
V alkoinen, jossa musta raita
Altavoz izquierdo (frontal)
Cassa sinistra (anteriore)
Vänster högtalare (främre)
Vasen kaiutin (etu)
B3A3
Blanco
Bianco
Vit
Valkoinen
7
Gris con rayas negras
Grigio a strisce nere
Grå med svart rand
Harmaa, jossa musta
raita
B2A2
Gris
Grigio
Grå
Harmaa
Altavoz derecho (frontal)
Cassa destra (anteriore)
Höger högtalare (främre)
Oikea kaiutin (etu)
Verde con rayas negras
Verde a strisce nere
Grön med svart rand
Vihreä, jossa musta raita
Altavoz izquierdo (trasero)
Cassa sinistra (posteriore)
Vänster högtalare (bakre)
Vasen kaiutin (taka)
B4A4
Verde
Verde
Grön
Vihreä
Púrpura con rayas negras
Porpora a strisce nere
Lila med svart rand
Sinipunainen, jossa musta raita
Altavoz derecho (trasero)
Cassa destra (posteriore)
Höger högtalare (bakre)
Oikea kaiutin (taka)
B1A1
Púrpura
Porpora
Lila
Sinipunainen
Page 95

PRECAUCIONES sobre las conexiones
de la fuente de alimentación y de los
altavoces:
PRECAUZIONI! Collegamento del
cavo di alimentazione e delle casse:
FÖRSIKTIGHETSANVISNINGAR för
ström- och högtalaranslutningar:
Virtalähdettä ja kaiutinliitäntöjä
koskevat VAROTOIMET:
• NO conecte los conductores de altavoz del cable
de alimentación a la batería de automóvil, pues
podrían producirse graves daños en la unidad.
• Conecte correctamente el conductor negro (a
tierra), el conductor amarillo (a la batería del
automóvil, 12 V constantes), y el conductor rojo
(a un terminal de accesorio).
• ANTES de conectar a los altavoces los conductores
de altavoz del cable de alimentación, verifique el
conexionado de altavoz de su automóvil.
– Si el conexionado de altavoz de su automóvil
es como se indica en las Fig. 1 y Fig. 2 de
abajo, NO conecte la unidad utilizando ese
conexionado de altavoz original. Si lo hace, se
producirán daños graves en la unidad.
Vuelva a efectuar el conexionado de altavoz de
manera que pueda conectar la unidad a los
altavoces de la manera indicada en la Fig. 3.
– Si el conexionado de altavoz de su automóvil es
como se indica en la Fig. 3, podrá conectar la unidad
utilizando el conexionado de altavoz original de su
automóvil.
– Si tiene dudas sobre el conexionado de altavoz de su
automóvil, consulte con su concesionario.
• NON collegare i fili del cavo di alimentazione
per le casse alla batteria dell’auto perché
l’apparecchio ne verrebbe seriamente
danneggiato.
• Realizzare il corretto collegamento dei seguenti
fili: filo nero (massa), filo giallo (alla batteria
dell’auto,
12 V costanti) e filo rosso (al terminale per
accessori).
• PRIMA di collegare i fili del cavo si
alimentazione per le casse alle casse stesse,
verificare il relativo cablaggio sulla vettura.
– Se il cablaggio per le casse sulla vettura
risulta come illustrato nelle Fig. 1 e Fig. 2
qui sotto, NON collegare l’apparecchio
usando il cablaggio originale, perché si
danneggia seriamente l’apparecchio.
Rifare il cablaggio delle casse in modo d
poter collegare l’apparecchio alle casse
come illustrato nella Fig. 3.
– Se il cablaggio delle casse sulla vettura
risulta come illustrato in Fig. 3, si può
collegare l’apparecchio usando il cablaggio
per casse originale presente in vettura.
– In caso di dubbio, rivolgersi alla propria
concessionaria auto.
• Anslut INTE nätsladdens högtalarledare till
bilens batteri. Gör du det kommer enheten
att skadas allvarligt.
•
Anslut den svarta ledaren (jord), den gula
ledaren (till bilens batteri, konstant 12 V) och
den röda ledaren (till ett tillbehörsuttag) på
korrekt sätt.
•
Kontrollera högtalarledningarna i bilen INNAN
nätsladdens högtalarledningar ansluts till
högtalarna.
–
Om högtalarledningarna i bilen är dragna
som i Fig. 1 och Fig. 2 nedan ska enheten
INTE anslutas med dessa ursprungliga
högtalarledningar. Gör du det kommer
enheten att skadas allvarligt.
Dra om högtalarledningarna så att du kan
ansluta enheten till högtalarna som i Fig. 3.
–
Om högtalarledningarna i bilen är dragna
som i Fig. 3
kan du ansluta enheten med hjälp
av bilens ursprungliga högtalarledningar.
–
Kontakta bilföretaget om du är osäker på hur
högtalarledningarna är dragna i din bil.
• ÄLÄ kytke verkkojohdon kaiutinjohtimia auton
akkuun, muuten laite v oi vahingoittua vakavasti.
• Kytke musta (maatto), keltainen (auton akkuun,
vakio 12 V) ja punainen johdin (lisäliittimeen)
oikein.
• Tarkista autosi kaiutinjohdotus ENNEN v erkkojohdon
kaiutinjohtimien kytkemistä kaiuttimiin.
– Jos autosi kaiutinjohdotus on tehty alla
olevista “Fig. 1” ja “Fig. 2” näkyvällä
tavalla, ÄLÄ kytke laitetta käyttämällä ko.
alkuperäistä kaiutinjohdotusta, muuten laite voi
vahingoittua vakavasti.
Tee kaiutinjohdotus uudelleen siten, että v oit kytkeä
laitteen kaiuttimiin “Fig. 3” näkyvällä tavalla.
– Jos autosi kaiutinjohdotus on tehty
“Fig. 3” näkyvällä tavalla, voit kytkeä laitteen
käyttämällä autosi alkuperäistä kaiutinjohdotusta.
– Jos et ole varma autosi kaiutinjohdotuksesta, ota
yhteys autokauppiaaseen.
+
L
-
+
R
-
Fig. 1
+
+
-
+
-
+
L
-
-
+
+
R
-
-
Fig. 2
+
L
-
+
R
-
Fig. 3
+
-
+
-
C Conexiones para añadir otros equipos / Collegamento di altre apparecchiature / Anslutningar med tillsats av annan utrustning /
Liitännät – Muiden laitteiden lisääminen
Amplificador / Amplificatore / Förstärkaren / Vahvistin
Usted podrá conectar un amplificador y otros
equipos para mejorar el sistema estéreo de su
automóvil.
• Conecte el conductor remoto (azul con rayas
blancas) al conductor remoto del otro equipo
para poderlo controlar a través de esta unidad.
Para KD-SH77R:
• Pala el amplificador:
– Conecte los terminales de salida de línea
de esta unidad con los terminales de
entrada de línea del amplificador.
– Desconecte los altavoces de esta unidad
y conéctelos al amplificador. Los cables
de los altavoces de esta unidad quedan
sin usar.
– Podrá desconectar el amplificador
incorporado y enviar las señales de audio
solamente al(los) amplificador(es)
externo(s) para obtener sonidos nítidos y
evitar que se caliente el interior de la unidad.
Consulte la página 25 de las instrucciones
(volumen separado).
– El nivel de salida de línea de esta unidad
permanece alto para que corresponda con
los sonidos de alta fidelidad reproducidos
por esta unidad.
Cuando conecte un amplificador externo
a esta unidad, disminuya el control de
ganancia del amplificador externo para
obtener un óptimo rendimiento de esta
unidad.
Para KD-SH55R:
• Pala el amplificador:
– Conecte los terminales de salida de línea
de esta unidad con los terminales de
entrada de línea del amplificador.
– Desconecte los altavoces de esta unidad
y conéctelos al amplificador. Los cables
de los altavoces de esta unidad quedan
sin usar.
• Para Subwoofer: Se requiere un filtro de paso
bajo (no suministrado) cuando se utilice un
amplificador de otro fabricante, es decir, que
no sea JVC. P odrá ajustar el niv el de salida a
través de las clavijas de salida de extension
(EXT OUT) (véase la página 20 de las
instrucciones (volumen separado)).
È possibile migliorare l’impianto stereo dell’auto
collegando un amplificatore ed altra apparecchiatura.
• Collegare il connettore a distanza (blu a strisce
bianche) al conduttore a distanza dell’altro
apparecchio in modo da poterlo gestire da
questa unità.
Per KD-SH77R:
• Per l’amplificatore:
– Collegare i terminali di uscita dell’apparecchio
ai terminali di entrata dell’amplificatore.
– Scollegare le casse dall’apparecchio e
collegarle all’amplificatore. Non utilizzare i
contatti delle casse dell’apparecchio.
– È possibile disabilitare l’amplificatore
incorporato ed inviare i segnali audio solo
all’amplificare esterno (o agli amplificatori
esterni) in modo da ottenere dei suoni distinti
ed evitare il surriscaldamento
dell’apparecchio. Cfr. pagina 25 delle
istruzioni (libretto separato).
– Il volume d’uscita linea dell’apparecchio viene
mantenuto elevato per conservare i suoni hifi da essa riprodotti.
Se all’apparecchio viene collegato un
amplificatore esterno, disattivare il controllo
del guadagno sull’amplificatore esterno per
ottenere le migliori prestazioni
dell’apparecchio.
Per KD-SH55R:
• Per l’amplificatore:
– Collegare i terminali di uscita dell’apparecchio
ai terminali di entrata dell’amplificatore.
– Scollegare le casse dall’apparecchio e
collegarle all’amplificatore. Non utilizzare i
contatti delle casse dell’apparecchio.
• Per il diffusore per frequenze ultrabasse: Se si
usa un amplificatore non JVC è necessario
inserire un filtro passa-basso. In questo modo
sarà possibile regolare il livello in uscita tramite
le prese EXT OUT (vedere pagina 20 delle
istruzioni (in volume separato)).
Du kan uppgradera ditt bilstereosystem genom
att ansluta en förstärkare och annan utrustning.
•
Anslut fjärrkabeln (blå med vit rand) till
fjärrkabeln på den andra utrustningen så att
den kan styras genom denna enhet.
Till KD-SH77R:
•
För förstärkaren:
– Anslut denna enhets linjeutgångar till
förstärkarens linjeingångar.
– Koppla bort högtalarna från denna enhet
och anslut dem till förstärkaren. Lämna
denna enhets högtalarledare oanvända.
– Du kan koppla av den inbyggda förstärkaren
och sända endast ljudsignalerna till extern(a)
förstärkare för att få tydligt ljud och hindra
överhettning inuti enheten. Se sid. 25 i
instruktionerna. (Separat del.)
– Ledningsutgången på denna enhets har hög
nivå för att bibehålla det hi-fi ljud som enheten
återger.
När en extern förstärkare ansluts till denna
enhets
bör volymkontrollen sänkas på den
externa förstärkaren för att få bästa prestanda
från denna enhets.
Till KD-SH55R:
•
För förstärkaren:
– Anslut denna enhets linjeutgångar till
förstärkarens linjeingångar.
– Koppla bort högtalarna från denna enhet
och anslut dem till förstärkaren. Lämna
denna enhets högtalarledare oanvända.
• För djupbashögtalaren: Ett lågpassfilter krävs
vid användning av en förstärkare från en
annan tillverkare än JVC. Du kan ställa in
uteffekten via EXT OUT-uttagen (se sidan 20 i
bruksanvisningen (separat del)).
Voit päivittää autostereojärjestelmäsi kytkemällä
vahvistimen sekä muita laitteita.
• Kytke ulkojohto (sininen, jossa valkea raita) muun
laitteiston ulkojohtoon niin, että sitä voidaan ohjata
tästä laitteesta.
Varten KD-SH77R:
• Vahvistin::
– Kytke tämän laitteen linjalähtöliittimet
vahvistimen linjatuloliittimiin.
– Irrota kaiuttimet tästä laitteesta ja liitä ne
vahvistimeen. Jätä tämän laitteen
kaiutinjohdot käyttämättä.
– Voit kytkeä sisäänrakennetun vahvistimen pois
päältä ja lähettää audiosignaalit vain
ulkovahvistimeen/vahvistimiin saadaksesi
kirkkaammat äänet ja estääksesi sisäisen
lämmönmuodostuksen laitteen sisällä. Ks.
ohjesivua 25. (Erillinen osa)
– Tämän laitteen linjalähtötaso pidetään korkeana
laitteen toistamien hi-fi-äänten ylläpitämiseksi.
Kun ulkopuolinen vahvistin kytketään
tähän laitteeseen, sen vahvistussäädin on
kierrettävä pienelle. Näin tästä laitteesta saadaan
paras mahdollinen suoritustaso.
Varten KD-SH55R:
• Vahvistin:
– Kytke tämän laitteen linjalähtöliittimet
vahvistimen linjatuloliittimiin.
– Irrota kaiuttimet tästä laitteesta ja liitä ne
vahvistimeen. Jätä tämän laitteen
kaiutinjohdot käyttämättä.
• Subwoofer: Käytettäessä toisten valmistajien kuin
JVC:n vahvistinta tarvitaanalipäästösuodatin.
Lähtötaso voidaan säätää EXT OUT -pistokkeiden
välityksellä (ks. käyttöohjeiden sivua 20
(erillinen julkaisu)).
Cable de señal (no suministrado con esta unidad)
Cavo dei segnali (non fornito con l’apparecchio)
Signalledning (levereras inte med denna enhet)
Signaalijohto (ei toimiteta tämän laitteen mukana)
Altavoces posteriores
Casse posteriori
INPUT
L
R
L
R
Amplificador de JVC
Amplificatore JVC
JVC Förstärkaren
JVC:n Vahvistin
Bakre högtalare
Takakaiuttimet
INPUT
L
R
Podrá conectar otro amplificador de potencia para los altavoces
delanteros.
È possibile collegare un altro amplificatore di potenza per le casse
frontali.
Amplificador de JVC
L
R
L
R
Amplificatore JVC
JVC Förstärkaren
JVC:n V ahvistin
L
LINE OUT (REAR)
LINE OUT (FRONT)
R
Altavoces delanteros
Casse frontali
Främre högtalare
Etukaiuttimet
Du kan ansluta en annan effektföstärkare för de främre högtalarna.
Voit liittää toisen tehovahvistimen etukaiuttimia varton.
Cable remoto
Filo remoto
Fjärrledare
Erillisjohdin
Cable remoto (Azul con rayas blancas)
Filo remoto (Blu a strisce bianche)
Fjärrledare (Blå med vit rand)
Erillisjohdin (Sininen, jossa valkoinen raita)
Corte los conductores de los altavoces posteriores del conector ISO del autómovil y conéctelos al amplificador.
A1
B1
*
*
Tagliare i conduttori della cassa posteriore del connettore ISO presente sulla vettura e collegarli all’amplificatore.
A2
B2
B3
B4
*
Klipp loss högtalarsladdarna från bilens ISO-kontakt och anslut dem till förstärkaren.
A3
Katkaise auton ISO-liittimen takakaiutinjohtimet ja kytke ne vahvistimeen.
A4
*
Altavoces posteriores
Casse posteriori
Bakre högtalare
Takakaiuttimet
Altavoces delanteros
Casse frontali
Främre högtalare
Etukaiuttimet
Conector en Y (no suministr ado con esta unidad)
Connettore ad Y
(non fornito con l’apparecchio)
Y-kontakt (levereras inte med denna enhet)
Y-kytkin (ei toimiteta tämän laitteen mukana)
A la antena motriz, si la hubiere
All’antenna, se presente
Till elektrisk antenn, om sådan finns
Tehoantenniin, mikäli käytössä
PRECAUCION / ATTENZIONE / VARNING / VAROITUS:
• Para evitar el aumento del calor interior de esta unidad, póngala DEBAJO
del otro equipo.
• Per evitare surriscaldamenti all’interno dell’unità, collocare quest’ultima
SOTTO l’altro apparecchio.
• För att hindra att värmen stiger inuti apparaten bör denna placeras UNDER
den övriga utrustningen.
• Aseta tämä laite muun laitteiston ALAPUOLELLE estääksesi sisäisen
lämmönmuodostuksen tähän laitteeseen.
Page 96

Cambiador de CD y sintonizador de DAB / CD changer e tuner DAB / CD-växlare och DAB radio / CD-vaihtaja ja DAB-viritin
Podrá conectar un cambiador de CD de JVC
y/o un sintonizador de DAB (Radiodifusión de
audio digital) de JVC.
• Para sus conexiones , refiérase a las
instrucciones suministradas con los mismos.
Cable de conexión suministrado con su
sintonizador de DAB
Collegamento del cavo fornito con il tuner
DAB
Anslutningssladd medföljer DAB radion
DAB-virittimen mukana toimitetun johdon
È possibile collegare un CD changer della JVC
e/o un tuner DAB (Digital Audio Broadcasting),
sempre della JVC.
• Per il collegamento, vedere i libretti d’istruzione
in dotazione a tali apparecchio.
Cable de conexión suministrado con su
cambiador de CD
Collegamento del cavo fornito con il CD
changer
Anslutningssladd medföljer CD-växlaren
CD-vaihtajan mukana toimitetun johdon liitäntä
liitäntä
Sintonizador de DAB de JVC
Tuner DAB della JVC
JVC DAB radio
JVC:n DAB-viritin
KD-SH77R
KD-SH55R
Cambiador de CD de JVC
CD changer della JVC
JVC CD-växlare
JVC:n CD-vaihtaja
• P odrá conectar ambos componentes en serie, como se indica en las ilustraciones
de arriba.
• È possibile collegare entrambi i componenti in serie come illustrato sopra.
Du kan ansluta båda komponenterna i serie, se illustrationen ovan.
•
• Voit kytkeä molemmat komponentit sarjana yllä kuvatulla tavalla.
Du kan ansluta en JVC CD-växlare och/eller
en JVC DAB radio (digital radiosändning).
• Beträffande deras anslutning hänvisas
till medföljande instruktioner.
Voit liittää JVC:n CD-vaihtajan ja/tai JVC:n DABvirittimen (digitaalinen äänenlähetys).
• Katso kyseiset liitännät laitteiden mukana
toimitetuista ohjeista.
Cable de conexión suministrado con su sintonizador de DAB o cambiador de CD
Collegamento del cavo fornito con il tuner DAB o il CD changer
Anslutningssladd medföljer DAB radion eller CD-växlaren
DAB-virittimen tai CD-vaihtajan mukana toimitetun johdon liitäntä
Cambiador de CD de JVC
CD changer della JVC
JVC CD-växlare
JVC:n CD-vaihtaja
KD-SH77R
KD-SH55R
Sintonizador de DAB de JVC
Tuner DAB della JVC
JVC DAB radio
JVC:n DAB-viritin
o
o
eller
tai
PRECAUCION / ATTENZIONE / VARNING / VAROITUS!:
• Antes de conectar el cambiador de CD y/o un sintonizador de DAB, asegúrese de
que la unidad esté apagada.
• Prima di collegare il CD changer e/o un tuner DAB,verificare che l’apparecc hio sia spento.
• Kontrollera att enheten är avstängd innan CD-växlaren och/eller en DAB radio ansluts.
• V armista ennen CD-vaihtajan ja/tai D AB-virittimenkytkentää, että laitteesta on katkaistu virta.
Subwoofer y el otro equipo fuente / Subwoofer ed altro apparecchio sorgente / Bashögtalare och annan ljudutrustning /
Subwoofer ja muut ohjelmalähdelaitteet
Cable de señal (no suministrado con esta unidad)
Puede conectar un subwoofer para reforzar
los sonidos graves.
• Para las conexiones, refiérase a las
instrucciones suministradas con cada
componente.
Du kan ansluta en djupbashögtalare för att
förstärka basen.
• Betr. anslutning hän visas till instruktionerna
som medföljer varje komponent.
Per potenziare i bassi è possibile collegare un
diffusore per frequenze ultrabasse.
• Per i rispettivi collegamenti, consultare i
manuali d’istruzioni forniti con i singoli
componenti.
Subwoofer voidaan kytkeä bassoa vahvistamaan.
• Katso niiden liitännät kunkin komponentin mukana
toimitetuista ohjeista.
SUBWOOFER OUT
(Sólo para KD-SH77R)
(Solo per KD-SH77R)
(Endast till KD-SH77R)
(Vain KD-SH77R:een)
KD-SH77R
KD-SH55R
Cavo dei segnali (non fornito con l’apparecchio)
Signalledning (levereras inte med denna enhet)
Signaalijohto (ei toimiteta tämän laitteen mukana)
L
L
RR
R
EXT OUT
(Sólo para KD-SH55R)
(Solo per KD-SH55R)
(Endast till KD-SH55R)
(Vain KD-SH55R:een)
DVD, VCR o TV / DVD, VCR o TV / DVD, VCR eller TV / DVD, Kuvanauhuria tai TV
Sólo para KD-SH77R / Solo per KD-SH77R / Endast till KD-SH77R / V ain KD-SH77R:een
Cable de señal (no suministrado con esta unidad)
Cavo dei segnali (non fornito con l’apparecchio)
Signalledning (levereras inte med denna enhet)
Signaalijohto (ei toimiteta tämän laitteen mukana)
L
R
LINE IN
KD-SH77R
TV
REMOTE
SENSOR
INPUT
*
DIGITAL
OUTPUT
(OPTICAL)
OUTPUT
AUDIO
L
R
Cable de señal (no suministrado con esta unidad)
Cavo dei segnali (non fornito con l’apparecchio)
Signalledning (levereras inte med denna enhet)
Signaalijohto (ei toimiteta tämän laitteen mukana)
Puede conectar el reproductor de DVD (KV-DV7).
È possibile collegare il lettore DVD (KV-DV7).
KV -D V7
Du kan ansluta DVD-spelaren (KV-DV7).
DVD-soitin (KV-DV7) voidaan kytkeä.
* Al sistema de monitor de color móvil o al terminal de entrada de audio-vídeo del TV de
VIDEO
1
2
audio-vídeo estereofónico.
* Al sistema di monitoraggio o a colori mobile o al terminale d’ingresso audio-video di un
TV audio-video stereo.
* Till mobil färg eller monitorsystem eller ljud/bild ingångsklämma på stereoljud/bild TV.
*
Kannettavaan väri- tai monitorijärjestelmään tai audio-video-stereo-TV :n audio-video-tuloliittimeen.
L
JVC Amplifier
JVC Verstärker
JVC Amplificateur
JVC V ersterker
Subwoofer
Subwoofer
Bashögtalare
Subwoofer
Cable de CONTROL
Cavo di CONTROLLO
Signalsladd
Filo dei dati del controllo remoto(fornito con KV-DV7)
Kabel för fjärrkontrolldata (fmedföljer KV-DV7)
Kauko-ohjaimen tietojohto (toimitetaan KV-DV7:n mukana)
CONTROL-johto
Componente exterior / Componente esterno / Extern utrustning / Toinen oheislaite
Sólo para KD-SH55R / Solo per KD-SH55R / Endast till KD-SH55R / Vain KD-SH55R:een
Cordón de datos de control remoto (suministrado con KV-DV7)
KD-SH55R
Jack para el cambiador de CD
Presa per CD changer
CD-växlarjack
CD-vaihtajajakki
LOCALIZACION DE AVERIAS
• El fusible se quema.
* ¿Están los conductores rojo y negro
correctamente conectados?
• No es posible conectar la alimentación.
* ¿Está el cable amarillo conectado?
• No sale sonido de los altavoces.
* ¿Está el cable de salida del altav oz cortocircuitado?
• El sonido presenta distorsión.
* ¿Está el cable de salida del altavoz conectado
a masa?
* ¿Están los terminales “–” de los altavoces L y
R conectados a una masa común?
• La unidad se calienta.
* ¿Está el cable de salida del altavoz conectado a masa?
* ¿Están los terminales “–” de los altavoces L y
R conectados a una masa común?
Adaptador de entrada de línea KS-U57
(no suministrado con esta unidad)
Adattatore d’ingresso linea KS-U57
(non fornito con l’apparecchio)
Linjeingångsadapter KS-U57
(levereras inte med denna enhet)
Linjatulosovittimen KS-U57
(ei toimiteta tämän laitteen mukana)
RICERCA GUASTI
• Il fusibile brucia.
* I fili rossi e neri sono stati collegati correttamente?
• Non si riesce ad accendere l’apparecchio.
* Il filo giallo è stato collegato?
• Non esce alcun suono dalle casse.
* Il filo di uscita delle casse è stato protetto contro
i cortocircuiti?
• Suono distorto.
* Il filo di uscita delle casse è collegato a terra?
* I terminali “–” delle casse di sinistra e destra
sono stati collegati a terra in comune?
• L’apparecchio si surriscalda.
* Il filo di uscita delle casse è stato collegato a
terra?
* I terminali “–” delle casse di sinistra e destra
sono stati collegati a terra in comune?
• Säkringen går.
* Är de röda och svarta ledarna korrekt anslutna?
• Strömmen kan inte slås på.
* Är den gula ledaren ansluten?
• Inget ljud från högtalarna.
* Är den utgående högtalarsladden kortsluten?
• Ljudet är förvrängt.
* Är den utgående högtalarsladden jordad?
* Är de vänstra och högra högtalarnas “–”-uttag
gemensamt jordade?
• Enheten blir varm.
* Är den utgående högtalarsladden jordad?
* Är de vänstra och högra högtalarnas “–”-uttag
gemensamt jordade?
L
R
L
R
Cable de señal
Cavo dei segnali
Signalledning
Signaalijohto
FELSÖKNING
(no suministrado con esta unidad)
(non fornito con l’apparecchio)
(levereras inte med denna enhet)
(ei toimiteta tämän laitteen mukana)
VIANETSINTÄ
• Varoke palaa.
* Ovatko punaiset ja mustat johtimet liitetty oikein?
• Virran kytkentä ei onnistu.
* Onko keltainen johdin kytketty?
• Kaiuttimista ei kuulu ääntä.
* Onko kaiuttimen lähtöjohtimessa tapahtunut
oikosulku?
• Ääni on vääristynyt.
* Onko kaiuttimen lähtöjohdin maatettu?
* Ovatko vasemman ja oikean kaiuttimen “–”-navat
maatettu yhdessä?
• Laite kuumenee.
* Onko kaiuttimen lähtöjohdin maatettu?
* Ovatko vasemman ja oikean kaiuttimen “–”-navat
maatettu yhdessä?
L
R
Componente exterior
Componente esterno
Extern utrustning
Toinen oheislaite
L
R
Page 97

CD RECEIVER
CD-RECEIVER
RECEPTEUR CD
CD-RECEIVER
ENGLISH
DEUTSCH
KD-SH77R/KD-SH55R
KD-SH77R
ATT
ANGLE
EQ
CD
FM
R D
AM
CH
AUX SEL
VOLUME
RM-RK100
For installation and connections, refer to the separate manual.
Angaben zu Einbau und Verkabelung entnehmen Sie bitte der gesonderten Anleitung.
Pour l’installation et les raccordements, se référer au manuel séparé.
Zie de afzonderlijke handleiding voor details aangaande het installeren en verbinden van het
toestel.
INSTRUCTIONS
BEDIENUNGSANLEITUNG
MANUEL D’INSTRUCTIONS
GEBRUIKSAANWIJZING
KD-SH55R
FRANÇAIS
NEDERLANDS
LVT0625-001A
[E/EX]
Page 98

Emplacement et reproduction des étiquettes
Panneau inférieur de l’appareil principal
Nom/plaque d’identification
CLASS
LASER
1
PRODUCT
FRANÇAIS
Attention:
Caution:
Ce produit contient un composant
This product contains a laser component
laser de classe laser supérieure à la
of higher laser class than Class 1.
Classe 1.
Comment réinitialiser votre appareil
Appuyez sur la touche de réinitialisation sur le
panneau avant en utilisant un
stylo-bille ou un objet similaire.
Remarque:
Les ajustements que vous avez
préréglés – tels que les canaux
préréglés ou les ajustements
sonores – seront aussi effacés.
CAUTION: Invisible laser
radiation when open and
interlock failed o r defeated.
AVOID DIRECT EXPOSURE
TO BEAM. (e)
ADVARSEL: Usynlig laserstråling ved åbning, når
sikkerhedsafbrydere er ude
af funktion. Undgåudsættelse for stråling. (d)
VARNING: Osynlig laserstrålning när denna del är
öppnad och spärren är
urkopplad. Betrakta ej
strålen. (s)
VARO : Avattaessa ja
suojalukitus ohitettaessa
olet alttiina näkymättömälle lasersäteilylle.
Älä katso säteeseen. (f)
IMPORTANT POUR
PRODUITS LASER
Precautions:
1. PRODUIT LASER CLASSE 1
2. ATTENTION: Radiation laser invisible quand
l’appareil est ouvert ou que le verrouillage est
en panne ou désactivé. Éviter une exposition
directe au rayon.
3. ATTENTION: Ne pas ouvrir le volet supérieur.
Il n’y a pas de pièce réparable par l’utilisateur
à l’intérieur. Confier le service après-vente à
un personnel qualifié.
4. ATTENTION: Ce lecteur CD utilise une
radiation laser invisible, toutefois, il est équipé
de commutateurs de sécurité qui empêchent
l’émission de radiation en retirant les disques.
Il est dangereux de désactiver les
commutateurs de sécurité.
5. ATTENTION: L’utilisation des commandes des
réglages et effectuer des procédures autres
que celles spécifiées dans ce manuel peut
provoquer une exposition aux radiations
dangereuses.
A TTENTION:
N’INSÉREZ JAMAIS
vos doigts entre le
panneau de commande
et l’appareil car il
pourrait être pris dans
l’appareil et vous
pourriez vous blesser.
(Voir la page 28.)
Remarque:
Pour des raisons de sécurité, une carte d’identification numérotée est fournie avec cet appareil,
et le même numéro d’identification est impr imé sur le châssis de l’appareil. Conserver cette carte
dans un endroit sûr, elle pourra aider les autorités pour identifier votre appareil en cas de vol.
AVANT D’UTILISER L’APPAREIL
*
Par sécurité....
• N’augmentez pas trop le volume car cela bloquerait les
sons de l’extérieur rendant la conduite dangereuse.
• Arrêtez la voiture avant de réaliser toute opération
compliquée.
2
*
Température à l’intérieur de la voiture....
Si votre voiture est restée garée pendant longtemps
dans un climat chaud ou froid, attendez que la
température à l’intérieur de la voiture redevienne
normale avant d’utiliser l’appareil.
Page 99

Merci pour avoir acheté un produit JVC. Veuillez lire attentivement toutes les instructions avant
d’utiliser l’appareil afin de bien comprendre son fonctionnement et d’obtenir les meilleures
performances possibles.
TABLE DES MATIERES
Comment réinitialiser votre appareil......... 2
EMPLACEMENT DES TOUCHES ......... 4
Panneau de commande ........................... 4
Télécommande ........................................ 5
Préparation de la télécommande ............. 6
FONCTIONNEMENT DE BASE ............ 7
FONCTIONNEMENT DE BASE DE LA
RADIO ...................................... 8
Ecoute de la radio.................................... 8
Mémorisation des stations........................ 9
Accord d’une station présélectionnée ...... 10
FONCTIONNEMENT RDS ................. 11
Présentation du RDS EON ....................... 11
Autres fonctions RDS pratiques
et ajustements....................................... 14
FONCTIONNEMENT DU LECTEUR DE
CD ........................................... 17
Lecture d’un CD....................................... 17
Lecture d’un CD Text ................................ 18
Localisation d’une plage ou d’un point
particulier sur un CD .............................. 18
Sélection des modes de lecture de CD .... 19
Interdiction de l’éjection du CD................. 19
AJUSTEMENT DU SON ................... 20
Ajustement du son................................... 20
Sélection des modes sonores préréglés .. 21
Mémorisation de votre propre
ajustement sonore ................................. 22
AUTRES FONCTIONS PRINCIPALES .... 23
Réglage de l’horloge................................. 23
Modification des réglages
généraux (PSM) .................................... 23
Attribution de noms aux sources .............. 27
Modification de l’angle du panneau de
commande ............................................ 28
Détachement du panneau de
commande ............................................ 29
FONCTIONNEMENT DES APPAREILS
EXTERIEURS............................... 30
Lecture d’un appareil extérieur................. 30
FONCTIONNEMENT DU CHANGEUR DE
CD ........................................... 32
Lecture de CD ......................................... 32
Sélection du mode de lecture de CD ....... 33
FONCTIONNEMENT DU TUNER DAB.... 34
Accord d’un ensemble et d’un service ..... 34
Mémorisation de services DAB ................ 36
Accord d’un service DAB
présélectionné....................................... 37
Ce que vous pouvez faire avec le DAB .... 37
INFORMATIONS ADDITIONNELLES..... 38
ENTRETIEN ................................ 39
Manipulation des CD ................................ 39
DEPANNAGE ............................... 40
SPECIFICATIONS .......................... 41
FRANÇAIS
À propos du mode de démonstration (DEMO MODE)...
À l’expédition de l’usine, “DEMO MODE” est réglé sur “DEMO ON”.
La démonstration des caractéristiques principales de l’appareil apparaît automatiquement sur
l’affichage s’il n’y a aucun son pendant 3 minutes. (Voir la page 26.)
• 24bit DAC : (Convertisseur numérique-analogique 24 bits: Vous offre une grande qualité de
son après une conversion N/A.)
• HS TUNER :(Tuner à haute sensibilité: Vous permet de réliser un accord fin des stations.)
• EQUALIZER :(Vous permet d’ajuster avec précision le son à votre goût.)
• SUB WOOFER : (SEULEMENT pour le KD-SH77R: Vous permet de connecter un caisson de
grave et d’ajuster son niveau de sortie.)
PRÉCAUTIONS sur le réglage du volume
Les CD produise relativement peut de bruit par rapport aux autres sources sonores. Si le niveau de volume
est ajusté, par exemple, pour le tuner, les enceintes risquent d’être endommagées par l’augmentation
soudaine du niveau de sortie. Par conséquent, n’oubliez pas de réduire le volume avant de reproduire un
disque et de l’ajuster comme requis pendant la lecture.
3
Page 100

EMPLACEMENT DES TOUCHES
Panneau de commande
1
2
FRANÇAIS
1 Touche (éjection)
2 Molette de commande
3 Touche SEL (sélection)
4 Touche EQ (mémoire de commande du son)
5 Touche D (affichage)
6 Touche TP (émission d’informations routières)
7 Touche PTY (type de programme)
8 Touche M/B (mode/bande)
9 Touches ¢ / 4
•
Fonctionnent aussi comme touches SSM quand
elles sont pressées en même temps.
p Touche ATT (angle / atténuation)
q Prise d'entree auxiliaire
3
4 5
t
6
7
8
9
ry
w Touche (détachement du panneau de
commande)
e Capteur de télécommande
r Touches numériques
• Touche MO (monaural)
• Touche LO (local)
• Touche INT (balayage des introductions)
• Touche RPT (répétition)
• Touche RND (aléatoire)
• Touches de fonctionnement des appareils
vidéo (SEULEMENT pour le KD-SH77R)
t Touche SOURCE (attente/sous tension)
y Touche de réinitialisation
e
p
w
q
Comment utiliser les touches numériques:
SI vous appuyez sur M/B (mode/bande), l’appareil entre en mode de fonctions et les touches
numériques peuvent être utilisées comme touches de fonction.
Normalement
Pendant le
mode de fonction
Pour utiliser de nouveau ces touches comme touches numériques après avoir appuyé sur
M/B (mode/bande), attendez 5 secondes sans appuyer sur aucune touche, jusqu’à ce que le mode
de fonctions soit annulé.
• Appuyer de nouveau sur M/B (mode/bande) annule aussi le mode de fonctions.
4
Indicateur de
courbe
d’égalisation
Indicateur de
durée restante
 Loading...