

Page 1

CD RECEIVER
CD-RECEIVER
RECEPTEUR CD
CD-RECEIVER
KD-SC601
SOUND
ATT
U
SOURCE
F
R
D
VOL
VOL
• This unit is equipped with the display demonstration. To cancel it, see page 8.
• Dieses Gerät ist mit einer Demonstrationsfunktion für das Display ausgestattet. Auf
Seite 8 wird beschrieben, wie Sie diese Demonstrationsfunktion deaktivieren können.
• Cet appareil est équipé d’une fonction de démonstration des affichages. Pour l’annuler,
référez-vous à la page 8.
• Dit toestel heeft een display-demonstratiefunctie. Zie bladzijde 8 voor het annuleren van
deze functie.
KD-SC601
ENGLISH
DEUTSCH
FRANÇAIS
NEDERLANDS
For installation and connections, refer to the separate manual.
Für den Einbau und die Anschlüsse siehe das eigenständige Handbuch.
Pour l’installation et les raccordements, se référer au manuel séparé.
Bijzonderheden over de installatie en aansluiting van het apparaat vindt u in de
desbetreffende handleiding.
INSTRUCTIONS
BEDIENUNGSANLEITUNG
MANUEL D’INSTRUCTIONS
GEBRUIKSAANWIJZING
GET0191-001A
[E/EX]
Page 2
IMPORTANT FOR LASER PRODUCTS
1. CLASS 1 LASER PRODUCT
2. CAUTION: Do not open the top cover. There are no user serviceable parts inside the unit; leave all
servicing to qualified service personnel.
ENGLISH
3. CAUTION: Visible and invisible laser radiation when open and interlock failed or defeated. Avoid
direct exposure to beam.
4. REPRODUCTION OF LABEL: CAUTION LABEL, PLACED OUTSIDE THE UNIT.
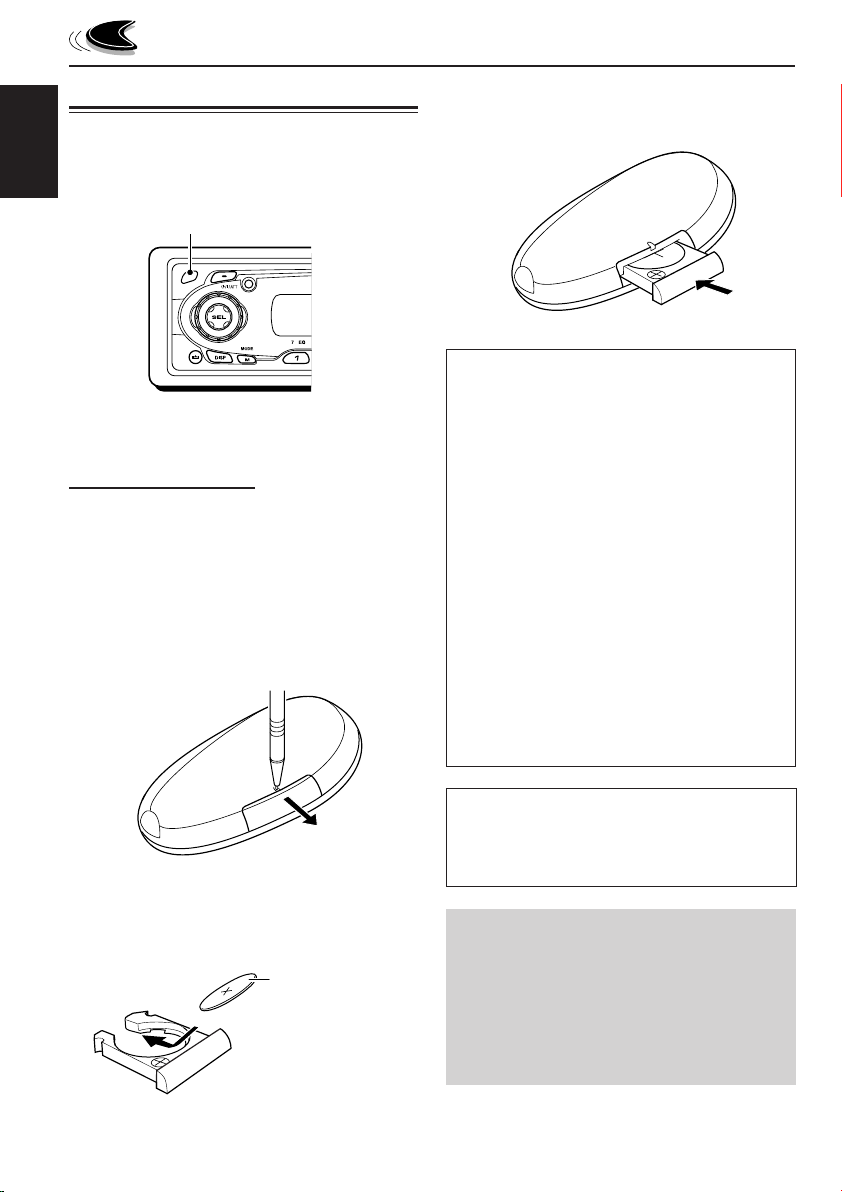
How to reset your unit
After detaching the control panel, press the
reset button on the panel holder using a ballpoint pen or a similar tool.
This will reset the built-in microcomputer.
Note:
Your preset adjustments—such as preset channels
or sound adjustments—will also be erased.
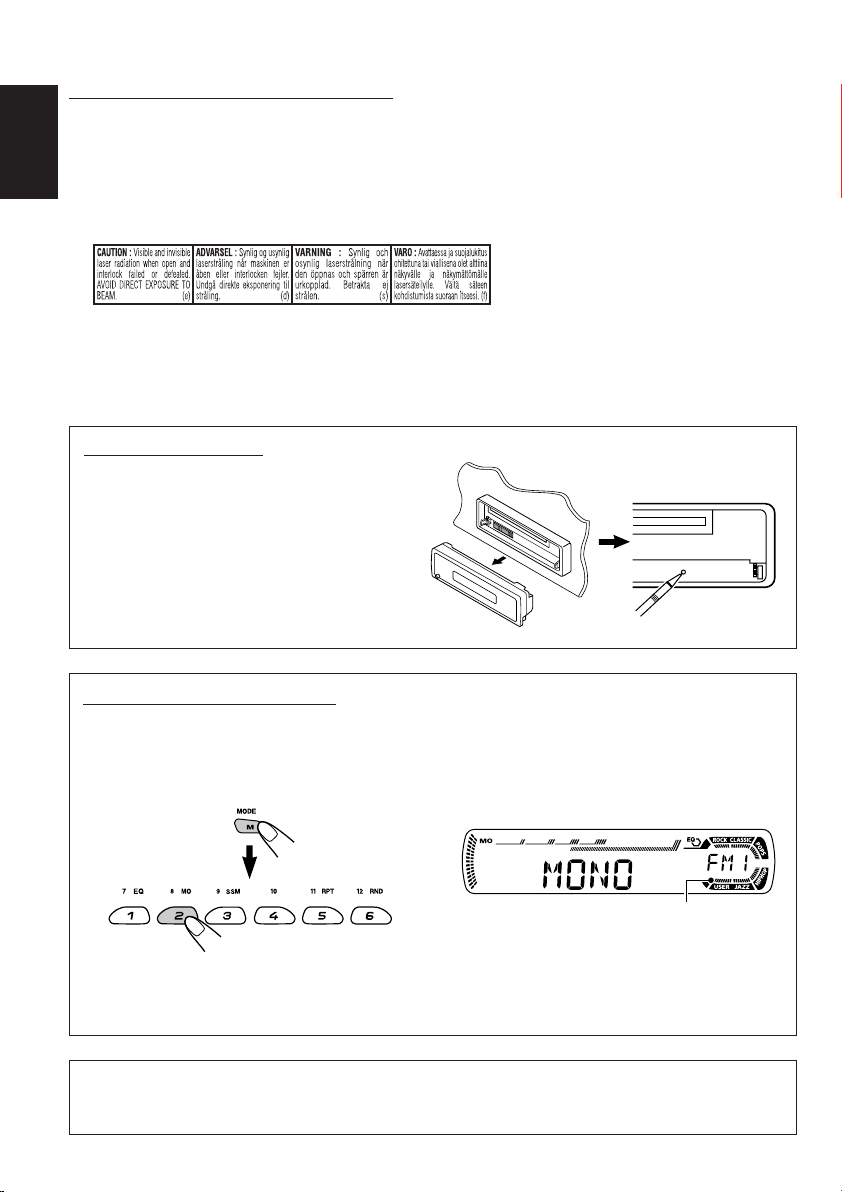
How to use the M MODE button
If you press M MODE, the unit goes into functions mode, then the number buttons and 5/∞ buttons
work as different function buttons.
Ex.: When number button 2 works as MO (monaural) button.
Time countdown indicator
To use these buttons for original functions again after pressing M MODE, wait for 5 seconds
without pressing any of these buttons until the functions mode is cleared.
• Pressing M MODE again also clears the functions mode.
Note:
For security reasons, a numbered ID card is provided with this unit, and the same ID number is imprinted on
the unit’s chassis. Keep the card in a safe place, as it will help the authorities to identify your unit if stolen.
2
Page 3

Thank you for purchasing a JVC product. Please read all instructions carefully before operation,
to ensure your complete understanding and to obtain the best possible performance from the unit.
CONTENTS
How to reset your unit ............................... 2
How to use the M MODE button ............... 2
LOCATION OF THE BUTTONS ............ 4
Control panel ............................................. 4
Remote controller ...................................... 5
Preparing the remote controller ................ 6
BASIC OPERATIONS ....................... 7
Turning on the power ................................ 7
Canceling the display demonstration ........ 8
Setting the clock ........................................ 9
RADIO OPERATIONS ...................... 10
Listening to the radio ................................. 10
Storing stations in memory ....................... 11
Tuning in to a preset station ...................... 12
RDS OPERATIONS ......................... 13
What you can do with RDS ....................... 13
Other convenient RDS functions and
adjustments ............................................ 18
CD OPERATIONS ........................... 20
Playing a CD ............................................. 20
Locating a track or a particular portion
on a CD .................................................. 21
Selecting CD playback modes .................. 22
Playing a CD Text ...................................... 23
Prohibiting disc ejection ............................ 23
MP3/WMA INTRODUCTION .............. 24
What are MP3/WMA? ............................... 24
How are MP3/WMA files recorded and
played back? .......................................... 24
ENGLISH
MP3/WMA OPERATIONS.................. 25
Playing a disc ............................................ 25
Locating a file or a particular portion
on a disc ................................................. 26
Selecting playback modes ........................ 28
SOUND ADJUSTMENTS ................... 29
Selecting preset sound modes
(C-EQ: custom equalizer) ....................... 29
Adjusting the sound .................................. 30
OTHER MAIN FUNCTIONS ................ 31
Changing the general settings (PSM) ....... 31
Assigning names to the source .................. 34
Changing the standard plate ..................... 35
Detaching the control panel ...................... 37
CD CHANGER OPERATIONS .............. 38
Playing discs ............................................. 38
Selecting the playback modes .................. 41
EXTERNAL COMPONENT OPERATIONS ... 42
Playing an external component ................. 42
DAB TUNER OPERATIONS ................ 43
Tuning in to an ensemble and one of the
services .................................................. 43
Storing DAB services in memory .............. 44
Tuning in to a preset DAB service ............. 45
What you can do more with DAB .............. 46
TROUBLESHOOTING ...................... 47
MAINTENANCE ............................. 50
Handling discs ........................................... 50
SPECIFICATIONS........................... 51
BEFORE USE
*For safety....
• Do not raise the volume level too much, as this will
block outside sounds, making driving dangerous.
• Stop the car before performing any complicated
operations.
*Temperature inside the car....
If you have parked the car for a long time in hot
or cold weather, wait until the temperature in the
car becomes normal before operating the unit.
3
Page 4

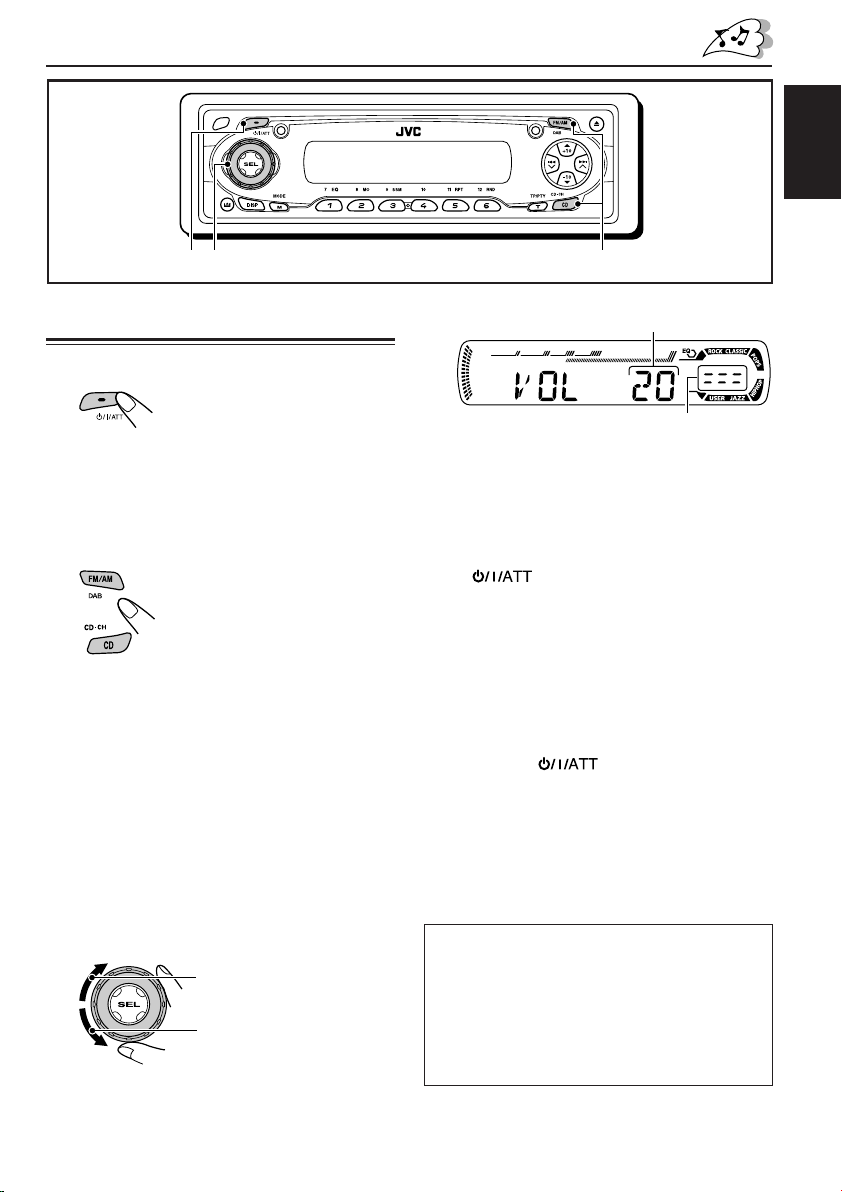
Control panel
Display window
ENGLISH
LOCATION OF THE BUTTONS
KD-SC601
1 Remote sensor
2 Control dial
3 (standby/on/attenuator) button
4 SEL (select) button
5 Screws (M2 × 5 mm)
6 Plate cover and standard plate
7 FM/AM DAB button
8 5 (up) button
+10 button
9 0 (eject) button
p 4 /¢ buttons
q (control panel release) button
w DISP (display) button
e M MODE button
r Display window
t EQ (equalizer) button
y MO (monaural) button
u SSM (Strong-station Sequential Memory) button
i RPT (repeat) button
o RND (random) button
; Number buttons
a T TP/PTY (traffic programme/programme
type) button
s CD CD-CH (CD changer) button
4
d ∞ (down) button
–10 button
Display window
f Tuner reception indicators—MO (monaural),
ST (stereo)
g Disc type indicators—WMA, MP3
h CH (CD changer) indicator
j CD indicator
k RDS indicators—TP, PTY, AF, REG
l Playback mode/item indicators—RND (random),
(disc), (folder), RPT (repeat)
/ LOUD (loudness) indicator
z EQ (equalizer) indicator
x Sound mode (C-EQ: custom equalizer)
indicators—ROCK, CLASSIC, POPS, HIP HOP,
JAZZ, USER
• also works as level meter during play if
the level meter is activated (see page 33).
c Disc information indicators—TAG (ID3 Tag),
(folder), (track/file)
v Main display
b Source display
Volume level indicator
n Tr (track) indicator
Page 5

Remote controller
SOUND
ATT
U
SOURCE
R
VOL
1 • Turns on the unit if pressed when the unit is
turned off.
• Turns off the unit if pressed and held until
“SEE YOU” appears on the display.
• Drops the volume level in a moment if
pressed briefly.
Press again to resume the volume.
2 • Selects the band while listening to the radio
(or the DAB tuner).
Each time you press the button, the band
changes.
• Skips to the first file of the next folder while
listening to an MP3 or a WMA disc.
Each time you press the button, you can
move to the next folder and start playing the
first file.
• While playing an MP3 disc on an MP3compatible CD changer;
– Skips to the next disc if pressed briefly.
– Skips to the next folder if pressed and
held.
Note:
While playing a CD on a CD changer, this
always skips to the next disc.
F
D
VOL
3 • Selects the preset stations (or services)
while listening to the radio (or the DAB
tuner).
Each time you press the button, the preset
station (or service) number increases, and
the selected station (or service) is tuned in.
• Skips to the first file of the previous folder
while listening to an MP3 or a WMA disc.
Each time you press the button, you can
move to the previous folder and start playing
the first file.
• While playing an MP3 disc on an MP3compatible CD changer;
– Skips to the previous disc if pressed
briefly.
– Skips to the previous folder if pressed and
held.
Note:
While playing a CD on a CD changer, this
always skips to the previous disc.
4 Functions the same as the control dial on the
main unit.
Note:
These buttons do not function for the
preferred setting mode adjustment.
5 Selects the sound mode (C-EQ: custom
equalizer).
Each time you press the button, the sound
mode (C-EQ) changes.
6 Selects the source.
Each time you press the button, the source
changes.
7 • Searches for stations while listening to the
radio.
• Selects services while listening to the DAB
tuner if pressed briefly.
• Searches for ensembles while listening to
the DAB tuner if pressed for more than one
second.
• Fast-forwards or reverses the track/file if
pressed and held while listening to a disc.
• Skips to the beginning of the next track/file
or goes back to the beginning of the current
(or previous) tracks/files if pressed briefly
while listening to a disc.
ENGLISH
5
Page 6
Preparing the remote controller
Before using the remote controller:
• Aim the remote controller directly at the remote
sensor on the main unit. Make sure there is no
ENGLISH
obstacle in between.
Remote sensor
• Do not expose the remote sensor to strong
light (direct sunlight or artificial lighting).
Installing the battery
When the controllable range or effectiveness of
the remote controller decreases, replace the
battery.
1. Remove the battery holder.
1) Push out the battery holder in the direction
indicated by the arrow using a ball-point
pen or a similar tool.
2) Remove the battery holder.
3. Return the battery holder.
Insert again the battery holder by pushing it
until you hear a clicking sound.
(back side)
WARNING:
• Store the battery in a place where children
cannot reach.
If a child accidentally swallows the battery,
consult a doctor immediately.
• Do not recharge, short, disassemble, or heat the
battery or dispose of it in a fire.
Doing any of these things may cause the battery
to give off heat, crack, or start a fire.
• Do not leave the battery with other metallic
materials.
Doing this may cause the battery to give off heat,
crack, or start a fire.
• When throwing away or saving the battery, wrap
it in tape and insulate; otherwise, the battery
may start to give off heat, crack, or start a fire.
• Do not poke the battery with tweezers or similar
tools.
Doing this may cause the battery to give off heat,
crack, or start a fire.
(back side)
2. Place the battery.
Slide the battery into the holder with the +
side facing upwards so that the battery is
fixed in the holder.
Lithium coin
battery (product
number: CR2025)
6
CAUTION:
DO NOT leave the remote controller in a place
(such as dashboards) exposed to direct sunlight for
a long time. Otherwise, it may be damaged.
KD-SC601 is equipped with the steering
wheel remote control function.
If your car is equipped with the steering wheel
remote controller, you can operate this unit
using the controller.
• See the Installation/Connection Manual
(separate volume) for connection to utilize
this function.
Page 7
123
BASIC OPERATIONS
ENGLISH
Turning on the power
1
Turn on the power.
Note on One-Touch Operation:
When you select a source in step 2 below, the
power automatically comes on. You do not have
to press this button to turn on the power.
2
Select the source.
To operate the tuner (FM or AM),
see pages 10 – 19.
To play a CD,
see pages 20 – 23.
To play an MP3/WMA disc,
see pages 25 – 28.
To operate the CD changer,
see pages 38 – 41.
To operate the external component
(LINE IN), see page 42.
To operate the DAB tuner,
see pages 43 – 46.
Volume level appears.
Volume level indicator
4
Adjust the sound as you want. (See
pages 29 and 30.)
To drop the volume in a moment
Press briefly while listening to any
source. “ATT” starts flashing on the display, and
the volume level will drop in a moment.
To resume the previous volume level, press the
button briefly again.
• If you turn the control dial, you can also restore
the sound.
To turn off the power
Press and hold for more than one
second.
“SEE YOU” appears, then the unit turns off.
• If you turn off the power while listening to a
disc, disc play will start from where playback
has been stopped previously, next time you
turn on the power.
3
Adjust the volume.
To increase the volume
To decrease the volume
CAUTION on Volume Setting:
Discs produce very little noise compared with
other sources. If the volume level is adjusted for
the tuner, for example, the speakers may be
damaged by the sudden increase in the output
level. Therefore, lower the volume before playing a
disc and adjust it as required during playback.
7
Page 8

ENGLISH
Canceling the display
demonstration
When shipped from the factory, display
demonstration has been activated, and starts
automatically when no operations are done for
about 20 seconds.
• It is recommended to cancel the display
demonstration before you use the unit for the
first time.
To cancel the display demonstration, follow
the procedure below:
1
Press and hold SEL (select) for more
than 2 seconds so that one of the
PSM items appears on the display.
(PSM: see pages 31 and 32.)
2
Select “DEMO” if not shown on the
display.
3
Select “DEMO OFF.”
DEMO OFF
4
Finish the setting.
To activate the display demonstration, repeat
the same procedure and select “DEMO ON” in
step 3.
DEMO ON
8
Page 9
ENGLISH
Frequency
Clock
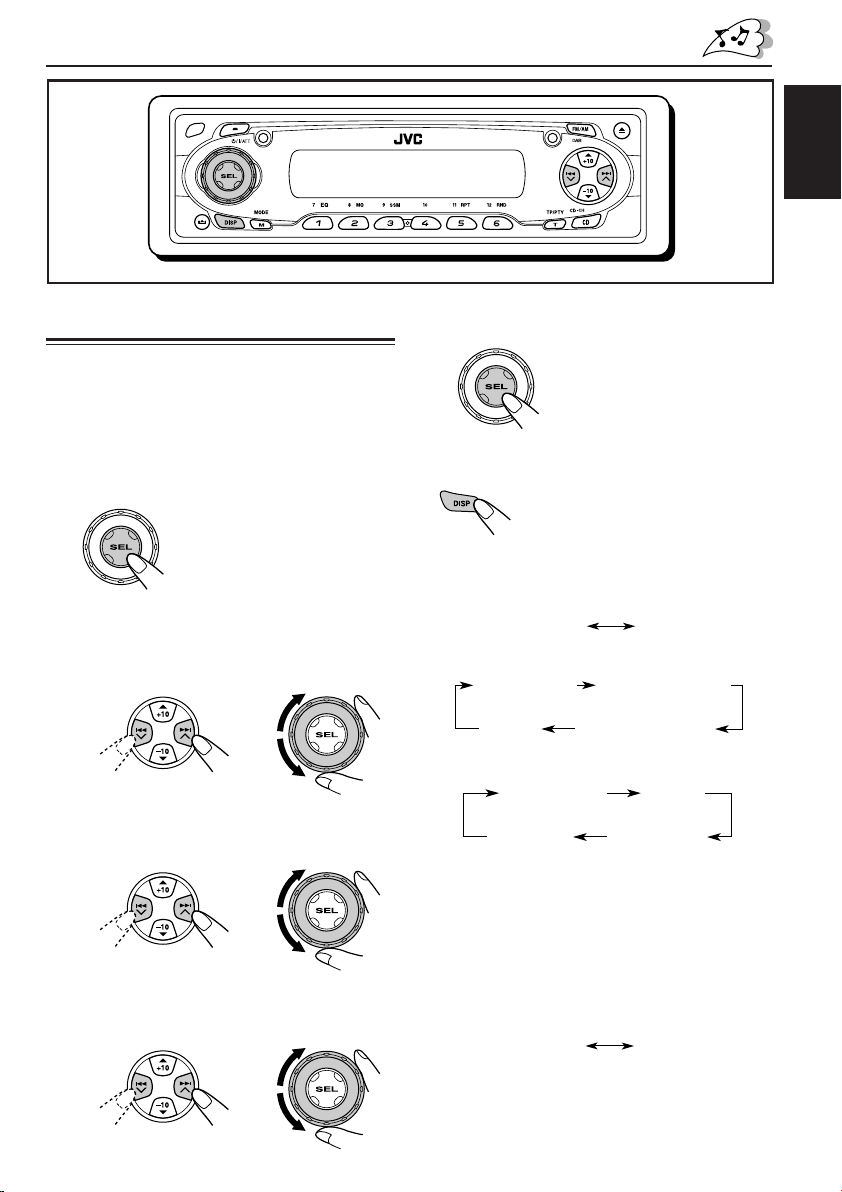
Setting the clock
You can also set the clock system to either
24 hours or 12 hours.
1
Press and hold SEL (select) for more
than 2 seconds so that one of the
PSM items appears on the display.
(PSM: see pages 31 and 32.)
2
Set the hour.
1 Select “CLOCK H” (hour) if not shown on
the display.
2 Adjust the hour.
12
3
Set the minute.
1 Select “CLOCK M” (minute).
2 Adjust the minute.
12
4
Set the clock system.
1 Select “24H/12H.”
2 Select “24H” or “12H.”
12
5
Finish the setting.
To check the current clock time or change the
display mode
Press DISP (display) repeatedly.
Each time you press the button,
the display changes as follows:
• During AM and FM non-RDS station
operation:
• During FM RDS Station operation:
Station name
• During disc operation:
Elapsed
playing time
Track title
Notes:
• While playing a conventional CD, “NO NAME”
appears for the disc title/performer and the track
title.
• For indication change while playing a CD Text or
an MP3/WMA disc, see also pages 23 and 26.
• During external component operation:
LINE IN
• During power off:
The power turns on and the clock time is
shown for 5 seconds, then the power turns off.
Station frequency
Programme typeClock
Clock
Disc title /
performer
Clock
9
Page 10

ENGLISH
RADIO OPERATIONS
Listening to the radio
You can use either automatic searching or manual
searching to tune in to a particular station.
Searching for a station automatically:
Auto search
1
Select the band (FM1 – 3, AM).
Each time you press the
button, the band changes as
follows:
FM1 FM2 FM3 AM
Lights up when receiving an FM stereo
broadcast with sufficient signal strength.
Selected band appears.
Note:
This receiver has three FM bands (FM1, FM2,
FM3). You can use any one of them to listen to
an FM broadcast.
2
Start searching for a station.
To search for stations of
higher frequencies
To stop searching before a station is
received, press the same button you have
pressed for searching.
Searching for a station manually:
Manual search
1
Select the band (FM1 – 3, AM).
Each time you press the
button, the band changes as
follows:
FM1 FM2 FM3 AM
Note:
This receiver has three FM bands (FM1, FM2,
FM3). You can use any one of them to listen to
an FM broadcast.
2
Press and hold ¢ or 4
until “M” (manual) starts flashing on
the display.
To search for stations of lower frequencies
When a station is received, searching stops.
10
Page 11

3
Tune in to a station you want while
“M” (manual) is still flashing.
To tune in to stations of
higher frequencies
To tune in to stations of lower frequencies
• If you release your finger from the button,
the manual mode will automatically turns
off after 5 seconds.
• If you hold down the button, the frequency
keeps changing (in 50 kHz intervals for
FM and 9 kHz for AM—MW/LW) until you
release the button.
When an FM stereo broadcast is hard to
receive:
1 Press M MODE to enter the
functions mode while listening
to an FM stereo broadcast.
2 Press MO (monaural), while
“MODE” is still flashing on the
display, so that “MONO”
appears on the display.
Each time you press the button,
monaural mode turns on and off
alternately.
Storing stations in memory
You can use one of the following two methods to
store broadcasting stations in memory.
• Automatic preset of FM stations: SSM (Strongstation Sequential Memory)
• Manual preset of both FM and AM stations
FM station automatic preset: SSM
You can preset 6 local FM stations in each FM
band (FM1, FM2, and FM3).
1
Select the FM band (FM1 – 3) you
want to store FM stations into.
Each time you press the
button, the band changes as
follows:
FM1 FM2 FM3 AM
2
Press M MODE to enter the
functions mode.
3
Press and hold SSM for about 2
seconds.
ENGLISH
MO (monaural) indicator
When the MO indicator is lit on the display, the
sound you hear becomes monaural but the
reception will be improved.
“SSM” flashes, then disappears when
automatic preset is over.
Local FM stations with the strongest signals are
searched and stored automatically in the band
number you have selected (FM1, FM2, or FM3).
These stations are preset in the number buttons
—No.1 (lowest frequency) to No.6 (highest
frequency).
When automatic preset is over, the station stored
in number button 1 will be automatically tuned in.
11
Page 12

Manual preset
You can preset up to 6 stations in each band
(FM1, FM2, FM3, and AM) manually.
4
Repeat the above procedure to store
other stations into other preset
numbers.
ENGLISH
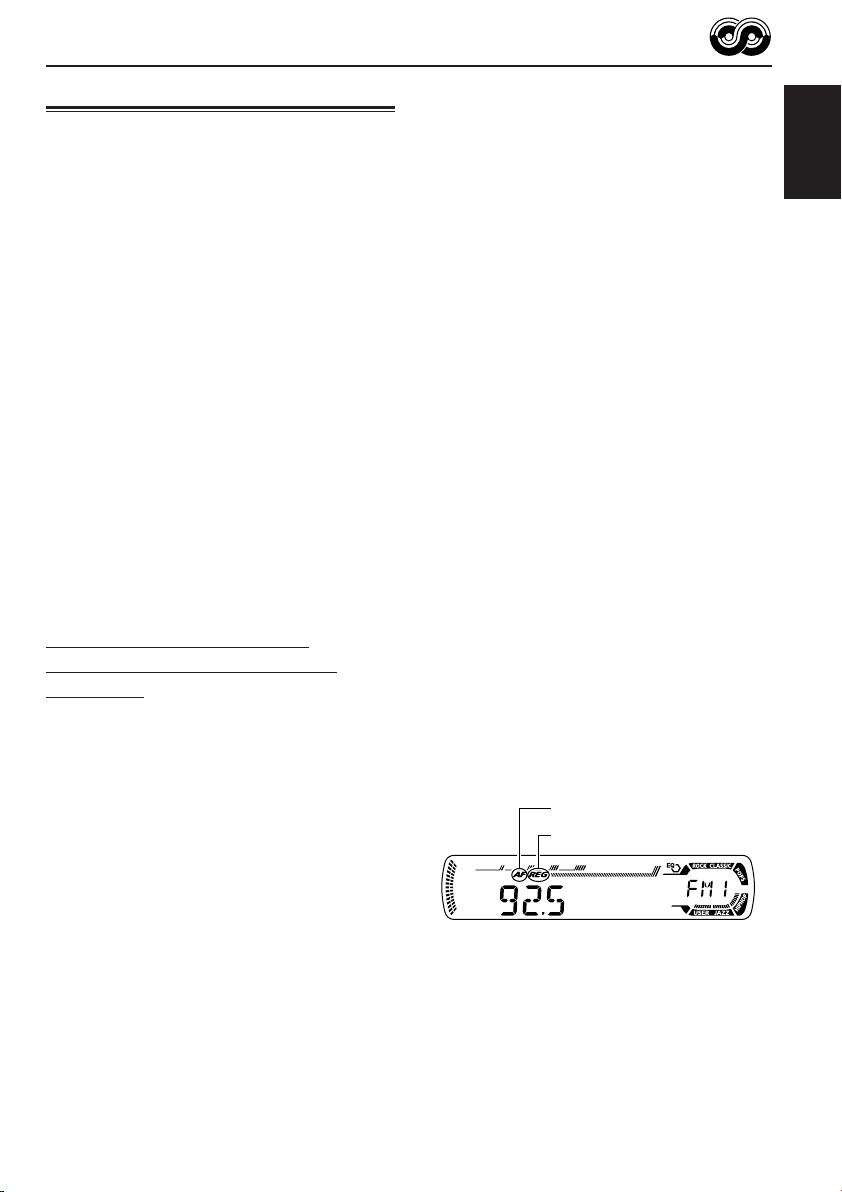
Ex.: Storing FM station of 92.5 MHz into the
preset number 1 of the FM1 band.
1
Select the band (FM1 – 3, AM) you
want to store stations into (in this
example, FM1).
Each time you press the
button, the band changes as
follows:
FM1 FM2 FM3 AM
2
Tune in to a station (in this example,
of 92.5 MHz).
To tune in to stations of
higher frequencies
To tune in to stations of lower frequencies
3
Press and hold the number button
(in this example, 1) for more than
2 seconds.
Notes:
• A previously preset station is erased when a new
station is stored in the same preset number.
• Preset stations are erased when the power supply to
the memory circuit is interrupted (for example,
during battery replacement). If this occurs, preset
the stations again.
Tuning in to a preset station
You can easily tune in to a preset station.
Remember that you must store stations first. If
you have not stored them yet, see “Storing
stations in memory” on pages 11 and 12.
1
Select the band (FM1 – 3, AM).
Each time you press the
button, the band changes as
follows:
FM1 FM2 FM3 AM
2
Select the number (1 – 6) for the
preset station you want.
12
Preset number flashes for a while.
Page 13
RDS OPERATIONS
What you can do with RDS
RDS (Radio Data System) allows FM stations to
send an additional signal along with their regular
programme signals. For example, the stations
send their station names, as well as information
about what type of programme they broadcast,
such as sports or music, etc.
Another advantage of RDS function is called
“Enhanced Other Networks.” By using the
Enhanced Other Networks data sent from a
station, you can tune in to a different station of a
different network broadcasting your favorite
programme or traffic announcement while
listening to another programme or to another
source such as CD.
By receiving the RDS data, this unit can do the
following:
• Tracing the same programme automatically
(Network-Tracking Reception)
• Standby Reception of TA (Traffic
Announcement) or your favorite programme
• PTY (Programme Type) search
• Programme search
• And some other functions
Tracing the same programme
automatically (Network-Tracking
Reception)
When driving in an area where FM reception is
not good, the tuner built in this unit automatically
tunes in to another RDS station, broadcasting the
same programme with stronger signals. So, you
can continue to listen to the same programme in
its finest reception, no matter where you drive.
(See the illustration on page 19.)
Two types of the RDS data are used to make
Network-Tracking Reception work correctly
—PI (Programme Identification) and AF
(Alternative Frequency).
Without receiving these data correctly from the
RDS station you are listening to, NetworkTracking Reception will not operate.
To use Network-Tracking Reception
You can select the different modes of networktracking reception to continue listening to the
same programme in its finest reception.
When shipped from the factory, “AF” is selected.
• AF: Network-Tracking Reception is
activated with Regionalization set to
“off.”
With this setting, the unit switches to
another station within the same
network when the received signals
from the current station become
weak. (In this mode, the programme
may differ from the one currently
received.)
The AF indicator lights up but the
REG indicator does not.
• AF REG: Network-Tracking Reception is
activated with Regionalization set to
“on.”
With this setting, the unit switches to
another station, within the same
network, broadcasting the same
programme when the received
signals from the current station
become weak.
Both the AF indicator and the REG
indicator light up.
• OFF: Network-Tracking Reception is
deactivated.
Neither the AF indicator nor the REG
indicator lights up.
AF indicator
REG indicator
Note:
If a DAB tuner is connected and Alternative Reception
(for DAB services) is activated, Network-Tracking
Reception is also activated (“AF”) automatically. On
the other hand, Network-Tracking Reception cannot
be deactivated without deactivating Alternative
Reception. (See page 46.)
ENGLISH
CONTINUED ON THE NEXT PAGE
13
Page 14

1
Press and hold SEL (select) for more
than 2 seconds so that one of the
PSM items appears on the display.
(PSM: see pages 31 and 32.)
ENGLISH
2
Select “AF-REG” (alternative
frequency/regionalization reception)
if not shown on the display.
3
Select the desired mode—“AF,”
“AF REG,” or “OFF.”
4
Finish the setting.
Using TA Standby Reception
TA Standby Reception allows the unit to switch
temporarily to Traffic Announcement (TA) from
the current source (another FM station, CD, or
other connected components).
• TA Standby Reception will not work if you are
listening to an AM station.
Press T TP/PTY to activate TA Standby Reception.
7 When the current source is FM, the TP
indicator either lights up or flashes.
• If the TP indicator lights up, TA Standby
Reception is activated.
If a station starts broadcasting a traffic
announcement, “TRAFFIC” appears on the
display, and this unit automatically tunes in to
the station. The volume changes to the
preset TA volume level (see page 18) and the
traffic announcement can be heard.
• If the TP indicator flashes, TA Standby
Reception is not yet activated since the
station being received does not provide the
signals used for TA Standby Reception.
To activate TA Standby Reception, you need
to tune in to another station providing these
signals. Press ¢ or 4 to search
for such a station.
When a station providing these signals is
tuned in, the TP indicator stops flashing and
remains lit. Now TA Standby Reception is
activated.
7 When the current source is other than FM,
the TP indicator lights up.
If a station starts broadcasting a traffic
announcement, “TRAFFIC” appears on the
display, and this unit automatically changes the
source and tunes in to the station.
14
To deactivate the TA Standby Reception,
press T TP/PTY again. The TP indicator
disappears.
Page 15

Using PTY Standby Reception
PTY Standby Reception allows the unit to switch
temporarily to your favorite programme (PTY:
Programme Type) from the current source
(another FM station, CD, or other connected
components).
4
Finish the setting.
ENGLISH
• PTY Standby Reception will not work if you are
listening to an AM station.
You can select your favorite programme type for
PTY Standby Reception.
When shipped from the factory, PTY Standby
Reception is turned off. (“OFF” is selected for
PTY Standby Reception.)
1
Press and hold SEL (select) for more
than 2 seconds so that one of the
PSM items appears on the display.
(PSM: see pages 31 and 32.)
2
Select “PTY STBY” (standby) if not
shown on the display.
3
Select one of the twenty-nine PTY
codes. (See page 19.)
Selected code name
appears on the display
and is stored into
memory.
7 When the current source is FM, the PTY
indicator either lights up or flashes.
• If the PTY indicator lights up, PTY Standby
Reception is activated.
If a station starts broadcasting the selected
PTY programme, this unit automatically
tunes in to the station.
• If the PTY indicator flashes, PTY Standby
Reception is not yet activated since the
station being received does not provide the
signals used for PTY Standby Reception.
To activate PTY Standby Reception, you
need to tune in to another station providing
these signals. Press ¢ or 4 to
search for such a station.
When a station providing these signals is
tuned in, the PTY indicator stops flashing
and remains lit. Now PTY Standby Reception
is activated.
7 When the current source is other than FM,
the PTY indicator lights up.
If a station starts broadcasting the selected
PTY programme, this unit automatically
changes the source and tunes in to the station.
To deactivate the PTY Standby Reception,
select “OFF” in step 3 on the left column. The
PTY indicator disappears.
15
Page 16

Searching your favorite programme
You can search any one of the PTY codes.
In addition, you can store your 6 favorite
programme types in the number buttons.
ENGLISH
When shipped from the factory, the following
6 programme types have been stored in the
number buttons (1 to 6).
To store your favorite programme types, see
below.
To search your favorite programme type, see
page 17.
1
POP M
45
CLASSICS
To store your favorite programme types
1
Press and hold T TP/PTY for more
than 2 seconds while listening to an
FM station.
2
ROCK M EASY M
AFFAIRS
VARIED
3
Press and hold the number button
for more than 2 seconds to store the
PTY code selected into the preset
number you want.
3
6
4
Press and hold T TP/PTY for more
Selected PTY code and
“MEMORY” appear
alternately for a while.
than 2 seconds to exit from this
mode.
16
The last selected PTY code appears.
2
Select one of the twenty-nine PTY
codes. (See page 19.)
Selected code name
appears on the display.
Page 17
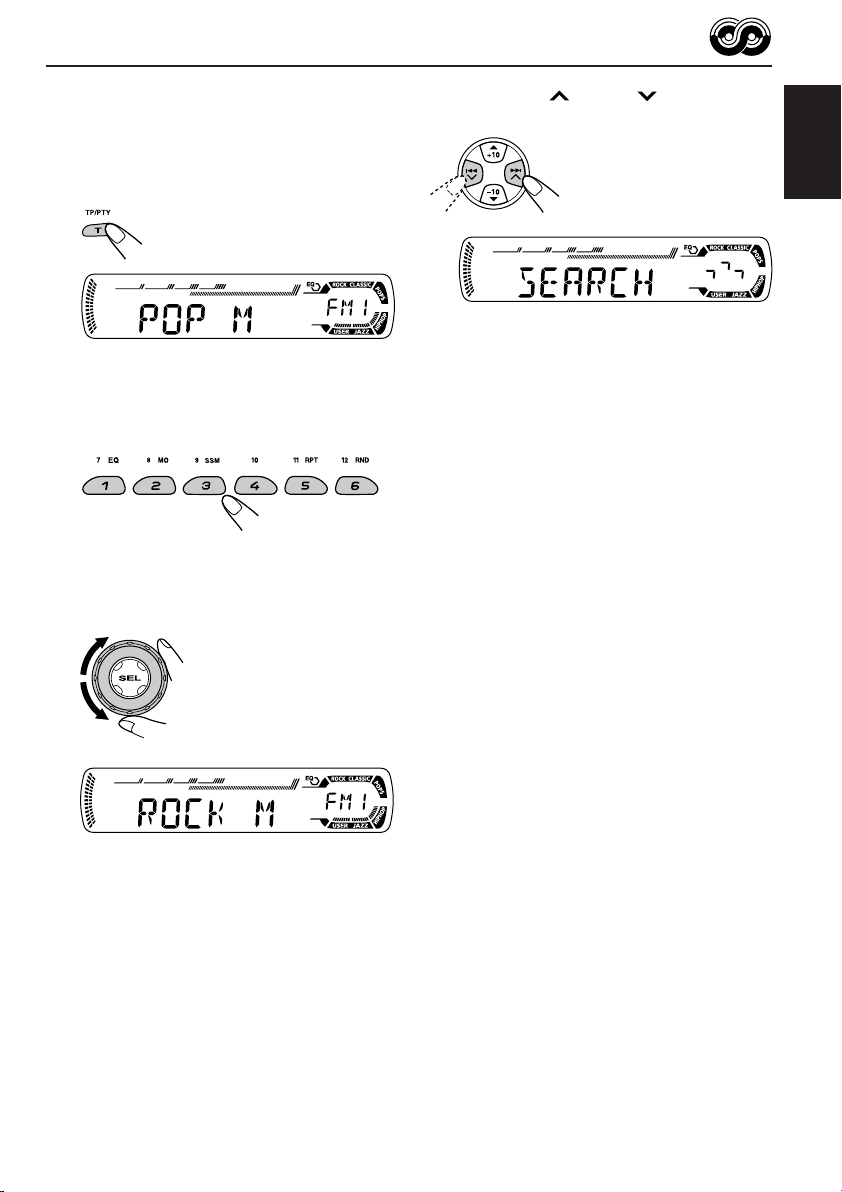
To search your favorite programme type
1
Press and hold T TP/PTY for more
than 2 seconds while listening to an
FM station.
The last selected PTY code appears.
2
To select one of your favorite
programme type
or
To select any one of the twenty-nine
PTY codes.
3
Press ¢ or 4 to start PTY
search for your favorite programme.
• If there is a station broadcasting a programme
of the same PTY code as you selected, that
station is tuned in.
• If there is no station broadcasting a
programme of the same PTY code as you
selected, the station will not change.
Note:
In some areas, the PTY search will not work correctly.
ENGLISH
Ex.: When “ROCK M” is selected
17
Page 18

Other convenient RDS
functions and adjustments
Automatic selection of the station
ENGLISH
when using the number buttons
Usually when you press the number button, the
preset station is tuned in.
However, when the preset station is an RDS
station, something different will happen. If the
signals from that preset station are not sufficient
for good reception, this unit, using the AF data,
tunes in to another frequency broadcasting the
same programme as the original preset station is
broadcasting. (Programme search)
• The unit takes some time to tune in to another
station using programme search.
To activate programme search, follow the
procedure below.
• See also “Changing the general settings
(PSM)” on page 31.
1 Press and hold SEL (select) for more than
2 seconds so that one of the PSM items
appears on the display.
2 Press ¢ or 4 to select
“P(Programme)-SEARCH.”
3 Turn the control dial clockwise to select “ON.”
Now programme search is activated.
4 Press SEL (select) to finish the setting.
To cancel programme search, repeat the same
procedure and select “OFF” in step 3 by turning
the control dial counterclockwise.
Setting the TA volume level
You can preset the volume level for TA Standby
Reception. When a traffic programme is received,
the volume level automatically changes to the
preset level.
• See also “Changing the general settings
(PSM)” on page 31.
1 Press and hold SEL (select) for more than
2 seconds so that one of the PSM items
appears on the display.
2 Press ¢ or 4 to select “TA VOL”
(volume).
3 Turn the control dial to set to the desired
volume.
You can set it from “VOL 00” to “VOL 30” or
“VOL 50” (depending on the amplifier gain
control setting: see page 34).
4 Press SEL (select) to finish the setting.
Automatic clock adjustment
When shipped from the factory, the clock built in
this unit is set to be readjusted automatically
using the CT (Clock Time) data in the RDS
signal.
If you do not want to use automatic clock
adjustment, follow the procedure below.
• See also “Changing the general settings
(PSM)” on page 31.
1 Press and hold SEL (select) for more than
2 seconds so that one of the PSM items
appears on the display.
2 Press ¢ or 4 to select “AUTO
ADJ” (adjustment).
3 Turn the control dial counterclockwise to select
“OFF.”
Now automatic clock adjustment is canceled.
4 Press SEL (select) to finish the setting.
18
To reactivate clock adjustment, repeat the
same procedure and select “ON” in step 3 by
turning the control dial clockwise.
Note:
You must stay tuned to the same station for more than
2 minutes after setting “AUTO ADJ” to “ON.”
Otherwise, the clock time will not be adjusted. (This is
because the unit takes up to 2 minutes to capture the
CT data in the RDS signal.)
Page 19

PTY codes
NEWS: News
AFFAIRS: Topical programmes expanding
on current news or affairs
INFO: Programmes which impart
advice on a wide variety of topics
SPORT: Sport events
EDUCATE: Educational programmes
DRAMA: Radio plays
CULTURE: Programmes on national or
regional culture
SCIENCE: Programmes on natural science
and technology
VARIED: Other programmes like comedies
or ceremonies
POP M: Pop music
ROCK M: Rock music
EASY M: Easy-listening music
LIGHT M: Light music
CLASSICS: Classical music
OTHER M: Other music
WEATHER: Weather information
FINANCE: Reports on commerce, trading,
the Stock Market, etc.
CHILDREN: Entertainment programmes for
children
SOCIAL: Programmes on social
activities
RELIGION: Programmes dealing with any
aspect of belief or faith, or the
nature of existence or ethics
PHONE IN: Programmes where people can
express their views either by
phone or in a public forum
TRAVEL: Programmes about travel
destinations, package tours,
and travel ideas and
opportunities
LEISURE: Programmes concerned with
recreational activities such as
gardening, cooking, fishing,
etc.
JAZZ: Jazz music
COUNTRY: Country music
NATION M: Current popular music from
another nation or region, in that
country’s language
OLDIES: Classic pop music
FOLK M: Folk music
DOCUMENT: Programmes dealing with
factual matters, presented in an
investigative style
ENGLISH
The same programme can be received on different frequencies.
Programme 1
broadcasting on
frequency A
Programme 1
broadcasting on
frequency B
Programme 1
broadcasting on
frequency C
Programme 1
broadcasting on
frequency E
Programme 1
broadcasting on
frequency D
19
Page 20

ENGLISH
CD OPERATIONS
Refer “MP3/WMA OPERATIONS” on pages 25 to
28 for operating MP3/WMA discs.
Playing a CD
1
Open the control panel.
Note on One-Touch operation:
When a CD is already in the loading slot,
pressing CD CD-CH turns on the unit and starts
playback automatically.
2
Insert a CD into the loading slot.
The unit turns on,
draws the CD and
starts playback
automatically.
3
Close the control panel by hand.
All tracks will be played repeatedly until you
stop playback.
The display changes to show the following:
CD indicator
Current source indication
Total playing time
of the inserted disc
Elapsed playing
time
Notes:
• When a CD is inserted upside down, the CD
automatically ejects (if the control panel is open).
If the control panel is closed, the source changes to
the previously selected source, “PLEASE” and
“EJECT” appear alternately on the display.
• If there is no CD in the loading slot, you cannot
select CD as the source. “NO DISC” appears on
the display.
• If the current disc is a CD Text, disc title/performer
and then track title will automatically appear.
Total track number
of the inserted disc
Current track
number
20
Page 21

To stop play and eject the CD
Press 0.
CD play stops and the control panel flips down.
The CD automatically ejects from the loading
slot. The source changes to the previously
selected source.
• If you change the source, CD play also stops
(without ejecting the CD).
Next time you select “CD” as the source, CD
play starts from where playback has been
stopped previously.
Notes:
• If the ejected disc is not removed for about
15 seconds, the disc is automatically inserted again
into the loading slot to protect it from dust.
(Disc play will not start this time.)
• You can eject the disc even when the unit is turned
off.
Locating a track or a
particular portion on a CD
To fast-forward or reverse the track
Press and hold ¢ ,
while playing a CD, to
fast-forward the track.
To go to a particular track directly
Press the number button corresponding to the
track number to start its playback.
ENGLISH
• To select a track number from 1 – 6:
Press 1 (7) – 6 (12) briefly.
• To select a track number from 7 – 12:
Press and hold 1 (7) – 6 (12) for more than one
second.
To go to a track quickly (+10 and –10 buttons)
1 Press M MODE to enter the functions mode
while playing a CD.
2 Press +10 or –10.
To skip 10 tracks* forwards
to the last track
To skip 10 tracks* backwards
to the first track
Press and hold 4 , while playing a CD, to
reverse the track.
To go to the next or previous tracks
Press ¢ briefly, while
playing a CD, to go ahead
to the beginning of the next
track.
Each time you press the
button consecutively, the
beginning of the next
tracks is located and
played back.
Press 4 briefly, while playing a CD, to go
back to the beginning of the current track.
Each time you press the button consecutively,
the beginning of the previous tracks is located
and played back.
* First time you press +10 or –10 button, the
track skips to the nearest higher or lower
track with a track number of multiple ten (ex.
10th, 20th, 30th).
Then each time you press the button, you can
skip 10 tracks (see “How to use the +10 and
–10 buttons” on page 22).
• After the last track, the first track will be
selected, and vice versa.
CONTINUED ON THE NEXT PAGE
21
Page 22

How to use the +10 and –10 buttons
• Ex. 1: To select track number 32 while
playing track number 6
ENGLISH
(Three times) (Twice)
Track 6 \ 10 \ 20 \ 30 \ 31 \ 32
• Ex. 2 :To select track number 8 while
playing track number 36
(Three times) (Twice)
Track 36 \ 30 \ 20 \ 10 \ 9 \ 8
Selecting CD playback modes
To play back tracks at random
(Disc Random Play)
You can play back all tracks on the CD at random.
1 Press M MODE to enter the
functions mode while playing a
CD.
To play back tracks repeatedly
(Track Repeat Play)
You can play back the current track repeatedly.
1 Press M MODE to enter the
functions mode while playing a
CD.
2 Press RPT (repeat), while
“MODE” is still flashing on the
display, so that “TRK RPT”
appears on the display.
Each time you press the button,
track repeat play mode turns on
and off alternately.
RPT indicator
When track repeat play is turned on, the RPT
indicator lights up on the display. The current
track starts playing repeatedly.
2 Press RND (random), while
“MODE” is still flashing on the
display, so that “DISC RND”
appears on the display.
Each time you press the button,
disc random play mode turns on
and off alternately.
RND and (disc) indicators
When disc random play is turned on, the RND
and indicators light up on the display. A track
randomly selected starts playing.
22
Page 23
Playing a CD Text
Prohibiting disc ejection
In a CD Text, some information about the disc (its
disc title, performer, and track title) is recorded.
This CD Text information will be shown
automatically when you play a CD Text.
To change the CD Text information
manually, select text display mode while
playing a CD Text.
Press DISP (display) repeatedly.
Each time you press the button,
the display changes as follows:
Disc title / performer
Track title
( lights up on the display)
Elapsed playing time and
Current track number
Clock and
Current track number
Notes:
• The display shows up to 8 characters at one time
and scrolls if there are more than 8 characters.
See also “To select the scroll mode—SCROLL” on
page 33.
Some characters or symbols will not be shown (and
be blanked) on the display.
(Ex. “ABCå!d#” ]“ABCA D ”)
• When you press DISP (display) while playing a
conventional CD, “NO NAME” appears for the
disc title/performer and the track title.
• When track title is shown, the Tr indicator and
current track number also appear on the right side
of the display.
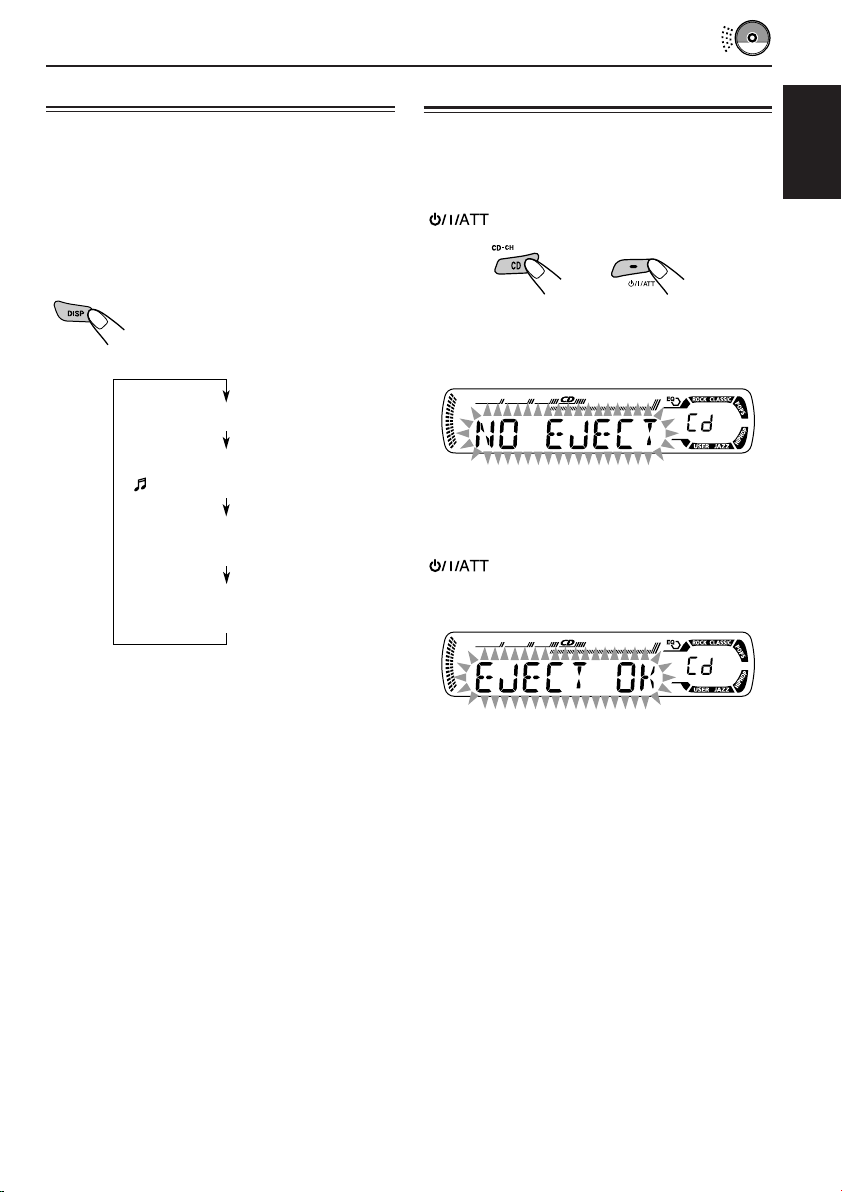
You can prohibit disc ejection and can lock a disc
in the loading slot.
ENGLISH
While pressing CD CD-CH, press and hold
for more than 2 seconds.
“NO EJECT” flashes on the display for about
5 seconds, and the disc is locked and cannot be
ejected.
To cancel the prohibition and unlock the
disc
While pressing CD CD-CH, press and hold
again for more than 2 seconds.
“EJECT OK” flashes on the display for about
5 seconds, and the disc is unlocked.
23
Page 24

MP3/WMA INTRODUCTION
What are MP3/WMA?
MP3 is an abbreviation of Motion Picture Experts
Group (or MPEG) Audio Layer 3. MP3 is simply a
file format with a data compression ratio of 1:10
ENGLISH
(128 Kbps*).
* Bit rate is the average number of bits that one
second of audio data will consume. The unit used is
Kbps. To get a better audio quality, choose a higher
bit rate. The most popular bit rate for encoding is
128 Kbps.
WMA (Windows Media® Audio) is the digital
audio compression format developed by
Microsoft Corporation.
• For details information about the MP3/WMA
discs, refer to “A Guide to MP3/WMA”
(separate volume).
Compatible with ID3 Tag
Extra information data such as album title,
performer name, song title, recording year, music
genre and a brief comment can be stored within
an MP3/WMA file.
This unit can show both ID3v1 (Version 1) and
ID3v2 (Version 2) tags on the display. (See page
26.)
• Some characters cannot be shown correctly.
• If both ID3v1 and ID3v2 are recorded on a
disc, ID3v2 information will be shown.
How are MP3/WMA files
recorded and played back?
MP3/WMA “files (tracks)” can be recorded in
“folders” —in PC terminology.
During recording, the files and folders can be
arranged in a way similar to arranging files and
folders of computer data.
“Root” is similar to the root of a tree. Every file
and folder can be linked to and be accessed from
the root.
The illustration below shows an example of how
MP3/WMA files are recorded on a CD-R or
CD-RW, how they are played back, and how they
are searched for on this unit.
Notes:
• This unit cannot read or play an MP3 file without
the extension code <.mp3> and a WMA track
without the extension code <.wma>.
• This unit is not compatible with MP3 files encoded
with Layer 1 and Layer 2 formats.
• This unit is not compatible with WMA files which
are not based upon Windows Media® Audio.
• This unit is not compatible with Playlist**.
**A playlist is a simple text file, used on a PC, which
enables users to make their own playback order
without physically rearranging the files.
Hierarchy
Level 1 Level 2 Level 3 Level 4 Level 5
01
ROOT
05
1
2
• Microsoft and Windows Media are either registered trademarks or trademarks of Microsoft Corporation in the
United States and/or other countries.
02 03
3
10
11
04
12
4
5
24
6
7
: Folder and their playback
01
order
8
: MP3/WMA files and their
9
1
playback order
Page 25

MP3/WMA OPERATIONS
ENGLISH
Refer also to “CD OPERATIONS” on pages
20 to 23.
Playing a disc
1
Open the control panel.
Note on One-Touch operation:
When a disc is already in the loading slot,
pressing CD CD-CH turns on the unit and starts
playback automatically.
2
Insert a disc into the loading slot.
The unit turns on,
draws the disc and
starts playback
automatically.
3
Close the control panel by hand.
All files will be played repeatedly until you
stop playback.
The display changes to show the following:
CD indicator
Current source indication
WMA or MP3 indicator*
Total folder
number
Ex.: When the disc contains 19 folders and
144 MP3/WMA files
* WMA or MP3 indicator lights up depending on the
first detected file.
Notes:
• MP3/WMA discs require a longer readout time.
(It differs due to the complexity of the folder/file
configuration.)
• When playback starts, folder and file names (or ID3
tags) will automatically appear. (See also page 26.)
• If you change the source or turn the power off, disc
playback stops (without ejecting the disc).
Next time you select the CD player as the source or
turn the power on, disc play starts from where
playback has been stopped previously.
Total file
number
25
Page 26

To stop play and eject the disc
Press 0.
Playback stops and the control panel flips down.
The disc automatically ejects from the loading slot.
ENGLISH
To change the display information
While playing back an MP3/WMA file, you can
change the disc information shown on the display.
Press DISP (display) repeatedly.
Each time you press the button,
the display changes to show the
following:
Notes:
• The display shows up to 8 characters at a time and
scrolls if there are more than 8 characters.
See also “To select the scroll mode—SCROLL” on
page 33.
• When folder or file name is shown, current folder
number or the Tr indicator and current file number
also appear on the right side of the display.
Locating a file or a particular
portion on a disc
• When “TAG DISP” is set to “TAG ON”
(initial setting: see page 34)
Album name / performer
(folder name*)
(TAG lights up on the display)
Track title (file name*)
(TAG lights up on the display)
Elapsed playing time and
Current file number
Clock and
Current file number
* If ID3 tags are not recorded, folder name and
file name appear. In this case, the TAG indicator
will not light up on the display.
• When “TAG DISP” is set to “TAG OFF”
Folder name
( lights up on the display)
File name
( lights up on the display)
Elapsed playing time and
Current file number
To fast-forward or reverse the file
Press and hold ¢
while playing a disc, to fastforward the file.
Press and hold 4 while playing a disc, to
reverse the file.
Note:
During this operation, you can only hear intermittent
sounds. (The elapsed playing time also changes
intermittently on the display.)
To skip to the next or previous files
Press ¢ briefly while
playing, to skip ahead to
the beginning of the next
file.
Each time you press the
button consecutively, the
beginning of the next files is
located and played back.
Press 4 briefly, while playing, to skip back
to the beginning of the current file.
Each time you press the button consecutively,
the beginning of the previous files is located and
played back.
26
Clock and
Current file number
Page 27

To go to a particular file quickly within the
current folder (+10 and –10 buttons)
1 Press M MODE to enter the functions mode
while playing a disc.
2 Press +10 or –10.
To skip 10 files* forwards to
the last file
To skip 10 files* backwards to
the first file
* First time you press +10 or –10 button, the
file skips to the nearest higher or lower file
with a file number of multiple ten (ex. 10th,
20th, 30th).
Then each time you press the button, you can
skip 10 files (see “How to use the +10 and
–10 buttons” below).
• After the last file, the first file will be selected,
and vice versa.
How to use the +10 and –10 buttons
• Ex. 1: To select file number 32 while playing
file number 6
(Three times) (Twice)
File 6 \ 10 \ 20 \ 30 \ 31 \ 32
To go to a particular folder directly
IMPORTANT:
To directly select the folders using the number
button(s), it is required that folders are
assigned 2 digit numbers at the beginning of
their folder names. (This can only be done
during the recording of CD-Rs or CD-RWs.)
Ex.: If folder name is “01 ABC”
= Press 1 to go to Folder 01 ABC.
If folder name is “1 ABC,” pressing 1
does not work.
If folder name is “12 ABC”
= Press and hold 6 (12) to go to Folder
12 ABC.
Press the number button corresponding to the
folder number to start playing the first file in the
selected folder.
• To select a folder number from 01 – 06:
Press 1 (7) – 6 (12) briefly.
• To select a folder number from 07 – 12:
Press and hold 1 (7) – 6 (12) for more than one
second.
Notes:
• If indicator flashes on the display after you
have selected a folder, it means that the folder does
not contain any MP3/WMA files.
• You cannot directly select a folder with a number
greater than 12.
ENGLISH
• Ex. 2 :To select file number 8 while playing
file number 36
(Three times) (Twice)
File 36 \ 30 \ 20 \ 10 \ 9 \ 8
To select a particular file in a folder, press
¢ or 4 after selecting the folder.
CONTINUED ON THE NEXT PAGE
27
Page 28

To skip to the next or previous folder
Press 5 (up) while playing a disc
to skip to the next folder.
ENGLISH
Press ∞ (down) while playing a disc to skip back
to the previous folder.
Each time you press the button consecutively,
the previous folder is located (and the first file in
the folder starts playing, if recorded).
Note:
If the folder does not contain any MP3/WMA files, it
is skipped.
Each time you press the button
consecutively, the next folder is
located (and the first file in the
folder starts playing, if recorded).
Mode
FLDR RND RND and All files of the
DISC RND RND and All files on the disc.
Active
indicator
indicators current folder, then
light up. files of the next
indicators
light up.
Plays at random
folder and so on.
To play back files repeatedly
(Track Repeat/Folder Repeat Play)
You can play back the current file or all the files
in the current folder repeatedly.
1 Press M MODE to enter the
functions mode while playing a
disc.
Selecting playback modes
To play back files at random
(Folder Random/Disc Random Play)
You can play back all files of the current folder or
all files on the disc at random.
1 Press M MODE to enter the
functions mode while playing a
disc.
2 Press RND (random), while
“MODE” is still flashing on the
display, so that “FLDR RND” or
“DISC RND” appears on the
display.
Each time you press the button,
the random play mode changes
as follows:
DISC RNDFLDR RND
Canceled
RND and (folder) indicators
2 Press RPT (repeat), while
“MODE” is still flashing on the
display, so that “TRK RPT” or
“FLDR RPT” appears on the
display.
Each time you press the button,
the repeat play mode changes
as follows:
TRK RPT FLDR RPT
Canceled
RPT indicator
Ex.: When you select “TRK RPT”
while listening to an MP3 file
Mode
TRK RPT RPT indicator The current (or
FLDR RPT and RPT All files of the
Active
indicator
lights up. specified) file.
indicators current (or
light up. specified) folder.
Plays repeatedly
28
Ex.: When you select “FLDR RND”
while listening to an MP3 file
Page 29
SOUND ADJUSTMENTS
Selecting preset sound modes
(C-EQ: custom equalizer)
You can select a preset sound mode (C-EQ:
custom equalizer) suitable to the music genre.
• There is a time limit in doing the following
procedure. If the setting is canceled before you
finish, start from step 1 again.
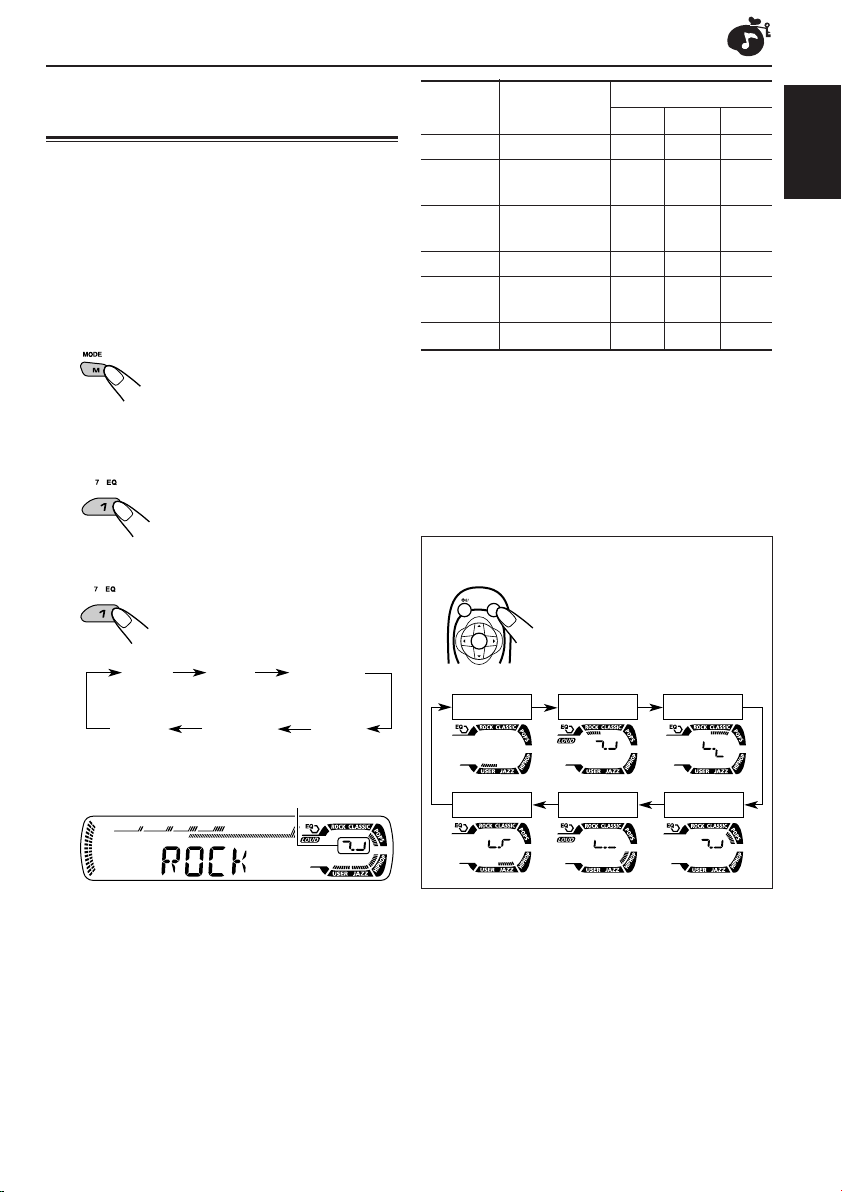
1
Press M MODE to enter the functions
mode.
2
Press EQ (equalizer) while “MODE”
is still flashing on the display.
You can confirm the current
sound mode.
3
Select the sound mode you want.
Each time you press the
button, the sound modes
change as follows:
USER
ROCK
CLASSIC
Indication For: Preset values
BAS TRE LOUD
USER (Flat sound) 00 00 OFF
ROCK Rock or +03 +01 ON
CLASSIC Classical +01 –02 OFF
POPS Light music +04 +01 OFF
HIP HOP Funk or rap +02 00 ON
JAZZ Jazz music +02 +03 OFF
Note:
You can adjust each sound mode to your preference.
Once you make an adjustment, it is automatically
stored for the currently selected sound mode. See
“Adjusting the sound” on page 30.
disco music
music
music
When using the remote controller:
SOUND
ATT
U
SOURCE
F
R
D
Press SOUND repeatedly.
Each time you press the
button, the sound modes
change as follows:
ENGLISH
POPSHIP HOPJAZZ
Indication pattern changes for each
sound mode except for “USER.”
Ex.: When you select “ROCK”
JAZZ
HIP HOP
CLASSICROCKUSER
POPS
29
Page 30

Adjusting the sound
You can adjust the sound characteristics to your
preference.
ENGLISH
1
Select the item you want to adjust.
Each time you press the
button, the adjustable items
change as follows:
BAS
(bass)
VOL
(volume)
Indication To do: Range
1
BAS*
1
TRE*
2
FAD *
BAL Adjust the left L06 (Left only)
1
LOUD*
SUB. W*3Adjust the 00 (min.)
4
VOL*
TRE
(treble)
Adjust the bass. –06 (min.)
Adjust the treble. –06 (min.)
Adjust the front R06 (Rear only)
and rear speaker |
balance. F06 (Front only)
and right speaker |
balance. R06 (Right only)
Boost low and
high frequencies LOUD ON
to produce a well- |
balanced sound LOUD OFF
at low volume
level.
subwoofer |
output level. 08 (max.)
Adjust the volume. 00 (min.)
FAD
(fader)
SUB. W
(subwoofer)
(loudness)
|
+06 (max.)
|
+06 (max.)
|
30 or 50 (max.)*
BAL
(balance)
LOUD
1
*
When you adjust the bass, treble, or loudness, the
adjustment you have made is stored for the
currently selected sound mode (C-EQ) including
“USER.”
2
*
If you are using a two-speaker system, set the fader
level to “00.”
3
*
This takes effect only when a subwoofer is
connected.
4
*
Normally the control dial works as the volume
control. So you do not have to select “VOL” to
adjust the volume level.
5
*
Depending on the amplifier gain control setting.
(See page 34 for details.)
2
Adjust the setting.
To increase the level or
turn on the loudness
To decrease the level or
turn off the loudness
Indication pattern changes as
you adjust the bass or treble.
Ex. 1: When you adjust “TRE” (treble)
Ex. 2: When you turn on the loudness
3
Repeat steps 1 and 2 to adjust the
other items.
To reset each sound mode to the factory
settings, repeat the same procedure and
reassign the preset values listed in the table on
page 29.
5
30
Page 31

OTHER MAIN FUNCTIONS
Changing the general settings
3
Adjust the PSM item selected.
(PSM)
You can change the items listed in the table
below and on page 32 by using the PSM
(Preferred Setting Mode) control.
Basic Procedure
1
Press and hold SEL (select) for more
than 2 seconds so that one of the
PSM items appears on the display.
(See below and page 32.)
2
Select the PSM item you want to
adjust.
Preferred Setting Mode (PSM) items
• For detailed operations of each PSM items, refer to the pages listed in the table.
4
Repeat steps 2 and 3 to adjust the
other PSM items if necessary.
5
Finish the setting.
ENGLISH
Indications Selectable values/items
DEMO Display demonstration
CLOCK H Hour adjustment
CLOCK M Minute adjustment
COLOR Display color
24H/12H 24/12-hour time display
AUTO ADJ Automatic clock setting
AF-REG Alternative frequency/
Regionalization reception
1
*
Displayed only when the “DAB AF” is set to “OFF.”
DEMO ONDEMO OFF
0 — 23 (1 — 12)
00 — 59
(See page 33.)
12H 24H
OFF ON
AF AF REG
1
OFF*
CONTINUED ON THE NEXT PAGE
Factory-preset See
settings page
DEMO ON 8
0 (0:00)
00 (0:00)
ALL DEMO 33
24H
ON
AF
9
9
18
13, 14
31
Page 32

Indications Selectable values/items
PTY STBY PTY standby
ENGLISH
TA VOL Traffic announcement
volume
OFF
29 programme types
(see page 19)
VOL 00 — VOL 30 or 50*
Factory-preset See
settings page
OFF
2
VOL 20
15
18
P-SEARCH Programme search
DAB AF*3Alternative frequency
search
DAB VOL*3DAB volume adjustment
LEVEL Level display
DIMMER Dimmer mode
OFF ON
AF OFF AF ON
VOL –12 — VOL 12
OFF
AUTO OFF
ON
TEL Telephone muting
OFF
MUTING 1
MUTING 2
BEEP Key-touch tone
SCROLL Scroll mode
OFF ON
ONCE AUTO
OFF
4
EXT IN*
TAG DISP Tag display
AMP GAIN Amplifier gain control
2
*
Depending on the amplifier gain control setting. (See page 34 for details.)
3
*
Displayed only when the DAB tuner is connected.
4
*
Displayed only when one of the following sources is selected—FM, AM, and CD.
External component
CHANGER LINE IN CHANGER
TAG OFF TAG ON TAG ON 34
LOW PWR HIGH PWR HIGH PWR 34
OFF
AF ON
VOL 00
ON ON
AUTO
OFF
ON 33
ONCE
18
46
46
33
33
33
33
34
32
Page 33

To select the display color—COLOR
You can select the color of the display according
to your preference.
When shipped from the factory, “ALL DEMO” is
selected.
The selectable colors are as follows:
ALL DEMO O SOURCE O BLUE O
OCEAN O PURPLE O PINK O ROSE O
RED O (back to the beginning)
• ALL DEMO: The display color changes every 6
seconds (rose = pink = ocean =
red = purple = blue = back to
the beginning).
• SOURCE: The display color is fixed to red
while listening to FM or AM, blue
while listening to CD, and purple
while listening to external
component.
To select the level meter—LEVEL
You can activate or deactivate the level meter
according to your preference.
When shipped from the factory, level meter is
activated.
• ON: Shows the audio level indicator.
• OFF: Cancels the audio level indicator;
sound mode indicator is shown.
To select the dimmer mode—DIMMER
When you turn on the car headlights, the display
automatically dims (Auto Dimmer).
When shipped from the factory, Auto Dimmer
mode is activated.
• AUTO: Activates Auto Dimmer.
• OFF: Cancels Auto Dimmer.
• ON: Always dims the display.
To select the telephone muting—TEL
This mode is used when a cellular phone system
is connected. Depending on the phone system
used, select either “MUTING 1” or “MUTING 2”
whichever mutes the sounds from this unit.
When shipped from the factory, this mode is
deactivated.
• MUTING 1: Select if this setting can mute the
sounds.
• MUTING 2: Select if this setting can mute the
sounds.
• OFF: Cancels the telephone muting.
To turn on/off the key-touch tone—BEEP
You can deactivate the key-touch tone if you do
not want it to beep each time you press a button.
When shipped from the factory, the key-touch
tone is activated.
• ON: Activates the key-touch tone.
• OFF: Deactivates the key-touch tone.
To select the scroll mode—SCROLL
You can select the scroll mode for the disc
information (when the entire text cannot be
shown at once).
When shipped from the factory, scroll mode is set
to “ONCE.”
• ONCE: Scrolls only once.
• AUTO: Repeats the scroll (5-second
intervals in between).
• OFF: Cancels scroll mode.
Note:
Even if the scroll mode is set to “OFF,” you can scroll
the display by pressing DISP (display) for more than
one second.
ENGLISH
Note:
Auto Dimmer equipped for this unit may not work
correctly on some vehicles, particularly on those
having a control dial for dimming.
In this case, set the dimmer mode to “ON” or “OFF.”
CONTINUED ON THE NEXT PAGE
33
Page 34

To select the external component to use
—EXT IN
You can connect the external component to the
CD changer jack on the rear using the Line Input
ENGLISH
Adapter KS-U57 (not supplied).
To use the external component as the playback
source through this unit, you need to select
which component—CD changer or external
component—to use.
When shipped from the factory, CD changer is
selected as the external component.
• CHANGER: To use the CD changer.
• LINE IN: To use the external component
other than CD changer.
Note:
For connecting the Line Input Adapter KS-U57 and
the external component, refer to the Installation/
Connection Manual (separate volume).
To select the amplifier gain control
—AMP GAIN
You can change the maximum volume level of
this unit. When the maximum power of the
speakers is less than 50 W, select “LOW PWR”
to prevent them from being damaged.
When shipped from the factory, “HIGH PWR” is
selected.
• LOW PWR: You can adjust the volume level
from “VOL 00” to “VOL 30.”
Note:
If you change the setting from “HIGH
PWR” to “LOW PWR” while
listening at a volume level more than
30, the unit automatically changes the
volume level to “VOL 30.”
• HIGH PWR: You can adjust the volume level
from “VOL 00” to “VOL 50.”
To turn the tag display on or off
—TAG DISP
An MP3/WMA file can contain file information
called “ID3 Tag” where its album name,
performer, track title, etc. are recorded.
There are two versions–ID3v1 (ID3 Tag version
1) and ID3v2 (ID3 Tag version 2). If both ID3v1
and ID3v2 are recorded on a disc, ID3v2
information will be shown.
When shipped from the factory, “TAG ON” is
selected.
• TAG ON: Turns on the ID3 tag display while
playing MP3/WMA files.
• If an MP3/WMA file does not
have ID3 tags, folder name and
file name appear.
• TAG OFF: Turns off the ID3 tag display while
playing MP3/WMA files. (Only the
folder name and file name can be
shown.)
Assigning names to the source
You can assign names to CDs (both in this unit
and in the CD changer).
After assigning a name, it will appears on the
display when you select the source.
Source Maximum number of characters
CDs* Up to 32 characters (up to 40
discs)
* You cannot assign a name to a CD Text or an MP3/
WMA disc.
1
Select a source you want to assign a
name to.
CD CD-CH
When you select a source, the power
automatically comes on.
34
Page 35

2
While pressing DISP (display), press
and hold SEL (select) for more than
2 seconds.
Notes:
• When you try to assign a name to the 41st disc,
“NAME FULL” appears on the display. (In this
case, delete unwanted names before assignment.)
• When the CD changer is connected, you can assign
names to CDs in the CD changer. These names can
also be shown on the display if you insert the CDs
in this unit.
Changing the standard plate
ENGLISH
Ex.: When you select CD as the source
3
Select a character.
A B C D E F G H I J
K L M N O P Q R S T
U V W X Y Z
4 5 6 7 8 9
space
4
Move the cursor to the next
(or previous) character position.
5
Repeat steps 3 and 4 until you
finish entering the name.
6
Finish the procedure while the last
selected character is flashing.
0 1 2 3
–
You can change the standard plate with another
plate supplied with your unit.
You can also download them by visiting
<http://www.jvc.co.jp/jvccar>.
• When changing the plate, be careful not to
leave your fingerprints on the plate or cover.
1
Loosen the screws with the supplied
hex screwdriver.
<
/
>
2
Remove the plate cover and the
standard plate.
Standard plate
Plate cover
To erase the input characters
To erase all the characters at a time, press and
hold DISP (display) for more than 1 second as
described in the procedure above.
CONTINUED ON THE NEXT PAGE
35
Page 36

3
Replace with another plate (a
standard, cutout, or downloaded
plate) of your preference.
ENGLISH
• When attaching a standard plate
Standard plate
• When attaching a cutout or downloaded
Plate cover
Plate cover
plate
Add the transparent plate (supplied)
between the cutout or downloaded plate
and the plate cover in order to attach the
plate cover in place.
Cutout or
downloaded
plate
Notes:
• Be sure to keep the hex screwdriver for future use.
• Two spare screws for the plate cover attachment are
provided with the unit. See the Installation/
Connection Manual (separate volume).
• When you attach the plate cover, do not tighten the
screws too hard; otherwise, the plate cover might be
cracked.
How to use the cutout plates
1 Unfold the supplied cutout plates.
2 Cut the plates out using a scissors.
Transparent plate
(supplied)
When attaching the plate cover
Openings
Protruding parts
Ensure the two protruding parts at the bottom
of the plate cover are inserted into the two
openings on the control panel, as illustrated.
36
3 Trim out the window and two knobs using
a knife on a rubber mat.
Page 37

Detaching the control panel
You can detach the control panel when leaving
the car.
When detaching or attaching the control panel,
be careful not to damage the connectors on the
back of the control panel and on the panel
holder.
Detaching the control panel
Before detaching the control panel, be sure to
turn off the power.
1
Unlock the control panel.
2
Pull the control panel out of the unit.
3
Put the detached control panel into
the provided case.
Attaching the control panel
1
Insert the right side of the control
panel into the groove on the panel
holder.
2
Press the left side of the control
panel to fix it to the panel holder.
Note on cleaning the connectors:
If you frequently detach the control panel, the
connectors will deteriorate.
To minimize this possibility, periodically wipe the
connectors with a cotton swab or cloth moistened
with alcohol, being careful not to damage the
connectors.
ENGLISH
Connectors
37
Page 38

ENGLISH
CD CD-CH*
CD CHANGER OPERATIONS
We recommend that you use the JVC MP3compatible CD changer with your unit.
By using this CD changer, you can play back
your original CD-Rs (Recordable) and CD-RWs
(Rewritable) recorded either in audio CD format
or in MP3 format.
• You can also connect other CH-X series
CD changers (except CH-X99 and CH-X100).
However, they are not compatible with MP3
discs, so you cannot play back MP3 discs.
• You cannot use the KD-MK series CD
changers with this unit.
Before operating your CD changer:
• Refer also to the Instructions supplied for
your CD changer.
• If no discs are in the magazine of the CD
changer or the discs are inserted upside
down, “NO DISC” will appear on the display.
If this happens, remove the magazine and
set the discs correctly.
• If no magazine is loaded in the CD changer,
“NO MAG” appears on the display. If this
happens, insert the magazine in the CD
changer.
• If “RESET 1” – “RESET 8” appears on the
display, something is wrong with the
connection between this unit and the CD
changer. If this happens, check the
connection and make sure the cords are
connected firmly. Then, press the reset
button of the CD changer.
Playing discs
Select the CD changer (CD-CH).
* If you have changed “EXT IN” setting to “LINE IN”
(see page 34), you cannot select the CD changer.
• When the current disc is an MP3 disc:
Playback starts from the first folder of the
current disc once file check is completed.
Selected disc number
MP3 indicator
(folder) indicator Selected folder
number
Note:
You cannot control and play any WMA disc on the CD
changer.
38
Note:
Folder name appears on the display instead of
“ROOT,” if an MP3 disc contains a folder.
Page 39

• When the current disc is a CD:
Playback starts from the first track of the
current disc.
Selected disc number
Elapsed playing
time
Current track
number
To go to a particular disc directly
Press the number button corresponding to the
disc number to start its playback (while the CD
changer is playing).
ENGLISH
• To select a disc number from 1 – 6:
Press 1 (7) – 6 (12) briefly.
• To select a disc number from 7 – 12:
Press and hold 1 (7) – 6 (12) for more than
one second.
To fast-forward or reverse the track/file
Press and hold ¢ ,
during play, to fast-forward
the track/file.
Notes:
• When you press CD CD-CH, the power
automatically comes on. You do not have to press
to turn on the power.
• If you change the source, CD changer play also
stops. Next time you select the CD changer as the
source, CD changer play starts from where
playback has been stopped previously.
• When you start playing back a CD Text or MP3
disc, disc information will automatically appear on
the display. (See pages 23 and 26.)
Press and hold 4 , during play, to reverse
the track/file.
Note:
During this operation, you can only hear intermittent
sounds. (The elapsed playing time also changes
intermittently on the display.)
To skip to the next or previous tracks/files
Press ¢ briefly
during play, to skip ahead
to the beginning of the next
track/file.
Each time you press the
button consecutively, the
beginning of the next
tracks/files is located and
played back.
Press 4 briefly during play, to skip back to
the beginning of the current track/file.
Each time you press the button consecutively,
the beginning of the previous tracks/files is
located and played back.
39
Page 40

This operation is only possible when
using JVC MP3-compatible CD changer
(CH-X1500).
To go to a track/file quickly (+10 and –10
ENGLISH
buttons)
1 Press M MODE to enter the functions mode
while playing a disc.
To skip to the next or previous folder
(only for MP3 discs)
Press 5 (up) while playing an
MP3 disc, to go to the next
folder.
Each time you press the button
consecutively, the next folder is
located, and the first file in the
folder starts playback.
2 Press +10 or –10.
To skip 10 tracks/files*
forwards to the last track/file
To skip 10 tracks/files*
backwards to the first track/
file
* First time you press +10 or –10 button, the
track/file skips to the nearest higher or lower
track/file with a track/file number of multiple
ten (ex. 10th, 20th, 30th).
Then each time you press the button, you can
skip 10 tracks/files (see “How to use the +10
and –10 buttons” below).
• After the last track/file, the first track/file will
be selected, and vice versa.
Note:
If the current playing disc is an MP3 disc, files are
skipped within the same folder.
How to use the +10 and –10 buttons
• Ex. 1: To select track/file number 32 while
playing track/file number 6
Press ∞ (down) while playing an MP3 disc, to go
to the previous folder.
Each time you press the button consecutively,
the previous folder is located, and the first file in
the folder starts playback.
To show the disc information for CD Text
and MP3 discs
This is possible only when connecting a JVC CD
changer equipped with CD Text and/or MP3 disc
information reading capability.
Select text display mode while playing a
CD Text or an MP3 disc.
• For details, see page 23 about CD Text disc
information and page 26 about MP3 disc
information.
(Three times) (Twice)
Track/File 6 \ 10 \ 20 \ 30 \ 31 \ 32
• Ex. 2 :To select track/file number 8 while
playing track/file number 36
(Three times) (Twice)
Track/File 36 \ 30 \ 20 \ 10 \ 9 \ 8
40
Page 41

Selecting the playback modes
To play back tracks/files at random
(Folder Random/Disc Random/Magazine
Random Play)
1 Press M MODE to enter the
functions mode during play.
2 Press RND (random), while
“MODE” is still flashing on the
display.
Each time you press the button,
the random play mode changes
as follows:
For MP3 discs:
DISC RNDFLDR RND
Canceled
For CDs:
RND indicator
MAG RND
MAG RNDDISC RND
Canceled
To play back tracks/files repeatedly
(Track Repeat/Folder Repeat/Disc Repeat
Play)
1 Press M MODE to enter the
functions mode during play.
2 Press RPT (repeat), while
“MODE” is still flashing on the
display.
Each time you press the button,
the repeat play mode changes
as follows:
For MP3 discs:
TRK RPT
Canceled
For CDs:
TRK RPT DISC RPT
(disc) and RPT indicators
FLDR RPT
DISC RPT
Canceled
ENGLISH
Ex.: When you select “MAG RND”
Note:
MP3 indicator also lights up if the current playing disc
is an MP3 disc.
Mode
FLDR RND* RND and All files of the
DISC RND RND and All tracks/files of
MAG RND RND indicator All tracks/files of
* “FLDR RND” is only applicable for MP3 discs.
Active
indicator
indicators current folder, then
light up. files of the next
indicators the current (or
light up. specified) disc.
lights up. the inserted discs.
Plays at random
folder and so on.
Ex.: When you select “DISC RPT”
Note:
MP3 indicator also lights up if the current playing disc
is an MP3 disc.
Mode
TRK RPT RPT indicator The current (or
FLDR RPT* and RPT All files of the
DISC RPT and RPT All tracks/files of
* “FLDR RPT” is only applicable for MP3 discs.
Active
indicator
lights up. specified) track/
indicators current (or
light up. specified) folder of
indicators light the current (or
up. specified) disc.
Plays repeatedly
file.
the current disc.
41
Page 42

ENGLISH
EXTERNAL COMPONENT OPERATIONS
Playing an external component
You can connect the external component to the
CD changer jack on the rear using the Line Input
Adapter KS-U57 (not supplied).
Preparations:
• For connecting the Line Input Adapter KS-U57 and
the external component, refer to the Installation/
Connection Manual (separate volume).
• Before operating the external component using the
following procedure, select the external input
correctly. See “To select the external component to
use—EXT IN” on page 34.
1
Select the external component
(LINE IN).
CD LINE IN*
• If “LINE IN”* does not appear on the display,
see page 34 and select the external input
(“LINE IN”).
* Displayed only when one of the following sources is
selected—FM, AM, and CD.
2
Turn on the connected component
and start playing the source.
3
Adjust the volume.
4
Adjust the sound as you want. (See
pages 29 and 30.)
Note on One-Touch Operation:
When you press CD CD-CH, the power automatically
comes on. You do not have to press to turn
on the power.
42
Page 43

DAB TUNER OPERATIONS
ENGLISH
We recommend that you use DAB (Digital Audio
Broadcasting) tuner KT-DB1500 or KT-DB1000
with your unit.
If you have another DAB tuner, consult your JVC
IN-CAR ENTERTAINMENT dealer.
• Refer also to the Instructions supplied for your
DAB tuner.
What is DAB system?
DAB is one of the digital radio broadcasting
systems available today. It can deliver CD
quality sound without any annoying
interference and signal distortion.
Furthermore, it can carry text, pictures, and
data.
In contrast to FM broadcast, where each
programme is transmitted on its own
frequency, DAB combines several
programmes (called “services”) to form one
“ensemble.”
In addition, each “service”—called “primary
service”—can also be divided into its
components (called “secondary service”).
With the DAB tuner connected with this unit,
you can enjoy these DAB services.
Tuning in to an ensemble and
one of the services
A typical ensemble has 6 or more programmes
(services) broadcast at the same time. After
tuning in to an ensemble, you can select a
service you want to listen to.
Before you start....
Press FM/AM DAB briefly if CD, CD changer, or
external component is the current source.
1
Select the DAB tuner.
Each time you press and
hold the button, the DAB
tuner and the FM/AM tuner
are alternately selected.
FM/AMDAB
2
Select the DAB band (DAB1, DAB2,
or DAB3).
Each time you press the
button, the DAB band
changes as follows:
DAB1 DAB2 DAB3
Note:
When reception switches between DAB and FM, the
listening volume level may increase or decrease
inconveniently. This change in the volume level results
from unequal audio injection levels at broadcaster
site, but not from the malfunction of this unit.
To prevent this inconvenience, you can adjust the DAB
volume level. (See “To adjust the DAB volume level”
on page 46.)
Note:
This receiver has three DAB bands (DAB1,
DAB2, DAB3). You can use any of them to tune
in to an ensemble.
CONTINUED ON THE NEXT PAGE
43
Page 44

3
Start searching for an ensemble.
To search for ensembles of
higher frequency
ENGLISH
To search for ensembles of lower frequency
When an ensemble is received, searching
stops.
To stop searching before an ensemble is
received, press the same button you have
pressed for searching.
4
Select a service (either primary or
secondary) you want to listen to.
To select the next service
(If a primary service has
some secondary services,
they are selected before the
next primary service is
selected.)
To tune in to a particular ensemble
without searching
Before you start....
Press FM/AM DAB briefly if CD, CD changer, or
external component is the current source.
1 Press and hold FM/AM DAB to select DAB
tuner as the source.
2 Press FM/AM DAB repeatedly to select the
DAB band (DAB1, DAB2, or DAB3).
3 Press and hold ¢ or 4 for more
than one second.
4 Press ¢ or 4 repeatedly until the
ensemble you want is reached.
• If you hold down the button, the frequency
keeps changing until you release the
button.
5 Press 5 (up) or ∞ (down) to select a service
(either primary or secondary) you want to
listen to.
To restore the FM/AM tuner
Press and hold FM/AM DAB again.
To select the previous service (either
primary or secondary)
To change the display information while
tuning in to an ensemble
Normally service name is shown on the display.
If you want to check the ensemble name or its
frequency, press DISP (display) repeatedly.
Each time you press the button,
the following information appears
for a while on the display.
Service name
Ensemble name
Channel number
Frequency
Clock
44
Storing DAB services in memory
You can preset up to 6 DAB services in each
DAB band (DAB1, DAB2, and DAB3) manually.
Before you start....
Press FM/AM DAB briefly if CD, CD changer, or
external component is the current source.
1
Select the DAB tuner.
Each time you press and
hold the button, the DAB
tuner and the FM/AM tuner
are alternately selected.
FM/AMDAB
2
Select the DAB band (DAB1, DAB2,
or DAB3) you want.
Each time you press the
button, the DAB band
changes as follows:
DAB1 DAB2 DAB3
Page 45

3
Tune in to an ensemble you want.
Tuning in to a preset DAB
service
4
Select a service of the ensemble you
want to listen to.
To select the next service
To select the previous service
5
Press and hold the number button
(in this example, 1) for more than 2
seconds to store the selected
service into the preset number you
want.
Selected preset number
6
Repeat the above procedure to store
other DAB services into other preset
numbers.
You can easily tune in to a preset DAB service.
Remember that you must store services first. If
you have not stored them yet, see “Storing DAB
services in memory” on pages 44 and 45.
Before you start....
Press FM/AM DAB briefly if CD, CD changer, or
external component is the current source.
1
Select the DAB tuner.
Each time you press and
hold the button, the DAB
tuner and the FM/AM tuner
are alternately selected.
FM/AMDAB
2
Select the DAB band (DAB1, DAB2,
or DAB3) you want.
Each time you press the
button, the DAB band
changes as follows:
DAB1 DAB2 DAB3
3
Select the number (1 – 6) for the
preset DAB service (primary) you
want.
ENGLISH
Notes:
• You can only preset primary DAB services. If you
store a secondary service, its primary service will
be stored instead.
• A previously preset DAB service is erased when a
new DAB service is stored in the same preset
number.
• Preset DAB services are erased when the power
supply to the memory circuit is interrupted (for
example, during battery replacement). If this
occurs, preset the DAB services again.
Note:
If the selected primary service has some secondary
services, pressing the same number button repeatedly
will tune in to the secondary services.
45
Page 46

What you can do more with
DAB
Tracing the same programme automatically
ENGLISH
(Alternative Reception)
You can keep listening to the same programme.
• While receiving a DAB service:
When driving in an area where a service
cannot be received, this unit automatically
tunes in to another ensemble or FM RDS
station, broadcasting the same programme.
• While receiving an FM RDS station:
When driving in an area where a DAB service
is broadcasting the same programme as the
FM RDS station is broadcasting, this unit
automatically tunes in to the DAB service.
To use Alternative Reception
When shipped from the factory, Alternative
Reception is activated.
• See also “Changing the general settings
(PSM)” on page 31.
1 Press and hold SEL (select) for more than
2 seconds so that one of the PSM items
appears on the display.
2 Press ¢ or 4 to select “DAB AF”
(alternative frequency).
3 Turn the control dial to select the desired
mode.
• AF ON: Traces the programme among
• AF OFF: Alternative Reception is
4 Press SEL (select) to finish the setting.
DAB services and FM RDS
stations—Alternative Reception.
The AF indicator lights up on the
display (see page 13).
deactivated.
To adjust the DAB volume level
You can adjust the volume level of DAB tuner
and store it in memory. By adjusting the volume
level properly to match it to the FM sound level,
you will not need to adjust the volume level each
time you change the source.
When shipped from the factory, DAB volume
level is set at “00.”
• See also “Changing the general settings
(PSM)” on page 31.
1 Press and hold SEL (select) for more than
2 seconds so that one of the PSM items
appears on the display.
2 Press ¢ or 4 to select “DAB VOL”
(volume).
3 Turn the control dial to set to the desired
volume.
You can set it from “VOL –12” to “VOL 12.”
4 Press SEL (select) to finish the setting.
Note:
When Alternative Reception (for DAB services) is
activated, Network-Tracking Reception (for RDS
stations: see page 13) is also activated automatically.
On the other hand, Network-Tracking Reception
cannot be deactivated without deactivating
Alternative Reception.
46
Page 47

TROUBLESHOOTING
What appears to be trouble is not always serious. Check the following points before calling a service
center.
Symptoms
• Sound cannot be heard
from the speakers.
• This unit does not work
at all.
General
• SSM (Strong-station
Sequential Memory)
automatic preset does
not work.
FM/AM
• Static noise while
listening to the radio.
• Disc cannot be played
back.
• CD-R/CD-RW cannot be
played back.
• Tracks on the CD-R/
CD-RW cannot be
skipped.
Causes
The volume level is set to the
minimum level.
Connections are incorrect.
The built-in microcomputer may
have functioned incorrectly due
to noise, etc.
Signals are too weak.
The aerial is not connected
firmly.
Disc is inserted upside down.
CD-R/CD-RW is not finalized.
Remedies
Adjust it to the optimum level.
Check the cords and connections.
Press the reset button on the
panel holder after detaching the
control panel. (The clock setting
and preset stations stored in
memory are erased.)
(See page 2.)
Store stations manually.
Connect the aerial firmly.
Insert the disc correctly.
• Insert a finalized CD-R/
CD-RW.
• Finalize the CD-R/CD-RW
with the component which
you used for recording.
ENGLISH
• Disc cannot be ejected.
• Disc sound is sometimes
interrupted.
Disc Playback
• “NO DISC” appears on
the display.
Disc is locked.
You are driving on rough roads.
Disc is scratched.
Connections are incorrect.
No disc in the loading slot.
Disc is inserted incorrectly.
Unlock the disc.
(See page 23.)
Stop playback while driving on
rough roads.
Change the disc.
Check the cords and connections.
Insert a disc into the loading
slot.
Insert the disc correctly.
47
Page 48

Symptoms
Causes
Remedies
• Disc cannot be played
ENGLISH
• Noise is generated.
• A longer readout time is
• Files cannot be played back
MP3/WMA Playback
• Elapsed playing time is not
back.
required (“CHECK” keeps
flashing on the display).
as you have intended them
to play.
correct.
No MP3/WMA files are
recorded on the disc.
MP3/WMA files do not have
the extension code <.mp3> or
<.wma> in their file names.
MP3/WMA files are not
recorded in the format
compliant with ISO 9660 Level
1, Level 2, Romeo, or Joliet.
The file played back is not an
MP3/WMA file (although it has
the extension code <.mp3> or
<.wma>).
Readout time varies due to
the complexity of the folder/file
configuration.
Playback order is determined
when the files are recorded.
This sometimes occurs during
play. This is caused by how
the files are recorded on the
disc.
Change the disc.
Add the extension code
<.mp3> or <.wma> to their file
names.
Change the disc.
(Record MP3/WMA files using a
compliant application.)
Skip to another file or change
the disc. (Do not add the
extension code <.mp3> or
<.wma> to non-MP3 or nonWMA files.)
Do not use too many hierarchies
and folders.
48
• indicator flashes on the
display.
• “NO FILES” appears on the
display.
• Correct characters are not
displayed (e.g. album
name).
The current folder does not
contain any MP3/WMA file.
The current disc does not
contain any MP3/WMA file.
This unit can only display
alphabets (capital: A–Z),
numbers, and a limited
number of symbols.
Select another folder.
Insert a disc that contains MP3/
WMA files.
Page 49

Symptoms
Causes
Remedies
• “NO DISC” appears on the
display.
• “NO MAG” appears on the
display.
• “RESET 8” appears on the
display.
• “RESET 1” – “RESET 7”
appears on the display.
• The CD changer does not
work at all.
No disc is in the magazine.
Discs are inserted upside down.
No magazine is loaded in the
CD changer.
This unit is not connected to the
CD changer correctly.
The built-in microcomputer may
function incorrectly due to
noise, etc.
Insert discs into the
magazine.
Insert discs correctly.
Insert the magazine.
Connect this unit and the
CD changer correctly and
press the reset button of the
CD changer.
Press the reset button of the
CD changer.
Press the reset button on the
panel holder after detaching
the control panel. (The clock
setting and preset stations
stored in memory are
erased.) (See page 2.)
About mistracking:
Mistracking may result from driving on extremely rough roads. This does not damage the unit and the disc,
but will be annoying.
We recommend that you stop disc play while driving on such rough roads.
ENGLISH
CD Changer
49
Page 50

MAINTENANCE
Handling discs
This unit has been designed to reproduce CDs,
CD-Rs (Recordable), CD-RWs (Rewritable), and
CD Texts.
ENGLISH
• This unit is also compatible with MP3 and
WMA discs.
How to handle discs
When removing a disc
from its case, press down
the center holder of the case
and lift the disc out, holding
it by the edges.
• Always hold the disc by the edges. Do not
touch its recording surface.
When storing a disc into its case, gently insert
the disc around the center holder (with the
printed surface facing up).
• Make sure to store discs into the cases after
use.
To keep discs clean
A dirty disc may not be played
correctly. If a disc does become
dirty, wipe it with a soft cloth in a
straight line from center to edge.
To play new discs
New discs may have some rough
spots around the inner and outer
edges. If such a disc is used, this
unit may reject the disc.
To remove these rough spots, rub
the edges with a pencil or ball-point pen, etc.
Moisture condensation
Moisture may condense on the lens inside the
CD player in the following cases:
• After starting the heater in the car.
• If it becomes very humid inside the car.
Should this occur, the CD player may
malfunction. In this case, eject the disc and leave
the unit turned on for a few hours until the
moisture evaporates.
Center holder
When playing a CD-R or CD-RW
Before playing back CD-Rs or CD-RWs, read
their instructions or cautions carefully.
• Use only “finalized” CD-Rs or CD-RWs.
• Some CD-Rs or CD-RWs may not be played
back on this unit because of their disc
characteristics, and for the following reasons:
– Discs are dirty or scratched.
– Moisture condensation on the lens inside the
unit.
– The pickup lens inside the unit is dirty.
• CD-RWs may require a longer readout time
since the reflectance of CD-RWs is lower than
that of regular CDs.
• CD-Rs or CD-RWs are susceptible to high
temperatures or high humidity, so do not leave
them inside your car.
• Do not use following CD-Rs or CD-RWs:
– Discs with stickers, labels, or protective seal
stuck to the surface.
– Discs on which labels can be directly printed
by an ink jet printer.
Using these discs under high temperatures or
high humidity may cause malfunctions or
damage to discs. For example,
– Stickers or labels may shrink and warp a
disc.
– Stickers or labels may be peeled off so discs
cannot be ejected.
– Print on discs may get sticky.
Read instructions or cautions about labels and
printable discs carefully.
CAUTIONS:
• Do not insert 8 cm discs (single CDs) into the
loading slot. (Such discs cannot be ejected.)
• Do not insert any disc of unusual shape—like a
heart or flower; otherwise, it will cause a
malfunction.
• Do not expose discs to direct sunlight or any
heat source or place them in a place subject to
high temperature and humidity. Do not leave
them in a car.
• Do not use any solvent (for example,
conventional record cleaner, spray, thinner,
benzine, etc.) to clean discs.
50
Warped
disc
Sticker
Sticker
residue
Disc
Stick-on
label
Page 51

SPECIFICATIONS
AUDIO AMPLIFIER SECTION
Maximum Power Output:
Front: 50 W per channel
Rear: 50 W per channel
Continuous Power Output (RMS):
Front: 19 W per channel into 4 Ω, 40 Hz
to 20 000 Hz at no more than
0.8% total harmonic distortion.
Rear: 19 W per channel into 4 Ω, 40 Hz
to 20 000 Hz at no more than
0.8% total harmonic distortion.
Load Impedance: 4 Ω (4 Ω to 8 Ω allowance)
Tone Control Range:
Bass: ±10 dB at 100 Hz
Treble: ±10 dB at 10 kHz
Frequency Response: 40 Hz to 20 000 Hz
Signal-to-Noise Ratio: 70 dB
Line-Out Level/Impedance:
2.0 V/20 kΩ load (full scale)
Output Impedance: 1 kΩ
Subwoofer-Out Level/Impedance:
2.0 V/20 kΩ load (full scale)
Cut off frequency: 120 Hz (fixed)
TUNER SECTION
Frequency Range:
FM: 87.5 MHz to 108.0 MHz
AM: (MW) 522 kHz to 1 620 kHz
(LW) 144 kHz to 279 kHz
[FM Tuner]
Usable Sensitivity:
11.3 dBf (1.0 µV/75 Ω)
50 dB Quieting Sensitivity:
16.3 dBf (1.8 µV/75 Ω)
Alternate Channel Selectivity (400 kHz):
65 dB
Frequency Response: 40 Hz to 15 000 Hz
Stereo Separation: 30 dB
Capture Ratio: 1.5 dB
CD PLAYER SECTION
Type: Compact disc player
Signal Detection System: Non-contact optical
pickup (semiconductor laser)
Number of channels: 2 channels (stereo)
Frequency Response: 5 Hz to 20 000 Hz
Dynamic Range: 96 dB
Signal-to-Noise Ratio: 98 dB
Wow and Flutter: Less than measurable limit
MP3 decoding format:
MPEG 1/2 Audio Layer 3
Max. Bit Rate: 320 Kbps
WMA (Windows Media® Audio) decoding format:
Max. Bit Rate: 192 Kbps
GENERAL
Power Requirement:
Operating Voltage:
DC 14.4 V (11 V to 16 V allowance)
Grounding System: Negative ground
Allowable Operating Temperature: 0°C to +40°C
Dimensions (W × H × D):
Installation Size (approx.):
182 mm × 52 mm × 150 mm
Panel Size (approx.):
188 mm × 58 mm × 12 mm
Mass (approx.):
1.4 kg (excluding accessories)
Design and specifications are subject to change
without notice.
If you want some additional downloaded
plates, you can download them by visiting
<http://www.jvc.co.jp/jvccar>.
ENGLISH
[MW Tuner]
Sensitivity: 20 µV
Selectivity: 35 dB
[LW Tuner]
Sensitivity: 50 µV
51
Page 52

WICHTIG FÜR LASER-PRODUKTE
1. LASER-PRODUKT DER KLASSE 1
2. ACHTUNG: Die obere Abdeckung nicht öffnen. Das Gerät enthält keine Teile, die vom Benutzer
gewartet werden können. Wartungen nur von qualifziertem Fachpersonal durchführen lassen.
3. ACHTUNG: Sichtbare und unsichtbare Laserstrahlung bei offenem Gerät und Defekt oder
Umgehen der Verriegelung. Setzen Sie sich dem Strahl nicht direkt aus.
4. ANBRINGEN DES ETIKETTS: WARNHINWEIS-ETIKETT, AUSSEN AM GERÄT ANGEBRACHT.
DEUTSCH
Zurücksetzen des Geräts
Drücken Sie, nachdem Sie das Bedienfeld
abgenommen haben, die Rücksetztaste.
Hierzu kann z. B. die Spitze eines
Kugelschreibers verwendet werden.
Dadurch wird der eingebaute Mikro-Computer
zurückgesetzt.
Hinweis:
Ihre Voreinstellungen—wie Vorwahlkanäle oder
Klangeinstellungen—werden ebenfalls gelöscht.
Verwenden der Taste M MODE
Wenn die Taste M MODE gedrückt wird, geht das Gerät in den Funktionsbetrieb und die Zifferntasten
und Tasten 5/∞ dienen als verschiedene Funktionstasten.
Beispiel: Mit der Zifferntaste 2 kann nun in den MO (Monophon) geschaltet werden.
Countdown-Zeitanzeige
Wenn die Zifferntasten für etwa 5 Sekunden nach dem Drücken der Taste M MODE nicht bedient
werden, wird der Funktionsbetrieb beendet und die Tasten können wieder als Zifferntasten
verwendet werden.
• Die Taste M MODE nochmals drücken und der Funktionsbetrieb wird ebenfalls gelöscht.
Hinweis:
Zu diesem Gerät wird eine Identifikationskarte mitgeliefert, auf der die Gerätechassis-Nummer vermerkt ist.
Heben Sie diese Karte getrennt vom Gerät auf. Im Falle eines Diebstahls kann sie die Geräteidentifizierung
erleichtern.
2
Page 53

Wir danken Ihnen für den Kauf eines JVC Produkts. Bitte lesen Sie die Anleitung vollständig durch,
bevor Sie das Gerät in Betrieb nehmen, um sicherzustellen, daß Sie alles vollständig verstehen und
die bestmögliche Leistung des Geräts erhalten.
INHALT
Zurücksetzen des Geräts .......................... 2
Verwenden der Taste M MODE ................. 2
ANORDNUNG DER TASTEN............... 4
Bedienfeld ................................................. 4
Fernbedieneinheit ..................................... 5
Vorbereiten der Fernbedienung ................ 6
GRUNDBEDIENUNGEN .................... 7
Einschalten der Stromversorgung............. 7
Beendigung der Display-Demonstration ... 8
Stellen der Uhr .......................................... 9
RADIO-BETRIEB ............................ 10
Radiohören ............................................... 10
Speichern der Sender ............................... 11
Anwahl eines vorabgestimmten Senders...
12
RDS-BETRIEB .............................. 13
Betriebsmöglichkeiten mit der Funktion
RDS ........................................................ 13
Weitere praktische RDS-Funktionen und
-Einstellungsmöglichkeiten ..................... 18
CD-BETRIEB ................................ 20
Wiedergabe einer CD ............................... 20
Aufsuchen eines Titel oder bestimmten
Passage auf einer CD ............................ 21
Wählen der CD-Abspielbetriebsarten ....... 22
Wiedergeben einer CD mit CD-Text .......... 23
Unterdrücken des Disc-Auswurfs .............. 23
EINLEITUNG FÜR MP3/WMA ............. 24
Was ist MP3/WMA? .................................. 24
Wie werden MP3/WMA-Dateien
aufgenommen und wiedergegeben? ...... 24
MP3/WMA-BEDIENVORGÄNGE .......... 25
Wiedergabe einer Disc.............................. 25
Aufsuchen einer Datei oder bestimmten
Passage auf einer Disc........................... 26
Wählen von Wiedergabe-Modi.................. 28
KLANGEINSTELLUNG ..................... 29
Auswählen der vorprogrammierten
Klangmodi (C-EQ: eigener Equalizer) .... 29
Klang-Einstellschritte ................................ 30
ANDERE WICHTIGE FUNKTIONEN ....... 31
Ändern der allgemeinen Einstellungen
(PSM) ..................................................... 31
Zuweisung von Namen für Signalquellen ...
So wechseln Sie die Standardplatte ......... 35
Abnehmen des Bedienfelds ...................... 37
34
CD-WECHSLERBETRIEB .................. 38
Abspielen der Discs .................................. 38
Auswahl der Wiedergabemodi .................. 41
BETRIEB EINER EXTERNEN
KOMPONENTE ............................ 42
Wiedergeben einer externen
Komponente ........................................... 42
BETRIEB DES DAB-TUNERS .............. 43
Einstellen eines Ensembles und eines
Dienstes ................................................. 43
Sichern von DAB-Diensten im Speicher ... 44
Einstellen eines gespeicherten
DAB-Dienstes ......................................... 45
Welche weiteren Möglichkeiten bietet
DAB? ...................................................... 46
FEHLERSUCHE ............................. 47
WARTUNG .................................. 50
Handhaben der Discs ............................... 50
TECHNISCHE DATEN ...................... 51
DEUTSCH
VOR DEM GEBRAUCH
*Für die Sicherheit....
• Die Lautstärke nicht zu laut stellen, da dadurch
Außengeräusche überdeckt werden und das
Autofahren gefährlich wird.
• Das Auto vor dem Durchführen von komplizierten
Bedienschritten anhalten.
*Temperatur im Auto....
Wenn Sie das Auto für lange Zeit in heißem oder
kaltem Wetter parken, bitte warten, bis sich die
Temperatur im Auto sich normalisiert hat, bevor Sie
das Gerät einschalten.
3
Page 54

Bedienfeld
DEUTSCH
ANORDNUNG DER TASTEN
Displayfenster
KD-SC601
1 Fernbediensensor
2 Steuerregler
3 Taste (Bereitschaft/Netz/Dämpfer)
4 Taste SEL (Auswahl)
5 Schrauben (M2 × 5 mm)
6 Plattenabdeckung und Standardplatte
7 Taste FM/AM DAB
8 Taste 5 (aufwärts)
Taste +10
9 Taste 0 (Auswerfen)
p Tasten 4 /¢
q Taste (Freigabe des Bedienfelds)
w Taste DISP (Display)
e Taste M MODE
r Displayfenster
t Taste EQ (Equalizer)
y Taste MO (Monophon)
u Taste SSM (
Sender
i Taste RPT (Wiederholung)
o Taste RND (Zufall)
; Zifferntasten
a Taste T TP/PTY (Verkehrsinformationen/
Sendungstypen)
s Taste CD CD-CH (CD-Wechsler)
d Taste ∞ (abwärts)
Taste –10
4
Sequentialspeicher für starke
)
Displayfenster
f Anzeigen des Tunerempfangsmodus
—MO (Monophon), ST (Stereo)
g Disctyp-Anzeigen—WMA, MP3
h Anzeige CH (CD-Wechsler)
j Anzeige CD
k Anzeigen RDS—TP, PTY, AF, REG
l Wiedergabemodus/Gegenstand-Anzeigen
—RND (Zufall), (Disc), (Ordner),
RPT (Wiederholung)
/ Anzeige LOUD (Lautstärkekontur)
z Anzeige EQ (Equalizer)
x Klangmodus (C-EQ: eigener Equalizer)-
Anzeigen—ROCK, CLASSIC, POPS, HIP
HOP, JAZZ, USER
• arbeitet auch Pegelmesser bei der
Wiedergabe, wenn der Pegelmesser aktiviert ist
(siehe Seite 33).
c Disc-Informationsanzeigen—TAG (ID3 Tag),
(Ordner), (Titel/Datei)
v Hauptdisplay
b Quellenanzeige
Anzeige des Lautstärkepegels
n Anzeige Tr (Track)
Page 55

Fernbedieneinheit
ATT
U
SOURCE
R
D
VOL
SOUND
F
VOL
3 • Wählt die Festsender (oder Dienste),
während Sie Radio (oder den DAB-Tuner)
hören.
Wenn Sie diese Taste mehrfach
hintereinander drücken, wird die jeweilige
nächsthöhere Speicherplatznummer (oder
Dienstenummer) ausgewählt, und der
entsprechende Sender (oder
Dienstenummer) wird eingestellt.
• Springt zur ersten Datei des vorherigen
Ordners, während eine MP3- oder WMADisc gehört wird.
Bei jedem Druck auf diese Taste kann zum
vorhergehenden Ordner gewechselt und die
erste Datei abgespielt werden.
• Während der Wiedergabe einer MP3-Disc
auf einem MP3-kompatiblen CD-Wechsler;
– Wechselt durch kurzen Tastendruck zur
vorherigen Disc.
– Springt zum vorherigen Ordner, wenn die
Taste gedrückt gehalten wird.
Hinweis:
Hierdurch wird immer zur vorherigen
Disc gewechselt, wenn eine CD auf
dem CD-Wechsler wiedergegeben wird.
DEUTSCH
1 • Wenn diese Taste bei ausgeschaltetem
Gerät gedrückt wird, wird das Gerät
eingeschaltet.
• Das Gerät wird ausgeschaltet, wenn diese
Taste gedrückt gehalten wird, bis „SEE YOU“
im Display erscheint.
• Die Lautstärke wird sofort abgesenkt, wenn
die Taste kurz gedrückt wird.
Drücken Sie diese Taste erneut, um die
Lautstärke wiederherzustellen.
2 • Wählt das Frequenzband aus, während Sie
Radio (oder der DAB-Tuner) hören.
Wenn Sie diese Taste mehrfach hintereinander
drücken, wird der Empfangsbereich
umgeschaltet.
• Springt zur ersten Datei des nächsten
Ordners, während eine MP3- oder WMADisc gehört wird.
Bei jedem Druck auf diese Taste kann zum
nächsten Ordner gewechselt und die erste
Datei abgespielt werden.
• Während der Wiedergabe einer MP3-Disc
auf einem MP3-kompatiblen CD-Wechsler;
– Wechselt durch kurzen Tastendruck zur
nächsten Disc.
– Springt zum nächsten Ordner, wenn die
Taste gedrückt gehalten wird.
Hinweis:
Hierdurch wird immer zur nächsten
Disc gewechselt, wenn eine CD auf
dem CD-Wechsler wiedergegeben wird.
4 Diese Taste hat dieselbe Funktion wie der
Steuerregler am Hauptgerät.
Hinweis:
Die Tasten arbeiten nicht für
Einstellungen im
Präferenzinstellungsmodus.
5 Wählt den Klangmodus (C-EQ: eigener
Equalizer) aus.
Wenn Sie diese Taste mehrfach hintereinander
drücken, ändert sich der Klangmodus (C-EQ).
6
Dient der Signalquellenwahl.
Wenn Sie diese Taste mehrfach hintereinander
drücken, ändert sich die Signalquelle.
7 • Arbeitet bei Radioempfang als
Sendersuchlauftaste.
• Wählt bei aktiviertem DAB-Tuner Dienste
aus, wenn Sie die Taste kurz drücken.
• Sucht bei aktiviertem DAB-Tuner
Ensembles, wenn Sie die Taste länger als
1 Sekunde drücken.
• Drücken und Halten bewirkt einen schnellen
Vor-/Rücklauf des Titels/der Datei während
einer CD-Wiedergabe.
• Kurzzeitiges Drücken bewirkt einen Sprung
zum Anfang des nächsten Titels/der
nächsten Datei oder die Rückkehr zum
Anfang des momentanen (oder vorherigen)
Titels/der momentaten Datei, während eine
CD wiedergegeben wird.
5
Page 56

Vorbereiten der Fernbedienung
Vor dem Gebrauch der Fernbedieneinheit:
• Die Fernbedieneinheit direkt auf den
Fernbediensensor am Gerät ausrichten.
Sicherstellen, daß keine störenden
Gegenstände den Fernbediensignalpfad
behindern können.
Fernbediensensor
DEUTSCH
• Den Fernbediensensor niemals einer starken
Lichtquelle aussetzen (z.B. Sonnenlicht oder
starke Lampe usw.).
Einlegen der Batterie
Wechseln Sie die Batterie, wenn der
Wirkungsbereich oder die Wirksamkeit der
Fernbedienung abnimmt.
1. Nehmen Sie den Batteriehalter heraus.
1)
Schieben Sie den Halter in der
dargestellten Pfeilrichtung heraus, und
verwenden Sie hierzu einen Kugelschreiber
oder eine ähnliche Vorrichtung.
2) Nehmen Sie den Batteriehalter heraus.
(Rückseite)
3. Setzen Sie den Batteriehalter wieder ein.
Setzen Sie den Batteriehalter wieder ein,
indem Sie ihn in die Fernbedienung drücken,
bis Sie ein Klickgeräusch hören.
(Rückseite)
WARNUNG:
• Lagern Sie Batterie an einem Ort, zu dem Kinder
keinen Zugang haben.
Wenn ein Kind die Batterie verschluckt, konsultieren
Sie sofort einen Arzt.
• Laden Sie Batterie nicht auf, schließen Sie sie nicht
kurz, bauen Sie sie nicht auseinander, erhitzen Sie sie
nicht, und halten Sie sie auch nicht in eine offene
Flamme.
Sollten Sie sich nicht an diese Vorschriften halten,
Kann die Batterie Wärme abgeben, können sich Risse
in der Batterie bilden, oder Kann ein Feuer verursacht
werden.
• Bringen Sie die Batterie nicht mit anderen Metallen in
Berührung.
Wenn Sie sich nicht an diese Vorschriften halten, Kann
die Batterie Wärme abgeben, können sich Risse in der
Batterie bilden, oder Kann ein Feuer verursacht
werden.
•
Wenn Sie Batterie wegwerfen oder aufbewahren, wickeln
Sie sie in Folie ein, und isolieren Sie sie. Wenn Sie sich
nicht an diese Vorschriften halten, Kann die Batterie
Wärme abgeben, können sich Risse in der Batterie
bilden, oder Kann ein Feuer verursacht werden.
• Stecken Sie nicht mit einem Metallstift oder ähnlichem
Gegenstand in die Batterie.
Wenn Sie sich nicht an diese Vorschriften halten, Kann
die Batterie Wärme abgeben, können sich Risse in der
Batterie bilden, oder Kann ein Feuer verursacht werden.
2. Legen Sie die Batterie ein.
Drücken Sie die Batterie so in den Halter, daß
die Seite mit dem eingeprägten Pluszeichen
nach oben weist und die Batterie fest in der
Vertiefung sitzt.
LithiumFlachbatterie
(Produktnummer:
CR2025)
6
ACHTUNG:
Legen Sie die Fernbedienung nicht an Orten ab
(z. B. auf einem Armaturenbrett), die über einen längeren
Zeitraum direkter Sonneneinstrahlung ausgesetzt sind.
Anderenfalls kann das Gerät beschädigt werden.
Der KD-SC601 verfügt über eine
Lenkradfernbedienfunktion.
Wenn Ihr Fahrzeug mit der Lenkradfernbedienung
ausgestattet ist, können diese Geräte über diese
Steuerung betrieben werden.
• Siehe Einbau/Anschlußanleitung
(separates Dokument) bzgl. der Aktivierung
dieser Funktion.
Page 57

123
GRUNDBEDIENUNGEN
Einschalten der
Stromversorgung
1
Das Gerät einschalten.
Hinweis zum Ein-Tastendruck-Betrieb:
Wenn Sie die Programmquelle in Schritt 2 unten
wählen, wird das Gerät automatisch
eingeschaltet. Sie brauchen dafür nicht die Taste
zu drücken.
2
Die Programmquelle wählen.
Für die Bedienung des Tuners (UKW oder
MW/LW), siehe Seite 10 – 19.
Für die Wiedergabe einer CD,
siehe Seite 20 – 23.
Zur Wiedergabe einer MP3/WMA-Disc,
siehe Seite 25 – 28.
Für die Bedienung des CD-Wechslers,
siehe Seite 38 – 41.
Für den Betrieb von externen Komponenten
(LINE IN), siehe Seite 42.
Für die Bedienung des DAB-Tuners,
siehe Seite 43 – 46.
3
Die Lautstärke einstellen.
So erhöhen Sie die
Lautstärke
So verringern Sie die
Lautstärke
Der Lautstärkepegel wird angezeigt.
Anzeige des Lautstärkepegels
4
Den Klang wie gewünscht einstellen.
(Siehe Seite 29 und 30).
Für ein sofortiges Absenken der Lautstärke
Kurz die Taste beim Hören einer
beliebigen Programmquelle drücken. „ATT “ blinkt
auf dem Display und die Lautstärke fällt sofort ab.
Zur Wiederherstellung der vorherigen
Lautstärkepegel die Taste nochmals kurz drücken.
• Wenn Sie den Steuerregler drehen, können
Sie die Lautstärke auch wiederherstellen.
Zum Ausschalten des Geräts
Drücken Sie die Taste , und halten Sie
die Taste länger als eine Sekunde gedrückt.
Es erscheint „SEE YOU“, und das Gerät schaltet
ab.
• Wenn Sie die Stromversorgung
ausschalten, während Sie eine Disc hören,
wird die Disc beim nächsten Einschalten an
derselben Stelle wiedergeben, an der Sie die
Stromversorgung ausgeschaltet haben.
VORSICHT beim Einstellen der Lautstärke:
Discs produzieren sehr wenig Störgeräusche im
Vergleich zu anderen Signalquellen. Wenn zum
Beispiel die Lautstärke für den Tuner eingestellt
wurde, können die Lautsprecher durch den
plötzlichen Anstieg des Ausgangssignals
beschädigt werden. Verringern Sie daher die
Lautstärke, bevor Sie eine Disc abspielen, und
justieren Sie die Lautstärke dann während des
Abspielens je nach Bedarf nach.
DEUTSCH
7
Page 58

DEUTSCH
Beendigung der DisplayDemonstration
3
Wählen Sie „DEMO OFF“ aus.
Die Display-Demonstration ist werkseitig aktiviert
und beginnt automatisch, wenn für ca. 20
Sekunden keine Aktionen durchgeführt wurden.
• Es wird empfohlen, die Display-Demonstration
vor der ersten Verwendung des Geräts
auszuschalten.
Führen Sie die folgenden Schritte zur
Beendigung der Display-Demonstration aus:
1
Drücken Sie die Taste SEL
(Auswahl), und halten Sie sie länger
als 2 Sekunden gedrückt, bis eines
der PSM-Elemente im Display
angezeigt wird. (PSM: siehe Seite 31
und 32).
2
Wählen Sie „DEMO“, sofern nicht
bereits im Display angezeigt.
DEMO OFF
4
Bestätigen Sie die Einstellung.
Zum Aktivieren der Display-Demonstration
wiederholen Sie das gleiche Verfahren und
wählen „DEMO ON“ in Schritt 3.
DEMO ON
8
Page 59

Stellen der Uhr
Die Uhr kann so eingestellt werden, daß
entweder das 24-Stunden- oder das
12-Stunden-System angezeigt wird.
1
Drücken Sie die Taste SEL (Auswahl),
und halten Sie sie länger als 2
Sekunden gedrückt, bis eines der
PSM-Elemente im Display angezeigt
wird. (PSM: siehe Seite 31 und 32).
2
Stellen Sie die Stunden ein.
1 Wählen Sie „CLOCK H“ (Stunden),
sofern nicht bereits im Display angezeigt.
2 Stellen Sie die Stunden ein.
12
3
Stellen Sie die Minuten ein.
1 Wählen Sie „CLOCK M“ (Minuten).
2 Stellen Sie die Minuten ein.
12
4
Stellen Sie das Uhrzeitsystem ein.
1 Wählen Sie „24H/12H“.
2 Wählen Sie „24H“ oder „12H“.
12
5
Bestätigen Sie die Einstellung.
So zeigen Sie die aktuelle Uhrzeit an oder
ändern die Anzeigebetriebsart
Drücken Sie die Taste DISP
(Display) wiederholt.
Wenn Sie diese Taste merhrfach
hintereinander drücken, ändert sich
die Anzeigebetriebsart wie folgt:
• Bei AM-Betrieb oder bei UKW-Sendern
ohne RDS:
Frequenz
• Beim Empfang von UKW RDS-Sendern:
Sendername
Uhrzeit
Senderfrequenz
ProgrammtypUhrzeit
• Während des Disc-Betriebs:
Verstrichene
Spielzeit
Titelbezeichnung
Hinweise:
• Wenn Sie eine herkömmliche CD wiedergeben, wird
„NO NAME“ für den CD-Titel/Künstler und die
Titelbezeichnungen angezeigt.
• Zur Anzeigeänderung während der Wiedergabe
eines CD-Text oder einer MP3/WMA-Disc siehe
auch Seite 23 und 26.
• Beim Betrieb externer Komponenten:
LINE IN
• Bei ausgeschalteter Stromversorgung:
Die Stromversorgung wird eingeschaltet, und
die Uhrzeit wird 5 Sekunden lang angezeigt.
Anschließend wird die Stromversorgung
ausgeschaltet.
Uhrzeit
CD-Titel /
Künstler
Uhrzeit
DEUTSCH
9
Page 60

RADIO-BETRIEB
DEUTSCH
Radiohören
Um einen Sender einzustellen, können Sie
entweder den automatischen Suchlauf verwenden,
oder Sie können den Sender manuell einstellen.
Automatisches Suchen eines Senders:
Automatischer Suchlauf
1
Wählen Sie den Wellenbereich
(FM1 – 3, AM).
Wenn Sie diese Taste
mehrfach hintereinander
drücken, ändert sich der
Wellenbereich wie folgt:
FM1 FM2 FM3 AM
Leuchtet auf, wenn eine UKWStereosendung mit ausreichender
Signalstärke empfangen wird.
Das gewählte Frequenzband wird angezeigt.
Hinweis:
Dieser Receiver verfügt über drei UKW-
Frequenzbänder (FM1, FM2, FM3). Sie können
ein beliebiges Frequenzband wählen, um sich
eine UKW-Sendung anzuhören.
Zum Anhalten der Suche bevor ein Sender
empfangen wird, die gleiche Taste, die Sie für
die Suche gedrückt haben, nochmals drücken.
Manuelles Suchen eines Senders:
Manueller Suchlauf
1
Wählen Sie den Wellenbereich
(FM1 – 3, AM).
Wenn Sie diese Taste
mehrfach hintereinander
drücken, ändert sich der
Wellenbereich wie folgt:
FM1 FM2 FM3 AM
Hinweis:
Dieser Receiver verfügt über drei UKWFrequenzbänder (FM1, FM2, FM3). Sie können
ein beliebiges Frequenzband wählen, um sich
eine UKW-Sendung anzuhören.
2
Drücken Sie die Taste ¢ oder
4
bis „M“ (manuell) im Display zu
blinken beginnt.
, und halten Sie sie gedrückt,
2
Beginnen Sie mit der Suche nach
einem Sender.
Suchen von Sendern mit
höherer Frequenz
Suchen von Sendern mit niedrigerer Frequenz
10
Wenn ein Sender empfangen wird, stoppt
die Suche.
Page 61

3
Stellen Sie den gewünschten Sender
ein, während „M“ (manuell) blinkt.
Um Sender einzustellen,
die auf höheren
Frequenzen senden
Um Sender einzustellen, die auf niedrigeren
Frequenzen senden
• Wenn Sie die Taste loslassen, wird der
manuelle Modus automatisch nach 5
Sekunden deaktiviert.
• Wenn Sie die Taste gedrückt halten,
ändert sich die Frequenz (in 50 kHz
Intervallen bei UKW- und 9 kHz
Intervallen bei MW/LW), bis Sie die Taste
freigeben.
Schlechter Empfang einer UKWStereosendung:
1 Die Taste M MODE drücken,
um bei laufender UKWStereosendung in den
Funktionsbetrieb zu
gelangen.
2 Drücken Sie die Taste MO
(Monophon), während „MODE“
noch im Display blinkt, so daß
„MONO“ im Display erscheint.
Bei jedem Druck auf die Taste
wird der Mono-Modus zwischen
ein und aus umgeschaltet.
Speichern der Sender
Sie können Rundfunksender auf zwei Arten
abspeichern.
•
Automatisches Vorabstimmen der UKW-Sender:
SSM (Sequentialspeicher für starke Sender)
• Manuelles Vorabstimmen für UKW- und
MW-/LW-Sender
Automatische UKW-Vorabstimmung:
SSM
Sie können 6 lokale UKW-Sender pro UKWEmpfangsbereich (FM1, FM2 und FM3)
vorabstimmen.
1
Die gewünschte FMWellenbereichzahl (FM1 – 3), in der
UKW-Sender gespeichert werden
sollen, wählen.
Wenn Sie diese Taste
mehrfach hintereinander
drücken, ändert sich der
Wellenbereich wie folgt:
FM1 FM2 FM3 AM
2
Drücken Sie die Taste M MODE, um in
den Funktionsbetrieb zu gelangen.
3
Halten Sie SSM etwa 2 Sekunden
lang gedrückt.
DEUTSCH
Anzeige MO (Monophon)
Wenn die Anzeige MO im Display leuchtet,
erfolgt die Wiedergabe Monophon. Allerdings
verbessert sich dadurch der Empfang.
„SSM“ blinkt, und verschwindet wenn die
automatische Voreinstellung ausgeführt ist.
Die lokalen UKW-Sender mit den stärksten
Signalen werden gesucht und automatisch in der
Empfangsbereichszahl (FM1, FM2 oder FM3),
die Sie gewählt haben, gespeichert.
Diese vorabgestimmten Sender werden auf den
Zifferntasten abgespeichert—Nr.1 (niedrigste
Frequenz) bis Nr.6 (höchste Frequenz).
Wenn die automatische Vorabstimmung
abgeschlossen ist, wird der Sender der
Ziffertaste 1 automatisch angewählt.
11
Page 62

Manuelles Vorabstimmen
Sie können bis zu 6 Sender pro Wellenbereich
(FM1, FM2, FM3 und AM) von Hand
vorabstimmen.
Beispiel: Speichern des UKW-Senders 92,5 MHz
1
DEUTSCH
2
auf der Speichertaste 1 des FM1Wellenbereichs.
Die gewünschte Wellenbereichzahl
(FM1 – 3, AM), in der Sender
gespeichert werden sollen, wählen
(in diesem Beispiel FM1).
Wenn Sie diese Taste
mehrfach hintereinander
drücken, ändert sich der
Wellenbereich wie folgt:
FM1 FM2 FM3 AM
Auf den Sender (in diesem Beispiel
92,5 MHz) abstimmen.
Um Sender einzustellen,
die auf höheren
Frequenzen senden
Um Sender einzustellen, die auf niedrigeren
Frequenzen senden
4
Das obige Verfahren zum Speichern
der anderen Sender auf andere
Zifferntasten wiederholen.
Hinweise:
• Ein vorheriger vorabgestimmter Sender wird
gelöscht, wenn ein neuer Sender auf der gleichen
Speichertaste abgespeichert wird.
• Vorabgestimmte Sender werden gelöscht, wenn die
Stromversorgung des Speicherstromkreises
unterbrochen wird (z.B. beim Wechseln der
Batterie). In diesem Fall die Sender nochmals
vorabstimmen.
Anwahl eines
vorabgestimmten Senders
Sie können einfach einen vorabgestimmten
Sender aufrufen. Bedenken Sie, daß Sie zuerst
Sender speichern müssen. Wenn Sie das noch
nicht getan haben, siehe „Speichern der Sender“
auf Seiten 11 und 12.
1
Wählen Sie den Wellenbereich
(FM1 – 3, AM).
Wenn Sie diese Taste
mehrfach hintereinander
drücken, ändert sich der
Wellenbereich wie folgt:
12
3
Drücken Sie die Ziffertaste (in
diesem Beispiel 1), und halten Sie
sie länger als 2 Sekunden gedrückt.
Die Festsendernummer blinkt eine
Zeit lang.
FM1 FM2 FM3 AM
2
Die gewünschte Ziffer (1 – 6) für den
vorabgestimmten Sender wählen.
Page 63

RDS-BETRIEB
Betriebsmöglichkeiten mit der
Funktion RDS
Das Radiodatensystem (RDS) ermöglicht es
UKW-Sendern, zusammen mit den regulären
Sendesignalen ein zusätzliches Signal zu
übertragen. Beispielsweise können Sender ihren
Sendernamen sowie Informationen über die
aktuelle Sendung übermitteln, wie z. B. Sport
oder Musik usw.
Eine weitere Eigenschaft des RDS-Systems
heißt „Enhanced Other Networks“. Wenn Sie die
Enhanced Other Networks-Daten verwenden, die
von einem Sender übertragen werden, können
Sie einen anderen Sender eines anderen Netzes
einstellen, der Ihr Lieblingsprogramm oder
Verkehrsnachrichten überträgt, während Sie eine
andere Sendung hören oder eine andere
Signalquelle wiedergeben, wie beispielsweise
eine CD.
Wenn das Gerät RDS-Daten empfängt, sind
folgende Funktionen möglich:
• Automatisches Verfolgen derselben Sendung
(Empfang mit Sendernetzerfassung)
• Es kann auf Bereitschaftsempfang von
Verkehrsnachrichten (TA: Verkehrsnachrichten)
oder Ihrer Lieblingssendung geschaltet werden
• Ein Sendungstyp (PTY: Sendungstyp) kann
gesucht werden
• Sendungssuchlauf
• Einige weitere Funktionen sind möglich
Wenn Sie den Empfang mit
Sendernetzerfassung verwenden wollen
Sie können die verschiedenen Modi des
Alternativfrequenzempfangs auswählen, um
weiterhin dasselbe Programm unter besten
Empfangsbedingungen zu hören.
Werkseitig ist die Einstellung „AF“ aktiviert.
• AF: Die Sendernetzerfassung ist bei
aktivierter Regionalisierung
„ausgeschaltet“.
Wenn die Eingangssignale des zur
Zeit eingestellten Senders zu
schwach werden, wechselt bei dieser
Einstellung das Gerät innerhalb
desselben Netzes von diesem
Sender zu einem anderen. (In dieser
Betriebsart kann die Sendung von
der aktuell empfangenen Sendung
abweichen).
Die Anzeige AF schaltet sich ein,
nicht jedoch die Anzeige REG.
• AF REG: Die Sendernetzerfassung ist bei
aktivierter Regionalisierung
„eingeschaltet“.
Wenn die Eingangssignale des zur
Zeit eingestellten Senders zu
schwach werden, wechselt bei dieser
Einstellung das Gerät innerhalb
desselben Netzes von diesem
Sender zu einem anderen, der
dasselbe Programm ausstrahlt.
Sowohl die Anzeige AF als auch die
Anzeige REG schalten sich ein.
DEUTSCH
Automatisches Verfolgen derselben
Sendung (Empfang mit
Sendernetzerfassung)
Wenn Sie in einem Bereich fahren, in dem der
UKW-Empfang schlecht ist, stellt der Tuner, der
in dieses Gerät integriert ist, automatisch einen
anderen RDS-Sender ein, der dieselbe Sendung
mit stärkeren Signalen ausstrahlt. So können Sie
dieselbe Sendung auf der gesamten
Fahrtstrecke mit bestem Empfang hören. (Siehe
Abbildung auf Seite 19).
Es werden zwei Arten von RDS-Daten
verwendet, damit der Empfang mit
Sendernetzerfassung richtig funktioniert
—PI (Sendungskenndaten) und
AF (Alternativfrequenzdaten).
Wenn diese Daten vom eingestellten RDSSender nicht richtig empfangen werden, ist ein
Empfang mit Sendernetzerfassung nicht möglich.
• OFF: Die Sendernetzerfassung ist
deaktiviert.
Weder die Anzeige AF noch die
Anzeige REG schaltet sich ein.
Anzeige AF
Anzeige REG
Hinweis:
Wenn ein DAB-Tuner angeschlossen ist und der Empfang
von Alternativfrequenzen (für DAB-Dienste) aktiviert ist,
wird der Empfang mit Sendernetzverfassung („AF“)
ebenfalls automatisch aktiviert. Andererseits kann der
Empfang mit Sendernetzverfassung nicht deaktiviert
werden, ohne den Empfang von Alternativfrequenzen zu
deaktivieren. (Siehe Seite 46).
FORTSETZUNG AUF DER NÄCHSTEN SEITE
13
Page 64

1
Drücken Sie die Taste SEL
(Auswahl), und halten Sie sie länger
als 2 Sekunden gedrückt, bis eines
der PSM-Elemente im Display
angezeigt wird. (PSM: siehe Seite 31
und 32).
Verwenden des TA-Standby-Empfangs
Mit Hilfe des TA-Standby-Empfangs können Sie
das Gerät vorübergehend von der aktuellen
Signalquelle (anderer UKW-Sender, CD oder
sonstige angeschlossene Komponente) auf
Verkehrsnachrichten (TA) umschalten.
• Der TA-Standby-Empfang funktioniert nicht, wenn
Sie einen MW-/LW-Sender empfangen.
DEUTSCH
2
Wählen Sie „AF-REG”
(Alternativfrequenz-/
Regionalempfang), sofern nicht
bereits im Display angezeigt.
3
Wählen Sie den gewünschten
Modus—„AF“, „AF REG“ oder
„OFF“.
4
Bestätigen Sie die Einstellung.
Drücken Sie die Taste T TP/PTY, um den
TA-Standby-Empfang zu aktivieren.
7 Wenn UKW als aktuelle Signalquelle
ausgewählt ist, leuchtet die Anzeige TP
entweder kontinuierlich oder blinkt.
• Wenn die Anzeige TP leuchtet, ist der
TA-Standby-Empfang aktiviert.
Wenn ein Sender eine Verkehrsdurchsage
überträgt, wird „TRAFFIC“ im Display
angezeigt, und das Gerät stellt den Sender
automatisch ein. Die Lautstärke wird auf den
voreingestellten TA-Lautstärkepegel
eingestellt (siehe Seite 18), und die
Verkehrsdurchsage wird wiedergegeben.
• Wenn die Anzeige TP blinkt, ist der TA-
Standby-Empfang noch nicht aktiviert,
da der empfangene Sender keine
Signale überträgt, die für den TA-StandbyEmpfang verwendet werden.
Um den TA-Standby-Empfang zu aktivieren,
müssen Sie einen anderen Sender
einstellen, der diese Signale überträgt.
Drücken Sie die Taste ¢ oder 4
um einen solchen Sender zu suchen.
Wenn ein Sender eingestellt ist, der diese
Signale bereitstellt, blinkt die Anzeige TP
nicht mehr, sondern leuchtet kontinuierlich.
Jetzt ist der TA-Standby-Empfang aktiviert.
7 Wenn zur Zeit eine andere Signalquelle als
UKW ausgewählt ist, leuchtet die Anzeige TP.
Wenn ein Sender eine Verkehrsdurchsage
überträgt, wird „TRAFFIC“ im Display
angezeigt, und das Gerät wechselt
automatisch die Signalquelle und stellt den
Sender ein.
14
Wenn Sie den TA-Standby-Empfangs
deaktivieren möchten, drücken Sie die Taste
T TP/PTY erneut. Die Anzeige TP erlischt.
Page 65

Verwenden des PTY-Standby-Empfang
Mit Hilfe des PTY-Standby-Empfangs können Sie
das Gerät vorübergehend von der aktuellen
Signalquelle (anderer UKW-Sender, CD oder
sonstige angeschlossene Komponente) auf Ihre
Lieblingssendung (PTY: Sendungstyp)
umschalten.
4
Bestätigen Sie die Einstellung.
• Der PTY-Standby-Empfang funktioniert nicht, wenn
Sie einen MW-/LW-Sender empfangen.
Sie können Ihr Lieblingsprogramm für den PTYStandby-Empfang auswählen.
Werkseitig ist der PTY-Standby-Empfang
deaktiviert. („OFF“ ist für den PTY-StandbyEmpfang ausgewählt).
1
Drücken Sie die Taste SEL
(Auswahl), und halten Sie sie länger
als 2 Sekunden gedrückt, bis eines
der PSM-Elemente im Display
angezeigt wird. (PSM: siehe Seite 31
und 32).
2
Wählen Sie „PTY STBY“ (PTYBereitschaft), sofern nicht bereits im
Display angezeigt.
3
Wählen Sie einen der
neunundzwanzig PTY-Codes.
(Siehe Seite 19).
Der gewählte Codename
wird im Display
angezeigt und im
Speicher gesichert.
7 Wenn UKW als aktuelle Signalquelle
ausgewählt ist, leuchtet die Anzeige PTY
entweder kontinuierlich oder blinkt.
• Wenn die Anzeige PTY leuchtet, ist der PTYStandby-Empfang aktiviert.
Wenn ein Sender das ausgewählte PTYProgramm überträgt, stellt das Gerät den
Sender automatisch ein.
• Wenn die Anzeige PTY blinkt, ist der PTYStandby-Empfang noch nicht aktiviert, da der
empfangene Sender keine Signale überträgt,
die für den PTY-Standby-Empfang verwendet
werden.
Um den PTY-Standby-Empfang zu
aktivieren, müssen Sie einen anderen
Sender einstellen, der diese Signale
überträgt. Drücken Sie die Taste ¢
oder 4 um einen solchen Sender zu
suchen.
Wenn ein Sender eingestellt ist, der diese
Signale bereitstellt, blinkt die Anzeige PTY
nicht mehr, sondern leuchtet kontinuierlich.
Jetzt ist der PTY-Standby-Empfang aktiviert.
7 Wenn zur Zeit eine andere Signalquelle als
UKW ausgewählt ist, leuchtet die Anzeige
PTY.
Wenn ein Sender das ausgewählte PTYProgramm überträgt, wechselt das Gerät
automatisch die Signalquelle und stellt den
Sender ein.
Wenn Sie den PTY-Standby-Empfang
deaktivieren möchten, wählen Sie in der linken
Spalte in Schritt „OFF“ der
Verfahrensbeschreibung die Einstellung 3 aus.
Die Anzeige PTY erlischt.
DEUTSCH
15
Page 66

Suchen Ihrer Lieblingssendung
Sie können einen beliebigen PTY-Code suchen.
Darüber hinaus können Sie unter den
Zifferntasten 6 Lieblingsprogrammtypen
speichern.
Bei Auslieferung ab Werk sind die folgenden 6
Sendungstypen unter den Ziffertasten (1 bis 6)
gespeichert.
Weiter unten finden Sie Informationen, wie Sie
Ihre Lieblingssendungstypen speichern
DEUTSCH
können.
Hinweise zu Suche Ihres Lieblingssendung
finden Sie auf Seite 17.
1
POP M
45
CLASSICS
So speichern Sie Ihre
Lieblingssendungstypen
1
Drücken Sie die Taste T TP/PTY, und
halten Sie sie länger als 2 Sekunden
gedrückt, während Sie einen UKW-
Sender hören.
2
ROCK M EASY M
AFFAIRS
VARIED
3
Halten Sie die Zifferntaste länger als
2 Sekunden gedrückt, um den
gewählten PTY-Code unter der
gewünschten Festsendernummer zu
speichern.
3
6
4
Drücken Sie die Taste T TP/PTY, und
Der gewählte PTYCode und „MEMORY“
erscheinen eine Zeit
lang abwechselnd.
halten Sie sie länger als 2 Sekunden
gedrückt, um diesen Modus zu
verlassen.
16
Der zuletzt gewählte PTY-Code wird
angezeigt.
2
Wählen Sie einen der
neunundzwanzig PTY-Codes.
(Siehe Seite 19).
Der gewählte Codename
wird im Display
angezeigt.
Page 67

So suchen Sie Ihren Lieblingssendungstyp
1
Drücken Sie die Taste T TP/PTY, und
halten Sie sie länger als 2 Sekunden
gedrückt, während Sie einen UKWSender hören.
3
Drücken Sie die Taste ¢ oder
4
, um die PTY-Suche nach
Ihrem Lieblingsprogramm zu
starten.
DEUTSCH
Der zuletzt gewählte PTY-Code wird
angezeigt.
2
Auswählen eines Ihrer
Lieblingsprogrammtypen
oder
Auswählen eines der
neunundzwanzig PTY-Codes
Beispiel: Wenn Sie „ROCK M“ auswählen
• Wenn ein Sender eine Sendung mit dem PTYCode ausstrahlt, den Sie gewählt haben, wird
dieser Sender eingestellt.
• Wenn kein Sender eine Sendung mit dem
PTY-Code ausstrahlt, den Sie gewählt haben,
wird der aktuell eingestellte Sender weiterhin
wiedergegeben.
Hinweis:
In einigen Gebieten funktioniert die PTY-Suche
möglicherweise nicht richtig.
17
Page 68

Weitere praktische RDSFunktionen und
-Einstellungsmöglichkeiten
Automatische Auswahl des Senders
bei Verwenden der Ziffertasten
Wenn Sie die Ziffertaste drücken, wird
normalerweise der unter dieser Taste
gespeicherte Sender eingestellt.
Wenn es sich bei diesem gespeicherten Sender
DEUTSCH
um einen RDS-Sender handelt, geschieht jedoch
etwas anderes. Sollten die Signale des
gespeicherten Senders für einen guten Empfang
nicht ausreichen, sucht das Gerät mit Hilfe der
AF-Daten einen anderen Sender, der dieselbe
Sendung wie der ursprünglich ausgewählte
Sender ausstrahlt. (Sendungssuchlauf)
• Es dauert eine gewisse Zeit, bis das Gerät
einen anderen Sender mit Hilfe des
Sendersuchlaufs eingestellt hat.
Führen Sie das nachstehend beschriebene
Verfahren durch, um den Sendungssuchlauf zu
aktivieren.
• Weitere Informationen finden Sie unter
„Ändern der allgemeinen Einstellungen (PSM)“
auf Seite 31.
1
Drücken Sie die Taste SEL (Auswahl), und halten
Sie sie länger als 2 Sekunden gedrückt, bis eines
der PSM-Elemente im Display angezeigt wird.
2 Drücken Sie die Taste ¢ oder 4
um die Funktion „P(Sendung)-SEARCH“
auszuwählen.
3 Drehen Sie den Steuerregler im Uhrzeigersinn,
um „ON“ zu wählen.
Der Sendungssuchlauf ist jetzt aktiviert.
4 Drücken Sie die Taste SEL (Auswahl), um die
Einstellung abzuschließen.
Um den Sendungssuchlauf zu deaktivieren,
wiederholen Sie dasselbe Verfahren, und wählen
Sie in Schritt „OFF“ die Einstellung 3 aus, indem
Sie den Steuerregler entgegen dem
Uhrzeigersinn drehen.
Einstellen des Lautstärkepegels für
Verkehrsnachrichten
Sie können den Lautstärkepegel für den
Bereitschaftsempfang von Verkehrsnachrichten
speichern. Wenn Verkehrsnachrichten gesendet
werden, werden sie automatisch in der
gespeicherten Lautstärke wiedergegeben.
• Weitere Informationen finden Sie unter
„Ändern der allgemeinen Einstellungen (PSM)“
auf Seite 31.
18
1 Drücken Sie die Taste SEL (Auswahl), und
halten Sie sie länger als 2 Sekunden gedrückt,
bis eines der PSM-Elemente im Display
angezeigt wird.
2 Drücken Sie die Taste ¢ oder 4
um die Funktion „TA VOL“ (Lautstärke)
auszuwählen.
3 Drehen Sie den Steuerregler, um die
gewünschte Lautstärke einzustellen.
Sie können die Einstellung von „VOL 00“ bis
„VOL 30“ oder „VOL 50“ vornehmen (je nach
Verstärker-Verstärkungsgradeinstellung: siehe
Seite 34).
4 Drücken Sie die Taste SEL (Auswahl), um die
Einstellung abzuschließen.
Automatische Uhreinstellung
Bei Auslieferung ab Werk ist die Uhr, die in
dieses Gerät integriert ist, so eingestellt, daß sie
die Uhrzeit automatisch unter Verwendung der im
RDS-Signal enthaltenen Uhrzeitdaten CT
(Uhrzeit) korrigiert.
Wenn Sie die automatische Uhreinstellung nicht
wünschen, befolgen Sie das nachstehende
Verfahren.
• Weitere Informationen finden Sie unter
„Ändern der allgemeinen Einstellungen (PSM)“
auf Seite 31.
1 Drücken Sie die Taste SEL (Auswahl), und
halten Sie sie länger als 2 Sekunden gedrückt,
bis eines der PSM-Elemente im Display
angezeigt wird.
2 Drücken Sie die Taste ¢ oder 4
um die Funktion „AUTO ADJ“ (Einstellung)
auszuwählen.
3 Drehen Sie den Steuerregler entgegen dem
Uhrzeigersinn, um „OFF“ zu wählen.
Die automatische Uhreinstellung ist jetzt
deaktiviert.
4 Drücken Sie die Taste SEL (Auswahl), um die
Einstellung abzuschließen.
Wenn Sie die Uhreinstellung erneut aktivieren
möchten, wiederholen Sie dasselbe Verfahren,
und wählen Sie in Schritt „ON“ die Einstellung 3
aus, indem Sie den Steuerregler im
Uhrzeigersinn drehen.
Hinweis:
Derselbe Sender muß mindestens 2 Minuten lang
eingestellt bleiben, nachdem „AUTO ADJ“ auf „ON“
gesetzt wurde. Anderenfalls kann die Uhrzeit nicht
eingestellt werden. (Das Gerät benötigt etwa 2
Minuten, um die CT-Daten im RDS-Signal zu
erfassen).
Page 69

PTY-Codes
NEWS: Nachrichten
AFFAIRS: Nachrichtenmagazin/Aktuelle
Themen
INFO: Ratgeber aller Art
SPORT: Sport
EDUCATE: Bildungsprogramme
DRAMA: Hörspiel
CULTURE: Kulturereignisse (regional/
überregional)
SCIENCE: Wissenschaft und Technik
VARIED: Gemischte Programme
(Komödien, Feiern usw.)
POP M: Popmusik
ROCK M: Rockmusik
EASY M: Leichte Unterhaltungsmusik
LIGHT M: Leichte Musik
CLASSICS: Klassische Musik
OTHER M: Sonstige Musik
WEATHER: Wettermeldungen
FINANCE: Finanz-Themen,
Wirtschaftsmeldungen usw.
CHILDREN: Kindersendungen
Dieselbe Sendung kann auf verschiedenen Frequenzen empfangen werden.
SOCIAL: Soziale Themen
RELIGION: Sendungen mit religiösen,
philosophischen Themen,
Gottesdienste usw.
PHONE IN: Hörermeinungen
(Telefonumfragen, Befragungen
usw.)
TRAVEL: Reisemagazine, Reiseberichte,
Reiseangebote usw.
LEISURE: Sendungen für
Freizeitgestaltung und Hobbies
(Garten, Kochen, Angeln usw.)
JAZZ: Jazzmusik
COUNTRY: Countrymusik
NATION M: Unterhaltungsprogramme in
einer Fremdsprache
OLDIES: Schlageroldies
FOLK M: Volksmusik
DOCUMENT: Dokumentationen und
Themenmagazine
DEUTSCH
Sendung 1 wird
auf Frequenz A
ausgestrahlt
Sendung 1 wird
auf Frequenz B
ausgestrahlt
Sendung 1 wird
auf Frequenz C
ausgestrahlt
Sendung 1 wird
auf Frequenz E
ausgestrahlt
Sendung 1 wird
auf Frequenz D
ausgestrahlt
19
Page 70

CD-BETRIEB
DEUTSCH
Siehe „MP3/WMA-BEDIENVORGÄNGE“ auf Seite
25 bis 28 zum Betrieb von MP3/WMA-Discs.
Wiedergabe einer CD
1
Öffnen Sie das Bedienfeld.
Hinweis zum Ein-Tastendruck-Betrieb:
Befindet sich bereits eine CD im Ladeschlitz,
wird durch Drücken von CD CD-CH das Gerät
eingeschaltet und das Abspielen beginnt
automatisch.
2
Setzen Sie eine CD in den
Ladeschlitz ein.
Das Anlage schaltet
sich ein, zieht die CD
ein und beginnt
automatisch mit der
Wiedergabe.
3
Schließen Sie das Bedienfeld von
Hand.
Alle Titel werden wiederholt wiedergegeben,
bis Sie die Wiedergabe beenden.
Das Display ändert sich wie folgt:
Anzeige CD
Aktuelle Anzeige für die Signalquelle
Gesamtspielzeit
der eingelegten CD
Verstrichene
Spielzeit
Hinweise:
• Wenn Sie eine CD verkehrt herum einlegen, wird
die CD automatisch ausgeworfen (wenn das
Bedienfeld geöffnet ist).
Wenn das Bedienfeld geschlossen wird, schaltet die
Quelle auf die vorher gewählte Quelle um.
„PLEASE“ und „EJECT“ erscheinen abwechselnd
im Display.
• Sie können CD nicht als Signalquelle auswählen,
wenn sich keine CD im Ladeschlitz befindet. Auf
dem Display wird „NO DISC“ angezeigt.
• Verfügt die Disc über CD-Text, erscheint
automatisch der CD-Titel/Künstler und danach der
Titelbezeichnung.
Gesamttitelzahl
der eingelegten CD
Aktuelle
Titelnummer
20
Page 71

Zum Beenden des Abspielens und
Auswerfen der CD
Drücken Sie die Taste 0.
Die CD-Wiedergabe wird gestoppt und der
Ladeschlitz klappt nach unten. Die CD wird
automatisch aus dem Ladeschlitz ausgeworfen.
Als Signalquelle wird die zuvor eingestellte
Signalquelle ausgewählt.
• Die CD-Wiedergabe wird auch angehalten
(ohne daß die CD ausgeworfen wird), wenn die
Signalquelle gewechselt wird.
Wenn Sie das nächste Mal „CD“ als
Signalquelle auswählen, wird die CD an
derselben Stelle wiedergegeben, an der Sie
die Wiedergabe gestoppt haben.
Hinweise:
• Wird die ausgeworfene CD nicht innerhalb von 15
Sekunden entnommen, wird die CD automatisch
wieder in den Ladeschlitz eingefahren, um sie vor
Staub zu schützen.
(Die CD wird diesmal jedoch nicht abgespielt).
• Sie können die CD auswerfen lassen, indem Sie das
Gerät ausschalten.
Aufsuchen eines Titel oder
bestimmten Passage auf einer
CD
Zum direkten Anwählen eines bestimmten
Titels
Die Ziffertaste, die der Titelnummer entspricht,
drücken, um sein Abspielen zu beginnen.
• So wählen Sie eine Titelnummer von 1 – 6 aus:
Drücken Sie kurz auf 1 (7) – 6 (12).
• So wählen Sie eine Titelnummer von
7 – 12 aus:
Drücken und halten Sie 1 (7) – 6 (12) länger
als eine Sekunde.
Zum schnellen Wechsel zu einem Titel
(Tasten +10 und –10)
1 Drücken Sie während der Wiedergabe einer
CD auf die Taste M MODE, um auf FunktionModus zu schalten.
2 Die Taste +10 oder –10 drücken.
DEUTSCH
Zum schnellen Vor- oder Rücklauf des Titels
Bei laufender CD die Taste
¢ drücken und
halten, um den Titel
schnell vorzuspulen.
Bei laufender CD die Taste 4 drücken und
halten, um den Titel zurückzuspulen.
So springen Sie zu den nächsten oder
vorherigen Titeln
Bei laufender CD die Taste
¢ kurz drücken, um
zum Anfang des nächsten
Titels zu springen.
Mit jedem Druck auf diese
Taste wird zum Anfang der
nächsten Titel gesprungen
und diese wiedergegeben.
Bei laufender CD die Taste 4 kurz drücken,
um zurück zum Anfang der aktuellen Titel zu
springen.
Mit jedem Druck auf diese Taste wird zum Anfang
der jeweils vorherigen Titel gesprungen und diese
wiedergegeben.
Um 10 Titel* vorwärts zum
letzten Titel zu springen
Um 10 Titel* rückwärts zum
ersten Titel zu springen
* Werden die Tasten +10 oder –10 zum ersten
Mal gedrückt, wird zum nächsthöheren oder
-niedrigeren Titel gewechselt, der eine durch
10 teilbare Titelnummer besitzt (z. B. 10., 20.,
30.).
Jedes Mal, wenn Sie danach die Taste
drücken, werden 10 Titel übersprungen (siehe
„Verwendung der Tasten +10 und –10“ auf
Seite 22).
• Nach dem letzten Titel wird der erste Titel
ausgewählt, und umgekehrt.
FORTSETZUNG AUF DER NÄCHSTEN SEITE
21
Page 72

Verwendung der Tasten +10 und –10
• Beispiel 1: Titel 6 wird wiedergegeben und
Titel 32 soll ausgewählt werden
(3x) (2x)
Titel 6 \ 10 \ 20 \ 30 \ 31 \ 32
• Beispiel 2: Titel 36 wird wiedergegeben und
DEUTSCH
Titel 36 \ 30 \ 20 \ 10 \ 9 \ 8
Titel 8 soll ausgewählt werden
(3x) (2x)
Wählen der CDAbspielbetriebsarten
Zum Abspielen der Titel nach dem
Zufallsprinzip (Zufällige Wiedergabe der Discs)
Sie können alle Titel der CD in zufälliger
Reihenfolge wiedergeben.
1 Drücken Sie während der
Wiedergabe einer CD auf die
Taste M MODE, um auf
Funktion-Modus zu schalten.
Zum wiederholten Abspielen der Titel
(Titelwiederholung)
Sie können den aktuellen Titel wiederholt
wiedergeben.
1 Drücken Sie während der
Wiedergabe einer CD auf die
Taste M MODE, um auf
Funktion-Modus zu schalten.
2 Drücken Sie die Taste RPT
(Wiederholung), während
„MODE“ im Display blinkt, so
daß „TRK RPT“ im Display
erscheint.
Wenn Sie diese Taste mehrfach
hintereinander drücken, wird der
Titelwiederholungs-Modus
wechselweise ein- und
ausgeschaltet.
Anzeige RPT
Wenn die Titelwiederholung eingeschaltet wird,
leuchtet die RPT-Anzeige auf dem Display auf.
Der aktuelle Titel wird wiederholt wiedergegeben.
2 Drücken Sie die Taste RND
(Zufall), während „MODE“ im
Display blinkt, so daß „DISC
RND“ im Display erscheint.
Wenn Sie diese Taste mehrfach
hintereinander drücken, wird der
Zufalls-Wiedergabemodus
wechselweise ein- und
ausgeschaltet.
RND- und (Disc)-Anzeigen
Wenn der Zufallswiedergabemodus
eingeschaltet wird, leuchtet RND- und Anzeigen auf dem Display auf. Es wird ein
zufällig ausgewählter Titel wiedergegeben.
22
Page 73

Wiedergeben einer CD mit
CD-Text
Unterdrücken des DiscAuswurfs
Auf einer CD mit CD-Text werden bestimmte
Informationen über die CD (CD-Titel, Künstler
und Titelbezeichnungen) gespeichert. Diese
Textinformation wird automatisch angezeigt,
wenn Sie eine CD mit CD-Text wiedergeben.
Wählen Sie den Textanzeige-Modus
während der Wiedergabe einer CD mit
CD-Text aus, um die Textinformationen
manuell zu ändern.
Drücken Sie die Taste DISP
(Display) wiederholt.
Wenn Sie diese Taste mehrfach
hintereinander drücken, ändert
sich die
Anzeigebetriebsart
folgt:
wie
CD-Titel / Künstler
Titelbezeichnung
( leuchtet auf dem Display auf)
Verstrichene Spielzeit und
aktuelle Titelnummer
Uhrzeit und
aktuelle Titelnummer
Sie können den Auswurf einer Disc blockieren
und eine Disc im Ladeschlitz verriegeln.
Halten Sie die Taste CD CD-CH, gedrückt
und drücken Sie die Taste
länger
als 2 Sekunden.
„NO EJECT“ wird etwa 5 Sekunden lang im
Display angezeigt. Die Disc ist damit verriegelt
und kann nicht ausgeworfen werden.
Wenn Sie die Verriegelung aufheben
wollen
Während Sie die Taste CD CD-CH gedrückt
halten, drücken und halten Sie die
Taste länger als 2 Sekunden erneut
gedrückt.
„EJECT OK“ blinkt etwa 5 Sekunden lang im
Display und die Verriegelung der Disc wird
aufgehoben.
DEUTSCH
Hinweise:
• Auf dem Display werden bis zu 8 Zeichen auf
einmal dargestellt. Der Text rollt nach unten, wenn
mehr als 8 Zeichen vorhanden sind.
Siehe auch „Wählen des Bildlaufmodus—SCROLL“
auf Seite 33.
Einige Zeichen oder Symbole werden nicht auf dem
Display dargestellt (sie werden als Leerzeichen
dargestellt).
(Beispiel: „ABCå!d#“ ]„ABCA D “)
• Wenn Sie die Taste DISP (Display) drücken,
während Sie eine konventionelle CD wiedergeben,
wird „NO NAME“ für den CD-Titel/Künstler und
die Titelbezeichnungen angezeigt.
• Wenn der Titelbezeichnung gezeigt wird, erscheinen
die Tr-Anzeige und die aktuelle Titelnummer
ebenfalls rechts im Display.
23
Page 74

EINLEITUNG FÜR MP3/WMA
Was ist MP3/WMA?
MP3 ist die Abkürzung von Motion Picture
Experts Group (oder MPEG) Audio Layer 3. MP3
ist nichts anderes als ein Dateiformat mit
einem Datenkompressionsverhältnis von 1:10
(128 kbit/s*).
* Die Bitrate ist die durchschnittliche Anzahl der Bits,
die pro Sekunde für die Audiodaten verwendet
werden. Die verwendete Einheit lautet kbit/s.
Wählen Sie eine höhere Bitrate, um eine bessere
DEUTSCH
Audioqualität zu erzielen. Die beliebteste Bitrate
für die Codierung ist 128 kbit/s.
WMA (Windows Media® Audio) ist das von
Microsoft Corporation entwickelte digitale
Kompressionsformat.
• Detailinformationen über MP3/WMA-Discs
siehe „Informationen zu MP3/WMA“
(separates Dokument).
Kompatibel mit ID3 Tag
Weitere Informationen wie Albumtitel,
Interpretenname, Songtitel, Aufnahmejahr,
Musikgenre und ein kurzer Kommentar können in
einer MP3/WMA-Datei gespeichert werden.
Das Gerät kann sowohl ID3v1- (Version 1) als
auch ID3v2- (Version 2) Tags darstellen. (Siehe
Seite 26).
• Manche Zeichen können nicht korrekt
wiedergegeben werden.
• Wenn sowohl ID3v1 und ID3v2 auf einer Disc
aufgezeichnet wurden, werden die ID3v2Informationen angezeigt.
Wie werden MP3/WMADateien aufgenommen und
wiedergegeben?
MP3/WMA-„Dateien (Titeln)“ können in
„Ordner“ aufgenommen werden—in PC-
Terminologie.
Während der Aufzeichnung können die Dateien
und Ordner in ähnlicher Weise wie Dateien und
Ordner auf der Festplatte eines Computers
angeordnet werden.
Der „Hauptordner“ entspricht in einer
Baumstruktur dem Ordner der obersten Ebene.
Alle Dateien und Ordner können mit dem
Hauptordner verknüpft werden, so daß auf jede
Datei und jeder Ordner über diesen Hauptordner
zugegriffen werden kann.
Die Abbildung unten zeigt ein Bespiel, wie MP3/
WMA-Dateien auf CD-R oder CD-RW
aufgenommen werden, und wie sie auf diesem
Gerät gesucht werden.
Hinweise:
• Dieses Gerät kann nicht eine MP3-Datei ohne die
Dateierweiterung <.mp3> und einen WMA-Track
ohne die Dateierweiterung <.wma> lesen oder
wiedergeben.
•
Dieses Gerät ist nicht mit MP3-Dateien kompatibel,
die mit den Formaten Layer 1 und Layer 2 codiert sind.
•
Dieses Gerät ist nicht mit WMA-Dateien kompatibel,
die nicht auf Windows Media® Audio basieren.
• Dieses Gerät ist nicht mit Playlist** kompatibel.
**Eine Playlist ist eine einfache Textdatei, die in
Computersystemen verwendet wird. Mit dieser
Playlist können Benutzer eine eigene
Wiedergabereihenfolge erstellen, ohne daß die
eigentlichen Dateien umgeordnet werden müssen.
Hierarchie
Ebene 1 Ebene 2 Ebene 3 Ebene 4 Ebene 5
01
ROOT
05
• Microsoft und Windows Media sind entweder eingetragene Marken oder Marken von Microsoft Corporation in
24
den Vereinigten Staaten und/oder anderen Ländern.
1
2
02 03
3
10
11
04
12
4
5
6
7
: Ordner und ihre
01
Wiedergabereihenfolge
8
: MP3/WMA-Dateien und ihre
9
1
Wiedergabereihenfolge
Page 75

MP3/WMA-BEDIENVORGÄNGE
Siehe auch „CD-BETRIEB“ auf den Seiten
20 bis 23.
Wiedergabe einer Disc
1
Öffnen Sie das Bedienfeld.
Hinweis zum Ein-Tastendruck-Betrieb:
Befindet sich bereits eine Disc im Ladeschlitz,
wird durch Drücken von CD CD-CH das Gerät
eingeschaltet und das Abspielen beginnt
automatisch.
2
Setzen Sie eine Disc in den
Ladeschlitz ein.
Die Anlage schaltet
sich ein, zieht die Disc
ein und beginnt
automatisch mit der
Wiedergabe.
3
Schließen Sie das Bedienfeld von
Hand.
Alle Dateien werden wiederholt
wiedergegeben, bis Sie die Wiedergabe
beenden.
Das Display ändert sich wie folgt:
Anzeige CD
Aktuelle Anzeige für die Signalquelle
WMA- oder MP3-Anzeige*
Anzahl aller
Ordner
Beispiel: Wenn die Disc 19 Ordner und 144
MP3/WMA-Dateien enthält
* Die WMA- oder MP3-Anzeige leuchtet auf, je nach
der ersten erkannten Datei.
Hinweise:
• MP3/WMA-Discs erfordern eine längere
Auslesezeit.
(Abhängig von der Komplexität der Ordner/DateiKonfiguration).
• Beim Wiedergabebeginn werden Ordner- und
Dateinamen (oder ID3-Tags) automatisch
angezeigt. (Siehe auch Seite 26).
• Wenn Sie die Signalquelle ändern oder die
Stromzufuhr unterbrechen, wird die Wiedergabe
ebenfalls gestoppt (allerdings wird die Disc nicht
ausgeworfen).
Wenn Sie das nächste Mal den CD-Spieler als
Signalquelle auswählen, wird die Disc an derselben
Stelle wiedergegeben, an der Sie die Wiedergabe
gestoppt haben.
Anzahl aller
Dateien
DEUTSCH
25
Page 76

Zum Beenden des Abspielens und
Auswerfen der Disc
Drücken Sie die Taste 0.
Die Wiedergabe wird gestoppt und der
Ladeschlitz klappt nach unten. Die Disc wird
automatisch aus dem Ladeschlitz ausgeworfen.
Zum Wechseln der Anzeigeinformationen
Während der Wiedergabe einer MP3/WMA-Datei
können Sie die im Display gezeigte DiscInformation ändern.
DEUTSCH
• Wenn Sie „TAG DISP“ auf „TAG ON“
eingestellt haben (siehe Seite 34
bzgl. der Grundeinstellung)
*
Wenn ID3-Tags nicht aufgezeichnet sind,
erscheinen Ordnername und Dateiname. In
diesem Fall erscheint TAG nicht auf dem Display.
• Wenn Sie „TAG DISP“ auf „TAG OFF“
eingestellt haben
26
Drücken Sie die Taste DISP
(Display) wiederholt.
Bei jedem Drücken der Taste
wechselt das Display zwischen
folgenden Anzeigen um:
Name des Albums / Künstler
(Ordnername*)
(TAG leuchtet auf dem Display auf)
Titelbezeichnung (Dateiname*)
(TAG leuchtet auf dem Display auf)
Verstrichene Spielzeit und
aktuelle Dateinummer
Uhrzeit und
aktuelle Dateinummer
Ordnername
( leuchtet auf dem Display auf)
Dateiname
( leuchtet auf dem Display auf)
Verstrichene Spielzeit und
aktuelle Dateinummer
Uhrzeit und
aktuelle Dateinummer
Hinweise:
• Auf dem Display werden bis zu 8 Zeichen auf
einmal dargestellt. Der Text rollt nach unten, wenn
mehr als 8 Zeichen vorhanden sind.
Siehe auch „Wählen des Bildlaufmodus—SCROLL“
auf Seite 33.
• Wenn der Ordner- oder Dateiname gezeigt wird,
erscheinen die aktuelle
Anzeige und die aktuelle Dateinummer ebenfalls
rechts im Display.
Ordner
nummer oder Tr-
Aufsuchen einer Datei oder
bestimmten Passage auf einer
Disc
Zum schnellen Vor- oder Rücklauf der Datei
Halten Sie die Taste
¢ während der
Wiedergabe einer Disc
gedrückt, um schnell durch
die Datei vorzufahren.
Halten Sie die Taste 4 während der
Wiedergabe einer Disc gedrückt, um schnell
durch die Datei zurückzufahren.
Hinweis:
Bei diesem Vorgang erfolgt die Wiedergabe
Discontinuierlich. (Die verstrichene Spielzeit ändert
sich im Display ebenfalls Discontinuierlich).
So springen Sie zu den nächsten oder
vorherigen Dateien
Drücken Sie die Taste ¢
während der Wiedergabe kurz,
um zum Anfang der nächsten
Datei zu springen.
Mit jedem Druck auf diese
Taste wird zum Anfang der
nächsten Dateien
gesprungen und diese
wiedergegeben.
Drücken Sie die Taste 4 während der
Wiedergabe kurz, um zurück zum Anfang der
aktuellen Datei zu springen.
Mit jedem Druck auf diese Taste wird zum
Anfang der jeweils vorherigen Dateien
gesprungen und diese wiedergegeben.
Page 77

Zum schnellen Wechsel zu einer Datei
innerhalb des aktuellen
Ordner
s (Tasten
+10 und –10)
1 Drücken Sie während der Wiedergabe einer
Disc auf die Taste M MODE, um auf
Funktion-Modus zu schalten.
2 Die Taste +10 oder –10 drücken.
Um 10 Dateien* vorwärts
zur letzten Datei zu springen
Um 10 Dateien* rückwärts
zur ersten Datei zu springen
*
Werden die Tasten +10 oder –10 zum ersten
Mal gedrückt, wird zur nächsthöheren oder
-niedrigeren Datei gewechselt, die eine durch
10 teilbare Dateinummer besitzt (z. B. 10., 20.,
30.).
Jedes Mal, wenn Sie danach die Taste
drücken, werden 10 Dateien übersprungen
(siehe „Verwendung der Tasten +10 und –10“
unten).
• Nach der letzten Datei wird die erste Datei
ausgewählt, und umgekehrt.
Zum direkten Anwählen eines bestimmten
Ordner
s
WICHTIG:
Zur direkten Auswahl der
Nummerntaste(n) müssen den
zweistellige Nummern am Anfang der
Ordner
namen zugewiesen werden. (Sie
können dies nur während der Aufnahme von
CD-Rs oder CD-RWs tun).
Beispiel: Wenn der
Drücken Sie die Zifferntaste, die der
Ordner
der ersten Datei in dem gewählten
beginnen.
„01 ABC“ hat
= Drücken Sie 1, um zum
01 ABC zu wechseln.
Wenn der
„1 ABC“ hat, und Sie drücken 1,
so funktioniert dies nicht.
Wenn der
„12 ABC“ hat
= Drücken und halten Sie 6 (12),
um zum
wechseln.
nummer entspricht, um die Wiedergabe
Ordner
Ordner
Ordner
Ordner
Ordner
mit Hilfe der
Ordner
den Namen
den Namen
den Namen
12 ABC zu
Ordner
Ordner
zu
DEUTSCH
Verwendung der Tasten +10 und –10
• Beispiel 1: Datei 6 wird wiedergegeben und
Datei 32 soll ausgewählt werden
(3x) (2x)
Datei 6 \ 10 \ 20 \ 30 \ 31 \ 32
• Beispiel 2: Datei 36 wird wiedergegeben und
Datei 8 soll ausgewählt werden
(3x) (2x)
Datei 36 \ 30 \ 20 \ 10 \ 9 \ 8
• So wählen Sie eine
01 – 06 aus:
Drücken Sie kurz auf 1 (7) – 6 (12).
• So wählen Sie eine
07 – 12 aus:
Drücken und halten Sie 1 (7) – 6 (12) länger
als eine Sekunde.
Hinweise:
• Wenn die Anzeige im Display blinkt, nachdem
Sie einen
der Ordner keine MP3/WMA-Dateien enthält.
• Sie können
eine Nummer hat, die größer als 12 ist.
Drücken Sie zur Auswahl einer bestimmten
Datei in einem
4 , nachdem der
FORTSETZUNG AUF DER NÄCHSTEN SEITE
Ordner
keinen Ordner
Ordner
nummer von
Ordner
nummer von
gewählt haben, bedeutet dies, dass
direkt auswählen, der
Ordner
die Taste ¢ oder
Ordner
ausgewählt wurde.
27
Page 78

So springen Sie zum nächsten oder
vorherigen Ordner
D
ie Taste 5 (aufwärts
der Wiedergabe einer Disc drücken,
um zum nächsten Ordner zu
springen.
Mit jedem Druck auf diese Taste wird
der nächste Ordner gesucht (und die
erste Datei in diesem Ordner
wiedergegeben, wenn sie
aufgezeichnet wurde).
D
ie Taste ∞ (abwärts
DEUTSCH
einer Disc drücken, um zum vorherigen Ordner zu
springen.
Mit jedem Druck auf diese Taste wird der vorherige
Ordner gesucht (und die erste Datei in diesem Ordner
wiedergegeben, wenn sie aufgezeichnet wurde).
Hinweis:
Wenn der Ordner keine MP3/WMA-Dateien enthält,
wird er übersprungen.
) während der Wiedergabe
) während
Wählen von Wiedergabe-Modi
So geben Sie Dateien in zufälliger
Reihenfolge wieder
(Zufällige Ordner-/Disc-Wiedergabe)
Sie können alle Dateien des aktuellen
oder alle Dateien in zufälliger Reihenfolge
wiedergeben.
1
Drücken Sie während der DiscWiedergabe auf
M MODE, um auf FunktionModus zu schalten.
2 Drücken Sie die Taste RND
(Zufall), während „MODE“ im
Display blinkt, so daß „FLDR
RND“ oder „DISC RND“ im
Display erscheint.
Bei jedem Druck auf diese Taste
verändert sich der ZufallsWiedergabemodus wie folgt:
DISC RNDFLDR RND
Deaktiviert
RND- und (Ordner)-Anzeigen
Beispiel: Wenn Sie „FLDR RND“ wählen,
28
während Sie eine MP3-Datei hören
Ordners
die Taste
Modus Anzeige Zufallswiedergabe
FLDR RND RND und - Alle Dateien des
DISC RND RND und - Alle Dateien auf
Anzeigen aktuellen Ordners,
leuchten auf. danach die Dateien
des nächsten
Ordners usw.
Anzeigen der Disc.
leuchten auf.
So geben Sie Dateien wiederholt wieder
(wiederholte Wiedergabe von Titel/
Ordner)
Sie können die aktuelle Datei oder alle Dateien des
aktuellen Ordners wiederholt wiedergeben.
1
Drücken Sie während der DiscWiedergabe auf
M MODE, um auf FunktionModus zu schalten.
2 Drücken Sie die Taste RPT
(Wiederholung), während
„MODE“ im Display blinkt, so
daß „TRK RPT“ oder „FLDR
RPT“ im Display erscheint.
Wiederholtes Drücken der Taste
ändert den Wiederholbetrieb für
die Wiedergabe wie folgt:
TRK RPT FLDR RPT
Deaktiviert
Anzeige RPT
Beispiel: Wenn Sie „TRK RPT“ wählen,
während Sie eine MP3-Datei hören
Modus Anzeige
TRK RPT RPT Die aktuelle (oder
Angezeige angegebenen)
leuchtet auf. Datei.
FLDR RPT und RPT- Alle Dateien des
Anzeigen aktuellen (oder
leuchten auf. angegebenen)
die Taste
Wiederholt die
wiedergabe
Ordners.
Page 79

KLANGEINSTELLUNG
Auswählen der
vorprogrammierten Klangmodi
(C-EQ: eigener Equalizer)
Sie können einen vorprogrammierten
Klangmodus auswählen (C-EQ: eigener
Equalizer), der für das wiederzugebende
Musikgenre geeignet ist.
• Es besteht ein Zeitlimit für die Ausführung der
folgenden Schritte. Wenn die Einstellung
abgebrochen wird, bevor Sie sie fertiggestellt
haben, beginnen Sie erneut mit Schritt 1.
1
Drücken Sie die Taste M MODE, um in
den Funktionsbetrieb zu gelangen.
2
Drücken Sie die Taste EQ (Equalizer)
während „MODE“ im Display blinkt.
Sie können den aktuellen
Klangmodus bestätigen.
3
Wählen Sie den gewünschten
Klangmodus aus.
Bei jedem Drücken der Taste
schalten die Klangmodi wie
folgt um.
USER
ROCK
CLASSIC
Anzeige Verwendung Vorprogrammierte
USER (lineare 00 00 OFF
ROCK Rock- oder +03 +01 ON
CLASSIC Klassische +01 –02 OFF
POPS Leichte Musik +04 +01 OFF
HIP HOP Funk- oder +02 00 ON
JAZZ Jazz-Musik +02 +03 OFF
Hinweis:
Jede Klangmodus kann entsprechend angepaßt
werden. Sobald Änderungen vorgenommen werden,
werden diese automatisch für den aktuellen
Klangmodus gespeichert. Sie siehe Seite 30 „Klang-
Einstellschritte“.
für Werte
BAS TRE LOUD
Einstellung)
Disco-Musik
Musik
Rap-Musik
Bei Verwendung der Fernbedienung:
SOUND
ATT
U
SOURCE
F
R
D
Drücken Sie die Taste
SOUND wiederholt.
Bei jedem Drücken der
Taste schalten die
Klangmodi wie folgt um.
CLASSICROCKUSER
DEUTSCH
POPSHIP HOPJAZZ
Das Anzeigemuster wechselt für jeden
Klangmodus mit Ausnahme von „USER“.
Beispiel: Die Einstellung „ROCK“ wird
ausgewählt
JAZZ
HIP HOP
POPS
29
Page 80

Klang-Einstellschritte
Sie können das Klangbild wie gewünscht
einstellen.
1
Die einzustellende Position wählen.
Wenn Sie diese Taste
mehrfach hintereinander
drücken, ändern sich die
einstellbaren Funktionen wie
DEUTSCH
BAS
(Tiefen)
VOL
(Lautstärke)
Anzeige Zutun: Bereich
1
BAS*
1
TRE*
2
FAD *
BAL Einstellen des
1
LOUD*
SUB. W*3Ausgangspegel 00 (min.)
4
VOL*
folgt:
TRE
(Höhen)
Einstellen der –06 (min.)
Tiefen. |
Einstellen der –06 (min.)
Höhen. |
Einstellen des
vorderen und R06 (
hinteren |
Lautsprecheraus- F06 (Nur vorne)
gleichs.
linken und rechten
Lautsprecherausgleichs.
Tiefe und hohe
Frequenzen
werden betont,
um bei niedrigem
Laustärkepegel
ein ausgeglicheneres Klangbild
zu erzielen.
des Subwoofers |
einstellen. 08 (max.)
Einstellen der 00 (min.)
Lautstärke. |
FAD
(Fader)
SUB. W
(Subwoofer)
(
BAL
(Balance)
LOUD
Lautstärkekontur
+06 (max.)
+06 (max.)
Nur hinten)
L06 (Nur links)
|
R06 (
Nur rechts
LOUD ON
|
LOUD OFF
30 oder
50 (max.)*
5
1
*
Wenn Änderungen von Tiefen, Höhen oder
Lautstärkekontur vorgenommen werden, werden
diese Änderungen für den aktuellen Klangmodus
(C-EQ) einschließlich „USER“ gespeichert.
2
*
Wenn Sie eine Anlage mit zwei Lautsprechern
verwenden, stellen Sie den Fader auf „00“.
3
*
Diese Einstellung wird nur aktiv, wenn ein
Subwoofer angeschlossen ist.
4
*
Normalerweise funktioniert der Steuerregler als
Lautstärkeregelung. Zum Einstellen des
Lautstärkepegels muß also nicht erst „VOL“
ausgewählt werden.
5
*
Je nach Verstärker-Verstärkungsgradeinstellung.
(Einzelheiten siehe Seite 34).
2
)
)
Lautstärkekontur einstellen.
Lautstärke erhöhen
oder Lautstärkekontur
einschalten
Lautstärke reduzieren
oder Lautstärkekontur
ausschalten
Das Anzeigemuster wechselt, während
Sie Tiefen oder Höhen einstellen.
Beispiel 1: „TRE“ (Höhen) wird eingestellt
Beispiel 2: Lautstärkekontur wird
3
Wiederholen Sie die Schritte 1 und
2
, um weitere Optionen zu ändern.
Sollen die Klangmodi auf die
Werkseinstellungen zurückgesetzt werden,
das gleiche Verfahren wiederholen und die
voreingestellten Werte, die auf Seite 29
aufgeführt sind, erneut zuweisen.
eingeschaltet
30
Page 81

ANDERE WICHTIGE FUNKTIONEN
Ändern der allgemeinen
Einstellungen (PSM)
Sie können die Elemente in der unten
aufgeführten Tabelle und auf Seite 32 mit Hilfe
der PSM-Steuerung (allgemeine Einstellungen)
ändern.
Grundverfahren
1
Drücken Sie die Taste SEL
(Auswahl), und halten Sie sie länger
als 2 Sekunden gedrückt, bis eines
der PSM-Elemente im Display
angezeigt wird. (Siehe unten und
Seite 32).
2
Wählen Sie das PSM-Element, das
Sie einstellen möchten.
3
Stellen Sie die gewählte PSM-
Funktion ein.
4
Wiederholen Sie die Schritte 2 und
3
, um gegebenenfalls weitere PSM-
Einstellungen zu ändern.
5
Bestätigen Sie die Einstellung.
Präferenzeinstellungsmodus (PSM) Punkte
• Schauen Sie auf den entsprechenden Seiten, die in der Tabelle angegeben sind, bzgl. näherer
Informationen über den Betrieb aller PSM-Punkte nach.
DEUTSCH
Anzeige
DEMO Display-Demonstration
CLOCK H Stundeneinstellung
CLOCK M Minuteneinstellung
COLOR Displayfarbe
24H/12H 24/12-Std. Einstellung
AUTO ADJ Automatische
Uhrzeiteinstellung
AF-REG Alternativfrequenz-/
Regionalempfang
1
*
Wird nur angezeigt, wenn „DAB AF“ auf „OFF“ gestellt ist.
ausgewählt werden können ab Werk Seite
Werte/Elemente, die Einstellung Siehe
DEMO ONDEMO OFF
0 — 23 (1 — 12)
00 — 59
(Siehe Seite 33).
12H 24H
OFF ON
AF AF REG
FORTSETZUNG AUF DER NÄCHSTEN SEITE
OFF*
1
DEMO ON 8
0 (0:00)
00 (0:00)
ALL DEMO 33
24H
ON
AF
18
13, 14
9
9
31
Page 82

Anzeige
PTY STBY PTY-Bereitschaft
Werte/Elemente, die Einstellung Siehe
ausgewählt werden können ab Werk Seite
OFF
29 Programmsparten
(siehe Seite 19)
OFF
15
TA VOL Verkehrsfunkmeldungs-
Lautstärke
P-SEARCH Sendungssuchlauf
DEUTSCH
DAB AF*3Alternativfrequenzsuche
DAB VOL*3DAB-Lautstärkeanpassung
LEVEL Pegelanzeige
DIMMER Dimmerfunktion
VOL 00 — VOL 30 oder 50*
OFF ON
AF OFF AF ON
VOL –12 — VOL 12
OFF
AUTO OFF
2
ON ON
ON
TEL Telefonstummschaltung
OFF
MUTING 1
MUTING 2
BEEP Tastensignalton
SCROLL Bildlaufmodus
OFF ON
ONCE AUTO
OFF
4
EXT IN*
Externe Komponente
TAG DISP Anzeige der Tags
AMP GAIN Verstärker-
Verstärkungsgradregelung
2
*
Je nach Verstärker-Verstärkungsgradeinstellung. (Einzelheiten siehe Seite 34).
3
*
Wird nur bei angeschlossenem DAB-Tuner angezeigt.
4
*
Wird nur dann angezeigt, wenn eine der folgenden Signalquellen ausgewählt ist—FM, AM und CD.
CHANGER LINE IN CHANGER
TAG OFF TAG ON TAG ON 34
LOW PWR HIGH PWR HIGH PWR 34
VOL 20
OFF
AF ON
VOL 00
AUTO
OFF
ON 33
ONCE
18
18
46
46
33
33
33
33
34
32
Page 83

Klicken, um die Displayfarbe zu wählen
—COLOR
Sie können die Displayfarbe nach Wunsch wählen.
Bei Versand ab Werk ist „ALL DEMO“ gewählt.
Die wählbaren Farben sind wie folgt:
ALL DEMO O SOURCE O BLUE O
OCEAN O PURPLE O PINK O ROSE O
RED O (zurück zum Anfang)
• ALL DEMO: Das Display wechselt alle 6
Sekunden um (Rose = Rosa =
Blaugrün = Rot = Violett = Blau
= zurück zum Anfang).
• SOURCE: Die Displayfarbe ist fest auf Rot
gestellt, wenn UKW oder MW/LW
gehört wird, Blau beim Hören von
CD und Violett beim Hören von
externen Komponenten.
So wählen Sie die
Telefonstummschaltung—TEL
Dieser Modus wird verwendet, wenn ein
Funktelefon angeschlossen ist. Wählen Sie in
Abhängigkeit vom verwendeten Telefonsystem
entweder die Einstellung „MUTING 1“ oder
„MUTING 2“.
Werkseitig wurde dieser Modus deaktiviert.
• MUTING 1: Wählen Sie diese Einstellung,
wenn damit die Lautstärke des
Gerät stummgeschaltet werden
kann.
• MUTING 2: Wählen Sie diese Einstellung,
wenn damit die Lautstärke des
Gerät stummgeschaltet werden
kann.
• OFF: Die Telefonstummschaltung wird
deaktiviert.
DEUTSCH
Zum Wählen der Pegelanzeige—LEVEL
Sie können die Pegelanzeige nach Wunsch
aktivieren oder deaktivieren.
Werkseitig ist die Pegelanzeige aktiviert.
• ON: Zeigt die Audio-Pegelanzeige.
• OFF: Hebt die Audio-Pegelanzeige auf;
die Klangmodusanzeige erscheint.
Wählen des Abblendmodus—DIMMER
Wenn Sie die Autoscheinwerfer einschalten, wird
das Display automatisch abgeblendet
(automatische Abblendung).
Werkseitig ist die automatische Abblendung
aktiviert.
• AUTO: Die automatische Abblendung wird
aktiviert.
• OFF: Die automatische Abblendung wird
deaktiviert.
• ON: Das Display wird immer
abgeblendet.
Hinweis:
Die automatische Abblendfunktion, mit der dieses
Gerät ausgestattet ist, funktioniert möglicherweise bei
einigen Fahrzeugen nicht korrekt, insbesondere bei
solchen, die einen Abblendregler besitzen.
Ist dies der Fall, stellen Sie den Abblendmodus auf
„ON“ oder „OFF“.
Ein- oder Ausschalten des
Tastensignaltons—BEEP
Sie können den Tastensignalton deaktivieren,
wenn Sie nicht möchten, daß ein Signalton
ertönt, wenn Sie eine Taste drücken.
Werkseitig ist der Tastensignalton aktiviert.
• ON: Der Tastensignalton wird aktiviert.
• OFF: Der Tastensignalton wird deaktiviert.
Wählen des Bildlaufmodus—SCROLL
Sie können den Bildlaufmodus für die
Discinformationen einstellen (wenn der gesamte
Text nicht auf einmal angezeigt werden kann).
Werkseitig ist der automatische Bildlaufmodus
auf „ONCE“ gesetzt.
• ONCE: Der Bildlauf erfolgt nur einmal.
• AUTO: Der Bildlauf wird wiederholt.
(Dazwischenliegende
5-Sekunden-Intervalle).
• OFF: Der Bildlaufmodus wird deaktiviert.
Hinweis:
Auch wenn der Bildlauf deaktiviert ist „OFF“,
können Sie einen Bildlauf durchführen, indem Sie die
Taste DISP (Display) länger als 1 Sekunde gedrückt
halten.
FORTSETZUNG AUF DER NÄCHSTEN SEITE
33
Page 84

Zum Wählen der zu verwendenden
CD CD-CH
externen Komponente—EXT IN
Sie können die externe Komponente an die
Buchse für den CD-Wechsler auf der
Geräterückseite mit Hilfe des Eingangsadapters
KS-U57 (der nicht zum Lieferumfang gehört)
anschließen.
Um die externe Komponente als
Wiedergabesignalquelle für dieses Gerät
verwenden zu können, müssen Sie auswählen,
welche Komponente—CD-Wechsler oder externe
Komponente—verwendet werden soll.
DEUTSCH
Bei der Auslieferung ab Werk ist der
CD-Wechsler als externe Komponente ausgewählt.
• CHANGER: Der CD-Wechsler wird verwendet.
• LINE IN: Es wird eine andere externe
Hinweis:
In der Einbau/Anschlußanleitung (separates
Dokument) finden Sie Informationen, wie der
Eingangsadapter KS-U57 und die externe
Komponente angeschlossen werden.
Komponente als der CD-Wechsler
verwendet.
Zum Wählen der Verstärker-
Verstärkungsgradregelung—AMP GAIN
Sie können den maximalen Lautstärkepegel
dieses Geräts ändern. Wenn die Maximalleistung
der Lautsprecher weniger als 50 W beträgt,
wählen Sie „LOW PWR“ um Schäden an den
Lautsprechern zu vermeiden.
Bei Versand ab Werk ist „HIGH PWR“ gewählt.
• LOW PWR: Sie können den Lautstärkepegel
von „VOL 00“ bis „VOL 30“
einstellen.
Hinweis:
Wenn Sie die Einstellung von „HIGH
PWR“ auf „LOW PWR“ umstellen,
während Sie mit einem
Lautstärkepegel von mehr als 30
hören, schaltet das Gerät automatisch
den Lautstärkepegel auf „VOL 30“
um.
• HIGH PWR: Sie können den Lautstärkepegel
von „VOL 00“ bis „VOL 50“
einstellen.
So schalten Sie die Anzeige der Tags an
oder aus—TAG DISP
Eine MP3/WMA-Datei kann Dateiinformation mit
der Bezeichnung „ID3-Tag“ enthalten, während
ihr Albumname, Künstler, Titelbezeichnung usw.
aufgezeichnet werden.
Es gibt zwei Versionen—ID3v1 (ID3 Tag Version
1) und ID3v2 (ID3 Tag Version 2). Wenn sowohl
ID3v1 und ID3v2 auf einer Disc aufgezeichnet
wurden, werden die ID3v2-Informationen
angezeigt.
Werkseitig ist die Einstellung „TAG ON“
gespeichert.
• TAG ON: Schaltet die ID3-Tag-Anzeige bei
• TAG OFF: Schaltet die ID3-Tag-Anzeige bei
34
der Wiedergabe von MP3/WMADateien ein.
• Wenn die MP3/WMA-Datei
keine ID3-Tags hat, erscheinen
Ordnername und Dateiname.
der Wiedergabe von MP3/WMADateien aus. (Nur Ordnername
und Dateiname können gezeigt
werden).
Zuweisung von Namen für
Signalquellen
Sie können CDs benennen (sowohl in diesem
Gerät als auch im CD-Wechsler).
Wenn ein Name zugewiesen wurde, erscheint
dieser im Display, wenn Sie die entsprechende
Auswahl treffen.
Signalquelle Maximale Zeichenanzahl
CDs* Maximal 32 Zeichen (maximal 40
* Sie können keinen Namen zu einer CD-Text- oder
einer MP3/WMA-Disc zuweisen.
1
Wählen Sie eine Signalquelle, der
Sie einen Namen zuweisen möchten.
Wenn Sie eine Signalquelle wählen, wird
das Gerät automatisch eingeschaltet.
CDs)
Page 85

2
Drücken Sie die Taste DISP (Display)
und drücken und halten Sie die
Taste SEL (Auswahl) länger als 2
Sekunden gedrückt.
Hinweise:
• Wenn Sie einer 41. CD einen Namen zuweisen, wird
„NAME FULL“ im Display angezeigt. (Ist dies der
Fall, löschen Sie vor der Zuweisung unerwünschte
Namen).
• Wenn der CD-Wechsler angeschlossen ist, können
Sie CDs im CD-Wechsler Namen zuweisen. Diese
Namen werden ebenfalls im Display angezeigt,
wenn Sie die CDs in dieses Gerät einlegen.
Beispiel: Sie haben CD als Signalquelle gewählt
3
Wählen Sie ein Zeichen.
A B C D E F G H I J
K L M N O P Q R S T
U V W X Y Z
4 5 6 7 8 9
leerzeichen
4
Verschieben Sie den Cursor auf die
nächste (oder vorherige)
Zeichenposition.
5
Wiederholen Sie die Schritte 3 und
4
, bis der Name eingegeben ist.
0 1 2 3
–
<
/
So wechseln Sie die
Standardplatte
Sie können die Standardplatte gegen eine
andere Platte (im Lieferumfang enthalten)
auswechseln.
Sie können die Platten auch über folgende
Adresse über das Internet herunterladen
<http://www.jvc.co.jp/jvccar>.
• Achten Sie beim Wechseln der Platte darauf,
daß Sie keine Fingerabdrücke auf der Platte
oder der Abdeckung hinterlassen.
1
Lösen Sie die Schrauben mit dem
>
mitgelieferten
Innensechskantschlüssel.
2
Entfernen Sie die Plattenabdeckung
und die Standardplatte.
DEUTSCH
6
Schließen Sie das Verfahren ab,
während das letzte gewählte
Zeichen blinkt.
Zum Löschen der Eingabezeichen
Zum Löschen aller Zeichen gleichzeitig drücken und
halten Sie
Sekunde gedrückt, wie im Verfahren unten
beschrieben.
die Taste
DISP (Display) für mehr als 1
Standardplatte
Plattenabdeckung
FORTSETZUNG AUF DER NÄCHSTEN SEITE
35
Page 86

3
Tauschen Sie die Platte gegen eine
beliebige andere aus (Standardplatte,
Schablonenplatte oder
heruntergeladene Schablonenplatte).
• Beim Anbringen einer Standardplatte
Standardplatte
DEUTSCH
• Beim Anbringen einer
(heruntergeladenen) Schablonenplatte
Fügen Sie die durchsichtige Platte (im
Lieferumfang enthalten) zwischen der
(heruntergeladenen) Schablonenplatte
und der Plattenabdeckung ein, damit die
Plattenabdeckung richtig sitzt.
Schablonenplatte oder
heruntergeladene
Schablonenplatte
Plattenabdeckung
Plattenabdeckung
Hinweise:
• Bewahren Sie den Innensechskantschlüssel gut auf.
• Im Lieferumfang des Geräts sind zwei
Ersatzschrauben für die Plattenabdeckung
enthalten. Siehe Einbau/Anschlußanleitung
(separates Dokument).
• Achten Sie beim Anbringen der Platte darauf, daß
Sie die Schrauben nicht zu fest anziehen, da sonst
Brüche in der Plattenabdeckung auftreten können.
So verwenden Sie die Schablonenplatten
1 Klappen Sie die mitgelieferten
Schablonenplatten auf.
2 Schneiden Sie die Platten mit einer
Schere aus.
Durchsichtige Platte
(im Lieferumfang
enthalten)
Beim Anbringne der Abdeckplatte
Öffnungen
Zungen
Stellen Sie sicher, daß die beiden Zungen auf
der Unterseite der Plattenabdeckung in die
beiden Öffnungen des Bedienfelds eingeführt
werden (siehe Abbildung).
36
3 Legen Sie die Platte auf eine
Gummioberfläche und schneiden Sie das
Fenster und die beiden Knöpfe mit einem
Messer aus.
Page 87

Abnehmen des Bedienfelds
Sie können das Bedienfeld abnehmen, wenn Sie
das Fahrzeug verlassen.
Wenn Sie das Bedienfeld abnehmen oder wieder
einsetzen, achten Sie darauf, daß Sie die
Anschlüsse auf der Rückseite des Bedienfelds
und am Schalttafelhalter nicht beschädigen.
Anbringen des Bedienfelds
1
Führen Sie die rechte Seite des
Bedienfelds in die Aussparung an
der Halterung des Bedienfelds ein.
Abnehmen des Bedienfelds
Bevor Sie das Bedienfeld abnehmen, schalten
Sie unbedingt die Stromversorgung aus.
1
Entriegeln Sie das Bedienfeld.
2
Das Bedienfeld anheben und
abnehmen.
3
Legen Sie das abgenommene
Bedienfeld in das mitgelieferte Etui.
2
Drücken Sie auf die linke Seite des
Bedienfelds, um sie an der
Halterung des Bedienfelds zu
befestigen.
Hinweis zum Reinigen der Anschlüsse:
Wenn Sie das Bedienfeld häufig abnehmen, kann
sich der Zustand der Anschlüsse verschlechtern.
Um diese Möglichkeit zu minimieren, wischen Sie
die Anschlüsse in regelmäßigen Abständen mit
einem Wattestäbchen oder einem Tuch ab, die
zuvor mit Alkohol angefeuchtet wurden. Achten Sie
darauf, daß Sie die Anschlüsse nicht beschädigen.
DEUTSCH
Anschlüsse
37
Page 88

CD-WECHSLERBETRIEB
CD CD-CH*
DEUTSCH
Wir empfehlen Ihnen, den MP3-kompatiblen
CD-Wechsler von JVC mit diesem Gerät zu
verwenden.
Durch die Verwendung dieses CD-Wechslers
können originale CD-Rs (beschreibbar) und
CD-RWs (wiederbeschreibbar) im Audio-CDoder MP3-Format wiedergegeben werden.
• Sie können auch andere CD-Wechsler der
Serie CH-X anschließen (außer CH-X99 und
CH-X100). Diese Geräte sind jedoch nicht
kompatibel zu MP3-Discs, so daß die
Wiedergabe von MP3-Discs nicht möglich ist.
• CD-Wechsler der Serie KD-MK können mit
diesem Gerät nicht verwendet werden.
Vor dem Betreiben Ihres CD-Wechslers:
• Siehe auch die Anleitung, die Ihrem
CD-Wechsler beiliegt.
• Sind keine CD im Magazin des
CD-Wechslers oder sind die CD mit der
Oberseite nach unten eingelegt, erscheint
„NO DISC“ (keine Disc) wird im Display
angezeigt. In diesem Fall das Magazin
herausnehmen und die CD richtig einlegen.
• Wenn kein Magazin in den CD-Wechsler
eingelegt ist, wird „NO MAG“ (kein
Magazin) im Display angezeigt. Sollte diese
Meldung erscheinen, legen Sie das
Magazin in den CD-Wechsler ein.
• Wird „RESET 1“ – „RESET 8“ im Display
angezeigt, stimmt etwas nicht mit der
Verbindung zwischen dem Gerät und dem
CD-Wechsler. In diesem Fall die Verbindung
überprüfen und das (die) Kabel ggf. fest
anschließen. Dann die Rücksetztaste des
CD-Wechslers drücken.
Abspielen der Discs
Den CD-Wechsler wählen (CD-CH).
* Wenn Sie die Einstellung für „EXT IN“ auf „LINE
IN“ (siehe Seite 34) geändert haben, kann der CDWechsler nicht ausgewählt werden.
• Wenn die aktuelle Disc eine MP3-Disc ist:
Die Wiedergabe startet vom erstem Ordner der
aktuellen Disc, sobald die Dateiprüfung
abgeschlossen ist.
Ausgewählte Discnummer
MP3-Anzeige
Anzeige
(Ordner)
Gewählte
Ordnernummer
Hinweis:
Sie können WMA-Discs nicht auf dem CD-Wechsler
steuern oder wiedergeben.
38
Hinweis:
Der Ordnername wird anstelle von „ROOT“
angezeigt, wenn eine MP3-Disc einen Ordner enthält.
Page 89

• Wenn die aktuelle Disc eine CD ist:
Die Wiedergabe startet vom erstem Titel der
aktuellen CD.
Zum direkten Anwählen einer bestimmten
Disc
Die Zifferntaste der jeweiligen Disc-Nummer
drücken, um diese abzuspielen (während der
CD-Wechsler-Wiedergabe).
Ausgewählte Discnummer
Verstrichene
Spielzeit
Hinweise:
• Wenn Sie CD CD-CH drücken, wird das Gerät
automatisch eingeschaltet. Sie brauchen dafür nicht
die Taste zu drücken.
• Wenn Sie die Signalquelle wechseln, wird die
Wiedergabe vom CD-Wechsler beendet. Wenn Sie
das nächste Mal den CD-Wechsler als Signalquelle
auswählen, beginnt die Wiedergabe an derselben
Stelle, an der Sie die Wiedergabe zuletzt gestoppt
haben.
• Bei der Wiedergabe einer CD-Text oder einer MP3Disc werden die Discinformationen automatisch auf
dem Display angezeigt. (Siehe Seite 23 und 26).
Aktuelle
Titelnummer
• So wählen Sie eine Disc-Nummer von 1 – 6
aus:
Drücken Sie kurz auf 1 (7) – 6 (12).
• So wählen Sie eine Disc-Nummer von 7 – 12
aus:
Drücken und halten Sie 1 (7) – 6 (12) länger
als eine Sekunde.
Zum schnellen Vor- oder Rücklauf von
Titel/Datei
Die Taste ¢ während
der Wiedergabe drücken
und gedrückt halten, um
einen schnellen Vorlauf im
Titel/in der Datei
durchzuführen.
Die Taste 4 während der Wiedergabe
drücken und gedrückt halten, um einen schnellen
Rücklauf im Titel/in der Datei durchzuführen.
Hinweis:
Bei diesem Vorgang erfolgt die Wiedergabe
Diskontinuierlich. (Die verstrichene Spielzeit ändert
sich im Display ebenfalls Diskontinuierlich).
So springen Sie zu den nächsten oder
vorheringen Titels/Dateien
Drücken Sie die Taste
¢ während der
Wiedergabe kurz, um zum
Anfang des nächsten Titels/
der nächsten Datei zu
springen.
Mit jedem Druck auf diese
Taste wird zum Anfang des
nächsten Titels/der
nächsten Dateien
gesprungen und diese(r)
wiedergegeben.
Drücken Sie die Taste 4 während der
Wiedergabe kurz, um zum Anfang des aktuellen
Titels/der aktuellen Datei zu springen.
Mit jedem Druck auf diese Taste wird zum Anfang
des vorherigen Titels/der vorherigen Dateien
gesprungen und diese(r) wiedergegeben.
DEUTSCH
39
Page 90

Diese Funktion kann nur mit dem MP3kompatiblen JVC CD-Wechsler (CH-X1500)
ausgeführt werden.
Zum schnellen Wechsel zu einem Titel/
einer Datei (Tasten +10 und –10)
1 Drücken Sie während der Wiedergabe einer
Disc auf die Taste M MODE, um auf FunktionModus zu schalten.
DEUTSCH
2 Die Taste +10 oder –10 drücken.
Um 10 Titel/Dateien* vorwärts
zur letzten Titel/Datei
springen
Um 10 Titel/Dateien* rückwärts
zur ersten Titel/Datei zu springen
* Werden die Tasten +10 oder –10 zum ersten
Mal gedrückt, wird zu dem nächsthöheren
oder -niedrigeren Titel oder der Datei
gewechselt, der/die eine durch 10 teilbare
Titelnummer/Dateinummer besitzt (z. B. 10.,
20., 30.).
Jedes Mal, wenn Sie danach die Taste drücken,
werden 10 Titel/Dateien übersprungen (siehe
„Verwendung der Tasten +10 und –10“ unten).
• Nach dem letzten Titel/Datei wird der erste
Titel/Datei ausgewählt, und umgekehrt.
zu
Zum nächsten oder vorherigen Ordner
springen (nur bei MP3-Discs)
Die Taste 5 (
der Wiedergabe einer MP3-Disc
drücken, um zum nächsten
Ordner zu gelangen.
Mit jedem Druck auf diese Taste
wird der nächste Ordner gesucht
und die erste Datei in diesem
Ordner wiedergegeben.
Die Taste ∞ (
einer MP3-Disc drücken, um zum
Ordner zu gelangen.
Mit jedem Druck auf diese Taste wird der
vorherige Ordner gesucht und die erste Datei in
diesem Ordner wiedergegeben.
abwärts
aufwärts
) während der Wiedergabe
) während
vorherigen
So zeigen Sie die Discinformationen für
CD-Text und MP3-Discs an
Dies ist nur möglich, wenn ein CD-Text- und/oder
MP3-Disc-fähiger JVC CD-Wechsler
angeschlossen ist.
Wählen Sie den Textanzeige-Modus bei
der Wiedergabe einer CD mit CD-Text
oder einer MP3-Disc aus.
Hinweis:
Handelt es sich bei der momentan wiedergegebenen
Disc um eine MP3-Disc, werden Dateien im gleichen
Ordner übersprungen.
Verwendung der Tasten +10 und –10
• Beispiel 1: Titel/Datei 6 wird wiedergegeben
Titel/Datei 6 \ 10 \ 20 \ 30 \ 31 \ 32
• Beispiel 2: Titel/Datei 36 wird
Titel/Datei 36 \ 30 \ 20 \ 10 \ 9 \ 8
40
und Titel/Datei 32 soll ausgewählt
werden
(3x) (2x)
wiedergegeben und Titel/Datei 8
soll ausgewählt werden
(3x) (2x)
• Siehe Seite 23 bzgl. näherer Informationen
über CD-Text und Seite 26 über MP3-
Discinformationen.
Page 91

Auswahl der Wiedergabemodi
So geben Sie Titel/Dateien in zufälliger
Reihenfolge wieder (Zufällige Ordner-/
Disc-/Magazin-Wiedergabe)
1 Drücken Sie während der
Wiedergabe auf die Taste
M MODE, um auf FunktionModus zu schalten.
2 Drücken Sie die Taste RND
(Zufall) während „MODE“ im
Display blinkt.
Bei jedem Druck auf diese Taste
verändert sich der ZufallsWiedergabemodus wie folgt:
So geben Sie Titel/Dateien wiederholt
wieder (Wiederholte Wiedergabe von
Titel/Ordner/Disc)
1 Drücken Sie während der
Wiedergabe auf die Taste
M MODE, um auf FunktionModus zu schalten.
2 Drücken Sie die Taste RPT
(Wiederholung) während
„MODE“ im Display blinkt.
Wiederholtes Drücken der Taste
ändert den Wiederholbetrieb für
die Wiedergabe wie folgt:
Bei MP3-Discs:
DEUTSCH
Bei MP3-Discs:
DISC RNDFLDR RND
Deaktiviert
Bei CDs:
MAG RND
MAG RNDDISC RND
Deaktiviert
Anzeige RND
Beispiel: Wenn Sie „MAG RND“ auswählen
Hinweis:
Die MP3-Anzeige wird ebenfalls angezeigt, wenn die
aktuell wiedergegebene Disc eine MP3-Disc ist.
Modus Anzeige Zufallswiedergabe
FLDR RND* RND und - Alle Dateien des
DISC RND RND und -
MAG RND RND Alle Titel/Dateien
* „FLDR RND“ kann nur bei MP3-Discs angewendet
werden.
Anzeigen aktuellen Ordners,
leuchten auf. danach die Dateien
Anzeigen
leuchten auf.
Anzeige der eingelegten
leuchtet auf. Discs.
des nächsten
Ordners usw.
Alle Titel/Dateien
der aktuellen (oder
angegebenen) Disc.
TRK RPT
Deaktiviert
Bei CDs:
FLDR RPT
DISC RPT
TRK RPT DISC RPT
Deaktiviert
(Disc)- und RPT-Anzeigen
Beispiel: Wenn Sie „DISC RPT“ auswählen
Hinweis:
Die MP3-Anzeige wird ebenfalls angezeigt, wenn die
aktuell wiedergegebene Disc eine MP3-Disc ist.
Modus Anzeige
TRK RPT RPT Der aktuelle
Anzeige (oder angegebene)
leuchtet auf. Titel/Datei.
FLDR RPT* und RPT- Alle Dateien des
Anzeigen aktuellen (oder
leuchten auf. angegebenen)
DISC RPT und RPT-
Anzeigen
leuchten auf.
* „FLDR RPT“ kann nur bei MP3-Discs angewendet
werden.
Wiederholt die
wiedergabe
Ordners oder der
aktuellen Disc.
Alle Titel/Dateien
der aktuellen (oder
angegebenen) Disc.
41
Page 92

BETRIEB EINER EXTERNEN KOMPONENTE
DEUTSCH
Wiedergeben einer externen
Komponente
Sie können eine externe Komponente an den
Anschluß des CD-Wechslers auf der
Gehäuserückseite anschließen. Hierzu wird der
Line-Eingangsadapter KS-U57 (nicht im
Lieferumfang enthalten) verwendet.
Vorbereitungen:
• In der Einbau/Anschlußanleitung (separates
Dokument) finden Sie Informationen, wie der
Eingangsadapter KS-U57 und die externe
Komponente angeschlossen werden.
• Bevor Sie die externe Komponente mit Hilfe des
nachstehend beschriebenen Verfahrens betreiben,
wählen Sie zuvor den richtigen externen Eingang
aus. Sehen Sie hierzu „Zum Wählen der zu
verwendenden externen Komponente—EXT IN“ auf
Seite 34.
1
Wählen Sie die externe Komponente
(LINE IN).
CD LINE IN*
Hinweis zum Ein-Tastendruck-Betrieb:
Wenn Sie die Taste CD CD-CH drücken, wird das
Gerät automatisch eingeschaltet. Sie brauchen dafür
nicht die Taste zu drücken.
2
Schalten Sie die angeschlossene
Komponente ein, und starten Sie die
Wiedergabe der Signalquelle.
3
Die Lautstärke einstellen.
4
Den Klang wie gewünscht einstellen.
(Siehe Seite 29 und 30).
• Wenn „LINE IN“* im Display nicht angezeigt
wird, lesen Sie siehe Seite 34 nach, und
aktivieren Sie den externen Eingang
(„LINE IN“).
* Wird nur dann angezeigt, wenn eine der folgenden
Signalquellen ausgewählt ist—FM, AM und CD.
42
Page 93

BETRIEB DES DAB-TUNERS
FM/AMDAB
Wir empfehlen Ihnen, den DAB-Tuner
KT-DB1500 oder KT-DB1000 (DAB: Digital Audio
Broadcasting = digitaler Rundfunk) zusammen
mit diesem Gerät zu verwenden.
Wenn Sie einen anderen DAB-Tuner besitzen,
setzen Sie sich mit Ihrem Fachhändler für JVCAutostereoanlagen in Verbindung.
• Lesen Sie auch die Bedienungsanleitung des
DAB-Tuner.
Was ist das DAB-System?
DAB ist eines der digitalen Rundfunksysteme,
die heute angeboten werden. Sie können
Übertragungen in CD-Qualität empfangen,
ohne daß sie durch Störungen und
Signalverzerrungen beeinträchtigt werden.
Darüber hinaus können im digitalen Rundfunk
auch Text, Bilder und Daten gesendet
werden.
Im Gegensatz zum UKW-Rundfunk, bei dem
jede Sendung auf einer eigenen Frequenz
übertragen wird, werden beim DAB-System
mehrere Sendungen („Dienste“ genannt)
kombiniert, um ein „Ensemble“ zu bilden.
Zusätzlich kann auch jeder „Dienst“, auch
„Primärdienst“ genannt, in Unterdienste,
sogenannte „Sekundärdienste“, unterteilt
werden.
Wenn Sie einen DAB-Tuner an dieses Gerät
angeschlossen haben, können Sie diese
DAB-Dienste empfangen.
Hinweis:
Wenn der Empfang zwischen DAB und UKW
umgeschaltet wird, wird die Lautstärke
möglicherweise unangenehm erhöht oder gesenkt.
Diese Änderung der Lautstärke liegt an der
unterschiedlichen Lautstärkeeinspeisung bei den
Sendern, ist aber keine Fehlfunktion dieses Geräts.
Um diese Unannehmlichkeit zu verhindern, können
Sie die DAB-Lautstärke anpassen. (Sehen Sie hierzu
„So passen Sie die DAB-Lautstärke an“ auf Seite 46).
Einstellen eines Ensembles
und eines Dienstes
Ein typisches Ensemble enthält 6 oder mehr
Sendungen (Dienste), die gleichzeitig
ausgestrahlt werden. Nachdem Sie ein Ensemble
eingestellt haben, können Sie den Dienst wählen,
den Sie hören möchten.
Bevor Sie beginnen....
Drücken Sie kurz die Taste FM/AM DAB, wenn
die CD, der CD-Wechsler oder eine externe
Komponente als aktuelle Signalquelle ausgewählt
ist.
1
Wählen Sie den DAB-Tuner.
Wenn Sie diese Taste
mehrfach hintereinander
drücken und halten, werden
abwechselnd DAB-Tuner und
UKW/AM-Tuner (FM/AM)
aktiviert.
2
Wählen Sie das DAB-Frequenzband
(DAB1, DAB2 oder DAB3).
Wenn Sie diese Taste
mehrfach hintereinander
drücken, ändert sich das
DAB-Frequenzband wie folgt:
DAB1 DAB2 DAB3
Hinweis:
Dieser Receiver verfügt über drei DABFrequenzbänder (DAB1, DAB2, DAB3). Sie
können alle drei Bänder verwenden, um ein
Ensemble einzustellen.
FORTSETZUNG AUF DER NÄCHSTEN SEITE
DEUTSCH
43
Page 94

FM/AMDAB
3
Suchen Sie ein Ensemble.
Zur Suche von
Ensembles mit höheren
Frequenzen
Zur Suche von Ensembles mit tieferen
Frequenzen
Wenn ein Ensemble empfangen wird,
brechen Sie die Suche ab.
DEUTSCH
Wenn Sie die Suche abbrechen wollen,
bevor ein Ensemble empfangen wird,
drücken Sie erneut die Taste, die Sie zum
Start der Suche gedrückt haben.
4
Wählen Sie einen Dienst aus
(entweder primär oder sekundär),
den Sie hören möchten.
Zur Auswahl des nächsten
Dienstes (Wenn ein
Primärdienst über
Sekundärdienste verfügt,
werden diese zuerst
ausgewählt, bevor der
nächste Primärdienst
ausgewählt wird.)
Zur Auswahl des vorherigen Dienstes
(entweder Primär- oder Sekundärdienst)
So ändern Sie die Displayinformationen,
während Sie ein Ensemble einstellen
Normalerweise wird der Name des Dienstes im
Display angezeigt.
Wenn sie den Ensemble-Namen oder seine
Frequenz prüfen wollen, drücken Sie die Taste
DISP (Display) wiederholt.
Wenn Sie diese Taste mehrfach
hintereinander drücken, werden
folgende Informationen einen
Augenblick lang im Display
angezeigt.
Name des Dienstes
So stellen Sie ein bestimmtes Ensemble
ein, ohne es zu suchen
Bevor Sie beginnen....
Drücken Sie kurz die Taste FM/AM DAB, wenn die
CD, der CD-Wechsler oder eine externe Komponente
als aktuelle Signalquelle ausgewählt ist.
1 Drücken Sie die Taste FM/AM DAB, und halten
um den DAB-Tuner als Signalquelle zu wählen.
2 Drücken Sie wiederholt FM/AM DAB, um das
DAB-Frequenzband (DAB1, DAB2 oder
DAB3) zu wählen.
3 Drücken Sie die Taste ¢ oder 4 und
halten Sie sie länger als 1 Sekunde gedrückt.
4 Drücken Sie gegebenenfalls die Taste ¢
oder 4 bis das gewünschte
Ensemble eingestellt worden ist.
• Wenn Sie die Taste gedrückt halten, ändert
sich die Frequenz, bis Sie die Taste loslassen.
5 Drücken Sie die Taste 5 (aufwärts) oder ∞
(abwärts), um einen Dienst (entweder primär
oder sekundär) zum Hören auszuwählen.
So schalten Sie den UKW-/AM-Tuner
wieder ein
Halten Sie die Taste FM/AM DAB erneut gedrückt.
Sichern von DAB-Diensten im
Speicher
Sie können maximal 6 DAB-Dienste in jedem
DAB-Frequenzband (DAB1, DAB2 und DAB3)
manuell speichern.
Bevor Sie beginnen....
Drücken Sie kurz die Taste FM/AM DAB, wenn die
CD, der CD-Wechsler oder eine externe Komponente
als aktuelle Signalquelle ausgewählt ist.
1
Wählen Sie den DAB-Tuner.
Wenn Sie diese Taste
mehrfach hintereinander
drücken und halten, werden
abwechselnd DAB-Tuner und
UKW-/MW/LW-Tuner (FM/
AM) aktiviert.
44
Name des Ensembles
2
Wählen Sie das DAB-Frequenzband
(DAB1, DAB2 oder DAB3).
Kanalnummer
Frequenz
Uhrzeit
Wenn Sie diese Taste
mehrfach hintereinander
drücken, ändert sich das
DAB-Frequenzband wie folgt:
DAB1 DAB2 DAB3
Page 95

3
FM/AMDAB
Stellen Sie das gewünschte
Ensemble ein.
4
Wählen Sie den gewünschten Dienst
des Ensembles, den Sie hören
möchten.
Zur Auswahl des nächsten
Dienstes
Zur Auswahl des vorherigen
Dienstes
5
Halten Sie die Zifferntaste (in diesem
Beispiel 1) länger als 2 Sekunden
gedrückt, um den gewählten Dienst
unter der gewünschten
Festsendernummer zu speichern.
Gewählte Festsendernummer
6
Wiederholen Sie das oben
beschriebene Verfahren, um weitere
DAB-Dienste in anderen Kanälen zu
speichern.
Hinweise:
• Sie können nur primäre DAB-Dienste speichern.
Wenn Sie versuchen einen Sekundärdienst zu
speichern, wird der zugehörige Primärdienst dafür
gespeichert.
• Ein zuvor gespeicherter DAB-Dienst wird gelöscht,
wenn ein neuer DAB-Dienst unter derselben
Kanalnummer gespeichert wird.
• DAB-Dienste werden gelöscht, wenn die
Stromversorgung der Speichereinheit unterbrochen
wird (beispielsweise beim Auswechseln von
Batterien). Wenn dieser Fall eintritt, speichern Sie
die DAB-Dienste erneut.
Einstellen eines
gespeicherten DAB-Dienstes
Sie können einen gespeicherten DAB-Dienst
ganz einfach einstellen.
Denken Sie daran, daß Sie die Dienste zunächst
speichern müssen. Wenn Sie sie noch nicht
gespeichert haben, lesen Sie die Informationen
„Sichern von DAB-Diensten im Speicher“ auf
Seite 44 und 45.
Bevor Sie beginnen....
Drücken Sie kurz die Taste FM/AM DAB, wenn
die CD, der CD-Wechsler oder eine externe
Komponente als aktuelle Signalquelle
ausgewählt ist.
1
Wählen Sie den DAB tuner.
Wenn Sie diese Taste
mehrfach hintereinander
drücken und halten, werden
abwechselnd DAB-Tuner und
UKW-/MW/LW-Tuner (FM/
AM) aktiviert.
2
Wählen Sie das DAB-Frequenzband
(DAB1, DAB2 oder DAB3).
Wenn Sie diese Taste
mehrfach hintereinander
drücken, ändert sich das
DAB-Frequenzband wie folgt:
DAB1 DAB2 DAB3
3
Wählen Sie die Nummer (1 – 6),
unter der Sie den gewünschten
DAB-Dienst (primär) gespeichert
haben.
Hinweis:
Wenn der ausgewählte Primärdienst Sekundärdienste
enthält, wird durch das wiederholte Betätigen der
gleichen Ziffertaste der Sekundärdienst empfangen.
DEUTSCH
45
Page 96

Welche weiteren
Möglichkeiten bietet DAB?
Automatisches Erfassen identischer
Sendungstypen (Empfang von
Alternativfrequenzen)
In den folgenden Fällen können Sie denselben
Sendungstyp hören.
• Sie empfangen einen DAB-Dienst:
DEUTSCH
Wenn Sie in einem Gebiet fahren, in dem Sie
einen Dienst nicht empfangen können, stellt
dieses Gerät automatisch ein anderes
Ensemble oder einen anderen UKW-RDSSender ein, der eine identische Sendung
ausstrahlt.
• Sie empfangen einen UKW-RDS-Sender:
Wenn Sie in einem Gebiet fahren, in dem ein
DAB-Dienst dieselbe Sendung ausstrahlt wie
der UKW-RDS-Sender, wird bei diesem Gerät
automatisch der DAB-Dienst eingestellt.
So empfangen Sie Alternativfrequenzen
Werkseitig sind alle alternativen
Empfangsmöglichkeiten aktiviert.
• Weitere Informationen finden Sie unter
„Ändern der allgemeinen Einstellungen (PSM)“
auf Seite 31.
1 Drücken Sie die Taste SEL (Auswahl), und
halten Sie sie länger als 2 Sekunden
gedrückt, bis eines der PSM-Elemente im
Display angezeigt wird.
2 Drücken Sie die Taste ¢ oder 4
um die Funktion „DAB AF“
(Alternativfrequenzen) auszuwählen.
3 Drehen Sie den Steuerregler, um den
gewünschten Modus auszuwählen.
• AF ON: Die Sendung wird in den DAB
Diensten und UKW-RDS-Sendern
verfolgt—Empfang von
Alternativfrequenzen. Die Anzeige
AF im Display schaltet sich ein
• AF OFF: Der Empfang von
4 Drücken Sie die Taste SEL (Auswahl), um die
Einstellung abzuschließen.
(siehe Seite 13).
Alternativfrequenzen wird
deaktiviert.
Hinweis:
Wenn der Empfang von Alternativfrequenzen (für
DAB-Dienste) aktiviert ist, wird der Empfang mit
Sendernetzerfassung (RDS-Sender: siehe Seite 13)
ebenfalls automatisch aktiviert. Andererseits kann der
Empfang mit Sendernetzerfassung nicht deaktiviert
werden, ohne den Empfang von Alternativfrequenzen
zu deaktivieren.
So passen Sie die DAB-Lautstärke an
Sie können den Eingangspegel des DAB-Tuners
anpassen und im Speicher sichern. Wenn Sie
den Eingangspegel an den UKWLautstärkepegel anpassen, brauchen Sie die
Lautstärke nicht jedes Mal zu ändern, wenn Sie
die Signalquelle wechseln.
Werkseitig wurde die DAB-Lautstärke auf den
Wert „00“ eingestellt.
• Weitere Informationen finden Sie unter
„Ändern der allgemeinen Einstellungen (PSM)“
auf Seite 31.
1 Drücken Sie die Taste SEL (Auswahl), und
halten Sie sie länger als 2 Sekunden
gedrückt, bis eines der PSM-Elemente im
Display angezeigt wird.
2 Drücken Sie die Taste ¢ oder 4
um die Funktion „DAB VOL“ (Lautstärke)
auszuwählen.
3 Drehen Sie den Steuerregler, um die
gewünschte Lautstärke einzustellen.
Sie können die Lautstärke zwischen
„VOL –12“ bis „VOL 12“ einstellen.
4 Drücken Sie die Taste SEL (Auswahl), um die
Einstellung abzuschließen.
46
Page 97

FEHLERSUCHE
Was wie ein Problem aussieht, muß nicht immer eines sein. Die folgenden Punkte vor einem Anruf bei
einer Kundendienststelle überprüfen.
Symptome
• Die Lautsprecher geben
keinen Ton wieder.
• Dieses Gerät arbeitet
überhaupt nicht.
Allgemeines
• Automatische SSMAbspeicherung
(Sequentialspeicher für
starke Sender) arbeitet
nicht.
FM/AM
• Störgeräusche beim
Radiohören.
• Discs können nicht
wiedergegeben werden.
• Die CD-R/CD-RW wird
nicht wiedergegeben.
• Titel auf der CD-R/CDRW können nicht
angesteuert werden.
Ursachen
Die Lautstärke ist auf den
kleinsten Pegel eingestellt.
Anschlüsse sind falsch.
Der eingebaute Mikro-Computer
funktioniert aufgrund von Lärm
usw. nicht richtig.
Signale sind zu schwach.
Die Antenne ist nicht fest
angeschlossen.
Disc ist falsch herum eingelegt.
Die CD-R/CD-RW ist nicht
finalisiert.
Abhilfen
Auf optimales Niveau einstellen.
Die Kabel und Anschlüsse
überprüfen.
Drücken Sie die Rückstelltaste
am Feld nach dem Abnehmen
des Bedienfelds. (Die im Speicher
gespeicherte Uhreinstellung und
die Sendervoreinstellung wird
gelöscht). (Siehe Seite 2).
Die Sender von Hand
speichern.
Die Antenne fest anschließen.
Disc richtig herum einlegen.
• Legen Sie eine finalisierte
CD-R/CD-RW ein.
• Finalisieren Sie die CD-R/
CD-RW in dem Gerät, mit dem
Sie die CD gebrannt haben.
DEUTSCH
• Die Disc kann nicht
ausgeworfen werden.
• Ton der Disc ist
manchmal unterbrochen.
CD-Wiedergabe
• „NO DISC“ wird im
Display angezeigt.
Die Disc ist gesperrt.
Sie fahren auf einer holprigen
Straße.
Disc ist verkratzt.
Anschlüsse sind falsch.
Im Ladeschacht befindet sich
keine Disc.
Die Disc ist falsch eingelegt.
Heben Sie die Disc-Sperre auf.
(Siehe Seite 23).
Keine Disc auf holpriger Straße
abspielen.
Disc wechseln.
Die Kabel und Anschlüsse
überprüfen.
Eine Disc in den Ladeschacht
einschieben.
Legen Sie die Disc richtig ein.
47
Page 98
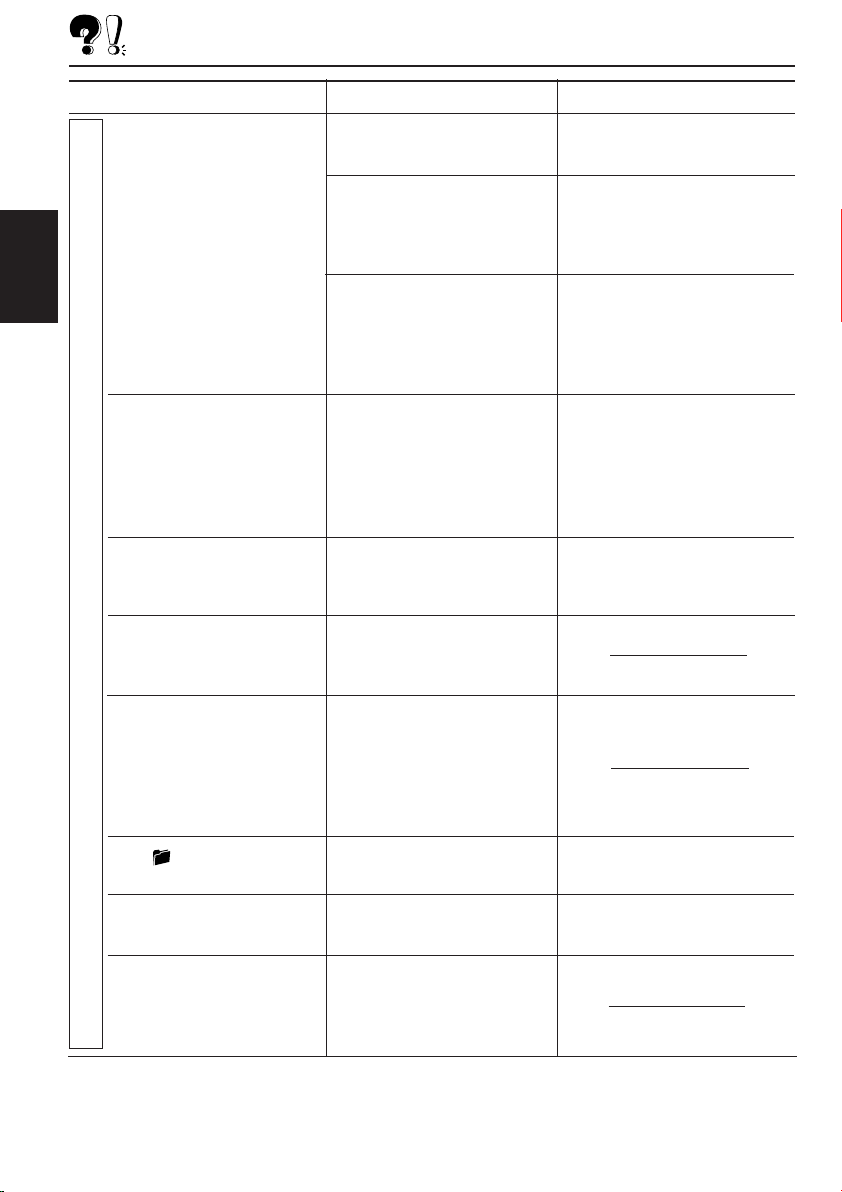
Symptome
Ursachen
Abhilfen
• Die Disc kann nicht
DEUTSCH
• Die Musikwiedergabe ist
• Eine längere Einlesezeit
• Dateien können nicht in der
MP3/WMA-Wiedergabe
wiedergegeben werden.
verrauscht.
wird benötigt („CHECK“
blinkt im Display).
vorgesehenen Reihenfolge
wiedergegeben werden.
Keine MP3/WMA-Dateien sind
auf der Disc aufgezeichnet.
MP3/WMA-Dateien haben
nicht die Erweiterung <.mp3>
oder <.wma> in ihren
Dateinamen.
MP3/WMA-Dateien sind nicht
in dem mit ISO 9660
konformen Format Level 1,
Level 2, Romeo oder Joliet
aufgezeichnet.
Die abgespielte Datei ist keine
MP3/WMA-Datei (obwohl sie
die Erweiterung <.mp3> oder
<.wma> hat).
Die Einlesezeit hängt von der
Komplexität der Ordner-/
Dateikonfiguration ab.
Die Wiedergabereihenfolge
wird bei der Aufnahme der
Dateien festgelegt.
Wechseln Sie die Disc.
Fügen Sie die Erweiterung
<.mp3> oder <.wma> zu ihren
Dateinamen hinzu.
Wechseln Sie die Disc.
(Nehmen Sie MP3/WMADateien mit einer konformen
Anwendung auf).
Springen Sie zu einer anderen
Datei weiter oder wechseln Sie
die Disc. (Fügen Sie nicht die
Erweiterung <.mp3> oder
<.wma> zu Nicht-MP3- oder
nicht-WMA-Dateien hinzu).
Verwenden Sie nicht zu viele
Ebenen und Ordner.
48
• Die verstrichene
Wiedergabezeit wird nicht
richtig angezeigt.
• Die -Anzeige blinkt im
Display.
•„NO FILES“ wird im Display
angezeigt.
• Es werden falsche Zeichen
angezeigt. (z. B. Name des
Albums).
Während der Wiedergabe tritt
dies manchmal auf. Diese
falsche Anzeige geht darauf
zurück, in welcher Weise die
Dateien auf der CD
aufgezeichnet werden.
Der aktuelle Ordner enthält
keine MP3/WMA-Datei.
Die aktuelle Disc enthält keine
MP3/WMA-Datei.
Dieses Gerät kann nur die
Großbuchstaben A–Z und
eine begrenzte Anzahl von
Zahlen anzeigen.
Wählen Sie einen anderen
Ordner aus.
Legen Sie eine Disc ein, die
MP3/WMA-Dateien enthält.
Page 99

Symptome
Ursachen
Abhilfen
•„NO DISC“ wird im Display
angezeigt.
•„NO MAG“ wird im Display
angezeigt.
•„RESET 8“ wird im Display
angezeigt.
•„RESET 1“ – „RESET 7“
wird im Display angezeigt.
• Der CD-Wechsler arbeitet
überhaupt nicht.
Im Magazin befindet sich keine
Disc.
Discs sind mit der falschen
Seite nach oben eingelegt.
Es befindet sich kein Magazin
im CD-Wechsler.
Das Gerät ist nicht richtig am
CD-Wechsler angeschlossen.
Der eingebaute MikroComputer funktioniert aufgrund
von Lärm usw. nicht richtig.
Discs in das Magazin
einlegen.
Discs ordnungsgemäß
einlegen.
Setzen Sie das Magazin ein.
Das Gerät und den
CD-Wechsler richtig
miteinander verbinden und
die Rückstelltaste des CDWechslers drücken.
Die Rückstelltaste des CDWechslers drücken.
Drücken Sie die Rückstelltaste
am Feld nach dem Abnehmen
des Bedienfelds. (Die im
Speicher gespeicherte
Uhreinstellung und die
Sendervoreinstellung wird
gelöscht). (Siehe Seite 2).
Sprunghaftes Abspielen:
Ein sprunghaftes Abspielen kann auf sehr holprigen Straßen vorkommen. Dadurch wird das Gerät und die
CD nicht beschädigt, esist jedoch sehr ärgerlich.
Wir empfehlen von einem Abspielen von CD auf holprigen Straßen abzusehen.
DEUTSCH
CD-Wechsler
49
Page 100

WARTUNG
Handhaben der Discs
Dieses Gerät dient zur Reproduktion von CDs
und CD-Rs (beschreibbar), CD-RWs
(wiederbeschreibbar) und CD Texts.
• Das Gerät ist auch mit MP3- und WMADiscs kompatibel.
Umgehen mit Discs
Beim Entnehmen einer Disc
aus ihrer Hülle den mittleren
DEUTSCH
Halter der Hülle nach unten
drücken und die Disc
herausheben, wobei sie an der
Außenkante festgehalten wird.
• Die Disc immer an der Außenkante festhalten.
Niemals die Aufnahmeoberfläche berühren.
Beim Aufbewahren einer Disc in ihrer Hülle die
Disc behutsam um den mittleren Halter der Hülle
legen (mit der bedruckten Seite nach oben).
• Die Discs nach dem Gebrauch immer in ihren
Hüllen aufbewahren.
Zum Sauberhalten der Discs
Eine schmutzige Disc kann evtl.
nicht richtig abspielen.
Ist eine Disc verschmutzt, den
Schmutz mit einem weichen
Tuch in gerader Linie von der Mitte
aus zur Außenkante abwischen.
Zum Abspielen neuer Discs
Neue Discs können an der Innenund Außenkante rauhe Stellen
haben. Wird eine solche Disc
verwendet, kann das Gerät ein
Abspielen der Disc verweigern.
Zum Entfernen dieser rauhen Stellen die Kanten mit
einem Bleistift oder Kugelschreiber o.ä. nachfahren.
Feuchtigkeitskondensation
Feuchtigkeit kann auf den Linsen im Innern des
CD-Spielers in folgenden Fällen kondensieren:
• Nach dem Einschalten der Autoheizung.
• Wenn es im Auto feucht wird.
In diesen Fällen kann der CD-Spieler evtl. nicht
richtig funktionieren. Daher die Disc auswerfen
und das Gerät für einige Stunden eingeschaltet
lassen, bis die Feuchtigkeit verdampft ist.
Mittlerer Halter
Bei der Wiedergabe einer CD-R oder CD-RW
Lesen Sie vor der Wiedergabe einer CD-R oder
CD-RW die zugehörigen Anleitungen bzw.
Vorsichtsmaßnahmen sorgfältig durch.
• Verwenden Sie nur „finalisierte“ CD-Rs oder
CD-RWs.
• Manche CD-Rs oder CD-RWs können
aufgrund ihrer Disc-Charakteristiken aus
folgenden Gründen nicht mit diesem Gerät
wiedergegeben werden:
– Die Discs sind schmutzig oder verkratzt.
– Kondenswasserbildung auf der Linse im
Innern dieses Geräts.
– Die Aufnahmelinse in diesem Gerät ist
verschmutzt.
• Bei CD-RWs dauert das Lesen möglicherweise
etwas länger, da sie eine niedrigere Reflexion
als reguläre CDs aufweisen.
• CD-Rs oder CD-RWs sind gegen hohe
Temperaturen oder hohe Luftfeuchtigkeit
empfindlich. Lassen Sie die CDs aus diesem
Grund nicht in Ihrem Wagen liegen.
• Verwenden Sie die folgenden CD-Rs oder
CD-RWs nicht:
– Discs mit Aufklebern, Etiketten oder mit
Schutzfolie auf der Oberfläche.
– Discs, auf deren Beschriftung direkt mit einem
Tintenstrahldrucker gedruckt werden kann.
Die Verwendung dieser Discs bei hohen
Temperaturen oder hoher Luftfeuchtigkeit kann
zu Fehlfunktionen oder Schäden an den Discs
führen. Zum Beispiel:
– Aufkleber oder Etiketten können schrumpfen
und eine Disc verziehen.
– Aufkleber oder Etiketten können sich ablösen
und die Disc können nicht ausgeworfen werden.
– Der Druck auf den Discs kann klebrig werden.
Lesen Sie die Anweisungen oder
Warnhinweise über Etiketten und bedruckbare
Discs aufmerksam durch.
VORSICHT:
• Keine Single-Discs (8 cm) im Ladeschlitz einlegen.
(Diese Discs können nicht ausgeworfen werden).
• Keine Discs mit ungewöhnlicher Form
einlegen—z.B. Herz- oder Blumenform, da das
Probleme bereitet.
• Discs nicht dem direkten Sonnenlicht und einer
Wärmequelle aussetzen oder sie an einem Ort
aufbewahren, der hohen Temperaturen oder
Feuchtigkeit unterliegt. Discs nicht im Auto lassen.
• Keine Lösungsmittel (z.B. herkömmliche
Schallplattenreinger, -sprays, Verdünner, Benzol
usw.) zum Reinigen der Discs verwenden.
50
Verzogene
Disc
Aufkleber
Klebriger
Rückstand
Disc
Klebeetikett
 Loading...