

Page 1
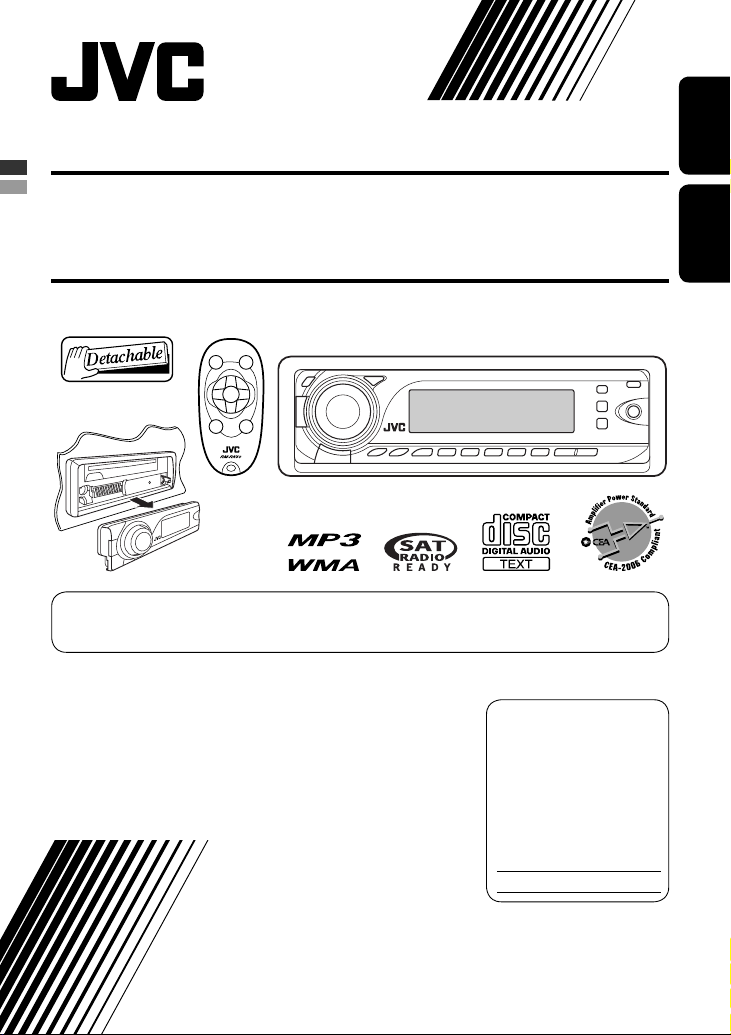
CD RECEIVER KD-S34
RECEPTOR CON CD KD-S34
For canceling the display demonstration, see page 7.
Para cancelar la demostración en pantalla, consulte la página 7.
ENGLISHESPAÑOL
For installation and connections, refer to the separate manual.
Para la instalación y las conexiones, refiérase al manual separado.
INSTRUCTIONS
MANUAL DE INSTRUCCIONES
For customer Use:
Enter below the Model
No. and Serial No. which
are located on the top or
bottom of the cabinet. Retain
this information for future
reference.
Model No.
Serial No.
GET0518-001A
[J]
Page 2

Thank you for purchasing a JVC product.
Please read all instructions carefully before operation, to ensure your complete understanding and to obtain the best
possible performance from the unit.
INFORMATION (For U.S.A.)
ENGLISH
This equipment has been tested and found to comply with the limits for a Class B digital device, pursuant to Part
15 of the FCC Rules. These limits are designed to provide reasonable protection against harmful interference in
a residential installation. This equipment generates, uses, and can radiate radio frequency energy and, if not
installed and used in accordance with the instructions, may cause harmful interference to radio communications.
However, there is no guarantee that interference will not occur in a particular installation. If this equipment does
cause harmful interference to radio or television reception, which can be determined by turning the equipment
off and on, the user is encouraged to try to correct the interference by one or more of the following measures:
– Reorient or relocate the receiving antenna.
– Increase the separation between the equipment and receiver.
– Connect the equipment into an outlet on a circuit different from that to which the receiver is connected.
– Consult the dealer or an experienced radio/TV technician for help.
Caution:
Changes or modifications not approved by JVC could void the user’s authority to operate the equipment.
IMPORTANT FOR LASER PRODUCTS
1. CLASS 1 LASER PRODUCT
2. CAUTION: Do not open the top cover. There are no user serviceable parts inside the unit; leave all servicing to
qualified service personnel.
3. CAUTION: (For U.S.A.) Visible and/or invisible class II laser radiation when open. Do not stare into beam.
(For Canada) Visible and/or invisible class 1M laser radiation when open. Do not view directly with
optical instruments.
4. REPRODUCTION OF LABEL: CAUTION LABEL, PLACED OUTSIDE THE UNIT.
[European Union only]
Warning:
If you need to operate the unit while driving, be
sure to look around carefully or you may be involved
in a traffic accident.
2
For safety...
• Do not raise the volume level too much, as this will
block outside sounds, making driving dangerous.
• Stop the car before performing any complicated
operations.
Temperature inside the car...
If you have parked the car for a long time in hot or cold
weather, wait until the temperature in the car becomes
normal before operating the unit.
Page 3
The following marks are used to indicate...
: Built-in CD player operations.
: External CD changer operations.
: Indicator displayed for the
corresponding operation.
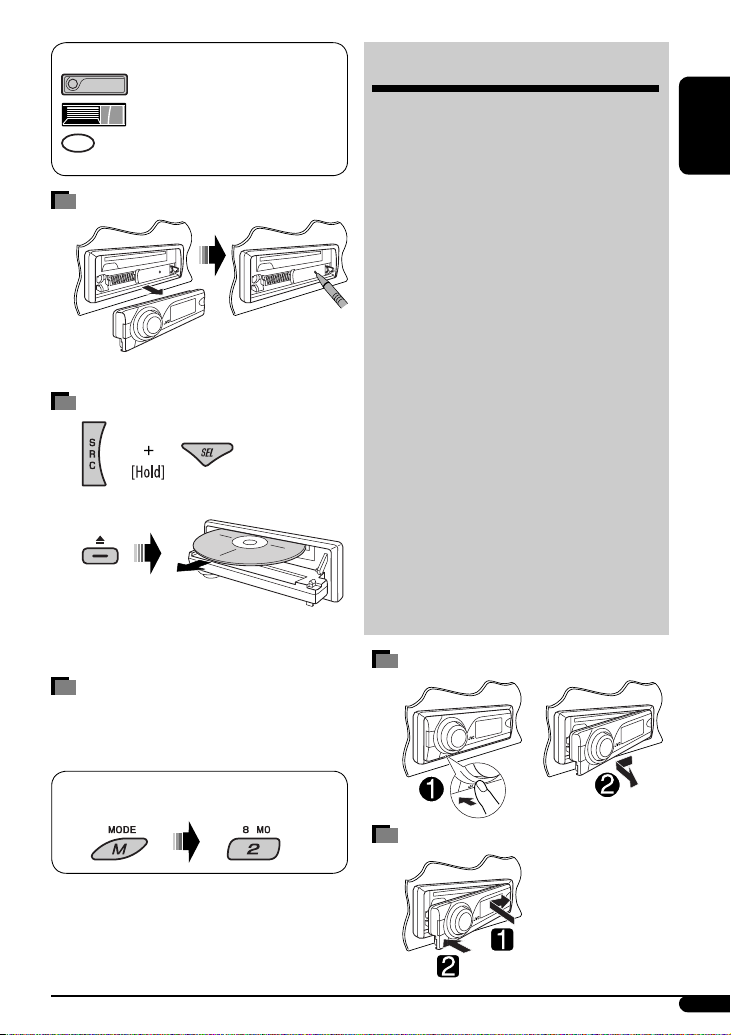
How to reset your unit
• Your preset adjustments will also be erased.
How to forcibly eject a disc
“PLEASE” and “EJECT” appear alternately on the display.
• Be careful not to drop the disc when it ejects.
• If this does not work, reset your unit.
How to use the M MODE button
If you press M MODE, the unit goes into functions mode,
then the number buttons and 5/∞ buttons work as
different function buttons.
Ex.: When number button 2 works as MO (monaural)
button.
CONTENTS
Control panel .................................. 4
Remote controller —
Getting started ................................ 6
Basic operations ................................................... 6
Radio operations ............................. 7
Disc operations ................................ 8
Playing a disc in the unit ..................................... 8
Playing discs in the CD changer ........................... 9
Sound adjustments .......................... 11
General settings — PSM .................. 12
Title assignment .............................. 15
Satellite radio operations ................. 15
iPod/D. player operations ................. 18
Other external component
operations ................................... 20
More about this unit ........................ 20
Maintenance ................................... 23
Troubleshooting .............................. 24
Specifications .................................. 27
Detaching the control panel
Attaching the control panel
RM-RK50 ............. 5
ENGLISH
To use these buttons for their original functions
again after pressing M MODE, wait for 5 seconds
without pressing any of these buttons until the
functions mode is cleared or press M MODE again.
3
Page 4
Control panel
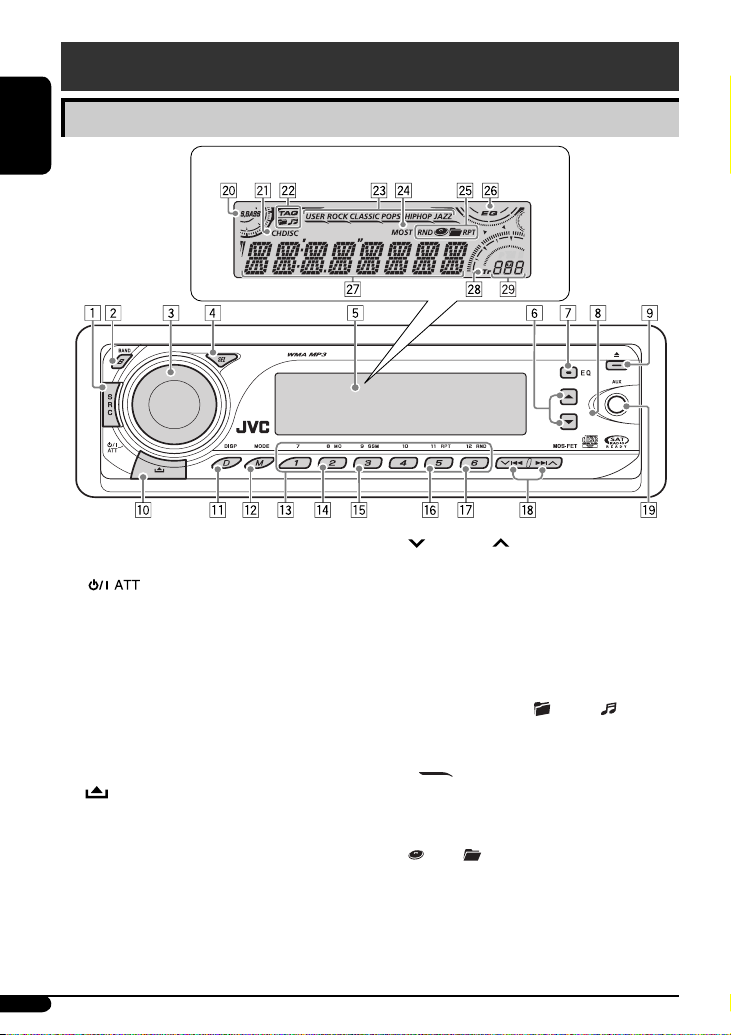
Parts identification
ENGLISH
1 SRC (source) button
2 B BAND button
3 (standby/on attenuator) button /
Display window
Control dial
4 SEL (select) button
5 Display window
6 5 (up) / ∞ (down) buttons
7 EQ (equalizer) button
8 Remote sensor
DO NOT expose the remote sensor to strong light
(direct sunlight or artificial lighting).
9 0 (eject) button
p (control panel release) button
q D DISP (display) button
w M MODE button
e Number buttons
r MO (monaural) button
t SSM (Strong-station Sequential Memory) button
y RPT (repeat) button
u RND (random) button
i 4 /¢ buttons
o AUX (auxiliary) input jack
; S.BASS (super bass) indicator
a Playback source indicators—
CH: Lights up only when CD-CH is selected as the
playback source.
DISC: Lights up for the built-in CD player.
s Disc information indicators—
TAG (Tag information), (folder), (track/file)
d Sound mode (iEQ: intelligent equalizer) indicators
—USER, ROCK, CLASSIC, POPS, HIP HOP, JAZZ
• lights up for the selected item.
f Tuner reception indicators—MO (monaural),
ST (stereo)
g Playback mode / item indicators—RND (random),
(disc), (folder), RPT (repeat)
h EQ (equalizer) indicator
j Main display
k Tr (track) indicator
l Source display / Time countdown indicator
4
Page 5
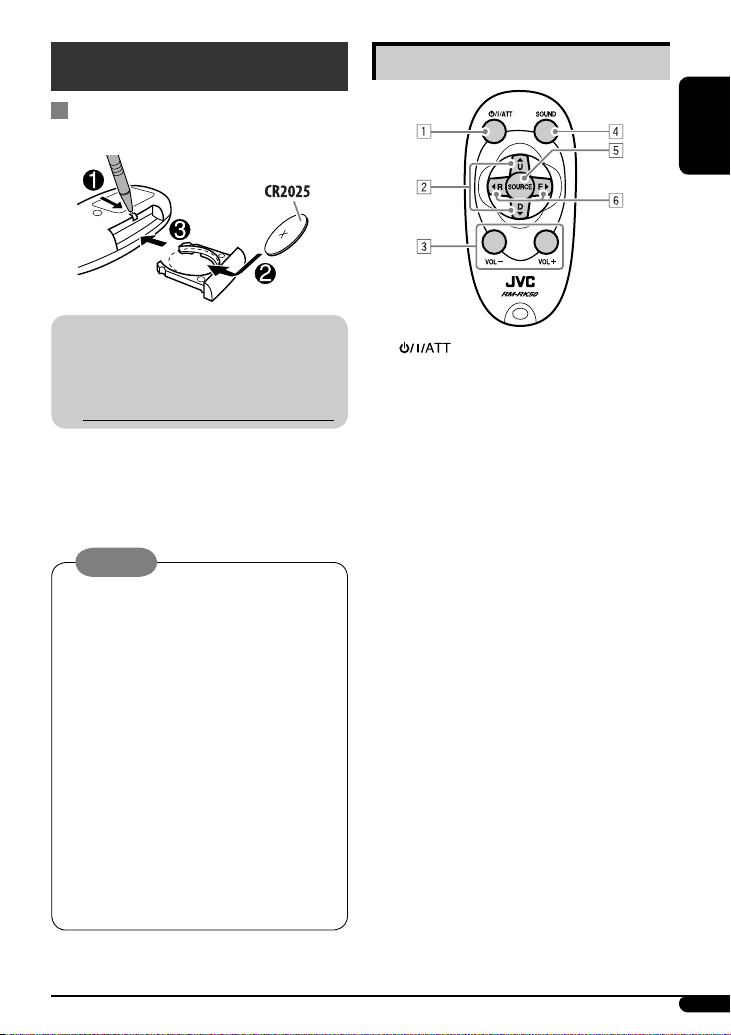
Remote controller — RM-RK50
Installing the lithium coin battery
(CR2025)
Main elements and features
ENGLISH
For USA-California Only:
This product contains a CR Coin Cell Lithium Battery
which contains Perchlorate Material—special
handling may apply.
See www.dtsc.ca.gov/hazardouswaste /perchlorate
Aim the remote controller directly at the remote
sensor on the unit. Make sure there is no obstacle
in between.
Warning:
• Do not install any battery other than CR2025 or its
equivalent; otherwise, it may explode.
• Do not leave the remote controller in a place
(such as dashboards) exposed to direct sunlight
for a long time; otherwise, it may explode.
• Store the battery in a place where children cannot
reach to avoid risk of accident.
• To prevent the battery from over-heating,
cracking, or starting a fire:
– Do not recharge, short, disassemble, heat the
battery, or dispose of it in a fire.
– Do not leave the battery with other metallic
materials.
– Do not poke the battery with tweezers or similar
tools.
– Wrap the battery with tape and insulate when
throwing away or saving it.
1 (standby/on/attenuator) button
• Turns the power on if pressed briefly or
attenuates the sound when the power is on.
• Turns the power off if pressed and held.
2 5 U (up) / D (down) ∞ buttons
• Changes the FM/AM bands with 5 U.
• Changes the preset stations with D ∞.
• Changes the folder of the MP3/WMA discs.
• While playing an MP3 disc on an MP3-compatible
CD changer:
– Changes the disc if pressed briefly.
– Changes the folder if pressed and held.
• While listening to the satellite (SIRIUS or XM)
radio:
– Changes the categories.
• While listening to an Apple iPod or a JVC
D. player:
– Pauses/stops or resumes playback with D ∞.
– Enters the main menu with 5 U.
(Now 5 U/D ∞/2 R/F 3 work as the menu
selecting buttons.)*
3 VOL – / VOL + buttons
• Adjusts the volume level.
4 SOUND button
• Selects the sound mode (iEQ: intelligent
equalizer).
* 5 U : Returns to the previous menu.
D ∞ : Confirms the selection.
Continued on the next page
5
Page 6
5 SOURCE button
• Selects the source.
6 2 R (reverse) / F (forward) 3 buttons
• Searches for stations if pressed briefly.
• Fast-forwards or reverses the track if pressed and
held.
ENGLISH
• Changes the tracks if pressed briefly.
• While listening to the satellite radio:
– Changes the channels if pressed briefly.
– Changes the channels rapidly if pressed and
held.
• While listening to an iPod or a D. player (in menu
selecting mode):
– Selects an item if pressed briefly. (Then, press
∞ to confirm the selection.)
D
– Skips 10 items at a time if pressed and held.
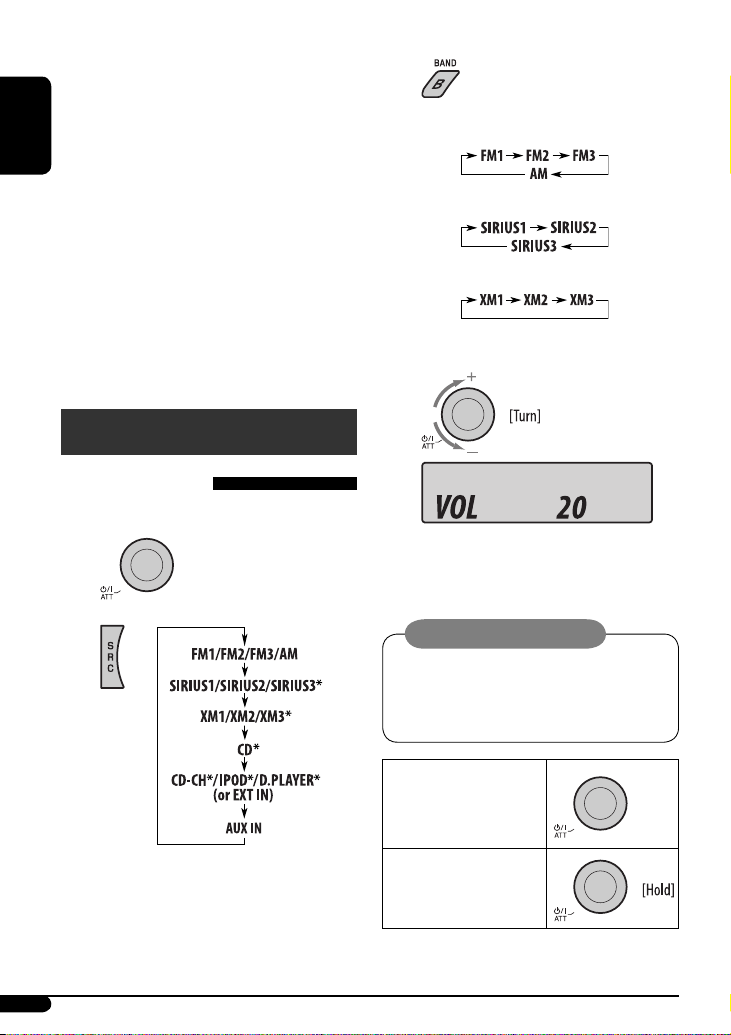
Getting started
Basic operations
!
• For FM/AM tuner
• For SIRIUS radio
• For XM radio
⁄ Adjust the volume.
~ Turn on the power.
Ÿ
* You cannot select these sources if they are not
ready or not connected.
6
Volume level appears.
@ Adjust the sound as you want. (See
pages 11 and 12.)
Caution on volume setting:
Discs produce very little noise compared with other
sources. Lower the volume before playing a disc
to avoid damaging the speakers by the sudden
increase of the output level.
To drop the volume in a
moment (ATT)
To restore the sound, press
the button again.
To turn off the power
Page 7

Basic settings
• See also “General settings — PSM” on pages
12 – 14.
1
! Start searching for a station.
When a station is received, searching stops.
To stop searching, press the same button
again.
ENGLISH
2
1 Canceling the display demonstrations
Select “DEMO,” then “DEMO OFF.”
2 Setting the clock
Select “CLOCK H” (hour), then adjust the hour.
Select “CLOCK M” (minute), then adjust the
minute.
3 Finish the procedure.
To check the current clock time while the
power is turned off
Clock time is shown on the
display for about 5 seconds. See
also page 13.
Radio operations
~
To tune in to a station manually
In step ! above...
1
2 Select a desired station frequency.
When an FM stereo broadcast is hard to
receive
Lights up when monaural mode is activated.
Reception improves, but stereo effect will be lost.
To restore the stereo effect, repeat the same
procedure. “MONO OFF” appears and the MO indicator
goes off.
Ÿ
Lights up when receiving an FM stereo
broadcast with sufficient signal strength.
7
Page 8
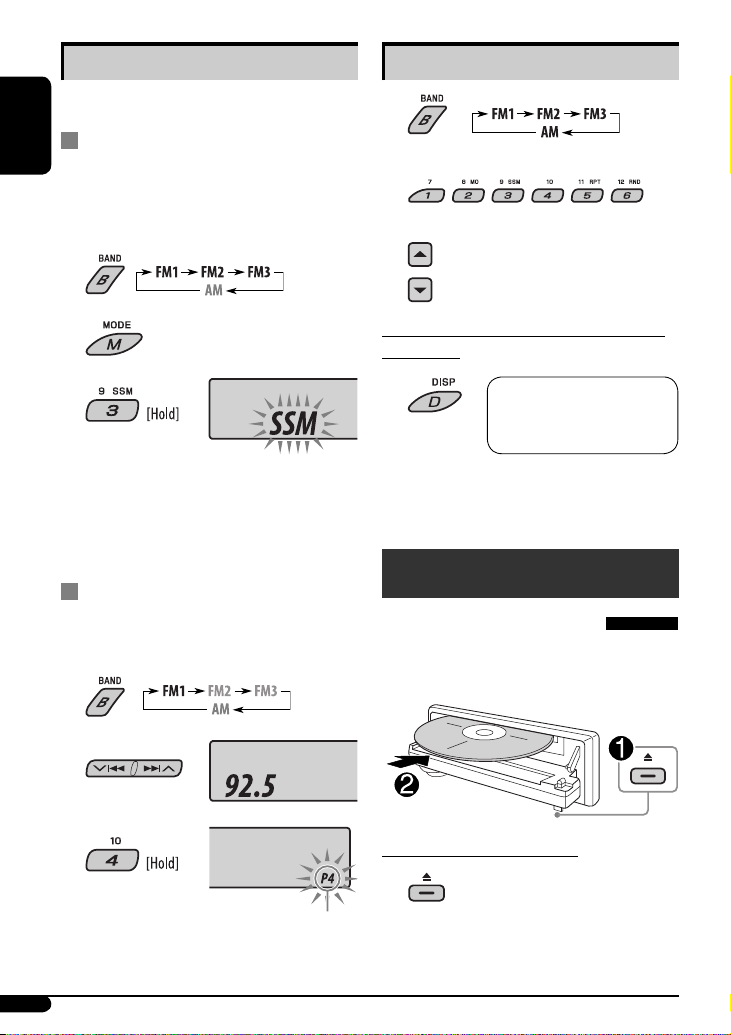
Storing stations in memory
You can preset six stations for each band.
FM station automatic presetting —
ENGLISH
SSM (Strong-station Sequential
Memory)
1 Select the FM band (FM1 – FM3) you want to
store into.
Listening to a preset station
1
2 Select the preset station (1 – 6) you want.
or
2
3
“SSM” flashes, then disappears when automatic
presetting is over.
Local FM stations with the strongest signals are
searched and stored automatically in the FM band.
Manual presetting
Ex.: Storing FM station of 92.5 MHz into preset number
4 of the FM1 band.
1
2
3
Preset number flashes for a while.
To check other information while listening
to the radio
Clock = Station name* =
Frequency = (back to the
beginning)
* If no title is assigned to a station, “NO NAME” appears.
To assign a title to a station, see page 15.
Disc operations
Playing a disc in the unit
All tracks will be played repeatedly until you change the
source or eject the disc.
To stop play and eject the disc
• Press SRC to listen to another
playback source.
8
Page 9
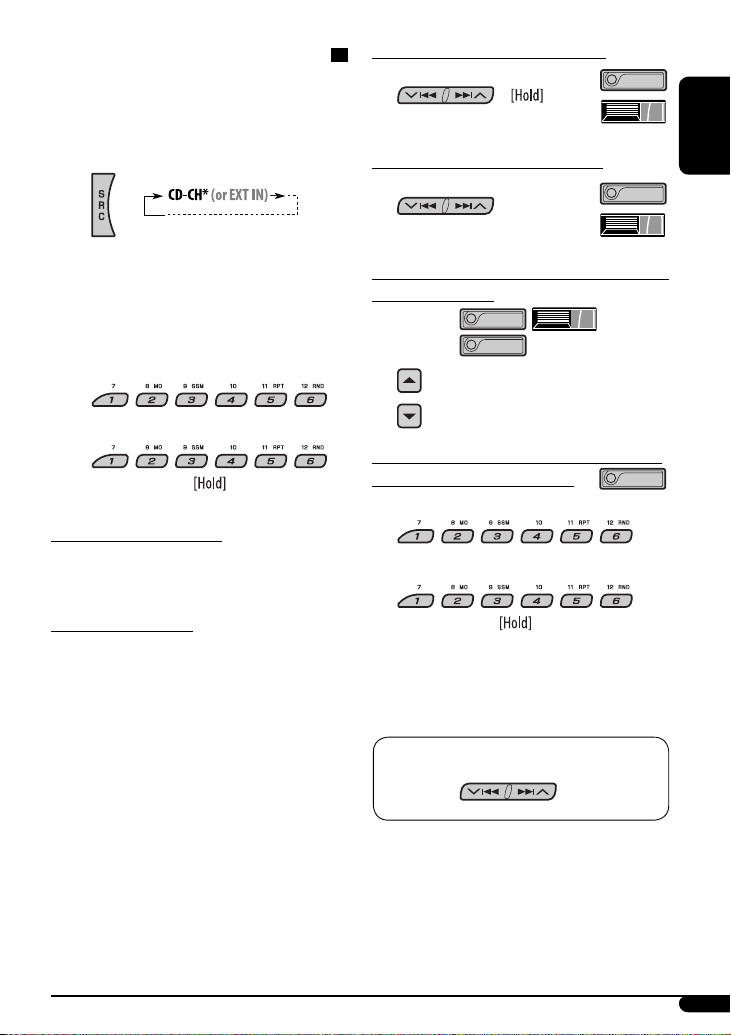
Playing discs in the CD changer
All discs in the magazine will be played repeatedly until
you change the source.
• Ejecting the magazine will also stop playback.
~
To fast-forward or reverse the track
To go to the next or previous tracks
ENGLISH
* If you have changed the external input setting
to “EXT IN” (see page 14), you cannot select the
CD changer.
Ÿ Select a disc.
For disc number from 01 – 06:
For disc number from 07 – 12:
About MP3 and WMA discs
MP3 and WMA “tracks” (words “file” and “track” are
used interchangeably) are recorded in “folders.”
About the CD changer
It is recommended to use a JVC MP3-compatible CD
changer with your unit.
• You can also connect MP3-incompatible CD changers.
However, these units are not compatible with MP3
discs.
• You cannot use the CH-X99, CH-X100, and KD-MK
series CD changers with this unit.
• You cannot play any WMA disc in the CD changer.
• Disc text information recorded in the CD Text can be
displayed when a JVC CD Text compatible CD changer
is connected.
• For connection, see Installation/Connection Manual
(separate volume).
To go to the next or previous folders (only for
MP3 or WMA discs)
For MP3 discs:
For WMA discs:
To locate a particular track (for CD) or folder
(for MP3 or WMA discs) directly
To select a number from 01 – 06:
To select a number from 07 – 12:
• To use direct folder access on MP3/WMA discs, it
is required that folders are assigned with 2-digit
numbers at the beginning of their folder names—
01, 02, 03, and so on.
To select a particular track in a folder (for MP3 or
WMA discs):
9
Page 10
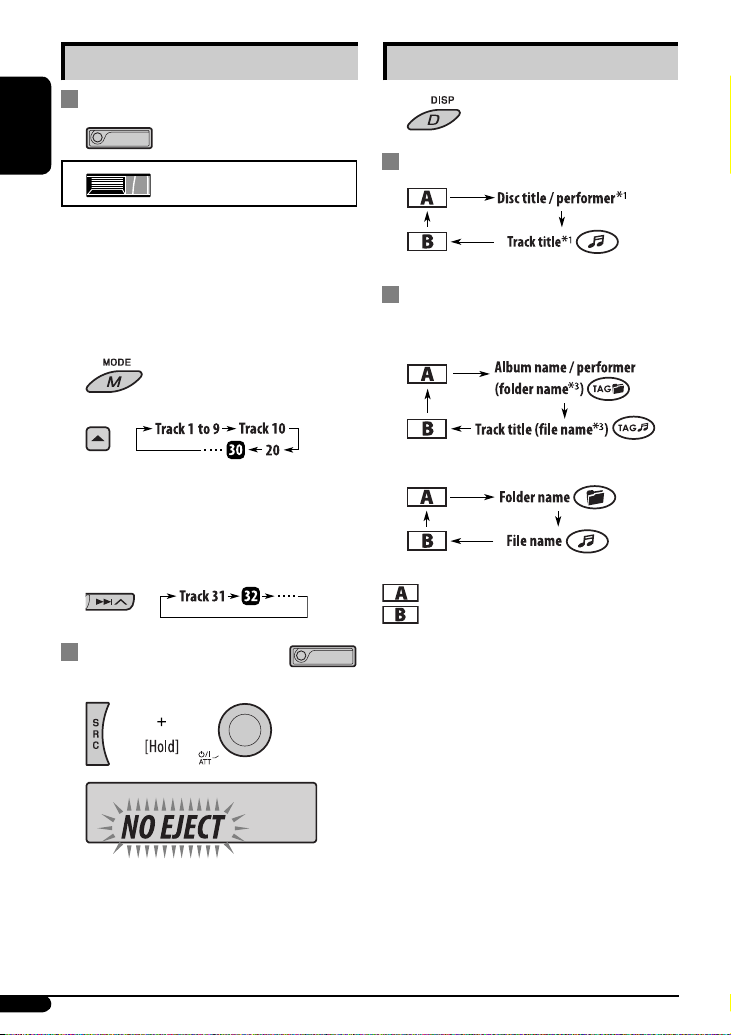
Other main functions
Skipping tracks quickly during play
Changing the display information
ENGLISH
Only possible on JVC
MP3-compatible CD changer
• For MP3 or WMA discs, you can skip tracks within the
same folder.
Ex.: To select track 32 while playing a track whose
number is a single digit (1 to 9)
1
2
Each time you press the button, you can skip 10
tracks.
• After the last track, the first track will be selected
and vice versa.
3
Prohibiting disc ejection
You can lock a disc in the loading slot.
While playing an audio CD or a CD Text
2
While playing an MP3 or a WMA
• When “TAG DISP” is set to “TAG ON” (see
page 14)
• When “TAG DISP” is set to “TAG OFF”
: Clock with the current track number
: Elapsed playing time with the current
track number
*1 If the current disc is an audio CD, “NO NAME” appears.
*2 Only for the built-in CD player.
*3 If an MP3/WMA file does not have Tag information,
folder name and file name appear. In this case, the
TAG indicator will not light up.
*
disc
To cancel the prohibition, repeat the same
procedure.
10
Page 11
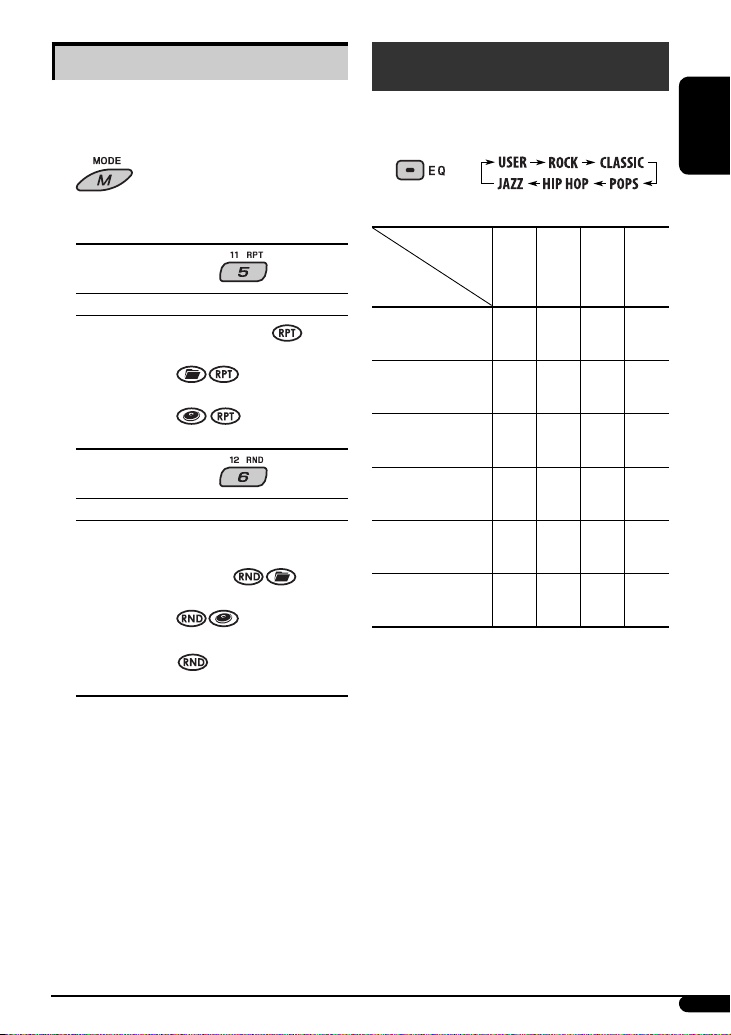
Selecting the playback modes
You can use only one of the following playback modes
at a time.
1
Sound adjustments
You can select a preset sound mode suitable to the
music genre (iEQ: intelligent equalizer).
ENGLISH
2 Select your desired playback mode.
7 Repeat play
Mode Plays repeatedly
TRK RPT : The current track.
FLDR RPT*1 : All tracks of the current folder.
DISC RPT*2 : All tracks of the current disc.
RPT OFF : Cancels.
7 Random play
Mode Plays at random
1
FLDR RND*
DISC RND : All tracks of the current disc.
MAG RND*2 : All tracks of the inserted discs.
RND OFF : Cancels.
1
*
Only while playing an MP3 or a WMA disc.
*2 Only while playing discs in the CD changer.
: All tracks of the current folder,
then tracks of the next folder
and so on.
Preset values
1
BAS*
MID*2TRE*3S.BS*
Indication (For)
USER
(Flat sound)
ROCK
(Rock or disco music)
CLASSIC
(Classical music)
POPS
(Light music)
HIP HOP
(Funk or rap music)
JAZZ
(Jazz music)
1
*
: Bass; *2 : Mid-range; *3 : Treble; *4 : Super bass
00 00 00 OFF
+03 00 +02 ON
+01 00 +03 OFF
+02 +01 +02 OFF
+04 –02 +01 ON
+03 00 +03 OFF
4
11
Page 12
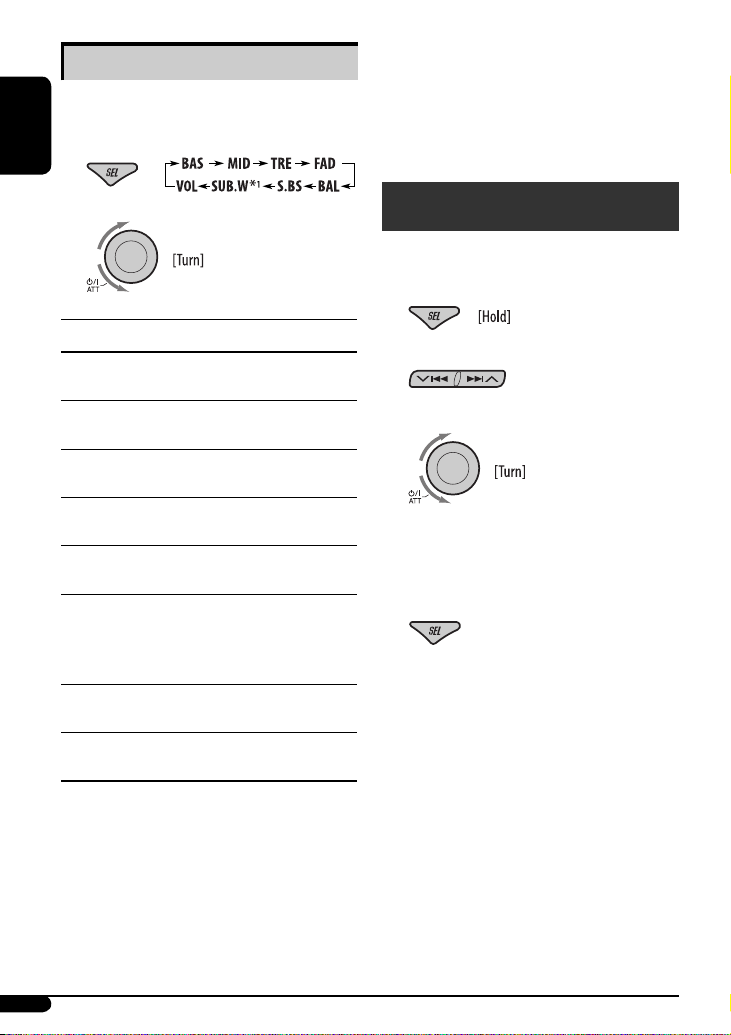
Adjusting the sound
You can adjust the sound characteristics to your
preference.
ENGLISH
1
*4 This adjustment will not affect the subwoofer output.
*5 Range adjustment for super bass is adjustable only
when it is set to “S.BS ON.“
*6 Depending on the amplifier gain control setting. (See
page 14 for details.)
2
Indication, [Range]
2
(bass), [–06 to +06]
BAS*
Adjust the bass.
2
MID*
(mid-range), [–06 to +06]
Adjust the mid-range frequencies sound level.
2
TRE*
(treble), [–06 to +06]
Adjust the treble.
3
(fader), [R06 to F06]
FAD*
Adjust the front and rear speaker balance.
4
BAL*
(balance), [L06 to R06]
Adjust the left and right speaker balance.
2
S.BS*
(super bass), [S.BS ON or S.BS OFF],
[01 to 05, initial: 03]*
Maintain the richness and fullness of the bass sound
regardless of how low you set the volume.
1
(subwoofer), [00 to 08, initial: 04]
SUB.W*
Adjust the subwoofer output level.
VOL (volume), [00 to 30 or 50*
Adjust the volume.
1
Displayed only when “L/O MODE” is set to “WOOFER”
*
(see page 14).
*2 When you adjust the bass, mid-range, treble, or super
bass, the adjustment you have made is stored for the
currently selected sound mode (iEQ) including “USER.”
*3 If you are using a two-speaker system, set the fader
level to “00.”
5
6
]
General settings — PSM
You can change PSM (Preferred Setting Mode) items
(except “SID”) listed in the table on pages 13 and 14.
1
2 Select a PSM item.
3 Adjust the PSM item selected.
4 Repeat steps 2 and 3 to adjust other PSM
items if necessary.
5 Finish the procedure.
12
Page 13
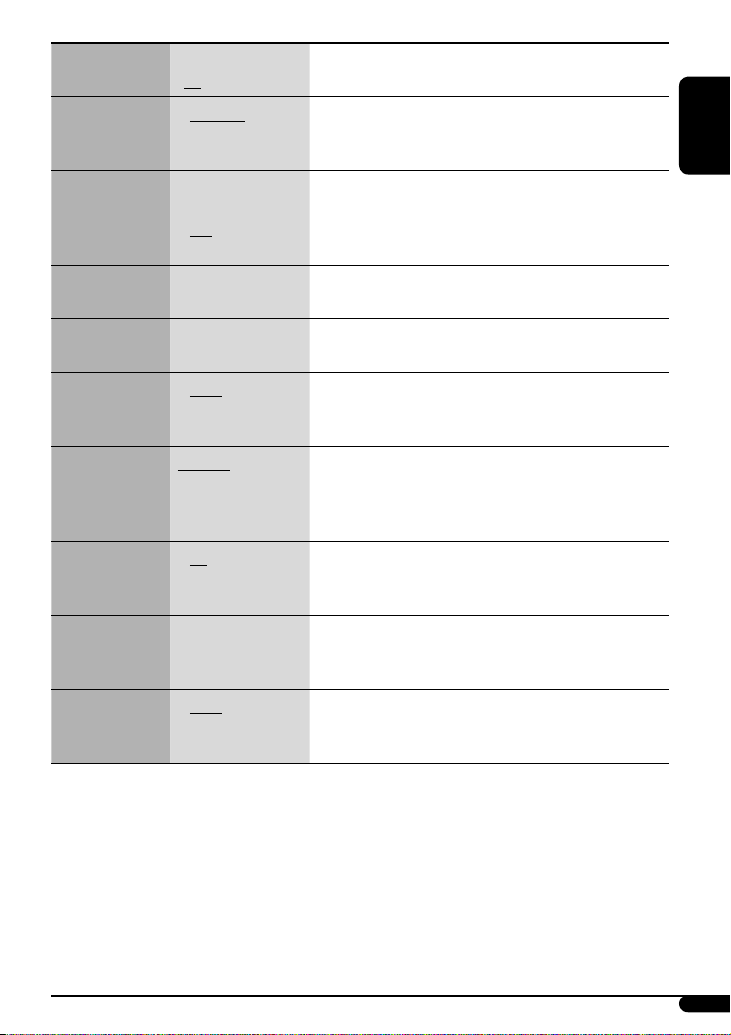
Indications Item
Setting, [reference page]
( : Initial)
DEMO
Display
demonstration
1
CLK DISP*
Clock display
• DEMO ON
• DEMO OFF
• ON
• OFF
: Display demonstration will be activated automatically if no
operation is done for about 20 seconds, [7].
: Cancels.
: Clock display is shown on the display even when the power is
turned off.
: Cancels; pressing D DISP will show the clock time for about
5 seconds when the power is turned off, [7].
CLOCK H
1 – 12 [Initial: 1 (1:00)], [7].
Hour adjustment
CLOCK M
00 – 59 [Initial: 00 (1:00)], [7].
Minute adjustment
2
CLK ADJ*
Clock adjustment
2
, *
T-ZONE*
Time zone
• AUTO
• OFF
3
EASTERN, ATLANTIC,
NEWFOUND, ALASKA,
: The built-in clock is automatically adjusted using the clock data
provided via the satellite radio channel.
: Cancels.
: Select your residential area from one of the following time
zones for clock adjustment.
PACIFIC, MOUNTAIN,
CENTRAL
2
3
DST*
, *
Daylight savings
time
4
SID*
SIRIUS ID
• ON
: Activates daylight savings time if your residential area is subject
to DST.
• OFF
: Cancels.
— : The 12-digit SIRIUS identification number scrolls on the display
5 seconds after “SID” is selected, [16].
• Press SEL to resume the previous display.
DIMMER
Dimmer
1
If the power supply is not interrupted by turning off the ignition key of your car, it is recommended to select “OFF” to
*
• AUTO
• ON
• OFF
: Dims the display when you turn on the headlights.
: Activates dimmer.
: Cancels.
save the car’s battery.
*2 Displayed only when SIRIUS Satellite radio or XM Satellite radio is connected.
*3 Displayed only when “CLK ADJ” is set to “AUTO.”
*4 Displayed only when SIRIUS Satellite radio is connected.
ENGLISH
Continued on the next page
13
Page 14
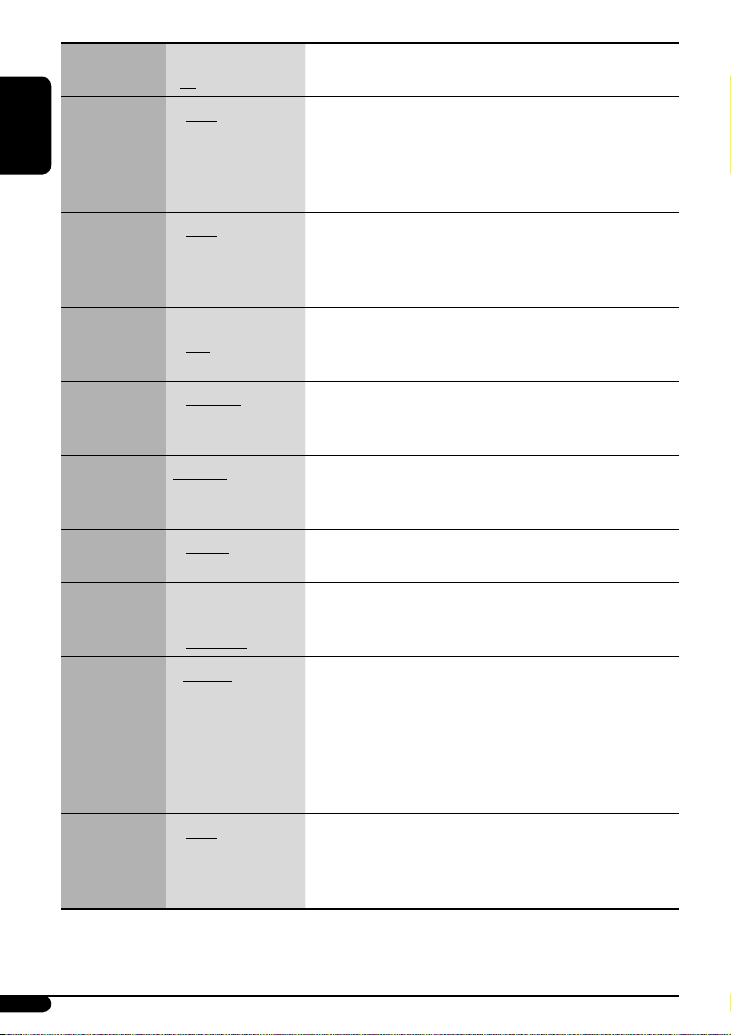
Indications Item
Setting, [reference page]
( : Initial)
5
SCROLL*
Scroll
ENGLISH
• ONCE
• AUTO
• OFF
: Scrolls the disc information once.
: Repeats scrolling (at 5-second intervals).
: Cancels.
• Pressing D DISP for more than one second can scroll the display
regardless of the setting.
L/O MODE
Line output
mode
• REAR
• WOOFER
: Select if both the LINE OUT terminals are used for connecting the
speakers (through an external amplifier).
: Select if the REAR LINE OUT terminals are used for connecting a
subwoofer (through an external amplifier).
6
WOOFER*
Subwoofer
cutoff frequency
7
EXT IN*
External input
AUX ADJ
Auxiliary input
level adjustment
TAG DISP
Tag display
AMP GAIN
Amplifier gain
control
AREA
Tuner channel
interval
• LOW
• MID
• HIGH
• CHANGER
: Frequencies lower than 90 Hz are sent to the subwoofer.
: Frequencies lower than 135 Hz are sent to the subwoofer.
: Frequencies lower than 180 Hz are sent to the subwoofer.
: To use a JVC CD changer, [9], a JVC compatible satellite
(SIRIUS/XM) tuner, [15], an Apple iPod or a JVC D. player, [18].
• EXT IN
: To use any other external component than the above, [20].
A.ADJ 00 — A.ADJ 05 : Adjust the auxiliary input level to avoid the sudden increase of the
output level when changing the source from external component
connected to the AUX input jack on the control panel.
• TAG ON
• TAG OFF
• LOW PWR
: Shows the Tag information while playing MP3/WMA tracks, [10].
: Cancels.
: VOL 00 – VOL 30 (Select this if the maximum power of the speaker
is less than 50 W to prevent damaging the speaker.)
• HIGH PWR
• AREA US
: VOL 00 – VOL 50
: When using in North/Central/South America. AM/FM intervals are
set to 10 kHz/200 kHz.
• AREA EU
: When using in any other areas except North/Central/South
America. AM/FM intervals are set to 9 kHz/50 kHz (100 kHz during
auto search).
• AREA SA
: When using in South American countries. AM/FM intervals are set
to 10 kHz/100 kHz.
IF BAND
Intermediate
frequency band
• AUTO
• WIDE
: Increases the tuner selectivity to reduce interference noises
between close stations. (Stereo effect may be lost.)
: Subject to interference noises from adjacent stations, but sound
quality will not be degraded and the stereo effect will remain.
5
Some characters or symbols will not be shown correctly (or will be blanked) on the display.
*
*6 Displayed only when “L/O MODE” is set to “WOOFER.”
*7 Displayed only when one of the following sources is selected—FM, AM, CD, or AUX IN.
14
Page 15
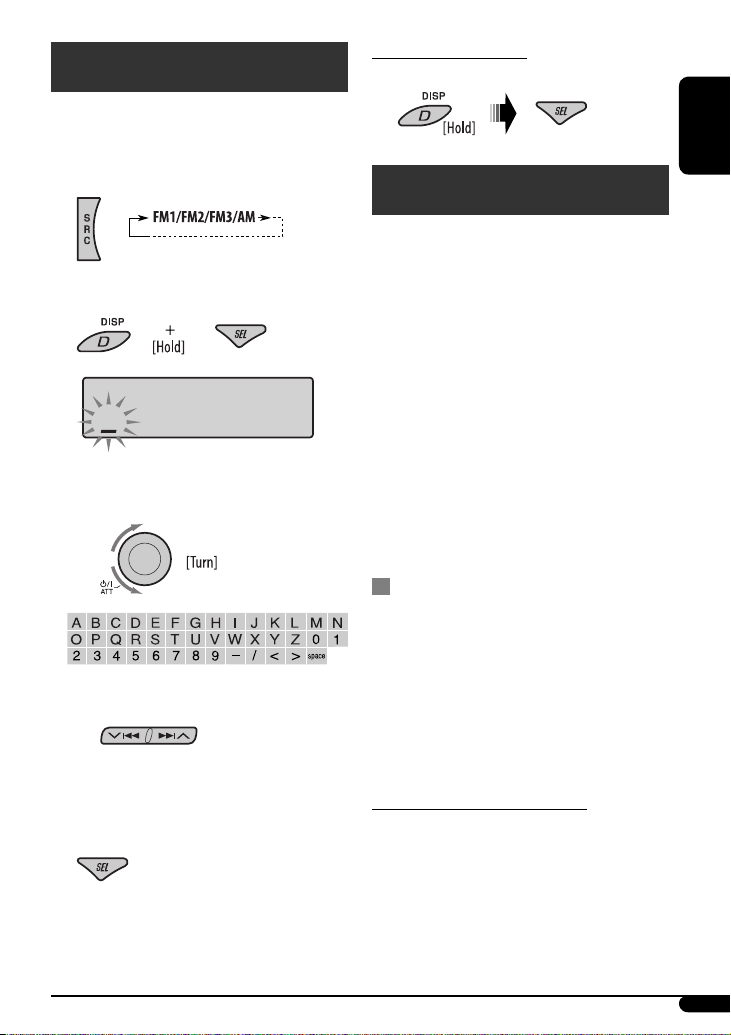
Title assignment
You can assign names to 30 station frequencies (FM and
AM) and up to 8 characters for each station name.
1 Select FM/AM.
To erase the entire title
In step 2 on the left...
ENGLISH
Satellite radio operations
This unit is satellite (SAT) Radio Ready—compatible
with both SIRIUS Satellite radio and XM Satellite radio.
2 Show the title entry screen.
3 Assign a title.
1 Select a character.
2 Move to the next (or previous) character
position.
3 Repeat steps 1 and 2 until you finish
entering the title.
4 Finish the procedure.
Before operating your satellite radio:
• For connection, see Installation/Connection Manual
(separate volume).
• Refer also to the Instructions supplied with your
SIRIUS Satellite radio or XM Satellite radio.
• “SIRIUS” and the SIRIUS dog logo are registered
trademarks of SIRIUS Satellite Radio Inc.
• XM and its corresponding logos are registered
trademarks of XM Satellite Radio Inc.
• “SAT Radio,” the SAT Radio logo and all related marks
are trademarks of SIRIUS Satellite Radio Inc., and XM
Satellite Radio, Inc.
Listening to the satellite radio
Connect either one of the following (separately
purchased) to the CD changer jack on the rear of this
unit.
• JVC SIRIUS radio DLP—Down Link Processor, for
listening to the SIRIUS Satellite radio.
• XMDirectTM Universal Tuner Box—Using a JVC
Smart Digital Adapter (XMDJVC100: not supplied), for
listening to the XM Satellite radio.
GCI (Global Control Information) update:
• If channels are updated after subscription, updating
starts automatically.
“UPDATING” flashes and no sound can be heard.
• Update takes a few minutes to complete.
• During update, you cannot operate your satellite
radio.
Continued on the next page
15
Page 16
Activate your SIRIUS subscription after
connection:
1
ENGLISH
2
JVC DLP starts updating all the SIRIUS channels.
Once completed, JVC DLP tunes in to the preset
channel, CH184.
3 Check your SIRIUS ID, see page 13.
3 Check your XM Satellite radio ID labelled on
the casing of the XMDirectTM Universal Tuner
Box, or tune in to “Channel 0” (see page 17).
4 Contact XM Satellite radio on the internet
at <http://xmradio.com/activation/> to
activate your subscription, or you can call
1-800-XM-RADIO (1-800-967-2346).
Once completed, the unit tunes in to one of the
available channels (Channel 4 or higher).
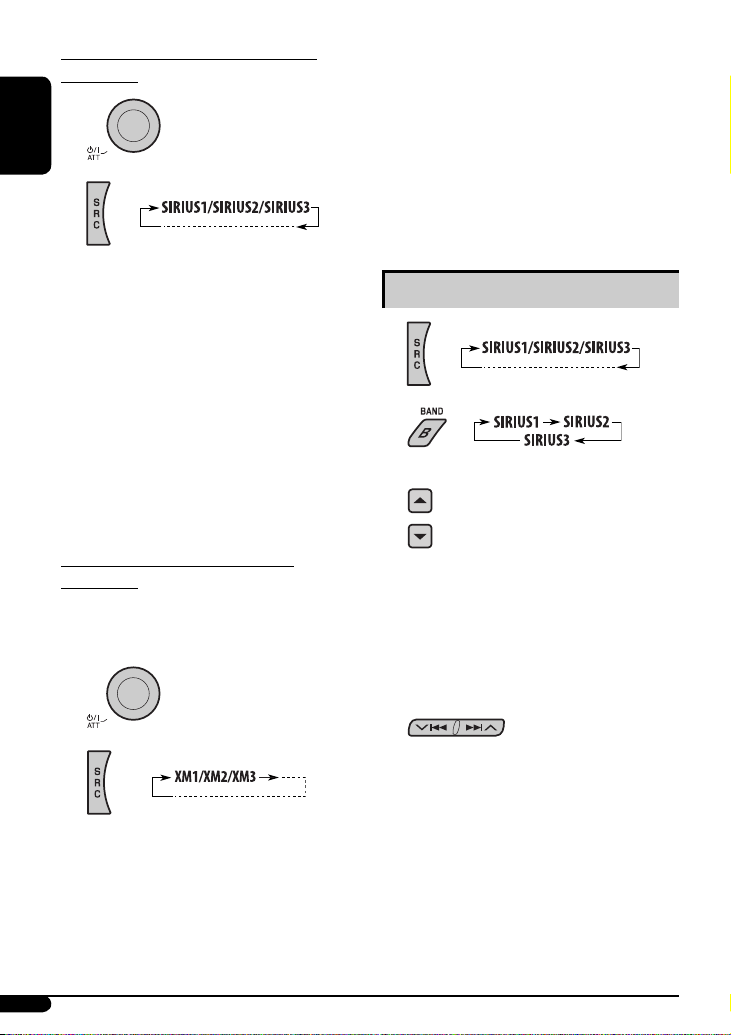
Listening to the SIRIUS Satellite radio
1
4 Contact SIRIUS on the internet at
<http://activate.siriusradio.com/> to
activate your subscription, or you can call
SIRIUS toll-free at 1-888-539-SIRIUS (7474).
“SUB UPDT PRESS ANY KEY” scrolls on the display
once subscription has been completed.
Activate your XM subscription after
connection:
• Only Channel 0, 1, and 247 are available before
activation.
1
2
XMDirectTM Universal Tuner Box starts updating
all the XM channels. “Channel 1” is tuned in
automatically.
2
3 Select a category.
You can tune in to all the channels of every
category by selecting “ALL.”
Selecting a particular category (SPORTS,
ENTERTAINMENT, etc.) allows you to enjoy only the
channels from the selected category.
4 Select a channel for listening.
Holding the button changes the channels rapidly.
• When changing the category or channel, invalid and
unsubscribed channels are skipped.
16
Page 17
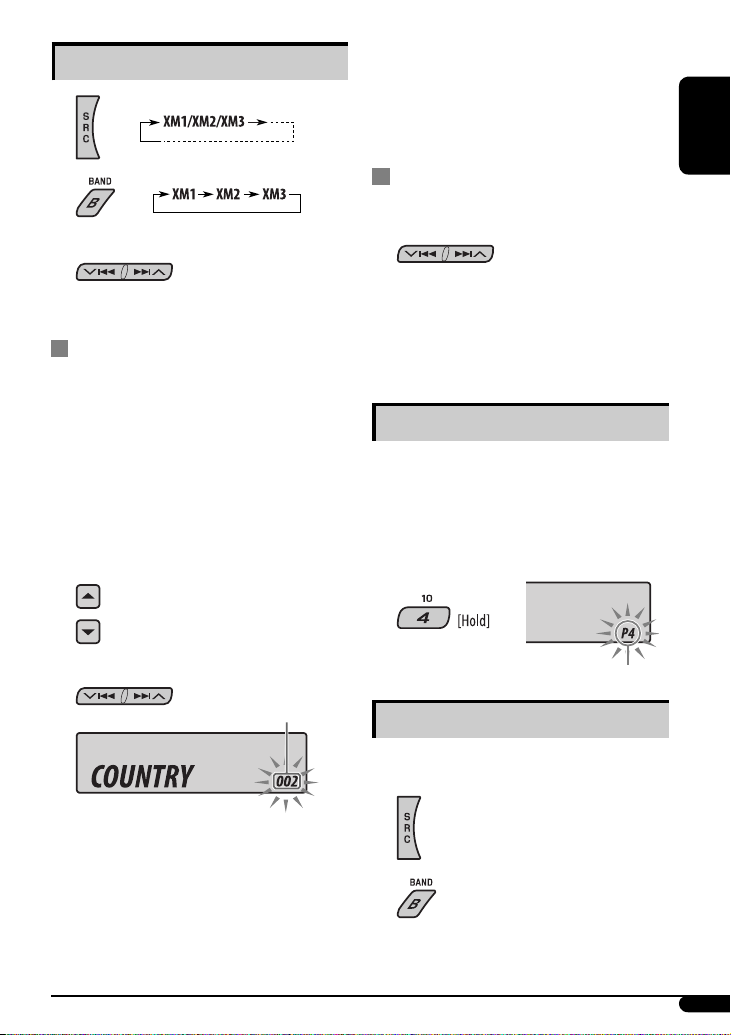
Listening to the XM Satellite radio
1
2
3 Select a channel for listening.
In Channel Search, channel name and channel
number appear on the display during search.
• While searching, invalid and unsubscribed channels
are skipped.
ENGLISH
Checking the XM Satellite radio ID
While selecting “XM1,” “XM2,” or “XM3,” select
“Channel 0.”
Holding the button changes the channels rapidly.
Searching for category/channel
You can search for programs by category (Category
Search) or channel number (Channel Search).
• In Category Search, you can tune in to the channels
of the selected category. Category Search begins from
the currently selected channel. The selected channel
number flashes on the display.
• In Channel Search, you can tune in to all channels
(including non-categorised channels).
1 Select a category (Category Search).
• For Channel Search, skip this
step.
2 Select a channel for listening.
Current channel number
Ex.: When you select “COUNTRY” for Category Search
If no operation is done for about 15 seconds,
Category Search is canceled.
The display alternately shows “RADIO ID” and the
8-digit (alphanumeric) ID number.
To cancel the ID number display, select any channel
other than “Channel 0.”
Storing channels in memory
You can preset six channels for each band.
Ex.: Storing a channel into preset number 4.
1 Tune in to a channel you want.
2
Preset number flashes for a while.
Listening to a preset channel
1 Select either SIRIUS Satellite radio or XM
Satellite radio.
2
Continued on the next page
17
Page 18

3 Select the preset channel (1 – 6) you want.
Preparations:
Make sure “CHANGER” is selected for the external input
setting, see page 14.
ENGLISH
To change the display information while
listening to a channel
Clock = Category name = Channel name =
Artist name = Composer name* = Song/
program name/title = (back to the beginning)
* Only for SIRIUS Satellite radio.
iPod / D. player operations
This unit is ready for operating an Apple iPod or a JVC
D. player from the control panel.
Before operating your iPod or D. player:
Connect either one of the following (separately
purchased) to the CD changer jack on the rear of this
unit.
• Interface adapter for iPod—KS-PD100 for
controlling an iPod.
• D. player interface adapter—KS-PD500 for
controlling a D. player.
• For connection, see Installation/Connection Manual
(separate volume).
• For details, refer also to the manual supplied with the
interface adapter.
~
Ÿ
Playback starts automatically from where it has
been paused*
1
or stopped*2 previously.
! Adjust the volume.
⁄ Adjust the sound as you want. (See
pages 11 and 12.)
• Make sure the equalizer on the iPod or
D. player is deactivated.
To pause*1 or
2
stop
*
playback
To resume playback,
press the button again.
To fast-forward or
reverse the track
To go to the next
or previous tracks
*1 For iPod
*2 For D. player
18
Page 19

Selecting a track from the menu
Selecting the playback modes
1 Enter the main menu.
Now the 5/∞/ 4 /¢ buttons work
as the menu selecting buttons*.
* The menu selecting mode will be canceled:
– If no operations are done for about 5 seconds.
– When you confirm the selection of a track.
2 Select the desired menu.
For iPod:
PLAYLIST Ô ARTISTS Ô ALBUMS Ô
SONGS Ô GENRES Ô COMPOSER Ô
(back to the beginning)
For D. player:
PLAYLIST
Ô ARTIST Ô ALBUM Ô GENRE
Ô TRACK Ô (back to the beginning)
3 Confirm the selection.
To move back to the previous
menu, press
• If a track is selected, playback starts
automatically.
• If the selected item has another layer, you will
enter the layer. Repeat steps 2 and 3 until the
desired track is played.
• Holding 4 /¢ can skip 10 items at
a time.
5.
1
2 Select your desired playback mode.
7 Repeat play
ONE RPT
Functions the same as “Repeat One” of the iPod or
“Repeat Mode = One” for the D. player.
ALL RPT
Functions the same as “Repeat All” of the iPod or
“Repeat Mode = All” for the D. player.
RPT OFF
Cancels.
7 Random play
ALBM RND*
Functions the same as “Shuffle Albums” of the
iPod.
SONG RND/RND ON
Functions the same as “Shuffle Songs” of the iPod
or “Random Play = On” of the D. player.
RND OFF
Cancels.
* For iPod: Functions only if you select “ALL” in
“ALBUMS” of the main “MENU.”
To check other information while listening
to an iPod or a D. player
ENGLISH
19
Page 20

Other external component
operations
You can connect an external component to...
ENGLISH
• CD changer jack on the rear using the Line Input
Adapter—KS-U57 (not supplied) or AUX Input
Adapter—KS-U58 (not supplied) for any other
components (except iPod and D. player).
• AUX (auxiliary) input jack on the control panel.
For connection, see Installation/Connection Manual
(separate volume).
For listening to the Satellite radio, iPod, or D. player, see
pages 15 – 19.
Ÿ Turn on the connected component and
start playing the source.
! Adjust the volume.
⁄ Adjust the sound as you want. (See
pages 11 and 12.)
To check other information while listening
to an external component
Connecting an external component to the
AUX input jack
~ For selecting the external component
connected to...
• AUX input jack
• CD changer jack on the rear using KS-U57
or KS-U58
If “EXT IN” does not appear, see page 14 and
select the external input (“EXT IN”).
Clock Ô AUX IN or EXT IN
More about this unit
Basic operations
Turning on the power
• By pressing SRC on the unit, you can also turn on the
power. If the source is ready, playback also starts.
Turning off the power
• If you turn off the power while listening to a disc, disc
play will start from where playback has been stopped
previously, next time you turn on the power.
Tuner operations
Storing stations in memory
• During SSM search...
– All previously stored stations are erased and
stations are stored newly.
– Received stations are preset in No. 1 (lowest
frequency) to No. 6 (highest frequency).
– When SSM is over, the station stored in No. 1 will
be automatically tuned in.
• When storing a station manually, the previously
preset station is erased when a new station is stored
in the same preset number.
20
Page 21

Disc operations
Caution for DualDisc playback
• The Non-DVD side of a “DualDisc” does not comply
with the “Compact Disc Digital Audio” standard.
Therefore, the use of Non-DVD side of a DualDisc on
this product may not be recommended.
General
• This unit has been designed to reproduce CDs/CD
Texts, and CD-Rs (Recordable)/CD-RWs (Rewritable)
in audio CD (CD-DA), MP3 and WMA formats.
• When a disc is inserted upside down, “PLEASE” and
“EJECT” appear alternately on the display. Press 0 to
eject the disc.
• While fast-forwarding or reversing on an MP3 or
WMA disc, you can only hear intermittent sounds.
Playing a CD-R or CD-RW
• Use only “finalized” CD-Rs or CD-RWs.
• This unit can play back only files of the same type
which are first detected if a disc includes both audio
CD (CD-DA) files and MP3/WMA files.
• This unit can play back multi-session discs; however,
unclosed sessions will be skipped while playing.
• Some CD-Rs or CD-RWs may not play back on this
unit because of their disc characteristics, or for the
following reasons:
– Discs are dirty or scratched.
– Moisture condensation occurs on the lens inside
the unit.
– The pickup lens inside the unit is dirty.
– CD-R/CD-RW on which the files are written with
“Packet Write” method.
– There are improper recording conditions (missing
data, etc.) or media conditions (stained, scratched,
warped, etc.).
• CD-RWs may require a longer readout time since the
reflectance of CD-RWs is lower than that of regular
CDs.
• Do not use the following CD-Rs or CD-RWs:
– Discs with stickers, labels, or a protective seal stuck
to the surface.
– Discs on which labels can be directly printed by an
ink jet printer.
Using these discs under high temperatures or high
humidities may cause malfunctions or damage to the
unit.
ENGLISH
Playing an MP3/WMA disc
• This unit can play back MP3/WMA files with the
extension code <.mp3> or <.wma> (regardless of
the letter case—upper/lower).
• This unit can show the names of albums, artists
(performer), and Tag (Version 1.0, 1.1, 2.2, 2.3, or
2.4) for MP3 files and for WMA files.
• This unit can display only one-byte characters. No
other characters can be correctly displayed.
• This unit can play back MP3/WMA files meeting the
conditions below:
– Bit rate: 8 kbps — 320 kbps
– Sampling frequency:
48 kHz, 44.1 kHz, 32 kHz (for MPEG-1)
24 kHz, 22.05 kHz, 16 kHz (for MPEG-2)
– Disc format: ISO 9660 Level 1/Level 2, Romeo,
Joliet, Windows long file name
• The maximum number of characters for file/folder
names vary among the disc format used (includes 4
extension characters—<.mp3> or <.wma>).
– ISO 9660 Level 1: up to 12 characters
– ISO 9660 Level 2: up to 31 characters
– Romeo: up to 128 characters
– Joliet: up to 64 characters
– Windows long file name: up to 128 characters
• This unit can play back files recorded in VBR (variable
bit rate).
Files recorded in VBR have a discrepancy in elapsed
time display, and do not show the actual elapsed
time. Especially, after performing the search function,
this difference becomes noticeable.
• This unit can recognize a total of 512 files, of 200
folders, and of 8 hierarchies.
• This unit cannot play back the following files:
– MP3 files encoded with MP3i and MP3 PRO format.
– MP3 files encoded in an inappropriate format.
Continued on the next page
21
Page 22

– MP3 files encoded with Layer 1/2.
– WMA files encoded with lossless, professional, and
voice format.
– WMA files which are not based upon Windows
Media® Audio.
– WMA files copy-protected with DRM.
ENGLISH
– Files which have the data such as AIFF, ATRAC3,
etc.
• The search function works but search speed is not
constant.
Changing the source
• If you change the source, playback also stops.
Next time you select “CD” for the playback source,
disc play starts from where it has been stopped
previously.
Ejecting a disc
• If the ejected disc is not removed within 15 seconds,
the disc is automatically inserted again into the
loading slot to protect it from dust. Playback starts
automatically.
• After ejecting a disc, “NO DISC” appears and you
cannot operate some of the buttons. Insert another
disc or press SRC to select another playback source.
General settings—PSM
• “AUTO” setting for “DIMMER” may not work correctly
on some vehicles, particularly on those having a
control dial for dimming.
In this case, change “DIMMER” setting to any other
than “AUTO.”
• If you change the “AMP GAIN” setting from
“HIGH PWR” to “LOW PWR” while the volume level
is set higher than “VOL 30,” the unit automatically
changes the volume level to “VOL 30.”
Title assignment
• If you try to assign titles to more than 30 station
frequencies, “NAMEFULL” appears. Delete unwanted
titles before assignment.
Satellite radio operations
• You can also connect the JVC SIRIUS radio PnP (Plug
and Play), using the JVC SIRIUS radio adapter,
KS-U100K (not supplied) to the CD changer jack on
the rear.
By turning on/off the power of the unit, you can turn
on/off the JVC PnP. However, you cannot control it
from this unit.
• To know more about SIRIUS Satellite radio or to sign
up, visit <http://www.sirius.com>.
• For the latest channel listings and programming
information, or to sign up for XM Satellite radio, visit
<http://www.xmradio.com>.
iPod or D. player operations
• When you turn on this unit, the iPod or D. player is
charged through this unit.
• While the iPod or D. player is connected, all
operations from the iPod or D. player are disabled.
Perform all operations from this unit.
• The text information may not be displayed correctly.
– Some characters such as accented letters cannot be
shown correctly on the display.
– Depends on the condition of communication
between the iPod or D. player and the unit.
• If the text information includes more than 8
characters, it scrolls on the display. This unit can
display up to 40 characters.
Notice:
When connecting an iPod or a D. player, some
operations may not be performed correctly or as
intended. In this case, visit the following JVC web
site:
For iPod users: <http://www.jvc.co.jp/english/car/
support/ks-pd100/index.html>
For D. player users: <http://www.jvc.co.jp/
english/car/support/ks-pd500/index.html>
• Microsoft and Windows Media are either registered
trademarks or trademarks of Microsoft Corporation in
the United States and/or other countries.
• iPod is a trademark of Apple Inc., registered in the
U.S. and other countries.
22
Page 23

Maintenance
How to clean the connectors
Frequent detachment will deteriorate the connectors.
To minimize this possibility, periodically wipe the
connectors with a cotton swab or cloth moistened with
alcohol, being careful not to damage the connectors.
Connector
Moisture condensation
Moisture may condense on the lens inside the unit in
the following cases:
• After starting the heater in the car.
• If it becomes very humid inside the car.
Should this occur, the unit may malfunction. In this
case, eject the disc and leave the unit turned on for a
few hours until the moisture evaporates.
To keep discs clean
A dirty disc may not play correctly.
If a disc does become dirty, wipe it with
a soft cloth in a straight line from center
to edge.
• Do not use any solvent (for example, conventional
record cleaner, spray, thinner, benzine, etc.) to clean
discs.
To play new discs
New discs may have some rough spots
around the inner and outer edges. If
such a disc is used, this unit may reject
the disc.
To remove these rough spots, rub the edges with a
pencil or ball-point pen, etc.
Do not use the following discs:
Warped disc
Sticker
Sticker residue
ENGLISH
How to handle discs
When removing a disc from its
case, press down the center holder
of the case and lift the disc out,
holding it by the edges.
• Always hold the disc by the edges. Do not touch its
recording surface.
When storing a disc into its case, gently insert the
disc around the center holder (with the printed surface
facing up).
• Make sure to store discs into the cases after use.
Center holder
Stick-on label
Unusual shape
Single CD—8 cm
(3-3/16”) disc
23
Page 24

Troubleshooting
What appears to be trouble is not always serious. Check the following points before calling a service center.
ENGLISH
Symptoms Remedies/Causes
• Sound cannot be heard from the speakers. • Adjust the volume to the optimum level.
• Check the cords and connections.
General
• The unit does not work at all. Reset the unit (see page 3).
• SSM automatic presetting does not work. Store stations manually.
FM/AM
• Static noise while listening to the radio. Connect the antenna firmly.
• Disc cannot be played back. Insert the disc correctly.
• CD-R/CD-RW cannot be played back.
• Tracks on the CD-R/CD-RW cannot be skipped.
• Disc can neither be played back nor ejected. • Unlock the disc (see page 10).
• Disc sound is sometimes interrupted. • Stop playback while driving on rough roads.
Disc playback
• “NO DISC” appears on the display. Insert a playable disc into the loading slot.
• “PLEASE” and “EJECT” appear alternately on
the display.
• Disc cannot be played back. • Use a disc with MP3/WMA tracks recorded in the
• Noise is generated. Skip to another track or change the disc. (Do not add the
MP3/WMA playback
• A longer readout time is required (“CHECK”
keeps flashing on the display).
• Tracks do not play back in the order you have
intended them to play.
• Insert a finalized CD-R/CD-RW.
• Finalize the CD-R/CD-RW with the component which
you used for recording.
• Eject the disc forcibly (see page 3).
• Change the disc.
• Check the cords and connections.
This occurs sometimes due to over-heating. Eject the disc
or change to another playback source.
format compliant with ISO 9660 Level 1, Level 2,
Romeo, or Joliet.
• Add the extension code <.mp3> or <.wma> to the
file names.
extension code <.mp3> or <.wma> to non-MP3 or
WMA tracks.)
Do not use too many hierarchies and folders.
Playback order is determined when the files are recorded.
24
Page 25

Symptoms Remedies/Causes
• Elapsed playing time is not correct. This sometimes occurs during play. This is caused by how
the tracks are recorded on the disc.
• “PLEASE” and “EJECT” appear alternately on
the display.
• Correct characters are not displayed (e.g.
MP3/WMA playback
album name).
• “NO DISC” appears on the display. Insert a disc into the magazine.
• “NO MAG” appears on the display. Insert the magazine.
• “RESET 8” appears on the display. Connect this unit and the CD changer correctly and press
CD changer
• “RESET 1” – “RESET 7” appears on the display. Press the reset button of the CD changer.
• The CD changer does not work at all. Reset the unit (see page 3).
• “CALL 1-888-539-SIRIUS TO SUBSCRIBE”
scrolls on the display while listening to the
SIRIUS Satellite radio.
• No sound can be heard. “UPDATING” appears
on the display.
• Either “NO SIGNAL” scrolls or “NO SIGNL”
appears on the display.
• Either “NO ANTENNA” scrolls or “ANTENNA”
appears on the display.
• “NO CH” appears on the display for about 5
seconds, then returns to the previous display
Satellite radio
while listening to the SIRIUS Satellite radio.
• “NO (information)*” scrolls on the display
while listening to the SIRIUS Satellite radio.
• “---” appears on the display while listening to
the XM Satellite radio.
• “---” appears on the display for about 2
seconds, then returns to the previous channel
while listening to the XM Satellite radio.
Insert a disc that contains MP3/WMA tracks.
This unit can only display letters (upper case), numbers,
and a limited number of symbols.
the reset button of the CD changer.
Starts subscribing SIRIUS Satellite radio (see page 16).
The unit is updating the channel information and it takes
a few minutes to complete.
Move to an area where signals are stronger.
Connect the antenna firmly.
No broadcast on the selected channel.
Select another channel or continue listening to the
previous channel.
No text information for the selected channel.
Selected channel is no longer available or is unauthorized.
Select another channel or continue listening to the
previous channel.
ENGLISH
* NO CATEGORY, NO ARTIST, NO COMPOSER, and NO SONG/PROGRAM
Continued on the next page
25
Page 26

Symptoms Remedies/Causes
• “OFF AIR” appears on the display while
listening to the XM Satellite radio.
ENGLISH
• “LOADING” appears on the display while
listening to the XM Satellite radio.
Satellite radio
• “RESET 8” appears on the display.
• Satellite radio does not work at all.
• The iPod or D. player does not turn on or does
not work.
• The sound is distorted. Deactivate the equalizer either on the unit or the
• “NO IPOD” or “NO DP” appears on the display. • Check the connecting cable and its connection.
• Playback stops. The headphones are disconnected during playback.
• No sound can be heard when connecting an
iPod nano.
• No sound can be heard.
• “ERROR 01” appears on the display when
iPod/D. player playback
connecting a D. player.
• “NO FILES” or “NO TRACK” appears on the
display.
• “RESET 1” – “RESET 7” appears on the display. Disconnect the adapter from both the unit and iPod/
• “RESET 8” appears on the display. Check the connection between the adapter and this unit.
• The iPod’s or D. player’s controls do not work
after disconnecting from this unit.
Selected channel is not broadcasting at this time.
Select another channel or continue listening to the
previous channel.
The unit is loading the channel information and audio.
Text information are temporarily unavailable.
Reconnect this unit and the satellite radio correctly, then
reset the unit.
• Check the connecting cable and its connection.
• Update the firmware version.
•
Charge the battery.
iPod/D. player.
• Charge the battery.
Restart the playback operation using the control panel
(see page 18).
• Disconnect the headphones from the iPod nano.
• Update the firmware version of the iPod nano.
Disconnect the adapter from the D. player. Then, connect
it again.
No tracks are stored. Import tracks to the iPod or
D. player.
D. player. Then, connect it again.
Reset the iPod or D. player.
26
Page 27

Specifications
AUDIO AMPLIFIER SECTION
Power Output:
20 W RMS × 4 Channels at 4 Ω and
≤ 1% THD+N
Signal-to-Noise Ratio:
80 dBA (reference: 1 W into 4 Ω)
Load Impedance: 4 Ω (4 Ω to 8 Ω allowance)
Tone Control Range:
Bass/Mid-range/
Treble:
Frequency Response: 40 Hz to 20 000 Hz
Line-Out/SubwooferOut Level/Impedance:
Output Impedance: 1 kΩ
Other Terminal: CD changer, AUX (auxiliary)
±12 dB at 60 Hz/1 kHz/
7.5 kHz
2.5 V/20 kΩ load (full scale)
input jack
TUNER SECTION
Frequency Range:
FM: 87.5 MHz to 107.9 MHz
(with channel interval set to 100 kHz or 200 kHz)
87.5 MHz to 108.0 MHz
(with channel interval set to 50 kHz)
AM: 530 kHz to 1 710 kHz
(with channel interval set to 10 kHz)
531 kHz to 1 602 kHz
(with channel interval set to 9 kHz)
FM Tuner
Usable Sensitivity: 11.3 dBf (1.0 μV/75 Ω)
50 dB Quieting
Sensitivity:
Alternate Channel
Selectivity (400 kHz):
Frequency Response: 40 Hz to 15 000 Hz
Stereo Separation: 35 dB
AM Tuner
Sensitivity/Selectivity: 20 μV/35 dB
16.3 dBf (1.8 μV/75 Ω)
65 dB
CD PLAYER SECTION
Type: Compact disc player
Signal Detection
System:
Number of Channels: 2 channels (stereo)
Frequency Response: 5 Hz to 20 000 Hz
Dynamic Range: 96 dB
Signal-to-Noise Ratio: 98 dB
Wow and Flutter: Less than measurable limit
MP3 Decoding Format: (MPEG1/2 Audio Layer 3)
Max. Bit Rate: 320 kbps
WMA (Windows Media® Audio) Decoding Format:
Max. Bit Rate: 192 kbps
Non-contact optical pickup
(semiconductor laser)
GENERAL
Power Requirement:
Operating Voltage: DC 14.4 V
(11 V to 16 V allowance)
Grounding System: Negative ground
Allowable Operating
Temperature:
Dimensions (W × H × D): (approx.)
Installation Size: 182 mm × 52 mm × 150 mm
(7-3/16” × 2-1/16” × 5-15/16”)
Panel Size: 188 mm × 58 mm × 12 mm
(7-7/16” × 2-5/16” × 1/2”)
Mass:
Design and specifications are subject to change without
notice.
If a kit is necessary for your car, consult your
telephone directory for the nearest car audio
speciality shop.
0°C to + 40°C (32°F to 104°F)
1.4 kg (3.1 lbs)
(excluding accessories)
ENGLISH
27
Page 28

Como primer paso, por favor lea detenidamente este manual para comprender a fondo todas las instrucciones y
Muchas gracias por la compra de un producto JVC.
obtener un máximo disfrute de esta unidad.
IMPORTANTE (EE.UU.)
Este equipo se ha sometido a todo tipo de pruebas y cumple con las normas establecidas para dispositivos
de Clase B, de conformidad con la Parte 15 de las reglas de la FCC (Comisión Federal de Comunicaciones).
Estas reglas están diseñadas para asegurar una protección razonable contra este tipo de interferencias en las
instalaciones residenciales. Este equipo genera y utiliza energía de radiofrecuencia. Si no se instala y utiliza
debidamente, es decir, conforme a las instrucciones, podrían producirse interferencias en radiocomunicaciones.
Sin embargo, no se garantiza que estas interferencias no se produzcan en una instalación determinada. Si
este equipo ocasiona interferencias en la recepción de radio o televisión, lo cual puede comprobarse mediante
ESPAÑOL
la conexión o desconexión del equipo, el problema podrá corregirse mediante una o una combinación de las
siguientes medidas:
– Reoriente la antena receptora o cámbiela de lugar.
– Aumente la separación entre el equipo y el aparato receptor.
– Enchufe el equipo a una toma de corriente situada en un circuito distinto del aparato receptor.
– Consulte a su distribuidor o a un técnico experto en radio/televisión.
Precaución:
Los cambios o modificaciones no aprobados por JVC pueden anular la autoridad del usuario para operar el equipo.
IMPORTANTE PARA PRODUCTOS LÁSER
1. PRODUCTO LÁSER CLASE 1
2. PRECAUCIÓN: No abra la tapa superior. En el interior de la unidad no hay piezas que pueda reparar el usuario;
encargue el servicio a personal técnico cualificado.
3. PRECAUCIÓN: (EE.UU.) Radiación láser de clase II visible y/o invisible, cuando está abierto. No mire
(Para Canadá) Radiación láser de clase 1M visible y/o invisible cuando ésta abierto. No mirar
4. REPRODUCCIÓN DE LA ETIQUETA: ETIQUETA DE PRECAUCIÓN, COLOCADA EN EL EXTERIOR DE LA UNIDAD.
fijamente el haz.
directamente con instrumental óptico.
[Sólo Unión Europea]
Advertencia:
Si necesita operar la unidad mientras conduce,
asegúrese de mirar atentamente a su alrededor pues de
lo contrario, se podría producir un accidente de tráfico.
2
Para fines de seguridad...
• No aumente demasiado el nivel de volumen pues es
muy peligroso conducir si no se escuchan los sonidos
exteriores.
• Detenga el automóvil antes de efectuar cualquier
operación complicada.
Temperatura dentro del automóvil...
Si ha dejado el automóvil estacionado durante largo
tiempo en un sitio cálido o frío, no opere la unidad hasta
que se normalice la temperatura del habitáculo.
Page 29

Las siguientes marcas se utilizan para indicar...
: Operaciones del reproductor de CD
incorporado.
: Operaciones del cambiador de CD
externo.
: Indicador mostrado para la
operación correspondiente.
Cómo reposicionar su unidad
• También se borrarán los ajustes preestablecidos por
usted.
Cómo expulsar el disco por la fuerza
“PLEASE” y “EJECT” aparecen alternativamente en la
pantalla.
CONTENIDO
Panel de control .............................. 4
Control remoto —
Procedimientos iniciales .................. 6
Operaciones básicas ............................................. 6
Operaciones de la radio .................... 7
Operaciones de los discos ................. 8
Para reproducir un disco en el receptor ............... 8
Para reproducir discos en el cambiador de CD ..... 9
Ajustes del sonido ............................ 11
Configuraciones generales — PSM ... 12
Asignación de título ......................... 15
Operaciones de la radio satelital ....... 15
Operaciones del iPod/reproductor D.
Operaciones del otro componente
externo ........................................ 20
Más sobre este receptor ................... 20
Mantenimiento ............................... 23
Localización de averías ..................... 24
Especificaciones ............................... 27
RM-RK50 ................. 5
... 18
ESPAÑOL
•
Tenga cuidado de no dejar caer el disco al ser expulsado.
• Si esto no funciona, intente reposicionar su receptor.
Cómo usar el botón M MODE
Si usted pulsa M MODE, el receptor entra al modo de
funciones y, a continuación, los botones numéricos y los
botones 5/∞ funcionan como botones de diferentes
funciones.
Ej.: Cuando el botón numérico 2 funciona como
botón MO (monaural).
Si después de pulsar M MODE desea volver a usar
estos botones para las funciones originales,
espere 5 segundos sin pulsar ninguno de estos botones
hasta que se cancele el modo de funciones, o presione
M MODE otra vez.
Desmontaje del panel de control
Fijación del panel de control
3
Page 30

Panel de control
ESPAÑOL
Identificación de las partes
Ventanilla de visualización
1 Botón SRC (fuente)
2 Botón B BAND
3 Botón (atenuador/en espera encendido)
/ Disco de control
4 Botón SEL (seleccionar)
5 Ventanilla de visualización
6 Botones 5 (arriba) / ∞ (abajo)
7 Botón EQ (ecualizador)
8 Sensor remoto
NO exponga el sensor remoto a una luz potente (luz
solar directa o iluminación artificial).
9 Botón 0 (expulsión)
p Botón (liberación del panel de control)
q Botón D DISP (visualizar)
w Botón M MODE
e Botones numéricos
r Botón MO (monaural)
t Botón SSM (Memoria secuencial de las emisoras
más fuertes)
y Botón RPT (repetición)
u Botón RND (aleatorio)
i Botones 4 /¢
o Toma de entrada AUX (auxiliar)
4
; Indicador S.BASS (super graves)
a Indicadores de la fuente de reproducción —
CH: Se enciende sólo cuando se selecciona
CD-CH como fuente de reproducción.
DISC: Se enciende para el reproductor de CD
incorporado.
s Indicadores de información del disco—
TAG (información de etiqueta), (carpeta),
(pista/archivo)
d Indicadores del modo de sonido (iEQ: ecualizador
inteligente)—USER, ROCK, CLASSIC, POPS, HIP
HOP, JAZZ
• se enciende para la opción seleccionada.
f Indicadores de recepción del sintonizador—
MO (monaural), ST (estéreo)
g Indicadores del modo de reproducción /
ítem—RND (aleatoria), (disco), (carpeta),
RPT (repetición)
h Indicador EQ (ecualizador)
j Pantalla principal
k Indicador Tr (pista)
l Visualización de fuente / Indicador de cuenta atrás
del tiempo
Page 31

Control remoto — RM-RK50
Instalación de la pila botón de litio
(CR2025)
Elementos principales y funciones
ESPAÑOL
Sólo para EE.UU.-California:
Este producto contiene una batería de litio CR
de tipo botón que contiene perclorato (puede
requerirse una manipulación especial).
Visite www.dtsc.ca.gov/hazardouswaste/
perchlorate
Apunte el control remoto directamente hacia el
sensor remoto del receptor. Asegúrese de que no
hayan obstáculos entremedio.
Advertencia:
• No instale ninguna pila que no sea la CR2025 o su
equivalente; de lo contrario, podrá explotar.
• No deje el control remoto en un lugar expuesto
a la luz directa del sol (como los cubretableros)
durante un tiempo prolongado, pues de lo
contrario, podrá explotar.
• Para evitar riesgos de accidentes, guarde la pila
en un lugar seguro, fuera del alcance de los niños.
• Para proteger la pila contra el recalentamiento,
las grietas, o para evitar que produzca incendio:
– Evite recargar, cortocircuitar, desarmar, calentar
la pila, o arrojarla al fuego.
– No deje la pila con otros objetos metálicos.
– No toque la pila con pinzas u otras herramientas
similares.
– Enrolle la pila con una cinta y aíslela antes de
desecharla o guardarla.
1 Botón (atenuador/en espera/encendido)
• La unidad se enciende al pulsarlo brevemente o
el sonido se atenúa cuando está encendida.
• La unidad se apaga si lo pulsa y mantiene
pulsado.
2 Botones 5 U (“Up”, arriba) / D (“Down”, abajo) ∞
• Cambia las bandas FM/AM mediante 5 U.
• Cambia las emisoras preajustadas mediante D ∞.
• Cambia la carpeta de los discos MP3/WMA.
• Mientras se reproduce un disco MP3 en un
cambiador de CD compatible con MP3:
– Cambia el disco si lo pulsa brevemente.
– Cambia la carpeta si lo pulsa y mantiene
pulsado.
• Mientras escucha la radio satelital (SIRIUS o XM):
– Cambia las categorías.
• Mientras escucha un Apple iPod o un reproductor
D. JVC:
– Pone en pausa/detiene o reanuda la
reproducción mediante D ∞.
– Acceda al menú principal mediante 5 U.
(Ahora, 5 U/D ∞/2 R/F 3 funcionan como
botones selectores de menús).*
3 Botones VOL – / VOL +
• Ajusta el nivel de volumen.
4 Botón SOUND
• Selección del modo de sonido (iEQ: ecualizador
inteligente).
* 5 U : Vuelve al menú anterior.
D ∞ : Confirma la selección.
Continúa en la página siguiente
5
Page 32

5 Botón SOURCE
• Selecciona la fuente.
6 Botones 2 R (retroceso) / F (avance) 3
• Efectúa la búsqueda de emisoras si lo pulsa
brevemente.
• Efectúa el avance rápido o el retroceso de la pista
si lo pulsa y mantiene pulsado.
• Cambia las pistas si lo pulsa brevemente.
• Mientras escucha la radio satelital:
– Cambia los canales si lo pulsa brevemente.
– Cambia rápidamente los canales si lo pulsa y
ESPAÑOL
mantiene pulsado.
• Mientras escucha un iPod o un reproductor D. (en
el modo de selección de menú):
– Selecciona una opción si lo pulsa brevemente.
(Seguidamente, pulse D
selección).
– Salta 10 opciones simultáneamente si lo pulsa
y mantiene pulsado.
∞ para confirmar la
Procedimientos iniciales
!
• Para el sintonizador FM/AM
• Para la radio SIRIUS
• Para la radio XM
⁄ Ajuste el volumen.
Operaciones básicas
~ Encienda la unidad.
Ÿ
* No podrá seleccionar estas fuentes si no están
preparadas o conectadas.
6
Aparece el nivel de volumen.
@ Ajuste el sonido según se desee.
(Consulte las páginas 11 y 12.)
Precaución sobre el ajuste de volumen:
Los discos producen muy poco ruido al compararse
con otras fuentes. Antes de reproducir un disco, baje
el volumen para evitar daños a los altavoces debido
a un repentino aumento del nivel de salida.
Para disminuir el
volumen en un
instante (ATT)
Para restablecer el
sonido, presione el botón
otra vez.
Para apagar la unidad
Page 33

Ajustes básicos
• Véase también “Configuraciones generales — PSM”
en las páginas 12 a 14.
1
2
1 Cancelación de las demostraciones en
pantalla
Seleccione “DEMO” y, a continuación, “DEMO
OFF”.
2 Puesta en hora del reloj
Seleccione “CLOCK H” (hora) y, seguidamente
ajuste la hora.
Seleccione “CLOCK M” (minutos) y,
seguidamente ajuste los minutos.
3 Finalice el procedimiento.
Para verificar la hora actual cuando la
unidad está apagada
El reloj muestra la hora en la
pantalla por unos 5 segundos.
Consulte también la página 13.
! Comience la búsqueda de la emisora.
La búsqueda se interrumpe cuando se recibe una
emisora.
Para detener la búsqueda, presione
nuevamente el mismo botón.
Para sintonizar manualmente una emisora
En el paso ! de arriba...
1
2 Seleccione la frecuencias de la emisora
deseada.
Cuando una radiodifusión en FM estéreo sea
difícil de recibir
Se enciende cuando se activa el modo monaural.
ESPAÑOL
Operaciones de la radio
~
Ÿ
Se enciende cuando se recibe una radiodifusión FM
estéreo con una intensidad de señal suficiente.
Se consigue mejorar la recepción, pero se pierde el
efecto estereofónico.
Para restablecer el efecto estereofónico, repita el
procedimiento. Aparece “MONO OFF” y el indicador MO
se apaga.
7
Page 34

Cómo almacenar emisoras en la
memoria
Se pueden preajustar seis emisoras para cada banda.
Cómo escuchar una emisora
preajustada
1
Preajuste automático de emisoras
FM —SSM (Memoria secuencial de las
emisoras más fuertes)
1 Seleccione la banda FM (FM1 – FM3) en la que
desea almacenar.
ESPAÑOL
2
3
“SSM” parpadea, y luego desaparece al finalizar el
preajuste automático.
Las emisoras FM locales con las señales más intensas
serán exploradas y almacenadas automáticamente en
la banda FM.
Preajuste manual
Ej.: Almacenando una emisora FM de 92,5 MHz en el
número de preajuste 4 de la banda FM1.
1
2 Seleccione la emisora preajustada (1 – 6)
deseada.
o
Para verificar la otra información mientras
escucha la radio
Reloj = Nombre de la
emisora* = Frecuencias
= (vuelta al comienzo)
* Si no se le ha asignado título a la emisora, aparecerá
“NO NAME”. Para asignar un título a una emisora,
consulte la página 15.
Operaciones de los discos
Para reproducir un disco en el
receptor
Todas las pistas se reproducen repetidamente hasta que
usted cambie la fuente o extraiga el disco.
2
3
Para detener la reproducción y expulsar el
disco
El número de preajuste parpadea
durante unos momentos.
8
• Pulse SRC para escuchar otra
fuente de reproducción.
Page 35

Para reproducir discos en el
cambiador de CD
Todos los discos del cargador se reproducen
repetidamente hasta que usted cambie la fuente.
• La reproducción también cesa al expulsar el cargador.
~
* Si ha cambiado el ajuste de entrada exterior a
“EXT IN” (consulte la página 14), no se podrá
seleccionar el cambiador de CD.
Ÿ Seleccione un disco.
Para un número de disco del 01 – 06:
Para un número de disco del 07 – 12:
Acerca de los discos MP3 y WMA
Las “pistas” (los términos “archivo” y “pista” se utilizan
indistintamente) MP3 y WMA se graban en “carpetas”.
Para el avance rápido o el retroceso de la
pista
Para ir a las pistas siguientes o anteriores
ESPAÑOL
Para ir a las carpetas siguientes o anteriores
(sólo para disco MP3 o WMA)
Para discos MP3:
Para discos WMA:
Para localizar directamente una pista (para
CD) o carpeta (para discos MP3 o WMA)
específica
Para seleccionar un número del 01 – 06:
Para seleccionar un número del 07 – 12:
Acerca del cambiador de CD
Se recomienda usar un cambiador de CD compatible con
MP3 JVC con este receptor.
• También es posible conectar cambiadores de CD no
compatibles con MP3. Sin embargo, estas unidades
no son compatibles con discos MP3.
• No podrá usar con esta unidad cambiadores de CD de
las series CH-X99, CH-X100, y KD-MK.
• No podrá reproducir ningún disco WMA en el
cambiador de CD.
• La información de texto del disco grabada en el CD
Text se puede visualizar cuando se ha conectado un
cambiador de CD compatible con CD Text JVC.
• Para la conexión, consulte el Manual de instalación/
conexión (volumen separado).
• Para poder utilizar el acceso directo a carpetas en
los discos MP3/WMA, tiene que haber asignado a
las carpetas un número de 2 dígitos que preceda
a sus respectivos nombres—01, 02, 03, y así
sucesivamente.
Para seleccionar una pista específica de una carpeta
(para discos MP3 o WMA):
9
Page 36

Otras funciones principales
Salto rápido de las pistas durante la
reproducción
Posible solamente en un
cambiador de CD compatible
con MP3 de JVC
ESPAÑOL
• Si es un disco MP3 o WMA, podrá saltar pistas dentro
de la misma carpeta.
Ej.: Para seleccionar la pista 32 durante la reproducción
de una pista de un solo dígito (del 1 al 9)
1
2
Cambio de la información en pantalla
Mientras se reproduce un CD de audio
o un CD Text
Mientras se reproduce un disco MP3 o
2
*
WMA
• Cuando se ajusta “TAG DISP” a “TAG ON”
(consulte la página 14)
Cada vez que pulsa el botón, podrá saltar 10 pistas.
• Después de la última pista, se seleccionará la
primera pista, y viceversa.
3
Prohibición de la expulsión del disco
Podrá bloquear un disco en la ranura de carga.
Para cancelar la prohibición, repita el mismo
procedimiento.
10
• Cuando se ajusta “TAG DISP” a “TAG OFF”
: Reloj con el número de pista actual
: Tiempo de reproducción transcurrido
para el número de pista actual
*1 Si el disco actual es un CD de audio, aparecerá “NO
NAME”.
*2 Sólo para el reproductor CD incorporado.
*3 Si un archivo MP3/WMA no dispone de la información
de etiqueta, aparecerán el nombre de la carpeta y el
nombre del archivo. En este caso, el indicador TAG no
se encenderá.
Page 37

Cómo seleccionar los modos de
reproducción
Podrá utilizar solamente uno de los siguientes modos
de reproducción a la vez.
1
Ajustes del sonido
Podrá seleccionar un modo de sonido preajustado
adecuado al género musical (iEQ: ecualizador
inteligente).
2 Seleccione el modo de reproducción deseado.
7 Reproducción
repetida
Modo Reproduce repetidamente
TRK RPT : La pista actual.
FLDR RPT*1 : Todas las pistas de la carpeta
actual.
DISC RPT*2 : Todas las pistas del disco actual.
RPT OFF : Se cancela.
7 Reproducción
aleatoria
Modo Reproduce aleatoriamente
1
FLDR RND*
DISC RND : Todas las pistas del disco actual.
MAG RND*2 : Todas las pistas de los discos
RND OFF : Se cancela.
1
*
Sólo mientras se reproduce un disco MP3 o WMA.
*2 Sólo mientras se reproducen discos en el
: Todas las pistas de la carpeta
actual, después las pistas
de la carpeta siguiente y así
sucesivamente.
insertados.
cambiador de CD.
Valores
preajustados
BAS*1MID*2TRE*3S.BS*
Indicación (Para)
USER
(Sonido plano)
ROCK
(Música de rock o de
discoteca)
CLASSIC
(Música clásica)
POPS
(Música liviana)
HIP HOP
(Música funk o rap)
JAZZ
(Música jazz)
1
*
: Graves; *2 : Rango medio; *3 : Agudos;
*4 : Super graves
00 00 00 OFF
+03 00 +02 ON
+01 00 +03 OFF
+02 +01 +02 OFF
+04 –02 +01 ON
+03 00 +03 OFF
ESPAÑOL
4
11
Page 38

Cómo ajustar el sonido
Usted puede ajustar las características de sonido según
sus preferencias.
1
*4 Este ajuste no puede afecta la salida del subwoofer.
*5 La gama de los supergraves es ajustable solamente
poniéndolo en “S.BS ON”.
*6 Dependiendo del ajuste de control de ganancia del
amplificador. (Para los detalles, consulte la página
14).
2
ESPAÑOL
Indicación, [Margen]
2
(graves), [–06 a +06]
BAS*
Ajustar los graves.
2
MID*
(rango medio), [–06 a +06]
Ajuste el nivel de sonido de las frecuencias de rango
medio.
2
TRE*
(agudos), [–06 a +06]
Ajustar los agudos.
3
(fader), [R06 a F06]
FAD*
Ajusta el balance de los altavoces delanteros y traseros.
4
BAL*
(balance), [L06 a R06]
Ajusta el balance de los altavoces izquierdo y derecho.
2
S.BS*
(super graves), [S.BS ON o S.BS OFF],
[01 a 05, inicial: 03]*
Mantiene la riqueza y la amplitud de los sonidos graves,
independientemente de cuán bajo esté ajustado el
volumen.
1
SUB.W*
Ajusta el nivel de salida del subwoofer.
VOL (volumen), [00 a 30 o 50*
Ajuste el volumen.
1
Se visualiza sólo cuando “L/O MODE” se ajusta a
*
“WOOFER” (consulte la página 14).
*2 Cuando usted ajusta los graves, rango medio, agudos,
o super graves, dicho ajuste será almacenado para
el modo de sonido actualmente seleccionado (iEQ),
incluyendo “USER”.
*3 Si está utilizando un sistema de dos altavoces, ajuste
el nivel de fader a “00”.
5
(subwoofer), [00 a 08, inicial: 04]
6
]
Configuraciones generales
— PSM
Podrá cambiar las opciones (excepto “SID”) de PSM
(Modo de ajustes preferidos) listadas en las páginas 13
y 14.
1
2 Seleccione una opción de PSM.
3 Ajuste la opción de PSM seleccionada.
4 Repita los pasos 2 y 3 para ajustar las otras
opciones de PSM, si fuera necesario.
5 Finalice el procedimiento.
12
Page 39

Indicaciones Opción
Ajuste, [página de referencia]
( : Inicial)
DEMO
Demostración en
pantalla
1
CLK DISP*
Indicación del reloj
• DEMO ON
• DEMO OFF
• ON
• OFF
: La demostración en pantalla se activará automáticamente si no
se efectúa ninguna operación durante unos 20 segundos, [7].
: Se cancela.
: El reloj siempre mostrará la hora en la pantalla aunque la
unidad esté apagada.
: Se cancela; al pulsar D DISP el reloj mostrará la hora por unos 5
segundos cuando la unidad esté apagada, [7].
CLOCK H
1 – 12 [Inicial: 1 (1:00)], [7].
Ajuste de la hora
CLOCK M
00 – 59 [Inicial: 00 (1:00)], [7].
Ajuste de los
minutos
2
CLK ADJ*
Ajuste del reloj
2
, *
T-ZONE*
Zona horaria
• AUTO
• OFF
3
EASTERN, ATLANTIC,
NEWFOUND, ALASKA,
: El reloj incorporado se ajustará automáticamente gracias a los
datos de reloj suministrados mediante el canal de radio satelital.
: Se cancela.
: Para el ajuste del reloj, seleccione su área residencial entre una
de las siguientes zonas horarias.
PACIFIC, MOUNTAIN,
CENTRAL
2
3
DST*
, *
Hora de verano
4
SID*
SIRIUS ID
• ON
: El horario de ahorro de luz diurna se activa si su zona residencial
está sujeta a DST.
• OFF
: Se cancela.
— : El número de identificación SIRIUS de 12 dígitos se desplaza
por la pantalla 5 segundos después de que “SID” se haya
seleccionado, [16].
• Pulse SEL para restablecer la visualización anterior.
DIMMER
Atenuador de
luminosidad
1
Si la alimentación no se interrumpe al desconectar la llave de encendido de su automóvil, se recomienda seleccionar
*
• AUTO
• ON
• OFF
: Al encender los faros, la pantalla se oscurece.
: El atenuador de luminosidad se activa.
: Se cancela.
“OFF” para economizar batería del automóvil.
*2 Sólo aparece cuando está conectada la radio satelital SIRIUS o XM.
*3 Se visualiza sólo cuando “CLK ADJ” se ajusta a “AUTO”.
*4 Se visualiza sólo cuando está conectada la radio SIRIUS.
ESPAÑOL
Continúa en la página siguiente
13
Page 40

Indicaciones Opción
Ajuste, [página de referencia]
( : Inicial)
5
SCROLL*
Desplazamiento
• ONCE
• AUTO
• OFF
: La información del disco se desplaza una sola vez.
: El desplazamiento se repite (a intervalos de 5 segundos).
: Se cancela.
• Pulsando D DISP durante más de 1 segundo podrá desplazar la
indicación independientemente del ajuste.
L/O MODE
Modo de salida
de línea
ESPAÑOL
WOOFER*
Frecuencia
de corte del
• REAR
: Selecciónelo si ambos terminales LINE OUT se utilizan para
conectar los altavoces (a través de un amplificador externo).
• WOOFER
: Selecciónelo si los terminales REAR LINE OUT se utilizan para
conectar un subwoofer (a través de un amplificador externo).
6
• LOW
• MID
• HIGH
: Las frecuencias inferiores a 90 Hz se envían al subwoofer.
: Las frecuencias inferiores a 135 Hz se envían al subwoofer.
: Las frecuencias inferiores a 180 Hz se envían al subwoofer.
subwoofer
7
EXT IN*
Entrada externa
• CHANGER
: Para usar un cambiador de CD JVC, [9], un sintonizador satélite
(SIRIUS/XM) compatible con JVC, [15], un reproductor Apple iPod
o un reproductor D. JVC, [18].
• EXT IN
: Para usar cualquier otro componente exterior que no sea lo de
arriba, [20].
AUX ADJ
Ajuste del nivel
de entrada
auxiliar
TAG DISP
Visualización de
etiqueta
AMP GAIN
Control de
ganancia del
amplificador
AREA
Intervalo entre
canales del
sintonizador
A.ADJ 00 — A.ADJ 05 : Ajuste el nivel de entrada auxiliar para evitar el repentino
aumento del nivel de salida que podría producirse al cambiar la
fuente, del componente externo conectado, al jack de entrada
AUX en el panel de control.
• TAG ON
: Muestra la información de etiqueta mientras se reproducen pistas
MP3/WMA, [10].
• TAG OFF
• LOW PWR
: Se cancela.
: VOL 00 – VOL 30 (Selecciónelo si la potencia máxima del altavoz
es de menos de 50 W, con el fin de evitar posibles daños en el
altavoz).
• HIGH PWR
• AREA US
: VOL 00 − VOL 50
: Cuando se utiliza en América del Norte/Central/Sur. Los intervalos
de AM/FM están ajustados a 10 kHz/200 kHz.
• AREA EU
: Cuando se utiliza en un área que no sea América del Norte/
Central/Sur. Los intervalos de AM/FM están ajustados a 9 kHz/
50 kHz (100 kHz durante la búsqueda automática).
• AREA SA
: Cuando se utiliza en los países sudamericanos. Los intervalos de
AM/FM están ajustados a 10 kHz/100 kHz.
IF BAND
Banda de
frecuencia
intermedia
• AUTO
• WIDE
: Aumenta la selectividad del sintonizador para reducir las
interferencias entre estaciones cercanas. (El efecto estereofónico
puede perderse).
: Sujeto a interferencias de las emisoras adyacentes, pero la calidad
del sonido no se degrada y se conserva el efecto estereofónico.
5
*
Algunos caracteres o símbolos no serán mostrados correctamente (o aparecerán en blanco) sobre la pantalla.
*6 Se visualiza sólo cuando “L/O MODE” se ajusta a “WOOFER”.
*7 Se visualiza sólo al seleccionar una de las fuentes siguientes—FM, AM, CD o AUX IN.
14
Page 41

Asignación de título
Puede asignar nombres a 30 frecuencias de emisoras
(FM y AM) y hasta un máximo de 8 caracteres para cada
nombre de emisora.
1 Selecciona FM/AM.
Para borrar el título entero
En el paso 2 de la izquierda...
Operaciones de la radio
satelital
2 Muestre la pantalla de entrada de título.
3 Asigne un título.
1 Seleccione un carácter.
2 Muévase a la posición del carácter
siguiente (o anterior).
3 Repita los pasos 1 y 2 hasta que
termine de introducir el título.
4 Finalice el procedimiento.
Esta es una unidad “Satellite (SAT) Radio Ready”—
compatible tanto con la radio satelital SIRIUS y la radio
satelital XM.
Antes de utilizar la radio satelital:
• Para la conexión, consulte el Manual de instalación/
conexión (volumen separado).
• Consulte también las instrucciones que se
suministran con la radio satelital SIRIUS o XM.
• “SIRIUS” y el logo del perro de SIRIUS son marcas
comerciales registradas de SIRIUS Satellite Radio Inc.
• XM y los logos correspondientes son marcas
comerciales registradas de XM Satellite Radio Inc.
• “SAT Radio”, el logo de SAT Radio y todas las demás
marcas relacionadas son marcas comerciales de SIRIUS
Satellite Radio Inc. y de XM Satellite Radio, Inc.
Para escuchar la radio satelital
Conecte a la toma del cambiador de CD de la parte
trasera del receptor uno de los siguientes dispositivos
(adquirido separadamente):
• SIRIUS radio DLP (Down Link Processor) de JVC,
para escuchar la radio satelital SIRIUS.
• XMDirectTM Universal Tuner Box—Usando
un Smart Digital Adapter JVC (XMDJVC100: no
suministrado), para escuchar la radio XM Satellite.
Actualización de GCI (“Global Control Information”):
• Si los canales han sido actualizados después
de la suscripción, la actualización se inicia
automáticamente.
“UPDATING” parpadea y no se escucha ningún sonido.
• La actualización tarda algunos minutos en finalizar.
• Durante la actualización no podrá utilizar la radio
satelital.
Continúa en la página siguiente
ESPAÑOL
15
Page 42

Active la suscripción de SIRIUS después de la
conexión:
1
3 Consulte el número de identificación de la
radio satelital XM que aparece en la etiqueta
de la carcasa del Sintonizador universal
XMDirectTM o sintonice el “Channel 0”
(consulte la página 17).
2
El DLP JVC comienza a actualizar todos los canales
ESPAÑOL
SIRIUS.
Una vez que termine, el DLP JVC sintoniza el canal
preajustado, CH184.
3 Verifique su SIRIUS ID, consulte la página 13.
4 Póngase en contacto con SIRIUS por Internet
en <http://activate.siriusradio.com/> para
activar su suscripción, o haga una llamada
gratuita a SIRIUS marcando 1-888-539-SIRIUS
(7474).
Una vez que haya finalizado su suscripción, “SUB
UPDT PRESS ANY KEY” se desplaza en la pantalla.
Active la suscripción de XM después de la
conexión:
• Antes de la activación sólo están disponibles los
canales 0, 1 y 247.
1
4 Para activar su suscripción, visite el sitio web
de la radio satelital XM en
<http://xmradio.com/activation/> o llame al
1-800-XM-RADIO (1-800-967-2346).
Una vez que termine, la unidad sintoniza uno de
los canales disponibles (Canal 4 o superior).
Para escuchar la radio SIRIUS Satellite
1
2
3 Seleccione una categoría.
Seleccionando “ALL”, podrá sintonizar todos los
canales de cada categoría.
La selección de una categoría específica (SPORTS,
ENTERTAINMENT, etc.) le permitirá escuchar
solamente de los canales de la categoría
seleccionada.
2
El Sintonizador universal XMDirectTM comienza a
actualizar todos los canales XM. El “Channel 1” se
sintoniza automáticamente.
16
4 Seleccione el canal de audición.
Al mantener pulsado el botón, los canales se
cambian rápidamente.
• Cuando cambie de categorías o canales, los canales
inválidos y no suscritos se omiten.
Page 43

Para escuchar la radio satelital XM
1
En búsqueda por canal, el nombre y el número del
canal aparecen en la pantalla durante la búsqueda.
• Durante la búsqueda, se omiten los canales no válidos
y aquellos a los que no está suscrito.
2
3 Seleccione el canal de audición.
Al mantener pulsado el botón, los canales se
cambian rápidamente.
Búsqueda de categoría/canal
Puede buscar programas por categoría (búsqueda por
categoría) o por número de canal (búsqueda por canal).
• En la búsqueda por categoría puede sintonizar
los canales de la categoría seleccionada. La búsqueda
de categoría comienza desde el canal actualmente
seleccionado. El número del canal seleccionado
parpadea en la pantalla.
• En la búsqueda por canal puede sintonizar todos
los canales (incluidos los que no pertenecen a
ninguna categoría).
1 Seleccione una categoría (búsqueda por
categoría).
• Omita ese paso para la
búsqueda de canal.
2 Seleccione el canal de audición.
Para consultar el número de
identificación de la radio satelital XM
Mientras selecciona “XM1”, “XM2” o “XM3”,
seleccione “Channel 0”.
ESPAÑOL
La pantalla muestra alternativamente “RADIO ID” y el
número de identificación de 8 caracteres alfanuméricos.
Para cancelar la visualización del número de
identificación seleccione un canal diferente al
“Channel 0”.
Cómo almacenar canales en la
memoria
Se pueden preajustar seis canales para cada banda.
Ej.: Almacenando un canal en el número de preajuste 4.
1 Sintonice el canal que desee.
2
El número de preajuste parpadea
durante unos momentos.
Número de canal actual
Ej.: Cuando seleccione “COUNTRY” para la búsqueda de
categoría
Si no se realiza ninguna operación durante 15
segundos, la búsqueda por categoría se cancela.
Cómo escuchar un canal preajustado
1 Seleccione la radio satelital SIRIUS o XM.
2
Continúa en la página siguiente
17
Page 44

3 Seleccione el canal preajustado (1 – 6)
deseado.
Para cambiar la información en pantalla
mientras escucha un canal
ESPAÑOL
Preparativos:
Asegúrese de que se ha seleccionado “CHANGER” para el
ajuste de entrada externa, consulte la página 14.
~
Ÿ
Reloj = Nombre de la categoría = Nombre
del canal = Nombre del artista = Nombre
del compositor* = Nombre de la canción/
programa/título = (vuelta al comienzo)
* Sólo para la radio satelital SIRIUS.
Operaciones del iPod/
reproductor D.
Con este receptor puede utilizar un iPod de Apple o un
reproductor D. JVC desde el panel de control.
Antes de operar su iPod o reproductor D.:
Conecte a la toma del cambiador de CD de la parte
trasera del receptor uno de los siguientes dispositivos
(adquirido separadamente):
• Adaptador de interfaz para iPod—KS-PD100
para controlar un iPod.
• Adaptador de interfaz del reproductor D.
—KS-PD500 para controlar un reproductor D.
• Para la conexión, consulte el Manual de instalación/
conexión (volumen separado).
• Para mayor información, consulte también el manual
entregado con el adaptador de interfaz.
La reproducción se inicia automáticamente
desde el punto de pausa*
1
o detención*2 previo.
! Ajuste el volumen.
⁄ Ajuste el sonido según se desee.
(Consulte las páginas 11 y 12.)
• Asegúrese de que esté desactivado el
ecualizador del iPod o del reproductor D.
Para poner la
reproducción
en pausa
parada
Para reanudar
la reproducción,
presione el botón
otra vez.
Para el avance
rápido o el
retroceso de la
pista
Para ir a las pistas
siguientes o
anteriores
*1 Para iPod
*2 Para el reproductor D.
1
*
o
2
*
18
Page 45

Seleccionar una pista en el menú
1 Ingrese al menú principal.
Ahora los botones 5/∞/ 4 /¢
funcionan como botones selectores de menús*.
* El modo de selección de menú será cancelado:
– Si no se realiza ninguna operación durante
aproximadamente 5 segundos.
– Cuando usted confirma la selección de una
pista.
2 Seleccione el menú deseado.
Para iPod:
PLAYLIST Ô ARTISTS Ô ALBUMS Ô
SONGS Ô GENRES Ô COMPOSER Ô
(vuelta al comienzo)
Para el reproductor D.:
PLAYLIST
Ô ARTIST Ô ALBUM Ô GENRE
Ô TRACK Ô (vuelta al comienzo)
3 Confirme la selección.
Para retroceder al menú anterior,
5.
pulse
• Si se selecciona una pista, la reproducción se
inicia automáticamente.
• Si el elemento seleccionado dispone de otra
capa, se accederá a esa capa. Repita los pasos 2 y
3 hasta que se reproduzca la pista deseada.
• Si mantiene pulsado 4/¢ se
pueden saltar 10 opciones simultáneamente.
Cómo seleccionar los modos de
reproducción
1
2 Seleccione el modo de reproducción deseado.
7 Reproducción repetida
ONE RPT
Funciona de igual manera que “Repetir Una” del
iPod o “Modo Repetición = Una” del reproductor
D.
ALL RPT
Funciona de igual manera que “Repetir Todas”
del iPod o “Modo Repetición = Todos” del
reproductor D.
RPT OFF
Se cancela.
7 Reproducción aleatoria
ALBM RND*
Funciona de igual manera que “Aleatorio Álbumes”
del iPod.
SONG RND/RND ON
Funciona de igual manera que “Aleatorio
Canciones” del iPod o “Reprod. Aleatoria = Sí” del
reproductor D.
RND OFF
Se cancela.
* Para iPod: Funciona sólo si se selecciona “ALL” en
“ALBUMS” del “MENU” principal.
ESPAÑOL
Para verificar otra información mientras se
escucha un iPod o un reproductor D.
19
Page 46

Operaciones del otro
componente externo
Podrá conectar un componente externo a...
• Jack del cambiador de CD en la parte trasera,
utilizando Adaptador de entrada de línea—
KS-U57 (no suministrado) o Adaptador de entrada
AUX—KS-U58 (no suministrado) para cualesquier
otros componentes (excepto iPod y reproductor D.).
• Jack de entrada AUX (auxiliar) en el panel de control.
ESPAÑOL
Ÿ Encienda el componente conectado y
comience a reproducir la fuente.
! Ajuste el volumen.
⁄ Ajuste el sonido según se desee.
(Consulte las páginas 11 y 12.)
Para la conexión, consulte el Manual de instalación/
conexión (volumen separado).
Para escuchar la radio vía satélite, el iPod, o el
reproductor D., consulte las páginas 15 – 19.
Conectando un componente externo al jack
de entrada AUX
~ Para seleccionar el componente
externo conectado a...
• Toma de entrada AUX
• Jack para el cambiador de CD de la parte
trasera que utiliza KS-U57 o KS-U58
Si “EXT IN” no aparece, consulte la página 14 y
seleccione la entrada externa (“EXT IN”).
Para consultar otra información mientras
escucha un componente externo
Reloj Ô AUX IN o EXT IN
Más sobre este receptor
Operaciones básicas
Conexión de la alimentación
• También es posible conectar la alimentación
pulsando SRC en el receptor. Si está preparada la
fuente, también se iniciará la reproducción.
Apagado de la unidad
•
Si apaga la unidad mientras está escuchando un disco,
la reproducción del disco se iniciará desde donde la
detuvo la próxima vez que encienda la unidad.
Operaciones del sintonizador
Cómo almacenar emisoras en la memoria
• Durante la búsqueda SSM...
– Todas las emisoras almacenadas previamente se
borran y se almacenan las emisoras nuevas.
– Las emisoras recibidas quedan preajustadas en
los botones No 1 (frecuencia más baja) a No 6
(frecuencia más alta).
– Cuando finalice el SSM, se sintonizará
automáticamente la emisora almacenada en el
botón No 1.
• Al almacenar una emisora manualmente, la emisora
preajustada previamente se borra cuando se almacena
una emisora nueva en el mismo número de preajuste.
20
Page 47

Operaciones de los discos
Precaución sobre la reproducción de DualDisc
• El lado no DVD de un “DualDisc” no es compatible
con la norma “Compact Disc Digital Audio”. Por
consiguiente, no se recomienda usar el lado no DVD
de un DualDisc en este producto.
General
• Este receptor ha sido diseñado para reproducir
discos CDs/CD Texts, y CD-Rs (Grabables)/CD-RWs
(Reescribibles) en formato de audio CD (CD-DA), MP3
y WMA.
• Cuando se inserta un disco al revés, “PLEASE” y
“EJECT” aparecerán alternativamente en la pantalla.
Pulse 0 para sacar el disco.
• Durante el avance rápido o el retroceso de un
disco MP3 o WMA, podrá escuchar sólo sonidos
intermitentes.
Reproducción de un CD-R o CD-RW
• Utilice sólo CD-Rs o CD-RWs “finalizados”.
• Si un disco incluye tanto archivos CD de audio
(CD-DA) como archivos MP3/WMA, esta unidad sólo
podrá reproducir los archivos del mismo tipo que
fueron detectados en primer término.
• Este receptor puede reproducir discos multisesión;
no obstante, las sesiones no cerradas serán omitidas
durante la reproducción.
• Puede suceder que algunos discos CD-Rs o CD-RWs
no se puedan reproducir en esta unidad debido a las
características propias de los mismos, o por uno de los
siguientes motivos:
– Los discos están sucios o rayados.
– Ha ocurrido condensación de humedad en la lente
del interior del receptor.
– Suciedad en el lente captor del interior del
receptor.
– CD-R/CD-RW con archivos escritos mediante el
método “Packet Write”.
– Las condiciones inadecuadas de grabación (datos
faltantes, etc.), o del medio (manchas, arañazos,
alabeo, etc.).
• Los CD-RWs pueden requerir un tiempo de lectura
mayor debido a que la reflectancia de los CD-RWs es
menor que la de los CDs regulares.
• No utilice los CD-Rs o CD-RWs siguientes:
– Discos con pegatinas, etiquetas o un sello de
protección adheridos a la superficie.
– Discos en los cuales las etiquetas pueden
imprimirse directamente mediante una impresora
de chorro de tinta.
El uso de estos discos a temperaturas o humedad
elevadas podría producir fallos de funcionamiento o
daños a la unidad.
Reproducción de discos MP3/WMA
•
Este receptor puede reproducir solamente archivos MP3/
WMA con el código de extensión <.mp3> o <.wma>
(sin distinción de caja—mayúsculas/minúsculas).
• Este receptor puede mostrar los nombres de los
álbumes, artistas (ejecutantes), y etiqueta (Versión
1,0, 1,1, 2,2, 2,3 o 2,4) para archivos MP3 y para
archivos WMA.
• Esta unidad puede manejar solamente caracteres
de un byte. Otros caracteres no serán visualizados
correctamente.
• Este receptor puede reproducir archivos MP3/WMA
que cumplan con las siguientes condiciones:
– Velocidad de bit: 8 kbps — 320 kbps
– Frecuencia de muestreo:
48 kHz, 44,1 kHz, 32 kHz (para MPEG-1)
24 kHz, 22,05 kHz, 16 kHz (para MPEG-2)
–
Formato del disco: ISO 9660 Level 1/Level 2, Romeo,
Joliet, nombre de archivo largo de Windows
• El número máximo de caracteres para los nombres
de archivo/carpeta varía según el formato de disco
usado (incluye extensión de 4 caracteres—<.mp3>
o <.wma>).
– ISO 9660 Level 1: hasta 12 caracteres
– ISO 9660 Level 2: hasta 31 caracteres
– Romeo: hasta 128 caracteres
– Joliet: hasta 64 caracteres
– Nombre de archivo largo de Windows: hasta 128
caracteres
• Este receptor puede reproducir archivos grabados en
VBR (velocidad variable de bits).
Los archivos grabados en VBR presentan una
discrepancia en la visualización del tiempo
transcurrido, y no muestran el tiempo transcurrido
real. Especialmente, esta diferencia se vuelve más
notable después de efectuar la función de búsqueda.
• Esta unidad puede reconocer un total de 512
archivos, 200 carpetas, y 8 jerarquías.
•
Este receptor no puede reproducir los siguientes archivos:
– Archivos MP3 codificados con formato MP3i y MP3
PRO.
–
Archivos MP3 codificados en un formato inapropiado.
Continúa en la página siguiente
ESPAÑOL
21
Page 48

– Archivos MP3 codificados con Layer 1/2.
– Archivos WMA codificados con formatos sin
pérdida, profesional, y de voz.
– Archivos WMA no basados en Windows Media®
Audio.
– Archivos formateados WMA protegidos contra
copia por DRM.
– Archivos que disponen de datos tales como AIFF,
ATRAC3, etc.
• La función de búsqueda funciona pero la velocidad de
búsqueda no es constante.
ESPAÑOL
Cambio de la fuente
• Si cambia de fuente, la reproducción también se
interrumpe.
La próxima vez que seleccione “CD” como fuente
de reproducción, el disco comenzará a reproducirse
desde el punto de detención anterior.
Expulsión del disco
• Si no saca el disco expulsado en el lapso de 15
segundos, será reinsertado automáticamente en la
ranura de carga para protegerlo contra el polvo. La
reproducción se inicia automáticamente.
• Después de expulsar un disco, aparece “NO DISC” y
algunos botones quedan inoperantes. Inserte otro
disco o pulse SRC para seleccionar otra fuente de
reproducción.
Configuraciones generales—PSM
• En algunos vehículos, puede suceder que el ajuste
“AUTO” para “DIMMER” no se efectúe correctamente,
especialmente en aquellos que disponen de un
control giratorio para la atenuación de luz.
En este caso, cambie el ajuste “DIMMER” a cualquier
otra opción distinta de “AUTO”.
• Si usted cambia la configuración “AMP GAIN” de
“HIGH PWR” a “LOW PWR” mientras el nivel de
volumen está ajustado a más de “VOL 30”, el receptor
cambiará automáticamente el nivel de volumen a
“VOL 30”.
Asignación de título
• Cuando intente asignar títulos a más de 30
frecuencias de emisoras, aparecerá “NAMEFULL”.
Antes de asignar, borre los títulos que no necesita.
Operaciones de la radio satelital
• También puede conectar la radio SIRIUS PnP (Plug
and Play) de JVC con el adaptador de radio SIRIUS
KS-U100K de JVC (no suministrado) a la toma del
cambiador de CD, situada en la parte trasera.
Al apagar o encender el receptor, también se apaga o
enciende la radio PnP de JVC. Sin embargo, no podrá
controlarse desde este receptor.
• Para obtener más información sobre la radio satelital
SIRIUS o para suscribirse, visite el sitio web
<http://www.sirius.com>.
• Para la información más reciente sobre listados y
programación de canales, o para suscribirse a la radio
XM Satellite, visite <http://www.xmradio.com>.
Operaciones del iPod o reproductor D.
• Al encender esta unidad, el iPod o el reproductor D. se
carga a través de esta unidad.
• Todas las operaciones realizadas por el iPod o el
reproductor D. se inhabilitarán mientras se encuentre
conectado el iPod o el reproductor D. Realice todas las
operaciones desde esta unidad.
• La información de texto podría no visualizarse
correctamente.
– Las letras con acento y ciertos caracteres no se
pueden visualizar correctamente en la pantalla.
– Depende de las condiciones de comunicación entre
el iPod o reproductor D. y la unidad.
• Si la información de texto incluye más de 8
caracteres, será desplazada en la pantalla. Esta
unidad puede visualizar hasta un máximo de 40
caracteres.
Nota:
Cuando opere un iPod o un reproductor D., algunas
operaciones podrían no ejecutarse correctamente o
en la forma intentada. En tal caso, visite el siguiente
sitio web de JVC:
Para usuarios de iPod: <http://www.jvc.co.jp/
english/car/support/ks-pd100/index.html>
Para los usuarios del reproductor D.:
<http://www.jvc.co.jp/english/car/support/
ks-pd500/index.html>
• Microsoft y Windows Media son marcas registradas o
bien marcas comerciales de Microsoft Corporation en
los Estados Unidos y/u otros países.
• iPod es una marca comercial de Apple Inc., registrada
en los EE.UU. y otros países.
22
Page 49

Mantenimiento
Cómo limpiar los conectores
Un desmontaje frecuente producirá el deterioro de los
conectores.
Para reducir esta posibilidad al mínimo, limpie
periódicamente los conectores con un palillo de
algodón, teniendo cuidado de no dañar los conectores.
Para mantener los discos limpios
Un disco sucio podría no reproducirse
correctamente.
Si se llegara a ensuciar un disco, límpielo
con un lienzo suave, en línea recta desde
el centro hacia el borde.
• No utilice ningún tipo de solvente (por ejemplo,
limpiador de discos convencional, pulverizadores,
diluyente, bencina, etc.) para limpiar los discos.
Conector
Condensación de humedad
Podría condensarse humedad en el lente del interior de
la unidad, en los siguientes casos:
• Después de encender el calefactor del automóvil.
• Si hay mucha humedad en el habitáculo.
Si se produce condensación, la unidad podría no
funcionar correctamente. En este caso, saque el disco y
deje el receptor encendido durante algunas horas hasta
que se evapore la humedad.
Cómo manejar los discos
Cuando saque un disco de su
estuche, presione el sujetador
central del estuche y extraiga el disco
hacia arriba, agarrándolo por los
bordes.
• Siempre sujete el disco por sus bordes. No toque la
superficie de grabación.
Cuando guarde un disco en su estuche, insértelo
suavemente alrededor del sujetador central (con la
superficie impresa hacia arriba).
• Asegúrese de guardar los discos en sus estuches
después del uso.
Sujetador central
Para reproducir discos nuevos
Los discos nuevos podrían presentar
ciertas irregularidades en sus bordes
interior y exterior. Si intenta utilizar un
disco en tales condiciones, el receptor
podría rechazar el disco.
Elimine las irregularidades raspando los bordes con un
lápiz o bolígrafo, etc.
No utilice los siguientes discos:
Disco alabeado
Pegatina
Restos de pegatina
Rótulo
autoadhesivo
Forma irregular
CD simple— disco de
8 cm (3-3/16 pulgada)
ESPAÑOL
23
Page 50

Localización de averías
Lo que aparenta ser una avería podría resolverse fácilmente. Verifique los siguientes puntos antes de llamar al centro
de servicio.
Síntomas Soluciones/Causas
• No se puede escuchar elsonido a través de los
altavoces.
General
• El receptor no funciona en absoluto. Reinicialice el receptor (consulte la página 3).
ESPAÑOL
• El preajuste automático SSM no funciona. Almacene manualmente las emisoras.
FM/AM
• Ruidos estáticos mientras se escucha la radio. Conecte firmemente la antena.
• No se puede reproducir el disco. Inserte correctamente el disco.
• No se puede reproducir el CD-R/CD-RW.
• No se pueden saltar las pistas del CD-R/
CD-RW.
• No es posible reproducir ni expulsar el disco. • Desbloquee el disco (consulte la página 10).
• Algunas veces el sonido del disco se
interrumpe.
Reproducción del disco
• Aparece “NO DISC” en la pantalla. Inserte un disco reproducible en la ranura de carga.
• “PLEASE” y “EJECT” aparecen
alternativamente en la pantalla.
• No se puede reproducir el disco. • Utilice un disco con pistas MP3/WMA grabadas en
• Se generan ruidos. Salte a otra pista o cambie el disco. (No añada el código
• Se requiere mayor tiempo de lectura (“CHECK”
permanece parpadeando en la pantalla).
Reproducción de MP3/WMA
• Las pistas no se reproducen en el orden de
reproducción intentado por usted.
• Ajuste el volumen al nivel óptimo.
• Inspeccione los cables y las conexiones.
• Inserte un CD-R/CD-RW finalizado.
• Finalice el CD-R/CD-RW con el componente utilizado
para la grabación.
• Efectúe la expulsión forzada del disco (consulte la
página 3).
• Detenga la reproducción mientras conduce por caminos
accidentados.
• Cambie el disco.
• Inspeccione los cables y las conexiones.
Esto sucede a veces debido a recalentamiento. Expulse el
disco o cambie a otra fuente de reproducción.
un formato compatible con ISO 9660 Nivel 1, Nivel 2,
Romeo o Joliet.
• Añada el código de extensión <.mp3> o <.wma> a
los nombres de archivos.
de extensión <.mp3> o <.wma> a pistas que no sean
MP3 o WMA).
No utilice demasiadas jerarquías y carpetas.
Se ha determinado el orden de reproducción durante la
grabación de los archivos.
24
Page 51

Síntomas Soluciones/Causas
• El tiempo de reproducción transcurrido no
escorrecto.
• “PLEASE” y “EJECT” aparecen
alternativamente en la pantalla.
• No se visualizan los caracteres correctos (por
ej.: nombre del álbum).
Reproducción de MP3/WMA
• Aparece “NO DISC” en la pantalla. Inserte el disco en el cargador.
• Aparece “NO MAG” en la pantalla. Inserte el cargador.
• Aparece “RESET 8” en la pantalla.
• Aparece “RESET 1” – “RESET 7” en la pantalla. Pulse el botón de reinicialización del cambiador de CD.
Cambiador de CD
• El cambiador de CD no funciona en absoluto. Reinicialice el receptor (consulte la página 3).
• El texto “CALL 1-888-539-SIRIUS TO
SUBSCRIBE” (llame al 1-888-539-SIRIUS
para suscribirse) se desplaza por la pantalla
mientras escucha la radio SIRIUS.
• El sonido no se escucha. Aparece “UPDATING”
en la pantalla.
• El texto “NO SIGNAL” se desplaza o “NO
SIGNL” aparece en la pantalla.
• El texto “NO ANTENNA” se desplaza o
“ANTENNA” aparece en la pantalla.
• Aparece “NO CH” en la pantalla durante
unos 5 segundos y, a continuación, vuelve a
aparecer la visualización anterior mientras se
Radio satelital
escucha la radio satelital SIRIUS.
• “NO (information)*” (sin información) se
desplaza por la pantalla mientras escucha la
radio satelital SIRIUS.
• La señal “---” aparece en la pantalla mientras
escucha la radio satelital XM.
• La señal “---” aparece en la pantalla durante
2 segundos y después vuelve al canal anterior
mientras escucha la radio satelital XM.
* NO CATEGORY, NO ARTIST, NO COMPOSER y NO SONG/PROGRAM
Esto sucede a veces durante la reproducción. Esto
depende de cómo fueron grabadas las pistas en el disco.
Inserte un disco que contenga pistas MP3/WMA.
Esta unidad sólo puede visualizar letras (mayúsculas),
números, y un número limitado de símbolos.
Conecte correctamente este receptor y el cambiador de CD
y pulse el botón de reinicialización del cambiador de CD.
Se inicia la suscripción a la radio satelital SIRIUS (consulte
la página 16).
El receptor está actualizando la información de canal y
tarda algunos minutos en finalizar.
Muévase hacia un área donde las señales sean más
fuertes.
Conecte firmemente la antena.
No hay transmisión en el canal seleccionado.
Seleccione otro canal o continúe escuchando el canal
anterior.
No hay información de texto para el canal seleccionado.
El canal seleccionado ya no está disponible o no está
autorizado.
Seleccione otro canal o continúe escuchando el canal
anterior.
ESPAÑOL
Continúa en la página siguiente
25
Page 52

Síntomas Soluciones/Causas
• La señal “OFF AIR” aparece en la pantalla
mientras escucha la radio satelital XM.
• La señal “LOADING” aparece en la pantalla
mientras escucha la radio satelital XM.
Radio satelital
• Aparece “RESET 8” en la pantalla.
• La radio satelital no funciona.
ESPAÑOL
• El iPod o el reproductor D. no se enciende o
no funciona.
• El sonido está distorsionado. Desactive el ecualizador en la unidad o bien en el iPod/
• Aparece “NO IPOD” o “NO DP” en la pantalla. • Verifique el cable de conexión y su conexión.
• La reproducción se detiene. Los auriculares están desconectados durante la
• No se escucha ningún sonido al conectar un
iPod nano.
• El sonido no se escucha.
• Aparece “ERROR 01” en la pantalla al
conectar un reproductor D.
• Aparece “NO FILES” o “NO TRACK” en la
Reproducción con el iPod/reproductor D.
pantalla.
• Aparece “RESET 1” – “RESET 7” en la pantalla. Desconecte el adaptador de la unidad y del iPod/
• Aparece “RESET 8” en la pantalla. Verifique la conexión entre el adaptador y esta unidad.
• Los controles del iPod o del reproductor D.
no funcionarán después de desconectarlo de
esta unidad.
El canal seleccionado no está emitiendo en ese momento.
Seleccione otro canal o continúe escuchando el canal
anterior.
El receptor está cargando la información del canal y
el audio. La información de texto no está disponible
temporalmente.
Vuelva a conectar correctamente esta unidad y la radio
por satélite y, a continuación, reinicialice la unidad.
• Verifique el cable de conexión y su conexión.
• Actualice la versión de firmware.
•
Cargue la pila.
reproductor D.
• Cargue la pila.
reproducción. Reinicie la operación de reproducción
usando el panel de control (consulte la página 18).
• Desconecte los auriculares del iPod nano.
• Actualice la versión de firmware del iPod nano.
Desconecte el adaptador del reproductor D.
Seguidamente, vuélvalo a conectar.
No hay pistas almacenadas. Importe pistas al iPod o
reproductor D.
reproductor D. Seguidamente, vuélvalo a conectar.
Reinicialice el iPod o el reproductor D.
26
Page 53

Especificaciones
SECCIÓN DEL AMPLIFICADOR DE AUDIO
Salida de potencia:
20 W RMS × 4 canales a 4 Ω y
≤ 1% THD+N
Relación señal a ruido:
80 dBA (referencia: 1 W en 4 Ω)
Impedancia de carga: 4 Ω (tolerancia de 4 Ω a 8 Ω)
Gama de control de tono:
Graves/Rango medio/
Agudos:
Respuesta de
frecuencias:
Nivel de salida de
línea/Nivel de salida del
subwoofer/Impedancia:
Impedancia de salida: 1 kΩ
Otro terminal: Cambiador de CD, Toma de
±12 dB a 60 Hz/1 kHz/
7,5 kHz
40 Hz a 20 000 Hz
2,5 V/20 kΩ de carga (plena
escala)
entrada AUX (auxiliar)
SECCIÓN DEL SINTONIZADOR
Gama de frecuencias:
FM: 87,5 MHz a 107,9 MHz
(con el intervalo entre canales ajustado a
100 kHz o 200 kHz)
87,5 MHz a 108,0 MHz
(con el intervalo entre canales ajustado a 50 kHz)
AM: 530 kHz a 1 710 kHz
(con el intervalo entre canales ajustado a 10 kHz)
531 kHz a 1 602 kHz
(con el intervalo entre canales ajustado a 9 kHz)
Sintonizador de FM
Sensibilidad útil: 11,3 dBf (1,0 μV/75 Ω)
50 dB sensibilidad de
silenciamiento:
Selectividad de canal
alternativo (400 kHz):
Respuesta de
frecuencias:
Separación
estereofónica:
Sintonizador de AM
Sensibilidad/Selectividad:
16,3 dBf (1,8 μV/75 Ω)
65 dB
40 Hz a 15 000 Hz
35 dB
20 μV/35 dB
SECCIÓN DEL REPRODUCTOR DE CD
Tipo: Reproductor de discos
Sistema de detección
de señal:
Número de canales: 2 canales (estereofónicos)
Respuesta de
frecuencias:
Gama dinámica: 96 dB
Relación señal a ruido: 98 dB
Lloro y trémolo: Inferior al límite medible
Formato de decodificación MP3: (MPEG1/2 Audio
Layer 3)
Máx. velocidad de bits:
Formato de decodificación WMA (Windows Media®
Audio):
Máx. velocidad de bits:
compactos
Captor óptico sin contacto
(láser semiconductor)
5 Hz a 20 000 Hz
320 kbps
192 kbps
GENERAL
Requisitos de potencia:
Voltaje de
funcionamiento:
Sistema de puesta a
tierra:
Temperatura de
funcionamiento
admisible:
Dimensiones (An × Al × Pr): (aprox.)
Tamaño de instalación: 182 mm × 52 mm × 150 mm
Tamaño del panel: 188 mm × 58 mm × 12 mm
(7-7/16 pulgada × 2-5/16
Peso:
El diseño y las especificaciones se encuentran sujetos a
cambios sin previo aviso.
Si necesita un kit para su automóvil, consulte
su directorio telefónico para buscar la tienda
especializada en car audio más cercana.
14,4 V CC
(tolerancia de 11 V a 16 V)
Negativo a masa
0°C a + 40°C (32°F a 104°F)
(7-3/16 pulgada × 2-1/16
pulgada × 5-15/16 pulgada)
pulgada × 1/2 pulgada)
1,4 kg (3,1 lbs)
(excluyendo accesorios)
ESPAÑOL
27
Page 54

Having TROUBLE with operation?
Please reset your unit
Refer to page of How to reset your unit
Still having trouble??
USA ONLY
Call 1-800-252-5722
http://www.jvc.com
We can help you!
EN, SP
© 2007 Victor Company of Japan, Limited
0607DTSMDTJEIN
 Loading...