

Page 1
ENGLISHРУCCKИЙУКРАЇНА
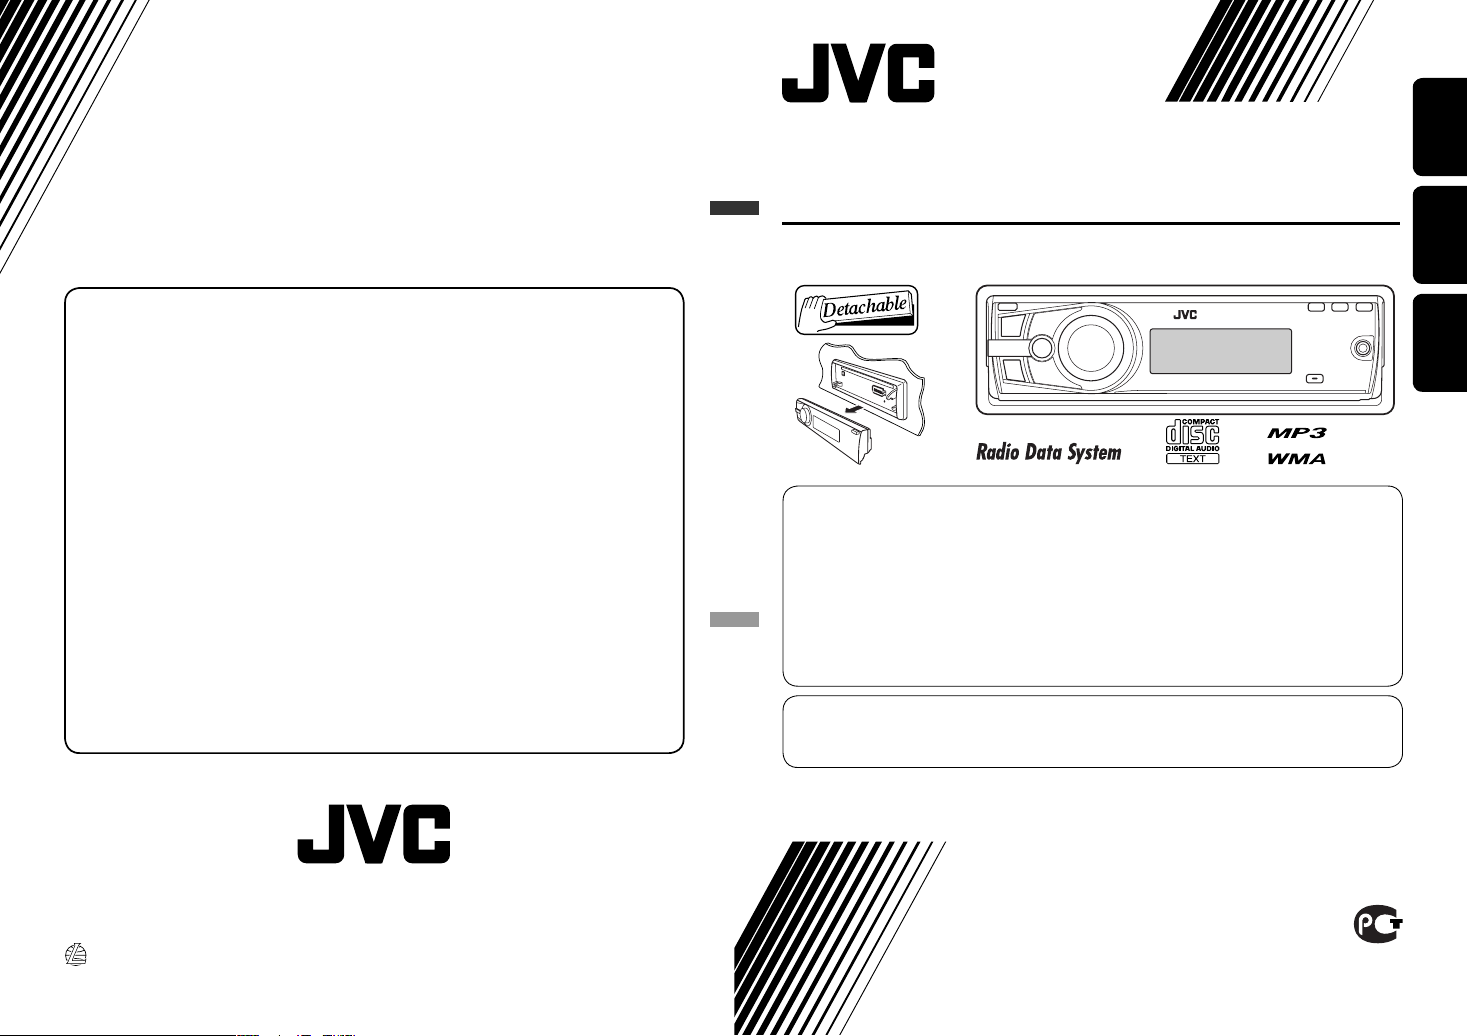
CD RECEIVER
РЕСИВЕР С ПРОИГРЫВАТЕЛЕМ КОМПАКТ-ДИСКОВ
ПРИЙМАЧ З ПРОГРАВАЧЕМ КОМПАКТ-ДИСКІВ
KD-R507
For installation and connections, refer to the separate manual.
Указания по установке и выполнению соединений приводятся в отдельной инструкции.
Вказівки по встановленню та виконанню підключень наведені у окремій інструкції.
INSTRUCTIONS
ИНСТРУКЦИИ ПО ЭКСПЛУАТАЦИИ
ІНСТРУКЦІЇ
GET0586-001A
[EE]
For canceling the display demonstration, see page 6.
Информацию об отмене демонстрации функций дисплея см. на стр. 6.
Інформацію щодо відміни демонстрації функцій дисплею див. на стор. 6.
В соответствии с Законом Российской Федерации “О защите прав потре бителей” срок службы (годности) данного
товара “по истечении которого он может представлять опасность для жизни, здоровья потребителя, причинять вред
его имуществу или окружающей среде” составляет семь (7) лет со дня производства. Этот срок является временем, в
течение которого потребитель данного товара может безопасно им пользоваться при условии соблюдения
ин струк ции по эксплуатации данного товара, проводя необходимое обслуживание, включающее замену расходных
материалов и/или соответствующее ремонтное обеспечение в специализированном сервисном центре.
Дополнительные косметические материалы к данному товару, поставляе мые вместе с ним, могут храниться в
течение двух (2) лет со дня его производства.
Срок службы (годности), кроме срока хранения дополнительных космети ческих материалов, упомянутых в
предыдущих двух пунктах, не затрагивает никаких других прав потребителя, в частности, гарантийного свидетельства
JVC, которое он может получить в соответствии с законом о правах потребителя или других законов, связанных с ним.
EN, RU, UK
1208DTSMDTJEIN
Having TROUBLE with operation?
Please reset your unit
Refer to page of How to reset your unit
Затруднения при эксплуатации?
Пожалуйста, перезагрузите Ваше устройство
Для получения информации о перезагрузке Вашего устройства
обратитесь на соответствующую страницу
Маєте ПРОБЛЕМУ з функціонуванням?
Повторно налаштуйте систему
Див. сторінку “Як повторно налаштувати пристрій”
© 2008 Victor Company of Japan, Limited
Bіктор Компані оф Джепен Лімітед
12, 3-чоме, Морійя-чо, Канагава-ку, Йокогама, Канагава 221-8520, Японія
Page 2
ENGLISH
2
Thank you for purchasing a JVC product.
Please read all instructions carefully before operation, to ensure your complete understanding and to obtain the best
possible performance from the unit.
IMPORTANT FOR LASER PRODUCTS
1. CLASS 1 LASER PRODUCT
2. CAUTION: Do not open the top cover. There are no user serviceable parts inside the unit; leave all servicing to
qualified service personnel.
3. CAUTION: Visible and/or invisible class 1M laser radiation when open. Do not view directly with optical
instruments.
4. REPRODUCTION OF LABEL: CAUTION LABEL, PLACED OUTSIDE THE UNIT.
[European Union only]
Warning:
If you need to operate the unit while driving, be sure to
look around carefully or you may be involved in a traffic
accident.
Caution on volume setting:
Discs produce very little noise compared with other
sources. Lower the volume before playing a disc to
avoid damaging the speakers by the sudden increase of
the output level.
For safety...
• Do not raise the volume level too much, as this will
block outside sounds, making driving dangerous.
• Stop the car before performing any complicated
operations.
Temperature inside the car...
If you have parked the car for a long time in hot or cold
weather, wait until the temperature in the car becomes
normal before operating the unit.
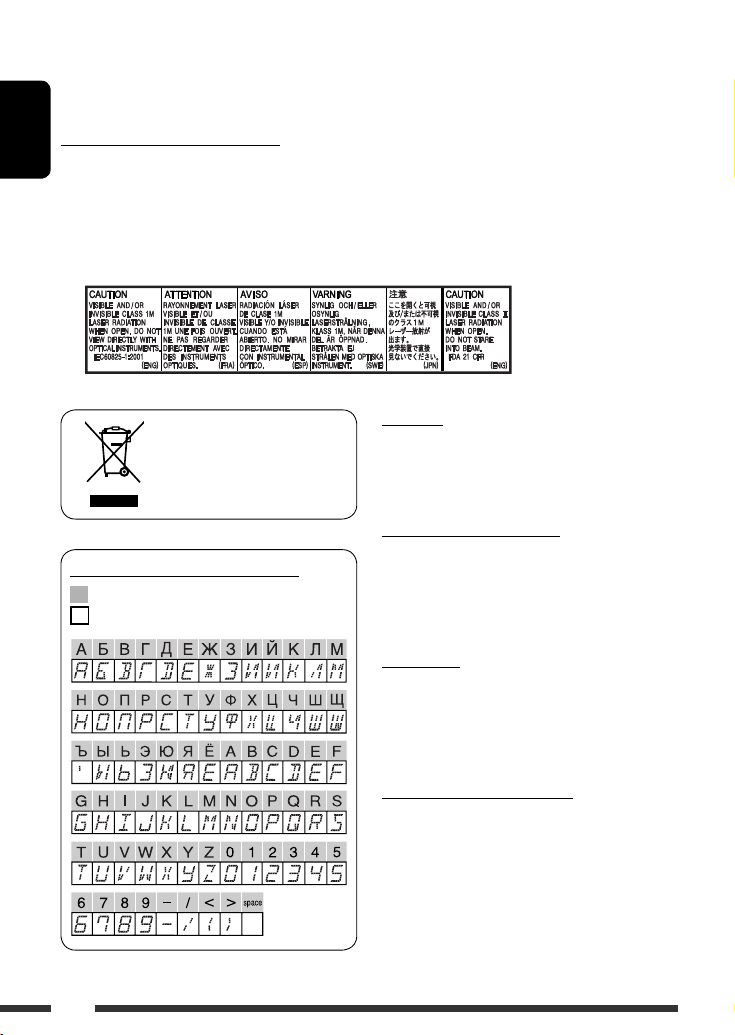
Available characters on the display
Available characters
Display indications
Page 3
ENGLISH
3
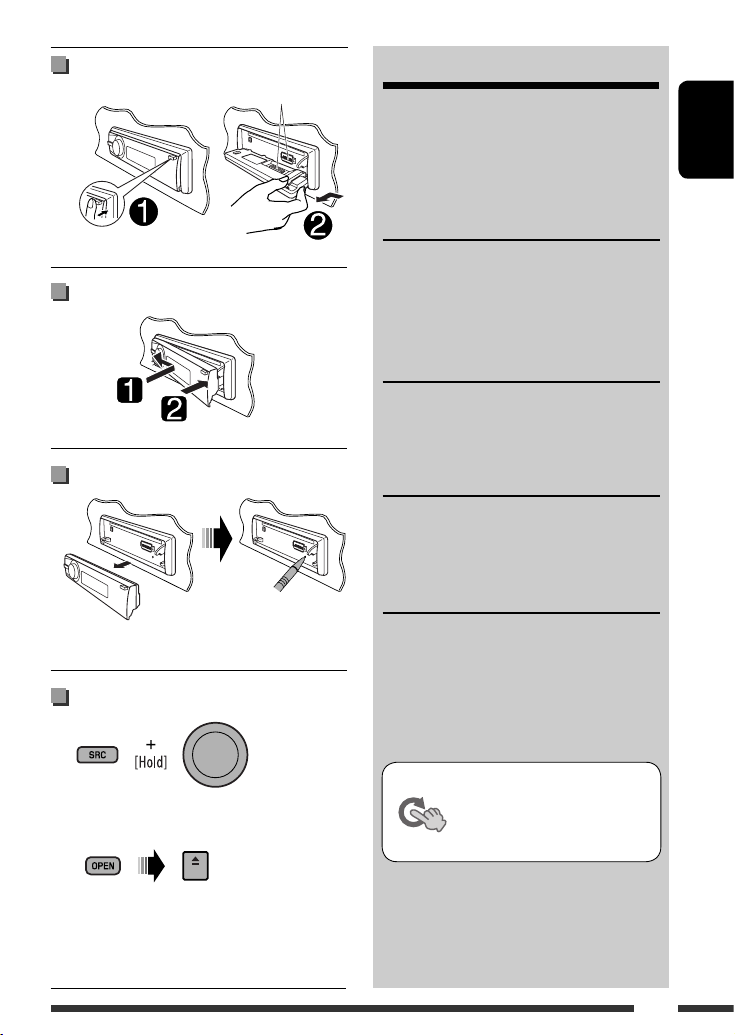
How to reset your unit
• Your preset adjustments will also be erased.
How to forcibly eject a disc
• “PLEASE” and “EJECT“ appear alternately on the
display.
• You can forcibly eject the loaded disc even if the disc is
locked. To lock/unlock the disc, see page 10.
• Be careful not to drop the disc when it ejects.
• If this does not work, reset your unit.
CONTENTS
Detaching the control panel ......................... 3
Attaching the control panel ......................... 3
How to reset your unit ................................. 3
How to forcibly eject a disc ........................... 3
OPERATIONS
Basic operations ........................................... 4
Preparation .................................................. 6
Listening to the radio ................................... 7
Disc operations ............................................. 10
EXTERNAL DEVICES
Listening to the other external
components .............................................. 11
Using the remote controller—
RM-RK50 ...... 12
SETTINGS
Selecting a preset sound mode .................... 13
Menu operations .......................................... 15
Color settings ............................................... 18
REFERENCES
More about this unit .................................... 19
Troubleshooting ........................................... 21
Maintenance ................................................ 23
Specifications ............................................... 24
Detaching the control panel
Attaching the control panel
This mark is used to indicate...
Turn the control dial to make a
selection, then press to confirm the
selection.
Avoid touching the connectors.
Page 4
ENGLISH
4
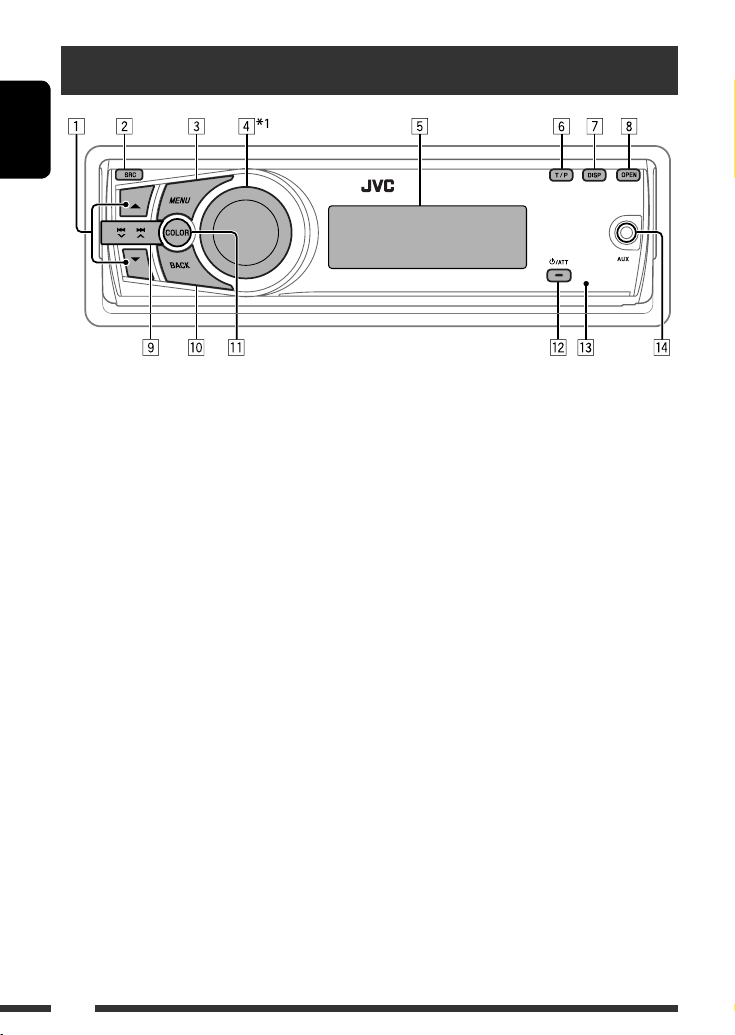
Basic operations
q Select the display and button illumination color.
w • Turn on the power.
• Attenuate the sound (if the power is on).
• Turn off the power [Hold].
e Remote sensor
• You can control this unit with an optionally
purchased remote controller. For details, see
page 12.
r AUX (auxiliary) input jack
*1 Also known as “Control dial” in this manual.
*2 You cannot select “CD” as the playback source if no
disc is in the unit.
*3 You cannot select these sources if they were disabled
in the Menu (see “SRC SELECT” in “Menu
operations” on page 18).
1 • FM/AM/FM-LO: Select preset station.
• CD: Select folder.
2 Select the source.
FM = CD *2 = AUX IN *3 = AM *3 = FM-LO
= (back to the beginning)
3 • Enter list operations.
• Enter Menu setting [Hold] .
4 • Control the volume or select items [Turn].
• Confirm the selection [Press] .
• FM/FM-LO: Enter SSM preset mode [Hold] .
• CD: Enter playback mode [Hold] .
5 Display window
6 • Activate/deactivate TA Standby Reception.
• Enter PTY Searching mode [Hold].
7 Change the display information.
8 Flip down the control panel.
• To eject the disc, flip down the control panel
then press 0 on the unit.
9 • FM/AM/FM-LO: Search for station.
• CD: Select track.
p Return to the previous menu.
Page 5
ENGLISH
5OPERATIONS
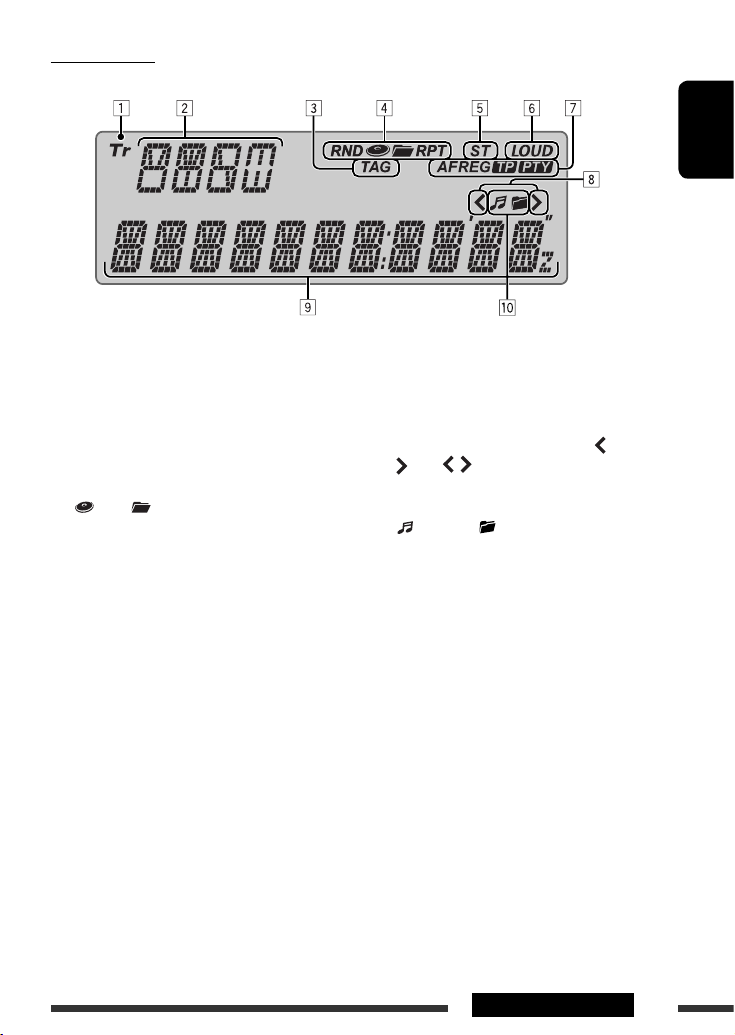
Display window
1 Tr (track) indicator
2 Source display / Track number / Folder number
/ Time countdown indicator / Setting and list
operation information
3 TAG (Tag information) indicator
4 Playback mode / item indicators— RND (random),
(disc), (folder), RPT (repeat)
5 ST (stereo) indicator
6 LOUD (loudness) indicator
7 Radio Data System indicators—AF, REG, TP, PTY
8 Menu hierarchy position indicator—
(bottom),
(top), (middle)
9 Main display
p Disc information indicators—
(track/file), (folder)
Page 6
ENGLISH
6
Preparation
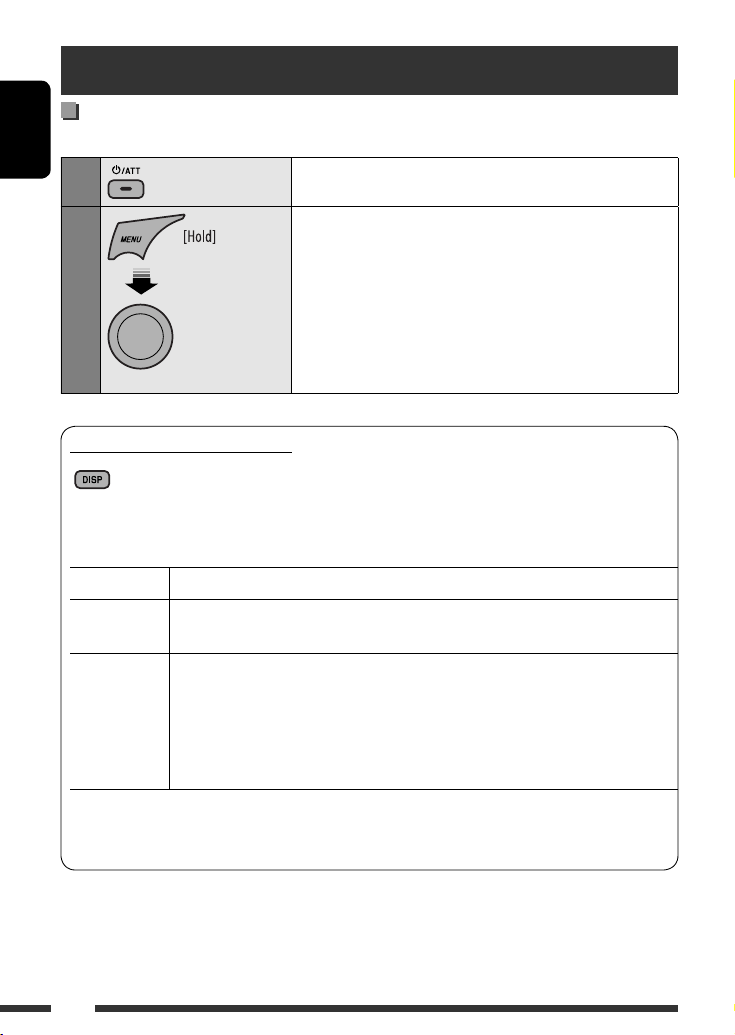
Canceling the display demonstration and setting the clock
• See also page 15.
1
Turn on the power.
2
[Turn] = [Press]
Cancel the display demonstrations
Select “DEMO,” then “DEMO OFF.”
Set the clock
Select “CLOCK” = “CLOCK SET.”
Adjust the hour, then press control dial once to proceed to adjust
the minute.
Select “24H/12H,” then “24 HOUR” or “12 HOUR.”
• To return to the previous menu, press BACK.
Changing the display information
When the power is turned off: The current clock time is displayed if “CLOCK DISP” is set to “CLOCK OFF,”
(see page 15).
When the power is turned on: The display information of the current source changes as follows:
FM/AM/FM-LO Station Frequency = Clock = (back to the beginning)
FM Radio Data
System
Station name (PS) = Station Frequency = Programme type (PTY) = Clock = (back to the
beginning)
CD Audio CD/CD Text: Disc title/performer *1 = Track title *1 = Current track number with the
elapsed playing time = Current track number with the clock time =
(back to the beginning)
MP3/WMA: Album name/performer (folder name) *2 = Track title (file name) *2 =
Current track number with the elapsed playing time = Current track
number with the clock time = (back to the beginning)
*1 If the current disc is an audio CD, “NO NAME” appears.
*2 If an MP3/WMA file does not have Tag information or “TAG DISPLAY” is set to “TAG OFF” (see page 15),
folder name and file name appear.
Press and hold until
the main menu is
called up.
• Repeat this
procedure.
Page 7
ENGLISH
7OPERATIONS
Listening to the radio
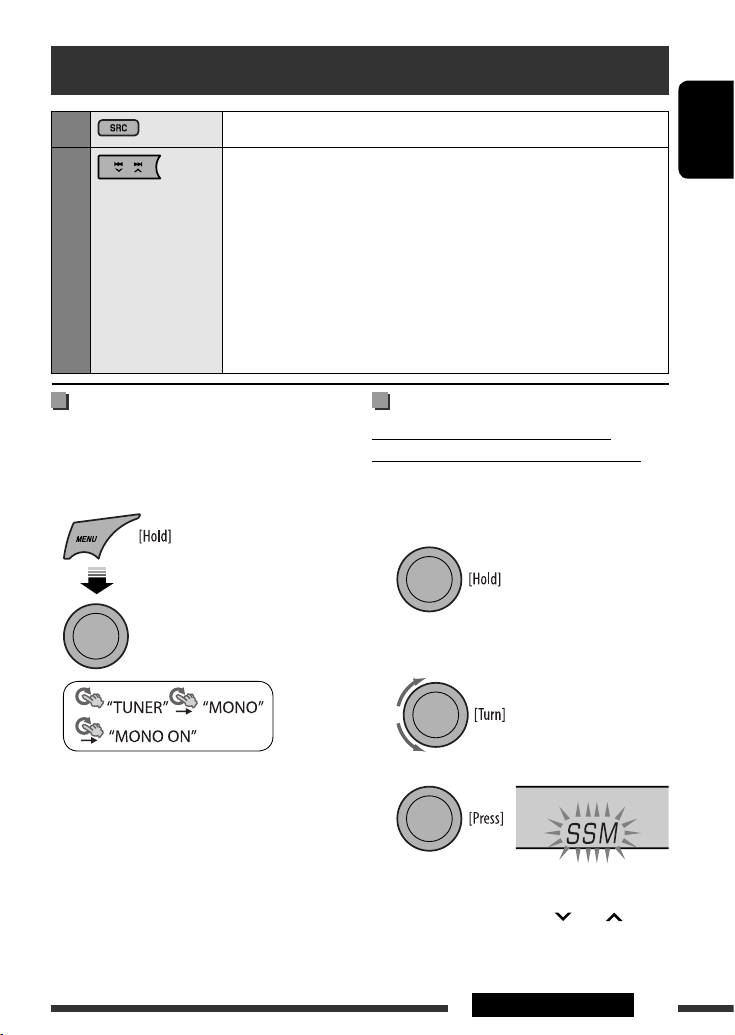
1
Select “FM,” “AM,” or “FM-LO.”
2
Search for a station to listen—Auto Search.
When a station is tuned in, searching stops. To stop searching, press the same
button again.
• You can also search for a station manually—Manual Search. Hold either one of
the buttons until “M” flashes on the display, then press it repeatedly.
• When receiving an FM stereo broadcast with sufficient signal strength, the ST
indicator lights up on the display.
Note:
FM: 87.5 MHz – 108.0 MHz
FM-LO: 65.00 MHz – 74.00 MHz
Improving the FM reception
When an FM stereo broadcast is hard to receive,
activate monaural mode for better reception.
• Not applicable when the source is “FM-LO.”
• See also page 16.
Reception improves, but stereo effect will be lost.
To restore the stereo effect, repeat the same
procedure to select “MONO OFF.”
Storing stations in memory
Automatic presetting (FM/FM-LO)—
SSM (Strong-station Sequential Memory)
You can preset up to 12 stations for FM, and 6 stations
for FM-LO.
1 While listening to a station...
2 Select the preset number range you want to
store.
FM:
SSM 01–06, SSM 07–12
FM-LO:
SSM 01–06
3
Local FM stations with the strongest signals are
searched and stored automatically.
• To stop searching, press 4
/¢ .
To preset other 6 stations, repeat from step 1 again.
[Turn] = [Press]
Continued on the next page
Page 8
ENGLISH
8
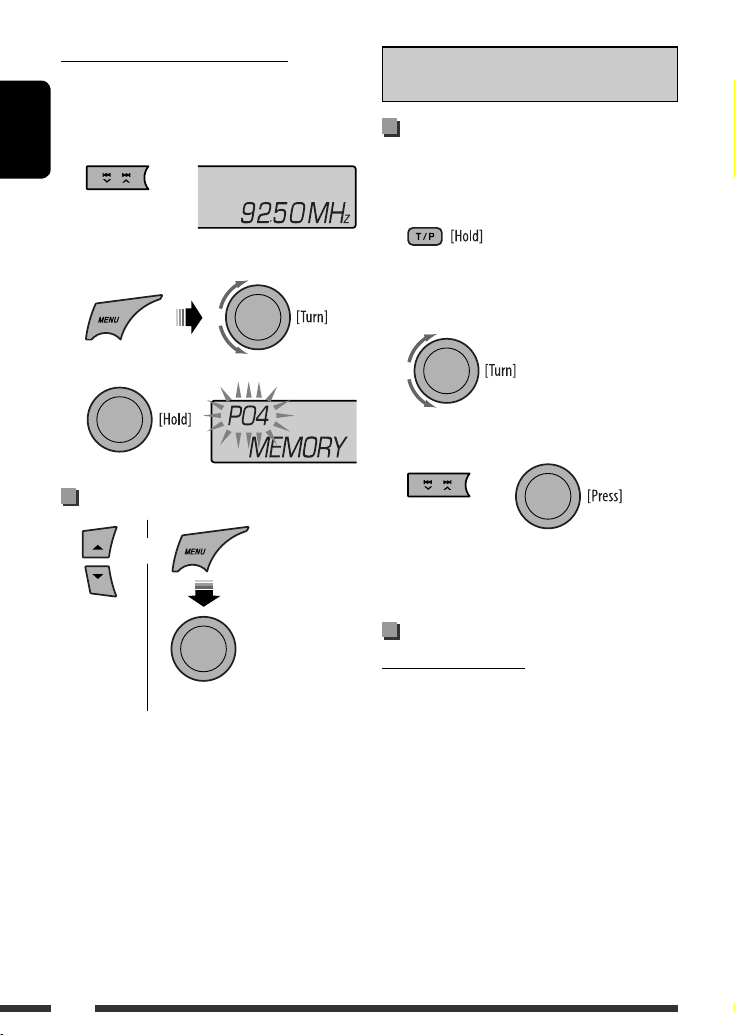
Manual presetting (FM/AM/FM-LO)
You can preset up to 12 stations for FM, 6 stations for
FM-LO, and 6 stations for AM.
Ex.: Storing FM station of 92.50 MHz into preset
number “04.”
1
2 Select preset number “04.”
3
Selecting preset station
or
[Turn] = [Press]
The following features are available only for FM
Radio Data System stations.
Searching for FM Radio Data
System programme—PTY Search
You can tune in to a station broadcasting your favorite
programme by searching for a PTY code.
1 The last selected PTY code
appears.
2 Select one of your favorite programme types
or a PTY code.
3 Start searching for your favorite programme.
or
If a station is broadcasting a programme of the
same PTY code as you have selected, that station is
tuned in.
Using the standby receptions
TA Standby Reception
TA Standby Reception allows the unit to switch
temporarily to Traffic Announcement (TA) from any
source other than AM and FM-LO.
The volume changes to the preset TA volume level if the
current level is lower than the preset level (see
page 16).
Page 9
ENGLISH
9OPERATIONS
To activate TA Standby Reception
The TP (Traffic Programme)
indicator either lights up or flashes.
• If the TP indicator lights up, TA Standby Reception is
activated.
• If the TP indicator flashes, TA Standby Reception is
not yet activated. (This occurs when you are listening
to an FM station without the Radio Data System
signals required for TA Standby Reception.)
To activate the reception, tune in to another station
providing these signals. The TP indicator will stop
flashing and remain lit.
To deactivate the TA Standby Reception
The TP indicator goes off.
PTY Standby Reception
PTY Standby Reception allows the unit to switch
temporarily to your favorite PTY programme from any
source other than AM and FM-LO.
To activate and select your favorite PTY code for
PTY Standby Reception, see page 16.
The PTY indicator either lights up or flashes.
• If the PTY indicator lights up, PTY Standby Reception
is activated.
• If the PTY indicator flashes, PTY Standby Reception is
not yet activated.
To activate the reception, tune in to another station
providing these signals. The PTY indicator will stop
flashing and remain lit.
To deactivate the PTY Standby Reception, select
“PTY OFF” for the PTY code (see page 16). The PTY
indicator goes off.
Tracing the same programme—
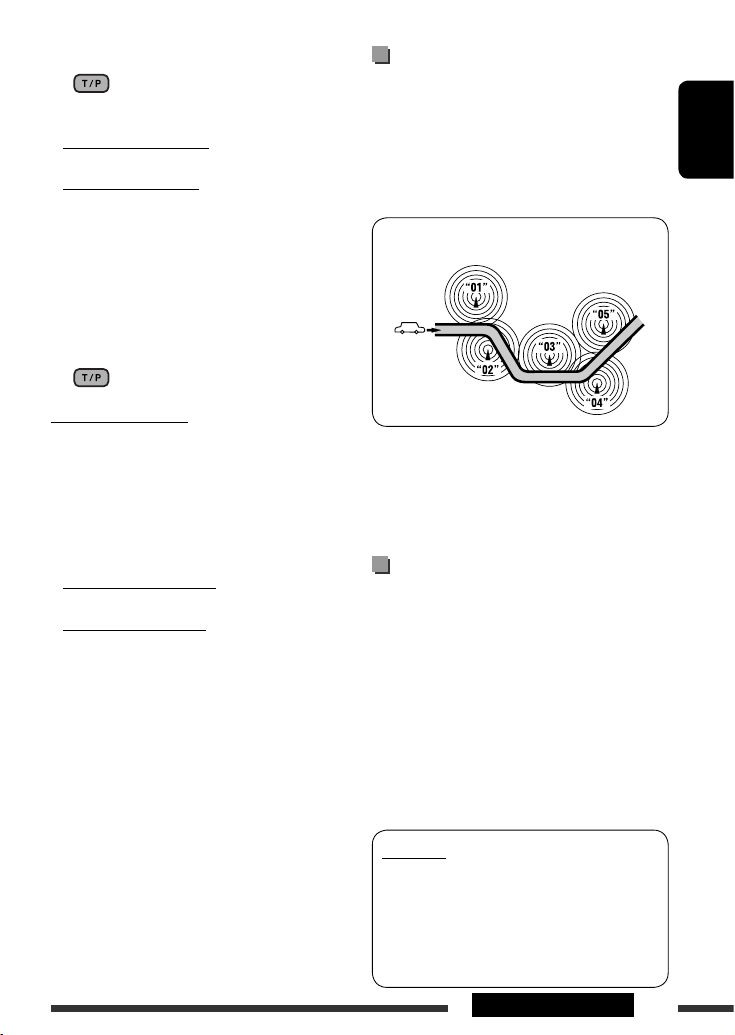
Network-Tracking Reception
When driving in an area where FM reception is not
sufficient enough, this unit automatically tunes in to
another FM Radio Data System station of the same
network, possibly broadcasting the same programme
with stronger signals (see the illustration below).
Programme A broadcasting on different frequency areas
(01 – 05)
When shipped from the factory, Network-Tracking
Reception is activated.
To change the Network-Tracking Reception
setting, see “AF-REG” on page 16.
Automatic station selection—
Programme Search
Usually when you select a preset number, the station
preset in that number is tuned in.
If the signals from the FM Radio Data System preset
station are not sufficient for good reception, this
unit, using the AF data, tunes in to another frequency
possibly broadcasting the same programme as the
original preset station is broadcasting.
• The unit takes some time to tune in to another
station using programme search.
• See also page 16.
PTY codes
NEWS, AFFAIRS, INFO, SPORT, EDUCATE, DRAMA, CULTURE,
SCIENCE, VARIED, POP M (music), ROCK M (music), EASY
M (music), LIGHT M (music), CLASSICS, OTHER M (music),
WEATHER, FINANCE, CHILDREN, SOCIAL, RELIGION, PHONE
IN, TRAVEL, LEISURE, JAZZ, COUNTRY, NATION M (music),
OLDIES, FOLK M (music), DOCUMENT
Page 10
ENGLISH
10
OPERATIONS
Pressing (or holding) the following buttons allows you
to...
MP3/WMA: Select folder
[Press] Select track
[Hold] Reverse/fast-forward track
Disc operations
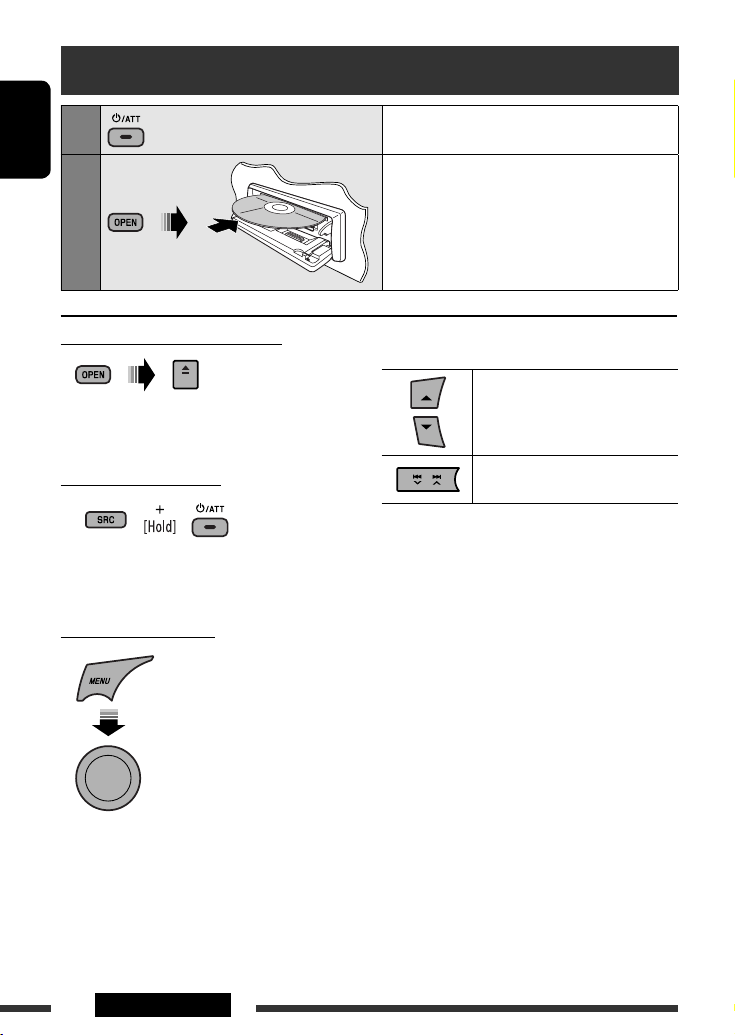
1
Turn on the power.
2
Insert a disc.
All tracks will be played repeatedly until you change
the source or eject the disc.
Stop playing and ejecting the disc
• “NO DISC” appears. Press SRC to listen to another
playback source.
Prohibiting disc ejection
To cancel the prohibition, repeat the same
procedure.
Selecting a track/folder
• For MP3/WMA discs, select the desired folder,
then the desired track by repeating the control dial
procedures.
• To return to the previous menu, press BACK.
[Turn] = [Press]
Page 11
ENGLISH
11
OPERATIONS & EXTERNAL DEVICES
REPEAT
TRACK RPT : Repeats current track
FOLDER RPT : MP3/WMA: Repeats current folder
RANDOM
FOLDER RND : MP3/WMA: Randomly plays all
tracks of current folder, then
tracks of next folders
ALL RND : Randomly plays all tracks
• To cancel repeat play or random play, select
“RPT OFF” or “RND OFF.”
• To return to the previous menu, press BACK.
Selecting the playback modes
You can use only one of the following playback modes
at a time.
1
2
3
[Turn] = [Press]
REPEAT Ô RANDOM
[Turn] = [Press]
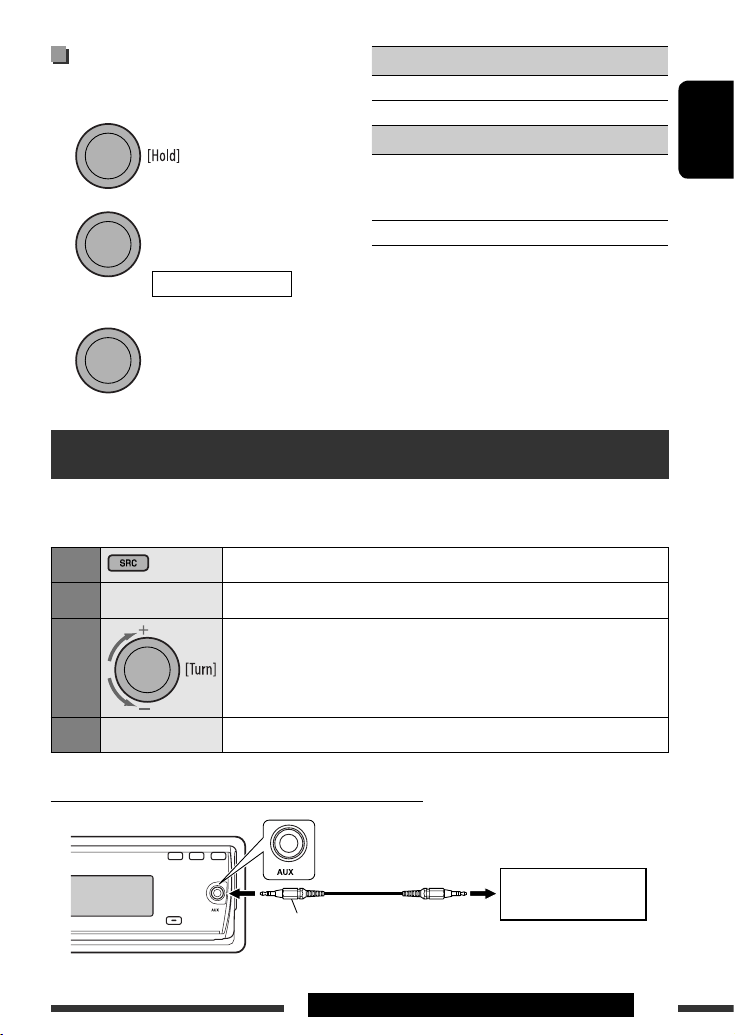
Listening to the other external components
You can connect an external component to AUX (auxiliary) input jack on the control panel.
Preparation: Make sure “AUX ON” is selected in the “SRC SELECT” = “AUX IN” setting, see page 18.
1
Select “AUX IN.”
2
—
Turn on the connected component and start playing the source.
3
Adjust the volume.
4
—
Adjust the sound as you want (see pages 13 and 14).
Connecting an external component to the AUX input jack
3.5 mm stereo mini plug
(not supplied)
Portable audio player, etc.
Page 12
ENGLISH
12
EXTERNAL DEVICES
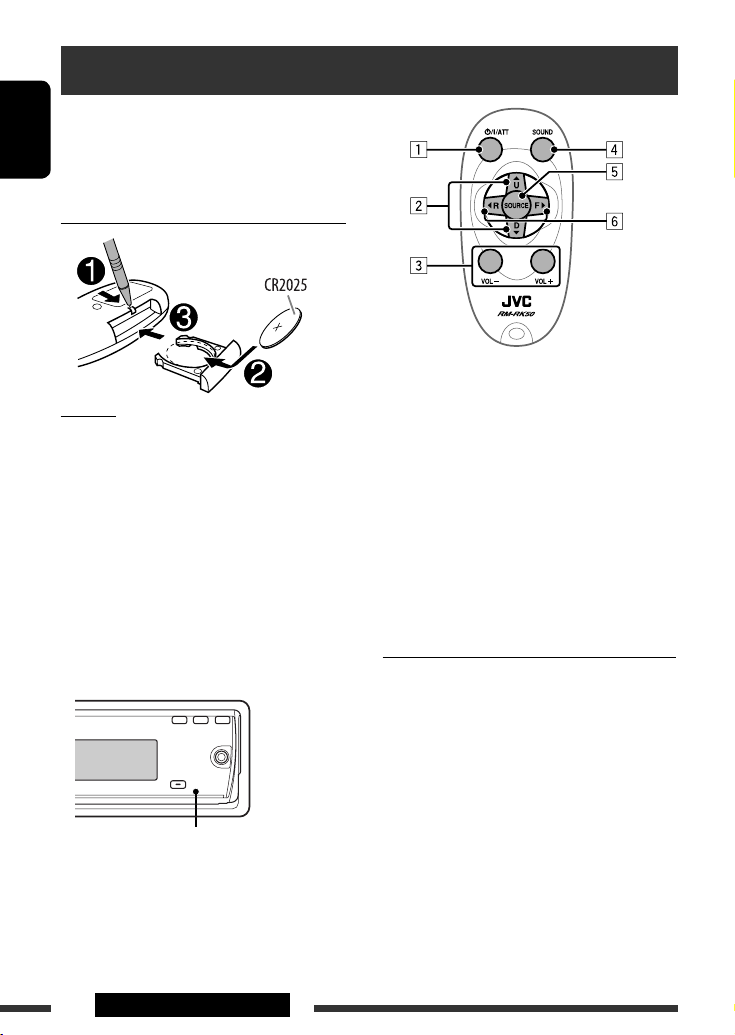
Using the remote controller — RM-RK50
This unit can be remotely controlled as instructed here
(with an optionally purchased remote controller). We
recommend that you use remote controller RM-RK50
with your unit.
Installing the lithium coin battery (CR2025)
Caution:
• Danger of explosion if battery is incorrectly replaced.
Replace only with the same or equivalent type.
• Battery shall not be exposed to excessive heat such as
sunshine, fire, or the like.
If the effectiveness of the remote controller
decreases, replace the battery.
Before using the remote controller:
• Aim the remote controller directly at the remote
sensor on the unit.
• DO NOT expose the remote sensor to bright light
(direct sunlight or artificial lighting).
1 • Turns the power on if pressed briefly or
attenuates the sound when the power is on.
• Turns the power off if pressed and held.
2 • Changes the preset stations.
• Changes the folder of the MP3/WMA.
3 Adjusts the volume level.
4 Selects the sound mode.
5 Selects the source.
6 • Searches for stations if pressed briefly.
• Fast-forwards or reverses the track if pressed and
held.
• Changes the tracks if pressed briefly.
Warning (to prevent accidents and damage):
• Do not install any battery other than CR2025 or its
equivalent.
• Do not leave the remote controller in a place (such
as dashboards) exposed to direct sunlight for a long
time.
• Store the battery in a place where children cannot
reach.
• Do not recharge, short, disassemble, heat the battery,
or dispose of it in a fire.
• Do not leave the battery with other metallic
materials.
• Do not poke the battery with tweezers or similar
tools.
• Wrap the battery with tape and insulate when
throwing away or saving it.
Remote sensor
Page 13
ENGLISH
13
SETTINGS
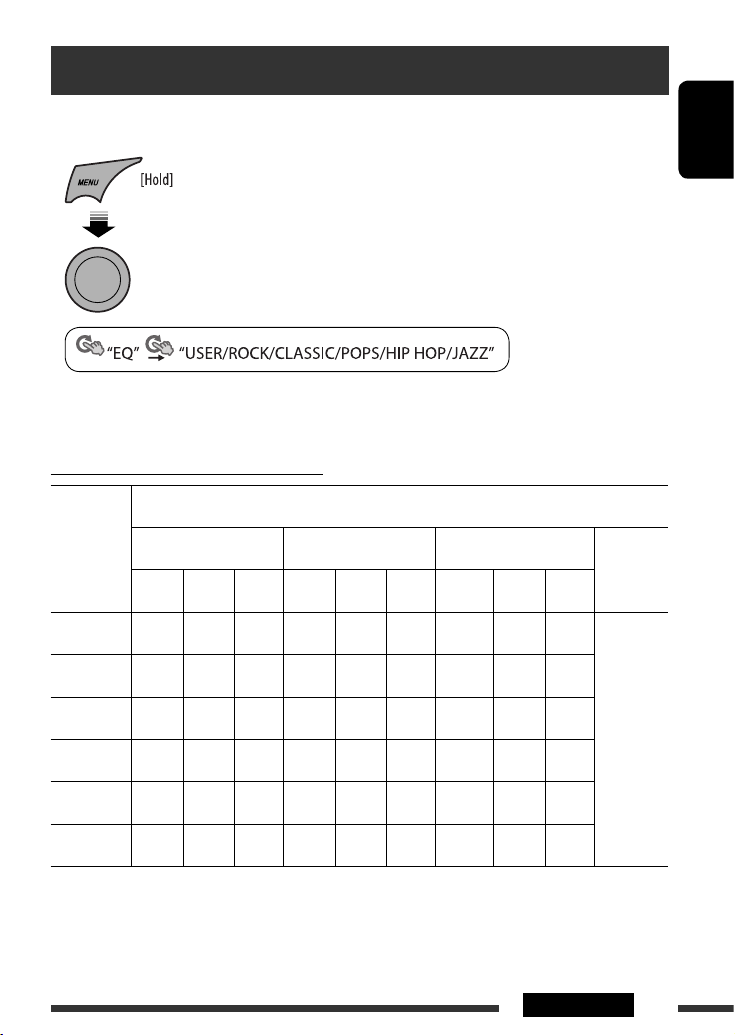
Selecting a preset sound mode
You can select a preset sound mode suitable to the music genre.
• See also page 15.
• See page 14 for “USER” settings.
Preset value setting for each sound mode
Sound
mode
Preset value
BASS MIDDLE TREBLE LOUD
(loudness)
Freq. Level Q Freq. Level Q Freq. Level Q
USER 60 Hz 00 Q1.0 1.0 kHz 00 Q1.0 10.0 kHz 00 Q1.25
OFF
ROCK 100 Hz +03 Q1.0 1.0 kHz 00 Q1.25 10.0 kHz +02 Q1.25
CLASSIC 80 Hz +01 Q1.0 1.0 kHz 00 Q1.25 10.0 kHz +03 Q1.25
POPS 100 Hz +02 Q1.0 1.0 kHz +01 Q1.25 10.0 kHz +02 Q1.25
HIP HOP 60 Hz +04 Q1.0 1.0 kHz –02 Q1.0 10.0 kHz +01 Q1.25
JAZZ 80 Hz +03 Q1.0 1.0 kHz 00 Q1.25 10.0 kHz +03 Q1.25
Freq.: Frequency Q: Q-slope
[Turn] = [Press]
Continued on the next page
Page 14
ENGLISH
14
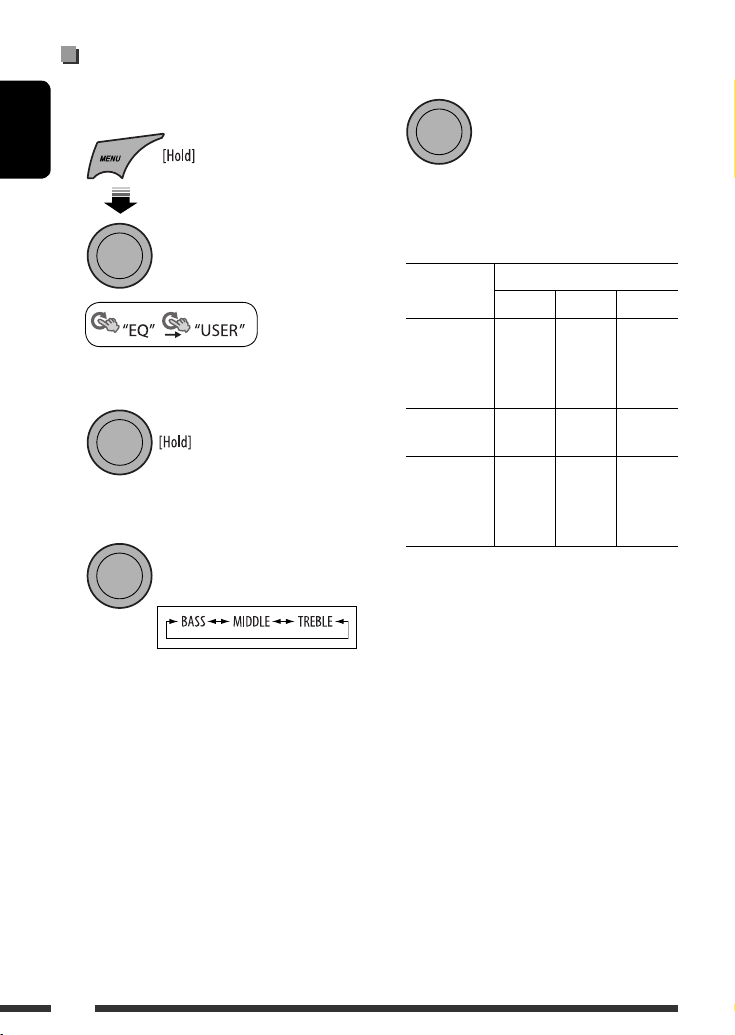
4 Adjust the sound elements of the selected
tone.
1 Adjust the frequency.
2 Adjust the level.
3 Adjust the Q-slope.
Sound
elements
Range/selectable items
BASS MIDDLE TREBLE
Frequency 60 Hz
80 Hz
100 Hz
120 Hz
0.5 kHz
1.0 kHz
1.5 kHz
2.5 kHz
7.5 kHz
10.0 kHz
12.5 kHz
15.0 kHz
Level –06 to
+06
–06 to
+06
–06 to
+06
Q Q0.5
Q1.0
Q1.5
Q2.0
Q0.75
Q1.0
Q1.25
Q1.5
Q0.75
Q1.25
5 Repeat steps 3 and 4 to adjust other sound
characteristics.
The adjustment made will be stored automatically.
Storing your own sound mode
You can store your own adjustments in memory.
1 Select “USER.”
2 While “USER” is shown on the display...
3 Select a tone.
[Turn] = [Press]
[Turn] = [Press]
[Turn] = [Press]
Page 15
ENGLISH
15
SETTINGS
Initial: Underlined
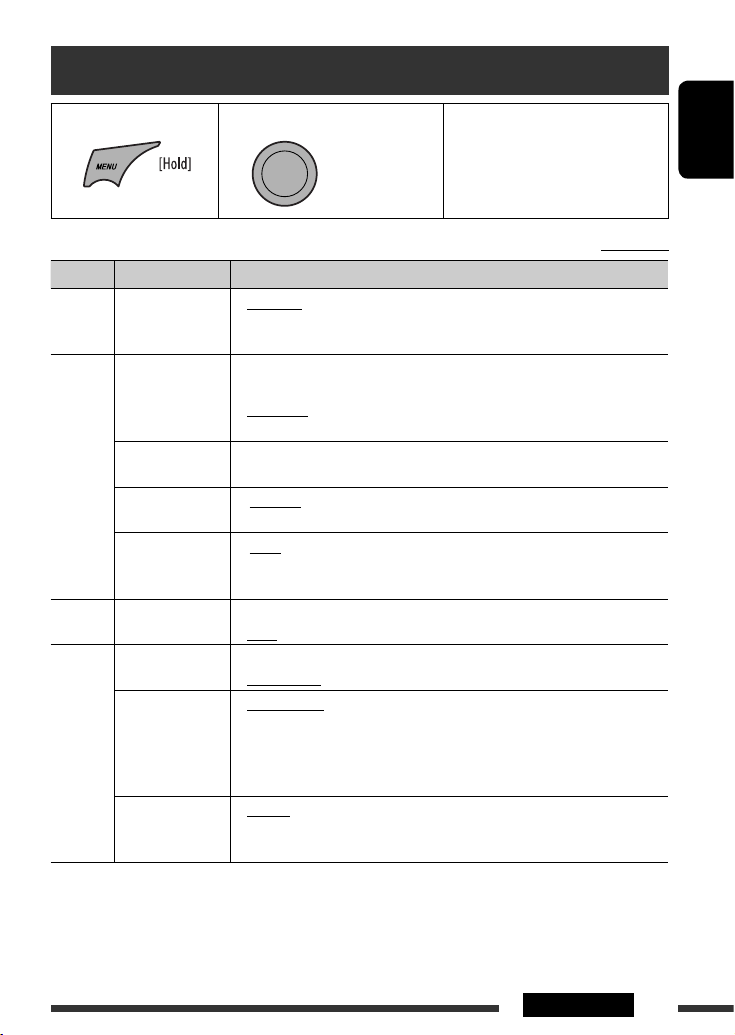
Menu operations
Category Menu items Selectable settings, [reference page]
DEMO
DEMO
Display
demonstration
• DEMO ON
• DEMO OFF
: Display demonstration will be activated automatically if no
operation is done for about 20 seconds, [6].
: Cancels.
CLOCK
CLOCK DISP *
1
Clock display
• CLOCK ON
• CLOCK OFF
: Clock time is shown on the display at all times when the
power is turned off.
: Cancels; pressing DISP will show the clock time for about
5 seconds when the power is turned off, [6].
CLOCK SET
Clock setting
: Adjust the hour, then the minute, [6].
(Initial: 0:00)
24H/12H
Time display mode
• 24 HOUR
• 12 HOUR
: See also page 6 for setting.
CLOCK ADJ *
2
Clock adjustment
• AUTO
• OFF
: The built-in clock is automatically adjusted using the CT
(clock time) data in the Radio Data System signal.
: Cancels.
EQ
EQ
Equalizer
: Select a preset sound mode suitable to the music genre.
USER, ROCK, CLASSIC, POPS, HIP HOP, JAZZ
DISPLAY
DIMMER
Dimmer
• DIMMER ON
• DIMMER OFF
: Dims the display and button illumination.
: Cancels.
SCROLL*
3
Scroll
• SCROLL ONCE
• SCROLL AUTO
• SCROLL OFF
: Scrolls the displayed information once.
: Repeats scrolling (at 5-second intervals).
: Cancels.
Pressing DISP for more than one second can scroll the display regardless of the
setting.
TAG DISPLAY
Tag display
• TAG ON
• TAG OFF
: Shows the Tag information while playing MP3/WMA
tracks.
: Cancels.
*1 If the power supply is not interrupted by turning off the ignition key of your car, it is recommended to select
“CLOCK OFF” to save the car’s battery.
*
2
Takes effect only when CT data is received.
*3 Some characters or symbols will not be shown correctly (or will be blanked) on the display.
1 Call up the menu. 2 Select the desired item. 3 Repeat step 2 if necessary.
• To return to the previous menu,
press BACK.
• To exit from the menu, press
DISP or MENU.
[Turn] = [Press]
Continued on the next page
Page 16
ENGLISH
16
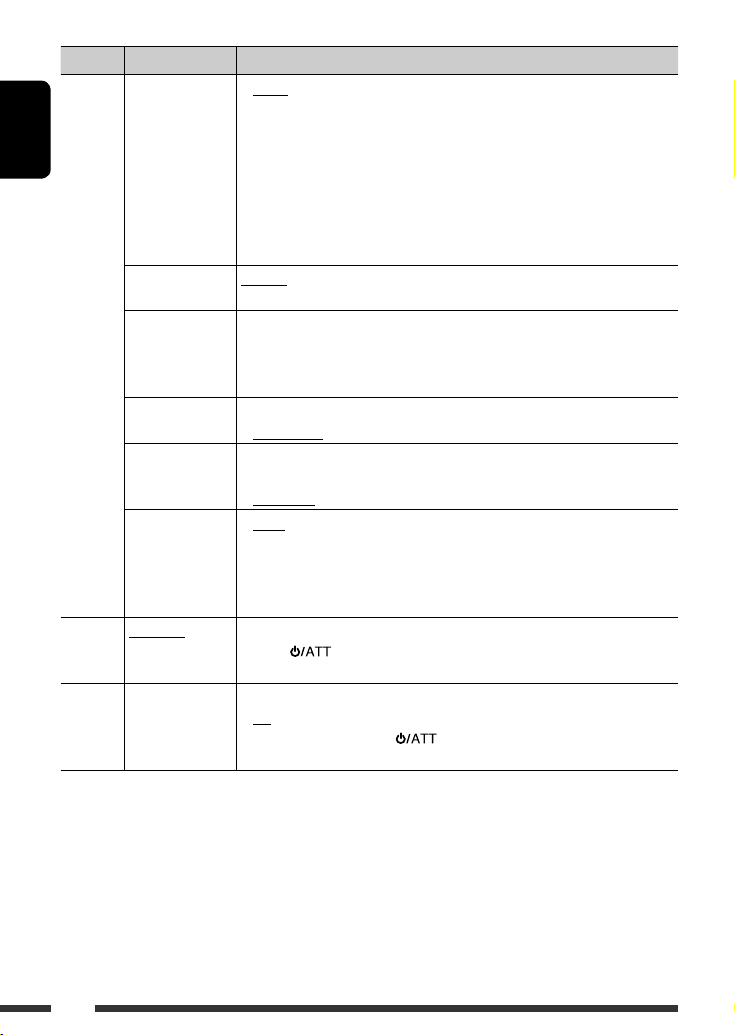
Category Menu items Selectable settings, [reference page]
TUNER
AF-REG *
4
Alternative
frequency/
regionalization
reception
• AF ON
• AF-REG ON
• OFF
: When the currently received signals become weak, the unit
switches to another station (the programme may differ
from the one currently received), [9].
• The AF indicator lights up.
: When the currently received signals become weak, the
unit switches to another station broadcasting the same
programme.
• The AF and REG indicators light up.
: Cancels.
PTY-STANDBY *
4
PTY standby
PTY OFF, PTY
codes
: Activates PTY Standby Reception with one of the PTY
codes, [9].
TA VOLUME *
4
Traffic
announcement
volume
VOLUME 00
– VOLUME 50
(or VOLUME 00
– VOLUME 30)*
5
: (Initial: VOLUME 15)
P-SEARCH *
4
Programme search
• SEARCH ON
• SEARCH OFF
: Activates Programme Search, [9].
: Cancels.
MONO *
6
Monaural mode
• MONO ON
• MONO OFF
: Activate monaural mode to improve FM reception, but
stereo effect will be lost, [7].
: Restore the stereo effect.
IF BAND
Intermediate
frequency band
• AUTO
• WIDE
: Increases the tuner selectivity to reduce interference noises
between adjacent stations. (Stereo effect may be lost.)
: Subject to interference noises from adjacent stations, but
sound quality will not be degraded and the stereo effect
will remain.
COLOR
COLOR 01
– COLOR 29,
USER
: Select one of the preset or user color for display and button (except T/P/DISP/
OPEN/
) illumination.
(For customize color settings, “USER,” see page 18.)
MENU
COLOR
MENU COLOR
Menu color
• OFF
• ON
: Cancels.
: Changes the display and button (except T/P/DISP/
OPEN/
) illumination during menu, list search and
playback mode operations.
*4 Only for FM Radio Data System stations.
*5 Depends on the amplifier gain control.
*6 Displayed only when the source is “FM.”
Page 17

ENGLISH
17
SETTINGS
Continued on the next page
Category Menu items Selectable settings, [reference page]
AUDIO
FADER*7, *
8
Fader
R06 – F06 : Adjust the front and rear speaker output balance.
(Initial: 00)
BALANCE *
8
Balance
L06 – R06 : Adjust the left and right speaker output balance.
(Initial: 00)
LOUD
Loudness
• LOUD OFF
• LOUD ON
: Cancels.
: Boost low and high frequencies to produce a well-balanced
sound at a low volume level.
VOL ADJUST
Volume adjust
VOL ADJ –05
—
VOL ADJ +05
(Initial: VOL
ADJ 00)
: Preset the volume adjustment level of each source (except
FM), compared to the FM volume level. The volume level
will automatically increase or decrease when you change the
source.
• Before making an adjustment, select the source you want to
adjust.
• “VOL ADJ FIX” appears on the display if “FM” is selected as
the source.
L/O MODE
Line output
mode
• SUB.W
• REAR
: Select if the REAR LINE OUT terminals are used for connecting
a subwoofer (through an external amplifier).
: Select if the REAR LINE OUT terminals are used for connecting
the speakers (through an external amplifier).
SUB.W FREQ *
9
Subwoofer
cutoff frequency
• LOW
• MID
• HIGH
: Frequencies lower than 72 Hz are sent to the subwoofer.
: Frequencies lower than 111 Hz are sent to the subwoofer.
: Frequencies lower than 157 Hz are sent to the subwoofer.
SUB.W LEVEL *
9
Subwoofer level
SUB.W 00
— SUB.W 08
: Adjust the subwoofer output level.
(Initial: SUB.W 04)
BEEP
Key touch tone
• BEEP OFF
• BEEP ON
: Deactivates the key touch tone.
: Activates the key touch tone.
TEL MUTING
Telephone
muting
• MUTING 1/
MUTING 2
• MUTING OFF
: Select either one which mutes the sounds while using a
cellular phone.
: Cancels.
AMP GAIN *
10
Amplifier gain
control
• LOW POWER
• HIGH POWER
: VOLUME 00 – VOLUME 30 (Select if the maximum power
of each speaker is less than 50 W to prevent damaging the
speaker.)
: VOLUME 00 – VOLUME 50
*
7
If you are using a two-speaker system, set the fader level to “00.”
*8 This adjustment will not affect the subwoofer output.
*9 Displayed only when “L/O MODE” is set to “SUB.W.”
*10 The volume level automatically changes to “VOLUME 30” if you change to “LOW POWER” with the volume level
set higher than “VOLUME 30.”
Page 18
ENGLISH
18
SETTINGS
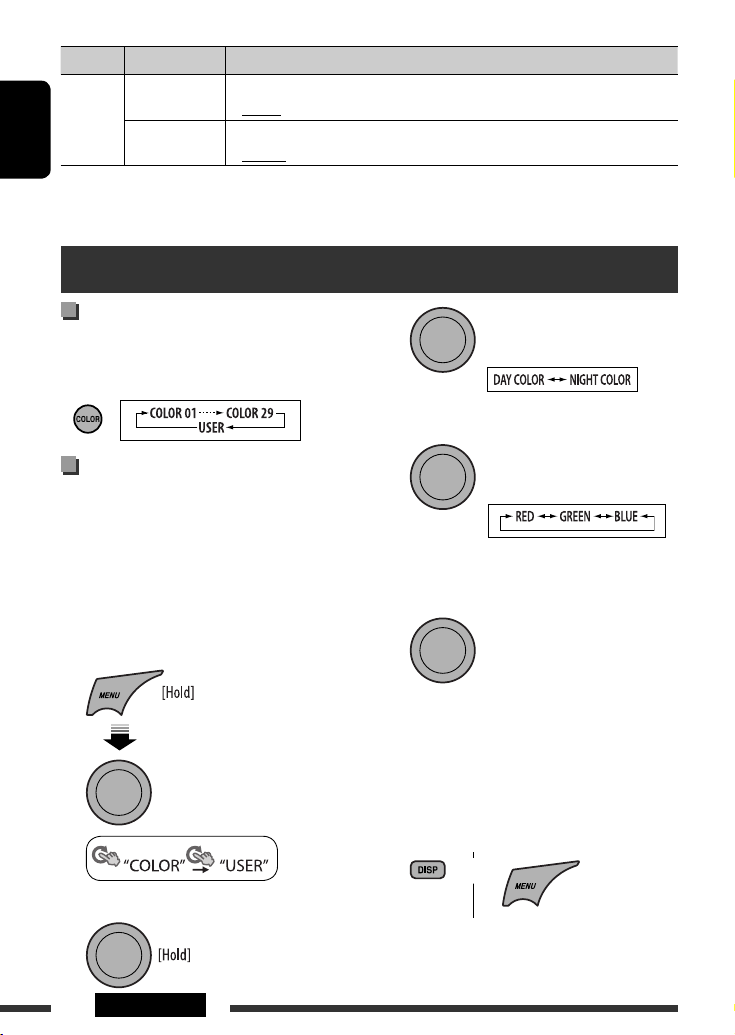
Selecting a preset color
You can select a preset color for the buttons and
display.
• See also page 16.
Creating your own color
—USER Color
You can create your own colors—“DAY COLOR” or
“NIGHT COLOR.”
DAY COLOR: Used when “DIMMER” is set to
“DIMMER OFF.”
NIGHT COLOR: Used when “DIMMER” is set to
“DIMMER ON.”
1 Select “USER.”
2 While “USER” is shown on the display...
3
4 Select a primary color.
5 Adjust the level (00 to 31) of the selected
primary color.
If “00” is selected for all the primary colors, nothing
appear on the display.
6 Repeat steps 4 and 5 to adjust other primary
colors.
7 Exit from the setting.
Select “USER” to show your own colors for the buttons
and display.
[Turn] = [Press]
[Turn] = [Press]
Color settings
Category Menu items Selectable settings, [reference page]
SRC SELECT
AM *
11
AM station
• AM OFF
• AM ON
: Disable “AM” in source selection.
: Enable “AM” in source selection, [4].
AUX IN *
12
Auxiliary input
• AUX OFF
• AUX ON
: Disable “AUX IN” in source selection.
: Enable “AUX IN” in source selection, [4].
*11 Displayed only when any source other than “AM” is selected.
*12 Displayed only when any source other than “AUX IN” is selected.
[Turn] = [Press]
or
[Turn] = [Press]
Page 19

ENGLISH
19
REFERENCES
Basic operations
Turning on the power
• By pressing SRC button on the unit, you can also turn
on the power. If the source is ready, playback also
starts.
Turning off the power
• If you turn off the power while listening to a track,
playback will start from where it had been stopped
previously next time you turn on the power.
General
• If you change the source while listening to a disc,
playback stops.
Next time you select “CD” as the playback source,
playback will start from where it had been stopped
previously.
• After ejecting a disc, “NO DISC” appears and you
cannot operate some of the buttons. Insert another
disc or press SRC to select another playback source.
• If no operation is done for about 30 seconds after
pressing MENU button, the operation will be
canceled.
Tuner operations
Storing stations in memory
• During SSM search...
– All previously stored stations are erased and the
stations are stored anew.
– When SSM is over, the station stored in the lowest
preset number will be automatically tuned in.
• When storing a station manually, the previously
preset station is erased when a new station is stored
in the same preset number.
FM Radio Data System operations
• Network-Tracking Reception requires two types
of Radio Data System signals—PI (Programme
Identification) and AF (Alternative Frequency)
to work correctly. Without receiving these data
correctly, Network-Tracking Reception will not
operate correctly.
• If a Traffic Announcement is received by TA Standby
Reception, the volume level automatically changes to
the preset level (TA VOL) if the current level is lower
than the preset level.
• When Alternative Frequency Reception is activated
(with AF selected), Network-Tracking Reception is
also activated automatically.
Disc operations
Caution for DualDisc playback
• The Non-DVD side of a “DualDisc” does not comply
with the “Compact Disc Digital Audio” standard.
Therefore, the use of Non-DVD side of a DualDisc on
this product may not be recommended.
General
• This unit has been designed to reproduce
CDs/CD Texts, and CD-Rs (Recordable)/CD-RWs
(Rewritable) in audio CD (CD-DA), MP3/WMA
formats.
• When a disc is inserted upside down, “PLEASE” and
“EJECT” appear alternately on the display. Press
OPEN, then 0 to eject the disc.
• MP3 and WMA “tracks” (words “file” and “track” are
used interchangeably) are recorded in “folders.”
• While fast-forwarding or reversing on an MP3 or
WMA disc, you can only hear intermittent sounds.
More about this unit
Continued on the next page
Page 20

ENGLISH
20
– Disc format: ISO 9660 Level 1/Level 2, Romeo,
Joliet, Windows long file name.
• The maximum number of characters for file/folder
names vary depending on the disc format used
(includes 4 extension characters—<.mp3> or
<.wma>).
– ISO 9660 Level 1: up to 12 characters
– ISO 9660 Level 2: up to 31 characters
– Romeo: up to 128 characters
– Joliet: up to 64 characters
– Windows long file name: up to 128 characters
• This unit can recognize a total of 512 files,
255 folders, and 8 hierarchical levels.
• This unit can play back files recorded in VBR (variable
bit rate).
Files recorded in VBR have a discrepancy in the
elapsed time display, and do not show the actual
elapsed time. In particular, this difference becomes
noticeable after performing the search function.
• This unit cannot play back the following files:
– MP3 files encoded in MP3i and MP3 PRO format.
– MP3 files encoded in an inappropriate format.
– MP3 files encoded with Layer 1/2.
– WMA files encoded in lossless, professional, and
voice format.
– WMA files which are not based upon Windows
Media ® Audio.
– WMA files copy-protected with DRM.
– Files which have data such as AIFF, ATRAC3, etc.
• The search function works but search speed is not
constant.
Ejecting a disc
• If the ejected disc is not removed within 15 seconds,
it is automatically inserted into the loading slot again
to protect it from dust. Playback starts automatically.
Menu operations
• If you change the “AMP GAIN” setting from
“HIGH POWER” to “LOW POWER” while
the volume level is set higher than “VOLUME 30,”
the unit automatically changes the volume level to
“VOLUME 30.”
Playing a CD-R or CD-RW
• Use only “finalized” CD-Rs or CD-RWs.
• This unit can only play back files of the same type as
those detected first if a disc includes both audio CD
(CD-DA) files and MP3/WMA files.
• This unit can play back multi-session discs; however,
unclosed sessions will be skipped while playing.
• Some CD-Rs or CD-RWs may not play back on this
unit because of their disc characteristics, or for the
following reasons:
– Discs are dirty or scratched.
– Moisture condensation has occurred on the lens
inside the unit.
– The pickup lens inside the unit is dirty.
– The files on the CD-R/CD-RW are written using the
“Packet Write” method.
– There are improper recording conditions (missing
data, etc.) or media conditions (stained, scratched,
warped, etc.).
• CD-RWs may require a longer readout time since the
reflectance of CD-RWs is lower than that of regular
CDs.
• Do not use the following CD-Rs or CD-RWs:
– Discs with stickers, labels, or a protective seal stuck
to the surface.
– Discs on which labels can be directly printed by an
ink jet printer.
Using these discs under high temperature or high
humidity may cause malfunctions or damage to the
unit.
Playing an MP3/WMA disc
• This unit can play back MP3/WMA files with the
extension code <.mp3> or <.wma> (regardless of
the letter case—upper/lower).
• This unit can show the names of albums, artists
(performer), and Tag (Version 1.0, 1.1, 2.2, 2.3, or
2.4) for MP3 files and for WMA files.
• This unit can play back MP3/WMA files meeting the
conditions below:
– Bit rate: 8 kbps — 320 kbps
– Sampling frequency:
48 kHz, 44.1 kHz, 32 kHz (for MPEG-1)
24 kHz, 22.05 kHz, 16 kHz (for MPEG-2)
Page 21

ENGLISH
21
REFERENCES
Troubleshooting
What appears to be trouble is not always serious. Check the following points before calling a service center.
Symptoms Remedies/Causes
General
• Sound cannot be heard from the speakers. • Adjust the volume to the optimum level.
• Check the cords and connections.
• The unit does not work at all. Reset the unit (see page 3).
• “AUX IN” cannot be selected. Check the “SRC SELECT” = “AUX IN” setting (see
page 18).
• Nothing appear on the display. Check the USER color settings (see page 18).
FM/AM
• SSM automatic presetting does not work. Store stations manually.
• Static noise while listening to the radio. Connect the aerial firmly.
• “AM” cannot be selected. Check the “SRC SELECT” = “AM” setting (see
page 18).
Discs in general
• Disc cannot be played back. Insert the disc correctly.
• CD-R/CD-RW cannot be played back.
• Tracks on the CD-R/CD-RW cannot be
skipped.
• Insert a finalized CD-R/CD-RW.
• Finalize the CD-R/CD-RW with the component which
you used for recording.
• Disc can neither be played back nor ejected. • Unlock the disc (see page 10).
• Eject the disc forcibly (see page 3).
• Disc sound is sometimes interrupted. • Stop playback while driving on rough roads.
• Change the disc.
• Check the cords and connections.
• “NO DISC” appears on the display. Insert a playable disc into the loading slot.
• “PLEASE” and “EJECT“ appear alternately
on the display.
Press OPEN, then 0 to eject the disc, then insert a disc
correctly.
Continued on the next page
Page 22

ENGLISH
22
Symptoms Remedies/Causes
MP3/WMA playback
• Disc cannot be played back. • Use a disc with MP3/WMA tracks recorded in a format
compliant with ISO 9660 Level 1, Level 2, Romeo, or
Joliet.
• Add the extension code <.mp3> or <.wma> to the
file names.
• Noise is generated. Skip to another track or change the disc. (Do not add the
extension code <.mp3> or <.wma> to non-MP3 or
WMA tracks.)
• A longer readout time is required
(“READING” keeps flashing on the display).
Do not use too many hierarchical levels and folders.
• Tracks do not play back in the order you
have intended them to play.
The playback order is determined when the files are
recorded.
• The elapsed playing time is not correct. This sometimes occurs during playback. This is caused by
how the tracks are recorded on the disc.
• “NO FILE” appears on the display. Selected folder is an empty folder*. Select another folder
that contains MP3/WMA tracks.
* Folder that is physically empty or folder that contains
data but does not contain valid MP3/WMA track.
• The correct characters are not displayed
(e.g. album name).
This unit can only display Roman alphabets (upper case),
Cyrillic alphabets (upper case), numbers, and a limited
number of symbols (see page 2).
• Microsoft and Windows Media are either registered trademarks or trademarks of Microsoft Corporation in the
United States and/or other countries.
Page 23

ENGLISH
23REFERENCES
How to clean the connectors
Frequent detachment will deteriorate the connectors.
To minimize this possibility, periodically wipe the
connectors with a cotton swab or cloth moistened with
alcohol, being careful not to damage the connectors.
Moisture condensation
Moisture may condense on the lens inside the unit in
the following cases:
• After starting the heater in the car.
• If it becomes very humid inside the car.
Should this occur, the unit may malfunction. In this
case, eject the disc and leave the unit turned on for a
few hours until the moisture has evaporated.
How to handle discs
When removing a disc from its
case, press down the center holder
of the case and lift the disc out,
holding it by the edges.
• Always hold the disc by the edges. Do not touch its
recording surface.
When storing a disc in its case, gently insert the
disc around the center holder (with the printed surface
facing up).
• Make sure to store discs in cases after use.
Connectors
Center holder
To keep discs clean
A dirty disc may not play correctly.
If a disc does become dirty, wipe it with
a soft cloth in a straight line from center
to edge.
• Do not use any solvents (for example, conventional
record cleaner, spray, thinner, benzine, etc.) to clean
discs.
To play new discs
New discs may have some rough spots
around the inner and outer edges. If
such a disc is used, this unit may reject
the disc.
To remove these rough spots, rub the edges with a
pencil or ball-point pen, etc.
Do not use the following discs:
Single CD (8 cm disc) Warped disc
Sticker and sticker residue Stick-on label
Unusual shape
C-thru Disc (semi-
transparent disc)
Transparent or semi-
transparent parts on its
recording area
Maintenance
Page 24

ENGLISH
24
AUDIO AMPLIFIER SECTION
Maximum Power Output: Front/Rear: 50 W per channel
Continuous Power Output (RMS): Front/Rear: 19 W per channel into 4 Ω, 40 Hz to 20 000 Hz
at no more than 0.8% total harmonic
distortion.
Load Impedance: 4 Ω (4 Ω to 8 Ω allowance)
Tone Control Range: Bass: ±12 dB (60 Hz, 80 Hz, 100 Hz, 120 Hz)
Q0.5, Q1.0, Q1.5, Q2.0
Middle: ±12 dB (0.5 kHz, 1.0 kHz, 1.5 kHz, 2.5 kHz)
Q0.75, Q1.0, Q1.25, Q1.5
Treble: ±12 dB (7.5 kHz, 10.0 kHz, 12.5 kHz,
15.0 kHz)
Q0.75, Q1.25
Frequency Response: 40 Hz to 20 000 Hz
Signal-to-Noise Ratio: 70 dB
Line-Out Level/Impedance: 2.5 V/20 kΩ load (full scale)
Output Impedance: 1 kΩ
Subwoofer-Out Level/Impedance: 2.5 V/20 kΩ load (full scale)
Other Terminal: AUX (auxiliary) input jack
TUNER SECTION
Frequency Range: FM: 87.5 MHz to 108.0 MHz
FM-LO: 65.00 MHz to 74.00 MHZ
AM: MW: 522 kHz to 1 620 kHz
LW: 144 kHz to 279 kHz
FM Tuner Usable Sensitivity: 9.3 dBf (0.8 μV/75 Ω)
50 dB Quieting Sensitivity: 16.3 dBf (1.8 μV/75 Ω)
Alternate Channel Selectivity (400 kHz): 65 dB
Frequency Response: 40 Hz to 15 000 Hz
Stereo Separation: 40 dB
MW Tuner Sensitivity: 20 μV
Selectivity: 40 dB
LW Tuner Sensitivity: 50 μV
Specifications
Page 25

ENGLISH
25REFERENCES
CD PLAYER SECTION
Type: Compact disc player
Signal Detection System: Non-contact optical pickup
(semiconductor laser)
Number of Channels: 2 channels (stereo)
Frequency Response: 5 Hz to 20 000 Hz
Dynamic Range: 96 dB
Signal-to-Noise Ratio: 98 dB
Wow and Flutter: Less than measurable limit
MP3 Decoding Format: (MPEG1/2 Audio Layer 3) Max. Bit Rate: 320 kbps
WMA (Windows Media® Audio) Decoding Format: Max. Bit Rate: 320 kbps
GENERAL
Power Requirement: Operating Voltage: DC 14.4 V (11 V to 16 V allowance)
Grounding System: Negative ground
Allowable Operating Temperature: 0°C to +40°C
Dimensions (W × H × D): (approx.) Installation Size: 182 mm × 52 mm × 160 mm
Panel Size: 188 mm × 58 mm × 12 mm
Mass:
1.3 kg (excluding accessories)
Design and specifications are subject to change without notice.
Page 26

РУCCKИЙ
2
Благодарим Вас за приобретение изделия JVC.
Перед тем, как приступать к эксплуатации, пожалуйста, внимательно прочитайте все инструкции с тем,
чтобы полностью изучить и обеспечить оптимальную работу этого устройства.
ВАЖНО ДЛЯ ЛАЗЕРНОЙ АППАРАТУРЫ
1. ЛАЗЕРНАЯ АППАРАТУРА КЛАССА 1
2. ПРЕДУПРЕЖДЕНИЕ: Не открывайте верхнюю крышку. Внутри устройства нет частей, которые
пользователь может отремонтировать. Ремонт должен осуществляться
квалифицированным обслуживающим персоналом.
3. ПРЕДУПРЕЖДЕНИЕ: В открытом состоянии происходит видимое и/или невидимое излучение лазера
класса 1M. Не смотрите непосредственно в оптические инструменты.
4. ЭТИКЕТКА: ПРЕДУПРЕЖДАЮЩАЯ ЭТИКЕТКА, РАЗМЕЩЕННАЯ НА НАРУЖНОЙ СТОРОНЕ УСТРОЙСТВА.
[только Европейсий Союз]
Предупреждение:
Если данное устройство используется во время
поездки на автомобиле, следует, не отвлекаясь,
следить за дорогой, иначе может произойти
дорожно-транспортное происшествие.
Предостережение, касающееся настройки
громкости:
По сравнению с другими источниками звука
диски создают незначительный шум. Уменьшите
громкость перед воспроизведением диска, чтобы
предотвратить повреждение динамиков из-за
внезапного повышения уровня громкости на выходе.
Для Вашей безопасности...
• Не повышайте слишком сильно громкость,
поскольку в результате этого заглушаются
внешние звуки, что делает опасным управление
автомобилем.
• Остановите автомобиль перед тем, как выполнять
любые сложные операции.
Температура внутри автомобиля...
Если Вы припарковали Ваш автомобиль на
длительное время в жаркую или холодную погоду,
перед тем, как включать это устройство, подождите
до тех пор, пока температура в автомобиле не
придет в норму.
Доступные символы дисплея
Допустимые символы
Отображение индикаторов
Page 27

РУCCKИЙ
3
Как перенастроить Ваше устройство
• Запрограммированные настройки будут также
удалены.
Принудительное извлечение диска
• На дисплее поочередно появляются надписи
“PLEASE” и “EJECT”.
• Можно принудительно извлечь загруженный
диск, даже если он заблокирован. Сведения о
блокировке/разблокировке диска см. на стр. 10.
• Будьте осторожны, не уроните диск при
извлечении.
• Если это не поможет, попробуйте
перенастроить приемник.
CОДЕРЖАНИЕ
Отсоединение панели управления ............ 3
Подключение панели управления ............ 3
Как перенастроить Ваше устройство ........ 3
Принудительное извлечение диска .......... 3
ОПЕРАЦИИ
Основные операции ................................... 4
Подготовка ................................................. 6
Прослушивание радио ............................... 7
Операции с дисками .................................. 10
ВНЕШНИЕ УСТРОЙСТВА
Прослушивание с других внешних
устройств ................................................. 11
Использование пульта дистанционного
управления—
RM-RK50 ........................... 12
НАСТРОЙКИ
Выбор запрограммированного режима
звучания .................................................. 13
Операции с меню ....................................... 15
Настройки цветов ...................................... 18
СПРАВОЧНАЯ ИНФОРМАЦИЯ
Дополнительная информация о
приемнике .............................................. 19
Устранение проблем .................................. 21
Обслуживание ............................................ 23
Технические характеристики .................... 24
Отсоединение панели управления
Подключение панели управления
Данный знак используется для
указания...
Чтобы сделать выбор, поверните
ручку управления, после чего
нажмите на нее для
подтверждения выбора.
Не прикасайтесь к разъемам.
Page 28

РУCCKИЙ
4
Основные операции
q Выбор цвета подсветки дисплея и кнопок.
w • Включение питания.
• Ослабление звука (при включенном питании).
• Выключение питания [Удерживать].
e Телеметрический датчик
• Управлять этим устройством можно с
помощью дополнительно приобретенного
пульта дистанционного управления. Более
подробную информацию см. на стр. 12.
r Дополнительный входной разъем AUX
*1 Известен также как “Диск управления” в данном
руководстве.
*2 Выбрать “CD” в качестве источника
воспроизведения нельзя, если диск в устройстве
отсутствует.
*3 Если эти источники были запрещены в меню, их
невозможно выбрать (см. раздел
“SRC SELECT” в “Операции с меню” на стр.
18).
1 • FM/AM/FM-LO: Выбор запрограммированной
радиостанции.
• CD: Выберите папку.
2 Выбор источников.
FM = CD *2 = AUX IN *3 = AM *3 = FM-LO
= (возврат в начало)
3 • Ввод списка.
• Переход к настройке меню [Удерживать] .
4 • Регулировка громкости или выбор элементов
списка [Смена].
• Подтвердите выбор [Нажмите] .
• FM/FM-LO: Переход в запрограммированный
режим SSM [Удерживать] .
• CD: Введите режим воспроизведения
[Удерживать].
5 Окно дисплея
6 • Включение или выключение функции
резервного приема TA.
• Переход в режим поиска PTY [Удерживать].
7 Изменение отображаемой информации.
8 Откидывание панели управления.
• Для извлечения диска откиньте панель
управления и нажмите 0 на устройстве.
9 • FM/AM/FM-LO: Поиск радиостанции.
• CD: Выберите дорожку.
p Возврат к предыдущему меню.
Page 29

РУCCKИЙ
5ОПЕРАЦИИ
Окно дисплея
1 Индикатор Tr (дорожка)
2 Исходный дисплей / номер дорожки / номер
папки / индикатор таймера обратного отсчета /
информация о настройке и операциях списка
3 Индикатор TAG (информация тегов)
4 Режим воспроизведения / индикаторы
элементов—RND (произвольное
воспроизведение),
(диск), (папка),
RPT (повторное воспроизведение)
5 Индикатор ST (стерео)
6 Индикатор LOUD (громкость)
7 Индикаторы Radio Data System—AF, REG, TP,
PTY
8 Индикатор положения иерархии меню -
(низ), (верх), (центр)
9 Основной дисплей
p Индикаторы информации диска—
(дорожка/файл), (папка)
Page 30

РУCCKИЙ
6
Подготовка
Отмена демонстрации функций дисплея и настройка часов
• См. также стр. 15.
1
Включение питания.
2
[Смена] = [Нажмите]
Отмена демонстрации функций дисплея
Выберите “DEMO”, затем “DEMO OFF”.
Настройка часов
Выберите “CLOCK” = “CLOCK SET”.
Настройте час, затем нажмите один раз диск управления
для настройки минут.
Выберите “24H/12H”, затем “24 HOUR” или
“12 HOUR”.
• Для возврата в предыдущее меню нажмите BACK.
Изменение информации на дисплее
Если питание выключено: Текущее время отображается, если для настройки “CLOCK DISP”
установлено значение “CLOCK OFF” (см. стр. 15).
Если питание включено: Отображаемая информация текущего источника изменяется следующим
образом:
FM/AM/FM-LO Частота радиостанции = Часы = (возврат в начало)
FM Radio Data
System
Название радиостанции (PS) = Частота радиостанции = Тип программы (PTY) =
Часы = (возврат в начало)
CD Звуковой компакт-диск/CD-текст: Название диска/исполнитель *1 = Название
дорожки *1 = Номер текущей дорожки и истекшее
время воспроизведения = Номер текущей дорожки
и часы = (возврат в начало)
Для диска MP3/WMA: Название альбома/исполнитель (имя папки) *2 =
Название дорожки (имя файла) *2 = Номер текущей
дорожки и истекшее время воспроизведения =
Номер текущей дорожки и часы = (возврат в
начало)
*1 Если текущим диском является звуковой компакт-диском, появляется надпись “NO NAME”.
*2 Если файл MP3/WMA не содержит информации тегов или для настройки “TAG DISPLAY”
установлено значение “TAG OFF” (см. стр. 15), появятся имя папки и файла.
Нажать и удерживать
до тех пор, пока не
появится главное меню.
• Повторить эту
процедуру.
Page 31

РУCCKИЙ
7ОПЕРАЦИИ
Прослушивание радио
1
Bыберите “FM”, “AM” или “FM-LO”.
2
Поиск радиостанции—автоматический поиск.
При достижении настройки на радиостанцию поиск прекращается. Чтобы
остановить поиск, нажмите эту же кнопку еще раз.
• Также имеется возможность ручного поиска радиостанции—“Manual Search”
(Ручной поиск). Удерживайте нажатой одну из кнопок, пока на дисплее не
замигает индикатор “M”, а затем неоднократно нажмите кнопку.
• При приеме стереовещания в диапазоне FM с достаточным уровнем сигнала
на экране дисплея загорается индикатор “ST”.
Пpимечaние.
FM: От 87,5 МГц до 108,0 МГц
FM-LO: От 65,00 МГц до 74,00 МГц
Улучшение приема FM
При слабом стереофоническом радиовещании FM
активируйте монофонический режим для лучшего
приема.
• Не применимо, если источником является
“FM-LO”.
• См. также стр. 16.
Прием улучшается, но стереоэффект будет потерян.
Для восстановления стереоэффекта повторите
те же действия и выберите “MONO OFF”.
Сохранение радиостанций
Автоматическое программирование (FM/
FM-LO) — SSM (Strong-station Sequential
Memory — последовательная память для
радиостанций с устойчивым сигналом)
Имеется возможность запрограммировать до 12
станций в диапазоне FM и 6 станций в диапазоне FM-LO.
1 При прослушивании радиостанции...
2 Выберите диапазон номеров, в котором
хотите сохранить радиостанцию.
FM:
SSM 01–06, SSM 07–12
FM-LO:
SSM 01–06
3
Автоматически выполняется поиск и сохранение
местных FM-радиостанций с наиболее сильными
сигналами.
• Чтобы остановить поиск, нажмите 4
/
¢
.
Для сохранения других 6 радиостанций
повторите действие 1.
[Смена] = [Нажмите]
Продолжение не следующей странице
Page 32

РУCCKИЙ
8
Программирование вручную (FM/AM/FM-LO)
Имеется возможность запрограммировать до 12
станций в диапазоне FM, 6 станций в диапазоне
FM-LO и 6 станций в диапазоне AM.
Пример: Сохранение FM-радиостанции на частоте
92,50 МГц с номером “04”.
1
2 Выбор запрограммированного номера
“04”.
3
Выбор запрограммированной
радиостанции
или
[Смена] = [Нажмите]
Следующие функции доступны только при
прослушивании радиостанций FM Radio Data
System.
Поиск программы FM Radio Data
System—поиск PTY
Посредством поиска кода PTY можно настроиться
на радиостанцию, передающую Вашу любимую
программу.
1 Появляется последний
выбранный код PTY.
2 Выберите один из предпочитаемых типов
программ или укажите код PTY.
3 Запустите поиск любимой программы.
или
Если радиостанция передает в эфир программу
того же кода PTY, что был Вами выбран,
осуществляется настройка на эту радиостанцию.
Использование функции
резервного приема
Резервный прием TA
Резервный прием TA позволяет временно
переключаться на передачу сообщений о движении
на дорогах (TA) с любого источника, кроме
радиостанции AM и FM-LO.
Громкость устанавливается на
запрограммированный уровень TA, если текущий
уровень ниже запрограммированного (см.
стр. 16).
Page 33

РУCCKИЙ
9ОПЕРАЦИИ
Включение функции резервного приема TA
Индикатор TP (программа о
движении на дорогах) либо
загорается, либо мигает.
• Если индикатор TP загорается, функция
резервного приема TA включена.
• Если индикатор TP мигает, функция резервного
приема TA еще не включена. (Это происходит при
прослушивании FM-радиостанции без Radio Data
System-сигналов, необходимых для резервного
приема TA).
Для включения функции приема настройтесь
на другую радиостанцию, обеспечивающую
соответствующие сигналы. Индикатор TP
прекратит мигать и будет гореть.
Отключение функции резервного приема TA
Индикатор TP гаснет.
Резервный прием PTY
Резервный прием PTY позволяет приемнику
временно переключаться на любимую программу
PTY с любого источника, кроме радиостанции AM и
FM-LO.
Информацию об активации и выборе
предпочитаемого кода PTY для функции
резервного приема PTY см. на стр. 16.
Индикатор PTY либо загорается, либо мигает.
• Если индикатор PTY загорается, функция
резервного приема PTY включена.
• Если индикатор PTY мигает, функция резервного
приема PTY еще не включена.
Для включения функции приема настройтесь
на другую радиостанцию, обеспечивающую
соответствующие сигналы. Индикатор PTY
прекратит мигать и будет гореть.
Для отключения резервного приема PTY
выберите “PTY OFF” для кода PTY (см. стр. 16).
Индикатор PTY гаснет.
Отслеживание той же программы
(сеть-отслеживающий прием)
При поездке по региону, где невозможен качественный
прием в диапазоне FM, данный приемник
автоматически настраивается на другую радиостанцию
FM Radio Data System в той же сети, которая может
передавать в эфир ту же программу с помощью более
сильных сигналов (см. иллюстрацию ниже).
Радиовещание программы А в других диапазонах
частот (01 – 05)
В настройках, установленных на заводеизготовителе, сеть-отслеживающий прием включен.
Для получения информации об изменении
параметров сеть-отслеживающего приема см.
“AF-REG” на стр. 16.
Автоматический выбор
радиостанции—поиск программы
Обычно при выборе запрограммированного
номера устройство настраивает радиостанцию,
соответствующую этому номеру.
Если уровень сигналов от запрограммированной
радиостанции FM Radio Data System (системы
передачи цифровой информации) является
недостаточным для качественного приема, данное
устройство с помощью данных AF настраивается
на другую частоту, по которой может передаваться
та же программа, что передает первоначальная
запрограммированная радиостанция.
• Настройка устройства на другую радиостанцию с
помощью поиска программы занимает некоторое
время.
• См. также стр. 16.
Коды PTY
NEWS, AFFAIRS, INFO, SPORT, EDUCATE, DRAMA, CULTURE,
SCIENCE, VARIED, POP M (музыка), ROCK M (музыка),
EASY M (музыка), LIGHT M (музыка), CLASSICS, OTHER M
(музыка), WEATHER, FINANCE, CHILDREN, SOCIAL, RELIGION,
PHONE IN, TRAVEL, LEISURE, JAZZ, COUNTRY, NATION M
(музыка), OLDIES, FOLK M (музыка), DOCUMENT
Page 34

10
ОПЕРАЦИИ
РУCCKИЙ
Нажатие (или удерживание нажатыми) следующих
кнопок позволяет выполнять следующие
операции...
Для диска MP3/WMA: Выберите
папку
[Нажмите] Выберите дорожку
[Удерживать] Перемотка
дорожки назад или
вперед
Операции с дисками
1
Включение питания.
2
Вставьте диск.
Все дорожки будут воспроизводиться
последовательно до тех пор, пока не произойдет
смена источника или не будет извлечен диск.
Остановка воспроизведения и извлечение
диска
• Отображается надпись “NO DISC”. Нажмите кнопку
SRC для прослушивания другого источника
воспроизведения.
Запрещение извлечения диска
Для отмены блокировки повторите эту же
процедуру.
Выбор дорожки или папки
• Для дисков MP3 или WMA выберите необходимую
папку, затем нужную дорожку, повторяя
процедуру с диском управления.
• Для возврата в предыдущее меню нажмите BACK.
[Смена] = [Нажмите]
Page 35

11
ОПЕРАЦИИ и ВНЕШНИЕ УСТРОЙСТВА
РУCCKИЙ
REPEAT
TRACK RPT : Повтор текущей дорожки
FOLDER RPT : Для диска MP3/WMA: Повтор
текущей папки
RANDOM
FOLDER RND : Для диска MP3/WMA:
Произвольное воспроизведение
всех дорожек текущей папки, а
затем дорожек других папок
ALL RND : Произвольное
воспроизведение всех дорожек
• Чтобы отключить повторное или произвольное
воспроизведение, выберите “RPT OFF” или
“RND OFF”.
• Для возврата в предыдущее меню нажмите BACK.
Выбор режимов
воспроизведения
В одно и то же время возможна работа только в
одном из следующих режимов воспроизведения.
1
2
3
[Смена] = [Нажмите]
REPEAT Ô RANDOM
[Смена] = [Нажмите]
Прослушивание с других внешних устройств
Ко входному разъему AUX (дополнительный) на панели управления могут подключаться внешние
устройства.
Подготовка: Убедитесь в том, что для настройки “SRC SELECT” = “AUX IN” выбрано значение
“AUX ON”, см. стр. 18.
1
Выберите “AUX IN”.
2
—
Включите подключенное устройство и начните
воспроизведение звука с его помощью.
3
Настройте громкость.
4
—
Настройка необходимого звука (См. страницы 13 и 14).
Подключение внешнего устройства к входному разъему AUX
Мини-разъем стерео - 3,5 мм
(не входит в комплект поставки)
Портативный
аудиопроигрыватель и т. д.
Page 36

12
ВНЕШНИЕ УСТРОЙСТВА
РУCCKИЙ
Использование пульта дистанционного управления — RM-RK50
Согласно приведенным в настоящем документе
инструкциям, данным устройством можно
управлять в дистанционном режиме (с помощью
дополнительно приобретенного пульта
дистанционного управления). Для управления
данным устройством рекомендуется использовать
пульт дистанционного управления модели RM-RK50.
Установка литиевой батареи-таблетки
(CR2025)
Внимание:
• При неправильной замене аккумуляторных
батарей существует опасность взрыва. При
замене следует использовать батареи того же
типа или их эквиваленты.
• Батарейки необходимо предохранять от
чрезмерного нагревания, например, воздействия
лрямого солнечного света, открытого огня и проч.
При уменьшении эффективности пульта
дистанционного управления замените батарею.
Перед использованием пульта дистанционного
управления выполните следующие действия:
• Направьте пульт дистанционного управления
непосредственно на телеметрический датчик
приемника.
• НЕ подвергайте телеметрический датчик
воздействию яркого света (прямых солнечных
лучей или искусственного освещения).
1 • Включение питания при кратковременном
нажатии или ослабление звука при
включенном питании.
• Отключение питания при нажатии и
удерживании.
2 • Смена запрограммированных радиостанций.
• Изменение папки MP3/WMA.
3 Настройка уровня звука.
4 Выбор режимов звучания.
5 Выбор источников.
6 • При кратковременном нажатии выполняется
поиск радиостанций.
•
Быстрая перемотка дорожки вперед или назад
при нажатии и удерживании нажатыми.
•
Смена дорожек при кратковременном нажатии.
Предупреждение (предотвращение
несчастных случаев и повреждений):
• Устанавливайте только аккумуляторную батарею
CR2025 или эквивалентную ей.
• Не оставляйте пульт дистанционного управления в
местах, подверженных длительному воздействию
прямых солнечных лучей (например на приборной
панели).
• Храните аккумуляторную батарею в недоступном
для детей месте.
• Не перезаряжайте, не укорачивайте, не разбирайте
и не нагревайте батарею, а также не подвергайте ее
воздействию огня.
• Не оставляйте аккумуляторную батарею рядом с
другими металлическими материалами.
• Не разбирайте аккумуляторную батарею с помощью
пинцета или аналогичного инструмента.
• При утилизации батареи или помещении ее на
хранение оберните батарею изоляционной лентой и
изолируйте ее полюса.
Телеметрический датчик
Page 37

13
НАСТРОЙКИ
РУCCKИЙ
Выбор запрограммированного режима звучания
Можно выбрать режим звучания, соответствующий музыкальному жанру.
• См. также стр. 15.
• Описание настроек “USER” см. на стр. 14.
Запрограммированные значения настроек для каждого режима звучания
Режим
воспроизведения
звука
Запрограммированное значение
BASS MIDDLE TREBLE LOUD
(громкость)
Частота Уровень Q Частота Уровень Q Частота Уровень Q
USER 60 Гц 00 Q1,0 1,0 кГц 00 Q1,0 10,0 кГц 00 Q1,25
OFF
ROCK 100 Гц +03 Q1,0 1,0 кГц 00 Q1,25 10,0 кГц +02 Q1,25
CLASSIC 80 Гц +01 Q1,0 1,0 кГц 00 Q1,25 10,0 кГц +03 Q1,25
POPS 100 Гц +02 Q1,0 1,0 кГц +01 Q1,25 10,0 кГц +02 Q1,25
HIP HOP 60 Гц +04 Q1,0 1,0 кГц –02 Q1,0 10,0 кГц +01 Q1,25
JAZZ 80 Гц +03 Q1,0 1,0 кГц 00 Q1,25 10,0 кГц +03 Q1,25
Частота: Частота Q: Q-slope
[Смена] = [Нажмите]
Продолжение не следующей странице
Page 38

14
РУCCKИЙ
4 Настройте элементы звучания для
выбранного тона.
1 Настройте частоту.
2 Настройте уровень.
3 Настройте коэффициент качества (Q-slope).
Параметры
звука
Диапазон/элементы для
выбора
BASS MIDDLE TREBLE
Частота 60 Гц
80 Гц
100 Гц
120 Гц
0,5 кГц
1,0 кГц
1,5 кГц
2,5 кГц
7,5 кГц
10,0 кГц
12,5 кГц
15,0 кГц
Уровень от –06
до +06
от –06
до +06
от –06
до +06
Q Q0,5
Q1,0
Q1,5
Q2,0
Q0,75
Q1,0
Q1,25
Q1,5
Q0,75
Q1,25
5 Повторите действия 3 и 4 для настройки
других характеристик звучания.
Изменения будут сохранены автоматически.
Сохранение собственного
режима звучания
Можно сохранить настройки в памяти.
1 Выберите “USER”.
2 Когда “USER” отображается на дисплее...
3 Выберите тон.
[Смена] = [Нажмите]
[Смена] = [Нажмите]
[Смена] = [Нажмите]
Page 39

15
НАСТРОЙКИ
РУCCKИЙ
По умолчанию: Подчеркнуто
Операции с меню
Категория Элементы меню Выбираемые настройки, [страница для справки]
DEMO
DEMO
Демонстрация
функций дисплея
• DEMO ON
• DEMO OFF
:
Если в течение 20 секунд не будет выполнено операций,
начнется демонстрация функций дисплея, [6].
: Отмена.
CLOCK
CLOCK DISP *
1
Отображение
часов
• CLOCK ON
• CLOCK OFF
: Когда устройство выключено, время постоянно
отображается на дисплее.
: Отмена; Если устройство выключено, при нажатии
“DISP” время отображается примерно в течение 5
секунд, [6].
CLOCK SET
Настройка часов
: Настройка часов, а затем минут, [6].
(По умолчанию: 0:00)
24H/12H
Формат
отображения
времени
• 24 HOUR
• 12 HOUR
: Описание настройки см. на стр. 6.
CLOCK ADJ *
2
Настройка часов
• AUTO
• OFF
: Встроенные часы автоматически настраиваются
с помощью данных CT (время на часах) в сигнале
Radio Data System.
: Отмена.
EQ
EQ
Equalizer
(эквалайзер)
: Выбор режима звучания, соответствующего музыкальному жанру.
USER, ROCK, CLASSIC, POPS, HIP HOP, JAZZ
DISPLAY
DIMMER
Затемнение
• DIMMER ON
• DIMMER OFF
: Снижается яркость подсветки дисплея и кнопок.
: Отмена.
SCROLL*
3
Прокрутка
• SCROLL ONCE
• SCROLL AUTO
• SCROLL OFF
: Однократная прокрутка отображаемой информации.
:
Повторная прокрутка (через 5-секундные интервалы).
: Отмена.
При нажатии кнопки DISP в течение более одной секунды происходит
включение функции прокрутки информации на дисплее независимо от
имеющейся настройки.
TAG DISPLAY
Отображение
тегов
• TAG ON
• TAG OFF
: Отображение информации о тегах во время
воспроизведения дорожек MP3 или WMA.
: Отмена.
*1 Если подача питания не прекращается при выключении зажигания автомобиля, рекомендуется выбрать
“CLOCK OFF” для сохранения заряда аккумулятора автомобиля.
*2 Действует только при получении данных CT.
*3 Некоторые буквы или символы не будут отображаться правильно (или не будут отображаться) на
дисплее.
1 Активируйте меню. 2 Выберите необходимый
элемент.
3 При необходимости
повторите действие 2.
• Для возврата в предыдущее
меню нажмите BACK.
• Для выхода из меню нажмите
“DISP” или “MENU”.
[Смена] = [Нажмите]
Продолжение не следующей странице
Page 40

16
РУCCKИЙ
Категория
Элементы меню
Выбираемые настройки, [страница для справки]
TUNER
AF-REG *
4
Прием на
альтернативных
частотах/прием
региональных
передач
• AF ON
• AF-REG ON
• OFF
: Если принимаемые сигналы ослабевают, устройство
переключается на другую радиостанцию (программа
может отличаться от принимаемой в данный момент
программы), [9].
• Загорается индикатор AF.
: Если принимаемые сигналы ослабевают, устройство
переключается на другую радиостанцию,
передающую в эфир ту же программу.
• Загораются индикаторы AF и REG.
: Отмена.
PTY-STANDBY *
4
Резервный PTY
PTY OFF, кодов
PTY
: Включение функции резервного приема PTY с
помощью одного из кодов PTY, [9].
TA VOLUME *
4
Громкость
передачи
сообщений о
движении на
дорогах
VOLUME 00
– VOLUME 50
(или VOLUME 00
– VOLUME 30)*
5
: (По умолчанию: VOLUME 15)
P-SEARCH *
4
Поиск программ
• SEARCH ON
• SEARCH OFF
: Активация поиска программы, [9].
: Отмена.
MONO *
6
Монорежим
• MONO ON
• MONO OFF
:
Включение монорежима для более качественного
приема FM-сигнала (стереоэффект будет потерян), [7].
: Восстановление стереоэффекта.
IF BAND
Полоса
промежуточных
частот
• AUTO
• WIDE
: Повышение избирательности тюнера для
устранения интерференционных помех от
соседних радиостанций. (Сопровождается потерей
стереоэффекта.)
: Могут возникать интерференционные помехи от
соседних радиостанций, но качество звучания при
этом не ухудшается и сохраняется стереоэффект.
COLOR
COLOR 01
– COLOR 29,
USER
: Выберите один из запрограммированных или пользовательских цветов
для подсветки дисплея и кнопок (кроме T/P/DISP/OPEN/
).
(Сведения о настройках цвета “USER” см. на странице 18.)
MENU COLOR
MENU COLOR
Цвет меню
• OFF
• ON
: Отмена.
: Изменение подсветки дисплея и кнопок (кроме
T/P/DISP/OPEN/
) во время операций с
меню, поиска списка и операций с режимами
воспроизведения.
*4 Только для радиостанций FM Radio Data System.
*5 Зависит от использования регулятора усиления.
*6 Отображается только в том случае, если в качестве источника выбрано “FM”.
Page 41

17
НАСТРОЙКИ
РУCCKИЙ
Продолжение не следующей странице
Категория
Элементы меню
Выбираемые настройки, [страница для справки]
AUDIO
FADER*7, *
8
микшер
R06 – F06 : Настройка выходного баланса передних и задних
динамиков.
(По умолчанию: 00)
BALANCE *
8
баланс
L06 – R06 :
Настройка выходного баланса левых и правых динамиков.
(По умолчанию: 00)
LOUD
Громкость
• LOUD OFF
• LOUD ON
: Отмена.
: Увеличьте низкие и высокие частоты для получения
хорошо сбалансированного звучания при низком
уровне громкости.
VOL ADJUST
настройка
громкости
VOL ADJ –05
—
VOL ADJ +05
(По умолчанию:
VOL ADJ 00)
: Запрограммируйте уровень громкости для каждого
источника (кроме FM) в соответствии с уровнем
громкости FM. Уровень громкости автоматически
увеличивается или уменьшается при смене источника.
• Перед выполнением настройки выберите источник,
который необходимо настроить.
• Если в качестве источника выбрано “FM”, на дисплее
появляется надпись “VOL ADJ FIX”.
L/O MODE
Pежим линейного
свыходa
• SUB.W
• REAR
: Выберите этот параметр, если разъемы REAR LINE
OUT используются для подключения сабвуфера (через
внешний усилитель).
: Выберите, если при подключении динамиков через
внешний усилитель используются терминалы REAR
LINE OUT.
SUB.W FREQ *
9
Предельная
частота
низкочастотного
динамика
• LOW
• MID
• HIGH
: Низкочастотный динамик воспроизводит частоты
ниже 72 Гц.
: Низкочастотный динамик воспроизводит частоты
ниже 111 Гц.
: Низкочастотный динамик воспроизводит частоты
ниже 157 Гц.
SUB.W LEVEL *
9
Уровень
низкочастотного
динамика
SUB.W 00
— SUB.W 08
: Настройте уровень выходного сигнала
низкочастотного динамика.
(По умолчанию: SUB.W 04)
BEEP
Звук нажатия
кнопки
• BEEP OFF
• BEEP ON
: Выключение звука нажатия кнопки.
: Включение звука нажатия кнопки.
TEL MUTING
Отключение
звука телефона
• MUTING 1/
MUTING 2
• MUTING OFF
:
Выберите любой из параметров, обеспечивающий
отключение звука при использовании сотового телефона.
: Отмена.
AMP GAIN *
10
Регулятор
усиления
• LOW POWER
• HIGH POWER
: VOLUME 00 – VOLUME 30 (Если максимальная
мощность динамика меньше 50 Вт, выберите этот
параметр, чтобы предотвратить повреждение
динамика.)
: VOLUME 00 – VOLUME 50
*7 При использовании системы с двумя динамиками установите для уровня баланса значение “00”.
*8 Эта настройка не влияет на выходной сигнал сабвуфера.
*9 Отображается только в том случае, если параметр “L/O MODE” имеет значение “SUB.W”.
*10 При выборе “LOW POWER”, если громкость выше, чем “VOLUME 30”, автоматически
устанавливается громкость “VOLUME 30”.
Page 42

18
НАСТРОЙКИ
РУCCKИЙ
Выбор запрограммированного
цвета
Можно выбрать напрограммированный цвет для
кнопок и дисплея.
• См. также стр. 16.
Создание собственного цвета
—USER цвет
Можно создавать свои собственные цвета—
“DAY COLOR” или “NIGHT COLOR”.
DAY COLOR: Используется, когда для
настройки “DIMMER”
установлено значение
“DIMMER OFF”.
NIGHT COLOR: Используется, когда для
настройки “DIMMER”
установлено значение
“DIMMER ON”.
1 Выберите “USER”.
2 Когда “USER” отображается на дисплее...
3
4 Выберите основной цвет.
5 Настройте насыщенность (00 – 31)
выбранного основного цвета.
Если для всех первичных цветов выбрано
значение “00”, на дисплее ничего не
появляется.
6 Повторите действия 4 и 5, чтобы
настроить другие первичные цвета.
7 Выйдите из режима настройки.
Выберите “USER”, чтобы отобразить собственные
цвета для кнопок и дисплея.
[Смена] = [Нажмите]
[Смена] = [Нажмите]
Настройки цветов
Категория Элементы меню Выбираемые настройки, [страница для справки]
SRC SELECT
AM *
11
AM-радиостанция
• AM OFF
• AM ON
: Отключение варианта “AM” при выборе источника.
: Включение варианта “AM” при выборе источника, [4].
AUX IN *
12
Дополнительный
входной разъем
• AUX OFF
• AUX ON
: Отключение варианта “AUX IN” при выборе источника.
:
Включение варианта “AUX IN” при выборе источника, [4].
*11 Отображается, если выбран любой источник, кроме “AM”.
*12 Отображается, если выбран любой источник, кроме “AUX IN”.
[Смена] = [Нажмите]
или
[Смена] = [Нажмите]
Page 43

19
СПРАВОЧНАЯ ИНФОРМАЦИЯ
РУCCKИЙ
Основные операции
Включение питания
• Для включения питания приемника также можно
использовать кнопку SRC. Если источник готов,
воспроизведение также начинается.
Выключение питания
• Если питание отключается во время
прослушивания дорожки, при последующем
включении питания воспроизведение начнется с
того места, где оно было остановлено.
Общие сведения
• При изменении источника во время
прослушивания диска воспроизведение
останавливается.
При следующем выборе “CD” в качестве
источника воспроизведение начнется с места
последнего останова.
• После извлечения диска появляется надпись
“NO DISC” и невозможно использовать некоторые
кнопки. Вставьте другой диск или нажмите
кнопку SRC для выбора другого источника
воспроизведения.
• Операция отменяется, если в течение 30 секунд
после нажатия кнопки MENU не выполнено ни
одного действия.
Операции с тюнером
Сохранение радиостанций
• Во время поиска SSM...
– Все ранее сохраненные радиостанции
удаляются, и сохранение радиостанций будет
выполняться заново.
– По завершении использования функции SSM
будет выполнена автоматическая настройка
на радиостанцию, сохраненную с наименьшим
номером.
• В режиме сохранения радиостанций вручную
ранее запрограммированная радиостанция
удаляется, если сохранение новой радиостанции
выполняется с использованием того же
запрограммированного номера.
Операции с FM Radio Data System
• Для правильной работы функции сетьотслеживающего приема требуется два типа
сигналов Radio Data System—PI (идентификация
программы) и AF (альтернативная частота).
Если прием указанных данных осуществляется
неправильно, функция сеть-отслеживающего
приема не будет работать.
•
Если осуществляется прием сообщений о движении
на дорогах с помощью резервного приема TA,
уровень громкости автоматически меняется на
запрограммированный (TA VOL), когда текущий
уровень ниже запрограммированного.
• Когда функция приема на альтернативных
частотах включена (выбрано AF), автоматически
включается сеть-отслеживающий прием.
Операции с дисками
Предостережение для воспроизведения
дисков DualDisc
• Сторона диска DualDisc, отличная от DVD, не
совместима со стандартом “Compact Disc Digital
Audio”. Поэтому не рекомендуется использовать
сторону диска DualDisc, отличную от DVD, на
данном устройстве.
Общие сведения
• Данный приемник предназначен для
воспроизведения компакт-дисков/CD-текста, а
также дисков однократной или многократной
записи в формате звукового компакт-диска
(CD-DA), MP3/WMA.
• Если диск вставляется верхней стороной вниз,
на дисплее поочередно появляются надписи
“PLEASE” и “EJECT”. Нажмите OPEN, затем 0 для
извлечения диска.
• “Дорожки” MP3 и WMA (слова “файл” и “дорожка”
взаимозаменяемы в данном руководстве)
записываются в “папки”.
• При быстрой перемотке дорожки MP3 или
WMA вперед или назад можно услышать лишь
прерывистый звук.
Дополнительная информация о приемнике
Продолжение не следующей странице
Page 44

20
РУCCKИЙ
– Формат диска: ISO 9660 Level 1/ Level 2, Romeo,
Joliet, длинное имя файла Windows.
• Максимальное количество символов для
названий файлов или папок зависит от
используемого формата диска (включая
4 символа расширения <.mp3> или <.wma>).
– ISO 9660 Level 1: до 12 символов
– ISO 9660 Level 2: до 31 символов
– Romeo: до 128 символов
– Joliet: до 64 символов
– Длинное имя файла Windows: до 128 символов
• Данное устройство может распознавать до 512
файлов, 255 папок и 8 уровней иерархической
структуры.
• Данный приемник может воспроизводить файлы,
записанные в режиме VBR (переменная скорость
в битах).
Для файлов, записанных в режиме VBR, по разному
отображается время от начала воспроизведения,
и это время не соответствуют действительности.
Эта разница становится особенно заметной после
выполнения функции поиска.
• Данный приемник не может воспроизводить
следующие файлы:
– файлы MP3, закодированные в форматах MP3i
и MP3 PRO;
– файлы MP3, закодированные в
непредусмотренном формате;
– файлы MP3, закодированные в формате Layer
1/2;
– файлы WMA, закодированные в формате
“без потерь”, профессиональном и голосовом
форматах;
– файлы WMA, основой которых служит формат,
отличный от формата Windows Media ® Audio.
– файлы формата WMA, защищенные от
копирования по методу DRM;
– файлы, содержащие данные, например, AIFF,
ATRAC3 и т.д.
• Функция поиска выполняется, но скорость поиска
не является постоянной.
Извлечение диска
• Если в течение 15 секунд извлеченный диск не
будет вынут, он автоматически помещается
обратно в загрузочный отсек в целях защиты
от загрязнения. Воспроизведение начинается
автоматически.
Операции с меню
• Если для элемента “AMP GAIN” настройка
“HIGH POWER” меняется на “LOW POWER”
и при этом для уровня громкости установлено
значение больше “VOLUME 30”, приемник
автоматически меняет уровень громкости на
“VOLUME 30”.
Воспроизведение компакт-дисков
однократной и многократной записи
• Используйте только “завершенные” компактдиски однократной и многократной записи.
• Данный приемник может воспроизводить только
файлы одного типа, который первым будет
распознан, если на диске содержатся файлы как в
формате звукового компакт-диска (CD-DA), так и
в формате MP3/WMA.
• На данном приемнике возможно
воспроизведение дисков с несколькими сеансами
записи; однако, незавершенные сеансы будут
пропускаться при воспроизведении.
• Некоторые компакт-диски однократной или
многократной записи не воспроизводятся на
данном устройстве в связи с их особенностями, а
также по следующим причинам:
– Диски загрязнены или поцарапаны;
– На линзе внутри приемника присутствует
конденсат влаги;
– Линза звукоснимателя загрязнена;
– При записи файлов на компакт-диск
однократной или многократной записи
использовался метод “пакетной записи”;
– Некорректное состояние записи (отсутствие
данных и т.д.) или носителя (пятна, царапины,
деформация и т.д.).
• Для считывания дисков многократной записи
может потребоваться больше времени, так как
они имеют меньшую отражательную способность
по сравнению с обычными компакт-дисками.
• Не используйте следующие компакт-диски
однократной или многократной записи:
– Диски с наклейками, этикетками или
защитными пленками на поверхности;
– Диски, на которых можно печатать этикетки с
помощью струйного принтера.
Использование этих дисков при высокой
температуре или высокой влажности может привести
к неисправности или повреждению устройства.
Воспроизведение диска MP3/WMA
• Данный приемник может воспроизводить файлы
MP3/WMA с расширением <.mp3> или <.wma> (не
зависит от регистра).
• Данный приемник может отображать названия
альбомов, артистов (исполнителей) и тег (версии 1,0,
1,1, 2,2, 2,3 или 2,4) для файлов MP3 и файлов WMA.
• Файлы MP3/WMA отображаются на данном
приемнике в соответствии со следующими
характеристиками:
– Cкорость передачи данных: 8 кбит/с — 320 кбит/с
– Частота дискретизации:
48 кГц, 44,1 кГц, 32 кГц (для MPEG-1)
24 кГц, 22,05 кГц, 16 кГц (для MPEG-2)
Page 45

21
СПРАВОЧНАЯ ИНФОРМАЦИЯ
РУCCKИЙ
Устранение проблем
Не всякое нарушение в работе устройства является результатом его неисправности. Перед обращением в
сервисный центр проверьте следующее.
Симптомы Способы устранения/Причины
Общие сведения
• Не слышен звук из динамиков. • Установите оптимальный уровень громкости.
• Проверьте кабели и соединения.
• Приемник не работает. Перенастройте приемник (см. стр. 3).
• Невозможно выбрать “AUX IN”. Проверьте настройку “SRC SELECT”
= “AUX IN”
(см. стр. 18).
• На дисплее ничего не появляется. См. настройки USER цветов на стр. 18.
FM/AM
• Автоматическое программирование
SSM не работает.
Сохраните радиостанции вручную.
• Статические помехи при прослушивании
радио.
Плотно подсоедините антенну.
• Невозможно выбрать “AM”. Проверьте настройку “SRC SELECT” = “AM” (см.
стр. 18).
Все диски
• Диск не воспроизводится. Вставьте диск правильно.
• Не воспроизводятся компакт-диски
однократной и многократной записи.
• Не осуществляется переход на дорожки
компакт-дисков однократнойи
многократной записи.
• Вставьте компакт-диск однократной или
многократной записи с закрытым сеансом.
• Закройте сеанс компакт-диска однократной или
многократной записи с помощью устройства,
которое использовалось для записи.
• Диск не может быть воспроизведен и
или извлечен.
• Снимите блокировку с диска (см. стр. 10).
• Принудительно извлеките диск (см. стр. 3).
• Звук, записанный на диске, иногда
прерывается.
• Остановите воспроизведение на время езды по
неровной дороге.
• Смените диск.
• Проверьте кабели и соединения.
• На дисплее появляется надпись
“NO DISC”.
Вставьте в загрузочный отсек диск, который можно
воспроизвести.
• На дисплее поочередно появляются
надписи “PLEASE” и “EJECT“.
Нажмите OPEN, затем 0 для извлечения диска,
затем правильно вставьте диск.
Продолжение не следующей странице
Page 46

22
РУCCKИЙ
Симптомы Способы устранения/Причины
Воспроизведение MP3/WMA
• Диск не воспроизводится. • Используйте диск с дорожками MP3/WMA,
записанными в формате, совместимом с ISO 9660
Level 1, Level 2, Romeo или Joliet.
• Добавьте к именам файлов расширение <.mp3>
или <.wma>.
• Слышен шум. Перейдите к другой дорожке или смените диск. (Не
добавляйте расширение <.mp3> или <.wma> к
файлам, не являющимся файлами MP3 или WMA).
• Для чтения требуется более длительное
время (на дисплее продолжает мигать
надпись “READING”).
Не используйте многоуровневую иерархическую
структуру и много папок.
• Порядок воспроизведения дорожек
отличается от заданного.
Порядок воспроизведения определяется при записи
файлов.
• Время от начала воспроизведения
неправильное.
Это иногда происходит во время воспроизведения.
Причиной является способ записи дорожек.
• На дисплее появляется надпись
“NO FILE”.
Выбранная папка является пустой*. Выберите другую
папку, содержащую дорожки MP3 или WMA.
* Папка, которая физически пуста, либо папка,
которая содержит данные, но среди них нет
звуковых дорожек MP3/WMA в нужном формате.
• Не отображаются правильные символы
(т.е. название альбома).
На данном устройстве могут отображаться буквы
латинского алфавита (заглавные), кириллица
(заглавные), числа и ограниченное количество
символов (см. стр. 2).
• Microsoft и Windows Media являются либо зарегистрированными торговыми марками или торговыми
марками корпорации Microsoft в США и/или других странах.
Page 47

23СПРАВОЧНАЯ ИНФОРМАЦИЯ
РУCCKИЙ
Очистка разъемов
При частом отсоединении разъемы загрязняются.
Чтобы снизить уровень загрязнения, периодически
проводите очистку разъемов с помощью ватных
валиков или ткани, смоченных спиртом, соблюдая
при этом меры предосторожности во избежание
повреждения разъемов.
Конденсация влаги
Влага может конденсироваться на линзе внутри
устройства в следующих случаях:
• После включения автомобильного обогревателя.
• При повышении влажности внутри автомобиля.
Это может привести к неисправной работе
устройства. В этом случае извлеките диск и оставьте
приемник включенным на несколько часов, чтобы
испарилась влага.
Как обращаться с дисками
При извлечении диска из
футляра, нажмите на
центральный держатель футляра
и снимите диск, удерживая его за
края.
• Всегда удерживайте диск за края. Не
прикасайтесь к поверхности, на которой
находится запись.
Чтобы поместить диск в футляр, аккуратно
установите диск на центральный держатель
(стороной с изображением вверх).
• После прослушивания обязательно помещайте
диски в футляры.
Разъемы
Центральный
держатель
Хранение дисков в чистом виде
Воспроизведение грязного диска
может быть некорректным.
Если диск загрязнится, протрите его
мягкой тканью по прямой линии от
центра к краю.
• Не используйте растворители (например, обычное
средство для чистки кассет, распыляемые
средства, разбавитель, бензин и т.д.) для чистки
дисков.
Прослушивание новых дисков
Вблизи внутреннего и внешнего краев
новых дисков иногда бывают грубые
выступы. Такой диск не может быть
загружен в приемник.
Чтобы удалить такие пятна, потрите их
карандашом или шариковой ручкой и т.д.
Не используйте следующие диски:
Один компакт-диск
(диаметром 8 см) Изогнувшийся диск
Наклейка и остаток
наклейки
Диск с наклеиваемой
этикеткой
Необычная форма
Диск C-thru
(полупрозрачный диск)
Прозрачные или
полупрозрачные
компоненты на области
записи
Обслуживание
Page 48

24
РУCCKИЙ
БЛОК УСИЛИТЕЛЕЙ ЗВУКА
Максимальная выходная мощность: Передние/
Задние:
50 Вт на каждый канал
Длительная выходная мощность (RMS): Передние/
Задние:
19 Вт на канал в при 4 Ω, от 40 Гц до
20 000 Гц и не более чем 0,8% общего
гармонического искажения.
Импеданс нагрузки: 4 Ω (допустимо от 4 Ω до 8 Ω)
Диапазон настройки тембра: Низкие
частоты:
±12 дБ (60 Гц, 80 Гц, 100 Гц, 120 Гц)
Q0,5, Q1,0, Q1,5, Q2,0
Диапазон
средних
частот:
±12 дБ (0,5 кГц, 1,0 кГц, 1,5 кГц, 2,5 кГц)
Q0,75, Q1,0, Q1,25, Q1,5
Верхние
частоты:
±12 дБ (7,5 кГц, 10,0 кГц, 12,5 кГц, 15,0 кГц)
Q0,75, Q1,25
Частотная характеристика: от 40 Гц до 20 000 Гц
Отношение сигнал/помеха: 70 дБ
Уровень линейного выхода/полное сопротивление: нагрузка 2,5 В/20 kΩ (полная шкала)
Импеданс выходного сигнала: 1 kΩ
Уровень выхода низкочастотного динамика/полное
сопротивление:
нагрузка 2,5 В/20 kΩ (полная шкала)
Другой терминал: Дополнительный входной разъем AUX
БЛОК РАДИОПРИЕМНИКА
Диапазон частот: FM: от 87,5 МГц до 108,0 МГц
FM-LO: от 65,00 МГц до 74,00 МГц
AM: CB: от 522 кГц до 1 620 кГц
ДB: от 144 кГц до 279 кГц
Радиоприемник в
диапазоне FM
Полезная чувствительность: 9,3 dBf (0,8 μВ/75 Ω)
50 дБ пороговая чувствительность: 16,3 dBf (1,8 μВ/75 Ω)
Альтернативная отстройка (400 кГц): 65 дБ
Частотная характеристика: от 40 Гц до 15 000 Гц
Разделение стереоканалов: 40 дБ
Радиоприемник в
диапазоне CB
Чувствительность: 20 μВ
Избирательность: 40 дБ
Радиоприемник в
диапазоне ДB
Чувствительность: 50 μВ
Технические характеристики
Page 49

25СПРАВОЧНАЯ ИНФОРМАЦИЯ
РУCCKИЙ
БЛОК ПРОИГРЫВАТЕЛЯ КОМПАКТ-ДИСКОВ
Тип: проигрыватель компакт-дисков
Система обнаружение сигнала: бесконтактное оптическое считывание
(полупроводниковый лазер)
Число каналов: 2 канала (стерео)
Частотная характеристика: от 5 Гц до 20 000 Гц
Динамический диапазон: 96 дБ
Отношение сигнал/помеха: 98 дБ
Коэффициент детонации: в пределах допусков измерительной
аппаратуры
допусков измерительной аппаратуры Формат
декодирования MP3: (MPEG1/2 Audio Layer 3)
Макс. скорость передачи битов: 320 кбит/с
Формат декодирования WMA (Windows Media® Audio): Макс. скорость передачи битов: 320 кбит/с
ОБЩИЕ ТРЕБОВАНИЯ
Электрическое питание: Рабочее напряжение: постоянное напряжение 14,4 В (допустимо
от 11 В до 16 В)
Система заземления: отрицательное заземление
Допустимая рабочая температура: от 0°C до +40°C
Габариты, мм (Ш × В × Г):
(прибл.)
Монтажный размер: 182 мм × 52 мм × 160 мм
Размер панели: 188 мм × 58 мм × 12 мм
Масса: 1,3 кг (без дополнительных
принадлежностей)
Конструкция и технические требования могут быть изменены без уведомления.
Page 50

2
УКРАЇНА
Дякуємо за придбання продукції JVC.
Перед роботою уважно ознайомтеся з усіма інструкціями; досягти найкращої роботи пристрою можна тільки
добре розуміючи їх.
ВАЖЛИВО ДЛЯ ЛАЗЕРНИХ ПРИСТРОЇВ
1. ЛАЗЕРНИЙ ПРИСТРІЙ КЛАСУ 1
2. УВАГА: Не відкривайте верхню кришку. В пристрої немає частин, які міг би обслуговувати користувач;
будь-яке обслуговування має виконуватися кваліфікованим сервісним спеціалістом.
3. УВАГА: У відкритому вигляді існує небезпека видимого та/або невидимого випромінювання,
притаманного лазерним продуктам класу 1М. Не вдивляйтеся безпосередньо або за
допомогою оптичних інструментів.
4. РОЗТАШУВАННЯ МАРКУВАННЯ: ЗАПОБІЖНЕ МАРКУВАННЯ ЗЗОВНІ ПРИСТРОЮ.
[Тільки для Європейського Союзу]
Обережно:
Якщо вам потрібно скористатися пристроєм під час
руху, уважно стежте за рухом, щоб не потрапити в
аварію.
Попередження щодо настройок гучності:
Шум при роботі дисків дуже низьким порівняно з
іншими джерелами. Перед програванням диску
уменшіть гучність, щоб не допустити пошкодження
гучномовців при раптовому збільшенні рівня
вихідного сигналу.
Для безпеки...
• Не слід занадто підвищувати рівень гучності,
оскільки при цьому приглушуються зовнішні
звуки і керування машиною стає небезпечним.
• Зупиняйте машину перед виконанням складних
операцій.
Температура в автомобілі...
Залишивши машину на тривалий час у жарку
чи холодну погоду, перед роботою з пристроєм
зачекайте, поки температура в автомобілі не стане
нормальною.
Доступні символи на екрані
Доступні символи
Символи, що з’являються на екрані.
Kомпанія JVC встановлює термін служби виробів JVC, що дорівнює 7 рокам, за умови дотримання правил
експлуатаціЇ. Eксплуатацію даного виробу може бути продовжено після закінчення терміну служби.
Aле ми радимо Bам звернутись до найближчого уповноваженого сервісного центру JVC для перевірки стану
даного виробу. Tакож, якщо є потреба утилізації цього виробу, зверніться за консультацією до найближчого
уповноваженого сервісного центру JVC.
Page 51

3
УКРАЇНА
Як повторно налаштувати
пристрій
• Будуть також стерті зроблені вами настройки.
Примусове виймання диску
• На дисплеї по черзі з’являються написи “PLEASE”
та “EJECT” (“будь ласка” та “вийміть”).
• Можна примусово вийняти завантажений
диск, навіть якщо диск заблокований. Щоби
заблокувати/розблокувати диск, зверніться до
інформації на стор. 10.
• Виймаючи диск, не впустіть його на підлогу.
• Якщо цей спосіб не спрацьовує, перезавантажте
пристрій.
ЗМІСТ
Від’єднання панелі управління ................. 3
Приєднання панелі управління ................. 3
Як повторно налаштувати пристрій .......... 3
Примусове виймання диску ...................... 3
РОБОТА
Основні функції .......................................... 4
Підготовка .................................................. 6
Прослуховування радіо ............................. 7
Робота з дисками ....................................... 10
ЗОВНІШНІ ПРИСТРОЇ
Прослуховування інших зовнішніх
компонентів ............................................ 11
Використання пульту дистанційного
керування—
RM-RK50 ............................. 12
НАЛАШТУВАННЯ
Вибір запрограмованих режимів
звучання .................................................. 13
Робота з меню ............................................ 15
Налаштування кольорів ............................ 18
ДОВІДКОВА ІНФОРМАЦІЯ
Додаткова інформація про пристрій ........ 19
Пошук та усунення несправностей ............ 21
Обслуговування .......................................... 23
Характеристики .......................................... 24
Від’єднання панелі управління
Приєднання панелі управління
Цей знак використовується для
зазначення...
Щоби зробити вибір, поверніть
ручку управління, після чого
натисніть на неї для підтвердження
вибору.
Не торкайтесь з’єднувачів.
Page 52

4
УКРАЇНА
Основні функції
q Вибрати освітленість дисплею та кнопок.
w • Увімкніть живлення.
• Приглушення звуку (при увімкненому
живленні).
• Вимикання живлення [Утримувати].
e Дистанційний датчик
• Ви можете керувати цим пристроєм за
допомогою додатково придбаного пульту
дистанційного керування. Детальну
інформацію наведено на стор. 12.
r AUX (зовнішнє) гніздо вхідного сигналу
*1 Також згадується в інструкції, як “Ручка
керування”.
*2 Не можна вибрати “CD” (компакт-диск)
джерелом відтворення, якщо у пристрої диску
немає.
*3 Не можна вибирати ці джерела, якщо вони
вимкнені у меню (див. “SRC SELECT” (Вибір
джерела) в “Робота з меню” на стор. 18).
1 • FM/AM/FM-LO: Вибрати запрограмовану
станцію.
• CD: Вибір папки.
2 Вибір джерела.
FM = CD *2 = AUX IN *3 = AM *3 = FM-LO
= (назад до початку)
3 • Ввійти до переліку операцій.
• Вхід до настроювання меню [Утримувати] .
4 • Регулювання гучності або вибір елементів
списку [Обертання].
• Підтвердіть вибір [Натисніть кнопку] .
• FM/FM-LO: Вхід до режиму програмування
SSM-станцій [Утримувати] .
• CD: Вхід до режиму відтворення
[Утримувати] .
5 Вікно дисплея
6 • Вмикання та вимикання прийому
повідомлень про стан дорожнього руху у
режимі очікування.
• Вхід у режим PTY-пошуку [Утримувати].
7 Зміна інформації, що відображається на
дисплеї.
8 Відкинути вниз панель керування.
• Щоб витягти диск, відкиньте вниз панель
керування, потім натисніть 0 на головному
блоці.
9 • FM/AM/FM-LO: Пошук станції.
• CD: Вибір доріжки.
p Повернення до попереднього меню.
Page 53

5РОБОТА
УКРАЇНА
Вікно дисплея
1 Індикатор Tr (доріжка)
2 Джерело відтворення / Номер доріжки / Номер
папки / Індикатор зворотного відліку часу
/ Інформація про налаштування та перелік
операцій
3 Індикатор TAG (інформація тегу)
4 Режим програвання та індикатори
компонентів—RND (випадкове відтворення),
(диск), (папка), RPT (повторення)
5 Індикатор ST (стерео)
6 Індикатор LOUD (гучність)
7 Індикатори Radio Data System—AF, REG, TP, PTY
8 Індикатор положення в ієрархії меню—
(низ),
(верх), (середина)
9 Головний дисплей
p Індикатори інформації про диск—
(трек/файл), (папка)
Page 54

6
УКРАЇНА
Підготовка
Відміна демонстрації функцій дисплею та встановлення часу на
годиннику.
• Див. також стор. 15.
1
Вмикання живлення.
2
[Обертання] =
[Натисніть кнопку]
Відмініть демонстрацію функцій дисплею
Виберіть “DEMO”, а потім “DEMO OFF”.
Встановіть час на годиннику
Виберіть “CLOCK” = “CLOCK SET”.
Настройте години, а потім натисніть ручку керування один
раз, щоб перейти до настройки хвилин.
Виберіть “24H/12H”, а потім “24 HOUR” або
“12 HOUR”.
• Для того, щоб повернутись до попереднього меню, натисніть
BACK.
Зміна інформації, що відображається
При вимкненому живленні: Поточний час відображається, якщо для “CLOCK DISP” (Відображення
годинника) задано “CLOCK OFF” (Вик. годинник) (див. сторінку 15).
При увімкненому живленні: Відображення інформації, щодо поточного джерела сигналу, змінюється на
наступне:
FM/AM/FM-LO Частота станції = Годинник = (назад до початку)
FM Radio Data
System
Ім’я станції (PS) = Частота станції = Тип програми (PTY) = Годинник = (назад до
початку)
CD аудіо CD/CD Text: Заголовок диску/виконавець *1 = Заголовок доріжки *1 = Номер
поточної доріжки і час, що минув з початку відтворення = Номер
поточної доріжки і покази годинника = (назад до початку)
MP3/WMA: Назва альбому/виконавець (назва папки) *2 = Заголовок доріжки
(ім’я файлу) *2 = Номер поточної доріжки і час, що минув з початку
відтворення = Номер поточної доріжки і покази годинника =
(назад до початку)
*1 Якщо програється аудіо компакт-диск, на дисплеї з’являється “NO NAME”.
*2 Якщо файл MP3/WMA не містить інформації у своєму тегові, або коли параметр “TAG DISPLAY”
встановлено на “TAG OFF” (див. стор. 15), з’являються ім’я папки та ім’я файлу.
Натисніть та утримуйте,
поки не з’явиться
головне меню.
• Повторити цю
процедуру.
Page 55

7РОБОТА
УКРАЇНА
Прослуховування радіо
1
Виберіть “FM”, “AM” або “FM-LO”.
2
Пошук станції для прослуховування—Автоматичний пошук.
Коли налаштування на станцію відбулося, пошук зупиняється. Щоби зупинити
пошук, натисніть знов на ту ж саму кнопку.
• Також є можливість ручного пошуку станції—“Manual Search” (ручний пошук).
Утримуйте натиснутою одну з кнопок доки “M” блимає на дисплеї, після чого
повторно натисніть ту саму кнопку.
• При отриманні від FM-радіостанції стереосигналу достатньої потужності на
екрані загорається індикатор ST.
Примітка:
FM: 87,5 МГц – 108,0 МГц
FM-LO: 65,00 МГц – 74,00 МГц
Покращення прийому FM хвилі
Якщо прийом радіостанції в режимі FM стерео
утруднений, ввімкніть режим моно, щоб покращити
сигнал.
• Не застосовується, якщо джерелом є “FM-LO”.
• Див. також стор. 16.
Прийом покращується, але стереоефект буде
втрачено.
Для відновлення стереоефекту повторіть ту ж
саму процедуру та виберіть параметр “MONO
OFF” (монофонічний звук вимкнено).
Занесення станцій у пам’ять
Автоматичне запам’ятовування
радіостанцій (FM/FM-LO)—SSM (Послідовна
пам’ять станцій з потужним сигналом)
Є можливість запрограмувати до 12 станцій
діапазону FM та 6 станцій діапазону FM-LO.
1 Під час прослуховування станції...
2 Виберіть номер, під яким ви бажаєте
зберегти станцію.
FM:
SSM 01–06, SSM 07–12
FM-LO:
SSM 01–06
3
Відбувається автоматичний пошук та збереження
в пам’яті місцевих FM станцій з найвищим рівнем
сигналу.
• Для припинення пошуку натисніть 4
/¢ .
Щоб запрограмувати інші 6 станцій, повторіть
процедуру, починаючи з кроку 1, знову.
[Обертання] =
[Натисніть кнопку]
Продовження на наступній сторінці
Page 56

8
УКРАЇНА
Запам’ятовування станції в ручному
режимі (FM/AM/FM-LO)
Є можливість запрограмувати до 12 станцій
діапазону FM, 6 станцій діапазону FM-LO та 6 станцій
діапазону AM.
Напр.: Збереження FM-станції на частоті 92,50 МГz
у ділянку пам’яті під номером “04”.
1
2 Виберіть запрограмований номер “04”.
3
Перехід до запрограмованої
станції
або
[Обертання] =
[Натисніть кнопку]
Наступні функції доступні лише для станцій FM
Radio Data System.
Пошук програми FM Radio Data
System—PTY-пошук
Ви можете налаштуватися на станцію, яка транслює
вашу улюблену програму, шляхом пошуку
відповідного PTY-коду.
1 З’явиться останній
обраний PTY-код.
2 Виберіть один з ваших улюблених типів
програм або PTY-код.
3 Почніть пошук вашої улюбленої програми.
Якщо станція транслює програму з тим самим
PTY-кодом, що обраний вами, відбудеться
налаштування на цю станцію.
Прийом вибраних програм
Прийом повідомлень про стан
дорожнього руху у режимі очікування
Функція прийому повідомлень про стан дорожнього
руху (ТА) у режимі очікування дозволяє тимчасово
переключатись у режим повідомлень про стан
дорожнього руху з будь-якого джерела, крім
діапазонів АМ та FM-LO.
Рівень гучності змінюється на запрограмований у
режимі ТА-прийому, якщо поточний рівень буде
нижчим від запрограмованого (див. стор. 16).
або
Page 57

9РОБОТА
УКРАЇНА
Для активації прийому повідомлень про стан
дорожнього руху у режимі очікування:
Індикатор ТР (програма
повідомлень про стан дорожнього
руху) або буде горіти, або блимати.
•
Коли індикатор TP загориться, режим прийому
повідомлень про стан дорожнього руху у режимі
очікування буде включено.
•
Коли індикатор TP блимає, режим прийому
повідомлень про стан дорожнього руху у режимі
очікування ще не включений. (Це відбувається у
разі прослуховування FM-станції, яка не транслює
Radio Data System-сигнали, потрібні для прийому
повідомлень про стан дорожнього руху у режимі
очікування).
Для активації прийому настройтесь на іншу станцію,
яка транслює ці сигнали. При цьому індикатор ТР
перестане блимати та буде горіти стійко.
Для відключення режима прийому
повідомлень про стан дорожнього руху у
режимі очікування:
Індикатор ТР погасне.
Прийом вибраних програм у режимі
очікування
Функція прийому вибраних програм (PTY) у режимі
очікування дозволяє тимчасово переключатись на
вашу улюблену програму з будь-якого джерела, крім
діапазонів АМ та FM-LO.
Щодо активації та вибору PTY-коду вашої
улюбленої програми для прийому у режимі
очікування, див. стор. 16.
Індикатор PTY або загорається, або блимає.
• Коли індикатор PTY загориться, режим прийому
вибраних програм у режимі очікування буде
включено.
• Коли індикатор PTY блимає, режим прийому
вибраних програм у режимі очікування ще не
включений.
Для активації прийому настройтесь на іншу станцію,
яка транслює ці сигнали. При цьому індикатор PTY
перестане блимати та буде горіти стійко.
Щоби відключити режим прийому вибраних
програм у режимі очікування, виберіть “PTY OFF”
(відключити) для коду PTY (див. стор.16). Індикатор
PTY погасне.
Відстеження однієї програми
—Прийом з мережевим
відстеженням
При перетинанні місцевості, де FM-прийом
недостатньо якісний, система автоматично
налаштовується на іншу FM-станцію з послугою
Radio Data System тієї ж радіомережі, яка, можливо,
транслює ту ж саму програму, але з більш потужним
сигналом (див. ілюстрацію нижче).
Транслювання програми А у різних місцевостях на
різних частотних діапазонах (01 – 05)
Завод-виробник постачає систему вже з активованим
прийомом з мережевим відстеженням.
Щоб змінити параметри режиму прийому з
мережним відстеженням, див. “AF-REG” на стор. 16.
Автоматичний вибір
радіостанції—Пошук програми
Зазвичай при натисканні цифрових програмних
кнопок включається станція, запрограмована під цим
номером.
Якщо сигнали від запрограмованої FM-станції з
Radio Data System-прийомом недостатньо потужні
для якісного прийому, то ця система, користуючись
AF-даними, налаштовується на іншу частоту, яка,
можливо, транслює ту ж саму програму, що й
первісно запрограмована станція.
• Системі потрібен деякий час для налаштування
на іншу станцію за допомогою функції пошуку
програми.
• Див. також стор. 16.
Коди PTY
NEWS, AFFAIRS, INFO, SPORT, EDUCATE, DRAMA, CULTURE,
SCIENCE, VARIED, POP M (музика), ROCK M (музика), EASY M
(музика), LIGHT M (музика), CLASSICS, OTHER M (музика),
WEATHER, FINANCE, CHILDREN, SOCIAL, RELIGION, PHONE
IN, TRAVEL, LEISURE, JAZZ, COUNTRY, NATION M (музика),
OLDIES, FOLK M (музика), DOCUMENT
Page 58

10
РОБОТА
УКРАЇНА
Щоби виконати наступні дії, потрібно натиснути (або
утримувати) наступні кнопки...
MP3/WMA: Вибір папки
[Натиснення] Вибір доріжки
[Утримання] Швидкий перехід
вперед або назад до
потрібної доріжки
Робота з дисками
1
Вмикання живлення.
2
Вставте диск.
Усі доріжки будуть програватись у повторному
режимі, доки не буде змінено джерело або
висунуто диск.
Зупинити програвання та висунути диск
• На дисплеї з’являється “NO DISC”. Натисніть “SRC”,
щоб змінити джерело прослуховування.
Блокування висування диску
Щоби відмінити блокування, повторіть ту ж
саму процедуру.
Вибір доріжки/папки
• При використанні дисків формату MP3/WMA
виберіть потрібну папку, а потім потрібну
доріжку, повторюючи процедури з диском
керування.
• Для того, щоб повернутись до попереднього
меню, натисніть BACK.
[Обертання] =
[Натисніть кнопку]
Page 59

11
РОБОТА ТА ЗОВНІШНІ ПРИСТРОЇ
УКРАЇНА
REPEAT
TRACK RPT : Повторно відтворюється
поточна доріжка
FOLDER RPT : MP3/WMA: Повторюється
відтворення поточної папки
RANDOM
FOLDER RND : MP3/WMA: У випадковому
порядку відтворюються всі
доріжки з поточної папки, потім
- доріжки з наступної папки і т.д
ALL RND : У випадковій послідовності
відтворюються всі доріжки
• Щоби скасувати відтворення з повтором або
відтворення у випадковому порядку, виберіть
“RPT OFF” або “RND OFF”.
• Для того, щоб повернутись до попереднього
меню, натисніть BACK.
Вибір режимів програвання
Водночас можна користуватися тільки одним з
наступних режимів програвання:
1
2
3
[Обертання] =
[Натисніть кнопку]
REPEAT Ô RANDOM
[Обертання] =
[Натисніть кнопку]
Прослуховування інших зовнішніх компонентів
Ви можете підключити зовнішній компонент до гнізда вхідного сигналу AUX (зовнішній), розташованого на
панелі керування.
Підготовка: Переконайтеся, що вибрано “AUX ON” (Ввімкнення додаткового входу) у налаштуванні
“SRC SELECT” = “AUX IN” (Вибір джерела = Додатковий вхід), див. стор. 18.
1
Виберіть пункт “AUX IN”.
2
—
Ввімкніть приєднаний пристрій та почніть відтворення
треків з обраного джерела.
3
Регулювання гучності.
4
—
Відрегулюйте звук за потребою (див. стор. 13 і 14).
Приєднання зовнішнього пристрою до гнізда вхідного сигналу AUX
Мініатюрний стереофонічний штекер 3,5 мм
(не входить до комплекту поставки)
Портативний аудіоплеєр
і т. ін.
Page 60

12
ЗОВНІШНІ ПРИСТРОЇ
УКРАЇНА
Використання пульту дистанційного керування —
RM-RK50
Ця система може бути керована дистанційно за
інструкціями, наведеними тут (за допомогою пульта
дистанційного керування, який можна придбати
окремо). Ми рекомендуємо для вашої системи
користуватись пультом дистанційного керування
RM-RK50.
Встановлення літієвої таблеткової батареї
(CR2025)
Застереження:
• При неналежній заміні батареї має місце ризик
вибуху. Заміняти батарею лише тим самим типом
або його еквівалентом.
• Не дозволяється піддавати батарею впливу
надмірного нагріву, як, наприклад, сонячного
проміння, вогню і т. п.
Якщо знижується ефективність дії пульту
дистанційного керування, замініть батарею.
Перед використанням пульту дистанційного
керування:
• Націльте пульт прямо на дистанційний датчик
пристрою.
• НЕ ЗАЛИШАЙТЕ дистанційний датчик при
сильному освітленні (під прямими променями
сонця або штучного освітлення).
1 •
При короткочасному натисканні – увімкнення
живлення, а при увімкненому живленні
– зменшення звуку.
•
При натисканні та утриманні – вимкнення
живлення.
2 •
Заміна запрограмованих станцій.
•
Зміна папки MP3/WMA.
3
Регулювання рівня гучності.
4
Вибір режиму звучання.
5
Вибір джерела.
6 •
При короткочасному натисненні виконує
пошук станцій.
•
При натисканні та утриманні – швидкий
перехід вперед або назад.
•
При короткому натисканні – переміна доріжки.
Попередження (щоби запобігти
нещасним випадкам та пошкодженням):
•
Не встановлюйте ніякі інші батареї, окрім CR2025
або її еквіваленту.
•
Не залишайте пульт дистанційного керування у
місцях дії прямого сонячного випромінювання
(таких як приладова дошка) на тривалий час.
•
Зберігайте батареї в місцях, недоступних для дітей.
•
Не перезаряджайте батарею, не замикайте її
на коротко, не розбирайте, не нагрівайте й не
піддавайте дії вогню.
•
Не зберігайте батарею разом з іншими металевими
предметами.
•
Не тикайте в батарею пінцетом або іншими
інструментами.
•
Викидаючи батарею або зберігаючи її, обгорніть її
ізоляційною стрічкою.
Дистанційний датчик
Page 61

13
НАЛАШТУВАННЯ
УКРАЇНА
Вибір запрограмованих режимів звучання
Можна вибрати запрограмований режим звучання, який краще підходить до музичного жанру.
• Див. також стор. 15.
• Щодо налаштувань еквалайзера “USER” (Користувальницький), див. стор. 14.
Запрограмоване налаштування для кожного режиму звучання
Режим
звучання
Запрограмоване значення
BASS MIDDLE TREBLE LOUD
(гучність)
Частота Рівень Q Частота Рівень Q Частота Рівень Q
USER 60 Гц 00 Q1,0 1,0 кГц 00 Q1,0 10,0 кГц 00 Q1,25
OFF
ROCK 100 Гц +03 Q1,0 1,0 кГц 00 Q1,25 10,0 кГц +02 Q1,25
CLASSIC 80 Гц +01 Q1,0 1,0 кГц 00 Q1,25 10,0 кГц +03 Q1,25
POPS 100 Гц +02 Q1,0 1,0 кГц +01 Q1,25 10,0 кГц +02 Q1,25
HIP HOP 60 Гц +04 Q1,0 1,0 кГц –02 Q1,0 10,0 кГц +01 Q1,25
JAZZ 80 Гц +03 Q1,0 1,0 кГц 00 Q1,25 10,0 кГц +03 Q1,25
Частота: Частота Q: Коефіцієнт якості
[Обертання] = [Натисніть кнопку]
Продовження на наступній сторінці
Page 62

14
УКРАЇНА
4 Відрегулюйте елементи звуку для
обраного тембру.
1
Відрегулюйте частоту.
2
Регулювання рівня гучності.
3
Налаштування коефіцієнта якості.
Елементи
звуку
Пункту діапазону/вибору
BASS MIDDLE TREBLE
Частота 60 Гц
80 Гц
100 Гц
120 Гц
0,5 кГц
1,0 кГц
1,5 кГц
2,5 кГц
7,5 кГц
10,0 кГц
12,5 кГц
15,0 кГц
Рівень від –06
до +06
від –06
до +06
від –06
до +06
Q Q0,5
Q1,0
Q1,5
Q2,0
Q0,75
Q1,0
Q1,25
Q1,5
Q0,75
Q1,25
5 Повторіть кроки 3 і 4, щоб відрегулювати
інші характеристики звука.
Зроблені налаштування будуть збережені
автоматично.
Занесення у пам’ять власних
налаштувань звуку
Ви можете зберігати власті налаштування у пам’яті.
1 Виберіть пункт “USER”.
2 Під час відображення на дисплеї “USER”
(користувач)...
3 Виберіть тембр звуку.
[Обертання] =
[Натисніть кнопку]
[Обертання] =
[Натисніть кнопку]
[Обертання] =
[Натисніть кнопку]
Page 63

15
НАЛАШТУВАННЯ
УКРАЇНА
Первісне значення: Виділяється підкресленням
Робота з меню
Категорія Пункти меню Можливі налаштування, [відповідна сторінка]
DEMO
DEMO
Демонстрація
функцій дисплею
• DEMO ON
• DEMO OFF
: Демонстраційний режим буде активізовано автоматично при
відсутності дій протягом 20 секунд, [6].
: Відміняє.
CLOCK
CLOCK DISP *
1
Показ часу
• CLOCK ON
• CLOCK OFF
: Час буде відображатися на дисплеї кожного разу при відключенні
живлення.
: Відміняє; після натиску DISP на дисплеї буде відображатися час
протягом близько 5 секунд, якщо відключене живлення, [6].
CLOCK SET
Встановлення
годинника
: Настройте години, потім хвилини, [6].
(Первісне значення: 0:00)
24H/12H
Режим показу часу
• 24 HOUR
• 12 HOUR
: Щодо встановлення див. також стор. 6.
CLOCK ADJ *
2
Налаштування
годинника
• AUTO
• OFF
: Вбудований годинник налаштовується автоматично за даними СТ
(точного часу) у сигналі Radio Data System.
: Відміняє.
EQ
EQ
Еквалайзер
: Оберіть запрограмований режим звучання, який краще підходить до музичного
жанру.
USER (користувальницький), ROCK (рок), CLASSIC (класика), POPS (поп), HIP
HOP (хіп-хоп), JAZZ (джаз)
DISPLAY
DIMMER
Затемнювач
• DIMMER ON
• DIMMER OFF
: Затемнює освітленість дисплею та кнопок.
: Відміняє.
SCROLL*
3
Scroll (Скролінг)
• SCROLL ONCE
• SCROLL AUTO
• SCROLL OFF
: Одноразово прокручує виведену на екран інформацію.
: Повторює скролінг (з 5-секундними інтервалами).
: Відміняє.
Якщо натиснути на кнопку DISP та утримувати її більше однієї секунди, почнеться
скролінг дисплею незалежно від режиму.
TAG DISPLAY
Показ тегу
• TAG ON
• TAG OFF
: Показує інформацію з тега під час програвання треків MP3/WMA.
: Відміняє.
*1 Якщо живлення не припиняється поворотом ключу запалювання вашого авто, рекомендується вибирати
“CLOCK OFF” задля економії акумулятора авто.
*2 Набуває чинності лише за умови отримання даних CT.
*3 Деякі букви чи символи не будуть відображатися коректно (або їх не буде зовсім) на дисплеї.
1 Активуйте меню. 2 Виберіть бажаний пункт
меню.
3 Повторіть крок 2 у разі
необхідності.
• Для того, щоб повернутись до
попереднього меню, натисніть
BACK.
• для виходу з меню натисніть
DISP або MENU.
[Обертання] =
[Натисніть кнопку]
Продовження на наступній сторінці
Page 64

16
УКРАЇНА
Категорія Пункти меню Можливі налаштування, [відповідна сторінка]
TUNER
AF-REG *
4
Прийом на альтернативній
частоті / регіональний
варіант станції прийому
• AF ON
• AF-REG ON
• OFF
: Коли сигнали, що приймаються, слабішають,
система переключається на іншу станцію (програма
якої може відрізнятися від тієї, що приймається),
[9].
• Індикатор AF загорається.
: Коли сигнали, що їх приймає система, стають
слабкими, система переключається на іншу станцію,
що транслює ту ж саму програму.
• Індикатори AF та REG загораються.
: Відміняє.
PTY-STANDBY *
4
PTY у режимі очікування
PTY OFF, коди
PTY
: Активізує режим прийому вибраних програм у
режимі очікування з одним з PTY-кодів, [9].
TA VOLUME *
4
Рівень звуку при прийомі
повідомлень про стан
дорожнього руху
VOLUME 00
– VOLUME 50
(або VOLUME 00
– VOLUME 30)*
5
: (Первісне значення: VOLUME 15)
P-SEARCH *
4
Пошук програми
• SEARCH ON
• SEARCH OFF
: Активізує пошук програми, [9].
: Відміняє.
MONO *
6
Режим моно
• MONO ON
• MONO OFF
: Для покращення прийому в діапазоні FM активуйте
монофонічний режим, але стереоефект буде
втрачено, [7].
: Відновіть стереоефект.
IF BAND
Селективність по
проміжній частоті
• AUTO
• WIDE
: Підвищує селективність тюнеру для зменшення
шумових перешкод між суміжними станціями.
(Стереоефект може бути втрачений).
: Залежить від шумових перешкод, які надходять
від суміжних станцій, але якість звучання не буде
погіршено і залишиться стереоефект.
COLOR
COLOR 01 – COLOR 29,
USER
: Виберіть один з запрограмованих або користувацьких кольорів для
підсвічування дисплея та кнопки (за винятком T/P/DISP/OPEN/
).
(Для індивідуального налаштування кольорів, “USER”, див стор. 18.)
MENU COLOR
MENU COLOR
Меню кольорів
• OFF
• ON
: Відміняє.
: Змінює колір підсвічування дисплею та кнопки
(за винятком T/P/DISP/OPEN/
) протягом
відображення режимів меню, пошуку у списку та
відтворення.
*4 Тільки для станцій FM Radio Data System.
*5 Залежить від встановленого коефіцієнту підсилювання.
*6 Відображується тільки, якщо джерелом є “FM”.
Page 65

17
УКРАЇНА
НАЛАШТУВАННЯ
Продовження на наступній сторінці
Категорія Пункти меню Можливі налаштування, [відповідна сторінка]
AUDIO
FADER*
7, *8
Мікшер
R06 – F06 : Налаштування вихідного балансу звучання передньої і
задньої колонок.
(Первісне значення: 00)
BALANCE *
8
Баланс
L06 – R06 : Налаштування вихідного балансу звучання лівої і правої
колонок.
(Первісне значення: 00)
LOUD
Гучність
• LOUD OFF
• LOUD ON
: Відміняє.
: Підсилення низьких та високих частот для отримання гарно
збалансованого звучання на малій гучності.
VOL ADJUST
Регулювання гучності
VOL ADJ –05
—
VOL ADJ +05
(Первісне
значення: VOL
ADJ 00)
: Налаштуйте рівень гучності для кожного з джерел (за
винятком FM) відносно рівня гучності FM-радіо. При
зміні джерела сигналу рівень гучності буде автоматично
підвищуватись або зменшуватись.
• Перш ніж робити налаштування, оберіть джерело, яке ви
бажаєте налаштувати.
• Якщо “FM” задано, як джерело, на дисплеї з’являється
напис “VOL ADJ FIX” (Регулювання гучності налаштовано).
L/O MODE
Режим лінійного виходу
• SUB.W
• REAR
: Вибирається у разі, якщо з’єднувачі REAR LINE OUT (лінійний
вихід на задні колонки) використовуються для приєднання
низькочастотного динаміка (через зовнішній підсилювач).
: Вибирається у разі, якщо з’єднувачі REAR LINE OUT (лінійний
вихід на задні колонки) використовуються для приєднання
гучномовців (через зовнішній підсилювач).
SUB.W FREQ *
9
Гранична частота
низькочастотного
динаміка
• LOW
• MID
• HIGH
: Частоти, нижчі за 72 Гц, відправляються на
низькочастотний динамік.
: Частоти, нижчі за 111 Гц, відправляються на
низькочастотний динамік.
: Частоти, нижчі за 157 Гц, відправляються на
низькочастотний динамік.
SUB.W LEVEL *
9
Рівень низькочастотного
динаміка
SUB.W 00
— SUB.W 08
: Регулювання рівня вихідного сигналу низькочастотного
динаміка.
(Первісне значення: SUB.W 04)
BEEP
Звукові сигнали при
натисненні на кнопки
• BEEP OFF
• BEEP ON
: Дезактивує звукові сигнали при натисненні на кнопки.
: Активує звукові сигнали при натисненні на кнопки.
TEL MUTING
Тимчасове вимкнення
звуку
• MUTING 1/
MUTING 2
• MUTING OFF
: Виберіть будь-який режим, що вимикає звук на час
розмови по мобільному телефону.
: Відміняє.
AMP GAIN *
10
Регулювання коефіцієнту
підсилювання
• LOW POWER
• HIGH POWER
: VOLUME 00 – VOLUME 30 (Вибирайте, якщо максимальна
потужність кожної колонки менш ніж 50 Вт, щоб не
пошкодити динамік).
: VOLUME 00 – VOLUME 50
*7 При використанні системи з двома колонками, встановіть мікшер на “00”.
*
8
Налаштування не будуть впливати на вихідний сигнал низькочастотного динаміка.
*9 Виводиться не екран тільки в разі, якщо встановлено режим лінійного виходу (L/O MODE) заданий як
SUB.W (низькочастотний динамік).
*10 Рівень гучності автоматично змінюється на “VOLUME 30” у разі зміни на “LOW POWER”, коли
встановлено рівень гучності, вищий за “VOLUME 30”.
Page 66

18
УКРАЇНА
НАЛАШТУВАННЯ
Вибір запрограмованого кольору
Можна вибрати запрограмований колір кнопок та
дисплею.
• Див. також стор. 16.
Створення власного кольору
—колір користувача
Ви можете створювати власні кольори—“DAY
COLOR” (денний) та “NIGHT COLOR” (нічний).
DAY COLOR: Використовується, коли параметр
“DIMMER” встановлено на
“DIMMER OFF” .
NIGHT COLOR: Використовується, коли параметр
“DIMMER” встановлено на
“DIMMER ON”.
1 Виберіть пункт “USER”.
2 Під час відображення на дисплеї “USER”...
3
4 Виберіть первинний колір.
5 Налаштуйте рівень первинного кольору
(від 00 до 31).
Якщо для первинних кольорів вибрано “00”,
дисплей залишиться незмінним.
6 Повторіть кроки 4 і 5, щоб відрегулювати
первинні кольори.
7 Вихід з налаштувань.
Вибрати “USER” для виводу кольорів за
індивідуальним налаштуванням для кнопок та
дисплею.
Налаштування кольорів
Категорія Пункти меню Можливі налаштування, [відповідна сторінка]
SRC SELECT
AM *
11
AM станція
• AM OFF
• AM ON
: Відключення “AM” у виборі джерела.
: Ввімкнення “AM” у виборі джерела, [4].
AUX IN *
12
Вхідний сигнал від
зовнішнього пристрою
• AUX OFF
• AUX ON
: Відключення “AUX IN” у виборі джерела.
: Ввімкнення “AUX IN” у виборі джерела, [4].
*11 Відображується тільки при виборі джерела, відмінного від “AM”.
*12 Відображується тільки при виборі джерела, відмінного від “AUX IN”.
[Обертання] =
[Натисніть кнопку]
або
[Обертання] =
[Натисніть кнопку]
[Обертання]
=
[Натисніть кнопку]
[Обертання] =
[Натисніть кнопку]
Page 67

19
ДОВІДКОВА ІНФОРМАЦІЯ
УКРАЇНА
Основні функції
Включення живлення
• Живлення можна також включити, натиснувши на
кнопку SRC в системі. Якщо джерело програвання
готове, також почнеться й його програвання.
Відключення живлення
• Якщо відключити живлення під час
прослуховування доріжки, то після наступного
включення живлення відтворення розпочнеться з
того місця, на якому його було перервано.
Загальні несправності
• Якщо ви змінюєте джерело при прослуховуванні
диску, відтворення зупиняється.
Якщо наступним разом ви обираєте “CD” як
джерело програвання, відтворення почнеться з
того місця, де було зупинено раніше.
• Після того, як диск висунеться, на дисплеї
з’явиться надпис “NO DISC” і використання деяких
кнопок унеможливиться. Вставте інший диск,
або натисніть SRC, щоби вибрати інше джерело
прослуховування.
• Якщо протягом 30 секунд після натиснення на
кнопку MENU не виконується жодної дії, операція
буде відмінена.
Робота з тюнером
Занесення станцій у пам’ять
• Під час SSM-пошуку...
– Всі попередньо запрограмовані станції
затираються, а у пам’ять станції записуються
заново.
– По завершенні SSM-пошуку буде здійснено
автоматичне налаштування на станцію під
найнижчим попередньо заданим номером.
• При записуванні станції вручну попередня
записана станція видаляється одночасно з
записом за тим же номером нової станції.
Функції FM Radio Data System
• Прийом з мережним відстеженням для
коректного функціонування потребує двох типів
Radio Data System-сигналів—PI (ідентифікація
програми) та AF (альтернативна частота). Без
коректного прийому цих даних режим прийому з
мережним відстеженням не буде функціонувати
належним чином.
• При прийнятті повідомлення про стан дорожнього
руху у режимі очікування, рівень звуку
автоматично змінюється на запрограмований
(TA VOL), якщо поточний рівень нижчий від
запрограмованого.
• Коли активовано прийом з альтернативної
частоти (з вибраною альтернативною частотою),
прийом з мережним відстеженням також
активується автоматично.
Робота з дисками
Застереження при програванні дисків
DualDisc
• Сторона дисків “DualDisc”, що не призначена для
DVD, не відповідає стандартові цифрових аудіо
компакт-дисків. Тобто, програвання тієї сторони
дисків DualDisc, що не призначена для DVD, на цій
системі не рекомендовано.
Загальні несправності
• Ця система була створена для відтворювання
компакт-дисків/дисків CD Texts та дисків CD-R
(одноразового запису)/CD-RW (багаторазового
запису), що записані у форматах аудіо-CD (CD-DA)
та MP3/WMA.
• Коли диск покладено невірною стороною, на
екрані мають по черзі з’являтися написи “PLEASE”
(будь ласка) та “EJECT” (вийміть диск). Натисніть
кнопку OPEN, а потім 0 щоб витягти диск.
• “Доріжки” MP3 та WMA (при цьому терміни
“файл” та “доріжка” вживаються як
взаємозамінні) записуються у “папки”.
•
При “перемотці” уперед або назад диску з MP3 або
WMA ви будете чути тільки переривчасті звуки.
Додаткова інформація про пристрій
Продовження на наступній сторінці
Page 68

20
УКРАЇНА
– Формат диску: ISO 9660 Level 1/ Level 2, Romeo,
Joliet, довгі імена файлів Windows.
• Найбільша кількість символів у імені файлу/папки
(включаючи чотири символи розширення—
<.mp3> або <.wma>) є різною для різних
вживаних форматів дисків.
– ISO 9660 Level 1: до 12 символів
– ISO 9660 Level 2: до 31 символів
– Romeo: до 128 символів
– Joliet: до 64 символів
– Довгі імена файлів Windows: до 128 символів
• Ця система може взагалі розпізнати 512 файлів,
255 папок та 8 ієрархій.
• Ця система може програвати файли, записані у
режимі VBR (з мінливим бітрейтом).
Файли, записані у режимі VBR, дають невірну
індикацію пройденого часу та не показують
фактичного пройденого часу. Зокрема ця різниця
стає помітною після виконання функції пошуку.
• Ця система не може програвати наступні файли:
– MP3-файли, закодовані у форматах MP3i та
MP3 PRO.
– MP3-файли, закодовані у невідповідному
форматі.
– MP3-файли, закодовані у стандарті Layer 1/2.
– WMA-файли, закодовані у безвтратному,
професійному та голосовому форматі.
– WMA-файли, створені не на базі Windows
Media ® Audio.
– WMA-файли, захищені від копіювання за
допомогою DRM.
– Файли даних, такі як AIFF, ATRAC3, та ін.
• Функція пошуку працює, але швидкість пошуку не
є постійною.
Висування диску
• Якщо диск після його висування не буде забрано
протягом 15 секунд, то, з метою його захисту від
пилу, він знову буде автоматично втягнений у
завантажувальний отвір. Відтворення почнеться
автоматично.
Робота з меню
• Якщо змінити параметр підсилювання
“AMP GAIN” з “HIGH POWER” на
“LOW POWER” при рівні гучності, вищому
за “VOLUME 30”, система автоматично змінить
рівень на “VOLUME 30”.
Програвання дисків CD-R або CD-RW
• Користуйтесь дисками CD-R або CD-RW тільки з
завершеними сесіями запису.
• Цей пристрій може відтворювати файли тільки
того типу, який буде знайдений першим, якщо
на диску зберігаються і файли формату аудіо
компакт-диску (CD-DA), і файли MP3/WMA.
• Система може програвати багатосесійні диски;
однак незакриті сесії будуть пропускатися під час
програвання.
• Деякі диски CD-R або CD-RW можуть не
програватись на цій системі завдяки їхнім
характеристикам, або з наступних причин:
– Диски забруднені або подряпані.
– Волога сконденсувалась на лінзі всередині
системи.
– Звукознімальна лінза всередині системи
забруднена.
– Файли на дику CD-R/CD-RW записані методом
пакетного запису “Packet Write”.
– Неналежні умови запису (відсутність даних, і
т. ін.) або стан носія (заплямований, подертий,
погнутий і т. ін.)
• Диски CD-RW можуть потребувати більше часу на
зчитування, оскільки відбивна здатність CD-RWдисків нижча від звичайних компакт-дисків.
• Не користуйтеся наступними дисками CD-R або
CD-RW:
– Диски з наклейками, етикетками або захисною
оболонкою, що приклеїлась до поверхні.
– Диски, наклейки на які можна напряму
роздруковувати струминним принтером.
Користування цими дисками в умовах високої
температури або вологості може призвести до
збоїв або ушкодження системи.
Програвання диску MP3/WMA
• Ця система може програвати файли MP3/WMA з
розширенням <.mp3> або <.wma> (незалежно
від регістру літер—верхнього чи нижнього).
• Ця система може показувати назви альбомів,
імена артистів (виконувачів) та теги (версії 1.0,
1.1, 2.2, 2.3, або 2.4) для файлів MP3 та WMA.
• Ця система може програвати файли MP3/WMA за
наступних умов:
– Бітрейт: 8 кбіт/с — 320 кбіт/с
– Частота дискретизації:
48 кГц, 44,1 кГц, 32 кГц (для MPEG-1)
24 кГц, 22,05 кГц, 16 кГц (для MPEG-2)
Page 69

21
ДОВІДКОВА ІНФОРМАЦІЯ
УКРАЇНА
Пошук та усунення несправностей
Те, що здається проблемою, не завжди виявляється серйозним. Перш ніж телефонувати до сервісного
центру, спробуйте наступне.
Симптоми Засоби виправлення/Причини
Загальні несправності
• З колонок не чути звук. • Налаштуйте гучність до оптимального рівня.
• Перевірте шнури та з’єднання.
• Пристрій не працює взагалі. Повторно налаштуйте систему (див. стор. 3).
• “AUX IN” не можна вибирати. Перевірте налаштування “SRC SELECT”
=
“AUX IN” (див. стор. 18).
• Дисплей залишається незмінним. Зверніться до опису індивідуальних налаштувань
кольорів “USER” (див. стор. 18.)
FM/AM
• Автоматичне програмування станцій
SSM не функціонує.
Програмуйте станції вручну.
• Статичні перешкоди під час
прослуховування радіо.
Приєднайте міцно провід антени.
• “AM” не можна вибирати. Перевірте налаштування “SRC SELECT” = “AM”
(див. стор. 18).
Диски взагалі
• Диск не відтворюється. Вставте диск правильно.
• Диски CD-R/CD-RW не програються.
• Доріжки на диску CD-R/CD-RW не
вдається пропустити.
• Вставте диск CD-R/CD-RW з закритими сесіями.
• Закрийте сесії на диску CD-R/CD-RW на тому
пристрої, на якому ви виконували запис.
• Диск не можна ані програти, ані
висунути.
• Розблокуйте диск (див. стор. 10).
• Виконайте примусове висування диску
(див.стор. 3).
• Звук диску інколи переривається. • Зупиняйте відтворення на поганих ділянках доріг.
• Змініть диск.
• Перевірте шнури та з’єднання.
• На дисплеї з’являється “NO DISC”. Вставте у завантажувальний отвір диск, що може
програватися.
• На дисплеї по черзі з’являються написи
“PLEASE” та “EJECT”.
Натисніть “OPEN”, потім “0”, щоби витягти диск,
після цього вставте диск належним чином.
Продовження на наступній сторінці
Page 70

22
УКРАЇНА
Симптоми Засоби виправлення/Причини
Програвання MP3/WMA
• Диск не відтворюється. • Користуйтесь диском з доріжками MP3/WMA,
записаними у форматі, що відповідає стандартам
ISO 9660 Level 1, Level 2, Romeo, або Joliet.
• Додайте до імен файлів розширення <.mp3> або
<.wma>.
• Чути шум. Перейдіть на іншу доріжку або змініть диск. (Не
додавайте розширень <.mp3> чи <.wma> до імен
доріжок, що не є доріжками MP3 або WMA).
• Потрібний більший час для зчитування
(на дисплеї довго блимає “READING”).
Не використовуйте дуже багато рівнів ієрархії та
папок.
• Доріжки програються не в тому
порядку, у якому ви передбачали їхнє
програвання.
Порядок програвання визначається під час запису
файлів.
• Час, що минув з початку відтворення,
показується невірно.
Це іноді відбувається під час відтворення. Це
залежить від того, як доріжки записуються на диск.
• На дисплеї з’являється “NO FILE”. Вибрана папка порожня*. Виберіть іншу папку, яка
містить доріжки MP3/WMA.
* Папка, яка є фізично порожньою або така, яка
містить лише дані, а не доріжки у форматі MP3/
WMA.
• Символи відображаються некоректно
(наприклад, назва альбому).
Ця система може відображати тільки символи
латинського алфавіту (у верхньому регістрі),
кириличного алфавіту (у верхньому регістрі), цифри
та обмежену кількість символів (див. стор. 2).
• Microsoft та Windows Media є або зареєстрованими торговими марками, або торговими марками
корпорації Microsoft Corporation у Сполучених Штатах Америки та/або в інших країнах.
Page 71

23ДОВІДКОВА ІНФОРМАЦІЯ
УКРАЇНА
Як чистити з’єднувачі
Часте від’єднання з’єднувачів погіршує їх стан.
Для зменшення ризику виведення з ладу
періодично обережно протирайте з’єднувачі ватним
тампоном або тканиною, змоченою у спирті, аби не
пошкодити їх.
Конденсація вологи
Волога може конденсуватись на лінзі всередині
системи у наступних випадках:
• Після запуску в машині обігрівача.
• Коли в салоні машини стане дуже сиро.
У цих випадках система може дати збій. У цьому
випадку витягніть диск та залиште систему
включеною на декілька годин, доки не випариться
волога.
Як поводитися з дисками
Виймаючи диск з коробки,
натисніть на утримувач усередині
коробки по центру та витягніть
диск вгору, тримаючи його за
вінця.
• Завжди тримайте диск за вінця. Не торкайтеся
його робочої поверхні.
Вкладаючи диск у коробку, легко вставте його
навколо центрального утримувача (друкованою
поверхнею догори).
• Завжди зберігайте диски у коробках.
З’єднувачі
Центральний
утримувач
Чищення дисків
Забруднений диск може програватись
некоректно.
Якщо диск забруднився, протріть його
м’якою тканиною прямими рухами від
центру до краю.
• Для очищення дисків не використовуйте ніякі
розчинники (наприклад, очищувач для звичайних
грампластинок, аерозоль, розчинник, бензин та
ін.).
Програвання нових дисків
Нові диски можуть мати деякі
нерівності навколо внутрішнього та
зовнішнього країв. Якщо спробувати
вставити такий диск у систему, вона
може не прийняти його.
Для усунення цих нерівностей, потріть краї
олівцем або кульковою ручкою.
Не користуйтеся наступними дисками:
Малий компакт-диск
(8 см)
пожолобленими
дисками
Наліпка та залишок
наліпки Клейка етикетка
диск має незвичайну
форму
C-thru Disc
(напівпрозорий диск)
Прозорі або напівпрозорі
елементи робочої
поверхні для запису
Обслуговування
Page 72

24
УКРАЇНА
АУДІО ПІДСИЛЮВАЧ
Максимальна вихідна потужність: Передні/задні
колонки:
50 Вт на канал
Тривала вихідна потужність
(ефективна):
Передні/задні
колонки:
19 Вт на канал на 4 Ом, від 40 Гц до 20 000 Гц
при не більш ніж 0,8% загальних нелінійних
викривлень.
Імпеданс навантаження: 4 Ом (допускається 4 Ом – 8 Ом)
Діапазон регулювання тону: Низькі частоти: ±12 дБ (60 Гц, 80 Гц, 100 Гц, 120 Гц)
Q0,5, Q1,0, Q1,5, Q2,0
Низькі: ±12 дБ (0,5 кГц, 1,0 кГц, 1,5 кГц, 2,5 кГц)
Q0,75, Q1,0, Q1,25, Q1,5
Високі частоти: ±12 дБ (7,5 кГц, 10,0 кГц, 12,5 кГц, 15,0 кГц)
Q0,75, Q1,25
Частотні характеристики: 40 Гц – 20 000 Гц
Співвідношення “сигнал/шум”: 70 дБ
Вихідний рівень/імпеданс: 2,5 В/20 кОм навантаження (за повною шкалою)
Вихідний імпеданс: 1 кОм
Вихідний рівень сигналу/імпеданс низькочастотного
динаміка:
2,5 В/20 кОм навантаження (за повною шкалою)
Інші рознімання: AUX (зовнішнє) гніздо вхідного сигналу
ТЮНЕР
Частотний діапазон: FM: 87,5 МГц – 108,0 МГц
FM-LO: 65,00 МГц – 74,00 МГц
AM: MW (СХ): 522 кГц – 1 620 кГц
LW (ДХ): 144 кГц – 279 кГц
FM-тюнер Реальна чутливість: 9,3 дБ на 1 фВт (0,8 мкВ/75 Ом)
50 дБ чутливості при заданому
співвідношенні «сигнал/шум»:
16,3 дБ на 1 фВт (1,8 мкВ/75 Ом)
Селективність альтернативного
каналу (400 кГц):
65 дБ
Частотні характеристики: 40 Гц – 15 000 Гц
Розділення стереоканалів: 40 дБ
Середньохвильовий
(MW) тюнер
Чутливість: 20 мкВ
Селективність: 40 дБ
Довгохвильовий
(LW) тюнер
Чутливість: 50 мкВ
Характеристики
Page 73

25ДОВІДКОВА ІНФОРМАЦІЯ
УКРАЇНА
ПРОГРАВАЧ КОМПАКТ-ДИСКІВ
Тип: Програвач компакт-дисків
Система виявлення сигналу: Безконтактне оптичне знімання
(напівпровідниковим лазером)
Кількість каналів: 2-канальний (стерео)
Частотні характеристики: 5 Гц – 20 000 Гц
Динамічний діапазон: 96 дБ
Співвідношення “сигнал/шум”: 98 дБ
Коефіцієнт детонації: менший за межу вимірювання
Формат декодування MP3: (MPEG1/2 Audio Layer 3) Макс. бітрейт: 320 кбіт/с
Формат декодування WMA (Windows Media® Audio): Макс. бітрейт: 320 кбіт/с
ЗАГАЛЬНІ ХАРАКТЕРИСТИКИ
Вимоги до живлення: Робоча напруга: 14,4 В постійного струму (допускається від
11 В до 16 В)
Система заземлення: Мінус на землю
Припустима робоча температура: від 0°C – +40°C
Розміри (Ш х В х Д): (приблизно) Встановчі розміри: 182 мм × 52 мм × 160 мм
Розмір панелі: 188 мм × 58 мм × 12 мм
Маса: 1,3 кг (без допоміжних пристроїв)
Конструкція та характеристики можуть змінюватися без попередження.
 Loading...