

Page 1
CD RECEIVER
CD-RECEIVER
РЕСИВЕР С ПРОИГРЫВАТЕЛЕМ КОМПАКТ-ДИСКОВ
∆ΕΚΤΗΣ ΜΕ CD
KD-R501/KD-R402/KD-R401
For canceling the display demonstration, see page 6.
Zum Abbrechen der Displaydemonstration siehe Seite 6.
Информацию об отмене демонстрации функций дисплея см. на стр. 6.
Για να ακυρώσετε την επίδειξη λειτουργίας στην θóνη, βλ. σελίδα 6.
ENGLISHDEUTSCHРУCCKИЙ
ΕΛΛΗΝΙΚΑ
For installation and connections, refer to the separate manual.
Für den Einbau und die Anschlüsse siehe das eigenständige Handbuch.
Указания по установке и выполнению соединений приводятся в отдельной инструкции.
Για πληρoφoρίες σχετικά µε την εγκατάσταση και τις συνδέσεις, ανατρέξτε στo αντίστoιχo ξεχωριστό εγχειρίδιo.
INSTRUCTIONS
BEDIENUNGSANLEITUNG
ИНСТРУКЦИИ ПО ЭКСПЛУАТАЦИИ
Ο∆ΗΓΙΕΣ
GET0574-006A
[EY]
Page 2

Thank you for purchasing a JVC product.
Please read all instructions carefully before operation, to ensure your complete understanding and to obtain the best
possible performance from the unit.
IMPORTANT FOR LASER PRODUCTS
ENGLISH
1. CLASS 1 LASER PRODUCT
2. CAUTION: Do not open the top cover. There are no user serviceable parts inside the unit; leave all servicing to
qualified service personnel.
3. CAUTION: Visible and/or invisible class 1M laser radiation when open. Do not view directly with optical
instruments.
4. REPRODUCTION OF LABEL: CAUTION LABEL, PLACED OUTSIDE THE UNIT.
Warning:
If you need to operate the unit while driving, be sure to
look around carefully or you may be involved in a traffic
Battery
Products
Information for Users on Disposal of Old
Equipment and Batteries
[European Union only]
These symbols indicate that the product and the
battery with this symbol should not be disposed as
general household waste at its end-of-life.
If you wish to dispose of this product and the
battery, please do so in accordance with applicable
national legislation or other rules in your country
and municipality.
By disposing of this product correctly, you will help
to conserve natural resources and will help prevent
potential negative effects on the environment and
human health.
Notice:
The sign Pb below the symbol for batteries indicates
that this battery contains lead.
accident.
Caution on volume setting:
Digital devices (CD/USB) produce very little noise
compared with other sources. Lower the volume before
playing these digital sources to avoid damaging the
speakers by sudden increase of the output level.
For safety...
• Do not raise the volume level too much, as this will
block outside sounds, making driving dangerous.
• Stop the car before performing any complicated
operations.
Temperature inside the car...
If you have parked the car for a long time in hot or cold
weather, wait until the temperature in the car becomes
normal before operating the unit.
2
Page 3

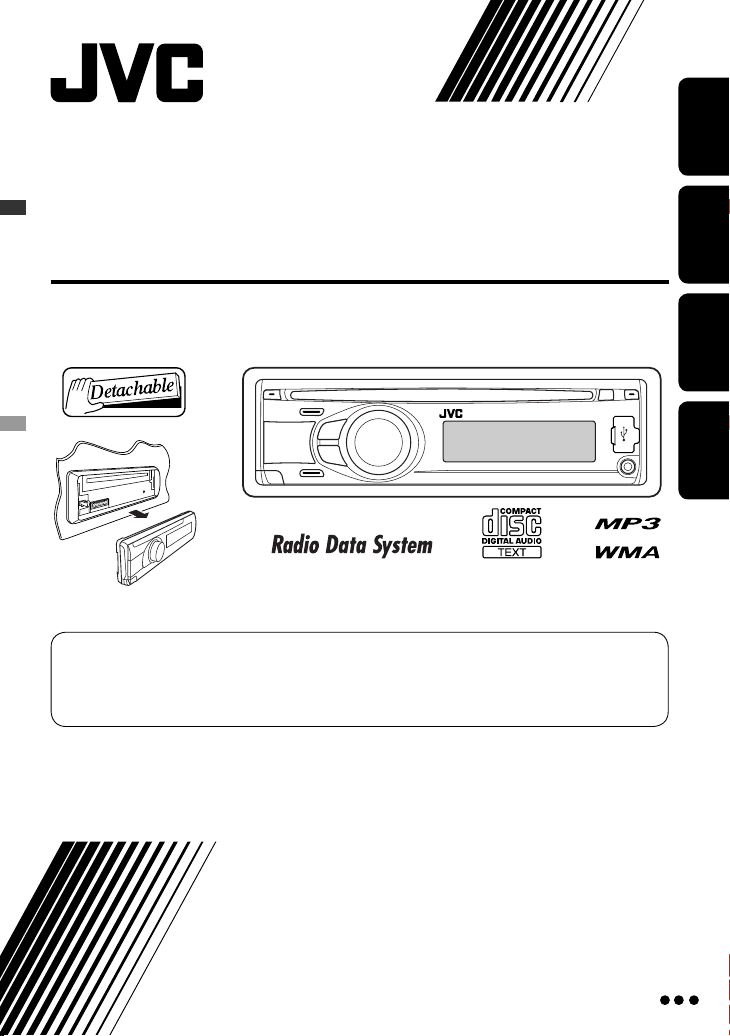
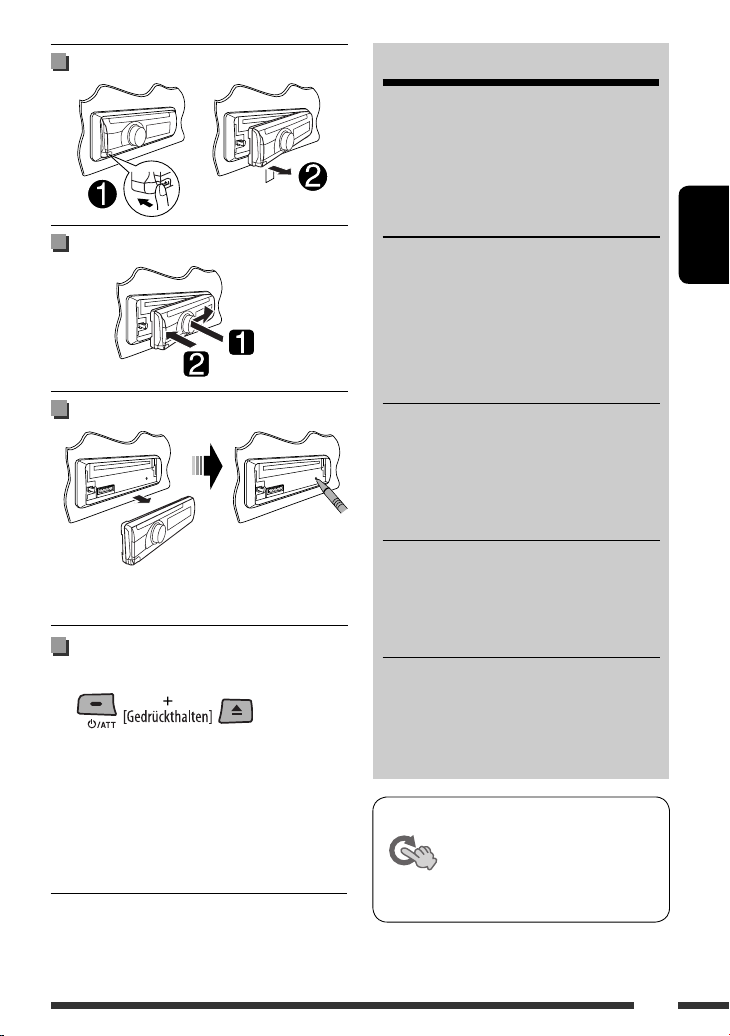
Detaching the control panel
Attaching the control panel
How to reset your unit
CONTENTS
Detaching the control panel ......................... 3
Attaching the control panel ......................... 3
How to reset your unit ................................. 3
How to forcibly eject a disc ........................... 3
OPERATIONS
Basic operations ........................................... 4
Preparation .................................................. 6
Listening to the radio ................................... 7
Disc operations ............................................. 10
Listening to the USB device .......................... 11
EXTERNAL DEVICES
Listening to the other external
components .............................................. 12
Using the remote controller—
SETTINGS
Selecting a preset sound mode .................... 14
Menu operations .......................................... 16
Color settings (for KD-R501) ........................ 19
RM-RK50 ...... 13
ENGLISH
• Your preset adjustments will also be erased.
How to forcibly eject a disc
• You can forcibly eject the loaded disc even if the disc is
locked. To lock/unlock the disc, see page 10.
• Be careful not to drop the disc when it ejects.
• If this does not work, reset your unit.
REFERENCES
More about this unit .................................... 20
Troubleshooting ........................................... 23
Maintenance ................................................ 25
Specifications ............................................... 26
This mark is used to indicate...
Turn the control dial to make a
selection, then press to confirm the
selection.
3
Page 4

Basic operations
ENGLISH
1 • FM/AM: Select preset station.
• CD/USB: Select folder.
2 • Turn on the power.
• Attenuate the sound (if the power is on).
• Turn off the power [Hold].
3 Select the source.
FM = CD *2 = USB = AUX IN *3 = AM *3 =
(back to the beginning)
4 • Enter list operations.
• Enter Menu setting [Hold] .
5 • Control the volume *
4
or select items [Turn].
p Detach the panel.
q Change the display information.
w • FM/AM: Search for station.
• CD/USB: Select track.
e Return to the previous menu.
r Remote sensor
• You can control this unit with an optionally
purchased remote controller. For details, see
page 13.
t AUX (auxiliary) input jack
y USB (Universal Serial Bus) input jack
• Confirm the selection [Press] .
• FM: Enter SSM preset mode [Hold] .
• CD/USB: Enter playback mode [Hold] .
Pause/resume playback *4 [Press] .
6 Loading slot
7 Display window
8 Eject disc.
9 • Activate/deactivate TA Standby Reception.
• Enter PTY Searching mode [Hold].
*1 Also known as “Control dial” in this manual.
*2 You cannot select “CD” as the playback source if no
disc is in the unit.
*3 You cannot select these sources if they were disabled
in the Menu (see “SRC SELECT” in “Menu
operations” on page 19).
*4 You can still adjust the volume during pause when
the selected source is CD/USB.
Before resume playback, check to be sure that you
have not raise the volume level too much.
KD-R501: You can change the display and button illumination (see “COLOR” on page 17).
4
Page 5

Display window
ENGLISH
1 Tr (track) indicator
2 Source display / Track number / Folder number /
Time countdown indicator
3 DISC indicator
4 Sound mode indicators—CLASSIC, HIP HOP, JAZZ,
ROCK, POPS, USER
5 Playback mode / item indicators— RND (random),
(disc), (folder), RPT (repeat)
6 EQ (equalizer) indicator
7 LOUD (loudness) indicator
8 Disc information indicators—
TAG (Tag information), (track/file), (folder)
9 Main display
p Radio Data System indicators—AF, REG, TP, PTY
q Tuner reception indicators—ST (stereo),
MO (monaural)
5OPERATIONS
Page 6

Preparation
Canceling the display demonstration and setting the clock
• See also page 16.
ENGLISH
1
Turn on the power.
2
Press and hold until
the main menu is
called up.
[Turn] = [Press]
• Repeat this
procedure.
Cancel the display demonstrations
Select “DEMO,” then “DEMO OFF.”
Set the clock
Select “CLOCK” = “CLOCK SET.”
Adjust the hour, then press control dial once to proceed to adjust
the minute.
Select “24H/12H,” then “24 HOUR” or “12 HOUR.”
• To return to the previous menu, press BACK.
Changing the display information
When the power is turned off: The current clock time is displayed if “CLOCK DISP” is set to “CLOCK OFF,”
(see page 16).
When the power is turned on: The display information of the current source changes as follows:
FM/AM Station Frequency = Clock = (back to the beginning)
FM Radio
Data System
CD
CD/USB
Station name (PS)
beginning)
Audio CD/CD Text: Disc title/performer *
MP3/WMA: Album name/performer (folder name) *2 = Track title (file name) *2 =
= Station Frequency = Programme type (PTY) = Clock = (back to the
1
= Track title *1 = Current track number with the
elapsed playing time = Current track number with the clock time =
(back to the beginning)
Current track number with the elapsed playing time = Current track
number with the clock time = (back to the beginning)
*1 If the current disc is an audio CD, “NO NAME” appears.
*2 If an MP3/WMA file does not have Tag information or “TAG DISPLAY” is set to “TAG OFF” (see page 16),
folder name and file name appear.
6
Page 7

Listening to the radio
1
2
Select “FM” or “AM.”
Search for a station to listen—Auto Search.
When a station is tuned in, searching stops. To stop searching, press the same
button again.
• You can also search for a station manually—Manual Search. Hold either one of
the buttons until “M” flashes on the display, then press it repeatedly.
• When receiving an FM stereo broadcast with sufficient signal strength, the ST
indicator lights up on the display.
Improving the FM reception
When an FM stereo broadcast is hard to receive,
activate monaural mode for better reception.
• See also page 17.
[Turn] = [Press]
Reception improves, but stereo effect will be lost.
• The MO indicator lights up on the display.
ENGLISH
Storing stations in memory
Automatic presetting (FM)— SSM (Strongstation Sequential Memory)
You can preset up to 18 stations for FM.
1 While listening to a station...
2 Select the preset number range you want to
store.
To restore the stereo effect, repeat the same
procedure to select “MONO OFF.” The MO indicator
goes off.
3
Local FM stations with the strongest signals are
searched and stored automatically.
• To stop searching, press 4 /¢ .
To preset other 6 stations, repeat from step 1 again.
Continued on the next page
7OPERATIONS
Page 8

Manual presetting (FM/AM)
You can preset up to 18 stations for FM and 6 stations
for AM.
Ex.: Storing FM station of 92.50 MHz into preset
number “04.”
ENGLISH
1
2 Select preset number “04.”
3
Selecting preset station
The following features are available only for FM
Radio Data System stations.
Searching for FM Radio Data
System programme—PTY Search
You can tune in to a station broadcasting your favorite
programme by searching for a PTY code.
1 The last selected PTY code
appears.
2 Select one of your favorite programme types
or a PTY code.
3 Start searching for your favorite programme.
or
If a station is broadcasting a programme of the
same PTY code as you have selected, that station is
tuned in.
Using the standby receptions
[Turn] = [Press]
8
TA Standby Reception
TA Standby Reception allows the unit to switch
temporarily to Traffic Announcement (TA) from any
source other than AM.
The volume changes to the preset TA volume level if the
current level is lower than the preset level (see
page 17).
Page 9

To activate TA Standby Reception
The TP (Traffic Programme)
indicator either lights up or flashes.
• If the TP indicator lights up, TA Standby Reception is
activated.
• If the TP indicator flashes, TA Standby Reception is
not yet activated. (This occurs when you are listening
to an FM station without the Radio Data System
signals required for TA Standby Reception.)
To activate the reception, tune in to another station
providing these signals. The TP indicator will stop
flashing and remain lit.
To deactivate the TA Standby Reception
The TP indicator goes off.
PTY Standby Reception
PTY Standby Reception allows the unit to switch
temporarily to your favorite PTY programme from any
source other than AM.
To activate and select your favorite PTY code for
PTY Standby Reception, see page 17.
The PTY indicator either lights up or flashes.
• If the PTY indicator lights up, PTY Standby Reception
is activated.
• If the PTY indicator flashes, PTY Standby Reception is
not yet activated.
To activate the reception, tune in to another station
providing these signals. The PTY indicator will stop
flashing and remain lit.
To deactivate the PTY Standby Reception, select
“PTY OFF” for the PTY code (see page 17). The PTY
indicator goes off.
Tracing the same programme—
Network-Tracking Reception
When driving in an area where FM reception is not
sufficient enough, this unit automatically tunes in to
another FM Radio Data System station of the same
network, possibly broadcasting the same programme
with stronger signals (see the illustration below).
When shipped from the factory, Network-Tracking
Reception is activated.
To change the Network-Tracking Reception
setting, see “AF-REG” on page 17.
Programme A broadcasting on different frequency areas
(01 – 05)
Automatic station selection—
Programme Search
Usually when you select a preset number, the station
preset in that number is tuned in.
If the signals from the FM Radio Data System preset
station are not sufficient for good reception, this
unit, using the AF data, tunes in to another frequency
possibly broadcasting the same programme as the
original preset station is broadcasting.
• The unit takes some time to tune in to another
station using programme search.
• See also page 17.
ENGLISH
PTY codes
NEWS, AFFAIRS, INFO, SPORT, EDUCATE, DRAMA, CULTURE,
SCIENCE, VARIED, POP M (music), ROCK M (music), EASY
M (music), LIGHT M (music), CLASSICS, OTHER M (music),
WEATHER, FINANCE, CHILDREN, SOCIAL, RELIGION, PHONE
IN, TRAVEL, LEISURE, JAZZ, COUNTRY, NATION M (music),
OLDIES, FOLK M (music), DOCUMENT
9OPERATIONS
Page 10

Disc operations
1
ENGLISH
2
Stop playing and ejecting the disc
• “NO DISC” appears. Press SRC to listen to another
playback source.
Prohibiting disc ejection
To cancel the prohibition, repeat the same
procedure.
Selecting a track/folder
Turn on the power.
Insert a disc.
All tracks will be played repeatedly until you change
the source or eject the disc.
Pressing (or holding) the following buttons allows you
to...
[Press] Pause/resume playback.
MP3/WMA: Select folder
[Press] Select track
[Hold] Reverse/fast-forward track
[Turn] = [Press]
• For MP3/WMA discs, select the desired folder,
then the desired track by repeating the control dial
procedures.
• To return to the previous menu, press BACK.
10
Page 11
Selecting the playback modes
You can use only one of the following playback modes
at a time.
1
2
[Turn] = [Press]
REPEAT Ô RANDOM
REPEAT
TRACK RPT : Repeats current track
FOLDER RPT : MP3/WMA: Repeats current folder
RANDOM
FOLDER RND : MP3/WMA: Randomly plays all
tracks of current folder, then
tracks of next folders
ALL RND : Randomly plays all tracks
• To cancel repeat play or random play, select
“RPT OFF” or “RND OFF.”
• To return to the previous menu, press BACK.
3
[Turn] = [Press]
Listening to the USB device
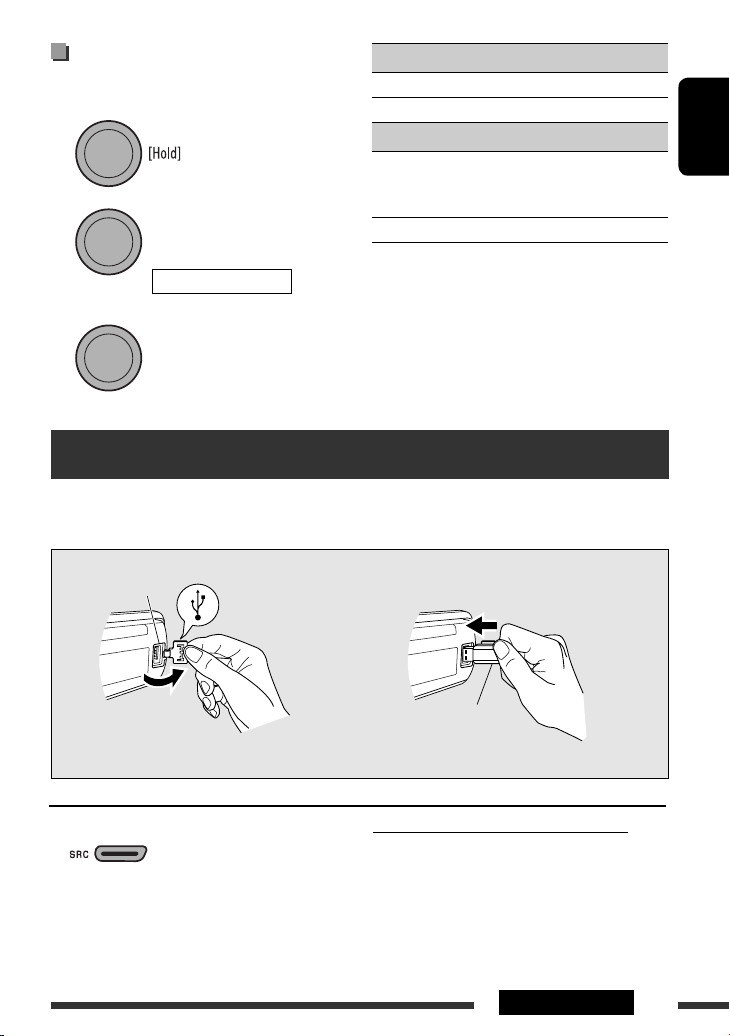
This unit can play MP3/WMA tracks stored in a USB device.
All tracks will be played repeatedly until you change the source or detach the USB device.
USB input jack
ENGLISH
If a USB device has been attached...
Playback starts from where it has been stopped
previously.
• If a different USB device is currently attached,
playback starts from the beginning.
USB memory
To stop play and detach the USB device
Straightly pull it out from the unit.
• Press SRC to listen to another playback source.
You can operate the USB device in the same way you
operate the files on a disc. (See pages 10 and 11.)
Continued on the next page
OPERATIONS
11
Page 12
Cautions:
• Avoid using the USB device if it might hinder your
safety driving.
• Do not pull out and attach the USB device repeatedly
while “READING” is shown on the display.
ENGLISH
• Do not start the car engine if a USB device is
connected.
• This unit may not be able to play the files depending
on the type of USB device.
• Operation and power supply may not work as
intended for some USB devices.
• You cannot connect a computer to the USB input
terminal of the unit.
• Make sure all important data has been backed up to
avoid losing the data.
• Do not leave a USB device in the car, expose to direct
sunlight, or high temperature to avoid deformation
or cause damages to the device.
• Some USB devices may not work immediately after
you turn on the power.
• For more details about USB operations, see page 22.
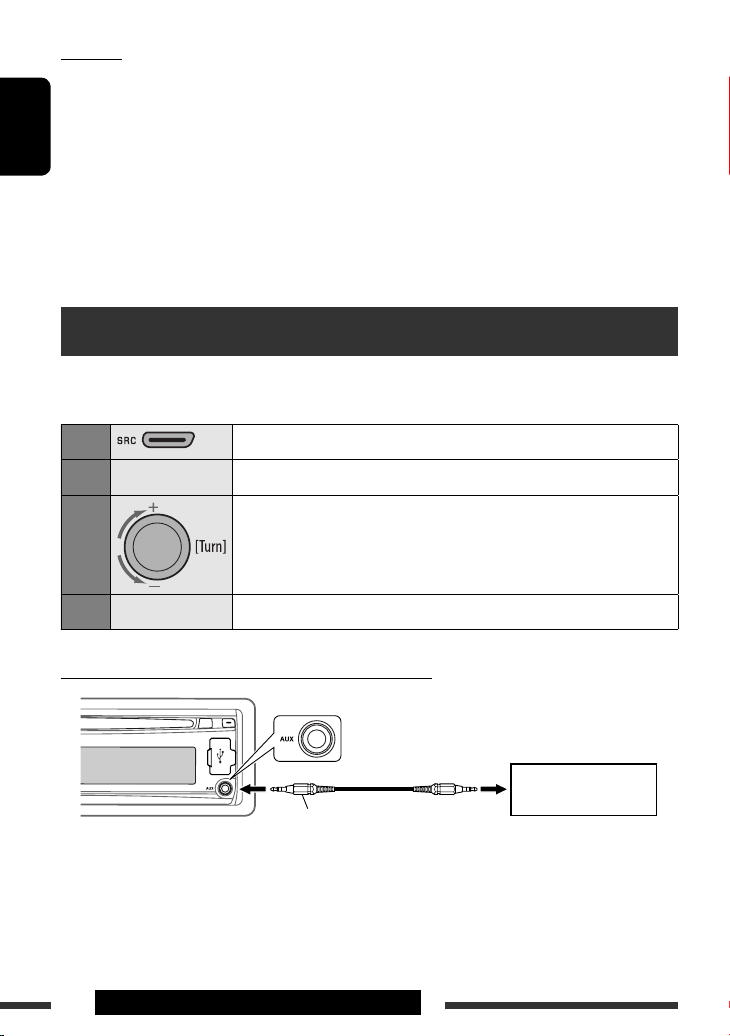
Listening to the other external components
You can connect an external component to AUX (auxiliary) input jack on the control panel.
Preparation: Make sure “AUX ON” is selected in the “SRC SELECT” = “AUX IN” setting, see page 19.
1
2
—
3
4
Connecting an external component to the AUX input jack
12
—
OPERATIONS & EXTERNAL DEVICES
Select “AUX IN.”
Turn on the connected component and start playing the source.
Adjust the volume.
Adjust the sound as you want (see pages 14 and 15).
3.5 mm stereo mini plug
(not supplied)
Portable audio player, etc.
Page 13

Using the remote controller — RM-RK50
This unit can be remotely controlled as instructed here
(with an optionally purchased remote controller). We
recommend that you use remote controller RM-RK50
with your unit.
Installing the lithium coin battery (CR2025)
1 • Turns the power on if pressed briefly or
Caution:
• Danger of explosion if battery is incorrectly replaced.
Replace only with the same or equivalent type.
• Battery shall not be exposed to excessive heat such as
sunshine, fire, or the like.
If the effectiveness of the remote controller
decreases, replace the battery.
Before using the remote controller:
• Aim the remote controller directly at the remote
sensor on the unit.
• DO NOT expose the remote sensor to bright light
(direct sunlight or artificial lighting).
Remote sensor
attenuates the sound when the power is on.
• Turns the power off if pressed and held.
2 • Changes the preset stations.
• Changes the folder of the MP3/WMA.
3 Adjusts the volume level.
4 Selects the sound mode.
5 Selects the source.
6 • Searches for stations if pressed briefly.
• Fast-forwards or reverses the track if pressed and
held.
• Changes the tracks if pressed briefly.
Warning (to prevent accidents and damage):
• Do not install any battery other than CR2025 or its
equivalent.
• Do not leave the remote controller in a place (such
as dashboards) exposed to direct sunlight for a long
time.
• Store the battery in a place where children cannot
reach.
• Do not recharge, short, disassemble, heat the battery,
or dispose of it in a fire.
• Do not leave the battery with other metallic
materials.
• Do not poke the battery with tweezers or similar
tools.
• Wrap the battery with tape and insulate when
throwing away or saving it.
ENGLISH
EXTERNAL DEVICES
13
Page 14

Selecting a preset sound mode
You can select a preset sound mode suitable to the music genre.
• See also page 16.
ENGLISH
[Turn] = [Press]
• See page 15 for “USER” settings.
Preset value setting for each sound mode
Preset value
Sound
mode
USER 60 Hz 00 Q1.25 1.0 kHz 00 Q1.0 10.0 kHz 00 —
BASS MIDDLE TREBLE LOUD
Freq. Level Q Freq. Level Q Freq. Level Q
(loudness)
ROCK 100 Hz +03 Q1.0 1.0 kHz 00 Q1.25 10.0 kHz +02 —
CLASSIC 80 Hz +01 Q1.25 1.0 kHz 00 Q1.25 10.0 kHz +03 —
POPS 100 Hz +02 Q1.25 1.0 kHz +01 Q1.25 10.0 kHz +02 —
HIP HOP 60 Hz +04 Q1.0 1.0 kHz –02 Q1.0 10.0 kHz +01 —
JAZZ 80 Hz +03 Q1.25 1.0 kHz 00 Q1.25 10.0 kHz +03 —
Freq.: Frequency Q: Q-slope
14
OFF
Page 15

Storing your own sound mode
You can store your own adjustments in memory.
1 Select “USER” for “EQ.”
[Turn] = [Press]
2 While “USER” is shown on the display...
3 Select a tone.
4 Adjust the sound elements of the selected
tone.
[Turn] = [Press]
1 Adjust the frequency.
2 Adjust the level.
3 Adjust the Q-slope.
Sound
elements
Frequency 60 Hz
Level –06 to
Q Q1.0
Range/selectable items
BASS MIDDLE TREBLE
80 Hz
100 Hz
200 Hz
+06
Q1.25
Q1.5
Q2.0
0.5 kHz
1.0 kHz
1.5 kHz
2.5 kHz
–06 to
+06
Q0.75
Q1.0
Q1.25
10.0 kHz
12.5 kHz
15.0 kHz
17.5 kHz
–06 to
+06
Fixed
ENGLISH
[Turn] = [Press]
5 Repeat steps 3 and 4 to adjust other sound
characteristics.
The adjustment made will be stored automatically.
SETTINGS
15
Page 16
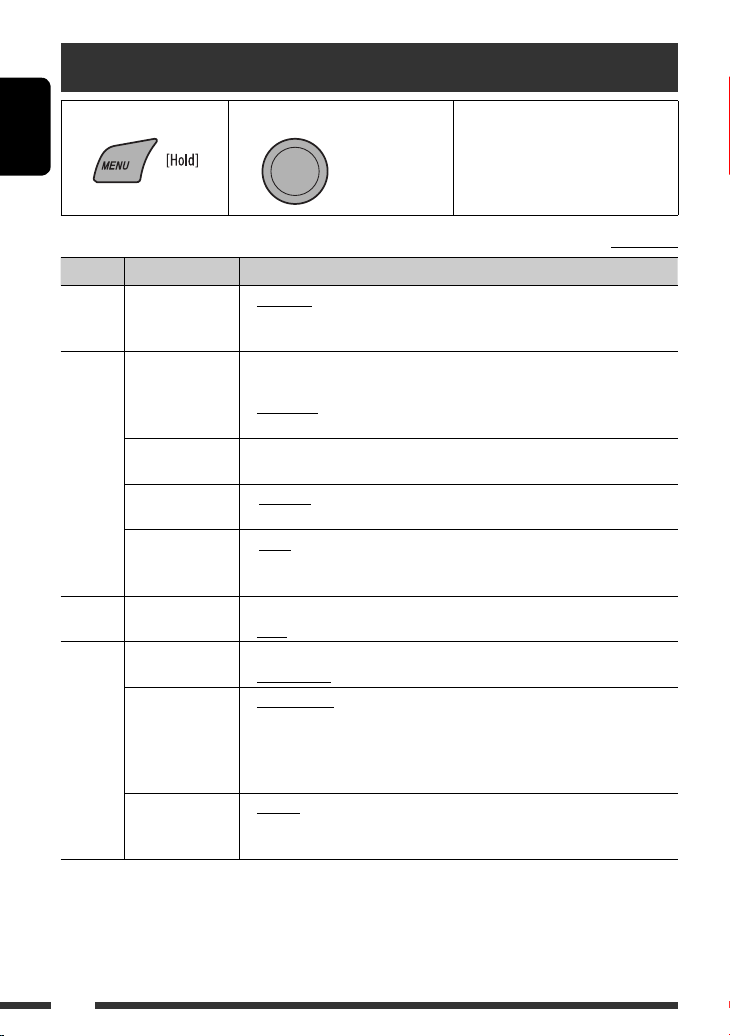
Menu operations
1 Call up the menu. 2 Select the desired item. 3 Repeat step 2 if necessary.
ENGLISH
[Turn] = [Press]
Category Menu items Selectable settings, [reference page]
DEMO
Display
DEMO
demonstration
CLOCK DISP *
Clock display
1
• DEMO ON
• DEMO OFF
• CLOCK ON
• CLOCK OFF
: Display demonstration will be activated automatically if no
operation is done for about 20 seconds, [6].
: Cancels.
: Clock time is shown on the display at all times when the
power is turned off.
: Cancels; pressing DISP will show the clock time for about
5 seconds when the power is turned off, [6].
CLOCK SET
Clock setting
CLOCK
24H/12H
Time display mode
CLOCK ADJ *
Clock adjustment
EQ
EQ
Equalizer
DIMMER
Dimmer
3
SCROLL*
Scroll
DISPLAY
TAG DISPLAY
Tag display
1
*
If the power supply is not interrupted by turning off the ignition key of your car, it is recommended to select
: Adjust the hour, then the minute, [6].
(Initial: 0:00)
• 24 HOUR
: See also page 6 for setting.
• 12 HOUR
2
• AUTO
: The built-in clock is automatically adjusted using the CT
(clock time) data in the Radio Data System signal.
• OFF
: Cancels.
: Select a preset sound mode suitable to the music genre.
USER, ROCK, CLASSIC, POPS, HIP HOP, JAZZ
• DIMMER ON
• DIMMER OFF
• SCROLL ONCE
• SCROLL AUTO
• SCROLL OFF
: Dims the display and button illumination.
: Cancels.
: Scrolls the displayed information once.
: Repeats scrolling (at 5-second intervals).
: Cancels.
Pressing DISP for more than one second can scroll the display regardless of the
setting.
• TAG ON
: Shows the Tag information while playing MP3/WMA
tracks.
• TAG OFF
: Cancels.
“CLOCK OFF” to save the car’s battery.
2
*
Takes effect only when CT data is received.
3
Some characters or symbols will not be shown correctly (or will be blanked) on the display.
*
• To return to the previous menu,
press BACK.
• To exit from the menu, press
DISP or MENU.
Initial: Underlined
16
Page 17

Category Menu items Selectable settings, [reference page]
4
AF-REG *
Alternative
frequency/
regionalization
reception
• AF ON
• AF-REG ON
: When the currently received signals become weak, the unit
switches to another station (the programme may differ
from the one currently received), [9].
• The AF indicator lights up.
: When the currently received signals become weak, the
unit switches to another station broadcasting the same
programme.
• The AF and REG indicators light up.
PTY-STANDBY *
PTY standby
TA VOLUME *
Traffic
TUNER
announcement
volume
P-SEARCH *
Programme search
MONO *
Monaural mode
IF BAND
Intermediate
frequency band
• OFF
4
PTY OFF, PTY
codes
4
VOLUME 00
– VOLUME 50
(or VOLUME 00
– VOLUME 30)*
4
• SEARCH ON
• SEARCH OFF
6
• MONO ON
• MONO OFF
• AUTO
• WIDE
: Cancels.
: Activates PTY Standby Reception with one of the PTY
codes, [9].
: (Initial: VOLUME 15)
5
: Activates Programme Search, [9].
: Cancels.
: Activate monaural mode to improve FM reception, but
stereo effect will be lost, [7].
: Restore the stereo effect.
: Increases the tuner selectivity to reduce interference noises
between adjacent stations. (Stereo effect may be lost.)
: Subject to interference noises from adjacent stations, but
sound quality will not be degraded and the stereo effect
will remain.
COLOR
COLOR 01
– COLOR 29,
USER
: Select one of the preset or user color for display and button (except T/P/
/0) illumination.
(For customize color settings, “USER,” see page 19.)
(for KD-R501)
MENU COLOR
Menu color
• OFF
• ON
: Cancels.
: Changes the display and button (except T/P/ /0)
illumination during menu, list search and playback mode
MENU COLOR
(for KD-R501)
4
*
Only for FM Radio Data System stations.
operations.
*5 Depends on the amplifier gain control.
*6 Displayed only when the source is “FM.”
ENGLISH
Continued on the next page
SETTINGS
17
Page 18

Category Menu items Selectable settings, [reference page]
8
R06 – F06 : Adjust the front and rear speaker output balance.
(Initial: 00)
8
L06 – R06 : Adjust the left and right speaker output balance.
(Initial: 00)
• LOUD OFF
• LOUD ON
: Cancels.
: Boost low and high frequencies to produce a well-balanced
ENGLISH
FADER*7, *
Fader
BALANCE *
Balance
LOUD
Loudness
sound at a low volume level.
VOL ADJUST
Volume adjust
VOL ADJ –05
—
VOL ADJ +05
(Initial: VOL
ADJ 00)
: Preset the volume adjustment level of each source (except
FM), compared to the FM volume level. The volume level
will automatically increase or decrease when you change the
source.
• Before making an adjustment, select the source you want to
adjust.
• “VOL ADJ FIX” appears on the display if “FM” is selected as
the source.
AUDIO
L/O MODE
Line output
mode
• SUB.W
• REAR
: Select if the REAR LINE OUT terminals are used for connecting
a subwoofer (through an external amplifier).
: Select if the REAR LINE OUT terminals are used for connecting
the speakers (through an external amplifier).
SUB.W FREQ *
Subwoofer
cutoff frequency
SUB.W LEVEL *
Subwoofer level
BEEP
Key touch tone
TEL MUTING
Telephone
muting
AMP GAIN *
Amplifier gain
control
7
If you are using a two-speaker system, set the fader level to “00.”
*
9
• LOW
• MID
• HIGH
9
SUB.W 00
— SUB.W 08
• BEEP OFF
• BEEP ON
• MUTING 1/
• MUTING OFF
10
• LOW POWER
• HIGH POWER
MUTING 2
: Frequencies lower than 72 Hz are sent to the subwoofer.
: Frequencies lower than 111 Hz are sent to the subwoofer.
: Frequencies lower than 157 Hz are sent to the subwoofer.
: Adjust the subwoofer output level.
(Initial: SUB.W 04)
: Deactivates the key touch tone.
: Activates the key touch tone.
: Select either one which mutes the sounds while using a
cellular phone.
: Cancels.
: VOLUME 00 – VOLUME 30 (Select if the maximum power
of each speaker is less than 50 W to prevent damaging the
speaker.)
: VOLUME 00 – VOLUME 50
*8 This adjustment will not affect the subwoofer output.
*9 Displayed only when “L/O MODE” is set to “SUB.W.”
*10 The volume level automatically changes to “VOLUME 30” if you change to “LOW POWER” with the volume level
set higher than “VOLUME 30.”
18
Page 19

Category Menu items Selectable settings, [reference page]
11
AM *
AM station
AUX IN *
SRC SELECT
Auxiliary input
11
*
Displayed only when any source other than “AM” is selected.
*12 Displayed only when any source other than “AUX IN” is selected.
• AM OFF
• AM ON
12
• AUX OFF
• AUX ON
: Disable “AM” in source selection.
: Enable “AM” in source selection, [4].
: Disable “AUX IN” in source selection.
: Enable “AUX IN” in source selection, [4].
Color settings (for KD-R501)
ENGLISH
Creating your own color
—USER Color
You can create your own colors—“DAY COLOR” or
“NIGHT COLOR.”
DAY COLOR: Used when “DIMMER” is set to
“DIMMER OFF.”
NIGHT COLOR: Used when “DIMMER” is set to
“DIMMER ON.”
1
2
Select “COLOR” = “USER.”
[Turn] = [Press]
3 While “USER” is shown on the display...
4
[Turn] = [Press]
5 Select a primary color.
[Turn] = [Press]
6 Adjust the level (00 to 31) of the selected
primary color.
[Turn] = [Press]
If “00” is selected for all the primary colors, nothing
appear on the display.
7 Repeat steps 5 and 6 to adjust other primary
colors.
8 Exit from the setting.
• If no operation is done for about 30 seconds, the
operation will be canceled.
SETTINGS
19
Page 20

More about this unit
Basic operations
Turning on the power
ENGLISH
• By pressing SRC button on the unit, you can also turn
on the power. If the source is ready, playback also
starts.
Turning off the power
• If you turn off the power while listening to a track,
playback will start from where it had been stopped
previously next time you turn on the power.
General
• If you change the source while listening to a disc,
playback stops.
Next time you select “CD” as the playback source,
playback will start from where it had been stopped
previously.
• If no operation is done for about 30 seconds after
pressing MENU button, the operation will be
canceled.
Tuner operations
Storing stations in memory
• During SSM search...
– All previously stored stations are erased and the
stations are stored anew.
– When SSM is over, the station stored in the lowest
preset number will be automatically tuned in.
• When storing a station manually, the previously
preset station is erased when a new station is stored
in the same preset number.
FM Radio Data System operations
• Network-Tracking Reception requires two types
of Radio Data System signals—PI (Programme
Identification) and AF (Alternative Frequency)
to work correctly. Without receiving these data
correctly, Network-Tracking Reception will not
operate correctly.
• If a Traffic Announcement is received by TA Standby
Reception, the volume level automatically changes to
the preset level (TA VOL) if the current level is lower
than the preset level.
• When Alternative Frequency Reception is activated
(with AF selected), Network-Tracking Reception is
also activated automatically.
Disc operations
Caution for DualDisc playback
• The Non-DVD side of a “DualDisc” does not comply
with the “Compact Disc Digital Audio” standard.
Therefore, the use of Non-DVD side of a DualDisc on
this product may not be recommended.
General
• This unit has been designed to reproduce
CDs/CD Texts, and CD-Rs (Recordable)/CD-RWs
(Rewritable) in audio CD (CD-DA), MP3/WMA
formats.
• When a disc is inserted upside down, “PLEASE” and
“EJECT” appear alternately on the display. Press 0 to
eject the disc.
• MP3 and WMA “tracks” (words “file” and “track” are
used interchangeably) are recorded in “folders.”
• While fast-forwarding or reversing on an MP3 or
WMA disc, you can only hear intermittent sounds.
20
Page 21

Playing a CD-R or CD-RW
• Use only “finalized” CD-Rs or CD-RWs.
• This unit can only play back files of the same type as
those detected first if a disc includes both audio CD
(CD-DA) files and MP3/WMA files.
• This unit can play back multi-session discs; however,
unclosed sessions will be skipped while playing.
• Some CD-Rs or CD-RWs may not play back on this
unit because of their disc characteristics, or for the
following reasons:
– Discs are dirty or scratched.
– Moisture condensation has occurred on the lens
inside the unit.
– The pickup lens inside the unit is dirty.
– The files on the CD-R/CD-RW are written using the
“Packet Write” method.
– There are improper recording conditions (missing
data, etc.) or media conditions (stained, scratched,
warped, etc.).
• CD-RWs may require a longer readout time since the
reflectance of CD-RWs is lower than that of regular
CDs.
• Do not use the following CD-Rs or CD-RWs:
– Discs with stickers, labels, or a protective seal stuck
to the surface.
– Discs on which labels can be directly printed by an
ink jet printer.
Using these discs under high temperature or high
humidity may cause malfunctions or damage to the
unit.
Playing an MP3/WMA disc
• This unit can play back MP3/WMA files with the
extension code <.mp3> or <.wma> (regardless of
the letter case—upper/lower).
• This unit can show the names of albums, artists
(performer), and Tag (Version 1.0, 1.1, 2.2, 2.3, or
2.4) for MP3 files and for WMA files.
• This unit can display only one-byte characters. No
other characters can be correctly displayed.
• This unit can play back MP3/WMA files meeting the
conditions below:
– Bit rate of MP3: 32 kbps — 320 kbps
– Sampling frequency of MP3:
32 kHz, 44.1 kHz, 48 kHz (for MPEG-1)
16 kHz, 22.05 kHz, 24 kHz (for MPEG-2)
– Bit rate of WMA: 32 kbps — 320 kbps
– Sampling frequency of WMA: 22.05 kHz, 32 kHz,
44.1 kHz, 48 kHz
– Disc format: ISO 9660 Level 1/Level 2, Romeo,
Joliet, Windows extension.
• The maximum number of characters for file/folder
names vary depending on the disc format used
(includes 4 extension characters—<.mp3> or
<.wma>).
– ISO 9660 Level 1: up to 12 characters
– ISO 9660 Level 2: up to 31 characters
– Romeo: up to 64 characters
– Joliet: up to 32 characters
– Windows extension: up to 64 characters
• This unit can recognize a total of 512 files,
255 folders, and 8 hierarchical levels.
• This unit can play back files recorded in VBR (variable
bit rate).
Files recorded in VBR have a discrepancy in the
elapsed time display, and do not show the actual
elapsed time. In particular, this difference becomes
noticeable after performing the search function.
• This unit cannot play back the following files:
– MP3 files encoded in MP3i and MP3 PRO format.
– MP3 files encoded in an inappropriate format.
– MP3 files encoded with Layer 1/2.
– WMA files encoded in lossless, professional, and
voice format.
– WMA files which are not based upon Windows
Media ® Audio.
– WMA files copy-protected with DRM.
– Files which have data such as AIFF, ATRAC3, etc.
• The search function works but search speed is not
constant.
ENGLISH
Continued on the next page
REFERENCES
21
Page 22

Playing MP3/WMA tracks from a USB device
• While playing from a USB device, the playback order
may differ from other players.
• This unit may be unable to play back some USB
devices or some files due to their characteristics or
ENGLISH
recording conditions.
• Depending on the shape of the USB devices and
connection ports, some USB devices may not be
attached properly or the connection might be loose.
• Connect one USB mass storage class device to the unit
at a time. Do not use a USB hub.
• If the connected USB device does not have the correct
files, “CANNOT PLAY” appears.
• This unit can show Tag (Version 1.0, 1.1, 2.2, 2.3, or
2.4) for MP3 files and for WMA files.
• This unit can play back MP3/WMA files meeting the
conditions below:
– Bit rate of MP3: 32 kbps — 320 kbps
– Sampling frequency of MP3:
32 kHz, 44.1 kHz, 48 kHz (for MPEG-1)
16 kHz, 22.05 kHz, 24 kHz (for MPEG-2)
– Bit rate of WMA: 32 kbps — 320 kbps
– Sampling frequency of WMA: 22.05 kHz, 32 kHz,
44.1 kHz, 48 kHz
• This unit can play back MP3 files recorded in VBR
(variable bit rate).
• The maximum number of characters for:
– Folder names : 32 characters
– File names : 32 characters
– MP3 Tag : 64 characters
– WMA Tag : 32 characters
• This unit can recognize a total of 5 000 files, 255
folders (255 files per folder including folder without
unsupported files), and of 8 hierarchies.
• This unit does not support SD card reader.
• This unit cannot recognize a USB device whose rating
is other than 5 V and exceeds 500 mA.
• USB devices equipped with special functions such as
data security functions cannot be used with the unit.
• Do not use a USB device with 2 or more partitions.
• This unit may not recognized a USB device connected
through a USB card reader.
• This unit may not play back files in a USB device
properly when using a USB extension cord.
• This unit cannot play back the following files:
– MP3 files encoded with MP3i and MP3 PRO format.
– MP3 files encoded in an inappropriate format.
– MP3 files encoded with Layer 1/2.
– WMA files encoded in lossless, professional, and
voice format.
– WMA files not based on Windows Media® Audio.
Ejecting a disc or removing a USB device
• If the ejected disc is not removed within 15 seconds,
it is automatically inserted into the loading slot again
to protect it from dust.
• After ejecting a disc or removing a USB device,
“NO DISC” or “NO USB“ appears and you cannot
operate some of the buttons. Insert another disc,
reattach a USB device, or press SRC to select another
playback source.
Menu operations
• If you change the “AMP GAIN” setting from
“HIGH POWER” to “LOW POWER” while
the volume level is set higher than “VOLUME 30,”
the unit automatically changes the volume level to
“VOLUME 30.”
22
Page 23

Troubleshooting
What appears to be trouble is not always serious. Check the following points before calling a service center.
Symptoms Remedies/Causes
• Sound cannot be heard from the speakers. • Adjust the volume to the optimum level.
• Check the cords and connections.
• The unit does not work at all. Reset the unit (see page 3).
• “AUX IN” cannot be selected. Check the “SRC SELECT” = “AUX IN” setting (see
General
• KD-R501: Nothing appear on the display. KD-R501: Check the USER Color settings (see page 19)
• SSM automatic presetting does not work. Store stations manually.
• Static noise while listening to the radio. Connect the aerial firmly.
FM/AM
• “AM” cannot be selected. Check the “SRC SELECT”
• Disc cannot be played back. Insert the disc correctly.
• CD-R/CD-RW cannot be played back.
• Tracks on the CD-R/CD-RW cannot be
skipped.
• Disc can neither be played back nor ejected. • Unlock the disc (see page 10).
• Disc sound is sometimes interrupted. • Stop playback while driving on rough roads.
Discs in general
• “NO DISC” appears on the display. Insert a playable disc into the loading slot.
• “PLEASE” and “EJECT“ appear alternately
on the display.
• Disc cannot be played back. • Use a disc with MP3/WMA tracks recorded in a format
playback
MP3/WMA
page 19).
= “AM” setting (see
page 19).
• Insert a finalized CD-R/CD-RW.
• Finalize the CD-R/CD-RW with the component which
you used for recording.
• Eject the disc forcibly (see page 3).
• Change the disc.
• Check the cords and connections.
0, then insert a disc correctly.
Press
compliant with ISO 9660 Level 1, Level 2, Romeo, or
Joliet.
• Add the extension code <.mp3> or <.wma> to the
file names.
ENGLISH
Continued on the next page
23REFERENCES
Page 24

Symptoms Remedies/Causes
• Noise is generated. Skip to another track or change the disc. (Do not add the
extension code <.mp3> or <.wma> to non-MP3 or
WMA tracks.)
ENGLISH
• A longer readout time is required
(“READING” keeps flashing on the display).
• Tracks do not play back in the order you
have intended them to play.
• The elapsed playing time is not correct. This sometimes occurs during playback. This is caused by
• “NO FILE” appears on the display. Selected folder is an empty folder*. Select another folder
MP3/WMA playback
• The correct characters are not displayed
(e.g. album name).
• Noise is generated. The track played back is not an MP3/WMA track. Skip to
• “READING” keeps flashing on the display. • Readout time varies depending on the USB device.
• “NO FILE” appears on the display. Selected folder is an empty folder*. Select another folder
• Tracks/folders are not played back in the
order you have intended.
USB device playback
• “CANNOT PLAY” flashes on the display.
• “NO USB” appears on the display.
• The unit cannot detect the USB device.
• Correct characters are not displayed (e.g.
album name).
• While playing a track, sound is sometimes
interrupted.
• Microsoft and Windows Media are either registered trademarks or trademarks of Microsoft Corporation in the
United States and/or other countries.
Do not use too many hierarchical levels and folders.
The playback order is determined when the files are
recorded.
how the tracks are recorded on the disc.
that contains MP3/WMA tracks.
* Folder that is physically empty or folder that contains
data but does not contain valid MP3/WMA track.
This unit can only display letters (upper case), numbers,
and a limited number of symbols.
another file. (Do not add the extension code <.mp3> or
<.wma> to non-MP3 or WMA tracks.)
• Do not use too many hierarchy or folders.
• Turn off the power then on again.
• Reattach the USB device again.
that contains MP3/WMA tracks.
* Folder that is physically empty or folder that contains
data but does not contain valid MP3/WMA track.
The playback order is determined by the write-in time
stamp. The first track/folder written into the USB device
will be the first track/folder for playback.
• Attach a USB device that contains tracks encoded in an
appropriate format.
• Reattach the USB device again.
This unit can only display alphabets (upper case),
numbers, and a limited number of symbols.
The MP3/WMA tracks have not been properly copied into
the USB device.
Copy MP3/WMA tracks again into the USB device, and
try again.
24
Page 25
Maintenance
How to clean the connectors
Frequent detachment will deteriorate the connectors.
To minimize this possibility, periodically wipe the
connectors with a cotton swab or cloth moistened with
alcohol, being careful not to damage the connectors.
Connectors
Moisture condensation
Moisture may condense on the lens inside the unit in
the following cases:
• After starting the heater in the car.
• If it becomes very humid inside the car.
Should this occur, the unit may malfunction. In this
case, eject the disc and leave the unit turned on for a
few hours until the moisture has evaporated.
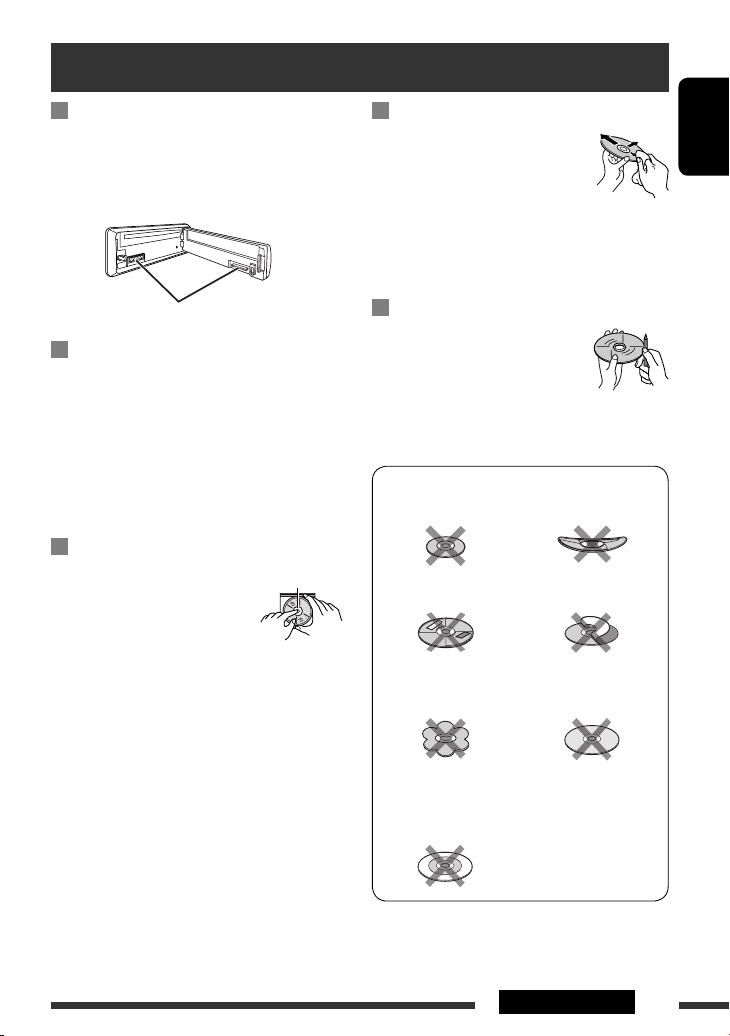
How to handle discs
When removing a disc from its
case, press down the center holder
of the case and lift the disc out,
holding it by the edges.
• Always hold the disc by the edges. Do not touch its
recording surface.
When storing a disc in its case, gently insert the
disc around the center holder (with the printed surface
facing up).
• Make sure to store discs in cases after use.
Center holder
To keep discs clean
A dirty disc may not play correctly.
If a disc does become dirty, wipe it with
a soft cloth in a straight line from center
to edge.
• Do not use any solvents (for example, conventional
record cleaner, spray, thinner, benzine, etc.) to clean
discs.
To play new discs
New discs may have some rough spots
around the inner and outer edges. If
such a disc is used, this unit may reject
the disc.
To remove these rough spots, rub the edges with a
pencil or ball-point pen, etc.
Do not use the following discs:
Single CD (8 cm disc) Warped disc
Sticker and sticker residue Stick-on label
Unusual shape
Transparent or semi-
transparent parts on its
recording area
C-thru Disc (semi-
transparent disc)
ENGLISH
25REFERENCES
Page 26

Specifications
AUDIO AMPLIFIER SECTION
Maximum Power Output: Front/Rear: 50 W per channel
ENGLISH
Continuous Power Output (RMS): Front/Rear: 19 W per channel into 4 Ω, 40 Hz to 20 000 Hz
at no more than 0.8% total harmonic
distortion.
Load Impedance: 4 Ω (4 Ω to 8 Ω allowance)
Tone Control Range: Bass: ±12 dB (60 Hz, 80 Hz, 100 Hz, 200 Hz)
Q1.0, Q1.25, Q1.5, Q2.0
Middle: ±12 dB (0.5 kHz, 1.0 kHz, 1.5 kHz, 2.5 kHz)
Q0.75, Q1.0, Q1.25
Treble: ±12 dB (10.0 kHz, 12.5 kHz, 15.0 kHz,
17.5 kHz)
Q = Fixed
Frequency Response: 40 Hz to 20 000 Hz
Signal-to-Noise Ratio: 70 dB
Line-Out Level/Impedance: 2.5 V/20 kΩ load (full scale)
Output Impedance: 1 kΩ
Subwoofer-Out Level/Impedance: 2.5 V/20 kΩ load (full scale)
Other Terminal: USB input jack, AUX (auxiliary) input jack
TUNER SECTION
Frequency Range: FM: 87.5 MHz to 108.0 MHz
AM: MW: 522 kHz to 1 620 kHz
LW: 144 kHz to 279 kHz
FM Tuner Usable Sensitivity: 11.3 dBf (1.0 μV/75 Ω)
50 dB Quieting Sensitivity: 16.3 dBf (1.8 μV/75 Ω)
Alternate Channel Selectivity (400 kHz): 65 dB
Frequency Response: 40 Hz to 15 000 Hz
Stereo Separation: 30 dB
MW Tuner Sensitivity: 20 μV
Selectivity: 35 dB
LW Tuner Sensitivity: 50 μV
26
Page 27

CD PLAYER SECTION
Type: Compact disc player
Signal Detection System: Non-contact optical pickup
(semiconductor laser)
Number of Channels: 2 channels (stereo)
Frequency Response: 5 Hz to 20 000 Hz
Dynamic Range: 96 dB
Signal-to-Noise Ratio: 98 dB
Wow and Flutter: Less than measurable limit
MP3 Decoding Format: (MPEG1/2 Audio Layer 3) Max. Bit Rate: 320 kbps
WMA (Windows Media® Audio) Decoding Format: Max. Bit Rate: 320 kbps
USB SECTION
USB Standard: USB 1.1, USB 2.0
Data Transfer Rate (Full Speed): Max. 12 Mbps
Compatible Device: Mass storage class
Compatible File System:
Playable Audio Format:
Max. Current: DC 5 V
GENERAL
Power Requirement: Operating Voltage: DC 14.4 V (11 V to 16 V allowance)
Grounding System: Negative ground
Allowable Operating Temperature: 0°C to +40°C
Dimensions (W × H × D): (approx.) Installation Size: 182 mm × 52 mm × 160 mm
Panel Size: 188 mm × 58 mm × 12 mm
Mass:
FAT 32/16/12
MP3/WMA
500 mA
1.3 kg (excluding accessories)
ENGLISH
Design and specifications are subject to change without notice.
27REFERENCES
Page 28
Wir danken Ihnen für den Kauf eines JVC Produkts.
Bitte lesen Sie die Anleitung vollständig durch, bevor Sie das Gerät in Betrieb nehmen, um sicherzustellen, daß Sie
alles vollständig verstehen und die bestmögliche Leistung des Geräts erhalten.
WICHTIG FÜR LASER-PRODUKTE
1. LASER-PRODUKT DER KLASSE 1
2. ACHTUNG: Die obere Abdeckung nicht öffnen. Das Gerät enthält keine Teile, die vom Benutzer gewartet werden
können. Wartungen nur von qualifziertem Fachpersonal durchführen lassen.
3. ACHTUNG: Sichtbare und/oder unsichtbare Laserstrahlung der Klasse 1M bei offenen Abdeckungen. Nicht direkt
mit optischen Instrumenten betrachten.
4. ANBRINGEN DES ETIKETTS: WARNHINWEIS-ETIKETT, AUSSEN AM GERÄT ANGEBRACHT.
DEUTSCH
Warnung:
Wenn Sie das Gerät beim Fahren bedienen müssen,
dürfen Sie nicht den Blick von der Straße nehmen, da
Batterie
Produkte
Benutzerinformationen zur Entsorgung alter
Geräte und Batterien
[Nur Europäische Union]
Diese Symbole zeigen an, dass das damit
gekennzeichnete Produkt bzw. die Batterie nicht als
normaler Haushaltsabfall entsorgt werden sollen.
Wenn Sie dieses Produkt und die Batterie
entsorgen möchten, halten Sie sich dabei bitte an
die entsprechenden Landesgesetze und andere
Regelungen in Ihrem Land bzw. Ihrer Gemeinde.
Die korrekte Entsorgung dieses Produkts dient dem
Umweltschutz und verhindert mögliche Schäden für
die Umwelt und die menschliche Gesundheit.
sonst die Gefahr von Verkehrsunfällen besteht.
Achtung bei der Lautstärkeeinstellung:
Digitale Geräte (CD/USB) erzeugen im Vergleich mit
anderen Tonträgern sehr geringes Rauschen. Senken
Sie die Lautstärke vor dem Abspielen solcher digitalen
Tonquellen, um Beschädigung der Lautsprecher durch
plötzliche Tonspitzen zu vermeiden.
Für die Sicherheit...
• Die Lautstärke nicht zu laut stellen, da dadurch
Außengeräusche überdeckt und das Autofahren
gefährlich wird.
• Das Auto vor dem Durchführen von komplizierten
Bedienschritten anhalten.
Temperatur im Auto...
Hinweis:
Das Zeichen Pb unterhalb dem Batteriesymbols gibt
an, dass diese Batterie Blei enthält.
Wenn Sie das Auto für lange Zeit in heißem oder kaltem
Wetter parken, bitte warten, bis sich die Temperatur
im Auto sich normalisiert hat, bevor Sie das Gerät
einschalten.
2
Page 29
Abnehmen des Bedienfelds
Anbringen des Bedienfelds
Zurücksetzen des Geräts
• Ihre vorgegebenen Einstellungen werden ebenfalls
gelöscht.
INHALT
Abnehmen des Bedienfelds ......................... 3
Anbringen des Bedienfelds .......................... 3
Zurücksetzen des Geräts ............................... 3
Zwangsweises Ausschieben einer Disc ......... 3
BEDIENUNG
Grundlegende Bedienung ............................ 4
Vorbereitung ................................................ 6
Rundfunkempfang ....................................... 7
Bedienung der Disc ...................................... 10
Hören vom USB-Gerät .................................. 11
EXTERNE GERÄTE
Hören von den anderen externen
Komponenten ........................................... 12
Verwendung der Fernbedienung
—
RM-RK50 ............................................... 13
EINSTELLUNGEN
Wählen eines Vorgabe-Klangmodus ............ 14
Menü-Bedienungen ..................................... 16
Farbeinstellungen (für KD-R501) ................. 19
DEUTSCH
Zwangsweises Ausschieben einer
Disc
• Sie können die eingelegte Disc zwangsweise
ausschieben, auch wenn die Disc gesperrt ist. Zum
Sperren/Freigeben der Disc siehe Seite 10.
• Achten Sie darauf, die ausgeschobene Disc nicht fallen
zu lassen.
• Wenn das nicht funktioniert, führen Sie einen Reset am
Gerät aus.
ZUR BEZUGNAHME
Weitere Informationen zu Ihrem Receiver
Störungssuche ............................................. 23
Wartung ...................................................... 25
Technische Daten ......................................... 26
Diese Markierungen kennzeichnet...
Drehen Sie die den Steuerregler, um
eine Auswahl vorzunehmen, und
drücken Sie dann zum Bestätigen der
Auswahl.
..... 20
3
Page 30

Grundlegende Bedienung
DEUTSCH
1 • UKW/AM: Wählt den Festsender.
• CD/USB: Wählen Sie einen Ordner.
2 • Einschalten.
• Dämpfen Sie den Klang (in eingeschaltetem
Zustand).
• Schalten Sie das Gerät aus [Gedrückthalten].
3 Wählt die Quelle.
FM = CD *2 = USB = AUX IN *3 = AM *3 =
(zurück zum Anfang)
4 • Geben Sie die List-Bedienungen ein.
• Auf Menü-Einstellung schalten [Gedrückthalten] .
5 • Regeln Sie die Lautstärke *
4
oder wählen Sie
Gegenstände [Drehen].
• Bestätigen Sie die Auswahl [Drücken Sie] .
• UKW: Schalten Sie auf SSM-
Voreinstellungsmodus [Gedrückthalten] .
• CD/USB: Schalten Sie auf den Wiedergabemodus
[Gedrückthalten] .
Pausieren/Fortsetzen der
Wiedergabe *4 [Drücken Sie].
6 Ladeschlitz
7 Displayfenster
8 Disc auswerfen.
9 • Aktivieren/deaktivieren Sie den TA-Standby-
Empfang.
• Schalten Sie auf PTY-Suchmodus
[Gedrückthalten].
p Nehmen Sie das Bedienfeld ab.
q Zum Ändern der Display-Information.
w • UKW/AM: Suchen Sie nach einem Sender.
• CD/USB: Wählen Sie den Track.
e Schalten Sie zum vorherigen Menü zurück.
r Fernbedienungssensor
• Sie können diesen Receiver mit einer optional
gekauften Fernbedienung steuern. Einzelheiten
siehe Seite 13.
t AUX (Hilfs-) Eingangsbuchse
y USB- (Universal Serial Bus) Eingangsbuchse
*1 In dieser Anleitung auch als „Steuerregler“ bezeichnet.
*2 Sie können nicht „CD“ als Wiedergabequelle wählen,
wenn keine Disc im Gerät eingesetzt ist.
3
Sie können diese Quellen nicht wählen, wenn sie im
*
Menü deaktiviert wurden (siehe „SRC SELECT“ in
„Menü-Bedienungen“ auf Seite 19).
*4 Sie können die Lautstärke auch im Pausebetrieb
einstellen, wenn die gewählte Quelle CD/USB ist.
Vor dem Fortsetzen der Wiedergabe prüfen Sie, ob die
Lautstärke nicht zu hoch eingestellt ist.
KD-R501: Sie können die Display- und Tastenbeleuchtung ändern (siehe „COLOR“ (Farbe) auf Seite 17).
4
Page 31

Displayfenster
DEUTSCH
1 Tr (Titel)-Anzeige
2 Quellenanzeige / Tracknummer / Ordnernummer /
Zeit-Countdown-Anzeige
3 DISC-Anzeige
4 Sound-Modus-Anzeigen—CLASSIC, HIP HOP,
JAZZ, ROCK, POPS, USER
5 Wiedergabemodus / Gegenstand-Anzeigen—
RND (Zufall), (Disc), (Ordner),
RPT (Wiederholung)
6 EQ (Equalizer)-Anzeige
7 LOUD (Loudness)-Anzeige
8 Disc-Information-Anzeigen—TAG (Tag-
Information), (Titel/Datei), (Ordner)
9 Hauptdisplay
p Radio Data System-Anzeigen—AF, REG, TP, PTY
q Tuner-Empfangsanzeigen—ST (Stereo),
MO (Mono)
5BEDIENUNG
Page 32

Vorbereitung
Beenden der Display-Demonstration und Einstellen der Uhrzeit
• Siehe auch Seite 16.
1
Einschalten.
2
DEUTSCH
Gedrückt halten,
bis das Hauptmenü
aufgerufen wird.
[Drehen] =
[Drücken Sie]
• Wiederholen Sie
dieses Verfahren.
Beenden Sie die Display-Demonstrationen
Wählen Sie „DEMO“, und dann „DEMO OFF“.
Stellen Sie die Uhr ein
Wählen Sie „CLOCK“ = „CLOCK SET“.
Stellen Sie die Stunde ein, und drücken Sie dann den Steuerregler,
um die Minute einzustellen.
Wählen Sie „24H/12H“, und dann „24 HOUR“ oder
„12 HOUR“.
• Zum Zurückschalten zum vorherigen Menü drücken Sie BACK.
Ändern der Displayinformation
Bei ausgeschalteter Stromversorgung: Die aktuelle Uhrzeit wird angezeigt, wenn „CLOCK DISP“ auf
„CLOCK OFF“ gestellt ist (siehe Seite 16).
Bei eingeschalteter Stromversorgung: Die Display-Information der aktuellen Quelle wechselt wie folgt um:
UKW/AM Senderfrequenz = Uhrzeit = (zurück zum Anfang)
UKW Radio
Data System
CD
CD/USB
Sendername (PS)
Anfang)
Audio CD/CD Text: Disc-Bezeichnung/Interpret *
MP3/WMA: Name des Albums/Interpret (Ordnername) *2 = Titelbezeichnung
= Senderfrequenz = Programmtyp (PTY) = Uhrzeit = (zurück zum
1
= Titelbezeichnung *1 = Aktuelle
Tracknummer mit verflossener Spielzeit = Aktuelle Tracknummer mit
Uhrzeit = (zurück zum Anfang)
(Dateiname) *2 = Aktuelle Tracknummer mit verflossener Spielzeit =
Aktuelle Tracknummer mit Uhrzeit = (zurück zum Anfang)
*1 Wenn die aktuelle Disc eine Audio-CD ist, erscheint „NO NAME“.
*2 Wenn eine MP3/MWA-Datei nicht Tag-Information hat oder „TAG DISPLAY“ auf „TAG OFF“ gestellt ist
(siehe Seite 16), erscheinen Ordnername und Dateiname.
6
Page 33

Rundfunkempfang
1
2
Wählen Sie „FM“ oder „AM“.
Suchen Sie einen Sender zum Hören—Automatischer Suchlauf.
Wenn ein Sender abgestimmt ist, stoppt der Suchlauf. Um den Suchlauf zu
stoppen, betätigen Sie die Taste erneut.
• Sie können auch einen Sender manuell suchen – Manueller Suchlauf. Halten
Sie eine der Tasten gedrückt, bis „M“ im Display blinkt, und drücken Sie die
Taste dann wiederholt.
• Beim Empfang einer UKW-Stereosendung mit ausreichender Signalstärke
leuchtet die ST-Anzeige im Display auf.
Verbessern des UKW-Empfangs
Wenn Sie Schwierigkeiten haben, eine UKW-Sendung
in Stereo zu empfangen, schalten Sie für besseren
Empfang auf Mono um.
• Siehe auch Seite 17.
[Drehen] = [Drücken Sie]
DEUTSCH
Speichern von Sendern
Automatische Voreinstellung (UKW)—SSM
(Sequentieller Speicher für starke Sender)
Sie können für UKW (FM) bis zu 18 Sender voreinstellen.
1 Während des Hörens eines Senders...
2 Wählen Sie den Festsendernummerbereich,
unter dem gespeichert werden soll.
Der Empfang wird besser, jedoch geht der Stereo-Effekt
verloren.
• Die MO-Anzeige leuchtet im Display auf.
Zum Wiederherstellen des Stereoeffekts,
wiederholen Sie den Vorgang, um „MONO OFF“ zu
wählen. Die MO-Anzeige erlischt.
3
Das Gerät sucht nach den UKW-Ortssendern mit den
stärksten Einfallssignalen und speichert sie automatisch
als Festsender ab.
• Zum Stoppen des Suchlaufs drücken Sie auf
4 /¢ .
Zur Voreinstellung der anderen 6 Sender
wiederholen Sie den Vorgang ab Schritt 1 erneut.
Fortsetzung auf nächster Seite
7BEDIENUNG
Page 34

Manuelle Voreinstellung (UKW/AM)
Sie können für jedes Frequenzband bis zu 18 Sender für
UKW und 6 Sender für AM voreinstellen.
Beisp.: Speichern des UKW-Senders bei 92,50 MHz
unter der Festsendernummer „04“.
1
2 Wählen Sie die Festsendernummer „04“.
DEUTSCH
3
Wählen eines Festsenders
Die folgenden Merkmale stehen nur für UKW-Radio
Data System-Sender zur Verfügung.
Suchen nach UKW Radio Data
System-Programm—PTY-Suchlauf
Um eine bestimmte Sendung einzustellen, können Sie
nach deren PTY-Code suchen.
1 Der zuletzt gewählte
PTY-Code erscheint.
2 Wählen Sie einen ihrer gewünschten
Programmtypen oder einen PTY-Code.
3 Beginnen Sie die Suche nach Ihrer
bevorzugten Sendung.
oder
[Drehen] =
[Drücken Sie]
Wenn ein Sender eine Sendung mit dem PTY-Code
ausstrahlt, den Sie gewählt haben, wird dieser
Sender eingestellt.
Verwenden des Standbyempfangs
TA-Standbyempfang
Verkehrsdurchsagen-Standby erlaubt es dem Receiver,
von allen Signalquellen außer AM kurzzeitig auf
Verkehrsdurchsagen (TA) umzuschalten.
Die Lautstärke schaltet auf den voreingestellten TALautstärkepegel um, wenn der aktuelle Pegel niedriger
als der vorgegebene Pegel ist (siehe Seite 17).
8
Page 35

So aktivieren Sie den TA-Standbyempfang
Die TP-Anzeige
(Verkehrsprogramm) leuchtet oder
blinkt.
• Wenn die TP-Anzeige aufleuchtet, ist der TAStandbyempfang aktiviert.
• Wenn die TP-Anzeige blinkt, ist der TAStandbyempfang noch nicht aktiviert. (Dies ist der
Fall, wenn Sie einen UKW-Sender hören, bei dem die
für den TA-Standbyempfang erforderlichen Radio
Data System-Signale nicht mitgesendet werden).
Zum Aktivieren des Empfangs müssen Sie einen
anderen Sender einstellen, bei dem diese Signale
mitgesendet werden. Die TP-Anzeige geht von
Blinken auf Dauerleuchten über.
So deaktivieren Sie den TA-Standbyempfang
Die TP-Anzeige erlischt.
PTY-Standbyempfang
PTY-Standby erlaubt es dem Receiver, von der aktuellen
Signalquelle außer AM kurzzeitig auf Ihr bevorzugtes
PTY-Programm umzuschalten.
Zum Aktivieren und Wählen Ihres bevorzugten
PTY-Codes für PTY-Standbyempfang, siehe Seite
17.
Die PTY-Anzeige leuchtet auf oder blinkt.
• Wenn die PTY-Anzeige aufleuchtet, ist der PTYStandbyempfang aktiviert.
• Wenn die PTY-Anzeige blinkt, ist der PTYStandbyempfang noch nicht aktiviert.
Zum Aktivieren des Empfangs müssen Sie einen
anderen Sender einstellen, bei dem diese Signale
mitgesendet werden. Die PTY-Anzeige geht von
Blinken auf Dauerleuchten über.
Verfolgen des gleichen Programms
—Network-Tracking-Empfang
Wenn Sie in einem Bereich unterwegs sind, in dem kein
guter UKW-Empfang möglich ist, sucht dieser Receiver
automatisch nach anderen Frequenzen, auf denen das
UKW-Radio Data System-Programm möglicherweise
besser empfangen werden kann (siehe Abbildung
unten).
Bei Versand ab Werk ist der Network-Tracking-Empfang
aktiviert.
Zum Ändern der Einstellung des NetworkTracking-Empfangs, siehe „AF-REG“ auf Seite 17.
Programm A wird in unterschiedlichen Frequenzbereichen
ausgestrahlt (01 – 05)
Automatische Senderauswahl—
Programmsuche
Normalerweise wird beim Wählen einer
Vorgabenummer der unter dieser Nummer abgelegte
Festsender abgestimmt.
Wenn die Signale vom UKW Radio Data SystemFestsender nicht mit ausreichender Signalstärke
empfangen werden können, wählt das Gerät mithilfe
der AF (Alternativfrequenz)-Daten eine andere
Frequenz mit möglicherweise demselben Programm
wie der Festsender aus.
• Das Gerät benötigt eine gewisse Zeit, um bei
Programm-Suchlauf auf einen anderen Sender
abzustimmen.
• Siehe auch Seite 17.
DEUTSCH
Zum Deaktivieren des PTY-Standbyempfangs,
wählen Sie „PTY OFF“ für den PTY-Code (siehe Seite 17).
Die PTY-Anzeige erlischt.
PTY-Codes
NEWS, AFFAIRS, INFO, SPORT, EDUCATE, DRAMA, CULTURE,
SCIENCE, VARIED, POP M (Musik), ROCK M (Musik), EASY
M (Musik), LIGHT M (Musik), CLASSICS, OTHER M (Musik),
WEATHER, FINANCE, CHILDREN, SOCIAL, RELIGION, PHONE
IN, TRAVEL, LEISURE, JAZZ, COUNTRY, NATION M (Musik),
OLDIES, FOLK M (Musik), DOCUMENT
9BEDIENUNG
Page 36

Bedienung der Disc
1
2
DEUTSCH
Stoppen Sie die Wiedergabe und werfen die
Disc aus
• „NO DISC“ erscheint. Drücken Sie SRC, um eine andere
Wiedergabequelle zu wählen.
Auswurfsperre
Um die Sperre aufzuheben, wiederholen Sie das
gleiche Verfahren.
Wählen eines Tracks/Ordners
Einschalten.
Setzen Sie eine Disc ein.
Alle Titel werden wiederholt abgespielt, bis Sie die
Quelle umschalten oder die Disc ausschieben.
Durch Drücken (oder Gedrückhalten) der folgenden
Tasten können Sie...
[Drücken Sie] Pausieren/Fortsetzen
der Wiedergabe
MP3/WMA: Ordner wählen
[Drücken Sie] Tracks wählen
[Gedrückthalten] Tracks
zurückspulen/
vorspulen
[Drehen] = [Drücken Sie]
• Für MP3/WMA-Discs wählen Sie den gewünschten
Ordner und dann den gewünschten Track durch
Wiederholen oder obigen Betätigungen des
Steuerreglers.
• Zum Zurückschalten zum vorherigen Menü drücken
Sie BACK.
10
Page 37

Auswählen von Wiedergabemodi
Sie können jeweils einen der folgenden WiedergabeModi verwenden.
1
2
[Drehen] = [Drücken Sie]
REPEAT Ô RANDOM
3
[Drehen] = [Drücken Sie]
REPEAT
TRACK RPT : Aktuellen Track wiederholen
FOLDER RPT : MP3/WMA: Aktuellen Ordner
wiederholen
RANDOM
FOLDER RND : MP3/WMA: Spielt in zufälliger
Reihenfolge alle Tracks des
aktuellen Ordners ab, und dann
Tracks der nächsten Ordner
ALL RND : Spielt alle Tracks in zufälliger
Reihenfolge ab
• Zum Aufheben der Wiederholungswiedergabe oder
der Zufallswiedergabe wählen Sie „RPT OFF“ oder
„RND OFF“.
• Zum Zurückschalten zum vorherigen Menü drücken
Sie BACK.
Hören vom USB-Gerät
Dieses Gerät kann MP3/WMA-Tracks abspielen, die in einem USB-Gerät abgelegt sind.
Alle Tracks werden wiederholt abgespielt, bis Sie die Quelle umschalten oder das USB-Gerät abnehmen.
USB-Eingangsbuchse
DEUTSCH
Wenn ein USB-Gerät angebracht ist...
Die Wiedergabe startet von der Stelle, wo sie vorher
abgebrochen wurde.
• Wenn momentan ein anderes USB-Gerät angebracht
ist, startet die Wiedergabe von Anfang an.
USB-Speicher
Zum Stoppen der Wiedergabe und
Abnehmen des USB-Geräts
Direkt von der Einheit abziehen.
• Drücken Sie SRC, um eine andere Wiedergabequelle
zu wählen.
Sie können das USB-Gerät auf gleiche Weise bedienen
wie die Dateien auf einer Discs. (Siehe Seiten 10 und 11.)
Fortsetzung auf nächster Seite
BEDIENUNG
11
Page 38

Vorsichtsmaßregeln:
• Vermeiden Sie Verwendung des USB-Geräts, wenn es
das sichere Fahren behindern kann.
• Das USB-Gerät nicht wiederholt abnehmen oder
einsetzen, während „READING“ (Lesen) im Display
erscheint.
• Starten Sie nicht den Motor, wenn ein USB-Gerät
angeschlossen ist.
• Diese Einheit kann möglicherweise die Dateien nicht
abspielen, je nach dem Typ des USB-Geräts.
• Betrieb und Stromversorgung arbeiten
DEUTSCH
möglicherweise nicht wie vorgesehen bei
bestimmten USB-Geräten.
• Sie können keinen Computer an den USB-Eingang des
Geräts anschließen.
• Stellen Sie sicher, dass alle wichtigen Daten gesichert
sind, um Datenverlust zu vermeiden.
• Lassen Sie nicht ein USB-Gerät im Fahrzeug, setzen
Sie es nicht direktem Sonnenlicht oder hohen
Temperaturen aus, um Verformung oder Schäden am
Gerät zu vermeiden.
• Manche USB-Geräte arbeiten möglicherweise nicht
sofort nach dem Einschalten der Stromversorgung.
• Zu weiteren Einzelheiten über USB-Betrieb siehe
Seite 22.
Hören von den anderen externen Komponenten
Sie können eine externe Komponente an die Eingangsbuchse AUX (Auxiliary) am Bedienfeld anschließen.
Vorbereitung: Stellen Sie sicher, dass „AUX ON“ in der Einstellung „SRC SELECT“ = „AUX IN“ gewählt
ist, siehe Seite 19.
1
2
—
3
4
—
Wählen Sie „AUX IN“.
Schalten Sie die angeschlossene Komponente ein und starten
Sie die Wiedergabe der Quelle.
Stellen Sie die Lautstärke ein.
Stellen Sie den Klang nach Wunsch ein (Siehe Seiten 14 und
15).
Anschließen einer externen Komponente, die an die AUX-Eingangsbuchse
Tragbarer Audio-Player usw.
3,5-mm-Stereo-Ministecker
(nicht mitgeliefert)
12
BEDIENUNG u. EXTERNE GERÄTE
Page 39

Verwendung der Fernbedienung — RM-RK50
Dieser Receiver kann wie hier beschrieben
ferngesteuert werden (mit einem getrennt erhältlichen
Fernbedienungsteil). Wir empfehlen, dass Sie das
Fernbedienungsteil RM-RK50 mit Ihrem Receiver
verwenden.
Einsetzen der Lithiumknopfbatterie
(CR2025)
1 • Schaltet das Gerät ein oder dämpft bei kurzem
Drücken bei eingeschaltetem Gerät kurz den
Ton.
Vorsicht:
• Explosionsgefahr bei falsch eingesetzter Batterie. Nur
mit dem gleichen oder einem gleichwertigen Typ
ersetzen.
• Die Batterie sollte keiner übermäßigen Hitze wie
direktem Sonnenlicht, Feuer o. Ä. ausgesetzt werden.
Wenn die Wirkung der Fernbedienung abnimmt,
muss die Batterie ausgewechselt werden.
Vor der Verwendung der Fernbedienung:
• Richten Sie die Fernbedienung direkt auf den
Fernbedienungssensor am Gerät.
• Setzen Sie den Fernbedienungssensor KEINEM
intensiven Licht (direkte Sonneneinstrahlung oder
künstliches Licht) aus.
Fernbedienungssensor
• Schaltet das Gerät aus, wenn gedrückt gehalten.
2 • Ändert die Festsender.
• Ändert den Ordner der MP3/WMA.
3 Zum Einstellen des Lautstärkepegels.
4 Wählt den Klangmodus.
5 Wählt die Quelle.
6 • Sucht bei kurzem Drücken Sender auf.
• Fährt im Titel schnell vor oder zurück, wenn
gedrückt gehalten.
• Wechselt die Tracks bei kurzem Drücken.
Warnung (um Unfälle und Schäden zu
vermeiden):
• Keine anderen Batterien als CR2025 oder
entsprechende einsetzen.
• Lassen Sie die Fernbedienung nicht an einem Ort (wie
etwa auf dem Armaturenbrett) liegen, wo sie längere
Zeit direktem Sonnenlicht ausgesetzt ist.
• Legen Sie die Batterie an einem Ort ab, wo sie außer
Reichweite kleiner Kinder ist.
• Die Batterie nicht aufladen, kurzschließen oder
erhitzen oder in einem Feuer entsorgen.
• Die Batterie nicht zusammen mit anderen
Metallgegenständen ablegen.
• Die Batterie nicht mit Pinzetten oder ähnlichen
Werkzeugen anstoßen.
• Die Batterie mit Klebeband umwickeln und isolieren,
wenn sie entsorgt oder aufbewahrt wird.
DEUTSCH
EXTERNE GERÄTE
13
Page 40

Wählen eines Vorgabe-Klangmodus
Sie können eine Vorwahl-Klangmodus wählen, der dem Musikgenre entspricht.
• Siehe auch Seite 16.
DEUTSCH
• Siehe Seite 15 zu „USER“-Einstellungen.
[Drehen] = [Drücken Sie]
Vorwahl-Werteinstellung für jeden Klangmodus
Vorwahlwert
Klangmodus
USER 60 Hz 00 Q1,25 1,0 kHz 00 Q1,0 10,0 kHz 00 —
ROCK 100 Hz +03 Q1,0 1,0 kHz 00 Q1,25 10,0 kHz +02 —
CLASSIC 80 Hz +01 Q1,25 1,0 kHz 00 Q1,25 10,0 kHz +03 —
POPS 100 Hz +02 Q1,25 1,0 kHz +01 Q1,25 10,0 kHz +02 —
HIP HOP 60 Hz +04 Q1,0 1,0 kHz –02 Q1,0 10,0 kHz +01 —
JAZZ 80 Hz +03 Q1,25 1,0 kHz 00 Q1,25 10,0 kHz +03 —
BASS MIDDLE TREBLE LOUD
Freq. Pegel Q Freq. Pegel Q Freq. Pegel Q
(Loudness)
OFF
Freq.: Frequenz Q: Q-slope
14
Page 41

Speichern Ihres eigenen
Klangmodus
Sie können Ihre eigenen Einstellungen im Speicher
ablegen.
1 Wählen Sie „USER“ für „EQ“.
4 Stellen Sie die Klangelemente des gewählten
Tons ein.
[Drehen] = [Drücken Sie]
1 Stellen Sie die Frequenz ein.
2 Stellen Sie den Pegel ein.
3 Stellen Sie Q-slope ein.
[Drehen] = [Drücken Sie]
2 Während „USER“ im Display erscheint...
3 Wählen Sie einen Ton.
[Drehen] = [Drücken Sie]
Klang-
elemente
Frequenz 60 Hz
Pegel von – 06
Q Q1,0
Bereich/wählbare
Gegenstände
BASS MIDDLE TREBLE
80 Hz
100 Hz
200 Hz
bis + 06
Q1,25
Q1,5
Q2,0
0,5 kHz
1,0 kHz
1,5 kHz
2,5 kHz
von – 06
bis + 06
Q0,75
Q1,0
Q1,25
10,0 kHz
12,5 kHz
15,0 kHz
17,5 kHz
von – 06
bis + 06
Fest
eingestellt
5 Wiederholen Sie Schritt 3 und 4 zur
Einstellung anderer Klangeigenschaften.
Die vorgenommene Einstellung wird automatisch
gespeichert.
DEUTSCH
EINSTELLUNGEN
15
Page 42

Menü-Bedienungen
1 Rufen Sie das Menü auf. 2 Wählen Sie den
gewünschten
Gegenstand.
[Drehen] =
[Drücken Sie]
DEUTSCH
Kategorie Menügegenstände Wählbare Einstellungen, [Bezugsseite]
DEMO
Display-
DEMO
Demonstration
CLOCK DISP *
Uhrzeitanzeige
CLOCK SET
Uhreinstellung
CLOCK
24H/12H
Zeitanzeige-Modus
CLOCK ADJ *
Uhreinstellung
EQ
EQ
Equalizer
DIMMER
Abblendung
3
SCROLL*
Blättern
DISPLAY
TAG DISPLAY
Markenanzeige
1
*
Wenn die Stromversorgung beim Ausschalten der Zündung des Fahrzeugs nicht unterbrochen wird, wird empfohlen,
„CLOCK OFF“ zu wählen, um die Fahrzeugbatterie zu schonen.
*2 Nur wirksam, wenn CT-Daten empfangen werden.
*3 Manche Zeichen oder Symbole werden nicht richtig im Display angezeigt (oder werden ausgeblendet).
• DEMO ON
• DEMO OFF
1
• CLOCK ON
• CLOCK OFF
: Stellen Sie die Stunde ein, und dann die Minute [6].
(Anfänglich: 0:00)
• 24 HOUR
• 12 HOUR
2
• AUTO
• OFF
: Wählen Sie einen Vorwahl-Klangmodus, der dem Musikgenre entspricht.
USER, ROCK, CLASSIC, POPS, HIP HOP, JAZZ
• DIMMER ON
• DIMMER OFF
• SCROLL ONCE
• SCROLL AUTO
• SCROLL OFF
Durch Drücken von DISP für länger als eine Sekunde wird die Anzeige
ungeachtet der Einstellung weitergeblättert.
• TAG ON
• TAG OFF
: Display-Demonstration wird automatisch aktiviert,
wenn 20 Sekunden lang keine Bedienung erfolgt, [6].
: Hebt auf.
: Die Uhrzeit wird immer beim Einschalten im Display
gezeigt.
: Bricht ab; Durch Drücken von DISP wird die Uhrzeit
etwa 5 Sekunden lang beim Ausschalten gezeigt, [6].
: Siehe auch Seite 6 zur Einstellung.
: Die eingebaute Uhr wird automatisch mit den
CT-Daten (Uhrzeit) im Radio Data System-Signal
eingestellt.
: Hebt auf.
: Blendet die Display- und Tastenbeleuchtung ab.
: Hebt auf.
: Scrollt die angezeigte Information einmal.
: Wiederholt das Scrollen (in 5-Sekunden-Intervallen).
: Hebt auf.
: Schaltet die Tag-Information bei der Wiedergabe von
MP3/WMA-Tracks ein.
: Hebt auf.
3 Wiederholen Sie Schritt 2 wenn
erforderlich.
• Zum Zurückschalten zum
vorherigen Menü drücken Sie BACK.
• Zum Verlassen des Menüs drücken
Sie DISP oder MENU.
Anfänglich: Unterstrichen
16
Page 43

Kategorie Menügegenstände Wählbare Einstellungen, [Bezugsseite]
4
AF-REG *
AlternativFrequenzen/
RegionalisierungEmpfang
• AF ON
• AF-REG ON
: Wenn die aktuell empfangenen Signale schwach
werden, schaltet das Gerät auf einen anderen Sender
um (das Programm kann sich von dem aktuell
empfangenen unterscheiden), [9].
• Die AF-Anzeige leuchtet auf.
: Wenn die aktuell empfangenen Signale schwach
werden, schaltet das Gerät auf einen anderen Sender
mit dem gleichen Programm um.
• Die AF- und REG-Anzeigen leuchten auf.
PTY-STANDBY *
PTY-Standby
TA VOLUME *
VerkehrsansageLautstärke
TUNER
P-SEARCH *
Programmsuchlauf
MONO *
Mono-Mode
• OFF
4
PTY OFF,
PTY-Codes
4
VOLUME 00
– VOLUME 50
(oder
VOLUME 00
– VOLUME 30)*
4
• SEARCH ON
• SEARCH OFF
6
• MONO ON
: Hebt auf.
: Aktiviert PTY-Standbyempfang mit einem der PTY-
Codes, [9].
: (Anfänglich: VOLUME 15)
5
: Aktiviert den Programmsuchlauf, [9].
: Hebt auf.
: Aktivieren Sie den Mono-Modus zum Verbessern des
UKW-Empfangs, aber der Stereoeffekt geht verloren
[7].
IF BAND
ZwischenfrequenzWellenbereich
• MONO OFF
• AUTO
• WIDE
: Stellen Sie den Stereoeffekts wieder her.
: Steigert die Tuner-Empfindlichkeit, um Störgeräusche
zwischen benachbarten Sendern zu verringern.
(Stereo-Effekt kann verlorengehen.)
: Ist Interferenz von benachbarten Sendern ausgesetzt,
aber die Klangqualität wird nicht verringert, und der
Stereoeffekt wird bewahrt.
COLOR
COLOR 01
– COLOR 29,
USER
: Wählen Sie eine der Vorgabe- oder Benutzerfarben für die Beleuchtung
von Display und Tasten (ausgenommen T/P/ /0).
(Zur Benutzeranpassung der Farbeinstellung „USER“ siehe Seite 19).
(bei KD-R501)
MENU COLOR
Menüfarbe
• OFF
• ON
: Hebt auf.
: Schaltet die Beleuchtung von Display und Tasten
(ausgenommen T/P/ /0) während Menü,
MENU COLOR
(bei KD-R501)
4
*
Nur für Radio Data System-UKW-Sender.
Listen-Suche und Wiedergabebetrieb um.
*5 Je nach Verstärker-Verstärkungsgradeinstellung.
*6 Nur angezeigt, wenn die Quelle „FM“ ist.
Fortsetzung auf nächster Seite
EINSTELLUNGEN
DEUTSCH
17
Page 44

Kategorie Menügegenstände Wählbare Einstellungen, [Bezugsseite]
FADER*7, *
Fader
8
R06 – F06 : Stellen Sie die Ausgangsbalance zwischen
vorderen und hinteren Lautsprechern ein.
(Anfänglich: 00)
BALANCE *
Balance
8
L06 – R06 : Stellen Sie die Ausgangsbalance zwischen linken
und rechten Lautsprechern ein.
(Anfänglich: 00)
LOUD
Loudness
• LOUD OFF
• LOUD ON
: Hebt auf.
: Verstärken Sie niedrige und hohe Frequenzen
um eine gute Klangwirkung auch bei niedriger
Lautstärke zu erhalten.
DEUTSCH
VOL ADJUST
Lautstärke-einstellung
VOL ADJ –05
—
VOL ADJ +05
(Anfänglich: VOL
ADJ 00)
: Nehmen Sie eine Vorwahl des Lautstärkepegels
für jede Quelle (ausgenommen UKW) in
Bezug auf den UKW-Lautstärkepegel vor. Der
Lautstärkepegel wird automatisch angehoben
oder abgesenkt, wenn Sie die Quelle ändern.
• Bevor Sie eine Einstellung vornehmen, wählen
Sie eine anzupassende Quelle aus.
• „VOL ADJ FIX“ erscheint im Display, wenn „FM“
als Quelle gewählt ist.
L/O MODE
Line-Ausgabemodus
• SUB.W
: Wählen, wenn die Klemmen REAR LINE OUT
zum Anschließen eines Subwoofers (über einen
externen Lautsprecher) verwendet werden.
AUDIO
• REAR
: Wählen, wenn die Klemmen REAR LINE OUT
zum Anschließen der Lautsprecher (über einen
externen Lautsprecher) verwendet werden.
SUB.W FREQ *
9
SubwooferSchwellenfrequenz
• LOW
• MID
: Niedrigere Frequenzen als 72 Hz werden zum
Subwoofer geleitet.
: Niedrigere Frequenzen als 111 Hz werden zum
Subwoofer geleitet.
• HIGH
: Niedrigere Frequenzen als 157 Hz werden zum
Subwoofer geleitet.
SUB.W LEVEL *
Subwoofer-Pegel
BEEP
Tastenberührungston
TEL MUTING
Telefon stummschalten
9
SUB.W 00
— SUB.W 08
• BEEP OFF
• BEEP ON
• MUTING 1/
MUTING 2
: Stellen Sie den Ausgabepegel des Subwoofers ein.
(Anfänglich: SUB.W 04)
: Deaktiviert den Tastenberührungston.
: Aktiviert den Tastenberührungston.
: Wählen Sie eine davon, die den Ton bei der
Verwendung eines Mobiltelefons stummschalten
kann.
AMP GAIN *
10
VerstärkerVerstärkungsgradregelung
• MUTING OFF
• LOW POWER
: Hebt auf.
: VOLUME 00 – VOLUME 30 (Wählen Sie dies, wenn
die Maximalleistung jedes Lautsprechers weniger
als 50 W beträgt, um Schäden am Lautsprecher zu
verhindern).
• HIGH POWER
7
Wenn Sie eine Anlage mit zwei Lautsprechern verwenden, stellen Sie den Fader-Pegel auf „00“.
*
: VOLUME 00 – VOLUME 50
*8 Die Einstellung kann nicht den Subwoofer-Ausgang beeinflussen.
*9 Erscheint nur, wenn „L/O MODE“ auf „SUB.W.“ gestellt ist.
*10 Der Lautstärkepegel wird automatisch auf „VOLUME 30“ eingestellt, wenn Sie auf „LOW POWER“ mit höher als
auf „VOLUME 30“ eingestelltem Lautstärkepegel umschalten.
18
Page 45

Kategorie Menügegenstände Wählbare Einstellungen, [Bezugsseite]
11
AM *
MW-Sender
12
AUX IN *
SRC SELECT
Auxiliary-Eingabe
11
*
Nur angezeigt, wenn eine andere Quelle als „AM“ gewählt ist.
*12 Nur angezeigt, wenn eine andere Quelle als „AUX IN“ gewählt ist.
• AM OFF
• AM ON
• AUX OFF
• AUX ON
: Deaktivieren Sie „AM“ in der Quellenwahl.
: Aktivieren Sie „AM“ in der Quellenwahl, [4].
: Deaktivieren Sie „AUX IN“ in der Quellenwahl.
: Aktivieren Sie „AUX IN“ in der Quellenwahl, [4].
Farbeinstellungen (für KD-R501)
Erzeugen Ihrer eigenen Farbe
—USER Color
Sie können Ihre eigenen Farben erzeugen—
„DAY COLOR“ oder „NIGHT COLOR“.
DAY COLOR: Verwendet, wenn „DIMMER“
auf „DIMMER OFF“ gestellt
ist.
NIGHT COLOR: Verwendet, wenn „DIMMER“
auf „DIMMER ON“ gestellt ist.
1
2
Wählen Sie „COLOR“ = „USER“.
[Drehen] = [Drücken Sie]
3 Während „USER“ im Display erscheint...
4
[Drehen] = [Drücken Sie]
5 Wählen Sie eine Primärfarbe.
6 Passen Sie den Pegel (00 – 31) der gewählten
Wenn „00“ für alle Primärfarben gewählt ist,
7 Wiederholen Sie Schritt 5 und 6 zur
8 Verlassen Sie die Einstellung.
• Wenn ca. 30 Sekunden lang keine Bedienung erfolgt,
wird der Betrieb aufgehoben.
DEUTSCH
[Drehen] = [Drücken Sie]
Primärfarbe an.
[Drehen] = [Drücken Sie]
erscheint keine Anzeige im Display.
Einstellung der anderen Primärfarben.
EINSTELLUNGEN
19
Page 46

Weitere Informationen zu Ihrem Receiver
Grundlegende Bedienung
Einschalten
• Durch Drücken der SRC-Taste am Gerät kann ebenfalls
eingeschaltet werden. Wenn die gewählte Quelle
startbereit ist, startet auch die Wiedergabe.
Ausschalten
• Wenn Sie das Gerät beim Hören eines Tracks
DEUTSCH
ausschalten, startet die Wiedergabe beim
nächsten Einschalten von der Stelle, wo sie vorher
abgebrochen wurde.
Allgemeines
• Wenn Sie die Quelle beim Hören von einer Disc
ändern, stoppt die Wiedergabe.
Wenn Sie zum nächsten Mal "CD" als
Wiedergabequelle wählen, startet die Wiedergabe
von der Stelle, wo sie vorher abgebrochen wurde.
• Wenn etwa 30 Sekunden nach dem Drücken der
MENU-Taste keine Bedienung erfolgt, wird die
Bedienung aufgehoben.
Bedienung des Tuners
Speichern von Sendern
• Während des SSM-Suchlaufs...
– Alle vorher gespeicherten Sender werden gelöscht,
und Sender werden neu gespeichert.
– Wenn SSM beendet ist, wird der in der niedrigsten
Festsendernummer gespeicherte Sender
automatisch aufgerufen.
• Beim manuellen Speichern eines Senders wird ein
vorher vorgewählter Sender gelöscht, wenn ein
neuer Sender unter der gleichen Festsendernummer
gespeichert wird.
UKW-Radio Data System-Funktionen
• Network-Tracking-Empfang erfordert zwei Typen von
Radio Data System-Signalen—PI (Programmkennung)
und AF (Alternativfrequenz) zur richtigen Funktion.
Ohne richtigen Empfang dieser Daten arbeitet
Network-Tracking-Empfang nicht richtig.
• Wenn eine Verkehrsansage mit TA-Standbyempfang
empfangen wird, wird die Lautstärke (TA VOL)
automatisch auf den voreingestellten Lautstärkepegel
umgeschaltet, wenn der aktuelle Pegel niedriger als
der voreingestellte Pegel ist.
• Wenn Alternativfrequenzempfang aktiviert ist (bei
gewähltem AF) ist auch Network-Tracking-Empfang
automatisch aktiviert.
Bedienung der Disc
Achtung bei DualDisc-Wiedergabe
• Die Nicht-DVD-Seite einer „DualDisc“ entspricht nicht
dem „Compact Disc Digital Audio“-Standard. Deshalb
wird die Verwendung der Nicht-DVD-Seite einer
DualDisc auf diesem Produkt nicht empfohlen.
Allgemeines
• Das Gerät wurde dafür konstruiert, CDs/CD-Text und
CD-Rs (bespielbar)/CD-RWs (überschreibbar) in den
Formaten Audio-CD (CD-DA), MP3/WMA abzuspielen.
• Wenn eine Disc umgekehrt herum eingesetzt ist,
erscheint „PLEASE“ und „EJECT“ abwechselnd im
Display. Drücken Sie 0 zum Auswerfen der Disc.
• MP3- und WMA- „Titel“ (die Wörter „Datei“ und
„Titel“ werden in dieser Anleitung mit gleicher
Bedeutung verwendet) sind in „Ordnern“
aufgezeichnet.
• Beim Vorlauf oder Rücklauf auf einer MP3- oder
WMA-Disc können Sie nur unterbrochene Töne hören.
20
Page 47

Wiedergabe einer CD-R oder CD-RW
• Verwenden Sie nur „finalisierte“ CD-Rs oder CD-RWs.
• Dies Gerät kann nur Dateien des gleichen Typs wie
zuerst erkannt abspielen, wenn eine eingelegte Disc
sowohl Audio-CD (CD-DA)-Dateien als auch MP3/
WMA-Dateien enthält.
• Dieser Receiver kann Multi-Session-Discs abspielen;
nicht abgeschlossene Sessions werden aber bei der
Wiedergabe übersprungen.
• Manche CD-Rs oder CD-RWs können sich auf diesem
Gerät aufgrund ihrer Disc-Eigenschaften oder aus den
folgenden Gründen nicht abspielen lassen:
– Discs sind schmutzig oder zerkratzt.
– Kondensationsbildung ist auf der Linse im Gerät
aufgetreten.
– Die Tonabnehmerlinse im Receiver ist verschmutzt.
– Die Dateien auf der CD-R/CD-RW sind in der
„Packet Write“-Methode aufgezeichnet.
– Es liegen falsche Aufnahmebedingungen (fehlende
Daten, usw.) oder Medienbedingungen (befleckt,
zerkratzt, verzogen usw.) vor.
• CD-RWs können eine längere Auslesezeit erfordern,
da die Reflektanz von CD-RWs niedriger als die
normaler CDs ist.
• Verwenden Sie nicht die folgenden CD-Rs oder
CD-RWs:
– Discs mit Aufklebern, Etiketten oder Schutzsiegeln
auf der Oberfläche.
– Discs, auf denen Beschriftungen direkt mit einem
Tintenstrahldrucker aufgedruckt werden können.
Bei Verwendung solcher Discs bei hoher Temperature
oder hoher Luftfeuchtigkeit können Fehlfunktionen
oder Schäden am Gerät verursacht werden.
Wiedergabe einer MP3/WMA-Disc
• Dieser Receiver kann MP3/WMA-Dateien mit
der Dateierweiterung <.mp3> oder <.wma>
abspielen (ungeachtet der Schreibung mit Groß- und
Kleinbuchstaben).
• Dieser Receiver kann die Namen von Alben,
Interpreten (Künstlern) sowie Tag (Version 1,0, 1,1,
2,2, 2,3 oder 2,4) für MP3-Dateien und WMA-Dateien
anzeigen.
• Dieses Gerät kann nur Einzelbyte-Zeichen anzeigen.
Andere Zeichen können nicht korrekt angezeigt
werden.
• Dieser Receiver kann MP3/WMA-Dateien abspielen,
die den unten aufgeführten Bedingungen
entsprechen:
– Bit-Rate von MP3: 32 kbps — 320 kbps
– Samplingfrequenz von MP3:
32 kHz, 44,1 kHz, 48 kHz (für MPEG-1)
16 kHz, 22,05 kHz, 24 kHz (für MPEG-2)
– Bit-Rate von WMA: 32 kbps — 320 kbps
– Samplingfrequenz von WMA: 22,05 kHz, 32 kHz,
44,1 kHz, 48 kHz
– Disc-Format: ISO 9660 Level 1/Level 2, Romeo,
Joliet, Windows-Erweiterung.
• Die maximale Zeichenzahl für Datei-/OrderNamen kann je nach verwendetem Discformat
unterschiedlich sein (einschließlich 4
Erweiterungszeichen—<.mp3> oder <.wma>).
– ISO 9660 Level 1: bis zu 12 Zeichen
– ISO 9660 Level 2: bis zu 31 Zeichen
– Romeo: bis zu 64 Zeichen
– Joliet: bis zu 32 Zeichen
– Windows-Erweiterung: bis zu 64 Zeichen
• Dieses Gerät kann insgesamt 512 Dateien, 255 Ordner
und 8 Ebenen erkennen.
• Dieser Receiver kann die mit VBR (variabler Bitrate)
aufgenommenen Dateien abspielen.
Die mit VBR aufgenommenen Dateien weisen eine
Discrepanz zwischen Anzeige verflossener Zeit auf
und zeigen nicht die tatsächlich verflossene Zeit an.
Insbesondere nach Ausführung der Suchfunktion wird
dieser Unterschied merkbar.
• Dieses Gerät eignet sich nicht zur Wiedergabe der
folgenden Dateien:
– MP3-Dateien, die in den Formaten MP3i und MP3
PRO codiert sind.
– MP3-Dateien sind in einem ungeeigneten Format
codiert.
– MP3-Dateien, die mit Layer 1/2 codiert sind.
– WMA-Dateien, die mit verlustfreiem,
professionellem und Sprachformat codiert sind.
– WMA-Dateien, die nicht auf Windows Media ®
Audio basieren.
– WMA-Dateien, die mit DRM kopiergeschützt sind.
– Dateien, die Daten wie AIFF, ATRAC3 usw.
enthalten.
• Die Suchfunktion arbeitet, aber die
Suchgeschwindigkeit ist nicht konstant.
DEUTSCH
Fortsetzung auf nächster Seite
ZUR BEZUGNAHME
21
Page 48

Wiedergabe von MP3/WMA-Tracks von
einem USB-Gerät
• Bei der Wiedergabe von einem USB-Gerät kann sich
die Wiedergabereihenfolge von anderen Playern
unterscheiden.
• Diese Einheit kann nicht in der Lage sein, bestimmte
USB-Geräte oder bestimmte Dateien aufgrund
ihrer Eigenschaften oder Aufnahmebedingungen
abzuspielen.
• Je nach der Form der USB-Geräte und Anschluss-Ports
können manche USB-Geräte nicht richtig angebracht
DEUTSCH
werden, oder die Verbindung kann locker sein.
• Schließen Sie jeweils ein USB-Massenspeichergerät
zur Zeit an die Einheit an. Verwenden Sie keinen USBHub.
• Wenn das angeschlossene USB-Gerät nicht die
richtigen Dateien enthält, erscheint „CANNOT PLAY“.
• Dieses Gerät kann den Tag (Version 1,0, 1,1, 2,2,
2,3 oder 2,4) für MP3-Dateien und WMA-Dateien
anzeigen.
• Dieser Receiver kann MP3/WMA-Dateien abspielen,
die den unten aufgeführten Bedingungen
entsprechen:
– Bit-Rate von MP3: 32 kbps — 320 kbps
– Samplingfrequenz von MP3:
32 kHz, 44,1 kHz, 48 kHz (für MPEG-1)
16 kHz, 22,05 kHz, 24 kHz (für MPEG-2)
– Bit-Rate von WMA: 32 kbps — 320 kbps
– Samplingfrequenz von WMA: 22,05 kHz, 32 kHz,
44,1 kHz, 48 kHz
• Dieses Gerät kann mit VBR (variabler Bitrate)
aufgenommene MP3-Dateien abspielen.
• Maximalzahl von Zeichen für:
– Ordnernamen : 32 Zeichen
– Dateinamen : 32 Zeichen
– MP3-Tag : 64 Zeichen
– WMA-Tag : 32 Zeichen
• Dieses Gerät kann insgesamt 5 000 Dateien, 255
Ordner (255 Dateien pro Ordner einschließlich Ordner
ohne nicht-unterstützte Dateien) und 8 Hierarchien
erkennen.
• Das Gerät unterstützt nicht einen SD-Kartenleser.
• Diese Einheit kann nicht ein USB-Gerät mit einer
anderen Bewertung als 5 V und mehr als 500 mA
erkennen.
• USB-Geräte, die mit Spezialfunktionen wie
Datenschutzfunktionen ausgestattet sind, können
mit dieser Einheit nicht verwendet werden.
• Verwenden Sie kein USB-Gerät mit 2 oder mehr
Partitionen.
• Diese Einheit erkennt möglicherweise nicht ein USBGerät, das über einen USB-Kartenleser angeschlossen
ist.
• Diese Einheit kann möglicherweise Dateien in einem
USB-Gerät nicht korrekt abspielen, wenn ein USBVerlängerungskabel verwendet wird.
• Dieses Gerät eignet sich nicht zur Wiedergabe der
folgenden Dateien:
– MP3-Dateien, die in den Formaten MP3i und MP3
PRO codiert sind.
– MP3-Dateien sind in einem ungeeigneten Format
codiert.
– MP3-Dateien, die mit Layer 1/2 codiert sind.
– WMA-Dateien, die mit verlustfreiem,
professionellem und Sprachformat codiert sind.
– WMA-Dateien, die nicht auf Windows Media®
Audio basieren.
Auswrfen einer Disc oder Abnehmen eines
USB-Geräts
• Wenn die ausgeworfene Disc nicht innerhalb von 15
Sekunden entfernt wird, wird sie Disc automatisch
wieder in den Ladeschlitz eingezogen, um sie vor
Staub zu schützen.
• Nach dem Auswerfen einer Disc oder Entfernen eines
USB-Geräts erscheint „NO DISC“ oder „NO USB“, und
Sie können einzelne der Tasten nicht mehr bedienen.
Setzen Sie eine andere Disc ein, bringen Sie wieder
ein USB-Gerät an oder drücken Sie SRC, um eine
andere Wiedergabequelle zu wählen.
Menü-Bedienungen
• Wenn Sie die Einstellung von „AMP GAIN“
von „HIGH POWER“ auf „LOW POWER“
umstellen, während Sie mit einem Lautstärkepegel
von mehr als „VOLUME 30“ hören, schaltet der
Receiver automatisch den Lautstärkepegel auf
„VOLUME 30“ um.
22
Page 49

Störungssuche
Was wie eine Betriebsstörung erscheint, muss nicht immer ein ernstes Problem darstellen. Gehen Sie die folgenden
Prüfpunkte durch, bevor Sie sich an den Kundendienst wenden.
Symptome Abhilfen/Ursachen
• Es kommt kein Ton von den
Lautsprechern.
• Das Gerät funktioniert überhaupt nicht. Nehmen Sie einen Reset am Receiver vor (siehe Seite 3).
• „AUX IN“ kann nicht gewählt werden. Prüfen Sie die Einstellung „SRC SELECT“
Allgemeines
• KD-R501: Auf dem Display erscheint keine
Anzeige.
• SSM automatische Vorwahl funktioniert
nicht.
• Statikrauschen beim Radiohören. Schließen Sie das Antennenkabel fest an.
UKW/AM
• „AM“ kann nicht gewählt werden. Prüfen Sie die Einstellung „SRC SELECT“
• Die Disc kann nicht wiedergegeben
werden.
• CD-R/CD-RW kann nicht wiedergegeben
werden.
• Titel auf der CD-R/CD-RW können nicht
übersprungen werden.
• Die Disc kann weder abgespielt noch
ausgeschoben werden.
• Der Disc-Klang ist manchmal
unterbrochen.
Discs im Allgemeinen
• „NO DISC“ erscheint im Display. Setzen Sie eine abspielbare Disc in den Ladeschlitz ein.
• „PLEASE“ und „EJECT“ erscheinen
abwechselnd im Display.
• Die Disc kann nicht wiedergegeben
werden.
MP3/WMA-
Wiedergabe
• Die Lautstärke auf den optimalen Pegel einstellen.
• Prüfen Sie die Kabel und Verbindungen.
=
„AUX IN“ (siehe Seite 19).
KD-R501: Prüfen Sie die USER-Farbeinstellungen (siehe
Seite 19)
Speichern Sie die Sender manuell.
= „AM“
(siehe Seite 19).
Setzen Sie die Disc richtig ein.
• Setzen Sie eine finalisierte CD-R/CD-RW ein.
• Finalisieren Sie die CD-R/CD-RW mit dem zur
Aufnahme verwendeten Gerät.
• Die Disc freigeben (siehe Seite 10).
• Die Disc gezwungen ausschieben (siehe Seite 3).
• Stoppen Sie die Wiedergabe beim Fahren auf einer
holperigen Straße.
• Ändern Sie die Disc.
• Prüfen Sie die Kabel und Verbindungen.
Drücken Sie 0 und setzen Sie eine Disc richtig ein.
• Verwenden Sie eine Disc mit MP3/WMA-Titel, die in
dem mit ISO 9660 konformen Format Level 1, Level 2,
Romeo oder Joliet aufgezeichnet sind.
• Fügen Sie die Erweiterung <.mp3> oder <.wma> zu
ihren Dateinamen hinzu.
DEUTSCH
Fortsetzung auf nächster Seite
23ZUR BEZUGNAHME
Page 50

Symptome Abhilfen/Ursachen
• Rauschen wird erzeugt. Springen Sie zu einem anderen Titel weiter
• Eine längere Auslesezeit ist erforderlich
(„READING“ blinkt weiter im Display).
• Tracks, die nicht in der gewünschten
Reihenfolge abgespielt werden.
• Verflossene Spielzeit ist nicht richtig. Dies kann manchmal bei der Wiedergabe auftreten. Dies
DEUTSCH
• „NO FILE“ erscheint im Display. Der gewählte Ordner ist leer.* Wählen Sie einen anderen
MP3/WMA-Wiedergabe
• Richtige Zeichen werden nicht angezeigt
(z.B. Albumname).
• Rauschen wird erzeugt. Der abgespielte Track ist kein MP3/WMA-Track.
• „READING“ blinkt weiter im Display. • Die Auslesezeit ist je nach USB-Gerät unterschiedlich.
• „NO FILE“ erscheint im Display. Der gewählte Ordner ist leer.* Wählen Sie einen anderen
• Tracks/Ordner werden nicht in der
gewünschten Reihenfolge abgespielt.
• „CANNOT PLAY“ blinkt im Display.
USB-Gerät-Wiedergabe
• „NO USB“ erscheint im Display.
• Die Einheit kann das USB-Gerät nicht
erkennen.
• Richtige Zeichen werden nicht angezeigt
(z.B. Albumname).
• Während der Wiedergabe eines Tracks
treten manchmal Tonaussetzer auf.
• Microsoft und Windows Media sind entweder eingetragene Marken oder Marken der Microsoft Corporation in den
Vereinigten Staaten und/oder anderen Ländern.
oder wechseln Sie die Disc. (Fügen Sie nicht den
Erweiterungscode <.mp3> oder <.wma> zu Nicht-MP3
oder WMA-Titeln hinzu).
Verwenden Sie nicht zu viele Hierarchie-Ebenen und
Ordner.
Die Wiedergabe-Reihenfolge wird bestimmt, wenn die
Dateien aufgezeichnet werden.
liegt daran, wie die Titel auf der Disc aufgezeichnet sind.
Ordner, der MP3/WMA-Titel enthält.
* Ordner, der physisch leer ist, oder Ordner, der Daten
enthält, aber keinen gültigen MP3/WMA-Track.
Dieses Gerät kann nur Buchstaben (Großbuchstaben),
Zahlen und eine begrenzte Anzahl von Symbolen
anzeigen.
Springen Sie zu einer anderen Datei. (Fügen Sie nicht die
Erweiterung <.mp3> oder <.wma> zu Nicht-MP3 oder
WMA-Titeln hinzu).
• Verwenden Sie nicht zu viele Hierarchien oder Ordner.
• Schalten Sie die Stromversorgung aus und dann
wieder ein.
• Bringen Sie das USB-Gerät erneut an.
Ordner, der MP3/WMA-Titel enthält.
* Ordner, der physisch leer ist, oder Ordner, der Daten
enthält, aber keinen gültigen MP3/WMA-Track.
Die Wiedergabe-Reihenfolge wird durch den Write-inZeitstempel bestimmt. Der erste Track/Ordner im USBGerät ist der este Track/Ordner zur Wiedergabe.
• Bringen Sie ein USB-Gerät an, das in einem geeigneten
Format codierte Tracks enthält.
• Bringen Sie das USB-Gerät erneut an.
Dieses Gerät kann nur alphabetische Zeichen
(Großbuchstaben) und eine begrenzte Anzahl von
Symbolen anzeigen.
Die MP3/WMA-Tracks wurden nicht richtig in das USBGerät kopiert.
Kopieren Sie MP3/WMA-Tracks erneut in das USB-Gerät
und wiederholen Sie den Vorgang.
24
Page 51

Wartung
Reinigen der Anschlüsse
Durch häufiges Einstecken und Abtrennen werden die
Anschlüsse verschlissen.
Um diese Gefahr zu minimieren, sollten Sie die
Anschlüsse mit einem mit Alkohol befeuchteten
Wattetupfer oder Lappen reinigen, wobei darauf
geachtet werden muss, die Anschlusskontakte nicht zu
beschädigen.
Anschlüsse
Feuchtigkeitskondensation
Feuchtigkeitskondensation auf der Linse in dem Gerät
kann sich in den folgenden Fällen bilden:
• Nach dem Einschalten der Heizung im Auto.
• Wenn es sehr feucht im Auto wird.
In diesem Fall kann eine Fehlfunktion in dem Gerät
auftreten. In diesem Fall entnehmen Sie die Disc und
lassen das Gerät einige Stunden lang eingeschaltet, bis
die Feuchtigkeit verflogen ist.
Umgang mit Discs
Beim Entnehmen einer Disc aus
ihrer Hülle immer den Mittenhalter
der Hülle eindrücken und die Disc an
den Rändern haltend herausheben.
• Die Disc immer an den Rändern halten. Berühren Sie
nicht die Aufnahmeoberfläche.
Beim Einsetzen einer Disc in ihre Hülle die Disc
vorsichtig um den Mittenhalter eindrücken (mit der
beschrifteten Seite nach oben weisend).
• Denken Sie immer daran, die Discs nach der
Verwendung wieder in ihren Hüllen abzulegen.
Mittenhalter
Sauberhalten der Discs
Eine verschmutzte Disc lässt sich
möglicherweise nicht richtig abspielen.
Wenn eine Disc verschmutzt wird,
wischen Sie diese mit einem weichen
Lappen gerade von der Mitte nach außen hin ab.
• Verwenden Sie keine Lösungsmittel (z.B.
Schallplattenreiniger, Spray, Terpentin, Benzol usw.)
zur Reinigung von Discs.
Wiedergabe neuer Discs
Neue Discs haben möglicherweise rauhe
Stellen an den Innen- und Außenrändern.
Wenn solch eine Disc verwendet wird,
kann sie von diesem Receiver abgewiesen
werden.
Um solche rauhen Stellen zu beseitigen, reiben Sie
die Ränder mit einem Bleistift, Kugelschreiber usw.
Discs mit folgenden Mängeln dürfen nicht
verwendet werden:
Single-CD (8-cm-Disc) Verzogene Disc
Aufkleber und
Aufkleberreste Aufklebetikett
Ungewöhnliche Form
Transparente oder
halbtransparente Teile auf
der Aufnahmefläche
See-through-Disc
(halbtransparente Disc)
DEUTSCH
25ZUR BEZUGNAHME
Page 52

Technische Daten
AUDIO-VERSTÄRKERSEKTION
Max. Ausgangsleistung: Vorne/Hinten: 50 W pro Kanal
Sinus-Ausgangsleistung (eff.): Vorne/Hinten: 19 W pro Kanal an 4 Ω, 40 Hz bis 20 000 Hz bei nicht
mehr als 0,8% Klirrfaktor.
Lastimpedanz: 4 Ω (4 Ω bis 8 Ω Toleranz)
Klang-Steuerbereich: Tiefen: ±12 dB (60 Hz, 80 Hz, 100 Hz, 200 Hz)
DEUTSCH
Mittel: ±12 dB (0,5 kHz, 1,0 kHz, 1,5 kHz, 2,5 kHz)
Höhen: ±12 dB (10,0 kHz, 12,5 kHz, 15,0 kHz, 17,5 kHz)
Frequenzgang: 40 Hz bis 20 000 Hz
Signal-Rauschabstand: 70 dB
Line-Out Pegel/Impedanz: 2,5 V/20 kΩ Last (volle Skala)
Ausgangsimpedanz: 1 kΩ
Subwoofer-Ausgangspegel/Impedanz: 2,5 V/20 kΩ Last (volle Skala)
Andere Klemme: USB-Eingangsbuchse, AUX (Hilfs-) Eingangsbuchse
TUNER-SEKTION
Frequenzgang: UKW: 87,5 MHz bis 108,0 MHz
AM: MW: 522 kHz bis 1 620 kHz
UKW-Tuner Nutzbare Empfindlichkeit: 11,3 dBf (1,0 µV/75 Ω)
50 dB Geräuschberuhigung: 16,3 dBf (1,8 µV/75 Ω)
Ausweichkanalabstimmschärfe (400 kHz): 65 dB
Frequenzgang: 40 Hz bis 15 000 Hz
Übersprechdämpfung: 30 dB
MW-Tuner Empfindlichkeit: 20 μV
Trennschärfe: 35 dB
LW-Tuner Empfindlichkeit: 50 μV
Q1,0, Q1,25, Q1,5, Q2,0
Q0,75, Q1,0, Q1,25
Q = Fest eingestellt
LW: 144 kHz bis 279 kHz
26
Page 53

CD-PLAYER-SEKTION
Typ: CD-Spieler
Signalerkennungssystem: Kontaktfreier optischer Tonabnehmer
(Halbleiterlaser)
Kanäle: 2 Kanäle (Stereo)
Frequenzgang: 5 Hz bis 20 000 Hz
Dynamikumfang: 96 dB
Signal-Rauschabstand: 98 dB
Gleichlaufschwankungen: Unter der Messgrenze
MP3-Decodierungsformat: (MPEG1/2 Audio Layer 3) Max. Bitrate: 320 kbps
WMA (Windows Media® Audio) Decodierformat: Max. Bitrate: 320 kbps
USB-SEKTION
USB-Standard: USB 1.1, USB 2.0
Datentransfer-Rate (Full Speed): Max. 12 Mbps
Kompatibles Gerät: Massenspeichergerät
Kompatibles Dateisystem:
Abspielbares Audio-Format:
Max. Strom: DC 5 V
FAT 32/16/12
MP3/WMA
500 mA
DEUTSCH
ALLGEMEINES
Betriebsstromanforderungen: Betriebsspannung: DC 14,4 V (11 V bis 16 V Toleranz)
Erdungssystem: Negative Masse
Zulässige Betriebstemperatur: 0°C bis +40°C
Abmessungen (B × H × T): (ca.) Einbaugröße: 182 mm × 52 mm × 160 mm
Tafelgröße: 188 mm × 58 mm × 12 mm
Gewicht: 1,3 kg (ohne Zubehör)
Änderungen bei Design und technischen Daten bleiben vorbehalten.
27ZUR BEZUGNAHME
Page 54

Перед тем, как приступать к эксплуатации, пожалуйста, внимательно прочитайте все инструкции с тем,
чтобы полностью изучить и обеспечить оптимальную работу этого устройства.
Благодарим Вас за приобретение изделия JVC.
ВАЖНО ДЛЯ ЛАЗЕРНОЙ АППАРАТУРЫ
1. ЛАЗЕРНАЯ АППАРАТУРА КЛАССА 1
2. ПРЕДУПРЕЖДЕНИЕ: Не открывайте верхнюю крышку. Внутри устройства нет частей, которые
3. ПРЕДУПРЕЖДЕНИЕ: В открытом состоянии происходит видимое и/или невидимое излучение лазера
4. ЭТИКЕТКА: ПРЕДУПРЕЖДАЮЩАЯ ЭТИКЕТКА, РАЗМЕЩЕННАЯ НА НАРУЖНОЙ СТОРОНЕ УСТРОЙСТВА.
пользователь может отремонтировать. Ремонт должен осуществляться
квалифицированным обслуживающим персоналом.
класса 1M. Не смотрите непосредственно в оптические инструменты.
РУCCKИЙ
Предупреждение:
Если данное устройство используется во время
поездки на автомобиле, следует, не отвлекаясь,
следить за дорогой, иначе может произойти
Батарея
Изделия
Сведения для пользователей по
утилизации старого оборудования и
батарей
[только Европейсий Союз]
Эти символы указывают на то, что изделие и
батарея, на которые они нанесены, в конце
срока службы не должны утилизироваться, как
обычные бытовые отходы.
Утилизация данного изделия и батареи должна
осуществляться в соответствии с требованиями
национального законодательства или другими
правилами, действующими в Вашей стране и
городе.
Обеспечивая правильную утилизацию данного
продукта, Вы помогаете сберечь природные
ресурсы и предотвращаете возможный ущерб
для окружающей среды и здоровья людей.
Уведомление:
Надпись Pb под символом батарей указывает на
то, что данная батарея содержит свинец.
дорожно-транспортное происшествие.
Предостережение, касающееся настройки
громкости:
По сравнению с другими источниками
воспроизведения цифровые устройства (CD/USB)
создают незначительный шум. Уменьшите громкость
перед воспроизведением, чтобы предотвратить
повреждение динамиков из-за внезапного
повышения уровня громкости на выходе.
Для Вашей безопасности...
• Не повышайте слишком сильно громкость,
поскольку в результате этого заглушаются
внешние звуки, что делает опасным управление
автомобилем.
• Остановите автомобиль перед тем, как выполнять
любые сложные операции.
Температура внутри автомобиля...
Если Вы припарковали Ваш автомобиль на
длительное время в жаркую или холодную погоду,
перед тем, как включать это устройство, подождите
до тех пор, пока температура в автомобиле не
придет в норму.
2
Page 55

Отсоединение панели управления
Подключение панели управления
Как перенастроить Ваше
устройство
• Запрограммированные настройки будут также
удалены.
Принудительное извлечение диска
• Можно принудительно извлечь загруженный
диск, даже если он заблокирован. Сведения о
блокировке/разблокировке диска см. на стр. 10.
• Будьте осторожны, не уроните диск при
извлечении.
• Если это не поможет, попробуйте
перенастроить приемник.
CОДЕРЖАНИЕ
Отсоединение панели управления ............ 3
Подключение панели управления ............ 3
Как перенастроить Ваше устройство ........ 3
Принудительное извлечение диска .......... 3
ОПЕРАЦИИ
Основные операции ................................... 4
Подготовка ................................................. 6
Прослушивание радио ............................... 7
Операции с дисками .................................. 10
Прослушивание устройства USB ................ 11
ВНЕШНИЕ УСТРОЙСТВА
Прослушивание с других внешних
устройств ................................................. 12
Использование пульта дистанционного
управления—
НАСТРОЙКИ
Выбор запрограммированного режима
звучания .................................................. 14
Операции с меню ....................................... 16
Настройки цвета (для KD-R501) ................ 19
СПРАВОЧНАЯ ИНФОРМАЦИЯ
Дополнительная информация о
приемнике .............................................. 20
Устранение проблем .................................. 23
Обслуживание ............................................ 25
Технические характеристики .................... 26
Данный знак используется для указания...
RM-RK50 ........................... 13
Чтобы сделать выбор, поверните
ручку управления, после чего
нажмите на нее для подтверждения
выбора.
РУCCKИЙ
3
Page 56

Основные операции
РУCCKИЙ
1 • FM/AM: Выбор запрограммированной
радиостанции.
• CD/USB: Выберите папку.
2 • Включение питания.
• Ослабление звука (при включенном питании).
• Выключение питания [Удерживать].
3 Выбор источников.
FM
2
= CD *
= USB = AUX IN *3 = AM *3 =
(возврат в начало)
4 • Ввод списка.
• Переход к настройке меню [Удерживать] .
5 • Регулировка громкости *
4
или выбор
элементов списка [Вращение].
• Подтвердите выбор [Нажмите] .
• FM: Переход в запрограммированный режим
SSM [Удерживать] .
• CD/USB: Введите режим воспроизведения [Уд
ерживать] .
Пауза или возобновление
воспроизведения*
6 Загрузочный отсек
7 Окно дисплея
8 Извлечение диска.
9 • Включение или выключение функции
4
[Нажмите] .
резервного приема TA.
• Переход в режим поиска PTY [Удерживать].
p Отсоединение панели.
q Изменение отображаемой информации.
w • FM/AM: Поиск радиостанции.
• CD/USB: Выберите дорожку.
e Возврат к предыдущему меню.
r Телеметрический датчик
• Управлять этим устройством можно с
помощью дополнительно приобретенного
пульта дистанционного управления. Более
подробную информацию см. на стр. 13.
t Дополнительный входной разъем AUX
y Входной разъем USB (универсальная
последовательная шина)
1
*
Известен также как “Диск управления” в данном
руководстве.
*2 Выбрать “CD” в качестве источника
воспроизведения нельзя, если диск в устройстве
отсутствует.
*3 Если эти источники были запрещены в меню,
их невозможно выбрать (см. раздел “SRC
SELECT” в “Операции с меню” на стр. 19).
*4 Громкость можно настроить во время паузы,
если выбранным источником является CD/USB.
Прежде чем продолжить воспроизведение,
убедитесь в том, что Вы не слишком повысили
уровень громкости.
KD-R501: Можно изменить подсветку дисплея и кнопок (см. категорию “COLOR” на стр. 17).
4
Page 57

Окно дисплея
1 Индикатор Tr (дорожка)
2 Отображение источника/Номер дорожки/
Номер папки/Индикатор обратного отсчета
времени
3 Индикатор DISC
4 Индикаторы режимов звучания—CLASSIC,
HIP HOP, JAZZ, ROCK, POPS, USER
5 Режим воспроизведения / индикаторы
элементов—RND (произвольное
воспроизведение), (диск), (папка), RPT
(повторное воспроизведение)
6 Индикатор EQ (эквалайзер)
7 Индикатор LOUD (громкость)
8 Индикаторы информации на диске—
TAG (информация о тегах), (дорожка/файл),
(папка)
9 Основной дисплей
p Индикаторы Radio Data System—AF, REG, TP,
PTY
q Индикаторы приема тюнера—ST (стерео), MO
(монофонический)
РУCCKИЙ
5ОПЕРАЦИИ
Page 58

Подготовка
Отмена демонстрации функций дисплея и настройка часов
• См. также стр. 16.
1
Включение питания.
2
РУCCKИЙ
Нажать и удерживать
до тех пор, пока не
появится главное
меню.
[Смена] = [Нажмите]
• Повторить эту
процедуру.
Отмена демонстрации функций дисплея
Выберите “DEMO”, затем “DEMO OFF”.
Настройка часов
Выберите “CLOCK” = “CLOCK SET”.
Настройте час, затем нажмите один раз диск управления для
настройки минут.
Выберите “24H/12H”, затем “24 HOUR” или “12 HOUR”.
• Для возврата в предыдущее меню нажмите BACK.
Изменение информации на дисплее
Если питание выключено: Текущее время отображается, если для настройки “CLOCK DISP”
установлено значение “CLOCK OFF” (см. стр. 16).
Если питание включено: Отображаемая информация текущего источника изменяется следующим
образом:
FM/AM
FM Radio
Data System
CD
CD/USB
Частота радиостанции = Часы = (возврат в начало)
Название радиостанции (PS) = Частота радиостанции = Тип программы (PTY) =
Часы = (возврат в начало)
Звуковой компакт-диск/CD-текст: Название диска/исполнитель *1 = Название
дорожки *1 = Номер текущей дорожки и истекшее
время воспроизведения = Номер текущей дорожки и
часы = (возврат в начало)
Для диска MP3/WMA: Название альбома/исполнитель (имя папки) *2 =
Название дорожки (имя файла) *2 = Номер текущей
дорожки и истекшее время воспроизведения =
Номер текущей дорожки и часы = (возврат в начало)
*1 Если текущим диском является звуковой компакт-диском, появляется надпись “NO NAME”.
*2 Если файл MP3/WMA не содержит информации тегов или для настройки “TAG DISPLAY”
установлено значение “TAG OFF” (см. стр. 16), появятся имя папки и файла.
6
Page 59

Прослушивание радио
1
2
Bыберите “FM” или “AM”.
Поиск радиостанции—автоматический поиск.
При достижении настройки на радиостанцию поиск прекращается. Чтобы
остановить поиск, нажмите эту же кнопку еще раз.
• Также имеется возможность ручного поиска радиостанции — “Manual
Search” (Ручной поиск). Удерживайте нажатой любую из кнопок, пока на
дисплее не замигает индикатор “M”, а затем несколько раз нажмите эту
кнопку.
• При приеме стереовещания в диапазоне FM с достаточным уровнем
сигнала на экране дисплея загорается индикатор “ST”.
Улучшение приема FM
При слабом стереофоническом радиовещании FM
активируйте монофонический режим для лучшего
приема.
• См. также стр. 17.
[Смена] = [Нажмите]
Прием улучшается, но стереоэффект будет потерян.
• На дисплее загорается индикатор “MO”.
Для восстановления стереоэффекта повторите
те же действия и выберите “MONO OFF”.
Индикатор MO гаснет.
Сохранение радиостанций
Автоматическое программирование
(FM)—SSM (Strong-station Sequential
Memory—последовательная память для
радиостанций с устойчивым сигналом)
Можно запрограммировать до 18 радиостанций FM.
1 При прослушивании радиостанции...
2 Выберите диапазон номеров, в котором
хотите сохранить радиостанцию.
3
Автоматически выполняется поиск и сохранение
местных FM-радиостанций с наиболее сильными
сигналами.
• Чтобы остановить поиск, нажмите
¢ .
Для сохранения других 6 радиостанций
повторите действие 1.
Продолжение не следующей странице
4 /
РУCCKИЙ
7ОПЕРАЦИИ
Page 60

Программирование вручную (FM/AM)
Можно сохранить 18 FM-радиостанций и 6 AMрадиостанций.
Пример: Сохранение FM-радиостанции на частоте
92,50 МГц с номером “04”.
1
2 Выбор запрограммированного номера
“04”.
РУCCKИЙ
3
Выбор запрограммированной
радиостанции
Следующие функции доступны только при
прослушивании радиостанций FM Radio Data
System.
Поиск программы FM Radio Data
System— поиск PTY
Посредством поиска кода PTY можно настроиться
на радиостанцию, передающую Вашу любимую
программу.
1 Появляется последний
выбранный код PTY.
2 Выберите один из предпочитаемых типов
программ или укажите код PTY.
3 Запустите поиск любимой программы.
или
[Смена] =
[Нажмите]
Если радиостанция передает в эфир программу
того же кода PTY, что был Вами выбран,
осуществляется настройка на эту радиостанцию.
Использование функции
резервного приема
Резервный прием TA
Резервный прием TA позволяет временно
переключаться на передачу сообщений о движении
на дорогах (TA) с любого источника, кроме
радиостанции AM.
Громкость устанавливается на
запрограммированный уровень TA, если текущий
уровень ниже запрограммированного (см. стр. 17).
8
Page 61

Включение функции резервного приема TA
Индикатор TP (программа о
движении на дорогах) либо
загорается, либо мигает.
• Если индикатор TP загорается, функция
резервного приема TA включена.
• Если индикатор TP мигает, функция резервного
приема TA еще не включена. (Это происходит при
прослушивании FM-радиостанции без Radio Data
System-сигналов, необходимых для резервного
приема TA).
Для включения функции приема настройтесь
на другую радиостанцию, обеспечивающую
соответствующие сигналы. Индикатор TP
прекратит мигать и будет гореть.
Отключение функции резервного приема TA
Индикатор TP гаснет.
Резервный прием PTY
Резервный прием PTY позволяет приемнику
временно переключаться на любимую программу
PTY с любого источника, кроме радиостанции AM.
Информацию об активации и выборе
предпочитаемого кода PTY для функции
резервного приема PTY см. на стр. 17.
Индикатор PTY либо загорается, либо мигает.
• Если индикатор PTY загорается, функция
резервного приема PTY включена.
• Если индикатор PTY мигает, функция резервного
приема PTY еще не включена.
Для включения функции приема настройтесь
на другую радиостанцию, обеспечивающую
соответствующие сигналы. Индикатор PTY
прекратит мигать и будет гореть.
Для отключения резервного приема PTY
выберите “PTY OFF” для кода PTY (см. стр. 17).
Индикатор PTY гаснет.
Отслеживание той же программы
(сеть-отслеживающий прием)
При поездке по региону, где невозможен
качественный прием в диапазоне FM, данный
приемник автоматически настраивается на другую
радиостанцию FM Radio Data System в той же сети,
которая может передавать в эфир ту же программу с
помощью более сильных сигналов (см. иллюстрацию
ниже).
В настройках, установленных на заводеизготовителе, сеть-отслеживающий прием включен.
Для получения информации об изменении
параметров сеть-отслеживающего приема см.
“AF-REG” на стр. 17.
Радиовещание программы А в других диапазонах
частот (01 – 05)
Автоматический выбор
радиостанции—поиск программы
Обычно при выборе запрограммированного
номера устройство настраивает радиостанцию,
соответствующую этому номеру.
Если уровень сигналов от запрограммированной
радиостанции FM Radio Data System (системы
передачи цифровой информации) является
недостаточным для качественного приема, данное
устройство с помощью данных AF настраивается
на другую частоту, по которой может передаваться
та же программа, что передает первоначальная
запрограммированная радиостанция.
• Настройка устройства на другую радиостанцию с
помощью поиска программы занимает некоторое
время.
• См. также стр. 17.
Коды PTY
NEWS, AFFAIRS, INFO, SPORT, EDUCATE, DRAMA, CULTURE,
SCIENCE, VARIED, POP M (музыка), ROCK M (музыка),
EASY M (музыка), LIGHT M (музыка), CLASSICS, OTHER M
(музыка), WEATHER, FINANCE, CHILDREN, SOCIAL, RELIGION,
PHONE IN, TRAVEL, LEISURE, JAZZ, COUNTRY, NATION M
(музыка), OLDIES, FOLK M (музыка), DOCUMENT
9ОПЕРАЦИИ
РУCCKИЙ
Page 62

Операции с дисками
1
2
Остановка воспроизведения и извлечение
РУCCKИЙ
диска
• Отображается надпись “NO DISC”. Нажмите кнопку
SRC для прослушивания другого источника
воспроизведения.
Запрещение извлечения диска
Для отмены блокировки повторите эту же
процедуру.
Включение питания.
Вставьте диск.
Все дорожки будут воспроизводиться
последовательно до тех пор, пока не произойдет
смена источника или не будет извлечен диск.
Нажатие (или удерживание нажатыми) следующих
кнопок позволяет выполнять следующие
операции...
[Нажмите] Пауза или
возобновление
воспроизведения
Для диска MP3/WMA: Выберите
папку
[Нажмите] Выберите дорожку
[Удерживать] Перемотка
дорожки назад или
вперед
Выбор дорожки или папки
[Смена] = [Нажмите]
• Для дисков MP3 или WMA выберите необходимую
папку, затем нужную дорожку, повторяя
процедуру с диском управления.
• Для возврата в предыдущее меню нажмите BACK.
10
Page 63

Выбор режимов
воспроизведения
В одно и то же время возможна работа только в
одном из следующих режимов воспроизведения.
1
2
[Смена] = [Нажмите]
REPEAT Ô RANDOM
3
REPEAT
TRACK RPT : Повтор текущей дорожки
FOLDER RPT : Для диска MP3/WMA: повтор
текущей папки
RANDOM
FOLDER RND : Для диска MP3/WMA:
Произвольное воспроизведение
всех дорожек текущей папки, а
затем дорожек других папок
ALL RND : Произвольное
воспроизведение всех дорожек
• Чтобы отключить повторное или произвольное
воспроизведение, выберите “RPT OFF” или “RND
OFF”.
• Для возврата в предыдущее меню нажмите BACK.
[Смена] = [Нажмите]
Прослушивание устройства USB
Данное устройство может воспроизводить дорожки MP3 и WMA, сохраненные на устройстве USB.
Все дорожки будут воспроизводиться повторно до изменения источника или отсоединения устройства USB.
Входной
разъем USB
РУCCKИЙ
Если устройство USB подключено...
Воспроизведение начинается с того места, где оно
ранее было остановлено.
• При подключении другого устройства USB
воспроизведение начинается с начала.
USB-память
Останов воспроизведения и отключение
устройства USB
Выньте его из устройства.
• Нажмите кнопку SRC для прослушивания другого
источника воспроизведения.
Работать с устройством USB можно таким же
образом, как и с папками на диске. (См. стр. 10 и 11.)
Продолжение не следующей странице
ОПЕРАЦИИ
11
Page 64

Внимание:
• Не используйте устройство USB, если это может
помешать безопасному вождению.
• Не отключайте и не подключайте несколько раз
устройство USB, когда на дисплее отображается
надпись “READING”.
• Не запускайте двигатель автомобиля, если
подключено устройство USB.
• Способность приемника воспроизводить файлы
зависит от типа устройства USB.
• При работе с некоторыми видами USB-устройств
возможна неправильная работа и сбои питания.
Прослушивание с других внешних устройств
РУCCKИЙ
Ко входному разъему AUX (дополнительный) на панели управления могут подключаться внешние
устройства.
Подготовка: Убедитесь в том, что для настройки “SRC SELECT”
ON”, см. стр. 19.
• Вам не удастся соединить компьютер со входным
USB-разъемом устройства.
• Во избежание потери данных убедитесь в том, что
создана резервная копия всех важных данных.
• Во избежание повреждения не оставляйте
устройство USB в автомобиле, не подвергайте
его воздействию прямых солнечных лучей или
высокой температуры.
• Некоторые виды USB-устройств начинают
функционировать только по истечении
определенного времени с момента включения
питания.
• Дополнительные сведения об операциях с
устройствами USB см. на стр. 22.
= “AUX IN” выбрано значение “AUX
1
2
—
3
4
—
Выберите “AUX IN”.
Включите подключенное устройство и начните
воспроизведение звука с его помощью.
Настройте громкость.
Настройка необходимого звука (См. страницы 14 и 15).
Подключение внешнего устройства к входному разъему AUX
Мини-разъем стерео - 3,5 мм
(не входит в комплект поставки)
12
ОПЕРАЦИИ И ВНЕШНИЕ УСТРОЙСТВА
Портативный
аудиопроигрыватель и т. д.
Page 65

Использование пульта дистанционного
управления—
Согласно приведенным в настоящем документе
инструкциям, данным устройством можно управлять
в дистанционном режиме (с помощью дополнительно
приобретенного пульта дистанционного управления).
Для управления данным устройством рекомендуется
использовать пульт дистанционного управления
модели RM-RK50.
Установка литиевой батареи-таблетки
(CR2025)
RM-RK50
Внимание:
•
При неправильной замене аккумуляторных
батарей существует опасность взрыва. При замене
следует использовать батареи того же типа или их
эквиваленты.
•
Батарейки необходимо предохранять от чрезмерного
нагревания, например, воздействия лрямого
солнечного света, открытого огня и проч.
При уменьшении эффективности пульта
дистанционного управления замените батарею.
Перед использованием пульта дистанционного
управления выполните следующие действия:
• Направьте пульт дистанционного управления
непосредственно на телеметрический датчик
приемника.
• НЕ подвергайте телеметрический датчик
воздействию яркого света (прямых солнечных лучей
или искусственного освещения).
Телеметрический датчик
1 •
Включение питания при кратковременном
нажатии или ослабление звука при включенном
питании.
•
Отключение питания при нажатии и удерживании.
2 •
Смена запрограммированных радиостанций.
•
Изменение папки MP3/WMA.
3
Настройка уровня звука.
4
Выбор режимов звучания.
5
Выбор источников.
6 •
При кратковременном нажатии выполняется
поиск радиостанций.
•
Быстрая перемотка дорожки вперед или назад
при нажатии и удерживании нажатыми.
•
Смена дорожек при кратковременном нажатии.
Предупреждение (предотвращение
несчастных случаев и повреждений):
•
Устанавливайте только аккумуляторную батарею
CR2025 или эквивалентную ей.
•
Не оставляйте пульт дистанционного управления в
местах, подверженных длительному воздействию
прямых солнечных лучей (например на приборной
панели).
•
Храните аккумуляторную батарею в недоступном для
детей месте.
•
Не перезаряжайте, не укорачивайте, не разбирайте
и не нагревайте батарею, а также не подвергайте ее
воздействию огня.
•
Не оставляйте аккумуляторную батарею рядом с
другими металлическими материалами.
•
Не разбирайте аккумуляторную батарею с помощью
пинцета или аналогичного инструмента.
•
При утилизации батареи или помещении ее на
хранение оберните батарею изоляционной лентой и
изолируйте ее полюса.
ВНЕШНИЕ УСТРОЙСТВА
13
РУCCKИЙ
Page 66

Выбор запрограммированного режима звучания
Можно выбрать режим звучания, соответствующий музыкальному жанру.
• См. также стр. 16.
[Смена] = [Нажмите]
РУCCKИЙ
• Описание настроек “USER” см. на стр. 15.
Запрограммированные значения настроек для каждого режима звучания
Запрограммированное значение
Режим
воспроизведения
звука
USER 60 Гц 00 Q1,25 1,0 кГц 00 Q1,0 10,0 кГц 00 —
BASS MIDDLE TREBLE LOUD
Частота Уровень Q Частота Уровень Q Частота Уровень Q
(громкость)
ROCK 100 Гц +03 Q1,0 1,0 кГц 00 Q1,25 10,0 кГц +02 —
CLASSIC 80 Гц +01 Q1,25 1,0 кГц 00 Q1,25 10,0 кГц +03 —
POPS 100 Гц +02 Q1,25 1,0 кГц +01 Q1,25 10,0 кГц +02 —
HIP HOP 60 Гц +04 Q1,0 1,0 кГц –02 Q1,0 10,0 кГц +01 —
JAZZ 80 Гц +03 Q1,25 1,0 кГц 00 Q1,25 10,0 кГц +03 —
Частота: Частота Q: Q-slope
14
OFF
Page 67

Сохранение собственного
режима звучания
Можно сохранить настройки в памяти.
1 Выберите “USER” для “EQ”.
4 Настройте элементы звучания для
выбранного тона.
[Смена] = [Нажмите]
1 Настройте частоту.
2 Настройте уровень.
3 Настройте коэффициент качества (Q-slope).
[Смена] = [Нажмите]
2 Когда “USER” отображается на дисплее...
3 Выберите тон.
[Смена] = [Нажмите]
Параметры
звука
Частота 60 Гц
Уровень от –06
Q Q1,0
Диапазон/элементы для
выбора
BASS MIDDLE TREBLE
0,5 kГц
10,0 кГц
80 Гц
1,0 кГц
12,5 кГц
100 Гц
1,5 кГц
15,0 кГц
200 Гц
2,5 кГц
17,5 кГц
от –06
от –06 до
до +06
до +06
+06
Q0,75
Исправлено
Q1,25
Q1,0
Q1,5
Q1,25
Q2,0
5 Повторите действия 3 и 4 для настройки
других характеристик звучания.
Изменения будут сохранены автоматически.
РУCCKИЙ
НАСТРОЙКИ
15
Page 68

Операции с меню
1 Активируйте
меню.
Категория Элементы меню Выбираемые настройки, [страница для справки]
DEMO
Демонстрация
DEMO
функций дисплея
CLOCK DISP *
РУCCKИЙ
1
*
Если подача питания не прекращается при выключении зажигания автомобиля, рекомендуется выбрать
“CLOCK OFF” для сохранения заряда аккумулятора автомобиля.
*2 Действует только при получении данных CT.
*3 Некоторые буквы или символы не будут отображаться правильно (или не будут отображаться) на дисплее.
Отображение
часов
CLOCK SET
Настройка часов
24H/12H
CLOCK
Формат
отображения
времени
CLOCK ADJ *
Настройка часов
EQ
Equalizer
EQ
(эквалайзер)
DIMMER
Затемнение
SCROLL*
Прокрутка
DISPLAY
TAG DISPLAY
Отображение
тегов
2
Выберите необходимый
элемент.
[Смена] =
[Нажмите]
• DEMO ON
• DEMO OFF
1
• CLOCK ON
• CLOCK OFF
: Настройка часов, а затем минут, [6].
(По умолчанию: 0:00)
• 24 HOUR
• 12 HOUR
2
• AUTO
• OFF
: Выбор режима звучания, соответствующего музыкальному жанру.
USER, ROCK, CLASSIC, POPS, HIP HOP, JAZZ
• DIMMER ON
• DIMMER OFF
3
• SCROLL ONCE
• SCROLL AUTO
• SCROLL OFF
При нажатии кнопки DISP в течение более одной секунды происходит
включение функции прокрутки информации на дисплее независимо от
имеющейся настройки.
• TAG ON
• TAG OFF
3 При необходимости повторите
действие 2.
• Для возврата в предыдущее меню нажмите
BACK.
• Для выхода из меню нажмите DISP или MENU.
По умолчанию: Подчеркнуто
: Если в течение 20 секунд не будет выполнено операций,
начнется демонстрация функций дисплея, [6].
: Отмена.
: Когда устройство выключено, время постоянно
отображается на дисплее.
:
Отмена; Если устройство выключено, при нажатии “DISP”
время отображается примерно в течение 5 секунд, [6].
: Описание настройки см. на стр. 6.
: Встроенные часы автоматически настраиваются с
помощью данных CT (время на часах) в сигнале Radio
Data System.
: Отмена.
: Снижается яркость подсветки дисплея и кнопок.
: Отмена.
: Однократная прокрутка отображаемой информации.
: Повторная прокрутка (через 5-секундные интервалы).
: Отмена.
: Отображение информации о тегах во время
воспроизведения дорожек MP3 или WMA.
: Отмена.
16
Page 69

Категория Элементы меню Выбираемые настройки, [страница для справки]
4
AF-REG *
Прием на
альтернативных
частотах/прием
региональных
передач
• AF ON
• AF-REG ON
: Если принимаемые сигналы ослабевают, устройство
переключается на другую радиостанцию (программа
может отличаться от принимаемой в данный момент
программы), [9].
• Загорается индикатор AF.
: Если принимаемые сигналы ослабевают, устройство
переключается на другую радиостанцию, передающую
в эфир ту же программу.
• Загораются индикаторы AF и REG.
TUNER
PTY-STANDBY *
Резервный PTY
TA VOLUME *
Громкость
передачи
сообщений о
• OFF
4
PTY OFF, кодов
PTY
4
VOLUME 00
– VOLUME 50
(или VOLUME 00
– VOLUME 30)*
: Отмена.
:
Включение функции резервного приема PTY с
помощью одного из кодов PTY, [9].
:
(По умолчанию: VOLUME 15)
5
движении на
дорогах
P-SEARCH *
Поиск программ
MONO *
Монорежим
IF BAND
Полоса
промежуточных
частот
4
• SEARCH ON
• SEARCH OFF
6
• MONO ON
: Активация поиска программы, [9].
: Отмена.
: Включение монорежима для более качественного
приема FM-сигнала (стереоэффект будет потерян), [7].
• MONO OFF
• AUTO
: Восстановление стереоэффекта.
: Повышение избирательности тюнера для устранения
интерференционных помех от соседних радиостанций.
(Сопровождается потерей стереоэффекта.)
• WIDE
: Могут возникать интерференционные помехи от
соседних радиостанций, но качество звучания при этом
не ухудшается и сохраняется стереоэффект.
COLOR
COLOR 01
– COLOR 29,
USER
: Выберите один из запрограммированных или пользовательских цветов
для подсветки дисплея и кнопок (кроме T/P/ /0).
(Сведения о настройке цветов “USER” см. на стр. 19.)
(для KD-R501)
MENU COLOR
Цвет меню
• OFF
• ON
: Отмена.
: Изменение подсветки дисплея и кнопок (кроме T/P/
/0) во время операций с меню, поиска списка и
MENU COLOR
(для KD-R501)
операций с режимами воспроизведения.
*4 Только для радиостанций FM Radio Data System.
5
*
Зависит от использования регулятора усиления.
*6 Отображается только в том случае, если в качестве источника выбрано “FM”.
РУCCKИЙ
Продолжение не следующей странице
НАСТРОЙКИ
17
Page 70

Категория Элементы меню Выбираемые настройки, [страница для справки]
8
FADER*7, *
Микшер
R06 – F06 : Настройка выходного баланса передних и задних
динамиков.
(По умолчанию: 00)
8
BALANCE *
Баланс
LOUD
Громкость
L06 – R06 : Настройка выходного баланса левых и правых динамиков.
(По умолчанию: 00)
• LOUD OFF
• LOUD ON
: Отмена.
: Увеличьте низкие и высокие частоты для получения хорошо
сбалансированного звучания при низком уровне громкости.
VOL ADJUST
Настройка
громкости
VOL ADJ –05
—
VOL ADJ +05
(По умолчанию:
VOL ADJ 00)
: Запрограммируйте уровень громкости для каждого
источника (кроме FM) в соответствии с уровнем громкости
FM. Уровень громкости автоматически увеличивается или
уменьшается при смене источника.
• Перед выполнением настройки выберите источник,
который необходимо настроить.
• Если в качестве источника выбрано “FM”, на дисплее
РУCCKИЙ
L/O MODE
Pежим линейного
свыходa
• SUB.W
• REAR
появляется надпись “VOL ADJ FIX”.
: Выберите этот параметр, если разъемы REAR LINE OUT
используются для подключения сабвуфера (через внешний
усилитель).
: Выберите, если при подключении динамиков через
внешний усилитель используются терминалы REAR LINE OUT.
SUB.W FREQ *
AUDIO (ЗВУК)
Предельная
частота
низкочастотного
динамика
9
• LOW
: Низкочастотный динамик воспроизводит частоты ниже
72 Гц.
• MID
: Низкочастотный динамик воспроизводит частоты ниже
111 Гц.
• HIGH
: Низкочастотный динамик воспроизводит частоты ниже
157 Гц.
SUB.W LEVEL *
Уровень
низкочастотного
9
SUB.W 00
— SUB.W 08
: Настройте уровень выходного сигнала низкочастотного
динамика.
(По умолчанию: SUB.W 04)
динамика
BEEP
Звук нажатия
• BEEP OFF
• BEEP ON
: Выключение звука нажатия кнопки.
: Включение звука нажатия кнопки.
кнопки
TEL MUTING
Отключение звука
телефона
AMP GAIN *
Регулятор
усиления
7
*
При использовании системы с двумя динамиками установите для уровня баланса значение “00”.
10
• MUTING 1/
MUTING 2
• MUTING OFF
• LOW POWER
• HIGH POWER
: Выберите любой из параметров, обеспечивающий
отключение звука при использовании сотового телефона.
: Отмена.
: VOLUME 00 – VOLUME 30 (Если максимальная мощность
динамика меньше 50 Вт, выберите этот параметр, чтобы
предотвратить повреждение динамика.)
: VOLUME 00 – VOLUME 50
*8 Эта настройка не влияет на выходной сигнал сабвуфера.
*9 Отображается только в том случае, если параметр “L/O MODE” имеет значение “SUB.W”.
*10 При выборе “LOW POWER”, если громкость выше, чем “VOLUME 30”, автоматически устанавливается
громкость “VOLUME 30”.
18
Page 71

Категория Элементы меню Выбираемые настройки, [страница для справки]
11
AM *
AM-радиостанция
12
AUX IN *
Дополнительный
SRC SELECT
входной разъем
*11 Отображается, если выбран любой источник, кроме “AM”.
*12 Отображается, если выбран любой источник, кроме “AUX IN”.
• AM OFF
• AM ON
• AUX OFF
• AUX ON
: Отключение варианта “AM” при выборе источника.
: Включение варианта “AM” при выборе источника, [4].
: Отключение варианта “AUX IN” при выборе источника.
: Включение варианта “AUX IN” при выборе источника, [4].
Настройки цвета (для KD-R501)
Создание собственного цвета
—USER цвет
Можно создавать свои собственные цвета—”DAY
COLOR” или “NIGHT COLOR”.
DAY COLOR: Используется, когда для
настройки “DIMMER”
установлено значение
“DIMMER OFF”.
NIGHT COLOR: Используется, когда для
настройки “DIMMER”
установлено значение
“DIMMER ON”.
1
2
Выберите “COLOR” = “USER”.
[Смена] = [Нажмите]
3 Когда “USER” отображается на дисплее...
4
[Смена] = [Нажмите]
5 Выберите основной цвет.
[Смена] = [Нажмите]
6 Настройте насыщенность (00 – 31)
выбранного основного цвета.
[Смена] = [Нажмите]
Если для всех первичных цветов выбрано
значение “00”, на дисплее ничего не
появляется.
7 Повторите действия 5 и 6, чтобы
настроить другие первичные цвета.
8 Выйдите из режима настройки.
• Если в течение 30 секунд не будет введена ни
одна команда, операция будет отменена.
РУCCKИЙ
НАСТРОЙКИ
19
Page 72

Дополнительная информация о приемнике
Основные операции
Включение питания
• Для включения питания приемника также можно
использовать кнопку SRC. Если источник готов,
воспроизведение также начинается.
Выключение питания
• Если питание отключается во время прослушивания
дорожки, при последующем включении питания
воспроизведение начнется с того места, где оно
было остановлено.
Общие сведения
РУCCKИЙ
• При изменении источника во время прослушивания
диска воспроизведение останавливается.
При следующем выборе “CD” в качестве источника
воспроизведение начнется с места последнего
останова.
• Операция отменяется, если в течение 30 секунд
после нажатия кнопки MENU не выполнено ни
одного действия.
Операции с тюнером
Сохранение радиостанций
• Во время поиска SSM...
– Все ранее сохраненные радиостанции удаляются,
и сохранение радиостанций будет выполняться
заново.
– По завершении использования функции SSM
будет выполнена автоматическая настройка
на радиостанцию, сохраненную с наименьшим
номером.
• В режиме сохранения радиостанций вручную ранее
запрограммированная радиостанция удаляется,
если сохранение новой радиостанции выполняется
с использованием того же запрограммированного
номера.
Операции с FM Radio Data System
• Для правильной работы функции сетьотслеживающего приема требуется два типа
сигналов Radio Data System—PI (идентификация
программы) и AF (альтернативная частота).
Если прием указанных данных осуществляется
неправильно, функция сеть-отслеживающего
приема не будет работать.
• Если осуществляется прием сообщений о движении
на дорогах с помощью резервного приема TA,
уровень громкости автоматически меняется на
запрограммированный (TA VOL), когда текущий
уровень ниже запрограммированного.
• Когда функция приема на альтернативных частотах
включена (выбрано AF), автоматически включается
сеть-отслеживающий прием.
Операции с дисками
Предостережение для воспроизведения
дисков DualDisc
•
Сторона диска DualDisc, отличная от DVD, не
совместима со стандартом “Compact Disc Digital
Audio”. Поэтому не рекомендуется использовать
сторону диска DualDisc, отличную от DVD, на данном
устройстве.
Общие сведения
• Данный приемник предназначен для
воспроизведения компакт-дисков/CD-текста, а
также дисков однократной или многократной записи
в формате звукового компакт-диска (CD-DA), MP3/
WMA.
• Если диск вставляется верхней стороной вниз, на
дисплее поочередно появляются надписи “PLEASE” и
“EJECT”. Нажмите 0 для извлечения диска.
• “Дорожки” MP3 и WMA (слова “файл” и “дорожка”
взаимозаменяемы в данном руководстве)
записываются в “папки”.
• При быстрой перемотке дорожки MP3 или
WMA вперед или назад можно услышать лишь
прерывистый звук.
20
Page 73

Воспроизведение компакт-дисков
однократной и многократной записи
• Используйте только “завершенные” компакт-диски
однократной и многократной записи.
• Данный приемник может воспроизводить только
файлы одного типа, который первым будет
распознан, если на диске содержатся файлы как в
формате звукового компакт-диска (CD-DA), так и в
формате MP3/WMA.
• На данном приемнике возможно воспроизведение
дисков с несколькими сеансами записи; однако,
незавершенные сеансы будут пропускаться при
воспроизведении.
• Некоторые компакт-диски однократной или
многократной записи не воспроизводятся на данном
устройстве в связи с их особенностями, а также по
следующим причинам:
– Диски загрязнены или поцарапаны;
– На линзе внутри приемника присутствует
конденсат влаги;
– Линза звукоснимателя загрязнена;
– При записи файлов на компакт-диск однократной
или многократной записи использовался метод
“пакетной записи”;
– Некорректное состояние записи (отсутствие
данных и т.д.) или носителя (пятна, царапины,
деформация и т.д.).
• Для считывания дисков многократной записи может
потребоваться больше времени, так как они имеют
меньшую отражательную способность по сравнению
с обычными компакт-дисками.
• Не используйте следующие компакт-диски
однократной или многократной записи:
– Диски с наклейками, этикетками или защитными
пленками на поверхности;
– Диски, на которых можно печатать этикетки с
помощью струйного принтера.
Использование этих дисков при высокой
температуре или высокой влажности может привести
к неисправности или повреждению устройства.
Воспроизведение диска MP3/WMA
• Данный приемник может воспроизводить файлы
MP3/WMA с расширением <.mp3> или <.wma> (не
зависит от регистра).
• Данный приемник может отображать названия
альбомов, артистов (исполнителей) и тег (версии 1,0,
1,1, 2,2, 2,3 или 2,4) для файлов MP3 и файлов WMA.
• Данный приемник может обрабатывать только
однобайтовые символы. Все остальные символы
отображаются неправильно.
• Файлы MP3/WMA отображаются на данном
приемнике в соответствии со следующими
характеристиками:
– Битрейт для МР3: 32 кбит/с—320 кбит/с
– Частота передачи данных для МР3:
32 кГц, 44,1 кГц, 48 кГц (для MPEG-1)
16 кГц, 22,05 кГц, 24 кГц (для MPEG-2)
– Битрейт для WMA: 32 кбит/с—320 кбит/с
– Частота передачи данных для WMA:
22,05 кГц, 32 кГц, 44,1 кГц, 48 кГц
– Формат диска: ISO 9660 Level 1/ Level 2, Romeo,
Joliet, расширение Windows.
• Максимальное количество символов для названий
файлов или папок зависит от используемого формата
диска (включая 4 символа расширения <.mp3> или
<.wma>).
– ISO 9660 Level 1: до 12 символов
– ISO 9660 Level 2: до 31 символов
– Romeo: до 64 символов
– Joliet: до 32 символов
– Расширение Windows: до 64 символов
• Данное устройство может распознавать до 512
файлов, 255 папок и 8 уровней иерархической
структуры.
• Данный приемник может воспроизводить файлы,
записанные в режиме VBR (переменная скорость в
битах).
Для файлов, записанных в режиме VBR, по разному
отображается время от начала воспроизведения,
и это время не соответствуют действительности.
Эта разница становится особенно заметной после
выполнения функции поиска.
• Данный приемник не может воспроизводить
следующие файлы:
– файлы MP3, закодированные в форматах MP3i и
MP3 PRO;
– файлы MP3, закодированные в
непредусмотренном формате;
– файлы MP3, закодированные в формате Layer 1/2;
– файлы WMA, закодированные в формате
“без потерь”, профессиональном и голосовом
форматах;
– файлы WMA, основой которых служит формат,
отличный от формата Windows Media ® Audio.
– файлы формата WMA, защищенные от
копирования по методу DRM;
– файлы, содержащие данные, например, AIFF,
ATRAC3 и т.д.
• Функция поиска выполняется, но скорость поиска не
является постоянной.
Продолжение не следующей странице
СПРАВОЧНАЯ ИНФОРМАЦИЯ
21
РУCCKИЙ
Page 74

Воспроизведение дорожек MP3 или WMA с
устройства USB
• Порядок воспроизведения с устройства USB может
отличаться от других устройств воспроизведения.
• Приемник может не воспроизводить некоторые
устройства USB или некоторые файлы из-за их
характеристик или условий записи.
• В зависимости от конфигурации устройств USB и
коммуникационных портов некоторые устройства
USB могут быть подключены неправильно, или
соединение может быть потеряно.
• К приемнику можно одновременно подключить
только одно запоминающее устройство USB
большой емкости. Не используйте концентратор
USB.
• Если подключенное устройство USB не содержит
файлов требуемого формата, появляется надпись
РУCCKИЙ
“CANNOT PLAY”.
• Устройство может отображать тег (версии 1,0, 1,1,
2,2, 2,3 или 2,4) для файлов MP3 и WMA.
• Файлы MP3/WMA отображаются на данном
приемнике в соответствии со следующими
характеристиками:
– Битрейт для МР3: 32 кбит/с—320 кбит/с
– Частота передачи данных для МР3:
32 кГц, 44,1 кГц, 48 кГц (для MPEG-1)
16 кГц, 22,05 кГц, 24 кГц (для MPEG-2)
– Битрейт для WMA: 32 кбит/с—320 кбит/с
– Частота передачи данных для WМA:
22,05 кГц, 32 кГц, 44,1 кГц, 48 кГц
• Данное устройство может воспроизводить файлы
MP3, записанные в режиме VBR (переменная
скорость в битах).
• Максимальное количество символов для следующих
элементов ограничено.
– Имена папок: 32 символа
– Имена файлов: 32 символа
– Теги MP3: 64 символа
– Теги WMA: 32 символа
• Данное устройство может распознавать до 5 000
файлов, 255 папок (255 файлов в папке, включая
папку без неподдерживаемых файлов) и 8 иерархий.
• Данное устройство не поддерживает устройство
считывания карт SD.
• Приемник не распознает запоминающие устройства
USB с номинальным напряжением, отличным от 5 В,
и допускает превышение 500 мА.
• Приемник не поддерживает использование USBустройств со специальными функциями, например с
функциями защиты данных.
• Не используйте USB-устройства с 2 или более
разделами.
• Данный приемник может не распознать устройство
USB, подключенное через USB-устройство чтения
карт.
• Приемник может неправильно воспроизводить
файлы с устройства USB при использовании
удлинителя USB.
• Данный приемник не может воспроизводить
следующие файлы:
– файлы MP3, закодированные в форматах MP3i и
MP3 PRO;
– файлы MP3, закодированные в
непредусмотренном формате;
– файлы MP3, закодированные в формате Layer 1/2;
– файлы WMA, закодированные в формате
“без потерь”, профессиональном и голосовом
форматах;
– файлы WMA, основой которых служит формат,
отличный от формата Windows Media® Audio.
Извлечение диска или отключение
устройства USB
• Если в течение 15 секунд извлеченный диск не будет
вынут, он автоматически помещается обратно в
загрузочный отсек в целях защиты от загрязнения.
• После извлечения диска или устройства USB
появляется надпись “NO DISC” или “NO USB”, и
невозможно использовать некоторые кнопки.
Вставьте другой диск, снова подключите устройство
USB или нажмите SRC для выбора другого источника
воспроизведения.
Операции с меню
• Если для элемента “AMP GAIN” настройка
“HIGH POWER” меняется на “LOW POWER”
и при этом для уровня громкости установлено
значение больше “VOLUME 30”, приемник
автоматически меняет уровень громкости на
“VOLUME 30”.
22
Page 75

Устранение проблем
Не всякое нарушение в работе устройства является результатом его неисправности. Перед обращением в
сервисный центр проверьте следующее.
Симптомы Способы устранения/Причины
• Не слышен звук из динамиков. • Установите оптимальный уровень громкости.
• Приемник не работает. Перенастройте приемник (см. стр. 3).
• Невозможно выбрать “AUX IN”. Проверьте настройку “SRC SELECT”
Общие сведения
• KD-R501: На дисплее ничего не появляется. KD-R501: См. настройки USER цветов на стр. 19.
• Автоматическое программирование SSM
не работает.
• Статические помехи при прослушивании
радио.
FM/AM
• Невозможно выбрать “AM”. Проверьте настройку “SRC SELECT”
• Диск не воспроизводится. Вставьте диск правильно.
• Не воспроизводятся компакт-диски
однократной и многократной записи.
• Не осуществляется переход на дорожки
компакт-дисков однократнойи
многократной записи.
• Диск не может быть воспроизведен и или
извлечен.
• Звук, записанный на диске, иногда
Все диски
прерывается.
• На дисплее появляется надпись “NO DISC”. Вставьте в загрузочный отсек диск, который
• На дисплее поочередно появляются
надписи “PLEASE” и “EJECT“.
• Диск не воспроизводится. • Используйте диск с дорожками MP3/WMA,
MP3/WMA
Воспроизведение
• Проверьте кабели и соединения.
IN” (см. стр. 19).
Сохраните радиостанции вручную.
Плотно подсоедините антенну.
(см. стр. 19).
• Вставьте компакт-диск однократной или
многократной записи с закрытым сеансом.
• Закройте сеанс компакт-диска однократной или
многократной записи с помощью устройства,
которое использовалось для записи.
• Снимите блокировку с диска (см. стр. 10).
• Принудительно извлеките диск (см. стр. 3).
• Остановите воспроизведение на время езды по
неровной дороге.
• Смените диск.
• Проверьте кабели и соединения.
можно воспроизвести.
Нажмите
0 и вставьте диск правильно.
записанными в формате, совместимом с ISO
9660 Level 1, Level 2, Romeo или Joliet.
• Добавьте к именам файлов расширение
<.mp3> или <.wma>.
= “AUX
= “AM”
РУCCKИЙ
Продолжение не следующей странице
23СПРАВОЧНАЯ ИНФОРМАЦИЯ
Page 76

Симптомы Способы устранения/Причины
• Слышен шум. Перейдите к другой дорожке или смените диск. (Не
• Для чтения требуется более длительное
время (на дисплее продолжает мигать
надпись “READING”).
• Порядок воспроизведения дорожек
отличается от заданного.
• Время от начала воспроизведения
неправильное.
• На дисплее появляется надпись “NO FILE”. Выбранная папка является пустой*. Выберите другую
Воспроизведение MP3/WMA
• Не отображаются правильные символы (т.е.
РУCCKИЙ
• Microsoft и Windows Media являются либо зарегистрированными торговыми марками или торговыми
название альбома).
• Слышен шум. Воспроизводимая дорожка не является дорожкой
• На дисплее продолжает мигать сообщение
“READING” (Чтение).
• На дисплее появляется надпись “NO FILE”. Выбранная папка является пустой*. Выберите другую
• Дорожки/папки не воспроизводятся в
необходимом порядке.
• На дисплее мигает надпись “CANNOT PLAY”.
Воспроизведение с устройства USB
• На дисплее появляется надпись “NO USB”.
• Приемник не может определить устройство
USB.
• Не отображаются правильные символы (т.е.
название альбома).
• Звук иногда прерывается во время
воспроизведения дорожки.
марками корпорации Microsoft в США и/или других странах.
добавляйте расширение <.mp3> или <.wma> к
файлам, не являющимся файлами MP3 или WMA).
Не используйте многоуровневую иерархическую
структуру и много папок.
Порядок воспроизведения определяется при записи
файлов.
Это иногда происходит во время воспроизведения.
Причиной является способ записи дорожек.
папку, содержащую дорожки MP3 или WMA.
* Папка, которая физически пуста, либо папка,
которая содержит данные, но среди них нет
звуковых дорожек MP3/WMA в нужном формате.
Приемник может отображать только буквы (верхнего
регистра), цифры и ограниченное число символов.
MP3 или WMA. Перейдите к другому файлу. (Не
добавляйте расширение <.mp3> или <.wma> к
файлам, не являющимся файлами MP3 или WMA).
• Время считывания меняется в зависимости от
устройства USB.
• Не используйте слишком сложную иерархию или
большое количество папок.
• Выключите питание, а затем снова его включите.
• Повторно подключите устройство USB.
папку, содержащую дорожки MP3 или WMA.
* Папка, которая физически пуста, либо папка,
которая содержит данные, но среди них нет
звуковых дорожек MP3/WMA в нужном формате.
Порядок воспроизведения определяется с помощью
отметки времени записи. Первая дорожка или
папка, записанная на устройстве USB, будет
воспроизводиться первой.
• Подключите устройство USB, которое содержит
дорожки, кодированные в соответствующем
формате.
• Повторно подключите устройство USB.
Данное устройство может отображать только буквы
(верхнего регистров), цифры и ограниченное число
символов.
Дорожки MP3 или WMA не были надлежащим
образом скопированы на устройство USB.
Скопируйте дорожки MP3 или WMA на устройство USB
еще раз и повторите попытку.
24
Page 77

Обслуживание
Очистка разъемов
При частом отсоединении разъемы загрязняются.
Чтобы снизить уровень загрязнения, периодически
проводите очистку разъемов с помощью ватных
валиков или ткани, смоченных спиртом, соблюдая
при этом меры предосторожности во избежание
повреждения разъемов.
Разъемы
Конденсация влаги
Влага может конденсироваться на линзе внутри
устройства в следующих случаях:
• После включения автомобильного обогревателя.
• При повышении влажности внутри автомобиля.
Это может привести к неисправной работе
устройства. В этом случае извлеките диск и оставьте
приемник включенным на несколько часов, чтобы
испарилась влага.
Как обращаться с дисками
При извлечении диска
из футляра, нажмите на
центральный держатель футляра
и снимите диск, удерживая его за
края.
• Всегда удерживайте диск за края. Не
прикасайтесь к поверхности, на которой
находится запись.
Чтобы поместить диск в футляр, аккуратно
установите диск на центральный держатель
(стороной с изображением вверх).
• После прослушивания обязательно помещайте
диски в футляры.
Центральный
держатель
Хранение дисков в чистом виде
Воспроизведение грязного диска
может быть некорректным.
Если диск загрязнится, протрите его
мягкой тканью по прямой линии от
центра к краю.
• Не используйте растворители (например, обычное
средство для чистки кассет, распыляемые
средства, разбавитель, бензин и т.д.) для чистки
дисков.
Прослушивание новых дисков
Вблизи внутреннего и внешнего краев
новых дисков иногда бывают грубые
выступы. Такой диск не может быть
загружен в приемник.
Чтобы удалить такие пятна, потрите их
карандашом или шариковой ручкой и т.д.
Не используйте следующие диски:
Один компакт-диск
(диаметром 8 см) Изогнувшийся диск
Наклейка и остаток
наклейки
Необычная форма
Прозрачные или
полупрозрачные
компоненты на области
записи
Диск с наклеиваемой
этикеткой
Диск C-thru
(полупрозрачный диск)
РУCCKИЙ
25СПРАВОЧНАЯ ИНФОРМАЦИЯ
Page 78

Технические характеристики
БЛОК УСИЛИТЕЛЕЙ ЗВУКА
Максимальная выходная мощность: Передние/Задние: 50 Вт на каждый канал
Длительная выходная мощность
(RMS):
Импеданс нагрузки: 4 Ω (допустимо от 4 Ω до 8 Ω)
Диапазон настройки тембра: Низкие частоты: ±12 дБ (60 Гц, 80 Гц, 100 Гц, 200 Гц)
Частотная характеристика: от 40 Гц до 20 000 Гц
РУCCKИЙ
Отношение сигнал/помеха: 70 дБ
Уровень линейного выхода/полное сопротивление: нагрузка 2,5 В/20 kΩ (полная шкала)
Импеданс выходного сигнала: 1 kΩ
Уровень выхода низкочастотного динамика/полное
сопротивление:
Другой терминал: Входной разъем USB, Дополнительный
БЛОК РАДИОПРИЕМНИКА
Диапазон частот: FM: от 87,5 МГц до 108,0 МГц
AM: CB: от 522 кГц до 1 620 кГц
Радиоприемник в
диапазоне FM
Радиоприемник в
диапазоне CB
Радиоприемник в
диапазоне ДB
Полезная чувствительность: 11,3 dBf (1,0 μВ/75 Ω)
50 дБ пороговая чувствительность: 16,3 dBf (1,8 μВ/75 Ω)
Альтернативная отстройка (400 кГц): 65 дБ
Частотная характеристика: от 40 Гц до 15 000 Гц
Разделение стереоканалов: 30 дБ
Чувствительность: 20 μВ
Избирательность: 35 дБ
Чувствительность: 50 μВ
Передние/Задние: 19 Вт на канал в при 4 Ω, от 40 Гц до 20 000 Гц
Диапазон средних
частот:
Верхние частоты: ±12 дБ (10,0 кГц, 12,5 кГц, 15,0 кГц, 17,5 кГц)
и не более чем 0,8% общего гармонического
искажения.
Q1,0, Q1,25, Q1,5, Q2,0
±12 дБ (0,5 kГц, 1,0 кГц, 1,5 кГц, 2,5 кГц)
Q0,75, Q1,0, Q1,25
Q = Исправлено
нагрузка 2,5 В/20 kΩ (полная шкала)
входной разъем AUX
ДB: от 144 кГц до 279 кГц
26
Page 79

БЛОК ПРОИГРЫВАТЕЛЯ КОМПАКТ-ДИСКОВ
Тип: проигрыватель компакт-дисков
Система обнаружение сигнала: бесконтактное оптическое считывание
(полупроводниковый лазер)
Число каналов: 2 канала (стерео)
Частотная характеристика: от 5 Гц до 20 000 Гц
Динамический диапазон: 96 дБ
Отношение сигнал/помеха: 98 дБ
Коэффициент детонации: в пределах допусков измерительной
аппаратуры
допусков измерительной аппаратуры Формат декодирования
Макс. скорость передачи битов: 320 кбит/с
MP3: (MPEG1/2 Audio Layer 3)
Формат декодирования WMA (Windows Media® Audio): Макс. скорость передачи битов: 320 кбит/с
БЛОК USB
Стандартный USB: USB 1.1, USB 2.0
Скорость передачи данных (полная): максимум 12 Мбит/с
Совместимое устройство: Запоминающее устройство большой емкости
Совместимая файловая система: FAT 32/16/12
Формат воспроизводимого звука: MP3/WMA
Максимальный ток: 5 В пост. тока
500
mA
ОБЩИЕ ТРЕБОВАНИЯ
Электрическое питание: Рабочее напряжение: постоянное напряжение 14,4 В (допустимо
от 11 В до 16 В)
Система заземления: отрицательное заземление
Допустимая рабочая температура: от 0°C до +40°C
Габариты, мм (Ш × В × Г):
(прибл.)
Масса:
Монтажный размер: 182 мм × 52 мм × 160 мм
Размер панели: 188 мм × 58 мм × 12 мм
1,3 кg (без дополнительных
принадлежностей)
Конструкция и технические требования могут быть изменены без уведомления.
РУCCKИЙ
В соответствии с Законом Российской Федерации “О защите прав потребителей” срок службы (годности) данного
товара “по истечении которого он может представлять опасность для жизни, здоровья потребителя, причинять вред
его имуществу или окружающей среде” составляет семь (7) лет со дня производства. Этот срок является временем, в
течение которого потребитель данного товара может безопасно им пользоваться при условии соблюдения ин струк ции
по эксплуатации данного товара, проводя необходимое обслуживание, включающее замену расходных материалов
и/или соответствующее ремонтное обеспечение в специализированном сервисном центре.
Дополнительные косметические материалы к данному товару, поставляе мые вместе с ним, могут храниться в течение
двух (2) лет со дня его производства.
Срок службы (годности), кроме срока хранения дополнительных космети ческих материалов, упомянутых в
предыдущих двух пунктах, не затрагивает никаких других прав потребителя, в частности, гарантийного свидетельства
JVC, которое он может получить в соответствии с законом о правах потребителя или других законов, связанных с ним.
27СПРАВОЧНАЯ ИНФОРМАЦИЯ
Page 80

Σας ευχαριστούµε που αγοράσατε ένα προϊόν JVC.
Μελετήστε προσεκτικά όλες τις οδηγίες πριν aπό τη λειτουργία, για να βεβαιωθείτε ότι έχετε κατανοήσει πλήρως τη
λειτουργία της µονάδας και να διασφαλίσετε την καλύτερη δυνατή απόδοσή της.
ΣΗΜΑΝΤΙΚΟ ΓΙΑ ΠΡΟΪΟΝΤΑ ΛΕΪΖΕΡ
1. ΠΡΟΪΟΝ ΛΕΪΖΕΡ ΚΑΤΗΓΟΡΙΑΣ 1
2. ΠΡΟΣΟΧΗ: Μην ανοίγετε το επάνω καπάκι. ∆εν υπάρχουν επισκευάσιµα από το χρήστη εξαρτήµατα στο
εσωτερικό της συσκευής. Για κάθε εργασία σέρβις, απευθύνεστε στους εξουσιοδοτηµένους τεχνικούς
σέρβις.
3. ΠΡΟΣΟΧΗ: Ορατή και/ή μη ορατή ακτινοβολία λέιζερ κατηγορίας 1M όταν είναι ανοικτό. Μην κοιτάτε απευθείας
με οπτικά όργανα.
4. ΑΝΑΠΑΡΑΓΩΓΗ ΕΤΙΚΕΤΑΣ: ΕΤΙΚΕΤΑ ΠΟΥ ΣΑΣ ΚΑΛΕΙ ΝΑ ΠΡΟΣΕΞΕΤΕ, ΤΟΠΟΘΕΤΗΜΕΝΗ ΣΤΟ ΕΞΩΤΕΡΙΚΟ ΤΗΣ
ΣΥΣΚΕΥΗΣ.
Προειδοποίηση:
Αν χρειαστεί να λειτουργήσετε το δέκτη ενώ οδηγείτε,
EΛΛHNIKA
Μπαταρία
Προϊόντα
βεβαιωθείτε ότι κοιτάτε προσεκτικά προς τα εμπρός,
διότι διαφορετικά μπορεί να εμπλακείτε σε τροχαίο
ατύχημα.
Προσοχή κατά τη ρύθµιση της έντασης του
Πληροφορίες για τους χρήστες σχετικά με την
απόρριψη του παλαιού εξοπλισμού και των
μπαταριών.
[Ευρωπαϊκή Ένωση μόνο]
Τα σύμβολα αυτά δηλώνουν ότι το προϊόν και η
μπαταρία που φέρουν αυτό το σύμβολο δεν πρέπει
να απορρίπτονται ως οικιακά απόβλητα κατά το
τέλος της ωφέλιμης ζωής τους.
Εάν θέλετε να απορρίψετε το προϊόν αυτό και την
μπαταρία, κάντε το σύμφωνα με την ισχύουσα
εθνική νομοθεσία ή άλλους κανονισμούς που
ισχύουν στη χώρα ή την περιοχή σας.
Η σωστή απόρριψη αυτού του προϊόντος βοηθά
στη διατήρηση των φυσικών πόρων και στην
πρόληψη ενδεχόμενων αρνητικών επιπτώσεων στο
περιβάλλον και την ανθρώπινη υγεία.
Επισήμανση:
Το σήμα Pb κάτω από το σύμβολο για τις μπαταρίες
δηλώνει ότι αυτή η μπαταρία περιέχει μόλυβδο.
ήχου:
Οι ψηφιακές συσκευές (CD/USB) παράγουν πολύ μικρό
θόρυβο σε σύγκριση με άλλες πηγές. Μειώστε την
ένταση του ήχου πριν την αναπαραγωγή από αυτές τις
ψηφιακές πηγές για να μην καταστραφούν τα ηχεία από
την απότομη αύξηση της στάθμης εξόδου.
Για την ασφάλειά σας...
• Μην αυξάνετε υπερβολικά την ένταση του ήχου, διότι
κάτι τέτοιο θα επικαλύψει τους εξωτερικούς ήχους και
θα καταστήσει την οδήγηση επικίνδυνη.
• Προτού εκτελέσετε σύνθετους χειρισµούς,
ακινητοποιείτε το όχηµά σας.
Θερµοκρασία στο εσωτερικό του οχήµατος...
Εάν είχατε σταθµεύσει το όχηµά σας επί µακρό διάστηµα
σε πολύ ψυχρές ή πολύ θερµές καιρικές συνθήκες,
περιµένετε να επανέλθει η θερµοκρασία στο εσωτερικό
του οχήµατος στα φυσιολογικά επίπεδα προτού θέσετε
τη µονάδα σε λειτουργία.
2
Page 81

Απόσπαση της πρόσοψης
ΠΕΡΙΕΧΌΜΕΝΑ
Απόσπαση της πρόσοψης ............................. 3
Προσαρτήστε της πρόσοψης ........................ 3
Επαναφορά της µονάδας .............................. 3
Τρόπος εξαγωγής του δίσκου µε
εξαναγκασµό ............................................ 3
Προσαρτήστε της πρόσοψης
Επαναφορά της µονάδας
• Οι προεπιλεγµένες ρυθµίσεις θα διαγραφούν.
Τρόπος εξαγωγής του δίσκου µε
εξαναγκασµό
• Μπορείτε να εξαγάγετε με εξαναγκασμό το δίσκο που
εισαγάγατε, ακόμη και αν αυτός είναι κλειδωμένος. Για
να κλειδώσετε/ξεκλειδώσετε το δίσκο, βλ. σελίδα 10.
• Προσέξτε να µην σας πέσει ο δίσκος κατά την εξαγωγή.
• Εάν αυτή η ενέργεια αποτύχει, επιχειρήστε να
επαναφέρετε το δέκτη.
ΛΕΙΤΟΥΡΓΙΕΣ
Βασικές λειτουργίες ...................................... 4
Προετοιμασία ............................................... 6
Ακρόαση ραδιοφωνικών σταθµών ............... 7
Λειτουργίες δίσκου ....................................... 10
Ακρόαση συσκευής USB ............................... 11
ΕΞΩΤΕΡΙΚΕΣ ΣΥΣΚΕΥΕΣ
Ακρόαση άλλων εξωτερικών συσκευών ....... 12
Χρήση του τηλεχειριστηρίου—
ΡΥΘΜΙΣΕΙΣ
Επιλογή προεπιλεγμένης κατάστασης
ήχου ......................................................... 14
Λειτουργίες μενού ........................................ 16
Ρυθμίσεις χρώματος (για το KD-R501) .......... 19
ΠΑΡΑΠΟΜΠΕΣ
Περισσότερα σχετικά µε το δέκτη αυτό ........ 20
Αντιμετώπιση προβλημάτων ........................ 23
Συντήρηση ................................................... 25
Προδιαγραφές .............................................. 26
Αυτή η ένδειξη χρησιμοποιείται για να δείξει...
Γυρίστε τον περιστροφικό διακόπτη
για να κάνετε μια επιλογή και στη
συνέχεια πιέστε για να επιβεβαιώσετε
την επιλογή.
RM-RK50 ...... 13
EΛΛHNIKA
3
Page 82

Βασικές λειτουργίες
1 • FM/AM: Επιλέξτε προεπιλεγμένο σταθμό.
• CD/USB: Επιλέγει φάκελο.
2 • Ενεργοποιήστε την παροχή ρεύματος.
• Μειώνει την ένταση του ήχου (αν είναι
ενεργοποιημένη η παροχή ρεύματος).
• Απενεργοποιεί την παροχή ρεύματος [Κρατήστε
πιεσμένο].
EΛΛHNIKA
3 Επιλέγει την πηγή.
FM = CD *2 = USB = AUX IN *3 = AM *3 =
(επιστροφή στη αρχή)
4 • Εισάγει λειτουργίες λίστας.
• Εισάγει τη ρύθμιση μενού [Κρατήστε πιεσμένο] .
5 • Ελέγχει την ένταση του ήχου *
4
ή επιλεγμένα
p Απόσπαση της πρόσοψης.
q Αλλάζει τις πληροφορίες στην οθόνη.
w • FM/AM: Αναζήτηση σταθμού.
• CD/USB: Επιλέγει μουσικό κομμάτι.
e Επιστροφή στο προηγούμενο μενού.
r Αισθητήρας τηλεχειρισµού
• Μπορείτε να χειριστείτε τονπαρόντα δέκτη µε
τηλεχειριστήριοτο οποίο µπορείτε να αγοράσετε
προαιρετικά. Για λεπτοµέρειες, βλ. σελίδα 13.
t Υποδοχή εισόδου AUX (βοηθητική)
y Ακροδέκτης εισόδου USB (Ενιαίος Σειριακός
∆ίαυλος)
στοιχεία [Περιστρέψτε].
• Επιβεβαιώστε την επιλογή [Πιέστε] .
• FM: Εισάγει την προεπιλεγμένη κατάσταση SSM
[Κρατήστε πιεσμένο] .
• CD/USB: Εισάγει την κατάσταση αναπαραγωγής
[Κρατήστε πιεσμένο] .
Προσωρινή διακοπή/συνέχιση
αναπαραγωγής *4 [Πιέστε] .
6 Υποδοχή τοποθέτησης
7 Παράθυρο οθόνης
8 Εξαγωγή δίσκου.
9 • Ενεργοποιεί/απενεργοποιεί την αναμονή λήψης
ΤΑ.
• Εισάγει την κατάσταση αναζήτησης PTY
[Κρατήστε πιεσμένο].
*1 Αναφέρεται επίσης ως “Περιστροφικός διακόπτης” στο
παρόν εγχειρίδιο.
*2 ∆εν μπορείτε να επιλέξετε το “CD” ως πηγή
αναπαραγωγής, αν δεν έχει τοποθετηθεί δίσκος στη
μονάδα.
*3 ∆εν μπορείτε να επιλέξετε αυτές τις πηγές αν έχουν
απενεργοποιηθεί στο μενού (βλ. “SRC SELECT”
στην ενότητα “Λειτουργίες μενού”, στη σελίδα 19).
*4 Μπορείτε να ρυθμίσετε την ένταση του ήχου κατά τη
διάρκεια της προσωρινής διακοπής, όταν η επιλεγμένη
πηγή είναι CD/USB.
Πριν τη συνέχιση της αναπαραγωγής, ελέγξτε για να
βεβαιωθείτε ότι δεν έχετε ανεβάσει υπερβολικά τη
στάθμη της έντασης του ήχου.
KD-R501: Μπορείτε να αλλάξετε το πρότυπο εμφάνισης της οθόνης και το φωτισμό των κουμπιών (βλ.
“COLOR” (Χρώμα) στη σελίδα 17).
4
Page 83

Παράθυρο οθόνης
1 Ένδειξη Tr (µουσικό κοµµάτι)
2 Οθόνη πηγής / Αριθμός μουσικού κομματιού
/ Αριθμός φακέλου / Ένδειξη αντίστροφης
χρονομέτρησης
3 Ένδειξη DISC
4 Ενδείξεις κατάστασης λειτουργίας ήχου—CLASSIC,
HIP HOP, JAZZ, ROCK, POPS, USER
5 Ενδείξεις κατάστασης αναπαραγωγής /
στοιχείου—RND (τυχαία σειρά), (δίσκος),
(φάκελος), RPT (επανάληψη)
6 Ένδειξη EQ (ισοσταθµιστής)
7 Ένδειξη LOUD (ακουστότητα)
8 Ενδείξεις πληροφοριών για το δίσκο—TAG
(πληροφορίες σε μορφή Tag), (μουσικό
κομμάτι/αρχείο), (φάκελος)
9 Kύρια οθόνη
p Ενδείξεις Radio Data System—AF, REG, TP, PTY
q ∆είκτες λήψης δέκτη—ST (στερεοφωνική), MO
(µονοφωνική)
EΛΛHNIKA
5ΛΕΙΤΟΥΡΓΙΕΣ
Page 84

Προετοιμασία
Ακύρωση της επίδειξης λειτουργίας στην οθόνη και ρύθμιση της ώρας
• ∆είτε επίσης τη σελίδα 16.
1
Ενεργοποιήστε την παροχή ρεύματος.
2
Πιέστε και κρατήστε
πιεσμένο μέχρι να
εμφανιστεί το κύριο μενού.
[Περιστροφή] =
[Πιέστε]
• Επαναλάβετε τη
διαδικασία αυτή.
Αλλαγή του προτύπου εµφάνισης στην οθόνη
EΛΛHNIKA
Ενώ η παροχή ρεύματος είναι απενεργοποιημένη: Εμφανίζεται η τρέχουσα ώρα όταν η ένδειξη “CLOCK DISP”
είναι ρυθμισμένη σε “CLOCK OFF”, (βλ. σελίδα 16).
Ενώ η παροχή ρεύματος είναι ενεργοποιημένη: Οι πληροφορίες στην οθόνη για την τρέχουσα πηγή αλλάζουν ως
εξής:
FM/AM Συχνότητα σταθµού = Ρολόι = (επιστροφή στη αρχή)
FM Radio
Data System
CD
CD/USB
Όνοµα σταθµού (PS)
(επιστροφή στη αρχή)
Audio CD/CD Text: Τίτλος δίσκου/καλλιτέχνης *
MP3/WMA: Όνομα άλμπουμ/καλλιτέχνης (όνομα φακέλου) *2 = Τίτλος μουσικού
Ακυρώστε τη λειτουργία επίδειξης στην οθόνη
Επιλέξτε “DEMO” και στη συνέχεια “DEMO OFF”.
Ρυθμίστε το ρολόι
Επιλέξτε “CLOCK” = “CLOCK SET”.
Ρυθμίστε την ώρα και στη συνέχεια πιέστε μια φορά τον
περιστροφικό διακόπτη για να ρυθμίσετε τα λεπτά.
Επιλέξτε “24H/12H” και στη συνέχεια “24 HOUR”
(24ώρη μορφή) ή “12 HOUR” (12ώρη μορφή).
• Για να επιστρέψετε στο προηγούμενο μενού, πιέστε το “BACK”
(εάν εµφανίζεται).
= Συχνότητα σταθµού = Τύπος προγράµµατος (PTY) = Ρολόι =
1
= Τίτλος μουσικού κομματιού *1 =
Αριθμός τρέχοντος μουσικού κομματιού και χρόνος αναπαραγωγής
που πέρασε = Αριθμός τρέχοντος μουσικού κομματιού και ώρα =
(επιστροφή στη αρχή)
κομματιού (όνομα αρχείου) *2 = Αριθμός τρέχοντος μουσικού κομματιού
και χρόνος αναπαραγωγής που πέρασε = Αριθμός τρέχοντος μουσικού
κομματιού και ώρα = (επιστροφή στη αρχή)
*1 Εάν ο τρέχων δίσκος είναι CD ήχου, εµφανίζεται στην οθόνη η ένδειξη “NO NAME”.
*2 Αν το αρχείο MP3/WMA δεν διαθέτει πληροφορίες σε μορφή Tag, ή αν η επιλογή “TAG DISPLAY” (Εμφάνιση
TAG) είναι ρυθμισμένη στο “TAG OFF” (Απενεργοποίηση TAG) (βλ. σελίδα 16), εμφανίζεται το όνομα του
φακέλου και το όνομα του αρχείου.
6
Page 85

Ακρόαση ραδιοφωνικών σταθµών
1
2
Επιλέξτε “FM” ή “AM”.
Αναζήτηση για σταθμό προς ακρόαση—Αυτόματη αναζήτηση.
Μετά τη λήψη του σταθμού, η αναζήτηση σταματά. Για να σταματήσει η
αναζήτηση, πιέστε πάλι το ίδιο κουμπί.
• Μπορείτε επίσης να κάνετε αναζήτηση σταθμών με το χέρι—Manual Search
(αναζήτηση με το χέρι). Κρατήστε πιεσμένο οποιοδήποτε από τα δύο κουμπιά
μέχρι να αρχίσει να αναβοσβήνει η ένδειξη “M” στην οθόνη και στη συνέχεια
πιέστε το επανειλημμένα.
• Κατά τη λήψη στερεοφωνικής εκπομπής στα FM με επαρκώς ισχυρό σήμα,
ανάβει η ένδειξη ST στην οθόνη.
Βελτίωση της λήψης FM
Όταν είναι δύσκολη η λήψη μιας στερεοφωνικής
εκπομπής στα FM, ενεργοποιήστε την κατάσταση
μονοφωνικού ήχου για καλύτερη λήψη.
• ∆είτε επίσης τη σελίδα 17.
[Περιστρέψτε] = [Πιέστε]
Αποθήκευση των σταθµών στη
µνήµη
Αυτόματη προεπιλογή (FM)—SSM (Μνήμη
ακολουθίας σταθμών με ισχυρό σήμα)
Μπορείτε να προεπιλέξετε έως 18 σταθμούς για FM.
1 Κατά την ακρόαση ενός σταθμού...
2 Eπιλέξτε το εύρος προεπιλεγμένων αριθμών
στο οποίο θέλετε να γίνει η αποθήκευση.
EΛΛHNIKA
Η λήψη βελτιώνεται, αλλά χάνεται η στερεοφωνική
απόδοση.
• Ανάβει η ένδειξη MO στην οθόνη.
Για να αποκατασταθεί η στερεοφωνική απόδοση,
επαναλάβετε την ίδια διαδικασία και επιλέξτε “MONO
OFF”. Η ένδειξη MO σβήνει.
3
Γίνεται αυτόματη αναζήτηση και αποθήκευση των
τοπικών ραδιοφωνικών σταθμών FM με τα ισχυρότερα
σήματα.
• Για να σταματήσει η αναζήτηση, πιέστε 4 /
¢ .
Για να προεπιλέξετε άλλους 6 σταθμούς,
επαναλάβετε πάλι την ίδια διαδικασία από το βήμα 1.
Συνεχίζεται στην επόμενη σελίδα
7ΛΕΙΤΟΥΡΓΙΕΣ
Page 86

Προεπιλογή µε το χέρι (FM/AM)
Μπορείτε να προεπιλέξετε έως 18 σταθμούς για τα FM
και 6 σταθμούς για τα AM.
Π.χ.: Αποθήκευση ενός σταθμού FM των 92,50 MHz στον
προεπιλεγμένο αριθμό “04”.
1
2 Eπιλέξτε τον προεπιλεγμένο αριθμό “04”.
3
EΛΛHNIKA
Επιλογή προεπιλεγμένου σταθμού
ή
Οι παρακάτω δυνατότητες είναι διαθέσιμες μόνο για
σταθμούς FM Radio Data System.
Αναζήτηση για πρόγραμμα
FM με το σύστημα Radio Data
System (ραδιοφωνικό σύστημα
δεδομένων)—Αναζήτηση PTY
Μπορείτε να συντονιστείτε στο σταθµό που εκπέµπει το
αγαπηµένο σας πρόγραµµα µε αναζήτηση για κωδικό
PTY.
1 Εµφανίζεται ο πιο πρόσφατα
επιλεγµένος κωδικός PTY.
2 Επιλέξτε έναν από τους αγαπημένους σας
τύπους προγράμματος ή έναν κωδικό PTY.
3 Έναρξη αναζήτησης του αγαπηµένου σας
προγράµµατος.
Εάν υπάρχει σταθμός που εκπέμπει πρόγραμμα με
[Περιστρέψτε]
= [Πιέστε]
τον κωδικό PTY που επιλέξατε, γίνεται συντονισμός
στο σταθμό αυτό.
Χρήση της αναµονής λήψης
Αναµονή λήψης ΤΑ
Η αναµονή λήψης ΤΑ επιτρέπει στο δέκτη να
συντονίζεται προσωρινά σε λειτουργία λήψης
ανακοινώσεων για την κίνηση στους δρόµους (TA) από
οποιαδήποτε πηγή διαφορετική από AM.
Η ένταση του ήχου αλλάζει στην προεπιλεγμένη στάθμη
έντασης ήχου TA αν η τρέχουσα στάθμη είναι μικρότερη
από την προεπιλεγμένη (βλ. σελίδα 17).
8
Page 87

Για να ενεργοποιηθεί η αναµονή λήψης ΤΑ
Η ένδειξη TP (πρόγραμμα για την
κίνηση στους δρόμους) είτε ανάβει
είτε αναβοσβήνει.
• Εάν η ένδειξη TP ανάψει, η αναµονή λήψης ΤΑ έχει
ενεργοποιηθεί.
• Εάν η ένδειξη TP αναβοσβήνει, η αναµονή λήψης ΤΑ
δεν έχει ακόµη ενεργοποιηθεί. (Αυτό συµβαίνει όταν
κάνετε ακρόαση ενός σταθµού FM που δεν εκπέµπει
τα σήµατα Radio Data System που απαιτούνται για την
αναµονή λήψης ΤΑ).
Για να ενεργοποιηθεί η λήψη, συντονιστείτε σε έναν
άλλο σταθμό που παρέχει αυτά τα σήματα. Η ένδειξη
TP θα σταµατήσει να αναβοσβήνει και παραµένει
αναµµένη.
Για να απενεργοποιηθεί η αναµονή λήψης ΤΑ
Η ένδειξη TP σβήνει.
Αναµονή λήψης PTY
Η αναµονή λήψης PTY επιτρέπει στο δέκτη να
συντονίζεται προσωρινά στο αγαπηµένο σας πρόγραµµα
PTY από οποιαδήποτε πηγή διαφορετική από AM.
Για να ενεργοποιήσετε και να επιλέξετε τον
αγαπηµένο σας κωδικό PTY για αναµονή λήψης
PTY, δείτε τη σελίδα 17.
Η ένδειξη PTY είτε ανάβει είτε αναβοσβήνει.
• Εάν η ένδειξη PTY ανάψει, η αναµονή λήψης PTY έχει
ενεργοποιηθεί.
• Εάν η ένδειξη PTY αναβοσβήνει, η αναµονή λήψης
PTY δεν έχει ακόµη ενεργοποιηθεί.
Για να ενεργοποιηθεί η λήψη, συντονιστείτε σε έναν
άλλο σταθμό που παρέχει αυτά τα σήματα. Η ένδειξη
PTY θα σταµατήσει να αναβοσβήνει και παραµένει
αναµµένη.
Για να απενεργοποιήσετε την αναµονή λήψης
PTY, επιλέξτε “PTY OFF” για τον κωδικό PTY (βλ. σελίδα
17). Η ένδειξη PTY σβήνει.
Εντοπισµός του ίδιου
προγράµµατος—Λήψη µε
εντοπισµό δικτύου
Όταν οδηγείτε σε περιοχή όπου η λήψη FM δεν είναι
καλή, ο δέκτης συντονίζεται αυτόµατα σε έναν άλλο
σταθµό FM Radio Data System του ίδιου δικτύου, που
εκπέµπει ενδεχοµένως το ίδιο πρόγραµµα αλλά µε
δυνατότερο σήµα (δείτε την παρακάτω απεικόνιση).
Κατά την αποστολή από το εργοστάσιο, η λειτουργία
λήψης µε εντοπισµό δικτύου έχει ενεργοποιηθεί.
Για να αλλάξετε τη ρύθμιση της λήψης με
εντοπισμό δικτύου, βλ. “AF-REG” στη σελίδα 17.
Πρόγραµµα “A” που εκπέµπεται σε διαφορετικές περιοχές
συχνότητας (01 – 05)
EΛΛHNIKA
Αυτόματη επιλογή σταθμού—
Αναζήτηση προγράμματος
Συνήθως, όταν επιλέξετε έναν προεπιλεγμένο αριθμό, o
δέκτης συντονίζεται στο σταθμό με τον προεπιλεγμένο
αριθμό.
Εφόσον τα σήματα του προεπιλεγμένου σταθμού FM
Radio Data System δεν είναι αρκετά ισχυρά για να
υπάρξει καλή λήψη, η παρούσα μονάδα συντονίζεται, με
χρήση των δεδομένων της λειτουργίας AF, σε μια άλλη
συχνότητα που ενδέχεται να μεταδίδει πρόγραμμα ίδιο
με αυτό του αρχικά προεπιλεγμένου σταθμού.
• Η μονάδα χρειάζεται κάποιο χρόνο για να συντονιστεί
σε έναν άλλο σταθμό χρησιμοποιώντας την αναζήτηση
προγράμματος.
• ∆είτε επίσης τη σελίδα 17.
Kωδικοί PTY
NEWS, AFFAIRS, INFO, SPORT, EDUCATE, DRAMA, CULTURE,
SCIENCE, VARIED, POP M (µουσική), ROCK M (µουσική),
EASY M (µουσική), LIGHT M (µουσική), CLASSICS, OTHER M
(µουσική), WEATHER, FINANCE, CHILDREN, SOCIAL, RELIGION,
PHONE IN, TRAVEL, LEISURE, JAZZ, COUNTRY, NATION M
(µουσική), OLDIES, FOLK M (µουσική), DOCUMENT
9ΛΕΙΤΟΥΡΓΙΕΣ
Page 88

Λειτουργίες δίσκου
1
2
∆ιακοπή της αναπαραγωγής και εξαγωγή του
δίσκου
• Εμφανίζεται η ένδειξη “NO DISC” (∆εν υπάρχει
δίσκος). Πατήστε το κουμπί SRC (Πηγή) για ακρόαση
μέσω μιας άλλης πηγή αναπαραγωγής.
EΛΛHNIKA
Απαγόρευση εξαγωγής δίσκου
Για να ακυρωθεί η απαγόρευση, επαναλάβετε την
ίδια διαδικασία.
Επιλογή φακέλου/μουσικού κομματιού
Ενεργοποιήστε την παροχή ρεύματος.
Εισαγάγετε το δίσκο.
Όλα τα µουσικά κοµµάτια θα αναπαράγονται
επανειληµµένα έως ότου αλλάξετε την πηγή ή βγάλετε
το δίσκο.
Αν πιέσετε (ή κρατήσετε πιεσμένα) τα παρακάτω
κουμπιά, μπορείτε να κάνετε τα εξής:
[Πιέστε] Προσωρινή διακοπή/
συνέχιση αναπαραγωγής.
MP3/WMA: Επιλογή φακέλου
[Πιέστε] Επιλογή μουσικού
κομματιού
[Κρατήστε πατημένο]
Επιστροφή/γρήγορη
προώθηση εντός μουσικού
κομματιού
[Περιστρέψτε] = [Πιέστε]
• Για δίσκους MP3/WMA, επιλέξτε τον επιθυμητό
φάκελο και στη συνέχεια το επιθυμητό μουσικό
κομμάτι, χρησιμοποιώντας ξανά τον περιστροφικό
διακόπτη.
• Για να επιστρέψετε στο προηγούμενο μενού, πιέστε το
“BACK” (εάν εµφανίζεται).
10
Page 89

Επιλογή καταστάσεων λειτουργίας
αναπαραγωγής
Μπορείτε να χρησιµοποιήσετε µόνο µία από τις παρακάτω
καταστάσεις αναπαραγωγής κάθε φορά.
1
2
[Περιστρέψτε] = [Πιέστε]
REPEAT Ô RANDOM
3
[Περιστρέψτε] = [Πιέστε]
REPEAT
TRACK RPT
FOLDER RPT
: Επανάληψη του τρέχοντος μουσικού
κομματιού
: MP3/WMA: Επανάληψη του
τρέχοντος φακέλου
RANDOM
FOLDER RND
ALL RND
• Για να ακυρώσετε την επαναλαμβανόμενη αναπαραγωγή
ή την αναπαραγωγή με τυχαία σειρά, επιλέξτε
“RPT OFF” ή “RND OFF”.
• Για να επιστρέψετε στο προηγούμενο μενού, πιέστε το
“BACK” (εάν εµφανίζεται).
: MP3/WMA: Αναπαραγωγή με τυχαία
σειρά όλων των μουσικών κομματιών
του τρέχοντος φακέλου και στη
συνέχεια των μουσικών κομματιών
των επόμενων φακέλων
: Αναπαραγωγή με τυχαία σειρά όλων
των μουσικών κομματιών
Ακρόαση συσκευής USB
Η μονάδα αυτή μπορεί να αναπαραγάγει μουσικά κομμάτια MP3/WMA που είναι αποθηκευμένα σε συσκευή USB.
Όλα τα μουσικά κομμάτια θα αναπαράγονται επανειλημμένα έως ότου αλλάξετε την πηγή ή βγάλετε τη συσκευή USB.
υποδοχή εισόδου USB
Μνήμη USB
Αν έχει συνδεθεί συσκευή USB...
Η αναπαραγωγή ξεκινά από το σημείο όπου είχε
σταματήσει προηγουμένως.
• Αν επί του παρόντος είναι συνδεδεμένη κάποια
διαφορετική συσκευή USB, η αναπαραγωγή ξεκινά από
την αρχή.
Για να σταματήσετε την αναπαραγωγή και να
βγάλετε τη συσκευή USB
Τραβήξτε την με ευθύγραμμη κίνηση, για να τη βγάλετε
από το δέκτη.
• Πατήστε το κουμπί SRC (Πηγή) για ακρόαση μέσω μιας
άλλης πηγή αναπαραγωγής.
Μπορείτε να χειριστείτε τη συσκευή USB με τον ίδιο τρόπο
που χειρίζεστε τα αρχεία σε κάποιο δίσκο. (Βλ. σελίδες 10
και 11.)
Συνεχίζεται στην επόμενη σελίδα
ΛΕΙΤΟΥΡΓΙΕΣ
EΛΛHNIKA
11
Page 90

Προσοχή:
• Μη χρησιμοποιείτε τη συσκευή USB, αν αυτή
πρόκειται να παρεμποδίσει την ασφαλή οδήγηση.
• Μη βγάζετε και συνδέετε κατ’ επανάληψη τη
συσκευή USB ενώ εμφανίζεται στην οθόνη η ένδειξη
“READING” (Ανάγνωση).
• Μη βάζετε εμπρός τον κινητήρα του αυτοκινήτου αν
είναι συνδεδεμένη μια συσκευή USB.
• Ανάλογα με τον τύπο της συσκευής USB, ο δέκτης
αυτός ενδέχεται να μην μπορεί να αναπαραγάγει τα
αρχεία.
• Σε ορισμένες συσκευές USB, η λειτουργία και η
τροφοδοσία τους μπορεί να μην εκτελούνται όπως
προβλέπεται.
• ∆εν μπορείτε να συνδέσετε υπολογιστή στον
ακροδέκτη εισόδου USB της μονάδας.
• Βεβαιωθείτε ότι έχετε δημιουργήσει αντίγραφα
ασφαλείας για όλα τα σημαντικά δεδομένα, ώστε να
μην υπάρξει απώλεια δεδομένων.
• Μην αφήνετε τη συσκευή USB στο αυτοκίνητο, ούτε
να την εκθέτετε στο άμεσο φως του ήλιου ή σε υψηλή
θερμοκρασία, για να μην προκληθεί παραμόρφωση ή
ζημιά στη συσκευή.
• Ορισμένες συσκευές USB μπορεί να μην τίθενται σε
λειτουργία αμέσως αφού ενεργοποιήσετε την παροχή
ρεύματος.
• Για περισσότερες λεπτομέρειες σχετικά με τις
λειτουργίες USB, βλ. σελίδα 22.
Ακρόαση άλλων εξωτερικών συσκευών
Μπορείτε να συνδέσετε μια εξωτερική συσκευή στην υποδοχή εισόδου AUX (βοηθητική), στην πρόσοψη.
Προετοιμασία: Βεβαιωθείτε ότι έχετε επιλέξει “AUX ON” στη ρύθμιση “SRC SELECT” = “AUX IN”, βλ.
σελίδα 19.
EΛΛHNIKA
1
2
—
3
Επιλέξτε “AUX IN”.
Ενεργοποιήστε τo συνδεδεµένo εξάρτηµα και αρχίστε την
αναπαραγωγή της πηγής.
Ρυθµίστε την ένταση του ήχου.
4
—
Ρυθμίστε τον ήχο όπως θέλετε (βλ. σελίδες 14 και 15).
Σύνδεση εξωτερικού εξαρτήματος με την υποδοχή εισόδου AUX
Στερεοφωνικό βύσμα μίνι-καρφί 3,5 mm
(δεν παρέχεται)
ΛΕΙΤΟΥΡΓΙΕΣ & ΕΞΩΤΕΡΙΚΕΣ ΣΥΣΚΕΥΕΣ
12
Φορητή συσκευή
αναπαραγωγής ήχου, κ.τ.λ.
Page 91

Χρήση του τηλεχειριστηρίου — RM-RK50
Μπορείτε να χειριστείτε από απόσταση τον παρόντα
δέκτη σύµφωνα µε τις οδηγίες που ακολουθούν (µε
τηλεχειριστήριο το οποίο µπορείτε να αγοράσετε
προαιρετικά). Σας συνιστούµε να χρησιµοποιήσετε µε το
δέκτη σας το τηλεχειριστήριο RM-RK50.
Τοποθέτηση της µπαταρίας λιθίου (CR2025)
1 • Ενεργοποιεί την παροχή ρεύματος αν το πιέσετε
σύντομα ή μειώνει την ένταση του ήχου όταν η
παροχή ρεύματος είναι ενεργοποιημένη.
Προσοχή:
• Κίνδυνος έκρηξης αν η μπαταρία αντικατασταθεί
λανθασμένα. Αντικαταστήστε μόνο με μπαταρία ίδιου ή
ισοδύναμου τύπου.
• Η μπαταρία δεν πρέπει να εκτίθεται σε υπερβολική
θερμότητα όπως ηλιακό φως, πυρκαγιά, κ.λ.π.
Αν η αποτελεσματικότητα του τηλεχειριστηρίου
μειωθεί, αντικαταστήστε την μπαταρία.
Πριν χρησιμοποιήσετε το τηλεχειριστήριο:
• Στοχεύστε το τηλεχειριστήριο απευθείας στον
απομακρυσμένο αισθητήρα της συσκευής.
• ΜΗΝ εκθέτετε τον αισθητήρα τηλεχειρισμού σε ισχυρό
φως (άμεσο φως του ήλιου ή τεχνητό φωτισμό).
Αισθητήρας τηλεχειρισµού
• Απενεργοποιεί την παροχή ρεύματος εάν το
πιέσετε και το κρατήσετε πιεσμένο.
2 • Αλλάζει τους προεπιλεγµένους σταθµούς.
• Αλλάζει το φάκελο του δίσκου MP3/WMA.
3 Ρυθµίζει την ένταση του ήχου.
4 Επιλέγει την κατάσταση λειτουργίας ήχου.
5 Επιλέγει την πηγή.
6 • Αναζητά σταθµούς, εάν πατηθεί στιγµιαία.
• Προχωρά γρήγορα το µουσικό κοµµάτι προς τα
εµπρος ή προς τα πίσω εάν πατηθεί και κρατηθεί
πατηµένο.
• Αλλάζει το μουσικό κομμάτι αν το πιέσετε σύντομα.
Προειδοποίηση (προς αποφυγή ατυχημάτων
και ζημιάς):
• Μην τοποθετείτε καμία μπαταρία διαφορετική από την
CR2025 ή το ισοδύναμό της.
• Μην αφήνετε το τηλεχειριστήριο σε χώρο (όπως το
ταμπλό) που είναι εκτεθειμένος στο άμεσο φως του
ήλιου για μεγάλο χρονικό διάστημα.
• Αποθηκεύστε τη μπαταρία σε χώρο στον οποίο δεν
έχουν πρόσβαση τα παιδιά.
• Μην επαναφορτίζετε, βραχυκυκλώνετε,
αποσυναρµολογείτε την µπαταρία ούτε να τη
θερµαίνετε ή να την απορρίπτετε σε φωτιά.
Μην αφήνετε την µπαταρία µαζί µε άλλα µεταλλικά υλικά.
•
• Μην πειράζετε την µπαταρία µε τσιµπιδάκια ή παρόµοια
εργαλεία.
• Όταν απορρίπτετε ή αποθηκεύετε την µπαταρία, τυλίξτε
την µε ταινία και µονώστε την ένταση του ήχου.
EΛΛHNIKA
ΕΞΩΤΕΡΙΚΕΣ ΣΥΣΚΕΥΕΣ
13
Page 92

Επιλογή προεπιλεγμένης κατάστασης ήχου
Μπορείτε να επιλέξετε µια κατάσταση ήχου κατάλληλη για το συγκεκριµένο είδος µουσικής.
• ∆είτε επίσης τη σελίδα 16.
[Περιστρέψτε] = [Πιέστε]
• Βλ. σελίδα 15 για τις ρυθμίσεις “USER”.
Προεπιλεγμένη τιμή για κάθε κατάσταση λειτουργίας ήχου
EΛΛHNIKA
Ενδείξεις
κατάστασης
ήχου
Συχν. Στάθμη Q Συχν. Στάθμη Q Συχν. Στάθμη Q
USER
ROCK
CLASSIC
POPS
HIP HOP
JAZZ
Συχν.: Συχνότητα Q: Κλίση Q
100 Hz +03 Q1,0 1,0 kHz 00 Q1,25 10,0 kHz +02 —
100 Hz +02 Q1,25 1,0 kHz +01 Q1,25 10,0 kHz +02 —
14
Προεπιλεγμένη τιμή
BASS MIDDLE TREBLE LOUD
(ακουστότητα)
60 Hz 00 Q1,25 1,0 kHz 00 Q1,0 10,0 kHz 00 —
80 Hz +01 Q1,25 1,0 kHz 00 Q1,25 10,0 kHz +03 —
OFF
60 Hz +04 Q1,0 1,0 kHz –02 Q1,0 10,0 kHz +01 —
80 Hz +03 Q1,25 1,0 kHz 00 Q1,25 10,0 kHz +03 —
Page 93

Aποθήκευση της δικής σας
κατάστασης λειτουργίας ήχου
Μπορείτε να αποθηκεύσετε τις δικές σας ρυθμίσεις στη
μνήμη.
1 Επιλέξτε “USER” για “EQ”.
4 Ρυθμίστε τα στοιχεία ήχου του επιλεγμένου
τόνου.
[Περιστρέψτε] = [Πιέστε]
1 Ρυθμίστε τη συχνότητα.
2 Ρυθμίστε την ένταση του ήχου.
3 Ρυθμίστε την κλίση Q.
[Περιστρέψτε] = [Πιέστε]
2 Ενώ εμφανίζεται η ένδειξη “USER”
(χρήστης) στην οθόνη...
3 Επιλέξτε τόνο.
[Περιστρέψτε] = [Πιέστε]
Στοιχεία
ήχου
Συχνότητα 60 Hz
Στάθμη –06 έως
Q Q1,0
Εύρος/επιλέξιμα στοιχεία
BASS MIDDLE TREBLE
80 Hz
100 Hz
200 Hz
+06
Q1,25
Q1,5
Q2,0
0,5 kHz
1,0 kHz
1,5 kHz
2,5 kHz
–06 έως
+06
Q0,75
Q1,0
Q1,25
10,0 kHz
12,5 kHz
15,0 kHz
17,5 kHz
–06 έως
+06
Σταθερό
5 Eπαναλάβετε τα βήματα 3 και 4 για να
ρυθμίσετε και άλλα χαρακτηριστικά ήχου.
Η ρύθμιση που κάνατε, θα αποθηκευτεί αυτόματα.
EΛΛHNIKA
ΡΥΘΜΙΣΕΙΣ
15
Page 94

Λειτουργίες μενού
1 Εμφανίστε το
μενού.
Κατηγορία Στοιχεία μενού Επιλεγόµενες ρυθµίσεις, [σελίδα αναφοράς]
DEMO
Επίδειξη λειτουργίας στη
οθόνη
DEMO
CLOCK DISP *
Ένδειξη ρολογιού
CLOCK SET
EΛΛHNIKA
*1 Αν η παροχή ρεύματος δεν διακοπεί γυρίζοντας το διακόπτη της μίζας στη θέση off (απενεργοποιημένο), συνιστάται
να επιλέξετε τη ρύθμιση “CLOCK OFF” για να μην έχετε άσκοπη κατανάλωση της μπαταρίας του αυτοκινήτου.
*2 Τίθεται σε ισχύ μόνο όταν λαμβάνονται δεδομένα CT.
*3 Ορισμένοι χαρακτήρες ή σύμβολα δεν θα εμφανίζονται σωστά (ή καθόλου) στην οθόνη.
Ρύθμιση ώρας
CLOCK
24H/12H
Κατάσταση εμφάνισης ώρας
CLOCK ADJ *
Ρύθµιση ρολογιού
EQ
Ένδειξη ισοσταθμιστή
EQ
DIMMER
Ρύθµιση µείωσης φωτισµού
SCROLL*
Κύλιση
DISPLAY
TAG DISPLAY
Ένδειξη Tag
2 Επιλέξτε το στοιχείο που
θέλετε.
[Περιστρέψτε]
= [Πιέστε]
• DEMO ON
1
2
3
• DEMO OFF
• CLOCK ON
• CLOCK OFF
: Ρυθμίστε την ώρα και στη συνέχεια τα λεπτά, [6].
(Αρχική ρύθµιση: 0:00)
• 24 HOUR
• 12 HOUR
• AUTO
• OFF
: Επιλέξετε μια προεπιλεγμένη κατάσταση ήχου κατάλληλη για το
συγκεκριμένο είδος μουσικής.
USER, ROCK, CLASSIC, POPS, HIP HOP, JAZZ
• DIMMER ON
• DIMMER OFF
• SCROLL ONCE
• SCROLL AUTO
• SCROLL OFF
Εάν πατήσετε DISP για περισσότερο από ένα δευτερόλεπτο, διενεργείται
κύλιση της οθόνης ανεξάρτητα από τη ρύθµιση.
• TAG ON
• TAG OFF
3 Επαναλάβετε το βήμα 2 αν χρειάζεται.
• Για να επιστρέψετε στο προηγούμενο
μενού, πιέστε το “BACK” (εάν
εµφανίζεται).
• Για να βγείτε από το μενού, πιέστε πάλι
DISP ή MENU.
Αρχική ρύθμιση: Υπογραμμισμένο
: Εάν δεν εκτελεστεί κανένας χειρισµός για περίπου
20 δευτερόλεπτα, η επίδειξη λειτουργίας στην
οθόνη θα ενεργοποιηθεί αυτόµατα, [6].
: Ακύρωση.
: Η ώρα εμφανίζεται στην οθόνη πάντοτε, εφόσον η
παροχή ρεύματος είναι απενεργοποιημένη.
: Ακύρωση. Αν πιέσετε το πλήκτρο DISP, θα
εμφανιστεί η ώρα για περίπου 5 δευτερόλεπτα όταν
η παροχή ρεύματος είναι απενεργοποιημένη, [6].
: Βλ. επίσης σελίδα 6 για τη ρύθμιση.
: Το ενσωµατωµένο ρολόι ρυθµίζεται αυτόµατα
χρησιµοποιώντας τα δεδοµένα CT (ένδειξη ώρας)
του σήµατος Radio Data System.
: Ακύρωση.
: Μειώνει το φωτισμό της οθόνης και των κουμπιών.
: Ακύρωση.
: ∆ιενεργεί κύλιση των εμφανιζόμενων πληροφοριών
μια φορά.
: Η κύλιση επαναλαµβάνεται (ανά διάστηµα των 5
δευτερολέπτων).
: Ακύρωση.
: Εμφανίζει τις πληροφορίες σε μορφή Tag κατά την
ακρόαση μουσικών κομματιών MP3/WMA.
: Ακύρωση.
16
Page 95

Κατηγορία Στοιχεία μενού Επιλεγόµενες ρυθµίσεις, [σελίδα αναφοράς]
4
AF-REG *
Eναλλασσόµενη
συχνότητα/λήψη µε
περιφερειακή διαίρεση
• AF ON
: Όταν τα τρέχοντα σήματα που λαμβάνονται γίνουν
αδύνατα, η μονάδα συντονίζεται σε κάποιο άλλο
σταθμό (το πρόγραμμα του οποίου μπορεί να διαφέρει
από το τρέχον πρόγραμμα που λαμβάνεται), [9].
• Ανάβει η ένδειξη AF.
• AF-REG ON
: Όταν τα τρέχοντα σήματα που λαμβάνονται γίνουν
αδύνατα, η μονάδα συντονίζεται σε κάποιο άλλο
σταθμό που μεταδίδει το ίδιο πρόγραμμα.
• Ανάβουν οι ενδείξεις ΑF και REG.
PTY-STANDBY *
Αναµονή PTY
TA VOLUME *
Ένταση ήχου των
ανακοινώσεων για την
κίνηση στους δρόµους
TUNER
P-SEARCH *
Αναζήτηση
• OFF
4
PTY OFF,
Kωδικοί PTY
4
VOLUME 00
– VOLUME 50
(ή VOLUME 00
– VOLUME 30)*
4
• SEARCH ON
• SEARCH OFF
: Ακύρωση.
:
Ενεργοποιεί την αναµονή λήψης PTY µε έναν από
του κωδικούς PTY, [9].
:
(Αρχική ρύθμιση: VOLUME 15)
5
: Ενεργοποιεί την αναζήτηση προγράμματος, [9].
: Ακύρωση.
προγράµµατος
6
MONO *
Κατάσταση μονοφωνικού
ήχου
IF BAND
Ενδιάμεση ζώνη
συχνοτήτων
• MONO ON
• MONO OFF
• AUTO
: Ενεργοποιήστε την κατάσταση μονοφωνικού ήχου
για να βελτιώσετε τη λήψη FM, αλλά θα χαθεί η
στερεοφωνική απόδοση, [7].
: Επαναφέρει τη στερεοφωνική απόδοση.
: Αυξάνει την επιλεκτικότητα του δέκτη προκειμένου να
μειωθούν οι παρεμβολές μεταξύ των παρακείμενων
σταθμών. (Ενδέχεται να χαθεί η στερεοφωνική
απόδοση).
• WIDE
: Ο δέκτης συνεχίζει να δέχεται παρεμβολές από
σταθμούς σε γειτονικές συχνότητες, αλλά η ποιότητα
του ήχου δεν υποβαθμίζεται και η στερεοφωνική
απόδοση διατηρείται.
COLOR 01 –
COLOR 29, USER
COLOR
(για το
KD-R501)
MENU COLOR
Χρώμα μενού
(για το
KD-R501)
MENU COLOR
4
*
Μόνο για σταθμούς FM Radio Data System.
: Επιλέξτε ένα από τα προεπιλεγμένα χρώματα ή τα χρώματα χρήστη για
το φωτισμό της οθόνης και των πλήκτρων (εκτός των T/P/ /0).
(Για τις προσαρμοσμένες ρυθμίσεις χρώματος, “USER”, βλ. σελίδα 19).
• OFF
• ON
: Ακύρωση.
: Αλλάζει το φωτισμό της οθόνης και των πλήκτρων
(εκτός των T/P/ /0) όταν χρησιμοποιείτε
το μενού, την αναζήτηση λίστας και την κατάσταση
αναπαραγωγής.
*5 Ανάλογα µε τον έλεγχο απολαβής του ενισχυτή.
*6 Εμφανίζεται μόνο όταν η πηγή είναι “FM”.
EΛΛHNIKA
Συνεχίζεται στην επόμενη σελίδα
ΡΥΘΜΙΣΕΙΣ
17
Page 96

Κατηγορία Στοιχεία μενού Επιλεγόµενες ρυθµίσεις, [σελίδα αναφοράς]
8
FADER*7, *
βαθµιαία
R06 – F06 : Ρυθμίστε την ισχύ εξόδου των μπροστινών και πίσω ηχείων.
(Αρχική ρύθµιση: 00)
αυξοµείωση της
εξόδου του ηχείου
8
BALANCE *
εξισορρόπηση
LOUD
Aκουστότητα
L06 – R06 : Ρυθμίστε την ισχύ εξόδου των δεξιών και αριστερών ηχείων.
(Αρχική ρύθµιση: 00)
• LOUD OFF
• LOUD ON
: Ακύρωση.
: Ενισχύστε τις χαµηλές και τις υψηλές συχνότητες για να
κατανεµηθεί καλά ο ήχος σε χαµηλή στάθµη έντασης.
VOL ADJUST
Ρύθμιση έντασης
ήχου
VOL ADJ –05 —
VOL ADJ +05
(Αρχική ρύθµιση:
VOL ADJ 00)
: Προεπιλέγει τη στάθμη της έντασης του ήχου κάθε πηγής
(εκτός των FM), σε σύγκριση με τη στάθμη της έντασης του
ήχου των FM. Η στάθμη της έντασης του ήχου αυξάνεται ή
μειώνεται αυτόματα κατά την αλλαγή της πηγής.
• Πριν κάνετε κάποια ρύθμιση, επιλέξτε την πηγή που
θέλετε να ρυθμίσετε.
• Αν επιλέξετε τα “FM” ως πηγή, εμφανίζεται η ένδειξη
“VOL ADJ FIX” στην οθόνη.
EΛΛHNIKA
AUDIO
L/O MODE
Κατάσταση
λειτουργίας εξόδου
Line
SUB.W FREQ *
Συχνότητα διακοπής
για το υπογούφερ
• SUB.W
: Επιλέξτε αν οι ακροδέκτες REAR LINE OUT χρησιμοποιούνται
για τη σύνδεση υπογούφερ (μέσω εξωτερικού ενισχυτή).
• REAR
: Επιλέξτε αν οι ακροδέκτες REAR LINE OUT χρησιμοποιούνται
για τη σύνδεση των ηχείων (μέσω εξωτερικού ενισχυτή).
9
• LOW
: Οι συχνότητες που είναι χαµηλότερες από 72 Hz
αποστέλλονται στο υπογούφερ.
• MID
: Οι συχνότητες που είναι χαµηλότερες από 111 Hz
αποστέλλονται στο υπογούφερ.
• HIGH
: Οι συχνότητες που είναι χαµηλότερες από 157 Hz
αποστέλλονται στο υπογούφερ.
SUB.W LEVEL *
Στάθμη του
SUB.W 00
— SUB.W 08
: Ρυθμίστε το επίπεδο της ισχύος εξόδου του υπογούφερ.
(Αρχική ρύθµιση: SUB.W 04)
9
υπογούφερ
BEEP
Ήχος αφής πλήκτρου
TEL MUTING
Σίγαση τηλεφώνου
AMP GAIN *
Έλεγχος απολαβής
ενισχυτή
*7 Εάν χρησιµοποιείτε σύστηµα δύο ηχείων, ρυθµίστε τη στάθµη του fader στο “00”.
8
*
Αυτή η ρύθμιση δεν μπορεί να επηρεάσει την έξοδο του υπογούφερ.
10
• BEEP OFF
• BEEP ON
• MUTING 1/
MUTING 2
• MUTING OFF
• LOW POWER
• HIGH POWER
: Απενεργοποιεί τον ήχο αφής πλήκτρου.
: Ενεργοποιεί τον ήχο αφής πλήκτρου.
: Επιλέξτε οποιαδήποτε από τις δύο επιλογές, οι οποίες
επιτυγχάνουν τη σίγαση του κινητού σας τηλεφώνου.
: Ακύρωση.
: VOLUME 00 – VOLUME 30 (Επιλέξτε αυτή τη ρύθμιση, εάν
η μέγιστη ισχύς του κάθε ηχείου είναι μικρότερη από 50 W,
για να μην καταστραφεί το ηχείο.)
: VOLUME 00 – VOLUME 50
*9 Εμφανίζεται μόνο όταν το “L/O MODE” (Κατάσταση λειτουργίας εξόδου Line) είναι ρυθμισμένο στο “SUB.W”
(Γούφερ).
*10 Η στάθμη της έντασης του ήχου αλλάζει αυτόματα σε “VOLUME 30” αν αλλάξετε σε “LOW POWER” με τη στάθμη
της έντασης του ήχου να έχει ρυθμιστεί υψηλότερα από το “VOLUME 30”.
18
Page 97

Κατηγορία Στοιχεία μενού Επιλεγόµενες ρυθµίσεις, [σελίδα αναφοράς]
11
AM *
Σταθμός AM
12
AUX IN *
SRC SELECT
Βοηθητική είσοδος
*11 Εμφανίζεται μόνο όταν επιλεχθεί οποιαδήποτε πηγή διαφορετική από τα “AM”.
*12 Εμφανίζεται μόνο όταν επιλεχθεί οποιαδήποτε πηγή διαφορετική από τα “AUX IN”.
• AM OFF
• AM ON
• AUX OFF
• AUX ON
: Απενεργοποιεί τα “AM” κατά την επιλογή πηγής.
: Ενεργοποιεί τα “AM” κατά την επιλογή πηγής, [4].
: Απενεργοποιεί τα “AUX IN” κατά την επιλογή πηγής.
: Ενεργοποιεί τα “AUX IN” κατά την επιλογή πηγής, [4].
Ρυθμίσεις χρώματος (για το KD-R501)
∆ηµιουργία του δικού σας
χρώµατος—Χρώμα USER
(χρήστης)
Μπορείτε να δηµιουργήσετε τα δικά σας χρώµατα—
“DAY COLOR” ή “NIGHT COLOR”.
DAY COLOR: Χρησιμοποιείται όταν η μείωση
φωτισμού (“DIMMER”) είναι
ρυθμισμένη στο “DIMMER
OFF” .
NIGHT COLOR: Χρησιμοποιείται όταν η μείωση
φωτισμού (“DIMMER”) είναι
ρυθμισμένη στο “DIMMER
ON”.
1
2
Επιλέξτε “COLOR” = “USER”.
[Περιστρέψτε] = [Πιέστε]
3 Ενώ εμφανίζεται η ένδειξη “USER” στην
οθόνη...
5 Επιλέξτε ένα βασικό χρώμα.
[Περιστρέψτε] = [Πιέστε]
6 Ρυθµίστε το επίπεδο (00 – 31) του
επιλεγµένου πρωταρχικού χρώµατος.
[Περιστρέψτε] = [Πιέστε]
Αν επιλέξετε “00” για όλα τα βασικά χρώματα, δεν
εμφανίζεται τίποτα στην οθόνη.
7 Eπαναλάβετε τα βήματα 5 και 6 για να
ρυθμίσετε και άλλα βασικά χρώματα.
8 Βγείτε από τη ρύθµιση.
• Αν δεν εκτελεστεί καμία λειτουργία για περίπου 30
δευτερόλεπτα, η λειτουργία θα ακυρωθεί.
EΛΛHNIKA
4
[Περιστρέψτε] = [Πιέστε]
ΡΥΘΜΙΣΕΙΣ
19
Page 98

Περισσότερα σχετικά µε το δέκτη αυτό
Βασικές λειτουργίες
Ενεργοποίηση της παροχής ρεύµατος
• Αν πιέσετε το κουμπί SRC (Πηγή) της μονάδας,
μπορείτε επίσης να ενεργοποιήσετε την παροχή
ρεύματος. Εάν η πηγή είναι έτοιμη, αρχίζει και η
αναπαραγωγή.
Απενεργοποίηση της παροχής ρεύµατος
• Αν απενεργοποιήσετε την παροχή ρεύματος κατά
την ακρόαση ενός μουσικού κομματιού, την επόμενη
φορά που θα ενεργοποιήσετε την παροχή ρεύματος,
η αναπαραγωγή θα αρχίσει από το σημείο όπου
διακόπηκε προηγουμένως.
Γενικά
• Αν αλλάξετε την πηγή κατά την ακρόαση δίσκου, η
αναπαραγωγή διακόπτεται.
Την επόμενη φορά που θα επιλέξετε “CD” ως πηγή
αναπαραγωγής, η αναπαραγωγή αρχίζει από το
σημείο όπου σταμάτησε προηγουμένως.
EΛΛHNIKA
• Αν δεν εκτελεστεί κανένας χειρισμός για περίπου 30
δευτερόλεπτα αφού πιέσετε το πλήκτρο MENU, η
λειτουργία θα ακυρωθεί.
Λειτουργίες δέκτη
Αποθήκευση των σταθµών στη µνήµη
• Κατά την αναζήτηση SSM...
– Όλοι οι σταθμοί που αποθηκεύτηκαν προηγουμένως
διαγράφονται και οι σταθμοί αποθηκεύονται εκ
νέου.
– Αφού ολοκληρωθεί το SSM, η μονάδα συντονίζεται
αυτόματα στο σταθμό που αποθηκεύτηκε στο
χαμηλότερο προεπιλεγμένο αριθμό.
• Κατά την αποθήκευση ενός σταθμού με το χέρι,
ο σταθμός που είχε προεπιλεχτεί προηγουμένως
διαγράφεται όταν αποθηκευτεί νέος σταθμός στον
ίδιο προεπιλεγμένο αριθμό.
Λειτουργίες FM Radio Data System
• Η λήψη µε εντοπισµό δικτύου απαιτεί δύο τύπους
σηµάτων Radio Data System—PI (Αναγνώριση
προγράµµατος) και AF (Εναλλακτική συχνότητα)
για να λειτουργεί σωστά. Εάν αυτά τα δεδομένα δεν
λαμβάνονται σωστά, η λήψη με εντοπισμό δικτύου δεν
λειτουργεί σωστά.
• Εάν ληφθεί ανακοίνωση για την κίνηση στους δρόμους
μέσω της αναμονής λήψης TA, η στάθμη της έντασης
του ήχου αλλάζει αυτόματα στην προεπιλεγμένη
στάθμη (TA VOL) αν η τρέχουσα στάθμη είναι
μικρότερη από την προεπιλεγμένη.
• Εάν είναι ενεργοποιημένη η εναλλακτική λήψη
συχνότητας (με επιλεγμένη τη λειτουργία AF),
ενεργοποιείται αυτόματα και η λήψη με εντοπισμό
δικτύου.
Λειτουργίες δίσκου
Προσοχή κατά την αναπαραγωγή ‘‘διπλού
δίσκου’’ (DualDisc)
• Η μη DVD πλευρά ενός ‘‘διπλού δίσκου’’ (DualDisc)
δεν συμφωνεί με το πρότυπο “Compact Disc Digital
Audio”. Για το λόγο αυτό, δεν συνιστάται η χρήση της
μη DVD πλευράς ενός ‘‘διπλού δίσκου’’ (DualDisc) σε
αυτό το προϊόν.
Γενικά
• Αυτός ο δέκτης έχει σχεδιαστεί να αναπαραγάγει
CD/CD κειμένου και CD-R (εγγράψιμο)/CD-RW
(επανεγγράψιμο) σε μορφές CD ήχου (CD-DA), MP3/
WMA.
• Όταν ένας δίσκος εισαχθεί ανάποδα, οι ενδείξεις
“PLEASE” (παρακαλώ) και “EJECT” (εξαγωγή)
εμφανίζονται εναλλάξ στην οθόνη. Πιέστε 0 για να
βγάλετε το δίσκο.
• Τα “µουσικά κοµµάτια” (οι λέξεις “αρχείο” και
“µουσικό κοµµάτι” χρησιµοποιούνται κατ’ εναλλαγή)
MP3 και WMA είναι εγγεγραµµένα σε “φακέλους”.
• Κατά τη γρήγορη µετάβαση προς τα εµπρός ή πίσω σε
ένα δίσκο MP3 ή WMA, µπορείτε να ακούσετε µόνο
διακεκοµµένους ήχους.
20
Page 99

Κατά την αναπαραγωγή CD-R ή CD-RW
• Χρησιµοποιήστε µόνο οριστικοποιηµένους (finalized)
δίσκους CD-R ή CD-RW.
• Αν ο δίσκος περιλαμβάνει τόσο αρχεία ήχου CD
(CD-DA) όσο και αρχεία MP3/WMA, ο δέκτης αυτός
μπορεί να αναπαραγάγει μόνο τα αρχεία που ανήκουν
στον τύπο αρχείου που ανιχνεύτηκε πρώτα.
• Ο δέκτης αυτος µπορεί να αναπαραγάγει δίσκους
πολλαπλής εγγραφής (multi-session). Ωστόσο, τα
µη κλειστά “sessions” θα παραλειφθούν κατά την
αναπαραγωγή.
• Ορισμένα CD-R ή CD-RW μπορεί να μην
αναπαράγονται στη μονάδα αυτή λόγω των
χαρακτηριστικών του δίσκου, καθώς και λόγω των
ακόλουθων περιπτώσεων:
– Οι δίσκοι είναι βρόµικοι ή γρατσουνισµένοι.
– Έχει παρουσιαστεί συμπύκνωση υγρασίας στο φακό
που βρίσκεται στο εσωτερικό της μονάδας.
– Ο φακος συλλογής στο εσωτερικό του δέκτη είναι
βρόµικος.
– Τα αρχεία στους δίσκους CD-R/CD-RW είναι
εγγεγραμμένα με τη μέθοδο “Packet Write”.
– Ακατάλληλες συνθήκες εγγραφής (δεδομένα που
λείπουν, κ.λ.π.) ή υλικών (λεκέδες, γρατσουνιές,
παραμόρφωση, κ.λ.π.).
• Για τα CD-RW ενδέχεται να απαιτηθεί µεγαλύτερος
χρόνος ανάγνωσης λόγω του ότι η ανακλασιµότητα
ενός CD-RW είναι χαµηλότερη από την
ανακλασιµότητα ενός κανονικού CD.
• Μη χρησιµοποιείτε τους παρακάτω δίσκους CD-R ή
CD-RW:
– ∆ίσκους με αυτοκόλλητα, ετικέτες ή προστατευτικό
σφράγισμα κολλημένα στην επιφάνειά τους.
– ∆ίσκοι των οποίων οι ετικέτες µπορούν να
εκτυπωθούν απευθείας σε εκτυπωτή τύπου inkjet.
Η χρήση αυτών των δίσκων σε συνθήκες υψηλής
θερμοκρασίας ή υψηλής υγρασίας μπορεί να
προκαλέσει δυσλειτουργία ή ζημιά στη μονάδα.
Αναπαραγωγή δίσκου MP3/WMA
• Ο δέκτης αυτος µπορεί να αναπαραγάγει αρχεία MP3/
WMA µε τον κωδικό επέκτασης <.mp3> ή <.wma>
(ανεξάρτητα εάν τα γράµµατα είναι πεζά/κεφαλαία).
• Ο δέκτης αυτος έχει τη δυνατότητα να εµφανίζει τα
ονόµατα των άλµπουµ, των καλλιτεχνών, και το Tag
(Έκδοση 1,0, 1,1, 2,2, 2,3, ή 2,4) για αρχεία MP3 και
αρχεία WMA.
• Η μονάδα αυτή μπορεί να εμφανίσει μόνο χαρακτήρες
ενός byte. Κανένας άλλος χαρακτήρας δεν
εµφανίζεται σωστά.
• Ο δέκτης αυτος µπορεί να αναπαραγάγει αρχεία MP3/
WMA που πληρούν τις παρακάτω συνθήκες:
– Ρυθμός Bit του MP3: 32 kbps — 320 kbps
– Συχνότητα δειγματοληψίας του MP3:
32 kHz, 44,1 kHz, 48 kHz (για MPEG-1)
16 kHz, 22,05 kHz, 24 kHz (για MPEG-2)
– Ρυθμός Bit του WMA: 32 kbps — 320 kbps
– Συχνότητα δειγματοληψίας του WMA: 22,05 kHz,
32 kHz, 44,1 kHz, 48 kHz
– Μορφή δίσκου: ISO 9660 επίπεδο 1/επίπεδο 2,
Romeo, Joliet, επέκταση Windows.
• Ο μέγιστος αριθμός χαρακτήρων για ονόματα
αρχείου/φακέλου ποικίλλει ανάλογα με τη μορφή
του δίσκου που χρησιμοποιείται (περιλαμβάνει 4
χαρακτήρες επέκτασης—<.mp3> ή <.wma>).
– ISO 9660 Level 1: Έως 12 χαρακτήρες
– ISO 9660 Level 2: Έως 31 χαρακτήρες
– Romeo: Έως 64 χαρακτήρες
– Joliet: Έως 32 χαρακτήρες
– Επέκταση Windows: Έως 64 χαρακτήρες
• Αυτή η μονάδα μπορεί να αναγνωρίσει συνολικά 512
αρχεία, 255 φακέλους και 8 επίπεδα ιεραρχίας.
• Αυτός ο δέκτης µπορεί να αναπαραγάγει αρχεία
εγγεγραµµένα σε VBR (µεταβλητό ρυθµό bit).
Τα αρχεία που είναι εγγεγραμμένα σε VBR
παρουσιάζουν μια ασυμφωνία στην εμφάνιση
του χρόνου αναπαραγωγής που πέρασε και δεν
εμφανίζουν τον πραγματικό χρόνο αναπαραγωγής
που πέρασε. Ειδικότερα, η διαφορά αυτή γίνεται
αντιληπτή μετά τη διενέργεια της λειτουργίας
αναζήτησης.
• Αυτός ο δέκτης δεν µπορεί να αναπαραγάγει τα
παρακάτω αρχεία:
– Αρχεία MP3 κωδικοποιημένα στη μορφή MP3i και
MP3 PRO.
– Αρχεία MP3 κωδικοποιημένα σε ακατάλληλη
μορφή.
– Αρχεία MP3 κωδικοποιηµένα µε Layer 1/2.
– Αρχεία WMA κωδικοποιημένα με τις μορφές
lossless, professional και ήχου.
– Αρχεία WMA που δεν είναι βασισµένα σε Windows
Media ® Audio.
– Aρχεία WMA με προστασία από αντιγραφή με DRM.
– Αρχεία τα οποία περιέχουν δεδοµένα όπως AIFF,
ATRAC3, κ.λ.π.
• Η λειτουργία αναζήτησης λειτουργεί αλλά η ταχύτητα
αναζήτησης δεν είναι σταθερή.
Συνεχίζεται στην επόμενη σελίδα
ΠΑΡΑΠΟΜΠΕΣ
21
EΛΛHNIKA
Page 100

Αναπαραγωγή μουσικών κομματιών MP3/
WMA από συσκευή USB
• Κατά την αναπαραγωγή από συσκευή USB, η σειρά
αναπαραγωγής μπορεί να διαφέρει σε σχέση με άλλες
συσκευές αναπαραγωγής.
• Ο δέκτης αυτός ενδέχεται να μην είναι σε θέση να
διενεργήσει αναπαραγωγή ορισμένων συσκευών USB
ή κάποιων αρχείων, λόγω των χαρακτηριστικών τους
ή των συνθηκών εγγραφής τους.
• Ανάλογα με το σχήμα των συσκευών USB και των
θυρών σύνδεσης, κάποιες συσκευές USB ενδέχεται να
μην συνδέονται σωστά ή η σύνδεση ενδέχεται να είναι
χαλαρή.
• Συνδέετε μία συσκευή USB, κατηγορίας μαζικής
αποθήκευσης, με το δέκτη κάθε φορά. Μη
χρησιμοποιείτε διανομέα USB.
• Αν η συνδεδεμένη συσκευή USB δεν έχει τα σωστά
αρχεία, εμφανίζεται η ένδειξη “CANNOT PLAY” (∆εν
είναι δυνατή η αναπαραγωγή).
• Αυτή η μονάδα μπορεί να εμφανίσει ένδειξη Tag
(Έκδοση 1,0, 1,1, 2,2, 2,3 ή 2,4) για αρχεία MP3 και
WMA.
EΛΛHNIKA
• Ο δέκτης αυτος µπορεί να αναπαραγάγει αρχεία MP3/
WMA που πληρούν τις παρακάτω συνθήκες:
– Ρυθμός Bit του MP3: 32 kbps — 320 kbps
– Συχνότητα δειγματοληψίας του MP3:
32 kHz, 44,1 kHz, 48 kHz (για MPEG-1)
16 kHz, 22,05 kHz, 24 kHz (για MPEG-2)
– Ρυθμός Bit του WMA: 32 kbps — 320 kbps
– Συχνότητα δειγματοληψίας του WMA: 22,05 kHz,
32 kHz, 44,1 kHz, 48 kHz)
• Η μονάδα αυτή μπορεί να αναπαραγάγει αρχεία MP3
εγγεγραμμένα σε VBR (μεταβλητό ρυθμό bit).
• Μέγιστος αριθμός χαρακτήρων για:
– Ονόματα φακέλου : 32 χαρακτήρες
– Ονόματα αρχείου : 32 χαρακτήρες
–
Πληροφορίες σε μορφή Tag για MP3 :
64 χαρακτήρες
– Πληροφορίες σε μορφή Tag για WMA :
32 χαρακτήρες
• Αυτή η μονάδα μπορεί να αναγνωρίσει συνολικά
5 000 αρχεία, 255 φακέλους (255 αρχεία ανά
φάκελο συμπεριλαμβανομένου του φακέλου χωρίς
υποστηριζόμενα αρχεία) και 8 ιεραρχίες.
• Η συσκευή αυτή δεν υποστηρίζει συσκευή ανάγνωσης
κάρτας SD.
22
• Ο δέκτης αυτός δεν μπορεί να αναγνωρίσει συσκευή
USB, η οποία έχει ονομαστική τάση διαφορετική από
5 V και υπερβαίνει τα 500 mA.
• Με αυτό το δέκτη δεν είναι δυνατή η χρήση συσκευών
USB οι οποίες διαθέτουν ειδικές λειτουργίες, όπως οι
λειτουργίες ασφαλείας δεδομένων.
• Μη χρησιμοποιείτε συσκευή USB με 2 ή περισσότερα
διαμερίσματα.
• Ο δέκτης αυτός μπορεί να μην αναγνωρίσει μια
συσκευή USB που είναι συνδεδεμένη μέσω συσκευής
ανάγνωσης κάρτας USB.
• Ο δέκτης αυτός μπορεί να μην κάνει σωστή
αναπαραγωγή αρχείων σε συσκευή USB, όταν
χρησιμοποιείται καλώδιο επέκτασης USB.
• Αυτός ο δέκτης δεν µπορεί να αναπαραγάγει τα
παρακάτω αρχεία:
– Αρχεία MP3 κωδικοποιηµένα µε τις µορφές MP3i
και MP3 PRO.
– Αρχεία MP3 κωδικοποιημένα σε ακατάλληλη
μορφή.
– Αρχεία MP3 κωδικοποιηµένα µε Layer 1/2.
– Αρχεία WMA κωδικοποιημένα με τις μορφές
lossless, professional και ήχου.
– Αρχεία WMA που δεν είναι βασισμένα σε Windows
Media® Audio.
Εξαγωγή του δίσκου ή αφαίρεση της
συσκευής USB
• Εάν ο δίσκος δεν αφαιρεθεί εντός 15 δευτερολέπτων
μετά την εξαγωγή, τότε επανεισάγεται αυτόματα στην
υποδοχή τοποθέτησης για να μη σκονιστεί.
• Μετά την εξαγωγή του δίσκου ή την αφαίρεση της
συσκευής USB, εμφανίζεται η ένδειξη “NO DISC” (∆εν
υπάρχει δίσκος) ή “NO USB” (∆εν υπάρχει USB) και
δεν μπορείτε να χρησιμοποιήσετε ορισμένα από τα
κουμπιά. Εισαγάγετε έναν άλλο δίσκο, επανασυνδέστε
τη μνήμη USB ή πιέστε το κουμπί SRC (Πηγή) για να
επιλέξετε μια άλλη πηγή αναπαραγωγής.
Λειτουργίες μενού
• Εάν αλλάξετε τη ρύθµιση “AMP GAIN” από
“HIGH POWER” σε “LOW POWER” ενώ η
στάθµη έντασης του ήχου έχει ρυθµιστεί υψηλότερα
από “VOLUME 30”, η στάθµη έντασης ήχου του δέκτη
αλλάζει αυτόµατα στο “VOLUME 30”.
 Loading...