

Page 1
JVC
CD RECEIVER
RECEPTOR CON CD
RECEPTEUR CD
KD-HDW10
KD-HDW10
KD-HDW10
llilo~1m
DIGITAL
AUDIO
I TEXT I
For canceling the display demonstration, see page
Para cancelar la demostracionenpantalla, consulte la pagina
Pour
annuler la demonstration des affichages, referez-vous ala page
For installation
Para la instalacion y las conexiones, refierase al manual separado.
Pour
!'installation etles raccordements, se referer au manuel separe.
and
connections, refer to the separate manual.
SRSCeJ
C4j,M(.i"i.i@#l
7.
7.
INSTRUCTIONS
MANUAL
MANUEL D'INSTRUCTIONS
DE
INSTRUCCIONES
~
'RAD10..l
READY
7.
For customer Use:
Enter below the Model
No. and Serial No. which
are located
bottomofthe cabinet.
Retain this information
for future reference.
Model No.
Serial No.
on
the top
LVT1706-001A
or
[J]
Page 2
Thankyou for purchasing a
Please read
INFORMATION
This equipment has been tested and found
to complywith the limits for a Class Bdigital
device, pursuant to Part
Rules. These limits are designed to provide
reasonable protection against harmful
interference
This equipment generates, uses, and can
radiate radio frequency energy and,
installed and used in accordance with the
instructions, may cause harmful interference
to radio communications. However, there
is
no guarantee that interference will not
occur in a particular installation.
equipment does cause harmful interference
to radio
be determined by turning the equipment
offand on, the user
correct the interference by one
the following measures:
- Reorient
- Increase the separation between the
equipment and receiver.
- Connect the equipment into an outlet
a circuit different from that to which the
receiver
- Consult the dealer
radio/TV technician for help.
all
instructions carefully before operation, to ensure your complete understanding and to
obtain the best possible performance from the unit.
(For
U.S.A.)
15ofthe FCC
in
a residential installation.
if
not
If
this
or
television reception, which can
is
encouraged to try to
or
more
or
relocate the receiving antenna.
is
connected.
or
an experienced
of
on
JVC
product.
•
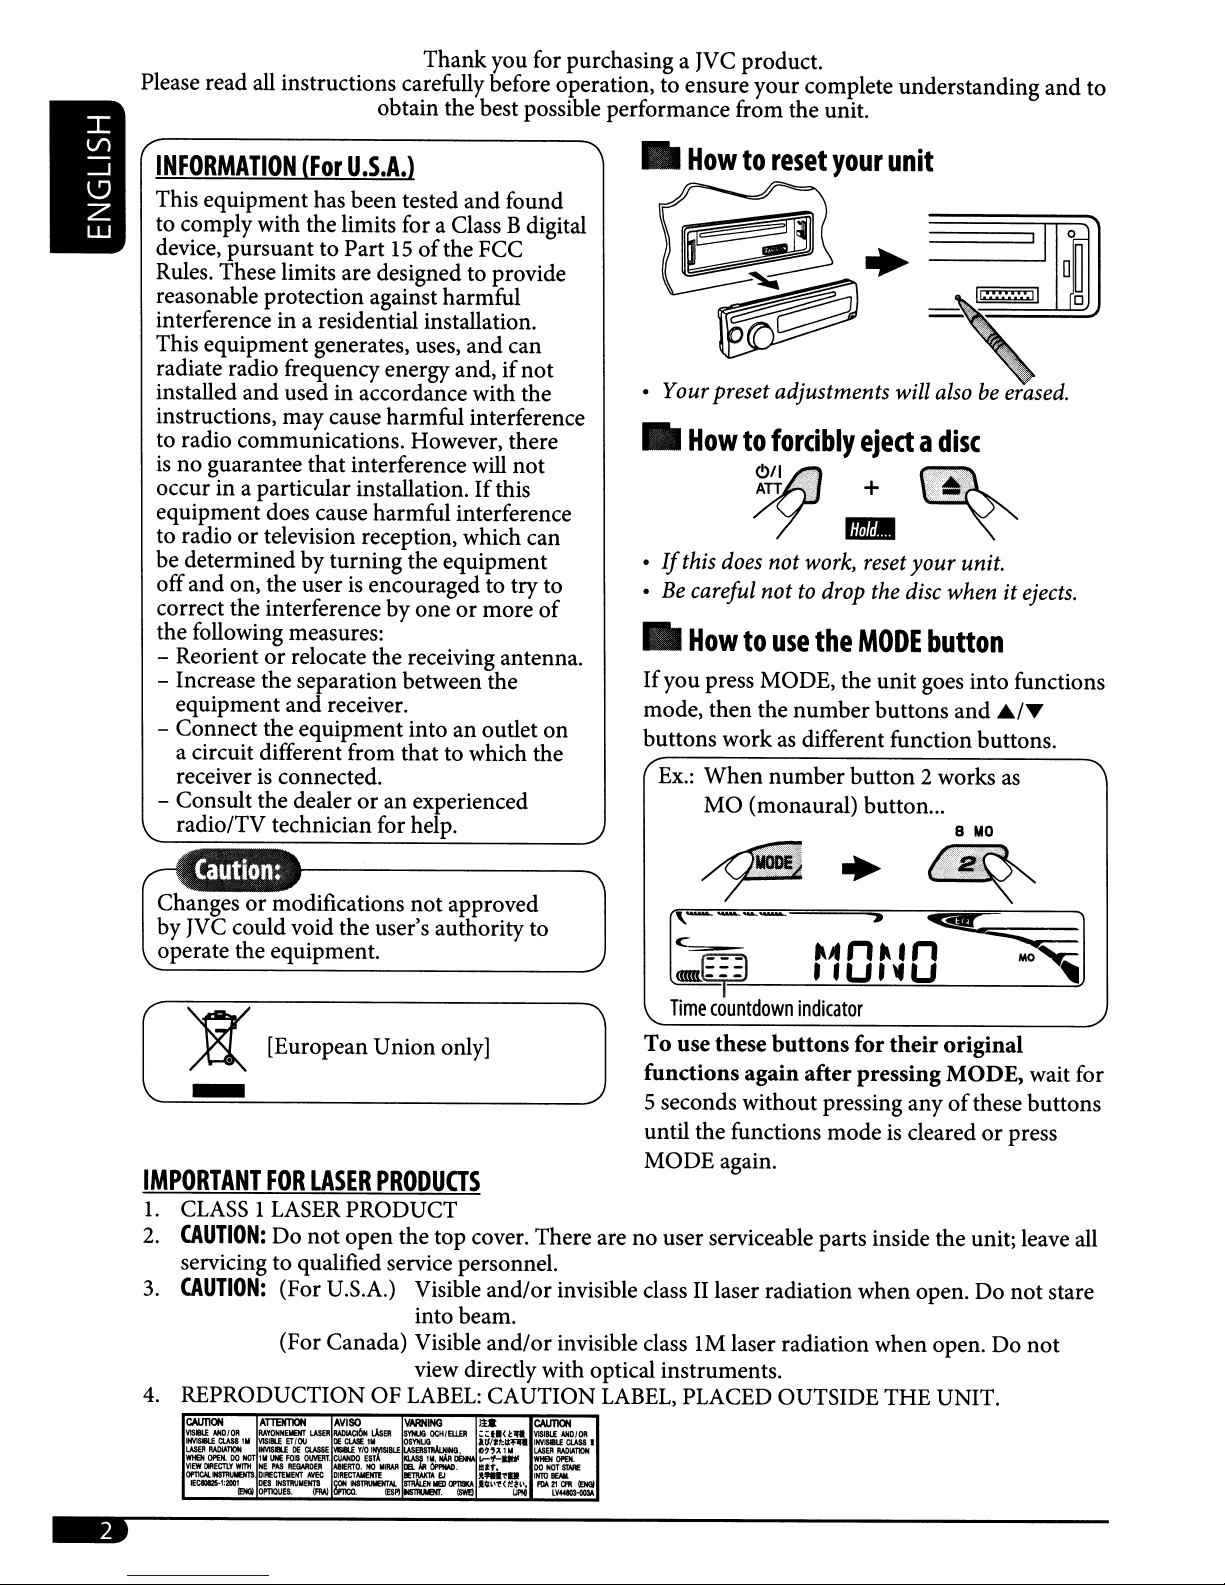
Howtoreset
• Yourpreset adjustments will also be erased.
•
Howtoforcibly
/1
ATT>".1!i.:
7?
•Ifthis does
• Be careful
•
Howtouse
If
you press MODE, the unit goes into functions
mode, then the number buttons and
buttons workasdifferent function buttons.
Ex.:
When number button 2 works
MO (monaural) button
not
not
your
unit
ejectadisc
··.>FC
+
,,~
I1D
work, reset
to drop the disc when it ejects.
the
your
MODE
button
unit.
.1/;,./.",
as
...
Changesormodifications not approved
JVC
by
operate the equipment.
could void the user's authority to
[European Union only]
-
IMPORTANT
1.
CLASS1LASER
2.
CAUTION:
servicing to qualified service personnel.
3.
CAUTION:
4.
REPRODUCTION OF
FOR
LASER
Do not open the top cover. There are no user serviceable parts inside the unit; leave all
(For U.S.A.) Visible and/or invisible class II laser radiation when open. Do not stare
(For Canada) Visible and/or invisible class
PRODUCTS
PRODUCT
into beam.
view directly with optical instruments.
LABEL:
CAUTION
~==~~--
~:I:)_----'-r--'-1-=O~r
Time
countdown
To
use these
functions again after pressing MODE, wait for
5 seconds without pressing any
until the functions mode
MODE again.
1M
laser radiation when open. Do not
LABEL,
PLACED OUTSIDE THE UNIT.
indicator
buttons
~.:.....;:'
O~
__
~_MO_,..=
for
their
original
of
these buttons
is
clearedorpress
-
Page 3
•
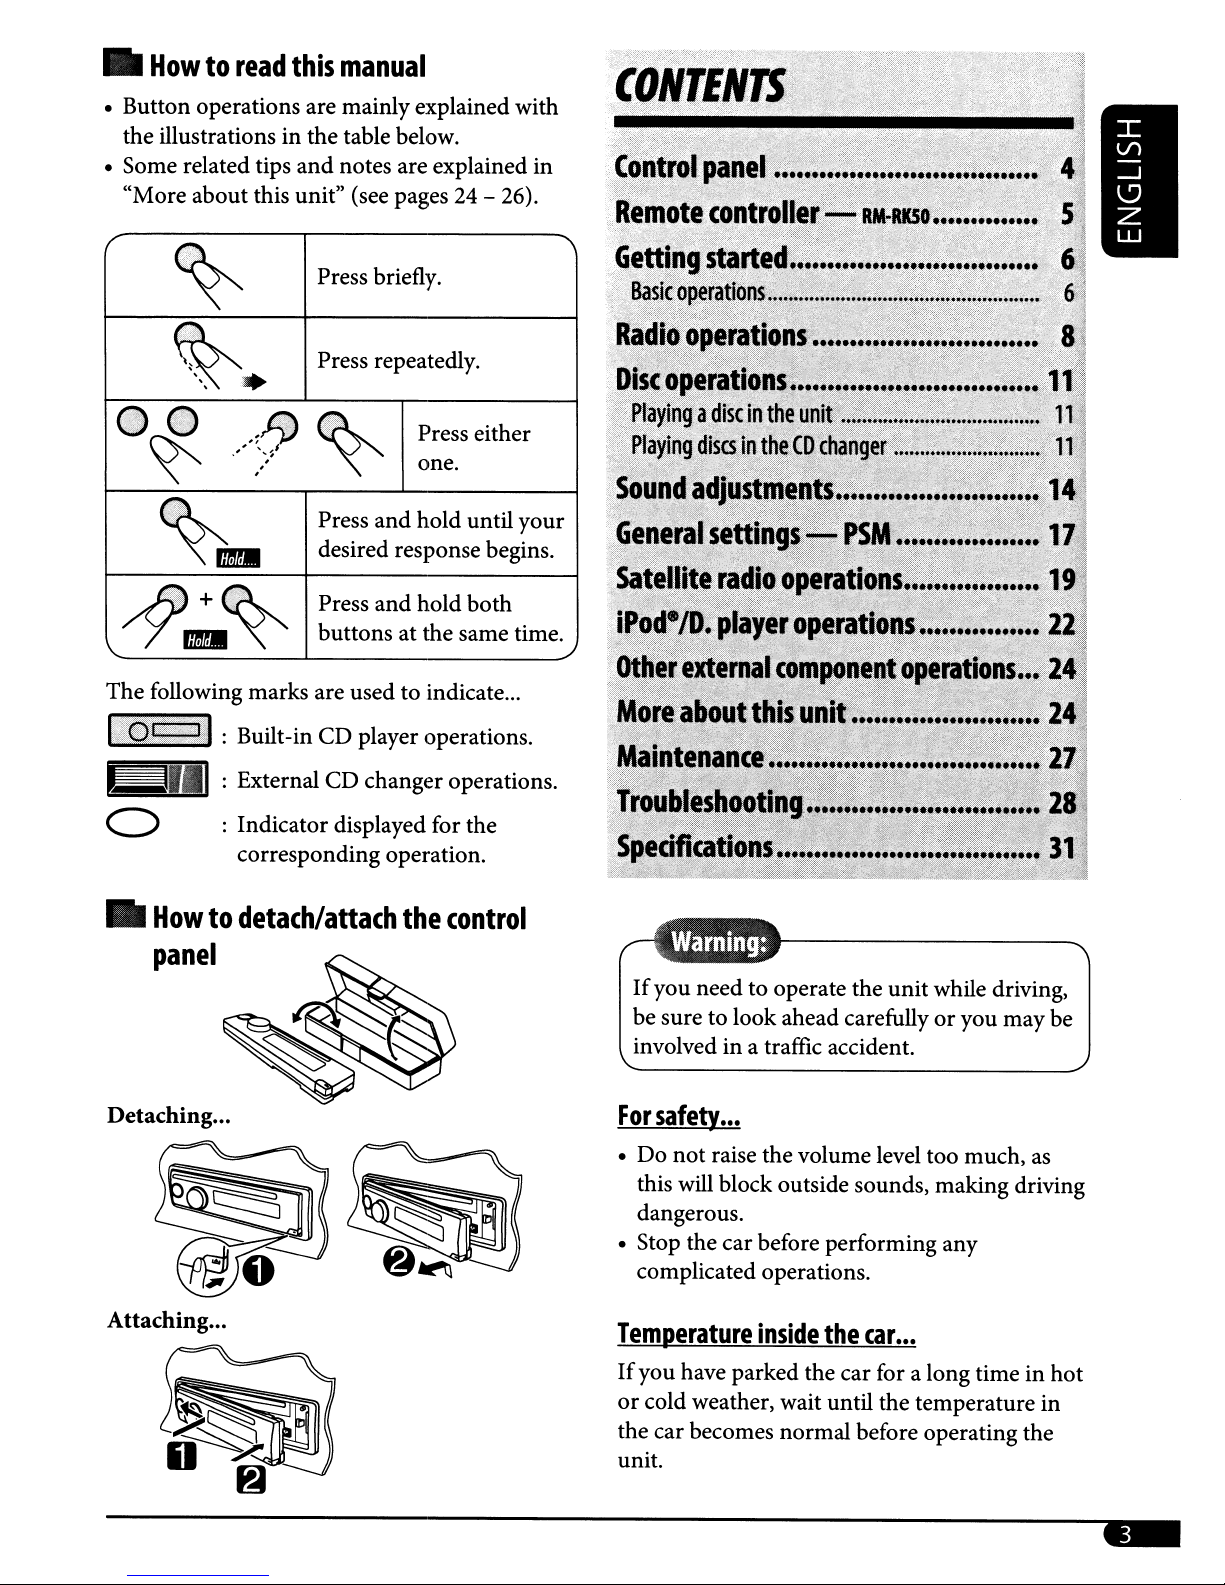
Howtoread
• Button operations are mainly explained with
the illustrations in the table below.
• Some related tips
"More about this unit" (see pages
this
manual
and
notes are explained in
Press briefly.
24
- 26).
~
Press repeatedly.
~.
"-
@e
~
.}?,;
~
~+~
,
The following marks are used to indicate
U~R~!I
rmI
.~RJ
"
',,~I
.
.
rmI
~
Press and hold until your
desired response begins.
Press and hold both
buttons at the same time.
:Built-in CD player operations.
: External CD changer operations.
Press either
one.
o :Indicatordisplayed for the
corresponding operation.
•
Howtodetach/attach
panel
the
control
...
If
you need to operate the unit while driving,
be sure to look ahead carefully or you may be
involved in a traffic accident.
Attaching...
For
safety
• Do
this will block outside sounds, making driving
dangerous.
• Stop the car before performing any
complicated operations.
Temperature
If
you have parked the car for a long time in hot
or
cold weather, wait until the temperature in
the car becomes normal before operating the
unit.
...
not
raise the volume level too much,
inside
the
car
...
as
-
Page 4
Control
panel
OJ
~
v
/~
A.
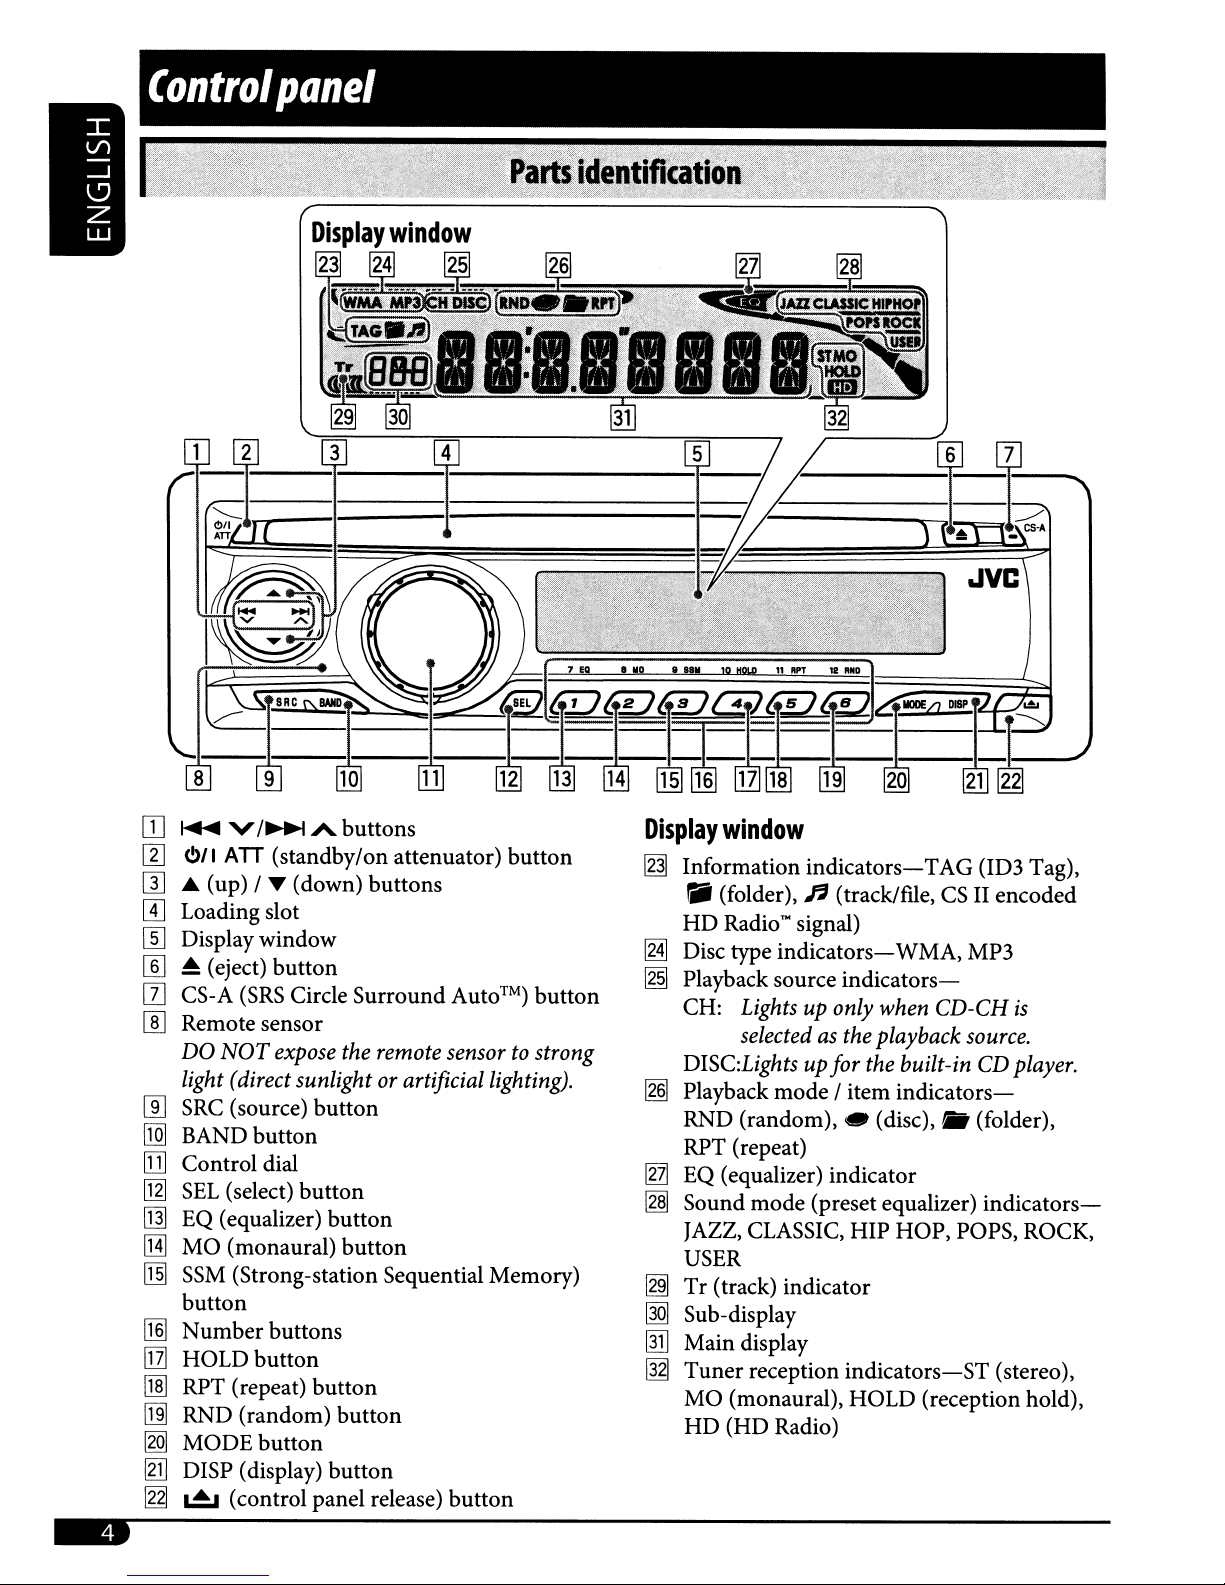
[1]
0/1
ATT
(standby/on attenuator)
W A (up) /
[II
Loading slot
[[] Display window
[II
~
[I]
CS-A
[]] Remote sensor
DO
light (direct sunlight
W SRC (source)
[Q]
BAND
!TIl
Control dial
[Jl]
SEL
[]] EQ (equalizer)
[J]
MO
[ill
SSM
button
[lliI
Number
!IZJ
HOLD
0]] RPT (repeat)
~
RND (random)
[gQ]
MODE
[gD
DISP (display)
~
,.A, (control panel release)
....
(down) buttons
(eject)
button
(SRS
Circle Surround Auto™)
NOT
expose
button
button
(select)
(monaural)
(Strong-station Sequential Memory)
button
button
buttons
button
button
button
button
buttons
the
remote
or artificial lighting).
button
button
sensortostrong
button
button
button
Display
~
~
~
~
[nJ
~
~
~
ffi]
IE]
window
Information
Iii
(folder),fi(track/ftle,CSII encoded
HD
Radio~
Disc type
Playback source
CH:
Lightsuponly when CD-CH
selectedasthe playback
DISC:Lightsupfor the built-in CD player.
Playback
RND (random), • (disc),
RPT (repeat)
EQ (equalizer) indicator
Sound mode (preset equalizer)
JAZZ, CLASSIC, HIP HOP, POPS, ROCK,
USER
Tr
(track) indicator
Sub-display
Main display
Tuner
MO
(monaural), HOLD (reception hold),
HD
(HD Radio)
indicators-TAG
signal)
indicators-
mode
/ item
reception
WMA, MP3
indicators-
indicators-
it
indicators-ST
(ID3 Tag),
source.
(folder),
indicators-
is
(stereo),
-
Page 5
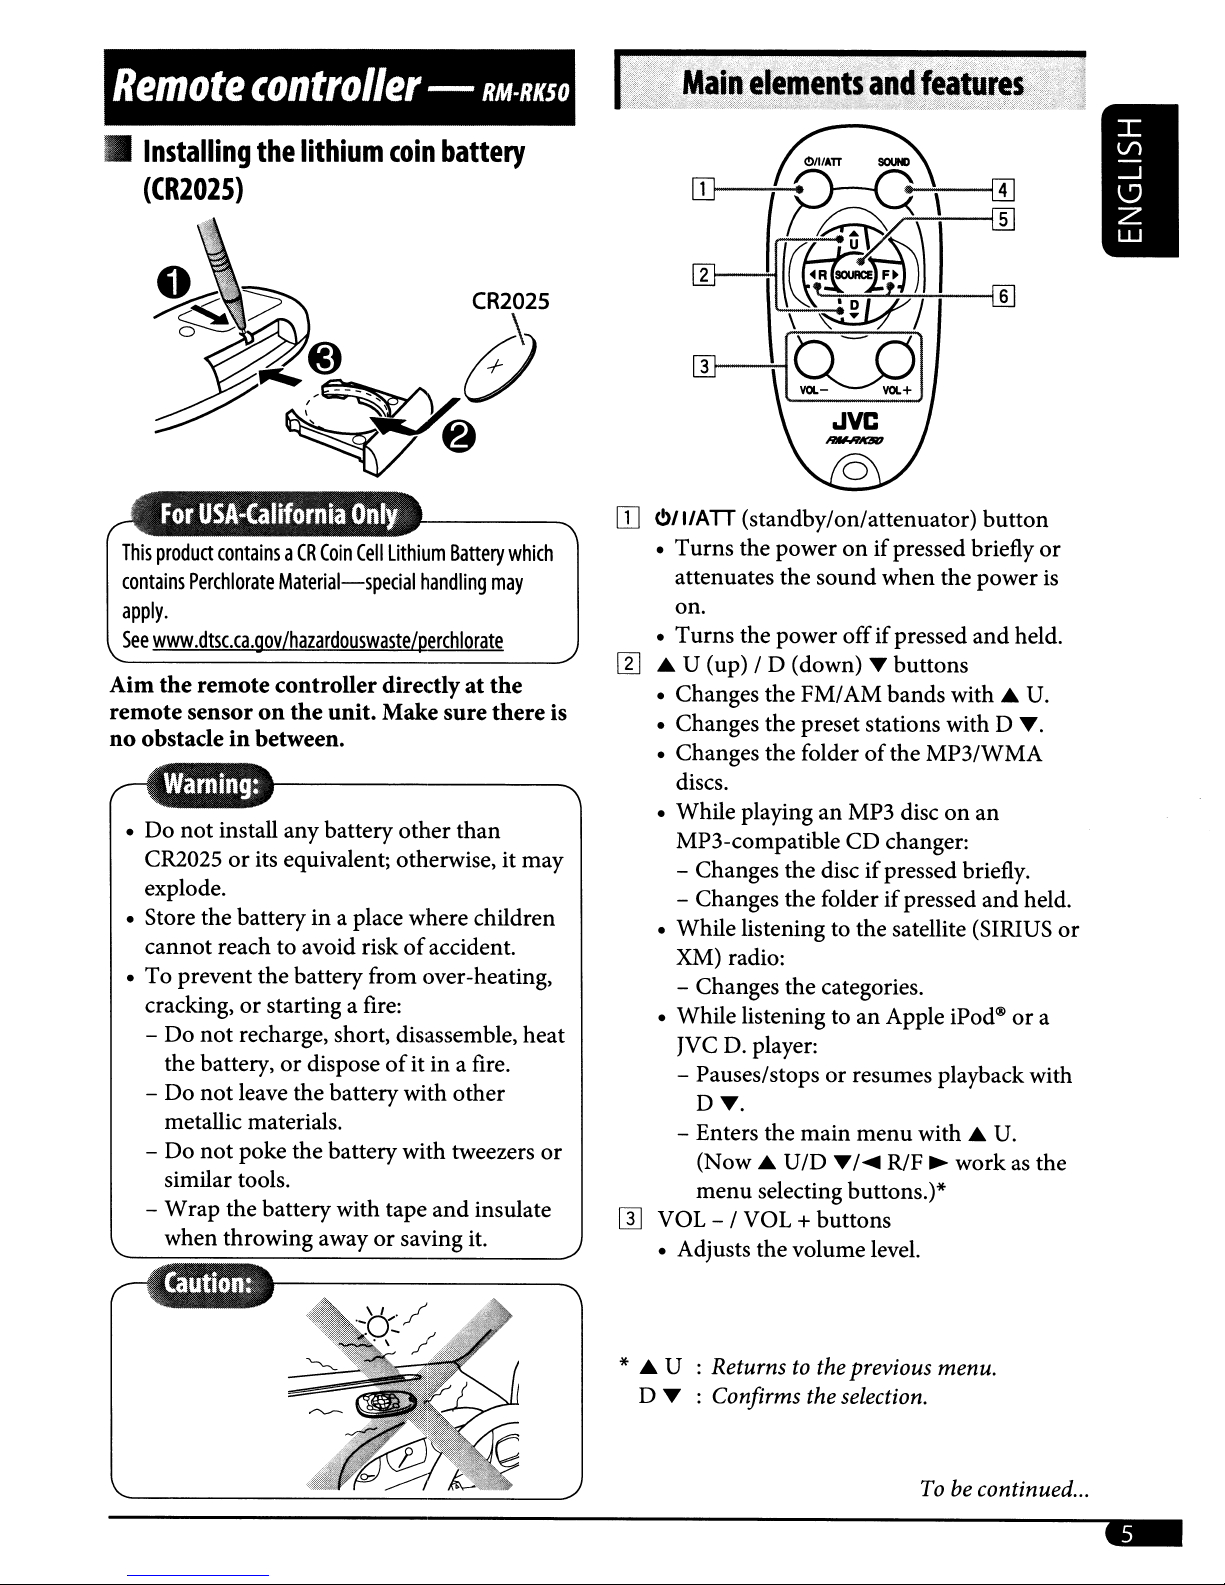
Remote
controller
-
RM·RKSO
Installing
the
lithium
coin
battery
(CR202S)
CR2025
This
product
contains
apply.
See
www.dtsc.ca.gov/hazardouswaste/perchlorate
Aim
remote
no
obstacleinbetween.
•
Do
CR2025orits equivalent; otherwise, it
explode.
• Store
cannot
To
•
cracking,
-
-
-
-
containsaCR
Perchlorate
the
remote
sensoronthe
not
install
the
batteryina place where children
reachtoavoid riskofaccident.
prevent
Do
the
Do
metallic materials.
Do
similar tools.
Wrap
when
the
or
not
recharge, short, disassemble,
battery,ordisposeofitina fire.
not
leave the
not
poke
the
throwing
Coin
Cell
Lithium
Material-special
controllerdirectlyatthe
unit.
Make
any
battery
battery from over-heating,
starting a fire:
battery
the
battery
battery with
awayorsaving it.
other
with
with
tape
Battery
handling
sure
than
other
tweezers
and
which
may
there
may
heat
insulate
or
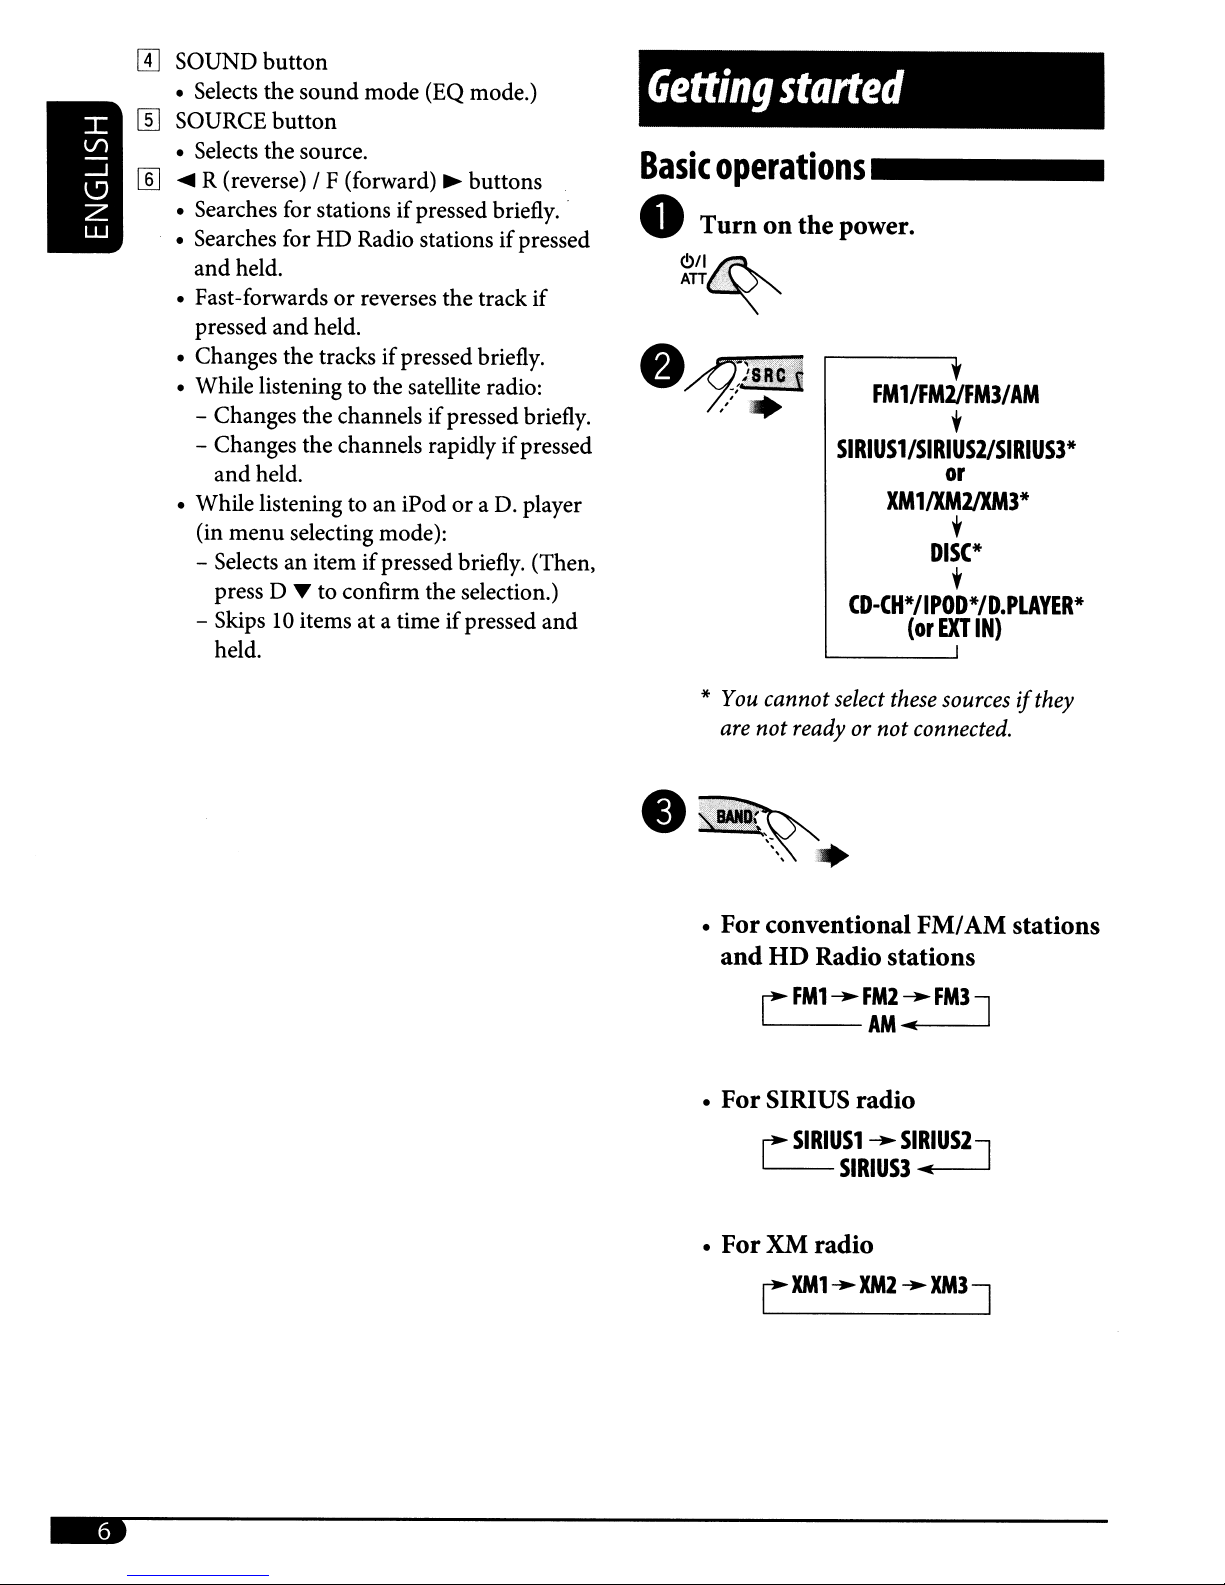
OJ
O/l/ATT
•
Turns
attenuates
on.
Turns
•
rn
£.
is
• Changes
• Changes the preset stations with D
• Changes
discs.
• While playinganMP3 disconan
MP3-compatible
- Changes
- Changes
While
•
XM) radio:
- Changes
•
While
JVC D. player:
- Pauses/stops
- Enters
[I]
VOL - I VOL +
• Adjusts
(standby/on/attenuator)
the
poweronif
the
sound
the
power
U (up) I D (down)~buttons
the
FM/AM
the
folderofthe
the
discifpressed briefly.
the
folderifpressed
listening to
the
categories.
listeningtoan
or
DT.
the
main
(Now£.
menu
U/D
selecting buttons.)*
buttons
the
volume level.
pressed briefly
when
offifpressed
CD
the
resumes playback with
menu
T/'"
the
bands
changer:
Apple
RlF
with£.
MP3/WMA
satellite (SIRIUS
iPod@ora
with£.
~
button
or
power
and
and
workasthe
is
held.
U.
T.
held.
U.
or
---------------------
*
£.
U : Returns
D
~
to
the previous menu.
: Confirms the selection.
To be continued
...
Page 6
[I]
SOUND
• Selects the sound mode (EQ mode.)
button
W SOURCE button
• Selects the source.
[§]
....
R (reverse) / F (forward)~buttons
• Searches for stations
• Searches for
and
held.
• Fast-forwards
pressed and held.
• Changes the tracks
• While listening to the satellite radio:
- Changes the channels
- Changes the channels rapidly
and
held.
• While listening to an iPod
(in
menu
- Selects an item
press D
- Skips
held.
HD
or
selecting mode):
T to confirm the selection.)
10
items at a timeifpressed
if
pressed briefly
Radio stationsifpressed
reverses the track if
if
pressed briefly.
if
if
pressed briefly. (Then,
..
pressed briefly.
if
pressed
or
a D. player
and
Getting
Basic
o
operations
Turn
~ii~
started
on
the power.
SIRIUS1/SIRIUS2ISIRIUS3*
CD-CH*/IPOD*/D.PLAYER*
_
FM1/FM2IFM3/AM
t
or
XM11XM2IXM3*
t
DISC*
t
(or
EXT
IN)
*
•
•
•
You
cannot
are
not
For
conventional
and
HD
rFM1~F::FM3J
For
SIRIUS radio
r:
L
For
XM
select
these
sources
readyornot
Radio stations
SIRIUS1~SIRIUS2]
SIRIUS3...
radio
connected.
FMI
AM stations
ifthey
-
-
LIM'
-.IM2
-.
1M3
J
Page 7
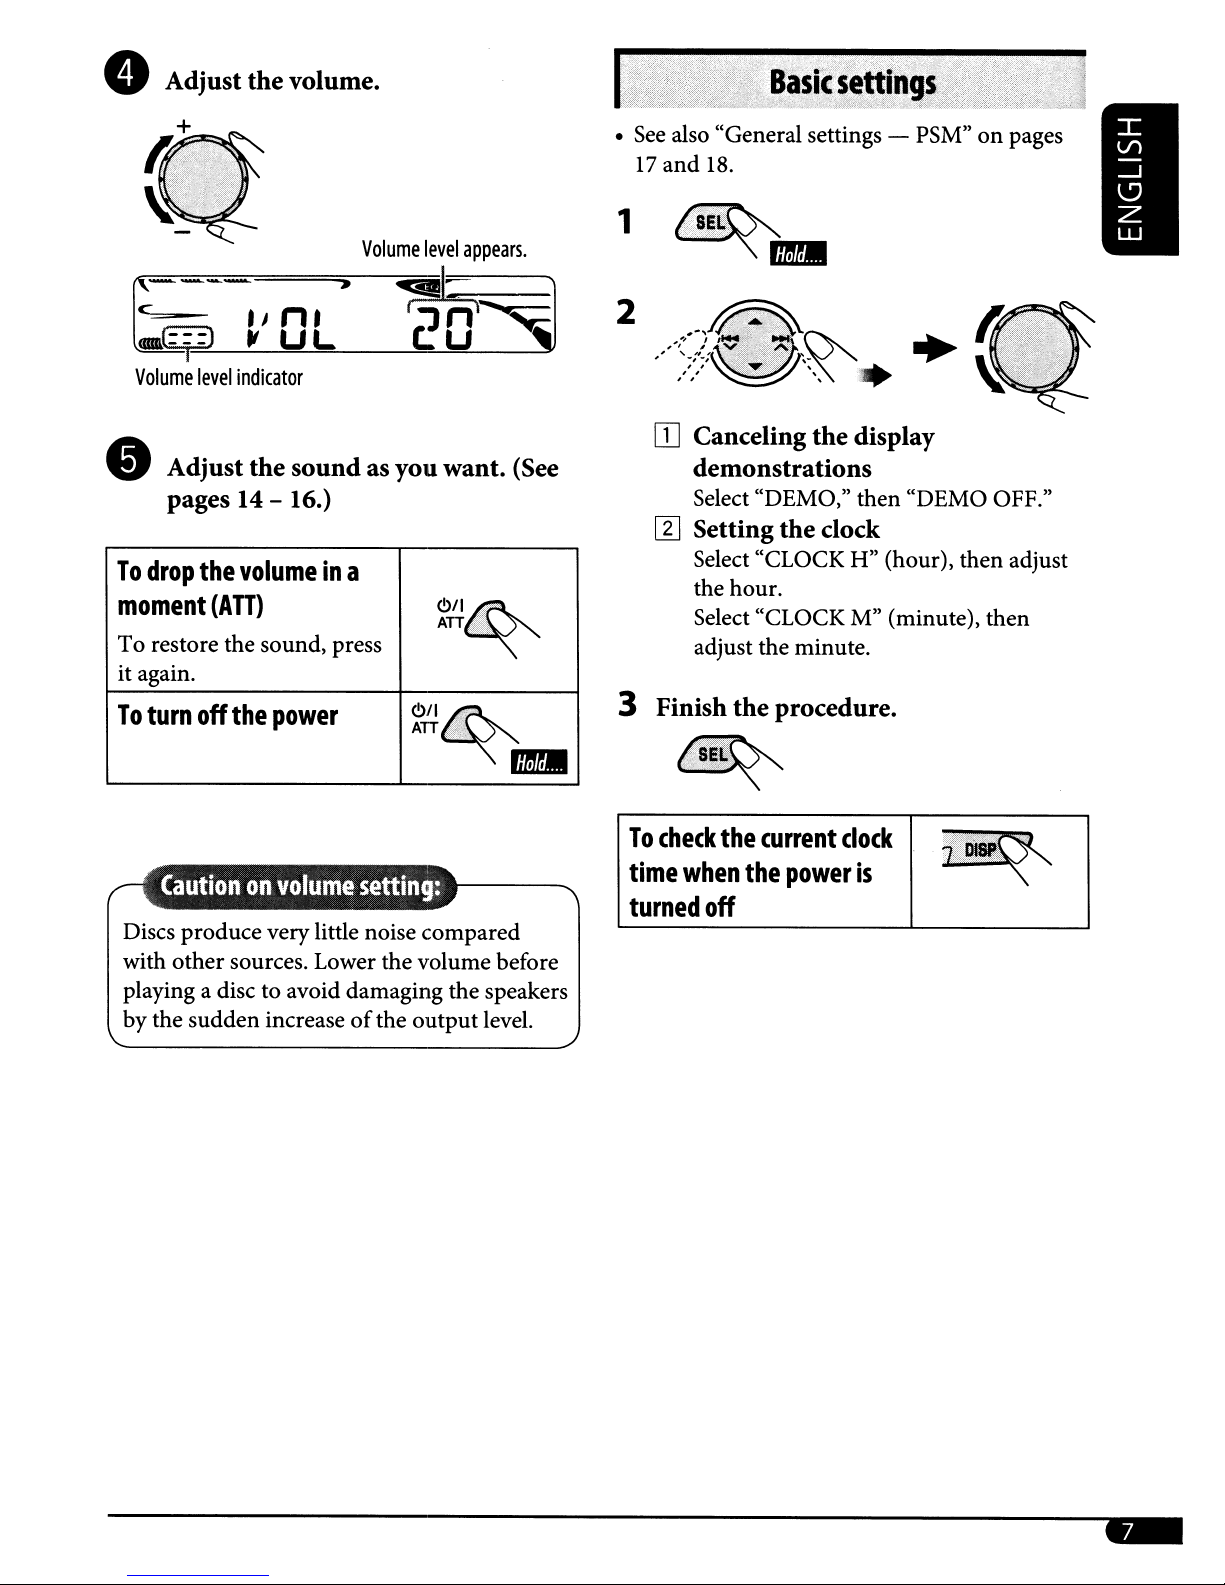
• Adjust
the
volume.
Volume
level
appears.
•
See
also "General settings - PSM"onpages
17
and
18.
1
&---
..-
;C;1=)
Volume
• Adjust
pages14- 16.)
To
drop
moment
To restore the sound, press
it again.
To
turn off
'In,
~
level
indicator
the
the
volumeina
(ATT)
the
power
,
UL
soundasyou
2
~O'~
OJ
Canceling the display
want. (See
~~~
ATT
?.
<!l"~
..
3 Finish
To
time
demonstrations
Select "DEMO," then "DEMO OFF."
I1J
Setting
Select "CLOCK H" (hour), then adjust
the hour.
Select "CLOCK M" (minute), then
adjust the minute.
t~~~~
check
when
the
the
current
the
the
dock
procedure.
clock
power
is
Discs produce very little noise compared
with other sources. Lower the volume before
playing a disc to avoid damaging the speakers
by the suddenincrease
of
the output level.
turned
off
-
Page 8
Radio
operations
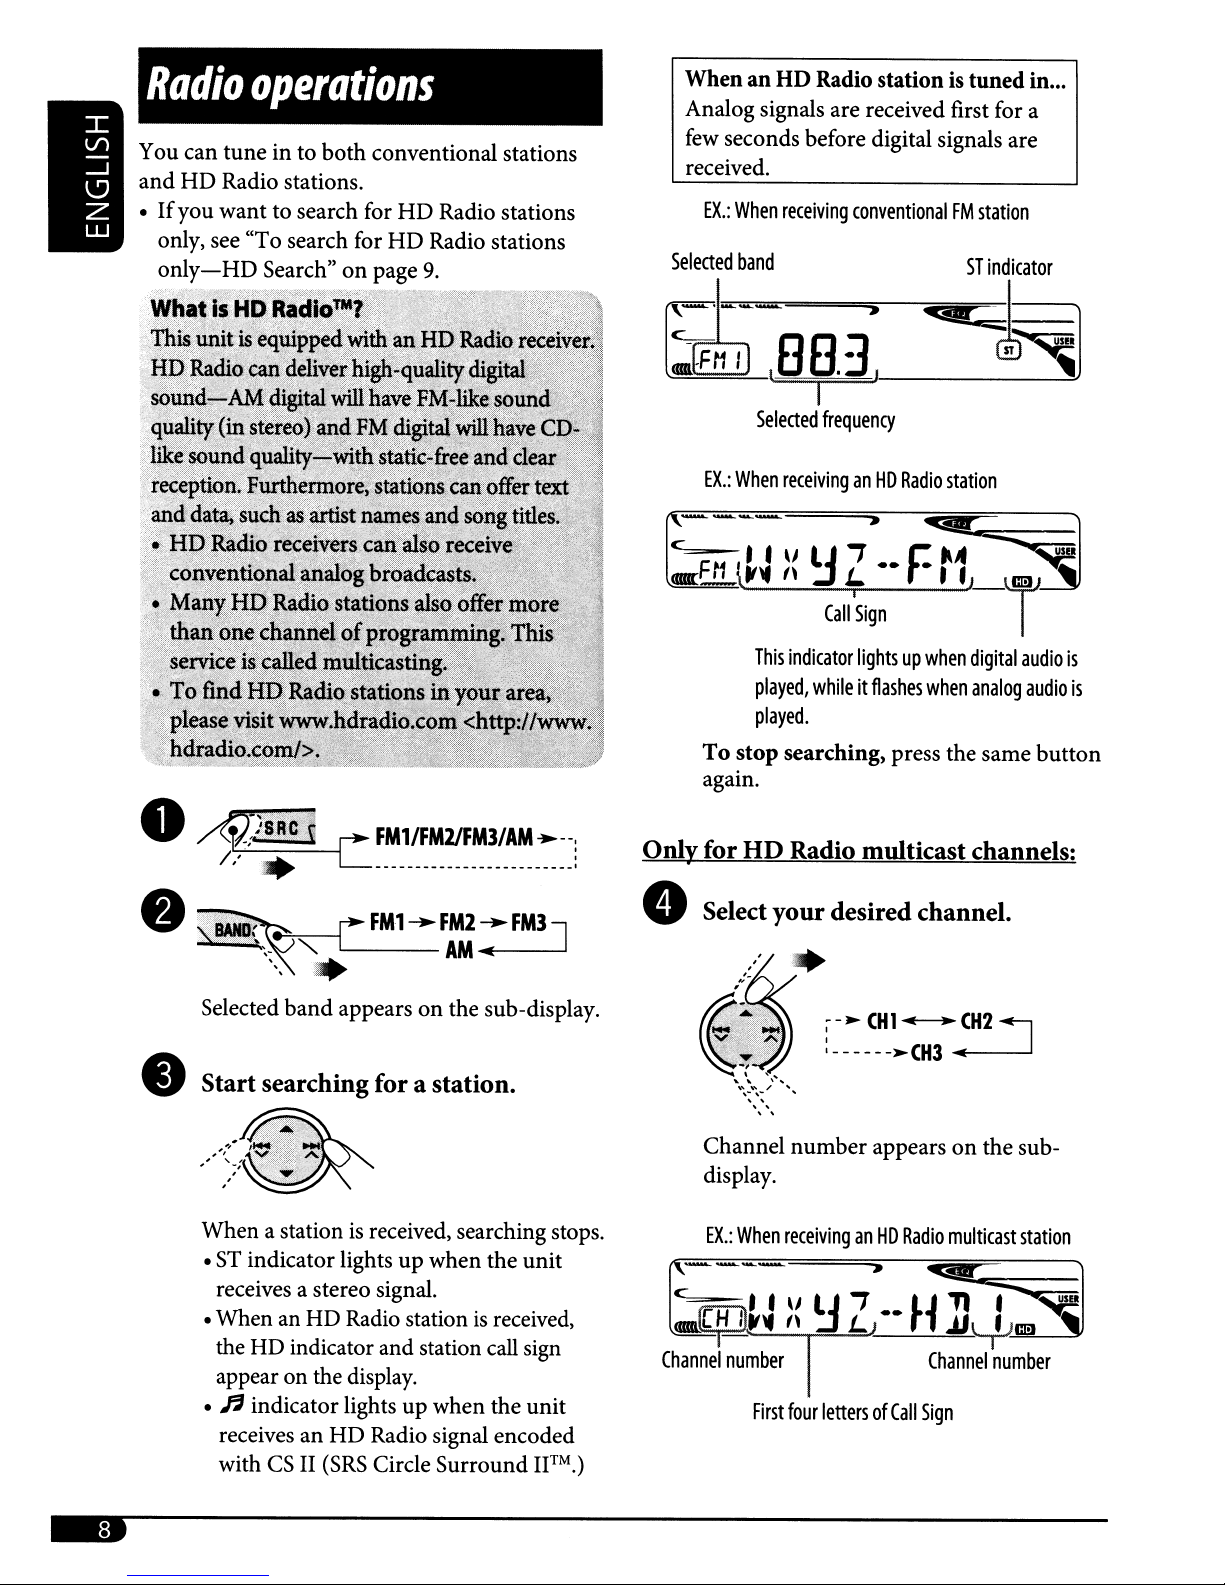
WhenanHD
Analog signals are received first for a
few
seconds before digital signals are
received.
EX.:
When
Radio station is
receiving
conventionalFMstation
tunedin...
o
~SRC1
/'
'. -------------------------,
L
FM1/FM2IFM3/AM
.--,
Selected
@i~
f'.----
c
c=:
,
Onlyfor
band
Selected
EX.:
When
F~
" •
II
\If~
This
played,
played.
To
stop
again.
HD
ST
indicator
~~]
frequency
receivinganHD
'J
lJ
"
:J
Call
indicator
whileitflashes
searching) press the same
Radio multicast channels:
Radio
station
»'<i!!!iC=~~
i
..
F
"A
~
~
Sign
lightsupwhen
•
.}
when
digital
analog
__
T'
audio
audio
J~
button
1
is
is
•
{~"
Selected
•
Start
When a stationisreceived, searching stops.
•
ST
receives a stereo signal.
•When an HD Radio station
the HD indicator and station call sign
appear
• A indicator lights
receives an
with
rFM1--F::FM3]
" .
' '
band
appearsonthe sub-display.
searchingfor a station.
indicator lightsupwhen the unit
is
received,
on
the display.
up
HD
CSII(SRS
when the
Radio signal encoded
Circle Surround IFM.)
unit
8 Select
Channel
display.
EX.:
When
C r
HI'
<DII!L
_'
If~
Channel
number
your
desired channel.
-
:------~CH3
number
receivinganHD
•
'J
lJ
"
:J
First
four
lettersofCall
-.,CH1""'-
appearsonthe sub-
»
i
..
L
CH2
....--J
Radio
multicast
~;;;:::o...::=----I
lJ
11
rl
JJL/-J--"",CIiJ,,---~
Channel
Sign
~
station
.~
number
-
Page 9
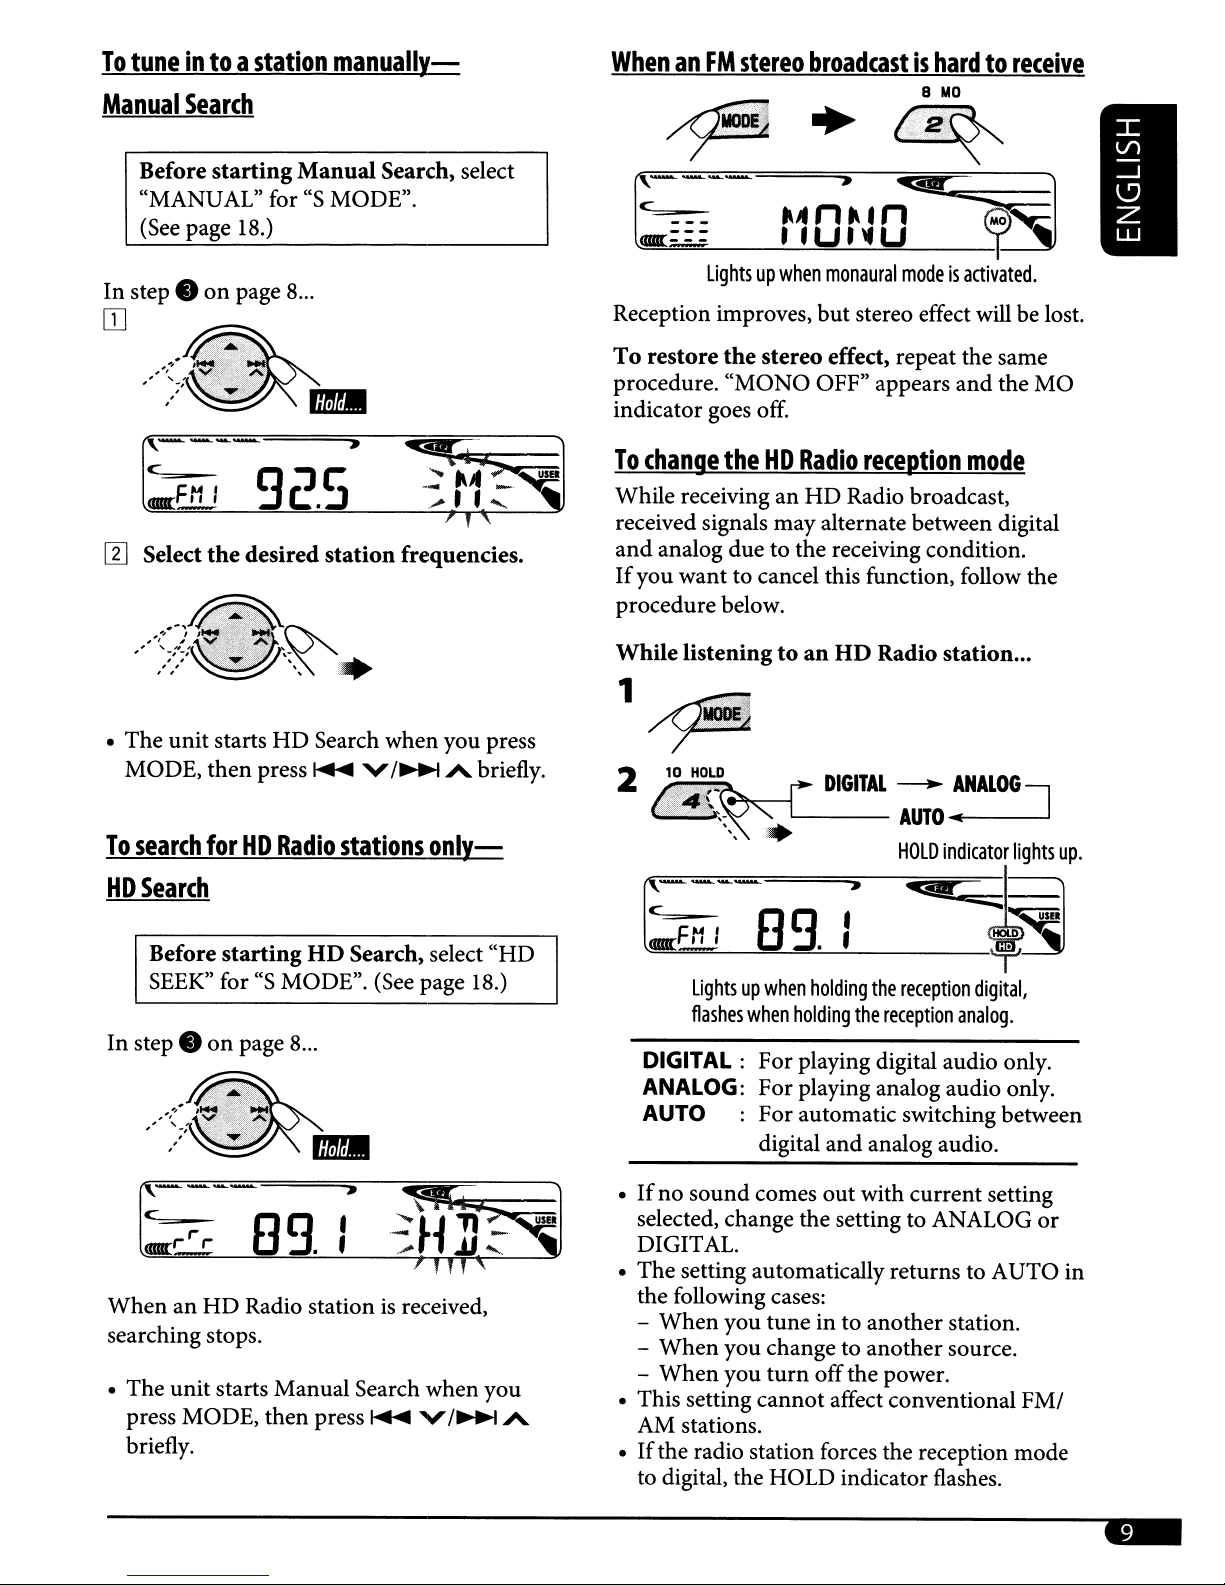
To
tuneintoastation
Manual
Search
manually-
WhenanFM
stereo
broadcastishardtoreceive
8
MO
Before
"MANUAL" for
(See page 18.)
step.
In
starting
on
page 8
OJ
,----
c_
cmrcFM
[I]
Select
• The unit starts
MODE, then press
To
search
HD
Search
I
the
forHDRadio
Manual
"s
...
9c
....
.~
desired
HD
Search, select
MODE".
»~~i~;::;:==1
5
station
Search when you press
~
stations
-'
:.. , •
frequencies.
V
/~
t..A~
::
....
T , ,
A briefly.
~
only-
~
Lightsupwhen
Reception improves,
To
restore
procedure. "MONO OFF" appears
indicator goes off.
To
change
While receiving an
received signals may alternate between digital
and
analog due to the receiving condition.
If
you want to cancel this function, follow the
procedure below.
While
1
~.'.~
the
stereo effect, repeat the same
theHDRadio
listeningtoan
/~
2 !'.
T.f;{.L~~
l.:.!:.
."".-
'"
"
..
~____
monaural
but
stereo effect will be lost.
reception
HD
Radio broadcast,
UD
C
DIGITAL
-
•
modeisactivated.
and
the MO
mode
Radio
---.
AUTO
station
ANALOG
.....
'----
...
]
H:di"~~P
Before
SEEK"
In
step.
f'----
:Crrr
When an
searching stops.
• The unit starts Manual Search when you
press MODE, then press
briefly.
starting
for"SMODE". (See page 18.)
on
page 8
UD
Search, select
...
»
89.:
,
'n
HD
Radio station is received,
~
V
/~
"HD
'
l:E!1J
Lightsupwhen
flashes
DIGITAL:
ANALOG:
AUTO
•
If
no sound comes out with current setting
selected, change the setting to ANALOG or
DIGITAL.
• The setting automatically returns to AUTO in
the following cases:
When
-
- When you change to another source.
- When you
A
• This setting cannotaffect conventional FM/
AM stations.
If
the radio station forces the reception mode
•
to digital, the HOLD indicator flashes.
89.:
holding
the
reception
when
holding
For playing digital audio only.
For playing analog audio only.
For automatic switching between
digital and analog audio.
you tune in to another station.
turn
the
reception
offthe power.
*~
digital,
analog.
-
Page 10
I;·,":·.:.
S!!ringstCl!i!n~
~~1~~m;~~:;~"1J~i
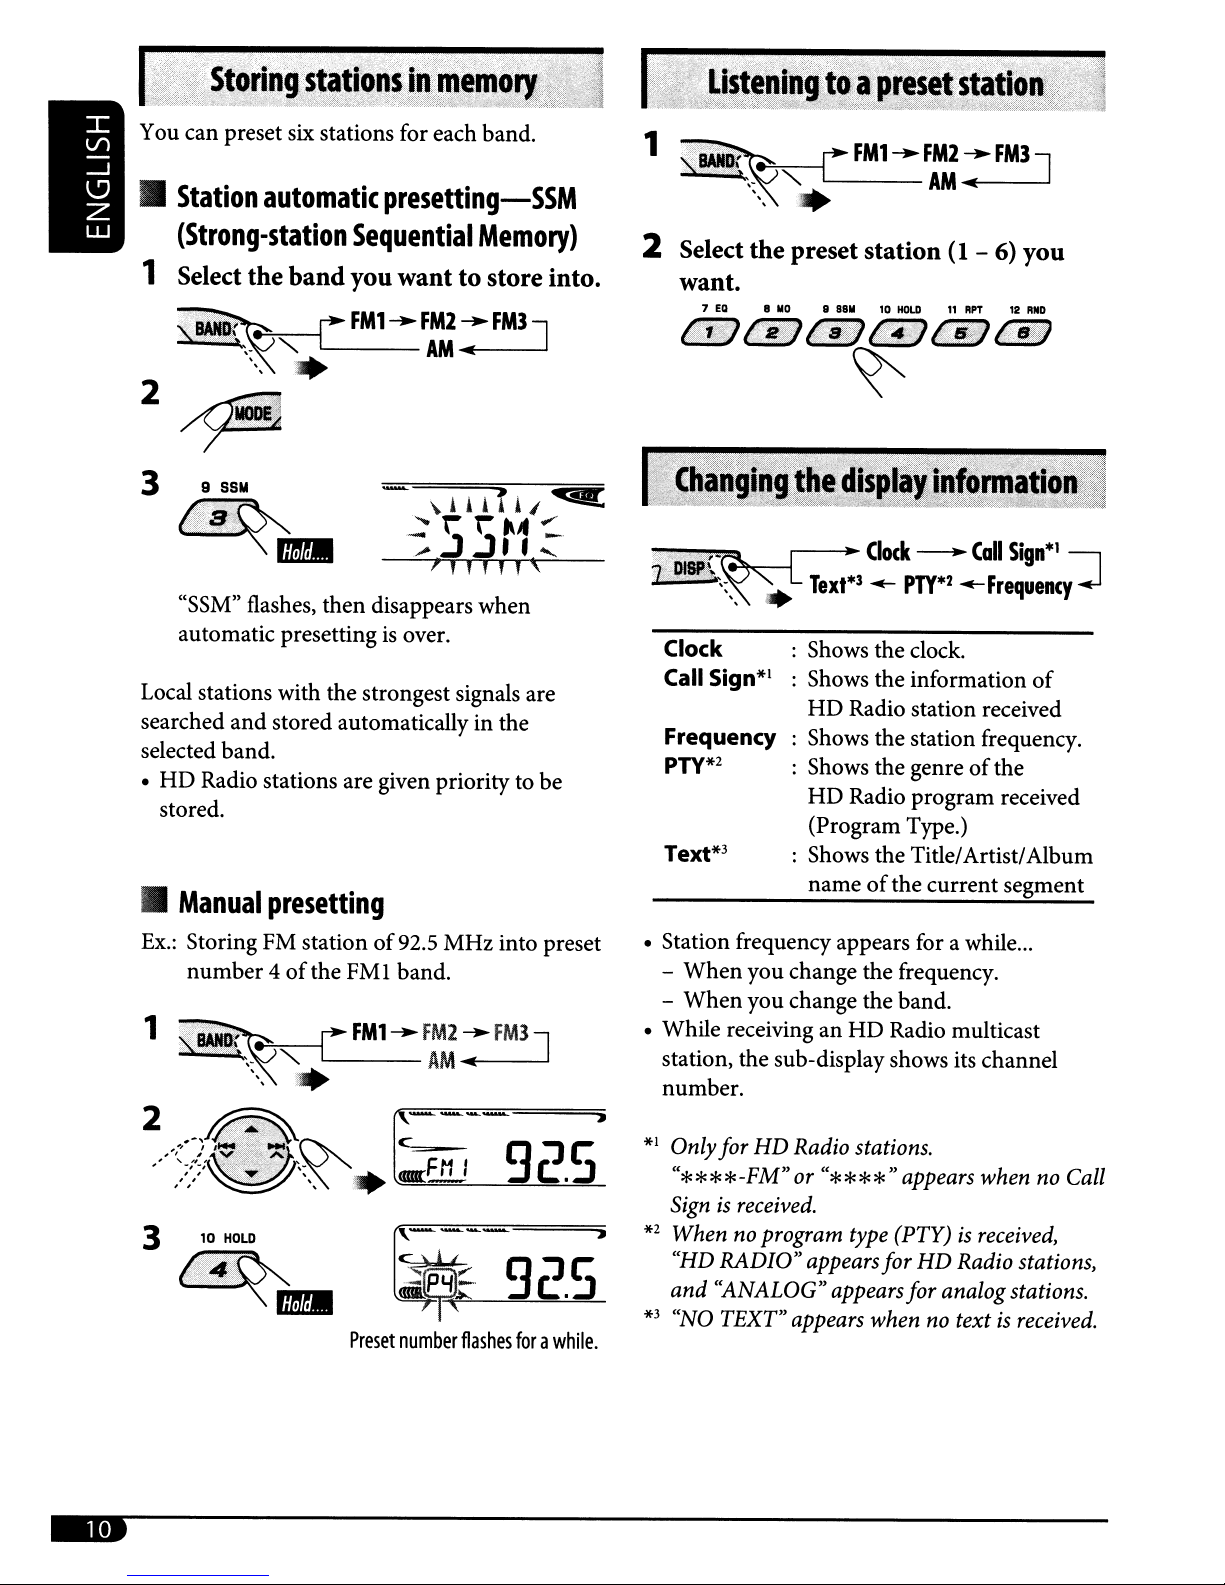
You can preset six stations for each
•
Station
(Strong-station
1 Select the
"~
automatic
band
~,-
"'"
,
,
,
presetting-SSM
Sequential
youwanttostore into.
rFM1--FAMM2~FM3J
band
.
Memory)
-.;
2?
3 9
Local stations with the strongest signals are
searched
selected band.
•
•
SSM
'.;;L.;.··S.·;··.I:'.;
•....
".,
':;,t,
""','.'
)->
~
"SSM" flashes, thendisappears when
automatic presetting
HD
Radio stations are given priorityto be
stored.
Manual
mDI
is
over.
and
stored automatically in the
presetting
,,,,,,,
2 Select the preset station
(1
want.
.' , ' .. ,10 [ •
2
DISP\~~;;
Clock
Call Sign*1
Frequency
PTY*2
Text*3
: Shows the clock.
: Shows the information
: Shows the station frequency.
: Shows the genre
: Shows the Title/Artist/Album
Clock
-
Text*3
HD
HD
(Program Type.)
name
...-
PTY*2
Radio station received
Radio program received
of
the current segment
-
6)
you
Call
Sign*'
I
...-Frequency
of
of
the
~
Ex.:
Storing FM stationof92.5 MHz into preset
number4of
the
FMl
band.
c~
4, 9:J
:"'lPYl~
<BII.~""~---"'~~~
Preset
number
flashes
c:
c:
.:J
forawhile.
• Station frequency appears for a while
-
When
-
When
• While receiving
station, the sub-display shows its channel
number.
*1
Onlyfor HD Radio stations.
"****-FM"
Sign
*2
When no program type (PTY)isreceived,
"HD
and
*3
"NO TEXT"appears when no textisreceived.
you change the frequency.
you change the band.
an
HD
Radio multicast
or
"****"
is
received.
RADIO"
"ANALOG" appears for analog stations.
appearsfor
appears when no Call
HD
...
Radio stations,
Page 11

Disc
Playingadiscinthe
All
change the source
To
disc
operations
unit
tracks will be played repeatedly until you
or
eject the disc.
d C
stop
play
and
eject
the
_
Playing
All discs in the magazine will be played
repeatedly until youchange the source.
• Ejecting the magazine will also stop playing.
•
•
discsinthe
~;JSRC;';i
I,'
• :
*
If
you
have changed the external
setting to "EXT
cannot select the CD changer.
Select a disc.
For disc number from01-
7
ED
C:'JY:fi
4:st'l'
B
110
L
II
1111/)
CD
changer
CD·CH*(orEXTIN)-.--,
IN"
(see
page 18),
06:
881110HOLD
t~:fJ
11
RPT
Pi$~?}
I'?t(:{}
input
you
12
RNO
~
_
For disc number from 07 -
About
MP3 and WMA "tracks" (words "me"
"track" are used interchangeably) are recorded
in "folders."
About
It
MP3-compatible CD changer with your unit.
• You can also connect other CH-X series CD
• You cannot play any WMA disc in the CD
• You cannot use the KD-MK series CD
• Disc text information recorded in the CD
• For connection, see Installation/Connection
MP3
and
WMA
discs
theCOchanger
is recommended to use a JVC
changers (except CH-X99 and CH-XlOO).
These units are
discs.
changer.
changers with this unit.
Text can be displayed when a JVC CD Text
compatible CD changer
Manual (separate volume).
not
compatible with MP3
is
12:
and
connected.
...
Page 12
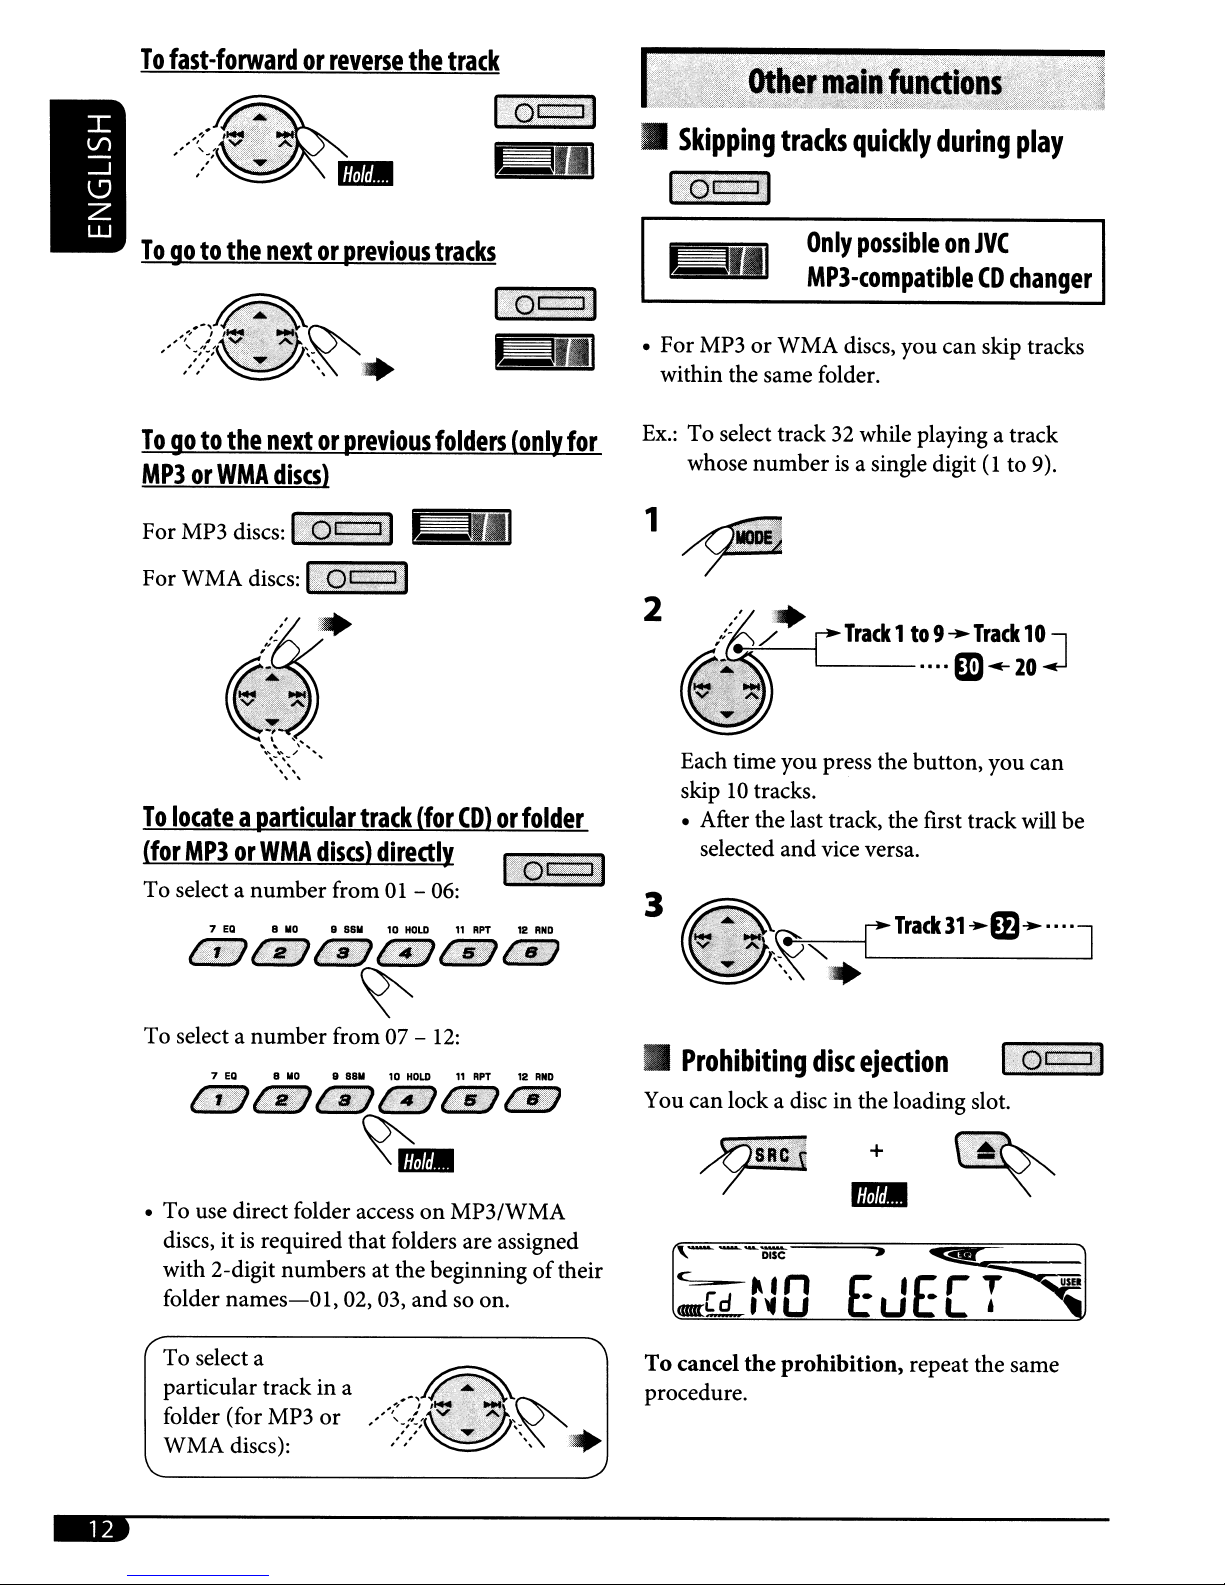
To
fast-forwardorreverse
Togoto
the
nextorprevious
the
track
1;'oc:tJ1
liill
tracks
l;a'o~1
•
Skipping
I.Q~~I
tracks
quickly
Only
possibleonJVC
during
play
MP3-compatibleCDchanger
Togoto
MP3orWMA
To
(for
To select a
the
nextorprevious
discsl.
locateaparticular
MP3orWMA
number
7
EO
8
@~.tr;iGY
@i~
110
"fi
track
discs)
from01-
8
8811
ls;
l;Ii)'
IiiIIl
• For MP3orWMA
folders
(only
for
I
(for
CD)
or
folder
directly
06:
10
HOLD
"RPT
@:~4fl4fSci\'
12
RNO
/i8;;;f)
Ex.:
1
2
3
discs, you can skip tracks
within the same folder.
To select track32while playing a track
whose
Each time you press the button, you can
skip
• After the last track, the first track will be
numberisa single digit(lto 9).
{~'---_[
Track1to
---····m
10
tracks.
selected
and
vice versa.
9~Track
...
20
10J
~
To select a
{.
• To use direct folder accessonMP3/WMA
discs, it
with 2-digit numbers at the beginning
folder
To select a
particular track in a
folder (for MP3
WMA discs):
number
7
EO
i,
"17
{;
is
required that folders are assigned
names-O1,02, 03,
8
110
a:}
from 07 -
II
8811
f;l!tfj
~
or
10
~
..
HOLD
and
12:
f
"RPT
1$11
so on.
12
R_O
t:FJ
of
their
•
Prohibiting
You can lock a disc in the loading slot.
C
'd
<am:L._'
To
cancel
procedure.
".
the
disc
ejection
+
n E •Er T
~
U U
prohibition,
L'
repeat the same
loc:j:1
usn
Page 13
j_£:~
.
:~
'.
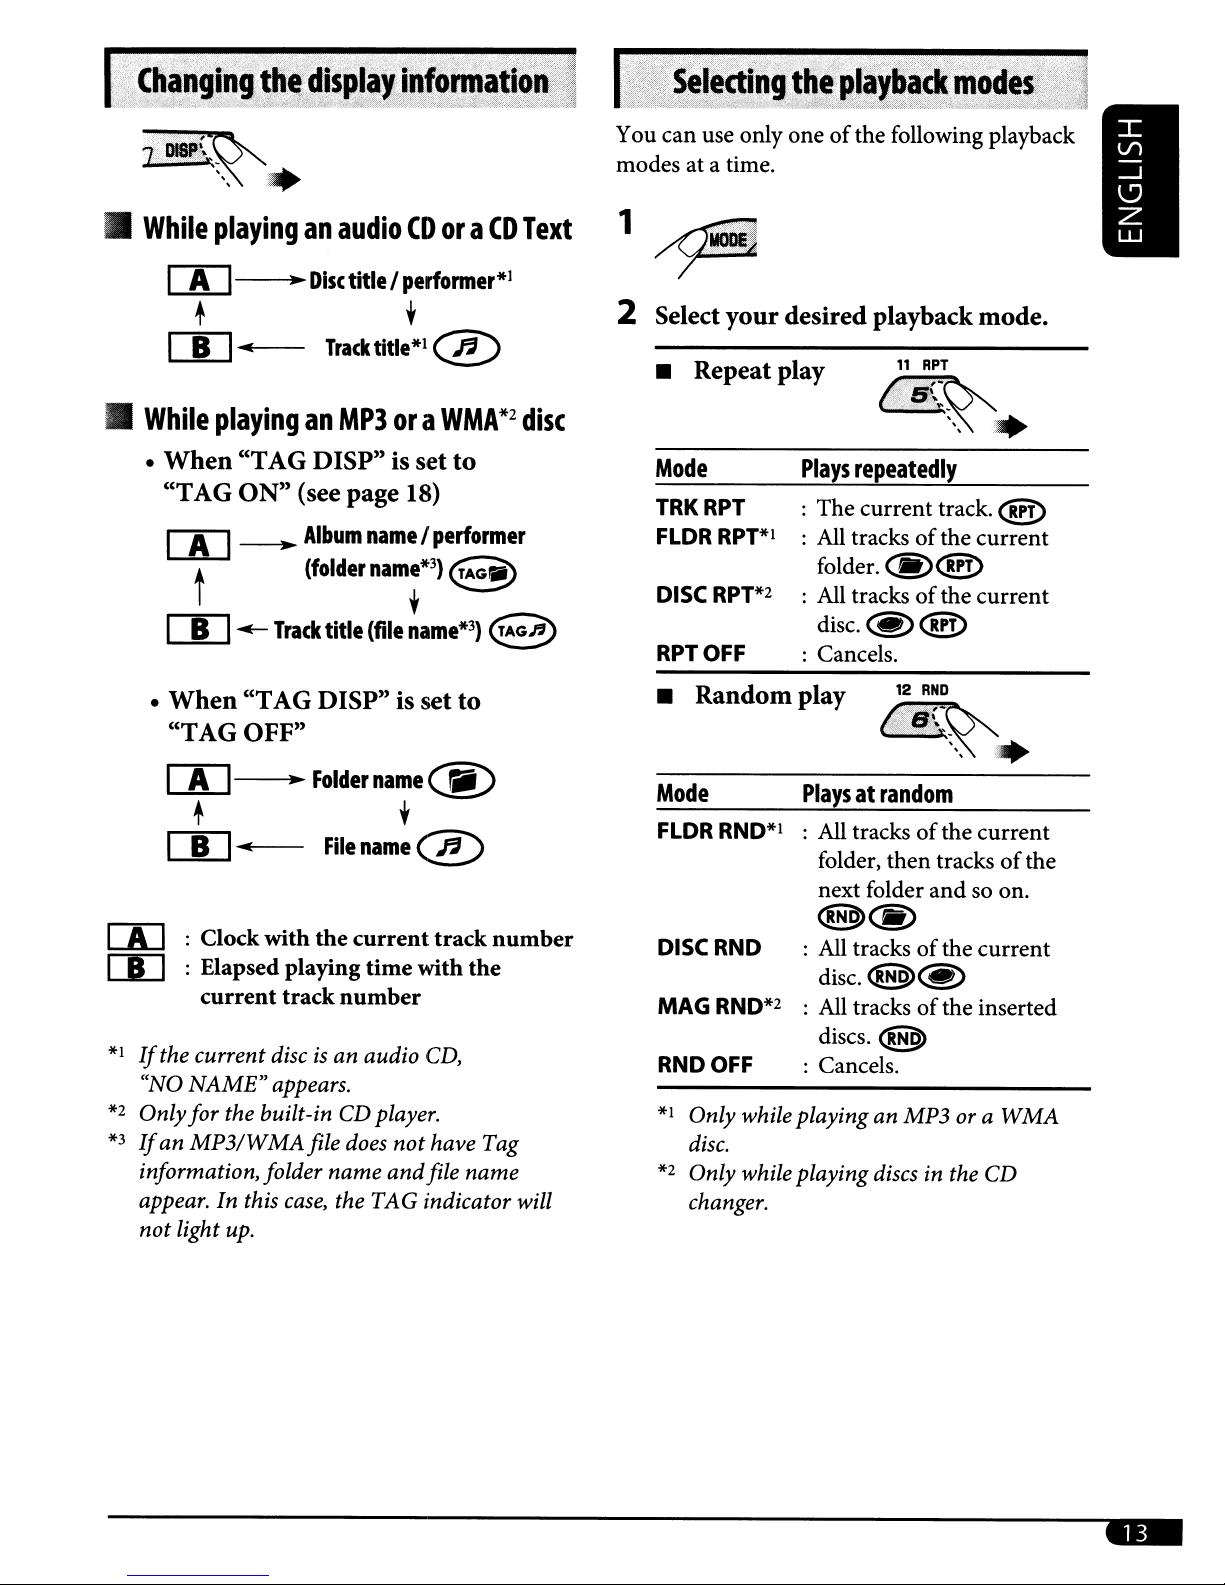
You can use only
at
modes
a time.
oneofthe following playback
While
playinganaudio
00---..
Disc
titleI
+ ,
•
rn....
While
•
•
playinganMP3
When
"TAG
rn
"TAG DISP" is set
ON"
~
t
rn
When
"TAG OFF"
.-
rn
"TAG DISP" is set
Tracktitle*l@
(see page 18)
Album
(folder
Track
title
~
FOldername~)
+ ,
rn
[A]
[I]
*1
If
the current discisan audio
"NO
*2
Onlyfor the built-in CD player.
*3
If
an
information, folder name
appear. In this
not
light up.
...
: Clockwith
File
the
: Elapsed playing
current
NAME"
MP3/WMAfile
track
appears.
case,
number
the TAG indicator will
does
CDora
perfonner*1
ora
nameIperformer
namr3)
(file
name*3)
name
@
current
time
with
CD,
not
and
CD
WMA*2
to
E~
e
to
track
the
have Tag
file name
Text
disc
number
1~
2 Select
• Repeat play
Mode
TRKRPT
FLDR
DISC
RPT
• Random play
Mode
FLDR
DISC
MAG
RND
*1
*2
your
RPT*l
RPT*2
OFF
RND*I
RND
RND*2
OFF
Only while playing an MP3ora
disc.
Only while playing discs in the CD
changer.
desired playbackmode.
11
RPT
~~~
Plays
repeatedly
:
The
current
: All tracksofthe
folder.
: All tracks
disc.~@D
: Cancels.
(§)@!)
of
12
RND
track.
the
.
@!)
current
current
6.B~~.
Playsatrandom
: All tracks
folder,
next folder
@>@)
: All tracks
disc.
: All tracks
discs.
: Cancels.
of
the
then
tracksofthe
and
of
the
<!H9>@)
of
the inserted
@>
current
so on.
current
WMA
-
Page 14
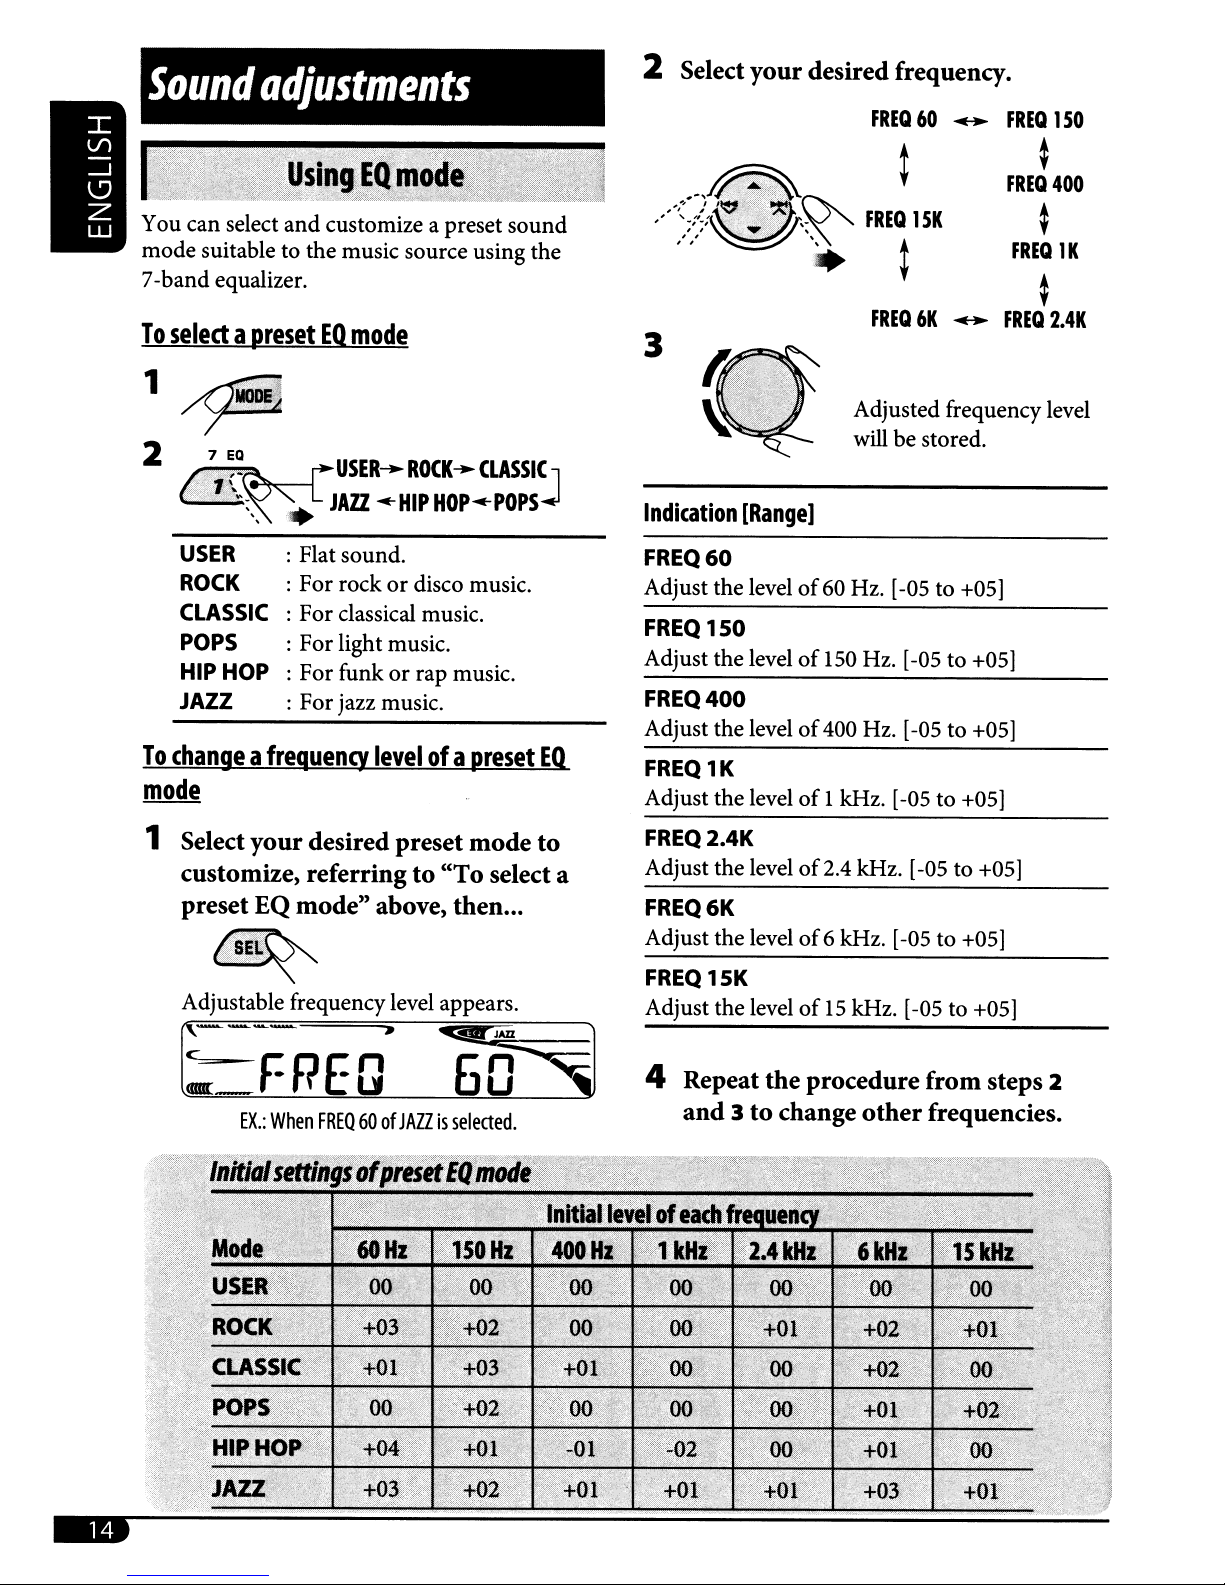
Sound
adjustments
2 Selectyour desired frequency.
FREQ60..
FREQ1SO
~
FREQ
400
You can select
mode suitabletothe music source using the
7-band equalizer.
To
selectapresetEQmode
and
customize a preset
sound
'?
7
2
To
mode
EQ
USER
ROCK
CLASSIC
POPS
HIP
HOP
JAZZ
USER
•
JAZZ
: Flat sound.
: For rock
: For classical music.
: Forlight music.
: For funk
: For jazz music.
changeafrequency
....
ROCK
'-HIP
HOP'-POPS
or
disco music.
or
rap music.
levelofa
...
CLASSI~
preset
EQ.
3
Indication
FREQ60
Adjust the level
FREQ
Adjust the level
FREQ400
Adjust the level
FREQ
Adjust the level
[Rangel
150
1K
FREQ6K..
Adjusted frequency level
will
be stored.
of
60 Hz. [-05 to +05]
of
150 Hz. [-05 to +05]
of
400 Hz. [-05 to +05]
of
1 kHz. [-05 to +05]
~
FREQ
~
FREQ
1K
2.4K
1 Selectyour desired preset mode to
customize, referringto"To
preset EQ mode" above, then...
Adjustable frequency level appears.
r-FREQ'
EX.:
When
FREQ60of
JAZZisselected
select a
6'f§1
.
FREQ
Adjust the level
FREQ6K
Adjust the level
FREQ
Adjust the level
2.4K
15K
of
2.4 kHz. [-05 to +05]
of
6 kHz. [-05to+05]
of15kHz. [-05 to +05]
4 Repeat the procedure from steps 2
and3to
change
other
frequencies.
..
Page 15

1
2
~
..
,SEt.. •
...'\.
j-
C
FAD
---.
VOL~SUB.W
BAL
J
SRS
Circle Surround
technology specially aimed for car audio, and
it can reproduce S.l-channel sound system
through conventional4-door mounted speaker
system (with
SRS
Circle Surround
or
Auto™isa surround
without subwoofer.)
Auto™ismadeof...
Indication
FAD*I,*2(fader)
Adjust the front
[R06 to
BAL
Adjust the left
[L06toR06]
SUB.W*3
Adjust the subwoofer output level.
VOL
Adjust the volume.
*1
If
fader level to "00."
*2
This adjustment cannot affect the subwoofer
output.
*3
This takes effect only when a subwoofer
connected.
*4
Depending on the amplifier gain control
setting. (See page
[Range]
and
rear speaker balance.
F06]
*2
(balance)
and
right speaker balance.
(subwoofer)
[00to08]
(volume)
[00
to 30orSO*4]
you
are using a two-speaker system, set the
18for details.)
SRS
Circle Surround
Converts the soundofCD, AM/FM radio
broadcast and other various source into multi-
channel sounds.
SRS
FOCUS8:
Elevates the sound field to a more optimal
listening level.
SRS
TruBass
Createsanultra rich bass using the standard
speakers with no subwoofer connected.
To
selectapreset
8
:
WM
decoder:
modeofSRS
Circle
Surround
Auto™
is
~~s-A.
'~-.
",
TYPE
TYPE
TYPEC:
OFF
A :
B :
USER
TYPEA..
.
For the system oflarge front
speaker with tweeter
tray speaker.
For the system oflarge front
speaker with tweeter and doormounted rear speaker.
For the system
speaker
rear speaker.
Foryour preference.
Cancels
TYPEB..
OFF
~
of
and
door-mounted
CS-
A mode.
:YPE
USER
and
small front
( J
rear
To
be continued...
..
Page 16

To
adjustapreset
Surround
You can adjust the
TruBass·ofeach preset CS-A mode.
Auto™
modeofSRS
SRS
FOCUS·
Circle
and
the
SRS
3
Adjusted settings will be
stored.
1 Selectyour desired
adjust, referring
modeofSRS Circle
page
15, then...
CS-
"To
select a
Surround
A mode
Auto™''
(;s~t~
Adjustable item appears.
r-=:Focu's
I r
Selected
2 Select
item
name
an
item to adjust.
appears
Th~
Level
FOCUS
F
~
TBASS
W
~
to
preset
number
FOCUS
TBASS
TBASS
on
(0-9.)
R
~
F
~
R
Indication
FOCUSF(SRS
Adjust the
[0to9]
FOCUSR(SRS
Adjust the
[0to9]
TBASSF(SRS
Adjust the
[0 to
TBASSR(SRS
Adjust the
[0to9]
TBASSW(SRS
Adjust the
[0 to
9]
9]
[Rangel
FOCUS·
SRS
FOCUS·ofthe
FOCUS·
SRS
FOCUS·ofthe rear speaker.
TruBass·
SRS
TruBass·ofthe front speaker.
TruBass·
SRS
TruBass·ofthe rear speaker.
TruBass·
SRS
TruBass·ofthe subwoofer.
Front)
front
Rear)
Front)
Rear)
Subwoofer)
speaker.
4 Repeat the procedure from steps 2
and3to
change
other
item.
..
Page 17

General
You can change PSM (Preferred Setting Mode)
items (except "SID") listed
follows.
settings
in
-
PSM
the table
that
3 Adjust
the
PSM
item
selected.
1
Ls~~r:.a
2 Select a PSM item.
Ex.:
When
"DIMMER"isselected
Indications
DEMO
Display
demonstration
CLOCKH
Hour
adjustment
CLOCKM
Minute adjustment
CLKADJ*1
Clock adjustment
T-ZONE*I,
Time zone
DST*I,
Daylight savings time
510*3
SIRIUS ID
*2
*2
Selectable
DEMO ON : {Initial]; Display demonstration will be activated
DEMOOFF : Cancels.
1 - 12,
[Initial: 1 (1:00)J
00 - 59,
[Initial: 00 (1:00)J
AUTO : [InitiaIJ;
OFF : Cancels.
Select
adjustment.
ON
your
EASTERN [InitialJ
PACIFIC
Activate this
OFF : Cancels.
The
12-digit SIRIUS identification
after "SID"
• Press
4 Repeat steps 2
PSM itemsifnecessary.
5 Finish
~
settings,
[7]
[7]
residential area from
~
is
SEL
to resume the previous display.
[reference
automatically, [7].
the clock data provided via the satellite radio channel.
~
ATLANTIC
MOUNTAIN
if
your
residential areaissubject to DST.
: {InitiaIJ; Activates daylight savings time.
selected, [19].
page]
The
built-in clockisautomatically adjusted using
~
CENTRAL
and
3 to adjust
the
procedure.
oneofthe following time zones for clock
~
NEWFOUND
~
number
(back to the beginning)
scrollsonthe display 5 seconds
~
ALASKA
other
~
DIMMER
Dimmer
*1
Displayed only when SIRIUS Satellite radio or XM Satellite radioisconnected.
*2
Displayed only
*3
Displayed only when SIRIUS Satellite radioisconnected.
mode
when
ON : Dims the display illumination
OFF : Cancels.
AUTO : {InitiaIJ; Dims the display when you
"eLK
AD!"isset to
"AUTO."
of
this unit.
turnonthe headlights.
To be continued...
..
Page 18

Indications
Selectable
settings,
[reference
pagel
SCROLL*1
Scroll mode
WOOFER
Subwoofer cutoff
frequency
EXT
IN*2
External
TAGDISP
input
Tag display
BEEP
Key-touch tone
AMP
GAIN
Amplifier gain
control
AREA
Tuner channel
interval
SMODE
Radio station
search mode
IF
BAND
Intermediate
frequency
CSON HD
band
CS-A mode standby
on
HD
Radio
ONCE
AUTO
OFF
• Pressing DISP for more
of
the setting.
LOW
MID : [Initial}; Frequencies lower
: [Initial}; Scrolls the information once.
: Repeats scrolling (5-second intervals in between).
: Cancels.
than
one second can scroll the display regardless
: Frequencies lower
than
90 Hz are sent to the subwoofer.
than
135
Hz are sent to the
subwoofer.
HIGH : Frequencies lower
CHANGER
: [Initial}; To use a JVC CD changer, [11], a JVC
than
180 Hz are sentto the subwoofer.
compatible satellite (SIRIUS/XM) tuner, [19], an Apple
iPod
or
a JVC D. player, [22].
EXT
TAG
IN
ON
: To use any otherexternal component than the above, [24].
: [Initial}; Shows the Tag information while playing MP3/
WMA tracks, [13].
TAG
OFF
ON
OFF
You can change the maximum volume level
LOW
PWR
: Cancels.
: [Initial]; Activates the key-touch tone.
: Cancels.
of
this unit.
: VOL 00 - VOL
of
the speakerisless than50W to prevent
30
(Select thisifthe maximum power
them
damaging the speaker.)
HIGH
OFF
AREA
AREA
AREAEU
PWR
US
SA
: [Initial]; VOL 00 - VOL
50
: Deactivates the built-in amplifier.
: [Initial];
When
using the unit in North/Central/South
America. AM/FM intervals are set to
:
When
using the unit in South American countries where
FM interval is 100 kHz. AM interval
:
When
are set to 9 kHz/50 kHz
using the
unit
in any other areas. AM/FM intervals
(l00
kHz during auto search).
10
kHz/200 kHz.
is
set to10kHz.
You can change radio station search mode operation using the
~
V/~A
MANUAL : [Initial]; To search for a station
buttons.
manually-for
search, [9].
HDSEEK
AUTO
WIDE
AUTO
OFF
: To search for an HD Radio station
: [Initial}; Increases the tuner selectivity to reduce interference
noises between the stations. (Stereo effect
: Subject to the interference noises from adjacent stations,
but
not
sound
be lost.)
quality will
not
be degraded. (Stereo effect will
: Automatically activates "USER" for the CS-A mode when
is
the CS-A mode
set to "OFF",
radio broadcast encoded with
: [Initial]; Cancels.
only-for
will
and
the unit receiving a
CS
II.
from
Manual
HD search,
be lost.)
[9].
*1
Some characters or symbols will
*2
Displayed only when oneofthefollowing sourcesisselected-PM,
not
be shown correctly (or will be blanked)onthe display.
AM,
or DISC.
Page 19

Satellite
This unitissatellite (SAT) Radio
compatible with both SIRIUS Satellite radio
XM
Satellite radio.
Before operating your satellite radio:
• For connection, see Installation/Connection
Manual (separate volume).
• Refer also to the Instructions supplied with
your SIRIUS Satellite radio
radio.
radio
operations
Ready-
or
XM Satellite
and
Activate
your
SIRIUS
subscription
after
connection:
IT]
<!>/I~.
ATT~
[1]
£)')S"R'e"E
/'
"11:'
/.,.
JVC DLP starts updating all the SIRIUS
channels.
Once completed, JVC DLP tunes in to the
preset channel, CH184.
"
.
i{~
~SIRIUS1/SIRIUS2ISIRIUS3
L.---------------------.---:J
• "SIRIUS"
registered trademarks
Inc.
•
XM
trademarks
• "SA T Radio," the SA T Radio logo
related marks are trademarks
Satellite Radio Inc.,
Inc.
•
Listeningtothe
Connect either oneofthe following (separately
purchased) to the CD changer jack on the rear
of
this unit.
• JVC SIRIUS
Processor, for listening to the SIRIUS Satellite
radio.
XMDirect™
•
Jve
(not supplied), for listening to the
Satellite radio.
GCI (Global Control Information) update:
•
If
channels are updated after subscription,
updating starts automatically.
"UPDATING" flashes and no sound can be
heard.
• Update takes a
• During update, you cannot operate your
satellite radio.
and
the SIRIUS dog logo are
of
SIRIUS Satellite Radio
and
its corresponding logos are registered
of
XM
Satellite Radio Inc.
and
of
SIRIUS
and
XM
Satellite Radio,
Smart
radio
Universal
Digital
few
satellite
DLP-Down
Tuner
Adapter-XMDJVCI00
minutes to complete.
radio
Link
Box using a
all
XM
W Check
m
Contact
<http://activate.siriusradio.com/>
activate
call SIRIUS toll-free
SIRIUS (7474).
"SUB
on
completed.
Activate
your
SIRIUS ID, see page 17.
SIRIUS
your
UPDT
the display once subscription has been
your
XM
on
the
internet
subscription,oryou
at
1-888-539-
PRESS
subscription
ANY
KEY"
after
connection:
• Only Channel0,I,
before activation.
[1]
A.T/.-YS'R
;:,'
/.
.•
XMDirect™ Universal Tuner Box starts
updating all the
is
tuned in automatically.
W Check
ID
XMDirect™
tuneinto
c~
your
labeled
and
247 are available
~
~
L
XM11XM2IXM3-..----:
._-------_._-------------.
XM
channels. "Channel
XM Satellite
on
the
casingofthe
Universal
"Channel
radio
Tuner
0))
(see page 21).
at
scrolls
Box,
to
can
,
1"
or
To be continued...
..
Page 20

rn
Contact XM Satellite radio
the internet at <http://xmradio.
com/activation/> to activate your
subscription, or you can call 1-800XM-RADIO (1-800-967-2346).
Once completed, the unit tunes in to one
of
the available channels (Channel 4
higher).
You can tune
category by selecting "ALL."
Selecting a particular category (SPORTS,
ENTERTAINMENT, etc.) allows you to
enjoy only the channels from the selected
category.
in
to all the channelsofevery
4 Select a channel for listening.
on
or
Holding the button changes the channels
rapidly.
•
Searching
You can search for programs by category
(Category Search)
Search).
•InCategorySearch, you can tune in to the
channels
Search begins from the currently selected
channel. The selected channel number flashes
on
the display.
• In Channel Search, you can tune in to
all channels (including non-categorized
channels).
for
category/channel
or
channel number (Channel
of
the selected category. Category
1 Select a category (CategorySearch).
• For Channel Search, skip
this step.
Holding the
rapidly.
• When changing the category
invalid and unsubscribed channels are
skipped.
button
changes the channels
or
channel,
Page 21

2 Select a
channel
for
listening.
"
;"';·~':;~:~~~~~,i!,_,~~:.~~e,~~,'i,https://manualmachine.com/~~~I1~···):,~
~
"'S?~~.
tff'
Ex.:
When
you
select
"COUNTRY"
If
no operationisdone for about
15
seconds, Category Searchiscanceled.
In
Channel Search, channel name
channel
during search.
• While searching, invalid
channels are skipped.
number
appear on the display
for
Category
and
unsubscribed
Search
and
You can preset six channels for each band.
Ex.:
Storing a channel into preset number
1
Tuneintoachannel
2
10
HOLD
6'~rJD
Preset
1 Select
either
SIRIUS Satellite
you
want.
c-~
~(
~~
ClIlI.fr'('=----
number
flashes
forawhile.
radio
XM Satellite radio.
~):.~
4.
or
Checking
While selecting
"XM3," select
The display alternately shows "RADIO ID" and
the 8-digit (alphanumeric) ID number.
To
cancel
channel other than "Channel 0."
the
XM
Satellite
"XMI,"
"Channel
theIDnumber
radio
"XM2,"
ID
or
0."
display, select any
2§;~.
3 Select
want.
G:.v,ng
To
change
listeningtoa
tDlSP;;~
Clock~Category
Artist
name/title
the
preset
7
EQ
8
MO
888M
2
1::
:9
t:,,;/
~
the
display
channel
" .
name~Channel
name~Composer
~
(back to the beginning)
channel(1- 6)
10
HOLD
/!;~4/:}
information
name*~Song/program
l:
11
RPT
'l!J,i;
name
you
12
RHO
lis,q
while
~
* Only
for
SIRIUS Satellite radio.
Page 22

iPod®/D.
This unitisready for operatinganApple iPod
or
a JVCD.player from the control panel.
player
operations
Before operating your iPod
Connect either one
purchased) to the CD changer jack
of
this unit.
• Interface adapter for
controlling an iPod.
player interface adapter-KS-PDSOO for
• D.
controlling a
• For connection, see Installation/Connection
Manual (separate volume).
• For details, refer also to the manual supplied
with the interface adapter.
Make sure to
vehicle's ignition switch before connecting
or
disconnecting the iPodorD.
of
D.
player.
turn
offthis unit or
orD.player:
the following (separately
on
the rear
iPI
iPod
-KS-PD100
turn
player.
for
offthe
• Adjust the soundas
pages 14 - 16.)
• Make sure the equalizeronthe iPod
D.
playerisdeactivated.
To
pause*'
stop*2
To resume
playback, press it
again.
To
fast-forward
reverse
Togoto
or
playback
the
track
the
next
or
you
want. (See
or
Preparations:
Make sure "CHANGER"isselected for the
external input setting. (See page 18.)
Playback starts automatically from
where it has been paused*1
previously.
or
stopped*2
or
previous
*1
For
iPod
*2
ForD.player
tracks
Page 23

1 Enterthe
main
menu.
Now the
work
as
....
the
/~
/~
menu
V
/~
A.
selecting buttons*3.
2 Select the desired menu.
ForiPod:
PLAYLISTS-ARTISTS-ALBUMS
SONGS-GENRES-COMPOSERS
(back to the beginning)
ForD. player:
PLAYLIST-ARTIST-ALBUM-GENRE
-
TRACK
- (back to the beginning)
buttons
-
-
2 Select
• Repeat play
ONERPT@D
Functions the sameas"Repeat One"
the iPod or "Repeat Mode One" for the
D.
ALLRPT~@D
Functions the sameas"Repeat All"ofthe
iPod
RPTOFF
Cancels.
• Random play
your
player.
or
desired playbackmode.
11
RPT
"Repeat Mode All" for theD.player.
12
RHD
(>I!I>.~.
of
3 Confirm the selection.
To move back to the previous
menu, press
•
If
a track is selected, playback starts
automatically.
•
If
the selected item has another layer, you
will enter the layer. Repeat steps 2
until the desired trackisconfirmed.
~
V
• Holding
items at a time.
*3
The
menu
selecting mode will be canceled:
- Ifno operations are done
5 seconds.
you
- When
confirm the selectionofa track.
/~
.....
A.
for
can skip
about
and
10
ALBM
Functions the sameas"Shuffle Album"
the iPod.
SONG RND/RND ON
Functions the sameas"Shuffle Songs"ofthe
iPod or "Random Play On"
RNDOFF
3
Cancels.
*4
To
check
an
iPodoraD.player
RND*4
For
iPod: Only if
"ALBUMS"
other
information
~~
~
you
select "ALL" in
of
the "Music" menu.
while
of
theD.player.
listening
of
to
7,D1.'\~
.~~
',.
Page 24

More
about
this
unit
You can connect an external component to
on
the CD changerjack
Input
Input
o
Adapter-KS-U57
Adapter-KS-U58
• For connection, see Installation/Connection
Manual (separate volume).
For listening to the satellite radio, iPod,
D.
player, refer to pages19-
AI./i?iUt~i
';~
If
"EXT IN" does
and select the external input ("EXT IN").
•
Turn
and
on
start
the
playing
the rear using the Line
(not supplied)orAUX
(not supplied).
or
23.
~
EXTIN(orCD-CH)-'--i
~-------------------------,
not
appear, see page
connected
the
component
source.
•
18
Basic
Turningonthe
•
Turning
•Ifyou
Tuner
Storing
operations
power
By
pressing
on
the power.Ifthe sourceisready, playback
also starts.
disc, disc play will start from where playback
has been stopped previously, next time you
turnonthe power.
operations
• During
- All stations including
searched and stored for the selected band.
- All previously stored stations are erased and
stations are stored newly.
- Received stations are preset in
frequency) to
- When
No.1
• When storing a station manually, the
previously preset station
station
SRConthe unit, you can also
off
the
power
turn
offthe power while listening to a
II·
stationsinmemory
SSM
search
SSMisover, the station stored in
will be automatically tuned in.
is
stored in the same preset number.
...
HD
No.6
(highest frequency).
is
erased when a new
Radio stations are
No.1
(lowest
_
turn
_
8 Adjust
pages 14 - 16.)
To
check
external
JOlsA:~~
the
sound
the
clock
time
component
..
as youwant. (See
while
(
listeningtoan
Clock
-
EXTIN)
Disc
operations
Caution
• The Non-DVD sideofa "DualDisc" does
not
Audio" standard. Therefore, the use
DVD side
may not be recommended.
for
comply with the "Compact Disc Digital
II,
DualDisc
of
a "DualDisc"onthis product
playback
of
Non-
General
• This unit has been designed to reproduce
CDs/CD Texts,
CD-RWs (Rewritable) in audio CD (CD-DA),
MP3 and WMA formats.
• When a disc has been loaded, selecting "DISC"
for the playback source starts disc play.
and
CD-Rs (Recordable)/
_
Page 25

Insertingadisc
PlayinganMP3IWMA
disc
•
When
automatically ejects.
• Do
and
into the loading slot.
a disc is inserted upside down, the disc
not
insert 8
unusual shape discs (heart, flower, etc.)
cm
(3-3/16") discs (single CD)
Playingadisc
• While fast-forwardingorreversing an MP3
or
WMA disc, you can only hear intermittent
sounds.
PlayingaCD-RorCD-RW
• Use only "finalized" CD-RsorCD-RWs.
• This unit can play back only
type which are first detected
both audio CD (CD-DA)
WMA files.
• This unit can play back multi-session discs;
however, unclosed sessions will be skipped
while playing.
• Some CD-Rs
on
back
characteristics,
- Discs are dirty
- Moisture condensation occurs
inside the unit.
- The pickup lens inside the unit
-
CD-RlCD-RW
written with "Packet Write" method.
- There are improper recording conditions
(missing data, etc.)
(stained, scratched, warped, etc.).
• CD-RWs may require a longer readout time
since the reflectance
that
of
regular CDs.
not
• Do
- Discs with stickers, labels,
stuck to the surface.
- Discs
printed by an inkjet printer.
Using these discs under high temperatures or
high humidities may cause malfunctions
damage to the unit.
or
CD-RWs may
this unit becauseoftheir disc
or
for the following reasons:
or
scratched.
on
which the
or
ofCD-RWsislower than
use the following CD-RsorCD-RWs:
on
which labels can be directly
fIlesofthe same
if
a disc includes
fIles
and MP3/
not
play
on
the lens
is
dirty.
fIles
are
media conditions
or
protective seal
or
• This unit can play back MP3/WMA
with the extension code <.mp3> or <.wma>
(regardless
• This unit can show the namesofalbums,
artists (performer),
2.2,
2.3,or2.4) for MP3
fIles.
• This unit can display only one-byte
characters. No other characters can be
correctly displayed.
• This unit can play back MP3/WMA
meeting the conditions below:
- Bit rate: 8 kbps - 320 kbps
- Sampling frequency:
48
kHz,
24
kHz, 22.05 kHz,16kHz (for MPEG-2)
- Disc format: ISO 9660 Level1/Level2,
Romeo, Joliet, Windows long
• The maximum number
folder names vary among the disc format used
(includes 4 extension
<.wma».
~
ISO 9660 Levell: up to12characters
- ISO 9660 Level
- Romeo: up to
- Joliet: up to 64 characters
- Windows long
characters
• This unit can play back
(variable bit rate).
Files recorded in
in elapsed time display,
the actual elapsed time. Especially, after
performing the search function, this
difference becomes noticeable.
• This unit can recognize a total
200 folders, andof8 hierarchies.
of
the letter
44.1
kHz,32kHz (for MPEG-1)
128
case-upper/lower).
and
Tag (Version
fIles
and for WMA
of
characters for fIlel
characters-<.mp3>
2:
up to31characters
characters
fIle
name: up to
fIles
recorded in
VBR
have a discrepancy
anddonot
of
fIle
name
128
show
512
fIles
1.0,
fIles
fIles,
1.1,
or
VBR
of
Tobecontinued
...
Page 26

• This
• The search function works
Changing
•Ifyou change the source, playback also stops
unit
cannot play back the following
- MP3
- MP3
- MP3
-
-
- WMA
- Files which have the data such
not
(without ejecting the disc).
Next time you select "DISC" for the playback
source, disc play starts from where it has been
stopped previously.
fIles
encoded with MP3i
MP3 PRO format.
fIles
encoded in an inappropriate format.
fIles
encoded with Layer 1/2.
WMA
professional,
WMA
Windows
ATRAC3, etc.
fIles
fIles
fIles
constant.
the
encoded with lossless,
and
which are
Media~
copy-protected with DRM.
source
voice format.
not
based upon
Audio.
but
and
as
search speed
fIles:
WAVE,
Ejectingadisc
•Ifthe ejected discisnot
15
seconds, the discisautomatically inserted
again into the loading slot to protectit from
dust. (Disc will
General
settings-PSM
not
removed within
play this time.)
_
iPod~
•
• While the iPod
• The text information may not be displayed
is
•
orD.player
When
D. playerischarged through this unit.
to this unit, all operations from the iPod
D. player are disabled. Perform all operations
from this unit.
correctly.
- Some characters such
- Depends
If
8 characters, it scrollsonthe display (see
also page 18). This unit can display up to 40
characters.
you
turnonthis unit, the iPod
cannot be shown correctly
on
communication between the iPod
D. player
the text information includes more
and
operations
orD.playerisconnected
as
accented letters
on
the condition
the unit.
of
Notice:
When
some operations may
correctly
follOWing
For
For
connectinganiPodora D. player,
not
be performed
orasintended.Inthis case, visit the
JVC web site:
iPod
users: <http://www.jvc.co.jp/
english/car/support/ks-pdl00/index.html>
D. player users: <http://www.jvc.co.jp/
english/car/support/ks-pd500/index.html>
_
or
or
the display.
or
than
•Ifyou change the "AMP GAIN" setting from
"HIGH
volume level
unit automatically changes the volume level to
"VOL 30."
Satellite
• You can also connect the JVC SIRIUS radio
PnP (Plug
radio adapter,
the CD changer jack
By
can
cannot control it from this unit.
• To know more about SIRIUS Satellite radio
to sign up, visit <<http://www.sirius.com)).
• For the latest channel listings and programming
information,
radio, visit
PWR" to "LOW PWR" while the
is
radio
turning
turn
set higher
operations
and
Play), using the JVC SIRIUS
KS-UlOOK
on/off
on/off
<<http://www.xmradio.com>>.
the powerofthe unit, you
the JVC PnP. However, you
or
to sign up for
than
(not supplied) to
on
the rear.
XM
"VOL
Satellite
30,"
the
_
or
• Microsoft
registered trademarks
Microsoft Corporation in the United States
and/or
• iPod
Computer, Inc.
CS
Automotive,
•
trademarks
CS
Automotive technologyisincorporated
under
HD
•
License From iBiquity Digital Corporation.
iBiquity Digital and the
Symbols are registered trademarksofiBiquity
Digital Corporation.
Patents.
and
Windows Media are either
or
trademarks
other countries.
is
a registered trademarkofApple
SRS
and
CeJ symbol are
of
SRS
Labs, Inc.
license from
Radio~
Technology Manufactured
SRS
U.S.
Labs, Inc.
HD
Radio
and
Foreign
of
and
Under
HD
Page 27

Maintenance
•
Howtoclean
Frequent detachment will deteriorate the
connectors.
To minimize this possibility, periodically wipe
the connectors with a cotton swab or cloth
moistened with alcohol, being careful
damage the connectors.
•
Moisture
the
connedors
condensation
not
to
•
To
keep
A dirty disc may
If
a disc does become dirty, wipe it
with a soft cloth in a straight line
from center to edge.
• Do
not
conventional record cleaner, spray, thinner,
benzine, etc.) to clean discs.
•
To
New discs may have some rough
spots around the inner and outer
edges.
unit may reject the disc.
To remove these rough spots, rub the edges
with a pencil or ball-point pen, etc.
If
discs
clean
not
play correcrly.
use any solvent (for example,
play
new
discs
such a discisused, this
Moisture may condenseonthe lens inside the
CD player in the following cases:
• After starting the heater in the car.
•
If
it becomes very
Should this occur, the CD player may
malfunction.
leave the unit turned
the moisture evaporates.
•
Howtohandle
When
its case, press down the center
holder
disc out, holding it by the edges.
• Always hold the disc by the
When
the disc
printed surface facing up).
• Make sure to store discs into the cases after
removinga disc
of
edges. Do
storing
use.
In
the case
not
around
humid
this case, eject the disc and
on
inside the car.
for a
few
hours until
discs
from
and
lift the
touch its recording surface.
a disc
into
its case, genrly insert
the center holder (with the
Center
holder
Do
not
use
Warped
the
following discs:
disc
-#
Sticker
*
~
Stickerresidue
Stick-on
label
Page 28

Troubleshooting
What
appears to be troubleisnot
center.
Symptoms
always serious. Check the following points before calling a service
Page 29

Symptoms
• A longer readout timeisrequired
("CHECK" keeps flashing
display).
on
the.
. .
• Either'"NG-ANTENNA"'scrolls
"ANTENNA" appearsonthe
"NQ
Clr
•
appea~
ab6utp~~c~nds;
on
the
th~n
Pf~iousdisplay~~ileH~t~niJ1g
th~.
SIRIUS Satellite
• "NQ(information)*" scrollsonthe-
display while listening to the,SIRIUS
Satellite radio.
.•
"---~
appears.oil~hedisplay
listening to the
*
NO
CATEGORY,
NO
radio.~t
XM.·
..
Satellite radio.
ARTIST,
or
display.
disnlayfo'r
return.~;t~
NO
the'
to···
while
COMPOSER,
and
NO
SONG/PROGRAM
To
be continued
...
Page 30

Symptoms
.',
"NO
FILES"
.
appearsonthe
or"NOTRAGK"
disphiX""\'~
.'
Page 31

Specifications
•
AUDIO
Power Output:
Signal to Noise Ratio:
SRS
Circle Surround
Load Impedance: 4
Equalizer Control Range:
60 Hz,
6 kHz,
Level:±l0
Frequency Response: 40 Hz to20000
Line-Out Level/Impedance:
2.5
Output
Subwoofer-Out Level/Impedance:
2.0
Other Terminal: CD changer
•
TUNER
HD Radio System Compatible
Frequency Range:
FM:
AM:
[FM Tuner]
Usable Sensitivity:
50
dB
16.3
Alternate Channel Selectivity (400 kHz): 65
Frequency Response:
HD Radio broadcast:
Conventional broadcast:
Stereo Separation:
HD Radio broadcast:
Conventional broadcast:35dB
Capture Ratio:
AMPLIFIER
20WRMS
at 4
Q
80dBA
(reference: 1 W into 4
dB
V
120
Impedance: 1
V
120
x 4 Channels
and~1% THD+N
150
Hz, 400 Hz, 1kHz, 2.4 kHz,
15
kHz
ill
load (full scale)
ill
load (full scale)
SECTION
Q)
Auto™
Q (4 Q to 8 Q allowance)
ill
Compatible
SECTION
87.5 MHz to 107.9 MHz
(with channel interval set to
or
200 kHz)
87.5 MHz to 108.0 MHz
(with channel interval set to
530 kHz to 1 710 kHz
(with channel interval set to
531
kHz to 1 602 kHz
(with channel interval set to 9 kHz)
11.3
dBf (1.0
Quieting Sensitivity:
dBf(1.8
~V/75
1.5
dB
Q)
~lV175
20
Hz to20000 Hz
40
Hz to15000
85
dB
Hz
100
50
10
Q)
kHz
kHz)
kHz)
dB
Hz
[AM Tuner]
Sensitivity:
Selectivity:
Frequency Response: 30 Hz to15000 Hz
Stereo Separation:
•
CD
Type: Compact disc player
Signal Detection System: Non-contact optical
pickup (semiconductorlaser)
NumberofChannels: 2 channels (stereo)
Frequency Response: 5 Hz to
Dynamic Range:
Signal-to-Noise Ratio:
Wow and Flutter: Less than measurable limit
MP3 Decoding Format:
MPEG1/2 Audio Layer 3
Max. Bit Rate: 320 kbps
WMA (Windows
Format:
Max. Bit Rate:
•
GENERAL
Power Requirement:
Operating Voltage:
Grounding System: Negative ground
Allowable Operating Temperature:
Dimensions (W x H x D):
Installation Size (approx.):
Panel Size (approx.):
Mass (approx.):
1.5
Design
without
If
a kitisnecessary for your car, consult your
telephone directory for the nearest car audio
speciality shop.
20~V
35
dB
(HD Radio broadcast)
85dB(HD
PLAYER
DC 14.4 V (l1 V to
O°C
182
(7-3/16" x
188mmx58mmx
(7-7/16" x 2-5/16" x
kg (3.3lbs) (excluding accessories)
and
notice.
SECTION
98
102
Media@
192
to +40°C (32°F to 104°F)
mmx
specifications are subject to change
52
2-1/16"x5-15/16")
Audio) Decoding
kbps
mmx150
Radio
20
dB
dB
16
V allowance)
mm
11
mm
7/16")
broadcast)
000 Hz
..
Page 32

r
Having
USA
ONLY
Call 1-800-252-5722
TROUBLE
Please
Refer
to
page
Still
http://www.jvc.com
reset
of
having
We
can
How
help
with
your
to
reset
operation?
unit
your
trouble??
you!
unit
@ EN, SP,
© 2007 Victor Company of Japan, Limited
FR
.lye
0107MNMMDWJEIN
Page 33

KD-HDW10
..lye
LVT1706-002A
ENGLISH
This unitisdesigned to operate on12V DC,
electrical
voltage inverterisrequired, which can be purchased at
dealers.
[J]
systems.
Installation/Connection
Manual
Manuel
If your vehicle does not have this system, a
de
d'installation/raccordement
NEGATIVE
Manual
instalaci6n/conexi6n
ESPANOL
ground
Jve
car audio
Esta
unidad esta disenada para funcionar
sistemas
eh~ctricos
este sistema,
adquirido en
automoviles.
sera
con
12
de
masa
necesarlO un inversordetension,
los
concesionariosdeJVCdeequiposdeaudio
NEGATIVA.
V
SI
su
vehiculo no posee
de
que
ee,
puede
con
para
FRAN<;:AIS
Cel appareil esl
continu
ser
type d'alimelltation, il vous
pOllvez acheter
©
2007
COrlpl
pour
de12Va
fonctionner
masse
NEGATIVE.
fautWIconvertisseur de tension,
chezunrevendeur d'autoradios
0107MNMMDWJEIN
EN,SP,FR
Victor
Company
sur des sources de
Si votre vehicule n'offrepas
jVc.
of Japan, Limited
courant
ce
que
vous
WARNINGS
To prevent
short
battery's negative terminal and make all electrical connections before
installing
Be
installation.
Notes:
Replace
frequently,
It
is
powerofmOTe
impedance
change
damaged
•Toprevent
with
The
when
circuits,werecommend
the
unit.
suretoground
recommendedtoconnecttothe
"AMP
insulating
heat
removing
the
fuse
with
consult
thanSOW
of
40to8
GAIN"
(see page18of
short-circuit,
tape.
sink
becomes
this
this
unittothe
oneofthe
your
Jve
(bothatthe
0).
If
settingtoprevent
the INSTRUCTIONS).
cover
very
unit.
~ue~I;~~~~te,m;co
that you disconnect the
car's
specified rating. If
car
audio
dealer.
speakers
rear
the
maximum
the
the
terminalsofthe
hot
after use.Becareful
chassis
with
andatthe
power
is less
speakers
~
again
the
fuse blows
maximum
front, with
than
from
UNUSED
noltotouch
after
being
50
leads
D;s;;pateu'dedWleu~~
PRECAUTIONSonpower
connections:
•DONOT
connect
car
battery;
• BEFORE
speakers,
otherwise,
connecting
check
the
the
the
speaker
speaker
the
unit
speaker
wiringinyour
L _ _
supply
leadsofthe
willbeseriously
leadsofthe
car.
.
and
power
power
speaker
cordtothe
damaged.
cordtothe
ADVERTENCIAS
Para
evitar cortocircuitos, recomendamos
delabateria y
negativo
de
instalarlaunidad.
antes
•
Aseguresedevolveraconectar
del
automovil
Notas:
• Reemplaceelfusible
fusiblesequemase frecuentemente consulte
de
JVCdeequiposdeaudio
an
Se
recomienda conectar los altavoces can una potencia maxima
•
W,
it
de
de mas
0 a 8
de 4
"AMP GAIN" para evitardanos en los altavoces (consultelapagina
del MANUAL
•
Para
eVltar cortoclrcultos, cubra los cables NO UTILIZADOS con cinta
aislante
EI
sumidero termicoestara
•
denotocarloaldesmontar esta unidad.
PRECAUCIONES
que
efectue todas
despuesdela
por
uno
50 W (tanto arras
0).
Silapotencia maximaesde
DE
INSTRUCCIONES)
muy
sobre
fuentedealimentaci6nyde
•NOconecte
alimentacion
producirse
•
ANTESdeconectar a los allavoces los conductoresdealtavoz del
cable
aUlom6vii
los
conductoresdealtavoz
a la
bateriadeautomovil,
graves
danosenla
de
alimentaci6n, verifiqueelconexionadodealtavozdesu
que
desconecteelterminal
las
conexiones electricas
amasa
esta
instalacion.
conlacorriente especificada.Siel
para autom6viles.
como
caliente despuesdel usa. Asegurese
las
L _ _
consuconcesionario
adelante, con una impedancia
menosde50W,cambie
conexionesdela
los
altavoces:
del
pues
unidad
.
.
unidadalchasis
cable
de
podrian
AVERTISSEMENTS
Pour eviter
tout
la
borne negative de la batterie et d'effectuer
electriques
•
Assurez-vousderaccorderdenouveaulamise
cet
Remarques:
• RemplacerIefusible
souvent, COl/suiter volre revendeur d'autoradios
• If est
plus de 50
impedance
injerieure
vos enceintes (voir page 18
18
Pour eviter les court-circuits, couvrir les barnes desjlls (lui ne
PAS UTILISES avec de la ballde iso/ante.
• Le dissipateur de chaleur devie,.,t tres
attention
PRECAUTIONS
connexion
•NECONNECTEZ
d'alimentation
serieusement
• A VAN'!' de collnecter ies fils d'cnceinles du cordoll d'alimen/(lliol/
nux
court-circuit, nous
avant
d'illstalfer f'appareil.
appareilauchassisdela
parunde la valeur precisee. Siiefusible
recommande
de connecter des ellceintes avec
W (les ellceintes arriere et
comprise entre 4 n
a
50W,c1umgez
de ne pasIetoucher
sur
des
enceintes:
PAS
ill
la
endommage.
cnccintes. verifiezIecablage des el1ceinles de votre voiture.
VOflS
recommalldons de debrancher
voiture
aprlih
les
ellceinles aVallt, avec urle
et80).
Si
"AMP
df{
la
GAIN"
pour
MANUEL
D'iNS·IRUCTIONS).
chaud
el1
reUrant cet appareil.
I'alimentationetla
les
fils
d'enceintesducordon
batterie;
sinon,
I'appareil
L _ _
.
tOllS
les
raccordemeflts
ill
I'installation.
jVc.
une
puissance
eviterd'endommager
apres usage. Faire
sera
la
masse
saute
puissallce de
maximum
SO/It
it
de
est
06]
R _ _
Parts
list
for
your
goma
installation
parts
are
Jve
car
provided
audio
dealer
~
The
following
consult
A / B
Hard case/Control panel
Estuche duro/Panel de control
ftuidetrallsport/PallllealldecommalJde
(E
Power
cord
I
Rubber cushion
Cojin de
AlllorlisSClIren
(aolllc!ull/c
+ •
and
connection
for
this
unit.Ifany
immediately.
itemismissing,
(,J1
Handles
Manijas
Poigllces
+ •
R _ _
Cl:J
Listadepiezas
Con esta
unidadsesuministran
elemento
faltante, consulte
JVCdeequiposdeaudio para autom6viles.
®
Washer
(05)
Arandela
(oS)
RO/ldcUe
(05)
jj
©
Sleeve
Cubierta
MallcllOll
para
instalaci6nyconexi6n
las
inmediatamente
@J
Lock
Tuercadeseguridad
Ecrou
LJ:l
Liste
des
siguientes piezas.51hay algun
consuconcesionario
nul
(MS) •
(MS)
d'arret (M5)
(K
Remote controller Battery
Control remota
Tetecolllmade
.
raccordement
de
Les
manquail,
®
Mounting
Perno de
HOII/Oll
_
..
1
pieces
pieces suivantes
SO/If
col1sultez votre revendeurautoradio
@
Trim
plate
Placa
de guarnici6n
Plaque (i'assemblage
bolt-MS
x 20mm(MS x 13/16")
montaje-MS
de
IllOllIage-A'f5
+ -
R _ _
pour
I'installation
fournies avec cet appareil. Si quelque chose
x 20mm(MS
x 20
mill
(M5
(!:
Pila
Pile
x 13/16 pulgada)
x 13//6/JOlIccs)
0
(R2025
et
jVC
immediatement.
~
Page 34

INSTALLATION
(IN-DASH
The
following illustration shows a typical installation. If you have
questionsorrequire information regarding installation kits, consult
your
Jve
• If
yOli
by
a qualified technician.
~
'------'
MOUNTING)
car audio dealer or a company supplying kits.
are
not
sure
howtoinstall this unit correctly, have it installed
B
,
~
~
*1
1j
+
J',
~
~
l J
" endommager
~
INSTALACION
(MONTAJEENEL
TABLERODEINSTRUMENTOS)
any
La
siguiente ilustraci6n muestra
0 necesita informacion
pregunta
instalaci6n, consulte consuconcesionano de
para
autom6viles 0 a
Si
ustednoesta
•
hagala
seguro de como instalar correctamentelaunidad,
instalar poruntecnico cualificado.
una
instalaci6n tipica.Sitiene alguna
acercadelas
una
compania que suministra tales herramientas
herramientas
JVC
de equipos deaudio
para
""~~~~IIIlIIIIIIIIIII~---~
Do the required electrical connections.
Realice
las
conexiones electricas requeridas.
Reafisez
les
connexions electriques.
*1
When
you stand
the
be careful
.,
~ep~~;r~~
tenga
cUldadodeno
el
fusible provlsto en
parte posterior.
.,
~~;~:~:j~~U:a
fa/re attentlMIderiC
sur
l'arriere.
unit,
not
to damage
~~~.;:~r~ertlcal'
danar
la
7:;~;c:'e,
pas
Ie
fusible situe
INSTALLATION
(MONTAGE
DANSLETABLEAUDEBORD)
L'illustration suivante est un exemple d'installation typique.
vous avez
des
d'installalion, consulter votre revendeur d'autoradios
compagnie d'approvisionnement.
•Siron n'est pas sur de pouvoir installer correctement
questions ou avez besoin d'information sur
faire installer parun technicien qualifie.
Bend
the
appropnate
sleeve firmly
Doble
retener flrmementelamangaensu
l'ordez
mamtewrIemanchonenplace
In
las
lenguetas apropladas
les
languettes appropnees pour
place
tabs to
JVC
cet
hold
para
Si
des
kits
ou une
appareil,
the
lugar
ie
Removing
Before removing the unit, release
When using
so
option
the
unit
the
rear section.
the
porte
opcionall
Firewall
Tablque a prueba de
C/OgOO
J)ashboa~d
Tablerode
Instrumentos
lableallde
bord
I~
~
\..............
""'~~
gl
optional
stayICuando
emplea
LorsdeI'utilisationduhauban
Incend:
~
~Cf{
~
Install the unitatan angle ofless than
Instalelaunidad aunangulo de menos de 30·
lnstallez I'appareil avec un allgle lie moills de
f
r:~
'-'-.'b
~
0
~
"t.
Screw
Torndlo(opc,on)
"",.•",,,,
Extracci6ndela
Antes de extraerlaunidad, Iiberelaseccion
un
en
Stay
(option)
Soporte (opcion)
Hauban (en
option)
(optIOn)
30'
30'
unidad
trasera
Insert the two handles, then pull
illustrated so
Inserte
extraigalas de
para
lnserez
illustreedefarronIiretirer l'appareil.
When installing
la
cubierta
In a Toyota car for example, first remove the
En
un automOvil Toyota, par ejemplo,enprimer lugar
Dans une voiture Toyota, par exemple, retirez d'abord l'autoradioetinstallez l'appareil Iisaplace.
Flat
type
(M5x3/8")'
Tornillo')
(MS
x 3/8 pulgada)""
Vis
a tete
(MS x
3/8
Note
Nota
Remarque
the
I Lors
screws-MS x8
tlPO
plano-MS
plate~M5
pOllces)*
When
screws are used, they
Cuando instalalaunidadenla
longitud.Sise
Lorsdel'installationdel'appareil surlesupportdemontage, s'assurer d'utiliser
(3/8 pouces). Si
unit
de
I'installationdeI'appareil
mm
x 8mm
x 8
mm
installing
utilizan tornillos
des
that
the
las
dos
manijasy,a continuacion,
la
manera
poder desmontarlaunidad
ies
deux poignces, puis tirezdelafarron
without
car
~
the
unitonthe
mounting
could
damage
mensula de montaje, asegurese de utilizar
mas
vis
plus longues sont utilisees,
RetraitdeI'appareil
A vant
de
retirer l'appareil,
them
unit can be removed.
indicadaenla
using
radio
and
des
l4,,,"",-
"-....
the
unit.
largos,
as
i1ustracion
the
sleeve
Iinstalaci6ndela
scans
install
monteelautorradio einstalelaunidadensu
bracket,
estos
pueden danarlaunidad
eUes
utiliserdeman
the
unit
in its place.
make
sure
to use
peuvent endommager
fibererlasection arriere.
*
Not
* No suministrado con
* Non fourni avec
Flat
type screws-M5 x 8
(M5
x 3/8")*
Tornillos tipo
(MS
x 3/8 pulgada)*
Vis
atete
(MS x
3/8
the8mm
los
tomillosde8 mm (3/8 pulgada)
f'appareil.
unidad
chon
lugar.
supplied for this unit.
mm
plano-M5
x 8
plate~MS
x 8
pouces)*
(3/8") -long screws.
des
mm
vis
d'une longueurde8
sin utilizar
esta
unidad.
cet
appareil.
mm
Iflonger
de
mm
I
TROUBLESHOOTING
•
The
fuse
blows.
* Are the red
•
* Is
• No
* Is
·
* Is the speaker
* Are the
• Noise
*
• Unit
* Is the speaker
* Are the
• This
* Have you reset
and
Power
the
sound
the
Soundisdistorted.
Is
the rear
shorter
black leads connected correctly?
cannotbeturned
yellow lead connected?
comes
speaker
output
output
"-"
terminals
interfere
with
ground
and
thicker cords?
becomes
hot.
output
"-"
terminals
unit
does
not
your
out
from
lead short-circuited?
lead grounded?
ofL
sounds.
terminal
lead grounded?
ofL
workatall.
unit?
I I
on.
the
speakers.
and
R speakers
groundedincommon?
connected
to the car'schassis using
and
Rspeakers
groundedincommon?
LOCALIZACIONDEAVERIAS
•EIfusiblesequema.
* L
Estan
los
conductores rojo ynegro correctamente conectados?
• Noesposible
*
LEstaelcable amarillo conectado?
• No
...
LEstaelcable de
•EIsonido
*
LEstaelcable de
*
LEstan
masa
•
Perturbaci6nderuido.
*
LEI
utilizando
•Launidadsecalienta.
*
LEstaelcabledesalida
*
LEst2ln
masacomun?
• Este
* LReinicializo
conectarlaalimentacion.
sale
sonidodelos
presenta
105
terminales
comun?
terminaldetierra trasero
los
los
terminales
receptornofuncionaenabsoluto.
alta
voces.
salida
del altavoz cortocircuitado?
distorsi6n.
salida
del altavoz conectado amasa?
"_"delos
cordones
el
receptor?
esta
mas
corto y
del altavoz conectado amasa?
"_"delos
altavoces Ly Rconectados a
conectadoalchasis
altavoces Ly Rconectados a
mas
grueso?
I
del automovil
una
una
I
EN
CASDEDIFFICULTES
•Lefusible
*
•
*
•
*
•Leson
*
...
•
*
•
...
*
•
...
saute.
Les
fils
rougeetnoir sont-ils
L'appareilnepeut
I.e
fil jatme
est-eUe
Pasdeson
des
I.e
fildesortie d'enceinte est-if court-circuiter
est
deforme.
I.e
fil
de
sortie d'ellceinte est-ifa
I.es
bornes
"-"
a
la
Interference
La
voiture avec un cordon courtetepais?
L'appareil
I.e
Les
Ii
la
eet
Avez-vous reirtitialise votre appareil?
des
masse?
avec
prise arrieredemiseIila
devient
fildesortie d'enceinte est-ifIila
barnes
"-"
des
masse?
appareilnefonctionne
racordes
pas
etre
mise
raccordee?
enceintes.
enceintes gaucheetdroit
les
enceintes gaucheetdroit sont-elles mises ensemble
fa
sons.
terre est-elle connectee au chassisdela
chaud
.
pasdutout.
correctement?
sous
tension.
masse?
masse?
I
sont-eUes
mises ellsemble
Page 35

ENGLISH
ESPANOL
FRANC;:AIS
ELECTRICAL
Typical
Before connecting: Check the wiring
Incorrect connection may cause serious damage to this unit.
The leads
body may be different in color.
Connect the colored leads
specified in the illustration below.
CONNECTIONS
connections/Conexiones
of
the powercord and thoseofthe connector from the car
in
the vehicle carefully.
of
the power cord in the order
1 Connect the antenna cord.
J Finallyconnect the wiring harness to the unit.
-----------
..
t(;jj"~e
..d..
,a~gr
..
a..m..Ill..:
lli)
..ll.l.)l..L..-.-
Salida
de
linea 3 Negro
(vease d,ag,ama Ill)
SortIe de llgne
m)
1 Amarillo*2
Terminal de tierra
posterior
Borne arriere de
Antenna
termlllal
Terminaldela
Borne de I
antenne
f""T'"1~Ik--r-"l""T
-f·...L,"rn"eilo;"u
(vOIrledwgramme
anrena
~
J
*2
Before checkingthe operationofthis
this lead must
turned on.
*2 Antes de
ade
contrarionose
*2
Pour verifierIefonctiormementdeeel appareil avant
installatiol/,cefil doit etre raccorde,
pas
be
connected, otherwise power cannot
comprobarelfuncionarniento de esta
la
instalaci6n.esnecesario conectar este cable.
podra conectarlaalimentaci6n.
bre
mis
sous tension.
unit
prior
to installation,
unidad
sillolll'appareilne
be
de
tipicas /
previa
10
peut
®
CONEXIONES
Raccordements
Antesdela conexi6n: Verifique
vehiculo. Una
unidad.
Los
cordones del cabledealimentaci6n y
delacarrocerfa
(onecte
los
orden
especificadoenla
1 Conecte el cable
3
Por
ultimo, conecteelcabledealimentBci6n alaunidad.
To
external components
A los componenres externos (veaseeldiagrama
Aux
appareils exterieurs (voirJediagramme
~
~
------I:f
..-..·
B;~;~·Fus~bl.e.15.A
t
Noir
~======CD
Yellow*2 }
~=J=au=,=re=*2===:::17
~~~
Rouge
~=========
Blue
with
Azul con
Bleu avec bande blanche
======:::::I@
Orange
Naranja con
Orange avec
~=====================®
ELECTRICAS
typiques
conexi6n
del
automovil
conductoresdecolor
de
ISAfuse
FUSible
de15A :*1No
white stripe
rayas
blancas
with
white
rayas
band
atentamenteelconexionado
incorrecta podria
ilustraci6ndeabajo
antena
(see
............................•...•...
~
® A un terminal accesorio del bloque de fusibles
stripe
blancas
blanche
producir
los
podrian
ser
de
del
cabledealimentaci6nenel
diagram
[i
)
To
rnetallic
bodyorchassisofthe car }
Auncuerpo metalico 0 chasis del autom6vil
Vers corps merallique ou chassis
To
a live terminalinthe
(bypassing the
Aunterminal activo del bloque de fusibles conectado alabateria del
autom6vil (desviandoelinterruptor de encendido) (12 V constantes)
A
voiture (en derivant l'interrupteur d'allumage) (J2 V co1lStant)
(ILLUMINATION)
ignition
WIC
borne sous tension du porte-fusible connectee Iila!Jatterie de
To
all accessory terminal
Vcrs borne accessoire du porte-fusible Porte-fus,Me
RACCORDEMENTS
del
Avant de commencer la connexion: Verifiez attentivement
danos gravesen
del conector procedentes
diferemes
en
color.
{j])
{j])
cabfage du vehicule. Une connexion incorrecte peut endommager
la
serieusement l'appareil.
Lefil du cordon d'alimentation et ceux
la
voiture peuvenl eire differents en couieur.
ies
fiis
coion~s
Connectez
specifie
sur
1 Connectez
l'illustration ci-dessous.
Ie
J Finalement, connectez
du cordon d'alimentation dans l'ordre
cordon d'antenne.
Ie
faisceau de fils al'appareil.
7
~·····;;·~~·~~~·~i,~df~·r·;h;;·~~·,;··············
sumlnlstrado
:
Non
Journt
(ielavoitllre
fuse
block
connecting10the car battery
switch) (constant12V)
in
the fuse block
To
the remote leadofother equipmentorautomatic antennaifany (200 rnA max.)
AI
conductor
remotadeotro
Alifil
de telecommande de l'autre appareil
(200 filA
max.)
To
~I
A l'interrupteur d'eclmrage de
avec
equipo
car
light
interruptor
con
esta
unldad
eel
apparelt
11*1
.........
~'
~
..........
la
}j
0 de
la
anrena automatica.sihubiere (max. 200 rnA)
Oil
a l'anlenne autofllatique s'ily
control
switch
de
cont~ol
de
las
luces del autom6vil
la
voiture
ELECTRIQUES
Ie
des
connecteurs du chassis de
Ignition
switch
Interruptor de encendido
Interrupteur d'allumage
0"0
~~~ub:~c:
fusibles
erl(jlme
White
with
black stripe
rayas
Blanco con
Blanc avec bande noire
Connecting
exterieurs
You
can connect amplifiers to upgrade your car stereo system.
• Connect the remote lead (blue with white stripe) to the remote
lead
this unit.
• Disconnect
amplifier. Leave
Altavoces delanteros
Amplificador de
negras
the
et/ou
of
the other equipment so that
the
speakers fromthis unit, connect
the
speaker leadsofthis
Front
speakers
Enceilltes avant
Jye
Amplifier
IveA mplificateur
JVe
White
Blanco Gris con
Blallc Gris avec !Jande noire
Left speaker
Altavoz izquierdo(frontal)
Eflceintegauche «(want)
external
d'un
caissondegrave
it
can
Gray
(front)
amplifiers
be
controlled through
unit
unused.
with
rayas
and/or
themtothe
Remote lead
Cable
hi
black stripe
negras
subwoofer
Usted
desuautom6vil.
•
(onecteelconductor
remoto
• Desconecte los altavocesdeesta unidad y conectelos al
amplificador.
quedan
Remote lead
remota
Cable
Fil
d'alimefllationIIdistance
(Bille
remoto
(Azul con
d'alimefl/atiofl(Idistance (Bleu avec
Gray
Gris
Gris Vert avec bande noire
H
(+)
Right speaker
,
Altavoz derecho (frontal)
Enceil/te droit (avant)
I Conexi6n
podra
conectar
del
otra
Los
sin
usar.
with
white
stripe)
rayas
blancas)
Green
with
black stripe
Verde con
rayas
(front)
de
los amplificadores
amplificadores
equipo
cables de
remoto
para
para
(azul
con
rayas blancas)alconductor
poderlo
(ontrolar
105
altavoces de esta unidad
V-connector (not supplied
Conector en Y(no suministradocon esta unidad)
Connectellr Y
bmule
(IlOIl
lJ/anche)
KD-HDW10
Front
speakers
Altavoces delanteros
E/Jceintes avant
SUBWOOFER
SUBWOOFER
(Subwoofer)
SUBWOOFEU (Caisson degrave)
negras
~
Green Purple
Verde Purpura con
(-)
(+) Vert Violet avec bande noire
~
Left speaker (rear)
Altav~z
Encemte gauche (arriere)
y/o
mejorarelsistema
a travesdeesta
fOllmi avec cel appareil)
To
the remote leadofother equipment
automatic antennaifany
AI
conductor
antena automatica,sihubiere
Allfil
rall/ellne rlutolll(/tique s'il y 1'/1 a
($ubwoofer)
estereo
unidad
for
this
unit)
rematodeotro
de telecol1lmande de I'autre appareil
with
black stripe
rayas
negras
izquierdo (trasero)
subwoofer
equipo
externos
Vous pouvez cOllnecter des arnplificateurs pour arne/iorer votre
systeme atltoradio.
• Connectez
• Deconnectez
Ii/Ie
Ie
aufii
puisse
it
inutilises.
fit de cornmande adistance (bleu avec bat/dc biallche)
de commQ/lde adistance de l'autre appareil
are
commande
I'amplificateur. Laissez
0 de
les
or
la
Oil
a
~
I Connexion
via cet appareil.
enceintes decet appareiletconnectez-Ies
les
*3
Firmly
attach the
bodyorto the chassisofthe
uncoated
the paint before ilttaching the wire). Failure to do
so
Illay
cause
-ll-3
Fije firrnementeelcable de tierra alacarroceria
metalica 0
can pintura
de
fijarelcable).
antes
producir danos en
-ll-3
Attachez
so/idementIefil de mise Ilia masse all
d/(1ssis merallique delavoiture-(I
n'est
11(IS
recoul'Crtdepeilltlm: (s'i! esl
de peilltllre, elllevcz
It'attacherIefil). L 'appareil peut
si
alaII'est pasfail correctelllell/.
*4 Signal cord
-ll-4
Cable de senal (no suministrado con esta unidad)
-ll-4
Cordon de sigllal
Purple
Purpura
(-)
(+)
Violet
~
Right speaker (rear)
Altav.oz derecho (trasero)
Encel1lte droit (arrii:re)
d'amplificateurs
fils d'enceintes de cet appareil
ground
wire
with
damage to the unit.
al
chasis-aunlugarnocubierto
(si
esta cubierto con pintura. quitela
(not
car-to
paint
(if
coated
De10contrario.sepodrian
la
unidad
d'abonill/
,~upplied
for
(flOI/
foumi
avec cet appareit)
de
farOll
10 the metallic
the place
with
paint, remove
1111
ellt/roil q/li
reCOl/vcrt
pein/llre
are
endomfllage
this
unit)
qu'i!
(IVlllll
Page 36

Connecting
JVCCDchanger,
iPod"deApple 0
•
Set
"(HANGER"
Reglez
"(HANGER"
You
can connect these componentsinseriesasillustrated below. Estos componentes se puedenconectarenserie.
• For listening to the SIRIUS Satellite radio. connect a
-Down
• The iPod*sorD.
adapler
(no'
D. player).
Connection
1(integrated (onnectionl/Conexion 1
I:t
P Processeur DLP IVC ChangeurdeCD
O
~
To
CD changer, KS-PDIOO,
or KS-PD500
AI
cambiador de
KS-PD
All
c1lallgeur
KS-PDJOOoII
the
external
SIRIUS
reproductor
for
the
external
pourIereglagedeI'
Link Processor (separately purchased) to this unit. • Para escucharlaradio satelital
player can be connected usinganinterface Processor)
supplied)-KS-PDIOO
CD
changer
Jack
paraelcambiador de
Prise
aU.
dumgeur
~
",.-------------------------------------------------------------------------------------------------------------------------------------------------------------------------
:...
:
: •
: adaptadar Smart Digital
: • Pour eeouterfaradio satellite XM, vous potlvez aussi eonllecterIetuner universe!
: Iwnuirique intelligent
CD.
100 0
KS-PD5oo
de CD,
KS-PDSOO
components
Satellite
radio,XMSatellite radio, Apple
JVC
0./
input
setting
entree
(for
iPod)orKS-PDSOO
((onexion
jack
CD
CD
.1.
.,
KD-HDW10 DLP
I Conexi6n
ChangeurdeCD
(See
page18of
exterieures
(Voir
Jve
DLP
(for
integrada) "onnexion 1
•
For
lIstenmgtothe
Smart
DIgItal
Para
escucharlaradio satelital
de
los
JVC,
radio
the
INSTRUClIONS.)/Sele«ione
page18du
MANUEL
enlailustraci6ndeabajo.
• Puedeconectar el
de
interfaz
(para el
reproductor
((onnexion
*6
XM Satellite radIO,
Adaptcr-XMDJVCIOO
XMDJVCIOOdeJVC
jVC-XMDjVCIOO
Li:.LJ-------,.~
XMDJVC100
'-
.~.
--'.
componentes
externos
iPod@,orJVCD.playerICambiadordeCDdeJVC,
satellite
SIRIUS,
"(HANGER"
D'INSTRU<lIONS.)
de
JVe
(na
suminisrrada)-KS-PDl
integree)
IYC
XM,
~
SIRIUS,
(adquirido per separado)alreceptor.
iPad*'
ael reproduclOr
0.).
DLP
JVC
yOll
can
also
(not
supphed).
tambien
puede
conectarelSintonizador universal XMDirect'M (adquirido
(na
,umini'tradal.
(noll
fourni).
*8
I Connexion des appareils
radio
satellite
XM,
iPod®
AppleoulecteurD.JVC
poraelajustedeentrada
tal
como se muestra
coneeteunDLP
D.
usanda un adaptador
00 (para iPod) a
JYCCDchanger
CambladordeCDdeJVC
connect
XMDlrect™
(Down
KS-PDSOO
IVC
Umversal
externa
(ansulte10pcigina18
VOLIS
pOllvez connecter
l'illustration.
•
Pour
Link
XMDirect','1
ecouterlaradio
-Processeur
•LeiPod*souIe
adaptateur d'i"terface (non fourni)-KS-PDlOO (pour iPod) ou
KS-PD500
0 JVCD.player(separatelypurchased)
Tuner
Box (separately
(vendu separement) a
..
XMDirecP·
...
• TuneruniverseIXMDirec:l""
'-------'
Sintonizador
Universal
universal XMDirect"·
exterieurs
radio
satelital
SIRIUS,
radio
satelital
XM,
del
MANUALDEINSTRUWONES.)
ces
appareilsenserie commemontree
satellite
SIRIUS,
de
signaux satellite-terre (vendu separemenl) a
leeteurD.peut etre eonneeteenutilisant
(pour
Ie
feetellr
purchased)
par
separado)alreceptor mediante un
Antenna (supplied with
Antena (suministrada conelSintonizador universal XMDirect"')
Alltelllle (foun/ie avecletuner
Tuner
Box
eonneetezunproeesseur
D.).
Apple iPod (separately purchased)
Apple iPod (adqufrido separadamente)
iPod ApplL
(vendu
Reproductor DNC(adqUindo
separadamente)
Leerellr
D /VC (vendu sepa,emenr)
through
thIS lImt
cet
appareil en uti{isant l'adaptateur
XMDirect™
Universal Tuner Box)
universel XMDirectr,,)
separement)
uS1I1g
Jve
eet
un
/
sur
DLP
apparei/.
JVC
Connection
21alternative (onnectionl/Conexion 2
CD changerjack
Jack
paraelcambiadordeCD
Prisedudlangeur
CD
Ir
~
r-----.-----------------------------------------------
.
••••_••••_••_••••••••••••_••••_••_••••_••••_••
CAUTION/PRECAU(ION/PRECAUTION:
• Before
connecting
the
external
make
sure
that
the
• Antesdeconectar los
externos, aseguresedequelaunidad est€
apagada.
valltdeCOl/fleeter
• A
assurez-volls que I'appareil esl hors tension.
JVC
PnP (Plug
•
Set
"EXT
IN"
pourIereglagedeI'
You
can
also
KS-UIOOK
•
Turning
Tambien podra coneclarlaPnP
para radia
• Al encender/apagar el receptor tambien
VOIlS
pouvez allssi
radio SIRIUS
• Mettre
sOlls/hors
Other
external
•
Sel
"EXT
IN"
pourIereglagedeI'
Jack
paraelcamblador de
Prisedu
unitisturned
and
IN"
for
the
connect
Jve
(not
supplied).
on/offthe
unit
SIRIUS
JVC,
KS-Ul
COI/flecterIePnP
j\fC
KS-U
twsiolll'autoradio pellt allssi mettre
component/Otro
IN"
for
the
CDch,ngerl'ck
cJ"mgeurCD
components,
off.
componentes
les
appareils exterieurs,
Play) / PnP ("Plug
external
input
entree
exterieure
PnP
through
can
also
turns
NC a traves
OOK
(na
sumlnlStrada).
/VCtleet
lOOK
(11011 fourl/i).
exlernal
input
enlree
exterieure
~.~(D=>,~
~.effi~""~
~.
CD
~
--f---------------------.---------------..!
~
((onexion
alternatiya) /
Connexion2((onnexion
alternative)
r--------------------------------"'\
L
""",
----------------------------------------------------------------------------------------------------------------':
r-----~:J---_l
lU..r-------,
'--------'.
*5 iPod
is
a registered
Computer,
·S
iPodesuna marca registradadeApple
Computer, Inc.
*5
iPod est
IUle
Computer,
and
Play")
setting
(See
page18of
page18du
Jye SIRIUS
Jye PnP.
sOfls/llors
page18of
page18du
_
the
MANUEL
tensionIePIIP
externo/Autre
the
MANUEL
~
~
(Voir
this
unit
using
on/offthe
de
este receptor utilizando el adaprador
se
enciende/apagalaPnP
autorlldio en lItilisant 1'1Idaptateurde
componente
setting
(See
(Voir
KD-HDW10]
•••__
/*7
*.
••••••_••_••_•••••
and
.~
.~.
trademarkofApple
Inc.
marque deposee d'Apple
Inc.
JVC
/ PnP ("Plug
INSTRU<lIONS.)/Seleeeione
D'INSTRU<lIONS.)
radio
adapter,
NC.
jVc.
Jack
appareil
INSTRU<lIONS,)/Seleeeione
D'INSTRUC1IONS.)
i---------------------------------------'
ct
t
1111
Play")
"EXT
CD
paraelcambiador
Prise dll c}ul1Igellr CD
"EXT
External
C~;~~;e~fn:;t~;::.:~ar
3.5
Miniclavija estereode
MillificIJestereode3,S1/lm
I Antena (suministrada con
..
..
_L.__-_-__-_-__..,_-__-_-
JVC
IN"
paraelajustedeentrada
KD-HDW10
changer
jack
de
CD
exterieur
IN"
para
elajustedeentrada
component
mm
stereo
mini
plug
3,5
mm
Apple iPod (separately purchased)
Apple iPod (adquirido separadamente)
iPod
Apple
(vendu
separbnent)
IYC D. player (separately purchased)
Reproduetor
D.
NC
separadamente)
Lecteur
T
••
Antenna (supplied with XMDirect
Ameline
(foun/ie /lvee
__
-_..J
••
XMDirect''''
Sintonizador
~~~
Universal
Tuner
universal XMOirect'"
~~~'.~i.v~~~~~~~.~~~~'.t~~
*7
Signal
Smart
*7
Cabledeserial suministrado
caneladap,adar Smart Digital
*7
Cordon designaljourni avec
votre adaptateur
intelligellt
extema
(onsulle10pcigina18
Box
__.._.__..~....._...•.._...._...
cord
supplied
Adapter
1I1111uirique
with
Digital
del
Stereo mini plug
Mlnictavija estereo
Ficllesteremifli
"
Universal
el
Sintonizador universal XMDirect"')
Ie
tuner
universel XMDireet"")
your
*8
Audio signal cord supplied
Smart Digital Adapter
*8
Cable de senal deaudio
suministrado con
Smart Digital
*8
Cordon
adaptateur flllmeriqlle intelligent
MANUALDEINSTRUWONES.)/Reglez
To headphones jack
AI
jac para auriculares
A
la
prise dll casque
(adquirido
D.
JVC
(vendu
separement)
Tuncr
Box) ,
~._
.._..__.._..
el
adaptador
audio
IVI/TIli
alICe
d'tcoute
\
)
To
DC IN jack
AljackOCIN
A
fa
prisl?DCIN
externa
(onsulte10pcigina18
External
component
Componente
Appareilexterieur
*9
*9
*9
*10
*10
*10
exterior
Line
Adaptadordeentradadelinea
unidad)
Adaptateur d'e1ttreedeligne KS-U57 (Ilofljoumi avec
AUX Input'
Adaptadordeentrada
unidadl
Adaptateur d'entree AUX KS-U58 (nofljourtli avec
Input
del
MANUALDEINSTRUWONES.)/Reglez
Adapter
KS-U57
(not
supplied
KS-U57
(no suministradocan esta
Adapter
KS·U58
(not
supplied
AUX
KS-U5B
(no suministradocan
for this
for
this
unit)
unit)
eet
with
your
votre
B
JVC
PnP
eel
appareil)
esta
autoradio)
#
"EXT
"EXT
Page 37

When
it is
not
required
to
detach the front control panel
from the main unit, use the
provided screw to attach the
control panel to the main unit
FSYA4001-001
Page 38

&CAUTION
CONNECT BLACK WIRE (
OTHERWISE, DAMAGE
TO
CD
GND)
YOUR UNIT
TO
GROUND
MAY
FIRST.
OCCUR.
Q)
METALLIC
OF
INCORRECT CONNECTION CAUSES SERIOUS
PLEASE
CONNECT GROUND
THE
CAR
CONNECT
READ
BODY
ANTENNA
INSTALLATION/CONNECTION
FIRST
OR CHASSIS
TERMINAL
®
DAMAGE
MANUAL
CONNECT OTHER WIRES
CONNECT POWER CORD TO
TO
THIS UNIT
CAREFULLY.
THE
UNIT
J'
Page 39

NOTICE / AVISO / AVIS
A
ENGLISH
This unitisequipped with the
security tag case
shipped from the factory.
•Itis
To remove
follow
1 Loosen the screw with
2 Remove the security tag case.
requiredtoremove the
security
connect the unitinyour
screwdriver.
tag
the
the
procedure below:
(@)
when
case before
security
you
car.
tag case,
ESPANOL
Esta unidad viene de fabrica
equipada
seguridad
•
Tenga
de
la
Para
seguridad, realice
procedimiento:
1 Afloje
destornillador.
2 Retire
conlaetiqueta de
(@).
a bien retirarlaetiqueta
seguridad antes de conectar
unidad
retirarlaetiqueta
en
su
autom6vil.
de
el
siguiente
el
tornillo con
la
etiqueta de seguridad.
un
FRANCAIS
AI'expedition de I'usine, cet appareil
est muni d'un couvercle protecteur
d'etiquette de securite
•IIfaut enleverIecouvercle
protecteur d'etiquette de securite
avantdeconnecterI'appareil dans
votre voiture.
Pour
protecteur
suivezlaprocedure ci-dessous.
1 Devissez
2 Retirez
retirerIecouvercle
d'etiquettedesecurite,
la
vis avecuntournevis.
Ie
couvercle protecteur
d'etiquette de securite.
(@).
GET0222-001 A
[J]
Page 40

Instructions
Foldsoopeningisat
Tapeinmiddleoron
Thank
the
top.
front.
you
for
purchasing
Pleasedonot
correspondencetothis
JVC
1700
Wayne,NJ07470
307C
send
AMERICAS
Valley
Road
productsorother
CORP
PRODUCT
address.
JVC®
PO BOX 9580
PEORIA IL 61612-9580
I.II•••
"
11.11"."11••
REGISTRATION
PLACE
II
1.11.I•••
I
I.I.I"I.
II
II."I"I.
II.
11I1
••
FIRST·CLASS
STAMP
HERE
11
CARD/QUESTIONNAIRE
Registering
event
This
this
a product
formisfor
form
THANK
your
does
not
YOU
REGISTER
I
us
product
safety
Product
diminish
FOR
ONLINE
CUSTOMERS
will
allowusto
notificationisrequired.
Registration
your
rights
PURCHASING
AT:
ONLY
contact
purposes
during
THIS
WWW.JVC.COM
I
youinthe
only.
the
warranty
JVC
unlikely
Failuretoreturn
period.
PRODUCT
Page 41

JVC®product Registration
First Name:
Last Name:
Address:
Apt#"
City:
State:
Zip:
Phone:
Email Address:
Thank you!Weappreciate your responses to this questionnaire.
The information you choose to share with us will be used
product information and other communications that may interest you.
If you prefer not to be contacted about these special offers, please check here. { }
Date of Purchase
Model Number
Serial Number
Purchase Price
Dealer
IMPORTANT: Please fill-out and return
10 days or Log to JVC.com
and register On-Line
by
JVC to offer you
in
1) Did you:
- Purchase this product your self?
- Receive this product as a gift?
2)Isthis Product:
- The first product of this type you have ever owned?
- A replacement for a similar JVC product?
- A replacement for a similar product made by another
company?
- An addition to a similar product you are still using?
3) What factors most influenced your
decision to purchase this product?
- JVC brand reputation
- Previous experience with JVC products
- Price
- Specific product features
- Style/appearance
- Salesperson's recommendation
- Friend/relative's recommendation
- Warranty coverage
- Other
4) How did you learn about this product?
- Magazine Advertisement
- Newspaper Advertisement
- TV/Radio Announcement
- Product Brochure
- Direct Mail
- Mail Order Catalog
- Friend/Relative Recommendations
- Salesperson/Store Recommendation
- Internet
- Dealer Event
- Other
BT-51041-1
(0406)
5) Your Gender:
- Male
- Female
6) Your Marital Status
- Married
- Single
7) What is your approximate annual
household income level?
- Under $25,000
- $25,000 - $49,000
- $50,000 - $74,000
- $75,000 - $99,000
- $100,000 and over
Comments:
JVCThanks you for completing this
questionnaire.
Your
responses will help us reach you with
offers that may interest you.
If
you prefer not to receive these offers
please check here { }
PrintedinIndonesia
Page 42

,..
OWNER'S COPY OF WARRANTY CARD
COPIE D'ENREGISTREMENTDElA
DU
PROPRIETAIRE
(Save sales docket together with this warranty card, as a proofofdateofpurchase.
La facture et cette grantie sont vas preuvesdela date d'achat; rangez-Ies.)
MOD~L
. SERIAL
MODELE'
Purchase
from.
Ache!e chez
Dealer's Address .
Adresse du
Vendeu(
No.
6iiY·(;~·Tc;~n···
Ville
Owner's
Nom du Proprietaire:.
Owner's Address
Adresse du Proprietaire
C"ii'
'
c;;
y
Ville
BT-52007-1
(0107)
WARRANTY CONTROL CARD
CARTEDECONTROlEDElA
IMPORTANT: This warranty control card must
on
the back hereof or register via internet within 7 (seven) days from the date of purchase.
IMPORTAt>:IT:
dans les 7 Jours de
MODEL.
MODELE· .
Purchased from
Achete chez
Dealer's Address
Adresse du Vendeur
Ciiy'o~TO;;~'"
Ville
Owner's Name
g~~e~~
Adresse du Proprietaire'
No Rue
Provo
Name
·····No:···
'T(;~~'
Cette carte doit etre renvoyee dOment remplie aI'adresse indiquee
la
date d'achatoualler surIesite par internet pour enregistrement.
. NODESEAlE'.
~rggr~i~jre'
.:N.o
No Rue
r----;---,---.,,-.,
You
may also register on-line
at:www.;vc.ca
Provo
..............................
No
Provo
Provo
Detach here.
(PLEASE PRINT/EN LETIERS MOULEES)
.............
·······P;.o~
Prov
Provo
Provo
GARANTIE
NO.
NODESERlE'
Street
............................................................................
GARANTIE
be
SERIAL
.. Date achete ..
...
.
Date
purchased.
Date
achete .
.
Street
Rue
adecouper
ici
WARRANTY
D1SmIBUTEDINCANADABYJVC
filled in and posted to the address indicated
NO
Date purchased
S".." , , .
Vous
pouvez egalement vous
inscrire par internet
Postal Code
Code Postal
Postal Code
Code Postal
PrintedinIndonesia
APPLIES
"Post<ii
Code Postal
a:~
.
ONLYTOPRODUCT
CANADA
INC.
au
verso,
'Code'"
.
..
JVC
..
WARRANTY
filAIANTl1
JVC CANADA INC.
21
Finchdene
TEL:
JVC
CANADA INC. (hereafter called "JVC") gives JVC CANADA INC. (ci-apres appele "JVC") enonce
the following express warranty for each new JVC la garantie expresse suivante pour tout nouveau
product distributedinCanadabyJVC and sold by produit
an authorized JVC dealer. par un detaillant JVC autorise.
JVC
warrants that this JVC productisfree, under JVC vous garantit que ce produit JVC est degage,
normal use and maintenance, from any defectsinsous
material and workmanship subject to the following defauts d'habilete professionnelle et d'articles sous
terms and conditions: reserve des modalites et conditions suivantes:
1. To
Obtain
Warranty
(a) The JVC Warranty Control Card herein
provided mustbecompletedinfull and
posted or registered
of
date of purchase of the JVC product.
(b)
This JVC Warranty Control Card must
completedinfull and presented together
with proof of purchase of the JVC product
requiring service.
(c) The JVC product mustbebroughtinfor
servicetoan
2.
Limitation:
This Warranty shall not apply to:
(a) Repair or replacement of any cabinets,
batteries, plates, connection cords, anten-
nas, dust covers, knobs, speaker grills,
speaker cones, projection screens, projection
screen savers, and all accessories.
(b)
Any
defects caused or repairs required as a
result of misuse, abusive operation, negligence, improper
(c) Any defect causedorrepairs required as a
result of not following the instructionsinthe
operation manual.
(d)
Any JVC product tampered with, adjusted
or repairedbyany party other than JVC or
authorized JVC Service Centre personnel.
Service:
via
internet within 7
authorized JVC Service Centre.
use
and/or insufficientcare.
Square,
(416)
293-1311
http:LLwww.jvc.ca
Toronto,ONM1X
FAX:
1.
(a)Lacarte garantie de controle JVC ci-incluse
days
be
(b)
(c)Leproduit JVC
2.
Restrictions:
Cette garantie ne s'applique pas aux:
(a) Reparation ou
(b) Tous defauts occasionnes ou reparations
(c) Tous defauts occasionnes ou reparations
(d)
(416)
JVC,
une
Pour
doit contenir les renseignements complets
etre postee d'achat du produit JVC ou aller
surIesite par internet pour enregistrement (7)
de
Cette carte garantie de contrale JVC doit
contenir les renseignements complets et etre
presentee avec la preuve d'achat de I'article
JVC pour obtenirIeservice.
detaillant
d'entretien.
cabinets,
cordons de raccord, antennes, housses de
protection, boutons, treillis d'enceinte
accoustique, cones de haul-parleur, ecrans
de
projection, et tous les accessories.
requises suite a une utilisation abusive
mauvaise, de negligence, soins insuffisants
eVou
requises suite a I'omission de suivre les
recommandations d'un manuel d'instruction.
Tout
toute autre entreprise que JVCouun
de
autorise JVC.
1A7
293-8208
distribueauCanada par JVCetvendu
utilisation et d'entretiens normaux, de tout
oblenirunservicedegarantie:
la date d'achat du produit JVC.
doil
JVC
projection, protecteurs d'ecrans de
utilisation incorecte.
produit JVC touche, ajusteourepare par
service d'entretien et de reparation
etre apporte chez
autorise pour un service
remplacement
batteries,
panneaux avant,
de tous
centre
et
un
ou
Page 43

JVC
productsonwhich the serial num-
Any
(e)
ber has been defaced, modified or removed. mutile, modifie ou enteve.
(f)
Maintenance, cleaning or periodic check-up
(g) Conversion to foreign or domestic voltage or nettoyage.
frequency.
(h) Any
JVC
Electrical Safety Regulations
(i)
Any JVC products used for commercial or
institutional, rental, or display purposes.
Any JVC product which has been resold and Main-d'oeuvre..gO
(i)
no longer owned by the original purchaser.
Product purchased from "outside Canada". n'est plus la propriete de I'acheteur originel.
(k)
"bankruptcy" or "liquidator". (k) Produit achete
product without
Parts
.....
1 year (except video head days) Pieces
Labour...gOdays video -gOjours)
the
Canadian ertangereaudomestique.
ID.
gO
Tout
produit JVC dontIenumero de serie a ete
(e)
L}entretien,
(f)
La
(g)
Tout
(h)
(SA) du Canada.
(i)
Tout
ou institutionnelles, de locationaud'etalage.
(j)
Tout produit JVC qui a ete revendu et qui
"faillite" ou "Iiquidateur"
verifications
periodiques
conversion a une fn§quence, une tension
produit JVC sansIesigne d'identification
produrt
JVC utulise a
..
an
1
des
fins commerciales
(excepte
jours
a "I'exterieur
du
WARRANTYTERM (VALID FROM THE DATE OF PURCHASE)
DE
CONDITIONS
ProjectionfTVs,
ProjectionfTV In-Home Service (25" and above)
TeM!viseurs couleurs, ecrans de projection
adomicile pour
Service
TV
VCR
Combo
TV
VCR Comb
D-ILA
Rear
Projection
projection arriere D-ILA
TV
In·Home
service to be provided where available.
*
Where
it is
packing, shipment, and all costs associated with the delivery of the equipment to and from
Authorized Service Centre.
Service
* S'il
un
depuisIedetaillant JVC autorise
Receivers, Home Speaker Systems, Front Projection, Car Audio
"digifine" and "ARSENAL'series
Recepteurs, systemes de haut-parleur maison, Projecteur avant,
Audio D'auto des series "digifine"et"ARSENAL:'
AC Adapters, Remote Controls, Headphones, Microphones
Adaptateurs AC, telecommande, casque d'ecoute, microphones,
piles
Lamp
Garantie
Lamp Warranty For Commercial Use
Garantiedela lampe
All
Toutes les autres categories
not
a domicile fourni par un detaillant disponible.
n'y
apas
de
emballage
adequant, lexpedition, ainsi que tous les couts associes ala Iivraison
Warranty For Consumer Use
de
la lampe pour utilisationdeconsommateur
Other Categories
GARANTIE
PRODUCT
PRODUIT
~krans
de
TV
available, the Purchaser must assume the responsibility and expense for the proper
service JVC disponible aproximite, I'acheteur doit assumer la responsabilite et les
pour
utilisationdecommerciale
(VALABLE11PARTIRDELA
projection couleur (25"e1plus)
pour
un Service d'entretien.
DATE
PARTS
(Years)
PIECES
(annees)
1 1
2 2
90
days 90 days
90 jours
1
90
days
90 jours
1 1
D'ACHAT)
Labour (Years)
MAIN·Q'OEUVER
the
closest JVC
de
I'equipment par et
90
jours
1
90 days
90 jours
les tetes
Canada",
(annees)
coUts
pour
(I)
Tous
(I)
Any defects causedbyfire, flood, lightning,
power surge, or other events beyond the
au
control of JVC.
(m) FOR AUTO PRODUCTS
Warranty
does
not
cover
static or electrical interferences, cleaning
of head, adjustments,orlabour cost for the
removal or reinstallation of the unit for
repair.
3.
Standards:
If
any defects should be foundina JVC product
within the applicable terms, necessary repairs
shall be madeatno cost to the purchaser for
parts or labour when JVC acknowledges that
such defects are due
manship.
ExclusionofAll
4.
This warranty constitutes the entire express
warranty given
no
dealerorservice
its or their agent or employee
rized to extend or enlarge this warranty on be·
half
of
5.
DisclaimerofConsequential
To
the extent the law permits JVC disclaims
any responsibility for loss of time or use of its
product,
indirect, incidentalorconsequential damage or
inconvenience.
~
Other
by
JVC.
transportation
And
mail
You
may also register on-line
at:www.jvc.ca
elimination of
to
faulty material or work-
Express
Warranties:
JVC for JVC products and
centre
personnelorhis,
is,
or are autho·
Damage:
costs, or
any
to the address below.
Detach here.
car
3,
4.
5.
other
~
dommages
inondation,
evenements horsducontrale de JVC.
(m) POUR LES PRODUITSDEL:AUTOMOBILE
La garantie ne couvre pas I'elimination
d'interferences statiques
voiture,
Ie
ou
les
coutsdemain-d'oeuvre
I'enlevement ou ala reinstallation de I'unte
pour
reparation.
Criteres:
Siunproduit JVC s'averait defectueux selon les
conditions
necessaries
additionnels aI'acheteur pour les pieces et main
d'oeuvre lorsque
defectuosite
de materiel au de fabrication.
Exclusiondetoutes autres garanties expresses:
Cette garantie constilue l'enMre garantie express
donnee par
representant ou employe d'un detaillant ou d'un
service
d'entretien
garantieaunom de JVC.
Denegation
Dans la mesure permise parlaloi,
responsabilite pour perte de temps ou d'usage de
ses produits, des couts de transports, ou tout
autre
dommageouinconvenient
accidenteletconsequent.
Et
Vous pouvez egalement vous
inscrire par internet a:www.jvc.ca
adecouper ici
occasionnes
eclair,
surtensionouaut
ou
nettoyage de
applicables,
seront
JVC reconnait que de telles
sont
causees
JVC
pour les produits JVC. Nul
n'est
des
dam
poster
aI'adress
PLACE STAMP
HERE
(affranchisse-
ment)
tete,
les
effectuees
par
autorise
mages
ci-dessous.
electriques de la
les
une
apro
indirects:
JVC denie toute
par
Ie feu,
adjustements,
associes
reparations
sans
coOts
defectuosite
longer
cette
indirect,
res
a
JVC CANADA INC.
21
Finchdene
Toronto,ONM1X
Square
lA7
Page 44

TO OUR VALUED CUSTOMER
--
THANK
YOU
FOR PURCHASING THIS JVC PRODUCT.
WE WANT TO HELP
NEED HELP ON HOWTO
NEED ASSISTANCE ON HOWTO OPERATE?
NEEDTO LOCATE A
LIKETO PURCHASE ACCESSORIES?
JVC®IS
TOLL
FREE: 1(800)252-5722
http://www.jvc.com
YOU
ACHIEVE A PERFECT EXPERIENCE.
JVC
HOOK
SERVICE CENTER?
UP?
HERETO HELP!
Remembertoretain
---
Do
not
Caution
To
prevent
There
Please refer
your
BillofSale
attempttoservice the
electrical shock,
are
no
user
to
qualified service personnel
for
Warranty
serviceable
product
do
not
open
parts inside.
Service.
the
for
yourself
cabinet.
repairs.
BT-51018-5
(0306)
PrintedinIndonesia
Page 45

******************************************************************************
i
JVC®
: I
LIMITED
ONLY
FOR
PRODUCT
WARRANTY
PURCHASEDINU.S.A.
1-1
I
USA
ONLY
Ii
I :
*JVC Americas Corp. (JVC) warrants this product and all parts thereof, except as set forth below ONLY TO THE *
: ORIGINAL RETAIL PURCHASER tobeFREE FROM DEFECTIVE MATERIALS AND WORKMANSHIP from the dateof:
* original
* *
: IPARTS ILABOR :
*
* *
* . *
*THIS LIMITED WARRANTY IS VALID ONLY
:INTHE COMMONWEALTH OF PUERTO RICO. :
: WHAT WE
: If this product
*rebuilt equivalents at no charge to the original owner. Such repair and replacement services shall
*
during normal business hours at JVC authorized service centers. Parts used for replacement are warranted only for the :
: remainder of the Warranty Period. All products may be brought to a JVC authorized service center
Color televisions with a screen size of 27" or greater qualify for in-home service.
*
: to your home and either repair the TV there or remove and return it if it cannot be repairedinyour home. :
::
WHAT YOU MUST DO FOR WARRANTY SERVICE:
* Please
::
Instead, return
*center, please be sure
: the problem(s). Please call 1-800-252-5722 to locate the nearest JVC authorized service center. Service locations :
*can
*representative will require clear access
* *
: If you have
purchase
do
also
be obtained
for
the
period
shown
WILL
DO: :
is
found to be defective within the warranty period, JVC will repair or replace defective parts with new or
not
return your
your
any
questions concerning your
product
producttothe JVC authorized service center nearest you. If
to
packageitcarefully, preferablyinthe original packaging, and include a brief description
from
our
website http://www.jvc.com. If
below. ("The
1.
IN
THE FIFTY (50) UNITED STATES, THE DISTRICT OF COLUMBIA AND *
to the retailer *
to
the product. *
JVC
Warranty
VR
Product, please contact
Period") *
your
product
1
VR
be
rendered by JVC *
on
In
such cases, a technician will come *
shipping
qualifies
our
Customer Care Center at 800-252-5722
the
for
in-home service, the service *
a carry-in basis. *
producttothe service :
of
*
::
::
*
::
* *
*WHAT IS NOT COVERED: *
: This limited warranty provided by JVC does not cover:
*
1.
Products which have been subject to abuse, accident, alteration, modification, tampering, negligence, misuse, faulty *
: installation, lack of reasonable care, or if repaired or serviced by anyone other than a service facility authorized by
::
::
* JVC to render such service, or if affixed to any attachment not provided with the products, or if the model or serial *
* number has been altered, tampered with, defaced or removed; *
:
2.
Initial installation, installation and removal from cabinets or mounting systems.
*
3.
::
*
::
*
*
:
Operational adjustments covered in the Owner's Manual, normal maintenance, video and audio head cleaning; *
4.
Damage that occursinshipment, due to act of God, and cosmetic damage; ;
5.
Signal reception problems and failures due to line power surge; *
6.
User
Removal
7.
Accessories; *
8.
Batteries (except that Rechargeable Batteries are covered for 90 days from the date of purchase); *
9.
Products used for commercial purposes, including, but not limited to rental. :
Memory DevicesNideo Pick-up Tubes/CCD
Image
Sensors
are
covered
for90days
from
the
dateofpurchase; :
* 10. Loss of data resultant from malfunction of hard drive or other data storage device; *
* *
::
There are no express warranties exceptaslisted above.
: THE DURATION OF ANY IMPLIED WARRANTIES, INCLUDING THE IMPLIED WARRANTY OF MERCHANTABILITY,IS::
*LIMITED TO THE DURATION OF THE EXPRESS WARRANTY HEREIN. *
* *
JVC SHALL NOT
*
: DAMAGES, WHETHER DIRECT, INCIDENTAL OR CONSEQUENTAL (INCLUDING, WITHOUT LIMITATION, :
BE
LIABLE FOR ANY LOSS OF USE OF THE PRODUCT, INCONVIENCE, OR ANY OTHER *
* DAMAGE TO TAPES, RECORDS OR DISCS) RESULTING FROM THE USE OF THIS PRODUCT, OR ARISING OUT *
*OF ANY BREACH OF THIS WARRANTY. ALL EXPRESS AND IMPLIED WARRANTIES, INCLUDING THE *
::
WARRANTIES OF MERCHANTABILITY AND FITNESS FOR PARTICULAR PURPOSE, ARE LIMITED TO THE
: WARRANTY PERIOD SET FORTH ABOVE.
:
Some
implied
statesdonot
warranty
and
*
: legal rights
* ** JVC AMERICAS
::
allow
may
the
also
lasts,sothese
you
exclusionofincidentalorconsequential
limitationsorexclusions
have
other rights which
1700 Valley
Road,
may
not
vary
from state to state. :
Wayne, New Jersey 07470
applytoyou.
CORP.
damagesorlimitationsonhow
This
warranty
gives
you
long
specific
* http://www.jvc.com *
* . *
******************************************************************************
REFURBISHED PRODUCTS CARRY A SEPARATE WARRANTY, THIS WARRANTY DOES NOTAPPLY. FOR DETAIL
OF REFURBISHED PRODUCT WARRANTY, PLEASE REFER TO THE REFURBISHED PRODUCT WARRANTY
INFORMATION PACKAGED WITH EACH REFURBISHED PRODUCT.
an
::
::
::
::
::
*
*
::
For
customer
Enter below the Model No. and Serial No. which is located either on the rear, bottom or side of the cabinet.
Retain this information for future reference.
Model
Purchase
use:
No.:
date:
Serial No. :
Nameofdealer:
 Loading...