

Page 1
ENGLISHРУCCKИЙУКРАЇНА
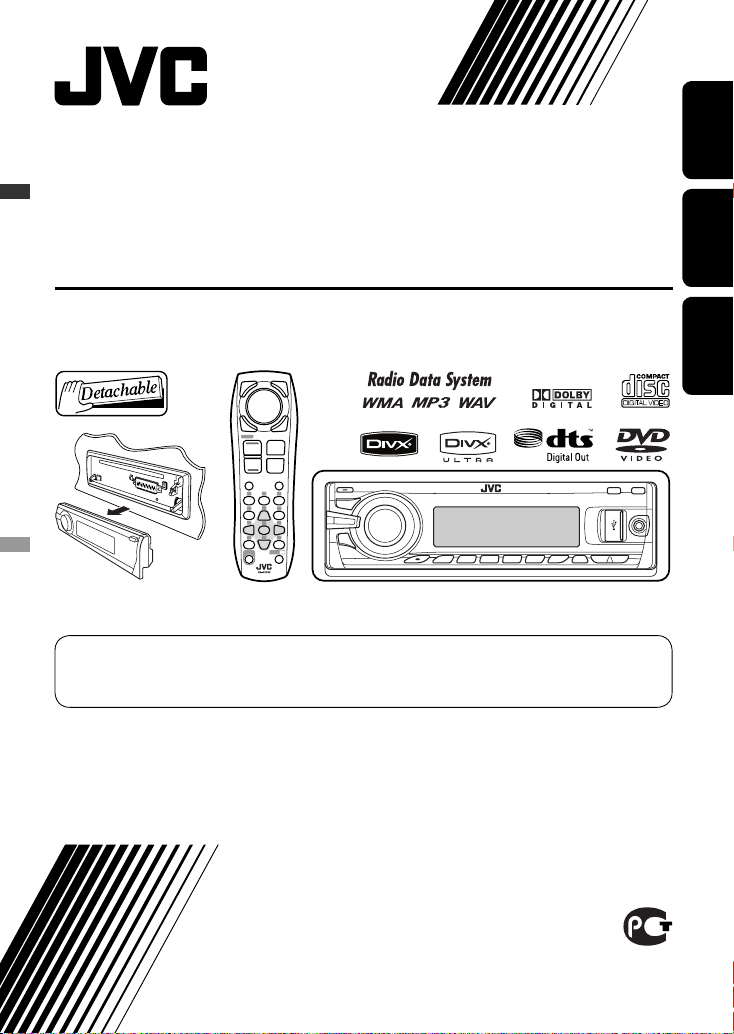
DVD/CD RECEIVER
ПРИЕМНИК ДЛЯ ВОСПРОИЗВЕДЕНИЯ ДИСКОВ DVD И КОМПАКТ-ДИСКОВ
ПРИЙМАЧ З ПРОГРАВАЧЕМ DVD/CD-ДИСКІВ
KD-DV7408/KD-DV7407
For installation and connections, refer to the separate manual.
Указания по установке и выполнению соединений приводятся в отдельной инструкции.
Вказівки по встановленню та виконанню підключень наведені у окремій інструкції.
INSTRUCTIONS
ИНСТРУКЦИИ ПО ЭКСПЛУАТАЦИИ
ІНСТРУКЦІЇ
GET0535-001A
[EE]
For canceling the display demonstration, see page 7.
Информацию об отмене демонстрации функций дисплея см. на стр. 7.
Інформацію щодо відміни демонстрації функцій дисплею див. на стор. 7.
Page 2
ENGLISH
2
Thank you for purchasing a JVC product.
Please read all instructions carefully before operation, to ensure your complete understanding and to obtain the best
possible performance from the unit.
IMPORTANT FOR LASER PRODUCTS
1. CLASS 1 LASER PRODUCT
2. CAUTION: Do not open the top cover. There are no user serviceable parts inside the unit; leave all servicing to
qualified service personnel.
3. CAUTION: Visible and/or invisible class 1M laser radiation when open. Do not view directly with optical
instruments.
4. REPRODUCTION OF LABEL: CAUTION LABEL, PLACED OUTSIDE THE UNIT.
[European Union only]
Caution on volume setting:
Digital devices (CD/USB) produce very little noise
compared with other sources. Lower the volume before
playing these digital sources to avoid damaging the
speakers by sudden increase of the output level.
Caution for DualDisc playback
The Non-DVD side of a “DualDisc” does not comply with
the “Compact Disc Digital Audio” standard. Therefore,
the use of Non-DVD side of a DualDisc on this product
may not be recommended.
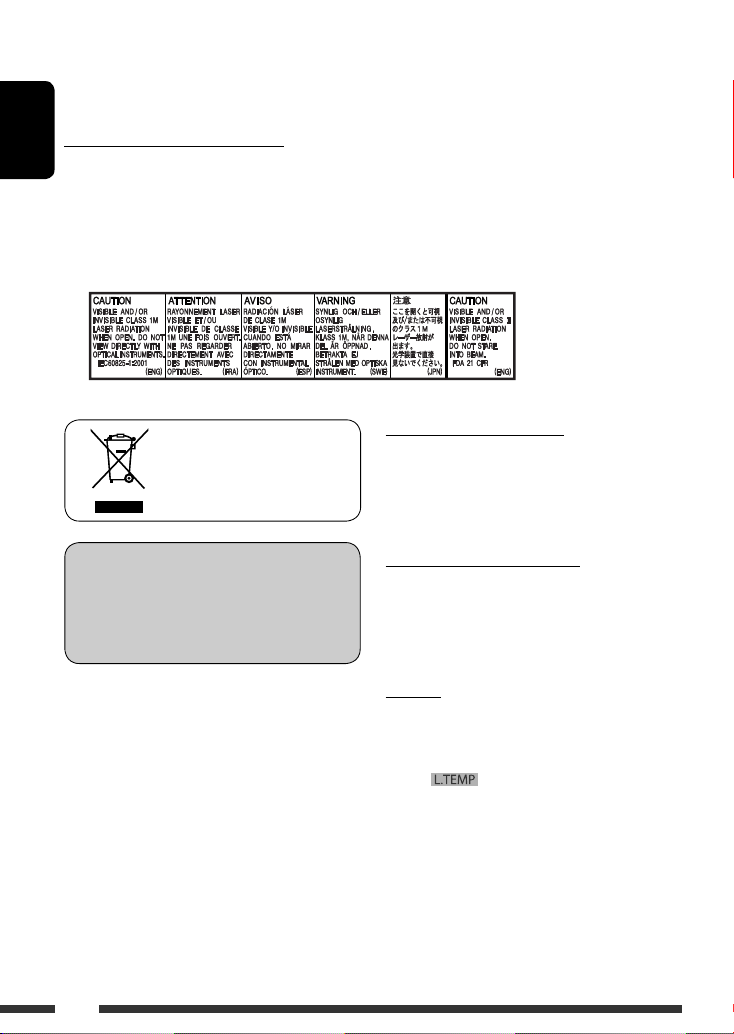
Caution:
If the temperature inside the car is below 0°C, the
movement of animation and text scroll will be halted
on the display to prevent the display from being
blurred.
appears on the display.
When the temperature increases, and the operating
temperature is resumed, these functions will start
working again.
Indication language:
In this manual, English indications are used
for purposes of explanation. You can select
the indication language on the monitor on the
“LANGUAGE” setting (see page 47).
Page 3
ENGLISH
3
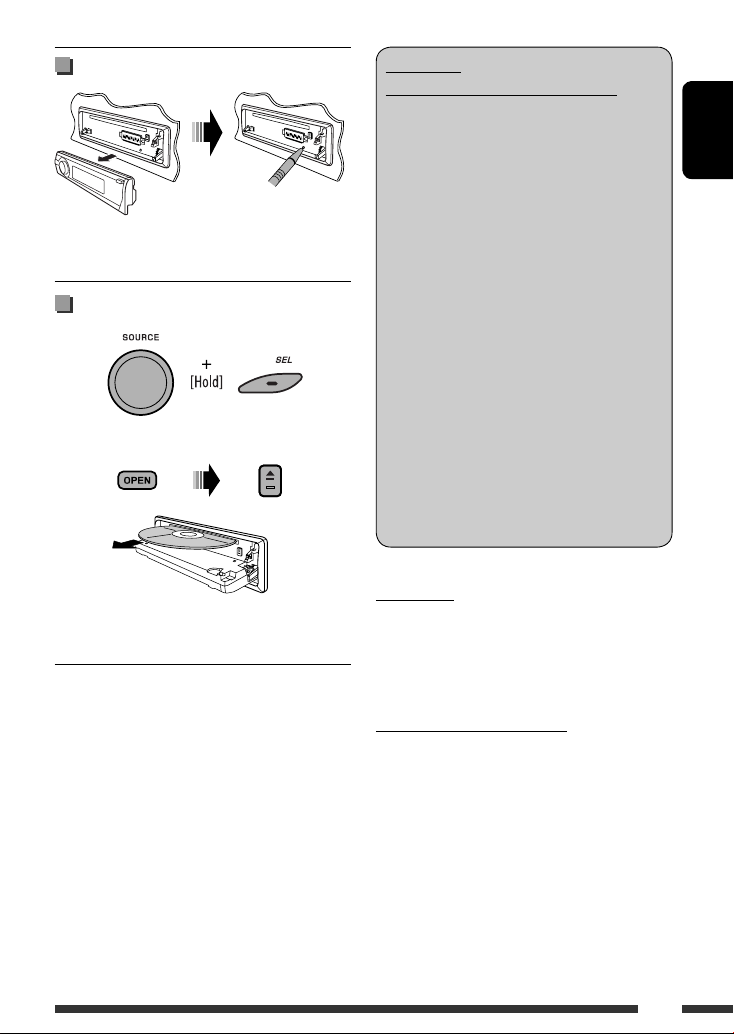
How to reset your unit
• Your preset adjustments will also be erased (except the
registered Bluetooth device, see pages 28 and 29).
How to forcibly eject a disc
“Please Eject” appears on the display.
• Be careful not to drop the disc when it ejects.
• If this does not work, reset your unit.
WARNINGS:
(To prevent accidents and damage)
• DO NOT install any unit or wire any cable in
a location where;
– it may obstruct the steering wheel and
gearshift lever operations.
– it may obstruct the operation of safety
devices such as air bags.
– it may obstruct visibility.
• DO NOT operate the unit while driving.
• If you need to operate the unit while
driving, be sure to look around carefully.
• The driver must not watch the monitor
while driving.
If the parking brake is not engaged,
“DRIVER MUST NOT WATCH THE MONITOR
WHILE DRIVING.” appears on the monitor,
and no playback picture will be shown.
– This warning appears only when the
parking brake lead is connected to the
parking brake system built in the car
(refer to the Installation/Connection
Manual).
For safety...
• Do not raise the volume level too much, as this will
block outside sounds, making driving dangerous.
• Stop the car before performing any complicated
operations.
Temperature inside the car...
If you have parked the car for a long time in hot or cold
weather, wait until the temperature in the car becomes
normal before operating the unit.
Page 4
ENGLISH
4
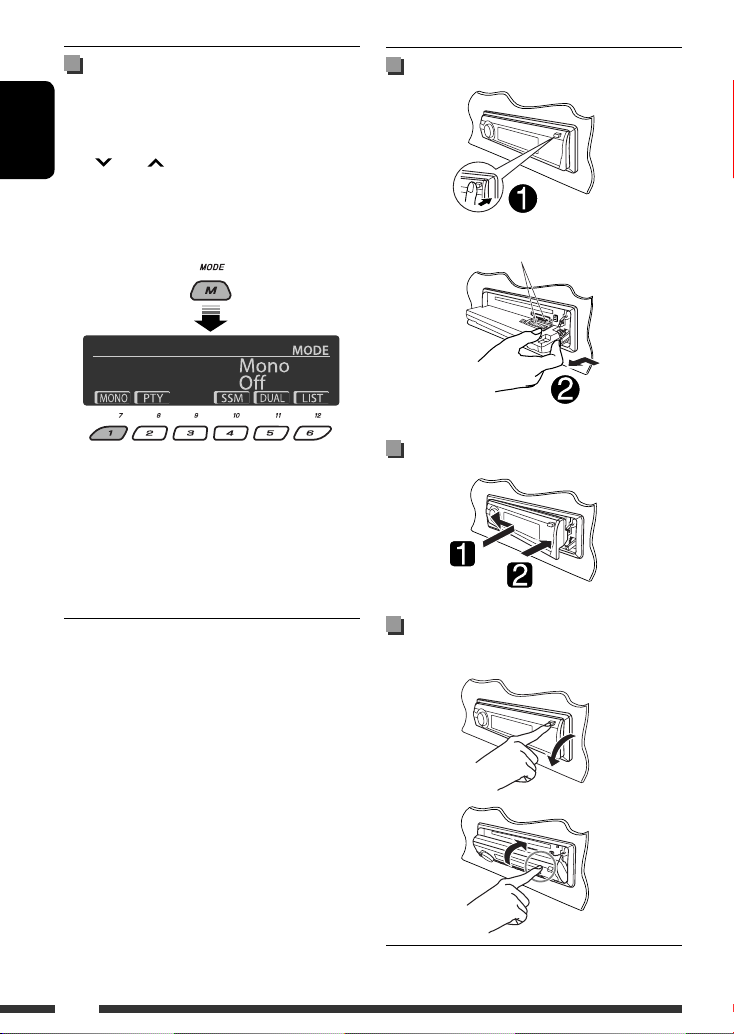
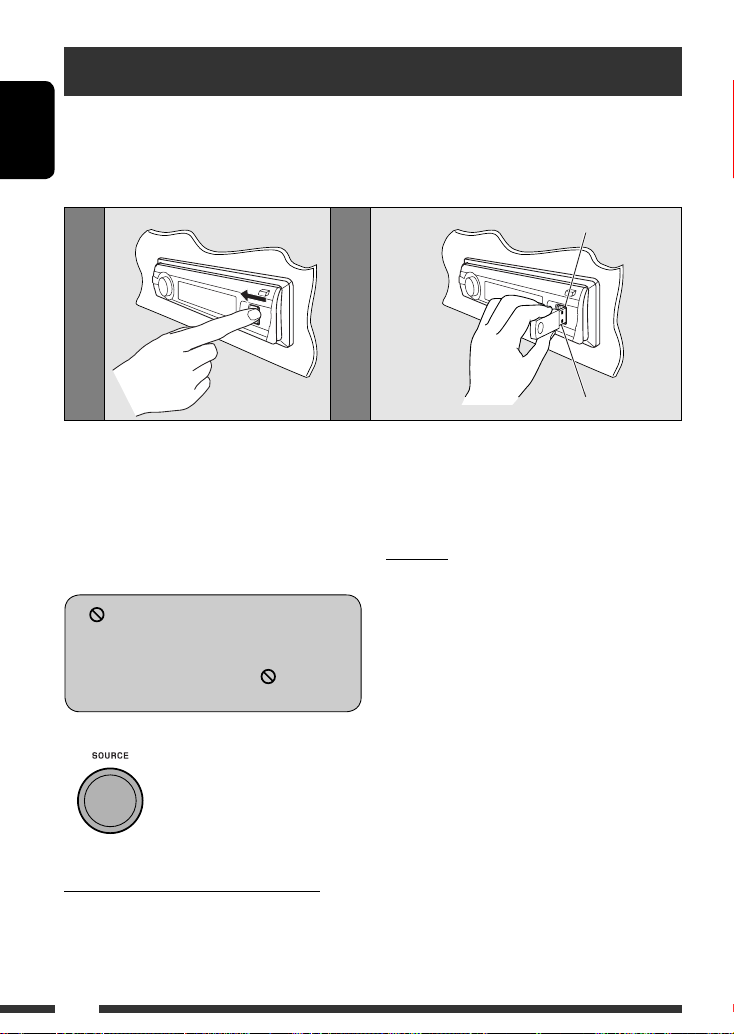
Detaching the control panel
Attaching the control panel
Opening and closing the control
panel
Avoid touching the connectors.
How to use the M MODE and SEL
buttons
If you use M MODE or SEL (select), the display and some
controls (such as the number buttons,
4
/¢ buttons, 5/∞ buttons, and the
control dial) enter the corresponding control mode.
Ex.: When you press number button 1 after pressing
M MODE, to operate the FM tuner.
To use these controls for original functions, press
M MODE again.
• However, pressing SEL makes the unit enters a
different mode.
• Waiting for about 15 seconds (or 30 seconds for
Bluetooth sources) without pressing any of these
buttons will automatically cancels the control.
Open...
Close...
Page 5

ENGLISH
5
CONTENTS
INTRODUCTIONS
Playable disc type ........................................................................................................................... 6
Preparation ..................................................................................................................................... 7
OPERATIONS
Basic operations .............................................................................................................................. 8
• Using the control panel ............................................................................................................................ 8
• Using the remote controller (RM-RK252) ................................................................................................. 9
Listening to the radio ...................................................................................................................... 12
Disc operations ................................................................................................................................ 16
• Operations using the control panel .......................................................................................................... 17
• Operations using the remote controller (RM-RK252) ............................................................................... 20
Listening to the USB device ............................................................................................................. 26
Dual Zone operations ...................................................................................................................... 27
EXTERNAL DEVICES
Listening to the Bluetooth® devices ................................................................................................ 28
• Using the Bluetooth cellular phone ......................................................................................................... 30
• Using the Bluetooth audio player ............................................................................................................ 32
Listening to the CD changer ............................................................................................................ 33
Listening to the iPod ....................................................................................................................... 34
• When connecting with the USB cable ...................................................................................................... 34
• Operations using the control screen ......................................................................................................... 35
• When connecting with the interface adapter .......................................................................................... 37
• Selecting the playback modes ................................................................................................................. 37
Listening to the other external components ................................................................................... 38
SETTINGS
Selecting a preset sound mode ....................................................................................................... 40
General settings — PSM ................................................................................................................ 42
Disc setup menu .............................................................................................................................. 47
Bluetooth settings .......................................................................................................................... 49
REFERENCES
Maintenance ................................................................................................................................... 50
More about this unit ....................................................................................................................... 51
Troubleshooting .............................................................................................................................. 59
Specifications .................................................................................................................................. 64
Page 6
ENGLISH
6
Disc type Recording format, file type, etc Playable
DVD DVD Video (Region Code: 5) *
1
DVD Audio
DVD-ROM
DVD Recordable/Rewritable
(DVD-R/-RW *
2
, +R/+RW *3)
• DVD Video: UDF bridge
• DVD-VR
• DivX/MPEG-1/MPEG-2/MP3/
WMA/WAV: ISO 9660 level 1,
level 2, Romeo, Joliet
DVD Video
DVD-VR
DivX/MPEG1/MPEG2
MP3/WMA/WAV
AAC
JPEG/MPEG4
DVD+VR
DVD-RAM
Dual Disc DVD side
Non-DVD side
CD/VCD Audio CD/CD Text (CD-DA)/DTS-CD *
4
VCD (Video CD)
SVCD (Super Video CD)
CD-ROM
CD-I (CD-I Ready)
CD Recordable/Rewritable
(CD-R/-RW)
• ISO 9660 level 1, level 2, Romeo,
Joliet
CD-DA
DivX/MPEG1/MPEG2
MP3/WMA/WAV
AAC
JPEG/MPEG4
*1 If you insert a DVD Video disc of an incorrect Region Code, “REGION CODE ERROR” appears on the monitor.
*2 DVD-R recorded in multi-border format is also playable (except for dual layer discs). DVD-RW dual layer discs are not
playable.
*3 It is possible to play back finalized +R/+RW (Video format only) discs. +RW double layer discs are not playable.
*4 To reproduce DTS sound, use the DIGITAL OUT terminal (see also pages 48 and 57).
Playable disc type
Page 7
ENGLISH
7INTRODUCTIONS
Preparation
Cancel the display demonstration and set the clock
• See also pages 42 and 43.
1
Turn on the power.
2
Enter the PSM settings.
3
Cancel the display demonstrations
Select “Demo,” then “Off.”
Set the clock
Select “Clock Hr” (hour), then adjust the hour.
Select “Clock Min” (minute), then adjust the minute.
Select “24H/12H,” then “24Hours” or “12Hours.”
4
Finish the procedure.
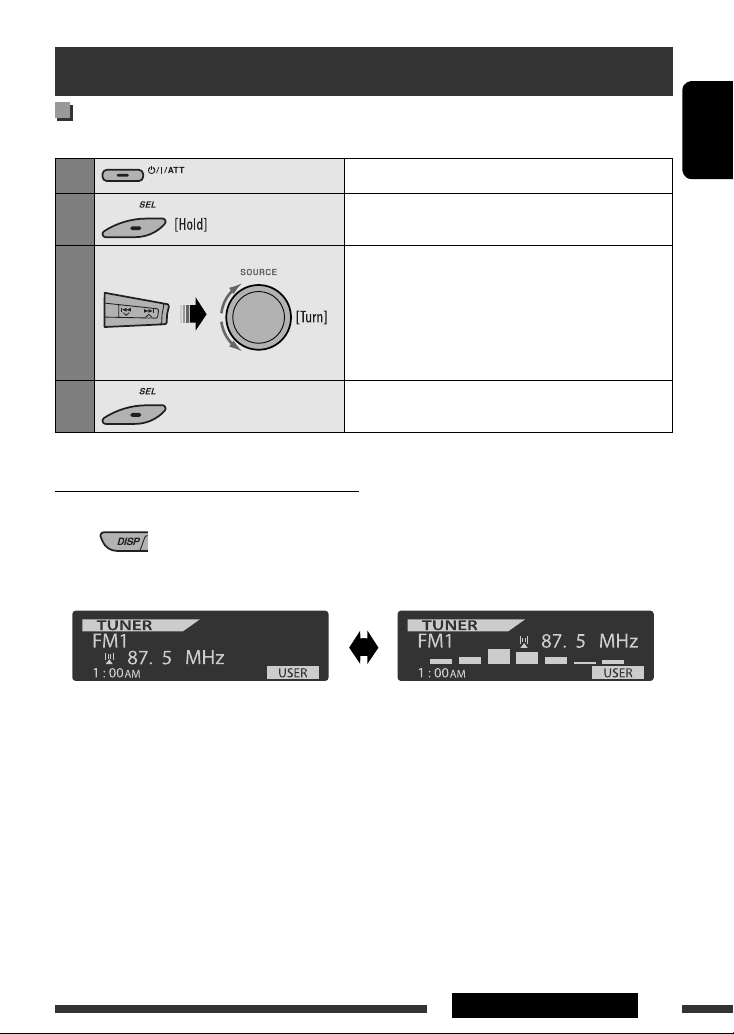
Changing the display information and pattern
• When the power is turned off: Check the current clock time
Ex.: When tuner is selected as the source
Source operation display Audio level meter display
(see “LevelMeter” on page 42)
Page 8
ENGLISH
8
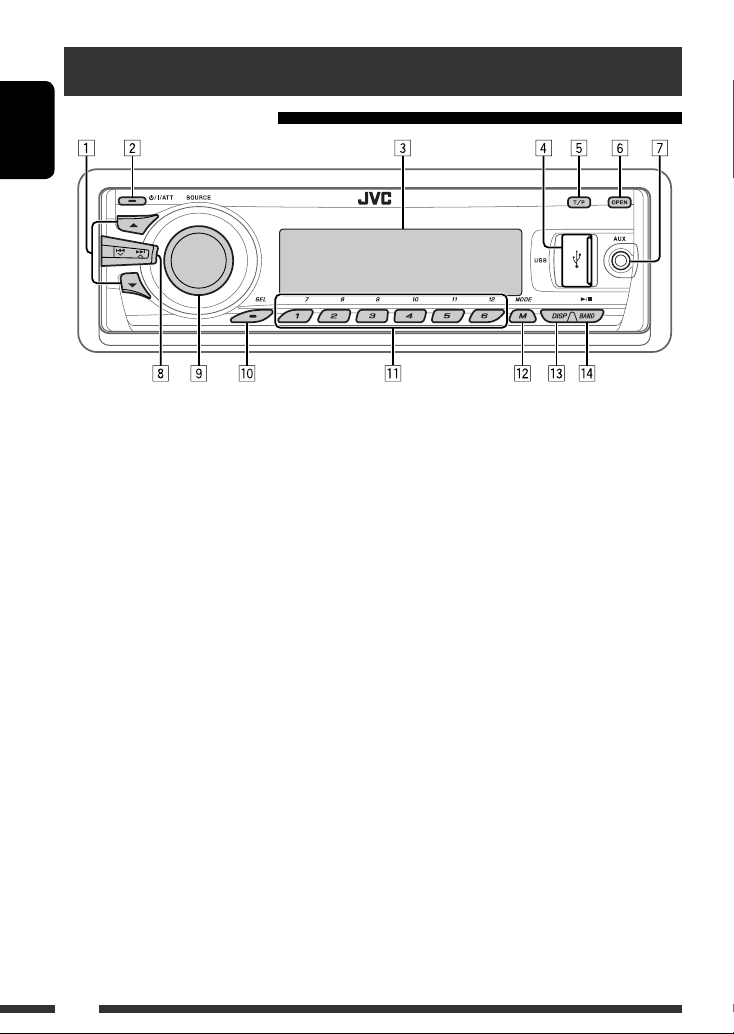
Basic operations
Using the control panel
9 • Volume control [Turn].
• Select the source [Press] *1.
TUNER = DISC *2 = USB *2 (or
USB- iPod) *
2
= CD-CH *
2
/iPod *2 (or EXT IN)
= BT-PHONE *
2
= BT-AUDIO *2 = LINE IN
= AV IN = (back to the beginning)
p • Select/adjust the sound mode.
• Enter the PSM settings [Hold].
q • TUNER: Select preset station.
• DISC/USB/CD-CH: Select chapter/title/
program/folder/track/disc (for CD changer).
• BT-PHONE: Dial preset phone number *3.
w • Enter functions mode.
• BT-PHONE: Activate Voice Dialing [Hold].
e Change the display information and pattern.
r • TUNER: Select the bands.
• DISC/USB/USB-iPod: Start/pause playback.
• BT-AUDIO: Start/pause playback.
*1 Holding SOURCE will enter Bluetooth menu if a
Bluetooth phone is connected.
*2 You cannot select these sources if they are not ready
or not connected.
*3 For storing preset phone number, see page 32.
1 • TUNER: Select preset station.
• DISC/USB/CD-CH: Select title/program/
playlist/folder.
• USB-iPod: Enter the main menu [Hold].
• iPod: Enter the main menu/Pause playback/
Confirm selection.
• BT-PHONE/BT-AUDIO: Select a registered
device.
2 • Turn on the power.
• Turn off the power [Hold].
• Attenuate the sound (if the power is on).
3 Display window
4 USB (Universal Serial Bus) input jack
5 • Activate/deactivate TA Standby Reception.
• Enter programme type searching mode [Hold].
6 Flip down the control panel.
• To eject the disc, flip down the control panel
then press 0 on the unit.
7 AV-IN (video) input jack
8 • TUNER: Search for station.
• DISC/USB/USB-iPod/CD-CH/iPod: Select
chapter/track.
• BT-AUDIO: Reverse skip/forward skip.
Page 9
ENGLISH
9OPERATIONS
Continued on the next page
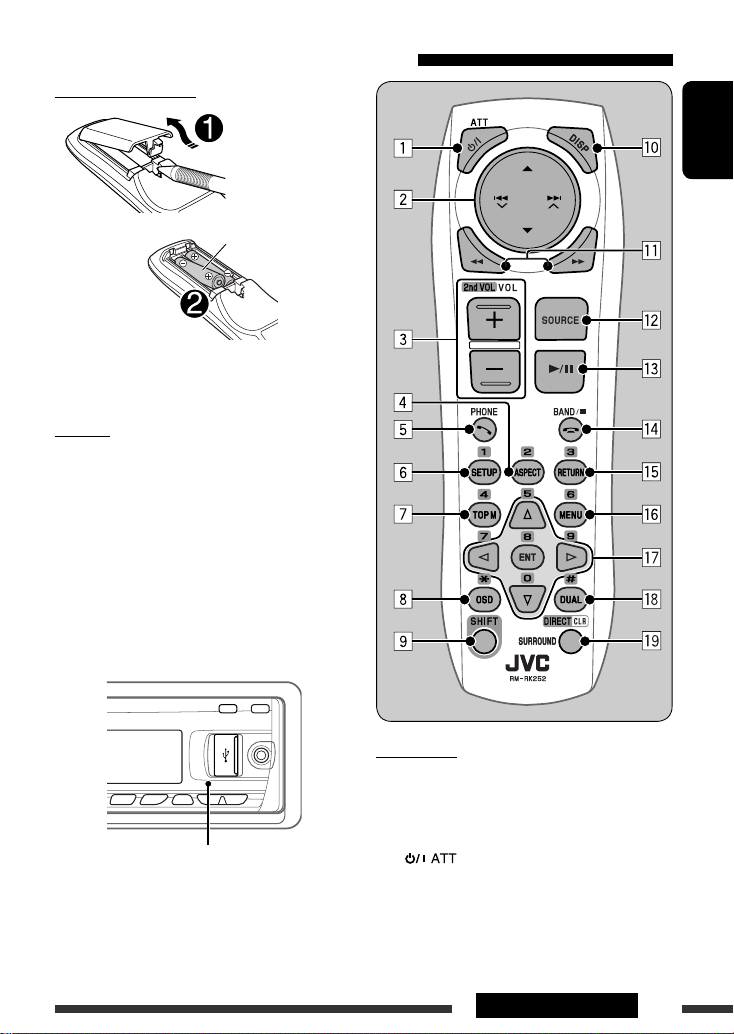
Installing the battery
Insert the batteries into the remote controller by
matching the polarity (+ and –) correctly.
Caution:
Battery shall not be exposed to excessive heat such as
sunshine, fire, or the like.
If the effectiveness of the remote controller
decreases, replace both batteries.
Before using the remote controller:
• Aim the remote controller directly at the remote
sensor on the unit.
• DO NOT expose the remote sensor to bright light
(direct sunlight or artificial lighting).
Using the remote controller (RM-RK252)
R03/LR03/AAA
Remote sensor
IMPORTANT:
If Dual Zone is activated (see page 27), the remote
controller only functions for operating the DVD/CD
player.
1*
1
button
• Turns the power on if pressed briefly or
attenuates the sound when the power is on.
• Turns the power off if pressed and held.
Page 10

ENGLISH
10
2 5/∞ buttons
• TUNER: Selects the preset stations.
• DISC:
– DVD-Video: Selects the title.
– DVD-VR: Selects the program/playlist.
– DivX/MPEG Video/MP3/WMA/WAV: Selects
the folders if included.
• USB:
– DivX/MPEG Video/MP3/WMA/WAV: Selects
the folders if included.
• CD-CH: Selects the folders if included.
• iPod:
– 5 : Enters the main menu (then 5 / ∞ /
4
/ ¢ work as menu
selecting buttons.)
5 : Returns to the previous menu.
∞ : Confirms the selection.
– ∞ : Pauses or resumes playback.
4 / ¢ buttons
• TUNER:
– Searches for stations automatically if pressed
briefly.
– Searches for stations manually if pressed and
held.
• DISC/USB/USB-iPod/CD-CH:
– Reverse skip/forward skip if pressed briefly.
– Reverse search/forward search if pressed and
held.
• BT-AUDIO: Reverse skip/forward skip if pressed
briefly.
• iPod:
– Reverse skip/forward skip if pressed briefly.
– Reverse search/forward search if pressed and
held.
In menu selecting mode:
– Selects an item if pressed briefly. (Then, press
∞ to confirm the selection.)
– Skips 10 items at a time if pressed and held.
3 VOL (volume) + / – buttons
• Adjusts the volume level.
2nd VOL (volume) buttons
• Adjust the volume level through the 2nd AUDIO
OUT plug when pressed with SHIFT button (see
page 27).
4 *
2
ASPECT button
• Not applicable for this unit.
5*
1
PHONE button
• Answer incoming calls.
• Enters “Redial” menu when a Bluetooth phone
is connected [Hold].
6 *
2
SETUP button
• Enters disc setup menu (during stop).
7 *
2
TOP M (menu) button
• DVD-Video/DivX: Shows the disc menu.
• DVD-VR: Shows the Original Program screen.
• VCD: Resumes PBC playback.
• USB-iPod: Enters the search mode menu (see
page 36).
8 *
2
OSD (on-screen display) button
• Shows the on-screen bar.
9 SHIFT button
• Functions with other buttons.
p DISP (display) button
• Changes the display information.
q 1 / ¡ buttons
• DVD-Video: Slow motion playback (during
pause).
• DVD-VR/VCD: Forward slow motion playback
(during pause).
• DISC/USB/USB-iPod: Reverse search/forward
search.
w*
1
SOURCE button
• Selects the source.
Page 11
ENGLISH
11OPERATIONS
e 3 (play) / 8 (pause) button
• DISC/USB/USB-iPod/BT-AUDIO: Starts/
pauses playback.
r
(end call) button
• Ends the call.
BAND / 7 (stop) buttons
• TUNER: Selects the bands.
• DISC/USB/USB-iPod/BT-AUDIO: Stops
playback.
t *
2
RETURN button
• VCD: Returns to the PBC menu.
• USB-iPod: Returns to Control Screen.
y *
2
MENU button
• DVD-Video/DivX: Shows the disc menu.
• DVD-VR: Shows the Playlist screen.
• VCD: Resumes PBC playback.
• USB-iPod: Enters the search mode menu (see
page 36).
u *
2
% / fi buttons
• DVD-Video: Makes selection/settings.
• CD-CH: Changes discs in the magazine.
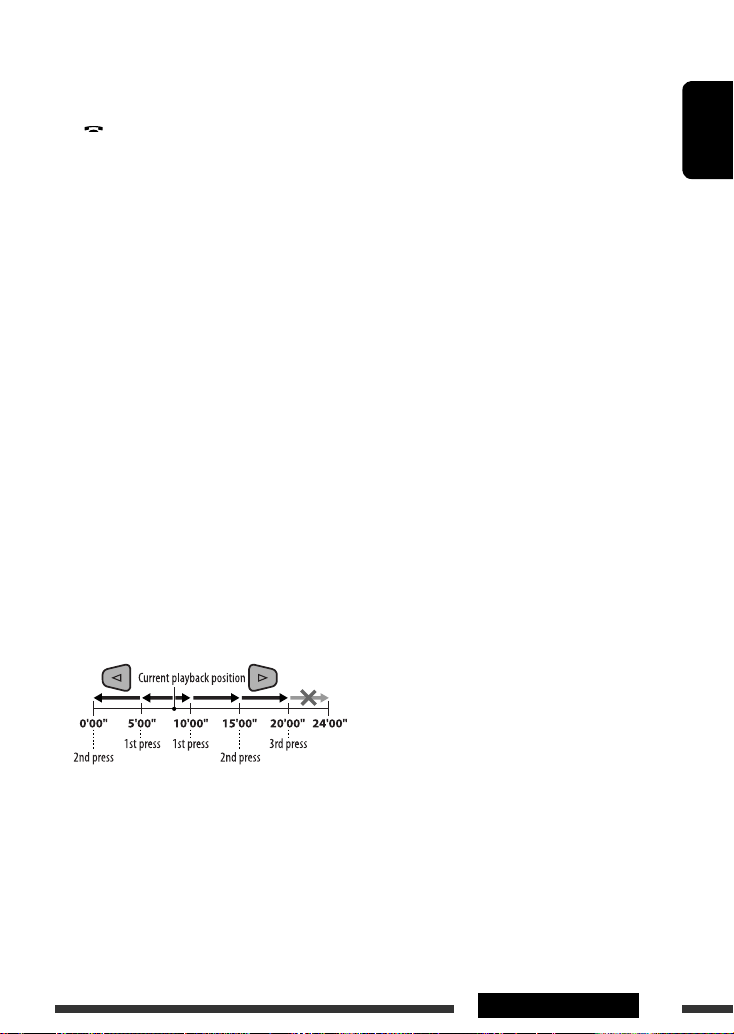
@ / # buttons
• DVD-Video: Makes selection/settings.
• DivX/MPEG Video: Skips back or forward by
about five minutes.
ENT (enter) button
• Confirms selection.
i *
2
DUAL button
• Activates or deactivates Dual Zone.
o SURROUND button
• Not applicable for this unit.
DIRECT button
• DISC/USB: Enters direct search mode for
chapter/title/program/playlist/folder/track
when pressed with SHIFT button (see page 20
for details).
CLR (clear) button
• DISC/USB: Erases the misentry when pressed
with SHIFT button.
*
1
When Dual Zone is activated, these buttons cannot be
used.
*2 Functions as number buttons/* (asterisk)/# (hash)
when pressed with SHIFT button.
– Tuner: Selects the preset stations (1 – 6).
– DISC: Enters chapter/title/program/playlist/folder/
track number after entering search mode by
pressing SHIFT and DIRECT (see page 20 for details).
Page 12
ENGLISH
12
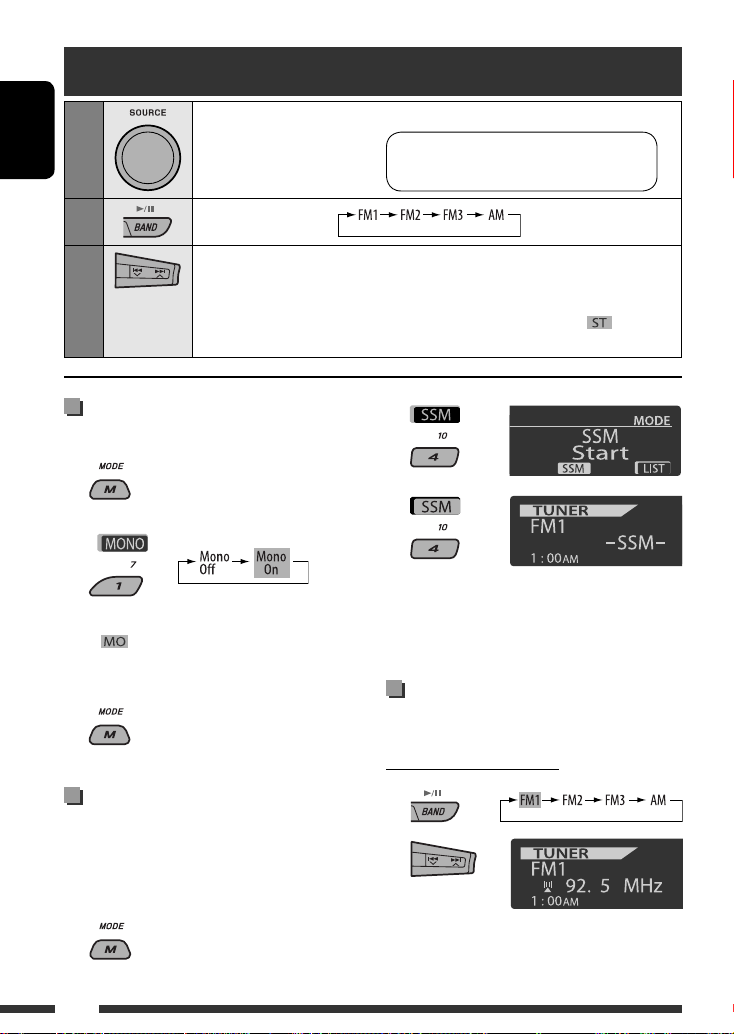
When an FM stereo broadcast is
hard to receive
1
2
Reception improves, but stereo effect will be lost.
•
lights up on the display.
3 Exit from the setting.
FM station automatic presetting
— SSM (Strong-station Sequential
Memory)
You can preset up to six stations for each band.
1 While listening to a station...
2
3
Local FM stations with the strongest signals are
searched and stored automatically in the selected
FM band.
Manual presetting
Ex.: Storing FM station of 92.5 MHz into preset number
4 of the FM1 band.
Using the number buttons
1
2
Listening to the radio
1
Select “TUNER.”
2
Select the bands.
3
Search for a station to listen—Auto Search.
Manual Search: Hold either one of the buttons until “M” lights up on the display, then
press it repeatedly.
• When receiving an FM stereo broadcast with sufficient signal strength,
lights up
on the display.
Note: FM1 and FM2: 87.5 MHz – 108.0 MHz
FM3: 65.00 MHz – 74.00 MHz
Page 13

ENGLISH
13OPERATIONS
Listening to the preset station on
the Preset Station List
1 Display the Preset Station List, then select
the preset station you want to listen to.
2 Change to the selected station.
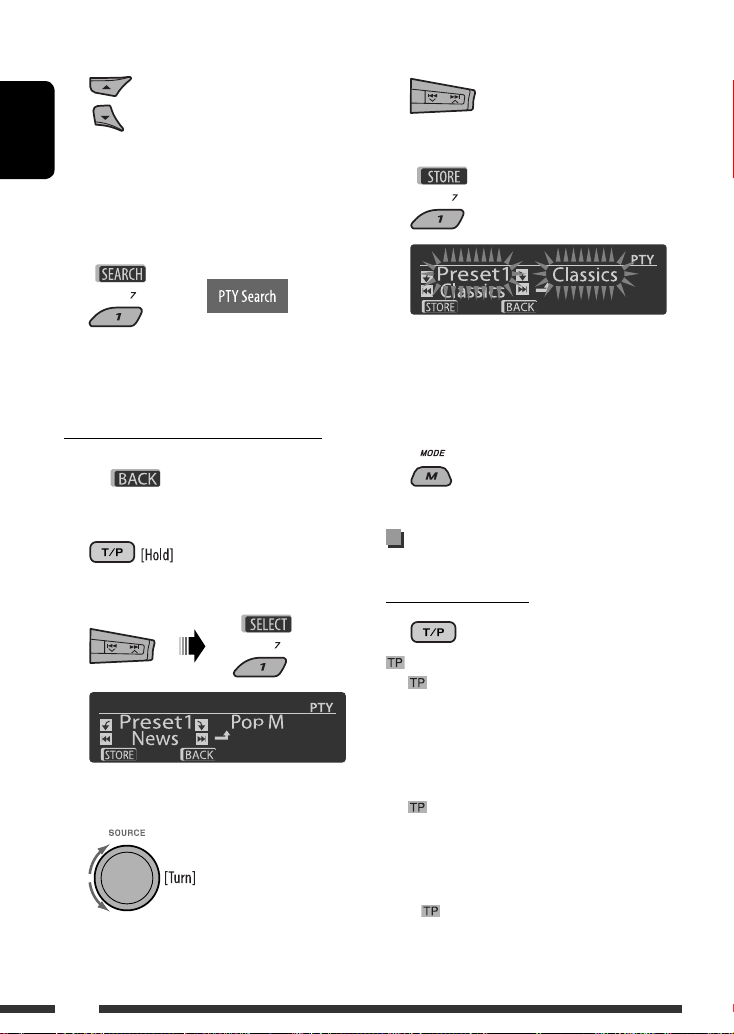
The following features are available only for FM
Radio Data System stations.
Searching for FM Radio Data
System programme — PTY Search
You can tune in to a station broadcasting your favorite
programme by searching for a PTY code.
• When
appears on the display, you can
move back to the previous display by pressing
number button 3.
• When
/ appears on the display,
you can move to the other lists by pressing number
button 5 or 6 repeatedly.
1
2 Select “Search.”
The six preset PTY codes appears on the display.
3
Using the Preset Station list
• When
is shown on the display, you can
move back to the previous screen by pressing number
button 3.
1 Follow steps 1 and 2 of “Using the number
buttons” on page 12.
• By holding 5 / ∞, the Preset Station List will
also appear (go to step 4).
2
3
Display the Preset Station List.
4 Select the preset number you want to store
into.
• You can move to the lists of the other FM bands
by pressing number button 5 (
) or
6 (
) repeatedly.
5 Store the station.
Preset number flashes for a while.
Continued on the next page
Page 14
ENGLISH
14
3 Select a PTY code.
You can select a PTY code from the
29 preset PTY codes or from the six
stored PTY codes.
• To store your favorite programme types, see the
following.
4 Start searching for your favorite programme.
If there is a station broadcasting a programme
of the same PTY code as you have selected, that
station is tuned in.
Storing your favorite programme types
You can store six favorite programme types.
• When
appears on the display, you can
move back to the previous display by pressing
number button 3.
1
2 Select “Memory.”
3 Select a preset number (“Preset1”–
“Preset6”) you want to store into.
4 Select one of the PTY codes.
5 Store the selected PTY code.
6 Repeat steps 3 to 5 to store other PTY codes
into other preset numbers.
7 Exit from the setting.
Activating TA/PTY Standby
Reception
TA Standby Reception
either lights up or flashes on the display.
• If
lights up, the unit temporarily will switch to
Traffic Announcement (TA), if available, from any
source other than AM.
The volume changes to the preset TA volume level if
the current level is lower than the preset level (see
page 44).
• If
flashes, TA Standby reception is not yet
activated. Tune in to another station providing the
Radio Data System signals.
To deactivate TA Standby Reception, press TP
again.
goes off.
Ex.: When “Classics” is selected in step 4
Page 15
ENGLISH
15OPERATIONS
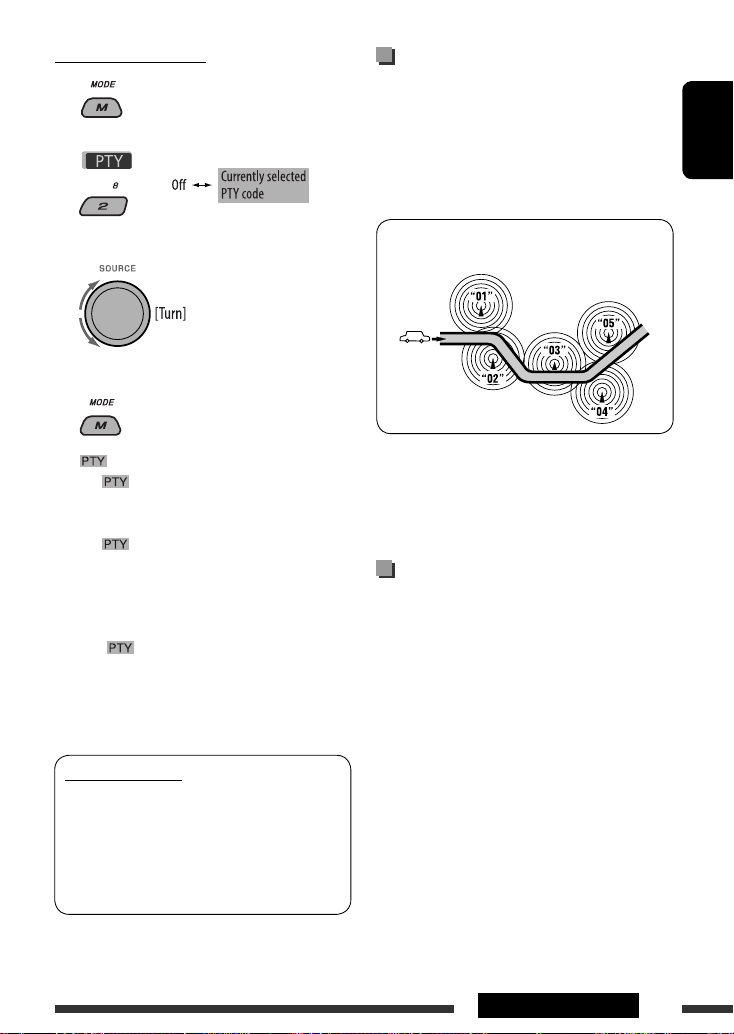
PTY Standby Reception
1
2
3 Select a PTY code.
4 Exit from the setting.
either lights up or flashes on the display.
• If
lights up, the unit temporarily will switch
to your favorite PTY programme from any source
other than AM.
• If
flashes, PTY Standby reception is not yet
activated. Tune in to another station providing
the Radio Data System signals.
To deactivate PTY Standby Reception, select “Off”
in step 2.
goes off.
• The unit will not switch to Traffic Announcement or
PTY programme when a call connection is established
through the “BT-PHONE.”
Available PTY codes
News, Affairs, Info, Sport, Educate, Drama, Culture,
Science, Varied, Pop M (music), Rock M (music),
Easy M (music), Light M (music), Classics, Other
M (music), Weather, Finance, Children, Social,
Religion, Phone In, Travel, Leisure, Jazz, Country,
Nation M (music), Oldies, Folk M (music), Document
Tracing the same programme—
Network-Tracking Reception
When driving in an area where FM reception is not
sufficient enough, this unit automatically tunes in to
another FM Radio Data System station of the same
network, possibly broadcasting the same programme
with stronger signals (see the illustration below).
Programme A broadcasting on different frequency
areas (01 – 05)
When shipped from the factory, Network-Tracking
Reception is activated.
To change the Network-Tracking Reception
setting, see “AF-Regn’l” on page 44.
Automatic station selection—
Programme Search
Usually when you press the number buttons, the preset
station is tuned in.
If the signals from the FM Radio Data System preset
station are not sufficient for good reception, this
unit, using the AF data, tunes in to another frequency
broadcasting the same programme as the original
preset station is broadcasting.
• The unit takes some time to tune in to another
station using programme search.
• See also page 44.
Page 16
ENGLISH
16
To stop play and eject the disc
• Press SOURCE to listen to another playback source.
Prohibiting disc ejection
To cancel the prohibition, repeat the same
procedure.
Disc operations
Before performing any operations...
Turn on the monitor to watch the playback picture. If you turn on the monitor, you can also control playback of other
discs by referring to the monitor screen. (See pages 22 – 25.)
The disc type is automatically detected, and playback starts automatically (for DVD: automatic start depends on its
internal program).
If the current disc does not have any disc menu, all tracks will be played repeatedly until you change the source or
eject the disc.
If “
” appears on the monitor when pressing a button, the unit cannot accept the operation you have tried to
do.
• In some cases, without showing “
,” operations will not be accepted.
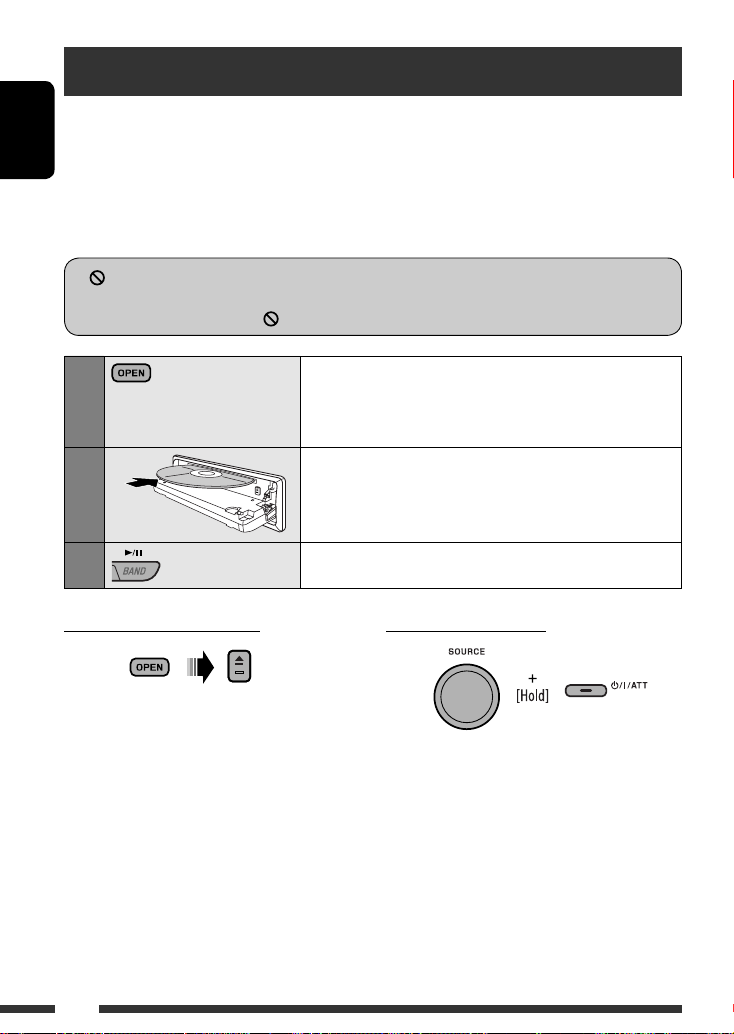
1
Open the control panel.
Make sure to detach the USB device before opening the control
panel, as it might block the opening mechanism.
• To detach the USB device, see page 26.
2
Insert the disc.
Playback starts automatically.
3
Start playback if necessary.
Page 17

ENGLISH
17OPERATIONS
Operations using the control panel
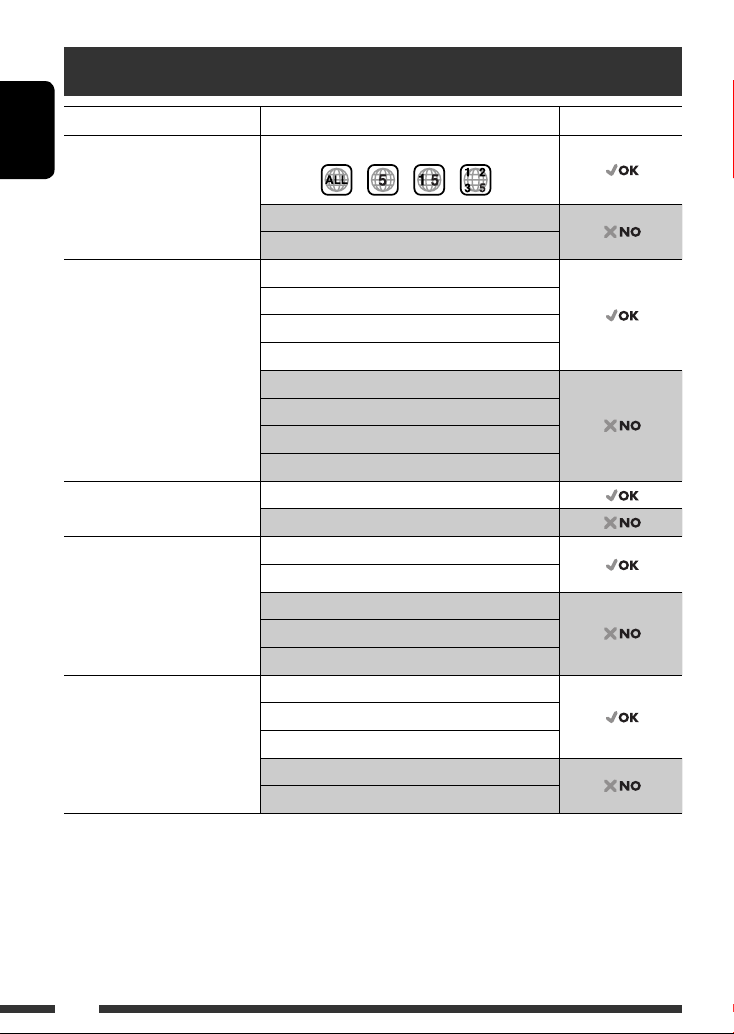
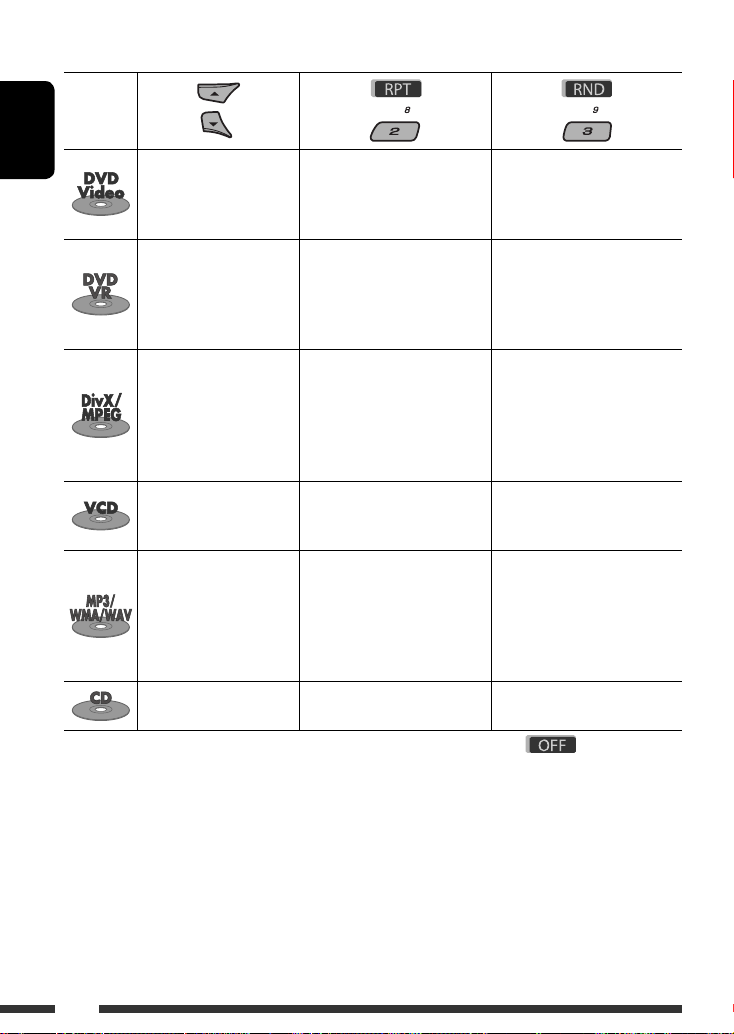
Pressing (or holding) the following buttons allows you to...
Disc type
(Number buttons) *
3
[Press] Select chapter
[Hold] Reverse/fast-forward
chapter *
1
Select title During stop: Locate title
During play/pause: Locate
chapter
[Press] Select chapter
[Hold] Reverse/fast-forward
chapter *
1
Select program number/
playlist number
During stop: Locate program
During play/pause: Locate
chapter
[Press] Select track
[Hold] Reverse/fast-forward track *
2
Select folder Locate particular folder directly
[Press] Select track
[Hold] Reverse/fast-forward track *
1
—
Locate particular track directly
(PBC not in use)
[Press] Select track
[Hold] Reverse/fast-forward track *
1
Select folder Locate particular folder directly
[Press] Select track
[Hold] Reverse/fast-forward track *
1
—
Locate particular track directly
*
1
Search speed:
*2 Search speed:
*3 Press to select number 1 to 6; hold to select number 7 to 12.
Continued on the next page
Page 18
ENGLISH
18
After pressing M MODE, press the following buttons to...
Disc type
Skip 10 chapters (during
play or pause)
Repeat Chapter:
Repeat current chapter
Repeat Title:
Repeat current title
—
Skip 10 chapters (during
play or pause)
Repeat Chapter:
Repeat current chapter
Repeat Program:
Repeat current program (not
available for Playlist Playback)
—
Skip 10 tracks (within the
same folder)
Repeat Track:
Repeat current track
Repeat Folder:
Repeat current folder
Random Folder:
Randomly play all tracks of
current folder, then tracks of
next folders
Random All:
Randomly play all tracks
Skip 10 tracks (PBC not in
use)
Repeat Track:
Repeat current track (PBC not in
use)
Random All:
Randomly play all tracks (PBC
not in use)
Skip 10 tracks (within the
same folder)
Repeat Track:
Repeat current track
Repeat Folder:
Repeat current folder
Random Folder:
Randomly play all tracks of
current folder, then tracks of
next folders
Random All:
Randomly play all tracks
Skip 10 tracks Repeat Track:
Repeat current track
Random All:
Randomly play all tracks
• You can also cancel the playback mode by selecting “Off” or press number button 4 (
).
Page 19
ENGLISH
19OPERATIONS
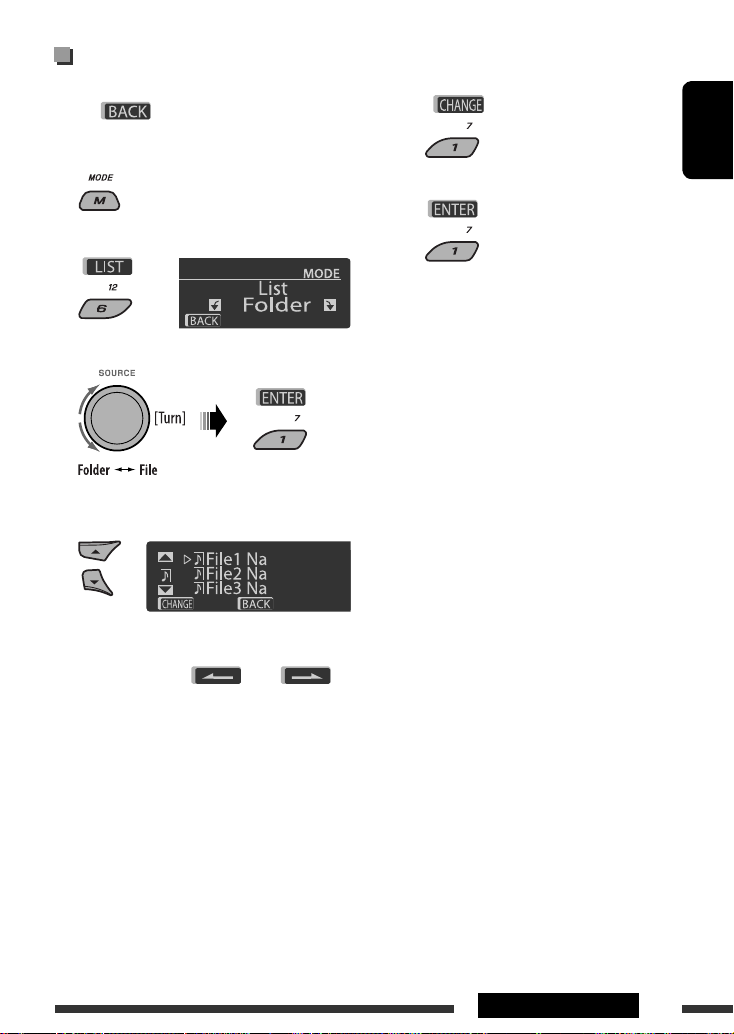
Selecting a folder/track on the list
(only for MP3/WMA/WAV file)
• When
is shown on the display, you can
move back to the previous screen by pressing number
button 3.
1
2 Select “LIST.”
3 Select the list type.
4 Select an item.
• You can move to the other lists by pressing
number button 5 (
) or 6 ( )
repeatedly.
5 Change to the selected item.
A If File List is selected
The list disappears and playback
starts.
B If Folder List is selected
• If the current folder is selected, File List
appears, then repeat steps 4 and 5 A to
start playback.
• If another folder is selected, playback starts
from the 1st file of the selected folder.
Ex.: When “File” is selected in step 3
Page 20

ENGLISH
20
To search for chapter/title/program/playlist/folder/track directly (DVD/DivX/MPEG Video/VCD/
MP3/WMA/WAV/CD)
1 While holding SHIFT, press DIRECT repeatedly to select the desired search mode.
DVD-Video :
VCD :
DVD-VR : CD :
DivX/MPEG Video :
MP3/WMA/WAV :
2 While holding SHIFT, press the number buttons (0 – 9) to enter the desired number.
3 Press ENT (enter) to confirm.
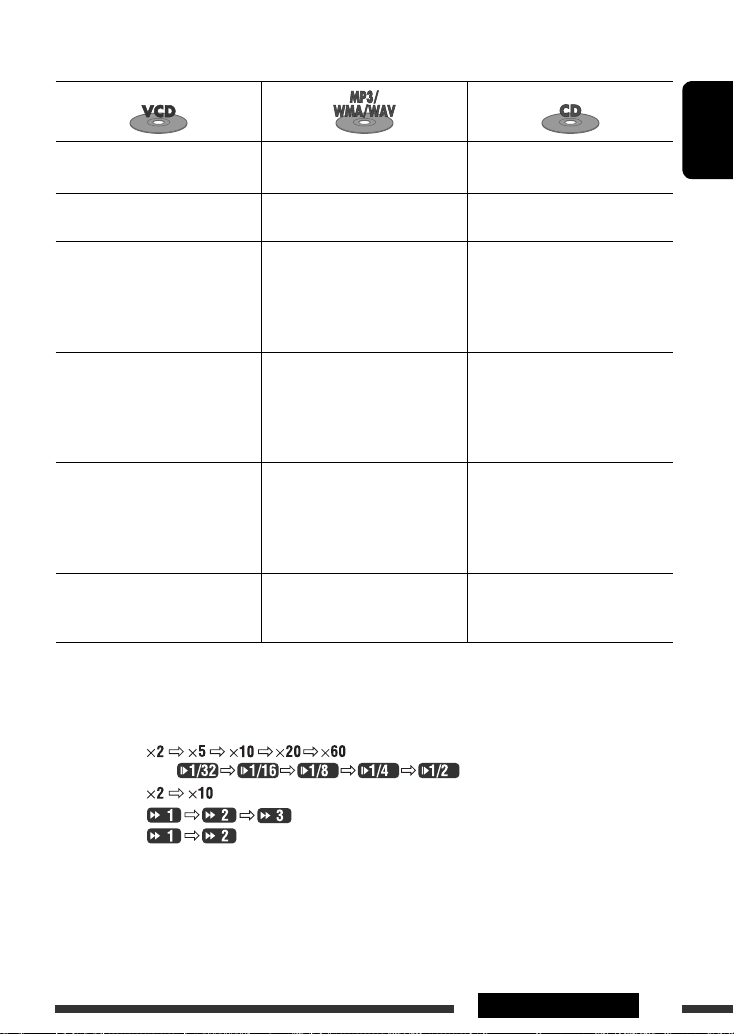
Button
/
Stop play Stop play
Start play/Pause (if pressed during play) Start play/Pause (if pressed during play)
• Reverse/forward chapter search *1 (No
sound can be heard.)
• Slow motion *2 during pause (No sound can
be heard.)
* DVD-VR: Reverse slow motion does not work.
Reverse/forward track search *4 (No sound can
be heard.)
[Press] Select chapter (during play or pause)
[Hold] Reverse/fast-forward chapter search *
3
[Press] Select track (during play or pause)
[Hold] Reverse/fast-forward track search *
5
(No sound can be heard.)
• DVD-Video: Select title (during play or
pause)
• DVD-VR: Select playlist/program (during
play or pause)
Select folder
—
• Skip back or forward the scenes by about
five minutes
• Select chapter
Operations using the remote controller (RM-RK252)
Disc
Page 21
ENGLISH
21OPERATIONS
Stop play Stop play Stop play
Start play/Pause (if pressed during
play)
Start play/Pause (if pressed during
play)
Start play/Pause (if pressed during
play)
Reverse/forward track search *
1
• Forward slow motion *2 during
pause. (No sound can be heard.)
* Reverse slow motion does not work.
Reverse/forward track search *
1
Reverse/forward track search *
1
[Press] Select track (during play or
pause)
[Hold] Reverse/fast-forward track
search *3 (No sound can be
heard.)
[Press] Select track (during play or
pause)
[Hold] Reverse/fast-forward track
search *
3
[Press] Select track (during play or
pause)
[Hold] Reverse/fast-forward track
search *
3
—
Select folder
—
———
Continued on the next page
• For DivX/MPEG Video/MP3/WMA/WAV, track is searched within the same folder.
• To erase a misentry, press CLR (clear) while holding SHIFT.
• To return to the previous screen, press RETURN.
*1 Search speed:
*2 Slow motion speed:
*3 Search speed:
*4 Search speed:
*5 Search speed:
Page 22
ENGLISH
22
Operations using the
on-screen bar
(DVD/DVD-VR/DivX/MPEG Video/VCD)
These operations are possible on the monitor using the
remote controller.
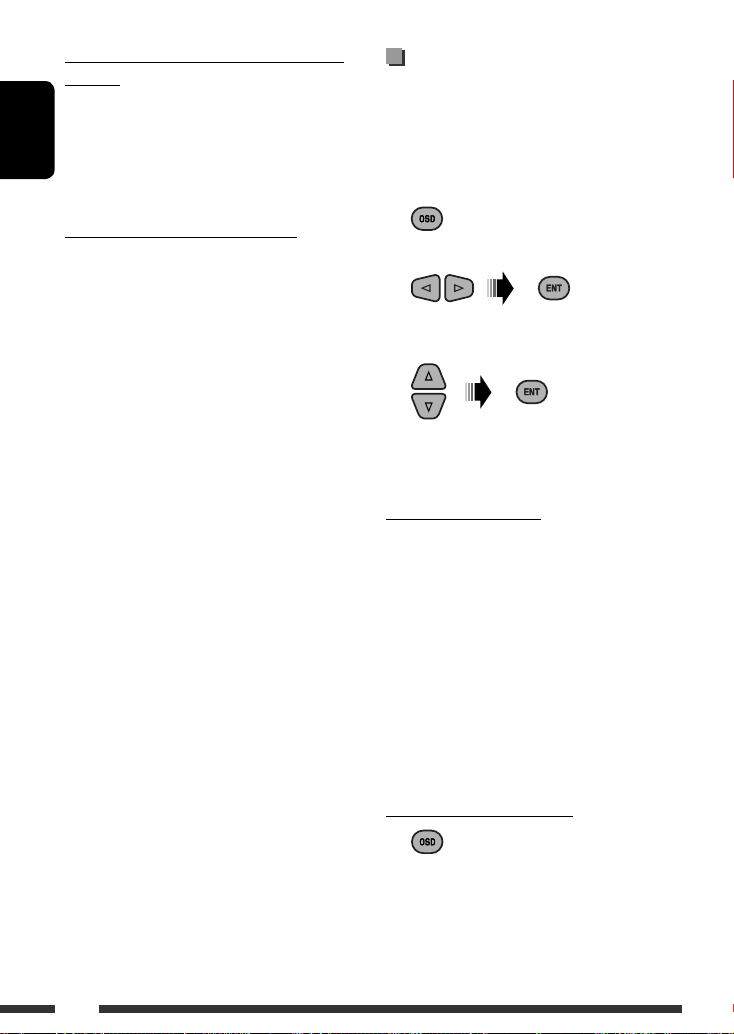
1 Show the on-screen bar (see page 23).
2 Select an item.
3 Make a selection.
If pop-up menu appears...
• To cancel pop-up menu, press RETURN.
• For entering time/numbers, see the following.
Entering time/numbers
Press % / fi to change the number, then press @ / # to
move to the next entry.
• Each time you press % / fi, the number increases/
decreases by one value.
• After entering the numbers, press ENT (enter).
• It is not required to enter the zero and tailing zeros
(the last two digits in the example below).
Ex.: Time search
DVD: _:_ _:_ _ (Ex.: 1:02:00)
Press % once, then # twice to go to the third entry, %
twice, then press ENT (enter).
To remove the on-screen bar
(twice)
Using menu driven features... (DVD-Video/
DVD-VR)
1 Press TOP M/MENU to enter the menu screen.
2 Press % / fi / @ * / # * to select an item you want
to start play.
3 Press ENT (enter) to confirm.
* Not applicable for DVD-VR.
Canceling the PBC playback... (VCD)
1 During stop, press DIRECT while holding SHIFT.
2 Hold SHIFT, then press the number buttons (0 – 9)
to enter the desired number.
3 Press ENT (enter) to confirm.
• To resume PBC, press TOP M/MENU.
Page 23
ENGLISH
23OPERATIONS
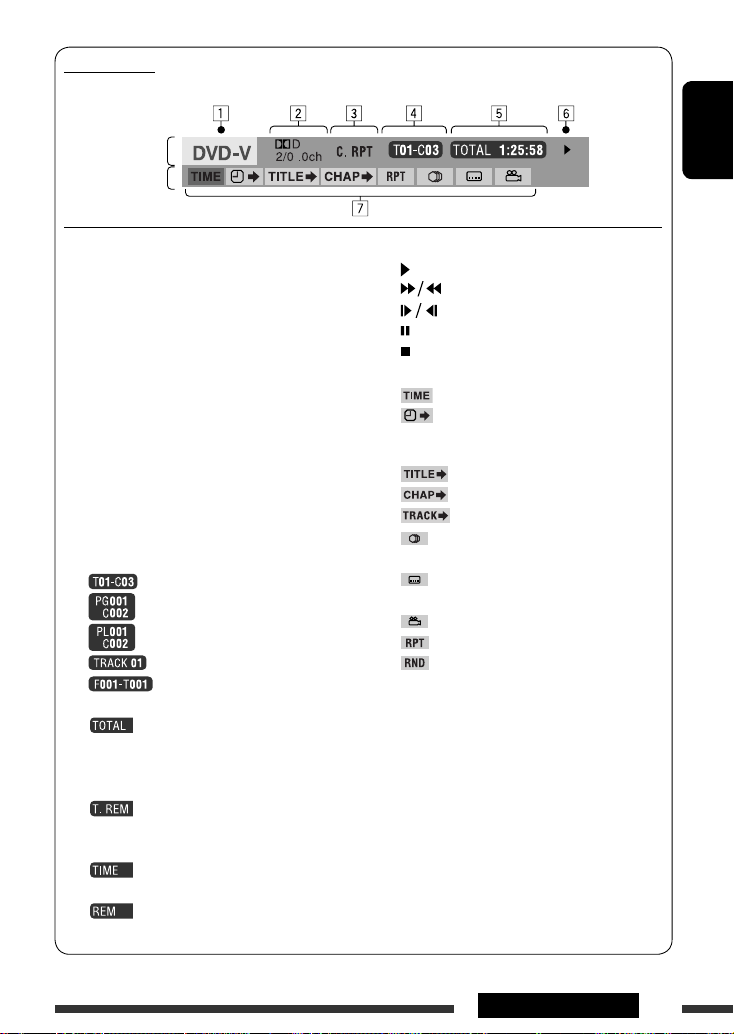
Information
Operation
On-screen bar
Ex.: DVD-Video
1 Disc type
2 • DVD-Video/DTS-CD: Audio signal format type
and channel
• VCD: PBC
3 Playback mode *
1
DVD-Video: T. RPT: Title repeat
C. RPT: Chapter repeat
DVD-VR: C. RPT: Chapter repeat
PG. RPT: Program repeat
DivX/MPEG Video: T. RPT: Track repeat
F. RPT: Folder repeat
F. RND: Folder random
A. RND: All random
VCD *2: T. RPT: Track repeat
A. RND: All random
4 Playback information
Current title/chapter
Current program/chapter
Current playlist/chapter
Current track
Current folder/track
5 Time indication
Elapsed playing time of the disc
(For DVD-Video, elapsed playing
time of the current title/program/
playlist.)
DVD-Video/DVD-VR: Remaining
title/program/playlist time
VCD: Remaining disc time
Elapsed playing time of the current
chapter/track *
3
Remaining time of the current
chapter/track *
3
6 Playback status
Play
Forward/reverse search
Forward/reverse slow-motion
Pause
Stop
7 Operation icons
Change time indication (see 5)
Time Search (Enter the elapsed playing
time of the current title/program/
playlist or of the disc.)
Title Search (by its number)
Chapter Search (by its number)
Track Search (by its number)
Change the audio language or audio
channel
Change or turn off the subtitle
language
Change the view angle
Repeat play *
1
Random play *
1
*1 For repeat play/random play, see also page 18.
*2 While PBC is not in use.
*3 Not applicable for DVD-VR.
Page 24
ENGLISH
24
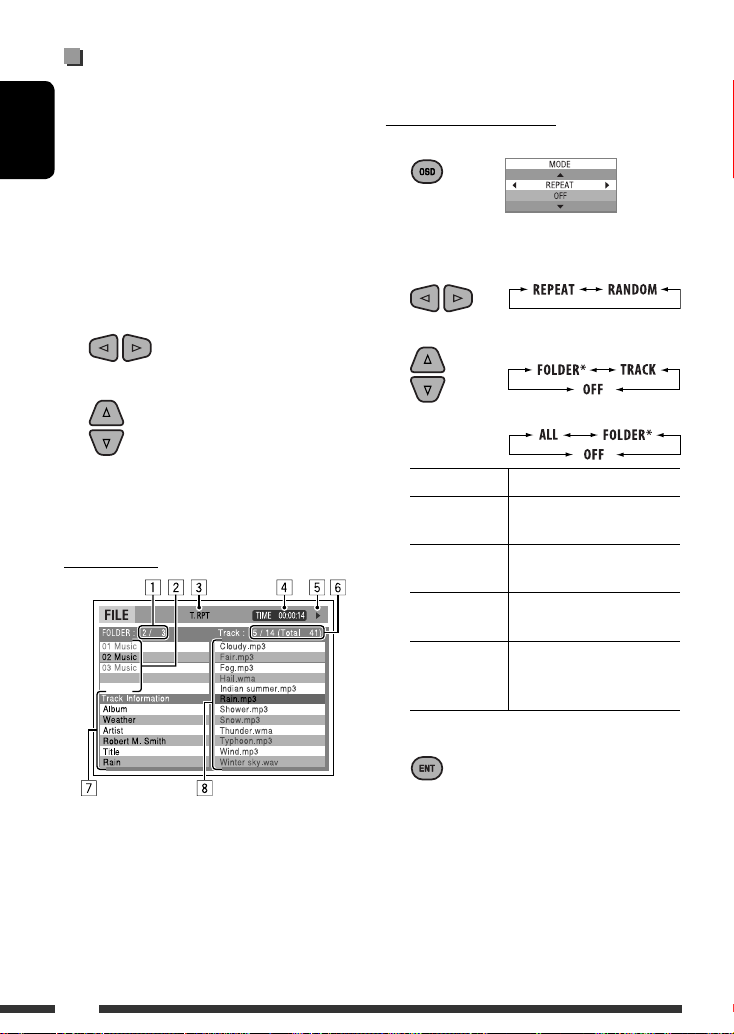
7 Track information
8 Track list with the current track selected
To select a playback mode
1 While control screen is displayed...
Playback mode selection screen appears on the
folder list section of the control screen.
2 Select a playback mode.
3 Select an item.
REPEAT:
RANDOM:
Mode Playback functions
F. RPT
(folder repeat):
Repeat current folder
T. RPT
(track repeat):
Repeat current track
A. RND
(all random):
Randomly play all tracks
F. RND
(folder random):
Randomly play all tracks of
current folder, then tracks of
next folders
4 Confirm the selection.
* Not selectable for CD.
Operations using the control
screen
(DivX/MPEG Video/MP3/WMA/WAV/CD)
These operations are possible on the monitor using the
remote controller.
1 Show the control screen.
DivX/MPEG Video: Press 7 during play.
MP3/WMA/WAV/CD: Automatically appear during
play.
2 Select “Folder” column or “Track” column
(except for CD).
3 Select a folder or track.
4 Start playback.
DivX/MPEG Video: Press ENT (enter) or 3/8.
MP3/WMA/WAV/CD: Playback starts automatically.
Control screen
1 Current folder number/total folder number
2 Folder list with the current folder selected
3 Selected playback mode
4 Elapsed playing time of the current track
5 Operation mode icon ( 3, 7, 8, ¡, 1 )
6 Current track number/total number of tracks in the
current folder (total number of tracks on the disc)
Ex.: MP3/WMA/WAV disc
Page 25
ENGLISH
25OPERATIONS
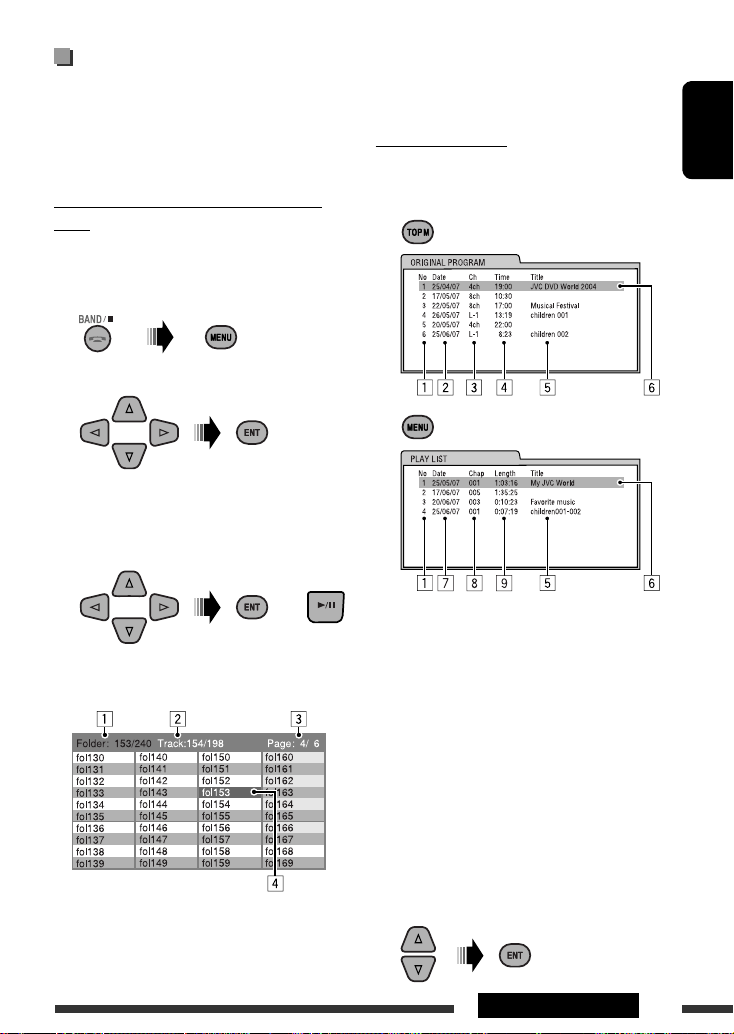
3 Current page/total number of the pages included
in the list
4 Current folder/track (highlighted bar)
List screen (DVD-VR)
You can use ORIGINAL PROGRAM or PLAY LIST screen
anytime while playing DVD-VR with its data recorded.
1 Select a list screen.
1 Program/playlist number
2 Recording date
3 Recording source (TV station, the input
terminal of the recording equipment, etc.)
4 Start time of recording
5 Title of the program/playlist *
6 Current selection (highlighted bar)
7 Creating date of playlist
8 Number of chapters
9 Playback time
* The title of the original program or playlist may
not be displayed depending on the recording
equipment.
2 Select an item from the list.
Operations using the list
screen
(DVD-VR/DivX/MPEG Video/MP3/WMA/WAV)
These operations are possible on the monitor using the
remote controller.
List screen (DivX/MPEG Video/MP3/WMA/
WAV)
Before playing, you can display the folder list/track list
to confirm the contents and start playing a track.
1 Display the folder list while stop.
2 Select an item from the folder list.
• Track list of the selected folder appears.
• To go back to the folder list, press RETURN.
3 Select a track to start playing.
• MP3/WMA/WAV: Control screen appears (see
page 24).
1 Current folder number/total folder number
2 Current track number/total number of tracks in the
current folder
Ex.: Folder list
or
Page 26
ENGLISH
26
Turn on the monitor to watch the playback picture if
you play back a DivX/MPEG file. You can also control
playback by referring to the monitor screen. (See also
pages 22 – 25.)
• See pages 20 – 25 for operation using the remote
controller.
• See pages 47, 48, and 53 for more settings.
If “
” appears on the monitor when pressing a
button, the unit cannot accept the operation you
have tried to do.
• In some cases, without showing “
,” operations
will not be accepted.
If a USB device has been attached...
Playback starts from where it has
been stopped previously.
• If a different USB device is
currently attached, playback starts
from the beginning.
To stop play and detach the USB device
Straightly pull it out from the unit.
• Press SOURCE to listen to another playback source.
You can operate the USB device in the same way you
operate the files on a disc. (See pages 16 – 25.)
• You cannot select “USB” when Dual Zone is in use
(see page 27).
Cautions:
• Avoid using the USB device if it might hinder your
safety driving.
• Do not pull out and attach the USB device repeatedly
while “Reading” is shown on the display.
• Do not start the car engine if a USB device is
connected.
• This unit may not be able to play the files depending
on the type of USB device.
• Operation and power supply may not work as
intended for some USB devices.
• You cannot connect a computer to the USB input
terminal of the unit.
• Make sure all important data has been backed up to
avoid losing the data.
• Do not leave a USB device in the car, expose to direct
sunlight, or high temperature to avoid deformation
or cause damages to the device.
• Some USB devices may not work immediately after
you turn on the power.
• For more details about USB operations, see page 53.
Listening to the USB device
You can connect a USB mass storage class device such as a USB memory, portable HDD, etc. to the unit.
• You can also connect an Apple iPod to the USB input jack. For details of the operations, see pages 34 – 38.
This unit can play DivX/MPEG Video/MP3/WMA/WAV tracks stored in a USB device.
All tracks will be played repeatedly until you change the source or detach the USB device.
12
USB memory
USB input jack
Page 27
ENGLISH
27OPERATIONS
On the control panel:
1
2 Enter Dual Zone settings.
Activate or deactivate Dual Zone.
The source automatically changes to “DISC” when
Dual Zone is activated.
Dual Zone operations
You can enjoy disc playback on the external monitor connected to the VIDEO output terminal and 2nd AUDIO OUT
plugs while listening to any source (other than “AM” and “USB”) through the speakers.
• You cannot select “AM” or “USB” as the source when Dual Zone is activated.
• When Dual Zone is in use, you can only operate the DVD/CD player using the remote controller. For operations, see
pages 20 – 25.
These operations are possible on the monitor using the remote controller.
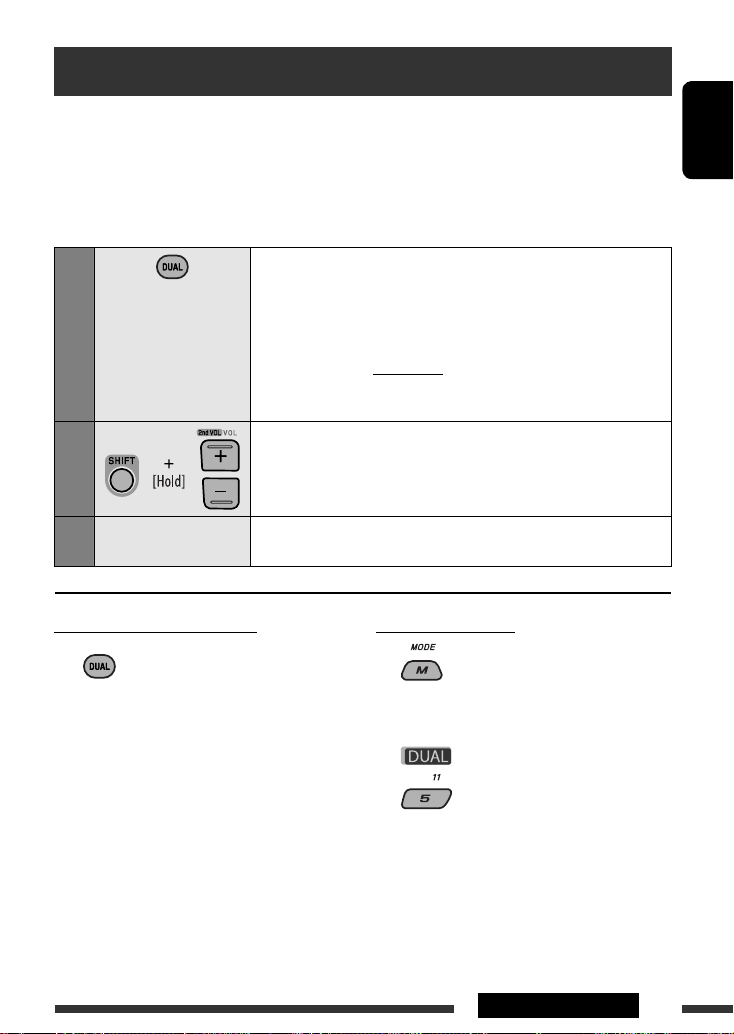
1
Activate Dual Zone.
• DUAL indicator lights up on the display.
The main source automatically changes to “DISC.”
To select a different source (main source) to listen through the speakers,
press SOURCE on the control panel.
• By using the buttons on the control panel, you can operate the newly
selected source without affecting Dual Zone operations.
2
Adjust the volume through the 2nd AUDIO OUT plug.
3
—
Operate the DVD/CD player using the remote controller by
referring to the monitor screen.
To cancel Dual Zone operations
• DUAL indicator goes off.
Page 28
ENGLISH
28
Listening to the Bluetooth ® devices
For Bluetooth operations, it is required to connect the
Bluetooth Adapter (KS-BTA200) to the CD changer
jack on the rear of this unit.
• Refer also to the instructions supplied with the
Bluetooth adapter and the Bluetooth device.
• Refer to the list (included in the box) to check
the countries where you may use the Bluetooth ®
function.
To use a Bluetooth device through the unit
(“BT-PHONE” and “BT-AUDIO”) for the first time,
you need to establish Bluetooth wireless connection
between the unit and the device.
• Once the connection is established, it is registered in
the unit even if you reset your unit. Up to five devices
can be registered in total.
• Only one device can be connected at a time for each
source (“BT-PHONE” and “BT-AUDIO”).
Registering a Bluetooth device
Registration (Pairing) methods
Use either of the following items in the Bluetooth menu
to register and establish the connection with a device.
• Select “BT-PHONE” or “BT-AUDIO” as the source to
operate the Bluetooth menu.
Open Make the unit ready to establish a new
Bluetooth connection.
Connection is established by operating the
Bluetooth device.
Search Make the unit ready to establish a new
Bluetooth connection.
Connection is established by operating
the unit.
• When
is shown on the display, you can
move back to the previous screen by pressing number
button 3.
Registering using “Open”
Preparation: Operate the device to turn on its
Bluetooth function.
1 Select “BT-PHONE” or “BT-AUDIO.”
2 Select “New.”
3 Enter setting menu.
4 Select “Open.”
5 Enter a PIN (Personal Identification Number)
code to the unit.
• You can enter any number you like (1-digit to
16-digit number). [Initial: 0000]
• To enter a PIN code less than 4-digit, firstly
delete the initial PIN code (0000) by pressing
number button 5 (
) .
* Some devices have their own PIN code. Enter the
specified PIN code to the unit.
1 Move to the next (or previous) number
position.
Page 29
ENGLISH
29
EXTERNAL DEVICES
2 Select a device you want to connect.
3 • For available devices...
1 Enter the specific PIN code of the device to
the unit.
Refer to the instructions supplied with the
device to check the PIN code.
2 Use the Bluetooth device to connect.
Now connection is established and you can
use the device through the unit.
• For special device...
Use “Open” or “Search” to connect.
Connecting/disconnecting/deleting a
registered device
1 Select “BT-PHONE” or “BT-AUDIO.”
2 Select a registered device you want to
connect/disconnect/delete.
3 Enter setting menu.
4 • Select “Connect” or “Disconnect” to
connect/disconnect the selected device.
2 Select a number or blank space.
3 Repeat steps 1 and 2 until you finish
entering a PIN code.
4 Confirm the entry.
“Open...” flashes on the display.
6 Use the Bluetooth device to search and
connect.
On the device to be connected, enter the same
PIN code you have just entered for this unit.
“Connected (and device name)” appears on the
display.
Now connection is established and you can use the
device through the unit.
The device remains registered even after you
disconnect the device. Use “Connect“ (or activate
“Auto Connect”) to connect the same device from
next time on. (See the following and page 49.)
Connecting a device
Perform steps 1 – 3 on page 28, then...
1 • Select “Search” to search for available
devices.
The unit searches and displays the list of the
available devices.
If no available device is detected, “Device not
found” appears.
• Select “Special” to connect a special device.
The unit displays the list of the preset devices.
Continued on the next page
Page 30
ENGLISH
30
• Select “Delete,” then confirm the selection.
You can set the unit to connect the Bluetooth device automatically when the unit is turned on. (See
“Auto Connect” on page 49.)
Using the Bluetooth cellular phone
1
Select “BT-PHONE.”
2
Enter Bluetooth menu.
3
—
Establish the connection with a device, then make a call (or settings
using the Bluetooth menu) (See pages 31 and 49.).
Press number button 3 to
select “No” or return to the
previous screen.
When a call comes in....
The source is automatically changed to “BT-PHONE.”
When “Auto Answer” is activated....
The unit answers the incoming calls automatically, see
page 49.
• When “Auto Answer” is deactivated, press any
button (except
/control dial) to answer the
incoming call.
To end the call
Hold any button (except /control dial).
• You can adjust the microphone volume level (see
page 49).
When a text message comes in....
If the cellular phone is compatible with Text Message
(notified through JVC Bluetooth adapter) and “Message
Info” is set to “Auto” (see page 49), the unit rings and
“Received Message” appears on the display to inform
you of the message arrival.
Page 31

ENGLISH
31
EXTERNAL DEVICES
Making a call
You can make a call using one of the Dial Menu items.
• When
is shown on the display, you can
move back to the previous screen by pressing number
button 3.
1 Select “BT-PHONE.”
2 Enter setting menu.
3 Select “Dial Menu.”
4 Select the method to make a call.
• Redial *: Shows the list of the phone numbers
you have dialed. Go to the following step.
• Received *: Shows the list of the received calls.
Go to the following step.
• Phonebook *: Shows the phone book of the
connected cellular phone. Go to the following
step.
• Missed *: Shows the list of the missed calls. Go
to the following step.
• Number: Shows the phone number entry
screen. See “How to enter phone number” on the
right column.
• Voice Dial (Only accessible when the connected
cellular phone has the voice recognition system):
Speak the name (registered words) you want to
call.
* Displayed only when your cellular phone is
equipped with these functions.
– If not displayed, try to transfer the phone book
memory of the cellular phone to this unit.
(Refer to the instruction manual supplied with
your cellular phone.)
– With some cellular phones, the phone book
memory is transferred automatically.
5 Select the name/phone number you want to
call.
How to enter phone number
Select a number.
Move the entry position.
Confirm the entry.
Continued on the next page
Page 32

ENGLISH
32
2 Select a phone number.
You can also enter a new phone
number (see also “How to enter
phone number” on page 31) to store.
3 Select a preset number to store.
To call a preset number
While in Bluetooth phone....
• Refer also to pages 29 and 30 for connecting/
disconnecting/deleting a registered device.
Bluetooth Information:
If you wish to receive more information about
Bluetooth, visit the following JVC web site: <http://
www.jvc-victor.co.jp/english/car/>.
Using the Bluetooth audio player
• Operations and display indications differ depending on their availability on the connected audio player.
Select “BT-AUDIO.”
If playback does not start automatically, operate the Bluetooth audio player to start playback.
• If playback does not pause when you change the source, operate the Bluetooth audio player to
pause playback.
Reverse skip/forward skip
Start/pause playback
Enter setting menu (Device list)
Using voice command
1 “Say...” appears on the display.
2 Speak the name (registered words) you want
to call.
• You can also use voice command from the Dial
Menu. Select “Voice Dial” from the Dial Menu.
• If your cellular phone does not support the voice
recognition system, “Error” appears on the
display.
Presetting the phone number
You can preset up to six phone numbers.
• When
is shown on the display, you can
move back to the previous screen by pressing number
button 3.
1 Display the phone number you want to
preset by using one of the “Dial Menu” items.
Page 33

ENGLISH
33
EXTERNAL DEVICES
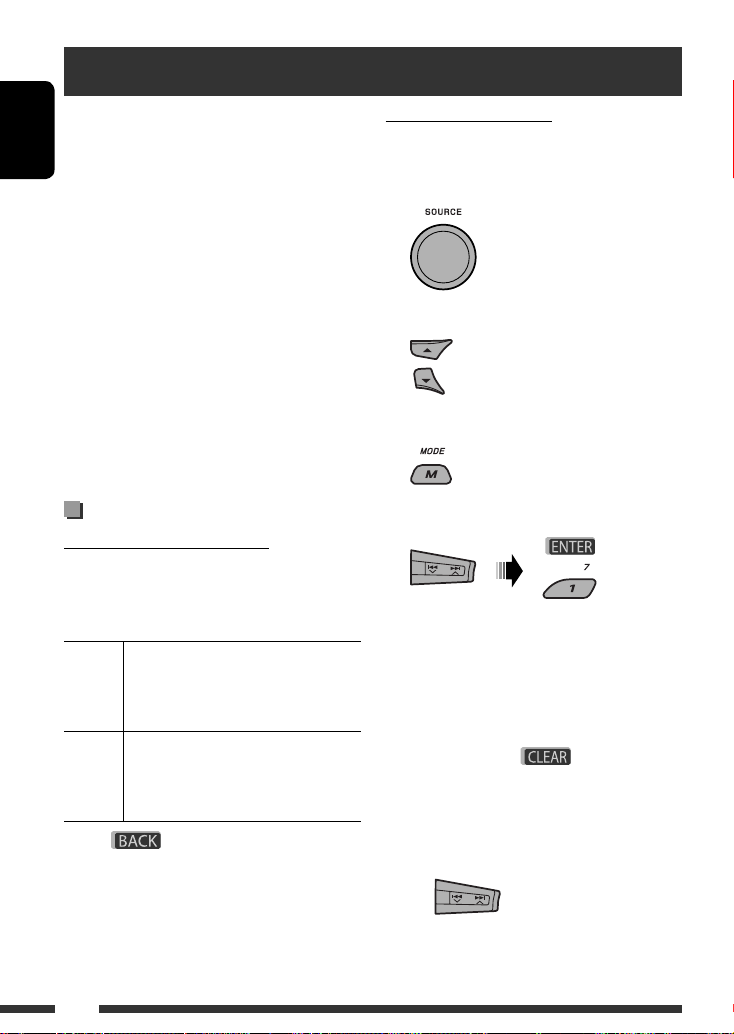
Listening to the CD changer
It is recommended to use a JVC MP3-compatible CD changer with your unit. You can connect a CD changer to the
CD changer jack on the rear of the unit.
• You can only play conventional CDs (including CD Text) and MP3 discs.
Preparation: Make sure “Changer” is selected for the external input setting, see page 44.
1
Select “CD-CH.”
2
Select a disc to start playing.
[Press] For selecting disc number 1 – 6.
[Hold] For selecting disc number 7 – 12.
[Press] Select track
[Hold] Reverse/fast-forward track
MP3: Select folders
* By holding either one of the buttons, you can display
the Disc List (see page 19).
To select a disc/folder/track on the list
See “Selecting a folder/track on the list (only for MP3/
WMA/WAV file)” on page 19.
Select “Disc” in step 3 to display the Disc List of the CD
changer.
After pressing M MODE, press the following buttons to...
Skip 10 tracks
MP3: Within the same folder
Repeat Track:
Repeat current track
Repeat Folder:
MP3: Repeat all tracks of current
folder
Repeat Disc:
Repeat all tracks of the current disc
Random Folder:
MP3: Randomly play all tracks of
the current folder, then tracks of the
next folder
Random Disc:
Randomly play all tracks of current
disc
Random All:
Randomly play all tracks of the discs
in the magazine
• You can also cancel the playback mode by selecting
“Off” or press number button 4 (
).
*
Page 34

ENGLISH
34
You can connect an Apple iPod using the following cable or adapter:
To: Cable or adapter: Connect to:
Listen to the
music
USB 2.0 cable (supplied for the iPod) USB input jack on the control panel
Interface adapter for iPod, KS-PD100
(not supplied)
CD changer jack on the rear of the unit
Preparation: Make sure “Changer” is selected for
the external input setting, see page 44.
Watch the video USB Audio and Video cable for iPod,
KS-U19 (not supplied)
USB input jack and AV-IN input jack on the control
panel
• Turn on the monitor to watch the video.
• You can control playback from the unit.
• Disconnecting the iPod will stop playback. Press SOURCE to listen to another playback source.
• For details, refer also to the manual supplied for your iPod.
• See also page 54
Caution:
• Avoid using the iPod if it might hinder your safety while driving.
• Make sure all important data has been backed up to avoid losing the data.
When connecting with the USB cable
Connect using USB 2.0 cable (supplied for iPod): Connect using USB Audio and Video cable for
iPod, KS-U19 (not supplied):
Playback starts automatically from where it had been paused previously.*
* Not applicable for video files.
Listening to the iPod
USB cable supplied
for your iPod
USB input jack
KS-U19 (not supplied)
USB input jack
AV-IN input jack
Page 35

ENGLISH
35
EXTERNAL DEVICES
Continued on the next page
[Press] Go to the next or previous
track
[Hold] Fast-forward or reverse the
track during playback
[Hold] Enter main menu
[Press] Pause/resume playback.
Selecting a track from the menu
1 Enter the main menu.
2 Select the desired menu.
3 Confirm the selection.
• By holding ¢
, you can start play back the
selected item directly.
• By holding 4
, you can exit from the menu.
• By holding 5/∞, you can fast skip in every layer of
the main menu.
Menu items:
For Music:
“Playlists,” “Artists,” “Albums,” “Songs,” “Podcasts,”
“Genres,” “Composers,” or “Audiobooks”
For Videos:
“Video Playlists,” “Movies,” “Music Videos,” “TV Shows,”
or “Video Podcasts”
• If a track is selected, playback starts automatically.
• If the selected item has another layer, you will enter
the layer. Repeat steps 2 and 3 until the desired track
is played.
Operations using the control
screen
• These operations are possible on the monitor using
the remote controller.
• Connect your iPod to the USB input jack on the
control panel using the USB cable supplied for your
iPod, or KS-U19 for watching video file.
1 Turn on the monitor.
Control screen appears on the monitor.
1 Current category number/total category
number
2 Category list with the current category
selected
3 Elapsed playing time of the current track
4 Operation mode icon ( 3, 7, 8, ¡, 1 )
5 Current track number/total number of tracks
in the current category
6 Track information
7 Track list with the current track selected
2 Select the desired item.
If the selected item has another layer, you will
enter the layer. Repeat this step until the desired
track is played.
Page 36

ENGLISH
36
To select a track from Search Mode
1 Enter Search Mode menu.
2 Select a menu item.
• Selecting Shuffle Songs starts playback.
3 Select a search mode category, then the desired
track.
Search modes category:
For Music:
“Playlists,” “Artists,” “Albums,” “Songs,” “Podcasts,”
“Genres,” “Composers,” or “Audiobooks”
For Videos:
“Video Playlists,” “Movies,” “Music Videos,”
“TV Shows,” or “Video Podcasts”
• Available Search Modes depend on the type of your
iPod.
• To return to the previous search mode screen,
press MENU.
• To return to the control screen, press RETURN.
or
To select a playback mode/change the speed
of the Audiobooks
1 While control screen is displayed...
Playback mode selection screen appears on the
category list section of the control screen.
2 Select an item.
3 Select a playback mode/speed.
REPEAT:
RANDOM:
AUDIO BOOK:
REPEAT ONE Same as “Repeat One.”
REPEAT ALL Same as “Repeat All.”
RANDOM
ALBUMS*
Same as “Shuffle Albums.”
RANDOM
SONGS:
Same as “Shuffle Songs.”
NORMAL Plays at normal speed.
FASTER Plays faster.
SLOWER Plays slower.
* Functions only if you select “All Albums” or “All” in
“Albums” of the main “MENU.”
Page 37

ENGLISH
37
EXTERNAL DEVICES
4 Confirm the selection.
• You can also change the settings from the PSM
(Preferred Setting Mode) items. See “AudioBooks” on
page 44.
When connecting with the
interface adapter
Playback starts automatically from where it had been
paused previously.
• If an iPod has been connected, press SOURCE to select
“iPod” to listen to music.
[Press] Go to the next or previous
track
[Hold] Fast-forward or reverse the
track during playback
[Press] Enter main menu when you
press 5. Pause/resume
playback when ∞ is pressed.
CD changer jack
Selecting a track from the menu
1 Enter the main menu.
2 Select the desired menu.
Playlists Ô Artists Ô Albums Ô Songs Ô
Genres Ô Composers
3 Confirm the selection.
• By holding 4
/¢ , you can fast skip
during song search in the main menu.
• If a track is selected, playback starts automatically.
• If the selected item has another layer, you will enter
the layer. Repeat steps 2 and 3 until the desired track
is played.
Selecting the playback modes
After pressing M MODE, press the following buttons
to...
Repeat One:
Same as “Repeat One.”
Repeat All:
Same as “Repeat All.”
Repeat Off:
Cancels.
Random Album *2:
Same as “Shuffle Albums.”
Random Song:
Same as “Shuffle Songs.”
Random Off:
Cancels.
*1 Not applicable for video files.
*2 Functions only if you select “All Albums” or “All” in
“Albums” of the main “MENU.”
Continued on the next page
*
1
Page 38

ENGLISH
38
Listening to the other external components
You can connect an external component to:
• CD changer jack on the rear of this unit using the following adapters:
– Line Input Adapter, KS-U57
– AUX Input Adapter, KS-U58
Preparation: Make sure “Ext In” is selected for the external input setting, see page 44.
• AV-IN (video) input jack on the control panel.
Preparation: Make sure to connect and turn on the monitor to watch the playback picture. If the parking brake
is not engaged, “Parking Brake” appears on the display and no playback video on the monitor. For connection, see
Installation/Connection Manual (separate volume).
• LINE IN terminals on the rear of this unit.
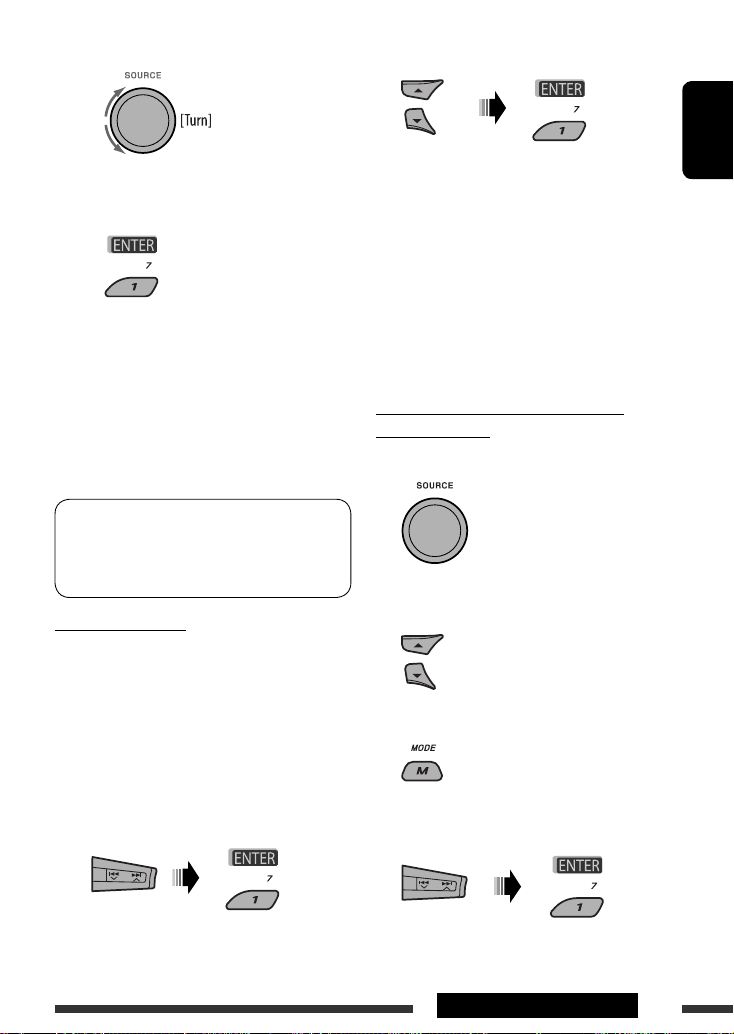
1
Select “EXT IN,” “LINE IN,” or “AV IN.”
2
—
Turn on the connected component and start playing the source.
3
Adjust the volume.
4
—
Adjust the sound as you want (see pages 40 and 41).
The menu selecting mode will be canceled:
• If no operations are performed for about:
– 5 seconds for iPod connected through KS-PD100.
– 15 seconds for iPod connected to the USB input
jack.
• When you confirm the selection of a track.
Page 39

ENGLISH
39
EXTERNAL DEVICES
Connecting an external component to the AV-IN input jack
* Portable Video/Audio player of this pin-allocation can be connected:
AV mini plug cable (supplied)
Portable Video/Audio
player *
1234
Audio (R) GND Video Audio (L) Camcorder
Video GND Audio (R) Audio (L) iPod, etc.
GND Audio (R) Audio (L) AUX
Page 40

ENGLISH
40
Selecting a preset sound mode
You can select a preset sound mode suitable to the music genre (iEQ: intelligent equalizer).
1
Enter the setting menu.
2
Select “EQ.”
3
Select “On.”
• If “Bypass” is selected, you can listen to the original
sound mode recorded.
lights up on the
display.
4
Select a preset sound mode.
Adjusting the sound
You can adjust the sound characteristics to your
preference.
• When
is shown on the display, you can
move back to the previous screen by pressing number
button 3 or 6.
1
2
• For “EQ” setting, see above.
3 Adjust the selected setting item.
A Fad/Bal (Fader/Balance)
1 Press number button 1 (
)
to move to the “Fad/Bal” adjustment
display.
2 Adjust the speaker output balance by
pressing:
5 / ∞: between the front and rear
speakers. [F6 to R6]
4 /¢ : between the left and
right speakers. [L6 to R6]
B Subwoofer
1 Press number button 1 (
) to
move to the “Subwoofer” adjustment
display.
2 Use 4
/¢ to select a cutoff
frequency to the subwoofer.
• Off *: All signals are sent to the
subwoofer.
• 55Hz: Frequencies higher than 55 Hz
are cut off.
• 85Hz: Frequencies higher than 85 Hz
are cut off.
• 120Hz: Frequencies higher than 120 Hz
are cut off.
3 Turn the control dial to adjust the
subwoofer output level. [0 to 8]
4 Press number button 1 ( ) to
move to another setting level.
4
/¢ : select the quality of
LPF. [–12dB/oct or –24dB/oct]
Control dial: Turn the control dial to select
the subwoofer phase. [0deg (normal) or
180deg (reverse)]
Page 41

ENGLISH
41SETTINGS
* If “Off” is selected in step 2, you can only
adjust the subwoofer phase.
C Hi Pass (Hi Pass Filter)
Turn the control dial to select the cutoff
frequency to the front/rear speakers. Set this
to match the LPF setting.
• Off: All signals are sent to the front/rear
speakers.
• 62Hz: Frequencies lower than 62 Hz are
cut off.
• 95Hz: Frequencies lower than 95 Hz are
cut off.
• 135Hz: Frequencies lower than 135 Hz are
cut off.
D VolAdjust, [–5 to +5]
Turn the control dial to adjust the input level
of each source (except FM).
Adjust to match the input level of the FM
sound level.
• Before making an adjustment, select the
source you want to adjust.
E Loudness, [Off or On]
Turn the control dial to select “Off” or
“On.” When “On” is selected, low and high
frequencies sound are boosted to produce a
well-balanced sound at low volume level.
4 Exit from the setting.
Storing your own sound modes
You can adjust the sound modes and store your own
adjustments in memory.
• When
is shown on the display, you can
move back to the previous screen by pressing number
button 6.
1
2 Select a sound mode.
3 Select a frequency range to adjust.
4 Adjust the sound elements of the selected
frequency range.
1 Press 4
/¢ to select the
frequency band, then press 5 / ∞ to
enhanced level for the selected frequency
band. [–6 to +6]
2 Press number button 5 ( ), then turn
the control dial to select the frequency.
3 Press number button 5 (
), then turn
the control dial to select the quality slope (Q).
5 Repeat steps 3 and 4 to adjust the other
frequency bands.
6 Store the adjustments.
Preset value setting for each sound mode
Sound
mode
Preset value
Band 1
(100 Hz)
Band 2
(320 Hz)
Band 3
(1 kHz)
Band 4
(3.2 kHz)
Band 5
(10 kHz)
USER 00000
ROCK +3 +2 0 +1 +1
CLASSIC +2+20+10
POPS 0+10+1+2
HIP HOP +4 +1 –2 0 +1
JAZZ +3 +2 +1 +2 +2
Page 42

ENGLISH
42
4 Adjust the selected PSM item.
5 Repeat steps 2 – 4 to adjust other PSM items
if necessary.
6 Finish the procedure.
You can change PSM (Preferred Setting Mode) items
listed in the table below and on pages 43 – 45.
1 Enter the PSM settings.
2 Select a PSM category.
3 Select a PSM item.
By pressing either one of the buttons repeatedly,
you can also move to the item of the other
categories.
General settings — PSM
Category Indication Item
( : Initial)
Setting, [reference page]
MOV (movie)
Demo
Display
demonstration
• On
• Off
: Display demonstration will be activated automatically if no
operation is done for about 20 seconds, [7].
: Cancels.
LevelMeter
Audio level meter
• Meter 1
• Meter 2
: Select the different level meter patterns.
• Press DISP to show the selected level meter.
CLOCK
Clock Disp *
1
Clock display
• On
• Off
: Clock time is shown on the display when the power is
turned off.
: Cancels; pressing DISP will show the clock time for about
5 seconds when the power is turned off, [7].
*1 If the power supply is not interrupted by turning off the ignition key of your car, it is recommended to select “Off” to
save the car’s battery.
To display the rest
Page 43

ENGLISH
43SETTINGS
Continued on the next page
Category Indication Item
( : Initial)
Setting, [reference page]
CLOCK
Clock Hr
Hour adjustment
0 – 23
(1 – 12AM/
1 – 12PM)
: Initial: 0 (0:00AM), [7].
Clock Min
Minute adjustment
00 – 59 : Initial: 00 (0:00AM), [7].
24H/12H
Time display mode
• 12Hours
• 24Hours
: See also page 7 for setting.
Clock Adj
Clock adjustment
• Auto
• Off
: The built-in clock is automatically adjusted using the CT
(clock time) data in the Radio Data System signal.
: Cancels.
DISP (display)
Scroll *
2
Scroll
• Once
• Auto
• Off
: Scrolls the track information only once.
: Repeats the scroll (in 5-second intervals).
: Cancels.
• Pressing DISP for more than one second can scroll the
display regardless of the setting.
Dimmer
Dimmer
From – To *
3
• Auto
• Off
• On
• Time Set
—
: Dims the display when you turn on the headlights.
: Cancels.
: Dims the display and button illumination.
: Set the timer for dimmer, [45].
Any hour – Any hour
: Initial: 18 – 7
Contrast
Contrast
1 – 8
Initial: 5
: Adjust the display contrast to make the display indications
clear and legible.
LCD Type
Display type
• Auto
• Positive
• Negative
: Positive pattern will be selected during the day time *4;
while negative pattern will be used during the night
time *4.
: Positive pattern of the display.
: Negative pattern of the display.
Tag
Tag display
• On
• Off
: Shows the tag while playing MP3/WMA/WAV tracks.
: Cancels.
*2 Some characters or symbols will not be shown correctly (or will be blanked) on the display.
*3 Adjustable only when “Dimmer” is set to “Time Set.”
*4 Depends on the “Dimmer” setting.
Page 44

ENGLISH
44
Category Indication Item
( : Initial)
Setting, [reference page]
TUNER
AF-Regn‘l
Alternative
frequency/
regionalization
reception
• AF
• AF REG
• Off
: When the currently received signals become weak, the unit
switches to another station or service (the programme may
differ from the one currently received), [15].
: When the currently received signals become weak, the
unit switches to another station broadcasting the same
programme.
: Cancels.
TA Vol
Traffic
announcement
volume
Volume 0
– Volume 30
(or Volume 0 –
Volume 50)*
5
: Initial: Volume 15
P-Search
Programme search
• On
• Off
: Activates Programme Search, [15].
: Cancels.
IF Band
Intermediate
frequency band
• Auto
• Wide
: Increases the tuner selectivity to reduce interference noises
between adjacent stations. (Stereo effect may be lost.)
: Subject to interference noises from adjacent stations, but
sound quality will not be degraded and the stereo effect
will remain.
AUDIO
Ext Input *
6
External input
• Changer
• Ext In
: To use a JVC CD changer, [33], or an Apple iPod, [34].
: To use any other external component, [38].
Telephone
Telephone muting
• Muting 1/
Muting 2
• Off
: Select either one which mutes the sounds while using a
cellular phone.
: Cancels.
AudioBooks *
7
Speed control of
“Audiobook”
• Normal
• Faster
• Slower
: You can select the playback speed of the “Audiobook”
sound file in your iPod.
• Initial selected item depends on your iPod setting.
Amp Gain
Amplifier gain
control
• High PWR
• Low PWR
: Volume 00 – Volume 50
: Volume 00 – Volume 30 (Select if the maximum power of
each speaker is less than 50 W to prevent damaging the
speaker.)
Rear Spk *
8
Rear speaker output
• On
• Off
: Select this to turn on the rear speaker output.
: Cancels.
*5 Depends on the amplifier gain control.
*6 Displayed only when one of the following sources is selected—TUNER, DISC, USB, LINE IN, AV IN, or Bluetooth.
*7 Displayed only when an iPod is connected to the USB input jack and playback is controlled from the unit.
*8 Displayed only when Dual Zone is activated (see page 27).
Page 45

ENGLISH
45SETTINGS
Continued on the next page
3 Adjust the dimmer start time.
1 Turn the control dial to set the dimmer start
time.
2 Press ¢
to select “To.” Then, turn the
control dial to set the dimmer end time.
4 Exit from the setting.
Changing the display color
You can select your favorite display color for each source
(or all sources).
• When
is shown on the display, you can
move back to the previous screen by pressing number
button 3 or 6.
Setting the time for dimmer
• When is shown on the display, you can
move back to the previous screen by pressing number
button 3.
1 Follow steps 1 to 3 on page 42.
• In step 2, select “DISP.”
• In step 3, select “Dimmer.”
2 Select “Time Set.”
Category Indication Item
( : Initial)
Setting, [reference page]
COLOR
Color Sel
Color selection
Initial: All
Source;
Color: Pale
: Select your favorite display color for each source (or for all
sources), [45, 46].
Color Set
Color setting
Red
Green
Blue
—
Day Color
NightColor
00 — 11
00 — 11
00 — 11
: Create your own colors, and select them for the display color,
[46].
: User color during the day time *9.
: User color during the night time *9.
: Initial: Day Color: 07, NightColor: 05
: Initial: Day Color: 07, NightColor: 05
: Initial: Day Color: 07, NightColor: 05
Key Illum
Illumination switch
• Red
• Green
: You can select some of the buttons illumination according to
your preference.
*9 Depends on the “Dimmer” setting.
Page 46

ENGLISH
46
Setting the display color
1 Follow steps 1 to 3 on page 42.
• In step 2, select “COLOR.”
• In step 3, select “Color Sel.”
2
3 Select a source.
All Source *1 Ô DISC Ô Changer *3 (or
Ext In*2) Ô Line In Ô USB Ô FM Ô AM
Ô iPod *
3
Ô BT Phone *3 Ô BT Audio *3
Ô AV In Ô (back to the beginning)
*1 When you select “All Source,” you can use the
same color for all the sources.
*2 Depends on the “Ext Input” setting, see page 44.
*3 Displayed only when the target component is
connected.
4 Select a color.
Pale Ô Aqua Ô Sky Ô Sea Ô Leaves
Ô Grass Ô Apple Ô Rose Ô Amber Ô
Honey Ô Violet Ô Grape Ô Every *4 Ô
User *5 Ô (back to the beginning)
*
4
The color changes every 2 seconds.
*5 The user-edited colors—“Day Color” and
“NightColor” will be applied (see the right
column for details).
5 Repeat steps 3 and 4 to select the color for
each source (except when selecting “All
Source” in step 3).
6 Exit from the setting.
Creating your own color—User Color
You can create your own colors—“Day Color” or
“NightColor.”
1 Follow steps 1 to 3 on page 42.
• In step 2, select “COLOR.”
• In step 3, select “Color Set.”
2 Select “Day Color” or “NightColor.”
3 Select a primary color.
4 Adjust the level (00 to 11) of the selected
primary color.
5 Repeat steps 3 and 4 to adjust other primary
colors.
6 Exit from the setting.
Page 47

ENGLISH
47SETTINGS
Continued on the next page
Disc setup menu
These operations are possible on the monitor using the remote controller.
1 Enter the disc setup menu while stop.
2 Select a menu.
3 Select an item you want to set up.
• To cancel pop-up menu, press RETURN.
4 Select an option.
To return to normal screen
Menu Item Setting
LANGUAGE
MENU
LANGUAGE
Select the initial disc menu language. Refer also to “Language codes” on page 58.
AUDIO
LANGUAGE
Select the initial audio language. Refer also to “Language codes” on page 58.
SUBTITLE Select the initial subtitle language or remove the subtitle (OFF). Refer also to
“Language codes” on page 58.
ON SCREEN
LANGUAGE
Select the language for the on screen display.
PICTURE
MONITOR TYPE Select the monitor type to watch a wide screen picture on your monitor.
Page 48

ENGLISH
48
Menu Item Setting
PICTURE
OSD POSITION Select the on-screen bar position on the monitor.
• 1 : Higher position
• 2 : Lower position (Guidance below the disc setup menu will disappear.)
AUDIO
DIGITAL AUDIO
OUTPUT
Select the signal format to be emitted through the DIGITAL OUT (Optical) terminal.
• OFF : Cancels.
• PCM ONLY : Select for an amplifier or a decoder incompatible
with Dolby Digital, DTS, MPEG Audio, or when
connecting to a recording device.
• DOLBY DIGITAL/PCM : Select for an amplifier or a decoder compatible
with Dolby Digital.
• STREAM/PCM : Select for an amplifier or a decoder compatible
with Dolby Digital, DTS, and MPEG Audio.
DOWN MIX When playing back a multi-channel disc, this setting affects the signals reproduced
through the LINE OUT jacks (and through the DIGITAL OUT terminal when “PCM
ONLY” is selected for “DIGITAL AUDIO OUTPUT”).
• SURROUND COMPATIBLE : Select to enjoy multi-channel surround audio by
connecting an amplifier compatible with Dolby
Surround.
• STEREO : Normally select this.
D. RANGE
COMPRESSION
You can enjoy a powerful sound at low or middle volume levels while playing a
Dolby Digital software.
• AUTO : Select to apply the effect to multi-channel
encoded software (excluding 1-channel and
2-channel software).
• ON : Select to always use this function.
OTHER
DivX
REGISTRATION
This unit has its own Registration Code. Once you have played back a disc in which
the Registration Code recorded, this unit’s Registration Code is overwritten for
copyright protection.
FILE TYPE (DISC) Select playback file type when a disc contains different types of files.
• AUDIO : Play MP3/WMA/WAV files.
• VIDEO : Play DivX/MPEG Video files.
• AUDIO + VIDEO : Play MP3/WMA/WAV/DivX/MPEG Video files.
FILE TYPE (USB) Select playback file type when a USB contains different types of files.
• AUDIO : Play MP3/WMA/WAV files.
• VIDEO : Play DivX/MPEG Video files.
• AUDIO + VIDEO : Play MP3/WMA/WAV/DivX/MPEG Video files.
Page 49

ENGLISH
49SETTINGS
Bluetooth settings
Setting menu ( : Initial)
Auto Connect
When the unit is turned on, the connection is
established automatically with...
Off: No Bluetooth device.
Last: The last connected Bluetooth device.
Order: The available registered Bluetooth device
found at first.
Auto Answer
Only for the device being connected for “BT-PHONE.”
On: The unit answers the incoming calls
automatically.
Off: The unit does not answer the calls
automatically. Answer the calls manually.
Reject: The unit rejects all incoming calls.
Message Info
Only for the device being connected for “BT-PHONE.”
Auto: The unit informs you of the arrival of
a message by ringing and displaying
“Received Message.”
Manual: The unit does not inform you of the arrival of
a message.
MIC setting (microphone setting)
Only for the device being connected for “BT-PHONE.”
Adjust the built-in microphone volume,
[LEVEL 01/02/03].
Version
The Bluetooth software and hardware versions are
shown.
You can change the settings listed on the right column
according to your preference.
• When
is shown on the display, you can
move back to the previous screen by pressing number
button 3.
1 Select “BT-PHONE” or “BT-AUDIO.”
2 Enter the Bluetooth menu.
3 Select “Setting.”
4 Select a setting item.
*1 Displayed only when a Bluetooth phone is
connected.
*2 Appears only when a Bluetooth phone is
connected and it is compatible with text message
(notified through JVC Bluetooth adapter).
*3 Bluetooth Audio: Shows only “Version.”
5 Change the setting accordingly.
Page 50

ENGLISH
50
How to clean the connectors
Frequent detachment will deteriorate the connectors.
To minimize this possibility, periodically wipe the
connectors with a cotton swab or cloth moistened with
alcohol, being careful not to damage the connectors.
Moisture condensation
Moisture may condense on the lens inside the unit in
the following cases:
• After starting the heater in the car.
• If it becomes very humid inside the car.
Should this occur, the unit may malfunction. In this
case, eject the disc and leave the unit turned on for a
few hours until the moisture has evaporated.
How to handle discs
When removing a disc from its case,
press down the center holder of the
case and lift the disc out, holding it by
the edges.
• Always hold the disc by the edges. Do not touch its
recording surface.
When storing a disc in its case, gently insert the
disc around the center holder (with the printed surface
facing up).
• Make sure to store discs in cases after use.
Connectors
Center holder
To keep discs clean
A dirty disc may not play correctly.
If a disc does become dirty, wipe it with
a soft cloth in a straight line from center
to edge.
• Do not use any solvents (for example, conventional
record cleaner, spray, thinner, benzine, etc.) to clean
discs.
To play new discs
New discs may have some rough spots
around the inner and outer edges. If
such a disc is used, this unit may reject
the disc.
To remove these rough spots, rub the edges with a
pencil or ball-point pen, etc.
Do not use the following discs:
Maintenance
Warped disc
Sticker and
sticker residue
Stick-on label
Unusual shape
Single CD (8 cm disc)
C-thru Disc (semi-
transparent disc)
Transparent or semi-transparent
parts on its recording area
Page 51

ENGLISH
51REFERENCES
More about this unit
FM Radio Data System operations
• Network-Tracking Reception requires two types
of Radio Data System signals—PI (Programme
Identification) and AF (Alternative Frequency)
to work correctly. Without receiving these data
correctly, Network-Tracking Reception will not
operate correctly.
• If a Traffic Announcement is received by TA Standby
Reception, the volume level automatically changes to
the preset level (TA Vol) if the current level is lower
than the preset level.
• TA Standby Reception and PTY Standby Reception
will be temporarily canceled while listening to an AM
station.
• If you want to know more about Radio Data System,
visit <http://www.rds.org.uk>.
Disc operations
General
• In this manual, words “track” and “file” are
interchangeably used.
• This unit can only play back audio CD (CD-DA) files if
different type of files are recorded in the same disc.
Inserting a disc
• When a disc is inserted upside down, “Please Eject”
appears on the display. Press OPEN, then 0 to eject
the disc.
Ejecting a disc
• If the ejected disc is not removed within 15 seconds,
the disc is automatically inserted again into the
loading slot to protect it from dust. Playback starts
automatically.
• After ejecting a disc, “NO DISC” appears and you
cannot operate some of the buttons. Insert another
disc or press SOURCE to select another playback
source.
Basic operations
Turning on the power
• By pressing SOURCE on the unit, you can also turn on
the power. If the source is ready, playback also starts.
Turning off the power
• If you turn off the power while listening to a track,
playback will start from where it had been stopped
previously next time you turn on the power.
General
• If you change the source while listening to a disc,
playback stops.
Next time you select “DISC” as the playback source,
playback will start from where it had been stopped
previously.
• After ejecting a disc or removing a USB device,
“No Disc” or “No USB” appears and you cannot
operate some of the buttons. Insert another disc,
reattach a USB device, or press SOURCE to select
another playback source.
Tuner operations
Storing stations in memory
• During SSM search...
– All previously stored stations are erased and the
stations are stored anew.
– Received stations are preset in No. 1 (lowest
frequency) to No. 6 (highest frequency).
– When SSM is over, the station stored in No. 1 will
be automatically tuned in.
• When storing a station manually, the previously
preset station is erased when a new station is stored
in the same preset number.
Continued on the next page
Page 52

ENGLISH
52
Playing Recordable/Rewritable discs
• This unit can recognize a total of 5 000 files and 250
folders (a maximum of 999 files per folder).
• This unit can recognize a total 25 characters for file/
folder names.
• Use only “finalized” discs.
• This unit can play back multi-session discs; however,
unclosed sessions will be skipped while playing.
• This unit may be unable to play back some discs
or files due to their characteristics or recording
conditions.
• Rewritable discs may require a longer readout time.
Playing DVD-VR files
• For details about DVD-VR format and playlist, refer
to the instructions supplied with the recording
equipment.
Playing MP3/WMA/WAV files
• The maximum number of characters for folder and
file names is 25 characters; 128 characters for MP3/
WAV and 64 characters for WMA tag information.
• This unit can play back files with the extension code
<.mp3>, <.wma>, or <.wav> (regardless of the
letter case—upper/lower).
• This unit can show the names of albums, artists
(performer), and Tag (Version 1.0, 1.1, 2.2, 2.3, or
2.4) for the MP3/WMA/WAV files.
• This unit can display only one-byte characters. No
other characters can be correctly displayed.
• This unit can play back files recorded in VBR (variable
bit rate).
Files recorded in VBR have a discrepancy in elapsed
time indication.
• This unit cannot play back the following files:
– MP3 files encoded with MP3i and MP3 PRO format.
– MP3 files encoded with Layer 1/2.
– WMA files encoded with lossless, professional, and
voice format.
– WMA files which are not based upon Windows
Media® Audio.
– WMA files copy-protected with DRM.
– Files which have the data such as ATRAC3, etc.
– AAC files and OGG files.
Playing DivX files
• This unit can play back DivX files with the extension
code <.divx>, <.div>, <.avi> (regardless of the
letter case—upper/lower).
• This unit supports DivX Media Format files, <.divx>
or <.avi>.
• This unit can display a unique registration code—
DivX Video-on-Demand (VOD—a kind of Digital
Rights Management). For activation and more
details, visit <www.divx.com/vod>.
• Audio stream should conform to MP3 or Dolby
Digital.
• This unit does not support GMC (Global Motion
Compression).
• The file encoded in the interlaced scanning mode
may not be played back correctly.
• This unit cannot play back the following files:
– Files encoded in Codec (Compressor-decompressor)
other than DivX Codec.
• The maximum bit rate for video signals (average) is
4 Mbps.
• If you want to know more about DivX, visit
<http://www.divx.com>.
Playing MPEG Video files
• This unit can play back MPEG Video files with the
extension code <.mpg>, <.mpeg>, or <.mod>*.
* <.mod> is an extension code used for the MPEG-2 files
recorded by JVC Everio camcorders.
• Audio stream should conform to MPEG1 Audio
Layer 2.
• This unit cannot playback the following files:
– WMV (Windows Media Video) files
– RM (Real Media) format files
• The maximum bit rate for video signals (average) is
4 Mbps.
Changing the source
• If you change the source, playback also stops
(without ejecting the disc).
Next time you select “DISC” for the playback source,
disc play starts from where it has been stopped
previously.
Page 53

ENGLISH
53REFERENCES
Continued on the next page
Bluetooth operations
General
• While driving, do not perform complicated operation
such as dialing the numbers, using phone book, etc.
Stop your car in a safe place before you perform these
operations.
• Some Bluetooth devices may not be connected to
this unit depending on the Bluetooth version of the
device.
• This unit may not work for some Bluetooth devices.
• Connecting condition may vary depending on the
circumstances around you.
• When the unit is turned off, the device is
disconnected.
appears when the connection is established.
Appears when the Bluetooth phone is
connected.
Appears when the Bluetooth audio player
is connected.
Appears when the Bluetooth phone and
Bluetooth audio player are connected.
Icons for phone types
These icons indicate the phone type set on the device:
: Cellular phone : General
: Household phone
: Other than above
: Office
: Unknown
Warning messages for Bluetooth operations
• Connection Error:
The device is registered but the connection has failed.
Use “Connect” to connect the device again. (See
page 29.)
• Error
Try the operation again. If “Error” appears again,
check if the device supports the function you have
tried.
USB operations
• Connecting a USB device automatically changes the
source to “USB.”
• While playing from a USB device, the playback order
may differ from the one from other players.
• This unit may be unable to play back some USB
devices or some files due to their characteristics or
recording conditions.
• Depending on the shape of the USB devices and
connection ports, some USB devices may not be
attached properly or the connection might be loose.
• When connecting a USB mass storage class device,
refer also to its instructions.
• Connect one USB mass storage class device to the unit
at a time. Do not use a USB hub.
• This unit is compatible with the USB Full-Speed.
• If the connected USB device does not have the correct
files, “No File” appears.
• This unit can play back MP3 files recorded in VBR
(variable bit rate).
• The maximum number of characters for folder and
file names is 25 characters; 128 characters for MP3/
WAV and 64 characters for WMA Tag information.
• This unit can recognize a total of 5 000 files and 250
folders (999 files per folder).
• The unit cannot recognize a USB mass storage class
device whose rating is other than 5 V and exceeds
500 mA.
• USB devices equipped with special functions such as
data security functions cannot be used with the unit.
• Do not use a USB device with 2 or more partitions.
• This unit may not recognized a USB device connected
through a USB card reader.
• This unit may not play back files in a USB device
properly when using a USB extension cord.
• This unit cannot assure proper functions or supply
power to all types of USB devices.
• For MPEG1/2 files: The maximum bit rate for video
signals (average) is 2 Mbps.
Page 54

ENGLISH
54
• While the unit is being turned on, the iPod is charged
through this unit.
• iPod shuffle and iPhone cannot be used with this
unit.
• You can control the iPod from this unit when “JVC” or
“
” appears on the iPod display after connection.
• The song order displayed on the selection menu of
this unit may differ from that of the iPod.
• If playback is stopped, select a track from the
selection menu or press 3/8 (BAND) to play back
the same track again.
• The text information may not be displayed correctly:
– Some characters such as accented letters cannot be
shown correctly on the display.
– Depends on the condition of communication
between the iPod and the unit.
• If the text information includes more than
16 characters, it scrolls on the display. This unit can
display up to 128 characters.
Notice:
When operating an iPod, some operations may not
be performed correctly or as intended. In this case,
visit the following JVC web site:
– For the USB connection: <http://www.jvc-
victor.co.jp/english/car/>
– For the inferface adapter connection:
<http://www.jvc.co.jp/english/car/support/
ks-pd100/index.html>
• Device not found
No available Bluetooth device is detected by
“Search...”.
• Loading...
The unit is updating the phone book and/or text
messages.
• Please Wait...
The unit is preparing to use the Bluetooth function. If
the message does not disappear, turn off and turn on
the unit, then connect the device again (or reset the
unit).
• Reset 08
Check the connection between the adapter and this
unit.
iPod
• Controllable iPod (connected through....):
(A) KS-PD100:
– iPod with dock connector (3rd Generation)
– iPod with click wheel (4th Generation)
– iPod nano (1st & 2nd *1 Generation)
– iPod mini (1st Generation)
– iPod video (5th Generation) *
2
– iPod photo
(B) USB input jack:
– iPod nano (1st & 2nd Generation)
– iPod video (5th Generation) *
3
*1 When you connect the iPod nano to the interface
adapter, be sure to disconnect the headphones;
otherwise, no sound is heard.
*2 It is not possible to browse video files on the “Videos”
menu while the iPod is connected to the interface
adapter.
*3 To watch the video with its audio, connect the iPod
using the USB Audio and Video cable (not supplied).
• Update your iPod to the latest software version
before using it with this unit.
– You can check the software version of your iPod
under “About” in the “Setting” menu of the iPod.
– For details about updating your iPod, visit
<http://www.apple.com>.
Page 55

ENGLISH
55REFERENCES
Continued on the next page
General settings—PSM
• “Auto” setting for “Dimmer” may not work correctly
on some vehicles, particularly on those having a
control dial for dimming.
In this case, change the “Dimmer” setting to any
other than “Auto.”
• If “LCD Type” is set to “Auto,” the display pattern
will change to the “Positive” or “Negative” pattern
depending on the “Dimmer” setting.
• If you change the “Amp Gain” setting from
“High PWR” to “Low PWR” while the volume level is
set higher than “Volume 30,” the unit automatically
changes the volume level to “Volume 30.”
Disc setup menu
• When the language you have selected is not recorded
on a disc, the original language is automatically used
as the initial language. In addition, for some discs,
the initial languages settings will not work as you set
due to their internal disc programming.
• When you select “16:9” for a picture whose aspect
ratio is 4:3, the picture slightly changes due to the
process for converting the picture width.
• Even if “4:3 PAN SCAN” is selected, the screen size
may become “4:3 LETTERBOX” for some discs.
Available characters on the display
This unit can display Romans alphabets (A – Z,
a – z), Cyrillic alphabets, numbers, and symbols (see
below).
These characters are also used to show the various
information on the display.
Upper case (Cyrillic alphabets)
Lower case (Cyrillic alphabets)
Numbers and symbols
On-screen guide icons
During playback, the following guide icons may
appear for a while on the monitor.
: Playback
: Pause
: DVD-Video/VCD: Forward slow motion
: DVD-Video: Reverse slow motion
: Forward search
: Reverse search
DVD: The following icons appear at the beginning of
a scene containing:
: Multi-subtitle languages
: Multi-audio languages
: Multi-angle views
Page 56

ENGLISH
56
Adjustable sound elements
Sound elements
Range/selectable items
Band 1
(100 Hz)
Band 2
(320 Hz)
Band 3
(1 kHz)
Band 4
(3.2 kHz)
Band 5
(10 kHz)
Frequency 68 Hz
100 Hz
150 Hz
210 Hz
320 kHz
460 kHz
680 Hz
1 kHz
1.5 kHz
2.1 kHz
3.2 kHz
4.6 kHz
6.8 kHz
10 kHz
15 kHz
Level –6 to +6 –6 to +6 –6 to +6 –6 to +6 –6 to +6
Q (Q-slope) Q0.7
Q1.0
Q1.4
Q2.0
Q0.7
Q1.0
Q1.4
Q2.0
Q0.7
Q1.0
Q1.4
Q2.0
Q0.7
Q1.0
Q1.4
Q2.0
Q0.7
Q1.0
Q1.4
Q2.0
About sounds reproduced through the rear terminals
• Through the analog terminals (Speaker out/LINE OUT):
2-channel signal is emitted. When playing a multi-channel encoded disc, multi-channel signals are
downmixed. DTS sound cannot be reproduced. (AUDIO—DOWN MIX: see page 48.)
• Through DIGITAL OUT (optical):
Digital signals (Linear PCM, Dolby Digital, DTS, MPEG Audio) are emitted through this terminal. (For more
details, see table on page 57.)
To reproduce multi-channel sounds such as Dolby Digital, DTS, and MPEG Audio, connect an amplifier or a
decoder compatible with these multi-channel sources to this terminal, and set “DIGITAL AUDIO OUTPUT”
correctly. (See page 48.)
• About Dual Zone:
Through the 2nd AUDIO OUT, 2-channel signal is emitted. When playing a multi-channel encoded disc, multi-
channel signals are downmixed. (See page 27.)
Page 57

ENGLISH
57REFERENCES
Continued on the next page
Output signals through the DIGITAL OUT terminal
Output signals are different depending on the “DIGITAL AUDIO OUTPUT” setting on the setup menu (see
page 48).
Playback Disc
Output Signal
STREAM/PCM DOLBY DIGITAL/
PCM
PCM ONLY OFF
DVD-Video 48 kHz, 16/20/24 bits
Linear PCM
48 kHz, 16 bits stereo Linear PCM *
OFF
96 kHz Linear PCM 48 kHz, 16 bits stereo Linear PCM
Dolby Digital
Dolby Digital bitstream
48 kHz, 16 bits
stereo Linear PCM
DTS DTS bitstream 48 kHz, 16 bits stereo Linear PCM
MPEG Audio MPEG bitstream 48 kHz, 16 bits stereo Linear PCM
Audio CD, Video CD 44.1 kHz, 16 bits stereo Linear PCM /
48 kHz, 16 bits stereo Linear PCM
Audio CD with DTS DTS bitstream 48 kHz, 16 bits stereo Linear PCM
DivX/
MPEG
Dolby Digital
Dolby Digital bitstream
48 kHz, 16 bits
stereo Linear PCM
MPEG Audio 32/44.1/48 kHz, 16 bits Linear PCM
MP3/WMA 32/44.1/48 kHz, 16 bits Linear PCM
WAV 44.1 kHz, 16 bits stereo Linear PCM
* Digital signals may be emitted at 20 or 24 bits (at their original bit rate) through the DIGITAL OUT terminal if the
discs are not copy-protected.
Page 58

ENGLISH
58
Language codes
Code Language Code Language Code Language Code Language Code Language
AA Afar FA Persian KK Kazakh NO Norwegian ST Sesotho
AB Abkhazian FI Finnish KL Greenlandic OC Occitan SU Sundanese
AF Afrikaans FJ Fiji KM Cambodian OM (Afan) Oromo SW Swahili
AM Ameharic FO Faroese KN Kannada OR Oriya TA Tamil
AR Arabic FY Frisian KO Korean (KOR) PA Panjabi TE Telugu
AS Assamese GA Irish KS Kashmiri PL Polish TG Tajik
AY Aymara GD Scots Gaelic KU Kurdish PS Pashto, Pushto TH Thai
AZ Azerbaijani GL Galician KY Kirghiz QU Quechua TI Tigrinya
BA Bashkir GN Guarani LA Latin RM Rhaeto-
Romance
TK Turkmen
BE Byelorussian GU Gujarati LN Lingala RN Kirundi TL Tagalog
BG Bulgarian HA Hausa LO Laothian RO Rumanian TN Setswana
BH Bihari HI Hindi LT Lithuanian RW Kinyarwanda TO Tonga
BI Bislama HR Croatian LV Latvian, Lettish SA Sanskrit TR Turkish
BN Bengali, Bangla HU Hungarian MG Malagasy SD Sindhi TS Tsonga
BO Tibetan HY Armenian MI Maori SG Sangho TT Tatar
BR Breton IA Interlingua MK Macedonian SH Serbo-Croatian TW Twi
CA Catalan IE Interlingue ML Malayalam SI Singhalese UK Ukrainian
CO Corsican IK Inupiak MN Mongolian SK Slovak UR Urdu
CS Czech IN Indonesian MO Moldavian SL Slovenian UZ Uzbek
CY Welsh IS Icelandic MR Marathi SM Samoan VI Vietnamese
DZ Bhutani IW Hebrew MS Malay (MAY) SN Shona VO Volapuk
EL Greek JA Japanese MT Maltese SO Somali WO Wolof
EO Esperanto JI Yiddish MY Burmese SQ Albanian XH Xhosa
ET Estonian JW Javanese NA Nauru SR Serbian YO Yoruba
EU Basque KA Georgian NE Nepali SS Siswati ZU Zulu
Page 59

ENGLISH
59REFERENCES
Continued on the next page
Troubleshooting
What appears to be trouble is not always serious. Check the following points before calling a service center.
Symptom Remedy/Cause
General
• Sound cannot be heard from the speakers. • Adjust the volume to the optimum level.
• Check the cords and connections.
• The unit does not work at all. Reset the unit (see page 3).
• “Connect Error” appears on the display. Remove the control panel, wipe the connector, then
attach it again (see page 4).
FM/AM
• SSM automatic presetting does not work. Store stations manually.
• Static noise while listening to the radio. Connect the aerial firmly.
Discs in general
• Disc cannot be played back. Insert the disc correctly.
• Disc can be neither played back nor ejected. • Unlock the disc (see page 16).
• Eject the disc forcibly (see page 3).
• Recordable/Rewritable discs cannot be
played back.
• Tracks on the Recordable/Rewritable discs
cannot be skipped.
• Insert a finalized disc.
• Finalize the discs with the component which you
have used for recording.
• Disc cannot be recognized. Eject the disc forcibly (see page 3).
• Sound and pictures are sometimes
interrupted or distorted.
• Stop playback while driving on rough roads.
• Change the disc.
• Check the cords and connections.
• No playback picture (DVD-Video/DivX/MPEG/
VCD) appears on the monitor.
Parking brake wire is not connected properly. (See
Installation/Connection Manual.)
• No picture appears on the monitor at all. • Connect the video cord correctly.
• Select a correct input on the monitor.
• The left and right edges of the picture are
missing on the monitor.
Select “4:3 LETTERBOX” (see page 47).
Page 60

ENGLISH
60
Symptom Remedy/Cause
DivX/MPEG Video/MP3/WMA/WAV
• Disc cannot be played back. • Change the disc.
• Record the tracks using a compliant application in
the appropriate discs (see page 6).
• Add the extension code <.divx>, <.div>, <.avi>,
<.mpg>, <.mpeg>, <.mp3>, <.wma>, or
<.wav> to the file names.
• Noise is generated. Skip to another track or change the disc.
• Tracks cannot play back as you have intended
them to play.
Playback order is determined when files are recorded.
• Longer readout time is required (“Reading”
keeps flashing on the display).
Readout time varies due to the complexity of the
folder/file configuration. Do not use too many
hierarchies and folders.
• No sound can be heard when picture is
displayed while playing a DivX/MPEG Video
file.
• Record the audio track using MP3 or Dolby Digital as
the audio stream of DivX files.
• Record the audio track using MPEG1 Audio Layer 2 as
the audio stream for MPEG Video files.
• Elapsed playing time is not correct. This sometimes occurs during playback. This is caused
by how the tracks are recorded.
• “Please Eject” appears on the display. Insert a disc that contains tracks of appropriate formats.
• Correct characters are not displayed (e.g.
album name).
This unit can display Roman alphabets, Cyrillic
alphabets, numbers and symbols (see page 55).
USB device
• Noise is generated. • The track played back is not a playable file format
(MP3/WMA/WAV). Skip to another file.
• Do not add the extension code <.mp3>, <.wma>,
or <.wav> to non-MP3/WMA/WAV tracks.
• Tracks cannot play back as you have intended
them to play.
Playback order may differs from the one played back
using other players.
• “Reading” keeps flashing on the display. • Readout time varies depending on the USB device.
• Do not use too many hierarchy, folders and empty
folders.*
• Turn off the power then on again.
• Do not pull out or connect the USB device repeatedly
while “Reading” is displayed on the display.
* Folder that is physically empty or folder that contains
data but does not contain valid MP3/WMA/WAV track.
Page 61

ENGLISH
61REFERENCES
Continued on the next page
Symptom Remedy/Cause
USB device
• “No File” flashes on the display.
• “No USB” appears on the display.
Connect a USB device that contains tracks encoded in an
appropriate format.
• “Not Support” appears on the display and
track skips.
The track is unplayable.
• “Read failed” appears on the display. The connected USB device may be malfunctioning,
or may not have been formatted correctly. The files
included in the USB device are corrupted.
• Correct characters are not displayed (e.g.
album name).
For available characters, see page 55.
• While playing a track, sound is sometimes
interrupted.
The tracks have not been properly copied into the USB
device. Copy tracks again into the USB device, and try
again.
• The sound is interrupted or skipped during
playback of a USB device.
• Turn off, then turn on the unit.
• Connect the device again, when the sound is not yet
restored.
Bluetooth ®
• Bluetooth device does not detect the unit. The unit can be connected with one Bluetooth cellular
phone and one Bluetooth audio device at a time.
While connecting a device, this unit cannot be detected
from another device. Disconnect currently connected
device and search again.
• The unit does not detect the Bluetooth
device.
• Check the Bluetooth setting of the device.
• Search from the Bluetooth device. After the device
detects the unit, select “Open...” on the unit to connect
the device. (See page 28.)
• The unit does not make pairing with the
Bluetooth device.
• Enter the same PIN code for both the unit and target
device.
• Select the device name from “Special,” then try to
connect again. (See page 29.)
• Phone sound quality is poor. • Reduce the distance between the unit and the
Bluetooth cellular phone.
• Move the car to a place where you can get a better
signal reception.
Page 62

ENGLISH
62
Symptom Remedy/Cause
Bluetooth ®
• The sound is interrupted or skipped during
playback of a Bluetooth audio player.
• Reduce the distance between the unit and the
Bluetooth audio player.
• Turn off, then turn on the unit.
• When the sound is not yet restored: Connect the player
again.
• The connected audio player cannot be
controlled.
Check whether the connected audio player supports
AVRCP (Audio Video Remote Control Profile).
(Operations depend on the connected audio player.)
CD changer
• “No Disc” appears on the display. Insert a disc into the magazine.
• “No Magazine” appears on the display. Insert the magazine.
• “Reset 08” appears on the display. Connect this unit and the CD changer correctly and press
the reset button of the CD changer.
• “Reset 01” – “Reset 07” appears on the
display.
Press the reset button of the CD changer.
• The CD changer does not work at all. Reset the unit (see page 3).
iPod
• The iPod does not turn on or does not work. • Check the connecting cable and its connection.
• Update the firmware version.
• Charge the battery.
• The sound is distorted. Deactivate the equalizer either on this unit or the iPod.
• “Disconnect” appears on the display. • Check the connecting cable and its connection.
• Charge the battery.
• Playback stops. The headphones are disconnected during playback.
Restart the playback operation (see page 34).
• No sound can be heard when connecting an
iPod nano.
• Disconnect the headphones from the iPod nano.
• Update the firmware version of the iPod nano.
• “No File” appears on the display. No tracks are stored. Import tracks to the iPod.
Page 63

ENGLISH
63REFERENCES
Symptom Remedy/Cause
iPod
• “Reset 01” – “Reset 07” appears on the
display.
Disconnect the adapter from both this unit and iPod.
Then, connect it again.
• “Reset 08” appears on the display. Check the connection between the adapter and this unit.
• The iPod’s controls do not work after
disconnecting from this unit.
Reset the iPod.
• Manufactured under license from Dolby Laboratories. Dolby and the double-D symbol are trademarks of Dolby
Laboratories.
• “DTS” and “DTS Digital Out” are registered trademarks of DTS, Inc.
• “DVD Logo” is a trademark of DVD Format/Logo Licensing Corporation registered in the US, Japan and other
countries.
• DivX, DivX Ultra Certified, and associated logos are trademarks of DivX, Inc. and are used under license.
• Official DivX® Ultra Certified product
• Plays all versions of DivX® video (including DivX® 6) with enhanced playback of DivX® media files and the DivX®
Media Format
• Microsoft and Windows Media are either registered trademarks or trademarks of Microsoft Corporation in the
United States and/or other countries.
• The Bluetooth word mark and logos are owned by the Bluetooth SIG, Inc. and any use of such marks by Victor
Company of Japan, Limited (JVC) is under license. Other trademarks and trade names are those of their respective
owners.
• iPod is a trademark of Apple Inc., registered in the U.S. and other countries.
• This product incorporates copyright protection technology that is protected by U.S. patents and other intellectual
property rights. Use of this copyright protection technology must be authorized by Macrovision, and is intended
for home and other limited viewing uses only unless otherwise authorized by Macrovision. Reverse engineering or
disassembly is prohibited.
Page 64

ENGLISH
64
Specifications
AUDIO AMPLIFIER SECTION
Maximum Power Output: Front/Rear: 50 W per channel
Continuous Power Output
(RMS):
Front/Rear: 19 W per channel into 4 Ω, 40 Hz to
20 000 Hz at no more than 0.8% total
harmonic distortion
Load Impedance: 4 Ω (4 Ω to 8 Ω allowance)
Equalizer Control
Range:
Frequency: Band 1: 68 Hz, 100 Hz, 150 Hz
Band 2: 210 Hz, 320 Hz, 460 Hz
Band 3: 680 Hz, 1 kHz, 1.5 kHz
Band 4: 2.1 kHz, 3.2 kHz, 4.6 kHz
Band 5: 6.8 kHz, 10 kHz, 15 kHz
Level: ±10 dB
Signal to Noise Ratio: 70 dB
Audio Output Level: Digital (DIGITAL OUT: Optical): Signal wave length: 660 nm
Output level: –21 dBm to –15 dBm
Line-Out Level/Impedance: 2.5 V/20 kΩ load (full scale)
Output Impedance: 1 kΩ
Subwoofer-out Level/Impedance: 2.5 V/20 kΩ load (full scale)
Color system: PAL
Video Output (composite): 1 Vp-p/75 Ω
Other Terminal: CD changer, AV-IN (video) input jack, USB input jack, Aerial input, 2nd AUDIO
OUT, LINE IN
TUNER SECTION
Frequency Range: FM1/FM2: 87.5 MHz to 108.0 MHz
FM3 65.00 MHz to 74.00 MHz
AM: (MW) 522 kHz to 1 620 kHz
(LW) 144 kHz to 279 kHz
FM Tuner: Usable Sensitivity: 11.3 dBf (1.0 μV/75 Ω)
50 dB Quieting Sensitivity: 16.3 dBf (1.8 μV/75 Ω)
Alternate Channel Selectivity (400 kHz): 65 dB
Frequency Response: 40 Hz to 15 000 Hz
Stereo Separation: 35 dB
MW Tuner: Sensitivity: 20 μV
Selectivity: 35 dB
LW Tuner: Sensitivity: 50 μV
Page 65

ENGLISH
65REFERENCES
DVD/CD PLAYER SECTION
Signal Detection System: Non-contact optical pickup (semiconductor laser)
Number of Channels: 2 channels (stereo)
Frequency Response: DVD, fs=48 kHz/96 kHz: 16 Hz to 22 000 Hz
CD, fs=44.1 kHz: 16 Hz to 20 000 Hz
Dynamic Range/Signal-to-Noise Ratio: 96 dB/98 dB
Wow and Flutter: Less than measurable limit
DivX/MPEG
Video:
Video: Max. Resolution: 720 × 480 pixels (30 fps)
720 × 576 pixels (25 fps)
Audio: Bit Rate: DivX: 32 kbps – 320 kbps
MPEG Video: 32 kbps – 320 kbps
Sampling Frequency: DivX: MPEG-1: 32 kHz, 44.1 kHz, 48 kHz
MPEG-2: 16 kHz, 22.05 kHz, 24 kHz
Sampling Frequency: MPEG Video: 32 kHz, 44.1 kHz, 48 kHz
MP3: Bit Rate: 32 kbps – 320 kbps
Sampling Frequency: MPEG-1: 32 kHz, 44.1 kHz, 48 kHz
MPEG-2: 16 kHz, 22.05 kHz, 24 kHz
WMA: Bit Rate: 32 kbps – 320 kbps
Sampling Frequency: 22.05 kHz, 32 kHz, 44.1 kHz, 48 kHz
WAV: Quantization Bit Rate: 16 bit
Sampling Frequency: 44.1 kHz
USB SECTION
USB Standards: USB 1.1, USB 2.0
Data Transfer Rate: Full Speed: Maximum 12 Mbps
Low Speed: Maximum 1.5 Mbps
Compatible Device: Mass storage class
Compatible File System: FAT 32/16/12
Playable Audio Format: DivX/MPEG1/MPEG2/MP3/WMA/WAV
Max. Current: 500 mA/5 V
GENERAL
Power Requirement: Operating Voltage: DC 14.4 V (11 V to 16 V allowance)
Grounding System: Negative ground
Allowable Operating Temperature: 0°C to +40°C
Dimensions
(W × H × D):
Installation Size (approx.): 182 mm × 52 mm × 159 mm
Panel Size (approx.): 188 mm × 58 mm × 12 mm
Mass (approx.):
1.5 kg (excluding accessories)
Design and specifications are subject to change without notice.
Page 66

2
РУCCKИЙ
Благодарим Вас за приобретение изделия JVC.
Перед тем, как приступать к эксплуатации, пожалуйста, внимательно прочитайте все инструкции с тем,
чтобы полностью изучить и обеспечить оптимальную работу этого устройства.
ВАЖНО ДЛЯ ЛАЗЕРНОЙ АППАРАТУРЫ
1. ЛАЗЕРНАЯ АППАРАТУРА КЛАССА 1
2. ПРЕДУПРЕЖДЕНИЕ: Не открывайте верхнюю крышку. Внутри устройства нет частей, которые
пользователь может отремонтировать. Ремонт должен осуществляться квалифицированным
обслуживающим персоналом.
3. ПРЕДУПРЕЖДЕНИЕ: В открытом состоянии происходит видимое и/или невидимое излучение лазера
класса 1M. Не смотрите непосредственно в оптические инструменты.
4. ЭТИКЕТКА: ПРЕДУПРЕЖДАЮЩАЯ ЭТИКЕТКА, РАЗМЕЩЕННАЯ НА НАРУЖНОЙ СТОРОНЕ УСТРОЙСТВА.
[только Европейсий Союз]
Предостережение, касающееся настройки
громкости:
По сравнению с другими источниками
воспроизведения цифровые устройства (CD/USB)
создают незначительный шум. Уменьшите
громкость перед воспроизведением, чтобы
предотвратить повреждение динамиков из-за
внезапного повышения уровня громкости на
выходе.
Предостережение для воспроизведения
дисков DualDisc
Сторона диска DualDisc, отличная от DVD, не
совместима со стандартом “Compact Disc Digital
Audio”. Поэтому не рекомендуется использовать
сторону диска DualDisc, отличную от DVD, на данном
устройстве.
Внимание:
Если температура внутри автомобиля ниже 0°C,
функции анимации и прокрутки текста будут
приостановлены, чтобы предотвратить появление
“смазанного” изображения на дисплее. На дисплее
появляется надпись
.
Когда температура повысится до нормального
рабочего значения, эти функции опять будут
работать.
Язык отображения:
В данном руководстве в качестве примера языка
отображения используется английский язык.
Язык отображения на мониторе можно выбрать
с помощью настройки “ЯЗЬIK” (см. стр. 47).
В соответствии с Законом Российской Федерации “О
защите прав потре бителей” срок службы (годности)
данного товара “по истечении которого он может
представлять опасность для жизни, здоровья
потребителя, причинять вред его имуществу или
окружающей среде” составляет семь (7) лет со дня
производства. Этот срок является временем, в течение
которого потребитель данного товара может безопасно
им пользоваться при условии соблюдения ин струк ции
по эксплуатации данного товара, проводя необходимое
обслуживание, включающее замену расходных
материалов и/или соответствующее ремонтное
обеспечение в специализированном сервисном центре.
Дополнительные косметические материалы
к данному товару, поставляе мые вместе с ним,
могут храниться в течение двух (2) лет со дня его
производства.
Срок службы (годности), кроме срока хранения
дополнительных космети ческих материалов,
упомянутых в предыдущих двух пунктах, не
затрагивает никаких других прав потребителя, в
частности, гарантийного свидетельства JVC, которое
он может получить в соответствии с законом о правах
потребителя или других законов, связанных с ним.
Page 67

3
РУCCKИЙ
Как перенастроить Ваше
устройство
• Запрограммированные настройки будут также
удалены (за исключением зарегистрированного
устройства Bluetooth, см. стр. 28 и 29).
Принудительное извлечение
диска
На дисплее появляется надпись “Please Eject”.
• Будьте осторожны, не уроните диск при
извлечении.
• Если это не поможет, попробуйте
перенастроить приемник.
ПРЕДУПРЕЖДЕНИЯ:
(Предотвращение несчастных случаев
и повреждений)
• НЕ устанавливайте устройства и не
прокладывайте провода в местах, где:
– оно может помешать рулевому
управлению и переключению передач;
– оно может помешать
функционированию средств
безопасности, например,
пневмоподушкам;
– может ухудшиться обзор.
• НЕ управляйте устройством во время
вождения автомобиля.
• При необходимости управления
устройством во время вождения
автомобиля внимательно следите за
дорогой.
• Водителю не следует смотреть на
монитор во время вождения.
Если стояночный тормоз не включен,
на мониторе появляется сообщение
“BОДИТЕЛЬ НЕ ДОЛЖЕН СМОТРЕТЬ
НА МОНИТОР ВО ВРЕМЯ ВОЖДЕНИЯ.”
и изображение воспроизведения
отображаться не будет.
– Это предупреждение появляется
только в том случае, если провод
стояночного тормоза подключен
к стояночной тормозной системе
автомобиля (см. Руководство по
установке / подключению).
Для Вашей безопасности...
• Не повышайте слишком сильно громкость,
поскольку в результате этого заглушаются
внешние звуки, что делает опасным управление
автомобилем.
• Остановите автомобиль перед тем, как выполнять
любые сложные операции.
Температура внутри автомобиля...
Если Вы припарковали Ваш автомобиль на
длительное время в жаркую или холодную погоду,
перед тем, как включать это устройство, подождите
до тех пор, пока температура в автомобиле не
придет в норму.
Page 68

4
РУCCKИЙ
Отсоединение панели
управления
Подключение панели
управления
Открытие и закрытие панели
управления
Не прикасайтесь к разъемам.
Использование кнопок M MODE и
SEL
При использовании кнопок M MODE или SEL (выбор),
дисплея и некоторых элементов управления
(например, нумерованных кнопок, кнопок
4
/¢ , кнопок 5/∞ и диска
управления) введите соответствующий режим
управления.
Напр.: Нажатие нумерованной кнопки 1 после
выбора кнопки M MODE позволяет работать с
FM-тюнером.
Чтобы использовать эти элементы управления для
выполнения исходных функций, нажмите M MODE
еще раз.
• Однако нажатие кнопки SEL переводит устройство
в другой режим.
• При ожидании в течение приблизительно 15
секунд (или 30 секунд для источников Bluetooth)
без нажатия какой-либо из этих кнопок
управление автоматически отменяется.
Открытие...
Закрытие...
Page 69

5
РУCCKИЙ
CОДЕРЖАНИЕ
ВВЕДЕНИЕ
Тип воспроизводимых дисков ..................................................................................................... 6
Подготовка .................................................................................................................................... 7
ОПЕРАЦИИ
Основные операции ...................................................................................................................... 8
• Использование панели управления ..................................................................................................... 8
• Использование пульта дистанционного управления (RM-RK252) ...................................................... 9
Прослушивание радио .................................................................................................................. 12
Операции с дисками ..................................................................................................................... 16
• Операции с помощью панели управления ........................................................................................... 17
• Операции с помощью пульта дистанционного управления (RM-RK252) ........................................... 20
Прослушивание устройства USB ................................................................................................... 26
Операции в режиме “Dual Zone” .................................................................................................. 27
ВНЕШНИЕ УСТРОЙСТВА
Прослушивание устройств Bluetooth® ......................................................................................... 28
• Использование сотового телефона Bluetooth ...................................................................................... 30
• Использование аудиопроигрывателя Bluetooth .................................................................................. 32
Прослушивание с устройства автоматической смены компакт-дисков ................................... 33
Прослушивание проигрывателя iPod .......................................................................................... 34
• При подключении с помощью кабеля USB ........................................................................................... 34
• Операции с использованием экрана управления ................................................................................ 35
• При подключении с помощью интерфейсного адаптера .................................................................... 37
• Выбор режимов воспроизведения ....................................................................................................... 37
Прослушивание с других внешних устройств ............................................................................. 38
НАСТРОЙКИ
Выбор запрограммированного режима звучания ..................................................................... 40
Общие настройки — PSM ............................................................................................................ 42
Меню настройки диска ................................................................................................................. 47
Настройки Bluetooth ..................................................................................................................... 49
СПРАВОЧНАЯ ИНФОРМАЦИЯ
Обслуживание ............................................................................................................................... 50
Дополнительная информация о приемнике ............................................................................... 51
Устранение проблем ..................................................................................................................... 59
Технические характеристики ....................................................................................................... 64
Page 70

6
РУCCKИЙ
Тип диска Формат записи, тип файла и т.д. Поддерживаемые
DVD DVD Video (код региона: 5) *
1
Звуковые DVD-диски
DVD-ROM (данные)
DVD-диск однократной или
многократной записи
(DVD-R/-RW *2, +R/+RW *3)
• Видео DVD-диск: UDF-мост
• DVD-VR
• DivX/MPEG-1/MPEG-2/MP3/
WMA/WAV: ISO 9660 level 1,
level 2, Romeo, Joliet
Видео DVD-диск
DVD-VR
DivX/MPEG1/MPEG2
MP3/WMA/WAV
AAC
JPEG/MPEG4
DVD+VR
диски DVD-RAM
Dual Disc Сторона DVD
Сторона не-DVD
CD/VCD Звуковой компакт-диск/Экран управления для
CD-текста (CD-DA)/DTS-CD*
4
VCD (Видео компакт-диск)
SVCD (Super Video CD)
Компакт-диски формата CD-ROM
CD-I (CD-I Ready)
Компакт-диск однократной
или многократной записи
(CD-R/-RW)
• ISO 9660 level 1, level 2,
Romeo, Joliet
CD-DA
DivX/MPEG1/MPEG2
MP3/WMA/WAV
AAC
JPEG/MPEG4
*1 Если вставить видео DVD-диск с неправильным кодом региона, на мониторе отображается сообщение
“ОЩИБКА В КОДЕ РЕГИОНА”.
*
2
Диски DVD-R, записанные в формате “multi-border”, тоже воспроизводятся (кроме двухслойных дисков).
Двухслойные диски DVD-RW не воспроизводятся.
*
3
Возможно воспроизведение завершенных дисков +R/+RW (только в видеоформате). Двухслойные диски
+RW не воспроизводятся.
*4 Для воспроизведения звука в формате DTS используйте терминал DIGITAL OUT (Цифровой выход) (см.
также стр. 48 и 57).
Тип воспроизводимых дисков
Page 71

7ВВЕДЕНИЕ
РУCCKИЙ
Подготовка
Отмена демонстрации функций дисплея и настройка часов
• См. также стр. 42 и 43.
1
Включение питания.
2
Войдите в настройки PSM.
3
Отмена демонстрации функций дисплея
Выберите “Demo”, затем “Off”.
Настройка часов
Выберите “Clock Hr” (час) и настройте час.
Выберите “Clock Min” (минута) и настройте минуту.
Выберите “24H/12H”, затем “24Hours” или “12Hours”.
4
Завершите процедуру.
Изменение отображаемой информации и оформления
• Если питание выключено: Просмотр текущего времени на часах
Напр.: Когда в качестве источника звука выбран тюнер
Исходный рабочий дисплей Отображение измеренного уровня громкости
(см. “LevelMeter” на стр. 42)
Page 72

8
РУCCKИЙ
Основные операции
Использование панели управления
9 • Регулятор громкости [Cмена].
• Выберите источник [Нажмите] *1.
TUNER = DISC *2 = USB *2 (или
USB- iPod) *
2
= CD-CH *
2
/iPod *2 (или EXT
IN) = BT-PHONE *2 = BT-AUDIO *2 = LINE
IN = AV IN = (возврат в начало)
p • Выбор/настройка режима звучания.
• Войдите в настройки PSM [Удерживать].
q • TUNER: Выбор запрограммированнойрадио
станции.
• DISC/USB/CD-CH: Выбор раздела/названия/
программы/папки/дорожки/диска (для
устройства автоматической смены компактдисков).
• BT-PHONE: Набор запрограммированного
номера телефона*3.
w • Вход в режим настройки функций.
• BT-PHONE: Включение функции голосового
набора [Удерживать].
e Изменение отображаемой информации и
оформления.
r • TUNER: Выберите диапазон частот.
• DISC/USB/USB-iPod: Начало или пауза
воспроизведения.
• BT-AUDIO: Начало или пауза
воспроизведения.
*1 При удерживании кнопки SOURCE произойдет
переход в меню Bluetooth, если подключен
телефон Bluetooth.
*2 Если эти источники не готовы или не
подключены, их невозможно выбрать.
*3 Информацию о сортировке
запрограммированных номеров телефонов см.
на стр. 32.
1 • TUNER: Выбор запрограммированной
радиостанции.
• DISC/USB/CD-CH: Выбор называния/
программы/списка воспроизведения/папки.
• USB-iPod: Перейдите главное меню
[Удерживать].
• iPod: Вход в главное меню/Пауза/
Подтверждение выбора.
• BT-PHONE/BT-AUDIO: Выбор
зарегистрированного устройства.
2 • Включение питания.
• Выключение питания [Удерживать].
• Ослабление звука (при включенном
питании).
3 Окно дисплея
4 Входной разъем USB (универсальная
последовательная шина)
5 • Включение или выключение функции
резервного приема TA.
• Переход к режиму поиска типа программы
[Удерживание].
6 Откидывание панели управления.
• Для извлечения диска откиньте панель
управления и нажмите 0 на устройстве.
7 Входной разъем AV-IN (видео)
8 • TUNER: Поиск радиостанции.
• DISC/USB/USB-iPod/CD-CH/iPod: Выбор
раздела или дорожки.
• BT-AUDIO: Прокрутка назад/прокрутка
вперед.
Page 73

9ОПЕРАЦИИ
РУCCKИЙ
Продолжение не следующей странице
Установка аккумуляторной батареи
Вставьте аккумуляторные батареи в пульт
дистанционного управления, соблюдая полярность
(“+” и “–”).
Внимание:
Не подвергайте аккумуляторные батареи действию
повышенных температур: не подвергайте их
длительному воздействию солнечных лучей, не
бросайте в огонь и т.п.
При уменьшении эффективности пульта
дистанционного управления замените обе
батареи.
Перед использованием пульта
дистанционного управления выполните
следующие действия:
• Направьте пульт дистанционного управления
непосредственно на телеметрический датчик
приемника.
• НЕ подвергайте телеметрический датчик
воздействию яркого света (прямых солнечных
лучей или искусственного освещения).
Использование пульта дистанционного управления (RM-RK252)
R03/LR03/AAA
Телеметрический датчик
ВАЖНО:
Если включен режим “Dual Zone” (см. стр. 27) пульт
дистанционного управления используется только
для управления проигрывателем компакт-дисков
или DVD-дисков.
1*
1
Кнопка
• Включение питания при кратковременном
нажатии или ослабление звука при
включенном питании.
• Отключение питания при нажатии и
удерживании.
Page 74

10
РУCCKИЙ
2 Кнопки 5/∞
• TUNER: Выбор запрограммированных
радиостанций.
• DISC:
– Видео DVD-диск: Выбор названия.
– DVD-VR: Выбор программы/списка
воспроизведения.
– DivX/MPEG Video/MP3/WMA/WAV: Выбор
папок, если содержатся.
• USB:
– DivX/MPEG Video/MP3/WMA/WAV: Выбор
папок, если содержатся.
• CD-CH: Выбор папок, если содержатся.
• iPod:
– 5 : Вход в главное меню (кнопки
5 / ∞ / 4
/ ¢ служат для
перемещения по меню).
5 : Возврат к предыдущему меню.
∞ : Подтверждение выбора.
– ∞ : Пауза или возобновление
воспроизведения.
Кнопки 4
/¢
• TUNER:
– Автоматический поиск радиостанций при
кратковременном нажатии.
– Поиск радиостанций вручную при нажатии
и удерживании нажатой.
• DISC/USB/USB-iPod/CD-CH:
– Прокрутка назад и вперед при
кратковременном нажатии.
– Поиск в обратном и прямом направлениях
при нажатии и удерживании нажатой.
• BT-AUDIO: Прокрутка назад и вперед при
кратковременном нажатии.
• iPod:
– Прокрутка назад и вперед при
кратковременном нажатии.
– Поиск в обратном и прямом направлениях
при нажатии и удерживании нажатой.
В режиме выбора меню для
воспроизведения:
– Выбор элемента при кратковременном
нажатии. (Затем нажмите ∞ для
подтверждения выбора.)
– Пропуск сразу 10 элементов при нажатии и
удерживании нажатой.
3 Кнопки VOL (громкость) + / –
• Настройка уровня звука.
Кнопки 2nd VOL (громкость)
• Настройка уровня громкости сигнала,
получаемого через разъем 2nd AUDIO OUT,
осуществляется при удерживании нажатой
кнопки SHIFT (см. стр. 27).
4 *
2
Кнопка ASPECT
• Не применяется для данного устройства.
5*
1
Кнопка
PHONE
• Ответ на входящие вызовы.
• Переход в меню “Redial”, если подключен
телефон Bluetooth [Удерживание].
6 *
2
Кнопка SETUP
• Переход в меню настройки диска (во время
остановки).
7 *
2
Кнопка TOP M (меню)
• DVD-Video/DivX: Отображение меню дисков.
• DVD-VR: Отображение экрана “Original
Program”.
• VCD: Возобновление воспроизведения PBC.
• USB-iPod: Войдите в меню режима поиска
(см. стр. 36).
8 *
2
Кнопка OSD (on-screen display)
• Отображение строки состояния.
9 Кнопка SHIFT
• Используется в сочетании с другими
кнопками.
p Кнопка DISP (дисплей)
• Изменение отображаемой информации.
q Кнопки 1 / ¡
• Видео DVD-диск: Медленное
воспроизведение (во время паузы).
• DVD-VR/VCD: Медленная прокрутка вперед
(во время паузы).
• DISC/USB/USB-iPod: Поиск назад/поиск
вперед.
w*
1
Кнопка SOURCE
• Осуществляет выбор источника звука.
Page 75

11ОПЕРАЦИИ
РУCCKИЙ
e Кнопка 3 (воспроизведение) / 8 (пауза)
• DISC/USB/USB-iPod/BT-AUDIO: Начало
воспроизведения/пауза.
r Кнопка
(завершение вызова)
• Завершение вызова.
Кнопки BAND / 7 (остановка)
• TUNER: Выбор диапазонов частот.
• DISC/USB/USB-iPod/BT-AUDIO: Останов
воспроизведения.
t *
2
Кнопка RETURN
• VCD: Возврат к меню PBC.
• USB-iPod: Возврат на экран управления.
y *
2
Кнопка MENU
• DVD-Video/DivX: Отображение меню дисков.
• DVD-VR: Отображение списка
воспроизведения.
• VCD: Возобновление воспроизведения PBC.
• USB-iPod: Войдите в меню режима поиска
(см. стр. 36).
u *
2
Кнопки % / fi
• Видео DVD-диск: Выбор или выполнение
настроек.
• CD-CH: Смена дисков в загрузочном
устройстве.
Кнопки @ / #
• Видео DVD-диск: Выбор или выполнение
настроек.
• DivX/MPEG Video: Перемотка на пять минут
вперед или назад
Кнопка ENT (ввод)
• Подтверждение выбора.
i *
2
Кнопка DUAL
• Включение или отключение функции “Dual
Zone”.
o Кнопка SURROUND
• Не применяется для данного устройства.
Кнопка DIRECT
• DISC/USB: Переход в режим прямого поиска
по разделу, названию, программе, списку
воспроизведения, папке, дорожке при
нажатии одновременно с кнопкой SHIFT (см.
стр. 20).
Кнопка CLR (очистка)
• DISC/USB: В сочетании с кнопкой SHIFT
позволяет удалить неправильно введенный
символ.
*
1
Когда включена функция “Dual Zone”, эти кнопки
использовать нельзя.
*2 В сочетании с кнопкой SHIFT выполняет функцию
нумерованных кнопок, * (звездочка) или # (хэш).
– Тюнер: Выбор запрограммированных
радиостанций (1 – 6).
– DISC: Ввод номера раздела, названия,
программы, списка воспроизведения, папки
или дорожки после перехода в режим поиска
путем нажатия клавиш SHIFT и DIRECT (см.
стр. 20).
Page 76

12
РУCCKИЙ
При слабом стереофоническом
радиовещании на частоте FM
1
2
Прием улучшается, но стереоэффект будет
потерян.
•
На экране дисплея загорается индикатор .
3 Выйдите из режима настройки.
Автоматическое
программирование FMрадиостанций—SSM (Strongstation Sequential Memory—
последовательная память для
радиостанций с устойчивым
сигналом)
Для каждого диапазона частот можно
запрограммировать до шести радиостанций.
1 При прослушивании радиостанции...
2
3
Осуществляется поиск местных FM-
радиостанций с наиболее сильными сигналами
и их автоматическое сохранение в выбранном
FM-диапазоне.
Запоминание станций в ручном
режиме
Напр.: Сохранение FM-радиостанции с частотой
92,5 МГц для запрограммированного
канала с номером 4 диапазона FM1.
Использование нумерованных кнопок
1
2
Прослушивание радио
1
Выберите “TUNER”.
2
Выберите диапазон частот.
3
Поиск радиостанции—автоматический поиск.
Поиск вручную: Удерживайте нажатой одну из кнопок, пока на дисплее не загорится
индикатор “M”, а затем нажмите ее несколько раз.
• При приеме стереовещания FM с нормальным уровнем сигнала на экране
дисплея загорается индикатор
.
Примечание: FM1 и FM2: От 87,5 МГц до 108,0 МГц
FM3: От 65,00 МГц до 74,00 МГц
Page 77

13ОПЕРАЦИИ
РУCCKИЙ
Прослушивание
запрограммированной
станции из списка
запрограммированных станций
1 Отобразите список запрограммированных
радиостанций, затем выберите
необходимую радиостанцию.
2 Измените радиостанцию на выбранную.
Следующие функции доступны только при
прослушивании радиостанций FM Radio Data
System.
Поиск программы FM Radio Data
System — поиск PTY
Посредством поиска кода PTY можно настроиться
на радиостанцию, передающую Вашу любимую
программу.
• При появлении на дисплее индикатора
можно вернуться к предыдущему экрану, нажав
нумерованную кнопку 3.
• При появлении на дисплее индикатора
/ можно выполнить переход
в другие списки, несколько раз нажав
нумерованную кнопку 5 или 6.
1
2 Выберите “Search”.
На дисплее появятся шесть
запрограммированных кодов PTY (типов
программ).
3
Использование списка
запрограммированных радиостанций
• При появлении на дисплее индикатора
можно вернуться на предыдущий экран, нажав
нумерованную кнопку 3.
1 Выполните действия 1 и 2 в разделе
“Использование нумерованных кнопок”
(стр. 12).
• При нажатии и удерживании кнопки 5 /
∞, появится список запрограммированных
радиостанций (перейдите к действию 4).
2
3 Отобразите список запрограммированных
радиостанций.
4 Выберите номер, под которым хотите
сохранить станцию.
• Можно перейти к другим спискам и другим
диапазонам FM, несколько раз нажав
нумерованную кнопку 5 (
) или 6
(
).
5 Сохраните радиостанцию.
Запрограммированный номер
мигает некоторое время.
Продолжение не следующей странице
Page 78

14
РУCCKИЙ
3 Выберите код PTY.
Можно выбрать один из 29
запрограммированных или из
шести сохраненных кодов PTY
(типов программ).
• Для сохранения любимых типов программ
см. информацию далее.
4 Запустите поиск любимой программы.
Если есть радиостанция, передающая в эфир
программу того же кода PTY, что был Вами
выбран, осуществляется настройка на эту
радиостанцию.
Сохранение любимых программ
Можно сохранить шесть типов любимых программ.
• При появлении на дисплее индикатора
можно вернуться к предыдущему экрану, нажав
нумерованную кнопку 3.
1
2 Выберите “Memory”.
3 Выберите запрограммированный номер
(“Preset1” – “Preset6”), под которым
необходимо сохранить программу.
4 Выберите один из кодов PTY.
5 Сохраните выбранный код PTY.
6 Повторите действия 3 до 5 для
сохранения других кодов PTY для других
запрограммированных номеров.
7 Выйдите из режима настройки.
Включение функции резервного
приема сообщений о движении
на дорогах (TA) или PTY
Резервный прием TA
На экране дисплея горит или мигает индикатор
.
• Если загорится индикатор
, устройство
временно перейдет в режим резервного приема
сообщений о движении на дорогах (TA), если
таковые имеются, из любого источника, кроме
AM.
Громкость устанавливается на
запрограммированный уровень TA, если текущий
уровень ниже запрограммированного (см. стр.
44).
• Если индикатор
мигает, то функция
резервного приема TA не активирована.
Настройтесь на другую радиостанцию,
передающую сигналы Radio Data System.
Для отключения функции резервного приема
TA нажмите TP еще раз. Индикатор
гаснет.
Напр.: Если в действии 4 выбран параметр “Classics”.
Page 79

15ОПЕРАЦИИ
РУCCKИЙ
Резервный прием PTY
1
2
3 Выберите код PTY.
4 Выйдите из режима настройки.
На экране дисплея горит или мигает индикатор
.
• Если загорится индикатор
, устройство
временно перейдет на избранную программу
PTY из любого источника, кроме AM.
• Если индикатор
мигает, функция
резервного приема PTY еще не активирована.
Настройтесь на другую радиостанцию,
передающую сигналы Radio Data System.
Чтобы отключить функцию резервного
приема PTY, выберите значение “Off” (Выкл.) в
действии 2. Индикатор погаснет.
• Устройство не будет переключаться на прием
сообщений о движении на дорогах (Traffic
Announcement) или программу PTY, если для
соединения вызова используется “BT-PHONE”.
Доступные коды PTY
News, Affairs, Info, Sport, Educate, Drama, Culture,
Science, Varied, Pop M (музыка), Rock M (музыка),
Easy M (музыка), Light M (музыка), Classics, Other
M (музыка), Weather, Finance, Children, Social,
Religion, Phone In, Travel, Leisure, Jazz, Country,
Nation M (музыка), Oldies, Folk M (музыка),
Document
Отслеживание той же программы
(сеть-отслеживающий прием)
При поездке по региону, где невозможен
качественный прием в диапазоне FM, данный
приемник автоматически настраивается на
другую радиостанцию FM Radio Data System в той
же сети, которая может передавать в эфир ту же
программу с помощью более сильных сигналов (см.
иллюстрацию ниже).
Радиовещание программы А в других
диапазонах частот (01 – 05)
В настройках, установленных на заводеизготовителе, сеть-отслеживающий прием включен.
Для получения информации об изменении
параметров сеть-отслеживающего приема см.
“AF-Regn’l” на стр. 44.
Автоматический выбор
радиостанции—поиск
программы
Обычно при нажатии нумерованных кнопок
производится настройка на запрограммированную
радиостанцию.
Если уровень сигналов от запрограммированной
радиостанции FM Radio Data System является
недостаточным для качественного приема, данное
устройство с помощью данных AF настраивается
на другую частоту, по которой может передаваться
та же программа, что передает первоначальная
запрограммированная радиостанция.
• Настройка устройства на другую радиостанцию с
помощью поиска программы занимает некоторое
время.
• См. также стр. 44.
Page 80

16
РУCCKИЙ
Останов воспроизведения и извлечение
диска
• Нажмите кнопку SOURCE для прослушивания
другого источника воспроизведения.
Запрещение извлечения диска
Для отмены блокировки повторите эту же
процедуру.
Операции с дисками
Перед выполнением любых операций выполните следующие действия...
Включите монитор для просмотра воспроизводимого изображения. Если монитор включен,
воспроизведением других дисков также можно управлять с помощью экрана монитора. (См. страницы 22 до
25).
Устройство автоматически распознает диск и начинает его воспроизведение (для DVD-дисков:
автоматическое воспроизведение зависит от внутренней программы).
Если на текущем диске нет дискового меню, все дорожки будут воспроизводиться последовательно до тех
пор, пока не произойдет смена источника или диск не будет извлечен.
Если при нажатии кнопки на экране появляется значок “
”, значит, запрашиваемая операция не может
быть выполнена приемником.
• Иногда операция не выполняется и при отсутствии значка “
”.
1
Откройте панель управления.
Перед открытием панели управления убедитесь в том, что
USB-устройство отсоединено, так как это может блокировать
открывающий механизм.
• Информацию об отсоединении USB-устройства см. на стр. 26.
2
Вставка диска.
Воспроизведение начинается автоматически.
3
Начало воспроизведения при необходимости.
Page 81

17ОПЕРАЦИИ
РУCCKИЙ
Операции с помощью панели управления
Нажатие (или удерживание нажатыми) следующих кнопок позволяет выполнять следующие операции...
Тип
диска
(Нумерованные кнопки) *
3
[Нажмите] Выбор раздела
[Удерживать] Перемотка раздела
назад или в перед*
1
Выбор названия Во время останова:
определение
местоположения названия
При воспроизведении или во
время паузы; Определение
местоположения раздела
[Нажмите] Выбор раздела
[Удерживать] Перемотка раздела
назад или в перед*
1
Выбор номера
программы/номера
списка воспроизведения
Во время останова: Поиск
программы
При воспроизведении или во
время паузы; Определение
местоположения раздела
[Нажмите] Выберите дорожку
[Удерживать] Перемотка дорожки
назад или вперед *
2
Выберите папку Непосредственный поиск
определенной папки
[Нажмите] Выберите дорожку
[Удерживать] Перемотка дорожки
назад или вперед *
1
—
Непосредственный
поиск определенной
дорожки (функция PBC не
используется)
[Нажмите] Выберите дорожку
[Удерживать] Перемотка дорожки
назад или вперед *
1
Выберите папку Непосредственный поиск
определенной папки
[Нажмите] Выберите дорожку
[Удерживать] Перемотка дорожки
назад или вперед *
1
—
Непосредственный поиск
определенной дорожки
*1 Скорость поиска:
*2 Скорость поиска:
*3 Нажмите для выбора номеров от 1 до 6, удерживайте для выбора номеров от 7 до 12.
Продолжение не следующей странице
Page 82

18
РУCCKИЙ
После нажатия M MODE нажмите следующие кнопки...
Тип
диска
Пропуск 10 разделов (при
воспроизведении или во
время паузы)
Repeat Chapter:
Повтор текущего раздела
Repeat Title:
Повтор текущего названия
—
Пропуск 10 разделов (при
воспроизведении или во
время паузы)
Repeat Chapter:
Повтор текущего раздела
Repeat Program:
Повторение текущей
программы (недоступно при
воспроизведении списка
воспроизведения)
—
Пропуск 10 дорожек
(внутри одной папки)
Repeat Track:
Повтор текущей дорожки
Repeat Folder:
Повтор текущей папки
Random Folder:
Произвольное
воспроизведение всех
дорожек текущей папки, а
затем дорожек других папок
Random All:
Произвольное
воспроизведение всех
дорожек
Пропуск 10 дорожек
(функция PBC не
используется)
Repeat Track:
Повтор текущей дорожки
(функция PBC не
используется)
Random All:
Произвольное
воспроизведение всех
дорожек (функция PBC не
используется)
Пропуск 10 дорожек
(внутри одной папки)
Repeat Track:
Повтор текущей дорожки
Repeat Folder:
Повтор текущей папки
Random Folder:
Произвольное
воспроизведение всех
дорожек текущей папки, а
затем дорожек других папок
Random All:
Произвольное
воспроизведение всех
дорожек
Пропуск 10 дорожек Repeat Track:
Повтор текущей дорожки
Random All:
Произвольное
воспроизведение всех
дорожек
• Можно также отменить режим воспроизведения, выбрав значение “Off” (Выкл.) или нажав цифровую
кнопку 4 (
).
Page 83

19ОПЕРАЦИИ
РУCCKИЙ
Выбор папки/дорожки из списка
(только для файла MP3/WMA/
WAV).
• При появлении на дисплее индикатора
можно вернуться на предыдущий экран, нажав
нумерованную кнопку 3.
1
2 Выберите “LIST”.
3 Выберите тип списка.
4 Выберите элемент.
• Можно перейти к другим спискам, несколько
раз нажав нумерованную кнопку 5 (
)
или 6 (
).
5 Измените элемент на выбранный.
A При выборе списка файлов
Список исчезает, и начинается
воспроизведение.
B При выборе списка папок
• Если текущая папка выбрана, появляется
список файлов. Далее повторите
действия 4 и 5 A, чтобы начать
воспроизведение.
• Если выбрана другая папка,
воспроизведение начинается с первого
файла выбранной папки.
Напр.: Если в действии 3 выбран
параметр “File”.
Page 84

20
РУCCKИЙ
Быстрый поиск раздела, названия, программы, списка воспроизведения, папки или
дорожки (DVD/DivX/MPEG Video/VCD/MP3/WMA/WAV/CD)
1 Чтобы выбрать режим поиска, нажмите кнопку SHIFT и, не отпуская ее, последовательно нажимайте
кнопку DIRECT.
Видео DVD-диск :
Для диска
VCD :
DVD-VR : CD :
DivX/MPEG Video :
MP3/WMA/WAV :
2 Чтобы ввести номер, нажмите кнопку SHIFT и, не отпуская ее, нажимайте нумерованные кнопки (0 – 9).
3 Для подтверждения нажмите ENT (ввод).
Кнопка
/
Останов воспроизведения Останов воспроизведения
Начало воспроизведения/пауза (при нажатии во
время воспроизведения)
Начало воспроизведения/пауза (при
нажатии во время воспроизведения)
• Поиск раздела путем перемотки назад или
вперед*1 (Звук не слышен).
• Медленное воспроизведение *2 во время паузы
(Звук не слышен).
* DVD-VR: Медленное воспроизведение назад не
работает.
Поиск дорожки путем перемотки
назад или вперед *4 (Звук не
слышен).
[Нажмите] Выбор раздела (при воспроизведении
или во время паузы)
[Удерживать] Поиск раздела путем перемотки
назад или быстрой перемотки вперед *
3
[Нажмите] Выберите дорожку (при
воспроизведении или во
время паузы)
[Удерживать] Поиск дорожки путем
перемотки назад или быстрой
перемотки вперед *5 (Звук не
слышен).
• Видео DVD-диск: Выбор названия (при
воспроизведении или во время паузы)
• DVD-VR: Выбор списка воспроизведения или
программы (при воспроизведении или во
время паузы).
Выберите папку
—
• Перемотка изображения на пять
минут вперед или назад
• Выбор раздела
Операции с помощью пульта дистанционного управления
(RM-RK252)
Диск
Page 85

21ОПЕРАЦИИ
РУCCKИЙ
Останов воспроизведения Останов воспроизведения Останов воспроизведения
Начало воспроизведения/пауза (при
нажатии во время воспроизведения)
Начало воспроизведения/
пауза (при нажатии во время
воспроизведения)
Начало воспроизведения/
пауза (при нажатии во время
воспроизведения)
Поиск дорожки путем перемотки
назад или вперед *
1
• Медленное воспроизведение
вперед *2 во время паузы. (Звук
не слышен).
* Медленное воспроизведение назад
не работает.
Поиск дорожки путем
перемотки назад или вперед *
1
Поиск дорожки путем перемотки
назад или вперед *
1
[Нажмите] Выберите дорожку (при
воспроизведении или во
время паузы)
[Удерживать] Поиск дорожки путем
перемотки назад или быстрой
перемотки вперед *3 (Звук не
слышен).
[Нажмите] Выберите дорожку
(при воспроизведении
или во время паузы)
[Удерживать] Поиск дорожки
путем перемотки назад
или быстрой перемотки
вперед *
3
[Нажмите] Выберите дорожку
(при воспроизведении или
во время паузы)
[Удерживать] Поиск дорожки
путем перемотки назад
или быстрой перемотки
вперед *
3
—
Выберите папку
—
———
Продолжение не следующей странице
• Для DivX/MPEG Video/MP3/WMA/WAV поиск дорожки выполняется в той же папке.
• Кнопка CLR (очистка) в сочетании с кнопкой SHIFT позволяет удалить неправильно введенный символ.
• Для возврата на предыдущий экран нажмите кнопку RETURN.
*1 Скорость поиска:
*2 Замедленное воспроизведение:
*3 Скорость поиска:
*4 Скорость поиска:
*5 Скорость поиска:
Page 86

22
РУCCKИЙ
Операции с помощью
строки состояния
(DVD/DVD-VR/DivX/MPEG Video/VCD)
Эти операции можно выполнять на мониторе с
помощью пульта дистанционного управления.
1 Отобразите строку состояния на экране
(см. стр. 23).
2 Выберите элемент.
3 Подтвердите выбор.
Если появилось всплывающее меню...
• Для закрытия всплывающего меню нажмите
RETURN.
• Информацию о вводе времени и чисел см.
далее.
Ввод времени и чисел
Нажмите % / fi для смены номера, затем нажмите
@ / # для перехода к следующему элементу.
• При каждом нажатии % / fi, номер увеличивается
или уменьшается на единицу.
• После ввода номеров нажмите ENT (ввод).
• Вводить завершающие нули (последние
две цифры в приведенных выше примерах)
необязательно.
Напр.: Поиск по времени
DVD:_:_ _:_ _ (Пример: 1:02:00)
Нажмите % один раз, затем нажмите # два раза
для перехода к третьему элементу, нажмите % два
раза и затем нажмите ENT (ввод).
Скрытие строки состояния
(два раза)
Использование функций, управляемых с
помощью меню... (Видео DVD-диск/DVDVR)
1 Нажмите TOP M/MENU для перехода в меню.
2 Нажмите % / fi / @ * / # *, чтобы выбрать
элемент для воспроизведения.
3 Для подтверждения нажмите ENT (ввод).
* Неприменимо для DVD-VR.
Отмена воспроизведения PBC... (VCD)
1 Во время остановки нажмите кнопку DIRECT,
удерживая кнопку SHIFT.
2 Чтобы ввести номер, нажмите кнопку SHIFT
и, не отпуская ее, нажимайте нумерованные
кнопки (0 – 9).
3 Для подтверждения нажмите ENT (ввод).
• Для возобновления PBC нажмите TOP M/MENU.
Page 87

23ОПЕРАЦИИ
РУCCKИЙ
Информация
Управление
Строки состояния
Напр.: Видео DVD-диск
1 Тип диска
2 • DVD-Video/DTS-CD: Тип формата и канал
звукового сигнала
• VCD: PBC
3 Режим воспроизведения*
1
Видео DVD-диск:
T. RPT: Повтор названия
C. RPT: Повтор раздела
DVD-VR: C. RPT: Повтор раздела
PG. RPT: Повторение программы
DivX/MPEG Video:
T. RPT: Повтор дорожки
F. RPT: Повтор папки
F. RND: Произвольная папка
A. RND: Все в произвольном порядке
VCD *2: T. RPT: Повтор дорожки
A. RND: Все в произвольном порядке
4 Информация о воспроизведении
Текущее название или раздел
Текущая программа/раздел
Текущий список
воспроизведения/раздел
Текущая дорожка
Текущая папка/дорожка
5 Отображение времени
Время от начала
воспроизведения диска (Для
DVD-дисков время от начала
воспроизведения текущего
названия/программы/списка
воспроизведения.)
Видео DVD-диск/DVD-
VR: Оставшееся время
воспроизведения названия,
программы или списка
воспроизведения
VCD: Оставшееся время для диска
Время, прошедшее от начала
воспроизведения текущего
раздела или дорожки *
3
Оставшееся время
воспроизведения текущего
раздела или дорожки *
3
6 Состояние воспроизведения
Воспроизведение
Поиск вперед или назад
Замедленное воспроизведение
вперед или назад
Приостановка
Останов
7 Значки операций
Изменение индикатора времени
(см. 5)
Поиск времени (Введите время от
начала воспроизведения текущего
названия, программы, списка
воспроизведения или диска.)
Поиск названия (по номеру)
Поиск раздела (по номеру)
Поиск дорожки (по номеру)
Смена языка звучания или
звукового канала
Изменение или отключение языка
субтитров
Смена угла просмотра
Повторное воспроизведение *
1
Воспроизведение в произвольном
порядке *
1
*1
Дополнительную информацию о повторном или
произвольном воспроизведении см. на стр. 18.
*2 Когда не используется функция PBC.
*3 Неприменимо для DVD-VR.
Page 88

24
РУCCKИЙ
7 Информация о дорожке
8 Список дорожек с выбранной текущей
дорожкой
Выбор режима воспроизведения
1 Пока отображается экран управления...
В области списка папок на экране управления
отображается экран выбора режима
воспроизведения.
2 Выберите режим воспроизведения.
3 Выберите элемент.
REPEAT:
RANDOM:
Режим Функции
воспроизведения
F. RPT
(повтор папки):
Повтор текущей папки
T. RPT
(повтор
дорожки):
Повтор текущей дорожки
A. RND
(в
произвольном
порядке):
Произвольное
воспроизведение всех
дорожек
F. RND
(произвольная
папка):
Произвольное
воспроизведение всех
дорожек текущей папки, а
затем дорожек других папок
4 Подтвердите выбор.
* Недоступно для компакт-диска.
Операции с использованием
экрана управления
(DivX/MPEG Video/MP3/WMA/WAV/CD)
Эти операции можно выполнять на мониторе с
помощью пульта дистанционного управления.
1 Отобразите экран управления.
DivX/MPEG Video: Нажмите 7 во время
воспроизведения.
MP3/WMA/WAV/CD: Отображается
автоматически во время воспроизведения.
2 Выберите столбец “Folder” или “Track”
(кроме компакт-диска).
3 Выберите папку или дорожку.
4 Начало воспроизведения.
DivX/MPEG Video: Нажмите ENT (ввод) или 3/8.
MP3/WMA/WAV/CD: Воспроизведение
начинается автоматически.
Экран управления
1 Номер текущей папки/общее число папок
2 Список папок с выбранной текущей папкой
3 Выбранный режим воспроизведения
4 Истекшее время воспроизведения текущей
дорожки
5 Значок режима работы ( 3, 7, 8, ¡, 1 )
6 Номер текущей дорожки/общее число дорожек
в текущей папке (общее число дорожек на
диске)
Напр.: Диск MP3/WMA/WAV
Page 89

25ОПЕРАЦИИ
РУCCKИЙ
3 Текущая страница/общее число входящих в
список страниц
4 Текущая папка/дорожка (выделена)
Экран списка (DVD-VR)
При воспроизведении данных с диска DVD-VR
можно в любой момент использовать экраны
“OPИГИНAЛЬН. ПPOГPAMMA.” и “СПИСOК
ВOСПPOИЗВ.”.
1 Выберите экран списка.
1 Номер программы или списка
воспроизведения
2 Дата записи
3 Источник записи (телевизионный канал,
внешнее записывающее оборудование и
т.д.)
4 Время начала записи
5 Название программы или списка
воспроизведения*
6 Текущий элемент (выделена)
7 Дата создания списков воспроизведения
8 Количество разделов
9 Время воспроизведения
* Отображение названия исходной программы
и списка воспроизведения зависит от
записывающего оборудования.
2 Выберите элемент списка.
Операции с помощью
экрана списка
(DVD-VR/DivX/MPEG Video/MP3/WMA/WAV)
Эти операции можно выполнять на мониторе с
помощью пульта дистанционного управления.
Экран списка (DivX/MPEG Video/MP3/WMA/
WAV)
Перед воспроизведением можно отобразить список
папок или список дорожек, чтобы проверить их
содержимое и начать воспроизведение дорожки.
1 Отобразите список папок во время
останова.
2 Выберите элемент из списка папок.
• Отображается список дорожек выбранной
папки.
• Чтобы вернуться к списку папок, нажмите
RETURN.
3 Выберите дорожку для воспроизведения.
• MP3/WMA/WAV: Oтображается экран
управления (см. стр. 24).
1 Номер текущей папки/общее число папок
2 Номер текущей дорожки/общее число дорожек
в текущей папке
Напр.: Список папок
или
Page 90

26
РУCCKИЙ
При воспроизведении файла DivX/MPEG
включите монитор для просмотра изображения
воспроизведения. Можно также управлять
воспроизведением, обращаясь к экрану
монитора. (См. также стр. 22 – 25.)
• Информацию о выполнении операций с помощью
пульта дистанционного управления см. на стр. 20
– 25.
• Дополнительную информацию о настройках см.
на стр. 47, 48 и 53.
Если при нажатии кнопки на экране появляется
значок “ ”, значит, запрашиваемая операция
не может быть выполнена приемником.
• Иногда операция не выполняется и при
отсутствии значка “ ”.
Если устройство USB подключено...
Воспроизведение начинается с
того места, где оно ранее было
остановлено.
• При подключении другого
устройства USB воспроизведение
начинается с начала.
Останов воспроизведения и отключение
устройства USB
Выньте его из устройства.
• Нажмите кнопку SOURCE для прослушивания
другого источника воспроизведения.
Работать с устройством USB можно таким же образом,
как и с папками на диске. (См. страницы 16 – 25.)
• Выбор “USB” недоступен при использовании
режима “Dual Zone” (см. стр. 27).
Внимание:
• Не используйте устройство USB, если это может
помешать безопасному вождению.
• Не отключайте и не подключайте несколько раз
устройство USB, когда на дисплее отображается
надпись “Reading”.
• Не запускайте двигатель автомобиля, если
подключено устройство USB.
• Способность приемника воспроизводить файлы
зависит от типа устройства USB.
• При работе с некоторыми видами устройств USB
возможна неправильная работа и сбои питания.
• Вам не удастся соединить компьютер со входным
USB-разъемом устройства.
• Во избежание потери данных убедитесь в том, что
создана резервная копия всех важных данных.
•
Во избежание повреждения не оставляйте устройство
USB в автомобиле, не подвергайте его воздействию
прямых солнечных лучей или высокой температуры.
•
Некоторые виды USB-устройств начинают
функционировать только по истечении определенного
времени с момента включения питания.
• Дополнительные сведения об операциях с
устройствами USB см. на стр. 53.
Прослушивание устройства USB
К устройству можно подключить запоминающее устройство USB большой емкости, например USB-память,
съемный жесткий диск и т. д.
• Можно также подключать Apple iPod к входному разъему USB. Подробные сведения об операциях см. на
страницах 34 – 38.
Приемник может воспроизводить дорожки DivX/MPEG Video/MP3/WMA/WAV, сохраненные на
устройстве USB.
Все дорожки будут воспроизводиться повторно до изменения источника или отсоединения устройства USB.
12
USB-память
Входной разъем USB
Page 91

27ОПЕРАЦИИ
РУCCKИЙ
На панели управления:
1
2 Перейдите в настройки “Dual Zone”.
Включение или отключение “Dual Zone”.
Когда активирована операция “Dual Zone”,
источник автоматически меняется на “DISC”.
Операции в режиме “Dual Zone”
Воспроизводимое с диска содержимое можно передавать на внешний монитор, подключенный к выходному
разъему VIDEO и разъему 2nd AUDIO OUT, и в то же время прослушивать через динамики любой другой
источник (кроме “AM” и “USB”).
• При включенной функции Dual Zone в качестве источника можно выбрать “AM” или “USB”.
• При использовании режима “Dual Zone” можно управлять проигрывателем DVD-дисков и компакт-дисков
с помощью пульта дистанционного управления. Сведения об операциях см. на страницах 20 – 25.
Эти операции можно выполнять на мониторе с помощью пульта дистанционного управления.
1
Включите функцию “Dual Zone”.
• На дисплее загорается индикатор DUAL.
Происходит автоматическая смена главного источника на “DISC”.
Для выбора другого источника (главного источника)
прослушивания через динамики нажмите кнопку SOURCE на
панели управления.
• Используя кнопки на панели управления, можно осуществлять
управление только что выбранным источником, не прибегая к
операциям “Dual Zone”.
2
Настройте громкость сигнала, получаемого через
второй разъем 2nd AUDIO OUT.
3
—
Для управления проигрывателем компакт-дисков
и DVD-дисков используйте пульт дистанционного
управления и экран монитора.
Отмена операций “Dual Zone”
• Индикатор DUAL гаснет.
Page 92

28
РУCCKИЙ
Прослушивание устройств Bluetooth®
Для работы с устройствами Bluetooth необходимо
подключить адаптер Bluetooth (KS-BTA200)
к разъему устройства автоматической смены
компакт-дисков, расположенному на задней панели
устройства.
• См. также инструкции, прилагаемые к адаптеру
Bluetooth и устройству Bluetooth.
• Список стран, в которых возможно использование
функции Bluetooth®, включен в упаковку изделия.
При первом использовании устройства Bluetooth с
помощью данного устройства (режимы “BT-PHONE”
и “BT-AUDIO”) необходимо установить беспроводное
соединение Bluetooth между этими устройствами.
• После установления соединения оно
регистрируется в приемнике, даже если
выполняется сброс приемника. Всего можно
зарегистрировать до пяти устройств.
• Для каждого источника (“BT-PHONE” и “BT-AUDIO”)
можно одновременно подключить только одно
устройство.
Регистрация устройства
Bluetooth
Методы регистрации (сопряжения)
Для регистрации и установления соединения с
устройством используйте один из приведенных
ниже пунктов меню “Bluetooth”.
• Для работы с меню “Bluetooth” выберите “BTPHONE” или “BT-AUDIO” в качестве источника.
Open Подготовьте приемник к установлению
нового соединения Bluetooth.
Соединение устанавливается с
устройства Bluetooth.
Search Подготовьте приемник к установлению
нового соединения Bluetooth.
Соединение устанавливается с
приемника.
• При появлении на дисплее индикатора
можно вернуться на предыдущий экран, нажав
нумерованную кнопку 3.
Регистрация с помощью функции “Open”
Подготовка: Включите функцию Bluetooth на
устройстве.
1 Выберите “BT-PHONE” или “BT-AUDIO”.
2 Выберите “New”.
3 Меню ввода настроек.
4 Выберите “Open”.
5 Введите PIN-код (Personal Identification
Number – личный идентификационный
номер) на приемнике.
• Можно ввести любой номер (от 1 до 16 цифр).
[По умолчанию: 0000]
• Для ввода PIN-кода длиной менее 4 знаков
сначала удалите первоначальный PIN-код
(0000), нажав нумерованную кнопку 5
(
).
* Некоторые устройства имеют собственный
PIN-код. Введите указанный PIN-код в
приемник.
1 Перейдите к положению следующей
(предыдущей) цифры.
Page 93

29
ВНЕШНИЕ УСТРОЙСТВА
РУCCKИЙ
2 Выберите устройство, с которым
необходимо установить соединение.
3 • Для доступных устройств...
1 Введите на приемнике PIN-код данного
устройства.
Информацию о PIN-коде см. в
инструкциях, поставляемых с
устройством.
2 Используйте устройство Bluetooth для
установления соединения.
Соединение установлено, теперь можно
использовать устройство с помощью
приемника.
• Для специального устройства...
Для подключения используйте функции
“Open” или “Search”.
Подключение, отключение или удаление
зарегистрированного устройства
1 Выберите “BT-PHONE” или “BT-AUDIO”.
2 Выберите зарегистрированное
устройство, которое необходимо
подключить, отключить или удалить.
3 Меню ввода настроек.
4 • Для подключения или отключения
выбранного устройства выберите
“Connect” или “Disconnect”.
2 Выберите цифру или пробел.
3 Повторяйте действия 1 и 2 до тех пор,
пока не завершите ввод PIN-кода.
4 Подтвердите ввод.
На дисплее мигает надпись
“Open...”.
6 Используйте устройство Bluetooth для
поиска и установления соединения.
На подключенном устройстве введите тот же
PIN-код, который был введен для приемника.
На дисплее появится сообщение: “Connected (и
имя устройства)”.
Соединение установлено, теперь можно
использовать устройство с помощью
приемника.
Устройство остается зарегистрированным
даже после его отключения. Для следующего
подключения этого же устройства выберите
“Connect” (или включите функцию
“Auto Connect”). (См. далее и на стр. 49.)
Подключение устройства
Выполните действия 1 до 3 на стр. 28, затем...
1 • Выберите “Search” для поиска
доступных устройств.
Приемник осуществляет поиск списка
доступных устройств и их отображение.
Если доступные устройства не обнаружены,
отображается сообщение “Device not found”.
• Выберите “Special” для подключения
специального устройства.
На дисплее приемника отображается список
запрограммированных устройств.
Продолжение не следующей странице
Page 94

30
РУCCKИЙ
• Выберите “Delete”, затем подтвердите выбор.
Можно настроить автоматическое подключение устройства Bluetooth при включении приемника. (См.
раздел “Auto Connect” на стр. 49).
Использование сотового телефона Bluetooth
1
Выберите “BT-PHONE”.
2
Выберите меню “Bluetooth”.
3
—
Установите соединение с устройством, а затем выполните звонок
(или настройки с помощью меню Bluetooth) (См. стр. 31 и 49.)
Нажмите нумерованную
кнопку 3, чтобы выбрать
значение “No”.
При входящем вызове....
Источник автоматически меняется на “BT-PHONE”.
При включенной функции “Auto Answer”....
Приемник автоматически отвечает на входящие
вызовы, см. стр. 49.
• При отключенной функции “Auto Answer”
(автоответ), ответ на входящий вызов
осуществляется нажатием любой кнопки (кроме
/диска управления).
Завершение вызова
Удерживайте любую кнопку (кроме
/диска
управления).
• Можно настроить уровень громкости микрофона
(см. стр. 49).
При получении текстового сообщения....
Если сотовый телефон поддерживает текстовые
сообщения (получил уведомление посредством
адаптера JVC Bluetooth) и для настройки “Message
Info” установлено значение “Auto” (см. стр. 49),
устройство издает звуковой сигнал, и на дисплее
появляется сообщение “Received Message”,
указывающее на поступление сообщения.
Page 95

31
ВНЕШНИЕ УСТРОЙСТВА
РУCCKИЙ
Выполнение вызова
С помощью одного из элементов меню Dial можно
выполнить звонок.
• При появлении на дисплее индикатора
можно вернуться на предыдущий экран, нажав
нумерованную кнопку 3.
1 Выберите “BT-PHONE”.
2 Меню ввода настроек.
3 Выберите “Dial Menu”.
4 Выбор способа выполнения вызова.
• Redial *: Отображение списка набранных
телефонных номеров. Перейдите к
следующему действию.
• Received *: Отображение списка принятых
вызовов. Перейдите к следующему действию.
• Phonebook *: Отображение телефонной
книги подключенного сотового телефона.
Перейдите к следующему действию.
• Missed *: Отображение списка непринятых
вызовов. Перейдите к следующему действию.
• Number: Отображение экрана ввода
телефонного номера. См. раздел “Порядок
ввода телефонного номера” в колонке
справа.
• Voice Dial (Доступно, только если
подключенный сотовый телефон оснащен
системой голосового набора): Произнесите
имя (зарегистрированные слова)
вызываемого абонента.
* Отображается только при поддержке
данных функций сотовым телефоном.
– Если эта информация не отображается,
попытайтесь перенести телефонную книгу
с сотового телефона на данный приемник.
(Дополнительную информацию см. в
руководстве по эксплуатации мобильного
телефона.)
– При подключении некоторых мобильных
телефонов перенос телефонной книги
выполняется автоматически.
5 Выберите имя или телефонный номер для
выполнения вызова.
Порядок ввода телефонного номера
Выбор номера.
Перемещение курсора.
Подтвердите ввод.
Продолжение не следующей странице
Page 96

32
РУCCKИЙ
2 Выберите номер телефона.
Можно также ввести номер
телефона (см. также “Порядок
ввода телефонного номера” на стр.
31), чтобы сохранить его.
3 Выберите запрограммированный номер,
под которым следует его сохранить.
Вызов запрограммированного номера
При использовании телефона Bluetooth...
• По поводу подключения/отключения/удаления
зарегистрированного устройства см. также стр.
29, 30.
Информация о Bluetooth:
Дополнительные сведения о функциях Bluetooth
можно найти на веб-сайте JVC по адресу:
<http://www.jvc-victor.co.jp/english/car/>.
Использование аудиопроигрывателя Bluetooth
• Функции и отображаемые элементы могут различаться в зависимости от их наличия на подключенном
аудиопроигрывателе.
Выберите “BT-AUDIO”.
Если воспроизведение не начинается автоматически, включите его с помощью элементов
управления аудиопроигрывателя Bluetooth.
• Если при смене источника останова воспроизведения не происходит, остановите
воспроизведение с помощью аудиопроигрывателя Bluetooth.
Прокрутка назад/прокрутка вперед
Начало или пауза воспроизведения
Меню ввода настроек (список
устройств)
Использование голосовой команды
1 На дисплее появляется
надпись “Say...”.
2 Произнесите имя (зарегистрированные
слова) вызываемого абонента.
• Можно также использовать голосовую
команду из меню набора. Выберите “Voice
Dial” из меню набора.
• Если сотовый телефон не поддерживает
функцию распознавания голоса, появляется
надпись “Error”.
Программирование номера
телефона
Можно запрограммировать до шести номеров
телефонов.
• При появлении на дисплее индикатора
можно вернуться на предыдущий экран, нажав
нумерованную кнопку 3.
1 С помощью элементов меню Dial
отобразите номер телефона, который
нужно запрограммировать.
Page 97

33
ВНЕШНИЕ УСТРОЙСТВА
РУCCKИЙ
Прослушивание с устройства автоматической
смены компакт-дисков
Для подключения к данному приемнику рекомендуется использовать устройство автоматической смены
компакт-дисков компании JVC, совместимое с MP3. Можно подключить устройство автоматической смены
компакт-дисков к разъему устройства автоматической смены компакт-дисков на задней панели приемника.
• Можно воспроизводить только обычный компакт-диск (включая CD-текст) и диски MP3.
Подготовка: Убедитесь в том, что для настройки внешнего входа выбрано значение “Changer” (см. стр. 44).
1
Выберите “CD-CH”.
2
Выберите диск для воспроизведения.
[Нажмите] Выбор диска с номером от 1 до 6.
[Удерживать] Выбор диска с номером от 7 до 12.
[Нажмите] Выберите дорожку
[Удерживать] Перемотка дорожки
назад или вперед
MP3: Выбор папок
* При удерживании одной из этих кнопок
отображается список дисков (см. стр. 19).
Выбор диска, папки или дорожки из
списка
См. раздел “Выбор папки/дорожки из списка (только
для файла MP3/WMA/WAV)” на стр. 19.
Чтобы отобразить список дисков устройства
автоматической смены компакт-дисков, в действии
3 выберите “Disc”.
После нажатия M MODE нажмите следующие
кнопки...
Пропуск 10 дорожек
MP3: внутри одной папки
Repeat Track:
Повтор текущей дорожки
Repeat Folder:
MP3: Повтор всех дорожек из
текущей папки
Repeat Disc:
Повтор всех дорожек текущего диска
Random Folder:
MP3: Произвольное воспроизведение
всех дорожек текущей папки, а затем
дорожек следующей папки
Random Disc:
Произвольное воспроизведение
всех дорожек текущего диска
Random All:
Произвольное воспроизведение всех
дорожек дисков, установленных в
загрузочный механизм.
• Можно также отменить режим воспроизведения,
выбрав значение “Off” (Выкл.) или нажав
цифровую кнопку 4 (
).
*
Page 98

34
РУCCKИЙ
Можно подключить Apple iPod с помощью следующего кабеля или адаптера:
Действие: Кабель или адаптер: Разъем для подключения:
Прослушивание
музыки
кабель USB 2.0 (поставляется с iPod) Разъем USB-входа на панели управления
Интерфейсный адаптер для iPod,
KS-PD100 (не входит в комплект
поставки)
Разъем устройства автоматической смены
компакт-дисков, расположенный на задней
панели устройства
Подготовка: Убедитесь в том, что для
настройки внешнего входа выбрано значение
“Changer” (см. стр. 44).
Просмотр видео Кабель USB Audio и Video для iPod,
KS-U19 (не входит в комплект
поставки)
Разъем USB-входа и входной разъем AV-IN на
панели управления
• Включите монитор для просмотра видео.
• Можно управлять воспроизведением с помощью приемника.
• Воспроизведение будет остановлено при отключении проигрывателя iPod. Нажмите кнопку SOURCE для
прослушивания другого источника воспроизведения.
• Дополнительную информацию см. в руководстве, поставляемом с проигрывателем iPod.
• См. также стр. 54
Внимание:
• Не используйте проигрыватель iPod, если это может отрицательно повлиять на безопасность вождения.
• Во избежание потери данных убедитесь в том, что создана резервная копия всех важных данных.
При подключении с помощью кабеля USB
Подключение с помощью кабеля USB 2.0
(поставляется с iPod):
Подключение с помощью кабеля USB Audio и
Video для iPod, KS-U19 (не входит в комплект
поставки):
Воспроизведение начинается автоматически с того места, где оно ранее было приостановлено.*
* Не используется для видеофайлов.
Прослушивание проигрывателя iPod
Кабель USB,
поставляемый с iPod
Входной
разъем USB
KS-U19 (не входит в
комплект поставки)
Входной разъем USB
Входной разъем AV-IN
Page 99

35
ВНЕШНИЕ УСТРОЙСТВА
РУCCKИЙ
Продолжение не следующей странице
[Нажмите] Переход к следующей
или предыдущей дорожке
[Удерживать] Быстрая перемотка
дорожки вперед или назад во
время воспроизведения
[Удерживать] Вход в главное меню
[Нажмите] Пауза или
возобновление
воспроизведения.
Выбор дорожки из меню
1 Перейдите главное меню.
2 Выберите необходимое меню.
3 Подтвердите выбор.
• При удерживании кнопки ¢
нажатой
начинается непосредственное воспроизведение
выбранного элемента.
• Удерживая 4 , можно выйти из меню.
• Удерживая нажатыми кнопки 5/∞, можно
быстро перемещаться по уровням в главном
меню.
Элементы меню:
Для музыки:
“Playlists”, “Artists”, “Albums”, “Songs”, “Podcasts”,
“Genres”, “Composers” или “Audiobooks”
Для видео:
“Video Playlists”, “Movies”, “Music Videos”, “TV Shows”
или “Video Podcasts”
• Если выбрана дорожка, воспроизведение
начинается автоматически.
• Если выбранный элемент позволяет перейти на
следующий уровень, будет выполнен переход.
Повторяйте действия 2 и 3 до тех пор, пока не
будет воспроизводиться нужная дорожка.
Операции с использованием
экрана управления
• Эти операции можно выполнять на мониторе с
помощью пульта дистанционного управления.
• Для просмотра видеофайла подключите
проигрыватель iPod к разъему USB-входа на
панели управления с помощью кабеля USB KSU19, поставляемого с iPod.
1 Включите монитор.
На мониторе появляется экран управления.
1 Номер текущей категории/общее число
категорий
2 Список категорий с выбранной текущей
категорией
3 Истекшее время воспроизведения текущей
дорожки
4 Значок режима работы ( 3, 7, 8, ¡,
1 )
5 Номер текущей дорожки/общее число
дорожек в текущей категории
6 Информация о дорожке
7 Список дорожек с выбранной текущей
дорожкой
2 Выберите необходимый элемент.
Если выбранный элемент позволяет перейти на
следующий уровень, будет выполнен переход.
Повторяйте это действие до тех пор, пока не
будет воспроизводиться необходимая дорожка.
Page 100

36
РУCCKИЙ
Выбор дорожки в режиме поиска
1 Перейдите в меню “Search Mode”.
2 Выберите элемент меню.
• При выборе “Shuffle Songs” начинается
воспроизведение.
3 Выберите категорию режима поиска, затем
нужную дорожку.
Категория режимов поиска:
Для музыки:
“Playlists”, “Artists”, “Albums”, “Songs”, “Podcasts”,
“Genres”, “Composers” или “Audiobooks”
Для видео:
“Video Playlists”, “Movies”, “Music Videos”, “TV Shows”
или “Video Podcasts”
• Доступные режимы поиска зависят от типа iPod.
• Для возврата на предыдущий экран режима
поиска нажмите MENU.
• Для возврата на экран управления нажмите
кнопку RETURN.
или
Выбор режима воспроизведения/
изменения скорости воспроизведения
аудиокниг
1 Пока отображается экран управления...
В области списка категорий на экране
управления отображается экран выбора
режима воспроизведения.
2 Выберите элемент.
3 Выберите режим или скорость
воспроизведения.
REPEAT:
RANDOM:
AUDIO BOOK :
REPEAT ONE Соответствует функции
“Repeat One”.
REPEAT ALL Соответствует функции
“Repeat All”.
RANDOM
ALBUMS*
Соответствует функции
“Shuffle Albums”.
RANDOM
SONGS
Соответствует функции
“Shuffle Songs”.
NORMAL Воспроизведение на
обычной скорости.
FASTER Более быстрое
воспроизведение.
SLOWER Более медленное
воспроизведение.
* Работает только при выборе значения
“All Albums” или “All” в элементе “Albums”
главного меню “MENU”.
 Loading...