

Page 1
ENGLISHFRANÇAISРУCCKИЙ
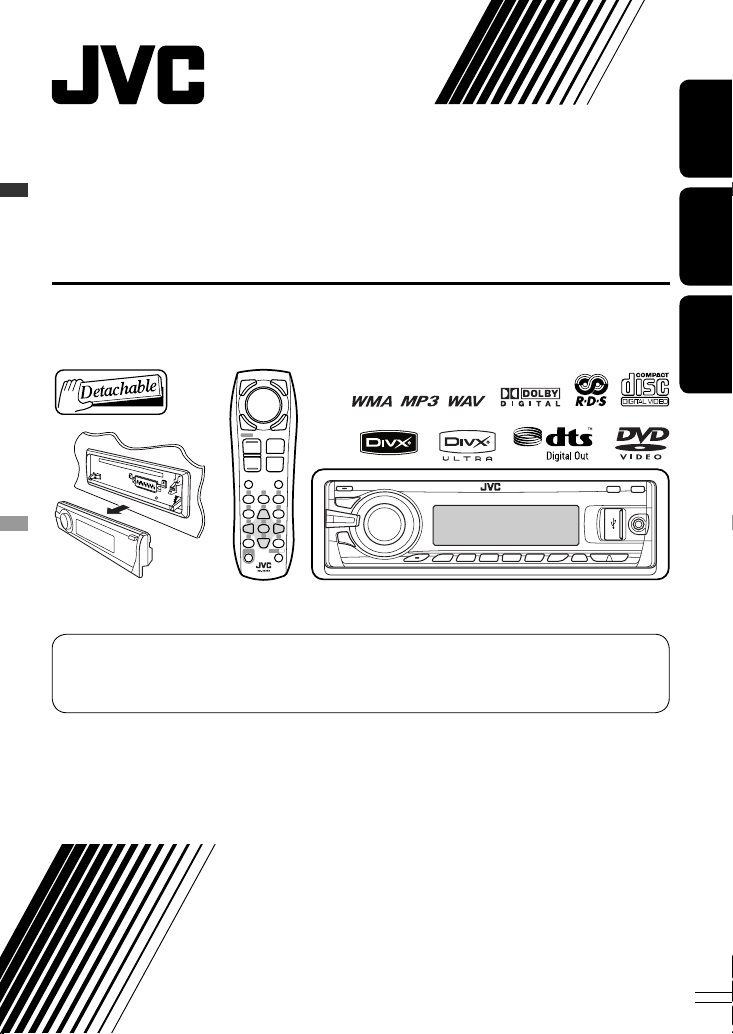
DVD/CD RECEIVER
RÉCEPTEUR DVD/CD
ПРИЕМНИК ДЛЯ ВОСПРОИЗВЕДЕНИЯ ДИСКОВ DVD И КОМПАКТ-ДИСКОВ
KD-DV7402/KD-DV7401
For canceling the display demonstration, see page 7.
Pour annuler la démonstration des affichages, référez-vous à la page 7.
Информацию об отмене демонстрации функций дисплея см. на стр. 7.
For installation and connections, refer to the separate manual.
Pour l’installation et les raccordements, se référer au manuel séparé.
Указания по установке и выполнению соединений приводятся в отдельной инструкции.
INSTRUCTIONS
MANUEL D’INSTRUCTIONS
ИНСТРУКЦИИ ПО ЭКСПЛУАТАЦИИ
GET0534-003A
[EU]
Page 2

Thank you for purchasing a JVC product.
Please read all instructions carefully before operation, to ensure your complete understanding and to obtain the best
possible performance from the unit.
IMPORTANT FOR LASER PRODUCTS
ENGLISH
1. CLASS 1 LASER PRODUCT
2. CAUTION: Do not open the top cover. There are no user serviceable parts inside the unit; leave all servicing to
qualified service personnel.
3. CAUTION: Visible and/or invisible class 1M laser radiation when open. Do not view directly with optical
instruments.
4. REPRODUCTION OF LABEL: CAUTION LABEL, PLACED OUTSIDE THE UNIT.
Caution on volume setting:
Digital devices (CD/USB) produce very little noise
[European Union only]
compared with other sources. Lower the volume before
playing these digital sources to avoid damaging the
speakers by sudden increase of the output level.
This unit is equipped with the steering wheel
remote control function.
• See the Installation/Connection Manual (separate
volume) for connection.
2
Caution for DualDisc playback
The Non-DVD side of a “DualDisc” does not comply with
the “Compact Disc Digital Audio” standard. Therefore,
the use of Non-DVD side of a DualDisc on this product
may not be recommended.
Caution:
If the temperature inside the car is below 0°C, the
movement of animation and text scroll will be halted
on the display to prevent the display from being
blurred. appears on the display.
When the temperature increases, and the operating
temperature is resumed, these functions will start
working again.
Page 3
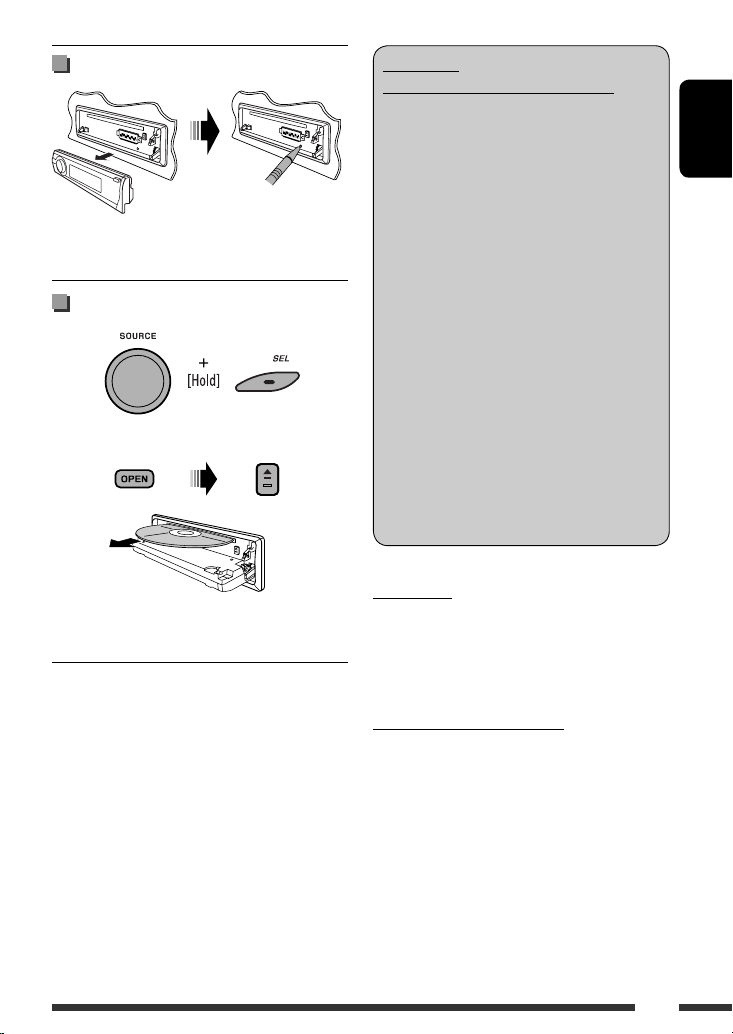
How to reset your unit
• Your preset adjustments will also be erased (except the
registered Bluetooth device, see pages 28 and 29).
How to forcibly eject a disc
“Please Eject” appears on the display.
• Be careful not to drop the disc when it ejects.
• If this does not work, reset your unit.
WARNINGS:
(To prevent accidents and damage)
• DO NOT install any unit or wire any cable in
a location where;
– it may obstruct the steering wheel and
gearshift lever operations.
– it may obstruct the operation of safety
devices such as air bags.
– it may obstruct visibility.
• DO NOT operate the unit while driving.
• If you need to operate the unit while
driving, be sure to look around carefully.
• The driver must not watch the monitor
while driving.
If the parking brake is not engaged,
“DRIVER MUST NOT WATCH THE MONITOR
WHILE DRIVING.” appears on the monitor,
and no playback picture will be shown.
– This warning appears only when the
parking brake lead is connected to the
parking brake system built in the car
(refer to the Installation/Connection
Manual).
For safety...
• Do not raise the volume level too much, as this will
block outside sounds, making driving dangerous.
• Stop the car before performing any complicated
operations.
ENGLISH
Temperature inside the car...
If you have parked the car for a long time in hot or cold
weather, wait until the temperature in the car becomes
normal before operating the unit.
3
Page 4
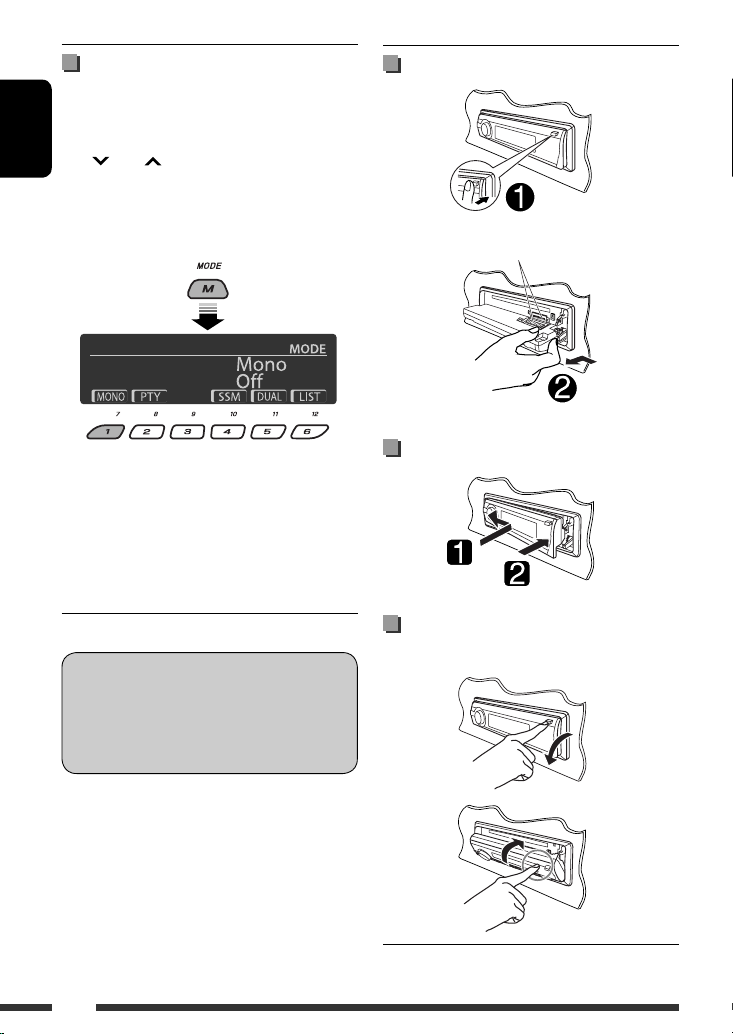
How to use the M MODE and SEL
buttons
If you use M MODE or SEL (select), the display and some
controls (such as the number buttons,
4 /¢ buttons, 5/∞ buttons, and the
ENGLISH
control dial) enter the corresponding control mode.
Ex.: When you press number button 1 after pressing
M MODE, to operate the FM tuner.
Detaching the control panel
Avoid touching the connectors.
To use these controls for original functions, press
M MODE again.
• However, pressing SEL makes the unit enters a
different mode.
• Waiting for about 15 seconds (or 30 seconds for
Bluetooth sources) without pressing any of these
buttons will automatically cancels the control.
Indication language:
In this manual, English indications are used
for purposes of explanation. You can select
the indication language on the monitor on the
“LANGUAGE” setting (see page 50).
4
Attaching the control panel
Opening and closing the control
panel
Open...
Close...
Page 5

CONTENTS
INTRODUCTIONS
Playable disc type ........................................................................................................................... 6
Preparation ..................................................................................................................................... 7
OPERATIONS
Basic operations .............................................................................................................................. 8
• Using the control panel ............................................................................................................................ 8
• Using the remote controller (RM-RK252) ................................................................................................. 9
Listening to the radio ...................................................................................................................... 12
Disc operations ................................................................................................................................ 16
• Operations using the control panel .......................................................................................................... 17
• Operations using the remote controller (RM-RK252) ............................................................................... 20
Listening to the USB device ............................................................................................................. 26
Dual Zone operations ...................................................................................................................... 27
EXTERNAL DEVICES
Listening to the Bluetooth® devices ................................................................................................ 28
• Using the Bluetooth cellular phone ......................................................................................................... 30
• Using the Bluetooth audio player ............................................................................................................ 32
Listening to the CD changer ............................................................................................................ 33
Listening to the DAB tuner .............................................................................................................. 34
Listening to the iPod ....................................................................................................................... 37
• When connecting with the USB cable ...................................................................................................... 37
• Operations using the control screen ......................................................................................................... 38
• When connecting with the interface adapter .......................................................................................... 40
• Selecting the playback modes ................................................................................................................. 40
Listening to the other external components ................................................................................... 41
ENGLISH
SETTINGS
Selecting a preset sound mode ....................................................................................................... 43
General settings — PSM ................................................................................................................ 45
Disc setup menu .............................................................................................................................. 50
Bluetooth settings .......................................................................................................................... 52
REFERENCES
Maintenance ................................................................................................................................... 53
More about this unit ....................................................................................................................... 54
Troubleshooting .............................................................................................................................. 61
Specifications .................................................................................................................................. 66
5
Page 6
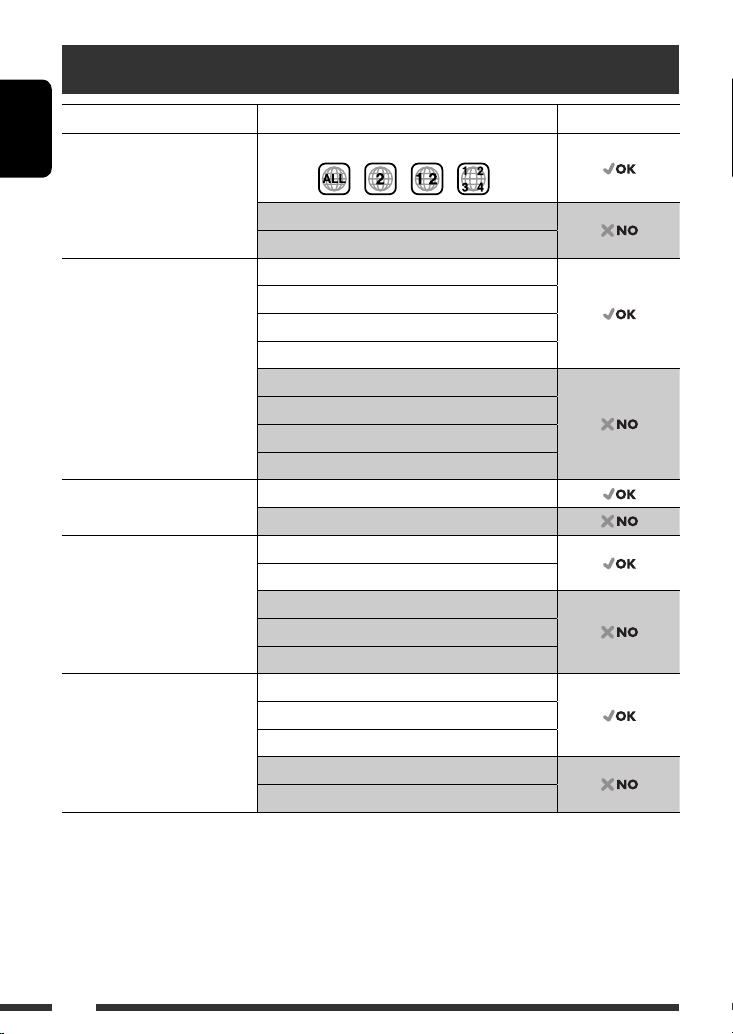
Playable disc type
Disc type Recording format, file type, etc Playable
DVD DVD Video (Region Code: 2) *
ENGLISH
DVD Audio
DVD-ROM
DVD Recordable/Rewritable
(DVD-R/-RW *
2
, +R/+RW *3)
• DVD Video: UDF bridge
• DVD-VR
• DivX/MPEG-1/MPEG-2/MP3/
WMA/WAV: ISO 9660 level 1,
level 2, Romeo, Joliet
DVD Video
DVD-VR
DivX/MPEG1/MPEG2
MP3/WMA/WAV
AAC
JPEG/MPEG4
DVD+VR
DVD-RAM
Dual Disc DVD side
Non-DVD side
CD/VCD Audio CD/CD Text (CD-DA)/DTS-CD *
VCD (Video CD)
SVCD (Super Video CD)
CD-ROM
CD-I (CD-I Ready)
CD Recordable/Rewritable
(CD-R/-RW)
• ISO 9660 level 1, level 2, Romeo,
Joliet
CD-DA
DivX/MPEG1/MPEG2
MP3/WMA/WAV
AAC
JPEG/MPEG4
1
If you insert a DVD Video disc of an incorrect Region Code, “REGION CODE ERROR” appears on the monitor.
*
*2 DVD-R recorded in multi-border format is also playable (except for dual layer discs). DVD-RW dual layer discs are not
playable.
*3 It is possible to play back finalized +R/+RW (Video format only) discs. +RW double layer discs are not playable.
*4 To reproduce DTS sound, use the DIGITAL OUT terminal (see also pages 51 and 59).
1
4
6
Page 7
Preparation
Cancel the display demonstration and set the clock
• See also pages 45 and 46.
1
2
Turn on the power.
Enter the PSM settings.
ENGLISH
3
4
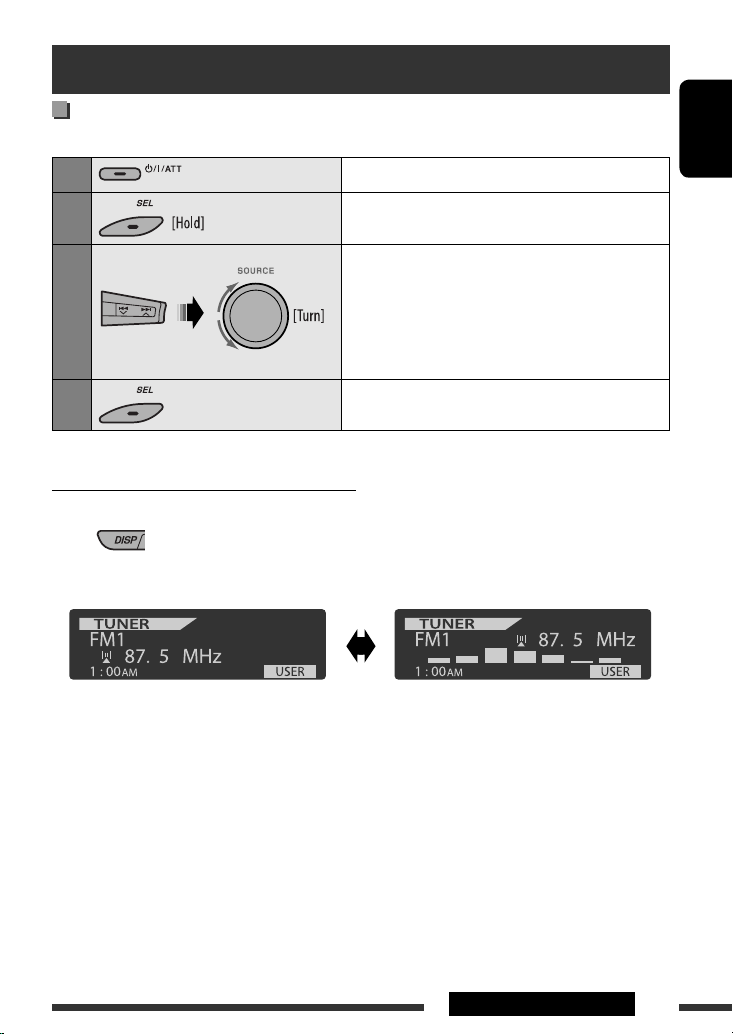
Changing the display information and pattern
• When the power is turned off: Check the current clock time
Ex.: When tuner is selected as the source
Source operation display Audio level meter display
Cancel the display demonstrations
Select “Demo,” then “Off.”
Set the clock
Select “Clock Hr” (hour), then adjust the hour.
Select “Clock Min” (minute), then adjust the minute.
Select “24H/12H,” then “24Hours” or “12Hours.”
Finish the procedure.
(see “LevelMeter” on page 45)
7INTRODUCTIONS
Page 8
Basic operations
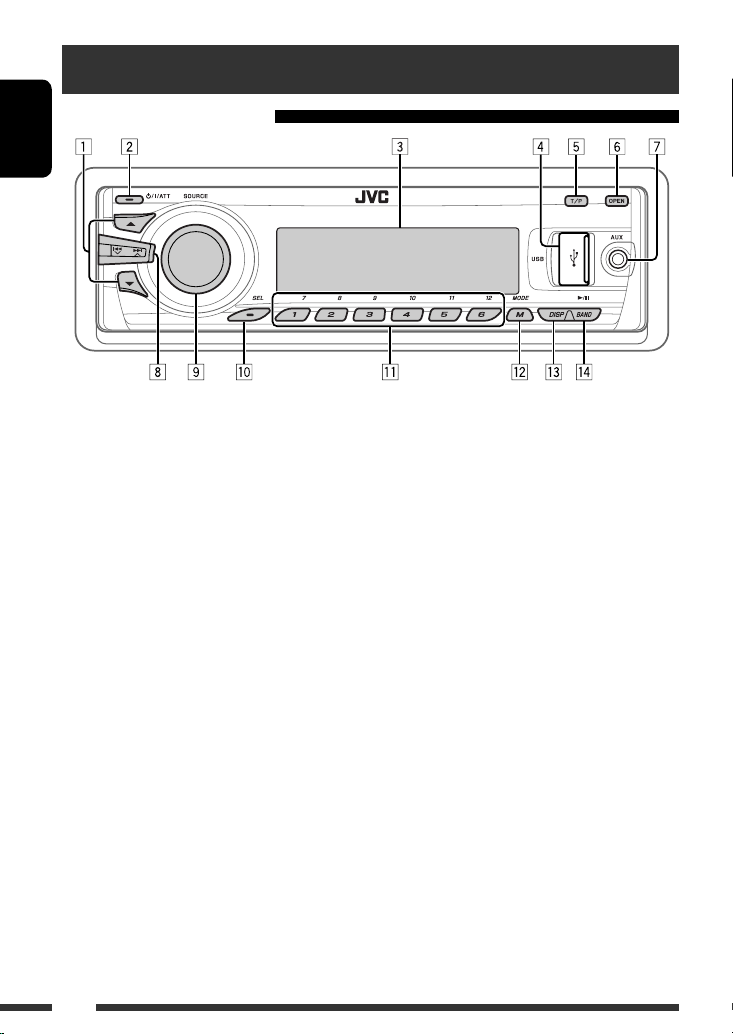
Using the control panel
ENGLISH
1 • DAB: Select DAB service.
• DISC/USB/CD-CH: Select title/program/
playlist/folder.
• USB-iPod: Enter the main menu [Hold].
• iPod: Enter the main menu/Pause playback/
Confirm selection.
• BT-PHONE/BT-AUDIO: Select a registered
device.
2 • Turn on the power.
• Turn off the power [Hold].
• Attenuate the sound (if the power is on).
3 Display window
4 USB (Universal Serial Bus) input jack
5 • Activate/deactivate TA Standby Reception.
• Enter programme type searching mode [Hold].
6 Flip down the control panel.
• To eject the disc, flip down the control panel
then press 0 on the unit.
7 AV-IN (video) input jack
8 • TUNER: Search for station.
• DAB: Search for DAB ensemble.
• DISC/USB/USB-iPod/CD-CH/iPod: Select
chapter/track.
• BT-AUDIO: Reverse skip/forward skip.
9 • Volume control [Turn].
• Select the source [Press] *1.
TUNER = DAB *2 = DISC *2 = USB *2 (or
USB-iPod) *2 = CD-CH *2/iPod *2 (or EXT IN)
= BT-PHONE *
= AV IN = (back to the beginning)
p • Select/adjust the sound mode.
2
= BT-AUDIO *2 = LINE IN
• Enter the PSM settings [Hold].
q • TUNER/DAB: Select preset station/DAB service.
• DISC/USB/CD-CH: Select chapter/title/
program/folder/track/disc (for CD changer).
• BT-PHONE: Dial preset phone number *3.
w • Enter functions mode.
• BT-PHONE: Activate Voice Dialing [Hold].
e Change the display information and pattern.
r • TUNER/DAB: Select the bands.
• DISC/USB/USB-iPod: Start/pause playback.
• BT-AUDIO: Start/pause playback.
*1 Holding SOURCE will enter Bluetooth menu if a
Bluetooth phone is connected.
*2 You cannot select these sources if they are not ready
or not connected.
*3 For storing preset phone number, see page 32.
8
Page 9
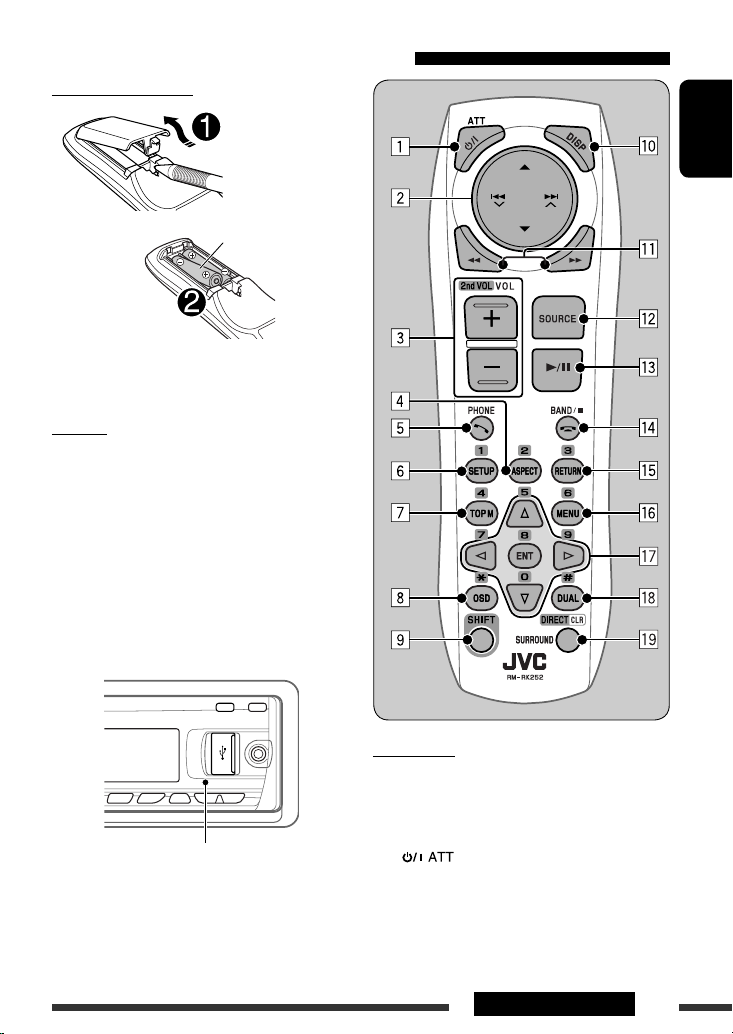
Using the remote controller (RM-RK252)
Installing the battery
R03/LR03/AAA
Insert the batteries into the remote controller by
matching the polarity (+ and –) correctly.
Caution:
Battery shall not be exposed to excessive heat such as
sunshine, fire, or the like.
If the effectiveness of the remote controller
decreases, replace both batteries.
Before using the remote controller:
• Aim the remote controller directly at the remote
sensor on the unit.
• DO NOT expose the remote sensor to bright light
(direct sunlight or artificial lighting).
ENGLISH
Remote sensor
IMPORTANT:
If Dual Zone is activated (see page 27), the remote
controller only functions for operating the DVD/CD
player.
1
1*
button
• Turns the power on if pressed briefly or
attenuates the sound when the power is on.
• Turns the power off if pressed and held.
Continued on the next page
9OPERATIONS
Page 10

2 5/∞ buttons
• TUNER/DAB: Selects the preset stations/
services.
• DISC:
– DVD-Video: Selects the title.
– DVD-VR: Selects the program/playlist.
ENGLISH
– DivX/MPEG Video/MP3/WMA/WAV: Selects
the folders if included.
• USB:
– DivX/MPEG Video/MP3/WMA/WAV: Selects
the folders if included.
• CD-CH: Selects the folders if included.
• iPod:
5 : Enters the main menu (then 5 / ∞ /
–
4 / ¢ work as menu
selecting buttons.)
5 : Returns to the previous menu.
∞ : Confirms the selection.
– ∞ : Pauses or resumes playback.
4 / ¢ buttons
• TUNER:
– Searches for stations automatically if pressed
briefly.
– Searches for stations manually if pressed and
held.
• DAB:
– Select ensembles if pressed briefly.
– Searches for ensembles if pressed and held.
• DISC/USB/USB-iPod/CD-CH:
– Reverse skip/forward skip if pressed briefly.
– Reverse search/forward search if pressed and
held.
• BT-AUDIO: Reverse skip/forward skip if pressed
briefly.
• iPod:
– Reverse skip/forward skip if pressed briefly.
– Reverse search/forward search if pressed and
held.
In menu selecting mode:
– Selects an item if pressed briefly. (Then, press
∞ to confirm the selection.)
– Skips 10 items at a time if pressed and held.
3 VOL (volume) + / – buttons
• Adjusts the volume level.
2nd VOL (volume) buttons
• Adjust the volume level through the 2nd AUDIO
OUT plug when pressed with SHIFT button (see
page 27).
2
4 *
ASPECT button
• Not applicable for this unit.
1
5*
PHONE button
• Answer incoming calls.
• Enters “Redial” menu when a Bluetooth phone
is connected [Hold].
2
6 *
SETUP button
• Enters disc setup menu (during stop).
2
7 *
TOP M (menu) button
• DVD-Video/DivX: Shows the disc menu.
• DVD-VR: Shows the Original Program screen.
• VCD: Resumes PBC playback.
• USB-iPod: Enters the search mode menu (see
page 39).
2
8 *
OSD (on-screen display) button
• Shows the on-screen bar.
9 SHIFT button
• Functions with other buttons.
p DISP (display) button
• Changes the display information.
q 1 / ¡ buttons
• DVD-Video: Slow motion playback (during
pause).
• DVD-VR/VCD: Forward slow motion playback
(during pause).
• DISC/USB/USB-iPod: Reverse search/forward
search.
1
w*
SOURCE button
• Selects the source.
10
Page 11
e 3 (play) / 8 (pause) button
• DISC/USB/USB-iPod/BT-AUDIO: Starts/
pauses playback.
r (end call) button
• Ends the call.
BAND /
7 (stop) buttons
• TUNER/DAB: Selects the bands.
• DISC/USB/USB-iPod/BT-AUDIO: Stops
playback.
2
t *
RETURN button
• VCD: Returns to the PBC menu.
• USB-iPod: Returns to Control Screen.
2
y *
MENU button
• DVD-Video/DivX: Shows the disc menu.
• DVD-VR: Shows the Playlist screen.
• VCD: Resumes PBC playback.
• USB-iPod: Enters the search mode menu (see
page 39).
2
u *
% / fi buttons
• DVD-Video: Makes selection/settings.
• CD-CH: Changes discs in the magazine.
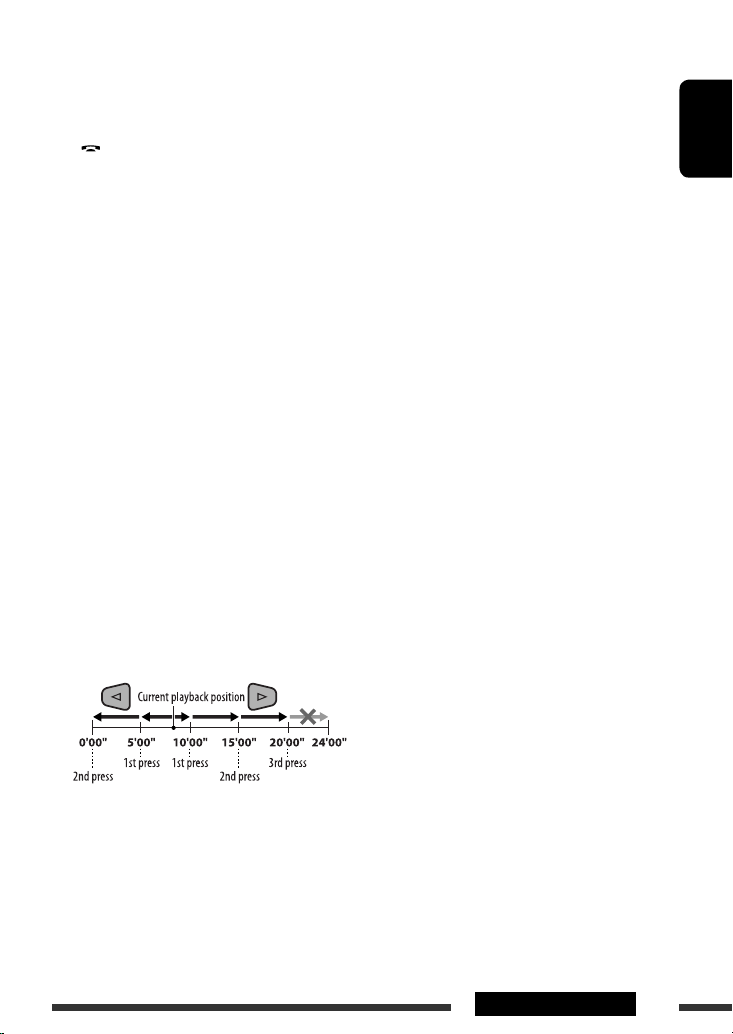
@ / # buttons
• DVD-Video: Makes selection/settings.
• DivX/MPEG Video: Skips back or forward by
about five minutes.
DIRECT button
• DISC/USB: Enters direct search mode for
chapter/title/program/playlist/folder/track
when pressed with SHIFT button (see page 20
for details).
CLR (clear) button
• DISC/USB: Erases the misentry when pressed
with SHIFT button.
1
When Dual Zone is activated, these buttons cannot be
*
used.
*2 Functions as number buttons/* (asterisk)/# (hash)
when pressed with SHIFT button.
– TUNER/DAB: Selects the preset stations/services
(1 – 6).
– DISC: Enters chapter/title/program/playlist/folder/
track number after entering search mode by
pressing SHIFT and DIRECT (see page 20 for details).
ENGLISH
ENT (enter) button
• Confirms selection.
2
i *
DUAL button
• Activates or deactivates Dual Zone.
o SURROUND button
• Not applicable for this unit.
11OPERATIONS
Page 12
Listening to the radio
1
ENGLISH
2
3
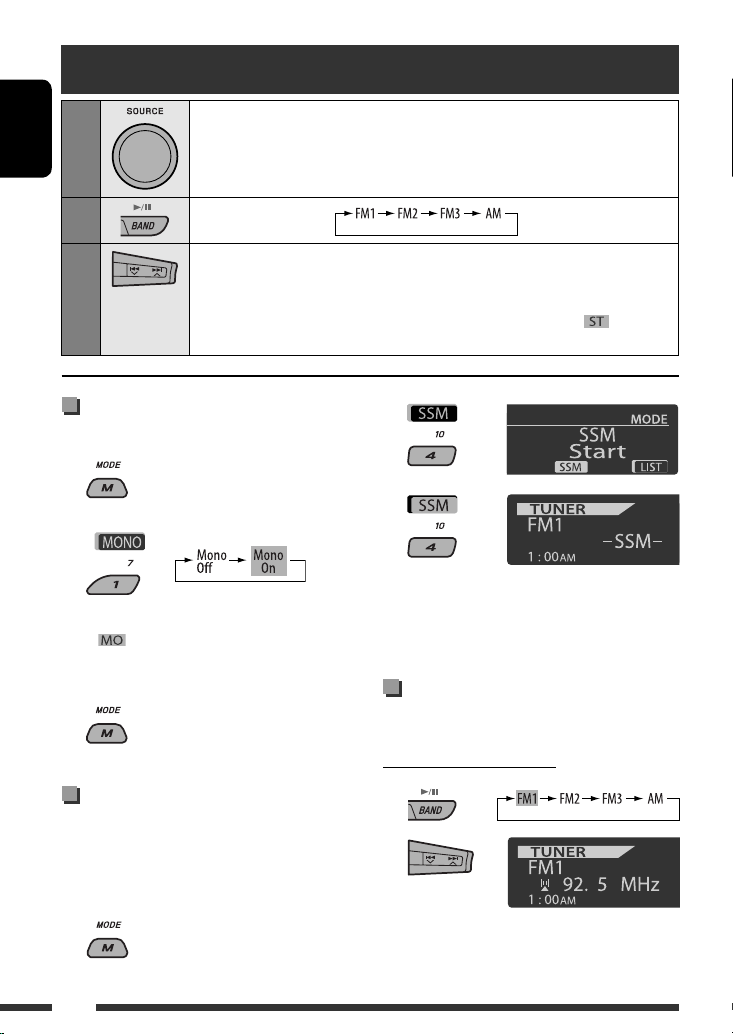
Select “TUNER.”
Select the bands.
Search for a station to listen—Auto Search.
Manual Search: Hold either one of the buttons until “M” lights up on the display, then
press it repeatedly.
• When receiving an FM stereo broadcast with sufficient signal strength, lights up
on the display.
When an FM stereo broadcast is
hard to receive
1
2
Reception improves, but stereo effect will be lost.
• lights up on the display.
3 Exit from the setting.
FM station automatic presetting
— SSM (Strong-station Sequential
Memory)
You can preset up to six stations for each band.
1 While listening to a station...
2
3
Local FM stations with the strongest signals are
searched and stored automatically in the selected
FM band.
Manual presetting
Ex.: Storing FM station of 92.5 MHz into preset number
4 of the FM1 band.
Using the number buttons
1
2
12
Page 13
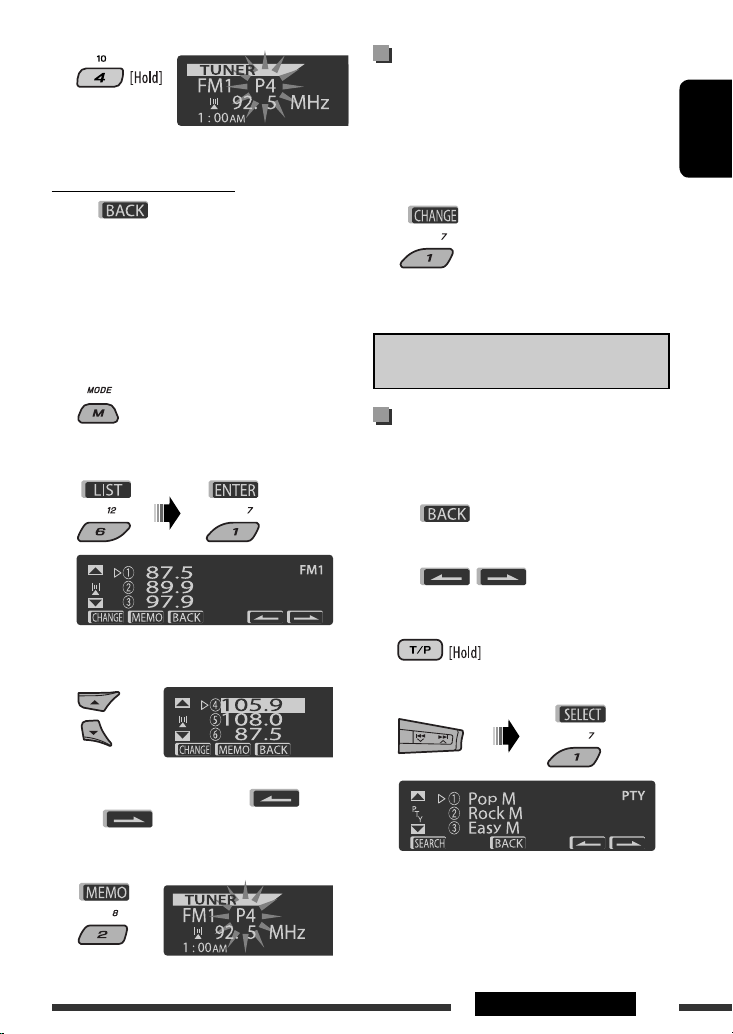
3
Preset number flashes for a while.
Using the Preset Station list
• When is shown on the display, you can
move back to the previous screen by pressing number
button 3.
1 Follow steps 1 and 2 of “Using the number
buttons” on page 12.
• By holding 5 / ∞, the Preset Station List will
also appear (go to step 4).
2
3
Display the Preset Station List.
4 Select the preset number you want to store
into.
Listening to the preset station on
the Preset Station List
1 Display the Preset Station List, then select
the preset station you want to listen to.
ENGLISH
2 Change to the selected station.
The following features are available only for FM RDS
stations.
Searching for FM RDS programme
— PTY Search
You can tune in to a station broadcasting your favorite
programme by searching for a PTY code.
• When appears on the display, you can
move back to the previous display by pressing
number button 3.
• When / appears on the display,
you can move to the other lists by pressing number
button 5 or 6 repeatedly.
1
2 Select “Search.”
• You can move to the lists of the other FM bands
by pressing number button 5 ( ) or
6 ( ) repeatedly.
5 Store the station.
The six preset PTY codes appears on the display.
Continued on the next page
13OPERATIONS
Page 14
3 Select a PTY code.
You can select a PTY code from the
29 preset PTY codes or from the six
stored PTY codes.
ENGLISH
• To store your favorite programme types, see the
following.
4 Start searching for your favorite programme.
4 Select one of the PTY codes.
5 Store the selected PTY code.
If there is a station broadcasting a programme
of the same PTY code as you have selected, that
station is tuned in.
Storing your favorite programme types
You can store six favorite programme types.
• When appears on the display, you can
move back to the previous display by pressing
number button 3.
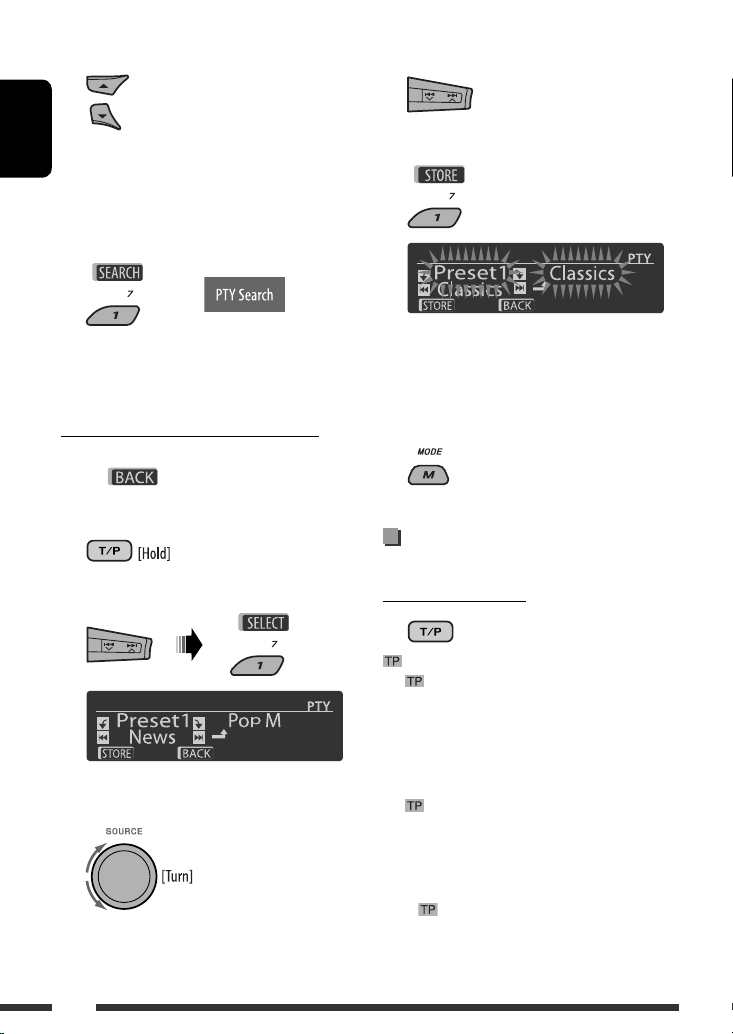
1
2 Select “Memory.”
3 Select a preset number (“Preset1”–
“Preset6”) you want to store into.
Ex.: When “Classics” is selected in step 4
6 Repeat steps 3 to 5 to store other PTY codes
into other preset numbers.
7 Exit from the setting.
Activating TA/PTY Standby
Reception
TA Standby Reception
either lights up or flashes on the display.
• If lights up, the unit temporarily will switch to
Traffic Announcement (TA), if available, from any
source other than AM.
The volume changes to the preset TA volume level if
the current level is lower than the preset level (see
page 47).
• If flashes, TA Standby reception is not yet
activated. Tune in to another station providing the
RDS signals.
To deactivate TA Standby Reception, press TP
again. goes off.
14
Page 15
PTY Standby Reception
1
2
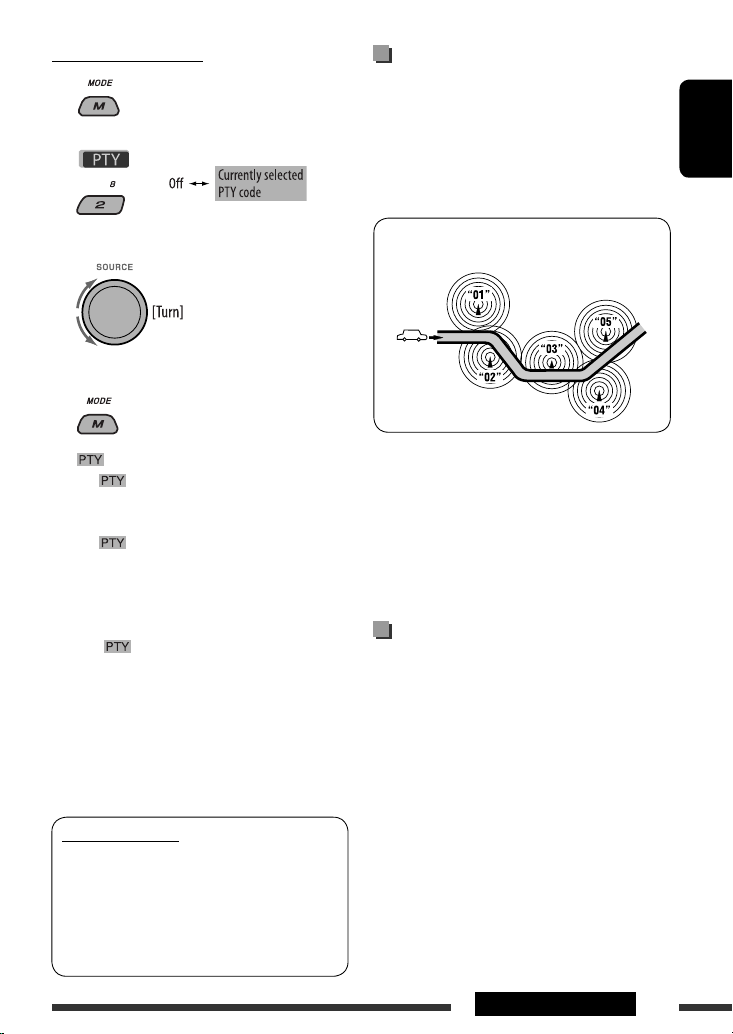
Tracing the same programme—
Network-Tracking Reception
When driving in an area where FM reception is not
sufficient enough, this unit automatically tunes in to
another FM RDS station of the same network, possibly
broadcasting the same programme with stronger
signals (see the illustration below).
ENGLISH
3
Select a PTY code.
4 Exit from the setting.
either lights up or flashes on the display.
• If lights up, the unit temporarily will switch
to your favorite PTY programme from any source
other than AM.
• If
flashes, PTY Standby reception is not yet
activated. Tune in to another station (or service)
providing the RDS signals.
To deactivate PTY Standby Reception, select “Off”
in step 2. goes off.
• When a DAB tuner is connected, TA/PTY Standby
Reception also searches for services. (See also
page 35.)
• The unit will not switch to Traffic Announcement or
PTY programme when a call connection is established
through the “BT-PHONE.”
Available PTY codes
News, Affairs, Info, Sport, Educate, Drama, Culture,
Science, Varied, Pop M (music), Rock M (music),
Easy M (music), Light M (music), Classics, Other
M (music), Weather, Finance, Children, Social,
Religion, Phone In, Travel, Leisure, Jazz, Country,
Nation M (music), Oldies, Folk M (music), Document
Programme A broadcasting on different frequency
areas (01 – 05)
When shipped from the factory, Network-Tracking
Reception is activated.
To change the Network-Tracking Reception
setting, see “AF-Regn’l” on page 47.
• When the DAB tuner is connected, refer to “Tracing
the same programme—Alternative Frequency
Reception (DAB AF)” on page 36.
Automatic station selection—
Programme Search
Usually when you press the number buttons, the preset
station is tuned in.
If the signals from the FM RDS preset station are not
sufficient for good reception, this unit, using the AF
data, tunes in to another frequency broadcasting the
same programme as the original preset station is
broadcasting.
• The unit takes some time to tune in to another
station using programme search.
• See also page 47.
15OPERATIONS
Page 16
Disc operations
Before performing any operations...
Turn on the monitor to watch the playback picture. If you turn on the monitor, you can also control playback of other
discs by referring to the monitor screen. (See pages 22 – 25.)
ENGLISH
The disc type is automatically detected, and playback starts automatically (for DVD: automatic start depends on its
internal program).
If the current disc does not have any disc menu, all tracks will be played repeatedly until you change the source or
eject the disc.
” appears on the monitor when pressing a button, the unit cannot accept the operation you have tried to
If “
do.
• In some cases, without showing “ ,” operations will not be accepted.
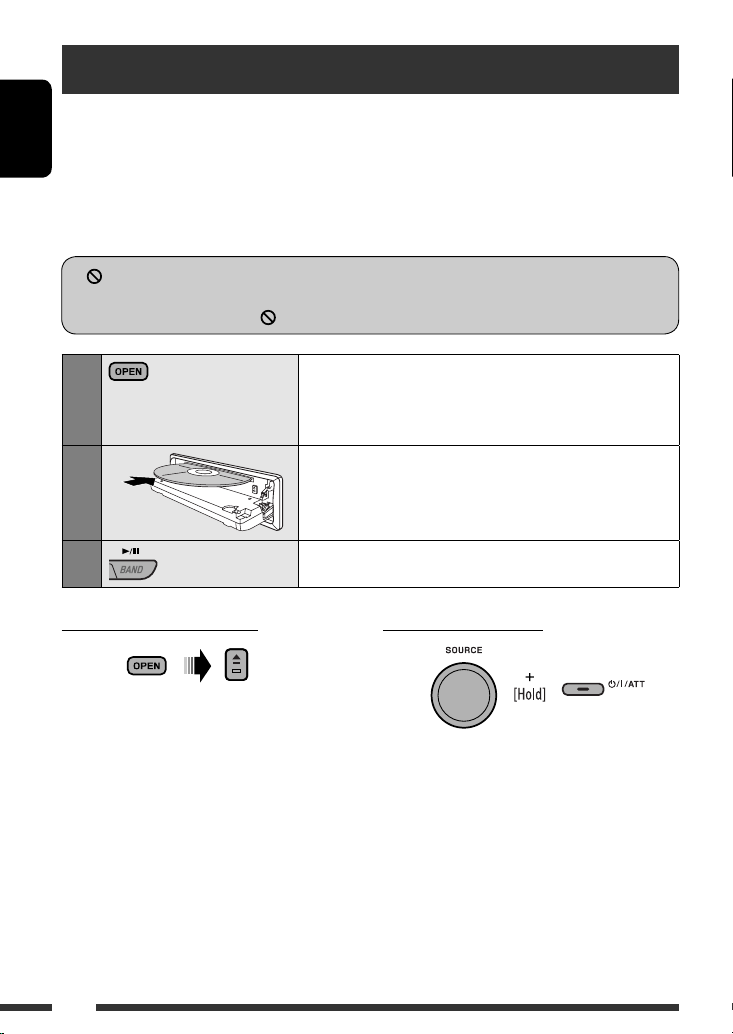
1
2
3
To stop play and eject the disc
• Press SOURCE to listen to another playback source.
Open the control panel.
Make sure to detach the USB device before opening the control
panel, as it might block the opening mechanism.
• To detach the USB device, see page 26.
Insert the disc.
Playback starts automatically.
Start playback if necessary.
Prohibiting disc ejection
To cancel the prohibition, repeat the same
procedure.
16
Page 17
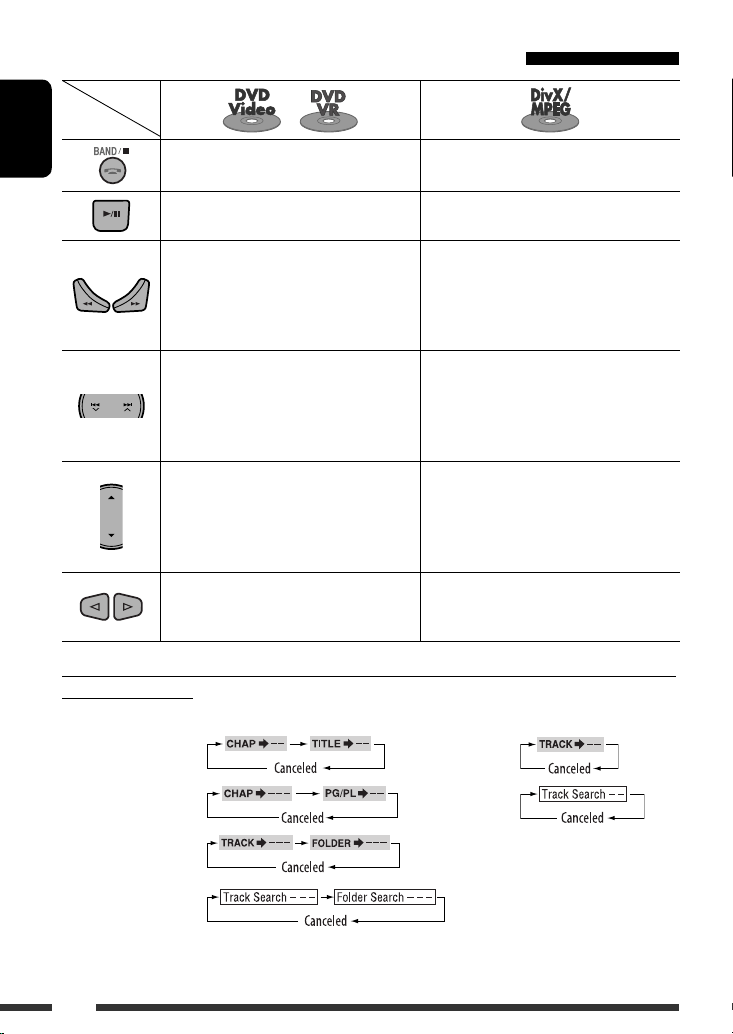
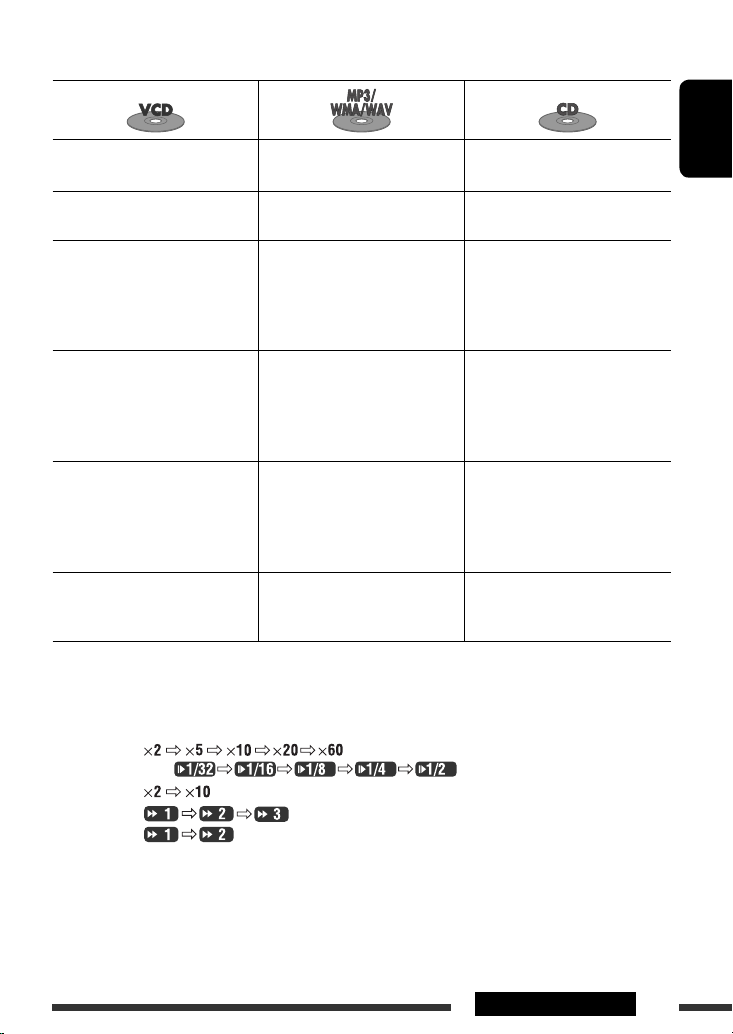
Operations using the control panel
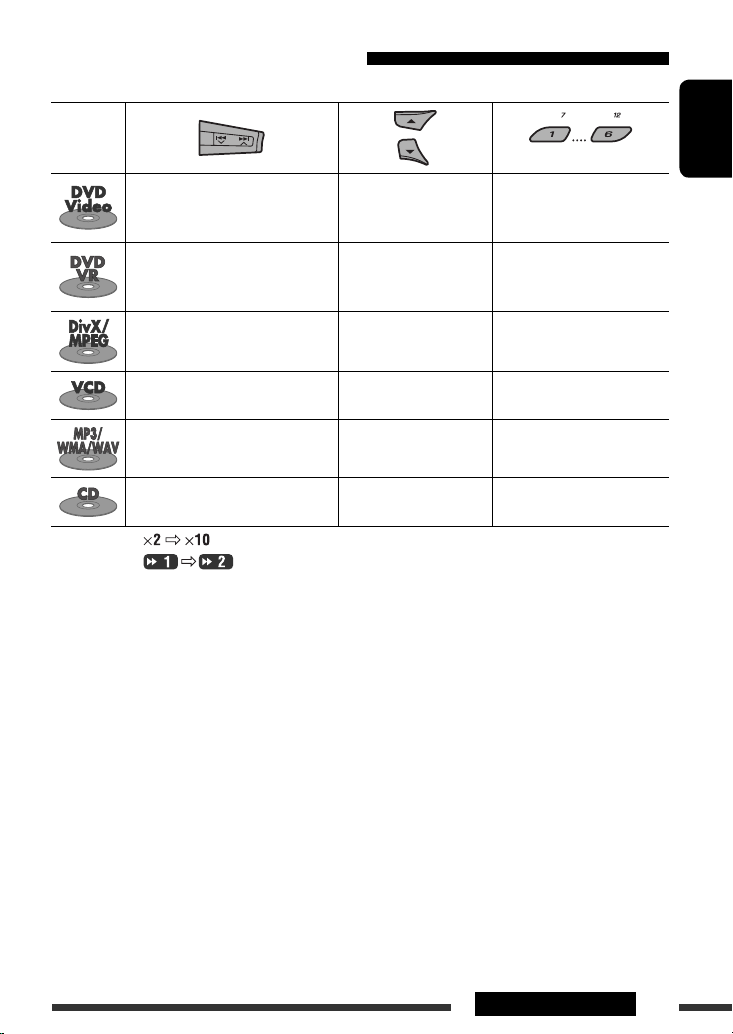
Pressing (or holding) the following buttons allows you to...
Disc type
[Press] Select chapter
[Hold] Reverse/fast-forward
1
chapter *
[Press] Select chapter
[Hold] Reverse/fast-forward
1
chapter *
[Press] Select track
[Hold] Reverse/fast-forward track *
[Press] Select track
[Hold] Reverse/fast-forward track *
[Press] Select track
[Hold] Reverse/fast-forward track *
[Press] Select track
[Hold] Reverse/fast-forward track *
1
*
Search speed:
*2 Search speed:
*3 Press to select number 1 to 6; hold to select number 7 to 12.
Select title During stop: Locate title
Select program number/
playlist number
Select folder Locate particular folder directly
2
1
Select folder Locate particular folder directly
1
1
—
—
(Number buttons) *
3
During play/pause: Locate
chapter
During stop: Locate program
During play/pause: Locate
chapter
Locate particular track directly
(PBC not in use)
Locate particular track directly
ENGLISH
Continued on the next page
17OPERATIONS
Page 18
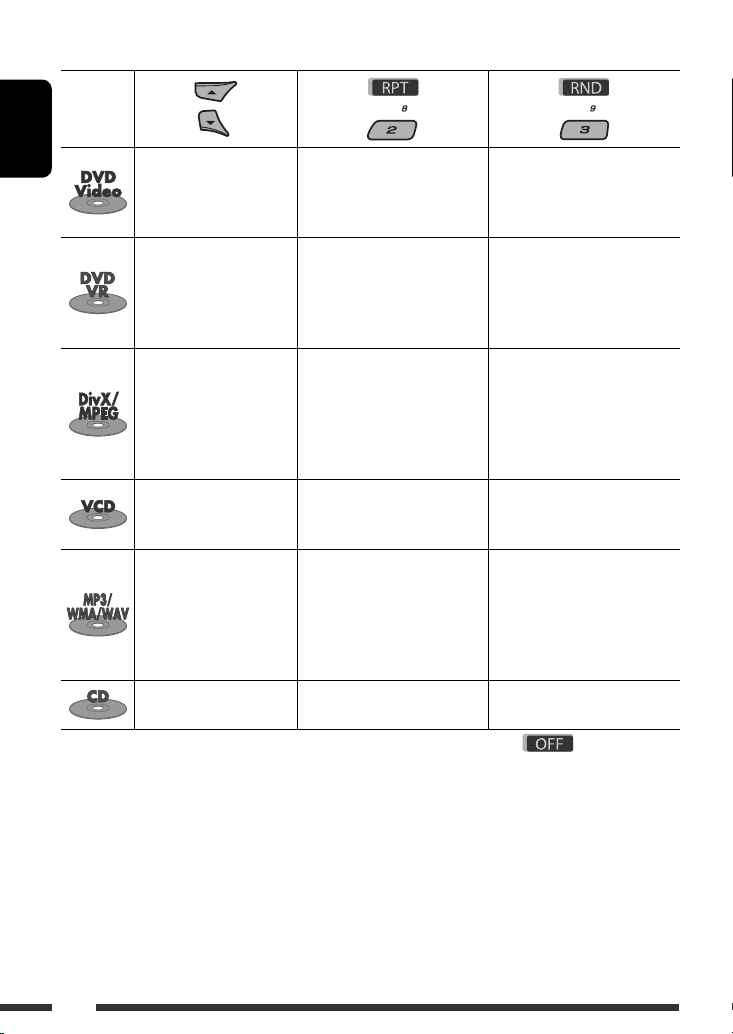
After pressing M MODE, press the following buttons to...
Disc type
ENGLISH
• You can also cancel the playback mode by selecting “Off” or press number button 4 (
Skip 10 chapters (during
play or pause)
Skip 10 chapters (during
play or pause)
Skip 10 tracks (within the
same folder)
Skip 10 tracks (PBC not in
use)
Skip 10 tracks (within the
same folder)
Skip 10 tracks Repeat Track:
Repeat Chapter:
Repeat current chapter
Repeat Title:
Repeat current title
Repeat Chapter:
Repeat current chapter
Repeat Program:
Repeat current program (not
available for Playlist Playback)
Repeat Track:
Repeat current track
Repeat Folder:
Repeat current folder
Repeat Track:
Repeat current track (PBC not in
use)
Repeat Track:
Repeat current track
Repeat Folder:
Repeat current folder
Repeat current track
—
—
Random Folder:
Randomly play all tracks of
current folder, then tracks of
next folders
Random All:
Randomly play all tracks
Random All:
Randomly play all tracks (PBC
not in use)
Random Folder:
Randomly play all tracks of
current folder, then tracks of
next folders
Random All:
Randomly play all tracks
Random All:
Randomly play all tracks
).
18
Page 19
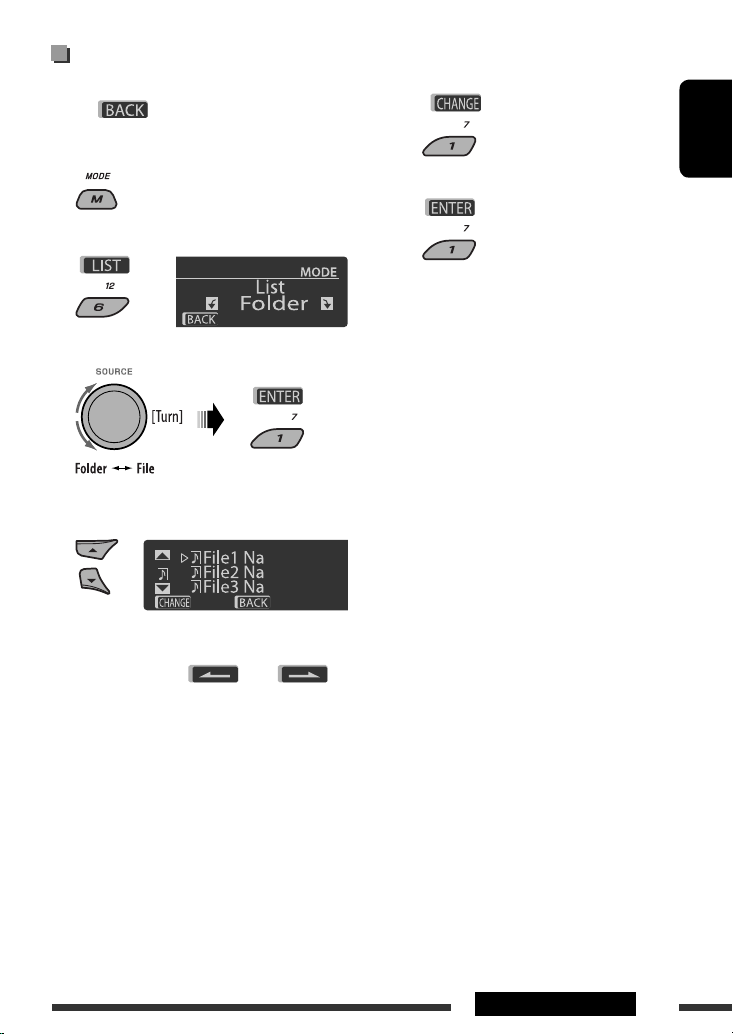
Selecting a folder/track on the list
(only for MP3/WMA/WAV file)
• When is shown on the display, you can
move back to the previous screen by pressing number
button 3.
1
Select “LIST.”
2
3 Select the list type.
4 Select an item.
Ex.: When “File” is selected in step 3
• You can move to the other lists by pressing
number button 5 ( ) or 6 ( )
repeatedly.
5 Change to the selected item.
A If File List is selected
The list disappears and playback
starts.
B If Folder List is selected
• If the current folder is selected, File List
appears, then repeat steps 4 and 5 A to
start playback.
• If another folder is selected, playback starts
from the 1st file of the selected folder.
ENGLISH
19OPERATIONS
Page 20
Operations using the remote controller (RM-RK252)
Disc
Button
ENGLISH
Stop play Stop play
Start play/Pause (if pressed during play) Start play/Pause (if pressed during play)
• Reverse/forward chapter search *1 (No
sound can be heard.)
• Slow motion *2 during pause (No sound can
be heard.)
* DVD-VR: Reverse slow motion does not work.
[Press] Select chapter (during play or pause)
[Hold] Reverse/fast-forward chapter search *
• DVD-Video: Select title (during play or
• DVD-VR: Select playlist/program (during
/
pause)
play or pause)
—
Reverse/forward track search *4 (No sound can
be heard.)
[Press] Select track (during play or pause)
3
[Hold] Reverse/fast-forward track search *
(No sound can be heard.)
Select folder
• Skip back or forward the scenes by about
five minutes
• Select chapter
To search for chapter/title/program/playlist/folder/track directly (DVD/DivX/MPEG Video/VCD/
MP3/WMA/WAV/CD)
1 While holding SHIFT, press DIRECT repeatedly to select the desired search mode.
5
DVD-Video :
DVD-VR : CD :
DivX/MPEG Video :
MP3/WMA/WAV :
2 While holding SHIFT, press the number buttons (0 – 9) to enter the desired number.
3 Press ENT (enter) to confirm.
VCD :
20
Page 21
Stop play Stop play Stop play
ENGLISH
Start play/Pause (if pressed during
play)
Reverse/forward track search *
Start play/Pause (if pressed during
play)
1
Reverse/forward track search *
Start play/Pause (if pressed during
play)
1
Reverse/forward track search *
• Forward slow motion *2 during
pause. (No sound can be heard.)
* Reverse slow motion does not work.
[Press] Select track (during play or
pause)
[Hold] Reverse/fast-forward track
search *3 (No sound can be
[Press] Select track (during play or
pause)
[Hold] Reverse/fast-forward track
3
search *
[Press] Select track (during play or
[Hold] Reverse/fast-forward track
heard.)
Select folder
—
———
• For DivX/MPEG Video/MP3/WMA/WAV, track is searched within the same folder.
• To erase a misentry, press CLR (clear) while holding SHIFT.
• To return to the previous screen, press RETURN.
*1 Search speed:
*2 Slow motion speed:
*3 Search speed:
*4 Search speed:
*5 Search speed:
pause)
search *
1
3
—
Continued on the next page
21OPERATIONS
Page 22

Using menu driven features... (DVD-Video/
DVD-VR)
1 Press TOP M/MENU to enter the menu screen.
2 Press % / fi / @ * / # * to select an item you want
to start play.
ENGLISH
3 Press ENT (enter) to confirm.
* Not applicable for DVD-VR.
Canceling the PBC playback... (VCD)
1 During stop, press DIRECT while holding SHIFT.
2 Hold SHIFT, then press the number buttons (0 – 9)
to enter the desired number.
3 Press ENT (enter) to confirm.
• To resume PBC, press TOP M/MENU.
Operations using the
on-screen bar
(DVD/DVD-VR/DivX/MPEG Video/VCD)
These operations are possible on the monitor using the
remote controller.
1 Show the on-screen bar (see page 23).
(twice)
2 Select an item.
3 Make a selection.
If pop-up menu appears...
• To cancel pop-up menu, press RETURN.
• For entering time/numbers, see the following.
Entering time/numbers
Press % / fi to change the number, then press @ / # to
move to the next entry.
• Each time you press % / fi, the number increases/
decreases by one value.
• After entering the numbers, press ENT (enter).
• It is not required to enter the zero and tailing zeros
(the last two digits in the example below).
22
Ex.: Time search
DVD: _:_ _:_ _ (Ex.: 1:02:00)
Press % once, then # twice to go to the third entry, %
twice, then press ENT (enter).
To remove the on-screen bar
Page 23
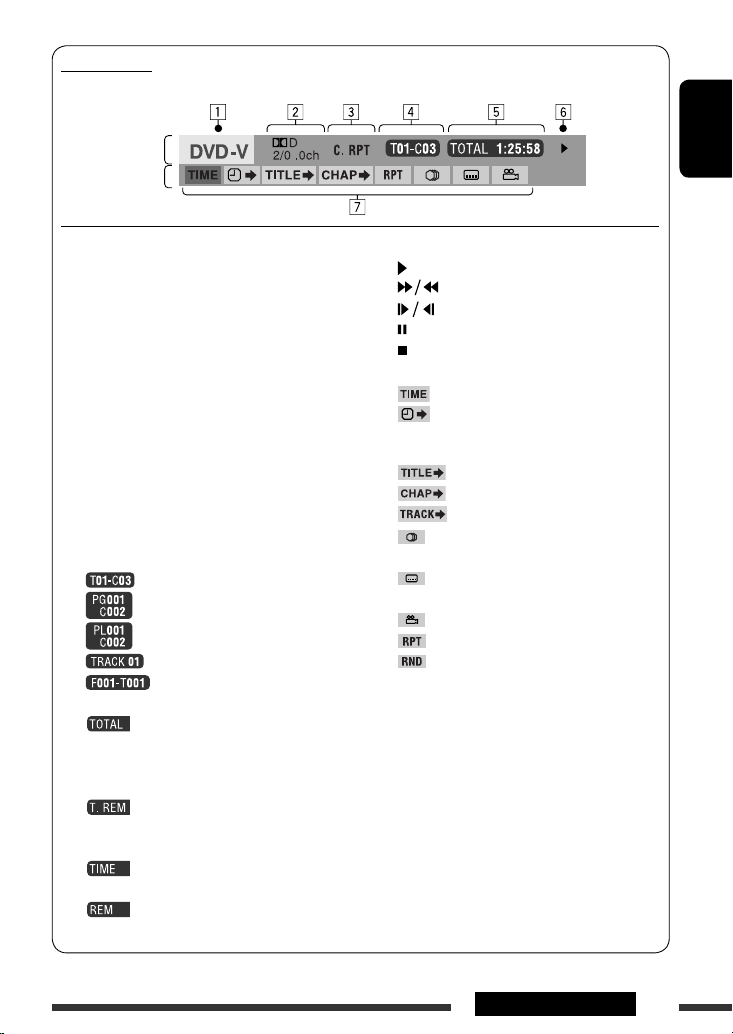
On-screen bar
Ex.: DVD-Video
Information
Operation
1 Disc type
2 • DVD-Video/DTS-CD: Audio signal format type
and channel
• VCD: PBC
3 Playback mode *
1
DVD-Video: T. RPT: Title repeat
C. RPT: Chapter repeat
DVD-VR: C. RPT: Chapter repeat
PG. RPT: Program repeat
DivX/MPEG Video: T. RPT: Track repeat
F. RPT: Folder repeat
F. RND: Folder random
A. RND: All random
VCD *2: T. RPT: Track repeat
A. RND: All random
4 Playback information
Current title/chapter
Current program/chapter
Current playlist/chapter
Current track
Current folder/track
5 Time indication
Elapsed playing time of the disc
(For DVD-Video, elapsed playing
time of the current title/program/
playlist.)
DVD-Video/DVD-VR: Remaining
title/program/playlist time
VCD: Remaining disc time
Elapsed playing time of the current
chapter/track *
3
Remaining time of the current
chapter/track *
3
6 Playback status
Play
Forward/reverse search
Forward/reverse slow-motion
Pause
Stop
7 Operation icons
Change time indication (see 5)
Time Search (Enter the elapsed playing
time of the current title/program/
playlist or of the disc.)
Title Search (by its number)
Chapter Search (by its number)
Track Search (by its number)
Change the audio language or audio
channel
Change or turn off the subtitle
language
Change the view angle
Repeat play *
Random play *
1
1
*1 For repeat play/random play, see also page 18.
*2 While PBC is not in use.
*3 Not applicable for DVD-VR.
ENGLISH
23OPERATIONS
Page 24
Operations using the control
screen
(DivX/MPEG Video/MP3/WMA/WAV/CD)
These operations are possible on the monitor using the
remote controller.
ENGLISH
1 Show the control screen.
DivX/MPEG Video: Press
MP3/WMA/WAV/CD: Automatically appear during
play.
2 Select “Folder” column or “Track” column
(except for CD).
3 Select a folder or track.
7 during play.
7 Track information
8 Track list with the current track selected
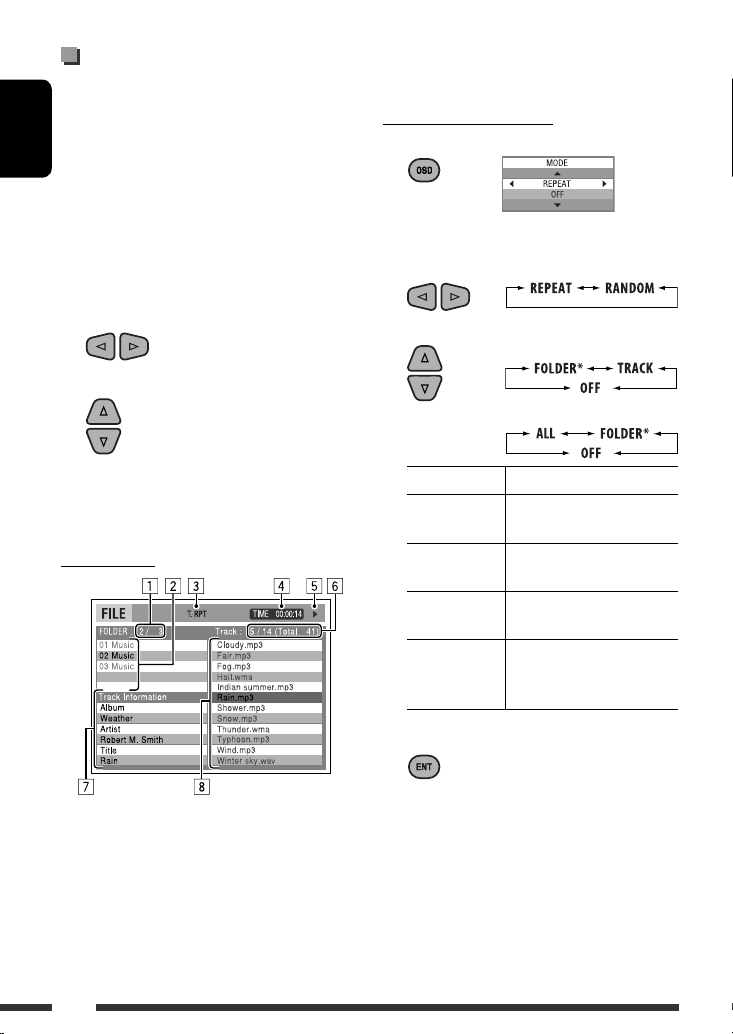
To select a playback mode
1 While control screen is displayed...
Playback mode selection screen appears on the
folder list section of the control screen.
2 Select a playback mode.
3 Select an item.
REPEAT:
RANDOM:
4 Start playback.
DivX/MPEG Video: Press ENT (enter) or 3/8.
MP3/WMA/WAV/CD: Playback starts automatically.
Control screen
Ex.: MP3/WMA/WAV disc
1 Current folder number/total folder number
2 Folder list with the current folder selected
3 Selected playback mode
4 Elapsed playing time of the current track
5 Operation mode icon ( 3, 7, 8, ¡, 1 )
6 Current track number/total number of tracks in the
current folder (total number of tracks on the disc)
24
Mode Playback functions
F. RPT
(folder repeat):
T. RPT
(track repeat):
A. RND
(all random):
F. RND
(folder random):
4 Confirm the selection.
* Not selectable for CD.
Repeat current folder
Repeat current track
Randomly play all tracks
Randomly play all tracks of
current folder, then tracks of
next folders
Page 25
Operations using the list
screen
(DVD-VR/DivX/MPEG Video/MP3/WMA/WAV)
These operations are possible on the monitor using the
remote controller.
List screen (DivX/MPEG Video/MP3/WMA/
WAV)
Before playing, you can display the folder list/track list
to confirm the contents and start playing a track.
1 Display the folder list while stop.
2 Select an item from the folder list.
• Track list of the selected folder appears.
• To go back to the folder list, press RETURN.
3 Select a track to start playing.
or
• MP3/WMA/WAV: Control screen appears (see
page 24).
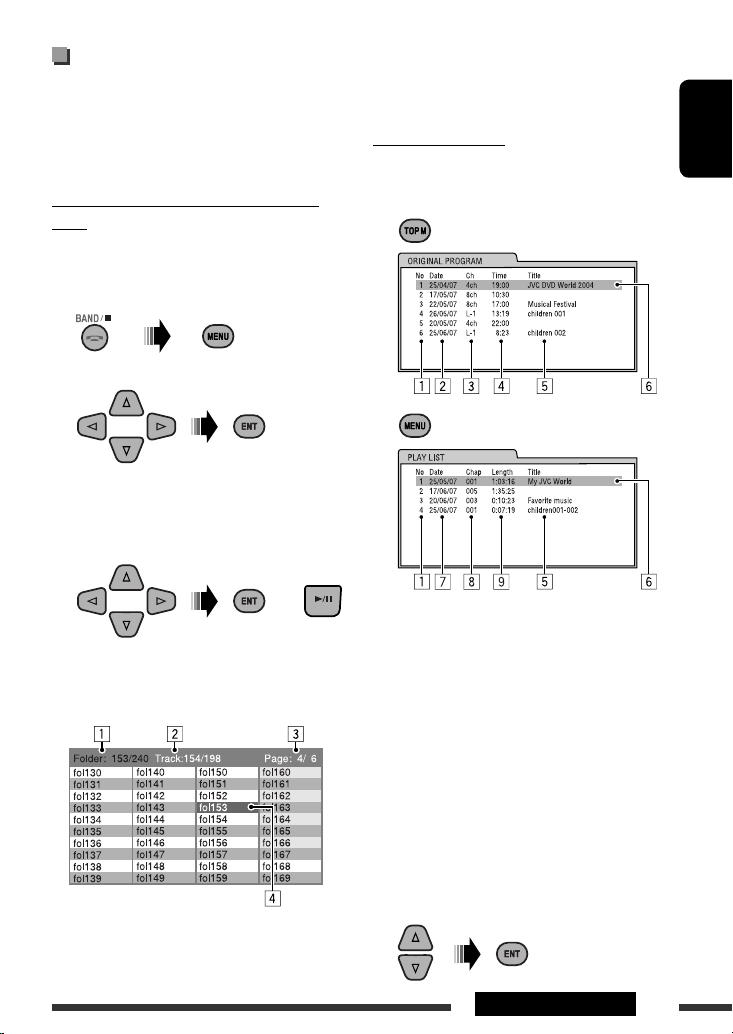
Ex.: Folder list
1 Current folder number/total folder number
2 Current track number/total number of tracks in the
current folder
3 Current page/total number of the pages included
in the list
4 Current folder/track (highlighted bar)
List screen (DVD-VR)
You can use ORIGINAL PROGRAM or PLAY LIST screen
anytime while playing DVD-VR with its data recorded.
1 Select a list screen.
1 Program/playlist number
2 Recording date
3 Recording source (TV station, the input
terminal of the recording equipment, etc.)
4 Start time of recording
5 Title of the program/playlist *
6 Current selection (highlighted bar)
7 Creating date of playlist
8 Number of chapters
9 Playback time
* The title of the original program or playlist may
not be displayed depending on the recording
equipment.
2 Select an item from the list.
ENGLISH
25OPERATIONS
Page 26

Listening to the USB device
You can connect a USB mass storage class device such as a USB memory, portable HDD, etc. to the unit.
• You can also connect an Apple iPod to the USB input jack. For details of the operations, see pages 37 – 41.
This unit can play DivX/MPEG Video/MP3/WMA/WAV tracks stored in a USB device.
ENGLISH
All tracks will be played repeatedly until you change the source or detach the USB device.
12
USB input jack
USB memory
Turn on the monitor to watch the playback picture if
you play back a DivX/MPEG file. You can also control
playback by referring to the monitor screen. (See also
pages 22 – 25.)
• See pages 20 – 25 for operation using the remote
controller.
• See pages 50, 51, and 56 for more settings.
If “ ” appears on the monitor when pressing a
button, the unit cannot accept the operation you
have tried to do.
• In some cases, without showing “ ,” operations
will not be accepted.
If a USB device has been attached...
Playback starts from where it has
been stopped previously.
• If a different USB device is
currently attached, playback starts
from the beginning.
To stop play and detach the USB device
Straightly pull it out from the unit.
• Press SOURCE to listen to another playback source.
26
You can operate the USB device in the same way you
operate the files on a disc. (See pages 16 – 25.)
• You cannot select “USB” when Dual Zone is in use
(see page 27).
Cautions:
• Avoid using the USB device if it might hinder your
safety driving.
• Do not pull out and attach the USB device repeatedly
while “Reading” is shown on the display.
• Do not start the car engine if a USB device is
connected.
• This unit may not be able to play the files depending
on the type of USB device.
• Operation and power supply may not work as
intended for some USB devices.
• You cannot connect a computer to the USB input
terminal of the unit.
• Make sure all important data has been backed up to
avoid losing the data.
• Do not leave a USB device in the car, expose to direct
sunlight, or high temperature to avoid deformation
or cause damages to the device.
• Some USB devices may not work immediately after
you turn on the power.
• For more details about USB operations, see page 56.
Page 27
Dual Zone operations
You can enjoy disc playback on the external monitor connected to the VIDEO output terminal and 2nd AUDIO OUT
plugs while listening to any source (other than “AM” and “USB”) through the speakers.
• You cannot select “AM” or “USB” as the source when Dual Zone is activated.
• When Dual Zone is in use, you can only operate the DVD/CD player using the remote controller. For operations, see
pages 20 – 25.
These operations are possible on the monitor using the remote controller.
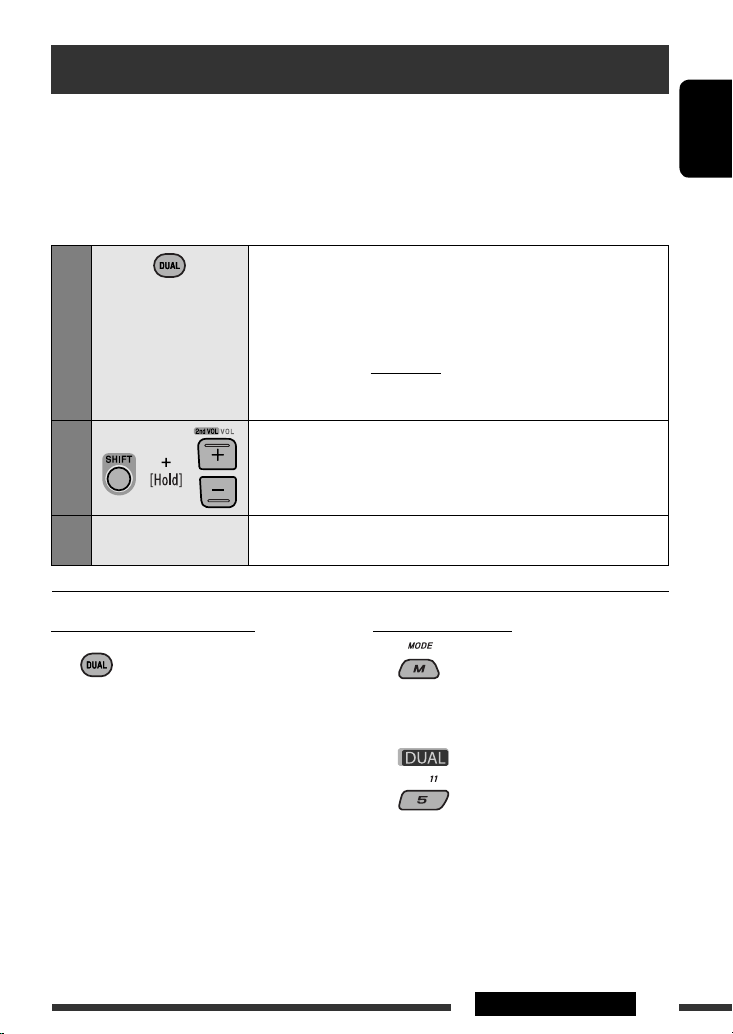
1
2
Activate Dual Zone.
• DUAL indicator lights up on the display.
The main source automatically changes to “DISC.”
To select a different source (main source) to listen through the speakers,
press SOURCE on the control panel.
• By using the buttons on the control panel, you can operate the newly
selected source without affecting Dual Zone operations.
Adjust the volume through the 2nd AUDIO OUT plug.
ENGLISH
3
To cancel Dual Zone operations
• DUAL indicator goes off.
—
Operate the DVD/CD player using the remote controller by
referring to the monitor screen.
On the control panel:
1
Enter Dual Zone settings.
2
Activate or deactivate Dual Zone.
The source automatically changes to “DISC” when
Dual Zone is activated.
27OPERATIONS
Page 28
Listening to the Bluetooth ® devices
For Bluetooth operations, it is required to connect the
Bluetooth Adapter (KS-BTA200) to the CD changer
jack on the rear of this unit.
ENGLISH
• Refer also to the instructions supplied with the
Bluetooth adapter and the Bluetooth device.
• Refer to the list (included in the box) to check
the countries where you may use the Bluetooth ®
function.
To use a Bluetooth device through the unit
(“BT-PHONE” and “BT-AUDIO”) for the first time,
you need to establish Bluetooth wireless connection
between the unit and the device.
• Once the connection is established, it is registered in
the unit even if you reset your unit. Up to five devices
can be registered in total.
• Only one device can be connected at a time for each
source (“BT-PHONE” and “BT-AUDIO”).
Registering a Bluetooth device
Registration (Pairing) methods
Use either of the following items in the Bluetooth menu
to register and establish the connection with a device.
• Select “BT-PHONE” or “BT-AUDIO” as the source to
operate the Bluetooth menu.
Open Make the unit ready to establish a new
Bluetooth connection.
Connection is established by operating the
Bluetooth device.
Search Make the unit ready to establish a new
Bluetooth connection.
Connection is established by operating
the unit.
• When
move back to the previous screen by pressing number
button 3.
is shown on the display, you can
Registering using “Open”
Preparation: Operate the device to turn on its
Bluetooth function.
1 Select “BT-PHONE” or “BT-AUDIO.”
2 Select “New.”
3 Enter setting menu.
4 Select “Open.”
5 Enter a PIN (Personal Identification Number)
code to the unit.
• You can enter any number you like (1-digit to
16-digit number). [Initial: 0000]
• To enter a PIN code less than 4-digit, firstly
delete the initial PIN code (0000) by pressing
number button 5 ( ) .
* Some devices have their own PIN code. Enter the
specified PIN code to the unit.
1 Move to the next (or previous) number
position.
28
Page 29
2 Select a number or blank space.
2 Select a device you want to connect.
3 Repeat steps 1 and 2 until you finish
entering a PIN code.
4 Confirm the entry.
“Open...” flashes on the display.
6 Use the Bluetooth device to search and
connect.
On the device to be connected, enter the same
PIN code you have just entered for this unit.
“Connected (and device name)” appears on the
display.
Now connection is established and you can use the
device through the unit.
The device remains registered even after you
disconnect the device. Use “Connect“ (or activate
“Auto Connect”) to connect the same device from
next time on. (See the following and page 52.)
Connecting a device
Perform steps 1 – 3 on page 28, then...
1 • Select “Search” to search for available
devices.
The unit searches and displays the list of the
available devices.
If no available device is detected, “Device not
found” appears.
• Select “Special” to connect a special device.
The unit displays the list of the preset devices.
3 • For available devices...
1 Enter the specific PIN code of the device to
the unit.
Refer to the instructions supplied with the
device to check the PIN code.
2 Use the Bluetooth device to connect.
Now connection is established and you can
use the device through the unit.
• For special device...
Use “Open” or “Search” to connect.
Connecting/disconnecting/deleting a
registered device
1 Select “BT-PHONE” or “BT-AUDIO.”
2 Select a registered device you want to
connect/disconnect/delete.
3 Enter setting menu.
4 • Select “Connect” or “Disconnect” to
connect/disconnect the selected device.
ENGLISH
Continued on the next page
EXTERNAL DEVICES
29
Page 30
• Select “Delete,” then confirm the selection.
ENGLISH
You can set the unit to connect the Bluetooth device automatically when the unit is turned on. (See
“Auto Connect” on page 52.)
Using the Bluetooth cellular phone
1
2
3
When a call comes in....
The source is automatically changed to “BT-PHONE.”
When “Auto Answer” is activated....
The unit answers the incoming calls automatically, see
page 52.
• When “Auto Answer” is deactivated, press any
button (except /control dial) to answer the
incoming call.
Select “BT-PHONE.”
Enter Bluetooth menu.
Establish the connection with a device, then make a call (or settings
—
using the Bluetooth menu). (See pages 31 and 52.)
When a text message comes in....
If the cellular phone is compatible with Text Message
(notified through JVC Bluetooth adapter) and “Message
Info” is set to “Auto” (see page 52), the unit rings and
“Received Message” appears on the display to inform
you of the message arrival.
Press number button 3 to
select “No” or return to the
previous screen.
To end the call
Hold any button (except /control dial).
• You can adjust the microphone volume level (see
page 52).
30
Page 31

Making a call
You can make a call using one of the Dial Menu items.
• When is shown on the display, you can
move back to the previous screen by pressing number
button 3.
1 Select “BT-PHONE.”
2 Enter setting menu.
* Displayed only when your cellular phone is
equipped with these functions.
– If not displayed, try to transfer the phone book
memory of the cellular phone to this unit.
(Refer to the instruction manual supplied with
your cellular phone.)
– With some cellular phones, the phone book
memory is transferred automatically.
5 Select the name/phone number you want to
call.
ENGLISH
3 Select “Dial Menu.”
4 Select the method to make a call.
• Redial *: Shows the list of the phone numbers
you have dialed. Go to the following step.
• Received *: Shows the list of the received calls.
Go to the following step.
• Phonebook *: Shows the phone book of the
connected cellular phone. Go to the following
step.
• Missed *: Shows the list of the missed calls. Go
to the following step.
• Number: Shows the phone number entry
screen. See “How to enter phone number” on the
right column.
• Voice Dial (Only accessible when the connected
cellular phone has the voice recognition system):
Speak the name (registered words) you want to
call.
How to enter phone number
Select a number.
Move the entry position.
Confirm the entry.
Continued on the next page
EXTERNAL DEVICES
31
Page 32

Using voice command
1 “Say...” appears on the display.
2 Speak the name (registered words) you want
ENGLISH
to call.
• You can also use voice command from the Dial
Menu. Select “Voice Dial” from the Dial Menu.
• If your cellular phone does not support the voice
recognition system, “Error” appears on the
display.
2 Select a phone number.
You can also enter a new phone
number (see also “How to enter
phone number” on page 31) to store.
3 Select a preset number to store.
To call a preset number
While in Bluetooth phone....
Presetting the phone number
You can preset up to six phone numbers.
• When is shown on the display, you can
move back to the previous screen by pressing number
button 3.
1 Display the phone number you want to
preset by using one of the “Dial Menu” items.
Using the Bluetooth audio player
• Operations and display indications differ depending on their availability on the connected audio player.
Select “BT-AUDIO.”
If playback does not start automatically, operate the Bluetooth audio player to start playback.
• If playback does not pause when you change the source, operate the Bluetooth audio player to
pause playback.
32
Reverse skip/forward skip
Start/pause playback
Enter setting menu (Device list)
• Refer also to pages 29 and 30 for connecting/
disconnecting/deleting a registered device.
Bluetooth Information:
If you wish to receive more information about
Bluetooth, visit the following JVC web site: <http://
www.jvc-victor.co.jp/english/car/>.
Page 33

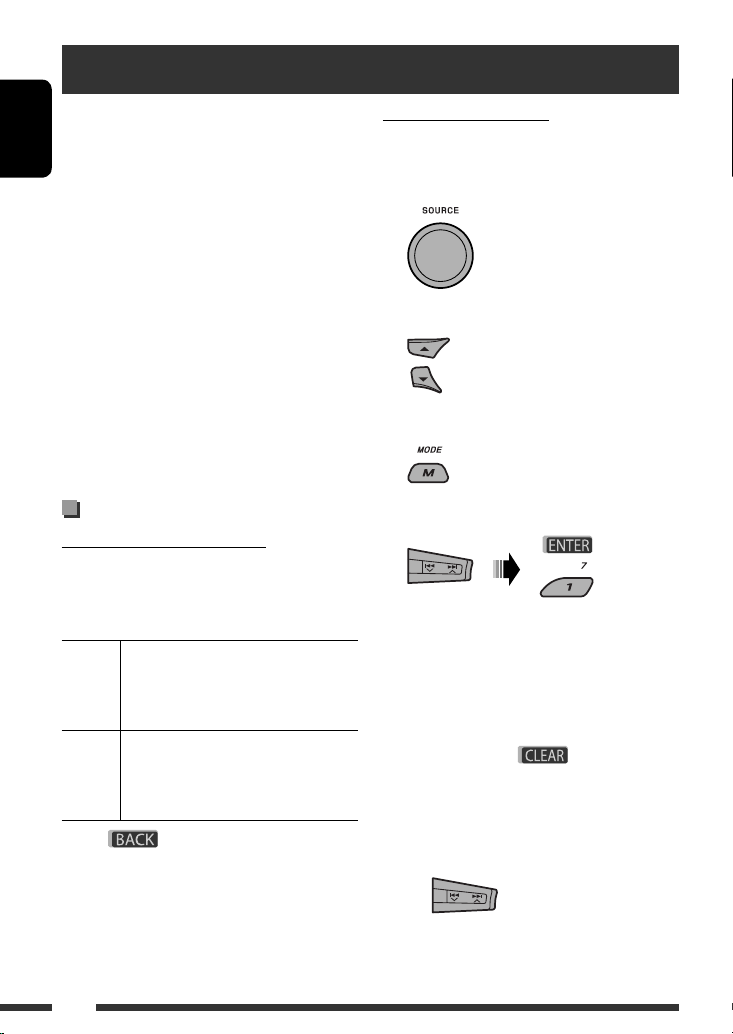
Listening to the CD changer
It is recommended to use a JVC MP3-compatible CD changer with your unit. You can connect a CD changer to the
CD changer jack on the rear of the unit.
• You can only play conventional CDs (including CD Text) and MP3 discs.
Preparation: Make sure “Changer” is selected for the external input setting, see page 47.
1
Select “CD-CH.”
ENGLISH
2
[Press] Select track
[Hold] Reverse/fast-forward track
MP3: Select folders
*
* By holding either one of the buttons, you can display
the Disc List (see page 19).
Select a disc to start playing.
[Press] For selecting disc number 1 – 6.
[Hold] For selecting disc number 7 – 12.
To select a disc/folder/track on the list
See “Selecting a folder/track on the list (only for MP3/
WMA/WAV file)” on page 19.
Select “Disc” in step 3 to display the Disc List of the CD
changer.
After pressing M MODE, press the following buttons to...
Skip 10 tracks
MP3: Within the same folder
Repeat Track:
Repeat current track
Repeat Folder:
MP3: Repeat all tracks of current
folder
Repeat Disc:
Repeat all tracks of the current disc
Random Folder:
MP3: Randomly play all tracks of
the current folder, then tracks of the
next folder
Random Disc:
Randomly play all tracks of current
disc
Random All:
Randomly play all tracks of the discs
in the magazine
• You can also cancel the playback mode by selecting
“Off” or press number button 4 (
).
EXTERNAL DEVICES
33
Page 34

Listening to the DAB tuner
Before operating, connect the JVC DAB tuner, KT-DB1000 (separately purchased) to the CD changer jack on the rear
of the unit.
ENGLISH
Preparation: Make sure “Changer” is selected for the external input setting, see page 47.
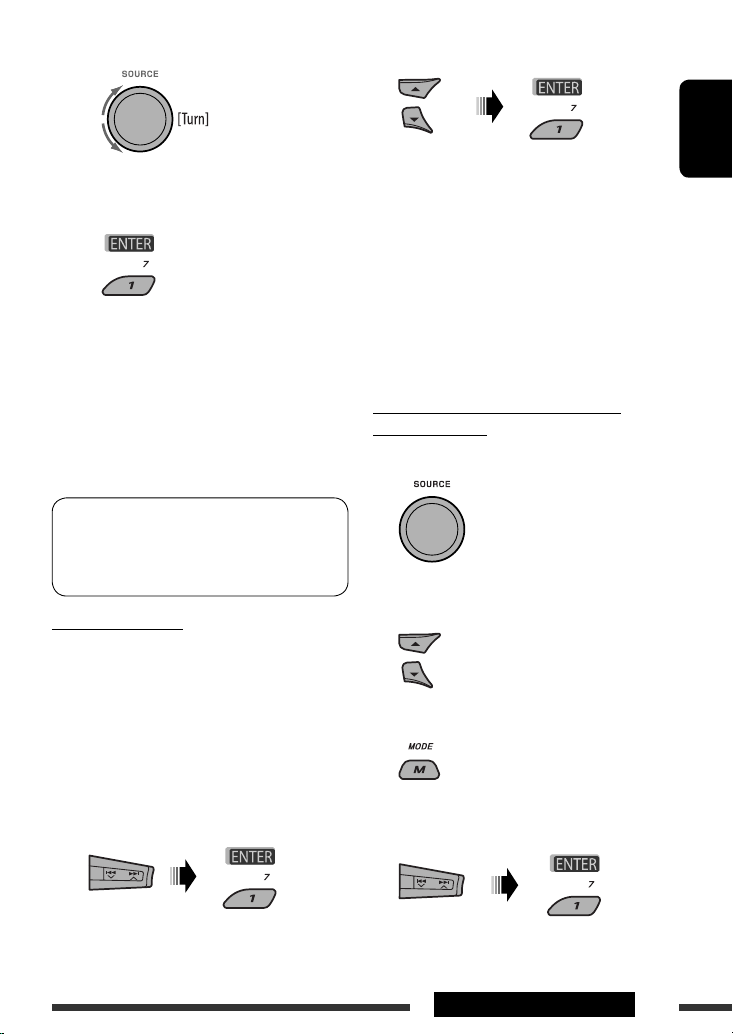
1
Select “DAB.”
2
3
4
Select the bands.
Searching for an ensemble.
Manual Search: Hold either one of the buttons until “M” flashes on the display, then press
it repeatedly.
Select a service (either primary or secondary) to listen to.
When surrounding sounds are
noisy
Some services provide Dynamic Range Control (DRC)
signals together with their regular programme signals.
DRC will reinforce the low level sounds to improve your
listening.
1
2
Select one of the DRC signals levels (1, 2, or
3).
• As the number increases, the effect becomes
stronger.
3 Exit from the setting.
appears on the display.
• will be highlighted only when receiving
DRC signals from the tuned service.
Storing DAB services in memory
You can preset six DAB services (primary) for each band.
• When appears on the display, you can
move back to the previous display by pressing
number button 3.
Ex.: Storing an ensemble (primary service) into the
preset number 4 of the DAB 1 band.
Using the number buttons
1
34
Page 35

2 Select an ensemble (primary service).
3 Preset number “P4” appears on
the display.
Using the Preset Service List
1 Follow steps 1 and 2 of “Using the number
buttons” on page 34 and above.
• By holding
appear (go to step 4).
5 / ∞, the Preset Service List will
2
3 Display the Preset Service List.
4 Select a preset number you want to store
into.
Listening to the preset service
using the Preset Service List
1 Display the Preset Service List, then select
the preset DAB service you want to listen to.
ENGLISH
2 Change to the selected DAB service.
Using the standby reception
You can use three types of Standby Reception.
• Road Traffic News Standby Reception—TA Standby
Reception
• Announcement Standby Reception
• PTY Standby Reception
Activating/deactivating TA/PTY Standby
Reception
• Operations are exactly the same as explained on
pages 14 and 15 for FM RDS stations.
• You cannot store PTY codes separately for the DAB
tuner and for the FM tuner.
Announcement Standby Reception
Announcement Standby Reception allows the
unit to switch temporarily to your favorite service
(announcement type).
• You can move to the lists of the other DAB bands
by pressing number button 5 ( ) or
6 ( ) repeatedly, but you cannot store
the selected service into these bands.
5 Store the service.
Preset number “P4” appears on
the display.
To activate the Announcement Standby
Reception and select the announcement type
1
2
Activating the Announcement Standby
Reception.
Display the currently selected announcement type.
Continued on the next page
EXTERNAL DEVICES
35
Page 36

3 Selecting an announcement type.
ENGLISH
4 Exit from the setting.
either lights up or flashes on the playback
display.
• If lights up, Announcement Standby
Reception is activated.
• If flashes, Announcement Standby
Reception is not yet activated.
To activate, tune in to another service providing
the related signals. will stop flashing and
remain lit.
• While receiving an FM RDS station:
When driving in an area where a DAB service is
broadcasting the same programme as the FM RDS
station is broadcasting, this unit automatically tunes
in to the DAB service.
When shipped from the factory, Alternative Frequency
Reception is activated.
To deactivate the Alternative Frequency
Reception, see page 47.
To show the Dynamic Label Segment (DLS)
information
While listening to an ensemble that supports DLS....
To deactivate the Announcement Standby
Reception
Select “Announce Off” in step 2 on page 35.
goes off.
Announcement types
Travel, Warning, News, Weather, Event, Special, Rad
Inf (Radio Information), Sports, Finance
Tracing the same programme—
Alternative Frequency Reception
(DAB AF)
You can keep listening to the same programme by
activating the Alternative Frequency Reception.
• While receiving a DAB service:
When driving in an area where a service cannot be
received, this unit automatically tunes in to another
ensemble or FM RDS station, broadcasting the same
programme.
36
Lights up when receiving a service providing Dynamic
Label Segment (DLS)—DAB radio text.
• The DLS display will be temporarily canceled
when you operate the unit.
Page 37

Listening to the iPod
You can connect an Apple iPod using the following cable or adapter:
To: Cable or adapter: Connect to:
Listen to the
music
Watch the video USB Audio and Video cable for iPod,
• You can control playback from the unit.
• Disconnecting the iPod will stop playback. Press SOURCE to listen to another playback source.
• For details, refer also to the manual supplied for your iPod.
• See also page 57.
Caution:
• Avoid using the iPod if it might hinder your safety while driving.
• Make sure all important data has been backed up to avoid losing the data.
When connecting with the USB cable
Connect using USB 2.0 cable (supplied for iPod): Connect using USB Audio and Video cable for
USB 2.0 cable (supplied for the iPod) USB input jack on the control panel
Interface adapter for iPod, KS-PD100
(not supplied)
KS-U19 (not supplied)
CD changer jack on the rear of the unit
Preparation: Make sure “Changer” is selected for
the external input setting, see page 47.
USB input jack and AV-IN input jack on the control
panel
• Turn on the monitor to watch the video.
iPod, KS-U19 (not supplied):
AV-IN input jack
USB input jack
ENGLISH
USB input jack
USB cable supplied
for your iPod
Playback starts automatically from where it had been paused previously.*
* Not applicable for video files.
KS-U19 (not supplied)
Continued on the next page
EXTERNAL DEVICES
37
Page 38

[Press] Go to the next or previous
track
[Hold] Fast-forward or reverse the
track during playback
ENGLISH
[Hold] Enter main menu
[Press] Pause/resume playback.
Selecting a track from the menu
1 Enter the main menu.
2 Select the desired menu.
Operations using the control
screen
• These operations are possible on the monitor using
the remote controller.
• Connect your iPod to the USB input jack on the
control panel using the USB cable supplied for your
iPod, or KS-U19 for watching video file.
1 Turn on the monitor.
3 Confirm the selection.
• By holding ¢ , you can start play back the
selected item directly.
• By holding 4 , you can exit from the menu.
• By holding 5/∞, you can fast skip in every layer of
the main menu.
Menu items:
For Music:
“Playlists,” “Artists,” “Albums,” “Songs,” “Podcasts,”
“Genres,” “Composers,” or “Audiobooks”
For Videos:
“Video Playlists,” “Movies,” “Music Videos,” “TV Shows,”
or “Video Podcasts”
• If a track is selected, playback starts automatically.
• If the selected item has another layer, you will enter
the layer. Repeat steps 2 and 3 until the desired track
is played.
38
Control screen appears on the monitor.
1 Current category number/total category
number
2 Category list with the current category
selected
3 Elapsed playing time of the current track
4 Operation mode icon ( 3, 7, 8, ¡, 1 )
5 Current track number/total number of tracks
in the current category
6 Track information
7 Track list with the current track selected
2 Select the desired item.
If the selected item has another layer, you will
enter the layer. Repeat this step until the desired
track is played.
Page 39

To select a track from Search Mode
1 Enter Search Mode menu.
or
To select a playback mode/change the speed
of the Audiobooks
1 While control screen is displayed...
ENGLISH
Playback mode selection screen appears on the
category list section of the control screen.
2 Select an item.
2 Select a menu item.
• Selecting Shuffle Songs starts playback.
3 Select a search mode category, then the desired
track.
Search modes category:
For Music:
“Playlists,” “Artists,” “Albums,” “Songs,” “Podcasts,”
“Genres,” “Composers,” or “Audiobooks”
For Videos:
“Video Playlists,” “Movies,” “Music Videos,”
“TV Shows,” or “Video Podcasts”
• Available Search Modes depend on the type of your
iPod.
• To return to the previous search mode screen,
press MENU.
• To return to the control screen, press RETURN.
3 Select a playback mode/speed.
REPEAT:
RANDOM:
AUDIO BOOK:
REPEAT ONE Same as “Repeat One.”
REPEAT ALL Same as “Repeat All.”
RANDOM
ALBUMS*
RANDOM
SONGS:
NORMAL Plays at normal speed.
FASTER Plays faster.
SLOWER Plays slower.
* Functions only if you select “All Albums” or “All” in
“Albums” of the main “MENU.”
Same as “Shuffle Albums.”
Same as “Shuffle Songs.”
Continued on the next page
EXTERNAL DEVICES
39
Page 40

4 Confirm the selection.
• You can also change the settings from the PSM
(Preferred Setting Mode) items. See “AudioBooks” on
page 47.
ENGLISH
When connecting with the
interface adapter
CD changer jack
Selecting a track from the menu
1 Enter the main menu.
2 Select the desired menu.
Playlists
Ô Artists Ô Albums Ô Songs Ô
Genres Ô Composers
3 Confirm the selection.
• By holding 4 /¢ , you can fast skip
during song search in the main menu.
• If a track is selected, playback starts automatically.
• If the selected item has another layer, you will enter
the layer. Repeat steps 2 and 3 until the desired track
is played.
Playback starts automatically from where it had been
paused previously.
• If an iPod has been connected, press SOURCE to select
“iPod” to listen to music.
[Press] Go to the next or previous
track
[Hold] Fast-forward or reverse the
track during playback
[Press] Enter main menu when you
press 5. Pause/resume
playback when ∞ is pressed.
40
Selecting the playback modes
After pressing M MODE, press the following buttons
to...
Repeat One:
Same as “Repeat One.”
Repeat All:
Same as “Repeat All.”
Repeat Off:
Cancels.
1
*
1
Not applicable for video files.
*
*2 Functions only if you select “All Albums” or “All” in
“Albums” of the main “MENU.”
Random Album *2:
Same as “Shuffle Albums.”
Random Song:
Same as “Shuffle Songs.”
Random Off:
Cancels.
Page 41

The menu selecting mode will be canceled:
• If no operations are performed for about:
– 5 seconds for iPod connected through KS-PD100.
– 15 seconds for iPod connected to the USB input
jack.
• When you confirm the selection of a track.
Listening to the other external components
You can connect an external component to:
• CD changer jack on the rear of this unit using the following adapters:
– Line Input Adapter, KS-U57
– AUX Input Adapter, KS-U58
Preparation: Make sure “Ext In” is selected for the external input setting, see page 47.
• AV-IN (video) input jack on the control panel.
Preparation: Make sure to connect and turn on the monitor to watch the playback picture. If the parking brake
is not engaged, “Parking Brake” appears on the display and no playback video on the monitor. For connection, see
Installation/Connection Manual (separate volume).
• LINE IN terminals on the rear of this unit.
1
Select “EXT IN,” “LINE IN,” or “AV IN.”
ENGLISH
2
—
3
4
—
Turn on the connected component and start playing the source.
Adjust the volume.
Adjust the sound as you want (see pages 43 and 44).
Continued on the next page
EXTERNAL DEVICES
41
Page 42

Connecting an external component to the AV-IN input jack
ENGLISH
AV mini plug cable (supplied)
* Portable Video/Audio player of this pin-allocation can be connected:
1234
Audio (R) GND Video Audio (L) Camcorder
Video GND Audio (R) Audio (L) iPod, etc.
GND Audio (R) Audio (L) AUX
Portable Video/Audio
player *
42
EXTERNAL DEVICES
Page 43

Selecting a preset sound mode
You can select a preset sound mode suitable to the music genre (iEQ: intelligent equalizer).
1
2
Enter the setting menu.
Select “EQ.”
ENGLISH
3
4
Adjusting the sound
You can adjust the sound characteristics to your
preference.
• When
move back to the previous screen by pressing number
button 3 or 6.
1
2
• For “EQ” setting, see above.
3 Adjust the selected setting item.
A Fad/Bal (Fader/Balance)
1 Press number button 1 ( )
2 Adjust the speaker output balance by
5 / ∞: between the front and rear
is shown on the display, you can
to move to the “Fad/Bal” adjustment
display.
pressing:
speakers. [F6 to R6]
Select “On.”
• If “Bypass” is selected, you can listen to the original
sound mode recorded. lights up on the
display.
Select a preset sound mode.
4 /¢ : between the left and
right speakers. [L6 to R6]
B Subwoofer
1 Press number button 1 ( ) to
move to the “Subwoofer” adjustment
display.
2 Use 4 /¢ to select a cutoff
frequency to the subwoofer.
• Off *: All signals are sent to the
subwoofer.
• 55Hz: Frequencies higher than 55 Hz
are cut off.
• 85Hz: Frequencies higher than 85 Hz
are cut off.
• 120Hz: Frequencies higher than 120 Hz
are cut off.
3 Turn the control dial to adjust the
subwoofer output level. [0 to 8]
4 Press number button 1 ( ) to
move to another setting level.
4 /¢ : select the quality of
LPF. [–12dB/oct or –24dB/oct]
Control dial: Turn the control dial to select
the subwoofer phase. [0deg (normal) or
180deg (reverse)]
Continued on the next page
43SETTINGS
Page 44

* If “Off” is selected in step 2, you can only
adjust the subwoofer phase.
C Hi Pass (Hi Pass Filter)
Turn the control dial to select the cutoff
frequency to the front/rear speakers. Set this
ENGLISH
to match the LPF setting.
• Off: All signals are sent to the front/rear
speakers.
• 62Hz: Frequencies lower than 62 Hz are
cut off.
• 95Hz: Frequencies lower than 95 Hz are
cut off.
• 135Hz: Frequencies lower than 135 Hz are
cut off.
D VolAdjust, [–5 to +5]
Turn the control dial to adjust the input level
of each source (except FM).
Adjust to match the input level of the FM
sound level.
• Before making an adjustment, select the
source you want to adjust.
E Loudness, [Off or On]
Turn the control dial to select “Off” or
“On.” When “On” is selected, low and high
frequencies sound are boosted to produce a
well-balanced sound at low volume level.
4 Exit from the setting.
3 Select a frequency range to adjust.
4 Adjust the sound elements of the selected
frequency range.
1 Press 4 /¢ to select the
frequency band, then press 5 / ∞ to
enhanced level for the selected frequency
band. [–6 to +6]
2 Press number button 5 ( ), then turn
the control dial to select the frequency.
3 Press number button 5 ( ), then turn
the control dial to select the quality slope (Q).
5 Repeat steps 3 and 4 to adjust the other
frequency bands.
6 Store the adjustments.
Storing your own sound modes
You can adjust the sound modes and store your own
adjustments in memory.
• When is shown on the display, you can
move back to the previous screen by pressing number
button 6.
1
2 Select a sound mode.
44
Preset value setting for each sound mode
Preset value
Sound
mode
USER 00000
ROCK +3 +2 0 +1 +1
CLASSIC +2 +2 0 +1 0
POPS 0 +1 0 +1 +2
HIP HOP +4 +1 –2 0 +1
JAZZ +3 +2 +1 +2 +2
Band 1
(100 Hz)
Band 2
Band 3
(320 Hz)
(1 kHz)
Band 4
(3.2 kHz)
Band 5
(10 kHz)
Page 45

General settings — PSM
You can change PSM (Preferred Setting Mode) items
listed in the table below and on pages 46 – 48.
4 Adjust the selected PSM item.
1 Enter the PSM settings.
2 Select a PSM category.
5 Repeat steps 2 – 4 to adjust other PSM items
if necessary.
6 Finish the procedure.
To display the rest
3 Select a PSM item.
By pressing either one of the buttons repeatedly,
you can also move to the item of the other
categories.
Category Indication Item
( : Initial)
Demo
Display
demonstration
LevelMeter
MOV (movie)
Audio level meter
Clock Disp *
Clock display
CLOCK
1
If the power supply is not interrupted by turning off the ignition key of your car, it is recommended to select “Off” to
*
save the car’s battery.
• On
• Off
• Meter 1
• Meter 2
1
• On
• Off
Setting, [reference page]
: Display demonstration will be activated automatically if no
operation is done for about 20 seconds, [7].
: Cancels.
: Select the different level meter patterns.
• Press DISP to show the selected level meter.
: Clock time is shown on the display when the power is
turned off.
: Cancels; pressing DISP will show the clock time for about
5 seconds when the power is turned off, [7].
ENGLISH
Continued on the next page
45SETTINGS
Page 46

Category Indication Item
Setting, [reference page]
( : Initial)
Clock Hr
Hour adjustment
ENGLISH
Clock Min
0 – 23
: Initial: 0 (0:00AM), [7].
(1 – 12AM/
1 – 12PM)
00 – 59 : Initial: 00 (0:00AM), [7].
Minute adjustment
CLOCK
24H/12H
Time display mode
Clock Adj
Clock adjustment
2
Scroll *
Scroll
• 12Hours
• 24Hours
• Auto
• Off
• Once
: See also page 7 for setting.
: The built-in clock is automatically adjusted using the CT
(clock time) data in the RDS signal.
: Cancels.
: For track information: scrolls the track information only
once.
For DAB text: scrolls the detailed DAB text.
• Auto
: For track information: repeats the scroll (in 5-second
intervals).
For DAB text: scrolls the detailed DAB text.
• Off
: For track information: cancels.
For DAB text: shows only headline if any.
• Pressing DISP for more than one second can scroll the
display regardless of the setting.
Dimmer
Dimmer
DISP (display)
From – To *
Contrast
Contrast
LCD Type
Display type
3
• Auto
• Off
• On
• Time Set
—
1 – 8
Initial: 5
• Auto
: Dims the display when you turn on the headlights.
: Cancels.
: Dims the display and button illumination.
: Set the timer for dimmer, [48].
Any hour – Any hour
: Initial: 18 – 7
: Adjust the display contrast to make the display indications
clear and legible.
: Positive pattern will be selected during the day time *
while negative pattern will be used during the night
time *4.
Tag
Tag display
• Positive
• Negative
• On
• Off
: Positive pattern of the display.
: Negative pattern of the display.
: Shows the tag while playing MP3/WMA/WAV tracks.
: Cancels.
*2 Some characters or symbols will not be shown correctly (or will be blanked) on the display.
*3 Adjustable only when “Dimmer” is set to “Time Set.”
*4 Depends on the “Dimmer” setting.
4
;
46
Page 47

Category Indication Item
Setting, [reference page]
( : Initial)
AF-Regn‘l
Alternative
frequency/
regionalization
reception
• AF
• AF REG
: When the currently received signals become weak, the unit
switches to another station or service (the programme may
differ from the one currently received), [15].
: When the currently received signals become weak, the
unit switches to another station broadcasting the same
programme.
TA Vol
Traffic
announcement
volume
TUNER
P-Search
Programme search
IF Band
Intermediate
frequency band
• Off
Volume 0
– Volume 30
(or Volume 0 –
Volume 50)*
• On
• Off
• Auto
• Wide
: Cancels (not selectable when “DAB AF” is set to “On”).
: Initial: Volume 15
5
: Activates Programme Search, [15].
: Cancels.
: Increases the tuner selectivity to reduce interference noises
between adjacent stations. (Stereo effect may be lost.)
: Subject to interference noises from adjacent stations, but
sound quality will not be degraded and the stereo effect
will remain.
6
DAB AF *
Alternative
frequency reception
Ext Input *
External input
Telephone
Telephone muting
AUDIO
AudioBooks *
Speed control of
“Audiobook”
5
Depends on the amplifier gain control.
*
7
8
• On
• Off
• Changer
• Ext In
• Muting 1/
Muting 2
• Off
• Normal
• Faster
• Slower
: Traces the programme among DAB services and FM RDS
stations, [36].
: Cancels.
: To use a JVC CD changer, [33], JVC DAB tuner, [34], or an
Apple iPod, [37].
: To use any other external component, [41].
: Select either one which mutes the sounds while using a
cellular phone.
: Cancels.
: You can select the playback speed of the “Audiobook”
sound file in your iPod.
• Initial selected item depends on your iPod setting.
*6 Displayed only when DAB tuner is connected.
*7 Displayed only when one of the following sources is selected—TUNER, DAB, DISC, USB, LINE IN, AV IN, or Bluetooth.
*8 Displayed only when an iPod is connected to the USB input jack and playback is controlled from the unit.
ENGLISH
Continued on the next page
47SETTINGS
Page 48

Category Indication Item
( : Initial)
Amp Gain
Amplifier gain
ENGLISH
9
*
*10 Depends on the “Dimmer” setting.
control
AUDIO
Rear Spk *
Rear speaker output
Color Sel
Color selection
Color Set
Color setting
COLOR
Red
Green
Blue
Key Illum
Illumination switch
Displayed only when Dual Zone is activated (see page 27).
• High PWR
• Low PWR
9
• On
• Off
Initial: All
Source;
Color: Pale
—
Day Color
NightColor
00 — 11
00 — 11
00 — 11
• Red
• Green
Setting, [reference page]
: Volume 00 – Volume 50
: Volume 00 – Volume 30 (Select if the maximum power of each
speaker is less than 50 W to prevent damaging the speaker.)
: Select this to turn on the rear speaker output.
: Cancels.
: Select your favorite display color for each source (or for all
sources), [48, 49].
: Create your own colors, and select them for the display color,
[49].
: User color during the day time *
: User color during the night time *10.
: Initial: Day Color: 07, NightColor: 05
: Initial: Day Color: 07, NightColor: 05
: Initial: Day Color: 07, NightColor: 05
: You can select some of the buttons illumination according to
your preference.
10
.
Setting the time for dimmer
• When is shown on the display, you can
move back to the previous screen by pressing number
button 3.
1 Follow steps 1 to 3 on page 45.
• In step 2, select “DISP.”
• In step 3, select “Dimmer.”
2 Select “Time Set.”
48
3 Adjust the dimmer start time.
1 Turn the control dial to set the dimmer start
time.
2 Press ¢ to select “To.” Then, turn the
control dial to set the dimmer end time.
4 Exit from the setting.
Changing the display color
You can select your favorite display color for each source
(or all sources).
• When is shown on the display, you can
move back to the previous screen by pressing number
button 3 or 6.
Page 49

Setting the display color
1 Follow steps 1 to 3 on page 45.
• In step 2, select “COLOR.”
• In step 3, select “Color Sel.”
2
3 Select a source.
All Source *1 Ô DISC Ô Changer *3 (or
Ext In*2) Ô Line In Ô USB Ô FM Ô AM
3
Ô DAB *
Audio *
*
*2 Depends on the “Ext Input” setting, see page 47.
*3 Displayed only when the target component is
Ô iPod *3 Ô BT Phone *3 Ô BT
3
Ô AV In Ô (back to the beginning)
1
When you select “All Source,” you can use the
same color for all the sources.
connected.
4 Select a color.
5 Repeat steps 3 and 4 to select the color for
each source (except when selecting “All
Source” in step 3).
6 Exit from the setting.
Creating your own color—User Color
You can create your own colors—“Day Color” or
“NightColor.”
1 Follow steps 1 to 3 on page 45.
• In step 2, select “COLOR.”
• In step 3, select “Color Set.”
2 Select “Day Color” or “NightColor.”
3 Select a primary color.
4 Adjust the level (00 to 11) of the selected
primary color.
ENGLISH
Pale Ô Aqua Ô Sky Ô Sea Ô Leaves
Ô Grass Ô Apple Ô Rose Ô Amber Ô
Honey
Ô Violet Ô Grape Ô Every *
User *5 Ô (back to the beginning)
4
The color changes every 2 seconds.
*
*5 The user-edited colors—“Day Color” and
“NightColor” will be applied (see the right
column for details).
4
Ô
5 Repeat steps 3 and 4 to adjust other primary
colors.
6 Exit from the setting.
49SETTINGS
Page 50

Disc setup menu
These operations are possible on the monitor using the remote controller.
1 Enter the disc setup menu while stop.
ENGLISH
2 Select a menu.
3 Select an item you want to set up.
• To cancel pop-up menu, press RETURN.
4 Select an option.
Menu Item Setting
MENU
LANGUAGE
AUDIO
LANGUAGE
SUBTITLE Select the initial subtitle language or remove the subtitle (OFF). Refer also to
LANGUAGE
ON SCREEN
LANGUAGE
MONITOR TYPE Select the monitor type to watch a wide screen picture on your monitor.
PICTURE
Select the initial disc menu language. Refer also to “Language codes” on page 60.
Select the initial audio language. Refer also to “Language codes” on page 60.
“Language codes” on page 60.
Select the language for the on screen display.
To return to normal screen
50
Page 51

Menu Item Setting
OSD POSITION Select the on-screen bar position on the monitor.
PICTURE
DIGITAL AUDIO
OUTPUT
DOWN MIX When playing back a multi-channel disc, this setting affects the signals reproduced
AUDIO
D. RANGE
COMPRESSION
DivX
REGISTRATION
FILE TYPE (DISC) Select playback file type when a disc contains different types of files.
OTHER
FILE TYPE (USB) Select playback file type when a USB contains different types of files.
• 1 : Higher position
• 2 : Lower position (Guidance below the disc setup menu will disappear.)
Select the signal format to be emitted through the DIGITAL OUT (Optical) terminal.
• OFF : Cancels.
• PCM ONLY : Select for an amplifier or a decoder incompatible
with Dolby Digital, DTS, MPEG Audio, or when
connecting to a recording device.
• DOLBY DIGITAL/PCM : Select for an amplifier or a decoder compatible
with Dolby Digital.
• STREAM/PCM : Select for an amplifier or a decoder compatible
with Dolby Digital, DTS, and MPEG Audio.
through the LINE OUT jacks (and through the DIGITAL OUT terminal when “PCM
ONLY” is selected for “DIGITAL AUDIO OUTPUT”).
• SURROUND COMPATIBLE : Select to enjoy multi-channel surround audio by
connecting an amplifier compatible with Dolby
Surround.
• STEREO : Normally select this.
You can enjoy a powerful sound at low or middle volume levels while playing a
Dolby Digital software.
• AUTO : Select to apply the effect to multi-channel
encoded software (excluding 1-channel and
2-channel software).
• ON : Select to always use this function.
This unit has its own Registration Code. Once you have played back a disc in which
the Registration Code recorded, this unit’s Registration Code is overwritten for
copyright protection.
• AUDIO : Play MP3/WMA/WAV files.
• VIDEO : Play DivX/MPEG Video files.
• AUDIO + VIDEO : Play MP3/WMA/WAV/DivX/MPEG Video files.
• AUDIO : Play MP3/WMA/WAV files.
• VIDEO : Play DivX/MPEG Video files.
• AUDIO + VIDEO : Play MP3/WMA/WAV/DivX/MPEG Video files.
ENGLISH
51SETTINGS
Page 52

Bluetooth settings
You can change the settings listed on the right column
according to your preference.
• When
ENGLISH
move back to the previous screen by pressing number
button 3.
is shown on the display, you can
1 Select “BT-PHONE” or “BT-AUDIO.”
2 Enter the Bluetooth menu.
3 Select “Setting.”
4 Select a setting item.
*1 Displayed only when a Bluetooth phone is
connected.
*2 Appears only when a Bluetooth phone is
connected and it is compatible with text message
(notified through JVC Bluetooth adapter).
*3 Bluetooth Audio: Shows only “Version.”
Setting menu ( : Initial)
Auto Connect
When the unit is turned on, the connection is
established automatically with...
Off: No Bluetooth device.
Last: The last connected Bluetooth device.
Order: The available registered Bluetooth device
found at first.
Auto Answer
Only for the device being connected for “BT-PHONE.”
On: The unit answers the incoming calls
automatically.
Off: The unit does not answer the calls
automatically. Answer the calls manually.
Reject: The unit rejects all incoming calls.
Message Info
Only for the device being connected for “BT-PHONE.”
Auto: The unit informs you of the arrival of
a message by ringing and displaying
“Received Message.”
Manual: The unit does not inform you of the arrival of
a message.
MIC setting (microphone setting)
Only for the device being connected for “BT-PHONE.”
Adjust the built-in microphone volume,
[LEVEL 01/02/03].
Version
The Bluetooth software and hardware versions are
shown.
5 Change the setting accordingly.
52 SETTINGS
Page 53

Maintenance
How to clean the connectors
Frequent detachment will deteriorate the connectors.
To minimize this possibility, periodically wipe the
connectors with a cotton swab or cloth moistened with
alcohol, being careful not to damage the connectors.
Connectors
Moisture condensation
Moisture may condense on the lens inside the unit in
the following cases:
• After starting the heater in the car.
• If it becomes very humid inside the car.
Should this occur, the unit may malfunction. In this
case, eject the disc and leave the unit turned on for a
few hours until the moisture has evaporated.
How to handle discs
When removing a disc from its case,
press down the center holder of the
case and lift the disc out, holding it by
the edges.
• Always hold the disc by the edges. Do not touch its
recording surface.
When storing a disc in its case, gently insert the
disc around the center holder (with the printed surface
facing up).
• Make sure to store discs in cases after use.
Center holder
To keep discs clean
A dirty disc may not play correctly.
If a disc does become dirty, wipe it with
a soft cloth in a straight line from center
to edge.
• Do not use any solvents (for example, conventional
record cleaner, spray, thinner, benzine, etc.) to clean
discs.
To play new discs
New discs may have some rough spots
around the inner and outer edges. If
such a disc is used, this unit may reject
the disc.
To remove these rough spots, rub the edges with a
pencil or ball-point pen, etc.
Do not use the following discs:
Single CD (8 cm disc)
Sticker and
sticker residue
Unusual shape
Warped disc
Stick-on label
C-thru Disc (semi-
transparent disc)
ENGLISH
Transparent or semi-transparent
parts on its recording area
53REFERENCES
Page 54

More about this unit
Basic operations
Turning on the power
ENGLISH
• By pressing SOURCE on the unit, you can also turn on
the power. If the source is ready, playback also starts.
Turning off the power
• If you turn off the power while listening to a track,
playback will start from where it had been stopped
previously next time you turn on the power.
General
• If you change the source while listening to a disc,
playback stops.
Next time you select “DISC” as the playback source,
playback will start from where it had been stopped
previously.
• After ejecting a disc or removing a USB device,
“No Disc” or “No USB” appears and you cannot
operate some of the buttons. Insert another disc,
reattach a USB device, or press SOURCE to select
another playback source.
Tuner operations
Storing stations in memory
• During SSM search...
– All previously stored stations are erased and the
stations are stored anew.
– Received stations are preset in No. 1 (lowest
frequency) to No. 6 (highest frequency).
– When SSM is over, the station stored in No. 1 will
be automatically tuned in.
• When storing a station manually, the previously
preset station is erased when a new station is stored
in the same preset number.
FM RDS operations
• Network-Tracking Reception requires two types of
RDS signals—PI (Programme Identification) and AF
(Alternative Frequency) to work correctly. Without
receiving these data correctly, Network-Tracking
Reception will not operate correctly.
• If a Traffic Announcement is received by TA Standby
Reception, the volume level automatically changes to
the preset level (TA Vol) if the current level is lower
than the preset level.
• When Alternative Frequency Reception is activated
(with AF selected), Network-Tracking Reception is
also activated automatically. On the other hand,
Network-Tracking Reception cannot be deactivated
without deactivating Alternative Frequency
Reception. (See pages 15 and 36.)
• TA Standby Reception and PTY Standby Reception
will be temporarily canceled while listening to an AM
station.
• If you want to know more about RDS, visit
<http://www.rds.org.uk>.
Disc operations
General
• In this manual, words “track” and “file” are
interchangeably used.
• This unit can only play back audio CD (CD-DA) files if
different type of files are recorded in the same disc.
Inserting a disc
• When a disc is inserted upside down, “Please Eject”
appears on the display. Press OPEN, then 0 to eject
the disc.
Ejecting a disc
• If the ejected disc is not removed within 15 seconds,
the disc is automatically inserted again into the
loading slot to protect it from dust. Playback starts
automatically.
54
Page 55

• After ejecting a disc, “NO DISC” appears and you
cannot operate some of the buttons. Insert another
disc or press SOURCE to select another playback
source.
Playing Recordable/Rewritable discs
• This unit can recognize a total of 5 000 files and 250
folders (a maximum of 999 files per folder).
• This unit can recognize a total 25 characters for file/
folder names.
• Use only “finalized” discs.
• This unit can play back multi-session discs; however,
unclosed sessions will be skipped while playing.
• This unit may be unable to play back some discs
or files due to their characteristics or recording
conditions.
• Rewritable discs may require a longer readout time.
Playing DVD-VR files
• For details about DVD-VR format and playlist, refer
to the instructions supplied with the recording
equipment.
Playing MP3/WMA/WAV files
• The maximum number of characters for folder and
file names is 25 characters; 128 characters for MP3/
WAV and 64 characters for WMA tag information.
• This unit can play back files with the extension code
<.mp3>, <.wma>, or <.wav> (regardless of the
letter case—upper/lower).
• This unit can show the names of albums, artists
(performer), and Tag (Version 1.0, 1.1, 2.2, 2.3, or
2.4) for the MP3/WMA/WAV files.
• This unit can display only one-byte characters. No
other characters can be correctly displayed.
• This unit can play back files recorded in VBR (variable
bit rate).
Files recorded in VBR have a discrepancy in elapsed
time indication.
• This unit cannot play back the following files:
– MP3 files encoded with MP3i and MP3 PRO format.
– MP3 files encoded with Layer 1/2.
– WMA files encoded with lossless, professional, and
voice format.
– WMA files which are not based upon Windows
Media® Audio.
– WMA files copy-protected with DRM.
– Files which have the data such as ATRAC3, etc.
– AAC files and OGG files.
ENGLISH
Playing DivX files
• This unit can play back DivX files with the extension
code <.divx>, <.div>, <.avi> (regardless of the
letter case—upper/lower).
• This unit supports DivX Media Format files, <.divx>
or <.avi>.
• This unit can display a unique registration code—
DivX Video-on-Demand (VOD—a kind of Digital
Rights Management). For activation and more
details, visit <www.divx.com/vod>.
• Audio stream should conform to MP3 or Dolby
Digital.
• This unit does not support GMC (Global Motion
Compression).
• The file encoded in the interlaced scanning mode
may not be played back correctly.
• This unit cannot play back the following files:
– Files encoded in Codec (Compressor-decompressor)
other than DivX Codec.
• The maximum bit rate for video signals (average) is
4 Mbps.
• If you want to know more about DivX, visit
<http://www.divx.com>.
Playing MPEG Video files
• This unit can play back MPEG Video files with the
extension code <.mpg>, <.mpeg>, or <.mod>*.
* <.mod> is an extension code used for the MPEG-2 files
recorded by JVC Everio camcorders.
• Audio stream should conform to MPEG1 Audio
Layer 2.
• This unit cannot playback the following files:
– WMV (Windows Media Video) files
– RM (Real Media) format files
• The maximum bit rate for video signals (average) is
4 Mbps.
Continued on the next page
55REFERENCES
Page 56

Changing the source
• If you change the source, playback also stops
(without ejecting the disc).
Next time you select “DISC” for the playback source,
disc play starts from where it has been stopped
ENGLISH
previously.
USB operations
• Connecting a USB device automatically changes the
source to “USB.”
• While playing from a USB device, the playback order
may differ from the one from other players.
• This unit may be unable to play back some USB
devices or some files due to their characteristics or
recording conditions.
• Depending on the shape of the USB devices and
connection ports, some USB devices may not be
attached properly or the connection might be loose.
• When connecting a USB mass storage class device,
refer also to its instructions.
• Connect one USB mass storage class device to the unit
at a time. Do not use a USB hub.
• This unit is compatible with the USB Full-Speed.
• If the connected USB device does not have the correct
files, “No File” appears.
• This unit can play back MP3 files recorded in VBR
(variable bit rate).
• The maximum number of characters for folder and
file names is 25 characters; 128 characters for MP3/
WAV and 64 characters for WMA Tag information.
• This unit can recognize a total of 5 000 files and 250
folders (999 files per folder).
• The unit cannot recognize a USB mass storage class
device whose rating is other than 5 V and exceeds
500 mA.
• USB devices equipped with special functions such as
data security functions cannot be used with the unit.
• Do not use a USB device with 2 or more partitions.
• This unit may not recognized a USB device connected
through a USB card reader.
• This unit may not play back files in a USB device
properly when using a USB extension cord.
• This unit cannot assure proper functions or supply
power to all types of USB devices.
• For MPEG1/2 files: The maximum bit rate for video
signals (average) is 2 Mbps.
Bluetooth operations
General
• While driving, do not perform complicated operation
such as dialing the numbers, using phone book, etc.
Stop your car in a safe place before you perform these
operations.
• Some Bluetooth devices may not be connected to
this unit depending on the Bluetooth version of the
device.
• This unit may not work for some Bluetooth devices.
• Connecting condition may vary depending on the
circumstances around you.
• When the unit is turned off, the device is
disconnected.
appears when the connection is established.
Appears when the Bluetooth phone is
connected.
Appears when the Bluetooth audio player
is connected.
Appears when the Bluetooth phone and
Bluetooth audio player are connected.
Icons for phone types
These icons indicate the phone type set on the device:
: Cellular phone : General
: Household phone
: Office
Warning messages for Bluetooth operations
• Connection Error:
The device is registered but the connection has failed.
Use “Connect” to connect the device again. (See
page 29.)
: Other than above
: Unknown
56
Page 57

• Error
Try the operation again. If “Error” appears again,
check if the device supports the function you have
tried.
• Device not found
No available Bluetooth device is detected by
“Search...”.
• Loading...
The unit is updating the phone book and/or text
messages.
• Please Wait...
The unit is preparing to use the Bluetooth function. If
the message does not disappear, turn off and turn on
the unit, then connect the device again (or reset the
unit).
• Reset 08
Check the connection between the adapter and this
unit.
DAB
• PTY Standby Reception works for the DAB tuner only
using a Dynamic PTY, but not a Static PTY.
• Only the primary DAB service can be preset even
when you store a secondary service.
• A previously preset DAB service is erased when a new
DAB service is stored in the same preset number.
iPod
• Controllable iPod (connected through....):
(A) KS-PD100:
– iPod with dock connector (3rd Generation)
– iPod with click wheel (4th Generation)
– iPod nano (1st & 2nd *1 Generation)
– iPod mini (1st Generation)
– iPod video (5th Generation) *
– iPod photo
(B) USB input jack:
– iPod nano (1st & 2nd Generation)
– iPod video (5th Generation) *
*1 When you connect the iPod nano to the interface
adapter, be sure to disconnect the headphones;
otherwise, no sound is heard.
2
3
*2 It is not possible to browse video files on the “Videos”
menu while the iPod is connected to the interface
adapter.
*3 To watch the video with its audio, connect the iPod
using the USB Audio and Video cable (not supplied).
• Update your iPod to the latest software version
before using it with this unit.
– You can check the software version of your iPod
under “About” in the “Setting” menu of the iPod.
– For details about updating your iPod, visit
<http://www.apple.com>.
• While the unit is being turned on, the iPod is charged
through this unit.
• iPod shuffle and iPhone cannot be used with this
unit.
• You can control the iPod from this unit when “JVC” or
” appears on the iPod display after connection.
“
• The song order displayed on the selection menu of
this unit may differ from that of the iPod.
• If playback is stopped, select a track from the
selection menu or press
the same track again.
• The text information may not be displayed correctly:
– Some characters such as accented letters cannot be
shown correctly on the display.
– Depends on the condition of communication
between the iPod and the unit.
• If the text information includes more than
16 characters, it scrolls on the display. This unit can
display up to 128 characters.
Notice:
When operating an iPod, some operations may not
be performed correctly or as intended. In this case,
visit the following JVC web site:
– For the USB connection: <http://www.jvc-
victor.co.jp/english/car/>
– For the inferface adapter connection:
<http://www.jvc.co.jp/english/car/support/
ks-pd100/index.html>
3/8 (BAND) to play back
ENGLISH
Continued on the next page
57REFERENCES
Page 58

General settings—PSM
• “Auto” setting for “Dimmer” may not work correctly
on some vehicles, particularly on those having a
control dial for dimming.
In this case, change the “Dimmer” setting to any
ENGLISH
other than “Auto.”
• If “LCD Type” is set to “Auto,” the display pattern
will change to the “Positive” or “Negative” pattern
depending on the “Dimmer” setting.
• If you change the “Amp Gain” setting from
“High PWR” to “Low PWR” while the volume level is
set higher than “Volume 30,” the unit automatically
changes the volume level to “Volume 30.”
Disc setup menu
• When the language you have selected is not recorded
on a disc, the original language is automatically used
as the initial language. In addition, for some discs,
the initial languages settings will not work as you set
due to their internal disc programming.
• When you select “16:9” for a picture whose aspect
ratio is 4:3, the picture slightly changes due to the
process for converting the picture width.
• Even if “4:3 PAN SCAN” is selected, the screen size
may become “4:3 LETTERBOX” for some discs.
Available characters
Upper case
Lower case
Numbers and symbols
About sounds reproduced through the
rear terminals
• Through the analog terminals (Speaker out/
LINE OUT):
2-channel signal is emitted. When playing a
multi-channel encoded disc, multi-channel
signals are downmixed. DTS sound cannot be
reproduced. (AUDIO—DOWN MIX: see page 51.)
• Through DIGITAL OUT (optical):
Digital signals (Linear PCM, Dolby Digital, DTS,
MPEG Audio) are emitted through this terminal.
(For more details, see table on page 59.)
To reproduce multi-channel sounds such as
Dolby Digital, DTS, and MPEG Audio, connect an
amplifier or a decoder compatible with these
multi-channel sources to this terminal, and set
“DIGITAL AUDIO OUTPUT” correctly. (See page
51.)
• About Dual Zone:
Through the 2nd AUDIO OUT, 2-channel signal is
emitted. When playing a multi-channel encoded
disc, multi-channel signals are downmixed. (See
page 27.)
On-screen guide icons
During playback, the following guide icons may
appear for a while on the monitor.
: Playback
: Pause
: DVD-Video/VCD: Forward slow motion
: DVD-Video: Reverse slow motion
: Forward search
: Reverse search
DVD: The following icons appear at the beginning of
a scene containing:
: Multi-subtitle languages
: Multi-audio languages
: Multi-angle views
58
Page 59

Output signals through the DIGITAL OUT terminal
Output signals are different depending on the “DIGITAL AUDIO OUTPUT” setting on the setup menu (see
page 51).
Output Signal
Playback Disc
DVD-Video 48 kHz, 16/20/24 bits
Linear PCM
96 kHz Linear PCM 48 kHz, 16 bits stereo Linear PCM
Dolby Digital
DTS DTS bitstream 48 kHz, 16 bits stereo Linear PCM
MPEG Audio MPEG bitstream 48 kHz, 16 bits stereo Linear PCM
Audio CD, Video CD 44.1 kHz, 16 bits stereo Linear PCM /
Audio CD with DTS DTS bitstream 48 kHz, 16 bits stereo Linear PCM
DivX/
MPEG
MP3/WMA 32/44.1/48 kHz, 16 bits Linear PCM
WAV 44.1 kHz, 16 bits stereo Linear PCM
* Digital signals may be emitted at 20 or 24 bits (at their original bit rate) through the DIGITAL OUT terminal if the
discs are not copy-protected.
Dolby Digital
MPEG Audio 32/44.1/48 kHz, 16 bits Linear PCM
STREAM/PCM DOLBY DIGITAL/
PCM
48 kHz, 16 bits stereo Linear PCM *
Dolby Digital bitstream
48 kHz, 16 bits stereo Linear PCM
Dolby Digital bitstream
PCM ONLY OFF
48 kHz, 16 bits
stereo Linear PCM
OFF
48 kHz, 16 bits
stereo Linear PCM
ENGLISH
Adjustable sound elements
Range/selectable items
Sound elements
Frequency 68 Hz
Level –6 to +6 –6 to +6 –6 to +6 –6 to +6 –6 to +6
Q (Q-slope) Q0.7
Band 1
(100 Hz)
100 Hz
150 Hz
Q1.0
Q1.4
Q2.0
Band 2
(320 Hz)
210 Hz
320 kHz
460 kHz
Q0.7
Q1.0
Q1.4
Q2.0
Band 3
(1 kHz)
680 Hz
1 kHz
1.5 kHz
Q0.7
Q1.0
Q1.4
Q2.0
Band 4
(3.2 kHz)
2.1 kHz
3.2 kHz
4.6 kHz
Q0.7
Q1.0
Q1.4
Q2.0
Continued on the next page
(10 kHz)
6.8 kHz
10 kHz
15 kHz
Q0.7
Q1.0
Q1.4
Q2.0
Band 5
59REFERENCES
Page 60

Language codes
Code Language Code Language Code Language Code Language Code Language
AA Afar FA Persian KK Kazakh NO Norwegian ST Sesotho
AB Abkhazian FI Finnish KL Greenlandic OC Occitan SU Sundanese
ENGLISH
AF Afrikaans FJ Fiji KM Cambodian OM (Afan) Oromo SW Swahili
AM Ameharic FO Faroese KN Kannada OR Oriya TA Tamil
AR Arabic FY Frisian KO Korean (KOR) PA Panjabi TE Telugu
AS Assamese GA Irish KS Kashmiri PL Polish TG Tajik
AY Aymara GD Scots Gaelic KU Kurdish PS Pashto, Pushto TH Thai
AZ Azerbaijani GL Galician KY Kirghiz QU Quechua TI Tigrinya
BA Bashkir GN Guarani LA Latin RM Rhaeto-
Romance
BE Byelorussian GU Gujarati LN Lingala RN Kirundi TL Tagalog
BG Bulgarian HA Hausa LO Laothian RO Rumanian TN Setswana
BH Bihari HI Hindi LT Lithuanian RW Kinyarwanda TO Tonga
BI Bislama HR Croatian LV Latvian, Lettish SA Sanskrit TR Turkish
BN Bengali, Bangla HU Hungarian MG Malagasy SD Sindhi TS Tsonga
BO Tibetan HY Armenian MI Maori SG Sangho TT Tatar
BR Breton IA Interlingua MK Macedonian SH Serbo-Croatian TW Twi
CA Catalan IE Interlingue ML Malayalam SI Singhalese UK Ukrainian
CO Corsican IK Inupiak MN Mongolian SK Slovak UR Urdu
CS Czech IN Indonesian MO Moldavian SL Slovenian UZ Uzbek
CY Welsh IS Icelandic MR Marathi SM Samoan VI Vietnamese
DZ Bhutani IW Hebrew MS Malay (MAY) SN Shona VO Volapuk
EL Greek JA Japanese MT Maltese SO Somali WO Wolof
EO Esperanto JI Yiddish MY Burmese SQ Albanian XH Xhosa
ET Estonian JW Javanese NA Nauru SR Serbian YO Yoruba
EU Basque KA Georgian NE Nepali SS Siswati ZU Zulu
TK Turkmen
60
Page 61

Troubleshooting
What appears to be trouble is not always serious. Check the following points before calling a service center.
Symptom Remedy/Cause
• Sound cannot be heard from the speakers. • Adjust the volume to the optimum level.
• Check the cords and connections.
• The unit does not work at all. Reset the unit (see page 3).
General
• “Connect Error” appears on the display. Remove the control panel, wipe the connector, then
attach it again (see page 4).
• SSM automatic presetting does not work. Store stations manually.
• Static noise while listening to the radio. Connect the antenna firmly.
FM/AM
• Disc cannot be played back. Insert the disc correctly.
• Disc can be neither played back nor ejected. • Unlock the disc (see page 16).
• Eject the disc forcibly (see page 3).
• Recordable/Rewritable discs cannot be
played back.
• Tracks on the Recordable/Rewritable discs
cannot be skipped.
• Disc cannot be recognized. Eject the disc forcibly (see page 3).
• Sound and pictures are sometimes
interrupted or distorted.
Discs in general
• No playback picture (DVD-Video/DivX/MPEG/
VCD) appears on the monitor.
• No picture appears on the monitor at all. • Connect the video cord correctly.
• The left and right edges of the picture are
missing on the monitor.
• Insert a finalized disc.
• Finalize the discs with the component which you
have used for recording.
• Stop playback while driving on rough roads.
• Change the disc.
• Check the cords and connections.
Parking brake wire is not connected properly. (See
Installation/Connection Manual.)
• Select a correct input on the monitor.
Select “4:3 LETTERBOX” (see page 50).
ENGLISH
Continued on the next page
61REFERENCES
Page 62

• Disc cannot be played back. • Change the disc.
ENGLISH
• Noise is generated. Skip to another track or change the disc.
• Tracks cannot play back as you have intended
them to play.
• Longer readout time is required (“Reading”
keeps flashing on the display).
• No sound can be heard when picture is
displayed while playing a DivX/MPEG Video
file.
DivX/MPEG Video/MP3/WMA/WAV
• Elapsed playing time is not correct. This sometimes occurs during playback. This is caused
• “Please Eject” appears on the display. Insert a disc that contains tracks of appropriate formats.
• Correct characters are not displayed (e.g.
album name).
• Noise is generated. • The track played back is not a playable file format
• Tracks cannot play back as you have intended
them to play.
• “Reading” keeps flashing on the display. • Readout time varies depending on the USB device.
USB device
Symptom Remedy/Cause
• Record the tracks using a compliant application in
the appropriate discs (see page 6).
• Add the extension code <.divx>, <.div>, <.avi>,
<.mpg>, <.mpeg>, <.mp3>, <.wma>, or
<.wav> to the file names.
Playback order is determined when files are recorded.
Readout time varies due to the complexity of the
folder/file configuration. Do not use too many
hierarchies and folders.
• Record the audio track using MP3 or Dolby Digital as
the audio stream of DivX files.
• Record the audio track using MPEG1 Audio Layer 2 as
the audio stream for MPEG Video files.
by how the tracks are recorded.
This unit can only display letters (capital: A – Z,
small: a – z), numbers, and a limited number of
symbols (see page 58).
(MP3/WMA/WAV). Skip to another file.
• Do not add the extension code <.mp3>, <.wma>,
or <.wav> to non-MP3/WMA/WAV tracks.
Playback order may differs from the one played back
using other players.
• Do not use too many hierarchy, folders and empty
folders.*
• Turn off the power then on again.
• Do not pull out or connect the USB device repeatedly
while “Reading” is displayed on the display.
* Folder that is physically empty or folder that contains
data but does not contain valid MP3/WMA/WAV track.
62
Page 63

Symptom Remedy/Cause
• “No File” flashes on the display.
• “No USB” appears on the display.
• “Not Support” appears on the display and
track skips.
• “Read failed” appears on the display. The connected USB device may be malfunctioning,
• Correct characters are not displayed (e.g.
USB device
album name).
• While playing a track, sound is sometimes
interrupted.
• The sound is interrupted or skipped during
playback of a USB device.
• Bluetooth device does not detect the unit. The unit can be connected with one Bluetooth cellular
• The unit does not detect the Bluetooth
device.
• The unit does not make pairing with the
Bluetooth ®
Bluetooth device.
• Phone sound quality is poor. • Reduce the distance between the unit and the
Connect a USB device that contains tracks encoded in an
appropriate format.
The track is unplayable.
or may not have been formatted correctly. The files
included in the USB device are corrupted.
For available characters, see page 58.
The tracks have not been properly copied into the USB
device. Copy tracks again into the USB device, and try
again.
• Turn off, then turn on the unit.
• Connect the device again, when the sound is not yet
restored.
phone and one Bluetooth audio device at a time.
While connecting a device, this unit cannot be detected
from another device. Disconnect currently connected
device and search again.
• Check the Bluetooth setting of the device.
• Search from the Bluetooth device. After the device
detects the unit, select “Open...” on the unit to connect
the device. (See page 28.)
• Enter the same PIN code for both the unit and target
device.
• Select the device name from “Special,” then try to
connect again. (See page 29.)
Bluetooth cellular phone.
• Move the car to a place where you can get a better
signal reception.
ENGLISH
Continued on the next page
63REFERENCES
Page 64

ENGLISH
Bluetooth ®
CD changer
DAB
Symptom Remedy/Cause
• The sound is interrupted or skipped during
playback of a Bluetooth audio player.
• The connected audio player cannot be
controlled.
• “No Disc” appears on the display. Insert a disc into the magazine.
• “No Magazine” appears on the display. Insert the magazine.
• “Reset 08” appears on the display. Connect this unit and the CD changer correctly and press
• “Reset 01” – “Reset 07” appears on the
display.
• The CD changer does not work at all. Reset the unit (see page 3).
• “No DAB Signal” appears on the monitor.
• “Reset 08” appears on the monitor.
• The DAB tuner does not work at all.
• “Antenna Power NG” appears on the
monitor.
• Reduce the distance between the unit and the
Bluetooth audio player.
• Turn off, then turn on the unit.
• When the sound is not yet restored: Connect the player
again.
Check whether the connected audio player supports
AVRCP (Audio Video Remote Control Profile).
(Operations depend on the connected audio player.)
the reset button of the CD changer.
Press the reset button of the CD changer.
Move to an area with stronger signals.
Connect this unit and the DAB tuner correctly and reset
the unit (see page 3).
Check the cords and connections.
Reconnect this unit and the DAB tuner correctly and
reset the unit (see page 3).
64
Page 65

Symptom Remedy/Cause
• The iPod does not turn on or does not work. • Check the connecting cable and its connection.
• Update the firmware version.
• Charge the battery.
• The sound is distorted. Deactivate the equalizer either on this unit or the iPod.
• “Disconnect” appears on the display. • Check the connecting cable and its connection.
• Charge the battery.
• Playback stops. The headphones are disconnected during playback.
Restart the playback operation (see page 37).
iPod
• No sound can be heard when connecting an
iPod nano.
• “No File” appears on the display. No tracks are stored. Import tracks to the iPod.
• “Reset 01” – “Reset 07” appears on the
display.
• “Reset 08” appears on the display. Check the connection between the adapter and this unit.
• The iPod’s controls do not work after
disconnecting from this unit.
• Manufactured under license from Dolby Laboratories. Dolby and the double-D symbol are trademarks of Dolby
Laboratories.
• “DTS” and “DTS Digital Out” are registered trademarks of DTS, Inc.
• “DVD Logo” is a trademark of DVD Format/Logo Licensing Corporation registered in the US, Japan and other
countries.
• DivX, DivX Ultra Certified, and associated logos are trademarks of DivX, Inc. and are used under license.
• Official DivX® Ultra Certified product
• Plays all versions of DivX® video (including DivX® 6) with enhanced playback of DivX® media files and the DivX®
Media Format
• Microsoft and Windows Media are either registered trademarks or trademarks of Microsoft Corporation in the
United States and/or other countries.
• The Bluetooth word mark and logos are owned by the Bluetooth SIG, Inc. and any use of such marks by Victor
Company of Japan, Limited (JVC) is under license. Other trademarks and trade names are those of their respective
owners.
• iPod is a trademark of Apple Inc., registered in the U.S. and other countries.
• This product incorporates copyright protection technology that is protected by U.S. patents and other intellectual
property rights. Use of this copyright protection technology must be authorized by Macrovision, and is intended
for home and other limited viewing uses only unless otherwise authorized by Macrovision. Reverse engineering or
disassembly is prohibited.
• Disconnect the headphones from the iPod nano.
• Update the firmware version of the iPod nano.
Disconnect the adapter from both this unit and iPod.
Then, connect it again.
Reset the iPod.
ENGLISH
65REFERENCES
Page 66

Specifications
Maximum Power Output: Front/Rear: 50 W per channel
ENGLISH
Continuous Power Output
(RMS):
Load Impedance: 4 Ω (4 Ω to 8 Ω allowance)
Equalizer Control
Range:
Signal to Noise Ratio: 70 dB
Audio Output Level: Digital (DIGITAL OUT: Optical): Signal wave length: 660 nm
AUDIO AMPLIFIER SECTION
Subwoofer-out Level/Impedance: 2.5 V/20 kΩ load (full scale)
Color system: PAL
Video Output (composite): 1 Vp-p/75 Ω
Other Terminal: CD changer, AV-IN (video) input jack, USB input jack, Steering wheel remote
Frequency Range: FM: 87.5 MHz to 108.0 MHz
FM Tuner: Usable Sensitivity: 11.3 dBf (1.0 μV/75 Ω)
TUNER SECTION
MW Tuner: Sensitivity: 20 μV
LW Tuner: Sensitivity: 50 μV
Front/Rear: 19 W per channel into 4 Ω, 40 Hz to
20 000 Hz at no more than 0.8% total
harmonic distortion
Frequency: Band 1: 68 Hz, 100 Hz, 150 Hz
Band 2: 210 Hz, 320 Hz, 460 Hz
Band 3: 680 Hz, 1 kHz, 1.5 kHz
Band 4: 2.1 kHz, 3.2 kHz, 4.6 kHz
Band 5: 6.8 kHz, 10 kHz, 15 kHz
Level: ±10 dB
Output level: –21 dBm to –15 dBm
Line-Out Level/Impedance: 2.5 V/20 kΩ load (full scale)
Output Impedance: 1 kΩ
input, Aerial input, 2nd AUDIO OUT, LINE IN
AM: (MW) 522 kHz to 1 620 kHz
(LW) 144 kHz to 279 kHz
50 dB Quieting Sensitivity: 16.3 dBf (1.8 μV/75 Ω)
Alternate Channel Selectivity (400 kHz): 65 dB
Frequency Response: 40 Hz to 15 000 Hz
Stereo Separation: 35 dB
Selectivity: 35 dB
66
Page 67

Signal Detection System: Non-contact optical pickup (semiconductor laser)
Number of Channels: 2 channels (stereo)
Frequency Response: DVD, fs=48 kHz/96 kHz: 16 Hz to 22 000 Hz
CD, fs=44.1 kHz: 16 Hz to 20 000 Hz
Dynamic Range/Signal-to-Noise Ratio: 96 dB/98 dB
Wow and Flutter: Less than measurable limit
DivX/MPEG
Video:
DVD/CD PLAYER SECTION
MP3: Bit Rate: 32 kbps – 320 kbps
WMA: Bit Rate: 32 kbps – 320 kbps
WAV: Quantization Bit Rate: 16 bit
USB Standards: USB 1.1, USB 2.0
Data Transfer Rate: Full Speed: Maximum 12 Mbps
Compatible Device: Mass storage class
Compatible File System: FAT 32/16/12
USB SECTION
Playable Audio Format: DivX/MPEG1/MPEG2/MP3/WMA/WAV
Max. Current: 500 mA/5 V
Video: Max. Resolution: 720 × 480 pixels (30 fps)
720 × 576 pixels (25 fps)
Audio: Bit Rate: DivX: 32 kbps – 320 kbps
MPEG Video: 32 kbps – 320 kbps
Sampling Frequency: DivX: MPEG-1: 32 kHz, 44.1 kHz, 48 kHz
MPEG-2: 16 kHz, 22.05 kHz, 24 kHz
Sampling Frequency: MPEG Video: 32 kHz, 44.1 kHz, 48 kHz
Sampling Frequency: MPEG-1: 32 kHz, 44.1 kHz, 48 kHz
MPEG-2: 16 kHz, 22.05 kHz, 24 kHz
Sampling Frequency: 22.05 kHz, 32 kHz, 44.1 kHz, 48 kHz
Sampling Frequency: 44.1 kHz
Low Speed: Maximum 1.5 Mbps
ENGLISH
Power Requirement: Operating Voltage: DC 14.4 V (11 V to 16 V allowance)
Grounding System: Negative ground
Allowable Operating Temperature: 0°C to +40°C
Dimensions
GENERAL
(W × H × D):
Mass (approx.):
Design and specifications are subject to change without notice.
Installation Size (approx.): 182 mm × 52 mm × 159 mm
Panel Size (approx.): 188 mm × 58 mm × 12 mm
1.5 kg (excluding accessories)
67REFERENCES
Page 68

Merci pour avoir acheté un produit JVC.
Veuillez lire attentivement toutes les instructions avant d’utiliser l’appareil afin de bien comprendre son
fonctionnement et d’obtenir les meilleures performances possibles.
IMPORTANT POUR PRODUITS LASER
1. PRODUIT LASER CLASSE 1
2. ATTENTION: N’ouvrez pas le couvercle supérieur. Il n’y a aucune pièce réparable par l’utilisateur à l’intérieur de
l’appareil; confiez toute réparation à un personnel qualifié.
3. ATTENTION: Rayonnement laser visible et/ou invisible de classe 1 M une fois ouvert. Ne pas regarder
directement avec des instruments optiques.
4. REPRODUCTION DE L’ÉTIQUETTE: ÉTIQUETTE DE PRÉCAUTION PLACÉE À L’EXTÉRIEUR DE L’APPAREIL.
FRANÇAIS
Précautions sur le réglage du volume:
[Union européenne seulement]
Les appareils numériques (CD/USB) produisent très
peut de bruit par rapport aux autres sources. Réduisez
le volume avant de reproduire ces sources numériques
afin d’éviter d’endommager les enceintes par la
soudaine augmentation du niveau de sortie.
L’autoradio est muni d’une fonction de
télécommande de volant.
•
Référez-vous au Manuel d’installation/
raccordement (volume séparé) pour les connexion.
2
Précautions pour la lecture de disques à
double face
La face non DVD d’un disque à “DualDisc” n’est pas
compatible avec le standard “Compact Disc Digital
Audio”. Par conséquent, l’utilisation de la face non DVD
d’un disque à double face sur cet appareil n’est pas
recommandée.
Attention:
Si la température à l’intérieur de la voiture est inférieure
à 0°C, le mouvement des animations et le défilement
des textes sur l’affichage sont interrompus pour éviter
que l’affichage devienne flou. apparaît sur
l’affichage.
Quand la température augmente et atteint de nouveau
la température de fonctionnement, ces fonctions sont
de nouveau accessibles.
Page 69

Comment réinitialiser votre
appareil
• Vous ajustements préréglés sont aussi effacés (sauf le
périphérique Bluetooth enregistré, voir pages 28 et 29).
Comment forcer l’éjection d’un
disque
“Please Eject” apparaît sur l’affichage.
• Faites attention de ne pas faire tomber le disque quand
il est éjecté.
• Si cela ne fonctionne pas, essayez de réinitialiser
l’autoradio.
AVERTISSEMENTS:
(Pour éviter tout accident et tout
dommage)
• N’INSTALLEZ aucun appareil ni aucun câble
dans un endroit où:
– il peut gêner l’utilisation du volant ou du
levier de vitesse.
– il peut gêner le fonctionnement de
dispositifs de sécurité tels que les coussins
de sécurité.
– où il peut gêner la visibilité.
• NE manipulez pas l’appareil quand vous
conduisez.
• Si vous devez commander l’appareil
pendant que vous conduisez, assurez-vous
de bien regarder autour de vous.
• Le conducteur ne doit pas regarder le
moniteur lorsqu’il conduit.
Si le frein de stationnement n’est pas mis,
“LE CONDUCTEUR NE DOIT PAS REGARDER LE
MONITEUR EN CONDUISANT”. apparaît sur le
moniteur et l’image de lecture n’apparaît
pas.
– Cet avertissement apparaît uniquement
quand le fil du frein de stationnement
est connecté au système de frein de
stationnement intégré à la voiture
(référez-vous au Manuel d’installation/
raccordement).
Température à l’intérieur de la voiture...
Si votre voiture est restée garée pendant longtemps
dans un climat chaud ou froid, attendez que la
température à l’intérieur de la voiture redevienne
normale avant d’utiliser l’appareil.
FRANÇAIS
Pour sécurité...
• N’augmentez pas trop le volume car cela bloquerait
les sons de l’extérieur rendant la conduite
dangereuse.
• Arrêtez la voiture avant de réaliser toute opération
compliquée.
3
Page 70

Comment utiliser les touches M
MODE et SEL
Si vous utilisez M MODE ou SEL (sélection), l’affichage
et certaines commandes (telles que les touches
numériques, les touches 4 /¢ , les touches
5/∞ et la molette de commande) entrent dans le
mode de commande correspondant.
Retrait du panneau de commande
Ex.: Quand vous appuyez sur la touche numérique 1
après avoir appuyez sur M MODE, pour commander
FRANÇAIS
le tuner FM.
Pour utiliser ces commandes pour les fonctions
d’origine, appuyez de nouveau sur M MODE.
• Cependant, appuyer sur SEL fait entrer l’appareil dans
un mode différent.
• Attendre pendant environ 15 secondes (ou 30
secondes pour les sources Bluetooth) sans appuyer
sur aucune de ces touches annuler automatiquement
la commande.
Langue des indications:
Dans ce manuel, les indications en anglais sont
utilisées à titre d’exemples. Vous pouvez choisir
la langue des indications sur le moniteur avec le
réglage “LANGUE” (voir page 50).
Évitez de toucher les connecteurs.
Fixation du panneau de
commande
Ouverture et fermeture du
panneau de commande
Ouverture...
Fermeture...
4
Page 71

TABLE DES MATIERES
INTRODUCTIONS
Type de disque compatible ............................................................................................................. 6
Préparation ..................................................................................................................................... 7
FONCTIONNEMENT
Opérations de base ......................................................................................................................... 8
• Utilisation du panneau de commande ..................................................................................................... 8
• Utilisation de la télécommande (RM-RK252) ........................................................................................... 9
Écoute de la radio ............................................................................................................................ 12
Opérations des disques ................................................................................................................... 16
• Opérations en utilisant le panneau de commande ................................................................................... 17
• Opérations en utilisant de la télécommande (RM-RK252) ....................................................................... 20
Écoute du périphérique USB ............................................................................................................ 26
Fonctionnement sur Deux Zones ..................................................................................................... 27
APPAREILS EXTÉRIEURS
Écoute d’un périphérique Bluetooth® ............................................................................................. 28
• Utilisation d’un téléphone portable Bluetooth ........................................................................................ 30
• Utilisation d’un lecteur audio Bluetooth .................................................................................................. 32
Écoute du changeur de CD ............................................................................................................... 33
Écoute du tuner DAB ....................................................................................................................... 34
Écoute de iPod ................................................................................................................................ 37
• Lors de la connexion avec le câble USB .................................................................................................... 37
• Opérations en utilisant l’écran de commande .......................................................................................... 38
• Lors de la connexion avec l’adaptateur d’interface .................................................................................. 40
• Sélection des modes de lecture ................................................................................................................ 40
Écoute d’un autre appareil extérieur ............................................................................................... 41
FRANÇAIS
RÉGLAGES
Sélection d’un mode sonore préréglé .............................................................................................. 43
Réglages généraux — PSM ............................................................................................................ 45
Menu de réglage du disque ............................................................................................................. 50
Réglages Bluetooth ......................................................................................................................... 52
RÉFÉRENCES
Entretien ......................................................................................................................................... 53
Pour en savoir plus à propos de cet autoradio ................................................................................. 54
Guide de dépannage ....................................................................................................................... 61
Spécifications .................................................................................................................................. 66
5
Page 72

Type de disque compatible
Type de disque
DVD DVD Vidéo (Code de région: 2) *
DVD enregistrable/
FRANÇAIS
réinscriptible
(DVD-R/-RW *
• DVD vidéo: UDF bridge
• DVD-VR
• DivX/MPEG-1/MPEG-2/MP3/
WMA/WAV: ISO 9660 Niveau 1,
Niveau 2, Romeo, Joliet
2
, +R/+RW *3)
Format d’enregistrement, type de fichier, etc
1
DVD Audio
DVD-ROM
DVD Vidéo
DVD-VR
DivX/MPEG1/MPEG2
MP3/WMA/WAV
AAC
JPEG/MPEG4
DVD+VR
Compatible
DVD-RAM
Dual Disc Côté DVD
Face non DVD
CD/VCD CD Audio/CD Text (CD-DA)/DTS-CD*
4
VCD (CD Vidéo)
SVCD (Super CD Vidéo)
CD-ROM
CD-I (CD-I Ready)
CD enregistrable/réinscriptible
CD-DA
(CD-R/-RW)
• ISO 9660 Niveau 1, Niveau 2,
Romeo, Joliet
MP3/WMA/WAV
AAC
JPEG/MPEG4
1
*
Si vous insérez un disque DVD Vidéo d’un code de région incorrect “ERREUR DE CODE REGIONAL” apparaît sur le
moniteur.
*2 Un DVD-R enregistré en format MultiBorder est également compatible (à l’exception des disques double-couche). Les
disques DVD-RW à double couche ne peuvent pas être reproduits.
*3 Il est possible de reproduire des disques +R/+RW (format vidéo uniquement) finalisés. Les disques +RW à double
couche ne peuvent pas être reproduits.
*4 Pour reproduire le son DTS, utilisez la prise DIGITAL OUT (voir aussi les pages 51 et 59).
DivX/MPEG1/MPEG2
6
Page 73

Préparation
Annulez la démonstration des affichages et réglez l’horloge
• Voir aussi pages 45 et 46.
1
2
3
4
Changement des informations et de la courbe sur l’affichage
• Quand l’appareil est hors tension: Vérifiez l’heure actuelle
Ex.: Quand le tuner est choisi comme source
Mise sous tension de l’appareil.
Accédez aux réglages PSM.
Annulez de la démonstration des affichages
Choisissez “Demo”, puis “Off”.
Réglez l’horloge
Choisissez “Clock Hr” (heures), puis ajustez les heures.
Choisissez “Clock Min” (minutes), puis ajustez les
minutes.
Choisissez “24H/12H”, puis “24Hours” ou “12Hours”.
Terminez la procédure.
FRANÇAIS
Affichage de l’état de fonctionnement de la source Affichage de l’indicateur de niveau sonore
(voir “LevelMeter” à la page 45)
7INTRODUCTIONS
Page 74

Opérations de base
Utilisation du panneau de commande
FRANÇAIS
1 • DAB: Choisissez un service DAB.
• DISC/USB/CD-CH: Choisissez un titre/
programme/liste de lecture/dossier.
• USB-iPod: Entrez dans le menu principal
[Maintenez pressée].
• iPod: Accès au menu principal/Pause de la
lecture/Confirmation de votre choix.
• BT-PHONE/BT-AUDIO: Choisissez un appareil
enregistré.
2 • Mise sous tension de l’appareil.
• Mise hors tension de l’appareil [Maintenez
pressée].
• Atténuation du son (si l’appareil est sous
tension).
3 Fenêtre d’affichage
4 Prise d’entrée USB (bus série universel)
5 • Mise en/hors service de l’attente de réception
TA.
• Permet d’entrer en mode de recherche de type
de programme [Maintenez pressée].
6 Faites pivoter le panneau de commande vers le
bas.
• Pour éjecter le disque, faites pivoter le panneau
de commande vers le bas, puis appuyez sur 0
sur l’appareil.
7 Prise d’entrée AV-IN (vidéo)
8 • TUNER: Recherchez une station.
• DAB: Recherchez un ensemble DAB.
• DISC/USB/USB-iPod/CD-CH/iPod: Sélection
d’un chapitre/plage.
• BT-AUDIO: Saut vers l’arrière/saut vers l’avant.
9 • Réglage du volume [Tournez].
• Choisissez la source [Appuyez sur la touche] *1.
TUNER = DAB *2 = DISC *2 = USB *2 (ou
USB-iPod)*2 = CD-CH *2/iPod *2 (ou EXT IN)
= BT-PHONE *
=AV IN = (retour au début)
p • Sélection/ajustement du mode sonore.
2
= BT-AUDIO *2 = LINE IN
• Accédez aux réglages PSM [Maintenez pressée].
q •
TUNER/DAB: Choisissez une station/service DAB.
• DISC/USB/CD-CH: Sélection d’un chapitre/
titre/programme/dossier/plage/disque (pour le
changeur de CD).
• BT-PHONE: Compose un numéro de téléphone
préréglé*3.
w • Accès au mode de fonction.
• BT-PHONE: Met en service la composition
vocale [Maintenez pressée].
e Changez les informations et la courbe sur
l’affichage.
r • TUNER/DAB: Sélection de la bande.
• DISC/USB/USB-iPod: Démarre/met en pause
la lecture.
• BT-AUDIO: Démarre/met en pause la lecture.
*1 Maintenir pressée SOURCE permet d’afficher le menu
Bluetooth si un téléphone Bluetooth est connecté.
*2 Vous ne pouvez pas choisir ces sources si elles ne sont
pas prêtes ou connectées.
*3 Pour mémoriser un numéro de téléphone préréglé,
voir page 32.
8
Page 75

Utilisation de la télécommande (RM-RK252)
Mise en place de la pile
R03/LR03/AAA
Insérez les piles dans la télécommande en respectant
les polarités (+ et –).
Attention:
La pile ne doit pas être exposée à une chaleur excessive
telle que la lumière du soleil, un feu ou quelque chose
de similaire.
Si la télécommande perd de de son efficacité,
remplacez les deux piles.
Avant d’utiliser la télécommande:
• Dirigez la télécommande directement sur le capteur
de télécommande de autoradio.
• N’EXPOSEZ PAS le capteur de télécommande à une
forte lumière (lumière directe du soleil ou éclairage
artificiel).
FRANÇAIS
Capteur de télécommande
IMPORTANT:
Le la fonction de double zone est en service (voir page
27), la télécommande fonctionne uniquement pour
commander le lecteur de DVD/CD.
1
1*
Touche
• Appuyez brièvement sur cette touche pour
mettre l’appareil sous tension ou atténuer le
son si l’appareil est déjà sous tension.
• Maintenez cette touche pressée pour mettre
l’appareil hors tension.
Suite à la page suivante
9FONCTIONNEMENT
Page 76

2 Touches 5/∞
• TUNER/DAB: Choisit les stations/services
préréglés.
• DISC:
– DVD Vidéo: Permet de choisir le titre.
–
DVD-VR: Choisit le programme/liste de lecture.
– DivX/MPEG Vidéo/MP3/WMA/WAV: Choisit
les dossiers s’il y en a.
• USB:
– DivX/MPEG Vidéo/MP3/WMA/WAV: Choisit
les dossiers s’il y en a.
• CD-CH: Choisit les dossiers s’il y en a.
FRANÇAIS
• iPod:
5 : Affiche le menu principal (puis 5 / ∞ /
–
4 / ¢ fonctionnent comme
touches de sélection de menu).
5 : Retourne au menu précédent.
∞ : Valide la sélection.
– ∞ : Arrête provisoirement (pause) ou reprend
la lecture.
Touches
4 / ¢
• TUNER:
– Appuyez brièvement pour rechercher
automatiquement les stations.
– Maintenez pressé pour rechercher des
stations manuellement.
• DAB:
– Appuyez brièvement sur la touche pour
choisir les ensembles.
– Maintenez cette touche pressée pour
rechercher des ensembles.
• DISC/USB/USB-iPod/CD-CH:
– Appuyez brièvement pour effectuer un saut
vers l’arrière/saut vers l’avant.
– Maintenez pressé pour effectuer une
recherche rapide vers l’arrière/vers l’avant.
• BT-AUDIO: Appuyez brièvement pour effectuer
un saut vers l’arrière/saut vers l’avant.
• iPod:
– Appuyez brièvement pour effectuer un saut
vers l’arrière/saut vers l’avant.
– Maintenez pressé pour effectuer une
recherche rapide vers l’arrière/vers l’avant.
En mode de sélection de menu:
– Appuyez brièvement sur la touche pour
choisir un élément. (Puis, appuyez sur ∞
pour valider le choix.)
– Maintenez pressée la touche pour sauter 10
éléments en même temps.
10
3 Touches VOL (volume) + / –
• Ajuste le niveau de volume.
Touches 2nd VOL (volume)
• Appuyez sur cette touche tout en maintenant
pressée SHIFT pour ajuster le niveau volume à
travers la fiche 2nd AUDIO OUT (voir page 27).
2
4 *
Touche ASPECT
• Ne peut pas être utilisé pour cet appareil.
1
5*
Touche PHONE
• Permet de répondre aux appels entrants.
• Affiche le menu “Redial” quand un téléphone
Bluetooth est connecté [Maintenez pressée].
2
6 *
Touche SETUP
• Affiche le menu de réglage du disque (à l’arrêt).
2
7 *
Touche TOP M (menu)
• DVD Vidéo/DivX: Affiche le menu de disque.
• DVD-VR: Affiche l’écran du programme original.
• VCD: Reprend la lecture PBC.
• USB-iPod: Affiche le menu de mode de
recherche (voir page 39).
2
8 *
Touche OSD (affichage sur l’écran)
• Affiche la barre d’écran.
9 Touche SHIFT
• Fonctionne avec les autres touches.
p Touche DISP (affichage)
• Change l’information sur l’affichage.
q Touches 1 / ¡
• DVD Vidéo: Lecture au ralenti (pendant une
pause).
• DVD-VR/VCD: Lecture au ralenti vers l’avant
(pendant une pause).
• DISC/USB/USB-iPod: Recherche vers l’arrière/
recherche vers l’avant.
1
w*
Touche SOURCE
• Choisit la source.
Page 77

e Touche 3 (lecture) / 8 (pause)
• DISC/USB/USB-iPod/BT-AUDIO: Démarre/
arrête momentanément (pause) la lecture.
r Touche (terminer un appel)
• Termine l’appel.
Touches BAND /
7 (arrêt)
• TUNER/DAB: Choisit les bandes.
• DISC/USB/USB-iPod/BT-AUDIO: Arrêt de la
lecture.
2
t *
Touche RETURN
• VCD: Retourne au menu PBC.
• USB-iPod: Retourne à l’écran de commande.
2
y *
Touche MENU
• DVD Vidéo/DivX: Affiche le menu de disque.
• DVD-VR: Affiche l’écran de liste de lecture.
• VCD: Reprend la lecture PBC.
• USB-iPod: Affiche le menu de mode de
recherche (voir page 39).
2
u *
Touches % / fi
• DVD Vidéo: Permet de réaliser la sélection/les
réglages.
• CD-CH: Changes les disques dans le magasin.
Touches
@ / #
• DVD Vidéo: Permet de réaliser la sélection/les
réglages.
• DivX/MPEG Vidéo: Fait un saut de cinq minutes
vers l’arrière ou l’avant.
Touche DIRECT
• DISC/USB: Appuyez sur cette touche tout en
maintenant pressée la touche SHIFT pour entrer
en mode de recherche directe de chapitre/titre/
programme/liste de lecture/dossier/plage (voir
page 20 pour les détails).
Touche CLR (annuler)
• DISC/USB: Appuyez sur cette touche tout en
maintenant pressée SHIFT pour annuler une
mauvaise entrée.
1
Quand le fonctionnement sur deux zones est en
*
service, ces touches ne peuvent pas être utilisées.
*2 Fonctionnent comme touches numériques/*
(astérisque)/# (carré) quand les touches sont pressées
en même temps que la touche SHIFT.
– TUNER/DAB: Choisit des stations/services préréglés
(1 – 6).
– DISC: Permet d’entrer un numéro de chapitre/titre/
programme/liste de lecture/dossier/plage après
être entré en mode de recherche en appuyant sur
SHIFT et DIRECT (voir page 20 pour les détails).
FRANÇAIS
Touche ENT (entrée)
• Valide la sélection.
2
i *
Touche DUAL
• Met en et hors service la fonction de double
zone.
o Touche SURROUND
• Ne peut pas être utilisé pour cet appareil.
11FONCTIONNEMENT
Page 78

Écoute de la radio
1
2
3
FRANÇAIS
Choisissez “TUNER”.
Sélection de la bande.
Recherchez la station que vous souhaitez écouter—Recherche
automatique.
Recherche manuelle: Maintenez pressée une des touches jusqu’à ce que “M” s’allume sur
l’affichage, puis appuyez répétitivement sur la touche.
• Lors de la réception d’une émission FM stéréo de signal suffisamment fort,
s’allume sur l’affichage.
Quand une émission FM stéréo est
difficile à recevoir
1
2
La réception est améliorée, mais l’effet stéréo est
perdu.
• s’allume sur l’affichage.
3 Quittez le réglage.
Préréglage automatique des
stations FM —SSM (Mémorisation
automatique séquentielle des
stations puissantes)
Vous pouvez prérégler six stations maximum pour
chaque bande.
1 Pendant l’écoute d’une station...
2
3
Les stations FM locale avec les signaux les plus forts
sont recherchées et mémorisées automatiquement
dans la bande FM choisie.
Préréglage manuel
Ex.:
Mémorisation de la station FM de fréquence
92,5 MHz sur le numéro de préréglage 4 de la bande
FM1.
Utilisation des touches numériques
1
2
12
Page 79

3
Le numéro de préréglage
clignote un instant.
Utilisation de la liste des stations préréglées
• Quand apparaît sur l’affichage, vous pouvez
retourner à l’écran précédent en appuyant sur la
touche numérique 3.
1 Suivez les étapes 1 et 2 de “Utilisation des
touches numériques” à la page 12.
• Si vous maintenez pressée 5 / ∞, la liste des
stations préréglées apparaît (allez à l’étape 4).
2
3
Affichez la liste des stations préréglées.
4 Choisissez le numéro de préréglage sur lequel
vous souhaitez mémoriser le programme.
Écoute d’une station préréglée de
la liste des stations préréglées
1 Affichez la liste des stations préréglée, puis
choisissez la station préréglée que vous
souhaitez écouter.
2 Passez à la station choisie.
FRANÇAIS
Les fonctionnalités suivantes sont accessibles
uniquement pour les stations FM RDS.
Recherche d’un programme FM
RDS — Recherche PTY
Vous pouvez accorder une station diffusant votre
programme préféré en effectuant une recherche par
code PTY.
• Quand apparaît sur l’affichage, vous pouvez
retourner à l’affichage précédent en appuyant sur la
touche numérique 3.
• Quand / apparaît sur l’affichage,
vous pouvez passer sur d’autres listes en appuyant
répétitivement sur la touche numérique 5 ou 6.
1
• Vous pouvez aller directement à une autre bande
FM en appuyez répétitivement sur la touche
numérique 5 ( ) ou 6 ( ).
5 Mémorisez la station.
2 Choisissez “Search”.
Les six codes PTY apparaissent sur l’affichage.
Suite à la page suivante
13FONCTIONNEMENT
Page 80

3 Choisissez un code PTY
Vous pouvez choisir un code PTY
parmi les 29 codes PTY préréglés ou
les six codes PTY mémorisés.
• Pour mémoriser vos types de programme
préférés, référez-vous à ce qui suit.
4 Démarrez la recherche de votre programme
préféré.
FRANÇAIS
4 Choisissez un des codes PTY.
5 Mémorisez le code PTY choisi.
Ex.: Quand “Classics” est choisi à l’étape 4
S’il y a une station diffusant un programme du
code PTY que vous avez choisi, la station est
accordée.
Mémorisation de vos types de programme
préférés
Vous pouvez mémoriser six de vos types de programme
préféré.
• Quand apparaît sur l’affichage, vous pouvez
retourner à l’affichage précédent en appuyant sur la
touche numérique 3.
1
2 Choisissez “Memory”.
3 Choisissez le numéro de préréglage
(“Preset1” – “Preset6”) sur lequel vous
souhaitez mémoriser le programme.
6 Répétez les étapes 3 à 5 pour mémoriser
d’autres codes PTY sur des autres numéros de
préréglage.
7 Quittez le réglage.
Mise en service de l’attente de
réception TA/PTY
Attente de réception TA
s’allume ou clignote sur l’affichage.
• Si s’allume, l’appareil commute temporairement
sur l’annonce d’informations routières (TA), s’il y en
a une, à partir de n’importe quelle source autre que
AM.
Le volume change sur le niveau de volume TA
préréglé si le niveau actuel est inférieur au niveau
préréglé (voir page 47).
• Si clignote, c’est que l’attente de réception TA
n’est pas encore en service. Accordez une autre
station offrant les signaux RDS.
Pour mettre hors service l’attente de réception
TA, appuyez de nouveau sur TP. s’éteint.
14
Page 81

Attente de réception PTY
1
2
3
Choisissez un code PTY
4 Quittez le réglage.
Poursuite du même programme—
Poursuite de réception en réseau
Lorsque vous conduisez dans une région où la réception
FM n’est pas suffisamment forte, cet autoradio accorde
automatiquement une autre station FM RDS du même
réseau, susceptible de diffuser le même programme
avec un signal plus fort (voir l’illustration ci-dessous).
Programme A diffusé sur une zone de fréquence
différente (01 à 05)
FRANÇAIS
s’allume ou clignote sur l’affichage.
• Si s’allume, l’appareil commute
temporairement sur votre programme PTY
préféré à partir de n’importe quelle source autre
que AM.
• Si clignote, c’est que l’attente de réception
PTY est n’est pas encore en service. Accordez une
autre station (ou service) offrant les signaux RDS.
Pour mettre hors service l’attente de réception
PTY, choisissez “Off” à l’étape 2.
• Quand un tuner DAB est connecté, l’attente de
réception TA/PTY recherche aussi les services.
(Référez-vous aussi à la page 35.)
• L’appareil ne commute pas sur une annonce
d’informations routières ou un programme PTY
quand un appel est établi par “BT-PHONE”.
Codes PTY disponibles
News, Affairs, Info, Sport, Educate, Drama,
Culture, Science, Varied, Pop M (musique), Rock M
(musique), Easy M (musique), Light M (musique),
Classics, Other M (musique), Weather, Finance,
Children, Social, Religion, Phone In, Travel, Leisure,
Jazz, Country, Nation M (musique), Oldies, Folk M
(musique), Document
s’éteint.
À l’expédition de l’usine, la poursuite de réception en
réseau est en service.
Pour changer le réglage de la poursuite de
réception en réseau, référez-vous à “AF-Regn’l” à la
page 47.
• Quand le tuner DAB est connecté, référez-vous à
“Poursuite du même programme—Recherche de
fréquence alternative (DAB AF)” à la page 36.
Sélection automatique des
stations—Recherche de
programme
Normalement, quand vous appuyez sur les touches
numériques, les stations préréglées sont accordées.
Si les signaux des stations préréglés FM RDS ne
permettent pas une bonne réception, cet appareil
utilise les données AF et accorde une autre station
diffusant le même programme que la station préréglée
originale.
• Il faut un certain temps à cet appareil pour accorder
une autre station en utilisant la recherche de
programme.
• Référez-vous aussi à la page 47.
15FONCTIONNEMENT
Page 82

Opérations des disques
Avant de réaliser n’importe quelle opération...
Mettez le moniteur sous tension pour regarder l’image de lecture. Si vous mettez le moniteur sous tension, vous
pouvez aussi commander la lecture des autres disques en vous référant à l’écran du moniteur. (Voir les pages 22 à 25)
Le type de disque est détecté automatiquement et la lecture démarre automatiquement (pour les DVD: le démarrage
automatique de la lecture dépend de son programme interne).
Si le disque actuel ne possède pas de menu de disque, toutes les plages sont reproduites répétitivement jusqu’à ce
que vous changiez la source ou éjectiez le disque.
” apparaît sur le moniteur quand vous appuyez sur une touche, c’est que l’autoradio ne peut pas accepter la
Si “
FRANÇAIS
commande effectuée.
• Dans certains cas, la commande peut être refusée sans que “ ” apparaisse.
.
1
2
3
Pour arrêter la lecture et éjecter le disque
• Appuyez sur SOURCE pour écouter une autre source
de lecture.
Ouvre le panneau de commande.
Assurez-vous de détacher le périphérique USB avant d’ouvrir le
panneau de commande car il risque de bloquer le mécanisme
d’ouverture.
• Pour détacher le périphérique USB, voir page 26.
Insérez un disque.
La lecture démarre automatiquement.
Démarrage de la lecture, si nécessaire.
Interdiction de l’éjection du disque
Pour annuler l’interdiction, répétez la même
procédure.
16
Page 83

Opérations en utilisant le panneau de commande
Appuyer ou (maintenir pressées) les touches suivantes vous permet de...
Type de
disque
[Appuyez sur la touche]
Sélection d’un chapitre
[Maintenez pressée la touche]
Reculer/avancer rapidement
un chapitre*
1
[Appuyez sur la touche]
Sélection d’un chapitre
[Maintenez pressée la touche]
Reculer/avancer rapidement
un chapitre*
1
[Appuyez sur la touche]
Sélection d’une plage
Sélection d’un titre À l’arrêt: Localisation d’un titre
Choisissez le numéro de
programme/numéro de
liste de lecture
Sélection d’un dossier Localiser un dossier particulier
(Touches numériques) *
Pendant la lecture ou une
pause: Localisation d’un
chapitre
À l’arrêt: Localiser un
programme
Pendant la lecture ou une
pause: Localisation d’un
chapitre
directement
3
[Maintenez pressée la touche]
Recherche rapide de plage vers
l’arrière/vers l’avant *
[Appuyez sur la touche]
Sélection d’une plage
[Maintenez pressée la touche]
Recherche rapide de plage vers
l’arrière/vers l’avant *
[Appuyez sur la touche]
Sélection d’une plage
[Maintenez pressée la touche]
2
Localiser une plage particulière
directement (PBC non utilisé)
—
1
Sélection d’un dossier Localiser un dossier particulier
directement
Recherche rapide de plage vers
l’arrière/vers l’avant *
[Appuyez sur la touche]
Sélection d’une plage
[Maintenez pressée la touche]
Recherche rapide de plage vers
l’arrière/vers l’avant *
1
Vitesse de recherche:
*
1
Localiser une plage particulière
directement
—
1
*2 Vitesse de recherche:
*3 Appuyez sur ces touches pour choisir un numéro de 1 à 6; maintenez pressées ces touches pour choisir un numéro de
7 à 12.
FRANÇAIS
Suite à la page suivante
17FONCTIONNEMENT
Page 84

Après avoir appuyé sur M MODE, appuyez sur les touches suivantes pour...
Type de
disque
FRANÇAIS
• Vous pouvez aussi annuler le mode de lecture en choisissant “Off” ou en appuyant sur la touche numérique 4
(
).
Sauter 10 chapitres
(pendant la lecture ou une
pause)
Sauter 10 chapitres
(pendant la lecture ou une
pause)
Sauter 10 plages (à
l’intérieur du même dossier)
Sauter 10 plages (PBC hors
service)
Sauter 10 plages (à
l’intérieur du même dossier)
Sauter 10 plages Repeat Track:
Repeat Chapter:
Répéter le chapitre actuel
Repeat Title:
Répéter le titre actuel
Repeat Chapter:
Répéter le chapitre actuel
Repeat Program:
Répétez le programme actuel
Repeat Track:
Répéter la plage actuelle
Repeat Folder:
Répéter le dossier actuel
Repeat Track:
Répéter la plage actuelle (PBC
Repeat Track:
Répéter la plage actuelle
Repeat Folder:
Répéter le dossier actuel
Répéter la plage actuelle
(non disponible pour la lecture
de liste de lecture).
non utilisé)
—
—
Random Folder:
Reproduire aléatoirement
toutes les plages du dossier
actuel, puis toutes les plages
des dossiers suivants
Random All:
Reproduire aléatoirement
toutes les plages
Random All:
Reproduire aléatoirement
toutes les plages (PBC hors
service)
Random Folder:
Reproduire aléatoirement
toutes les plages du dossier
actuel, puis toutes les plages
des dossiers suivants
Random All:
Reproduire aléatoirement
toutes les plages
Random All:
Reproduire aléatoirement
toutes les plages
18
Page 85

Sélection d’un dossier/plage sur la
liste (uniquement pour les fichiers
MP3/WMA/WAV)
• Quand apparaît sur l’affichage, vous pouvez
retourner à l’écran précédent en appuyant sur la
touche numérique 3.
1
Choisissez “LIST”.
2
3 Choisissez le type de liste.
4 Choisissez un élément.
5 Passez à l’option choisie.
A Si la Liste des fichiers est choisie
La liste disparaît et la lecture
démarre.
B Si la Liste des dossiers est choisie
• Si le dossier actuel est choisi. La liste des
fichiers apparaît, puis répétez les étapes 4 et
5 A pour démarrer la lecture.
• Si un autre dossier est choisi, la lecture
démarre à partir du premier fichier du
dossier choisi.
FRANÇAIS
Ex.: Quand “File” est choisi à l’étape 3
• Vous pouvez aller directement à une autre
liste en appuyez répétitivement sur la touche
numérique 5 ( ) ou 6 ( ).
19FONCTIONNEMENT
Page 86

Opérations en utilisant de la télécommande (RM-RK252)
Disc
Touche
FRANÇAIS
Arrêt de la lecture Arrêt de la lecture
Démarre la lecture/met la lecture en pause (si
la touche est pressée pendant la lecture)
• Recherche de chapitre vers l’arrière/vers
1
l’avant*
• Lecture au ralenti si la touche est pressée
pendant une pause (Aucun son n’est entendu.)
* DVD-VR: La lecture au ralenti vers l’arrière ne
fonctionne pas.
/
(Aucun son n’est entendu.)
Démarre la lecture/met la lecture en pause (si
la touche est pressée pendant la lecture)
Recherche de plage vers l’arrière/vers
l’avant *4 (Aucun son n’est entendu.)
*2
[Appuyez sur la touche]
Sélection d’un chapitre (pendant la
lecture ou une pause)
[Maintenez pressée la touche]
Recherche rapide de chapitre vers
l’arrière/vers l’avant *
• DVD Vidéo: Sélection d’un titre (pendant la
• DVD-VR:
lecture ou une pause)
Choisissez la liste de lecture/
programme (pendant la lecture ou
une pause)
3
—
[Appuyez sur la touche]
Sélection d’une plage
lecture ou une pause)
[Maintenez pressée la touche]
Recherche rapide de plage vers
l’arrière/vers l’avant *5 (Aucun son
n’est entendu.)
Sélection d’un dossier
• Sautez des scènes de cinq minutes vers
l’arrière ou l’avant
• Sélection d’un chapitre
(pendant la
Pour rechercher un chapitre/titre/programme/liste de lecture/dossier/plage directement
(DVD/DivX/MPEG Vidéo/VCD/MP3/WMA/WAV/CD)
1
Tout en maintenant pressée SHIFT, appuyez répétitivement sur DIRECT pour choisir le mode de recherche souhaité.
DVD Vidéo :
DVD-VR :
DivX/ MPEG Vidéo :
MP3/WMA/WAV :
2 Tout en maintenant pressée SHIFT, appuyez sur les touches numériques (0 – 9) pour entrer le numéro souhaité.
3 Appuyez sur ENT (entrée) pour valider.
VCD :
CD :
20
Page 87

Arrêt de la lecture Arrêt de la lecture Arrêt de la lecture
Démarre la lecture/met la lecture
en pause (si la touche est pressée
pendant la lecture)
Recherche de plage vers l’arrière/
vers l’avant *
1
Démarre la lecture/met la lecture
en pause (si la touche est pressée
pendant la lecture)
Recherche de plage vers l’arrière/
vers l’avant *
1
Démarre la lecture/met la lecture
en pause (si la touche est pressée
pendant la lecture)
Recherche de plage vers l’arrière/
vers l’avant *
1
• Lecture au ralenti vers l’avant *2 si
la touche est pressée pendant une
pause. (Aucun son n’est entendu.)
* La lecture au ralenti vers l’arrière ne
fonctionne pas.
[Appuyez sur la touche]
Sélection d’une plage
(pendant la lecture ou une
pause)
[Maintenez pressée la touche]
Recherche rapide de plage
vers l’arrière/vers l’avant *
[Appuyez sur la touche]
Sélection d’une plage
(pendant la lecture ou une
pause)
[Maintenez pressée la touche]
3
Recherche rapide de plage
vers l’arrière/vers l’avant *
[Appuyez sur la touche]
Sélection d’une plage
(pendant la lecture ou une
pause)
[Maintenez pressée la touche]
3
Recherche rapide de plage
vers l’arrière/vers l’avant *
(Aucun son n’est entendu.)
Sélection d’un dossier
—
—
———
• Pour les DivX/MPEG Vidéo/MP3/WMA/WAV, une plage est recherchée à l’intérieur du même dossier.
• Pour annuler une mauvaise entrée, appuyez sur CLR (annuler) tout en maintenant SHIFT pressée.
• Pour revenir à l’écran précédent, appuyez sur RETURN.
1
*
Vitesse de recherche:
*2 Vitesse de la lecture au ralenti:
*3 Vitesse de recherche:
*4 Vitesse de recherche:
*5 Vitesse de recherche:
FRANÇAIS
3
Suite à la page suivante
21FONCTIONNEMENT
Page 88

Utilisation des fonctions de commande à
partir du menu... (DVD-Vidéo/DVD-VR)
1 Appuyez sur TOP M/MENU pour afficher l’écran de
menu.
2 Appuyez sur % / fi / @ * / # * pour choisir
l’élément que vous souhaitez reproduire.
3 Appuyez sur ENT (entrée) pour valider.
* Non disponible pour les DVD-VR.
Annulation de la lecture PBC... (VCD)
FRANÇAIS
1 À l’arrêt, appuyez sur DIRECT tout en maintenant
pressée SHIFT.
2 Maintenez pressée SHIFT, puis appuyez sur les
touches numériques (0 – 9) pour entrer le numéro
souhaité.
3 Appuyez sur ENT (entrée) pour valider.
• Pour rétablir la lecture PBC, appuyez sur TOP M/
MENU.
Opérations en utilisant la
barre sur l’écran
(DVD/DVD-VR/DivX/MPEG Vidéo/VCD)
Ces opérations sont possibles sur le moniteur en
utilisant la télécommande.
1 Affichez la barre sur l’écran (voir page 23).
(deux fois)
2 Choisissez un élément.
3 Choisissez un article.
Si le menu déroulant apparaît...
• Pour annuler le menu déroulant, appuyez sur
RETURN.
• Pour entrer une durée ou des nombres, référez à
ce qui suit.
Entrée d’une durée ou d’un nombre
Appuyez sur % / fi pour changer le nombre, puis
appuyez sur @ / # pour passez à l’entrée suivante.
• Chaque fois que vous appuyez sur % / fi, le nombre
augmente/diminue d’une valeur.
• Après avoir entré le nombre, appuyez sur ENT
(entrée).
• Il n’est pas nécessaire d’entrer le zéro et les zéros
finaux (les deux derniers chiffres dans les exemples
ci-dessous).
22
Ex.: Recherche temporelle
DVD: _:_ _:_ _ (Ex.: 1:02:00)
Appuyez une fois sur %, puis deux fois sur # pour passer
à la troisième entrée, deux fois sur %, puis appuyez sur
ENT (entrée).
Pour effacer la barre sur l’écran
Page 89

Barres sur l’écran
Ex.: DVD Vidéo
Informations
Opérations
1 Type de disque
2 • DVD Vidéo/DTS-CD: Type de format de signal
audio et canal
• VCD: PBC
3 Mode de lecture*
1
DVD Vidéo: T. RPT: Répétition de titre
C. RPT: Répétition de
chapitre
DVD-VR: C. RPT: Répétition de
chapitre
PG. RPT: Répétition de
programme
DivX/MPEG Vidéo: T. RPT: Répétition de plage
F. RPT: Répétition de
dossier
F. RND: Lecture aléatoire
de dossiers
A. RND: Tout aléatoire
VCD *2: T. RPT: Répétition de plage
A. RND: Tout aléatoire
4 Informations sur la lecture
Titre/chapitre actuel
Programme/chapitre actuel
Liste de lecture/chapitre actuel
Plage actuelle
Dossier/plage actuelle
5 Indications de la durée
Durée de lecture écoulée du
disque (pour les DVD-Vidéo,
durée de lecture écoulée du titre/
programme/liste de lecture actuel.)
DVD-Vidéo/DVD-VR: Durée
de lecture restante du titre/
programme/liste de lecture
VCD: Durée de lecture restante du
disque
Durée de lecture écoulée du
chapitre ou de la plage actuelle *
Durée de lecture restante du
chapitre ou de la plage actuelle *
6 État de lecture
Lecture
Recherche vers l’avant/vers l’arrière
Lecture au ralenti vers l’avant/vers
l’arrière
Pause
Arrêt
7 Icônes de fonctionnement
Changement de l’indication de la
durée (voir 5)
Recherche temporelle (Entrée la
durée de lecture écoulée du titre/
programme/liste de lecture actuel ou
du disque.)
Recherche d’un titre (par son numéro)
Recherche d’un chapitre (par son
numéro)
Recherche d’une plage (par son
numéro)
Changement de la langue des
dialogues ou le canal audio
Changez ou mettez hors service la
langue des sous-titres
Changement de l’angle de vue
Lecture répétée*
Lecture aléatoire*
1
1
*1 Pour la lecture répétée/lecture aléatoire, référez-
vous aussi à la page 18.
*2 Quand PBC n’est pas utilisé.
*3 Non disponible pour les DVD-VR.
3
3
FRANÇAIS
23FONCTIONNEMENT
Page 90

Opérations en utilisant
l’écran de commande
(DivX/MPEG Vidéo/MP3/WMA/WAV/CD)
Ces opérations sont possibles sur le moniteur en
utilisant la télécommande.
1
Affiche l’écran de commande.
DivX/MPEG Vidéo: Appuyez sur 7 pendant la lecture
MP3/WMA/WAV/CD: Apparaît automatiquement
pendant la lecture.
FRANÇAIS
2 Choisissez la colonne “Folder” ou la colonne
“Track” (sauf pour les CD).
3 Choisissez un dossier ou une plage.
4 Démarrage de la lecture.
DivX/MPEG Vidéo: Appuyez sur ENT (entrée) ou sur
3/8.
MP3/WMA/WAV/CD: La lecture démarre
automatiquement.
Écran de commande
7 Informations sur la plage
8 Liste des plages et la plage actuellement choisie
Pour choisir un mode de lecture
1 Pendant que l’écran de commande est affiché...
.
L’écran de sélection du mode de lecture apparaît
sur la section de la liste des dossier de l’écran de
commande.
2 Choisissez un mode de lecture.
3 Choisissez un élément.
REPEAT:
RANDOM:
Mode Fonctions de lecture
F. RPT
(répétition de
dossier):
T. RPT
(répétition de
plage):
A. RND
(tout aléatoire):
F. RND
(lecture
aléatoire de
dossier):
Répéter le dossier actuel
Répéter la plage actuelle
Reproduire aléatoirement
toutes les plages
Reproduire aléatoirement
toutes les plages du dossier
actuel, puis toutes les plages
des dossiers suivants
1 Numéro du dossier actuel/nombre total de dossiers
Ex.: Disque MP3/WMA/WAV
2 Liste des dossiers et le dossier actuellement choisi
3 Mode de lecture choisi
4 Durée de lecture écoulée de la plage actuelle
5 Icône de mode de fonctionnement
( 3, 7, 8, ¡, 1 )
6 Numéro de la plage actuelle/nombre total de
plages du dossier actuel (nombre total de plage du
disque)
24
4 Validez le choix.
* Ne peut pas être choisi pour les CD.
Page 91

Opérations en utilisant
l’écran de liste
(DVD-VR/DivX/MPEG Vidéo/MP3/WMA/WAV)
Ces opérations sont possibles sur le moniteur en
utilisant la télécommande.
Écran de liste (DivX/MPEG Vidéo/MP3/WMA/
WAV)
Avant de commencer la lecture, vous pouvez afficher
la liste des dossiers/plages pour vérifier le contenu et
démarrer la lecture d’une plage.
1 Affichez la liste des dossiers quand l’appareil
est à l’arrêt.
2
Choisissez un élément sur la liste des dossiers.
• La liste des plages du dossier choisi apparaît.
• Pour retournier à la liste des dossiers, appuyez
sur RETURN.
3 Choisissez la plage à reproduire.
3 Page actuelle/nombre total de pages composant la
liste
4 Dossier/plage actuelle (mis en valeur)
Écran de liste (DVD-VR)
Vous pouvez utiliser l’écran PROGRAMME ORIGINAL ou
LISTE LECTURE à n’importe quel moment pendant la
lecture d’un DVD-VR avec ses données enregistrées.
1 Choisissez un écran de liste.
FRANÇAIS
ou
• MP3/WMA/WAV: L’écran de commande apparaît
(voir page 24).
Ex.: Liste des dossiers
1 Numéro du dossier actuel/nombre total de dossiers
2 Numéro de la plage actuelle/nombre total de
plages du dossier actuel
1 Numéro de programme/liste de lecture
2 Date d’enregistrement
3
Source d’enregistrement (chaîne de télévision,
prise d’entrée de l’appareil d’enregistrement, etc.)
4 Heure de début de l’enregistrement
5 Titre du programme/liste de lecture*
6 Sélection actuelle (mise en valeur)
7 Date de création de la liste de lecture
8 Numéro des chapitres
9 Durée de lecture
* Le titre du programme original ou de la liste de
lecture peut ne pas être affiché en fonction de
l’appareil d’enregistrement.
2 Choisissez un élément sur la liste.
25FONCTIONNEMENT
Page 92

Écoute du périphérique USB
Vous pouvez connecter un périphérique USB à mémoire de grande capacité tel qu’une mémoire USB, un disque dur
portable, etc. à cet appareil.
•
Vous pouvez aussi connecter un iPod Apple à la prise d’entrée USB. Pour en savoir plus, référez-vous aux pages 37 – 41.
Cet appareil peut reproduite les plages DivX/MPEG Vidéo/MP3/WMA/WAV stockées sur un périphérique USB.
Toutes les plages sont reproduites répétitivement jusqu’à ce que vous changiez la source ou détachiez le
périphérique USB.
12
FRANÇAIS
Mettez le moniteur sous tension pour voir l’image de
lecture si vous reproduisez un fichier DivX/MPEG. Vous
pouvez aussi commander la lecture en vous référant à
l’écran du moniteur. (Voir aussi pages 22 à 25).
• Référez-vous aux pages 20 – 25 pour les opérations
en utilisant la télécommande.
• Référez-vous aux pages 50, 51 et 56 pour plus de
réglages.
Si “
” apparaît sur le moniteur quand vous
appuyez sur une touche, c’est que l’autoradio ne
peut pas accepter la commande effectuée.
• Dans certains cas, la commande peut être refusée
sans que “ ” apparaisse.
Si un périphérique USB est connecté...
•
La lecture démarre à partir de
l’endroit où elle a été interrompue la
dernière fois.
Si un périphérique USB différent est
actuellement connecté à l’appareil,
la lecture démarre à partir du début.
Pour arrêter la lecture et détacher le
périphérique USB
Tirez en ligne droite pour le détacher le périphérique.
• Appuyez sur SOURCE pour écouter une autre source
de lecture.
26
Vous pouvez commander le périphérique USB de la même
façon que les fichiers sur un disque. (Voir pages 16 à 25.)
• Vous ne pouvez pas choisir “USB” quand le
fonctionnement sur deux zones est en service
(voir page 27).
Attention:
• Éviter d’utiliser le périphérique USB s’il peut gêner
une conduite une conduite en toute sécurité.
• Ne déconnectez puis ne reconnectez pas le
périphérique USB répétitivement pendant que
“Reading” apparaît sur l’affichage.
• Ne démarrez pas le moteur de la voiture si un
périphérique USB est connecté.
• Il se peut que cet appareil ne puisse pas lire des
fichiers en fonction du type de périphérique USB.
Le fonctionnement et l’alimentation peuvent ne pas
•
fonctionner comme prévu pour certains périphériques USB.
• Vous ne pouvez pas connecter un ordinateur à la prise
d’entrée USB de l’appareil.
• Assurez-vous que toutes les données importantes ont
été sauvegardées pour éviter toute perte de données.
• Ne laissez pas un périphérique USB dans la voiture,
exposé aux rayons directs du soleil ou aux hautes
températures pour éviter toute déformation ou tout
dommage du périphérique.
•
Certains périphériques USB peuvent ne pas fonctionner
immédiatement après la mise sous tension de l’appareil.
•
Pour en savoir plus sur les opérations USB, voir page 56.
Prise d’entrée USB
Mémoire USB
Page 93

Fonctionnement sur Deux Zones
Vous pouvez profiter de la lecture de disque sur le moniteur extérieur connecté à la prise VIDEO et et aux fiches 2nd
AUDIO OUT, tout en écoutant n’importe quelle source (sauf “AM” et “USB”) par les enceintes.
• Vous ne pouvez pas choisir “AM” ou “USB” comme source quand le fonctionnement sur deux zone est en service.
• Quand le fonctionnement sur deux zone est en service, vous pouvez commander le lecture de DVD/CD uniquement
en utilisant la télécommande. Pour les opérations, référez-vous aux pages 20 – 25.
Ces opérations sont possibles sur le moniteur en utilisant la télécommande.
1
2
Mettez en service le fonctionnement sur deux zones.
• L’indicateur DUAL s’allume sur l’affichage
La source principale change automatiquement sur “DISC”.
Pour écouter une source différente (source principale) avec le casque
d’écoute, appuyez sur SOURCE sur le panneau de commande.
• En utilisant les touches du panneau de commande, vous pouvez
commander la dernière source choisie sans affecter les opérations de la
deuxième zone.
Ajustez le volume à travers la fiche 2nd AUDIO OUT.
FRANÇAIS
3
—
Commander le lecteur de DVD/CD en utilisant la
télécommande et en vous référant à l’écran du moniteur.
Pour annuler le fonctionnement sur deux
zones
• L’indicateur DUAL s’éteint.
Sur le panneau de commande:
1
Affiche les réglages du fonctionnement sur deux
2
zones.
Met en ou hors service la fonction de double zone.
La source change automatiquement sur “DISC”
quand le fonctionnement sur deux zone est en
service.
27FONCTIONNEMENT
Page 94

Écoute d’un périphérique Bluetooth ®
Pour les opérations Bluetooth, il faut connecter
l’adaptateur Bluetooth (KS-BTA200) à la prise de
changeur de CD à l’arrière de cet appareil.
• Référez-vous aussi aux instructions fournies avec
l’adaptateur Bluetooth et le périphérique Bluetooth.
• Référez-vous à la liste (comprise dans la boîte) pour
vérifier les pays où vous pouvez utiliser la fonction
Bluetooth®.
FRANÇAIS
Pour utiliser un appareil Bluetooth à travers cet appareil
(“BT-PHONE” et “BT-AUDIO”) pour la première fois,
vous devez établir la connexion sans fil Bluetooth entre
l’appareil Bluetooth et cet appareil.
• Une fois que la connexion est établie, le périphérique
reste enregistré dans cet appareil même si vous
réinitialisez l’appareil. Un maximum de cinq appareils
peuvent être enregistrés en tout.
• Un seul périphérique peut être connecté en même
temps pour chaque source (“BT-PHONE” et “BTAUDIO” ).
Enregistrement d’un périphérique
Bluetooth
Méthodes d’enregistrement (pairage)
Utilisez une des options suivantes dans le menu
Bluetooth pour enregistrer et établir la connexion avec
un périphérique.
• Choisissez “BT-PHONE” ou “BT-AUDIO” comme source
pour commander le menu Bluetooth.
Open Rendez l’appareil prêt pour établir une
nouvelle connexion Bluetooth.
La connexion est établie à partir du
périphérique Bluetooth.
Search Rendez l’appareil prêt pour établir une
nouvelle connexion Bluetooth.
La connexion est établie à partir de cet
appareil.
• Quand
retourner à l’écran précédent en appuyant sur la
touche numérique 3.
apparaît sur l’affichage, vous pouvez
Enregistrement en utilisant “Open”
Préparation: Réglez l’appareil pour mettre en service
la fonction Bluetooth.
1 Choisissez “BT-PHONE” ou “BT-AUDIO”.
2 Choisissez “New”.
3 Affichez le menu de réglage.
4 Choisissez “Open”.
5 Entrez un code PIN (Numéro personnel
d’identification) dans l’appareil.
• Vous pouvez entrer n’importe quel nombre
(entre 1 et 16 chiffres). [Réglage initial: 0000]
• Pour entrer un code PIN de moins de 4 chiffres,
effacez d’abord le code PIN initial (0000) en
appuyant sur la touche numérique 5 ( ).
* Certains périphériques ont leur propre code PIN.
Entrez le code PIN spécifié sur l’appareil.
1 Déplacez-vous à la position du chiffre suivant
(ou précédent).
28
Page 95

2 Choisissez un chiffre ou une espace.
3 Répétez les étapes 1 et 2 jusqu’à ce que le
code PIN soit entré complètement.
4 Vérifiez l’entrée.
“Open...” clignote sur l’affichage.
6 Utilisez le périphérique Bluetooth pour faire
la recherche et réaliser la connexion.
Sur le périphérique à connecter, entrez le même
code PIN que vous venez juste d’entrer sur cet
appareil. “Connected (et le nom de l’appareil)”
apparaît sur l’affichage.
Maintenant la connexion est établie et vous pouvez
utiliser le périphérique à travers cet appareil.
Le périphérique reste enregistré même après que
vous le déconnectez. Utilisez “Connect” (ou mettez
en service “Auto Connect”) pour connecter le
même périphérique la prochaine fois. (Référez-vous
à ce qui suit et à la page 52.)
2 Choisissez le périphérique que vous
souhaitez connecter.
3 • Pour les périphériques disponibles...
1 Entrez le code PIN spécifique de l’appareil
extérieur sur cet appareil.
Référez-vous aux instructions fournies avec
le périphérique pour vérifier le code PIN.
2 Utilisez le périphérique Bluetooth pour
réaliser la connexion.
Maintenant la connexion est établie et vous
pouvez utiliser le périphérique à travers cet
appareil.
• Pour les périphériques spéciaux...
Utilisez “Open” ou “Search” pour réaliser la
connexion.
Connexion/déconnexion/suppression d’un
périphérique enregistré
1 Choisissez “BT-PHONE” ou “BT-AUDIO”.
FRANÇAIS
Connexion d’un périphérique
Réalisez les étapes 1 à 3 de la page 28, puis...
1 • Choisissez “Search” pour rechercher les
périphériques disponibles.
L’appareil recherche et affiche la liste des
périphériques disponibles.
Si aucun appareil disponible n’est détecté,
“Device not found” apparaît.
• Choisissez “Special” pour connecter un
périphérique spécial.
L’appareil affiche la liste des périphériques
préréglés.
2 Choisissez un appareil enregistré que vous
souhaitez connecter/déconnecter/supprimer.
3 Affichez le menu de réglage.
4 •
Choisissez “Connect” ou “Disconnect” pour
connecter/déconnecter le périphérique choisi.
Suite à la page suivante
APPAREILS EXTÉRIEURS
29
Page 96

• Choisissez “Delete”, puis validez votre choix.
Appuyez sur la touche numérique
3 pour choisir “No” ou retournez à
l’écran précédent.
Vous régler l’appareil pour vous connecter automatiquement au périphérique Bluetooth quand l’autoradio est
mis sous tension. (Référez-vous à “Auto Connect” à la page 52.)
FRANÇAIS
Utilisation d’un téléphone portable Bluetooth
1
2
3
Choisissez “BT-PHONE”.
Affichez le menu Bluetooth.
Établissez la connexion avec un appareil, puis faites un appel (ou faites
—
un réglage en utilisant le menu Bluetooth) (voir pages 31 et 52).
Quand un appel arrive....
La source change automatiquement sur “BT-PHONE”.
Quand “Auto Answer” est en service....
L’appareil répond automatiquement aux appels
entrant, voir page 52.
• Quand “Auto Answer” (réponse automatique) est
hors service, appuyez sur n’importe quelle touche
(sauf /molette de commande) pour
répondre à un appel entrant.
Pour terminer un appel
Maintenez pressée n’importe quelle touche (sauf
/molette de commande).
• Vous pouvez ajuster le niveau de volume du
microphone (voir page 52).
30
Quand un message textuel arrive....
Si le téléphone portable est compatible avec les
messages textuels (notifi és via l’adaptateur Bluetooth
JVC) et que “Message Info” est réglé sur “Auto” (voir
page 52), l’appareil sonne et “Received Message”
apparaît sur l’affi chage pour vous informer de l’arriver
d’un message.
Page 97

Pour faire un appel
Vous pouvez faire un appel en utilisant une des options
du menu de composition.
• Quand apparaît sur l’affichage, vous pouvez
retourner à l’écran précédent en appuyant sur la
touche numérique 3.
1 Choisissez “BT-PHONE”.
2 Affichez le menu de réglage.
3 Choisissez “Dial Menu”.
4 Choisissez la méthode pour faire un appel.
• Redial *: Affiche la liste des numéros de
téléphone que vous avez composés. Passez à
l’étape suivante.
• Received *: Affiche la liste des appels reçus.
Passez à l’étape suivante.
• Phonebook *: Affiche le répertoire
téléphonique du téléphone portable connecté.
Passez à l’étape suivante.
• Missed *: Affiche la liste des appels ratés. Passez
à l’étape suivante.
• Number: Affiche l’écran d’entrée de numéro de
téléphone. Référez-vous à “Comment entrer un
numéro de téléphone” sur la colonne de droite.
• Voice Dial (accessible uniquement quand
le téléphone portable connecté possède un
système de reconnaissance vocale): Dites le nom
(mots enregistrés) que vous souhaitez appeler.
* Apparaît uniquement quand votre
téléphone portable est muni de ces
fonctions.
– S’il n’apparaît pas, essayez de transférer la
mémoire du répertoire téléphone du téléphone
portable dans cet appareil. (Référez-vous
au manuel d’instructions fourni avec votre
téléphone portable.)
– Avec certains téléphones portables, la mémoire
du répertoire téléphone est transférée
automatiquement.
5 Choisissez le nom/numéro de téléphone que
vous souhaitez appeler.
Comment entrer un numéro de téléphone
Choisissez un nombre.
Déplacez la position
d’entrée.
Vérifiez l’entrée.
Suite à la page suivante
APPAREILS EXTÉRIEURS
31
FRANÇAIS
Page 98

Utilisation de la commande vocale
1 “Say...” apparaît sur
l’affichage.
2 Dites le nom (mots enregistrés) que vous
souhaitez appeler.
• Vous pouvez aussi utiliser une commande vocale
à partir du menu de composition de numéro.
Choisissez “Voice Dial” à partir du menu de
composition de numéro.
• Si votre téléphone portable ne prend pas en
FRANÇAIS
charge le système de reconnaissance vocale,
“Error” apparaît sur l’affichage.
2 Choisissez un numéro de téléphone.
Vous pouvez aussi entrer un nouveau
numéro de téléphone (référez-vous
aussi à “Comment entrer un numéro
de téléphone” à la page 31) pour le
mémoriser.
3 Choisissez un numéro de préréglage à
mémoriser.
Pour appeler un numéro préréglé
Préréglage d’un numéro de
Pendant l’utilisation d’un téléphone Bluetooth...
téléphone
Vous pouvez prérégler un maximum de six numéros de
téléphone.
• Quand
pouvez retourner à l’écran précédent en appuyant sur
la touche numérique 3.
apparaît sur l’affichage, vous
1 Affichez le numéro de téléphone que vous
souhaitez prérégler en utilisant une des
options du menu “Dial Menu”.
Utilisation d’un lecteur audio Bluetooth
• Les opérations et les indications de l’affichage diffèrent en fonction de leur disponibilité sur le lecteur audio
connecté.
Choisissez “BT-AUDIO”.
Si la lecture ne démarre pas automatiquement, utilisez le lecture audio Bluetooth pour démarrer
la lecture.
• Si la lecture n’entre pas en pause quand vous changez la source, utilisez le lecteur audio
Bluetooth pour mettre la lecture en pause.
32
Saut vers l’arrière/saut vers l’avant
Démarre/met en pause la lecture.
Affichez le menu de réglage (liste des
périphériques)
• Référez-vous aussi aux pages 29 et 30 pour
connecter/déconnecter/supprimer un périphérique
enregistré.
Informations sur le système Bluetooth:
Si vous souhaitez recevoir plus d’informations sur
le système Bluetooth, consultez le site web de JVC
suivant: <http://www.jvc-victor.co.jp/english/
car/>.
Page 99

Écoute du changeur de CD
Il est recommandé d’utiliser un changeur de CD JVC compatible MP3 avec votre autoradio. Vous pouvez connecter un
changeur de CD à la prise de changeur de CD à l’arrière de l’appareil.
• Vous pouvez uniquement reproduire les CD ordinaire (y compris les CD Text) et les disques MP3.
Préparation: Assurez-vous que “Changer” est choisi pour le réglage de l’entrée extérieure, voir page 47.
1
Choisissez “CD-CH”.
2
[Appuyez sur la touche]
[Maintenez pressée la touche]
MP3: Sélection de dossiers
*
* En maintenant une de ces touches pressée, vous pouvez
afficher la liste des disques (voir page 19).
Choisissez le disque à reproduire.
[Appuyez sur la touche] Pour choisir un numéro de disque de 1 à 6.
[Maintenez pressée la touche] Pour choisir un numéro de disque de 7 à 12.
Sélection d’une plage
Recherche rapide de plage
vers l’arrière/vers l’avant
Choisissez un disque/dossier/plage sur la
liste.
Référez-vous à “Sélection d’un dossier/plage sur la liste
(uniquement pour les fichiers MP3/WMA/WAV)” à la
page 19.
Choisissez “Disc” à l’étape 3 pour afficher la liste des
disques du changeur de CD.
Après avoir appuyé sur M MODE, appuyez sur les
touches suivantes pour...
Sauter 10 plages
MP3: À l’intérieur du même dossier
Repeat Track:
Répéter la plage actuelle
Repeat Folder:
MP3: Répétition de toutes les plages
• Vous pouvez aussi annuler le mode de lecture en
choisissant “Off” ou en appuyant sur la touche
numérique 4 (
du dossier actuel
Repeat Disc:
Répétition de toutes les plages du
disque actuel
Random Folder:
MP3: Lecture aléatoire de toutes
les plages du dossier actuel, puis de
toutes les plages du dossier suivant
Random Disc:
Lecture aléatoirement de toutes les
pages du disque actuel
Random All:
Reproduit aléatoirement toutes les
plages des disques dans le magasin.
).
FRANÇAIS
APPAREILS EXTÉRIEURS
33
Page 100

Écoute du tuner DAB
Avant de commencer, connectez le tuner DAB JVC , KT-DB1000 (vendu séparément) à la prise du changeur de CD à
l’arrière de l’appareil.
Préparation: Assurez-vous que “Changer” est choisi pour le réglage de l’entrée extérieure, voir page 47.
1
Choisissez “DAB”.
FRANÇAIS
2
3
4
Sélection de la bande.
Recherchez un ensemble.
Recherche manuelle: Maintenez pressée une des touches jusqu’à ce que “M” clignote sur
l’affichage, puis appuyez répétitivement sur la touche.
Choisissez le service (primaire ou secondaire) que vous souhaitez
écouter.
Quand les sons environnants sont
bruyants
Certains services offrent des signaux de commande
de la plage dynamique (DRC) en même temps que les
signaux ordinaires de leur signal. Le DRC permet de
renforcer les sons de faible niveau afin d’améliorer le
confort d’écoute.
1
2
Choisissez un des niveaux de signal DRC (1, 2
ou 3).
3 Quittez le réglage.
apparaît sur l’affichage.
• s’allume uniquement lors de la réception
de signaux DRC d’un service accordé.
Mémorisation de services DAB
Vous pouvez prérégler 6 services DAB (primaires) pour
chaque bande.
• Quand apparaît sur l’affichage, vous pouvez
retourner à l’affichage précédent en appuyant sur la
touche numérique 3.
• Plus le numéro augmente, plus le niveau de
l’effet devient fort.
34
Ex.: Mémorisation d’un ensemble (service primaire) sur
le numéro de préréglage 4 de la bande DAB 1.
Utilisation des touches numériques
1
 Loading...