

Page 1
KD-DB52/KD-DB42
CD RECEIVER / RÉCEPTEUR CD / CD-RECEIVER
Only for KD-DB52 /
Uniquement pour le KD-DB52 /
Nur bei KD-DB52:
For canceling the display demonstration, see page 4. /
Pour annuler la démonstration des achages, référez-vous à la page 4. /
Zum Abbrechen der Displaydemonstration siehe Seite 4.
For installation and connections, refer to the separate manual.
Pour l’installation et les raccordements, se référer au manuel séparé.
Für den Einbau und die Anschlüsse siehe das eigenständige Handbuch.
ENGLISH
FRANÇAIS
DEUTSCH
INSTRUCTIONS
MANUEL D’INSTRUCTIONS
BEDIENUNGSANLEITUNG
LVT2221-001B
[E]
Page 2
Please read all instructions carefully before operation, to ensure your complete understanding and to
IMPORTANT FOR LASER PRODUCTS
1. CLASS 1 LASER PRODUCT
2. CAUTION:
Do not open the top cover. There are no user serviceable parts inside the unit; leave
all servicing to qualied service personnel.
3. CAUTION:
Visible and/or invisible class 1M laser radiation when open. Do not view directly with
optical instruments.
4. REPRODUCTION OF LABEL: CAUTION LABEL, PLACED OUTSIDE THE UNIT.
Information for Users on Disposal of
Old Equipment and Batteries
[European Union only]
These symbols indicate that the product and the
battery with this symbol should not be disposed
as general household waste at its end-of-life.
If you wish to dispose of this product and the
battery, please do so in accordance with
applicable national legislation or other rules in
your country and municipality.
By disposing of this product correctly, you will
help to conserve natural resources and will help
prevent potential negative eects on the
environment and human health.
Notice:
The sign Pb below the symbol for batteries
indicates that this battery contains lead.
Products
Battery
Thank you for purchasing a JVC product.
obtain the best possible performance from the unit.
.
.
Warning:
Stop the car before operating the unit.
Caution:
Adjust the volume so that you can hear sounds
outside the car. Driving with the volume too high
may cause an accident.
Avoid using the USB device or iPod/iPhone if it
might hinder driving safety.
Caution on volume setting:
Digital devices (CD/USB) produce very little noise
compared with other sources. Lower the volume
before playing these digital sources to avoid
damaging the speakers by the sudden increase of
the output level.
Temperature inside the car:
If you have parked the car for a long time in hot
or cold weather, wait until the temperature in the
car becomes normal before operating the unit.
| ENGLISH
2
Condensation:
When the car is air-conditioned, moisture may
collect on the laser lens. This may cause disc read
errors. In this case, remove the disc and wait for
the moisture to evaporate.
JVC bears no responsibility for any loss of data in
iPod/iPhone and/or USB mass storage class
device while using this system.
Page 3

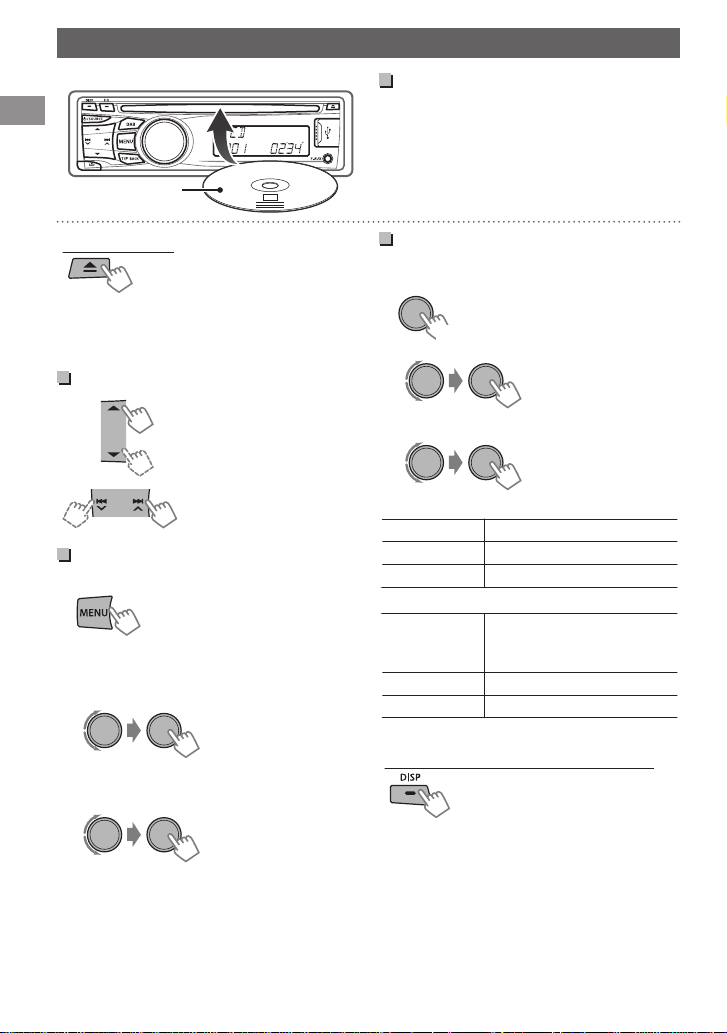
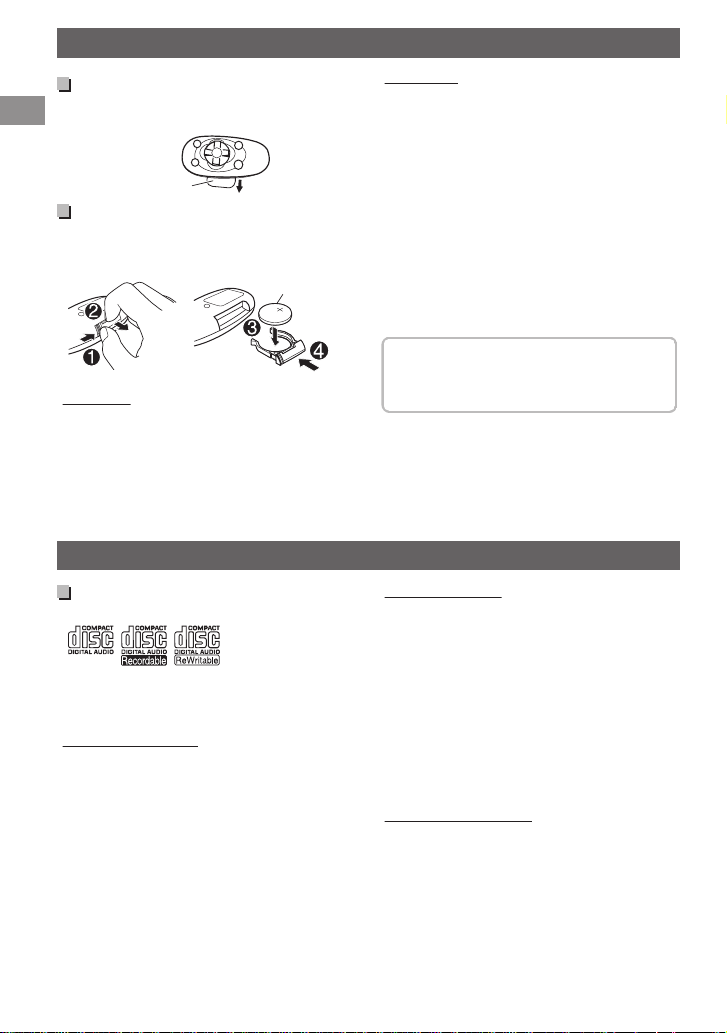
How to attach/detach the
(Hold)
control panel
.
How to reset your unit
Your preset adjustments will
also be erased.
How to forcibly eject a disc
.
0
Be careful not to drop the disc when it ejects.
0
If this does not work, reset your unit.
Maintenance
Cleaning the unit
Wipe off the dirt on the panel with a dry silicon or
soft cloth. Failure to observe this precaution may
result in damage to the unit.
Cleaning the connector
Wipe off dirt on the connector of the unit and
panel. Use a cotton swab or cloth.
Contents
Preparation ........................................................... 4
Canceling the display demonstration
Setting the clock ............................................ 4
Basic operations ................................................. 5
Listening to the radio ....................................... 6
Listening to the Digital Audio Broadcasting
(DAB)
....................................................................... 8
Listening to a disc ............................................ 10
Listening to a USB device ............................. 11
Listening to an iPod/iPhone (KD-DB52 only)
................................................................................. 11
Listening to other external components
................................................................................. 13
Changing the buttons illumination and
display color (KD-DB52 only) ....................... 14
Adjusting the sound ....................................... 15
Using BluetoothT devices
............................... 16
Menu operations ............................................. 17
Using the remote controller (KD-DB52 only)
................................................................................. 20
Additional information .................................. 20
Troubleshooting .............................................. 22
Specifications .................................................... 24
How to read this manual:
0
This manual mainly explains operations
using the buttons on the control panel.
0
< > indicates the displays on the control
panel.
....... 4
ENGLISH |
3
Page 4
(Initial setting)
(Hold)
(Initial setting)
(Initial setting)
(Hold)
(Initial setting)
Preparation
Preparation
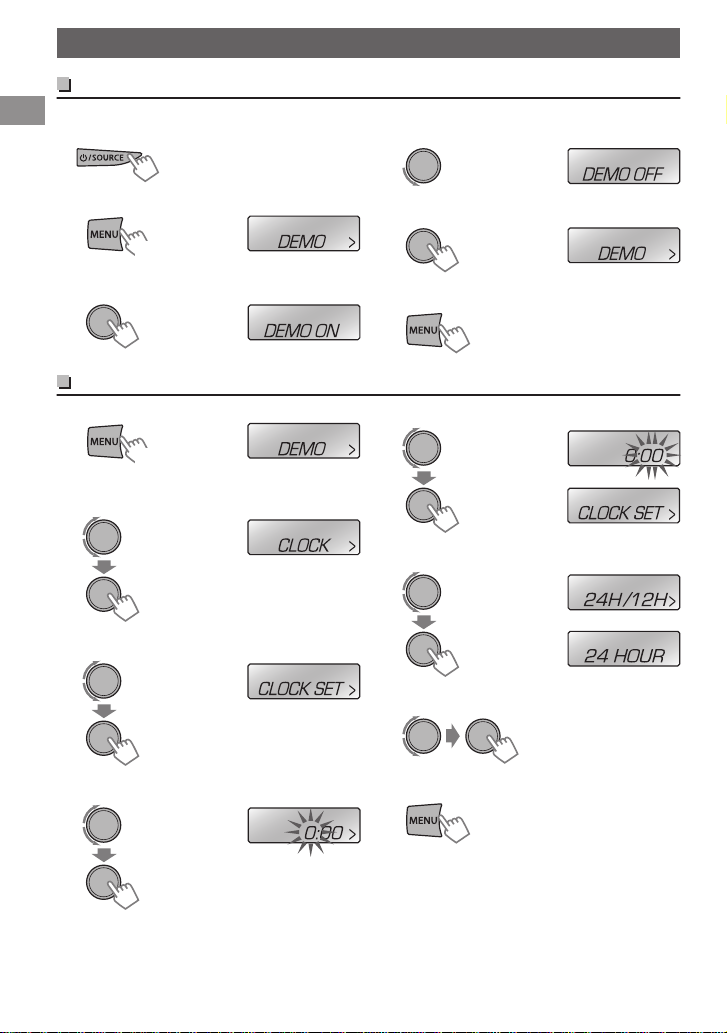
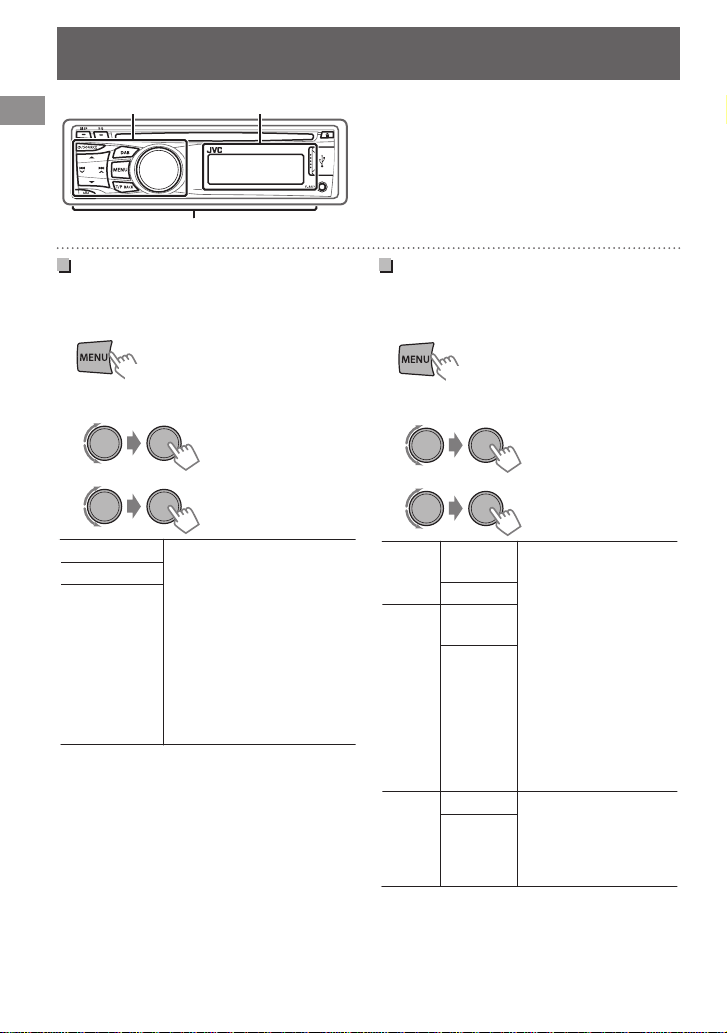
Canceling the display demonstration
The display demonstration is always turned on unless you cancel it.
Turn on the power.
1
.
.
.
2
Select <DEMO OFF>.
4
.
5
.
.
3
Setting the clock
.
1
Select <CLOCK>.
2
Select <CLOCK SET>.
3
Adjust the hour.
4
Complete the procedure.
6
Adjust the minute.
5
.
Select <24H/12H>.
6
.
Select <24 HOUR> or <12 HOUR>.
7
.
Complete the procedure.
8
.
.
.
.
.
| ENGLISH
4
Page 5
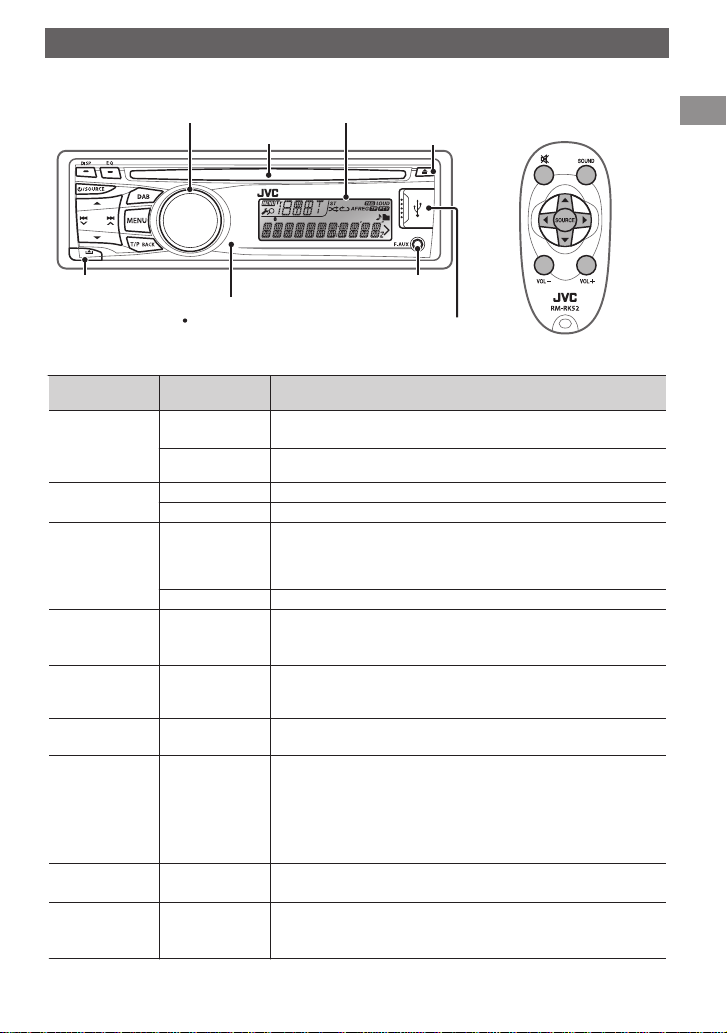
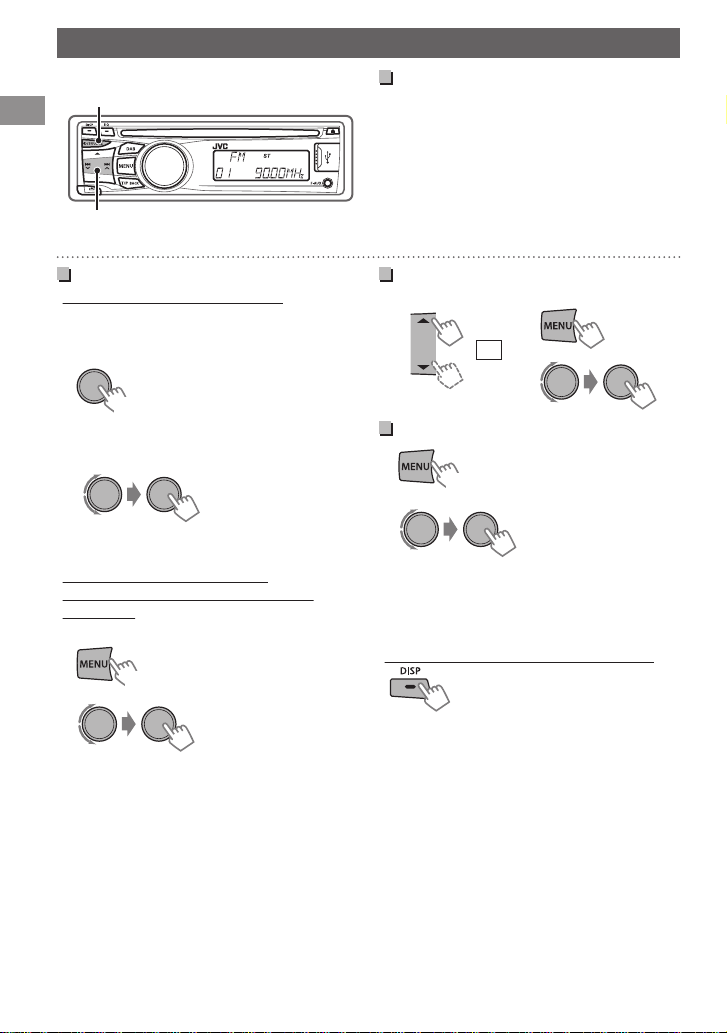
(KD-DB52 only)
Remote controller
USB input terminal
Front auxiliary
input jack
DO NOT expose to
bright sunlight.
Remote sensor
Detaches the panel
Ejects the disc
Display windowControl dial
Loading slot
Control panel
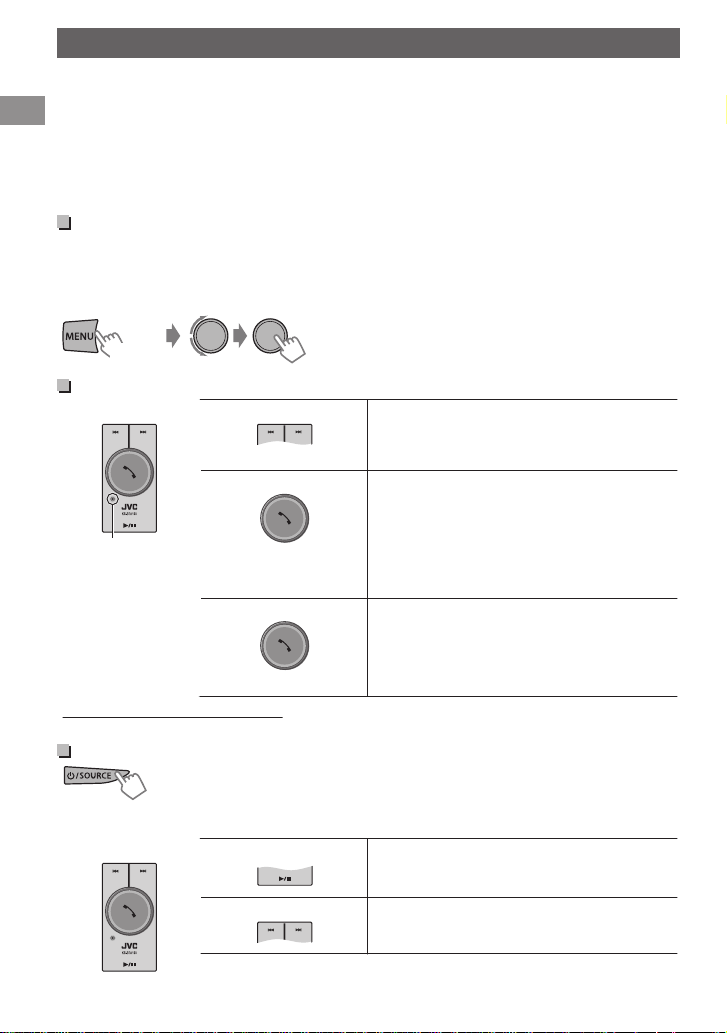
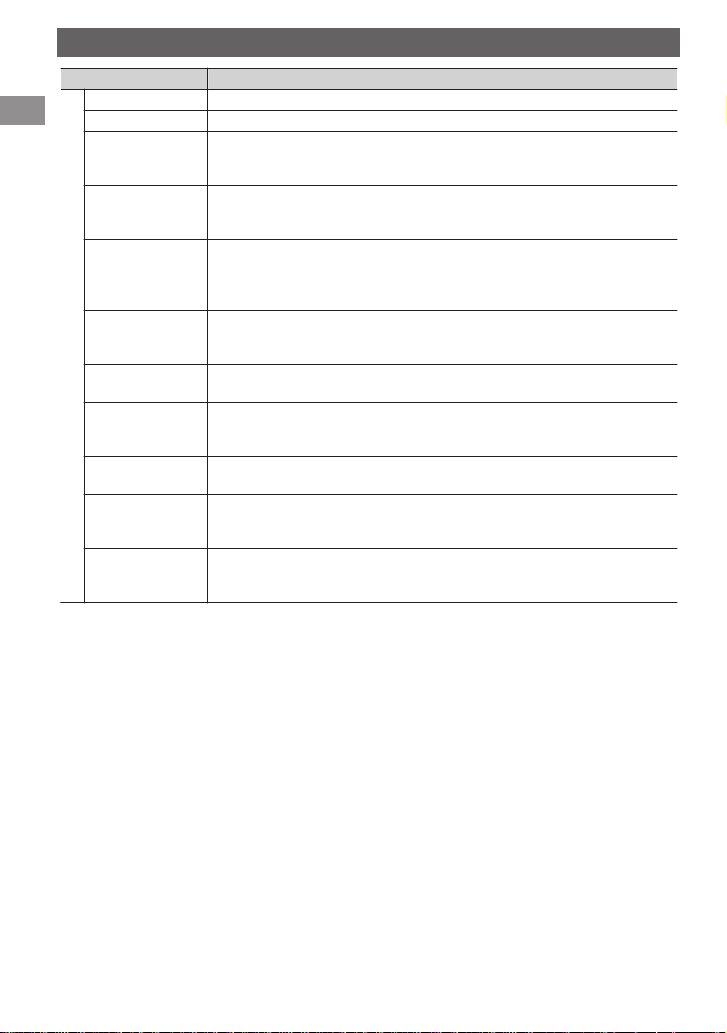
Basic operations
.
When you press or hold the following button(s)...
Control panel
B /SOURCE
Control dial
(turn)
Control dial
(press)
DAB -
EQ SOUND
DISP -
T/P BACK -
J
K
E F
Remote
controller
-
SOURCE Selects the sources. “CD” or “USB” is selectable only when a disc
0
Turns on.
0
Turns off. (Hold)
is loaded or a USB device is connected.
VOL - / + Adjusts the volume level.
- Selects items.
0
Attenuates the sound. If the source is “CD” or “USB/USB-IPOD”
d
playback pauses.
0
Press the button again to cancel attenuating or resume
playback.
- Confirms selection.
0
Enters DAB mode. (A page 8)
0
Enters DAB SORTING mode. (Hold)
0
Displays DAB services.
0
Selects the preset sound mode.
0
Hold the EQ button on the control panel to enter tone level
adjustment directly. (A page 15)
0
Changes the display information.
0
Scrolls the display information. (Hold)
0
Activates/deactivates TA Standby Reception. (A page 7)
0
Enters PTY Search mode. (Hold) (A page 7)
0
Selects the controlling terminal of an iPod/iPhone. (Hold)
J
K
H I
(KD-DB52 only) (A page 12)
0
Returns to the previous menu.
0
Exits from the menu. (Hold)
0
Selects a preset station or service. (A page 6, 8)
0
Selects MP3/WMA/AAC folder. (A page 10)
0
Searches for a station or service. (A page 6, 8)
0
Selects track. (A page 10, 12)
0
Fast-forwards or reverses track. (Hold)
Basic operations
General function
ENGLISH |
5
Page 6
A
B
(Hold)
(Hold)
1
2
or
(Hold)
Listening to the radio
Listening to the radio
.
Searching for a station
A
Select <FM> or <AM>.
B
Auto search. (Press)
Manual search. (Hold)
“M” flashes, then press the button repeatedly.
“ST” lights up when receiving an FM stereo broadcast with sufficient signal strength.
Storing stations in memory
Manual presetting (FM/AM)
You can preset up to 18 stations for FM and 6
stations for AM.
While listening to a station...
1
.
“PRESET MODE” flashes.
Select preset number.
2
.
The preset number flashes and “MEMORY”
appears.
Auto presetting (FM only)
SSM (Strong-station Sequential
Memory)
You can preset up to 18 stations for FM.
1
.
2
.
“SSM” flashes. When all the stations are stored,
“SSM” stops flashing.
To preset <SSM 07 – 12>/<SSM 13 – 18>,
repeat steps 1 and 2.
B<TUNER>
B<SSM>
B<SSM 01 – 06>
Selecting a preset station
.
Improving the FM reception
1
.
2
.
0
Reception improves, but stereo effect will be
lost.
To restore the stereo effect, repeat the same
procedure to select <MONO OFF>.
Changing the display information
.
(for non-Radio Data System station)
Frequency 1 Clock
(for FM Radio Data System station)
Station name (PS) B Frequency B Programme
type (PTY) B Clock B (back to the beginning)
B<TUNER>
B<MONO>
B<MONO ON>
6
| ENGLISH
Page 7
The following features are available only
(Hold)
(Hold)
(Hold)
for FM Radio Data System stations.
Searching for your favorite Programmes—Programme Type (PTY) Search
1
.
Select a PTY code.
2
.
.
PTY Search starts.
If there is a station broadcasting a programme of the
same PTY code as you have selected, that station is
tuned in.
PTY codes
NEWS, AFFAIRS, INFO, SPORT, EDUCATE, DRAMA, CULTURE,
SCIENCE, VARIED, POP M (music), ROCK M (music), EASY M
(music), LIGHT M (music), CLASSICS, OTHER M (music),
WEATHER, FINANCE, CHILDREN, SOCIAL, RELIGION, PHONE
IN, TRAVEL, LEISURE, JAZZ, COUNTRY, NATION M (music),
OLDIES, FOLK M (music), DOCUMENT
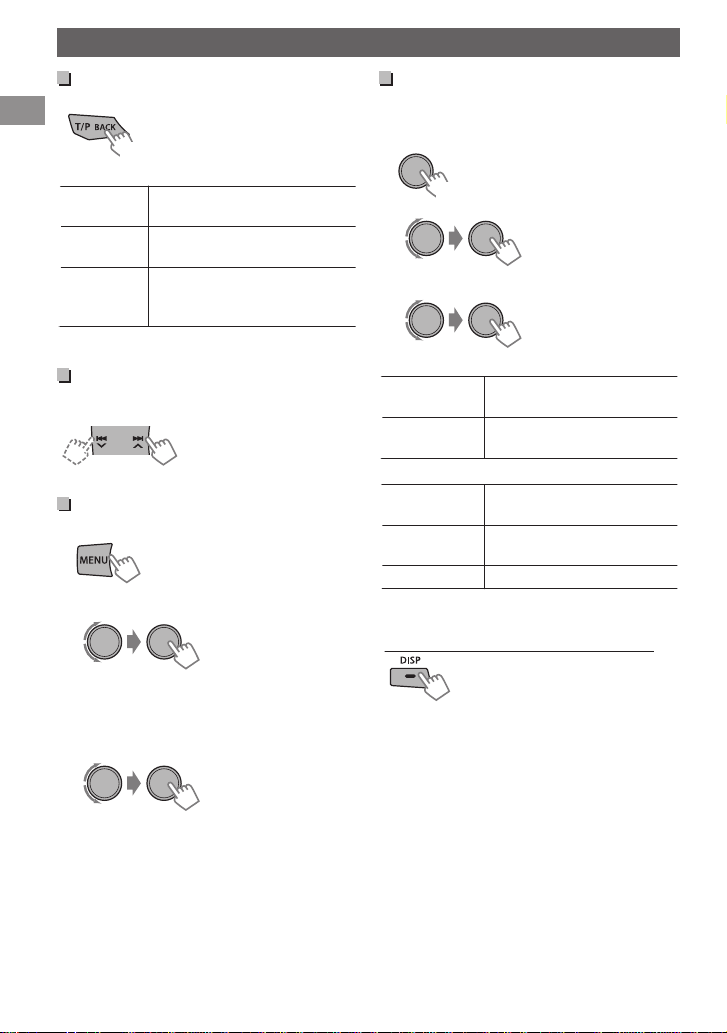
Activating TA/News Standby Reception
Standby Reception allows the unit to switch
temporarily to Traffic Announcement (TA) or
NEWS programme from any source other than
AM.
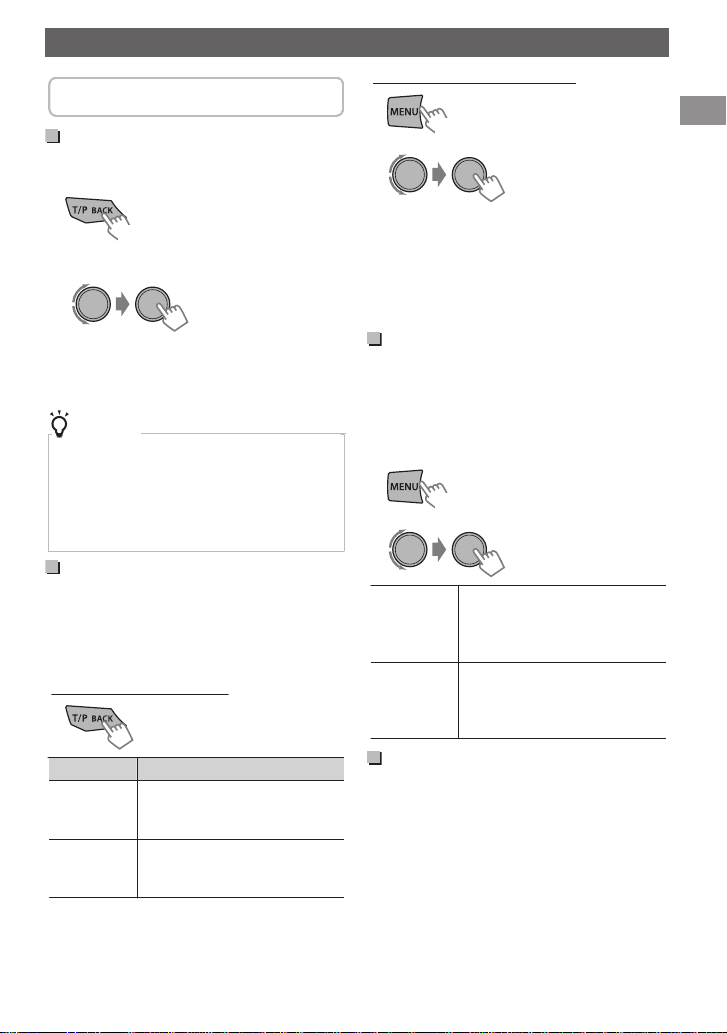
TA Standby Reception
.
TP indicator TA Standby Reception
Lights up
Flashes
0
To deactivate, press T/P BACK again.
The unit will temporarily switch
to Traffic Announcement (TA) if
available.
Not yet activated. Tune in to
another station providing the
Radio Data System signals.
Listening to the radio
NEWS Standby Reception
1
.
2
.
The unit will temporarily switch to News
B<TUNER>
B<NEWS-STBY>
B<NEWS ON>
Programme if available.
0
The volume adjustment for Traffic
Announcement or News is automatically
memorized. It will be applied the next time the
unit switches to Traffic Announcement or
News.
Tracking the same programme —Network-Tracking Reception
When driving in an area where FM reception is
not sufficient enough, this unit automatically
tunes in to another FM Radio Data System station
of the same network, possibly broadcasting the
same programme with stronger signals.
1
.
2
.
B<TUNER>
B<AF-REG>
Switches to another station. The
AF ON
programme may differ from the
one currently received (the AF
indicator lights up).
Switches to another station
AF-REG ON
broadcasting the same
programme (the AF and REG
indicators light up).
Automatic station selection— Programme Search
When the signal of a preset station you have
selected is weak, this unit searches for another
station possibly broadcasting the same
programme as the original preset station is
broadcasting.
<P-SEARCH> (A page 19)
ENGLISH |
7
Page 8
Listening to the Digital Audio Broadcasting (DAB)
A A
BC
*
or
(Hold)
(Hold)
1
2
or
.
Searching for a service in alphabetical order—Alphabet Search
Start DAB services sorting.
1
.
“DAB SORTING” flashes.
.
“DAB SORTING” disappears when sorting is
complete.
Display the services.
2
.
.
The services appear in alphabetical order.
0
“LIST EMPTY” appears if there is no service.
Select the desired character.
3
- A to Z Search
.
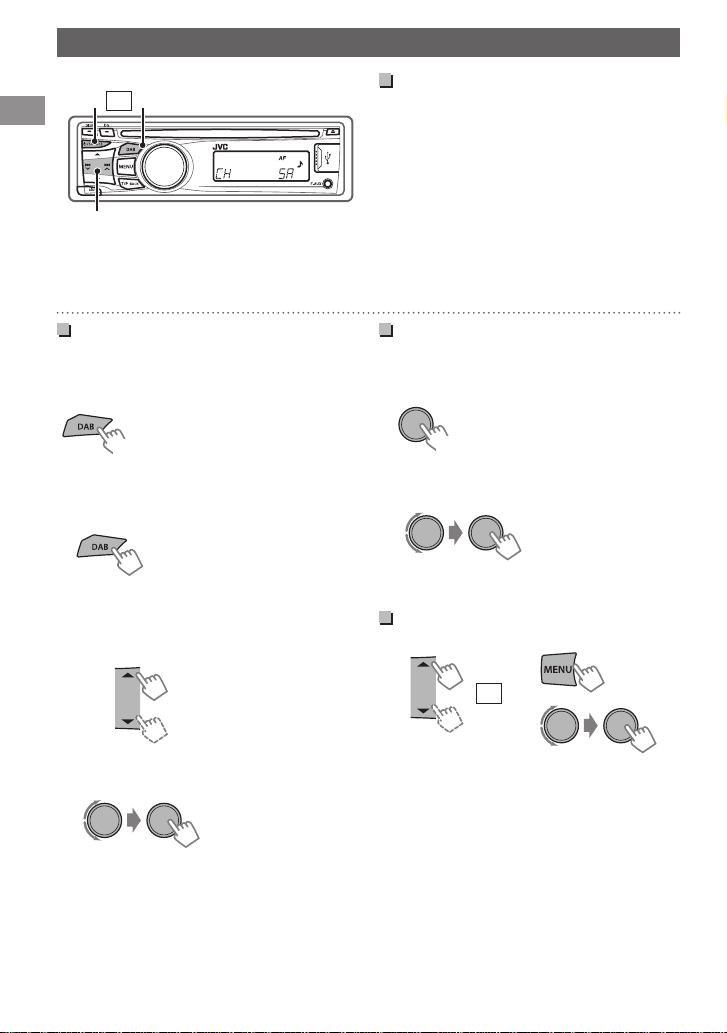
Searching for a service
A
Select <DAB>.
* Usable only when switching from other
sources.
B
Start searching for an ensemble.
0
Auto search. (Press)
When an ensemble is received, searching stops.
To stop searching, press the same button again.
0
Manual search. (Hold)
“M” flashes, then press the button repeatedly.
C
Select a service (either primary or secondary)
to listen to.
Storing DAB services in memory
You can preset up to 18 DAB services.
While listening to a service...
1
.
“PRESET MODE” flashes.
Select preset number.
2
.
The preset number flashes and “MEMORY”
appears.
Selecting a preset DAB service
.
0
Skip this step if not many services are available.
Select the desired service.
4
.
.
8
| ENGLISH
Page 9
(Hold)
(Hold)
(Hold)
Listening to the Digital Audio Broadcasting (DAB)
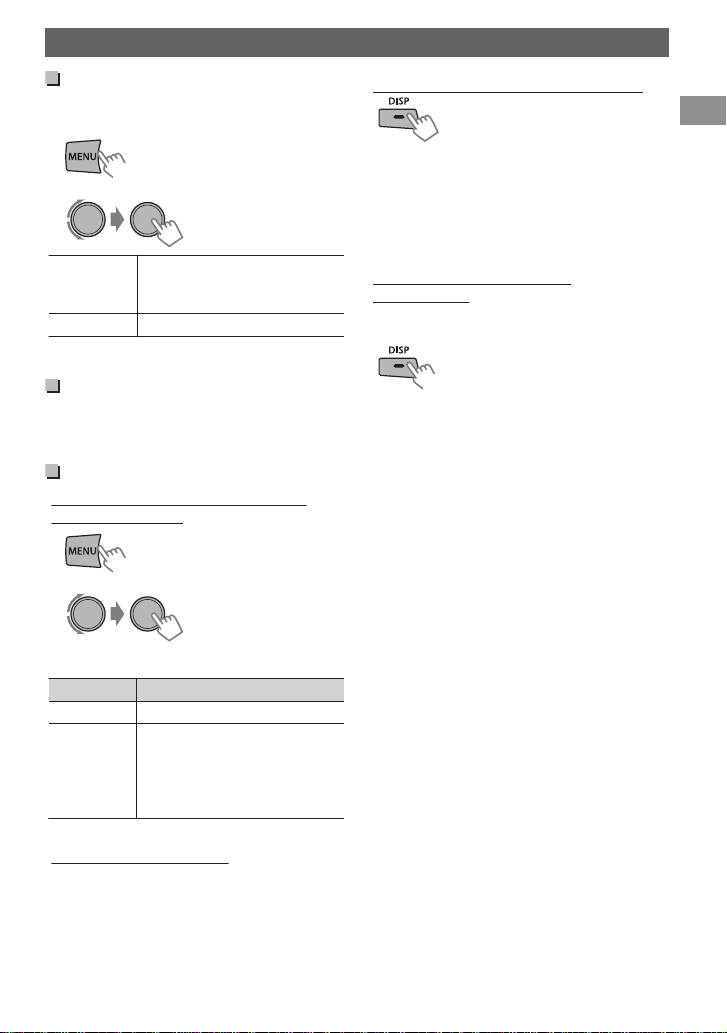
Tracking the same programme —DAB Alternative Frequency (AF) Reception
1
.
2
.
B<TUNER>
B<DAB AF>
Traces the programme among
DAB AF ON
DAB services and FM Radio Data
System stations.
DAB AF OFF Cancels.
0
Alternative Frequency Reception is activated in
the default factory setting.
Searching for your favorite Programmes—Programme Type (PTY) Search
(A page 7)
Activating Standby Reception
Programme Type Standby (PTYSTBY) Reception
1
.
2
.
Select your favorite PTY code.
3
PTY indicator PTY Standby Reception
Flashes Not yet activated.
Lights up The unit is on standby for the
0
To deactivate, select <OFF> in step 2.
TA Standby Reception
TA Standby Reception allows the unit to switch
temporarily to Traffic Announcement (TA) from
any source.
(A page 7)
B<TUNER>
B<PTY-STBY>
target PTY. When the
programme starts, “Service
name” and “PTY code” flashes
alternately.
Changing the display information
.
Service name B Ensemble name B Channel
number B Frequency B Programme type (PTY)
B Dynamic Label Segment (DLS) B Digital Radio
Type/Audio Bit Rate B Clock B (back to the
beginning)
0
“NO SIGNAL” appears if there is no signal.
Displaying the radio text
information
When “D” indicator lights on the display, you can
check the Dynamic Label Segment (DLS) directly.
.
ENGLISH |
9
Page 10
Label side
(Hold)
Listening to a disc
Listening to a disc
.
Playing a disc
The source changes to “CD” and playback starts.
All tracks will be played repeatedly until you
change the source or eject the disc.
To eject a disc
.
0
If the ejected disc is not removed within 15
seconds, it will automatically reload into the
loading slot.
0
If the disc cannot be ejected, A page 3.
Selecting a folder/track
Selects folder.
(For MP3/WMA/AAC)
0
Selects track. (Press)
0
Fast-forwards or reverses
the track. (Hold)
Selecting a track/folder from the list
1
.
The current folder name/track no. appears.
Select a folder.
2
(For MP3/WMA/AAC)
.
The current track title appears.
Select a track.
3
.
.
0
For MP3/WMA/AAC
If the disc contains many folders or tracks, you
can fast search for desired folder or track by
turning the control dial quickly.
Selecting the playback modes
You can select one of the following playback
modes at a time.
1
.
2
.
h<REPEAT>1<RANDOM>
3
.
REPEAT B
TRACK RPT Repeats current track.
FOLDER RPT * Repeats current folder.
RPT OFF Cancels repeat playback.
RANDOM A
FOLDER RND *
ALL RND Randomly plays all tracks.
RND OFF Cancels random playback.
* For MP3/WMA/AAC
Changing the display information
.
Track no./Playing time B Track no./Clock time B
Album title/Artist* B Track title* B (back to the
beginning)
* “NO NAME” appears for conventional CDs or if
not recorded.
Randomly plays all tracks of
current folder, then tracks of
next folders.
| ENGLISH
10
Page 11
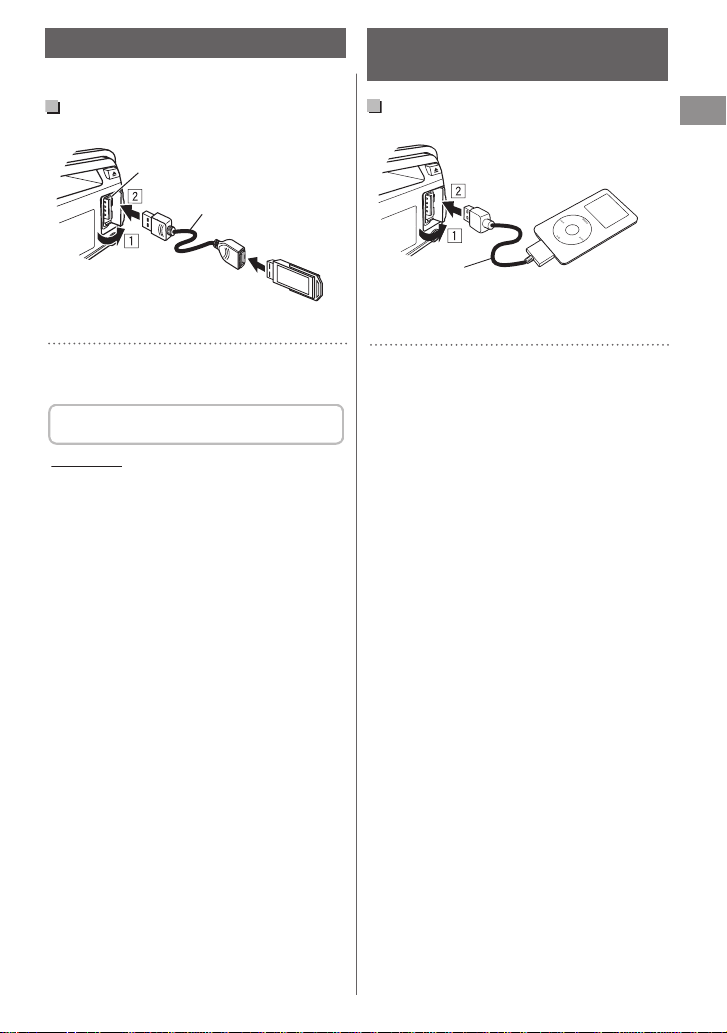
USB 2.0 cable
(not supplied)
USB input terminal
USB 2.0 cable (accessory of the
iPod/iPhone)
USB input terminal
Apple iPod/iPhone
Listening to a USB device
Listening to an iPod/iPhone (KD-DB52 only)
Playing a USB device
.
The source changes to “USB” and playback starts.
.
0
This unit can play MP3/WMA/AAC files stored
in a USB mass storage device (such as a USB
memory, Digital Audio Player, etc.).
You can operate the USB device in the same
way you operate the files on a disc. (A page 10)
Cautions
0
Make sure all important data has been backed
up.
0
Do not pull out and attach the USB device
repeatedly while “READING” is shown on the
display.
0
Electrostatic shock at connecting a USB device
may cause abnormal playback of the device. In
this case, disconnect the USB device then reset
this unit and the USB device.
0
Do not leave a USB device in the car, expose to
direct sunlight, or high temperature. Failure to
do so may result in deformation or cause
damages to the device.
0
For more details about USB operation,
A page 21.
Playing an iPod/iPhone
.
The source changes to “USB” B “USB-IPOD” and
playback starts.
.
0
iPod/iPhone that can be connected to this unit:
- iPod touch (4th generation)
- iPod touch (3rd generation)
- iPod touch (2nd generation)
- iPod touch (1st generation)
- iPod classic
- iPod with video (5th generation)*
- iPod nano (6th generation)
- iPod nano (5th generation)
- iPod nano (4th generation)
- iPod nano (3rd generation)
- iPod nano (2nd generation)
- iPod nano (1st generation)*
- iPhone 4
- iPhone 3GS
- iPhone 3G
- iPhone
*<IPOD MODE/EXT MODE> are not applicable.
0
It is not possible to browse video files on the
“Videos” menu in <HEAD MODE>.
0
The song order displayed on the selection
menu of this unit may differ from that of the
iPod.
0
When operating an iPod/iPhone, some
operations may not be performed correctly or
as intended. In this case, visit the following JVC
website:
<http://www.jvc.jp/english/car/index.html>
(English website only).
ENGLISH |
11
Page 12
(Hold)
(Hold)
Listening to an iPod/iPhone (KD-DB52 only)
Selecting the control terminal —IPOD SWITCH
.
h<HEAD MODE/IPOD MODE/EXT MODE>
HEAD MODE Controls iPod playback through
this unit.
IPOD MODE Controls iPod playback from the
iPod/iPhone.
EXT MODE Allows any audio signals from
iPod/iPhone. The display always
shows “EXT MODE”.
0
You can also change the setting using <IPOD
SWITCH> in the menu.
Selecting a track
Applicable under <HEAD MODE/IPODMODE>
only.
0
Selects track/chapter.
(Press)
0
Fast-forwards or reverses
the track. (Hold)
Selecting a track from the menu
Applicable under <HEAD MODE> only.
1
.
Select the desired menu.
2
.
.
PLAYLISTS1ARTISTS1ALBUMS1SONGS1POD
CASTS1GENRES1COMPOSERS1 (back to the
beginning)
Select the desired track.
3
.
Selecting the playback modes
You can select one of the following playback
modes at a time.
Applicable under <HEAD MODE> only.
1
.
2
.
h<REPEAT>1<RANDOM>
3
.
REPEAT B
ONE RPT
ALL RPT
RANDOM A
SONG RND
ALBUM RND
RND OFF Cancels random playback.
0
“ALBUM RND” is not applicable for some iPod/
iPhone.
Changing the display information
.
Track no./Playing time B Track no./Clock time B
Album title/Artist B Track title B (back to the
beginning)
Functions the same as “Repeat
One” of the iPod.
Functions the same as “Repeat
All” of the iPod.
Functions the same as “Shuffle
Songs” of the iPod.
Functions the same as “Shuffle
Albums” of the iPod.
.
Repeat this step until the desired track is selected.
0
If the selected menu contains many tracks, you
can fast search for the desired track by turning
the control dial quickly.
| ENGLISH
12
Page 13
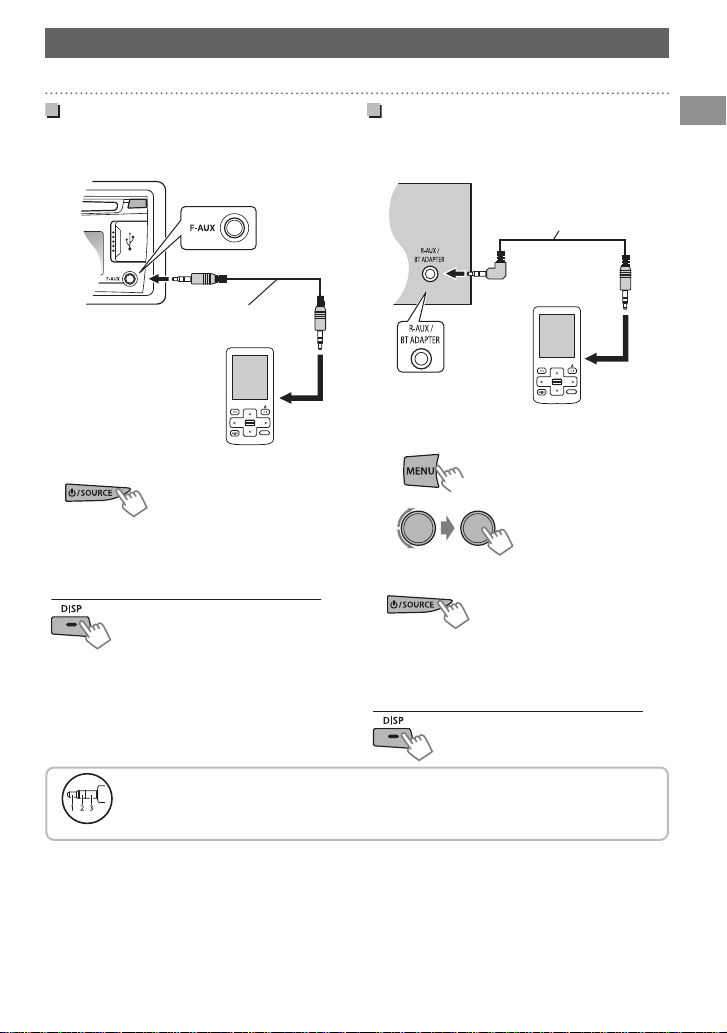
Portable audio
player, etc.
3.5 mm stereo mini plug
(not supplied)
Portable audio
player, etc.
3.5 mm stereo mini plug
(with “L” shaped connector)
(not supplied)
(Hold)
Recommended to use a 3-terminal plug head stereo mini plug for optimum audio
output.
Listening to other external components
Listening to other external components
For details, refer also to the instructions supplied with the external components.
Playing an external component from Front AUX
Connect to F-AUX on the front panel.
1
Select <F-AUX>.
2
.
.
Turn on the connected component and
3
start playing the source.
Changing the display information
F-AUX1AUX/Clock time
Playing an external component from Rear AUX
.
Connect to R-AUX on the rear panel.
1
Set the source.
2
A
.
B
.
Select <R-AUX>.
3
.
.
Turn on the connected component and
4
start playing the source.
Changing the display information
R-AUX1AUX/Clock time
B<SRC SELECT>
B<R-AUX>
B<R-AUX ON>
.
.
ENGLISH |
13
Page 14
Changing the buttons illumination and display color
All zone
Display zoneButton zone
(Hold)
(Hold)
(KD-DB52 only)
All zone: Includes both Button zone and Display
zone.
.
Selecting the preset color
You can select a preset color for <BUTTON
ZONE>, <DISP ZONE>, and <ALL ZONE>
separately.
1
.
Select <COLOR>.
2
.
.
3
.
BUTTON ZONE COLOR 01-29/USER/
DISP ZONE
ALL ZONE
0
Initial color: BUTTON ZONE [06], DISP ZONE
[01], ALL ZONE [06].
0
If <ALL ZONE> is selected, the button and
display illumination will change to the current/
selected <BUTTON ZONE> color.
COLOR FLOW 01-03*
* COLOR FLOW 01:
Color changes every 9
seconds.
COLOR FLOW 02:
Color changes every 5
seconds.
COLOR FLOW 03:
Color changes every 3
seconds.
Storing your own color adjustments
You can store your own day and night colors for
<BUTTON ZONE> and <DISP ZONE> separately.
1
.
Select <COLOR SETUP>.
2
.
3
.
DAY
BUTTON
COLOR
ZONE
DISP ZONE
NIGHT
BUTTON
COLOR
ZONE
DISP ZONE
MENU
ON Changes the display and
COLOR
OFF
0
NIGHT COLOR/DAY COLOR is changed by
turning on/off your car’s headlight.
0
Select a primary color
<RED/GREEN/BLUE>,
and then adjust the
level <00-31>. Repeat
this procedure until
you have adjusted all
the three primary
colors.
0
Your adjustment is
automatically stored
to “USER”.
0
If “00” is selected for
all the primary colors
for <DISP ZONE>,
nothing appears on
the display.
buttons illumination
during menu, list search,
and playback mode
operations.
| ENGLISH
14
Page 15
20
-5
0
+5
+10
+15
50 100 200 500 1k 2k 5k 10k 20k
[Hz]
[dB]
(Hold)
(Hold)
Adjusting the sound
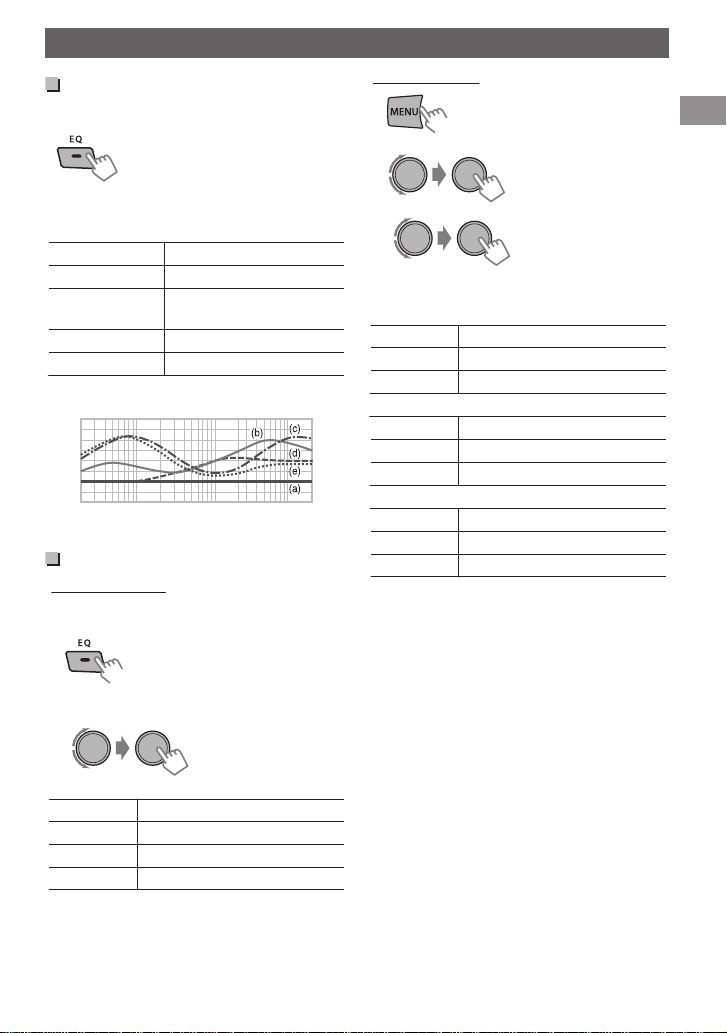
Selecting a preset sound mode
You can select a preset sound mode suitable for
the music genre.
.
FLATBNATURALBDYNAMICBVOCAL
BOOSTBBASS BOOSTBUSERB (back to the
beginning)
(a) FLAT
(b) NATURAL
(c) DYNAMIC
(d) VOCAL BOOST
(e) BASS BOOST
.
Frequency characteristics of the sounds
Storing your own adjustment
Easy Equalizer
While listening, you can adjust the subwoofer
level and tone level of the selected sound mode.
1
.
Adjust the level.
2
.
Flat for all range.
High frequency is boosted.
High and low frequency are
boosted.
Mid frequency is boosted.
Low frequency is boosted.
Adjusting the sound
Pro Equalizer
1
.
2
.
B<PRO EQ>
B<BASS/MIDDLE/
TREBLE>
3
.
Adjust the sound elements of the selected tone.
BASS
Frequency 60/[80]/100/200 Hz
Level LVL -06 to +06 [00]
Q [Q1.0]/Q1.25/Q1.5/Q2.0
MIDDLE
Frequency 0.5/[1.0]/1.5/2.5 kHz
Level LVL -06 to +06 [00]
Q Q0.75/Q1.0/[Q1.25]
TREBLE
Frequency [10.0]/12.5/15.0/17.5 kHz
Level LVL -06 to +06 [00]
Q [Q FIX]
Repeat steps 2 and 3 to adjust other
4
tones.
The adjustments are stored and <USER> is
activated.
(Initial: [XX])
.
SUB.W* 00 to 08 [04]
BASS LVL -06 to +06 [00]
MID LVL -06 to +06 [00]
TRE LVL -06 to +06 [00]
The adjustments are stored and <USER> is
activated.
* Available only when <L/O MODE> is set to
<SUB.W>.
(Initial: [XX])
ENGLISH |
15
Page 16
(Hold)
(High)
(Low)
(Press)
(Hold)
KS-BTA100
Microphone
(CD receiver)
KS-BTA100
Using BluetoothT devices
Using BluetoothT devices
For Bluetooth operations, it is required to connect the Bluetooth adapter, KS-BTA100 (separately
purchased) to the auxiliary input jack (R-AUX/BT ADAPTER) on the rear of the unit. (A Installation/
Connection Manual)
0
KS-BTA100 is not available in some countries. Please contact your dealer where you purchased this
unit.
0
For details, refer also to the instructions supplied with the Bluetooth adapter and the Bluetooth
device.
0
Operations may be different depending on the connected device.
Preparation
Register (pair) a Bluetooth device with KS-BTA100.
1
.
0
Refer to the instructions manual supplied with KS-BTA100.
Change the <SRC SELECT> settings of this unit.
2
.
B<SRC SELECT>
B<R-AUX>
B<BT ADAPTER>
Using the Bluetooth mobile phone
.
.
.
About microphone volume:
0
When you turn off the power of the unit, the volume level changes to Normal.
Adjusting the microphone volume
Volume level: High/ Normal (initial)/ Low
0
Receiving a call
When a call comes in...
0
Making a call
Making a call to the last connected number from
your phone.
0
Switching between hands-free and phone
While talking...
0
Ends/rejects call
0
Voice dialing
Voice dialing is available only when the
connected mobile phone has the voice
recognition system.
Using the Bluetooth audio device
B “BT AUDIO”
.
| ENGLISH
16
. Starts/pauses playback.
.
0
If playback does not start, operate the
Bluetooth audio player to start playback.
0
Selects track. (Press)
0
Fast-forwards or reverses the track. (Hold)
Page 17
(Hold)
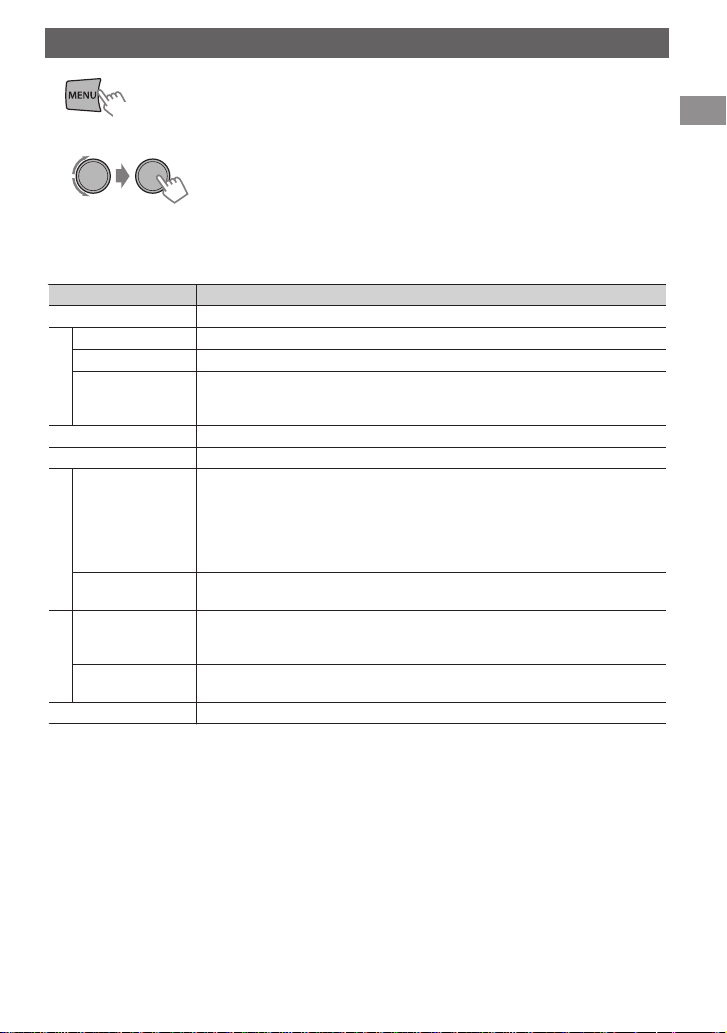
Menu operations
Menu operations
1
.
If no operation is done for about 60 seconds, the operation will be canceled.
2
.
Repeat step 2 if necessary.
3
0
To return to the previous menu, press T/P BACK.
0
To exit from the menu, press DISP or MENU.
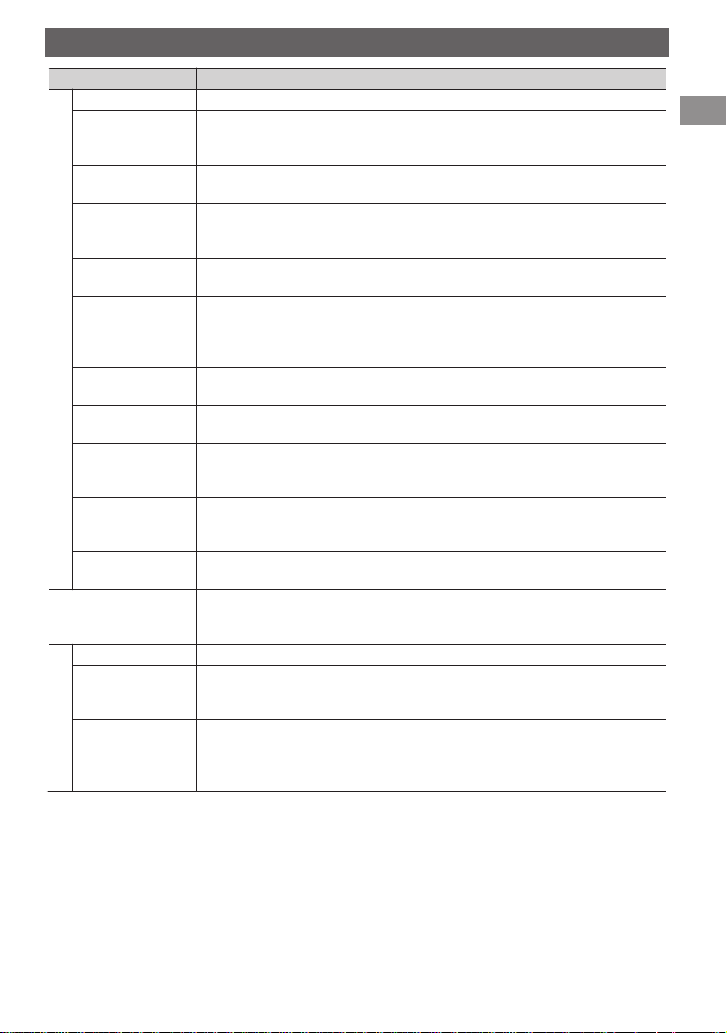
Menu item Selectable setting (Initial: [XX])
DEMO
CLOCK SET
24H/12H
CLOCK ADJ *1
CLOCK
(Clock adjustment)
COLOR
COLOR SETUP
DIMMER SET Selects the display and button illumination adjusted in the <BRIGHTNESS>/
DIMMER
BRIGHTNESS DAY [25] /NIGHT [11]: Selects the display and button illumination
SCROLL *3 [ONCE]: Scrolls the display information once.
TAG DISPLAY [ON]: Shows the TAG information while playing MP3/WMA/AAC tracks.
DISPLAY
PRO EQ
*1 Takes effect only when clock data is received.
*2 The illumination control lead connection is required. (See “Installation/Connection Manual”.) This
setting may not work correctly on some vehicles (particularly on those having a control dial for
dimming). In this case, change the setting to other than <DIMMER AUTO>.
*3 Some characters or symbols will not be shown correctly (or will be blanked) on the display.
For settings, A page 4.
For settings, A page 4.
For settings, A page 4.
[AUTO]: The built-in clock is automatically adjusted using the clock data in
the DAB signal.
OFF: Cancels.
For settings, A page 14. (KD-DB52 only)
For settings, A page 14. (KD-DB52 only)
<COLOR SETUP> setting.
[AUTO]: Changes between the Day and Night adjustments when you turn
off/on the car headlights. *2
ON: Selects the Night adjustments.
OFF: Selects the Day adjustments.
brightness level 00-31 for day and night.
AUTO: Repeats scrolling (at 5-second intervals).
OFF: Cancels.
OFF: Cancels.
For settings, A page 15.
ENGLISH |
17
Page 18
Menu operations
Menu item Selectable setting (Initial: [XX])
FADER *4*5 R06-F06 [00]: Adjusts the front and rear speaker output balance.
BALANCE *5 L06-R06 [00]: Adjusts the left and right speaker output balance.
LOUD
(Loudness)
VOL ADJUST
(Volume adjust)
L/O MODE
(Line output
mode)
SUB.W LPF *6
(Subwoofer lowpass filter)
AUDIO
SUB.W LEVEL *6
(Subwoofer level)
HPF
(High-pass filter)
BEEP
(Keytouch tone)
TEL MUTING *7
(Telephone
muting)
AMP GAIN *8
(Amplifier gain)
*4 If you are using a two-speaker system, set the fader level to “00”.
*5 This adjustment will not affect the subwoofer output.
*6 Displayed only when <L/O MODE> is set to <SUB.W>.
*7 This setting does not work if <BT ADAPTER> is selected for <R-AUX> of <SRC SELECT>.
*8 The volume level automatically changes to “VOLUME 30” if you change to <LOW POWER> with
the volume level set to higher than “VOLUME 30”.
ON: Boosts low and high frequencies to produce a well-balanced sound at a
low volume level.
[OFF]: Cancels.
-05 - +05 [00]: Presets the volume adjustment level of each source,
compared to the FM volume level. Before adjustment, select the source you
want to adjust. (“VOL ADJ FIX” appears if “FM” is selected.)
Select if the REAR/SW terminals are used for connecting the following
devices (through an external amplifier).
SUB.W: Subwoofer
[REAR]: Speakers
LOW 55Hz / [LOW 85Hz] / LOW 120Hz:
Audio signals with frequencies lower than 55 Hz/85 Hz/120 Hz are sent to
the subwoofer.
00-08 [04]: Adjusts the subwoofer output level.
ON: Activates the High Pass Filter. Low frequency signals are cut off from the
front/rear speakers.
[OFF]: Deactivates. (All signals are sent to the front/rear speakers.)
[ON]/OFF: Activates or deactivates the keypress tone.
ON: Attenuates the sounds while using the cell phone (not connected
through KS-BTA100).
[OFF]: Cancels.
LOW POWER: VOLUME 00-VOLUME 30 (Select if the maximum power of
each speaker is less than 50 W to prevent damaging the speakers.)
[HIGH POWER]: VOLUME 00-VOLUME 50
| ENGLISH
18
Page 19
Menu operations
Menu item Selectable setting (Initial: [XX])
SSM
AF-REG *9 [AF ON]: Activates Alternative Frequency Reception.
NEWS-STBY *9
(News standby)
P-SEARCH *9
(Programme
search)
MONO
(Monaural mode)
IF BAND
(Intermediate
frequency band)
TUNER
DAB AF [ON]/OFF: Activates or deactivates DAB Alternative Frequency Reception.
DAB L-BAND *10 ON: Searches BAND-III and L-BAND.
DAB ANT PWR
(Antenna power)
PTY-STBY
(Programme type
standby)
DAB Vxxx *11 Displays the version number of DAB software. (Displayed only when the
IPOD SWITCH
(iPod/iPhone control)
AM *12 [ON]/OFF: Enables or disables “AM” in source selection.
F-AUX *12
(Front auxiliary
input)
R-AUX *12
(Rear auxiliary
SRC SELECT
input)
*9 Only for FM Radio Data System stations.
*10 When you change the setting, the preset stations will be initialized.
*11 For updating DAB software, visit the following JVC website:
<http://www.jvc.jp/english/car/index.html> (English website only).
*12 Displayed only when any source other than the corresponding setting “AM/F-AUX/R-AUX/BT
AUDIO” is selected.
For settings, A page 6. (Displayed only when the source is “FM”.)
AF-REG ON: Activates Alternative Frequency Regionalization Reception.
OFF: Cancels. (Selectable only when <DAB AF> is set to <OFF>) (A page 9)
ON/[OFF]: Activates or deactivates NEWS Standby Reception. (Displayed
only when the source is “FM”.) (A page 7)
SEARCH ON/[SEARCH OFF]:
Activates Programme Search (if <AF-REG> is set to
<AF ON> or <AF-REG ON>) or deactivates.
[MONO OFF]/MONO ON:
For settings, A page 6. (Displayed only when the source is “FM”.)
[AUTO]: Increases the tuner selectivity to reduce interference noises
between adjacent stations. (Stereo effect may be lost.)
WIDE: Subject to interference noises from adjacent stations, but sound
quality will not be degraded and the stereo effect will remain.
(A page 9)
[OFF]: Searches only BAND-III. (Displayed only when the source is “DAB”.)
[ON]: The unit supplies the power to the DAB aerial with the booster. Select
when using the DAB aerial with the booster.
OFF: Select when using the DAB aerial without the booster.
[OFF]: Cancels.
PTY codes: Activates PTY Standby Reception with one of the PTY codes.
(Displayed only when the source is “DAB”.) (A page 9)
source is “DAB”.)
[HEAD MODE]/IPOD MODE/EXT MODE:
For settings, A page 12. (Displayed only when the source is “USB-IPOD”.)
(KD-DB52 only)
[ON]/OFF: Enables or disables “F-AUX” in source selection.
ON/OFF: Enables or disables “R-AUX” in source selection.
[BT ADAPTER]: Select if the rear auxiliary input jack is connected to the
Bluetooth adapter, KS-BTA100 (A page 16). The source name will be
changed to “BT AUDIO”.
ENGLISH |
19
Page 20
Insulation sheet
CR2025
Using the remote controller (KD-DB52 only)
Using the remote controller (KD-DB52 only)
Preparing
When you use the remote controller for the first
time, pull out the insulation sheet.
.
Replacing the lithium coin battery
0
If the effectiveness of the remote controller
decreases, replace the battery.
Warning:
0
Do not install any battery other than CR2025 or
its equivalent.
0
Do not leave the remote controller in places
(such as dashboards) exposed to direct
sunlight for a long time.
0
Store the battery in places out of reach of
children.
0
Do not recharge, short, disassemble, heat the
battery, or dispose of it in a fire.
0
Do not place the battery with other metallic
materials.
0
Do not poke the battery with tweezers or
similar tools.
0
Insulate the battery by wrapping it with tape
when disposing or storing it.
This unit is equipped with the steering wheel
.
Caution:
0
Danger of explosion if battery is incorrectly
replaced. Replace only with the same or
equivalent type.
0
Battery shall not be exposed to excessive heat
such as sunshine, fire, or the like.
remote control function. For details, refer also to
the instructions supplied with the remote
adapter.
KD-DB42 can be controlled with the remote
controller RM-RK52. (optionally purchased)
Additional information
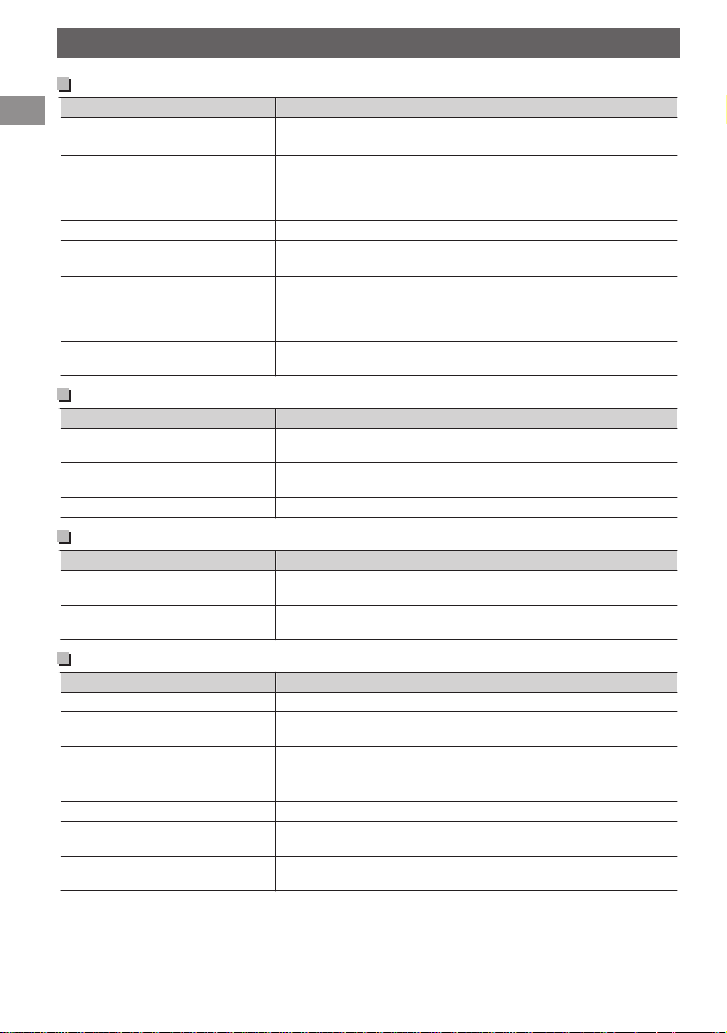
About discs
This unit can only play the following CDs:
.
This unit can play back multi-session discs;
however, unclosed sessions will be skipped
during playback.
Unplayable discs
0
Discs that are not round.
0
Discs with coloring on the recording surface or
discs that are dirty.
0
Recordable/ReWritable disc that has not been
finalized. (For details on disc finalization, refer
to your disc writing software and your disc
recorder instruction manual.)
0
8 cm (3 inch) CD. Attempt to insert using an
adapter can cause malfunction.
Handling discs
0
Do not touch the recording surface of the disc.
0
Do not stick tape etc. on the disc, or use a disc
with tape stuck on it.
0
Do not use any accessories for the disc.
0
Clean from the center of the disc and move
outwards.
0
Clean the disc with a dry silicon or soft cloth.
Do not use any solvents.
0
When removing discs from this unit, pull them
out horizontally.
0
Remove the rims from the center hole and disc
edge before inserting a disc.
DualDisc playback
The Non-DVD side of a “DualDisc” does not
comply with the “Compact Disc Digital Audio”
standard. Therefore, the use of Non-DVD side of a
DualDisc on this product may not be
recommended.
| ENGLISH
20
Page 21

Additional information
Audio files
Playable files
0
File extensions: MP3(.mp3), WMA(.wma),
AAC-LC(.m4a)
(regardless of the letter case—upper/lower)
0
Bit rate:
MP3: 32 kbps - 320 kbps
WMA: 32 kbps - 192 kbps
AAC: 8 kbps - 320 kbps
0
Sampling frequency:
MP3/AAC: 48 kHz, 44.1 kHz, 32 kHz, 24 kHz,
22.05 kHz, 16 kHz, 12 kHz, 11.025 kHz, 8 kHz
WMA: 48 kHz, 44.1 kHz, 32 kHz, 22.05 kHz
0
Variable bit rate (VBR) files. (The elapsed time
for VBR files will not be displayed correctly.)
Unplayable files
0
MP3 files:
- encoded in MP3i and MP3 PRO format
- encoded in an inappropriate format
- encoded with Layer 1/2
0
WMA files:
- encoded in lossless, professional, and voice
format
- not based upon Windows Media ® Audio
- copy-protected with DRM
0
AAC files:
- copy-protected with DRM
0
Files which include data such as AIFF, ATRAC3,
etc.
Maximum number of characters for
file/folder name
Varies depending on the disc format used
(includes 4 extension characters—<.mp3>,
<.wma> or <.m4a>).
0
ISO 9660 Level 1 and 2: 64 characters
0
Romeo: 64 characters
0
Joliet: 32 characters
0
Windows long file name: 64 characters
Others
0
This unit can show WMA Tag and ID3 Tag
Version 1.0/1.1/2.2/2.3/2.4 (for MP3).
0
The search function works but search speed is
not constant.
About USB device
0
When connecting a USB cable, use the USB 2.0
cable.
0
You cannot connect a computer or portable
HDD to the USB input terminal of the unit.
0
Connect only one USB device to the unit at a
time. Do not use a USB hub.
0
USB devices equipped with special functions
such as data security functions cannot be used
with the unit.
0
Do not use a USB device with 2 or more
partitions.
0
This unit cannot recognize a USB device whose
rating is other than 5 V and exceeds 500 mA.
0
This unit may not recognize a memory card
inserted into the USB card reader.
0
This unit may not play back files in a USB
device properly when using a USB extension
cord.
0
Depending on the shape of the USB devices
and connection ports, some USB devices may
not be attached properly or the connection
might be loose.
0
Operation and power supply may not work as
intended for some USB devices.
0
The maximum number of characters for:
– Folder names: 63 characters
– File names: 63 characters
– MP3 Tag: 60 characters
– WMA Tag: 60 characters
– AAC Tag: 60 characters
0
This unit can recognize a total of 65,025 files,
255 folders (255 files per folder including folder
without unsupported files), and of 8
hierarchies.
Trademark and licence notice
0
Microsoft and Windows Media are either
registered trademarks or trademarks of
Microsoft Corporation in the United States
and/or other countries.
Only for KD-DB52:
0
“Made for iPod” and “Made for iPhone” mean
that an electronic accessory has been designed
to connect specifically to iPod, or iPhone,
respectively, and has been certified by the
developer to meet Apple performance
standards. Apple is not responsible for the
operation of this device or its compliance with
safety and regulatory standards. Please note
that the use of this accessory with iPod, or
iPhone may affect wireless performance.
0
iPhone, iPod, iPod classic, iPod nano, and iPod
touch are trademarks of Apple Inc., registered
in the U.S. and other countries.
ENGLISH |
21
Page 22
Troubleshooting
Troubleshooting
General
Sound cannot be heard from the
speakers.
“MISWIRING CHK WIRING THEN
RESET UNIT” appears on the
display and no operations can be
done.
The unit does not work at all.
“F-AUX” or “R-AUX” cannot be
selected.
Sound is sometimes interrupted
while listening to an external
component connected to the
auxiliary input jack.
The correct characters are not
displayed (e.g. album name).
Symptom Remedy/Cause
0
Adjust the volume to the optimum level.
0
Check the cords and connections.
Check to be sure the terminals of the speaker leads are covered
with insulating tape properly, then reset the unit. (A page 3)
If the message does not disappear, consult your JVC car audio
dealer or a company supplying kits.
Reset the unit. (A page 3)
Check the <SRC SELECT>B<F-AUX / R-AUX> setting.
(A page 19)
Check to be sure the recommended stereo mini plug is used for
connection. (A page 13)
This unit can only display letters (upper case), numbers, and a
limited number of symbols.
FM/AM
SSM automatic presetting does
not work.
Static noise while listening to the
radio.
“AM” cannot be selected.
Symptom Remedy/Cause
Store stations manually.
Connect the aerial firmly.
Check the <SRC SELECT>B<AM> setting. (A page 19)
DAB
“NO SIGNAL” appears on the
display.
“CHK ANTENNA” flashes on the
display.
Symptom Remedy/Cause
Move to an area with stronger signals.
Check the cord and connections.
Disc playback
Disc cannot be played back. Insert the disc correctly.
CD-R/CD-RW cannot be played
back and track cannot be skipped.
Disc sound is sometimes
interrupted.
“NO DISC” appears on the display.0Insert a playable disc into the loading slot.
“PLEASE” and “EJECT” appear
alternately on the display.
“IN DISC” appears on the display. The disc cannot be ejected properly. Make sure nothing is
Symptom Remedy/Cause
Insert a finalized CD-R/CD-RW (finalize with the component
which you used for recording).
0
Stop playback while driving on rough roads.
0
Change the disc.
0
Check the cords and connections.
0
Press [M], then insert a disc correctly.
blocking the loading slot.
| ENGLISH
22
Page 23
Troubleshooting
MP3/WMA/AAC playback
Disc cannot be played back.
Symptom Remedy/Cause
“READING” keeps flashing on the
display.
Tracks do not play back in the
order you have intended them to
play.
The elapsed playing time is not
correct.
0
Record the tracks using a compliant application on the
appropriate discs. (A page 20)
0
Add appropriate file extensions to the file names.
A longer readout time is required. Do not use too many
hierarchical levels and folders.
The playback order is determined when the files are recorded.
This sometimes occurs during playback. This is caused by how
the tracks are recorded on the disc.
USB device playback
“READING” keeps flashing on the
Symptom Remedy/Cause
display.
“NOT SUPPORT” appears on the
display and track skips.
Tracks/folders are not played back
in the order you have intended.
0
“CANNOT PLAY” flashes or “NO
USB” appears on the display.
0
The unit cannot detect the USB
device.
While playing a track, sound is
sometimes interrupted.
0
A longer readout time is required. Do not use too many
hierarchical levels and folders.
0
Turn off the power then on again.
0
Reattach the USB device again.
Check whether the track is a playable file format.
The playback order is determined by the file name. Folders with
names beginning with numbers are sorted in numerical order.
Folders with names not beginning with numbers are sorted
according to the file system of the USB device.
0
Check whether the connected USB device is compatible with
this unit.
0
Reattach the USB device again.
The tracks have not been properly copied into the USB device.
Copy tracks again into the USB device, and try again.
iPod/iPhone playback (KD-DB52 only)
The iPod does not turn on or does
not work.
The sound is distorted. Deactivate the equalizer either on this unit or the iPod/iPhone.
Noise is generated. Turn off (uncheck) the “VoiceOver” feature of the iPod.
Playback stops. The headphones are disconnected during playback.
“CANNOT PLAY” flashes on the
display.
Symptom Remedy/Cause
0
Check the connecting cable and its connection. If this does
not solve the problem, reset the iPod/iPhone.
0
Turn off the power and then turn it on again.
0
Detach the iPod/iPhone from this unit, turn off the iPod/
iPhone and then turn it on again.
0
Reset the iPod/iPhone using hardware reset and not the reset
function in the menu.
0
Charge the battery of the iPod/iPhone.
0
Check whether <IPOD SWITCH> setting is appropriate.
(A page 12)
For details, visit <http://www.apple.com>.
Restart the playback operation. (A page 11)
Check whether the connected iPod/iPhone is compatible with
this unit. (A page 11)
ENGLISH |
23
Page 24

Specifications
Specifications
AUDIO AMPLIFIER SECTION
Maximum Power Output 50 W per channel
Continuous Power Output (RMS) 20 W per channel into 4Ω, 40 Hz to 20,000 Hz at
Load Impedance 4Ω (4Ω to 8Ω allowance)
Frequency Response 40 Hz to 20,000 Hz
Signal-to-Noise Ratio 70 dB
Line-Out, Subwoofer-Out Level/Impedance 2.5 V/20 kΩ load (full scale)
Output Impedance ≤ 600Ω
less than 1% total harmonic distortion.
TUNER SECTION
DAB Frequency Range Band lll: 174.928 MHz to 239.200 MHz
Sensitivity Band lll: -100 dBm
Selectivity 45 dB
Stereo Separation 80 dB
Aerial Connector Type “SMB”
Aerial Output Voltage DC 14.4 V (11 V to 16 V)
Aerial Maximum Current < 100 mA
FM Frequency Range 87.5 MHz to 108.0 MHz
Usable Sensitivity 9.3 dBf (0.8 μV/75Ω)
50 dB Quieting Sensitivity 16.3 dBf (1.8 μV/75Ω)
Stereo Separation 40 dB
AM Frequency Range MW: 531 kHz to 1,611 kHz
Sensitivity MW: 20 μV, LW: 50 μV
Selectivity MW: 40 dB, LW: 40 dB
L-Band: 1452.960 MHz to 1490.624 MHz
L-Band: -98 dBm
LW: 153 kHz to 279 kHz
CD PLAYER SECTION
Signal Detection System Non-contact optical pickup (semiconductor laser)
Number of Channels 2 channels (stereo)
Frequency Response 5 Hz to 20,000 Hz
Signal-to-Noise Ratio 98 dB
Wow and Flutter Less than measurable limit
| ENGLISH
24
Page 25

USB SECTION
USB Standard USB 1.1, USB 2.0
Data Transfer Rate (Full Speed) Max. 12 Mbps
Compatible Device Mass storage class
Compatible File System FAT 32/16/12
Playable Audio Format MP3/WMA/AAC
Output Power
DC 5 V d 500 mA
GENERAL
Power Requirement (Operating Voltage) DC 14.4 V (11 V to 16 V allowance)
Grounding System Negative ground
Allowable Operating Temperature 0°C to +40°C
Dimensions
(W × H × D)
Mass 1.3 kg (excluding accessories)
Subject to changes without notice.
Installation Size approx. 182 mm × 52 mm × 159 mm
Panel Size approx. 188 mm × 59 mm × 8.5 mm
Specifications
ENGLISH |
25
Page 26

Veuillez lire attentivement toutes les instructions avant d’utiliser l’appareil afin de bien comprendre son
N’ouvrez pas le couvercle supérieur. Il n’y a aucune pièce réparable par l’utilisateur à
l’intérieur de l’appareil; conez toute réparation à un personnel qualié.
Rayonnement laser visible et/ou invisible de classe 1M une fois ouvert. Ne pas
regarder directement avec des instruments optiques.
IMPORTANT POUR PRODUITS LASER
1. PRODUIT LASER CLASSE 1
2. ATTENTION:
3. ATTENTION:
4.
REPRODUCTION DE L’ÉTIQUETTE: ÉTIQUETTE DE PRÉCAUTION PLACÉE À L’EXTÉRIEUR DE L’APPAREIL.
Informations relatives à l’élimination
des appareils et des piles usagés, à
l’intention des utilisateurs
[Union européenne seulement]
Ces symboles signient que le produit et les piles
ne doivent pas être éliminés en tant que déchet
ménager à la n de son cycle de vie.
Si vous souhaitez éliminer ce produit et les piles,
faites-le conformément à la législation nationale
ou autres règles en vigueur dans votre pays et
votre municipalité.
En éliminant correctement ce produit, vous
contribuez à la conservation des ressources
naturelles et à la prévention des éventuels eets
négatifs sur l’environnement et la santé humaine.
Notication:
La marque Pb en dessous du symbole des piles
indique que cette pile contient du plomb.
Produits
Pile
Merci pour avoir acheté un produit JVC.
fonctionnement et d’obtenir les meilleures performances possibles.
.
.
Avertissement :
Arrêtez la voiture avant de manipuler l’appareil.
Attention :
Ajustez le volume de façon à pouvoir entendre
les sons extérieurs à la voiture. Conduire avec le
volume trop haut peut être la cause d’un
accident.
Évitez d’utiliser un périphérique USB ou un iPod/
iPhone s’il peut gêner une conduite en toute
sécurité.
Précautions sur le réglage du
volume :
Les appareils numériques (CD/USB) produisent
très peut de bruit par rapport aux autres sources.
Réduisez le volume avant de reproduire ces
sources numériques afin d’éviter d’endommager
les enceintes par la soudaine augmentation du
niveau de sortie.
Température à l’intérieur de la
| FRANÇAIS
2
voiture :
Si votre voiture est restée garée pendant
longtemps dans un climat chaud ou froid,
attendez que la température à l’intérieur de la
voiture redevienne normale avant d’utiliser
l’appareil.
Condensation :
Quand une voiture est climatisée, de la
condensation peut se produire sur la lentille du
laser. Cela peut être la cause d’une erreur de
lecture du disque. Dans ce cas, retirez le disque et
attendez que l’humidité s’évapore.
JVC ne peut être tenu responsable pour toute
perte de données dans un iPod/iPhone et/ou
un périphérique USB à mémoire de grande
capacité lors de l’utilisation de ce système.
Page 27

Comment attacher/détacher le
(Maintenez pressée)
panneau de commande
.
Comment réinitialiser votre appareil
Vos ajustements préréglés
sont aussi effacés.
Comment forcer l’éjection d’un disque
.
0
Faites attention de ne pas faire tomber le
disque quand il est éjecté.
0
Si cela ne fonctionne pas, essayez de
réinitialiser l’appareil.
Entretien
Nettoyage de l’appareil
Essuyez la saleté sur le panneau avec un chiffon
sec au silicone ou un chiffon doux. Ne pas
respecter ces précautions peut entraîner des
dommages à l’appareil.
Nettoyage du connecteur
Essuyez toute les saletés sur le connecteur de
l’appareil et le panneau. Utilisez une coton-tige
ou un chiffon.
Table des matières
Préparation ........................................................... 4
Annulation des démonstrations des
affichages ......................................................... 4
Réglage de l’horloge .................................... 4
Opérations de base ........................................... 5
Écoute de la radio .............................................. 6
Écoute de la radiodiffusion numérique -
Digital Audio Broadcasting (DAB) ................ 8
Écoute d’un disque ......................................... 10
Écoute d’un périphérique USB ................... 11
Lecture d’un iPod/iPhone (KD-DB52
uniquement) ..................................................... 11
Écoute d’un autre appareil extérieur ........ 13
Changement de l’éclairage des touches et
de la couleur de l’affichage (KD-DB52
uniquement) ..................................................... 14
Ajustement du son .......................................... 15
Utilisation de périphériques BluetoothT
................................................................................. 16
Utilisation des menus ..................................... 17
Utilisation de la télécommande (KD-DB52
uniquement) ..................................................... 20
Informations complémentaires .................. 20
Guide de dépannage ..................................... 22
Spécifications .................................................... 24
Comment lire ce manuel :
0
Ce manuel explique principalement les
opérations à l’aide des touches du panneau
de commande.
0
< > indique les affichages du panneau de
commande.
FRANÇAIS |
3
Page 28

(Réglage initial)
(Maintenez pressée)
(Réglage initial)
(Réglage initial)
(Maintenez pressée)
(Réglage initial)
Préparation
Préparation
Annulation des démonstrations des affichages
Les démonstrations d’affichage sont toujours activées sauf si vous les annulez.
Mise sous tension de l’appareil.
1
.
.
.
2
Choisissez <DEMO OFF>.
4
.
5
.
.
3
Réglage de l’horloge
.
1
Choisissez <CLOCK>.
2
Choisissez <CLOCK SET>.
3
Ajustez les heures.
4
.
Terminez la procédure.
6
Ajustez les minutes.
5
.
Choisissez <24H/12H>.
6
.
Choisissez <24 HOUR> ou <12 HOUR>.
7
Terminez la procédure.
8
.
.
.
.
.
| FRANÇAIS
4
Page 29

(KD-DB52 uniquement)
Télécommande
Prise d’ entrée USB
Prise d’entrée
auxiliaire avant
N’ EXPOSEZ PAS à la
lumière directe du soleil.
Capteur de télécommande
Retrait du panneau
Éjection d’ un disque
Fenêtre d’achage
Molette de commande
Fente d’ insertion
Panneau de commande
Opérations de base
.
Quand vous appuyez ou maintenez pressées les touches suivantes...
Panneau de
commande
B /SOURCE
Molette de
commande
(tournez)
Molette de
commande
(appuyez)
DAB -
EQ SOUND
DISP -
T/P BACK -
J
K
E F
Télécommande
-
SOURCE
VOL - / + Ajuste le niveau de volume.
- Choisissez les éléments.
d
- Valide la sélection.
J
K
H I
Fonctionnement général
0
Met l’appareil sous tension.
0
Met l’appareil hors tension. (Maintenez pressée)
Choisit la source. “CD” ou “USB” peut être chois uniquement quand un
disque est en place ou qu’un périphérique USB est connecté.
0
Atténue le son. Si la source est “CD” ou “USB/USB-IPOD”, la
lecture se met en pause.
0
Appuyez de nouveau sur la touche pour annuler l’atténuation
ou reprendre la lecture.
0
Entrez en mode DAB. (A page 8)
0
Entrez en mode DAB SORTING. (Maintenez pressée)
0
Affiche les services DAB.
0
Choisit les modes sonores préréglés.
0
Maintenez enfoncée la touche EQ du panneau de
commande pour accéder directement à l’ajustement du
niveau de tonalité. (A page 15)
0
Change l’information sur l’affichage.
0
Fait défiler les informations de l’affichage. (Maintenez pressée)
0
Mise en/hors service de l’attente de réception TA. (A page 7)
0
Entrez en mode de recherche de PTY. (Maintenez pressée)
(A page 7)
0
Permet de sélectionner la prise de commande d’un iPod/iPhone.
(Maintenez pressée) (KD-DB52 uniquement) (A page 12)
0
Retourne au menu précédent.
0
Quitte le menu. (Maintenez pressée)
0
Sélectionne une station ou un service préréglé. (A page 6, 8)
0
Sélectionne le dossier MP3/WMA/AAC. (A page 10)
0
Recherche une station ou un service. (A page 6, 8)
0
Choisit une plage. (A page 10, 12)
0
Avance ou recule rapidement la plage. (Maintenez pressée)
Opérations de base
FRANÇAIS |
5
Page 30

A
B
(Maintenez pressée)
(Maintenez pressée)
1
2
ou
(Maintenez pressée)
Écoute de la radio
Écoute de la radio
.
Recherche d’une station
A
Choisissez <FM> ou <AM>.
B
Recherche automatique. (Appuyez sur la
touche)
Recherche manuelle. (Maintenez pressée)
“M” clignote, puis appuyez sur la touche
répétitivement.
“ST” s’allume lors de la réception d’une émission FM stéréo avec un signal suffisamment fort.
Mémorisation de stations
Préréglage manuel (FM/AM)
Vous pouvez prérégler un maximum de 18
stations pour FM et de 6 stations pour AM.
Pendant l’écoute d’une station...
1
.
“PRESET MODE” clignote.
Choisissez un numéro de préréglage.
2
Le numéro de préréglage clignote et “MEMORY”
apparaît.
Préréglage automatique (FM
automatique)
SSM (Mémorisation automatique
séquentielle des stations puissantes)
Vous pouvez prérégler un maximum de 18
stations pour FM.
1
.
2
.
“SSM” clignote. Lorsque toutes les stations sont
mémorisées, “SSM” arrête de clignoter.
Pour prérégler <SSM 07 – 12>/
<SSM 13 – 18>, répétez les étapes 1 et 2.
B<TUNER>
B<SSM>
B<SSM 01 – 06>
Sélection d’une station préréglée
.
.
Amélioration de la réception FM
1
.
2
.
0
La réception est améliorée, mais l’effet stéréo
est perdu.
Pour rétablir l’effet stéréo, répétez la même
procédure et choisissez <MONO OFF>.
Changement des informations sur
l’affichage
.
(pour les stations non Radio Data System)
Fréquence 1 Horloge
(pour les stations FM Radio Data System)
Nom de la station (PS) B Fréquence B Type de
programme (PTY) B Horloge B (retour au début)
B<TUNER>
B<MONO>
B<MONO ON>
| FRANÇAIS
6
Page 31

Les fonctionnalités suivantes sont
(Maintenez pressée)
(Maintenez pressée)
(Maintenez pressée)
accessibles uniquement pour les stations
FM Radio Data System.
Recherche de vos programmes préférés—Recherche par type de programme (PTY)
1
.
Choisissez un code PTY.
2
.
.
La recherche PTY démarre.
S’il y a une station diffusant un programme du code
PTY que vous avez choisi, la station est accordée.
Codes PTY
NEWS, AFFAIRS, INFO, SPORT, EDUCATE, DRAMA, CULTURE,
SCIENCE, VARIED, POP M (musique), ROCK M (musique),
EASY M (musique), LIGHT M (musique), CLASSICS, OTHER M
(musique), WEATHER, FINANCE, CHILDREN, SOCIAL,
RELIGION, PHONE IN, TRAVEL, LEISURE, JAZZ, COUNTRY,
NATION M (musique), OLDIES, FOLK M (musique),
DOCUMENT
Mise en service de l’attente de réception TA/d’informations
L’attente de réception permet à l’appareil de
commuter temporairement sur des informations
routières (TA) ou programme d’informations à
partir de n’importe quelle source autre que AM.
Attente de réception TA
.
Indicateur TP Attente de réception TA
S’allume
Clignote
0
Pour mettre hors service, appuyez à
nouveau sur T/P BACK.
L’appareil sera temporairement
commuté sur des informations
routières (TA), si disponibles.
N’est pas encore en service.
Accordez une autre station
diffusant les signaux Radio Data
System.
Écoute de la radio
Attente de réception d’informations
1
.
2
.
L’appareil sera temporairement commuté sur le
B<TUNER>
B<NEWS-STBY>
B<NEWS ON>
programme d’informations, si disponible.
0
L’ajustement du volume des informations
routières ou informations est
automatiquement mémorisé. Il sera appliqué à
la prochaine commutation de l’appareil aux
informations routières ou informations.
Poursuite du même programme—Poursuite de réception en réseau
Lorsque vous conduisez dans une région où la
réception FM n’est pas suffisamment forte, cet
appareil accorde automatiquement une autre
station FM Radio Data System du même réseau,
susceptible de diffuser le même programme avec
un signal plus fort.
1
.
2
.
B<TUNER>
B<AF-REG>
Commutation vers une autre
AF ON
station. Le programme peut
différer de celui actuellement
reçu (l’indicateur AF s’allume).
Commutation vers une autre
AF-REG ON
station diffusant le même
programme (les indicateurs AF
et REG s’allument).
Sélection automatique des stations—Recherche de programme
Lorsque le signal d’une station préréglée que
vous avez sélectionnée est faible, cet appareil
recherche une autre station diffusant le même
programme que la station préréglée originale.
<P-SEARCH> (A page 19)
FRANÇAIS |
7
Page 32

Écoute de la radiodiffusion numérique - Digital Audio
A A
BC
*
ou
(Maintenez pressée)
(Maintenez pressée)
1
2
ou
Broadcasting (DAB)
.
Recherche d’un service
A
Choisissez <DAB>.
* Utile uniquement pour la commutation à
partir d’autres sources.
B
Démarrez la recherche d’un ensemble.
0
Recherche automatique. (Appuyez sur la
touche)
Lorsqu’un ensemble est reçu, la recherche
s’arrête.
Pour arrêter la recherche, appuyez à nouveau sur
la même touche.
0
Recherche manuelle. (Maintenez pressée)
“M” clignote, puis appuyez sur la touche
répétitivement.
C
Sélectionnez un service (principal ou
secondaire) à écouter.
Recherche d’un service par ordre alphabétique— Recherche alphabétique
Commencez le classement des services
1
DAB.
.
“DAB SORTING”
.
“DAB SORTING” disparaît lorsque le classement
clignote.
est terminé.
Affichez les services.
2
.
.
Les services apparaissent par ordre alphabétique.
0
“LIST EMPTY” apparaît s’il n’y a aucun service.
Choisissez le caractère souhaité.
3
- recherche de A à Z
0
Sautez cette étape si peu de services sont
disponibles.
Choisissez le service souhaité.
4
.
.
| FRANÇAIS
8
Mémorisation de services DAB
Vous pouvez prérégler un maximum de 18
services DAB.
Pendant l’écoute d’un service...
1
.
“PRESET MODE” clignote.
Choisissez un numéro de préréglage.
2
.
Le numéro de préréglage clignote et “MEMORY”
apparaît.
Sélection d’un service DAB
.
préréglé
.
Page 33

(Maintenez pressée)
(Maintenez pressée)
(Maintenez pressée)
Écoute de la radiodiffusion numérique - Digital Audio Broadcasting (DAB)
Poursuite du même programme—Réception de fréquence alternative (AF) DAB
1
.
2
.
DAB AF ON
B<TUNER>
B<DAB AF>
Poursuit le programme parmi les
services DAB et les stations FM
Radio Data System.
DAB AF OFF Annulation.
0
La réception de fréquence alternative est en
service selon les réglages d’usine par défaut.
Recherche de vos programmes préférés—Recherche par type de programme (PTY)
(A page 7)
Mise en service de l’attente de réception
Type de programme - attente de
réception (PTY-STBY)
1
.
2
.
Sélectionnez votre code PTY préféré.
3
Indicateur
PTY
Clignote N’est pas encore en service.
S’allume L’appareil est en attente pour le
0
Pour mettre hors service, choisissez <OFF>
dans l’étape 2.
Attente de réception TA
L’attente de réception TA permet à l’appareil de
commuter temporairement sur des informations
routières (TA) à partir de n’importe quelle source.
(A page 7)
B<TUNER>
B<PTY-STBY>
Attente de réception PTY
PTY cible. Lorsque le programme
démarre, “Nom de service” et
“Code PTY” clignotent
alternativement.
Changement des informations sur
l’affichage
.
Nom de service B Nom d’ensemble B Nombre
de canaux B Fréquence B Type de programme
(PTY) B Segment d’étiquette dynamique (DLS) B
Type de radio numérique/Débit binaire audio B
Horloge B (retour au début)
0
“NO SIGNAL” apparaît s’il n’y a aucun signal.
Affichage des informations
textuelles de radio
Lorsque l’indicateur “D” s’allume sur l’écran, vous
pouvez vérifier directement le Dynamic Label
Segment (DLS).
.
FRANÇAIS |
9
Page 34

Face de l’étiquette
(Maintenez pressée)
Écoute d’un disque
Écoute d’un disque
.
Lecture d’un disque
La source change en “CD” et la lecture démarre.
Toutes les plages sont reproduites répétitivement
jusqu’à ce que vous changiez la source ou
éjectiez le disque.
Pour éjecter un disque
.
0
Si le disque éjecté n’est pas retiré avant 15
secondes, il est réinséré automatiquement
dans la fente d’insertion.
0
Si le disque ne peut pas être éjecté, A page 3.
Sélection d’un dossier/plage
Choisit un dossier.
(pour MP3/WMA/AAC)
0
Choisit une plage.
(Appuyez sur la touche)
0
Avance ou recule
rapidement la plage.
(Maintenez pressée)
Sélection d’une plage/dossier à partir de la liste
1
.
Le nom du dossier/numéro de plage actuel apparaît.
Choisissez un dossier.
2
(Pour MP3/WMA/AAC)
.
Le titre de la plage actuelle apparaît.
Sélectionnez une plage.
3
.
.
0
Pour MP3/WMA/AAC
Si le disque contient beaucoup de dossiers ou de
plages, vous pouvez effectuer une recherche rapide
du dossier ou de la plage souhaitée en tournant
rapidement la molette de commande.
Sélection des modes de lecture
Vous pouvez sélectionner un des modes de
lecture suivants à la fois.
1
.
2
.
h<REPEAT>1<RANDOM>
3
.
REPEAT B
TRACK RPT Répète la plage actuelle.
FOLDER RPT * Répète le dossier actuel.
RPT OFF Annule la lecture répétée.
RANDOM A
FOLDER RND *
ALL RND
RND OFF Annule la lecture aléatoire.
* Pour MP3/WMA/AAC
Changement des informations sur
l’affichage
.
Numéro de la plage/durée de lecture B Numéro
de la plage/horloge B Album Titre de l’album/
Artiste* B Titre de la plage* B (retour au début)
* “NO NAME” apparaît pour les CD ordinaire ou
si aucun nom n’a été enregistré.
Reproduit aléatoirement
toutes les plages du dossier
actuel, puis toutes les plages
des dossiers suivants.
Reproduit aléatoirement
toutes les plages.
| FRANÇAIS
10
Page 35

Câble USB 2.0
(non fourni)
Prise d’ entrée USB
Câble USB 2.0 (accessoire du
iPod/iPhone)
Prise d’ entrée USB
iPod/iPhone Apple
Écoute d’un périphérique USB
Lecture d’un iPod/iPhone (KD-DB52 uniquement)
Lecture d’un périphérique USB
.
La source change en “USB” et la lecture démarre.
.
0
Cet appareil peut reproduire les fichiers MP3/
WMA/AAC mémorisées dans un périphérique
USB à mémoire de grande capacité (tel qu’une
mémoire USB, un lecteur audio numérique,
etc.).
Vous pouvez commander le périphérique USB
de la même façon que les fichiers sur un disque.
(A page 10)
Attention
0
Assurez-vous que toutes les données
importantes ont été sauvegardées.
0
Ne déconnectez puis ne reconnectez pas le
périphérique USB répétitivement pendant que
“READING” apparaît sur l’affichage.
0
Un choc électrostatique à la connexion d’un
périphérique USB peut causer une lecture
anormale du périphérique. Dans ce cas,
déconnectez le périphérique USB puis
réinitialiser cet appareil et le périphérique USB.
0
Ne laissez pas un périphérique USB dans une
voiture, exposé à la lumière directe du soleil, ou
à une température élevée. Ne pas respecter ces
précautions peut entraîner des déformations
ou des dommages à l’appareil.
0
Pour plus de détails sur le fonctionnement USB,
A page 21.
Lecture d’un iPod/iPhone
.
La source change en “USB” B “USB-IPOD” et la
lecture démarre.
.
0
iPod/iPhone qui peuvent être raccordés à cet
appareil :
- iPod touch (4e Génération)
- iPod touch (3e Génération)
- iPod touch (2e Génération)
- iPod touch (1e Génération)
- iPod classic
- iPod avec vidéo (5e Génération)*
- iPod nano (6e Génération)
- iPod nano (5e Génération)
- iPod nano (4e Génération)
- iPod nano (3e Génération)
- iPod nano (2e Génération)
- iPod nano (1e Génération)*
- iPhone 4
- iPhone 3GS
- iPhone 3G
- iPhone
*<IPOD MODE/EXT MODE> ne sont pas
applicables.
0
Il n’est pas possible de parcourir les fichiers
vidéo sur le menu “Videos” en mode <HEAD
MODE>.
0
L’ordre des morceaux affichés sur le menu de
sélection de cet appareil peut être différent de
celui de iPod.
0
Lors de l’utilisation d’un iPod/iPhone, certaines
opérations peuvent ne pas être réalisées
correctement ou comme prévues. Dans ce cas,
consultez le site Web JVC suivant :
<http://www.jvc.jp/english/car/index.html>
(Site web en anglais uniquement).
FRANÇAIS |
11
Page 36

(Maintenez pressée)
(Maintenez pressée)
Lecture d’un iPod/iPhone (KD-DB52 uniquement)
Sélection de la prise de commande—IPOD SWITCH
.
h<HEAD MODE/IPOD MODE/EXT MODE>
HEAD MODE Commande la lecture du iPod à
travers cet appareil.
IPOD MODE Commande la lecture du iPod
provenant du iPod/iPhone.
EXT MODE Permet les signaux audio des
iPod/iPhone. L’affichage indique
toujours “EXT MODE”.
0
Vous pouvez également modifier le réglage à
l’aide de <IPOD SWITCH> dans le menu.
Sélection d’une plage
Applicable sous <HEAD MODE/IPODMODE>
uniquement.
0
Choisit une plage/chapitre.
(Appuyez sur la touche)
0
Avance ou recule
rapidement la plage.
(Maintenez pressée)
Sélection d’une plage à partir du menu
Applicable sous <HEAD MODE> uniquement.
1
.
Choisissez le menu souhaité.
2
.
.
PLAYLISTS1ARTISTS1ALBUMS1SONGS1POD
CASTS1GENRES1COMPOSERS1 (retour au
début)
Choisissez la plage souhaitée.
3
.
.
Répétez cette étape jusqu’à ce que la plage
souhaitée soit choisie.
0
Si le menu sélectionné contient beaucoup de
plages, vous pouvez effectuer une recherche
rapide de la plage souhaitée en tournant
rapidement la molette de commande.
Sélection des modes de lecture
Vous pouvez sélectionner un des modes de
lecture suivants à la fois.
Applicable sous <HEAD MODE> uniquement.
1
.
2
.
h<REPEAT>1<RANDOM>
3
.
REPEAT B
ONE RPT
ALL RPT
RANDOM A
SONG RND
ALBUM RND
RND OFF Annule la lecture aléatoire.
0
“ALBUM RND” n’est pas applicable à certains
iPod/iPhone.
Changement des informations sur
l’affichage
.
Numéro de la plage/durée de lecture B Numéro
de la plage/horloge B Album Titre de l’album/
Artiste B Titre de la plage B (retour au début)
Fonctionne de la même façon
que la fonction “Répéter Un”
pour iPod.
Fonctionne de la même façon
que la fonction “Répéter Tous”
pour iPod.
Fonctionne de la même façon
que la fonction “Aléatoire
Morceaux” pour iPod.
Fonctionne de la même façon
que la fonction “Aléatoire
Albums” pour iPod.
| FRANÇAIS
12
Page 37

Lecteur audio
portable, etc.
Mini che stéréo de
3,5 mm (non fournie)
Lecteur audio
portable, etc.
Mini che stéréo de 3,5 mm
(avec connecteur en forme de
“L” ) (non fournie)
(Maintenez pressée)
Il est recommandé d’ utiliser une mini che stéréo munie d’ une che à 3
connecteurs pour obtenir une sortie audio optimum.
Écoute d’un autre appareil extérieur
Écoute d’un autre appareil extérieur
Pour plus d’informations, référez-vous aussi aux instructions fournies avec les appareils extérieurs.
Lecture d’un appareil extérieur à partir de l’entrée auxiliaire avant (Front AUX)
Connectez F-AUX au panneau avant.
1
Choisissez <F-AUX>.
2
.
.
Mettez l’appareil connecté sous tension
3
et démarrez la lecture de la source.
Changement des informations sur
l’affichage
F-AUX1AUX/Horloge
Lecture d’un appareil extérieur à partir de l’entrée auxiliaire arrière (Rear AUX)
.
Connectez R-AUX au panneau arrière.
1
Définit la source.
2
A
.
B
.
Choisissez <R-AUX>.
3
.
.
Mettez l’appareil connecté sous tension
4
et démarrez la lecture de la source.
Changement des informations sur
l’affichage
R-AUX1AUX/Horloge
.
B<SRC SELECT>
B<R-AUX>
B<R-AUX ON>
.
FRANÇAIS |
13
Page 38

Changement de l’éclairage des touches et de la couleur
Toutes les zones
Zone d’achageZone des touches
(Maintenez pressée)
(Maintenez pressée)
de l’affichage (KD-DB52 uniquement)
Toutes les zones : inclut la zone Touches et la
zone Affichage.
.
Sélection de la couleur préréglée
Vous pouvez choisir une couleur prédéfinie pour
<BUTTON ZONE>, <DISP ZONE>, et <ALL ZONE>
séparément.
1
.
Choisissez <COLOR>.
2
.
.
3
.
BUTTON ZONE COLOR 01-29/USER/
DISP ZONE
ALL ZONE
0
Couleur initiale : BUTTON ZONE [06], DISP
ZONE [01], ALL ZONE [06].
0
Si <ALL ZONE> est sélectionné, l’éclairage des
touches et de l’affichage passera à la couleur
actuelle/choisie de <BUTTON ZONE>.
COLOR FLOW 01-03*
* COLOR FLOW 01 :
La couleur change toutes
les 9 secondes.
COLOR FLOW 02 :
La couleur change toutes
les 5 secondes.
COLOR FLOW 03 :
La couleur change toutes
les 3 secondes.
Mémorisation de vos propres réglages de la couleur
Vous pouvez mémoriser vos propres couleurs de
jour et de nuit pour <BUTTON ZONE> et
<DISP ZONE> séparément.
1
.
Choisissez <COLOR SETUP>.
2
.
3
.
DAY
BUTTON
COLOR
ZONE
DISP ZONE
NIGHT
BUTTON
COLOR
ZONE
DISP ZONE
MENU
ON Modifie l’éclairage de
COLOR
OFF
0
NIGHT COLOR/DAY COLOR est modifié en
activant/désactivant les phares de votre
voiture.
0
Choisissez une
couleur primaire
<RED/GREEN/BLUE>,
puis ajustez le niveau
<00-31>. Répétez
cette procédure
jusqu’à ce que les
trois couleurs
principales soient
ajustées.
0
Votre réglage est
automatiquement
mémorisé sur “USER”.
0
Si “00” est choisi pour
les principales
couleurs de
<DISP ZONE>, rien
n’apparaît sur l’écran.
l’affichage et des
touches durant les
opérations en mode de
menu, recherche de liste
et lecture.
| FRANÇAIS
14
Page 39

20
-5
0
+5
+10
+15
50 100 200 500 1k 2k 5k 10k 20k
[Hz]
[dB]
(Maintenez pressée)
(Maintenez pressée)
Ajustement du son
Sélection d’un mode sonore préréglé
Vous pouvez sélectionner un mode sonore
préréglé adapté à votre genre de musique.
.
FLATBNATURALBDYNAMICBVOCAL
BOOSTBBASS BOOSTBUSERB (retour au début)
(a) FLAT
(b) NATURAL
(c) DYNAMIC
(d) VOCAL BOOST
(e) BASS BOOST
.
Les caractéristiques de fréquence des sons
Mémorisation de votre ajustement
Égaliseur simple
Pendant l’écoute, vous pouvez ajuster le niveau
du caisson de grave et le niveau de tonalité du
mode sonore choisi.
1
Plat pour toutes les bandes.
Les hautes fréquences sont
accentuées.
Les hautes et basses
fréquences sont accentuées.
Les fréquences moyennes
sont accentuées.
Les basses fréquences sont
accentuées.
Ajustement du son
Égaliseur pro
1
.
2
.
B<PRO EQ>
B<BASS/MIDDLE/
TREBLE>
3
.
Ajustez les éléments sonores de la tonalité
sélectionnée.
BASS
Fréquence 60/[80]/100/200 Hz
Niveau LVL -06 à +06 [00]
Q [Q1.0]/Q1.25/Q1.5/Q2.0
MIDDLE
Fréquence 0.5/[1.0]/1.5/2.5 kHz
Niveau LVL -06 à +06 [00]
Q Q0.75/Q1.0/[Q1.25]
TREBLE
Fréquence [10.0]/12.5/15.0/17.5 kHz
Niveau LVL -06 à +06 [00]
Q [Q FIX]
Répétez les étapes 2 et 3 pour ajuster les
4
autres tonalités.
Les réglages sont mémorisés et <USER> est
activé.
(Réglage initial : [XX])
.
Ajustez le niveau.
2
.
.
(Réglage initial : [XX])
SUB.W* 00 à 08 [04]
BASS LVL -06 à +06 [00]
MID LVL -06 à +06 [00]
TRE LVL -06 à +06 [00]
Les réglages sont mémorisés et <USER> est activé.
* Disponible uniquement quand <L/O MODE>
est réglé sur <SUB.W>.
FRANÇAIS |
15
Page 40

(Maintenez pressée)
(Élevé)
(Faible)
(Appuyez sur la touche)
(Maintenez pressée)
KS-BTA100
Microphone
(Récepteur CD)
KS-BTA100
Utilisation de périphériques BluetoothT
Utilisation de périphériques BluetoothT
Pour les opérations Bluetooth, il faut connecter l’adaptateur Bluetooth, KS-BTA100 (vendu séparément)
à la prise d’entrée auxiliaire (R-AUX/BT ADAPTER) à l’arrière de cet appareil. (A Manuel d’installation/
raccordement)
0
KS-BTA100 n’est pas disponible dans certains pays. Veuillez contacter le revendeur à qui vous avez
acheté cet appareil.
0
Pour en savoir plus, référez-vous aussi aux instructions fournies avec l’adaptateur Bluetooth et le
périphérique Bluetooth.
0
L’opération peut différer en fonction du périphérique connecté.
Préparation
Enregistrement (pairage) d’un appareil Bluetooth avec le KS-BTA100.
1
.
0
Référez-vous aux manuels d’instruction fournis avec le KS-BTA100.
Changez les réglages <SRC SELECT> de cet appareil.
2
.
B<SRC SELECT>
B<R-AUX>
B<BT ADAPTER>
Utilisation d’un téléphone portable Bluetooth
.
Ajustement du volume du microphone
Niveau de volume : Élevé/Normal (initial)/Faible
À propos du volume du microphone :
0
Quand vous mettez hors tension l’appareil, le niveau de volume change sur Normal.
Utilisation d’un périphérique audio Bluetooth
.
| FRANÇAIS
16
.
.
0
Réception d’un appel
Quand un appel arrive...
0
Pour faire un appel
Faire à appel au dernier numéro connecté à partir
de votre téléphone.
0
Commutation entre le mode mains libres et
le téléphone
Pendant une conversation...
0
Permet de terminer/refuser l’appel
0
Composition vocale
La composition vocale est disponible uniquement
quand le téléphone portable connecté possède
un système de reconnaissance vocale.
B “BT AUDIO”
. Démarre/met sur pause la lecture.
.
0
Si la lecture ne démarre pas, utilisez le lecture
audio Bluetooth pour démarrer la lecture.
0
Choisit une plage. (Appuyez sur la touche)
0
Avance ou recule rapidement la plage.
(Maintenez pressée)
Page 41

(Maintenez pressée)
Utilisation des menus
Utilisation des menus
1
.
Si aucune opération n’est effectuée pendant environ 60 secondes, l’opération est annulée.
2
.
Répéter l’étape 2 si nécessaire.
3
0
Pour revenir au menu précédent, appuyez sur T/P BACK.
0
Pour quitter le menu, appuyez sur DISP ou MENU.
Article de menu Réglages pouvant être choisis (Réglage initial : [XX])
DEMO
CLOCK SET
24H/12H
CLOCK ADJ *1
CLOCK
(Réglage de
l’horloge)
COLOR
COLOR SETUP
DIMMER SET Sélectionne l’éclairage de l’affichage et des boutons ajusté dans le réglage
DIMMER
BRIGHTNESS DAY [25] /NIGHT [11] : Choisit le niveau de luminosité de l’affichage et de
SCROLL *3 [ONCE] : Fait défiler une fois les informations affichées.
TAG DISPLAY [ON] : Affiche les informations des balises lors de la lecture d’une plage MP3/
DISPLAY
PRO EQ
*1 Prend effet uniquement quand les données d’horloge sont reçues.
*2 La connexion du fil de commande de l’éclairage est requise. (Référez-vous au “Manuel
d’installation/raccordement”.) Ce réglage peut ne pas fonctionner correctement sur certains
véhicules (en particulier sur ceux qui possèdent une bague de commander de gradation). Dans ce
cas, changez le réglage sur autre que <DIMMER AUTO>.
*3 Certains caractères ou symboles n’apparaissent pas correctement (ou un blanc apparaît à leur
place) sur l’affichage.
Pour les réglages, A page 4.
Pour les réglages, A page 4.
Pour les réglages, A page 4.
[AUTO] : L’horloge intégrée est ajustée automatiquement en utilisant les
données de l’horloge dans le signal DAB.
OFF : Annulation.
Pour les réglages, A page 14. (KD-DB52 uniquement)
Pour les réglages, A page 14. (KD-DB52 uniquement)
<BRIGHTNESS>/<COLOR SETUP>.
[AUTO] : Bascule entre les réglages Jour et Nuit lorsque vous activez/
désactivez les phares de la voiture. *2
ON : Sélectionne les réglages Nuit.
OFF : Sélectionne les réglages Jour.
l’éclairage des touches 00-31 pour le jour et la nuit.
AUTO : Répète le défilement (à 5 secondes d’intervalle).
OFF : Annulation.
WMA/AAC.
OFF : Annulation.
Pour les réglages, A page 15.
FRANÇAIS |
17
Page 42

Utilisation des menus
Article de menu Réglages pouvant être choisis (Réglage initial : [XX])
FADER *4*5 R06-F06 [00] : Ajustez la balance de sortie avant-arrière des enceintes.
BALANCE *5 L06-R06 [00] : Ajustez la balance de sortie gauche-droite des enceintes.
LOUD
(Volume)
VOL ADJUST
(Réglage du
volume)
L/O MODE
(Mode de sortie de
ligne)
SUB.W LPF *6
(Filtre passe bas de
caisson de grave)
SUB.W LEVEL *6
AUDIO
(Niveau de caisson
de grave)
HPF
(Filtre passe haut)
BEEP
(Tonalité de
touche)
TEL MUTING *7
(Sourdine de
téléphone)
AMP GAIN *8
(Gain
d’amplificateur)
*4 Si vous utilisez un système à deux enceintes, réglez le niveau du fader sur “00”.
*5 L’ajustement ne peut pas affecter la sortie du caisson de grave.
*6 Est affiché uniquement quand <L/O MODE> est réglé sur <SUB.W>.
*7 Ce réglage ne fonctionne pas si <BT ADAPTER> est choisi pour <R-AUX> de <SRC SELECT>.
*8 Le niveau de volume change automatiquement sur “VOLUME 30” si vous réglez sur
<LOW POWER> quand le niveau de volume est plus haut que “VOLUME 30”.
ON : Accentue les basses et hautes fréquences pour produire un son plus
équilibré aux faibles niveaux de volume.
[OFF] : Annulation.
-05 - +05 [00] : Préréglez le niveau d’ajustement du volume de chaque
source, en comparaison avec le niveau de volume FM. Avant un ajustement,
choisissez la source que vous souhaitez ajuster. (“VOL ADJ FIX” apparaît si
“FM” est sélectionné.)
Choisissez ce réglage si les prises REAR/SW sont utilisées pour connecter les
appareils suivants (à travers un amplificateur externe).
SUB.W : Caisson de grave
[REAR] : Enceintes
LOW 55Hz / [LOW 85Hz] / LOW 120Hz :
Les signaux audio avec des fréquences inférieures à 55 Hz/85 Hz/120 Hz sont
envoyées sur le caisson de grave.
00-08 [04] : Ajuste le niveau de sortie du caisson de grave.
ON : Met en service le filtre passe haut. Les signaux basse fréquence sont
coupés des enceintes avant/arrière.
[OFF] : Met hors service. (Tous les signaux sont envoyés aux enceintes avant/
arrière.)
[ON]/OFF : Met en ou hors service la tonalité des touches.
ON : Atténue le son pendant l’utilisation d’un téléphone portable (non
connecté par le KS-BTA100).
[OFF] : Annulation.
LOW POWER : VOLUME 00-VOLUME 30 (Choisissez ce réglage si la
puissance maximum de chaque enceinte est inférieure à 50 W pour éviter
tout dommage des enceintes.)
[HIGH POWER] : VOLUME 00-VOLUME 50
| FRANÇAIS
18
Page 43

Utilisation des menus
Article de menu Réglages pouvant être choisis (Réglage initial : [XX])
SSM
AF-REG *9 [AF ON] : Met en service la réception de fréquence alternative.
NEWS-STBY *9
(Attente
d’informations)
P-SEARCH *9
(Recherche de
programme)
MONO
(Mode monaural)
IF BAND
(Bande de
fréquence
TUNER
intermédiaire)
DAB AF [ON]/OFF : Met en ou hors service la réception de fréquence alternative
DAB L-BAND *10 ON : Recherche de BAND-III et L-BAND.
DAB ANT PWR
(Alimentation
d’antenne)
PTY-STBY
(Attente de type
programme)
DAB Vxxx *11 Affiche le numéro de la version du logiciel DAB. (Est affiché uniquement
IPOD SWITCH
(Commande d’un
iPod/iPhone)
AM *12 [ON]/OFF : Met en ou hors service “AM” dans la sélection de la source.
F-AUX *12
(Entrée auxiliaire
avant)
R-AUX *12
(Entrée auxiliaire
SRC SELECT
arrière)
*9 Uniquement pour les stations FM Radio Data System.
*10 Lorsque vous changez le réglage, les stations préréglées seront initialisées.
*11 Pour actualiser le logiciel DAB, consultez le site Web de JVC :
<http://www.jvc.jp/english/car/index.html> (Site web en anglais uniquement).
*12 Affiché uniquement quand une source autre que le réglage “AM/F-AUX/R-AUX/BT AUDIO”
correspondant est sélectionné.
Pour les réglages, A page 6. (Est affiché uniquement quand la source “FM”.)
AF-REG ON : Met en service la réception de régionalisation de fréquence
alternative.
OFF : Annulation. (Sélectionnable uniquement quand <DAB AF> est réglé
sur <OFF>) (A page 9)
ON/[OFF] : Met en ou hors service de l’attente de réception d’informations.
(Est affiché uniquement quand la source “FM”.) (A page 7)
SEARCH ON/[SEARCH OFF] :
Met en ou hors service la recherche de programme (si <AF-REG> est réglé
sur <AF ON> ou <AF-REG ON>).
[MONO OFF]/MONO ON :
Pour les réglages, A page 6. (Est affiché uniquement quand la source “FM”.)
[AUTO] : Augmente la sélectivité du tuner pour réduire les interférences
entre les stations adjacentes. (L’effet stéréo peut être perdu.)
WIDE : Il y a des interférences des stations adjacentes, mais la qualité du son
n’est pas dégradée et l’effet stéréo est conservé.
DAB. (A page 9)
[OFF] : Recherche uniquement BAND-III. (Est affiché uniquement quand la
source “DAB”.)
[ON] : L’appareil fournit l’alimentation à l’antenne DAB avec le booster.
Sélectionnez lors de l’utilisation de l’antenne DAB avec le booster.
OFF : Sélectionnez lors de l’utilisation de l’antenne DAB sans le booster.
[OFF] : Annulation.
PTY codes : Met en service l’attente de réception PTY avec un des codes
PTY. (Est affiché uniquement quand la source “DAB”.) (A page 9)
quand la source “DAB”.)
[HEAD MODE]/IPOD MODE/EXT MODE :
Pour les réglages, A page 12. (Est affiché uniquement quand la source
“USB-IPOD”.)
(KD-DB52 uniquement)
[ON]/OFF : Met en ou hors service “F-AUX” dans la sélection de la source.
ON/OFF : Met en ou hors service “R-AUX” dans la sélection de la source.
[BT ADAPTER] : Choisir si la prise d’entrée auxiliaire arrière est connectée à
l’adaptateur Bluetooth, KS-BTA100. (A page 16). Le nom de la source
changera à “BT AUDIO”.
FRANÇAIS |
19
Page 44

Feuille d’i solation
CR2025
Utilisation de la télécommande (KD-DB52 uniquement)
Utilisation de la télécommande (KD-DB52 uniquement)
Préparation
Lorsque vous utilisez la télécommande pour la
première fois, retirez la feuille d’isolation.
.
Remplacement de la pilebouton au lithium
0
Si la télécommande perd de son efficacité,
remplacez la pile.
Avertissement :
0
N’installez pas une autre pile qu’une CR2025 ou
son équivalent.
0
Ne laissez pas la télécommande dans un
endroit (tel que le tableau de bord) exposé à la
lumière directe du soleil pendant longtemps.
0
Conservez la pile dans un endroit hors
d’atteinte des enfants.
0
Ne rechargez pas, ne court-circuitez pas, ne
chauffez pas la pile ni ne la jeter dans un feu.
0
Ne laissez pas la pile avec d’autres objets
métalliques.
0
Ne piquez pas la pile avec des ciseaux ou
d’autres objets similaires.
0
Isolez la pile en l’enveloppant d’un ruban lors
de son dépôt ou rangement.
Cet appareil est équipé d’un fonction de
.
Attention :
0
Danger d’explosion si la pile est remplacée de
façon incorrecte. Remplacez-la uniquement avec le
même type de pile ou un type équivalent.
0
Les piles ne doivent en aucun cas être
exposées à une chaleur excessive (lumière du
soleil, feu, etc.).
télécommande de volant. Pour plus
d’informations, référez-vous aussi aux
instructions fournies avec l’adaptateur de
télécommande.
KD-DB42 peut être contrôlé avec la
télécommande RM-RK52. (vendu en option)
Informations complémentaires
À propos des disques
Cet appareil ne peut lire que les CD suivants :
.
Cet appareil peut reproduire les disques multisession; mais les sessions non fermée sont
sautées lors de la lecture.
Disques non pris en charge
0
Disques qui ne sont pas ronds.
0
Disques avec des colorations sur la surface
d’enregistrement ou disques sales.
0
Disque enregistrable/réinscriptible qui n’a pas
été finalisé. (Pour plus d’informations sur la
finalisation du disque, reportez-vous au logiciel
utilisé pour graver le disque et au mode
d’emploi du graveur de disque.)
0
CD de 8 cm (3 pouces). Essayer d’insérer un
disque à l’aide d’un adaptateur peut entraîner
un dysfonctionnement de l’appareil.
Manipulation des disques
0
Ne pas toucher la surface d’enregistrement du
disque.
0
Ne pas coller de ruban adhésif, etc. sur les
disques et ne pas utiliser de disque avec du
ruban adhésif collé dessus.
0
N’utilisez aucun accessoire pour le disque.
0
Nettoyez le disque en partant du centre vers
l’extérieur.
0
Nettoyez le disque avec un chiffon sec au
silicone ou un chiffon doux. N’utilisez aucun
solvant.
0
Pour retirer les disques de cet appareil, tirez-les
horizontalement.
0
Retirez les ébarbures du bord du trou central
du disque avant d’insérer un disque.
Lecture de disques à double face
La face non DVD d’un disque à “DualDisc” n’est
pas compatible avec le standard “Compact Disc
Digital Audio”. Par conséquent, l’utilisation de la
face non DVD d’un disque à double face sur cet
appareil n’est pas recommandée.
| FRANÇAIS
20
Page 45

Informations complémentaires
Fichiers audio
Fichiers compatibles
0
Extensions de fichiers : MP3(.mp3),
WMA(.wma), AAC-LC(.m4a)
(quel que soit la casse des lettres—majuscules/
minuscules)
0
Débit binaire :
MP3 : 32 kbps à 320 kbps
WMA : 32 kbps à 192 kbps
AAC : 8 kbps à 320 kbps
0
Fréquence d’échantillonnage :
MP3/AAC : 48 kHz, 44,1 kHz, 32 kHz, 24 kHz,
22,05 kHz, 16 kHz, 12 kHz, 11,025 kHz, 8 kHz
WMA : 48 kHz, 44,1 kHz, 32 kHz, 22,05 kHz
0
Fichiers à débit binaire variable (VBR). (La durée
écoulée des fichiers VBR ne s’affichera pas
correctement.)
Fichiers incompatibles
0
Fichiers MP3 :
- codé au format MP3i et MP3 PRO
- codé dans un format inapproprié
- codé avec une couche 1/2
0
Fichiers WMA :
- codés au format sans perte (lossless),
professionnel et vocal
- avec un format non basé sur Windows Media ®
Audio
- protégé contre la copie avec DRM
0
Fichiers AAC :
- protégé contre la copie avec DRM
0
Fichiers qui contiennent des données telles
que AIFF, ATRAC3, etc.
Nombre maximum de caractères par
nom de fichier/dossier
Varie en fonction du format du disque utilisé (et
inclus les 4 caractères de l’extension—<.mp3>,
<.wma> ou <.m4a>).
0
ISO 9660 Niveau 1 et 2: 64 caractères
0
Romeo : 64 caractères
0
Joliet : 32 caractères
0
Nom de fichier long Windows : 64 caractères
Autres
0
Cet appareil peut affiché les balises WMA et
ID3, version 1.0/1.1/2.2/2.3/2.4 (pour MP3).
0
La fonction de recherche fonctionne mais la
vitesse de recherche n’est pas constante.
À propos du périphérique USB
0
Lors de la connexion avec un câble USB, utilisez
un câble USB 2.0.
0
Vous ne pouvez pas connecter un ordinateur ou un
disque dur portable à la prise d’entrée USB de l’appareil.
0
Connectez uniquement un périphérique USB à
la fois à cet appareil. N’utilisez pas de nœud de
raccordement USB.
0
Les périphériques USB munis de fonctions spéciales
telles que des fonctions de protection des données ne
peuvent pas être utilisés avec cet appareil.
0
N’utilisez pas un périphérique USB avec 2
partitions ou plus.
0
Cet appareil ne peut pas reconnaître les
périphériques USB dont l’alimentation n’est pas
de 5 V et dépasse 500 mA.
0
Il se peut que cet appareil ne reconnaisse pas la
carte mémoire insérée dans le lecteur de carte USB.
0
Il se peut que cet appareil ne puisse pas
reproduire correctement des fichiers d’un
périphérique USB quand celui-ci est connecté
à l’aide d’un cordon prolongateur.
0
En fonction de la forme du périphérique USB et du
port de connexion, il se peut que certains
périphériques USB ne puissent pas être connectés
correctement ou que la connexion soit lâche.
0
Le fonctionnement et l’alimentation peuvent
ne pas fonctionner comme prévu pour certains
périphériques USB.
0
Nombre maximum de caractère pour :
– Noms de dossier : 63 caractères
– Noms de fichier : 63 caractères
– Balises MP3 : 60 caractères
– Balises WMA : 60 caractères
– Balises AAC : 60 caractères
0
Cet appareil peut reconnaître un maximum de
65.025 fichiers, 255 dossiers (255 fichiers par dossier
y compris les dossiers sans fichier) et 8 hiérarchies.
Notification de marque de commerce et de licence
0
Microsoft et Windows Media est une marque
déposée ou une marque de commerce de
Microsoft Corporation aux États-Unis et/ou
dans les autres pays.
Uniquement pour KD-DB52 :
0
“Made for iPod” and “Made for iPhone” mean
that an electronic accessory has been designed
to connect specifically to iPod, or iPhone,
respectively, and has been certified by the
developer to meet Apple performance
standards. Apple is not responsible for the
operation of this device or its compliance with
safety and regulatory standards. Please note
that the use of this accessory with iPod, or
iPhone may affect wireless performance.
0
iPhone, iPod, iPod classic, iPod nano, and iPod
touch are trademarks of Apple Inc., registered
in the U.S. and other countries.
FRANÇAIS |
21
Page 46

Guide de dépannage
Guide de dépannage
Généralités
Aucun son n’est entendu des
enceintes.
“MISWIRING CHK WIRING THEN
RESET UNIT” apparaît sur
l’affichage et aucune opération ne
peut être réalisée.
Cet appareil ne fonctionne pas du
tout.
“F-AUX” ou “R-AUX” ne peuvent
pas être choisis.
Le son est parfois interrompu
pendant l’écoute d’un appareil
extérieur connecté à la prise
d’entrée auxiliaire.
Les caractères corrects ne sont
pas affichés (ex. : nom de l’album).
Symptôme Remède/Cause
0
Ajustez le volume sur le niveau optimum.
0
Vérifiez les cordons et les connexions.
Assurez-vous que les prises des fils d’enceintes sont recouvertes
correctement de ruban isolant, puis réinitialisez l’appareil.
(A page 3)
Si le message ne disparaît, consultez votre revendeur d’autoradio
JVC ou la société qui fabrique les kits.
Réinitialisez l’appareil. (A page 3)
Cochez le réglage <SRC SELECT>B<F-AUX / R-AUX>.
(A page 19)
Assurez-vous d’utiliser une fiche mini stéréo recommandée pour
la connexion. (A page 13)
Cet appareil peut uniquement afficher les lettres (majuscules), les
chiffres et un nombre limité de symboles.
FM/AM
Le préréglage automatique SSM
ne fonctionne pas.
Bruit statique pendant l’écoute de
la radio.
Vous ne pouvez pas choisir “AM”.
Symptôme Remède/Cause
Mémorises les stations manuellement.
Connectez l’antenne solidement.
Cochez le réglage <SRC SELECT>B<AM>. (A page 19)
DAB
“NO SIGNAL” apparaît sur
l’affichage.
“CHK ANTENNA” clignote sur
l’affichage.
Symptôme Remède/Cause
Déplacez-vous vers une zone avec des signaux plus forts.
Vérifiez le cordon et les connexions.
Lecture de disque
Le disque ne peut pas être
reproduit.
Un CD-R/CD-RW ne peut pas être
reproduit et les plages ne peuvent
pas être sautées.
Le son du disque est parfois
interrompu.
“NO DISC” apparaît sur l’affichage.0Insérez un disque reproductible dans la fente d’insertion.
“PLEASE” et “EJECT” apparaissent
alternativement sur l’affichage.
“IN DISC” apparaît sur l’affichage. Le disque ne peut pas être éjecté correctement. Assurez-vous
Symptôme Remède/Cause
Insérez le disque correctement.
Insérez un CD-R/CD-RW finalisé (finalisez-le avec l’appareil que
vous avez utilisé pour l’enregistrement).
0
Arrêtez la lecture lorsque vous conduisez sur une route
accidentée.
0
Changez le disque.
0
Vérifiez les cordons et les connexions.
0
Appuyez sur [M], puis insérez un disque correctement.
que rien ne bloque la fente d’insertion.
| FRANÇAIS
22
Page 47

Guide de dépannage
Lecture MP3/WMA/AAC
Le disque ne peut pas être
Symptôme Remède/Cause
reproduit.
“READING” continue de clignoter
sur l’affichage.
Les plages ne sont par reproduites
dans l’ordre dans lequel vous
vouliez les reproduire.
La durée de lecture écoulée n’est
pas correcte.
0
Enregistrez les plages à l’aide d’une application compatible sur
les disques appropriés. (A page 20)
0
Ajoutez les extensions de fichiers appropriées aux noms de fichiers.
Un temps d’initialisation plus long est requis. N’utilisez pas trop
de niveaux de hiérarchie et de dossiers.
L’ordre de lecture est déterminé quand les fichiers sont
enregistrés.
Cela se produit quelque fois pendant la lecture. C’est causé par la
façon don’t les plages ont été enregistrées sur le disque.
Lecture de périphérique USB
“READING” continue de clignoter
Symptôme Remède/Cause
sur l’affichage.
“NOT SUPPORT” apparaît sur
l’écran et la plage est sautée.
Les plages/dossiers ne sont pas
reproduites dans l’ordre prévu.
0
“CANNOT PLAY” clignote ou “NO
USB” apparaît sur l’affichage.
0
L’appareil ne peut pas détecter
le périphérique USB.
Lors de la lecture d’une plage, le
son tes parfois interrompu.
0
Un temps d’initialisation plus long est requis. N’utilisez pas
trop de niveaux de hiérarchie et de dossiers.
0
Mettez l’appareil hors tension puis de nouveau sous tension.
0
Rattachez le périphérique USB.
Vérifiez si la plage est dans un format compatible.
L’ordre de lecture est déterminé par le nom du fichier. Les
dossiers dont le nom commence par des chiffres sont triés par
ordre numérique. Les dossiers dans le nom ne commence pas
par des chiffres sont triés en fonction du système de fichier du
périphérique USB.
0
Vérifiez si le périphérique USB connecté est compatible avec
cet appareil.
0
Rattachez le périphérique USB.
Les plages n’ont pas été copiées correctement sur le
périphérique USB. Copiez de nouveau les plages sur le
périphérique USB et essayez à nouveau.
Lecture de iPod/iPhone (KD-DB52 uniquement)
Symptôme
iPod ne peut pas être mis sous
tension ou ne fonctionne pas.
Le son est déformé.
Du bruit est produit. Mettez hors service (décochez) la fonction “VoiceOver” de l’iPod.
La lecture s’arrête. Le casque d’écoute a été déconnecté pendant la lecture.
“CANNOT PLAY” clignote sur
l’affichage.
0
Vérifiez le câble de connexion et le raccordement. Si cela ne permet
pas de résoudre le problème, réinitialisez l’iPod/iPhone.
0
Mettez l’appareil hors tension puis de nouveau sous tension.
0
Détachez l’iPod/iPhone de l’appareil, mettez l’iPod/iPhone
hors tension puis à nouveau sous tension.
0
Réinitialisez l’iPod/iPhone à l’aide de la réinitialisation du
matériel et non pas à l’aide de la fonction de réinitialisation
située dans le menu.
0
Chargez la batterie du iPod/iPhone.
0
Vérifiez si le réglage <IPOD SWITCH> est correct. (A page 12)
Mettez hors service l’égaliseur sur cet appareil ou sur le iPod/iPhone.
Pour en savoir plus, consultez le site <http://www.apple.com>.
Redémarrer l’opération de lecture. (A page 11)
Vérifiez si le iPod/iPhone connecté est compatible avec cet
appareil. (A page 11)
Remède/Cause
FRANÇAIS |
23
Page 48

Spécifications
Spécifications
SECTION DE L’AMPLIFICATEUR AUDIO
Puissance de sortie maximum 50 W par canal
Puissance de sortie en mode continu (RMS) 20 W par canal pour 4Ω, 40 Hz à 20.000 Hz avec
Impédance de charge 4Ω (4Ω à 8Ω admissible)
Réponse en fréquence 40 Hz à 20.000 Hz
Rapport signal sur bruit 70 dB
Niveau de sortie de ligne, niveau de sortie du
caisson de grave/Impédance
Impédance de sortie ≤ 600Ω
moins de 1% de distorsion harmonique totale.
2,5 V/20 kΩ en charge (pleine échelle)
SECTION DU TUNER
DAB Plage de fréquences Band lll : de 174,928 MHz à 239,200 MHz
Sensibilité Band lll : -100 dBm
Sélectivité 45 dB
Séparation stéréo 80 dB
Connecteur d’antenne Type “SMB”
Tension de sortie de
l’antenne
Courant maximum de
FM Plage de fréquences 87,5 MHz à 108,0 MHz
AM Plage de fréquences MW : 531 kHz à 1.611 kHz
l’antenne
Sensibilité utile 9,3 dBf (0,8 µV/75 Ω)
Sensibilité utile à 50 dB 16,3 dBf (1,8 µV/75 Ω)
Séparation stéréo 40 dB
Sensibilité MW : 20 μV, LW : 50 μV
Sélectivité MW : 40 dB, LW : 40 dB
L-Band : de 1452,960 MHz à 1490,624 MHz
L-Band : -98 dBm
CC 14,4 V (11 V à 16 V)
< 100 mA
LW : 153 kHz à 279 kHz
SECTION DU LECTEUR CD
Système de détection du signal
Nombre de canaux 2 canaux (stéréo)
Réponse en fréquence 5 Hz à 20.000 Hz
Rapport signal sur bruit 98 dB
Pleurage et scintillement Inférieur à la limite mesurable
Capteur optique sans contact (laser semi-conducteur)
| FRANÇAIS
24
Page 49

SECTION USB
Standard USB USB 1.1, USB 2.0
Vitesse de transfert de données (Full Speed) Max. 12 Mbps
Périphériques compatibles À mémoire de grande capacité
Système de fichiers compatible FAT 32/16/12
Format audio compatible MP3/WMA/AAC
Puissance de sortie
CC 5 V d 500 mA
GÉNÉRALITÉS
Alimentation (tension de fonctionnement) CC 14,4 V (11 V à 16 V admissibles)
Système de mise à la masse Masse négative
Températures de fonctionnement admissibles 0°C à +40°C
Dimensions
(L × H × P)
Masse 1,3 kg (sans les accessoires)
Sujet à changement sans notification.
Taille d’installation environ 182 mm × 52 mm × 159 mm
Taille du panneau environ 188 mm × 59 mm × 8,5 mm
Spécifications
FRANÇAIS |
25
Page 50

Bitte lesen Sie die Anleitung vollständig durch, bevor Sie das Gerät in Betrieb nehmen, um
Die obere Abdeckung nicht önen. Das Gerät enthält keine Teile, die vom Benutzer
gewartet werden können. Wartungen nur von qualifziertem Fachpersonal durchführen lassen.
Sichtbare und/oder unsichtbare Laserstrahlung der Klasse 1M bei oenen
Abdeckungen. Nicht direkt mit optischen Instrumenten betrachten.
WICHTIG FÜR LASER-PRODUKTE
1. LASER-PRODUKT DER KLASSE 1
2. ACHTUNG:
3. ACHTUNG:
4. ANBRINGEN DES ETIKETTS: WARNHINWEIS-ETIKETT, AUSSEN AM GERÄT ANGEBRACHT.
Benutzerinformationen zur
Entsorgung alter Geräte und Batterien
[Nur Europäische Union]
Diese Symbole zeigen an, dass das damit
gekennzeichnete Produkt bzw. die Batterie
nicht als normaler Haushaltsabfall entsorgt
werden sollen.
Wenn Sie dieses Produkt und die Batterie entsorgen
möchten, halten Sie sich dabei bitte an die
entsprechenden Landesgesetze und andere
Regelungen in Ihrem Land bzw. Ihrer Gemeinde.
Die korrekte Entsorgung dieses Produkts dient
dem Umweltschutz und verhindert mögliche
Schäden für die Umwelt und die menschliche
Gesundheit.
Hinweis:
Das Zeichen Pb unterhalb des Batteriesymbols
gibt an, dass diese Batterie Blei enthält.
Produkte
Batterie
Wir danken Ihnen für den Kauf eines JVC Produkts.
sicherzustellen, daß Sie alles vollständig verstehen und die bestmögliche Leistung des Geräts erhalten.
.
.
Warnung:
Das Auto vor dem Bedienen des Geräts anhalten.
Vorsicht:
Stellen Sie die Lautstärke so ein, dass Sie
Geräusche von außerhalb des Fahrzeugs hören
können. Fahren mit zu hoher Lautstärke kann zu
Unfällen führen.
Vermeiden Sie es, USB-Geräte oder iPod/iPhone
zu benutzen, wenn diese das sichere Fahren
behindern könnten.
Achtung bei der
Lautstärkeeinstellung:
Digitale Geräte (CD/USB) erzeugen im Vergleich
mit anderen Tonträgern sehr geringes Rauschen.
Senken Sie die Lautstärke vor dem Abspielen
solcher digitalen Tonquellen, um Beschädigung
der Lautsprecher durch plötzliche Tonspitzen zu
| DEUTSCH
2
vermeiden.
Temperatur im Auto:
Wenn Sie das Auto für lange Zeit in heißem oder
kaltem Wetter parken, bitte warten, bis sich die
Temperatur im Auto sich normalisiert hat, bevor
Sie das Gerät einschalten.
Kondensation:
Wenn das Fahrzeug eine Klimaanlage hat, kann
sich Beschlag auf der Laserlinse bilden. Dies kann
zu Disc-Lesefehlern führen. In diesem Fall
entnehmen Sie die Disc und warten, bis der
Beschlag verschwunden ist.
JVC übernimmt keine Verantwortung für
jeglichen Datenverlust in einem iPod/iPhone
und/oder einem USB-Massenspeichergerät bei
der Verwendung dieser Anlage.
Page 51

Anbringen/Abnehmen des
(Gedrückt halten)
Bedienfelds
.
Zurücksetzen des Geräts
Ihre vorgegebenen
Einstellungen werden
ebenfalls gelöscht.
Zwangsweises Ausschieben einer Disc
.
0
Achten Sie darauf, die ausgeschobene Disc
nicht fallen zu lassen.
0
Wenn das nicht funktioniert, führen Sie einen
Reset am Gerät aus.
Wartung
Reinigen des Geräts
Wischen Sie Schmutz vom Panel sanft mit einem
trockenen Silikontuch oder weichen Lappen ab.
Wenn Sie diese Vorsichtsmaßregeln nicht
beachten, kann das Gerät beschädigt werden.
Reinigen des Anschlusses
Wischen Sie Schmutz vom Anschluss des Geräts
und des Panels ab. Verwenden Sie einen
Wattetupfer oder Lappen.
Inhaltsverzeichnis
Vorbereitung ....................................................... 4
Abbrechen der Display-
Demonstrationen .......................................... 4
Einstellung der Uhr ....................................... 4
Grundlegende Bedienung .............................. 5
Rundfunkempfang ............................................ 6
Hören von Digital Audio Broadcasting
(DAB) ....................................................................... 8
Hören einer Disc ............................................... 10
Von einem USB-Gerät hören ....................... 11
Von einem iPod/iPhone hören (nur
KD-DB52) ............................................................ 11
Hören von den anderen externen
Komponenten ................................................... 13
Ändern der Tastenbeleuchtung und der
Anzeigefarbe (nur KD-DB52) ....................... 14
Anpassen des Klangs ...................................... 15
Verwendung von BluetoothT-Geräten
................................................................................. 16
Menü-Bedienungen ....................................... 17
Benutzung der Fernbedienung (nur
KD-DB52) ............................................................ 20
Zusätzliche Information ................................ 20
Störungssuche .................................................. 22
Technische Daten ............................................ 24
Hinweise zu dieser
Bedienungsanleitung:
0
Diese Bedienungsanleitung erläutert die
Bedienung über die Tasten am Bedienfeld.
0
< > weist auf die Displayanzeigen am
Bedienfeld hin.
DEUTSCH |
3
Page 52

(Anfangseinstellung)
(Gedrückt halten)
(Anfangseinstellung)
(Anfangseinstellung)
(Gedrückt halten)
(Anfangseinstellung)
Vorbereitung
Vorbereitung
Abbrechen der Display-Demonstrationen
Die Displaydemonstration ist immer aktiviert, bis Sie sie beenden.
Einschalten.
1
.
.
.
2
Wählen Sie <DEMO OFF>.
4
.
5
.
.
3
Einstellung der Uhr
.
1
Wählen Sie <CLOCK>.
2
Wählen Sie <CLOCK SET>.
3
Stellen Sie die Uhrzeit ein.
4
Schließen Sie den Vorgang ab.
6
Stellen Sie die Minute ein.
5
.
Wählen Sie <24H/12H>.
6
.
Wählen Sie <24 HOUR> oder <12 HOUR>.
7
.
Schließen Sie den Vorgang ab.
8
.
.
.
.
.
| DEUTSCH
4
Page 53

(nur KD-DB52)
Fernbedienung
USB-Eingangsterminal
Vordere
AUX-Eingangsbuchse
NICHT dem direkten
Sonnenlicht aussetzen.
Fernbedienungssensor
Nehmen Sie das
Bedienfeld ab
Disc auswerfen
DisplayfensterSteuerregler
Ladeschlitz
Bedienfeld
Grundlegende Bedienung
.
Wenn Sie die folgende(n) Taste(n) drücken oder gedrückt halten...
Bedienfeld
B /SOURCE
Steuerregler
(drehen)
Steuerregler
(Drücken Sie)
DAB
DISP
T/P BACK -
E F
EQ SOUND
J
K
Fernbedienung
-
SOURCE Zum Auswählen der Quelle. „CD“ oder „USB“ ist nur wählbar,
VOL - / + Zum Einstellen des Lautstärkepegels.
- Zur Auswahl von Menüpunkten.
d
- Bestätigt die Auswahl.
-
-
J
K
H I
0
Zum Einschalten.
0
Zum Ausschalten. (Gedrückt halten)
wenn eine Disc eingelegt oder ein USB-Gerät angeschlossen ist.
Allgemeine Funktion
0
Zum Dämpfen des Tons. Zum Pausieren der Wiedergabe,
wenn „CD“ oder „USB/USB-IPOD“ als Quelle gewählt wurde.
0
Drücken Sie die Taste erneut, um das Dämpfen des Tons
aufzuheben oder die Wiedergabe fortzusetzen.
0
Zum Aktivieren des DAB-Modus. (A Seite 8)
0
Zum Aktivieren des DAB SORTING-Modus. (Gedrückt halten)
0
Zur Anzeige von DAB-Services.
0
Zur Auswahl des Vorgabe-Klangmodus.
0
Halten Sie die Taste EQ am Bedienfeld gedrückt, um die
Klangpegeleinstellung direkt anzuzeigen. (A Seite 15)
0
Ändert die Display-Information.
0
Scrollt die Display-Information. (Gedrückt halten)
0
Aktiviert/deaktiviert den TA-Standby-Empfang. (A Seite 7)
0
Zum Aktivieren des PTY-Suchmodus. (Gedrückt halten)
(A Seite 7)
0
Wählt den Steuerungsanschluss eines iPod/iPhone. (Gedrückt
halten) (nur KD-DB52) (A Seite 12)
0
Schaltet zum vorherigen Menü zurück.
0
Zum Verlassen des Menüs. (Gedrückt halten)
0
Zur Auswahl eines voreingestellten Senders oder Services.
(A Seite 6, 8)
0
Zur Auswahl des MP3/WMA/AAC-Ordners. (A Seite 10)
0
Zur Sender- oder Servicesuche. (A Seite 6, 8)
0
Wählt den Track. (A Seite 10, 12)
0
Den Track vorspulen oder zurückspulen. (Gedrückt halten)
Grundlegende Bedienung
DEUTSCH |
5
Page 54

A
B
(Gedrückt halten)
(Gedrückt halten)
1
2
oder
(Gedrückt halten)
Rundfunkempfang
Rundfunkempfang
.
Sendersuche
A
Wählen Sie <FM> oder <AM>.
B
Automatische Suche. (Drücken Sie)
Manuelle Suche. (Gedrückt halten)
„M“ blinkt, und dann drücken Sie die Taste
wiederholt.
„ST“ leuchtet auf, wenn eine UKW-Stereosendung mit ausreichender Signalstärke empfangen wird.
Speichern von Sendern
Manuelle Voreinstellung (UKW/AM)
Sie können für jedes Frequenzband bis zu 18
Sender für UKW (FM) und 6 Sender für AM
voreinstellen.
Während des Hörens eines Senders...
1
.
„PRESET MODE“ blinkt.
Wählen Sie die Festsendernummer.
2
Die Festsendernummer blinkt, und „MEMORY“
erscheint.
Automatische Voreinstellung (nur UKW)
SSM (Sequentieller Speicher für starke
Sender)
Sie können für UKW (FM) bis zu 18 Sender
voreinstellen.
1
.
2
.
„SSM“ blinkt. Sind alle Sender gespeichert, hört
„SSM“ auf zu blinken.
Zum Vorprogrammieren von <SSM 07 – 12>/
<SSM 13 – 18> wiederholen Sie die Schritte 1
und 2.
B<TUNER>
B<SSM>
B<SSM 01 – 06>
Auswahl eines gespeicherten Senders
.
Verbessern des UKW-Empfangs
.
1
.
2
.
0
Der Empfang wird besser, jedoch geht der
Stereo-Effekt verloren.
Zum Wiederherstellen des Stereoeffekts
wiederholen Sie den Vorgang, um <MONO OFF>
zu wählen.
Ändern der Displayinformationen
.
(für andere als Radio Data System-Sender)
Frequenz 1 Uhrzeit
(für Radio Data System-UKW-Sender)
Sendername (PS) B Frequenz B Programmtyp
(PTY) B Uhrzeit B (zurück zum Anfang)
B<TUNER>
B<MONO>
B<MONO ON>
| DEUTSCH
6
Page 55

Die folgenden Merkmale stehen nur für
(Gedrückt halten)
(Gedrückt halten)
(Gedrückt halten)
UKW-Radio Data System-Sender zur
Verfügung.
Lieblingsprogramm suchen— Programmtypensuche (PTY)
1
.
Wählen Sie eine PTY-Code.
2
.
.
Die PTY-Suche beginnt.
Wenn ein Sender eine Sendung mit dem PTY-Code
ausstrahlt, den Sie gewählt haben, wird dieser
Sender eingestellt.
PTY-Codes
NEWS, AFFAIRS, INFO, SPORT, EDUCATE, DRAMA, CULTURE,
SCIENCE, VARIED, POP M (Musik), ROCK M (Musik), EASY M
(Musik), LIGHT M (Musik), CLASSICS, OTHER M (Musik),
WEATHER, FINANCE, CHILDREN, SOCIAL, RELIGION, PHONE
IN, TRAVEL, LEISURE, JAZZ, COUNTRY, NATION M (Musik),
OLDIES, FOLK M (Musik), DOCUMENT
Aktivieren von TA/NewsStandbyempfang
Der Standbyempfang erlaubt es dem Receiver,
von allen Signalquellen, außer AM, kurzzeitig auf
Verkehrsdurchsagen (TA) oder Nachrichten
(NEWS) umzuschalten.
TA-Standbyempfang
.
TP-Anzeige TA-Standbyempfang
Falls verfügbar, wird das Gerät
Leuchtet auf
Blinkt
0
Zum Deaktivieren drücken Sie T/P BACK
noch einmal.
kurzzeitig auf die
Verkehrsdurchsagen (TA)
umschalten.
Noch nicht aktiviert. Suchen Sie
einen anderen Sender, der Radio
Data System Signale ausstrahlt.
Rundfunkempfang
NEWS-Standbyempfang
1
.
2
.
Falls verfügbar, wird das Gerät kurzzeitig auf die
B<TUNER>
B<NEWS-STBY>
B<NEWS ON>
Nachrichtenprogramme umschalten.
0
Die Lautstärkeeinstellung für
Verkehrsdurchsagen bzw. Nachrichten wird
automatisch gespeichert. Beim nächsten
Umschalten auf Verkehrsdurchsagen bzw.
Nachrichten wird diese entsprechend
angewendet.
Verfolgen des gleichen Programms —Network-Tracking-Empfang
Wenn Sie in einem Bereich unterwegs sind, in
dem kein guter UKW-Empfang möglich ist, sucht
dieser Receiver automatisch nach anderen
Frequenzen, auf denen das UKW-Radio Data
System-Programm möglicherweise besser
empfangen werden kann.
1
.
2
.
B<TUNER>
B<AF-REG>
Schaltet auf einen anderen
Sender um. Es handelt sich
AF ON
gegebenenfalls um ein anderes
Programm als das gerade
empfangene (AF-Anzeige
leuchtet auf).
Zum Umschalten auf einen
anderen Sender mit dem
AF-REG ON
gleichen Programm (die
Anzeigen AF und REG leuchten
auf).
Automatische Senderauswah— Programmsuche
Ist das Signal eines von Ihnen voreingestellten
Senders zu schwach, sucht das Gerät nach einem
anderen Sender, der möglicherweise das gleiche
Programm wie der ursprünglich voreingestellte
Sender ausstrahlt.
<P-SEARCH> (A Seite 19)
DEUTSCH |
7
Page 56

Hören von Digital Audio Broadcasting (DAB)
A A
BC
*
oder
(Gedrückt halten)
(Gedrückt halten)
1
2
oder
.
Servicesuche in alphabetischer Reihenfolge—Alphabetische Suche
Starten Sie die DAB-Servicesortierung.
1
.
„DAB SORTING“
.
„DAB SORTING“ wird ausgeblendet, wenn die
Sortierung abgeschlossen ist.
Rufen Sie die Services auf.
2
.
.
Die Services werden in alphabetischer
Reihenfolge angezeigt.
0
Ist kein Service vorhanden, wird „LIST EMPTY“
angezeigt.
Wählen Sie das gewünschte Zeichen
3
aus.
- Suche A bis Z
blinkt.
Servicesuche
A
Wählen Sie <DAB>.
* Nur nutzbar, wenn von anderen Quellen
umgeschaltet wird.
B
Suchen Sie nach einem Ensemble.
0
Automatische Suche. (Drücken Sie)
Wird ein Ensemble empfangen, stoppt die Suche.
Drücken Sie die gleiche Taste noch einmal, um
die Suche zu stoppen.
0
Manuelle Suche. (Gedrückt halten)
„M“ blinkt, und dann drücken Sie die Taste
wiederholt.
C
Wählen Sie einen Service (primär oder
sekundär) aus, den Sie anhören möchten.
Speichern von DAB-Services
Sie können bis zu 18 DAB-Services voreinstellen.
Während des Hörens eines Services...
1
.
„PRESET MODE“ blinkt.
Wählen Sie die Festsendernummer.
2
Die Festsendernummer blinkt, und „MEMORY“
erscheint.
Auswahl eines gespeicherten DAB-Service
.
.
.
0
Überspringen Sie diesen Schritt, wenn nur
wenige Services verfügbar sind.
Wählen Sie den gewünschten Service
4
aus.
.
.
| DEUTSCH
8
Page 57

(Gedrückt halten)
(Gedrückt halten)
(Gedrückt halten)
Hören von Digital Audio Broadcasting (DAB)
Programmverfolgung—DAB-AF (Alternativfrequenzen eines Senders)
1
.
2
.
B<TUNER>
B<DAB AF>
Zum Verfolgen des Programms
DAB AF ON
innerhalb der DAB-Services und
UKW-Radio Data System-Sender.
DAB AF OFF Hebt auf.
0
In den Grundeinstellungen ab Werk ist AF
(Alternativfrequenzen eines Senders) aktiviert.
Lieblingsprogramm suchen— Programmtypensuche (PTY)
(A Seite 7)
Aktivieren des Standbyempfangs
Empfang mit Programmtyp-Standby
(PTY-STBY)
1
.
2
.
Wählen Sie den gewünschten
3
PTY-Code.
PTY-
Anzeige
Blinkt Noch nicht aktiviert.
Leuchtet
auf
0
Zum Deaktivieren wählen Sie in Schritt 2
<OFF>.
TA-Standbyempfang
Verkehrsdurchsagen-Standby erlaubt es dem
Receiver, von allen Signalquellen kurzzeitig auf
Verkehrsdurchsagen (TA) umzuschalten.
(A Seite 7)
B<TUNER>
B<PTY-STBY>
PTY-Standbyempfang
Das Gerät befindet sich für den
gewünschten PTY-Code in
Standby. Beginnt das Programm,
blinken „Servicename“ und
„PTY-Code“ abwechselnd.
Ändern der Displayinformationen
.
Servicename B Name des Ensembles B
Sendernummer B Frequenz B Programmtyp
(PTY) B Dynamic Label Segment (DLS) B Digital
Radio Type/Audio-Bitrate B Uhr B (zurück zum
Anfang)
0
Ist kein Signal vorhanden, wird „NO SIGNAL“
angezeigt.
Anzeige von
Radiotextinformationen
Wird die „D“-Anzeige im Display eingeblendet,
können Sie das Dynamic Label Segment (DLS)
direkt prüfen.
.
DEUTSCH |
9
Page 58

Etikettseite
(Gedrückt halten)
Hören einer Disc
Hören einer Disc
.
Wiedergabe einer Disc
Die Quelle wechselt zu „CD“ und die Wiedergabe
beginnt.
Alle Titel werden wiederholt abgespielt, bis Sie
die Quelle umschalten oder die Disc ausschieben.
Auswurf der Disc
.
0
Wenn die ausgeworfene Disc nicht innerhalb
von 15 Sekunden entfernt wird, wird sie
automatisch erneut im Ladeschlitz geladen.
0
Kann die Disc nicht ausgeworfen werden,
A Seite 3.
Auswahl eines Ordners/Tracks
Zur Auswahl des Ordners.
(Für MP3/WMA/AAC)
0
Wählt den Track.
(Drücken Sie)
0
Den Track vorspulen oder
zurückspulen. (Gedrückt
halten)
Auswahl eines Ordners/Tracks aus der Liste
1
.
Der aktuelle Ordnername/die Track-Nr. wird
eingeblendet.
Wählen Sie einen Ordner aus.
2
(Für MP3/WMA/AAC)
.
Der aktuelle Trackname wird eingeblendet.
Wählen Sie einen Track aus.
3
.
.
0
Für MP3/WMA/AAC
Enthält die Disc viele Ordner bzw. Tracks,
können Sie eine Schnellsuche nach einem
gewünschten Ordner bzw. Track ausführen,
indem Sie den Steuerregler schnell drehen.
Auswahl von Wiedergabemodi
Sie können jeweils einen der folgenden
Wiedergabe-Modi wählen.
1
.
2
.
h<REPEAT>1<RANDOM>
3
.
REPEAT B
TRACK RPT Aktuellen Track wiederholen.
FOLDER RPT *
RPT OFF
RANDOM A
FOLDER RND *
ALL RND
RND OFF
* Für MP3/WMA/AAC
Ändern der Displayinformationen
.
Track-Nr./Spielzeit B Track-Nr./Uhrzeit B
Albumtitel/Künstler* B Trackname* B (zurück
zum Anfang)
* „NO NAME“ (Kein Name) erscheint bei
herkömmlichen CDs oder wenn keine
Aufnahme vorhanden ist.
Aktuellen Ordner
wiederholen.
Bricht die wiederholte
Wiedergabe ab.
Spielt in zufälliger Reihenfolge
alle Tracks des aktuellen
Ordners ab, und dann Tracks
der nächsten Ordner.
Spielt alle Tracks in zufälliger
Reihenfolge ab.
Bricht die Zufallswiedergabe
ab.
| DEUTSCH
10
Page 59

USB-2.0-Kabel
(nicht mitgeliefert)
USB-Eingangsterminal
USB-2.0-Kabel (Zubehör beim
iPod/iPhone)
USB-Eingangsterminal
Apple iPod/iPhone
Von einem USB-Gerät hören
Von einem iPod/iPhone hören (nur KD-DB52)
Wiedergabe von einem USB-Gerät
.
Die Quelle wechselt zu „USB“ und die
Wiedergabe beginnt.
.
0
Mit diesem Gerät können auf einem USBMassenspeichergerät (wie USB-Speicher,
digitaler Audioplayer usw.) gespeicherte MP3/
WMA/AAC-Dateien abgespielt werden.
Sie können das USB-Gerät auf gleiche Weise
bedienen wie die Dateien auf einer Discs.
(A Seite 10)
Vorsichtsmaßregeln
0
Stellen Sie sicher, dass alle wichtigen Daten
gesichert sind.
0
Das USB-Gerät nicht wiederholt abnehmen
oder einsetzen, während „READING“ (Lesen) im
Display erscheint.
0
Elektrostatischer Schlag beim Anschließen
eines USB-Geräts kann anormale Wiedergabe
am Gerät verursachen. In diesem Fall trennen
Sie das USB-Gerät ab und setzen dann diese
Einheit und das USB-Gerät zurück.
0
Lassen Sie USB-Geräte nicht im Fahrzeug
liegen und setzen Sie sie keinem direkten
Sonnenlicht bzw. hohen Temperaturen aus.
Anderenfalls kann es zu Deformationen oder
anderen Schäden am Gerät kommen.
0
Für weitere Details zum USB-Betrieb
A Seite 21.
Wiedergabe von iPod/iPhone
.
Die Quelle wechselt zu „USB“ B „USB-IPOD“ und
die Wiedergabe beginnt.
.
0
Ein iPod/iPhone kann an dieses Gerät
angeschlossen werden:
- iPod touch (4. Generation)
- iPod touch (3. Generation)
- iPod touch (2. Generation)
- iPod touch (1. Generation)
- iPod classic
- iPod mit Video (5. Generation)*
- iPod nano (6. Generation)
- iPod nano (5. Generation)
- iPod nano (4. Generation)
- iPod nano (3. Generation)
- iPod nano (2. Generation)
- iPod nano (1. Generation)*
- iPhone 4
- iPhone 3GS
- iPhone 3G
- iPhone
*<IPOD MODE/EXT MODE> werden nicht
unterstützt.
0
Es ist nicht möglich, Videodateien im Menü
„Videos“ in <HEAD MODE> zu durchsuchen.
0
Die Song-Reihenfolge, die im gewählten Menü
dieser Einheit erscheint, kann sich vom iPod
unterscheiden.
0
Beim Betrieb eines iPod/iPhone kann es sein,
dass manche Vorgänge nicht richtig oder nach
Wunsch ausgeführt werden. In diesem Fall
besuchen Sie folgende JVC-Website:
<http://www.jvc.jp/english/car/index.html>
(nur englische Website).
DEUTSCH |
11
Page 60

(Gedrückt halten)
(Gedrückt halten)
Von einem iPod/iPhone hören (nur KD-DB52)
Auswahl des Steuerterminals— IPOD SWITCH
.
h<HEAD MODE/IPOD MODE/EXT MODE>
HEAD MODE Steuert die iPod-Wiedergabe
über dieses Gerät.
IPOD MODE Steuert die iPod-Wiedergabe
über den iPod/das iPhone.
EXT MODE Lässt beliebige Audiosignale
vom iPod/iPhone zu. Das Display
zeigt immer „EXT MODE“.
0
Sie können die Einstellung auch über <IPOD
SWITCH> im Menü ändern.
Auswahl eines Tracks
Gilt nur für <HEAD MODE/IPODMODE>.
0
Wählt Sie einen Track/
Kapitel. (Drücken Sie)
0
Den Track vorspulen oder
zurückspulen. (Gedrückt
halten)
Auswahl eines Tracks im Menü
Gilt nur für <HEAD MODE>.
1
.
Wählen Sie das gewünschte Menü.
2
.
.
PLAYLISTS1ARTISTS1ALBUMS1SONGS1POD
CASTS1GENRES1COMPOSERS1 (zurück zum
Anfang)
Wählen Sie den gewünschten Track.
3
.
Auswahl von Wiedergabemodi
Sie können jeweils einen der folgenden
Wiedergabe-Modi wählen.
Gilt nur für <HEAD MODE>.
1
.
2
.
h<REPEAT>1<RANDOM>
3
.
REPEAT B
ONE RPT
ALL RPT
RANDOM A
SONG RND
ALBUM RND
RND OFF
0
„ALBUM RND“ kann für einige iPods/iPhones
nicht genutzt werden.
Ändern der Displayinformationen
.
Track-Nr./Spielzeit B Track-Nr./Uhrzeit B
Albumtitel/Künstler B Trackname B (zurück zum
Anfang)
Hat die gleiche Funktion wie
„Wiederholen Ein“ am iPod.
Hat die gleiche Funktion wie
„Wiederholen Alle“ am iPod.
Hat die gleiche Funktion wie
„Zufall Titel“ am iPod.
Hat die gleiche Funktion wie
„Zufall Alben“ am iPod.
Bricht die Zufallswiedergabe
ab.
.
Wiederholen Sie diesen Schritt, bis der
gewünschte Track ausgewählt ist.
0
Enthält das gewählte Menü viele Tracks,
können Sie eine Schnellsuche nach einem
gewünschten Track ausführen, indem Sie den
Steuerregler schnell drehen.
| DEUTSCH
12
Page 61

Tragbarer
Audio-Player usw.
3,5 mm-Stereo-Ministecker
(nicht mitgeliefert)
Tragbarer
Audio-Player usw.
3,5 mm-Stereo-Ministecker
(mit „L “-förmigem
Anschluss) (nicht mitgeliefert)
(Gedrückt halten)
Die Verwendung eines 3-poligen Stereo-Ministeckers für optimale Audioausgabe.
Hören von den anderen externen Komponenten
Hören von den anderen externen Komponenten
Einzelheiten siehe mit den externen Komponenten mitgelieferte Bedienungsanleitung.
Wiedergabe von externer
Komponente über den
vorderen AUX-Anschluss
Am vorderen F-AUX-Anschluss
1
anschließen.
Wählen Sie <F-AUX>.
2
.
.
Schalten Sie die angeschlossene
3
Komponente ein und starten Sie die
Wiedergabe der Quelle.
Ändern der Displayinformationen
F-AUX1AUX/Uhrzeit
.
Wiedergabe von externer Komponente über den hinteren AUX-Anschluss
Am hinteren R-AUX-Anschluss
1
anschließen.
Wählen Sie die Quelle aus.
2
A
.
B
B<SRC SELECT>
B<R-AUX>
.
Wählen Sie <R-AUX>.
3
.
.
Schalten Sie die angeschlossene
4
B<R-AUX ON>
Komponente ein und starten Sie die
Wiedergabe der Quelle.
Ändern der Displayinformationen
R-AUX1AUX/Uhrzeit
.
.
DEUTSCH |
13
Page 62

Ändern der Tastenbeleuchtung und der Anzeigefarbe
Alle Bereiche
DisplaybereichTastenbereich
(Gedrückt halten)
(Gedrückt halten)
(nur KD-DB52)
Alle Bereiche: Umfasst Tasten- und
Displaybereich.
.
Auswahl der Vorgabe-Farbe
Sie können für <BUTTON ZONE>, <DISP ZONE>
und <ALL ZONE> separat eine Vorgabefarbe
auswählen.
1
.
Wählen Sie <COLOR>.
2
.
.
3
.
BUTTON ZONE COLOR 01-29/USER/
DISP ZONE
ALL ZONE
0
Anfangsfarbe: BUTTON ZONE [06], DISP ZONE
[01], ALL ZONE [06].
0
Wenn <ALL ZONE> ausgewählt wurde,
wechselt die Tasten- und Displaybeleuchtung
zur aktuellen/ausgewählten <BUTTON ZONE>Farbe.
| DEUTSCH
14
COLOR FLOW 01-03*
* COLOR FLOW 01:
Farbe wechselt alle 9
Sekunden.
COLOR FLOW 02:
Farbe wechselt alle 5
Sekunden.
COLOR FLOW 03:
Farbe wechselt alle 3
Sekunden.
Speichern Ihrer eigenen Farbanpassungen
Sie können Ihre eigenen Tag- und Nachtfarben
für <BUTTON ZONE> und <DISP ZONE> separat
speichern.
1
.
Wählen Sie <COLOR SETUP>.
2
3
.
DAY
BUTTON
COLOR
ZONE
DISP ZONE
NIGHT
BUTTON
COLOR
ZONE
DISP ZONE
MENU
ON Verändert die Display-
COLOR
OFF
0
NIGHT COLOR/DAY COLOR wechselt beim
Ein-/Ausschalten der Autoscheinwerfer.
0
Wählen Sie eine der
Primärfarben <RED/
GREEN/BLUE> aus
und passen Sie
anschließend die
Farbstufe an <00-31>.
Wiederholen Sie
diesen Vorgang, bis
Sie alle drei
Primärfarben
eingestellt haben.
0
Ihre Einstellungen
werden automatisch
unter „USER“
gespeichert.
0
Wenn Sie für alle
Primärfarben „00“ für
<DISP ZONE>
auswählen, wird
nichts im Display
angezeigt.
und Tastenbeleuchtung
während der
Bedienschritte im Menü,
in der Listensuche und
im Wiedergabemodus.
.
Page 63

20
-5
0
+5
+10
+15
50 100 200 500 1k 2k 5k 10k 20k
[Hz]
[dB]
(Gedrückt halten)
(Gedrückt halten)
Anpassen des Klangs
Auswahl eines Vorgabe-Klangmodus
Sie können einen Vorwahl-Klangmodus wählen,
der dem Musikgenre entspricht.
.
FLATBNATURALBDYNAMICBVOCAL
BOOSTBBASS BOOSTBUSERB (zurück zum
Anfang)
(a) FLAT
(b) NATURAL
(c) DYNAMIC
(d) VOCAL BOOST
(e) BASS BOOST
.
Speichern Ihrer eigenen Anpassungen
Easy Equalizer
Sie können beim Hören den Subwooferpegel und
Klangpegel des gewählten Klangmodus
anpassen.
1
Alle Frequenzen eben.
Hohe Frequenzen werden
angehoben.
Hohe und niedrige
Frequenzen werden
angehoben.
Mittlere Frequenzen werden
angehoben.
Niedrige Frequenzen
werden angehoben.
Frequenzmerkmale der Töne
Anpassen des Klangs
Pro Equalizer
1
.
2
.
B<PRO EQ>
B<BASS/MIDDLE/
TREBLE>
3
.
Stellen Sie die Klangelemente des gewählten
Tons ein.
BASS
Frequenz 60/[80]/100/200 Hz
Pegel LVL von –06 bis +06 [00]
Q [Q1.0]/Q1.25/Q1.5/Q2.0
MIDDLE
Frequenz 0.5/[1.0]/1.5/2.5 kHz
Pegel LVL von –06 bis +06 [00]
Q Q0.75/Q1.0/[Q1.25]
TREBLE
Frequenz [10.0]/12.5/15.0/17.5 kHz
Pegel LVL von –06 bis +06 [00]
Q [Q FIX]
Wiederholen Sie Schritt 2 und 3 zur
4
Einstellung anderer Klänge.
Die Einstellungen werden gespeichert und
<USER> wird aktiviert.
(Anfänglich: [XX])
.
Stellen Sie den Pegel ein.
2
.
.
SUB.W* von 00 bis 08 [04]
BASS LVL von –06 bis +06 [00]
MID LVL von –06 bis +06 [00]
TRE LVL von –06 bis +06 [00]
Die Einstellungen werden gespeichert und
<USER> wird aktiviert.
* Nur verfügbar, wenn für <L/O MODE> die
Option <SUB.W> gewählt wurde.
(Anfänglich: [XX])
DEUTSCH |
15
Page 64

(Gedrückt halten)
(Hoch)
(Niedrig)
(Drücken Sie)
(Gedrückt halten)
KS-BTA100
Microfon
(CD-Receiver)
KS-BTA100
Verwendung von BluetoothT-Geräten
Verwendung von BluetoothT-Geräten
Für Bluetooth-Bedienvorgänge ist es erforderlich, den Bluetooth-Adapter KS-BTA100 (separat zu
erwerben) an die AUX-Eingangsbuchse (R-AUX/BT ADAPTER) auf der Rückseite dieses Geräts
anzuschließen. (A Einbau/Anschlussanleitung)
0
KS-BTA100 ist nicht in allen Ländern erhältlich. Bitte erkundigen Sie sich bei Ihrem Händler, wo Sie
dieses Gerät erwerben können.
0
Einzelheiten siehe auch mit dem Bluetooth-Adapter und dem Bluetooth-Gerät mitgelieferte
Bedienungsanleitung.
0
Die Bedienung kann je nach angeschlossenem Gerät unterschiedlich sein.
Vorbereitung
Registrieren (pairen) Sie ein Bluetooth-Gerät mit KS-BTA100.
1
.
0
Siehe mit dem KS-BTA100 mitgelieferte Bedienungsanleitung.
Ändern Sie die Einstellung <SRC SELECT> an diesem Gerät.
2
.
B<SRC SELECT>
B<R-AUX>
B<BT ADAPTER>
Verwendung des Bluetooth-Handys
.
.
.
Über die Mikrofonlautstärke:
0
Wenn Sie das Gerät ausschalten, wechselt der Lautstärkepegel auf die Stellung Normal um.
Stellen Sie die Mikrofonlautstärke ein.
Lautstärkepegel: Hoch/Normal (anfänglich)/
Niedrig
0
Einen Ruf empfangen
Wenn ein Anruf empfangen wird...
0
Einen Ruf tätigen
Tätigen eines Anrufs zur zuletzt verbundenen
Nummer von Ihrem Telefon.
0
Umschalten zwischen Handfrei und Telefon
Während des Gesprächs...
0
Beendet/weist den Ruf ab
0
Sprach-Anwahl
Sprach-Anwahl ist nur verfügbar, wenn das
angeschlossene Handy mit dem
Spracherkennungssystem ausgestattet ist.
Verwendung des Bluetooth-Audiogeräts
B „BT AUDIO“
.
| DEUTSCH
16
. Startet/pausiert die Wiedergabe.
.
0
Wenn die Wiedergabe nicht startet, bedienen
Sie den Bluetooth-Audioplayer zum Starten der
Wiedergabe.
0
Wählt den Track. (Drücken Sie)
0
Den Track vorspulen oder zurückspulen.
(Gedrückt halten)
Page 65

(Gedrückt halten)
Menü-Bedienungen
Menü-Bedienungen
1
.
Wenn ca. 60 Sekunden lang keine Bedienung erfolgt, wird der Betrieb aufgehoben.
2
.
Wiederholen Sie Schritt 2 wenn erforderlich.
3
0
Zum Zurückschalten zum vorherigen Menü drücken Sie T/P BACK.
0
Zum Verlassen des Menüs drücken Sie DISP oder MENU.
Menügegenstand Wählbare Einstellung (Anfänglich: [XX])
DEMO
CLOCK SET
24H/12H
CLOCK ADJ *1
CLOCK
(Anpassung der
Uhrzeit)
COLOR
COLOR SETUP
DIMMER SET Zur Auswahl der Display- und Tastenbeleuchtung, die unter <BRIGHTNESS>/
DIMMER
BRIGHTNESS DAY [25] /NIGHT [11]: Wählt die Display- und Tastenbeleuchtungsstärke
SCROLL *3 [ONCE]: Scrollt die angezeigte Information einmal.
TAG DISPLAY [ON]: Schaltet die Tag-Information bei der Wiedergabe von MP3/WMA/AAC-
DISPLAY
PRO EQ
*1 Nur wirksam, wenn Uhrzeitdaten empfangen werden.
*2 Die Leitungsverbindung für Beleuchtung ist erforderlich. (Siehe „Einbau/Anschlussanleitung“.)
Diese Einstellung arbeitet möglicherweise bei bestimmen Fahrzeugen nicht richtig (insbesondere
bei solchen mit Steuerregler zur Abblendung). In diesem Fall stellen Sie die Einstellung auf eine
andere als <DIMMER AUTO>.
*3 Manche Zeichen oder Symbole werden nicht richtig im Display angezeigt (oder werden
ausgeblendet).
Für Einstellungen, A Seite 4.
Für Einstellungen, A Seite 4.
Für Einstellungen, A Seite 4.
[AUTO]: Die integrierte Uhr wird automatisch mithilfe der im DAB-Signal
enthaltenen Uhrzeitdaten gestellt.
OFF: Hebt auf.
Für Einstellungen, A Seite 14. (nur KD-DB52)
Für Einstellungen, A Seite 14. (nur KD-DB52)
<COLOR SETUP> eingestellt wurde.
[AUTO]: Wechselt zwischen den Tag- und Nachteinstellungen, wenn Sie die
Autoscheinwerfer ein-/ausschalten. *2
ON: Zur Auswahl der Nachteinstellungen.
OFF: Zur Auswahl der Tageinstellungen.
00-31 für Tag und Nacht.
AUTO: Wiederholt das Scrollen (in 5-Sekunden-Intervallen).
OFF: Hebt auf.
Tracks ein.
OFF: Hebt auf.
Für Einstellungen, A Seite 15.
DEUTSCH |
17
Page 66

Menü-Bedienungen
Menügegenstand Wählbare Einstellung (Anfänglich: [XX])
FADER *4*5 R06-F06 [00]: Stellen Sie die Ausgangsbalance zwischen vorderen und
BALANCE *5 L06-R06 [00]: Stellen Sie die Ausgangsbalance zwischen linken und rechten
LOUD
(Tonstärke)
VOL ADJUST
(Lautstärkeanpassung)
L/O MODE
(Ausgangsanschlussmodus)
SUB.W LPF *6
(Subwoofer
Niedrigpassfilter)
AUDIO
SUB.W LEVEL *6
(Subwooferpegel)
HPF
(Hochpassfilter)
BEEP
(Tastenberührungston)
TEL MUTING *7
(TelefonStummschaltung)
AMP GAIN *8
(Verstärkerzugabe)
*4 Wenn Sie eine Anlage mit zwei Lautsprechern verwenden, stellen Sie den Fader-Pegel auf „00“.
*5 Die Einstellung kann nicht den Subwoofer-Ausgang beeinflussen.
*6 Erscheint nur, wenn <L/O MODE> auf <SUB.W> gestellt ist.
*7 Diese Einstellung funktioniert nicht, wenn <BT ADAPTER> für <R-AUX> unter <SRC SELECT>
gewählt ist.
*8 Der Lautstärkepegel wird automatisch auf „VOLUME 30“ eingestellt, wenn Sie auf <LOW POWER>
mit höher als auf „VOLUME 30“ eingestelltem Lautstärkepegel umschalten.
hinteren Lautsprechern ein.
Lautsprechern ein.
ON: Verstärkt niedrige und hohe Frequenzen um eine gute Klangwirkung bei
niedriger Lautstärke zu erhalten.
[OFF]: Hebt auf.
-05 - +05 [00]: Nehmen Sie eine Vorwahl des Lautstärkepegels für jede
Quelle in Bezug auf den UKW-Lautstärkepegel vor. Vor der Einstellung
wählen Sie eine anzupassende Quelle aus. („VOL ADJ FIX“ erscheint, wenn
„FM“ ausgewählt wurde.)
Wählen Sie diese Option, wenn die REAR/SW-Anschlüsse zum Anschluss der
folgenden Geräte (über einen externen Verstärker) verwendet werden.
SUB.W: Subwoofer
[REAR]: Lautsprechern
LOW 55Hz / [LOW 85Hz] / LOW 120Hz:
Audiosignale mit Frequenzen, die niedriger sind als 55 Hz/85 Hz/120 Hz,
werden zum Subwoofer geleitet.
00-08 [04]: Stellt den Ausgabepegel des Subwoofers ein.
ON: Aktiviert den Hochpassfilter. Niederfrequenzsignale werden von den
vorderen/hinteren Lautsprechern ausgefiltert.
[OFF]: Deaktiviert. (Alle Signale werden zu den vorderen/hinteren
Lautsprechern geleitet.)
[ON]/OFF: Aktiviert oder deaktiviert den Tastenberührungston.
ON: Dämpft den Ton, wenn das Handy benutzt wird (nicht über KS-BTA100
angeschlossen).
[OFF]: Hebt auf.
LOW POWER: VOLUME 00-VOLUME 30 (Wählen Sie dies, wenn die
Maximalleistung jedes Lautsprechers weniger als 50 W beträgt, um Schäden
an den Lautsprechern zu verhindern.)
[HIGH POWER]: VOLUME 00-VOLUME 50
| DEUTSCH
18
Page 67

Menü-Bedienungen
Menügegenstand Wählbare Einstellung (Anfänglich: [XX])
SSM
AF-REG *9 [AF ON]: Aktiviert AF (Alternativfrequenzen eines Senders).
NEWS-STBY *9
(News-Standby)
P-SEARCH *9
(Programmsuche)
MONO
(Mono-Modus)
IF BAND
(Zwischenfrequenzband)
TUNER
DAB AF [ON]/OFF: Aktiviert bzw. deaktiviert DAB-AF (Alternativfrequenzen eines
DAB L-BAND *10 ON: Durchsucht BAND-III und L-BAND.
DAB ANT PWR
(Antennenstrom)
PTY-STBY
(Programmtypenstandby)
DAB Vxxx *11 Zeigt die Versionsnummer der DAB-Software an. (Wird nur angezeigt, wenn
IPOD SWITCH
(iPod/iPhoneSteuerung)
AM *12 [ON]/OFF: Aktiviert bzw. deaktiviert „AM“ in der Quellenauswahl.
F-AUX *12
(Vorderer AUXEingang)
R-AUX *12
(Hinterer AUX-
SRC SELECT
Eingang)
*9 Nur für UKW-Radio Data System-Sender.
*10 Wenn Sie die Einstellung ändern, werden die vorprogrammierten Sender gestartet.
*11 Zum Aktualisieren der DAB-Software besuchen Sie die folgende JVC-Website:
<http://www.jvc.jp/english/car/index.html> (nur englische Website).
*12 Wird nur angezeigt, wenn eine Quelle ausgewählt wurde, die nicht der entsprechenden
Einstellung „AM/F-AUX/R-AUX/BT AUDIO“ entspricht.
Für Einstellungen, A Seite 6. (Wird nur angezeigt, wenn „FM“ als Quelle
gewählt wurde.)
AF-REG ON: Aktiviert den Empfang der regionalen Alternativfrequenzen
eines Senders.
OFF: Hebt auf. (Nur wählbar, wenn für <DAB AF> die Option <OFF> gewählt
wurde) (A Seite 9)
ON/[OFF]: Aktiviert oder deaktiviert den NEWS-Standbyempfang. (Wird nur
angezeigt, wenn „FM“ als Quelle gewählt wurde.) (A Seite 7)
SEARCH ON/[SEARCH OFF]:
Aktiviert bzw. deaktiviert die Programmsuche (wenn für <AF-REG> die
Option <AF ON> oder <AF-REG ON> gewählt wurde).
[MONO OFF]/MONO ON:
Für Einstellungen, A Seite 6. (Wird nur angezeigt, wenn „FM“ als Quelle
gewählt wurde.)
[AUTO]: Steigert die Tuner-Empfindlichkeit, um Störgeräusche zwischen
benachbarten Sendern zu verringern. (Stereo-Effekt kann verlorengehen.)
WIDE: Ist Interferenz von benachbarten Sendern ausgesetzt, aber die
Klangqualität wird nicht verringert, und der Stereoeffekt wird bewahrt.
Senders). (A Seite 9)
[OFF]: Durchsucht nur BAND-III. (Wird nur angezeigt, wenn „DAB“ als Quelle
gewählt wurde.)
[ON]: Das Gerät versorgt die DAB-Antenne mithilfe des Boosters mit Strom.
Wählen Sie diese Option, wenn Sie die DAB-Antenne mit dem Booster
nutzen.
OFF: Wählen Sie diese Option, wenn Sie die DAB-Antenne ohne Booster
nutzen.
[OFF]: Hebt auf.
PTY codes: Aktiviert den PTY-Standbyempfang mit einem der PTY-Codes.
(Wird nur angezeigt, wenn „DAB“ als Quelle gewählt wurde.) (A Seite 9)
„DAB“ als Quelle gewählt wurde.)
[HEAD MODE]/IPOD MODE/EXT MODE:
Für Einstellungen, A Seite 12. (Wird nur angezeigt, wenn „USB-IPOD“ als
Quelle gewählt wurde.)
(nur KD-DB52)
[ON]/OFF: Aktiviert bzw. deaktiviert „F-AUX“ in der Quellenauswahl.
ON/OFF: Aktiviert bzw. deaktiviert „R-AUX“ in der Quellenauswahl.
[BT ADAPTER]: Wählen Sie aus, ob die hintere AUX-Eingangsbuchse an den
Bluetooth-Adapter KS-BTA100 (A Seite 16) angeschlossen ist. Als Quelle wird
nun „BT AUDIO“ angegeben.
DEUTSCH |
19
Page 68

Isolierblättchen
CR2025
Benutzung der Fernbedienung (nur KD-DB52)
Benutzung der Fernbedienung (nur KD-DB52)
Vorbereitungen
Ziehen Sie das Isolierblättchen aus der
Fernbedienung, bevor Sie sie zum ersten Mal
benutzen.
.
Austausch der Lithiumknopfbatterie
0
Wenn die Wirkung der Fernbedienung
abnimmt, muss die Batterie ausgewechselt
werden.
.
Vorsicht:
0
Explosionsgefahr, wenn Batterie falsch
eingesetzt wird. Nur durch den selben oder
entsprechenden Typ ersetzen.
0
Die Batterie sollte keiner übermäßigen Hitze
wie direktem Sonnenlicht, Feuer o. Ä.
ausgesetzt werden.
KD-DB42 kann mithilfe der Fernbedienung
RM-RK52 gesteuert werden. (getrennt erhältlich)
Warnung:
0
Keine anderen Batterien als CR2025 oder
entsprechende einsetzen.
0
Lassen Sie die Fernbedienung nicht an Orten
liegen, wo sie längere Zeit dem direkten
Sonnenlicht ausgesetzt ist (wie z. B. auf dem
Armaturenbrett).
0
Bewahren Sie die Batterie außerhalb der
Reichweite von Kindern auf.
0
Die Batterie nicht aufladen, kurzschließen oder
erhitzen oder in einem Feuer entsorgen.
0
Bewahren Sie die Batterie nicht mit anderen
Metallgegenständen auf.
0
Die Batterie nicht mit Pinzetten oder ähnlichen
Werkzeugen anstoßen.
0
Isolieren Sie die Batterie zum Aufbewahren
oder Entsorgen, indem Sie sie mit Klebeband
umwickeln.
Dieses Gerät ist mit einer Lenkradfernbedienung
ausgestattet. Einzelheiten siehe mit dem
Fernbedienungsadapter mitgelieferte
Bedienungsanleitung.
Zusätzliche Information
Informationen über Discs
Dieses Gerät kann nur folgende CDs abspielen:
.
Dieser Receiver kann Multi-Session-Discs
abspielen; nicht abgeschlossene Sessions werden
aber bei der Wiedergabe übersprungen.
Nicht abspielbare Discs
0
Discs, die nicht rund sind.
0
Discs mit Färbung auf der Aufnahmeoberfläche
oder schmutzige Discs.
0
Recordable/ReWritable Disc, die nicht finalisiert
ist. (Einzelheiten zur Finalisierung von Discs
finden Sie in Ihrer Schreibsoftware für Discs
und der Bedienungsanleitung des DiscRecorders.)
0
8 cm (3 Zoll) -CD. Der Versuch, einen Adapter
einzuschieben, kann zu Fehlfunktionen führen.
Umgang mit Discs
0
Berühren Sie nicht die Aufnahmeoberfläche
der Disc.
0
Kleben Sie kein Klebeband usw. auf die Disc,
und verwenden Sie keine Discs, auf denen
Band klebt.
0
Verwenden Sie keine Zubehörteile für die Disc.
0
Reinigen Sie die Disc durch Abwischen von
innen nach außen.
0
Reinigen Sie die Disc mit einem trockenen
Silikontuch oder einem weichen Lappen. Keine
flüchtigen organischen Lösungsmittel
verwenden.
0
Beim Entfernen von Discs von diesem Gerät
ziehen Sie diese waagerecht ab.
0
Entfernen Sie die Ränder vom Mittenloch und
der Disc-Kante, bevor Sie eine Disc einsetzen.
DualDisc-Wiedergabe
Die Nicht-DVD-Seite einer „DualDisc“ entspricht
nicht dem „Compact Disc Digital Audio“Standard. Deshalb wird die Verwendung der
Nicht-DVD-Seite einer DualDisc auf diesem
Produkt nicht empfohlen.
| DEUTSCH
20
Page 69

Zusätzliche Information
Audiodateien
Abspielbare Dateien
0
Dateierweiterungen: MP3(.mp3), WMA(.wma),
AAC-LC(.m4a)
(ungeachtet der Schreibung mit Groß- und
Kleinbuchstaben)
0
Bit-Rate:
MP3: 32 kbps - 320 kbps
WMA: 32 kbps - 192 kbps
AAC: 8 kbps - 320 kbps
0
Samplingfrequenz:
MP3/AAC: 48 kHz, 44,1 kHz, 32 kHz, 24 kHz,
22,05 kHz, 16 kHz, 12 kHz, 11,025 kHz, 8 kHz
WMA: 48 kHz, 44,1 kHz, 32 kHz, 22,05 kHz
0
Dateien mit Variabler Bitrate (VBR). (Für VBRDateien wird die abgelaufene Spielzeit nicht
korrekt angezeigt.)
Nicht abspielbare Dateien
0
MP3-Dateien:
- codiert im Format MP3i und MP3 PRO
- codiert in einem ungeeigneten Format
- codiert mit Layer 1/2
0
WMA-Dateien:
- codiert in verlustfreien, professionellem und
Sprachformat
- nicht auf Windows Media ® basierend
- kopiergeschützt mit DRM
0
AAC-Dateien:
- kopiergeschützt mit DRM
0
Dateien, die Daten wie AIFF, ATRAC3 usw.
enthalten.
Maximale Zeichenanzahl für Datei-/
Ordnernamen
Ist vom verwendeten Discformat abhängig
(einschließlich 4 Dateierweiterungszeichen <.mp3>, <.wma> oder <.m4a>).
0
ISO 9660 Level 1 und 2: 64 Zeichen
0
Romeo: 64 Zeichen
0
Joliet: 32 Zeichen
0
Lange Windows-Dateinamen: 64 Zeichen
Sonstiges
0
Diese Einheit kann die WMA-Tag- und ID3-TagVersion 1.0/1.1/2.2/2.3/2.4 (für MP3) anzeigen.
0
Die Suchfunktion arbeitet, aber die
Suchgeschwindigkeit ist nicht konstant.
Informationen über USB-Geräte
0
Verwenden Sie im Fall eines Anschlusses über
ein USB-Kabel das USB-2.0-Kabel.
0
Sie können keinen Computer oder ein
portables Festplattenlaufwerk an den USBEingang des Geräts anschließen.
0
Schließen Sie jeweils ein USB-Gerät zur Zeit an
die Einheit an. Verwenden Sie keinen USB-Hub.
0
USB-Geräte, die mit Spezialfunktionen wie
Datenschutzfunktionen ausgestattet sind, können
mit dieser Einheit nicht verwendet werden.
0
Verwenden Sie kein USB-Gerät mit 2 oder mehr
Partitionen.
0
Diese Einheit kann nicht ein USB-Gerät mit
einer anderen Bewertung als 5 V und mehr als
500 mA erkennen.
0
Diese Einheit erkennt möglicherweise nicht
eine Speicherkarte, die in den USB-Kartenleser
eingesetzt ist.
0
Diese Einheit kann möglicherweise Dateien in
einem USB-Gerät nicht korrekt abspielen, wenn
ein USB-Verlängerungskabel verwendet wird.
0
Je nach der Form der USB-Geräte und
Anschluss-Ports können manche USB-Geräte
nicht richtig angebracht werden, oder die
Verbindung kann locker sein.
0
Betrieb und Stromversorgung arbeiten
möglicherweise nicht wie vorgesehen bei
bestimmten USB-Geräten.
0
Maximalzahl von Zeichen für:
– Ordnernamen: 63 Zeichen
– Dateinamen: 63 Zeichen
– MP3-Tag: 60 Zeichen
– WMA-Tag: 60 Zeichen
– AAC-Tag: 60 Zeichen
0
Dieses Gerät kann insgesamt 65.025 Dateien,
255 Ordner (255 Dateien pro Ordner
einschließlich Ordner ohne nicht-unterstützte
Dateien) und 8 Hierarchien erkennen.
Warenzeichen und Lizenzhinweis
0
Microsoft und Windows Media sind entweder
eingetragene Marken oder Marken der
Microsoft Corporation in den Vereinigten
Staaten und/oder anderen Ländern.
Nur für KD-DB52:
0
“Made for iPod” and “Made for iPhone” mean
that an electronic accessory has been designed
to connect specifically to iPod, or iPhone,
respectively, and has been certified by the
developer to meet Apple performance
standards. Apple is not responsible for the
operation of this device or its compliance with
safety and regulatory standards. Please note
that the use of this accessory with iPod, or
iPhone may affect wireless performance.
0
iPhone, iPod, iPod classic, iPod nano, and iPod
touch are trademarks of Apple Inc., registered
in the U.S. and other countries.
DEUTSCH |
21
Page 70

Störungssuche
Störungssuche
Allgemeines
Es kommt kein Ton von den
Lautsprechern.
„MISWIRING CHK WIRING THEN
RESET UNIT“ erscheint im Display,
und es können keine
Bedienungen vorgenommen
werden.
Das Gerät funktioniert überhaupt
nicht.
„F-AUX“ oder „R-AUX“ kann nicht
gewählt werden.
Ton wird manchmal
unterbrochen, während eine
externe Komponente gehört wird,
die an die AUX-Eingangsbuchse
angeschlossen ist.
Richtige Zeichen werden nicht
angezeigt (z.B. Albumname).
Symptom Abhilfe/Ursache
0
Die Lautstärke auf den optimalen Pegel einstellen.
0
Prüfen Sie die Kabel und Verbindungen.
Prüfen Sie, um sicherzustellen, dass die Klemmen der
Lautsprecherkabel richtig mit Isolierband abgedeckt sind, und
setzen Sie dann das Gerät zurück. (A Seite 3)
Wenn die Meldung nicht verschwindet, wenden Sie sich an Ihren
JVC-Autoradiohändler oder eine Firma, die Kits liefert.
Setzen Sie das Gerät zurück. (A Seite 3)
Prüfen Sie die Einstellung <SRC SELECT>B<F-AUX / R-AUX>.
(A Seite 19)
Stellen Sie sicher, dass der empfohlene Stereo-Ministecker zum
Anschluss verwendet wird. (A Seite 13)
Dieses Gerät kann nur Buchstaben (Großbuchstaben), Zahlen und
eine begrenzte Anzahl von Symbolen anzeigen.
UKW/AM
SSM automatische Vorwahl
funktioniert nicht.
Statikrauschen beim Radiohören. Schließen Sie das Antennenkabel fest an.
„AM“ kann nicht gewählt werden.
Symptom Abhilfe/Ursache
Speichern Sie die Sender manuell.
Prüfen Sie die Einstellung <SRC SELECT>B<AM>. (A Seite 19)
DAB
„NO SIGNAL“ erscheint im Display. Begeben Sie sich an einen Standort mit stärkeren Signalen.
„CHK ANTENNA“ blinkt im Display. Prüfen Sie die Kabel und Verbindungen.
Symptom Abhilfe/Ursache
Disc-Wiedergabe
Die Disc kann nicht
wiedergegeben werden.
CD-R/CD-RW können abgespielt
werden, und Tracks können nicht
übersprungen werden.
Der Disc-Klang ist manchmal
unterbrochen.
„NO DISC“ erscheint im Display.
„PLEASE“ und „EJECT“ erscheinen
abwechselnd im Display.
„IN DISC“ erscheint im Display. Die Disc kann nicht richtig ausgeschoben werden. Stellen Sie
Symptom Abhilfe/Ursache
Setzen Sie die Disc richtig ein.
Setzen Sie eine finalisierte CD-R/CD-RW ein (finalisieren Sie mit
dem zur Aufnahme verwendeten Gerät).
0
Stoppen Sie die Wiedergabe beim Fahren auf einer holperigen
Straße.
0
Ändern Sie die Disc.
0
Prüfen Sie die Kabel und Verbindungen.
0
Setzen Sie eine abspielbare Disc in den Ladeschlitz ein.
0
Drücken Sie [M] und setzen Sie eine Disc richtig ein.
sicher, dass der Ladeschlitz nicht blockiert ist.
| DEUTSCH
22
Page 71

Störungssuche
MP3/WMA/AAC-Wiedergabe
Die Disc kann nicht
Symptom Abhilfe/Ursache
wiedergegeben werden.
„READING“ blinkt weiter im
Display.
Tracks, die nicht in der
gewünschten Reihenfolge
abgespielt werden.
Verflossene Spielzeit ist nicht
richtig.
0
Nehmen Sie die Tracks mithilfe einer kompatiblen
Anwendung auf eine geeignete Disc auf. (A Seite 20)
0
Speichern Sie die Dateien mit einer geeigneten Dateierweiterung.
Eine längere Auslesezeit ist erforderlich. Verwenden Sie nicht zu
viele Hierarchie-Ebenen und Ordner.
Die Wiedergabe-Reihenfolge wird bestimmt, wenn die Dateien
aufgezeichnet werden.
Dies kann manchmal bei der Wiedergabe auftreten. Dies liegt
daran, wie die Titel auf der Disc aufgezeichnet sind.
Wiedergabe USB-Gerät
„READING“ blinkt weiter im
Symptom Abhilfe/Ursache
Display.
„NOT SUPPORT“ erscheint im
Display und der Track wird
übersprungen.
Tracks/Ordner werden nicht in der
gewünschten Reihenfolge
abgespielt.
0
„CANNOT PLAY“ blinkt oder
„NO USB“ erscheint im Display.
0
Die Einheit kann das USB-Gerät
nicht erkennen.
Während der Wiedergabe eines Tracks
treten manchmal Tonaussetzer auf.
0
Eine längere Auslesezeit ist erforderlich. Verwenden Sie nicht
zu viele Hierarchie-Ebenen und Ordner.
0
Schalten Sie die Stromversorgung aus und dann wieder ein.
0
Bringen Sie das USB-Gerät erneut an.
Prüfen Sie, ob der Track ein abspielbares Dateiformat hat.
Die Wiedergabe-Reihenfolge wird durch den Dateinamen
bestimmt. Ordner, deren Namen mit einer Ziffer beginnen,
werden in numerischer Reihenfolge sortiert. Ordner, deren
Namen ohne Ziffern beginnen, werden entsprechend dem
Dateisystem des USB-Geräts sortiert.
0
Prüfen Sie, ob das angeschlossene USB-Gerät kompatibel mit
diesem Gerät ist.
0
Bringen Sie das USB-Gerät erneut an.
Die Tracks wurden nicht richtig in das USB-Gerät kopiert. Kopieren Sie
Tracks erneut in das USB-Gerät und wiederholen Sie den Vorgang.
Wiedergabe iPod/iPhone (nur KD-DB52)
Symptom
Der iPod schaltet nicht ein oder
funktioniert nicht.
Der Klang ist verzerrt. Deaktivieren Sie den Equalizer entweder an dieser Einheit oder
Rauschen wird erzeugt.
Die Wiedergabe stoppt. Die Kopfhörer sind während der Wiedergabe abgetrennt.
„CANNOT PLAY“ blinkt im Display. Prüfen Sie, ob der angeschlossene iPod/iPhone kompatibel mit
0
Prüfen Sie das Verbindungskabel und seinen Anschluss. Wird das
Problem auf diese Weise nicht gelöst, setzen Sie den iPod/das iPhone
in die Werkseinstellungen zurück.
0
Schalten Sie die Stromversorgung aus und dann wieder ein.
0
Trennen Sie iPod/iPhone von diesem Gerät, schalten Sie iPod/
iPhone aus und dann wieder ein.
0
Setzen Sie iPod/iPhone mithilfe eines Hardware-Resets in die
Werkseinstellungen zurück. Nutzen Sie nicht die Reset-Funktion im Menü.
0
Laden Sie die Batterie des iPod/iPhone.
0
Prüfen Sie, ob die Einstellung <IPOD SWITCH> geeignet ist. (A Seite 12)
am iPod/iPhone.
Schalten Sie die „VoiceOver“-Funktion des iPod aus (Markierung freigeben).
Für Einzelheiten besuchen Sie <http://www.apple.com>.
Starten Sie den Wiedergabebetrieb neu. (A Seite 11)
dieser Einheit ist. (A Seite 11)
Abhilfe/Ursache
DEUTSCH |
23
Page 72

Technische Daten
Technische Daten
AUDIO-VERSTÄRKERSEKTION
Max. Ausgangsleistung 50 W pro Kanal
Sinus-Ausgangsleistung (eff.) 20 W pro Kanal an 4Ω, 40 Hz bis 20.000 Hz bei
Lastimpedanz 4Ω (4Ω bis 8Ω Toleranz)
Frequenzgang 40 Hz bis 20.000 Hz
Signal-Rauschabstand 70 dB
Line-Out, Subwoofer-Out Pegel/Impedanz 2,5 V/20 kΩ Last (volle Skala)
Ausgangsimpedanz ≤ 600Ω
weniger als 1 % Klirrfaktor.
TUNER-SEKTION
DAB Frequenzbereich Band lll: 174,928 MHz bis 239,200 MHz
Empfindlichkeit Band lll: -100 dBm
Trennschärfe 45 dB
Übersprechdämpfung 80 dB
Antennenstecker Typ „SMB“
Antennenausgangsspannung
Antennenhöchststrom < 100 mA
UKW Frequenzbereich 87,5 MHz bis 108,0 MHz
Nutzbare Empfindlichkeit 9,3 dBf (0,8 μV/75Ω)
50 dB Geräuschberuhigung 16,3 dBf (1,8 μV/75Ω)
Übersprechdämpfung 40 dB
AM Frequenzbereich MW: 531 kHz bis 1.611 kHz
Empfindlichkeit MW: 20 μV, LW: 50 μV
Trennschärfe MW: 40 dB, LW: 40 dB
L-Band: 1452,960 MHz bis 1490,624 MHz
L-Band: -98 dBm
DC 14,4 V (11 V bis 16 V)
LW: 153 kHz bis 279 kHz
CD-PLAYER-SEKTION
Signalerkennungssystem Kontaktfreier optischer Tonabnehmer
Kanäle 2 Kanäle (Stereo)
Frequenzgang 5 Hz bis 20.000 Hz
Signal-Rauschabstand 98 dB
Gleichlaufschwankungen Unter der Messgrenze
(Halbleiterlaser)
| DEUTSCH
24
Page 73

Technische Daten
USB-SEKTION
USB-Standard USB 1.1, USB 2.0
Datentransfer-Rate (Full Speed) Max. 12 Mbps
Kompatibles Gerät Massenspeichergerät
Kompatibles Dateisystem FAT 32/16/12
Abspielbares Audio-Format MP3/WMA/AAC
Ausgangsleistung
DC 5 V d 500 mA
ALLGEMEINES
Betriebsstromanforderungen (Betriebsspannung) DC 14,4 V (11 V bis 16 V Toleranz)
Erdungssystem Negative Masse
Zulässige Betriebstemperatur 0°C bis +40°C
Abmessungen
(B × H × T)
Gewicht 1,3 kg (ohne Zubehör)
Änderungen bleiben vorbehalten.
Einbaugröße ca. 182 mm × 52 mm × 159 mm
Tafelgröße ca. 188 mm × 59 mm × 8,5 mm
DEUTSCH |
25
Page 74

.
EN, FR, GE
0311MYMSANJEIN© 2011 JVC KENWOOD Corporation
Dear Customer,
This apparatus is in conformance with the valid
European directives and standards regarding
electromagnetic compatibility and electrical safety.
European representative of JVC KENWOOD
Corporation is:
JVC Technical Services Europe GmbH
Postfach 10 05 04
61145 Friedberg
Germany
Sehr geehrter Kunde, sehr geehrte Kundin,
dieses Gerät stimmt mit den gültigen europäischen
Richtlinien und Normen bezüglich elektromagnetischer
Verträglichkeit und elektrischer Sicherheit überein.
Die europäische Vertretung für die JVC KENWOOD
Corporation ist:
JVC Technical Services Europe GmbH
Postfach 10 05 04
61145 Friedberg
Deutschland
Cher(e) client(e),
Cet appareil est conforme aux directives et
normes européennes en vigueur concernant la
compatibilité électromagnétique et à la sécurité
électrique.
Représentant européen de la société
JVC KENWOOD Corporation:
JVC Technical Services Europe GmbH
Postfach 10 05 04
61145 Friedberg
Allemagne
Having TROUBLE with operation?
Please reset your unit
Vous avez des PROBLÈMES de fonctionnement?
Réinitialisez votre appareil
Référez-vous à la page intitulée Comment réinitialiser votre appareil
Haben Sie PROBLEME mit dem Betrieb?
Bitte setzen Sie Ihr Gerät zurück
Siehe Seite Zurücksetzen des Geräts
Refer to page of How to reset your unit
 Loading...