

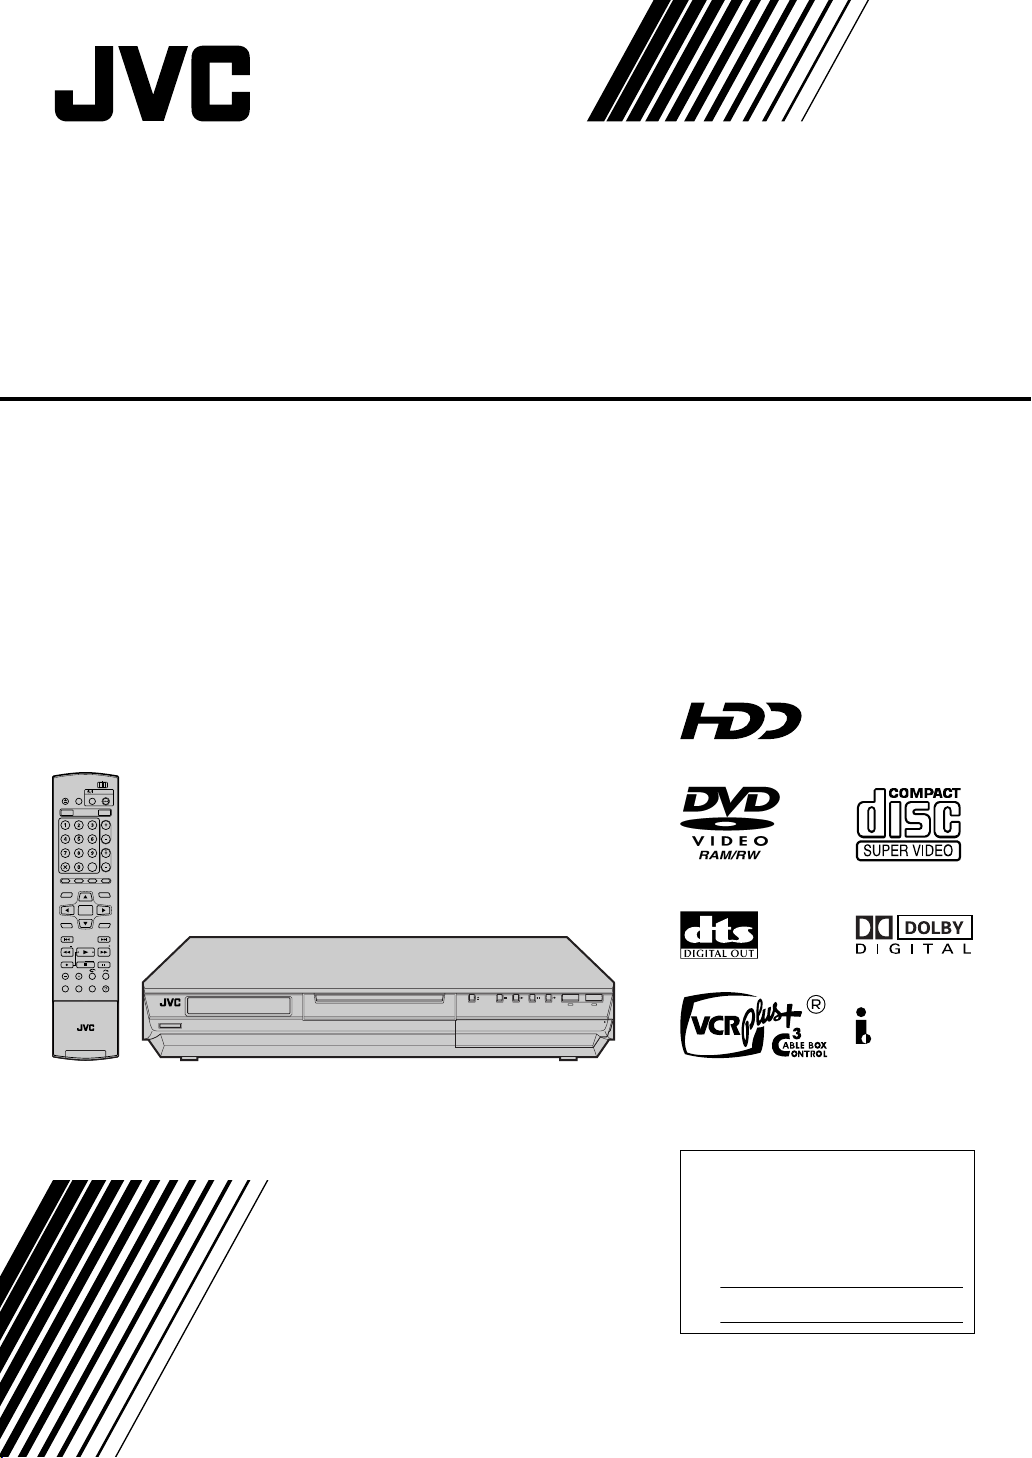
DVD & HDD VIDEO RECORDER
DR-MH30S/
DR-MH20S
CABLE/DBS
DVDTV
STANDBY ON
TV/
OPEN/
DVD
TV/CBL/DBS
VIDEO
CLOSE
HDD DVD
TV VOLUME
CH
AUX
CANCEL
MEMO/MARK
PROGRAM
EDITDUBBING
LIVE
TV MUTING
NAVIGATIONTOP MENU
ENTER
RETURN
MENU
NEXTPREVIOUS
SLOWSLOW PLAY/SELECT
CLEAR
PAUSEREC
STOP/
JUMP
REC MODE
DISPLAY
ON SCREEN
REC LINK SET UP
AUDIO
SUBTITLE
ANGLE
LIVE CHECK
PROGRESSIVE
HELP
1
STANDBY/ON
SCAN
F1
S-VIDEO VIDEO
L(MONO)-AUDIO-R
DV
HDD DVD
DV IN
PULL - OPEN
INSTRUCTIONS
For Customer Use:
Enter below the Model No. and
Serial No. which are located on
the rear of cabinet. Retain this
information for future reference.
Model No.
Serial No.
LPT0921-001A
2 EN
A
SAFETY FIRST
Dear Customer,
Thank you for purchasing the JVC DVD & HDD video recorder.
Before use, please read the safety information and precautions
to ensure safe use of your new unit.
Cautions
The lightning flash with arrowhead symbol, within
an equilateral triangle, is intended to alert the user
to the presence of uninsulated “dangerous
voltage” within the product’s enclosure that may
be of sufficient magnitude to constitute a risk of
electric shock to persons.
The exclamation point within an equilateral
triangle is intended to alert the user to the
presence of important operating and maintenance
(servicing) instructions in the literature
accompanying the appliance.
CAUTION:
A UNIT IS A CLASS 1 LASER PRODUCT. HOWEVER THIS
UNIT USES A VISIBLE LASER BEAM WHICH COULD CAUSE
HAZARDOUS RADIATION EXPOSURE IF DIRECTED. BE
SURE TO OPERATE THE UNIT CORRECTLY AS
INSTRUCTED.
WHEN THIS UNIT IS PLUGGED INTO THE WALL OUTLET, DO
NOT PLACE YOUR EYES CLOSE TO THE OPENING OF THE
DISC TRAY AND OTHER OPENINGS TO LOOK INTO THE
INSIDE OF THIS UNIT.
USE OF CONTROLS OR ADJUSTMENTS OR
PERFORMANCE OF PROCEDURES OTHER THAN THOSE
SPECIFIED HEREIN MAY RESULT IN HAZARDOUS
RADIATION EXPOSURE.
DO NOT OPEN COVERS AND DO NOT REPAIR YOURSELF.
REFER SERVICING TO QUALIFIED PERSONNEL.
CLASS 1 LASER PRODUCT
REPRODUCTION OF LABELS
WARNING LABEL INSIDE OF THE UNIT
WAR N I N G :
TO PREVENT FIRE OR SHOCK HAZARD, DO NOT EXPOSE
THIS UNIT TO RAIN OR MOISTURE.
CAUTION:
This unit should be used with AC 120Vd, 60Hz only.
To prevent electric shocks and fire hazards, DO NOT use any
other power source.
CAUTION:
TO PREVENT ELECTRIC SHOCK, MATCH WIDE BLADE OF
PLUG TO WIDE SLOT, FULLY INSERT.
TTENTION:
POUR ÉVITER LES CHOCS ÉLECTRIQUES, INTRODUIRE LA
LAME LA PLUS LARGE DE LA FICHE DANS LA BORNE
CORRESPONDANTE DE LA PRISE ET POUSSER JUSQU’AU
FOND.
Note to CATV system installer:
This reminder is provided to call the CATV system installer’s
attention to Article 820-40 of the NEC that provides guidelines
for proper grounding and, in particular, specifies that the cable
ground shall be connected to the grounding system of the
building, as close to the point of cable entry as practical.
CAUTION:
Changes or modifications not approved by JVC could void user’s
authority to operate the equipment.
A
Important product safety
instructions
Electrical energy can perform many useful functions. But improper
use can result in potential electrical shock or fire hazards. This
product has been engineered and manufactured to assure your
personal safety. In order not to defeat the built-in safeguards,
observe the following basic rules for its installation, use and
servicing.
TTENTION:
Follow and obey all warnings and instructions marked on your product
and its operating instructions. For your safety, please read all the safety
and operating instructions before you operate this product and keep
this booklet for future reference.
INSTALLATION
1. Grounding or Polarization
(A)Your product may be equipped with a polarized alternating-
current line plug (a plug having one blade wider than the other).
This plug will fit into the power outlet only one way. This is a
safety feature.
If you are unable to insert the plug fully into the outlet, try
reversing the plug. If the plug should still fail to fit, contact your
electrician to replace your obsolete outlet. Do not defeat the
safety purpose of the polarized plug.
(B)Your product may be equipped with a 3-wire grounding-type
plug, a plug having a third (grounding) pin. This plug will only fit
into a grounding-type power outlet. This is a safety feature.
If you are unable to insert the plug into the outlet, contact your
electrician to replace your obsolete outlet. Do not defeat the
safety purpose of the grounding-type plug.
2. Power Sources
Operate your product only from the type of power source indicated
on the marking label. If you are not sure of the type of power
supply to your home, consult your product dealer or local power
company. If your product is intended to operate from battery power,
or other sources, refer to the operating instructions.
3. Overloading
Do not overload wall outlets, extension cords, or integral
convenience receptacles as this can result in a risk of fire or
electric shock.
4. Power Cord Protection
Power supply cords should be routed so that they are not likely to
be walked on or pinched by items placed upon or against them,
paying particular attention to cords at plugs, convenience
receptacles, and the point where they exit from the product.
5. Ventilation
Slots and openings in the cabinet are provided for ventilation. To
ensure reliable operation of the product and to protect it from
overheating, these openings must not be blocked or covered.
● Do not block the openings by placing the product on a bed, sofa, rug
or other similar surface.
● Do not place the product in a built-in installation such as a bookcase
or rack unless proper ventilation is provided or the manufacturer’s
instructions have been adhered to.
6. Wall or Ceiling Mounting
The product should be mounted to a wall or ceiling only as
recommended by the manufacturer.
SAFETY FIRST
EN 3
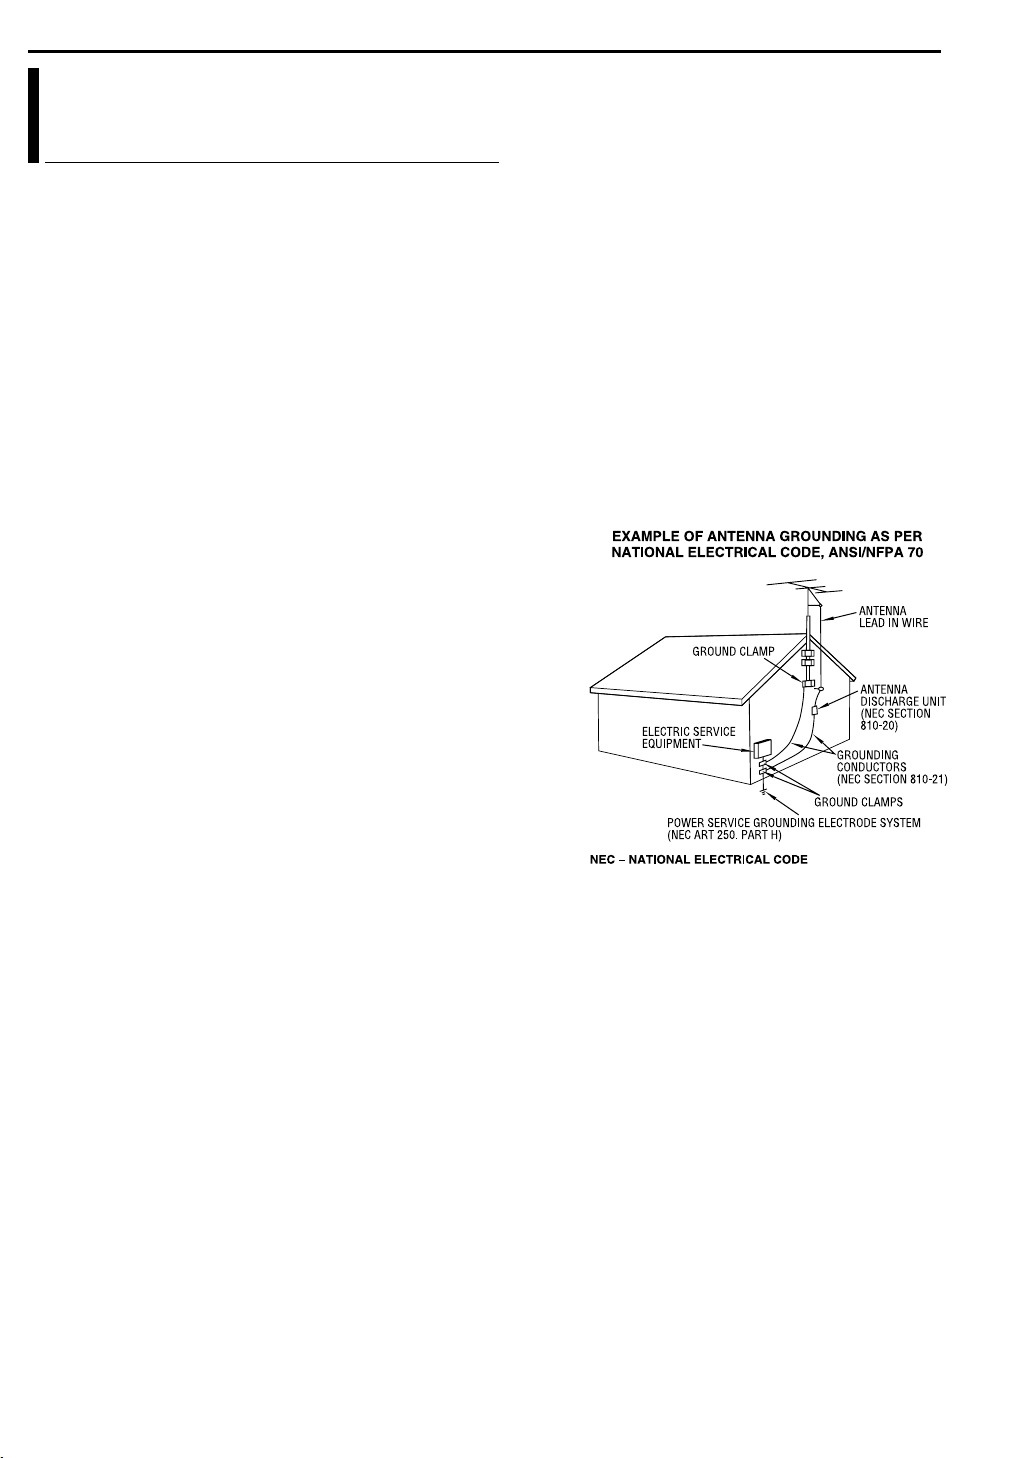
ANTENNA INSTALLATION INSTRUCTIONS
1. Outdoor Antenna Grounding
If an outside antenna or cable system is connected to the product,
be sure the antenna or cable system is grounded so as to provide
some protection against voltage surges and built-up static charges.
Article 810 of the National Electrical Code, ANSI/NFPA 70,
provides information with regard to proper grounding of the mast
and supporting structure, grounding of the lead-in wire to an
antenna discharge unit, size of grounding connectors, location of
antenna discharge unit, connection to grounding electrodes, and
requirements for the grounding electrode.
2. Lightning
For added protection for this product during a lightning storm, or
when it is left unattended and unused for long periods of time,
unplug it from the wall outlet and disconnect the antenna or cable
system. This will prevent damage to the product due to lightning
and power-line surges.
3. Power Lines
An outside antenna system should not be located in the vicinity of
overhead power lines or other electric light or power circuits, or
where it can fall into such power lines or circuits. When installing
an outside antenna system, extreme care should be taken to keep
from touching such power lines or circuits as contact with them
might be fatal.

4 EN
SAFETY FIRST
USE
1. Accessories
To avoid personal injury:
● Do not place this product on an unstable cart, stand, tripod, bracket,
or table. It may fall, causing serious injury to a child or adult, and
serious damage to the product.
● Use only with a cart, stand, tripod, bracket, or table recommended by
the manufacturer or sold with the product.
● Use a mounting accessory recommended by the manufacturer and
follow the manufacturer’s instructions for any mounting of the product.
● Do not try to roll a cart with small casters across thresholds or deeppile carpets.
2. Product and Cart Combination
A product and cart combination should be
moved with care. Quick stops, excessive
force, and uneven surfaces may cause the
product and cart combination to overturn.
3. Water and Moisture
Do not use this product near water—for
example, near a bath tub, wash bowl,
kitchen sink or laundry tub, in a wet
basement, or near a swimming pool and
the like.
4. Object and Liquid Entry
Never push objects of any kind into this product through openings
as they may touch dangerous voltage points or short-out parts that
could result in a fire or electric shock. Never spill liquid of any kind
on the product.
5. Attachments
Do not use attachments not recommended by the manufacturer of
this product as they may cause hazards.
6. Cleaning
Unplug this product from the wall outlet before cleaning. Do not
use liquid cleaners or aerosol cleaners. Use a damp cloth for
cleaning.
7. Heat
The product should be situated away from heat sources such as
radiators, heat registers, stoves, or other products (including
amplifiers) that produce heat.
SERVICING
1. Servicing
If your product is not operating correctly or exhibits a marked
change in performance and you are unable to restore normal
operation by following the detailed procedure in its operating
instructions, do not attempt to service it yourself as opening or
removing covers may expose you to dangerous voltage or other
hazards. Refer all servicing to qualified service personnel.
2. Damage Requiring Service
Unplug this product from the wall outlet and refer servicing to
qualified service personnel under the following conditions:
a. When the power supply cord or plug is damaged.
b. If liquid has been spilled, or objects have fallen into the product.
c. If the product has been exposed to rain or water.
d. If the product does not operate normally by following the
operating instructions. Adjust only those controls that are
covered by the operating instructions as an improper
adjustment of other controls may result in damage and will often
require extensive work by a qualified technician to restore the
product to its normal operation.
e. If the product has been dropped or damaged in any way.
f. When the product exhibits a distinct change in performance—
this indicates a need for service.
3. Replacement Parts
When replacement parts are required, be sure the service
technician has used replacement parts specified by the
manufacturer or which have the same characteristics as the
original part. Unauthorized substitutions may result in fire, electric
shock or other hazards.
4. Safety Check
Upon completion of any service or repairs to this product, ask the
service technician to perform safety checks to determine that the
product is in safe operating condition.
HOW TO USE THIS INSTRUCTION MANUAL
● All major sections and subsections are listed in the Table Of Contents
on page 6. Use this when searching for information on a specific
procedure or feature.
● The Index on pages 12 – 15 lists frequently-used terms, and the
number of the page on which they are used or explained in the
manual. This section also illustrates the controls and connections on
the front and rear panel, the front display panel and the remote
control.
墌 mark signals a reference to another page for instructions or
● The
related information.
● Operation buttons necessary for the various procedures are clearly
indicated through the use of illustrations at the beginning of each
major section.
BEFORE YOU INSTALL YOUR NEW UNIT . . .
. . . please read the sections/literature listed below.
● “Cautions” on page 2
● “Important product safety instructions” on pages 3 – 5
Declaration of Conformity
3
A
Model Number: DR-MH30S/DR-MH20S
Trade Name: JVC
Responsible Party: JVC Americas Corp.
Address: 1700 Valley Road Wayne, N.J. 07470
Telephone Number: 973-317-5000
This device complies with Part 15 of FCC Rules.
Operation is subject to the following two conditions:
(1) This device may not cause harmful interference, and (2) this
device must accept any interference received, including
interference that may cause undesired operation.
This equipment has been tested and found to comply with the
limits for a Class B digital device, pursuant to Part 15 of the FCC
Rules. These limits are designed to provide reasonable
protection against harmful interference in a residential
installation. This equipment generates, uses, and can radiate
radio frequency energy and, if not installed and used in
accordance with the instructions, may cause harmful
interference to radio communications. However, there is no
guarantee that interference will not occur in a particular
installation. If this equipment does cause harmful interference to
radio or television reception, which can be determined by turning
the equipment off and on, the user is encouraged to try to correct
the interference by one or more of the following measures:
Reorient or relocate the receiving antenna.
Increase the separation between the equipment and
receiver.
Connect the equipment into an outlet on a circuit different
from that to which the receiver is connected.
Consult the dealer or an experienced radio/TV technician for
help.
● Manufactured under licence from Dolby Laboratories. “Dolby” and
double-D symbol are trademarks of Dolby Laboratories.
● “DTS” and “DTS Digital Out” are trademarks of Digital Theater
Systems, Inc.
● VCR Plus+, C and PlusCode are registered trademarks of Gemstar
Development Corporation. The VCR Plus+ system is manufactured
under license from Gemstar Development Corporation.
TM
● DSS is an official trademark of DIRECTV, Inc., a unit of GM
Hughes Electronics. DISH Network is a trademark of Echostar
Communications Corporation.
● This product incorporates copyright protection technology that is
protected by method claims of certain U.S. patents and other
intellectual property rights owned by Macrovision Corporation and
other rights owners. Use of this copyright protection technology must
be authorized by Macrovision Corporation, and is intended for home
and other limited viewing users only unless otherwise authorized by
Macrovision Corporation. Reverse engineering or disassembly is
prohibited.
TM
SAFETY FIRST
EN 5
When the equipment is installed in a cabinet or a shelf, make sure
that it has sufficient space on all sides to allow for ventilation
(10 cm or more on both sides, on top and at the rear).
When discarding batteries, environmental problems must be
considered and the local rules or laws governing the disposal of
these batteries must be followed strictly.
Failure to heed the following precautions may result in
damage to the unit, remote control or disc/cassette.
1. DO NOT
place the unit —
— in an environment prone to extreme temperatures or
humidity.
— in direct sunlight.
— in a dusty environment.
— in an environment where strong magnetic fields are
generated.
— on a surface that is unstable or subject to vibration.
2. DO NOT
block the unit’s ventilation openings or holes.
(If the ventilation openings or holes are blocked by a newspaper
or cloth, etc., the heat may not be able to get out.)
3. DO NOT
4. DO NOT
place heavy objects on the unit or remote control.
place anything which might spill on top of the unit
or remote control.
(If water or liquid is allowed to enter this equipment, fire or
electric shock may be caused.)
5. DO NOT
6. DO NOT
expose the apparatus to dripping or splashing.
use this equipment in a bathroom or places with
water. Also DO NOT place any containers filled with water or
liquids (such as cosmetics or medicines, flower vases, potted
plants, cups, etc.) on top of this unit.
7. DO NOT
place any naked flame sources, such as lighted
candles, on the apparatus.
8. AVOID
violent shocks to the unit during transport.
MOISTURE CONDENSATION
Moisture in the air will condense on the unit when you move it from
a cold place to a warm place, or under extremely humid
conditions—just as water droplets form on the surface of a glass
filled with cold liquid. In conditions where condensation may occur,
disconnect the unit’s power plug from the wall and keep it
disconnected for a few hours to let the moisture dry, then turn on
the unit.
TTENTION:
To mobile phone users:
Using a mobile phone in the vicinity of the unit may cause picture
vibration on the TV screen or change the screen to a blue back
display.
On placing the unit:
Some TVs or other appliances generate strong magnetic fields.
Do not place such appliances on top of the unit as it may cause
picture disturbance.

6 EN
CONTENTS
DISC INFORMATION 7
About Discs ...................................................................................7
INDEX 12
INSTALLING YOUR NEW UNIT 19
Basic Connections ......................................................................19
INITIAL SETTINGS 20
Plug & Play Set ...........................................................................20
Language ....................................................................................21
Clock Set .....................................................................................22
Tuner Set ....................................................................................23
Cable Box and/or DBS Receiver Control Setting .................. 24
Monitor Set ..................................................................................26
BASIC OPERATIONS ON DVD DECK 27
Basic Playback ............................................................................27
Playback Features ......................................................................28
Using The On-screen Bar ...........................................................32
Parental Lock ..............................................................................36
Basic Recording ..........................................................................37
Recording Features .....................................................................38
BASIC OPERATIONS ON HDD DECK 40
Basic Recording ..........................................................................40
Recording Features .....................................................................41
Basic Playback ............................................................................42
Playback Features ......................................................................42
Live Memory Playback ................................................................43
TIMER RECORDING 46
VCR Plus+® Timer Programing ....................................................46
Manual Timer Programing ...........................................................48
Automatic Satellite Program Recording ......................................50
NAVIGATION 51
Library Database Navigation .......................................................51
Modify Original Information .........................................................52
Modify Play List Information ........................................................54
Modify Library Information ...........................................................56
Playback With MP3/WMA/JPEG Navigation ...............................57
EDITING 58
High Speed Dubbing (From HDD To DVD) ................................ 58
Just Dubbing (From HDD To DVD) ............................................ 58
Manual Dubbing (From HDD To DVD) ....................................... 59
Original Dubbing (From DVD To HDD) ...................................... 59
DV Dubbing ................................................................................ 60
Edit From A Camcorder .............................................................. 61
Edit To Or From Another Recorder ............................................ 62
Digital Audio Dubbing ................................................................. 63
REMOTE CONTROL 64
Remote Control Functions .......................................................... 64
SYSTEM CONNECTIONS 66
Connecting To A Dolby Digital Decoder Or An Amplifier With
Built-in DTS ........................................................................... 66
SUBSIDIARY SETTINGS 67
Mode Set .................................................................................... 67
Scan Mode Set ........................................................................... 69
Changing VCR Plus+
Format A Disc (DVD Deck Only) ................................................ 71
Finalize A Disc (DVD Deck Only) ............................................... 72
Help Function ............................................................................. 73
Tray Lock (DVD Deck Only) ....................................................... 73
®
Setting ..................................................... 70
TROUBLESHOOTING 74
SPECIFICATIONS 78
APPENDIX 79
LIST OF TERMS 82
About Discs
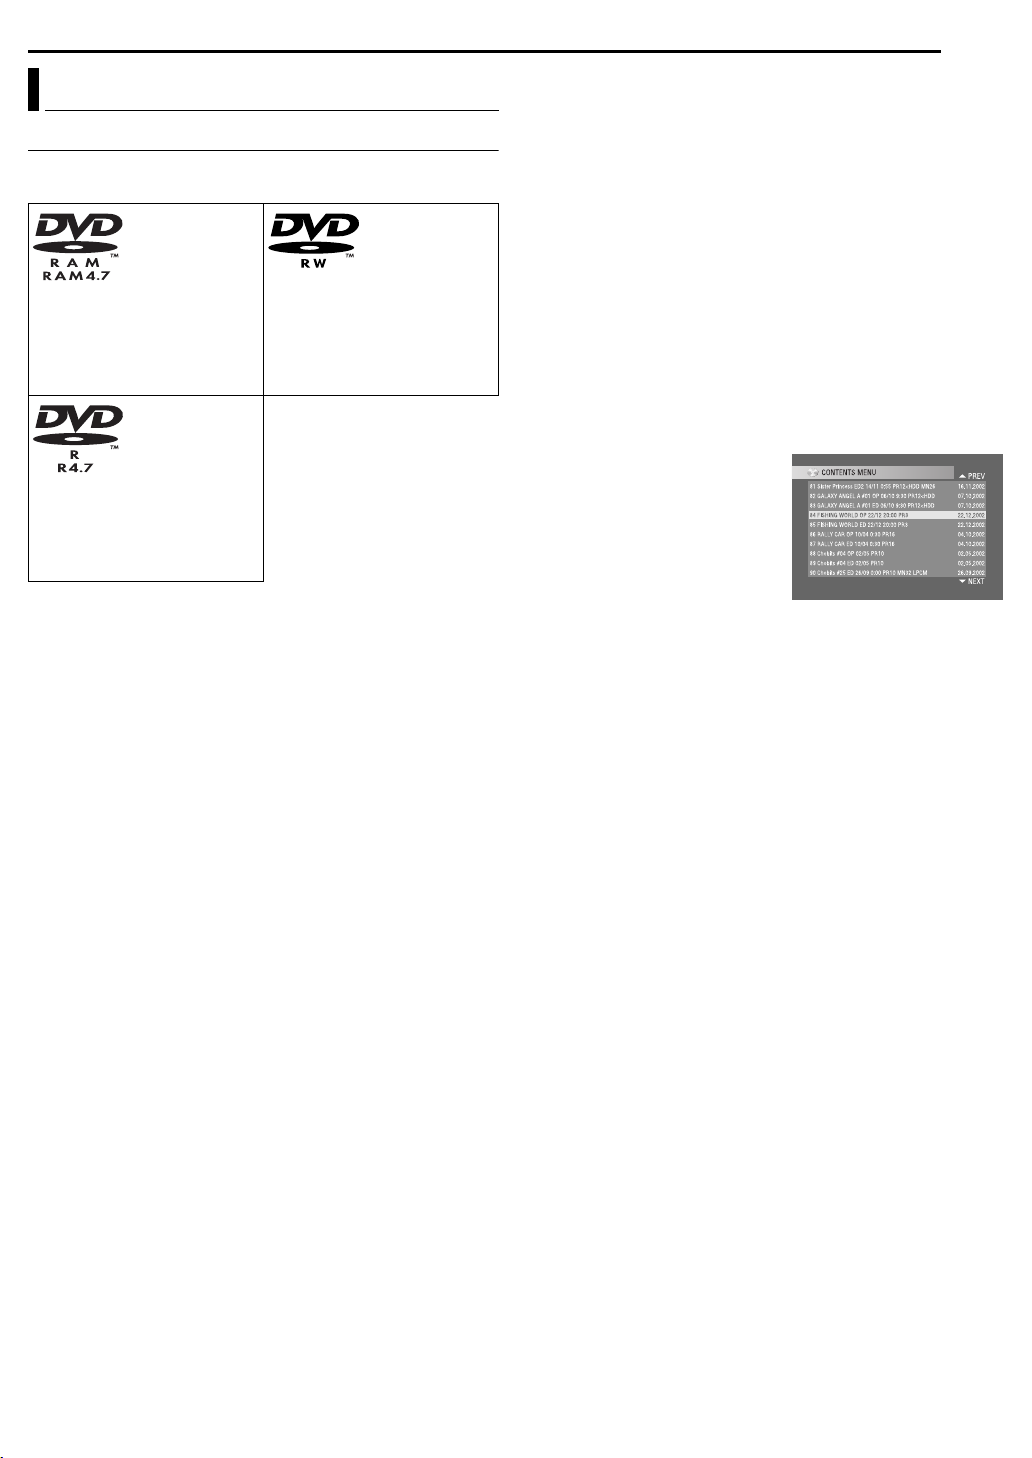
Recordable/playable Discs
You can use discs with the following logos for recording and
playback.
DVD-RAM
12 cm: 4.7 GB/9.4 GB
8 cm: 1.4 GB/2.8 GB
Ver. 2.0/2x speed
Ver. 2.1/1x – 2x speed
DVD- R
12 cm: 4.7 GB
8 cm: 1.4 GB
Ver. 2.0/1x – 4x speed (Video
mode)
● The above table is based on the information as of February 2004.
● Recording and playback may not be performed depending on the
characteristics and condition of the disc used, leading to
unsatisfactory results. Using discs manufactured by JVC is
recommended since they have been tested to be compatible with this
unit.
DVD-RAM Discs
It is only possible to use discs which conform with DVD-RAM
standard Version 2.0 or 2.1.
● It is impossible to record on DVD-RAM discs which do not conform to
this standard. If you use a disc formatted under a different standard
version, format it on this unit before use.
● It may not be possible to record, play back, edit or dub a DVD-RAM
disc even if it conforms to the standard if it was recorded or edited on
the devices from other manufacturers or on a PC, or if it has far too
many titles, or if there is very little available capacity remaining on the
disc.
● DVD-RAM discs recorded on this unit cannot be played back on an
incompatible DVD player.
● It is possible to record copy-once programs of digital broadcasts only
onto 4.7/9.4 GB DVD-RAM discs (2.8 GB DVD-RAM discs are not
compatible).
DVD-RW
12 cm: 4.7 GB/9.4 GB
Ver. 1.1/1x – 2x speed (Video
mode/VR mode)
DISC INFORMATION
EN 7
DVD-R/RW Discs
It is only possible to use DVD-R discs which conform with DVD-R
standard Version 2.0.
When a DVD-R/RW disc (Video mode) is finalized (墌 pg. 72), it
can be played back on a standard DVD player as a DVD VIDEO
disc.
When a DVD-RW disc (VR mode) is finalized (墌 pg. 72), it can be
played back on a standard DVD player compatible with the VR
mode of DVD-RW discs.
Before finalizing —
— it is possible to record on unrecorded areas of the disc, edit the
disc title and program titles, and delete programs.
● It is impossible to record or edit DVD-R/RW discs recorded on other
devices even if they have not been finalized.
● It is impossible to overwrite recorded areas of DVD-R discs.
● Available recording capacity does not increase even if a recorded
program is deleted from a DVD-R disc.
After finalizing —
After a DVD-R/RW disc (Video mode) has been finalized, it is
possible to play back the recorded programs (video and/or audio)
on a standard DVD video player as a DVDVIDEO disc.
● Edited titles are displayed as the
“DVD menu” in video mode.
● It is impossible to record, edit or
delete the data either in video
mode or in VR mode.
● Either in video mode or in VR
mode, although the disc can be
played back on DVD players from
other manufacturers, sometimes it
may not be possible to play back
depending on the disc and recording conditions.
● It is impossible to record on CD-R/RW or DVD-R discs used for
authoring.
● It is impossible to record onto DVD-R/RW (Video mode) discs
broadcasts that allow you to copy once. The copy once programs can
only be recorded onto DVD-RW discs formatted in VR mode.
NOTE:
The following may result if you play back a DVD-R disc recorded on
another unit.
● The disc does not play.
● A mosaic pattern (block noise) appears on the screen.
● Video or audio may be dropped out.
● The unit stops during playback.
8 EN
DISC INFORMATION
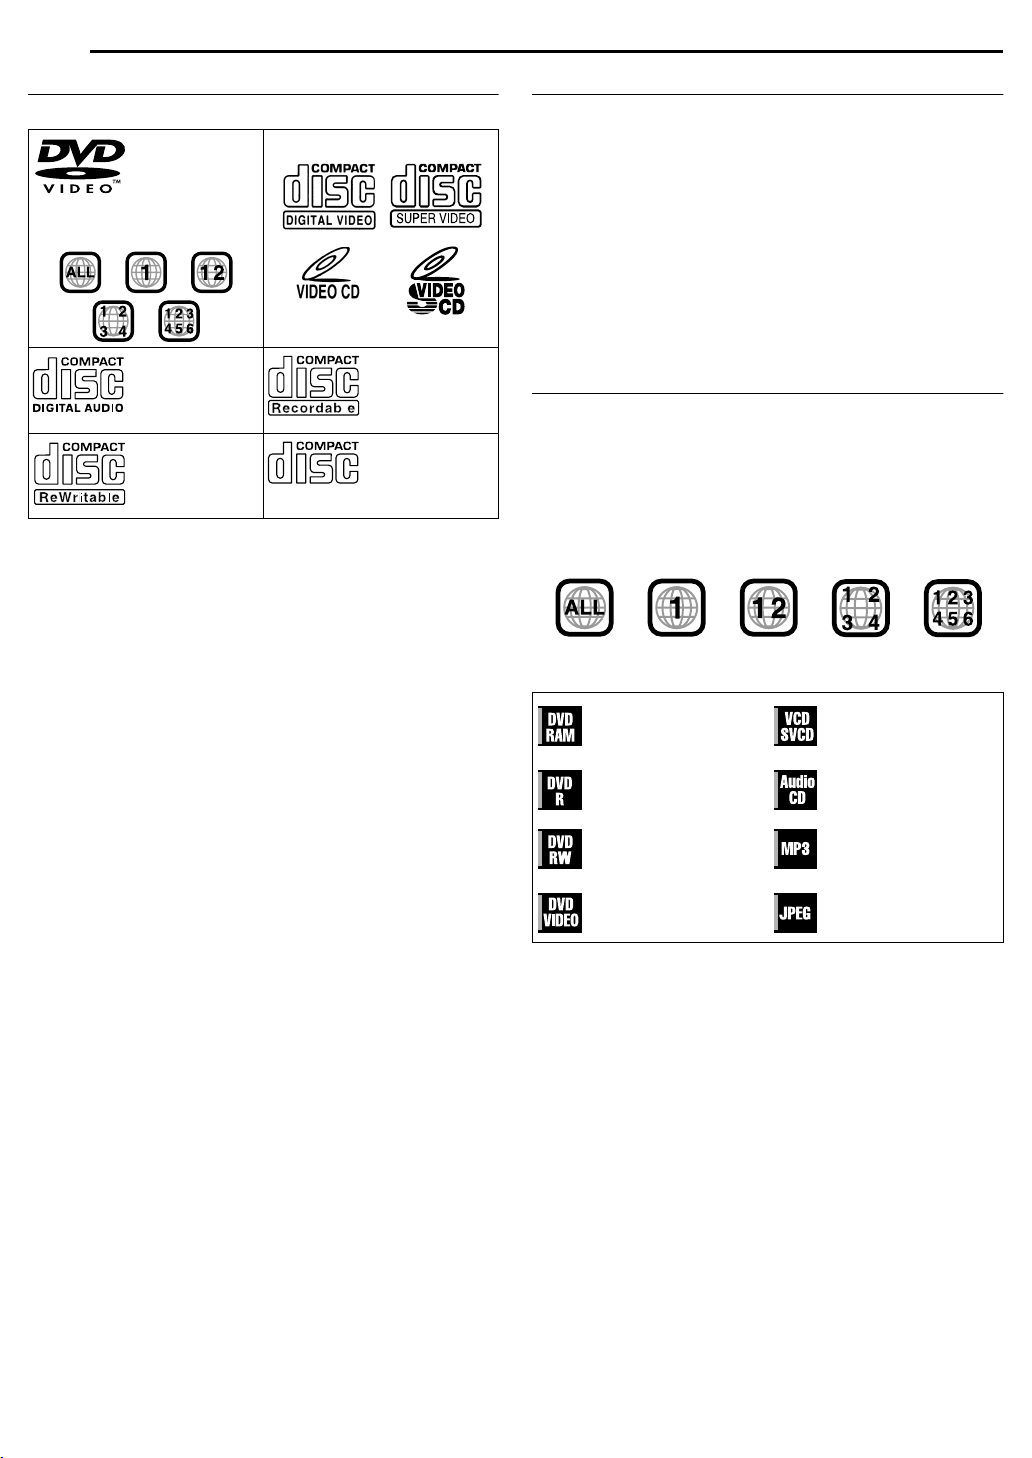
Discs For Playback Only
You can use discs with the following logos for playback only.
DVD VIDEO Video CD/Super Video CD
(example of region code
indications)
Audio CD
CD-DA files
CD-RW
CD-DA/JPEG/
MP3 files
● Playback may not be performed depending on the characteristics and
condition of the disc used.
● DTS Audio CDs can also be played back (An optional DTS decoder is
required).
● MP3 and JPEG discs can be played back on this unit only when they
have been recorded in the ISO9660 or Joliet format and finalized.
● JPEG files that can be played back on this unit must conform to JFIF/
Baseline process, and the maximum resolution of a JPEG file is
2,812 x 2,112 pixels.
● CD-R/RW discs recorded in music CD format need to be finalized to
play back on this unit.
● Operation and audio quality of this unit are not guaranteed for discs
that do not conform to the Compact Disc specification (CD-DA).
Before you play back a CD, check for the CD logo and read the notes
on the package to confirm that it conforms to the Compact Disc
specification.
● Depending on the intentions of the author of the software, recording
conditions of DVD discs and Video CD/SVCD discs may be
restricted. Since this unit plays back discs according to the intentions
of the author of the software as indicated on the disc, some functions
may not operate as commanded.
● When switching from the first layer to the second layer of doublelayered DVD VIDEO discs, the image and sound may be momentarily
distorted. This is not a malfunction.
● DVD-AUDIO discs compatible with DVD video players can be played.
● Super Audio CDs (SACD) compatible with conventional CD players
can be played.
CD-R
CD-DA/JPEG/
MP3 files
CD-ROM
JPEG/MP3 files
Unplayable Discs
The following types of discs cannot be played using this unit.
Do not attempt to play back any kind of disc that is damaged
(cracked, warped, or repaired with adhesive tape) or discs in
unusual shapes (heart-shaped, octagonal, or other forms). If such
discs are accidentally played back, it may cause noise that can
lead to speaker damage.
● CD-ROM discs (including PHOTO-CD and CD-G)
● Discs recorded in Packet Write (UDF) format
● 1.3-GB double density CDs (DDCD)
● High density CDs (HDCD)
The following discs also cannot be played back.
● Discs of a region number other than “1”
● DVD-RAM (2.6 GB/5.2 GB)
● DVD-RAM (TYPE1)
Region Number
The world is divided into 6 regions for DVD VIDEO discs.
DVDVIDEO discs are assigned a region number to indicate which
region they may be played back in. A disc cannot be played back
on this unit unless the region number of the disc matches that of
the unit. The region number for this unit is “1”. Only discs whose
region number includes “1” or “ALL” can be played back such as
shown below.
Examples of DVD VIDEO labels which can be played back
using this unit.
Marks of discs in this instruction manual
Allows operation with a
DVD-RAM disc.
Allows operation with a
DVD-R disc.
Allows operation with a
DVD-RW disc.
Allows operation with a
DVDVIDEO disc.
Allows operation with a
Video CD/Super Video
CD (SVCD) disc.
Allows operation with
an Audio CD disc.
Allows operation with a
disc including MP3
files.
Allows operation with a
disc including JPEG
files.
Recording Medium And Format
DVD-RAM
● Recording and erasing can be performed as many times as possible
on a disc.
● Editing can be performed after recording, such as deleting unwanted
parts.
● While recording, it is possible not only to start playback of a program
currently being recorded, but also to watch another program
previously recorded.
DVD-RW (VR mode)
● Recording and erasing can be performed as many times as possible
on a disc.
● Editing can be performed after recording, such as deleting unwanted
parts.
DVD-RW (Video mode)
● Can be played back on other DVD players.
● New recording can be performed by erasing all the data on a disc
once played back.
DVD-R
● Can be played back on other DVD players.
● Suitable when keeping a recorded disc for a long time.
File Structure Of Discs
DVD VIDEO
Typically, DVD VIDEO discs are made up of larger units called
“titles”. Each title has a number (title number) that can be used to
select desired titles. Titles are further divided into units called
“chapters”. Each chapter has a number (chapter number) that can
also be used to select desired chapters. Note that some discs are
not divided into titles and chapters.
When you record a program on a DVD-RAM/RW (VR mode)
disc
A single recording session results in a single title (a single
chapter). However, chapter marks are automatically inserted when
recording is paused, or audio changes from monaural to stereo
due to commercial breaks, etc. It is also possible to insert chapter
marks at desired locations during playback. (墌 pg. 29)
When you record a program on a DVD-R/RW (Video mode)
disc
A single recording session results in a single title (a single
chapter). However, chapter marks are automatically inserted when
recording is paused, or audio changes due to commercial breaks,
etc. It is also possible to insert chapter marks at desired locations
during either recording or playback. Once the disc has been
finalized, these chapter marks are deleted and new chapter marks
are assigned automatically approximately every 5 minutes.
DVD-RAM, DVD-RW, DVD-R or DVD VIDEO disc
Title 1 Title 2
Chapter 1 Chapter 2
● In Video mode, even before finalizing, it is impossible to perform
editing operations other than changing the disc name and/or title
names and deleting programs and/or titles.
● After finalizing, it is impossible to perform editing operations.
Chapter 3
Chapter 1
Chapter 2
Chapter 3
DISC INFORMATION
EN 9
Audio CD/Video CD/SVCD
Typically, Audio CD discs are divided into separate tracks each
containing one song. Each track is assigned a number. For
example, the third track is Track 3. The same is true for Video CD/
SVCD discs.
However, some discs are not divided into tracks.
S
Track 1 Track 2 Track 3 Track 4
Audio CD or Video CD/SVCD
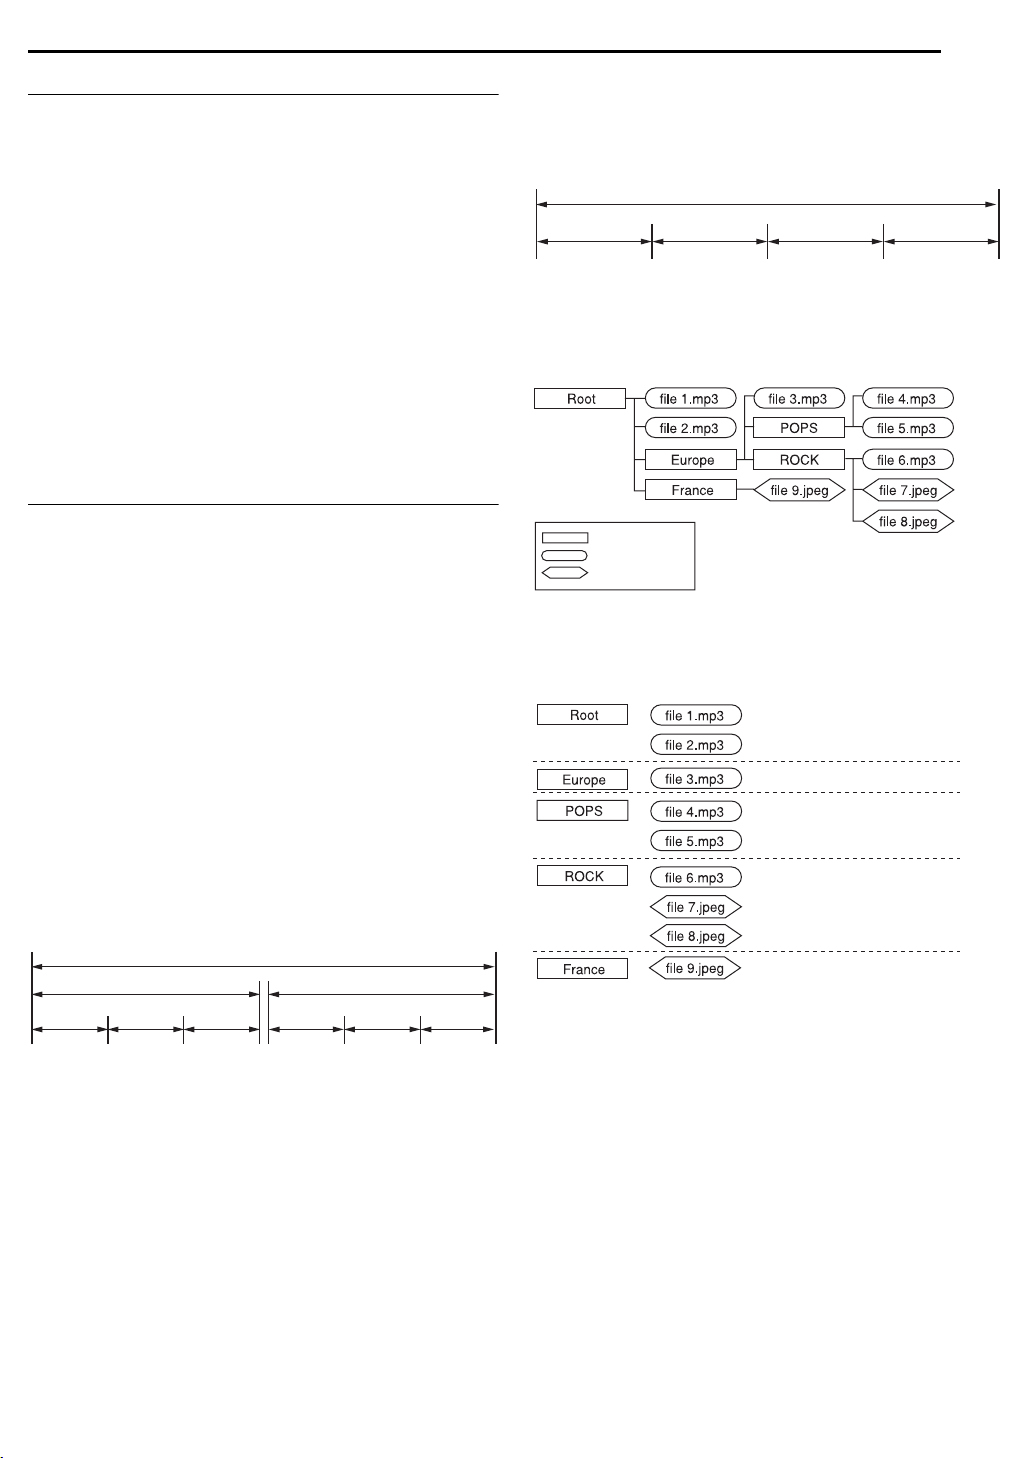
JPEG/MP3 Disc (CD-R/RW/ROM)
MP3/JPEG files put in directories nested in several levels on a disc
will be organized as if they were put in single level directories
(groups) by the MP3/JPEG Navigation of this unit. (墌 pg. 57)
File structure of a disc before starting the MP3/JPEG
Navigation
Directory
MP3 file
JPEG file
File structure of the disc after starting the MP3/JPEG
Navigation
Files are automatically grouped as follows and displayed on the
MP3/JPEG Navigation screen. Data is displayed in the
alphabetical order of file name. Files are grouped based on roots.
● This unit can recognise up to 9 hierarchies including directories and
files.
Also, it can recognise up to 250 files in each group, and up to 99
groups on a disc.
NOTES:
● Video CD/SVCD discs that support Playback Control (PBC)
The contents of a disc are recorded into several hierarchies, and played
back according to the instructions on the screen while navigating through
the hierarchies. It is also possible to playback recorded tracks
consecutively without activating the PBC function even when playing a
PBC-compatible disc. (
● Regarding the contents recorded on discs
Some files may not be played back depending on the file types and other
factors.
墌 pg. 31)
10 EN
HDD DVD
CABLE/DBS
DVDTV
DVD
CH
TV/CBL/DBS
STANDBY/ON
OPEN/
CLOSE
TV/
VIDEO
TV VOLUME
DISC INFORMATION
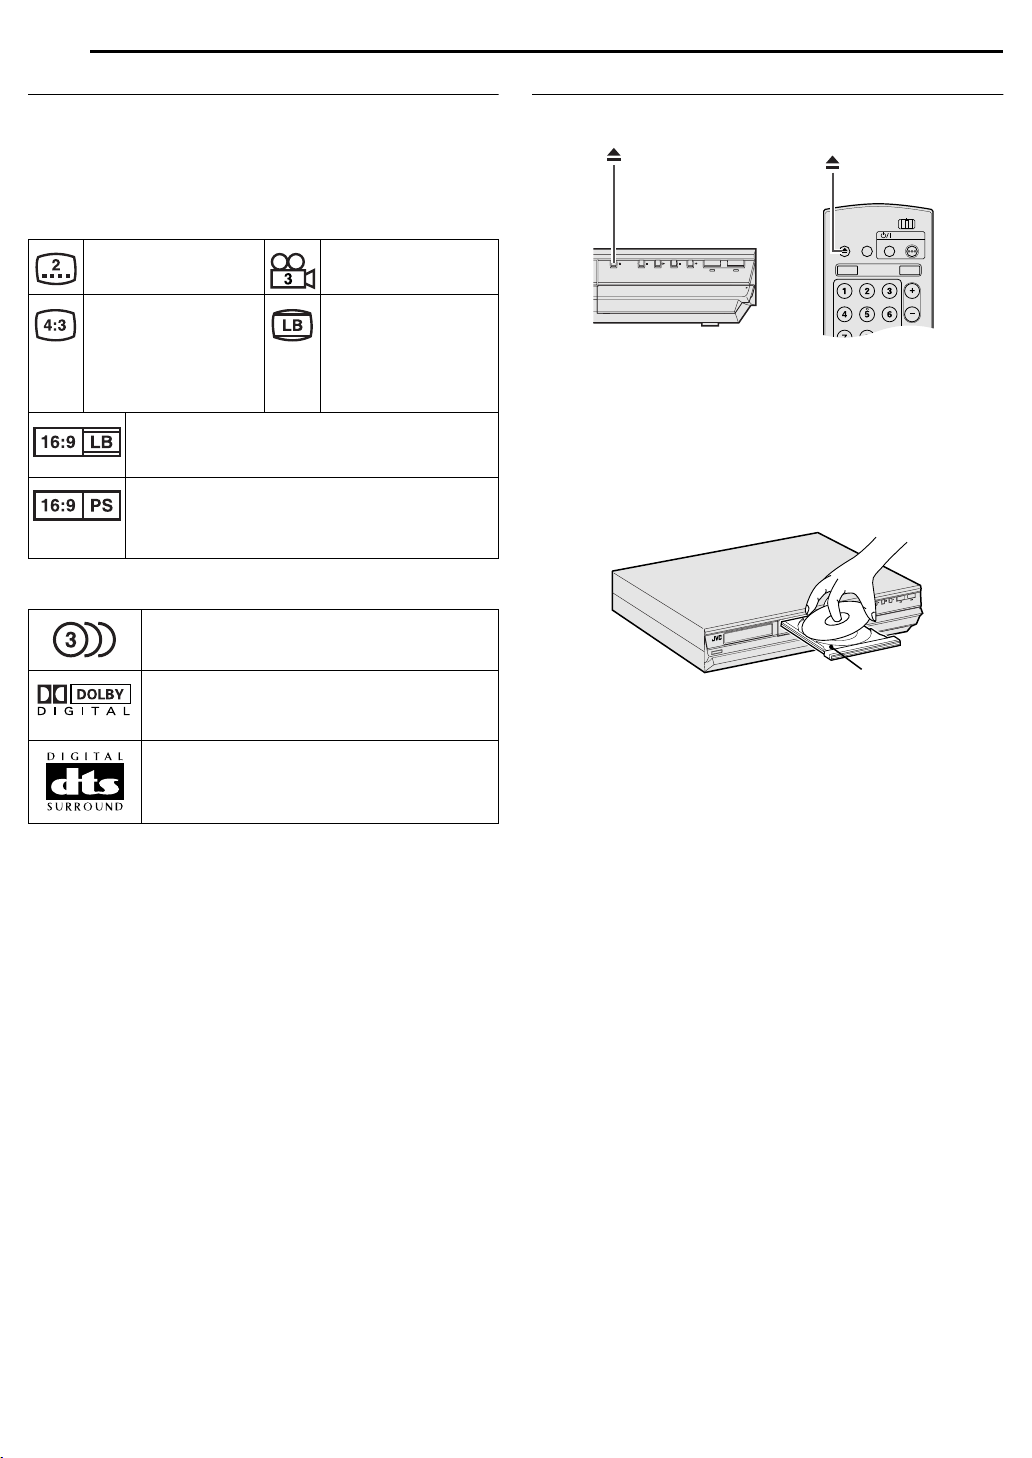
DVD VIDEO Marks
Sometimes marks are printed on a DVD disc and/or on its
packaging to indicate information regarding the contents and
functions of the disc. Check the marks indicating the contents and
functions of the disc. Note, however, that in some cases a disc may
not include a mark even for a function it supports.
Marks related to video
Number of subtitles Number of angles
Recorded under the
standard 4:3 aspect
ratio
Video playback is in Wide video mode (16:9) on
wide televisions, but in letter box on televisions
with standard 4:3 aspect ratio.
Video playback is in Wide video mode (16:9) on
wide televisions, but pan and scan is used on
televisions with standard 4:3 aspect ratio (either
the left or right side of the image is cut-out).
Marks related to audio
Number of audio tracks
Dolby Digital mark
It has been developed by Dolby Laboratories as
a digital surround system.
DTS (Digital Theater Systems)
You can enjoy DTS audio if you connect an
amplifier with a built-in DTS decoder to the
DIGITAL OUT connector of the unit.
Screen includes black
bands at the top and
the bottom of image
which has a standard
4:3 aspect ratio (letter
box)
Placing A Disc
Opening the disc tray
Press x to open the disc tray.
HDD DVD
F1
S-VIDEO VIDEO
L(MONO)-AUDIO-R
● Pressing the button again closes the disc tray.
● Use the buttons to open and close the disc tray.
● Do not block the disc tray with your hand while it is opening or closing
as this may result in hardware failure.
● Do not place unplayable discs or any object other than a disc on the
disc tray.
● Do not press down strongly on the disc tray or place any heavy
objects on it.
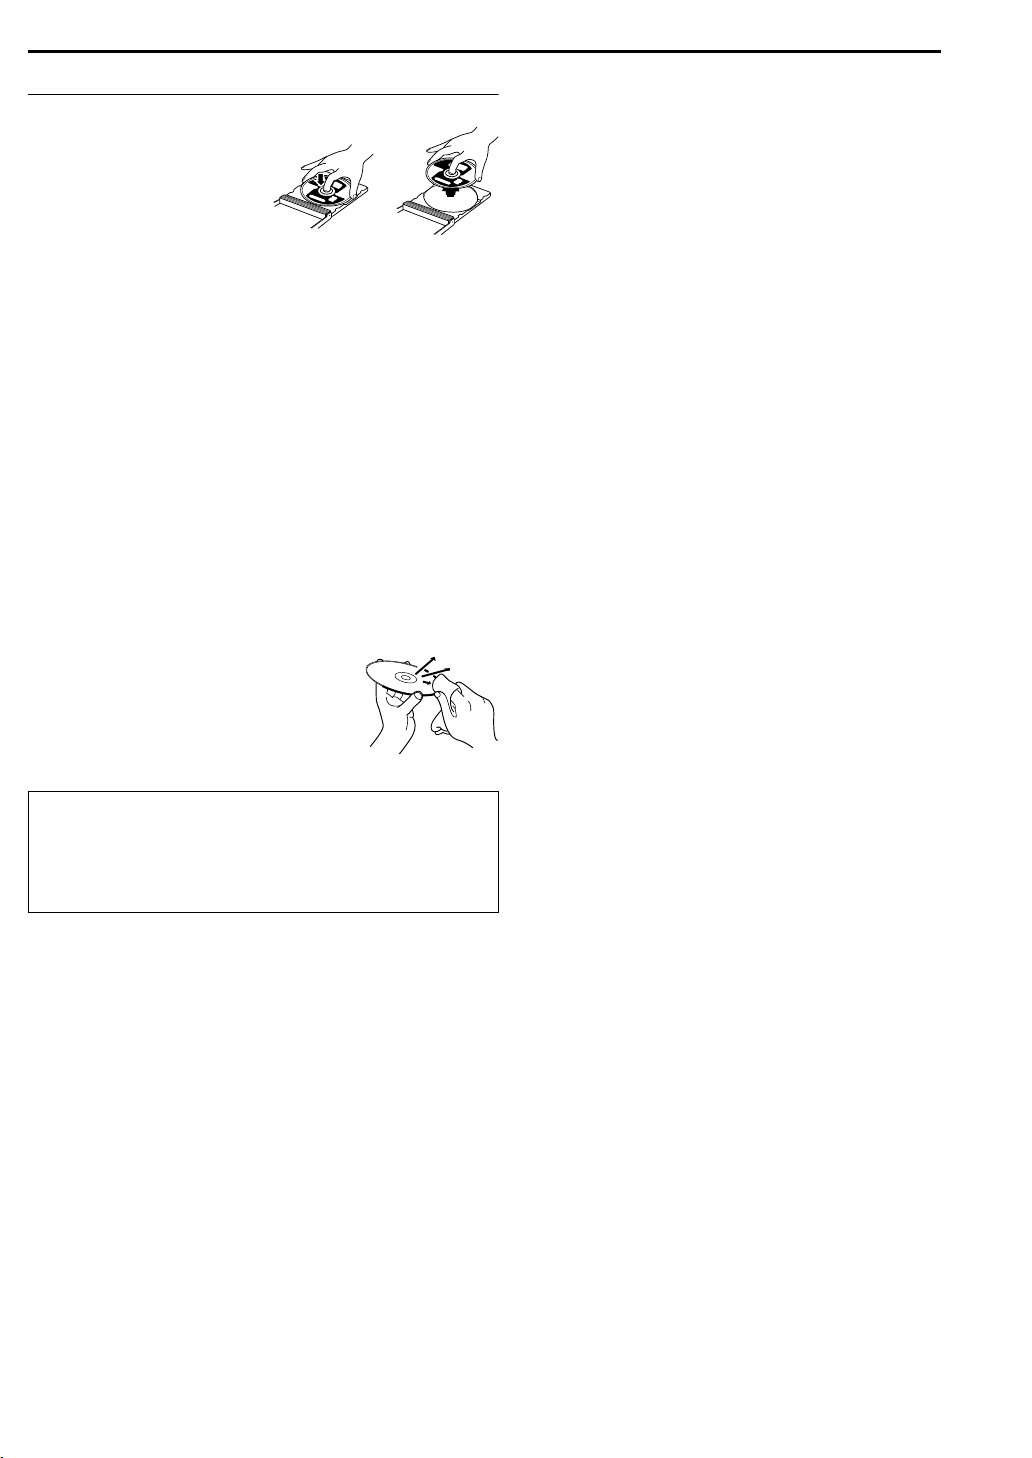
Discs without cartridges
Place the disc on the disc tray with the label side facing up. Since
disc size changes depending on the disc to be played back, be
sure to correctly align the disc with the grooves for its size. If the
disc is not in its groove, it may be scratched or otherwise damaged.
To insert an 8 cm disc, place it according to the inner groove.
DVD-RAM discs contained in cartridges
Double-sided discs:
Remove the disc from the cartridge. Align the disc with the grooves
on the disc tray as shown in the illustration and insert with the side
you wish to play back or record facing down. If you insert the disc
with “Side A” facing down, programs are recorded on the side A.
Single-sided discs:
Remove the disc from the cartridge. Align the disc with the grooves
on the disc tray as shown in the illustration and insert with the label
side facing up.
PULL - OPEN
DV
DV IN
D
V
D
D
D
H
PULL - OPEN
O
E
ID
V
N
BY/O
ND
TA
S
1
Disc tray
Care And Handling Of Discs
How to handle discs
When handling a disc, do not
touch the surface of the disc.
Since discs are made of
plastic, they are easily
damaged. If a disc gets dirty,
dusty, scratched or warped, the
images and sound will not be
picked up correctly, and such a
disc may cause the unit to malfunction.
Label side
Do not damage the label side, stick paper to or use any adhesives
on its surface.
Recording side
Make sure that discs are not scratched and dirty on the recording
side before use. Scratches and dirt on the recording side of a disc
may hinder proper playback and recording. Also be careful that a
DVD-RAM disc may get scratched or dirt when removed from
cartridge then put back in after use.
Storage
Make sure that discs are kept in their cases. If discs are piled on
top of one another without their protective cases, they can be
damaged. Do not put discs in a location where they may be
exposed to direct sunlight, or in a place where the humidity or
temperature is high. Avoid leaving discs in your car!
DISC INFORMATION
EN 11
Maintenance of discs
If there are fingerprints or other dirt adhering
to a disc, wipe with a soft dry cloth, moving
from the centre outwards.
If a disc is difficult to clean, wipe with a cloth
moistened with water. Never use record
cleaners, petrol, alcohol or any anti-static
agents.
CAUTION:
Sometimes during playback, noise may appear or images may
be garbled. This is sometimes due to the disc. (It may not be up
to industry standards.)
These symptoms are caused by the discs, not by the malfunction
of the unit.
12 EN
INDEX
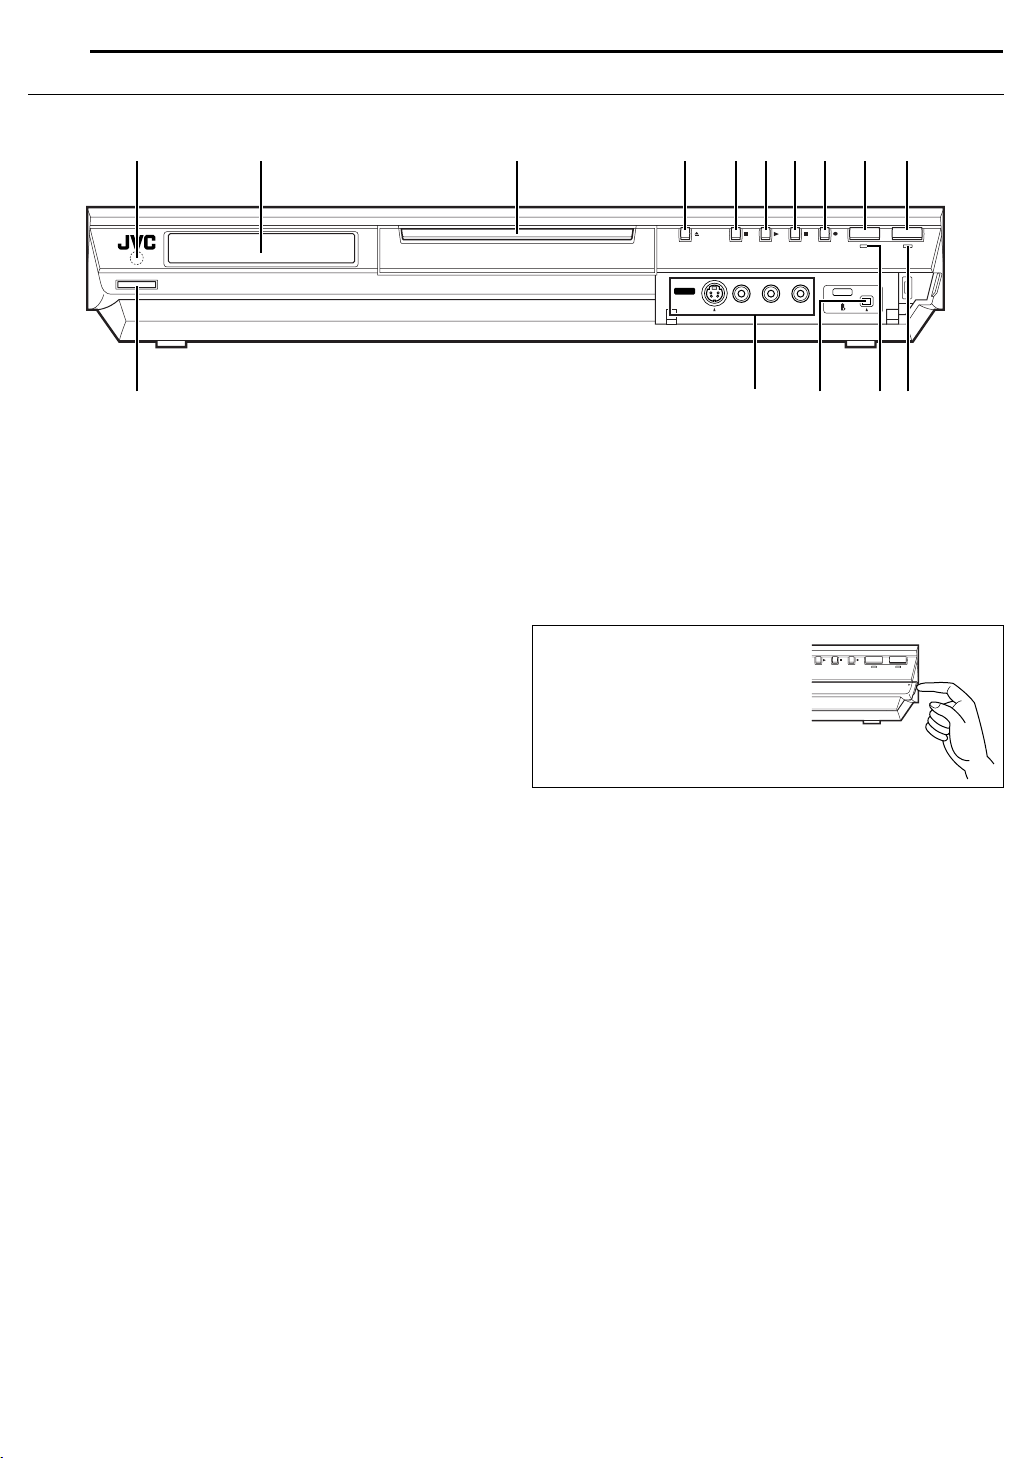
Front View
1
STANDBY ON
C D FE G H I JBA
HDD DVD
F1
S-VIDEO VIDEO
L(MONO)-AUDIO-R
DV
DV IN
K
A Infrared Beam Receiving Window
B Front Display Panel
C Disc Tray
D Open/Close Button (x)
E Stop Button (8)
F Play Button (4)
G Pause Button (9)
H Record Button (7)
I HDD Button
J DVD Button
墌 pg. 27
墌 pg. 14
墌 pg. 10
墌 pg. 27, 42
墌 pg. 27, 42
墌 pg. 27, 42
墌 pg. 37, 40
墌 pg. 40
L ONM
K Standby/On Button (1)
L S-Video/Video/Audio Input Connectors (S-VIDEO/
VIDEO/AUDIO (L/R)) 墌 pg. 61
M DV Input connector (DV IN (i*))
* i (i.Link) refers to the IEEE1394-1995 industry specification and
extensions thereof. The i logo is used for products compliant with the
i.Link standard.
N HDD Lamp 墌 pg. 40
O DVD Lamp
To access covered connectors, pull
and open the connector cover.
墌 pg. 27
墌 pg. 60
DV
L(MONO)-AUDIO-R
HDD DVD
DV IN
PULL - OPEN

Rear View
A E FC DB G H
INDEX
EN 13
IN
OUT
ANTENNA OUTPUT INPUT
Y
P
B
P
R
COMPONENT
S-VIDEO
L-2L-1
L-1
VIDEO
LEFT
L-2
AUDIO
RIGHT
A Antenna Connectors (ANTENNA IN/OUT) 墌 pg. 19
B Component Video Output Connectors (COMPONENT
VIDEO OUT) 墌 pg. 19
C S-video Output Connectors (S-VIDEO OUTPUT (L-1/
墌 pg. 19, 62
L-2))
D Video/Audio Output Connectors (VIDEO/AUDIO
OUTPUT (L-1/L-2))
墌 pg. 62
E S-video Input Connectors (S-VIDEO INPUT (L-1/L-2))
墌 pg. 62
F Video/Audio Input Connectors (VIDEO/AUDIO INPUT
(L-1/L-2)) 墌 pg. 62
G Region Number Label
H AC Power Cord
墌 pg. 8
墌 pg. 19
L-1
L-2
L-1 L-2
S-VIDEO
VIDEO
LEFT
AUDIO
RIGHT
AV COMPU LINK
CABLE BOX
PCM STREAM
DIGITAL OUT
COAXIALOPTICAL
J K LI
I Cable Box Control Connector (CABLE BOX)
J AV COMPU LINK Connector*
* Not function with this unit.
K Digital Audio Output Connectors
(DIGITAL OUT (OPTICAL/COAXIAL))
L Cooling Fan
● This prevents the temperature from rising inside the unit.
Do not remove it.
● Install the unit so as not to block the area around the fan.
● The cooling fan on the rear of the unit may be activated even if
the unit is turned off in the following cases;
— In the Automatic Satellite Program Recording standby mode
(墌 pg. 50)
— when “AUTO CLOCK” is set to “ON” (墌 pg. 22)
(Set “AUTO CLOCK” to “OFF” if you mind the noise of the fan.)
1
墌 pg. 24
墌 pg. 63, 66
14 EN
INDEX
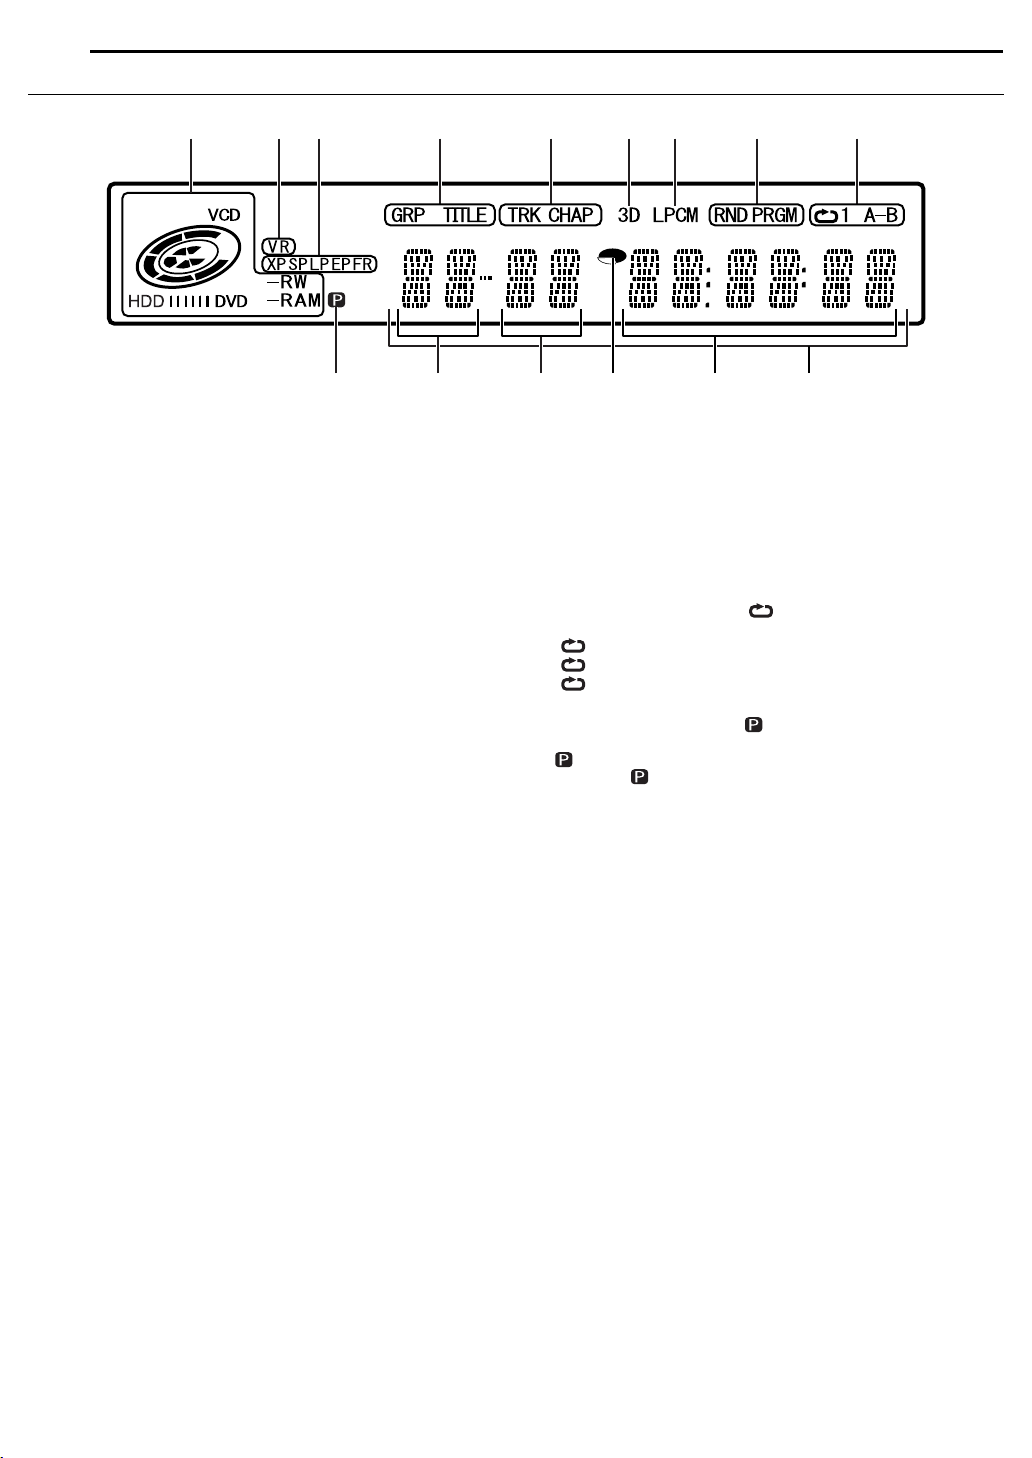
Front Display Panel
ABC FEDHGI
A Disc Type Indicator
When a disc is loaded, the type of the disc is indicated.
Disc Status Indicator
When a disc is running, the disc marks rotate.
During High-Speed Search: Rotate faster than normal playback.
During Slow Motion: Rotate slower than normal playback.
While recording: Inner red ring lights in the same way
While paused: Disc marks blink when either
While stopped: Disc marks all light.
While resume stopped: Disc marks all blink.
While the disc tray opened: Disc marks all light out.
No disc on the disc tray: Disc marks all light out.
B VR Mode Indicator 墌 pg. 71
Lights when a DVD-RW disc is formatted in VR mode.
C Recording Mode Indicator (XP/SP/LP/EP/FR) 墌 pg. 37
Blinks when recording mode is being set.
While “FR” is blinking, the left 3 digits of the Multi Display (K L)
indicate setting values ranging from “60” to “480”. After the value
has been set, only “FR” lights.
D Group/Title Indicator (GRP/TITLE)
“GRP” or “TITLE” lights depending on a disc loaded while the left 2
digits of the Multi Display (K) indicate the numbers explained below.
“GRP”: Total number of groups or group number being played
back are displayed on the Multi Display.
“TITLE”: Total number of titles or title number being played back
are displayed on the Multi Display.
E Track/Chapter Indicator (TRK/CHAP)
“TRK” or “CHAP” lights depending on a disc loaded while the 3rd
and 4th digits from the left of the Multi Display (L) indicate the
numbers explained below.
“TRK”: Total number of tracks or track number being played
back are displayed on the Multi Display.
“CHAP”: Chapter number being played back are displayed on the
Multi Display.
as normal playback. During Instant
Timer Recording (ITR), inner red ring
slowly blinks.
recording or playing back.
MLKJNO
F Simulated Surround Effect Indicator (3D) 墌 pg. 34
Lights when a simulated surround effect is set to “3D-ON” on the
on-screen bar.
G Linear PCM Indicator (LPCM)
Lights when “XP MODE REC AUDIO” is set to “LINEAR PCM”
(
墌 pg. 68) for recording with HDD, DVD-RAM, DVD-R and
DVD-RW discs, and when Linear PCM audio is played.
H Random/Program Playback Mode Indicator (RND/
PRGM)
“RND”: Lights when Random Playback mode is set.
“PRGM”: Lights when Program Playback mode is set.
I Repeat Mode Indicator ( /1/A–B) 墌 pg. 33
Select Repeat Playback mode on the on-screen bar.
“”: Whole disc is played back repeatedly.
“ 1”: A single title/chapter/track is played back repeatedly.
“ A–B”: The selected part (A–B) is played back repeatedly.
No display: Repeat Playback mode is off.
J Video Output Indicator ( ) 墌 pg. 69
No display:Indicates that interlace mode is engaged.
(Example) lights when video output mode is in progressive
mode.
K Group/Title Number Display
L Track/Chapter Number Display
M Remaining Time/Elapsed Time Indicator 墌 pg. 30, 38
Lights when remaining time of DVD-RAM, DVD-R and DVD-RW
discs is displayed, and lights out when elapsed time is displayed.
The right 6 digits of the Multi Display (N) indicate elapsed or
remaining time of each track.
No display: Indicates elapsed time of the disc.
Displayed: Indicates remaining time of the disc.
N Remaining Time/Elapsed Time Display 墌 pg. 30, 38
O Multi Display
Displays clock, received channel, elapsed time, and remaining time.
Also displays status of the unit (NO DISC/OPEN/CLOSE/
READING).
墌 pg. 35
: Indicates that progressive mode is engaged.
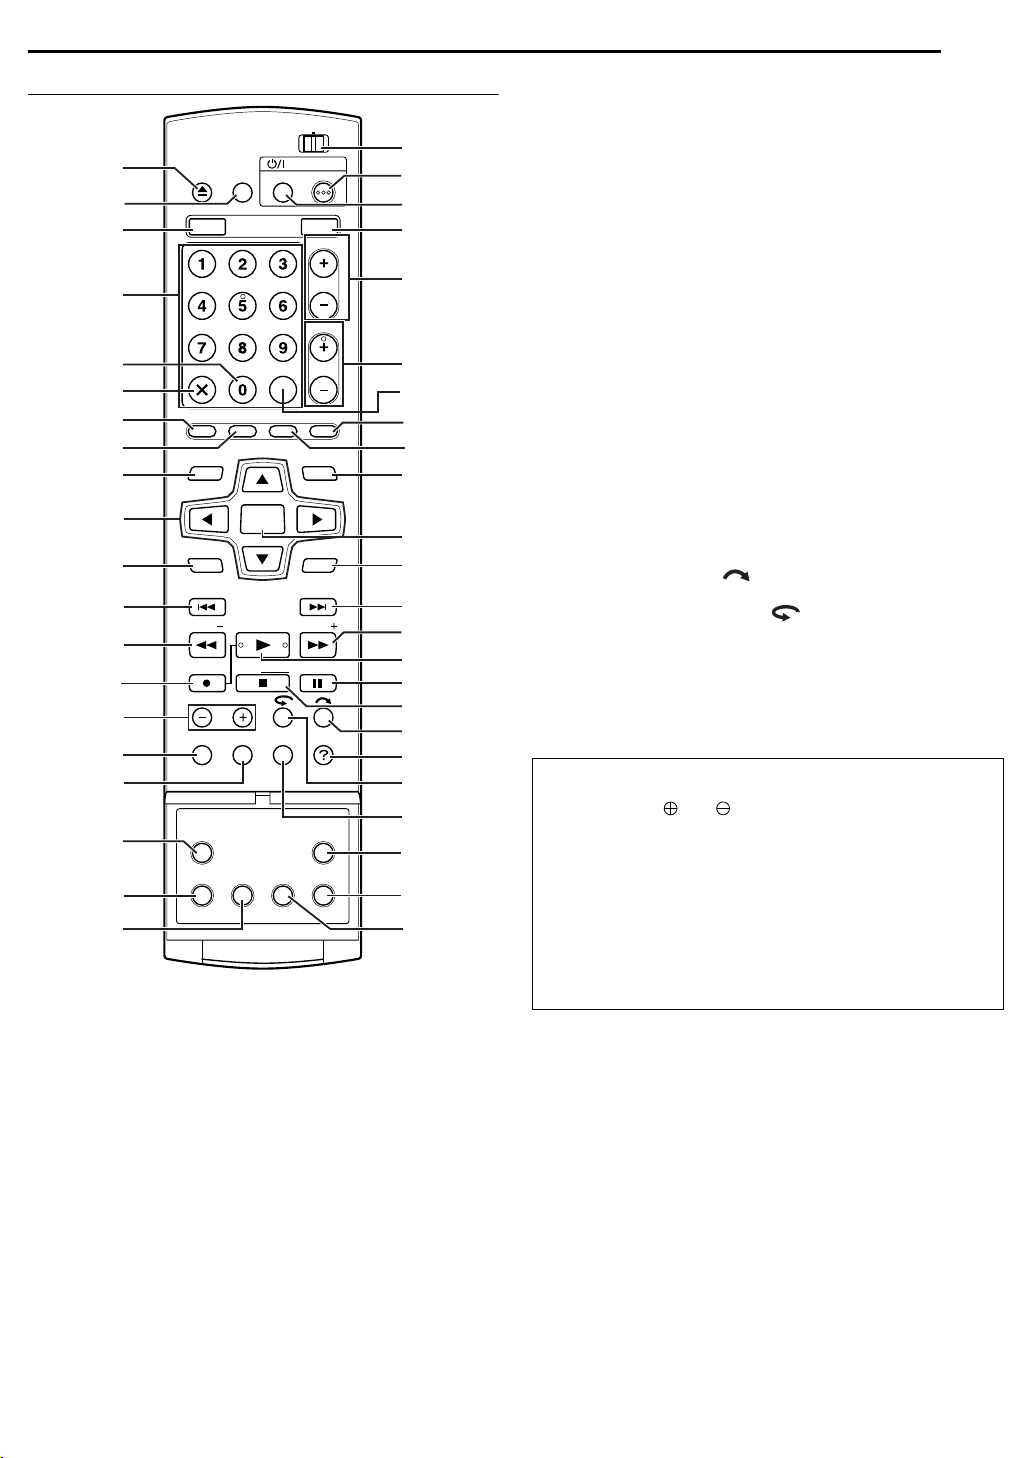
Remote Control
I
d
f
g
U
V
Y
W
Z
a
C
G
H
K
L
Q
M
N
A
D
E
h
e
i
j
k
m
l
o
q
p
r
n
R
S
T
O
F
J
P
B
X
c
b
CABLE/DBS
DVDTV
STANDBY ON
TV/
OPEN/
VIDEO
CLOSE
HDD DVD
AUX
CANCEL
LIVE
TV MUTING
ENTER
MENU
STOP/
JUMP
REC MODE
DISPLAY
REC LINK SET UP
AUDIO
SUBTITLE
A Open/Close Button (x) 墌 pg. 10
B TV/VIDEO Button
C HDD Button
D Number Keys
E Auxiliary Button (AUX)
F Cancel Button (& (CANCEL))
G Live Button (LIVE)
H Dubbing Button (DUBBING)
TV Muting Button (TV MUTING)
I Top Menu Button (TOP MENU)
J rt w e Buttons
K Menu Button (MENU)
L Reverse Skip Button (2)
Previous Button (PREVIOUS)
M Reverse Search Button (3)
Reverse Slow Button (SLOW –)
N Record Button (7)
O Jump Button (JUMP +/–)
P Recording Mode Button (REC MODE)
Q Display Button (DISPLAY)
R Automatic Satellite Program Recording Button (REC
LINK) 墌 pg. 50
墌 pg. 38, 41
墌 pg. 40
墌 pg. 23, 37, 40
墌 pg. 48
墌 pg. 44
墌 pg. 21
墌 pg. 28
墌 pg. 37, 40
墌 pg. 45
DVD
TV/CBL/DBS
TV VOLUME
CH
MEMO/MARK
PROGRAM
EDITDUBBING
NAVIGATIONTOP MENU
RETURN
NEXTPREVIOUS
SLOWSLOW PLAY/SELECT
CLEAR
PAUSEREC
ON SCREEN
HELP
PROGRESSIVE
ANGLE
SCAN
LIVE CHECK
墌 pg. 46
墌 pg. 58
墌 pg. 64
墌 pg. 28
墌 pg. 28, 44, 45
墌 pg. 31
墌 pg. 28, 44
墌 pg. 29
墌 pg. 37, 40
墌 pg. 30, 38
INDEX
EN 15
S Audio Button (AUDIO)
T Subtitle Button (SUBTITLE)
U TV/CABLE/DBS/DVD switch
墌 pg. 31
墌 pg. 30
墌 pg. 21
V DVD Standby/On Button (DVD 1)
W TV/CBL/DBS Standby/On Button (TV/CBL/DBS 1)
墌 pg. 64
X DVD Button
Y TV Volume Buttons (TV VOLUME +/–)
Z Channel Buttons (CH +/–)
a Memo Button (MEMO)
Mark Button (MARK)
b Programing Button (PROGRAM)
c Edit Button (EDIT)
d Navigation Button (NAVIGATION)
e Enter Button (ENTER)
f Return Button (RETURN)
g Forward Skip Button (6)
Next Button (NEXT)
h Forward Search Button (5)
Forward Slow Button (SLOW +)
i Play Button (4)
Select Button (SELECT)
j Pause Button (9)
k Stop Button (8)
Clear Button (CLEAR)
l Skip Search Button ( )
m Help Button (?)
n One Touch Replay Button ( )
o On-Screen Button (ON SCREEN)
p Set Up Button (SET UP)
墌 pg. 27
墌 pg. 64
墌 pg. 37, 64
墌 pg. 52, 55
墌 pg. 29
墌 pg. 46, 48, 49
墌 pg. 52
墌 pg. 51
墌 pg. 21
墌 pg. 31, 46
墌 pg. 28, 44, 45
墌 pg. 31
墌 pg. 28, 44
墌 pg. 29
墌 pg. 27, 42
墌 pg. 27, 52
墌 pg. 27, 42
墌 pg. 27, 42
墌 pg. 33, 46
墌 pg. 29, 44
墌 pg. 73
墌 pg. 44
墌 pg. 16, 32
墌 pg. 21
q Progressive Scan Button (PROGRESSIVE SCAN)
墌 pg. 69
r Angle Button (ANGLE) (DVD deck only)
Live Check Button (LIVE CHECK)
How To Use
Before use, insert two AA size batteries into the remote control
with the polarity ( and ) matched correctly as indicated on
the battery compartment or on the lid.
The remote control can operate most of your unit’s functions, as
well as basic functions of TV sets of JVC and other brands.
(墌 pg. 64)
● Point the remote control toward the receiving window.
● The maximum operating distance of the remote control is about
8m.
NOTE:
If the remote control doesn’t work properly, remove its batteries, wait
a short time, replace the batteries and then try again.
墌 pg. 30
墌 pg. 44
16 EN
INDEX
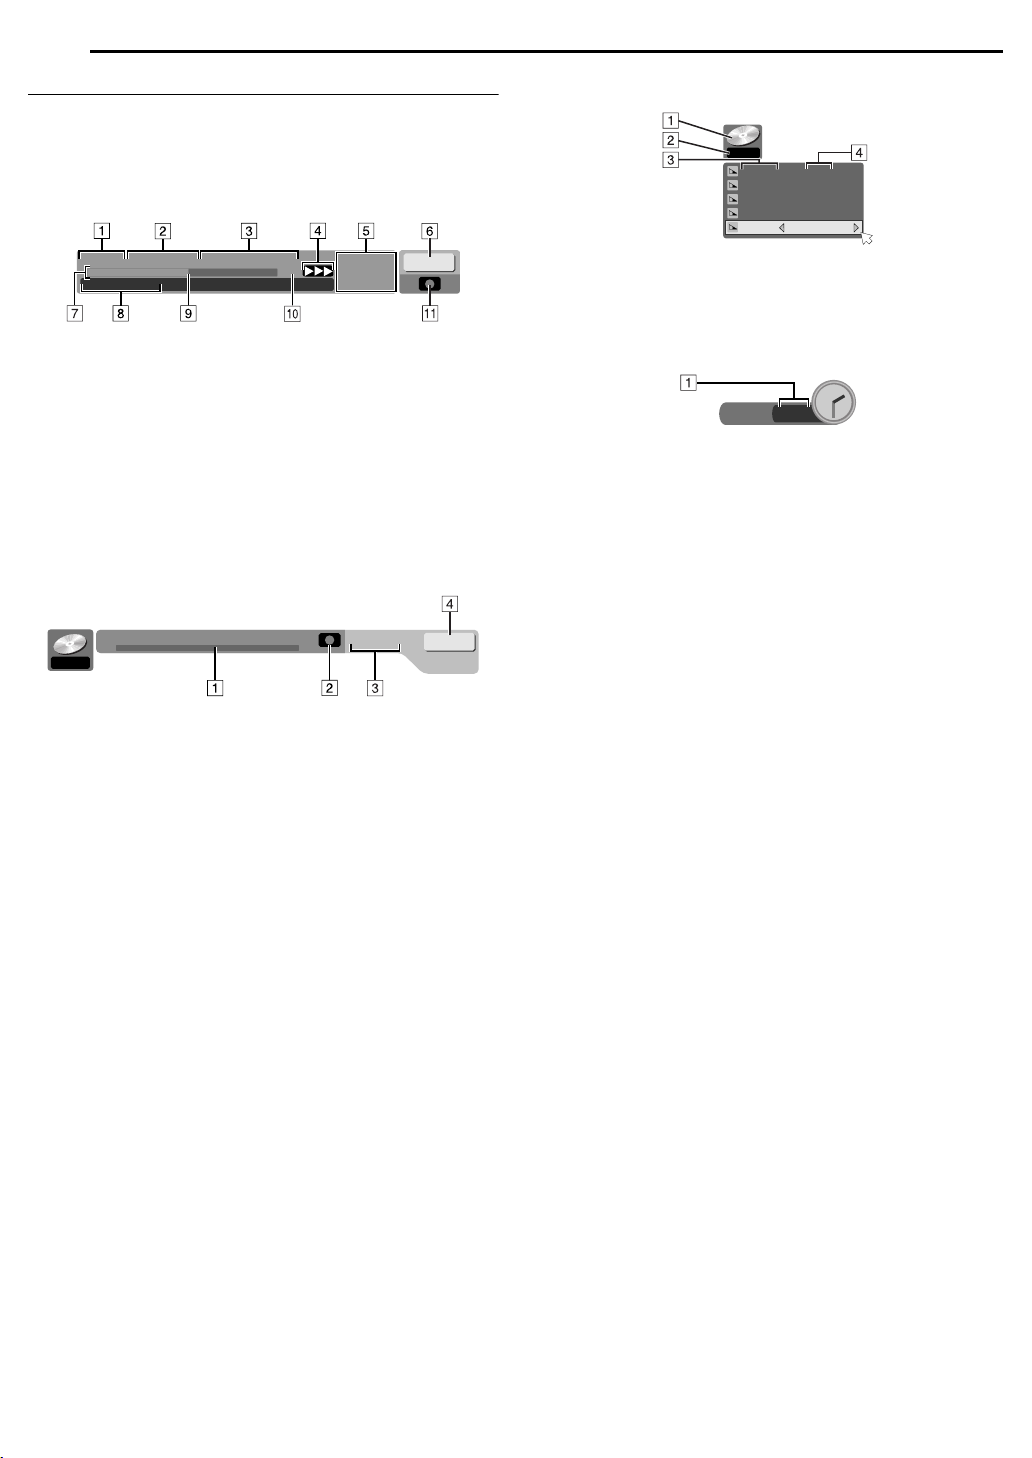
On-Screen Display (DVD deck)
When “SUPERIMPOSE” is set to “AUTO” and ON SCREEN on the
remote control is pressed, various operational indicators appear on
the TV screen. To clear the operational indicators, press ON
SCREEN twice.
When playing back a recorded title
TITLE99 CHAPTER999 T. REMAIN6:59:59 01:16:48
FISHING WORLD
XP
A Playback title number
B Playback chapter number
C Disc remaining time
D Current status (playback)
E Audio mode
F Current received (recording) channel position number
(On playback background)
G Bar meter
H Name of title (or play list) currently being played back
I Current playback point
J Recorded mode
K Live Memory mode (recording)
When recording
12
When pressing REC MODE
(Appears for eight seconds.)
RAM
FR360
7: 00 XP
10: 00 SP
20: 00 LP
28: 00
36: 00
EP
FR480
A Disc type
B Current recording speed
C Remaining disc time for each recording speed
D Recording speed
When pressing 7 during recording
ITR 2 : 30
A Recording time for Instant Timer Recording (ITR) mode
TITLE99 CHAPTER999 T. REMAIN6:59:59
RAM
FR360
A Recording point
B Current status (recording)
C Current time
D Recording channel number
11:35 AM
12
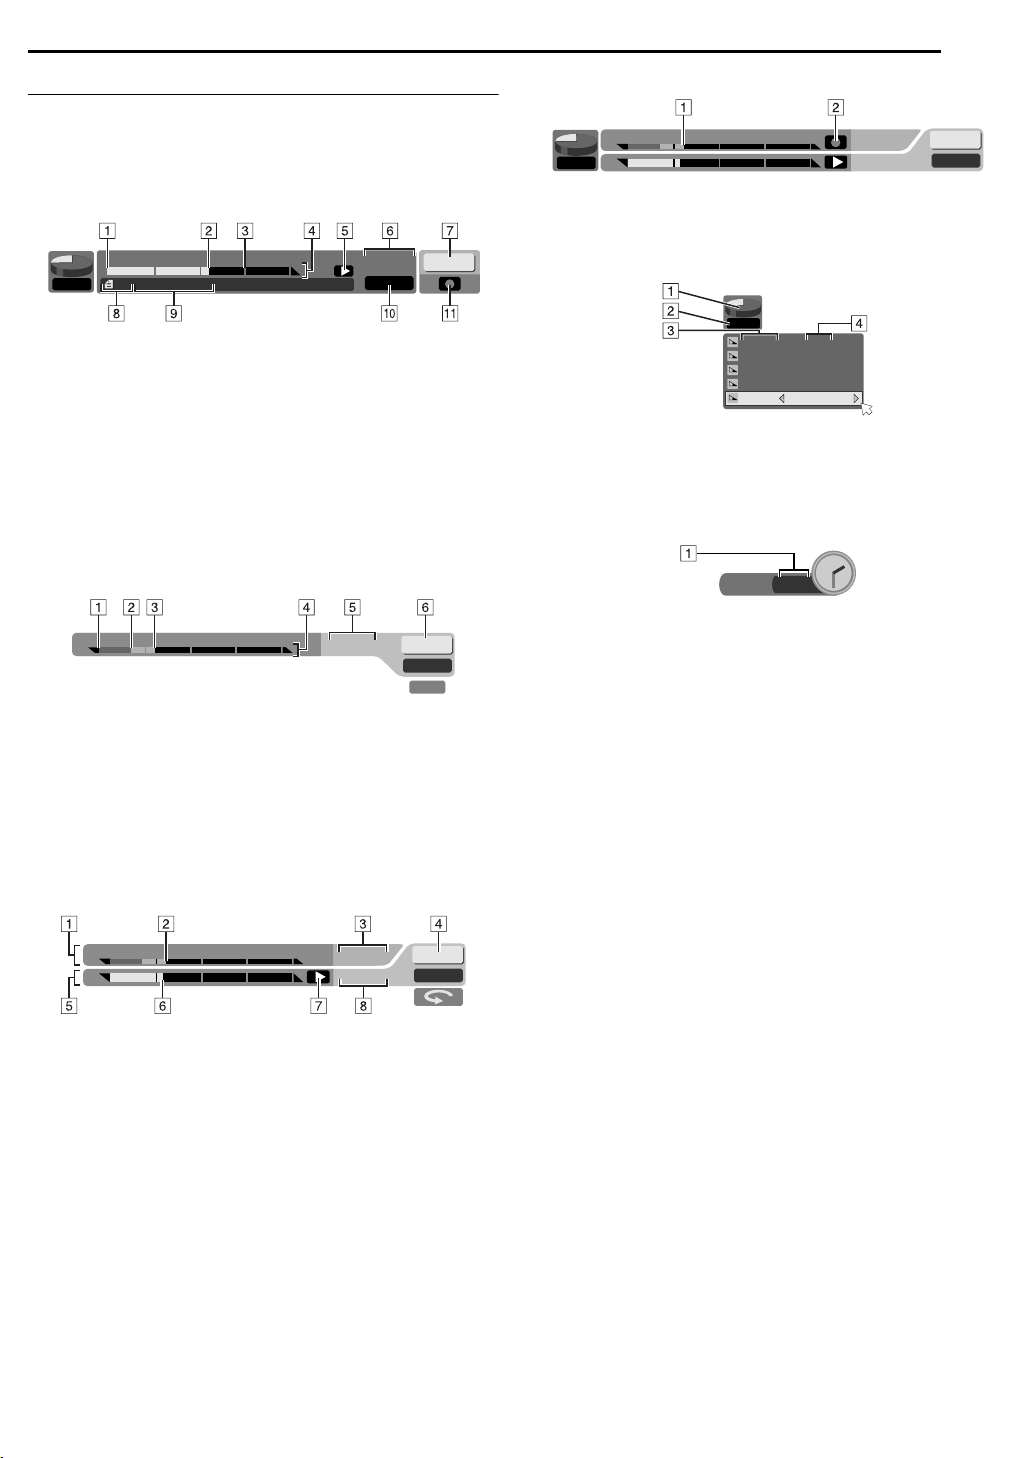
On-Screen Display (HDD deck)
When “SUPERIMPOSE” is set to “AUTO” and ON SCREEN on the
remote control is pressed, various operational indicators appear on
the TV screen. To clear the operational indicators, press ON
SCREEN twice.
When playing back a recorded title
When recording
11:00 12:00 1:00
FR360
A Live Memory Recording point
B Live Memory Recording mode
11:35AM
11:33AM
INDEX
EN 17
12
STEREO
0:00 1:00 2:00 01:16:48
004 FISHING WORLD
FR360
STEREO
12
A Title start
B Current playback point
C Title end
D Time scale (This title is an hour and a half long.)
E Play mode
F Elapsed playing time
G Current received (recording) channel position number
(On playback background)
H Recorded title (or play list) number currently being played back
I Name of title currently being played back
J Audio mode
K Live Memory mode (recording)
When watching a program on air
11:00 12:00 1:00
11:35AM
12
STEREO
ON AIR
A Possible start point from where Live Memory Playback can be
performed
B Possible start point from where Live Memory Recording can be
performed
(Received channel has changed at this point.)
C Currently viewed point
D Time scale
E Current time
F Current received channel position number
When pressing REC MODE
(Appears for eight seconds.)
FR360
7: 00 XP
10: 00 SP
20: 00 LP
28: 00
36: 00
EP
FR480
A HDD capacity graph
B Current recording speed
C Remaining HDD time for each recording speed
D Recording speed
When pressing 7 during recording
ITR 2 : 30
A Recording time for Instant Timer Recording (ITR) mode
When using Live Memory playback
11:00 12:00 1:00
A Time scale for Temporary Recording
B Current Temporary Recording point
C Current time
D Current playback channel position number
E Time scale for Live Memory Playback
F Current playback point
G Live Memory playback mode
H Current playback time
11:35AM
11:35AM
12
STEREO
18 EN
INDEX
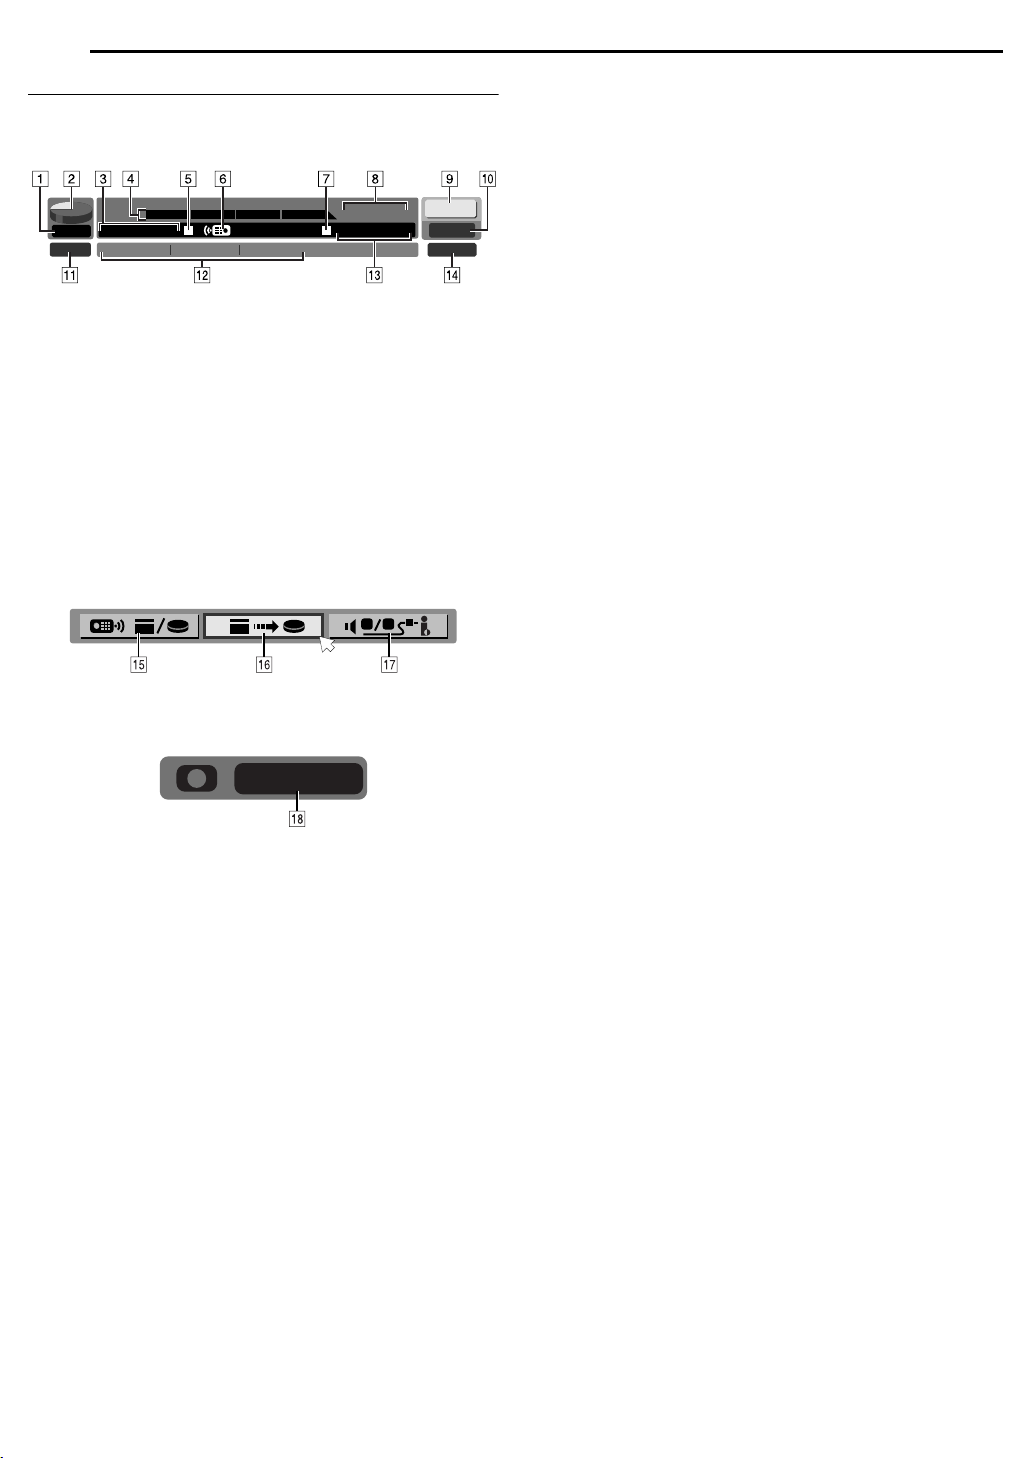
On-Screen Display (DV Dubbing)
When capturing images from the external DV
equipment
FR360
12bit
0:00 1:00 2:00
HDD
00: 00:00. 00
JVC
GR-DV3500DV
GR-DV3500
00: 00:00. 00
L - R
SOUND1
A Recording speed
B HDD capacity graph
C HDD time counter
D Recording time scale
E HDD mode
F Remote control mode
G Connected DV equipment mode
H Connected DV equipment model information
I Input channel
J Sound mode
K Sound input bit-rate*
* Indicates the sound bit-rate of the connected DV equipment
L Connected DV equipment information*
* Maker name and model name, etc. may not appear depending on the
connected equipment.
M Time counter for the connected DV equipment
N Sound monitor mode
DV DV
1 2
O Remote control switch
P Auto capture button
Q Sound monitor switch
179 :59 :59
DV
R Elapsed recording time
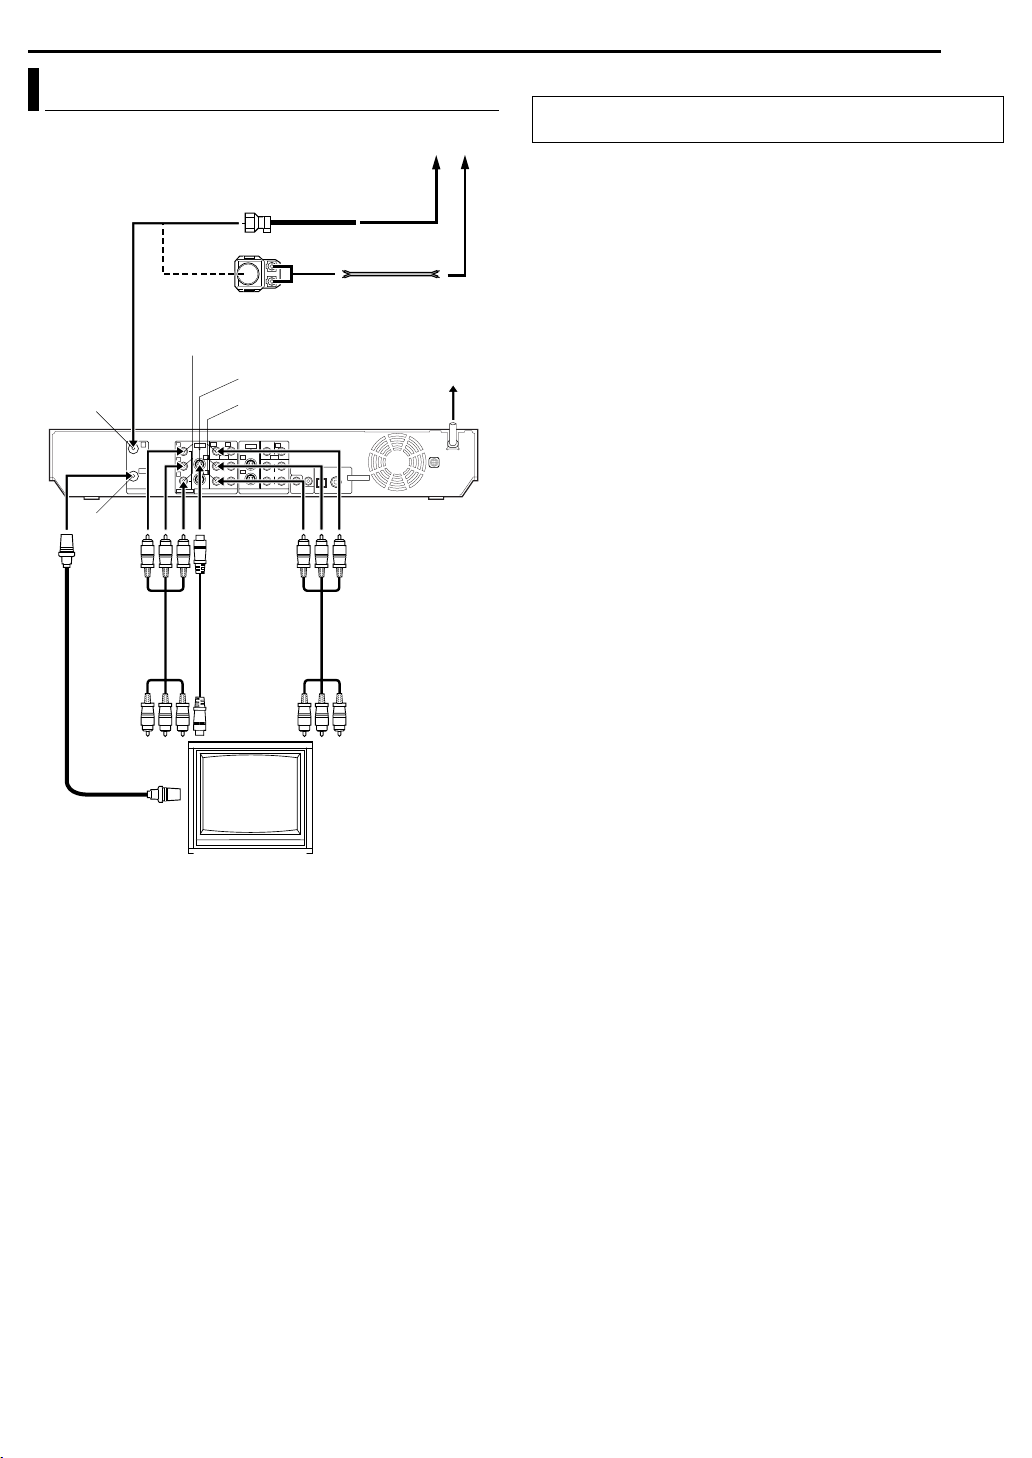
Basic Connections
COMPONENT OUTPUT
ANTENNA IN
ANTENNA
OUT
Component
video cable
(not provided)
RF cable
(provided)
To 75 ohm
terminal
S-Video cable
(not provided)
Coaxial cable
Matching transformer
(not provided)
S-VIDEO OUTPUT
AUDIO/VIDEO
OUTPUT
L-1
Audio/video cable
(provided)
TV
Antenna or Cable
Flat feeder
AC outlet
AC power cord
1
Back of unit
INSTALLING YOUR NEW UNIT
EN 19
It’s essential that your unit be properly connected.
THESE STEPS MUST BE COMPLETED BEFORE ANY VIDEO
OPERATION CAN BE PERFORMED.
1 Make sure the package contains all of the accessories listed in
“SPECIFICATIONS” on page 78.
2 Place the unit on a stable, horizontal surface.
3 Connect the unit to a TV depending on the TV and cables you
use.
8 AV Connection
To connect to a TV with AV input connectors —
A Disconnect the TV aerial cable from the TV.
B Connect the TV antenna cable to the ANTENNA IN connector
on the rear panel of the unit.
C Connect the provided RF cable between the ANTENNA OUT
connector on the rear panel of the unit and the TV’s antenna
terminal.
D Connect the provided audio/video cable between the AUDIO/
VIDEO OUTPUT connectors on the rear panel of the unit and
the TV’s audio/video input connectors.
8 S-Video Connection
To connect to TV’s S-VIDEO input and AUDIO input
connectors —
A Perform A – C in “AV Connection”.
B Connect the unit’s S-VIDEO OUTPUT connector to the TV’s
S-VIDEO input connector.
C Connect the unit’s AUDIO OUTPUT connectors to the TV’s
AUDIO input connectors.
● You can obtain high-quality S-VHS pictures.
● If your TV is not stereo-capable, use the unit’s AUDIO OUTPUT
connectors to connect to an audio amplifier for Hi-Fi stereo sound
reproduction.
8 Component Video Connection
To connect to TV’s component video input connectors —
A Perform A – C in “AV Connection”.
B Connect the unit’s COMPONENT OUTPUT connectors to the
TV’s component video input connectors.
C Connect the unit’s AUDIO OUTPUT connectors to the TV’s
AUDIO input connectors.
● You can obtain high-quality component video pictures.
● If your TV is not stereo-capable, use the unit’s AUDIO OUTPUT
connectors to connect to an audio amplifier for Hi-Fi stereo sound
reproduction.
● By using the component video connection, you can view the images
in the progressive mode. For switching to the progressive mode, refer
to “Scan Mode Set” (墌 pg. 69).
4 Plug the end of the AC power cord into an AC outlet. This unit
performs Plug & Play Set automatically. (墌 pg. 20)
● “LOADING” blinks on the front display panel when the AC plug of the
AC power cord is connected into an AC outlet and it takes
approximately 50 seconds for the unit to be turned on. This is not a
malfunction.
20 EN
A
INITIAL SETTINGS
Plug & Play Set
Auto Clock Set/Auto Tuner Set
This unit sets the clock and tuner channels automatically when AC
power cord is first connected to an AC outlet. The antenna cable
must be connected for the Plug & Play setting.
The time and date can be set automatically by the clock setting
data transmitted from one of the regular TV broadcast channels.
We call this TV channel the “host channel” and it is a PBS channel
in your area.
TTENTION:
● If you use a cable box, Plug&Play will not function; set the clock
and tuner channels separately. (墌 pg. 22 – 23)
● Depending on areas or reception conditions, the unit may not
receive the Auto clock setting data from the PBS channel. If this
function is taking a considerable amount of time, it may be
necessary to perform the Semiauto or Manual Clock Set
procedure.
1
1 Connect the antenna cable to the unit. (墌 pg. 19) Then connect
the AC power cord to an AC outlet. Do not turn on the unit.
The clock and tuner channels will be set automatically.
● “LOADING” blinks on the front display panel when the AC plug of the
AC power cord is connected into an AC outlet and it takes
approximately 50 seconds for the unit to be turned on. This is not a
malfunction.
NOTES:
● Auto Clock Set is performed first.
“AUTO” blinks on the front display panel during Auto Clock Set.
● Auto Channel Set is performed next. Auto Channel Set scans all the
channels that are receivable by your unit. During Auto Channel Set,
the channel numbers are displayed as they are scanned and set.
● When Plug & Play setting has been complete successfully, the
correct clock time is displayed. If you perform Plug & Play setting
successfully, there is no need to perform “Clock Set” (墌 pg. 22) and
“Tun e r S e t” (墌 pg. 23). If, however, you want to add or delete
channels, refer to “Manual Channel Set” (墌 pg. 23).
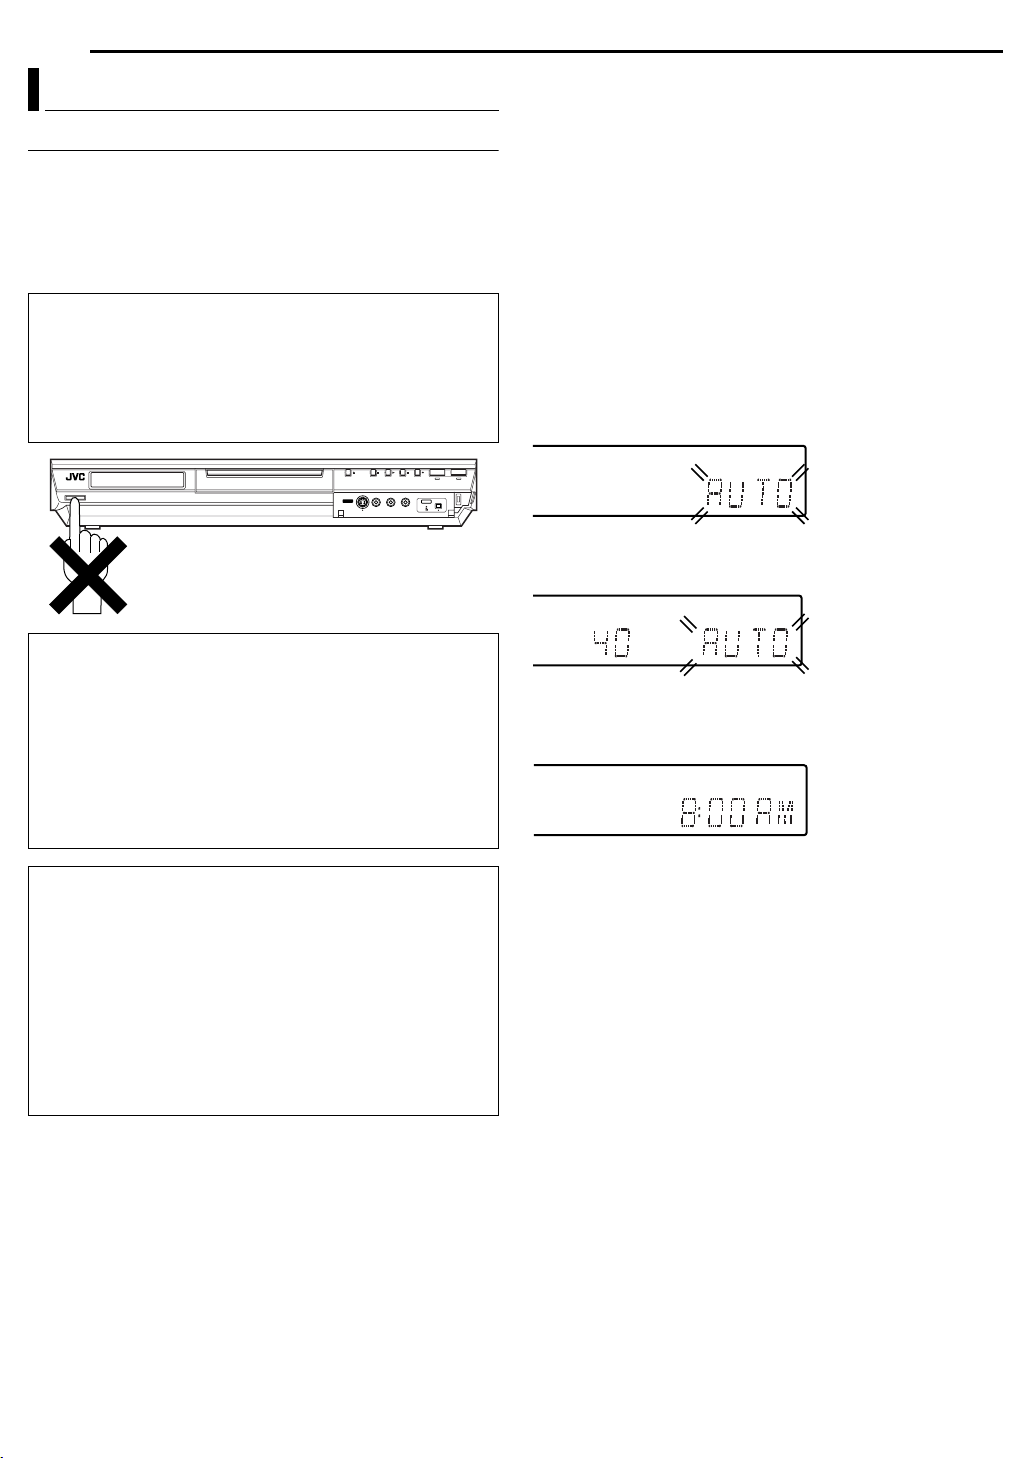
During Auto Clock Set
“AUTO” blinks.
During Auto Channel Set
The channel numbers are displayed and “AUTO” blinks as they
are scanned and set.
INFORMATION
● If “AUTO CLOCK” is set to “ON” (墌 pg. 22), the clock will be
adjusted automatically by the host channel every hour (except
11:00 PM, midnight, 1:00 AM and 2:00 AM) using the incoming
PBS channel clock setting data. (This automatic clock adjustment
can only be performed when the unit is turned off. The clock will be
adjusted just on these hours — on the time displayed on the front
display panel, not on the actual real time.) The default setting of
“AUTO CLOCK” is “ON”. (墌 pg. 22)
● If the memory backup fails, because a power outage occurs or
because the AC power cord is unplugged, Plug & Play will be
performed when power is restored to the unit.
What to do if Plug & Play setting failed
● If an incorrect time is displayed on the front display panel, you may
be receiving the clock setting data of a PBS channel from an
adjacent time zone, or an incorrect PBS channel from a cable TV
system. In this case, perform “Semiauto Clock Set” (墌 pg. 22) or
“Manual Clock Set” (
● If “– –:––” appears on the front display panel, your antenna cable
may not be connected to the unit or there may not be a Host PBS
signal available in your area. Ensure that the antenna cable is
connected correctly. Then turn on and off the unit; the Plug & Play
setting will be automatically reactivated. If Plug & Play setting is not
performed though the antenna cable is connected correctly,
perform “Manual Clock Set” (
(墌 pg. 23) or “Manual Channel Set” (墌 pg. 23).
墌 pg. 22).
墌 pg. 22) and “Auto Channel Set”
Plug&Play Completed
The current time is displayed.
● If an incorrect clock time or “– –:––” appears on the front display
panel, see “What to do if Plug & Play setting failed” (墌 pg. 20).
INITIAL SETTINGS
EN 21
Language
● Turn on the unit.
● Turn on the TV and select the AV mode.
● Slide the TV/CABLE/DBS/DVD switch to DVD.
ENTER
rtwe
SET UP
CABLE/DBS
On-screen Language Set
This unit offers you the choice to view on-screen messages in 3
different languages.
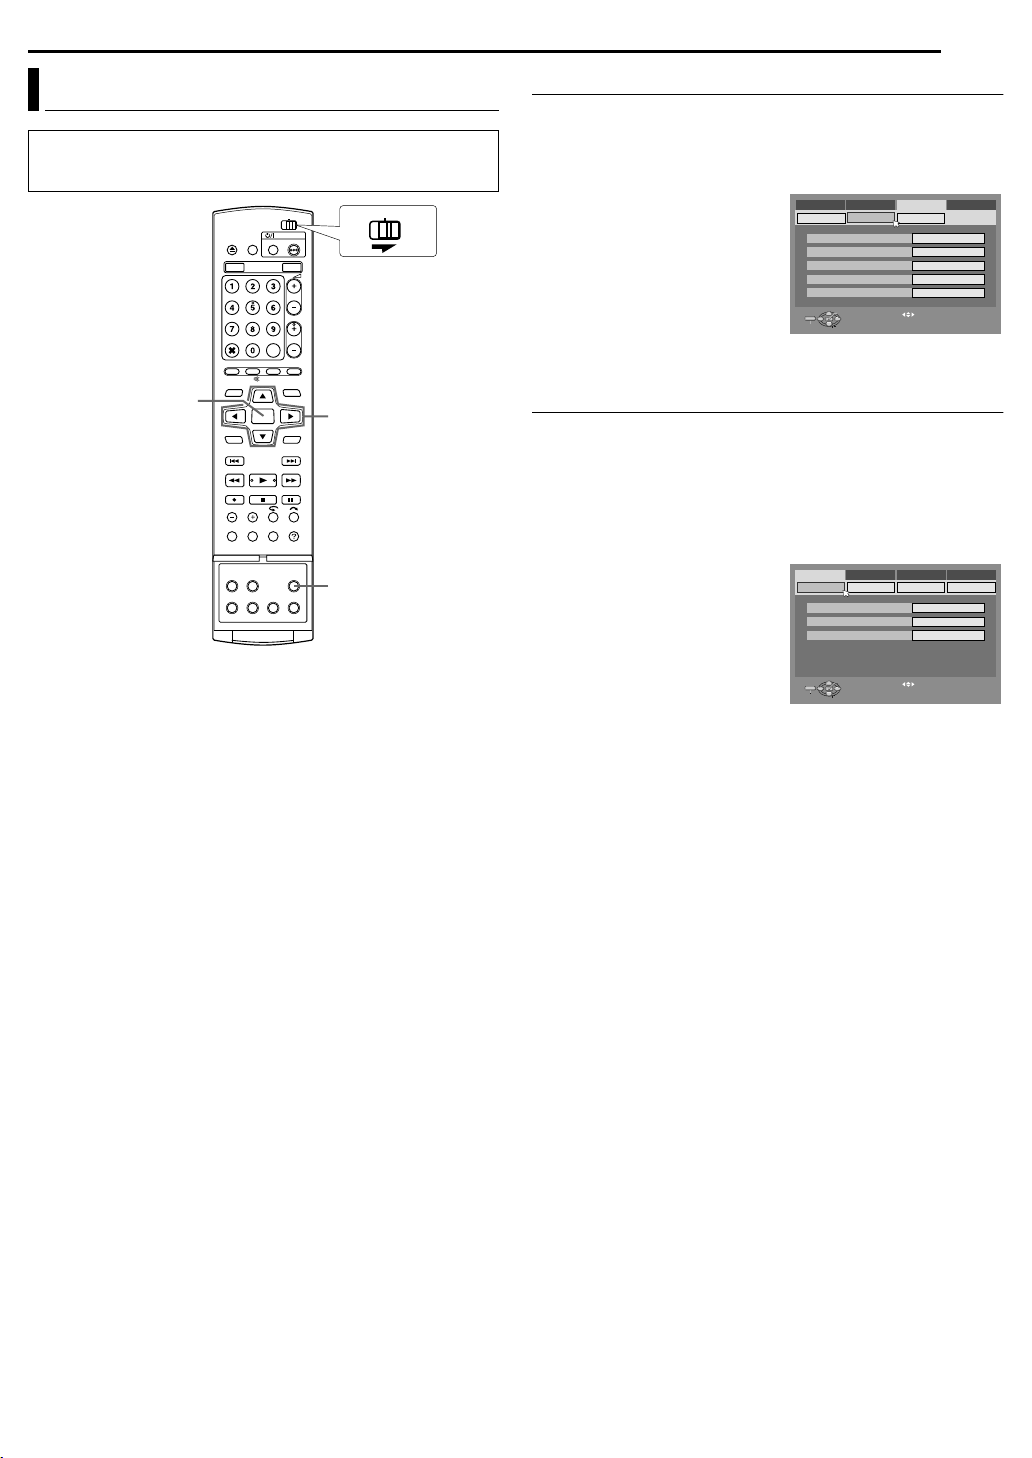
1 Press SET UP to access the Main Menu screen.
2 Press we to select “FUNCTION SET UP”, then press t.
3 Press we to select “DISPLAY
DVDTV
SET”, then press t.
4 Press rt to select “ON
SCREEN LANGUAGE”, then
press ENTER.
5 Press rt to select your
desired language, then press
ENTER.
DVD VIDEO SET UP INITIAL SET UPHDD/DVD SET UP
SUPERIMPOSE
BLUE BACK
DIMMER BRIGHT
POWER SAVE OFF
ON SCREEN LANGUAGE ENGLISH
ENTER
SET UP
EXIT
SELECT
FUNCTION SET UP
DISPLAY SETRECORD/PLAY VIDEO IN/OUT
SELECT WITH [ ] THEN PRESS [ENTER]
PRESS [SET UP] TO EXIT
AUTO
ON
6 Press SET UP to complete the setting.
Menu/Audio/Subtitle Language Set (DVD deck only)
Some DVD discs contain the DVD menu display, audio and
subtitles in multiple languages. With these discs, you can set the
default language as you like.
● The procedure shows how to set “MENU LANGUAGE” as an
example.
1 Press SET UP to access the Main Menu screen.
2 Press we to select “DVD VIDEO SET UP”, then press ENTER.
3 Press we to select
“LANGUAGE SET”, then press
ENTER.
4 Press rt to select “MENU
LANGUAGE”, then press ENTER.
5 Press rt to select your
desired language, then press
ENTER.
● See “Language Code List”
(墌 pg. 79).
6 Press SET UP to complete the setting.
NOTE:
When the selected language is not available on the disc, the disc’s
default menu language is played back.
DVD VIDEO SET UP INITIAL SET UPHDD/DVD SET UP
LANGUAGE SET
MENU LANGUAGE
AUDIO LANGUAGE
SUBTITLE ENGLISH
ENTER
SET UP
EXIT
SELECT
FUNCTION SET UP
AUDIO OUTPUT
PARENTAL LOCK DISC SET UP
SELECT WITH [ ] THEN PRESS [ENTER]
PRESS [SET UP] TO EXIT
ENGLISH
ENGLISH

22 EN
INITIAL SETTINGS
Clock Set
Perform clock setting only if the clock has not been set correctly by
the Plug&Play setting.
● Turn on the unit.
● Turn on the TV and select the AV mode.
● Slide the TV/CABLE/DBS/DVD switch to DVD.
CABLE/DBS
DVDTV
ENTER
Semiauto Clock Set
You can change the host channel/D.S.T. (Daylight Saving Time)/
time zone setting manually.
NOTE:
The time set previously will be erased when “AUTO CLOCK”, “HOST
CH”, “D.S .T.” or “TIME ZONE” setting is changed.
1 Press SET UP to access the Main Menu screen.
2 Press we to select “INITIAL SET UP”, then press ENTER.
3 Press we to select “CLOCK
SET UP”, then press ENTER.
4 Press rt to select “AUTO
CLOCK”, then press ENTER.
Press rt to select “ON”, then
press ENTER.
5 Press rt to select “HOST
CH”, then press ENTER.
Press rt to select “AUTO” or the
desired PBS channel number, then press ENTER.
NOTE:
Some PBS channels do not transmit clock setting data.
6 Press rt to select “D.S.T.”, then press ENTER. Press rt to
select the desired setting, then press ENTER.
AUTO: Select if you want to adjust your unit’s clock automatically by
the incoming signal from the host channel. Be sure to select the
correct time zone manually in step 7.
ON: Adjustment will be made by the built-in clock itself.
OFF: Select when Daylight Saving Time does not apply to you.
7 Press rt to select “TIME ZONE”, then press ENTER. Press
rt to select “AUTO” or the desired time zone, then press ENTER.
● Each time you press rt, the time zone changes as follows:
{AUTO{ATLANTIC{EASTERN{CENTRAL{
MOUNTAIN{PACIFIC{ALASKA{HAWAII{
(back to the beginning)
rtwe
SET UP
DVD VIDEO SET UP INITIAL SET UPHDD/DVD SET UP
AUTO CLOCK
HOST CH
D. S. T. AUTO
TIME ZONE AUTO
ENTER
SET UP
EXIT
SELECT
FUNCTION SET UP
STB SET UPTUNER SET UP CLOCK SET UP
SELECT WITH [ ] THEN PRESS [ENTER]
PRESS [SET UP] TO EXIT
ON
AUTO
NOTE:
If an incorrect time is displayed by the Plug & Play function, you may be
receiving the clock setting data of a PBS channel from an adjacent time
zone or from an incorrect PBS channel from a cable TV system. If you
selected “AUTO” for the host channel in step 5, be sure to select the
correct time zone manually.
8 Press SET UP to complete the setting.
IMPORTANT:
Turn off the unit after performing Semiauto Clock. “AUTO” will appear
on the front display panel while the clock is being set. The current
clock time will appear automatically when the clock setting is
complete.
Auto Daylight Saving Time
This function enables automatic adjustment of the unit’s clock at
the start and end of Daylight Saving Time.
With Auto DST activated, —
— on the first Sunday of April at 2:00 AM, the clock is adjusted
to 3:00 AM.
— on the last Sunday of October at 2:00 AM, the clock is
adjusted to 1:00 AM.
NOTE:
Timer recording may not function correctly at the time Daylight
Saving Time is adjusted.
Manual Clock Set
1 Press SET UP to access the Main Menu screen.
2 Press we to select “INITIAL SET UP”, then press ENTER.
3 Press we to select “CLOCK
SET UP”, then press ENTER.
4 Press rt to select “AUTO
CLOCK”, then press ENTER.
Press rt to select “OFF”, then
press ENTER.
5 Press rt to select “TIME”,
then press ENTER. Press rt
until the desired time appears,
then press ENTER to start clock.
● Set the date and year in the same
way.
● Holding rt changes the time in 30-minute intervals, or changes the
date in 15-day intervals.
6 Press rt to select “D.S. T.”, then press ENTER. Press rt to
select the desired setting, then press ENTER.
ON: Adjustment will be made by the built-in clock itself.
OFF: Select when Daylight Saving Time does not apply to you.
7 Press SET UP to complete the setting.
DVD VIDEO SET UP INITIAL SET UPHDD/DVD SET UP
AUTO CLOCK
HOST CH
D. S. T. AUTO
TIME ZONE AUTO
ENTER
SET UP
EXIT
SELECT
DVD VIDEO SET UP INITIAL SET UPHDD/DVD SET UP
AUTO CLOCK
TIME
DATE 1/1(THU)
YEAR 2004
D. S. T. ON
ENTER
SET UP
EXIT
SELECT
FUNCTION SET UP
STB SET UPTUNER SET UP CLOCK SET UP
SELECT WITH [ ] THEN PRESS [ENTER]
PRESS [SET UP] TO EXIT
FUNCTION SET UP
STB SET UPTUNER SET UP CLOCK SET UP
SELECT WITH [ ] THEN PRESS [ENTER]
PRESS [SET UP] TO EXIT
ON
AUTO
OFF
- - : - -
INITIAL SETTINGS
EN 23
Tuner Set
● Turn on the unit.
● Turn on the TV and select the AV mode.
● Slide the TV/CABLE/DBS/DVD switch to DVD.
ENTER
rtwe
SET UP
CABLE/DBS
Manual Channel Set
You can add the channels you want or delete the channels you do
not want manually.
1 Press SET UP to access the Main Menu screen.
2 Press we to select “INITIAL SET UP”, then press ENTER.
3 Press we to select “TUNER SET UP”, then press ENTER.
DVDTV
4 Press rt to select “MANUAL CH SET”, then press ENTER.
5 Add or skip the desired channels.
To add channels
A Press rt to select “CH”, then
press ENTER.
B Press rt to select a channel
number you want to add, then
press ENTER.
C Press rt to select “ADD/SKIP”,
then press ENTER.
D Press rt to select “ADD”, then press ENTER.
E Repeat B – D to add other channels.
To skip channels
A Press rt to select “CH”, then press ENTER.
B Press rt to select a channel number you want to skip, then
press ENTER.
C Press rt to select “ADD/SKIP”, then press ENTER.
D Press rt to select “SKIP”, then press ENTER.
E Repeat B – D to skip other channels.
INITIAL SET UP > MANUAL CH SET
BAND
CH
ADD/SKIP ADD
ENTER
SET UP
EXIT
SELECT
SELECT WITH [ ] THEN PRESS [ENTER]
PRESS [SET UP] TO EXIT
CATV
RETURN
1
6 Press SET UP to complete the setting.
INFORMATION
The unit selects the correct band (TV or CATV) automatically
during Auto Channel Set. The selected band will be displayed on
the right side of “BAND” on the Tuner Set screen.
Auto Channel Set
Perform Auto Channel Set only if channels have not been set
correctly by the Plug&Play setting.
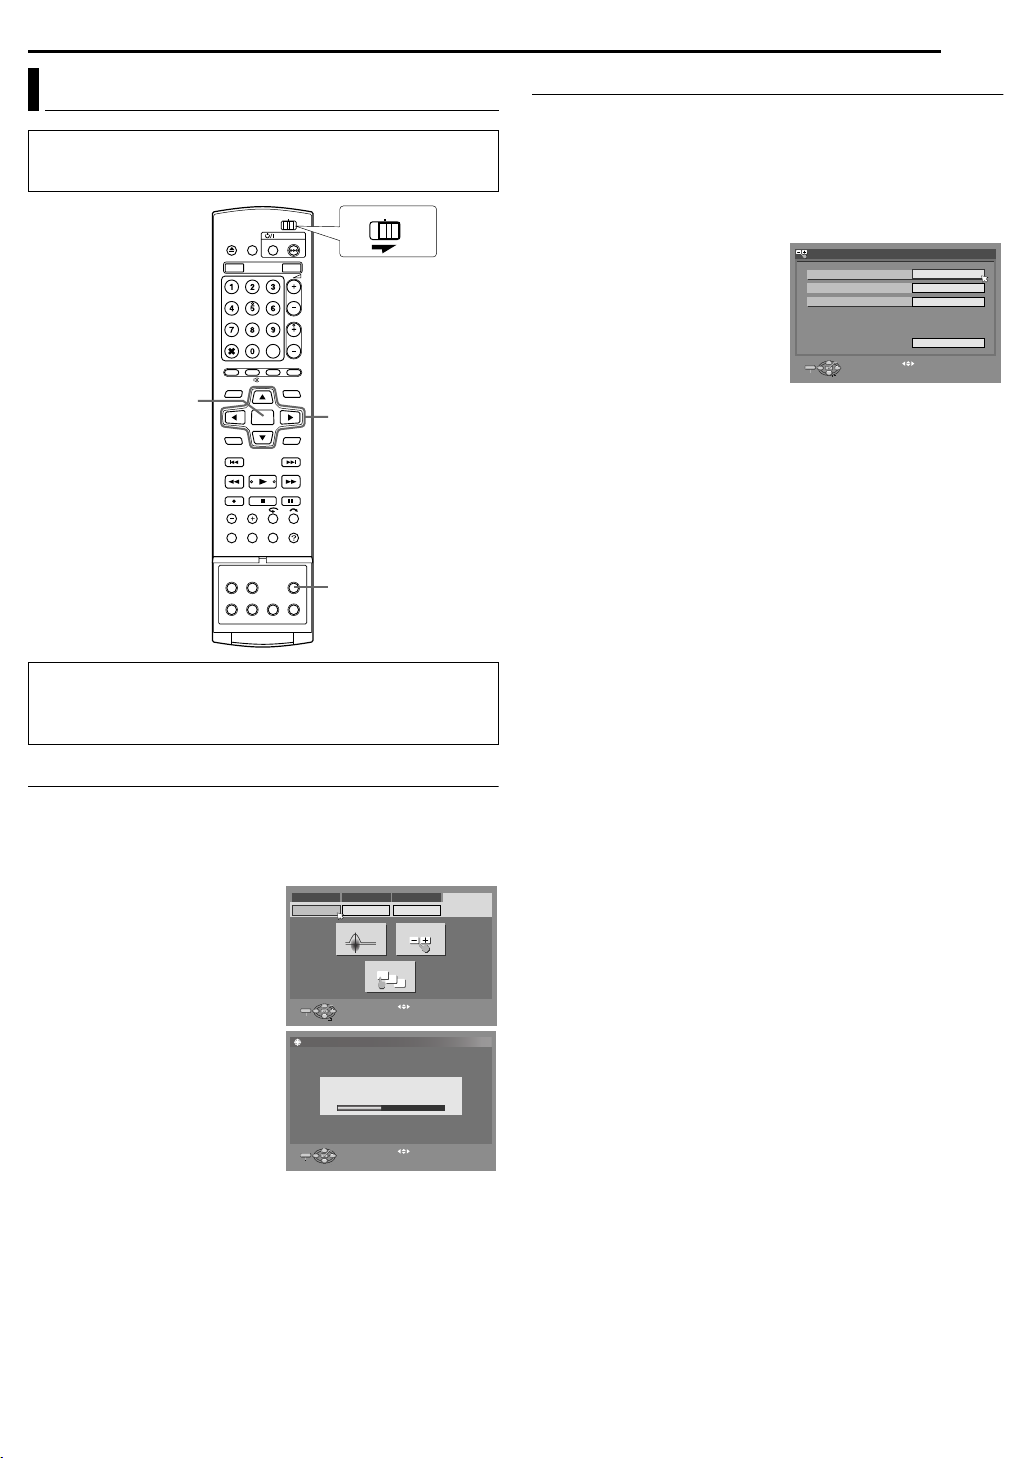
1 Press SET UP to access the Main Menu screen.
2 Press we to select “INITIAL SET UP”, then press ENTER.
3 Press we to select “TUNER
SET UP”, then press ENTER.
4 Press rt to select “AUTO CH
SET”, then press ENTER. You can
automatically set the receivable
channels in your area in the order
of their frequencies.
● When Auto Channel Set is
complete, “SCAN COMPLETED”
appears on the TV screen.
● If the scan was unsuccessful,
“SCAN COMPLETED–NO SIGNAL–” appears on screen. Check the
connections and start again.
5 Press SET UP to complete the setting.
DVD VIDEO SET UP INITIAL SET UPFUNCTION SET UPHDD/DVD SET UP
STB SET UP
TUNER SET UP CLOCK SET UP
AUTO CH SET
MANUAL CH SET
GUIDE CH SET
11
12
13
ENTER
SET UP
SET UP
EXIT
SELECT
INITIAL SET UP > AUTO CH SET
AUTO CHANNEL SET SCANNING
ENTER
EXIT
SELECT
SELECT WITH [ ] THEN PRESS [ENTER]
PRESS [SET UP] TO EXIT
SELECT WITH [ ] THEN PRESS [ENTER]
PRESS [SET UP] TO EXIT
24 EN
INITIAL SETTINGS
Cable Box and/or DBS Receiver Control Setting
The following procedure is required if you receive your TV
channels through a cable box (descrambler) and/or if you receive
satellite channels through DBS (Direct Broadcast Satellite)
receiver. The Controller allows the unit to automatically switch the
cable box and/or DBS receiver’s channels during timer recording.
NOTES:
● The Controller is effective for “VCR Plus+® Timer Programing”
(墌 pg. 46), or “Manual Timer Programing” (墌 pg. 48).
● When connecting your cable box, refer to its instruction manual.
Installing Controller
1 If both a cable box and a DBS receiver are used, position the
Controller so its signal reaches the receiving windows of both the
cable box and DBS receiver.
2 Fix securely using the adhesive strip attached on the back of the
Controller.
Cable box or DBS receiver
If your cable box or DBS receiver does not have audio/video
output connectors
Connect the RF output connector on the cable box or DBS receiver
to the ANTENNA IN connector on the rear of your unit.
If your cable box or DBS receiver has audio/video output
connectors
Connect the audio/video output connectors on the cable box or
DBS receiver to the AUDIO/VIDEO INPUT connectors on the rear
of the unit.
● If both a cable box and a DBS receiver are used, it is recommended
that you connect the DBS receiver to your unit’s AUDIO/VIDEO
INPUT connectors and the cable box to your unit’s ANTENNA IN
connector.
4 Connect the Controller to the CABLE BOX connector on the rear
panel.
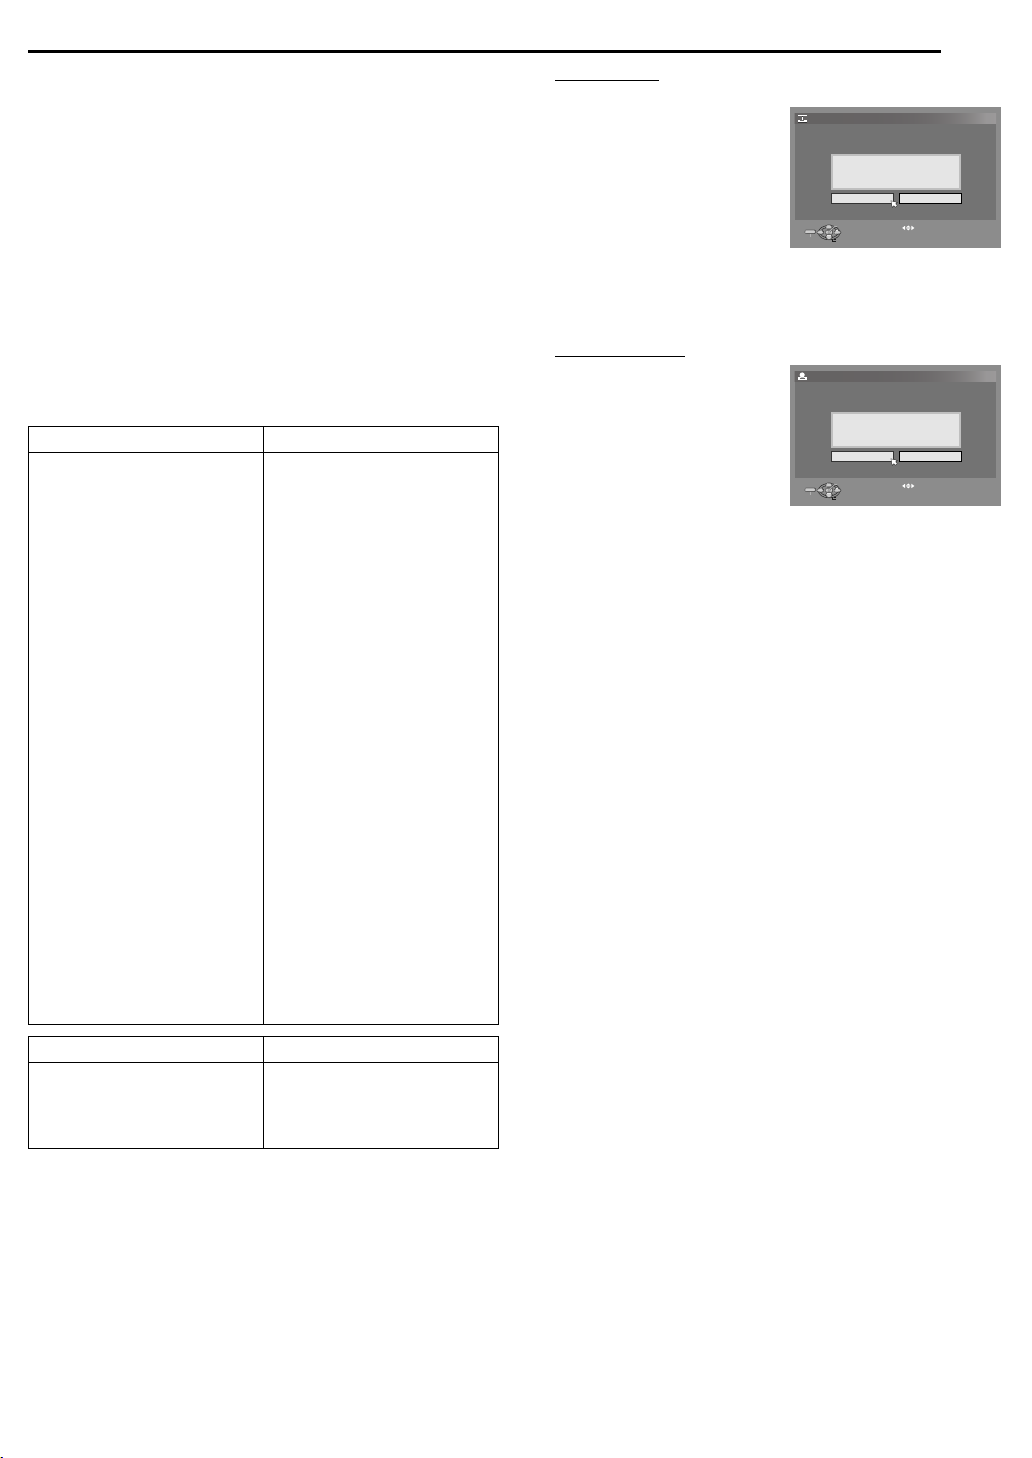
Setting Brand And Channel
After installation, set the cable box and/or DBS receiver’s brand
and channels correctly; otherwise, the Controller cannot work
correctly.
● Turn on the unit.
● Turn on the TV and select the AV mode.
● Slide the TV/CABLE/DBS/DVD switch to DVD.
CABLE/DBS
DVDTV
Your unit
3 Connect the controller to the unit.
a
Cable box or DBS receiver
To RF output To Audio/video
Transmitter
Controller
To ANTENNA IN
Your unit
Controller
(suggested locations)
CABLE
BOX
output
or
To AUDIO/
VIDEO INPUT
ENTER
rtwe
SET UP
1 Turn on the cable box and/or DBS receiver.
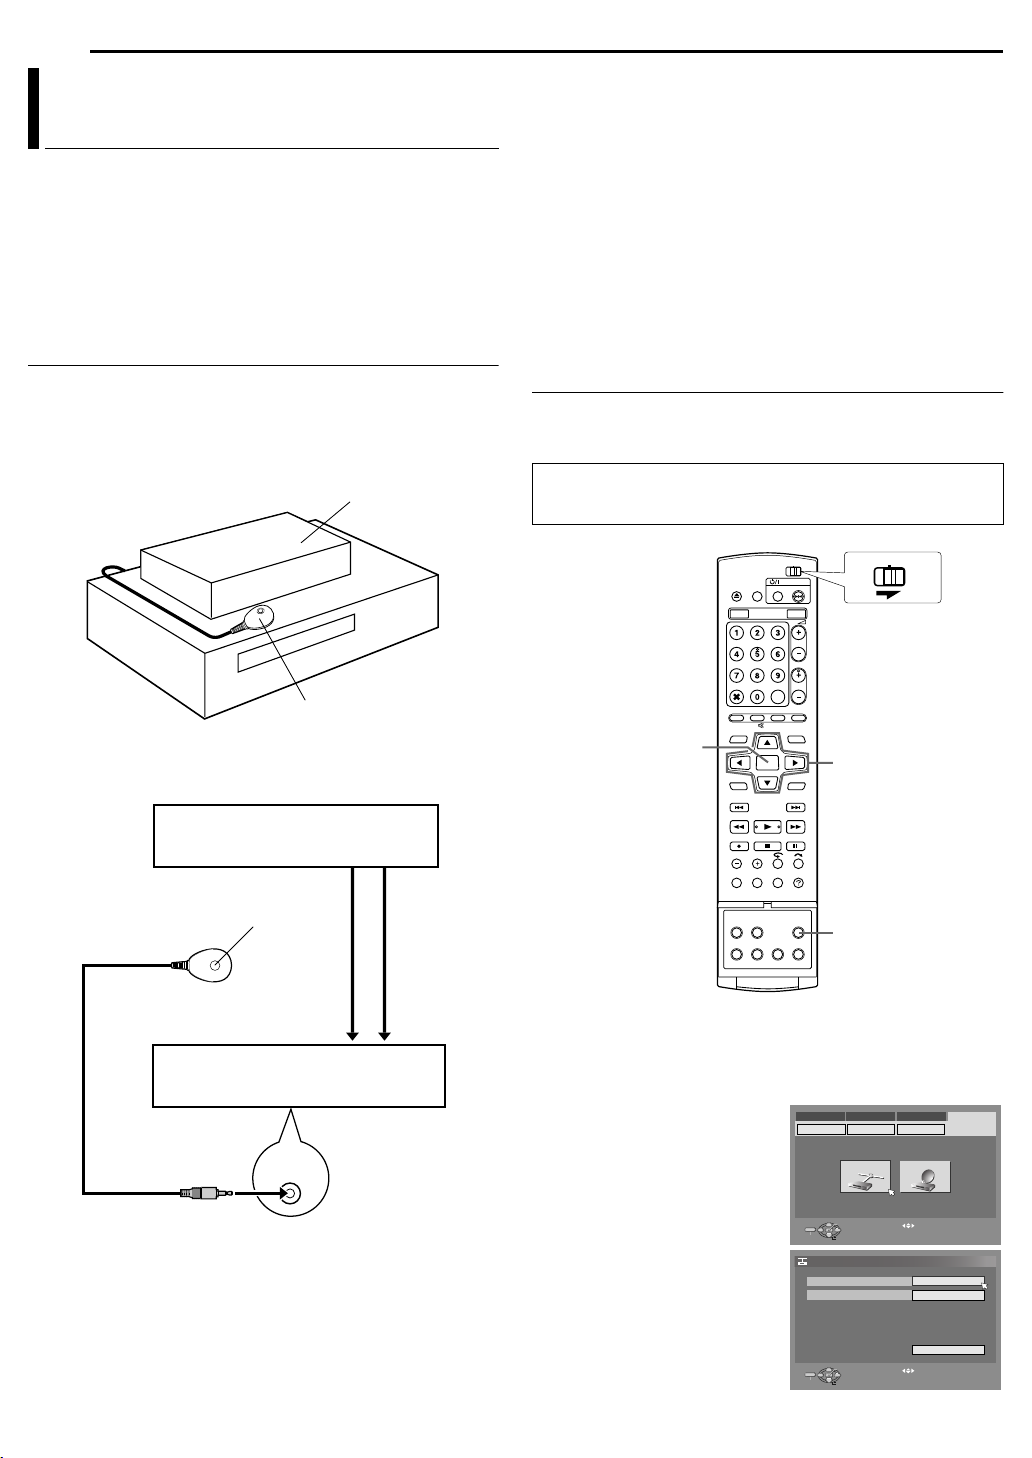
2 Press SET UP to access the Main Menu screen.
3 Press we to select “INITIAL SET UP”, then press t.
4 Press we to select “STB SET UP”, then press t.
5 Press rt to select “CABLE
BOX SET” or “DBS RECEIVER
SET”, then press ENTER.
6 Press rt to select “CABLE
BOX OUTPUT CH” or “DBS
RECEIVER OUTPUT CH”, then
press ENTER.
DVD VIDEO SET UP INITIAL SET UPFUNCTION SET UPHDD/DVD SET UP
STB SET UP
TUNER SET UP CLOCK SET UP
CABLE BOX SET DBS REC VER SET
ENTER
SET UP
SELECT WITH [ ] THEN PRESS [ENTER]
PRESS [SET UP] TO EXIT
EXIT
SELECT
INITIAL SET UP > CABLE BOX SET
CABLE BOX OUTPUT CH
CABLE BOX BRAND
OFF
1
SET UP
ENTER
EXIT
SELECT
TEST MODE
SELECT WITH [ ] THEN PRESS [ENTER]
PRESS [SET UP] TO EXIT
7 Select the output channel.
Your selection depends on how the cable box and/or DBS receiver
is connected to your unit.
● If the cable box or DBS receiver is connected to your unit’s
ANTENNA IN connector on the rear panel, press rt to select the
channel number representing the cable box’s output (CH2 – CH9),
then press ENTER.
● If the cable box or DBS receiver is connected to your unit’s
AUDIO/VIDEO Input connectors on the front panel, press rt to
select “F-1”, then press ENTER.
● If the cable box or DBS receiver is connected to your unit’s
AUDIO/VIDEO INPUT connectors on the rear panel, press rt to
select “L-1” or “L-2”, then press ENTER.
● If you do not use a cable box or DBS receiver, press rt to select
“OFF”, then press ENTER.
8 Press rt to select “CABLE BOX BRAND” or “DBS RECEIVER
BRAND”, then press ENTER. Press rt to select the brand code
from the following list, then press ENTER.
9 Press rt to select “TEST MODE”, then press ENTER.
CABLE BOX BRAND CODE
ARCHER
CABLETENNA
CABLEVIEW
CITIZEN
CURTIS
DIAMOND
GC BRAND
GEMINI
GENERAL INSTRUMENTS
HAMLIN
JASCO
JERROLD
NOVAVISION
OAK
PANASONIC
PULSER
RCA
REGAL
REMBRANDT
SAMSUNG
SCIENTIFIC ATLANTA
SIGMA
SL MARX
SPRUCER
STARGATE
TELEVIEW
TOCOM
UNIKA
UNIVERSAL
VIDEOWAY
ZENITH
DBS RECEIVER BRAND CODE
JVC (DISH Network)
ECHOSTAR (DISH Network)
SONY (DSS)
RCA (DSS)
1, 5, 17
1, 17
15, 16, 17, 21, 25
15, 16, 17, 21, 25
2, 8
1, 17
15, 16, 17, 21, 25
15
1, 4, 6, 11, 12, 15, 28
10, 18, 23
15
1, 4, 6, 11, 12, 15, 28
2, 8
7, 20
13, 14
15, 16, 17, 21, 25
13, 14
10, 18, 23
1, 16, 17
5, 16, 24
2, 8
7, 20
5, 16, 17, 24, 25
13, 14
5, 15, 16, 17, 21, 24, 25
5, 16, 24
1, 4, 16
1, 17
16, 17, 25
3, 9, 22
3, 9, 22
51
51
41
40
INITIAL SETTINGS
EN 25
8 For cable box
If the cable box’s channel changes to 9, setting is complete.
Press ENTER and “CABLE BOX
CONTROL IS ON” appears on the
INITIAL SET UP > CABLE BOX SET
screen for about 5 seconds, then
the screen in step 5 appears.
If the cable box’s channel does
not change to 9;
A Press we to select “NO”, then
press ENTER.
DID YOUR CABLE BOX CHANGE TO CHANNEL 09?
ENTER
SET UP
EXIT
SELECT
SELECT WITH [ ] THEN PRESS [ENTER]
PRESS [SET UP] TO EXIT
N OYES
B Repeat steps 8 – 9 until the cable box’s channel changes to 9
by entering another code.
C If the channel does not change after going through all the code
numbers listed for your model of cable box, then try all the other
numbers.
8 For DBS receiver
If the DBS receiver’s channel
changes to the channel listed
INITIAL SET UP > DBS RECEIVER SET
below for your brand, setting is
complete.
Press ENTER and “DBS
RECEIVER CONTROL IS ON”
appears on the screen for about 5
seconds, then press ENTER. The
screen in step 5 appears.
DID YOUR DBS BOX CHANGE TO CHANNEL 100?
ENTER
SET UP
EXIT
SELECT
SELECT WITH [ ] THEN PRESS [ENTER]
PRESS [SET UP] TO EXIT
N OYES
JVC ] 100 SONY ] 205
ECHOSTAR ] 100 RCA ] 205
If the DBS receiver’s channel does not change as shown
above;
A Press we to select “NO”, then press ENTER.
B Repeat steps 8 – 9.
NOTES:
● The Controller may not work with all types of cable box or DBS
receiver.
● If your cable box does not respond to any code between 1 and 28,
you cannot use the Controller to change cable box channels. In this
case, make sure to leave the cable box turned on and tuned to the
proper channel before the scheduled start time of timer recording.
Contact your cable company about the possibility of exchanging your
current cable box with the one compatible with your unit.
● If your DBS receiver does not respond to the code, you cannot use
the Controller to change satellite channels. In this case, make sure to
leave the DBS receiver turned on and tuned to the proper channel
before the scheduled start time of timer recording.
● The unit can only change the cable box or satellite channel through
the Controller during timer recording.
● If your cable box and/or DBS receiver cannot be operated with a
remote control (because it has no receiving window), you cannot use
the Controller to change its channels. Make sure to leave the cable
box and/or DBS receiver turned on and tuned to the proper channel
before the scheduled start time of timer recording.
● If the unit’s memory backup expires because of a power failure, set
the cable box and/or DBS receiver output channels and brands
again.
● For customers in U.S.A.: If you are unable to set the Controller,
contact JVC toll free at 1-800-252-5722.
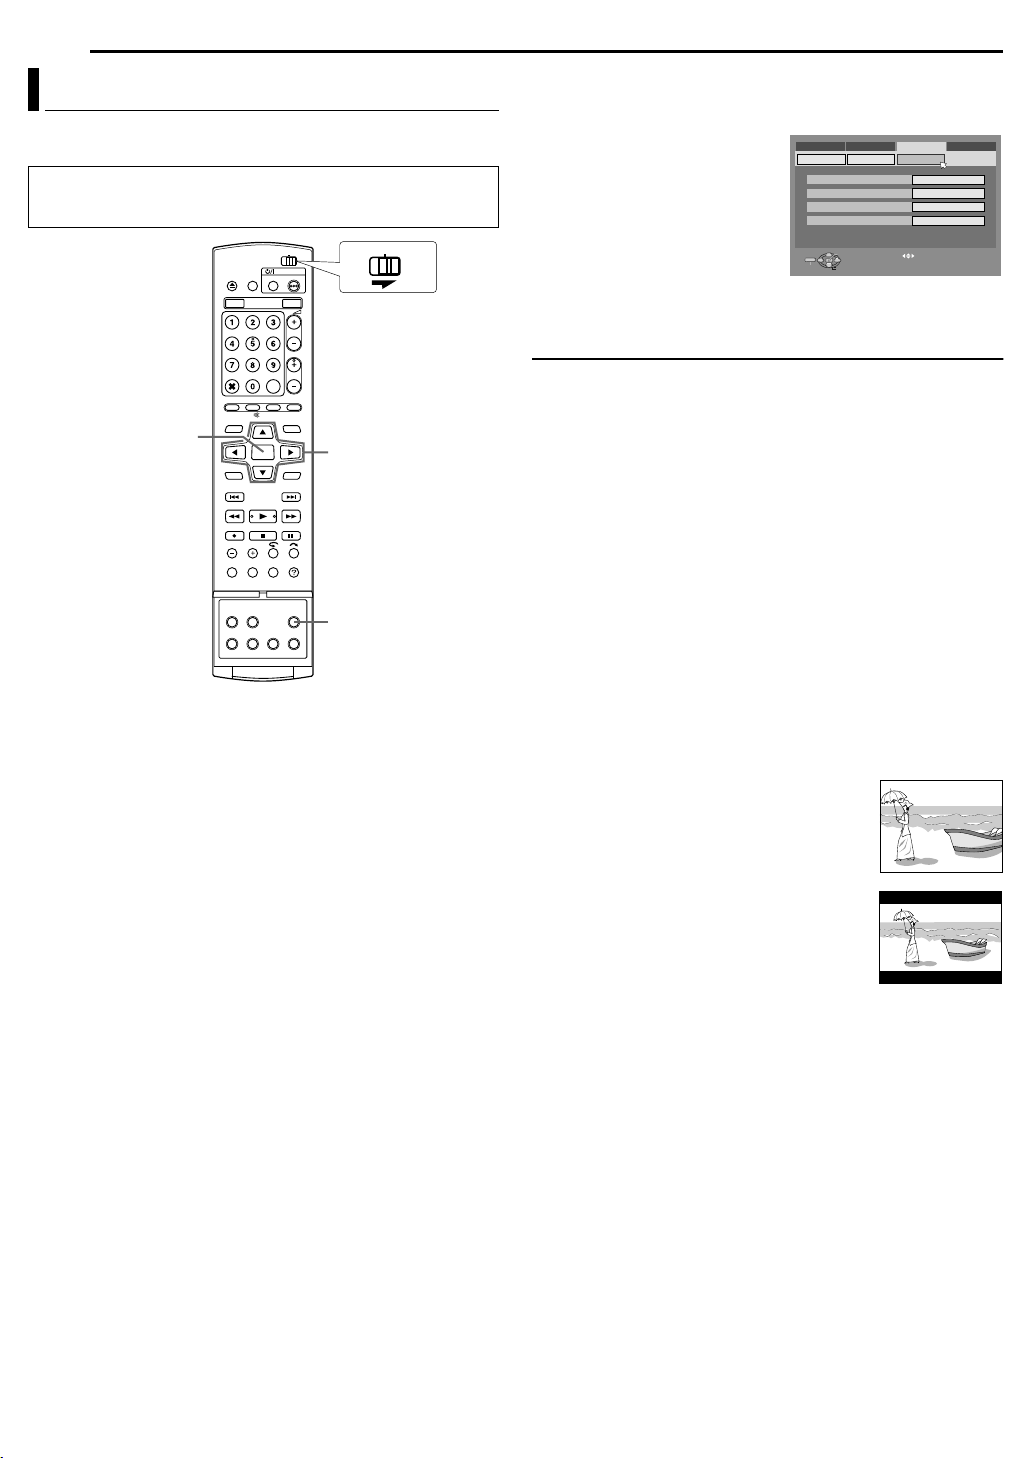
26 EN
INITIAL SETTINGS
Monitor Set
You can select the monitor type depending on the TV used when
you play back DVD VIDEO discs recorded for wide-screen TVs.
● Turn on the unit.
● Turn on the TV and select the AV mode.
● Slide the TV/CABLE/DBS/DVD switch to DVD.
CABLE/DBS
DVDTV
ENTER
rtwe
SET UP
1 Press SET UP to access the Main Menu screen.
● You cannot set the monitor type during recording or playback.
2 Press we to select “FUNCTION SET UP”, then press t.
3 Press we to select “VIDEO IN/
OUT”, then press t.
4 Press rt to select “MONITOR
TYPE”, then press ENTER.
5 Press rt to select the desired
option, then press ENTER.
6 Press SET UP to complete the
setting.
*The boldface settings below indicate the settings at your
purchase.
8 MONITOR TYPE — 4:3LB / 4:3PS / 16:9 AUTO / 16:9 FIX
4:3LB (Letter Box conversion): Select this when the aspect ratio of
your TV is 4:3 (conventional TV). While viewing a wide screen
picture, the black bars appear on the top and the bottom of the
screen.
4:3PS (Pan&Scan): Select this when the aspect ratio of your TV is
4:3 (conventional TV). While viewing a wide screen picture, the
black bars do not appear; however, the left and right edges of the
pictures will not be shown on the screen.
16:9 AUTO (Wide television conversion): Select this when the
aspect ratio of your TV is 16:9 (wide TV).
16:9 FIX (Wide television conversion): Select this when the aspect
ratio of your TV is fixed to 16:9 (wide TV). The unit automatically
adjusts the screen width of the output signal correctly when
playing back a picture whose aspect ratio is 4:3.
DVD VIDEO SET UP INITIAL SET UPHDD/DVD SET UP
MONITOR TYPE
F-1 INPUT
L-1 INPUT VEDIO
L-2 INPUT VEDIO
ENTER
SET UP
EXIT
SELECT
FUNCTION SET UP
DISPLAY SETRECORD/PLAY VIDEO IN/OUT
SELECT WITH [ ] THEN PRESS [ENTER]
PRESS [SET UP] TO EXIT
4:3LB
VEDIO
Pan&Scan/Letter Box
In general, DVD VIDEO disc are produced for a wide-screen TV
with 16:9 aspect ratio.
Material with this ratio will not fit to a TV with 4:3 aspect ratio.
There are two styles to display the image, “Pan&Scan” (PS) and
“Letter Box” (LB).
Pan&Scan
The right and left side of the image are cut off.
The image fills the screen.
● The picture will be shown in the “4:3LB” mode
depending on the disc even if the “4:3PS” mode
is selected.
Letter Box
Black bands appear at the top and bottom of
the image. The image itself appears in 16:9
aspect ratio.

Basic Playback
A
● Turn on the unit.
● Turn on the TV and select the AV mode.
● Slide the TV/CABLE/DBS/DVD switch to DVD.
x
ENTER
SELECT
x
4
8
DVD
9
4
8
9
CABLE/DBS
BASIC OPERATIONS ON DVD DECK
EN 27
To play back an MP3/JPEG disc, see “Playback With MP3/WMA/
JPEG Navigation” (墌 pg. 57).
1 Load a disc.
● For details, refer to “Placing A Disc” (墌 pg. 10).
● Pressing 4 also closes the disc tray.
● Playback begins automatically if an auto-playback DVD disc is
loaded.
2 Press DVD so that the DVD lamp lights up on the unit.
3 Press 4 to start playback.
DVD
DVDTV
● If you load a DVD disc whose region code does not match the unit,
“REGION CODE ERROR” appears on the TV screen. For details,
refer to “Region Number” (墌 pg. 8).
● If “CAN NOT PLAY BACK DISC UNDER CURRENT SETTING”
appears on the TV screen, refer to “Parental Lock” (墌 pg. 36).
● With Video CD/SVCD discs with PBC control or some DVD discs, the
menu display may appear on the TV screen after starting playback. In
this case, select an item which you want to play back from the menu.
Otherwise, the playback cannot go forward. Refer to “Playback
Control (PBC) Function” (墌 pg. 31) or “Locating A Desired Scene
Using The DVD Menu” (墌 pg. 28).
● The Library Database Navigation also enables you to search and
select the desired titles. (墌 pg. 52)
4 Press 9 to pause playback.
● To resume normal playback, press 4.
5 Press 8 to stop playback.
● When a recordable disc is played, playback stops and a program
received with the unit’s tuner resumes on the TV screen.
● When a playback-only disc is played, playback stops and the still
image at the time you press 8 remains on the TV screen. Pressing 8
again resumes a program received with the unit’s tuner.
● If x is pressed during playback, playback stops, then the disc tray
opens.
NOTES:
● When the Library Database Navigation screen appears, choose a
thumbnail image of the desired title on the TV screen, then press
SELECT(4) or ENTER. (墌 pg. 52)
● It is not possible to playback the DVD disc recorded in 96 kHz on
DVD during recording or Live Memory Playback on HDD.
TTENTION:
● It takes approximately 30 seconds to read a disc depending on the
type and condition of the disc since this unit is multi-disc
compatible (DVD-RAM, DVD-RW, DVD-R). It may even take
several minutes when a disc is dirty, scratched or warped.
● It may take a few seconds to start playback. This is not a
malfunction.
● Forward/reverse high-speed search and other operations cannot
be performed while playback is stopped.
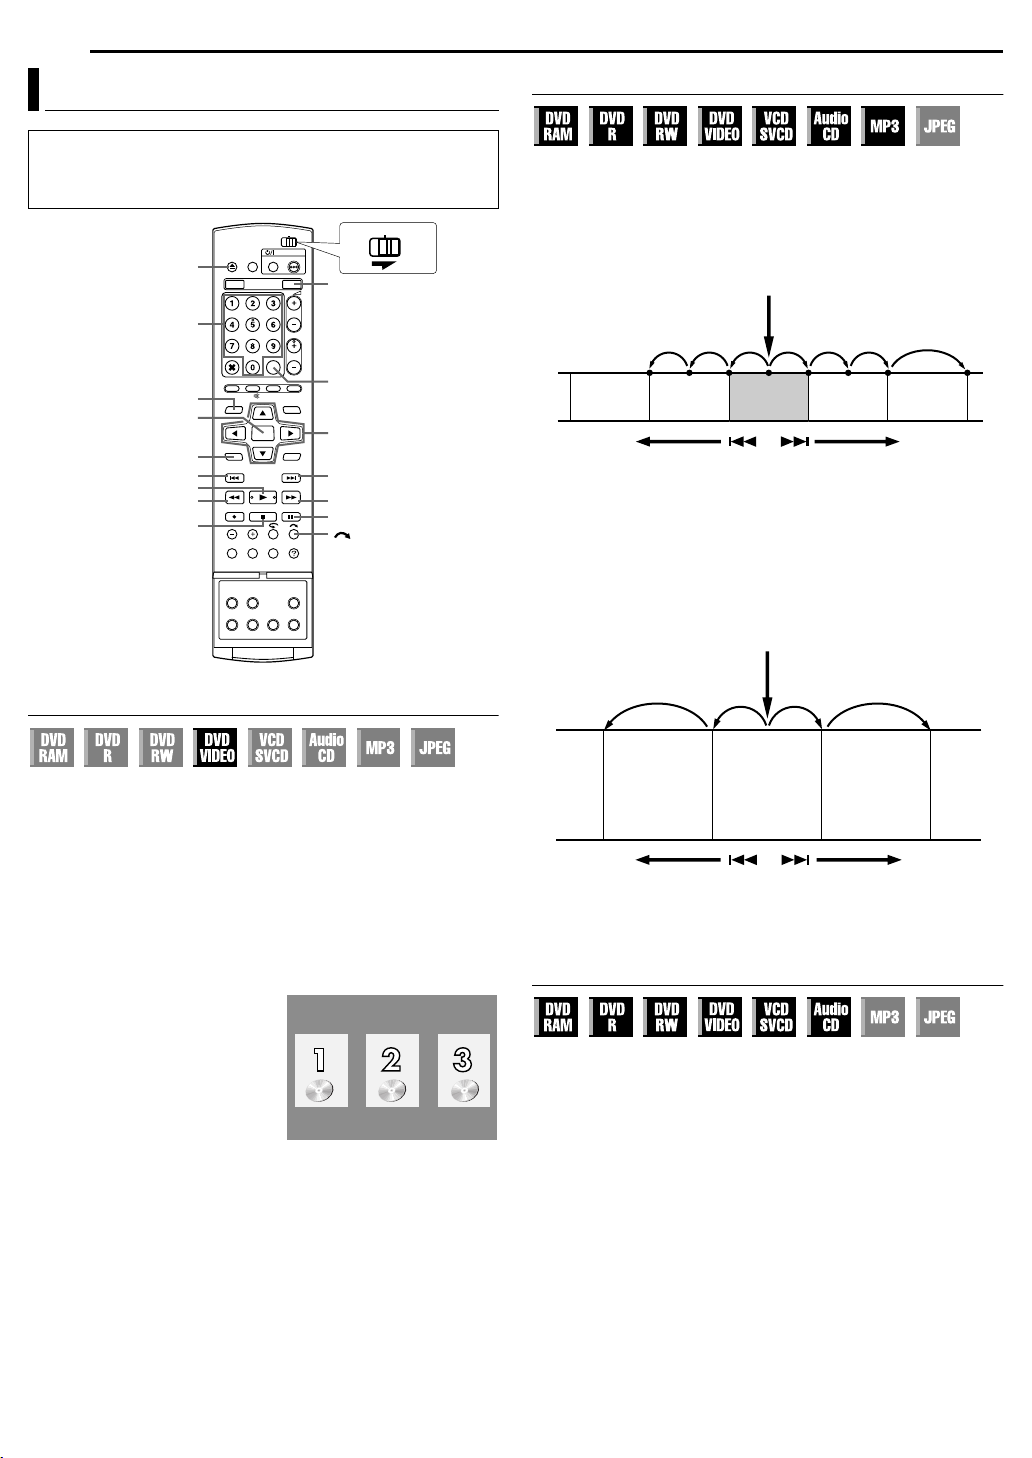
28 EN
BASIC OPERATIONS ON DVD DECK
Playback Features
● Turn on the unit.
● Turn on the TV and select the AV mode.
● Slide the TV/CABLE/DBS/DVD switch to DVD.
● Press DVD so that the DVD lamp lights up on the unit.
CABLE/DBS
0-9
TOP MENU
ENTER
MENU
2
x
4
-
8
DVD
MARK
rtwe
6
5/SLOW + 3/SLOW
9
Locating The Start Point Of The Item Or Skip The Item
Press 2 or 6 during playback.
● Pressing 6 locates the start point of the item or skips the item for
forward direction, then resumes playback.
● Pressing 2 locates the start point of the item or skips the item for
DVDTV
reverse direction, then resumes playback.
When a DVD-RAM/RW/R disc is played
Current program
News
Reverse Forward
Previous
program
●: marked points (墌 pg. 29)
Drama
Next
program
Movie
Example:
To locate the beginning of the next item, press 6 once.
To locate the beginning of the current item, press 2 once.
To locate the beginning of the previous item, press 2 three
times.
When a DVD VIDEO, Audio CD or Video CD/SVCD disc is
played
Playba ck point
Locating A Desired Scene Using The DVD Menu
DVD VIDEO discs may have top menu and disc menu.
Top m e nu
DVD discs generally have their own menus which show the disc
contents. These menus contain various items such as titles of a
movie, names of songs, or artist information. You can locate a
desired scene by using the top menu displayed on the TV screen.
Press TOP MENU to access the top menu.
Disc menu
Disc menus include playback data (angle menu, subtitle menu,
etc.) specific to each title.
Press MENU to access the disc menu.
1 Press TOP MENU or MENU to
access the DVD menu.
2 Press rt w e to select a
desired title, then press ENTER.
Playback starts.
● It may be possible to select the
desired item using the number
keys depending on the menu
display.
NOTE:
When “X” appears on the TV screen
in step 1, the disc does not have a top menu or disc menu.
Example:
Scene 2
(Chapter 2)
or
Tra c k 2
Reverse Forward
Scene 3
(Chapter 3)
or
Tra c k 3
Scene 4
(Chapter 4)
or
Track 4
Example:
To locate the beginning of the next item, press 6 once.
To locate the beginning of the current item, press 2 once.
High-Speed Search
During playback, press 5 for forward high-speed search, or 3
for reverse high-speed search.
● Each press of the button increases the search speed for each
direction.
● To resume normal playback, press 4.
For Audio CD
You can perform 4 levels of speed search with 5 and 3.
(Audio is active also during high-speed search.) You cannot
perform slow motion for each direction.

Still Picture/Frame-By-Frame Playback
1 Press 9 to pause during playback.
2 Press SLOW – (3) or SLOW + (5) to activate frame-by-
frame playback.
● Each press of SLOW – (3) or SLOW + (5) advances/reverses
the still picture frame by frame.
● Frame-by-frame playback for reverse direction cannot be performed
with Video CD/SVCD discs.
● To resume normal playback, press 4.
Slow Motion
1 Press 9 to pause during playback.
2 Press SLOW – (3) or SLOW + (5) for 2 or more seconds.
● Each press of SLOW – (3) or SLOW + (5) increases the slow
motion speed for each direction (from 1/16 to 1/2 times the normal
speed).
● Slow motion for reverse direction cannot be performed with Video
CD/SVCD discs.
Skip Search
During playback, press .
● Each press initiates an approximately 30-second period of fastmotion playback. Normal playback resumes automatically.
Resume Function
It is possible to memorize the position where you stop playback
and resume playback from that position.
● Be sure to set “RESUME” to “ON” or “DISC RESUME”. (墌 pg. 68)
1 Press 8 during playback to memorize a resume point.
● The unit enters Resume Stop mode and memorizes the position
where you have stopped playback as a resume point. (The inside of
the disc status indicator on the front display panel blinks while
memorising.)
● The unit retains a memory of the resume points of the last 30 discs
played back, even though they have been ejected if “RESUME” is set
to “DISC RESUME”. (墌 pg. 68)
● To clear the resume points:
(The inside of the disc status indicator stops blinking and lights.)
When “RESUME” is set to “ON”:
• Press 1 to turn off the unit.
• Press x to take out the disc.
• Press 8 in stop mode.
• Press TOP M ENU to display the top menu, then start playback by
selecting an item, etc.
• Press MENU to display the disc menu, then start playback by selecting
an item, etc.
When “RESUME” is set to “DISC RESUME”:
• Set “RESUME” to “OFF”. (墌 pg. 68)
• Press 8 in stop mode.
• Press TOP M ENU to display the top menu, then start playback by
selecting an item, etc.
• Press MENU to display the disc menu, then start playback by selecting
an item, etc.
2 Press 4 in stop mode to resume playback. The unit starts
playback from the resume point.
BASIC OPERATIONS ON DVD DECK
EN 29
NOTES:
● “DISC RESUME” setting works on DVD VIDEO, VCD, SVCD and
already finalized DVD-R/DVD-RW (video mode) discs. For other
types of discs, the function under “ON” setting will be applied even if
“RESUME” is set to “DISC RESUME”. (墌 pg. 68)
● If you stop the playback of a disc for which a resume point has
already been memorized, the memory will be updated with the new
resume point.
● After the unit has memorized the resume points for 30 discs,
remembering a new resume point will cause the unit to delete the
oldest memorized point. Stopping playback of a disc for which a
resume point is already stored may change the order in which the
points are stored. This may potentially change the order in which
points are deleted.
● When the unit memorizes a resume point for a disc, it also
remembers audio language, subtitle and angle settings.
● This function may not work for some Video CD/SVCDs.
● When “RESUME” is changed to “ON” or “OFF” (墌 pg. 68), resume
points of the discs memorized with “RESUME” set to “DISC
RESUME” will be cleared.
● Resume points are memorized for each side of a double-sided disc.
● When you switch to HDD during playing back CD, playback stops.
The Resume Function doesn’t work, when you switch to DVD after
that to playback the disc.
Marking Positions To Play Back Again Later
It is possible to mark positions (up to 999 points) where you want to
play back once again later, and start playback from a marked
position. Marking onto DVD-RAM/RW/R discs when recording is
helpful to locate a start point when you play back the discs later.
To mark positions:
During playback, press MARK at
positions you want to mark.
● “MARK” appears on the TV screen.
You can easily locate the marked
positions using 2 or 6 when you
play back the disc.
To delete the marked positions:
While paused, press 2 or 6 to
locate a marked position you want to
delete, then press MARK.
● Crossed “MARK” appears on the TV
screen, and the marked position is
deleted.
NOTES:
● When a monaural program changes to a stereo program while
recording, a mark signal is automatically recorded.
● When a DVD-R/RW (Video mode) disc is finalized, marked points
marked before finalizing will be deleted, and programs will be divided
automatically into “chapters” approximately every 5 minutes.
(墌 pg. 72)

30 EN
BASIC OPERATIONS ON DVD DECK
CABLE/DBS
DVDTV
DVD
0-9
TOP MENU
ENTER
MENU
PREVIOUS
4
8
DISPLAY
AUDIO
rtwe
RETURN
NEXT
SET UP
ANGLESUBTITLE
Checking The Time Information
You can check time information of a disc on the front display panel
and the TV screen.
Each press of DISPLAY changes the display as follows:
8 DVD-RAM/DVD-R/DVD-RW
During recording
Clock time (front display panel only) ] Current title elapsed time
] Disc remaining time* ] (back to the beginning)
* only discs before finalizing
● Clock time is displayed only when a recordable disc is played back.
During playback
Each title elapsed time ] Current title elapsed time ]
Disc remaining time* ] (back to the beginning)
* only discs before finalizing
In stop mode or during playback
● In FR mode, it is possible to set recording time in detail using we.
(墌 pg. 39)
● It is not possible to switch the recording mode during playback or
while recording.
8 DVD VIDEO/Video CD/SVCD/Audio CD
During playback
Current track elapsed time ] Current track remaining time ] Tota l
elapsed time ] Total remaining time ] (back to the beginning)
In stop mode
0:00 ] Playback time of track 1 ] 0:00 ] Total length of a disc ]
(back to the beginning)
NOTE:
When a PBC-compatible Video CD/SVCD disc is loaded, deactivate the
PBC function. (墌 pg. 31)
Angle Selection
You can enjoy a variety of scene angles if a DVD VIDEO disc
contains “multi-angle” parts, where the same scene was shot from
different angles.
If the disc contains “multi-angle” parts, “” appears on the TV
screen at the beginning of the “multi-angle” part.
1 Press ANGLE during playback.
The angle selection display
appears on the TV screen.
2 Press ANGLE or we to select
your desired angle.
● Each time you press ANGLE or
we, the angle changes.
● When “X” appears on the TV screen, the current scene is not
recorded from multiple angles. In addition, some discs prohibit angle
selection.
● To clear the angle selection display, press ENTER. In addition, the
angle selection display disappears automatically if no operation is
done for 10 seconds.
When 3 scene angles are
contained.
Subtitle Selection
Some DVDVIDEO discs contain more than one subtitle language,
from among which you can choose the desired subtitle language.
“” appears on the TV screen at the beginning of the part where
more than one subtitle language are recorded.
1 Press SUBTITLE during
playback. The subtitle selection
display appears on the TV screen.
● Each time you press SUBTITLE,
the subtitle display is switched on
and off.
When 3 subtitle languages are
contained.
2 Press we to select your desired language.
● To clear the subtitle selection display, press ENTER.
NOTES:
● When “X” appears on the TV screen, no subtitle language is
recorded.
● When the subtitle language won’t be changed with the procedure
above, change the subtitle on a disc menu displayed by pressing
MENU.
ENGLISH

Audio Language/Sound Selection
Some DVDVIDEO discs contain the multiple audio language or
sound. You can select the desired audio language or sound. For
some Video CD/SVCD discs, you can switch the audio channel to
choose Karaoke either with or without the vocal.
1 Press AUDIO during playback.
The Audio Language/Sound
selection display appears.
2 Press AUDIO or we to select
your desired audio language/
sound.
● Each time you press AUDIO or we, the audio language/sound
changes.
● To clear the Audio Language/Sound selection display, press ENTER.
NOTES:
● When “X” appears on the TV screen, no audio language is recorded.
● When the audio language won’t be changed with the procedure
above, change the audio on a disc menu displayed by pressing
MENU.
● It is only possible to select the audio language in stop mode. The
audio language cannot be selected during playback.
When 3 audio languages are
contained.
Audio Channel Selection
When watching bilingual programs or playing discs on which you
recorded bilingual or stereo programs, you can choose the desired
audio channel.
● When “SUPERIMPOSE” is set to “AUTO”, you can confirm on the TV
screen the audio channel you have chosen. (墌 pg. 69)
● Each time you press AUDIO, the audio channel
changes.
TRACK
On-Screen Display
For stereo discs
For audio of left channel
For audio of right channel
NOTE:
It is not possible for DVD-R/DVD-RW (Video mode) disc playback to
switch the audio channel. The audio channel is played back as set in
“VIDEO MODE RECORDING AUDIO” setting. (
USE
墌 pg. 68)
BASIC OPERATIONS ON DVD DECK
When you can’t switch the audio channel of a bilingual
program
When the unit is connected with a digital audio device using an
optional optical cable and “DIGITAL AUDIO OUT” is set to “DOLBY
DIGITAL/PCM”, it is not possible to switch the audio channel of a
bilingual program recorded on a DVD-RAM or DVD-RW (VR mode)
disc. (墌 pg. 66) In this case, perform the following steps using the
remote control to switch “DIGITAL AUDIO OUT” from “DOLBY
DIGITAL/PCM” to “PCM ONLY”.
A Press SET UP to access the Main Menu screen.
B Press we to select “DVD VIDEO SET UP”, then press t.
C Press we to select “AUDIO OUTPUT”, then press t.
D Press rt to select “DIGITAL AUDIO OUT”, then press
ENTER.
E Press rt to select “PCM ONLY”, then press ENTER.
(墌 pg. 67)
F Press SET UP to complete the setting.
G Press AUD IO to select the desired audio channel.
EN 31
Playback Control (PBC) Function
Some Video CD/SVCD discs support the PBC function. PBC is an
abbreviation of “Play Back Control”. A Video CD/SVCD disc
recorded with PBC has its own menus, such as a list of the songs
on the disc. You can locate a specific scene by using the menu.
1 Press 4 in stop mode. The PBC menu appears.
2 Press the number keys to enter the number of the desired
scene. The unit starts playback of the selected item.
● “PBC” appears on the front display panel.
● When “NEXT” or “PREVIOUS” appears on the TV screen:
Pressing NEXT (6) advances to the next page.
Pressing PREVIOUS (2) returns to the previous page.
● You can return to the menu by pressing RETURN.
● The method of the operation is different depending on the disc.
NOTES:
● If you want to playback a PBC-compatible Video CD/SVCD disc
without activating the PBC function, start playback in stop mode by
using the number keys, instead of the 4 button, to choose the track,
then press ENTER.
● To activate the PBC function when a PBC-compatible Video CD/
SVCD disc is being played back without the PBC function, press TOP
MENU, or press 8 then press 4.
To Move Back The Playback Position Slightly (One Touch Replay Function)
You can move back the playback position slightly.
1 Press .
● Each press skips back for approximately 7 seconds and resumes
playback.
● Pressing while paused skips back for approximately 7 seconds and
resumes pause.

32 EN
A
BASIC OPERATIONS ON DVD DECK
Using The On-screen Bar
The on-screen bar allows you to control various playback
functions. Some of the functions operated on Navigation Menu can
be controlled on the On-screen bar.
TTENTION:
The on-screen bar can also be used for the HDD deck.
Be sure to clear Library Database Navigation screen by pressing
NAVIGATION.
CABLE/DBS
DVDTV
CANCEL
ENTER
NAVIGATION
rtwe
A Disc type.
B Select this for Repeat Playback. (墌 pg. 33)
C Select this for A-B Repeat Playback. (墌 pg. 33)
D Select this for search function. (墌 pg. 33)
E Select this for time search function. (墌 pg. 34)
F Select this to switch Simulated Surround Effect function.
(墌 pg. 34)
G Select this for Picture Control function. (墌 pg. 34)
H Select this to switch picture source type. (墌 pg. 35)
I Current status area for the selected item.
J Select this for Program Playback. (墌 pg. 35)
K Select this for Random Playback. (墌 pg. 35)
L Select this to control the switching interval of the slide show.
(墌 pg. 35)
NOTE:
Although examples of the on-screen bar are provided here only for 3
types of discs, the on-screen bar will be displayed for whichever disc
indicated in the left column.
Basic Operation On The On-screen Bar
Example: When selecting Picture Control function of DVD
During playback or while stopped
1 Press ON SCREEN twice to access the on-screen bar. The item
currently selected is highlighted and pointed by H.
TRACK 99 EACH 0:00
3D-ON CINEMA AUTO 1
DVD-
VIDEO
TITLE 99
CLEAR
ON SCREEN
How To Access The On-screen Bar
1 Press ON SCREEN twice whenever a disc is loaded.
Contents of the on-screen bar during playback
DVD VIDEO
TITLE 99
DVD-
VIDEO
Video CD/SVCD
VCD
TRACK 99 EACH 0:00
3D-ON CINEMA AUTO 1
TRACK 99 EACH 0:00
CINEMA
2 Press we to select “”, then press ENTER. The pop-up
window appears under the selected item.
TRACK 99 EACH 0:00
3D-ON CINEMA AUTO 1
DVD-
VIDEO
TITLE 99
3 Press rt to select the desired option, then press ENTER.
TITLE 99
DVD-
VIDEO
To clear the on-screen bar
Press ON SCREEN.
NOTE:
See the corresponding pages for details on each menu item.
TRACK 99 EACH 0:00
3D-ON CINEMA AUTO 1
NORMAL
CINEMA
SHARP
SOFT
JPEG disc
TRACK 99 EACH 179:59GROUP 99
R
5 SEC.
CINEMA

Repeat Playback
You can repeat playback as you like according to the type of disc.
1 Press ON SCREEN twice to access the on-screen bar.
2 Press we to select “”, then press ENTER. The pop-up
window appears under the selected item.
TRACK 99 EACH 0:00
3D-ON CINEMA AUTO 1
DVD-
VIDEO
TITLE 99
3 Press rt repeatedly to select the desired Repeat mode, then
press ENTER.
DVD-RAM/RW/R
OFF: Repeat playback is not performed.
ALL REPEAT: The whole disc is played back repeatedly.
TITLE REPEAT: The current title is played back repeatedly.
DVD VIDEO
OFF: Repeat playback is not performed.
TITLE REPEAT: The current title is played back repeatedly.
CHAPTER REPEAT: The current chapter is played back repeatedly.
Audio CD/Video CD/SVCD/JPEG/MP3
OFF: Repeat playback is not performed.
ALL REPEAT: The whole disc is played back repeatedly.
GROUP REPEAT*: The current group is played back repeatedly.
TRACK REPEAT*: The current track is played back repeatedly.
* “GROUP REPEAT” cannot be selected for Audio CD and Video CD/SVCD
discs.
* “TRACK REPEAT” cannot be selected for JPEG discs.
To clear the on-screen bar
Press ON SCREEN.
To cancel Repeat Playback
Repeat the above procedure from step 1, select “OFF” in step 3,
then press ENTER.
NOTES:
● Repeat Playback is not possible for a Video CD/SVCD with PBC
function.
● Repeat Playback may not work properly depending on the type of the
disc being used.
A-B Repeat Playback
You can repeat the desired part.
During playback
1 Press ON SCREEN twice to access the on-screen bar.
2 Press we to select “”.
3 Press ENTER at the beginning of the desired part you want to
repeat (point A). The elapsed playing time of the point A appears.
TITLE 99
DVD-
VIDEO
AB1 : 25 : 58 : :
4 Press ENTER at the end of the desired part you want to repeat
(point B). The elapsed playing time of the point B appears.
● The selected part of the disc (between point A and B) is played
repeatedly.
TITLE 99
DVD-
VIDEO
TRACK 99 EACH 0:00
3D-ON CINEMA AUTO 1
TRACK 99 EACH 0:00
3D-ON CINEMA AUTO 1
BASIC OPERATIONS ON DVD DECK
To clear the on-screen bar
Press ON SCREEN.
To cancel A-B Repeat Playback
Press we to select “”, then press ENTER.
NOTES:
● A-B Repeat Playback may not work properly depending on the type
of disc being used.
● The subtitles recorded around the A-B point may not appear.
● When the end of the item is reached before the end point is set, the
on-screen bar disappears from the TV screen. In such a case, repeat
the procedure from step 1.
● The point B must be set at least 3 seconds after the point A.
● When playing back a DVD, A-B Repeat Playback is possible only
within the same title.
● “” cannot be selected during Program and Random
Playback.
● “” cannot be selected while stopped.
EN 33
Locating The Beginning Of A Desired Selection
You can locate the beginning of a title, chapter, group or track.
During playback or while stopped
1 Press ON SCREEN twice to access the on-screen bar.
2 Press we to select “”, then press ENTER.
3 Press rt to select the desired item, then press ENTER.
● Skip this step for Video CD/SVCD and Audio CD.
For DVD-RAM/RW/R, DVD VIDEO
“TITLE SEARCH” or “CHAPTER SEARCH” is selectable. (“TITLE
SEARCH” only is selectable while stopped.)
For JPEG, MP3
“GROUP SEARCH” or “TRACK SEARCH” is selectable.
For Video CD/SVCD, Audio CD
“TRACK” is selectable.
TRACK 99 EACH 179:59GROUP 99
DVD-
VIDEO
5
TITLE SEARCH
CHAPTER SEARCH
4 Press the number keys to enter the desired item number, then
press ENTER.
● Playback starts from the selected section.
Examples:
A To select track 5, press the number key “5”.
B To select track 15, press the number key “1” and “5”.
C To select track 25, press the number key “2”, then “5”.
If you have specified a wrong selection
Press CANCEL (&) or CLEAR (8) to clear the wrong number,
then enter the correct one before you press ENTER in this step.
To clear the on-screen bar
Press ON SCREEN.
NOTES:
● When “X” is displayed on the TV screen in step 4, the chapter you
have selected is not contained in the disc, or chapter search does not
work on the disc.
● Before you press ENTER, playback may start automatically when you
enter the section’s number depending on the disc.
● This function is not possible for a Video CD/SVCD with PBC function.
CINEMA
AB1 : 25 : 58 1 : 40 : 00

34 EN
BASIC OPERATIONS ON DVD DECK
CABLE/DBS
DVDTV
0-9
CANCEL
ENTER
2
4
CLEAR
rtwe
6
ON SCREEN
Time Search
You can play back a disc from the desired point by specifying the
elapsed playing time from the beginning of a program (DVD-RAM,
DVD-R, DVD-RW, DVD VIDEO and HDD) or a disc (Video CD/
SVCD and Audio CD).
1 Press ON SCREEN twice to access the on-screen bar.
2 Press we to select “”, then press ENTER. The pop-up
window appears under the selected item.
TITLE 99
DVD-
VIDEO
3 Press the number keys to enter the time, then press ENTER.
Playback starts from the specified time.
Example:
To play back from a point 12 (minutes): 50 (seconds) elapsed.
TRACK 99 EACH 0:00
CINEMA AUTO 1
Press 1 Press 2
Press 0Press 5
Simulated Surround Effect
It is possible to get a simulated surround effect from your stereo
system. You can enjoy the virtual surround sound with your
2-channel stereo system.
1 Press ON SCREEN twice to access the on-screen bar.
2 Press we to select “”, then press ENTER.
● Above the selected item, “3D-ON” appears and Simulated Surround
Effect is activated.
● Each time you press ENTER, “3D-ON” appears and disappears
alternately.
TITLE 99
DVD-
VIDEO
To clear the on-screen bar
Press ON SCREEN.
To cancel the simulated surround effect
Press ENTER to clear “3D-ON” from the screen.
NOTES:
● Simulated Surround Effect works correctly only when playing back a
title recorded in multichannels.
● Simulated Surround Effect does not affect the DVDVIDEO bitstream
signal from the DIGITAL OUT connectors.
● When Simulated Surround Effect is activated, the settings of
“ANALOG AUDIO OUT” and “D. RANGE CONTROL” are disabled.
(墌 pg. 67)
TRACK 99 EACH 0:00
3D-ON CINEMA AUTO 1
Adjusting The Picture Quality
You can obtain optimal picture quality by selecting an appropriate
picture mode.
1 Press ON SCREEN twice to access the on-screen bar.
2 Press we to select “”, then press ENTER. The pop-up
window appears under the selected item.
TITLE 99
DVD-
VIDEO
3 Press rt to select the desired option, then press ENTER.
NORMAL: Normally select this option.
CINEMA: Suitable for a movie disc, etc.
SHARP: Clearer, sharper-edged picture when viewing images with
lots of flat, same-colored surfaces such as cartoons.
SOFT: Select this option when too much noise appears.
To clear the on-screen bar
Press ON SCREEN.
TRACK 99 EACH 0:00
CINEMA AUTO 1
If you have specified a wrong selection,
Press CANCEL (&) (for the last entered number) or CLEAR (8)
(for whole numbers) to clear the wrong number, then enter the
correct one(s) before you press ENTER in this step.
To clear the on-screen bar
Press ON SCREEN.
NOTES:
● When “X” is displayed on the TV screen in step 3, you have selected
a point that excesses the recording time of the disc.
● Some DVD VIDEO discs do not contain time information, and it is not
possible to use the Time Search function. In such cases, “X” is
displayed on the TV screen as well.
● This function is not possible for a Video CD/SVCD with PBC function.

Setting The Progressive Mode
You can obtain optimal picture quality by selecting whether the
content on the disc is processed by field (video source) or by frame
(film source).
1 Press ON SCREEN twice to access the on-screen bar.
2 Press we to select “”, then press ENTER. The pop-up
window appears under the selected item.
TRACK 99 EACH 0:00
3D-ON CINEMA AUTO 1
DVD-
VIDEO
TITLE 99
3 Press rt to select the desired option, then press ENTER.
AUTO 1: Used to play a disc containing both video and film source
materials. This system recognizes the source type (video or film)
of the current disc according to the disc information. Normally
select this option.
AUTO 2: Almost the same as the “AUTO 1”, but the processing of
the scenes with movement is different. Select “AUTO 1” or
“AUTO 2” to your preference.
FILM: Suitable for playing back a progressive scanned film source
disc.
VIDEO: Suitable for playing back a video source disc. The outlines
on the played back pictures will be soft.
To clear the on-screen bar
Press ON SCREEN.
Program Playback
You can program up to 30 tracks (Video CD/SVCD or Audio CD) to
play back in the desired order.
While stopped
1 Press ON SCREEN twice to access the on-screen bar.
2 Press we to select “PRGM”, then press ENTER. The program
table appears under on-screen bar.
TRACK 99 EACH 0:00
VCD
3 Press the number keys to
enter the track numbers in the
desired order.
Examples:
A To select track 5, press the
number key “5” and ENTER.
B To select track 15, press the
number key “1” and “5”.
C To select track 25, press the number key “2” and “5”.
If you have specified a wrong selection
Press CANCEL (&). The last selection is erased.
Or press CLEAR (8). The whole selection is erased.
CINEMA
BASIC OPERATIONS ON DVD DECK
EN 35
4 Press 4. Playback starts in the programed order.
● When all of the programed tracks have been played back, Program
Playback stops, but the programed information remains.
● To add tracks to the end of the program, perform steps 1 through 3.
● During Program Playback, pressing 6 skips to the next selection of
the program. Pressing 2 returns to the beginning of the current
selection.
To clear the on-screen bar and the contents of the program
Press ON SCREEN.
To cancel Program Playback
Press we to select “PRGM”, then press ENTER.
NOTE:
Program Playback is not possible depending on the type of disc.
Random Playback
You can play back all the tracks on the disc in random order.
While stopped
1 Press ON SCREEN twice to access the on-screen bar.
2 Press we to select “RND”, then press ENTER. Playback starts
in random order.
TRACK 99 EACH 0:00
VCD
To clear the on-screen bar
Press ON SCREEN.
To cancel Random Playback
Perform steps 1 and 2.
NOTE:
The same track will not be played back more than once during Random
Playback.
CINEMA
Select The Switching Interval Of The Slide Show
You can control the switching interval of the slide show.
1 Press ON SCREEN twice to access the on-screen bar.
2 Press we to select “”, then press ENTER. The pop-up
window appears under the selected item.
TRACK 99 EACH 179:59GROUP 99
R
5 SEC.
3 Press rt to select the desired option, then press ENTER.
● Each time you press rt, the interval changes as follows:
5 SEC. { 10 SEC. { 15 SEC. { 20 SEC. { 25 SEC. {
30 SEC. { (Back to the beginning)
To clear the on-screen bar
Press ON SCREEN.
NOTE:
JPEG files are played back as a slide show. It may take more time to
display an image whose size is larger.
CINEMA

36 EN
BASIC OPERATIONS ON DVD DECK
Parental Lock
This function restricts playback of DVDVIDEO discs which contain
violent (and other) scenes according to the level set by the user.
For example, if a movie which includes violent scenes supports the
parental lock feature, such scenes which you do not want to let
children view can be cut or replaced by other scenes.
● Turn on the unit.
● Turn on the TV and select the AV mode.
● Slide the TV/CABLE/DBS/DVD switch to DVD.
● Press DVD so that the DVD lamp lights up on the unit.
CABLE/DBS
DVDTV
DVD
0-9
ENTER
To Set Parental Lock For The First Time
While stopped
1 Press SET UP to access the Main Menu screen.
2 Press we to select “DVD VIDEO SET UP”, then press t.
3 Press we to select
“PARENTAL LOCK”, then press
t.
LANGUAGE SET
PARENTAL LEVEL
COUNTRY CODE
rtwe
SET UP
AUDIO OUTPUT
INITIAL SET UPHDD/DVD SET UP FUNCTION SET UPDVD VIDEO SET UP
PARENTAL LOCK DISC SET UP
NONE
US
9 Press the number keys to enter the same password as in
step 6 above, then press ENTER.
10 Press SET UP to complete the setting.
NOTE:
Remember your password, or make a note of it.
To Change The Settings
You can change the Parental Lock settings later.
1 Perform steps 1 to 3 of “To Set Parental Lock For The First
Time” to access the “PARENTAL LOCK” screen before continuing.
To change the level
2 Press rt to select “PARENTAL LEVEL”, then press ENTER.
3 Press rt to select the desired level, then press ENTER.
To change the country code
4 Press rt to select “COUNTRY CODE”, then press ENTER.
5 Press rt to select your country code, then press ENTER.
● See “Country/Area Code List for Parental Lock” (墌 pg. 80).
6 Press the number keys to enter the same password as in
step 6 of “To Set Parental Lock For The First Time”, then press
ENTER.
7 Press SET UP twice to complete the setting.
NOTE:
If you forget your password, enter “8888” in step 6.
To Temporarily Release Parental Lock
When you set the Parental Lock level strictly, some discs may not
be played back at all. When you insert such a disc and try to play it
back, the confirmation screen appears on the TV screen, asking
you whether you want Parental Lock to be temporarily released or
not.
1 Load a disc.
● If the disc is rated higher than the selected level, the confirmation
screen appears.
2 Press we to select “YES”, then press ENTER.
● If you select “NO”, you cannot play back that disc.
3 Press the number keys to enter the same password as in
step 6 of “To Set Parental Lock For The First Time”, then press
ENTER.
● When you enter the correct password, the Parental Lock is released
and the unit starts playback.
● If you enter a wrong password, “ENTRY ERROR” appears on the TV
screen. Enter the correct password.
● If you have successively entered wrong password three times,
“ENTRY ERROR CAN NOT CHANGE PASSWORD” appears on the
TV screen. In such a case, press ENTER. The disc will stop. Then
play back the disc again, and try the procedure again from step 1.
NOTE:
If you forget your password, enter “8888” in step 3.
ENTER
4 Press rt to select
“PARENTAL LEVEL”, then press
ENTER.
5 Press rt to select the desired
SET UP
LANGUAGE SET
EXIT
PARENTAL LEVEL
COUNTRY CODE
SELECT
SELECT WITH [ ] THEN PRESS [ENTER]
PRESS [SET UP] TO EXIT
AUDIO OUTPUT
PARENTAL LOCK DISC SET UP
INITIAL SET UPHDD/DVD SET UP FUNCTION SET UPDVD VIDEO SET UP
NONE
US
level, then press ENTER.
● The smaller the value of level is,
the more restrictive the Parental
Lock level becomes.
SET UP
ENTER
EXIT
SELECT
SELECT WITH [ ] THEN PRESS [ENTER]
PRESS [SET UP] TO EXIT
● Select “NONE” to cancel the
restriction.
6 Press the number keys to enter your desired four-digit number,
then press ENTER.
● If you made a mistake, enter a correct number again.
7 Press rt to select “COUNTRY CODE”, then press ENTER.
8 Press rt to select your country code, then press ENTER.
● If you do not need to change your country code, jump to 10.
● See “Country/Area Code List for Parental Lock” (墌 pg. 80)

Basic Recording
A
● Turn on the unit.
● Turn on the TV and select the AV mode.
● Slide the TV/CABLE/DBS/DVD switch to DVD.
TTENTION:
It is not possible to record programs on a DVD-R disc which has
already been finalized.
DVD
7
4
9
DVD Lamp
DVDTV
0-9
ENTER
REC MODE
8
CABLE/DBS
DVD
CH+/
-
4
7
8
9
BASIC OPERATIONS ON DVD DECK
EN 37
NOTES:
● It is recommended to format a DVD-RAM disc before use if you use
the disc on this unit for the first time.
● When using a brand-new DVD-RW disc, format the disc either in VR
mode or in Video mode. (墌 pg. 71)
● Recordings made on DVD-R/RW disc must be finalized to play back
on other DVD players. Perform “Finalize A Disc (DVD Deck Only)”
(墌 pg. 72).
● You can record up to 99 programs and 999 play lists on each disc.
● Some programs can only be recorded one time.
● When recording is started, an index of the first part of recording is
automatically recorded. (墌 pg. 51) To record satellite programs, refer
to page 50. To delete the index, refer to page 53.
● Recording sometimes may stop or cannot be performed even if there
is enough available capacity remaining on the disc.
● It is not possible to record both on DVD and on HDD simultaneously.
Recording Mode
MPEG2 format is used as recording format. As a guide for picture
quality, the “bps” unit is used to represent how much data can be
recorded per second. The larger this value is, the better the picture
quality becomes but more capacity is required for the recording.
Select XP or SP for programs where quick movement occurs, such
as sports programs, and LP or EP for talk shows, etc. with
relatively less movement.
The recording modes for a 4.7 GB disc are set as follows:
Recording
mode
Recording amount
(approx.)
Maximum recording
time (approx.)
XP 10 Mbps 1 hour
SP 5 Mbps 2 hours
LP 2 Mbps 4 hours
EP 1.6 Mbps 6 hours
FR60–FR360
(墌 pg. 39)
FR420 7 hours
The amount varies
depending on the
selected time.
1 – 6 hours
FR480 8 hours
● For details on FR mode, refer to “Free Rate Function” (墌 pg. 39)
Recording Resume Function
If there is a power outage during recording, Instant Timer
Recording (ITR) (墌 pg. 38) or timer recording (墌 pg. 46, 48), the
recording will resume automatically when power is restored to the
unit unless the unit’s memory backup has expired.
1 Load a recordable disc.
● For details, refer to “Placing A Disc” (墌 pg. 10).
2 Press DVD so that the DVD lamp lights up on the unit.
3 Press CH +/– or the number keys to select the channel you
wish to record.
4 Press REC MODE repeatedly to select the recording mode,
then press ENTER.
● Each time you press REC MODE, the recording mode changes as
follows:
XP ] SP ] LP ] EP ] FR60–FR360* ] FR420, FR480]
(Back to the beginning)
* The value is selectable from 1 to 6 hours in 5-min. increment by
● For details on the recording mode, see the right column.
we
pressing
value in 30-min. increments, press and hold
repeatedly after selecting “FR60–FR360”. To change the
we
.
5 Press 7 on the unit to start recording. Or press and hold 7 and
press 4 on the remote control.
6 Press 7 and 9 simultaneously to pause recording.
● To resume recording, press 7 and 4 simultaneously.
7 Press 8 twice to stop recording.
● It takes about 10 seconds to end the writing session when you stop
recording.
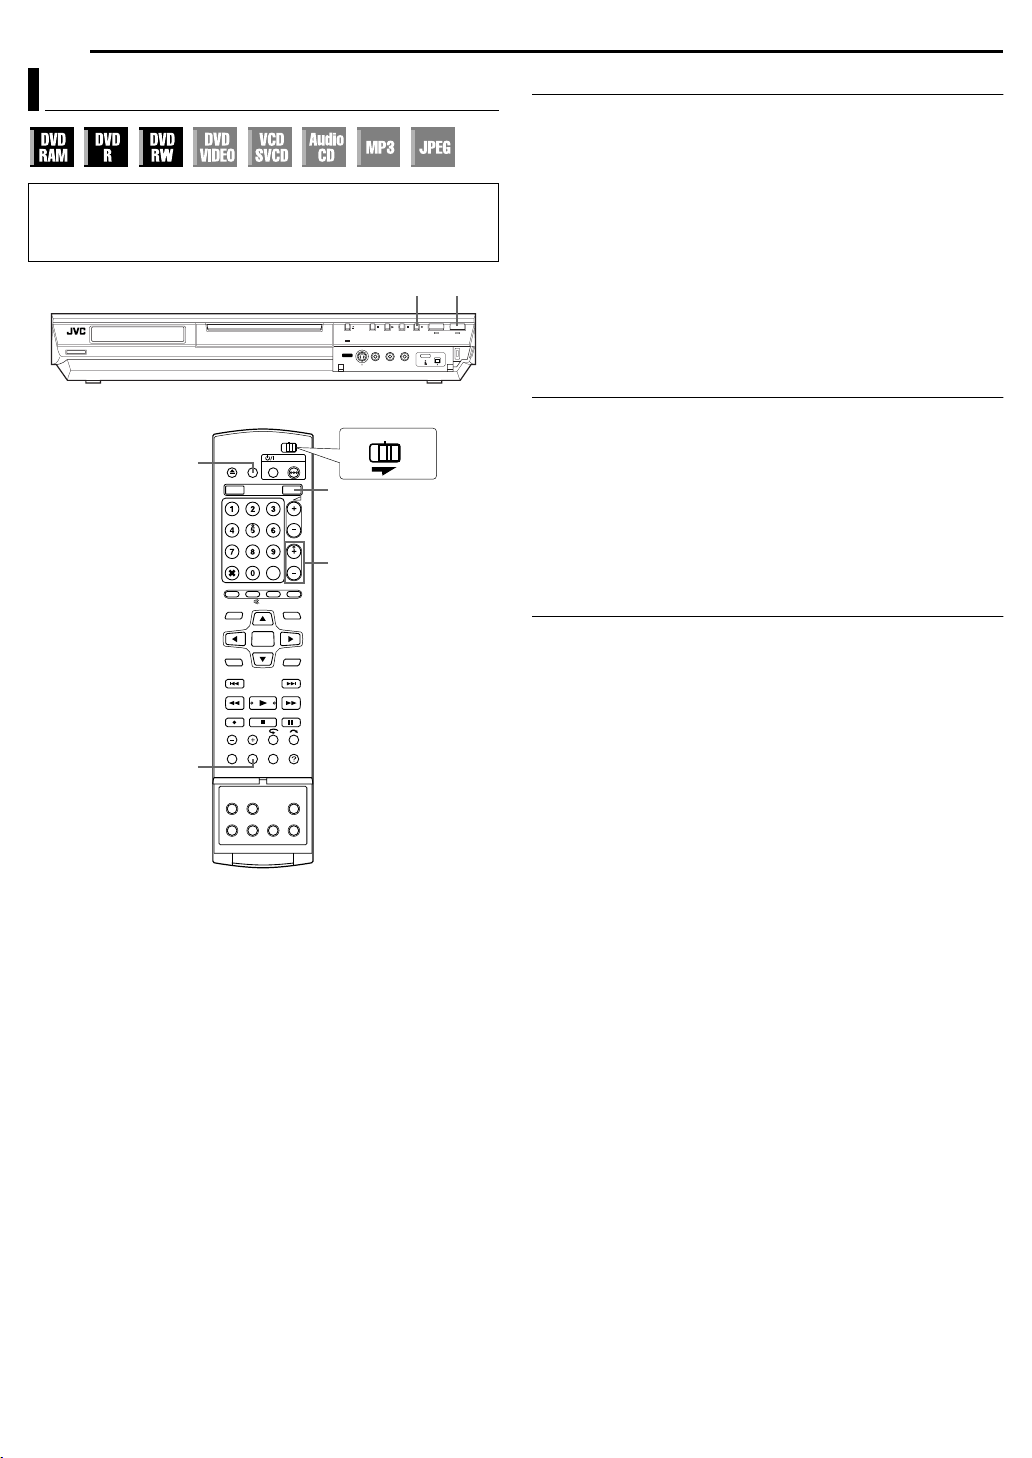
38 EN
BASIC OPERATIONS ON DVD DECK
Recording Features
● Turn on the unit.
● Turn on the TV and select the AV mode.
● Slide the TV/CABLE/DBS/DVD switch to DVD.
● Press DVD so that the DVD lamp lights up on the unit.
CABLE/DBS
TV AV/ VIDEO
DVD
CH+/
-
7 DVD
DVDTV
Instant Timer Recording (ITR)
This easy method lets you record for from 30 minutes to 6 hours
(selectable in 30-min. increments), and shuts the unit off after
recording is finished.
1 Press 7 on the unit to start recording.
2 Press 7 again to engage the ITR mode.
● On the front display panel, “0:30” appears.
3 If you want to record for more than 30 minutes, press 7 to
extend the time. Each press extends recording time by 30 minutes.
NOTES:
● You can only perform ITR using the 7 button on the unit.
● When the recording capacity becomes full during timer recording or
Instant Timer Recording, the unit automatically performs “Relief
Recording” (墌 pg. 48).
Watch Another Program While Recording On The Unit
While recording is going on, you can watch another program on the
TV by using the TV’s tuner.
NOTE:
It is required that the remote control is set to be able to operate the TV
in advance. (墌 pg. 64)
1 Slide the TV/CABLE/DBS/DVD switch to TV.
2 Press CH +/– repeatedly to select the desired channel.
Elapsed Recording Time And Disc Remaining Time Indication
During recording, press DISPLAY repeatedly until the desired
indication appears on the front display panel.
● Each time you press DISPLAY, the time indication changes as
follows:
Elapsed recording time ] Disc remaining time ] Clock ] (Back to
the beginning)
DISPLAY

Free Rate Function
A:1st
To record the entire program, the unit automatically sets the
appropriate recording mode depending on the combination of the
total time of the program to be recorded and either the remaining
disc space or the specified recording time (from 60 minutes to 480
minutes).
8 To record the entire program within the actual remaining
disc space (DVD deck only)
Select “FR (JUST)” in a recording mode selection procedure.
● Note that this function is available only for timer programing recording
(墌 pg. 46, 48) and dubbing from HDD to DVD (墌 pg. 58).
8 To record the entire program by specifying the desired
recording time
Select “FR60–FR360”, “FR420” or “FR480” in a recording mode
selection procedure. (墌 pg. 37, 40, 46, 48)
8 To record a 25-min. long daily program five times just on
the same DVD disc for example
Perform “VCR Plus+
sure to set the recording mode to “FR125” and set Weekly/Daily
Rec Function to “MON–FRI” in step 8 to fit the total recording time
to the whole disc space.
Blank
When the same program is recorded in SP mode instead of in
“FR125”, the 5th program cannot be recorded.
Blank
®
Timer Programing” (墌 pg. 46) procedure. Be
B: 2nd
C: 3rd
D: 4th
E: 5th
A: 1st
B: 2nd
C: 3rd
D: 4th
E: Blank (20 min.)
BASIC OPERATIONS ON DVD DECK
EN 39
NOTES:
● You can program this unit to timer-record, regardless of the disc
remaining time. When the disc remaining time is not enough, the unit
performs “Relief Recording” (墌 pg. 48). To avoid this, make sure of
the disc remaining time before setting timer-programing.
(Example) If you programed to timer-record for 60 minutes in SP
mode on a 120-minute disc, the disc remaining time would be 30
minutes in XP mode, 60 minutes in SP mode, 120 minutes in LP
mode, 180 minutes in EP mode, and 240 minutes in FR480 mode.
Timer-recording will not complete beyond these remaining times.
● The maximum recording time of FR (JUST) mode is the same as the
recording time of FR480 mode. When timer-programing a long
program in FR (JUST) mode on a disc whose remaining time is short,
it is recommended checking the disc remaining time in FR480 mode
to see if the remaining time is enough for the program.
● Even if more than one program are timer-programed in FR (JUST)
mode, only the first one is recorded.
● In order to ensure that the recording fits on the disc, this feature may
leave a slight non-recorded section at the end of the disc.
● There may be some noise and sound disturbance at the point on the
disc where the unit switches the mode.
Second Audio Recording
This unit’s built-in MTS decoder enables reception of Multichannel
TV Sound broadcast. To record a SAP program received, set “2ND
AUDIO RECORD” to “ON”. (墌 pg. 68)
NOTE:
When the channel is changed on the unit;
● The “MONO” indicator appears on the screen for about 5 seconds if
the program is a monaural broadcast.
● The “STEREO” indicator appears on the screen for about 5 seconds
if the program is a stereo broadcast.
● Both “STEREO” and “SAP” indicators appear when a stereo program
is accompanied by SAP sound.
● Both “MONO” and “SAP” indicators appear when the main audio on
the monaural broadcast is accompanied by SAP sound.

40 EN
A
BASIC OPERATIONS ON HDD DECK
Basic Recording
● Turn on the unit.
● Turn on the TV and select the AV mode.
● Slide the TV/CABLE/DBS/DVD switch to DVD.
TTENTION:
The HDD on the unit requires approximately 20 seconds to start up
after the unit has been turned on, during which no operation can be
made.
HDD
HDD
0-9
CH+/
8 7
CABLE/DBS
-
HDD Lamp
DVDTV
Pause recording on HDD deck
It is not possible to pause recording. Pressing 9 initiates Live
Memory Playback.
However, it is still possible to pause recording only when recording
the channels of external sources (“L-1”, “L-2”, “F-1”, and “DV”).
Press and hold 7, then press 9 on the remote. To resume
recording, press and hold 7, then press 4 on the remote.
No operation can be made with the buttons on the unit.
Recording Mode
Select XP or SP for programs where quick movement occurs, such
as sports programs, and LP or EP for talk shows, etc. with
relatively less movement.
DR-MH30S DR-MH20S
HDD capacity 160 GB 80 GB
Recording Time
XP 1 hour Approx. 34 hours Approx. 17 hours
SP 2 hours Approx. 68 hours Approx. 34 hours
LP 4 hours Approx. 136 hours Approx. 68 hours
EP 6 hours Approx. 204 hours Approx. 102 hours
FR480 8 hours Approx. 272 hours Approx. 136 hours
● For details on FR mode, refer to “Free Rate Function” (墌 pg. 39)
Recording Resume Function
If there is a power outage during recording, Instant Timer
Recording (ITR) (墌 pg. 41) or timer recording (墌 pg. 46, 48), the
recording will resume automatically when power is restored to the
unit unless the unit’s memory backup has expired.
4
8
7
REC MODE
9
1 Press HDD so that the HDD lamp lights up on the unit.
2 Press CH +/– or the number keys to select the channel you
wish to record.
3 Press REC MODE repeatedly to select the recording mode,
then press ENTER.
● Each time you press REC MODE, the recording mode changes as
follows:
XP ] SP ] LP ] EP ] FR60–FR360* ] FR420, FR480]
(Back to the beginning)
* The value is selectable from 1 to 6 hours in 5-min. increment by
● For details on the recording mode, see the right column.
we
pressing
value in 30-min. increments, press and hold
repeatedly after selecting “FR60–FR360”. To change the
we
.
4 Press 7 on the unit to start recording. Or press and hold 7 and
press 4 on the remote control.
5 Press 8 twice to stop recording.
● Pressing 8 once displays the confirmation message to stop
recording. Press 8 again to terminate recording.
NOTES:
● Continuous recording for over 48 hours is not possible.
● It is not possible to record both on DVD and on HDD simultaneously.
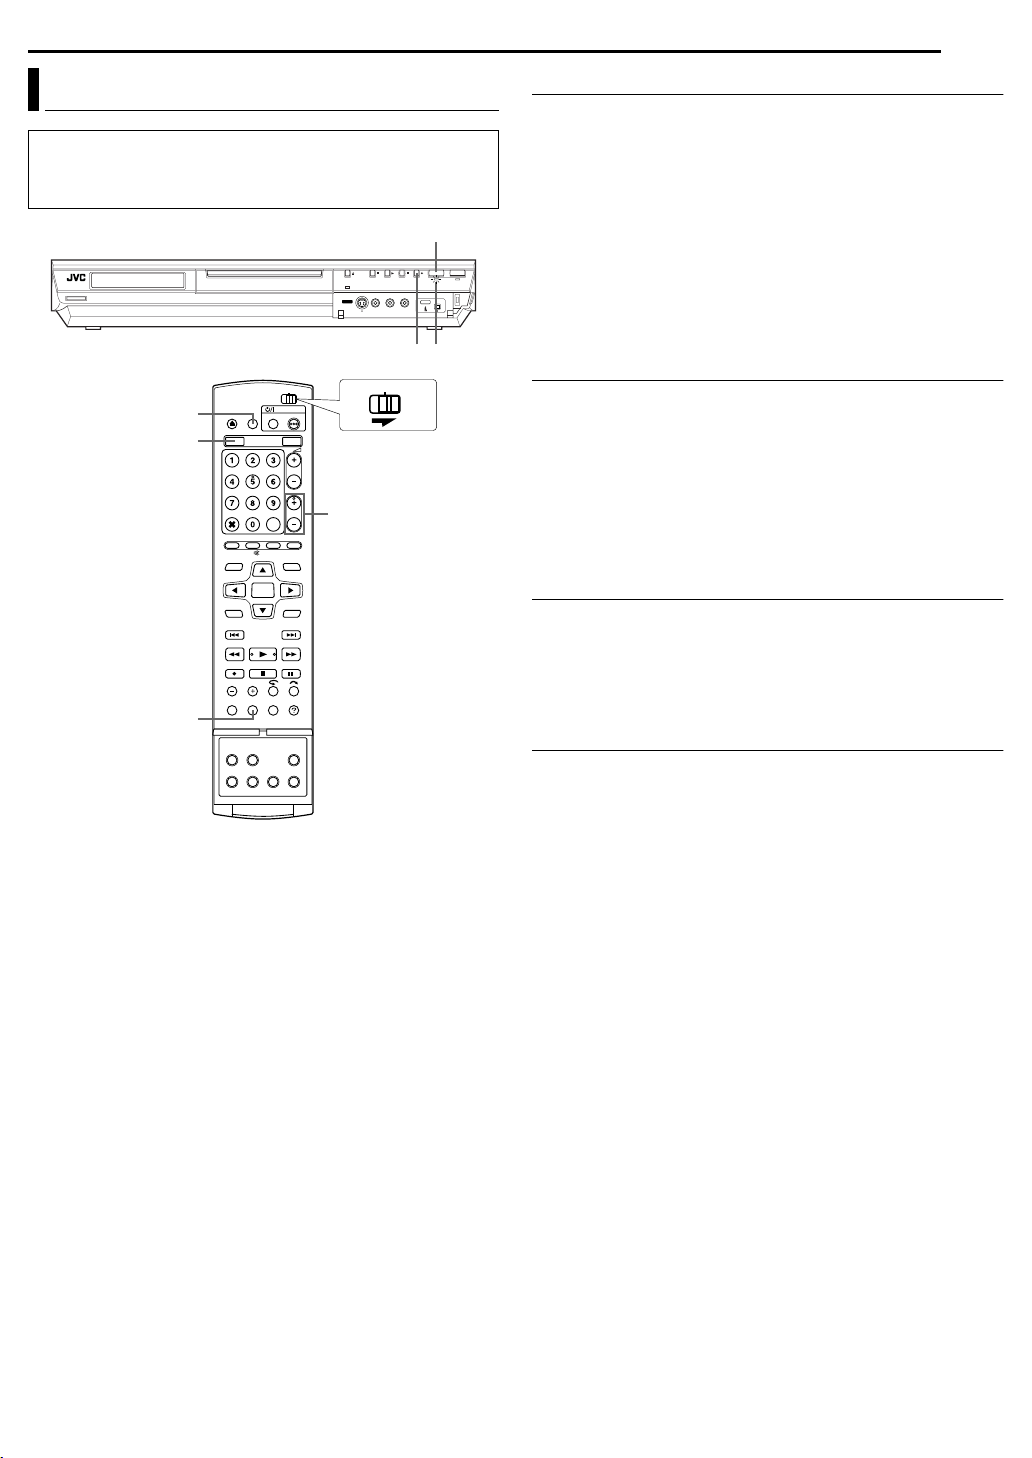
BASIC OPERATIONS ON HDD DECK
EN 41
Recording Features
● Turn on the unit.
● Turn on the TV and select the AV mode.
● Slide the TV/CABLE/DBS/DVD switch to DVD.
● Press HDD so that the HDD lamp lights up on the unit.
CABLE/DBS
TV AV/ VIDEO
HDD
CH+/
-
DISPLAY
7
DVDTV
HDD
HDD Lamp
Instant Timer Recording (ITR)
This easy method lets you record for from 30 minutes to 6 hours
(selectable in 30-min. increments), and shuts the unit off after
recording is finished.
1 Press 7 on the unit to start recording.
2 Press 7 again to engage the ITR mode.
● On the front display panel, “0:30” appears.
3 If you want to record for more than 30 minutes, press 7 to
extend the time. Each press extends recording time by 30 minutes.
NOTES:
● You can only perform ITR using the 7 button on the unit.
● When the recording capacity becomes full during timer recording or
Instant Timer Recording, the unit is automatically shut off.
Watch Another Program While Recording On The Unit
While recording is going on, you can watch another program on the
TV by using the TV’s tuner.
NOTE:
It is required that the remote control is set to be able to operate the TV
in advance. (墌 pg. 64)
1 Slide the TV/CABLE/DBS/DVD switch to TV.
2 Press CH +/– repeatedly to select the desired channel.
Elapsed Recording Time And Disc Remaining Time Indication
During recording, press DISPLAY repeatedly until the desired
indication appears on the front display panel.
● Each time you press DISPLAY, the time indication changes as
follows:
Elapsed recording time ] Disc remaining time ] Clock ] (Back to
the beginning)
Second Audio Recording
This unit’s built-in MTS decoder enables reception of Multichannel
TV Sound broadcast. To record a SAP program received, set “2ND
AUDIO RECORD” to “ON”. (墌 pg. 68)
NOTE:
When the channel is changed on the unit;
● The “MONO” indicator appears on the screen for about 5 seconds if
the program is a monaural broadcast.
● The “STEREO” indicator appears on the screen for about 5 seconds
if the program is a stereo broadcast.
● Both “STEREO” and “SAP” indicators appear when a stereo program
is accompanied by SAP sound.
● Both “MONO” and “SAP” indicators appear when the main audio on
the monaural broadcast is accompanied by SAP sound.
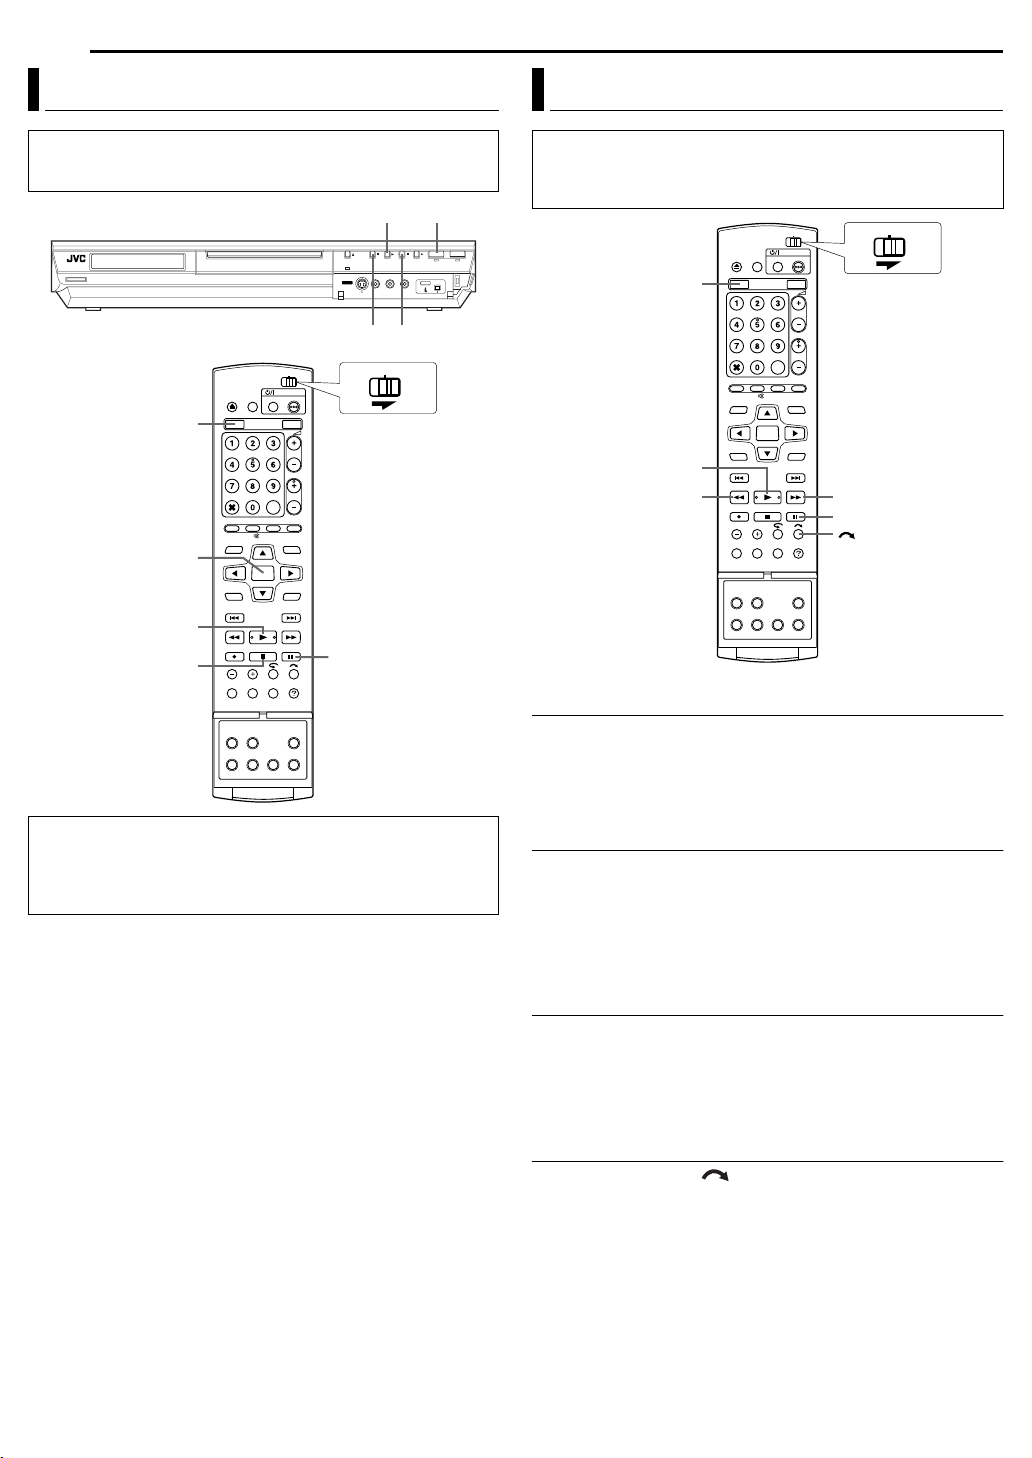
42 EN
A
BASIC OPERATIONS ON HDD DECK
Basic Playback
● Turn on the unit.
● Turn on the TV and select the AV mode.
● Slide the TV/CABLE/DBS/DVD switch to DVD.
HDD
ENTER
4
SELECT
8
9
849
CABLE/DBS
Playback Features
● Turn on the unit.
● Turn on the TV and select the AV mode.
● Slide the TV/CABLE/DBS/DVD switch to DVD.
HDD
DVDTV
● Press HDD so that the HDD lamp lights up on the unit.
CABLE/DBS
HDD
4
-
5/SLOW + 3/SLOW
9
DVDTV
TTENTION:
● It may take a few seconds to start playback. This is not a
malfunction.
● Forward/reverse high-speed search and other operations cannot
be performed while playback is stopped.
1 Press HDD so that the HDD lamp lights up on the unit.
2 Press 4 to start playback.
● The Library Database Navigation also enables you to search and
select the desired programs. (
墌 pg. 52)
3 Press 9 to pause playback.
● To resume normal playback, press 4.
4 Press 8 to stop playback.
NOTE:
When the Library Database Navigation screen appears, choose a
thumbnail image of the desired title on the TV screen, then press
SELECT(4) or ENTER. (墌 pg. 52)
High-Speed Search
During playback, press 5 for forward high-speed search, or 3
for reverse high-speed search.
● Each press of the button increases the search speed for each
direction.
● To resume normal playback, press 4.
Still Picture/Frame-By-Frame Playback
1 Press 9 to pause during playback.
2 Press SLOW – (3) or SLOW + (5) to activate frame-by-
frame playback.
● Each press of SLOW – (3) or SLOW + (5) advances/reverses
the still picture frame by frame.
● To resume normal playback, press 4.
Slow Motion
1 Press 9 to pause during playback.
2 Press SLOW – (3) or SLOW + (5) for 2 or more seconds.
● Each press of SLOW – (3) or SLOW + (5) increases the slow
motion speed for each direction (from 1/16 to 1/2 times the normal
speed).
Skip Search
During playback, press .
● Each press initiates an approximately 30-second period of fastmotion playback. Normal playback resumes automatically.

BASIC OPERATIONS ON HDD DECK
EN 43
Live Memory Playback
● Turn on the unit.
● Turn on the TV and select the AV mode.
● Slide the TV/CABLE/DBS/DVD switch to DVD.
● Press HDD so that the HDD lamp lights up on the unit.
This unit records pictures onto the hard disc, instead of video
tapes, then plays back the pictures recorded on the disc. This
makes it possible to achieve high-speed writing and read-out that
has not been possible with conventional VCRs, enabling recording
and playback simultaneously.
High-speed spin
(High-speed writing)
Recording
Image figure of the hard disc
It is called “Live Memory Playback” to start playback of the program
being recorded, with a time-lag between a recording point and a
playback point, as shown in the figure below.
Current playback point
(Live Memory Playback)
Current recording position
Playback
continues
(Recording point)
Recording start point
0 30 min. 1 hour
Currently elapsed recording time
Not only can this unit play back a program previously recorded
while recording or timer recording another program, but the unit
also allows you to play back from the beginning of a program while
continuing to record the same program.
Temporary recording for Live Memory
This unit automatically records the channel being received, within
the specified range of time, to the reserved space on the hard disc.
The time range can be set for 30 minutes, 1 hour, and 3 hours.
(墌 pg. 68)
NOTE:
Previous temporary recordings will be overwritten since the unit is
always recording the channel being received. Thus, it is not possible to
play back TV programs recorded beyond the specified range of time
since they are already overwritten. To avoid this in order to save titles,
perform normal recording (墌 pg. 40), timer recording (墌 pg. 46, 48),
or Live Memory Recording (墌 pg. 45).
Playback
(High-speed read-out)
Recording
continues
Recording/playback Status Display
CABLE/DBS
DVDTV
LIVE
NAVIGATION
Press NAVIGATION to display Library Database
Navigation menu, then choose a program to play
墌 pg. 51)
back. (
8
ON SCREEN
Live Memory Playback status can be checked by
pressing ON SCREEN to display the bar meter on
the superimpose display. The current status is
superimposed on the TV screen. (
using Live Memory playback”)
NOTES:
● Live Memory Playback cannot be performed for approximately 30
seconds after recording has started.
● Although high-speed search up to approximately 30 seconds before
the current recording point is possible during Live Memory Playback,
once the current recording point is reached, the unit resumes normal
playback and maintains a delay of approximately 30 seconds so that
recording and playback can continue.
● When using Live Memory Playback during timer recording, playback
continues even after the end of the recording.
● When using Live Memory Playback during timer recording, playback
is automatically stopped just before recording starts, and then
recording starts when the time arrives for the next timer-program.
● It is impossible to perform ITR even if you press 7 during Live
Memory Playback. (墌 pg. 41)
Press 8 to display the program being recorded, then perform ITR
settings.
● Playback may be paused for a moment during Live Memory
Playback, which does not interfere with recording.
● Live Memory Playback cannot be performed while recording the
source from DV input. (
● When LIVE CHECK is pressed to display the picture currently being
recorded, the picture size may not be correct.
● Press 7 or LIVE to stop Live Memory Playback.
● Live Memory Playback cannot be performed, even if the “LIVE
MEMORY” is set to other than OFF in “HDD SET UP”, because
temporary recording on HDD stops during recording on DVD.
墌 pg. 60, “DV Dubbing”)
墌 pg. 17, “When
About limitation on temporary recording
The temporary recording for Live Memory is cancelled in the
following cases, and will start all over again when it is to resume.
● When the power is turned off
● When the system is powered again after a power failure was
occurred
● When normal recording, timer recording, Live Memory Recording,
or Automatic Satellite Program Recording (
● When the “LIVE MEMORY” setting is changed (
● When tuner channel setting is performed (墌 pg. 23)
● When dubbing is performed by pressing DUBBING (
● When “DV” is selected by pressing CH +/– (
墌 pg. 50) is performed
墌 pg. 68)
墌 pg. 58)
墌 pg. 60)

44 EN
BASIC OPERATIONS ON HDD DECK
Buttons To Be Used During Live Memory Playback
● Turn on the unit.
● Turn on the TV and select the AV mode.
● Slide the TV/CABLE/DBS/DVD switch to DVD.
● Press HDD so that the HDD lamp lights up on the unit.
CABLE/DBS
DVDTV
HDD
A
B
C
E
G
H
D
F
I
J
K
A LIVE
Returns to on air program screen. When a confirmation message
appears by pressing this button during timer programing or title
editing, etc., follow the instruction to return to the previous screen.
B NAVIGATION
Displays Library Database Navigation menu. You can choose a title
to play back.
C 3
● Each press of the button during playback advances the playback
speed in 5 steps for reverse direction.
Available only when paused
● Each press of the button reverses the still picture frame by frame.
● Pressing down for 2 or more seconds reverses playback at 1/16 times
the normal speed. Then, each press of the button reverses slowmotion at 1/16 times, 1/4 times and 1/2 times the normal playback.
D 5
● Each press of the button during playback advances the playback
speed in 4 steps for forward direction.
Available only when paused
● Each press of the button advances the still picture frame by frame.
● Pressing down for 2 or more seconds advances playback at 1/16
times the normal speed. Then, each press of the button advances
slow-motion at 1/16 times, 1/4 times and 1/2 times the normal
playback.
E 8
● Pressing once during Live Memory Playback or Live Memory
Recording returns to the screen on air.
● Pressing twice during recording stops recording and returns to the
screen on air.
F 9
Pressing once pauses playback (still picture playback). Pressing
repeatedly advances the still picture frame by frame.
G JUMP –
Each press of the button during playback or Live Memory Playback
jumps back for the selected time interval and resumes playback.
(墌 pg. 45, “Jump Search”)
H JUMP +
Each press of the button during playback or Live Memory Playback
jumps forward for the selected time interval and resumes playback.
(墌 pg. 45, “Jump Search”)
I
Pressing once skips forward for approximately 30 seconds and
resumes playback.
Pressing repeatedly skips forward continuously as many times as
pressed.
It is useful when skipping over unwanted sections.
J
Pressing once skips back for approximately 30 seconds and
resumes playback.
Pressing repeatedly skips back for approximately 7 seconds
continuously as many times as pressed.
It is useful when watching sports programs, etc.
K LIVE CHECK
Pressing once displays the picture currently being recorded and
the one being played back simultaneously.
Pressing successively clears the Live Check window and displays
only the picture currently being played back.
You can check, for example, if the program you are recording has
already finished.

BASIC OPERATIONS ON HDD DECK
EN 45
To Play Back The Previous Part Of The Channel Currently Recording or Watching
You can play back the previous part of the channel you are
recording or watching (temporarily recorded on the background)
from the desired point. (墌 pg. 43, “Temporary recording for Live
Memory”)
1 Press 2 or 3 to locate the point to start playback from.
● Each press of 3 increases the reverse search speed.
2 Press 4 to start Live Memory Playback.
3 Press 8 to stop Live Memory Playback.
● The on-air screen resumes.
NOTES:
● You can use various playback features during Live Memory Playback.
(墌 pg. 42)
● If you have started actual recording by pressing 7, pressing 8 in
step 3 only resumes the on-air screen. To stop actual recording,
press 8 again.
To Record From The Previous Part Of The Channel Currently Watching (Live Memory Recording)
You can start recording from the previous part of the channel you
are currently watching (temporarily recorded on the background).
(墌 pg. 43, “Temporary recording for Live Memory”)
1 Press 2 or 3 to locate the point to start recording from.
● Each press of 3 increases the reverse search speed.
2 Press 7 on the unit to start Live Memory Recording. Or press
and hold 7 and press 4 on the remote control.
3 Press 8 to stop Live Memory Recording.
● The on-air screen resumes.
NOTES:
● You cannot use Live Memory Recording for channels other than the
channel you are currently watching.
● Recording speed is automatically set to SP mode when Live Memory
Recording is started.
● Temporarily recorded data prior to the beginning of Live Memory
Recording is erased when Live Memory Recording started.
1.5x Speed Search
You can play back a title quickly. (This feature can also be
performed with normal playback.)
1.5x speed search cannot be performed during recording on HDD
or DVD.
1 Press 3 to locate the point to start 1.5x speed search from.
2 Press 4 to resume playback.
3 Press 5 once.
● Pressing ON SCREEN displays “+X1.5” on the top right corner of the
screen.
NOTE:
When the unit is connected with a digital audio device using an optional
optical cable, set “DIGITAL AUDIO OUT” to “PCM ONLY”. (墌 pg. 31)
Jump Search
You can locate a scene ahead or behind the current one by
jumping scenes according to selected time intervals (墌 pg. 68)
during playback (or Live Memory Playback). This feature is also
available during recording (or Live Memory Recording) or when
watching a TV received program.
Press JUMP – or JUMP +.
● To advance forward or back, press JUMP – or JUMP + repeatedly
within 5 seconds of each press to continue jump.
● When you cannot advance any farther (beginning or end of program
reached), the message “UNABLE TO GO BACK ANYMORE”
appears on the screen and the on-air screen resumes. In such a
case, press 2, 3 or 8.
Example 1:
Playback search when jump interval is set to 30 MIN jumps
Time counter
0 min
Beginning of program
40 min 1 h 15 min
30 min 1 h
Current scene
End of program
To Move Back The Playback Position Slightly While Recording (One Touch Replay Function)
You can move back the playback position while continuing to
record or timer record.
Press .
● Each press skips back for approximately 7 seconds and resumes
playback.
● Pressing while paused skips back for approximately 7 seconds and
resumes pause.
To Resume Playback Of A TV Broadcast From The Paused Point
You can resume playback of a TV broadcast you were recording or
watching from the point you have paused.
1 Press 9 to pause a TV broadcast.
● Recording continues when recording.
2 Press 4 to start Live Memory Playback.
● Playback resumes from the paused position.
3 Press 8 to resume the on-air screen.
Example 2:
Recording search when jump interval is set to 15 MIN jumps
Clock time
9:00
Beginning of program Current scene End of program
9:15 9:30
9:40
9:45 10:00
10:15
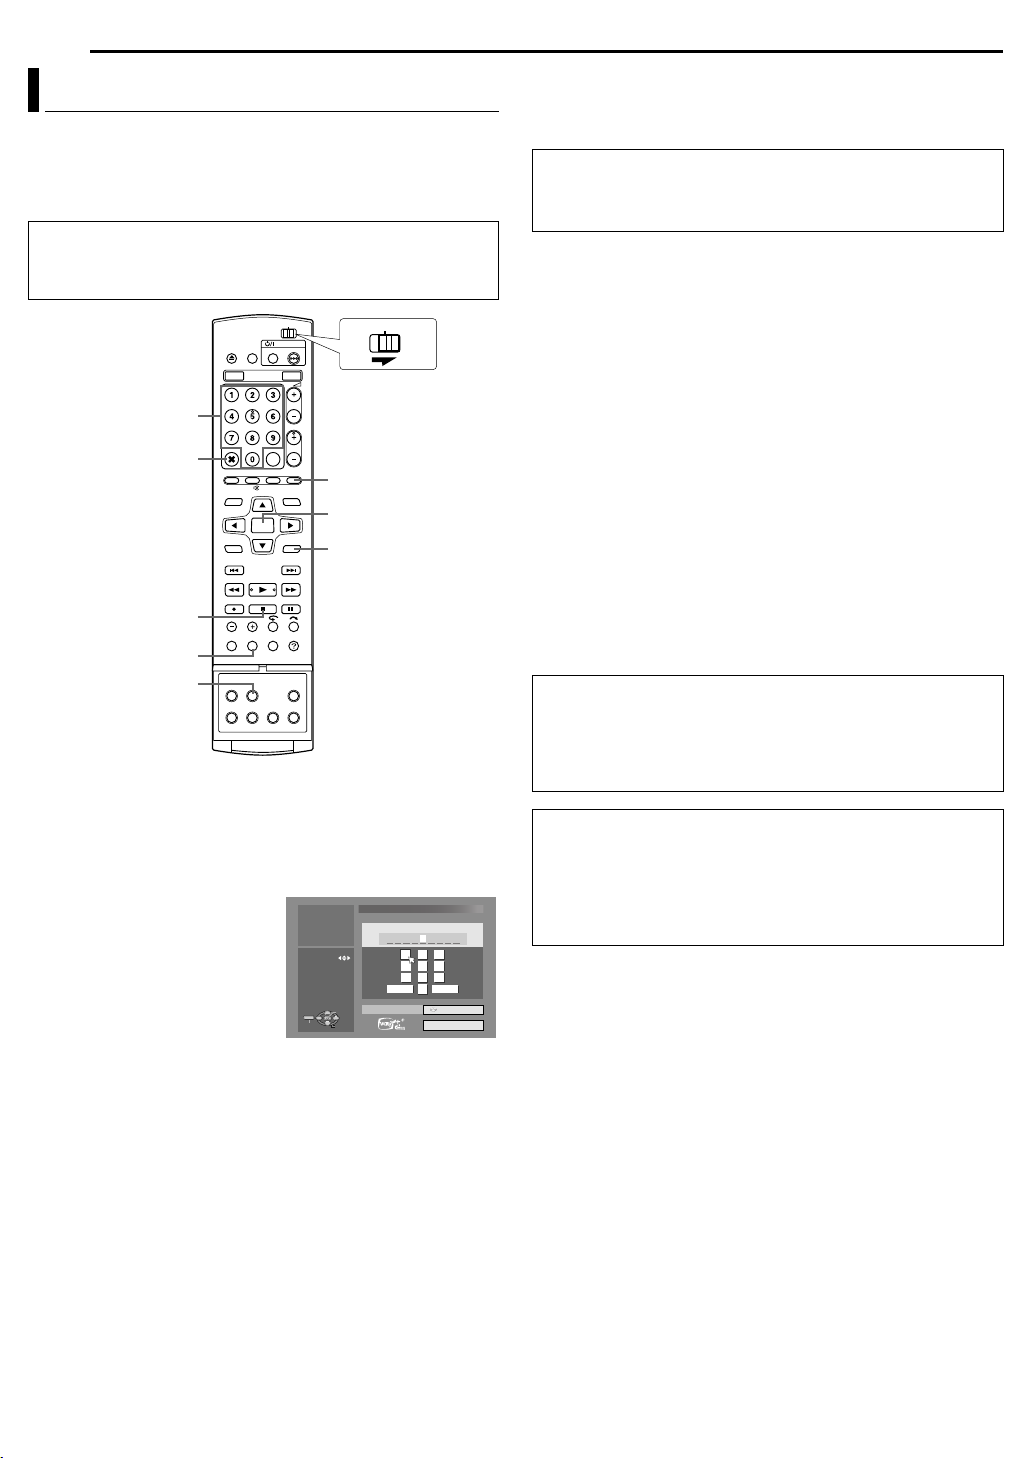
46 EN
TIMER RECORDING
VCR Plus+® Timer Programing
You can program this unit to timer-record as many as 32 programs.
With the VCR Plus+ system, timer programing is greatly simplified
because each TV program has a corresponding code number
which your unit is able to recognize.
You can use the remote control to enter the PlusCode number.
● Make sure that the unit’s built-in clock is set properly.
● Turn on the unit.
● Turn on the TV and select the AV mode.
● Slide the TV/CABLE/DBS/DVD switch to DVD.
CABLE/DBS
DVDTV
0 – 9
CANCEL
PROGRAM
ENTER
RETURN
CLEAR
DISPLAY
VPS/PDC#
1 Load a recordable disc if recording to DVD.
2 Press PROGRAM to access the program top screen.
3 Press rtw e to select “VCR PLUS+”, then press ENTER.
● When “PROGRAM FULL DELETE UNWANTED TIMER
PROGRAMS” appears on the TV screen, you need to cancel some of
the reserved programs. (墌 pg. 49)
4 Press the number keys to
enter the VCR Plus+ number of a
program you wish to record.
OR
Press rtw e to select the
desired number key on the
screen, then press ENTER.
SELECT WITH [ ]
THEN PRESS [ENTER]
PRESS [PROGRAM]
TO EXIT
PROGRAM
Repeat to enter all needed
numbers.
5 Press rt to select “RECORD TO”, then press ENTER. Press
rt to select the desired recording deck, then press ENTER.
6 Press rtw e to select “CONFIRM”, then press ENTER.
● If the number you entered is invalid, “PLUSCODE NO. ERROR
CONFIRM PLUSCODE NO. THEN RETRY” appears on the TV
screen. Input a valid PlusCode number.
● If “GUIDE PROGRAM IS NOT SET SET GUIDE PROGRAM THEN
RETRY” appears on the TV screen, set Guide Channel Numbers
manually. (墌 pg. 70)
1
1
3
PROGRAM > VCR PLUS+ (1/2)
3
2
2
2
PLUS CODE NO.
1234
3
12
456
789
DELETE
DELETE ALL
0
RECORD TO
ENTER
EXIT
SELECT
CONFIRM
DVD
7 The PlusCode number you entered and the matching timer-
recording information are displayed on the TV screen. Check the
program data.
● To cancel this setting, press RETURN.
IMPORTANT:
Make sure the channel position number you wish to record is
displayed; if not, see “Changing VCR Plus+® Setting” (墌 pg. 70) and
set the Guide Channel number correctly.
8 Press rt to select the desired recording option as required.
Press rt to select the desired setting, then press ENTER.
● “INPUT TITLE” (墌 pg. 52, “Modify Title Name”)
● “CATEGORY” (墌 pg. 53, “Modify Category”)
● “WEEKLY/DAILY” (墌 pg. 47, “Weekly/Daily Recording”)
● “REC MODE” (墌 pg. 37, “Recording Mode”)
9 Press rt to select “OK”, then press ENTER to access the
Program Confirmation screen.
10 Press we to select “EXIT”, then press ENTER to complete
timer programing.
● To program another timer, press we to select “CONTINUE”, then
press ENTER.
● If “PROGRAM OVERLAPPED” appears on the TV screen, see
page 49.
NOTES:
● There may be cases that the VCR Plus+ Timer Programing function
prolongs the stop time of the programing.
● When two successive programs are recorded on a DVD-RW disc with
the VCR Plus+ Timer Programing function, the beginning of the
second one may be left off the recording.
● If the copy limited program is received during timer-recording, the unit
enters Record Pause mode. Recording starts again if it is switched to
a recordable broadcast during the time you programed.
IMPORTANT:
If you have moved to a different area or if a broadcasting station’s
channel number has been changed, the wrong channel number will
be displayed on the VCR Plus+ program screen in step 7. When this
happens, set the correct Guide Channel number for that station.
(墌 pg. 70, “Changing VCR Plus+® Setting”)
Cable Box and DBS Receiver Users
To timer-record a satellite broadcast using the VCR Plus+
system:
A Perform “Cable Box and/or DBS Receiver Control Setting”
(墌 pg. 24).
B Perform “VCR Plus+
C Leave the cable box or DBS receiver’s power on.
®
Timer Programing” (墌 pg. 46).
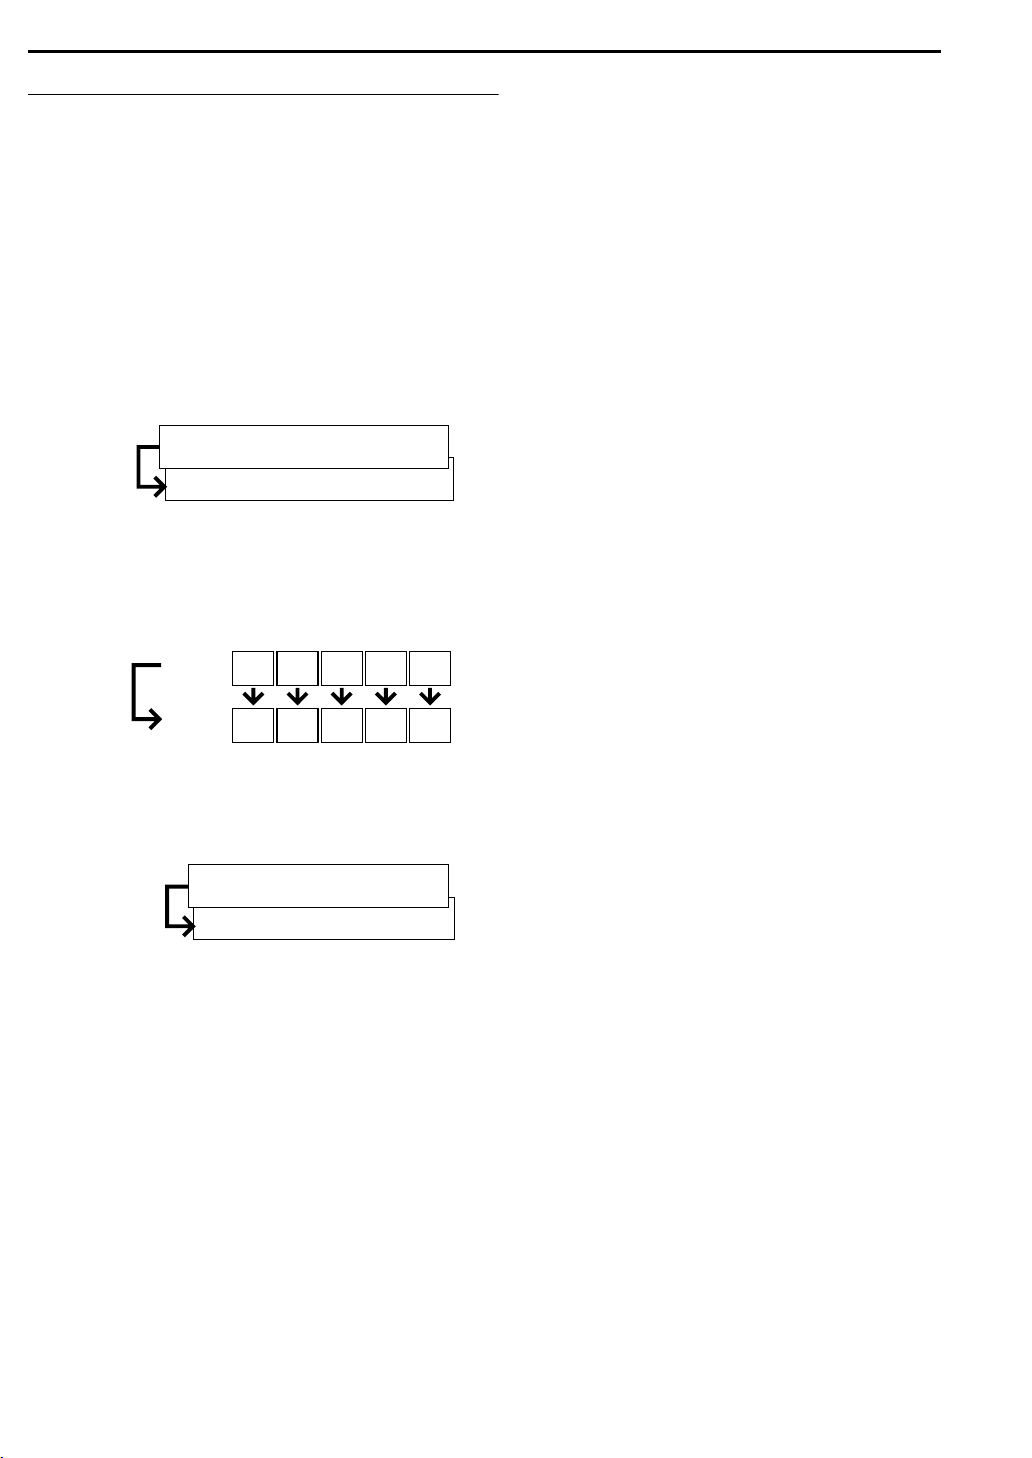
Weekly/Daily Recording
You can record programs with one of the following weekly/daily
timer settings.
For the HDD deck
When you select a mode other than ONCE, the space on the hard
disk drive is saved for new recordings by overwriting previous
recordings. To prevent loss of a needed recording, backup
programs you wish to save by dubbing them to DVD discs before
overwriting previous recordings. Or save the title of weekly/daily
programs to avoid overwriting of a previous week/day. (墌 pg. 49)
ONCE (One Time Recording)
In this mode a program will not be automatically overwritten.
WEEKLY (OVERWRITE) (Weekly Recording/Weekly Overwrite)
When the set weekly program is broadcast, the program recorded
last week is automatically deleted and overwritten by the new
program. Save the title of each program you wish to save, then the
recorded program is saved and will not be overwritten by the new
program.
This week’s drama
Overwritten
MON–SUN (FOR A WEEK)/ MON–SAT (FOR A WEEK)/ MON–FRI
(FOR A WEEK) (Daily Recording/Weekly Overwrite)
When the set weekly program is broadcast, the program recorded
on the same day last week is automatically deleted and overwritten
by the new program. Save the title of each program you wish to
save, then the recorded program is saved and will not be
overwritten by the new program.
This
Overwritten
week
Last
week
MON–SUN (OVERWRITE)/ MON–SAT (OVERWRITE)/ MON–FRI
(OVERWRITE) (Daily Recording/Daily Overwrite)
When the set daily program is broadcast, yesterday’s program is
automatically deleted and overwritten by the new program. Save
the title of each program you wish to save, then the recorded
program is saved and will not be overwritten by the new program.
Last week’s drama
MON TUE WED THU FRI
MON TUE WED THU FRI
TIMER RECORDING
EN 47
Overwritten
For the DVD deck
Tue sd ay ’s program
Monday’s program
ONCE (One Time Recording)
WEEKLY (Weekly Recording)
MON–SUN/ MON–SAT/ MON–FRI (Daily Recording)

48 EN
TIMER RECORDING
Manual Timer Programing
You can program this unit to timer-record as many as 32 programs.
If you do not know the VCR Plus+ number for the program you
wish to record, use the following procedure to set your unit to
timer-record the program.
● Make sure that the unit’s built-in clock is set properly.
● Turn on the unit.
● Turn on the TV and select the AV mode.
● Slide the TV/CABLE/DBS/DVD switch to DVD.
CABLE/DBS
DVDTV
AUX
ENTER
1 Load a recordable disc if recording to DVD.
2 Press PROGRAM to access the program top screen.
3 Press rtw e to select “CALENDAR PR.”, then press ENTER.
● When “PROGRAM FULL DELETE UNWANTED TIMER
PROGRAMS” appears on the TV screen, you need to cancel some of
the reserved programs. (墌 pg. 49)
4 Press rtw e to select the desired date, then press ENTER.
5 Press rt to select “RECORD
TO”, then press ENTER. Press
rt to select the desired
recording deck, then press
ENTER.
PROGRAM
rtwe
SELECT WITH [ ]
THEN PRESS [ENTER]
PRESS [PROGRAM]
TO EXIT
PROGRAM
EXIT
2
PROGRAM > CALENDAR PROG. (2/3)
01/08/03 WED 10:30PM - 11:00PM DBS 100
ENTER
SELECT
[MISC. ] XP
HDDRECORD TO
10:30PMSTART
11:00PMSTOP
DBSSOURCE
100CH
O K
6 Press rt to select “START”, then press ENTER. Press rt to
set the desired start time, then press ENTER.
● Each press of rt advances/goes back the start time in 1-min.
increments.
● To advance/go back the start time in 30-min. increments, press and
hold rt.
7 Press rt to select “STOP”, then press ENTER. Press rt to
set the desired stop time, then press ENTER.
● Each press of rt advances/goes back the stop time in 1-min.
increments.
● To advance/go back the stop time in 30-min. increments, press and
hold rt.
8 Press rt to select “SOURCE”, then press ENTER. Press rt
to select the desired source, then press ENTER.
9 Press rt to select “CH”, then press ENTER. Press rt to
select the desired channel.
10 Press rt to select “CONFIRM”, then press ENTER.
11 Set the other recording options as required.
● Refer to step 8 in “VCR Plus+® Timer Programing” (墌 pg. 46).
12 Press rt to select “OK”,
then press ENTER to access the
Program Confirmation screen.
13 Press we to select “EXIT”,
then press ENTER to complete
timer programing.
● To program another timer, press
we to select “CONTINUE”,
then press ENTER.
● If “PROGRAM OVERLAPPED” appears on the TV screen, see
page 49.
NOTES:
● When two successive programs are recorded on a DVD-RW disc with
Manual Timer Programing function, the beginning of the second one
may be left off the recording.
● If the copy limited program is received during timer-recording, the unit
enters Record Pause mode. Recording starts again if it is switched to
a recordable broadcast during the time you programed.
Cable Box and DBS Receiver Users
To timer-record a satellite broadcast using Manual Timer
Programing:
A Perform “Cable Box and/or DBS Receiver Control Setting”
(墌 pg. 24).
B Perform “Manual Timer Programing” (墌 pg. 48).
C Leave the cable box or DBS receiver’s power on.
Relief Recording
When a program that is set for the DVD deck cannot be recorded
properly, the program is recorded to the HDD deck instead in the
same recording mode as set.
● If the remaining capacity of the hard disc is not sufficient, the
program is recorded to the DVD deck until the remaining capacity
of the DVD disc lasts.
● If “JUST” is selected for the recording mode, the current recording
mode for the DVD deck is applied.
SELECT WITH [ ]
THEN PRESS [ENTER]
PRESS [PROGRAM]
TO EXIT
PROGRAM
ENTER
EXIT
SELECT
2
PROGRAM > CALENDAR PROG. (3/3)
01/08/03 WED 10:30PM - 11:00PM DBS 100
MON-FRI (FOR A WEEK)WEEKLY/DAILY
O K
[EDUCATION]GARDENING FR360
1:00 28:00
GARDENINGINPUT TITLE
EDUCATIONCATEGORY
FR360REC MODE

TIMER RECORDING
EN 49
ENTER
CABLE/DBS
PROGRAM
rtwe
Check Programs
DVDTV
To check the whole list of programs
1 Press PROGRAM to access the program top screen.
2 Press rtw e to select “PROGRAM LIST”, then press ENTER.
● The details of a selected program appear on the top of the screen.
● The daily program of a title is listed as one program.
To check the list of programs by date
1 Press PROGRAM to access the program top screen.
2 Press rtw e to select “CALENDAR LIST”, then press
ENTER.
3 Press rt to select the desired date, then press ENTER.
Cancel And Change Programs
● Repeat steps in “Check Programs” to select a program before
proceeding.
To cancel the program
1 Press rtw e to select “CANCEL”, then press ENTER.
To modify the program settings
1 Press rtw e to select “MODIFY”, then press ENTER.
2 Change the settings of the desired recording options as
required.
● Refer to steps 4 – 13 in “Manual Timer Programing” (墌 pg. 48).
To skip the weekly/daily programs to the next week/day
It is easy to temporarily cancel weekly/daily programs of a week/
day.
1 Press rtw e to select “PROGRAM SKIP”, then press ENTER.
2 Press we to select “SKIP”, then press ENTER twice.
To save the titles of weekly/daily programs (HDD Deck Only)
Use this function to avoid overwriting titles of weekly/daily
programs of a previous week/day.
1 Press rtw e to select “TITLE SAVE”, then press ENTER.
2 Press we to select “SAVE”, then press ENTER twice.
NOTE:
This function is available only when the remaining capacity of the hard
disc is sufficient.

50 EN
A
TIMER RECORDING
Automatic Satellite Program Recording
This function allows you to automatically record a satellite program
which is timer-programed on your external DBS receiver. Connect
a DBS receiver to the unit’s AUDIO/S-VIDEO/VIDEO INPUT (L-1)
connectors and program the timer on the DBS receiver. The unit
starts or stops recording by the signals input from the DBS
receiver. After recording, the unit’s power shuts off automatically.
● You can also connect the cable box if it has a timer.
TTENTION:
● Be sure not to turn on the DBS receiver before the program is
executed; otherwise, the unit will start recording when the DBS
receiver’s power is turned on.
● If you have connected another appliance other than a DBS
receiver to the AUDIO/S-VIDEO/VIDEO INPUT (L-1) connector, be
sure not to engage the Automatic Satellite Program Recording
mode; otherwise, the unit will star t recording when the connected
appliance’s power is turned on.
● Automatic Satellite Program Recording and timer-recording cannot
be done at the same time.
HDD
CABLE/DBS
DVDTV
HDD
● Make sure the DBS receiver is connected to the unit’s AUDIO/
S-VIDEO/VIDEO INPUT (L-1) connectors.
● Program the timer on the DBS receiver.
● Slide the TV/CABLE/DBS/DVD switch to DVD.
1 Press HDD to choose the recording deck.
2 Press REC MODE repeatedly to set the recording mode.
3 Press and hold REC LINK for about 2 seconds to engage the
Automatic Satellite Program Recording mode. “R-LK” appears on
the front display panel.
NOTES:
● To disengage the Automatic Satellite Program Recording mode,
press REC LINK.
● If the unit’s power is off, it is not possible to engage the Automatic
Satellite Program Recording mode.
● In step 3, if “R-LK” blinks quickly on the front display panel even
though your DBS receiver’s power is off, Automatic Satellite Program
Recording will not work properly with that DBS receiver*. If this is the
case, perform “Manual Timer Programing” (墌 pg. 48) to timer-record
a satellite program.
* Some DBS receivers output signals even if the power is off. Automatic
Satellite Program Recording is not possible with those DBS receivers.
● “R-LK” blinks on the front display panel while Automatic Satellite
Program Recording is in progress.
● For timer programing of the DBS receiver, refer to the instruction
manual of the DBS receiver.
● Automatic Satellite Program Recording is not possible if your DBS
receiver does not have a timer.
● Pressing the unit’s 1 button while Automatic Satellite Program
Recording is in progress turns off the unit’s power and disengages
the Automatic Satellite Program Recording mode.
● If there are more than one satellite programs you wish to record with
Automatic Satellite Program Recording, it is not possible to set
different recording modes for each program.
● Depending on the type of DBS receiver, the unit may not record a
slight portion of the beginning of the program or may record slightly
longer than the actual length of the program.
● If you engage the Automatic Satellite Program Recording mode when
the DBS receiver’s power is on, the unit will not start Automatic
Satellite Program Recording even though “R-LK” blinks on the front
display panel. When the DBS receiver shuts off once and is turned
back on again, the unit starts recording.
● You can also record a program from your cable system in the same
way if the system has a timer.
REC MODE
SAT#

Library Database Navigation
The Library Database Navigation enables you to search and select
the desired titles recorded on the HDD deck and the DVD deck
very easily.
You can record up to 99 titles on a disc.
Each time a title is recorded, the information of the title is
registered for the Library Database Navigation automatically.
So, you can confirm the information of the titles recorded with the
Library Database Navigation screen. And, you can also select one
of the titles recorded using the Library Database Navigation.
The following screen appears as the Library Database Navigation
screen when you press NAVIGATION. You can move the arrow to
select the desired position on the screen by pressing rt w e on
the remote control.
NAVIGATION > ORIGINAL
0026 143 MIN[FISH WORLD ]
A
B
SELECT WITH [ ]
THEN PRESS [ENTER]
PRESS [NAVIGATION]
TO EXIT
NAVIGATION
25/12/03 THU 10:00 - 10:15
FROG WORLD
ENTER
EXIT
SELECT
C
A Playback screen
(Indicates currently received TV program.)
B Guidance for operations
C Scroll bar
(Appears when there are over nine registered titles (or play
lists). The scroll bar only indicates that there are more titles (or
play lists) hidden off the current screen display. To show hidden
titles (or play lists), press rt w e repeatedly.)
D Recording information for the title indicated by the arrow
E Index list
(Thumbnail still of each title)
Thumbnail still is not to be played back.
F Index
: Indicates no index is registered.
: Indicates title in standby for timer recording.
: Indicates no title is registered.
G Icons
(Indicate the record condition of each title.)
[HOBBY] EP
S
3PR.
D
E
F
G
NAVIGATION
EN 51
Using Library Database Navigation system, you can easily modify
registered information, edit the title or play list, as well as search for
the beginning of each title.
About registration of information
The following information is automatically registered for each title
when ordinary recording or timer recording is performed, then
stored in an area specified on the unit.
● index* (reduced pictures to show program titles)
● program title*
● category*
● date and time
● channel
● recording mode
● length of recording time
The items marked with an asterisk (*) can be easily modified and
registered again after recording by using Library Database
Navigation system.
The limitations of registration
You can register information up to 99 titles for the DVD deck and
200 titles for the HDD deck.
When the amount of information is at the limits of registration, you
cannot record new titles any more. In this case, you need to delete
old titles to register new one. (墌 pg. 53)
NOTES:
● Once a DVD-R/RW (Video mode) disc has been finalized, the
displays for original and play list do not appear. Only display for
library appears.
● When you move the title recorded on HDD to DVD, the icon will be
changed to .
● Sound of received channel may be interrupted while the Library
Database Navigation screen is displayed.
● The order of thumbnail images which are displayed by pressing
DUBBING differs from the images displayed by pressing
NAVIGATION or EDIT.
● You cannot perform timer recording during editing the thumbnail
images or play lists by pressing
EDIT. Press EDIT to clear the
Editing screen before performing timer recording.
The Icons and their meanings
This title is write-protected.
S
This title has stereo sounds.
This title was recorded with timer recording.
W
D
D
NEW
This title is Weekly Recording/Weekly Overwrite.
This title is Daily Recording/Daily Overwrite.
This title is Daily Recording/Weekly Overwrite.
This title has not been played back.
This title is copy-protected.
This title was just once recordable (copy-once
title).

52 EN
A
NAVIGATION
Scan For Beginning Of Title
● Turn on the TV and select the AV mode.
● Slide the TV/CABLE/DBS/DVD switch to DVD.
● Press HDD or DVD to choose the corresponding deck.
● Load a DVD disc to scan.
CABLE/DBS
DVDTV
HDD DVD
MEMO
ENTER
CLEAR
8
You can scan the beginning of the title easily with the Library
Database Navigation.
1 Press NAVIGATION. The Library Database Navigation screen
appears.
2 Press rt w e to select “ORIGINAL”, then press ENTER.
3 Press rt w e to select the
index (small pictures) of the
desired title, then press ENTER.
● When you want the plural titles to
be played back continuously, press
MEMO after selecting the desired
title. The numbers of the playback
order appear on the index. You
can select up to 8 titles.
● When you want to correct the
order, move the arrow to the desired index and press MEMO. The
number disappears and the unit re-numbers the other programs
automatically.
● When you want to cancel the order, press CLEAR (8).
4 Press we to select
“BEGINNING”, then press ENTER.
● To repeat playback of a selected
title, press we to select
“REPEAT”, then press ENTER.
● To resume playback from the point
where playback was previously
stopped, press we to select
“RESUME”, then press ENTER.
5 Press 9 to pause playback.
● To resume normal playback, press 4.
6 Press 8 to stop playback.
NAVIGATION
rtwe
4
9
SELECT WITH [ ]
THEN PRESS [ENTER]
PRESS [NAVIGATION]
TO EXIT
NAVIGATION
EXIT
SELECT WITH [ ]
THEN PRESS [ENTER]
PRESS [NAVIGATION]
TO EXIT
NAVIGATION
EXIT
0026 143 MIN[FISH WORLD ]
12/26/02 THU 10:00AM - 10:15AM
FROG WORLD
ENTER
SELECT
BEGINNING
ENTER
SELECT
NAVIGATION > ORIGINAL
NAVIGATION > ORIGINAL
12/26/02 THU
10:00AM - 10:15AM
FROG WORLD
SELECT HOW TO PLAY BACK
RESUME REPEAT
[HOBBY] EP
TV
[HOBBY]
3TV
SP
S
3
Modify Original Information
● Turn on the TV and select the AV mode.
● Slide the TV/CABLE/DBS/DVD switch to DVD.
● Press HDD or DVD to choose the corresponding deck.
● Load a DVD disc to modify.
TTENTION:
It is not possible to modify discs recorded on DVD units from other
manufacturers.
Modify Index
1 Press EDIT. The Editing screen appears.
2 (DVD deck only) Press rt w e to select “MODIFY” under
“ORIGINAL/PLAY LIST”, then press ENTER.
3 Press rt w e to select “MODIFY” under “ORIGINAL”, then
press ENTER.
4 Press rt w e to select one title you want to modify, then press
ENTER.
5 Press we to select “INDEX”.
6 Search for the picture from the
title by pressing the appropriate
buttons (3, 4, 5, or 9). The
pictures of the title appear on the
left window.
7 Confirm the arrow is on
“REPLACE”, then press ENTER to
register new index. New index
appears on the right window.
● When you press ENTER with the arrow on “RETURN” you can return
to the previous screen.
S
8 Press EDIT to return to the normal screen.
Modify Title Name
1 Perform steps 1 – 4 of “Modify Index” (墌 pg. 52) before
continuing.
2 Press rt w e to select “NAME”, then press ENTER.
3 Press rt w e to select the
desired letter or command, then
press ENTER. Repeat this
process to complete the name.
● To correct a letter, press rt w e
to select “DELETE”, then press
ENTER.
● You can enter the letters up to 64.
4 Press rt w e to select
“SAVE”, then press ENTER.
5 Press EDIT to return to the normal screen.
EDITING > MODIFY INDEX
12/26/02 THU 10:00AM - 10:15AM
FROG WORLD [OTHERS] SP
0:01:03PROG. 1
SELECT IMAGE TO REPLACE WITH ON REMOTE
A
A
C
C
B
B
B
B
0026 64 MIN[FISH WORLD ]
12/26/02 THU 10:00AM - 10:15AM
FROG WORLD
ENTER
EDIT
EXIT
SELECT
FROG
A B C D E F a b c d e f 1 2 3
G H I J K L g h i j k l 4 5 6
M N O P Q R m n o p q r 7 8 9
S T U V W X s t u v w x 0 + -
Y Z y z * / =
! " # $ % & ; < > ? @ [ | } ~
' ( ) , . : \ ] ^ _ ` {
SELECT WITH [ ]
THEN PRESS [ENTER]
PRESS [EDIT]
TO EXIT
S
3TV
INDEX
RETURNREPLACE
EDITING > MODIFY NAME
W
ORLD
CANCEL DELETE SAVE
[HOBBY] XP
S
3TV

NAVIGATION
EN 53
Modify Category
1 Perform steps 1 – 4 of “Modify Index” (墌 pg. 52) before
continuing.
2 Press rt w e to select “CATEGORY”, then press ENTER.
3 Press rt w e to select the
desired category, then press
ENTER.
4 Press EDIT to return to the
normal screen.
SELECT WITH [ ]
THEN PRESS [ENTER]
PRESS [EDIT]
TO EXIT
EDIT
EXIT
EDITING > MODIFY CATEGORY
0026 64 MIN[FISH WORLD ]
12/26/02 THU 10:00AM - 10:15AM
FROG WORLD
MOVIE MUSIC DRAMA
ANIMATION SPORTS
NEWS WEATHER EDUCATION
ENTER
HOBBY
SELECT
ENTERTAINMENT
[HOBBY] XP
DOCUMENTARY
ART
S
3TV
Protect Title (DVD deck only)
You can protect titles to prevent accidental erasure of the important
titles.
1 Perform steps 1 – 3 of “Modify Index” (墌 pg. 52) before
continuing.
2 Press rt w e to select “PROTECT”, then press ENTER.
3 Press rt w e to select a title you want to protect, then press
ENTER.
4 Press we to select “PROTECT”, then press ENTER. “”
appears.
● To cancel the protection, repeat 3 – 4 again. In step 4, select
“CANCEL PROTECT”, then press ENTER.
5 Press EDIT to return to the normal screen.
NOTE:
All the titles on a disc will be deleted once the disc is formatted even if
they are protected titles. (墌 pg. 53)
Delete Title
You cannot record any more with Library Database Navigation
once the registered titles on the disc reach 99 titles for the DVD
deck and 200 titles for the HDD deck. Deleting unnecessary titles
after dubbing or other operations can increase remaining time and
available recording capacity. (For DVD-R discs, although it is
possible to delete recorded titles, available recording capacity does
not increase.) The deleted title is never resumed. Play lists and title
information in the unit’s library are also deleted.
1 Press EDIT. The Editing screen appears.
2 Press rt w e to select “DELETE” under “ORIGINAL”, then
press ENTER.
3 Press rt w e to select one title you want to delete, then press
ENTER.
4 Press we to select “DELETE”, then press ENTER.
● When you cancel the deletion, select “CANCEL”, then press ENTER.
5 Press EDIT to return to the normal screen.
Delete Unwanted Part Of The Title (DVD deck only)
You can delete unwanted part of the title.
1 Perform steps 1 – 3 of “Modify Index” (墌 pg. 52) before
continuing.
2 Press rt w e to select “DEL SCENE”, then press ENTER.
3 Press rt w e to select one title whose unwanted part you
want to delete, then press ENTER.
4 The playback pictures appear in the window on the screen. The
elapsed playing time starts counting with the arrow on “IN”.
5 Find the point where you want
the deletion to begin, then press
ENTER with the arrow on “IN”.
The edit-in time is fixed and the
elapsed playing time starts
counting again.
6 Find the point where you want
the deletion to end, then press
ENTER with the arrow on “OUT”.
The edit-out time is fixed.
● Press 3, 4, 5, 2, 6 or 9 to find the edit-in and edit-out
points.
7 Press we to select “PREVIEW”, then press ENTER to preview
the edited title.
8 Press we to select “OK”, then press ENTER.
● If you do not want to delete the scene, press EDIT or RETURN.
To modify the points
A Press EDIT or RETURN.
B Repeat steps 4 – 8 as necessary.
9 Press we to select “DELETE”, then press ENTER. The
selected scene is deleted.
● To cancel the deletion, press we to select “CANCEL”, then press
ENTER.
10 Press EDIT to return to the normal screen.
NOTES:
● There may be a discrepancy of several seconds between the scene
you intend to edit, and the scene which is actually edited.
● Available recording capacity may not match the deleted part after
deletion.
EDITING > ORIGINAL/DELETE SCENE
12/22/02 SUN 5:30AM - 8:00AM
RALLY CAR [OTHERS]INSP
PROG. 1
0:01:03
SELECT IMAGE TO REPLACE WITH ON REMOTE
IN OUT PREVIEW OK
OUT
0:05:15
0:06:15
S
12TV

54 EN
A
NAVIGATION
Divide Title
1 Press EDIT. The Editing screen appears.
2 Press rt w e to select “DIVIDE”, then press ENTER.
3 Press rt w e to select a title to divide, then press ENTER.
4 Locate a point to divide by pressing the appropriate buttons
(3, 4, 5, or 9).
5 Confirm the arrow is on “DIVIDE”, then press ENTER at the
dividing point.
● The first picture (start) of the newly created title appears in the
bottom right window.
6 Press we to select “PREVIEW”, then press ENTER.
● The first several seconds of the newly created title is played back,
then the playback pauses at the dividing point.
● To undo the division, press we to select “RETRY”, then press
ENTER. Repeat the above procedure to locate another point to
divide.
7 Press we to select “OK”, then press ENTER.
8 Press EDIT to return to the normal screen.
NOTE:
There may be a discrepancy of several seconds between the scene you
intend to edit, and the scene which is actually edited.
Modify Chapter
You can create and delete chapter marks in titles.
1 Perform steps 1 – 4 of “Modify Index” (墌 pg. 52) before
continuing.
2 Press rt w e to select “CHAPTER”, then press ENTER.
3 Confirm the arrow is on
“MARK”, then press ENTER at
positions you want to mark.
● The newly created chapter is
displayed.
● To undo the marking, press we to
select “RETRY”, then press
ENTER. Repeat the above
procedure to locate another point
to mark.
4 Press 4, and press 3 or 5 to select one chapter you want
to delete, then press 9.
5 Press we to select “ERASE”, then press ENTER.
● The selected chapter is deleted.
● To undo the deletion, press we to select “RETRY”, then press
ENTER. Repeat the above procedure to locate another point to
delete.
6 Press EDIT to return to the normal screen.
NOTE:
There may be a discrepancy of several seconds between the scene you
intend to edit, and the scene which is actually edited.
EDITING > MODIFY CHAPTER
CHAPTER 03/10
0:07:01
01 00: 00: 00 02 00: 05: 30 03 00 :07 :00 04 00 :30 :00
MARK ERASE RETRY RETURN
Modify Play List Information
● Turn on the TV and select the AV mode.
● Slide the TV/CABLE/DBS/DVD switch to DVD.
● Press HDD or DVD to choose the corresponding deck.
● Load a DVD disc to modify.
TTENTION:
It is not possible to modify discs recorded on DVD units from other
manufacturers.
CABLE/DBS
DVDTV
HDD DVD
MEMO
EDIT
ENTER
2
3
CLEAR
8
Play List
It is a collection of the scenes. A play list can be freely edited and
played back without ever changing any original recording data.
Using the random access of a disc (which allows video data to be
instantly read no matter where it is on the disc), a play list includes
information such as the timer counter for the playback start point
and end point, indexes for checking the contents of recorded data,
category information, and more. Playback according to a play list
you have created allows you to enjoy various combinations of
video images from a single title.
NAVIGATION
rtwe
6
4
5
9

NAVIGATION
EN 55
Create Play List
1 Press EDIT. The Editing screen appears.
2 (DVD deck only) Press rt w e to select “MODIFY” under
“ORIGINAL/PLAY LIST”, then press ENTER.
3 Press rt w e to select “CREATE”, then press ENTER.
4 Press rt w e to select a title that includes scenes to be
included in a play list, then press ENTER.
5 The playback pictures appear in the window on the screen. The
elapsed playing time starts counting with the arrow on “IN/OUT”.
6 Find the point where you want
the created play list to begin, then
press ENTER with the arrow on
“IN/OUT”. The edit-in time is fixed
and the elapsed playing time
starts counting again.
7 Find the point where you want
the created play list to end, then
EDITING > PLAY LIST/CREATE TOTAL 00 : 00: 00
PRO. 1
IN TO
IN/OUT MODIFY MOVE PREVIEW
SELECT TITLE DELETE RETRY OK
0:00:15
SCENE PAGE 1 / 1
1 PRO. 1
2
3
4
5
6
7
8
press ENTER with the arrow on
“IN/OUT”. The edit-out time is fixed.
● Press 3, 4, 5, 2, 6 or 9 to find the edit-in and edit-out
points.
● The edit-out point must come after the edit-in point.
8 Press rt w e to select “PREVIEW”, then press ENTER to
preview the play list.
9 Press rt w e to select “OK”, then press ENTER. The play list
is created.
To modify the points
A Press we to select “MODIFY”, then press ENTER.
B Repeat steps 5 – 9 as necessary.
10Press we to select “EXIT”, then press ENTER to return to the
normal screen.
NOTES:
● There may be a discrepancy of several seconds between the scene
you intend to edit, and the scene which is actually edited.
● The title, index and category of the play list can be modified in the
same way as “ORIGINAL”. (墌 pg. 52)
● You can modify the play list that has just been created here by
adding, moving, or deleting unwanted parts to create a digest edition,
etc.
Edit Scenes
1 Press EDIT. The Editing screen appears.
2 Press rt w e to select “MODIFY” under “PLAY LIST”, then
press ENTER.
3 Press rt w e to select a play list to modify, then press
ENTER.
4 Press rt w e to select “SCENE”, then press ENTER.
5 Press rt w e to select “MODIFY”, then press ENTER.
6 Press rt w e to select a scene to modify, then press ENTER.
7 Perform steps 5 – 10 in “Create Play List” (墌 pg. 55).
Add scenes
1 Perform steps 1 – 3 in “Edit Scenes” (墌 pg. 55) before
continuing.
2 Press rt w e to select “SELECT TITLE”, then press ENTER.
3 Perform steps 4 – 10 in “Create Play List” (墌 pg. 55).
Move Scenes
1 Perform steps 1 – 3 of “Edit Scenes” (墌 pg. 55) before
continuing.
2 Press rt w e to select “MOVE”, then press ENTER.
3 Press rt to select a scene to move, then press ENTER.
4 Press rt to select another scene to which the scene is to be
moved, then press ENTER.
● To cancel the move, press rt w e to select “RETRY”, then press
ENTER.
5 Perform steps 8 – 10 in “Create Play List” (墌 pg. 55).
Delete Scenes
1 Perform steps 1 – 4 of “Create Play List” (墌 pg. 55) before
continuing.
2 Press rt w e to select “DELETE”, then press ENTER.
3 Press rt to select a scene to delete, then press ENTER.
4 Perform steps 8 – 10 in “Create Play List” (墌 pg. 55).
Play Back Play List
1 Press NAVIGATION. The Library Database Navigation screen
appears.
2 Press rt w e to select “PLAY LIST”, then press ENTER.
3 Press rt w e to select the
index (small pictures) of the
desired play list, then press
ENTER.
● When you want the plural play lists
to be played back continuously,
press MEMO after selecting the
desired play lists. The numbers of
the playback order appear on the
index. You can select up to 30 play lists.
● When you want to correct the order, move the arrow to the desired
index and press MEMO. The number disappears and the unit renumbers the other play lists automatically.
● When you want to cancel the order, press CLEAR (8).
SELECT WITH [ ]
THEN PRESS [ENTER]
PRESS [NAVIGATION]
TO EXIT
NAVIGATION
EXIT
4 Press we to select “BEGINNING”, then press ENTER. The
playback starts.
5 Press 9 to pause playback.
● To resume normal playback, press 4.
6 Press 8 to stop playback.
ENTER
SELECT
NAVIGATION > PLAY LIST
[FISH WORLD ]
0026
026 CREATED 26/12/03 FRI
TEDDY BEAR 25/12
001 002 003
004 005 006
007 008 009
143 MIN
[MOVIE]

56 EN
NAVIGATION
Delete Play List
1 Press EDIT. The Editing screen appears.
2 Press rt w e to select “DELETE” under “PLAY LIST”, then
press ENTER.
3 Press rt w e to select one play list you want to delete, then
press ENTER.
4 Press we to select “DELETE”, then press ENTER.
● When you cancel the deletion, select “CANCEL”, then press ENTER.
5 Press EDIT to return to the normal screen.
NOTE:
Even if a play list is deleted, the titles recorded and the library
information are not affected at all.
Modify Index
A Perform steps 1 – 3 of “Edit Scenes” (墌 pg. 55) before
continuing.
B Perform steps 5 – 8 of “Modify Index” (墌 pg. 52).
Modify Play List Name
A Perform steps 1 – 3 of “Edit Scenes” (墌 pg. 55) before
continuing.
B Perform steps 2 – 5 of “Modify Title Name” (墌 pg. 52).
Modify Category
A Perform steps 1 – 3 of “Edit Scenes” (墌 pg. 55) before
continuing.
B Perform steps 2 – 4 of “Modify Category” (墌 pg. 53).
Modify Library Information
Title information can be registered in the unit’s memory for up to
600 DVD discs, 2,000 titles. It is helpful when finding a desired title
(or play list) by sorting according to the sort options registered
during (or after) recording.
● Turn on the TV and select the AV mode.
● Slide the TV/CABLE/DBS/DVD switch to DVD.
● Press HDD or DVD to choose the corresponding deck.
CABLE/DBS
DVDTV
HDD DVD
ENTER
NAVIGATION
rtwe
Scan For Title From Library
1 Press NAVIGATION. The Library Database Navigation screen
appears.
2 Press rt w e to select the
appropriate sort button to sort the
information, then press ENTER.
“DATE” : Sort by date
“DISC No.” : Sort by disc number
“CATEGORY” : Sort by category
“NAME” : Sort by name
● “DATE” and “DISC No.” are available
for the DVD deck only.
SELECT WITH [ ]
THEN PRESS [ENTER]
PRESS [NAVIGATION]
TO EXIT
NAVIGATION
EXIT
ENTER
SELECT
NAVIGATION
DVD NAVIGATION
ORIGINAL PLAY LIST.
DVD LIBRARY
DATE DISC No.
AA
CATEGORY
NAME
3 Press rt w e to select the desired title, then press ENTER.
● Playback begins automatically after the selected title is located.
NOTE:
If a disc registered in the library is recorded or modified on DVD units
from other manufacturers, it may become impossible to operate
properly.
Register Disc
When a disc that is not registered in the library is loaded, a
message appears confirming if the disc should be registered. If
registering, perform the following procedure.
1 Press we to select “REGISTER”, then press ENTER to confirm
the registration.
2 Press NAVIGATION to return to the normal screen.
NOTES:
● It is not possible to register discs formatted on devices other than
JVC’s DVD recorders.
● It is not possible to register discs recorded on devices other than
JVC’s DVD recorders.
● It is not possible to register discs when “SAVE AS LIBRARY” is set to
“OFF”. (
墌 pg. 68)

NAVIGATION
EN 57
Playback With MP3/WMA/JPEG Navigation
This unit can play back discs that MP3/WMA sound files and JPEG
image files taken with digital still cameras or other devices are
recorded.
The MP3/WMA/JPEG Navigation enables you to search and select
the desired files recorded on CD-R/RW or CD-ROM discs very
easily.
NAVIGATION > ORIGINAL
GROUP : 001/100 TRACK : 001/100
IT’S SHOWTIME! !/ B’z
ROOT
CLASSIC
CLUB
DANCE
EUROPE
FOREIGN GROUP
FOREIGN ROCK
001.
IT’S SHOWTIME! !/ B’z
002.
ONLY FLOWER IN THE WORLD/SMAP
003.
SEXY GUY/GOMAKI
004.
HEY?/AYAYA
005.
DOOR TO TOMORROW/I WISH
REASON/ASAMI
006.
007.
DIE ANOTHER DAY/JAMES BOND
A Selected group number/total number of groups on the disc
B Selected file number/total number of files in the group that
contains the selected file
C Elapsed time (MP3 only)
D Name of the selected file
E Group name
F Selected file
NOTE:
If there are more than 100 files the rest files are not displayed. In such a
case, press ON SCREEN to display them on the TV screen.
0:07:01
Locating The Desired Group And Tracks
1 Load a disc.
2 Press NAVIGATION.
3 Press rt w e to select “ORIGINAL”, then press ENTER.
4 Press rt to select the desired
group, then press ENTER.
● A list of files in the selected group
appears.
5 Press rt to select the desired
item, then press ENTER. The unit
starts playback from the selected
item.
● The unit stops when all items in
the selected group are played
back.
NOTES:
● If you press SELECT (4) instead
of ENTER in step 4, the unit starts playback from the first file of the
group.
● JPEG files are played back as a slide show at the set intervals.
(墌 pg. 35)
● If a file name includes any 2-byte character, the unit may not show
the file name correctly.
● The order of the groups and items shown in steps 4 and 5 may differ
from the order shown on your PC.
NAVIGATION > ORIGINAL
GROUP : 001/100 TRACK : 001/100
IT’S SHOWTIME! !/ B’z
ROOT
CLASSIC
CLUB
DANCE
EUROPE
FOREIGN GROUP
FOREIGN ROCK
GROUP : 001/100 TRACK : 001/100
IT’S SHOWTIME! !/ B’z
ROOT
CLASSIC
CLUB
DANCE
EUROPE
FOREIGN GROUP
FOREIGN ROCK
NAVIGATION > ORIGINAL
001.
IT’S SHOWTIME! !/ B’z
002.
ONLY FLOWER IN THE WORLD/SMAP
003.
SEXY GUY/GOMAKI
004.
HEY? /AYAYA
005.
DOOR TO TOMORROW/I WISH
REASON/ASAMI
006.
007.
DIE ANOTHER DAY/JAMES BOND
001.
IT’S SHOWTIME! !/ B’z
002.
ONLY FLOWER IN THE WORLD/SMAP
003.
SEXY GUY/GOMAKI
004.
HEY? /AYAYA
005.
DOOR TO TOMORROW/I WISH
REASON/ASAMI
006.
007.
DIE ANOTHER DAY/JAMES BOND
0:07:01
0:07:01

58 EN
EDITING
Dubbing
● Turn on the unit.
● Turn on the TV and select the AV mode.
● Slide the TV/CABLE/DBS/DVD switch to DVD.
DUBBING
ENTER
CABLE/DBS
MARK
rtwe
ON SCREEN
NOTES:
● Play lists are dubbed as programs.
● In Video mode, if the selected play list includes the scenes recorded
in the different transfer rate, the dubbing is performed in the highest
transfer rate of the scenes in the selected play list.
● It is not possible during dubbing to play back on HDD or DVD or to set
timer-programing.
DVDTV
Just Dubbing (From HDD To DVD)
By using Just Dubbing function, when dubbing all selected original
recordings and/or play lists, the unit automatically sets the
appropriate recording mode depending on the combination of the
total time of the selected recordings and/or play lists to be dubbed
and the available disc space.
1 Load a recordable disc.
2 Press DUBBING to access the Dubbing Menu screen.
3 Press rtw e to select “JUST”, then press ENTER.
4 Perform steps 4 – 5 of “High Speed Dubbing (From HDD To
DVD )”.
NOTES:
● Play lists are dubbed as programs.
● In Video mode, if the selected play list includes the scenes recorded
in the different transfer rate, the dubbing is performed in the highest
transfer rate of the scenes in the selected play list. However, the
lower transfer rate cannot be dubbed in the higher transfer rate.
● It is not possible during dubbing to play back on HDD or DVD or to set
timer-programing.
NOTE:
It is not possible to dub simultaneously when timer-programing is set.
Select either dubbing or timer-programing.
High Speed Dubbing (From HDD To DVD)
It is possible to dub the original recordings and/or play lists on the
HDD deck to DVD discs. The dubbing is performed in high speed,
keeping the original transfer rate.
NOTES:
● After accessing the Dubbing Menu screen, it is not possible to take
out a disc.
● It is not possible to dub copy-once titles in Video mode.
● When the dubbing is finished, the data will be moved from HDD to
DVD.
● When you cancel dubbing a copy-once title during dubbing, the
original recording on the HDD deck remains and the title copied to a
DVD disc is deleted.
● It is not possible to dub play lists which contain copy-once titles.
● It is not possible to dub the following programs to DVD-R/RW disc
(Video mode):
• which contains more than one audio language.
• which is on the play list.
• which is edited (also Live Memory Recording).
• which is recorded in LP mode or FP155-FP240 mode.
● Recording may not be performed in the highest speed depending on
the characteristics of the disc used.
1 Load a recordable disc.
2 Press DUBBING to access the Dubbing Menu screen.
3 Press rtw e to select “HIGH SPEED”, then press ENTER.
4 Press rtw e to select indexes (small pictures) of desired
original recordings and/or play lists, then press MARK. After
selecting all indexes you want to dub, press ENTER.
● You can select up to 8 original recordings and/or play lists.
5 Press we to select “EXECUTE” or “AUTO POWER OFF”, then
press ENTER. The dubbing screen appears for 5 seconds. To
display the dubbing screen again, press ON SCREEN.
EXECUTE: Select this to continue the dubbing operations.
AUTO POWER OFF: Select this to continue the dubbing operations
and turn off the unit after dubbing. While the dubbing screen is
displayed, you can also select this mode by pressing DUBBING.
CANCEL: Select this to cancel dubbing operation.

Manual Dubbing (From HDD To DVD)
It is possible to perform dubbing in the desired transfer rate.
1 Load a recordable disc.
2 Press DUBBING to access the Dubbing Menu screen.
3 Press rtw e to select “MANUAL”, then press ENTER.
4 Perform step 4 of “High Speed Dubbing (From HDD To DVD)”.
The Manual Dubbing screen appears.
5 Press rt to select “REC MODE”, then press ENTER. Press
rt to select the desired option, then press ENTER. The
confirmation screen appears.
NOTES:
● In Video mode, if the selected play list includes the scenes recorded
in the different transfer rate, the dubbing is performed in the highest
transfer rate of the scenes in the selected play list. However, the
lower transfer rate cannot be dubbed in the higher transfer rate.
● It is not possible during dubbing to play back on HDD or DVD or to set
timer-programing.
Original Dubbing (From DVD To HDD)
It is possible to dub the original recordings on DVD discs to the
HDD deck.
1 Load a disc you want to dub.
2 Press DUBBING to access the Dubbing Menu screen.
3 Press rtw e to select “TITLE”, then press ENTER.
4 Press rtw e to select indexes (small pictures) of desired
original recordings and/or play lists, then press MARK. After
selecting all indexes you want to dub, press ENTER.
● You can select up to 8 original recordings and/or play lists.
5 Press rt to select “EXECUTE” or “AUTO POWER OFF”, then
press ENTER to start dubbing.
EXECUTE: Select this to continue the dubbing operations.
AUTO POWER OFF: Select this to continue the dubbing operations
and turn off the unit after dubbing.
CANCEL: Select this to cancel dubbing operation.
6 Press we to select “EXECUTE”, then press ENTER for
confirmation. The dubbing screen appears for 5 seconds.
NOTES:
● It is not possible to dub play lists on DVD discs.
● It is not possible to dub pre-recorded DVD VIDEO discs.
EDITING
About Disc Remaining Display
The unit displays the time information for dubbing by bar meter. By
comparing the disc remaining time and the necessary time for
dubbing of the selected items, it is possible to check if the dubbing
can be performed completely or not.
When performing the High Speed Dubbing
Capacity of a disc Remaining capacity
Dark green: Length of already recorded item
Light green: Length of selected item
Yellow: Length of the item now being selected by arrow
Red: Excess over the capacity
When performing the Just Dubbing
● The unit displays the status on the assumption that the selected
items are dubbed in the lowest transfer rate.
● The total time of a loaded disc is displayed on the right of the bar
meter.
When performing the Manual Dubbing
● The unit displays the status on the assumption that the selected
items are dubbed in the lowest transfer rate.
● The available highest transfer rate is displayed on the right of the bar
meter.
NOTE:
The bar meter moves up and down regularly, but this is not a
malfunction.
EN 59
21%
TOTAL 105MIN
MAX FR240
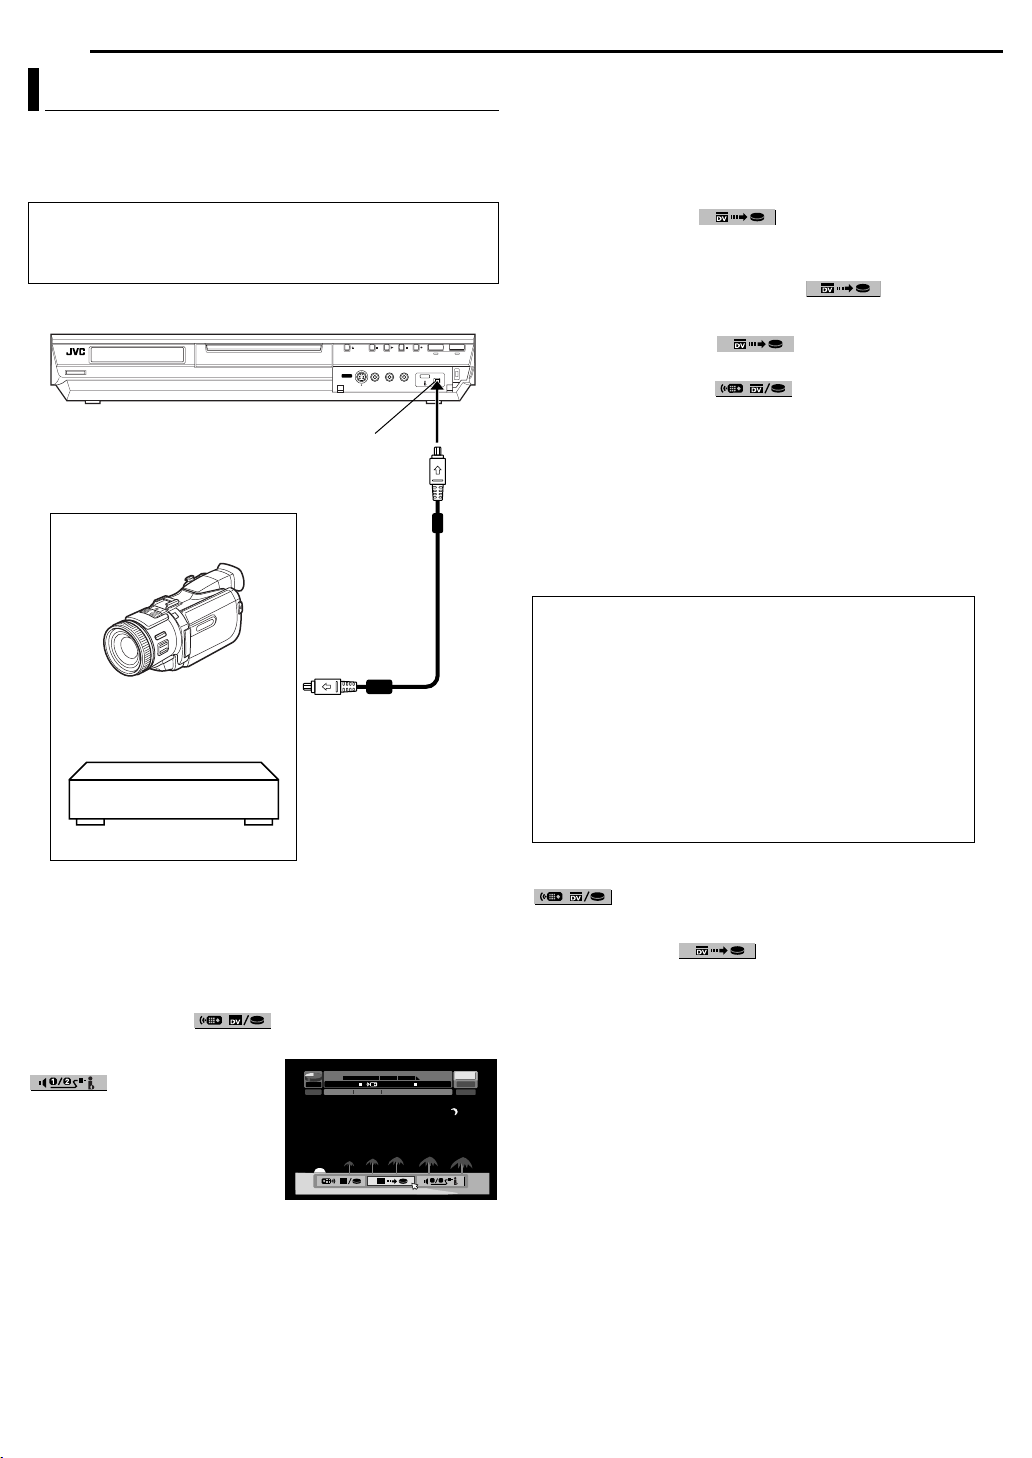
60 EN
EDITING
DV Dubbing
You can dub programs from a camcorder or DV equipment
connected to the unit with a DV cable. The unit’s remote control
allows you the limited control of the connected camcorder or DV
equipment functions during dubbing.
NOTES:
● Use the DV cable VC-VDV 204U for connection.
● When you connect a PC to the DV IN connector, we do not assure
the normal operation of this unit.
Your unit
DV IN connector
Camcorder
DV connector
DV equipment
DV cable
(VC-VDV 204U)
(not provided)
8 Locate the point from where you want to start dubbing, then
stop or pause playback by pressing the following buttons on the
remote control: 4, 5, 3, 8, 9
● To play back in slow speed (1/10 of the normal speed), press 9 to
pause playback, then press 3 or 5.
● To play back frame-by-frame, press 9 to pause playback, then press
9 repeatedly. Each press of 9 advances a frame.
● To change the playback direction, press 3 or 5.
9 Press we to select , then press ENTER. The
dubbing starts.
● Playback on the external DV equipment and recording on the unit
should start simultaneously.
● To pause dubbing, press we to select , then press
ENTER. Both the unit and the external DV equipment pause dubbing.
Pressing 9 on the unit also works the same way.
10 Press we to select , then press ENTER. Then
press 8. The DV equipment stops.
11 Press we to select , then press ENTER.
12 Press 8 twice on the remote control to stop dubbing.
● Both the unit and the external DV equipment stop dubbing.
NOTES:
● Dubbing copyright guarded programs is not possible.
● Original DV informations such as the recording date and time are not
recorded.
● The superimposed indication during the operation or dubbing is not
recorded.
● If the dubbing is paused while the channel is set to “DV”, you cannot
switch channels.
When you dub from DV equipment other than a
camcorder
A Perform step 1 to 4.
B Locate the point from where you want to start dubbing,
then stop on the DV equipment.
● If you pause the DV equipment in this step, a few second’s
still picture will be recorded at the beginning of the recorded
program.
C Set the input mode to “DV INPU T ” on the DV equipment.
● If you select an input mode other than “DV INPU T”, unwanted
pictures may be recorded at the beginning of the recorded
program.
D Perform step 9 to 12.
1 Connect a camcorder or DV equipment to the DV IN connector
on the unit’s front panel.
2 Press HDD.
3 Press CH +/– to set the channel to “DV”.
4 Press ON SCREEN.
● The on-screen display for DV dubbing appears.
5 Press we to select , then press ENTER to display
the remote icon (facing to the right) for the DV equipment.
6 Press we to select
, then press ENTER
repeatedly until the desired sound
HDD
00:00: 00. 00
FR360
12bit
0:00 1:00 2:00
GR-DV3500DV
JVC
GR-DV3500
00:00: 00. 00
L – R
SOUND1
DV
track appears on the TV screen.
AUDIO 1: Select this to record the
original stereo sound played
back on the connected DV
equipment.
DV DV
1 2
AUDIO 2: Select this to record the
dubbed stereo sound played back on the connected DV
equipment.
MIX: Select this to record the sound of both “AUDIO 1” and
“AUDIO 2”.
● Note that this selection is not available when the source program is
recorded in 16BIT (48 kHz) mode.
7 Press REC MODE repeatedly to set the recording mode.
To skip unwanted part of the source picture
Press ENTER to stop both equipment, then press we to select
.
Locate the point where you want to restart dubbing by pressing 4,
5, or 3, then press 8.
Press we to select , then press ENTER to restart
dubbing.
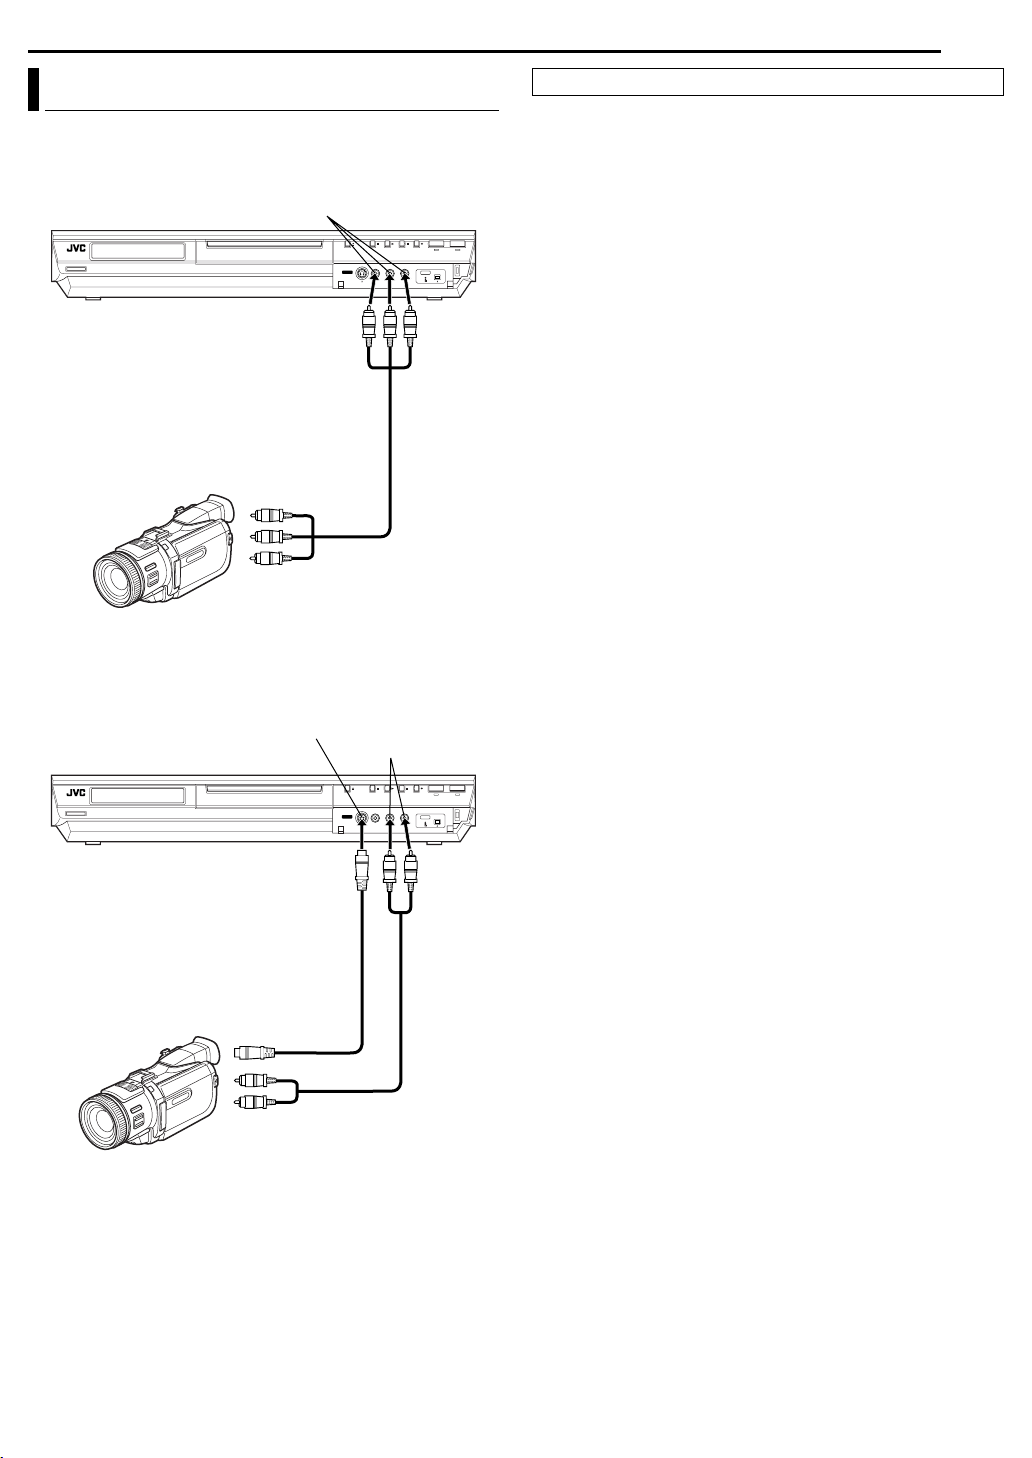
EDITING
EN 61
Edit From A Camcorder
You can use a camcorder as the source player and your unit as the
recording deck.
A If the camcorder has no S-VIDEO output connector:
AUDIO/VIDEO input
Recorder
Audio/video cable
(not provided)
AUDIO/VIDEO OUT
Player
● Slide the TV/CABLE/DBS/DVD switch to DVD.
1 Make connections.
A If the camcorder has no S-VIDEO output connector:
— connect the camcorder’s AUDIO/VIDEO OUT connectors to the
unit’s AUDIO/VIDEO input connectors on the front panel.
● When using a monaural camcorder, connect its AUDIO OUT
connector to the AUDIO L input connector on your unit.
B If the camcorder has an S-VIDEO output connector:
— connect the camcorder’s AUDIO OUT and S-VIDEO OUT
connectors to the unit’s AUDIO and S-VIDEO input connectors on
the front panel.
2 Press HDD or DVD repeatedly to select the recording deck.
3 Press CH +/– to select “F-1”.
● Set “FRONT AUX F-1” to “VIDEO” for the VIDEO input connector, or
“S-VIDEO” for the S-VIDEO input connector, depending on the
connector being used. (墌 pg. 68)
4 Press REC MODE repeatedly to set the recording mode.
5 Start playback on the camcorder slightly before the actual point
from where you wish to start dubbing.
6 Press 7 on the unit to start recording. Or press and hold 7 and
press 4 on the remote control. The dubbing starts.
7 Press 8 on the unit, then stop playback on the camcorder.
NOTES:
● All necessary cables can be obtained from your dealer.
● Refer to the camcorder’s instruction manual for operating procedure.
● The quality of dubbed picture becomes poorer than that of the
original.
B If the camcorder has an S-VIDEO output connector:
Recorder
Player
S-VIDEO input
S-video cable
(not provided)
S-VIDEO OUT
AUDIO OUT
AUDIO input
Audio cable
(not provided)

62 EN
EDITING
Edit To Or From Another Recorder
You can use your unit as the source player or as the recording
deck.
NOTE:
When using another recorder as the recording deck, refer to its
instruction manual.
Your unit
L-2
Recorder
TV receiver
Another recorder
Player
1
Slide the TV/CABLE/DBS/DVD switch to DVD.
1 Make connections.
A If another recorder has no S-VIDEO connector, connect the
unit’s AUDIO/VIDEO INPUT connectors to the audio/video output
connectors on another recorder.
B If another recorder has S-VIDEO connector, connect the
AUDIO INPUT and S-VIDEO INPUT connectors to the audio and
S-video output connectors on another recorder.
● If connecting a unit with an S-VIDEO connector, it is recommended to
use an optional S-Video cable to minimize picture degradation while
editing.
2 When using this unit as the recording deck, press HDD or DVD
to select the recording deck.
3 Press CH +/– to select “L-1” or “L-2” depending on the
connectors being used.
● Set “REAR AUX L-1” or “REAR AUX L-2” to “VIDEO” for the VIDEO
input connector, or “S-VIDEO” for the S-VIDEO input connector,
depending on the connector being used. (
墌 pg. 68)
4 When using this unit as the recording deck, press REC MODE
repeatedly to set the recording mode.
5 Engage the Play mode of the source player.
6 Engage the Record mode of the recording deck.
7 Stop recording on the recording deck, then stop playback on the
source player.
NOTES:
● All necessary cables can be obtained from your dealer.
● When you use this unit as the source player for editing, be sure to set
“SUPERIMPOSE” to “OFF” before starting. (墌 pg. 69)

Digital Audio Dubbing
You can dub selected audio from a DVD or Audio CD disc to a
digital audio device.
However, it is not possible to dub copy-protected discs.
● Turn on the TV and select the AV mode.
● Slide the TV/CABLE/DBS/DVD switch to DVD.
Example: Dubbing to an MD
Recorder
Digital audio device
(MD deck, etc.)
EDITING
EN 63
1 Connect the unit and a digital audio device using either an
optional optical cable or an optional coaxial cable.
2 Place a disc on the unit and load an MD on the connected digital
audio device.
3 Select the audio to be dubbed.
4 Start playback slightly before the actual point from where you
wish to start dubbing.
5 Press 9 to pause playback.
6 Select the input mode on the connected digital audio device.
7 Press 4 to start playback on the unit.
8 Start recording on the digital audio device.
9 Stop recording on the digital audio device. Then press 8 to stop
playback on the unit.
NOTE:
There may be a discrepancy of several seconds between where you
intend editing to start, and where it actually starts.
Player
Optical cable
(not provided)
Coaxial cable
(not provided)
DIGITAL OUT (OPTICAL)
L-2L-1
Y
IN
S-VIDEO
P
B
OUT
P
R
COMPONENT
ANTENNA OUTPUT INPUT
L-1 L-2
S-VIDEO
L-1
VIDEO
VIDEO
L-1
LEFT
LEFT
PCM STREAM
AV COMPU LINK
L-2
L-2
AUDIO
AUDIO
RIGHT
RIGHT
DIGITAL OUT
COAXIALOPTICAL
CABLE BOX
DIGITAL OUT (COAXIAL)
Note for connection:
Remove the protection cap from the optical cable.
1
Rear of unit
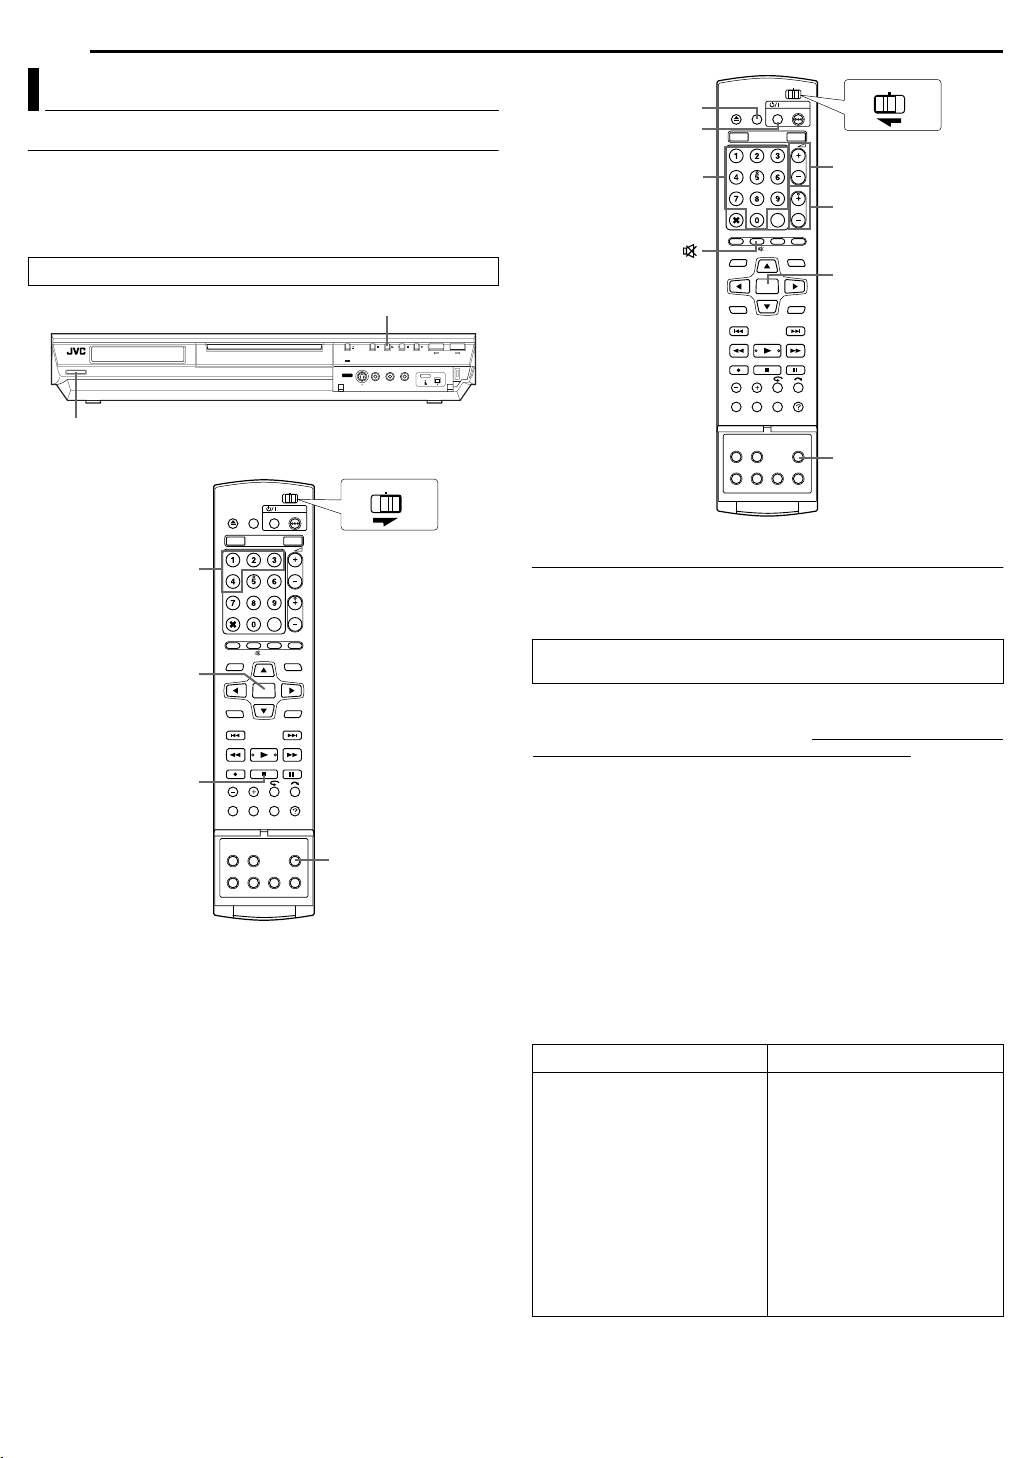
64 EN
REMOTE CONTROL
Remote Control Functions
Remote Control 1/2/3/4 Code Switching
The remote control is capable of controlling four JVC video units
independently. Each of the units can respond to one of four codes
(1, 2, 3 or 4). The remote control is preset to send 3 code signals
because your unit is initially set to respond to 3 code signals. You
can easily modify your unit to respond to 1, 2 or 4 code signals.
Slide the TV/CABLE/DBS/DVD switch to DVD.
4
1
CABLE/DBS
DVDTV
1 – 4
ENTER
8
SET UP
● Keep pressing SET UP down during step 1.
1 Press the number key “1” for 1, “2” for 2, “3” for 3 or “4” for 4
to change the remote control code, then press ENTER.
2 Press 1 on the unit to turn off the unit.
3 Press 4 on the unit for over 5 seconds while the unit is turned
off. The code currently set appears on the front display panel.
4 Press 8 on the remote control to change the unit’s code. The
code currently set on the remote control blinks on the front display
panel for approximately 5 seconds, and is applied to the unit.
NOTE:
When “POWER SAVE” is set to “ON” (墌 pg. 69), it is not possible to
change the remote code.
CABLE/DBS
TV AV/VIDEO
1
0 – 9
TV
TV% +/–
CH +/–
ENTER
SET UP
DVDTV
TV Multi-Brand Remote Control
Your remote control can operate the basic functions of your TV set.
In addition to JVC TVs, other manufacturer’s TVs can also be
controlled.
● Turn off the TV using its remote control.
● Slide the TV/CABLE/DBS/DVD switch to TV.
IMPORTANT:
Although the provided remote control unit is compatible with JVC
televisions, as well as many other models, it may not work with your TV,
or in some instances, may have limited function capability.
● Keep pressing SET UP down during step 1.
1 Enter your TV’s brand code using the number keys, then press
ENTER.
2 Press 1 on the unit’s remote control to turn on the TV and try
operations (墌 step 3).
● Once you have set the remote control to operate the TV, you do not
have to repeat this step until you replace your remote control’s
batteries.
● Some brands of TVs have more than one code. If the TV does not
function with one code, try entering another.
3 Press the corresponding buttons to operate the TV: 1, TV/
VIDEO, CH +/–, TV VOLUME +/–, TV MUTING, number keys.
● For some brands of TVs, you must press ENTER after having
pressed the number keys.
BRAND NAME CODE
JVC
HITACHI
MAGNAVOX
MITSUBISHI
PA N AS O N I C
RCA
SHARP
SONY
SAMSUNG
SANYO
SEARS
TOSHIBA
ZENITH
01, 03
10
02
03
04, 11
05
06
07
12
13
13
08
09

REMOTE CONTROL
EN 65
Cable Box Or DBS Receiver Multi-Brand Remote Control
Your remote control can operate the basic functions of your cable
box or DBS (Direct Broadcast Satellite) receiver set. In addition to
JVC cable boxes or DBS receivers, other manufacturer’s cable
boxes or DBS receivers can also be controlled.
● Slide the TV/CABLE/DBS/DVD switch to CABLE/DBS.
● Keep pressing SET UP down during step 1.
1 Enter your cable box or DBS receiver’s brand code using the
number keys, then press ENTER.
2 Press 1 on the unit’s remote control to turn on the cable box or
DBS receiver and try operations (墌 step 3).
● Once you have set the remote control to operate the cable box or
DBS receiver, you do not have to repeat this step until you replace
your remote control’s batteries.
● Some brands of cable box or DBS receiver have more than one code.
If the cable box or DBS receiver does not function with one code, try
entering another.
3 Press the corresponding buttons to operate the cable box or
DBS receiver: 1, CH +/–, number keys.
● For some brands of cable box, you must press ENTER after having
pressed the number keys.
● The number keys may not function with some cable boxes.
IMPORTANT:
It may not work with your cable box, or in some instances, may have
limited function capability.
NOTES:
● You must set the brand for your remote control and for your Controller
(墌 pg. 24) separately. The list of brands that can be controlled by
your remote control is different from the list of brands that can be
controlled by your controller.
● It’s not possible to operate a cable box or DBS receiver that is not
equipped with a receiving window.
● It’s not possible to set the remote control for both your cable box and
a DBS receiver at the same time. You can only set the remote control
to operate one of these units at a time.
CABLE BOX BRAND CODE
ARCHER
CABLETENNA
CABLEVIEW
CITIZEN
CURTIS
DIAMOND
GC BRAND
GEMINI
GENERAL INSTRUMENTS
HAMLIN
JASCO
JERROLD
NOVAVISION
OAK
PA N AS O N I C
PULSER
RCA
REGAL
REMBRANDT
SAMSUNG
SCIENTIFIC ATLANTA
SIGMA
SL MARX
SPRUCER
STARGATE
TELEVIEW
TOCOM
UNIKA
UNIVERSAL
VIDEOWAY
ZENITH
DBS RECEIVER BRAND CODE
JVC (DISH Network)
ECHOSTAR (DISH Network)
SONY (DSS)
RCA (DSS)
01, 05, 17
01, 17
15, 16, 17, 21, 25
15, 16, 17, 21, 25
02
01, 17
15, 16, 17, 21, 25
15
01, 04, 06, 11, 12, 15, 28
10, 18, 23
15
01, 04, 06, 11, 12, 15, 28
02
07
13, 14
15, 16, 17, 21, 25
13, 14
10, 18, 23
01, 16, 17
05, 16, 24
02
07
05, 16, 17, 24, 25
13, 14
05, 15, 16, 17, 21, 24, 25
05, 16, 24
01, 04, 16
01, 17
16, 17, 25
03, 09, 22
03, 09, 22
51
51
41
40
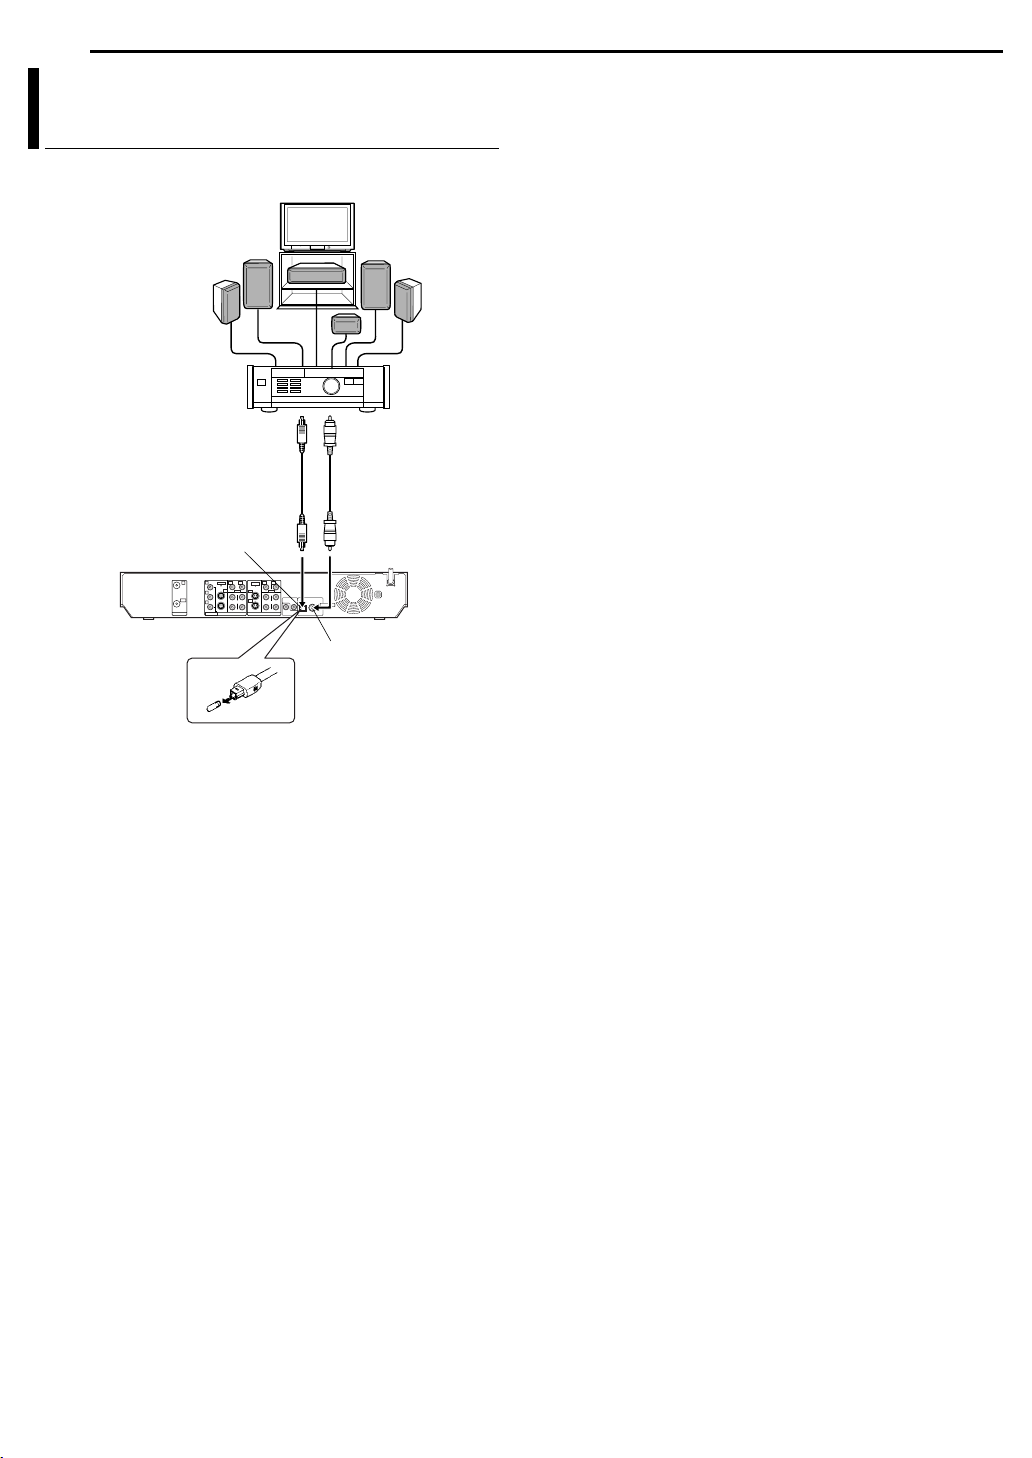
66 EN
SYSTEM CONNECTIONS
Connecting To A Dolby Digital Decoder Or An Amplifier With Built-in DTS
These instructions enable you to connect your unit to a Dolby
Digital Decoder or an amplifier with built-in DTS.
Dolby Digital Decoder or
amplifier with built-in DTS
To DIGITAL AUDIO input
1 Connect the unit and a Dolby Digital Decoder or an amplifier
with built-in DTS using either an optional optical cable or an
optional coaxial cable.
NOTES:
● For Dolby Digital sound, set “DIGITAL AUDIO OUT” to “DOLBY
DIGITAL/PCM”. (墌 pg. 67)
● For DTS sound, set “DIGITAL AUDIO OUT” to “STREAM/PCM”.
(墌 pg. 67)
CAUTIONS:
● This unit has a dynamic range of more than 110 dB with regards to its
Hi-Fi audio capability. It is recommended that you check the
maximum level if you are going to listen to the Hi-Fi audio signals
through a stereo amplifier. A sudden surge in the input level to the
speakers may damage them.
● Some speakers and televisions are specially shielded to prevent
television interference. If both are of the non-shielded type, do not
place the speakers adjacent to the TV set as this can adversely affect
the playback picture.
Optical cable
(not provided)
DIGITAL OUT (OPTICAL)
L-2
Note for connection:
Remove the protection cap from the optical
cable.
Coaxial cable
(not provided)
1
DIGITAL OUT (COAXIAL)

Mode Set
● Turn on the unit.
● Turn on the TV and select the AV mode.
● Slide the TV/CABLE/DBS/DVD switch to DVD.
CABLE/DBS
DVDTV
ENTER
AUDIO
Various modes of this unit are categorized into menus nested in 2
levels shown in the following table. To change the settings of these
modes, find the desired mode in the menu (for details on each
menu, see pages 67 through 68), then follow the procedure below.
DVD VIDEO SET UP LANGUAGE SET (墌 pg. 21)
AUDIO OUTPUT (墌 pg. 67)
PARENTAL LOCK (墌 pg. 36)
DISC PLAY SET UP (墌 pg. 68)
HDD/DVD SET UP
HDD SET UP
DVD SET UP (墌 pg. 68)
DISC SET UP (墌 pg. 71, 72)
FUNCTION SET UP
REC/PLAY SET UP
DISPLAY SET (墌 pg. 69)
VIDEO IN/OUT (墌 pg. 26, 68)
INITIAL SET UP TUNER SET (墌 pg. 23)
STB SET (墌 pg. 24)
CLOCK SET (墌 pg. 22)
● The procedure below shows how to set the desired option of the
“2ND AUDIO REC” mode as an example.
1 Press SET UP to access the Main Menu screen.
2 Press we to select “FUNCTION SET UP”, then press t.
3 Press we to select “REC/PLAY
SET UP”, then press t.
4 Press rt to select “2ND
AUDIO REC”, then press ENTER.
5 Press rt to select the desired
option, then press ENTER.
6 Press SET UP to complete the
setting.
rtwe
SET UP
(墌 pg. 68)
(墌 pg. 68)
DVD VIDEO SET UP INITIAL SET UPHDD/DVD SET UP
XP MODE REC AUDIO
2ND AUDIO REC
JUMP TIME 15MIN
ENTER
SET UP
EXIT
SELECT
FUNCTION SET UP
DISPLAY SETREC/PLAY SET UP VIDEO IN/OUT
SELECT WITH [ ] THEN PRESS [ENTER]
PRESS [SET UP] TO EXIT
DOLBY DIGITAL
OFF
SUBSIDIARY SETTINGS
*The boldface settings below indicate the settings at your purchase.
EN 67
AUDIO OUTPUT
8 DIGITAL AUDIO OUT — DOLBY DIGITAL/PCM / STREAM/
PCM / PCM ONLY
Set to the appropriate mode according to the type of the device
connected to DIGITAL OUT connector.
DOLBY DIGITAL/PCM: Select this when you connect the digital
input connector of a Dolby Digital Decoder or an amplifier with a
built-in Dolby Digital Decoder.
STREAM/PCM: Select this when you connect the digital input
connector of an amplifier with a built-in DTS, Dolby Digital, or
MPEG multichannel decoder.
PCM ONLY: Select this when you connect the linear PCM digital
input of other audio equipment (amplifier, MD or DAT deck, etc.).
NOTES:
● This setting functions also when HDD is active.
● If you watch or play back a title which contains multiple audio
languages, select “PCM ONLY” in advance and choose main or sub
audio with AUDIO.
8 ANALOG AUDIO OUT — STEREO / DOLBY SURROUND
Select the appropriate setting to accommodate the unit to the
connected A/V equipment. This function takes effect when a
DVD VIDEO disc is played back.
STEREO: Select this when listening to conventional two-channel
stereo audio with the unit’s AUDIO OUTPUT connectors
connected to a stereo amplifier/receiver or TV set, or in case you
want to record the audio from a DVD VIDEO disc to a Mini Disc,
etc.
DOLBY SURROUND: Select this when listening to multichannel
surround audio with the unit’s AUDIO OUTPUT connectors
connected to an amplifier/receiver with a built-in surround
decoder or a surround decoder.
8 D. RANGE CONTROL — NORMAL / WIDE RANGE /
TV MODE
The dynamic range (the difference between the loudest sound and
the quietest one) can be compressed during playback of a program
encoded in Dolby Digital format.
This function takes effect when a DVD VIDEO disc recorded in
Dolby Digital format is played back at low or middle volume.
NORMAL: Normally select this setting to activate this function.
WIDE RANGE: Select this to deactivate this function when you
enjoy wide dynamic range program.
TV MODE: Select this when you hear the sound through the TV’s
speaker(s).
NOTES:
● This function takes no effect on programs other than that recorded in
Dolby Digital format.
● This function dose not work when Simulated Surround Effect is
activated. (墌 pg. 34)
● The effect of “NORMAL” and “WIDE RANGE” may not be different
depending on discs.
8 OUTPUT LEVEL — STANDARD / LOW
You can lower the output level of analog audio to accommodate the
unit to the connected A/V equipment.
STANDARD: Normally select this setting.
LOW: The output level of analog audio is lowered.

68 EN
SUBSIDIARY SETTINGS
DISC PLAY SET UP
8 RESUME — OFF / ON / DISC RESUME
When this function is set to “ON” or “DISC RESUME”, you can use
the resume function. (墌 pg. 29)
OFF: You cannot use the resume function.
ON: You can start playback from the resume point of the placed
disc.
DISC RESUME: The unit retains a memory of the resume points of
the last 30 discs played back, even though they have been ejected.
NOTE:
“DISC RESUME” setting works on DVD VIDEO, VCD, SVCD and
already finalized DVD-R/DVD-RW (video mode) discs. For other types
of discs, the function under “ON” setting will be applied even if
“RESUME” is set to “DISC RESUME”.
HDD SET UP
8 LIVE MEMORY — OFF / 30 MIN / 1 HR / 3 HR
When this function is set to “30 MIN”, “1HR” or “3HR”, you can
apply the selected time length to “Temporary recording for Live
Memory” (墌 pg. 43).
DVD SET UP
8 SAVE AS LIBRARY — OFF / ON
When this function is set to “ON”, the recording information is
automatically stored in the library. For details, refer to “Modify
Library Information” (墌 pg. 56).
8 CONTINUOUS PLAY — OFF / ON
When this function is set to “ON”, multiple titles on a disc are
played back continuously one after another.
8 VIDEO MODE RECORDING ASPECT — PRIORITIZE 4:3 /
PRIORITIZE 16:9
This is the setting for the aspect ratio used when you dub titles to
DVD discs in video mode. If the titles you want to dub are recorded
in both 16:9 and 4:3, you must select one aspect ratio.
PRIORITIZE 4:3: If you select “PRIORITIZE 4:3”, even a title
recorded in 16:9 is dubbed in 4:3.
PRIORITIZE 16:9: If you select “PRIORITIZE 16:9”, even a title
recorded in 4:3 is dubbed in 16:9.
8 VIDEO MODE RECORDING AUDIO — MAIN / SUB
This is the setting for the audio channel to be selected when
dubbing titles to DVD discs in video mode. Select either one of the
two settings if the titles to be dubbed have two audio channels.
MAIN: Select this to dub the main channel.
SUB: Select this to dub the sub channel.
8 MP3 & WMA/JPEG — MP3 & WMA / JPEG
You can select files to play back, when both MP3/WMA files and
JPEG files are recorded on a disc.
MP3 & WMA: Select this to play back MP3/WMA files.
JPEG: Select this to play back JPEG files.
REC/PLAY SET UP
8 XP MODE REC AUDIO — DOLBY DIGITAL / LINEAR PCM
You can select the audio format when you record a title in XP
mode. When this function is set to “LINEAR PCM”, you can obtain
a high-quality audio sound.
DOLBY DIGITAL: To record in Dolby Digital format.
LINEAR PCM: To record in Linear PCM format.
8 2ND AUDIO RECORD — OFF /ON
When this function is set to “ON”;
If a SAP program is received, the SAP audio is recorded on L/R
tracks. The main audio is not recorded.
If a non-SAP program is received, the main audio is recorded on
L/R tracks.
When this function is set to “OFF”, the SAP audio cannot be
recorded.
NOTE:
When the channel is changed on the unit;
● The “MONO” indicator appears on the screen for about 5 seconds if
the program is a monaural broadcast.
● The “STEREO” indicator appears on the screen for about 5 seconds
if the program is a stereo broadcast.
● Both “STEREO” and “SAP” indicators appear when a stereo program
is accompanied by SAP sound.
● Both “MONO” and “SAP” indicators appear when the main audio on
the monaural broadcast is accompanied by SAP sound.
8 JUMP TIME — 15 MIN / 30 MIN / 1 HR
You can locate a scene ahead of or behind the currently viewed
one by jumping a selected time interval during playback (or Live
Memory Playback) or recording (or Live Memory Recording). For
details, refer to “Jump Search” (墌 pg. 45)
VIDEO IN/OUT
8 MONITOR TYPE — 4:3LB / 4:3PS / 16:9 AUTO / 16:9 FIX
You can select the monitor type depending on the TV used when
you play back DVD VIDEO discs recorded for wide-screen TVs. For
details, refer to “Monitor Set” (墌 pg. 26).
8 FRONT AUX F-1 — VIDEO / S-VIDEO
Select the appropriate mode depending on the connector (F-1)
being used on the front panel.
VIDEO: To use the VIDEO input connector on the front panel.
S-VIDEO: To use the S-VIDEO input connector on the front panel.
8 REAR AUX L-1 — VIDEO / S-VIDEO
Select the appropriate mode depending on the connector (L-1)
being used on the rear panel.
VIDEO: To use the VIDEO INPUT connector on the rear panel.
S-VIDEO: To use the S-VIDEO INPUT connector on the rear panel.
8 REAR AUX L-2 — VIDEO / S-VIDEO
Select the appropriate mode depending on the connector (L-2)
being used on the rear panel.
VIDEO: To use the VIDEO INPUT connector on the rear panel.
S-VIDEO: To use the S-VIDEO INPUT connector on the rear panel.

SUBSIDIARY SETTINGS
A
EN 69
DISPLAY SET
8 SUPERIMPOSE — OFF / AUTO
When this function is set to “AUTO”, various operational indicators
appear on the TV screen. Messages appear in the selected
language. (墌 pg. 21)
OFF: To turn off superimposed indications.
AUTO: To superimpose operational indications for approximately
five seconds just after the corresponding operation.
NOTES:
● Even when “SUPERIMPOSE” is set to “OFF”, you can display the
various operational indicators by pressing ON SCREEN. To clear the
operational indicators, press ON SCREEN again.
● When you use this unit as the source player for editing, be sure to set
“SUPERIMPOSE” to “OFF” before starting. (墌 pg. 62)
● When you select “AUTO”, during playback, the operation mode
indicators may be disturbed depending on the type of disc being used.
8 BLUE BACK — OFF / ON
When this function is set to “ON”, the TV screen becomes all blue
when receiving a channel not in use.
NOTE:
When you want to receive an unstable channel with poor signals, set
this function to “OFF”.
8 DIMMER — BRIGHT / DIMMED1 / DIMMED2 / OFF
You can change the brightness of the front display panel.
BRIGHT: Normally select this.
DIMMED1/DIMMED2: To change the brightness level. (Blue lamp
on the front display panel becomes dimmer.)
OFF: To dim the front display panel. (Blue lamp on the front display
panel is turned off.)
Scan Mode Set
If you connect the unit and TV with Component Video Connection
(墌 pg. 19), you can select the scan mode from two modes:
Interlaced scan mode which is used in the conventional TV system,
and Progressive scan mode which enables reproduction of higherquality images.
8 Interlaced scan
In the conventional video system, a picture is shown on the display
monitor in two halves. The Interlaced scan system places lines of
the second half of the picture in-between lines of the first half of the
picture.
8 Progressive scan
Progressive scan displays all the horizontal lines of a picture at one
time, as a single frame. This system can convert the interlaced
video from DVD into progressive format for connection to a
progressive display. It dramatically increases the vertical resolution.
TTENTION:
Your TV needs to be compatible with Progressive.
● Turn on the unit.
● Turn on the TV and select the AV mode.
● Slide the TV/CABLE/DBS/DVD switch to DVD.
CABLE/DBS
DVDTV
8 POWER SAVE — OFF / ON
When this function is set to “ON”, you can reduce the power
consumption while the unit is turned off.
NOTES:
● During Power Save mode —
— the front display panel will be turned off.
● Power Save does not work when —
— the unit is in the Timer mode.
— the unit’s power is turned off after timer-recording or Instant Timer
Recording.
— the Automatic Satellite Program Recording mode is engaged.
墌 pg. 50)
(
● It takes some time for the unit to complete initialisation after you turn
on the unit power, with “WAKE UP” blinking on the front display panel.
8 ON SCREEN LANGUAGE
This unit offers you the choice to view on-screen messages in 3
different languages.
For details, refer to “On-screen Language Set” (墌 pg. 21).
PROGRESSIVE SCAN
1 Press PROGRESSIVE SCAN for 3 or more seconds.
● Video output indicator ( ) lights on the front display panel if
Progressive scan mode has been established. (
● Each press of PROGRESSIVE SCAN for 3 or more seconds
switches the scan mode.
NOTES:
● Interlaced scan mode is the setting at your purchase.
● Interlaced scan mode might be suitable depending on video material.
● Scan mode cannot be set while menu screen is displayed.
● When the Progressive scan mode is engaged, no video signal is
output from S-VIDEO OUTPUT connectors and VIDEO/AUDIO
OUTPUT connectors.
墌 pg. 14)
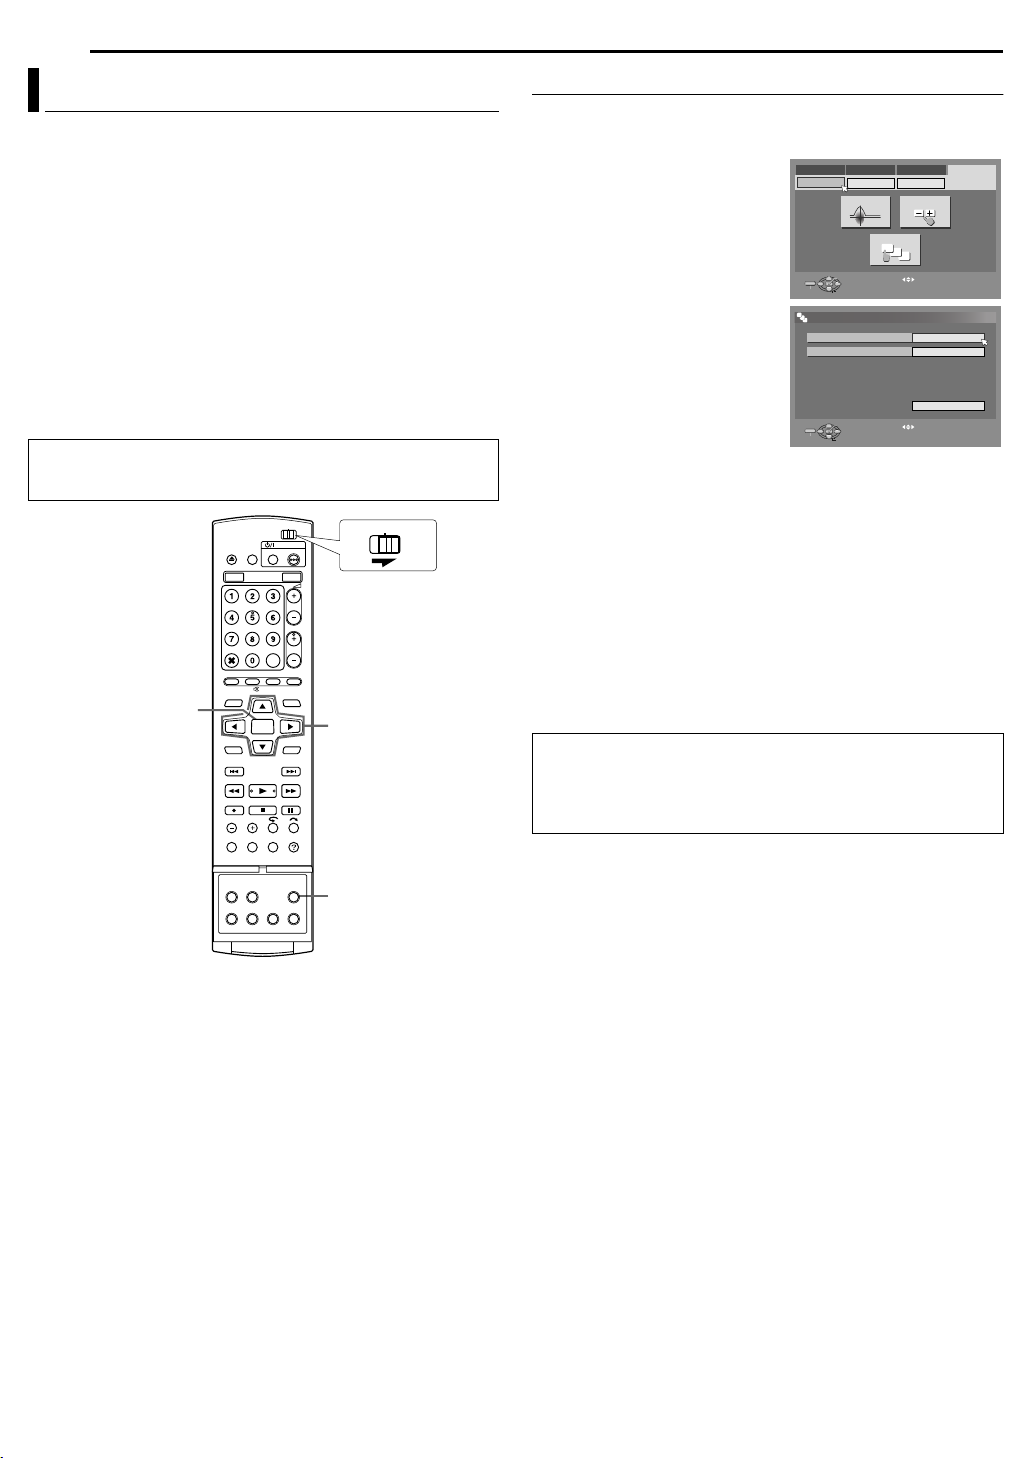
70 EN
SUBSIDIARY SETTINGS
Changing VCR Plus+® Setting
The VCR Plus+ programing system assigns a VCR Plus+ guide
channel to the TV channels and the cable channels. These guide
channel numbers are also called the VCR Plus+ channel codes.
Most TV listings have a section, usually a chart, indicating the
guide channel numbers assigned to each station.
To ensure that VCR Plus+ timer recording operates correctly, it is
necessary to set the “VCR Plus+ Guide Channel” for each station.
If you have moved to a different area or if a broadcasting station’s
channel number has been changed, perform the following steps to
set the correct guide channel number.
NOTES:
● In many instances, the VCR Plus+ guide channel numbers for cable
and broadcast TV stations DO NOT match the channel number on
which it is received by your unit or cable box. Check your TV listing,
or contact your cable supplier for details.
● Many TV stations can be viewed on cable. Check your TV listing, or
contact your cable supplier for details.
● Turn on the unit.
● Turn on the TV and select the AV mode.
● Slide the TV/CABLE/DBS/DVD switch to DVD.
CABLE/DBS
DVDTV
ENTER
rtwe
Guide Channel Number Set
1 Press SET UP to access the Main Menu screen.
2 Press we to select “INITIAL SET UP”, then press t.
3 Press we to select “TUNER
SET”, then press t.
4 Press rt w e to select “GUIDE
CH SET”, then press ENTER.
5 Press rt to select “GUIDE CH”,
then press ENTER.
6 Press rt to select the Guide
Channel number for the desired
station as shown in the TV listings.
Then press ENTER.
● To change the Guide Channel
number in 10 increments, press and
hold rt.
● If you receive your channels with a cable box and if you have properly
set your Controller, “CABLE CH” appears in place of “HDD/DVD CH”.
If not, perform “Cable Box and/or DBS Receiver Control Setting”
(墌 pg. 24).
7 Press rt to select “HDD/DVD CH”, then press ENTER. Press
rt to select the number of the unit’s channel position on which
the Guide Channel Number’s broadcast is received by the unit or
the DBS receiver. Then press ENTER.
● To timer-record a satellite program with the VCR Plus+ system, you
need to install the provided Satellite Controller and perform the
procedure described in “Cable Box and/or DBS Receiver Control
Setting” (墌 pg. 24).
● Repeat steps 5 – 7 as necessary.
8 Press SET UP to complete the setting.
Guide Channel Number
“Guide Channel (GUIDE CH) Number” refers to the assigned TV
station numbers, according to broadcast area, for the VCR Plus+
timer recording. The Guide Channel Numbers can be found in
most TV listings.
DVD VIDEO SET UP INITIAL SET UPFUNCTION SET UPHDD/DVD SET UP
STB SET UP
TUNER SET UP CLOCK SET UP
AUTO CH SET
MANUAL CH SET
GUIDE CH SET
11
12
13
ENTER
SET UP
11
12
13
SET UP
EXIT
EXIT
SELECT
INITIAL SET UP > GUIDE CH SET
GUIDE CH
CABLE CH
ENTER
SELECT
SELECT WITH [ ] THEN PRESS [ENTER]
PRESS [SET UP] TO EXIT
SELECT WITH [ ] THEN PRESS [ENTER]
PRESS [SET UP] TO EXIT
RETURN
1
- -
SET UP

SUBSIDIARY SETTINGS
A
EN 71
Format A Disc (DVD Deck Only)
Some DVD-RAM/RW discs are unformatted.
Format the disc when you use an unformatted disc or you want to
delete all recordings and data on the disc.
TTENTION:
● When a disc is formatted, all recordings and data are erased. It is
impossible to restore them.
● Never turn off the unit or disconnect the AC power cord while
“NOW FORMATTING...” is displayed on the TV screen.
● Turn on the unit.
● Turn on the TV and select the AV mode.
● Slide the TV/CABLE/DBS/DVD switch to DVD.
● Load a DVD-RAM/RW disc to format.
CABLE/DBS
DVDTV
ENTER
rtwe
Format A DVD-RAM Disc
1 Press SET UP to access the Main Menu screen.
2 Press we to select “HDD/DVD SET UP”, then press t.
3 Press we to select “DISC SET
UP”, then press t.
4 Press rt w e to select
“FORMAT”, then press ENTER.
Press we to select “OK”, then
press ENTER.
5 Press we to select “OK”, then
press ENTER.
DVD VIDEO SET UP INITIAL SET UPHDD/DVD SET UP
HDD SET UP
DVD SET UP
FINALIZE
Video
ENTER
SET UP
EXIT
SELECT WITH [ ] THEN PRESS [ENTER]
PRESS [SET UP] TO EXIT
SELECT
FORMAT
FUNCTION SET UP
DISC SET UP
CANC. FINALIZ.
Video
Format A DVD-RW Disc
1 Perform steps 1 to 3 of “Format A DVD-RAM Disc” on the above
before continuing.
2 Press rt w e to select “FORMAT”, then press ENTER. Press
we to choose “VR MODE” or “VIDEO MODE”, then press ENTER
when “DISC WILL BE FORMATTED” appears on the TV screen.
“VR MODE”: To be chosen when you want to record, erase, or
“VIDEO MODE”: To be chosen when you want to erase all the data
3 Press we to select “OK”, then press ENTER.
NOTES:
● It is impossible to format Version 1.0 DVD-RW discs in Video mode.
● It is impossible to format DVD-R discs.
● All the titles on a disc will be deleted once the disc is formatted even if
they are protected titles. (墌 pg. 53)
edit data on the disc repeatedly.
on the disc once played back to record new data,
or play back the disc on other DVD players.
SET UP
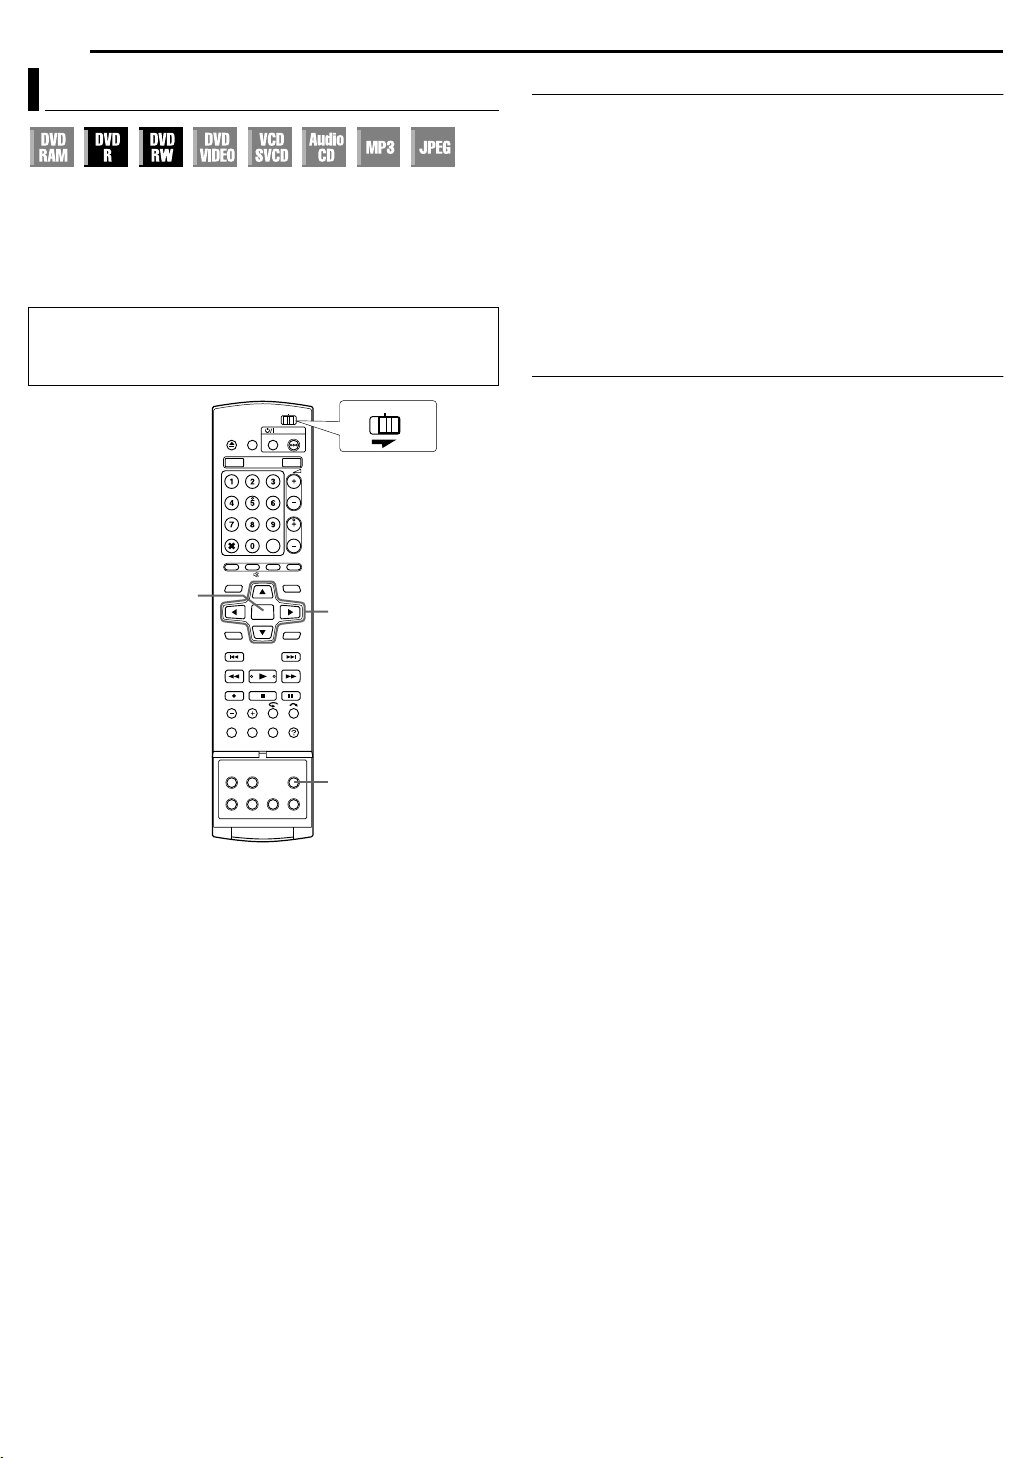
72 EN
SUBSIDIARY SETTINGS
Finalize A Disc (DVD Deck Only)
Finalizing DVD-R/RW discs recorded on this unit makes it possible
for the discs to be played back on other DVD players. DVD-RW
discs are finalized in the mode that the discs were formatted,
enabling playback on compatible DVD players.
Title names input in the Library Database Navigation are
registered as title names in the DVD menu. (墌 pg. 52)
● Turn on the unit.
● Turn on the TV and select the AV mode.
● Slide the TV/CABLE/DBS/DVD switch to DVD.
● Load a DVD-R/RW disc to finalize.
CABLE/DBS
DVDTV
ENTER
rtwe
Finalize A DVD-R/RW Disc
1 Perform steps 1 to 3 of “Format A DVD-RAM Disc” (墌 pg. 71)
before continuing.
2 Press rt w e to select “FINALIZE”, then press ENTER.
Press we to select “OK”, then press ENTER.
3 Press we to select “OK”, then press ENTER.
4 Press SET UP to return to the normal screen.
● Menu screen is cleared.
● Once a DVD-R/RW (Video mode) disc has been finalized, the
displays for original and play list do not appear. Only display for
library appears.
● Once a DVD-RW (VR mode) disc has been finalized, it can be played
on DVD players compatible with VR mode.
Cancel The Finalization Of A DVD-RW Disc
1 Load a DVD-RW disc to cancel the disc finalization, and perform
steps 1 to 3 of “Format A DVD-RAM Disc” (墌 pg. 71) before
continuing.
2 Press rt w e to select “CANC. FINALIZ.”, then press ENTER.
3 Press we to select “OK”, then press ENTER.
4 Press SET UP to return to the normal screen.
● When the disc finalization is cancelled, the mode in which the disc
was formatted is restored, making the disc recordable. (墌 pg. 9, 71)
SET UP
Before finalizing
● It is possible to record on a blank space.
● It is possible to enter title names. (
● It is possible to delete titles. (墌 pg. 53)
● It is impossible to overwrite recorded areas of DVD-R discs.
● Available recording capacity does not increase even if a recorded title
is deleted from a DVD-R disc.
● It is impossible to record or edit DVD-R/RW discs recorded on other
devices even if they have not been finalized.
After finalizing (For DVD-R/RW (Video mode) discs)
● Video and audio that have been recorded by then are recorded in
conformity to the DVD Video standard, enabling you to play back the
discs as DVD VIDEO discs.
● Although DVD-R/RW discs finalized on this unit become playable on
DVD players compatible with DVD-R/RW discs, some discs still may
not play, for which JVC cannot take responsibility.
● Marked points marked before finalizing will be deleted, and titles will
be divided automatically into “chapters” approximately every 5
minutes. (
● Depending on the DVD players and DVD-R/RW discs used, and on
the conditions of recording, it may not be possible to play back the
discs. In this case, play back the discs on this unit.
● Additional recordings become impossible.
墌 pg. 29)
墌 pg. 52)

SUBSIDIARY SETTINGS
EN 73
Help Function
Use this function if you encounter problems while operating this
unit.
● Turn on the unit.
● Turn on the TV and select the AV mode.
● Slide the TV/CABLE/DBS/DVD switch to DVD.
CABLE/DBS
DVDTV
rt
ENTER
2
PREVIOUS
?
Tray Lock (DVD Deck Only)
You can lock the disc tray to prohibit the unwanted disc ejection by
children.
● Turn off the unit.
x
1
8
To lock tray
While the unit is turned off, press and hold 8, then press x on the
unit. “LOCKED” appears on the front display panel and the disc
tray is locked.
To unlock tray
While the unit is turned off, press and hold 8, then press x on the
unit. “UNLOCK” appears on the front display panel.
1 Press ? to access the help screen.
● An INDEX screen that contains the most common needed topics
(headings) relating to the current status appears. Topics with the
icon refer to HDD deck operations and with the icon refer to
those for the DVD deck.
2 Press rt to search for the item that describes the solution to
your problem, then press ENTER.
● The selected help page appears.
● You can also browse help pages by pressing rt.
● To return to a previous page, press RETURN.
3 Press ? to return to the normal screen.
NOTE:
You cannot perform playback, recording, timer recording, or other
normal operations while accessing the help screen.

74 EN
Before requesting service for a problem, use this chart and see if
you can solve the trouble yourself. Small problems are often easily
solved, and this can save you the trouble of sending your unit off
for repair.
TROUBLESHOOTING
Initializing (DVD Deck Only)
Malfunction occurs on the unit.
]Press 1 to turn off the unit, press and hold 1, then press 8
for two seconds or more.
General
No power is supplied to the unit.
● The AC power plug is disconnected from the AC outlet.
]Connect the AC power plug to the AC outlet securely. (墌 pg. 19)
The remote control does not work properly.
]Remove the batteries, wait for 5 minutes or more, then load the
butteries again.
● The setting of the remote control code is inappropriate.
]Set the same remote control code (1, 2, 3, or 4) on both the unit
and the remote control. (墌 pg. 64)
● The batteries are discharged.
]Replace the dead batteries with new ones.
Dubbing from the external equipment is not possible.
● The source (another video recorder, camcorder) has not been
properly connected.
]Confirm that the source is properly connected.
● All necessary power switches have not been turned on.
]Confirm that all units’ power switches are turned on.
● The setting of the input channel position is inappropriate.
]Select the input channel position (“F-1”, “L-1”, or “L-2”) that
corresponds to the input terminal connected to the external
equipment. (墌 pg. 62)
The on-screen display superimposed on the program played
back/received on this unit is recorded when you dub the program
to an external recording equipment.
]Set “SUPERIMPOSE” to “OFF”. (墌 pg. 69)
The unit does not operate.
● There are cases when the operation is prohibited on the disc.
● Lightning or static electricity may cause malfunction of the unit.
]Press 1 to turn the power off, then press the button again to
turn the power on.
Playback (DVD Deck)
The DVD deck cannot be operated.
● The DVD deck is not selected.
]Press DVD so that the DVD lamp lights up on the unit.
Images do not appear on the TV screen.
● The TV receiver’s channel selector is not set to the AV mode.
]Set the TV to its AV mode.
● When interlace scanned program is played back, progressive
scan mode is selected.
]Press and hold PROGRESSIVE SCAN until disappears from
the front display panel. (墌 pg. 69)
Playback dose not start or stop immediately after playback is
started by pressing .
On the front display panel, “NO DISC” appears.
● The disc is loaded upside down.
]Place the disc on the disc tray with the playback surface facing
down. (墌 pg. 10)
● A disc not being compatible with the unit is loaded.
]Load a playable disc on the unit. (墌 pg. 7)
● A dirty disc is loaded.
]Clean the disc. (墌 pg. 11)
● Defective disc is loaded.
]Replace the warped or scratched disc with a normal one.
Images are blurred or distorted when you start High-Speed
Search.
]Images are blurred or distorted at the point where the playback
speed changes and this is not a malfunction of the unit.
Playback does not start.
]Playback does not start for approximately 30 seconds after
recording is stopped and this is not a malfunction of the unit.
Playback does not start when you select a title or a chapter.
● The Parental Lock is engaged and the disc is rated higher than
the set level.
]Release the Parental Lock temporarily or change the set level.
(墌 pg. 36)
Playback (HDD Deck)
The HDD deck cannot be operated.
● The HDD deck is not selected.
]Press HDD so that the HDD lamp lights up on the unit.

TROUBLESHOOTING
EN 75
Recording (DVD Deck)
The desired program cannot be recorded.
● The channel position does not correspond to that in the
receiving area.
]Set the correct channel position for the receiving broadcast.
(墌 pg. 23)
Recording cannot be made.
● No disc or a disc not being compatible with the unit is loaded.
]Load a recordable disc on the unit. (墌 pg. 7)
● The disc loaded is not formatted.
]Format the disc. (墌 pg. 71)
● A finalized DVD-R disc is loaded.
]Recording cannot be made on finalized discs. Load a recordable
disc on the unit.
● The disc is full or does not have enough space for the title to be
recorded.
]Clear unnecessary titles on the disc or load a blank disc.
(墌 pg. 53)
● The DVD-RAM disc loaded has had its protect tab slid to the
protect position.
]Release the protect tab. (墌 pg. 10)
Recording (HDD Deck)
TV broadcasts cannot be recorded.
● “L-1”, “L-2” or “F-1” has been selected as the input mode.
]Set to the desired channel.
Camcorder recording is not possible.
● The camcorder has not been properly connected.
]Confirm that the camcorder is properly connected.
● The input mode is not correct.
]Set the input mode to “F-1”. (墌 pg. 61)
Timer Recording
Timer programing cannot be made.
● Date and time is not correct.
]Set date and time correctly. (墌 pg. 22)
● Timer recording is in progress.
]Timer programing can’t be performed while a timer recording is
in progress. Wait until it finishes.
Timer programing recording does not start.
● Date and time is not correct.
]Set date and time correctly. (墌 pg. 22)
VCR Plus+ Timer Programing cannot be made.
● Date and time set on the unit is not correct.
]Set date and time correctly. (墌 pg. 22)
● The channel position does not correspond to that in the
receiving area.
]Set the correct channel position for the receiving broadcast.
(墌 pg. 23)
The VCR Plus+ system does not timer-record properly.
● The unit’s channel positions have been set incorrectly.
]Refer to “Changing VCR Plus+
reperform the procedure.
Automatic Satellite Program Recording does not start.
● The DBS receiver is not connected properly to this unit.
]Connect the DBS receiver to the AUDIO/VIDEO INPUT (L-1)
connectors properly. (墌 pg. 50)
On the front display panel, “– –:––” appears.
● Power failure occurred.
]Set date and time correctly. (墌 pg. 22)
“PROGRAM FULL” appears on the TV screen during timer
programing.
● 32 programs have already been timer programed.
]Clear unnecessary programs on the unit, then try timer
programing again. (墌 pg. 49)
The disc space does not increase when recorded titles are
cleared.
● The PC’s data recorded on a DVD-RAM drive cannot be cleared
on this unit.
]Format the disc. (When the disc is soiled, wipe the disc with a
soft dry cloth before formatting.) (墌 pg. 11, 71)
®
Setting” (墌 pg. 70) and

76 EN
TROUBLESHOOTING
Other Problems
The image of the TV broadcast appears distorted on the TV
screen.
For AV/S-video connection
]Press PROGRESSIVE SCAN for 3 or more seconds so that the
Video output indicator ( ) lights off on the front display panel.
For component video connection
]Press PROGRESSIVE SCAN for 3 or more seconds so that the
Video output indicator ( ) lights up on the front display panel.
Whistling or howling is heard from the TV during camcorder
recording.
● The camcorder’s microphone is too close to the TV.
]Position the camcorder so its microphone is away from the TV.
● The TV’s volume is too high.
]Turn the TV’s volume down.
When scanning channels, some of them are skipped over.
● Those channels have been designated to be skipped.
]If you need the skipped channels, restore them. (墌 pg. 23)
The channel cannot be changed.
● Recording or Live Memory recording* is in progress.
]Press 9 to pause the recording, change channels, then press 4
to resume recording.
* HDD deck only
Channel settings that were made manually seem to have
changed or disappeared.
● After the manual settings were made, Auto Channel Set was
performed.
]Perform “Manual Clock Set” (墌 pg. 22).
Even though Auto or Semiauto Clock Set has been performed,
the clock is incorrect.
● The clock setting data received from the host channel is
incorrect.
]Select a different host channel during “Semiauto Clock Set”
(墌 pg. 22), or perform “Manual Clock Set” (墌 pg. 22).
On-screen Message
DISC NOT REGISTERED IN THE LIBRARY
REGISTER DISC?
● A disc that is not registered in the library has been inserted.
Register the disc as necessary. (墌 pg. 56)
INSERT DISC XXXX
● Appears when a title that has been selected in the library is not
contained in the loaded disc.
CAN NOT RECORD OR MAKE PLAY LIST
DELETE UNWANTED TITLES
● Recording and/or editing cannot be performed.
● The number of titles exceeds 99.
● The number of play lists exceeds 999.
SET CLOCK BEFORE TIMER PROGRAMING
● To set the timer program, the clock must be set in advance.
(墌 pg. 22)
PROGRAM FULL
DELETE UNWANTED TIMER PROGRAMS
● You can program this unit to timer-record as many as 32
programs. To program more, you need to cancel a timer program
already set. (墌 pg. 49)
DISC NOT LOADED
● Operation has been attempted when a disc is not loaded, or
loaded upside down. (墌 pg. 10)
DISC NOT RECORDABLE
INSERT RECORDABLE DISC
● When a playback-only disc or a finalized disc is loaded, 7 has
been pressed. (墌 pg. 7)

TROUBLESHOOTING
EN 77
PLUSCODE NO. ERROR
CONFIRM PLUSCODE NO. THEN RETRY
● An invalid PlusCode number has been input. (墌 pg. 46)
GUIDE CHANNEL IS NOT SET
SET GUIDE CHANNEL THEN RETRY
● To set the timer program using the VCR Plus+ system, the
Guide Channel Number must be set in advance. (墌 pg. 70)
CAN NOT SET VCR PLUS TIMER PROGRAMING DURING TIMER
RECORDING OR INSTANT TIMER RECORDING
● Appears when you tried to input a PlusCode number during
timer recording or instant timer recording.
REGION CODE ERROR
CHECK DISC
● A disc loaded cannot be played back on this unit since the region
number of the disc does not match that of the unit. (墌 pg. 8)
UNREADABLE DISC
CHECK DISC
● When an incompatible disc is loaded, 4 has been pressed.
(墌 pg. 8)
COULD NOT FORMAT THE DISC
CHECK THE DISC
● Formatting is not complete since the disc may be dirty or
damaged. Take out the disc, clean it and retry. (墌 pg. 11, 71)
CAN NOT FINALIZE THIS DISC
● Finalizing is not complete since the disc may be dirty or
damaged. Take out the disc, clean it and retry. (墌 pg. 11, 72)
CAN NOT CANCEL FINALIZATION
OF THIS DISC
● Cancelling disc finalization is not complete since the disc may be
dirty or damaged. Take out the disc, clean it and retry. (墌 pg. 11,
72)
PRESS [STOP] AGAIN TO STOP RECORDING
● During Live Memory playback, 8 has been pressed. (墌 pg. 44)
TIMER RECORDING COMPLETED
● Timer recording has finished during Live Memory playback.
PLAYBACK WILL STOP
THEN TIMER RECORDING WILL START
● Timer recording finished during Live Memory playback, then the
next timer recording is about to begin while playback continues.
COPY PROHIBITED
CAN NOT RECORD
● An attempt has been made to record copy-protected contents.
● An attempt has been made to record copy-once contents on a
disc that is not CPRM compatible, such as DVD-R.
COPY PROHIBITED
CAN NOT PLAY
● The unit has detected invalid contents at the start or in the
middle of playback.
THE i.LINK DEVICE THAT YOU HAVE CONNECTED IS NOT
RECOGNIZED
MAKE SURE THAT THE DEVICE IS CONNECTED PROPERLY AND
POWERED ON
● An attempt has been made to start DV dubbing when a digital
video camera is not properly connected to the unit.
● Check the connection. (墌 pg. 60)

78 EN
A
SPECIFICATIONS
GENERAL
Power requirement
AC 120 Vd, 60 Hz
Power consumption
Power on: 35 W
Power off: 16.2 W
Temperature
Operating: 5°C to 40°C (41°F to 104°F)
Storage: –20°C to 60°C (–4°F to 140°F)
Operating position
Horizontal only
Dimensions (WxHxD)
435 mm x 70 mm x 345.5 mm (17-3/16" x 2-13/16" x 13-5/8")
Weight
6.1 kg (13.5 lbs)
Input/Output
S-video input:
Y: 0.8 – 1.2 Vp-p, 75 ohms
C: 0.2 – 0.4 Vp-p, 75 ohms
S-video output:
Y: 1.0 Vp-p, 75 ohms
C: 0.3 Vp-p, 75 ohms
Video input: 0.5 – 2.0 Vp-p, 75 ohms (pin jack)
Audio input:
–8 dB, 50 kilohms (pin jack)
Corresponding to mono (left)
Audio output: –8 dB, 1 kilohms (pin jack)
i.Link: 4-pin for DV input
Component video output:
Y: 1.0 Vp-p, 75 ohms
C
B/CR, PB/PR: 0.7 Vp-p, 75 ohms
Corresponding to copy protection
Digital audio output:
Optical: –18 dBm, 660 nm
Coaxial: 0.7 Vp-p, 75 ohms
Corresponding to Dolby Digital and DTS Digital Surround
Bit stream
Selectable in digital audio output setting menu
RCA connectors:
IN x 3, OUT x 2
VIDEO/AUDIO (DVD Deck)
Recording time
Maximum 8 hours (with 4.7 GB disc)
(XP): Approx. 1 hour
(SP): Approx. 2 hours
(LP): Approx. 4 hours
(EP): Approx. 6 hours
(FR): Approx. 1 hour – 8 hours
Audio recording system
Dolby Digital (2 ch)
Linear PCM (XP mode only)
Video recording compression system
MPEG2 (CBR/VBR)
VIDEO/AUDIO (HDD Deck)
Video recording compression system
MPEG2 (VBR)
Audio recording system
Dolby Digital (2 ch)
Linear PCM (XP mode only)
Recording time
DR-MH30S DR-MH20S
HDD capacity 160 GB 80 GB
Recording Time
XP 1 hour Approx. 34 hours Approx. 17 hours
SP 2 hours Approx. 68 hours Approx. 34 hours
LP 4 hours Approx. 136 hours Approx. 68 hours
EP 6 hours Approx. 204 hours Approx. 102 hours
FR480 8 hours Approx. 272 hours Approx. 136 hours
TUNER/TIMER
Channel coverage
VHF: Channels 2 – 13
UHF: Channels 14 – 69
CATV: 113 Channels
Memory backup time
Approx. 60 seconds
ACCESSORIES
Provided accessories
RF cable,
Audio/Video cable,
Satellite Controller,
Infrared remote control unit,
“AA” battery x 2
E.& O.E. Design and specifications subject to change without
notice.
TTENTION:
This unit contains microcomputers. External electronic noise or
interference could cause malfunctioning. In such cases, switch the
unit off and unplug the AC power cord. Then plug it in again and turn
the unit on. Take out the disc. After checking the disc, operate the
unit as usual.

Language Code List
AA Afar IK Inupiak RN Kirundi
AB Abkhazian IN Indonesian RO Rumanian
AF Afrikaans IS Icelandic RU Russian
AM Ameharic IW Hebrew RW Kinyarwanda
AR Arabic JI Yiddish SA Sanskrit
AS Assamese JW Javanese SD Sindhi
AY Aymara KA Georgian SG Sangho
AZ Azerbaijani KK Kazakh SH Serbo-Croatian
BA Bashkir KL Greenlandic SI Singhalese
BE Byelorussian KM Cambodian SK Slovak
BG Bulgarian KN Kannada SL Slovenian
BH Bihari KO Korean (KOR) SM Samoan
BI Bislama KS Kashmiri SN Shona
BN Bengali, Bangla KU Kurdish SO Somali
BO Tibetan KY Kirghiz SQ Albanian
BR Breton LA Latin SR Serbian
CA Catalan LN Lingala SS Siswati
CO Corsican LO Laothian ST Sesotho
CS Czech LT Lithuanian SU Sundanese
CY Welsh LV Latvian, Lettish SW Swahili
DZ Bhutani MG Malagasy TA Tamil
EL Greek MI Maori TE Telugu
EO Esperanto MK Macedonian TG Tajik
ET Estonian ML Malayalam TH Thai
EU Basque MN Mongolian TI Tigrinya
FA Persian MO Moldavian TK Turkmen
FJ Fiji MR Marathi TL Tagalog
FO Faroese MS Malay (MAY) TN Setswana
FY Frisian MT Maltese TO Tonga
GA Irish MY Burmese TR Turkish
GD Scots Gaelic NA Nauru TS Tsonga
GL Galician NE Nepali TT Tatar
GN Guarani OC Occitan TW Twi
GU Gujarati OM (Afan) Oromo UK Ukrainian
HA Hausa OR Oriya UR Urdu
HI Hindi PA Panjabi UZ Uzbek
HR Croatian PL Polish VI Vietnamese
HU Hungarian PS Pashto, Pushto VO Volapuk
HY Armenian PT Portuguese WO Wolof
IA Interlingua QU Quechua XH Xhosa
IE Interlingue RM Rhaeto-Romance YO Yoruba
ZU Zulu
APPENDIX
EN 79

80 EN
APPENDIX
Country/Area Code List for Parental Lock
AD Andorra CK Cook Islands GN Guinea
AE United Arab Emirates CL Chile GP Guadeloupe
AF Afghanistan CM Cameroon GQ Equatorial Guinea
AG Antigua and Barbuda CN China GR Greece
AI Anguilla CO Colombia GS South Georgia and the South
AL Albania CR Costa Rica GT Guatemala
AM Armenia CU Cuba GU Guam
AN Netherlands Antilles CV Cape Verde GW Guinea-Bissau
AO Angola CX Christmas Island GY Guyana
AQ Antarctica CY Cyprus HK Hong Kong
AR Argentina CZ Czech Republic HM Heard Island and McDonald
AS American Samoa DE Germany HN Honduras
AT Austria DJ Djibouti HR Croatia
AU Australia DK Denmark HT Haiti
AW Aruba DM Dominica HU Hungary
AZ Azerbaijan DO Dominican Republic ID Indonesia
BA Bosnia and Herzegovina DZ Algeria IE Ireland
BB Barbados EC Ecuador IL Israel
BD Bangladesh EE Estonia IN India
BE Belgium EG Egypt IO British Indian Ocean Territory
BF Burkina Faso EH Western Sahara IQ Iraq
BG Bulgaria ER Eritrea IR Iran (Islamic Republic of)
BH Bahrain ES Spain IS Iceland
BI Burundi ET Ethiopia IT Italy
BJ Benin FI Finland JM Jamaica
BM Bermuda FJ Fiji JO Jordan
BN Brunei Darussalam FK Falkland Islands (Malvinas) JP Japan
BO Bolivia FM Micronesia
(Federated States of)
BR Brazil FO Faroe Islands KG Kyrgyzstan
BS Bahamas FR France KH Cambodia
BT Bhutan FX France, Metropolitan KI Kiribati
BV Bouvet Island GA Gabon KM Comoros
BW Botswana GB United Kingdom KN Saint Kitts and Nevis
BY Belarus GD Grenada KP Korea, Democratic People’s
BZ Belize GE Georgia KR Korea, Republic of
CA Canada GF French Guiana KW Kuwait
CC Cocos (Keeling) Islands GH Ghana KY Cayman Islands
CF Central African Republic GI Gibraltar KZ Kazakhstan
CG Congo GL Greenland LA Lao People’s Democratic
CH Switzerland GM Gambia LB Lebanon
CI Côte d’Ivoire
KE Kenya
Sandwich Islands
Islands
Republic of
Republic

APPENDIX
LC Saint Lucia NU Niue SZ Swaziland
LI Liechtenstein NZ New Zealand TC Turks and Caicos Islands
LK Sri Lanka OM Oman TD Chad
LR Liberia PA Panama TF French Southern Territories
LS Lesotho PE Peru TG Togo
LT Lithuania PF French Polynesia TH Thailand
LU Luxembourg PG Papua New Guinea TJ Tajikistan
LV Latvia PH Philippines TK Tokelau
LY Libyan Arab Jamahiriya PK Pakistan TM Turkmenistan
MA Morocco PL Poland TN Tunisia
MC Monaco PM Saint Pierre and Miquelon TO Tonga
MD Moldova, Republic of PN Pitcairn TP East Timor
MG Madagascar PR Puerto Rico TR Turkey
MH Marshall Islands PT Portugal TT Trinidad and Tobago
ML Mali PW Palau TV Tuvalu
MM Myanmar PY Paraguay TW Taiwan
MN Mongolia QA Qatar TZ Tanzania, United Republic of
MO Macau RE Réunion UA Ukraine
MP Northern Mariana Islands RO Romania UG Uganda
MQ Martinique RU Russian Federation UM United States Minor Outlying
Islands
MR Mauritania RW Rwanda US United States
MS Montserrat SA Saudi Arabia UY Uruguay
MT Malta SB Solomon Islands UZ Uzbekistan
MU Mauritius SC Seychelles VA Vatican City State (Holy See)
MV Maldives SD Sudan VC Saint Vincent and the
Grenadines
MW Malawi SE Sweden VE Venezuela
MX Mexico SG Singapore VG Virgin Islands (British)
MY Malaysia SH Saint Helena VI Virgin Islands (U.S.)
MZ Mozambique SI Slovenia VN Viet Nam
NA Namibia SJ Svalbard and Jan Mayen VU Vanuatu
NC New Caledonia SK Slovakia WF Wallis and Futuna Islands
NE Niger SL Sierra Leone WS Samoa
NF Norfolk Island SM San Marino YE Yemen
NG Nigeria SN Senegal YT Mayotte
NI Nicaragua SO Somalia YU Yugoslavia
NL Netherlands SR Suriname ZA South Africa
NO Norway ST Sao Tome and Principe ZM Zambia
NP Nepal SV El Salvador ZR Zaire
NR Nauru SY Syrian Arab Republic ZW Zimbabwe
EN 81

82 EN
LIST OF TERMS
A
A-B Repeat Playback ................................................ 33
Adjusting The Picture Quality ..................................... 34
Angle Selection ........................................................ 30
Audio Channel Selection ........................................... 31
Audio Language/Sound Selection ............................... 31
Auto Channel Set ..................................................... 23
Auto Daylight Saving Time ........................................ 22
C
Cancel And Change Programs ................................... 49
Check Programs ....................................................... 49
D
Delete Title .............................................................. 53
Disc menu ............................................................... 28
Disc Remaining Time ...........................................38, 41
Disc Resume ........................................................... 68
Discs For Playback Only ............................................. 8
DVD menu ............................................................... 28
E
Elapsed Recording Time Indication .......................38, 41
F
File Structure Of Discs ................................................ 9
Free Rate Function ................................................... 39
G
Guide Channel Number ............................................. 70
H
High-Speed Search .............................................28, 42
I
Instant Timer Recording (ITR) ...............................38, 41
Interlaced scan ......................................................... 69
J
Jump Search ............................................................ 45
L
Letter Box ................................................................ 26
Live Memory ............................................................ 43
Live Memory Recording ............................................ 45
O
One Touch Replay .............................................. 31, 45
On-screen Bar .......................................................... 32
On-screen Language Set ........................................... 21
P
Pan&Scan ................................................................ 26
Play List ................................................................... 54
Playback Control (PBC) ............................................. 31
Programme Playback ................................................ 35
Progressive scan ...................................................... 69
R
Random Playback ..................................................... 35
Recordable/playable discs ........................................... 7
Recording Medium And Format .................................... 9
Recording Mode ................................................. 37, 40
Recording Resume Function ................................ 37, 40
Region Number .......................................................... 8
Register Disc ............................................................ 56
Relief Recording ....................................................... 48
Repeat Playback ...................................................... 33
Resume Function ..................................................... 29
S
SAP .................................................................. 39, 41
Second Audio Recording ..................................... 39, 41
Select The Switching Interval Of The Slide Show .........35
Setting The Progressive Mode ................................... 35
Simulated Surround Effect ......................................... 34
Skip Search ....................................................... 29, 42
Slow Motion ....................................................... 29, 42
Still Picture/Frame-By-Frame Playback ................. 29, 42
Subtitle Selection ...................................................... 30
T
Temporary Recording ................................................ 43
Time Search ............................................................ 34
Top menu ................................................................ 28
U
Unplayable Discs ........................................................ 8
M
Manual Channel Set ................................................. 23
Marking Positions To Play Back Again Later ................ 29
Menu/Audio/Subtitle Language Set ............................. 21

WARRANTY (Only in U.S.A.)
EN 83
LIMITED WARRANTY USA ONLY
ONLY FOR PRODUCT PURCHASED IN U.S.A. CONSUMER VIDEO 1-90
JVC COMPANY OF AMERICA warrants this product and all parts thereof, except as set forth below ONLY TO THE ORIGINAL
PURCHASER AT RETAIL to be FREE FROM DEFECTIVE MATERIALS AND WORKMANSHIP from the date of original retail purchase
for the period as shown below. (“The Warranty Period”)
THIS LIMITED WARRANTY IS VALID ONLY IN THE FIFTY (50) UNITED STATES, THE DISTRICT OF COLUMBIA AND IN
COMMONWEALTH OF PUERTO RICO.
WHAT WE WILL DO:
If this product is found to be defective, JVC will repair or replace defective parts at no charge to the original owner. Such repair and
replacement services shall be rendered by JVC during normal business hours at JVC authorized service centers. Parts used for
replacement are warranted only for the remainder of the Warranty Period. All products and parts thereof may be brought to a JVC
authorized service center on a carry-in basis except for Television sets having a screen size 25 inches and above which are covered on
an in-home basis.
WHAT YOU MUST DO FOR WARRANTY SERVICE:
Return your product to a JVC authorized service center with a copy of your bill of sale. For your nearest JVC authorized service center,
please call toll free: (800) 252-5722.
If service is not available locally, box the product carefully, preferably in the original carton, and ship, insured, with a copy of your bill of
sale plus a letter of explanation of the problem to the nearest JVC Factory Service Center, the name and location of which will be given
to you by the toll-free number.
If you have any questions concerning your JVC Product, please contact our Customer Relations Department.
WHAT IS NOT COVERED:
This limited warranty provided by JVC does not cover:
1. Products which have been subject to abuse, accident, alteration, modification, tampering, negligence, misuse, faulty installation,
lack of reasonable care, or if repaired or serviced by anyone other than a service facility authorized by JVC to render such service,
or if affixed to any attachment not provided with the products, or if the model number or serial number has been altered, tampered
with, defaced or removed;
2. Initial installation and installation and removal for repair;
3. Operational adjustments covered in the Owner’s Manual, normal maintenance, video and audio head cleaning;
4. Damage that occurs in shipment, due to act of God, and cosmetic damage;
5. Signal reception problems and failures due to line power surge;
6. Video Pick-up Tubes/CCD Image Sensor, Cartridge, Stylus (Needle) are covered for 90 days from the date of purchase;
7. Accessories;
8. Batteries (except that Rechargeable Batteries are covered for 90 days from the date of purchase);
There are no express warranties except as listed above.
THE DURATION OF ANY IMPLIED WARRANTIES, INCLUDING THE IMPLIED WARRANTY OF MERCHANTABILITY, IS LIMITED TO
THE DURATION OF THE EXPRESS WARRANTY HEREIN.
JVC SHALL NOT BE LIABLE FOR ANY LOSS OF USE OF THE PRODUCT, INCONVENIENCE, LOSS OR ANY OTHER DAMAGES,
WHETHER DIRECT, INCIDENTAL OR CONSEQUENTIAL (INCLUDING, WITHOUT LIMITATION, DAMAGE TO TAPES, RECORDS
OR DISCS) RESULTING FROM THE USE OF THIS PRODUCT, OR ARISING OUT OF ANY BREACH OF THIS WARRANTY. ALL
EXPRESS AND IMPLIED WARRANTIES, INCLUDING THE WARRANTIES OF MERCHANTABILITY AND FITNESS FOR
PARTICULAR PURPOSE, ARE LIMITED TO THE WARRANTY PERIOD SET FORTH ABOVE.
Some states do not allow the exclusion of incidental or consequential damages or limitations on how long an implied warranty lasts, so
these limitations or exclusions may not apply to you. This warranty gives you specific legal rights and you may also have other rights
which vary from state to state.
JVC COMPANY OF AMERICA
DIVISION OF JVC AMERICAS CORP.
REFURBISHED PRODUCTS CARRY A SEPARATE WARRANTY, THIS WARRANTY DOES NOT APPLY. FOR DETAILS OF
REFURBISHED PRODUCT WARRANTY, PLEASE REFER TO THE REFURBISHED PRODUCT WARRANTY INFORMATION
PACKAGED WITH EACH REFURBISHED PRODUCT.
For customer use:
Enter below the Model No. which is located either on the rear, bottom or side of the cabinet. Retain this information for future
reference.
Model No. : Serial No. :
Purchase date : Name of dealer :
1700 Valley Road
Wayne, NJ 07470

84 EN
FOR SERVICING (Only in U.S.A.)
TO OUR VALUED CUSTOMER
THANK YOU FOR PURCHASING THIS JVC PRODUCT.
WE WANT TO HELP YOU ACHIEVE A PERFECT EXPERIENCE.
NEED HELP ON HOW TO HOOK UP?
NEED ASSISTANCE ON HOW TO OPERATE?
NEED TO LOCATE A JVC SERVICE CENTER?
LIKE TO PURCHASE ACCESSORIES?
IS HERE TO HELP!
TOLL FREE: 1 (800) 252-5722
http://www.jvc.com
DR-MH30S/DR-MH20S
Remember to retain your Bill of Sale for Warranty Service.
Do not attempt to service the product yourself
Caution
To prevent electrical shock, do not open the cabinet.
There are no user serviceable parts inside.
Please refer to qualified service personnel for repairs.
COPYRIGHT © 2004 VICTOR COMPANY OF JAPAN, LTD.
US/UC
Printed in Beijing
0704MNH-ID-BJ
 Loading...