


Using a JVC Digital Camcorder with Windows XP and Windows Movie Maker
When using JVC’s Digital Camcorder with a DV connector, you are able to download your video and picture files to your Windows XP PC. This is best to do anytime you would like to edit, burn or even re-format the files to use with another software. Follow these simple instructions to transfer and save the files to your PC.
Before you begin:
Very Important - Please Read:
It is recommended that you copy the data from your JVC digital camcorder to your Windows based PC. Once transferred, you may use the provided Movie Maker software to perform functions as described herein (please see the HELP feature for further instructions). JVC shall not be responsible for the loss of any data or other information or any damage to the Digital Camcorder or PC.
•Make sure that you have the Movie Maker software installed, for more information about obtaining this software please visit www.microsoft.com
•Make sure that your camcorder is in the “OFF” position after you have rewound the entire tape.
•Connect your JVC Digital Camcorder to your provided power adapter to make sure your camcorder does not run out of battery during the transfer process.
1
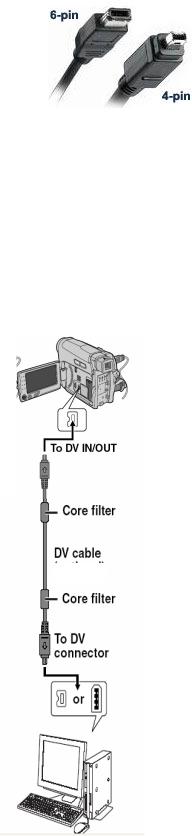
•For transfer of video from your Mini DV device you will require a DV/Fire wire port on your PC and will also require a DV cable (4-4 pin / 4-6 pin); see picture below:
Please note that your PC must also carry this port/connector, if your PC is not equipped with this port/connector, visit your local PC dealer such as Comp USA, Best Buy or Circuit City to inquire about purchasing a fire wire card/port for your PC.
•Once determined that you have all necessary equipment, proceed to connect your Camcorder to the PC using the appropriate cable. See illustration below:
NOTE: ALL JVC Camcorders carry a 4 pin DV port/connector.
2

Open Windows Movie Maker from the START menu on your desk top
Turn the JVC Camcorder from the “OFF” position to the “PLAY” position. You will see a window appear on the bottom right corner advising you that the camcorder is being recognized, such as illustration below:
A wizard should appear after the PC is done installing the new device, if wizard does not appear click on “Capture from video device” such as shown below:
3
 Loading...