

Page 1

ENGLISH
LBH-1790 / IP-310
INSTRUCTION MANUAL
Page 2

CONTENTS
1. NAME OF EACH SECTION OF THE OPERATION PANEL ............................................4
1-1 Body ..........................................................................................................................4
1-2 Buttons to be used in common ..............................................................................6
2. BASIC OPERATION OF THE SEWING MACHINE .........................................................7
3. LCD DISPLAY SECTION AT THE TIME OF INDEPENDENT SEWING .........................9
3-1 Data input screen ....................................................................................................9
3-2 Sewing screen .......................................................................................................12
4. HOW TO USE THE PEDAL ...........................................................................................15
4-1 Setting procedure of the pedal type ....................................................................15
4-2 Explanation of pedal motion ................................................................................17
5. INPUTTING THE PRESSER TYPE ...............................................................................18
5-1 Setting procedure of the presser type.................................................................18
5-2 Table of presser type .............................................................................................19
6. PERFORMING PATTERN NO. SELECTION .................................................................20
6-1 Selection from the data input screen ..................................................................20
6-2 Selection by means of DIRECT button ................................................................21
7. NAMING THE PATTERN ...............................................................................................22
8. PERFORMING SEWING SHAPE SELECTION .............................................................23
9. CHANGING NEEDLE THREAD TENSION ...................................................................25
10. PERFORMING RE-SEWING .......................................................................................27
10-1 To continue performing sewing from some point in sewing ...........................28
10-2 To perform sewing from the start ......................................................................28
11. WINDING BOBBIN THREAD .......................................................................................29
12. USING COUNTER .......................................................................................................30
12-1 Setting procedure of the counter .......................................................................30
12-2 Count-up releasing procedure ...........................................................................33
13. PERFORMING NEW REGISTRATION OF THE PATTERN ........................................34
14. SEWING SHAPE LIST .................................................................................................36
15. CHANGING SEWING DATA ........................................................................................37
15-1 Initial sewing data at the time of your purchase ..............................................37
15-2 Changing procedure of sewing data .................................................................38
15-3 Sewing data list ...................................................................................................40
16. SETTING PROCEDURE OF SEWING DATA WITH/WITHOUT EDIT .........................50
17. COPYING SEWING PATTERN ....................................................................................51
18. REGISTERING THE PATTERN TO DIRECT BUTTON ...............................................53
18-1 How to register ....................................................................................................53
18-2 Register state at the time of your purchase......................................................54
19. REGISTERING SEWING DATA TO CUSTOMIZE BUTTON .......................................55
19-1 How to register ....................................................................................................55
– 1 –
Page 3

– 2 –
19-2 Register state at the time of your purchase......................................................56
20. CHANGING SEWING MODE .......................................................................................57
21. LCD DISPLAY SECTION AT THE TIME OF CONTINUOUS STITCHING ..................58
21-1 Data input screen ................................................................................................58
21-2 Sewing screen .....................................................................................................60
22. PERFORMING CONTINUOUS STITCHING ................................................................63
22-1 Selection of the continuous stitching data ....................................................... 63
22-2 Editing procedure of the continuous stitching data ........................................64
23. LCD DISPLAY SECTION AT THE TIME OF CYCLE STITCHING ..............................67
23-1 Data input screen ................................................................................................67
23-2 Sewing screen .....................................................................................................69
24. PERFORMING CYCLE STITCHING ............................................................................72
24-1 Selection of the cycle data .................................................................................72
24-2 Editing procedure of the cycle data...................................................................73
25. PERFORMING CHANGE OF DISPLAY OF SEWING PRODUCT ..............................75
26. CHANGING MEMORY SWITCH DATA .......................................................................77
26-1 Changing procedure of memory switch data ...................................................77
26-2 Memory switch data list ......................................................................................79
27. EXPLANATION OF PLURAL MOTIONS OF KNIFE ...................................................86
28. ERROR CODE LIST ....................................................................................................89
29. USING COMMUNICATION FUNCTION ......................................................................98
29-1 Handling possible data .......................................................................................98
29-2 Performing communication by using the media ............................................100
29-3 Performing communication by using RS-232C ..............................................103
29-4 Take-in of the data .............................................................................................104
30. INFORMATION FUNCTION .......................................................................................107
30-1 Observing the maintenance and inspection information ..............................108
30-2 Inputting the inspection time ...........................................................................111
30-3 Releasing procedure of the warning ............................................................... 113
30-4 Observing the production control information ............................................... 114
30-4-1 When displaying from the information screen ..................................................... 114
30-4-2 When displaying from the sewing screen ............................................................ 116
30-5 Performing setting of the production control information ............................117
30-6 Observing the working measurement information ........................................121
31. TRIAL SEWING FUNCTION ......................................................................................125
31-1 Performing trial sewing.....................................................................................125
31-2 Vector parameter list .........................................................................................128
31-3 Thread tension value display color list ...........................................................129
32. PERFORMING KEY LOCK ........................................................................................130
33. DISPLAYING VERSION INFORMATION ...................................................................132
34. USING CHECK PROGRAM .......................................................................................133
34-1 Displaying the check program screen.............................................................133
Page 4

34-2 Performing needle thread trimmer origin adjustment ...................................135
34-3 Performing bobbin thread trimmer origin adjustment ...................................136
34-4 Performing sensor check .................................................................................137
34-5 Performing LCD check ......................................................................................139
34-6 Performing touch panel compensation ...........................................................140
35. COMMUNICATION SCREEN OF MAINTENANCE PERSONNEL LEVEL ...............143
35-1 Data which are possible to be handled ...........................................................143
35-2 Displaying maintenance personnel level ........................................................144
36. INFORMATION SCREEN OF THE MAINTENANCE PERSONNEL LEVEL .............145
36-1 Display of error record ......................................................................................145
36-2 Display of the cumulative working information ..............................................147
– 3 –
Page 5
– 4 –
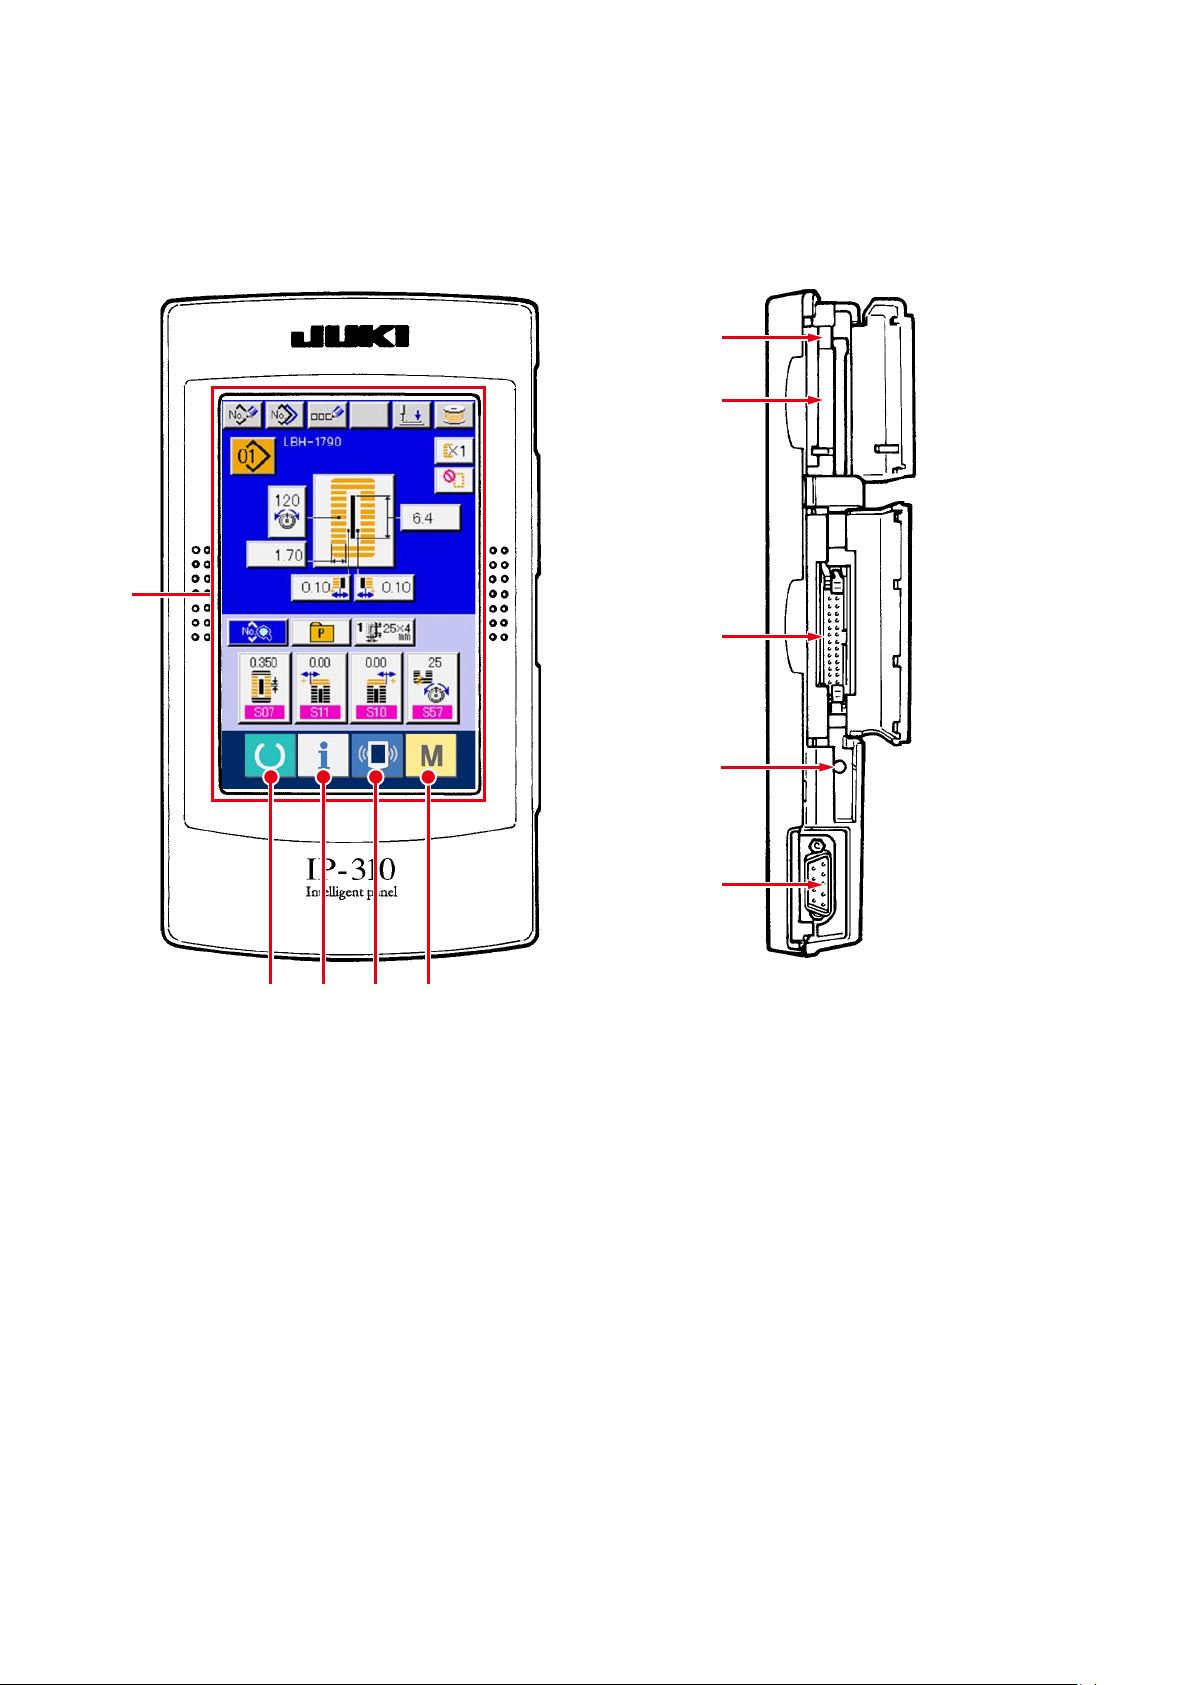
1. NAME OF EACH SECTION OF THE OPERATION PANEL
1-1 Body
( Front ) ( Right side )
!0
6
1
9
8
7
5432
Page 6

1
Touch panel • LCD display section
2
3
4
5
6
MEDIA slot
7
CONNECTOR for RS-232C communication
8
VARIABLE RESISTOR for adjusting contrast
READY key
INFORMATION key
COMMUNICATION key
MODE key
Changeover of the data input screen and the sewing
→
screen can be performed.
Changeover of the data input screen and the
→
information screen can be performed.
Changeover of the data input screen and the
→
communication screen can be performed.
Changeover of the data input screen and the mode
→
changeover screen which performs various detail
settings can be performed.
MEDIA slot (use it with lid closed.)
→
Contrast of the screen can be adjusted. Adjust it as
→
of colored LCD screen
9
CONNECTOR for external input
!0
MEDIA take-out lever
you like.
– 5 –
Page 7
– 6 –
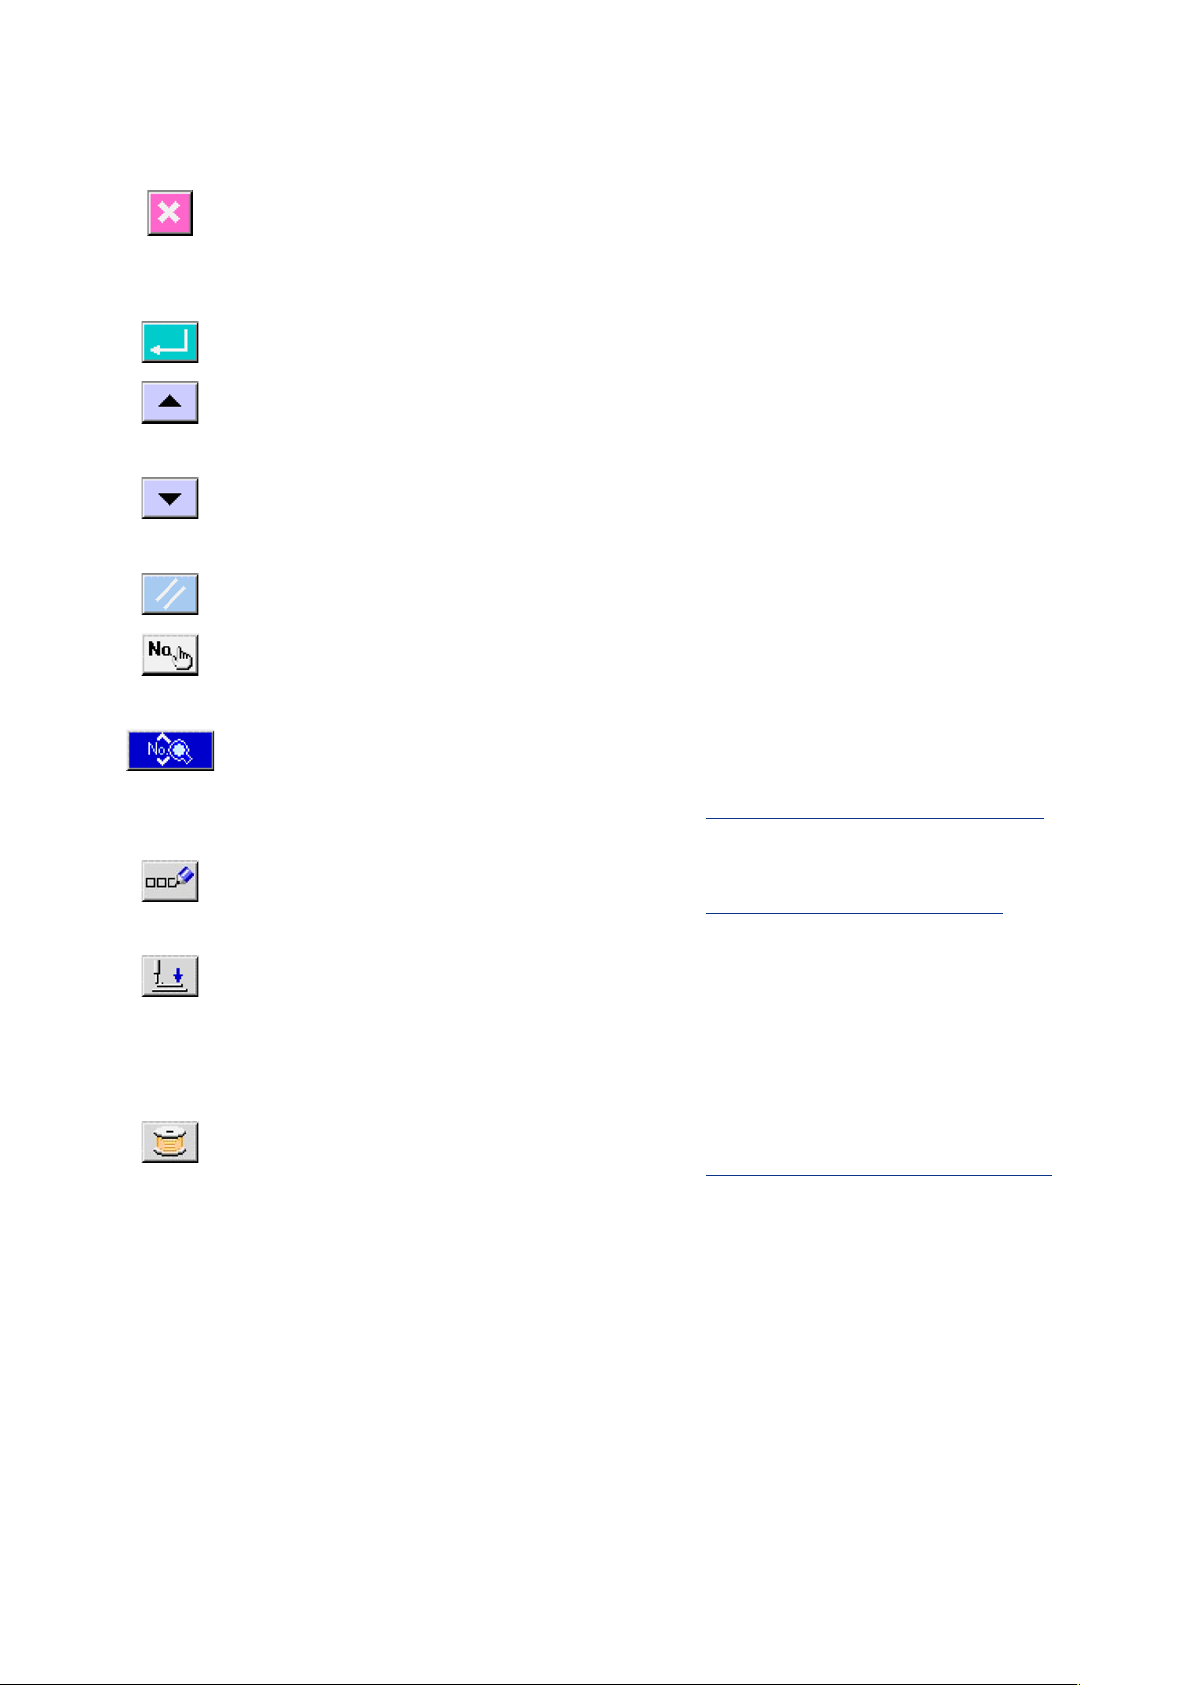
1-2 Buttons to be used in common
The buttons which perform common operations in each screen of IP-310 are as follows :
CANCEL button
ENTER button
UP SCROLL button
DOWN SCROLL button
RESET button
NUMERAL INPUT button
SEWING DATA DISPLAY button
This button closes the pop-up screen. In case of the
→
data change screen, the data being changed can be
cancelled.
This button determines the changed data.
→
This button scrolls the button or the display in the
→
upward direction.
This button scrolls the button or the display in the
→
downward direction.
This button performs the release of error.
→
This button displays ten keys and input of numerals
→
can be performed.
This button displays the sewing data list
→
corresponding to the pattern No. being selected.
CHARACTER INPUT button
PRESSER DOWN button
BOBBIN WINDER button
Refer to
→
This button displays the character input screen.
→
Refer to
→
This button lowers the presser and displays the
→
presser down screen. To raise the presser, press
PRESSER UP button displayed in the presser down
screen.
This button performs bobbin thread winding.
→
Refer to
→
15. CHANGING SEWING DATA, p.37
7. NAMING THE PATTERN, p.22
11. WINDING BOBBIN THREAD, p.29
.
.
.
Page 8

2. BASIC OPERATION OF THE SEWING MACHINE
Turn ON the power switch.
1
First, check that the presser type (A)
which has been set is the same as that of the
presser actually mounted. For checking and
B
setting procedures, refer to
PRESSER TYPE, p.18
Select the pattern No. you desire to sew.
2
When the power is turned ON, the data input
screen is displayed. Pattern No. button (B)
which is selected at present is displayed in the
upper section of the screen. Press the button to
select the pattern No. For selecting procedure
of the pattern No., refer to
PATTERN NO. SELECTION, p.20
When you purchase the sewing machine, Pattern
Nos. 1 to 10 described in
data at the time of your purchase have been
registered, p.37
Select the pattern No. you desire to sew from
among these numbers. (The No. to which the
pattern has not been registered is not displayed.)
.
5. INPUTTING THE
.
6. PERFORMING
.
15-1. Initial sewing
C
※ Forthedetailedexplanationofthisscreen,see
3. LCD DISPLAY SECTION AT THE TIME OF
INDEPENDENT SEWING, p.9
.
A
– 7 –
Page 9
– 8 –
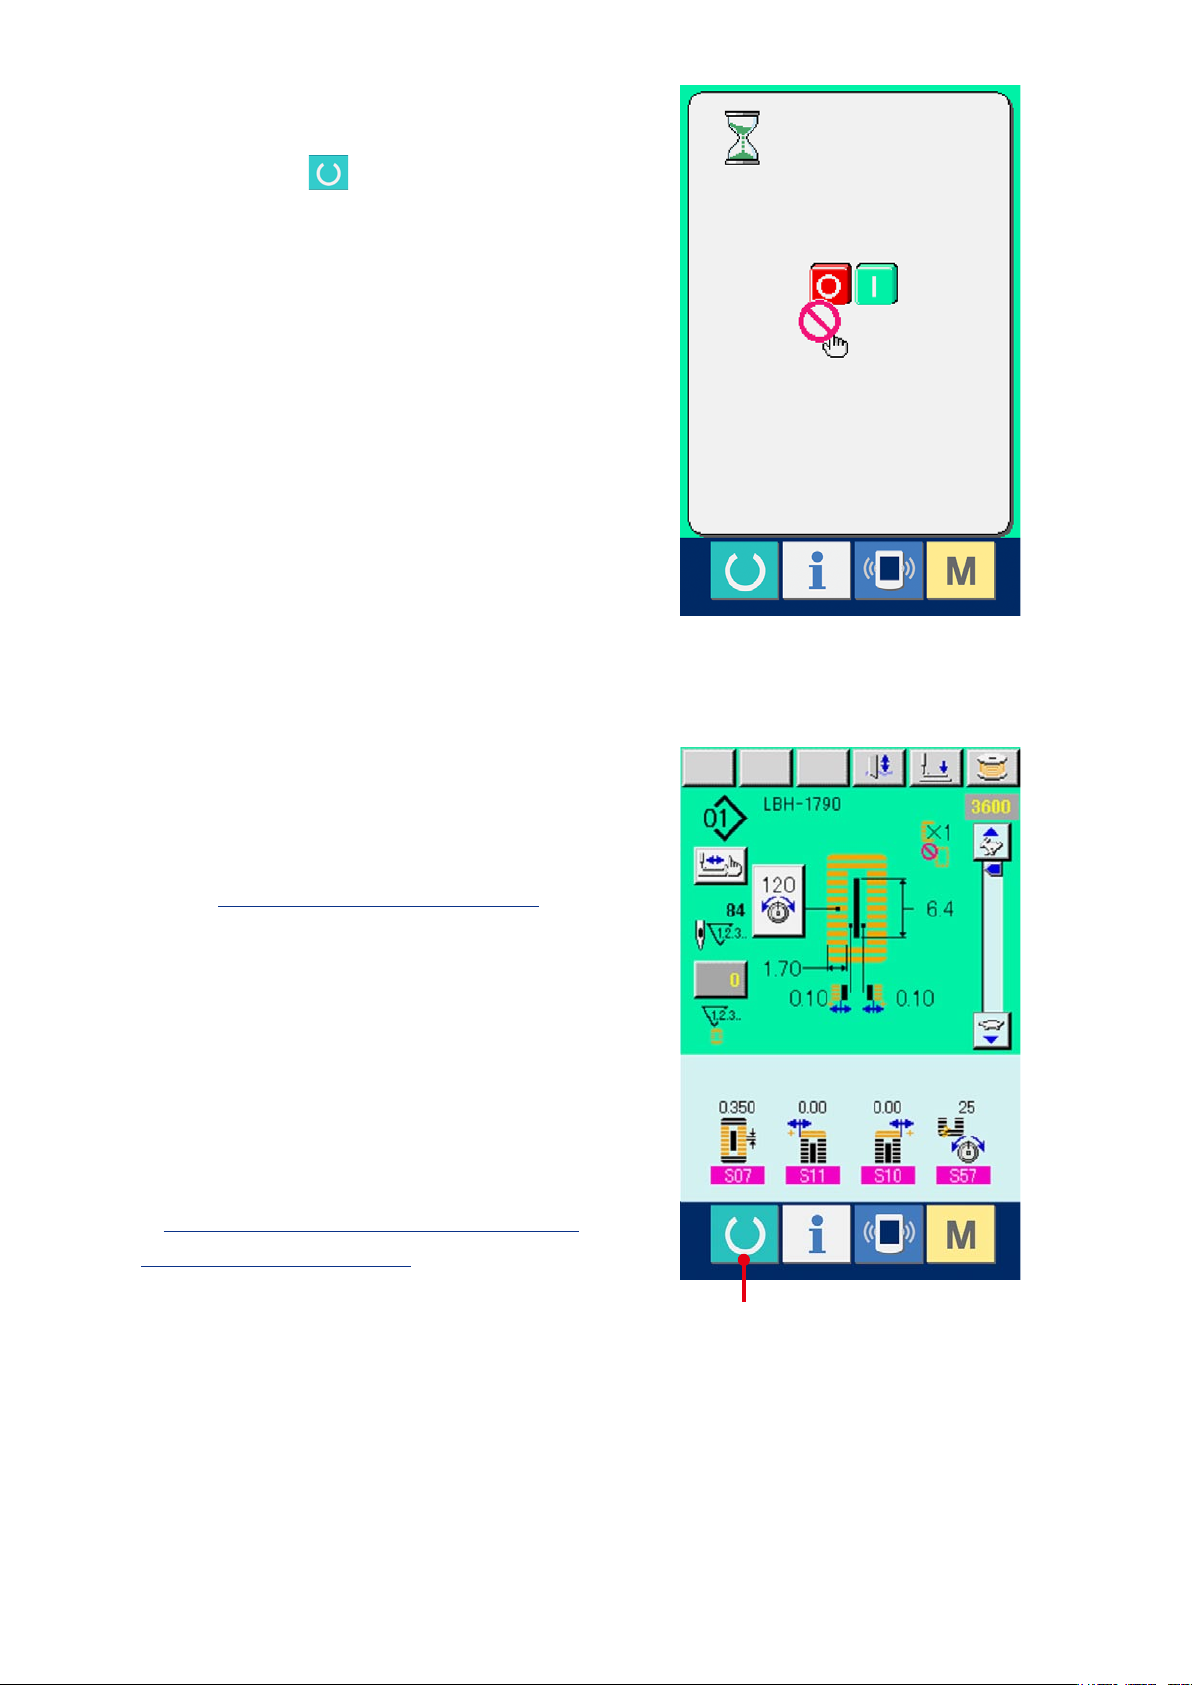
Set the sewing machine to sewing possible
3
state.
Press READY key (C), and POWER OFF
PROHIBITION screen is displayed. Make
preparations for sewing while this screen is
displayed. When the sewing is in a possible state,
the back-light of LCD display changes to green
color.
Start sewing.
4
Set the sewing product to the presser portion,
operate the pedal to start the sewing machine,
and sewing starts.
Refer to
→
4. HOW TO USE THE PEDAL, p.15
.
※ Forthedetailedexplanationofthisscreen,refer
to
3. LCD DISPLAY SECTION AT THE TIME OF
INDEPENDENT SEWING, p.9
.
C
Page 10
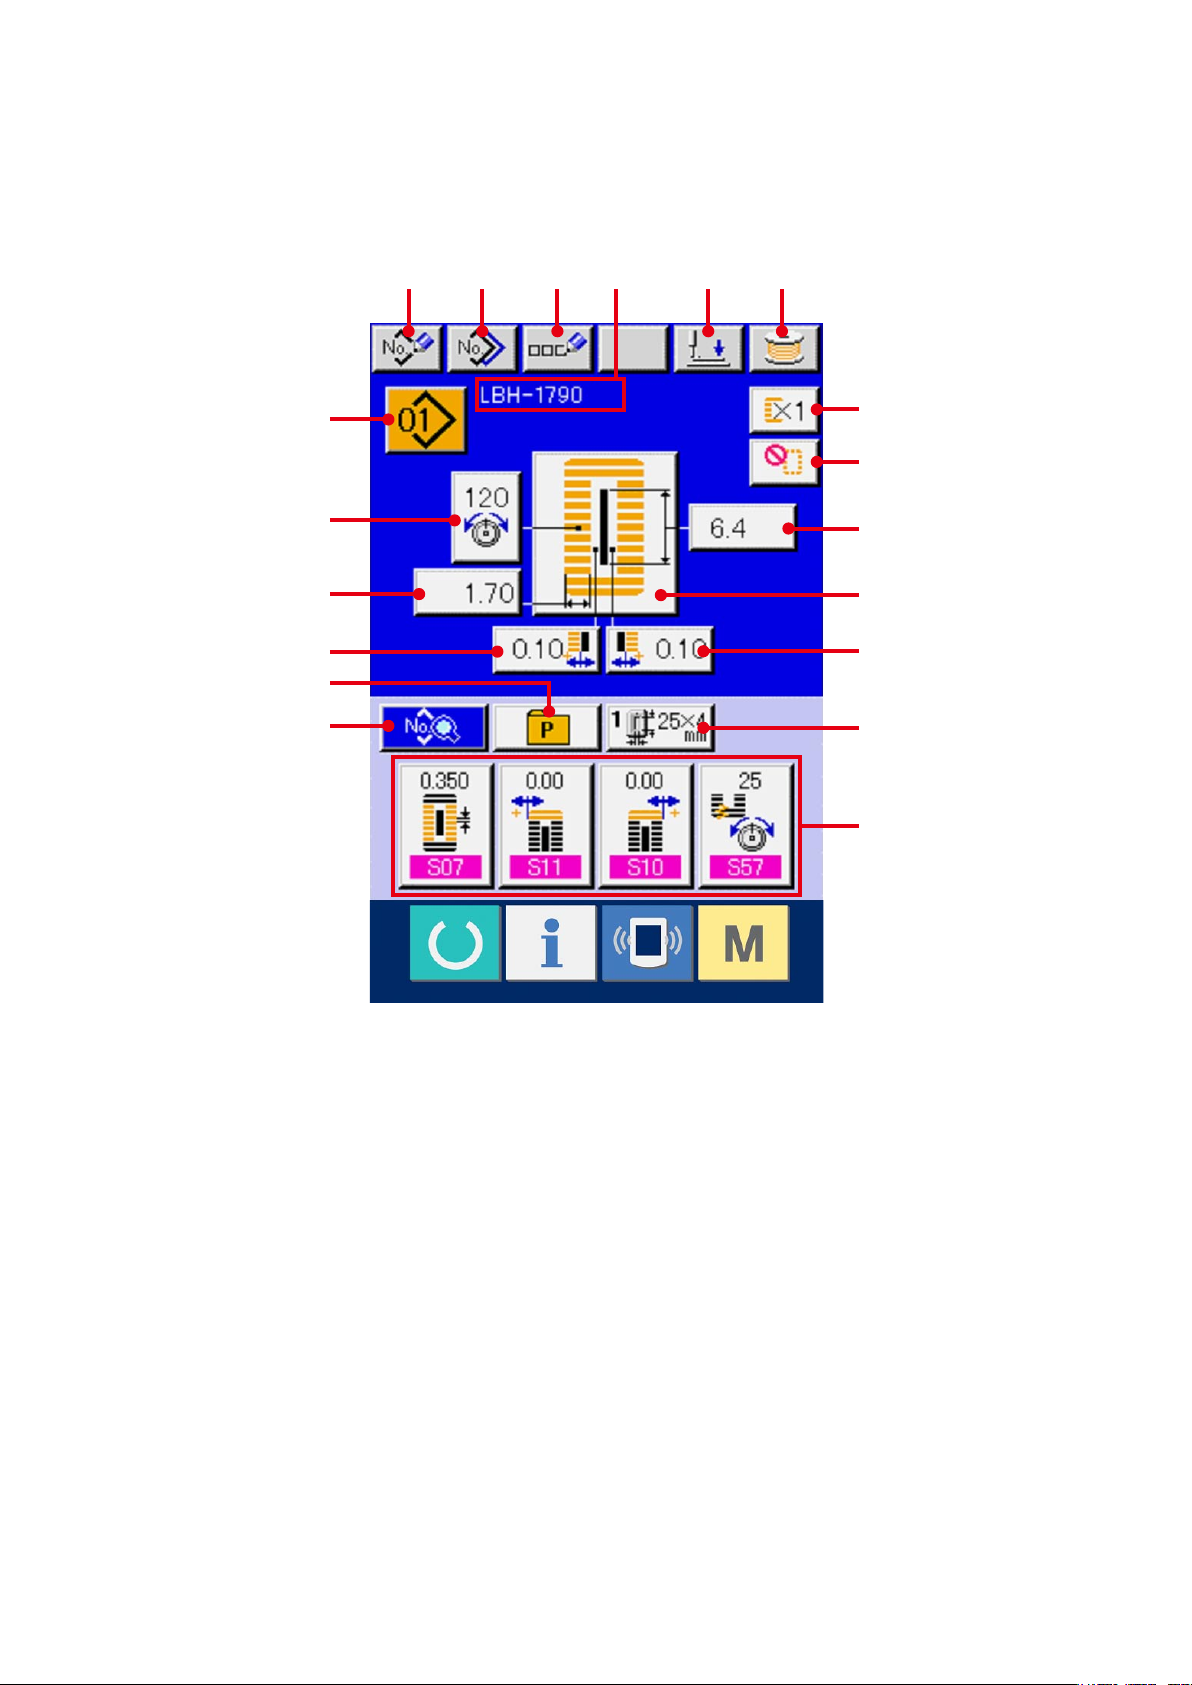
3. LCD DISPLAY SECTION AT THE TIME OF INDEPENDENT SEWING
3-1 Data input screen
A B C D E F
G
H
I
J
K
L
M
N
O
P
Q
R
S
– 9 –
Page 11
– 10 –
Button and display Description
A PATTERN NEW REGISTER button
Pattern No. new register screen is displayed.
Refer to
→
PATTERN, p.34
13. PERFORMING NEW REGISTER OF SEWING
.
B PATTERN COPY button
C PATTERN NAME SETTING button
D PATTERN NAME display Name which has been inputted to the sewing pattern being selected is
E PRESSER DOWN button Presser down screen is displayed and the needle moves to the right
F BOBBIN WINDER button
G PATTERN SELECTION button
Sewing data copy screen is displayed.
Refer to
→
Sewing pattern name input screen is displayed.
Refer to
→
displayed.
side. To raise the presser, press the presser up button displayd in the
presser down screen.
When performing threading in this state, turn OFF the power before
*
performing.
Bobbin thread can be wound.
Refer to
→
Pattern No. being selected at present is displayed on this button
and when the button is pressed, the pattern No. change screen is
displayed.
Refer to
→
17. COPYING SEWING PATTERN, p.51
7. NAMING THE PATTERN, p.22
11. WINDING BOBBIN THREAD, p.29
6. PERFORMING PATTERN NO. SELECTION, p.20
.
.
.
.
H NEEDLE THREAD TENSION
SETTING button
I OVEREDGING WIDTH, LEFT
SETTING button
J KNIFE GROOVE WIDTH, LEFT
SETTING button
K DIRECT SELECTION button When this button is pressed, the screen of pattern No. list registered to
Needle thread tension value which is set to the pattern data being
selected at present is displayed on this button and when the button is
pressed, the needle thread tension change screen is displayed.
Refer to
→
Overedging width, left which is set to the pattern data being selected at
present is displayed on this button and when the button is pressed, the
overedging width, left change screen is displayed.
Knife groove width, left which is set to the pattern data being selected
at present is displayed on this button and when the button is pressed,
the knife groove width, left change screen is displayed.
the direct selection button is displayed.
9. CHANGING NEEDLE THREAD TENSION, p.25
.
Page 12
Button and display Description
L SEWING DATA CHANGE button Sewing data list screen is displayed.
Refer to
→
15. CHANGING SEWING DATA, p.37
.
M WITH/WITHOUT DOUBLE
STITCHING SETTING button
N NUMBER OF TIMES OF BASTING
SETTING button
O CLOTH CUTTING LENGTH
SETTING button
P SEWING SHAPE SELECTION button Sewing shape which is set to the pattern data being selected at
Q KNIFE GROOVE WIDTH, RIGHT
SETTING button
R PRESSER TYPE SELECTION button Presser type being selected at present is displayed on this button
With/without double stitching which is set to the pattern data being
selected at present is displayed on this button and when the button is
pressed the with/without double stitching change screen is displayed.
Number of times of basting which is set to the pattern data being
selected at present is displayed on this button and when the button is
pressed, the number of times of basting change screen is displayed.
Cloth cutting length which is set to the pattern data being selected at
present is displayed on this button and when the button is pressed, the
cloth cutting length change screen is displayed.
present is displayed on this button and when the button is pressed, the
sewing shape change screen is displayed.
Refer to
→
Knife groove width, right which is set to the pattern data being selected
at present is displayed on this button and when the button is pressed,
the knife groove width, right change screen is displayed.
and when the button is pressed, the presser type change screen is
displayed.
Refer to
→
8. PERFORMING SEWING SHAPE SELECTION, p.23
5. INPUTTING PRESSER TYPE, p.18
.
.
S CUSTOMIZE button Sewing data which are more frequently used can be laid out to four
buttons. When this button is pressed, the laid-out sewing data change
screen is displayed.
Refer to
→
BUTTON, p.55
19. REGISTERING SEWING DATA TO CUSTOMIZE
.
– 11 –
Page 13
– 12 –
3-2 Sewing screen
G
H
J
K
L1
L2
M
N
A B C E F
I
D
O
P
Q
R
S
Page 14
Button and display Description
A NUMBER OF TIMES OF BASTING
display
B PATTERN NAME display Pattern name which is set to the pattern data during sewing is
Number of times of basting which is set to the pattern data during
sewing is displayed.
displayed.
C WITH/WITHOUT DOUBLE
STITCHING display
D KNIFE CANCEL button Every time this button is pressed, dropping of knife and non-dropping
E PRESSRER DOWN button Presser can be lowered and the knife down screen is displayed.
F BOBBIN WINDER button
G PATTERN NO. display Pattern No. during sewing is displayed.
H STEP STITCHING button
I NEEDLE THREAD TENSION button
With/without double stitching which is set to the pattern data during
sewing is displayed.
of knife can be changed over alternately.
To raise the presser, press the presser up button displayed in the
presser down screen.
When performing threading in this state, turn OFF the power before
*
performing.
Bobbin thread can be wound.
Refer to
→
When this button is pressed, the screen of step stitching to check
needle entry point and to perform re-sewing is displayed.
Refer to
→
Needle thread tension which is set to the pattern data during sewing is
displayed, and when this button is pressed, the needle thread tension
change screen is displayed.
Refer to
→
11. WINDING BOBBIN THREAD, p.29
10. PERFORMING RE-SEWING, p.27
9. CHANGING NEEDLE THREAD TENSION, p.25
.
.
.
J NUMBER OF TOTAL STITCHES
display
K OVEREDGING WIDTH, LEFT display Overedging width, left which is set to the pattern during sewing is
L1 COUNTER VALUE CHANGE button
L2 COUNTER CHANGE OVER button
Number of total stitches of the pattern data during sewing is displayed.
displayed.
Existing counter value is displayed on this button. When the button is
pressed, the counter value change screen is displayed.
Refer to
→
Display of sewing counter/No. of pcs. counter can be changed over.
Refer to
→
12. USING COUNTER, p. 30
12. USING COUNTER, p. 30
.
.
– 13 –
Page 15
– 14 –
Button and display Description
M KNIFE GROOVE WIDTH, LEFT
display
N SEWING SHAPE display Sewing shape of the pattern data during sewing is displayed.
O SPEED variable resistor Number of rotation of sewing machine can be changed.
P CLOTH CUTTING LENGTH display Cloth cutting length which is set to the pattern data during sewing is
Knife groove width, left which is set to the pattern during sewing is
displayed.
displayed.
Q KNIFE GROOVE WIDTH, RIGHT
display
R DIRECT SELECTION button When this button is pressed, the screen of pattern No. list registered
Knife groove width, right which is set to the pattern during sewing is
displayed.
to the direct selection button is displayed.Pattern No. during sewing is
displayed.
※ Atthetimeofyourpurchase,thebuttonissettonon-displaysetting.
When you desire to make it display, set K18
Display/non-display
setting of direct button to the display state.
Refer to
→
S CUSTOMIZE display Sewing data value which is laid out to the customize button is
displayed.
26. CHANGING MEMORY SWITCH DATA, p.77
.
Page 16
4. HOW TO USE THE PEDAL
This sewing machine can be used by selecting the pedal operating procedure from among 3 types described
later.Selecttheoperatingprocedureyoudesireforworkingefciencyandusethesewingmachine.
4-1 Setting procedure of the pedal type
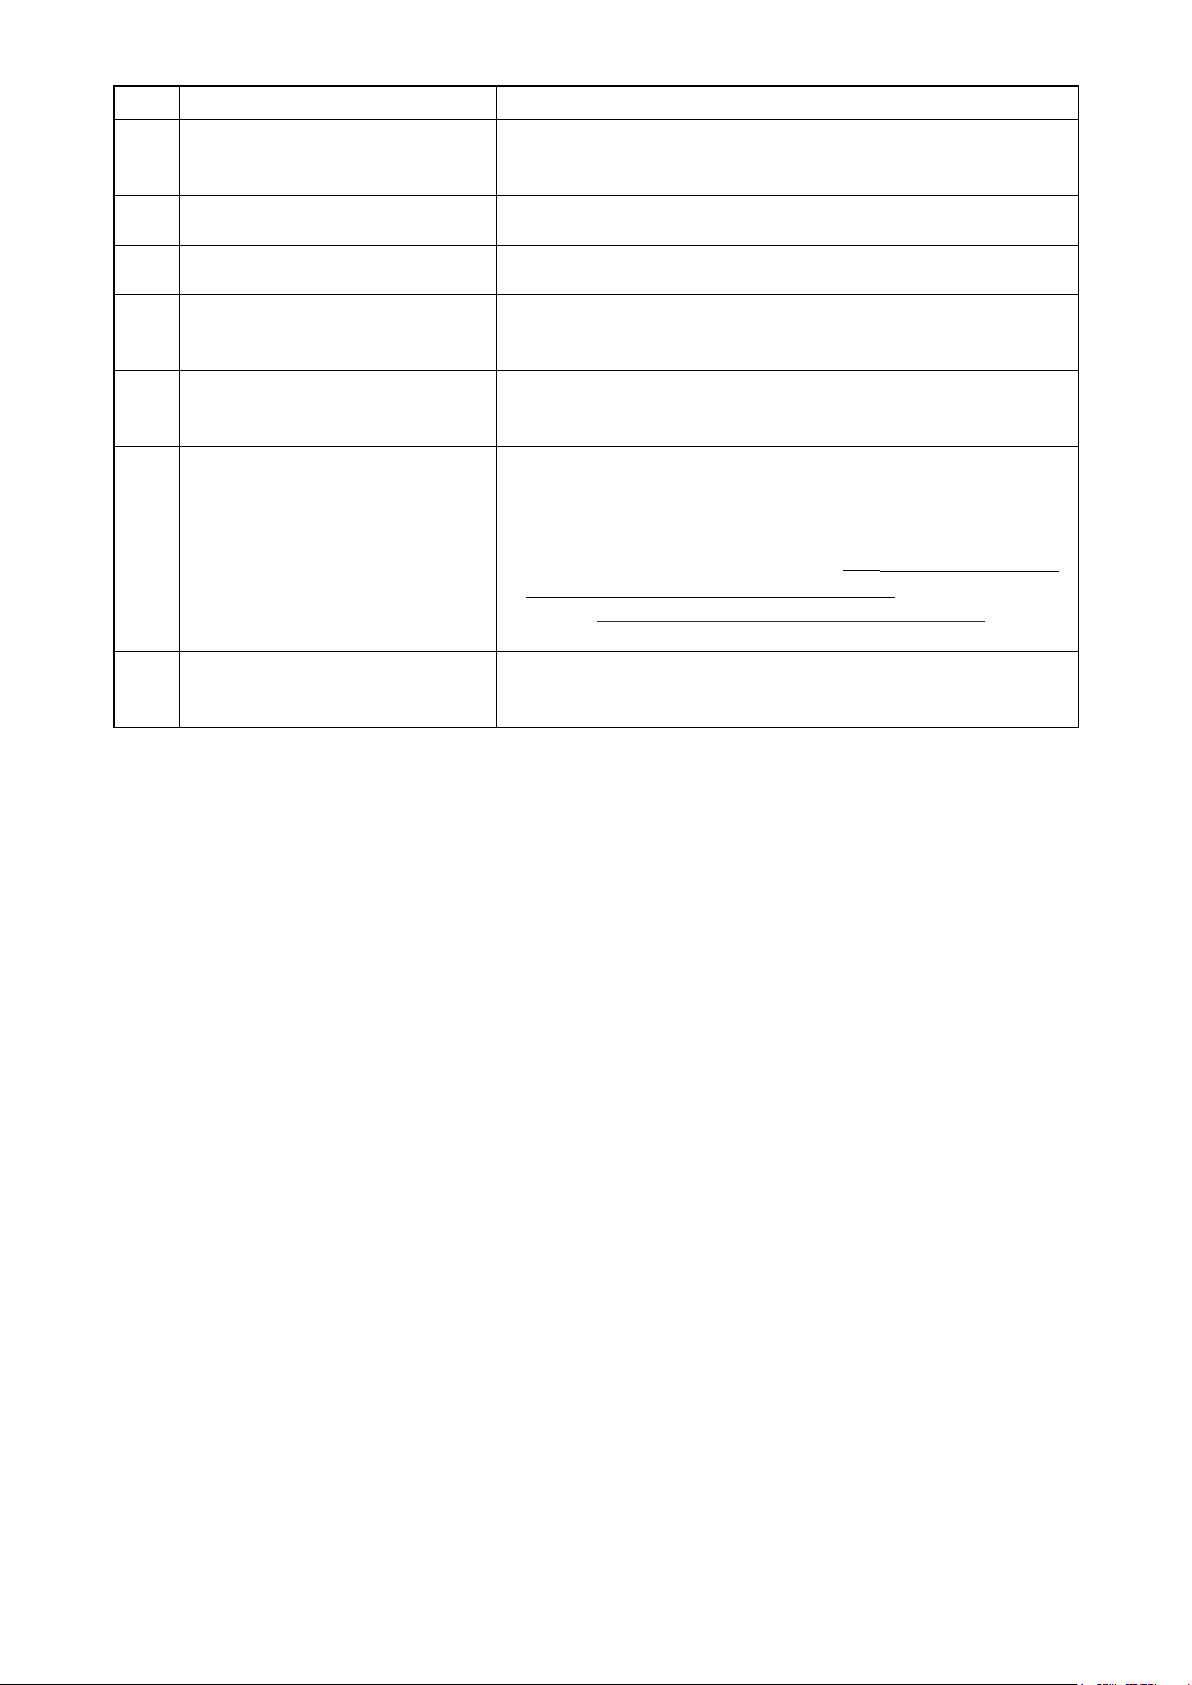
Call the pedal type setting parameter.
1
Hold pressing switch (A) for 6 seconds
and memory switch (level 2) button (B) is
displayed on the screen. When this button is
pressed, the memory switch (level 2) list screen
is displayed.
Press button K01 (C) of the pedal type
selection parameter on the memory switch (level
2) list screen and the pedal type change screen is
displayed.
B
A
C
– 15 –
Page 17

– 16 –
Select the pedal type.
2
Three kinds of pedal type buttons (D to F) are
displayed on the pedal type change screen.
Select the pedal type you desire and press
ENTER button (G). Close the pop-up
and display screen 1. When switch (A) is
pressed further, the screen returns to the data
edit screen.
D
F
E
D : 2-pedal
1-pedal (Without intermediate
E :
position)
1-pedal (With intermediate
F :
position)
G
A
Page 18
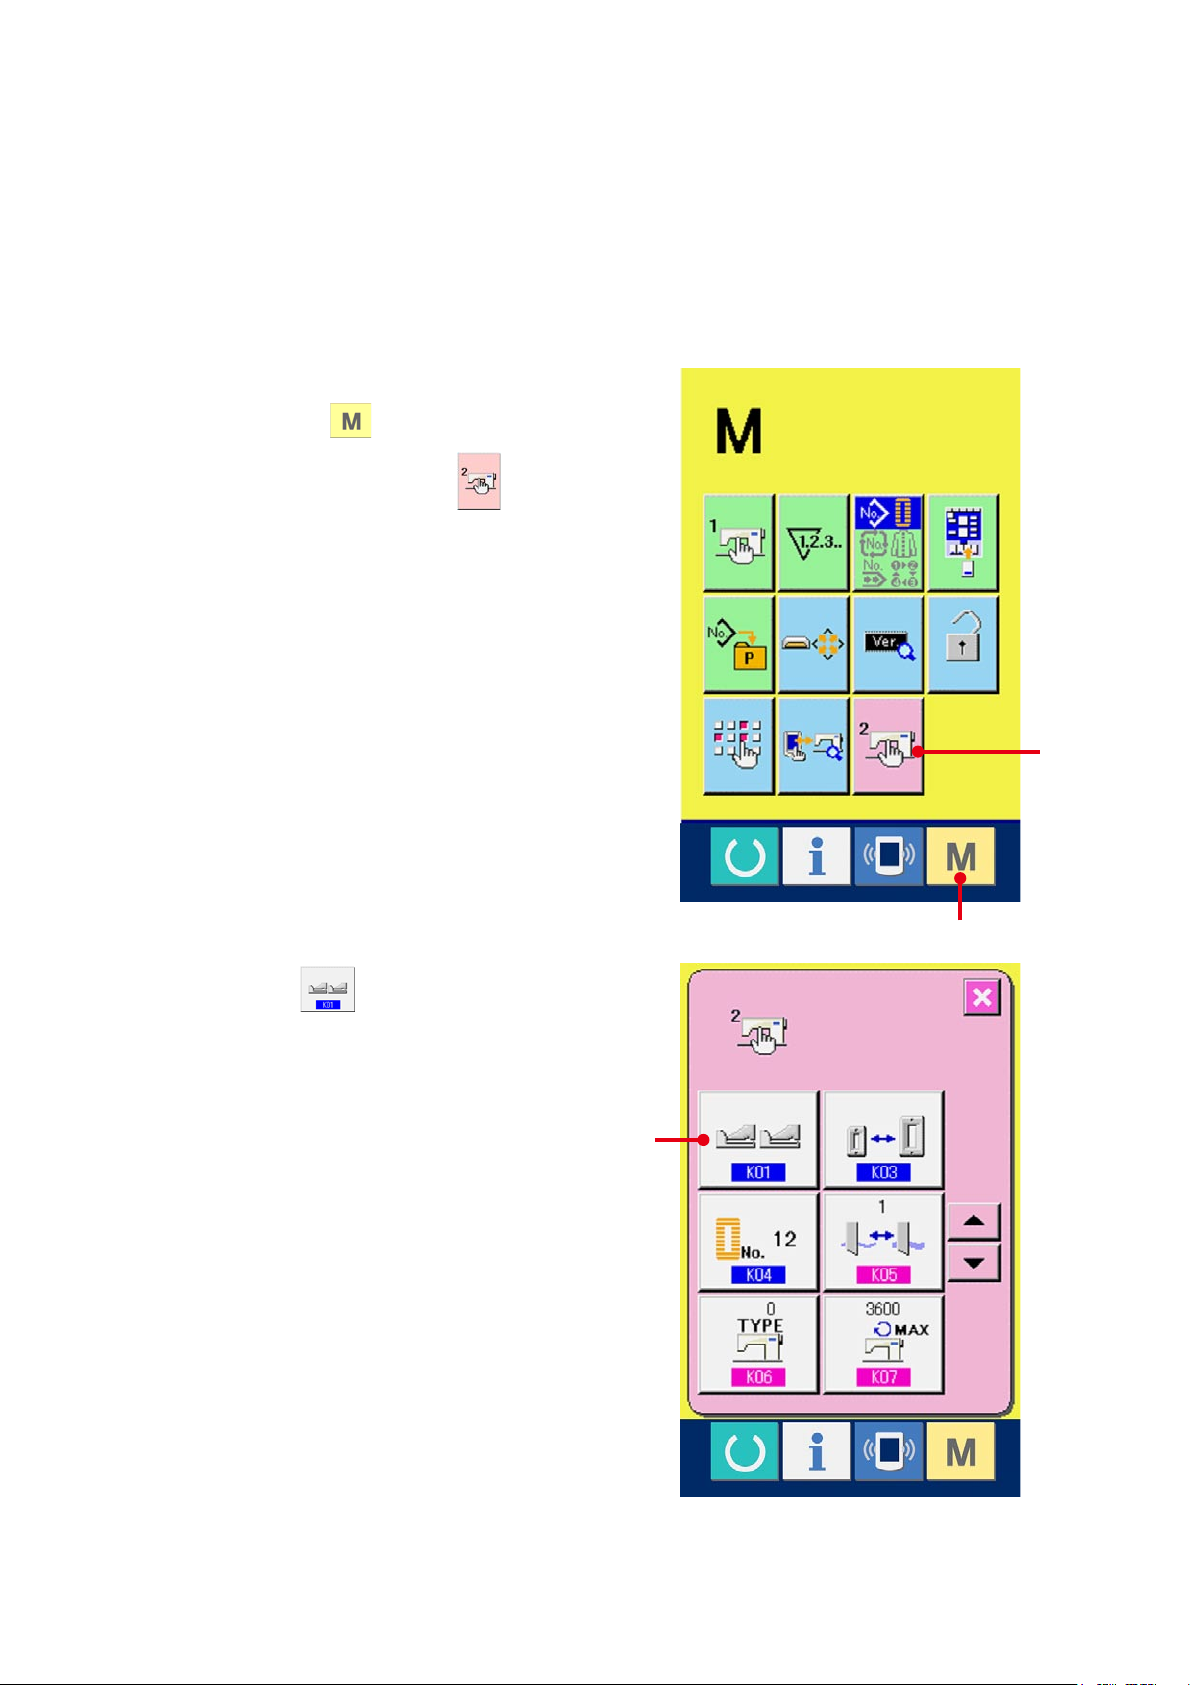
4-2 Explanation of pedal motion
2-pedal type
INITIAL POSITION
Presser : Intermediate position
or Sewing position
3
2
1) SETTING OF SEWING
PRODUCT
Presser goes up as high as the
pedal toe down amount of the left
side pedal.
2) START OF SEWING
Sewing starts when the right side
pedal is depressed.
3) END OF SEWING
Presser automatically goes up to
Intermediate position 2.
1-pedal
(Without intermediate position)
INITIAL POSITION
Presser : Maximum position
1
1) SETTING OF SEWING
PRODUCT
2) CONFIRMATION OF SETTING
OF SEWING PRODUCT
Presser comes down to Cloth
setting position 3whentherst
step of the right side pedal is
depressed.
3) START OF SEWING
Sewing starts when the second
step of the right side pedal is
depressed.
4) END OF SEWING
Presser automatically goes up to
Maximum position 1.
1-pedal
(With intermediate position)
INITIAL POSITION
Presser : Maximum position
1
1) SETTING OF SEWING
PRODUCT
2) CONFIRMATION OF SETTING
OF SEWING PRODUCT
Presser comes down to
Intermediate position 2 when the
rststepoftherightsidepedalis
depressed.
3) CONFIRMATION OF START
OF SEWING
Presser comes down to Cloth
setting position 3 when the
second step of the right side pedal
is depressed.
4) START OF SEWING
Sewing starts when the third
step of the right side pedal is
depressed.
5) END OF SEWING
Presser automatically goes up to
Maximum position 1.
※ Heightoftherespectivepositionsof1 to 3
described on the left side can be set or changed
by the memory switches.
26. METHOD OF CHANGING MEMORY
→
SWITCH DATA, p.77
.
Cloth
Pedal switch setting
●
1
2
3
Attachorremovethescrewshowninthegureaccordingtothesettingofthememoryswitch.
2-pedal type
1-pedal (Without intermediate position)
Remove the screw.
Attach the screw.
1-pedal (With intermediate position)
– 17 –
Page 19
– 18 –
5. INPUTTING THE PRESSER TYPE
5-1 Setting procedure of the presser type
Display the data input screen.
1
Only in case of the data input screen (blue), the
contents of setting can be changed. In case of the
sewing screen (green), press READY key
and display the data input screen.
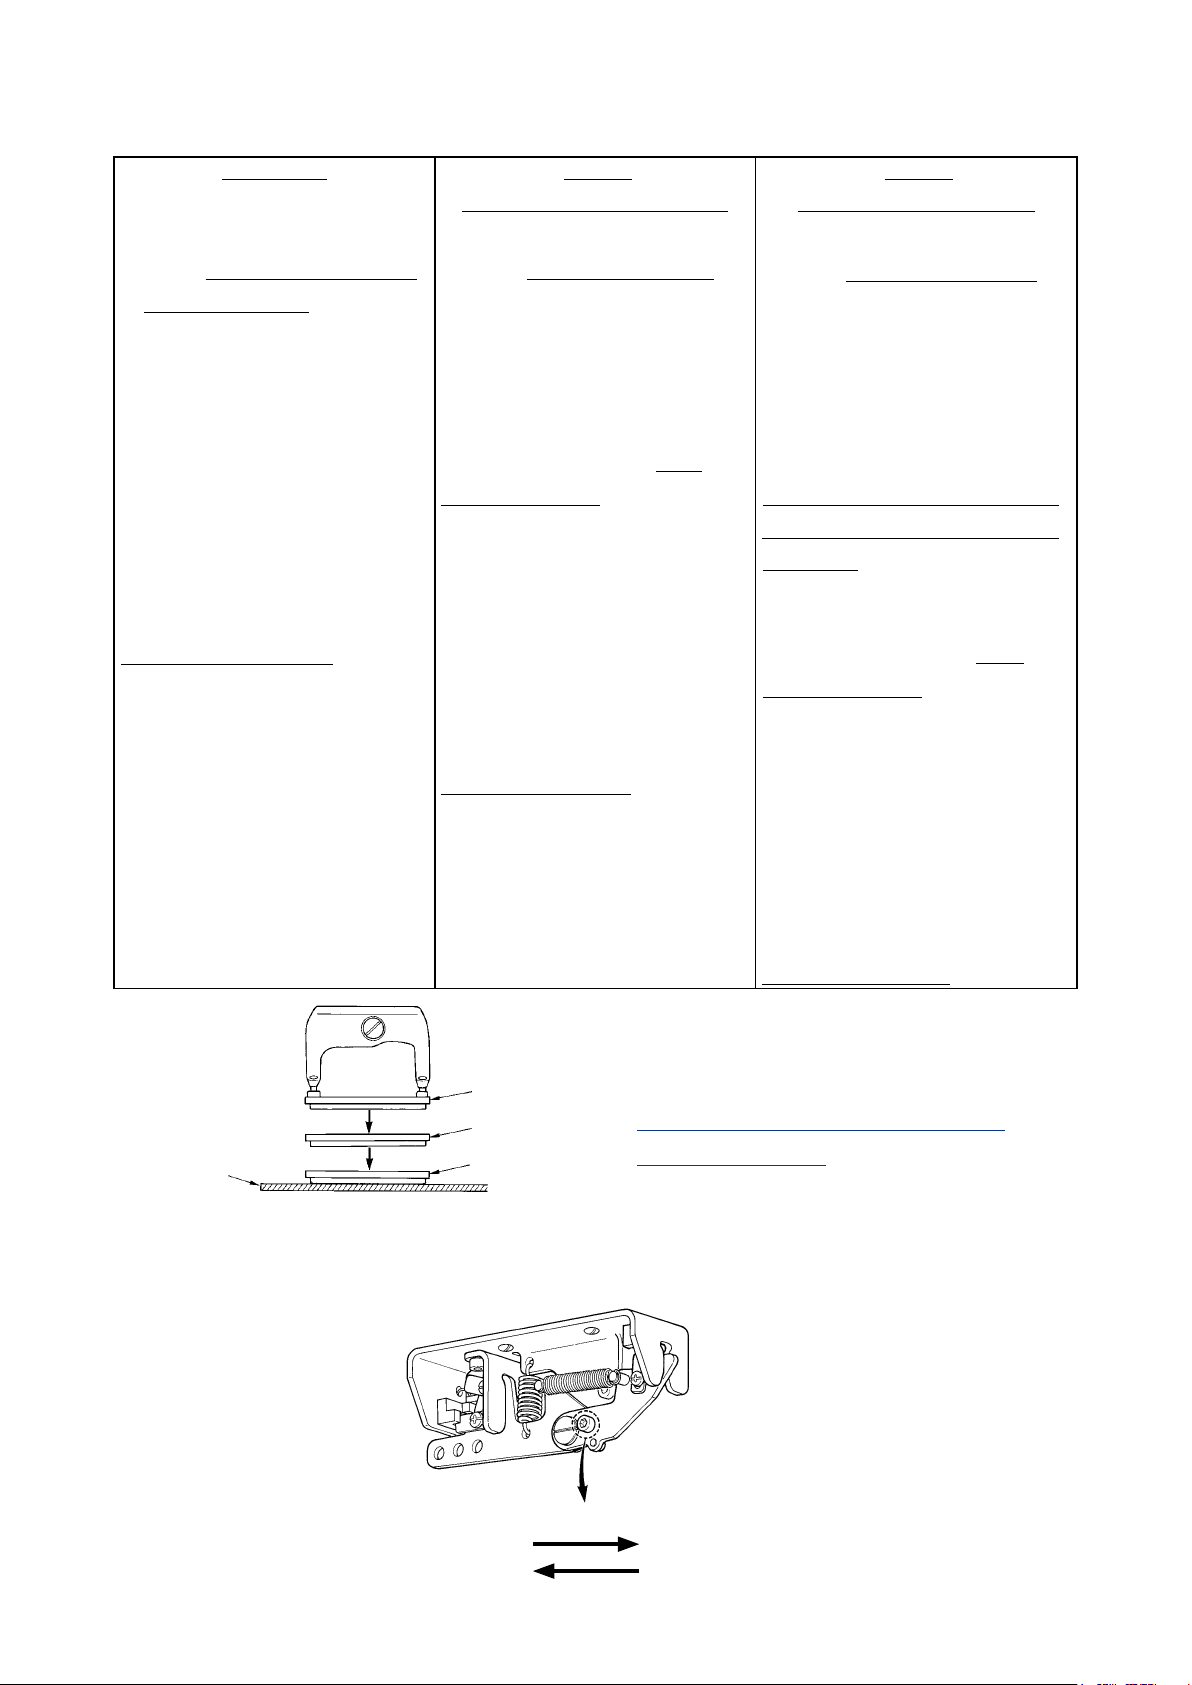
Call the presser type selection screen.
2
Press PRESSER TYPE SELECTION button
(A) and the presser type selection screen
is displayed.
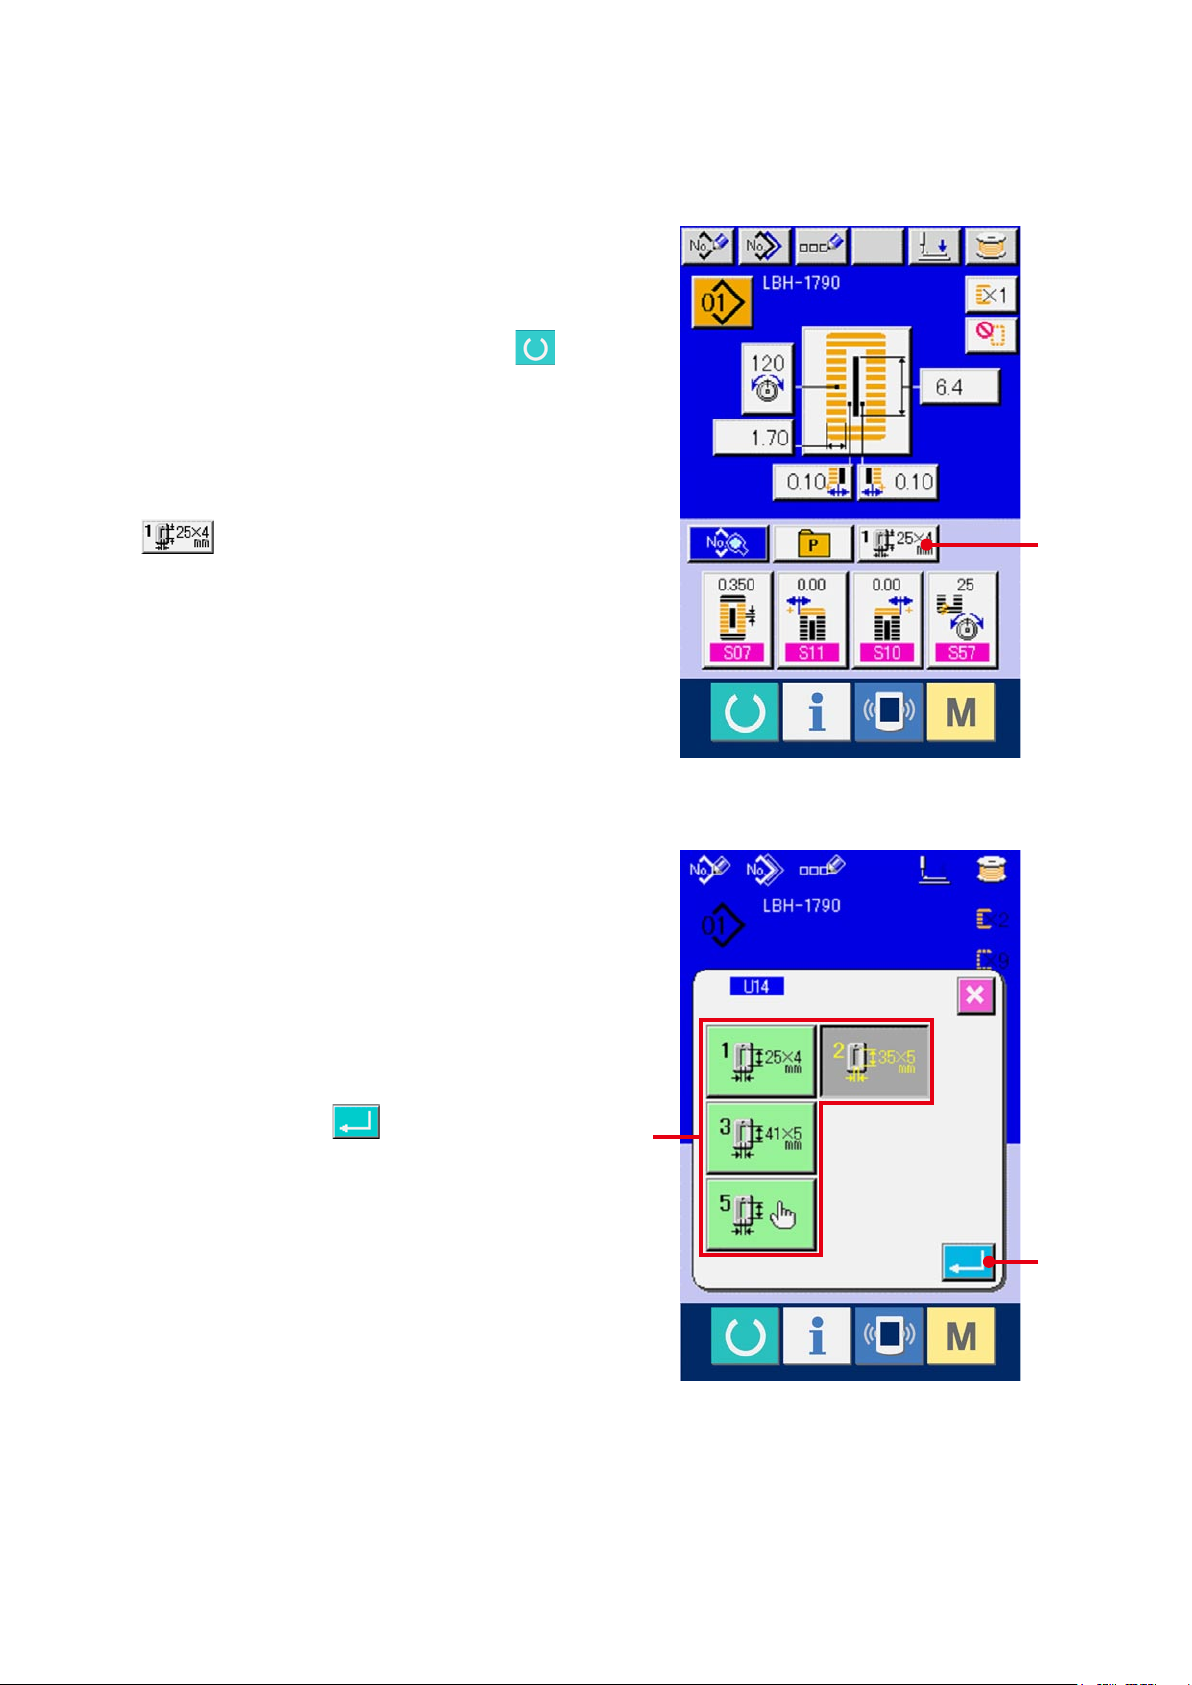
Select the presser type.
3
Press button (B) of the presser type mounted
on the sewing machine. The button pressed is
shown in reverse video. Set the presser type
referring to Table of presser type described later.
Determine the presser type.
4
A
Press ENTER button (C) and the presser
type change screen is closed. Then the change
hasbeennished.
B
C
Page 20
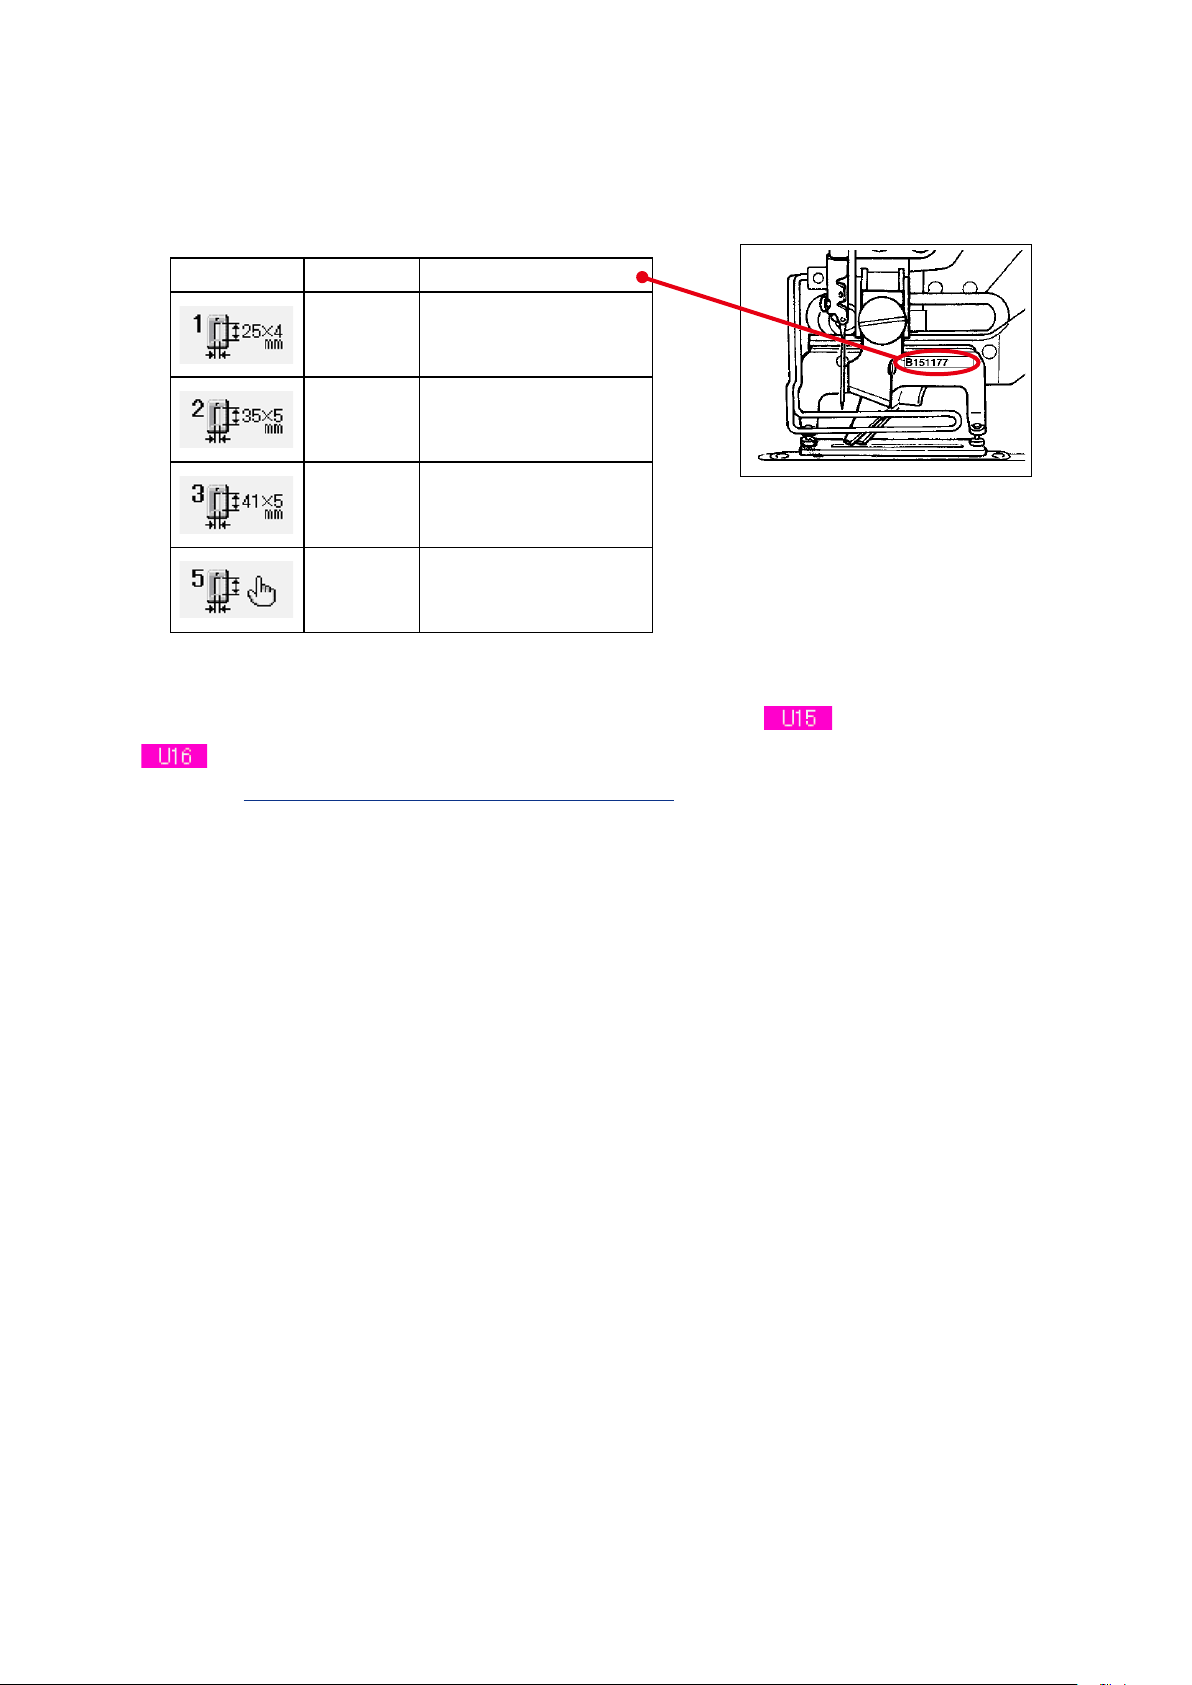
5-2 Table of presser type
Make the number in the frame of engraved part number of presser foot correspond to the type of presser.
Type Part No. of presser foot
Type 1
Type 2
Type 3
Type 5 -
B 1 5 1 1 7 7 1 0 0 0 *
B 1 5 1 1 7 7 2 0 0 0 *
B 1 5 1 1 7 7 3 0 0 0 *
※ Settype5whenusingthepresserfoototherthantype1to3.Change Presser size width and
Presser size length of the memory switch (level 1) to adjust to the presser to be used.
Refer to
→
26. CHANGING MEMORY SWITCH DATA, p.77
.
※ Whenusingtype5withstitchwidthof6mmormoreand41mmormoreinlength,itisnecessaryto
replace components such as presser arm, feed plate, etc.
– 19 –
Page 21
– 20 –
6. PERFORMING PATTERN NO. SELECTION
6-1 Selection from the data input screen
Display the data input screen.
1
Only in case of the data input screen (blue), the
contents of setting can be changed. In case of the
sewing screen (green), press READY key
and display the data input screen.
Call the PATTERN NO. SELECTION screen.
2
Press PATTERN NO. SELECTION button (A)
and the pattern No. selection screen is displayed.
Pattern No. which is selected at present and the
contents are displayed in the upper part of the
screen and the list of the pattern No. buttons
A
which have been registered is displayed in the
lower part.
Select the pattern No.
3
When UP or DOWN SCROLL button
(B) is pressed, the pattern No. buttons (C) which
have been registered are changed over in order.
The contents of the sewing data inputted in the
pattern No. are displayed in the button. Here,
press the pattern No. button (C) you desire to
select.
Determine the pattern No.
4
Press ENTER button (D), and the pattern
No. selection screen is closed. Then the selection
D
BC
E
hasbeennished.
※ Whenyoudesiretodeletetheregisteredpattern,
press DELETE button (E).
However, the pattern which is registered to
continuous stitching and cycle stitching cannot be
deleted.
Page 22
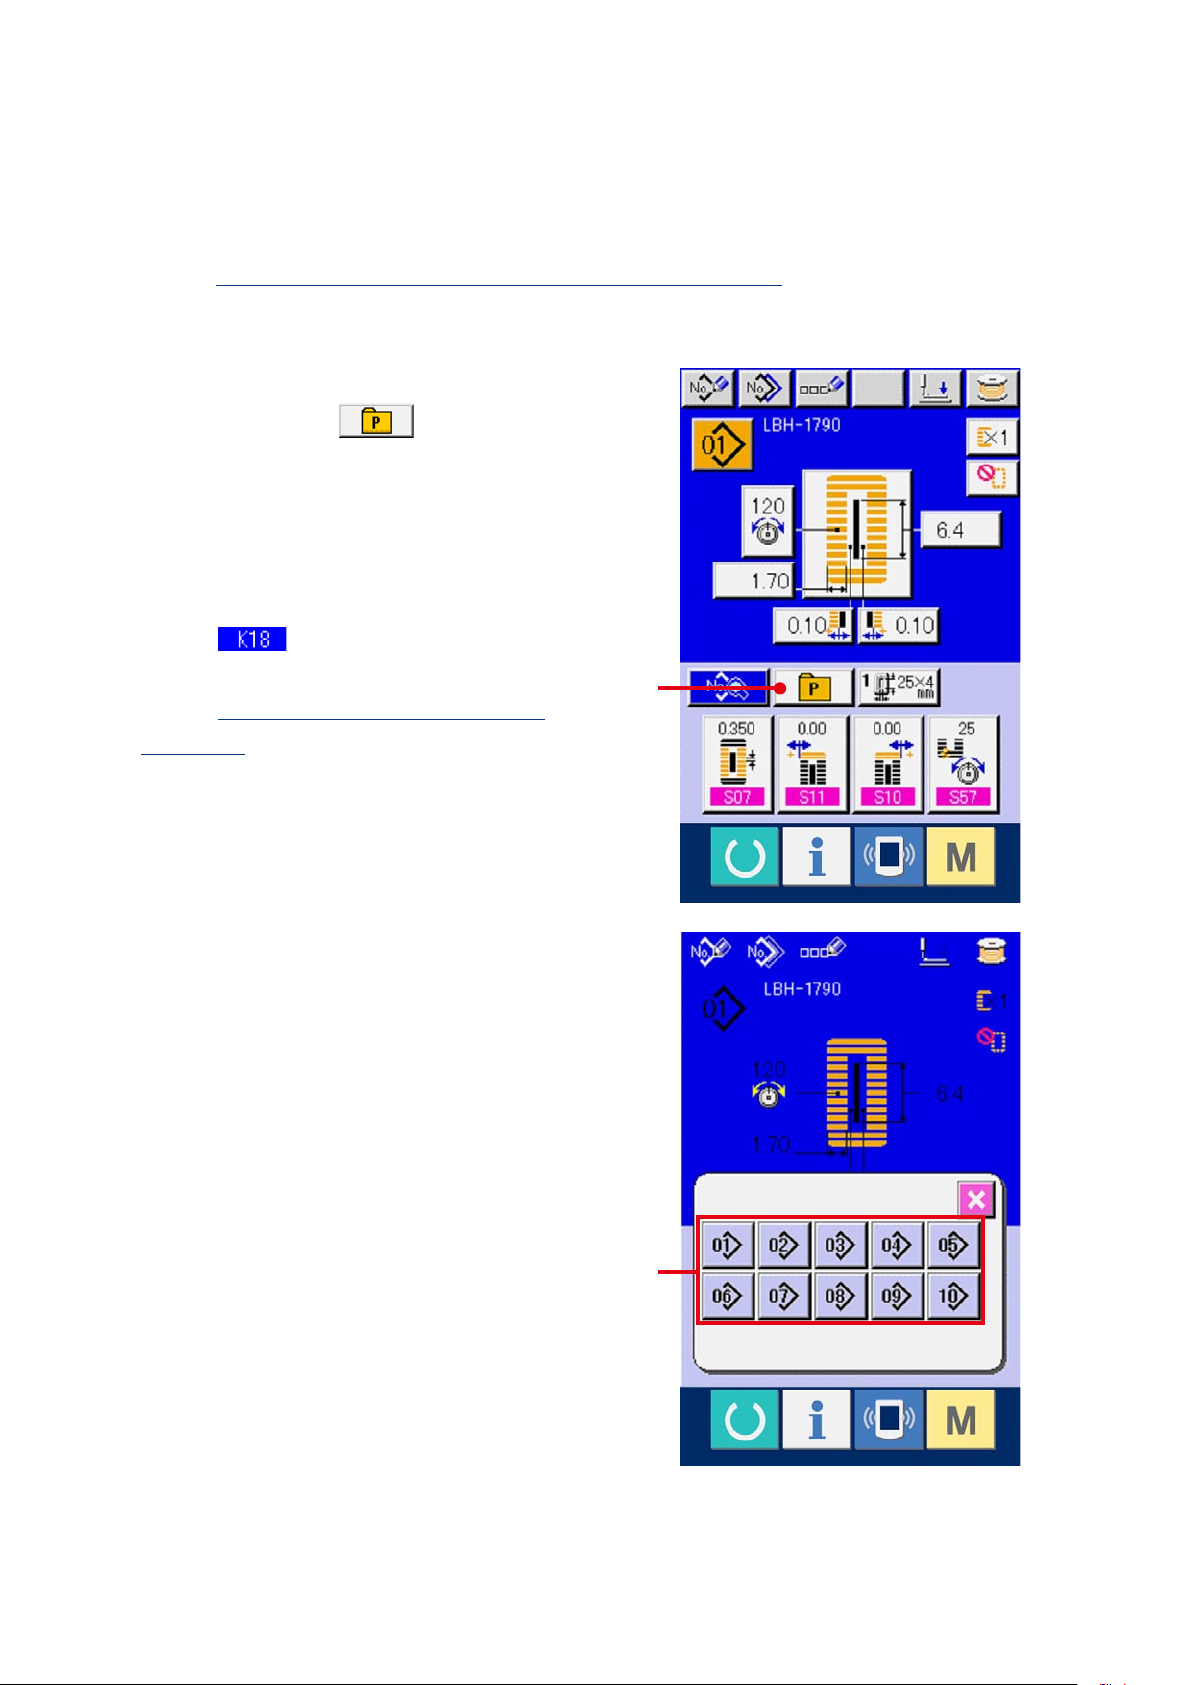
6-2 Selection by means of DIRECT button
This sewing machine can register the pattern No. you desire to DIRECT button.
When the pattern has been registered, the pattern selection can be simply performed only by pressing the
button.
Refer to
→
Display the direct button selection screen.
1
Press DIRECT button (A) in the data
input screen (blue) and display the DIRECT
button selection screen.
※ Whenthedisplayisselectedwiththedisplay/non-
display of the direct button of the memory switch
(level 2) DIRECT button can be used
even in the sewing screen.
Refer to
→
DATA, p.77
18. REGISTERING THE PATTERN TO DIRECT BUTTON, p.53
26. CHANGING MEMORY SWITCH
.
.
A
Select the pattern No.
2
The pattern Nos. which have been registered
to DIRECT button can be selected. Press the
PATTERN NO. button (B) you desire to select
and the direct button selection screen is closed.
Then the selected pattern No. is displayed.
B
– 21 –
Page 23
– 22 –
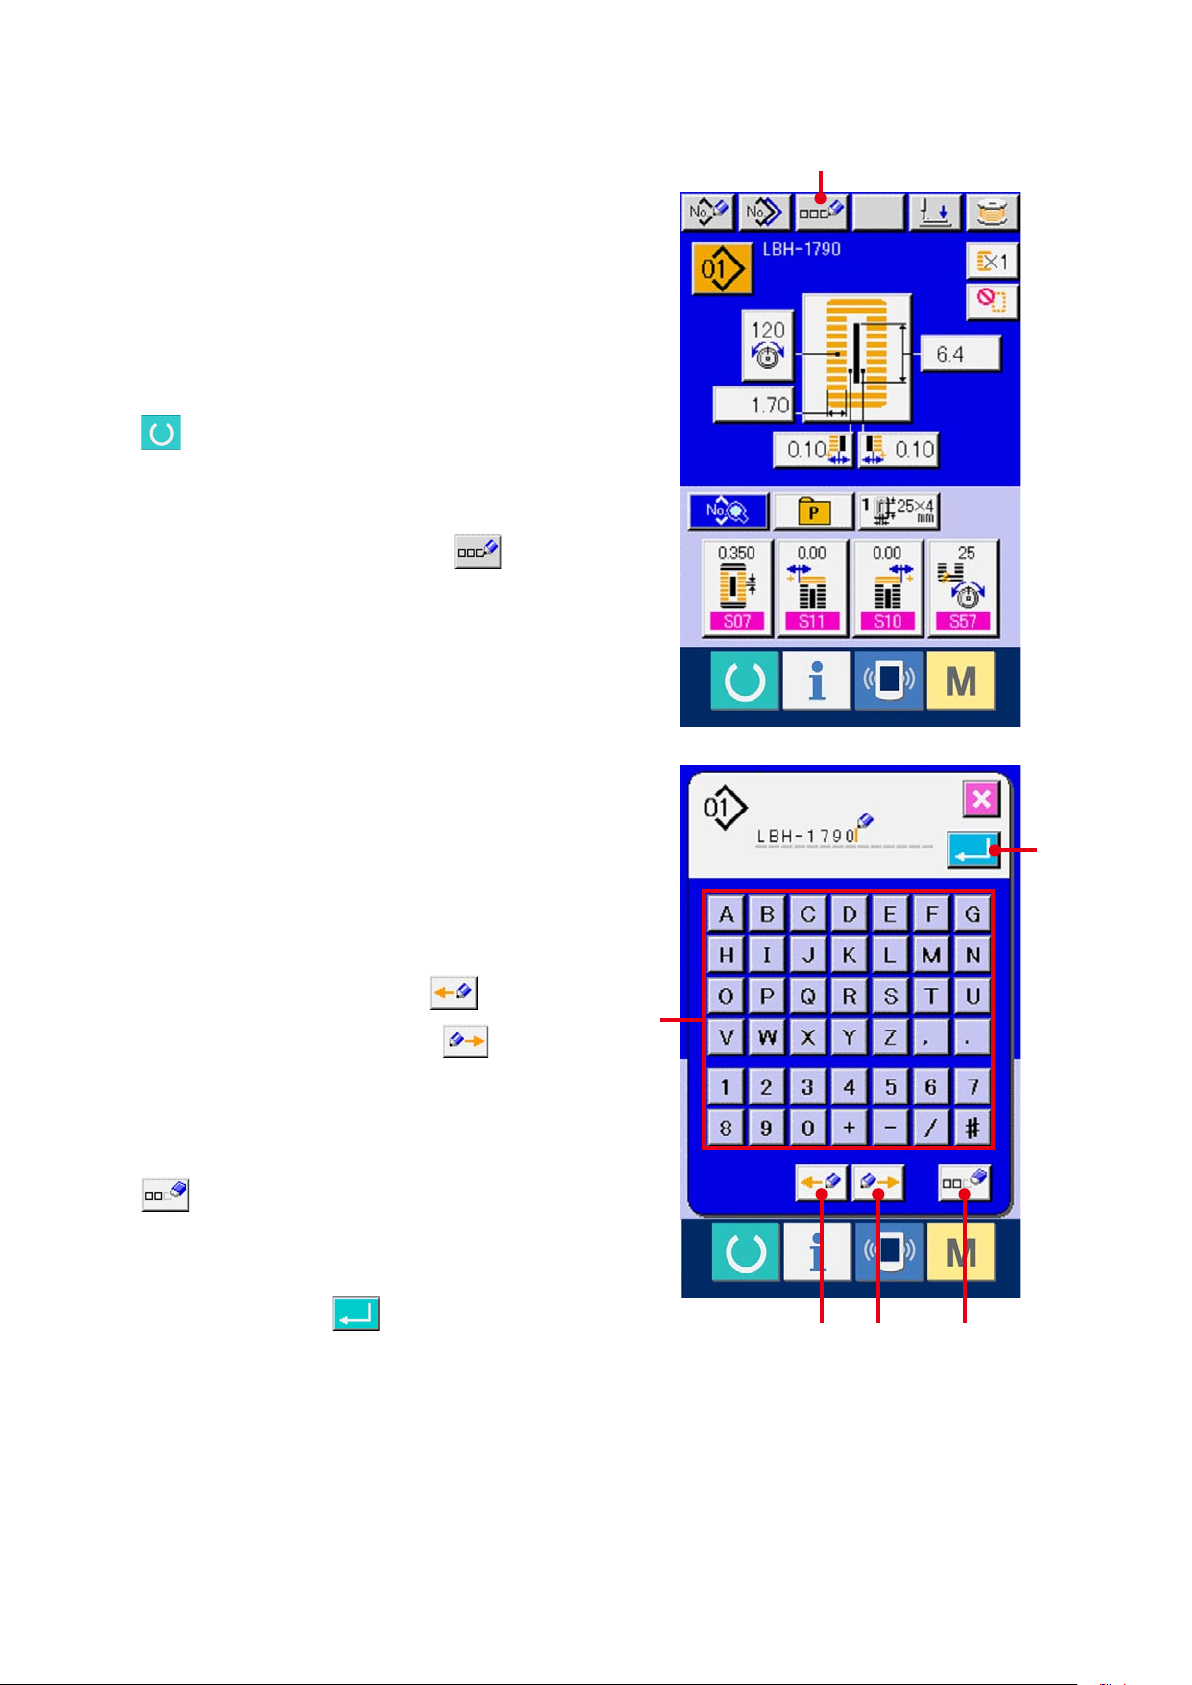
7. NAMING THE PATTERN
As many as 14 characters can be inputted to the
patterns respectively.
Display the data input screen.
1
Only in case of the data input screen (blue), input
of the pattern name can be performed. In case of
the sewing screen (green), press READY switch
and display the data input screen (blue).
Call the character input screen.
2
Press CHARACTER INPUT button (A) and
the character input screen is displayed.
A
Input the character.
3
Press the character button (B) you desire to input,
and input of the character can be performed.
Characters (A to Z and 0 to 9) and symbols (+, -, /,
#, ...) can be inputted. As many as 14 characters
can be inputted. The cursor can travel with
CURSOR LEFT TRAVEL button (C) and
CURSOR RIGHT TRAVEL button (D).
When you desire to delete the inputted character,
adjust the cursor to the position of the character
you desire to delete and press DELETE button
(E).
Finish inputting the character.
4
Press ENTER button (F) and inputting the
characterisnished.Afterthenish,theinputted
F
B
C D E
character is displayed in the upper part of the
data input screen (blue).
Page 24
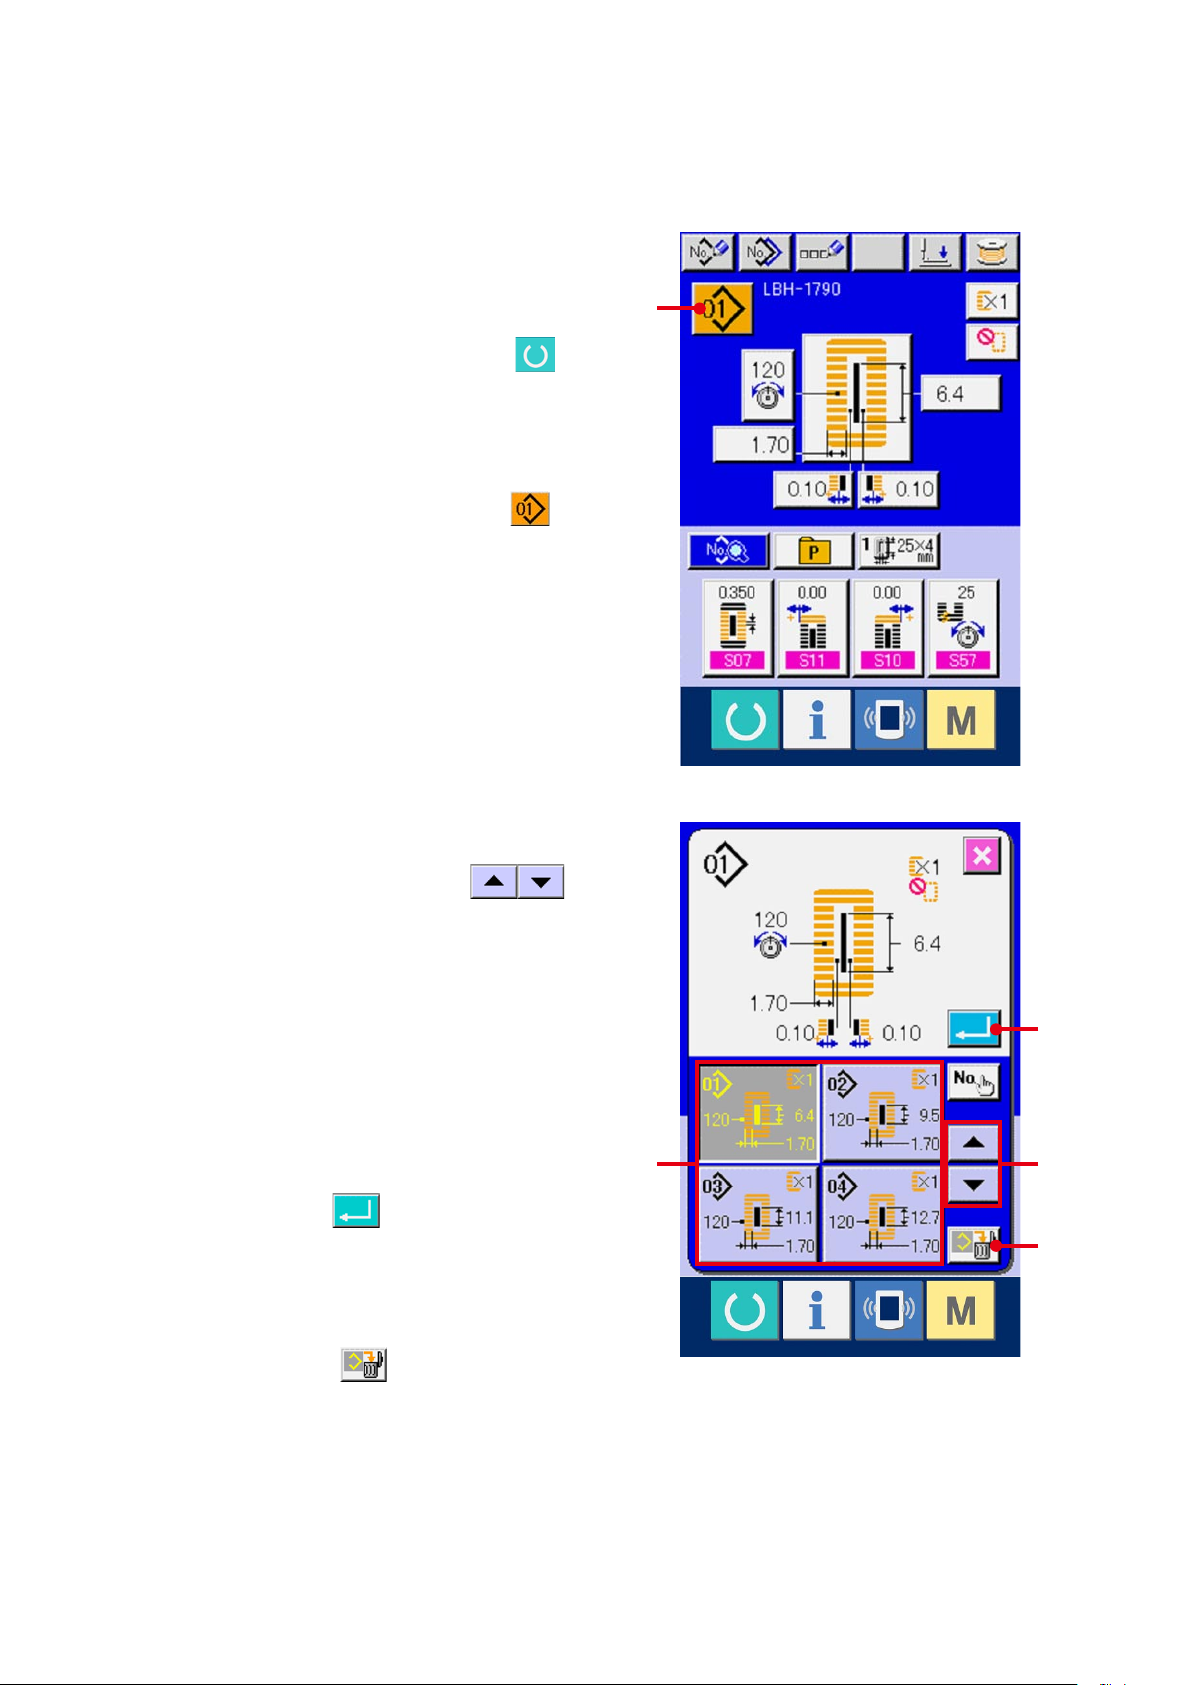
8. PERFORMING SEWING SHAPE SELECTION
Display the data input screen.
1
Only in case of the data input screen (blue), the
selection of sewing shape can be performed. In
case of the sewing screen (green), press READY
switch and display the data input screen
(blue).
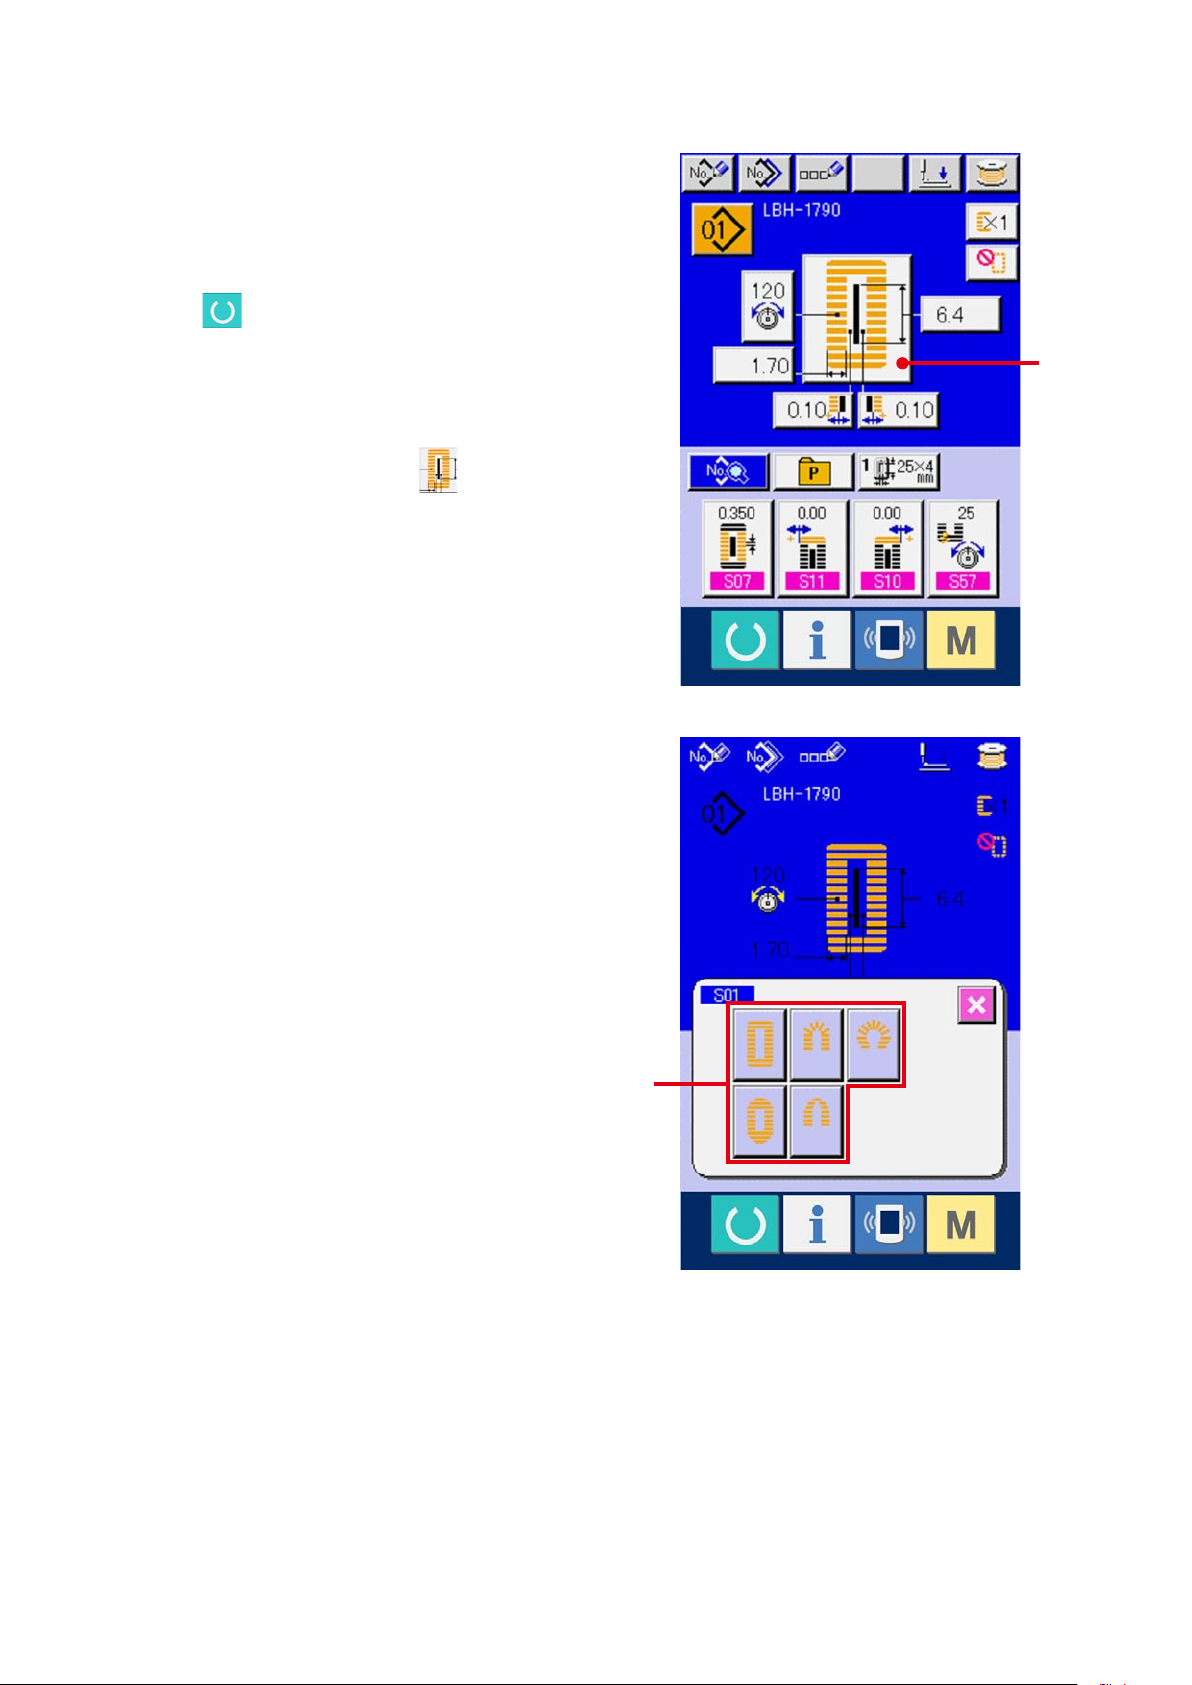
Call the sewing shape selection screen.
2
Press SEWING SHAPE button (A) and the
sewing shape selection screen is displayed.
Select the 1st bar-tacking section.
3
Select the shape you desire to sew from among
5 kinds of the 1st bar-tacking shape buttons
(B). When it is selected, the total sewing shape
in which the selected 1st bar-tacking is used is
displayed.
A
– 23 –
B
Page 25
– 24 –
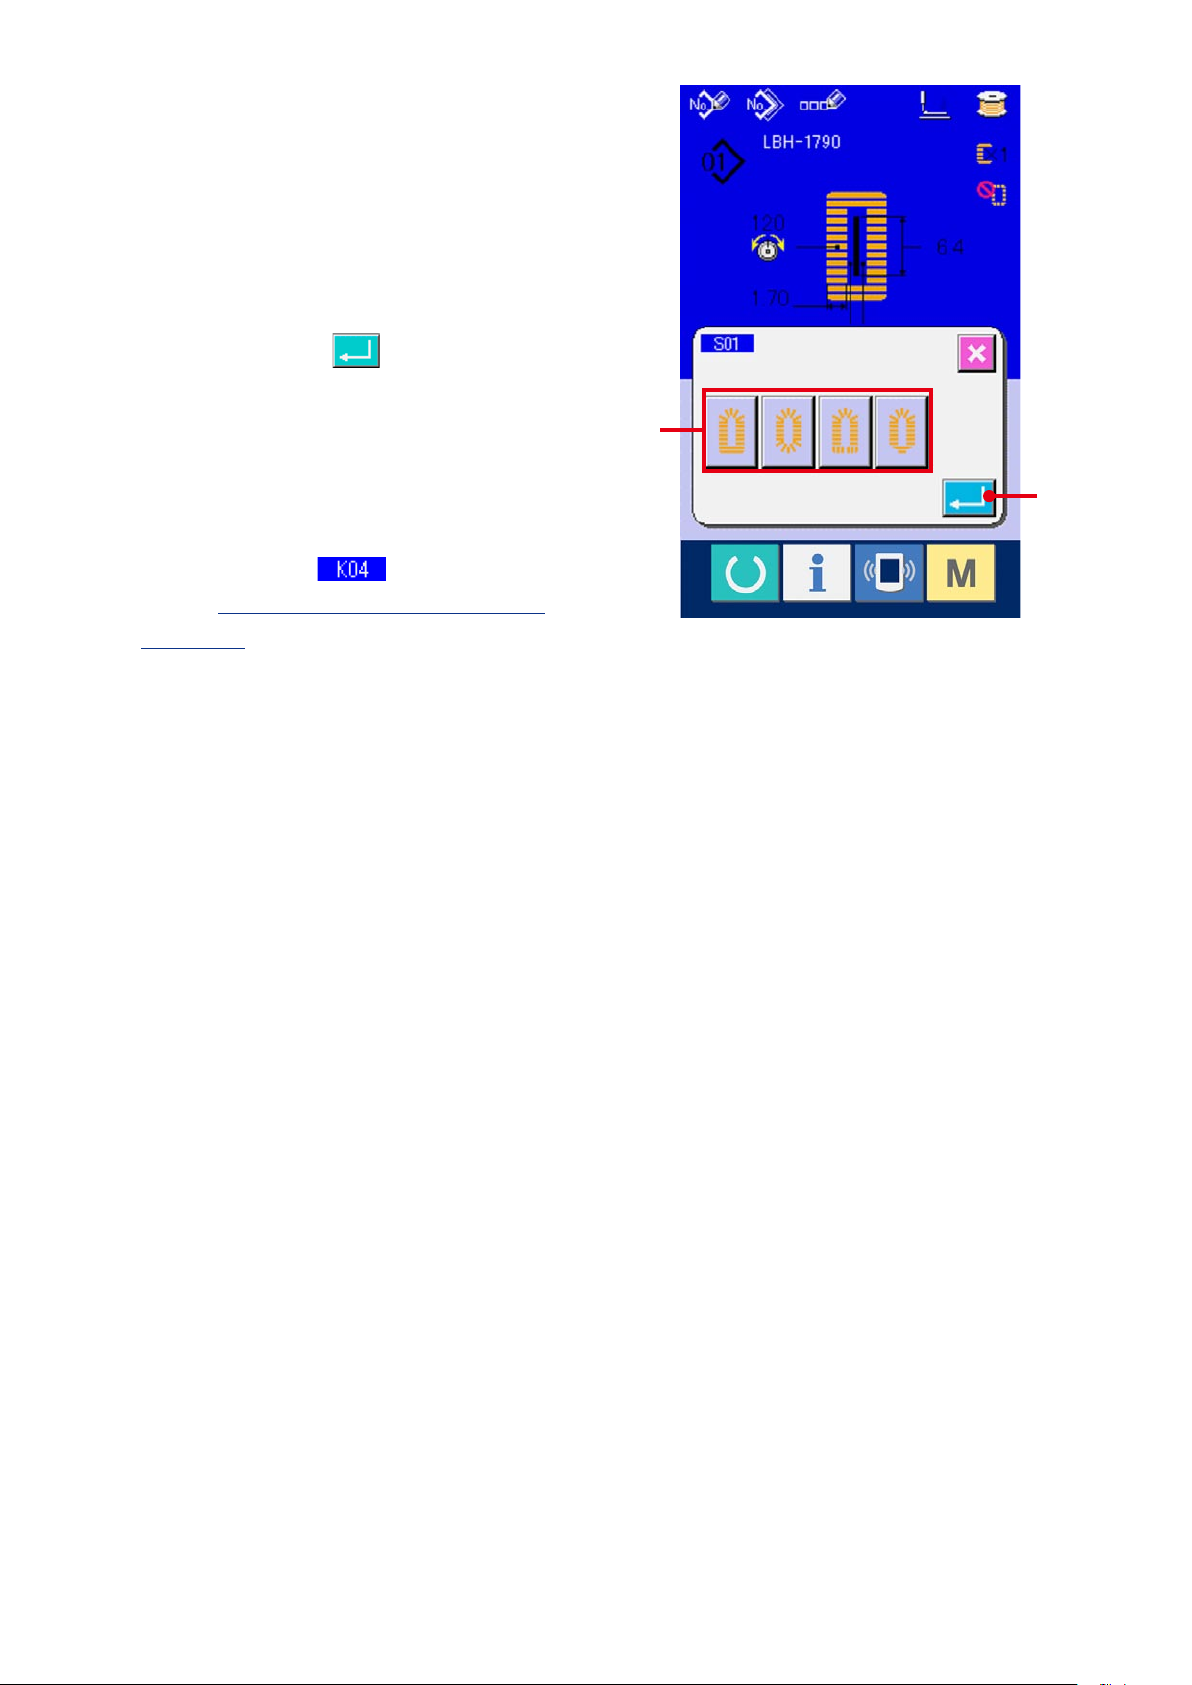
Select the sewing shape.
4
Select SEWING SHAPE button (C) you desire to
sew.
Finish the sewing shape selection.
5
Press ENTER button (D)tonishthe
shape selection and the selected sewing shape is
displayed in the data input screen (blue).
Note) The number of sewing shapes to be
displayed changes according to the level selected
in the sewing shape selection level of memory
DIP switch (level 2) .
Refer to
→
DATA, p.77
26. CHANGING MEMORY SWITCH
.
C
D
Page 26
9. CHANGING NEEDLE THREAD TENSION
Display the data input screen.
1
Only in case of the data input screen (blue),
needle thread tension can be changed. In case of
the sewing screen (green), press READY switch
and display the data input screen (blue).
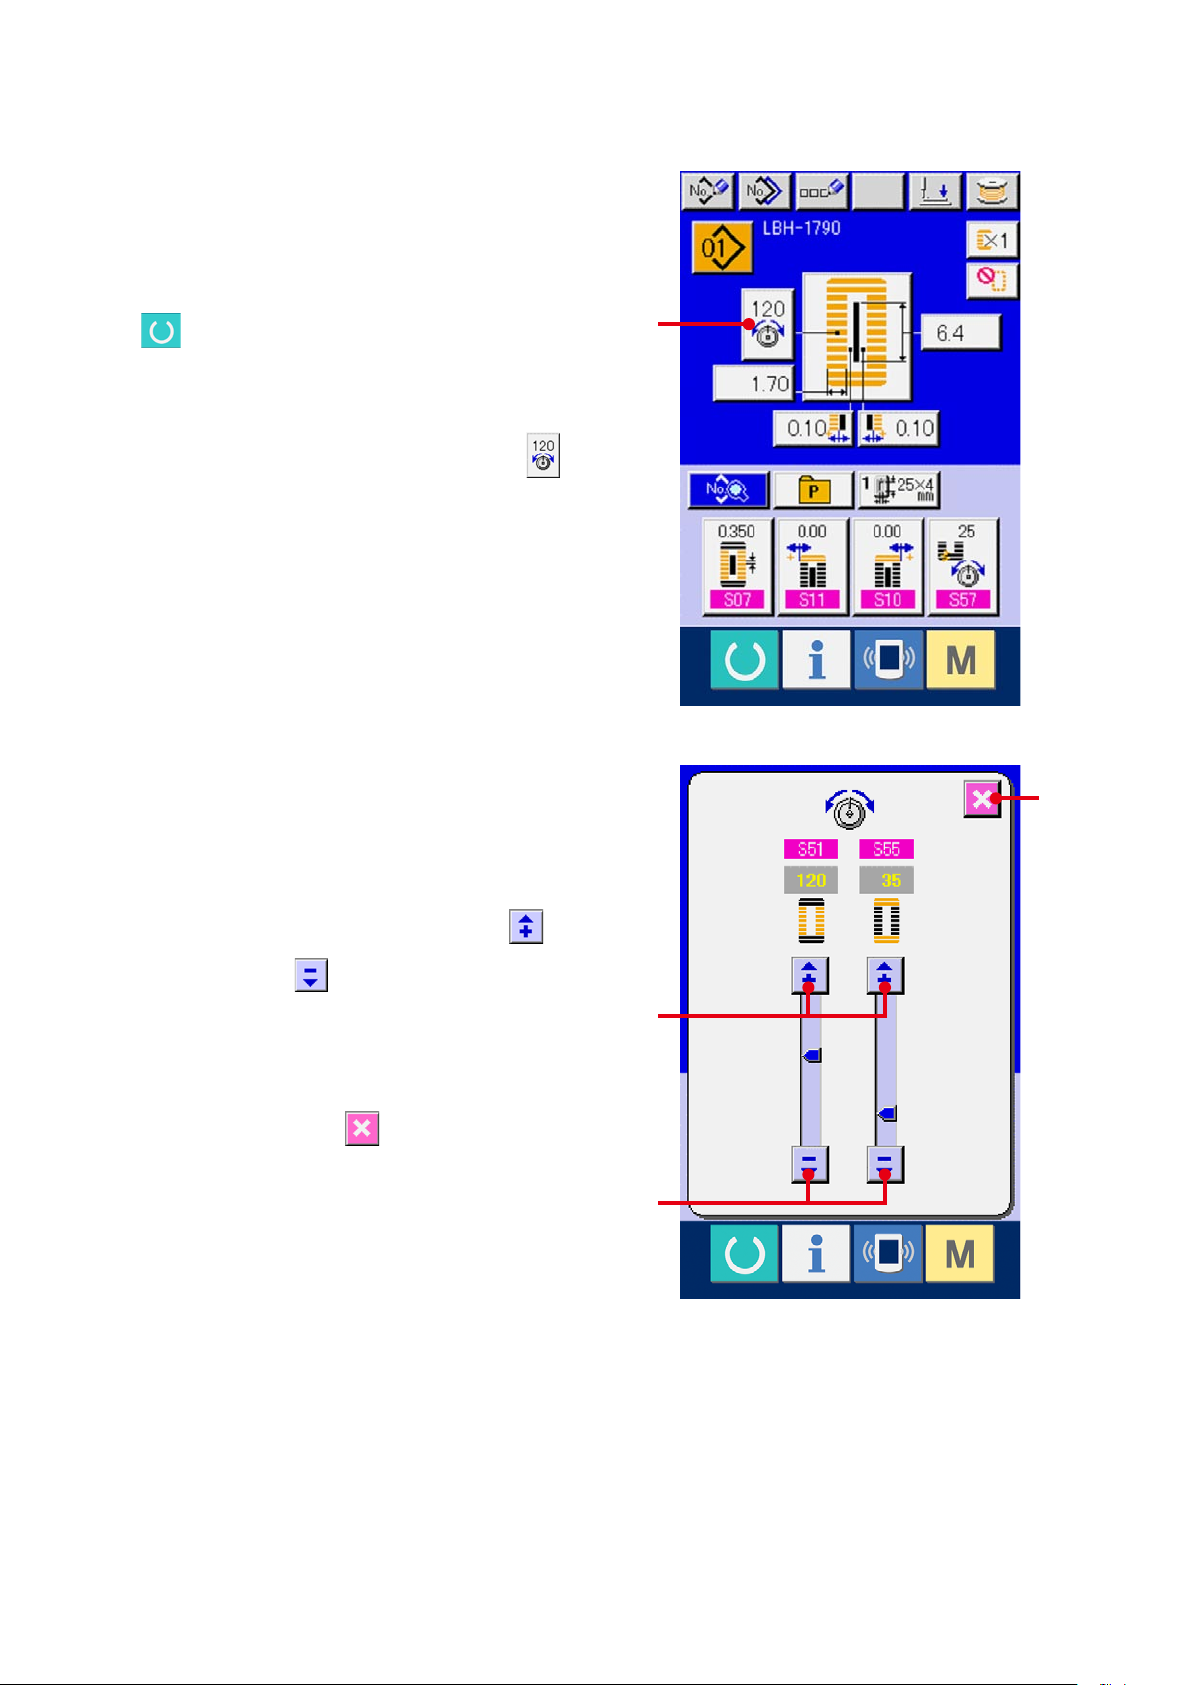
Call the needle thread tension change screen.
2
Press NEEDLE THREAD TENSION button
(A) and the needle thread tension change screen
is displayed.
Change the needle thread tension.
3
Needle thread tension at the parallel section and
that at the bar-tacking section can be changed in
the needle thread tension change screen.
A
D
Change the tension value with UP button (B)
or DOWN button (C) corresponding to the
respective sections.
Finish the change of needle thread tension.
4
Press CANCEL button (D) and the needle
thread tension change screen is closed. Then the
changehasbeennished.
B
C
– 25 –
Page 27
※ Forthetensionotherthanthatatparallelsectionandatbar-tackingsection,referto
15. CHANGING
SEWING DATA, p.37
and
26. CHANGING MEMORY SWITCH DATA, p.77
Set value of tension at 1 parallel section and 2 bar-tacking section
Set value on panel
Initial value
Parallel
Purl stitch
Whip stitch
1
section tension
Bar-tacking
2
tension
Parallel
1
section tension
Bar-tacking
2
tension
Crest is lowered. 120 Crest is raised.
Thread tension
is decreased.
Thread tension
is decreased.
Thread tension
is decreased.
35
60
60
Thread tension
is increased.
Thread tension
is increased.
Thread tension
is increased.
.
In case of the radial
eyelet shape, set
the bar-tacking
tensionrstto
approximately 120
and make the
balance of stitches.
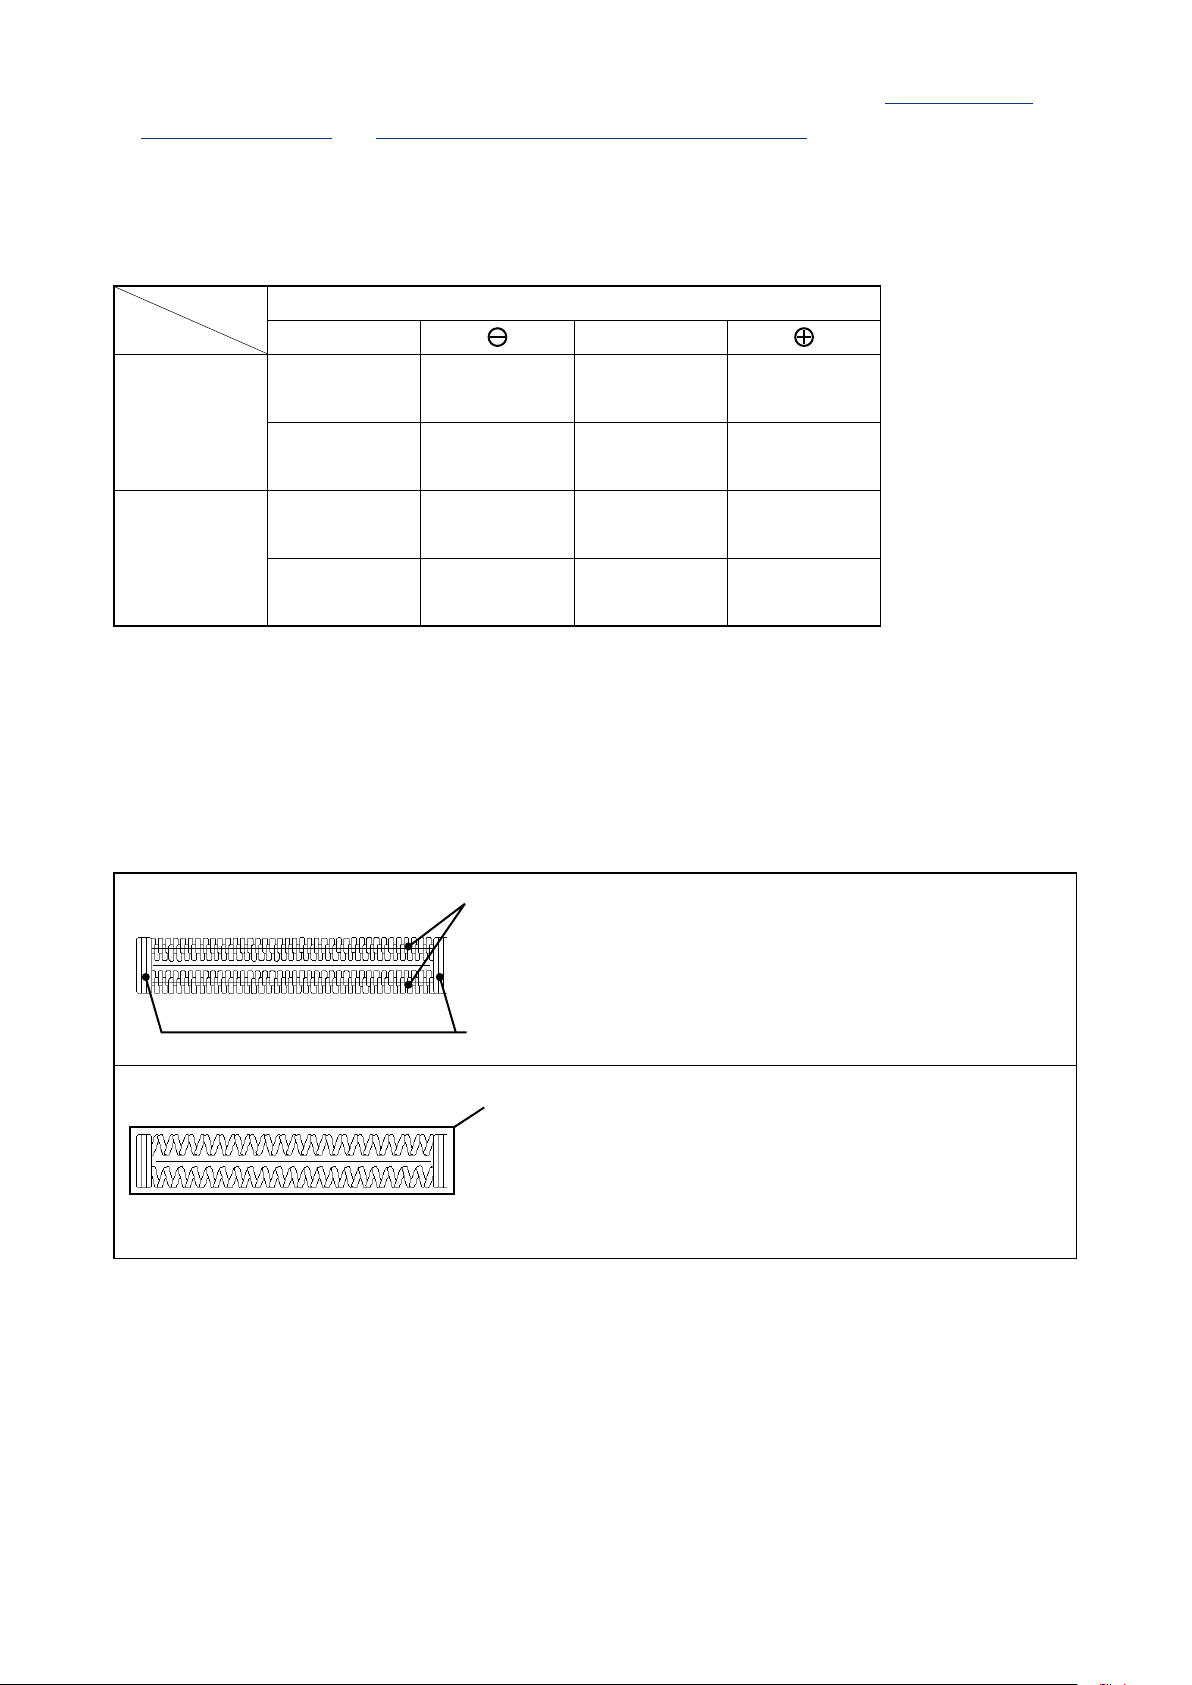
Purl stitch and Whip stitch
Purl stitch
Whip stitch
Whip stitch
Purl stitch
When applying higher tension to the needle thread to
permit it to pass straight through fabric, the purl stitch is
formed by the bobbin thread which is pulled over from
both sides to the center line.
Whip stitch
The whip stitch is formed in zigzag showing the needle
thread only on top of fabric, and the bobbin thread on the
bottom.
– 26 –
Page 28
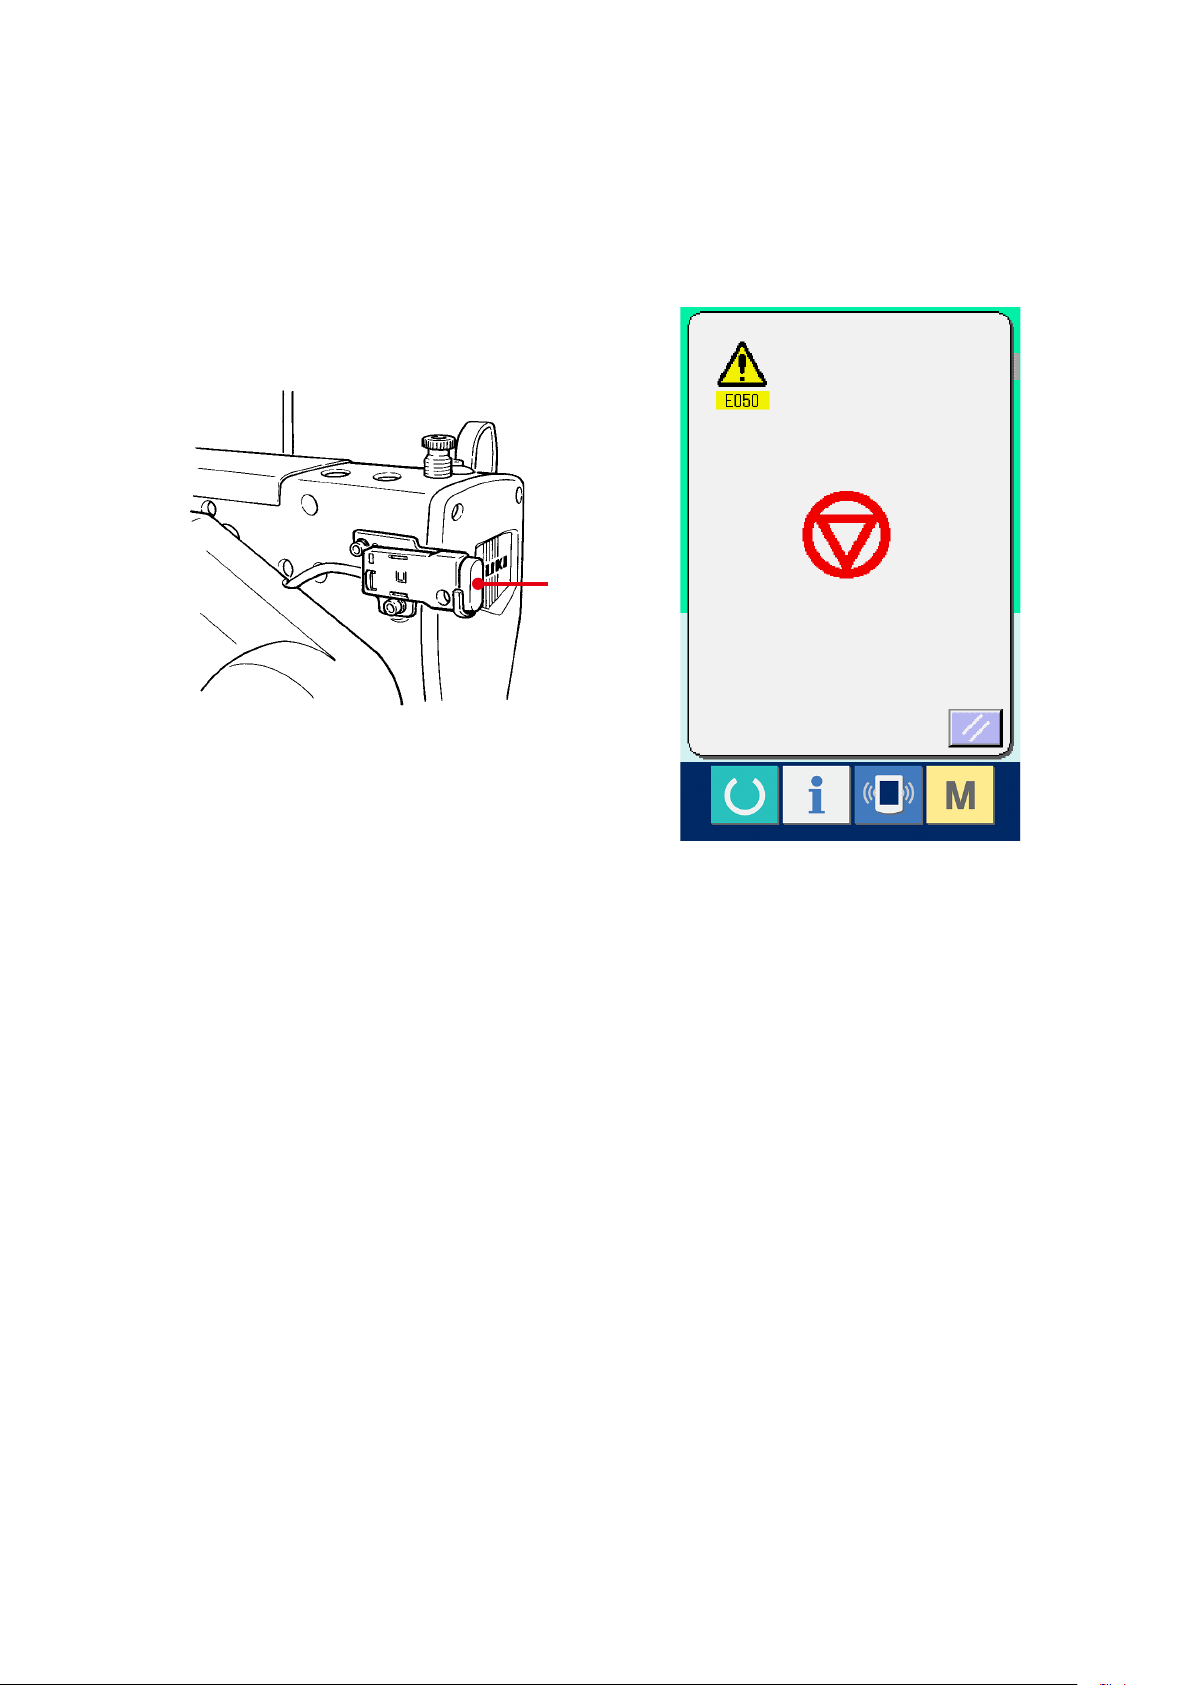
10. PERFORMING RE-SEWING
When STOP switch (A) is pressed during sewing, the sewing machine interrupts sewing and stops. At this
time, the error screen is displayed to inform that the STOP switch is pressed.
A
– 27 –
Page 29

– 28 –
10-1 To continue performing sewing from some point in sewing
Release the error.
1
Press RESET button (B) to release the
error. Then the step motion screen is displayed.
Return the presser.
2
Press BACKWARD button (C), and the presser
returns stitch by stitch.
Pre ss FORWA RD key (D), and the pres ser
J
I
advances stitch by stitch. Return the presser to
the re-sewing position.
Start sewing again.
3
Depress the right side pedal and sewing starts
again
.
10-2 To perform sewing from the start
Release the error.
1
Press RESET button (B) to release the
error. Then the step motion screen is displayed.
Return the sewing product to the setting
2
position.
Press INITIAL POSITION TRAVEL button
(E) and the presser returns to the sewing product
setting position (start position).
Press CANCEL button (I) to close the pop-
F
G
※ Theexistingsewingcommandsareshown
in reverse video in section (F). The kinds of
commands are 5 kinds below.
: Sewing command
: Thread trimming command
: Jump feed
: Thread tension
: Knife drive
H
D
E
C
up and the presser returns to the sewing product
setting position (start position).
Start the sewing.
3
When the right pedal is depressed, sewing starts
again.
※ In case of thecontinuous stitching, (E) moves
to the sewing start position of the shape during
sewing and when it is pressed subsequently, it
moves to the sewing start position of the previous
shape.
※ Theexistingnumberofstitches/numberoftotal
stitches are displayed in section (G).
※ Threadtensionvalueisdisplayedinsection(H).
When thread tension command is inputted in the
needle entry point by means of the external input
device, the button is displayed and thread tension
can be changed.
※ Knifecanbecancelledwith(J).
Page 30

11. WINDING BOBBIN THREAD
Set the bobbin.
1
Fit a bobbin fully onto the bobbin winder shaft.
Then push the bobbin thread guide in the
direction of the arrow mark.
Display the bobbin winding screen.
2
Press BOBBIN WINDER button (A) in the
data input screen (blue) or the sewing screen
(green) and the bobbin winding screen is
A
displayed.
Start bobbin winding.
3
Depress the start pedal, and the sewing machine
rotates and starts winding bobbin thread.
Stop the sewing machine.
4
Press STOP button (B) and the sewing
machine stops and returns to the normal mode.
Or, depress the start pedal twice during winding
bobbin and the sewing machine stops while the
bobbin thread winding mode stays as it is.
Depress the start pedal again and the bobbin
B
winding starts again. Use this way when winding
bobbin thread around plural bobbins.
When winding the bobbin thread in
the state that sewing is not performed,
remove the needle thread from the
thread path of thread take-up and
remove the bobbin from the hook.
– 29 –
Page 31

– 30 –
12. USING COUNTER
12-1 Setting procedure of the counter
Display the counter setting screen.
1
Press switch and the COUNTER SETTING
button (A) is displayed on the screen. When
this button is pressed, the counter setting screen
is displayed.
Selection of kinds of counters
2
This sewing machine has two kinds of counters,i.
e., sewing counter and No. of pcs. counter.
A
Press SEWING COUNTER KIND SELECTION
button (B) or NO. OF PCS. KIND
SELECTION button (C) to display the counter
kind selection screen. The kinds of the respective
counters can be set separately.
D
B
E
C
F
G
Page 32

[ Sewing counter ]
UP counter :
Every time the sewing of one shape is performed,
the existing value is counted up. When the existing
value is equal to the set value, the count-up screen
is displayed.
DOWN counter :
Every time the sewing of one shape is performed,
th e existin g value is cou nted down . Whe n the
existing value is reached to "0", the count-up screen
is displayed.
Counter not used
[ No. of pcs. counter ]
UP counter :
Every time one cycle or one continuous stitching is
performed, the existing value is counted up. When
the existing value is equal to the set value, the count-
up screen is displayed.
DOWN counter :
Every time one cycle or one continuous stitching
is performed, the existing value is counted down.
When the existing value is reached to "0", the count-
up screen is displayed.
Counter not used
– 31 –
Page 33

– 32 –
Change of counter set value
3
In case of the sewing counter, press button
(F) and in case of the No. of pcs. counter, press
button (G) and the set value input screen is
displayed.
Here, input the set value. (See p.30.)
Change of counter existing value
4
In case of the sewing counter, press button
(D) and in case of the No. of pcs. counter, press
button (E) and the existing value input screen
is displayed.
Here, input the existing value. (See p.30.)
Page 34

12-2 Count-up releasing procedure
When count-up condition is reached during sewing
work, the count-up screen is displayed and the
buzzer beeps.Press CLEAR button (H) to reset
the counter and the screen returns to the sewing
screen. Then the counter starts counting again.
H
– 33 –
Page 35

– 34 –
13. PERFORMING NEW REGISTRATION OF THE PATTERN
Display the data input screen.
1
Only in case of the data input screen (blue), new
registration of the pattern can be performed. In
case of the sewing screen (green), press READY
switch and display the data input screen
(blue).
Call the pattern new registration screen.
2
Press NEW REGISTRATION button (A) and
the pattern new registration screen is displayed.
Input the pattern No.
3
Input the pattern No. you desire to newly register
A
with the ten keys (B). When the pattern No.
which has been already registered is inputted,
the sewing shape which has been registered is
displayed in the upper part of the screen. Select
the pattern No. which is not displayed and has
not been registered. New registration to the
pattern No. which has been already registered is
prohibited.
It is possible to retrieve the pattern No. which has
not been registered with the - • + button
(C • D).
Determine pattern No.
4
Press ENTER button (E) to determine
the pattern NO. to be newly registered and the
screen of 1st bar-tacking shape list is displayed.
E
B
C D
Page 36

Select the 1st bar-tacking shape.
5
Select the shape you desire to sew from among 5
kinds of the 1st bar-tacking shape buttons (F).
When it is selected, the total sewing shape
in which the 1st bar-tacking shape is used is
displayed.
F
Select the sewing shape.
6
Select SEWING SHAPE button (G) you desire to
sew.
Finish the selection of sewing shape.
7
Press ENTER button (H)tonishthe
selection of the shape. Then the sewing shape
which has been selected is displayed in the data
input screen (blue). The initial value of sewing
data is inputted according to the selected sewing
shape.
Note) Number of sewing shapes to be displayed
changes according to the level selected in the
sewing shape selection level of memory DIP
switch (level 2) .
G
H
Refer to
→
DATA, p.77
26. CHANGING MEMORY SWITCH
.
– 35 –
Page 37

– 36 –
14. SEWING SHAPE LIST
1) Square type 2) Round type 3) Radial square type 4) Radial type 5) Radial straight bartacking type
6) Rad ial taper bar-
tacking type
11) Semilunar type 12) Round square
16) Eyelet semilunar
type
7) Eyelet square type 8) Eyelet radial type 9) Eyelet straight bar-
type
17) Eyelet round type 18) Square radial
13) Semilunar square
type
type
tacking type
14) Semilunar
straight bartacking type
19) Square semilunar
type
10) Eyelet taper bartacking type
15) Semilunar taper
bar-tacking type
20) Square round
type
21) Square straight
bar-tacking type
26) Semilunar round
type
22) Square taper bartacking type
27) Bar-tacking 28) Bar-tacking, right
23) Radial semilunar
type
cut
24) Radial round type 25) Semilunar radial
type
29) Bar-tacking, left
cut
30) Bar-tacking,
center cut
Page 38

15. CHANGING SEWING DATA
15-1 Initial sewing data at the time of your purchase
Patterns from 1 to 10 have been already registered at the time of your purchase. The initial values of the
square type shape which are different in the cloth cutting length only have been inputted in the sewing data.
For the initial values of the square type shape, refer to “13. INITIAL VALUE DATA FOR EACH SHAPE
→
TABLE” in the Instruction Manual supplied with the device.
Pattern No. Cloth cutting length
1 6.40 mm (1/4")
2 9.50 mm (3/8")
3 11.10 mm (7/16")
4 12.70 mm (1/2")
5 14.30 mm (9/16")
6 15.90 mm (5/8")
7 17.50 mm (11/16")
8 19.10 mm (3/4")
9 22.20 mm (7/8")
10 25.40 mm (1")
– 37 –
Page 39

– 38 –
15-2 Changing procedure of sewing data
Display the data input screen.
1
Only in case of the data input screen (blue),
change of the sewing data can be performed.
In case of the sewing screen (green), press
READY switch and display the data input
screen (blue).
Call the sewing data screen.
2
Press SEWING DATA button (A) and the
sewing data screen is displayed.
Select the sewing data to be changed.
3
Press UP/DOWN SCROLL button (B)
and select SEWING DATA ITEM button (C) you
desire to change. Data item not used according
to the shape and data item which is set to without
function are not displayed. So, be careful.
Refer to
→
SEWING DATA WITH/WITHOUT EDIT, p.50
16. SETTING PROCEDURE OF
.
A
C
B
Page 40

Change the data.
4
For the sewing data, there are the data item to
change the numeral and data item to select the
pictograph. No. in pink color such as is
put on the data item to change the numeral and
the set value can be changed with the +/- button
which is displayed in the change screen. No.
in blue color such as is put on the data
item to select the pictograph and the pictograph
which is displayed in the change screen can be
selected.For the details of the sewing data, refer
to
15-3 Sewing data list, p.40
.
– 39 –
Page 41

– 40 –
15-3 Sewing data list
Sewing data are those that can be inputted to 99 patterns from pattern 1 to 99 and can be inputted to
each pattern.
The sewing machine has been set in the state that the data which is necessary to set "With/ without edit"
cannot be set at the time of your purchase. Change over the function to "With edit" if necessary for use.
Refer to
→
No. Item Setting range Edit unit Remarks
16. SETTING PROCEDURE OF SEWING DATA WITH/WITHOUT EDIT, p.50
Sewing shape
This item selects the shape from among the sewing shapes
of 30 different kinds which the sewing machine has.
Refer to
→
※Only12kindsofstandardsewingshapescanbeselected
at the time of your purchase. When increasing the kinds
of shapes, perform setting of K04 Sewing shape selection
level of memory switch data.
Refer to
→
Cloth cut length
This item sets the length of cloth that is cut by
cloth cutting knife. However, in case of bartack shape (Nos. 27, 28, 29 and 30 of S01),
sewing length is set.
By making effective Function of plural motions of
cloth cutting knife of memory switch data, make the plural
motions of knife by the knife size set in the item
Cloth cutting knife size, and the sewing product is cut.
Refer to
→
Knife groove width, right
This item sets the clearance between cloth
cutting knife and right parallel section.
14. SEWING SHAPE LIST, p.36
1 〜 30
26-2 Memory switch list, p.79
26-2 Memory switch data list, p.79
.
.
.
1 to 30 1 ---
3.0 to 120.0 0.1mm ---
-2.00 to 2.00 0.05mm ---
.
(Remarks)
※1:Displayedaccordingtotheshape.
※2:Displayedwhenitissettowithedit.
Refer to
16. SETTING PROCEDURE OF SEWING DATA WITH/WITHOUT EDIT, p.50
※3:Displayedwhenthefunctionisselected.
.
Page 42

No. Item Setting range Edit unit Remarks
Knife groove width, left
-2.00 to 2.00 0.05mm --This item sets the clearance between cloth
cutting knife and left parallel section.
Overedging width, left
0.10 to 5.00 0.05mm --This item sets the overedging width of left
parallel section.
Ratio of right and left shapes
50 to 150 1% --This item sets enlargement/reduction ratio of
right side shape making the knife position as
the center.
Pitch at parallel section
This item sets sewing pitch of left and right
0.200 to
2.500
0.025mm ---
parallel sections.
2nd bar-tacking length
0.2 to 5.0 0.1mm --This item sets length of bar-tacking on the front
side.
Square
type,
bottom
Straight
bar-tack,
bottom
Flow,
bottom
1st bar-tacking length
This item sets length of bar-tacking on the rear
side.
Square
type, top
Compensation of bar-tacking width, right
This item adjusts left side outer shape of bartacking section in terms of overedging section.
Both 1st and 2nd bar-tacking can be
compensated.
Straight
bar-tack,
bottom
Square
type, top
Square
type,
bottom
Compensation of bar-tacking width, left
This item adjusts left side outer shape of bartacking in terms of overedging section.
0.2 to 5.0 0.1mm ---
-1.00 to 1.00 0.05mm ---
-1.00 to 1.00 0.05mm ---
– 41 –
Page 43

– 42 –
No. Item Setting range Edit unit Remarks
Flow bar-tacking offset, left
0.00 to 3.00 0.05mm ※1
This item sets length to form bar-tacking
sectionofowbar-tackingshape.
Flow bar-tacking offset, right
0.00 to 3.00 0.05mm ※1
This item sets length to form bar-tacking
sectionofowbar-tackingshape.
Eyelet shape length
1.0 to 10.0 1 ※1
This item sets upper side length from center of
eyelet of eyelet shape.
Number of stitches of eyelet shape
1 to 8 0.1mm ※1
This item sets number of stitches in the upper
90゚ofeyeletshape.
Eyelet width
1.0 to 10.0 0.1mm ※1
This item sets crosswise size of the inside of
eyelet shape.
Actual needle entry point is the dimension to
which S04 Knife groove width, left is added.
Eyelet length
1.0 to 10.0 0.1mm ※1
This item sets lengthwise size of the inside of
eyelet shape.
Round type shape length
1.0 to 5.0 0.1mm ※1
This item sets upper side length from the
center of round type shape.
Round
type, top
Radial, top Semilunar,
top
Round
type,
bottom
Radial,
bottom
Semilunar,
bottom
Number of stitches of radial shape
This item sets number of stitches in the upper
90° of radial shape.
1 to 8 1 ※1
Page 44

No. Item Setting range Edit unit Remarks
Reinforcement of radial shape
--- --- ※1,※2
This item sets with / without reinforcement
stitching
of radial shape.
: With : Without
Pitch at bar-tacking section
This item sets sewing pitch of bar-tacking
section.
Square
type, top
Square
type,
bottom
Round
type,
top
Round
type,
bottom
Semilunar,
top
Semilunar,
bottom
Straight
bar-tack,
bottom
1st clearance
This item sets the clearance between 1st
bar-tacking and knife groove. This item is
applied to all shapes.
2nd clearance
This item sets the clearance between 2nd
bar-tacking and knife groove. This item is
applied to all shapes.
Single/double stitching
This item selects single or double stitching.
: Single stitching :
Flow,
bottom
Double stitching
0.100 to
0.025mm ---
2.500
0.0 to 4.0 0.1mm ---
0.0 to 4.0 0.1mm ---
--- --- ---
– 43 –
Page 45

– 44 –
No. Item Setting range Edit unit Remarks
Double stitching cross selection
This item selects overlapped stitching or cross stitching at
the needle entry of parallel section when setting double
stitching.
--- --- ※3
: Overlapped
stitching
Compensation of double stitching
width
This item sets amount to narrow
overedging width of 1st cycle when
setting double stitching.
Number of times of basting
This item sets number of times of basting.
: Without
basting
Basting pitch
This item sets pitch at the time of
performing basting.
Rolling length of basting
This item sets rolling length of needle
thread when performing basting.
Rolling pitch of basting
This item sets rolling pitch of needle
thread when performing basting.
: Cross stitching
0.0 to 2.0 0.1mm ※3
0 to 9 1 ※3
: 1 to 9 times
1.0 to 5.0 0.1mm ※3
2.0 to 20.0 0.1mm ※3
0.2 to 5.0 0.1mm ※3
Rolling width of basting
This item sets rolling width of needle
thread when performing basting.
Lengthwise compensation of needle
entry of basting
This item sets the amount to move
needle entry position back and forth when
performing basting more than two cycles.
0.0 to 4.0 0.1mm ※3
0.0 to 2.5 0.1mm ※2,※3
Page 46

No. Item Setting range Edit unit Remarks
Crosswise compensation of needle
entry of basting
This item sets the amount to move needle
entry position to the right or left when
performing basting more than two cycles.
Compensation of left side position of
basting
This item sets the amount to move the
sewing reference position of basting from
the center of left overedging to the right or
left.
Compensation of right side position of
basting
This item sets the amount to move the
sewing reference position of basting from
the center of right overedging to the right
or left.
Speed setting of basting
This item sets speed of basting.
0.1 to 1.0 0.1mm ※3
-2.0 to 2.0 0.1mm ※2,※3
-2.0 to 2.0 0.1mm ※2,※3
400 to 4200 100rpm ※3
– 45 –
Page 47

No. Item Setting range Edit unit Remarks
Left parallel section tension
This item sets needle thread tension at
left parallel section.
Right parallel section tension
This item sets needle thread tension at
right parallel section.
Left parallel section tension (1st cycle
of double stitching)
This item sets needle thread tension at
left parallel section of 1st cycle at the time
of double stitching.
Right parallel section tension (1st
cycle of double stitching)
This item sets needle thread tension at
right parallel section of 1st cycle at the
time of double stitching.
Tension at 1st bar-tacking section
This item sets needle thread tension at
1st bar-tacking section.
Tension at 2nd bar-tacking section
This item sets needle thread tension at
2nd bar-tacking section.
0 to 200 1 ---
0 to 200 1 ※2
0 to 200 1 ※2,※3
0 to 200 1 ※2,※3
0 to 200 1 ---
0 to 200 1 ※2
Setting of needle thread tension at the
start of sewing
This item sets needle thread tension of tie
stitching at the start of sewing.
Setting of needle thread tension of
basting
This item sets needle thread tension of
basting.
0 to 200 1 ---
0 to 200 1 ※3
– 46 –
Page 48

No. Item Setting range Edit unit Remarks
ACT timing adjustment at the start of
1st bar-tacking
This item adjusts needle thread tension
output start timing at 1st bar-tacking
section.
ACT timing adjustment at the start of
right overedging
This item adjusts needle thread tension
output start timing at right overedging
section.
ACT timing adjustment at the start of
2nd bar-tacking
This item adjusts needle thread tension
output start timing at 2nd bar-tacking
section.
Number of stitches of tie stitching at
the start of sewing
This item sets number of stitches of tie
stitching at the start of sewing.
Sewing pitch of tie stitching at the start
of sewing
This item sets sewing pitch of tie stitching
at the start of sewing.
Tie stitching width at the start of
sewing
This item sets tie stitching width at the
start of sewing.
Lengthwise compensation of tie
stitching at the start of sewing
This item sets start position of tie stitching
in lengthwise direction at the start of
sewing.
Crosswise compensation of tie
stitching at the start of sewing
This item sets start position of tie stitching
in crosswise direction at the start of
sewing.
-5 to 5 1 stitch ※2
-5 to 5 1 stitch ※2
-5 to 5 1 stitch ※2
0 to 8 1 stitch ---
0.00 to 0.70 0.05mm ※2
0.0 to 3.0 0.1mm ---
0.0 to 5.0 0.1mm ※2
0.0 to 2.0 0.1mm ※2
– 47 –
Page 49

– 48 –
No. Item Setting range Edit unit Remarks
Tie stitching width at the end of sewing
This item sets tie stitching width at the
end of sewing.
Number of stitches of tie stitching at
the end of sewing
This item sets number of stitches of tie
stitching at the end of sewing.
Lengthwise compensation of tie
stitching at the end of sewing
This item sets start position of tie stitching
in lengthwise direction at the end of
sewing.
Crosswise compensation of tie
stitching at the end of sewing
This item sets start position of tie stitching
in crosswise direction at the end of
sewing.
Knife motion
This item sets "With/without motion" of normal cloth cutting
knife.
0.1 to 1.5 0.1mm ---
0 to 8 1 stitch ---
0.0 to 5.0 0.1mm ※2
0.0 to 2.0 0.1mm ※2
--- --- ---
: Normal knife
motion Off
Knife motion at 1st cycle of double stitching
This item sets "With/without motion" of cloth cutting knife at
1st cycle when double stitching is performed.
: Normal knife
motion Off
Maximum speed limitation
This item sets max. number of revolutions
of the sewing machine. The maximum
value of data edit is equal to the number
of revolutions of K07 Maximum speed
limitation of the memory switch data.
Refer to
→
list, p.79
26-2 Memory switch data
.
: Normal knife
motion ON
: Normal knife
motion ON
--- --- ※2,※3
400 to 4200 100rpm ---
Page 50

No. Item Setting range Edit unit Remarks
Pitch of going
This item sets sewing pitch of going side
of bar-tacking shape (Shape Nos. 27, 28,
29 and 30 of S01).
Width of going
This item sets width of going side of
bar-tacking shape (Shape Nos. 27, 28, 29
and 30 of S01).
Pitch of returning
This item sets sewing pitch of retuning
side of bar-tacking shape (Shape Nos.
27, 28, 29 and 30 of S01).
Width of returning
This item sets width of returning side of
bar-tacking shape (Shape Nos. 27, 28,
29 and 30 of S01).
0.200 to
2.500
0.10 to 10.00 0.05mm ---
0.200 to
2.500
0.10 to 10.00 0.05mm ---
0.025mm ---
0.025mm ---
– 49 –
Page 51

– 50 –
16. SETTING PROCEDURE OF SEWING DATA WITH/WITHOUT EDIT
Display the sewing data with/without edit
1
setting screen.
When continuing pressing switch for three
seconds, the sewing data with/without edit setting
button (A) is displayed on the screen.When
this button is pressed, the sewing data with/
without edit setting screen is displayed.
A
Select the sewing data with/without edit.
2
The list of data item buttons (B) which are
possible to set the data with/without edit among
the sewing data is displayed. When the button is
pressed, reverse display/normal display changes
over alternately.
When you desire to set "With edit", set the
reverse display.When you desire to set "Without
edit", set the normal display.
: Without edit
: With edit
Determine the sewing data with/without edit.
3
B
C
When ENTER button (C) is pressed, the
state of with/without edit of the sewing data item
which has been set is determined.
Page 52

17. COPYING SEWING PATTERN
The sewing data of the pattern No. which has been
already registered can be copied to the pattern No.
which has not been registered. Overwriting copy
of the pattern is prohibited. When you desire to
overwrite, perform it after erasing the pattern once.
Refer to
→
SELECTION, p.20
Display the data input screen.
1
Only in case of the data input screen (blue),
copying is possible. In case of the sewing screen
(green), press READY switch and display
the data input screen (blue).
6. PERFORMING PATTERN NO.
.
A
Call the pattern copy screen.
2
When pattern copy button (A) is pressed,
the pattern copy (copy source selection) screen is
displayed.
Select the pattern No. of copy source.
3
Select the pattern No. of copy source from the list
of pattern buttons (B).
Then press copy destination input button
(C) and the copy destination input screen is
displayed.
C
B
– 51 –
Page 53

– 52 –
Input the pattern No. of copy destination.
4
Input the pattern No. of copy destination with ten
keys (D). It is possible to retrieve the pattern No.
which is not used with - and + buttons
(E • F).
Start copying.
5
Press ENTER button (G) and copying
starts.
Pattern No. which has been copied in the
selected state returns to the pattern copy (copy
source selection) screen after approximately two
seconds.
※1 Cycledataandcontinuousstitchingdatacan
be copied by the same method.
※2 Whendeletionisperformedincasethe
remaining pattern No. which has been
registered is one, pattern deletion error (Error
code 402) is displayed.
※3 Whentryingtoperformcopyingtothepattern
D
G
E F
No. which has been already registered,
copy disapproval error (Error code 401) is
displayed.
Page 54

18. REGISTERING THE PATTERN TO DIRECT BUTTON
Register the pattern Nos. which are frequently used with the direct buttons for use.
Once the patterns are registered, the pattern selection can be performed with ease by pressing only the
button.
18-1 How to register
Display the direct pattern register screen.
1
When switch is pressed, direct pattern
register button (A) is displayed on the screen.
When this button is pressed, the direct pattern
register screen is displayed.
Select the button to be registered.
2
Direct patterns can be registered up to 10
patterns.
10 direct buttons (B) are displayed on the screen.
When the button located on the position you
desire to register is pressed, the pattern No. list
screen is displayed.
A
B
– 53 –
Page 55

– 54 –
Select the pattern No. to be registered.
3
Select the pattern No. you desire to register
from among pattern No. buttons (C). When the
selected button is pressed twice, the selection is
released.
Register the direct pattern.
4
When ENTER button (D) is pressed, the
registerofdirectpatternisnishedandthedirect
pattern No. register screen is displayed.
The registered pattern No. is displayed on the
direct button.
C
18-2 Register state at the time of your purchase
Pattern Nos. 1 to 10 have been registered at the time of your purchase.
D
Page 56

19. REGISTERING SEWING DATA TO CUSTOMIZE BUTTON
Register parameters which are frequently used to CUSTOMIZE button and use them.
Screen of the change of parameters which have been registered can be displayed by pressing only
CUSTOMIZE button in the data input screen.
19-1 How to register
Display the customize pattern register screen.
1
When switch is pressed, the customize
pattern register button (A) is displayed on the
screen.
When this button is pressed, the customize
pattern register screen is displayed.
Select the button to be registered.
2
The customize buttons can be registered up to
four buttons. Four costomize register buttons (B)
are displayed on the screen. When the button
located on the position you desire to register is
A
pressed, the sewing data list screen is displayed.
B
– 55 –
Page 57

– 56 –
Select the sewing data to be registered.
3
Select the sewing data you desire to register with
the sewing data buttons (C). When the selected
button is pressed twice, the selection is released.
Register to the customize button.
4
When ENTER button (D) is pressed,
registertothecustomizebuttonisnishedand
the customize button register screen is displayed.
The registered sewing data is displayed on the
customize button.
C
19-2 Register state at the time of your purchase
The following items have been registered in order at the time of your purchase.
Pitch at parallel section
Compensation of bar-tacking width, left
D
Compensation of bar-tacking width, right
Setting of needle thread tension at the start of sewing
Page 58

20. CHANGING SEWING MODE
Display the sewing mode selection screen.
1
When switch is pressed, the sewing mode
selection button (A) is displayed on the
screen. When this button is pressed, the sewing
mode selection screen is displayed.
※ Imageofthebuttonofthesewingmodeselection
button changes according to the sewing mode
which is selected at present.
When independent sewing is selected :
When cycle stitching is selected :
When continuous stitching is selected :
A
Select the sewing mode.
2
Select the sewing mode you desire to sew.
Independent sewing button (B) :
Cycle stitching button (C) :
Continuous stitching button (D) :
Determine the sewing mode.
3
When ENTER button (E) is pressed,
changeofthesewingmodeisnished.When
switch is pressed, the data input screen of
the selected sewing mode is displayed.
B
C
D
E
– 57 –
Page 59

– 58 –
21. LCD DISPLAY SECTION AT THE TIME OF CONTINUOUS STITCHING
This sewing machine can perform the continuous stitching that continuously sew the plural sewing
pattern data without lifting the presser.
It is possible to install a long presser of as long as 120 mm size and to automatically sew up to as many
as 6 shapes in the presser.
Inaddition,itispossibletoregisterasmanyas20data.Registerorcopythedatatolltheneedforuse.
Refer to
→
PATTERN, p.51
13. PERFORMING NEW REGISTRATION OF PATTERN, p.34
.
and
17. COPYING SEWING
※ Itisnecessarytochangethecomponentsfromthestateatthetimeofyourpurchaseaccordingto
the setting conditions.
21-1 Data input screen
A B C D E F
G
H
I
L
J
K
Page 60

Button and display Description
A CONTINUOUS STITCHING DATA
NEW REGISTER button
Continuous stitching data new register screen is displayed.
B CONTINUOUS STITCHING DATA
COPY button
C DATA NAME INPUT button
D DATA NAME display Name inputted in continuous stitching data No. which is being
E PRESSER DOWN button Presser down screen is displayed and the needle moves to the right
F BOBBIN WINDER button
G CONTINUOUS STITCHING
DATA NO. SELECTION button
H SEWING ORDER Sewing order of continuous stitching data which have been inputted is
Continuous stitching data copy screen is displayed.
Continuous stitching data name input screen is displayed.
Refer to
→
selected is displayed.
side. To raise the presser, press the presser up button displayd in the
presser down screen.
When performing threading in this state, turn OFF the power before
*
performing.
Bobbin thread can be wound.
Refer to
→
Continuous stitching data No. which is being selected at present is
displayed in the button. When it is pressed, continuous stitching data
No. selection screen is displayed.
displayed.
7. NAMING THE PATTERN, p.22
11. WINDING BOBBIN THREAD, p.29
.
.
I FEED AMOUNT INPUT button Cloth feed amount before sewing is displayed.
When the button is pressed, feed amount input screen is displayed.
J PATTERN NO. SELECTION
button
K SEWING DATA EDIT button Sewing data information such as pattern No., shape, cloth cutting
L ALL DELETE button Contents inputted to continuous stitching data which is being selected
Pattern No. which has been inputted is displayed.
When the button is pressed, pattern No. list screen is displayed and
pattern No. selection can be performed.
length, etc. which have been inputted is displayed
are deleted.
※ Number of patterns only to which buttons H to K and displays have been inputted is displayed.
– 59 –
Page 61

– 60 –
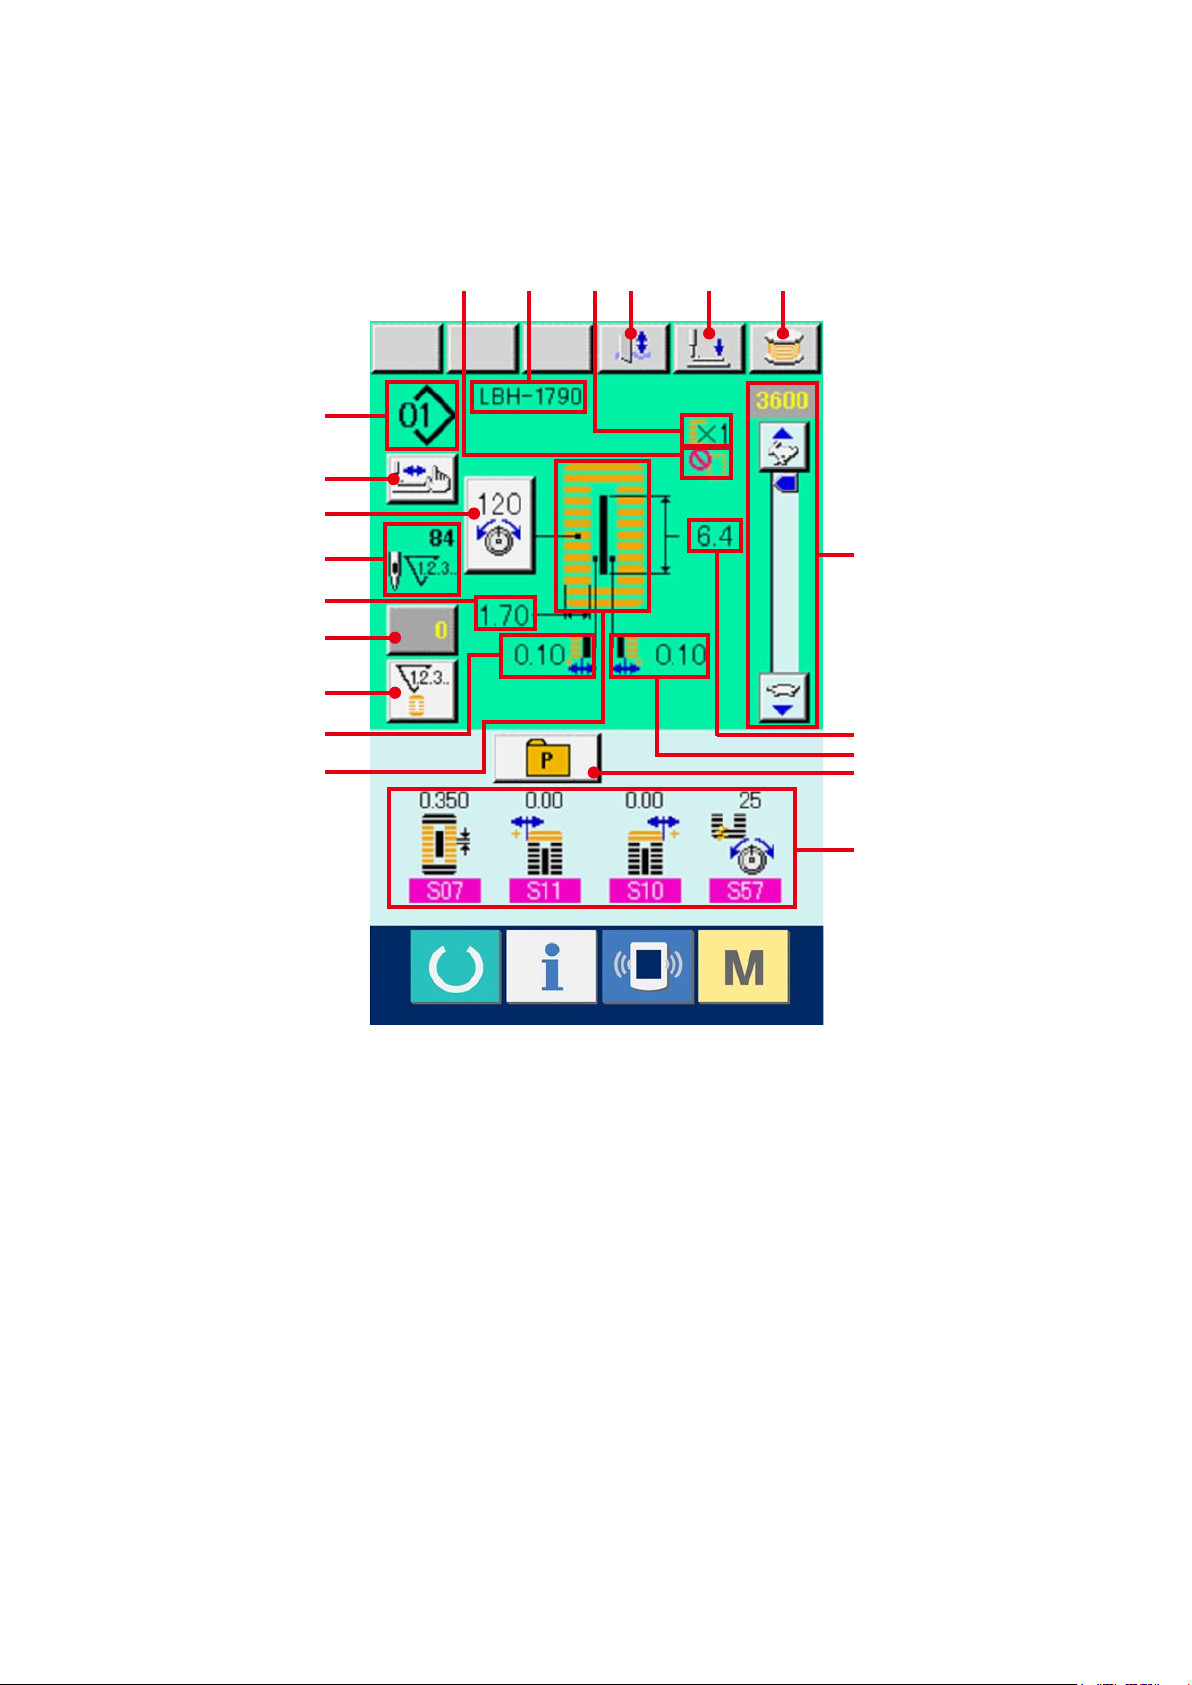
21-2 Sewing screen
A B C D
E
O
F
G
H
I
P
J
K1
K2
Q
L
M
N
R
Page 62

Button and display Description
A CONTINUOUS STITCHING DATA
NAME display
B KNIFE CANCEL button Every time the button is pressed, dropping/non-dropping knife is
C PRESSER DOWN button Presser can be lowered and the knife down screen is displayed.
Name inputted to continuous stitching data during sewing is displayed.
changed over alternately.
To raise the presser, press the presser up button displayed in the
presser down screen.
When performing threading in this state, turn OFF the power before
*
performing.
D BOBBIN WINER button
E CONTINUOUS STITCHING
PATTERN NO. display
F WITH/WITHOUT DOUBLE
STITCHING display
G NUMBER OF TIMES OF BASTING
display
H STEP STITCHING button
I NEEDLE THREAD TENSION
CHANGE button display
J NUMBER OF TOTAL STITCHES
display
K1 COUNTER VALUE CHANGE button
Bobbin thread can be wound.
Refer to
→
Continuous stitching data No. during sewing is displayed.
With/without double stitching which is set to the pattern data during
sewing is displayed.
Number of times of basting which is set to the pattern data during
sewing is displayed.
When the button is pressed, the step stitching screen to check the
needle entry point and to perform re-sewing is displayed.
Refer to
→
Needle thread tension which is set to the pattern data during sewing is
displayed.
Number of total stitches of the continuous stitching data during sewing
is displayed.
Existing counter value is displayed on this button. When the button is
pressed, the counter value change screen is displayed.
Refer to
→
11. WINDING BOBBIN THREAD, p.29
10. PERFORMING RE-SEWING, p.27
12. USING COUNTER, p. 30
.
.
.
K2 COUNTER CHANGE OVER button
L OVEREDGING WIDTH, LEFT button Overedging width, left which is set to the pattern data during sewing is
M KNIFE GROOVE WIDTH, LEFT
display
N SEWING SHAPE display Sewing shape during sewing is displayed.
Display of sewing counter/No. of pcs. counter can be changed over.
Refer to
→
displayed.
Knife groove width, left which is set to the pattern data during sewing
is displayed.
12. USING COUNTER, p. 30
.
– 61 –
Page 63

– 62 –
Button and display Description
O PATTERN NO. display Pattern No. inputted to continuous stitching data during sewing is
displayed. Pattern NO. being sewn at present is displayed in reverse
video.
P SPEED variable resistor Number of rotation of sewing machine can be changed. The number
of rotation which is set is displayed.
Q CLOTH CUTTING LENGTH display Cloth cutting length which is set to the pattern data during sewing is
displayed.
R KNIFE GROOVE WIDTH, RIGHT
display
Knife groove width, right which is set to the pattern data during sewing
is displayed.
Page 64

22. PERFORMING CONTINUOUS STITCHING
First, change the sewing mode to the continuous stitching before performing setting.
Refer to
→
20. CHANGING SEWING MODE, p.57
.
22-1 Selection of the continuous stitching data
Display the data input screen.
1
Only in case of the data input screen (light blue),
it is possible to select continuous stitching data
No. In case of the sewing screen (green), press
READY switch and display the data input
screen (light blue).
Call the continuous stitching data No.
2
selection screen.
When continuous stitching data No. selection
button (A) is pressed, the continuous
stitching data No. selection screen is displayed.
A
Continuous stitching data No. selected at present
and the contents are displayed in the upper part
of the screen and other continuous stitching
data No. buttons which have been registered are
displayed in the lower part of the screen.
Select the continuous stitching data No.
3
When UP/DOWN SCROOL button
is pressed, the registered continuous stitching
data No. buttons change over in order. Contents
registered to the continuous stitching data
are displayed in the buttons. Here, press the
continuous stitching data button (B) you desire to
select.
Determine the continuous stitching data No.
4
C
B
When ENTER button (C) is pressed, the
continuous stitching data No. selection screen is
closedandtheselectionhasbeennished.
– 63 –
Page 65

– 64 –
22-2 Editing procedure of the continuous stitching data
Display the data input screen.
1
Only in case of the data input screen (light blue),
it is possible to change the continuous stitching
data. In case of the sewing screen (green), press
READY switch and display the data input
screen (light blue).
After the screen is displayed, select the
continuous stitching data No. you desire to edit
referring to
stitching data, p.63
22-1 Selection of the continuous
. Continuous stitching data
No. 1 only has been registered at the time of your
purchase. However, pattern No. has not been
inputted and the screen is displayed as shown in
thegureontherightside.
Display the feed amount input screen.
2
When FEED AMOUNT button (A)
is pressed, the feed amount input screen is
displayed.
A
Input the feed amount.
3
Input the feed amount with plus/minus buttons
(B).
Determine the feed amount.
4
When ENTER button (C) is pressed, the
feed amount input screen is closed and input has
been completed.
B
C
Page 66

Call the pattern No. selection screen.
5
Press button (D) displayed under the sewing
orderdisplay.PatternNo.tosewrstselection
screen is displayed.
D
Select the pattern No.
6
When UP/DOWN SCROOL button is
pressed, the registered pattern No. buttons (E)
change over in order.
Contents of sewing data are displayed in the
buttons. Here, press the pattern No. button you
desire to select.
Determine the pattern No.
7
When ENTER button (F) is pressed, the
continuous stitching data No. selection screen is
closed and the selection has been completed.
F
E
– 65 –
Page 67

Edit the sewing data of pattern inputted to
8
continuous stitching data.
When the pattern No. is selected, the sewing
data button (G) displayed the contents of
the sewing data inputted to the selected pattern
No. is displayed. When the button is pressed, the
sewing data input screen is displayed.
Select the sewing data to be changed.
9
Press UP/DOWN SCROOLl button (H)
and select the data item button (I) you desire to
change. Data items which are not used according
to the shapes and those which have been set to
"Without function" are not displayed.
So, be careful.
G
Change the data.
!0
There are data items to change numerals and
those to select pictographs in the sewing data.
No. in pink color such as is put on the
data items to change numerals and the set value
can be changed with +/- button displayed in the
change screen. No. in blue color such as
is put on the data items to select pictographs and
the pictographs displayed in the change screen
can be selected.For the details of the sewing
data, refer to
15-3 Sewing data list, p.40
.
Repeat steps 2 through !0 and edit the data.
※ Now,inputhasbeencompleted.However,for
the continuous stitching, enter all data within
the range of the presser size. When the data is
outside the range, error is displayed. Be sure to
I
H
correctly input the presser size.
Refer to
→
5. INPUTTING PRESSER TYPE, p.18
.
– 66 –
Page 68

23. LCD DISPLAY SECTION AT THE TIME OF CYCLE STITCHING
This sewing machine can sew the plural sewing pattern data in order in cycle.
As many as 30 patterns can be inputted. Use this function when sewing plural different button holes on
the sewing product. In addition, as many as 20 cycles can be registered. Use this function for new
creation or copying in case of need.
Refer to
→
PATTERN, p.51
13. PERFORMING NEW REGISTRATION OF PATTERN, p.34
.
23-1 Data input screen
G
H
I
A B
C D E F
and
17. COPYING SEWING
M
N
J
K
L
O
P
– 67 –
Page 69

Button and display Description
A CYCLE DATA NEW REGISTER
button
B CYCLE DATA COPY button Cycle pattern No. copy screen is displayed.
Cycle data No. new register screen is displayed.
C CYCLE DATA NAME INPUT button
D CYCLE DATA NAME display Name inputted in cycle data which is being selected is displayed.
E PRESSER DOWN button Presser down screen is displayed and the needle moves to the right
F BOBBIN WINDER
G CYCLE DATA NO. SELECTION
button
H CURSOR display Cursor can move on sewing product with ARROW MARK button (N)
I SEWING PRODUCT display Image of sewing product is displayed.
Cycle data name input screen is displayed.
Refer to
→
side. To raise the presser, press the presser up button displayd in the
presser down screen.
When performing threading in this state, turn OFF the power before
*
performing.
Bobbin thread can be wound.
Refer to
→
Cycle data No. which is being selected is displayed in the button.
When the button is pressed, cycle data No. change screen is
displayed.
and can designate the position on sewing product to input pattern data.
7. NAMING THE PATTERN, p.22
11. WINDING BOBBIN THREAD, p.29
.
.
J SEWING PRODUCT SELECTION
button
K SEWING DATA CHANGE button Sewing data of pattern data inputted in the position of cursor change
L PATTERN SELECTION button When the button is pressed, pattern No. change screen is displayed.
M SEWING ORDER display Sewing order of inputted pattern data is displayed.
N ARROW MARK button Position of cursor (H) can be moved.
O PATTERN SEPARATE DELETE
button
P PATTERN ALL DELETE button Release of input of all pattern data inputted in cycle data which is being
Image of sewing product (I) selection screen is displayed.
screen is displayed.
In addition, pattern No. can be inputted in the position of cursor.
When the screen is changed over to the sewing screen, pattern to be
sewn rst is displayed in blue color.
Release of input of pattern data registered in the position of cursor can
be performed.
selected can be performed.
– 68 –
Page 70

23-2 Sewing screen
A B C D
E
F
G
H
I1
I2
J
K
N
O
P
Q
R
L
M
S
T
U
– 69 –
Page 71

Button and display Description
A CYCLE DATA NAME display Name inputted in cycle data during sewing is displayed.
B KNIFE CANCEL button Every time the button is pressed, dropping/non-dropping knife is
changed over alternately.
C PRESSER DOWN button Presser can be lowered and the knife down screen is displayed.
To raise the presser, press the presser up button displayed in the
presser down screen.
When performing threading in this state, turn OFF the power before
*
performing.
D BOBBIN WINDER button
E CYCLE DATA NO. display Cycle data No. during sewing is displayed.
F SEWING PRODUCT display Image of sewing product is displayed.
G STEP STITCHING button
H SEWUNG ORDER display Sewing order of inputted pattern data is displayed. Pattern data during
I1 COUNTER VALUE CHANGE button
I2 COUNTER CHANGE OVER button
J PATTERN NO. display Pattern No. during sewing is displayed.
K NEEDLE THREAD TENSION
CHANGE button
Bobbin thread can be wound.
Refer to
→
When the button is pressed, the step stitching screen to check the
needle entry point and to perform re-sewing is displayed.
Refer to
→
sewing is displayed in blue color.
Existing counter value is displayed on this button. When the button is
pressed, the counter value change screen is displayed.
Refer to
→
Display of sewing counter/No. of pcs. counter can be changed over.
Refer to
→
Needle thread tension inputted in the pattern data during sewing is
displayed.
When the button is pressed, the needle thread tension change screen
is displayed.
11. WINDING BOBBIN THREAD, p.29
10. PERFORMING RE-SEWING, p.27
12. USING COUNTER, p. 30
12. USING COUNTER, p. 30
.
.
.
.
L NUMBER OF TOTAL STITCHES
display
M OVEREDGING WIDTH, LEFT display Overedging width, left which is set to the pattern data during sewing is
N SPEED variable resistor Number of rotation of the sewing machine can be changed.
O WITH/WITHOUT DOUBLE
STITCHING display
P NUMBER OF TIMES OF DOUBLE
STITCHING display
Number of total stitches of the pattern data during sewing is displayed.
displayed.
With/without double stitching which is set to the pattern data during
sewing is displayed.
Number of times of basting which is set to the pattern data during
sewing is displayed.
– 70 –
Page 72

Button and display Description
Q SEWING ORDER RETURN button Sewing order to be sewn next is returned by one.
R SEWING ORDER DURING SEWING
display
S SEWING ORDER ADVANCE button Sewing order to be sewn next is advanced by one.
T CLOTH CUTTING LENGTH display Cloth cutting length which is set to the pattern data during sewing is
U SEWING SHAPE display Sewing shape of the pattern data during sewing is displayed.
Sewing order of pattern data during sewing is displayed.
displayed.
– 71 –
Page 73

24. PERFORMING CYCLE STITCHING
First, change the sewing mode to the cycle stitching before performing setting.
Refer to
→
20. CHANGING SEWING MODE, p.57
24-1 Selection of the cycle data
Selection of the cycle data
1
Display the data input screen.
Only in case of the data input screen (pink), it is
possible to select the cycle data No. In case of
the sewing screen (green), press READY switch
and display the data input screen (pink).
Call the cycle data No. selection screen.
2
When cycle data No. button (A) is pressed,
the cycle data selection screen is displayed.
Cycle data No. which is selected at present and
the contents are displayed in the upper part of the
.
A
screen and other cycle data No. buttons which
have been registered are displayed in the lower
part of the screen.
Select the cycle data No.
3
When UP/DOWN button is pressed, the
registered cycle data No. buttons (B) are
changed over in order. Contents of cycle data are
displayed in the buttons. Here, press the cycle
data button (B) you desire to select.
Determine the cycle data No.
4
When ENTER button (C) is pressed, the
cycle data No. selection screen is closed and the
selection has been completed.
C
B
– 72 –
Page 74

24-2 Editing procedure of the cycle data
Display the data input screen.
1
Only in case of the data input screen (pink), it is
possible to input the cycle data. In case of the
sewing screen (green), press READY switch
and display the data input screen (pink).
Move the cursor to the position you desire.
2
Move cursor (B) to the position you desire with
arrow mark button (A), press pattern No. selection
button (C), and call the pattern No. selection
screen.
Select the pattern No.
3
When UP/DOWN SCROOL button
(D) is pressed, the registered pattern No. buttons
B
A
C
(E) are changed over in order. Contents of the
pattern data are displayed in the buttons. Here,
press the pattern No. button you desire to select.
Determine the pattern No.
4
When ENTER button (F) is pressed, the
pattern No. selection screen is closed and the
selection has been completed.
F
E
D
– 73 –
Page 75

Edit the sewing data of pattern inputted in
5
cycle data.
When the pattern data is inputted in the
designated position, the inputted order is
displayed on the screen as the sewing order.
Adjust the cursor to the position where the
sewing order is displayed and press sewing data
button (G).Then sewing data input screen is
displayed.
Select the sewing data to be changed.
6
G
Press scroll UP/DOWN button (H)
and select the data item button (I) you desire to
change. Data items which are not used according
to the shape and data items which have been
set to Without function are not displayed. So, be
careful.
Change the data.
7
There are data items to change numerals and
those to select pictographs in the sewing data.
No. in pink color such as is put on the
data items to change numerals and the set value
can be changed with buttons displayed in the
change screen. No. in blue color such as
is put on the data items to select pictographs and
the pictographs displayed in the change screen
can be selected.
I
H
For the details of sewing data, refer to
→
Sewing data list, p.40
.
15-3
– 74 –
Page 76

25. PERFORMING CHANGE OF DISPLAY OF SEWING PRODUCT
The picture displayed in the center of the screen can be changed.
Display the data input screen.
1
Only in case of the data input screen (pink), it is
possible to change the sewing product. In case of
the sewing screen (green), press READY switch
and display the data input screen.
Call the sewing product selection screen.
2
When the sewing product selection button
(A) is pressed, the sewing product selection
screen is displayed.
Select the image of sewing product to be
3
displayed.
Select the sewing product button (B) you desire
to display.
Determine the image of the sewing product to
4
be displayed.
When ENTER button (C) is pressed, the
selection is determined and the data input screen
A
C
is displayed.
B
– 75 –
Page 77

Image of the selected sewing product is
5
displayed.
The image of selected sewing product is
displayed in the data input screen. Position and
number of pieces in which pattern data is inputted
are not changed to those before the change of
image of sewing product.
– 76 –
Page 78

26. CHANGING MEMORY SWITCH DATA
26-1 Changing procedure of memory switch data
Display the memory switch data list screen.
1
When switch is pressed, memory switch
button (A) is displayed on the screen. When
this button is pressed, the memory switch data
list screen is displayed.
Select the memory switch button you desire
2
to change.
Press UP/DOWN SCROOL button (B)
and select the data item button (C) you desire to
A
change.
C
B
– 77 –
Page 79

Change the memory switch data.
3
There are data items to change numerals and
those to select pictographs in the memory switch
data. No. in pink color such as is put on
the data items to change numerals and the set
value can be changed with buttons displayed
in the change screen. No. in blue color such
as is put on the data items to select
pictographs and the pictographs displayed in the
change screen can be selected.
For the details of memory switch data, refer to
→
26-2 Memory switch data list, p.79
.
– 78 –
Page 80

26-2 Memory switch data list
Level 1
1
Memory switch data (level 1) are the motion data that the sewing machine has in common and the data
that operate on all sewing patterns in common.
Item Setting range Edit unit Initial display
Presser lifter maximum position
Height of maximum position of
pedal operation is set.
0 to 17.0 0.1mm 14.0mm
Presser lifter intermediate
position
Height of intermediate position
of pedal operation is set.
Presser lifter cloth setting
position
Height of cloth setting position of
pedal operation is set.
Pedal toe down position of
2-pedal (%)
Operation feeling at the time of
2-pedal is set. For the details,
refer to the item below.
Lifting position of presser foot of
2-pedal
Operation feeling at the time of
2-pedal is set.
Pedal toe down
amount
Presser lifting
amount
0 to 14.0 0.1mm 6.0mm
0 to 14.0 0.1mm 0.0mm
5 to 95 1% 80%
5 to 95 1% 50%
U05 Lifting
U04 Pedal toe
down position
of 2-pedal(%)
Needle thread tension at sewing
end setting
Needle thread tension at thread
trimming
Needle thread tension of basting
for sewing together setting
position of presser
foot of 2-pedal (%)
0 to 200 1 50
0 to 200 1 35
0 to 200 1 60
– 79 –
Page 81

Item Setting range Edit unit Initial display
Soft-start speed setting 1st stitch
400 to 4200 100rpm 800rpm
Soft-start speed setting 2st stitch
Soft-start speed setting 3st stitch
Soft-start speed setting 4st stitch
Soft-start speed setting 5st stitch
Kind of presser
Set the kind of the presser.
Refer to
Presser size width (Type 5)
When type 5 of U14 Kind of presser
is set, input the width of the presser.
5. INPUTTING THE PRESSER TYPE.P.18
400 to 4200 100rpm 800rpm
400 to 4200 100rpm 2000rpm
5 to 95 100rpm 3000rpm
5 to 95 100rpm 4000rpm
--- ---
3.0 to 10.0 0.1mm 3.0mm
Type 1
– 80 –
Page 82

Item Setting range Edit unit Initial display
Presser size length (Type 5)
When type 5 of U14 Kind of presser is
set, input the length of the presser.
10.0 to 120.0 0.5mm 10.0mm
Sewing start position (Feed direction)
Sewing start position in terms of presser
is set. Set this item when starting position
is desired to be shifted due to overlapped
section or the like.
Cloth cutting knife size
Input knife size used.
Function of plural motions of cloth cutting knife
Ineffective/effective
: Ineffective
Function of thread breakage detection Ineffective/
effective
: Ineffective
Selection of presser position at the time of ON of
READY key (Up/Down)
Presser foot position when READY key is pressed is
set.
: Effective
: Effective
2.5 to 110.0 0.1mm 2.5mm
3.0 to 32.0 0.1mm 32.0mm
--- --- Ineffective
--- --- Effective
--- --- Presser UP
: Presser up
Selection of presser position at the time of
completion of 1-cycle (Up/Down)
Presser foot position when 1-cycle is completed is set.
: Presser up
Needle thread trimming release motion
start distance
Distance from start of sewing to start of
trimmer release motion of needle thread
trimmer motor is inputted.
: Presser
down
: Presser
down
--- --- Presser UP
0 to 15.0 0.1mm 1.0mm
– 81 –
Page 83

Item Setting range Edit unit Initial display
Bobbin thread trimming release motion
start distance
Distance from start of sewing to start of
trimmer release motion of bobbin thread
trimmer motor is inputted.
0 to 15.0 0.1mm 1.5mm
Counter updating unit
Unit to update sewing counter is set.
1 to 30 1 1
– 82 –
Page 84

Level 2
2
Memory switch data (level 2) can be edited when pressing MODE switch for as long as 6 seconds.
Item Setting range Edit unit Initial display
Pedal selection
Pedal type is set.
4. HOW TO USE THE PEDAL, p.15
→
: 2-pedal
: 1-pedal
(Without intermediate position)
: 1-pedal
(With intermediate position)
Function of prohibition of selection of kind of
presser Permitted/Prohibited
Prohibition of change of U14 Kind of presser is set.
.
--- --- 2-pedal
--- --- Change
permitted
: Change
permitted
Selection of machine type
Type of sewing machine head is set.
: 12
shapes
: 30
shapes
Cloth cutting knife power
Output power of cloth cutting knife is set.
0 : Min. power → 3 : Max. power
Selection of machine type
Type of sewing machine head is set.
0 : Standard type
1 : Dry head type
Max. speed limitation speed setting
Max. speed of sewing machine can be
limited.When K06
Selection of machine type is set to dry
head type, max. speed is automatically
limited to 3,300 rpm.
: Change
prohibited
--- --- 12 shapes
: 20
shapes
0 to 3 1 1
0 to 1 1 0
(Standard type)
400 to 4200 100rpm 3600rpm
– 83 –
Page 85

Item Setting range Edit unit Initial display
Compensation of unsteady needle
thread tension
Output value of needle thread tension
is wholly offset and compensated.
-30 to 30 1 0
Output time of needle thread tension changed
value
When data related to needle thread tension is
changed, the changed value is output as long as the
set-up time.
: Without output
: Output of set-up time
Function of origin retrieval each time
Origin retrieval is performed after completion of
sewing.
: Without
: After end
of sewing
Needle up by reverse run Effective/ Ineffective
When U01 Presser lifter maximum position is set to
14.0 mm or more, motion of needle up by reverse run
is automatically performed and the machine stops.
Prohibition of the motion can be set.
: After end of
cycle
0 to 20 1s Without output
--- --- Without
--- --- Permitted
: Needle up by reverse run prohibited
: Needle up by reverse run permitted
Knife solenoid lowering time setting
Knife solenoid lifting time setting
25 to 100 5ms 35
5 to 100 5ms 15
– 84 –
Page 86

Item Setting range Edit unit Initial display
KNIFE CYLINDER LOWERING TIME
(OPTIONAL)
5 to 300 5ms 70
Y-feed motor origin compensation
Needle-rocking motor origin
compensation
Presser lifter motor origin
compensation
Display/Non-display of direct button
: Display
Thread trimming on the way in continuous
stitching Permitted/ Prohibited.
In case of prohibited, jump feed setting becomes
invalid, and the registered pattern is sewn at the same
position. Then multi-sewing is possible.
: Permitte : Prohibit
: Nondisplay
-120 to 400 1 pulse
(0.025 mm)
-10 to 10 1 pulse
(0.05 mm)
-100 to 10 1 pulse
(0.05 mm)
--- --- Non-display
--- --- Permitted
0
0
0
Changeover of cloth cutting knife
return power
This item sets output power at the time of
returning the cloth cutting knife.
Release amount of bobbin thread
trimmer at the start of sewing
This item sets the amount of releasing
the bobbin thread trimmer at the start of
sewing.
Presser lifter speed selection
0 to 3 1 0
1 to 15 1 pulse 8
1 to 3 1 1
– 85 –
Page 87

27. EXPLANATION OF PLURAL MOTIONS OF KNIFE
This sewing machine can automatically actuate the knife plural times and sew a buttonhole larger than
the size of knife by setting the size of knife attached from the operation panel. Set and use this function
when sewing various sewing shapes without replacing the knife.
Display the memory switch list screen.
1
When switch is pressed, memory switch
button (A) is displayed on the screen.
When this button is pressed, the memory witch
list screen is displayed.
Select Cloth cutting knife size button.
2
Press UP/DOWN SCROOL button (B)
and select Cloth cutting knife size button
(C). The cloth cutting knife size input
A
screen is displayed.
B
C
– 86 –
Page 88

Input the cloth cutting knife size.
3
Press plus/minus buttons (D) and
input the size of knife attached.
Determine the cloth cutting knife size.
4
When ENTER button (E) is pressed, the
cloth cutting knife size input screen is closed and
the input has been completed.
Then the screen returns to the memory switch list
screen.
Select Function of plural motions of
5
cloth cutting knife button.
Press UP/DOWN SCROOL button and select
Function of plural motions of cloth cutting
knife button (F). The function of plural
motions of cloth cutting knife selection screen is
displayed.
D
E
– 87 –
F
Page 89

Make effective the function of plural motions
6
of cloth cutting knife.
Select the effective button (G).
Determine the function of plural motions of
7
cloth cutting knife.
When ENTER button (H) is pressed, the
function of plural motions of cloth cutting knife
screen is closed and the selection of the function
G
of plural motions of cloth cutting knife has been
completed.
Then the screen returns to the memory switch list
screen.
I
Perform sewing.
8
When READY switch (I) is pressed, the sewing screen (green) is displayed. At this time, when
Cloth cut length is set to larger than Cloth cutting knife size which has been set in step 3,
the sewing machine automatically actuates plural motions of knife and performs sewing.
※ Whenyoudesiretosewtheholeshapesmallerthanthesizeofknifeattached,error489appears.
H
Sewing data
S02 Cloth cutting length
1st time
2nd time
3rd time
Memory switch data (Level 1)
U18 Cloth cutting knife size
– 88 –
Page 90

28. ERROR CODE LIST
Error
code
E001 Contact of initialization of EEP-ROM of MAIN
CONTROL p.c.b.
When data is not written in EEP-ROM or data is
broken, data is automatically initialized and the
initialization is informed.
Description of error
How to
recover
Turn OFF the
power.
Place of
recovery
E007 Main shaft motor-lock
When large needle resistance sewing product is sewn
E011 External media not inserted
External media is not inserted.
E012 Read error
Data read from external media cannot be performed.
E013 Write error
Data write from external media cannot be performed.
E014 Write protect
External media is in the write prohibition state
Turn OFF the
power.
Possible to
re-enter after
reset
Possible to
re-start after
reset.
Possible to
re-start after
reset.
Possible to
re-start after
reset.
Previous
screen
Previous
screen
Previous
screen
E015 Format error
Format cannot be performed.
E016 External media capacity over
Capacity of external media is short.
Possible to
re-start after
reset.
Possible to
re-start after
reset.
Previous
screen
Previous
screen
– 89 –
Page 91

Error
code
E017 EEP-ROM capacity over
Capacity of EEP-ROM is short.
Description of error
How to
recover
Possible to
re-start after
reset.
Place of
recovery
Previous
screen
E018 Type of EEP-ROM is different.
When the mounted EEP-ROM is different in type.
E019 File size over
File is too large.
E022 File No. error
DesignatedleisnotinserverorMedia.
E023 Detection of step-out of presser lifting motor
When step-out of motor is detected at the time when
presser lifting motor passes origin sensor or starts
operation.
E024 Pattern data size over
When sewing cannot be performed since total size of
continuous stitching data or size of downloaded data is
too large.
Possible to
re-start after
reset.
Possible to
re-start after
reset.
Possible to
re-start after
reset.
Possible to
re-start after
reset.
Possible to
re-start after
reset.
Previous
screen
Previous
screen
Previous
screen
Data input
screen
Data input
screen
E025 Detection of step-out of needle thread trimmer motor
When step-out of motor is detected at the time when
needle thread trimmer motor passes origin sensor or
starts operation.
E026 Detection of step-out of bobbin thread trimmer motor
When step-out of motor is detected at the time when
bobbin thread trimmer motor passes origin sensor or
starts operation.
Possible to
re-start after
reset.
Possible to
re-start after
reset.
Data input
screen
Data input
screen
– 90 –
Page 92

Error
code
E027 Read error
Data read from server cannot be performed.
Description of error
How to
recover
Possible to
re-start after
reset.
Place of
recovery
Previous
screen
E028 Write error
Data write from server cannot be performed.
E029 Lid of Media slot is open. Possible to
E030 Needle bar upper position failure
When needle does not stop at UP position even with
needle.
UP operation at the time of starting sewing machine.
E042 Operation error
peration of sewing data cannot be performed.
E043 Enlarging error
Sewing pitch exceeds 5 mm.
Possible to
re-start after
reset.
re-start after
reset.
Possible to
re-start after
reset.
Possible to
re-start after
reset.
Possible to
re-start after
reset.
Previous
screen
Previous
screen
Previous
screen
Previous
screen
Data input
screen
E050 Stop switch
When stop switch is pressed during machine running.
E052 Thread breakage detection error
When thread breakage has occurred during machine
running.
Possible to
re-start after
reset.
Possible to
re-start after
reset.
Step screen
Step screen
– 91 –
Page 93

Error
code
E061 Memory switch data error
When memory switch data is broken or revision is old.
Description of error
How to
recover
Turn OFF the
power.
Place of
recovery
E062 Sewing data error
When sewing data is broken or revision is old.
E099 Interference of knife lowering command with thread
trimming motion
When inserting position of knife command is improper
and knife command interferes with thread trimming
motion in case of motion from external data.
E302 Conrmationoftiltofmachinehead
When tilt of machine head sensor is OFF.
E303 Main shaft semilunar plate sensor error
Semilunar plate of sewing machine motor is abnormal.
E304 Cloth cutting knife sensor error
When knife is held lowered or sensor is not OFF when
knife is lowered.
Turn OFF the
power.
Possible to
re-start after
reset.
Possible to
re-start after
reset.
Turn OFF the
power.
Turn OFF the
power.
Data input
screen
Data input
screen
E401 Copy disapproval error
When trying to perform copying to the pattern No.
which has been registered.
: In case of
continuous
stitching
E402 Pattern deletion error
When trying to perform deletion in case the remaining
pattern No. which has been registered is only one.
: In case of
continuous
stitching
: In case of cycle
stitching
: In case of cycle
stitching
Possible to
re-start after
pressing
cancel button.
Possible to
re-start after
pressing
cancel button.
Pattern list
screen
Pattern list
screen
– 92 –
Page 94

Error
code
E486 Eyelet knife length error
When the shape is not formed since the eyelet knife
length is too short in case of eyelet shape.
Description of error
How to
recover
Possible to
re-start after
reset.
Place of
recovery
Sewing data
input screen
E487 Eyelet shape length error
Eyelet shape length is too short to form the shape in
case of eyelet shape.
E488 Flow bar-tacking compensation error
When bar-tacking length is too short to form the shape
incaseofowbar-tackingshape.
E489 Knife size error (at the time of plural motions of knife)
When knife size is larger than cloth cutting knife size.
E492 Presser size over of basting
When stitching data of basting exceeds presser
E493 Presser size over of tie stitching at sewing end
When stitching data of tie stitching at sewing end
exceeds presser size.
size.
Possible to
re-start after
reset.
Possible to
re-start after
reset.
Possible to
re-start after
reset.
Possible to
re-start after
reset.
Possible to
re-start after
reset.
Sewing data
input screen
Sewing data
input screen
Sewing data
input screen
Sewing data
input screen
Sewing data
input screen
E494 Presser size over of tie stitching at sewing start
When stitching data of tie stitching at sewing start
exceeds presser size.
E495 Presser size error (Width direction : right only)
When stitching data exceeds the size of right only of
width direction of presser.
Possible to
re-start after
reset.
Possible to
re-start after
reset.
Sewing data
input screen
Sewing data
input screen
– 93 –
Page 95

Error
code
E496 Presser size error (Width direction : left only)
When stitching data exceeds the size of left only of
width direction of presser.
Description of error
How to
recover
Possible to
re-start after
reset.
Place of
recovery
Sewing data
input screen
E497 Presser size error (Length direction : front)
When stitching data exceeds the size of front of
length direction of presser.
E498 Presser size error (Width direction : right and left)
When stitching data exceeds the size of both right and
left of width direction of presser.
E499 Presser size error (Length direction : rear)
When stitching data exceeds the size of rear of length
direction of presser.
E703 Panel is connected to the machine other than
supposed. (Machine type error)
When machine type code of system is improper in
case of initial communication.
E704 Nonagreement of system version
When version of system software is improper in case
of initial communication.
E730 Main shaft motor encoder defectiveness or phase-out
When encoder of sewing machine motor is abnormal.
Possible to
re-start after
reset.
Possible to
re-start after
reset.
Possible to
re-start after
reset.
Possible
to rewrite
program after
pressing down
communication
switch.
Possible
to rewrite
program after
pressing down
communication
switch.
Turn OFF the
power.
Sewing data
input screen
Sewing data
input screen
Sewing data
input screen
Communication
screen
Communication
screen
E731 Main motor hole sensor defectiveness or position
sensor defectiveness
When hole sensor or position sensor of sewing
machine is defective.
– 94 –
Turn OFF the
power.
Page 96

Error
code
E733 Reverse rotation of main shaft motor
When sewing machine motor rotates in reverse
direction.
Description of error
How to
recover
Turn OFF the
power.
Place of
recovery
E801 Phase-lack of power
When phase-lack of input power occurs.
E802 Power instantaneous cut detection
When input power is instantaneously OFF.
E811 Overvoltage
When input voltage is 280V or more.
E813 Low voltage
When input voltage is 150V or less.
E901 Abnormality of main shaft motor IPM
When IPM of servo control p.c.b. is abnormal.
Turn OFF the
power.
Turn OFF the
power.
Turn OFF the
power.
Turn OFF the
power.
Turn OFF the
power.
E902 Overcurrent of main shaft motor
Whencurrentowsexcessivelytosewingmachine
motor.
E903 Abnormality of stepping motor power
When stepping motor power of servo control p.c.b.
uctuates±15%ormore.
Turn OFF the
power.
Turn OFF the
power.
– 95 –
Page 97

Error
code
E904 Abnormality of solenoid power
Whensolenoidpowerofservocontrolp.c.b.uctuates
±15%ormore.
Description of error
How to
recover
Turn OFF the
power.
Place of
recovery
E905 Abnormality of temperature of heat sink for servo
control p.c.b.
When temperature of heat sink of servo control p.c.b.
is 85°C or more.
E907 Zigzag width motor origin retrieval error
When origin sensor signal is not inputted at the time of
origin retrieval motion.
E908 Y-feed motor origin retrieval error
When origin sensor signal is not inputted at the time of
origin retrieval motion.
E909 Needle thread trimmer motor origin retrieval error
When origin sensor signal is not inputted at the time of
origin retrieval motion.
E910 Presser motor origin retrieval error
When origin sensor signal is not inputted at the time of
origin retrieval motion.
Turn OFF the
power.
Turn OFF the
power.
Turn OFF the
power.
Turn OFF the
power.
Turn OFF the
power.
E911 Bobbin thread trimmer motor origin retrieval error
When origin sensor signal is not inputted at the time of
origin retrieval motion.
Turn OFF the
power.
– 96 –
Page 98

Error
code
E915 Abnormality of communication between operation
panel and main CPU
When abnormality occurs in data communication.
Description of error
How to
recover
Turn OFF the
power.
Place of
recovery
E916 Abnormality of communication between main CPU and
main shaft CPU
When abnormality occurs in data communication.
E917 Failure of communication between operation panel
and personal computer
When abnormality occurs in data communication.
E918 Abnormality of temperature of heat sink for main
control p.c.b.
When temperature of heat sink of main control p.c.b. is
85°C or more.
E943 Defectiveness of EEP-ROM of main control p.c.b.
When data writing to EEP-ROM is not performed.
E946 Defectiveness of writing to EEP-ROM of head relay
p.c.b.
When data writing to EEP-ROM is not performed.
Turn OFF the
power.
Turn OFF the
power.
Turn OFF the
power.
Turn OFF the
power.
Turn OFF the
power.
E948 Abnormality of F ROM.
When deletion or writing of F ROM is not performed at
the time of downloading program.
E999 When cloth cutting knife does not return
When cloth cutting knife does not return after the lapse
of predetermined time.
Turn OFF the
power.
Turn OFF the
power.
– 97 –
Page 99

29. USING COMMUNICATION FUNCTION
Communication function can download the sewing data created with other sewing machine, creation of
sewing data and sewing data created by editing device PM-1 to the sewing machine. In addition, the function
can upload the aforementioned data to the media or personal computer.
Media and RS-232C port are prepared as the vehicle to communicate.
※ However,SU-1(dataserverutility)isnecessarytoperformdownload/uploadfromthepersonalcomputer.
29-1 Handling possible data
Handling possible sewing data are two kinds below. The respective data formats are as described below.
Data name Extension Description of data
Data of the needle entry point created
Vector format data VD00 ×××. VDT
with PM-1.
Format of the data which can be used in
common among JUKI sewing machines.
Parameter data LBH00 ×××. EPD
Format of the data of sewing proper to
LBH such as sewing shape, cloth cutting
length, overedging width, etc. created
with the sewing machine.
×××:leNO.
– 98 –
Page 100

In case of saving the data in the Media, save the data in the state of directory structure below.
Whenthedataarenotsavedinthecorrectfolder,readingoflecannotbeperformed.
Media drive
VDATA
Save vector
format data.
LBH1790
Save parameter
data (exclusive
for LBH).
VD00
VD00
VD00
LBH00
LBH00
LBH00
×××
×××
×××
×××
×××
×××
.VDT
.VDT
.VDT
.EPD
.EPD
.EPD
※ ThereisbeforehandthePROGfolderintheMediapurchasedfromourcompany.Donotdeleteit.
– 99 –
 Loading...