


ENGLISH
IP-310 / ACF-172-1790
INSTRUCTION MANUAL

– 1 –
CONTENTS
1. OPERATION TO DRIVE THE DEVICE (ACF MODE) .....................................................4
1-1. Name of each section of the operation panel ......................................................4
1-1-1. Body ..............................................................................................................................4
1-1-2. Buttons to be used in common ..................................................................................6
1-2. Basic operation of the sewing machine ...............................................................7
1-3. LCD display section under ACF mode ................................................................. 8
1-3-1. ACF data input screen .................................................................................................8
1-3-2. Automatic sewing screen .......................................................................................... 11
1-3-3. Manual sewing screen ............................................................................................... 13
1-4. Performing ACF pattern selection ......................................................................14
1-5. Performing re-sewing...........................................................................................15
1-6. Winding bobbin thread ........................................................................................17
1-7. Using counter .......................................................................................................18
1-7-1. Setting procedure of the counter .............................................................................18
1-7-2. Count-up releasing procedure ..................................................................................20
1-8. Performing new register of ACF pattern. ........................................................... 21
1-8-1. Performing the equal interval input .........................................................................21
1-8-2. Performing the individual input. ............................................................................... 24
1-9. Copying ACF pattern ............................................................................................27
1-10. Changeover of men's and ladies' wear. ............................................................29
1-11. Naming the pattern .............................................................................................30
2. OPERATION OF THE SINGLE UNIT OF SEWING MACHINE AND SETTING
PROCEDURE (LBH MODE) ........................................................................................31
2-1. LCD display section at the time of independent sewing .................................. 31
2-1-1. LBH data input screen ............................................................................................... 31
2-1-2. Independent sewing screen ...................................................................................... 34
2-2. Performing LBH pattern No. selection ...............................................................36
2-3. Performing sewing shape selection ...................................................................37
2-4. Performing re-sewing under LBH mode .............................................................39
2-4-1. To continue performing sewing from some point in sewing ................................. 39
2-4-2. To perform sewing from the start .............................................................................40
2-5. Performing new register of LBH pattern ............................................................ 41
2-6. Sewing shape list .................................................................................................43
2-7. Changing sewing data .........................................................................................44
2-7-1. Changing procedure of sewing data ........................................................................ 44
2-7-2. Sewing data list .......................................................................................................... 46
2-8. Inputting the presser type ...................................................................................56

– 2 –
2-8-1. Setting procedure of the presser type ..................................................................... 56
2-8-2. Table of presser type ................................................................................................. 57
2-9. Changing needle thread tension .........................................................................58
2-10. Setting procedure of sewing data with/without edit .......................................60
2-11. Copying LBH sewing pattern .............................................................................61
2-12. Registering sewing data to customize button .................................................63
2-12-1. How to register ......................................................................................................... 63
2-12-2. Register state at the time of your purchase .......................................................... 64
2-13. Changing sewing mode .....................................................................................65
2-14. LCD display section at the time of continuous stitching ...............................66
2-14-1. LBH continuous stitching data input screen ........................................................66
2-14-2. LBH continuous stitching sewing screen .............................................................68
2-15. Performing LBH continuous stitching ..............................................................71
2-15-1. Selection of LBH continuous stitching data .........................................................71
2-15-2. Editing procedure of the LBH continuous stitching data ....................................72
2-16. Explanation of plural motions of knife ............................................................. 75
2-17. Changing memory switch data .........................................................................78
2-17-1. Changing procedure of memory switch data ........................................................ 78
2-17-2. Memory switch data list ..........................................................................................80
3. OTHER FUNCTIONS .....................................................................................................87
3-1. Using communication function ...........................................................................87
3-1-1. Handling possible data ..............................................................................................87
3-1-2. Performing communication by using the media .....................................................89
3-1-3. Performing communication by using RS-232C .......................................................92
3-1-4. Take-in of the data .....................................................................................................93
3-2. Information function .............................................................................................96
3-2-1. Observing the maintenance and inspection information .......................................97
3-2-2. Inputting the inspection time .................................................................................... 99
3-2-3. Releasing procedure of the warning ...................................................................... 101
3-2-4. Observing the production control information ..................................................... 102
3-2-4-1. When displaying from the information screen ............................................................102
3-2-4-2. When displaying from the sewing screen ....................................................................104
3-2-5. Performing setting of the production control information ..................................105
3-2-6. Observing the working measurement information ............................................... 108
3-3. Trial sewing function .......................................................................................... 111
3-3-1. Performing trial sewing ........................................................................................... 111
3-3-2. Vector parameter list ............................................................................................... 114
3-3-3. Thread tension value display color list .................................................................. 115
4. ERROR CODE LIST ....................................................................................................116

– 3 –
5. MAINTENANCE MODE ...............................................................................................126
5-1. Performing key lock ...........................................................................................126
5-2. Displaying version information .........................................................................128
5-3. Using check program .........................................................................................129
5-3-1. Displaying the check program screen ...................................................................129
5-3-2. Performing needle thread trimmer origin adjustment .......................................... 130
5-3-3. Performing bobbin thread trimmer origin adjustment .........................................131
5-3-4. Performing sensor check ........................................................................................ 132
5-3-5. Performing LCD check ............................................................................................134
5-3-6. Performing touch panel compensation .................................................................135
5-4. Communication screen of maintenance personnel level ............................... 137
5-4-1. Data which are possible to be handled ..................................................................137
5-4-2. Displaying the maintenance personnel level ........................................................138
5-5. Information screen of the maintenance personnel level ................................ 139
5-5-1. Display of error record ............................................................................................139
5-5-2. Display of the cumulative working information .................................................... 141
− −
1. OPERATION TO DRIVE THE DEVICE (ACF MODE)
1-1. Name of each section of the operation panel
1-1-1. Body
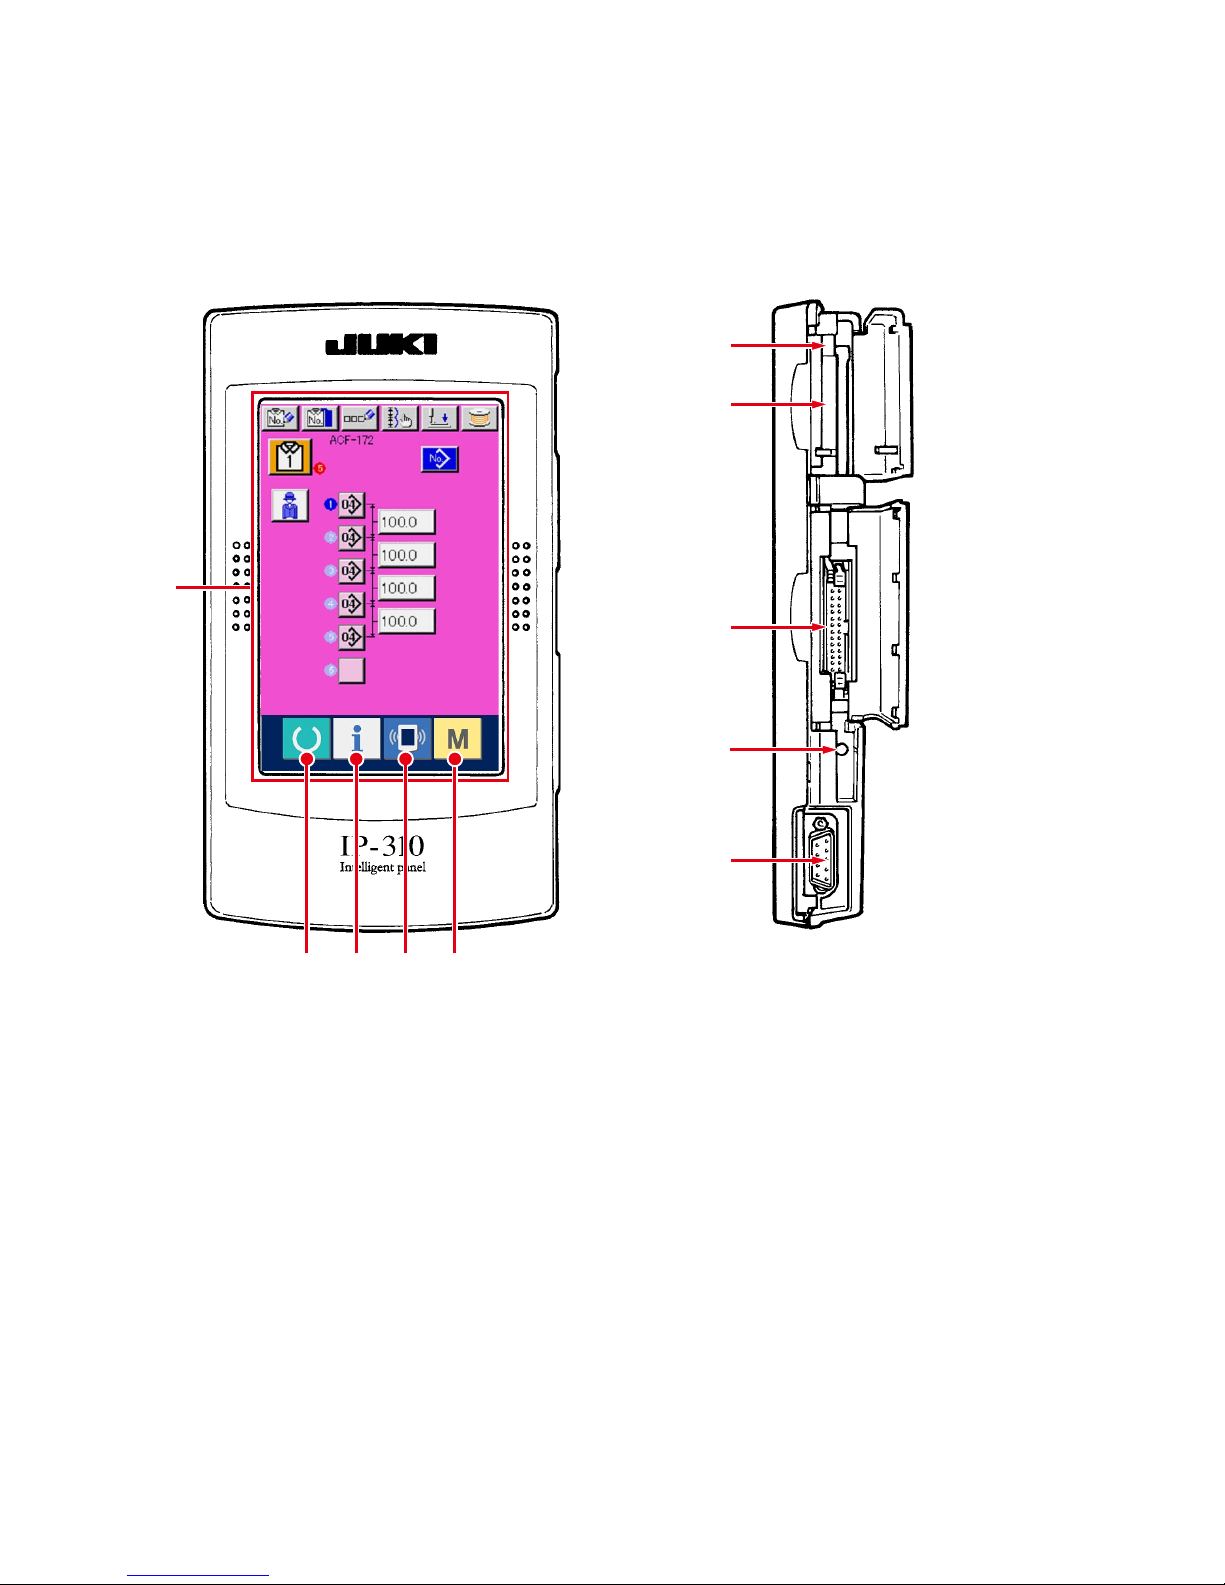
( Front ) ( Right side )
1
5432
6
9
8
7
!0
− −
1
Touch panel • LCD display section
2
READY key
→
Changeover of the data input screen and the sewing
screen can be performed.
3
INFORMATION key
→
Changeover of the data input screen and the
information screen can be performed.
4
COMMUNICATION key
→
Changeover of the data input screen and the
communication screen can be performed.
5
MODE key
→
Changeover of the data input screen and the mode
changeover screen which performs various detail
settings can be performed.
6
MEDIA slot
→
MEDIA slot (use it with lid closed.)
7
CONNECTOR for RS-232C communication
8
VARIABLE RESISTOR for adjusting contrast
of colored LCD screen
→
Contrast of the screen can be adjusted. Adjust it as
you like.
9
CONNECTOR for external input
!0
MEDIA take-out lever
− −
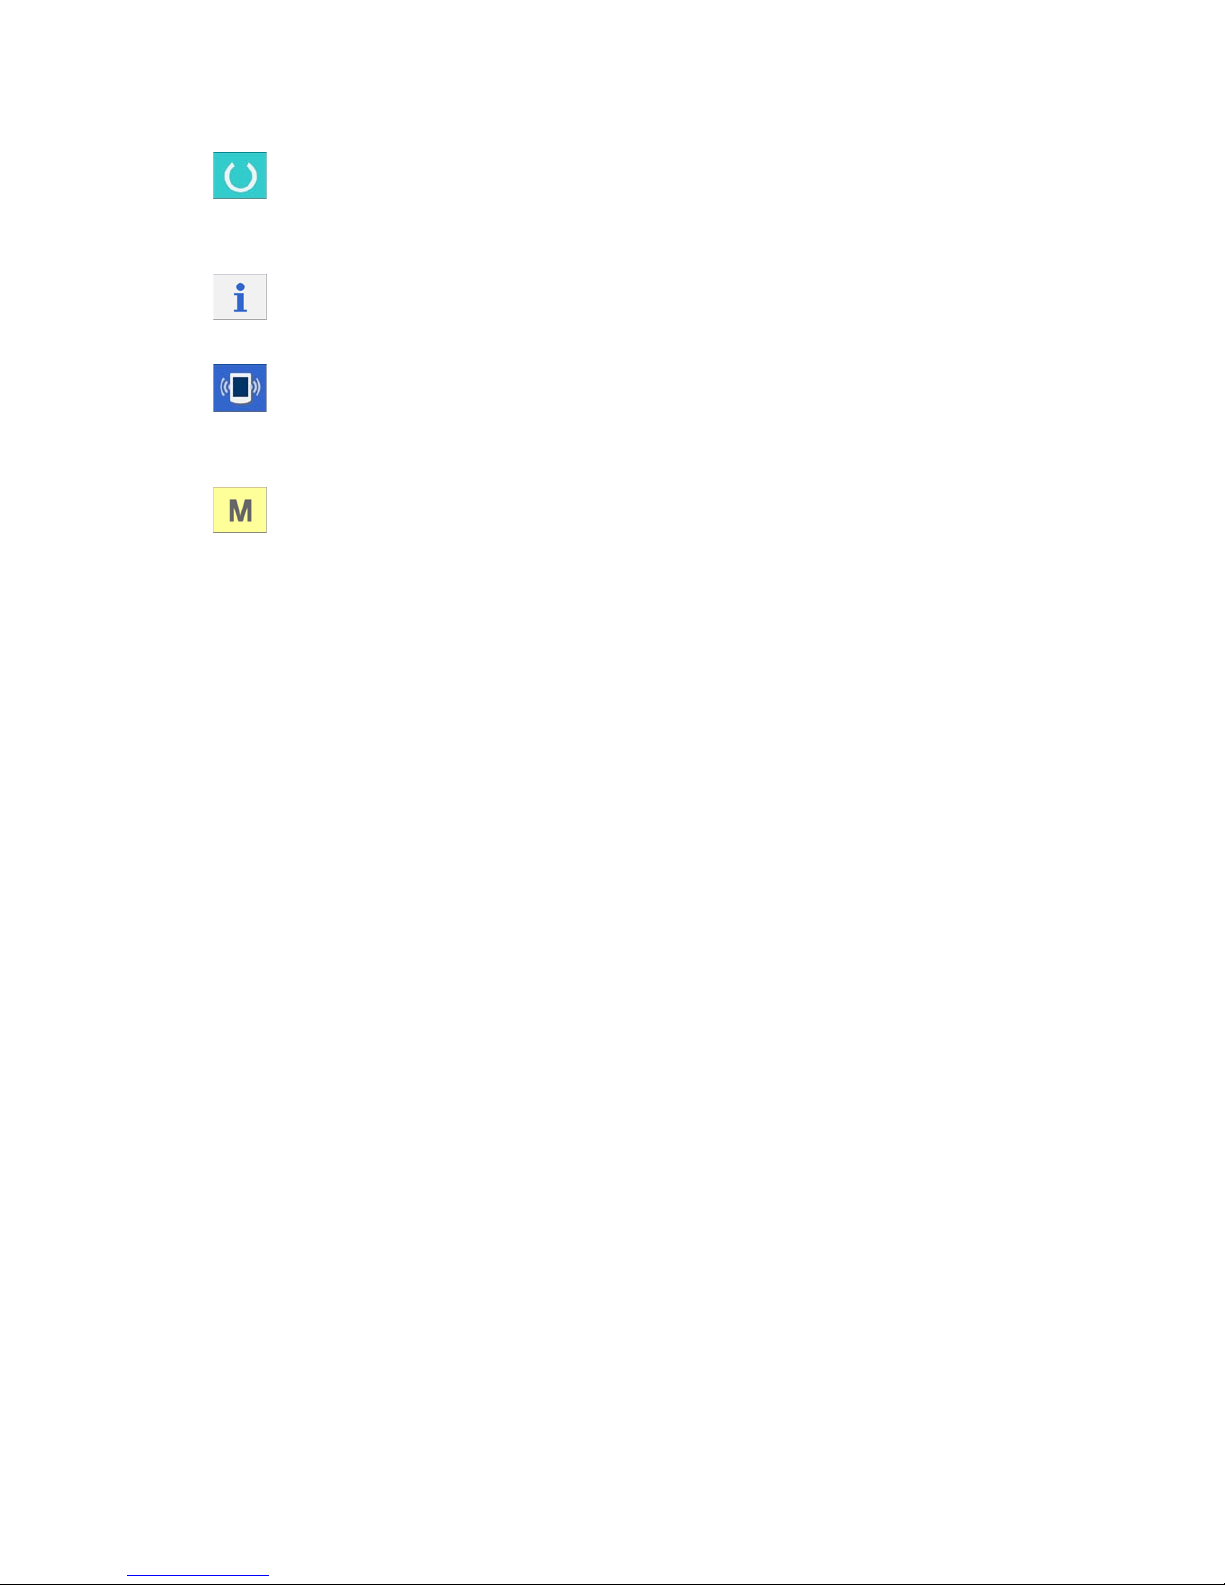
1-1-2. Buttons to be used in common
The buttons which perform common operations in each screen of IP-310 are as follows :
CANCEL button
→
This button closes the pop-up screen. In case of the
data change screen, the data being changed can be
cancelled.
ENTER button
→
This button determines the changed data.
UP SCROLL button
→
This button scrolls the button or the display in the
upward direction.
DOWN SCROLL button
→
This button scrolls the button or the display in the
downward direction.
RESET button
→
This button performs the release of error.
NUMERAL INPUT button
→
This button displays ten keys and input of numerals
can be performed.
SEWING DATA DISPLAY button
→
This button displays the sewing data list
corresponding to the pattern No. being selected.
→
Refer to
2-7. Changing sewing data, p.44
.
ACF PATTERN NAME setting
button
→
This button displays the character input screen.
→
Refer to
1-11. Naming the pattern, p.30
.
PRESSER DOWN button
→
This button lowers the presser and displays the
presser down screen. To raise the presser, press
PRESSER UP button displayed in the presser down
screen.
BOBBIN WINDER button
→
This button performs bobbin thread winding.
→
Refer to
1-6. Winding bobbin thread, p.17
.
− −
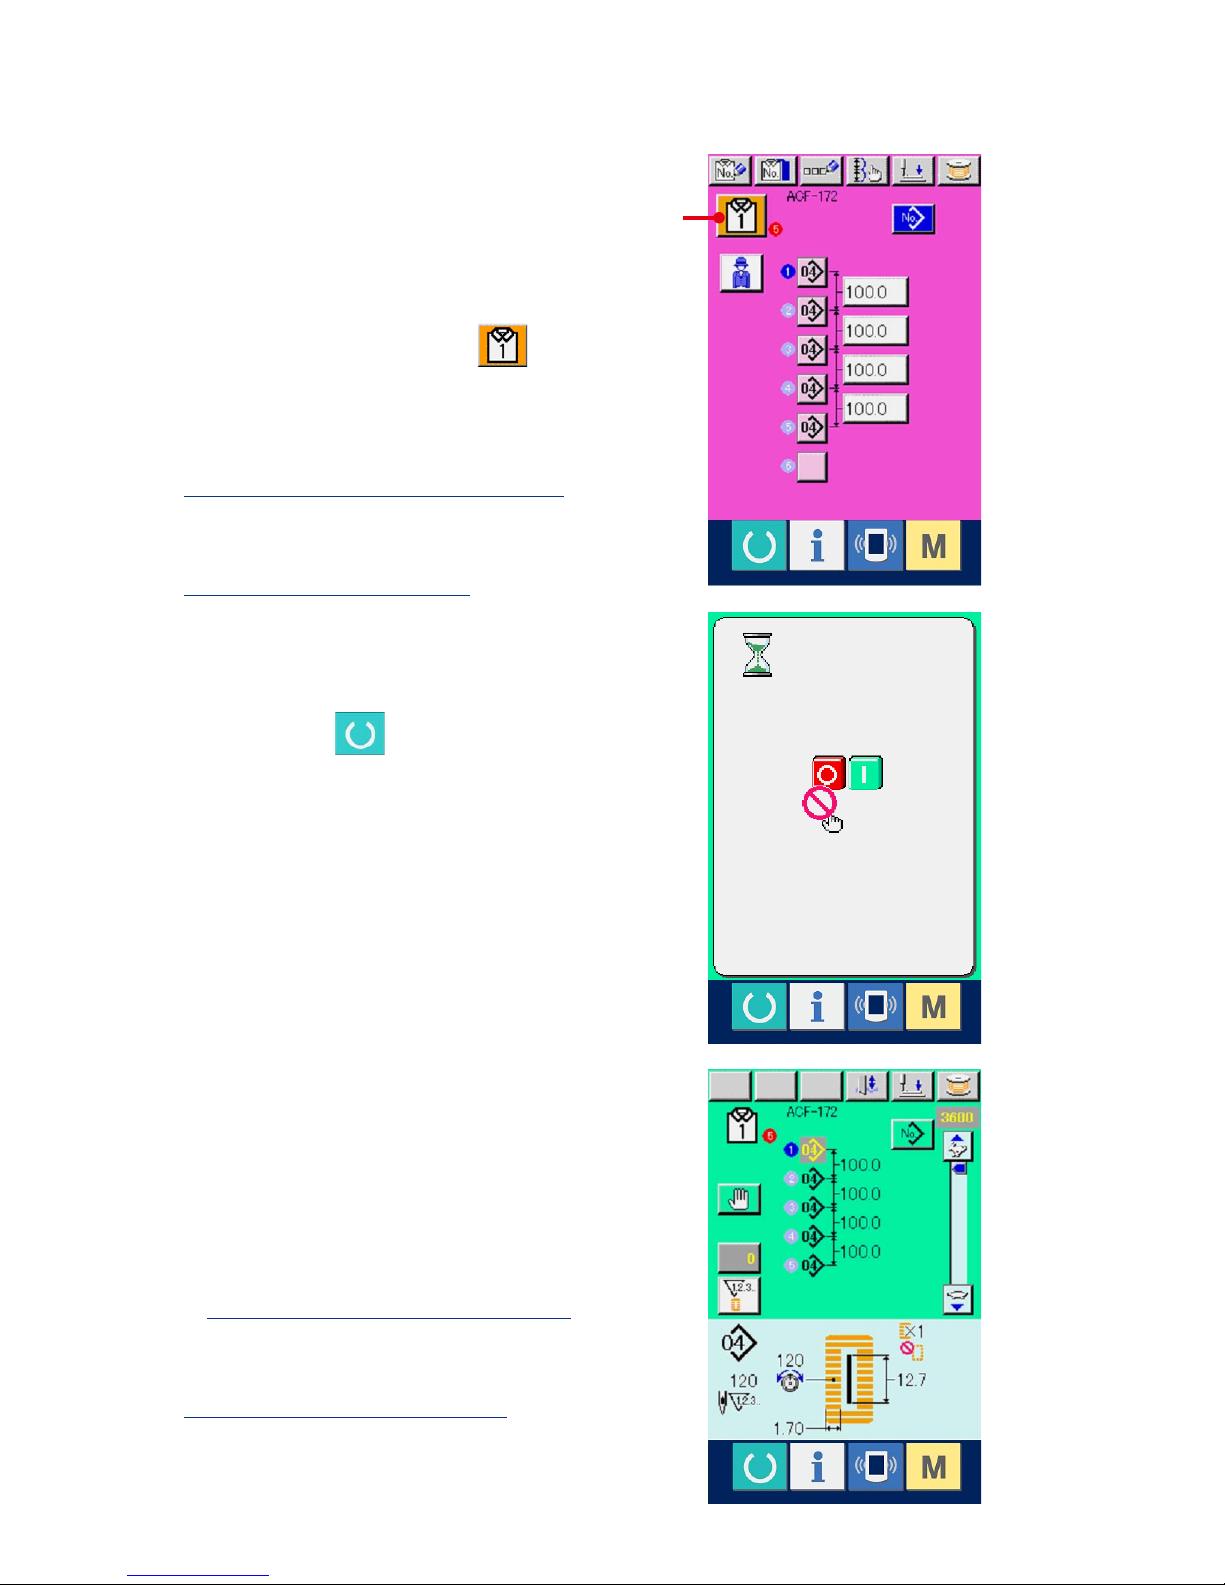
1-2. Basic operation of the sewing machine
1
Turn ON the power switch.
When the power is turned ON, the ACF data input
screen is displayed.
2
Select the pattern No. you desire to sew.
When ACF pattern selected button (A)
which is selected at present is pressed,selection
of ACF pattern No. can be performed.For the
selecting procedure of ACF pattern No, refer to
1-4. Performing ACF pattern selection,p.14
.
※
For the details of this screen, refer to
1-3-1. ACF data input screen,p.8
.
4
Start sewing.
Set the sewing product and press the knee switch
or hand switch (switch set to the start switch).
Then the sewing machine automatically starts
and sewing starts.
※ For the setting procedure of the start switch, refer
to
2-17. Changing memory switch data,p.78
.
※ For the detailed explanation of this screen, see
1-3-2. Automatic sewing screen,p.11
.
3
Set the sewing machine to sewing possible
state.
Press READY key
(C), and POWER
OFF PROHIBITION screen is displayed. Make
preparations for sewing while this screen is displayed.
When the sewing is in a possible state, the back-light
of LCD display changes to green color.
A

− −
1-3. LCD display section under ACF mode
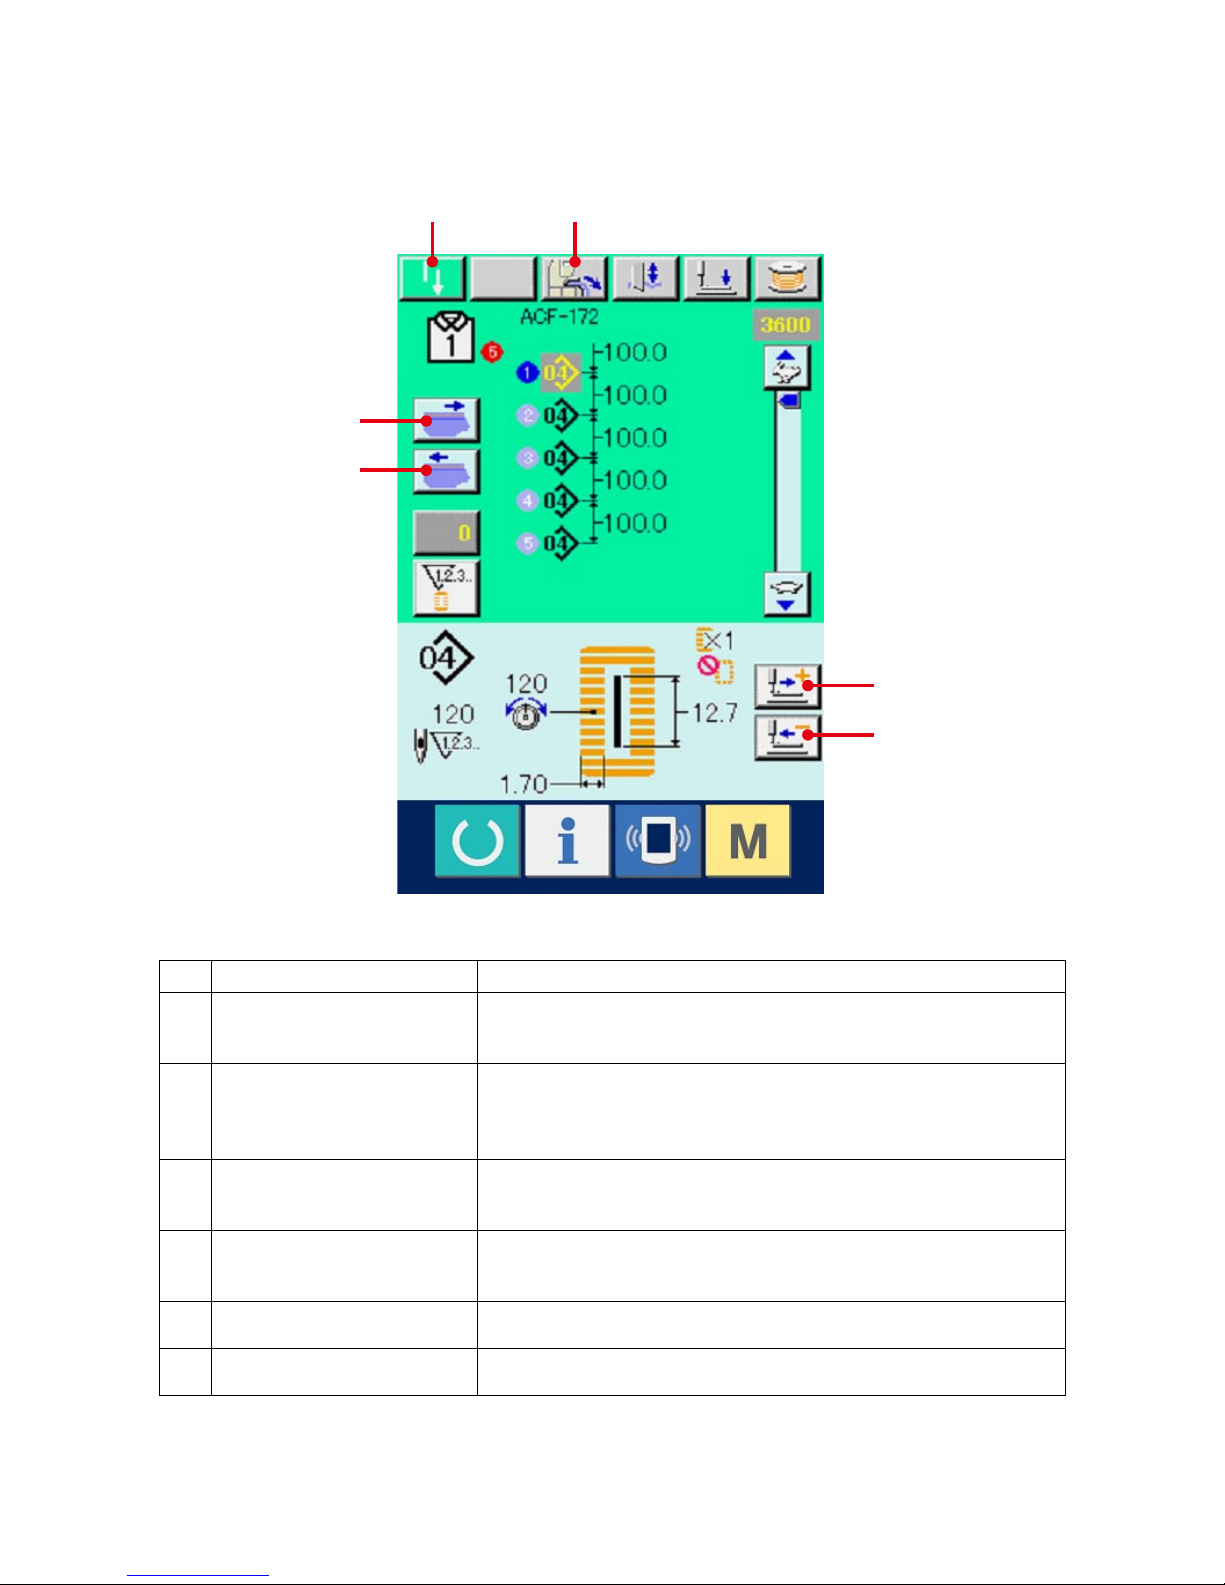
1-3-1. ACF data input screen
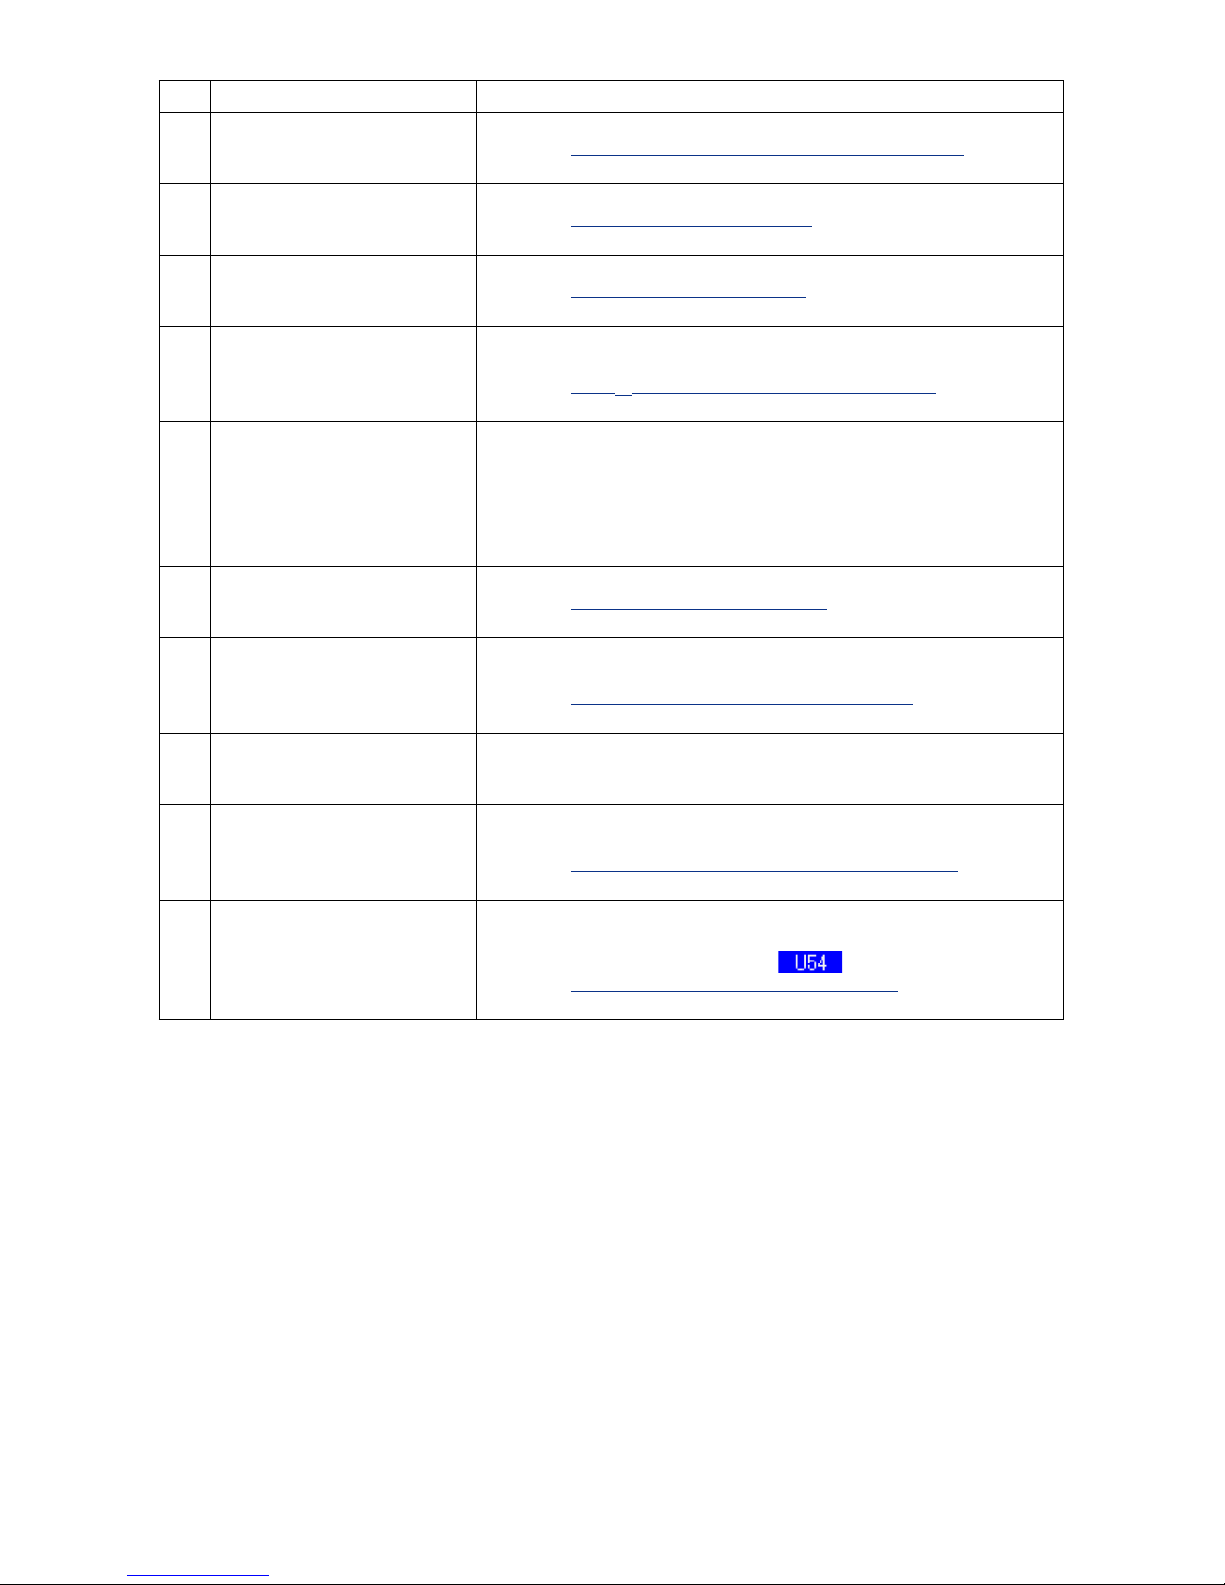
A B C D E F
N
O
P
Q
M
G
I
K
H
J
L
− −
Button and display Description
A ACF PATTERN NEW REGISTER
button
ACF pattern No. new register screen is displayed.
→
Refer to
1-8. Performing new register of ACF pattern.,p.21
.
B ACF PATTERN COPY button
ACF pattern No. copy screen is displayed.
→
Refer to
1-9. Copying ACF pattern,p.27
.
C ACF PATTERN NAME SETTING
button
Sewing pattern name input screen is displayed.
→
Refer to
1-11. Naming the pattern,p.30
.
D EQUAL INTERVAL INPUT button
Number of buttonholes input screen is displayed and ACF pattern data
being selected at present can be edited.
→
Refer to
1-8-1.6 Input the number of buttonholes,p.22
.
E PRESSER DOWN button Presser down screen is displayed and the needle moves to the right side. To
raise the presser, press the presser up button displayd in the presser down
screen.
*
When performing threading in this state, turn OFF the power before
performing.
F BOBBIN WINDER button
Bobbin thread can be wound.
→
Refer to
1-6. Winding bobbin thread,p.17
.
G ACF PATTERN SELECTION
button
ACF pattern No. being selected at present is displayed on this button and
when this button is pressed, ACF pattern No. selection screen is displayed.
→
Refer to
1-4. Performing ACF pattern selection,p.14
.
H NUMBER OF BUTTONHOLES
REGISTERED
Number of buttonholes registered to ACF pattern No. being selected at
present is displayed.being selected at present.
I MEN'S/LADIES' WEAR
SELECTION button
Every time this button is pressed down, men's and ladies' wear can be
changed over alternately.
→
Refer to
1-10. Changeover of men's and ladies' wear.p.29
.
J PAIR STACKING ON/OFF
SELECTION button
Every time this button is pressed down, pair stacking ON/OFF can be
changed over. This button is displayed only when the pair stacking use
setting of memory switch data (level 1)
is ON.
→
Refer to
2-17. Changing memory switch data,p.78
.
− 10 −
Button and display Description
K SEWING ORDER display Sewing order of the sewing data displayed on the right-hand side is
displayed.
L PATTERN BUTTONHOLE No.
INPUT button
LBH sewing data No. registered to ACF pattern being selected at present
is displayed on this button and when this button is pressed, LBH sewing
data No. can be changed.
M ACF PATTERN NAME display Name registered to ACF pattern No. being selected is displayed.
→
Refer to
1-11. Naming the pattern,p.30
.
N ACF MODE AND LBH MODE
CHANGEOVER button
When this button is pressed down, LBH data input screen is displayed and
operation or setting of the single unit of the sewing machine is possible.
→
Refer to
2. OPERATION OF THE SINGLE UNIT OF SEWING
MACHINE AND SETTING PROCEDURE (LBH MODE),p.31
.
O JUMP FEED AMOUNT INPUT
button
Inputted jump feed amount is displayed on the button. In addition, when
the button is pressed down, the jump feed amount input screen is
displayed and edit of data can be performed. This button is displayed only
when with/without jump feed input selection of memory switch data (level
1) is ON.
→
Refer to
2-17-2. Memory switch data list,p.80
.
P FEED AMOUNT INPUT button When this button is pressed down, the feed amount input screen is
displayed and edit of the data can be performed.
Q TURN PAGE button displayed only when or more of the sewing patterns are registered and it
is possible to observe the sewing data not displayed on the sewing screen.
− 11 −
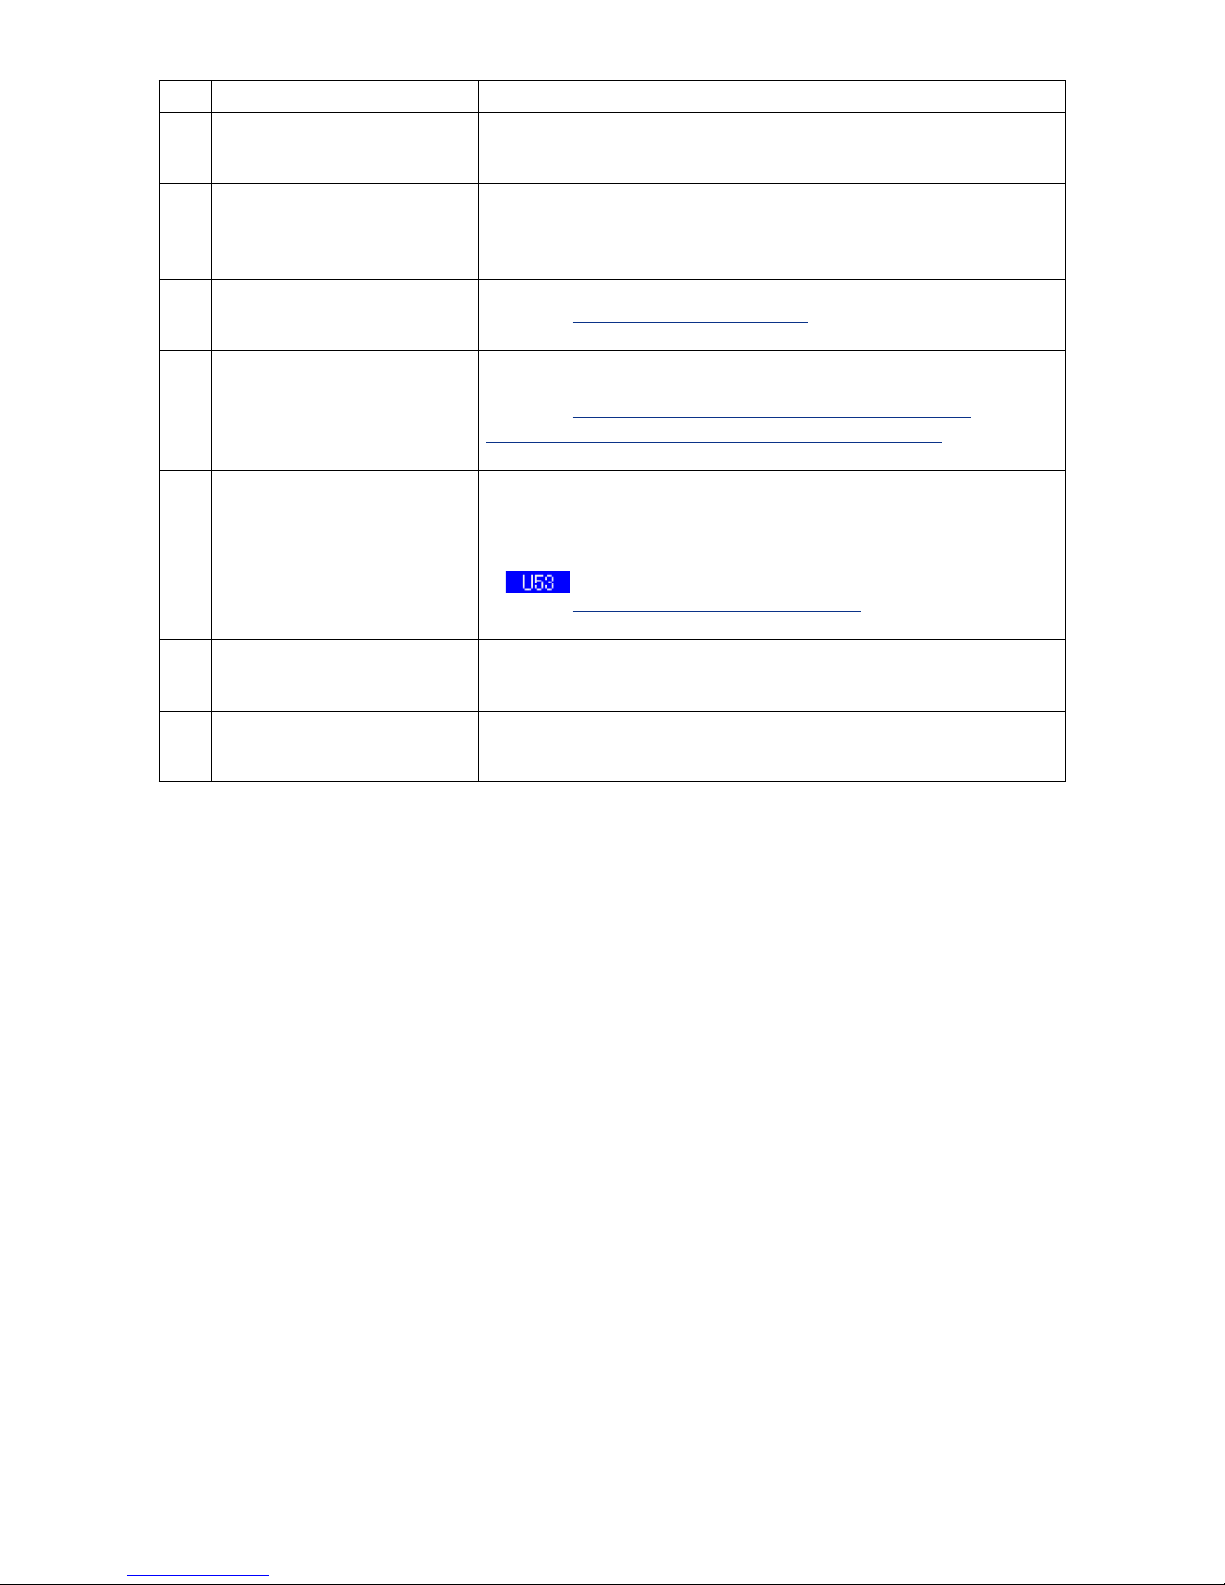
1-3-2. Automatic sewing screen
B C D E
O
H
G
M
I
A
L
P
J
K
N
F
− 12 −
Button and display Description
A NUMBER OF BUTTONHOLES
REGISTERED
Number of buttonholes registered to ACF pattern No. being selected at
present is displayed.
B ACF PATTERN NAME display Name registered to ACF pattern No. during sewing is displayed.
C KNIFE CANCEL button Every time this button is pressed down, dropping of knife and
non-dropping of knife can be changed over alternately.
D PRESSRER DOWN button Presser can be lowered and the knife down screen is displayed.
To raise the presser, press the presser up button displayed in the presser
down screen.
*
When performing threading in this state, turn OFF the power before
performing.
E BOBBIN WINDER button
Bobbin thread can be wound.
→
Refer to
1-6. Winding bobbin thread,p.17
.
F ACF PATTERN No. display ACF pattern No. during sewing is displayed.
G JUMP FEED AMOUNT display Only when jump feed is set, the amount is displayed.
H SEWING ORDER display Sewing order of respective sewing patterns is displayed.
I MANUAL SEWING
CHANGEOVER button
When this button is pressed down, the mode is changed to the manual
sewing mode and the manual sewing screen is displayed.
Note) Be careful since the pre-set is actuated.
J COUNTER display Existing counter value is displayed.
K COUNTER CHANGEOVER
button
Every time this button is pressed down, sewing counter and No. of pcs.
counter can be changed over.
L PATTERN No. display LBH sewing pattern No. registered to ACF data is displayed.
M FEED AMOUNT display Feed amount is displayed.
N CONTENTS OF PATTERN
DURING SEWING
(BUTTONHOLE) display
Sewing shape, cloth cutting length, width of left parallel section, thread
tension, with/without double stitching, number of times of basting, number
of stitches of LBH pattern No. being sewn at present are displayed.
O ACF MODE AND LBH MODE
CHANGEOVER button
When this button is pressed down, the LBH independent sewing screen is
displayed and independent sewing is possible.
P SEWING SPEED variable
resistor
Number of rotation of sewing machine can be changed.
− 13 −
1-3-3. Manual sewing screen
Button and display Description
A SEWING MACHINE START
button
When the button is pressed down, sewing of LBH pattern data set to the
step fed at C or D starts.
B CARRIAGE TILT/RAISE
button
This button is displayed only when the carriage is located at the position of
origin. Every time the button is pressed down, tilt of carriage and raise of
carriage can be changed over alternately.
C CLOTH FEED, RIGHT
button
In case of men's wear, carriage is returned to the previous LBH pattern data.
In case of ladies' wear, carriage is advanced to the next LBH pattern data.
D CLOTH FEED, LEFT button In case of men's wear, carriage is advanced to the next LBH pattern data. In
case of ladies' wear, carriage is returned to the previous LBH pattern data.
E ONE STITCH FEED button LBH pattern data set to the step fed at C or D is advanced by one stitch.
F ONE STITCH RETURN switch LBH pattern data set to the step fed at C or D is returned by one stitch.
BA
C
D
E
F
− 1 −
1-4. Performing ACF pattern selection
1
Display the data input screen.
Only in case of the ACF data input screen (pink),
ACF pattern No. can be selected. In case of the
sewing screen (green), press READY key
and display the data input screen.
2
Call the ACF pattern selection screen.
When ACF PATTERN SELECTION button
(A) is pressed down, the ACF pattern selection
screen is displayed.
A
3
Select the pattern No.
Press ACF pattern No. button (B) you desire to
select.
4
Determine the pattern No.
When ENTER button (C) is pressed, the
ACF pattern No. selection screen is closed. Then
the selection has been nished.
※ When you desire to delete the registered ACF
pattern, press DELETE button (D).
C
B
D

− 1 −
1-5. Performing re-sewing
When temporary stop switch (A) or (B) is pressed
during sewing under ACF mode, the sewing machine
interrupts sewing and stops. At this time, the error
screen is displayed to inform that the temporary stop
switch is pressed.
1
Release the error.
Press RESET button (C) to release
the error. Then the manual sewing screen is
automatically displayed.
C
B
A
− 16 −
2
Return the presser.
Press BACKWARD button (D), and the
presser returns stitch by stitch. Press FORWARD
key
(E), and the presser advances stitch by
stitch. In addition, when CLOTH FEED, RIGHT
button
(F) is pressed, sewing data returns
by one, and when CLOTH FEED, LEFT button
(G) is pressed, sewing data advances by
one.
Return the presser to the re-sewing position.
3
Perform again the sewing work from the start.
When the knee switch or hand switch (set to the
start switch) is pressed, sewing starts again.
※ For the setting procedure of the start switch, refer
to
2-17. Changing memory switch data,p.78
.
Note) When taking out the cloth and performing re-
sewing, advance the carriage up to the last with
CLOTH FEED, RIGHT / CLOTH FEED, LEFT
button
(F and G).
F
E
D
G
− 1 −
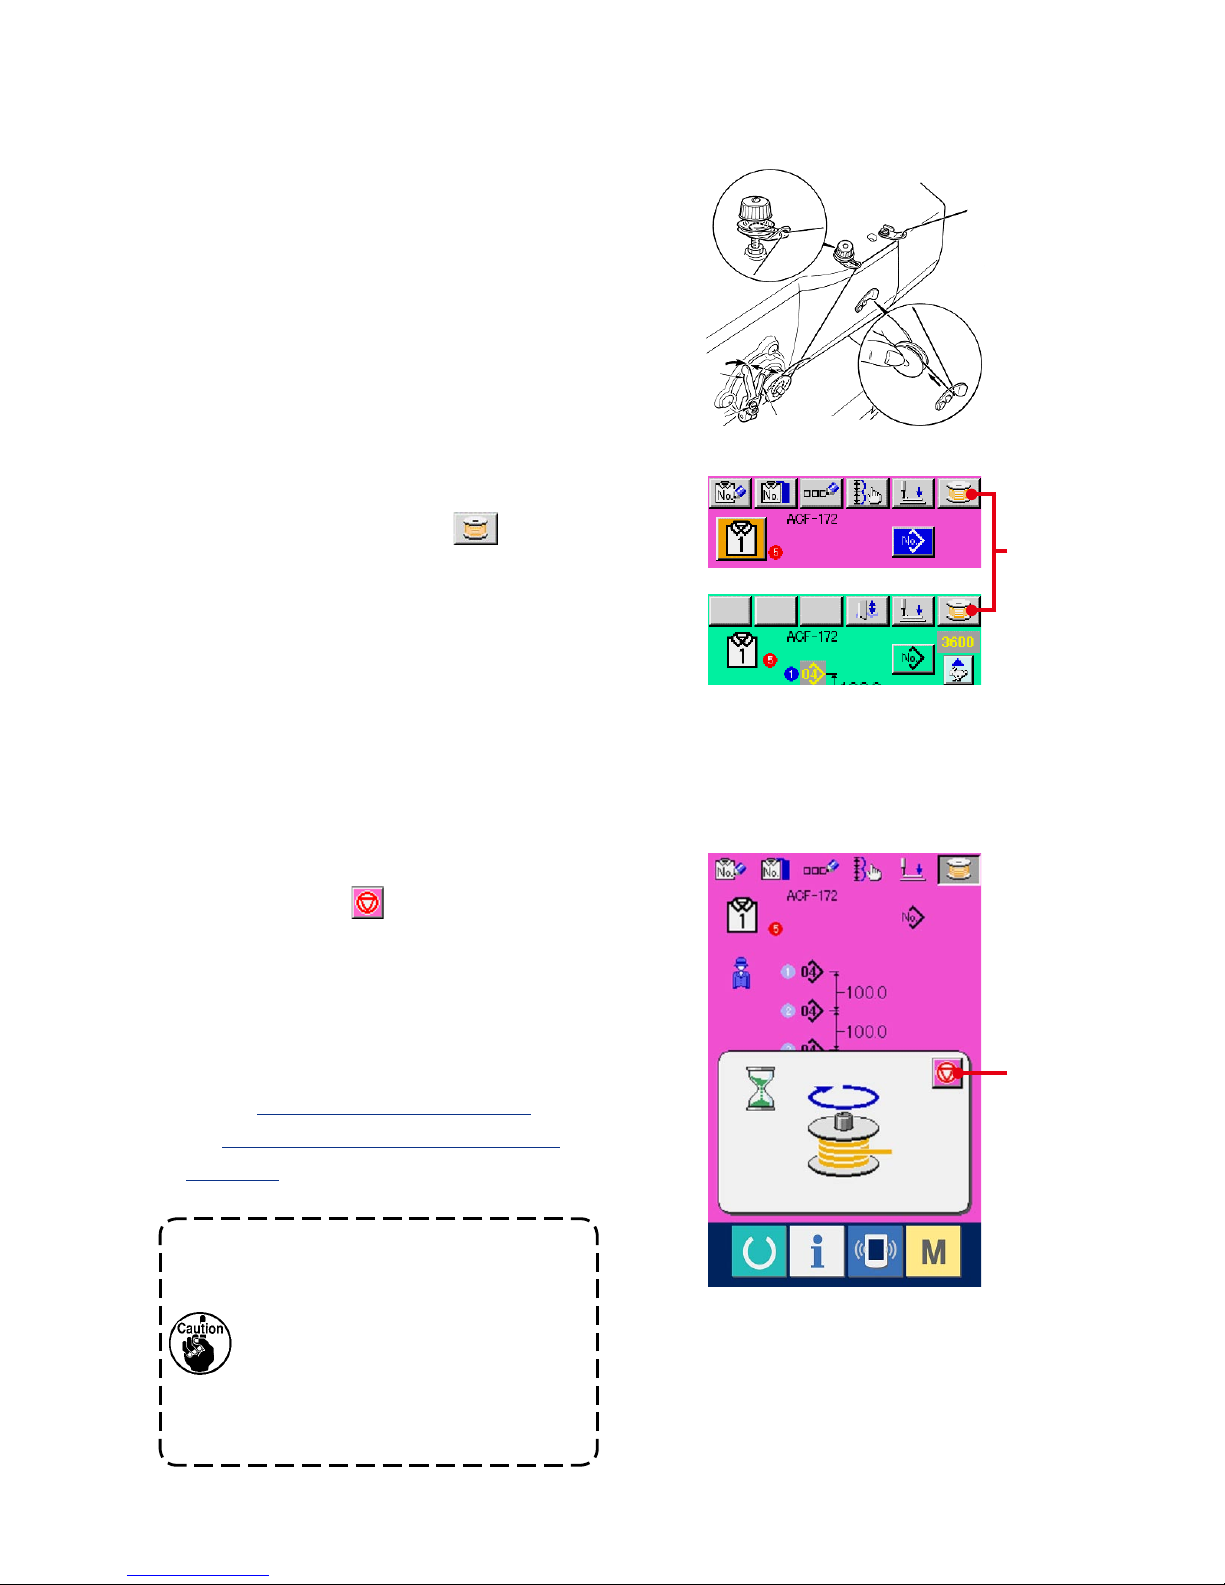
1-6. Winding bobbin thread
1
Set the bobbin.
Fit a bobbin fully onto the bobbin winder shaft.
Then push the bobbin thread guide in the
direction of the arrow mark.
4
Stop the sewing machine.
Press STOP button (B) and the sewing
machine stops and returns to the normal mode.
In addition, the sewing machine stops even when
the temporary stop switch is pressed. However,
the error screen is displayed to inform that the
temporary stop switch is pressed.
→
Refer to
1-5. Performing re-sewing,p.15
.
and
2-4. Performing re-sewing under LBH
mode,p.39
.
1. Remove needle thread from the thread
take - u p to need l e be f ore wi n d i n g
bobbin thread.
2. Wh en windin g t he bob bin thread in
the state that sewing is not performed,
re move the nee dle thre ad f rom the
thr e a d path of thr e a d take-up and
remove the bobbin from the hook.
2
Display the bobbin winding screen.
Press BOBBIN WINDER button (A) in
the ACF data input screen (pink), the automatic
sewing screen or manual sewing screen (green)
and the bobbin winding screen is displayed.
3
Start bobbin winding.
When the switch set to the start switch is pressed
with the knee switch or hand switch, the sewing
machine rotates and starts winding bobbin thread.
A
C
− 1 −
1-7. Using counter
1-7-1. Setting procedure of the counter
1
Display the counter setting screen.
When MODE key is pressed from the ACF
data input screen (pink), COUNTER SETTING
button (A) is displayed on the screen. When
this button is pressed, the counter setting screen
is displayed.
2
Selection of the kinds of counters.
This sewing machine has two kinds of
counters, i.e., sewing counter and No. of pcs.
counter. Press SEWING COUNTER KIND
SELECTION button (B) or NO. OF PCS.
KIND SELECTION button (C) to display
the counter kind selection screen. The kinds of
respective counters can be set separately.
A
G
F
B
C
E
D
− 1 −
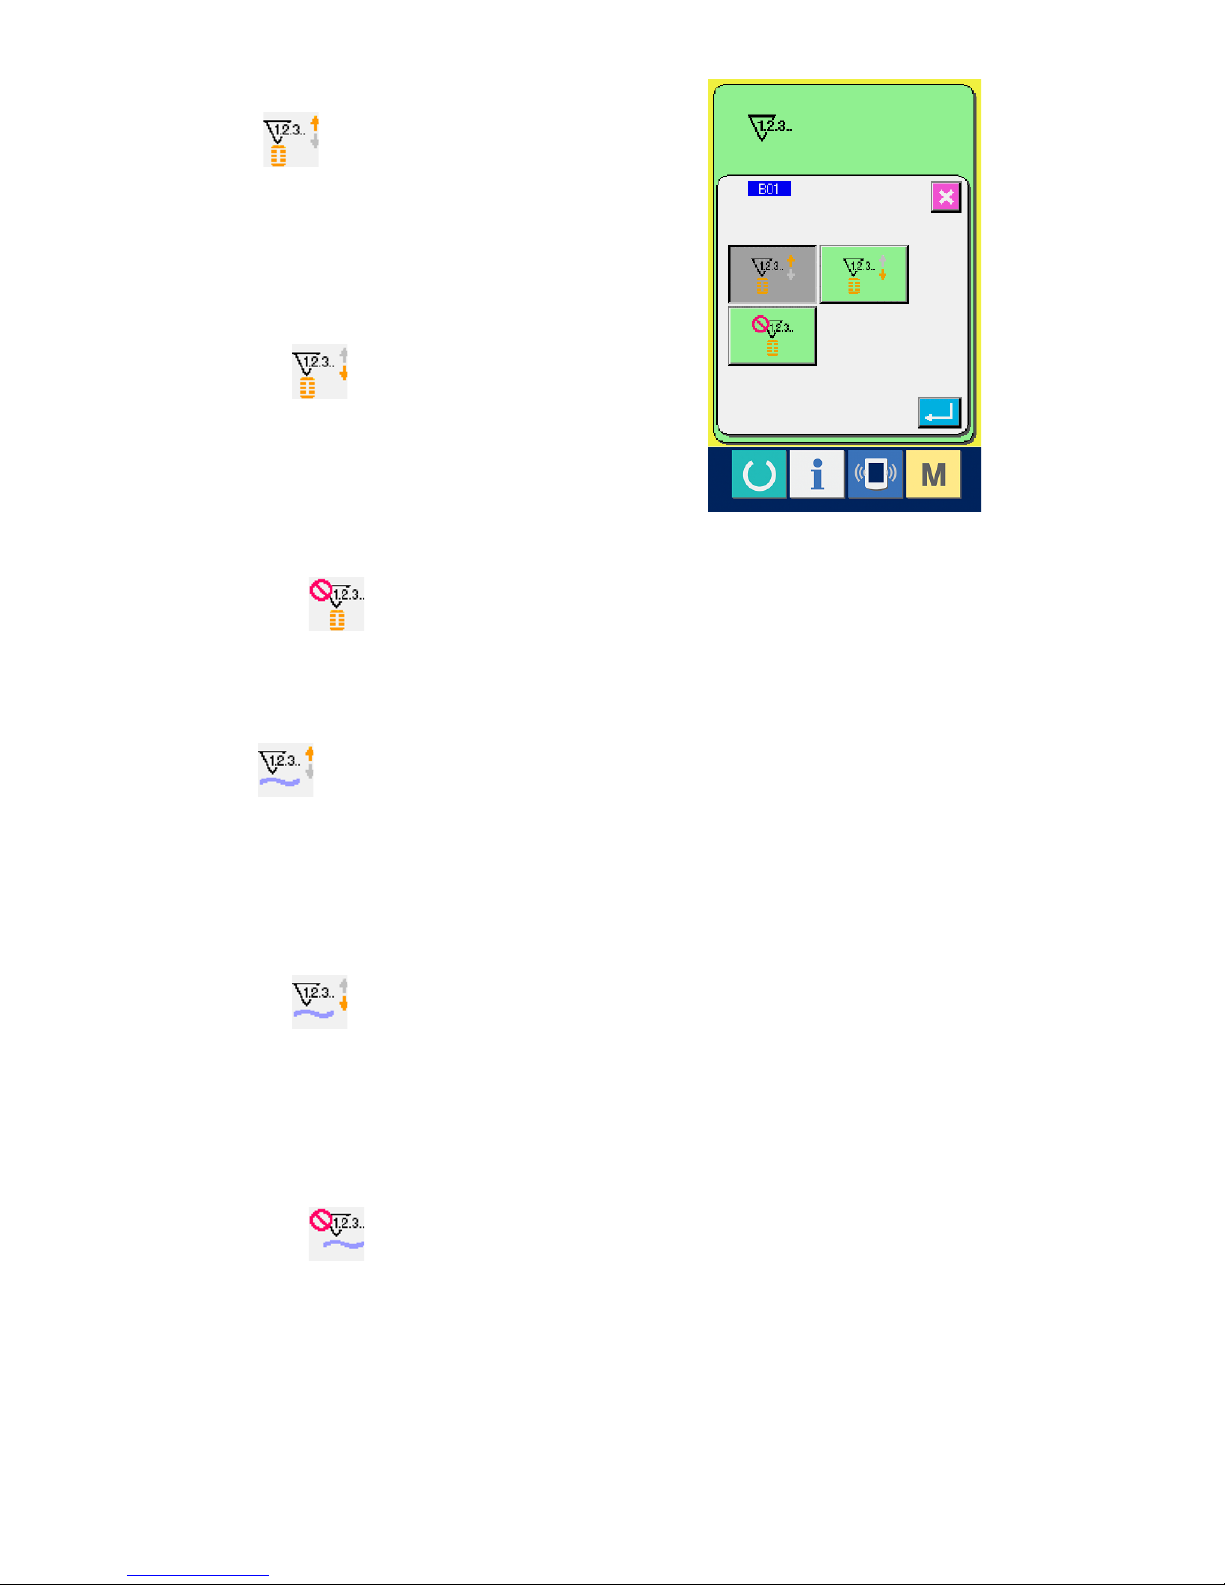
【
Sewing counter
】
UP counter :
Every time the sewing of one shape is performed,
the existing value is plussed by one. When the
existing value is equal to the set value, the count-up
screen is displayed.
DOWN counter :
Every time the sewing of one shape is performed,
the existing value is minus by one. When the
existing value is reached to "0", the count-up screen
is displayed.
Counter not used
【
No. of pcs. counter
】
UP counter :
Every time the sewing of one ACF data is
performed, the existing value is pulsed by one.
When the existing value is equal to the set value,
the count-up screen is displayed.
DOWN counter :
Every time the sewing of one ACF data is performed,
the existing value is minus by one. When the
existing value is reached to "0", the count-up screen
is displayed.
Counter not used

− 20 −
3
Change of counter set value
In case of the sewing counter, press button
(F) and in case of the No. of pcs. counter, press
button (G) and the set value input screen is
displayed.
Here, input the set value.
4
Change of counter existing value
In case of the sewing counter, press button
(D) and in case of the No. of pcs. counter, press
button (E) and the existing value input
screen is displayed.
Here, input the existing value.
1-7-2. Count-up releasing procedure
When count-up condition is reached during sewing
work, the count-up screen is displayed. CLEAR
button (H) to reset the counter and the screen
returns to the sewing screen. Then the counter starts
counting again.
H
− 21 −
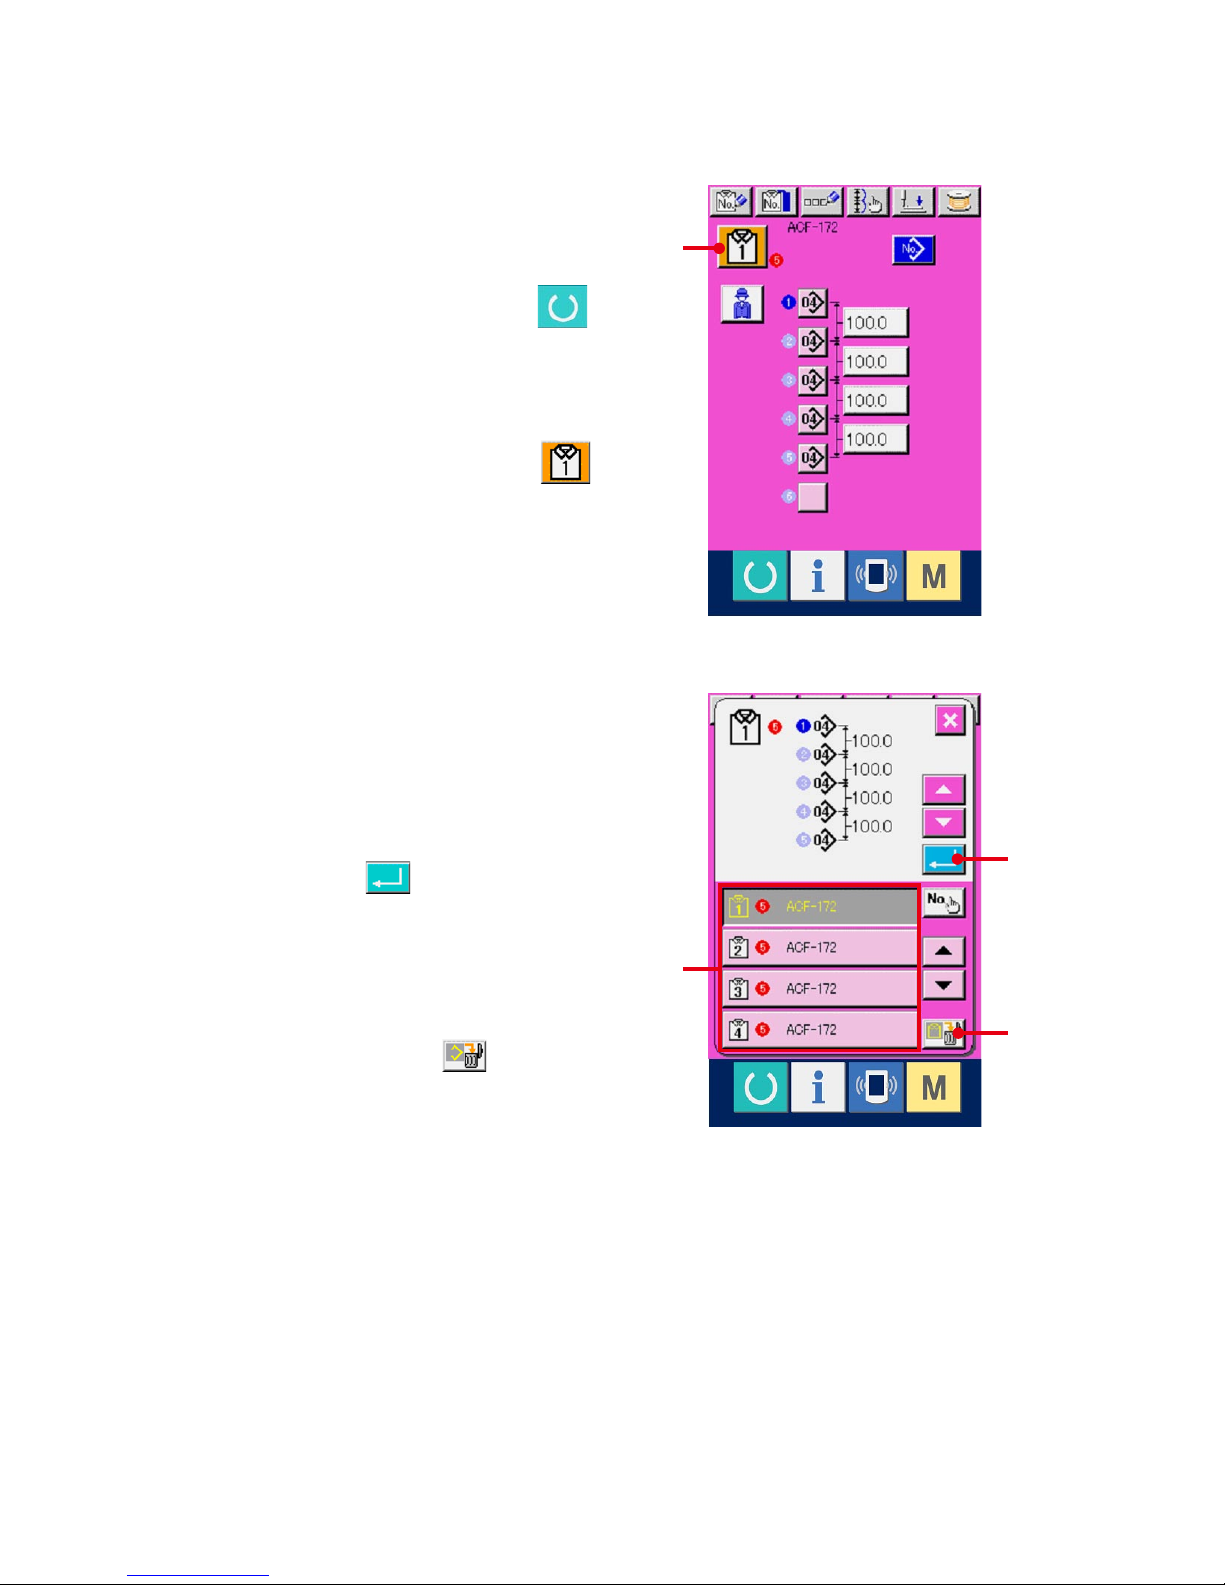
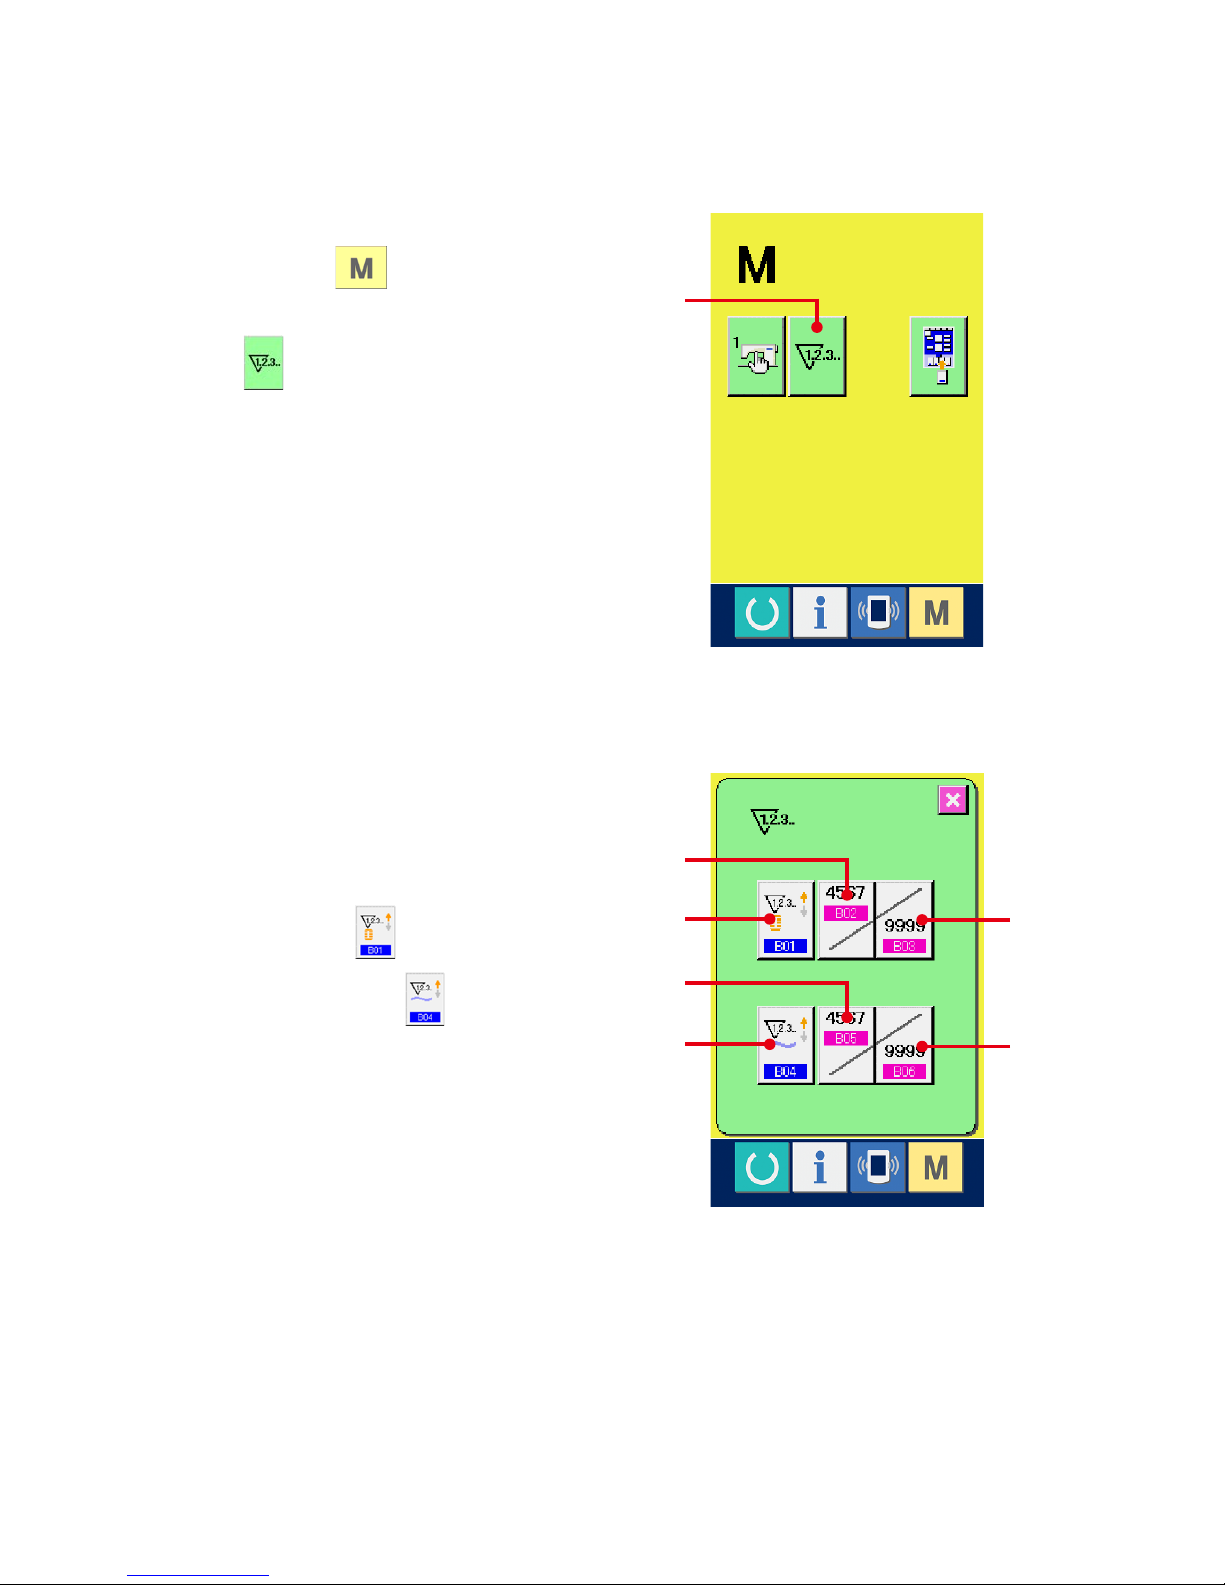
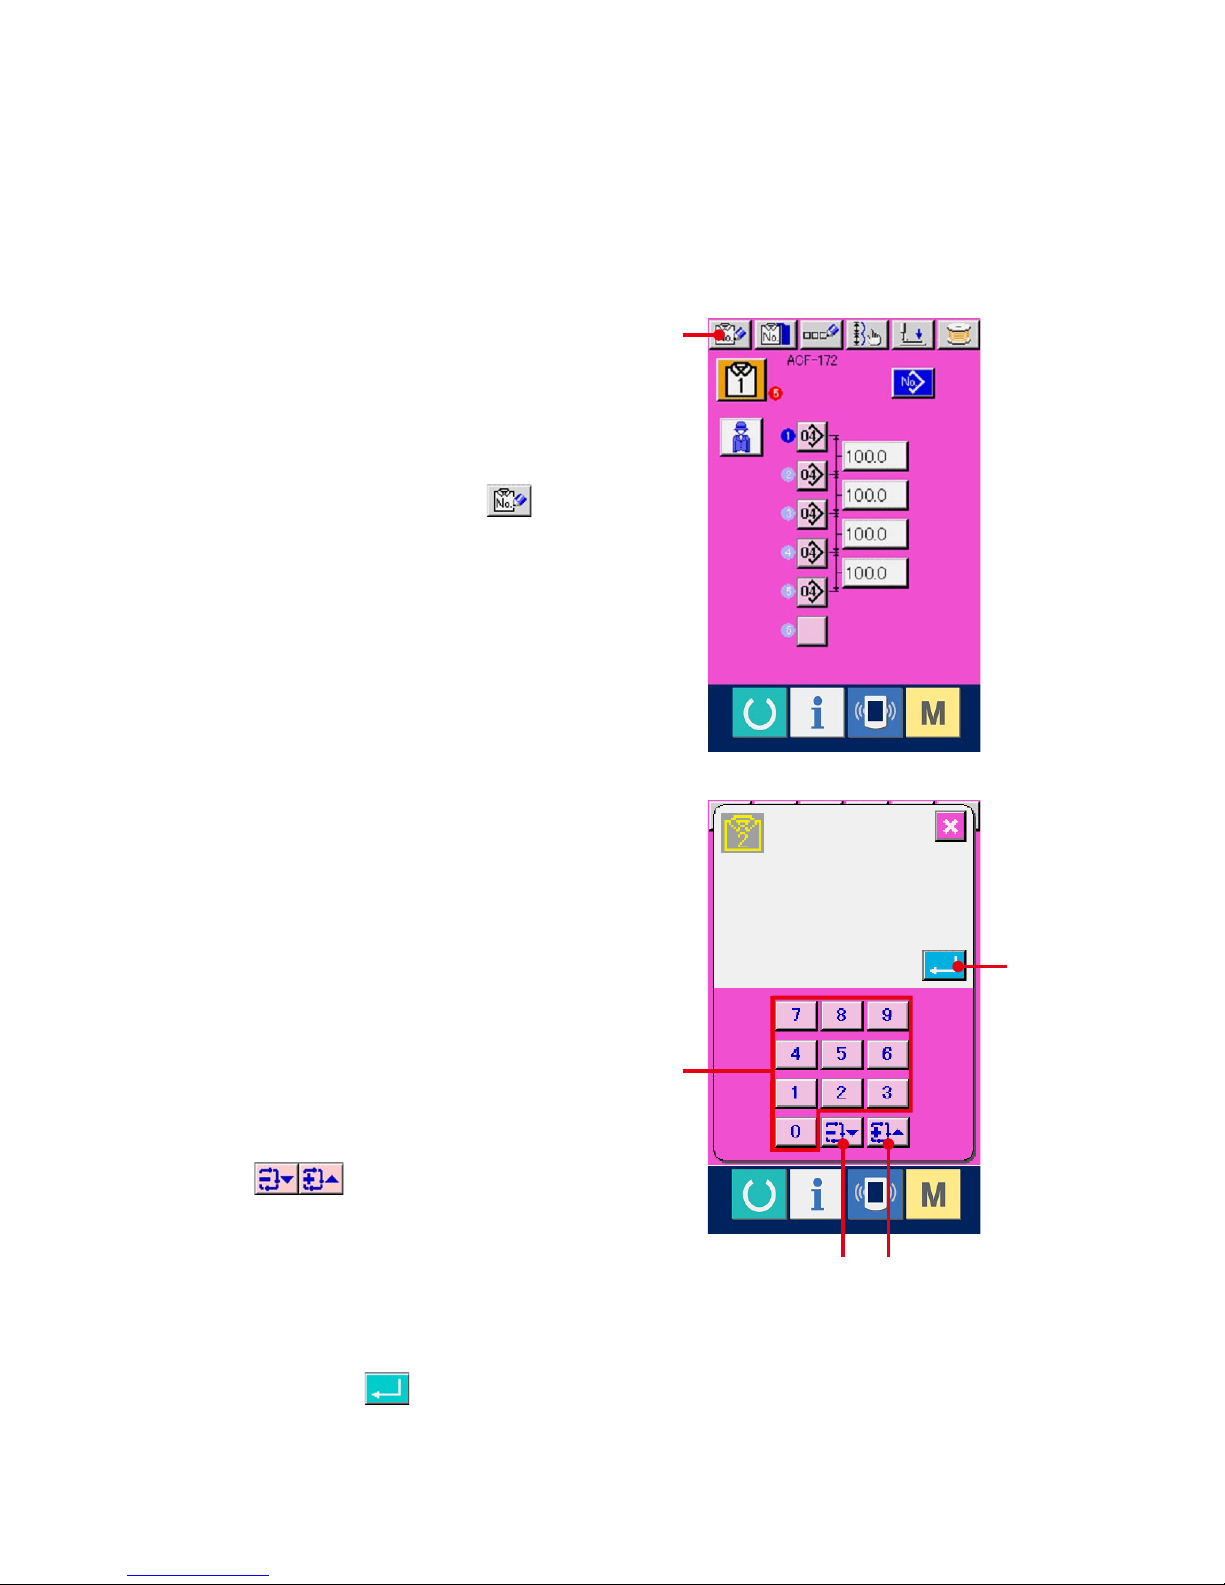
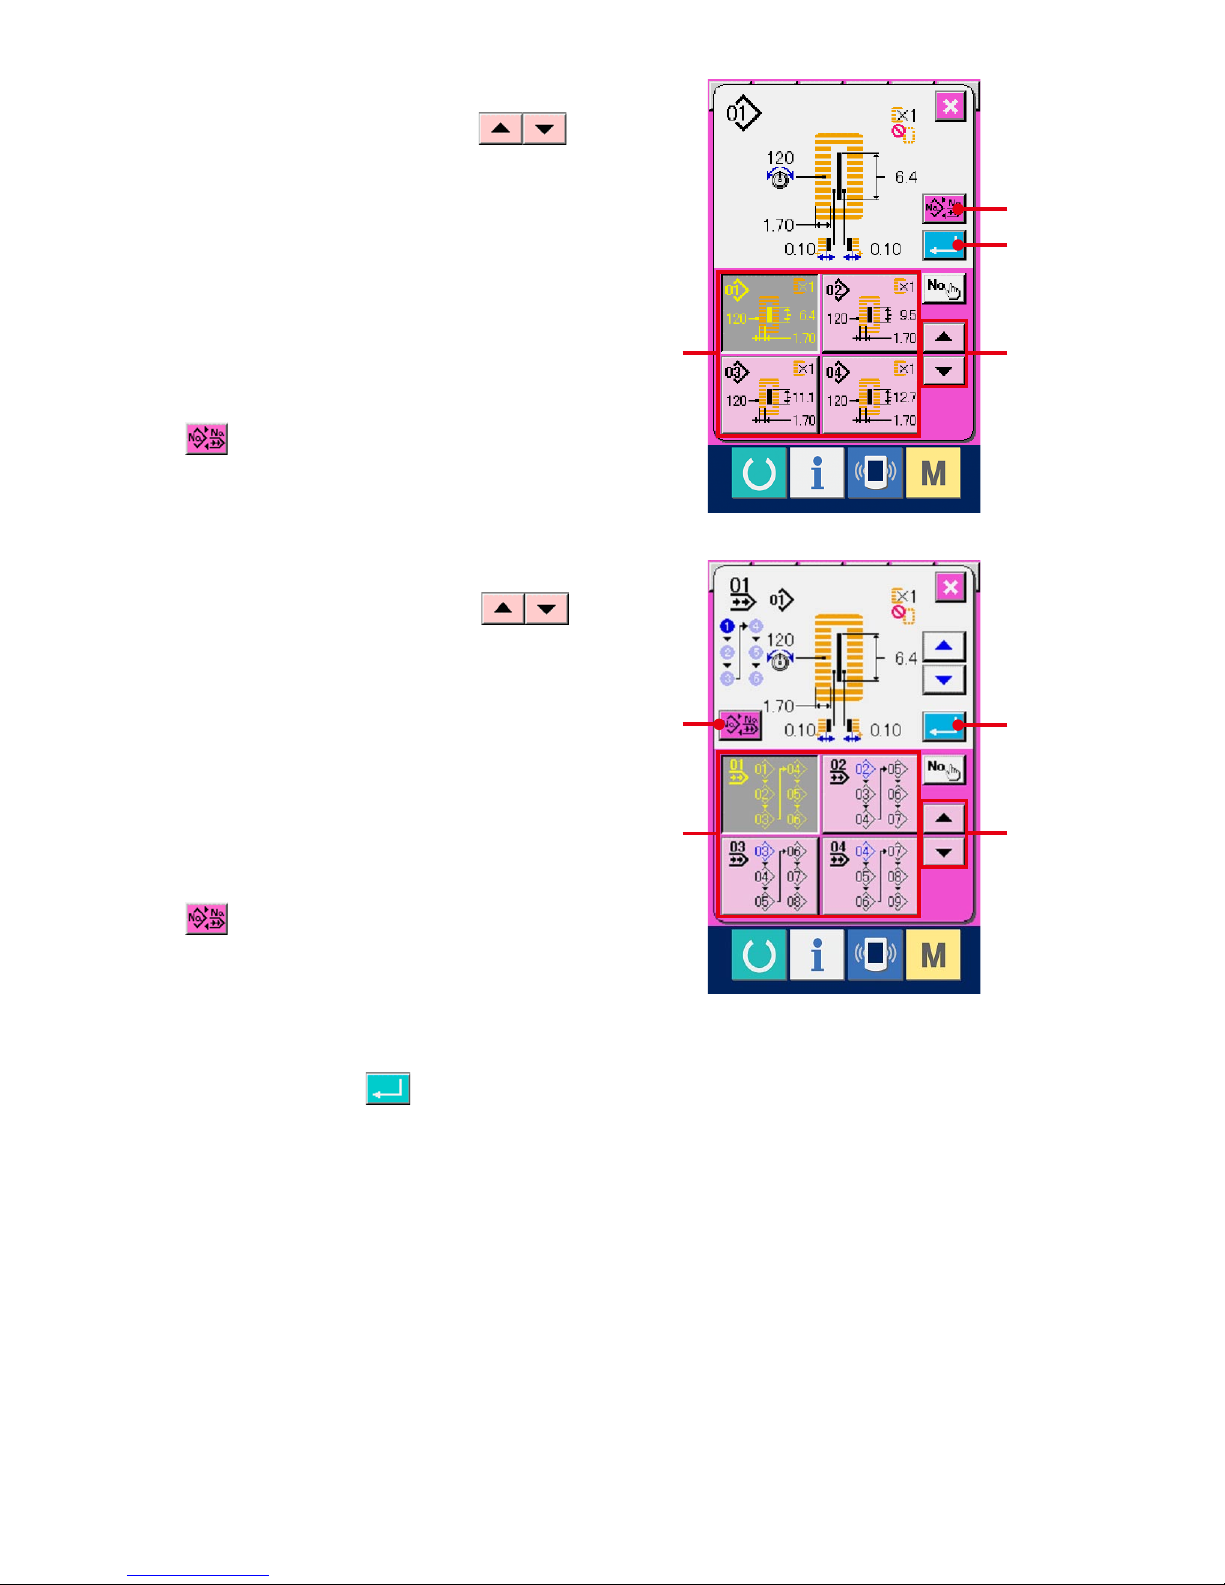
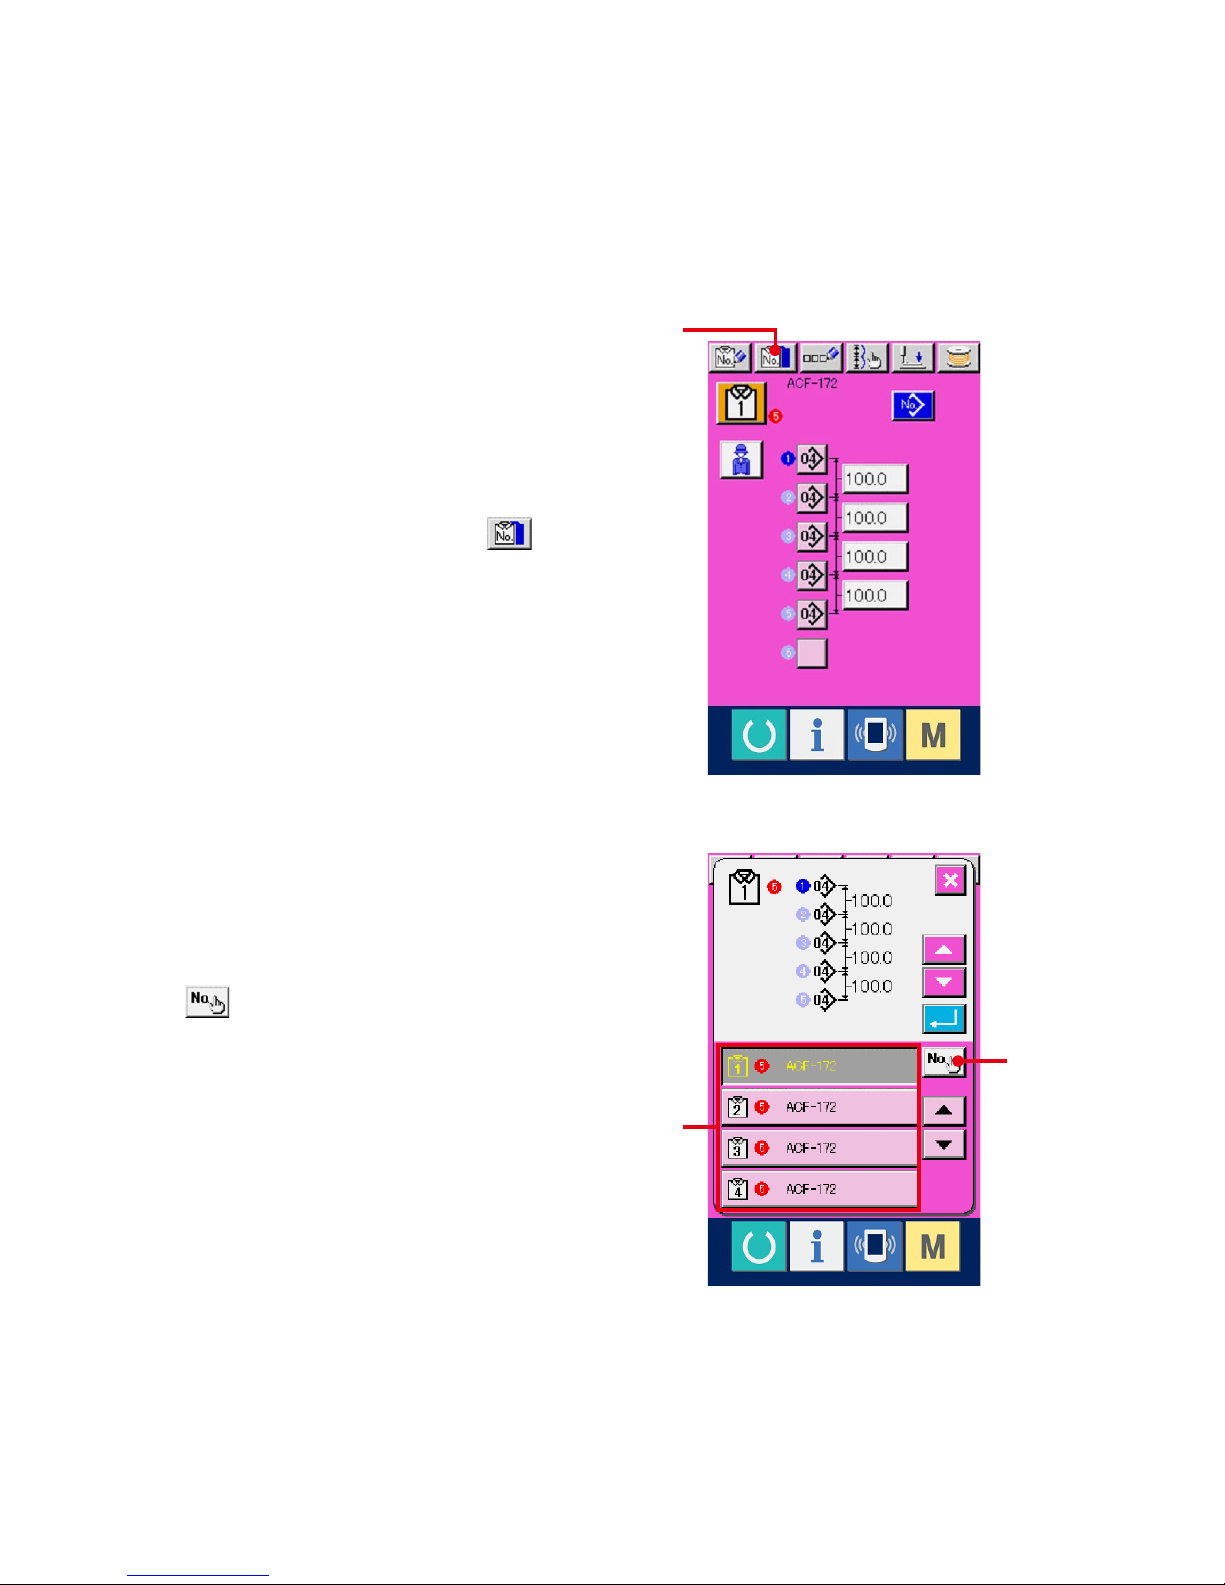
1-8. Performing new register of ACF pattern.
For the way of performing new register of ACF pattern, there are the equal interval input to set the number of
buttonholes and the interval of buttons, and the individual input to individually set the buttonholes one by one.
1-8-1. Performing the equal interval input
1
Display the data input screen.
Only in case of ACF data input screen (pink), new
register of the ACF pattern can be performed.
2
Call ACF pattern new register screen.
Press NEW ACF REGISTER button (A) and
the ACF pattern new register screen is displayed.
3
Input the pattern No.
Input ACF pattern No. you desire to newly
register with the ten keys (B). When ACF pattern
No. which has been already registered is inputted,
the sewing data which has been registered is
displayed in the upper part of the screen. Select
ACF pattern No. which is not displayed and
has not been registered. New register to ACF
pattern No. which has been already registered is
prohibited.It is possible to retrieve ACF pattern
No. which has not been registered with the -/+
buttons
(C • D).
Note) It is possible for ACF patterns No. to use 20
patterns from 1 to 20.
4
Determine pattern No.
Press ENTER button (E) to determine the
ACF pattern No. to be newly registered and the
equal interval input selection screen is displayed.
A
B
E
C D
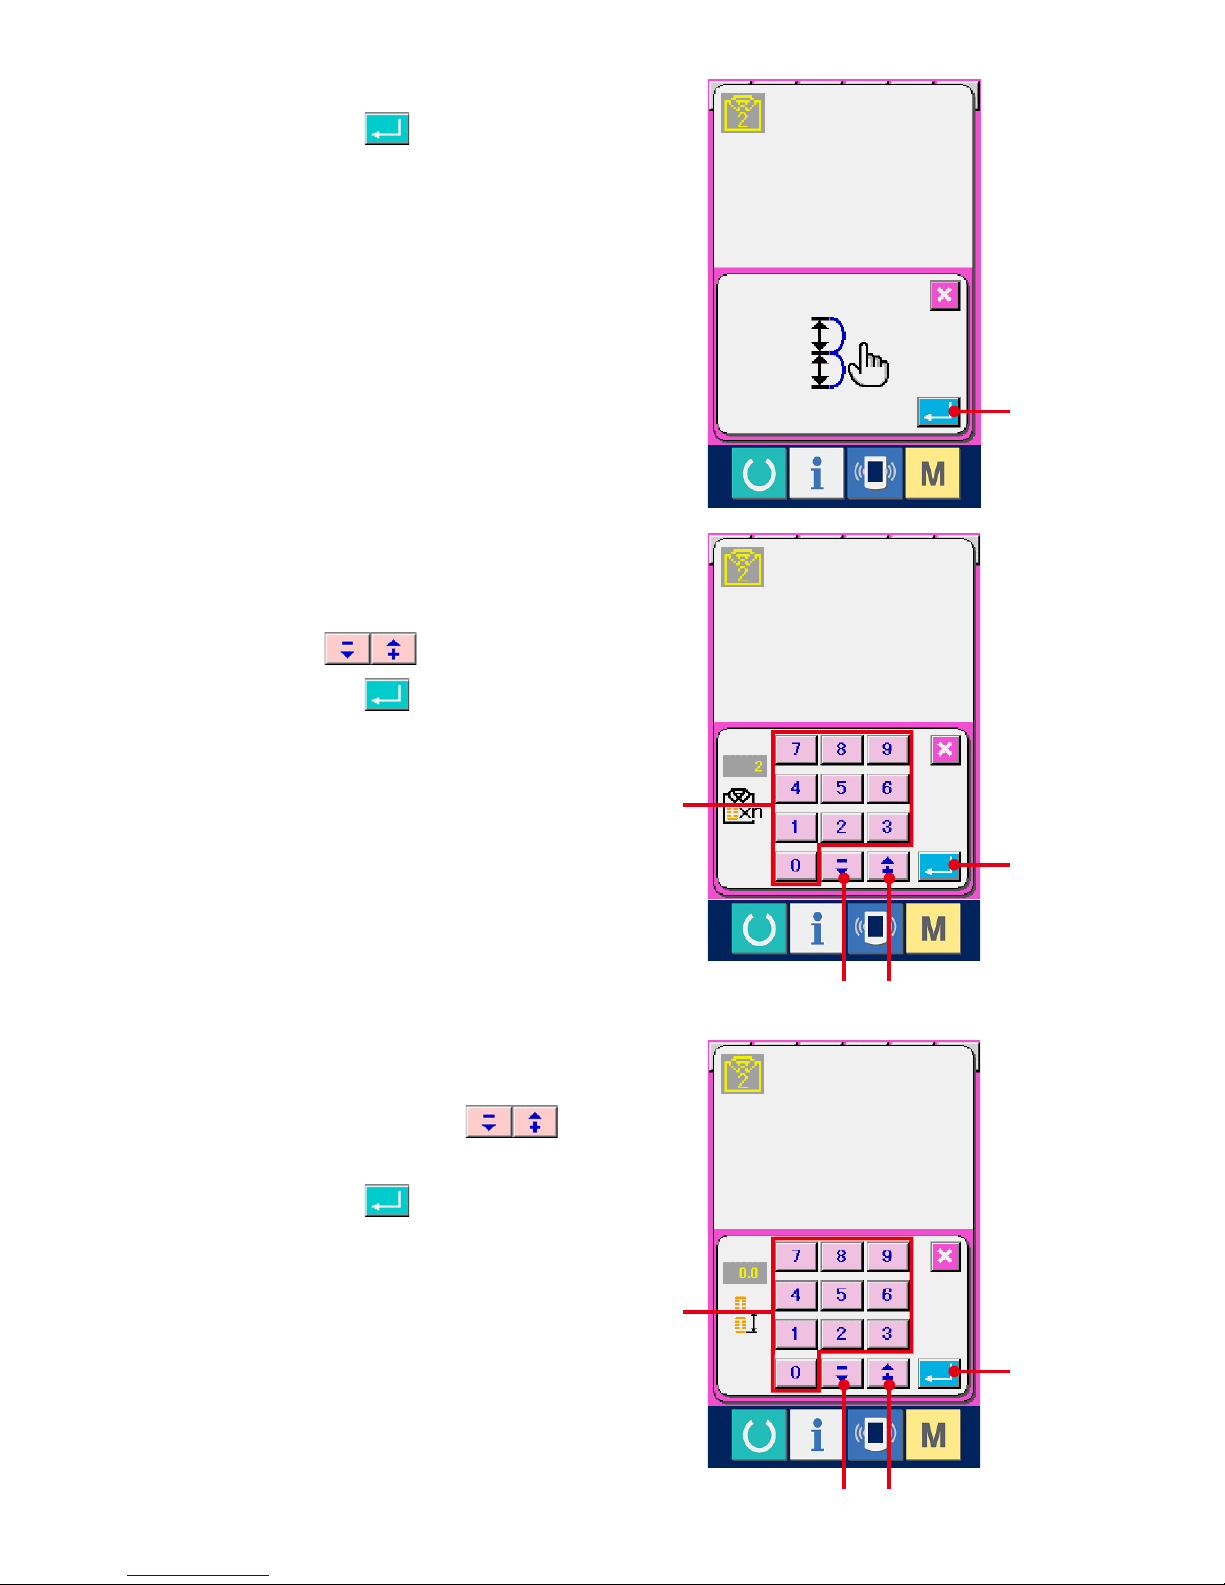
− 22 −
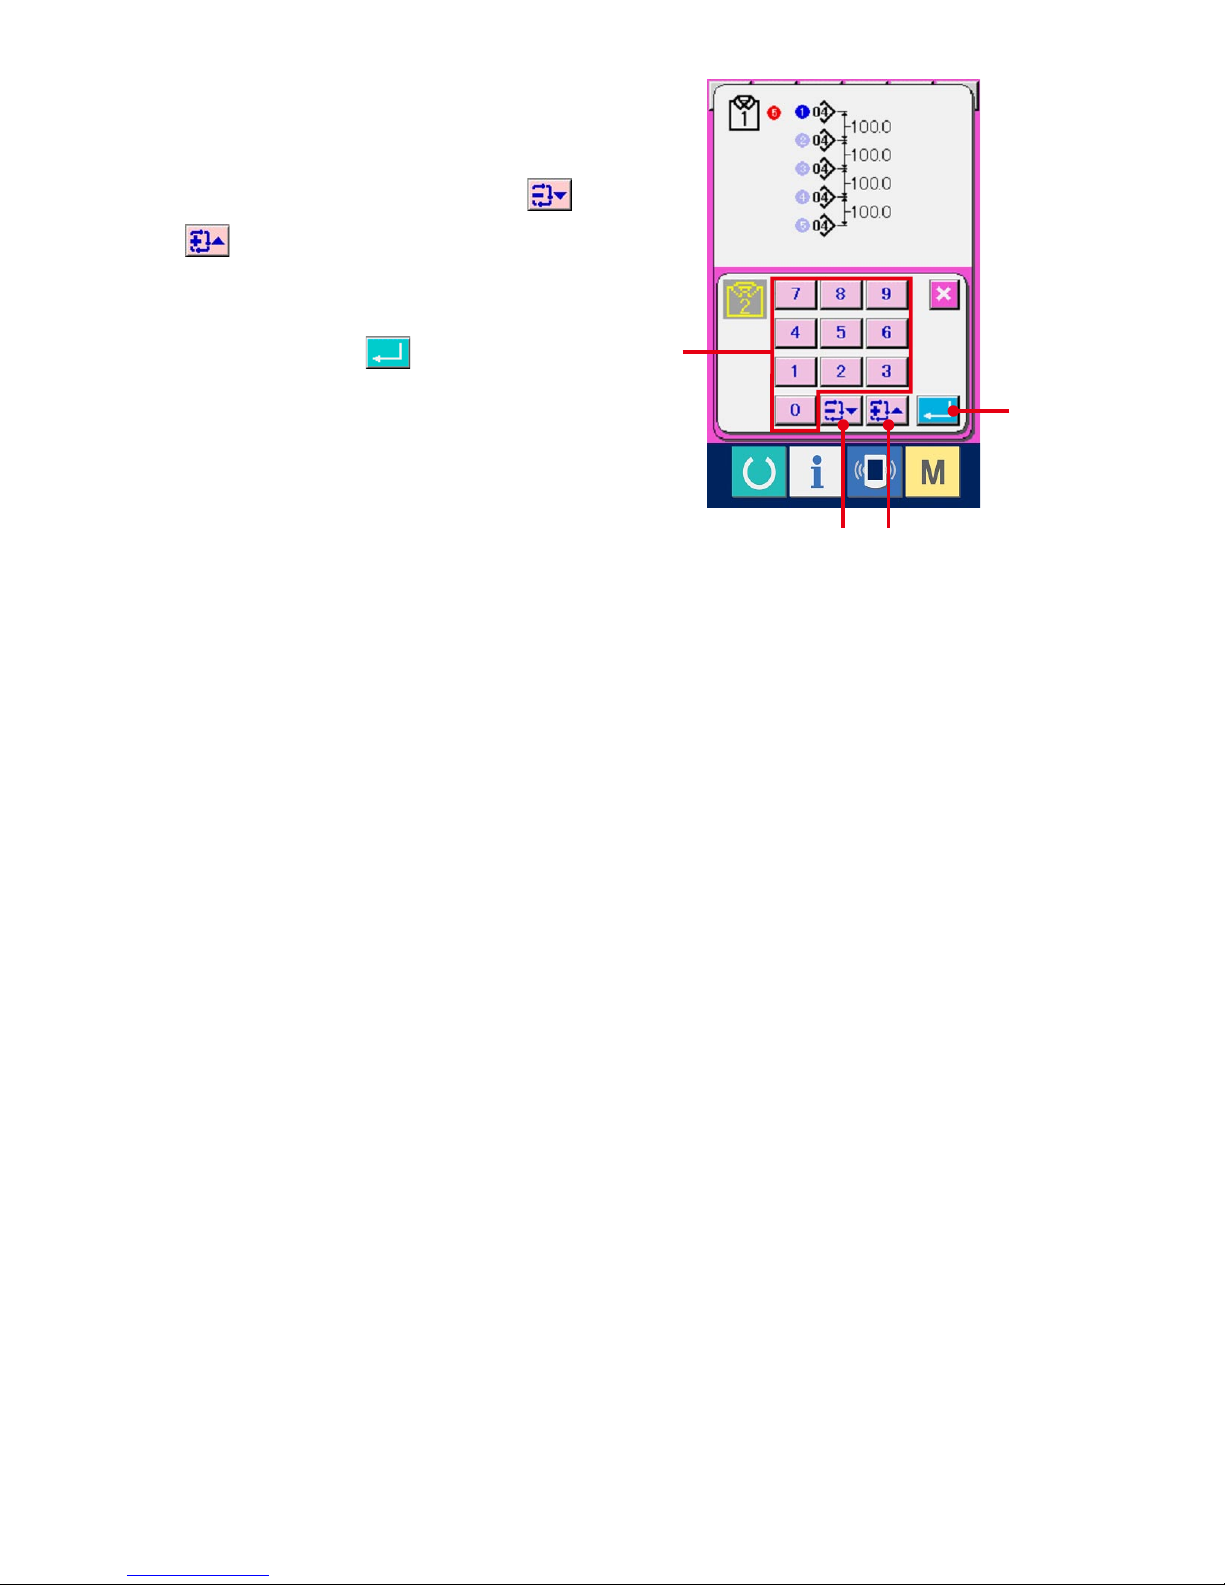
5
Select the equal interval input.
Press ENTER button (F) to select the equal
interval input, and the number of buttonholes
input screen is displayed.
7
Input the feed amount.
Input the feed amount with the ten keys (K). It is
possible to input from -/+ buttons
(L •
M).
Press ENTER button (N) to determine
the feed amount and the LBH pattern selection
screen is displayed.
H
6
Input the number of buttonholes.
Input the number of buttonholes to continuously
sew with the ten keys (G). It is possible to input
from -/+ buttons
(H • I) as well.
Press ENTER button (J) to determine the
number of buttonholes and the feed amount input
screen is displayed.
J
G
H I
N
K
L M
− 23 −
8
Select LBH sewing pattern No.
Press UP/DOWN SCROLL buttons (O)
and LBH sewing pattern No. buttons (P) which
have been registered are changed over by turns.
LBH sewing pattern No. and the contents of the
sewing data are displayed in the buttons.
Here, press the LBH sewing pattern No. you
desire to select.
When INDEPENDANT SEWING/CONTINUOUS
SEWING SELECTION CHANGEOVER button
(Q) is pressed, the screen is changed over
to the LBH continuous sewing pattern selection
screen.
B
Q
U
O
9
Select the LBH continuous sewing pattern No.
Press UP/DOWN SCROLL buttons (R)
and LBH continuous sewing pattern No. buttons
(S) which have been registered are changed
over by turns. The contents of continuous sewing
pattern are displayed in the buttons. Here, press
the LBH continuous sewing pattern No. you
desire to select.
When INDEPENDENT SEWING/CONTINUOUS
SEWING SELECTION CHANGEOVER button
(T) is pressed, the screen is changed over
to the LBH CONTINUOUS SEWING pattern
selection screen.
!0
Determine pattern No.
When ENTER button (U) is pressed in the
LBH pattern selection screen or LBH continuous
sewing pattern selection screen, the data is
determined and the selection has been nished.
S
U
R
T
− 2 −
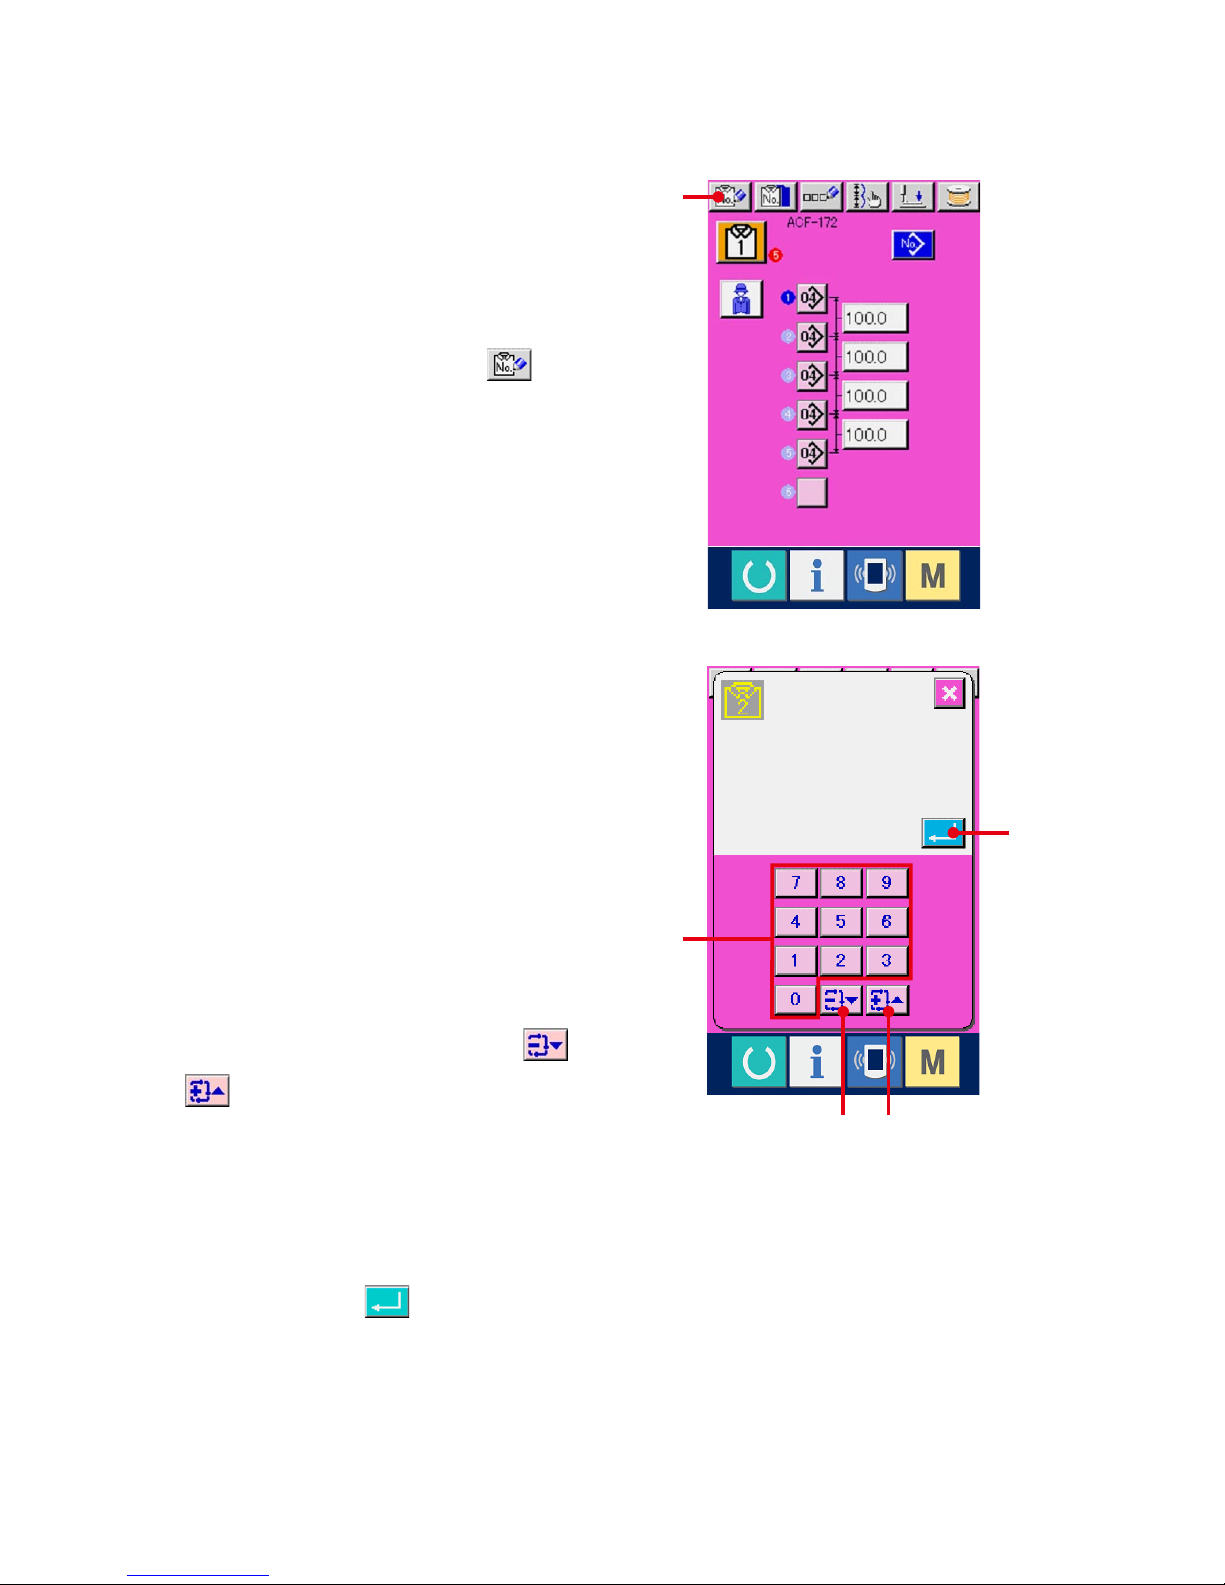
1-8-2. Performing the individual input.
1
Display the data input screen.
Only in case of the data input screen (pink), new
register of ACF pattern can be performed.
2
Call ACF pattern new register screen.
Press NEW ACF REGISTER button
(A) and
the ACF pattern new register screen is displayed.
3
Input pattern No.
Input ACF pattern No. you desire to newly
register with the ten keys (B). When ACF pattern
No. which has been already registered is inputted,
the sewing data which has been registered is
displayed in the upper part of the screen. Select
ACF pattern No. which is not displayed and
has not been registered. New register to ACF
pattern No. which has been already registered is
prohibited.
It is possible to retrieve ACF pattern No. which
has not been registered with -/+ buttons
(C • D).
Note) It is possible for ACF patterns No. to use 20
patterns from 1 to 20.
4
Determine pattern No.
Press ENTER button (E) to determine ACF
pattern No. to be newly registered and the equal
interval input selection screen is displayed.
A
E
B
C D
− 2 −
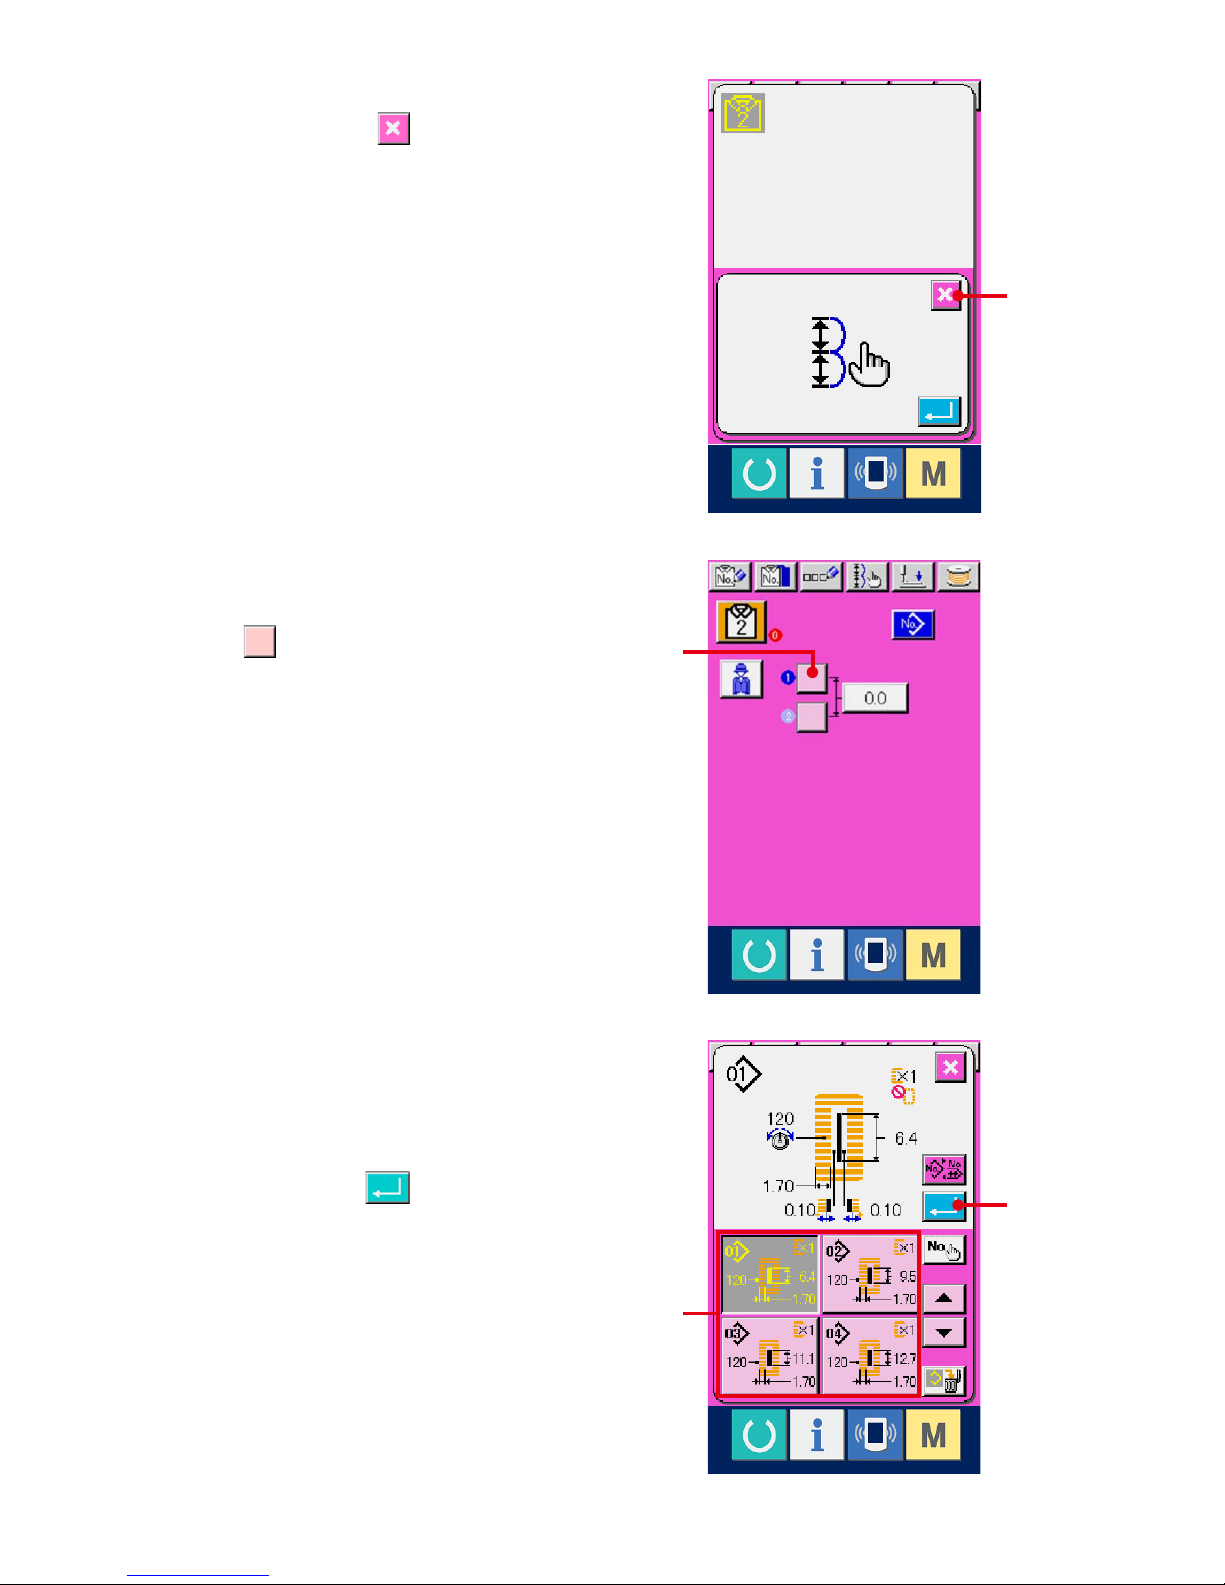
5
Select the individual input.
When CANCEL button (F) is pressed, it
means that the individual input is selected, and
the ACF data input screen is displayed.
6
Select LBH pattern No.
When LBH PATTERN BUTTONHOLE No. INPUT
button (G) is pressed, the LBH pattern
selection screen is displayed.
7
Determine LBH pattern No.
Press LBH pattern No. you desire to sew from
among LBH pattern Nos. (H) located at the
bottom of LBH pattern No. selection screen.
Press ENTER button (I) to determine LBH
pattern No. and the ACF data input screen is
displayed.
H
I
G
I
− 2 −
8
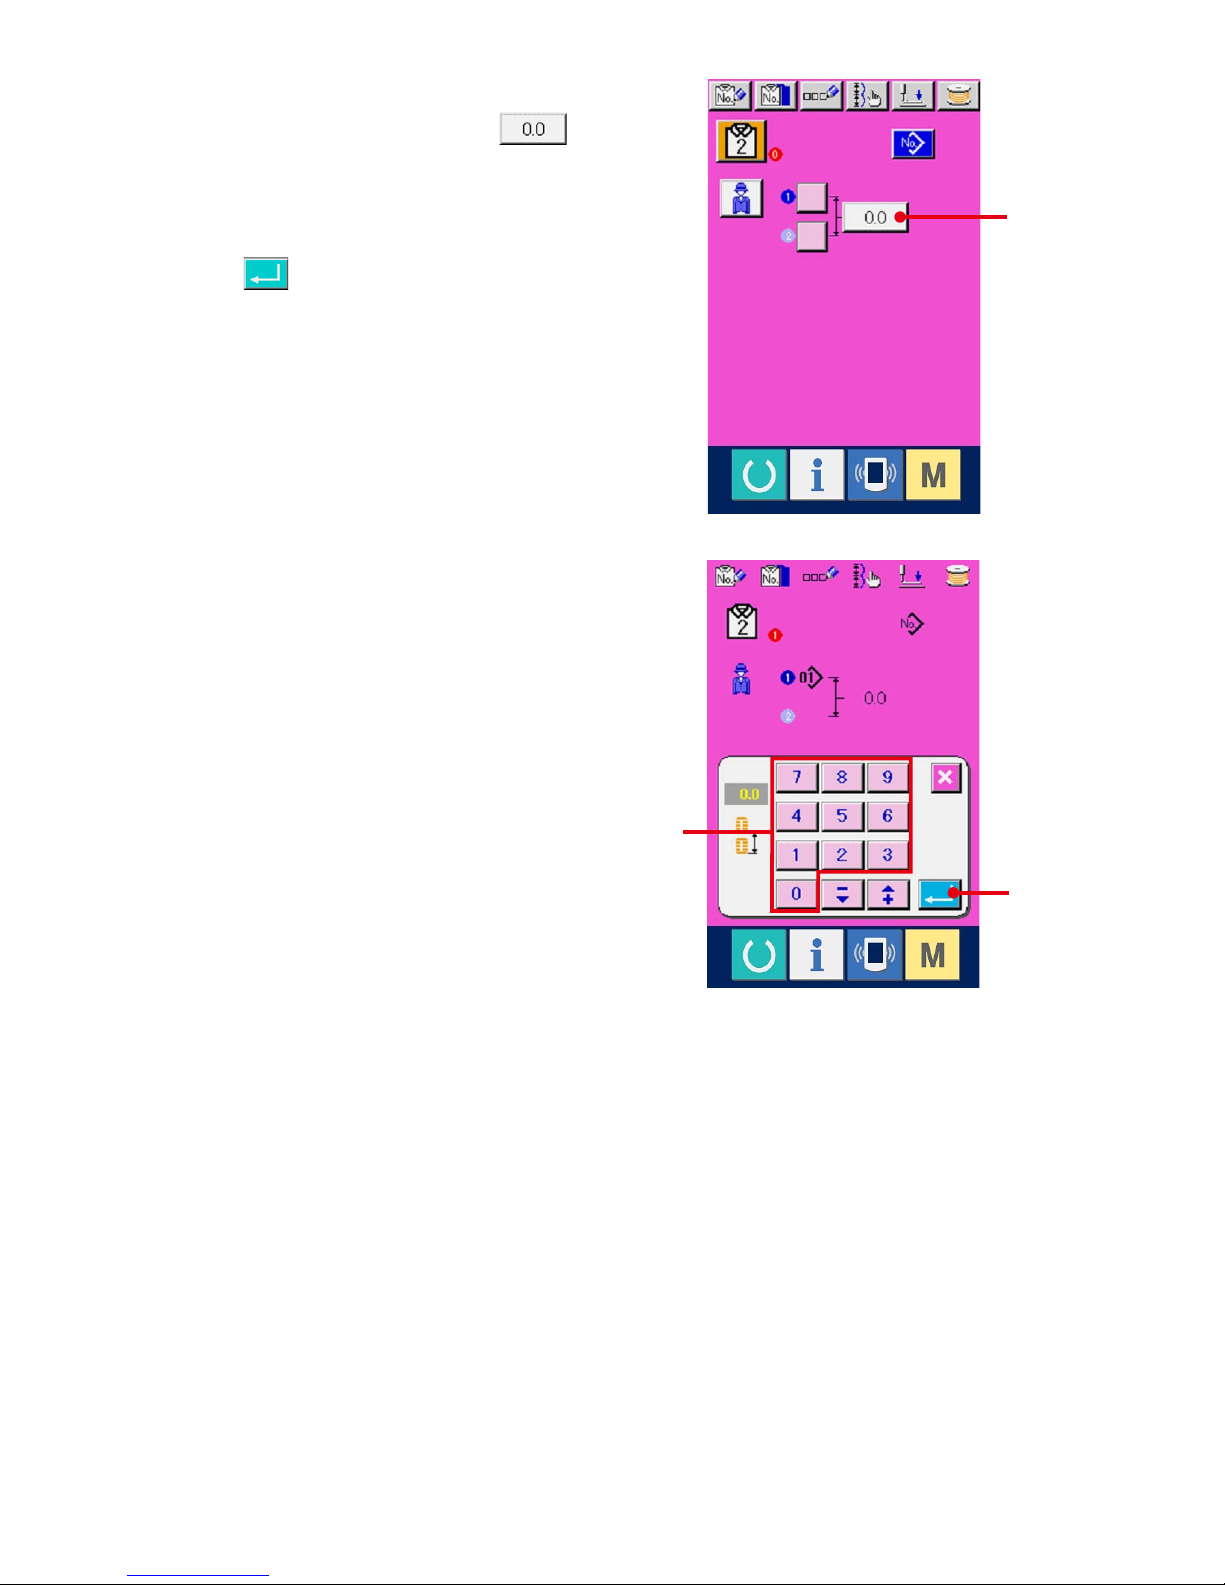
Input the feed amount.
When FEED AMOUNT INPUT button
(J) is pressed from ACF data input screen, the
feed amount input screen is displayed. Input the
feed amount from the ten keys (K). Press ENTER
button (L) to determine the feed amount
value and the ACF data input screen is displayed.
9
Register plural LBH pattern Nos.
In order to register plural LBH pattern Nos. to
the ACF pattern data, repeat the operation of
6
through 8.
L
K
J
− 2 −
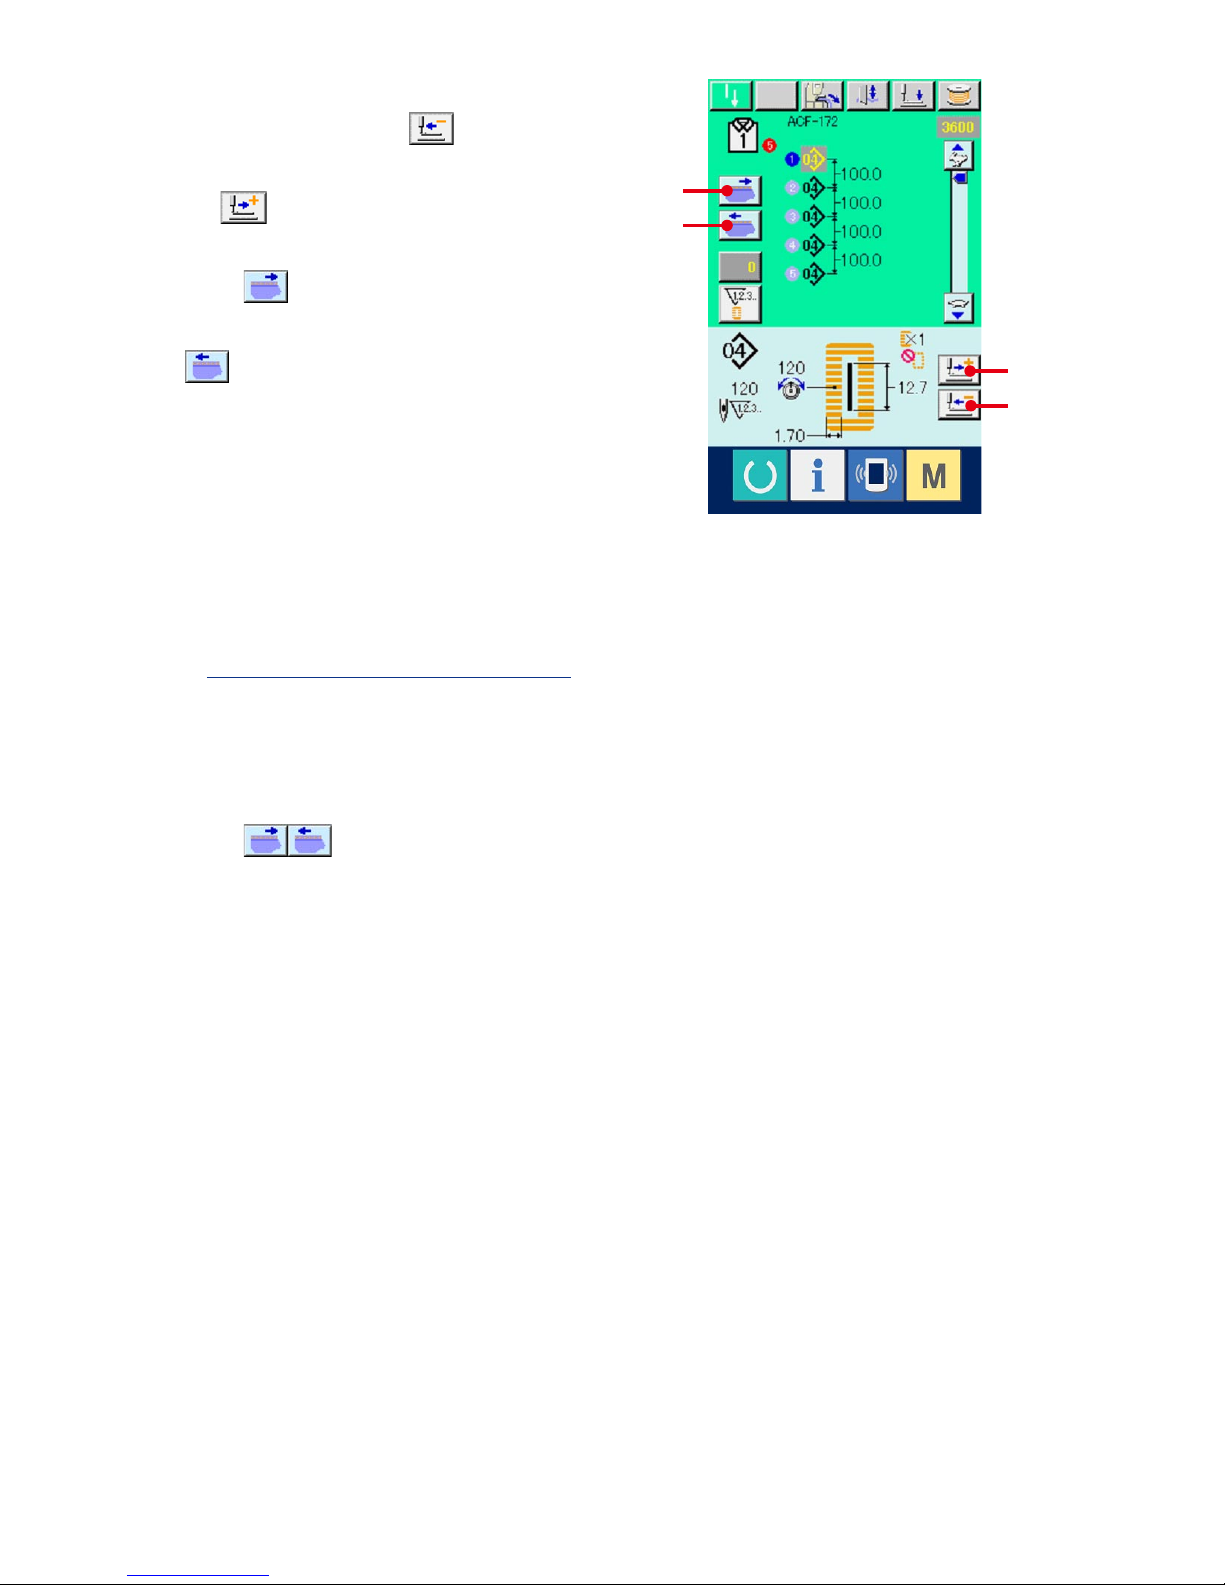
1-9. Copying ACF pattern
The data of ACF pattern No. which has been already registered can be copied to ACF pattern No. which
has not been registered.
Overwriting copy of the pattern is prohibited. When you desire to overwrite, perform it after deleting the
pattern once.
1
Display ACF data input screen.
Only in case of ACF data input screen (pink), it is
possible to copy ACF pattern.
2
Call ACF pattern copy source selection
screen.
When ACF PATTERN COPY button (A) is
pressed, the ACF pattern copy source selection
screen is displayed.
3
Select ACF pattern No. of copy source.
Select ACF pattern No. of copy source from
among ACF pattern list buttons (B).
Next, press COPY DESTINATION INPUT button
(C) and the ACF pattern copy destination
input screen is displayed.
A
B
C
− 2 −
4
Input ACF pattern No. of copy destination.
Input ACF pattern No. of copy destination from
the ten keys (D). It is possible to retrieve the
unused ACF pattern No. with -/+ buttons
(E • F).
5
Start copying.
When ENTER button (G) is pressed,
copying starts. The screen returns to ACF pattern
copy source selection screen in the state that the
copied ACF pattern No. has been selected after
approximately two seconds.
G
D
E F

− 2 −
1-10. Changeover of men's and ladies' wear.
Perform changeover of men's and ladies' wear since men's and ladies' wear are different in the carriage
direction of sewing products.
1
Display ACF data input screen.
Display the ACF data input screen (pink) of ACF
pattern No. you desire to sew.
2
Perform changeover of men's and ladies' wear.
When MEN'S/LADIES' WEAR SELECT button
(A) is pressed, changeover of men's and
ladies' wear can be performed.
Men's wear :
Ladies' wear :
【
Setting procedure of cloth
】
In case of men's wear, the position where sewing products are preset is the sewing start position of the
rst sewing pattern. In case of ladies' wear, the place moved to the right-hand by 00 mm from the
position where sewing products are preset is the sewing start position of the rst sewing pattern. For
both men's and ladies' wear, the sewing start position can be moved to the left-hand or right-hand by
jump feed before sewing .
(Reference)
1) Loosen thumbscrew 3 of gauge 2 of preset
table 1, move to the set place of scale 4 and x
it.
2) Afterwards, adjust top end C of cloth to inside D
of the pointer and set the cloth to position it. (For
the ladies' wear, similarly adjust with the pointer
and scale on the left side.)
A
4
23
1
D
D
2
3
C
Setting
paper
Needle
(Men's garment body)
(Ladies' garment body)
C
 Loading...