

Page 1
MODEL
DLD-432
HIGH
DIFFERENTIAL
INDUSTRIAL
SPEED,
SINGLE
FEED,
SEWING
NEEDLE,
LOCKSTITCH
MACHINE
Instruction
Book
TOKYO
JDKI
a
a
INDUSTRMl
CO„ITO.
Page 2

We
want to thank you for purchasing JUKI
Lockstitch Industrial SewingMachine.
This is a high
up to 4,200
it can
perform
straight
This is a
garments
or
shrinking
hi^
levelofsewing
INSTRUCTION BOOK thoroughly and digest the functions of all of its mechanism to
produce best results and to prolong the lifeofthe machine.
speed,
s.p.m.
sewing
machine
of light
nature. As a
differential
As this
stretch
stitchingorgather
with equal ease to boost up the
for
wide
weight
area of
to mediumheavy
differential
efficiency.
feed
machine
usage
feed
Before
DLD-432,
sewing
machine,
is equipped with a differential feed
stitching
sewing
and best suited for
weight
materials as
machine,
you start to use this
High
Speed, Differential Feed,
capableofattainingaspeed
with
utmost
ease.
efficiency.
Also,
sewing
well
it can be
asmaterials of stretchy
acclaimedtoproduce
machine,
various
please
mechanism,
it can
kinds
read the
perform
very
of
of
DLD-432
SPECIFICATIONS
Sewingspeed — Up to 4,200 s.p.m.
Differential feed ratio (3:1)
Stitch
length
0-5mm{13/64")
Stitch length regulator • • • • Dial system
Reverse sewing By reverse lever
Needles
Lubricating oil New Defrix Oil No. 1
DBxl (16x231)1738#14, #16, #18
Page 3
DLD-432
CONTENTS
Page
Installing the oil reservoir 2
Motor
pulley
and
the
belt
Cautions on operating the machine 3
Lubrication
1. Adjusting
the
oil supply to
the
face
part
2. The oil-adjusting pin 4
3. Adjusting the oil supply to the
hook
components 4
Threading the machine 5
Preparation
of
the bobbin thread 6
Inserting &removing the bobbin case 6
Windingthe bobbin thread 6
Howtoinsert
The
thread
tension
the
bobbin
Adjusting the needle thread tension 7
Thread take-up spring 7
Adjusting the bobbin thread tension 7
Presser
foot
and feed dog 8
Adjusting the pressure of the presser foot 8
The presser foot hand lifter 8
Heightof the feed dog 8
The stitch length 9
Adjusting the stitch length 9
Reverse sewing 9
Pushing pressure of the feed lever 9
Adjusting the differential feed 10
Stretch
Gather
Inserting
Installing
Relation
sewing
sewing 10
the
needle
and
removing
between
the
hook
the
sewing
and
the
hook
needle
10
11
11
12
Adjusting the heightofthe presser bar 13
Adjusting the amountofthe thread take-up 1:
How to use
attachments
(separate order) 1
How to use the differential feed regulating lever • 1
How to use attachmentfor gather sewing 1
Supplementary feed dogs (reverse toothed) 1^
2
3
4
6
7
(Note)
Due to improvements on the machine, some
INSTRUCTION BOOK might be changed
without
partsofthe
- I -
notice.
operational proceduresofthis
Page 4
INSTALLING
THE
OIL
RESERVOIR
Nail
Operatorside
MOTOR
Motor
Rubber
pulley
cushion
Oil
reservoir
Q
PULLEY
i-
HinRe
AND
m
side
THE
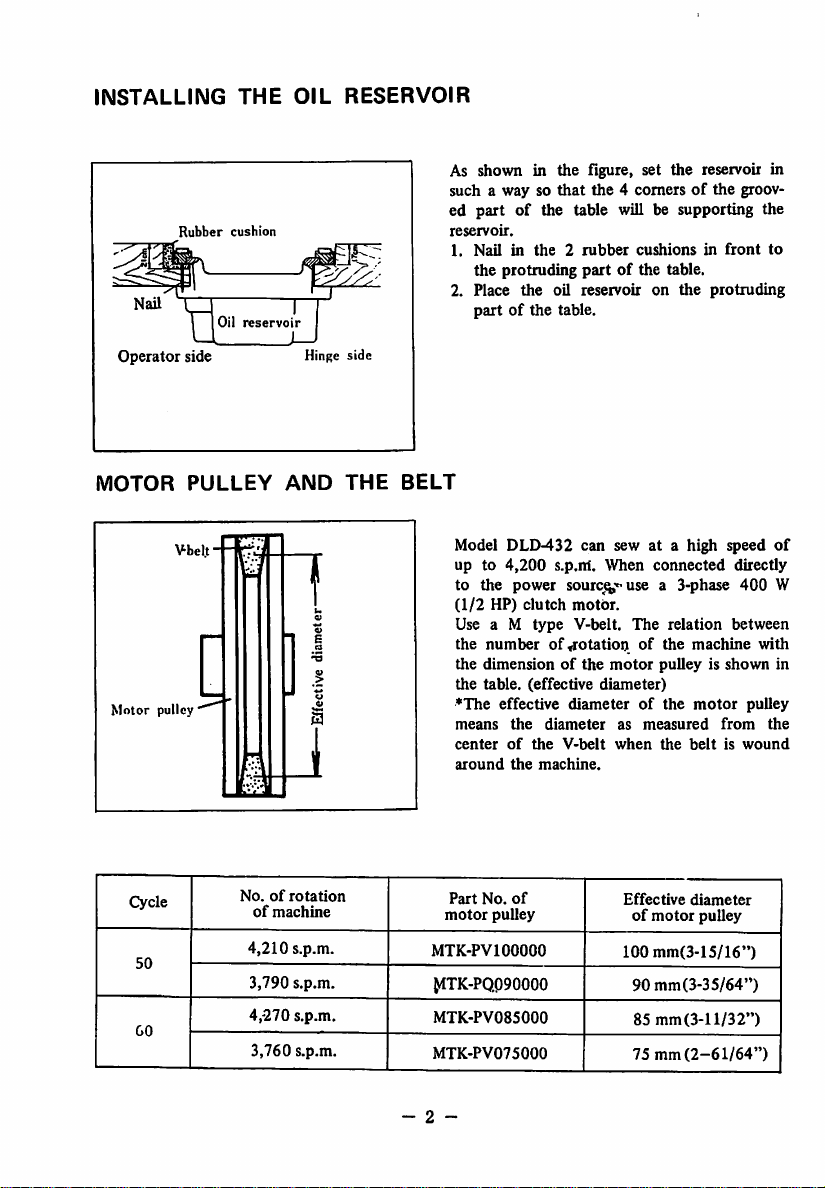
As shown in the
such a way so
flgure>
that
set the reservoii in
the4comersofthe
ed part of the table will be supporting the
reservoir.
1.
Nailinthe2rubber
the
protruding
cushionsinfront
partofthe table.
2. Place the oil reservoir on the protruding
partofthe
table.
BELT
Model DLD-432 can sew at a high
up to
4,200
s.p.nt. When
to the power
(1/2
HP)
clutch
sourc^^'"
motor.
Use a M type V-belt. The relation between
the
number
the
dimensionofthe
the
table,
♦The
means
center
around
ofiTOtationofthe
(effective
effective
the
diameter
of
the
V-belt
the
machine.
diameterofthe
connected
use a 3-phase 400 W
motor
pulleyisshown
diameter)
as
measured
when
the
groov
speed
directly
machine
motor
beltiswound
with
pulley
from
to
of
in
the
Cycle
50
GO
No.ofrotation
of
machine
4,210
s.p.m.
3,790
s.p.m.
4,270
s.p.m.
3,760
s.p.m.
Part
motor
MTK-PVl
^1TK-PQP90000
MTK-PV085000
MTK-PV075000
- 2
No.
pulley
of
00000
Effective
of
motor
100
mm(3-15/16")
90 mm (3-3
85
mm(3-11/32")
75 mm
diameter
pulley
5/64")
(2-61/64")
Page 5

CAUTIONS ON OPERATING THE MACHINE
®
Do
not
run
the
machine,
with
fresh
oU.
(D
Always
verse
(3)
This
LUBRICATION
rotate
the
direction.
machine
the speed to about 3,700 s.p.m.
can
under
any
circumstances,
machine
run
toward
the
withaspeedofupto4,200
before
operator.Donot
s.p.m.
the
run
but
oil
reservoirisfilled
the
machineinthe
for
the
first
month
up
re
drop
Before operating
1. Fill up the oil reservoir with JUKI New
Defrix Oil No.l up to the mark "HIGH".
2.
Watch
and
go below the "LOW" mark.
HIGH
mark
Oil
sight
0
m:D-49ai
LOW
mark
window
Oil
reservoir
3.
Under
chine is
oil will spurt against the oil sight window.
(Caution)
1) When the oil gets dirty, change it with new,
fresh oil. If the oil plug of the reservoir is
removed,
2)
When
the machine is to be run for the first
time or when it was idle for a great length
of time, run the machine at 3,000-3,500
s.p.m. for about 10 minutes and allow the
machine to get well-oiled.
see
normal
run
oil will
the
machine
that
the
oil
level
conditions,
after
it is filled up with oil, the
come
when
out.
does
the
not
ma
- 3 -
Page 6
Oil
Oil
gets
z
adjustiiig
pin
amount
less
rmr
I—n
Oil amountgets more
Needle
bar
crank
Grooveofeccentric
Oil
adjusting
Counterweight
pint |
Arm
shaft
Oil adjusting pin
Crank
I f
h)
II
screw
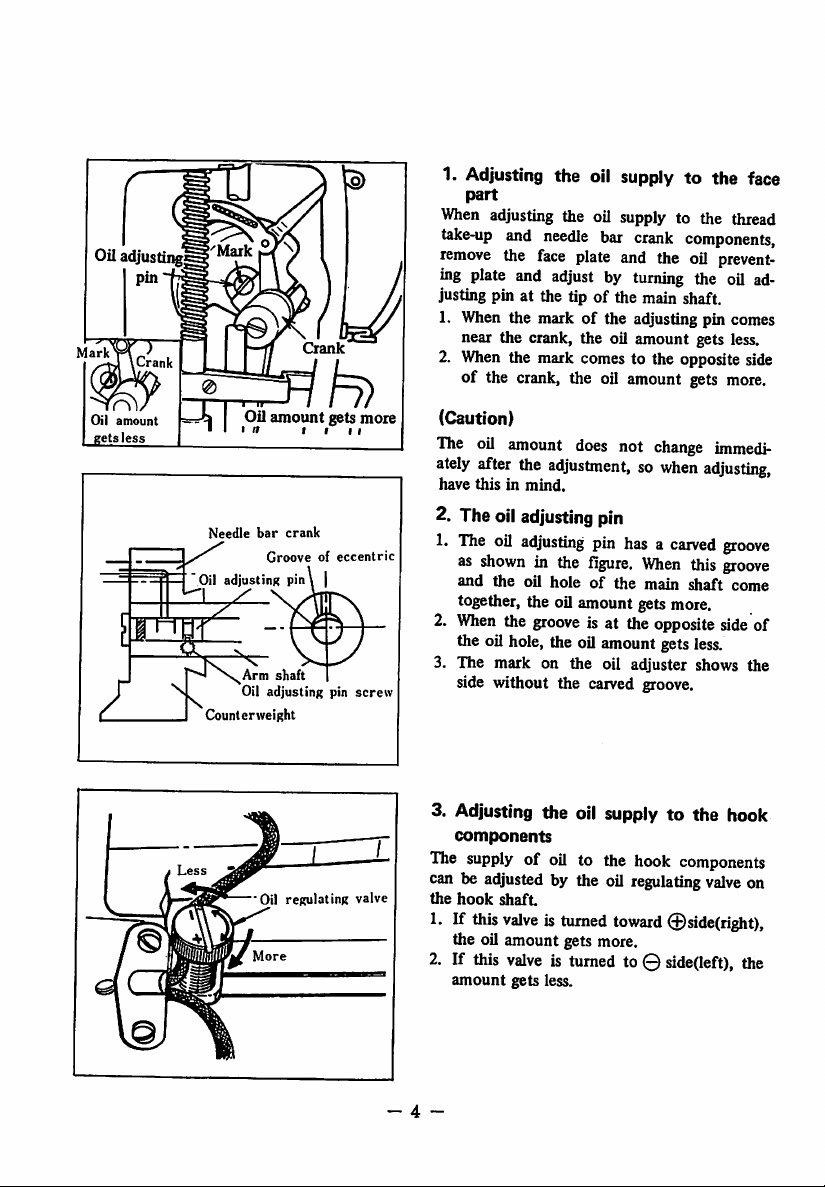
1. Adjusting the oil supply to the face
part
When
adjusting the oil supply to the thread
take-up
remove
ing
justingpin at the tip of the main shaft.
1. When the mark of the adjusting pin comes
2.
(Caution)
The
ately
have
2. Theoil
1.
2.
3. The mark on the oil adjuster shows the
and
needle
bar
crank
components,
the
face
plate
plate and the oil
and
adjustbyturning
near the crank, the oil amount gets less.
When
the mark comes to the opposite side
of the crank, the oil amount gets more.
oil
amount
after
thisinmind.
The
oil
as
shown
and the oil hole of the main shaft come
does
not
the
adjustment,sowhen
adjusting
adjusting
in the
pin
pin
hasacarved
figure.
change
When
prevent
the oil ad
immedi
adjusting,
groove
this
groove
together, the oil amountgets more.
When
the
groove
is at the
the oil hole, the oil amount gets
side without the carved groove.
opposite
less.
side
of
"Oil
regulating
valve
3. Adjusting the oil supply to the hook
components
The
supply
- 4 -
of oil to the
can be
adjusted
the
hook
1. If this
the oil amount gets more.
2. If this
amount
by the oil
shaft
valveisturned
valve
is turned to © side(left), the
gets
less.
hook
regulating
toward
components
valve
on
@side(right),
Page 7

THREADING THE MACHINE
Rotate
the
hand
1.
2.
3!
Pass
Pass
PuU
the
needle
the
thread
out
about10cm
wheeltoright
thread
to the
and
inthe
order
needle
eye
(4")ofthe
place
from
thread
0
the
shown
leftto right
from
thread
bythe
the
take-uptothe
figure.
needle
eye.
highest
position.
0
- 5 ~
Page 8

PREPARATION
<9
W/
-1
case
tfuKO
^
Bobbin
OF
^
THE
\
BOBBIN
\
Hook
THREAD
Inserting& removingthe bobbin case
1. Rotate the hand
bringthe
2. Tilt the
3. Lift up the knob of the bobbin case and
• If
bobbin
machine
supportonthe
takeitout.
you
hold
will
4.Toinsert
into the shaft of the hook so that the nose
of the
bobbin
of the hook and then close the knob.
wheel
needle
with your handand
to its
highest
and supportit by thehead
table.
the
knobinopen
not
fall
bobbin
case
off.
fully
case,
enters
the
position.
condition,
insertitdeep
the
groove
Trip
latch
Adjusting
screw
Thread passinghole
Thread
Tension
base
mouth
disc
Winding
1. Set the bobbin winder to the table with
2. Pass the thread in the order shown in the
3. Knock down the trip latch and contact the
4.
5.
6.
HowtoInsert
the
bobbin
screws.
figure and wind it around the bobbin sever
al
times.
pulleytothe
Adjust
the
adjusting screw so
When
the thread is wound
the thread
correcttoeven winding
When
the
latch
willbereleased
stop
automatically.
thread
belt.
winding
tension
amount
that
disc
about
base
condition.
windingiscompleted,
and the
the
bobbin
1. Holdthe bobbinand insert it to the bobbin
case
so that the thread
condition.
2.
Pass
the
of
the
3.
Then
the
thread
out
through the thread
threadtothe
bobbin
pull
the
tension
case.
thread
will
thread
anditwill
spring
mouth.
and
by the
winding
80% is wound.
unevenly,
move
to right and
the
pulley
bein
right-twist
passing
hole
pass
under
canbepulled
trip
will
- 6 -
Page 9

THE
THREAD
TENSION
Moving
range
Thread
Weaker
Thread
tension
Thread tension nut
take-up
spring
bar
Tension
set
screw
Stronger
bracket
jI
Adjusting
Ideal
thread
interlockedatthe
The
by
the
stitches
and
the
tensionofthe
the
thread
needle
are
formed
bobbin
centerofthe
needle
tension
thread
tension
when
thread
cloth.
threadisadjusted
nut.
the
needle
are perfectly
1. Turn it to right to make the tension stronger
andtothe
Thread
* To change
lefttomakeitweaker.
take-up
spring
the
moving rangeofthe
thread
tension spring;
Loosen
bracket.
Rotate
To change
the
the
thread
the
screw
of
tension
strengthofthe
the
bar.
thread
thread
tension
take-
up spring.
Loosen
tension
Loosen
and
When
right,
turned
the
set
bar.
the
screw,
thread
adjust
the
thread
tension
the
spring will get stronger
to left, it will
remove
tension
get
the
bar
baristurned
weaker.
Thread
bar
set
thread
screw
and
tension
set
to
screw
if
Adjusting
screw
Thread take-up spring
Adjusting
Rotate
case to adjust the
the
the
thread
bobbin
tension
bobbin
1. Rotate it to right to make the bobbin
tension stronger and to
weaker.
- 7 -
thread
screwofthe
thread
left
tension
bobbin
tension.
thread
to make it
Page 10

PRESSER
FOOT
AND
FEED
DOG
Pressure
adjusting
screw
0
^6)
Hand
lifter
—
0
Feeding driving fork
Slide
block
shaft
Differential
feed
dog
base
S
£
sy
0 1
0
jojl
Clamping screw
Main
^slide block
1l
(r
1 I
feed
dog
screwof the|
))^
shaft
base
Adjusting
1. Turn the pressure adjusting screw to right
Normal pressure for general fabric is about
5 kg (11 lbs.).
The presser
To stop :Ae presser foot at the lifted position:
1.
2. The presser
(13/64")
3. To lower the presser foot, activate the knee
lifter
4. With the knee lifter, the presser foot will
Height of
Set the height of the feed dog from
of
the
In sewing
too
To adjust the height of the feed dog:
1. Loosen the clamping screw
2. Move the main feed dog base (right side)
3. After adjusting, tightly tighten the clamping
4.
5. After adjusting, tighten the set screwofthe
the
pressure of
to make the pressure stronger and to left
to
makeitweaker.
foot
hand
Rotate
the
hand
part
either to right or
once
down to the original position.
go up about 10 mm(25/64").
the
throat
li^t
high, shrink-stitching
driving fork.
up
and
down
main feed dog.
screw.
Loosen
shaft and adjust the heightofthe different*
ial feed dog base by rotating the slide block
shaft.
slide
block
lifterinthe
foot
and
stops.
and
the
feed dog
plateto0.7~
weight materials, if this height is
and
the
set
shaft.
the
lifter
left
will go up
presser
0.8 mm.
may
adjust the heightofthe
screw
of
0.7—0.Sam
I
Feed
dog
Throat plate
presser
rearofthe
about
foot
will come
the
result.
of
the
slide
surface
the
foot
face
S mm
feed
block
- 8 -
Page 11
THE
STITCH
LENGTH
Feed
adjusting dial
Lever
DLP-432J
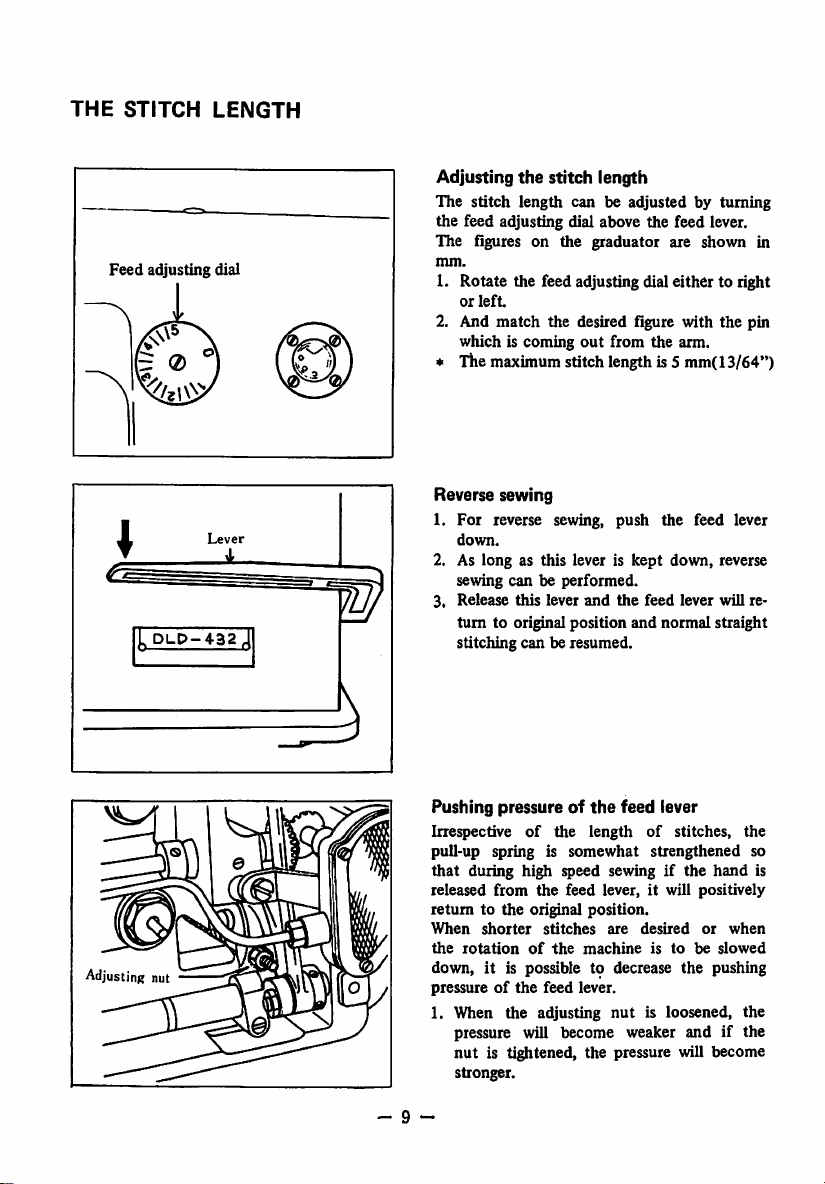
Adjusting
the
stitch length
The stitch length can be adjusted by turning
the feed adjusting dial above the feed lever.
The figures on the graduator are shown in
mm.
1. Rotate the feed adjusting dial either to right
or
left.
2. And
* The
match
the desired figure with
which is coming
maximum
the
pin
out
from the arm.
stitch lengthis 5mm(13/64")
Reverse sewing
1. For reverse sewing, push the feed lever
down.
2. As long as this lever is
sewing
canbeperformed.
3.
Release
this
lever
turn
to original
position
and
the
kept
feed
and
down,
lever
normal
reverse
will re
straight
stitching can be resumed.
Adjusting nut
Pushing pressureofthe
Irrespective
pull-up spring is
that
released
returntothe
When
the
rotation
of
the
during high speed sewing if the
from
the
original
shorter
of
stitches
the
feed
length
somewhat
feed lever,itwill positively
position.
are
desired
machine
down, it is possible t9 decrease the pushing
pressureofthe
1. When the adjusting
feed lever.
nut
is loosened, the
pressure will become weaker and if the
nut
is tightened, the pressure will become
stronger.
- 9 -
lever
of
stitches,
strengthened
istobe
hand
or
slowed
the
so
is
when
Page 12

(2)
®
\®\
Adjusting
This machine possesses 2
dog
differential
changestosew
To
follows:
the
differential
and
differential feed dog and by means
feed
regulator, the
stretchorgather
change
the
differential
feed
feed
dogs, main feed
feed
feed
amount
stitchings.
ratio,
do as
1 Loosen the set screw(1) of the differential
feed
regulator base.
2 Move
the
differential
(2) up and down
and
feed
match
regulator
the
indicating
base
line (D with the graduation ® of the
differential
3 If the indicating line is matched to
of
becomes
the
4 When
graduation,
differential feed regulator base.
Stretch
When
this
sewing,
for
stretch
sewing can be
stretch
Make this ratio larger as the stretch nature of
the
material
feed
crank.
the
graduation, the differential ratio
1:2
andifitismatchedto"3",
ratio
becomes
the
1:3.
indicating line is
tighten
the
matchedtothe
set
screwofthe
sewing
machineistobeused
attach
the
feed
dog
and
sewing. (Aofphoto)
performed
sewing
ratioof1:3.
gets
larger.
presser
The
by
the
for
stretch
foot
stretch
maximum
"2"
of
Gather
sewing
When
this
sewing,
machine
attach
(Bofphoto).
formedbythe
When straight sewing
is to be
the feed dog and presser
The gather sewing can be
maximum
ratioof1:3.
and
to be performed alternately, to change
sewing
type,
there
are special
available for this purpose. Please
separately.
-
10
-
used
for
gather
foot
per
gather sewing are
the
attachments
order
them
Page 13

INSERTING
THE
NEEDLE
Set
screw
Needle
INSTALLING
Feed
ba
Sewing
---il-JLSJ
AND
REMOVING
Bobbincase f
positioning finger
I
-Set
screw
I
Hook
set
Groove
screw
Use DB X 1 needles.
and
sizesofthe
There
needle,
but
are
select
many
numbers
the
correct
size and number depending on the thickness of
the thread or kindsofsewing material.
1. Rotate the hand wheel and bring the needle
bar to the highest position.
2. Loosen
3. Hold the needle so
the
the
needle
needle
clamp
that
comestoyour
screw.
the long groove
left
side.
4. Insert the needle deep into the needle hole
5.
Then
THE
During
securely tighten
screw.
SEWING
the running of the machine, if thread
HOOK
the
needle clamping
hards get into the hook or the position of the
hook changes for some reason or to exchange
the
hook
order:
with a new one, do as follows in
1. Rotate the hand wheel and bring the needle
bar to the highest position.
2. Remove
the
bobbin
case
and
the
3. Remove the bobbin case positioning finger
set
screw
and
take
out
the
bobbin
positioning finger.
4. Loosen the 3 screws of the sewing hook.
of
needle
case
Rotate the hand
wheel
and raise up the
feed base to its highest position.
Rotate the
and
the
figure.
place
sewing
it in
hook with your hand
the
positionasshown
in
Pull the hook to your left and take it out.
To install the hook back, reverse this pro
cedure.
-
11
-
Page 14

RELATION BETWEEN THE HOOK AND THE NEEDLE
Match the needle with the sewing hook as
follows:
1. Rotate the hand wheel and bring the needle
bar
to its
lowest
position.
2. Loosen the needle bar clamping set screw.
Clamp
screw
0T1
(Determine the height of
® DETERMINE
OF
THE
(2)
DETERMINE
OF
THE
Needle
Blade
point of
the
sewing
hook
THE
NEEDLE
Upper
'Lower
Needle
THE
POSITION
SEWING
yA
ILower indicating line
(At
this
the blade point of the
Q'sewing hook
with
the
of
HEIGHT
BAR
Needle
bar
lower
bushing
indicating
indicating line
bar
HOOK
position, match
center
the
needle
Sewing hook
line
3, Match the upper carved lineofthe needle
bar with the lower edgeofthe needle bar
lower bushing.
4. Tighten the needle bar clampingset screw.
(Determine
hook)
the
position
5. Loosen the 3 clamping screws of the hook
so that the hook can be rotated freely with
the
hand.
6. Placethe hook with your hand to the thread
passing position.
7. Rotate the hand wheel and match the lower
carved lineofthe needle bar
edge
of the
needle
barlower
8. In this
the
condition,
hook
with the center lineofthe needle
match
9. Make the clearance between the needle
and the hook blade point to 0.05 mm and
10.
Securely
screw.
tighten
the hook
the
of the
bushing.
the
with
blade
needle bar)
sewing
the lower
point of
clamping
set
12-
Page 15
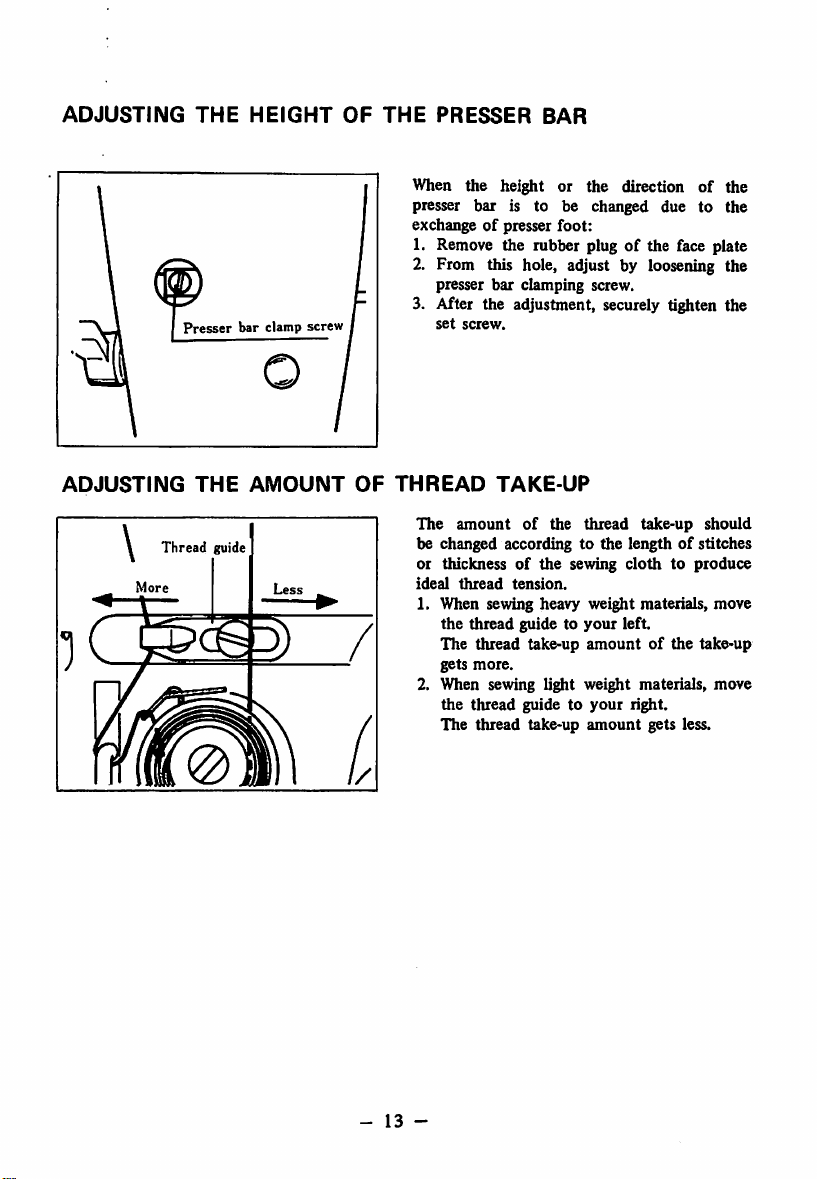
ADJUSTING
THE
Presser
HEIGHT
bar
clamp
screw
OF
THE
PRESSER
BAR
When the height or the direction of the
presser bar is to be changed due to
exchangeofpresser foot:
1. Remove the rubber plug of the face plate
2. From this hole, adjust by loosening the
presser bar clamping screw.
3. After the adjustment, securely tighten the
set
screw.
the
ADJUSTING
More
Thread
THE
guide
AMOUNT
OF
THREAD
The
amount
TAKE-UP
of
the
thread
be changed according to the lengthofstitches
or thickness
ideal
thread
of
the
tension.
sewing
1. When sewing heavy weight materials,
the
thread
guide to
your
The thread take-up amount of the take-up
gets
more.
2. When sewing light weight materials, move
the
thread
The thread take-up
guidetoyour
amount
take-up
should
clothtoproduce
move
left
right.
gets less.
-
13
-
Page 16

Stretch
Gather
feed dog(reverse
stitch
feed dog(reverse
toothed)
toothed)
Howtouse attachments (separate order)
(These
attachments
sory
partsofthe
separately)
Howtouse
lever
the
differential
are
not
machine.
includedasacces
Please
feed
When straight sewing or gather sewing is to be
performed by alternately changing the sewing
types, use the differential feed regulator lever
(D.
For example, when sewing by the differential
feed
ratioof1:1~
foUowing
1.
2. Match
Loosen
set
screw®.
order:
the
feed regulatorbase® to
andset with
3. Make
the
1:2,
make
adjustmentinthe
the
differential
feed
indicating lineofthe differential
"2"
nut®.
tipofthe
differential
inglever® to support the differential feed
regulator
Raise up
4.
® by the
the
Connect
5.
® with the
6.
When
starts,
®
ratio becomes
performed.
7. If
straight
regulator lever is used
and
«Howtouse
When
clothisgather-stitchedbythe
differential
This
by 2 set screws. Be sure to use exclusive
presser foot for this purpose.
*Supplementary
For
For gather stitching B-1613-432-B00
-
14
-
base.
the
differential feed adjusting lever
regulating
screw
® and
nut®
the
differential feed
pedal
with
chain.
pedalissteppedonand
the
differential feed
will
beraisedup andthe differential feed
1:2
and
the
pedal is released,
sewing.
Thus,
gather
sewing, alternately.
attachment
this
attachmentisused,
ratio.
attachment
stretch stitching B-1613-432-AGO
Stretch feed dog (reverse
Gather stitchfeed dog (reverse
canbeinstalled
Feed
Dogs (Reverse Toothed)
regulator
gather sewing can be
the
machine
the
differential feed
for
straight sewing
for
gather
only
amountofthe
order
them
regulating
regulator
of graduation
feed
adjust
tighten
adjusting
the
sewing
will do
sewing
the
very
toothed)
toothed)
lever
lower
easily
base
base
Page 17

TOKn
Head Office & Plant, 2 1,
Business
Cable Address;
JUKI
Office:
23,
JUKI
Kabuki-cfio,
TOKYO
INDUSTRIAl
8-chome,
Kokuryo-cho, Chofu-shi, Tokyo,
Shinjuku
ku, Tokyo,
Telex: 232-2301 JUKlSINJUku
C0..1TD.
Japan
432
BEB
PrintedinJapan(T)
Japan
 Loading...